Embed Size (px)
Citation preview
sd com.tom CODESYS
Getting Started V2.0
Copyright © 2015 Beck IPC GmbH Page 1 of 16
com.tom CODESYS Getting Started
sd com.tom CODESYS
Getting Started V2.0
Copyright © 2015 Beck IPC GmbH Page 2 of 16
TABLE OF CONTENTS
1 INTRODUCTION .................................................................................................. 3
2 SCOPE ................................................................................................................. 3
3 SYSTEM START-UP ............................................................................................ 3
3.1 WHAT DO WE NEED TO GET STARTED? .................................................................................. 3
3.2 STEP 1 – CABLE THE DEVICE ................................................................................................ 3
3.3 STEP 2 – SETUP CODESYS ................................................................................................ 3
3.4 STEP 3 – CONFIGURE THE DEVICE ........................................................................................ 4
3.5 STEP 4 – CREATE A NEW CODESYS PROGRAM ................................................................... 5
3.6 STEP 5 – DOWNLOAD AND START THE PROGRAM .................................................................. 8
3.7 STEP 6 – SET UP PORTAL COMMUNICATION ........................................................................... 8
3.8 STEP 7 – USE THE PORTAL’S WEB INTERFACE ...................................................................... 11
4 ADVANCED SETTINGS ..................................................................................... 13
4.1 CELLULAR MODEM CONFIGURATION..................................................................................... 13
5 WHERE TO GET FURTHER INFORMATION .................................................... 16
5.1 GETTING STARTED ............................................................................................................. 16
5.2 CODESYS ONLINE HELP .................................................................................................. 16
5.3 UPDATES, TOOLS, DOCUMENTATION .................................................................................... 16
5.4 SUPPORT ........................................................................................................................... 16

sd com.tom CODESYS
Getting Started V2.0
Copyright © 2015 Beck IPC GmbH Page 3 of 16
1 Introduction This document will help you get started with com.tom and CODESYS. CODESYS is the leading IEC61131-3 compatible PLC (Programmable Logic Controller) environment. It runs on several variants of com.tom devices. The CODESYS development environment enables comfortable software development for industrial applications. The special com.tom CODESYS runtime system allows mapping variables of the PLC program to the com.tom PORTAL.
2 Scope This documentation covers the com.tom CODESYS software package. com.tom CODESYS runs on devices with the following name pattern: com.tom <name> x.2 e.g. com.tom RADIO 8.2
3 System start-up
3.1 What do we need to get started?
The following components are among others included within the com.tom Starter Kits:
com.tom device running the com.tom CODESYS software
Power supply unit
Ethernet cable The following is needed on your local computer:
Ethernet network interface
Microsoft Windows XP/Vista/7
Internet connection
Web-browser (We recommend Mozilla Firefox)
com.tom-IP-Tool (can be downloaded at www.com-tom.de/download)
CODESYS (can be downloaded at www.com-tom.de/download)
com.tom TSP package (can be downloaded at www.com-tom.de/download)
3.2 Step 1 – Cable the device
Use an Ethernet cable to connect the com.tom device to your PC. If you have an existing network infrastructure, use a patch cable to connect the com.tom to your hub or switch. If not, use a crossover cable to directly connect the com.tom’s Ethernet jack to your PC’s Ethernet jack. Now connect the power supply unit to the com.tom’s power supply jack to power the device.
3.3 Step 2 – Setup CODESYS
Before getting in contact with the com.tom CODESYS you have to install the CODESYS development environment. You can download the latest version at www.com-tom.de/download. When the installation is finished you have to install the com.tom Target Support Package (TSP) to CODESYS. The latest version of the Target Support Package is also available at www.com-tom.de/download.

sd com.tom CODESYS
Getting Started V2.0
Copyright © 2015 Beck IPC GmbH Page 4 of 16
3.4 Step 3 – Configure the device
To be able to access the com.tom’s, the device must have a valid IP address and we have to know it. Therefore we’ll use the com.tom-IP-Tool. If you have not yet downloaded and installed this tool, please do so now. You can get it at www.com-tom.de/download. When you start the com.tom-IP-Tool it will scan for com.tom devices on the local network. The MAC IDs of the devices will be put on a list. Select the MAC ID of your device from the list. The MAC ID can be found on the label on the device’s housing.
You’ll now be shown the actual IP configuration of the device. By default the device will try to get an IP address from a DHCP server at start. If this does not work, an auto IP will be activated. Check if the current settings match the needs of your network. If you are in doubt, ask you network administrator.
If the configuration does not match, you may change it. Deselect the Use DHCP checkbox. Change the addresses as required and eventually click the Configure button. The IP-Tool will ask for a password. By default this password is com.tom. Wait for the confirmation “Configuration completed”.
If you’re running a firewall, make sure that it does not block any network functions of the com.tom-IP-Tool.

sd com.tom CODESYS
Getting Started V2.0
Copyright © 2015 Beck IPC GmbH Page 5 of 16
3.5 Step 4 – Create a new CODESYS Program
Start CODESYS from the Windows Start Menu. After that create a new project with the command New from the Menu File. In the appearing Target settings dialog choose your com.tom Target (e.g. com.tom RADIO 3.2) and press OK.
Now select POU type Program, the Name PLC_PRG and the Language FBD. After that press OK.
Now let’s create our first program with CODESYS portal communication. We’ll create a simple counter. Select the empty area behind the red question marks inside the PLC_PRG’s window
and use the Box icon from the symbol bar to add a new function block. Type TP for timer pulse and press enter. Select the red question marks above the newly created function block, assign the name myTP and press enter. In the appearing dialog press OK to acknowledge the newly created function block. Select the output Q on the right side of myTP and use the Box icon from the symbol bar
to add a new function block. Type CTU for counter up and press enter.
Select the red question marks above the newly created function block, assign the name myCTU and press enter. In the appearing dialog press OK to acknowledge the newly created function block. Now your program should look like this:

sd com.tom CODESYS
Getting Started V2.0
Copyright © 2015 Beck IPC GmbH Page 6 of 16
Now we have to define the interval time and trigger condition for the pulse timer myTP. Select the red question marks at the left side of the input IN of myTP and type NOT myTP.Q to reconnect it with the inverted output Q of myTP. Select the red question marks at the left side of the input PT of myTP and type T#5s which is the pulse time of 5 seconds. Now we create two variables and connect them with the counter myCTU. Select the red question marks at the left side of the input RESET of myCTU and type portalVar1. In the appearing dialog use the “...” button to select type BOOL and press OK to acknowledge the newly created variable. Click on the right side of the output CV of myCTU and type portalVar0. In the appearing dialog select type UDINT and press OK to acknowledge the newly created variable. Select the red question marks at the left side of the input PV of myCTU and press the delete key on your keyboard to delete them. Now your program should look like below:
Now we will connect the variables portalVar0 and portalVar1 to the portal. Therefore we have to create a second network. Use a right mouse click in the PLC_PRG’s window and choose Network (after) from the context menu, or press CTRL+t. In the newly created network select the empty area behind the red question marks and
use the Box icon from the symbol bar to add a new function block. Type KolibriController and press enter.
Select the red question marks above the newly created function block, assign the name myKolibriController and press enter. In the appearing dialog press OK to acknowledge the newly created function block. Select the red question marks at the left side of the input kolibriDatasets of myKolibriController and type myKolibriControllerDatasets. In the appearing dialog select type ARRAY. In the Array Boundaries dialog enter the value 1 for Dim 1 start and the value 2 for Dim 1 End, since the controller handles two variables. In the field Type enter KolibriDataset. Press OK to leave the dialog and press OK again to acknowledge the newly created variable.

sd com.tom CODESYS
Getting Started V2.0
Copyright © 2015 Beck IPC GmbH Page 7 of 16
In the PLC_PRG’s window click again on the newly created variable at the left side of the input kolibriDatasets and enclose it with the address operator ADR(), so that it looks like:
ADR(myKolibriControllerDatasets).
Select the red question marks at the left side of the input nDatasets and enter the value 2. Now your program should look like below:
Now we have to initialize the kolibriDatasets array that contains the mapping between CODESYS variables and portal variables. Each portal variable has a name. Add the following lines to the VAR-section of PLC_PRG.
portalVar0Name: STRING := '/variables/portalvar00';
portalVar1Name: STRING := '/variables/portalvar01';
We will encapsulate the rest of the initialisation in a separate action of PLC_PRG. In the POU tree on the left side of the screen click with the right mouse button on PLC_PRG. Select Add Action from the context menu. Enter the action name init and select the language ST. Press OK to create the action. Add the lines below to the newly created action to connect the CODESYS variable portalVariable0 with portal variable variables/variable000 and CODESYS variable portalVariable1 with portal variable variables/variable001. myKolibriControllerDatasets[1].path := ADR (portalVar0Name);
myKolibriControllerDatasets[1].val := ADR (portalVar0);
myKolibriControllerDatasets[1].dataType := KOLIBRI_DATA_TYPE_UINT32;
myKolibriControllerDatasets[2].path := ADR (portalVar1Name);
myKolibriControllerDatasets[2].val := ADR (portalVar1);
myKolibriControllerDatasets[2].dataType := KOLIBRI_DATA_TYPE_BOOL;

sd com.tom CODESYS
Getting Started V2.0
Copyright © 2015 Beck IPC GmbH Page 8 of 16
The init action has to be called once at start-up of the CODESYS application. Therefore we add a start event.
Enter the Resources tab and open the Task configuration. In the appearing dialog expand the Task configuration node and select System events. Select
the cell called POU in line Event: start and enter EvStart. Enable the check box in front of Event: Start and press the button Create POU EVSTART.
Now enter the POUs tab and double click on EvStart. Add the line below to the function to invoke the init action at the start of the program.
PLC_PRG.init;
3.6 Step 5 – Download and Start the Program
Before you can download the program you have to select the according target. For that click on the menu Online and the menu item Communication parameters. In the Communication Parameters dialog click on the button New. Now select Tcp/Ip, enter some name for the channel (e.g. the IP address) and press OK to create the new channel. After that click localhost in the column Value and enter your com.tom’s IP address and press return.
Press OK to acknowledge the communication parameters. Now connect the target using the menu Online and the menu item Login. In the opened dialog Click on Yes to download the program to the target. Now you can start the program. For that click on the menu Online and the menu item Run. Note: The program is not stored permanently. After a reboot the program is lost. To store the program permanently and start it automatically after a reboot click on the menu Online and the menu item Create boot project.
3.7 Step 6 – Set up portal communication
Of course we want to see the counter value on the com.tom PORTAL.

sd com.tom CODESYS
Getting Started V2.0
Copyright © 2015 Beck IPC GmbH Page 9 of 16
Now enter the device’s IP address into your web-browser’s address bar. On the Home site you
have to click the Settings button to go to the settings site. The website will request a username and password. Both are “com.tom” by default.
You will be forwarded to the Settings page now.
On the settings page there are several tabs on which you can adjust various configurations. On the Portal tab we have to configure the access data for the com.tom PORTAL. You have received these data when you registered the device with the com.tom PORTAL. If you have not yet registered the device, please do so first. After entering the correct data, press the Save button to store your changes on the device.
It is assumed that the com.tom device has access to an existing internet connection via its Ethernet interface. If this is not true, please refer to section 4.1 on how to configure the cellular modem.
sd com.tom CODESYS
Getting Started V2.0
Copyright © 2015 Beck IPC GmbH Page 10 of 16
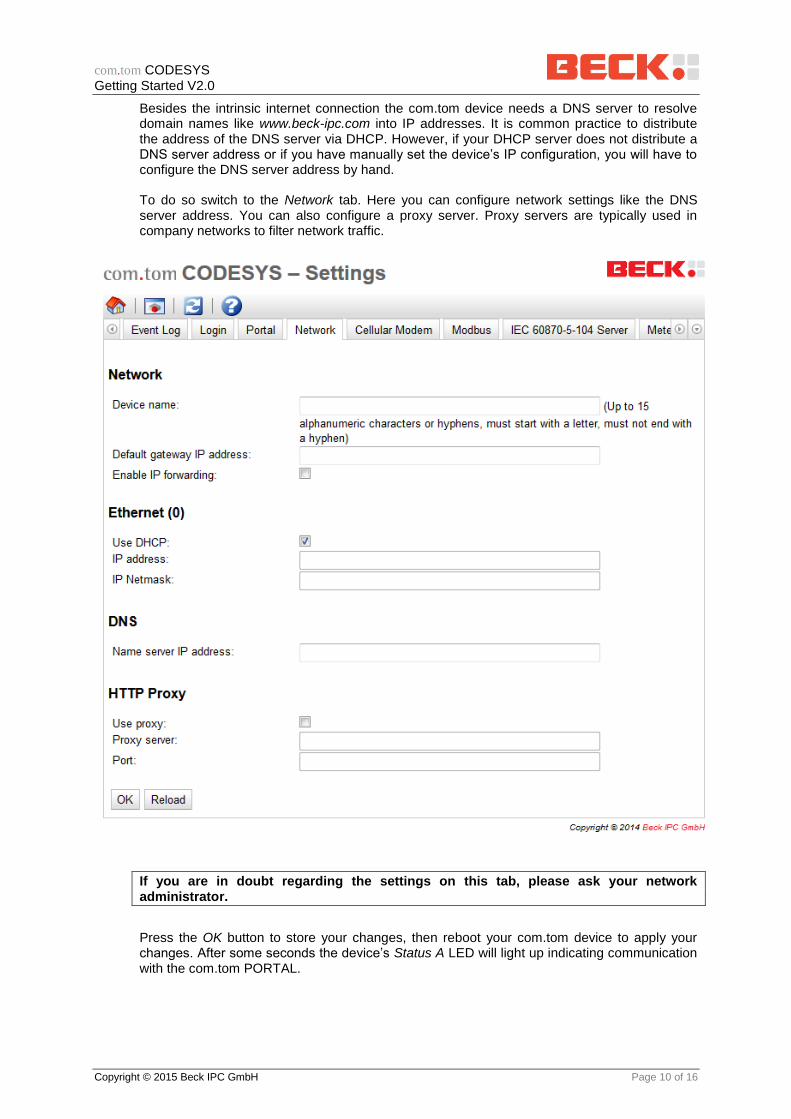
Besides the intrinsic internet connection the com.tom device needs a DNS server to resolve domain names like www.beck-ipc.com into IP addresses. It is common practice to distribute the address of the DNS server via DHCP. However, if your DHCP server does not distribute a DNS server address or if you have manually set the device’s IP configuration, you will have to configure the DNS server address by hand. To do so switch to the Network tab. Here you can configure network settings like the DNS server address. You can also configure a proxy server. Proxy servers are typically used in company networks to filter network traffic.
If you are in doubt regarding the settings on this tab, please ask your network administrator.
Press the OK button to store your changes, then reboot your com.tom device to apply your changes. After some seconds the device’s Status A LED will light up indicating communication with the com.tom PORTAL.

sd com.tom CODESYS
Getting Started V2.0
Copyright © 2015 Beck IPC GmbH Page 11 of 16
3.8 Step 7 – Use the portal’s web interface
Navigate your internet browser to the web interface of your com.tom PORTAL project. In our example the URL of our project is demo.com-tom.io. Log in to the portal with the login information provided to you.
You will now see an overview of all devices registered with this project. Click on the identification of your current device to see its contents.
sd com.tom CODESYS
Getting Started V2.0
Copyright © 2015 Beck IPC GmbH Page 12 of 16
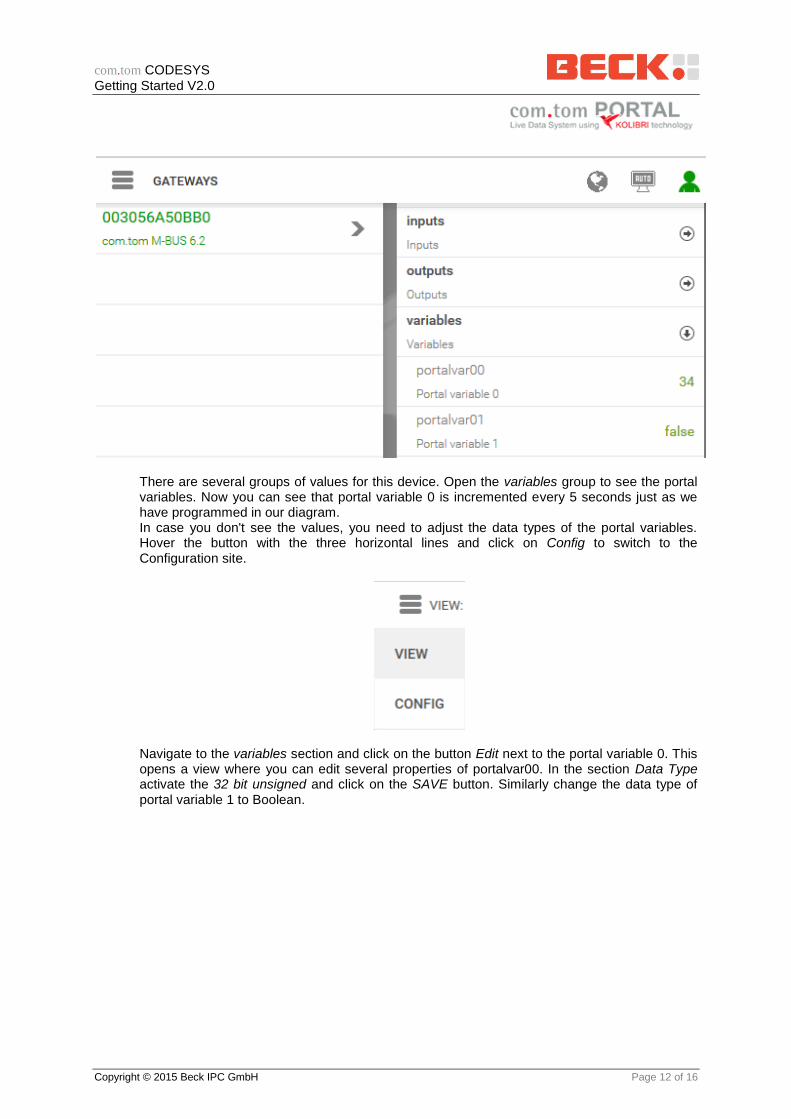
There are several groups of values for this device. Open the variables group to see the portal variables. Now you can see that portal variable 0 is incremented every 5 seconds just as we have programmed in our diagram. In case you don't see the values, you need to adjust the data types of the portal variables. Hover the button with the three horizontal lines and click on Config to switch to the Configuration site.
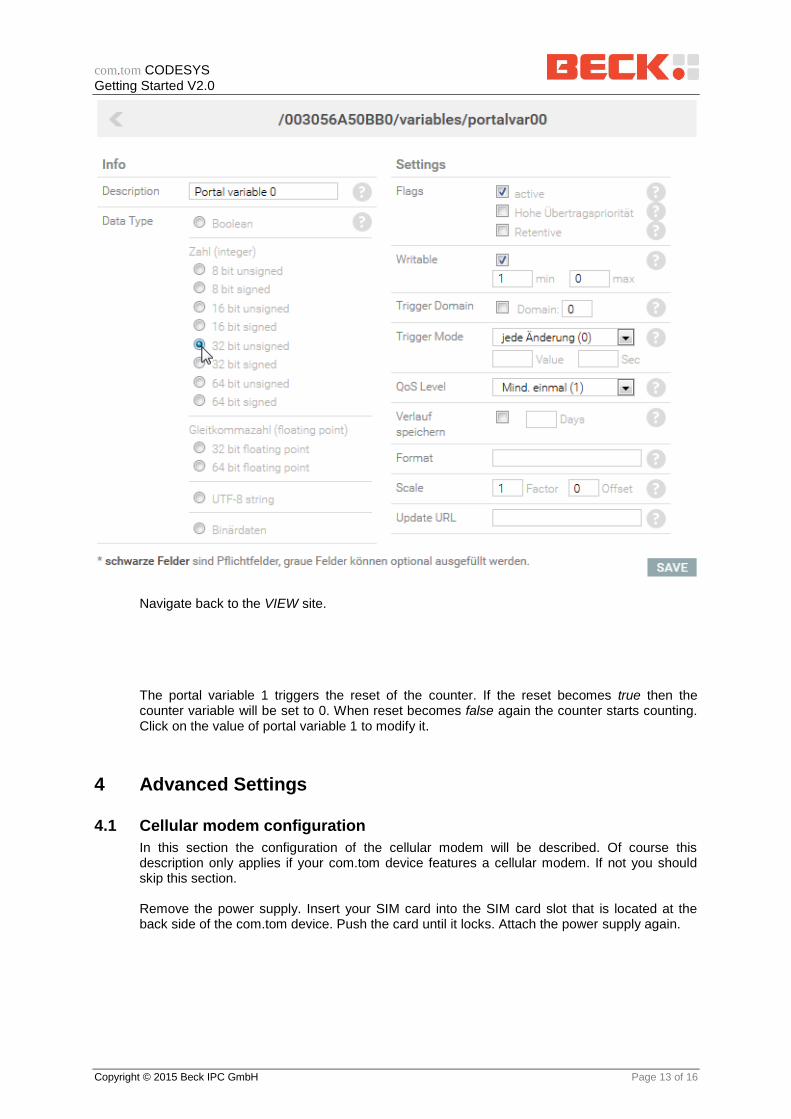
Navigate to the variables section and click on the button Edit next to the portal variable 0. This opens a view where you can edit several properties of portalvar00. In the section Data Type activate the 32 bit unsigned and click on the SAVE button. Similarly change the data type of portal variable 1 to Boolean.
sd com.tom CODESYS
Getting Started V2.0
Copyright © 2015 Beck IPC GmbH Page 13 of 16
Navigate back to the VIEW site.
The portal variable 1 triggers the reset of the counter. If the reset becomes true then the counter variable will be set to 0. When reset becomes false again the counter starts counting. Click on the value of portal variable 1 to modify it.
4 Advanced Settings
4.1 Cellular modem configuration
In this section the configuration of the cellular modem will be described. Of course this description only applies if your com.tom device features a cellular modem. If not you should skip this section. Remove the power supply. Insert your SIM card into the SIM card slot that is located at the back side of the com.tom device. Push the card until it locks. Attach the power supply again.

sd com.tom CODESYS
Getting Started V2.0
Copyright © 2015 Beck IPC GmbH Page 14 of 16
Go to the settings page and open the Cellular Modem tab. Check the Enable cellular modem checkbox. If your SIM card requires a PIN, enter it in the SIM PIN field. Enter your mobile phone provider’s Access point name in the APN field. If the APN requires authentication enter the appropriate values too.

sd com.tom CODESYS
Getting Started V2.0
Copyright © 2015 Beck IPC GmbH Page 15 of 16
Press the Save button to store your changes, then reboot your com.tom device to apply your changes. After some seconds first the com.tom’s Modem LED will light up indicating that the cellular modem has been initialised. After about a minute the GSM/GPRS LED should light up indicating that an internet connection has been established via the modem.

sd com.tom CODESYS
Getting Started V2.0
Copyright © 2015 Beck IPC GmbH Page 16 of 16
5 Where to get further information
5.1 Getting Started
All software referred to in this document can be downloaded from the Getting Started website at http://www.com-tom.de/start.
5.2 CODESYS Online Help
The CODESYS Online Help contains a com.tom specific section. You can find it in CODESYS in the menu Help | Contents | Target System | Beck IPC@CHIP Help | com.tom.
5.3 Updates, tools, documentation
Regularly check out the website at www.com-tom.de for
Firmware updates
Useful tools
Further documentation
5.4 Support
If you need support, please…
1. Check our support website at www.beck-ipc.com/ipc/support. 2. Contact our support at [email protected]. Of course you may also contact us by
phone. But please use email if possible. This not only reduces the time you spend on the phone, it also allows us to easily manage the questions and identify problem areas.
Copyright © 2000-2015 BECK IPC GmbH All rights reserved
No part of this document may be copied or reproduced in any
form or by any means without the prior written consent of
BECK IPC GmbH. The information in this document is subject
to change without notice. Devices sold by BECK IPC GmbH
are covered by warranty and patent indemnification
provisions appearing in BECK IPC GmbH Terms and
Conditions of Sale only.
BECK IPC GmbH MAKES NO WARRANTY, EXPRESS,
STATUTORY, IMPLIED OR BY DESCRIPTION,
REGARDING THE INFORMATION SET FORTH HEREIN OR
REGARDING THE FREEDOM OF THE DESCRIBED
DEVICES FROM INTELLECTUAL PROPERTY
INFRINGEMENT. BECK IPC GmbH MAKES NO
WARRANTY OF MERCHANTABILITY OR FITNESS FOR
ANY PURPOSE.
BECK IPC GmbH shall not be responsible for any errors that
may appear in this document. BECK IPC GmbH makes no
commitment to update or keep current the information
contained in this document.
Life critical applications - BECK products are not authorized
for use as critical components in life support devices or
systems unless a specific written agreement pertaining to
such intended use is executed between the customer and
BECK prior to use. Life support devices or systems are those
which are intended for surgical implantation into the body, or
which sustain life, and whose failure to perform, when
properly used in accordance with instructions for use provided
in the labeling, can be reasonably expected to result in
significant injury to the user. BECK IPC GmbH customers
using or selling these products for use in such applications do
so at their own risk and agree to fully indemnify BECK IPC
GmbH for any damages resulting from such application.
Right to make changes - Beck IPC GmbH reserves the right
to make changes without notice in the products, including
software, described or contained herein in order to improve
design and/or performance. Beck IPC GmbH assumes no
responsibility or liability for the use of any of these products.