Embed Size (px)
Citation preview

Visit the Gateway at https://gateway.ifionline.org/login.aspx
Gateway User Guide
Debt Worksheet

Page 1
Table of Contents
Introduction .............................................................................................................................................. 2
Customizing Debts by Funds List ............................................................................................................... 2
Accessing the Debt Worksheet ................................................................................................................. 4
Completing a Debt Worksheet.................................................................................................................. 6
Troubleshooting Incorrect Amounts ......................................................................................................... 9
Signing the Form Electronically ............................................................................................................... 10
Marking the Form “Ready to Submit” .................................................................................................... 10
Viewing and Printing the Form ............................................................................................................... 12

Page 2
Introduction The Debt Worksheet is essential for those units that need to repay any types of debt from a property tax backed debt service fund. If your unit does not levy a debt service payment from a debt service fund, you will not need to complete or submit a Debt Worksheet. The data in this form can later be pulled into the Form 4B.
Customizing Debts by Funds List
For those units needing to levy a debt service payment from a debt service fund, you will first need to link your debts submitted in Gateway Debt Management with a debt service fund in the budget program. For assistance with submitting a debt report in Debt Management, see the Gateway Debt Management user guide. . You may access the Customize Unit section from the Unit Main Menu by clicking “Customize Funds, Departments, Debts, Rev. Codes.”
The 2013 Budget program introduced the ability to link debt reported in Gateway’s Debt Management
application to a debt service fund. These debt linkages should have rolled over into the 2014 budget as
long as the debt is submitted and has not been marked as retired in Debt Management. In order to link a
reported debt to a debt service fund, first select “Customize Debts by Fund List” on the Customize Unit
menu. Once your funds and debts are linked, you will be able to complete your Debt Worksheet and
levy funds to fulfill upcoming debt service payments.

Page 3
You will now be on the Customize Debts by Fund page. On this page you should notice debt service
funds on the left and any linked submitted debts on the right. If you do not see any funds and need to
levy funds to meet debt service payments from a separate debt service fund, you would need to access
the Customize Funds List and add a debt service fund. Debt service funds can be identified by having an
“8” in the third digit in their fund code. For assistance, view the Adding, Deleting, and Connecting Funds
and Departments user guide.
In order to link a debt reported in Debt Management to a debt service fund, click on the pencil and
paper edit icon.
Clicking on the edit icon next to a fund will bring up a list of reported debts along with an option to link
fees and anticipated debt service with the fund as well. By checking the box to the left of listed options
and selecting “Update Record” you have linked a reported debt, fees, and/or anticipated debt service to
the selected fund.

Page 4
You should notice the table below now indicates which debts are to be repaid with their respective debt
service funds.
Accessing the Debt Worksheet
Now that you have linked your debts to their respective debt service funds, you are now ready to begin
working in the Debt Worksheet. To access the Debt Worksheet, select “View Forms, Enter and Edit
Budgets” on the Unit Main Menu.

Page 5
From the Budget Form Menu select “Debt Worksheet” and then select “Click to edit form.”
The Debt Worksheet will now be displayed on the page. Please note that the fund selection drop down
menu at the top of the page will be used in the event that your unit has multiple debt service funds.
Uncompleted Debt Worksheets will display either “$” or “$0” until amounts have been assigned. To
begin, click on the blue underlined debt name to access the amortization schedule.

Page 6
The amortization schedule will be pulled directly from Debt Management. For any debt classified as a
lease, the lease payment amounts will be pulled into the Debt Worksheet, for all other types of debt,
this page will pull the amounts from the period total and trustee fee columns in Debt Management. If
you do not see the amortization schedule appear, please click the long grey refresh bar at the top of the
page. If you see the amortization schedule, but do not see any amounts, or incorrect amounts, please
review the type of indebtedness selected and the amortization schedule entered in Debt Management.
Completing a Debt Worksheet
On this page, you will tell Gateway when the payments are made. For example, it is very possible that a
payment that reads 1/5/2013 is paid in December 2012, so be careful to verify the payment dates with
your records prior to completing the following steps.
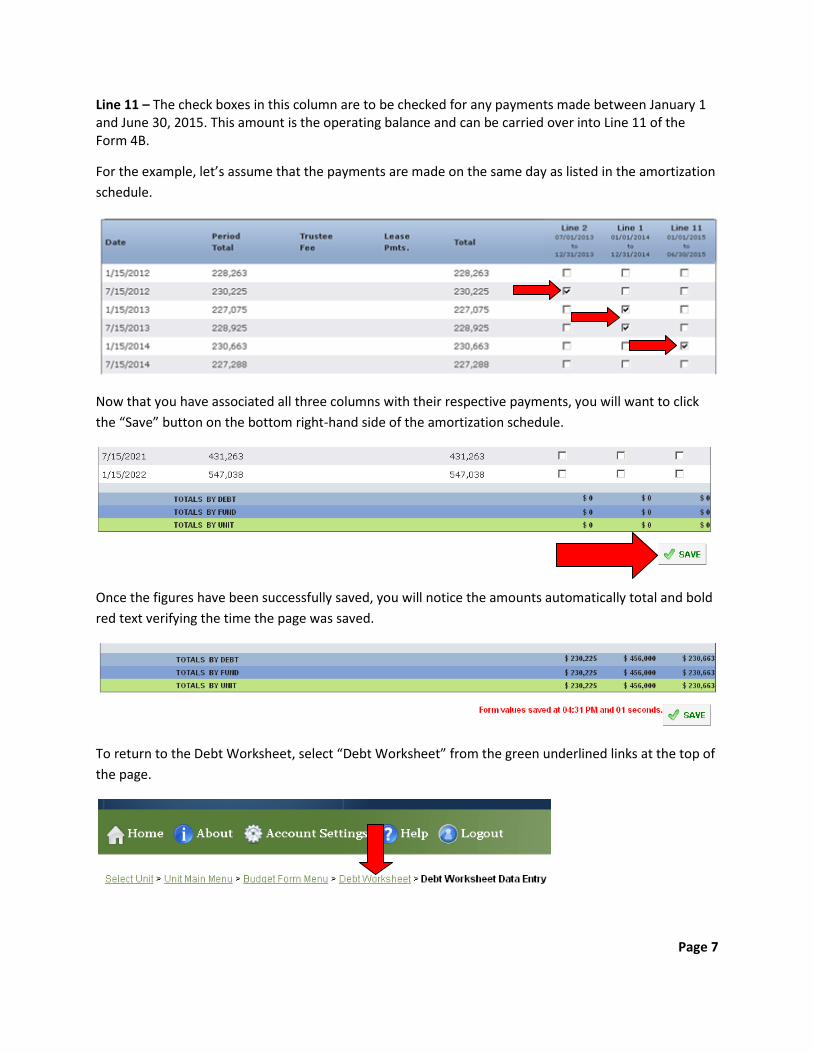
On the right-hand side of the page, you will notice the total amounts and three columns.
Total – This is the total amount that is derived from the lease payment amounts for leases or sum of the
trustee fee and period total for all other types of debt. This is the amount that will be added to the lines
if checked.
Line 2 – The check boxes in this column are to be checked for any payments made between July 1 and
December 31, 2013. This amount can be pulled into Line 2 of the Form 4B.
Line 1 – The check boxes in this column are to be checked for any payments made between January 1
and December 31,2014. This is the 2014 budgeted amount and can be carried over into Line 1 on your
Form 4B.
Page 7
Line 11 – The check boxes in this column are to be checked for any payments made between January 1 and June 30, 2015. This amount is the operating balance and can be carried over into Line 11 of the Form 4B.
For the example, let’s assume that the payments are made on the same day as listed in the amortization
schedule.
Now that you have associated all three columns with their respective payments, you will want to click
the “Save” button on the bottom right-hand side of the amortization schedule.
Once the figures have been successfully saved, you will notice the amounts automatically total and bold
red text verifying the time the page was saved.
To return to the Debt Worksheet, select “Debt Worksheet” from the green underlined links at the top of
the page.

Page 8
The process is the same for all other debts carried over from Debt Management. In addition to debts
reported in Debt Management, there are also a number of other debts that can be linked to a debt fund
that allow for manual data entry.
These include:
Fees – Any additional fees not currently included in the amortization schedules
Anticipated Debt Service – Levy a debt service payment for debts to be closed on by December
31 of the current year.
Interest on Temporary Loans – (School units only)
Unreimbursed Textbooks – (School units only)
To complete a Debt Worksheet for one of the above data entry types of debt that has already been linked to a debt service fund, first select the debt name. If a debt is needed, but does not appear, follow the steps above titled, Customizing Debts by Funds List.
Once you select the debt name, you will be directed to a page that will ask for the amounts of debt
service payments for three separate time periods.
Line 2 – This field is used to enter the total payments made between July 1 and December 31, 2013. This
amount can be pulled into Line 2 of the Form 4B.
Line 1 – This field is used to enter the total payments made between January 1 and December 31, 2014.
This amount can be pulled into Line 1 of the Form 4B.

Page 9
Line 11 – This field is used to enter the total payments made between January 1 and June 30, 2015. This
amount can be pulled into Line 11 of the Form 4B.
Simply click in a box and type in the amount for each of the three fields. If you do not have any
payments for a certain time period, you may leave it blank or type in a zero. Once completed you will
want to press the “Save” button to save your entries.
Once the form has been saved, you should notice the total row calculated and red text stating the time
the form was saved.
Troubleshooting Incorrect Amounts
If you access a specific debt in the Debt Worksheet with either no amounts or incorrect amounts, you
will first need to correct the issue in Debt Management.
Zero Amounts – For a lease, add your lease payment amounts under the lease payment column. For any
other types of debt, add your Period Total amounts and trustee fees, if applicable. The period total is
typically the principal plus the interest.
Annual Amounts for a Semi Annual Debt – Please be sure the dates in the amortization schedule are
entered semi annually. If the dates are correct, you need to check the amounts. Some units have
skipped every other row and entered a calculated annual amount. Lease payment amounts, or the
period total amounts for all other types of debts, are to be entered for every row and thus, semi
annually.
In the event that you will need to make a correction to a submitted debt report, you will need to contact
the DLGF and request which debt(s) you would like to be unlocked. Requests can be made to the DLGF
by emailing [email protected] or calling (317) 232-3777
Once your correction has been made in Debt Management, you will need to refresh the amounts that
pull into the Debt Worksheet. This can be done by going into the corrected debt’s Debt Worksheet and

Page 10
clicking on the long gray refresh bar at the very top of the screen. Once you refresh the values, you will
need to check the appropriate boxes and then press “Save”.
Signing the Form Electronically At the bottom of the Debt Worksheet, there is a box for you to use to place an electronic signature on the form. Only the user with submission rights will see the signature box. The signature box will be invisible to users with edit or read-only rights. To sign the form, first type your name and title into the signature box. After that, you will need to enter a four-digit PIN code. This PIN code has been sent to the person with submission rights via email. You may contact the DLGF at [email protected] or at (317)232-3777 in the event that you have lost or not received a PIN code. Once you select “Sign and Date Form,” today’s date will automatically populate the date field.
Once you see the red text stating “Form Signature Values Saved,” you have successfully signed the Debt
Worksheet.
Marking the Form “Ready to Submit”

Page 11
At the bottom of the Debt Worksheet and all other forms you will notice the Ready to Submit status
boxes. Before you complete the form you will notice a grey box that is titled Not Ready to Submit.
The budget forms have a feature built in called validation. This does not allow the form to be marked as
Ready to Submit, or be submitted until the required fields are completed. Validation will help prevent
some commonly found errors in previous years. Under a closer look, you will notice that the box states,
“You will be able to mark this form as 'Ready to Submit' once the form has been signed with a valid
four-digit PIN.”
Once the form has been signed, the yellow “Ready to Submit” option will appear. This gives users the
ability to mark the form as ready to submit by clicking on the check box. You will not want to check this
box until all necessary debt service payments, in all debt service funds have been accounted for in the
Debt Worksheet.
Once this box is checked, the box will turn green and the form will now be marked as “Ready to Submit.”
The Debt Worksheet can still be edited until it is submitted.
Note that after the Debt Worksheet has been marked as “Ready to Submit,” the Debt Worksheet section
of the Budget Form Menu now shows a green submit option.
If you have completed your Debt Worksheet and will not need to make any changes, you may click on
the green “Click to submit completed form to DLGF” button. You will notice a pop-up box asking you if
you are sure you want to submit this form. If you are ready to submit, simply press “OK.”

Page 12
As you will note below, Debt Worksheet on the Budget Form Menu will now appear green and will now
only have the option to view the form.
You may no longer edit a form once it is submitted. If you have submitted a form by mistake, please
contact the DLGF at [email protected] or at (317) 232-3777.
Viewing and Printing the Form
Page 13
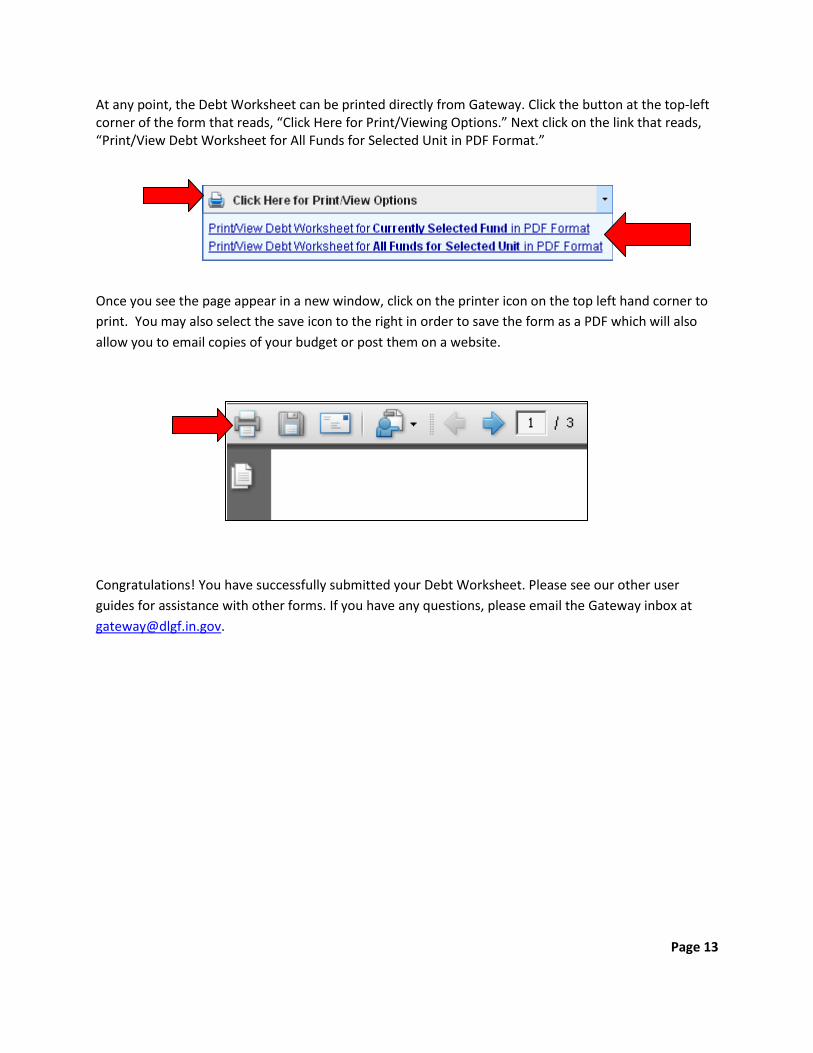
At any point, the Debt Worksheet can be printed directly from Gateway. Click the button at the top-left corner of the form that reads, “Click Here for Print/Viewing Options.” Next click on the link that reads, “Print/View Debt Worksheet for All Funds for Selected Unit in PDF Format.”
Once you see the page appear in a new window, click on the printer icon on the top left hand corner to
print. You may also select the save icon to the right in order to save the form as a PDF which will also
allow you to email copies of your budget or post them on a website.
Congratulations! You have successfully submitted your Debt Worksheet. Please see our other user
guides for assistance with other forms. If you have any questions, please email the Gateway inbox at