Embed Size (px)
Citation preview
Downloaded from www.secondarydandt.org – the website of Nuffield Secondary Design & Technology 1
Communicating your design ideas
CRT 1
In the business world, ideas can only be turned
into real, manufactured products if the designers
can communicate their design proposals
effectively. Graphic designers have to
communicate their design ideas to clients and
manufacturers, and us as the users.
The designer
I run my own graphic design studio and I employ
a small team of designers. Clear communication
with the client is essential at all stages of a
design. It is important that we know exactly what
is required, and
that the client
understands, and
is happy with, our
proposals.
The client
I am in the music industry and I manage a recording
company. I rely on the work of the graphic designers
to promote musicians as well as to advertise and
package new music. I have to be sure that the
designs they create will present the right image to
the public and will
help to sell our
music.
The manufacturer
When a designer brings work for printing, I need to
have clear information and the details of the
design job. Then I will
know exactly what
materials and manu-
facturing processes to
use for a successful
product.
The user
When I buy a new CD I think the graphics on the
package are important. I like to read about the band
and the words of the songs. The style of the images
and pictures also give the ‘feel’ of what the music
will be like. Sometimes
I’ve bought music by a
band that I’ve not
known much about, just
because I thought that
the CD cover looked
really interesting.
In your work you may be both the designer and the manufacturer. You might even be the client too.
Do not fall into the trap of thinking you don’t need to communicate your ideas just because you know
what you are doing! You have to communicate your ideas so that they can be understood by other
people. You can then ask them for their advice and opinions about your proposals. You will also be
able to judge more clearly whether your design is exactly right, before your start making. You can use
techniques in this section to help you communicate ideas.

Downloaded from www.secondarydandt.org – the website of Nuffield Secondary Design & Technology 2
Communicating your design ideas
Rough SketchesYour first thumb nail sketches of ideas probably
only make sense to you. To help you explain your
ideas to a client, you will need to make clearer
rough sketches. These are sometimes called
scamps. They are drawings that are made
quickly, but give a closer impression of the final
product. Rough sketches are usually drawn on
thin paper with a pencil or felt tips. The standard
required for these drawings depends on the type
of person with whom you are discussing your
ideas. If the client is familiar with how designers
work, sketchy drawings may be adequate. People
from outside the world of design may only
understand more precise coloured sketches.
Key points▲ Rough sketches should not be too time
consuming to produce. Draw with something
that you find quick and easy to work with.
▲ Decide on the level of detail that you will need
to give an impression of your idea.
▲ Use notes and arrows to explain your ideas
more fully.
▲ Only add colour if it is an important part of your
design.
▲ Make these sketches clear enough for other
people to understand your design proposals.
Layout roughs for a fanzine
Roughs for a florist’s corporate identity
CRT 1

Downloaded from www.secondarydandt.org – the website of Nuffield Secondary Design & Technology 3
Communicating your design ideas
Sketch modelsThese are three-dimensional versions of a rough
sketch or diagram. They are useful when you are
planning space or proportions, as in interior
design, or to show how something works, such as
a pop-up card mechanism. For this type of design,
a sketch model will give the client a better
understanding of your idea than a two dimensional
drawing.
Key Points▲ Sketch models should be very simple and
quick to make. They do not need to show
detail, but should act as a talking point for your
early ideas.
▲ Use materials that are easy to work with and
that can be quickly changed and adapted.
Paper, card, polystyrene foam and found
materials such as cardboard tubes and boxes
can be quickly assembled with double-sided
adhesive tape, paper fasteners and staples.
CRT 1

Downloaded from www.secondarydandt.org – the website of Nuffield Secondary Design & Technology 4
Communicating your design ideas
Simple mock-upsIf you are designing a three-dimensional product
such as a package or display stand, it is useful to
show your client a simple mock-up of your idea. A
mock-up is a three-dimensional model that is
made full size and will show the graphics that will
be used on the final product.
A 3D mock-up will allow you and the client to view
the design from all sides and judge if the colour,
scale, proportions and graphics look right. You
may decide to make changes to your design at this
stage, as ideas often look quite different in three
dimensions.
Guide to making mock-ups▲ Choose materials that are quick and easy to
work with, such as card for packages or
display stands. Block models can be sculpted
from polystyrene foam.
A dummyA dummy is an accurate drawing or a three-
dimensional model of the final design. It should be
the correct size and look exactly like the final
product.
You can use a dummy:
▲ to show the client a precise imitation of the
product. If the client is not satisfied with your
design, changes can still be made before
production. However, if your design is
accepted, the client may use the dummy to
advertise the new product;
▲ to show the dummy to the printer or
manufacturer as a guide for the production
methods and costings of your design solution.
CRT 1
▲ You should give a good impression of the final
design, but you do not need to use too much
detail. Simple mock-ups should give more
information than sketch models as your ideas
should be more developed.

Downloaded from www.secondarydandt.org – the website of Nuffield Secondary Design & Technology 5
Communicating your design ideas
Working drawingsWhen a three-dimensional product is ready for
making, the designer will present the model maker
or manufacturer with a working drawing. These
are drawings that contain all the instructions
necessary for making.
A working drawing must include:
▲ accurate dimensions of all parts;
▲ details of materials and the colours or surface
finishes required;
▲ construction and assembly instructions.
Working drawings show information using British
Standard Institution (BSI) conventions. This
provides a standard visual language that is
recognised throughout the world of industry. The
panel and drawings beneath it show some
examples of useful BSI conventions for drawings.
For further information refer to BSI 308 or PD 7308
(Engineering Drawing Practice for Schools and
Colleges).
continuous thick for visible outlines and edges
continuous thin for dimension and projection lines
continuous thin irregular limits of partial or interrupted views
chain thin centre lines, lines of symmetry
17 dimensioning
a diameter
First angle projection
Third angle projection
termination (common origin indicator)
25 28 30
small gap
projection line
short extension 92 dimension
dimension line termination (arrowhead)
Measured orthographic projectThese are accurate scale drawings that show
elevations (square-on views) of the product. They
should give all the construction information about
the design. Usually all the details can be shown
using three views: the plan view, a front elevation
and a side elevation. The drawing is set out in a
clear, organized arrangement as shown in the first
angle projection below.
CRT 2
Downloaded from www.secondarydandt.org – the website of Nuffield Secondary Design & Technology 6
Communicating your design ideas
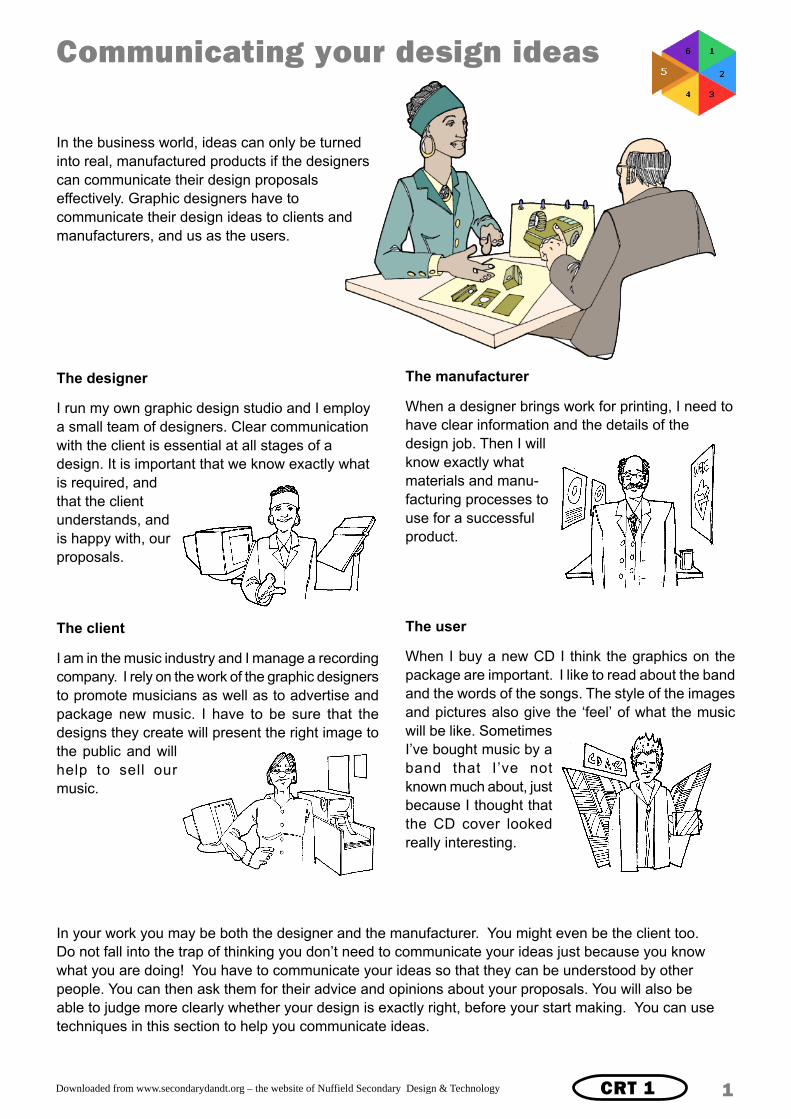
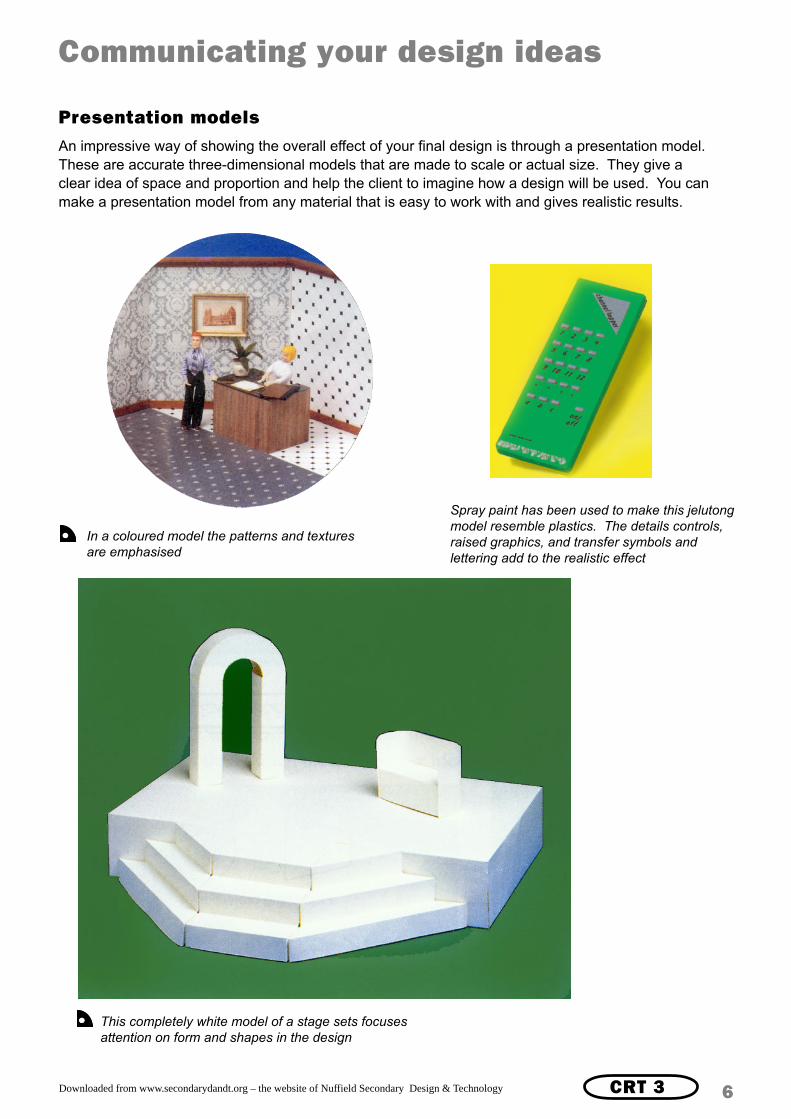
Presentation modelsAn impressive way of showing the overall effect of your final design is through a presentation model.
These are accurate three-dimensional models that are made to scale or actual size. They give a
clear idea of space and proportion and help the client to imagine how a design will be used. You can
make a presentation model from any material that is easy to work with and gives realistic results.
This completely white model of a stage sets focuses
attention on form and shapes in the design
Spray paint has been used to make this jelutong
model resemble plastics. The details controls,
raised graphics, and transfer symbols and
lettering add to the realistic effect
In a coloured model the patterns and textures
are emphasised
CRT 3
Downloaded from www.secondarydandt.org – the website of Nuffield Secondary Design & Technology 7
Communicating your design ideas
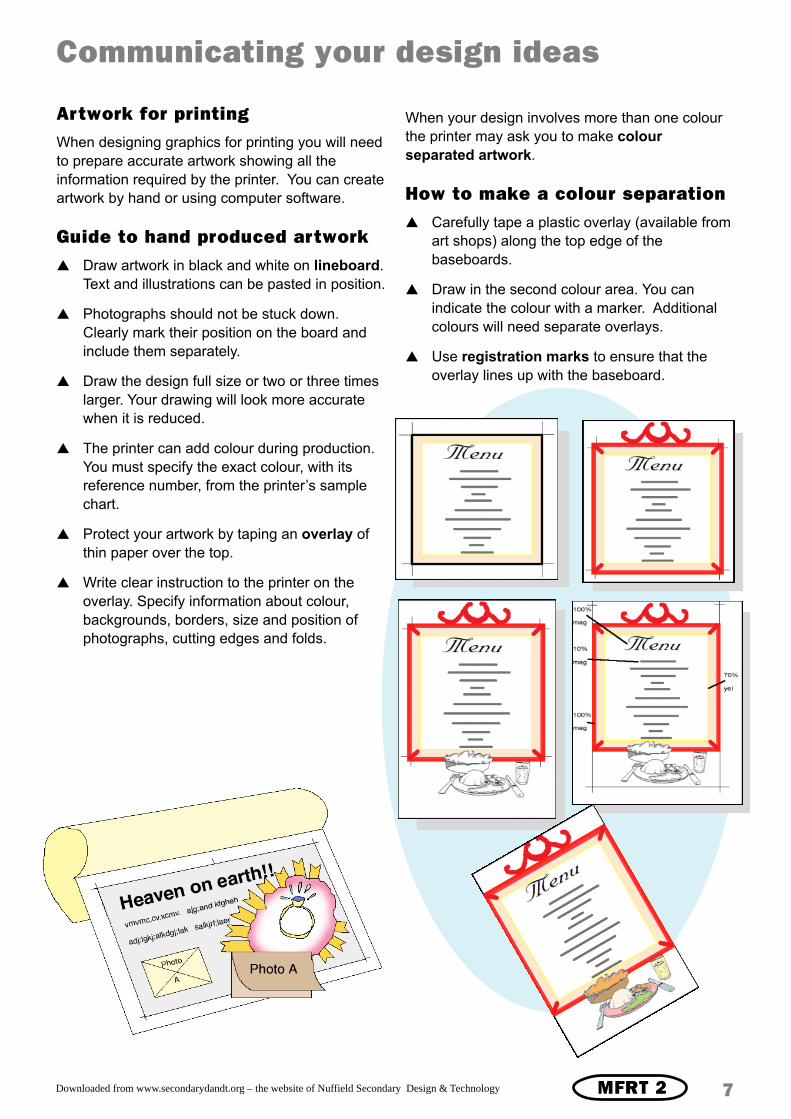
Artwork for printingWhen designing graphics for printing you will need
to prepare accurate artwork showing all the
information required by the printer. You can create
artwork by hand or using computer software.
Guide to hand produced artwork▲ Draw artwork in black and white on lineboard.
Text and illustrations can be pasted in position.
▲ Photographs should not be stuck down.
Clearly mark their position on the board and
include them separately.
▲ Draw the design full size or two or three times
larger. Your drawing will look more accurate
when it is reduced.
▲ The printer can add colour during production.
You must specify the exact colour, with its
reference number, from the printer’s sample
chart.
▲ Protect your artwork by taping an overlay of
thin paper over the top.
▲ Write clear instruction to the printer on the
overlay. Specify information about colour,
backgrounds, borders, size and position of
photographs, cutting edges and folds.
When your design involves more than one colour
the printer may ask you to make colour
separated artwork.
How to make a colour separation▲ Carefully tape a plastic overlay (available from
art shops) along the top edge of the
baseboards.
▲ Draw in the second colour area. You can
indicate the colour with a marker. Additional
colours will need separate overlays.
▲ Use registration marks to ensure that the
overlay lines up with the baseboard.
MFRT 2

Downloaded from www.secondarydandt.org – the website of Nuffield Secondary Design & Technology 8
Communicating your design ideas
Scale drawingA scale drawing is an accurate plan with elevations (sides views) and
sections (cut through views). Interiors are often drawn to a large scale
such as 1:50, where one centimetre represents a half metre. This allows
you to show details of furniture and fittings.
Floor planA floor plan usually shows a slice through the room at a height above
floor level which enables you to show the position of furniture and
windows. Symbols are used to represent doorways and windows. You
will need to create your own simple symbols for furniture.
Roman resting couches Frosted plated glass/mirrored

Downloaded from www.secondarydandt.org – the website of Nuffield Secondary Design & Technology 9
Communicating your design ideas
Wall elevationThis shows ‘flat’ views of the walls in the room
and often includes the furniture and fittings that
will be positioned on, or in front of
the walls. Elevations are usually
shown with the floor plan and should
be drawn to the same scale.
The illustration on the right shows
different types of scale drawings a
design drawing and a working
drawing. The design drawing is used
to show the appearance of the
interior to a client. The working
drawing shows constructional
information for the manufacturer.
Hints for making a successful scale drawing▲ The drawing should be well laid out and orderly. Lettering should be neat
and kept horizontal. A dimension may be written vertically if it runs along
a height line.
▲ Choose a scale that will allow you to show important details. Record the
scale in the bottom right hand corner of the drawing.
▲ If the plan, elevations and sections are on one sheet, the plan should be
at the bottom, with elevations above it and sections to the right.
▲ Use the plan as a guide to project lines for your elevation.
▲ The sides from which the elevations are viewed should be marked on
the plan.
▲ Use pencil crayon or marker to add colour or texture.
▲ Grid paper can act as a useful guide. Mark the outlines in pencil to make
sure everything will fit on the page. Then lay tracing paper over the top
and mark the lines nearly in pen. Use different line thicknesses to make
your drawings easier to understand.
▲ You can show the position of ceiling lights by making a tracing paper
overlay that mirrors the floor plan.

Downloaded from www.secondarydandt.org – the website of Nuffield Secondary Design & Technology 10
Communicating your design ideas
User supportMany products include information to support the use of the product.
This can include the following:
▲ instructions for assembly;
▲ instructions for safe use;
▲ instructions for maintenance and repair;
▲ information about insurance;
▲ information about associated products;
▲ how further information may be obtained.
Such pieces of information are graphic products in their own right.
The panel below shows a range of user support materials.