Embed Size (px)
Citation preview

CommPilot Web Portal User Guide
About This Guide
COMMPILOT WEB PORTAL USER GUIDE Access Point, Inc. PAGE 2 OF 144
Copyright © 2011 Cypress Communications, Inc. All rights reserved.
The information in this document is subject to change without notice. The statements, configurations, technical data, and recommendations in this document are believed to be accurate and reliable, but are presented without express or implied warranty. Users must take full responsibility for their applications of any products specified in this document. The information in this document is proprietary to Cypress Communications, Inc.
Trademarks
The Cypress Communications logo is a registered service mark of Cypress Communications, Inc.
All other marks used herein are the property of their respective owners.

About This Guide
COMMPILOT WEB PORTAL USER GUIDE Access Point, Inc. PAGE 3 OF 144
Contents
1 About This Guide...........................................................................................................................8
2 Profile...............................................................................................................................................9
2.1 Access Profile Menu.....................................................................................................................9
2.2 Profile ............................................................................................................................................9
2.3 Addresses .................................................................................................................................. 11
2.4 Passwords ................................................................................................................................. 13
2.4.1 Reset Your Password....................................................................................................... 13
2.5 Time Schedule........................................................................................................................... 14
2.5.1 Add a Schedule ................................................................................................................ 14
2.5.2 Modify or Delete a Time Schedule .................................................................................. 16
2.6 Privacy........................................................................................................................................ 16
2.6.1 Turn Privacy On and Off .................................................................................................. 16
3 Incoming Calls ............................................................................................................................ 18
3.1 Access Incoming Calls Menu.................................................................................................... 19
3.2 Anonymous Call Rejection........................................................................................................ 19
3.2.1 Turn Anonymous Call Rejection On and Off................................................................... 19
3.3 Calling Line ID Blocking Override ............................................................................................. 20
3.3.1 Turn Calling Line ID Blocking Override On and Off........................................................ 20
3.4 Calling Name Retrieval.............................................................................................................. 21
3.4.1 Turn Calling Name Retrieval On and Off ........................................................................ 21
3.5 Call Forwarding Always............................................................................................................. 22
3.5.1 Turn Call Forwarding Always On and Off........................................................................ 22
3.6 Call Forwarding Busy ................................................................................................................ 23
3.6.1 Turn Call Forwarding Busy On and Off ........................................................................... 23
3.7 Call Forwarding No Answer ...................................................................................................... 23
3.7.1 Turn Call Forwarding No Answer On and Off ................................................................. 23
3.8 Call Notify ................................................................................................................................... 24
3.8.1 Activate or Deactivate a Call Notify Entry........................................................................ 24
3.8.2 Add a Call Notify Entry ..................................................................................................... 25
3.8.3 Modify or Delete a Call Notify Entry................................................................................. 27
3.9 Do Not Disturb ........................................................................................................................... 27
3.9.1 Turn Do Not Disturb On and Off ...................................................................................... 27
3.10 External Calling Line ID Delivery .............................................................................................. 28
3.10.1 Turn External Calling Line ID Delivery On and Off ......................................................... 28
3.11 Internal Calling Line ID Delivery................................................................................................ 29
3.11.1 Turn Internal Calling Line ID Delivery .............................................................................. 29
3.12 Alternate Numbers (Distinctive Ring) ....................................................................................... 29
3.12.1 Turn Distinctive Ring Feature On and Off ....................................................................... 30

About This Guide
COMMPILOT WEB PORTAL USER GUIDE Access Point, Inc. PAGE 4 OF 144
3.12.2 Select Distinctive Ring Pattern......................................................................................... 31
3.13 Call Centers ............................................................................................................................... 31
3.13.1 Indicate Your Call Center Availability............................................................................... 32
3.14 Call Forwarding Selective ......................................................................................................... 32
3.15 Set the Default Forwarding Number......................................................................................... 33
3.15.1 Add a Call Forwarding Selective Call Entry .................................................................... 34
3.15.2 Modify or Delete a Call Forwarding Selective Entry ....................................................... 35
3.15.3 View, Activate, Deactivate Call Forwarding Selective Call Entries ................................ 36
3.16 CommPilot Express................................................................................................................... 37
3.16.1 Configure Profiles for Incoming Calls .............................................................................. 37
3.17 Custom Ringback User ............................................................................................................. 40
3.17.1 Add a Custom Ringback User ......................................................................................... 41
3.17.2 Modify or Delete a Custom Ringback User Entry ........................................................... 43
3.18 Priority Alert................................................................................................................................ 44
3.18.1 Activate or Deactivate a Priority Alert .............................................................................. 44
3.18.2 Add a Priority Alert ............................................................................................................ 45
3.18.3 Modify or Delete a Priority Alert ....................................................................................... 46
3.19 Selective Acceptance ................................................................................................................ 46
3.19.1 Activate or Deactivate a Selective Acceptance Entry..................................................... 47
3.19.2 Add a Selective Acceptance Entry .................................................................................. 48
3.19.3 Modify or Delete a Selective Acceptance Entry.............................................................. 49
3.20 Selective Rejection .................................................................................................................... 49
3.20.1 Activate or Deactivate a Selective Rejection Entry......................................................... 50
3.20.2 Add a Selective Rejection Entry....................................................................................... 50
3.20.3 Modify or Delete a Selective Rejection Entry .................................................................. 52
3.21 Sequential Ringing .................................................................................................................... 52
3.21.1 Configure Features of the Sequential Ringing Service .................................................. 53
3.21.2 Set the Ring Sequence .................................................................................................... 54
3.21.3 Add Sequential Ringing Call Entries................................................................................ 54
3.21.4 Modify or Delete Sequential Ringing Call Entries ........................................................... 55
3.21.5 View, Activate or Deactivate Sequential Ringing Call Entries........................................ 56
3.22 Series Completion ..................................................................................................................... 57
3.22.1 View Your Series Completion Groups............................................................................. 58
3.23 Simultaneous Ringing ............................................................................................................... 58
3.23.1 Activate or Deactivate Simultaneous Ringing ................................................................. 58
3.23.2 Add a Number or SIP-URI Address to Your Simultaneous Ringing List ....................... 59
3.23.3 Delete a Phone Number/SIP-URI Address from Your Simultaneous Ringing List....... 60
3.24 Automatic Hold Retrieve ........................................................................................................... 61
3.24.1 Holding a Call.................................................................................................................... 62
3.24.2 Retrieving a Call................................................................................................................ 62
3.24.3 AHR Recall ....................................................................................................................... 62
3.24.4 Configuring Automatic Hold/Retrieve .............................................................................. 62
4 Outgoing Calls ............................................................................................................................ 64

About This Guide
COMMPILOT WEB PORTAL USER GUIDE Access Point, Inc. PAGE 5 OF 144
4.1 Access Outgoing Calls Menu.................................................................................................... 65
4.2 Automatic Callback.................................................................................................................... 65
4.3 Call Return ................................................................................................................................. 65
4.4 Calling Party Category .............................................................................................................. 66
4.5 Last Number Redial................................................................................................................... 67
4.6 Calling Line ID Blocking ............................................................................................................ 67
4.7 Speed Dial 8 .............................................................................................................................. 68
4.8 Speed Dial 100 .......................................................................................................................... 69
4.8.1 View or Delete Speed Dial 100 Dialing Codes ............................................................... 69
4.8.2 Set a Speed Dial 100 Code ............................................................................................. 70
4.8.3 Modify a Speed Dial 100 Entry ........................................................................................ 71
4.9 Account Codes .......................................................................................................................... 71
4.10 Personal Phone List .................................................................................................................. 72
4.10.1 View or Delete Phone List Entries ................................................................................... 72
4.10.2 Add an Entry to Your Personal Phone List ..................................................................... 73
4.10.3 Modify or Delete an Entry in Your Personal Phone List ................................................. 74
4.10.4 Import a Comma-delimited Text File ............................................................................... 74
4.11 Preferred Carrier User............................................................................................................... 75
4.12 Two-Stage Dialing ..................................................................................................................... 75
5 Call Control .................................................................................................................................. 77
5.1 Access Call Control Menu......................................................................................................... 78
5.2 Barge-in Exempt........................................................................................................................ 78
5.2.1 Turning Barge-in Exempt On and Off.............................................................................. 78
5.3 Call Waiting ................................................................................................................................ 79
5.3.1 Turn Call Waiting On and Off........................................................................................... 79
5.4 Call Pickup ................................................................................................................................. 79
5.5 Customer Originated Trace....................................................................................................... 80
5.5.1 Verify Assigned Feature Access Codes.......................................................................... 81
5.6 Directed Call Pickup .................................................................................................................. 81
5.6.1 Pick Up a Call at an Extension of Your Call Pickup Group ............................................ 81
5.7 Directed Call Pickup with Barge-in ........................................................................................... 82
5.7.1 View the Status of the Warning Tone.............................................................................. 82
5.8 Diversion Inhibitor ...................................................................................................................... 82
5.9 Flash Call Hold........................................................................................................................... 83
5.10 Call Transfer............................................................................................................................... 84
5.11 Three-Way Call.......................................................................................................................... 84
5.12 N-Way Call................................................................................................................................. 85
5.13 Music/Video On Hold................................................................................................................. 86
5.13.1 Turn Music/Video On Hold On and Off ........................................................................... 86
5.14 Charge Number ......................................................................................................................... 86
5.15 Hoteling Host ............................................................................................................................. 87
5.16 Hoteling Guest ........................................................................................................................... 88
5.17 Instant Messaging and Presence ............................................................................................. 90

About This Guide
COMMPILOT WEB PORTAL USER GUIDE Access Point, Inc. PAGE 6 OF 144
5.18 Mobile Extension to Extension Dialing ..................................................................................... 90
5.19 Push to Talk ............................................................................................................................... 91
5.19.1 Configure Push to Talk Options....................................................................................... 91
5.19.2 Allow Push to Talk Calls From Selected Users .............................................................. 92
5.20 Physical Location....................................................................................................................... 92
5.21 Remote Office............................................................................................................................ 93
5.22 Shared Call Appearance ........................................................................................................... 94
5.22.1 Query the Alternate Locations Assigned to You ............................................................. 95
5.23 Video Add-On ............................................................................................................................ 96
5.23.1 Turn Video Add-On On and Off ....................................................................................... 96
5.23.2 Set the Maximum Originating Call Delay ........................................................................ 97
6 Calling Plans................................................................................................................................ 98
6.1 Access Calling Plans Menu ...................................................................................................... 98
6.2 Incoming Calling Plan................................................................................................................ 98
6.3 Outgoing Calling Plan................................................................................................................ 99
6.3.1 Display Outgoing Calls You Can Place ......................................................................... 100
6.3.2 Display the Outgoing Calls You Can Forward .............................................................. 101
6.3.3 Display the Outgoing Calls You Can Forward or Transfer ........................................... 102
6.3.4 Display Your Permission to be Forwarded or Transferred........................................... 104
6.4 Outgoing Digit Plan.................................................................................................................. 104
6.4.1 Display Special Calls You Can Make ............................................................................ 105
6.4.2 Display Special Calls You Can Forward or Transfer .................................................... 105
7 Client Applications ................................................................................................................... 107
7.1 Access Client Applications Menu ........................................................................................... 108
7.2 Busy Lamp Field ...................................................................................................................... 108
7.3 CommPilot Call Manager ........................................................................................................ 109
7.4 Client Call Control .................................................................................................................... 109
7.5 Outlook Integration .................................................................................................................. 110
7.6 Phone Status Monitoring......................................................................................................... 111
7.7 BroadWorks Agent .................................................................................................................. 112
7.8 BroadWorks Supervisor .......................................................................................................... 112
7.9 BroadWorks Assistant – Enterprise........................................................................................ 113
7.10 BroadWorks Receptionist ....................................................................................................... 114
7.11 Client License .......................................................................................................................... 114
8 Messaging.................................................................................................................................. 115
8.1.1 Access Messaging Menu ............................................................................................... 115
8.2 Aliases...................................................................................................................................... 116
8.2.1 View or Delete Your Aliases .......................................................................................... 116
8.2.2 Add an Alias .................................................................................................................... 116
8.3 Distribution Lists....................................................................................................................... 117
8.3.1 Create a Distribution List ................................................................................................ 117
8.3.2 Add or Delete a Distribution List Entry........................................................................... 118

About This Guide
COMMPILOT WEB PORTAL USER GUIDE Access Point, Inc. PAGE 7 OF 144
8.4 Greetings.................................................................................................................................. 119
8.4.1 To Set the Busy Greeting:.............................................................................................. 120
8.4.2 To Set the No Answer Greeting:.................................................................................... 121
8.5 Voice Portal.............................................................................................................................. 121
8.5.1 Upload a Recorded Personalized Name....................................................................... 121
8.6 Voice Management ................................................................................................................. 122
8.6.1 Activate and Set Up Voice Messaging .......................................................................... 122
8.6.2 Configure Advanced Settings for Voice Management ................................................. 124
8.7 Third-Party MWI Control ......................................................................................................... 125
8.7.1 Use Third-Party MWI Control......................................................................................... 125
8.8 Third-Party Voice Mail Support ............................................................................................... 125
8.8.1 Configure a Third-Party Voice Mail System .................................................................. 126
8.9 Voice Portal Calling ................................................................................................................. 126
8.9.1 Turn Voice Portal Calling On or Off ............................................................................... 126
9 Service Scripts .......................................................................................................................... 128
9.1 Access Service Scripts Menu ................................................................................................. 128
9.2 Configuration............................................................................................................................ 128
9.2.1 Enable or Disable CPL Scripts ...................................................................................... 128
9.3 Load.......................................................................................................................................... 129
9.3.1 Load a CPL Script .......................................................................................................... 129
9.4 Logs.......................................................................................................................................... 130
9.4.1 View and Clear the CPL Log.......................................................................................... 130
10 Utilities ........................................................................................................................................ 132
10.1 Access Utilities Menu .............................................................................................................. 132
10.2 Authentication .......................................................................................................................... 132
10.2.1 Set Your New Password ................................................................................................ 133
10.3 Feature Access Codes............................................................................................................ 133
10.3.1 View Your Feature Access Codes................................................................................. 133
10.4 Group Directory ....................................................................................................................... 138
10.4.1 View the Group Directory ............................................................................................... 138
10.4.2 View or Print a Summary of the Group Directory.......................................................... 139
10.4.3 View or Print a Phone List .............................................................................................. 140
10.5 Enterprise Directory................................................................................................................. 141
10.5.1 View the Enterprise Directory ........................................................................................ 141
10.5.2 View or Print a Summary of the Enterprise Directory ................................................... 142
10.5.3 View or Print a Phone List .............................................................................................. 143
10.6 Intercept User .......................................................................................................................... 143
10.6.1 View Intercept User Status............................................................................................. 144

COMMPILOT WEB PORTAL USER GUIDE Access Point, Inc. PAGE 8 OF 144
Profile
1 About This Guide
The BroadWorks Application Server User Web Interface Administration Guide is designed to assist users with all CommPilot Personal web portal functions for the BroadWorks Applications Server. The web portal enables users to self-configure and manage group and personal features in real-time. Detailed instructions for each CommPilot Personal function and page can be found both in this guide and in the online help, available from the Help link on each web page.
This guide assumes users are familiar with the procedures in the BroadWorks Getting Started Web Interface Administration Guide.

COMMPILOT WEB PORTAL USER GUIDE Access Point, Inc. PAGE 9 OF 144
Profile
2 Profile
Use the User – Profile menu page to manage your personal profile data. Once you’ve logged into the system, the User – Profile page appears, which is the user’s Home page. At any time you can click Home to return to your Home page.
Figure 1 User – Profile
Basic menu
The User – Profile – Basic menu displays the items that all users can use including:
o Profile
o Addresses
o Passwords
o Time Schedule
Advanced services
This menu displays the menu items that users can use only if such functions have been assigned to them:
o Privacy
2.1 Access Profile Menu
When you log in, the User – Profile menu page appears. This is your Home page. Click Home to access this page from any other page in CommPilot Personal web interface or click Profile in the Options list.
2.2 Profile
Use this menu item on the User – Profile menu page to modify your personal information. Information marked with an asterisk is required. You cannot edit read-only information.

COMMPILOT WEB PORTAL USER GUIDE Access Point, Inc. PAGE 10 OF 144
Profile
Figure 1 User – Profile
1) On the User – Profile menu page, click Profile. The User – Profile page appears.
2) On the Profile page, position your mouse pointer in the text box to edit and click. Required data are indicated with an asterisk (*). Other data are optional, but recommended.
3) Press DELETE on your keyboard to empty the field of its contents, or simply begin typing to enter new information.
Input Box Name Required? Instructions Example
Service Provider ID (Read only) Service provider for your group. SP01
Group (Read only) Name of the group to which you belong. GP01
User ID (Read only) Your login ID. Joe123
Last Name Yes Your last name. Smith
First Name Yes Your first name. Joe
Calling Line ID Last Name (Read only) Last name that appears on caller ID. Smith
Calling Line ID First Name (Read only) First name that appears on caller ID. Joe
Calling Line ID Phone Number*
(Read only)Optional
Phone number that appears on caller ID. If the system administrator has enabled the Configurable Calling Line ID (CLID) for Emergency Calls, this number appears for emergency calls (for example, 911). If this number does not appear, the Group CLID appears for emergency calls.
3015551000
Department (Read only) Your department. Finance

COMMPILOT WEB PORTAL USER GUIDE Access Point, Inc. PAGE 11 OF 144
Profile
Language Yes The language of your interface. English
Time Zone Yes A drop-down list of time zones. (GMT-05:00) – USIndiana
Additional Information Area
Title No Your title. Marketing Director
Pager No Your complete pager number. If this number is not one assigned to the group, type the complete number: +<country code> <national number>. For example, “+1” must precede a long-distance number within the U.S.
4105558888
Mobile No Your complete mobile phone number. If this number is not one assigned to the group, type the complete number: +<country code> <national number>. For example, “+1” must precede a long-distance number within the U.S.
4105559999
Yahoo ID No Your Instant Messaging Yahoo ID.
Chatsalot88
E-mail No Your valid e-mail address in the format of [email protected].
Location No Your specific location (for example floor number or cubicle number).
12th Floor
Address No Your street address; this is likely the company address. There are two lines for information such as a suite or office number.
123 Main Street Suite 701
City No Your city name. Baltimore
State/Province No A drop-down list of states and Canadian provinces.
MD
Zip/Postal Code No Your zip or postal code. 20877
Country No Your country. United States
NOTE: The Calling Line ID Phone Number does not appear on the web page if your administrator did not configure this item using the command line interface (CLI).
4) Save your changes. Click Apply or OK. Apply saves your changes. OK saves your changes and displays the previous page.
To exit without saving, select another page or click Cancel to display the previous page.
2.3 Addresses
Use this menu item on the User – Profile menu to view your phone numbers and other identities that are used to make and receive calls.

COMMPILOT WEB PORTAL USER GUIDE Access Point, Inc. PAGE 12 OF 144
Profile
Figure 3 User – Addresses
Figure 4 User – Addresses (CMS)
1) On the User – Profile menu page, click Addresses. The User – Addresses page appears.
The following table explains the items on this page:
Input Box Name Required? Instructions Example
Phone Number (Read-only) Your phone number. 3015551000
Extension (Read-only) Your extension. 1234
Aliases (Read-only) Up to three valid aliases to be used for URL dialing and other services.
[email protected] Or sip: [email protected]
Identity/Device Profile Area (not available in CMS)
Identity/Device Profile Name
(Read-only) Assigned IP phone. SipPhone2

COMMPILOT WEB PORTAL USER GUIDE Access Point, Inc. PAGE 13 OF 144
Profile
Line/Port (Read-only) Assigned line or port for your IP phone.
3015551000 Or [email protected]
Set Up Identity Area (CMS only)
Sip (Read-only) Assigned line identity for your phone.
Contact sip (Read-only) The statically registered contactsip, for devices capable of static registration.
<sip:3331111653@ 192.168.8.80:5060; user=phone;transpo rt=udp>
2) To display the previous page, click OK. The User – Profile menu page appears.
2.4 Passwords
Use this menu item on the User – Profile menu page to reset your password.
Figure 5 User – Passwords
2.4.1 Reset Your Password
Use this procedure to reset your web access or voice portal password.
1) On the User – Profile menu page, click Passwords. The User – Passwords page appears.
2) Click the button to indicate which password you are changing. To change the password that gets you into BroadWorks, click Set web access password. To change the password for your voice messaging options, click Set voice portal password.
3) Type your current password. Type the password exactly as you do when logging into the system, including capitalization. The password does not appear as you type on the keyboard; * appears for each character typed, for example, ******.
4) Type the new password. Enter the password exactly as you do when logging into the system, including capitalization. Web access passwords are alphanumeric combinations that must begin with a character. Voice portal passwords are numeric characters only. The password does not appear as you type on the keyboard; * appears for each character typed, for example ******.
5) Type the new password again. Re-type the new password exactly as it was typed the first time, including capitalization.

COMMPILOT WEB PORTAL USER GUIDE Access Point, Inc. PAGE 14 OF 144
Profile
6) Save your changes. Click Apply or OK. Apply saves your changes. OK saves your changes and displays the previous page.
To exit without saving, select another page or click Cancel to display the previous page.
2.5 Time Schedule
Use this menu item on the User – Profile menu page to:
Add a Schedule
Modify or Delete a Time Schedule
The User – Time Schedule page is a list page that contains an advanced search. The advanced search lets you define specific search criteria to narrow your search and display a manageable list. For more information on defining search criteria, see the BroadWorks Getting Started Web Interface Administration Guide.
Figure 6 User – Time Schedule
2.5.1 Add a Schedule
Use this procedure to add a personal schedule. Personal schedules effect the following service configurations: Selective Call Forwarding, Selective Call Rejection, Selective Call Acceptance, and Priority Alert.

COMMPILOT WEB PORTAL USER GUIDE Access Point, Inc. PAGE 15 OF 144
Profile
Figure 7 Time Schedule – Time Schedule Add
1) On the User – Profile menu page, click Time Schedule. The User – Time Schedule page
appears.
2) Click Add. The User – Time Schedule Add page appears. The time schedule is composed of call entries that include the day of the week, the start time, the end day, and the end time.
3) Type the name of the schedule in the Time Schedule Name text box.
4) From the Start Day drop-down list, select the day to start the entry.
5) Type the start time, and select “AM” or “PM” from the drop-down list (if required by the time format).
6) From the End Day drop-down box, select the end day of the entry.
7) Type the end time, and select “AM” or “PM” from the drop-down list (if required by the time format).
8) Repeat steps 3 through 6 for each entry to add to the schedule.
9) To save your changes and display the previous page, click OK.
To exit without saving, select another page or click Cancel to display the previous page.

COMMPILOT WEB PORTAL USER GUIDE Access Point, Inc. PAGE 16 OF 144
Profile
2.5.2 Modify or Delete a Time Schedule
Use this procedure to modify or delete a time schedule entry.
Figure 8 Time Schedule – Time Schedule Modify
1) On the User – Profile menu page, click Time Schedule. The User – Time Schedule page
appears.
2) Click Edit in the row for the entry. The User – Time Schedule Modify page appears.
3) To remove the time schedule click Delete. The entry is deleted and the User – Time Schedule page appears.
WARNING: This action cannot be undone. Once you click Delete, the schedule is permanently deleted.
4) To modify, change the information as required.
5) To save your changes and display the previous page, click OK.
To exit without saving, select another page or click Cancel to display the previous page.
2.6 Privacy
2.6.1 Turn Privacy On and Off
Use this menu item on the User – Profile page to turn Privacy on or off.
By default all user names and numbers appear in Group and Enterprise directory listings. These listings are accessible via the User – Utilities menu and the Call Manager Group/Enterprise tab. The Profile – Privacy menu page allows you to eliminate your name from these directory listings. With privacy on, when another user does a directory listing, your name, and information will not appear. With privacy off, you name appears as usual.
NOTE: Turning Privacy on hides your name and number from other users in your own group/enterprise and from group administrators. It does not hide it in LDAP listings or Outlook listings, nor does it remove it from people’s personal directories.

COMMPILOT WEB PORTAL USER GUIDE Access Point, Inc. PAGE 17 OF 144
Incoming Calls
Figure 9 User – Privacy
1) On the User – Profile menu page, click Privacy from the Advanced menu. The User –
Privacy page appears.
2) For Privacy, click “On”. To eliminate Privacy, click “Off”.
3) Save your changes. Click Apply or OK. Apply saves your changes. OK saves your changes and displays the previous page.
To exit without saving, select another page or click Cancel to display the previous page.

COMMPILOT WEB PORTAL USER GUIDE Access Point, Inc. PAGE 18 OF 144
Incoming Calls
3 Incoming Calls
Use the User – Incoming Calls menu page to manage incoming calls, for example, call forwarding or screening your calls.
Figure 10 User – Incoming Calls
The list of menu items below includes all existing functions and services, although you may not see all of them on your User −Incoming Calls menu page. Your User – Incoming Calls page displays menu items that you can use only if such items have been assigned to them. Contact your system administrator to have additional functions or services assigned to you.
The User – Incoming Calls menu page contains these menu items:
Basic menu
This menu displays menu items that all users can use:
− Anonymous Call Rejection
− Calling Line ID Blocking Override
− Calling Name Retrieval
− Call Forwarding Always
− Call Forwarding Busy

COMMPILOT WEB PORTAL USER GUIDE Access Point, Inc. PAGE 19 OF 144
Incoming Calls
− Call Forwarding No Answer
− Call Notify
− Do Not Disturb
− External Calling Line ID Delivery
− Internal Calling Line ID Delivery
Advanced services
This menu displays the menu items that users can use only if such functions have been assigned to them:
− Automatic Hold Retrieve
− Alternate Numbers
− Call Centers
− Call Forwarding Selective
− CommPilot Express
− Custom Ringback User
− Priority Alert
− Selective Acceptance
− Selective Rejection
− Sequential Ringing
− Series Completion
− Simultaneous Ringing
3.1 Access Incoming Calls Menu
To access the User – Incoming Calls menu page, click Incoming Calls in the Options list.
3.2 Anonymous Call Rejection
3.2.1 Turn Anonymous Call Rejection On and Off
Use this menu item on the User – Incoming Calls page to turn Anonymous Call Rejection on and off. The Anonymous Call Rejection service allows you to reject calls from callers who have blocked the identification of their phone numbers.

COMMPILOT WEB PORTAL USER GUIDE Access Point, Inc. PAGE 20 OF 144
Incoming Calls
Figure 11 Incoming Calls – Anonymous Call Rejection
1) On the User – Incoming Calls menu page, click Anonymous Rejection. The User –
Anonymous Call Rejection page appears.
2) For Anonymous Call Rejection, click “On”. To turn it off, click “Off”. When on, Anonymous Rejection rejects calls from callers who have chosen to block the identification of their phone numbers. The caller hears a message notifying that his/her call is being rejected.
3) Save your changes. Click Apply or OK. Apply saves your changes. OK saves your changes and displays the previous page.
To exit without saving, select another page or click Cancel to display the previous page.
3.3 Calling Line ID Blocking Override
3.3.1 Turn Calling Line ID Blocking Override On and Off
Use this menu item on the User – Incoming Calls page to turn Calling Line ID Blocking Override on or off. The Calling Line ID Blocking Override service allows you to view the calling line ID of callers, including those who have blocked their IDs.
Figure 12 Incoming Calls – Calling Line ID Blocking Override
1) On the User – Incoming Calls menu page, click Calling Line ID Blocking Override. The
User – Calling Line ID Blocking Override page appears.
2) To turn Calling Line ID Blocking Override on, click “On”. To turn it off, click “Off”.
3) Save your changes. Click Apply or OK. Apply saves your changes. OK saves your changes and displays the previous page.

COMMPILOT WEB PORTAL USER GUIDE Access Point, Inc. PAGE 21 OF 144
Incoming Calls
To exit without saving, select another page or click Cancel to display the previous page.
NOTE: You must also have Calling Line ID Delivery assigned to display blocked calling line IDs.
3.4 Calling Name Retrieval
3.4.1 Turn Calling Name Retrieval On and Off
Use this menu item on the User – Incoming Calls page to turn Calling Name Retrieval on and off. The Calling Name Retrieval service allows you to retrieve the names of callers from the network.
Figure 13 Incoming Calls – Calling Name Retrieval
1) On the User – Incoming Calls menu page, click, Calling Name Retrieval. The User –
Calling Name Retrieval page appears.
2) To enable Calling Name Retrieval, click “On”. To Disable it, click “Off”.
3) Save your changes. Click Apply or OK. Apply saves your changes. OK saves your changes and displays the previous page.
4) To exit without saving, select another page or click Cancel to display the previous page.
If any of the following services are configured, Call Name Retrieval does not retrieve the caller’s information:
Anonymous Call Rejection
Call Forwarding Busy
Call Forwarding Always
Call Forwarding Selective
Do Not Disturb
Selective Call Acceptance
Selective Call Rejection
Incoming Plan
Lawful Intercept Terminator Service

COMMPILOT WEB PORTAL USER GUIDE Access Point, Inc. PAGE 22 OF 144
Incoming Calls
Intercept User Service
CPL Service
3.5 Call Forwarding Always
3.5.1 Turn Call Forwarding Always On and Off
Use this menu item on the User – Incoming Calls page to turn Call Forwarding Always on and off. The Call Forwarding Always service allows you to redirect all your calls to another number or SIP-URL.
NOTE: You can access this page by clicking the CFA link on your CommPilot Call Manager page. When the CFA is activated, this service is on. When it is not activated, it is off. As well, you can access Call Forwarding Always from the Voice Portal service.
Figure 14 Incoming Calls – Call Forwarding Always
1) On the User – Incoming Calls menu page, click Call Forwarding Always. The User – Call
Forwarding Always page appears.
2) To enable Call Forwarding Always, click “On”. To disable it, click “Off”.
3) Type the number or SIP-URI address to forward your calls to in the Calls Forward to text box (dashes, parentheses, or spaces are not necessary). If this number is not one assigned to the group, type the complete number: +<country code> <national number>. For example, “+1” must precede long distance calls within the U.S. This is required information when the service is on. The text box must be populated with a valid phone number.
NOTE: You can enter feature access codes and speed codes in addition to phone numbers and extensions with this service.
4) To cause a short ring burst to be played at your office phone when a call is forwarded, check Play Ring Reminder when a call is forwarded.
5) Save your changes. Click Apply or OK. Apply saves your changes. OK saves your changes and displays the previous page.
To exit without saving, select another page or click Cancel to display the previous page.
NOTE: You can modify this information at any time. Remember to save your changes.

COMMPILOT WEB PORTAL USER GUIDE Access Point, Inc. PAGE 23 OF 144
Incoming Calls
3.6 Call Forwarding Busy
3.6.1 Turn Call Forwarding Busy On and Off
Use this menu item on the User – Incoming Calls page to turn Call Forwarding Busy on and off. The Call Forwarding Busy service allows you to redirect your calls to another number or SIP-URI when you are engaged in a call.
Figure 15 Incoming Calls – Call Forwarding Busy
1) On the User – Incoming Calls menu page, click Call Forwarding Busy. The User – Call
Forwarding Busy page appears.
2) To enable Call Forwarding Busy, click “On”. To disable it, click “Off”.
3) Type the number or SIP-URI to forward your calls to in the Calls Forward to text box (dashes, parentheses, or spaces are not necessary). If this number is not one assigned to the group, type the complete number: +<country code> <national number>. For example, “+1” must precede long distance calls within the U.S. This is required information when the service is on. The text box must be populated with a valid phone number.
NOTE: You can enter feature access codes and speed codes in addition to phone numbers and extensions with this service.
4) Save your changes. Click Apply or OK. Apply saves your changes. OK saves your changes and displays the previous page.
To exit without saving, select another page or click Cancel to display the previous page.
NOTE: You can modify this information at any time. Remember to save your changes.
3.7 Call Forwarding No Answer
3.7.1 Turn Call Forwarding No Answer On and Off
Use this menu item on the User – Incoming Calls page to turn Call Forwarding No Answer on and off. The Call Forwarding No Answer service allows you to redirect your calls to another number or SIP-URI when you do not answer after a certain number of rings.
NOTE: Other services, such as Messaging, share this setting and if it is changed in one service, that change affects all other services.

COMMPILOT WEB PORTAL USER GUIDE Access Point, Inc. PAGE 24 OF 144
Incoming Calls
Figure 16 Incoming Calls – Call Forwarding No Answer
1) On the User – Incoming Calls menu page, click Call Forwarding No Answer. The User –
Call Forwarding No Answer page appears.
2) To enable Call Forwarding No Answer, click “On”. To disable it, click “Off”
3) Type the number or SIP-URI address to forward your calls to in the Calls Forward to text box (dashes, parentheses, or spaces are not necessary). If this number is not one assigned to the group, type the complete number: +<country code> <national number>. For example, “+1” must precede long distance calls within the U.S. This is required information when the service is on. The text box must be populated with a valid phone number.
NOTE: You can enter feature access codes and speed codes in addition to phone numbers and extensions with this service.
4) Click the button that indicates the number of rings before forwarding.
5) Save your changes. Click Apply or OK. Apply saves your changes. OK saves your changes and displays the previous page.
To exit without saving, select another page or click Cancel to display the previous page.
NOTE: You can modify this information at any time. Remember to save your changes.
3.8 Call Notify
Use this menu item on the User – Incoming Calls page to:
Activate or Deactivate a Call Notify Entry
Add a Call Notify Entry
Modify or Delete a Call Notify Entry
The Call Notify service allows you to receive an e-mail notification when you receive a call.
3.8.1 Activate or Deactivate a Call Notify Entry
Use this procedure to activate or deactivate an existing Call Notify entry. The entry specifies the e-mail where a message is to be sent to notify you of an incoming call during a specific time schedule when it is activated. No notification is sent to an entry that is deactivated.

COMMPILOT WEB PORTAL USER GUIDE Access Point, Inc. PAGE 25 OF 144
Incoming Calls
Figure 17 Incoming Calls – Call Notify
1) On the User – Incoming Calls menu page, click Call Notify. The User – Call Notify page
appears.
2) Check the Active check box beside the selection to activate. To deactivate this selection, uncheck the Active check box.
3) Save your changes. Click Apply or OK. Apply saves your changes. OK saves your changes and displays the previous page.
To exit without saving, select another page or click Cancel to display the previous page.
NOTE: The Call Notify service is dependent on the Calling Line ID (external and internal) services. If Calling Line ID is not enabled, the caller’s name and number are not included in the Call Notify e-mail.
3.8.2 Add a Call Notify Entry
Use this procedure to add an e-mail address where you want to receive notification of an incoming call.

COMMPILOT WEB PORTAL USER GUIDE Access Point, Inc. PAGE 26 OF 144
Incoming Calls
Figure 18 Call Notify – Call Notify Add
1) On the User – Incoming Calls menu page, click Call Notify. The User – Call Notify page
appears.
2) Type the e-mail address to send the notification to in the Send e-mail to text box.
3) Click Apply to save your changes.
4) Click Add. The User – Call Notify Add page appears.
5) In the * Description text, type a description of the phone numbers in this selection.
6) Select the time schedule to use this service from the drop-down list.
NOTE: Define your time schedules on the User - Time Schedule page.
7) To have notifications of calls from any phone number sent, select Any phone number.
8) To receive notifications of calls from a defined telephone number, select Following phone numbers. You can select “Any private number” or “Any unavailable number”.
Click your cursor in the text box and type the complete number to trigger the service. If this number is not one assigned to the group, type the complete number: +<country code> <national number>. For example, “+1” must precede long distance numbers within the U.S. You can enter up to 12 numbers for this service.
You can use wild cards. The “?” is a wild card that can replace a single digit anywhere in a digit string. A trailing “*” represents a digit string and can only appear at the end of a string containing digits and “?” wild cards. For example, 45055512?4, 450555??34, and 4505?5*, are all valid call entries.
9) To save your changes and display the previous page, click OK.
To exit without saving, select another page or click Cancel to display the previous page.

COMMPILOT WEB PORTAL USER GUIDE Access Point, Inc. PAGE 27 OF 144
Incoming Calls
3.8.3 Modify or Delete a Call Notify Entry
Use this procedure to modify or delete a Call Notify entry.
Figure 19 Call Notify – Call Notify Modify
1) On the User – Incoming Calls menu page, click Call Notify. The User – Call Notify page
appears.
2) Click Edit in the row for the entry. The User – Call Notify Modify page appears.
3) To remove an entry, click Delete. The entry is deleted and the User – Call Notify page appears.
WARNING: This action cannot be undone. Once you click Delete, the instance is permanently deleted.
4) To modify, change the information as required.
5) To save your changes and display the previous page, click OK.
To exit without saving, select another page or click Cancel to display the previous page.
3.9 Do Not Disturb
3.9.1 Turn Do Not Disturb On and Off
Use this menu item on the User – Incoming Calls page to turn Do Not Disturb on and off. The Do Not Disturb service allows you to block your incoming calls.
NOTE: You can access this screen by clicking the DND link on the CommPilot Call Manager page. When the button to the left of the DND link on the CommPilot Call Manager is activated, this service is on. When it is not activated, it is off.

COMMPILOT WEB PORTAL USER GUIDE Access Point, Inc. PAGE 28 OF 144
Incoming Calls
Figure 20 Incoming Calls – Do Not Disturb
1) On the User – Incoming Calls menu page, click Do Not Disturb. The User – Do Not
Disturb page appears.
2) To activate Do Not Disturb, click "On”. To deactivate it, click “Off”.
3) To hear a ring when calls come in when Do Not Disturb is on, check the Play Ring Reminder when a call is blocked check box. A ring reminder is played if this service blocks a call while this check box is checked. To disengage the ring reminder, uncheck the Play Ring Reminder when a call is blocked check box.
4) Save your changes. Click Apply or OK. Apply saves your changes. OK saves your changes and displays the previous page.
To exit without saving, select another page or click Cancel to display the previous page.
3.10 External Calling Line ID Delivery
3.10.1 Turn External Calling Line ID Delivery On and Off
Use this menu item on the User – Incoming Calls page to turn External Calling Line ID Delivery on and off. The External Calling Line ID Delivery service allows you to view the caller identification of a caller from an external group.
Figure 21 Incoming Calls – External Calling Line ID Delivery
1) On the User – Incoming Calls menu page, click External Calling Line ID Delivery. The
User – External Calling Line ID Delivery page appears.

COMMPILOT WEB PORTAL USER GUIDE Access Point, Inc. PAGE 29 OF 144
Incoming Calls
2) To enable External Calling Line ID Delivery, click "On”. To disable it, click “Off”.
3) Save your changes. Click Apply or OK. Apply saves your changes. OK saves your changes and displays the previous page.
To exit without saving, select another page or click Cancel to display the previous page.
3.11 Internal Calling Line ID Delivery
3.11.1 Turn Internal Calling Line ID Delivery
Use this menu item on the User – Incoming Calls page to turn Internal Calling Line ID Deliver on and off. The Internal Calling Line ID Delivery service allows you to view the caller identification of a caller from within your group.
Figure 22 Incoming Calls – Internal Calling Line ID Delivery
1) On the User – Incoming Calls menu page, click Internal Calling Line ID Delivery. The
User – Internal Calling Line ID Delivery page appears.
2) To enable Internal Calling Line ID Delivery, click “On”. To disable it, click “Off”.
3) Save your changes. Click Apply or OK. Apply saves your changes. OK saves your changes and displays the previous page.
To exit without saving, select another page or click Cancel to display the previous page.
3.12 Alternate Numbers (Distinctive Ring)
Use this menu item on the User – Incoming Calls page to:
Turn Distinctive Ring Feature On and Off
Select Distinctive Ring Pattern
The Alternate Numbers service allows you to have up to ten alternate phone numbers or extensions assigned, in addition to your main phone number. You can be reached through any of the phone numbers. The first number is the main or primary phone number, while the additional ten numbers are your alternate or secondary phone numbers. Each alternate phone number can be a direct inward dialing number (DID) or an Extension.
For each alternate number, you can associate one of the four ring patterns. All calls to the main number result in the normal ring pattern. Calls to the alternate numbers result in a distinctive ring pattern that corresponds to the number that was used.

COMMPILOT WEB PORTAL USER GUIDE Access Point, Inc. PAGE 30 OF 144
Incoming Calls
If you are busy (and Call Waiting is enabled), an incoming call to the main number results in the usual call waiting tone, while an incoming call to any of the alternate numbers results in a distinctive call waiting tone.
When calls are placed to one of the alternate numbers using the CommPilot Call Manager, the alternate phone number in addition to the caller’s main number appear.
You can select whether or not a distinctive ring should be provided when a call arrives on an alternate number, or whether the normal ring (pattern 1) should always be used. You can assign one of four ring patterns to an alternate number. The support for a distinctive ring pattern depends on the capability of a user’s device. If the device does not support a distinctive ring pattern, then the normal ring pattern is applied.
NOTE: When someone calls into your CommPilot Call Manager, the originating number displays AS WELL AS, and (Alternate #) is displayed in parentheses.
3.12.1 Turn Distinctive Ring Feature On and Off
Use this procedure to enable or disable a distinctive ring for incoming calls on the alternate numbers displayed on this page.
Figure 23 Incoming Calls – Alternate Numbers
1) On the User – Incoming Calls menu page, click Alternate Numbers. The User – Alternate
Numbers page appears.
2) To enable Distinctive Ring, click “On”. To disable it, click “Off”.
3) Save your changes. Click Apply or OK. Apply saves your changes. OK saves your changes and displays the previous page.
To exit without saving, select another page or click Cancel to display the previous page.

COMMPILOT WEB PORTAL USER GUIDE Access Point, Inc. PAGE 31 OF 144
Incoming Calls
3.12.2 Select Distinctive Ring Pattern
Use this procedure to assign a distinctive ring pattern for each number.
Figure 24 Incoming Calls – Alternate Numbers
1) On the User – Incoming Calls menu page, click Alternate Numbers. The User – Alternate
Numbers page appears.
2) From the Ring Pattern drop-down list, select the ring pattern for the number you want to define. You can select from the following four ring patterns:
− Normal
− Long-Long
− Short-Short-Long
− Short-Long-Short
3) Save your changes. Click Apply or OK. Apply saves your changes. OK saves your changes and displays the previous page.
To exit without saving, select another page or click Cancel to display the previous page.
NOTE: There are different Call Waiting ring patterns associated with each of the four Alternate Number ring patterns. If the user has the Call Waiting feature assigned and enabled, the Call Waiting ring pattern is based on the Alternate Number ring pattern selected.
3.13 Call Centers
The Call Centers menu appears only if the group you are a member of has been assigned this service by your service provider.
Use this menu item on the User – Incoming Calls page to indicate your call center availability.

COMMPILOT WEB PORTAL USER GUIDE Access Point, Inc. PAGE 32 OF 144
Incoming Calls
The Call Centers service allows you to signal whether you are available or unavailable to take calls from your call centers.
3.13.1 Indicate Your Call Center Availability
Use this procedure to indicate whether you are available to your Call Center to receive calls.
Figure 25 Incoming Calls – Call Centers
1) On the User – Incoming Calls menu page, click Call Centers. The User – Call Centers
page appears.
The User – Call Centers page displays the items described below.
Item Description
Call Center ID Name or number of the Call Center assigned by the administrator.
Phone Number Phone number assigned to the Call Center.
Extension Extension associated with your Call Center phone.
2) Check the Available check box to indicate that you are available to receive calls in your
Call Center group. Uncheck the Available check box to indicate that you are unavailable to receive calls in your Call Center group.
3) Save your changes. Click Apply or OK. Apply saves your changes. OK saves your changes and displays the previous page.
To exit without saving, select another page or click Cancel to display the previous page.
3.14 Call Forwarding Selective
The Call Forwarding Selective service allows you to forward incoming calls with criteria that you set (a call entry) to a default phone number, SIP-URI address, or to another number of your choice.
NOTE: The criteria for each Call Forwarding Selective call entry can be a list of up to 12 caller phone numbers or digit patterns, or SIP-URI addresses, and a specified time schedule during which the service is active. All criteria for a call entry must be satisfied for the call to enter Call Forwarding Selective (phone number and day of week and time of day). Otherwise, the call does not activate the service.

COMMPILOT WEB PORTAL USER GUIDE Access Point, Inc. PAGE 33 OF 144
Incoming Calls
NOTE 2: You can enter feature access codes and speed codes in addition to phone numbers and extensions with this service.
Use the following procedures to configure the Call Forwarding Selective service and manage call entries.
Set the Default Forwarding Number
Add a Call Forwarding Selective Call Entry
Modify or Delete a Call Forwarding Selective Entry
View, Activate, Deactivate Call Forwarding Selective Call Entries
3.15 Set the Default Forwarding Number
Use this procedure to set the default forwarding number or SIP-URI address.
Figure 26 Incoming Calls − Call Forwarding Selective
1) On the User – Incoming Calls menu page, click Call Forwarding Selective. The User –
Call Forwarding Selective page appears.
2) In the *Default Calls Forward to phone number/SIP-URI text box, type the phone number or SIP-URI address that you want to be your default forwarding number. This is required information.
3) To associate a sound (a short burst of rings) with the delivery of forwarded calls, click to select Play Ring Reminder when a call is forwarded.
4) All calls you specify go to the default number or SIP-URI address unless you specify a different forwarding number or SIP-URI address. To specify a different forwarding number or SIP-URI address, see section 3.15.1 Add a Call Forwarding Selective Call Entry. You can enter feature access codes and speed codes in addition to phone numbers and extensions with this service.
5) To add an entry to specify criteria for callers whose numbers you want forwarded, see section 3.15.1 Add a Call Forwarding Selective Call Entry.
6) Save your changes. Click Apply or OK. Apply saves your changes. OK saves your changes and displays the previous page.

COMMPILOT WEB PORTAL USER GUIDE Access Point, Inc. PAGE 34 OF 144
Incoming Calls
To exit without saving, select another page or click Cancel to display the previous page.
3.15.1 Add a Call Forwarding Selective Call Entry
Use this procedure to specify an alternate forwarding number or SIP-URI address and to add a Call Forwarding Selective entry.
Figure 27 Call Forwarding Selective – Call Forwarding Selective Add
1) On the User – Incoming Calls menu page, click Call Forwarding Selective. The User –
Call Forwarding Selective page appears.
2) Click Add. The User – Call Forwarding Selective Add page appears.
3) In the *Description text box, type a name for the entry you are adding.
4) Choose the Use Default Forward phone number/SIP-URI or Forward to another phone number/SIP-URI option. Type in the number or SIP-URI address you want to use as your forwarding number or SIP-URI address if you choose the second option.
5) From the Selected Time Schedule drop-down list, choose a time period during which you want calls forwarded to the specified callers.
NOTE: Define your time schedules on the User – Profile −Time Schedule page. If you have not set any time schedules, your choices are “Every Day All Day” and any group time schedules that your group administrator has set.
6) To have calls from any phone number forwarded to the number or SIP-URI address you specified and at the time you specified, select Any phone number.
7) To receive notifications of calls from a defined telephone number, select Following phone numbers. You can select “Any private number” or “Any unavailable number”.
COMMPILOT WEB PORTAL USER GUIDE Access Point, Inc. PAGE 35 OF 144
Incoming Calls
Enter these phone numbers in the Specific phone numbers text boxes. If a number is not one assigned to the group, type the complete number: <country code> <national number>. You can enter up to 12 numbers for this service.
You can use wild cards. The “?” is a wild card that can replace a single digit anywhere in a digit string. A trailing “*” represents a digit string and can only appear at the end of a string containing digits and “?” wild cards. For example, 45055512?4, 450555??34, and 4505?5*, are all valid call entries.
You can enter only one number if you want. Entering information in these text boxes clears the Any phone number check box. You can add more numbers by creating another entry with the same forwarding number.
8) To save your changes and display the previous page, click OK.
To exit without saving, select another page or click Cancel to display the previous page.
To modify criteria in an entry, see section 3.15.2 Modify or Delete a Call Forwarding Selective Entry.
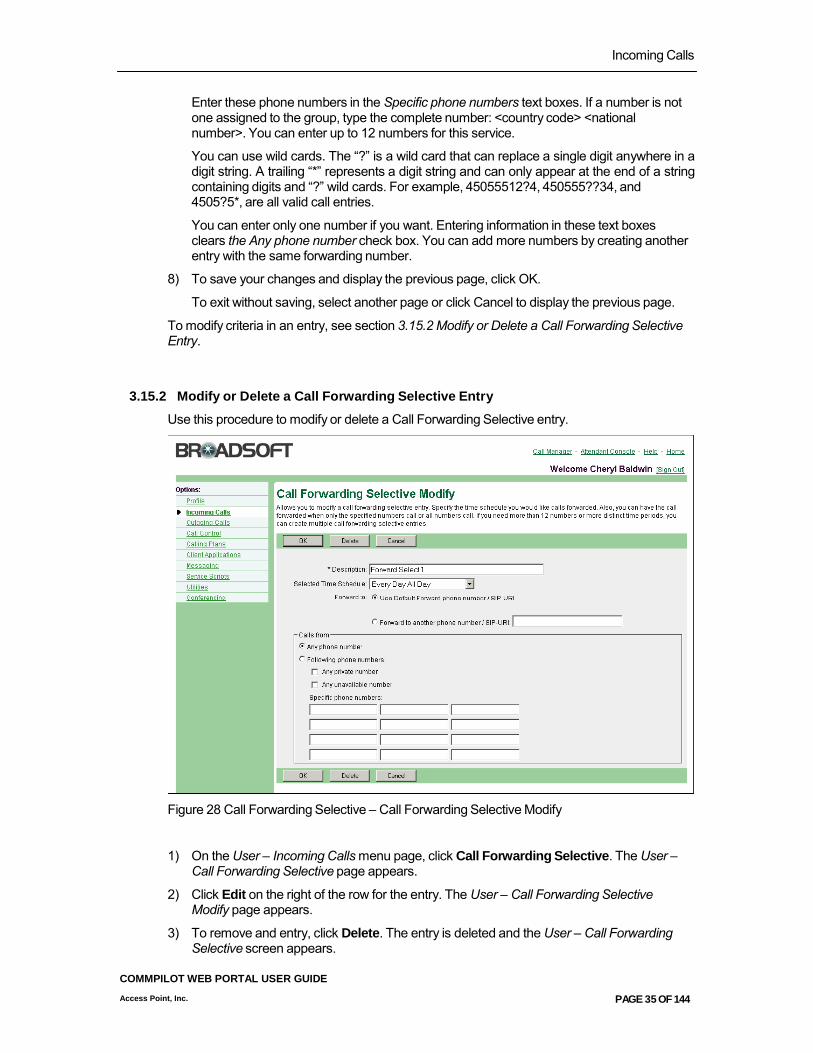
3.15.2 Modify or Delete a Call Forwarding Selective Entry
Use this procedure to modify or delete a Call Forwarding Selective entry.
Figure 28 Call Forwarding Selective – Call Forwarding Selective Modify
1) On the User – Incoming Calls menu page, click Call Forwarding Selective. The User –
Call Forwarding Selective page appears.
2) Click Edit on the right of the row for the entry. The User – Call Forwarding Selective Modify page appears.
3) To remove and entry, click Delete. The entry is deleted and the User – Call Forwarding Selective screen appears.

COMMPILOT WEB PORTAL USER GUIDE Access Point, Inc. PAGE 36 OF 144
Incoming Calls
WARNING: This action cannot be undone. Once you click Delete, the instance is permanently deleted.
4) To modify, change the information as required.
NOTE: Highlight the text box you wish to change and type over the highlighted entry. Do not use the Delete button on the page to clear a box. The Delete button permanently deletes all information for the entry on the page.
5) To save your changes and display the previous page, click OK.
To exit without saving, select another page or click Cancel to display the previous page.
3.15.3 View, Activate, Deactivate Call Forwarding Selective Call Entries
Use this procedure to view all call entries and activate and deactivate one or more call entries.
Figure 29 Incoming Calls − Call Forwarding Selective (View)
1) On the User – Incoming Calls menu page, click Call Forwarding Selective. The User –
Call Forwarding Selective page appears.
2) To view the call entries you have configured, look at the call entries at the bottom of the page. Call entries you have configured are automatically active.
− To see all details of an entry, click on Edit. The Call Forwarding Selective Modify page appears with the selected entry criteria displayed.
− Click OK to return to the Call Forward Selective page.
3) To activate an entry on the Call Forward Selective page, click on the Active check box to select it.
4) To deactivate an entry on the Call Forward Selective page, click on the Active check box to deselect it.
5) To save your changes and display the previous page, click OK.
To exit without saving, select another page or click Cancel to display the previous page.

COMMPILOT WEB PORTAL USER GUIDE Access Point, Inc. PAGE 37 OF 144
Incoming Calls
3.16 CommPilot Express
Use this menu item on the User – Incoming Calls page to configure profiles for incoming calls.
The CommPilot Express service allows you to select your CommPilot Express profile and configure the handling of your incoming calls.
3.16.1 Configure Profiles for Incoming Calls
Use this procedure to configure CommPilot Express profiles for incoming calls.
1) On the User – Incoming Calls menu page, click CommPilot Express. The User – CommPilot Express page appears.
2) From the Current Profile drop-down list, select your current status. The default status is “None”.
For the Available – In the Office Profile
Figure 30 Incoming Calls – CommPilot Express (Available – In the Office)
3) If you want your calls to ring at a phone or SIP-URI address in addition to your primary
phone, type an alternative phone number (not extension) or SIP-URI where you can be reached in the Also ring this phone number /SIP-URI text box. When you receive a call, your phone rings and so does the other phone number or SIP-URI address that you provide for this option. If this number is not one assigned to the group, type the complete number: +<country code> <national number>. For example, “+1” must precede a long distance number within the U.S.
NOTE: You can enter feature access codes and speed codes in addition to phone numbers and extensions with this service.

COMMPILOT WEB PORTAL USER GUIDE Access Point, Inc. PAGE 38 OF 144
Incoming Calls
4) To have Voice Messaging take the call when your line is busy, click the button beside this option.
Or,
To forward these calls, click the Forward to this Phone Number/SIP-URI button and type the phone number or SIP-URI address.
5) To have Voice Messaging take the call when there is no answer, click the button beside this option.
Or,
To forward calls when there is no answer, click the Forward to this Phone Number/SIP- URI button, and type the phone number or SIP-URI address.
For the Available - Out of the office profile:
Figure 31 Incoming Calls – CommPilot Express (Available – Out of the Office)
1) To have Voice Messaging take incoming calls, click the button beside this option.
Or,
To forward calls these calls, click the Forward to this Phone Number/SIP-URI button and type the phone number or SIP-URI address. If this number is not one assigned to the group, type the complete number: +<country code> <national number>. For example, “+1” must precede a long distance number within the U.S.
2) Check the Also E-mail me when a call comes in at check box, if you would like a short e- mail message sent to you when a message arrives, and then complete the E-mail Address text box.

COMMPILOT WEB PORTAL USER GUIDE Access Point, Inc. PAGE 39 OF 144
Incoming Calls
For the Busy Profile
Figure 32 Incoming Calls – CommPilot Express (Busy)
1) To specify up to three numbers to bypass the Busy setup, check the Send all calls to
Voice Messaging except calls from these Phone numbers check box and type the phone numbers from the calls to forward. This option allows you to screen your calls, allowing just a few selected ones to come through. Otherwise, when your status is Busy, all incoming calls are forwarded to your voice mail. If this number is not one assigned to the group, type the complete number: +<country code> <national number>. For example, “+1” must precede long distance numbers within the U.S.
2) Type the phone number or SIP-URI address where these calls can be answered in the text box called which will be forward to this phone number/SIP-URI. If this number is not one assigned to the group, type the complete number: +<country code> <national number>. For example, “+1” must precede a long distance number within the U.S.
3) If you want an e-mail notification, check the Also E-mail me a notification when a Voice Message is received to check box. Complete the E-mail Address text box.
For the Unavailable profile:
Figure 33 Incoming Calls – CommPilot Express (Unavailable)
1) To specify up to three numbers to bypass the Unavailable setup, check the Send all calls
to Voice Messaging except calls from these Phone numbers check box and type the phone numbers from the calls to forward. This option allows you to screen your calls,

COMMPILOT WEB PORTAL USER GUIDE Access Point, Inc. PAGE 40 OF 144
Incoming Calls
allowing just a few selected ones to come through. Otherwise, when your status is Unavailable all incoming calls are forwarded to your voice mail. If this number is not one assigned to the group, type the complete number: +<country code> <national number>. For example, “+1” must precede long distance numbers within the U.S.
2) Type the phone number or SIP-URI address where these calls can be answered in the text box called which will be forward to this phone number/SIP-URI. If this number is not one assigned to the group, type the complete number: +<country code> <national number>. For example, “+1” must precede a long distance number within the U.S.
3) Click the button to select the greeting you want callers to hear.
4) Save your changes. Click Apply or OK. Apply saves your changes. OK saves your changes and displays the previous page.
To exit without saving, select another page or click Cancel to display the previous page.
3.17 Custom Ringback User
A ringback is the ringing heard by the calling party when they have dialed a number but it has not yet been answered by the called party. Custom ringback tones are customizable clips of recorded music, video, or other personalized audio content that you can substitute for the default ringback. When someone calls you, instead of the default ringback, they hear the custom ringback you specified.
BroadWorks allows you to specify both a custom audio ringback and custom video ringback, at both the user and group level. What the caller hears or sees depends on the capabilities of their phone, and which custom ringbacks you have provided. It also depends on the date, time, and number criteria you have specified in the ringback profile.
For audio-only callers, the situation is straightforward. If you specify a custom audio ringback file at the user level, this is what they hear. Otherwise, they hear the custom audio ringback file that has been specified for the group. If no custom ringback has been specified at the user or group level, the system default ringback is heard.
For video-enabled callers, the “default” setting plays the custom audio file, if configured, with no accompanying video component. If no custom audio file is configured, the caller is played the video ringback file configured for the group.
The following table summarizes the behavior:
Audio Ringback
File
Video Ringback
File
Video- Capable
Caller
Result
Y
N
N Audio ringback is used.
Y Audio Ringback is used.
Y
N Audio Ringback is used.
Y Video ringback is used.
N
Y
N Custom Ringback (at user level) does not apply.
Y Video ringback is used.

COMMPILOT WEB PORTAL USER GUIDE Access Point, Inc. PAGE 41 OF 144
Incoming Calls
You can specify a different ringback tone for up to 12 phone numbers or digit patterns. Use this feature to play a different ringback for your manager, a family member, or a customer, for example. In addition to a number or digit pattern, you can specify time of day and day of week criteria as well.
The ringbacks, numbers, or digit patterns and time and day criteria are stored in profiles. For the custom ringback to apply, the incoming number must match all criteria in a profile. You can create as many ringback profiles as you like, activating and deactivating them as you see fit.
Figure 34 Incoming Calls – Custom Ringback User
On the User – Incoming Calls page, select Custom Ringback User from the Advanced Menu. The User – Custom Ringback User page appears.
3.17.1 Add a Custom Ringback User
1) Select Add from the User – Custom Ringback User page. The Custom Ringback User Add page appears.

COMMPILOT WEB PORTAL USER GUIDE Access Point, Inc. PAGE 42 OF 144
Incoming Calls
Figure 35 Custom Ringback User – Custom Ringback User Add
2) In the *Description text box, enter a description for the Ringback User.
3) In the Selected Time Schedule drop-down list, select the time schedule.
4) For Audio Ringback and Video Ringback, select:
− “Default”, or
− “Personal Ringback File” to select your own file. Select Browse to search, and then add your file to the Load text box.
5) To play the ringback for all calls, select Any phone number.
6) To play the ringback for calls from a defined telephone number, select Following phone numbers. You can select “Any private number” or “Any unavailable number”.
Click your cursor in a text box and type the phone numbers (not extensions). If this number is not one assigned to the group, type the complete number: +<country code> <national number>. For example, “+1” must precede a long distance number within the U.S. You can enter up to 12 numbers for this service.
7) You can use wild cards. The “?” is a wild card that can replace a single digit anywhere in a digit string. A trailing “*” represents a digit string and can only appear at the end of a string containing digits and “?” wild cards. For example, 45055512?4, 450555??34, and 4505?5* are all valid call entries.

COMMPILOT WEB PORTAL USER GUIDE Access Point, Inc. PAGE 43 OF 144
Incoming Calls
3.17.2 Modify or Delete a Custom Ringback User Entry
Use this page to modify or delete a Custom Ringback User entry.
Figure 36 Custom Ringback User – Customer Ringback User Modify
1) On the User – Incoming Calls menu page, click Custom Ringback User. The User –
Custom Ringback User page appears.
2) Click the Edit link next to the selection you want to modify or delete. The User – Custom Ringback User Modify page appears.
3) To remove an entry, click Delete. The entry is deleted and the User – Custom Ringback User page appears.
WARNING: This action cannot be undone. Once you click Delete, the instance is permanently deleted.
4) To modify, change the information as required.
5) To save your changes and display the previous page, click OK.
To exit without saving, select another page or click Cancel to display the previous page.

COMMPILOT WEB PORTAL USER GUIDE Access Point, Inc. PAGE 44 OF 144
Incoming Calls
3.18 Priority Alert
Use this menu item on the User – Incoming Calls page to:
Activate or Deactivate a Priority Alert
Add a Priority Alert
Modify or Delete a Priority Alert
The Priority Alert service allows you to assign a distinctive ring to certain selected incoming calls.
The table below provides an explanation of each priority alert:
Item Description
Description Description of the instance of the priority alert.
Days Days assigned to the priority alert.
Hours Hours assigned to the priority alert.
Calls From Phone numbers assigned to the priority alert.
3.18.1 Activate or Deactivate a Priority Alert
Use this procedure to set or deactivate an existing priority alert.
Figure 37 Incoming Calls – Priority Alert
1) On the User – Incoming Calls menu page, click Priority Alert. The User – Priority Alert
page appears.
2) Check the Active check box beside the selection to activate. If a check mark displays in the Active column, the corresponding priority alert is active. To deactivate an active priority alert, uncheck the check box.
3) Save your changes. Click Apply or OK. Apply saves your changes. OK saves your changes and displays the previous page.
To exit without saving, select another page or click Cancel to display the previous page.

COMMPILOT WEB PORTAL USER GUIDE Access Point, Inc. PAGE 45 OF 144
Incoming Calls
3.18.2 Add a Priority Alert
Use this procedure to add a new priority alert.
Figure 38 Priority Alert – Priority Alert Add
1) On the User – Incoming Calls menu page, click Priority Alert. The User – Priority Alert
page appears.
2) Click Add. The User – Priority Alert Add page appears.
3) In the * Description text box, type a description of the phone numbers assigned to this priority alert.
4) Select the time schedule to use this service from the drop-down list.
NOTE: Define your time schedules on the User - Time Schedule page.
5) When a call is received for this user, the Priority Alert service tags this call as external or group/enterprise.
− If the call is external:
To receive a distinctive ring for all calls outside of the company, check Any external phone number.
− If the call is group/enterprise:
When the call is a group call, the Priority Alert service always goes to the Following phone numbers even if it has not been selected.
6) To receive notifications of calls from a defined telephone number, enter the numbers in the Specific phone numbers text boxes. You can select “Any private number” or “Any unavailable number”.
Click your cursor in a text box and type the phone numbers to trigger Priority Alert (not extensions). If this number is not one assigned to the group, type the complete number: +<country code> <national number>. For example, “+1” must precede a long distance number within the U.S. You can enter up to 12 numbers for this service.

COMMPILOT WEB PORTAL USER GUIDE Access Point, Inc. PAGE 46 OF 144
Incoming Calls
You can use wild cards. The “?” is a wild card that can replace a single digit anywhere in a digit string. A trailing “*” represents a digit string and can only appear at the end of a string containing digits and “?” wild cards. For example, 45055512?4, 450555??34, and 4505?5* are all valid call entries.
7) To save your changes and display the previous page, click OK.
To exit without saving, select another page or click Cancel to display the previous page.
3.18.3 Modify or Delete a Priority Alert
Use this procedure to modify or delete an existing priority alert.
Figure 39 Priority Alert – Priority Alert Modify
1) On the User – Incoming Calls menu page, click Priority Alert. The User – Priority Alert
page appears.
2) Click the Edit link in the row for the entry. The User – Priority Alert Modify page appears.
3) To remove an entry, click Delete. The entry is deleted and the User – Priority Alert page appears.
WARNING: This action cannot be undone. Once you click Delete, the instance is permanently deleted.
4) To modify, change the information as required.
5) To save your changes and display the previous page, click OK.
To exit without saving, select another page or click Cancel to display the previous page.
3.19 Selective Acceptance
Use this menu item on the User – Incoming Calls page to:

COMMPILOT WEB PORTAL USER GUIDE Access Point, Inc. PAGE 47 OF 144
Incoming Calls
Activate or Deactivate a Selective Rejection Entry
Add a Selective Acceptance Entry
Modify or Delete a Selective Acceptance Entry
The Selective Acceptance service allows you to screen calls by defining criteria for calls to accept.
Below is an explanation of each item on this page:
Item Description
Description Description of the instance of the selected call type.
Time Schedule Time schedule assigned to the instance of the selected call type.
Calls from Phone numbers assigned to the instance of the selected call type.
3.19.1 Activate or Deactivate a Selective Acceptance Entry
Use this procedure to activate or deactivate a Selective Acceptance entry. Selective Acceptance allows you to accept only calls from selected numbers.
Figure 40 Incoming Calls – Selective Call Acceptance
1) On the User – Incoming Calls menu page, click Selective Acceptance. The User –
Selective Call Acceptance page appears.
2) Check the Active check box beside the selection to activate. To deactivate a Selective Acceptance entry, uncheck the Active check box beside the selection to deactivate.
3) Save your changes. Click Apply or OK. Apply saves your changes. OK saves your changes and displays the previous page.
To exit without saving, select another page or click Cancel to display the previous page.

COMMPILOT WEB PORTAL USER GUIDE Access Point, Inc. PAGE 48 OF 144
Incoming Calls
3.19.2 Add a Selective Acceptance Entry
Use this procedure to add a Selective Acceptance entry.
Figure 41 Selective Call Acceptance – Selective Call Acceptance Add
1) On the User – Incoming Calls menu page, click Selective Acceptance. The User –
Selective Call Acceptance page appears.
2) Click Add. The User – Selective Call Acceptance Add screen appears.
3) In the * Description text box, type a description of the phone numbers to add to your selective acceptance service.
4) Select the time schedule to use this service from the drop-down list.
NOTE: Define your time schedules on the User - Time Schedule page.
5) To receive calls from any number, select Any phone number.
6) To receive notifications of calls from a defined telephone number, select Following phone numbers. You can select “Any private number” or “Any unavailable number”.
Click your cursor in a text box and type the phone numbers to trigger Selective Acceptance (not extensions). If this number is not one assigned to the group, type the complete number: +<country code> <national number>. For example, “+1” must precede a long distance number within the U.S. You can enter up to 12 numbers for this service.
You can use wild cards. The “?” is a wild card that can replace a single digit anywhere in a digit string. A trailing “*” represents a digit string and can only appear at the end of a string containing digits and “?” wild cards. For example, 45055512?4, 450555??34, and 4505?5* are all valid call entries.
7) To save your changes and display the previous page, click OK.
To exit without saving, select another page or click Cancel to display the previous page.

COMMPILOT WEB PORTAL USER GUIDE Access Point, Inc. PAGE 49 OF 144
Incoming Calls
3.19.3 Modify or Delete a Selective Acceptance Entry
Use this procedure to modify or delete a Selective Acceptance entry.
Figure 42 Selective Call Acceptance – Selective Call Acceptance Modify
1) On the User – Incoming Calls menu page, click Selective Acceptance. The User –
Selective Call Acceptance page appears.
2) Click the Edit link in the row for the entry. The User – Selective Call Acceptance Modify page appears.
3) To remove the entry, click Delete. The entry is deleted and the User – Selective Call Acceptance page appears.
WARNING: This action cannot be undone. Once you click Delete, the instance is permanently deleted.
4) To modify, change the information as required.
5) To save your changes and display the previous page, click OK.
To exit without saving, select another page or click Cancel to display the previous page.
3.20 Selective Rejection
Use this menu item on the User – Incoming Calls page to:
Activate or Deactivate a Selective Rejection Entry
Add a Selective Rejection Entry
Modify or Delete a Selective Rejection Entry
The Selective Rejection service allows you to screen calls by rejecting certain specific calls.
Below is an explanation of each item on this page:

COMMPILOT WEB PORTAL USER GUIDE Access Point, Inc. PAGE 50 OF 144
Incoming Calls
Item Description
Description Description of the instance of the selected call type.
Time Schedule Time schedule assigned to the instance of the selected call type.
Calls From Phone numbers assigned to the instance of the selected call type.
3.20.1 Activate or Deactivate a Selective Rejection Entry
Use this procedure to activate or deactivate a Selective Rejection entry. Selective Rejection allows you to reject calls from certain selected numbers.
Figure 43 Incoming Calls – Selective Call Rejection
1. On the User – Incoming Calls menu page, click Selective Rejection. The User –
Selective Call Rejection page appears.
2. Check the Active check box beside the selection to activate. To deactivate a selection, uncheck the Active check box beside the selection to deactivate.
3. Save your changes. Click Apply or OK. Apply saves your changes. OK saves your changes and displays the previous page.
To exit without saving, select another page or click Cancel to display the previous page.
3.20.2 Add a Selective Rejection Entry
Use this procedure to add a new Selective Rejection entry.

COMMPILOT WEB PORTAL USER GUIDE Access Point, Inc. PAGE 51 OF 144
Incoming Calls
Figure 44 Selective Call Rejection – Selective Call Rejection Add
1. On the User – Incoming Calls menu page, click Selective Rejection. The User –
Selective Call Rejection page appears.
2. Click Add. The User – Selective Call Rejection Add screen appears.
3. In the * Description text box, type a description of the phone numbers to add to your selective rejection service.
4. From the Selected Time Schedule drop-down list, select the time schedule.
NOTE: Define your time schedules on the User - Time Schedule page.
5. To reject calls from any number, select Any phone number.
6. To receive notifications of calls from a defined telephone number, select Following phone numbers. You can select “Any private number” or “Any unavailable number”.
Click your cursor in a text box and type the phone numbers to trigger Selective Rejection (not extensions). If this number is not one assigned to the group, type the complete number: +<country code> <national number>. For example, “+1” must precede a long distance number within the U.S. You can enter up to 12 numbers for this service.
You can use wild cards. The “?” is a wild card that can replace a single digit anywhere in a digit string. A trailing “*” represents a digit string and can only appear at the end of a string containing digits and “?” wild cards. For example, 45055512?4, 450555??34, and 4505?5* are all valid call entries.
7. To save your changes and display the previous page, click OK.
To exit without saving, select another page or click Cancel to display the previous page.

COMMPILOT WEB PORTAL USER GUIDE Access Point, Inc. PAGE 52 OF 144
Incoming Calls
3.20.3 Modify or Delete a Selective Rejection Entry
Use this procedure to modify or delete a Selective Rejection entry.
Figure 45 Selective Call Rejection – Selective Call Rejection Modify
1. On the User – Incoming Calls menu page, click Selective Rejection. The User –
Selective Call Rejection page appears.
2. Click the Edit link next to the entry to modify. The User – Selective Call Rejection Modify page appears.
3. To remove the entry, click Delete. The entry is deleted and the User – Selective Call Rejection page appears.
WARNING: This action cannot be undone. Once you click Delete, the entry is permanently deleted.
4. To modify, change the information as required.
5. To save your changes and display the previous page, click OK.
To exit without saving, select another page or click Cancel to display the previous page.
3.21 Sequential Ringing
Sequential Ringing acts as a “Find me” service to send calls to your base location or other phone number or SIP-URI address you choose. The Sequential Ringing service allows you to configure multiple phones to ring in sequence on incoming calls with criteria you set (a call entry).
NOTE 1: The criteria for each Sequential Ringing call entry can be a list of up to 12 caller phone numbers or digit patterns, or SIP-URI addresses and a specified time schedule during which the service is active. All criteria for an entry must be satisfied for the call to enter Sequential Ringing (phone number and day of week and time of day). Otherwise, the call does not activate the service.

COMMPILOT WEB PORTAL USER GUIDE Access Point, Inc. PAGE 53 OF 144
Incoming Calls
NOTE 2: You can enter feature access codes and speed codes in addition to phone numbers and extensions with this service.
If your number is busy, you have the option of whether or not to continue the sequential search. If there is no answer at your number, the service tries up to five other locations in sequence until it receives an answer. The call is then connected as usual to the phone that answers. If none of the numbers in the sequence answer, the caller is directed to Voice Mail or to another no-answer service.
The caller has the option to terminate the Sequential Ringing service by pushing the # key. The call is then immediately forwarded to Voice Mail or other no-answer service. The caller hears a comfort message every 20 seconds during the ring sequence and is informed of the # key function.
Use the following procedures to configure the Sequential Ringing service and manage call entries.
Configure Features of the Sequential Ringing Service
Set the Ring Sequence
Add Sequential Ringing Call Entries
Modify or Delete Sequential Ringing Call Entries
View, Activate or Deactivate Sequential Ringing Call Entries
3.21.1 Configure Features of the Sequential Ringing Service
Use the following procedure to configure the Sequential Ringing service.
Figure 46 Incoming Calls − Sequential Ring

COMMPILOT WEB PORTAL USER GUIDE Access Point, Inc. PAGE 54 OF 144
Incoming Calls
1) On the User − Incoming Calls menu page, click Sequential Ring. The User − Sequential Ring page appears.
2) Click to select the check box to the left of Use Base Location first.
− If the check box is selected, your base location phone rings first in the ring sequence.
− If the check box is cleared, the first phone in the ring sequence rings first.
3) Set the number of rings for the base location. Click on one of the values from “None” to “6” to the right of Number of rings for Base Location.
4) Click to select the check box to the left of Continue the search process if the base location is busy.
− If the check box is selected, the service will continue to search.
− If the check box is cleared, the service will terminate the search.
5) Click to select the check box to the left of Enable caller to skip search process.
− If the check box is selected, the caller can end the sequential ring service at any time during the search by pressing the # key.
− If the check box is cleared, the caller cannot end the sequential ring service.
NOTE: Forwarding or messaging services must be configured if the caller is allowed to terminate the Sequential service.
6) To save your changes and display the previous page, click OK.
To exit without saving, select another page or click Cancel to display the previous page.
3.21.2 Set the Ring Sequence
Use this procedure to set the ring sequence for the Sequential Ringing service and to set the number of rings for each phone in the sequence. The service uses this ring sequence for call entries you have set.
1) On the User − Incoming Calls menu page, click Sequential Ringing. The User − Sequential Ring page appears.
2) In the text boxes below Phone Number/SIP-URI, enter up to five phone numbers or SIP- URI addresses to which you want sequential ring callers to be directed, in the order in which you want the phone numbers to be rung.
3) You can also enter feature access codes and speed codes in addition to the phone numbers.
4) For each phone number, select a value for Number of Rings, from "None" to "6".
5) To save your changes and display the previous page, click OK.
To exit without saving, select another page or click Cancel to display the previous page.
3.21.3 Add Sequential Ringing Call Entries
Use this procedure to add Sequential Ringing call entries. Each call entry must include a required set of criteria to activate the Ring Sequence service. The criteria are call entry description, time schedule, and directory number or numbers to be sent to the service.

COMMPILOT WEB PORTAL USER GUIDE Access Point, Inc. PAGE 55 OF 144
Incoming Calls
Figure 47 Sequential Ring − Sequential Ring Add
1) On the User − Incoming Calls menu page, click Sequential Ring. The User − Sequential
Ring page appears.
2) On the User – Sequential Ring page, click Add. The User – Sequential Ring Add page appears.
3) In the * Description text box, type a name for the call entry such as a supplier’s name.
4) From the Selected Time Schedule drop-down list, select a time period during which you wish to direct this entry to Sequential Ring.
NOTE: To add or edit Time schedules, go to the User − Profile − Time Schedules page.
5) In the Calls from box:
− Click the Any phone number check box to select it. All calls you receive in the time schedule designated for this entry go to the ring sequence specified.
− Click the Following phone numbers check box. You can select “Any private number” or “Any unavailable number”. The Any phone number check box is automatically unselected.
− Enter one or more phone numbers in the text boxes. For this call entry, only numbers in the text boxes go to the ring sequence.
6) To save your changes and display the previous page, click OK.
To exit without saving, select another page or click Cancel to display the previous page.
3.21.4 Modify or Delete Sequential Ringing Call Entries
Use this procedure to modify or delete Sequential Ringing call entries.

COMMPILOT WEB PORTAL USER GUIDE Access Point, Inc. PAGE 56 OF 144
Incoming Calls
Figure 48 Sequential Ring − Sequential Ring Modify
1) On the User − Incoming Calls menu page, click Sequential Ring. The User − Sequential
Ring page appears.
2) Click the Edit link in the row for the entry. The User – Sequential Ring Modify page appears.
3) To remove the entry, click Delete. The entry is deleted and the User – Sequential Ring page appears.
WARNING: This action cannot be undone. Once you click Delete, the recording is permanently deleted.
4) To modify the entry, change the information as required:
− In the * Description text box, highlight the text and type a new name for the call entry.
− From the Selected Time Schedule drop-down list, select a new time period during which you wish to direct this entry to Sequential Ringing.
NOTE: To add or edit Time schedules, go to the User − Profile − Time Schedules page.
− In the Calls from box, click Any phone number or Following phone numbers. Select “Any private number” or “Any unavailable number”. Change one or more phone numbers in the text boxes.
5) To save your changes and display the previous page, click OK.
To exit without saving, select another page or click Cancel to display the previous page.
3.21.5 View, Activate or Deactivate Sequential Ringing Call Entries
Use this procedure to view all Sequential Ringing call entries and activate and deactivate one or more call entries.

COMMPILOT WEB PORTAL USER GUIDE Access Point, Inc. PAGE 57 OF 144
Incoming Calls
Figure 49 Incoming Calls − Sequential Ring (View)
1) On the User – Incoming Calls menu page, click Sequential Ring. The User – Sequential
Ring page appears.
2) View the call entries you have configured at the bottom of the page. Call entries you have configured are automatically active.
− To see all details of an entry, click on Edit. The User – Sequential Ring Modify page appears with the selected entry criteria displayed.
− Click OK to return to the User – Sequential Ring page.
3) To activate an entry on the User – Sequential Ring page, click to select the Active check box.
4) To deactivate an entry on the User – Sequential Ring page, click to clear the Active check box.
5) To save your changes and display the previous page, click OK.
To exit without saving, select another page or click Cancel to display the previous page.
3.22 Series Completion
Use this menu item on the User – Incoming Calls page to view your series completion groups.
The Series Completion service allows calls to a member of a series completion group to be forwarded to the next member in the series if the called party is busy.
Below is an explanation of the items on this page.

COMMPILOT WEB PORTAL USER GUIDE Access Point, Inc. PAGE 58 OF 144
Incoming Calls
Item Description
Group Name Name of the series completion group.
Name Names of the users in the series completion group.
Department Departments of the users in the series completion group.
3.22.1 View Your Series Completion Groups
Use this procedure to verify the series completion groups to which you belong.
Figure 50 Incoming Calls – Series Completion
1) On the User – Incoming Calls menu page, click Series Completion. The User – Series Completion page appears, showing your series completion groups.
2) To display the previous page, click OK. The User – Incoming Calls menu page appears.
3.23 Simultaneous Ringing
Use this menu item on the User – Incoming Calls page to:
Activate or Deactivate Simultaneous Ringing
Add a Number or SIP-URI Address to Your Simultaneous Ringing List
Delete a Phone Number/SIP-URI Address from Your Simultaneous Ringing List
The Simultaneous Ringing service allows you to configure multiple phones to ring simultaneously on incoming calls.
3.23.1 Activate or Deactivate Simultaneous Ringing
Use this procedure to activate or deactivate Simultaneous Ringing. Simultaneous Ringing allows you to ring multiple phones or SIP-URI addresses simultaneously on incoming calls.

COMMPILOT WEB PORTAL USER GUIDE Access Point, Inc. PAGE 59 OF 144
Incoming Calls
Figure 51 Incoming Calls – Simultaneous Ring Personal
1) On the User – Incoming Calls menu page, click Simultaneous Ring Personal. The User
– Simultaneous Ring page appears.
2) To activate Simultaneous Ring Personal, click “On”. To deactivate it, click “Off”.
3) If you do not want numbers entered for this service to ring if you are on another phone call, click Don’t ring my Simultaneous Ring Numbers if I’m already on a call. This is the default for this service. If you do want numbers entered for this service to ring under any circumstance, click Ring all my Simultaneous Ring Numbers for all incoming calls. The second call can be answered at another phone or using call waiting on the in-use phone.
4) Save your changes. Click Apply or OK. Apply saves your changes. OK saves your changes and displays the previous page.
To exit without saving, select another page or click Cancel to display the previous page.
3.23.2 Add a Number or SIP-URI Address to Your Simultaneous Ringing List
Use this procedure to add a phone number or SIP-URI address to the list of numbers that ring simultaneously on incoming calls.

COMMPILOT WEB PORTAL USER GUIDE Access Point, Inc. PAGE 60 OF 144
Incoming Calls
Figure 52 Simultaneous Ring Personal – Simultaneous Ring Personal Add
1) On the User – Incoming Calls menu page, click Simultaneous Ring. The User –
Simultaneous Ring page appears.
2) Type the number or SIP-URI address in the Phone Number/SIP-URI text box.
NOTE: You can enter feature access codes and speed codes in addition to phone numbers and extensions with this service.
3) Click Add. The phone number or SIP-URI is added to your Simultaneous Ring list.
4) Save your changes. Click Apply or OK. Apply saves your changes. OK saves your changes and displays the previous page.
Click Cancel to display the previous page.
3.23.3 Delete a Phone Number/SIP-URI Address from Your Simultaneous Ringing List
Use this procedure to delete a phone number or SIP-URI address from the list of numbers that ring simultaneously on incoming calls.

COMMPILOT WEB PORTAL USER GUIDE Access Point, Inc. PAGE 61 OF 144
Incoming Calls
Figure 53 Simultaneous Ring Personal – Simultaneous Ring Personal Delete
1) On the User – Incoming Calls menu page, click Simultaneous Ring Personal. The User
– Simultaneous Ring Personal page appears.
2) Check the Delete box next to the phone number or SIP-URI address to delete.
3) Click Delete. The entry is deleted.
WARNING: This action cannot be undone. Once you click Delete, the entry is permanently deleted.
3.24 Automatic Hold Retrieve
The Automatic Hold and Retrieve service (AHR) provides an alternate method to hold and retrieve calls on BroadWorks users. The service is assigned to users so that incoming calls to these users are automatically held and retrieved, without having to use feature access codes.
NOTE: Only one call can be held on a subscriber with the Automatic Hold and Retrieve feature active.
Usually a subscriber with the Automatic Hold and Retrieve service should not have any device associated with it due to limitations with what that subscriber can do. For example, it would be impossible for that subscriber to receive calls, or invoke services that put calls on hold. For cases where a subscriber has a device and the Automatic Hold and Retrieve service is active, the Application Server blocks call origination from that subscriber and applies a treatment. The Application Server does not allow emergency and maintenance calls to go through.
Feature access codes (for example, Music On Hold activation/deactivation, Call Pickup, Call Retrieve) are also blocked.
While a subscriber, with the Automatic Hold and Retrieve feature active, is making an emergency or maintenance call, calls terminating to that subscriber get a busy signal.

COMMPILOT WEB PORTAL USER GUIDE Access Point, Inc. PAGE 62 OF 144
Incoming Calls
Figure 54 Incoming Calls – Automatic Hold/Retrieve
3.24.1 Holding a Call
A user can hold a call against a subscriber with the AHR service active. When this feature is active:
Calling a subscriber with AHR puts the caller on hold.
Transfer with consultation: Transferring a call to a subscriber with AHR holds the remote party.
Blind Transfer: Transferring a call to a subscriber with AHR holds the remote party.
Calls terminating to a subscriber with AHR can be originated within the group of the subscriber, outside the group of the subscriber, or from the PSTN.
3.24.2 Retrieving a Call
A user can retrieve a held call by calling a subscriber with the AHR service active with the call on hold. Calls terminating to a subscriber with AHR to retrieve a held call can be originated within the group of the subscriber, outside the group of the subscriber, or from the PSTN.
3.24.3 AHR Recall
After a call has been held on a subscriber with AHR active for a long time, the AHR service will try to recall the party who transferred the call to the AHR subscriber. If the recall is answered, the transferring party is connected to the held party. If the recall hits the busy treatment (or any other treatment), the recall is aborted, and will be retried 10 seconds later. If the recall is not answered, it will ring until there is device timeout, and then the recall will be retried 10 seconds later.
3.24.4 Configuring Automatic Hold/Retrieve
1) On the User – Incoming Calls page, click Automatic Hold/Retrieve from the Advanced menu.
2) For the Automatic Hold/Retrieve option, select “On” to enable the service, or “Off” to disable the service.

COMMPILOT WEB PORTAL USER GUIDE Access Point, Inc. PAGE 63 OF 144
Outgoing Calls
3) In the *Automatically retrieve the call after text box, specify the number of minutes. The recall portion of the AHR feature kicks in after the call has been held for the value specified here.
4) Save your changes. Click Apply or OK. Apply saves your changes. OK saves your changes and displays the previous page.
To exit without saving, select another page or click Cancel to display the previous page.

COMMPILOT WEB PORTAL USER GUIDE Access Point, Inc. PAGE 64 OF 144
Outgoing Calls
4 Outgoing Calls
Use the User – Outgoing Calls menu page to manage outgoing calls, for example, blocking your line ID or programming speed dial codes.
Figure 55 User – Outgoing Calls
The User – Outgoing Calls menu page contains these menu items:
Basic menu
This menu displays menu items that all users can use:
− Automatic Callback
− Call Return
− Calling Party Category
− Last Number Redial
− Calling Line ID Blocking
− Speed Dial 8
− Speed Dial 100
Advanced services
This menu displays the menu items that users can use only if such functions have been assigned to them:
− Account Codes
− Personal Phone List
− Preferred Carrier User
− Two-Stage Dialing

COMMPILOT WEB PORTAL USER GUIDE Access Point, Inc. PAGE 65 OF 144
Outgoing Calls
4.1 Access Outgoing Calls Menu
To access the Outgoing Calls menu page, click Outgoing Calls in the Options list.
4.2 Automatic Callback
Use this menu item on the User - Outgoing Calls menu page to: turn Automatic Callback on and off. The Automatic Callback service sends a distinctive ring to notify that a subscriber you are attempting to call is available.
Use this procedure to turn the Automatic Callback feature on. This service is used to send a notification when a busy line within your group becomes available. When this service is on, you are prompted to activate Automatic Callback when you get a busy signal. The system will monitor this line for thirty minutes by default.
NOTE: This service is not activated when you place a call to a subscriber with a SIP phone, or one that displays multiple calls.
Figure 56 Outgoing Calls – Automatic Callback
1) On the User – Outgoing Calls menu page, click Automatic Callback. The User –
Automatic Callback page appears.
2) To activate Automatic Callback, click “On”. To deactivate it, click “Off”.
NOTE: You can also deactivate current Automatic Callback sessions with a Feature Access Code (default is #8).
3) Save your changes. Click Apply or OK. Apply saves your changes. OK saves your changes and displays the previous page.
To exit without saving, select another page or click Cancel to display the previous page.
NOTE: You can monitor up to five lines with Automatic Callback at one time.
4.3 Call Return
Use this menu item on the User – Outgoing Calls menu page to return a call to the last party that called you.
The Call Return service allows you to easily return your last call, using a Feature Access Code. You can return a call whether or not the call was answered.

COMMPILOT WEB PORTAL USER GUIDE Access Point, Inc. PAGE 66 OF 144
Outgoing Calls
Figure 57 Outgoing Calls – Call Return
1) On the User – Outgoing Calls menu page, click Call Return. The User – Call Return page
appears, giving instructions for Call Return.
2) To call back the last party who called you, enter the Call Return Feature Access Code at your phone.
3) To display the previous page, click OK. The User – Outgoing Calls page appears.
4.4 Calling Party Category
Use this menu item on the User – Outgoing Calls menu page to the Calling Category assigned to you by the group administrator.
Figure 58 Outgoing Calls – Calling Party Category
1) On the User – Outgoing Calls menu page, click Calling Party Category. The User –
Calling Party Category page appears, describing Calling Party Category. Calling
Party Categories include:
− Ordinary
− Payphone
− Prison
− Hotel
− Hospital
− Special

COMMPILOT WEB PORTAL USER GUIDE Access Point, Inc. PAGE 67 OF 144
Outgoing Calls
2) To display the previous page, click OK. The User – Outgoing Calls page appears.
4.5 Last Number Redial
Use this menu item on the User – Outgoing Calls menu page to redial the last number you called.
You can also use a Feature Access code to make use of the Last Number Redial service (*66, by default).
Figure 59 Outgoing Calls – Last Number Redial
1) On the User – Outgoing Calls menu page, click Last Number Redial. The User – Last
Number Redial page appears, giving instructions for Last Number Redial.
2) To redial the last number you called, enter the Last Number Redial Feature Access Code at your phone or click the REDIAL button at your CommPilot Call Manager.
3) To display the previous page, click OK. The User – Outgoing Calls page appears.
4.6 Calling Line ID Blocking
Use this menu item on the User - Outgoing Calls menu page to enable or disable Calling Line ID Blocking. The Line ID Blocking service allows you to block or display your calling line ID when you make a call. When enabled, lines equipped with the Caller ID service will not see your name or number.
NOTE: Some people have their phones set up to refuse calls from "blocked numbers" - as with the Anonymous Rejection service. The Line ID Blocking service can be changed as needed for placing sensitive phone calls and turned off for placing calls to parties with Anonymous Rejection or similar services. This service does not apply to calls from within the group.

COMMPILOT WEB PORTAL USER GUIDE Access Point, Inc. PAGE 68 OF 144
Outgoing Calls
Figure 60 Outgoing Calls – Calling Line ID Delivery Blocking
1) On the User – Outgoing Calls menu page, click Line ID Blocking. The User – Calling Line
ID Delivery Blocking page appears.
2) To enable Block Calling Line ID on Outgoing Calls, (i.e. to hide your name and number) click “On”. To disable it, click “Off”.
3) Save your changes. Click Apply or OK. Apply saves your changes. OK saves your changes and displays the previous page.
To exit without saving, select another page or click Cancel to display the previous page.
4.7 Speed Dial 8
Use this menu item on the User – Outgoing Calls menu page to program up to eight single- digit speed dial numbers. Once set up, you can make a call using the speed dial code, rather than dialing the whole phone number. For example, to dial the number associated with speed dial code 7, you would dial 7#.
Speed Dial 8 numbers can also be programmed using the handset, using a Feature Access Code (FAC). For example, *74 3 9624 programs speed dial code 3 to dial the number 9642. (*74 is the default FAC for Speed Dial 8. It might be different on your system.)
Figure 61 Outgoing Calls – Speed Dial 8

COMMPILOT WEB PORTAL USER GUIDE Access Point, Inc. PAGE 69 OF 144
Outgoing Calls
1) On the User – Outgoing Calls menu page, click Speed Dial 8. The User – Speed Dial 8 page appears.
2) Type the phone number or SIP-URI address in the Phone Number/SIP-URI text box next to a speed dial code.
3) Type a name or description for the speed dial code in the corresponding Name text box. This name does not affect the operation of the speed dial code.
4) Save your changes. Click Apply or OK. Apply saves your changes. OK saves your changes and displays the previous page.
To exit without saving, select another page or click Cancel to display the previous page.
4.8 Speed Dial 100
Use this menu item on the User – Outgoing Calls menu page to:
View or Delete Speed Dial 100 Dialing Codes
Set a Speed Dial 100 Code
Modify a Speed Dial 100 Entry
Speed Dial 100 lets you assign a two-digit speed dial code to phone number or SIP-URI address. Once set up, you can make a call using the speed dial code, rather than dialing the whole number. For example, to dial the number associated with speed dial code 77, you would dial **77#.
As indicated, Speed Dial 100 codes have a two-digit prefix associated with them. This prefix is assigned by your system administrator, and must be dialed prior to the speed dial code. By default, it is **.
You can have up to 100 two-digit speed dial numbers, from 00–99.
4.8.1 View or Delete Speed Dial 100 Dialing Codes
Use this procedure to display your Speed Dial 100 call entries, or to delete entries from the list.
Figure 62 Outgoing Calls – Speed Dial 100
1) On the User – Outgoing Calls menu page, click Speed Dial 100. The User – Speed Dial
100 page appears, showing your Speed Dial 100 call entries.

COMMPILOT WEB PORTAL USER GUIDE Access Point, Inc. PAGE 70 OF 144
Outgoing Calls
− Note the Speed Dial 100 dialing prefix. This prefix is assigned by your administrator, and must be dialed before the two-digit speed dial code. For example, to dial the number associated with speed dial code 77, you would dial **77#. (** is the default prefix for activating Speed Dial 100. It might be different on your system.)
2) To delete an entry, check the Delete box next to the entry.
3) Click Apply or OK. Apply saves your changes. OK saves your changes and displays the previous page.
WARNING: This action cannot be undone. Once you click Apply or OK, the entry is permanently deleted.
To exit without saving, select another page or click Cancel to display the previous page.
4.8.2 Set a Speed Dial 100 Code
Use this procedure to set a two-digit speed dial code to dial a frequently dialed or hard-to- remember phone number or SIP-URI address. You can have up to 100 Speed Dial 100 numbers.
Speed Dial 100 numbers can also be set using the handset, using a Feature Access Code (FAC). For example, *75 33 9624 programs speed dial code 33 to dial the number 9642. (*75 is the default FAC for Speed Dial 100. It might be different on your system.)
Figure 63 Speed Dial 100 – Speed Dial 100 Add
1) On the User – Outgoing Calls menu page, click Speed Dial 100. The User – Speed Dial
100 page appears.
2) Click Add. The User – Speed Dial 100 Add page appears.
3) From the Speed Code 100 drop-down list, select a two-digit code.
4) Type a text description for the speed dial number in the Description text box.
5) Type the phone number or SIP-URI address to assign to the speed dial code in the * Phone Number/SIP-URI text box.
6) To save your changes and display the previous page, click OK.
To exit without saving, select another page or click Cancel to display the previous page.

COMMPILOT WEB PORTAL USER GUIDE Access Point, Inc. PAGE 71 OF 144
Outgoing Calls
4.8.3 Modify a Speed Dial 100 Entry
Use this procedure to make changes to a Speed Dial 100 entry.
Figure 64 Speed Dial 100 – Speed Dial 100 Modify
1) On the User – Outgoing Calls menu page, click Speed Dial 100. The User – Speed Dial
100 page appears.
2) Click Edit next to the entry to edit. The User – Speed Dial 100 Modify page appears.
3) To remove the entry click Delete. The User – Speed Dial 100 page appears.
WARNING: This action cannot be undone. Once you click Delete, the recording is permanently deleted.
4) To modify the entry, change the information as required. Enter a new description, phone number, or SIP-URI address for the speed dial code. You cannot edit the speed dial code.
5) To save your changes and display the previous page, click OK.
To exit without saving, select another page or click Cancel to display the previous page.
4.9 Account Codes
Use this menu item on the User – Outgoing Calls menu page to display your account codes. The Account Codes service displays the account codes assigned to you for making calls.
Figure 65 Outgoing Calls – Account Codes
On the User – Outgoing Calls menu page, click Account Codes. The User – Account Codes page appears.

COMMPILOT WEB PORTAL USER GUIDE Access Point, Inc. PAGE 72 OF 144
Outgoing Calls
The User – Account Codes page displays the information described below.
Item Description
Codes The number of the account assigned by the administrator.
Description A description of the account assigned by the administrator.
Place a Call Using an Account Code:
1) Dial the Feature Access Code for Per Call Account Code.
2) Dial the account code.
3) Dial the number.
If You Dial the Wrong Account Code:
1) While your call is in progress, flash the phone by clicking the flash button or clicking the hang-up button once. The active call is placed on hold.
2) Redial the Feature Access Code and the account code.
3) Resume your call.
To Exit this Page:
To display the previous page, click OK. The User – Outgoing Calls page appears.
4.10 Personal Phone List
Use this menu item on the User – Outgoing Calls menu page to:
View or Delete Phone List Entries
Add an Entry to Your Personal Phone List
Modify or Delete an Entry in Your Personal Phone List
Import a Comma-delimited Text File
The Personal Phone List service allows you to configure a list of phone numbers you call frequently or want to remember.
NOTE: Whenever you add, delete, or modify an entry on the list, the call entries are sorted automatically, in alphabetic order.
4.10.1 View or Delete Phone List Entries
Use this procedure to display your personal phone list, or to delete entries from the list.

COMMPILOT WEB PORTAL USER GUIDE Access Point, Inc. PAGE 73 OF 144
Outgoing Calls
Figure 66 Outgoing Calls – Personal Phone List
1) On the User – Outgoing Calls menu page, click Personal Phone List. The User –
Personal Phone List page appears, showing your customized phone list.
2) To delete an entry, check the Delete box next to the entry.
3) Click Apply or OK. Apply saves your changes. OK saves your changes and displays the previous page.
WARNING: This action cannot be undone. Once you click Apply or OK, the entry is permanently deleted.
To exit without saving, select another page or click Cancel to display the previous page.
4.10.2 Add an Entry to Your Personal Phone List
Use this procedure to add a number to your customized phone list.
Figure 67 Personal Phone List – Personal Phone List Add
1) On the User – Outgoing Calls menu page, click Personal Phone List. The User –
Personal Phone List page appears.
2) Click Add. The User – Personal Phone List Add page appears.
3) Type the name and number in the * Name and * Phone Number text boxes.
4) To save your changes and display the previous page, click OK.
To exit without saving, select another page or click Cancel to display the previous page.

COMMPILOT WEB PORTAL USER GUIDE Access Point, Inc. PAGE 74 OF 144
Outgoing Calls
4.10.3 Modify or Delete an Entry in Your Personal Phone List
Use this procedure to make changes to an entry in your customized phone list.
Figure 68 Personal Phone List – Personal Phone List Modify
1) On the User – Outgoing Calls menu page, click Personal Phone List. The User –
Personal Phone List page appears.
2) Click the Edit link next to the entry to modify. The User – Personal Phone List Modify page appears.
3) Modify the name and number as required.
4) To delete an entry, click Delete.
WARNING: This action cannot be undone. Once you click Delete, the entry is permanently deleted.
5) To save your changes and display the previous page, click OK.
To exit without saving, select another page or click Cancel to display the previous page.
4.10.4 Import a Comma-delimited Text File
Use this procedure to import personal phone list call entries from an existing comma-delimited text file (.CSV format files). To produce a comma-delimited text file, see the instructions for a program such as Microsoft Outlook, Word, or Excel.
Figure 69 Personal Phone List – Personal Phone List Import
1) On the User – Outgoing Calls menu page, click Personal Phone List. The User –
Personal Phone List page appears.

COMMPILOT WEB PORTAL USER GUIDE Access Point, Inc. PAGE 75 OF 144
Outgoing Calls
2) Click the Import Phone List link. The User - Personal Phone List Import page appears.
3) In the * Select a Phone List File text box, type the file name or click Browse to locate the .CSV file and click Open. The .CSV file must have headings “Name” and “Number”.
4) Save your changes. Click Apply or OK. Apply saves your changes. OK saves your changes and displays the previous page.
To exit without saving, select another page or click Cancel to display the previous page.
If you click Apply or OK, the names and numbers in the .CSV file appear in the Personal Phone List.
Below is an example of the call entries in an import list created in a text file before the file was converted to a .CSV file.
"Name","Number"
"Jane B Doe","301-555-1231"
"Jane M Doe","301-555-1232"
"Jane W Doe","301-555-1233"
"John B Doe","301-555-1234"
4.11 Preferred Carrier User
Use this menu item on the User – Profile menu page to view your preferred carriers.
Figure 70 User – Preferred Carrier
1) On the User – Profile menu page, click Preferred Carrier User. The User – Preferred
Carrier page appears, listing the carriers assigned to you. Preferred carriers include:
− Intra-LATA Carrier
− Inter-LATA Carrier
− Preferred International Carrier
2) To display the previous page, click OK. The User – Profile page appears.
4.12 Two-Stage Dialing
Use this menu item on the User - Outgoing Calls menu page to enable or disable Two-Staged Dialing. This service allows you to use BroadWorks services from your cell phone or PSTN

COMMPILOT WEB PORTAL USER GUIDE Access Point, Inc. PAGE 76 OF 144
Call Control
landline. Two-Stage Dialing provides the ability to route calls when an auxiliary line-type service is used in conjunction with BroadWorks.
Figure 71 Outgoing Calls – Two-Stage Dialing
1) On the User – Outgoing Calls menu page, click Two-Stage Dialing. The User – Two-
Stage Dialing page appears.
2) To enable Two-Stage Dialing, click “On”. To disable it, click “Off”.
3) Save your changes. Click Apply or OK. Apply saves your changes. OK saves your changes and displays the previous page.
To exit without saving, select another page or click Cancel to display the previous page.

COMMPILOT WEB PORTAL USER GUIDE Access Point, Inc. PAGE 77 OF 144
Call Control
5 Call Control
Use the User – Call Control menu page to configure or use call control services, for example, call waiting or flash call functionality.
Figure 72 User – Call Control
The User – Call Control menu page contains these menu items:
Basic menu
This menu displays menu items that all users can use:
− Barge-in Exempt
− Call Waiting
− Call Pickup
− Customer Originated Trace
− Directed Call Pickup
− Diversion Inhibitor
− Directed Call Pickup with Barge-in
− Flash Call Hold
− Call Transfer
− Three-Way Call

COMMPILOT WEB PORTAL USER GUIDE Access Point, Inc. PAGE 78 OF 144
Call Control
− N-Way Call
− Music/Video On Hold
Advanced services
This menu displays the menu items that users can use only if such functions have been assigned to them:
− Charge Number
− Hoteling Host
− Hoteling Guest
− Instant Messaging and Presence
− Mobile Extension to Extension Dialing
− Physical Location
− Remote Office
− Shared Call Appearance
− Video Add-On
5.1 Access Call Control Menu
To access the User – Call Control menu page, click Call Control in the Options list.
5.2 Barge-in Exempt
5.2.1 Turning Barge-in Exempt On and Off
Use this menu item on the User – Call Control menu page to turn Barge-in Exempt on and off. Barge-in Exempt allows you to prohibit others from interrupting your conversations with the Barge-in service. When it is on members of your group with the Barge-in service cannot interrupt your calls. When it is off, they can.
Figure 73 Call Control – Barge-in Exempt
1) On the User – Call Control menu page, click Barge-in Exempt. The User – Barge-in
Exempt page appears.
2) To enable Barge-in Exempt, click “On”. To disable it, click “Off”.

COMMPILOT WEB PORTAL USER GUIDE Access Point, Inc. PAGE 79 OF 144
Call Control
3) Save your changes. Click Apply or OK. Apply saves your changes. OK saves your changes and displays the previous page.
To exit without saving, select another page or click Cancel to display the previous page.
5.3 Call Waiting
5.3.1 Turn Call Waiting On and Off
Use this menu item on the User – Call Control menu page to turn Call Waiting on and off. The Call Waiting service allows you to receive a signal when a call comes in while you are engaged in another call. You can then pick up the call, should you want to.
NOTE: Busy treatment is given to callers when the service is deactivated.
Figure 74 Call Control – Call Waiting
1) On the User – Call Control menu page, click Call Waiting. The User – Call Waiting page
appears.
2) To enable Call Waiting, click “On”. To disable it, click “Off”.
3) Save your changes. Click Apply or OK. Apply saves your changes. OK saves your changes and displays the previous page.
To exit without saving, select another page or click Cancel to display the previous page.
5.4 Call Pickup
Use this menu item on the User – Call Control menu page to view your call pickup group.
The Call Pickup service allows you to answer a ringing call to another phone in your call pickup group.

COMMPILOT WEB PORTAL USER GUIDE Access Point, Inc. PAGE 80 OF 144
Call Control
Figure 75 Call Control – Call Pickup
1) On the User – Call Control menu page, click Call Pickup. The User – Call Pickup page
appears, showing the members of your Call Pickup group.
The User – Call Pickup page displays the items described below.
Item Description
Group Name Name of the Call Pickup group.
Name Name of the user in your Call Pickup group.
Department Department of the user in your Call Pickup group.
2) To pick up a ringing call at a member of your Call Pickup group, dial the Call Pickup
Feature Access Code. If there is more than one ringing call in your Call Pickup group, the call that has been ringing the longest is answered.
3) To display the previous page, click OK. The User – Call Control menu page appears.
5.5 Customer Originated Trace
Select this menu item on the User – Call Control menu page to view the Customer Originated Trace service description. You cannot configure this service. You must request your group administrator to assign the service to you. If you have been assigned this service, you can dial a feature access code to put a trace on your last incoming call.

COMMPILOT WEB PORTAL USER GUIDE Access Point, Inc. PAGE 81 OF 144
Call Control
Figure 76 Call Control − Customer Originated Trace
5.5.1 Verify Assigned Feature Access Codes
Use this procedure to determine whether or not you have been assigned this service.
1) From the Options List, click Utilities. The User-Utilities menu page opens.
2) On the User-Utilities menu page, click Feature Access Codes.
3) In the Feature Access Codes list, look for the Customer Originated Trace (COT) feature access code.
− If the COT feature access code is listed, you have been assigned this feature and can dial the code to trace your last incoming call.
− If the COT feature access code is not listed, you have not been assigned this feature and cannot use this service.
4) To display the previous page, click OK. The User – Utilities menu page appears.
5.6 Directed Call Pickup
Use this menu item on the User – Call Control menu page to pick up a call at an extension of your call pickup group.
The Directed Call Pickup service allows you to pick up a call at a specific extension of your call pickup group.
5.6.1 Pick Up a Call at an Extension of Your Call Pickup Group
Use this procedure to answer a call ringing at an extension of your Call Pickup group.

COMMPILOT WEB PORTAL USER GUIDE Access Point, Inc. PAGE 82 OF 144
Call Control
Figure 77 Call Control – Directed Call Pickup
1) On the User – Call Control menu page, click Directed Call Pickup. The User – Directed
Call Pickup page appears, showing instructions for Directed Call Pickup.
2) To pick up a ringing call at an extension in your Call Pickup group, enter the Directed Call Pickup Feature Access Code followed by the extension at your phone.
To display the previous page, click OK. The User – Call Control page appears.
5.7 Directed Call Pickup with Barge-in
Use this menu item on the User – Call Control menu page to view the status of the warning tone.
The Directed Call Pickup with Barge-in service allows you to prohibit other users from interrupting your calls with the Barge-in service.
NOTE: Dial *33 and the extension of the subscriber in your group to pickup or barge- in to a call.
5.7.1 View the Status of the Warning Tone
Use this procedure to view the status of the warning tone associated with Directed Call Pickup with Barge-in. The warning tone precedes a barge-in.
Figure 78 Call Control – Directed Call Pickup with Barge-in
1) On the User – Call Control menu page, click Directed Call Pickup with Barge-in. The
User – Directed Call Pickup with Barge-in page appears.
2) The Warning Tone displays “On” or “Off.” The group administrator sets the status of the Warning Tone.
3) To display the previous page, click OK. The User – Call Control page appears.
5.8 Diversion Inhibitor
Use this menu item on the User – Call Control menu page to view the Diversion Inhibitor FAC. Diversion Inhibitor allows a user to prevent redirection services from being activated on the terminating side of an unanswered call.

COMMPILOT WEB PORTAL USER GUIDE Access Point, Inc. PAGE 83 OF 144
Call Control
Figure 79 Call Control – Diversion Inhibitor
1) On the User – Call Control menu page, click Diversion Inhibitor. The User – Diversion
Inhibitor page appears, describing the Diversion Inhibitor Feature Access Code.
2) To display the previous page, click OK. The User – Call Control page appears.
5.9 Flash Call Hold
Use this menu item on the User – Call Control menu page to hold a call at a phone without the call control functionality.
The Flash Call Hold service allows you to hold a call at a phone with no Hold button.
Figure 80 Call Control – Flash Call Hold
1) On the User – Call Control menu page, click Flash Call Hold. The User – Flash Call Hold
page appears, showing instructions for Flash Call Hold.
2) To hold a call at a phone without call control functionality, flash the phone (click the flash button or click the Hangup button once).
3) Dial the Flash Call Hold Feature Activation Code.
4) Make the second call.
5) To toggle between calls, flash the phone and dial the Flash Call Hold Feature Activation Code.
6) To display the previous page, click OK. The User – Call Control page appears.

COMMPILOT WEB PORTAL USER GUIDE Access Point, Inc. PAGE 84 OF 144
Call Control
5.10 Call Transfer
Use this menu item on the User – Call Control menu page to transfer a call at the phone without the call control functionality.
The Call Transfer service allows you to transfer a call at a phone with no transfer button.
Figure 81 Call Control – Call Transfer
1) On the User – Call Control menu page, click Call Transfer. The User – Call Transfer page
appears, showing instructions for Call Transfer.
2) To turn Call Transfer Recall on or off, click “On” or “Off”. When on, Call Transfer Recall returns a call to the receptionist (or device that forwarded the call) when the target device is unavailable to take the call (based on the value selected in the Number of rings before recall text box).
3) From the Number of rings before recall drop-down list, select the number of rings (two to 20) to play before a call returns to the receptionist.
4) To enable or disable the Busy Camp On service, select or de-select the Enable Busy Camp On check box. Enter the number of seconds (30 to 600) for the Busy Camp On timer. (The default is 120 seconds.)
5) To turn the diversion inhibitor on or off for blind transfers, click “On” or “Off”. When on, the call is not redirected to an alternate destination or voice mail.
6) To turn the diversion inhibitor on or off for consultative calls, click “On” or “Off”. When turned on, the call is not redirected to an alternate destination or voice mail.
7) To save your changes, click Apply or OK. Apply saves your changes. OK saves your changes and displays the previous page.
5.11 Three-Way Call
Use this menu item on the User – Call Control menu page to connect three at a phone without conferencing functionality.
The Three-Way Call service allows you to set up a three-way conference call at a phone with no conferencing functionality.

COMMPILOT WEB PORTAL USER GUIDE Access Point, Inc. PAGE 85 OF 144
Call Control
Figure 82 Call Control – Three-Way Call
1) On the User – Call Control menu page, click Three-Way Call. The User – Three-Way Call
page appears, showing instructions for Three-Way Call.
2) To set up a three-way conference call at a phone with no conferencing functionality, make the first call.
3) When the number answers, flash the phone by clicking the flash button or clicking the Hangup button once.
4) Make the second call.
5) When the second number answers, flash the phone again.
6) To display the previous page, click OK. The User – Call Control page appears.
NOTE: If you have Three-Way Call, you are connected to the two callers in a three-way conference call. Hang up the phone to leave the other two callers connected.
5.12 N-Way Call
Use this procedure to connect four or more calls in a conference call at a phone without conferencing functionality.
Figure 83 Call Control – N-Way Call
1) On the User – Call Control menu page, click N-Way Call. The User – N-Way Call page
appears, showing instructions for N-Way Call.
2) To set up an n-way conference call at a phone with no conferencing functionality, make the first call.

COMMPILOT WEB PORTAL USER GUIDE Access Point, Inc. PAGE 86 OF 144
Call Control
3) When the number answers, flash the phone by clicking the flash button or clicking the Hangup button once.
4) Make the second call.
5) When the second number answers, flash the phone again.
6) To display the previous page, click OK. The User – Call Control page appears.
5.13 Music/Video On Hold
Use this menu item on the User – Call Control menu page to turn Music/Video On Hold on and off. The Music/Video On Hold plays music or a video for all calls when the remote party is held or parked.
5.13.1 Turn Music/Video On Hold On and Off
Figure 84 Call Control – Music/Video On Hold
1) On the User – Call Control menu page, click Music/Video On Hold. The User –
Music/Video On Hold page appears.
2) To turn activate Music On Hold, click “On”. To deactivate it, click “Off”
3) Save your changes. Click Apply or OK. Apply saves your changes. OK saves your changes and displays the previous page.
To exit without saving, select another page or click Cancel to display the previous page.
5.14 Charge Number
Use this menu item on the User – Call Control menu page to view your charge number.
The Charge Number service allows an administrator to assign a charge number, different from a user’s phone number, which will be included in the calls originated by the user. The charge number is visible in call detail records, and is used for the purposes of billing and record keeping.

COMMPILOT WEB PORTAL USER GUIDE Access Point, Inc. PAGE 87 OF 144
Call Control
Figure 85 Call Control – Charge Number
5.15 Hoteling Host
Use this menu item on the User – Call Control Page to activate or deactivate your phone device as a Hoteling Host. Hoteling allows users to associate their service profiles with devices other than their own.
This service can be used, for example, with transient employees. For example, an enterprise can set up a visitor office with a phone. The user account associated with this phone would have the Hoteling Host service assigned. A salesperson, with the Hoteling Guest service assigned, can associate their service profile with the phone in the visitor office.
Hoteling consists of two separate services, Hoteling Host and Hoteling Guest. The first service, Hoteling Host, is used to designate a particular user as a host, allowing other users, with the Hoteling Guest service assigned, to associate their service profile with the Host user’s device. The second service, Hoteling Guest, is used to allow Hoteling Guest users to associate their service profile with a Hoteling Host user’s device.
NOTE: A user may not be both a hoteling host and a hoteling guest at the same time. If both of these services are assigned to you, you will be unable to accept any guests or associate with any hosts until one of these services is unassigned.
Figure 86 Call Control – Hoteling Host
1) On the User – Call Control menu page, click Hoteling Host. The User – Hoteling Host
page appears, showing information on the Hoteling Host services.
2) To designate your phone as a Hoteling Host, click “On”. To deactivate it, click “Off”.

COMMPILOT WEB PORTAL USER GUIDE Access Point, Inc. PAGE 88 OF 144
Call Control
3) Save your changes. Click Apply or OK. Apply saves your changes. OK saves your changes and displays the previous page.
To exit without saving, select another page or click Cancel to display the previous page.
The User – Hoteling Host page displays information on the associated guest, described below.
Item Description
Association Limit The amount of time the Hoteling Guest is allowed to use your device.
Last name Last name of the Hoteling Guest using your device.
First Name First name of the Hoteling Guest using your device.
Phone Number The phone number of the Hoteling Guest using your device.
Extension The extension number of the Hoteling Guest using your device.
Association Date The date the Hoteling Guest began using your device.
5.16 Hoteling Guest
Use this menu item on the User-Call Control Page to activate or deactivate your phone as a Hoteling Guest.
Hoteling allows users to associate their service profiles with devices other than their own. This service can be used, for example, with transient employees. For example, an enterprise can set up a visitor office with a phone. The user account associated with this phone would have the Hoteling Host service assigned. Salespersons, with the Hoteling Guest service assigned, can associate their service profile with the phone in the visitor office.
Hoteling consists of two separate services, Hoteling Host and Hoteling Guest. The first service, Hoteling Host, is used to designate a particular user as a host, allowing other users, with the Hoteling Guest service assigned, to associate their service profile with the Host user’s device. The second service, Hoteling Guest, is used to allow Hoteling Guest users to associate their service profile with a Hoteling Host user’s device.
The User – Hoteling Guest page is a list page that contains an advanced search. The advanced search lets you define specific search criteria to narrow your search and display a manageable list. For more information on defining search criteria, see the BroadWorks Getting Started Web Interface Administration Guide.

COMMPILOT WEB PORTAL USER GUIDE Access Point, Inc. PAGE 89 OF 144
Call Control
Figure 87 Call Control – Hoteling Guest
1) On the User – Call Control menu page, click Hoteling Guest. The User – Hoteling Guest
page appears.
2) To activate your phone as a Hoteling Guest, select “On”. To deactivate it, select “Off”.
3) If activating the service, enter a time-out limit in the Association Timeout entry box, after which the Hotel-Guest association ends.
4) To select a host, move a name from the Available Hosts column to the Associated Hosts column.
− In the Available Hosts column, select the host.
− To select the selected host for Hoteling, click Add >.
5) To select another host, move users from the Associated Host column to the Available Host column.
− In the Associated Host column, select the user.
− To remove the selected users from the display, click Remove <.
6) Save your changes. Click Apply or OK. Apply saves your changes. OK saves your changes and displays the previous page.
NOTE: The Add > and Add All >> buttons always move items from a column on the left to a column on the right. The Remove < and Remove All << buttons always move items from a column on the right to a column on the left.
To exit without saving, select another page or click Cancel to display the previous page.

COMMPILOT WEB PORTAL USER GUIDE Access Point, Inc. PAGE 90 OF 144
Call Control
5.17 Instant Messaging and Presence
Use this menu item on the User – Call Control menu page to provide private instant messaging and presence to soft clients and SIP phones.
The Instant Messaging and Presence service allows other users to view your presence status by adding your BroadWorks ID to their contacts list. They can also send you instant messages by using your BroadWorks ID as the message destination.
Figure 88 Call Control – Instant Messaging and Presence
1) On the User – Call Control menu page, click Instant Messaging and Presence. The
User – Instant Messaging and Presence page appears, showing information on the Instant Messaging and Presence services.
2) To display the previous page, click OK. The User – Call Control page appears.
5.18 Mobile Extension to Extension Dialing
Use this menu item on the User – Call Control menu page to view your Mobile Extension to Extension Dialing information.
If you have been assigned this feature, when you dial one of your own directory numbers, the call is routed to the Network with 999 prefixed to the digits. The Network devices can then translate on the 999 and route the call accordingly.
NOTE: The 999 prefix digits are not configurable.
Figure 89 Call Control – Mobile Extension to Extension Dialing

COMMPILOT WEB PORTAL USER GUIDE Access Point, Inc. PAGE 91 OF 144
Call Control
5.19 Push to Talk
Use this menu item on the User – Call Control menu page to:
Configure Push to Talk Options
Allow Push to Talk Calls From Selected Users
Push to Talk provides an intercom-like functionality where you can call another party and be instantly connected.
5.19.1 Configure Push to Talk Options
Use this procedure to configure Push to Talk Options.
The User – Push to Talk page is a list page that contains an advanced search. The advanced search lets you define specific search criteria to narrow your search and display a manageable list. For more information on defining search criteria, see the BroadWorks Getting Started Web Interface Administration Guide.
Figure 90 Call Control – Push to Talk
1) On the User – Call Control menu page, click Push to Talk. The User – Push to Talk page
appears.
2) Select your Auto-Answer options.
− Select “On” if you want to automatically answer Push to Talk calls.
− Check “Off” if you do not want to automatically answer Push to Talk Calls.
3) Select the Outgoing Connection Type.

COMMPILOT WEB PORTAL USER GUIDE Access Point, Inc. PAGE 92 OF 144
Call Control
− Select “One-Way” to establish a one-way path. If this option is selected, then the originator of the call can talk to the party receiving the call, but the party receiving the call cannot talk to the originator of the call.
− Select “Two-Way” to establish a two-way path. If this option is selected, then both the originator of the call and the party receiving the call can talk to each other.
5.19.2 Allow Push to Talk Calls From Selected Users
Use this procedure to select which users Push to Talk calls can be received from.
1) On the User – Call Control menu page, click Push to Talk. The User – Push to Talk page appears.
2) Select your Access List options.
− Select “Allow calls only from the users selected below” to list the users who can use Push to Talk to call you.
− Select “Allow calls from everyone except the users selected below” to accept Push to Talk calls from everyone except the listed users.
3) To add users to the display, move users from the Available Users column to the Selected Users column.
− In the Available Users column, select the users. You can select some or all of the items in a column. Item names are listed in alphabetical order. To select several items in sequential order, click the first name, hold down the SHIFT key on the keyboard, and click the last name. To select several items, but not in a particular order, click the names while holding down the CTRL key on the keyboard.
− To add the selected users to the display, click Add >. To move all users (unselected) at once, click Add All >>.
4) To remove users from the display, move users from the Selected Users column to the Available Users column.
− In the Selected Users column, select the users.
− To remove the selected users from the display, click Remove <. To move all users (unselected) at once, click Remove All <<.
NOTE: The Add > and Add All >> buttons always move items from a column on the left to a column on the right. The Remove < and Remove All << buttons always move items from a column on the right to a column on the left.
5) Save your changes. Click Apply or OK. Apply saves your changes. OK saves your changes and displays the previous page.
To exit without saving, select another page or click Cancel to display the previous page.
5.20 Physical Location
Use this menu item on the User – Call Control menu page to view the Physical Location service configuration.
The Physical Location service allows proper support of emergency calling in countries and regions where the location of a user cannot be derived from the user's phone number. If the Physical Location service is configured for you, you can only make calls from the physical location designated for the calling device.

COMMPILOT WEB PORTAL USER GUIDE Access Point, Inc. PAGE 93 OF 144
Call Control
The administrator is responsible for both specifying the physical location of a device and activating the service.
Figure 91 Call Control – Physical Location
5.21 Remote Office
Use this menu item on the User – Call Control menu page to activate or deactivate Remote Office. The Remote Office service allows you to use an off-site phone, for example your home office phone or cell phone, as your business phone. When active, you can access your CommPilot Call Manager functionality from another phone.
All services available from your office home are available through Remote Office. In particular, if you subscribe to a name delivery service at home, External Calling Line ID must be enabled for your caller’s name and number to display with Remote Office.
Figure 92 Call Control – Remote Office
1) On the User – Call Control menu page, click Remote Office. The User – Remote Office
page appears.
NOTE: You can access this page by clicking RO on your CommPilot Call Manager page. When the button to the left of the RO link on the CommPilot Call Manager is selected, this service is on. When it is not selected, it is off.
2) To activate Remote Office, select “On”. To deactivate it, select “Off”
3) Type the number of the remote phone in the Remote Phone Number text box.
4) Save your changes. Click Apply or OK. Apply saves your changes. OK saves your changes and displays the previous page.

COMMPILOT WEB PORTAL USER GUIDE Access Point, Inc. PAGE 94 OF 144
Call Control
To exit without saving, select another page or click Cancel to display the previous page.
NOTE: If you have both Simultaneous Ringing and the Remote Office features active for the same phone number, an incoming call results in two calls. One of these calls is to the phone number. The other call is to the numbers listed in the Simultaneous Ringing service or the members of the Simultaneous Ringing Group.
5.22 Shared Call Appearance
Use this menu item on the User – Call Control menu page to query the alternate locations assigned to you. You can have a maximum of 35 appearances assigned to you. Shared Call Appearances (SCAs) are assigned by your administrator.
The Shared Call Appearance service allows you to view your alternate locations. Alternate locations are alerted along with the primary location when an incoming call is received. Any one of these locations can answer the incoming call. The location that answers the call becomes the active location.
The alternate locations can also be used to originate calls. The location originating the call becomes the active location.
Once one location is active, the other locations cannot be used until the active location is released.
The Users – Shared Call Appearance page is a list page that contains an advanced search. The Identity/Device Profile Type, Identity/Device Profile Name, and Line Port appear. Depending on the number of pages of data in a list, list pages allow you to present the data several different ways. You can click the headings of a column to change the sort order of items in the column, use the input boxes below the data to specify search criteria, or click the page links, for example, Next or Previous. The advanced search lets you define specific search criteria to narrow your search and display a manageable list. For more information on defining search criteria, see the BroadWorks Getting Started Web Interface Administration Guide.
NOTE: For the Client Management System (CMS), this page displays the identities of each of the shared locations (CMS identities) and not Identity/Device profiles.

COMMPILOT WEB PORTAL USER GUIDE Access Point, Inc. PAGE 95 OF 144
Call Control
5.22.1 Query the Alternate Locations Assigned to You
Figure 93 Call Control – Shared Call Appearance
Figure 94 Call Control – Shared Call Appearance (Bottom of Page for CMS)
1) On the User – Call Control menu page, click Shared Call Appearance. The User –
Shared Call Appearance page appears.
2) Select Alert all appearances for Click-to-Dial calls to enable Click-to-Dial alerts. When this is enabled, all of the user’s locations (primary and SCA) are alerted for a Click-to-Dial call when the user has no active location or the user has Multiple Call Arrangement (MCA) assigned and enabled. If you do not have MCA enabled, or it is disabled, and you have active location, only that active location is alerted.
3) For Multiple Call Arrangement, select “On” or “Off”. Multiple Call Arrangement provides the ability for multiple calls to be handled concurrently on different Shared Call Appearance locations for a user.
4) To configure a warning tone to alert you that a third party is now on the line, turn on one of the Bridge Warning Tone options: Barge-in only, or Barge-in and repeat every 30 seconds.
5) The User – Shared Call Appearance page list displays the items described below.
Item Description
Identity/Device Profile Type Type of device of the alternate location. (Not available for CMS.)
Identity/Device Profile Name Name of the device assigned to the alternate location. (Not

COMMPILOT WEB PORTAL USER GUIDE Access Point, Inc. PAGE 96 OF 144
Call Control
available for CMS.)
Line/Port Line or port assigned to the alternate location. (Not available for CMS.)
Shared Call Appearance Identity
Identity assigned to the alternate location. (Available only for CMS.)
6) From the drop-down list, select the “Identity/Device Profile Type”, “Identity/Device Profile
Name”, or “Line/Port” of the alternate location to search. For CMS only, select the “Shared Call Appearance Identity” to search.
7) From the drop-down list, select the search condition (“Starts With”, “Contains”, or “Equal To”).
8) Type a search string in the text box.
9) Click Find. The alternate location appears.
10) To display all alternate locations assigned to you, click Find All.
11) To display the previous page, click OK. The User – Call Control page appears.
5.23 Video Add-On
Use the Video Add-On service to configure a video-capable device to work with your audio device when making calls to a person who has video capability.
NOTE: You do not need this service if your audio device includes video capability.
If you do activate this feature, to receive video, you must have a video device, configured by your administrator, which is turned on and reachable by the system. If the video device cannot connect in the time allotted, the call comes through with the audio portion only.
NOTE: When you make a call with the Video Add-On service activated, it takes longer to start the call because the video is being set up.
If you set your calls to go to a remote office, and the Video Add-On service is active, only the audio portion of the call goes to the remote location. With the Video Add-On service disabled on your local device, both audio and video parts of the call go to the remote location.
Use the following procedures to configure the Video Add-On service.
Turn Video Add-On
Set the Maximum Originating Call Delay
5.23.1 Turn Video Add-On On and Off
Use this procedure to turn the Video Add-On service on and off.
The Identity/Device Profile area displays details for the device being configured.
NOTE: When the Client Management System (CMS) is enabled, the Identity/Device profile area is not shown.

COMMPILOT WEB PORTAL USER GUIDE Access Point, Inc. PAGE 97 OF 144
Calling Plans
Figure 95 Call Control – Video Add-On
Figure 96 Call Control – Video Add-On (CMS)
1) On the User − Call Control menu page, click Video Add-On. The User − Video Add-On
page appears.
2) To activate Video Add-On, select “On”. To deactivate it, select “Off”.
3) Save your changes. Click Apply or OK. Apply saves your changes. OK saves your changes and displays the previous page.
To exit without saving, select another page or click Cancel to display the previous page.
5.23.2 Set the Maximum Originating Call Delay
Use this procedure to set the maximum length of time in seconds before the call drops the search for the video add-on device.
1) From the Maximum Originating Call Delay drop-down list, select “2”, “5”, or “10” seconds.
2) Save your changes. Click Apply or OK. Apply saves your changes. OK saves your changes and displays the previous page.
To exit without saving, select another page or click Cancel to display the previous page.

COMMPILOT WEB PORTAL USER GUIDE Access Point, Inc. PAGE 98 OF 144
Calling Plans
6 Calling Plans
Use the User – Calling Plans menu page to view your calling plan parameters, such as the type of numbers you can call, and the type of numbers you can receive calls from.
Figure 97 User – Calling Plans
Basic menu
This menu displays menu items that all users can use:
− Incoming Calling Plan
Advanced services
This menu displays the menu items that users can use only if such functions have been assigned to them:
− Outgoing Calling Plan
− Outgoing Digit Plan
6.1 Access Calling Plans Menu
To access the User – Calling Plans menu page, click Calling Plans in the Options list.
6.2 Incoming Calling Plan
Use this menu item on the User – Incoming Calls page to view your incoming plan.
The Incoming Calling Plan service displays the types of incoming calls you are allowed to receive.

COMMPILOT WEB PORTAL USER GUIDE Access Point, Inc. PAGE 99 OF 144
Calling Plans
Figure 98 Calling Plans – Incoming Calling Plan
1) On the User – Calling Plans menu page, click Incoming Calling Plan. The User –
Incoming Calling Plan page appears.
The User – Incoming Calling Plan page displays the items described below.
Item Description
Permitted A check mark indicates you can receive this type of call. If no check mark appears, you cannot.
Name Indicates the name given to the type of incoming calls assigned to your group.
Legend Indicates the following permissions for receiving calls from outside of the group:
Y (Yes) – you can receive calls from outside of your group.
P (Partial) – you can receive calls from outside of the group if they are transferred to you by a member of the group.
N (No) – you cannot receive calls from outside of the group.
2) To display the previous page, click OK.
6.3 Outgoing Calling Plan
Use this menu item on the User –Calling Plans menu page to:
Display Outgoing Calls You Can Place
Display the Outgoing Calls You Can Forward
Display the Outgoing Calls You Can Forward or Transfer
Display Your Permission to be Forwarded or Transferred
The Outgoing Calling Plan service displays the types of outgoing calls you can place, forward, or transfer.

COMMPILOT WEB PORTAL USER GUIDE Access Point, Inc. PAGE 100 OF 144
Calling Plans
6.3.1 Display Outgoing Calls You Can Place
Use this procedure to display the types of outgoing calls you are permitted to make.
Figure 99 Calling Plans – Outgoing Calling Plan (Originating Calls)
1) On the User – Calling Plans menu page, click Outgoing Calling Plan. The User -
Outgoing Calling Plan page appears.
2) Click the Originating Calls tab.
The Originating Calls tab displays the information described below.
A “Y” in the Permitted column indicates that you can dial this type of call. If an “N” appears, you cannot. If an "A" appears in the Permitted column, an authorization code is required to make this type of call. If a "T1, T2, or T3" appears, the call is transferred to one of three alternate numbers. Below is an explanation of each call type:
Item Description
Group Calls to the business group. (Your group or system administrator designates your business group.)
Local Calls within the local calling area and local toll calls, which may or may not have charges associated with them.
Toll Free Free calls to numbers beginning with 1, usually followed by 800, 877, or 888.
Toll Chargeable calls within the same geographic region.

COMMPILOT WEB PORTAL USER GUIDE Access Point, Inc. PAGE 101 OF 144
Calling Plans
International Chargeable calls to other countries.
Operated Assisted Calls made with the assistance of an operator.
Chargeable Directory Assistance
Chargeable calls made to Directory Assistance such as 411 or the area code followed by 555-1212.
Special Services I Calls to 700 numbers. These calls may or may not be chargeable.
Special Services II (Reserved for System Administrator's discretion.)
Premium Services I Chargeable calls to numbers beginning with 900.
Premium Services II Chargeable calls to numbers beginning with 976.
Casual 101XXXX chargeable calls, for example, 1010321 followed by the number you are calling.
URL Dialing Calls made to an e-mail address that is outside of the business group.
Unknown Calls to unknown call types.
You are permitted to make emergency calls to numbers such as 911, if those services are available in your area.
3) To display the previous page, click OK. The User – Calling Plans menu page appears.
6.3.2 Display the Outgoing Calls You Can Forward
Use this procedure to display the types of outgoing calls you are permitted to forward.
NOTE: Depending on the way your system is configured, the Initiating Call Forwards tab may be replaced with an Initiating Call Forwards/Transfers tab.
Figure 100 Calling Plans – Outgoing Calling Plan (Initiating Call Forwards)

COMMPILOT WEB PORTAL USER GUIDE Access Point, Inc. PAGE 102 OF 144
Calling Plans
1) On the User – Calling Plans menu page, click Outgoing Calling Plan. The User –
Outgoing Calling Plan page appears.
2) Click the Initiating Call Forwards tab.
The Initiating Call Forwards/Transfers tab displays the information described below.
A check mark in the Permitted column indicates that you can forward this type of call. If no check mark appears, you cannot forward the call type. Below is a definition of the call types.
Item Description
Group Calls to the business group. (Your group or system administrator designates your business group.)
Local Calls within the local calling area and local toll calls, which may or may not have charges associated with them.
Toll Free Free calls to numbers beginning with 1, usually followed by 800, 877, or 888.
Toll Chargeable calls within the same geographic region.
International Chargeable calls to other countries.
Operated Assisted Calls made with the assistance of an operator.
Chargeable Directory Assistance
Chargeable calls made to Directory Assistance such as 411 or the area code followed by 555-1212.
Special Services I Calls to 700 numbers. These calls may or may not be chargeable.
Special Services II (Reserved for System Administrator's discretion.)
Premium Services I Chargeable calls to numbers beginning with 900.
Premium Services II Chargeable calls to numbers beginning with 976.
Casual 101XXXX chargeable calls, for example, 1010321 followed by the number you are calling.
URL Dialing Calls made to an e-mail address that is outside of the business group.
Unknown Calls to unknown call types.
3) To display the previous page, click OK. The User – Calling Plans menu page appears.
6.3.3 Display the Outgoing Calls You Can Forward or Transfer
Use this procedure to display the types of outgoing calls you are permitted to forward or transfer.
NOTE: Depending on the way your system is configured, the Initiating Call Forwards/Transfers tab may be replaced with an Initiating Call Forwards tab.

COMMPILOT WEB PORTAL USER GUIDE Access Point, Inc. PAGE 103 OF 144
Calling Plans
Figure 101 Calling Plans – Outgoing Calling Plan (Initiating Call Forwards/Transfers)
1) On the User – Calling Plans menu page, click Outgoing Calling Plan. The User –
Outgoing Calling Plan page appears.
2) Click the Initiating Call Forwards/Transfers tab.
The Initiating Call Forwards/Transfers tab displays the information described below.
A check mark in the Permitted column indicates that you can forward or transfer this type of call. If no check mark appears, you cannot forward or transfer the call type.
Below is a definition of the call types.
Item Description
Group Calls to the business group. (Your group or system administrator designates your business group.)
Local Calls within the local calling area and local toll calls, which may or may not have charges associated with them.
Toll Free Free calls to numbers beginning with 1, usually followed by 800, 877, or 888.
Toll Chargeable calls within the same geographic region.
International Chargeable calls to other countries.
Operated Assisted Calls made with the assistance of an operator.
Chargeable Directory Assistance
Chargeable calls made to Directory Assistance such as 411 or the area code followed by 555-1212.
Special Services I Calls to 700 numbers. These calls may or may not be chargeable.
Special Services II (Reserved for System Administrator's discretion.)

COMMPILOT WEB PORTAL USER GUIDE Access Point, Inc. PAGE 104 OF 144
Calling Plans
Premium Services I Chargeable calls to numbers beginning with 900.
Premium Services II Chargeable calls to numbers beginning with 976.
Casual 101XXXX chargeable calls, for example, 1010321 followed by the number you are calling.
URL Dialing Calls made to an e-mail address that is outside of the business group.
Unknown Calls to unknown call types.
6.3.4 Display Your Permission to be Forwarded or Transferred
Use this procedure to display the permission assigned to you for forwarding or transferring calls outside of your group.
Figure 102 Calling Plans – Outgoing Calling Plan (Being Forwarded/Transferred)
1) On the User – Calling Plans menu page, click Outgoing Calling Plan. The User –
Outgoing Calling Plan page appears.
2) Click the Being Forwarded/Transferred tab.
The Being Forwarded/Transferred tab appears. A check mark in the Permitted column indicates that you can transfer or forward calls outside of your group as well as transfer outside calls to another member of your group. If no check mark appears, you cannot transfer calls involving an outside number.
3) To display the previous page, click OK. The User – Calling Plans menu page appears.
6.4 Outgoing Digit Plan
Use this menu item on the User – Calling Plans menu page to:
Display Special Calls You Can Make
Display Special Calls You Can Forward or Transfer
The Outgoing Digit Plan service displays the special call types you are permitted to make, forward, or transfer.

COMMPILOT WEB PORTAL USER GUIDE Access Point, Inc. PAGE 105 OF 144
Calling Plans
6.4.1 Display Special Calls You Can Make
Use this procedure to display the special call types you are permitted to make. The call types on this screen are defined and assigned by your administrator.
Figure 103 Calling Plans – Outgoing Digit Plan (Originating Calls)
1) On the User – Calling Plans menu page, click Outgoing Digit Plan. The User – Outgoing
Digit Plan page appears.
2) Click the Originating Calls tab.
The Originating Calls tab displays the types of calls you are permitted to make.
A “Y” in the Permitted column indicates that you can make this type of call. An “N” indicates you cannot. If an “A” appears in the Permitted column, an authorization code is required to make this type of call. If a “T1”, “T2”, or “T3” appears, the call is transferred to one of three alternate numbers.
3) To display the previous page, click OK. The User – Outgoing Calls page appears.
6.4.2 Display Special Calls You Can Forward or Transfer
Use this procedure to display the special call types you are permitted to forward or transfer. The call types on this screen are defined and assigned by your administrator.

COMMPILOT WEB PORTAL USER GUIDE Access Point, Inc. PAGE 106 OF 144
Client Applications
Figure 104 Calling Plans – Outgoing Digit Plan (Forwarded/Transferred Calls)
1) On the User – Calling Plans menu page, click Outgoing Digit Plan. The User – Outgoing
Digit Plan page appears.
2) Click the Initiating Call Forwards/Transfers tab.
3) The Initiating Call Forwards/Transfers tab displays the types of calls you are permitted to forward or transfer. A check mark in the Permitted column indicates that you can forward or transfer this type of call. If no check mark appears, you cannot.
4) To display the previous page, click OK. The User – Outgoing Calls page appears.

COMMPILOT WEB PORTAL USER GUIDE Access Point, Inc. PAGE 107 OF 144
Client Applications
7 Client Applications
Figure 105 User – Client Applications
The User – Client Applications menu page contains these menu items:
Basic Menu
This menu displays menu items that all users can use:
− Busy Lamp Field
− CommPilot Call Manager
− Client Call Control
− Outlook Integration
Advanced Menu
This menu displays the menu items that users can use only if such functions have been assigned to them:
− BroadWorks Agent
− BroadWorks Supervisor
− BroadWorks Assistant – Enterprise
− BroadWorks Receptionist
− Client License

COMMPILOT WEB PORTAL USER GUIDE Access Point, Inc. PAGE 108 OF 144
Client Applications
7.1 Access Client Applications Menu
To access the User – Client Applications menu page, click Client Applications in the Options list.
7.2 Busy Lamp Field
The Busy Lamp Field feature allows SIP Attendant Console phones to manage the lamp and console displays for monitored users. You can select members in your group or enterprise to be monitored using a SIP Attendant Console phone.
Use the Busy Lamp Field page to add or remove users to be monitored.
Figure 108 User – Busy Lamp Field
1) To select users, move users from the Available Users column to the Monitored Users
column.
− In the Available Users column, select the users. You can select some or all of the items in a column. Item names are listed in alphabetical order. To select several items in sequential order, click the first name, hold down the SHIFT key on the keyboard, and click the last name. To select several items, but not in a particular order, click the names while holding down the CTRL key on the keyboard.
− To select the selected users, click Add >. To select all users (unselected) at once, click Add All >>.
2) To de-select, move users from the Monitored Users column to the Available Users column.
− In the Monitored Users column, select the users.
− To de-select the selected users, click Remove <. To de-select all users (unselected) at once, click Remove <<.

COMMPILOT WEB PORTAL USER GUIDE Access Point, Inc. PAGE 109 OF 144
Client Applications
NOTE: The Add > and Add All >> buttons always move items from a column on the left to a column on the right. The Remove < and Remove << buttons always move items from a column on the right to a column on the left.
3) Save your changes. Click Apply or OK. Apply saves your changes. OK saves your changes and displays the previous page.
To exit without saving, select another page or click Cancel to display the previous page.
7.3 CommPilot Call Manager
Use this menu item on the User – Client Applications menu page to display information on CommPilot Call Manager.
The CommPilot Call Manager service allows you to initiate, manipulate, and receive calls through a web-based interface.
Figure 109 Client Applications – CommPilot Call Manager
1) On the User – Client Applications menu page, click CommPilot Call Manager. The User
– CommPilot Call Manager page appears, showing information on the CommPilot Call Manager services.
2) To access CommPilot Call Manager, click Call Manager at the upper right of a page.
3) To have the CommPilot Call Manager launch automatically upon login, check Launch CommPilot Call Manager on Login.
To display the previous page, click OK. The User – Client Applications menu page appears.
7.4 Client Call Control
Use this menu item on the User – Client Applications menu page to view your account for third-party call control applications.
The Client Call Control service allows you to use applications such as the Client Application Protocol (CAP) interface through an external call client application. This service must be assigned to you by your group administrator. You cannot configure this service.

COMMPILOT WEB PORTAL USER GUIDE Access Point, Inc. PAGE 110 OF 144
Client Applications
Figure 110 Client Applications – Client Call Control
1) On the User – Client Applications menu page, click Client Call Control. The User – Client
Call Control page appears.
2) To display the previous page, click OK. The User – Client Applications page appears.
7.5 Outlook Integration
Use this menu item on the User – Client Applications menu page to activate or deactivate Outlook integration. The Outlook Integration service allows you to access your Outlook contacts from CommPilot Call Manager.
Figure 111 Client Applications – Outlook Integration
1) On the User – Client Applications menu page, click Outlook Integration. The User –
Outlook Integration page appears.
NOTE: When the CommPilot Call Manager page is opened, an alert box appears asking if a BroadSoft component can be downloaded, which enables Outlook Integration. Click OK to allow download and installation. (This can take a few minutes.) The CommPilot window appears upon completion.

COMMPILOT WEB PORTAL USER GUIDE Access Point, Inc. PAGE 111 OF 144
Client Applications
You may be instructed to reboot your PC for the changes to take effect. If you click NO, you do not have an Outlook list to view. Clicking NO can cause scripting errors. Until you download the necessary components, the alert box appears each time CommPilot is opened.
2) To activate Outlook Integration, select “On”. To deactivate it, select “Off”.
3) Specify the location from which your contacts are retrieved. Select either Retrieve Contacts From Default Contact Folder Only, or Retrieve All Contacts.
4) Save your changes. Click Apply or OK. Apply saves your changes. OK saves your changes and displays the previous page.
To exit without saving, select another page or click Cancel to display the previous page.
7.6 Phone Status Monitoring
Use this menu item on the User – Client Applications menu page to add users to the Phone Status Monitoring service. This service allows you to monitor calls within your group. It is configurable via the Attendant Console.
The User – Phone Status Monitoring page is a list page that contains an advanced search. The advanced search lets you define specific search criteria to narrow your search and display a manageable list. For more information on defining search criteria, see the BroadWorks Getting Started Web Interface Administration Guide.
Figure 112 Client Applications – Phone Status Monitoring
1) On the User – Client Applications menu page, click Phone Status Monitoring. The User
– Phone Status Monitoring page appears.
2) To add users to the display, move users from the Available Users column to the Monitored Users column.
− In the Available Users column, select the users. You can select some or all of the items in a column. Item names are listed in alphabetical order. To select several items in sequential order, click the first name, hold down the SHIFT key on the keyboard,

COMMPILOT WEB PORTAL USER GUIDE Access Point, Inc. PAGE 112 OF 144
Client Applications
and click the last name. To select several items, but not in a particular order, click the names while holding down the CTRL key on the keyboard.
− To add the selected users to the display, click Add >. To move all users (unselected) at once, click Add All >>.
3) To remove users from the display, move users from the Monitored Users column to the Available Users column.
− In the Monitored Users column, select the users.
− To remove the selected users from the display, click Remove <. To move all users (unselected) at once, click Remove All <<.
NOTE: The Add > and Add All >> buttons always move items from a column on the left to a column on the right. The Remove < and Remove All << buttons always move items from a column on the right to a column on the left.
4) To filter the users in the display, from the Show only drop-down list, select a filter.
5) Save your changes. Click Apply or OK. Apply saves your changes. OK saves your changes and displays the previous page.
To exit without saving, select another page or click Cancel to display the previous page.
7.7 BroadWorks Agent
The BroadWorks Agent is a toolbar for Microsoft Outlook and Internet Explorer that enables users to perform typical call center agent activities, call control, basic reporting, and service configuration.
For more information, see the BroadWorks Call Center User Guide.
Figure 114 Client Applications – BroadWorks Agent
1) On the User – Client Applications menu page, click BroadWorks Agent. The User –
BroadWorks Agent page appears.
2) To display the previous page, click OK. The User – Client Applications page appears.
7.8 BroadWorks Supervisor
The BroadWorks Supervisor is a toolbar for Microsoft Outlook and Internet Explorer that enables users to perform advanced call features of a call center such as:
Real-time queue monitoring capabilities

COMMPILOT WEB PORTAL USER GUIDE Access Point, Inc. PAGE 113 OF 144
Client Applications
Enhanced reporting
Supervisor barge-in service
BroadWorks Call Center service integration
For information on configuring BroadWorks Call Center, see the BroadWorks Call Center Administration Guide. For information on using BroadWorks Call Center, see the BroadWorks Call Center User Guide.
Figure 115 Client Applications – BroadWorks Supervisor
1) On the User – Client Applications menu page, click BroadWorks Supervisor. The User –
BroadWorks Supervisor page appears.
2) To display the previous page, click OK. The User – Client Applications page appears.
7.9 BroadWorks Assistant – Enterprise
The BroadWorks Assistant – Enterprise is an integrated toolbar that enables you to make and accept telephone calls, and change telephone settings, from within Internet Explorer and Outlook. For example, you can automatically initiate calls by clicking on phone numbers from within Outlook or Internet Explorer. You can also configure basic call control services, such as Selective Call Forwarding, Do Not Disturb, Voice Mail to E-mail, Simultaneous Ring, and so on.
For information on using BroadWorks Assistant – Enterprise, see your BroadWorks Assistant- Enterprise User Guide.
Figure 116 Client Applications – BroadSoft Assistant – Enterprise

COMMPILOT WEB PORTAL USER GUIDE Access Point, Inc. PAGE 114 OF 144
Messaging
1) On the User – Client Applications menu page, click BroadSoft Assistant – Enterprise. The BroadSoft Assistant – Enterprise page appears.
2) To display the previous page, click OK. The User – Client Applications page appears.
7.10 BroadWorks Receptionist
The BroadWorks Receptionist is an attendant console for use by receptionists, or telephone attendants, who manage and screen inbound calls for enterprises. It enables advanced call control specification, contact directories and phone status.
For information on using BroadWorks Receptionist, see the BroadWorks Receptionist User Guide.
Figure 117 Client Applications – BroadWorks Receptionist
1) On the User – Client Applications menu page, click BroadWorks Receptionist. The User
– BroadWorks Receptionist page appears.
2) To display the previous page, click OK. The User – Client Applications page appears.
7.11 Client License
Use this menu item on the User – Client Applications menu page to verify that a licensable third-party service has been assigned to you.
NOTE: If there is no Client License item on the menu, none has been assigned to you.
1) On the User – Client Applications menu page, click Client License. The User – Client License page appears.
− The message “This service has no configuration” indicates the third-party service has been assigned to you, and requires no configuration at the user level.
2) To display the previous page, click OK. The User – Client Applications page appears.

COMMPILOT WEB PORTAL USER GUIDE Access Point, Inc. PAGE 115 OF 144
Messaging
8 Messaging
Use the User –Messaging menu page to configure voice mail parameters, such as distribution lists or greetings.
Figure 121 User – Messaging
Basic menu
This menu displays menu items that all users can use:
− Aliases
− Distribution Lists
− Greetings
− Voice Portal
− Voice Management
Advanced services
This menu displays the menu items that users can use only if such functions have been assigned to them:
− Third-Party MWI Control
− Third-Party Voice Mail Support
− Voice Portal Calling
− Fax Messaging
8.1.1 Access Messaging Menu
To access the User – Messaging menu page, click Messaging in the Options list.

COMMPILOT WEB PORTAL USER GUIDE Access Point, Inc. PAGE 116 OF 144
Messaging
8.2 Aliases
Use this menu item on the User – Messaging menu page to:
View or Delete Your Aliases
Add an Alias
The Aliases service allows you to access your voice mailbox from other phones as if you were at your primary phone.
NOTE: To receive calls from other phones, you need to program your phone to forward and/or call forward no answer to the Voice Portal DN, or the number that you call to retrieve your messages.
8.2.1 View or Delete Your Aliases
Use this procedure to view or delete the other phone numbers from which you can access your voice mailbox as if you were at your office phone (for example, your cell phone).
Figure 122 Messaging – Aliases
1) On the User – Messaging menu page, click Aliases. The User – Aliases page appears,
showing your aliases.
2) To delete an entry, check the Delete box next to the entry.
3) Save your changes. Click Apply or OK. Apply saves your changes. OK saves your changes and displays the previous page.
WARNING: This action cannot be undone. Once you click Apply or OK, the entry is permanently deleted.
To exit without saving, select another page or click Cancel to display the previous page.
8.2.2 Add an Alias
Use this procedure to add a phone number from which you can access your voice mailbox as if you were at your office phone (for example, your cell phone).

COMMPILOT WEB PORTAL USER GUIDE Access Point, Inc. PAGE 117 OF 144
Messaging
Figure 123 Aliases – Aliases Add
1) On the User – Messaging menu page, click Aliases. The User – Aliases page appears,
showing your aliases.
2) Click Add. The User – Aliases Add page appears.
3) Type the alias phone number in the * Phone Number text box.
4) To save your changes and display the previous page, click OK.
To exit without saving, select another page or click Cancel to display the previous page.
5) In the User – Aliases page, save your changes. Click Apply or OK. Apply saves your changes. OK saves your changes and displays the previous page.
8.3 Distribution Lists
Use this menu item on the User – Messaging menu page to:
Create a Distribution List
Add or Delete a Distribution List
The Distribution Lists service allows you to create and maintain lists of phone numbers or SIP- URI addresses for distributing voice mail messages.
8.3.1 Create a Distribution List
Use this procedure to create a list of phone numbers or SIP-URI addresses for distributing voice mail messages. You can create up to 10 different lists.

COMMPILOT WEB PORTAL USER GUIDE Access Point, Inc. PAGE 118 OF 144
Messaging
Figure 124 Messaging – Distribution Lists
1) On the User – Messaging menu page, click Distribution Lists. The User – Distribution
Lists page appears.
2) Click the tab for the list that you want to create.
3) In the Description text box, enter a description of this list for your own reference.
4) Save your changes. Click Apply or OK. Apply saves your changes. OK saves your changes and displays the previous page.
To exit without saving, select another page or click Cancel to display the previous page.
NOTE: You can modify this list at any time. Remember to save your changes.
8.3.2 Add or Delete a Distribution List Entry
Use this procedure to add a phone number or SIP-URI address to a distribution list, or to delete one from it.

COMMPILOT WEB PORTAL USER GUIDE Access Point, Inc. PAGE 119 OF 144
Messaging
Figure 125 Distribution Lists – Distribution Lists Add/Delete
1) On the User – Messaging menu page, click Distribution Lists. The User – Distribution
Lists page appears.
2) Click the tab for the list that you want to add to or delete from.
3) To add an entry, type a phone number or SIP-URI address in the Phone Number/SIPURI text box.
4) Click Add. The entry is added to the list.
5) Or, to delete and entry, check the Delete box beside the phone number to be deleted.
6) Click Delete. The entry is deleted.
WARNING: This action cannot be undone. Once you click Delete, the entry is permanently deleted.
8.4 Greetings
Use this menu item on the User – Messaging menu page to configure your greetings.
The Greetings service allows you to configure the messages your callers hear or see when your phone is busy or you do not answer.
NOTE: You can upload video files to be used as your personal greetings. However, if the calling party is not able to see video, then only the audio portion is heard.

COMMPILOT WEB PORTAL USER GUIDE Access Point, Inc. PAGE 120 OF 144
Messaging
Figure 126 Messaging – Greetings
On the User – Messaging menu page, click Greetings. The User – Greetings page appears.
8.4.1 To Set the Busy Greeting:
1) If you want callers to hear or see the standard system greeting when your phone line is busy, select System greeting.
Or,
2) If you want callers to hear or see a personalized message, select Personal greeting.
3) Type the name of a .WAV file that contains your personalized greeting in the Load personal greeting text box, or click Browse to locate the file. If your voice messaging service has video support enabled, you can also type the name of a .MOV file that contains your personalized greeting in the Load Personal Video Greeting text box, or click Browse to locate the file.
NOTE: You can modify the Busy Greeting at any time. Remember to save your changes.

COMMPILOT WEB PORTAL USER GUIDE Access Point, Inc. PAGE 121 OF 144
Messaging
8.4.2 To Set the No Answer Greeting:
1) If you want callers to hear or see the standard system greeting when there is no answer, select System greeting.
Or,
2) If you want callers to hear or see a personalized message, select Unavailable Greeting.
3) Type the name of a .WAV file that contains your personalized greeting in the Load Unavailable Greeting text box, or click Browse to locate the file. Type the name of a .MOV file that contains your personalized greeting in the Load Unavailable Video Greeting text box, or click Browse to locate the file. Go to step 2 of this procedure.
If you have recorded an alternate greeting for callers to hear or see when there is no answer, type the name of the alternate greeting in the Greeting Name text box, click the button next to one of the alternate greetings. Type the name of a .WAV file that contains your personalized greeting in the Audio control, or click Browse to locate the file. If your voice messaging service has video support enabled, you can also type the name of a .MOV file that contains your personalized greeting in the Video control, or click Browse to locate the file.
NOTE: You may provide up to three alternate No Answer recordings. However, only one No Answer recording may be active at any time: the System Greeting, the Personal Greeting, or one of the alternate greetings.
4) Select the number of rings you want callers to hear before your greeting. Other services, such as Call Forwarding No Answer, share this setting, and if it is changed in one service, that change affects all other services using this value.
5) Save your changes. Click Apply or OK. Apply saves your changes. OK saves your changes and displays the previous page.
To exit without saving, select another page or click Cancel to display the previous page.
NOTE: You can modify the No Answer Greeting at any time. Remember to save your changes.
8.5 Voice Portal
Use this menu item on the User – Messaging menu page to upload a recorded personalized name.
The Personalized Name service allows you to configure a recording of your name for Auto Attendant and Messaging.
8.5.1 Upload a Recorded Personalized Name
Use this procedure to upload a recording of your name for Auto Attendant and Messaging.

COMMPILOT WEB PORTAL USER GUIDE Access Point, Inc. PAGE 122 OF 144
Messaging
Figure 127 Messaging – Voice Portal
1) On the User – Messaging menu page, click Voice Portal. The User – Voice Portal page
appears.
2) Check the box to indicate that the personalized name recording should be used with Auto Attendant and Voice Messaging. Callers hear the user name recording when using the name-dialing feature and when transferring to the user’s extension.
NOTE: Depending on the way your group administrator has configured the group Voice Portal, this checkbox may not be editable. For example, if the personalized name recording usage has been assigned to your group by the group administrator, a check- mark appears in the interface, but it is not editable.
3) Type the name of the .WAV file of the user name in the Load Name text box or click Browse to locate the file.
4) Check the Auto-login to Voice Portal when calling from my phone text box to enable the auto-login option. When this is enabled, the system recognizes the calling user, and the password collection phase is skipped.
5) Save your changes. Click Apply or OK. Apply saves your changes. OK saves your changes and displays the previous page.
To exit without saving, select another page or click Cancel to display the previous page.
8.6 Voice Management
Use this menu item on the User – Messaging menu page to:
Activate and Set Up Voice Messaging
Configure Advanced Settings for Voice Management
The Voice Management service allows you to configure the handling of your voice messages.
8.6.1 Activate and Set Up Voice Messaging
Use this procedure to specify how you want your voice messages handled.

COMMPILOT WEB PORTAL USER GUIDE Access Point, Inc. PAGE 123 OF 144
Messaging
Figure 128 Messaging – Voice Management
1) On the User – Messaging menu page, click Voice Management. The User –
Management page appears.
2) For Voice Messaging, select “On”.
3) Indicate if you want all calls, busy calls, or unanswered calls sent to voice mail.
4) To retrieve voice messages using the phone and e-mail, select Use unified messaging.
5) If you have selected unified messaging and you want to hear a stuttered dial tone (and on some phones see a blinking light) to inform you when you have messages waiting, check Use Phone Message Waiting Indicator.
6) If you always listen to your voice messages using your e-mail client and do not use the phone retrieval option, click Forward it to this e-mail address and type the e-mail address where you want your voice messages to be sent.
7) If you want to receive a short e-mail message informing you about incoming calls, check Notify me by e-mail of the new voice message at this address and type the e-mail address where you want these notifications to be sent.
8) If you want a carbon copy of your messages to be sent to another e-mail address, check E-mail a carbon copy of the voice message to and type the e-mail address where you want the copy to be sent.
9) If you want callers to be able to press 0 during your outgoing voice message and be transferred to another number, such as a mobile phone or Auto Attendant, check Transfer on “0” to Phone Number and type the phone number to transfer the calls.
10) Save your changes. Click Apply or OK. Apply saves your changes. OK saves your changes and displays the previous page.
To exit without saving, select another page or click Cancel to display the previous page.

COMMPILOT WEB PORTAL USER GUIDE Access Point, Inc. PAGE 124 OF 144
Messaging
8.6.2 Configure Advanced Settings for Voice Management
Use this procedure to configure advanced voice management settings. You can perform this procedure only if you have access to the (Advanced Settings [Also saves current screen data]) hyperlink. See your group administrator for access to this hyperlink.
Figure 129 Voice Management – Management Advanced Settings
1) On the User – Messaging menu page, click Voice Management. The User –
Management page appears.
2) Click the (Advanced Settings [Also saves current screen data]) link. The User – Management Advanced Settings screen appears.
3) If you want to use a personal server for your messages, go to step 8 of this procedure. Otherwise, click the Group’s Mail Server.
4) Type your e-mail address.
5) Type your user ID for the group mail server.
6) Type your password for the group mail server.
7) Go to step 14 of this procedure.
8) If you want to use a personal server for your messages, click a Personal Mail Server.
9) Type the IP address or the fully qualified name of the mail server hosting the e-mail account for your voice messages.
10) From the drop-down list, select the protocol that must be used to connect to the account, either “POP3” or “IMAP”.

COMMPILOT WEB PORTAL USER GUIDE Access Point, Inc. PAGE 125 OF 144
Messaging
11) Select Delete all messages marked for deletion when using IMAP to permanently delete all messages marked for deletion.
12) Type your e-mail address.
13) Type your user ID for the personal mail server.
14) Type your password for the personal mail server.
15) Save your changes. Click Apply or OK. Apply saves your changes. OK saves your changes and displays the previous page.
To exit without saving, select another page or click Cancel to display the previous page.
8.7 Third-Party MWI Control
Use this menu item on the User – Messaging menu page to use third-party MWI control.
The Third Party MWI Control service allows you to receive a message waiting indicator (MWI) to alert you of messages waiting on a third-party voice mail system. When you redirect incoming calls encountering a busy or no answer condition to a third-party voice mail system, this service gives you an MWI when messages are deposited on this mail system. The MWI can be a stuttered dial tone or, on some phones, a light on your phone. The MWI is deactivated when you retrieve your messages.
8.7.1 Use Third-Party MWI Control
Use this procedure to receive a message from other network elements to allow your Message Waiting Indicator (MWI) to work on your phone.
Figure 130 Messaging – Third-Party MWI Control
1) On the User – Messaging menu page, click Third-Party MWI Control. The User – Third-
Party MWI Control page appears, showing information about the Third-Party MWI Control service.
2) To display the previous page, click OK. The User – Messaging menu page appears.
8.8 Third-Party Voice Mail Support
Use this menu item on the User – Messaging menu page to configure a third-party voice mail system.

COMMPILOT WEB PORTAL USER GUIDE Access Point, Inc. PAGE 126 OF 144
Messaging
Third-Party Voice Mail Support allows you to use an external voice mail system to handle your voice messages.
8.8.1 Configure a Third-Party Voice Mail System
Use this procedure to configure a third-party voice mail system to handle your voice messages.
Figure 131 Messaging – Third-Party Voice Mail Support
1) On the User – Messaging menu page, click Third-Party Voice Mail Support. The User –
Third-Party Voice Mail Support page appears.
2) To activate third-party voice mail support, click “On”. Click “Off” to deactivate this service.
3) If you activated this service and want to send your busy calls to the third-party voice mail system, check the Send Busy Calls to Voice Mail box.
4) If you activated this service and want to send your unanswered calls to the third-party voice mail system, check the Send Unanswered Calls to Voice Mail box.
5) For Number of rings before greeting, select the number of rings before the voice mail greeting is played.
6) Save your changes. Click Apply or OK. Apply saves your changes. OK saves your changes and displays the previous page.
To exit without saving, select another page or click Cancel to display the previous page.
8.9 Voice Portal Calling
Use this menu item on the Messaging – Incoming Calls page to turn Voice Portal Calling on or off. The Voice Portal Calling service allows you to make a call from a phone as if you were calling from your desk phone. To access the Make Call option from the Voice Portal Calling menu, turn Voice Portal Calling on.
8.9.1 Turn Voice Portal Calling On or Off
Use this procedure to enable or disable Voice Portal Calling.

COMMPILOT WEB PORTAL USER GUIDE Access Point, Inc. PAGE 127 OF 144
Service Scripts
Figure 132 Messaging – Voice Portal Calling
1) On the User – Messaging menu page, click Voice Portal Calling. The User – Voice
Portal Calling page appears.
2) To enable Voice Portal Calling, click “On”. To disable it, click “Off”. When Voice Portal Calling is on, you can make calls from the Voice Portal menu from the Make Call option.
3) Save your changes. Click Apply or OK. Apply saves your changes. OK saves your changes and displays the previous page.
To exit without saving, select another page or click Cancel to display the previous page.

COMMPILOT WEB PORTAL USER GUIDE Access Point, Inc. PAGE 128 OF 144
Service Scripts
9 Service Scripts
Use the User – Service Scripts menu page to configure and load Call Processing Language (CPL) scripts and view the CPL logs.
CPL scripts are custom-written scripts for specialized call control. For example, a law firm may want to customize Call Notify to trigger an e-mail notification to the billing department for every incoming call. This could be accomplished using a CPL script. BroadSoft, certified third-party developers, certified group administrators, or service providers develop CPL scripts.
Figure 134 User – Service Scripts
The User – Service Scripts – Basic menu displays the items that all users can use including:
Configuration
Load
Logs
9.1 Access Service Scripts Menu
To access the User – Service Scripts menu page, click Service Scripts in the Options list.
9.2 Configuration
Use this menu item on the User – Service Scripts menu page to enable or disable a CPL script that has already been loaded.
NOTE: A Service Script you enable at the user level takes precedence over one enabled at the group level.
9.2.1 Enable or Disable CPL Scripts
Use this procedure to enable or disable a CPL script for specialized call control.

COMMPILOT WEB PORTAL USER GUIDE Access Point, Inc. PAGE 129 OF 144
Service Scripts
Figure 135 Service Scripts – Configuration
1) On the User – Service Scripts menu page, click Configuration. The User – Configuration
page appears. When selected, the path of the script file displays with the .cpl extension in the Script Source box.
2) Click “Enabled” or “Disabled”. “Enabled” indicates the feature is on.
3) Save your changes. Click Apply or OK. Apply saves your changes. OK saves your changes and displays the previous page.
To exit without saving, select another page or click Cancel to display the previous page.
9.3 Load
Use this menu item on the User – Service Scripts menu page to load a CPL script.
The Load service allows you to load a CPL script for use in specialized call control.
9.3.1 Load a CPL Script
Use this procedure to load a CPL script.

COMMPILOT WEB PORTAL USER GUIDE Access Point, Inc. PAGE 130 OF 144
Service Scripts
Figure 136 Service Scripts – Load
1) On the User – Service Scripts menu page, click Load. The User – Load page appears.
2) If the script is in a file, type the path and file name in the File text box or click the Browse button to locate the file. If the file is located on a web server, type the address in the URL text box.
3) Click Apply to start loading. To exit without loading, click Cancel or select another page.
− “Saved” indicates the file loaded and parsed correctly. If the file does not parse, an error message is displayed indicating the line number and error type.
4) To display the previous page, click OK. The User – Service Scripts page appears.
9.4 Logs
Use this menu item on the User – Service Scripts menu page to view and clear the CPL log.
The Logs service allows you to examine the CPL log file.
9.4.1 View and Clear the CPL Log
Use this procedure to view the CPL log and clear the log, if you wish.

COMMPILOT WEB PORTAL USER GUIDE Access Point, Inc. PAGE 131 OF 144
Utilities
Figure 137 Service Scripts – Logs
1) On the User – Service Scripts menu page, click Logs. The User – Logs page appears,
showing the CPL log trail. The logs displayed in the Log trail box are the logs generated by and specified in the script.
2) If you want to clear the log trail, check Clear Logs.
3) Save your changes. Click Apply or OK. Apply saves your changes. OK saves your changes and displays the previous page.
4) To exit without saving, select another page or click Cancel to display the previous page.
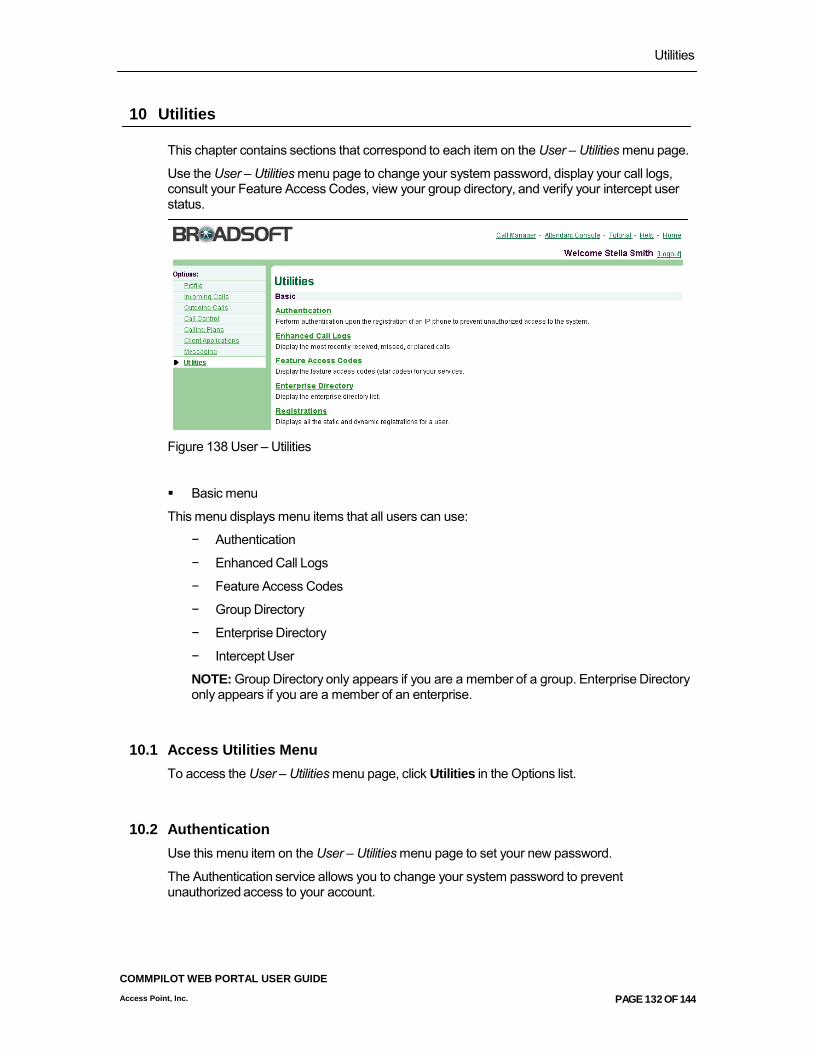
COMMPILOT WEB PORTAL USER GUIDE Access Point, Inc. PAGE 132 OF 144
Utilities
10 Utilities
This chapter contains sections that correspond to each item on the User – Utilities menu page.
Use the User – Utilities menu page to change your system password, display your call logs, consult your Feature Access Codes, view your group directory, and verify your intercept user status.
Figure 138 User – Utilities
Basic menu
This menu displays menu items that all users can use:
− Authentication
− Enhanced Call Logs
− Feature Access Codes
− Group Directory
− Enterprise Directory
− Intercept User
NOTE: Group Directory only appears if you are a member of a group. Enterprise Directory only appears if you are a member of an enterprise.
10.1 Access Utilities Menu
To access the User – Utilities menu page, click Utilities in the Options list.
10.2 Authentication
Use this menu item on the User – Utilities menu page to set your new password.
The Authentication service allows you to change your system password to prevent unauthorized access to your account.

COMMPILOT WEB PORTAL USER GUIDE Access Point, Inc. PAGE 133 OF 144
Utilities
10.2.1 Set Your New Password
Use this procedure to set your new system password. All text boxes are required.
Figure 139 Utilities – Authentication
1) On the User – Utilities menu page, click Authentication. The User – Authentication page
appears.
2) Type your Authentication User Name.
3) Type your current authentication password.
4) Type your new authentication password.
5) Confirm your new authentication password.
6) Save your changes. Click Apply or OK. Apply saves your changes. OK saves your changes and displays the previous page.
To exit without saving, select another page or click Cancel to display the previous page.
10.3 Feature Access Codes
Use this menu item on the User – Utilities menu page to view your feature access codes.
The Feature Access Codes service allows you to consult the list of star codes assigned to you. You can view, but not edit these codes.
10.3.1 View Your Feature Access Codes
Use this procedure to display your Feature Access Codes.

COMMPILOT WEB PORTAL USER GUIDE Access Point, Inc. PAGE 134 OF 144
Utilities
Figure 143 Utilities – Feature Access Codes
1) On the User – Utilities menu page, click Feature Access Codes. The User – Feature
Access Codes page appears, showing your star codes. The following table describes the Feature Access Codes.
Code Name Description
#8 Automatic Callback
Terminates all current Automatic Callback sessions.
Automatic Callback retries a busy line automatically, with

COMMPILOT WEB PORTAL USER GUIDE Access Point, Inc. PAGE 135 OF 144
Utilities
Deactivation notification as soon as the called party is free. The called party must be in the same group as you.
*72 Call Forwarding Always Activation
Redirects your incoming phone calls to another number, such as a mobile phone or administrative assistant. After dialing the feature access code, dial the phone number where you want your calls to be redirected.
*73 Call Forwarding Always Deactivation
Terminates the Call Forwarding Always service. Upon deactivation, your calls ring on your phone unless you have set up another service such as Call Forwarding Busy, Call Forwarding No Answer, or Do Not Disturb.
*21 Call Forwarding Always to Voice Mail Activation
Redirects incoming phone calls to your voice mail.
#21 Call Forwarding Always to Voice Mail Deactivation
Terminates the Call Forwarding Always To Voice Mail service. Upon deactivation, your calls ring on your phone unless you have set up another service such as Call Forwarding Busy, Call Forwarding Busy To Voice Mail, Call Forwarding No Answer, or Do Not Disturb.
*90 Call Forwarding Busy Activation
Redirects incoming phone calls to another number, such as a mobile phone or administrative assistant, when you are on the phone. After dialing the feature access code, dial the phone number where you want your calls to be redirected.
*91 Call Forwarding Busy Deactivation
Terminates the Call Forwarding Busy service. Upon deactivation, your calls ring on your phone unless you have set up another service such as Call Forwarding Always, Call Forwarding No Answer, or Call Management – Do Not Disturb.
*40 Call Forwarding Busy To Voice Mail Activation
Redirects incoming phone calls to your voice mail when you are on the phone.
#40 Call Forwarding Busy To Voice Mail Deactivation
Terminates the Call Forwarding Busy To Voice Mail service. Upon deactivation, your calls ring on your phone unless you have set up another service such as Call Forwarding Always, Call Forwarding Always To Voice Mail, Call Forwarding No Answer, or Call Management – Do Not Disturb.
*92 Call Forwarding No Answer Activation
Redirects your incoming phone calls to another number, such as a mobile phone or administrative assistant, when you do not answer your phone. After dialing the feature access code, dial the phone number where you want your calls to be redirected.
*93 Call Forwarding No Answer Deactivation
Terminates the Call Forwarding No Answer service. Upon deactivation, your calls ring on your phone unless you have set up another service such as Call Forwarding Busy, Call Forwarding Always, or Do Not Disturb.
*41 Call Forwarding No Answer To Voice Mail Activation
Redirects incoming phone calls to your voice mail when you do not answer their phone.

COMMPILOT WEB PORTAL USER GUIDE Access Point, Inc. PAGE 136 OF 144
Utilities
#41 Call Forwarding No Answer To Voice Mail Deactivation
Terminates the Call Forwarding Busy To Voice Mail service. Upon deactivation, your calls ring on your phone unless you have set up another service such as Call Forwarding Busy, Call Forwarding Busy To Voice Mail, Call Forwarding Busy, or Call Management – Do Not Disturb.
*31 Calling Line ID Delivery Blocking Persistent Activation
Prevents display of your calling line ID for all calls.
#31 Calling Line ID Delivery Blocking Persistent Deactivation
Displays your calling line ID for all calls.
*67 Calling Line ID Delivery Blocking per Call
Hides your calling line ID on a per call basis. Before placing a call, dial the feature access code; then place your call as usual. Note that this service is only active for one phone call.
*65 Calling Line ID Delivery per Call
Overrides the Calling Line ID Delivery Blocking Persistent setting for one call.
*68 Call Park Places a call on hold with the intent of retrieving it from another extension. The call can be parked on your own extension or another within your group.
*88 Call Park Retrieve Retrieves a call that has been parked.
*98 Call Pickup Picks up a call within your assigned group. You cannot pick up calls outside your business group. The extensions within your business group can be viewed on the CommPilot Call Manager in your Group list. The Call Pickup group to which you belong is determined by the group administrator and may or may not consist of those members listed in your Group phone list. When you dial the Call Pickup code, you answer the ringing phone in your group. If more than one phone is ringing, you answer the phone that has been ringing the longest.
*69 Call Return Returns a call to the phone number of the last call you received. You are allowed to return only calls to numbers that are acceptable according to your Outgoing Calling Plan.
*43 Call Waiting Persistent Activation
Turns on Call Waiting for all calls you place.
#43 Call Waiting Persistent Deactivation
Turns off Call Waiting for the next and all subsequent calls you place.
*70 Cancel Call Waiting
Turns off the Call Waiting service for the next call you place.
*99 Clear Voice Message Waiting Indicator
Clears the audible (and visible for some devices) message waiting indicator on your phone.
*57 Customer Places a trace on the last number that called you.

COMMPILOT WEB PORTAL USER GUIDE Access Point, Inc. PAGE 137 OF 144
Utilities
Originated Trace
*97 Directed Call Pickup
Picks up a call at a specific extension within your assigned group. The extensions within your business group can be viewed on the CommPilot Call Manager in your Group list. The Call Pickup group to which you belong is determined by the group administrator and may or may not consist of those members listed in your Group phone list. When you dial the Directed Call Pickup code followed by the extension, you answer the ringing call at that extension.
*33 Directed Call Pick- up with Barge-in
Dials an allowed prefix, followed by the assigned code and an extension to either pick up a ringing call in your group or to join an ongoing call with someone in your group.
*55 Directed Voice Mail Transfer
Transfers a caller on hold to your voice mail.
*80 Diversion Inhibitor Allows a user to prevent redirection services from being activated on the terminating side of an unanswered call.
*78 Do Not Disturb Activation
Activates the Do Not Disturb service. When Do Not Disturb is active, your phone does not ring and all calls go directly to "busy treatment", such as Voice Messaging.
*79 Do Not Disturb Deactivation
Turns off the Do Not Disturb service.
*22 Flash Call Hold Places a call on hold with the flash-hook to place another call. You can toggle between the two calls by pressing the flash- hook.
*66 Last Number Redial
Dials the most recently dialed phone number called from your extension.
*60 Music On Hold Per-Call Deactivation
Deactivates the Music On Hold service for the current calls.
*610 No Answer Timer Sets the numbers of rings before No-Answer handling is applied to the Voice Messaging, Third-Party Voice Mail Support, Call Forwarding No Answer, Call Forwarding No Answer To Voice Mail, and Sequential Ringing services.
*71 Per Call Account Code
Charges a call to an account code assigned to you.
*50 Push to Talk Provides an intercom-like functionality where you can call another party and be instantly connected.
*75 Speed Dial 100 Calls the two-digit speed dial number of the party you want to call.
*74 Speed Dial 8 Calls the two to nine-digit speed dial number of the party you want to call.
*47 Sustained Authorization Code Activation (calls unlocking)
Unlocks your calls.

COMMPILOT WEB PORTAL USER GUIDE Access Point, Inc. PAGE 138 OF 144
Utilities
*37 Sustained Authorization Code Deactivation (calls locking)
Locks your calls.
*62 Voice Portal Access
Allows you to access your Voice Portal.
2) To display the previous page, click OK. The User – Utilities menu page appears.
10.4 Group Directory
Use this menu item on the User – Utilities menu page to:
View the Group Directory
View or Print a Summary of the Group Directory
View or Print a Phone List
The Group Directory service allows you to display your group directory and view or print either a summary of detailed phone list.
10.4.1 View the Group Directory
The User – Group Directory page is a list page that contains an advanced search. The Yahoo ID, Name, Phone Number, Extension, Mobile, E-mail Address, and Department appear for each user in the Group. Depending on the number of pages of data in a list, list pages allow you to present the data several different ways. You can click the headings of a column to change the sort order of items in the column, use the input boxes below the data to specify search criteria, or click the page links, for example, Next or Previous. The advanced search lets you define specific search criteria to narrow your search and display a manageable list. For more information on defining search criteria, see the BroadWorks Getting Started Web Interface Administration Guide.
Use this procedure to display your Group Directory.
Figure 144 Utilities – Group Directory
1) On the User – Utilities menu page, click Group Directory. The User –Group Directory
page displays your group directory.

COMMPILOT WEB PORTAL USER GUIDE Access Point, Inc. PAGE 139 OF 144
Utilities
The items displayed on the Group Directory page are described below.
Item Description
Yahoo ID Displays the Yahoo ID of the person in the group.
Name Displays the name of the person in the group.
Phone Number Displays the phone number of the person in the group.
Extension Displays the phone extension of the person in the group.
Mobile Displays the mobile phone number of the person in the group.
E-mail Address Displays the e-mail address of the person in the group
Department Displays the department of the person in the group.
2) To display the previous page, click OK. The User – Utilities menu page appears.
10.4.2 View or Print a Summary of the Group Directory
Use this procedure to display or print your Group Directory.
Figure 145 Utilities – Group Directory Summary
1) On the User – Utilities menu page, click Group Directory. The User –Group Directory
page displays your group directory.
2) Click Group Directory Summary. The Group Directory Summary displays a group phone list in summary form.
The items displayed on the Group Directory Summary page are described below.
Item Description
Name Displays the name of the person in the Group.

COMMPILOT WEB PORTAL USER GUIDE Access Point, Inc. PAGE 140 OF 144
Utilities
Phone Displays the phone number of the person in the Group.
Extension Displays the phone extension of the person in the Group.
Mobile Displays the mobile phone number of the person in the Group.
E-mail Displays the e-mail address of the person in the Group.
Dept Displays the department of the person in the Group.
3) To display the previous page, click x in the right-hand corner of the page. The User –
Group Directory page appears.
10.4.3 View or Print a Phone List
Use this procedure to display or print your Group Directory Detail Phone List.
Figure 146 Utilities – Group Directory Detail
1) On the User – Utilities menu page, click Group Directory. The User –Group Directory
page displays your group directory.
2) Click Group Directory Detail. The Group Directory Detail displays a group phone list in detail. The name, department, and phone number of each group member appear.
3) To display the previous page, click x in the right-hand corner of the page. The User – Group Directory page appears.

COMMPILOT WEB PORTAL USER GUIDE Access Point, Inc. PAGE 141 OF 144
Utilities
10.5 Enterprise Directory
Use this menu item on the User – Utilities menu page to:
View the Enterprise Directory
View or Print a Summary of the Enterprise Directory
View or Print a Phone List
The Enterprise Directory service allows you to display your enterprise directory and view or print either a summary of the enterprise directory or a detailed phone list.
10.5.1 View the Enterprise Directory
The User – Enterprise Directory page is a list page that contains an advanced search. The Name, Phone Number, Extension, Mobile, E-mail Address, Group, and Department appear for each user in the Enterprise. Depending on the number of pages of data in a list, list pages allow you to present the data several different ways. You can click the headings of a column to change the sort order of items in the column, use the input boxes below the data to specify search criteria, or click the page links, for example, Next or Previous. The advanced search lets you define specific search criteria to narrow your search and display a manageable list. For more information on defining search criteria, see the BroadWorks Getting Started Web Interface Administration Guide.
Use this procedure to display your Enterprise Directory.
Figure 147 Utilities – Enterprise Directory
1) On the User – Utilities menu page, click Enterprise Directory. The User –Enterprise
Directory page displays your enterprise directory.
The items displayed on the Enterprise Directory page are described below.
Item Description
Name Displays the name of the person in the Enterprise.
Phone Number Displays the phone number of the person in the Enterprise.
Extension Displays the phone extension of the person in the Enterprise.
Mobile Displays the mobile phone number of the person in the Enterprise.
E-mail Address Displays the e-mail address of the person in the Enterprise.
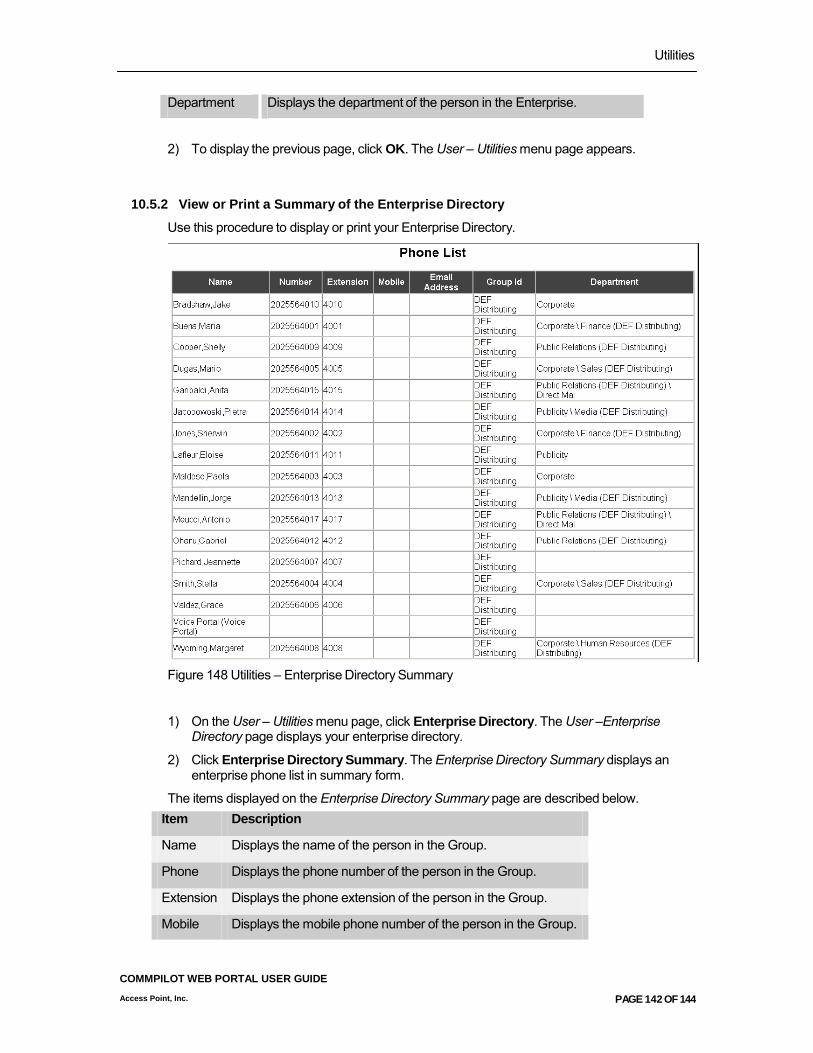
COMMPILOT WEB PORTAL USER GUIDE Access Point, Inc. PAGE 142 OF 144
Utilities
Department Displays the department of the person in the Enterprise.
2) To display the previous page, click OK. The User – Utilities menu page appears.
10.5.2 View or Print a Summary of the Enterprise Directory
Use this procedure to display or print your Enterprise Directory.
Figure 148 Utilities – Enterprise Directory Summary
1) On the User – Utilities menu page, click Enterprise Directory. The User –Enterprise
Directory page displays your enterprise directory.
2) Click Enterprise Directory Summary. The Enterprise Directory Summary displays an enterprise phone list in summary form.
The items displayed on the Enterprise Directory Summary page are described below.
Item Description
Name Displays the name of the person in the Group.
Phone Displays the phone number of the person in the Group.
Extension Displays the phone extension of the person in the Group.
Mobile Displays the mobile phone number of the person in the Group.

COMMPILOT WEB PORTAL USER GUIDE Access Point, Inc. PAGE 143 OF 144
Utilities
E-mail Displays the e-mail address of the person in the Group.
Dept Displays the department of the person in the Group.
3) To display the previous page, click x in the right-hand corner of the page. The User –
Enterprise Directory page appears.
10.5.3 View or Print a Phone List
Use this procedure to display or print your Enterprise Directory Detail Phone List.
Figure 149 Utilities – Enterprise Directory Detail
1) On the User – Utilities menu page, click Enterprise Directory. The User –Enterprise
Directory page displays your enterprise directory.
2) Click Enterprise Directory Detail. The Enterprise Directory Detail displays a group phone list in detail. The name, department, and phone number of each enterprise member appears.
3) To display the previous page, click x in the right-hand corner of the page. The User – Enterprise Directory page appears.
10.6 Intercept User
Use this menu item on the User – Utilities menu page to view intercept user status.
The Intercept User service allows you to verify if your service has been intercepted. If the service is on, calls to your number are intercepted. The caller hears a message indicating "Out of service”.

COMMPILOT WEB PORTAL USER GUIDE Access Point, Inc. PAGE 144 OF 144
If your calls are being directed to another number through messaging or when the caller presses '0', that choice is indicated in the Enabled column and a phone number appears in the Data column.
10.6.1 View Intercept User Status
Use this procedure to verify if your service has been intercepted.
Figure 150 Utilities – Intercept User
1) On the User – Utilities menu page, click Intercept User. The User – Intercept User page
appears, showing your intercept user status.
2) To display the previous page, click OK. The User – Utilities menu page appears.