Embed Size (px)
Citation preview

Key Voice” 1Voice Processing
DEBUT ANDLITE SYSTEM
ANDSUPERVISORGUIDE 1


8 LITE SYSTEM INSTALLATION AND SUPERVISOR GUIDE 9.0 VER. 1
1. System OverviewThis document discusses features and functionality provided in Small Office LitelM and DebuPsystems. Note that both these systems include the same feature set, and the system setup andmaintenance procedures are identical between systems. For documentation ease, these twosystems are collectively referred to as the Life system in this guide.
1.1 What Does the Lite System Do?
In its simplest form, the Lite system acts like a telephone receptionist. The system answersincoming calls and transfers them to the appropriate extension. If the called extension is notavailable (busy or no answer), the system offers to take a message or try an alternativeextension.
Lite system functionality includes:
l Automated attendant featuresl Voice mail features
These two functions work together to provide smooth call coverage for your application.
1.1.1 What is an Automated Attendant?
The Lite system automated attendant features perform the tasks of a live attendant. Thefollowing table illustrates how.
Answers an incoming call by lifting telephone. Answers an incoming call by going “off-hook.”
Greets the caller with “Welcome to FYZ Greets the caller by playing a pre-recordedCompany]. I’ greeting, “Welcome to /XYZ Company].”
1

8 LITE SYSTEM INSTALLATION AND SUPERVISOR GUIDE 9.0 VER. 1
2. System Setup Instructions..+ :.,
‘_ ,.
..*
The Lite system contains a default database with a setup configuration that allows the Litesystem to efficiently perform fundamental call processing tasks with minimal systemadjustments by the installing technician. This default database configuration includes 2 pre-defined classes of service (0 and 7), 1 supervisor mailbox (mailbox 70), and 3 Routingboxes--800, 801, 821. Information provided in this document explain how these pre-set .defaults function on the Lite system.
As you proceed through these setup instructions, you may decide to make adjustments tospecific information relating to the default setup. You may even decide to set up the other 2available Routing boxes to perform additional call routing tasks. As you make any changes,keep in mind that we urge YOU to maintain the initial general configuration of Routing boxes800, 80 1. and 821, class of service 7, and supervisor mailbox 70. This configuration allowsthe Lite system to efficiently perform fundamental call processing tasks. Maintaining it helpsboth you, the technician, and Lite system technical support to efficiently se’rvice the systemand resolve any call processing issues. For these reasons we urge you not to deviate from thisgeneral system setup default configuration.
Information on setting up and using box types other than Routing boxes and mailboxes isprovided in the Installation and Maintenance Manual,
Note: Section 2.6 provides an overview of the default database setup shipped onLite system units.
2.1 Available System Setup Techniques
There are two techniques you can use to set up Lite systems:. ._I up
l Attach a laptop to the Lite system unit and use the program’s screen interface to run theSystem PBX Setup utility then complete System Information and Box Setup screens

@j LITE SYSTEM INSTALLATION AND SUPERVISOR GUIDE 9.0 VER. 1
l Call into the Lite system and use the Teleparameter feature to run the System PBX Setuputility then enter parameter codes and corresponding values to set up system and boxinformation
<.rThis document provides instructions for using either system setup technique.
.L&i :
Technicians who have experience setting up Corporate Office, Small Office, or Lite systemsmay prefer to use the Teleparameter feature to quickly make modifications and get the Litesystem up and running at the customer’s site. Be advised, however, that since this techniqueinvolves inputting codes that represent system parameters and corresponding values to whichparameters are to be set, it is a bit more difficult to use effectively if you are unfamiliar withsetting up Corporate Office, Small Office, or Lite systems. For this reason, we recommendthat technicians unfamiliar with Corporate Office, Small Off-ice, or Lite systems attach alaptop to the PC and use the instructions provided here to complete all necessary system setupsteps through the screen interface.
Note : If you choose to set up the system using the Teleparameter feature, be sureto first review section 2.5.6.2 and 2.6 so you clearly understand the setup ofthe default database included on the Lite system unit.
Note that if you choose to initially set up the system by connecting it to a laptop and using thescreen interface, you can later make additional modifications by simply calling into the Litesystem and using options on the Supervisor menu (see section 3) or using the Teleparametelfeature (see section 2.7.2).
2.2 Preparing for System Setup
To install, set up, and maintain a Lite system voice processing system, you need thefollowing equipment:
Equipment Needed
l Lite system unit
l Portable diskette driveShould an unusual situation arise, it may be necessary for you to service the Lite .
,. -
6 .>

ti LITE SYSTEM INSTALLATION AND SUPERVISOR GUIDE 9.0 VER. 1
system by attaching a portable diskette drive to the Lite system unit. Therefore, westrongly recommended that technicians servicing Lite system units have access to aportable diskette drive.
l Authorization key (Small Office Lite systems only)The Small Office Lite system runs only if the mtl7orizntion key is attached to thePC’s parallel port. This key is shipped in the packaging with the Lite system unit.To attach the authorization key, simply plug the key into the parallel port in the backof the PC. (Debut units do not require an authorization key.)
Authorization Key
If you choose to set up the system by connecting a laptop to the Lite system unit, you needthe following additioual equipment:
0 Laptop computer
l Null modem serial cable
l KeyLink communications software (provided with the Lite system)
::,. . ... . .. .
This additional equipment is necessary because the Lite system does not have a keyboard andmonitor. To set up the system using a laptop, you must use a null modem serial cable toattach the laptop PC to the Lite system unit. So that the laptop computer can communicatewith the Lite system unit, you must install KeyLink communication software, provided withthe Lite system, onto the laptop PC. The KeyLink installation procedure is provided in thisdocument.
7

i l , LITE SYSTEM INSTALLATION AND SUPERVISOR GUIDE 9 . 0 VER. 1
Once the system is set up and tested, the system supervisor on-site can maintain the day-to-day aspects of the system (adding, deleting, modifying mailboxes; modifying greetings andcall routing; etc.) by simply calling into the system using a telephone. No specialTeleparameter modification instructions or laptop computers are necessary for regular dailymaintenance of the Lite system.
2.3 Connecting the Lite System Unit to the TelephoneSvstem
The Lite system unit can be connected directly to local telephone lines, typically Centrexservice, or behind a Key System or PBX. (For simplicity, the term “PBX” is used herein tomean “PBX or Key System”).
2.3.1 Connecting Directly to the Central Office (C.O.)
The Lite system unit can be connected directly to the telephone lines as shown below.
L i n e 1
L i n e 2
Connecting the Lite System Directly to Telephone Lines
a

8 LITE S YSTEM I NSTALLATION AND S UPERVISOR G UIDE 9.0 VER. 1
Note that the modular input connectors on the voice boards are RJ-I 4 jacks which containtwo independent telephone lines. The modular adapter shown (or its equivalent) must beused if the telephone lines are terminated with RJ-1 1 (single line) jacks.
If you want the Lite system to be able to transfer calls, make sure the telephone line haseither the call-transfer or three-way calling feature. If you are unsure whether the lines havethese capabilities, contact the local telephone company.
Local C.O. lines connected to the Lite system should not have the call-waiting featureassigned. Once again, if in doubt, contact the local telephone company.
’
2.3.2 Connecting the Lite System to a PBX or Key System
The Lite system unit connects to PBX station ports (each line to the Lite system unit lookslike an extension to the PBX), as shown below. The Lite system thus functions as one or1more extensions on the PBX.
Radio ShackL i n e 1
Line 2
Voice processing board
L i n e n
Normal PBX extensions
CentralOffice
Connecting the Lite System Behind a Key System or PBX
Note that the modular input connectors on the voice boards are RJ-14 jacks, which containtwo independent telephone lines. The modular adapter shown (or its equivalent) must beused if the PBX extensions are terminated with RJ-1 1 (single line) jacks.
..-9

8 LITE SYSTEM INSTALLATION AND SUPERVISOR GUIDE 9 . 0 VER. 1
Each line to the Lite system unit requires an industry-standard-telephone port on the PBX(this is also known by other names such as analogport, 2500 set interjbce, SLTport.). Sometelephone systems do not provide single-line-telephone ports, and they require a specialanalog interface box between the PBX and the voice-mail system, as shown below. If indoubt, contact the local PBX manufacturer’s representative.
number 279-402
ce-processing board
Normal PBX extensions
L i n e 1
L i n e 2
C e n t r a lO f f i ce
L i n e n
Connecting the Lite System to a PBX via External Analog Telephone Interface (ATI) Equipment
Connecting the Serial Cable Between the Lite System Unit and PBX
If you are establishing a serial integration, you must attach a serial cable between the Litesystem unit and the PBX. The Lite system unit is set up to use the COM I port tocommunicate with the phone system. Therefore, you should connect the serial cable to theLite system unit’s COM 1 port.
Consult the phone system documentation for instructions on attaching the serial cable to thephone system COM port.
Note: If the phone system you are working with is a Comdial DSU (Impression 24,48, 72), attach the serial cable to COM 1 on the DSU. If the phone system isa DSUII (Impact 24, 48, 72), attach the serial cable to COM 3 on the DSUII.
,. -

8 LITESYSTEMINSTALLATIONANDSUPERVISORGUIDE~.~ VER. 1
Typical Setup
. :
For typical automated attendant service, the PBX is programmed so that incoming calls arerouted via the PBX to ring the Lite system. The Lite system answers the call and asks thecaller to enter the required extension (or mailbox) number. The caller enters the number, andthe Lite system transfers the call just as a live attendant would.
2.4 Collecting Necessary Customer Information
While setting up the Lite system, you may need to adjust default settings for the customer’sregular business open hours and business closed hours. You also need to set up Routingboxes to handle incoming calls and set up mailboxes for subscribers who will be using thesystem. The following worksheets are provided to help the installing technician collect thisinformation from the system supervisor.
11

8 LITE SYSTEM INSTALLATION AND SUPERVISOR GUIDE 9.0 VER. 1
__ ,::_1’..:
Subscriber Ma ilbox Information Worksheet(System Supervisor Comp etes)
Photocopy this page, then complete the form for each subscriber who is to have a mailbox.
Subscriber Data
First name:
Last name:
Ex tens ion number :
Shou ld the sys tem announcethe caller’s name to thesubscr iber upon t rans fe r?
Should all conversations berecorded?
Paging Data
Pager number
Pager type (circle one)
Paging schedule (circle one)
(complete only if subscriber is to use the feature)
T O N E DIGITAL
Auto Message Forward andMessage Delivery Data
A lways During office open hours Dur ing c losed hoursSchedule*: A B C D
(complete only if subscriber is to use these features)
Auto forward new messages: To box:
Auto fo rward new messagesschedule (circle one):
A lways During office open hours Dur ing c losed hoursSchedule*: A B C D
Message delivery schedule 1: Number to call:
When shou ld de l ivery beactive? (circle one):
A lways During ofke open hours Dur ing c losed hoursSchedule*: A B C D
After h o u r s
Continued on back
1 5

ti LITE SYSTEM INSTALLATION AND SUPERVISOR GUIDE 9.0 VER. 1
Message delivery schedule 2:
When shou ld de l ivery beactive? (circle one):
Message delivery schedule 3:
When shou ld de l ivery beactive? (circle one):
Message delivery schedule 4:
When shou ld de l ivery beactive? (circle one):
Message delivery schedule 5:
When shou ld de l ivery beac t i ve?(circle one):
Number to call:
A lways During office open hours Dur ing c losed hoursSchedule*: A B C D
Number to call:
A lways During office open hours Dur ing c losed hoursSchedule*: A B C D
Number to call:
A lways During office open hours Dur ing c losed hoursSchedule*: A B C D
Number to call:
A lways During office open hours During closed hoursSchedule*: A B C D
*If specifying a particular schedule, complete a subscriber schedule worksheet for theindividual.
1 6 .:

.ci‘, LITE SYSTEM INSTALLATION AND SUPERVISOR GUIDE 9.0 VER. 1
Subscriber Schedule Worksheet(System Supervisor Completes)
Photocopy this page, then complete the form for each subscriber who is using the Paging,Auto Message Forwarding, or Message Delivery out-calling features according to a particularschedule, as indicated on his/her Subscriber Mailbox Information sheet.
You can designate up to 4 different schedules below, then apply one schedule to each out-calling feature the subscriber will be using. Enter information for 1 to 4 schedules below in24-hour format (for example S:OO PM is 20:OO). You do not need to complete the BOXNUMBER field.
HAIL B O X Page 3
'ox number: First Name: Last:
SCHEDULE 19 Start End SCHEDULE B Start EndSUN : - - S u n : - -
M o n : Hon: - -T u e : Tue: __ ___W e d : Wed: - -Thu: Thu: __ -F r i : Fri: ~Sat: S a t :
SCHEDULE C Start End SCHEDULE D Start EndS u n : - _ _ _ S u n : - -Non: - Hon : - -T u e : Tue:W e d : Wed: - -Thu: Thu: __F r i : Fri: __ ___S a t : S a t :
1 7

.~:;~,. . _I
ti LIE SYSTEM INSTALLATION AND SUPERVISOR GUIDE 9.0 VER. 1
Routing Worksheet (System Supervisor Completes)
Refer to section 3.2 to familiarize yourself with the function of Routing boxes. This sectionalso provides a sample of greetings that are typically recorded in the 3 Routing boxes pre-configured on the Lite system. After reviewing this information, complete this worksheet toindicate the wording for the greetings you want this Lite system to voice.
Note that you should indicate in your greeting any single-digit call routing options you want ’to provide to callers (I‘... Press 2for Sales... “) and identify the extension to which a callerpressing that single-digit number should be transferred.
Office Open Greeting:
Single digit routing paths:
Office Closed Greeting:
Single digit routing paths:
‘, I
Continued on back- -
1 9

ilr LITE SYSTEM INSTALLATION AND SUPERVISOR GUIDE 9.0 VER. 1
Office Holiday Greeting:
Single digit routing paths:
20

.$b LITE SYSTEM INSTALLATION AND SUPERVISOR GUIDE 9.0 VER. 1
2.5 Setting Up the System by Attaching a Laptop
Use the information in this section to complete all necessary system setup steps by attaching alaptop computer to the Lite system unit and using the Lite system’s screen interface to run thePBX Setup utility and to complete System Information and Box Setup screens.
2.51 Installing KeyLink Software onto the Laptop
I. Insert the KeyLink diskette into the diskette drive on the laptop computer. Change to thediskette drive by typing A: then pressing <Enter> (where A is the drive letter for thediskette drive).
2 . To start the installation process, type INSTALL then press <Enter>. The KeyLinkremote system communication program creates the \KEYLINK directory on the laptop’shard drive, then copies the KeyLink remote system communication program to thatdirectory. (The KeyLink host system communication program is pre-loaded on the Litesystem.)
3 . When all the necessary files have been copied to the \KEYLINK directory, a messagedisplays indicating the installation is complete.
2.52 Connecting the Laptop to the Lite System Unit
You connect the Lite system unit to the laptop computer using a null modem serial cable.
::c :‘_
When you install KeyLink software on the laptop computer, the program defaults to using theCOM 1 port on the laptop. Therefore, unless you change this default, you should connect oneend of the null modem serial cable to the laptop’s COM 1 port. Attach the other end of nullmodem cable to the COM 2 port if you are using the Small Office Lite system unit or theCOM 1 port if you are using the Debut system.
Establishing a Communication Link Between the Laptop and Lite System Unit:
1 . To access the Lite system program screens from the laptop PC, change to the \KEYLINKdirectory, then type REMOTE and press <Enter>.
..-21

8 LITE SYSTEM INSTALLATION AND SUPERVISOR GUIDE 9.0 VER. 1
2. A screen displays, prompting you to indicate the type of connection you are establishing.To indicate you are using a null modem cable connection, typeN then press <Enter>.
3 . The screen refreshes with a display that emulates the Lite system unit. The keyboard and :monitor of the laptop now effectively control the Lite systein unit.
.,‘_
Note: If the screen displays a message indicating the program is shutting downcommunications, you may need to adjust the COM port settings specified inthe KeyLink program. Do this by repeating step 1, then typing P to selectPort Assignments (instead of N) in step 2. Using, the up and down arrows,select the COM port to which the null modem cable is installed, then press<Enter>. Repeat steps 2 and 3.
If the appropriate COM port combination is specified, and you still cannotestablish communication with the Lite system unit, verify that you are using atrue null modem cable. Because it is difficult to visually distinguish nullmodem cables from other serial cables, some users mistakenly use thewrong cable type.
4 . Follow the procedures in this document to set up the Lite system.
Note: If you type EDIT to invoke a DOS editor on the Lite system unit, you willinvoke a special editor pre-installed on the unit. This editor was developedspecifically for use with a null modem cable. (Traditional DOS editorscannot communicate effectively over a null modem cable.)
5 . To break the connection between the laptop and Lite system unit, press <Ctrl>-<Break>.The KeyLink program ends its communication with the Lite system unit, and the laptopscreen refreshes. To re-establish communication with the Lite system, repeat step I,
Note: For information on transferring files between the Lite system and theattached PC, refer to section 10 of the Installation and Maintenance Manualor contact Key Voice technical support.

ti LITE SYSTEM INSTALLATION AND SUPERVISOR GUIDE 9.0 VER. 1
2.5.3 Completing the First Time Setup Procedure
Once you connect the Lite system to the phone system and access the Lite system using alaptop computer, you are ready to begin customizing the system. Customizing the systeminvolves:
l Running the PBX Setup utility0 Specifying System Informationl Specifying Routing Box and Mailbox Information
2.5.4 Running the PBX Setup Utility
The Lite system voice processing software is pre-installed on the Lite system unit before it isshipped to you. You must, however, run the PBX Setup utility so you can configure certaininstallation parameters for each specific customer’s site. * - .
On Debut units, you must run the PBX Setup utility using the teleparameter feature. Seesection 2.7.1 and section 2.7.1.1 for procedures. Once you run the utility, continue withsection 2.5.5 for information on specifying system information.
On Small Office Lite systems you can run the PBX Setup utility through the screen interfaceor using the teleparameter feature discussed in section 2.7. I . To run the utility through thescreen interface, use the following procedure.
1 . Make the Lite system unit hard disk the current drive, by typing C : then pressing<Enter>.
2 . To switch to the VM directory, type CD\V?zI then press <Enter>.
3 . To invoke the Install program, type INSTALL then press <Enter>.
4 . When the main Install menu displays, use the 1 key to highlight FIRST TIME SETUP thenpress <Enter>.
5 . When prompted, type C : \VM then press <Enter> to indicate the directory in which theLite system is installed.
2 3

i‘, LITESYSTEMINSTALLATIONANDSUPERVISORGUIDE~.~ VER. 1
6 . The system warns that it may over-write some changes to the Lite system database. Tocontinue, press <Y>.
7 . At the system prompt for the number of digits in the extension numbers, enter theappropriate number, then press <Enter>. At the.system prompt to confirm your entry,press <Enter>.
8 . A list of telephone systems displays. Note that you can use the <PgUp> and <PgDn>keys to scroll through all available selections. Enter the number corresponding to the .telephone system with which you are working, then press <Enter>. If the phone systemis not on the list, select option 0 DON’T KNOW (OR UNLISTED) then press <Enter>.
9 . The system prompts you to confirm your selection. To continue, press <Y>.
10. At the system prompt regarding message waiting lights, press <Y>.
1 I. The system prompts you to indicate the number of telephone lines connected to the Litesystem. Enter the appropriate number, then press <Enter>.
12. The system prompts you for the number of digits you want to use in mailbox passwords.Indicate the number of digits subscribers are to use, then press <Enter>. (You may wantto consult the system supervisor, in case he/she has a digit-length preference.)
13. The system prompts you to confirm your selection. To continue, press <Y>.
14. The system prompts you to automatically create mailboxes at this point. Though youmay elect to create mailboxes now, we strongly recommend that you select No, soyou can first make any necessary modifications to the prototype mailbox, whichserves as a template for creating mailboxes. By properly setting up the prototypemailbox, you simplify the number of adjustments you must make to refine the mailboxesfor each user. To continue without setting up mailboxes at this time, press <N>.
15. Depending on the phone system you selected, you may be prompted for additionalinformation. Enter the appropriate responses.
16. The system prompts you to use U.S. Daylight-Savings Time. To have the systemautomatically adjust the clock so it accommodates Daylight-Savings Time for the next 10years, press <Y>. If you do not want the system to automatically adjust for U.S.Daylight-Savings Time, press <N>.
17. The main Install program screen displays. To continue, select Exit then press <Enter>. .
24 - *

8 LITE S YSTEM I NSTALLATION AND S UPERVISOR G UIDE 9.0 VER. 1
18. The Install program must reboot the Lite system unit to make the changes indicated.Press <Y> when the system displays the reboot prompt. After the system reboots, theLine Status screen displays.
2.5.5 Specifying System Information
System Information screens contain system setup information that applies system-wide, to all’boxes set up on the system. There are six System Information screens:
0 General Information Screen0 Line Information Screenl Business Hours Screenl Call Transfer Screen0 Class of Service Screen(s)0 Other Customizations Screen
Before you set up Routing boxes and mailboxes, it is best to ensure all System Informationscreens are properly completed.
Note: Because the default information on System Information screens is set so theLite system is operational with as few changes as possible, the proceduresprovided in this document for entering data on System Information screensdo not go into detail about all the screen entries. Instead, the proceduresguide you through accessing and reviewing pertinent fields on certainscreens, so you can verify that default data is properly set and modify it ifabsolutely necessary. If you need to make additional changes to the SystemInformation screens, refer to information provided in the installation andMain tenance Manua l .
Note that you can access online help at any time by pressing <Fl>.
2.5.5.1 Integration Defaults Set by the Integration Program
When you run the PBX Setup utility (previous procedure), you are prompted to indicate thetype of telephone system the customer is using. If you are installing the Lite system on one
25 >

r;‘, LITE SYSTEM INSTALLATION AND SUPERVISOR GUIDE 9.0 V ER. 1
of the phone systems identified below, the Integration program automatically sets fields onseveral System Information screens to the phone system’s default settings. Unless youcustomize the phone system defaults, you probably do not need to modify these settings.
Comdial DigiTech / Impact / DSU - Serial IntegrationComdial DigiTech / Impact / DSU - Serial Integration - IVPCComdial DXP, DXP Plus, FX - Serial IntegrationComdial DXP, DXP Plus, FX - Serial Integration - IVPCComdial Executech 2000Comdial UnisynCortelco AriesEncore CX - ECX 1832 / 3672 / 361 I2Ericsson MD- I 10Fujitsu 9600 with Serial IntegrationFujitsu Allegra 26Fujitsu Series 3 / StarlogFujitsu StarlogHarris 20/20Isoetec IDS I08 / 228Isoetec System 96ITT / Cortelco System 3 100Iwatsu ADIXIwatsu ZT-DLucent Definity G3 - Calista Box - Vectoring - Bridged ModeLucent Definity G3 - VoiceBridgeLucent Definity G3 - VoiceBridge -Vectoring - Bridged ModeLucent Merlin IILuceut Merlin LegendLucent Partner ACSLucent Partner IILucent Partner PlusLucent System 25Lucent System 75Lucent System 85 and Definity Generic 2 - VoiceBridgeMite1 COV with D/42D-SX Voice BoardsMite1 SX 100 Digital PABX with ONS IntegrationMite1 SX200 Light with COV IntegrationMite1 SX200 Light with DNIC Integration
26 _ =

8 LITE SYSTEM INSTALLATION AND SUPERVISOR GUIDE 9.0 VER. 1
l
.
l
.
.
l
.
l
l
.
.
l
.
l
l
.
l
l
l
.
l
l
.
.
l
.
.
.
.
l
l
.
l
.
.
l
l
l
Mite1 SX200 Light with ONS IntegrationMite1 SX2000 and SX2000 Light with COV IntegrationMite1 SX2000 and SX2000 Light with DNIC IntegrationMite1 SX50 with COV IntegrationMite1 SX50 with DNIC IntegrationNEC Electra Professional Level INEC Electra Professional Level IINEC Mark IINEC NEAX- 1400 IMSNEC NEAX-2000NEC NEAX-2400 Serial IntegrationNitsuko DSO-I / ONYX / 124i / 384iNorthern Telecom Norstar - With VMI AdaptersNorthern Telecom SL-1 and Meridian-l/SL-I, (with D42-SL)Panasonic 1232 - AnalogPanasonic DBSPanasonic KXT-336Panasonic KX-TD 1232 DigitalPanther II 820 / 1032 / 2064 Release IVPhilips SOPHO-SPremier ESP / Intertel GMXRedwood 3.2Rolm 9200 BCS / Siemens HCM 200Samsung Prostar 56EX / 120MX / 1224Samsung Prostar DCS - DigitalSiemens Saturn I, 11, IIISMDI Installation Guide / CentrexSouthwestern Bell Landmark DKS 308 / 6 16Sprint Protege / Macrotel MT360 / 824 KSUTadiran Coral I, II, & IIITelrad 2464Telrad Digital Key BX, 200 DigitalToshiba DK- I6 / 24 / 56 / 96Toshiba DK-280Toshiba Perception EToshiba Perception EXToshiba Perception I & IIVodavi DHS
,..-27

8 LITE SYSTEM INSTALLATION AND SUPERVISOR GUIDE 9.0 VER. 1
l Vodavi Infinite DVXI, DVX2, & DVX3l Vodavi Starplus 2448EX / 4896EXl Vodavi Starplus 96EXl Vodavi Starplus Digitall Win 1OOD
If you are using a telephone system that is not listed here, the Integration program sets fieldson System Information screens to commonly used defaults. You may need to adjust thesesettings.
For detailed information on integrating the Lite system with the phone system, refer to boththe Instnllation md Muintenance Manual and the technical bulletin for the phone system.
2.5.5.2 Using Technical Bulletin Information
For almost every phone system supported by the Lite system, there is a technical bulletin thatdetails system-specific installation information and considerations. This information isparticularly useful if you are working with a phone system that is not on the list shown in theprevious section, since you may more likely need to adjust certain settings on SystemInformation screens.
You can obtain technical bulletins through the Key Voice fax distribution system. To accessthis system, phone (941) 922-3800 and press 7 at the main greeting. Follow the systemprompts and, when requested, enter the number corresponding to the bulletin for the phonesystem with which you are working. To obtain a listing of all available bulletins and theirassociated bulletin numbers, request document 01.
2.553 Accessing System Information Screens
I. From the Line Status screen, press <FlO>. The Main menu displays, and you areprompted to enter a system password.
2 . At the prompt to enter the system password, press <Enter>. (The default Customer levelpassword is blank. The default Technician level password is 1234 on Small Office Litesystems or, on Debut units, the last four digits of the bar code on the white sticker onthe bottom of the unit.)
28 _i’

ci‘ LITESYSTEMINSTALLATIONANDSUPERVISORGUIDE~II VER. 1
3 . From the Main Menu, select SYSTEM INFORMATION. The System Information menudisplays.
: : .:y.:.,.2.5.5.4 Setting Up the General Information Screen
1 . From the System Information menu, select GENERAL. The General Information setupscreen displays.
2 . Press <Enter> to move the cursor to the AUTOMATICALLY EXIT TO DOS AT field. Enterthe time at which the Lite system should exit to DOS to perform its auditing functions.The default setting is 3:00 AM.
3 . To save the information and exit the screen, press <FlO>. The System Informationmenu displays.
2.5.5.5 Setting Up the Line Information Screen
I .
2 .
3 .
4 .
.:: . . !5 .
: :
6 .
From the System Information menu, select LINE INFORMATION. The Line Informationsetup screen displays. Each row on this screen corresponds to one line connected to theLite system.
Press <Enter> to move the cursor to the Initial Box field under Day Service for line 1.Verify that 800 displays in this field, indicating that calls received during Day Servicehours are to go to Routing box 800.
Press <Enter> to move the cursor to Initial Box field under Night Service for line 1.Verify that 801 displays in this field, indicating that calls received after the day servicehours are to go to Routing box X0 1.
Press <Enter> to move the cursor to the Initial Box field under Lunch Service for line 1.Verify that 800 displays in this field, indicating that calls received during Lunch Serviceare also to go to Routing box 800.
Press <Enter> to move the cursor to the OUTGOING ALLOWED field for line 1. Verifythis field is set to No.
Repeat steps 3 through 5 for each line on the screen. For the last line, however, be sure toverify that Yes in the OUTGOING ALLOWED field.
29 -.

cil, LITE SYSTEM INSTALLATION AND SUPERVISOR GUIDE 9.0 VER. 1
7 . To save the information and exit the screen, press <FlO>. The System Informationmenu displays.
‘..
2.5.5.6 Setting Up the Business Hours Screen
1 . From the System Information menu, select BUSINESS HOURS. The Business Hours setupscreen displays.
2 . For each day of the week, enter the office opening time in the DAY SERVICE BEGINS
field and the office closing time in the DAY SERVICE ENDS field. The default is au officeopen time of 8:00 AM and office closing time of 17:OO (5:OO PM). If you want calls to behandled in the same way day and night, enter 0O:OO in the DAY SERVICE BEGINS field,and 24:00 in the DAY SERVICE ENDS field. Refer to the Business Hours Worksheetcompleted by the system supervisor for specific information.
3 . To save the information and exit the screen, press <FlO>. The System Informationmenu displays.
2.5.5.7 Setting Up the Call Transfer Screen
1 . From the System Information menu, select CALL TRANSFER. The Call Transfer setupscreen displays.
2 . The fields in the top half of the screen list the sequences that the Lite system is to dial totrausfer calls (the “!” signifies hook$ash and the comma signifiespazlsefir one seeon&Typically, these settings are appropriate for most telephone systems without anymodification. If you k71on the actual sequences required by the telephone system, andthey are different from those shown, make the changes as necessary.
3 . To save the information and exit the screen, press <FlO>. The System Informationmenu displays.
2.5.5.8 Setting Up the Class of Service Screen
Each mailbox on the system is assigned a class of service. The class of service assigned tothe box dictates which Lite system features the mailbox owner has access to and how he/shecan use those features.
,. -
30

ci‘, LITESYSTEMINSTALLATIONAND SUPERVISORGUIDE~.~ VER. 1
There are 8 classes of services (0 through 7) that can be set up then applied to mailboxes onthe Lite system. Two of them are pre-configured on the system. Class of service 0 isassigned by default to the prototype mailbox 9994, which serves as a template for everymailbox that you create on the system. Class of service 7 is assigned supervisor mailboxprivileges. This class of service is assigned to mailbox 70, which is also pre-configured onthe system. Mailbox 70, therefore, serves as the supervisor mailbox. By calling into thesystem and accessing the supervisor mailbox, the system supervisor can make necessary day-to-day modifications to the voice processing system, such as adding mailboxes, changingRouting box greetings, etc. See section 3 for details.
I. From the System Information menu, select CLASS OF SERVICE. The Class of Servicesetup screen displays.
2 . Use the information provided below to review and, if necessary, adjust the fields on twodifferent Class of Service screens. First, review class of service 0, which flmctions as theclass of service that will be assigned to subscriber mailboxes on the system. When youreviewed the screen for class of service 0, press <F6> to progress through the classes ofservice and go to the setup screen for class of service 7.
Review and, if necessary, adjust class of service 7. Ensure that in class of service 7 theSUPERVISOR STATUS? field is set to Yes. This allows the owner of the mailbox assignedthis class of service to access the Supervisor menu over the telephone. Using this menu,the system supervisor can call into the system to perform day-to-day maintenance on thesystem.
,.-31

8 LITE SYSTEM INSTALLATION AND SUPERVISOR GUIDE 9.0 VER. 1
C L A S S O F S E R V I C E
Class-of -seru ice number : a SS-OF-SERVICE NAME:Maximum number of greetings :
fhto-de lete NEW
Max lines allowed to hold for one box: Digits allowed while holding:
CLASS OF SERVICE NUMBER
This field indicates the number of the class of service you are currently working with. Tomove to the next class of service number, press <F6>. Once you assign a class of service to amailbox, the mailbox inherits all the privileges and restrictions defined in the class of service.
CLASS OF SERVICE NAME
Use this field to give the class of service a meaningfttl name. This helps remind you of thepurpose for the class of service. Sample names include Szrpewisom, Subscribers, etc.
MAXIMUM NUMBER OF GREETINGS
A mailbox can have up to 10 pre-recorded personal greetings. The mailbox owner mayrecord these greetings, store them in the mailbox, then choose the greeting that is to be activeat any specific time. You may want to offer use of all 10 greetiiigs to users or restrict them tofewer greetings. Use this field to define how many personal greetings users with this class ofservice should be allowed to record. If you set the field to 0, then callers who route to a
32 _ic

@ LITESYSTEMINSTALLATIONAND SUPERVISOR GUIDE~.~ VER. 1
mailbox belonging to this class of service always hear the pre-recorded system prompt, “Thatextension is not available... ” The default setting is 10.
Note that in class of service 7, this field must be set to allow at least 2 greetings. Class ofservice 7 is assigned to mailbox 70, the supervisor mailbox that controls the Routing boxeson the system. Because you will be setting up these Routing boxes with at least 2 greetings,this parameter must be set to at least 2 in the supervisor mailbox class of service.
MAXIMUM GREETING LENGTH
When a mailbox owner calls in to re-record his/her personal greeting, the Lite system limitsthe length of the new greeting to the value entered in this field. The default setting is 60.
MAXIMUM NUMBER OF MESSAGES
The Lite system can hold up to 200 messages per mailbox. However, you may want torestrict some mailboxes to a lower limit (to conserve disk space). Use this field to define themaximum number of messages that can be stored in mailboxes assigned this class of service;Once the limit is reached for a particular mailbox, callers attempting to leave more messagesin the mailbox are told that the box is full. The default setting is 200.
-.
MAXIMUM MESSAGE LENGTH
The value in this field defines the maximum length of a message (in seconds) that a caller canleave for mailboxes belonging to this class of service. The default setting is 60.
AUTOMATICALLY DELETE OLD MESSAGES FROM SYSTEM AFTER X DAYS
The Lite system deletes messages saved as Old from mailboxes belonging to this class ofservice after the number of days you specify. An old message is one the mailbox owner haslistened to, but has not yet deleted. If you enter 0 in this field, an old message is deleted atmidnight on the day the message became old. If you enter 1 in this field, an old message isdeleted at midnight on the day following the day the message became old.
.’ To disable deletion of Old messages, enter 99 in this field. However, do this with caution,‘; ::.. since accumulating messages may create disk storage problems. The default setting is30.
c-
33 .

8 LITE SYSTEM INSTALLATION AND SUPERVISOR GUIDE 9.0 VER. 1
AUTOMATICALLY DELETE NEW MESSAGES AFTER X DAYS
Note: Use this parameter with caution. Improper use may cause important .’messages to be lost. r
The Lite system deletes new messages from mailboxes belonging to this class of service afterthe number of days you specify. A new message is one the mailbox owner has not yetlistened to. If you enter 0 in this field, a new message is deleted at midnight on the day themessage was received. If you enter 1 in this field, a new message is deleted at midnight onthe day following the day the message was received.
To disable the deletion of new messages, retain the default setting of99 in this field. This isthe default operating mode. If you enter a number other than 99 in this field, remember thatmessages are deleted whether or not the mailbox owner has listened to them.
SUPERVISOR STATUS
This field defines whether mailboxes belonging to this class of service should have supervisorprivileges. A supervisor can perform certain actions not available to regular mailbox owners.For example, a supervisor can add a mailbox or delete a mailbox by calling in from anytelephone. Additional information on supervisor functions is provided in section 3. Thedefault setting in class of service 0 is No, in class of service 7 is Yes.
ACCESS TO GROUP BOXES
By setting this field to Yes, you allow subscribers assigned this class of service to access anyGroup boxes set up on the system. For information on setting up and using Group boxes,refer to the Installation and Maintenance Manual. The default setting is Yes.
DIAL-OUT ALLOWED
This field indicates whether the owner of a mailbox belonging to this class of service isallowed to place outgoing calls from the mailbox. The default setting is No.
ACCESS TO P.A.
When a caller is listening to a mailbox owner’s greeting, one of the features the Lite systemoffers is the option to have the call announced over the P.A. system. Use this field to allow

8 LITE SYSTEM INSTALLATION AND SUPERVISOR GUIDE 9.0 VER. 1
or deny access to the P.A. feature for callers to mailboxes belonging to this class of service.The default setting is Yes.
PLAY MENU AFTER GREETING
If an extension is busy or does not answer, the Lite system plays the mailbox owner’spersonal greeting. After playing the greeting, it can announce the options available to thecaller (for example, “Ifyou would like to leave a message, press 1. To try another extension,press 3, or to speak with an operator, yress 0. “). If the mailbox owners do not record these ’
-. options as part of their greetings, set this field to Yes so that the Lite system plays the menu.If you want to allow each mailbox owner to decide which options to offer, set this field toNoand instruct each mailbox owner to include the options in his/her personal greeting. Thedefault setting is No.
ALLOWED TO RECEIVE FAXMAIL
The Lite system users should retain the default setting No in this field.I
OPERATOR BOX (D AY) (NI GH T)
When a caller is listening to a mailbox greeting, one of the options is to dial zero to reach anoperator. Use these fields to indicate the mailbox to which the call should be routed if thecaller indicates that he/she wishes to speak with an operator. The default setting is 888.
WHEN EXITING OPEN MAILBOX, GO TO BOX
When a mailbox owner has logged in to his/her box, has concluded listening to messages,changing options, etc., and has selected to exit from the Main menu, this field tells the Litesystem where to send the call. The Lite system users should retain the default setting in thisfield as 821.
MAX LINES ALLOWED TO HOLD FOR ONE BOX
You can limit the number of lines that can simultaneously hold for a mailbox belonging tothis class of service. For example, if you set this number to 3, and lines 1, 3, and 6 are
:‘: 2 , holding for a mailbox, then subsequent callers are not offered the option to hold. Instead,they hear the personal greeting recorded for the box, so they can leave a message, try anotherextension, etc. The default setting is 2.
,.-35

@ LITE SYSTEM INSTALLATION AND SUPERVISOR GUIDE 9.0 VER. 1
Note: If you want to disable the Call Queuing feature for the class of service, setthis field to 0.
DIGITS ALLOWED WHILE HOLDING j
While a caller is in the queue holding for an extension, he/she can press a digit to leave thequeue and process the call differently. By default, the options open to the caller are the sameas those available when the caller hears the personal greeting (“Ifyou would like to leave amessage, press 1. To try another extension, press 3, or to speak with an operator, press 0.“).If you want to restrict the caller to fewer choices while in the queue, use this field to specifywhich digits are allowed. All other digits are ignored by the Lite system while the caller is inthe queue. For example, if you enter 13 in this field, the only options available to the callerare:
I To leave a message3 To try another extension
WHILE IN QUEUE, SAY POSITION IN LINE
While a caller is in the queue, holding for an extension, the Lite system can keep him/herinformed on the progress of the call. If you set this field to Yes, the Lite system announces tothe caller:
“That extension is still busy. You are number [x] in line. If you would prefer to leavea message, press I, or to speak with an operator, press 0.”
If you select No in this field, the Lite system voices:
“That e.xtension is still busy. If you would prefer to leave a message, press I, or tospeak with an operator, psess 0. ‘I
The default setting is No.
TRY EXTENSION X TIMES, BEFORE GOING BACK TO CALLER .i-..L.
This parameter applies only if the MAX LINES ALLOWED TO HOLD field is greater than 0. Ifthe caller chooses to hold, the Lite system plays a series of hold prompts to the caller (theseare typically music or commercials). At the end of each hold prompt, the Lite system triesthe extension again. If it is busy, then the next hold prompt is played to the caller.
.,c-
36 .3

c‘, LITESYSTEMINSTALLATIONANDSUPERVISORGUIDE~.OVER. 1
After the defined number of hold prompts have been played, the Lite system goes back to thecaller and offers the options to remain on hold, try another extension etc. This field allowsyou to specify the number of hold prompts that should be played before the Lite system offersthese options to the caller.
_’ As shipped, the Lite system has only one hold prompt recorded (system prompt # 146, see theInstallation and Maintenance Manual). Therefore, if you enter 3 in this field, a caller queuedto a busy station hears this same prompt three times before being offered the options again. Ifyou record the second hold prompt (# 147), then the caller hears prompt # 146, # 147, then# 146 again before being offered the options. You may record up to 100 different holdprompts, which are played in sequence. (Remember: At the end of each hold prompt, theLite system tries the extension again). After the Lite system plays the highest number holdprompt recorded, it returns to the lowest number after the next try. The default setting is 3.
Note : The time between tries to a busy extension is determined by the length ofeach hold prompt recorded. The prompt supplied with the Lite sygtem -.(#146) is approximately 30 seconds.
R E S T R I C T E D N U M B E R S
When a mailbox owner calls in to change his/her call-transfer number, pager number, ormessage notification number, you may want to prevent him/her from changing it to certainnumbers, such as long-distance numbers.
These fields allow you to define digit sequences that are to be blocked. The Lite systemlooks at each of these Digits fields to determine if any of them match the number entered bythe mailbox owner. If the number entered by the caller begins with the digits specified in theDigits field, the Lite system defines the number entered as a match.
For example, if you enter the digits 1900 in one.of the Digits fields, the Lite system considersI -9OO-555- I2 12, 1-900-l 23-4567, 1-900-l 1 l-2222 to be matches. Telephone number l-90 l-555- 12 I2 would not be considered a match.
‘:_ ^ If you enter the digit 0 in one of the digits fields, the Lite system considers all numbersbeginning with 0 to be matches. This would include calls to the operator (0), calls to the long-distance operator (00), international calls (01 I), and any operator-assisted call (0 followed bytelephone number).
..--3 7 .

ci‘, LITE SYSTEM INSTALLATION AND SUPERVISOR GUIDE 9.0 VER. 1
If the caller enters a number that matches one of the digit strings you enter here, the Litesystem informs the mailbox owner that the number is not acceptable and retains the currentset up.
Once you review and adjust all fields on both Class ‘of Service setup screen 0 and Class ofService setup screen 7, press <FlO> to save the information and exit. The SystemInformation menu displays.
Y OLI have now reviewed the necessary entries on the System lnformation screens. To returnto the Line Information screen, press <FlO>.
2.5.6 Specifying Box Information
2.5.6.1 What Is a Box?
When the Lite system answers a call, it processes it by sending it to a box. Each boxperforms a specific function (for example, playing a menu to the caller and waiting for aresponse). It then passes the call to another box, which in turn performs its specific function,etc.
Depending on the configuration purchased, the Lite system provides 5 Routing boxes and 25mailboxes or 5 Routing boxes and 50 mailboxes. The Routing boxes are used to answerincoming calls, play a listing of option to callers, and route the call to a specific mailboxbased on the digits dialed by the caller. The mailboxes transfer calls to their associatedextensions and store messages for system subscribers, and they can be set up to forward callsto another phone or extension number, deliver messages to another phone or pager, play oneof 9 pre-recorded greetings to callers, screen calls, queue calls when the extension is busy, orrecord call conversations.
2.5.6.2 Understanding Routing Box 800, 801, and 821
According to the entries specified on the Line Information screen, the Lite system will routeall incoming calls to Routing box 800. This box answers calls during the day and lunchservice hours and plays a greeting to callers. After day/lunch service hours, the system routes --
. . -
3% . .

r;‘, LITESYSTEMINSTALLATIONAND SUPERVISOR GUIDE~.~ VER. 1
:-,
calls to Routing box 801. Typically, companies offer more extensive call routing options tocallers during day/lunch service hours than during closed hours. Often, for example, single-digit call routing (“...Press 2 for Sales... “) is not offered during closed hours. Therefore, thegreeting voiced by and options available in Routing box 801 are often different than those inRouting box 800.
So that the system supervisor can alter the system to voice a generic holiday greeting onholidays the office is closed, you will set up both Routing box 800 and 801 to include aholiday greeting alternative. Therefore, procedures in this document guide you throughrecording two greetings in both boxes 800 and 80 I : an office open greeting and a holidaygreeting in box 800, and an office closed greeting and a holiday greeting in box 801. (Keepin mind that holidays last 24 hours, therefore calls received on a holiday may be processed byeither box 800 or 80 I, depending on when the call is received. For this reason, a holidaygreeting must be recorded in both box 800 and SOI). Sample greetings for these boxes areprovided in section 3.2.1.
Routing Box 821 is designed by default to take over and route calls once they have passedthrough Routing box 800 or 801. A call may go to Routing box 82 I, for eiample; after thecaller leaves a voice message in a subscriber’s mailbox. Routing box 821 offers callers amenu similar to Routing box 800, but box 82 1 is pre-configured so if a caller does not enteran extension or select a menu option, the call is disconnected. In Routing box 800 and 80 I,callers who do not enter an extension or select an option are transferred to the operator. Thisis a safety measure designed to assist callers who use rotary phones or are too slow to respondto system prompts. By disconnecting non-responsive callers in box 821, the system simplyassmnes that the caller knew how to select menu options in box 800 or 80 I, and therefore,since no option was selected in box 82 1, the caller hung up.
Because we recommend you record two greetings in both Routing box 800 and 80 I, you willnot use the GREETING RECORDED field on the Routing Box setup screens. This field allowsyou to record only one greeting for the Routing box. Instead you will record all necessarygreetings by following the steps in the section 2.5.6.9, which you will complete after youreview and set up the Routing boxes and mailboxes.
2.5.6.3 Accessing Box Information Screens
1 . From the Line Status screen, press <FlO>. The Main menu displays and you areprompted to enter a system password.
2 . At the prompt to enter the system password, press <Enter>.
39

#4 LITE SYSTEM INSTALLATION AND SUPERVISOR GUIDE 9.0 VER. 1
3 . From the Main Menu, select BOX INFORMATION. The Box Information menu displays.
You should review the setup for the following boxes:
l Routing Box 800
l Routing Box 801
l Routing Box 821
l Prototype Mailbox 9994
l Supervisor mailbox 70
After you review and, if necessary, adjust prototype mailbox 9994, you use it to set upsubscriber mailboxes. You then make necessary adjustments to these mailboxes to customizethem for system subscribers. This section details the steps you must follow to set up allnecessary boxes and make the required adjustments.
The following procedures identify screen setup entries necessary for the Lite system toeffectively process calls. Fields that are not specifically discussed contain default values thatshould be appropriate in nearly all setup situations. Detailed information on all fields onRouting Box and Mail Box setup screens is provided in the Installation am/MaintenanceManual. You can also access online help on any screen by pressing <Fl>.

8 LITE SYSTEM INSTALLATION AND SUPERVISOR GUIDE 9.0 VER. 1
2.5.6.4 Reviewing Routing Box 800, 801, and 821 and Setting Up Single-DigitCall Routing
1 . From the Box Information menu, select ROUTING BOX. The Routing Box setup screendisplays.
R O U T I N G B O X
Box number : m BOX NAME : . - - I
Greeting recorded : m Owner: m
Number of times to play the greeting :Number of seconds to wait for a digit: 8
If no digits dialed,If inualid digit dialRoute the call based l
W h e n d i g i t receiued, wait for men-e digits? m
Destination for digit 1 : 6 :2 : 7 :3 :4 :5 : I a
* : “‘3Ef# : I=.
8 :9 : Voice: mQ : ,: : :
2 . Press <F4> to access the box selection screen. A small window displays prompting youfor the box number. Type 800 then press <Enter>.
3 . Press <Enter> to move the cursor moves to the OWNER field. So that more than onegreeting can be recorded and stored for use with this Routing box, this box should beidentified as being owned by the supervisor mailbox, mailbox 70. By specifying amailbox owner for this Routing box, the box takes on certain “mailbox” attributes, whichinclude being allowed to house the same number of greetings as the mailbox owner’smailbox. (You specified this number when you set up class of service 7.)
4 . Press <Enter> to move the cursor to the DESTINATION FOR DIGIT fields. If you aresetting up the system to provide single-digit call routing options to callers, complete thesefields. Refer to the Routing Worksheet completed by the system supervisor for specificinformation on entries for these fields. Do not modify the DESTINATION FOR DIGIT *and # fields.
41

cil LITE SYSTEM INSTALLATION AND SUPERVISOR GUIDE 9.0 VER. 1
5 . Repeat steps 2 through 5 to set up Routing box 821. In step 2, type 821 (instead of 800)to access box 82 I. In the DESTINATION FOR DIGITS field, we recommend you make thesame entries as you did on the setup screen for box 800.
6 . Repeat steps 2 through 5 to set up Routing box 80 1. In step 2, type 801 (instead of 800)to access box 80 1. In the DESTINATION FOR DIGITS field, you may decide to modify orsimply not include the single-digit dialing options, since this box will control how callsare routed when the office is closed. If you choose to use the same single-digit dialingoptions, simply re-enter them here.
7 . To save all setup entries and exit the Routing Box setup screen, press <FlO>. The BoxInformation menu displays.
2.5.6.5 Setting Up Prototype Mailbox 9994
You need to create a mailbox for each subscriber who will use the system to record.messages.Since most of the setup information will be the same for every mailbox you need, you shouldreview the system’s prototype mailbox, which is used as the mailbox setup model. Theprototype mailbox is box number 9994. Every time you select to create a new mailbox, thesystem does so by making a copy of mailbox 9994.
I. From the Box Information menu, select MAIL BOX. The Mail Box setup screen displayswith the Page Number menu.
2 . Press <F4> to access the box selection screen. A small window displays prompting youfor the box number. Type 9994 then press <Enter>.
3. Press <Enter> to move the cursor to the TRANSFER TYPE field. When a call is routed tothe mailbox, the first action taken is to transfer the call to the number specified in the TO:field. The Lite system offers several options as to how the call can be transferred. Whenyou move the cursor to this field, the various options are presented in a menu.
All transfer type options are described below. Use this information to select a transfertype. Note that in almost all system setups, you should select either the Blind or Waitfor Riw transfer type, so the system can function most efficiently. The default setting isWait for Ring.
. . -
42 -i


@ LITE SYSTEM INSTALLATION AND SUPERVISOR GUIDE 9.0 VER. 1
5 . Repeat steps 3 through 5 for each subscriber mailbox you want to create.
6 . Once you create all necessary mailboxes, continue with the next procedure, below.
2.5.6.7 Customizing Subscriber Mailboxes
Using information the system supervisor provides on the Mailbox Setup Worksheets, you can rnow customize the mailboxes you created for each subscriber on the system.
The procedure below identifies the fields you should be sure to customize for each mailbox.Fields that are not specifically discussed contain default values that should be appropriate innearly all setup situations. Therefore, it is unlikely that you need to modify these fields.Detailed information on completing all fields on Mail Box setup screens is provided in theInstallation crnd Maintenance Manual. You can also access online help on any screen bypressing <F l>.
I. To access the mailbox you want to customize, press <F4>. A small window displaysprompting you for the box number. Type the box number then press <Enter>. The MailBox Page I setup screen displays.
46

a LITE SYSTEM INSTALLATION AND SUPERVISOR GUIDE 9.0 VER. 1
M A I L B O X Page 1 III
OX number:- FIRST NAME:- Last: ,, Ill
CclLL TRANSFER INFORMfiTIONTransfer tune:To: pRings to answer: iUse 3-way calling? iGet caller's name?Record conversation? 'Currently enabled?Transfer schedule: ,
PERSONAL DflTCIPassword:Name recorded:Greeting recorded:
PRIVILEGES
Class of seruice:Restricted - Client of:
Sequence to turn ON message-waiting lamp:- New: g
Sequence to turn OFF message-waiting lamp:- Old: d
=Help FZ=Add F3=Delete Flt=Select FIS=Preu Fb=Next FV=Next page FlB=Exit
2 . Press <Enter> to move the cursor to the FIRST NAME field. Enter the mailbox owner’sfirst name. Press <Enter> to move the cursor to the LAST field. Enter the mailboxowner’s last name.
3 . To go to Page 2 of the Mail Box setup screen, press <F9>. The Page 2 screen displays.
47

a LITE SYSTEM INSTALLATION AND SUPERVISOR GUIDE 9.0 VER. 1
H A I L B O X IPage 2)
lox number : m First Name :m Last::
PAGER NUMBER:Times to call:H Hins between calls:
flfter playing greeting:If cal ler chooses “other opt ions” :After leauing message, ,,,mIf call is uia D.I.D. play greeting in language: [Auto-forward NEW msgs to box m after m hours. Schedule :m
IESSAGE DELIVERY - Where and When Repeat Interua 1 ScheduleCa lCa lCa lCa lCa lR u n-=
4 . Press <Enter> to move the cursor to the PAGER NUMBER field. If the subscriber is to usethe Paging feature, use the following information to complete this section of the MailBox setup screen.
PAGER NUMBER
Enter the telephone number of the paging service. The mailbox owner may change thenumber remotely. Normally, access codes for outside lines are not required here.Instead, that information should be entered on the System Information / General setupscreen.
To restrict pager calls to use lines in a particular line group, enter the letter (A, B, C, orD) of the line group in braces { 3 before the telephone number (for example,{A}5551212).
Tone or Voice pagers may be used with the Message Delivery feature discussed later inthis section.
4 8 -7.

8 LITE SYSTEM INSTALLATION AND SUPERVISOR GUIDE 9.0 V ER. 1
._,.:.-.i‘;
The pager number you enter can contain the digits 0 through 9, star (*), pound (#), andthe following special characters:
call progress tones during the course of the call. Whenhed dialing, the system immediately assumes thatthe
pager sys tem has answered.
Specifies a line group is to be used (for example, {A}555-1212indicates “choose any line in line group A, and dial the number
Can be used for punctuation and is ignored.
,-
‘,.
‘.
PAGER TYPE
The Lite system supports both Tone and Digital pagers in this section of the mailboxprogramming. Specify here which type of pager the mailbox owner has (Digital, Tone orNone).
When a caller asks the Lite system to page a mailbox owner, the Lite system looks for afree line on which to call the paging service. If no lines are free to make the call, the Litesystem queues the request and re-tries every 10 seconds for approximately 10 minutes.
,.-49

#I LITE SYSTEM INSTALLATION AND SUPERVISOR GUIDE 9.0 VER. 1
NUMBER OF TIMES TO CALL
The Lite system calls the pager the number of times you specify in this field. Repetitivepaging may be useful if the pager is turned off periodically or is out of pager range.
Note : This field is used to tell the Lite system how many successful calls it shouldmake to the paging service. Do not confuse this with the pager-retry feature. Ifthe Lite system calls the pager number and does not hear it ring and answer,then it automatically re-tries the call at IO-second intervals, for a pre-definednumber of times.
MINUTES BETWEEN CALLS
If you enter a number greater than I in the TIMES TO CALL field, this field instructs theLite system how long it should wait between re-calls.
Note : This field tells the Lite system how long to wait between successful calls to thepaging service. Do not confuse this with the pager-retry feature.
CALL SCHEDULE
The Pager notification feature follows a time schedule. The options are:
ALWAYS
DAY SERVICE
Pager notification is available at all times.
Pager notification is available only during day/lunch service, asdefined in the System Information I Business Hours screen.
N I G H T S E R V I C E Pager notification is available only during non-day/lunch service,as defined in the System Information I Business Hours screen.
SCHEDULE A, B, C, or D Pager notification is available only during the schedule defined ?;on Page 3 of the Mail Box setup screen for this mailbox.
1
a--
50 ->,-

@ LITE SYS-~EM INSTALLATION AND SUPERVISOR GUIDE 9.0 VER. 1
,, . . . . ::
I .
. :
ENABLED
Set this field to Yes to indicate that the pager feature for this mailbox is currently on. Setthe field to No to indicate that the pager feature is off. The mailbox owner can alsotoggle this field on and off by calling into the system. If this field is set to No, itoverrides the call schedule set in the previous field.
5 . Press <Enter> to move the cursor to the first MESSAGE DELIVERY field. If the subscriberis to use the Message Delivery feature, use the following information to complete this Isection of the Mail Box setup screen.
CALL
Enter the telephone number the Lite system should call to inform the mailbox owner thatthere are new messages in his/her mailbox.
The number can contain the DTMF digits 0 - 9, * and #, plus any of the following specialcharacters: 1
IpI ~~~Use pulse (also known as ‘rotary’) dialing.
I T 1 Use tone dialing (the default). I
Short pause (duration can be changed in Technical Information screen.Default is 1 second).
% Medium pause (equal in length to 4 commas).I
L Long pause (equal in length to 8 commas).
! Hook f lash .
[I Enclosing the number in brackets prevents the mailbox owner from beingable to call in and change the number.
:0 Specifies a line group is to be used (for example, {A}555-1212 indicates
“choose any line in line group A, and dial the number 555-1212”).
I H Hang up immediately after dialing the number (must be last character). I
M Answering machine. This must be the last character in the telephonenumber. It tells the Lite system that the number being called has ananswering machine attached. When the Lite system calls the number, itannounces that there are messages, as usual. If the Lite system has not
“-
51

8 LITE SYSTEM~NSTALIATIONAND SUPERVISOR GUIDE~.~ VER. 1
r e c e i v e d a D T M F digit (1 for Yes, anything else for No), by the end of theannouncement cycle(s), it assumes that it is talking to an answeringmachine, and proceeds to play each new message in turn.
V Voice pager. This must be the last character in the telephone number.Details of voice pager programming are found later in this section.
I Internal (must be the first character). Overrides the INTERNAL parameter (inthe configuration file VM.CFG) and treats this number as an internal callregardless of the number of digits. The Lite system does not dial thesequence specified in the General Information / Digits To Get A Line OnExternal Call field.
E
N
External (must be the first character). Overrides the INTERNAL parameter(in the configuration file VM.CFG) and treats this number as an external callregardless of the number of digits. The Lite system dials the sequencespecified in the General Information / Digits To Get A Line On External Callfield.
No progress tones (must be the last character). The Lite system ignores allcall progress tones during the course of the call.
any o thercharac te r
Can be used for punctuation and is ignored.
The owner of a mailbox can call in and remotely change the first Message Notificationnumber, but cannot use or modify special characters.
REPEAT
Enter the number of successful calls to each telephone number. A successful call isgenerally defined as one where the Lite system has seized an available line port, dialedthe number, and detected an answer. If the call is not successful (for example, the callednumber was busy) the Lite system automatically re-tries every few seconds up to twentytimes.
INTERVAL
If the Repeat field contains a number greater than 1 or there are additional Call numbersequences, enter the interval (in minutes) between calls to this number and/or the intervalbefore proceeding to the next Call number sequence.
. ..-
52 . .

#I LITE SYSTEM INSTALLATION AND SUPERVISOR GUIDE 9.0 VER. 1
T....: :..,, : .&’
._
.::
SCHEDULE
Select when the Lite system should call this number. The options are:
The number is called any time a new message is left in thema i lbox .
DAY SERVICE The number is called only during day/lunch service, asdefined in the System Information / Business Hours screen.
N I G H T S E R V I C E The number is called only during non-day/lunch service, asdefined in the System Information I Business Hours screen.
SCHEDULE A, B, C, or D The number is called only during the schedule defined onPage 3 of the Mail Box setup screen for this mailbox.
R U N T H I S S E Q U E N C E N T I M E S
Once the Lite system has called every number listed, it considers that it has run thesequence one time. It will then check the value in this field. If this field is set to a numberhigher than I, the Lite system starts again and repeats the sequence the specified numberof times.
CURRENTLY ENABLED?
This field identifies which messages the Lite system is to deliver:
DISABLED The Lite system does not deliver messages.
.7:
.\ .,
URGENT MSGS ONLY The Lite system delivers only messages marked urgent,but does not call to deliver non-urgent messages.
ALL MESSAGES The Lite system calls every time a message is depositedinto the mailbox.
Setting this field to DISABLED overrides the SCHEDULE field.
The owner of a mailbox can call in remotely and turn his/her Message Delivery featureon or off, or change the first number to be called. The other telephone numbers, if in use,cannot be changed remotely.
,. -53
8 LITE SYSTEM INSTALLATION AND SUPERVISOR GUIDE 9.0 VER. 1
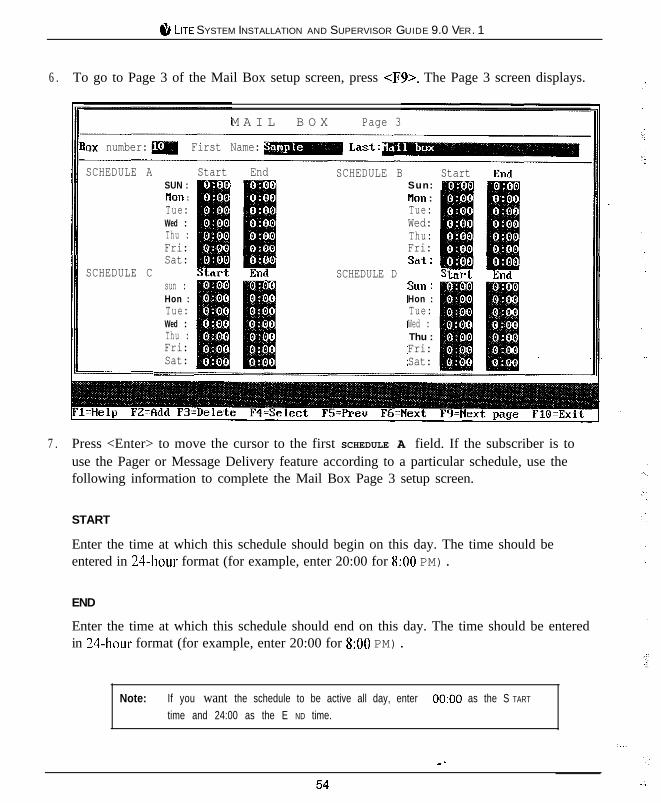
6 . To go to Page 3 of the Mail Box setup screen, press <F9>. The Page 3 screen displays.
M A I L B O X Page 3
lox number: First Name:
SCHEDULE A
SCHEDULE C
Start EndSUN :Bon :Tue:Wed :Thu :Fri:Sat:
sun :Hon :Tue:Wed :Thu :Fri:Sat:-
SCHEDULE B StartSun: I[iilNon :Tue:Wed:Thu:Fri:
SCHEDULE D Sat: !f!sun :Hon :Tue:Wed :Thu :Fri:Sat:
7 . Press <Enter> to move the cursor to the first SCHEDULE A field. If the subscriber is touse the Pager or Message Delivery feature according to a particular schedule, use thefollowing information to complete the Mail Box Page 3 setup screen.
START
Enter the time at which this schedule should begin on this day. The time should beentered in 24-hour format (for example, enter 20:00 for 8:OO PM).
END
Enter the time at which this schedule should end on this day. The time should be enteredin 24-hour format (for example, enter 20:00 for 8:OO PM).
//':.:..I
Note: If you want the schedule to be active all day, enter 0O:OO as the S TART
time and 24:00 as the E ND time.

8 LITESYSTEMINSTALLATIONAND SUPERVISORGUIDE~.~ VER. 1
3 . To go to Page 4 of the Mail Box setup screen, press <F9>. The Page 4 screen displays.
H A I L B O X (Page 4)
ox number:m First Name:- Last::Hotel guest privileges only? aWCIKE-UP TIME: m Currently scheduled? a
4 . Confirm that the ENABLED field is set to Yes for all four personal distribution lists. Thisallows subscribers to create up to 4 personal distribution lists in their mailboxes, whichthey can then use when sending messages to groups of subscribers.
5 . Repeat steps 1 through 9 to customize each mailbox you created for each subscriber onthe system. Once you customize all subscriber mailboxes, continue with the nextprocedure.
2.5.6.8 Customizing the System Supervisor Mailbox
I. To access the system supervisor mailbox, press <F4>. A small window displaysprompting you for the box number. Type 70 then press <Enter>.
2 . Press <Enter> to move the cursor to the FIRST NAME field. Type SUPERVISOR in thisfield. Press <Enter> to move the cursor to the LAST field. Enter the system supervisor’slast name. Note that though you may type any name or words in these fields, using these
. . -55

@ LITE SYSTEM INSTALLATION AND SUPERVISOR GUIDE 9.0 VER. 1
entries identifies this mailbox as the supervisor mailbox and identifies the individual whois currently acting as the on-site system supervisor.
3 . Press <Enter> to move the cursor to the CLASS OF SERVICE field. Verify that 7 is entered ;;in this field. This entry assigns class of service 7, which has supervisor privileges, to this , .mailbox.
4 . To go to Page 2 of the Mail Box setup screen, press <F9>. The Page 2 screen displays.
5 . To complete the supervisor mailbox setup, repeat steps 4 through 9 of the previousprocedure.
6 . To save all mailbox customizations and exit the Mail Box setup screen, press <FlO>.The Box Information menu displays.
2.5.6.9 Recording Routing Box Greetings
As described in section 2.5.6.2, the following procedure guides you through recording twogreetings in both Routing boxes 800 and 801: an office open greeting and a holiday greetingin box 800, and an office closed greeting and a holiday greeting in box 801. Samplegreetings for these boxes and for box 82 1 are provided in section 3.2.1.
Note: When you record Routing box greetings, you must include instructions thatidentify any single-digit call routing options available to the caller.
1. From a telephone, call into voice mail and log into supervisor mailbox 70. Note that thedefault password for the mailbox is the same as the mailbox number, 70.
2 . The Lite system tutorial session starts. Complete the tutorial. When prompted to recordthe name and greeting, you may elect to identify this as the supervisor mailbox. Whenchanging the password, be sure to inform the system supervisor of the number you select.When you complete the tutorial, press <*> to prevent it from voicing the next time the .5box is accessed.
L .
3 . The system voices the Main menu:
“To listen to your messages press 1. To send a message press 2. To change your options .press 3. ” x-
56 _ ;-


@ LITE SYSTEM INSTALLATION AND SUPERVISOR GUIDE 9.0 VER. 1
9. To record greeting(s) for Routing box SO 1, press <#> to exit the menu shown above andreturn to the Options menu. Then repeat steps 4 through 7 above. In step 5, press 801 toindicate you want to work with Routing box 801. In step 7, record the office closedgreeting, instead of the office open greeting.
10. To record the holiday greeting for Routing box 801, repeat step 7, select greetingnumber 1, and record the holiday greeting.
11. To record the greeting for Routing box 82 1, press <##> to exit the menu shown above andreturn to the Options menu. Then repeat steps 4 through 7 above. In step 5, press 821 toindicate you want to work with Routing box 821. In step 7, record the office opengreeting call routing options, omitting the introductory remarks “Welcome to . . . ”
12. When you have recorded all necessary greetings, press <#> to return to the Optionsmenu, then press <#> to return to the Main menu.
Be sure to instruct the system supervisor to refer to section 3.2 for detailed instrucGons on.changing the active Routing box greetings and recording new greetings.
2.6 Default Database Structure Overview
As mentioned previously, the Lite system contains a default database with a setupconfiguration that allows the Lite system to efficiently perform fundamental call processingtasks with minimal system adjustments by the installing technician. Information in thissection highlights portions of this default database configuration. More detailed informationon the purpose of Routing boxes and mailboxes and how box settings and other defaultsettings affect system functionality is provided earlier in this document.
Note: Though you may make adjustments to specific information relating to thisdefault setup, you are urcled to maintain the aeneral confiauration ofRoutina boxes 800,801, and 821, class of service 7, and suoervisormailbox 70. This configuration allows the Lite system to efficiently performfundamental call processing tasks. Maintaining it helps both you, thetechnician, and the Lite system technical support to efficiently service thesystem and resolve any call processing issues.
,.-
58 .v

@ LITE SYSTEM INSTALLATION AND SUPERVISOR GUIDE 9.0 VER. 1
l Technician Password:* Small Office Lite systems: 1234* Debut systems: the last 4 digits of the bar code on the white sticker on the bottom of
the unit
l Business Hours (specified on System Information / Business Hours screen):* S:OOAM - 5:00 PM
l Routing Box 800:* Answers all incoming calls during day/lunch hours (specified on System Information
/ Business Hours screen)* Owned by mailbox 70
l Routing Box 801:* Answers all incoming calls during non-day/lunch hours (specified on System
Information / Business Hours screen)* Owned by mailbox 70 * I.
l Routing Box 821:* Routes calls that have already passed through Routing box 800 or 801* Owned by mailbox 70
0 Class of Service 0:* Set up with the following parameter settings (for information on specific parameter
fields, refer to section 2.5.5.8):
: : '.: !,. /
MAX~MUMNUMBEROFGREETINGS: 10MAXIMUMNUMBEROFMESSAGES: 200MAXIMUMGREETINGLENGTH(SECS): 60MAXIMUMMESSAGELENGTH(SECS) 60AUTO-DELETEOLD MESSAGESAFTER~~DAYS.AUTODELETENEWMESSAGESAFTER~~DAYS.SUPERVISORSTATUS? NO
ACCESSTOGROUP-BOXES? YesDIAL-OUTALLOWED? NO
ACCESSTOP.A.? YesPLAYMENUAFTERGREETING? NoALLOWEDTORECEIVEFAXMAIL? NO
OPERATOR Box (DAY): 888 (NIGHT): 888WHENEXITINGOPENMAILBOX,GOTOBOX: 821
59

i”, LITE SYSTEM INSTALLATION AND SUPERVISOR GUIDE 9.0 VER. 1
MAXLINESALLOWEDTOHOLDFORONEBOX: 2~tIILEINQlJEUE,SAYPOSlTIONINLINE? NoTRYEXTENSION 3 TIMESBEFOREGOINGBACKTOCALLERRESTRICTEDDIGITS: [None]
0 Class of Service 7:* Set up with the class of service 0 options, but with SUPERVISOR STATUS? enabled.
l Extension Length:* 3 digits
l Password Length:* 4 digits
l Default Passwords:* Equal the mailbox rnunbers
l Mailbox 70:* Set up as the Supervisor mailbox with CLASS OF SERVICE: 7
l Prototype mailbox 9994 (features automatically assigned to all mailboxes created):TRANSFERTYPE: WaitforRingCLASSOFSERVICE: 0To: xX(signz$es the mailbox number)CURRENTLYENABLED: Yes
TRANSFERSCHEDULE: AlwaysPASSWORD: x (signifies the mailbox number)SEQIJENCETOTURNON/OFFMESSAGEWAITINGLAMP: (YsetbyIntegrationprogran?)AFTERPLAYINGGREETING: Waitfordigit
2.7 Setting Up the System Using the TeleparameterFeature
This section provides instructions on using the teleparameter feature to set up a new system ata customer site or to later make modifications to the system. Using the teleparameter feature,you can change the parameter values that affect system-wide setup information, box setups,and VM.CFG file data by simply calling into the system. You simply log into supervisormailbox 70 over the telephone, select to modify system parameters, then, as prompted, enter
6 0
-.
, . -:

8 LITE SYSTEM INSTALLATION AND SUPERVISOR GUIDE 9.0 VER. 1
codes that identify each parameter you want to change and the new value to which you wantto set the parameter. The screen illustrations and parameter value table provided in thissection indicate the parameters and their associated codes.
Technicians who have experience setting up Corporate Office, Small Office, or the Litesystems may prefer to use the Teleparameter feature to quickly make modifications and getthe Lite system up and running at the customer’s site. Be advised, however, that since thistechnique involves inputting codes that represent system parameters and correspondingvalues to which parameters are to be set, it is a bit more difficult to use effectively if you are ’unfamiliar with setting up Corporate Office, Small Office, or Lite systems. For this reason,we recommend that technicians unfamiliar with Corporate Office, Small Office, or Litesystems attach a laptop to the PC and use the instructions provided in the previous sections tocomplete all necessary system setup steps.
Note: If you choose to set up the system using the Teleparameter feature, be sureto first review section 2.5.6.2 and section 2.6 so you clearly und?rstand thesetup of the default database included on the Lite system unit.
- .
2.7.1 Using the Teleparameter Feature to Set up a NewSystem
2.7.1.1 Running the PBX Setup Utility
The Lite system voice processing software is pre-installed on the Lite system unit before it isshipped to you. You must, however, run the PBX Setup utility so you can configure certaininstallation parameters for each specific customer’s site. Use the following procedure to runthis utility by calling into the system over the telephone: .
..:1 . From a telephone, call into voice mail and log into supervisor mailbox 70. Note that the
default password for the mailbox is the same as the mailbox number, 70.
2 . The Lite system tutorial session starts. Complete the tutorial. When prompted to recordthe name and greeting, you may elect to identify this as the supervisor mailbox. Whenchanging the password, be sure to inform the system supervisor of the number you select.

8 LITE SYSTEM INSTALLATION AND SUPERVISOR GUIDE 9.0 VER. 1
3 .
4.
When you complete the tutorial, press <*> to prevent it from voicing the next time thebox is accessed.
The system voices the Main menu:
“To listen to your messages press I. To send a message press 2. To change your optiompress 3. ”
To access the Supervisor menu, press 6 (this option is not voiced). The system voicesthe Supervisor menu options:
Supervisor Menu
For Ma i lbox Admin is t ra t ion
For Routing Box Administration
For Ques t ion Box Admin is t ra t ion
For Port Administration
To Change the Sys tem Broadcas t Message
To Change the Voice Mail Day / Night Service
To Change the System Time
To Change the System Date
To Mod i f y Sys tem Paramete rs
To Perform First-Time Setup
Press 1
Press 2
Press 3
Press 4
Press 5
Press 6
Press 7
Press 8
Press 9
Press 0
5 . From the Supervisors menu, press 0 to perform first time setup. The system prompts youto enter the Technician password. By default, this password is 1234 on Small OfficeLite systems or, on Debut units, the last four digits of the bar code on the white stickeron the bottom of the unit.
6 . Foliow the prompts and enter the requested information. When you are prompted toindicate the type of phone system with which you are working, enter the number from thefollowing list that corresponds to the phone system:
0 8
7 6
1 1
7 4
Comdial DigiTech / Impact / DSU - Serial Integration
Comdial DigiTech / impact / DSU - Serial Integration - IVPC
Comdial DXP, DXP Plus, FX - Serial Integration
Comdial DXP, DXP Plus, FX - Serial Integration - IVPC*.-
6 2

8 LITE SYSTEM INSTALLATION AND SUPERVISOR GUIDE 9.0 VER. 1
2 2 Comdia l Execu tech 2000
4 4 Comd ia l Un i syn
7 9 Cor te lco Ar ies
4 5 Encore CX ECX 1832 / 3672- I 36112
7 7 Ericsson MD-l 10
7 5 Fujitsu 9600 with Serial Integration
9 6 Fujitsu Allegra 26
7 8 Fujitsu Series 3 / Starlog
4 1 Fujitsu Starlog
8 0 Harris 20120
5 5 lsoetec IDS 108 / 228
4 9 lsoetec System 96
3 0 ITT / Cortelco System 3100-.
2 8 lwatsu ADIX
I 2 0 1 lwatsu ZT-D I
9 4 Lucent Definity G3 - Calista Box - Vectoring - Bridged Mode
9 2 Lucent Definity G3 - VoiceBridge
8 9 Mite1 SXZOO Light with DNIC Integration

#I LITE SYSTEM INSTALLATION AND SUPERVISOR GUIDE 9.0 VER. 1

8 LITE SYSTEM INSTALLATION AND SUPERVISOR GUIDE 9.0 VER. 1
I 59 Tadiran Coral I, II, & III
6 8 Tel rad 2464
6 4 Telrad Digital Key BX, 200 Digital
4 6 Toshiba DK-16 I24 I56 I96
1 6 Tosh iba DK-280
2 6 Tosh iba Pe rcep t i on E
9 5 Tosh iba Percept ion EX
5 7 Toshiba Perception I & II
I 8 7 1 Vodavi DHS I
I 4 3 1 Vodavi Infinite DVXI, DVX2, & DVX3 I
I 4 8 Vodavi Starplus 2448EX l4896EX -15 8 Vodavi Starplus 96EX
1 4 Vodavi Starplus Digital< -.
I 6 2 1 W i n IOOD --1
7 . Once you enter all necessary information, press 1 as prompted to reboot the PC. Youmust allow the system to reboot so it can reset several parameters based on theinformation you entered. When the system reboots, your call into it is disconnected.Continue with the next procedure.
2.7.1.2 Adjusting System Information
You may need to customize certain fields on the System Information screens. Use thefollowing procedure:
1 . From a telephone, call into voice mail and log into the supervisor mailbox 70. Thesystem voices the Main menu:
2.. “To listen to your messages press 1. To send a message press 2. To change your optionspress 3. ”
6 5

#I LITE SYSTEM INSTALLATION AND SUPERVISOR GUIDE 9.0 VER. 1
2 . To access the Supervisor menu, press 6 (this option is not voiced). The system voicesthe Supervisor menu options:
Supervisor MenuFor Ma i lbox Admin is t ra t ion
For Routing Box Administration
For Ques t ion Box Admin is t ra t ion
For Port Administration
To Change the Sys tem Broadcas t Message
To Change the voice mail Day / Night Service
To Change the System Time
To Change the System Date
To Mod i f y Sys tem Paramete rs
To Perform First-Time Setup
To Exit
Press 1
Press 2
Press 3
Press 4
Press 5
Press 6
Press 7
Press 8
Press 9
Press 0
Press #
3 . From the Supervisors menu, press 9 to modify system parameters. The system promptsyou to enter the Technician password. By default, this password is 1234 on SmallOffice Lite systems or, on Debut units, the last four digits of the bar code on the whitesticker on the bottom of the unit.
4 . At the prompt, enter the number of the parameter you want to change, then, as prompted,the value to which you want to change the parameter. Parameter information is providedin a comprehensive table shown in section 2.7.2.
When you complete all modifications, press # to return to the Supervisor’s menu.
Note: Refer to section 2.7.2 for information on values you can specify for certainparameters and for information on adjusting parameters in the VMCFG file.For detailed information on each field of System Information screens, refer tothe Installation and Maintenance Manual.
. ..-
6 6 _ .:

8 LITE SYSTEM INSTALLATION AND SUPERVISOR GUIDE 9.0 VER. 1
2.7.1.3 Adjusting Routing Box Information
? ‘ ,,’ -:
As indicated in section 2.5.6.2, you need to adjust Routing Boxes 800, 801, and 82 1 toinclude any single-digit call routing options you want to provide to callers. You must alsorecord the necessary greetings for these boxes. Sample Routing box greetings are provided insection 3.2.1.
To record Routing box greetings, follow the procedure provided in section 3.2.2.
To modify single-digit call routing, you can follow the procedure in section 3.2.3 or you canuse the Teleparameter feature. To use the Teleparameter feature, follow steps 1 through 4 inthe previous procedure, referring to the parameter numbers provided in section 2.7.2. FOIdetailed information on each field of this screen, refer to the Installation andMaintenanceManual.
Note: If you enter a parameter number for a parameter that affects a particularbox, the system prompts you to enter the Item number. The Item numb&
I.
identifies the particular box in which you want to change the parameter. Atthe Item number prompt, enter the number of the box.
Note: Refer to section 2.7.2 for information on values you can specify for certainparameters and for information on adjusting parameters in the VM.CFG file.For detailed information on each field of Routing Box screens, refer to theIns ta l la t ion and Ma in tenance Manua l .
2.7.1.4 Creating and Adjusting Mailbox Box Information
:...,:
To create mailboxes on the system, follow the procedure in section 3.1.1. Ollce you createmailboxes, you can make detailed modifications to the box setups using the Teleparameterfeature. To use the Teleparameter feature to adjust mailbox information iu boxes you havecreated on the system, follow steps 1 through 4 in the procedure in section 2.7.1.2. FOIspecific parameters you can adjust, refer to section 2.7.2. For detailed information on eachfield of these screens, refer to the Installation and Maintenance Manual.
,. -6 7

@ LITE SYSTEM INSTALLATION AND SUPERVISOR GUIDE 9.0 VER. 1
Note: If you enter a parameter number for a parameter that affects a particularbox, the system prompts you to enter the Item number. The Item numberidentifies the particular box in which you want to change the parameter. Atthe Item number prompt, enter the num,ber of the box. .xL$
Note: Refer to section 2.7.2 for information on values you can specify for certainparameters and for information on adjusting parameters in the VM.CFG file.For detailed information on each field of Box Setup screens, refer to theinstallation and Main tenance Manua l .
2.7.1.5 Creating Other Box Types and Adjusting Information
To create other types of boxes, you must first follow the procedures presented earlier in thisdocument to connect a laptop computer to the Lite system unit and access Box Informationsetup screens. Once you create the boxes using this technique, you can make detailedmodifications to the box setups using the Teleparameter feature. To use the Teleparameterfeature to adjust information in boxes already created on the system, follow steps 1 through 4in the procedure in section 2.7.1.2. For specific parameters you can adjust, refer to section2.7.2. For detailed information on each field of these screens, refer to the Installation andMaintenance Manual.
Note: If you enter a parameter number for a parameter that affects a particularbox, the system prompts you to enter the Item number. The Item numberidentifies the particular box in which you want to change the parameter. Atthe Item number prompt, enter the number of the box.
Note: Refer to section 2.7.2 for information on values you can specify for certainparameters and for information on adjusting parameters in the VM.CFG file.For detailed information on each field of Box Setup screens, refer to theinstallation and Main tenance Manua l .
6 8 _-’

8 LITE SYSTEM INSTALLATION AND SUPERVISOR GUIDE 9.0 VER. 1
2.7.2 Teleparameter Value Tables
.:
The following table identifies all parameters you can adjust using the teleparameter featureand the entries you can make to indicate specific values for each parameter. Refer toinformation after this table for additional entries you can make in some fields.
AccountNumber BoxSetup
AccountNumber BoxSetup
AccountNumber BoxSetup
AccountNumber BoxSetup
AccountNumber BoxSetup
AccountNumber BoxSetup
AccountNumber BoxSetup
2700
2 7 0 1
2703
2704
2705
2706
Minimum number of digitsrequired for valid entrydetermination
Maximum number of digitsrequired for valid entrydetermination
Number of seconds to waitbefore determining all digitsare entered
Action to take aftermaximum retry attempts ifinvalid account number isentered
Box associated withparameter 2703
Retry attempts to allow if o-9invalid account numberentered
Number of mailbox thatowns the Account Numberbox
(Valid mailboxnumber)
0 = Return1 = Say ‘Goodbye’2 = Go to another box3 = Hang up
(Valid mailboxnumber)
~.: :.
,.-6 9
A prompt for theItem number refersto the box number.Enter the boxnumber .
A prompt for theItem number refersto the box number.Enter the boxnumber.
A prompt for theItem number refersto the box number.Enter the boxnumber .
A prompt for theItem number refersto the box number.Enter the boxnumber .
A prompt for theItem number refersto the box number.Enter the boxnumber .
A prompt for theItem number refersto the box number.Enter the boxnumber .
A prompt for theItem number refersto the box number.Enter the boxnumber .

8 LITESYSTEMINSTALLATIONANDSUPERVISORGUIDE~.OVER. 1
A prompt for theItem number refersto the box number.Enter the boxnumber .
A prompt for theItem number refersto the box number.Enter the boxnumber .
A prompt for theItem number refersto the box number.Enter the boxnumber.
A prompt for theItem number refersto the box number.Enter the boxnumber .
A prompt for theItem number refersto the box number.Enter the boxnumber .
A prompt for theItem number refersto the box number.Enter the boxnumber.
A prompt for theItem number refersto the box number.Enter the boxnumber.
A prompt for theItem number refersto the box number.Enter the boxnumber .
A prompt for theItem number refersto the box number.Enter the boxnumber.
AccountNumber BoxSetup
Action to take if accountnumber was previouslycollected during call
2707
2708
0 = Use the existingaccount number1 = Ask for a newaccount number
1 = YesO=No
AccountNumber BoxSetup
Repeat number entered forconfirmation?
AccountNumber BoxSetup
2001 Action to take if validaccount number is entered
0 = Return1 = Say ‘Goodbye’2 = Go to another box3 = Hang up
AccountNumber BoxSetup
2002 Box associated withparameter number 2001
(Valid box number)
ACD Box Setup 2520 Number of mailbox thatowns the ACD box
(Valid mailboxnumber)
ACD Box Setup 2521 Action to take when tryingextension
1 = Blind2 = Wait for answer3 = Screen4 = Wait for ring
ACD Box Setup 2522 Criteria by which hunt isstarted
0 = Start hunting fromfirst agent in group1 = Start hunting fromprevious agent
ACD Box Setup 2523 Number of announcementsafter which caller is offeredother options
0 - 99
ACD Box Setup 2524 Rings permitted before noanswer determination
0 - 99
,. -
7 0 =

ti LITE SYSTEM INSTALLATION AND SUPERVISOR GUIDE 9.0 VER. 1
ACD Box Setup
ACD Box Setup
ACD Box Setup
ACD Box Setup
ACD Box Setup
ACD Box Setup
ACD Box Setup
ACD Box Setup
Business HoursSetup
2526
2527
2528
2529
2530
2 5 3 1
2501 to2512
5042
Box default operator duringday service
Box default operator duringnight service
Action to take if allextensions are busy
Box associated withparameter 2527
Action to take if caller electsnot to remain in queue
Box associated withparameter 2529
If call is queued, stateposition in line?
ACD rotation box members
Hour day service begins
(Valid mailboxnumber)
(Valid mailboxnumber)
0 = Queue the call1 = Go to another box
(Valid box number)
0 = Return1 = Say ‘Goodbye’2 = Go to another box3 = Hang up
(Valid box number)
1 = Yes0 = No
(Valid mailboxnumbers)
00-24
A prompt for theItem number refersto the box number.Enter the boxnumber.
A prompt for theItem number refersto the box number.Enter the boxnumber .
A prompt for theItem number refersto the box number.Enter the boxnumber.
A prompt for theItem number refersto the box number.Enter the boxnumber .
A prompt for theItem number refersto the box number.Enter the boxnumber .
A prompt for theItem number refersto the box number.Enter the boxnumber .
A prompt for theItem number refersto the box number.Enter the boxnumber .
A prompt for theItem number refersto the box number.Enter the boxnumber .
A prompt for theItem number refersto the day of theweek. Enter 0(Sunday) through6 (Saturday).
*7 1 .

i‘, LITE SYSTEM INSTALLATION AND SUPERVISOR GUIDE 9.0 VER. 1
Business HoursSetup
(With parameter 5042)Minute day service begins
Business Hours 5044 Hour day service endsSetup
Business HoursSetup
5046 Hour lunch service begins
Business HoursSetup
5047 (With parameter 5046)Minute lunch service begins
Business HoursSetup
5048 Hour lunch service ends 00 - 24
Business HoursSetup
5049 (With parameter 5048)Minute lunch service ends
A prompt for theItem number refersto the day of theweek. Enter 0(Sunday) through6 (Saturday).
00 - 24 A prompt for theItem number refersto the day of theweek. Enter 0(Sunday) through6 (Saturday).
00 - 24
00 - 59
00 - 59
A prompt for theitem number refersto the day of theweek. Enter 0(Sunday) through6 (Saturday).
A prompi for theItem number refersto the day of theweek. Enter 0(Sunday) through6 (Saturday).
A prompt for theItem number refersto the day of theweek. Enter 0(Sunday) through6 (Saturday).
A prompt for the1 Item number refers
to the day of theweek. Enter 0(Sunday) through
Item number refers
week. Enter 0(Sunday) through
7 2 -3

i‘, LITE SYSTEM INSTALLATION AND SUPERVISOR GUIDE 9.0 VER. 1
:,:”
:: : :
Business HoursSetup
5067
Business HoursSetup
5068
I InformationSetup ICall TransferInformationSetup
5002
I Call TransferI
5003InformationSetupCall TransferInformation
informationSetup I
Hour at which greeting is tochange to good evening
(With parameter 5067)Minute at which greeting isto change to good evening
Sequence to initiate aninternal transfer
Sequence to initiate anexternal transfer
Sequence to complete aninternal transfer
Sequence to complete anexternal transfer
Sequence to return from noanswer on an internal call
Sequence to return from noanswer on an external call
Sequence to return frombusy on an internal call
Sequence to return frombusy on an external call
Sequence to return fromcall screening on aninternal call
Sequence to return fromcall screening on anexternal call
00-24
(Refer to technicalbulletin and phonedocumenta t ion)
(Refer to technicalbulletin and phonedocumenta t ion)
(Refer to technicalbulletin and phonedocumenta t ion)
(Refer to technicalbulletin and phonedocumenta t ion)
(Refer to technicalbulletin and phonedocumenta t ion)
(Refer to technicalbulletin and phonedocumenta t ion)
(Refer to technicalbulletin and phonedocumenta t ion)
(Refer to technicalbulletin and phonedocumenta t ion)
(Refer to technicalbulletin and phonedocumenta t ion)
(Refer to technicalbulletin and phonedocumenta t ion)
A prompt for theItem number refersto the day of theweek. Enter 0(Sunday) through6 (Saturday).
A prompt for theItem number refersto the day of theweek. Enter 0(Sunday) through6 (Saturday).
7 3

il, LITE SYSTEM INSTALLATION AND SUPERVISOR GUIDE 9.0 VER. 1
bulletin and phone
5010
5011
Sequence to transfer aninternal 3-way call
Sequence to transfer anexternal 3-way call
Call TransferInformationSetup
Call TransferInformationSetup
Call TransferInformationSetup
Should VP system detectdial tone?
1 =Yes0 = No
Call TransferInformationSetup
5023 Confirmation digits meaning‘Yes’
(Refer to technicalbulletin and phonedocumenta t ion)
Call TransferInformationSetup
Should VP system usetransfer bypass digit?
0 = None1 = First2 = Last
Call TransferInformationSetup
Maximum time for 3-waycall (minutes)
Class ofService Setup
7000 Number of days after whichOld messages are auto-de le ted
0 - 99 A prompt for theItem number refersto the Class ofService number.Enter 0 - 7.
Class ofService Setup
7 0 0 1 Number of days after whichNew messages are auto-de le ted
0 - 99 A prompt for theItem number refersto the Class ofService number.Enter 0 - 7.
Class ofService Setup
7002 Maximum message length(seconds) for a message
0 - 999 A prompt for theItem number refersto the Class ofService number.Enter 0 - 7.
Class ofService Setup
7003 Maximum number ofmessages allowed inmai lbox
0 - 200 A prompt for theItem number refersto the Class ofService number.Enter 0 - 7.
Class ofService Setup
7004 Maximum greeting length(seconds)
0 - 999 A prompt for theItem number refersto the Class ofService number.Enter 0 - 7.
7 4

Class ofService Setup
Class ofService Setup
7005
7006
Class ofService Setup
7007
Class ofService Setup
7008
Class ofService Setup
7009
Class ofService Setup
7010
Class ofService Setup
7 0 1 1
Class ofService Setup
7012
Class of 7013I-Service Setup
:
Caller access to P.A 1 = Yessystem allowed? 0 = No
::; _,:;>: Dial-out allowed?
Maximum number ofpersonal greetings allowed
Play menu after greeting to 1 = Yescallers? 0 = No
Maximum lines allowed tohold for mailbox
Number of times to try 0 - 99extension before returningto queued caller
Say position in line to calls 1 = Yesin queue? 0 = No
Access to Group boxes 1 = Yesal lowed? 0 = No
Supervisor status allowed? 1 = Yes0 = No
0 - 32
1 = Yes0 = No
A prompt for theItem number refersto the Class ofService number.Enter 0 - 7.
A prompt for theItem number refersto the Class ofService number.Enter 0 - 7.
A prompt for theItem number refersto the Class ofService number.Enter 0 - 7.
A prompt for theItem number refersto the Class ofService number..Enter 0 - 7.
8 LITE SYSTEM INSTALLATION AND SUPERVISOR GUIDE 9.0 VER. 1
A prompt for theItem number refersto the Class ofService number.Enter 0 - 7.
A prompt for theItem number refersto the Class ofService number.Enter 0 - 7.
A prompt for theItem number refersto the Class ofService number.Enter 0 - 7.
A prompt for theItem number refersto the Class ofService number.Enter 0 - 7.
A prompt for theItem number refersto the Class ofService number.Enter 0 - 7.
*-75

8 LITE SYSTEM INSTALLATION AND SUPERVISOR GUIDE 9.0 VER. 1
Class ofService Setup
Faxmail receipt allowed? 1 = Yes0 = No
A prompt for theItem number refersto the Class ofService number.Enter 0 - 7.
, : : :“..
,:
Class ofService Setup
Default operator box duringday service hours
(Valid mailboxnumber)
A prompt for theItem number refersto the Class ofService number.Enter 0 - 7 .
Class ofService Setup
(Valid mailboxnumber)
A prompt for theItem number refersto the Class ofService number.Enter 0 - 7.
Default operator box duringnight service hours
Class ofService Setup
7017 When exiting open mailbox,go to box #
(Valid box number) A prompt for theItem number refersto the Class ofService number.Enter 0 - 7.
Class ofService Setup
7018 Digits callers can presswhile holding
I-9.# A prompt for theItem number refersto the Class ofService number.Enter 0 - 7.
Class ofService Setup
7020 to Restricted outcalling7029 numbers
(Any digits) A prompt for theitem number refersto the Class ofService number.Enter 0 - 7.
Directory BoxSetup
2001 Action to take if no digitsare dialed
0 = Return1 = Say ‘Goodbye’2 = Go to another box3 = Hang up
A prompt for theItem number refersto the box number.Enter the boxnumber .
Directory BoxSetup
2002 Box associated withparameter 2001
(Valid box number) A prompt for theItem number refersto the box number.Enter the boxnumber .
Directory BoxSetup
2600 Number of time to playgreet ing
l - 3 A prompt for theItem number refersto the box number.Enter the boxnumber .
7 6 .i

8 LITE SYSTEM INSTALLATION AND S UPERVISOR G UIDE 9.0 V ER. 1
Directory BoxSetup
Directory BoxSetup
Directory BoxSetup
Directory BoxSetup
Directory Box 2605 Maximum number of digits l - 9Setup to collect from callers
GeneralInformationSetup
GeneralInformationSetuo
GeneralInformationSetup
GeneralInformationSetup
GeneralInformationSetup
GeneralInformationSetup
2 6 0 1 Box associated withparameter 2602
(Valid box number)
2602 Action to take if requested 0 = Returnname is not found 1 = Say ‘Goodbye’
2 = Go to another box3 = Hang up
2603 Say box number before 1 =Yestransferring call? 0 = No
2604 Allow callers to hear 1 = Yescomplete directory listing? 0 = No
5017 Fast-forwarded I rewindseconds
o- 10
5024 Technician password Up to 10 digits
5025 Customer password Up to 10 digits
5027
5053
Digits needed to get line for (Refer to technicalexternal call bulletin and phone
documenta t ion)
Store call log to: 0 = None1 = File2 = Printer
5056 (With parameter 5057) 0 - 30Maximum number ofminutes call can last beforebeing rerouted
A prompt for theItem number refersto the box number.Enter the boxnumber .
A prompt for theItem number refersto the box number.Enter the boxnumber.
A prompt for theItem number refersto the box number.Enter the boxnumber.
A prompt for theItem number refersto the-box number.Enter the boxnumber .
A prompt for theItem number refersto the box number.Enter the box
7 7

8 LITE SYSTEM INSTALLATION AND SUPERVISOR GUIDE 9.0 VER. 1
GeneralInformationSetup
GeneralInformationSetup
GeneralInformationSetup
Group BoxSetup
Group BoxSetup
HolidaySchedule Setup
HolidaySchedule Setup
HolidaySchedule Setup
Line InformationSetup
Line InformationSetup
5065
5066
2800
2801 to2850
5050
5 0 5 1
5052
1000
1001
(With parameter 5056) Boxto which calls are re-routed
Exit to DOS hour
Exit to DOS minutes
Maximum length of amessage (seconds) thatcan be sent to this box
Group box members
(With parameter 5051)Holiday month
(With parameter 5050)Holiday date
Box to which calls arerouted during holiday
Box to which calls on thisline are routed during dayservice hours
Box to which calls on thisline are routed during nightservice hours
(Valid box number)
00-23
(Valid box numbers)
00-12
01-31
(Valid box number)
(Valid box number)
(Valid box number)
. . -
A prompt for theItem number refersto the box number.Enter the boxnumber.
A prompt for theItem number refersto the box number.Enter the: boxnumber.
A prompt for theItem number refersto the holidaynumber. Enter 1through 20.
A prompt for theItem number refersto the holidaynumber. Enter 1through 20.
A prompt for theItem number refersto the holidaynumber. Enter 1through 20.
A prompt for theItem number refersto the line number.Enter the linenumber.
A prompt for theItem number refersto the line number.Enter the linenumber .
7 8 ).

: . _ : i
8 LITE SYSTEM INSTALLATION AND SUPERVISOR GUIDE 9.0 VER. 1
A prompt for theItem number refersto the line number.Enter the linenumber .
A prompt for theItem number refersto the line number.Enter the linenumber .A prompt for theItem number refersto the line number.Enter the linenumber.
A prompt for theItem number refersto the Line number.Enter the linenumber .
A prompt for theItem number refersto the line number.Enter the linenumber .
A prompt for theItem number refersto the line number.Enter the linenumber .
A prompt for theItem number refersto the line number.Enter the linenumber .
A prompt for theItem number refersto the line number.Enter the linenumber .
A prompt for theitem number refersto the line number.Enter the linenumber .
Line InformationSetup
Box to which calls on thisline are routed during lunchservice hours
(Valid box number)
Line InformationSetup
Rings before call isanswered during dayservice hours
Line InformationSetup
Rings before call isanswered during nightservice hours
Line informationSetup
Rings before call isanswered during lunchservice hours
Line InformationSetup
1006 Outgoing calls allowed on 1 =Yesthis line? 0 = No
Line InformationSetup
1007 Line belongs to Line Group 1 = YesA ? 0 = No
Line InformationSetup
Line belongs to Line Group 1 = YesB? 0 = No
1008
1009
1010
Line belongs to Line Group 1 = YesC? 0 = No
Line InformationSetup
Line belongs to Line Group 1 =YesD? 0= No
Line InformationSetup
7 9

cil, LITE S YSTEM I NSTALLATION AND S UPERVISOR G UIDE 9.0 VER. 1
Mailbox Setup Mailbox owner’s last name (Digits that will allow A prompt for thethe Dial-by-Name Item number refersdirectory feature to the box number.access this mailbox) Enter the box
number .
Mailbox Setup Action to be taken aftercaller leaves message
0 = Return A prompt for the1 = Say ‘Goodbye’ Item number refers2 = Go to another box to the box number.3 = Hang up Enter the box
number .
Mailbox Setup Box associated withparameter 2001
(Valid box number) A prompt for theItem number refersto the box number.Enter the boxnumber .
Mailbox Setup 2100 Mailbox password (Up to maximum A prompt for thedigits specified during Item number referssetup) to the box number..
Enter the boxnumber .
2101 Sequence to turn onmessage waiting lamp
(See technicalbulletin or phonedocumenta t ion)
A prompt for theItem number refersto the box number.Enter the boxnumber.
Mailbox Setup
2102 Sequence to turn offmessage waiting lamp
(See technicalbulletin or phonedocumenta t ion)
A prompt for theItem number refersto the box number.Enter the boxnumber.
Mailbox Setup
2110 Box associated withparameter 2111
(Valid box number) A prompt for theItem number refersto the box number.Enter the boxnumber.
Mailbox Setup
Mailbox Setup 2111 Action to be taken if callerchooses “other options”
0 = Return A prompt for the1 = Say ‘Goodbye’ Item number refers2 = Go to another box to the box number.3 = Hang up Enter the box
number .
. . -
80 -;.

8 LITE SYSTEM INSTALLATION AND SUPERVISOR GUIDE 9.0 VER. 1
Mailbox Setup
Mailbox Setup 2113
Mailbox Setup 2114
Mailbox Setup 2115
Mailbox Setup 2120
Mailbox Setup 2122
Mailbox has access to onlyHotel guest privileges?
Class of service assignedto mailbox
Mailbox to which thismailbox is a client, if this isa restricted mailbox
Language in which greetingis to play if call is via D.I.D
Type of transfer
Number of rings withinwhich called party mustanswer before systemdetermines a no answercondition
3-way calling used
1 =Yes0 = No
(Valid mailboxnumber)
o-9
0 = None A prompt for the1 = Blind Item number refers2 = Wait for answer to the box number.3 = Screen Enter the box4 = Wait for ring number.
0 = A lways1 = Day only2 = Night only3 = Schedule A4 = Schedule B5 = Schedule C6 = Schedule D
A prompt for theItem number refersto the box number.Enter the boxnumber.
0 = A lways1 = Day only2 = Night only3 = Schedule A4 = Schedule B5 = Schedule C6 = Schedule D
A prompt for theItem number refersto the box number.Enter the boxnumber.You can modifyonly one personaldistribution list forthe mailbox usingthe Teleparameterfeature
A prompt for theItem number refersto the box number.Enter the boxnumber.
A prompt for theItem number refersto the box number.Enter the boxnumber .A prompt for theItem number refersto the box number.Enter the boxnumber.
A prompt for theItem number refersto the box number.Enter the boxnumber .
81 .

Q LITE SYSTEM INSTALLATION AND SUPERVISOR GUIDE 9.0 VER. 1
A prompt for theitem number refersto the box number.Enter the boxnumber .
A prompt for theItem number refersto the box number.Enter the boxnumber
A prompt for theItem number refersto the box number.Enter the boxnumber .
A prompt for theItem number refersto the box number.Enter the boxnumber .
A prompt for theItem number refersto the box number.Enter the boxnumber.
A prompt for theItem number refersto the box number.Enter the boxnumber .
A prompt for theItem number refersto the box number.Enter the boxnumber .
A prompt for theItem number refersto the box number.Enter the boxnumber .
Call transfer schedule 0 = A lways1 = Day only2 = Night only3 = Schedule A4 = Schedule B5 = Schedule C6 = Schedule D
Mailbox Setup 2123
Mailbox Setup 2124
Mailbox Setup 2125
Mailbox Setup 2126
Caller’s name voiced upon 1 = Yesoickup? 0 = No
Record conversation? 1 1 = Yes0 = No
Transfer destination Extension number
Mailbox Setup 2130 (With parameter 2134)Type of pager
0 = None1 = Tone-only pager(no display)2 = Display pager
Mailbox Setup 2 1 3 1 (With parameter 2134)Minutes between calls topaw
00 - 20
Mailbox Setup 2132 (With parameter 2134)Number of times to callpaw
00 - 99
Mailbox Setup 2133 (With parameter 2134)Schedule during which callsshould be sent to pager
0 = A lways1 = Day only2 = Night only3 = Schedule A4 = Schedule B5 = Schedule C6 = Schedule D
,. -
8 2 .;

8 LITE S YSTEM I NSTALLATION AND S UPERVISOR G UIDE 9.0 VER. 1
Mailbox Setup
Mailbox Setup
Mailbox Setup
Mailbox Setup
Mailbox Setup
Mailbox Setup
2134
2 1 4 1
2142
2143
2144
2150
Mailbox owner’s pagernumber
Action to be taken afterpersonal greeting is played
Hours after whichmessages are to be auto-forwarded
(With parameter 2142) Boxto which new messages areto be auto-forwarded
(With parameters 2142 and2143) Schedule duringwhich auto-forwarding is tobe active
Number to call for messagedelivery
(Pager number)
0 = Wait for a digit1 = Begin recording amessage2 = Page the mailboxowner3 = Record amessage, then pagethe mailbox owner
0 - 999
(Valid mailboxnumber)
0 = A lways1 = Day only2 = Night only3 = Schedule A4 = Schedule B5 = Schedule C6 = Schedule D
(Phone or beepernumber)
A prompt for theItem number refersto the box number.Enter the boxnumber.
A prompt for theItem number refersto the box number.Enter the boxnumber .
A prompt for theItem number refersto the box number.Enter the boxnumber .
A prompt for theItem number refersto the box number.Enter the boxnumber.
A prompt for theItem number refersto the box number.Enter the boxnumber .
A prompt for theItem number refersto the box number.Enter the boxnumber .
You can modifyonly one messagedelivery set up forthe mailbox usingthe Teleparameterfeature.
,..-8 3

8 LITE SYSTEM INSTALLATION AND SUPERVISOR GUIDE 9.0 VER. 1
Wailbox Setup
Mailbox Setup
Mailbox Setup
Mailbox Setup
2 1 5 1
2152
2153
2154
,With parameter 5150)Vumber of times to run thenessage delivery cycle.
[With parameter 2150)Number of times number is:o be called
(With parameter 5152)Minutes in between calls tonumber
(With parameter 5150)Schedule during whichmessage delivery is active
0 - 99
2 - 99
0 = A lways1 = Day only2 = Night only3 = Schedule A4 = Schedule B5 = Schedule C6 = Schedule D
I. -
4 prompt for theItem number refers:o the box number.Enter the boxlumber.
You can modify3nly one messagedelivery set up forthe mailbox usingthe Teleparameterfeature.
A prompt for theItem number refersto the box number.Enter the boxnumber .
You can modifyonly one messagedelivery set up for.the mailbox usingthe Teleparameterfeature.
A prompt for theItem number refersto the box number.Enter the boxnumber .You can modifyonly one messagedelivery set up forthe mailbox usingthe Teleparameterfeature.
A prompt for theItem number refersto the box number.Enter the boxnumber.
You can modifyonly one messagedelivery set up forthe mailbox usingthe Teleparameterfeature.
_’
.
8 4 -,

8 LITE SYSTEM INSTALLATION AND SUPERVISOR GUIDE 9.0 VER. 1
PMailbox Setup
, . , q . . ,
: :
Mailbox Setup
’ OtherCustomizationsSetup
OtherCustomizationsSetup
OtherCustomizationsSetup
OtherCustomizationsSetup
OtherCustomizations
Customizations
Customizations
Personal distribution list 1enabled for mailbox?
2160 to Personal distribution list 12179 members
5018
5019
5 0 2 1
5022
5076 to5079
5086 to5089
Maximum box length callercan dial
Seconds of initial pausebefore main greeting isp layed
When VP system shouldplay time and date
Play called party’s namewhen call is answered?
Announce call when call isanswered?
Custom field (use underdirection of technicalsupport)Debug field (use underdirection of technicalsupport)
1 =Yes0 = No
(Valid mailboxnumbers)
A prompt for theItem number refersto the box number.Enter the boxnumber .You can modifyonly one personaldistribution list forthe mailbox usingthe Teleparameterfeature
A prompt for theItem number refersto the box number.Enter the boxnumber .
2-4
O-IO
0 = When caller asks1 = Before eachmessage2 = After eachmessage
1 = Yes0= No
1 = Yes0 = No
i-j--
a 5

@I LITE SYSTEM INSTALLATION AND SUPERVISOR GUIDE 9.0 VER. 1
Question BoxSetup
Question BoxSetup
Question BoxSetup
Question BoxSetup
Question BoxSetup
Question BoxSetup
Question BoxSetup
Question BoxSetup
Question BoxSetup
2 0 0 1
2002
2400
2 4 0 1
2402
2403
2404
2410
2 4 1 1
tction to take afterquestions are answered
Box associated withparameter 2404
Number of mailbox thatowns the Question box
Replay digit answers forverification?
Voice answers? (versusdigit)
Trigger owner mailboxnotification of answers inthis box?
Digits caller can press toexit this box
Answer type for Question1 0
Answer type for Question 1
0 = Return1 = Say ‘Goodbye’2 = Go to another box3 = Hang up
(Valid box number)
(Valid mailboxnumber)
1 = Yes0= No
1 = Yes0 = No
1 = Yes0 = No
0 - 9, *, #
0 = Voice1 = Digits
0 = Voice1 = Digits
,. -
A prompt for theItem number refersto the box number.Enter the boxnumber .
A prompt for theItem number refersto the box number.Enter the boxnumber .
A prompt for theItem number refersto the box number.Enter the boxnumber .
A prompt for theItem number refersto the box number..Enter the boxnumber .
A prompt for theItem number refersto the box number.Enter the boxnumber .
A prompt for theItem number refersto the box number.Enter the boxnumber.
A prompt for theItem number refersto the box number.Enter the boxnumber .
A prompt for theItem number refersto the box number.Enter the boxnumber .
A prompt for theItem number refersto the box number.Enter the boxnumber.
8 6 .-i:

4 LITE SYSTEM INSTALLATION AND SUPERVISOR GUIDE 9.0 VER. 1
A prompt for theItem number refersto the box number.Enter the boxnumber .
A prompt for theItem number refersto the box number.Enter the boxnumber.
A prompt for theItem number refersto the box number.Enter the boxnumber .
A prompt for theItem number refersto the box number.Enter (he boxnumber .
A prompt for theItem number refersto the box number.Enter the boxnumber.
A prompt for theItem number refersto the box number.Enter the boxnumber .
A prompt for theItem number refersto the box number.Enter the boxnumber .
A prompt for theItem number refersto the box number.Enter the boxnumber .
A prompt for theItem number refersto the box number.Enter the boxnumber .
Question BoxSetup
Answer type for Question 2 0 = Voice1 = Digits
2412
Question BoxSetup
2413 Answer type for Question 3 0 = Voice1 = Digits
Question BoxSetup
2414 Answer type for Question 4 0 = Voice1 = Digits
Question BoxSetup
2415 Answer type for Question 5 0 = Voice1 = Digits
Question BoxSetup
2416 Answer type for Question 6 0 = Voice1 = Digits
Question BoxSetup
2417 Answer type for Question 7 0 = Voice1 = Digits
Question BoxSetup
2418 Answer type for Question 8 0 = Voice1 = Digits
Question BoxSetup
2419 Answer type for Question 9 0 = Voice1 = Digits
Question BoxSetup
2420 If the answer type is digits,minimum number of digitsthat must be entered forvalid answer to question 10.
1-999
8 7

ci7, LITE SYSTEM INSTALLATION AND SUPERVISOR GUIDE 9.0 VER. 1
A prompt for theItem number refersto the box number.Enter the boxnumber .
A prompt for theItem number refersto the box number.Enter the boxnumber .
A prompt for theItem number refersto the box number.Enter the boxnumber.
A prompt for theItem number refersto the box number..Enter the boxnumber .
A prompt for theItem number refersto the box number.Enter the boxnumber .
A prompt for theItem number refersto the box number.Enter the boxnumber .
A prompt for theItem number refersto the box number.Enter the boxnumber.
A prompt for theItem number refersto the box number.Enter the boxnumber .
A prompt for theItem number refersto the box number.Enter the boxnumber .
Question BoxSetup
1 - 999If the answer type is digits,minimum number of digitsthat must be entered forvalid answer to question 1.
If the answer type is digits,minimum number of digitsthat must be entered forvalid answer to question 2.
If the answer type is digits,minimum number of digitsthat must be entered forvalid answer to question 3.
If the answer type is digits,minimum number of digitsthat must be entered forvalid answer to question 4.
If the answer type is digits,minimum number of digitsthat must be entered forvalid answer to question 5.
If the answer type is digits,minimum number of digitsthat must be entered forvalid answer to question 6.
If the answer type is digits,minimum number of digitsthat must be entered forvalid answer to question 7.
If the answer type is digits,minimum number of digitsthat must be entered forvalid answer to question 8.
If the answer type is digits,minimum number of digitsthat must be entered forvalid answer to question 9.
2 4 2 1
Question BoxSetup
2422 1 - 999
Question BoxSetup
2423 1 - 999
Question BoxSetup
2424 1 - 999
Question BoxSetup
2425 1 - 999
Question BoxSetup
2426 1 - 999
Question BoxSetup
2427 1 - 999
Question BoxSetup
2428 1-999
2429 1 - 999Question BoxSetup
,. -
8 8 _..

ii7, LKE SYSTEM INSTALLATION AND SUPERVISOR GUIDE 9.0 VER. 1
Question BoxSetup
Question BoxSetup
Question BoxSetup
Question BoxSetup
Question BoxSetup
Question BoxSetup
Question BoxSetup
Question BoxSetup
Question BoxSetup
2430
2 4 3 1
2432
2433
2434
2435
2436
2437
2438
If the answer type is digits,maximum number of digitsthat can be entered for validanswer to question 10.
If the answer type is digits,maximum number of digitsthat can be entered for validanswer to question 1.
If the answer type is digits,maximum number of digitsthat can be entered for validanswer to question 2.
If the answer type is digits,maximum number of digitsthat can be entered for validanswer to question 3.
If the answer type is digits,maximum number of digitsthat can be entered for validanswer to question 4.
If the answer type is digits,maximum number of digitsthat can be entered for validanswer to question 5.
If the answer type is digits,maximum number of digitsthat can be entered for validanswer to question 6.
If the answer type is digits,maximum number of digitsthat can be entered for validanswer to question 7.
If the answer tyise is digits,maximum number of digitsthat can be entered for validanswer to question 8.
1 - 999
1 - 999
1 - 999
1 - 999
1 - 999
1 - 999
1 - 999 .
1 - 999
A prompt for theItem number refersto the box number.Enter the boxnumber .
A prompt for theItem number refersto the box number.Enter the boxnumber .
A prompt for theItem number refersto the box number.Enter the boxnumber.
A prompt for theItem number refersto the box number.Enter ihe boxnumber .
A prompt for theItem number refersto the box number.Enter the boxnumber .
A prompt for theItem number refersto the box number.Enter the boxnumber.
A prompt for theItem number refersto the box number.Enter the boxnumber .
A prompt for theItem number refersto the box number.Enter the boxnumber .
A prompt for theItem number refersto the box number.Enter the boxnumber .
8 9 .

8 LITE SYSTEM INSTALLATION AND SUPERVISOR GUIDE 9.0 VER. 1
Question Box
Question BoxSetup
I
Question Box 1 2441Setup
Question BoxSetup
2442
Question BoxSetup
2443
Question BoxSetup
2444
If the answer type is digits,maximum number of digitsthat can be entered for validanswer to question 9.
Number of seconds ofsilence before VP systemdetermines caller hasfinished entering digits orspeak ing the answer forquestion 10.
Number of seconds ofsilence before VP systemdetermines caller hasfinished entering digits orspeaking the answer forquestion 1.
Number of seconds ofsilence before VP systemdetermines caller hasfinished entering digits orspeaking the answer forquestion 2.
Number of seconds ofsilence before VP systemdetermines caller hasfinished entering digits orspeaking the answer forquestion 3.
Number of seconds ofsilence before VP systemdetermines caller hasfinished entering digits orspeaking the answer forquestion 4.
Number of seconds ofsilence before VP systemdetermines caller hasfinished entering digits orspeaking the answer forquestion 5.
1 - 999
1-99
1-99
1-99
1 - 99
1 - 99
1-99
A prompt for theItem number refersto the box number.Enter the boxnumber .
A prompt for theItem number refersto the box number.Enter the boxnumber .
A prompt for theitem number refersto the box number.Enter the boxnumber .
A prompt for theItem number refersto the box number.Enter the boxnumber .
A prompt for theItem number refersto the box number.Enter the boxnumber .
A prompt for theItem number refersto the box number.Enter the boxnumber.
A prompt for theItem number refersto the box number.Enter the boxnumber .

& LITE SYSTEM INSTALLATION AND SUPERVISOR GUIDE 9.0 VER. 1
Question BoxSetup
Question BoxSetup
Question BoxSetup
Question BoxSetup
Routing BoxSetup
Routing BoxSetup
Routing BoxSetup
Routing BoxSetup
Routing BoxSetup
2447
2448
2449
2001
2002
2300
2 3 0 1
2302
Number of seconds ofsilence before VP systemdetermines caller hasfinished entering digits orspeaking the answer forquestion 6.
Number of seconds ofsilence before VP systemdetermines caller hasfinished entering digits orspeaking the answer forquestion 7.
Number of seconds ofsilence before VP systemdetermines caller hasfinished entering digits orspeaking the answer forquestion 8.
Number of seconds ofsilence before VP systemdetermines caller hasfinished entering digits orspeaking the answer forquestion 9.
Action to take if no digitsd ia led
Box associated withparameter 2001
Single-digit dialingdestination for digit 0
Single-digit dialingdestination for digit 1
Single-digit dialingdestination for digit 2
1-99
1-99
1-99
0 = Return1 = Say ‘Goodbye’2 = Go to another box3 = Hang up
(Valid box number)
(Valid box number)
(Valid box number)
(Valid box number)
4 prompt for theitem number refers:o the box number.Enter the boxlumber .
4 prompt for theItem number refersto the box number.Enter the boxnumber.
A prompt for theItem number refersto the box number.Enter the boxnumber.
A prompt for theItem number refersto the box number.Enter the boxnumber .
A prompt for theItem number refersto the box number.Enter the boxnumber .
A prompt for theItem number refersto the box number.Enter the boxnumber .
A prompt for theItem number refersto the box number.Enter the boxnumber .
,.-9 1

8 LITE SYSTEM INSTALLATION AND SUPERVISOR GUIDE 9.0 VER. 1 B
Technical 5063
I I
Hour at which systemInformation automatically updates MWISetup
Technical 5064InformationSetuo I I
(With parameter 5063)Minute at which systemautomaticallv uodates MWI
VM.CMG Se tup
VM.CMG Setup
9001
9003
t ransbypass=
d tmfon=
VM.CMG Se tupI
9004I
ignorenons i lence
VM.CMG Setup
VM.CMG Setup
9007
9 0 1 1
internal=
paget ime=
VM.CMG Setup 9012 ) pager re t ry=
VM.CMG Setup 9014 maxpassword leng th=
VM.CMG Setup 9015 greetsil=
VM.CMG SetupI
9017I
notifyreps=
VM.CMG Setup 9026 responset ime=
VM.CMG Setup 9099 pa.init=
VM.CMG Setup~ ~~ 1 9100 ( pa.cancel=
VM.CMG Se tup ( 9101 ( tutorialreps=
VM.CMG Setup 9102 pa.repeats=
See the installationManual.
See the InstallationManual.
See the InstallationManual.
See the InstallationManual. I
See the InstallationManual. ~ -TSee the InstallationManual. I
See the InstallationManual. I
See the InstallationManual. I
See the InstallationManual. ISee the InstallationManual. ISee the InstallationManual. I
94 E

#J LITE SYSTEM INSTALLATION AND SUPERVISOR GUIDE 9.0 VER. 1
lunchoperatorisday See the Installation
VM.CMG Setup 9126
VM.CMG Setup 9127
VM.CMG Setup 9135
VM.CMG Setup 9144
VM.CMG Setup 9146
VM.CMG Setup 9150
ignoredisconnects
n o n a m e t r a n s f e r
norecordbeep
repea tmw=
deleteafterfwd
remotepause=
See the InstallationManual.
See the InstallationManual.
See the InstallationManual.
See the InstallationManual.
See the InstallationManual.
See the InstallationManual.

il, LITE SYSTEM INSTALLATION AND SUPERVISOR GUIDE 9.0 VER. 1
VM.CMG Setup 9160 ringreset=
VM.CMG Setup 9 1 6 1 notifyrings=
See the InstallationManual.
See the InstallationManual.
VM.CMG Setup 9162 assumepagecon f i rm See the InstallationManual.
VM.CMG Setup 9163 assumehold= See the InstallationManual.
VM.CMG Setup 9165 externalfax See the InstallationManual.
VM.CMG Setup 9166 faxtimeout= See the InstallationManua l .
VM.CMG Setup 9167 nopcbeep See the InstallationManual.
VM.CMG Setup 9174 cdspeed= See the InstallationManual.
I VM.CMG SetupI
9182I
ignoreinitialdisconnectI
See the InstallationManual. I I
I VM.CMG Se tupI
9190I
lineaccessontransferI
See the InstallationManual. I I
VM.CMG Setup 9192 24hourc lockd isp lay See the InstallationManual.
VM.CMG Setup 9203 linesconnecfed= See the InstallationManua l .
VM.CMG Setup 9206 qboxposcon f i rm See the InstallationManual.
I9207
Iqboxdatapr in t See the Installation
Manual. I
See the Installation
9 6 .

@ LITE SYSTEM INSTALLATION AND SUPERVISOR GUIDE 9.0 VER. 1
VM.CMG Setup ( 9219 1 cp.dialtone=
VM.CMG Setup 9220 cp. busy=
VM.CMG Setup 9 2 2 1 cp.invalid=
VM.CMG SetupI
9222 cp.dnd=
VM.CMG Setup
VM.CMG Setup
9223
9224
cp.ans=
cp.initring=
VM.CMG Setup 1 9225 1 cp.interring=
VM.CMG Setup 9232 sendd isconnec t=
VM.CMG Setup ) 9256 1 p laybackde lay=
VM.CMG SetupI g273 I
cp.disconnect=
VM.CMG Setup 9282 qboxdataprinteject
VM.CMG Setup 9283 qboxusecon f i rmnumbers
VM.CMG Setup 1 9296 1 mboxdefaultdigit=
VM.CMG Setup 9 3 0 1 greet ing .noanswer=
See the InstallationManual. I I
See the Installation 1 IManual.
See the InstallationManual.
See the Installation 1 IManual. ! - .
See the InstallationManual. I
See the InstallationManual. I I
See the installationManual.
97

8 LITE SYSTEM I NSTALLATION AND S UPERVISOR G UIDE 9.0 VER. 1
VM.CMG Setup
VM.CMG Se tup
9302 greeting.busy=
9303 greet ing.dnd=
See the installationManual.
See the InstallationManual.
VM.CMG Setup 9337 noaccount in log See the InstallationManual.
VM.CMG Setup 9339 greeting.night= See the InstallationManual.
VM.CMG Setup 9340 faxpause= See the InstallationManual.
VM.CMG Setup 9342 samecallfaxok See the InstallationManual.
VM.CMG Setup 9343 mwonreps= See the InstallationManual.
VM.CMG Setup 9344 mwoffreps= See the InstallationManual.
( 9346 ( faxprefix= 1 zz Installation (
VM.CMG Setup 9349 faxgeneraldelivery= See the InstallationManual.
VM.CMG Setup 9 3 5 1 initialpauseidp= See the InstallationManual.
VM.CMG SetupI
9352 directoryidp= See the InstallationManual.
VM.CMG Setup 9353 messagepause t ime= See the InstallationManual.
VM.CMG Se tup 9354 sharefaxports See the InstallationManual.
VM.CMG Setup 9359 flowcontrol= See the InstallationManual.
VM.CMG Setup
VM.CMG Setup
9360 fastacdtransfer
9 3 6 1 pmsviatextfiles
See the InstallationManual.
See the InstallationManual.
VM.CMG Setup 9364 serv iceobservecode= See the InstallationManual.
VM.CMG Setup 9365 acdpause=
VM.CMG Setup 9383 wakeupr ings=
See the InstallationManual.
See the InstallationManual.
,. -
98 .>

cil LITE SYSTEM INSTALLATION AND SUPERVISOR GUIDE 9.0 VER. I
VM.CMG Setu
that controls the number of
authorizing the software forcertain phone system-related features.
See the InstallationManual.
See the installationManual.
See the InstallationManual. ISee the InstallationManual.-
(Code supplied by Code found onKey Voice) invoice.
(Code supplied byKey Voice)
Code found oninvoice.
(Code supplied byKey Voice)
(Code supplied byKey Voice)
Code found oninvoice.
Code found oninvoice.
The following table identifies additional values you can specify to indicate special charactersor information in some fields:
9 9


8 LUTE SYSTEM INSTALLATION AND SUPERVISOR GUIDE 9.0 VER. 1
values. For information on day-to-day modifications that can be made using Supervisormenu options (and not the Teleparameter feature), refer to section 3.
_i,..;:Ir
:‘, 2.8 Upgrading 2 Port Systems to 4 Ports
You can upgrade 2-port Lite systems to filnction as 4-port systems. Contact the Lite system ,sales representative for information. When you purchase a system port upgrade, you areprovided a code number (located on the invoice), which you must enter into the Lite system.This code enables the additional 2 ports for service.
To enter the upgrade code, use teleparameter 400 I as described earlier in this document.When prompted, simply enter the code provided on the invoice.
. -.
::.
,.-101

8 LITE SYSTEM INSTALLATION AND SUPERVISOR GUIDE 9.0 V ER. 1
‘Z
!.‘I
i
. . .
3. System Supervisor InstructionsThe procedures provided in this section indicate how a system supervisor can make changesto the system setup by calling into the system using a telephone. Each of these procedurescan also be performed by accessing the Lite system software screens through a serialconnection to a laptop PC. For procedures on making modifications through the screeninterface, refer to procedures earlier in this document, or to the Installation and MaintenanceManual or Supervisor’s Guide.
3.1 Working with Mailboxes
3.1.1 Adding, Deleting, or Modifying a Mailbox l -
1 . From a telephone, call into voice mail and log into the supervisor mailbox 70. Thesystem voices the Main menu:
“To listen to your messages press 1. To send a message press 2. To change your optionspress 3. ”
,. -103

#I LITE SYSTEM INSTALLATION AND SUPERVISOR GUIDE 9.0 VER. 1
2. To access the Supervisor menu, press 6 (this option is not voiced). The system voicesthe Supervisor menu options:
Supervisor Menu
For Ma i lbox Admin is t ra t ion
For Routing Box Administration
For Ques t ion Box Admin is t ra t ion
For Port Administration
To Change the Sys tem Broadcas t Message
To Change the Voice Mail Day I Night Service
To Change the System Time
To Change the System Date
To Mod i f y Sys tem Paramete rs
To Perform First-Time Setup
Press 1
Press 2
Press 3
Press 4
Press 5
Press 6
Press 7
Press 8
Press 9
Press 0
3 . From the Supervisors menu, press 1 for Mailbox Administration.
4 . When prompted, enter the number of the mailbox you want to add, modify, or delete.The system voices the number back to you.
5 . When prompted, press 1 to confirm the number you entered or press # if the number you -.
entered was incorrect. Once you press 1 to confirm, the system voices the Mailbox menuoptions:
Mailbox Menu
To Add Press 1
T o D e l e t e Press 2
To Modify Press 3
To Suspend Press 4
To Res to re Press 5
To Reset Press 6
To Exit Press #
,. -
104 .
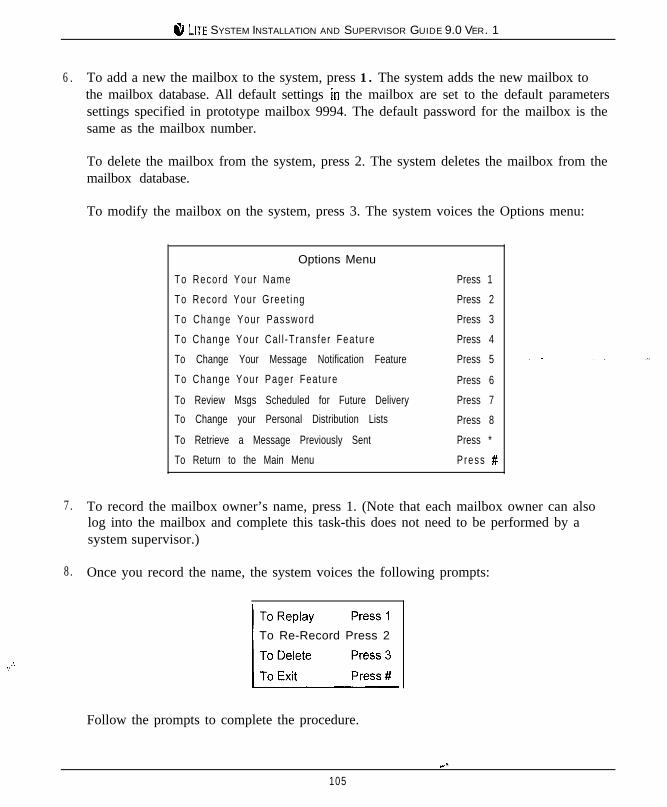
ci7, LKE SYSTEM INSTALLATION AND SUPERVISOR GUIDE 9.0 VER. 1
6 . To add a new the mailbox to the system, press 1. The system adds the new mailbox tothe mailbox database. All default settings in the mailbox are set to the default parameterssettings specified in prototype mailbox 9994. The default password for the mailbox is thesame as the mailbox number.
To delete the mailbox from the system, press 2. The system deletes the mailbox from themailbox database.
To modify the mailbox on the system, press 3. The system voices the Options menu:
Options Menu
To Record Your Name
To Record Your Greet ing
To Change Your Password
To Change Your Ca l l -T rans fer Feature
To Change Your Message Notification Feature
To Change Your Pager Feature
To Review Msgs Scheduled for Future Delivery
To Change your Personal Distribution Lists
To Retrieve a Message Previously Sent
To Return to the Main Menu
Press 1
Press 2
Press 3
Press 4
Press 5
Press 6
Press 7
Press 8
Press *
Press #
7 . To record the mailbox owner’s name, press 1. (Note that each mailbox owner can alsolog into the mailbox and complete this task-this does not need to be performed by asystem supervisor.)
8 . Once you record the name, the system voices the following prompts:
.k‘_’
To Re-Record Press 2
Follow the prompts to complete the procedure.
..-105

8 LITE SYSTEM I NSTALLATION AND S UPERVISOR G UIDE 9.0 V ER. 1
9 . To record a personal greeting for the mailbox, press 2. You can record up to 10 personalgreetings for the mailbox (0 through 9). (Note that each mailbox owner can also log intothe mailbox and complete this task-this does not need to be performed by a systemsupervisor.) -7
.iIO. Once you record a greeting, the system voices the following prompts:
To Re-Record the Gree t ing
To Delete the Greeting
To Choose a New Greeting
Press 1
Press 2
Press 3
Press 5
Press #
Follow the prompts to complete the procedure.
1 1. To change the mailbox password, press 3. Note that to change the password, you mustfirst enter the current password when prompted by the system. By default, the mailboxpassword is the same as the mailbox number. (Also note that each mailbox owner canlog into the mailbox and complete this task-this does not need to be performed by asystem supervisor.)
-.
Once you enter a new mailbox password and confirm the entry as prompted, the systemvoices a prompt informing you that the new password will be in effect the next time themailbox is accessed.
12. To change the call transfer feature, press 4. (Note that each mailbox owner can also loginto the mailbox and complete this task-this does not need to be performed by a systemsupervisor.)
13. The system voices a prompt identifjGng the current call transfer set up, then voices thecall transfer options:
Press 1 if you would like to change the number
Follow the prompts to complete the procedure. .I. -
106 .:

: .
...:. , . ;
c‘, LITE SYSTEM INSTALLATION AND SUPERVISOR GUIDE 9.0 VER. 1
14. To change the message notification feature, press 5. (Note that each mailbox owner canalso log into the mailbox and complete this task-this does not need to be performed by asystem supervisor.)
15. The system voices a prompt identifying the current message notification setup, thenvoices the notification options:
Press 1 if you would like to change the number
Follow the prompts to complete the procedure.
16. To change the pager feature, press 6. (Note that each mailbox owner can also log intothe mailbox and complete this task-this does not need to be performed by a systemsupervisor.)
17. The system voices a prompt identifying the current pager set up, then voices the pagingoptions:
Press 1 if you would like to change the number
Press *to turn this feature on or off, or
Press # if you are satisfied
Follow the prompts to complete the procedure.
18. To review messages scheduled for future delivery, press 7. (Note that each mailboxowner can also log into the mailbox and complete this task-this does not need to beperformed by a system supervisor.)
107

8 LKE SYSTEM INSTALLATION AND SUPERVISOR GUIDE 9.0 VER. 1
19. The system voices a prompt identifying any message scheduled for future delivery, thenvoices the options:
To Hear the Next Message (scheduled for future delivery)Xl .Follow the prompts to complete the procedure.
3.2 Working with Routing Boxes
3.2.1 Understanding the Routing Box Setup
The Lite system is pre-configured with 3 Routing boxes to process calls. Routing box 800answers calls during office open business hours (specified as “day service” hours during setLIP), box 801 answers calls after day service hours, and box 821 routes calls after they havealready passed through box 800 or 80 I.
During set up, the following greetings were recorded in Routing boxes 800, SO 1, and 82 I :
800 G r e e t i n g 0
800 Greeting 1
Office Open greeting and call routing options
Holiday greeting and call routing options
801 G r e e t i n g 0 Office Closed greeting and call routing options
801 Greeting 1
821 G r e e t i n g 0
Holiday greeting and call routing options
Call routing options ;.:. : :_-.
Typically, companies offer more extensive call routing options to callers during open hoursthan during closed hours. Often, single-digit call routing (for example, I‘... Press 2 for
108 .>

8 LITE SYSTEM INSTALLATION AND SUPERVISOR GUIDE 9 . 0 VER. 1
Sales.. . “) is not offered during office closed hours, therefore the prompts and call routingoptions differ between box 800 and 80 I.
. . . .I+‘,To accommodate the fact that a holiday lasts a full 24 hours, and thus holiday calls areanswered by both box 800 and 801 throughout those 24 hours, a holiday greeting is providedin both box 800 and 801.
Box 800, Greeting 0 Example:
“Welcome to [Company]. If you know the extension number of the person to ~~I70117 you wantto speak, dial it now. For a directory, press star. Or press zero for the operator. ”
Note: If the system is set up to provide callers single-digit call routing options(“. Press 2 for Sales.. .‘3, those options are also voiced to callers during thisgreet ing.
Box 800, Greeting 1 Example:
“[Company] is closed today for the holiday. To leave a message for a speciJic individual,dial the party ‘s extension now. For a directory, press star. If you would like to leave yourmessage with the operator, press zero now. ”
Box 801, Greeting 0 Example:
_’ “[Company] is presently closed. To leave a message for a speciJc individual, dial theparty’s extension now. For a directory, press star. Ifyou would like to leave your messagewith the operator, press zero now. ”
Box 801, Greeting I Example:
“[Company] is closed today for the holiday. Td Ieave a message for a spec$c individual,dial the party 3 extension now. For a directory, press star. If you wouId like to leave yourmessage with the operator, press zero now. ”
,.:::‘::
Box 821, Greeting 0 Example:
“If you know the extension number of the person to whom you want to speak, dial it now. Fora directory, press star. Or press zero for the operator. ”
c-109

& LIT-E SYSTEM INSTALLATION AND SUPERVISOR GUIDE 9.0 VER. 1
Note: If the system is set up to provide callers single-digit call routing options(“. Press 2 for Sales.. ‘3, those options are also voiced to callers during thisgreet ing.
Other Greetings
Up to IO different greetings can be recorded and stored in each Routing box. Procedures forrecording additional greetings a’nd changing the currently active greeting in each box areprovided later in this section. The chart below is provided for you to note any additionalgreetings set up on the system:
Box GreetingNumber
Greeting
i -
110 .*

8 LITE S YSTEM I NSTALLATION AND S UPERVISOR G UIDE 9.0 VER. 1
3.22 Recording Routing Box Greetings or Changing CurrentlyActive Greetings
1 . From a telephone, call into voice mail and log into the supervisor mailbox 70. Thesystem voices the Main menu:
“To listen to your messages press 1. To send a message press 2. To clmnge yoaw optionspress 3. ”
2 . Press 3 to change options. The system voices the Options menu:
Options MenuTo Record Your Name
To Record Your Greet ing
To Change Your Password
To Change Your Ca l l -T rans fer Feature
To Change Your Message Notification Feature
To Change Your Pager Feature
To Review Msgs scheduled for Future Delivery
To Change Your Personal Distribution Lists
To Retrieve a Message Previously Sent
To Return to the Main Menu
Press 1
Press 2
Press 3
Press 4
Press 5
Press 6
Press 7
Press 8
Press *
P r e s s #
3 . From the Options menu, press 2.
4 . When prompted, enter the number of the Routing box whose greeting you want tochange.
.’ r‘: ,.-
. . -111

@ LITE SYSTEM INSTALLATION AND SUPERVISOR GUIDE 9.0 VER. 1
5 . When prompted, press 1 to confirm the number you entered or press # if the number youentered was incorrect. Once you press 1 to confirm, the system voices the followingoptions, which relate to the currently active greeting:
..c
To Replay the Greeting Press 1
To Re-Record the Gree t ing Press 2
To Delete the Greeting Press 3
To Choose a New Greeting Press 5
To Exit P r e s s #
6 . If you intend to re-record the greeting, first press 1 to replay it. By replaying the greetingyou can 1) ensure you are re-recording the greeting you intended to modify, and 2) noteall the call routing options that are currently provided in the greeting so you can restatethe appropriate call routing options in the new greeting you record (for example,“...Press 2for Sules... “). Note that you can modify the single-digit call routing optionsby following the procedure provided later in this section.
1 - .
7 . To re-record the greeting, press 2. The system prompts you to enter the number of thegreeting you want to re-record. Enter the greeting number (0 through 9). Then, followthe prompts to complete the procedure.
8 . To choose a new greeting to play as the currently active greeting, press 5. The systemprompts you to enter the number of the greeting you would like to activate or to press starfor the currently active greeting. If you press *, the system voices the currently activegreeting number and greeting, then re-voices the options:
To Replay the Greeting Press 1
To Re-Record the Gree t ing Press 2
To Delete the Greeting Press 3
To Choose a New Greeting Press 5
To Exit P r e s s #
9 . Once you press 5 and enter a new greeting number, the system voices a confirmationprompt stating the greeting number and voicing the now-active greeting.
e--
112 i

.8 LITE SYSTEM INSTALLATION AND SUPERVISOR GUIDE 9.0 VER. 1
3.2.3 Changing the Single-Digit Call Routing
The Lite system can be set up to voice greetings to callers that include single-digit callrouting options, such as, “IVess 2 for Sales... ” On a system set up this way, a call istransferred to a certain mailbox when the caller presses 2 during or after the greeting. Youcan control the digit(s) callers can dial and the route their calls will subsequently take usingthe following procedure.
Note that if you use the following procedure to change the single-digit call routing set up, you’must update the Routing box greeting to relay new instructions to the caller. Use theprocedure in section 3.2.2 to update the greeting as necessary.
1 . From a telephone, call into voice mail and log into the supervisor mailbox 70. Thesystem voices the Main menu:
“To listen to your messages press 1. To send a message press 2. To change your optionspress 3. ” 4 I.
2 . To access the Supervisor menu, press 6 (this option is not voiced). The system voicesthe Supervisor menu options:
Supervisor MenuFor Ma i lbox Admin is t ra t ion
For Routing Box Administration
For Question Box Administration
For Port Administration
To Change the Sys tem Broadcas t Message
To Change the Voice Mail Day I Night Service
To Change the System Time
To Change the System Date
To Mod i f y Sys tem Paramete rs
To Perform First-Time Setup
To Exit
Press 1
Press 2
Press 3
Press 4
Press 5
Press 6
Press 7
Press 8
Press 9
P r e s s 0
Press #
3 . From the Supervisors menu, press 2 for Routing box Administration.
4 . When prompted, enter the number of the Routing box with which you want to work.
c-113 .

8 LITE SYSTEM INSTALLATION AND SUPERVISOR GUIDE 9.0 VER. 1
5 . When prompted, press 1 to corlfirm the number you entered or press # if the number youentered was incorrect. Once you press 1 to confirm, the system voices the Routing Boxadministration menu options:
Routing Box Menu
To Add Press 1
T o D e l e t e Press 2
To Modify Press 3
To Exit Press #
6 . To make modificatiorls to the Routing box, press 3. The system voices the modificationoptions:
To Change the Greet ing Press 1
To Change the Rout ing Press 2
To Exit Press #
7 . To change the routing structure, press 2. The system voices the prompt, “For digits zerothrough nine, please enter the digit, or press *for special routing options. ”
8 . Press the digit for which you want to modify the call routing. The system voices aprompt identifying the current call routing set up for the digit.
9 . When prompted, press 1 to change the routing for the digit. Then, when prompted, enterthe number of the box to which you now want callers who press the digit to route. Thesystem voices a prompt stating the new call routing structure.
Note that you can make special call routing refinements by pressing * in step 8 above.The system voices the following special routing options:
To Change the Destination for the Star Digit Press *
To Change the Destination for the Pound Digit Press #
To Change the No Digits Destination Press 1
To Change the invalid Digit Destination Press 2
To Change the Voice Detected Destination Press 3
114 .:

ti LITE SYSTEM INSTALLATION AND SUPERVISOR GUIDE 9.0 VER. 1
. )
;::
Once you access this menu, be advised that you must not press # to exit it, since the # keyinvokes a change to the destination for the pound key. If you want to return to theprevious menu, simply make no entry when you hear the special routing options prompt.
3.3 General System Maintenance
3.3.1 Enabling or Disabling a Port
1 . From a telephone, call into voice mail and log into the supervisor mailbox 70. Thesystem voices the Main menu:
“To listen to yous messages press 1. To send a message press 2. To change your optionspress 3. ” a -.
2 . To access the Supervisor menu, press 6 (this option is not voiced). The system voicesthe Supervisor menu options:
Supervisor MenuFor Ma i lbox Admin is t ra t ion
For Routing Box Administration
For Question Box Administration
For Port Administration
To Change the System Broadcast Message
To Change the Voice Mail Day I Night Service
To Change the System Time
To Change the System Date
To Mod i f y Sys tem Paramete rs
To Perform First-Time Setup
To Exit
Press 1
Press 2
Press 3
Press 4
Press 5
Press 6
Press 7
Press 8
Press 9
Press 0
Press #
3 . From the Supervisors menu, press 4 for Port Administration.
4 . When prompted, enter the number of the line with which you want to work.,. -
115

$4 LITE SYSTEM INSTALLATION AND SUPERVISOR GUIDE 9.0 VER. 1
5 . When prompted, press 1 to confirm the number you entered or press # if the number youentered was incorrect. Once you press I to confirm, the system voices the portadministration options:
To Disable a Port Press 1
To Enable a Port Press 2
To Exit Press #
6 . To shut down a port, press 1 to disable it. If you disable a port, all calls using that portare immediately terminated.
7 . To enable a port that is currently shut down, press 2.
3.3.2 Recording a Broadcast Message for All Mailboxes‘
A broadcast message is automatically sent to every mailbox on the system. The message isplayed to the mailbox owners the first time they log into their mailbox following therecording of the broadcast message. A broadcast message does not activate any messagewaiting lights or indicators on subscriber telephones and does not add to the message count ofnew or old messages in subscriber mailboxes.
I. From a telephone, call into voice mail and log into the supervisor mailbox 70. Thesystem voices the Main menu:
“To listen to your messages press 1. To send a message press 2. To change your optionspress 3. ”
..-
116 .>

a LITE SYSTEM INSTALLATION AND SUPERVISOR GUIDE 9.0 VER. 1
2 . To access the Supervisor menu, press 6 (this option is not voiced). The system voicesthe Supervisor menu options:
Supervisor Menu
For Ma i lbox Admin is t ra t ion
For Routing Box Administration
For Question Box Administration
For Port Administration
To Change the System Broadcast Message
To Change the Voice Mail Day I Night Service
To Change the System Time
To Change the System Date
To Mod i f y Sys tem Paramete rs
To Perform First-Time Setup
To Exit
Press 1
Press 2
Press 3
Press 4
Press 5
Press 6
Press 7
Press 8
Press 9
Press 0
Press #
3 . From the Supervisors menu, press 5 for System Broadcast Message. The system voicesthe following options:
To Hear the Current Broadcast Message
To Re- record the Broadcas t Message
To Delete the Broadcast Message
4 . To record a broadcast message, press 2. Follow the prompts to complete the procedure.
_-:3.3.3 Transferring a Caller to a Mailbox’s Voice Mail
Use the following procedure to transfer a caller directly to a mailbox, without having thesystem attempt to ring the mailbox’s associated extension.
1 . Press the TRANSFER key on the telephone.,.-
117

8 LITE SYSTEM INSTALLATION AND SUPERVISOR GUIDE 9 . 0 VER. 1
2 . Dial the number for voice mail or press the voice mail hotkey.
3 . Dial the number of the mailbox to which you want to transfer the call.,i
To divert the call directly to the mailbox’s voice mail, press *.-”
4 . .2
5 . Hang up the telephone.
3.3.4 Troubleshooting System Problems
Follow these guidelines to effectively report problems you may encounter:
Gather as much detail concerning the situation as possible:
l Time and date the problem occurred.
l Box and extension number(s) affected.
l Action immediately preceding problem.
l Action taken since problem occurred.
Attempt to duplicate the problem:
l Note the actions taken that apparently invoke the problem.
l Recall any recently made system set up changes that may be contributing to orcausing the problem.
l Attempt to duplicate the problem. If you cannot duplicate the problem, it may behave been attributed to user error.
118 ..,