Embed Size (px)
Citation preview
CCoommbbii 2244CCoommbbii 3300CCoommbbii 3388
Combination Condensing Boilers
Installation and Servicing Instructions
These instructions should be left with the user
© Dimplex Boilers 2008

GGAASS CCOOUUNNCCIILL NNUUMMBBEERRSS
NNaattuurraall GGaass
Dimplex Combi 38 - Gas Council Appliance No: 4477 114499 0011
Dimplex Combi 30 - Gas Council Appliance No: 4477 114499 0022
Dimplex Combi 24 - Gas Council Appliance No: 4477 114499 0033
22 © Dimplex Boilers 2008
APPROVED PRODUCT

CCOONNTTEENNTTSS
SSEECCTTIIOONN DDEESSCCRRIIPPTTIIOONN PPAAGGEE
1.0 Introduction 4
2.0 Boiler Layout 7
3.0 Boiler Operation 8
4.0 Technical Data 9
5.0 Dimensions 10
6.0 System Details 11
7.0 Site Requirements 14
8.0 Flue options 18
9.0 Installation 21
10.0 Commissioning 25
11.0 Service Mode 27
12.0 Servicing & Maintenance 28
13.0 Changing Components 31
14.0 Electrical 39
15.0 Spare Parts 40
16.0 Fault Finding 41
17.0 Benchmark 43
18.0 Warranty Terms & Conditions 47
© Dimplex Boilers 2008 33
11..00 IINNTTRROODDUUCCTTIIOONN
11..11 BBUUIILLDDIINNGG RREEGGUULLAATTIIOONNSS AANNDD BBEENNCCHHMMAARRKK CCHHEECCKKLLIISSTT
Building Regulations (England & Wales) require notification ofthe installation of a heating appliance to the relevant LocalAuthority Building Control Department.
From 1 April 2005 this can be achieved via a CompetentPersons Self Certification Scheme as an option to notifying theLocal Authority directly.
CORGI operates a Self Certification Scheme for gas heatingappliances.
With the introduction of Self Certification Schemes, theBenchmark Logbook is being withdrawn. However, a similardocument in the form of a commissioning checklist and serviceinterval record is incorporated at the back of theseinstructions.
This company is a member of the Benchmark initiative andfully supports the aims of the programme. Its aim is toimprove the standards of installation and commissioning ofcentral heating systems in the UK and to encourage the regularservicing of all central heating systems to ensure safety andefficiency.
Building Regulations require that installations should complywith manufacturer’s instructions. It is therefore important thatthe commissioning checklist is completed by the installer. Therelevant section of Building Regulations only relates todwellings. Therefore the checklist only applies if the applianceis being installed in a dwelling or some related structure.
44 © Dimplex Boilers 2008
11..22 IINNSSTTAALLLLAATTIIOONN,, CCOOMMMMIISSSSIIOONNIINNGG,, SSEERRVVIICCEE && RREEPPAAIIRR
This appliance must be installed in accordance with themanufacturer’s instructions and the regulations in force. Readthe instructions fully before installing or using the appliance.
In GB, this must be carried out by a competent person asstated in the Gas Safety (Installation & Use) Regulations.
DDeeffiinniittiioonn ooff ccoommppeetteennccee:: A person who works for a CORGIregistered company and holding current certificates in therelevant ACS modules, is deemed competent.
In IE, this must be carried out by a competent person as statedin I.S. 813 “Domestic Gas Installations”
No modifications or changes can be made to this appliancewithout prior written permission from Dimplex Boilers.
The manufacturers instructions must not be taken as overridingany statutory requirements. If in doubt contact Dimplex Boilerson 0844 3711121.
WWaarrnniinngg -- Check the information on the data plate iscompatible with local supply conditions.
All CORGI registered installers carry a CORGI identification cardand have a registration number. You can check your installer isregistered by telephoning 0870 4012300 or writing to:-
1 ElmwoodChineham Business ParkCrockford LaneBasingstokeRG24 8WG
or check online at www.corgi-gas-safety.com
These appliances meet the requirements of;Gas Appliance Directive 90/396/EECEfficiency of Hot Water Boilers Directive 92/42/EECLow Voltage Directive 92/42/EECElectromagnetic Compatibility Directive 92/31/EEC
Type test certified by:- Notified Body 0087 (Pin 87BT49).
Product/Production certified by:Notified Body 0086.
For GB/IE only
11..00 IINNTTRROODDUUCCTTIIOONN
11..33 LLEEGGIISSLLAATTIIOONN
TThhee aapppplliiaannccee iiss ssuuiittaabbllee oonnllyy ffoorr iinnssttaallllaattiioonn iinn GGBB aanndd IIEE aannddsshhoouulldd bbee iinnssttaalllleedd iinn aaccccoorrddaannccee wwiitthh tthhee rruulleess iinn ffoorrccee,, aannddoonnllyy uusseedd iinn aa ssuuiittaabbllyy vveennttiillaatteedd llooccaattiioonn..
In GB, the installation must be carried out by a CORGIRegistered Installer. It must be carried out in accordance withthe relevant requirements of the:• Gas Safety (Installation & Use) Regulations.• The appropriate Building Regulations either The Buildingregulations, The Building Regulations (Scotland), BuildingRegulations (Northern Ireland).• The Water Fittings Regulations or Water Byelaws inScotland.• The Current I.E.E. Wiring Regulations.
Where no specific instructions are given, reference should bemade to the relevant British Standard Code of Practice.
In IE, the installation must be carried out by a competentPerson and installed in accordance with the current edition ofI.S. 813 ‘Domestic Gas Installations’, the current BuildingRegulations and reference should be made to the current ETCIrules for electrical installation.
AAllll ssyysstteemmss mmuusstt bbee tthhoorroouugghhllyy fflluusshheedd aanndd ttrreeaatteedd wwiitthhiinnhhiibbiittoorr ((sseeee sseeccttiioonn 66..22))..
CCooddeess ooff PPrraaccttiiccee -- rreeffeerr ttoo tthhee mmoosstt rreecceenntt vveerrssiioonn
IInn GGBB tthhee ffoolllloowwiinngg CCooddeess ooff PPrraaccttiiccee aappppllyy::
SSttaannddaarrdd SSccooppee
BS 7967 Carbon monoxide in dwellings and the
combustion performance of gas fired appliances
BS 7967-2 Guide for using electronic portable combustion
gas analysers in the measurement of carbon
monoxide and the determination of combustion
performance
BS 7967-3 Guide for responding to measurements obtained
from electronic portable combustion gas
analysers
BS 7967-4 Guide for using electronic portable combustion
gas analysers as part of the process of servicing
and maintenance of gas fired appliances
BS 6891 Gas installation
BS 5546 Installation of hot water supplies for domestic
purposes
BS 5449 Forced circulation hot water systems
BS 6798 Installation of gas fired hot water boilers
BS 5440 Part 1 Flues
BS 5440 Part 2 Ventilation
BS 7074 Expansion vessels and ancillary equipment
for sealed water systems
BS 7593 Treatment of water in domestic hot water
central heating systems
IInn IIEE tthhee ffoolllloowwiinngg CCooddeess ooff PPrraaccttiiccee aappppllyy::
SSttaannddaarrdd SSccooppee
I.S. 813 Domestic Gas Installation
The following standards give valuable additional information;
BS 5546 Installation of hot water supplies for domestic
purposes
BS 5449 Forced circulation hot water systems
BS 7074 Expansion vessels and ancillary equipment
for sealed water systems
BS 7593 Treatment of water in domestic hot water
central heating systems
© Dimplex Boilers 2008 55
GGAASS LLEEAAKKSSDDOO NNOOTT OOPPEERRAATTEE AANNYY EELLEECCTTRRIICCAALL SSWWIITTCCHHEESS,, OORR UUSSEE AANNAAKKEEDD FFLLAAMMEE.. TTUURRNN OOFFFF TTHHEE GGAASS SSUUPPPPLLYY.. VVEENNTTIILLAATTEE TTHHEEAARREEAA BBYY OOPPEENNIINNGG DDOOOORRSS AANNDD WWIINNDDOOWWSS.. CCAALLLL OOUUTT YYOOUURRLLOOCCAALL GGAASS SSUUPPPPLLIIEERRTTEELL:: 00880000 111111 999999
CCoonnttrrooll ooff SSuubbssttaanncceess HHaazzaarrddoouuss ttoo HHeeaalltthhUnder Section 6 of the Health and Safety at Work Act 1974, itis required to provide information on substances hazardous tohealth.
The adhesives and sealants used in this appliance are cured andgive no known hazard in this state.
Insulation Pads - These can cause irritation to skin, eye andrespiratory tract. If you have a history of skin complaint youmay be susceptible to irritation. High dust levels are usual onlyif the material is broken. Normal handling should not causediscomfort, but follow normal good hygiene and wash yourhands before eating, drinking or going to the lavatory. If you dosuffer irritation to the eyes or severe irritation to the skin seekmedical attention.
GGaass aanndd EElleeccttrriicciittyy CCoonnssuummeerr CCoouunncciill ((EEnneerrggyywwaattcchh))Energywatch is an independent organisation, which protectsthe interests of gas users. If you need advice concerningenergy issues, they may be contacted on their consumer helpline number: 08459 060708, or via their website;www.energywatch.org.uk.
This appliance is not intended for use by persons (includingchildren) with reduced physical, sensory or mental capabilities,or lack of experience and knowledge, unless they have beengiven supervision or instructions concerning use of theappliance by a person responsible for their safety. Childrenshould be supervised to ensure that they do not play with theappliance.

11..00 IINNTTRROODDUUCCTTIIOONN
1. The appliances incorporate a microprocessor based, fullymodulating air/gas ratio control system with direct burnerignition. This provides a modulated heat output to eithercentral heating (CH) or domestic hot water (DHW) demands,with internal frost protection provided as standard. The heatexchanger is constructed from stainless steel encased in hightemperature polymer.
A combined circulating pump, diverter valve and automatic airvent assembly, pressure gauge, safety valve and systemexpansion vessel are included.
Isolation valves are fitted to the service connections. Theappliances have a DHW flow detection device, which givespriority to DHW demand and proportions the required heatingload to the DHW flow rate. An electro-mechanical 24 hourtime clock is also fitted as standard.
The boiler has a pump over run feature therefore the centralheating system must include either a proprietary automaticbypass valve or a radiator must be fitted with lock shieldvalves. A separate CH expansion vessel is not required if thetotal CH system content is less than 84 litres. However one isrequired for systems with volumes greater than 84 litres; referto section 6.5. A separate DHW expansion vessel is notrequired. It is recommended that a drain cock is fitted at thelowest point in the system.
66 © Dimplex Boilers 2008
11..55 DDEESSCCRRIIPPTTIIOONN
RF room thermostats etc, are available as optional extras.The integral clock may be removed, however the hole in thefascia must be covered using a fascia blanking panel (part no. 300635).
2. The boiler is set to give a maximum output of:-24kW Model - 24kW DHW
19.7kW CH (condensing)30kW Model - 30kW DHW
25.4kW CH (condensing)38kW Model - 38kW DHW
32kW CH (condensing)
3. It is designed for use on Natural Gas (G20). A natural gas topropane conversion kit is available for each Dimplex Combi.
4. The boiler is suitable for use only on fully pumped sealedheating systems. Priority is given to domestic hot water.
5. The boiler data badge gives details of the model, serialnumber and Gas Council number and is situated on the innerdoor panel. It is visible when the case front panel is lowered.(Fig. 1)
6. The boiler model name and serial number are also shown onthe information label on the inside of the fascia. This is foruser reference.
7. The boiler is intended to be installed in residential /commercial / light industrial E.M.C. environments on agoverned meter supply only.
8. The boiler must be installed with one of the purposedesigned flues such as the standard horizontal telescopic fluekit, part no. 956120.
9. AAllll ssyysstteemmss mmuusstt bbee tthhoorroouugghhllyy fflluusshheedd aanndd ttrreeaatteedd wwiitthhiinnhhiibbiittoorr ((sseeee sseeccttiioonn 66..22))..
11..66 OOPPTTIIOONNAALL EEXXTTRRAASS
• Boiler• Wall fixing jig• Templates & ‘Quick Fit’ Guide• Literature Pack• Filling Loop• Plugs and screws
11..77 PPAACCKK CCOONNTTEENNTTSS
11..44 SSAAFFEE MMAANNUUAALL HHAANNDDLLIINNGG
1. The boiler should be handled and lifted by two people.Wear appropriate Personal Protection Equipment e.g. protectivegloves, safety footwear etc.Plan your route to minimise the number of turns needed tohandle/lift the boiler.
2. Where possible transport the boiler using a sack truck orother suitable trolley. Try to avoid steps, wet or slipperysurfaces, unlit areas etc. and take special care on ladders/intolofts.
3. When handling or lifting always use safe techniques - keepyour back straight, bend your knees. Don’t twist - move yourfeet, avoid bending forwards and sideways and keep the loadas close to your body as possible.
4. Asses the risks associated with handling and liftingaccording to the conditions on site. If in doubt seek advicebefore proceeding. Health and Safety is the responsibility ofeveryone.
22..00 BBOOIILLEERR LLAAYYOOUUTT
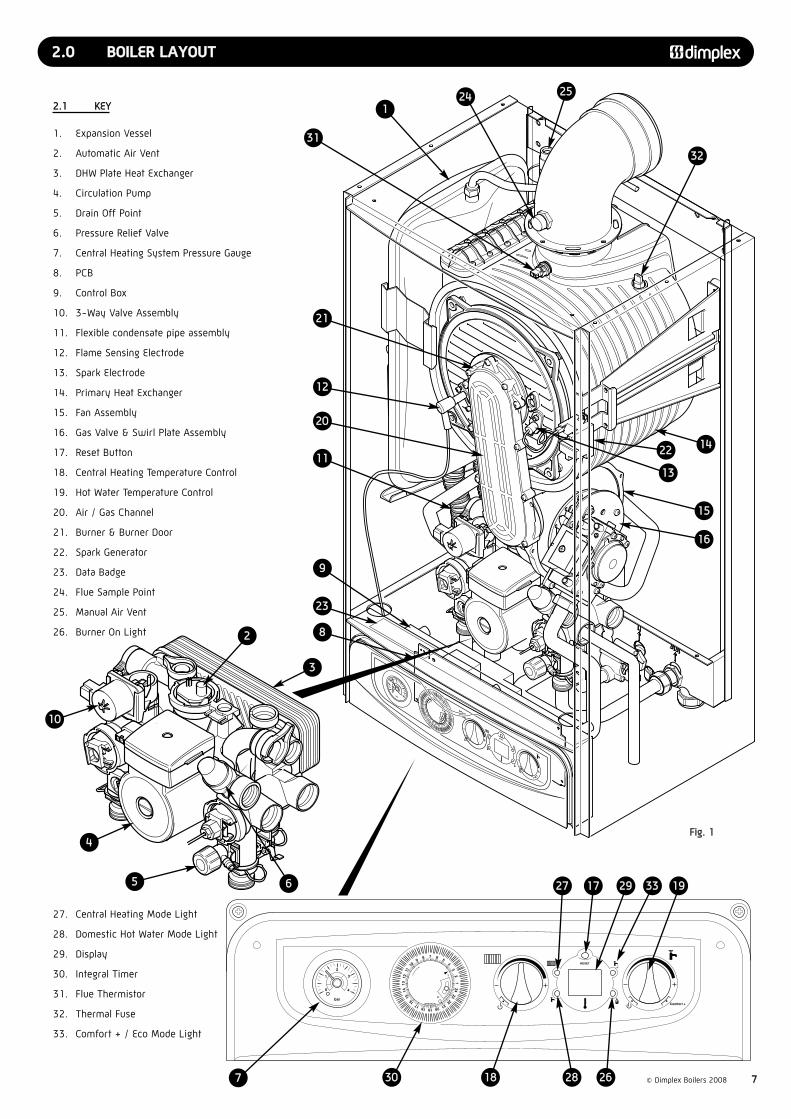
22..11 KKEEYY
1. Expansion Vessel
2. Automatic Air Vent
3. DHW Plate Heat Exchanger
4. Circulation Pump
5. Drain Off Point
6. Pressure Relief Valve
7. Central Heating System Pressure Gauge
8. PCB
9. Control Box
10. 3-Way Valve Assembly
11. Flexible condensate pipe assembly
12. Flame Sensing Electrode
13. Spark Electrode
14. Primary Heat Exchanger
15. Fan Assembly
16. Gas Valve & Swirl Plate Assembly
17. Reset Button
18. Central Heating Temperature Control
19. Hot Water Temperature Control
20. Air / Gas Channel
21. Burner & Burner Door
22. Spark Generator
23. Data Badge
24. Flue Sample Point
25. Manual Air Vent
26. Burner On Light
27. Central Heating Mode Light
28. Domestic Hot Water Mode Light
29. Display
30. Integral Timer
31. Flue Thermistor
32. Thermal Fuse
33. Comfort + / Eco Mode Light
© Dimplex Boilers 2008 77
Comfort +
1
13
2
14
3
15
4
16
5
17
6
18
7
19
8
20
9
21
10
22
11
23
12
240
1
0
1 2
bar
3
4
Comfort +
1
13
2
14
3
15
4
16
5
17
6
18
7
19
8
20
9
21
10
22
11
23
12
24
0
1
0
1
2
bar
3
4
FFiigg.. 11
112244
3311
3322
2255
22
1100
44
77
88
99
2233
1111
2200
1122
2211
1133
1155
1166
1177 2299 3333 11992277
11883300 22662288
11442222
55
33
66

33..00 BBOOIILLEERR OOPPEERRAATTIIOONN
33..11 CCEENNTTRRAALL HHEEAATTIINNGG MMOODDEE
1. With a demand for heating, the pump, circulates waterthrough the primary circuit.
2. Once the main burner ignites the fan speed controls the gasrate to maintain the heating temperature measured by thetemperature sensors.
3. When the demand is satisfied the burner is extinguished anda 5 minute delay occurs before the burner will re-light (anti-cycling), the pump continues to run for a period of 2 minutes(Pump Overrun).
88 © Dimplex Boilers 2008
33..22 DDOOMMEESSTTIICC HHOOTT WWAATTEERR MMOODDEE
1. Priority is given to the domestic hot water supply. A demand at atap or shower will override any central heating requirement.
2. The flow of water will operate the Flow Turbine which requests the3 way valve to change position. This will allow the pump to circulatethe primary water through the DHW plate heat exchanger.
3. The burner will light automatically and the temperature of thedomestic hot water is controlled by the temperature sensors.
4. When the domestic hot water demand ceases the burner willextinguish and the diverter valve will remain in the domestic hot watermode, unless there is demand for central heating.
33..33 FFRROOSSTT PPRROOTTEECCTTIIOONN MMOODDEE
1. Providing there is mains power supply to the appliance, the frostprotection mode is integral. If the system temperature falls below 5°C then the boiler will fire onits minimum setting until a flow temperature of 20°C is reached.Further protection can be incorporated by using a system frostthermostat.
33..44 PPUUMMPP PPRROOTTEECCTTIIOONN
1. The pump will automatically operate for 1 minute in every 24 hoursto prevent sticking.
ExpansionVessel
PrimaryHeat Exchanger
Burner &Burner Flange
Primary FlowPrimary Return
CH flowThermistor
CH returnThermistor
Plate HeatExchanger
CondensateTrap
PressureGauge
FlowTurbine
DHW ColdInlet
CHReturn
3 BAR Pressure Relief
ValveDHW Hot
Outlet
Pump &Hydroblock
Automatic Air
Vent
CHFlow
Flue Products
CH Mode ManualBleed Valve
ExpansionVessel
PrimaryHeat Exchanger
Burner &Burner Flange
Primary FlowPrimary Return
CH flowThermistor
CH returnThermistor
Plate HeatExchanger
CondensateTrap
PressureGauge
FlowTurbine
DHW ColdInlet
CHReturn
3 BAR Pressure Relief
ValveDHW Hot
Outlet
Pump &Hydroblock
Automatic Air
Vent
CHFlow
Flue Products
DHW Mode ManualBleed Valve
Flow RateRestrictor
Flow RateRestrictor
FFiigg.. 22
FFiigg.. 33

Appliance Classification C13, C33, C53, B23AApppplliiaannccee CCoommbbii 2244 CCoommbbii 3300 CCoommbbii 3388Mode RateCentral Heating Output (non-condensing)(80-60°C) Max kW 18.0 23.3 30.0
Min kW 6.0 7.4 9.8Central Heating Output (condensing)(50-30°C) Max kW 19.5 25.3 32.7
Central Heating Input Max Rate Net kW 18.4 23.9 30.6Gross kW 20.4 26.5 34.0
Central Heating Input Min Rate Net kW 5.6 6.9 9.2Gross kW 6.2 7.7 10.2
Domestic Hot Water Output Max kW 24.0 30.4 38.0Min kW 6.0 7.4 9.8
Domestic Hot Water Input Max Rate Net kW 24.6 31.3 38.8Gross kW 27.3 34.7 43.1
Domestic Hot Water Input Min Rate Net kW 5.6 6.9 9.2Gross kW 6.2 7.7 10.2
Central Heating Gas Rate (after 10 min operation - hot) Max m3
/h 1.95 2.49 3.24Domestic Hot Water Gas Rate (after 10 min operation - hot) Max m
3
/h 2.6 3.31 4.1Seasonal Efficiency % 90.3 90.3 90.5Seasonal Efficiency (SEDBUK) Band “A” “A” “A”Nox Classification Class “5” “5” “5”Design Domestic Hot Water Performance raised 35°C Ltr/min 9.8 12.3 15.6DHW Specific Rate (D) EN 625 Ltr/min 10.9 14.7 18.1Min Mains Water Inlet Pressure for Max Heat Output Bar 1.0 1.0 1.0Min Mains Water Inlet Pressure for Operation Bar 0.3 0.3 0.3Max Mains Water Inlet Pressure Bar 10 10 10Min Domestic Hot Water Flow Rate for Operation Ltr/min 2.0 2.0 2.5Min Central Heating System Pressure Bar 0.5 0.5 0.5Max Central Heating System Pressure Bar 2.5 2.5 2.5Max Domestic Hot Water Temperature °C 60 60 60Min Domestic Hot Water Temperature °C 40 40 40Max Central Heating Flow Temperature °C 80 80 80Min Central Heating Flow Temperature °C 30 30 30
GGeenneerraall SSppeecciiffiiccaattiioonnssMax lift weight kg 33.6 36.6 39.6Total water capacity Ltr 1.8 2.1 3.1Integral expansion vessel capacity Ltr 8 8 8Maximum heating system water content using fitted expansion vessel, @ 0.75 bar Ltr 84 84 84Electrical supply 230V 50Hz Fuse at 3AInternal fuse T4H 4A 250VMaximum power consumption W 125 140 146IP Rating IPX4 IPX4 IPX4Flue gas temperature Nat Gas 80/80 (Propane) °C 80 80 80Flue gas temperature Nat Gas 50/30 °C 70 75 77
CO2 value max rate (Nat Gas) (Case must be fitted when taking reading) % 8.8-9.2 9.1-9.5 8.9-9.3CO2 value min rate (Nat Gas) (Case must be fitted when taking reading) % 8.2-8.6 8.7-9.1 8.3-8.7CO value max rate (Nat Gas) (Case must be fitted when taking reading) P.P.M 40-120 40-120 40-120CO value min rate (Nat Gas) (Case must be fitted when taking reading) P.P.M 0-40 0-40 0-30
CO2 value max rate (Propane) (Case must be fitted when taking reading) % 10.5-10.9 10.7-11.1 10.5-10.9CO2 value min rate (Propane) (Case must be fitted when taking reading) % 10.2-10.6 10.2-10.6 10.4-10.8CO value max rate (Propane) (Case must be fitted when taking reading) P.P.M 80-160 100-180 70-150CO value min rate (Propane) (Case must be fitted when taking reading) P.P.M 0-40 0-40 0-40
Gas Pressure - Natural Gas mbar 18-20 18-20 18-20Gas Pressure - Propane mbar 37 37 37
CCoonnnneeccttiioonnssGas 22 mm compressionCH flow 22 mm compressionCH return 22 mm compressionDHW inlet 15 mm compressionDHW outlet 15 mm compressionPressure relief valve outlet 15 mm compressionCondensate Drain 21.5 - 22 mm plastic overflow pipePP..PP..MM == PPaarrttss PPeerr MMiilllliioonn
44..00 TTEECCHHNNIICCAALL DDAATTAA
44..11 PPEERRFFOORRMMAANNCCEE DDAATTAA
© Dimplex Boilers 2008 99

55..00 DDIIMMEENNSSIIOONNSS
1100 © Dimplex Boilers 2008
65mm 60mm 60mm 65mm10mm
CondensateDrain
CH Flow(22mm)
Domestic HotWater Outlet
(15mm)
Gas Inlet(22mm)
Mains ColdWater Inlet
(15mm)
CH Return(22mm)
Tap Rail
446mm
264mm 182mm
796mm
150mm94mm
333mm
148mm185mmTube Ø 100mm
FFiigg.. 44
FFiigg.. 55
66..00 SSYYSSTTEEMM DDEETTAAIILLSS
66..11 IINNFFOORRMMAATTIIOONN
1. The Dimplex Combi is a ‘Water Byelaws Scheme - ApprovedProduct’. Reference to the Water Research Council publications,‘Water fittings and materials directory’ and ‘Water supplybyelaws guide’ give full details of byelaws and the IRNs.
© Dimplex Boilers 2008 1111
66..33 SSYYSSTTEEMM CCOONNTTRROOLL
1. The boiler is fitted with an integral mechanical timer.
2. It is recommended that external controls e.g. roomthermostat are fitted to further improve the operatingefficiency of the boiler and system.
66..22 CCEENNTTRRAALL HHEEAATTIINNGG CCIIRRCCUUIITT
1. The appliance is suitable for fully pumped SEALED SYSTEMSONLY.
Treatment of Water Circulating Systems
Failure to flush and add inhibitor to the system willinvalidate the appliance warranty.
• Central heating water systems will be subject to corrosionunless an appropriate water treatment is applied. This meansthat the efficiency of the system will deteriorate as corrosionsludge accumulates within the system, risking damage to pumpand valves, boiler noise and circulation problems.
• When fitting new systems flux will be evident within thesystem, which can lead to damage of system components.
• All systems must be thoroughly drained and flushed out.Using, for example Betz-Dearborn Sentinel X300 or X400 orFernox Superfloc Universal Cleanser. They should be usedfollowing the flushing agent manufacturer’s instructions.
• System additives - corrosion inhibitors and flushingagents/descalers should comply to BS7593 requirements, e.g.Betz-Dearborn Sentinel X300 and Femox-Copal which shouldbe used following the inhibitor manufacturer’s instructions.
• It is important to check the inhibitor concentration afterinstallation, system modification and at every service inaccordance with the manufacturer’s instructions. (Test kits areavailable from inhibitor stockists.)
• For information or advice regarding any of the above contactTechnical Enquiries - Tel: 0844 3711121.
• If thermostatic radiator valves are fitted, a radiator must befitted with two lock shield valves or the system must include aproprietary automatic bypass valve, to enable correct operationof the pump over-run facility.

66..00 SSYYSSTTEEMM DDEETTAAIILLSS
66..44 SSYYSSTTEEMM FFIILLLLIINNGG AANNDD PPRREESSSSUURRIISSIINNGG
1. A filling point connection on the central heating returnpipework must be provided for initial filling and pressurisingand subsequent topping up of the system.
A filling loop is provided loose with the boiler
2. The filling method adopted must comply with all relevantwater supply regulations and use approved equipment.
3. Further details are given in;for GB: Guidance G24.2 and recommendation R24.2 of theWater Regulations Guide.for IE: the current edition of I.S. 813 “Domestic GasInstallations”.
4. The sealed primary circuits may be filled or topped up usinga temporary connection between the circuit and a supply pipe,provided a ‘Listed’ double check valve or some other no lesseffective backflow prevention device is permanently connectedat the inlet to the circuit and the temporary connection isremoved after use.
1122 © Dimplex Boilers 2008
66..55 EEXXPPAANNSSIIOONN VVEESSSSEELL ((CCEENNTTRRAALL HHEEAATTIINNGG OONNLLYY))
1. The appliance expansion vessel is pre-charged to 1 bar.Therefore the minimum cold fill pressure is 2 bar. The vessel issuitable for correct operation for system capacities up to 84litres. For greater system capacities an additional expansionvessel must be fitted. For GB refer to BS 7074 Pt 1. For IE, the current edition of I.S. 813 “Domestic GasInstallations”.
66..66 PPRREESSSSUURREE RREELLIIEEFF VVAALLVVEE
1. The pressure relief valve is set at 3 bar, therefore allpipework, fittings, etc. should be suitable for pressures inexcess of 3 bar and temperature greater than 100°C.
2. The pressure relief discharge pipe should be not less than15mm diameter, run continuously downward, and dischargeoutside the building, preferably over a drain. It should berouted in such a manner that no hazard occurs to occupants orcauses damage to wiring or electrical components. The end ofthe pipe should terminate facing down and towards the wall.
NNOOTTEE:: BBooiilliinngg wwaatteerr//sstteeaamm ccoouulldd ddiisscchhaarrggee ffrroomm tthhee ppiippee,,tthheerreeffoorree iitt sshhoouulldd bbee tteerrmmiinnaatteedd aawwaayy ffrroomm wwiinnddoowwss aannddddoooorrss..
DHWMainsInlet
CHReturn
PressureReliefDischargePipe
TemporaryLoop
StopValve
StopValve
DoubleCheckValve
GasDHWOutlet
CHFlow
Condensate
Dimplex Combi Range Available Head
Flow L/Min
Avai
labl
e H
ead
M
7.00
0 5 10 15 20 25
6.00
5.00
4.00
3.00
2.00
1.00
0.00
Dimplex Combi
FFiigg.. 88
FFiigg.. 77
Expansion Vessel
Pressure Relief Valve
Vessel charge and initialsystem pressure
Total water content ofsystem using 8 litrescapacity expansionvessel supplied withappliance
For systems having alarger capacity multiplythe total system capacityin litres by this factor toobtain the total minimumexpansion vessel capacityrequired in litres
bar
litres
0.5
96
0.75
84
0.093
1.0
73
1.5
50
FFiigg.. 66
FFiigg.. 99
NNOOTTEE:: DDoo nnoott uussee tthhee pprreessssuurree rreelliieeff vvaallvvee ttoo ddrraaiinn tthhee ssyysstteemm,, bbeeccaauussee ddiirrttaanndd ddeebbrriiss ccoouulldd pprreevveenntt tthhee vvaallvvee sseeaattiinngg ccoorrrreeccttllyy..

66..00 SSYYSSTTEEMM DDEETTAAIILLSS
66..77 DDOOMMEESSTTIICC HHOOTT WWAATTEERR CCIIRRCCUUIITT
1. All DHW circuits, connections, fittings, etc. should be fully inaccordance with relevant standards and water supplyregulations.
2. Further guidance is given in:for GB: Guidance G17 to G24 and recommendation R17 to R24of the Water Regulations Guide.for IE: the current edition of I.S. 813 “Domestic GasInstallations”.
3. When the domestic water system includes any device whichprevents water expanding back towards the supply (checkvalve, loose jumpered stopcock, water meter, water treatmentdevice) then an expansion vessel must be fitted (e.g. Zilmet160ml, R1/2 15bar).A single check valve must be fitted as shown in Fig. 10 toprevent backflow to the supply pipe and to ensure the efficientoperation of the expansion vessel which is required toaccommodate the thermal expansion of the water.If the hot water expansion is not provided for, then highpressures can develop which may result in damage to fittingsand devices on the system.
4. The boiler’s maximum working mains pressure is 10 bar,therefore all pipework, connections, fittings, etc. should besuitable for pressure in excess of 10 bar. A pressure reducingvalve must be fitted for pressures in excess of 10 bar.
5. The final 600mm of the cold mains supply and domestic hotwater outlet must be made in 15mm copper pipe.
6. A cold mains flow regulator is fitted on the inlet to the flowturbine (see Figs. 2 & 3 - page 8) to control water flow rates.This may be removed to obtain higher flow rates. Flow rateshigher than specified for the appliance will reduce thedomestic hot water temperature.
© Dimplex Boilers 2008 1133
66..88 SSHHOOWWEERRSS
1. If a shower control is supplied from the appliance it shouldbe of the thermostatic or pressure balanced type. Thermostatictype shower valves provide comfort and guard against highwater temperatures. Existing controls may not be suitable -refer to the shower valve manufacturer.
66..99 HHAARRDD WWAATTEERR AARREEAASS
1. If the area of the installation is recognised as a HARD WATERAREA then a suitable device should be fitted to treat the mainswater supply to the boiler. Contact your Water DistributionCompany for advice on suitable devices.
ExpansionVessel
Boiler
CheckValve
Stop Tap
Pressure Reducer
Valve
To HotTaps
Other TapOutlets
FFiigg.. 1100

77..00 SSIITTEE RREEQQUUIIRREEMMEENNTTSS
77..11 LLOOCCAATTIIOONN
1. The boiler may be fitted to any suitable wall with the fluepassing through an outside wall or roof and discharging toatmosphere in a position permitting satisfactory removal ofcombustion products and providing an adequate air supply. Theboiler should be fitted within the building unless otherwiseprotected by a suitable enclosure i.e. garage or outhouse. (Theboiler may be fitted inside an unvented cupboard - see section7.3).
2. If the boiler is fitted in a room containing a bath or showerreference must be made to the relevant requirements. In GB this is the current I.E.E. Wiring Regulations and BuildingRegulations.In IE reference should be made to the current edition of I.S.813 “Domestic Gas Installations” and current ETCI rules.
(Fig. 11 shows zone dimensions for a bathtub. For otherexamples refer to Section 601 of the current I.E.E. WiringRegulations) reference must be made to the relevantrequirements.The boiler is IPX4 rated and can be fitted in Zone 2 (Fig. 11).In GB this is the current I.E.E. Wiring Regulations and BuildingRegulations.In IE reference should be made to the current edition of I.S.813 “Domestic Gas Installations” and the current ETCI rules.
4. If the boiler is to be fitted into a building of timber frameconstruction then reference must be made to the currentedition of Institute of Gas Engineers Publication IGE/UP/7 (GasInstallations in Timber Framed Housing).
1144 © Dimplex Boilers 2008
77..22 CCLLEEAARRAANNCCEESS
1. A flat vertical area is required for the installation of theboiler.
2. These dimensions include the necessary clearance aroundthe boiler for case removal, spanner access and air movement.Additional clearances may be required for the passage of pipesaround local obstructions such as joists running parallel to thefront face of the boiler.
Zone 2
Zone 2
Zone 1
Zone 0Zone 3
Zone 3
Window RecessZone 2
WindowRecessZone 2
0.6 m 2.4 m
Zone 2 Zone 3
Zone 2Zone 1
Zone 0
Zone 3
Outside Zones
Ceiling
WindowRecessZone 23.0 m
2.25 m
0.6 m 2.4 m
285mm Wall
450mm MinFor Servicing
Purposes 5mm MinIn Operation
5mm Min
446mm
5mm Min
796mm
200mm
200mm
5mm Min5mm Min285mm Wall 285mm Wall
FFiigg.. 1111
FFiigg.. 1122

77..00 SSIITTEE RREEQQUUIIRREEMMEENNTTSS
77..33 VVEENNTTIILLAATTIIOONN OOFF CCOOMMPPAARRTTMMEENNTTSS
1. Where the appliance is installed in a cupboard orcompartment, no air vents are required. Where an open flued system is used - Flue kit E (B23classification) then an air vent communicating directly withoutside air must be provided in the same room or internalspace of the flue duct air inlet. Minimum free area:
Dimplex 24 = 88cm2
Dimplex 30 = 121.5cm2
Dimplex 38 = 159cm2
In addition if an open flued system is used - Flue kit (B23classification) and the boiler is fitted in a compartment, thenhigh and low level ventilation is required.BS 5440-2:2000 gives guidance on compartmental ventilation.
2. When the boiler is installed in a cupboard or compartmentand either flue kit A, B, C, D or F (Classification C13, C33, C53)is used, then no compartmental ventilation is required.
© Dimplex Boilers 2008 1155
77..44 GGAASS SSUUPPPPLLYY
1. The gas installation should be in accordance with therelevant standards. In GB this is BS 6891. In IE this is thecurrent edition of I.S. 813 “Domestic Gas Installations”.
2. The connection to the appliance is a 22mm copper taillocated at the rear of the gas service cock (Fig. 13).
3. Ensure that the pipework from the meter to the appliance isof adequate size, and the demands of any other gas appliancein the property are taken into consideration. Do not use pipesof a smaller diameter than the boiler gas connection (22mm).
4. For boilers connected to use LPG (propane), the inletpressure must be 37mbar.
NNOOTTEE:: The completed installation should always be testedfor gas tightness
77..55 EELLEECCTTRRIICCAALL SSUUPPPPLLYY
1. External wiring must be correctly earthed, polarised and inaccordance with relevant regulations/rules. In GB this is thecurrent I.E.E. Wiring Regulations. In IE reference should bemade to the current edition of the ETGI rules.
2. The mains supply is 230V - 50Hz fused at 3A
NNOOTTEE:: The mains supply connection must allow completeelectrical isolation of the appliance and system controlsonly.Connection may be via a fused double-pole isolator with acontact separation of at least 3mm in all poles and servicingthe boiler and system controls only.Any additional mains cable should comply fully with thecurrent I.E.E. wiring regulations.
FFiigg.. 1133
Gas ServiceCock

77..00 SSIITTEE RREEQQUUIIRREEMMEENNTTSS
77..66 CCOONNDDEENNSSAATTEE DDRRAAIINN
NNOOTTEE:: The appliance is fitted with a trap the depth ofwhich is >= 75mm, therefore no other traps are required inthe condensate run.
The condensation discharge pipe must not rise at any pointalong its length. There MUST be a fall of AT LEAST 2.5° (50mmper metre) along the entire run.
1. The condensate outlet will accept 21.5mm (3/4 in) plasticoverflow pipe which should discharge internally into thehousehold drainage system, downstream of all other traps. ifthis is not possible, discharge into an outside drain isacceptable.
2. Ensure the discharge of condensate complies with anynational or local regulations in force.BBSS 66779988::22000000 && PPaarrtt HHII ooff tthhee BBuuiillddiinngg RReegguullaattiioonnss ggiivveeffuurrtthheerr gguuiiddaannccee..
3. Metal pipework is NOT suitable for use in condensatedischarge systems.
4. The pipe should be a minimum of 21.5mm diameter andmust be supported properly.
5. IItt iiss aaddvviissaabbllee ttoo kkeeeepp tthhee ccoonnddeennssaattee ppiippee iinntteerrnnaall..
6. EExxtteerrnnaall rruunnss ggrreeaatteerr tthhaann 33 mmeettrreess oorr rruunnss iinn ccoolldd aarreeaasssshhoouulldd uussee 3322mmmm wwaassttee ppiippee aanndd bbee iinnssuullaatteedd..
7. If the boiler is fitted in an unheated location the entirecondensate discharge pipe should be treated as an externalrun.
8. In all cases discharge pipe must be installed to aid disposalof the condensate.
9. When discharging condensate into a soil stack or waste pipethe effects of existing plumbing must be considered. If soilpipes or waste pipes are subjected to internal pressurefluctuations when WC’s are flushed or sinks emptied thenback-pressure may force water out of the boiler trap andcause appliance lockout.Examples are shown of the following methods ofterminations:-i) to an internal soil & vent pipeii) via and internal discharge branch (e.g. sink waste)iii) to a drain or gullyiv) to a purpose made soakaway
10. In exceptional circumstances, such as when a boiler isinstalled in a basement without drainage, it may be necessaryto install a condensate pump to carry condensate up to ground/drain level. Such products are available from most plumbingmerchants. For help with selecting a condensate pump contactDimplex Boilers - Tel: 0844 3711121.
WWAARRNNIINNGG:: There must be no air breaks in the condensatepipework or drainage system.
1166 © Dimplex Boilers 2008
50mm per metre of pipe run2.5° Minimum fall
450mm min
Termination to an internal soil and vent pipe
50mm per metre of pipe run2.5° Minimum fall
External termination via internal discharge branche.g sink waste - downstream
Sink
Pipe must terminate above water level but below surrounding surface.
50mm per metre of pipe run2.5° Minimum fall
Termination to a purpose made soak-away
Holes in the soak-away mustface away from the building
500mm min
NNOOTT AALLLLOOWWEEDD
TThheerree sshhoouulldd bbee nnoo aaiirr ggaapp
FFiigg.. 1144
FFiigg.. 1155
FFiigg.. 1177
FFiigg.. 1166
77..00 SSIITTEE RREEQQUUIIRREEMMEENNTTSS
77..77 FFLLUUEE
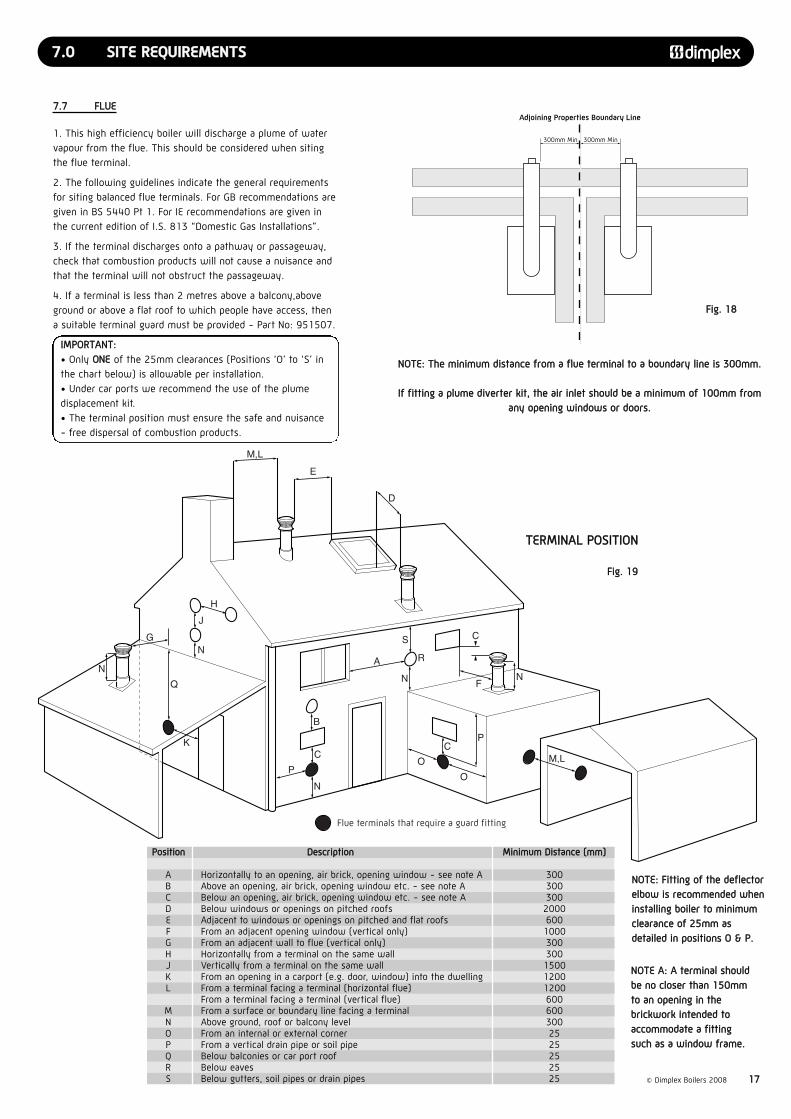
1. This high efficiency boiler will discharge a plume of watervapour from the flue. This should be considered when sitingthe flue terminal.
2. The following guidelines indicate the general requirementsfor siting balanced flue terminals. For GB recommendations aregiven in BS 5440 Pt 1. For IE recommendations are given inthe current edition of I.S. 813 “Domestic Gas Installations”.
3. If the terminal discharges onto a pathway or passageway,check that combustion products will not cause a nuisance andthat the terminal will not obstruct the passageway.
4. If a terminal is less than 2 metres above a balcony,aboveground or above a flat roof to which people have access, thena suitable terminal guard must be provided - Part No: 951507.
IIMMPPOORRTTAANNTT::• Only OONNEE of the 25mm clearances (Positions ‘O’ to ‘S’ inthe chart below) is allowable per installation.• Under car ports we recommend the use of the plumedisplacement kit.• The terminal position must ensure the safe and nuisance- free dispersal of combustion products.
© Dimplex Boilers 2008 1177
NNOOTTEE:: TThhee mmiinniimmuumm ddiissttaannccee ffrroomm aa fflluuee tteerrmmiinnaall ttoo aa bboouunnddaarryy lliinnee iiss 330000mmmm..
IIff ffiittttiinngg aa pplluummee ddiivveerrtteerr kkiitt,, tthhee aaiirr iinnlleett sshhoouulldd bbee aa mmiinniimmuumm ooff 110000mmmm ffrroommaannyy ooppeenniinngg wwiinnddoowwss oorr ddoooorrss..
NNOOTTEE AA:: AA tteerrmmiinnaall sshhoouullddbbee nnoo cclloosseerr tthhaann 115500mmmmttoo aann ooppeenniinngg iinn tthheebbrriicckkwwoorrkk iinntteennddeedd ttooaaccccoommmmooddaattee aa ffiittttiinnggssuucchh aass aa wwiinnddooww ffrraammee..
NNOOTTEE:: FFiittttiinngg ooff tthhee ddeefflleeccttoorreellbbooww iiss rreeccoommmmeennddeedd wwhheenniinnssttaalllliinngg bbooiilleerr ttoo mmiinniimmuummcclleeaarraannccee ooff 2255mmmm aassddeettaaiilleedd iinn ppoossiittiioonnss OO && PP..
A
M,L
M,L
N
C
F
P
O
O
R
N
S
CC
N
Flue terminals that require a guard fitting
P
B
J
H
N
NG
Q
K
D
E
PPoossiittiioonn DDeessccrriippttiioonn MMiinniimmuumm DDiissttaannccee ((mmmm))
A Horizontally to an opening, air brick, opening window - see note A 300B Above an opening, air brick, opening window etc. - see note A 300C Below an opening, air brick, opening window etc. - see note A 300D Below windows or openings on pitched roofs 2000E Adjacent to windows or openings on pitched and flat roofs 600F From an adjacent opening window (vertical only) 1000G From an adjacent wall to flue (vertical only) 300H Horizontally from a terminal on the same wall 300J Vertically from a terminal on the same wall 1500K From an opening in a carport (e.g. door, window) into the dwelling 1200L From a terminal facing a terminal (horizontal flue) 1200
From a terminal facing a terminal (vertical flue) 600M From a surface or boundary line facing a terminal 600N Above ground, roof or balcony level 300O From an internal or external corner 25P From a vertical drain pipe or soil pipe 25Q Below balconies or car port roof 25R Below eaves 25S Below gutters, soil pipes or drain pipes 25
300mm Min 300mm Min
Adjoining Properties Boundary Line
TTEERRMMIINNAALL PPOOSSIITTIIOONN
FFiigg.. 1188
FFiigg.. 1199

88..00 FFLLUUEE OOPPTTIIOONNSS
88..11 CCOONNCCEENNTTRRIICC AAIIRR//FFLLUUEE DDUUCCTT SSPPEECCIIFFIICCAATTIIOONNSS
The different flue applications shown in Fig. 20 are available askits comprising the connecting parts to the appliance and endterminal. Flue extension ducts and extension elbows areavailable as accessories.
1188 © Dimplex Boilers 2008
88..22 KKiitt AA ++ TTeelleessccooppiicc HHoorriizzoonnttaall WWaallll TTeerrmmiinnaall ((CC1133)) -- PPaarrtt NNoo.. 995566112200
60/100mm concentric, horizontal flue system Fig. 21, with amaximum length of 10M.The standard telescopic terminal is 615mm max length and430mm min length, but can be cut to a minimum flue length of250mm, which is suitable for single, 100mm (4”), brick walls.
NNoottee:: If the telescopic flue kit is installed without any flueextensions, it can be fitted horizontally. The maximumlength for 60/100mm horizontal concentric flue = 10M
NNoottee:: Dimplex Combi 38 only, with maximum concentricflue length of 10m, the heat input will be reduced by 6.1%
88..33 KKiitt BB VVeerrttiiccaall CCoonncceennttrriicc FFlluuee TTeerrmmiinnaall((CC3333)) -- HHBBLL PPaarrtt 995566008811
60/100mm concentric, vertical flue system, Fig. 22, with amaximum length of 12M. The kit comprises of the roof terminal, vertical adaptor withsampling point and bracket.The maximum length is measured from the top of theappliance casing to the underside of the air cowl.For installation details refer to the flue kit instructions.
Chimney flue liner kit- Part no. 956082
Vertical flue kit - Part no. 956081
Vertical flue kit - Part no. 956081with flat roof flashing plate
Split pipe vertical flue outlet kit - Part no. 956080
with flat roof flashing plate
Raised external flue outlet kit- Part no. 956084
Vertical flue kit - Part no. 956081
External vertical flue kit - Part no. 956085
Standard telescopichorizontal flue kit - Part no. 956120
Optional Flue Systems
The pluming from the flue maycause nuisance to neighboursor other buildings.
60/100 flue accessories:
0.5m flue extension duct - 9560921m flue extension duct - 95609393 flue extension elbow - 95609145 flue extension elbow (2x) - 956090Vertical flue turret - 956087
Ø60/100mm concentricstandard horizontal wallterminal.Max. length 10,000mm.Min. length 250mm.
Standard telescopic horizontal flue kit - Part no. 956120
Horizontal terminal has abuilt-in fall in the flue to allowcondensate to drain away.
If horizontal flue requiresextension pipe. the flueshould be installed suchthat there is no section less than1.5° - 3° to the horizontal,falling back towards the boiler.
93 flanged elbow (concentric)with sampling point
Kit A +
Vertical flue kit - Part no. 956081
Suitable for 25 - 45°Pitch Angle
Leng
th
Kit B
60/100 flue accessories:
0.5m flue extension duct - 9560921m flue extension duct - 95609393 flue extension elbow - 95609145 flue extension elbow (2x) - 956090Pitched roof flashing kit - 956089Flat roof flashing plate - 84051293 flanged flue elbow - 956086Max. length12m.Min. length 0.6m.
Roof terminalwith rain coverand pitched roofflashing kit.
Vertical flue socketwith sampling point.
Top of Boiler
to underside of Cowl
FFiigg.. 2200
FFiigg.. 2211
FFiigg.. 2222

88..00 FFLLUUEE OOPPTTIIOONNSS
88..55 KKiitt CC HHoorriizzoonnttaall AAnnttii--PPlluummee FFlluuee KKiitt((CC1133)) -- PPaarrtt NNoo.. 995566008844
This kit is recommended if the condensate plume from the fluemay cause a nuisance or affect the surroundings. The air inletremains outside and the flue duct is routed separately using a60mm duct enclosed by a protective 80mm tube. To calculatethe maximum lengths of 60/100 concentric flue and 60mmflue ducts, use the table below.
For installation details refer to the flue kit instructions.Dimensions from vertical terminals to opening windows shouldbe in line with Fig. 19.
(For use with Standard horizontal telescopic flue kit - Part no.956120 - only).
This kit is useful for deflecting the condensate plume awayfrom walls or boundaries. It should only be used to deflect thecondensate plume left or right.
60/100mm concentric vertical flue system. Maximum length = 12m. The flue kit contains two additional45° elbows and 2.5 metres of 60/100 concentric ducts as wellas a special wall bracket to pass the guttering (see Fig. 26).The concentric flue will be routed vertically alongside theoutside wall to above the roofline. Special seals are required toprevent rainwater penetrating the pipe joints.For installation details refer to the flue kit instructions.
© Dimplex Boilers 2008 1199
88..66 PPlluummee DDiivveerrtteerr TTeerrmmiinnaall KKiittPPaarrtt NNoo.. 995566110033
88..77 KKiitt DD EExxtteerrnnaall VVeerrttiiccaall FFlluuee((CC3333)) -- PPaarrtt nnoo.. 995566008855
93 flanged elbow (concentric)with sampling point
Raised external flue outlet kit -Part no. 956084
Kit C
Raised Ø60mm flueoutlet duct withØ80mm anti-freezepipe.Max height of raisedflue from top of boilerto centre of outlet 8.5mMin height 1m.
93 flanged elbow (concentric)with sampling point
Max. lengths (from top ofboiler to AIR COWL 12mMin. length 1m.
Kit D
Ø60/100mm concentricair/flue pipe -Part no. 956093(1m extension)andPart no, 956092(0.5m extension)
For outside installationsthe pipe joints have tobe covered with special“lip-seal” to preventrain ingress.
Ensure all horizontally fittedpipes are routed with a 1.5-3° fall towards the boiler.
External vertical flue kit - Part no. 956085
Roof terminalwith rain cover.
88..44 TToottaall EEqquuiivvaalleenntt LLeennggtthhss ffoorr CCoonncceennttrriicc ((6600//110000mmmm)) fflluuee ssyysstteemmss
FFiigg.. 2244
FFiigg.. 2233
FFiigg.. 2255
FFiigg.. 2266
CCoommppoonneenntt
45° Bend
93° Bend
0.5m Extension
1.0m Extension
Support Bracket
EEqquuiivvaalleenntt lleennggtthh iinn mmeettrreess
0.5m
1.0m
0.5m
1.0m
N/A
PPaarrtt nnuummbbeerr
956090 - 2 off
956091
956092
956093
840517
CCoonncceennttrriicc ((6600//110000mmmm))fflluuee lleennggtthh ((mmeettrreess))
00..33 00..55
4455°° BBeenndd
11..00 11..55 22..00 22..55 33..00 33..55 44..00 44..55 55..00
MMaaxxiimmuumm ((6600//8800mmmm)) fflluueelleennggtthh aalllloowweedd ((mmeettrreess))
99..22
EExxaammppllee:: IIff rreeqquuiirreedd lleennggtthh ooff 6600//110000mmmm ccoonncceennttrriicc == 11mm tthheenn mmaaxxiimmuumm 6600//8800 lleennggtthh == 88..55mm
99..00 88..55 88 77..55 77 66..55 66 55..55 55 44..55
SSuuppppoorrtt BBrraacckkeett
9933°° BBeenndd
00..55mm EExxtteennssiioonn
11..00mm EExxtteennssiioonn

88..00 FFLLUUEE OOPPTTIIOONNSS
88..88 KKiitt EE CChhiimmnneeyy FFlluuee LLiinneerr KKiitt((BB2233)) -- PPaarrtt nnoo.. 995566008822
NNoottee::Dimplex Combi 24 and 30kW: Maximum flue length = 30m.Dimplex Combi 38kW: Maximum flue length = 21m.Minimum length for all Dimplex Combi = 5m.
This kit is suitable for open flue application in accordance withBS5440 parts 1 & 2 where a room sealed flue installation isimpractical. The kit comprises of a flue adaptor from theappliance to the chimney, a flexible plastic flue liner withconnection parts and chimney terminal (see Fig. 27). Furtherguidance on ventilation requirements is given in section 7.3.
See ‘Total equivalent lengths for concentric (60/100mm) fluesystems’
2200 © Dimplex Boilers 2008
88..1100 KKiitt FF:: TTwwiinn FFlluuee SSyysstteemm ((CC5533)) -- PPaarrtt nnoo.. 995566008800
NNoottee::Maximum flue length (air duct + flue duct) = 38m.Minimum flue length (air duct + flue duct) = 10m.
The kit comprises of a twin adaptor suitable for 80mm ducts,from which the air intake is taken from the adjacent outsidewall (see Fig. 28) and the flue duct is routed vertically throughthe roof.It is nnoott recommended to route the flue duct through livingspace areas, i.e. bedrooms, living rooms etc.For installation details refer to the instructions provided withthe twin flued kit.
Centralising brackets
Chimney terminal
93 flanged elbow (concentric)with sampling point
Ø60/100mm concentricchimney adaptor pipe.
The chimney must be sweptand cleared of any debrisand obstructions.
Chimneyplate
Flexible corrugated plastic flue linerØ80mm according to EN 14471Max. length 30m.Min. length 5m.
KIT E
Chimney flue liner kit - Part no. 956082
Ø80mm air intake
Split flue system
Roof terminal with pitchedroof flashing kit.
If the flue pipe passesthrough compartmentfrom wall/floors, therequirements set outin Building RegulationsPart B must be followed.
Ø80mm twin adaptorwith sampling point.
If the flue pipe are boxed in then access must be provided to inspect the flue ducts during installationand subsequent service visits.The access panels and flue boxingshould be sealed from the room.
Split pipe verticalflue outlet kit -Part no. 956080
Kit F
FFiigg.. 2277
FFiigg.. 2288
CCoommppoonneenntt
90° Bend
45° Bend
1.0m Extension
2.0m Extension
EEqquuiivvaalleenntt lleennggtthh iinn mmeettrreess
AAiirr DDuucctt
4.0m
2.0m
1.0m
2.0m
FFlluuee DDuucctt
8.0m
4.0m
2.0m
4.0m
PPaarrtt nnuummbbeerr
956100
956099
956101
956102
88..99 KKiitt EE:: KKeeyy fflluuee ddiimmeennssiioonnss ++ AAcccceessssoorriieess
Minimum length 60/100mm horizontal flue 100mm From boiler to chimneyMaximum length 60/100mm horizontal flue 2000mm From boiler to chimney
Minimum length 60/100mm vertical flue 200mm From boiler to chimneyMaximum length 60/100mm vertical flue 2000mm From boiler to chimney
Minimum length 80mm flue liner 5000mm From adaptor to chimney terminalMaximum length 80mm flue liner 30000mm From adaptor to chimney terminal
AAcccceessssoorryy LLeennggtthh PPaarrtt NNuummbbeerr80mm Flexitube flue liner 10m 95611080mm Flexitube flue liner 20m 95611180mm Flexitube flue liner 30m 956112Boiler vertical flue adaptor/turret socket N/A 956087

99..00 IINNSSTTAALLLLAATTIIOONN
99..11 UUNNPPAACCKKIINNGG && IINNIITTIIAALL PPRREEPPAARRAATTIIOONN
TThhee ggaass ssuuppppllyy,, ggaass ttyyppee aanndd pprreessssuurree mmuusstt bbee cchheecckkeedd ffoorrssuuiittaabbiilliittyy bbeeffoorree ccoonnnneeccttiioonn
1. Remove the top cardboard tray from the carton.
2. The wall fixing jig is packed in its own cardboard sleeve.Carefully slide this out of the carton.
3. To avoid scratching the boiler outercase, keep the outercarton in place.
4. After reviewing the site requirements (see Section 7.0),position the fixing template on the wall ensuring it is level bothhorizontally and vertically.
5. Mark the position of the fixing holes for the wall plate andboiler lower fixing holes.
6. Mark the position of the centre of the flue hole (rear exit).For side flue exit, mark as shown (Fig. 4).
7. If required, mark the position of the gas and water pipes.Remove the template.
8. Cut the hole for the flue (minimum diameter 110mm).
9. Drill the wall as previously marked to accept the wall plugssupplied. Secure the wall fixing jig using the fixing screws.
10. Using a spirit level ensure that the fixing jig is level beforefinally tightening the screws.
11. Flush and clean the system using an appropriate cleanser(Fig. 30).
12. Connect the gas and water pipes to the valves on the wallfixing jig.
13. Fit the filling loop as described in the instructions suppliedwith it.
© Dimplex Boilers 2008 2211
FFiigg.. 3300
Flushing Pipe
Central Heating Flowor Return Pipe
FFiigg.. 2299

99..00 IINNSSTTAALLLLAATTIIOONN
99..22 FFIITTTTIINNGG TTHHEE BBOOIILLEERR
1. Remove the sealing caps from the boiler connections.
NOTE: A small amount of water may drain from the boileronce the caps are removed.
2. Check the sealing washers are located correctly in the tapson the wall jig.
3. Lift the boiler as indicated by the shaded areas. The boilershould be lifted by TWO PEOPLE. Engage the slots at the toprear of the boiler on the wall plate (Fig. 31) (see SSaaffee MMaannuuaallHHaannddlliinngg page 6).
4. Ensure the boiler is correctly located on the wall jig and theconnections align. Tighten all the connections.
NOTE: Take care with the Flow Turbine connection as it hasa plastic body.
2222 © Dimplex Boilers 2008
99..33 FFIITTTTIINNGG TTHHEE PPRREESSSSUURREE RREELLIIEEFF DDIISSCCHHAARRGGEE PPIIPPEE
1. Remove the two screws securing the front panel to theunderside of the boiler. Rotate the bottom of the panel outslightly and lift the panel upwards off its retaining studs on topof the appliance.
2. Determine the route of the discharge pipe.
3. Taking care not to disturb the case sealing grommet, thepipework must be at least 15mm diameter and runcontinuously downwards to a discharge point outside thebuilding.
4. Complete the discharge pipework and route it to the outsidedischarge point.
99..44 CCOONNDDEENNSSAATTEE DDRRAAIINN
1. Connect the condensate drain to the trap outlet pipe.
Ensure the discharge of condensate complies with anynational or local regulations in force.
2. The connection will accept 21.5 - 22mm plastic overflowpipe which should generally discharge internally into thehousehold drainage system. If this is not possible, dischargeinto an outside drain is acceptable.
FFiigg.. 3333
Pressure ReliefDischarge Pipe
Front PanelRetaining Stud
XX 22
XX 22
FFiigg.. 3311
FFiigg.. 3322

99..00 IINNSSTTAALLLLAATTIIOONN
99..55 FFIITTTTIINNGG TTHHEE FFLLUUEE
HORIZONTAL TELESCOPIC FLUE1. For correct flue installation please refer to the installationinstructions that are provided with the individual flue kit asdescribed in sections 7 & 8.
2. Measure the required flue length as shown in Fig. 34. Referto section 8 to determine whether any extension kits arerequired. Installations using only the standard ducts orstandard ducts with straight extensions are described in thissection. Installation instructions for all other flue systems areincluded in the various flue kits.
3. Ensure that all (inner and outer tube) sealing rings areprovided and assemble the air/flue ducts as shown in the flueinstructions.
4. Ensure that the flue and air seals are correctly fitted beforeassembly and that each section is fully engaged.
NOTE: NEVER CUT THE SWAGED END. Where necessary theplain ends of the extension ducts may be cut. Alwaysensure that the cut is square and free of burrs or debris.It is essential that the terminal is fitted the correct way up.See flue kit instructions (i.e. rain shield at the top).
IINNSSTTAALLLLIINNGG TTHHEE AAIIRR//FFLLUUEE DDUUCCTT FFRROOMM IINNSSIIDDEE TTHHEE RROOOOMMDetailed installation instructions are included in the flue kit.(Flue hole diameter 130mm).
1. Push the terminal through the wall taking care to ensurethat the terminal is the correct way round and the externalwall-sealing ring does not become dislodged.
2. Assemble the flue system extension ducts as necessary,referring to Fig. 35.
3. Pull the flue system towards the appliance to seat theexternal sealing ring against the outside wall, ensuring that theduct joints are not disturbed.
4. Use the internal sealing ring to make good the internal holeand check that the terminal is correctly located on the outsidewall. Where possible this should be visually checked fromoutside the building (Fig. 35).
5. Finally locate and secure the elbow to the appliance usingthe four screws provided.
IINNSSTTAALLLLIINNGG TTHHEE AAIIRR//FFLLUUEE DDUUCCTT FFRROOMM OOUUTTSSIIDDEE TTHHEE BBUUIILLDDIINNGGDetailed installation instructions are included in the flue kit.Flue hole diameter 100mm - 110mm.
1. Secure the flue elbow with seal to the appliance using 4screws.
2. Fit the external wall sealing ring over the flue and then fromoutside the building, push the flue system through the walltaking care to ensure that the terminal is the correct wayaround.
3. Loosely fit the internal wall sealing ring over the inside endof the flue.
4. Assemble the flue system extension ducts as necessaryreferring to the flue kit instructions and fit to the elbow.
5. Fit the flue terminal to the flue system, ensuring that theduct joints are not disturbed and that the external sealing ringis seated against the outside wall.
6. Finally use the internal sealing ring to make good theinternal hole. Check that the external wall sealing ring and theterminal is correctly located on the outside wall.
© Dimplex Boilers 2008 2233
FFiigg.. 3344
FFiigg.. 3355
‘L’ = Total flue length from flue outletcentre to outside wall face
LL
Fibre SealFitted
22 Align the assembledflue system elbow toappliance and secure
33 Slide internal wallsealing ring to wall to
form a good seal
11 Insert assembled fluesystem from inside the
room. External wallsealing ring opens
External WallSealing Ring
TerminalTop
Internal WallSealing Ring
99..00 IINNSSTTAALLLLAATTIIOONN
99..66 MMAAKKIINNGG TTHHEE EELLEECCTTRRIICCAALL CCOONNNNEECCTTIIOONNSS
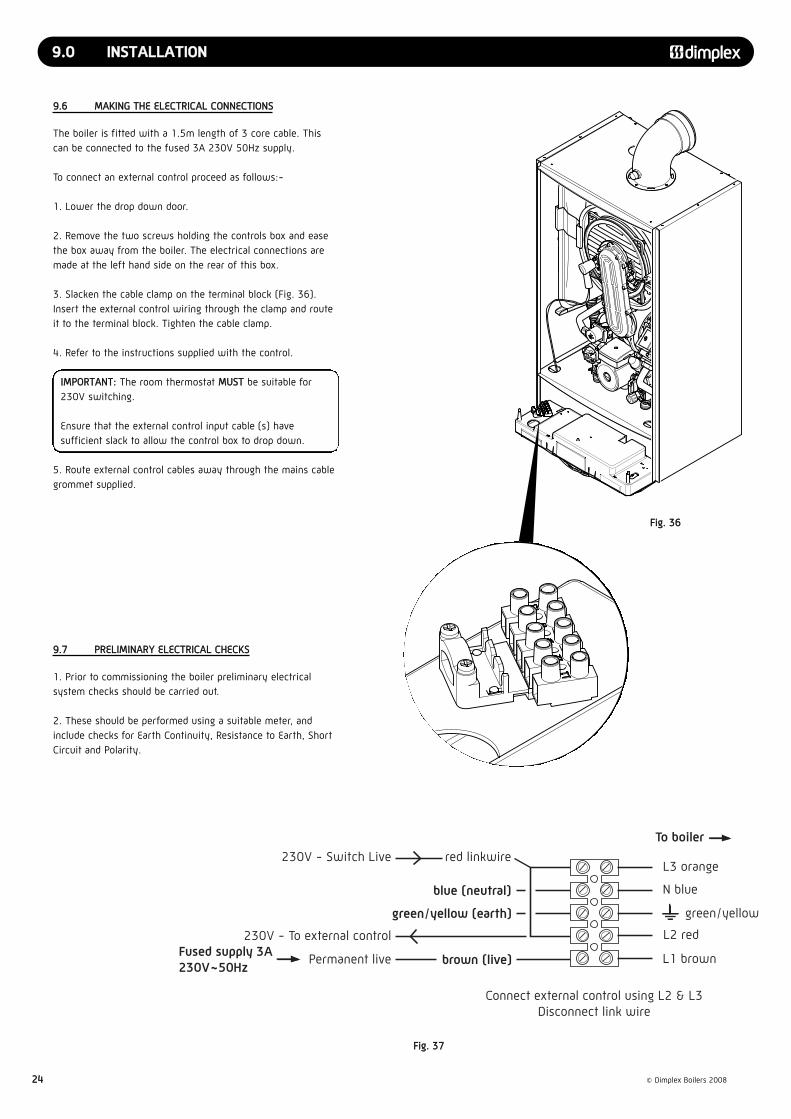
The boiler is fitted with a 1.5m length of 3 core cable. Thiscan be connected to the fused 3A 230V 50Hz supply.
To connect an external control proceed as follows:-
1. Lower the drop down door.
2. Remove the two screws holding the controls box and easethe box away from the boiler. The electrical connections aremade at the left hand side on the rear of this box.
3. Slacken the cable clamp on the terminal block (Fig. 36).Insert the external control wiring through the clamp and routeit to the terminal block. Tighten the cable clamp.
4. Refer to the instructions supplied with the control.
IIMMPPOORRTTAANNTT:: The room thermostat MMUUSSTT be suitable for230V switching.
Ensure that the external control input cable (s) havesufficient slack to allow the control box to drop down.
5. Route external control cables away through the mains cablegrommet supplied.
2244 © Dimplex Boilers 2008
99..77 PPRREELLIIMMIINNAARRYY EELLEECCTTRRIICCAALL CCHHEECCKKSS
1. Prior to commissioning the boiler preliminary electricalsystem checks should be carried out.
2. These should be performed using a suitable meter, andinclude checks for Earth Continuity, Resistance to Earth, ShortCircuit and Polarity.
L1 brown
L2 red
green/yellowgreen/yellow (earth)
Fused supply 3A230V~50Hz brown (live)
red linkwire230V - Switch Live
230V - To external control
Permanent live
blue (neutral) N blue
L3 orange
Connect external control using L2 & L3Disconnect link wire
To boiler
FFiigg.. 3377
FFiigg.. 3366

1100..00 CCOOMMMMIISSSSIIOONNIINNGG
1100..11 CCOOMMMMIISSSSIIOONNIINNGG TTHHEE BBOOIILLEERR
IIMMPPOORRTTAANNTT:: TThhee aaiirr vveenntt oonn ttoopp ooff tthhee bbooiilleerr mmuusstt bbeeOOPPEENN wwhheenn ffiilllliinngg tthhee ssyysstteemm.. AAttttaacchh aa ttuubbee ttoo tthhee aaiirr vveennttttoo ssaaffeellyy ccoolllleecctt aannyy eexxcceessss wwaatteerr ((FFiigg.. 3388))..
GGaass TTiigghhttnneessss1. Ensure the gas service cock on the boiler is turned on (Fig. 40). The entire gas installation must be tested for gastightness and purged in accordance with BS6891.
2. Open the service cocks to the mains cold water, CH flowand CH return supplies.
3. Purge the DHW system by opening a hot tap.
4. Connect the filling loop and fill and vent the CH system.
NNOOTTEE:: Ensure the boiler is completely vented using themanual air vent on top of the boiler.
5. Drain, flush and refill the boiler and system in accordancewith BS7593 (Fig. 30).
NNOOTTEE:: Failure to flush the system and to add inhibitor willinvalidate the appliance warranty.
6. Pressurise the system to 1.5 bar (Fig. 42).
EElleeccttrriiccaall SSaaffeettyy CChheecckkss oonn tthhee CCoonnttrroollss SSyysstteemm aanndd BBooiilleerr7. Carry out earth continuity, resistance to earth, short circuitand polarity checks using a suitable meter.
8. Switch on the electricity supply to the boiler.
9. Set the DHW temperature control to Max. (Fig. 43) and opena DHW tap. The display will initially show the targettemperature and then revert back to show the primary watertemperature within the boiler.
10. Set the controls to call for heat. The boiler will nowoperate in CH mode. Check the CH system for correctoperation.
11. Replace the outer door and two securing screws.
© Dimplex Boilers 2008 2255
0
1
2
bar
3
4
Comfort +
Air Vent
Tube
FFiigg.. 3399
FFiigg.. 3388
FFiigg.. 4400
FFiigg.. 4411
FFiigg.. 4422 FFiigg.. 4433
CH Return
CH Flow
Mains ColdWater Inlet
Gas Inlet
DHW Outlet
Boiler Drain Point
Comfort +
1
13
2
14
3
15
4
16
5
17
6
18
7
19
8
20
9
21
10
22
11
23
12
24
0
1
0
1
2
bar
3
4

1100..00 CCOOMMMMIISSSSIIOONNIINNGG
1100..22 FFAACCTTOORRYY SSEETTTTIINNGGSS
1. With the boiler firing at maximum gas rate, check that theinlet pressure at the appliance is 19mbar +/- 1mbar whenmeasured at the inlet pressure test point (Fig. 44).To set the boiler to maximum gas rate see section 11.0 (Service Mode).
2. Check the maximum and minimum gas rate at the gas meteraccording to the table below using a stopwatch.
NNOOTTEE:: This boiler is supplied factory set for operation onnatural gas. No further adjustments of the air/gas ratiovalve or measurement of the combustion performance arenecessary at the time of installation and commissioning.This is provided the appliance has been installed accordingto these instructions and the inlet gas pressure is withinour specification.
2266 © Dimplex Boilers 2008
NNOOTTEE:: If any doubts exist over the above checks then thecombustion of the appliance can be measured as describedin Section 12.0 of these instructions providing;• The person carrying out the measurement has been
assessed as competent in the use of a flue gas analyserand the interpretation of the results.
• The flue gas analyser used, meets the requirements of BS7927 or BS-EN50379-3.
• The flue gas analyser is calibrated in accordance with themanufacturers requirements.
1100..33 IINNLLEETT PPRREESSSSUURREE AANNDD GGAASS RRAATTEE CCHHEECCKKSS
1. On completion of the gas inlet pressure and gas rate checks,it is necessary to check the following:• The appliance installation conforms to these instructions.• The installation and integrity of the full flue system
including the seals in the flue pipes.• The boiler combustion circuit, including the burner door
seal, combustion door seal.
2. The recorded combustion values should be compared withthe values in Table 1 and Table 2 (see Section 12.2).
3. If the combustion value(s) is outside the values specified inSection 12.2 (Tables 1 & 2), do not attempt to adjust theair/gas ratio valve, please ring the helpline number - 00884444 337711 11112211.. IIff iinn ddoouubbtt -- AASSKK..
1100..44 CCOOMMBBUUSSTTIIOONN CCHHEECCKKSS DDUURRIINNGG CCOOMMMMIISSSSIIOONNIINNGG
GGaass RRaatteess ((NNaattuurraall GGaass)) aafftteerr 55 mmiinnuutteess ffrroomm ccoolldd
MMaaxxiimmuumm RRaatteeBBooiilleerr MMooddeell
m3/h ft3/h m3/h ft3/h
CCoommbbii 2244 2.6 91.8 0.59 20.8
CCoommbbii 3300 3.31 116.9 0.73 25.7
CCoommbbii 3388 4.1 144.7 0.97 34.2
MMiinniimmuumm RRaattee
FFiigg.. 4444
NNOOTTEE::Factory set - warranty
void if adjusted
Throttle Adjuster Screw
GGaass VVaallvvee
Inlet Test Point

1111..00 SSEERRVVIICCEE MMOODDEE
© Dimplex Boilers 2008 2277
NNOOTTEE:: Service Mode automatically stops after 10 minutesand the boiler returns to normal operation.
NNOOTTEE:: On Dimplex Combi 24, 30 and 38kW boilers, themaximum gas rate is only available when the boiler is in hotwater mode. Open two or more hot water taps and ensurethat the flow rate is not less than quoted in Table 3.
1. Turn the CH knob fully clockwise - Note the knob will turnpast the maximum temperature mark (Fig. 45).
2. The CH and DHW lights will flash continuously - the boiler isnow running at minimum rate.
1. To exit Service Mode, turn the CH knob anti-clockwise tothe temperature previously set by the customer. The CH andDHW lights will now stop flashing.
1. Set the boiler into Service Mode at Minimum Rate.
2. Whilst in Service Mode at Min Rate, turn the CH knob to 12‘O’ clock position and then back to fully clockwise (past themaximum temperature indicator) within 3 seconds. The boilerwill now run at maximum gas rate for 10 minutes.
1111..11 TTOO SSEETT TTHHEE BBOOIILLEERR AATT MMIINNIIMMUUMM GGAASS RRAATTEE
1111..22 TTOO SSEETT TTHHEE BBOOIILLEERR AATT MMAAXXIIMMUUMM GGAASS RRAATTEE
1111..33 TTOO SSEETT TTHHEE BBOOIILLEERR AATT MMAAXXIIMMUUMM GGAASS RRAATTEE IINN CCEENNTTRRAALL HHEEAATTIINNGG
FFiigg.. 4455 FFiigg.. 4466
Comfort +
1
13
2
14
3
15
4
16
5
17
6
18
7
19
8
20
9
21
10
22
11
23
12
24
0
1
0
1
2
bar
3
4
FFllooww rraattee ((lliittrreess//mmiinnuuttee))BBooiilleerr MMooddeell
CCoommbbii 2244kkWW 9.8
CCoommbbii 3300kkWW 12.3
CCoommbbii 3388kkWW 15.6
TTaabbllee 33

1122..00 SSEERRVVIICCIINNGG AANNDD MMAAIINNTTEENNAANNCCEE
1122..11 RROOUUTTIINNEE SSEERRVVIICCIINNGG AANNDD AALLLL MMAAIINNTTEENNAANNCCEE TTHHAATTIINNVVOOLLVVEESS TTHHEE EEXXCCHHAANNGGEE OOFF PPAARRTT OOFF TTHHEE CCOOMMBBUUSSTTIIOONN CCIIRRCCUUIITT
1. During routine servicing, e.g. an annual service check, andafter all maintenance that involves the exchange of parts ofthe combustion circuit, we recommend that (in this order) theintegrity of the full flue system and combustion circuit seals,the inlet gas pressure, gas rate and combustion performance isverified.
NNOOTTEE:: The combustion circuit on this appliance comprisesof the PCB, fan, air/gas ratio valve, burner, burner door,combustion box door, injector and flue system.
2. To ensure continued safe and efficient operation of theappliance it is recommended that the boiler is serviced at leastannually. Servicing must be performed by a competent person.BS 7967-1 gives guidance on identifying and managingsources of fumes, smells, spillage/leakage of combustionproducts and carbon monoxide detector activation.
SSaaffeettyy CChheecckkssOn any service visit always check;
a. Condition of flue system, both air and combustion productsducts.b. Condition of seals and joints.c. For evidence of leakage of combustion products.d. For evidence of heat staining.e. For operation at maximum heat input.f. The general condition of the boiler and its components.
11.. CCoommbbuussttiioonn cchheecckkss mmuusstt bbee ccaarrrriieedd oouutt wwiitthh tthhee oouutteerrccaasseeffiitttteedd..
2. Remove the sampling cap from the boiler flue elbow orboiler vertical flue adaptor.
3. Insert the probe from the portable electronic combustionanalyser into the sampling point.
4. With the appliance operational, connect the flue gasanalyser to the flue sampling point as shown in Fig. 47.
NNOOTTEE:: The outercase must be fitted for all combustionchecks.
5. With the boiler at minimum rate and then at maximum rate(allowing the combustion to stabilise at each rate before takinga reading) carry out the combustion checks as follows:
CCOOMMBBUUSSTTIIOONN CCHHEECCKKSS AATT MMIINNIIMMUUMM RRAATTEE6. The combustion values at minimum gas rate and maximumgas rate must be checked using a suitable calibrated flue gasanalyser. Further guidance is detailed in BS7967 parts 1 to 4.
7. Set the boiler into Service Mode at Min Rate (see section 11.1).
8. Check the Carbon Monoxide (CO) and Carbon Dioxide (CO2)readings are within the range quoted in the tables opposite(Table 1).
2288 © Dimplex Boilers 2008
1122..22 CCOOMMBBUUSSTTIIOONN CCHHEECCKKSS
Comfort +
1
13
2
14
3
15
4
16
5
17
6
18
7
19
8
20
9
21
10
22
11
23
12
240
1
0
1 2
bar
3
4
FFiigg.. 4477
Flue Gas Sampling Point
MMiinniimmuumm GGaass RRaattee
NNGG
BoilerModel(kW)
2244
3300
3388
CarbonMonoxide
COp.p.m
0 - 40
0 - 40
0 - 30
CarbonDioxideCO2 %
8.2 - 8.6
8.7 - 9.1
8.3 - 8.7
LLPPGG
CarbonMonoxide
COp.p.m
0 - 40
0 - 40
0 - 40
CarbonDioxideCO2 %
10.2 - 10.6
10.2 - 10.6
10.4 - 10.8
MMaaxxiimmuumm GGaass RRaattee
NNGG
BoilerModel(kW)
2244
3300
3388
CarbonMonoxide
COp.p.m
40 - 120
40 - 120
40 - 120
CarbonDioxideCO2 %
8.8 - 9.2
9.1 - 9.5
8.9 - 9.3
LLPPGG
CarbonMonoxide
COp.p.m
80 - 160
100 - 180
70 - 150
CarbonDioxideCO2 %
10.5 - 10.9
10.7 - 11.1
10.5 - 10.9
TTaabbllee 11
TTaabbllee 22

1122..00 SSEERRVVIICCIINNGG AANNDD MMAAIINNTTEENNAANNCCEE
1122..22 CCOOMMBBUUSSTTIIOONN CCHHEECCKKSS
CCOOMMBBUUSSTTIIOONN CCHHEECCKKSS AATT MMAAXXIIMMUUMM RRAATTEE9. Set the boiler to Maximum gas rate.
10. Check the Carbon Monoxide (CO) and Carbon Dioxide (CO2)readings are within the range quoted in the tables opposite(Table 2).
11. If the combustion value(s) is outside the values specifiedin Tables 1 and 2 and the integrity of the full flue system andcombustion circuit seals, the inlet gas pressure and gas ratehave been verified, it is possible to make an adjustment to thecombustion settings by adjustment of the air/gas ratio valve.See Section 12.3 Adjustment of the Gas Valve.
© Dimplex Boilers 2008 2299
1122..33 AADDJJUUSSTTMMEENNTT OOFF TTHHEE GGAASS//AAIIRR RRAATTIIOO VVAALLVVEE
CCOOMMBBUUSSTTIIOONN SSEETTTTIINNGG AADDJJUUSSTTMMEENNTT1. Adjustment of the offset screw is not allowed.
2. If the maximum rate setting is adjusted, then thecombustion values must be checked at minimum rate.
NNOOTTEE:: DO NOT ATTEMPT TO FIT OR ADJUST THE GAS/AIRRATIO VALVE UNLESS;• The person carrying out the measurement has been
assessed as competent in the use of a flue gas analyserand the interpretation of the results.
• The flue gas analyser used, meets the requirements of BS7927 or BS-EN50379-3.
• The flue gas analyser is calibrated in accordance with themanufacturers requirements.
3. At Maximum Gas Rate; put the appliance into Service Modeat Maximum Gas Rate (see Section 11.2).
4. Wait 5 minutes to allow the boiler to stabilise.
5. If the Carbon Dioxide (CO2) level is outside the requiredvalues given in Section 12.2 (Table 2) then adjust the throttlescrew (Fig. 48) until the CO2 is at the correct setting level. SeeTable 4. Clockwise to decrease CO2, anti-clockwise to increaseCO2.
NNOOTTEE:: Only turn the throttle in small steps of nnoo mmoorree tthhaann11//88tthh ooff aa ttuurrnn and wait 1 minute after each adjustment forthe combustion reading to stabilise.
IIMMPPOORRTTAANNTT:: After any adjustment of the gas valve, it isessential to check the combustion levels at minimum gasrate (Table 1). If the Carbon Monoxide or Carbon Dioxidelevels are outside the range quoted, call Dimplex Boilers LtdTechnical Helpline on 0844 3711121. If in doubt ASK!
TTaabbllee 44
FFiigg.. 4488
NNOOTTEE::Factory set - warranty
void if adjusted
Throttle Adjuster Screw
GGaass VVaallvvee
Inlet Test Point
CCaarrbboonn DDiiooxxiiddee ((CCOO22)) aacccceeppttaabbllee sseettttiinngg lleevveell aatt MMaaxxiimmuumm GGaass RRaattee aafftteerr 55 mmiinnuutteess ooppeerraattiioonn
NNaattuurraall GGaass %%BBooiilleerr MMooddeell
CCoommbbii 2244 9.0 10.7
CCoommbbii 3300 9.3 10.9
CCoommbbii 3388 9.1 10.7
LLPPGG ((PPrrooppaannee)) %%

1122..00 SSEERRVVIICCIINNGG AANNDD MMAAIINNTTEENNAANNCCEE
1122..11 AANNNNUUAALL SSEERRVVIICCIINNGG
8. Remove the two screws securing the front panel to theunderside of the boiler. Lift the panel upwards off its retainingstuds on top of the appliance.
9. Disconnect the two leads to the fan and one lead to the gasvalve.
10. Undo the nut on the gas inlet pipe to the valve and retainthe sealing washer.
11. Remove the four nuts holding the burner door plate andremove the valve and fan assembly (Fig. 51).
12. Clean any debris from the heat exchanger using a softbrush and check that the gaps between the tubes are clear.
13. Inspect the burner, electrode positions and insulation,cleaning or replacing if necessary.
14. Check the condition of the burner door seals, replacing ifnecessary. Check for gas tightness and check combustioncircuit is sealed.
15. Reassemble in reverse order.
16. To check if the condensate pipe is clear, carefully removethe pipe from the bottom of the primary heat exchanger. Blowdown the pipe to ensure it is clear. If required loosen anydebris with a small conical brush and flush through withwater. Before reassembly, fill the condensate pipe with waterto ensure a water trap is formed. Finally, ensure the grommetfitted to the condensate pipe is correctly located into the holein the bottom of the boiler case.
17. Complete the relevant Service Interval Record section ofthe Benchmark Commissioning Checklist at the rear of thispublication and then hand it back to the user.
3300 © Dimplex Boilers 2008
FFiigg.. 5511
FFiigg.. 4499
FFiigg.. 5500
FFiigg.. 5522 Gas Inlet Nut
Front PanelRetaining Stud
XX 44
XX 22
XX 22
Burner Door Seal
Inner Seal
1133..00 CCHHAANNGGIINNGG CCOOMMPPOONNEENNTTSS
IIMMPPOORRTTAANNTT:: When changing components ensure that boththe gas and electrical supplies to the boiler are isolatedbefore any work is started.
See Section 12 : “Annual Servicing” for removal of case, panel,door etc.
© Dimplex Boilers 2008 3311
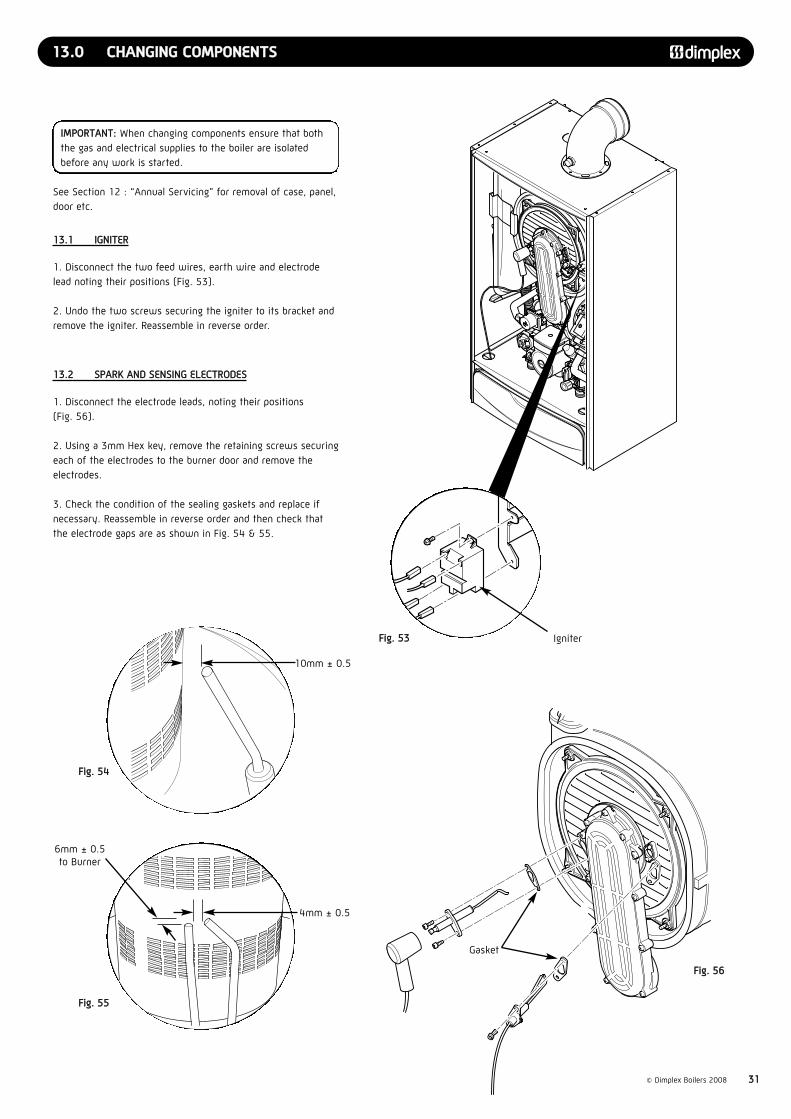
1133..11 IIGGNNIITTEERR
1. Disconnect the two feed wires, earth wire and electrodelead noting their positions (Fig. 53).
2. Undo the two screws securing the igniter to its bracket andremove the igniter. Reassemble in reverse order.
1133..22 SSPPAARRKK AANNDD SSEENNSSIINNGG EELLEECCTTRROODDEESS
1. Disconnect the electrode leads, noting their positions (Fig. 56).
2. Using a 3mm Hex key, remove the retaining screws securingeach of the electrodes to the burner door and remove theelectrodes.
3. Check the condition of the sealing gaskets and replace ifnecessary. Reassemble in reverse order and then check thatthe electrode gaps are as shown in Fig. 54 & 55.
FFiigg.. 5533
FFiigg.. 5544
FFiigg.. 5555
FFiigg.. 5566
Igniter
Gasket
6mm ± 0.5to Burner
4mm ± 0.5
10mm ± 0.5

1133..00 CCHHAANNGGIINNGG CCOOMMPPOONNEENNTTSS
1133..33 GGAASS VVAALLVVEE AANNDD FFAANN
1. Disconnect the two leads to the fan and one lead to the gasvalve.
2. Undo the nut on the gas inlet pipe to the valve and retainthe sealing washer.
3. Remove the three securing screws holding the air/gasChannel to the burner door plate and remove the valve and fanassembly (Fig. 57).
4. Remove the three screws holding the valve and swirl plateto the fan adaptor plate.
NNOOTTEE:: Mark on the adaptor plate which holes are beingused by the screws. Using the wrong holes on re-assembly will cause mis-alignment of the gas valve.
FFaann OOnnllyy6. Remove the three screws holding the fan adaptor to the fan.
7. Remove the four screws securing the fan to the air/gaschannel. Reassemble in reverse order ensuring all seals are inplace.
NNOOTTEE:: The gas valve throttle should be adjusted inaccordance with the instructions supplied in the spares kitSee Section 10.
3322 © Dimplex Boilers 2008
NNOOTTEE:: Dimplex Combi 38 will also be fitted with a blackplastic air cowl which encases the swirl plate.
FFiigg.. 5577
Swirl Plate
Fan
Fan Gasket
Burner Door
Air/Gas Channel
Fan Adaptor Plate
Injector Plate
Injector
Injector ‘O’ Ring
Gas Valve

1133..00 CCHHAANNGGIINNGG CCOOMMPPOONNEENNTTSS
1133..44 BBUURRNNEERR
1. Remove the valve and fan assembly as described in Section13.3.
2. Examine the gasket and replace if necessary.
3. Undo the four nuts securing the burner door and removefrom the heat exchanger.
4. Slowly withdraw the burner from the burner plate takingcare not to damage the insulation (Fig. 58).
5. Reassemble in reverse order.
© Dimplex Boilers 2008 3333
1133..55 IINNSSUULLAATTIIOONN
1. Remove the electrode leads, noting their positions. Removethe electrodes as described in section 13.2.
2. Remove the valve and fan assembly as described in Section13.3.
3. Examine the gasket and replace if necessary.
4. Undo the four nuts securing the burner door and removefrom the heat exchanger.
5. Slowly withdraw the burner from the burner door.
6. Replace the insulation if necessary.
7. Check the burner door seals.
8. The rear insulation is retained by a screw and large washer,remove these and draw the insulation out of the heatexchanger (Fig. 59).
9. Reassemble in reverse order.
Burner
Insulation
Gasket
Air/Gas Channel
Rear Insulation
Washer
Insulation
Retaining Screw
Burner Assembly
Burner Door
Burner Door Seal
FFiigg.. 5588
FFiigg.. 5599
Inner Seal

1133..00 CCHHAANNGGIINNGG CCOOMMPPOONNEENNTTSS
1133..66 FFLLUUEE//HHEEAATT TTEEMMPPEERRAATTUURREE TTHHEERRMMOOSSTTAATT
1. Disconnect the electrical plug.
2. Turn the sensor 90° anticlockwise to remove - it is abayonet connection (Fig. 60).
3. Reassemble in reverse order.
3344 © Dimplex Boilers 2008
1133..77 TTHHEERRMMAALL FFUUSSEE
1. The thermal fuse is non-changeable. If the fuse fails contactDimplex Technical Department.
1133..88 CCEENNTTRRAALL HHEEAATTIINNGG FFLLOOWW TTEEMMPPEERRAATTUURREE TTHHEERRMMIISSTTOORR
1. Disconnect the electrical plug.
2. Ease the sensor clip away from the pipe and remove (Fig. 61).
3. Reassemble in reverse order.
1133..99 CCEENNTTRRAALL HHEEAATTIINNGG RREETTUURRNN TTEEMMPPEERRAATTUURREE TTHHEERRMMIISSTTOORR
1. Disconnect the electrical plug.
2. Ease the sensor clip away from the pipe and remove (Fig. 61).
3. Reassemble in reverse order.
Comfort +
1
13
2
14
3
15
4
16
5
17
6
18
7
19
8
20
9
21
10
22
11
23
12
240
1
0
1 2
bar
3
4
FFiigg.. 6600
FFiigg.. 6611
Comfort +
1
13
2
14
3
15
4
16
5
17
6
18
7
19
8
20
9
21
10
22
11
23
12
240
1
0
1 2
bar
3
4
‘O’ Ring
Thermal Fuse
Central Heating FlowTemperature Thermistor
Central Heating ReturnTemperature Thermistor
Flue/Heat TemperatureThermostat

1133..00 CCHHAANNGGIINNGG CCOOMMPPOONNEENNTTSS
1133..1100 PPUUMMPP -- HHEEAADD OONNLLYY
1. Drain the primary circuit and disconnect the wiringconnector from the pump head.
2. Remove the four socket head screws securing the pumphead to the body and draw the head away (Fig. 62).
3. A replacement Grundfos 15-60 head can now be fitted (Fig. 62)(Part No: 500672).
4. Reassemble in reverse order.
5. Replace the wiring connector into the socket on the pumphead.
© Dimplex Boilers 2008 3355
1133..1111 HHYYDDRROOBBLLOOCCKK
1. Drain the primary circuit.
2. Remove the four stainless clips at the base of the hydro-block and disconnect the four pipes (Fig. 63).
3. Un-lock the two locking clips on the flow and return ports.
4. Disconnect the discharge pipe from the pressure relief valve.
5. Remove the four securing screws from below the boiler.
6. Carefully remove the hydro-block and change the relevantcomponents.
7. Reassemble in reverse order taking care to replace all theclips correctly. Ensure the locking clips are in the ‘Locked’position as shown opposite.
Pump Head
Locking Clip
FrontStainless Clips
RearStainless Clips
Un-Locked (viewed from pipe end)
Locked(viewed from pipe end)
XX 44
XX 22
XX 22
FFiigg.. 6622
FFiigg.. 6633
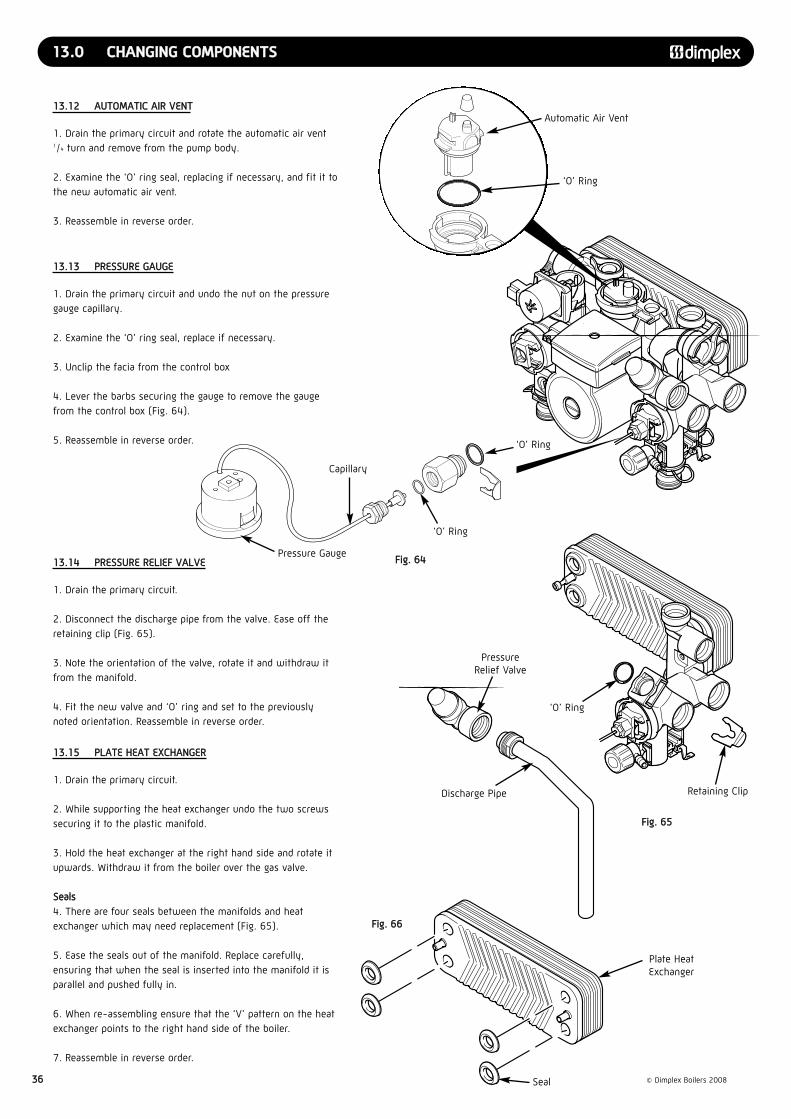
1133..00 CCHHAANNGGIINNGG CCOOMMPPOONNEENNTTSS
1133..1122 AAUUTTOOMMAATTIICC AAIIRR VVEENNTT
1. Drain the primary circuit and rotate the automatic air vent1/4 turn and remove from the pump body.
2. Examine the ‘O’ ring seal, replacing if necessary, and fit it tothe new automatic air vent.
3. Reassemble in reverse order.
3366 © Dimplex Boilers 2008
1133..1133 PPRREESSSSUURREE GGAAUUGGEE
1. Drain the primary circuit and undo the nut on the pressuregauge capillary.
2. Examine the ‘O’ ring seal, replace if necessary.
3. Unclip the facia from the control box
4. Lever the barbs securing the gauge to remove the gaugefrom the control box (Fig. 64).
5. Reassemble in reverse order.
1133..1144 PPRREESSSSUURREE RREELLIIEEFF VVAALLVVEE
1. Drain the primary circuit.
2. Disconnect the discharge pipe from the valve. Ease off theretaining clip (Fig. 65).
3. Note the orientation of the valve, rotate it and withdraw itfrom the manifold.
4. Fit the new valve and ‘O’ ring and set to the previouslynoted orientation. Reassemble in reverse order.
FFiigg.. 6644
FFiigg.. 6655
Automatic Air Vent
‘O’ Ring
Pressure Gauge
Pressure Relief Valve
Retaining Clip
‘O’ Ring
Discharge Pipe
Capillary
‘O’ Ring
‘O’ Ring
1133..1155 PPLLAATTEE HHEEAATT EEXXCCHHAANNGGEERR
1. Drain the primary circuit.
2. While supporting the heat exchanger undo the two screwssecuring it to the plastic manifold.
3. Hold the heat exchanger at the right hand side and rotate itupwards. Withdraw it from the boiler over the gas valve.
SSeeaallss4. There are four seals between the manifolds and heatexchanger which may need replacement (Fig. 65).
5. Ease the seals out of the manifold. Replace carefully,ensuring that when the seal is inserted into the manifold it isparallel and pushed fully in.
6. When re-assembling ensure that the ‘V’ pattern on the heatexchanger points to the right hand side of the boiler.
7. Reassemble in reverse order.
Plate HeatExchanger
Seal
FFiigg.. 6666
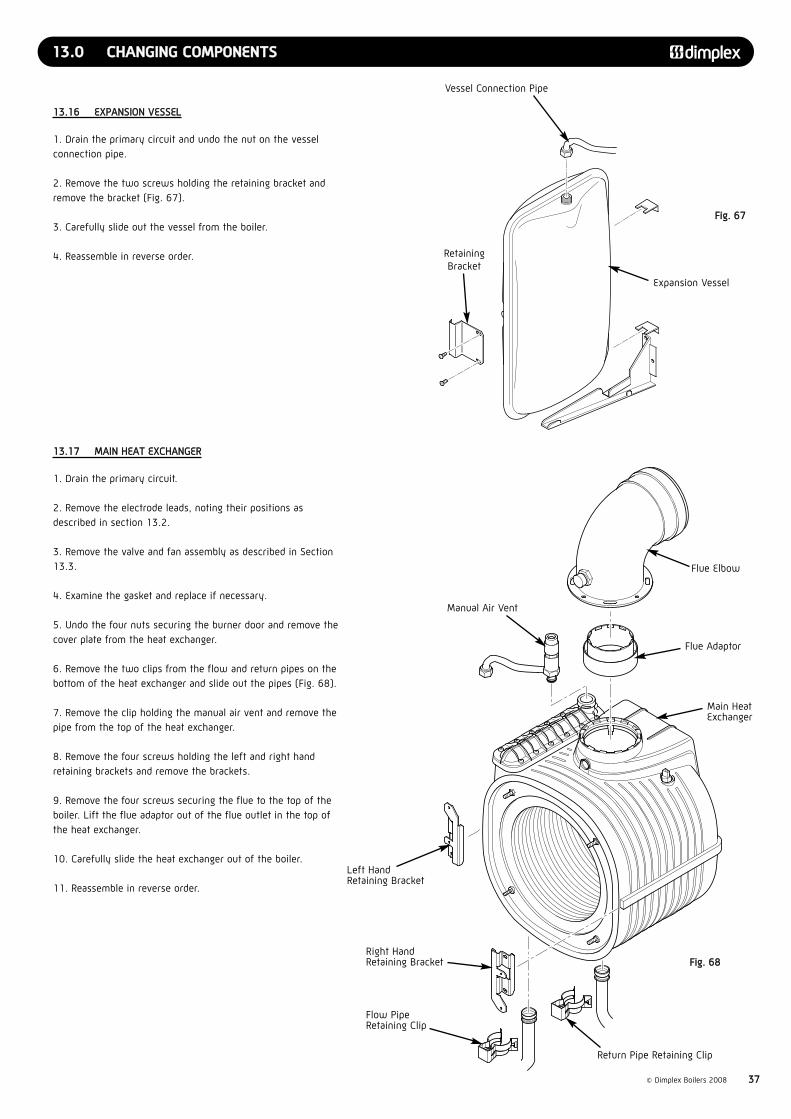
1133..00 CCHHAANNGGIINNGG CCOOMMPPOONNEENNTTSS
© Dimplex Boilers 2008 3377
1133..1166 EEXXPPAANNSSIIOONN VVEESSSSEELL
1. Drain the primary circuit and undo the nut on the vesselconnection pipe.
2. Remove the two screws holding the retaining bracket andremove the bracket (Fig. 67).
3. Carefully slide out the vessel from the boiler.
4. Reassemble in reverse order.
Expansion Vessel
Vessel Connection Pipe
RetainingBracket
FFiigg.. 6677
FFiigg.. 6688
Flue Elbow
Flue Adaptor
Main HeatExchanger
Left Hand Retaining Bracket
Right Hand Retaining Bracket
Flow PipeRetaining Clip
Return Pipe Retaining Clip
Manual Air Vent
1133..1177 MMAAIINN HHEEAATT EEXXCCHHAANNGGEERR
1. Drain the primary circuit.
2. Remove the electrode leads, noting their positions asdescribed in section 13.2.
3. Remove the valve and fan assembly as described in Section13.3.
4. Examine the gasket and replace if necessary.
5. Undo the four nuts securing the burner door and remove thecover plate from the heat exchanger.
6. Remove the two clips from the flow and return pipes on thebottom of the heat exchanger and slide out the pipes (Fig. 68).
7. Remove the clip holding the manual air vent and remove thepipe from the top of the heat exchanger.
8. Remove the four screws holding the left and right handretaining brackets and remove the brackets.
9. Remove the four screws securing the flue to the top of theboiler. Lift the flue adaptor out of the flue outlet in the top ofthe heat exchanger.
10. Carefully slide the heat exchanger out of the boiler.
11. Reassemble in reverse order.

1133..00 CCHHAANNGGIINNGG CCOOMMPPOONNEENNTTSS
1133..1188 PPCCBB
1. Ensure supply voltage is fully isolated.
2. Undo the screws holding the control box and gently easethe box forward (Fig. 69).
3. Locate the retaining barbs on the top of the fascia andunclip them from the control box.
4. Unclip the PCB from the plastic control box.
5. Note the positions of all the connections on the PCB and disconnect them.(DO NOT REMOVE THE YELLOW BCC (Fig. 69))
6. Carefully unclip and remove the ribbon cable from the PCB and withdraw.
7. Fit all the connection plugs to the new PCB including the ribbon cable, take care not to damage the PCB.
8. Unless specifically instructed NNOOTT to do so by the DimplexService Department, always fit the new BCC if supplied withthe replacement PCB.
NNOOTTEE:: Always double check the label on the BCC card toensure it is the correct BCC for the boiler model to which itis being fitted. NNEEVVEERR FFIITT AANN IINNCCOORRRREECCTT BBCCCC..
9. Reassemble in reverse order, ensuring that the control knobare reset to their previous positions
3388 © Dimplex Boilers 2008
1133..1199 BBCCCC
1. Ensure supply voltage is fully isolated.
2. Dismantle the control box as described above to gain accessto the PCB (Fig. 69).
3. Note the orientation of the existing BCC (if fitted) andcarefully remove by sliding it off the edge of the PCB.
4. Re-fit the new BCC by sliding it onto the edge of the PCB,ensuring the orientation is correct.
NNOOTTEE:: Always double check the label on the BCC card toensure it is the correct BCC for the boiler model to which itis being fitted. NNEEVVEERR FFIITT AANN IINNCCOORRRREECCTT BBCCCC..
5. Reassemble as above.
6. Power up boiler, and briefly press the reset button, wait forat least 5 seconds and then briefly press the reset buttonagain.
7. The boiler should now be checked for operation in DHW andCH modes.
PCB
Facia
Control Box
Retaining Barbs
PressureGauge
Timer
User Interface
Control Knobs
FFiigg.. 6699
BCC

1144..00 EELLEECCTTRRIICCAALL
1144..11 IILLLLUUSSTTRRAATTEEDD WWIIRRIINNGG DDIIAAGGRRAAMM
© Dimplex Boilers 2008 3399
brb
g/y
bkgo
bkb
ry
brb
g/y
gr
brb
brb
g/y
r
L3 L2 L1N
1A CH7 RT CLOCK
24Hr TIME CLOCKLCD DISPLAY
RIBBON TO PCB
RIBBON TOLCD DISPLAY
MAINSPOWER230V ~ AC
GAS VALVES230Vac
FAN230Vac
RETURN TEMPTHERMISTER(5K NTC)
BOILER TO PC COM PORT
FLOW TEMP THERMISTER(5K NTC)
BOILER PUMP230Vac
FLOW TURBINE0-5V DC
DETECTIONELECTRODE
IGNITIONELECTRODE
SPARK GENERATOR230Vac
ROOMSTAT OR LINK
1B MAINS
1C BOILER PUMP
2A GAS VALVES
3 FAN
5 COM PORT
6 FLOW N.T.C.
BOILER CHIP CARD BCC
6 RETURN N.T.C.
2B IGNITER / FLAME SENSOR
bkbk
bb
y
FLUE TEMPTHERMISTER(5K NTC)
THERMAL FUSE
o
r g
gbr
wy
Key - Cable Colours
g Greeny Yellowb Bluer Redbk Blacko Orangeg/y Green / Yellowbr Browngr Greyw White
br
br
bg/y
8 FAN CONTROL
8 FLUE
8 DHW FLOW
(IF FITTED)
4 HYDROBLOCK DIVERTER
y
o b g/y r br

1155..00 SSPPAARREE PPAARRTTSS
1155..11 SSHHOORRTT PPAARRTTSS LLIISSTT
4400 © Dimplex Boilers 2008
KKeeyy GGCC NNuummbbeerr DDeessccrriippttiioonn QQTTYY PPtt.. NNoo..1 H29-740 Electrode - Ignition c/w Gasket 1 9885262 H38-213 Detection Electrode c/w Gasket 1 9885403 H29-236 Spark Generator c/w Lead 1 5006654a TBA Dimplex Combi 24 gas control valve assembly NG 1 9886604b TBA Dimplex Combi 30 gas control valve assembly NG 1 9886614c TBA Dimplex Combi 38 gas control valve assembly NG 1 9886625 H38-215 Fan Assembly 1 6010166a H29-171 Burner (Combi 24) 1 7006006b H29-172 Burner (Combi 30) 1 7006016c H29-173 Burner (Combi 38) 1 7006027 TBA Burner Door Insulation 1 3526718a H38-217 Heat Exchanger (Combi 24) 1 4511018b H38-218 Heat Exchanger (Combi 30) 1 4511008c TBA Heat Exchanger (Combi 38) 1 4511519 H29-202 Pump Head 6m 1 50067210 H29-203 Diverter valve Motorised Head 1 50075011 H29-237 Expansion Vessel 1 45102012 TBA 3 Bar Pressure Relief valve 1 50075113 H29-213 Water Temperature sensor 2 50066114 H38-219 Flue Thermistor 1 50066215a TBA Dimplex Combi 24kW Plate Heat exchanger kit 1 98867115b TBA Dimplex Combi 30kW Plate Heat exchanger kit 1 98867215c TBA Dimplex Combi 38kW Plate Heat exchanger kit 1 98867316 E23-541 Pressure Gauge 4bar 1 45096117 TBA Auto Air Vent 1 50075218a TBA Dimplex Combi 24 NG PCB Kit 1 98866318b TBA Dimplex Combi 30 NG PCB Kit 1 98866418c TBA Dimplex Combi 38 NG PCB Kit 1 98866519 E23-671 Time Clock - Grasslin FM1STUH 1 60052020 TBA DHW Flow Turbine 1 30076621a TBA DHW Flow Regulator (Combi 24) 1 30071721b TBA DHW Flow Regulator (Combi 30) 1 30071521c TBA DHW Flow Regulator (Combi 35) 1 30071922 H29-179 Valve - Manual Bleed 1 30073023 H38-226 Heat Exchanger seal & Clip Kit 1 98854624 H29-208 Hydroblock - O-Ring and Clip 1 98866925 TBA Hydroblock Manual bleed cock 1 500708
1
2
3 4
5
6
8
7
1213
14
11
10
16
9
15
19
20
21
22
17
23
2425
18

1166..00 FFAAUULLTT FFIINNDDIINNGG
© Dimplex Boilers 2008 4411
1. The mains electrical supply to the boiler and systemcontrols are turned on.
2. The gas service cock is open.
3. External controls are calling for heat.
4. The system is filled with water and is correctly pressurized.
To follow the operational sequence of the boiler, press thereset button for approximately 3 seconds until the two dots onthe LCD display are flashing. With no demand for Heat or DHW,the display will show 0 0 .
On Demand for heat or DHW, the display will show thecontroller sequence. See table opposite.
To reset the display to normal operation, press the reset buttonfor approximately 1 second. The display will revert to showthe current boiler temperature.
NNOOTTEE:: To reset the appliance after a lockout, press the Redbutton.
1166..11 BBAASSIICC CCHHEECCKKSS
1166..44 CCHHEECCKKIINNGG GGAASS VVAALLVVEE SSOOLLEENNOOIIDD CCOOIILLSS
1166..22 OOPPEERRAATTIIOONNAALL SSEEQQUUEENNCCEE OOFF BBOOIILLEERR
1166..33 RREESSIISSTTAANNCCEE VVAALLUUEESS ΩΩ FFOORR FFLLOOWW,, RREETTUURRNN AANNDD FFLLUUEE TTHHEERRMMIISSTTOORRSS
DDiissppllaayy
0 00 10 20 30 40 50 60 70 80 91 01 11 21 31 4
EExxppllaannaattiioonn
Standby - Burner off
Fan on - Checking RPM feedback
Fan on - Checking RPM feedback
Pre purge of combustion circuit
Pre-ignition - gas valve closed
Gas valve open and ignition on
Flame stabilisation check
Flame established - BBuurrnneerr oonn ppeerriioodd ssttaarrttss
BBuurrnneerr ooffff ppeerriioodd ssttaarrttss.. Check gas valve solenoids are de-energised
Check gas valve solenoids are de-energised and check for no flame
Post purge of combustion circuit
Volatile or non-volatile lockout has occurred
Not used
Not used
Sequence fault
BBeeffoorree cchheecckkiinngg ffoorr aa ffaauulltt ccoonnddiittiioonn ccaarrrryy oouutt eelleeccttrriiccaall cchheecckkss ttoo eennssuurree tthhee bbooiilleerr hhaass EEaarrtthh ccoonnttiinnuuiittyy,, ccoorrrreecctt ppoollaarriittyy aanndd LLiivvee aanndd NNeeuuttrraallccoonnnneeccttiioonnss hhaavvee nnoo sshhoorrtt cciirrccuuiitt..
TTeemmppeerraattuurree °°CC 5
RReessiissttaannccee OOhhmmss ((ΩΩ)) 12890 7856 6245 5000 3265 2185 1242 625 456 390 337
NNOOTTEE:: Allow a tolerance of approximately +/- 10%.
15 20 25 35 45 60 80 90 95 100
1. The solenoid coils can be checked by measuring theresistance in Ohms (Ω).
2. Connect a multimeter across pins 1 and 5, resistance = 3770 Ω.
NNOOTTEE:: Allow a tolerance of approximately +/- 10% onresistance reading.
Pin 1
Pin 2
Pin 3 - Earth Connection
GGaass VVaallvvee EElleeccttrriiccaall CCoonnnneeccttiioonnss
Pin 4
Pin 5
Flow and Return Thermistors Flue Thermistor

1166..00 FFAAUULLTT FFIINNDDIINNGG
4422 © Dimplex Boilers 2008
DDEESSCCRRIIPPTTIIOONN OOFF CCAAUUSSEESS
Overheated appliance – Water temperature greater than 105°C. This causes a Non volatile lockout requiring a manual reset.
No Flame –No flame signal on ignition.The boiler makes up to 5 ignition attempts on loss of flame signal.Failure after 5 attempts causes a Non volatile lockout requiring amanual reset. No Flame –Loss of flame signal during normal operation Up to 5 loss of flame during normal operation is allowed before Nonvolatile lock out occurs requiring manual reset. The loss of flame count is reset when the boiler thermostat issatisfied
Temporarily overheated appliance – Water temperature is greaterthan 95°CThis causes a volatile lockout that will automatically reset when thetemperature drops below the boiler thermostat setting
Overheat on Flue system – Flue temperature greater than 92°CNon volatile lock out requiring a manual reset
Flame Simulation – Flame detection when gas valve is closedThis causes a Non volatile lockout requiring manual reset
Flow thermistor failureVolatile lock out that will automatically reset when fault is repairedORThermal fuse has activated (Heat exchanger temperature greater than165°C)Volatile lock out that will reset when fault is repaired
Flue thermistor failure Volatile lock out that will automatically reset when fault is repaired
CH return thermistor faultVolatile lock out that will automatically reset when fault is repaired
Gas vale solenoid failure
Fan failure
Boiler Chip Card Error.BCC is not suitable for the boiler model
Boiler Chip Card ErrorBCC is not connected
Boiler Chip Card Error
Boiler Chip Card Error
Boiler Chip Card Error
Boiler Chip Card Error
Return Temperature is greater than Flow temperature +12°.Temperature difference between Flow and Return is greater than45°C.Volatile lock out that will reset when fault is repaired.
No water flow across Heat exchangerReturn temperature has not changed by more than 1° within first15seconds from boiler firing
Boiler Chip Card Error
AACCTTIIOONNSS
Check for power failureCheck Pump operationCheck there is no air in Heat exchanger and check system bypassCheck Temperature thermistors are located on pipe work correctlyCheck resistance of thermistors Check plate to plate heat exchanger for blockages
Check gas supply and inlet operating (working) pressureCheck Gas valve operation and continuity across gas valve electrical lead.Check condensate drain is not blockedCheck entire flue system is connected correctly and terminatedcorrectlyCheck detection (flame sensing) Electrode and lead
Check Pump operationCheck there is no air in Heat exchanger and check system bypassCheck Temperature thermistors are located on pipe work correctlyCheck resistance of thermistorsCheck plate to plate heat exchanger for blockages
Check there is no air in Heat Exchanger and CH system.Check entire flue system is connected correctly and terminatedcorrectlyCheck minimum and maximum gas rates are correctCheck for correct water circulationCheck Heat exchanger flue ways are cleanCheck continuity of sensor leads
Check detection (flame sensing) electrode is cleanCheck burner surface is cleanCheck Gas valve operation and gas valve electrical supply
Check resistance across thermistor and check continuity of sensorleads at PCB connection 6Major fault. Possible causes are:-Complete dry fire that requires a replacement heat exchanger.Leak of Hot gases from combustion circuit.Faulty sensor that requires main Heat exchanger replacing
Check resistance across thermistor and check continuity of sensorsleads at PCB connection 8
Check resistance across thermistor and check continuity ofthermistor leads at PCB connection 6
Check resistance across Gas valve solenoidCheck continuity of Gas valve lead at PCB connection 2A
Check electrical supply to fan and continuity of fan leads at PCBconnections 3 Check signal control connections to fan and continuity at PCB connection 8
Replace with Correct BCC
Refit BCC; ensure it is located correctlyReplace BCC
BCC is damaged, Replace BCC
Replace with correct BCC
Replace with correct BCC
Reset the boiler following the BCC fitting Instructions
Check Flow and Return Sensors are correctly connectedCheck Resistances of Flow and of Return thermistorsCheck for air in Heat ExchangerCheck heating system Pipework is correct
Check Flow and Return Sensors are correctly connectedCheck Resistances of Flow and of Return thermistorsCheck for air in Heat ExchangerCheck heating system Pipework is correct
Reset the boiler following the BCC fitting instructions
EERRRROORR CCOODDEE
1
4
5
6
7
1 1
1 2
1 3
1 6
2 0
2 4
3 4
3 5
3 63 73 83 94 1
4 2
5 0
BBOOIILLEERR CCHHIIPP CCAARRDDSS ((BBCCCC)) AARREE OONNLLYY FFIITTTTEEDD IIFF TTHHEE PPCCBB HHAASS BBEEEENN RREEPPLLAACCEEDD OORR CCOONNVVEERRTTEEDD TTOO LLPPGG

1177..00 BBEENNCCHHMMAARRKK
© Dimplex Boilers 2008 4433
GAS BOILER SYSTEM COMMISSIONING CHECKLIST
CONTROLS Tick the appropriate boxes
Time and Temperature Control to Heating Room Thermostat and Programmable Load/Weather Optimum Start Programmer/Timer Room Thermostat Compensation Control
Time and Temperature Control to Hot Water Cylinder Thermostat and Programmer/Timer Combination Boiler
Heating Zone Valves Fitted Not Required
Hot Water Zone Valves Fitted Not Required
Thermostatic Radiator Valves Fitted Not Required
Automatic Bypass to System Fitted Not Required
Boiler Interlock Provided
ALL SYSTEMS
The system has been flushed and cleaned in accordance with BS7593 and boiler manufacturer’s instructions Yes
What system cleaner was used?
What inhibitor was used? Quantity litres
CENTRAL HEATING MODE Measure and Record:
Gas Rate m3/hr OR ft3/hr
Burner Operating Pressure (if applicable) mbar OR Gas Inlet Pressure mbar
Central Heating Flow Temperature °C
Central Heating Return Temperature °C
COMBINATION BOILERS ONLY
Is the installation in a hard water area (above 200ppm)? Yes No
If yes, has a water scale reducer been fitted? Yes No
What type of scale reducer has been fitted?
DOMESTIC HOT WATER MODE Measure and Record:
Gas Rate m3/hr OR ft3/hr
Burner Operating Pressure (at maximum rate) mbar OR Gas Inlet Pressure (at maximum rate) mbar
Cold Water Inlet Temperature °C
Hot water has been checked at all outlets Yes Temperature °C
Water Flow Rate l/min
CONDENSING BOILERS ONLY
The condensate drain has been installed in accordance with the manufacturer’s instructions and/or BS5546/BS6798 Yes
ALL INSTALLATIONS
If required by the manufacturer, record the following CO2 % OR CO ppm OR CO/CO2 Ratio
The heating and hot water system complies with the appropriate Building Regulations Yes
The boiler and associated products have been installed and commissioned in accordance with the manufacturer’s instructions Yes
The operation of the boiler and system controls have been demonstrated to and understood by the customer Yes
The manufacturer’s literature, including Benchmark Checklist and Service Record, has been explained and left with the customer Yes
*All installations in England and Wales must be notified to Local Authority Building Control (LABC) either directly or through a Competent Persons Scheme. A Building Regulations Compliance Certificate will then be issued to the customer.
©Heating and Hotwater Industry Council (HHIC) www.centralheating.co.uk
Commissioning Engineer’s Signature
Customer’s Signature(To confirm satisfactory demonstration and receipt of manufacturer’s literature)
This Commissioning Checklist is to be completed in full by the competent person who commissioned the boiler as a means of demonstrating compliance with the appropriate Building Regulations and then handed to the customer to keep for future reference.
Failure to install and commission this equipment to the manufacturer’s instructions may invalidate the warranty but does not affect statutory rights.
Customer Name Telephone Number
Address
Boiler Make and Model
Boiler Serial Number
Commissioned by (print name) CORGI ID Number
Company Name Telephone Number
Company Address
Commissioning Date
To be completed by the customer on receipt of a Building Regulations Compliance Certificate*:
Building Regulations Notification Number (if applicable)

1177..00 BBEENNCCHHMMAARRKK
4444 © Dimplex Boilers 2008
It is recommended that your heating system is serviced regularly and that the appropriate Service Record is completed.
Service ProviderBefore completing the appropriate Service Record below, please ensure you have carried out the service as described in the manufacturer’s instructions.
Always use the manufacturer’s specified spare part when replacing controls.
SERVICE 1 Date
Energy Efficiency Checklist completed? Yes No
Engineer Name
Company Name
Telephone Number
CORGI ID Number
Comments
Signature
SERVICE 3 Date
Energy Efficiency Checklist completed? Yes No
Engineer Name
Company Name
Telephone Number
CORGI ID Number
Comments
Signature
SERVICE 5 Date
Energy Efficiency Checklist completed? Yes No
Engineer Name
Company Name
Telephone Number
CORGI ID Number
Comments
Signature
SERVICE 7 Date
Energy Efficiency Checklist completed? Yes No
Engineer Name
Company Name
Telephone Number
CORGI ID Number
Comments
Signature
SERVICE 9 Date
Energy Efficiency Checklist completed? Yes No
Engineer Name
Company Name
Telephone Number
CORGI ID Number
Comments
Signature
SERVICE 2 Date
Energy Efficiency Checklist completed? Yes No
Engineer Name
Company Name
Telephone Number
CORGI ID Number
Comments
Signature
SERVICE 4 Date
Energy Efficiency Checklist completed? Yes No
Engineer Name
Company Name
Telephone Number
CORGI ID Number
Comments
Signature
SERVICE 6 Date
Energy Efficiency Checklist completed? Yes No
Engineer Name
Company Name
Telephone Number
CORGI ID Number
Comments
Signature
SERVICE 8 Date
Energy Efficiency Checklist completed? Yes No
Engineer Name
Company Name
Telephone Number
CORGI ID Number
Comments
Signature
SERVICE 10 Date
Energy Efficiency Checklist completed? Yes No
Engineer Name
Company Name
Telephone Number
CORGI ID Number
Comments
Signature
SERVICE RECORD

1177..00 BBEENNCCHHMMAARRKK
© Dimplex Boilers 2008 4455
MAINS PRESSURE HOT WATER STORAGE SYSTEM COMMISSIONING CHECKLIST
* llA installations in England and Wales must be notified to Local Authority Building Control (LABC) either directly or through a Competent Persons Scheme.A Building Regulations Compliance Certificate will then be issued to the customer.
©Heating and Hotwater Industry Council (HHIC) www.centralheating.co.uk
ALL SYSTEMS PRIMARY SETTINGS (indirect heating only)
Is the primary circuit a sealed or open vented system? Sealed Open
What is the maximum primary flow temperature? °C
ALL SYSTEMS
What is the incoming static cold water pressure at the inlet to the system? bar
Has a strainer been cleaned of installation debris (if fitted)? Yes No
Is the installation in a hard water area (above 200ppm)? Yes No
If yes, has a water scale reducer been fitted? Yes No
What type of scale reducer has been fitted?
What is the hot water thermostat set temperature? °C
What is the maximum hot water flow rate at set thermostat temperature (measured at high flow outlet)? l/min
Time and temperature controls have been fitted in compliance with Part L of the Building Regulations? Yes
Type of control system (if applicable) Y Plan S Plan Other
Is the cylinder solar (or other renewable) compatible? Yes No
What is the hot water temperature at the nearest outlet? °C
All appropriate pipes have been insulated up to 1 metre or the point where they become concealed Yes
UNVENTED SYSTEMS ONLY
Where is the pressure reducing valve situated (if fitted)?
What is the pressure reducing valve setting? bar
Has a combined temperature and pressure relief valve and expansion valve been fitted and discharge tested? Yes No
The tundish and discharge pipework have been connected and terminated to Part G of the Building Regulations Yes
Are all energy sources fitted with a cut out device? Yes No
Has the expansion vessel or internal air space been checked? Yes No
THERMAL STORES ONLY
What store temperature is achievable? °C
What is the maximum hot water temperature? °C
ALL INSTALLATIONS
The hot water system complies with the appropriate Building Regulations Yes
The system has been installed and commissioned in accordance with the manufacturer’s instructions Yes
The system controls have been demonstrated to and understood by the customer Yes
The manufacturer’s literature, including Benchmark Checklist and Service Record, has been explained and left with the customer Yes
Commissioning Engineer’s Signature
Customer’s Signature(To confirm satisfactory demonstration and receipt of manufacturer’s literature)
This Commissioning Checklist is to be completed in full by the competent person who commissioned the storage system as a means ofdemonstrating compliance with the appropriate Building Regulations and then handed to the customer to keep for future reference.
Failure to install and commission this equipment to the manufacturer’s instructions may invalidate the warranty but does not affect statutory rights.
Customer Name Telephone Number
Address
Cylinder Make and Model
Cylinder Serial Number
Commissioned by (print name) Registered Operative ID Number
Company Name Telephone Number
Company Address
Commissioning Date
To be completed by the customer on receipt of a Building Regulations Compliance Certificate*:
Building Regulations Notification Number (if applicable)

1177..00 BBEENNCCHHMMAARRKK
4466 © Dimplex Boilers 2008
SERVICE RECORDIt is recommended that your hot water system is serviced regularly and that the appropriate Service Record is completed.
Service ProviderBefore completing the appropriate Service Record below, please ensure you have carried out the service as described in the manufacturer’sinstructions.
SERVICE 1 Date
Engineer Name
Company Name
Telephone Number
Comments
Signature
SERVICE 2 Date
Engineer Name
Company Name
Telephone Number
Comments
Signature
SERVICE 3 Date
Engineer Name
Company Name
Telephone Number
Comments
Signature
SERVICE 4 Date
Engineer Name
Company Name
Telephone Number
Comments
Signature
SERVICE 5 Date
Engineer Name
Company Name
Telephone Number
Comments
Signature
SERVICE 6 Date
Engineer Name
Company Name
Telephone Number
Comments
Signature
SERVICE 7 Date
Engineer Name
Company Name
Telephone Number
Comments
Signature
SERVICE 8 Date
Engineer Name
Company Name
Telephone Number
Comments
Signature
SERVICE 9 Date
Engineer Name
Company Name
Telephone Number
Comments
Signature
SERVICE 10 Date
Engineer Name
Company Name
Telephone Number
Comments
Signature

1177..00 BBEENNCCHHMMAARRKK
© Dimplex Boilers 2008 4477
VENTED CYLINDER COMMISSIONING CHECKLISTThis Commissioning Checklist is to be completed in full by the competent person who commissioned the
cylinder as a means of demonstrating compliance with the appropriate Building Regulations and should
remain attached to the cylinder for future reference.
Failure to install and commission this equipment to the manufacturer’s instructions may invalidate the
warranty but does not affect statutory rights.
Commissioned by (print name)
Company Name
Company Address
Telephone Number Commissioning Date
To be completed by the customer on receipt of a Building Regulations Compliance Certificate*:
Building Regulations Notification Number (if applicable)
ALL CYLINDERS
The vent pipe has been installed to BS6700/BS5449 Yes
What is the static head? metres
Has an immersion heater been fitted? Yes No
If yes, does it have a non-auto resetting energy cut out? Yes No
Is the cold feed cistern supported in accordance with BS4213? Yes
Is the cylinder solar (or other renewable) compatible? Yes No
All appropriate pipes including the vent pipe have been insulated
up to 1metre or the point where they become concealed Yes
*Where an installation is notifiable in England & Wales this will be made to Local Authority Building Control(LABC) either directly or through a Competent Persons Scheme. A Building Regulations Compliance Certificate will then be issued to the customer.
©Heating and Hotwater Industry Council (HHIC) www.centralheating.co.uk
Commissioning Engineer’s Signature
Customer’s Signature
(To confirm satisfactory demonstration and receipt of manufacturer’s literature)
INDIRECT ONLY
A cylinder thermostat has been fitted in the recommended position Yes
The hot water is controlled by a programmer or time switch Yes
Is the system fully pumped? Yes No
Type of control system Y Plan S Plan Other
1188..00 WWAARRRRAANNTTYY TTEERRMMSS && CCOONNDDIITTIIOONNSS
1188..11 DDIIMMPPLLEEXX 55YYRR WWAARRRRAANNTTYY
1. Registration must be completed within 30 days of installation. Failure to return within 30 days will invalidate your warranty. Registration if effected by returning the enclosed registration card to the commercial center of Dimplex at 5 Spartan Close, Tachbrook Park, Leamington Spa, CV34 6RR. Proof of postage should be obtained.
2. The Benchmark document must be completed by installer/householder at the time of installation and must be presented to our engineer atsubsequent visits.
3. The boiler must be serviced annually, at the householders expenses in accordance with manufacturer’s instructions, and this service must be booked through Dimplex by calling 0844 371 1121
4. The service must be carried out by a Dimplex approved central heating engineer. Any work carried out by a non-Dimplex approved engineerwill invalidate this warranty.
5. Appropriate system cleaning (e.g. power flush) and the correct use of additives must be carried out at the time of installation. Failure to cleanse the system will invalidate this warranty. Evidence of cleansing should be presented to our engineer upon request.
6. This warranty applies only to manufacturing problems with the boiler; damage caused through misuse, incorrect operation, foreign bodies in the heating system, system faults and failures are not covered.
7. This warranty applies only if the boiler is installed and used in accordance with the manufacturer’s instructions, in normal domestic applications.
8. Providing all the above Terms and Conditions are met, this warranty covers functional parts and labour.9. Dimplex offer the opportunity for a system audit and commissioning check within 30 days of registration. This is chargeable at the same rate
as an annual service and if taken up then the first annual service will be provided free of charge. Failure to take up this offer may invalidate the full warranty which will revert to a standard 2 year warranty which will require an annual service In year 2 in any event.
10. Failure to meet any of the above Terms and Conditions will invalidate this warranty.

SSAALLEESS AANNDD SSEERRVVIICCEE HHEELLPPLLIINNEE:: 00884444 337711 11112211
© Dimplex Boilers 2008Part No: 751253 - Issue 2 - 27/1/09
Dimplex Boilers is continually improving its products and therefore
reserve the right to change product specifications without prior notice.
Errors & omissions excepted.
DDiimmpplleexx BBooiilleerrss2200//2222 FFiirrsstt AAvveennuuee
BBlluueebbrriiddggee IInndduussttrriiaall EEssttaatteeHHaallsstteeaadd
EEsssseexx CC0099 22EEXX
Telephone Sales and Service: 00884444 337711 11112211
Fax: 0011778877 447744558888
e-mail:
ssaalleess@@ddiimmpplleexxbbooiilleerrss..ccoo..uukk
eennqquuiirriieess@@ddiimmpplleexxbbooiilleerrss..ccoo..uukk
ttrraaiinniinngg@@ddiimmpplleexxbbooiilleerrss..ccoo..uukk
website:
wwwwww..ddiimmpplleexxbbooiilleerrss..ccoo..uukk