Embed Size (px)
Citation preview

PROGRAMMING COLECOVISION GAMES
DOCUMENT WRITTEN BY
DANIEL BIENVENU
2003
Version 1-E
Last update: August 4th, 2003

PROGRAMMING COLECOVISION GAMES
Table of content
TABLE OF CONTENT 2
INTRODUCTION 6
SETUP YOUR DEVELOPMENT ENVIRONMENT 7
MEMORY 8ROM (Read Only Memory) 8RAM (Read-Write Memory) 8MEMORY MAP 8RAM USED BY THE COLECOVISION BIOS 9
DATA TYPES 10char 10byte 10int 10unsigned 10float 11char [n] 11* (pointer) 11void 11
OPERATORS 12USUAL SET OF BINARY ARITHMETIC OPERATORS: 12INCREMENT (++) AND DECREMENT (--) 12BITWISE OPERATORS 12COMBINED OPERATORS 12RELATIONAL OPERATORS 13LOGICAL OPERATORS 13
SCREEN MODE 14
CHARACTERS 15VIDEO MEMORY FOR CHARACTERS 15CHARACTER PATTERN 16
EXAMPLE - SPACESHIP 16UPLOAD CHARACTER SET 18
SPRITES 19SPRITES COLOR 19SPRITES PATTERN 19SPRITES LOCATIONS ON SCREEN 20SPRITES ROUTINES 20
TOOLS 21WAV2CV 21WAV2CVDS 22I.C.V.G.M. 23BMP2PP 24PP2C and PP2ASM 25CVPAINT 26CCI - Coleco Compiler Interface 27
How to use CCI? 27
2

PROGRAMMING COLECOVISION GAMES
JOYSTICK 28JOYPAD 28KEYPAD 28
SOUND 29THE SOUND ROUTINES 29
update_sound (); 29start_sound (sound_data,sound_priority); 29sound_pointer = start_sound(sound_data, sound_priority); 29stop_sound(sound_pointer); 30sound_on(); 30sound_off(); 30play_dsound(sound_pointer, step); 30
THE WAY I ADD SOUNDS IN MY COLECO PROJECTS 31
LIBRARY: COLECO 32ROUTINES IN COLECO LIBRARY 32
vdp_out 32put_vram 32get_vram 32fill_vram 32put_vram_pattern 32set_default_name_table 32disable_nmi 33enable_nmi 33screen_on 33screen_off 33delay 33update_sound 33start_sound 33stop_sound 33sound_on 34sound_off 34sprites table 34update_sprites 34upload_ascii 34get_random 34
LIBRARY: GETPUT 35GETPUT 35
cls 35get_char 35put_char 35center_string 35print_at 36pause 36
GETPUT 1 37pause_delay 37rnd 37rnd_byte 37str 37show_picture 37screen_mode_2_bitmap 38screen_mode_2_text 38upload_default_ascii 38paper 38load_color 38load_namerle 38load_patternrle 39load_spatternrle 39
3

PROGRAMMING COLECOVISION GAMES
change_pattern 39change_spattern 39change_color 39fill_color 40change_multicolor 40change_multicolor_pattern 40choice_keypad_1 and choice_keypad_2 40updatesprites 40sprites_simple 41sprites_double 41sprites_8x8 41sprites_16x16 41Set of "AND" masks for the joystick: UP, DOWN, LEFT, RIGHT and FIREs 41wipe_off_down 41wipe_off_up 41
DSound library 42play_dsound 42
C library 42memcpy 42sizeof 42
GETPUT 1 - VIDEO MEMORY MAP 43
SHOW BITMAP PICTURE IN SCREEN MODE 2 WITHOUT GETPUT 1 44
SHOW BITMAP PICTURE IN SCREEN MODE 2 WITH GETPUT 1 46
FACES - SPRITES DEMO 47
REBOUND 49THE IDEA 49THE PROGRAM 51COMPILING 54STILL BUGY? 58CAN BE BETTER? 59
SMASH - A VIDEO GAME VERSION OF REBOUND 60PADDLE GRAPHIC 62THE PROGRAM 63
DEBUG EXERCISE 67A TEST PROGRAM TO DEBUG 67SOLUTION 68
ANNEXE - MORE TECHNICAL INFORMATIONS 70
HARDWARE SPECIFICATIONS 70
CARTRIDGE (ROM) HEADER 71
SOUND GENERATION HARDWARE 73TONE GENERATORS 73NOISE GENERATOR 73CONTROL REGISTERS 74SOUND DATA FORMATS 74NOTES TABLE CONVERSION: FREQUENCIES (Hz) <-> HEX values 75SCALES 75
VDP - VIDEO DISPLAY PROCESSOR 76REGISTERS 76
4

PROGRAMMING COLECOVISION GAMES
Control registers 76Status register 76
VDP register access 77NMI Non maskable interrupt 77Screen modes 78
Mode 0 78Mode 1 78Mode 2 78Mode 3 78
COLOR PALETTE 79
COLECO ASCII TABLE 80
5

PROGRAMMING COLECOVISION GAMES
INTRODUCTION
This text shows you the basic of ColecoVision capability and where you can find more information and software. You can do your own tools and documentation too. You need to know how to program in ANSI C language first. Learn the C language by yourself.
You need also to improve your programming skills by testing all the concepts and routines mentioned in this documentation before thinking of releasing new ColecoVision games.
Have fun!
6

PROGRAMMING COLECOVISION GAMES
SETUP YOUR DEVELOPMENT ENVIRONMENT
If you are using a Windows environment or a Linux with a great DOS emulator, you can setup your ColecoVision programming environment.
First, you need to download the Hi-Tech C compiler for CP/M.Second, you need to download a CP/M emulator for your system. 22NICE for DOS is my personal choice but you need to read carefully the text files.Third, you need to download the Coleco library by Marcel de Kogel. You have to extract files into the Hi-Tech C compiler directory.
To avoid all these steps, you can download an archive from my Coleco web site named “z80.zip”.
Use your preferred text editor to code in C your Coleco projects. Make sure your C code is in a pure text file format before trying to compile it. My personal choice is NOTEPAD or WORDPAD for too big text files.
You have two choices now to access to your Coleco environment:- You can create a shortcut on your desktop to run the CP/M emulator and go directly
into the Hi-Tech C compiler directory.- You can download from my Coleco web site my personal front-end for windows
named CCI (Coleco Compiler Interface). You just need to put the EXE file into your project directory to avoid using the command-line based interface under DOS.
There is a help section in my Coleco web site where you can find how to use the compiler and a few samples like how to create your own screen show.
7

PROGRAMMING COLECOVISION GAMES
MEMORY
Before programming a ColecoVision project, you must learn about the memory "limits" for this game system.
ROM (Read Only Memory)
The binary code in the cartridge is named ROM because it's a read-only memory. The memory space for the game starts at 8000. Today, we have no problem using big memory capacity so we try to use all the 32K available: 8000 - FFFF. At 8000, there is a header. The header starts with 55 AA or AA 55. After this 2 bytes, there are hex values in the header to say where start the game, what to do if there is an interrupt (example: rst 08h, NMI), etc.
The ColecoVision BIOS start at the address 0000 and it's the first thing running in the ColecoVision game system. First, the BIOS check if a cartridge is inserted by looking for the first two bytes of the ROM (cartridge). If these two bytes are “55 AA” or “AA 55”, the Coleco BIOS check the start address in the ROM header then start the game, otherwise, a default screen appear about how to insert a cartridge: “TURN GAME OFF BEFORE INSERTING CARTRIDGE OR EXPANSION MODULE”. Second, the BIOS had many routines like sounds and sprites routines. Using the BIOS routines gives more free ROM space for the game itself but you have to be careful to not use address in RAM used by the BIOS.
By using the Coleco library by Marcel de Kogel, don't worry about the header of your Coleco project because it’s already compiled into the “crtcv.obj” file.
RAM (Read-Write Memory)
The ColecoVision RAM is a bit weird. There is only 1K RAM (with a copy of itself at another memory location) and this RAM is not fully available if you use routines in the Coleco BIOS. The Coleco BIOS routines use some parts of the RAM at specific memory locations above 73B8. This is important to know to avoid memory corruption by using too big tables in RAM. Don’t worry, normally, your first ColecoVision project will never use more than the free memory space available… except if you implement complex AI and/or big dynamic environment.
MEMORY MAP
The ColecoVision BIOS starts at the address 0000 and ends at the address 1FFF.The cartridge (ROM) starts at the address 8000 and ends at the address FFFF.The read-write memory space is only 1K. The real addresses for the RAM are 7000-73FF. The RAM space addresses available in memory for your ColecoVision projects are 7000-73B8. The stack pointer is initialised at 73B9 (firsts instructions in BIOS) but the stack really started at 73B8, 73B7, 73B6, etc. If you need more RAM space, you can use the video memory (at your own risk).
8

PROGRAMMING COLECOVISION GAMES
RAM USED BY THE COLECOVISION BIOSThanks to Steve Bégin for all the informations (for expert only).
7020-702A: Used by BIOS sound routines 73B9-73C2: Used but we don't know by which routines yet 73C3: Used by video Read/Write routines. Copy of the video control register number 0. 73C4: Used by video Read/Write routines. Copy of the video control register number 1. 73C5: Seems to be unused by any BIOS routines (free) 73C6: Used by BIOS sprite routines. 73C7: Used by BIOS sprite routines. 73C8-73C9: Used by BIOS to generate Random numbers (call 1FFD). 73CA-73D2: Used by BIOS sprite routines. 73D3-73D6: Used by BIOS timer routines. 73D7-73EA: Used by BIOS joystick routines. (call 1FEB) 73EB: Used by BIOS joystick routines. Value of spinner on port#1 73EC: Used by BIOS joystick routines. Value of spinner on port#2 73ED: Seems to be unused by any BIOS routines (free) 73EE-73F1: Used by BIOS joystick routines. Raw joystick data from ports (Call 1F76). 73F2-73F3: Used Address of sprites attribute in VRAM. 73F4-73F5: Used by video Read/Write routines. Address of sprites pattern in VRAM. 73F6-73F7: Used by video Read/Write routines. Address of screen image (NAME). 73F8-73F9: Used by video Read/Write routines. Address of character pattern (PATTERN). 73FA-73FB: Used by video Read/Write routines. Address of character color pattern (COLOR). 73FC-73FD: Seems to be unused by any BIOS routines (free) 73FE-73FF: Temporary used when a call at routine in 1fbe is made.
Ok, it's more information than you really need to know especially if you program your ColecoVision projects in C like me. The most important to know is some BIOS routines are used in the ColecoVision library. You can't use the address 73B9-73FF in RAM for your own purpose. The only exception is the RAM used by the BIOS for the sound routines. Marcel de Kogel writes his own sound routines in the ColecoVision library so you can use the addresses 7020-702A for your game without any problem. The only problem is the data sound format is not the same between BIOS sound routines and ColecoVision library sounds routines. In this document, you will not find information about BIOS sound routines.
If you don't really know what is a stack, you may have a problem to understand why you can't really use all the free memory space 7000-73B8. If you program in C language, the Hi-Tech C compiler add some codes "pop" and "push" to stock information in the stack like the registers status. If you program in ASM, you have to add by yourself each "pop" and "push" instructions so you have more control but you have also more responsibility if your program doesn't run well. The stack is filled with data by decreasing first the stack pointer then by adding information. So, the real RAM space you can use depends on how big your stack can be. I think you must not use RAM address over 7300, otherwise you may have a problem of memory corruption.
9

PROGRAMMING COLECOVISION GAMES
DATA TYPES
char
definition: character or short integer1 byte and signedvalues : [ -128, 127 ]
Exemple:
char c = 'A';
byte
definition: byte or short unsigned integer1 byte and unsignedvalues : [ 0, 255 ]This type is defined in the coleco.h file.
Exemple:
byte i = 200;
int
definition: integer2 bytes and signedvalues : [ -32768, 32767 ]
Exemple:
int i = -1000;
unsigned
definition: unsigned integer2 bytes and unsignedvalues : [ 0, 65535 ]
Exemple:
unsigned score = 1000;print_at (10,0,str(score));
10

PROGRAMMING COLECOVISION GAMES
float
definition: floating point2 bytes and signedvalues : [ ??, ?? ]
Exemple:
float ratio = 10.0/4.0;
Note: Try to never use floating point variables.
char [n]
definition: character array or stringmax 256 bytes long
Note: A string ends with the character '/0'.
* (pointer)definition: pointer, address in memory where is the data2 bytesvalues : [ 0000 , FFFF ] (0,65535)
Exemple:
/* a char pointer */char *msg;
Note: A character pointer is not a character array.
void definition: no defined type, void2 bytes by default
Exemple:void *msg;
Note: This data type must be reserved for routines only.
11
PROGRAMMING COLECOVISION GAMES
OPERATORS
USUAL SET OF BINARY ARITHMETIC OPERATORS:- multiplication (*)- division (/)- modulus (%)- addition (+)- subtraction (-)
Note: Unary minus performs an arithmetic negation. Unary plus is supported.
INCREMENT (++) AND DECREMENT (--)
The most well know unary operators are increment (++) and decrement (--). These allow you to use a single operator that "adds 1 to" or "subtracts 1 from" any value. The increment and decrement can be done in the middle of an expression, and you can even decide whether you want it done before or after the expression is evaluated.
Example:int sum = a + b++; /* sum = a + b then increment 'b' */int sum = --a + b; /* decrement 'a' then sum = a + b */
BITWISE OPERATORS
- shift left (<<)- shift right (>>)- AND (&)- OR (|)- XOR (^)- NOT (~)
COMBINED OPERATORS
The expression form:<variable> = <variable> <operator> <expression>;
Can be replaced with:<variable> <operator>= <expression>;
Exemple:a +=b; /* is the same thing as the expression "a = a + b;"
12

PROGRAMMING COLECOVISION GAMES
RELATIONAL OPERATORS
Relational operators allow you to compare two values, yielding a result based on whether the comparison is true or false. If the comparison is false, then the resulting value is 0.
- greater than (>)- greater than or equal (>=)- less than (<)- less than or equal (<=)- equal to (==)- not equal to (!=)
LOGICAL OPERATORS
There are three logical operators:- AND (&&)- OR (||)- NOT (!)
Example:If (!(a==b && b==c)) /* If not (a equal to b and b equal to c) then… */If (a<b || a<c) /* If a less than b or a less than c then… */
Note: Do not be confused with the bitwise operators (&,!,~) previously mentioned. If you use "MASK" in a complex if condition you must isolate the bitwise operation with ( and ) like this: if ((a&b)==c) /* If a with an "AND MASK" b is equal to c then… */
13

PROGRAMMING COLECOVISION GAMES
SCREEN MODE
Before seeing any "HELLO WORLD" on screen, you have to setup the screen mode and update the video ram memory with an appropriate characters set.
To find the information about the Video Display Processor (VDP), look at this txt file. URL: http://www.msxnet.org/tech/tms9918a.txt http://home.swipnet.se/~w-16418/tech_vdp.htm
For a text adventure, the screen mode 1 with 40 columns should be a good choice. But for the other Coleco projects, the screen modes 0 and 2 are the most appropriate choices. The screen mode 3 (very big pixels on screen) is not a good choice. Do not use the undoccumented screen mode. For all my ColecoVision projects, I use the screen mode 2. This screen mode allow me to do bitmap title screen and colorfull characters set. Compute the VDP control registers values based on your own requierments.
In the Coleco library, “vdp_out” is a routine to update the VDP control registers' values:
vdp_out(register,value);
The most important control registers are 0 and 1.
Reg. 0 - - - - - - M2 ExtVIDReg. 1 4K/16K BLANK IE M1 M3 - SIZE MAG
M1, M2 and M3 are the bits to set the screen mode. EXVID is External VDP input (always disable this one with bit 0)... see TXT file
To set the screen mode 2 (like in my all my Coleco projects), I compute M1=0 (disable), M2=1 (enable), M3=0 (disable), ExtVID=0 (disable), 4/16K=1 (16K), BLANK=1 (enable display), IE=1 (enable NMI interruptions), SIZE=1 (16x16 sprites), MAG=0 (normal sprites, not doubled in size).
Reg. 0 0 0 0 0 0 0 1 0 02Reg. 1 1 1 1 0 0 0 1 0 E2
SCREEN MODE 2 (normal with 16x16 sized sprites) : vdp_out(0,2); vdp_out(1,0xe2);
We need to setup the other VDP registers too to complete the screen mode setup.
For the special screen mode 2, we have to imagine the screen divided in three parts: TOP, MIDDLE, BOTTOM. Each part (of 8 lines) use the same character set or different character sets. Normally, we use three different character sets to do a bitmap title screen. Otherwise, only one character set is needed. You must read carefully the text files about VDP before trying to compute yourself the control registers values.
14
PROGRAMMING COLECOVISION GAMES
CHARACTERS
The characters are used for most of the graphics on screen. They can be copied many times on screen without any problem. All the letters, numbers and symbols are characters. A character is 8x8 pixels sized except for screen mode 1 where a character is only 6x8. Normally, there is 32x24 spaces on screen where characters can be placed except for screen mode 1 (40 columns).
VIDEO MEMORY FOR CHARACTERS
The names of the three tables in Video RAM for characters are:
NAME: The screen (24x32) PATTERN: The characters pattern (256 characters: HEX values 00-FF) COLOR: The characters color(s)
A character has the same pattern and color anywhere on screen (one exception in screen mode 2). So you can't use the same character to print a blue 'A' and a red 'A' side-by-side. The solution is using two characters with the same pattern but with different colors.
In the ASCII code, the character '1' is the character 49 (31 in HEX value). You must understand the difference between the ASCII code and the symbol. The ASCII code for the character 'A' is 65 (41 in hex value).
Now, if the color of the character 'A' is blue and if you change the pattern of the character '1' to looks like an 'A' but with a red color, then you just have to print the characters 'A' and '1' side-by-side on screen to show two 'A' side-by-side... one blue and one red.
In the NAME table, there is HEX values 41 for the 'A' and 31 for the '1'. In the PATTERN table, there are identical HEX values for the character 'A' and '1'. In the COLOR table, there are different HEX values to have blue color(s) for the character 65 ('A') and red color(s) for the character 49 ('1').
DACMAN is a good example of a video game based on characters graphics.
In screen mode 0, there are only two colors (one color for bits 1 and one color for bits 0) for each bloc of 8 characters in the character set.In screen mode 1, there are only two colors (one color for bits 1 and one color for bits 0) for all the characters.In screen mode 2, there are two colors (one color for bits 1 and one color for bits 0) by line of 8 pixels for all the characters in the character set.
For the screen mode 0 and 2, if you want to see the background color set in the VDP register, you have to use the INVISIBLE color “0”.
15

PROGRAMMING COLECOVISION GAMES
CHARACTER PATTERN
Win-ICVGM can be used to create characters pattern and screen.
A character pattern is an 8x8 graphic. Some guys name this kind of graphic: tile.
EXAMPLE - SPACESHIP
Spaceship pattern0 0 0 1 1 0 0 0 180 0 0 1 1 0 0 0 991 0 0 1 1 0 0 1 991 0 1 1 1 1 0 1 BD1 1 1 0 0 1 1 1 E71 1 1 0 0 1 1 1 E71 0 1 1 1 1 0 1 BD0 0 1 1 1 1 0 0 3C
If we use the screen mode 0, we have only two colors (one for bits 1 and one for bits 0).
Spaceship colorsBits 1 Bits 0 Code
E1
Spaceship pattern with colors 0 0 0 1 1 0 0 01 0 0 1 1 0 0 11 0 0 1 1 0 0 11 0 1 1 1 1 0 11 1 1 0 0 1 1 11 1 1 0 0 1 1 11 0 1 1 1 1 0 10 0 1 1 1 1 0 0
If we use the screen mode 2, we have two colors per line.
16
PROGRAMMING COLECOVISION GAMES
Spaceship colorsBits 1 Bits 0 Code
81A1E1E1EFE7E181
Spaceship pattern with colors 0 0 0 1 1 0 0 01 0 0 1 1 0 0 11 0 0 1 1 0 0 11 0 1 1 1 1 0 11 1 1 0 0 1 1 11 1 1 0 0 1 1 11 0 1 1 1 1 0 10 0 1 1 1 1 0 0
17

PROGRAMMING COLECOVISION GAMES
UPLOAD CHARACTER SET
To upload a character set in video memory, you can use the “upload_ascii” routine from Coleco library.
upload_ascii (number of the first character to upload, number of characters to upload, offset, flags for the character format);
Example: upload_ascii (29,128-29, chrpos+29*8, BOLD); /* chrpos is the address location in video memory for the charcarter patterns */
But, you can use your own character set. You can use one of my tools named Win-ICVGM (I.C.V.G.M for Windows) to create your own character set. This tool is based on the screen mode 0 but can be used for the screen mode 2 too (except for the color patterns).
URL: http://www.geocities.com/newcoleco/tools.html
When your character set is done, save as a C file and upload your character set into video memory by using one of these routines from Coleco library.
put_vram (video memory location for character patterns, pointer to character set table without RLE compression, size of the character set table);
rle2vram (pointer to character set table with RLE compression, video memory location for character patterns);
18

PROGRAMMING COLECOVISION GAMES
SPRITES
The sprites are easy to use because you can place them anywhere on screen. Each sprite can be identified like a layer on screen. Normally, the size of a sprite is 16x16 but there is also the 8x8 format. The limits for using sprites are : never more than 4 sprites in a row, on the same scan line and never more than 32 sprites on screen at the same time. All the sprites can be magnified by 2 (by changing size of the pixels in sprites).
To display a sprite on screen, you need a vector of 4 bytes (Position Y, Position X, Pattern and Colour) in the right video memory location.
SPRITES COLOR
The bits 0 are already replaced by the invisible color so there is only one color per sprite.To use more than one color, you have two solutions:
- Use more than one sprite (one for each color)- Use a combination of sprites and characters like the solution used for the ghosts in
Atarisoft PacMan game: the eyes are one or two characters in grey color and the body is a sprite.
SPRITES PATTERN
A 8x8 sprite looks like a character in screen mode 0 but all bits 0 are colored with the invisible color 0. If we re-use the spaceship example, a 8x8 spaceship sprtie could be something like this.
Spaceship colorColor Code
4
Spaceship pattern with color 0 0 0 1 1 0 0 01 0 0 1 1 0 0 11 0 0 1 1 0 0 11 0 1 1 1 1 0 11 1 1 0 0 1 1 11 1 1 0 0 1 1 11 0 1 1 1 1 0 10 0 1 1 1 1 0 0
A 16x16 sprite is a combination of four (4) 8x8 patterns. These patterns are displayed like this:
1 32 4
Win-ICVGM can be used to create sprites pattern 16x16.
19

PROGRAMMING COLECOVISION GAMES
Sprite pattern with color code A (10)0 0 0 0 0 0 0 0 0 0 0 0 0 0 0 0 00 000 0 0 0 0 0 1 1 1 1 1 0 0 0 0 0 03 E00 0 0 0 1 1 1 1 1 1 1 1 1 0 0 0 0F F80 0 0 1 1 0 0 1 1 1 0 0 1 1 0 0 19 CC0 0 1 1 0 1 1 0 1 0 1 1 0 1 1 0 36 B60 0 1 1 1 1 1 1 1 1 1 1 1 1 1 0 3F FE0 1 1 1 1 1 1 1 1 1 1 1 1 1 1 1 7F FF0 1 1 1 1 1 1 1 1 1 1 1 1 1 1 1 7F FF0 1 1 1 1 1 1 1 1 1 1 1 1 1 1 1 7F FF0 1 1 1 0 0 0 0 0 0 0 0 0 1 1 1 70 070 0 1 1 0 0 0 0 0 0 0 0 0 1 1 0 30 060 0 1 1 1 0 0 0 0 0 0 0 1 1 1 0 38 0E0 0 0 1 1 1 1 0 0 0 1 1 1 1 0 0 1E 3C0 0 0 0 1 1 1 1 1 1 1 1 1 0 0 0 0F F80 0 0 0 0 0 1 1 1 1 1 0 0 0 0 0 03 E00 0 0 0 0 0 0 0 0 0 0 0 0 0 0 0 00 00
The sprite pattern is coded like this in video memory:00, 03, 0F, 19, 36, 3F, 7F, 7F, 7F, 70, 30, 38, 1E, 0F, 03, 00, 00, E0, F8, CC, B6, FE, FF, FF, FF, 07, 06, 0E, 3C, F8, E0, 00
SPRITES LOCATIONS ON SCREEN
The Y location of a sprite can be any values between 0 and 255 except 208. The special value 208 tells the video chip to stop checking for sprites to display on screen. If you want to don’t show sprite#1 but you want to show sprite#2, use a value like 207 for the Y location of sprite#1.
SPRITES ROUTINES
Note: These routines are available in the Coleco library.
/* This routine update in the right video memory location the sprites parameters with the sprites table in RAM */update_sprites (number of sprites, sprites table);
/* This routine makes sprites disappear by changing their Y location (in video memory only) to 207 */clear_sprites (first sprite to clear, number of sprites to clear); /* To make sure no sprites are showed on screen, use the following code */clear_sprites (0, 64);
/* Check collision is too complex to understand. Try to compute your own collision detection routine */check_collision (…);
20

PROGRAMMING COLECOVISION GAMES
TOOLS
The following pages show you some tools for Windows made by Marcel de Kogel and Daniel Bienvenu to help you in your ColecoVision projects. You may have to create your own tools if you are not satisfied.
Let's start with the only one who can convert sounds into ColecoVision sound format.
WAV2CVby Daniel Bienvenu
WAV2CV is programmed to convert uncompressed mono WAV files into a ColecoVision format. But, the current version of WAV2CV is based on the ColecoVision library, not on the ColecoVision BIOS. It uses the Fast Fourier Transform to extract frequencies from the WAVE for each time pitch. The first conversion result is never perfect but you can use different parameters to see if the result can be better.
Figure 1 WAV2CV user interface
21

PROGRAMMING COLECOVISION GAMES
WAV2CVDSby Daniel Bienvenu
WAV2CVDS is the only tool who can convert mono WAV files into a digital sound format for the ColecoVision. The digital sound format used is 4 bits per sample with special code $00 to indicate an RLE compression or the "end of sound" with another $00.
How to use it
1. Select a WAV file in the filelist box. The software read the WAV file primary information like the sample rate.
2. Write the sound size limit (in ROM) you want. The software compute the minimum step length you can use.
3. Set the step length of the digital sound. A big step gives you a sound with a poor quality but with less memory space than a small step.
4. Set the amplification.5. Click on the "Generate Wav File" button to listen the digital sound.6. Select your destination file format and click on the "Convert to Coleco" button.
Figure 2 WAV2CVDS user interface
Use play_dsound routine from DSound library to play the digital sounds generated with this tool.
22

PROGRAMMING COLECOVISION GAMES
I.C.V.G.M.by Daniel Bienvenu
ICVGM is my best graphics editor (for Windows) to quickly create characters and sprites. This software was based on CVEDITOR by John Dondzila and improved during the development of MS SPACE FURY project. ICVGM is almost completed and stable.
Figure 3 I.C.V.G.M. user interface
A. This is the screen area. Put characters in the screen by choosing first a character in the C zone then by clicking in the screen area.B. This is the character editor area. Modify a character pattern by clicking in the character editor area with the left and right mouse buttons.C. This is the character set (pattern) area.D. This is the sprite editor area. Modify a sprite pattern by choosing first which pattern to edit with the Previous and Next buttons then by clicking in the sprite editor area with the left and right mouse buttons.E. These buttons help you to move one step up, down, left and right.F. This is the colors of the character. Change colors by clicking on it first then by clicking the color in the color palette.G. This is the color palette.H. Move your mouse over the screen area to find out which character number is at X,Y.I. This is a simple indicator to know which character pattern you currently edit.J. These buttons are usefull tools to help you with your characters drawing.K. These buttons are usefull tools to help you with your sprites drawing.L. These buttons help you to select a sprite pattern to edit.M. This is a simple indicator to know which sprite pattern you currently edit.N. These buttons help you to copy, paste and clear all the character set at once. This could be usefull to copy a character set from another work file.O. This button will refresh all the areas: screen, character editor, characters set and sprites.P. This is the menu bar. Use "File" menu to load, save and export. Use "Fonts set" menu to select, load or save a characters set. Use "Print" in "File" menu to print your character pattern.
23

PROGRAMMING COLECOVISION GAMES
BMP2PPby Marcel de Kogel
BMP2PP convert BMP pictures and also pictures from the clipboard into a valid ColecoVision format named PowerPaint. You can also convert a PowerPaint picture into a BMP file. Adjust the parameters to convert as well as possible your bitmap picture. Go in the File menu to save the result into a PowerPaint file ".pp". If you need to edit some pixels on the converted picture, I suggest you to use CVPAINT. Otherwise you can only use PP2C or PP2ASM to convert and compress PowerPaint files into data for your ColecoVision projects.
Figure 4 BMP2PP user interface
24

PROGRAMMING COLECOVISION GAMES
PP2C and PP2ASMby Daniel Bienvenu
PP2C and PP2ASM are useful to convert and compress (RLE encoding based on the ColecoVision library) PowerPaint pictures. Use PP2C to convert your picture into C format. Use PP2ASM to convert your picture into [T]ASM format. PP2C and PP2ASM are also integrated in CVPAINT tool. Using compressed pictures let you add more than one picture in your ColecoVision projects without taking too much memory space (ROM space).
First, you need to double-click on the PowerPaint file ".pp" you want. When the picture is showed (after a few seconds), click on OK to continue.
Figure 5 PP2C - Open PP file window
Write the name of the file you want to create with the picture data.
Figure 6 PP2C - Export to C file window
After that, you need to write the name you will use in your program for this picture. That's it!
Figure 7 PP2C - Picture table name window
25

PROGRAMMING COLECOVISION GAMES
CVPAINTby Daniel Bienvenu
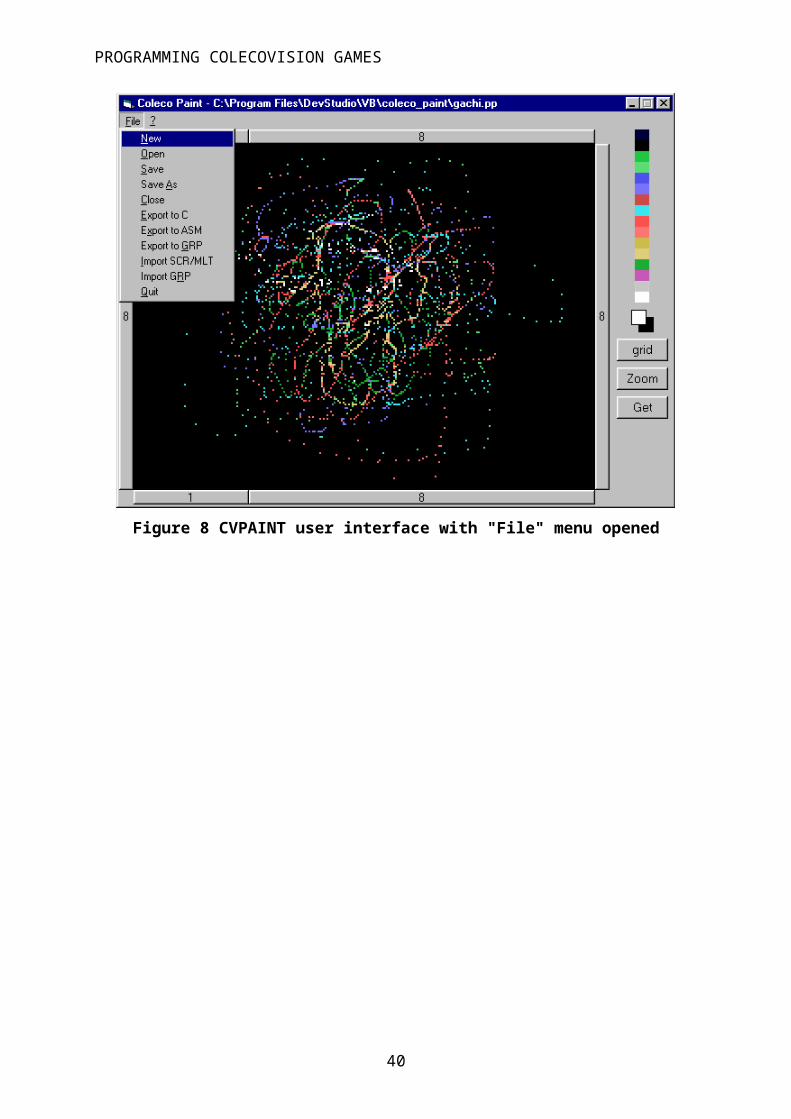
CVPAINT still a beta version. We will not talk too much about this software. The reason I programmed this tool is to avoid using many times BMP2PP to convert pictures just because I add some pixels on it. CVPAINT is (for now) the only graphic editor tool for Windows who respects the limit of the ColecoVision graphic chip. You can draw pixels per pixels, zoom and use a grid but you can't do a COPY-PASTE (not well programmed).
You can also import pictures from other formats like the one used for the ZX Spectrum (SCR and MLT). I added also the "Export to C" and "Export to ASM" routines from PP2C and PP2ASM to avoid using too many tools.
The "Get" button is a primitive "copy" function but it doesn't work well if you don't know how to use it. This is how it works. When you click on the "Get" button, the name change for "Select" and you have to select an area on screen to copy. When it's done, press the "Select" button. It creates a new layer at the top left of the screen. Use your mouse to drag this layer on screen where you want to copy it. Use the right click button on your mouse to merge the layer on screen. Don't use "Zoom" or "grid" button otherwise the copy can't be done. There is no "Back" button so be careful.
Figure 8 CVPAINT user interface with "File" menu opened
26

PROGRAMMING COLECOVISION GAMES
CCI - Coleco Compiler Interface
This tool uses the Hi-Tech C compiler (for CP/M) and 22NICE CP/M emulator (for DOS). This tool helps you to compile and link your project without editing batch files and writing command lines.
How to use CCI?
Before using this software you must copy it in your Coleco project directory.
1. To use the "Compile" button, you must select a file in the file list box first.2. Use the "Compile All" button to compile your entire project in one step.3. Select the libraries you need by checked the appropriated checkboxes.4. If you use a french version of Windows NT, 2000 or XP, then you may need to check the
"French Windows NT" checkbox.5. After selecting the right libraries, use the "Link" button to link them with your project.6. If every things ok, you will see a valid "result.rom" file in your project directory with a
"map.txt" file.7. The "Run" button will start the "result.rom" file with VirtualColeco emulator. If you want
to use another emulator, add a batch file named "run.bat" in your project directory. This batch file must have the right instructions to play "result.rom" file with another emulator.
Figure 9 CCI user interface
See a compiling example in the programs section in this document.
27

PROGRAMMING COLECOVISION GAMES
JOYSTICK
Note: The following text is based on the ColecoVision library by Marcel de Kogel.
The joystick is divided in two parts: keypad and joypad.
JOYPAD
Use joypad_1 and joypad_2 to know the direction and the (pressed) fire button(s). The joypad_1 is for the joystick at the port#1. The joypad_2 is for the joystick at the port#2.
How to use the joypad_1 and joypad_2 values? The value is a byte and each bit in this byte represents a fire button or a direction.
Fire 1 Fire 2 Fire 3 Fire 4 Left Down Right Up
So, you need to use a mask (AND) to extract the value you need.
Example: I want to do nothing until a fire button is pressed on port#1.
/* Bits for fire buttons are the four (4) highest bits in the joypad value. So, you need to do an AND mask with four (4) bits 1 and four (4) bits 0 like this: 11110000 = F0 */
while ( (joypad_1 & 0xf0) == 0 ); /* loop if no fire button is pressed (port#1) */
KEYPAD
Use keypad_1 and keypad_2 to know which number was pressed. The keypad_1 is for the keypad on port#1. The keypad_2 is for the keypad on port#2.
Note: The first time you call keypad_1 and keypad_2, the result will be 0 but it doesn't mean the number 0 was pressed. After this first time, the keypad value will match with the number key pressed.
0-9 = 0-9 10 = * (standard to pause the game and replay gamewith the same game option) 11 = # (standard to return to menu after the game) 12-14 = unused15 = no key pressed
28

PROGRAMMING COLECOVISION GAMES
SOUND
I use the sound routines included in the Coleco library by Marcel de Kogel so I can talk a little about making some sounds in Coleco projects.
The way I learn how to generate sounds in my Coleco project is by looking the source code of Cosmo Challenge by Marcel de Kogel and the technical information about tone generator.
To avoid computing myself a sound effect, I created a tool named WAV2CV to convert a sound from a normal WAV file into a C file to be used with the Coleco library sound routines. I have done two programs about sound effects with menus. The source code is available: visit my Coleco web site.
URL:http://www.geocities.com/newcoleco
Ok! My Coleco web site is not up-to-date but this is the web page where you can found some of my codes. Only in French, sorry!
URL:http://www.geocities.com/newcoleco/dev/devfr.html
THE SOUND ROUTINES
At the end of the NMI routine, I add the following instruction:
update_sound ();
This instruction placed in the nmi will update the sound at each vertical retrace. Yes, in the NMI routine, it's the best place to put this instruction.
start_sound (sound_data,sound_priority);
This instruction adds information in the RAM like the pointer to the sound in ROM and the sound priority. The information in RAM will be used by the update_sound routine to play the sound. When 3 sounds are played and another sound is started, the sound_priority is used to see which sound must be ignored because there is only 3 sound channel. A sound priority number 10 win over a sound priority number 1. (I hope you understand)
sound_pointer = start_sound(sound_data, sound_priority); You can get the information about the pointer in RAM where the sound information is placed. This way, you can use the following instruction to stop this particular sound without stops all sounds:
29

PROGRAMMING COLECOVISION GAMES
stop_sound(sound_pointer);
You cannot use stop_sound without the sound_pointer otherwise all sounds may stop forever.
sound_on();
This instruction enables sound output.
sound_off();
This instruction disables sound output.
play_dsound(sound_pointer, step);
This routine, from DSound library, plays digital sounds. You can set the sound pitch speed with 'step' parameter. You must disable NMI before using this routine.
30

PROGRAMMING COLECOVISION GAMES
THE WAY I ADD SOUNDS IN MY COLECO PROJECTS
I don't fully understand how works the sound routine "update_sound" but I can talk about my tool WAV2CV.
It's very easy. Simply open wav2cv and select the WAV file you want to convert. You can also change the parameters before selecting the WAV file to increase or decrease the sound quality. If it's a simple sound like BEEP, use only one channel. If it's a complex sound like a digitalized sound, use two or three channels. Note: WAV2CV can freeze if you ask for more channels than you really need (it's a bug i can't fix). Normally, WAV2CV will be minimized for short laps of time and take 90% of your CPU time. More longer is the sound, more longer you will freeze your Windows.WAV2CV applies FAST FOURRIER TRANSFORM to find frequencies of the sound... for each laps of time based on the vertical retrace frequency (NTSC 60Hz or PAL 50Hz).
The generated C file can be renamed and added into your Coleco project. You can also copy-paste the C code into your source code where you want to avoid having too much C files to compile. I suggest using one big C file to regroup all the sound data for your Coleco project.
WAV2CV cannot convert noisy sounds. To add a noise sound effect, you must refer to the sound data you can found in “Cosmo Challenge” source code.
static byte shoot_sound[]= {
1, 0xf8,0xe4, 1,0xf2, 1,0xe4, 1,0x63,0x02,0x01,0xe5,1,0xe4, 1,0xe5, 1,0xe4, 1,0xe5, 1,0xe4, 1,0xe5, 1,0xe4, 1,0xe5, 1,0xe4, 5, 0,0,0
};
Note: Sound data always end with three zero like this: "0,0,0"
31

PROGRAMMING COLECOVISION GAMES
LIBRARY: COLECO
The ColecoVision library made by Marcel de Kogel is programmed in ASM to be used with Hi-Tech C compiler. This library is divided in two parts: "crtcv.obj" and "cvlib.lib". "crtcv.obj" is the header of the ROM started at address 8000. "cvlib.lib" is the ColecoVision library itself with many useful routines.
ROUTINES IN COLECO LIBRARYThe following routines are the most important one available in the ColecoVision library.
vdp_out /* Write specified VDP register */void vdp_out (byte reg,byte val);
Note: the following "vram" routines are used in "getput 1" library.
put_vram /* Upload RAM to VRAM. count should be a multiple of 256 */void put_vram (unsigned offset,void *ptr,unsigned count);
get_vram /* Get array of VRAM bytes. count should be a multiple of 256 */void get_vram (unsigned offset,void *ptr,unsigned count);
fill_vram /* Fill VRAM area with specified value */void fill_vram (unsigned offset,byte value,unsigned count);
put_vram_pattern /* Upload pattern to VRAM */void put_vram_pattern (unsigned offset,void *pattern, byte psize,unsigned count);
Note: This routine is used in "screen_mode_2_bitmap" routine ("getput 1" library) to fill screen with the characters set. This is necessary to show a bitmap picture on screen.
set_default_name_table /* Upload default name table */void set_default_name_table (unsigned offset);
32

PROGRAMMING COLECOVISION GAMES
Note: Use "disable_nmi" to stop NMI interruptions when you do some important update then use "enable_nmi" to restart NMI interruption. In "getput 1" library, all the PRINT routines use already "disable_nmi" and "enable_nmi" except "put_char" and "get_char".
disable_nmi /* Disable NMI */void disable_nmi (void);
enable_nmi /* Enable NMI */void enable_nmi (void);
Note: "screen_on" and "screen_off" are used to display or not the screen. You can update the screen without showing the modification unless it's done.
screen_on /* Turn display on */void screen_on (void);
screen_off /* Turn display off */void screen_off (void);
Note: "delay" is necessary to slowdown the execution. Otherwise, the gameplay is too fast, too difficult to play well the game.
delay /* wait specified VBLANKs */void delay (unsigned count);
update_sound /* Check for new sound events */void update_sound (void);
start_sound /* Setup a sound channel. Returns pointer to sound channel allocated */void *start_sound (void *data,byte priority);
stop_sound /* Stop specified sound channel */void stop_sound (void *channel);
33

PROGRAMMING COLECOVISION GAMES
sound_on /* Enable sound output */void sound_on (void);
sound_off /* Disable sound output */void sound_off (void);
sprites table /* sprite_t: position Y,X, pattern number and colour code */typedef struct{ byte y; byte x; byte pattern; byte colour;} sprite_t;extern sprite_t sprites[64];
Note: If you use "getput 1" library and you don't know well how to use "update_sprites", you must use "updatesprites".
update_sprites /* Upload sprites to VRAM. Arguments are maximum number of sprites to upload (normally 32) and the sprite attribute table offset */void update_sprites (byte numsprites,unsigned sprtab);
Note: If you use the "getput 1" library, you must use "upload_default_ascii" routine.
upload_ascii /* Upload ASCII characters */void upload_ascii (byte first,byte count,unsigned offset,byte flags);
#define NORMAL 0#define ITALIC 1#define BOLD 2#define BOLD_ITALIC (ITALIC | BOLD)
get_random /* Fast random routines. Return a byte value between 0 and 255. */byte get_random (void);
34

PROGRAMMING COLECOVISION GAMES
LIBRARY: GETPUT
This is my own toolbox programmed in C to be used in any ColecoVision game projects. This library is based on screen mode 0 or 2 and Cosmo Challenge source code.
GETPUT
The first version of "getput" made in year 2000 has only 6 routines.
cls /* cls is a CLEAR SCREEN routine */void cls(void);
Example:cls();
get_char /* get_char: This routine return the character value (in video memory) at location X,Y */char get_char (byte x,byte y);
Example:char c;c = get_char (15,11);
put_char /* put_char: This routine put a character (in video memory) at location X,Y */void put_char (byte x,byte y,char s);
Example:char c;c = 'A';put_char(15,11,c);
center_string /* center_string: This routine PRINT a string on screen in the middle of the line L */void center_string (byte l,char *s);
Example:center_string (11,"GAME OVER");
35

PROGRAMMING COLECOVISION GAMES
print_at /* print_at: This routine PRINT a string on screen at location X,Y */void print_at (byte x, byte y,char *s);
Example:print_at (0,0,"HELLO WORLD");
pause /* pause: This routine waits for any pressed fire button on port#1 or port#2. */void pause (void);
Example:pause ();
36

PROGRAMMING COLECOVISION GAMES
GETPUT 1
An extended version of "getput" made in year 2003 has over 20 more routines. This new library is fully compatible with the original version "getput" but compiled in a real library format.
pause_delay /* pause_delay: waits for a laps of time but can be interrupted by pressing a fire button */void pause_delay(unsigned i);
Example:pause_delay (200);
rnd /* rnd: Return a random number between 1 and N (max 65535) */unsigned rnd(unsigned value);
Example:unsigned number = rnd(1000);
rnd_byte /* rnd_byte: Return a random number between 1 and N (max 255) */byte rnd_byte(byte value);
Example:byte number = rnd_byte(100);
str /* str: Convert an unsigned value into a string */char *str(unsigned value);
Example:print_at (10,10,str (100));
show_picture /* show_picture: Show a picture (encoded RLE) on screen */void show_picture(void *picture);
Example:show_picture (title);
37

PROGRAMMING COLECOVISION GAMES
screen_mode_2_bitmap /* screen_mode_2_bitmap: Set the screen mode 2 to show a bitmap picture */void screen_mode_2_bitmap(void);
Example:screen_mode_2_bitmap ();
screen_mode_2_text /* screen_mode_2_text: Set the screen mode 2 to print text on screen */void screen_mode_2_text(void);
Example:screen_mode_2_text ();
upload_default_ascii /* upload_default_ascii: Set the default character set */void upload_default_ascii(byte flags);
Example:upload_default_ascii (BOLD);
paper /* paper: Set the background color by using the VDP register 7 */void paper(byte color);
Example:Paper (4); /* A dark blue background color */
load_color /* load_color: Set the color of the character set (ICVGM) */void load_color(byte *color);
Example:load_color (color);
load_namerle /* load_namerle: Show a screen (rle encoded) on screen (ICVGM) */void load_namerle(byte *namerle);
Example:load_namerle (namerle);
38

PROGRAMMING COLECOVISION GAMES
load_patternrle /* load_patternrle: Set the characters pattern (ICVGM) */void load_patternrle(byte *patternrle);
Example:load_patternrle (patternrle);
load_spatternrle /* load_spatternrle: Set the sprites pattern (ICVGM) */void load_spatternrle(byte *spatternrle);
Example:load_spatternrle (spatternrle);
change_pattern /* change_pattern: update N characters starting with the character c */void change_pattern(byte c, byte *pattern, byte N);
Example:byte pattern[] = {1,2,4,8,16,32,64,128};change_pattern ('A',pattern,1);
change_spattern /* change_spattern: update N sprites patterns, starting with sprite pattern number s *//* N = number of 8x8 sprites patterns to update OR 4x number of 16x16 sprites pattern *//* If sprites are sized 16x16, s must be 4x the number of the first sprite pattern to update */void change_spattern(byte s, byte *pattern, byte N);
Example:byte spattern[] = {1,2,4,8,16,32,64,128, 128,64,32,16,8,4,2,1, 128,64,32,16,8,4,2,1,
1,2,4,8,16,32,64,128}; /* Can be one big 16x16 sprite pattern OR 4 little 8x8 sprite patterns */change_spattern (0,spattern,4);/* Note: s = (sprite number 0) x 4 = 0, N=(1 "big 16x16 pattern") x 4 = 4 */
change_color /* change_color: update N characters colour (starting with the character c) with color data */void change_color(byte c, byte *color, byte N);
Example:byte pattern_font[] = {0xA0, 0x70, 0x80};/* change the color of characters A (in yellow),B (in cyan) and C (in red)*/change_color ('A',pattern_font,3);
39
PROGRAMMING COLECOVISION GAMES
fill_color /* fill_color: fill the N characters (starting with the character c) in a color */void fill_color(byte c, byte color, byte n);
Example:/* The characters D,E,F and G will be in green color */fill_color ('D', 0x20 ,4);
change_multicolor /* change_multicolor: update the colors of the character c */void change_multicolor(byte c, byte *color);
Example:byte red_yellow_font [] = {0x60,0x80,0x90,0xA0,0x90,0x80,0x60,0x60};/* update the colors of the character H with the red-yellow color font */change_multicolor ('H',red_yellow_font);
change_multicolor_pattern /* change_multicolor_pattern: update the colors of the N characters (c and the following) */void change_multicolor_pattern(byte c, byte *color, byte n);
Example:byte green_yellow_font [] = {0xC0,0x20,0x30,0xA0,0x30,0x20,0xC0,0xC0};/* update the colors of the characters I and J with the green-yellow color font */change_multicolor ('I',green_yellow_font,2);
choice_keypad_1 and choice_keypad_2 /* Wait until a key is pressed on keypad#1 or keypad#2 between min and max */byte choice_keypad_1(byte min, byte max);byte choice_keypad_2(byte min, byte max);
Example:byte choice;/* use keypad#1 to select a number between 1,2,3 and 4 */choice = choice_keypad_1 (1,4); /* use keypad#2 to select a number between 5,6,7 and 8 */choice = choice_keypad_2 (5,8);
updatesprites /* updatesprites: Update N(count) sprites data in video memory with the sprites table */void updatesprites(byte first, byte count)
Example:/* Update 32 sprites [0,31] */updatesprites(0,32);
40

PROGRAMMING COLECOVISION GAMES
sprites_simple /* sprites_simple: To set sprites pixels at the normal size */void sprites_simple(void);
sprites_double /* sprites_double: To set sprites pixels two times bigger than normal */void sprites_double(void);
sprites_8x8 /* sprites_8x8: To set the sprites to be 8x8 pixels */void sprites_8x8(void);
sprites_16x16 /* sprites_16x16: To set the sprites to be 16x16 pixels */void sprites_16x16(void);
Set of "AND" masks for the joystick: UP, DOWN, LEFT, RIGHT and FIREs /* A set of CONSTANTS to help with the joystick return value (AND MASK) */#define UP 1#define RIGHT 2#define DOWN 4#define LEFT 8#define FIRE4 16#define FIRE3 32#define FIRE2 64#define FIRE1 128
Example:If (joypad_1&LEFT) /* joystick#1 go left? */ If (joypad_2&RIGHT) /* joystick#2 go right? */
wipe_off_down /* This is a special effect to clean smoothly the screen in bitmap mode from top to bottom */void wipe_off_down (void);
wipe_off_up /* This is a special effect to clean smoothly the screen in bitmap mode from bottom to top */void wipe_off_up (void);
41

PROGRAMMING COLECOVISION GAMES
DSound library
play_dsound /* This routine plays a digital sound ('sound_data') at a specified speed ('step') */void play_dsound (byte *sound_data, byte step);
C library
Useful routines from the C library.
memcpy /* Copy data from one memory location to another memory location (in RAM of course). */int memcpy(*destination,*source,unsigned number_of_byte_to_copy);
Example:/* This command can be used to initialise the table "sprites" with data in ROM. */memcpy(sprites, sprites_init, sizeof(sprites_init));
sizeof /* Return the table size (in byte); in getput, it used to print (center) a string on screen. */int sizeof(*table);
42

PROGRAMMING COLECOVISION GAMES
GETPUT 1 - VIDEO MEMORY MAP
Text Mode - Video Memory MapStart Address End Address Table Name Information
0000 07FF CHRGEN Characters Pattern (charset)0800 17FF - Free1800 1AFF CHRTAB Characters on Screen (NAME table)1B00 1BFF SPRTAB Sprites Table (y,x,pattern,colour)
2000 27FF COLTAB Characters Color Pattern2800 37FF - Free3800 3FFF SPRGEN Sprites Pattern
Graphic Mode - Video Memory MapStart Address End Address Table Name Information
0000 17FF CHRGEN Screen Graphic Pattern1800 1AFF CHRTAB Initialised with set_default_name_table1B00 1BFF SPRTAB Sprites Table (y,x,pattern,colour)1C00 1FFF - Free2000 37FF COLTAB Screen Graphic Colors3800 3FFF SPRGEN Sprites Pattern
43

PROGRAMMING COLECOVISION GAMES
SHOW BITMAP PICTURE IN SCREEN MODE 2 WITHOUT GETPUT 1
The following C code is used to show a bitmap title screen.Remarks in C are between '/*' and '*/'. The '//' is not an ANSI C standard remark syntax but used frequently in C++ language.
/* this is the header file (.h) for the Coleco library by Marcel de Kogel */ #include <coleco.h>
/* Important Video Memory Locations based on VDP control registers values */ #define chrgen 0x0000 #define coltab 0x2000 #define chrtab 0x1800
/* title is the name of the bitmap title screen table generated with PP2C in another C file */ extern byte title[];
/* The SHOOT sound from Cosmo Challenge */static byte shoot_sound[]= { 1,
0xf8,0xe4, 1,0xf2, 1,0xe4, 1,0x63,0x02,0x01,0xe5,1,0xe4, 1,0xe5, 1,0xe4, 1,0xe5, 1,0xe4, 1,0xe5, 1,0xe4, 5, 0,0,0};
/* The NMI routine: update sound at every vertical retrace. 60Hz (NTSC) or 50Hz (PAL) */void nmi(void) {
update_sound ();}
/* To setup the graphic screen mode 2 */ void screen_mode_2_bitmap(void) {
/* disable NMI calls*/ disable_nmi(); /* screen mode 2 */ vdp_out (0,2); /* set video memory address for chrgen and colortable */ vdp_out (3,0xff); vdp_out (4,0x03); /* fill screen with characters 00 to FF three times */set_default_name_table (chrtab); /* clear chrgen and color table */ fill_vram(chrgen,0x00,0x1800); fill_vram(coltab,0x00,0x1800); /* setup sprites and video memory size and enable NMI calls*/ vdp_out(1,0xe2);
}
44

PROGRAMMING COLECOVISION GAMES
/* By using tools like BMP2PP by Marcel de Kogel and PP2C by Daniel Bienvenu (me), you can do a bitmap title screen without any problem. The title screen will be RLE encoded so you can use the following lines to show the title screen. */
/* To show a picture on screen */ void show_picture(void *picture) {
/* turn display off */ screen_off (); /* disable NMI calls*/ disable_nmi (); /* Upload picture */ rle2vram (rle2vram(picture,coltab),chrgen); /* turn display on */ screen_on (); /* enable NMI calls*/ enable_nmi ();
} /* The "main" routine to show the title screen can be something like this: */void main(void) {
/* init graphic mode 2 */ screen_mode_2_bitmap(); /* show title screen */ show_picture(title); /* play sound SHOOT with priority 1 */start_sound(shoot_sound,1);/* infinite loop: constant relational expression (warning) */while(1);
}
Note: See the order of the routines. If a routine needs another one to run properly, this routine must be after the other one. Otherwise, the compiler will not see the dependency and the result will never work properly. A solution can be: adding routines header at the top of the C file just before the routines.
45

PROGRAMMING COLECOVISION GAMES
SHOW BITMAP PICTURE IN SCREEN MODE 2 WITH GETPUT 1
The following C code is used to show a bitmap title screen by using getput library routines.
/* This is the header files (.h) to include in the project for the Coleco library by Marcel de Kogel and the Getput 1 library by Daniel Bienvenu */ #include <coleco.h> #include <getput1.h>
/* title is the name of the bitmap title screen table generated with PP2C in another C file */ extern byte title[];
/* The SHOOT sound from Cosmo Challenge */static byte shoot_sound[]= { 1,
0xf8,0xe4, 1,0xf2, 1,0xe4, 1,0x63,0x02,0x01,0xe5,1,0xe4, 1,0xe5, 1,0xe4, 1,0xe5, 1,0xe4, 1,0xe5, 1,0xe4, 5, 0,0,0};
/* The NMI routine: update sound */void nmi(void) {
update_sound ();}
/* Do a title screen by using tools like BMP2PP by Marcel de Kogel and PP2C by Daniel Bienvenu (me). The title screen will be RLE encoded so you have to use show_picture */
/* The "main" routine to show the title screen can be something like this: */void main(void) {
/* init graphic mode 2 */ screen_mode_2_bitmap(); /* show title screen */ show_picture(title); /* play noise sound: SHOOT with priority 1 */start_sound(shoot_sound,1);/* infinite loop: constant relational expression (warning) */while(1);
} This new version of the "picture show" program with getput library is smaller than the first version. Getput 1 rules! It's the solution to program very quickly a ColecoVision project in C.
46

PROGRAMMING COLECOVISION GAMES
FACES - SPRITES DEMO
/* To test this demo, use ADAMEM with the following command line: *//* cvem -vi 1 -if 60 -sprite 1 result.rom */
#include <coleco.h>#include <getput1.h>
/* This flag is used to avoid VRAM corruption */byte flag;
/* sprite pattern - laughing face */byte sprite_pattern[]={ 0,3,15,25,54,63,127,127, 127,112,48,56,30,15,3,0,
0,224,248,204,182,254,255,255, 255,7,6,14,60,248,224,0};
void initialize(void){
byte i;/* load 1 big 16x16 sprite pattern in video memory */change_spattern(0,sprite_pattern,4);/* init the sprites table */clear_sprites(0,64);for (i=1;i<6;i++){
sprites[i].y = i<<5;sprites[i].y--;sprites[i].x = i<<5;sprites[i].pattern = 0;sprites[i].colour = i<<1;sprites[i].colour += 3;
}sprites_double();
}
void faces(void){
byte k;
initialize();
while(keypad_1 == 6) delay(1);
/* Allow updating sprites on screen now */flag=1;
while(keypad_1 != 6){
/* UPDATE SPRITES POSITION */
47

PROGRAMMING COLECOVISION GAMES
k = keypad_1;if (k>0 && k<6){
if (joypad_1&LEFT) sprites[k].x--;if (joypad_1&RIGHT) sprites[k].x++;if (joypad_1&UP) sprites[k].y--;if (joypad_1&DOWN) sprites[k].y++;if (sprites[k].y ==193 ) sprites[k].y = 241;if (sprites[k].y ==240 ) sprites[k].y = 192;
}/* TO SLOWDOWN THE ANIMATION */delay(1);
}}
void main(void){
/* Don't update sprites on screen now */flag=0;/* Initialize the VDP to the screen mode 2 */screen_mode_2_text();/* Set the default ascii character set */upload_default_ascii (BOLD);/* Print an important message on screen */center_string (10,"HOLD A NUMBER BETWEEN 1 AND 5");center_string (11,"TO SELECT A SPRITE");center_string (13,"THEN USE THE JOYSTICK");center_string (14,"TO MOVE IT");center_string (16,"PRESS 6 TO RESET POSITIONS");/* Start the sprite demo program */faces();
}
/* NMI routine: update sprites at every vertical retrace */void nmi(void){
/* THIS FLAG IS NECESSARY TO AVOID VRAM CORRUPTION */if (flag) updatesprites(0,7);
}
Note: To avoid VRAM corruption, you must avoid updating VRAM inside and outside the NMI routine. Using a flag in the NMI routine like this sprites example is not a very good idea. There still a possibility of corruption with a flag. The right places to update sprites are after updating the "sprites" table and before a delay.
48

PROGRAMMING COLECOVISION GAMES
REBOUND
THE IDEA
The following text explains how to program a simple bouncing ball in characters.
First of all, we need to figure out how to move a character on screen. A character is not a sprite so you can't move a character on screen. You can create the illusion of a moving character. To create the illusion of a moving character, you have to erase the character you want to move by printing a "background" character over it and then print the same character at another location near the last location to create the illusion of a moving character. So, you need to know the exact location of the character to move at any moment. You will use the type "char" to use the negative and positive values: [-128,127].
/* To keep the information about the location of the ball */char ball_x;char ball_y;
(…)
ball_y = 0; /* top */ball_x = 0; /* left */
Now, to create the movement of the bouncing ball, you have to change the location of the ball by adding the direction in X and Y to change the X and Y values of the ball.
/* To keep the information about the direction of the ball */char ball_dx;char ball_dy;
(…)
ball_dx = 1; /* moving to the right */ball_dy = 1; /* moving to the bottom */
(…)
ball_x += ball_dx;ball_y += ball_dy;
, to create the bouncing effect, you have to change the direction of the ball under some conditions. For this simple bouncing effect, you will use the border of the screen to rebound the ball on it. To know if the ball reach the border of the screen, you simply have to check the location of the ball you keep in memory. You can add a sound to indicate the bouncing condition is reached.
if ( ball_x == 0 || ball_x == 31) { ball_dx = -ball_dx; pop(); }if ( ball_y == 0 || ball_y == 23) { ball_dy = -ball_dy; pop(); }
49

PROGRAMMING COLECOVISION GAMES
Finally, to see the ball on screen, you must add, at the strategic places, the routines to "erase" and "print" the ball at the X and Y location. You need to add a delay to slow down the animation.
/* Erase the ball at the actual location */put_char ( ball_x, ball_y, 32 ); /* 32 is the value of the SPACE character */
/* Update the value of the location of the ball */update_ball_location ();
/* Print the ball at the new location */put_char ( ball_x, ball_y, 'O' );
/* Slowdown the animation */delay(5);
To keep running, you have to do a LOOP with a condition to stop the animation like pressing the fire button #1 on joystick #1.
while (!(joypad_1&FIRE1)){
/* Move the ball on screen */(…)
}
50

PROGRAMMING COLECOVISION GAMES
THE PROGRAM
To keep it simple, you can use the capital letter 'O' to be the ball and the "put_char" routine in "getput" library to print and erase the ball on screen.
#include <coleco.h>#include <getput1.h>
/* To keep the information about the location of the ball */char ball_x;char ball_y;
/* To keep the information about the direction of the ball */char ball_dx;char ball_dy;
/* A sound effect named "pop" is played when the ball reaches the border of the screen */static byte pop_sound[] ={
0, 0x63,0xf,1,0x81,0xa0,0x90,1, 0x81,0x1c,0x97,1, 0x81,0x2c,0x9d,2, 0x81,0x32,0x9e,1, 0,0,0
};
/* To start the "pop" sound */static void pop (void){
start_sound (pop_sound,2);}
/* To initialize the location and direction of the ball */static void initialize (void){
ball_y = 0; /* top */ball_x = 0; /* left */ball_dx = 1; /* moving to the right */ball_dy = 1; /* moving to the bottom */
}
/* Change the direction of the ball when bouncing horizontally on the border of the screen */static void bounce_on_walls_in_X (void){
if ( ball_x == 0 ) { ball_dx = -ball_dx; pop(); }if ( ball_x == 31 ) { ball_dx = -ball_dx; pop(); }
}
51
PROGRAMMING COLECOVISION GAMES
/* Change the direction of the ball when bouncing vertically on the border of the screen */static void bounce_on_walls_in_Y (void){
if ( ball_y == 0 ) { ball_dy = -ball_dy; pop(); }if ( ball_y == 23 ) { ball_dy = -ball_dy; pop(); }
}
/* To update the location and direction of the ball. */static void update_ball_location (void){
ball_x += ball_dx;ball_y += ball_dy;bounce_on_walls_in_X();bounce_on_walls_in_Y();
}
/* This part of the program is the game engine and it's used to rebound a ball on screen */static void bounce(void){
/* Initialize the ball location and direction */initialize ();
/* Clear screen */cls();
/* The animation will stop when pressing on fire1 on joystick#1 */while (!(joypad_1&FIRE1)){
/* Erase the ball at the actual location */put_char ( ball_x, ball_y, 32 ); /* 32 is the value of the SPACE character *//* Update the value of the location of the ball */update_ball_location ();/* Print the ball at the new location */put_char ( ball_x, ball_y, 'O' );/* Slowdown the animation */delay(5);
} /* Exit the bouncing routine when the fire button will be released */while (joypad_1&FIRE1);
}
/* NMI routine: update sound at every vertical retrace */void nmi(void){
update_sound();}
52

PROGRAMMING COLECOVISION GAMES
void main(void){
/* Initialize the VDP to the screen mode 2 */screen_mode_2_text();/* Set the default ascii character set */upload_default_ascii (BOLD);/* Start the bouncing ball program */bounce();
}
53

PROGRAMMING COLECOVISION GAMES
COMPILING
The rebound project must be in a sub-directory of the Hi-Tech C compiler. Name this sub-directory: "rebound". Create a new C file and write the rebound program. After writing the rebound program into a file named "rebound.c", you add the "cci.exe" program in the same sub-directory. If you don't see the extension of the files (".c" and ".exe"), there is a possibility that the rebound file you created didn't have the right extension. Note: CCI see only the files with the extension ".c" (for C files) and ".as" (for ASM files) in the current directory.
Figure 10 Rebound directory before compiling and linking the project
If the rebound C program is correctly done, the following steps will be so easy that you will not believe you are compiling a program. First, make sure that the checkbox "Getput 1" is checked and the "rebound.c" file is listed in the file list box. If you are using a french version of Windows NT, XP or Windows 2000, you may have to check the "French Windows NT" checkbox.
Figure 11 CCI running in Rebound sub-directory
54

PROGRAMMING COLECOVISION GAMES
Select the "rebound.c" file and click on the "Compile" button at the bottom. You can also simply click on "Compile All" button to compile all the files listed in the file list box. A popup DOS window will appear to run the 22NICE emulator. After you pressed the space bar to continue the execution of the 22NICE emulator, you will see the Hi-Tech C compiler compiling the Rebound program. Note: if you use the "Compile" button, after the compiling process, the execution will stop until you press a key. When the "rebound.c" file is compiled into a valid "rebound.obj" file, close the DOS Window if it's still opened. If the "rebound.obj" file is not a valid one (empty file, errors during the compiling process), it's because you make an error somewhere in your code. The error in your code is named a bug. A bug can be anything like not including the correct header files "#include <coleco.h>" and "#include <getput1.h>" or not using the correct routine name. There is no debug facility so you must be careful. To avoid doing so much errors when writing your code for the first time, try to write only one routine at a time and compile your code after each new version. To debug a code, you must use "/*" and "*/" (remarks) to "deactivate" the part of your code you think the bug is. Recompile your code and see if the bug is gone, if so, the bug is in the part of the code you placed in remarks.
Figure 12 Compiling Rebound program without any error
After compiling the Rebound program, you have to link the "rebound.obj" file created by the compiler with the "coleco" and "getput" libraries to create a ROM file. If the "getput 1" checkbox is checked, click on the "Link" button at the bottom to start the 22NICE emulator in a popup DOS window. After pressing the space bar to continue the execution of the 22NICE emulator, you will see the word "LINK>". Simply do PASTE* in the popup DOS window to add the options for the linker. If the linker do right is job, you must find a valid "result.rom" file in the Rebound directory. If an error appear during the linking process, it's probably because you omit something like the nmi routine in your project or checked the "getput 1" checkbox.
*: If you don't know how to PASTE in a popup DOS window, you can use the following trick: right-click on the title bar of the popup DOS window to see a popup menu and then choose the "Edit" option in the popup menu to see a PASTE option.
55

PROGRAMMING COLECOVISION GAMES
Figure 13 Linking Rebound program without any error
If a valid (not empty) "result.rom" file is created, simply click on the "Run" button to test Rebound with a ColecoVision emulator. If you didn't like the result, you may have to modify (calibrate) your code.
Figure 14 Running Rebound in the Virtual ColecoVision emulator for Windows
56
PROGRAMMING COLECOVISION GAMES
Now, if you check the Rebound directory you will find at least 6 files: "rebound.c", "cci.exe", "c.bat", "rebound.obj", "l.bat" and "result.rom". New versions of CCI add a file named "map.txt". The two batch files ("c.bat" and "l.bat") are generated by CCI to compile and link your project. You can erase these two batch files if you want.
Figure 15 Rebound directory after compiling and linking the project
Congratulation! You compiled a ColecoVision project in C.
After June 2003, new CCI versions add a "map.txt" file in your project directory after linking. If you open it, you will see the memory map of your project: where are your code, your data and how much ram you use, etc.
The following table is only a small part of the memory map file.
TOTAL Name Link Load Length(abs) 0 0 0text 8000 0 75Ddata 875D 75D 2Fbss 7000 78C 4E
Legend: "text" is for the ROM (header and code), "data" is for static data in ROM like text and graphics, and "bss" is for the RAM used by the ROM (doesn't include RAM used by the BIOS).
Note: Make sure that bss length is never bigger than 300 to avoid memory corruption. (see pages about memory) Nobody knows your code better than you and it's why you must try to figure out by yourself how to optimize your code.
57

PROGRAMMING COLECOVISION GAMES
STILL BUGY?
The compiler and the linker are not intelligent, so they can't find errors of logic you made in your code. These errors can be described like wrong instructions who make your project not do what supposed to do. This kind of bug is more difficult to find because it can be the result of a combination of instructions in your code or a problem with pointers (a programmer nightmare).
The programming kit came with the Virtual ColecoVision emulator for Windows but this emulator is not a good one to emulate perfectly the ColecoVision. My suggestion is to use ADAMEM and MESS to test your project. If your project works well with Virtual ColecoVision emulator but not with ADAMEM and MESS, maybe some instructions in your code are trying to write data in ROM (read only memory).
Look how easy a bug can be done.
# include <coleco.h>
/* "a" is a global variable (because not initialised here) */byte a; /* "b" is not a global variable but a constant in ROM */byte b=2;
/* Oops! Where is the nmi routine? BUG! */
void main(void){
/* c is a local variable */byte c; /* d is a valid local variable too because a local variable can be initialised */byte d=4;
a=1; /* We finally initialise the "a" global variable! Yeah! */b=d-a; /* Oops, we try to write in ROM. BUG! */c=(b+d)/2; /* No problem here */d=a+b+c; /* No problem here */
}
Note: Except for the nmi routine bug, this program will run perfectly with Virtual Coleco. Please, use a better Coleco emulator to test your projects.
58

PROGRAMMING COLECOVISION GAMES
CAN BE BETTER?
Yes, the Rebound project can be better by adding cool graphics, some colours and sound effects, a title screen, a background music, a menu, etc. All you can add in the project to make it better are welcome. But, all you are trying to add can makes some unwanted bugs. If so, you may have to forget about it unless you find another way to program what you want.
You must change the ball by another graphic. Using the letter O is not really cool. You have to use an unused character to change his pattern and colours to be the new ball. Character graphic: Ball Color Pattern0 0 1 1 1 1 0 0 40 3C0 1 1 1 1 1 1 0 40 7E1 0 0 1 1 1 1 1 47 9F1 0 0 1 1 1 1 1 47 9F1 1 1 1 1 1 1 1 40 FF1 1 1 1 1 1 1 1 40 FF0 1 1 1 1 1 1 0 40 7E0 0 1 1 1 1 0 0 40 3C
1. Add the color and pattern data in the project.
static byte ball_colors[] = {0x40, 0x40, 0x47, 0x47, 0x40, 0x40, 0x40, 0x40};static byte ball_pattern[] = {0x3C, 0x7E, 0x9F, 0x9F, 0xFF, 0xFF, 0x7E, 0x3C};
2. Add routines to load the pattern and color data into the video memory.
void initialize (void){
…/* To change the pattern and color of the character number 128 *//* We not use the capital letter O anymore to be the ball */change_pattern ( 128, ball_pattern,1 ); change_multicolor ( 128, ball_colors );
}
3. Modify the game engine to use the new graphic.
/* We replaced the 'O' by the character number 128 */put_char ( ball_x, ball_y, 128 );
59

PROGRAMMING COLECOVISION GAMES
SMASH - A VIDEO GAME VERSION OF REBOUND
The Rebound project can be modified to be a cool video game like Pong or Breakout. Try to figure out all you need to make this simple project a real video game. Think about all the variables and routines you need before starting to modify the source code.
Let's try to do a "smashing" game with the project Rebound by adding a paddle at the bottom of the screen. And if the ball reach the bottom of the screen, the game is over.
This paddle will be 4 characters long and will move only left and right. The ball will bounce on the walls and the paddle without erasing it.
You need to keep the information about the position of the paddle. Because the paddle move only horizontally (left and right) you can use a constant for the Y position of the paddle.
char paddle_x;char paddle_y = 22;char paddle_len = 4;
Don't forget to initialise the X position of the paddle.
static void initialize (void){
…paddle_x = 20;
}
You can use the position in X and Y of the ball and the paddle to detect if the ball is on the paddle. To make the ball bounce on the paddle, you need to change the Y direction of the ball.
static void bounce_on_walls_in_Y (void){
char temp_x;if ( ball_y == 0 ) { ball_dy = 1; pop(); }/* To make the ball bounce on the paddle */if ( ball_y == paddle_y-1 ){
if ( ball_x >= paddle_x && ball_x < paddle_x+paddle_len ){ ball_dy = -1; pop(); }else{ temp_x = ball_x + ball_dx;
if ( temp_x >= paddle_x && temp_x < paddle_x+paddle_len ){
ball_dx = -ball_dx; ball_dy = -1; pop(); bounce_on_walls_in_X();
}}
}}
60

PROGRAMMING COLECOVISION GAMES
If the Y position of the ball is the same as the Y position of the paddle then the game is over. So you have to change the condition of the "while" loop. In the "while" loop, you must add the instructions to show and move the paddle on screen.
static void bounce(void){
…while ( ball_y < paddle_y ){
if ( joypad_1 & ( LEFT | RIGHT ) ){
/* Erase the paddle */print_at ( paddle_x, paddle_y, " " ); /* four(4) spaces *//* Change the X position of the paddle */if ( joypad_1 & LEFT ) paddle_x--;if ( joypad_1 & RIGHT ) paddle_x++;/* Keep the paddle in the limit of the screen */if (paddle_x < 0 ) paddle_x = 0;if (paddle_x > 32-paddle_len ) paddle_x = 32-paddle_len;
}…print_at ( paddle_x, paddle_y, "XXXX" ); /* paddle: four(4) blocks *delay (5);
}/* Exit this bouncing routine by pressing the fire button */while (!(joypad_1&FIRE1));
}
After compiling and testing these modifications, you may notice that the game is too slow. The actual game speed is not challenging. Try this:
static void bounce(void){
…delay (3);
…}
The actual paddle speed is the same as the ball speed and this can be frustrating. You have to calibrate the game to let the paddle move faster than the ball sometimes. You may have to code a more natural movement for the paddle or use the fire button for fast movements. Find your own solution for the speed of the paddle.
Replace the characters of the paddle with cool graphics.
More suggestions: add bricks, modify the size of the paddle, add a "two players" mode, etc.
61

PROGRAMMING COLECOVISION GAMES
PADDLE GRAPHIC
Like for the ball character, we must use cool graphics for the paddle.
Paddle graphic: block Color Pattern1 1 1 1 1 1 1 1 E0 FF0 0 0 0 0 0 0 1 EF 011 1 1 1 1 0 1 1 E7 FB1 0 0 0 0 0 1 0 E7 821 1 0 1 1 0 0 0 E7 D80 0 0 0 1 0 1 0 E7 0A1 1 0 1 1 1 1 1 E7 DF1 1 1 1 1 1 1 1 E0 FF
Paddle graphic: left Color Pattern0 1 1 1 1 1 1 1 80 7F1 1 0 0 0 0 1 1 89 C31 0 0 1 1 1 1 1 89 9F1 0 1 1 1 1 1 1 89 BF1 1 1 1 1 1 0 1 86 FD1 1 1 1 0 0 0 1 86 F11 1 0 0 0 0 0 1 86 C10 1 1 1 1 1 1 1 80 7F
Paddle graphic: right Color Pattern1 1 1 1 1 1 1 0 80 FE1 0 0 0 0 0 1 1 89 831 0 0 1 1 1 1 1 89 9F1 0 1 1 1 1 1 1 89 BF1 1 1 1 1 1 0 1 86 FD1 1 1 1 0 0 0 1 86 F11 1 0 0 0 0 1 1 86 C31 1 1 1 1 1 1 0 80 FE
Note: The colors pattern of the extreme left and right part of the paddle are the same.
62

PROGRAMMING COLECOVISION GAMES
THE PROGRAM
#include <coleco.h>#include <getput1.h>
/* Information about the location of the ball */char ball_x;char ball_y;
/* Information about the direction of the ball */char ball_dx;char ball_dy;
/* Information about the paddle */char paddle_x;char paddle_y = 22;char paddle_len = 4;
/* Graphics of the ball and the paddle */ static byte ball_colors[] = {0x40, 0x40, 0x47, 0x47, 0x40, 0x40, 0x40, 0x40};static byte ball_pattern[] = {0x3C, 0x7E, 0x9F, 0x9F, 0xFF, 0xFF, 0x7E, 0x3C};
static byte paddle_bouncer_colors[] = {0x80, 0x89, 0x89, 0x89, 0x86, 0x86, 0x86, 0x80};static byte paddle_block_colors[] = {0xE0, 0xEF, 0xE7, 0xE7, 0xE7, 0xE7, 0xE7, 0xE0};static byte paddle_pattern[] ={0x7F, 0xC3, 0x9F, 0xBF, 0xFD, 0xF1, 0xC1, 0x7F, 0xFF, 0x01, 0xFB, 0x82, 0xD8, 0x0A, 0xDF, 0xFF, 0xFE, 0x83, 0x9F, 0xBF, 0xFD, 0xF1, 0xC3, 0xFE};
/* A sound effect named "pop" is played when the ball reaches the border of the screen */static byte pop_sound[] ={ 0, 0x63,0xf,1,
0x81,0xa0,0x90,1, 0x81,0x1c,0x97,1, 0x81,0x2c,0x9d,2, 0x81,0x32,0x9e,1, 0,0,0};
/* The SHOOT sound from Cosmo Challenge */static byte shoot_sound[]= { 1,
0xf8,0xe4, 1,0xf2, 1,0xe4, 1,0x63,0x02,0x01,0xe5,1,0xe4, 1,0xe5, 1,0xe4, 1,0xe5, 1,0xe4, 1,0xe5, 1,0xe4, 5, 0,0,0};
/* To start the "pop" sound */static void pop (void) { start_sound (pop_sound,2); }
/* To start the "shoot" sound */static void shoot (void) { start_sound (shoot_sound,1); }
63

PROGRAMMING COLECOVISION GAMES
/* To initialize the location and direction of the ball */static void initialize (void){
ball_y = 0; /* top */ball_x = 0; /* left */ball_dx = 1; /* moving to the right */ball_dy = 1; /* moving to the bottom */paddle_x = 20;
/* BALL */change_pattern ( 128, ball_pattern,1 ); change_multicolor ( 128, ball_colors );/* PADDLE */change_pattern ( 'x', paddle_pattern,3 ); change_multicolor ( 'x', paddle_bouncer_colors );change_multicolor ( 'y', paddle_block_colors );change_multicolor ( 'z', paddle_bouncer_colors );
}
/* Change the direction of the ball when bouncing horizontally on the border of the screen */static void bounce_on_walls_in_X (void){
if ( ball_x == 0 ) { ball_dx = -ball_dx; pop(); }if ( ball_x == 31 ) { ball_dx = -ball_dx; pop(); }
}
/* Change the direction of the ball when bouncing vertically on the border of the screen */static void bounce_on_walls_in_Y (void){
char temp_x;if ( ball_y == 0 ) { ball_dy = 1; pop(); }/* To make the ball bounce on the paddle */if ( ball_y == paddle_y-1 ){
if ( ball_x >= paddle_x && ball_x < paddle_x+paddle_len ){ ball_dy = -1; pop(); }else{ temp_x = ball_x + ball_dx;
if ( temp_x >= paddle_x && temp_x < paddle_x+paddle_len ){
ball_dx = -ball_dx; ball_dy = -1; pop(); bounce_on_walls_in_X();
}}
}}
64

PROGRAMMING COLECOVISION GAMES
/* To update the location and direction of the ball. */static void update_ball_location (void){
ball_x += ball_dx;ball_y += ball_dy;bounce_on_walls_in_X();bounce_on_walls_in_Y();
}
/* This part of the program is the game engine and it's used to rebound a ball on screen */static void smash(void){
/* Initialize the ball and the paddle */initialize ();/* Clear screen */cls();
/* The animation will stop when pressing on fire1 on joystick#1 */while ( ball_y < paddle_y ){
if ( joypad_1 & ( LEFT | RIGHT ) ){
/* Erase the paddle */print_at ( paddle_x, paddle_y, " " ); /* four(4) spaces *//* Change the X position of the paddle */if ( joypad_1 & LEFT ) paddle_x--;if ( joypad_1 & RIGHT ) paddle_x++;/* Keep the paddle in the limit of the screen */if (paddle_x < 0 ) paddle_x = 0;if (paddle_x > 32-paddle_len ) paddle_x = 32-paddle_len;
}
put_char ( ball_x, ball_y, 32 ); /* 32 is the value of the SPACE character *//* Update the value of the location of the ball */update_ball_location ();/* Print the ball at the new location */put_char ( ball_x, ball_y, 128 );/* Print the ball at the new location */print_at ( paddle_x, paddle_y, "xyyz" ); /* paddle *//* Slowdown the animation */delay(3);
} }
65

PROGRAMMING COLECOVISION GAMES
/* NMI routine: update sound at every vertical retrace */void nmi(void){
update_sound();}
void gameover(void){
/* Play shoot sound */shoot();/* Print "GAME OVER" on screen */center_string ( 11, "GAME OVER" );/* Waiting for FIRE button */pause();
}
void main(void){
/* Initialize the VDP to the screen mode 2 */screen_mode_2_text();/* Set the default ascii character set */upload_default_ascii (BOLD);/* Start the bouncing ball video game */smash();/* Print "GAME OVER" on screen */gameover();
}
Figure 16 Smash game running with VirtualColeco emulator
66

PROGRAMMING COLECOVISION GAMES
DEBUG EXERCISE
A TEST PROGRAM TO DEBUG
Try to find the bugs in the following code. What is missing? What is typed in a wrong way?You can try to compile this code to help you find the bugs.
#include <coleco.h>#include <getpput.h>
byte a=1;
static void test(void){
a--;}
void main(void) {
screen_mode_2_text();cls()print(5,6,"PRESS FIRE TO CONTINUE..?");pause();test();if (a==0){
print(5,6,"THIS PROGRAM IS BUG FREE");pause();
}}
67
PROGRAMMING COLECOVISION GAMES
SOLUTION
This is the corrected version of the previous test program. Read the remarks for information.
#include <coleco.h>/* getpput.h is not the right name to use for the getput 1 library */#include <getput1.h>
/* Oops, we can't initialise a global variable like this: byte a=0; */byte a;
static void test(void){
a--;}
/* Oops, we forgot the NMI process. This process is necessary and can't be omitted */void nmi(){
/* do nothing */}
void main(void) {
/* This is a good place to initialise the global variable "a" */a=1;screen_mode_2_text();/* Set the default ascii character set. Otherwise, we see nothing on screen. */upload_default_ascii (BOLD);/* Oops, we forgot the ";" to separate the instructions */cls();/* The print instruction is not valid. We have to use the print_at instruction */print_at(5,6,"PRESS FIRE TO CONTINUE..?");pause();/* Oops, an error of logic, we forgot to clear the screen */cls();test();if (a==0){
/* The print instruction is not valid. We have to use the print_at instruction */print_at(5,6,"THIS PROGRAM IS BUG FREE");pause();
}}
68

PROGRAMMING COLECOVISION GAMES
That’s all!
Now, it's your turn to create a ColecoVision project.
Make your first experimentation as simple as possible. Code your project one part at a time. Use a paper to write some notes. Find bugs by testing, testing and testing again or ask a beta-tester to test your creation for you. Share your new creation with your friends. Ask for feedback. Tune up your game. When the final version is ready, release your game in a cartridge format.
Words of wisdom that all new ColecoVision games designers should adhere to:
"You're very first effort should be something for YOU, not something you "You're very first effort should be something for YOU, not something you plan to release. Have fun with it, don't try to bite off more than you can plan to release. Have fun with it, don't try to bite off more than you can chew... trust me on that one."chew... trust me on that one."
Have fun!
Best regards,
Daniel Bienvenu
69

PROGRAMMING COLECOVISION GAMES
ANNEXE - MORE TECHNICAL INFORMATIONS
HARDWARE SPECIFICATIONS
Note: This information came from the ColecoVision FAQ.
Resolution: 256 x 192CPU: Z-80ABits: 8Speed: 3.58 MHzRAM: 1K (7000-73FF but copied at different addresses)Video RAM: 16K = 8x 2K (4116 RAM chip)Video Display Processor: Texas Instruments TMS9928ASprites: 32Colors: 16 (15 colors plus one invisible)Sound: Texas Instruments SN76489AN; 3 tone channels, 1 noiseCartridge ROM: 8K/16K/24K/32K
70

PROGRAMMING COLECOVISION GAMES
CARTRIDGE (ROM) HEADER
Note: This information came from a ColecoVision technical documentation.
8000 - 8001: If AA and 55, the CV will show the CV title screen. If 55 and AA, the CV will jump directly to the start address.
The following bytes always point to 0000 or RAM (7xxx)8002 - 8003: Pointer to Sprites table (table sprites properties: Y, X, pattern, colour?)8004 - 8005: Pointer to Sprites table (in which order the coleco bios show the sprites?)8006 - 8007: Pointer to RAM space to let ColecoVision BIOS to temporary stock data8008 - 8009: Pointer to Joysticks: 12 bytes: 2 control bytes, 5 bytes for joystick port#1, 5 bytes for joystick port#2.
control byte : [READ JOYSTICK?][][][KEYPAD][RIGHT][SPINNER][JOYPAD][LEFT])
5 bytes for the joystick attribute (bits set to one when pressed): left fire directions [left, down, right, up] spinner right fire keypad
800A - 800B: Start address of the game
800C - 800E: Jump to: RST 08h800F - 8011: Jump to: RST 10h8012 - 8014: Jump to: RST 18h8015 - 8017: Jump to: RST 20h8018 - 801A: Jump to: RST 28h801B - 801D: Jump to: RST 30h801E - 8020: Jump to: RST 38h
8021 - 8023: Jump to: NMI (Vertical Retrace Interrupt)
8024 - ????: Title screen data:
COLECOVISION
PRESENTS
LINE 1
LINE 2
YEAR
The title screen data is stored as one string with the '/' character (2Fh) used as a delimiter. It signals the end of a line, and isn't printed.
71

PROGRAMMING COLECOVISION GAMES
The lines are stored out of order like so: "LINE 2/LINE 1/YEAR"
Note: There isn't an end-of-line delimiter, because the year is always 4 characters long.
72

PROGRAMMING COLECOVISION GAMES
SOUND GENERATION HARDWARE
Note: This information came from a ColecoVision sound documentation.
The ColecoVision uses the Texas Instruments SN76489A sound generator chip. It contains three programmable tone generators, each with its own programmable attenuator, and a noise source with its own attenuator.
TONE GENERATORS
Each tone generator consists of a frequency synthesis section requiring ten bits of information to define half the period of the desired frequency (n). F0 is the most significant bit and F9 is the least significant bit. The information is loaded into a ten stage tone counter, which is decremented at a N/16 rate where N (3.579MHz) is the input clock frequency. When the tone counter decrements to zero, a borrowed signal is produced. This borrowed signal toggles the frequency flip-flop and also reloads the tone counter. Thus, the period of the desired frequency is twice the value of the period register.
The frequency can be calculated by the following:
f = 3.579MHz/(32n)
The output of the frequency flip-flop feeds into a four stage attenuator. The attenuator values, along with their bit position in the data word, are shown below. Multiple attenuation controlbits may be true simultaneously. Thus, the maximum attenuation is 28 db.
A0 A1 A2 A3 Weight0 0 0 1 2 db0 0 1 0 4 db0 1 0 0 8 db1 0 0 0 16 db1 1 1 1 OFF
NOISE GENERATOR
The noise generator consists of a noise source that is a shift register with an exclusive OR feedback network. The feedback network has provisions to protect the shift register from being locked in the zero state.
73

PROGRAMMING COLECOVISION GAMES
Noise Feedback ControlFeedback (FB) Configuration
0 “Periodic” Noise1 “White” Noise
Noise Generator Frequency ControlNF0 NF1 Shift Rate
0 0 N/5120 1 N/10241 0 N/20481 1 Tone gen. #3 output
CONTROL REGISTERS
The SN76489A has eight internal registers which are used to control the three tone generators and the noise source. During all data transfers to the SN76489A, the first byte contains a three bit field which determines the destination control register. The register address codes are shown here.
Register Address FieldR0 R1 R2 Destination Control Register0 0 0 Tone 1 Frequency0 0 1 Tone 1 Attenuation0 1 0 Tone 2 Frequency0 1 1 Tone 2 Attenuation1 0 0 Tone 3 Frequency1 0 1 Tone 3 Attenuation1 1 0 Noise Control1 1 1 Noise Attenuation
SOUND DATA FORMATS
The formats required to transfer data are shown below.
Frequency1 Reg. Addr Data 0 X Data
R0 R1 R2 F6 F7 F8 F9 F0 F1 F2 F3 F4 F5
Noise Control1 Reg. Addr X FB Shift
1 1 0 NF0 NF1
Attenuator1 Reg. Addr Data
R0 R1 R2 A0 A1 A2 A3
74

PROGRAMMING COLECOVISION GAMES
NOTES TABLE CONVERSION: FREQUENCIES (Hz) <-> HEX values
Hz HEX Hz HEX Hz HEX Hz HEX Hz HEXA 110.00 3F8 220.00 1FC 440.00 0FE 880.00 07F 1760.0 03F
A#/Bb 116.54 3BF 233.08 1DF 466.16 0EF 932.33 0FF 1864.6 03BB 123.47 389 246.94 1C4 493.88 0E2 987.77 071 1975.5 038C 130.81 356 261.63 1AB 523.25 0D5 1046.5 06A 2093.0 035
C#/Db 138.59 327 277.18 193 554.36 0C9 1108.7 064 2217.5 032D 146.83 2F9 293.66 17C 587.33 0BE 1174.7 05F 2349.3 02F
D#/Eb 155.56 2CE 311.13 167 622.25 0B3 1244.5 059 2489.0 02CE 164.81 2A6 329.63 153 659.25 0A9 1318.5 054 2637.0 02AF 174.61 280 349.23 140 698.46 0A0 1396.9 050 2793.8 028
F#/Gb 185.00 25C 370.00 12E 739.99 097 1480.0 04B 2960.0 025G 196.00 23A 391.99 11D 783.99 08E 1568.0 047 3136.0 023
G#/Ab 207.65 21A 415.30 10D 830.61 086 1661.2 043 3322.4 021
Remark: The frequency of the medium C is 523.25 Hz. The frequency of the same note C but an octave higher is 1046.5 Hz.
SCALESA Scale is a series of notes which we define as "correct" or appropriate for a song.
Examples of various Scales (Root = "C"):Name C Db D Eb E F Gb G Ab A Bb B
Major 1 2 3 4 5 6 7Minor 1 2 3 4 5 6 7Harmonic Minor 1 2 3 4 5 6 7Melodic Minor (asc) 1 2 3 4 5 6 7Melodic Minor (desc) 1 2 3 4 5 6 7Enigmatic 1 2 3 4 5 6 7Flamenco 1 2 3 4 5 6 7 8Major Triad 1 2 3Minor Triad 1 2 3
75

PROGRAMMING COLECOVISION GAMES
VDP - VIDEO DISPLAY PROCESSOR(from Texas Instrument documentation)
VDP has 8 control registers (0-7) and one status register.
REGISTERS
Control registers Register Bits
7 6 5 4 3 2 1 00 - - - - - - M2 EXT1 4/16K BL GINT M1 M3 - SI MAG2 - - - - PN13 PN12 PN11 PN103 CT13 CT12 CT11 CT10 CT9 CT8 CT7 CT64 - - - - - PG13 PG12 PG115 - SA13 SA12 SA11 SA10 SA9 SA8 SA76 - - - - - SG13 SG12 SG117 TC3 TC2 TC1 TC0 BD3 BD2 BD1 BD0
Legend
M1, M2, M3 Select screen modeEXT Enables external video input 4/16K Selects 16K Video RAM if setBL Blank screen if resetSI 16x16 sprites if set; 8x8 if notMAG Sprites enlarged if set (double sized: sprite pixels are 2x2)GINT Generate interrupts if setPN* Address for pattern name table (screen)CT* Address for colour table (special meaning in M2)PG* Address for pattern generator table (special meaning in M2)SA* Address for sprite attribute (y, x, pattern, colour) tableTC* Text colour (foreground)BD* Back drop (background)
Status register INT 5S C FS4 FS3 FS2 FS1 FS0
Legend
FS* Fifth sprite (first sprite not displayed). Valid if 5S is setC Sprite collision detected5S Fifth sprite (not displayed) detectedINT Set at each screen update (refresh)
76

PROGRAMMING COLECOVISION GAMES
VDP register access
The status register can't be write. After reading the status register, INT (bit#7) and C (bit#5) are reset.
In ASM: in a,(bfh) ; get register value (COLECO BIOS: call 1fdch)In C: byte a = vdp_status; /* vdp_status is updated after the NMI routine */
The control registers can't be read. Two bytes must be writen:
Bit 7 Bit 6 Bit 5 Bit 4 Bit 3 Bit 2 Bit 1 Bit 0Byte 0 V7 V6 V5 V4 V3 V2 V1 V0Byte 1 1 - - - - R2 R1 R0
Legend
V* Value to be writen in the register.R* Register number.
In ASM: ld a, valueout (bfh),a ; set valueld a, register_numberadd a,80hout (bfh),a ; write value in register
In C: vdp_out (register_number, value); /* (COLECO BIOS: call 1fd9h) */
NMI Non maskable interrupt
After the vertical retrace (refresh is done), the bit 7 of the status register is set.If GINT (bit 5 of control register#1) is set, the NMI interrupts the normal execution.When it's time again to refresh, the bit 7 of the status register is reset.
NMI can be used to execute something again and again at a regular speed like updating sounds. Some games use NMI to call the game engine.
77

PROGRAMMING COLECOVISION GAMES
Screen modes
Mode 0 Description: 32x24 characters, two colors per 8 characters, sprites active.
Mode 1 Description: 40x24 characters (6x8), colors set in control register#7, sprites inactive.
Mode 2 Description: 32x24 characters, 256x192 pixels, two colors per line of 8 pixels, sprites active.
Special meaning for CT* and PG*:
At control register#3, only bit 7 (CT13) sets the address of the color table (address: 0000 or 2000). Bits 6 - 0 are an AND mask over the top 7 bits of the character number.
At control register#4, only bit 2 (PG13) sets the address of the pattern table (address: 0000 or 2000). Bits 1 and 0 are an AND mask over the top 2 bits of the character number. If the AND mask is: 00, only one set (the first one) of 256 characters is used on screen. 01, the middle of the screen (8 rows) use another set (the second one) of 256 characters. 10, the bottom of the screen (8 rows) use another set (the third one) of 256 characters. 11, three set of 256 characters are used on screen: set one at the top (8 rows), set two in
the middle (8 rows), and set three at the bottom (8 rows).
Mode 3 Description: 64x48 big pixels (4x4), sprites active.
78

PROGRAMMING COLECOVISION GAMES
COLOR PALETTE
0 Invisible 1 Black 2 Medium Green 3 Light Green 4 Dark blue 5 Light blue 6 Dark Red (brown) 7 Cyan 8 Medium Red 9 Light Red (Pink/orange) 10 (A) Dark Yellow (Yellow) 11 (B) Light Yellow (Yellow + Light Grey) 12 (C) Dark Green 13 (D) Magenta 14 (E) Grey (Light Grey) 15 (F) White
0 1 2 3 4 5 6 7 8 9 A B C D E F
TMS9918 color palette calculated by Richard F. Drushel
TMS9938 color palette calculated by Marat Fayzullin
TMS9928 color palette used in MESS emulator
The default color palette used in ADAMEM is the one calculated by Richard F. Drushel.The color palette used in COLEM is the one calculated by Marat Fayzullin.The color palette I see in my Commodore monitor model 1802 looks like the one used in MESS emulator.
More information about Texas Instruments TMS99n8 color palette.
URL:http://junior.apk.net/~drushel/pub/coleco/twwmca/wk961118.htmlhttp://junior.apk.net/~drushel/pub/coleco/twwmca/wk961201.htmlhttp://junior.apk.net/~drushel/pub/coleco/twwmca/wk970202.html
79

PROGRAMMING COLECOVISION GAMES
COLECO ASCII TABLE
DEC: 0-63HEX: 00-3F
DEC HEX CHARACTER DEC HEX CHARACTER0 00 32 20 Space1 01 33 21 !2 02 34 22 "3 03 35 23 #4 04 36 24 $5 05 37 25 %6 06 38 26 &7 07 39 27 '8 08 40 28 (9 09 41 29 )10 0A 42 2A *11 0B 43 2B +12 0C 44 2C ,13 0D 45 2D -14 0E 46 2E .15 0F 47 2F /16 10 48 30 017 11 49 31 118 12 50 32 219 13 51 33 320 14 52 34 421 15 53 35 522 16 54 36 623 17 55 37 724 18 56 38 825 19 57 39 926 1A 58 3A :27 1B 59 3B ;28 1C 60 3C <29 1D © 61 3D =30 1E T 62 3E >31 1F M 63 3F ?
80

PROGRAMMING COLECOVISION GAMES
DEC: 64-127HEX: 40-7F
DEC HEX CHARACTER DEC HEX CHARACTER64 40 @ 96 60 `65 41 A 97 61 a66 42 B 98 62 b67 43 C 99 63 c68 44 D 100 64 d69 45 E 101 65 e70 46 F 102 66 f71 47 G 103 67 g72 48 H 104 68 h73 49 I 105 69 i74 4A J 106 6A j75 4B K 107 6B k76 4C L 108 6C l77 4D M 109 6D m78 4E N 110 6E n79 4F O 111 6F o80 50 P 112 70 p81 51 Q 113 71 q82 52 R 114 72 r83 53 S 115 73 s84 54 T 116 74 t85 55 U 117 75 u86 56 V 118 76 v87 57 W 119 77 w88 58 X 120 78 x89 59 Y 121 79 y90 5A Z 122 7A z91 5B [ 123 7B { (bracket left)92 5C \ 124 7C | (broken vertical)93 5D ] 125 7D } (bracket right)94 5E ^ 126 7E ~ (tilde)95 5F _ (underline) 127 7F ▒ (deleted)
81