Embed Size (px)
Citation preview

ADVANCED ENGINE MANAGEMENT INC. 2205 126TH Street, Unit A Hawthorne, CA. 90250
Phone: (310) 484-2322 Fax: (310) 484-0152 www.aempower.com
Instruction Part Number: 10-7548 2007 Honda Fit 1.5L C.A.R.B. E.O. #pending
Cold Air Intake Systems that are pending CARB approval are illegal in California except on racing vehicles which may never be used on public highways.
© Copyright 2006
COLD AIR INTAKE SYSTEM
Installation Instructions for:
Part Number: 21-518 2007 Honda Fit
Manual Transmission Only
2
Congratulations! You have just purchased the finest Air Induction & Filtration system for your car at any price! The AEM Cold Air System is the result of extensive development on a wide variety of cars. Each system is engineered for the particular application. The AEM Cold Air System differs from all others in several ways. We take the inlet air from outside of the engine compartment where the inlet air is considerably cooler than the hot under hood air. The cooler inlet air temperature translates to more power during the combustion process because cool air is denser than warm air. AEM has conducted extensive inlet air temperature studies and we have seen temperature reductions of up to 50 degrees by pulling air from outside of the engine compartment. The air mass flow to the engine is increased because of the increased airflow and reduced inlet temperature, which translates to more power. The AEM Cold Air Systems are 50 states Street Legal (some model and years still pending) and come with complete instructions for ease of installation.
Our system is constructed of lightweight aluminum and then painted with a zirconia based powder coat for superior heat insulating characteristics. The aluminum will not crack in extended use like plastic and it is actually lighter than plastic. The tube diameter and length are matched for each engine to give power over a broad rpm range. Unlike the plastic systems that use a continually diverging cross section, we take advantage of the acoustical energy in the duct to promote cylinder filling during the intake valve-opening event.
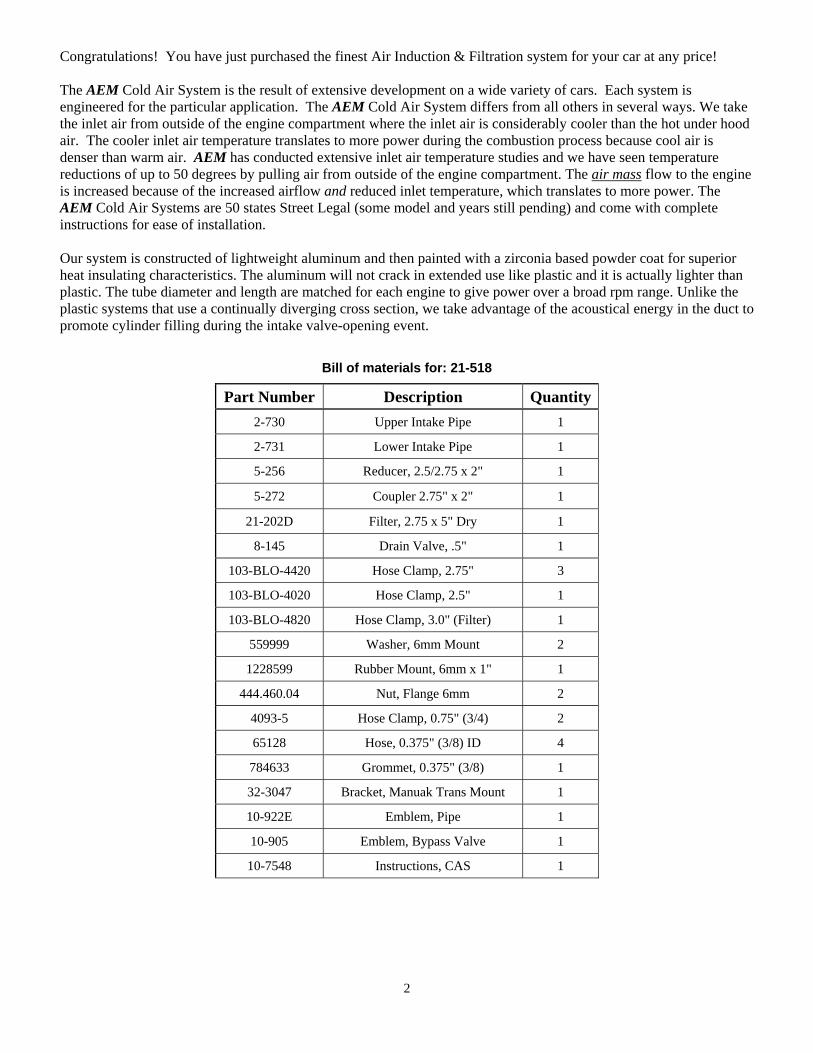
Bill of materials for: 21-518
Part Number Description Quantity 2-730 Upper Intake Pipe 1
2-731 Lower Intake Pipe 1
5-256 Reducer, 2.5/2.75 x 2" 1
5-272 Coupler 2.75" x 2" 1
21-202D Filter, 2.75 x 5" Dry 1
8-145 Drain Valve, .5" 1
103-BLO-4420 Hose Clamp, 2.75" 3
103-BLO-4020 Hose Clamp, 2.5" 1
103-BLO-4820 Hose Clamp, 3.0" (Filter) 1
559999 Washer, 6mm Mount 2
1228599 Rubber Mount, 6mm x 1" 1
444.460.04 Nut, Flange 6mm 2
4093-5 Hose Clamp, 0.75" (3/4) 2
65128 Hose, 0.375" (3/8) ID 4
784633 Grommet, 0.375" (3/8) 1
32-3047 Bracket, Manuak Trans Mount 1
10-922E Emblem, Pipe 1
10-905 Emblem, Bypass Valve 1
10-7548 Instructions, CAS 1
3
Read and understand these instructions BEFORE attempting to install this product. Note: This kit requires the removal and reinstallation of emissions related components. If
you are not familiar with the removal / installation and/or the operation of these components then please refer this installation to a qualified professional.
1) Getting started a) Make sure vehicle is parked on a level surface. b) Set parking brake. c) Disconnect both positive and negative battery terminals. d) If engine has run within the past two hours let it cool down.
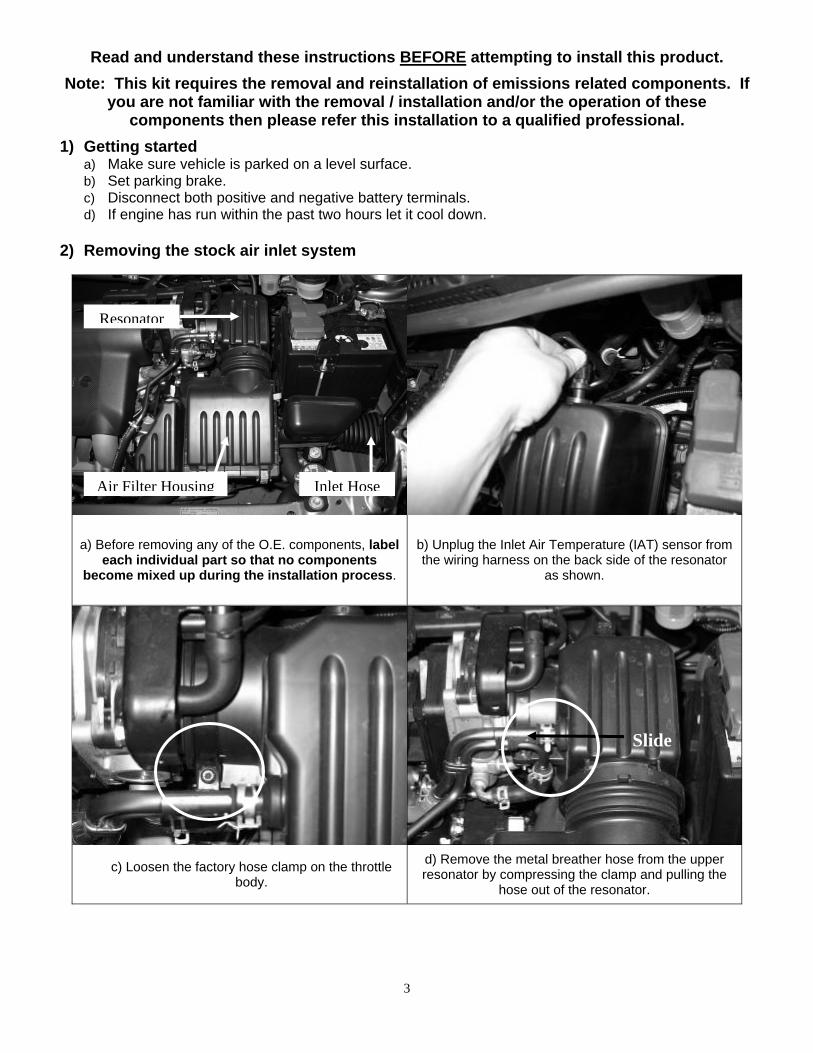
2) Removing the stock air inlet system
a) Before removing any of the O.E. components, label each individual part so that no components
become mixed up during the installation process.
b) Unplug the Inlet Air Temperature (IAT) sensor from the wiring harness on the back side of the resonator
as shown.
c) Loosen the factory hose clamp on the throttle body.
d) Remove the metal breather hose from the upper resonator by compressing the clamp and pulling the
hose out of the resonator.
Slide
Resonator
Air Filter Housing Inlet Hose

4
e) Remove the two bolts securing the air filter housing and upper resonator to the vehicle. Start with the bolt
closest to the engine. f) Remove the remaining bolt near the air inlet hose.
g) Remove the air inlet hose from the air filter housing by sliding off the housing.
h) Remove the air filter housing and resonator from the vehicle by sliding the resonator off the throttle
body and lifting straight out.
i) Remove the air inlet hose from the chassis by removing the plastic retaining clip securing it and
pulling it out of the fender opening.
j) Remove the retaining clips and bolts securing the driver side splash shield to the bumper and chassis.

5
k) From inside the wheel well, remove the retaining clips securing the underbody tray to the chassis.
l) From underneith the vehicle remove the plastic retaining clip located on the driver’s side subframe.
m) Unclip the underbody tray from the driver’s side fender liner and let it hang to gain access behind the
front bumper as shown.
n) From underneith the vehicle, trim the driver’s side fender liner to allow clearance. See step o) for how it
should be trimmed.
o) Trim fender liner as shown. p) Carefully remove the IAT sensor from the previously removed resonator and air filter housing.
6
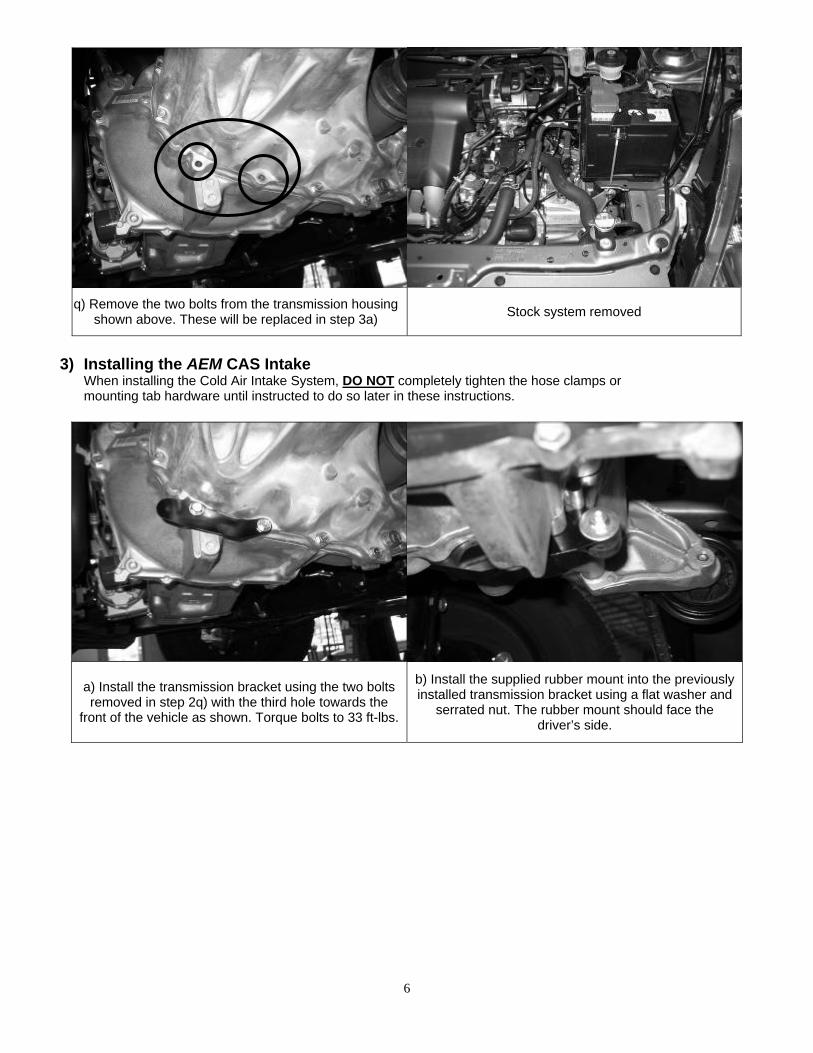
q) Remove the two bolts from the transmission housing shown above. These will be replaced in step 3a) Stock system removed
3) Installing the AEM CAS Intake
When installing the Cold Air Intake System, DO NOT completely tighten the hose clamps or mounting tab hardware until instructed to do so later in these instructions.
a) Install the transmission bracket using the two bolts removed in step 2q) with the third hole towards the
front of the vehicle as shown. Torque bolts to 33 ft-lbs.
b) Install the supplied rubber mount into the previously installed transmission bracket using a flat washer and
serrated nut. The rubber mount should face the driver’s side.

7
c) Install the rubber grommet into the hole on the short upper pipe as shown.
d) Carefully install the IAT sensor into the grommet. Fitment may be tight, if so use soapy water to ease
installation..
e) Install the supplied reducing coupler onto the throttle body using a #40 and #44 hose clamp as
shown.
f) Slide the short upper inlet into the throttle body with the IAT sensor facing the firewall. If clearance is
needed, loosen the battery mount and slide battery away from pipe.
g) Install the straight coupler onto the end of the upper pipe and secure using two #44 hose clamps.
h) Locate the hole on the lower inlet pipe and insert the supplied duck bill drain as shown.

8
i) From under the vehicle, slide the lower intake pipe up and into the previously installed coupler. Align the
bracket with the rubber mount installed in step 3b)
j) With the pipe bracket aligned with the rubber mount, install a washer and serrated nut to secure.
k) From under the vehicle, install the AEM DRYFLOW air filter onto the end of the lower pipe. Push the filter onto the pipe until the stop inside is
reached and secure using a #48 hose clamp.
l) Check for clearance around the lower pipe. If the radiator hose is too close or touching, gently bend its support bracket for clearance. Once clearance has
been verified, tighten all hose clamps and the nut on the rubber mount.
m) Plug the IAT sensor harness into the installed sensor on the upper inlet pipe.
n) Install the supplied 3/8” breather hose between the steel breather line and the nipple on the pipe. Secure
using the two ¾” hose clamps as shown.
Trim hose to fit

9
Before After Re-assemble the vehicle
a) Reinstall the splash shields. Check for proper intake fitment and readjust if needed. b) Inspect the engine bay for any loose tools and check that all fasteners that were moved or removed
are properly tight. c) Reconnect the battery cables to the battery (always connect positive first). d) Start the vehicle and check for proper operation of all the components that were removed.
For Technical Inquiries E-Mail Us At