Embed Size (px)
Citation preview

Original Document date June 2012; Updated March 2013
CoeusLite 4.5.1 Proposal Development
User Guide
Coeus® Version 4.5.1
Web-based application for preparing, routing, and submitting proposals
(All examples and figures created in the Coeus Consortium Test Instance)
Document Date: 29 June 2012

CoeusLite User Guide for version 4.5.1
, Page - 2 Original Document date June 2012; Updated March 2013
Table of Contents
INTRODUCTION ..................................................................................................................................................................... 4 ACCESSING COEUSLITE PROPOSAL DEVELOPMENT .................................................................................................... 4 OVERVIEW OF SCREEN NAVIGATION ............................................................................................................................... 5
IDENTIFYING VIEW MODES: MODIFY VERSUS VIEW ONLY ........................................................................................................ 5 LOCATING PROPOSALS IN COEUSLITE .................................................................................................................................... 6 PREVIEW A GRANTS.GOV OPPORTUNITY ................................................................................................................................ 8 CREATE PROPOSAL FROM THE GRANTS.GOV OPPORTUNITY SEARCH ...................................................................................... 9
CREATE A NEW PROPOSAL .............................................................................................................................................. 10 Navigating the CoeusLite Screens: ................................................................................................................................ 11
1. NAVIGATE TO THE GENERAL INFO SCREEN: ....................................................................................................................... 12 A. Enter your proposal information: ................................................................................................................................ 12 B. For Grants.gov System-to-System (S2S) Candidates: .............................................................................................. 14
2. NAVIGATE TO THE ORGANIZATION SCREEN TO ENTER ADDITIONAL PERFORMING ORGANIZATIONS OR SITES ........................ 18 To add an Other Organization ........................................................................................................................................ 19 To add a Performance Site (Location Address) ............................................................................................................. 20 To Delete Other Organizations or Performance Sites .................................................................................................... 20 To Delete Congressional Districts .................................................................................................................................. 20
3. NAVIGATE TO INVESTIGATORS & KEY PERSONNEL ............................................................................................................ 21 Optional Key Person Unit Maintenance.......................................................................................................................... 23 Notify Proposal Personnel to Self-Certify via Alternative Web-Questionnaire Certification ........................................... 29
4. NAVIGATE TO CREDIT SPLIT ........................................................................................................................................... 31 5. NAVIGATE TO SPECIAL REVIEWS .................................................................................................................................... 32 6. NAVIGATE TO ABSTRACTS .............................................................................................................................................. 33 7. NAVIGATE TO SCIENCE CODE ......................................................................................................................................... 34 8. NAVIGATE TO OTHERS ..................................................................................................................................................... 35 9. NAVIGATE TO YNQ: YES NO QUESTIONS ......................................................................................................................... 36 10. ASSIGN PROPOSAL ROLES ............................................................................................................................................ 37 11. QUESTIONNAIRE ............................................................................................................................................................ 39
Smart S2S Questionnaire for Grants.gov forms ............................................................................................................. 41 12. NAVIGATE TO BUDGET ................................................................................................................................................... 42
Viewing the Budget using the Print Feature ................................................................................................................... 42 Navigating the CoeusLite Budget Screens ..................................................................................................................... 43 Before you start your budget… ....................................................................................................................................... 44 Initial Budget screen Access – Budget Set up requirements. ........................................................................................ 44
13. BUDGET SETUP ............................................................................................................................................................. 45 A. Add and complete Budget Personnel entries ............................................................................................................. 45 B. Adjust Periods (boundaries) ...................................................................................................................................... 48 C. Proposal Rates .......................................................................................................................................................... 51 D. Navigate to Personnel Budget .................................................................................................................................. 53 E. Navigate to the Equipment Screen ........................................................................................................................... 58 F. Navigate to the Travel screen ................................................................................................................................... 60 G. Navigate to the Participant/Trainee screen .............................................................................................................. 62 H. Navigate to the Other Direct Costs screen ............................................................................................................... 64
1. Entering Standard Costs Line Items in the Budget .............................................................................................. 64
2. a. New Subaward Budget Tool – automatic form translation and line item entry ................................................ 66
2. b. Manual Entry of Other Direct Costs: Subaward/Subcontracts ......................................................................... 70
Special NIH Subcontract Instructions for Modular submissions: ......................................................................... 70
3. Formulated Costs (currently not in use at Northeastern University) .................................................................... 72
4. Other Budgeting Features .................................................................................................................................... 74
a. Cost Sharing of a detailed expense ................................................................................................................. 74 b. Cost Sharing in a Sub Award........................................................................................................................... 74 c. Underrecovery ................................................................................................................................................. 75

CoeusLite User Guide for version 4.5.1
, Page - 3 Original Document date June 2012; Updated March 2013
I. Generate All Periods from your Detailed Period 1 Budget .......................................................................................... 76 J. Navigate to the Budget Summary Screen ................................................................................................................. 79 K. Navigate to the Budget Versions Screen .................................................................................................................. 81 L. Navigate to Modular Budget Screen: ........................................................................................................................ 83 M. Navigate to Cost Sharing Distribution....................................................................................................................... 85 N. Navigate to Under Recovery Distribution .................................................................................................................. 87 M. Navigate to Project Income ...................................................................................................................................... 88 N. Perform Budget Validations ....................................................................................................................................... 89 O. Finalize Your Budget ................................................................................................................................................. 90
14. NAVIGATE TO UPLOAD ATTACHMENTS ............................................................................................................................ 91 Upload Proposal Attachment instructions:...................................................................................................................... 92 List of Proposal Attachments: ......................................................................................................................................... 93 Refresh Proposal Attachment instructions: .................................................................................................................... 94 Refresh an Uploaded Narrative File (replacing the existing file): ................................................................................... 95 Upload Personnel Attachment instructions: ................................................................................................................... 96 Upload Institutional Attachment instructions: ................................................................................................................. 97
15. NAVIGATE TO INSTITUTIONAL VALIDATIONS ..................................................................................................................... 98 16. NAVIGATE TO SUBMIT FOR APPROVAL ............................................................................................................................ 99 17. RECALL AN APPROVAL IN PROGRESS PROPOSAL .......................................................................................................... 100 18. NAVIGATE TO PRINT .................................................................................................................................................... 101 19. NAVIGATE TO COPY PROPOSAL.................................................................................................................................... 102
When Copied Proposal Narratives require special attention: ................................................................................ 103
20. NAVIGATE TO EMAIL: SEND EMAIL NOTIFICATIONS FROM YOUR PROPOSAL. .................................................................... 104 21. NAVIGATE TO ADD NEW ROLODEX ENTRY .................................................................................................................... 105 22. NAVIGATE TO SHOW APPROVAL ROUTING (AVAILABLE AFTER SUBMITTED FOR APPROVAL) .............................................. 106 23. NAVIGATE TO PROPOSAL SUMMARY SCREEN (AVAILABLE BEFORE AND AFTER SUBMITTAL) .............................................. 107 24. CHECK ON THE GRANTS.GOV SUBMISSION DETAILS STATUS: ........................................................................................ 112
Appendix A: When to Contact Your ORAF Grant Officer: ........................................................................................... 113

CoeusLite User Guide for version 4.5.1
, Page - 4 Original Document date June 2012; Updated March 2013
Introduction
CoeusLite Proposal Development allows users to prepare and view proposal funding applications and then route the completed applications for internal approval. Institution Administrators can view proposal funding applications. Institute Approvers can view, approve, or reject proposals for correction. Proposals prepared in CoeusLite are fully compatible with Coeus Premium for submission to Grants.gov by Institute Authorized Administrators.
The CoeusLite application allows users to search and view proposals where the user is an aggregator, an approver, or holds a specific authorization to view a proposal.
Accessing CoeusLite Proposal Development:
Contact your university Coeus administrator to establish your Coeus User ID and assign the Coeus proposal creator role in your unit.
Your Coeus Administrator will provide you with the URL address where you will access the software. You may also need valid certificates or LDAP credentials to access your university’s Coeus website.
Click on My Proposals to access Proposal Development

CoeusLite User Guide for version 4.5.1
, Page - 5 Original Document date June 2012; Updated March 2013
Overview of Screen Navigation:
The default view upon entry to My Proposals is Proposals in Progress.
- Select Proposals In Progress displays any non-approved proposal that you hold a view or modify role.
- Select All Proposals to see the list of all Coeus Proposals (in progress, approval in progress, submitted, etc.).
- Select Create New Proposal to start a new Coeus Proposal
- Select Proposal Search to locate a specific proposal.
- Select Grants.gov Opportunity Search to connect to Grants.gov and locate a funding opportunity
- Select anywhere on a proposal in the List of Proposals displayed in the lower pane to open the proposal
Select anywhere on the Proposal Line to open it. Select Budget to navigate directly to the Budget screens.
Identifying View Modes: Modify versus View Only
Open General Proposal Information: View only mode vs. Modify mode.
View all status proposals
Start a New proposal
Search all proposals
Search Grants.gov
View only In Progress proposals
Red warning notes another user has a lock on this proposal. You are in View Only Mode; you cannot edit this area of the proposal unless the other user exits.
You are in Modify Mode: you can edit this proposal. (No red warning; darker text in fields, drop down lists active)

CoeusLite User Guide for version 4.5.1
, Page - 6 Original Document date June 2012; Updated March 2013
Multiple Users in Modify Mode: CoeusLite versions 4.3 and higher allow multiple users to access the proposal in modify mode: one user access to modify the General Info and Upload Narratives screens while another user simultaneously modifies the Budget. Coeus Premium can support three users editing/modifying a proposal simultaneously (Details, Narratives, or Budget.
Open Budget Views: Modify mode vs. View-Only mode:
Locating Proposals in CoeusLite
List of All Proposals window: will display status Submitted, Approved, Approval in Progress, In Progress, Rejected, Post-Submission Approval, Post-Submission Rejection.
Budget open in Modify Mode: note dark text in fields, drop-down lists active, and no red warning note.
Budget open in View-Only Mode: note Red warning, grayed-out text in fields, and drop-down lists not active.

CoeusLite User Guide for version 4.5.1
, Page - 7 Original Document date June 2012; Updated March 2013
List of Proposals In Progress window: displays In Progress, Approval in Progress, and Rejected status.
Proposal Search window: enter search criteria value(s) then select Search.
Use the wildcard symbol * in Coeus search screens. Strategic use of wildcards can reduce the number of letters you have to type – reducing typos! Also, you only have to remember key words, not entire titles or names. Entering partial information in several search fields, with or without wildcards will also help to refine your search to the most relevant selections. The Premium user guide has additional information on search options.
Result: Select proposal, search again, or close the search window.

CoeusLite User Guide for version 4.5.1
, Page - 8 Original Document date June 2012; Updated March 2013
Preview a Grants.gov Opportunity
Grants.gov Opportunity Search window: enter the CFDA number or Sponsor Opportunity ID number to perform the search and review the results.
Grants.gov Search results (results below using CFDA 93.847 with the Grants.gov Test Server):
Review Opportunity details:
Enter CFDA or… Or Enter Opportunity Number, then Search
Click to >> to expand detail pane;
Click << to reduce detail pane

CoeusLite User Guide for version 4.5.1
, Page - 9 Original Document date June 2012; Updated March 2013
Create Proposal from the Grants.gov Opportunity Search
Use the Create Proposal option from the Grants.gov Opportunity Search results to generate a new proposal record that includes this Opportunity link & form set. If you choose to Create Proposal from a result, you may be presented with the select a unit screen if you have the Proposal Create role in more than one unit. The Opportunity ID and CFDA number will automatically be populated on the General Info window. You will need to maintain the mandatory fields on the General Info screen to save the proposal and complete the link.
Some opportunity schemas may not contain a CFDA number; this is very common with NIH opportunities. In these situations, the link to the Grants.gov opportunity is not completed upon saving the proposal. The proposal record will save, but the user must perform the standard “navigate to Grants.gov screen” step to complete the opportunity link to the proposal. As users should always navigate and link to Grants.gov during initial proposal preparation to review and select forms, this is not a blocking issue for this new functionality.

CoeusLite User Guide for version 4.5.1
, Page - 10 Original Document date June 2012; Updated March 2013
Create a New Proposal:
If you are authorized to create proposals in more than one Lead Unit, you will first be presented with your list of those units. Click on the appropriate Unit for this submission. Lead unit cannot be changed once a proposal is started. You will be able to add a unit(s) to support routing and credit split for each investigator on the Investigator Details screen.
NOTE: The Lead Unit is the primary department associated with the proposal. This is the department that will submit the proposal and manage the award, if funded.
Proposal Development: Initial entry screen
Use the Navigation Panel buttons to navigate your proposal. Don’t use your Browser’s “back” or “forward” buttons – these functions are not supported for use in navigation in Coeus.
Click one to select the unit to be Lead for this proposal.
Navigation Panel
Check marks will appear after you navigate to each screen and save
entered data.

CoeusLite User Guide for version 4.5.1
, Page - 11 Original Document date June 2012; Updated March 2013
Navigating the CoeusLite Screens:
Navigates to the Proposal Summary screen.
Enter details required to save and create a proposal. This panel will always be the first screen presented when a proposal is selected.
Displays the contact information of the submitting organization, performing organization, and allows users to add performing sites of additional locations.
Add Investigators and Key Persons and customize their unit, roles, and contact and degree details. Certify Investigators.
Enter credit allocation specifics for Investigators as defined by your institutional business practices.
Enter information for research requiring special review or approval such as use of animals or human subjects.
Except in the instances of NSF (suggested reviewers, deviation authorization, and reviewers not to include), field not used at Northeastern.
Not used at Northeastern.
Contains custom elements, e.g. name of PI from Prime Institution, etc.
Enter answers to compliance questions required by your Institution, sponsor, or both.
Add or remove user access to your proposal
Heading for Questionnaires- Locally defined and applied Questionnaires will
display in this category.
EXAMPLE Questionnaire…
Links the proposal to a Grants.gov opportunity; displays opportunity details, forms, and submission status
Navigates to the budget screens
Navigates to the file upload screens
Performs the locally defined validation checks and s2s validations if a Grants.gov opportunity has been selected and saved.
Starts Complete & Validated proposals routing for internal approval
Navigates to the print options screen to print the Grants.gov forms, generic forms, or sponsor paper-submittal forms from your Coeus proposal data
Allows authorized users to copy all or part of the proposal to a new proposal
Navigates to the email notification function that allows users to generate and send email messages.
Create a non-Institute investigator, performing site, contact, or key person Rolodex entry

CoeusLite User Guide for version 4.5.1
, Page - 12 Original Document date June 2012; Updated March 2013
1. Navigate to the General Info screen:
General Info is the default view upon opening a proposal. Users can select General Info from the left navigation bar to return to this screen. Fields with a red asterisk (*), as well as “Proposal Deadline Date” are
required to save and generate a proposal number.
A. Enter your proposal information:
1. Fill in the all (*) fields and as much of the General Proposal Information Screen as possible.
* Proposal Type Select the appropriate entry from the drop-down list. This information might be specified in the sponsor's announcement or guidelines.
* Activity Type Select the appropriate entry from the drop-down list.
* Start Date Date the project is expected to start. Enter in mm/dd/yy format or use the calendar tool.
* End Date Date the project is expected to end. Enter in mm/dd/yy format or use the calendar tool.
Original Proposal Number Required if the Proposal Type is Resubmission, Revision or Continuation. Use the Search icon to search the Institute Proposal module.
Award # (number) Required if the Proposal Type is Continuation, Renewal, or Revision. Leave this field blank for New, Resubmission, or Task Order. The Award # is a Coeus-generated number; to find it use the Search icon next to the field and search by Account number or other detail.
* Agency/Sponsor The sponsor is the organization that will provide funding. Enter the sponsor's six-digit code in this field or use the Search icon to find it.
Prime Sponsor If your institution will be the subcontractor for the proposal, the prime sponsor is the agency providing funds to your sponsor. If not, leave this field blank.

CoeusLite User Guide for version 4.5.1
, Page - 13 Original Document date June 2012; Updated March 2013
*(at NU) Proposal deadline date
Date the proposal is due at the sponsor.
Receipt/Postmarked Select which option defines the deadline receipt requirement.
NSF Science Code Not in use at Northeastern University. Leave blank.
Anticipated Award Type Select the type from the drop-down list, if known.
Sponsor Proposal No. (number)
Required if the Proposal Type is Renewal, Resubmission, Revision, or Continuation. Search the Award module or Institute Proposal module, as appropriate, to find this number.
* Title: Enter the descriptive title. For electronic submission, the title can contain no special characters. 200 character maximum; individual sponsors may require shorter titles. Refer to the sponsor instructions.
Program Title: Enter a program title provided by the sponsor. If this proposal will be submitted via Grants.gov, this field will be overwritten when you associate the proposal with a Grants.gov opportunity.
Proposal in Response to: Select an entry from the drop-down list to identify how this funding opportunity was announced.
Subcontract Select this checkbox if one or more subcontracts will be included in this proposal. If there will be no subcontracts, leave it unchecked.
Funding Opportunity Number
For paper submissions: enter data manually. For Grants.gov submissions: this will be populated automatically if CFDA is used to search and link. Otherwise, insert the Funding Opportunity Number to perform the Grants.gov search.
CFDA Number: Catalog of Federal Domestic Assistance number assigned by sponsor for funding opportunity. For paper submissions: enter the data manually, if known. For Grants.gov submissions, enter the CFDA number to support the Grants.gov search. Note: some NIH opportunities do not assign CFDA numbers until after award. Use the Funding Opportunity search for those applications and leave the CFDA field blank unless it is populated automatically by the selected Grants.gov opportunity.
Agency Program Code: This code is currently required only for NSF submissions. Locate the code in the announcement of opportunity, at Grants.gov, or the sponsor's web site.
Agency Division Code: This code is currently required only for NSF submissions. Locate the code in the announcement of opportunity, at Grants.gov, or the sponsor's web site.
2. Select Save
3. Result: Coeus assigns the next available proposal number, which will appear in the proposal header on all CoeusLite entry screens.

CoeusLite User Guide for version 4.5.1
, Page - 14 Original Document date June 2012; Updated March 2013
B. For Grants.gov System-to-System (S2S) Candidates:
If you did not use the Create Proposal option from the Grants.gov Opportunity search to start your proposal, you will need to search and select a valid funding opportunity. Enter the required information on the General Info screen, including the Funding Opportunity number or CFDA number, and save. Then, navigate to the Grants.gov screen and Coeus will launch a search of Grants.gov for the sponsor’s submission package. Linking to Grants.gov is only required if you intend to use the System-to-System (s2s) functionality. You must locate a valid opportunity in order for your application to be submitted electronically.
NOTE: Only federal agency opportunities are available at Grants.gov. You must enter a federal sponsor in the Sponsor field to perform the Grants.gov search.
1. Navigate to the Grants.gov screen:
Initial navigation to the Grants.gov screen links your proposal to an opportunity at Grants.gov. The General Info data fields for either CFDA Number or Funding Opportunity Number (aka Opportunity ID) – but not both - must be filled in order to perform the search. A completed search retrieves the sponsor’s electronic submission details for the application such as the list of mandatory and optional forms, program title, instructions, CFDA Number, Opportunity Number, some validation tests, etc., required for a successful proposal submission via Grants.gov.
A warning will appear if there is no match to your entry. Review your entry for typographic errors or verify you entered the current opportunity listing from the sponsor’s web page.
a. Grants.gov search results (partial screen shot from test instance: CFDA 00.000)
1. Click on the show option in the Details column to confirm selection:
2. Click on the Instruction URL: hyperlink to view the sponsor posted instructions, guide, or other information to aid the applicant.
3. Click on Select to choose this opportunity and retrieve the submission requirements, or click hide to close the detail panel; click show or Select another opportunity;

CoeusLite User Guide for version 4.5.1
, Page - 15 Original Document date June 2012; Updated March 2013
b. Results of selecting a Grants.gov opportunity package (default view):

CoeusLite User Guide for version 4.5.1
, Page - 16 Original Document date June 2012; Updated March 2013
Grants.gov opportunity package review (continued)
1. Review list of required forms (forms must be marked Available in the Desc column if required for this s2s submission.
2. Check the optional forms to Include for this submission (see sponsor opportunity instructions).
3. Click the Save button (scroll to the bottom of the page) to save the Grants.gov selected opportunity and the forms you selected to include for this submission.
Click to check forms to Include in the Grants.gov
submission.
Submit capability only available to
authorized Premium users.
Save your selected opportunity and
checked “to Include” forms.

CoeusLite User Guide for version 4.5.1
, Page - 17 Original Document date June 2012; Updated March 2013
c. Other Grants.gov screen functions:
Not active until
proposal is submitted to
Grants.gov
Change the opportunity
selected (only valid if multiple
listed in one
posting
Removes the opportunity; deletes
Program Title; Funding Opportunity & CFDA from the General info
Screen
Performs Grants.gov
validations
Generates printable PDFs of selected
forms
Save the selected opportunity and
forms selected.
Default Type = Application
Alternates: Pre-Application and Change/Corrected
Click individual boxes to select a form to print/preview.
Selections checked generates a list of forms to print. (print button at bottom of screen)
Click All Included to auto-select forms already checked to Include.
Deselect by clicking None
Submit capability only available to
authorized Premium users.

CoeusLite User Guide for version 4.5.1
, Page - 18 Original Document date June 2012; Updated March 2013
2. Navigate to the Organization Screen to enter Additional Performing Organizations or Sites
The Organization screen contains the contacts for your Institute and performing sites involved in the project. The data for your institution has been maintained by your Coeus Administrator, but may be modified for individual submissions.
Proposal Organization The legal entity for the proposal. When a proposal is created, this defaults to the organization listed in the lead unit’s organization field.
Performing Organization The organization performing the main portion of the project. There is only one, and for many institutions, this will likely be the same as the Proposal Organization. Multi-campus institutions may have Research Foundations or other centralized oversight office listed as the Proposal Organization and their specific campus or school as the Performing Organization.
Other Organization/Location Other Organizations are other participants in the project, often recipients of a subcontract.
Performance Site/ Location A site where work is being done that is not an organization (e.g. a volcano, a field camp location, or other significant off campus location that should be recognized in the proposal).
The Proposal Organization Address and Congressional District are populated from the centrally maintained data. The Proposal Organization cannot be removed. Use the Remove function to delete the supplied Congressional District. Use Add Congressional District function to insert a new field for the data, or multiple fields, if appropriate.
The Performing Organization Location can be changed, but the address will not update from the centrally maintained
data. Congressional Districts can be modified.
Use the Add Organization/Location function to perform a search to populate the required fields.
For Other Organizations, the Coeus Organization Table will be searched and the returned result will include the Location, Address, and Congressional District. Users can modify the district by deleting returned result and adding a new congressional district field. Using Other Organization will support populating DUNS Number to certain sponsor forms.
For Performance Site, the Location field must be manually entered, the Rolodex must be searched for the Address, and then the Congressional District field must be added and typed in. Rolodex does not support providing DUNS numbers to sponsor forms. If DUNS is required for your submission, use Other Organization.
1. Click Add Organization /Location to create additional panels.

CoeusLite User Guide for version 4.5.1
, Page - 19 Original Document date June 2012; Updated March 2013
To add an Other Organization from the Coeus Organization Table.
Select Add Organization/Location
Select Type: Other Organization from drop-down menu
Select Search to open Organization Search window
Enter the search criteria and select Search
Select a result or perform the search again to locate
If required, select Add Cong Dist: to generate a field for the congressional district. If the data is in the Organization Table, it will automatically populate. (Repeat Add if needed for multiple fields)
Enter the congressional district in the 2 character State, hyphen, 3-character District format. (AA-000)
Select Save to keep the Other Organization
Once Other Organization type is selected the Location and Find/Remove address fields will be replaced with a Search function.
Search for Organization. Selection from Results will populate here.
Use the Search function to locate the Organization.

CoeusLite User Guide for version 4.5.1
, Page - 20 Original Document date June 2012; Updated March 2013
To add a Performance Site (Location Address) from the Coeus Rolodex.
Select Add Organization/Location
Select Type: Performance Site from drop-down menu
Enter a contact name in the Location field.
Select Find Address to open the Rolodex Search window
Enter the criteria and select Search
Select a result or perform the search again to locate
Select Add Cong Dist: to generate a field for the congressional district. (Repeat if needed for multiple fields)
Enter the congressional district in the 2 character State, hyphen, 3 character District format. (AA-000)
Select Save to keep the Performance Site
To Delete Other Organizations or Performance Sites:
Select Remove (Type) to delete the entry.
To Delete Congressional Districts:
Select Remove (Cong. Dist) to remove the entry.
If all districts in a state are affected, enter “all” for the district number (ex. MA-all)
If nationwide (all districts in all states), enter US-all
If the program/project is outside the U.S., enter 00-000

CoeusLite User Guide for version 4.5.1
, Page - 21 Original Document date June 2012; Updated March 2013
3. Navigate to Investigators & Key Personnel
A. Search for and add the Principal Investigator on the Investigators/Key Persons screen.
- Employee Search will locate persons maintained in Coeus from the Northeastern HR system.
- DO NOT USE THIS SEARCH FOR PRINCIPAL (AND Co-) INVESTIGATORS. Non-Employee
Search will locate persons maintained in the Coeus Rolodex.
B. Edit the PI’s maintained data:
1. Modify or revise contact information
2. Enter Agency Credentials, e.g.
NIH: Commons User Name For any Grants.gov submission using the R&R Senior/Key Person Profile form-
this field will populate the ”Credential” field, e.g. agency login”
NSF: NSF User ID
3. Skip estimated percent of effort over the proposed project period (will be entered in Budget)
4. Skip estimated Academic/Summer/Calendar year effort (will be entered in Budget)
5. Select Multi PI, if relevant to your submission (see key box below).
6. Select Save
By default, the first individual entered is designated with Role: Principal Investigator. Use the Multi PI checkbox to designate Investigators as Multiple PI (including the Principal Investigator). The Principal Investigator role will be recognized as the Contact PI by NIH. At this time, NIH is the only sponsor that utilizes Multi PI; please review your NIH opportunity for more eligibility and submission requirements.
Result: Saved person is added to lower pane List of Investigators/Key Study Personnel

CoeusLite User Guide for version 4.5.1
, Page - 22 Original Document date June 2012; Updated March 2013
C. Search and add Co-Investigators and Key Study Persons. (Other Proposal Roles can only be added
after a PI is entered and saved)
Enter Co-Investigator: Proposal Role Co-Investigator defaults next, or select Key Study Person from drop-down list.
1. Search Employee or Non-Employee
2. Modify or enter contact or information
3. Enter Agency Credentials, e.g.
NIH: Commons User Name For any Grants.gov submission using the R&R Senior/Key Person Profile form-
this field will populate the ”Credential” field, e.g. agency login” and is required for Investigators designated as
Multi-PI
NSF: NSF User ID
4. Skip estimated percent of effort of proposed project period (will be added in Budget)
5. Skip estimated Academic/Summer/Calendar year effort (will be added in Budget)
6. Select Multi PI, if relevant.
7. Select Co-Investigator from Proposal Role drop-down list.
8. Select Save
Enter Key Study Person(s): Key Person Role field presented.
1. Search Employee or Non-Employee
2. Modify or enter contact and unit information
3. Enter Agency Credentials, e.g.
NIH: Commons User Name For any Grants.gov submission using the R&R Senior/Key Person Profile form-
this field will populate the ”Credential” field, e.g. agency login”
NSF: NSF User ID
4. Skip estimated percent of effort of proposed project period (will be added in Budget)
5. Note: intentionally disabled (grayed out) for Key Study Person - Academic/Summer/Calendar year effort
6. Select Proposal Role Key Study Person from the drop-down list
7. Enter or modify Key Person Role in presented field – defines this persons specific activity on this project.
8. Select Save

CoeusLite User Guide for version 4.5.1
, Page - 23 Original Document date June 2012; Updated March 2013
Optional Key Person Unit Maintenance
The 4.5 release provides the ability to maintain Units to the Key Persons. Key Person units are added to the proposal’s approval routing schema. This feature must be enabled by an application administrator.
Follow the standard instructions for adding Key Persons. If maintained for proposal persons, their home unit will populate in the Unit maintenance panel. Units may be searched and edited during the Add process, or by editing Details.
Adding a Key Person Unit during Person Search
1. Search Employee or Non-Employee
2. Modify or enter contact
3. Search for Unit if the unit is not displayed.
4. Enter Agency Credentials, e.g.
NIH: Commons User Name (if relevant) for any Grants.gov submission using the R&R Senior/Key Person
Profile form-this field will populate the ”Credential” field, e.g. agency login”
NSF: NSF User ID
5. Skip estimated percent of effort of proposed project period (will be added in Budget)
6. Note: intentionally disabled (grayed out) for Key Study Person - Academic/Summer/Calendar year effort
7. Select Proposal Role Key Study Person from the drop-down list
8. Enter or modify Key Person Role in presented field – defines this persons specific activity on this project.
9. Select Save
Once the Key Study Person is saved, the maintained unit will be listed in the Department column. See the section E on
Customizing Person Details for specific instructions on maintaining more units and deleting units.
When Key Study Person is the selected Proposal Role; Key Person Role field is presented. Entering this project role is mandatory.

CoeusLite User Guide for version 4.5.1
, Page - 24 Original Document date June 2012; Updated March 2013
D. Review Proposal Personnel
1. Name: list of Investigators and Key Persons in order of entry.
2. Department is the primary unit for the listed person.
3. LU is the Lead Unit for this proposal.
4. MPI check mark will populate to designate Multi PI.
5. Role is the Proposal Role applied or entered for the listed person.
6. % Effort
a. T is Total effort
b. A is Academic effort
c. S is Summer effort
d. C is Calendar effort
7. Remove: use to delete the named person entry.
8. Certify: open the Certify Investigator window and answer, review or print the answered questions.
Signifies certification is not completed.
Signifies certification is complete.
9. Details: select to open the Person Detail window to review, add, or modify contact and degree information.
Green check mark indicates Certification is complete.

CoeusLite User Guide for version 4.5.1
, Page - 25 Original Document date June 2012; Updated March 2013
E. Customize Proposal Person Details
Select Details: (click on the word “Details”) to open the Person Details screen.
1. Add Unit, if needed, to support approval routing and credit split.
a. Select Add Unit
Do not delete the PI Lead Unit entered by Coeus. The Lead Unit for the PI must match the Lead Unit for the proposal. If this is the wrong Lead Unit for this investigator or proposal, you must copy or create a new proposal in the correct unit. Otherwise, Use Add Unit to amend the list of units required to support routing and credit split.

CoeusLite User Guide for version 4.5.1
, Page - 26 Original Document date June 2012; Updated March 2013
b. Select Search of centrally maintained Units.
c. Enter search criteria to locate Unit number,
d. Select a Unit, search again, or close the window.
e. Confirm selection: Unit applied to Proposal Person Details:
f. Select Save at the bottom on the screen.
Use Search to locate Unit Number

CoeusLite User Guide for version 4.5.1
, Page - 27 Original Document date June 2012; Updated March 2013
2. Person Details: revise any white-background field entries as required for this proposal.
Changes made to Person Details on this screen will not update institute or Coeus person data; changes will only be applied and retained in this proposal record.
A. Modify entries as needed. White-background fields are editable.
B. Insert the Agency Credentials aka eRA Commons User ID For system-to-system submissions (s2s) utilizing the
RR Senior/Key Person Profile form, this field populates the “Credential; e.g. agency login” field. Enter the
sponsor-specific user ID appropriate to your submission e.g. NIH eRA Commons ID, NSF Fastlane ID, etc.
C. Provide Full Address, Phone and E-mail for Grants.gov submissions.
D. Division field has been added. If maintained, this field can be modified to support Grants.gov forms RR Key
Person Expanded (all entries); SF 424(R&R) (PI); SF 424 (PI)
a. For Rolodex person (non-employee), Division field default as "Unknown". Users can edit at the proposal level if the field is maintained to the Proposal Person Editable Columns code table.
b. For non-Rolodex person (person table/employee), this field will use the existing logic based on the
person's home unit, if maintained, using the 4th level node on the Unit hierarchy
3. Degree Details:
Review and modify degree data, if any, imported from your HR system; Add Degrees, Delete Degrees (not shown) if
incorrect.
Result: Fields generated to enter degree. Select Type from list, type in other field data; Save.

CoeusLite User Guide for version 4.5.1
, Page - 28 Original Document date June 2012; Updated March 2013
4. Certify Investigators
Open the Certify window from either the Person Details:
Or open Certify from the List of Investigator/Key Personnel panel:
a. Select Certify for the investigator you want certify to open the Certification window
b. Review the questions and select the appropriate answer in the electronic certificate.
c. Select Save to save your responses
d. Select Print Certification to generate a print-ready PDF file for the investigators signature. This signed document must be uploaded by the user as an Institutional Attachment, type “Other (see section 14).”
e. Select Return to Investigator to close the Certify window.
TIP: You must SAVE the answered Certification questions before you can print.
Click Save first and then Print Certification.
Result: The green check indicates that the Certification is complete for this investigator.

CoeusLite User Guide for version 4.5.1
, Page - 29 Original Document date June 2012; Updated March 2013
Notify Proposal Personnel to Self-Certify via Alternative Web-Questionnaire Certification
COMING SOON: This 4.4.4 - 4.5 enhancement will provide a tool to notify Investigators and Key Study Personnel that they have been named in a Development Proposal or IRB protocol. The notification is intended to solicit their acknowledgement by providing a link to a web-based certification Questionnaire. In order to utilize this notification, proposal-self-certify must be enabled. Questionnaire-based certification allows providing different questions/questionnaires to the PI vs. Co-I, vs. Key Persons, if desired.
To Send Notification:
1. Click the Send Notification button
2. In the SEND NOTIFICATION window the aggregator may
a. Select All by clicking the word All at the bottom of the window
b. Manually click a check-box under the Select column to pick individuals
c. Deselect all by clicking the word None at the bottom of the window.
3. Click the Send button to generate the notifications. Click OK in the confirmation window.
4. Click the Close button to close the window.
5. Once notifications have been sent, the date and time of the Last Notification is displayed in the window
6. Repeat, as needed. Notifications can be sent again, to some or all proposal personnel. Repeat the steps above.
Note: Self-certify functionality is an alternative to the Certify functionality as described in section 3.E.4 above. Only one or the other is used.

CoeusLite User Guide for version 4.5.1
, Page - 30 Original Document date June 2012; Updated March 2013
Example of a Web Certification notification
Notifications maintained to alert proposal person:
The email Notification includes custom text, and details about the proposal, the role of the proposal person, and a personalized link for that individual.
The Web page: In this screen shot, the link has been selected to display the certification page:

CoeusLite User Guide for version 4.5.1
, Page - 31 Original Document date June 2012; Updated March 2013
4. Navigate to Credit Split
The credit split indicates the percentage of participation in the proposal for each of the investigators and units, and factors
into the F&A percentages.
In the example above, the credit split indicates that each of the investigators will be recognized for 50% effort, with each
receiving 50% of the F&A costs. Since one investigator has a dual appointment, the F&A costs accorded to the
investigator are further split 50/50 between the investigators units. Each unit will receive 50% of the 50% F&A costs
accorded to the investigator.
With only one appointment, the second investigators unit will receive 100% of the 50% F&A costs accorded to the
investigator.
The total for all investigators must equal 100%; total of all units under each investigator must equal 100%.

CoeusLite User Guide for version 4.5.1
, Page - 32 Original Document date June 2012; Updated March 2013
5. Navigate to Special Reviews
The SPECIAL REVIEW screen is used to identify research that requires special review or approval, such as work with human subjects, animals, recombinant DNA, etc.
1. Click Add Special Review to generate the input fields.
2. Click the drop-down box in the field labeled Special Review
3. Select the type of Review that applies to the proposed project
4. Click the drop-down box in the field labeled Approval
5. Select a status appropriate to the review.
If the status is:
Approved, then a protocol number must be entered in the Protocol Number field and an approval date entered into the Approval Date field
Exempt, and then the exempt code (letter and number, i.e. E4) must be entered in the Comments field. Multiple exempt codes should be separated by a comma (i.e. E1,E4).
Pending, then all required information has been entered. Almost all Special Reviews at NU are PENDING.
6. Save the entry.
Select Special Review from drop-down list; select Approval Status from drop-down list; select Save.
Results:
Select View to see the Comments entered for that Special Review.
Select Remove to delete the review.

CoeusLite User Guide for version 4.5.1
, Page - 33 Original Document date June 2012; Updated March 2013
6. Navigate to Abstracts
Except in the instance of NSF (for “Suggested Reviewers,” “Deviation authorization,” and “Reviewers not to include” only), information inserted in Abstracts does not populate any form, so the section may be skipped.
Abstracts are text boxes for specific subjects.
Select abstract type to navigate to that abstract text entry panel
1. Enter or paste in text.
2. Save
Results:
Abstract selections – click to navigate to
this entry panel.
Blinking cursor: type or paste in text. See sponsor instructions
for content requirements.
Check denotes Abstract text entered. Color text identifies text pane in focus.
Identity of User who entered data and the timestamp of this action.

CoeusLite User Guide for version 4.5.1
, Page - 34 Original Document date June 2012; Updated March 2013
7. Navigate to Science Code
Currently, information inserted in Science Code does not populate any form, so the section may be skipped.
The SCIENCE CODE tab can be used to identify research projects by category or key words. Institutions can use this data to support internal reporting or tracking needs.
1. Navigate to Science Code screen; click Add Science Code
2. Click Search to open the search window
3. Enter a known code or an asterisk (*) to see the full list.
4. Click on a value to select a result, and then select OK to apply the code.
Click Remove to delete a science code, if needed.

CoeusLite User Guide for version 4.5.1
, Page - 35 Original Document date June 2012; Updated March 2013
8. Navigate to Others
This screen contains Custom Elements – fields that can be locally defined by your institution to provide additional data in your proposal record.
COI Disclosure Req. – Future use
NSPIRES USER NAME – NASA use only
Prime Admin Contact – Use this box to identify the name of the Prime Sponsor’s Administrative Contact when your proposal lists a Prime Sponsor on the General Information page
Prime Admin Email – Use this box to identify the email address of the Prime Admin Contact listed above
Note: If the Proposal lists a Prime Sponsor on the General Information screen, and the “Prime Admin” fields on the “Others” screen are not filled in, Coeus will present a warning upon validation/submission
Prime PI – Use this box to identify a Prime PI at another institution; Coeus uses this name to populate pre-loaded Letters of Intent templates.
Special Considerations - new mandatory field (denoted by the red asterisk) which assists the University in collecting data on whether the proposal is related to a Program Project, or a Young Investigator solicitation. Select the Search box next to the blank field, then select the appropriate value (Program Project, Young Investigator, or N/A - Not Applicable).

CoeusLite User Guide for version 4.5.1
, Page - 36 Original Document date June 2012; Updated March 2013
9. Navigate to YNQ: Yes No Questions
If present, answers to these YNQ questions are related to your local institutional requirements. Questions required for Grants.gov forms have been relocated to Questionnaires.
Answers to these compliance questions are required by the Institute, the sponsor, or both.
1. Answer all questions on the YNQ screen by clicking on the radial button.
2. Use More to read additional information about this question, if available.
3. Save the answers.

CoeusLite User Guide for version 4.5.1
, Page - 37 Original Document date June 2012; Updated March 2013
10. Assign Proposal Roles
Check the roles that have been assigned for your proposal on the Proposal Roles screen, and make changes as necessary. Any roles you assign to a user apply only to the current proposal. If you copy a proposal, access rights do not carry over. Access rights apply only to the specific proposal number in which they are granted.
1. Click Add User at Role category line
2. Search (users must have Coeus ID)
3. Select the user: they will be added to the role category
Role Definition
Aggregator/Aggregator Backup
Make changes to any part of the proposal, answer yes/no questions, certify investigators, submit for approval, Delete In Progress Proposals
Approver Approve the proposal. You cannot add or delete users from this role, but you can see which users have been designated as approvers after the proposal is routed for approval. The list of approvers is maintained by Coeus administrators.
Budget creator Create and edit the budget.
Narrative writer Create and edit the narratives.
Viewer View any part of the proposal. Cannot edit.
Modify Proposal Rates Edit the proposal rate table
Access Proposal Person Institutional Salaries
Aggregators can grant other proposal users view access to institutional salaries in the Budget Person window of the proposal.
Select to perform search of available Coeus users.
Select to remove user
(The remove option is disabled when there is only one aggregator – you must have one aggregator.)
CoeusLite User Guide for version 4.5.1
, Page - 38 Original Document date June 2012; Updated March 2013
To Remove a user:
1. Click Remove on the right-most edge for the user to remove from the proposal role.
Note: the Aggregator Remove function is disabled if there is only one aggregator present. If you wish to remove that user, you must add another Aggregator first.

CoeusLite User Guide for version 4.5.1
, Page - 39 Original Document date June 2012; Updated March 2013
11. Questionnaire
Questionnaire may appear in the navigation panel if a questionnaire has been designated as mandatory for this particular proposal record. If the questionnaire is mandatory, you will be alerted when the Coeus proposal validations are performed, or when attempting to validate or print/preview certain Grants.gov forms.
Navigating a Questionnaire
While answering a questionnaire, the following actions can be taken to review or revise your answers.
Save if there is only one panel of questions, the Save button will appear.
Save & Proceed button will appear if there are additional questions to answer after this panel.
Save & Complete button will appear when modifying a previously completed Questionnaire. The button will not appear if there are additional questions to answer due to a changed response.
Previous Previous allows a user to scroll back to the last question answered.
Modify Modify (edit) to open a previously completed questionnaire.
Start Over
Start Over deletes all prior answers and returns the user to the beginning of the Questionnaire.
Start over is active while a questionnaire is being answered.
To start over a completed questionnaire, with the questionnaire name selected, click Modify, and then click the Start Over.
Print will open a new browser window with a PDF report of the questions and answers.
Click the Print button prior to answering to review all the possible questions off-line.
The print report for a completed questionnaire will contain only the pairs of questions with answers (dependent Questions that did not apply will not print on the final report).
If maintained, the Questionnaire will print with your local print forms.
Exit Select another Navigation button

CoeusLite User Guide for version 4.5.1
, Page - 40 Original Document date June 2012; Updated March 2013
To complete a questionnaire:
Open the Questionnaire by clicking the questionnaire name.
1. Questions may be answered in any of the following formats:
clicking a radial button to respond to Yes/No, or Yes/No/NA,
Selecting a Date from the calendar tool
Entering text
Entering a number
Selecting from a defined list
Answer each question in the panel, and then click Save & Proceed to present the next question(s).
2. The “More” button may contain additional information to help you understand and answer the question.
3. Once the questions in view are answered, click Save or Save & Proceed to present the next question(s).
4. If you did not answer a question, or did not conform to the answer requirements, a notification window will open
identifying the question to complete.
5. With all applicable questions answered, a notification window will open confirming that the questionnaire is complete.
Click OK to close the alert. A green check mark will appear beside the questionnaire name to visually confirm that it
has been answered.
6. Close the Questionnaire for Proposal (record number) window.
CoeusLite User Guide for version 4.5.1
, Page - 41 Original Document date June 2012; Updated March 2013
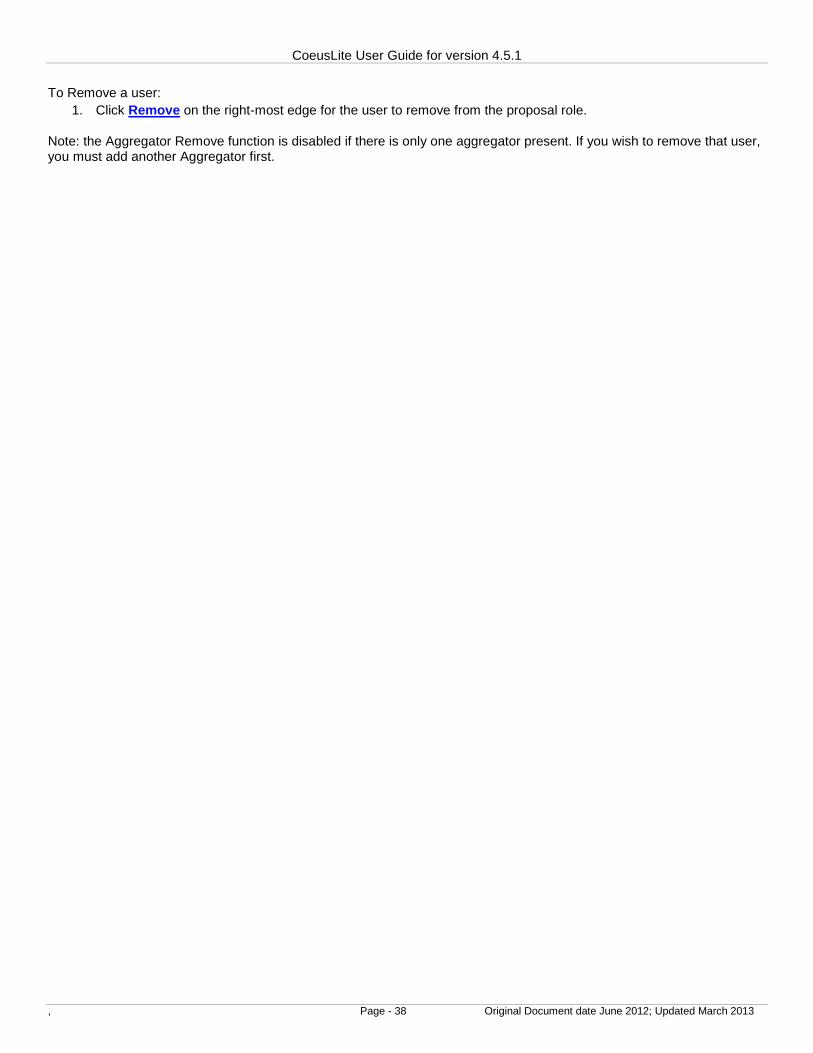
Smart S2S Questionnaire for Grants.gov forms
In Coeus 4.5, several Grants.gov forms are now mapped to a Smart s2s Questionnaire. Previously, these forms
utilized YNQ questions that always had to be answered. Now, the system presents a Questionnaire with only the relevant
questions for the Grants.gov forms that are required or selected to be included in the linked opportunity.
FORMS Versions
SF 424 R&R 1-0, 1-1, 1-2
SF 424 1-0, 2-0, 2-1
RR Other Project Info 1-0, 1-1, 1-2, 1-3
RR Other Project Info 1-0, 1-1
PHS398 Cover Page Supplement 1-3, 1-4
PHS398 Checklist 1-1, 1-3
ED SF 424 Supplement 1-1
NASA PI and AOR Supplemental Data Sheet 1-0
NASA Other Project Information 1-0
The new Smart Questionnaire requires an opening question, but a “No” answer will generate required questions.
The forms in the S2S Smart Questionnaire are usually Mandatory. But if any are optional, be sure to click to Include them in your application to generate those questions in the Questionnaire.

CoeusLite User Guide for version 4.5.1
, Page - 42 Original Document date June 2012; Updated March 2013
12. Navigate to Budget
Once you have saved a proposal, you can click the Budget link on the proposal navigation panel. The navigation options change when you access the Budgeting screens. To return to the other proposal screens from the Budget, select the Return to Proposal link at the top of the Budget navigation panel.
Proposal Navigation Menu Budget Navigation Menu
Viewing the Budget using the Print Feature
The Print feature will generate a PDF report of the budget that allows you to view all budgeted expenses. The Budget Summary by Period report is particularly useful; this is the budget format displayed during the Coeus Web Proposal Approval process. Most internal approvers evaluate this comprehensive view of the budget during their review process.

CoeusLite User Guide for version 4.5.1
, Page - 43 Original Document date June 2012; Updated March 2013
Navigating the CoeusLite Budget Screens
Select to return the general proposal navigation panel.
Displays a summary line for all budget versions created. Default budget launch screen when more than one budget version exists.
Displays summary budget information; i.e. budget totals, direct and indirect costs, underrecovery, cost sharing, period budget totals, etc.
Navigates to the Budget print options screen
Group header for budget set up screens
Add personnel for budgeting; enter salary details required for expense calculations.
Allows users to modify budget start and end dates, or to add or modify budget periods, or period lengths.
Displays institute overhead rates; allows for insertion of applicable rates.
Use the Validate tool to process any maintained Budget Business Rule Validations.
Update formulated costs with the centrally maintained rates.
Group header for Budget Costs Input screens
Add or remove personnel expense, customize their effort and time spent on this project.
Add or remove equipment expenses
Add or remove travel expenses
Add or remove participant/trainee expenses
Add or remove all other expenses.
Navigate to Modular Budget entry screen
Navigate to Cost Sharing Distribution entry screen
Navigate to Under Recovery Distribution entry screen
Navigate to Project Income entry screen
Calculate budget periods based on period 1 entries and create required additional budget period screens.
Navigate to the Subaward Upload screen.

CoeusLite User Guide for version 4.5.1
, Page - 44 Original Document date June 2012; Updated March 2013
Before you start your budget…
A note about Coeus Budget Calculations
If you have been using other programs or using spreadsheets to calculate your budget, you may notice that those calculations and Coeus calculations are slightly different.
Coeus calculates budget amounts based with a complex equation that uses a number of different variables such as, number of days of effort, percentage of inflation, overhead and fringe benefits, as well as the data you have entered on the Budget Set Up > Personnel screen regarding appointment types, base salaries, and effective dates.
Coeus does not average, and rounds from a much greater number of significant figures than a spreadsheet.
All of these factors result in a budget with a high degree of precision.
Turn Off Pop-up Blocker! Check the pop-up blocker settings for your web browser so you can be sure to Always Allow Pop-Ups from CoeusLite.
If while trying to view the details in the Budget Periods screens of your budget (Personnel, Equipment, Travel, Participant/Trainee, or Other Direct Costs) the Line Item Details screen does not appear when you click either the Edit or Details link next to specific line items, blocked pop-ups is most likely the problem.
Initial Budget screen Access – Budget Set up requirements.
The first time you navigate to the Budget, you will be prompted to start a new budget, and then you will be presented with the Budget Setup: Personnel screen. You may be prompted to Sync Budget Persons: select and save an Appointment Type for budget calculations. This is usually the case with Rolodex persons, but can also occur for other personnel.
Prompt for Rolodex persons or personnel with incomplete data in Coeus.
The personnel already added on the Investigators/Key Persons screen (PI, Co-I(s), and Key Study Persons) will automatically populate some of the data fields required on this screen from Person Data information fed to Coeus.
REMINDER: Most Northeastern Faculty have an 8 month appointment (September – April).
Personnel listed on this Budget Set Up Personnel screen will be available to add to the Personnel Budget. You must add your personnel to the set up screen in order to create the “pick-list” of all personnel to be added to your budgeted costs, though not all the persons on the table need be in any of the budget periods.
Once the Set Up is complete, enter Period 1 expenses, and then generate all periods. Once all the proposal periods have been generated, individual tabs will appear for each proposal period. You can then click on each tab and then navigate through the budget category screens to make adjustments relevant to that period.
Coeus-recommends an Appointment Type: either Save or select and enter alternate data. Job Code is NOT used (leave default value).
Faculty Appointment

CoeusLite User Guide for version 4.5.1
, Page - 45 Original Document date June 2012; Updated March 2013
13. Budget Setup
A. Add and complete Budget Personnel entries
1. Navigate to Personnel entry screen
2. Search for and Add the proposal personnel needed for your project budget. (Research staff, Support staff, Postdoctoral Associates, Graduate Students, or To-Be Announced staff, etc.):
- Employee Search will locate persons maintained in Coeus from your HR system.
- Non Employee Search will locate persons maintained in the Coeus Rolodex.
- Add TBA Search will locate a predefined list of to-be-announced persons by job title. (i.e. Project
Manager, Post Doc, Graduate Student, etc.)
Calculate All Base Salaries generates the Base Salary values that appear on the RR Budget form used in Grants.gov submissions.
Only the names of the PI, Co-I and Key Persons will be printed on the Grants.gov RR Budget (detail) forms. Refer to your sponsor guidelines for specific definitions of Key Personnel.
Budget Persons populated from Investigator/Key Persons:
Select Add Employee to search the HR database or select Add Non Employee to search the Rolodex.
Search for the employee by entering data into the fields on the search screen.
Entering Last Name and First Name is usually sufficient, use other fields to help narrow down searches.
Use the asterisk ( * ) before and after data in fields to widen searches and minimize typed entries.
Select search to display the search results.

CoeusLite User Guide for version 4.5.1
, Page - 46 Original Document date June 2012; Updated March 2013
Select the appropriate person displayed in the Person Search Results screen. Take time to scroll across the
entire window to be sure you’ve selected the correct person – some individuals may appear more than once.
Add TBA:
To add unnamed personnel (personnel that will be staffed but for whom you have not yet hired or assigned):
o Select Add TBA
o Select on the appropriate category displayed in the TBA Persons window.
o Save
Result of Add TBA selection:
3. Enter Eff Date: The Effective Date displayed automatically defaults to the start date of the proposal period. For Coeus to generate the most precise salary inflation, change the Effective Date to match the date of that employee scheduled increase. Refer to your departmental personnel administrator or HR for specific policy.
o Faculty, Students and other Academic Appointments: Sept 1
o Administrative and Support Staff: July 1
Default Eff Date matches proposal start date.

CoeusLite User Guide for version 4.5.1
, Page - 47 Original Document date June 2012; Updated March 2013
4. Enter Base Salary: Enter the person’s full current annual salary – as it relates to the length of appointment entered. The value should be as of the date of the last known salary increase. Do not use commas.
Job Code Only used to delineate between multiple TBA’s with the same title; otherwise, this field is not used at Northeastern University.
Appointment Type: Will be populated by the HR data feed. Review that this information is correct, as it is part of the calculation that charges salary to the budget. If you need to make a change, select the appropriate appointment type from the dropdown list.
o REG or 12M EMPLOYEE refers to a Regular Employee with a 12-month salary base.
o 8M EMPLOYEE refers to a professor with an 8-month appointment
o 9M EMPLOYEE refers to a professor with an 9-month appointment
o The “M” refers to months of appointment; i.e. a professor with an 8-month appointment will display as 8M EMPLOYEE
Coeus calculates Faculty salaries (including summer months) based on their 8-month academic appointment. Changing the Appointment type can impact your budget if you mismatch Appointment Type and Base Salary. Also, the Effective Date of the salary directly impacts when Coeus will inflate that salary in your budget.
5. Use the Calculate All Base Sal (salary) tool. This feature controls the Base Salary values that appear on the RR Budget form used in Grants.gov submissions.
- Click on Calculate All Base Sal
- Click on Base Salary by Period next to the Budget Person to view the calculated salaries. (The number of salary fields generated relates to the number of the proposal budget periods; but no more than 10 will ever be generated as that is the current Grants.gov form limit.)
- Adjust the salaries, as needed. (The percentage inflated is centrally maintained for all salaries.)
- These base salary values may also be manually entered.
If NO Base Salaries are entered, the RR Budget form Base Salary field will be $0.00 - the field is not required.
6. Save the proposal personnel once you have entered all personnel who will be part of your budget.
Not all personnel listed in the Set Up Personnel panel need to be applied as an expense line in your budget. PI’s Co-I’s, and Key Personnel will automatically be maintained to the Budget Person table, but you can leave any salary detail line blank if you will not use the individual in the budget.

CoeusLite User Guide for version 4.5.1
, Page - 48 Original Document date June 2012; Updated March 2013
B. Adjust Periods (boundaries)
The default budget periods are displayed on this screen. Coeus will automatically try to create 12-month budget periods based on the dates entered as Start and End dates on the General Info screen of the proposal. Refer to your sponsor announcement for specific guidance on required budget period lengths.
To change the periods, enter the revised dates or select dates using the calendar tool .
To add another period, click Add Period (located below the period line items), and enter the start and end dates.
To remove a period, click Remove (to the right of each period line item displayed).
Once you have made the necessary changes, select Save.
.
When copying a proposal with Start and End dates that do not match your new submission, be sure to adjust the Start and End dates on the General Info screen first. Then make the necessary changes for your new proposal on the Adjust Periods screen.
Do not forget: ~Proposal Rates screen: Sync – and Save – Proposal Rates; ~Budget Personnel screen: Update the “Eff Dates” for the “Base Salary” amounts

CoeusLite User Guide for version 4.5.1
, Page - 49 Original Document date June 2012; Updated March 2013
No. of Months (in budget period): This column displays the number of months in the project period. This indicator appears on the Budget Summary screen and in each Period tab header.
It is advised to generate these unusual budget periods before applying certain budget expense details. While this means additional steps to manually populate the expenses in each budget period, it is necessary for accurate personnel effort and other budgeting decisions that should be made by the user. If you choose to add personnel detail prior to generating budget periods, you must still review each Personnel Budget Detail window for each budget person to verify and/or modify.
For Personnel expenses:
Use the standard instructions to select cost elements and maintain the budget person details as detailed in this guide.
Be especially mindful to define the Start Date and End Date for each person as it relates to this budget period.
You may need to use the Add Person option several times for each person to expense them to Academic or Summer periods if
the budget period is especially long. The figure below describes a 12 month budget period: two (2) lines were needed to capture the Academic months. (The 3
rd line added below demonstrates the default start/end dates that appear upon Add Person.)
Note the default Start Date & End Date span the full 12 months of this project period 2.

CoeusLite User Guide for version 4.5.1
, Page - 50 Original Document date June 2012; Updated March 2013
For Non-Personnel Expenses (e.g. Equipment and Travel):
You can enter non-personnel line item expenses prior to generating budget periods. Costs will be inflated once per generated budget period if the “Apply Inflation” box is checked (or that expense has been centrally maintained to not inflate). Inflation at each budget period may be appropriate to budgets with greater than 12 month periods, but not for periods less than 12-month– like quarterly (3 month) budgets. Therefore, it is advised to review the costs generated in each budget period for appropriateness and make any necessary changes. It may be best to manually add these line items and expenses to each budget period.
To view the Line item details, enter a non-personnel expense, then select “edit” next to the line item. Line item details will be displayed in a pop-up box.
Turn Off Pop-up Blocker! Check the pop-up blocker settings for your web browser so you can be sure to Always Allow Pop-Ups from CoeusLite.

CoeusLite User Guide for version 4.5.1
, Page - 51 Original Document date June 2012; Updated March 2013
C. Proposal Rates
The Proposal Rates screen lists the F&A, Fringe Benefit, and Inflation rates that will be applied to your budgeted costs.
Rates are maintained centrally by your Coeus Application Administrator, but rates to be applied to this proposal can be entered on this rates screen.
If you have opened or copied an older proposal or revised the start and end date of the proposal, select Sync at the bottom of the screen to update your proposal with the appropriate Institute rates effective for your budget periods, and then Save.
If you make a mistake or change your mind, you can click Reset at the bottom of the screen to revert back to the Institute rates, and then Save.

CoeusLite User Guide for version 4.5.1
, Page - 52 Original Document date June 2012; Updated March 2013
To modify the applicable rates for this proposal:
1. Open the Proposal Rates screen.
2. Scroll down to the appropriate category of the screen and enter the percent rate to be used for this proposal in the Applicable Rate fields to the right of the Rate Type listed. Enter the rate in each Fiscal Year and for both On and Off Campus line item of this category, as needed.
If you are unable to modify the Applicable Rates in this proposal, contact your local Coeus administrators to determine if this feature has been disabled.
Example: Review/Modify Faculty Inflation
3. When you have adjusted the necessary rates, scroll down to the bottom of the screen and select Save.
.
Inflation rates may be applied by Rate Type (cost element), separately for each Budget Period and for On and/or Off Campus.
Enter inflation value to be applied to Faculty Salaries for this proposal.
Most Rate Types (shown above) represent personnel budget line item descriptions contained in
Budget Periods > Personnel Budget > Salary Types, depicted as:
Rate Types for Materials and Services (also shown above) represent all non-personnel budget line items listed under Budget Periods: Equipment, Travel, Participant/Trainee, and Other Direct
Cost, depicted as:

CoeusLite User Guide for version 4.5.1
, Page - 53 Original Document date June 2012; Updated March 2013
D. Navigate to Personnel Budget
When first opened, the Personnel Budget screen displays a tab for Period 1.
1. Select Add Person to add the personnel to be included in the budget from the pick-list of personnel previously added in the Budget Set Up > Personnel screen.
Select the checkboxes to the left of the names of all the personnel required for the Period 1 budget. You can also select the single checkbox at the top of the list to Select All.
Select Save.
.
You do not need to use all the Budget Personnel displayed. If they are not selected in the Add Person process, they will have no impact on your budget. You may need to maintain persons on this list that will not be included in your budget because of the Sync Budget Person prompt during set up.
Click here to select all, or check individually.

CoeusLite User Guide for version 4.5.1
, Page - 54 Original Document date June 2012; Updated March 2013
Result: all the personnel selected will now be displayed on the Personnel Budget screen.
Period 1 displays at initial budget entry. Other periods will be generated later. Customize each person.
Select Add Person to insert
more Persons. Select Calculate to see how
entries impact budget.
Select Save to calculate and save customized entries.
Subtotal of all personnel expenses.
Start date defaults to Project Start date.
End date defaults to Project End date.
Revise these dates as appropriate to impact the
calculated effort and requested funds.

CoeusLite User Guide for version 4.5.1
, Page - 55 Original Document date June 2012; Updated March 2013
2. Customize each Personnel Line Item:
Select the appropriate Salary Type from the drop-down menu. Contact your Grant Officer if you need help matching a salary type to personnel.
o Note: Salary type for Faculty during the summer is “Salary-Faculty Off Contract;” during the academic year, salary type for Faculty is “Salary-Faculty.”
Select the appropriate Period from the drop-down menu:
o Academic: The 8-month academic year: September 1 through April 30.
o Calendar: The 12-month calendar year.
o Summer: The months not covered by the Academic period, May 1 through August 31.
The Period selected should correlate with the number of months in the Appointment Type selected on the Set Up > Personnel Screen. Mismatched Periods to Types can impact budget calculations.
Enter % Charged and % Effort.
o Equal amounts mean the entire expense will be paid by the sponsor.
o % Charged is less than % Effort will generate cost sharing (expense that will not be paid by the sponsor).
Make sure % Charged equals % Effort to avoid cost sharing, unless cost sharing is required by the solicitation.
http://www.northeastern.edu/research/coeus/resources/summer-salary-coeus-calculator/
To calculate the correct Coeus % Charged and % Effort, enter Person Months and select “Press
to Calculate” in the left calculator; alternately, enter Summer Effort percentage in the right
calculator, and select “Press to Calculate.”
Edit the Start Date and or End Date to either correctly reflect Faculty Summer Month effort, or remove eligible vacation time, or accurately reflect time spent on the project, as needed.
At Northeastern, most Faculty have an 8 month appointment, with the Summer months recognized at 3.2 person months; Since Coeus would calculate a summer appointment at 4 months, use the Summer Salary Coeus Calculator on the Coeus webpage under “Resources” to determine the correct % Charged and % Effort to enter into Coeus.

CoeusLite User Guide for version 4.5.1
, Page - 56 Original Document date June 2012; Updated March 2013
Select Save when all added customized entries have been made.
Select Calculate (located below all of the personnel entries) if you want to see how a changed entry impacts the budget.
Select Remove to delete the person entered.
Select Edit to open the Line Item Details window for that personnel entry.
3. Enter Personnel Line Item Details
Select Edit to the right of each line item to display the Line Item Details window. (This link is labeled Details if the budget is marked complete or if you are authorized to view only.)
Personnel Line Item Details window:
Reminder! Your browser software must be set to Allow Pop-ups to view this Detail window
The following items on the Line Item Details window can be modified:
On Campus checkbox Defaults to checked; uncheck to apply off-campus overhead and fringe rates.
Impacts S2S forms population

CoeusLite User Guide for version 4.5.1
, Page - 57 Original Document date June 2012; Updated March 2013
Submit Cost Sharing checkbox Defaults to checked; uncheck to exclude this line item’s calculated cost share
expense from the Grants.gov system-to-system forms (SF 424 RR, Fed/Non-Fed Budgets). Cost sharing
requirements can be found in the sponsors solicitation.
The gray text fields on the Line Item Details window are read only in Lite. Edits and changes to Personnel entries must be made directly in the Personnel Budget screen, not in Line Item Details.
o
Save & Apply to Current and Later periods should only be used when adding a new personnel expense line in a budget with all periods generated. This feature does not update previously generated personnel line items. If this feature is used with an existing person, an additional line item appearance will be generated in the later periods.
Save and Apply to Current Period
Use this feature to save the checkbox selections made in this period
Save and Apply to Current and Later Periods
Use this feature to save and apply this line item to the current and all later periods in a generated budget. Use only for ADDING a new person to a generated budget.
Close

CoeusLite User Guide for version 4.5.1
, Page - 58 Original Document date June 2012; Updated March 2013
E. Navigate to the Equipment Screen
Please refer to your sponsor guidelines, specific opportunity instructions, and Institutional Policy and Procedures for budgeting equipment items.
1. Select Add Equipment to add individual items of equipment to the budget.
Select a Type from the drop-down menu.
o Equipment Types include: Equipment and Lab Equipment.
Enter a Description. Descriptions entered in the budget line items WILL print on Grants.gov Detailed budget forms. Current Grants.gov equipment budgeting requires a single line item for each equipment item and a description for each Equipment item.
Enter a cost in the Funds Requested ($) field – do not use commas.
Select Calculate to see how this item impacts budget totals. (Coeus will calculate automatically upon Save.)
Select Remove to delete the entry.
If there are no edits select: Close
Select Save to save your entered budget item. .

CoeusLite User Guide for version 4.5.1
, Page - 59 Original Document date June 2012; Updated March 2013
2. Enter Equipment Line Item Details
Select Edit to the right of each line item to display the Line Item Details window where you can enter more detailed information about each line item.
The following fields can be modified on the Line Item Details window:
o Description: Change the line item description as needed.
o Start Date and End Date: Change if relevant or required based on the sponsor instructions.
o Quantity: Enter if relevant or required based on the sponsor instructions.
o Cost: Change as needed. You will see the updated amount back on the main Equipment screen.
o Cost Sharing: Enter a value, if appropriate. Refer to Sponsor Guidelines and Institutional Policy regarding cost sharing requirements.
o Apply Inflation checkbox: Deselect this option if you want to have this line item generate to all periods at the same dollar value instead of inflated by the rate on the Proposal Rates screen.
o On Campus checkbox: Deselect this option to apply the Off Campus F&A rate. Please consult your Grant Officer and comply with Institute guidelines for off-campus project eligibility.
o Submit Cost Sharing checkbox: Deselect this option to subtract the cost share expense for this line item from being included on the Grants.gov S2S forms.
o Rate Types / Apply: Select and deselect the Apply checkboxes as needed (Note: Equipment is exempt from F&A, thus no calculated amounts are available to view.)
The following calculated costs are view only on the Line Item Details window:
o Underrecovery
o Rates applicable to the Line item. Note: Equipment is exempt from F&A.
If you’ve made any edits, select:
o Save and Apply to Current Period
o Save and Apply to Current and Later Periods, as relevant to your proposal
If there are no edits select: Close
You can add more items and make further changes to the entries on the Equipment screen as needed.

CoeusLite User Guide for version 4.5.1
, Page - 60 Original Document date June 2012; Updated March 2013
F. Navigate to the Travel screen
Please refer to your sponsor guidelines, specific opportunity instructions, and Institutional Policy and Procedures for budgeting Travel items.
1. Select Add Travel to add all of the travel costs to be included in the budget.
Select a Type from the drop-down menu.
o Travel types include: Foreign and Domestic.
Enter a Description. Descriptions entered here do NOT print on Grants.gov forms, but are useful for proposal preparation notes and Internal Review and Approval.
Enter a cost in the Funds Requested ($) field – do not use commas.
Select Calculate to see how this item impacts budget totals. (Coeus will calculate automatically upon Save.)
Select Remove to delete the entry.
Select Save to save your entered budget item. .
Results after entry:

CoeusLite User Guide for version 4.5.1
, Page - 61 Original Document date June 2012; Updated March 2013
2. Enter Travel Line Item Details
Select Edit to the right of each line item to display the Line Item Details window where you can enter more detailed information about each line item.
The following fields can be modified on the Line Item Details window:
o Description: Change the line item description as needed.
o Start Date and End Date: Change if relevant or required based on the sponsor instructions.
o Quantity: Enter if relevant or required based on sponsor instructions.
o Cost: Change as needed. You will see the updated amount back on the main Travel screen.
o Cost Sharing: Enter a value, if appropriate. Refer to Sponsor Guidelines and Institutional Policy regarding cost sharing requirements.
o Apply Inflation checkbox: Deselect this option if you want to have this line item generate to all periods at the same dollar value instead of inflated by the rate on the Proposal Rates screen.
o On Campus checkbox: Deselect this option to apply the Off Campus F&A rate. Please consult your Grant Officer and comply with Institute guidelines for off-campus project eligibility.
o Submit Cost Sharing checkbox: Deselect this option to subtract the cost share expense for this line item from being included on the Grants.gov S2S forms.
o Rate Types / Apply: Select and deselect the Apply checkboxes as needed
The following calculated costs can be viewed on the Line Item Details window:
o Underrecovery
o Rates applicable to the Line item. Cost and Cost Sharing amounts.
If you’ve made any edits, select:
o Save and Apply to Current Period
o Save and Apply to Current and Later Periods, if you wish to add this line item to later periods in a generated budget.
If there are no edits select: Close
You can add more items and make further changes to the entries on the Travel screen as needed.

CoeusLite User Guide for version 4.5.1
, Page - 62 Original Document date June 2012; Updated March 2013
G. Navigate to the Participant/Trainee screen
Please refer to your sponsor guidelines, specific opportunity instructions, and Institutional Policy and Procedures for budgeting Participant/Trainee expenses – not allowable expense on some funding mechanisms!
1. Select Add Participant/Trainee to add all of these costs to be included in the budget.
Select a Type from the drop-down menu.
o Participant/Trainee Type: Participant Costs
Enter a Description. Descriptions entered here do NOT print on Grants.gov forms, but are useful for proposal preparation notes and Internal Review and Approval. Examples of Participant/Trainee costs are: Costs related to a workshop or seminar on campus e.g. travel, supplies, food, etc.; sponsored program tuition for grad students (some colleges), etc.
Enter a cost in the Funds Requested ($) field – do not use commas.
Select Calculate to see how this item impacts budget totals. (Coeus will calculate automatically upon Save.)
Select Remove to delete the entry.
Select Save to save your entered budget item. .
Results after entry:

CoeusLite User Guide for version 4.5.1
, Page - 63 Original Document date June 2012; Updated March 2013
2. Enter Participant/Trainee Line Item Details
Select Edit to the right of each line item to display the Line Item Details window where you can enter more detailed information about each line item.
The following fields can be modified on the Line Item Details window:
o Description: Change the line item description as needed.
o Start Date and End Date: Change if relevant or required based on the sponsor instructions.
o Quantity: Enter if relevant or required based on sponsor instructions.
o Cost: Change as needed. You will see the changes on the main Participant/Trainee screen.
o Cost Sharing: Enter a value, if appropriate. Refer to Sponsor Guidelines and Institutional Policy regarding cost sharing requirements.
o Apply Inflation checkbox: Deselect this option if you want to have this line item generate to all periods at the same dollar value instead of inflated by the rate on the Proposal Rates screen.
o On Campus checkbox: Deselect this option to apply the Off Campus F&A rate. Please consult your Grant Officer and comply with Institute guidelines for off-campus project eligibility.
o Submit Cost Sharing checkbox: Deselect this option to subtract the cost share expense for this line item from being included on the Grants.gov S2S forms.
o Rate Types / Apply: Select and deselect the Apply checkboxes as needed. (Note: Participant/Trainee expenses are exempt from F&A, thus no calculated amounts are available to view.)
The following calculated costs can be viewed on the Line Item Details window:
o Underrecovery
o Rates applicable to the Line item. Cost and Cost Sharing amounts. (Participant/Trainee expenses are exempt from F&A)
If you’ve made any edits, select:
o Save and Apply to Current Period
o Save and Apply to Current and Later Periods, if you wish to add this line item to later periods in a generated budget.
If there are no edits select: Close
You can add more items and make further changes to the entries on the Participant/Trainee screen as needed.

CoeusLite User Guide for version 4.5.1
, Page - 64 Original Document date June 2012; Updated March 2013
H. Navigate to the Other Direct Costs screen
1. Entering Standard Costs Line Items in the Budget
Please refer to your sponsor guidelines, specific opportunity instructions, and Institutional Policy and Procedures for budgeting project expenses.
a. Select Add Direct Costs to add all of these costs to be included in the budget.
Select a Type from the drop-down menu.
Please Note: a sample of cost types will be displayed for budgeting purposes – not the complete list from your post-award financial system – as sponsors do not require exquisite detail in proposal budgets. Many of these individual cost types will “roll up” to a Budget Category composite line displayed in the sponsor budget form.
Enter a Description. Descriptions entered here do NOT print on Grants.gov forms, but are useful for proposal preparation notes and Internal Review and Approval.
Enter a cost in the Funds Requested ($) field – do not use commas.
Select Calculate to see how this item impacts budget totals. (Coeus will calculate automatically upon Save.)
Select Remove to delete the entry.
Select Save to save your entered budget item. .
Results after entries:
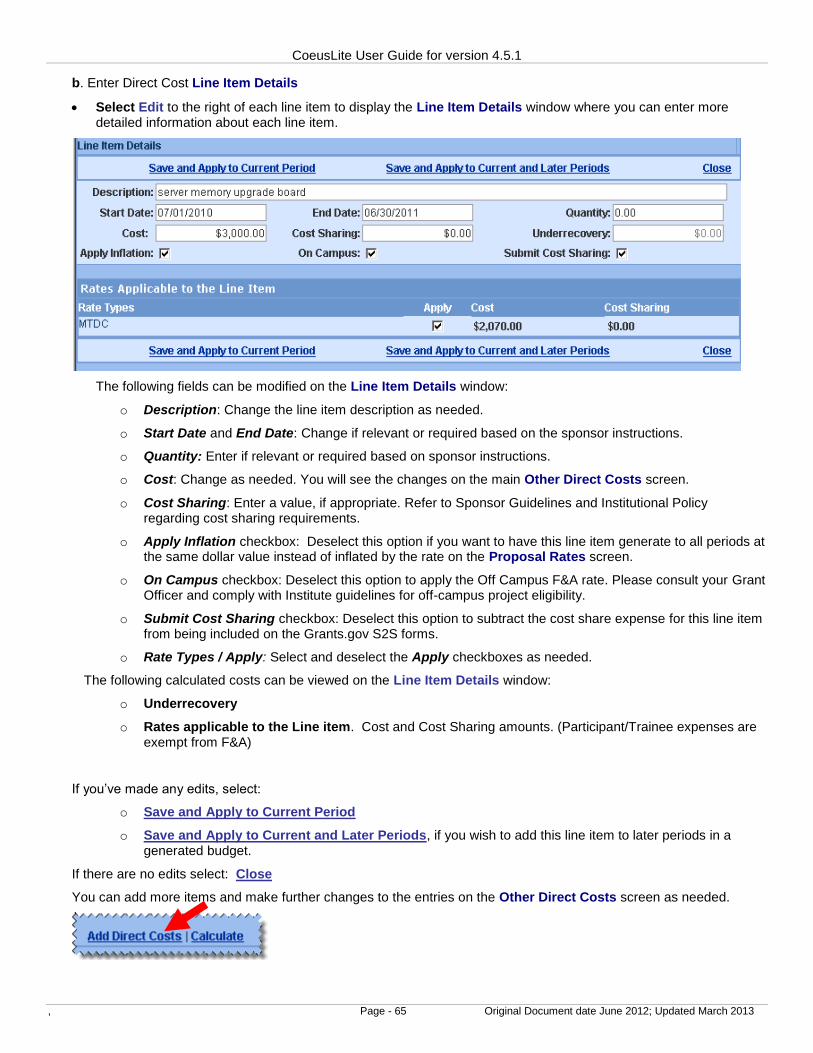
CoeusLite User Guide for version 4.5.1
, Page - 65 Original Document date June 2012; Updated March 2013
b. Enter Direct Cost Line Item Details
Select Edit to the right of each line item to display the Line Item Details window where you can enter more detailed information about each line item.
The following fields can be modified on the Line Item Details window:
o Description: Change the line item description as needed.
o Start Date and End Date: Change if relevant or required based on the sponsor instructions.
o Quantity: Enter if relevant or required based on sponsor instructions.
o Cost: Change as needed. You will see the changes on the main Other Direct Costs screen.
o Cost Sharing: Enter a value, if appropriate. Refer to Sponsor Guidelines and Institutional Policy regarding cost sharing requirements.
o Apply Inflation checkbox: Deselect this option if you want to have this line item generate to all periods at the same dollar value instead of inflated by the rate on the Proposal Rates screen.
o On Campus checkbox: Deselect this option to apply the Off Campus F&A rate. Please consult your Grant Officer and comply with Institute guidelines for off-campus project eligibility.
o Submit Cost Sharing checkbox: Deselect this option to subtract the cost share expense for this line item from being included on the Grants.gov S2S forms.
o Rate Types / Apply: Select and deselect the Apply checkboxes as needed.
The following calculated costs can be viewed on the Line Item Details window:
o Underrecovery
o Rates applicable to the Line item. Cost and Cost Sharing amounts. (Participant/Trainee expenses are exempt from F&A)
If you’ve made any edits, select:
o Save and Apply to Current Period
o Save and Apply to Current and Later Periods, if you wish to add this line item to later periods in a generated budget.
If there are no edits select: Close
You can add more items and make further changes to the entries on the Other Direct Costs screen as needed.

CoeusLite User Guide for version 4.5.1
, Page - 66 Original Document date June 2012; Updated March 2013
2. a. New Subaward Budget Tool – automatic form translation and line item entry
New in 4.5, a user-friendly process that reads the uploaded Adobe subaward form and inserts system-generated line items for subaward funding values for each project period into the proposal budget. Users may utilize the
new Subaward Details window to manually type in the direct, indirect costs, and cost sharing for the Sub Award for each period OR upload a completed SubAward Budget Adobe form. Uploaded form data will automatically sync budget expenses to the detail window. For either manual or sync'd sub award details, the system will parse the data into the appropriate line items in each budget period, including determining first $25K, F&A exempt of F&A, etc.
New Requirement: Generate All Periods BEFORE uploading the Sub Award file!
The proposal budget must be generated in order for the Sub Award Detail window to know how many budget periods to supply.
For every line item detailed subaward budget for your proposal:
1. Complete your other budget entries and generate all budget periods.
2. Navigate to Sub Award Budget
3. Click Add Subaward to generate the entry fields
4. Enter the required information:
a. Organization: this can be a descriptive name of your subawardee. Use only letters, numbers,
underscores or hyphens to avoid Grants.gov errors later.
b. Description: this will populate Coeus budget Description field for internal reference.
5. To Manually Enter Subaward Expenses:
a. Click Save. The Organization will be added to the list of sub awards.
b. Click Details to open the Sub Award Budget Details window

CoeusLite User Guide for version 4.5.1
, Page - 67 Original Document date June 2012; Updated March 2013
c. Enter the Direct and Indirect Costs for each budget period. The Total Cost will automatically sum from
those entries.
d. Enter Cost Sharing, if any, in the Cost Sharing column. Cost sharing entered here is for internal
reference and will not populate on forms.
e. Click Save to save the entries.
f. Repeat these steps for additional sub awards.
g. Navigate to Other Direct Costs to review the system-entered line items in each budget period.
h. The sub award line item details may be viewed, but any edits must be completed in the new Sub Award
entry window.

CoeusLite User Guide for version 4.5.1
, Page - 68 Original Document date June 2012; Updated March 2013
6. To Upload a Subaward Budget File for details to be extracted:
a. Enter the Organization name and Description.
b. Click Browse to locate the completed Adobe Subaward Budget XLS file to upload.
BEFORE YOU UPLOAD! Be certain that each subaward budget justification has a unique name with no spaces or special characters– these are the files uploaded in the PDF subaward form. Note: If everyone uses the same “budget_justification.pdf” name, your submission will error at Grants.gov!
c. Click Save. The Organization will be added to the list of sub awards.
d. Repeat the steps to maintain additional sub awards.
e. Click Details to review the sub award.
If the Adobe subaward budget form was successfully translated, the values will be in the window.
Use the Sync XML button to have the system extract the details from the budget file.
NOTE: the Start/End dates of the subaward file must be compatible with the prime budget to Sync
Cost Sharing column is user entered – there are no values in the uploaded subaward budget to sync.
Cost sharing referenced here is for internal reference and will not populate on forms
f. Click Save to close the window.
g. Navigate to Other Direct Costs to review the system-entered line items in each budget period.

CoeusLite User Guide for version 4.5.1
, Page - 69 Original Document date June 2012; Updated March 2013
7. Options available in the SUB AWARD BUDGET window: a. Details: opens the details window for review or manual entry b. View Form to view the Adobe Subaward Budget form. c. View XML to view the translated file d. Remove to delete the Organization, details, and any uploaded form. e. [+] or ‘[-] to collapse/view the information about the uploaded and translated file
Replacing an Uploaded Subaward File
Click Remove to delete the entry and then follow the Add Subaward instructions.
Viewing the uploaded Subaward Form from Coeus
Click View Form. The file displays in new browser window.
Click View XML. The file displays in a browser window.
You cannot modify the Subaward files already uploaded to Coeus from the View Form preview window. To make updates to the Subaward budget file or its Justification, return to the original Adobe Subaward file to make and save changes, and then re-upload that file to Coeus.

CoeusLite User Guide for version 4.5.1
, Page - 70 Original Document date June 2012; Updated March 2013
2. b. Manual Entry of Other Direct Costs: Subaward/Subcontracts
Per A-21 Cost Principles, subcontracts are subject to F&A for only the first $25,000 spent. For any subcontract that exceeds the cost of $25,000, you must have two budget line items: one for $25,000 that bears F&A, and one for the remaining amount of the subcontract which will be exempt. Cost elements are available to support this entry requirement.
Note: Northeastern University will only take F&A on a maximum of $25,000 of any Sub Award; this means that the maximum amount of F&A that the university is eligible to receive from a Sub Award is $13,875 (which is
55.5% of $25,000).
New in 4.5: User may manually add line items as described below or use the new Upload Sub Award > Sub Award Details tool to have the system generate the appropriate line items.
In order to enter costs in other periods, you must use the Generate All Periods function (described in the Generate All Periods section of this document). Then, enter the individual tabs for each period and make adjustments relevant to that period.
Special NIH Subcontract Instructions for Modular submissions:
You need to select the correct Other Direct Costs budget types for Subcontract F&A expenses to allow the Coeus Modular Budget Sync feature to work effectively for NIH Modular budget submissions. If you isolate the Subcontract Indirect Expense entries by selecting the Subcontractor’s F&A Types in your budget, Coeus will have the data to Sync to the NIH Modular budget screen and submission forms. The 4 direct cost types to use are below. Three examples for use follow.
Subcontracts – Subject to F&A (Direct Costs)
Subcontracts – Not Subject to F&A (Direct Costs)
Subcontractor’s F&A – Subject to F&A (Indirect Costs)
Subcontractor’s F&A – No F&A (Indirect Costs)
Example 1 A one year Sub Award in the amount of $21,000: Indirect Costs = $7,000; Direct Costs = $14,000
Select the Add Direct Costs link. A new budget line will appear. To properly enter this Sub Award in Coeus, two cost elements are required, so a second budget line must be added.
The first budget line should reflect the Sub Award’s Direct Costs subject to Northeastern’s F&A, up to a maximum
of $25,000.
The second budget line should reflect that Sub Award’s Indirect Costs subject to Northeastern’s F&A. This
example demonstrates that in cases where the Sub Award’s total Costs are less than $25,000, both the Direct
and Indirect would be subject to Northeastern’s F&A.

CoeusLite User Guide for version 4.5.1
, Page - 71 Original Document date June 2012; Updated March 2013
Example 2 One year Sub Award in the amount of $30,000.00: Indirect Costs = $10,000; Direct Costs = $20,000 This example will require the use of three cost elements; therefore 3 budget lines must be entered.
In this example, the Direct Costs for the Sub Award are below $25,000. The first budget line will reflect the Sub
Award’s Direct Costs subject to Northeastern’s F&A ($20,000).
The second budget line will reflect the portion of the Sub Award’s Indirect Costs that will be subject to Northeastern’s
F&A ($5,000).
Note: Since $20,000 in Direct costs have been subjected to Northeastern’s F&A rate in the first line, only $5,000 of Indirect Costs will be subject to Northeastern’s F&A (the difference between the maximum $25,000 and $20,000).
The third budget line will reflect the remaining Indirect Costs of the Sub Award, not subject to Northeastern’s F&A
($10,000 - $5,000 = $5,000).
Example 3 One year Sub Award in the amount of $150,000.00: Indirect Costs = $50,000; Direct Costs = $100,000 This example will require the use of three cost elements; therefore 3 budget lines must be entered.
In this example, the Direct Costs for the Sub Award are above $25,000. The first budget line will reflect the maximum
Sub Award’s Direct Costs subject to Northeastern’s F&A ($25,000).
The second budget line will reflect the remaining portion of the Sub Award’s Direct Costs that will not be subject to
Northeastern’s F&A ($75,000).
The third budget line will reflect the Sub Award’s Indirect Costs that will not be subject to Northeastern’s F&A ($50,000).

CoeusLite User Guide for version 4.5.1
, Page - 72 Original Document date June 2012; Updated March 2013
3. Formulated Costs (currently not in use at Northeastern University)
New formulated costs feature, if maintained, can provide a mechanism to define system formulated costs for use in proposal budgeting. When enabled, the cost elements defined for this tool present a maintenance window
where the user can select from a list of maintained types and enter the variables to have the system calculate the expenses. Once added to the budget period, the formulated cost line items will generate to all periods, and be editable in each budget period.
In the Budget, navigate to the Other Direct Costs section.
Select a Type maintained as a formulated cost.
Click Edit to launch the Formulated Cost Line Item window
Click Add Formulated Cost
Select a Formulated Type from the drop-down selection list; once the type is selected, the Unit Cost will populate with the maintained unit cost, but the Unit Cost field is editable.
Enter a numeric value for the Count (this is the number of persons, patients, events to be used as the basis. Example: Overnight Stays – enter the number of patients in the subject group requiring overnight.)
Enter a numeric value for the Frequency. The number should be at least 1, but if the type of cost is to recur, enter the number of recurrences as the Frequency. Example: Enter the number of overnight stays required.
The Calculated Expenses field will automatically multiply the Unit Cost x Count x Frequency.
Click Save. Rates will be calculated and a line will be detailed in the window.

CoeusLite User Guide for version 4.5.1
, Page - 73 Original Document date June 2012; Updated March 2013
Click Add Formulated Cost to create another line item in this cost element detail window, if appropriate.
Click Close. The Budget Period Other Direct Costs line will be updated with the expense.
Modify existing Formulated Costs:
Click Edit to open the Formulated Cost Line Item Details window.
Click Modify. Make the necessary changes and then click Save to preview the results.
Click Close to return to the Budget Period window OR if appropriate, click Save and Apply to Current and Later Periods to update all budget periods.
Remove an existing Formulated Cost Line Item:
Click Remove to delete the Formulated Cost Line Item. Click ‘Yes’ in the confirmation window.
Remove a detailed Formulated Type from the Formulated Cost Line Item window:
Click Edit to open the Formulated Cost Line Item Details window.
Click Remove to delete the Formulated Type.
Click Save and then Close OR if appropriate, click Save and Apply to Current and Later Periods to update all budget periods.
The line item will be updated in the Budget Period window.
Sync a Formulated Cost Line Item Costs
If the formulated costs have been updated centrally (hierarchy maintenance), existing proposals with calculated formulated costs applied can be refreshed. Sync only needs to occur if a formulated cost line item has been calculated and applied to a line item.
To Sync the calculated Formulated Costs:
Click the Sync Calculated Line Item Costs in the left Navigation Panel.
Click Yes in the confirmation window.
You will be returned to the Budget Summary screen. Navigate to the Other Direct Cost screen if you wish to review the Formulated Cost
line item details.

CoeusLite User Guide for version 4.5.1
, Page - 74 Original Document date June 2012; Updated March 2013
4. Other Budgeting Features
a. Cost Sharing of a detailed expense
Please review the appropriateness and administrative policy of cost sharing with ORAF.
If you need to express cost sharing in your budget, do so on each specific line item in the Budget Periods screens of your budget (Equipment, Travel, Participant/Trainee, or Other Direct Costs) that will be cost shared. In the case of Personnel – cost share is calculated by the difference between %charged and %effort.
Select Edit to open that item’s Line Item Details window
Enter the dollar value of the funding commitment in the Cost Sharing field.
Select
o Save and Apply to Current Period or
o Save and Apply to Current and Later Periods, as relevant to your proposal or,
o Close if you decide not to make an entry.
The amount of the cost sharing will also be updated in the Period Totals header and Budget Totals section of the Budget Summary screen.
Result after entry:
b. Cost Sharing in a Sub Award
Review the new Sub Award Detail Entry instructions in the Other Direct Costs section for specifics.
Note: Cost Sharing may be required to be distributed prior to marking a budget Complete.
Instructions for distribution are in later section of this guide.

CoeusLite User Guide for version 4.5.1
, Page - 75 Original Document date June 2012; Updated March 2013
c. Underrecovery
Please review the appropriateness and administrative policy of underrecovery with ORAF.
If underrecovery should be applied to your ENTIRE project budget, not just a specific line item, you should adjust the appropriate Rate(s) applied in the Proposal Rates screen and/or the Overhead Rate Type and Underrecovery Rate Type on the Budget Summary screen.
If you need to express underrecovery on a specific line item in the Budget Periods screens of your budget (Personnel, Equipment, Travel, Participant/Trainee, or Other Direct Costs):
Select Edit to open that item’s Line Item Details window
Deselect the appropriate Rate Types - Apply checkbox from the Rates Applicable to the Line Item, in the bottom section of the Line Items Detail window.
Click Save and Apply to Current Period or Save and Apply to Current and Later Periods, as relevant to your proposal, before closing this window.
The amount of the underrecovery will also be updated in the Budget Totals section of the Budget Summary screen.
Result of unchecked Apply MTDC Rate:
Note: Underrecovery may be required to be distributed prior to marking a budget Complete.
Instructions for distribution are in later section of this guide.
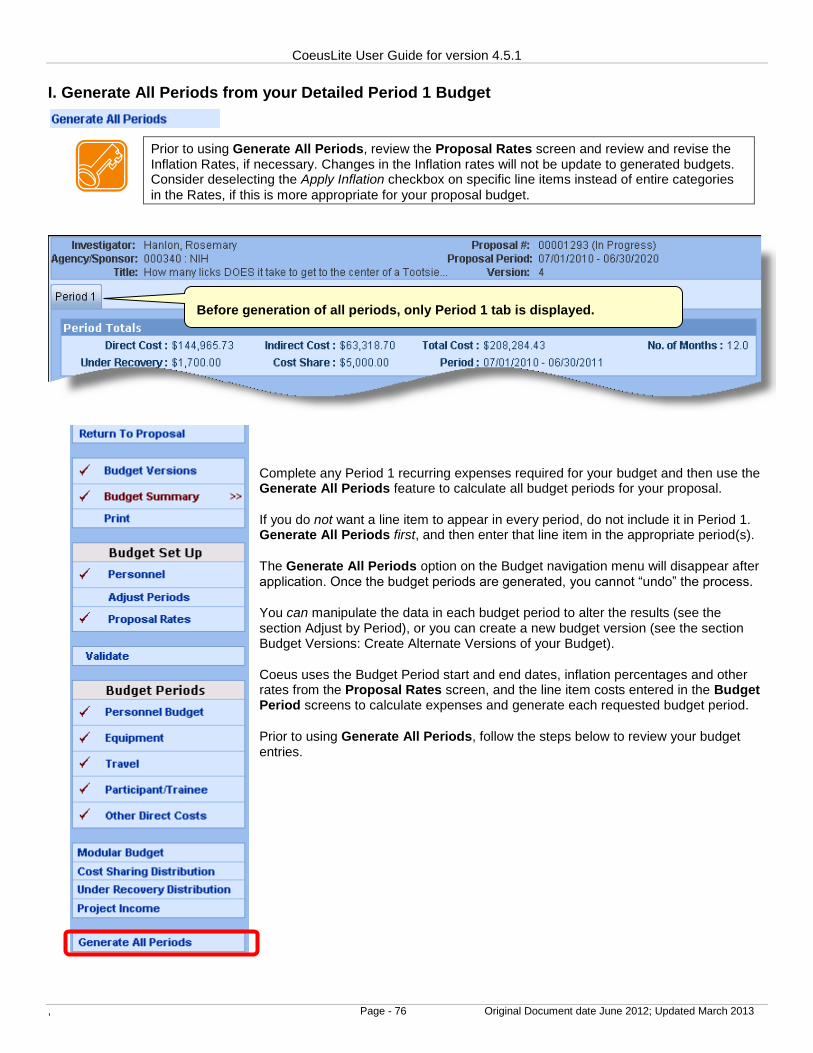
CoeusLite User Guide for version 4.5.1
, Page - 76 Original Document date June 2012; Updated March 2013
I. Generate All Periods from your Detailed Period 1 Budget
Prior to using Generate All Periods, review the Proposal Rates screen and review and revise the Inflation Rates, if necessary. Changes in the Inflation rates will not be update to generated budgets. Consider deselecting the Apply Inflation checkbox on specific line items instead of entire categories
in the Rates, if this is more appropriate for your proposal budget.
Complete any Period 1 recurring expenses required for your budget and then use the Generate All Periods feature to calculate all budget periods for your proposal.
If you do not want a line item to appear in every period, do not include it in Period 1. Generate All Periods first, and then enter that line item in the appropriate period(s).
The Generate All Periods option on the Budget navigation menu will disappear after application. Once the budget periods are generated, you cannot “undo” the process.
You can manipulate the data in each budget period to alter the results (see the section Adjust by Period), or you can create a new budget version (see the section Budget Versions: Create Alternate Versions of your Budget).
Coeus uses the Budget Period start and end dates, inflation percentages and other rates from the Proposal Rates screen, and the line item costs entered in the Budget Period screens to calculate expenses and generate each requested budget period.
Prior to using Generate All Periods, follow the steps below to review your budget entries.
Before generation of all periods, only Period 1 tab is displayed.

CoeusLite User Guide for version 4.5.1
, Page - 77 Original Document date June 2012; Updated March 2013
1. Preview All Budget Expenses
Before using the Generate All Periods function, preview your budget entries in all categories by printing a report.
Click Print on the Budget menu.
From the Proposal Print screen, click Budget Summary by Period.
Click the check box in the Print Budget Comments column to include those on the report
A new browser window will open to display the Internal Budget Summary view of your budget, by period, in a PDF format. This complete budget will display by Category and Sponsor Budget Group.
- Personnel, by name, will print out with Start and End dates, Fringe Rates applied (if appropriate), Fringe Benefit costs (if appropriate), and Salaries & Wages.
- Descriptions entered for all budget line items will print on this Summary form.
- The Calculation Methodology page of the summary lists any items excluded from the F&A base costs requested, the F&A rates and bases applied the Employee Benefit rates and bases, and Vacation Accrual Rates and bases.
This is the budget format displayed during the Coeus Web Proposal Approval process. Many campus approvers evaluate this comprehensive view of the budget in their review process.
You can print and/or save this PDF file for distribution by email or hardcopy to proposal participants for their review.

CoeusLite User Guide for version 4.5.1
, Page - 78 Original Document date June 2012; Updated March 2013
2: Navigate to Generate all Periods
Select Generate All Periods on the menu. This will start a process which will use all of the Period 1 line items to create details for subsequent periods.
a. A warning screen will appear to alert you of the one-time-use per budget of the Generate option. Click Generate Periods on this screen to continue.
b. A confirmation screen will display upon completion.
c. When you return to view the Budget Periods screens of your budget (Personnel, Equipment, Travel, Participant/Trainee, or Other Direct Costs), the additional periods will be displayed as tabs.
Notice the default period in focus (blue) is always Period 1. Other tabs headers appear silver/gray.
3: Adjust budget by period
Enter each budget category screen (Personnel Budget, Equipment, Travel, etc.) to review the line items and make adjustments per period as needed. You can edit, remove or add line items as appropriate for your project requirements.
For example:
Add and remove Personnel
Adjust Personnel effort, or period of performance
Add or remove expense line items
Adjust costs generated on line items
Most Edit, Modify, and Save actions in the budget will return the default Period 1 tab. Be certain to Click on the budget period tab you wish to edit, and make sure it is Blue.

CoeusLite User Guide for version 4.5.1
, Page - 79 Original Document date June 2012; Updated March 2013
J. Navigate to the Budget Summary Screen
On this screen, you can review your project costs: direct and indirect costs (totals and by project period), underrecovery, cost sharing (totals and by project period), and total costs (total and by project period).
Be sure to review the OverHead Rate Type and Underrecovery Rate Type applied for this proposal.
Things you can modify on the Budget Summary Screen:
Change the Budget Status drop-down to Complete once you have completed the budget (this can also be done on the Budget Versions screen). Note: The budget version must be marked Final before it can be marked Complete.
Select the Final checkbox to transmit this budget (this can also be done on the Budget Versions screen).
Select the Modular Budget checkbox if this budget will be an NIH Modular budget.
De-select the Submit Cost Sharing checkbox. The default is checked to submit – to publish budgeted cost share expense on the appropriate Grants.gov S2S forms.
o Uncheck the box to prohibit ALL the cost share expenses from appearing on the forms OR
o Keep the box checked and control the inclusion of cost sharing expense at each line item level.
Select the On/Off campus option to override the cost element overhead mapping.
o Select “Off” to have Coeus apply the maintained Off Campus Overhead rates to all the budgeted cost elements, despite the cost element description of On Campus.
o Select “On” to have Coeus apply the maintained On Campus Overhead rates to all budgeted cost elements, despite the cost element description of Off Campus.
o Select “Default” to have Coeus apply the maintained OH rate for that cost element. Default allows for the inclusion of both On- and Off-campus rates in the budget.
Enter Residual Funds (refer to sponsor guidelines for requirement definitions).
Enter a Total Cost Limit (reference only – this will NOT restrict your CoeusLite budget).

CoeusLite User Guide for version 4.5.1
, Page - 80 Original Document date June 2012; Updated March 2013
Enter a Direct Cost Limit (reference only – this will NOT restrict your CoeusLite budget).
Change the Over Head Rate Type and/or Underrecovery Rate Type.
Enter text in the Comments field to make notes about this budget.
Enter the Direct, Indirect, Cost Sharing in the Summary
If you create a detailed budget, the Summary budget fields will contain totals entered by Coeus, which are then read-only: you cannot modify the contents of these fields.
Alternatively, users can directly enter period budget total data into the fields instead of creating detailed period
budgets. This practice can be useful when sponsors do not require any budget details at the time of submission,
but still require the anticipated budget total to appear on the SF 424 R&R. Additionally, these entered values will
populate the Institute Proposal module Initial and Total Project columns.
Once you have completed your changes to this screen, Select Save.

CoeusLite User Guide for version 4.5.1
, Page - 81 Original Document date June 2012; Updated March 2013
K. Navigate to the Budget Versions Screen
a. Create Alternate Versions of your Budget
This screen displays a summary of all budget versions created in the proposal. If you have created more than one version of the budget, you must click Open to the right of the budget version you want to access.
Use the Budget Summary Comments to help identify the significant differences between versions.
Things you can do on the Budget Versions Screen:
Change the Budget Status of a selected version to Complete or Incomplete (you cannot edit a budget marked Complete).
Select or deselect the Final status checkbox. You must do this either on this screen or on the Budget Summary screen prior to routing for approval.
View the Comments entered in the Budget Summary panel for each budget version.
Navigate to the Budget details of a particular version; select Open the right of the budget version.
Create an alternate budget scenario by copying an existing version of the budget, click Copy – you can choose to copy only period one, or all periods, depending on how many changes you’d like to make
Create alternate budget scenario, select the Add New Version link to start a new, blank budget.
Once you have completed your changes to this screen, select .
Once you have more than one version of the budget, you will always be brought to this screen when you navigate to Budget. You must click Open to the right of the budget version you want to access.
Budget Summary Comments displays in the Version panel.

CoeusLite User Guide for version 4.5.1
, Page - 82 Original Document date June 2012; Updated March 2013
Coeus Lite and Modular Budgets (NIH ONLY)
Currently Modular budgets are a submission option for certain NIH opportunities ONLY. Review the specific funding opportunity to determine if Modular budgeting is an option or a requirement, as well as the module limits per budget period.
Note on Modular Budgets (NIH): Even if you are required to submit only a Modular budget (and not a detailed budget) to NIH, creating a detailed budget will assist you by populating the Modular Budget form. A Coeus detailed budget calculates indirect costs, which are required for these forms and can populate your calculated indirect costs to the Modular Budget screen, making finalizing your budget much quicker.
You have 2 options for providing this detailed budget in addition to the Modular budget:
1. You can create the detailed budget in CoeusLite and convert it to a Modular format.
If you prepared a Detailed budget in Coeus, use the Sync with Detailed Budget function to have Coeus convert the required details into a Modular budget (closest $25,000 module into the Direct Cost Less Consortium F&A field, Consortium F&A, and Indirect Cost details). You can then manually adjust the module amounts suggested by Coeus as needed.
2. Create a detailed budget outside of CoeusLite and manually create a Modular budget.
If your institution allows this, create an external supporting budget in the program of your choice, and upload it on the Upload Attachments screen in the Upload Institutional Attachments tab to assist reviewers during internal review.
To then create the Modular budget; manually enter the required details in the Modular Budget screen in order to populate the mandatory forms.
You must click the Modular Budget checkbox on the Budget Summary screen for Coeus to
populate your Modular budget information on the Grants.gov PHS Modular Budget Form.

CoeusLite User Guide for version 4.5.1
, Page - 83 Original Document date June 2012; Updated March 2013
L. Navigate to Modular Budget Screen:
1. With a Final Coeus detailed budget marked Modular on the Budget Summary screen, open the Modular Budget screen to sync the data for Direct Costs, Consortium F&A (subcontractors), and Indirect Costs data for the PHS form.
a. Select Modular Budget on the Budget menu
b. Select Sync with Detailed Budget
c. Select OK when the confirmation window opens.
Review the data defaulted in each of the Period tabs.
o All the white-background fields are editable: review each period and adjust the amounts, if needed.
o It is especially important to review in the Direct Cost less Consortium F&A field to reflect the appropriate number of $25,000 modules
o Review each Rate Number row, especially if Off campus rates are utilized in the budget, or if multiple Fiscal Year Rates are present for a budget period crossing Fiscal Years with varying maintained F&A rates.
d. Select Save

CoeusLite User Guide for version 4.5.1
, Page - 84 Original Document date June 2012; Updated March 2013
2. If you have NOT prepared a detailed budget in Coeus, you must manually enter the required costs in the Modular Budget screen. (You must still check the Modular option on the Budget Summary screen.)
For Period 1:
a. Select Modular Budget.
b. Enter the Direct Cost less Consortium F&A amount.
c. Enter Consortium F&A costs (if any).
d. Select Add Indirect Cost to create an entry line for the Indirect Cost data.
Enter Indirect Cost Type: MTDC, or as appropriate for you institution.
Enter IDC Rate (%) – field expressed as a percentage – enter whole numbers.
Enter IDC Base (from your non-Coeus Detailed budget).
Enter Funds Requested ($).
e. Select Save .
f. Repeat entries as needed for all remaining periods by clicking the Period 2 tab, Period 3 tab, etc.
g. Review the Cumulative screen to confirm totals.

CoeusLite User Guide for version 4.5.1
, Page - 85 Original Document date June 2012; Updated March 2013
M. Navigate to Cost Sharing Distribution
Select Cost Sharing Distribution from the left Navigation bar.
If you have not incurred cost sharing in your budget, you will receive a notice instead of the distribution screen.
If Cost Sharing commitments have been generated in the budget periods, the amounts will be displayed in the Total Cost Sharing Amount panel.
Use the Cost Sharing Distribution List panel to identify the source(s) of funding support for the commitment. The initial list will be generated with a line for each fiscal year a cost sharing commitment exists, but additional lines can be added to identify multiple sources for each fiscal year.
Enter the Banner Account Code in the Source Account field for each Fiscal Year Commitment.
If needed, use Add Cost Sharing Distribution to generate a new entry line.
o Edit the Project Year to align with the budget period, if needed
o Enter Percent (optional), Amount, and Banner Account Code in the Source Account field.
Use Remove to delete an unnecessary entry line.
Select Save
Click View Sub Award Cost Sharing to display any maintained values from added Sub Awards.

CoeusLite User Guide for version 4.5.1
, Page - 86 Original Document date June 2012; Updated March 2013
o Click on each Organization to view the amounts maintained in the Sub Award Details. (This is a view-only window. Edits must be made in the Sub Award Details window.)
o Use this feature to view totals and determine if you wish to attribute lines in the prime budget’s distribution list to one of these sources.
o Click Close to exit this window.
As maintained with a Source Account entered for each Project Year, with Project Year 1 using two lines.
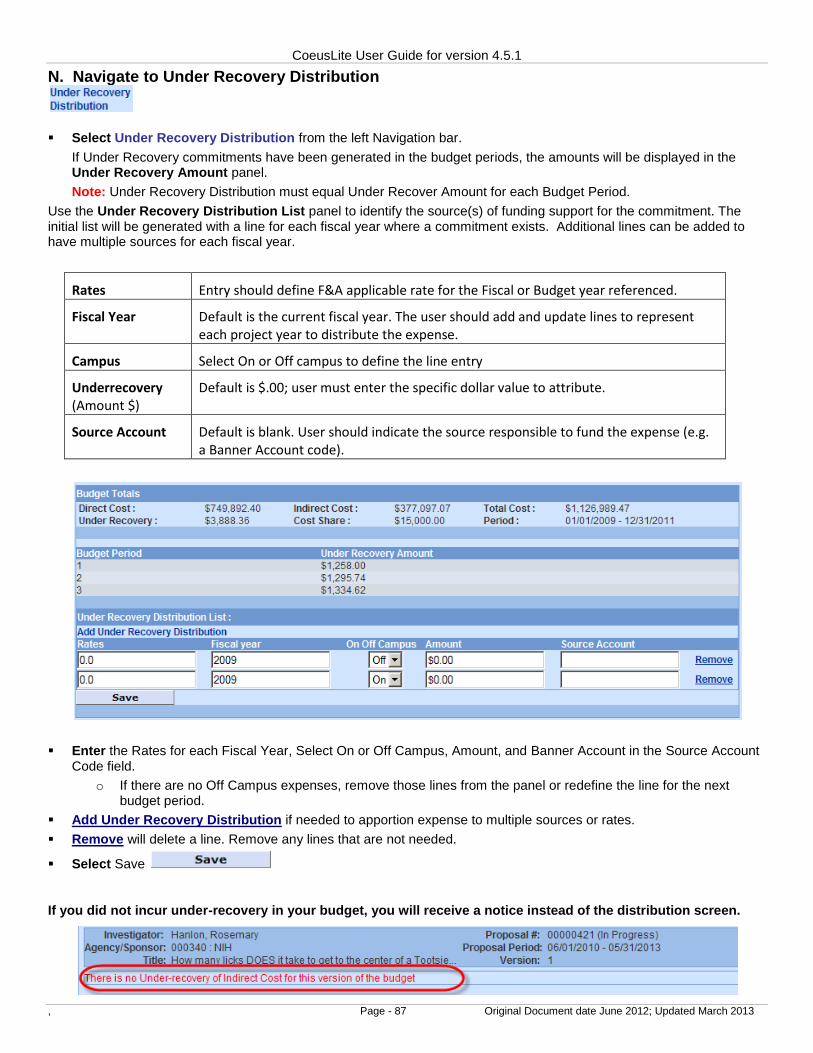
CoeusLite User Guide for version 4.5.1
, Page - 87 Original Document date June 2012; Updated March 2013
N. Navigate to Under Recovery Distribution
Select Under Recovery Distribution from the left Navigation bar.
If Under Recovery commitments have been generated in the budget periods, the amounts will be displayed in the Under Recovery Amount panel.
Note: Under Recovery Distribution must equal Under Recover Amount for each Budget Period.
Use the Under Recovery Distribution List panel to identify the source(s) of funding support for the commitment. The initial list will be generated with a line for each fiscal year where a commitment exists. Additional lines can be added to have multiple sources for each fiscal year.
Rates Entry should define F&A applicable rate for the Fiscal or Budget year referenced.
Fiscal Year Default is the current fiscal year. The user should add and update lines to represent each project year to distribute the expense.
Campus Select On or Off campus to define the line entry
Underrecovery (Amount $)
Default is $.00; user must enter the specific dollar value to attribute.
Source Account Default is blank. User should indicate the source responsible to fund the expense (e.g. a Banner Account code).
Enter the Rates for each Fiscal Year, Select On or Off Campus, Amount, and Banner Account in the Source Account Code field.
o If there are no Off Campus expenses, remove those lines from the panel or redefine the line for the next budget period.
Add Under Recovery Distribution if needed to apportion expense to multiple sources or rates.
Remove will delete a line. Remove any lines that are not needed.
Select Save
If you did not incur under-recovery in your budget, you will receive a notice instead of the distribution screen.

CoeusLite User Guide for version 4.5.1
, Page - 88 Original Document date June 2012; Updated March 2013
M. Navigate to Project Income
Review the sponsor program announcement and sponsor guidelines for specific instructions regarding the handling of Project Income in your submission.
To enter Project Income in your budget:
1. Select Project Income
2. Select Add Project Income.
3. Select the Period from the drop-down menu.
4. Enter the Income funds.
5. Enter a Description.
6. If you need to enter a more detailed description of the Income funds, select View to the right of the line item and enter your comments.
7. Select Remove to delete the entry.
8. Select Save .
Repeat for each period with Project Income to report.

CoeusLite User Guide for version 4.5.1
, Page - 89 Original Document date June 2012; Updated March 2013
N. Perform Budget Validations
Coeus can now provide budget-specific validation rules. Users can manually perform the validations prior to finalizing their budgets but budget validation rules will automatically be run when a budget is marked Complete. If the budget fails the validation rule, it cannot be marked Complete. The user will be presented with an error notice and be advised to return to the budget and fix the error condition.
The proposal must have a budget, and the budget must be marked Final in order to perform the Budget Business Rule Validations!
Budget Validation Errors:
If a proposal budget fails a validation rule, a red error notice is presented to the user.
The Department (unit) where the rule is applied appears in the alert text, as validation rules can be applied at any
level in the hierarchy.
The text from the validation rule’s User Message should be specific as the budget cannot be marked Complete
until the budget can pass the validation.
If more than one budget validation rule failed, all user messages will be presented with a red Error heading.
Budget Validation Warnings:
Validation Warnings are presented under a blue validation notice.
The Department (unit) where the rule is applied appears, as validation rules can be applied at any level in the
hierarchy.
Warning messages do not keep a budget from being marked Complete.
If more than one budget validation warning was triggered, all user messages will be presented with a blue
Warning heading.

CoeusLite User Guide for version 4.5.1
, Page - 90 Original Document date June 2012; Updated March 2013
O. Finalize Your Budget
Before submitting for approval routing, you must mark your budget as Final and Complete.
Navigate to the Budget Summary screen.
Select the Final checkbox to mark this version of the budget as Final. (Note: this indicates that only this version of the budget will be transmitted to the sponsor.) You can also indicate this Final status on the Budget Versions screen.
Select the Modular Budget check box if you are submitting this budget as Modular to NIH ONLY.
For Modular budget, you must also select the INCLUDE checkbox on the PHS398 Modular Budget form on the Grants.gov screen to validate and transmit the modular budget with your proposal.
Select Complete from the Budget Status drop-down menu.
Select Save .
Navigate to Return to Proposal.

CoeusLite User Guide for version 4.5.1
, Page - 91 Original Document date June 2012; Updated March 2013
14. Navigate to Upload Attachments
Select Upload Attachments screen.
There are three (3) areas where files can be uploaded:
Upload Proposal Attachments
These documents or files are required as defined by the sponsor opportunity instructions and their general submission guidelines. A base list of types will always be presented. To display the types required for Grants.gov submissions, an opportunity must already have been selected in General Info for this proposal.
Upload Personnel Attachments
These are person-specific files (biosketch, current & pending, etc.)
Upload Institutional Attachments
These are institutional attachments that do not get submitted to the sponsor. Examples include printed/signed investigator certifications, NU Cost Sharing Distribution, NU F&A Under-recovery distribution, Documentation of Sponsor required reduced F&A, foundation files, NSF Fastlane proposals.
TIP: Link your proposal to the sponsor opportunity using the Grants.gov screen before you
navigate to upload attachments. You won’t be able to see and select most of the form-specific attachment types until you link to an opportunity.
For Proposal Attachments: Coeus will filter the narrative types and present only those relevant to your submission. For Grants.gov submissions, the types presented will only be those relevant to the forms used in the sponsor selected.
You must link your proposal to a Grants.gov opportunity to
upload all the required narrative attachment types
Though most Attachment Types are restricted by sponsors and by Coeus to a single use per proposal, several Types may be used multiple times, including (but not limited to): Other, Additional_Key_Persons, and Additional_Equipment. When using one Attachment Type multiple times, each attachment must contain a unique Description.

CoeusLite User Guide for version 4.5.1
, Page - 92 Original Document date June 2012; Updated March 2013
ALERT: Follow the sponsor-specific instructions for what to name your uploaded documents. Put that name in the Description field in Coeus. The name of your uploaded file is NOT used by Coeus – your file can have the same name, but the Coeus Description field must conform to the sponsor instructions.
Upload Proposal Attachment instructions:
Select the Proposal Attachment tab
Select an Attachment Type from the
drop-down list (list varies by opportunity
selected)
Enter a Description (may be required
for some narrative types or per the sponsor instructions)
Check/Uncheck Complete box
Select Browse to find and upload your
file.
Save: Result: the file is added to List of
Proposal Attachments.
Repeat for all required Proposal
Narrative Attachment Types
Note: For Grants.gov proposals, file placement is dictated by the Attachment Type you choose – NOT the order
in which you upload the files.
Complete Narrative checkbox: The default is checked. Uncheck this box while routing draft or incomplete narratives for review and approval. If a narrative was not checked as Complete prior to routing for approval, the Complete column will display a red X. All narratives attachments must be marked Complete BEFORE final approval action. Use the Refresh Narratives function to upload the final document and/or check the box to confirm the complete status of the narrative attachments.

CoeusLite User Guide for version 4.5.1
, Page - 93 Original Document date June 2012; Updated March 2013
List of Proposal Attachments:
As narrative attachments are saved, they appear in a table below Add Documents.
Select Remove to delete the uploaded file and attachment type
Select View to open the file in a new browser window
Click on the Attachment Type/File Name to refresh the narrative attachment.
NOTE: For Grants.gov submissions, PDF and filename requirements apply. Refer to your sponsor opportunity or general submission guidelines for required uploads.
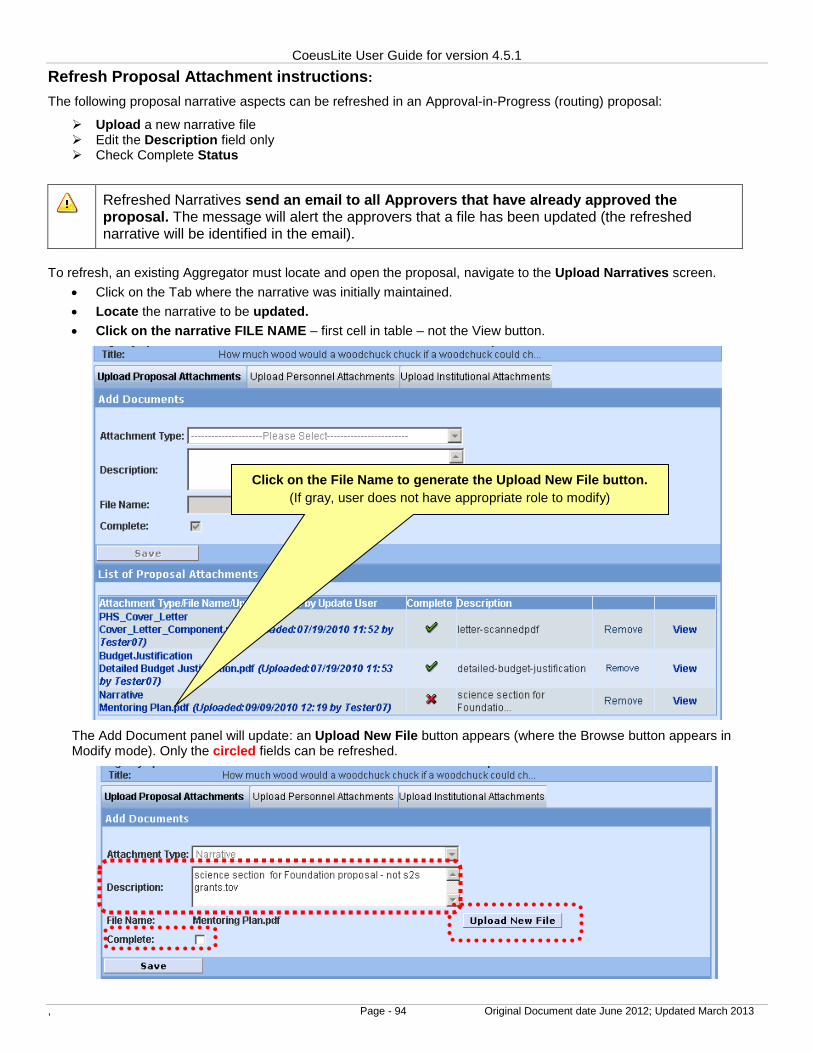
CoeusLite User Guide for version 4.5.1
, Page - 94 Original Document date June 2012; Updated March 2013
Refresh Proposal Attachment instructions:
The following proposal narrative aspects can be refreshed in an Approval-in-Progress (routing) proposal:
Upload a new narrative file Edit the Description field only Check Complete Status
Refreshed Narratives send an email to all Approvers that have already approved the proposal. The message will alert the approvers that a file has been updated (the refreshed narrative will be identified in the email).
To refresh, an existing Aggregator must locate and open the proposal, navigate to the Upload Narratives screen.
Click on the Tab where the narrative was initially maintained.
Locate the narrative to be updated.
Click on the narrative FILE NAME – first cell in table – not the View button.
The Add Document panel will update: an Upload New File button appears (where the Browse button appears in Modify mode). Only the circled fields can be refreshed.
Click on the File Name to generate the Upload New File button.
(If gray, user does not have appropriate role to modify)

CoeusLite User Guide for version 4.5.1
, Page - 95 Original Document date June 2012; Updated March 2013
Refresh an Uploaded Narrative File (replacing the existing file):
Click Upload New File, the button will convert to Browse
Click Browse; locate the file; select and save it to return to the Add Document screen.
Save.
To edit the Description only without replacing the file:
Click in the Description field and make the changes.
Save
To mark the Narrative as Complete: If a narrative was not checked as Complete prior to routing for approval, the ‘Complete’ column will display a red X. All narratives must be marked Complete in order to support final approval actions. Incomplete narratives will prohibit the proposal from completing the approval cycle. (submit to sponsor to achieve “submitted” status)
Click Complete checkbox.
Save
Refreshing Complete status: The Attachment type “Other” is incomplete.
After Refreshing the Complete status, the column contains green checks.
A narrative status can be changed from Complete to Incomplete, but this will negatively impact the final status of the proposal in the approval process.

CoeusLite User Guide for version 4.5.1
, Page - 96 Original Document date June 2012; Updated March 2013
Upload Personnel Attachment instructions:
Select the Personnel Attachment tab
Select an Attachment Type from the drop-down list
Select the Person relevant to the file being uploaded. (List generated from Investigators & Key Persons entries.)
Enter a Description (required)
Select Browse to find and upload your file
Select Save
Result: Person and file added to List of Personnel Attachments.
Select Remove to delete the uploaded file and attachment type
Select View to open the file in a new browser window
Repeat for all required Personnel and Personnel Narrative Attachment Types. Refer to your sponsor opportunity or general submission guidelines for required uploads.

CoeusLite User Guide for version 4.5.1
, Page - 97 Original Document date June 2012; Updated March 2013
Upload Institutional Attachment instructions:
Select the Institutional Attachment tab
Select an Attachment Type from the drop-down list
Enter a Description (Required)
Select Browse to find and upload your file
Select Save
Result: Narrative added to List of Institutional Attachments.
Select Remove to delete the uploaded file and attachment type
Select View to open the file in a new browser window
Repeat for all required Institutional Attachments Types.
Refer to your institutional policy or submission preparation instructions for required uploads.

CoeusLite User Guide for version 4.5.1
, Page - 98 Original Document date June 2012; Updated March 2013
15. Navigate to Institutional and Grants.Gov Validations
Select Validate to check your proposal against any validation rules which will help you verify that your proposal is complete and ready to be submitted for approval. Review any messages that appear and verify that appropriate files have been uploaded, questions answered, investigators certified, etc.
Several categories of validations may be processed on your proposal:
Coeus Proposal Validations: Several fundamental items must be completed to route your application, such as:
Answering all the Yes/No Questions
Certifying all the Investigators
Completing Mandatory Questionnaires
Marking a budget Final and Complete
Any locally-defined business rules applicable to your institute’s rules and regulations.
Coeus Budget Validations: Your local Coeus Administrator may have created Budget-specific business rules. These budget validation rules will be processed during this Validation.
Grants.gov Submission Validations: If your application is to be submitted electronically via Grants.gov and you’ve selected and saved a valid opportunity, the s2s validation check will also be performed. Examples include:
Missing a Budget (such as not selecting Modular on the Budget Summary)
Missing Narrative uploads for mandatory forms (such as Biosketches for RR Key Person form)
Missing eCommons User ID for NIH submissions
Make any corrections, additions, or changes as required and then perform the validation again. Once you pass the validations, you are ready to submit your application for approval routing.
Grants.gov Validations Use the navigation button to open the Grants.gov panel.
Click Validate to perform the Grants.gov system-to-system data validations.
If all the data requirements are met, you will be able to submit the proposal for approval routing.
If there are errors due to missing data or narratives, an alert message will present with a list of required corrections.
Proposal with validation errors cannot be submitted for approval routing.

CoeusLite User Guide for version 4.5.1
, Page - 99 Original Document date June 2012; Updated March 2013
16. Navigate to Submit for Approval
Select Submit for Approval when the proposal is complete (i.e., checked and validated) to begin routing for internal approval. The proposal must be complete for this process to begin. If it is not, Coeus will alert you to the non-compliant sections (i.e. Yes/No Questions unanswered, budget not marked final, etc.) Before you try to submit:
Finalize your proposal:
o Mark your budget as Final and Complete on the Budget Summary screen
o Navigate to the Grants.gov screen and select Validate;
Respond to any errors displayed – make the necessary corrections.
Return to the Grants.gov screen and Validate again. Repeat until the Validations Successful message is
displayed.
o Select the Validate button on the Budget Summary screen to check your proposal against any validation rules
Review the validation report if presented; fix any errors, and review any warnings.
o Make sure that you certified all the Investigators.
o Confirm that all YNQ’s are answered.
o Confirm that all mandatory Questionnaires are answered.
Click the Submit for Approval navigation button – it will run another validation:
o Read the validation report. If there are any errors, you will not be able to submit until they are resolved. If
there are only warnings and all have been addressed, click OK to close the summary.
o To submit to routing, click OK in the message box. To return to the proposal without submitting, click Cancel.
Click OK in the submission confirmation panel. You will be returned to the proposals General Info panel in View Only mode with the proposal in Approval in Progress status.
This screen displays the Business Rule Validations. Heed the Warnings (blue header) before clicking OK.
Red Error alerts must be corrected first before submitting.

CoeusLite User Guide for version 4.5.1
, Page - 100 Original Document date June 2012; Updated March 2013
17. Recall an Approval in Progress Proposal
4.5 now allows the Proposal Aggregator to "Recall" a proposal that is routing for approval. This feature was added as an alternative to requesting the proposal be rejected. The feature was designed to allow the aggregator to remove a proposal from routing/approval because of a mistake, missing elements, etc.
User should alert the approvers at the current stop of their intent to recall as a professional courtesy in case an approver is actively reviewing the proposal.
To Recall, locate and open the proposal. Use the Approval Routing button on the left Navigation panel.
Click Recall; the Add Comments screen will be presented.
In the Comments section, Type in the reason for recalling the proposal.
Click Recall, or click Back to cancel the recall.
Click Yes in the confirmation window or click cancel to return to the comments screen...
The proposal status is changed to Recalled and is now completed editable.

CoeusLite User Guide for version 4.5.1
, Page - 101 Original Document date June 2012; Updated March 2013
18. Navigate to Print
Select Print to open the print options screen o Sponsor Form Packages are for paper submittals Select Show or Hide to expand the available forms Select All to check all the forms available in the displayed group; None to deselect; or select individual forms.
o Grants.gov are the Grants.gov forms for s2s submissions (marked to Include on the Grants.gov window). Select Show or Hide to expand the available forms Select All to check all the forms available in the displayed group; None to deselect; or select individual forms. Select Print Selected to print. A new browser window will open to display your PDF document.
If maintained, in addition to the proposal Narrative, any Questionnaires will be included as bookmarks in the PDF file.

CoeusLite User Guide for version 4.5.1
, Page - 102 Original Document date June 2012; Updated March 2013
19. Navigate to Copy Proposal
Copying an existing proposal is especially useful for preparing a Grants.gov Change/Corrected, or for updating and resubmitting a similar work to the same or another sponsor: From My Proposals or Search – Find the proposal you want to copy
You must have the Aggregator Role in the original proposal to copy all Narratives and Budget.
Select the proposal title to open the proposal
Select Copy from the left navigation bar
If you are authorized to create proposals in more than one Unit, you will be prompted to select a Lead Unit.
When the next screen appears:
Active checkboxes have white backgrounds meaning there is something available to copy. If the boxy is gray, it means there is nothing
in the original proposal to copy.
Select to copy Budget – Click the checkbox if you wish to copy budget details. Once selected, choose to copy all budget
versions or only the budget version marked as Final.
Note: if you select Final Only, and no budget marked as final, no budget will be copied to your new proposal.
Select to copy Attachments (if appropriate –most of the proposal narrative files will need to be updated for all but
Change/Corrected applications).
Select to copy Questionnaire (if appropriate – you should review to revise your responses as needed.)
New Red Alert if the source proposal includes a linked Grants.gov opportunity

CoeusLite User Guide for version 4.5.1
, Page - 103 Original Document date June 2012; Updated March 2013
Review any warnings regarding Appointment Types, Period Types, or Cost Elements.
A warning will appear if any of these have been made inactive but are present in the selected budget. You will be required to remove inactive elements or select a valid alternative.
This warning will occur if a budget person has an Appointment or Period Type that has been made inactive. You may continue with the selected budget, or click ‘No’ and opt to create a new budget.
Your Copied Proposal will be created and appear on My Proposals screen – the highest proposal number on your list. Return to My Proposals to open the copied proposal.
When the Copy Proposal option includes Copy Narratives, Coeus will copy all the attachment types and uploaded files. These copied attachment types will only be valid for re-use as a system-to-system (s2s) submission if the copied proposal links to the same or similar Grants.gov opportunity. If the user navigates to Upload Attachments, all of the copied types – even Grants.gov opportunity specific - can be viewed and maintained prior to linking the newly copied proposal to a valid Grants.gov opportunity.
Update your Copied Proposal elements!
1. Adjust the start and end dates to meet your new submission requirements, if necessary.
2. Link to the Grants.gov opportunity and forms (the CFDA and/or Funding Opportunity Number info will
copy, but you still need to complete the link).
3. Recertify the Investigator(s).
4. Verify that any copied narrative types are still appropriate.
5. Adjust the budget period boundaries to reflect the new dates.
6. Review the rate tables, syncing the rates if necessary.
When Copied Proposal Narratives require special attention:
For example: NIH modified their research plan narrative requirements for submissions after January 25, 2010. Therefore, a copy of an NIH R01-style proposal submitted prior January 25, will contain all the narrative types used in the previous submission – several of these types have been retired and replaced by a single narrative. When the valid Grants.gov opportunity is linked, the user should review the current sponsor requirements and add the required narrative type for the new submission. While the extra (copied) narrative types & files won’t be transmitted to the sponsor, it is advised that the user delete the narratives that are no longer relevant to avoid confusing the internal reviewers.

CoeusLite User Guide for version 4.5.1
, Page - 104 Original Document date June 2012; Updated March 2013
20. Navigate to Email: Send Email Notifications from your proposal.
Navigate to Email
Select Add Employee to search the Coeus Person table HR data.
Select Add Non Employee to search the Rolodex.
Select Add Role to select a pre-defined approver on your Routing Map.
Selected person(s) will be inserted on to the To: line to receive your message
Enter a subject in the Subject line field provided.
Enter a message in the text box provided.
TIP: Include your name & email address in the Message content. The generated notification comes from the
Coeus Application, not your personal email account.
Select Send.
Coeus will send an email notification to the recipient(s).

CoeusLite User Guide for version 4.5.1
, Page - 105 Original Document date June 2012; Updated March 2013
21. Navigate to Add New Rolodex Entry
The Coeus Rolodex is used to maintain contact and organization information for people you want to include in your proposals that are not part of your institution. Whenever you search for non-personnel, you search in the Rolodex. Collaborators from other universities or research organizations, consultants, new hires that have been identified but not yet added to your personnel database are just a few examples of persons that would need to found in the Rolodex. Once a Coeus rolodex entry has been created, it stays in the database and is available for quick and easy entry in any proposal. Navigate to Add New Rolodex Entry
Enter the required fields
The following fields must be present for use in Grants.gov submissions. Once Rolodex entries are created, they are available to ALL Coeus users – so even if your submission is NOT Grants.gov, please fill in all these fields.
ONLY use letters (uppercase/lowercase A-Z, a-z), numbers (0-9), hyphens (-) and underscore (_). Special characters like an umlaut ü) will cause an error in transmission to Grants.gov. Even spaces between characters can cause problems for sponsors retrieving files from a successful Grants.gov submission!
Name
(Last and First),
Address (street address
on the first line; other
lines are optional),
City
State
Postal Code+4
Country
Phone,
The default status is
Active.
Select Save After saving, you’ll be provided with the new Rolodex ID:
You must have authorization from your Coeus Administrator to create Rolodex entries. Either contact your administrator to grant you the Rolodex Maintainer role, or ask your local Coeus Help-desk to create the Rolodex entry for you.

CoeusLite User Guide for version 4.5.1
, Page - 106 Original Document date June 2012; Updated March 2013
22. Navigate to Show Approval Routing (available after submitted for approval)
Locate the submitted Coeus proposal in My Proposals
Select Approval Routing
The routing path for the proposal is displayed, with the approval status displayed.
Select Show to expand the approval box
Select Hide to minimize the approval box
Select Hierarchy to see the Approval Map Hierarchy view.
Select Hide Legend to hide the panel of legend icons.
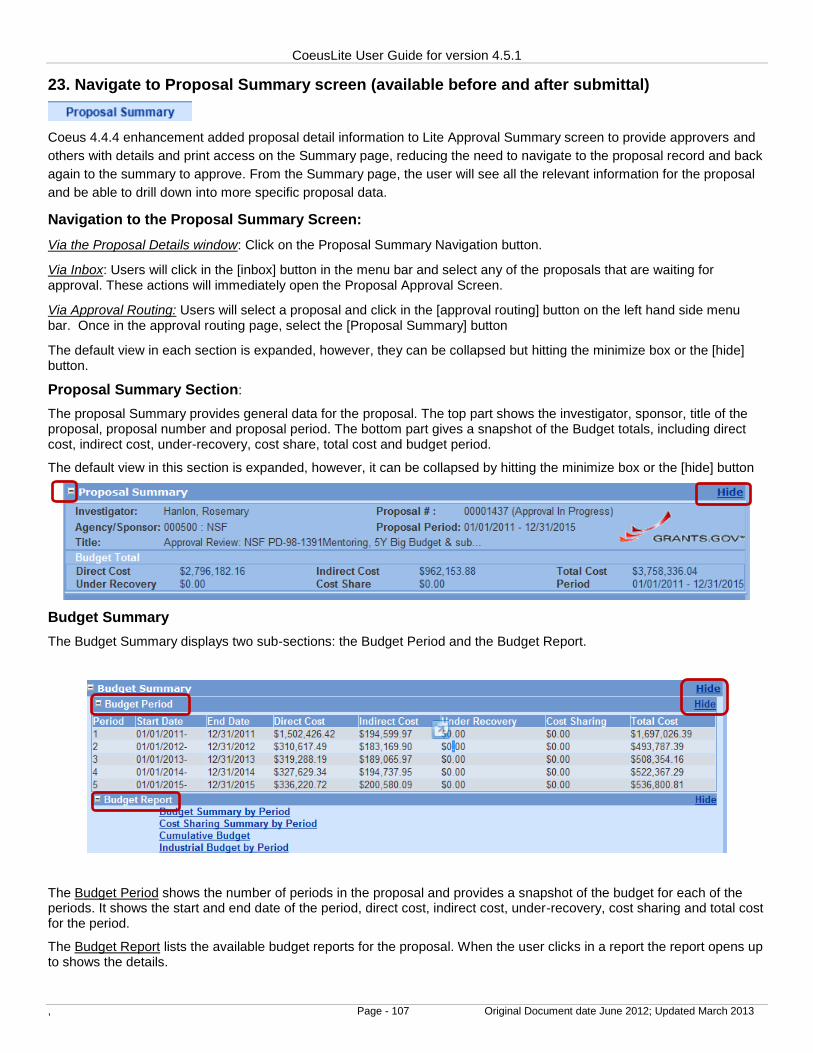
CoeusLite User Guide for version 4.5.1
, Page - 107 Original Document date June 2012; Updated March 2013
23. Navigate to Proposal Summary screen (available before and after submittal)
Coeus 4.4.4 enhancement added proposal detail information to Lite Approval Summary screen to provide approvers and
others with details and print access on the Summary page, reducing the need to navigate to the proposal record and back
again to the summary to approve. From the Summary page, the user will see all the relevant information for the proposal
and be able to drill down into more specific proposal data.
Navigation to the Proposal Summary Screen:
Via the Proposal Details window: Click on the Proposal Summary Navigation button.
Via Inbox: Users will click in the [inbox] button in the menu bar and select any of the proposals that are waiting for approval. These actions will immediately open the Proposal Approval Screen.
Via Approval Routing: Users will select a proposal and click in the [approval routing] button on the left hand side menu bar. Once in the approval routing page, select the [Proposal Summary] button
The default view in each section is expanded, however, they can be collapsed but hitting the minimize box or the [hide] button.
Proposal Summary Section:
The proposal Summary provides general data for the proposal. The top part shows the investigator, sponsor, title of the proposal, proposal number and proposal period. The bottom part gives a snapshot of the Budget totals, including direct cost, indirect cost, under-recovery, cost share, total cost and budget period.
The default view in this section is expanded, however, it can be collapsed by hitting the minimize box or the [hide] button
Budget Summary
The Budget Summary displays two sub-sections: the Budget Period and the Budget Report.
The Budget Period shows the number of periods in the proposal and provides a snapshot of the budget for each of the periods. It shows the start and end date of the period, direct cost, indirect cost, under-recovery, cost sharing and total cost for the period.
The Budget Report lists the available budget reports for the proposal. When the user clicks in a report the report opens up to shows the details.

CoeusLite User Guide for version 4.5.1
, Page - 108 Original Document date June 2012; Updated March 2013
Attachments
The attachments section displays a list with all the files attached to this proposal. When the user clicks “view” the attachment opens as a PDF. The attachments can be printed using the print button of the PDF file. This section is a snapshot of the “upload attachments” tab in the proposal details screen.
The default view in this section is expanded, however, it can be collapsed by hitting the minimize box or the [hide] button.
Special Review
The special Review section shows any special reviews of this proposal. The header of this section identifies the proposal number. The body of this section provides the type of review, the approval status, protocol number (if any), the application date, the approval date and any comments added to the special review. The comments are visible by clicking in the “view” button.
The default view for the special review section is expanded, however, it can be collapsed by hitting the minimize box or the [hide] button.
List of Investigators/Key Study Personnel
The list of investigators/key study personnel displays the PI, Co-PIs and Key persons listed in the proposal. The body of this section provides the following personnel information: Names, departments, the lead unit, roles and it also notes if the person is a multiple PI (co-investigator). The certify button allows the user to view the certification questionnaire. The “X” or the checkmark shows if the personnel have been certified or not.
The default view for the list of Investigators/key study personnel section is expanded, however, it can be collapsed by hitting the minimize box or the [hide] button.
Not Certified

CoeusLite User Guide for version 4.5.1
, Page - 109 Original Document date June 2012; Updated March 2013
Questionnaire
The questionnaire section shows the questionnaires completed when writing the proposal. This section displays the name of each questionnaire and its answers. The “print” button will provide the questionnaire in a printable PDF file format. The default view for the questionnaire section is expanded, however, it can be collapsed by hitting the minimize box or the [hide] button.
The “more” button opens the question functionality and provides the question, and possibly a brief explanation of the meaning of the particular question, the policy and regulation that applies to it.
Questionnaire Name

CoeusLite User Guide for version 4.5.1
, Page - 110 Original Document date June 2012; Updated March 2013
Proposal Print
The proposal print section provides a quick look at all the attachments provided to grants.gov and other sponsor forms attached to the proposal. The proposal print section is organized in two separated areas:
Grants.Gov
Sponsor Form Packages
The Grants.Gov area displays the forms that linked to the proposal from Grants.Gov. This data feeds from the “Grants.gov” tab in the proposal detail screens.
The user can pick the form that they want to review by ticking the box next to it or ticking any and all of the boxes at the same time. When hitting the “Print Selected” button, a PDF version of the form/s selected will open, allowing the user to review or print the form/s. The “select: All/None” buttons allow the user to select or de-select all the boxes at once.
The grants.gov area is expanded by default, but it can be collapsed by clicking the minimize box or the [hide] button.
This section shows up when the proposal is linked to grants.gov
The Sponsor Form Packages area is a summary of the Sponsor forms displayed in the print tab of the proposal detail screen. This area contains three categories:
Proposal Submission – Shows the school internal forms for routing and submission of the proposal.
Generic Print Forms – Shows the generic budget forms for the sponsor and its cover page.
Sponsor Specific Forms – Shows the specific form packages of the sponsor. If the sponsor is NSF, it would show
NFS specific form packages. If the sponsor in NIH, it would show NIH specific form packages and so on. This
section would not show if the sponsor doesn’t have any specific form packages. The sponsor may have more
than one specific form package. In this scenario, each package will be displayed as its own category.

CoeusLite User Guide for version 4.5.1
, Page - 111 Original Document date June 2012; Updated March 2013
The “show” button will open a menu that displays all the forms for each package category. From this view, the user can pick the form that they want to review by ticking the box next to it or ticking any and all of the boxes at the same time. When hitting the “Print Selected” button, a PDF version of the form/s selected will open, allowing the user to review or print the form/s.
The “select: All/None” buttons allow the user to select or de-select all the boxes at once.

CoeusLite User Guide for version 4.5.1
, Page - 112 Original Document date June 2012; Updated March 2013
24. Check on the Grants.Gov Submission Details status:
Locate the submitted Coeus proposal in My Proposals
Select Grants.gov
Select Refresh from options at the bottom of this screen to update the data
Items on this screen:
Received Date: This is timestamp for your submittal being processed into Grants.gov.
Last Modified Date: This displays the most recent refresh timestamp. Coeus refreshes submittals on an ongoing basis until the submission process is complete. Users can refresh manually.
Submission Status: Data provided back by Grants.gov. Not all sponsor supply data back via Grants.gov.
Grants Tracking Id: The Grants.gov tracking number
Agency Tracking Id: Agency-assigned tracking number – not all agencies provide data back via Grants.gov.
Notes: Information provided by Grants.gov.
Attachments: List of all uploaded documents submitted.

CoeusLite User Guide for version 4.5.1
, Page - 113 Original Document date June 2012; Updated March 2013
Appendix A: When to Contact Your ORAF Grant Officer…
1. Y ou have a complex budget and need to: Sync your period costs to a total period cost limit. Sync your period costs to a direct cost limit.
Display customizable views of your Coeus budget; e.g. display a cost-sharing column for each line item Change the budget category of a line item for this proposal, such as: publishing a Post Doc to the Senior
Personnel section of the RR Budget.
You prefer to budget by cost element (GL# not by category or description).
You want to see all expense line items in one screen while budgeting.
You have predefined, exact personnel cost totals that must appear by category, not by person.
2. You need to re-order your Proposal Personnel to change the order they are listed in the RR Key Person
(Expanded) form.
3. You need to maintain Proposal Person Citizenship details:
Some sponsor forms require citizenship details, which can only be maintained in the Premium Proposal Person Details screen (NIH Fellowship & Career Development forms).
4. You need to maintain Proposal Person details:
You need to modify the Person-Editable fields that have been defined by your institution.
You want to maintain the NIH eCommons login ID as the default id for your investigators.