Embed Size (px)
Citation preview

TO ENSURE A STRAIGHT EDGE, EXTEND THE DECKING BEYOND THE FINISHED EDGE AND TRIM AFTER ALL DECKING IS INSTALLED.
LEDGER BOARD
FASCIA
X
2" - 5"
5" MAX.
2" MIN.
5.5" MIN.
3/4" MIN.THROUGH BOLTS OR LAG SCREWS,
STAGGER IN 2 ROWS
Refer to local building codes to determine how to fasten deck to home.2" x 8" LEDGER BOARD FASTENER LAYOUT
JOIST PROTECTOR
1/8” - 1/4" THICK SPACERSENSURE CONSISTENT GAPS BETWEEN BOARDS
FASCIA
CONCRETE PAD
LEDGER BOARD
SIDINGLEDGERFLASHINGHOUSE
WRAP
CONCRETEPILE FOOTING
CONCRETESTAIR PAD
WOOD STRINGER
STEELSTRINGER
ALUMINUMSTRINGER
CONCRETE DECK BLOCK
POST BASE
SCREWPILE
RIMJOIST
POSTBRACE
POSTBLOCKING
DECKJOIST
MID-SPANJOIST BLOCKING
2-3 PLYBEAM
BRACE-TO-POSTCONNECTOR
JOIST-TO-BEAMCONNECTOR
JOISTHANGER
POST-TO-BEAMCONNECTOR
ALUMINUMPOST
POSTBLOCKING
END JOIST
4" x 4" POSTBLOCKING
STRINGERCONNECTOR
DROP-DOWNHEADER
MULTI - PLYJOIST HANGER
STAIRHEADER
DECKING-TO-JOISTCONNECTOR
COMPACTEDGRAVEL BASE
CONCEALED FLANGEJOIST HANGER
JOIST PROTECTOR
JOIST PROTECTOR
DECKING OPTIONS
BASIC CONSTRUCTION AND MATERIAL OPTIONS
RAILING OPTIONS
®CO-OP and design trademark are registered trademarks of TMC Distributing Ltd., Saskatoon S7K 3M9.
DECK Guide
GROOVE-EDGE COMPOSITE
SQUARE-EDGE COMPOSITE
COMPOSITE FASCIA
2” x 6” DECKING
5/4 RADIUS EDGE
TREATED WOOD FRAME METAL PICKETS
ALUMINUM FRAME GLASS PANEL
ALUMINUM FRAME AND PICKETS
FRAMELESS GLASS
TREATED WOOD
8194 HABS Deck Guide 8.5x14.indd 1 2018-11-14 1:19 PM
1. Research deck design and construction. Alw
ays make sure to check local
building codes prior to starting your deck project.
2. Establish the deck location. Check for objects such as vents, m
eters, air conditioners, plum
bing fixtures, etc. that may im
pact deck design and/or construction.
3. D
etermine how
the deck will be supported. Establish ledger board,
footing, post, beam, joist, bridging, stair, guard rail and handrail locations.
4. Confirm
footing locations. If screw or concrete piles are planned, have all
underground utilities located.
5. Confirm
the staircase design. Calculate the number of steps from
the finished deck surface to the ground, as w
ell as the distance the treads will
project outward from
the deck.
6. M
ake a “Site Plan” drawing. Show
the property lines, house and deck. Include the lot dim
ensions, overall deck dimensions and distance betw
een the deck and property lines in all directions.
7. M
ake a scaled “Plan View
” drawing. Show
all structural components of
the deck from a top-dow
n perspective. Include dimensions.
8. M
ake a scaled “Front Elevation” drawing. Show
the structural com
ponents of the deck from a straight-on, front-view
perspective. Include the dim
ensions.
9. D
evelop a materials list or take your deck plan to your local Co-op
Hom
e Centre for recomm
ended materials and a price quote.
10. Secure a building permit. Your draw
ings and material list w
ill be required.
• Tape measure
• Pencil• G
round stakes• M
ason line• Plum
b bob• Spade• Fram
ing hamm
er• Fram
ing square• U
tility knife• Pry bar
• Chalk line• Level• D
rill & bits
• Wrenches
• Caulking gun• H
andsaw• Circular saw• Safety glasses• Ear plugs
• Tool belt• G
loves• Sledge-
hamm
er• Speed square• Bar clam
p• Posthole
auger• Laser level• Construction
adhesive
• Chisel• M
etal snips• M
itre saw• Im
pact driver• Jigsaw• Table saw• Router• Sander
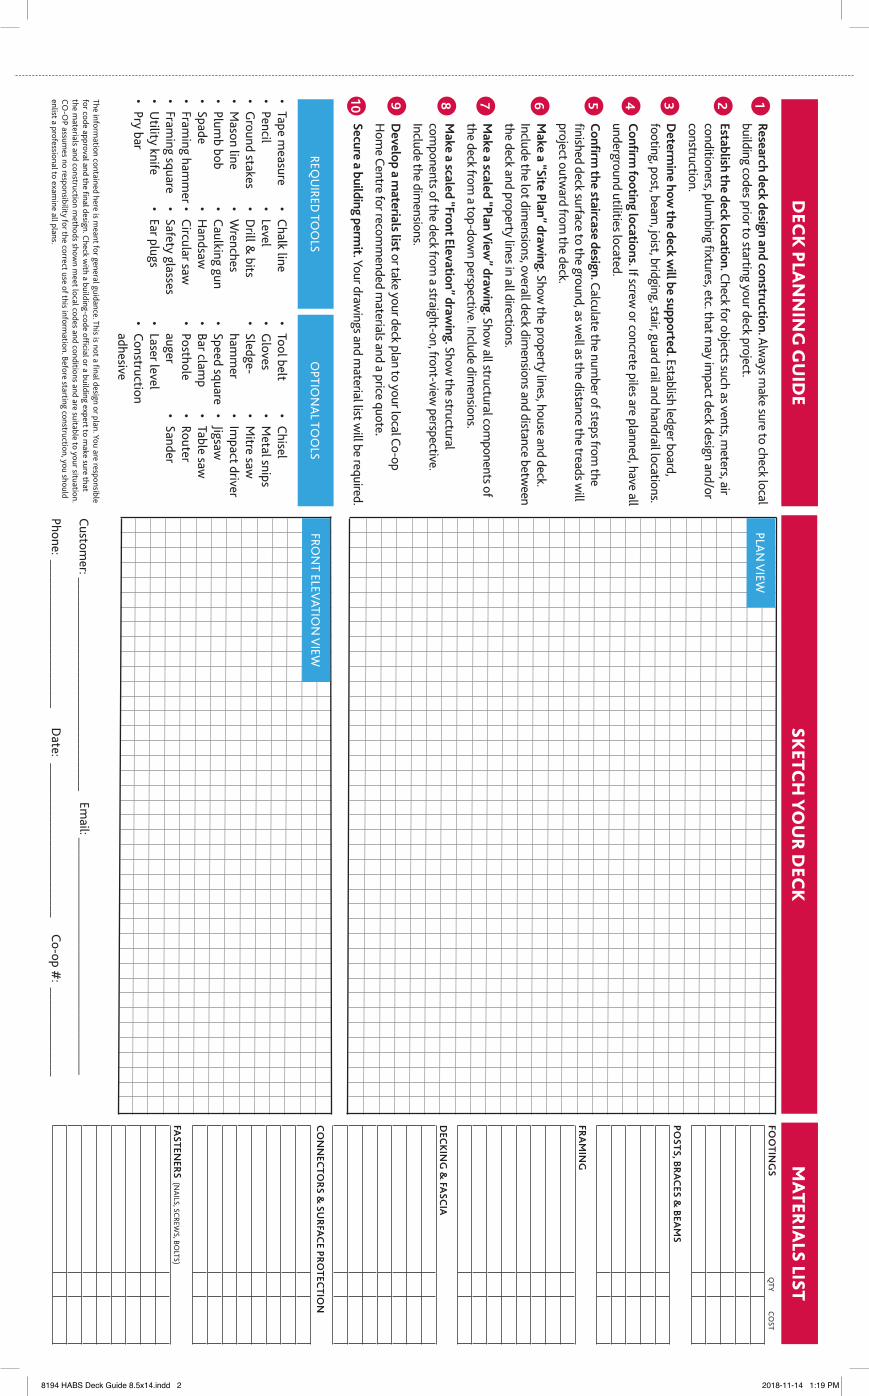
12345678910
SKETC
H YO
UR
DEC
KM
ATERIA
LS LISTD
ECK
PLAN
NIN
G G
UID
E
Date: __________________________
Customer: ____________________________________
Phone: _________________________Co-op #
: _______________
Email: ________________________________________
POSTS, BRAC
ES & BEA
MS
DEC
KING
& FA
SCIA
FASTEN
ERS(N
AILS, SCREWS, BO
LTS)
FOO
TING
SQ
TYCO
ST
FRAM
ING
CO
NN
ECTO
RS & SU
RFACE PRO
TECTIO
N
The information contained here is m
eant for general guidance. This is not a final design or plan. You are responsible for code approval and the final design. Check w
ith a building-code official or a building expert to make sure that
the materials and construction m
ethods shown m
eet local codes and conditions and are suitable to your situation. CO
-OP assum
es no responsibility for the correct use of this information. Before starting construction, you should
enlist a professional to examine all plans.
REQU
IRED TO
OLS
PLAN V
IEW
FRON
T ELEVATION
VIEW
OPTIO
NAL TO
OLS
8194 HABS Deck Guide 8.5x14.indd 2 2018-11-14 1:19 PM