Embed Size (px)
Citation preview

1
CM Truck Beds Owner’s ManualTable of Contents
Welcome.....................................................................................2Warranty.....................................................................................3SS Truck Bed Bed Installation, Fuel Filler Assembly Installation..............................8RD Truck Bed Bed Installation, Fuel Filler Assembly Installation..............................10SK Truck Bed Bed Installation, Fuel Filler Assembly Installation.............................12ER Truck Bed Bed Installation, Fuel Filler Assembly Installation.............................14TM Truck Bed Bed Installation, Fuel Filler Assembly Installation.............................16WD Truck Bed Bed Installation, Fuel Filler Assembly Installation.............................18GP Truck Bed Bed Installation, Fuel Filler Assembly Installation.............................20PL Truck Bed Bed Installation, Fuel Filler Assembly Installation.............................22RD-AL Truck Bed Bed Installation, Fuel Filler Assembly Installation.............................24SK-AL Truck Bed Bed Installation, Fuel Filler Assembly Installation.............................26PL-AL Truck Bed Bed Installation, Fuel Filler Assembly Installation.............................28ER-AL Truck Bed Bed Installation, Fuel Filler Assembly Installation.............................30Technical Information.......................................................................32Apendix..............................................................................................35

2
WELCOME TO THE CM TRUCK BEDS FAMILYThank you for purchasing your new CM truck bed. You have now joined an ever-growing team of quality conscious truck equipment buyers.
CM Truck Beds is a wholly owned subsidiary of Contract Manufacturer, L.L.C. manufacturing under the name of “CM Truck Beds.” Our beds are designed and manufactured to give you many years of reliable service. The combination of quality materials and top craftsmanship continues to put CM Truck Beds above the rest.
The safety and comfort of your cargo is the highest priority in every CM design and manufacturing phase. However, as a responsible truck bed owner, it is your responsibility to be familiar with your new truck bed and to follow safety guidelines and the recommended maintenance instructions to ensure you have many years of safe hauling.
As you begin to use your new CM truck bed, this Owner’s Manual will allow you to become more familiar with the operation, maintenance, and care of your truck bed. This manual will reference excerpts from other manufacturer’s manuals which have components on CM Truck Beds products.
Disclaimer
All truck beds manufactured by CM Truck Beds are designed to be used within the specific engineering guidelines. It is suggested that all truck beds are to be used as designated by the manufacturer.
CM Truck Beds reserves the right to make any change in color,design or construction as necessary for engineering. All visual representation, specification, and guidelines are based on the latest product information available at the time of this publication. All truck beds manufactured by Contract Manufacturer, L.L.C., d.b.a. “CM Truck Beds” are covered in this publication, with minor exceptions. For more information, call us at 580-564-7537 or, you can write us at 103 Titan Rd, Kingston, OK 73439, e-mail: [email protected], web site: www.cmtruckbeds.com

3
CM Truck Beds Manufacturer’s Limited WarrantyBailment Distributor:
MANUFACTURER’S LIMITED WARRANTY ON TRUCK BED PRODUCTS MANUFACTURED BY CONTRACT MANUFACTURER, L.L.C. AND SOLD UNDER THE “CM TRUCK BEDS” LABEL ARE SUBJECT TO SPECIFIC AND LIMITED WARRANTIES AS FOLLOWS:
Contract Manufacturer, L.L.C. warrants that each CM truck body, bulkhead, and stake rack bought and used by the original purchaser under normal use in the Continental United States will be free from defects in materials and workmanship for three (3) years or (36,000) miles following the original purchase, subject to the requirements, exclusions and limitations stated below which will be strictly applied. For warranty registration instructions please visit us at: www.cmtruckbeds.com
TO VALIDATE YOUR WARRANTYIn order to validate this Limited Warranty, the AUTHORIZED CM TRUCK BED UPFITTER must complete the warranty card or visit the online registration page at https://warranty.cmtruckbeds.com IF WARRANTY REGISTRATION IS NOT COMPLETED, ALL EXPRESS WARRANTIES CONTAINED IN THIS LIMITED WARRANTY SHALL BE NULL AND VOID.
THREE (3) YEAR (36,000) MILE LIMITED WARRANTYSubject to the requirements, exclusions and limitations stated below, the structure of the CM truck body is warranted to the original retail purchaser against defects in materials and workmanship by Contract Manufacturer, L.L.C., arising from normal use for three (3) years or (36,000) miles from the date of purchase.
ONE (1) YEAR LIMITED WARRANTYContract Manufacturer, L.L.C. warrants its finishes to be consistent with industry standards for one (1) year after the date of original retail purchase, with the exceptions of “normal use” limitations set forth below and of deterioration due to use, physical damage, or exposure, such as chipping, scratching, fading, cracks in caulk seams, road salt, tar, or pressure washing. Rust streaking originating from areas where it is virtually impossible to achieve total paint or powder coat coverage, i.e. behind rub rails or where two or more metals adjoin, are considered to be consistent with industry standards and not covered.
NORMAL USE, NO REPAIRS, ALTERATIONS, OR TRANSFERSThis Limited Warranty covers only defects in original components which arise

4
from normal use and does not apply if the truck body is subject to negligence, accident, abuse, misuse, overload, corrosive materials, improper installation, lack of proper maintenance, has been repaired or altered without the prior written consent of Contract Manufacturer, L.L.C, or is transferred from the original chassis of installation. Normal wear items, including but not limited to lights and doors, will not be replaced due to wear.
TRANSPORTATION COST EXCLUDEDTransportation of any truck body to and/or from the dealer or any approved repair facility shall be the responsibility of the truck bed owner. Contract Manufacturer, L.L.C. shall not be liable for any such costs.
PRIOR WRITTEN CONSENT REQUIRED AND RETURN OF DEFECTIVE PARTS REQUIREDNo reimbursement will be made to any dealer or owner for repairs made without the prior written consent of Contract Manufacturer, L.L.C. Any defective part(s) must be sent by prepaid freight to Contract Manufacturer, L.L.C. in order to qualify for replacement or reimbursement under this Limited Warranty.
OTHER EXCLUSIONSThis Limited Warranty applies exclusively to the above described truck bodies, bulkheads, and stake racks manufactured by Contract Manufacturer, L.L.C. Any other products manufactured by Contract Manufacturer, L.L.C. are specifically excluded from this warranty. Contract Manufacturer, L.L.C. expressly disclaims and excludes any responsibility or liability for any materials or workmanship related to the installation of a truck bed onto a vehicle chassis by any other person or company, including any incidental or consequential damages or contingent liabilities arising there from. Authorized repairs do not extend the term of this Limited Warranty.
LIMITATIONSTHE SOLE RESPONSIBILITY OF CONTRACT MANUFACTURER, L.L.C. UNDER THIS LIMITED WARRANTY SHALL BE TO REPAIR AND REPLACE PARTS AT THE CM TRUCK BED FACTORY; HOWEVER, UNDER UNUSUAL CIRCUMSTANCES WITH PRIOR WRITTEN APPROVAL AND AT CONTRACT MANUFACTURER, L.L.C.’S DISCRETION, A REASONABLE ALLOWANCE MAY BE MADE FOR REPAIR OFF SITE BY AN AUTHORIZED CM TRUCK BEDS’ DISTRIBUTOR OR BY ANOTHER CM APPROVED PERSON(S) OR COMPANY. ALL OTHER OBLIGATIONS OR LIABILITIES, INCLUDING INCIDENTAL OR CONSEQUENTIAL DAMAGES OR CONTINGENT LIABILITIES ARISING OUT OF THE FAILURE OF ANY PARTS TO OPERATE PROPERLY ARE HEREBY EXCLUDED, INCLUDING BUT NOT LIMITED TO ANY DAMAGES RESULTING FROM LOSS OF USE, INCONVENIENCE, LOSS OF TIME, COMMERCIAL LOSS OR ANY OTHER TYPE OF DAMAGES, GENERAL OR SPECIFIC, FORESEEN OR UNFORESEEN, UNLESS APPLICABLE STATE LAW PROVIDES OTHERWISE.

5
DISCLAIMERSTHIS WARRANTY IS EXPRESSLY IN LIEU OF ALL OTHER EXPRESSED WARRANTIES AND REPRESENTATIONS. CONTRACT MANUFACTURER, L.L.C. MAKES NO REPRESENTATION OR WARRANTY OF ANY KIND, EXPRESS OR IMPLIED, WITH RESPECT TO CM TRUCK BEDS WHETHER AS TO MERCHANTABILITY, FITNESS FOR A PARTICULAR PURPOSE OR ANY OTHER MATTER. NO ONE, INCLUDING AN AUTHORIZED CM TRUCK BEDS DEALER, IS AUTHORIZED TO MAKE FURTHER OR ADDITIONAL WARRANTIES ON BEHALF OF CONTRACT MANUFACTURER, L.L.C. ALL IMPLIED WARRANTIES OF MERCHANTABILITY AND FITNESS FOR INTENDED USE ARE LIMITED TO WARRANTY PERIODS STATED ABOVE, UNLESS ANY APPLICABLE STATE LAW PROVIDES OTHERWISE.

6
SS Bed RD Bed
SK Bed ER Bed
TM BedWD Bed
PL Bed
GP Bed

7
RD-AL Bed
PL-AL Bed
SK-AL Bed
ER-AL Bed

8
SS BedBED INSTALLATION
To determine which size CM Truck Bed you need, use the following guide: Length x Width x CA (cab to axle) x Runner
ExplanationBefore starting installation check all lights on truck to ensure proper operation and diconnect battery before performing installation. Measure frame on truck and runners on bed to make sure you have the right bed for the application. Position the bed so that the headache rack does not stick up over the cab of the truck more than 1 ½”. There should be 2” of space between the cab and the headache rack on the bed. Attach fastener on each side of the front, middle, and rear; bolt to the frame, and then either bolt the fastener to your bed runners or weld them up solid. *
* NOTE: Attachment components are not supplied. Please use adequatematerial to fasten the frame and bed together. For any questions concerning materials, please contact the manufacturer.
* CAUTION: Observe safety precautions when using a welder on yourvehicle. These are only recommendations and installation design is theresponsibility of the installer. Follow vehicle manufacturer specificationswhen attaching plates to the truck frame.
Cab to Axle (CA)
Length
Width
Runner

9
FUEL FILLER ASSEMBLY INSTALLATION
* WARNING: Installation requires cutting and grinding. Keep all ignition sources away when working with fuel tank filler pipe, or serious injury or death can occur.
* CAUTION: Fuel tank filler pipe must be installed according to vehicle requirements. Please read Owner’s Manual. Follow fuel tank pipe manufacturer’s instruction or serious injury can occur.
For Wiring Diagram See Appendix A

10
RD BedBED INSTALLATION
To determine which size CM Truck Bed you need, use the following guide: Length x Width x CA (cab to axle) x Runner
ExplanationBefore starting installation check all lights on truck to ensure proper operation and diconnect battery before performing installation. Measure frame on truck and runners on bed to make sure you have the right bed for the application. Position the bed so that the headache rack does not stick up over the cab of the truck more than 1 ½”. There should be 2” of space between the cab and the headache rack on the bed. Attach fastener on each side of the front, middle, and rear; bolt to the frame, and then either bolt the fastener to your bed runners or weld them up solid. *
* NOTE: Attachment components are not supplied. Please use adequatematerial to fasten the frame and bed together. For any questions concerning materials, please contact the manufacturer.
* CAUTION: Observe safety precautions when using a welder on yourvehicle. These are only recommendations and installation design is theresponsibility of the installer. Follow vehicle manufacturer specificationswhen attaching plates to the truck frame.
Cab to Axle (CA)
Length
Width
Runner

11
FUEL FILLER ASSEMBLY INSTALLATION
* WARNING: Installation requires cutting and grinding. Keep all ignition sources away when working with fuel tank filler pipe, or serious injury or death can occur.
* CAUTION: Fuel tank filler pipe must be installed according to vehicle requirements. Please read Owner’s Manual. Follow fuel tank pipe manufacturer’s instruction or serious injury can occur.
For Wiring Diagram See Appendix A

12
SK BedBED INSTALLATION
To determine which size CM Truck Bed you need, use the following guide: Length x Width x CA (cab to axle) x Runner
ExplanationBefore starting installation check all lights on truck to ensure proper operation and diconnect battery before performing installation. Measure frame on truck and runners on bed to make sure you have the right bed for the application. Position the bed so that the headache rack does not stick up over the cab of the truck more than 1 ½”. There should be 2” of space between the cab and the headache rack on the bed. Attach fastener on each side of the front, middle, and rear; bolt to the frame, and then either bolt the fastener to your bed runners or weld them up solid. *
* NOTE: Attachment components are not supplied. Please use adequatematerial to fasten the frame and bed together. For any questions concerning materials, please contact the manufacturer.
* CAUTION: Observe safety precautions when using a welder on yourvehicle. These are only recommendations and installation design is theresponsibility of the installer. Follow vehicle manufacturer specificationswhen attaching plates to the truck frame.
Cab to Axle (CA)
Length
Width
Runner

13
FUEL FILLER ASSEMBLY INSTALLATION
* WARNING: Installation requires cutting and grinding. Keep all ignition sources away when working with fuel tank filler pipe, or serious injury or death can occur.
* CAUTION: Fuel tank filler pipe must be installed according to vehicle requirements. Please read Owner’s Manual. Follow fuel tank pipe manufacturer’s instruction or serious injury can occur.
For Wiring Diagram See Appendix A

14
ER BedBED INSTALLATION
To determine which size CM Truck Bed you need, use the following guide: Length x Width x CA (cab to axle) x Runner
ExplanationBefore starting installation check all lights on truck to ensure proper operation and diconnect battery before performing installation. Measure frame on truck and runners on bed to make sure you have the right bed for the application. Position the bed so that the headache rack does not stick up over the cab of the truck more than 1 ½”. There should be 2” of space between the cab and the headache rack on the bed. Attach fastener on each side of the front, middle, and rear; bolt to the frame, and then either bolt the fastener to your bed runners or weld them up solid. *
* NOTE: Attachment components are not supplied. Please use adequatematerial to fasten the frame and bed together. For any questions concerning materials, please contact the manufacturer.
* CAUTION: Observe safety precautions when using a welder on yourvehicle. These are only recommendations and installation design is theresponsibility of the installer. Follow vehicle manufacturer specificationswhen attaching plates to the truck frame.
Cab to Axle (CA)
Length
Width
Runner

15
FUEL FILLER ASSEMBLY INSTALLATION
* WARNING: Installation requires cutting and grinding. Keep all ignition sources away when working with fuel tank filler pipe, or serious injury or death can occur.
* CAUTION: Fuel tank filler pipe must be installed according to vehicle requirements. Please read Owner’s Manual. Follow fuel tank pipe manufacturer’s instruction or serious injury can occur.
For Wiring Diagram See Appendix A

16
TM BedBED INSTALLATION
To determine which size CM Truck Bed you need, use the following guide: Length x Width x CA (cab to axle) x Runner
ExplanationBefore starting installation check all lights on truck to ensure proper operation and diconnect battery before performing installation. Measure frame on truck and runners on bed to make sure you have the right bed for the application. Position the bed so that the headache rack does not stick up over the cab of the truck more than 1 ½”. There should be 2” of space between the cab and the headache rack on the bed. Attach fastener on each side of the front, middle, and rear; bolt to the frame, and then either bolt the fastener to your bed runners or weld them up solid. *
* NOTE: Attachment components are not supplied. Please use adequatematerial to fasten the frame and bed together. For any questions concerning materials, please contact the manufacturer.
* CAUTION: Observe safety precautions when using a welder on yourvehicle. These are only recommendations and installation design is theresponsibility of the installer. Follow vehicle manufacturer specificationswhen attaching plates to the truck frame.
Cab to Axle (CA)
Length
Width
Runner

17
FUEL FILLER ASSEMBLY INSTALLATION
* WARNING: Installation requires cutting and grinding. Keep all ignition sources away when working with fuel tank filler pipe, or serious injury or death can occur.
* CAUTION: Fuel tank filler pipe must be installed according to vehicle requirements. Please read Owner’s Manual. Follow fuel tank pipe manufacturer’s instruction or serious injury can occur.
For Wiring Diagram See Appendix A

18
WD BedBED INSTALLATION
Cab to Axle (CA)
Length
Width
Runner
To determine which size CM Truck Bed you need, use the following guide: Length x Width x CA (cab to axle) x Runner
ExplanationBefore starting installation check all lights on truck to ensure proper operation and diconnect battery before performing installation. Measure frame on truck and runners on bed to make sure you have the right bed for the application. Position the bed so that the headache rack does not stick up over the cab of the truck more than 1 ½”. There should be 2” of space between the cab and the headache rack on the bed. Attach fastener on each side of the front, middle, and rear; bolt to the frame, and then either bolt the fastener to your bed runners or weld them up solid. *
* NOTE: Attachment components are not supplied. Please use adequatematerial to fasten the frame and bed together. For any questions concerning materials, please contact the manufacturer.
* CAUTION: Observe safety precautions when using a welder on yourvehicle. These are only recommendations and installation design is theresponsibility of the installer. Follow vehicle manufacturer specificationswhen attaching plates to the truck frame.

19
FUEL FILLER ASSEMBLY INSTALLATION
* WARNING: Installation requires cutting and grinding. Keep all ignition sources away when working with fuel tank filler pipe, or serious injury or death can occur.
* CAUTION: Fuel tank filler pipe must be installed according to vehicle requirements. Please read Owner’s Manual. Follow fuel tank pipe manufacturer’s instruction or serious injury can occur.
For Wiring Diagram See Appendix A

20
GP BedBED INSTALLATION
To determine which size CM Truck Bed you need, use the following guide: Length x Width x CA (cab to axle) x Runner
ExplanationBefore starting installation check all lights on truck to ensure proper operation and diconnect battery before performing installation. Measure frame on truck and runners on bed to make sure you have the right bed for the application. Position the bed so that the headache rack does not stick up over the cab of the truck more than 1 ½”. There should be 2” of space between the cab and the headache rack on the bed. Attach fastener on each side of the front, middle, and rear; bolt to the frame, and then either bolt the fastener to your bed runners or weld them up solid. *
* NOTE: Attachment components are not supplied. Please use adequatematerial to fasten the frame and bed together. For any questions concerning materials, please contact the manufacturer.
* CAUTION: Observe safety precautions when using a welder on yourvehicle. These are only recommendations and installation design is theresponsibility of the installer. Follow vehicle manufacturer specificationswhen attaching plates to the truck frame.
Cab to Axle (CA)
Length
Width
Runner

21
FUEL FILLER ASSEMBLY INSTALLATION
* WARNING: Installation requires cutting and grinding. Keep all ignition sources away when working with fuel tank filler pipe, or serious injury or death can occur.
* CAUTION: Fuel tank filler pipe must be installed according to vehicle requirements. Please read Owner’s Manual. Follow fuel tank pipe manufacturer’s instruction or serious injury can occur.
For Wiring Diagram See Appendix A

22
PL BedBED INSTALLATION
Cab to Axle (CA)
Length
Width
Runner
To determine which size CM Truck Bed you need, use the following guide: Length x Width x CA (cab to axle) x Runner
ExplanationBefore starting installation check all lights on truck to ensure proper operation and diconnect battery before performing installation. Measure frame on truck and runners on bed to make sure you have the right bed for the application. Position the bed so that the headache rack does not stick up over the cab of the truck more than 1 ½”. There should be 2” of space between the cab and the headache rack on the bed. Attach fastener on each side of the front, middle, and rear; bolt to the frame, and then either bolt the fastener to your bed runners or weld them up solid. *
* NOTE: Attachment components are not supplied. Please use adequatematerial to fasten the frame and bed together. For any questions concerning materials, please contact the manufacturer.
* CAUTION: Observe safety precautions when using a welder on yourvehicle. These are only recommendations and installation design is theresponsibility of the installer. Follow vehicle manufacturer specificationswhen attaching plates to the truck frame.

23
FUEL FILLER ASSEMBLY INSTALLATION
* WARNING: Installation requires cutting and grinding. Keep all ignition sources away when working with fuel tank filler pipe, or serious injury or death can occur.
* CAUTION: Fuel tank filler pipe must be installed according to vehicle requirements. Please read Owner’s Manual. Follow fuel tank pipe manufacturer’s instruction or serious injury can occur.
For Wiring Diagram See Appendix A

24
RD-AL BedBED INSTALLATION
To determine which size CM Truck Bed you need, use the following guide: Length x Width x CA (cab to axle) x Runner
ExplanationBefore starting installation check all lights on truck to ensure proper operation and diconnect battery before performing installation. Measure frame on truck and runners on bed to make sure you have the right bed for the application. Position the bed so that the headache rack does not stick up over the cab of the truck more than 1 ½”. There should be 2” of space between the cab and the headache rack on the bed. Attach fastener on each side of the front, middle, and rear; bolt to the frame, and then either bolt the fastener to your bed runners or weld them up solid. *
* NOTE: Attachment components are not supplied. Please use adequatematerial to fasten the frame and bed together. For any questions concerning materials, please contact the manufacturer.
* CAUTION: Observe safety precautions when using a welder on yourvehicle. These are only recommendations and installation design is theresponsibility of the installer. Follow vehicle manufacturer specificationswhen attaching plates to the truck frame.
Cab to Axle (CA)
Length
Width
Runner

25
FUEL FILLER ASSEMBLY INSTALLATION
* WARNING: Installation requires cutting and grinding. Keep all ignition sources away when working with fuel tank filler pipe, or serious injury or death can occur.
* CAUTION: Fuel tank filler pipe must be installed according to vehicle requirements. Please read Owner’s Manual. Follow fuel tank pipe manufacturer’s instruction or serious injury can occur.
For Wiring Diagram See Appendix A

26
SK-AL BedBED INSTALLATION
To determine which size CM Truck Bed you need, use the following guide: Length x Width x CA (cab to axle) x Runner
ExplanationBefore starting installation check all lights on truck to ensure proper operation and diconnect battery before performing installation. Measure frame on truck and runners on bed to make sure you have the right bed for the application. Position the bed so that the headache rack does not stick up over the cab of the truck more than 1 ½”. There should be 2” of space between the cab and the headache rack on the bed. Attach fastener on each side of the front, middle, and rear; bolt to the frame, and then either bolt the fastener to your bed runners or weld them up solid. *
* NOTE: Attachment components are not supplied. Please use adequatematerial to fasten the frame and bed together. For any questions concerning materials, please contact the manufacturer.
* CAUTION: Observe safety precautions when using a welder on yourvehicle. These are only recommendations and installation design is theresponsibility of the installer. Follow vehicle manufacturer specificationswhen attaching plates to the truck frame.
Cab to Axle (CA)
Length
Width
Runner

27
FUEL FILLER ASSEMBLY INSTALLATION
* WARNING: Installation requires cutting and grinding. Keep all ignition sources away when working with fuel tank filler pipe, or serious injury or death can occur.
* CAUTION: Fuel tank filler pipe must be installed according to vehicle requirements. Please read Owner’s Manual. Follow fuel tank pipe manufacturer’s instruction or serious injury can occur.
For Wiring Diagram See Appendix A
28
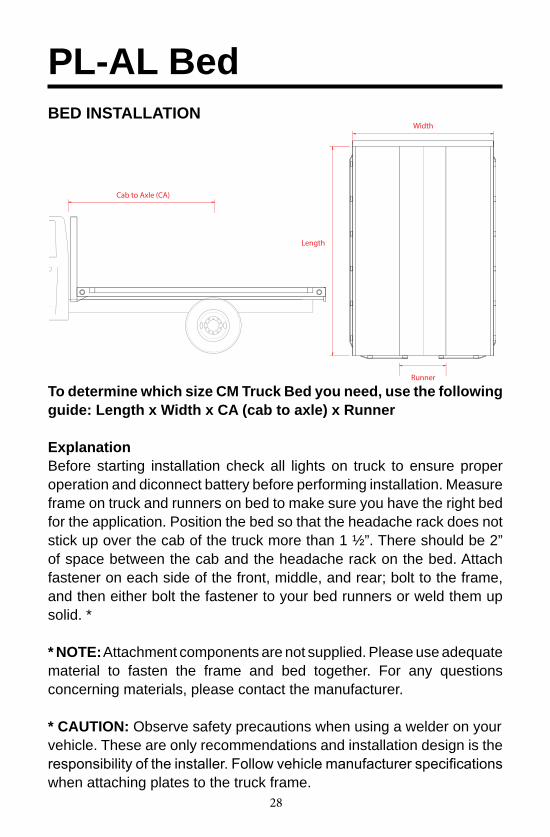
PL-AL BedBED INSTALLATION
Cab to Axle (CA)
Length
Width
Runner
To determine which size CM Truck Bed you need, use the following guide: Length x Width x CA (cab to axle) x Runner
ExplanationBefore starting installation check all lights on truck to ensure proper operation and diconnect battery before performing installation. Measure frame on truck and runners on bed to make sure you have the right bed for the application. Position the bed so that the headache rack does not stick up over the cab of the truck more than 1 ½”. There should be 2” of space between the cab and the headache rack on the bed. Attach fastener on each side of the front, middle, and rear; bolt to the frame, and then either bolt the fastener to your bed runners or weld them up solid. *
* NOTE: Attachment components are not supplied. Please use adequatematerial to fasten the frame and bed together. For any questions concerning materials, please contact the manufacturer.
* CAUTION: Observe safety precautions when using a welder on yourvehicle. These are only recommendations and installation design is theresponsibility of the installer. Follow vehicle manufacturer specificationswhen attaching plates to the truck frame.

29
FUEL FILLER ASSEMBLY INSTALLATION
* WARNING: Installation requires cutting and grinding. Keep all ignition sources away when working with fuel tank filler pipe, or serious injury or death can occur.
* CAUTION: Fuel tank filler pipe must be installed according to vehicle requirements. Please read Owner’s Manual. Follow fuel tank pipe manufacturer’s instruction or serious injury can occur.
For Wiring Diagram See Appendix A

30
ER-AL BedBED INSTALLATION
To determine which size CM Truck Bed you need, use the following guide: Length x Width x CA (cab to axle) x Runner
ExplanationBefore starting installation check all light on truck to ensure proper operation and diconnect battery before performing installation. Measure frame on truck and runners on bed to make sure you have the right bed for the application. Position the bed so that the headache rack does not stick up over the cab of the truck more than 1 ½”. There should be 2” of space between the cab and the headache rack on the bed. Attach fastener on each side of the front, middle, and rear; bolt to the frame, and then either bolt the fastener to your bed runners or weld them up solid. *
* NOTE: Attachment components are not supplied. Please use adequatematerial to fasten the frame and bed together. For any questions concerning materials, please contact the manufacturer.
* CAUTION: Observe safety precautions when using a welder on yourvehicle. These are only recommendations and installation design is theresponsibility of the installer. Follow vehicle manufacturer specificationswhen attaching plates to the truck frame.
Cab to Axle (CA)
Length
Width
Runner

31
FUEL FILLER ASSEMBLY INSTALLATION
* WARNING: Installation requires cutting and grinding. Keep all ignition sources away when working with fuel tank filler pipe, or serious injury or death can occur.
* CAUTION: Fuel tank filler pipe must be installed according to vehicle requirements. Please read Owner’s Manual. Follow fuel tank pipe manufacturer’s instruction or serious injury can occur.
For Wiring Diagram See Appendix A
32
Technical InformationALTERATIONS OR MODIFICATIONS TO YOURCM TRUCK BEDIf you plan to make any alterations or modifications to your CM truck bed, check with CM Truck Beds. Sometimes what appears to be a mi-nor alteration or modification could compromise the integrity of the truck bed.
Some manipulation of faulty exhaust systems may be required per manufacturing specifications.
Alterations to the wiring systems on CM truck beds should only be per-formed by a qualified professional technician.
For helpful information on locating a technician, contact your CM Truck Beds dealer.
Go online to OEM Body Builder website for specific specs of your ve-hicle.
GENERAL MAINTENANCE
All ModelsAll hinges, latches, etc. should be periodically lubricated for maximum efficiency and longevity.
TM ModelGas shocks should be checked periodically for wear. Replace if neces-sary.
POWDER COATING
About Powder CoatingPowder coating is an advanced method of applying a decorative and protective finish to a wide range of materials and products. The powder used for the process is a mixture of finely ground particles of pigment and resin, which is sprayed onto a surface to be coated. The charged powder particles adhere to the electrically grounded surfaces until heat-ed and fused into a smooth coating in a curing oven. The result is a uniform, durable, high-quality, and attractive finish.

33
Powder coating gives one of the most longest-lasting, and most col-or-durable quality finishes available. Additionally, powder coated sur-faces are more resistant to chipping, scratching, fading, and wearing than other finishes.
Please note: Any beds which are not black in color may be painted with wet paint and will not be powder coated.
ALUMINUM SURFACESCleaning any aluminum surface is recommended to be performed by a professional cleaning service. Acid, harsh detergent, and chemical washes are not recommended.
* CAUTION: Certain chemicals can burn or stain aluminum surfaces. Always consult professional cleaning services about the proper care of your aluminum product.
BUMPERBumper Hitch rating for trailer up to and including Class 4 with maxi-mum Gross Vehicle Weight Rating (GVWR) of 6577 KG (14,500 lbs) GVWR.
TURNING RADIUSAfter installing your new CM Truck Bed, check distance from your ball to your headache rack. If you intend on pulling a gooseneck trailer, be sure to check your turning radius and make sure you have enough clearance for the nose of your trailer. CM is not responsible for damage to truck, truck bed, or trailer do to a turning radius issue.
GOOSENECK BALLGooseneck Hitch rating for trailers are rated up to (11,793 KG).
LIGHTINGAll CM Truck Beds are equipped with sealed LED lighting replacement lights and can be purchased by contacting Tex Trail Trailer Parts at 877-795-3138.

34
TOOL BOXESIt is recommended that you maintain the seals of the toolboxes on your CM Truck Bed by checking the D bulb weather-stripping on the box every three months. Ensure that the weather-stripping is affixed to the inner rim of the box and that it is not cracked. Cracking can cause leak-ing and damage to contents in the bed. All CM Toolboxes are equipped with slam latches or compression T handle latches. Additional or replacement tool boxes can be purchased through Tex Trail by calling 580-795-3138.

35
Appendix A: Wiring Diagram Ford: 2000 Or Older 2007 - Present Chevy: 2002 Or Older Dodge 2007
To Present
Explanation
* NOTE: Observe all vehicle manufacturer recommendations when working with or connecting to vehicle electrical systems. These wiring instructions were created for trucks using separate brake and turn signal lights. Keep all lights turned off when making connections.
The wiring is installed starting on the right side of the headache rack, running through it and picking up the left side. It then travels back to the center of the bed where there is a 6 pin connection. The center harness is connected here and runs back to the tail skirt where there is another 6 pin connection for the rear skirt harness. Before the rear connection is a 6 wire pig tail to tie directly into the truck functions.
* NOTE: Wires that are not used from harness need to have a heat shrink butt connector put on the end so they don’t short out against the steel of the truck bed.

36
Appendix B: Wiring Diagram Dodge: 2003 to 2006 Chevy: 2001 - 2006
Explanation
* NOTE: Observe all vehicle manufacturer recommendations when working with or connecting to vehicle electrical systems. These wiring instructions were created for trucks using separate brake and turn signal lights. Keep all lights turned off when making connections.
The wiring is installed starting on the right side of the headache rack, running through it and picking up the left side. It then travels back to the center of the bed where there is a 6 pin connection. The center harness is connected here and runs back to the tail skirt where there is another 6 pin connection for the rear skirt harness. Before the rear connection is a 6 wire pig tail to tie directly into the truck functions.
* NOTE: Wires that are not used from harness need to have a heat shrink butt connector put on the end so they don’t short out against the steel of the truck bed.