Embed Size (px)
Citation preview

Clinical Workbench Product Manual
Version 1.2
© Copyright 2006-2010 BioPIER, Inc.

© Copyright 2006-2010 BioPIER, Inc. All rights reserved. No part of this publication including text, examples, diagrams or illustrations may be reproduced, transmitted, or translated in any form or by any means, electronic, mechanical, manual, optical or otherwise, for any purpose, without prior written permission of BioPIER, Inc.
Trademarks BioPIER, Universal Validation Manager, and Clinical Workbench are trademarks of BioPIER, Inc. in the United States and/or other countries. The names of actual companies and products mentioned herein may be the trademarks of their respective owners.
Clinical Workbench Product Manual 3Table of Contents
Table of Contents
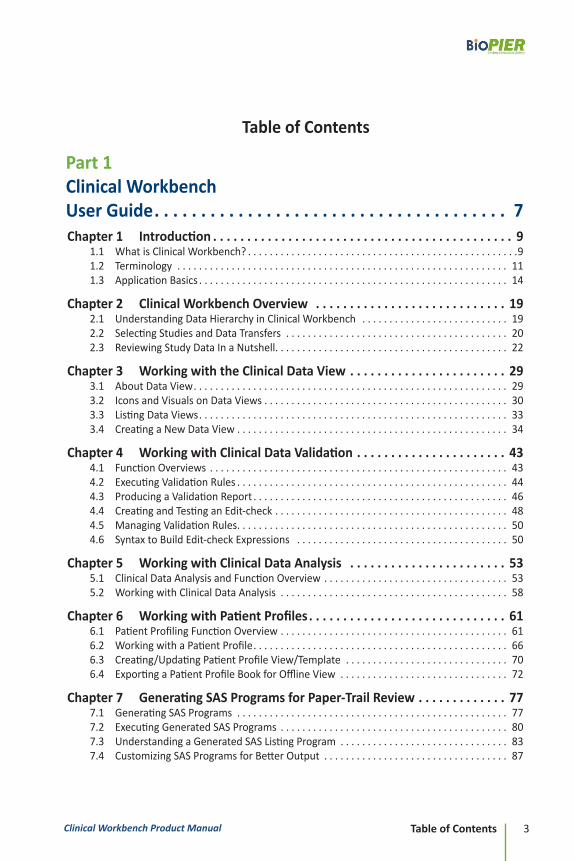
Part 1 Clinical Workbench User Guide . . . . . . . . . . . . . . . . . . . . . . . . . . . . . . . . . . . . . . 7Chapter 1 Introduction . . . . . . . . . . . . . . . . . . . . . . . . . . . . . . . . . . . . . . . . . . . . 9
1.1 WhatisClinicalWorkbench? . . . . . . . . . . . . . . . . . . . . . . . . . . . . . . . . . . . . . . . . . . . . . . . . . .91.2 Terminology . . . . . . . . . . . . . . . . . . . . . . . . . . . . . . . . . . . . . . . . . . . . . . . . . . . . . . . . . . . . . 111.3 ApplicationBasics . . . . . . . . . . . . . . . . . . . . . . . . . . . . . . . . . . . . . . . . . . . . . . . . . . . . . . . . . 14
Chapter 2 Clinical Workbench Overview . . . . . . . . . . . . . . . . . . . . . . . . . . . . 192.1 UnderstandingDataHierarchyinClinicalWorkbench . . . . . . . . . . . . . . . . . . . . . . . . . . . 192.2 SelectingStudiesandDataTransfers . . . . . . . . . . . . . . . . . . . . . . . . . . . . . . . . . . . . . . . . . 202.3 ReviewingStudyDataInaNutshell. . . . . . . . . . . . . . . . . . . . . . . . . . . . . . . . . . . . . . . . . . . 22
Chapter 3 Working with the Clinical Data View . . . . . . . . . . . . . . . . . . . . . . . 293.1 AboutDataView. . . . . . . . . . . . . . . . . . . . . . . . . . . . . . . . . . . . . . . . . . . . . . . . . . . . . . . . . . 293.2 IconsandVisualsonDataViews............................................. 303.3 ListingDataViews. . . . . . . . . . . . . . . . . . . . . . . . . . . . . . . . . . . . . . . . . . . . . . . . . . . . . . . . . 333.4 CreatingaNewDataView.................................................. 34
Chapter 4 Working with Clinical Data Validation . . . . . . . . . . . . . . . . . . . . . . 434.1 FunctionOverviews . . . . . . . . . . . . . . . . . . . . . . . . . . . . . . . . . . . . . . . . . . . . . . . . . . . . . . . 434.2 ExecutingValidationRules . . . . . . . . . . . . . . . . . . . . . . . . . . . . . . . . . . . . . . . . . . . . . . . . . . 444.3 ProducingaValidationReport . . . . . . . . . . . . . . . . . . . . . . . . . . . . . . . . . . . . . . . . . . . . . . . 464.4 CreatingandTestinganEdit-check. . . . . . . . . . . . . . . . . . . . . . . . . . . . . . . . . . . . . . . . . . . 484.5 ManagingValidationRules. . . . . . . . . . . . . . . . . . . . . . . . . . . . . . . . . . . . . . . . . . . . . . . . . . 504.6 SyntaxtoBuildEdit-checkExpressions . . . . . . . . . . . . . . . . . . . . . . . . . . . . . . . . . . . . . . . 50
Chapter 5 Working with Clinical Data Analysis . . . . . . . . . . . . . . . . . . . . . . . 535.1 ClinicalDataAnalysisandFunctionOverview. . . . . . . . . . . . . . . . . . . . . . . . . . . . . . . . . . 535.2 WorkingwithClinicalDataAnalysis . . . . . . . . . . . . . . . . . . . . . . . . . . . . . . . . . . . . . . . . . . 58
Chapter 6 Working with Patient Profiles . . . . . . . . . . . . . . . . . . . . . . . . . . . . . 616.1 PatientProfilingFunctionOverview. . . . . . . . . . . . . . . . . . . . . . . . . . . . . . . . . . . . . . . . . . 616.2 WorkingwithaPatientProfile. . . . . . . . . . . . . . . . . . . . . . . . . . . . . . . . . . . . . . . . . . . . . . . 666.3 Creating/UpdatingPatientProfileView/Template . . . . . . . . . . . . . . . . . . . . . . . . . . . . . . 706.4 ExportingaPatientProfileBookforOfflineView . . . . . . . . . . . . . . . . . . . . . . . . . . . . . . . 72
Chapter 7 Generating SAS Programs for Paper-Trail Review . . . . . . . . . . . . . 777.1 GeneratingSASPrograms . . . . . . . . . . . . . . . . . . . . . . . . . . . . . . . . . . . . . . . . . . . . . . . . . . 777.2 ExecutingGeneratedSASPrograms . . . . . . . . . . . . . . . . . . . . . . . . . . . . . . . . . . . . . . . . . . 807.3 UnderstandingaGeneratedSASListingProgram . . . . . . . . . . . . . . . . . . . . . . . . . . . . . . . 837.4 CustomizingSASProgramsforBetterOutput . . . . . . . . . . . . . . . . . . . . . . . . . . . . . . . . . . 87

Clinical Workbench Product Manual4 Table of Contents
Part 2 Clinical Workbench Data Administration Guide . . . . . . . . . . . . . . . . . . . . . . . . 97Chapter 1 Data Administration Overview . . . . . . . . . . . . . . . . . . . . . . . . . . . . 99
1.1 WhereandWhotoPerformDataAdministrationTasks. . . . . . . . . . . . . . . . . . . . . . . . . 1001.2 StudyDataAdministrationTasksAtaGlance. . . . . . . . . . . . . . . . . . . . . . . . . . . . . . . . . . 101
Chapter 2 Managing Studies . . . . . . . . . . . . . . . . . . . . . . . . . . . . . . . . . . . . . 1032.1 ListingExistingStudies.................................................... 1032.2 CreatingaStudyStructure . . . . . . . . . . . . . . . . . . . . . . . . . . . . . . . . . . . . . . . . . . . . . . . . . 1042.3 ManagingaStudy . . . . . . . . . . . . . . . . . . . . . . . . . . . . . . . . . . . . . . . . . . . . . . . . . . . . . . . 106
Chapter 3 Uploading Study Data . . . . . . . . . . . . . . . . . . . . . . . . . . . . . . . . . . 1113.1 Overview . . . . . . . . . . . . . . . . . . . . . . . . . . . . . . . . . . . . . . . . . . . . . . . . . . . . . . . . . . . . . . 1113.2 LoadingDatasetstoaStudy. . . . . . . . . . . . . . . . . . . . . . . . . . . . . . . . . . . . . . . . . . . . . . . . 1123.3 UploadingDocumentstoaStudy. . . . . . . . . . . . . . . . . . . . . . . . . . . . . . . . . . . . . . . . . . . 1173.4 SASTipsforDataUpload. . . . . . . . . . . . . . . . . . . . . . . . . . . . . . . . . . . . . . . . . . . . . . . . . . 119
Chapter 4 Configuring Study Data . . . . . . . . . . . . . . . . . . . . . . . . . . . . . . . . . 1214.1 StudyConfigurationOverview. . . . . . . . . . . . . . . . . . . . . . . . . . . . . . . . . . . . . . . . . . . . . . 1214.2 ManagingStudyLoadStatus............................................... 1244.3 CoreMappings. . . . . . . . . . . . . . . . . . . . . . . . . . . . . . . . . . . . . . . . . . . . . . . . . . . . . . . . . . 1264.4 DatasetMappings. . . . . . . . . . . . . . . . . . . . . . . . . . . . . . . . . . . . . . . . . . . . . . . . . . . . . . . . 1304.5 MarkingDateandTimeVariables . . . . . . . . . . . . . . . . . . . . . . . . . . . . . . . . . . . . . . . . . . . 1384.6 ManagingAnalysisParameters. . . . . . . . . . . . . . . . . . . . . . . . . . . . . . . . . . . . . . . . . . . . . 1394.7 ManagingSubjectLists. . . . . . . . . . . . . . . . . . . . . . . . . . . . . . . . . . . . . . . . . . . . . . . . . . . . 1424.8 ManagingStudyConfigurations . . . . . . . . . . . . . . . . . . . . . . . . . . . . . . . . . . . . . . . . . . . . 143
Clinical Workbench Product Manual 5Table of Contents
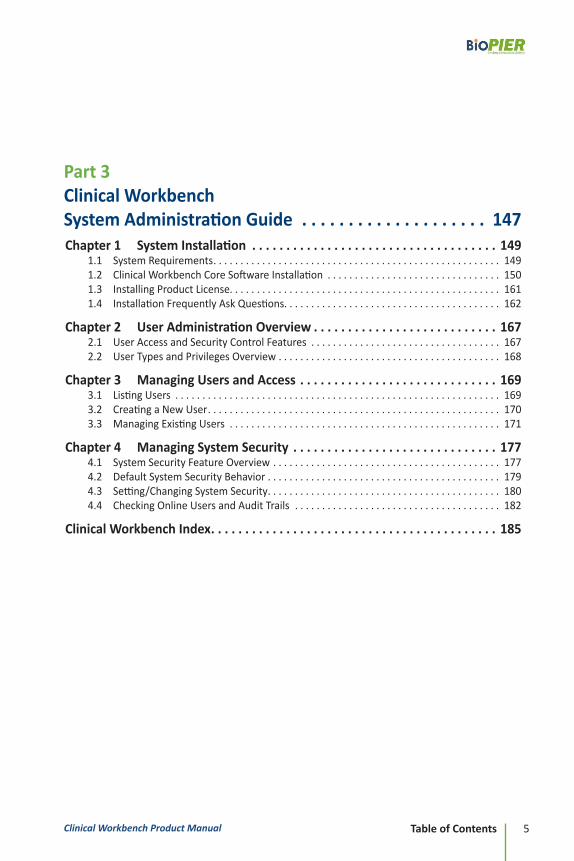
Part 3Clinical Workbench System Administration Guide . . . . . . . . . . . . . . . . . . . . 147Chapter 1 System Installation . . . . . . . . . . . . . . . . . . . . . . . . . . . . . . . . . . . . 149
1.1 SystemRequirements. . . . . . . . . . . . . . . . . . . . . . . . . . . . . . . . . . . . . . . . . . . . . . . . . . . . . 1491.2 ClinicalWorkbenchCoreSoftwareInstallation . . . . . . . . . . . . . . . . . . . . . . . . . . . . . . . . 1501.3 InstallingProductLicense. . . . . . . . . . . . . . . . . . . . . . . . . . . . . . . . . . . . . . . . . . . . . . . . . . 1611.4 InstallationFrequentlyAskQuestions. . . . . . . . . . . . . . . . . . . . . . . . . . . . . . . . . . . . . . . . 162
Chapter 2 User Administration Overview . . . . . . . . . . . . . . . . . . . . . . . . . . . 1672.1 UserAccessandSecurityControlFeatures . . . . . . . . . . . . . . . . . . . . . . . . . . . . . . . . . . . 1672.2 UserTypesandPrivilegesOverview. . . . . . . . . . . . . . . . . . . . . . . . . . . . . . . . . . . . . . . . . 168
Chapter 3 Managing Users and Access . . . . . . . . . . . . . . . . . . . . . . . . . . . . . 1693.1 ListingUsers . . . . . . . . . . . . . . . . . . . . . . . . . . . . . . . . . . . . . . . . . . . . . . . . . . . . . . . . . . . . 1693.2 CreatingaNewUser. . . . . . . . . . . . . . . . . . . . . . . . . . . . . . . . . . . . . . . . . . . . . . . . . . . . . . 1703.3 ManagingExistingUsers . . . . . . . . . . . . . . . . . . . . . . . . . . . . . . . . . . . . . . . . . . . . . . . . . . 171
Chapter 4 Managing System Security . . . . . . . . . . . . . . . . . . . . . . . . . . . . . . 1774.1 SystemSecurityFeatureOverview. . . . . . . . . . . . . . . . . . . . . . . . . . . . . . . . . . . . . . . . . . 1774.2 DefaultSystemSecurityBehavior........................................... 1794.3 Setting/ChangingSystemSecurity. . . . . . . . . . . . . . . . . . . . . . . . . . . . . . . . . . . . . . . . . . . 1804.4 CheckingOnlineUsersandAuditTrails. . . . . . . . . . . . . . . . . . . . . . . . . . . . . . . . . . . . . . 182
Clinical Workbench Index . . . . . . . . . . . . . . . . . . . . . . . . . . . . . . . . . . . . . . . . . . 185

Clinical Workbench Product Manual6 Table of Contents

Part 1
Clinical Workbench
User Guide


Clinical Workbench User Guide 9Introduction
Chapter 1Introduction
This chapter briefly describes features of the BioPIER Clinical Workbench application and the system requirements to run the application.
1 .1 What is Clinical Workbench?
BioPIER Clinical Workbench is a web-based clinical data review system. It provides functions for:
• Clinical data review
• Clinical data validation
• Clinical statistical analysis
• Integrated patient profiling
• Integrated study document viewing
• Clinical statistical reporting (CSR) automation and standardization
1 .1 .1 Who Uses Clinical Workbench?
BioPIER Clinical Workbench is designed to provide solutions in three major areas:
• Biotech or pharmaceutical companies can utilize the system as a single, centralized clinical data repository (CDR), allowing the entire clinical team to review, analyze, and validate study data, and to moni-tor clinical trials and drug safety.
• Clinical Data Managers (CDMs) can use the system as a clinical data repository (CDR), perform periodic study reviews, and run data validations for ongoing trials. Medical doctors and biostatisticians can
Clinical Workbench User Guide10 Introduction
leverage the products to view ongoing study data, play “what-if” sce-narios, view patient profiles, and analyze efficacy outcomes and safety events. The products also enable companies to automate and standard-ize clinical study reports (CSRs) for regulatory submissions.
• CRO or EDC companies can position it as a value-added service to al-low their customers to have visibility of ongoing study data.
1 .1 .2 Key Features
• Web-based Application: No installation or applet download is required on the user-end
• Integrated Interface: All study-related information is organized together
• Easy to Use: Designed for general audiences, and no programming knowledge is required
• Shared Data Listing Views: Data listing views can be easily configured and shared among clinical team members, or kept for personal use
• SAS Program Automation: Data listing views can be exported into the corresponding SAS programs to produce traditional paper-trail listings
• Built-in Domain Intelligence: For CDISC data, the system has out-of-box configuration for reporting and patient profiling; for non-CDISC data, the system provides the domain mapping technology to allow the same output
• Strong Visualization Features: Summary statistics and patient profiles can be switched between tabular and graphical format with one mouse click
• Universal Study Data In-Take: Ability to take clinical trial data from all vendors: paper trials, EDC trials; ability to accept data in both legacy format and CDISC format
• Data Drill-down and High Tractability: Summary statistics can be drilled down to its supported data listing
• Integrated Patient Profiles: Patient profiles can be viewed from a known subject or from any data listing view
• Unlimited Data Transfers for a Study: Allows multiple data transfers to be uploaded for a study, and the study configuration can be carried from one data transfer to another

Clinical Workbench User Guide 11Introduction
• Easy Post-hoc Edit-Checks: Edit-checks can be defined and executed any time during or after the data collection period; very simple data validation syntax for every CDM use; no SQL, SAS, or strong program-ming knowledge is required
• Strong Access Control: Although the system can host many studies, individuals only have visibility or work privileges to studies to which s/he is granted access
• Study Documents Related for Easy Viewing: Study documents such as Protocol, SAP, and the Clinical Trial Operation Plan can be uploaded to a study and can be viewed with the study data; study documents also can be linked to a study from a document control system such as Documen-tum, SharePoint, etc.
1 .2 Terminology
The followings are terms and concepts used by the Clinical Workbench.
Access Control Access control has two parts corresponding to admission to the system and network resources. The first part of access control is authenticating the user, which proves the identity of the user or client machine attempting to log on. The second part is granting the authenticated user access to specific resources based on company policies and the permission level assigned to the user or user group. The access control can be granulated over study-data level.
Access RightsThere are 5 levels of access rights, defined by roles:
System Administrator: The highest power within an organization, including full access. Only the system admin can manage user and organizational profiles.
Data Administrator: Can manage study structure, manage loaded data, and upload new data transfers.
Global Team User: Can access all studies within all global units of the organization, and can read data and create personal data views.
Study Power User: Can create shared views and validation rules for studies.
Study Team User: Can only access a specific granted study/studies; can read data and create personal data views.

Clinical Workbench User Guide12 Introduction
Clinical Trial Any investigation in human subjects intended to determine the clinical phar-macological, pharmacokinetic, and/or other pharmacodynamic effects of an investigational agent, and/or intended to identify any adverse reactions to an investigational agent to assess the agent’s safety and efficacy.
Product A drug, device, or biologic with potential beneficial effects to humans or ani-mals. For example, LIPITOR® (chemical name: atorvastatin) is a product from Pfizer.
Study A clinical trial for a specific product and for a specific purpose, which is de-signed to evaluate its efficacy and safety. Each study is often associated with a study protocol number. A product often has multiple studies. For example, LIPITOR® (as a product) has 400+ completed and ongoing studies.
Data Dictionary Dataset structural information including variable name, label, data type, length, format (code list), etc. Extended data dictionary adds code list (for-mat), distinct data values (for discrete variables), and descriptive statistics (for continuous variables).
Data Transfer A release of clinical data sets with a specific cut-off date or transfer date – a “version” of a study’s data. When the version of study’s data is uploaded into the system, it is also referred as a Data Load. A study may have many versions of data transfer/data load.
Data View A report view, or a listing view, on a data set. It contains metadata definitions such as columns, data filter, label, sorting, and many visual attributes. A view may be saved for personal use, or shared with an entire team. A dataset may have many data views. For example, the AE (Adverse Events) dataset can contain many data views such as “Listing of Serious Adverse Event”, “Listing of Serious Adverse Leading to Death”, and “Listing of AE Coding Informa-tion”, etc.
Shared Data View A data listing definition that can be visible to other users. A shared view is subject to access control; for example, if a person does not have read access to a study, s/he cannot see the view.
Personal Data View A private data listing definition that is visible to the view owner only.

Clinical Workbench User Guide 13Introduction
Data ValidationA process to determine whether data are accurate, complete, or meet speci-fied criteria. Data validation is done through applying validation rules to a specific data set.
Validation Rule Similar to an edit-check in EDC studies; however, validation rules used in Clinical Workbench can be defined dynamically and can be evaluated any time to the study data, often after the data is received in house. It is a Boolean expression to check the record validity, and a defined error message to show when the criteria is failed to meet.
Validation Syntax The defined permissible expressions that can be used to define validation rule. Note that the BioPIER validation syntax is greatly simplified for non-programmers’ use. See Chapter 5.3.1 for details.
Clinical Workbench User Guide14 Introduction
1 .3 Application Basics
Clinical Workbench is web-based. Users need only a web browser such as Internet Explorer (IE) or Firefox to perform various functions. Users do not need any client installation. SAS® software is not required on the client side.
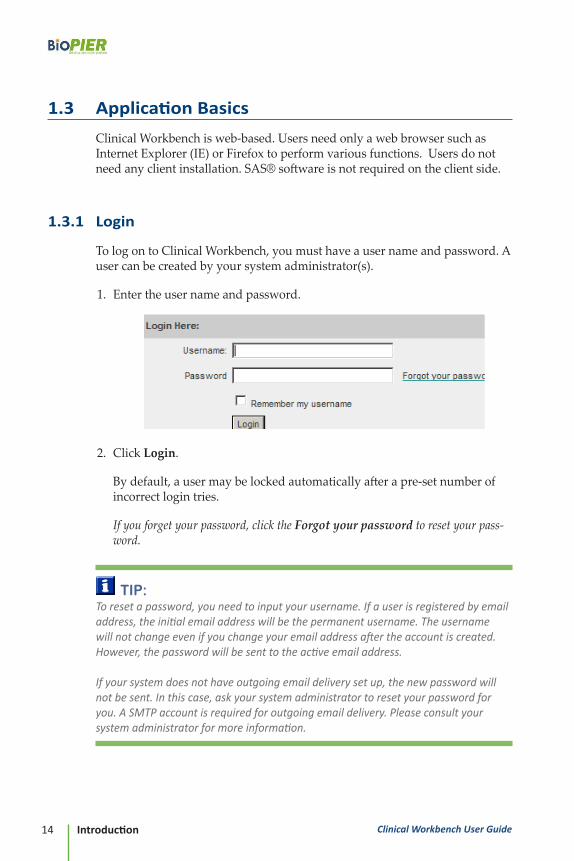
1 .3 .1 Login
To log on to Clinical Workbench, you must have a user name and password. A user can be created by your system administrator(s).
1. Enter the user name and password.
2. Click Login.
By default, a user may be locked automatically after a pre-set number of incorrect login tries.
If you forget your password, click the Forgot your password to reset your pass-word.
TIP:To reset a password, you need to input your username. If a user is registered by email address, the initial email address will be the permanent username. The username will not change even if you change your email address after the account is created. However, the password will be sent to the active email address. If your system does not have outgoing email delivery set up, the new password will not be sent. In this case, ask your system administrator to reset your password for you. A SMTP account is required for outgoing email delivery. Please consult your system administrator for more information.
Clinical Workbench User Guide 15Introduction
1 .3 .2 Changing Personal Profiles and Password
Once you login, you can change your personal profile.
To change your personal profile:
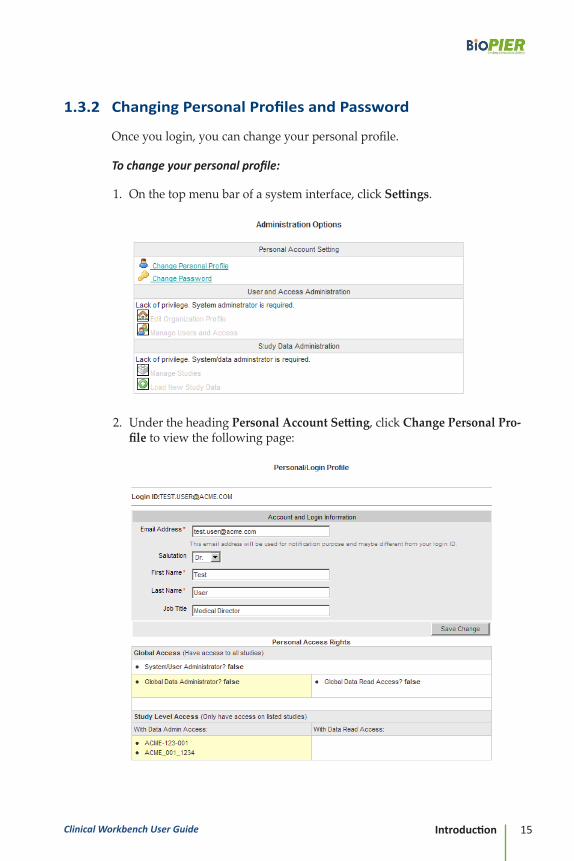
1. On the top menu bar of a system interface, click Settings.
2. Under the heading Personal Account Setting, click Change Personal Pro-file to view the following page:
Clinical Workbench User Guide16 Introduction
3. Enter the required changes, and then click Save Change.
To change the password:
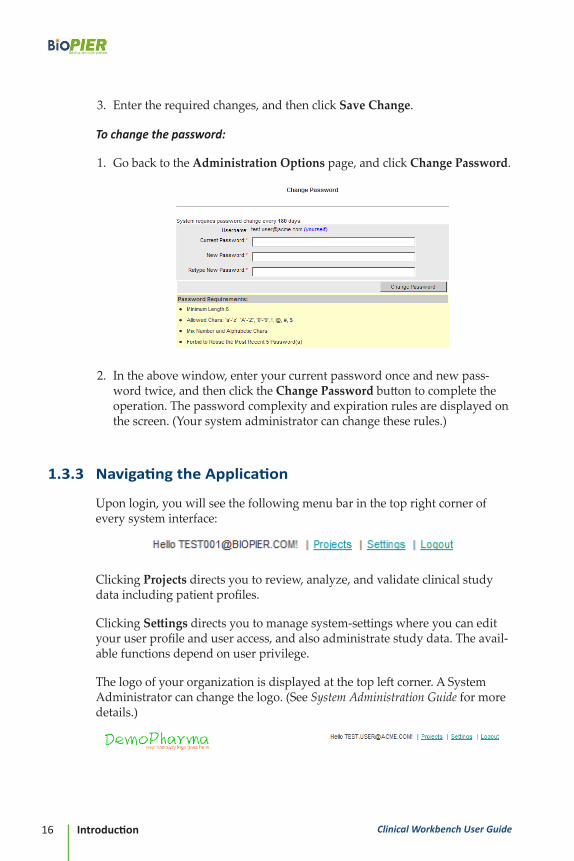
1. Go back to the Administration Options page, and click Change Password.
2. In the above window, enter your current password once and new pass-word twice, and then click the Change Password button to complete the operation. The password complexity and expiration rules are displayed on the screen. (Your system administrator can change these rules.)
1 .3 .3 Navigating the Application
Upon login, you will see the following menu bar in the top right corner of every system interface:
Clicking Projects directs you to review, analyze, and validate clinical study data including patient profiles.
Clicking Settings directs you to manage system-settings where you can edit your user profile and user access, and also administrate study data. The avail-able functions depend on user privilege.
The logo of your organization is displayed at the top left corner. A System Administrator can change the logo. (See System Administration Guide for more details.)
Clinical Workbench User Guide 17Introduction
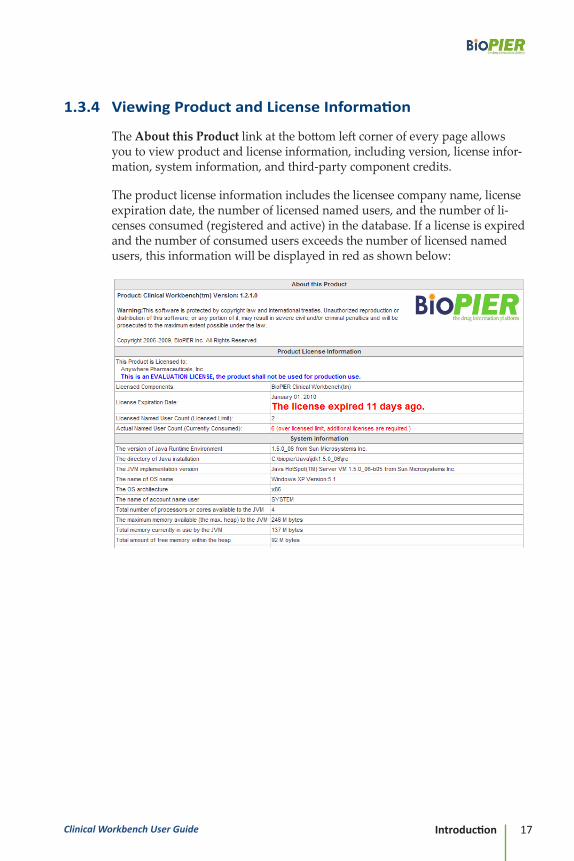
1 .3 .4 Viewing Product and License Information
The About this Product link at the bottom left corner of every page allows you to view product and license information, including version, license infor-mation, system information, and third-party component credits.
The product license information includes the licensee company name, license expiration date, the number of licensed named users, and the number of li-censes consumed (registered and active) in the database. If a license is expired and the number of consumed users exceeds the number of licensed named users, this information will be displayed in red as shown below:

Clinical Workbench User Guide18 Introduction
1 .3 .5 Providing Feedback to BioPIER
You may click the Write a Feedback link at the bottom right corner of every page at any time. Your name, email, license information, and feedback will be sent to BioPIER technical support, and you will receive a copy of the feedback as well.
Clinical Workbench User Guide 19Clinical Workbench Overview
Chapter 2Clinical Workbench Overview
This chapter describes how you navigate study data within Clinical Workbench.
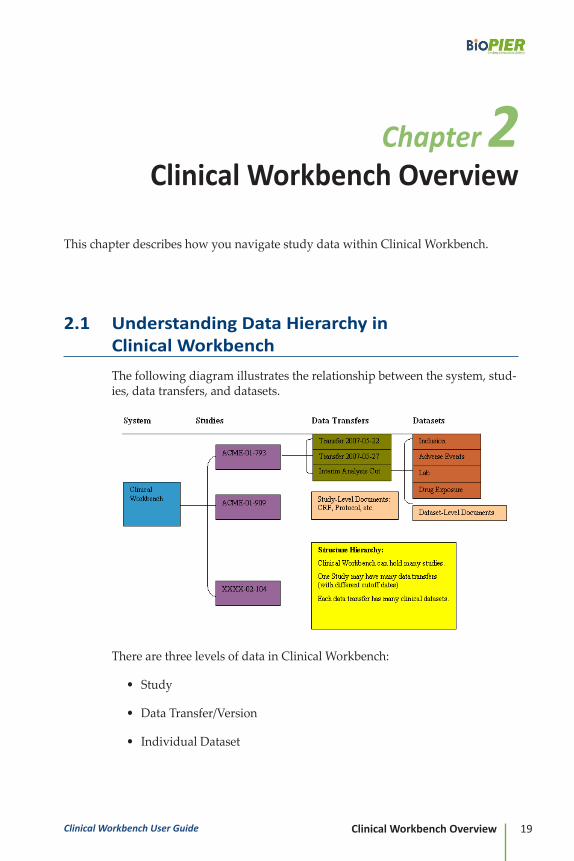
2 .1 Understanding Data Hierarchy inClinical Workbench
The following diagram illustrates the relationship between the system, stud-ies, data transfers, and datasets.
There are three levels of data in Clinical Workbench:
• Study
• Data Transfer/Version
• Individual Dataset

Clinical Workbench User Guide20 Clinical Workbench Overview
Clinical Workbench can hold many studies. One study may have many data transfers or data versions (with different cut-off dates), and each data transfer may have many clinical datasets.
To review study data, you must first select a study, and then choose the data transfer (version) to view datasets. A data transfer version can be marked as either current or archived. By default, only the current data transfers are dis-played. However, you can navigate to archived versions when you need to.
Study-level documents such as Annotated CRF Document, Protocol, and Statistical Analysis Plan (SAP) can be listed with a study. Physical documents may be uploaded to a study, or document URLs from a document control system may be linked to a study. Documents related to a specific data transfer can be attached to a data transfer version as well.
TIP:For simplification purposes, there is no level of product/compound in Clini-cal Workbench. We suggest that you include a product tag at the beginning of study name in order to distinguish compounds.
2 .2 Selecting Studies and Data Transfers
After login, by default All Study Data Loads under Projects will be dis-played. This page provides you with an overview of all study data transfers.
2 .2 .1 Data Transfer Listing Columns
The Study Number column contains the list of protocols or study numbers. By default, the distinct study numbers are highlighted.

Clinical Workbench User Guide 21Clinical Workbench Overview
The Data Load/Transfer Version column includes:
• Data Load ID:Contains study numbers as well as Data Load Versions and data trans-fer/cut-off date.
• Load Tag:The data version tag created when the original study data is uploaded to the system.
• Load Date:The data when the original study data is successfully uploaded.
The Status column displays the status of the study data transfers.
2 .2 .2 Narrowing Down to a Study
To locate data transfers for a single study:
1. Select one study from the pull-down menu at the left side of the page, and then click Go.

Clinical Workbench User Guide22 Clinical Workbench Overview
2 .2 .3 Selecting Archived Data Loads/Transfers
The default setting displays all current data transfers in the system. You can also view archived data transfers by clicking the Current + Archived link.
2 .3 Reviewing Study Data In a Nutshell
Click Data Load ID next to a single study data transfer to view the overview of the study:
• Datasets and Reports
• Parameter List for Analysis
• Patient Profiles
• Documents
You have many command options on the dataset reports section:
• View Data Dictionary
• Compare to Another Data-Load
• Export Views as SAS Programs

Clinical Workbench User Guide 23Clinical Workbench Overview
2 .3 .1 Viewing Patient Profiles
To view patient profiles:
1. Access the Patient Profile module at the top left corner of the overview page.
2. Select one patient ID from the pull-down menu and click Go to view the patient’s records under the same study in a new page. (See Chapter 6 for more instructions.)

Clinical Workbench User Guide24 Clinical Workbench Overview
2 .3 .2 Viewing Study Documents
Below the Patient Profile box is a Document module containing documents related to this study.
To download a file listed in the Document module:
1. Click (the download button) next to the target file.
Uploaded Files are physical files, and the Linked Files are links from documentation management systems such as SharePoint or Documentum.
2 .3 .3 Selecting Parameters for Analysis
When a study is configured, the study parameters can be listed for analysis.
To select parameters for analysis:
1. Choose one or many parameters, then click Analyze Selected to get the descriptive summary or frequency summary.
Chapter 5 – Working with Clinical Data Analysis will cover this topic in detail.
2 .3 .4 Datasets and Reports
The Data Sets and Reports module is on the right side of the page, and pro-vides you with an overview of all datasets under the study and data-views towards datasets. You can see the names of defined views for each dataset.

Clinical Workbench User Guide 25Clinical Workbench Overview
2 .3 .5 Shared and Personal Data Views
Click the List Data action link following one dataset name on the dataset overview page to view a complete data view including all columns and rows. See Chapter 3 - Working with the Clinical Data View for instructions.
2 .3 .6 Run Clinical Data Validations
Click the Validate action link next to a single dataset to view a validation report for the dataset. The Validation action gives you the capability to check data and locate invalid data by your conditions set in the proper format. See Chapter 4 - Working with Clinical Data Validation for more instructions.
2 .3 .7 Summarize Dataset
After the dataset is mapped in the study configuration, the Summarize link will appear. Click on Summarize to view a data summary on the dataset. See Chapter 5 – Working with Clinical Data Analysis for more instructions.
2 .3 .8 View Data Dictionary
Clinical Workbench has a built-in data dictionary feature. The data variable, label, data type, and formats are fetched from the SAS dataset itself, and the code list is fetched from the SAS formats catalog.

Clinical Workbench User Guide26 Clinical Workbench Overview
In addition to the data dictionary, you can also view the distinct values for each variable:
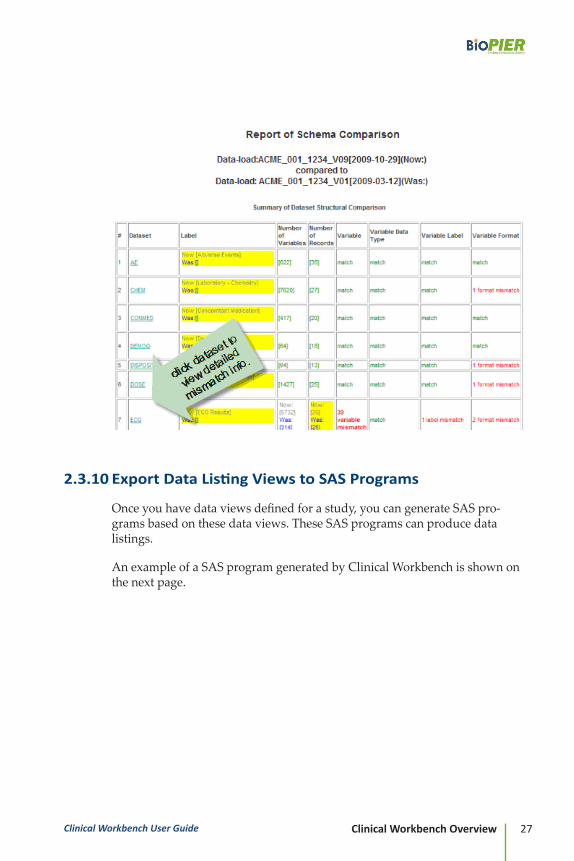
2 .3 .9 Compare Changes between Two Data Transfers
You can easily compare this data load to one of previous data loads (transfers) to check the data structure changes. The following are checked:
• Scope of Schema Comparison • Newly dropped or newly added datasets• Compare dataset labels • Compare the number of observations • Compare the number of total variables • Newly dropped or newly added variables• Compare variable labels • Compare variable data type • Compare variable formats/codelists
TIP: Dataset contents (the actual observations) are not compared.
Clinical Workbench User Guide 27Clinical Workbench Overview
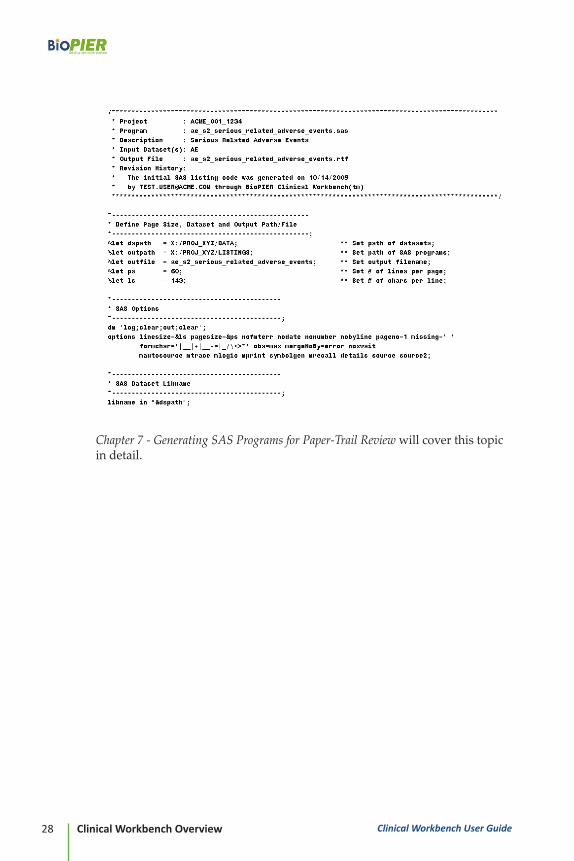
2 .3 .10 Export Data Listing Views to SAS Programs
Once you have data views defined for a study, you can generate SAS pro-grams based on these data views. These SAS programs can produce data listings.
An example of a SAS program generated by Clinical Workbench is shown on the next page.
Clinical Workbench User Guide28 Clinical Workbench Overview
Chapter 7 - Generating SAS Programs for Paper-Trail Review will cover this topic in detail.

Clinical Workbench User Guide 29Working with the Clinical Data View
Chapter 3Working with the Clinical Data View
This chapter introduces commands available for you to create or edit clinical data views.
3 .1 About Data View
A data view is a definition of a data listing or report. It is a metadata definition attached to a dataset. Such definition can be a combination of data filters (where clauses), data formats, labels, sorting orders, and other visual attributes. A view may be saved for personal use, or shared with the entire team. A dataset may have many views, and each view may have specific purposes. For example, the AE (Adverse Events) dataset can contain the following views: “Serious Adverse Event”, “Serious Adverse Leading to Death”, and “Adverse Coding Information”, etc.
The defined data views on each dataset are illustrated below:
The screenshot on the following page is an example of a data view:
Clinical Workbench User Guide30 Working with the Clinical Data View
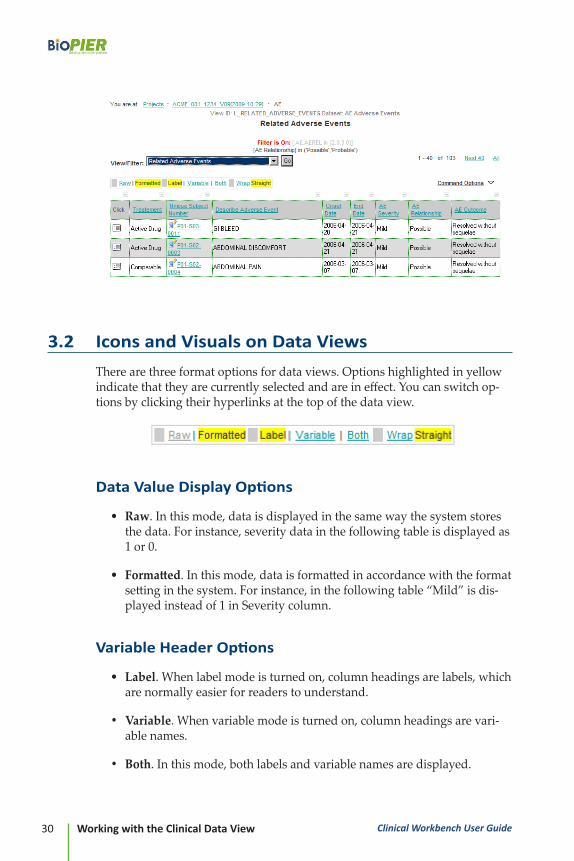
3 .2 Icons and Visuals on Data Views
There are three format options for data views. Options highlighted in yellow indicate that they are currently selected and are in effect. You can switch op-tions by clicking their hyperlinks at the top of the data view.
Data Value Display Options
• Raw. In this mode, data is displayed in the same way the system stores the data. For instance, severity data in the following table is displayed as 1 or 0.
• Formatted. In this mode, data is formatted in accordance with the format setting in the system. For instance, in the following table “Mild” is dis-played instead of 1 in Severity column.
Variable Header Options
• Label. When label mode is turned on, column headings are labels, which are normally easier for readers to understand.
• Variable. When variable mode is turned on, column headings are vari-able names.
• Both. In this mode, both labels and variable names are displayed.

Clinical Workbench User Guide 31Working with the Clinical Data View
Record Wrapping Options
• Wrapped. In order to print out a wide data view in regular portrait shape, a wrapped mode is provided. In this mode, a long row may be wrapped into more than one row, but the background color of the same row and the sequence do not change. Please observe the following screenshot to understand the position change in wrapped mode.
• Straight. In this mode, one record is fully displayed in only one row.
Distinct Values Highlighted in Sorting
In sorted columns, the distinct values appearing in their first time down the column are highlighted in brown. This format helps you to locate distinct values easily.
Clinical Workbench User Guide32 Working with the Clinical Data View
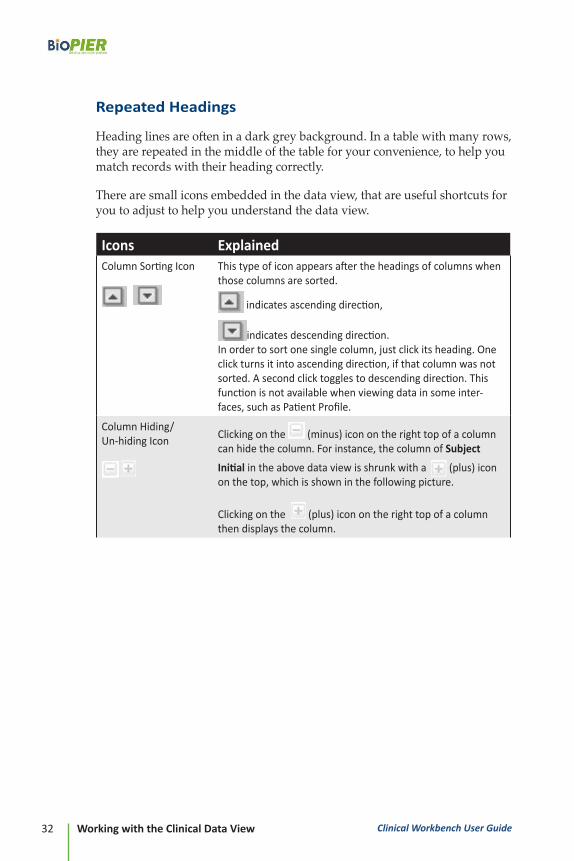
Repeated Headings
Heading lines are often in a dark grey background. In a table with many rows, they are repeated in the middle of the table for your convenience, to help you match records with their heading correctly.
There are small icons embedded in the data view, that are useful shortcuts for you to adjust to help you understand the data view.
Icons ExplainedColumnSortingIcon
Thistypeoficonappearsaftertheheadingsofcolumnswhenthosecolumnsaresorted.
indicatesascendingdirection,
indicatesdescendingdirection.Inordertosortonesinglecolumn,justclickitsheading.Oneclickturnsitintoascendingdirection,ifthatcolumnwasnotsorted.Asecondclicktogglestodescendingdirection.Thisfunctionisnotavailablewhenviewingdatainsomeinter-faces,suchasPatientProfile.
ColumnHiding/Un-hidingIcon
Clickingonthe (minus)iconontherighttopofacolumncanhidethecolumn.Forinstance,thecolumnofSubject
Initial intheabovedataviewisshrunkwitha (plus)icononthetop,whichisshowninthefollowingpicture.
Clickingonthe (plus)iconontherighttopofacolumnthendisplaysthecolumn.

Clinical Workbench User Guide 33Working with the Clinical Data View
Icons ExplainedRecorddetailsIcon Atthebeginningofeachrowisaicon.Clicktheiconofa
rowtoviewanewpagewheretherecordintheentirerowisdisplayedverticallywithcolumnlabelsontheleft.
Foradatasetwithmanyvariables,thisviewishelpfultostudyarecord.Youcanchoosetoseeaformattedvieworarawviewbyclickingtheformathyperlinksonthetop.Aformattedviewdisplaysthevariablelabelandformattedvalue,andarawviewdisplaysthevariablenameandthestoredrawdatavalue.
SubjectProfileIcon ForeveryrecordintheColumnUniqueSubjectNumber(Pa-tientID),thereisaSubjectProfileicon.ClickingontheicondirectsthepagetothePatientProfileinterfaceoftheselectedpatient.(Seechapter6fordetails.)
3 .3 Listing Data Views
Upon clicking List Data at Dataset Overview Page, you can see the default data view of that dataset. If a default view is not yet defined for the dataset, then the All Data, All Columns view will be displayed.
A pull-down menu of data views is at the top left of the page, which includes all data views that belong to the dataset. Once you select a data view listed in the menu, the data view will be displayed:

Clinical Workbench User Guide34 Working with the Clinical Data View
3 .4 Creating a New Data View
To create a new data view, you must start from the system All Data, All Col-umns view. Once you customize the view, a _draft data view will be created, and you can give the _draft view a name.
You also can create a new view by cloning an existing view. Open an existing view, then click Clone the View and you can edit from there.
At the top right corner of every data view, there is a Command Options menu choice:
Each command option is described in the following sections.

Clinical Workbench User Guide 35Working with the Clinical Data View
3 .4 .1 Sort Multiple Columns
You can sort one column by clicking its heading, as discussed in the previous chapter.
To sort up to five columns in the data view as needed:
1. Click Sort Multiple Columns, and a new window appears:
2. Select the columns to be sorted from the pull-down menus on the left.
3. Select the sorting direction for each column to be sorted.
4. Click Sort Data and Close this Window, and the data view will be up-dated instantly.
3 .4 .2 Selecting Columns, Layout and Labels
In a customized data view, you can choose to display only part of all of the columns in the dataset in defined order. Click Select and Order Columns to display the following, showing the sequence number, variable name, and display labels of all columns in the dataset. On this screen, you can define columns to be displayed in a new data view, and also the display sequence of those columns.

Clinical Workbench User Guide36 Working with the Clinical Data View
TIP:External variables such as are highlighted and available for you to select as a part of the data list view. Your data administrator can define these ex-ternal subject-level variables, for instance, from the demographics and ADSL dataset. (See the DataAdministrationGuidefor details.)
At the top of the order report, there are three action buttons in one line. (The same three are repeated at the bottom as well.)
• Select All: Choose all columns
• Unselect All: Uncheck all check boxes
• Refresh Order: Update the column order selected so far
Selecting and Changing Variable Order
Selecting columns and change the order of columns by checking the boxes at the front of variable lines. The sequence of your selection is automatically incremental by default. Positive numbers indicate columns to be displayed and negative numbers indicate columns to be suppressed.
If you want to insert a new column in between two adjacent columns, apply a column order with a number with a decimal. For example, USUBJID will be inserted after PROT and before SUBINIT.

Clinical Workbench User Guide 37Working with the Clinical Data View
Changing Variable Label
You may change the variable label for each variable when needed.
Applying Changes
To see new sequence, click the Refresh Order button at the top. Once you complete the reordering, click Apply & Save at the top right of the window. The data view in another window is instantly updated to the display selected columns only in defined sequence.
3 .4 .3 Choosing a Subset of a Dataset
In this instance, “subset” refers to a data subset of the dataset being edited.

Clinical Workbench User Guide38 Working with the Clinical Data View
1. Click Quick Select a Subset from the menu under the command options.The following window appears:
The menu displays the distinct values for each variable. Select one or more values from the list to qualify the subset criteria. While you select the sub-set criteria, the underlying data view is updated automatically.
2. Once you finish selecting values, click the Done and Close this Window button on the top right or bottom right of the window. The defined subset is instantly displayed.
TIP:To select multiple values, press the control (CTRL) key.
3 .4 .4 Updating/Saving Data View
After setting up your preferred view by selecting a subset and columns, you may want to save the view as a data view.
1. Click Save this View to access these further options:

Clinical Workbench User Guide 39Working with the Clinical Data View
The elements on the view/filter page are described below:
• Title: The title of the view.
• Sub-Title: The sub-title of the view. By default, if you apply a subsetting, the sub-title is populated with message of the where-clause.
• Sort-By Columns: The sorting columns. If in descending order, the variable will begin with ~. For example, A,B means Sort by A and B in ascending order ; and A,~B means Sort by A in ascending order, and B in descending order.
• Collapsed Columns: The columns are selected but not shown by de-fault.
• Column Header Type: Variable name, vs. Variable Label or both.
• Where Clause: The where-clause expression. The external variable must be prefixed with the dataset name.
• Column Order and Labels: The lower part is the columns selected for the view and their order and labels.
• Save this View: Save the view to database.

Clinical Workbench User Guide40 Working with the Clinical Data View
• Set Shared: If the view is personal/private view, use this button to set to Shared. System will prompt you to set a unique view ID. The suggested default view is given.
• Clone this View: When you want to make a new view based on an exist-ing view, you can choose the option to clone it as a new view, and adjust it from there.
• Delete this View: Deletes the view.
• List all Views and Set Default View: This option will list all views on this dataset, and you may set a shared view as a default view.
TIP:When you select a subset, or order select columns, a temporary view such as _draft_10-01-12 13:57:[email protected] will be created au-tomatically. You may need to clean these views through Managing Data View/Filter if you do not want them to be saved.
3 .4 .5 Saving a Data View as an Excel File (CSV)
The data view can be saved as a Microsoft Excel CSV file by clicking Save as Excel (CSV) in the menu under Command Options.
The following system query appears allowing you to designate how to deal with the Excel file.

Clinical Workbench User Guide 41Working with the Clinical Data View
3 .4 .6 Managing Data Views/Filters
You can access an overview page of all data views/filters using the Managing Filters/Views command at the bottom of the menu. From this page, you can display, edit, delete, or create a data view by clicking on respective hyper-links, and you can set any shared view as a default view by selecting the radio button at the beginning of its line.
You have the following options to manage filter/views:
• List: Open the data view.
• Edit: E dit the data view definition (the interface is the same as the Save this View).
• Clone: Clone this view as a new view and modify from there.
• Delete: Delete this view.
• Set Default View: The first column provides the option to save a view as a default view. Only a shared view that does not have a where-clause filter can be qualified as a default view. The qualified views are high-lighted with an orange background.
3 .4 .7 Exporting as SAS Programs for Paper-Trail Views
With the data listing views are defined, these data views can be easily con-verted to SAS programs, and the SAS program can be used to produce the traditional paper-trail data listing. See Chapter 7 - Generating SAS Programs for Paper-Trail Review for details.

Clinical Workbench User Guide42 Working with the Clinical Data View

Clinical Workbench User Guide 43Working with Clinical Validation
Chapter 4Working with
Clinical Data Validation
While more clinical trials are outsourced to CROs, the need to ensure clinical data quality is increasingly important – especially for sponsor companies with very limited data management resources. Clinical Workbench provides an easy-to-use tool to allow clinical data managers to validate existing clinical data. The process of clinical data validation is to apply validation rules to a set of datasets and to report data issues at its earlier stage. A validation rule is like an edit check in the EDC world; however, it can be defined and applied dynamically at any time to existing datasets. In this chapter we will use edit-checks to represent validation rules, and will cover topics on how to define, execute validations, and report vali-dation results.
4 .1 Function Overviews
Clinical Workbench provides the following data validation functions:
• Define edit-check and apply any time to existing datasets, and a validation report can be generated instantly.
• Unified edit-check syntax: The same edit-check syntax can be ap-plied to all studies.
• Rich and intuitive validation report in terse mode (edit-check cen-tric) and verbose (dataset record centric) mode
• Validation results can be exported to Excel, including edit-check definitions, and terse and verbose reports for off-line viewing.
• Edit-check definition can be exported to an Excel file, and the defini-tion can be reused to another data transfer or another study.
Clinical Workbench User Guide44 Working with Clinical Validation
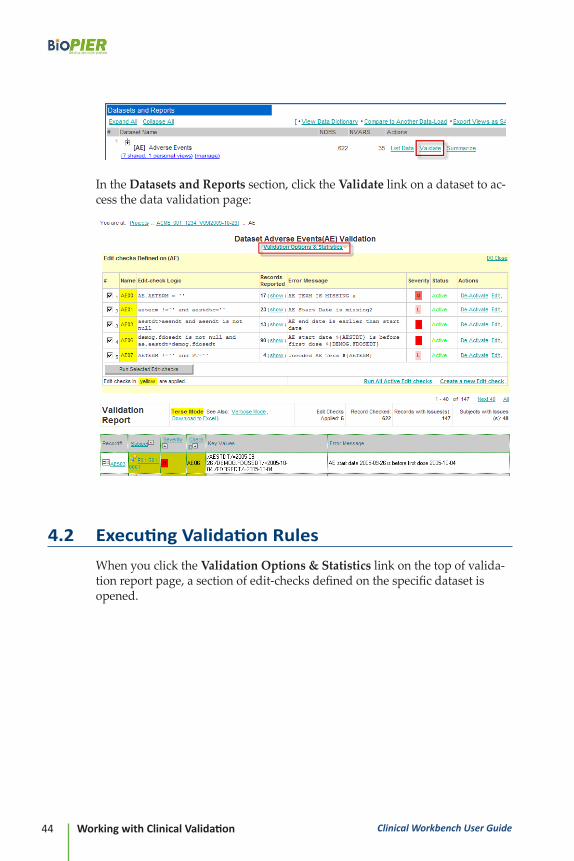
In the Datasets and Reports section, click the Validate link on a dataset to ac-cess the data validation page:
4 .2 Executing Validation Rules
When you click the Validation Options & Statistics link on the top of valida-tion report page, a section of edit-checks defined on the specific dataset is opened.

Clinical Workbench User Guide 45Working with Clinical Validation
The listing gives you all the edit-checks defined on the dataset, with edit-check ID, edit-check logic/expression, the number of records captured with data issues, exception messages, and severity and status.
You have options to:
• Run All Active Edit-checks: This is the default run when you click Validate link on a dataset.
• Run Selected Edit-checks: Select one or more edit-checks to see the validation result.
• Edit an Edit-check: Edit the specific edit-check. The interface is similar to the interface of creating a new edit-check. Please refer to Section 4.4- Creating and Testing an Edit-check for more details.
• De-activate/Activate an Edit-check: Toggles the edit-check status.
• Delete an Edit-check: The option is only available when an edit-check is de-activated. You cannot delete an active edit-check unless you de-activate it first.
• Create a New Edit-check: Open a page to create/test a new edit-check.
• View Validation Report of a Given Edit-check: On the Records Re-ported column, you can click (show) link to display the specific valida-tion report for the specific edit-check.

Clinical Workbench User Guide46 Working with Clinical Validation
4 .3 Producing a Validation Report
When you run a set of edit-checks against a dataset, or when you click the Validate link on a dataset, by default, a terse validation report is generated like the one below.
This report tells you the number of edit-checks applied, the number of dataset records that have been checked, and of those how many records failed one or more edit-checks. You have the following three options to view the report.
4 .3 .1 Terse Validation Report
The report is listed per dataset record, per edit-check. Each line shows the dataset record (subject id, dataset record #), edit-check ID, key-value pairs and exception messages. A dataset record may fail on multiple edit-checks, so one dataset record may be listed multiple times by different edit-checks. The key-values column has dumped information identified and supports the edit-check. For example, the edit-check checks the relationship of DEMOG.FDOSE and AESTDT, and the key-value information will automatically include these two DEMOG.FDOSE and AESTDT for the record.
4 .3 .2 Verbose Validation Report
The verbose mode gives you the validation report like a data listing which fails one or more selected edit-checks. Each data record is listed only once. The edit-check and its exception message are appended after the each record.
Clinical Workbench User Guide 47Working with Clinical Validation
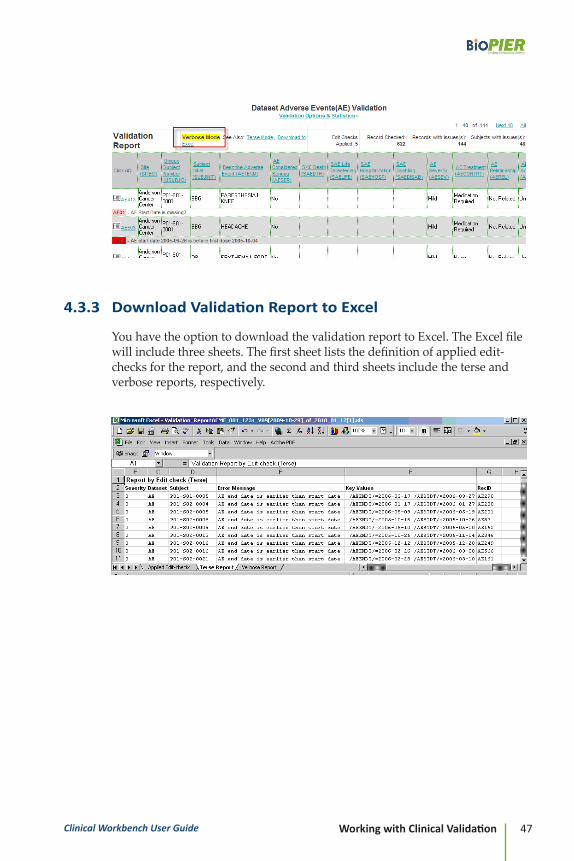
4 .3 .3 Download Validation Report to Excel
You have the option to download the validation report to Excel. The Excel file will include three sheets. The first sheet lists the definition of applied edit-checks for the report, and the second and third sheets include the terse and verbose reports, respectively.
Clinical Workbench User Guide48 Working with Clinical Validation
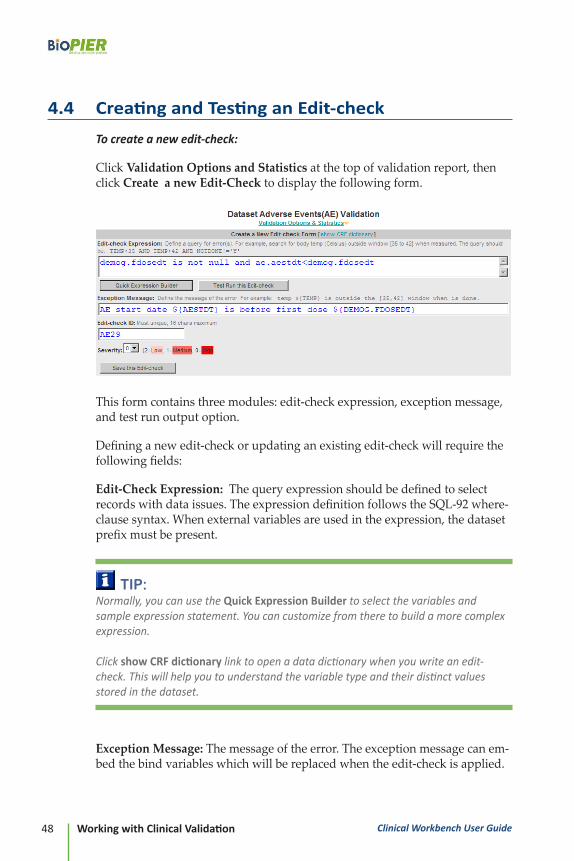
4 .4 Creating and Testing an Edit-check
To create a new edit-check:
Click Validation Options and Statistics at the top of validation report, then click Create a new Edit-Check to display the following form.
This form contains three modules: edit-check expression, exception message, and test run output option.
Defining a new edit-check or updating an existing edit-check will require the following fields:
Edit-Check Expression: The query expression should be defined to select records with data issues. The expression definition follows the SQL-92 where-clause syntax. When external variables are used in the expression, the dataset prefix must be present.
TIP:Normally, you can use the Quick Expression Builder to select the variables and sample expression statement. You can customize from there to build a more complex expression. Click show CRF dictionary link to open a data dictionary when you write an edit-check. This will help you to understand the variable type and their distinct values stored in the dataset.
Exception Message: The message of the error. The exception message can em-bed the bind variables which will be replaced when the edit-check is applied.

Clinical Workbench User Guide 49Working with Clinical Validation
Each bind variable must be wrapped by ${}, such as ${AESTDT}, and no calculation is supported with the bind variable.
Edit-Check ID: Unique ID for the edit-check, a maximum of 16 characters.
Severity: Severity of the error. 2=Low and 1=Medium, and 0=High
The following buttons are available on the edit-check definition page:
• Quick Expression Builder: Similar to selecting a subset, the quick expression builder allows you to select the subset of dataset with data issues.
• Test Run this Edit-Check: Once you have the expression, you can test-run this edit-check to see if the expression syntax can be accepted, and how many records can be captured through this edit-check.
• Save this Edit-check or Save the Update: When you are satisfied with the results, click the Save this Edit-Check button.

Clinical Workbench User Guide50 Working with Clinical Validation
4 .5 Managing Validation Rules
To manage edit-checks, click the Validation Options & Statistics link on the top of every validation report page to open a section view of edit-checks that are defined on the specific dataset.
This section allows you to manage existing edit-checks such as create, edit, change status, or delete. These topics are covered in Section 4.2 Executing Validation Rules.
4 .5 .1 Exporting and Import Edit-check Definitions
Exporting and importing Edit-check definition is a part of Study Data Ad-ministration, and a data administrator’s privilege is required to perform the function.
You can easily export edit-check definitions to an Excel file. Go to Settings > Managing Studies, locate the study and the data load, and click Export Con-figuration. There you will find the option to export Edit-checks to an Excel file.
You can also import edit-checks to a data load from the exported configura-tion.
4 .6 Syntax to Build Edit-check Expressions
There are basically four types of expressions (validation syntaxes) designed in the system. You can input more than one expression for one edit-check by using “OR” or “AND” as conjunctions between different expressions.
Edit-check Purpose Case ExampleRequired Field: Whenavariablemustcontainavalue,usethefollowingtoselect:Fornumericvariable:VAR is null
Forcharactervariable:VAR =’’
AEtermismissingAeterm=‘’

Clinical Workbench User Guide 51Working with Clinical Validation
Edit-check Purpose Case ExampleCheck Value Range: Whenthevalueofavari-ablemustexistwithinacertainrange,oravariablemustchooseavaluefromadesignatedcodelist.
Fornumericvariable:VAR not in (value1,…, valueN)
Forcharactervariable:VAR not in (‘value1’,…, ‘valu-eN’)
ForSAS/numeric,thedatevariableistreatedasnumericvariable.Forcharacter,thedatevari-ableistreatedzascharactervariable.
AErelationshipisonlyallowedtobe:1(Notrelated),2(Possible),3(Prob-able)
aerel not in (1, 2, 3)
SEXmustbeeither‘F’or‘M’sex not in (‘F’,’M’)
Comparing Two Fields:Useoperator:<,<=,>,>=,!=
Suchas,VAR<value1;VAR>value2;VAR!=value3;VAR=value4
AEstartdate(AESTDT)mustbelaterthanscreeningdate(SCRDT)
aestdt<scrdt
Multiple Condition Expression (AND/OR):Acomplexexpressionisnormallycomposedofsimpleexpressionsbelongingtothethreetypesdescribedabove.Byusing“OR”or“AND”or“()”,youcancombinedifferentexpressions.Thepriorityrelationshipofthosethreeconjunctionsis:“()”>“AND”>“OR”.
AEisnotconsideredasSAE,howevertheSAEHospitalizedorSAEDeathisflagged.sae=0 and (saehosp=1 or saedth=1)
AEstartdateisbeforefirstdose(de-mog.fdoseae.aestdtarenumericSASdatevariables)demog.fdosedt is not null and ae.aestdt<demog.fdosedt
Cross-Form Comparison (Using External Vari-ables):Variableprefixedbydatasetname.Theexternalvariablesmustbefromsubject-leveldataset(datasetcontainsonerecordpersubject).
AEstartdateisbeforefirstdose(de-mog.fdoseae.aestdtarenumericSASdatevariables)demog.fdosedt is not null and ae.aestdt<demog.fdosedt
Character Variable Starts With or Contains certain value:VARlike‘%VAL%’
Medicalhistorytermcontains‘diabetes’
mhterm like ‘%diabetes’
Database Specific Functions used in Expression .IfunderlyingdatabaseisMySQL,useMySQLdatabasefunctiontoconstructadvancedex-pression.Tofindtheunderyingdatabase,pleaseclicktheAbout Product linkatthebottomoftheapplicationpage.
Medicalhistorytermcontains‘diabetes’
upper(mhterm) like ‘%DIA-BETES’

Clinical Workbench User Guide52 Working with Clinical Validation

Clinical Workbench User Guide 53Working with Clinical Data Analysis
Chapter 5Working with
Clinical Data Analysis
If a data listing view is at record-level and patient profiling is at subject-level, then data analysis is focused on summarization and at group-level. We often refer data analysis to clinical study reporting (CSR), through which efficacy and safety data are summarized into tables or figures to report differences between treatment groups. Normally, biostatisticians design the statistical analysis specifications, and statisti-cal programmers implement such specifications. SAS® is the mainstream software for such analysis. Each report is programmed manually. The clinical statistical reporting is a resource-intensive process, and the reports are only available at the very end of the clinical trials. However, the efficacy and safety analysis is needed the most during a study. Medi-cal directors often need to analyze the drug efforts and explore the safety signals, patterns, and relationships. Also they need to understand which underlying data may be used to justify a statistical summary. Such analyses are often ad-hoc, and hard to define up front. Clinical Workbench data analysis functions fill the gap.
5 .1 Clinical Data Analysis and Function Overview
5 .1 .1 Key Data Analysis Features
Clinical Workbench data analysis provides the following key functions:
• Easy access to a descriptive summary for continuous variables and frequency analysis for categorical variables

Clinical Workbench User Guide54 Working with Clinical Data Analysis
• Easy-to-use interface to select study parameters for analysis
• Domain-specific data analysis functions, such as analysis for adverse events
• Interactive by-group and subgroup analysis to study what-if scenarios
• Interactive drill-down, and configurable group-by variables
• One-click switch from tabular summary to graphical format, or vice versa
• Statistical summary numbers are hyperlinked, with one-click to show the underlying data listing.
5 .1 .2 Descriptive Summary for Continuous Variables
For numeric continuous variables, a descriptive summary is presented. Grouping variables are listed on the left panel (and can be configured by a data administrator), and the descriptive summary statistics are displayed on the right panel.
Clinical Workbench User Guide 55Working with Clinical Data Analysis
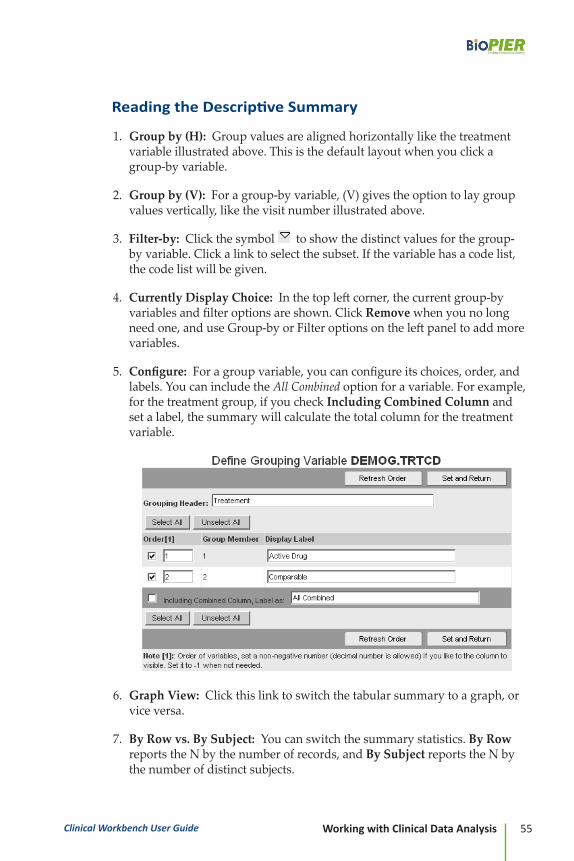
Reading the Descriptive Summary
1. Group by (H): Group values are aligned horizontally like the treatment variable illustrated above. This is the default layout when you click a group-by variable.
2. Group by (V): For a group-by variable, (V) gives the option to lay group values vertically, like the visit number illustrated above.
3. Filter-by: Click the symbol to show the distinct values for the group-by variable. Click a link to select the subset. If the variable has a code list, the code list will be given.
4. Currently Display Choice: In the top left corner, the current group-by variables and filter options are shown. Click Remove when you no long need one, and use Group-by or Filter options on the left panel to add more variables.
5. Configure: For a group variable, you can configure its choices, order, and labels. You can include the All Combined option for a variable. For example, for the treatment group, if you check Including Combined Column and set a label, the summary will calculate the total column for the treatment variable.
6. Graph View: Click this link to switch the tabular summary to a graph, or vice versa.
7. By Row vs. By Subject: You can switch the summary statistics. By Row reports the N by the number of records, and By Subject reports the N by the number of distinct subjects.
Clinical Workbench User Guide56 Working with Clinical Data Analysis
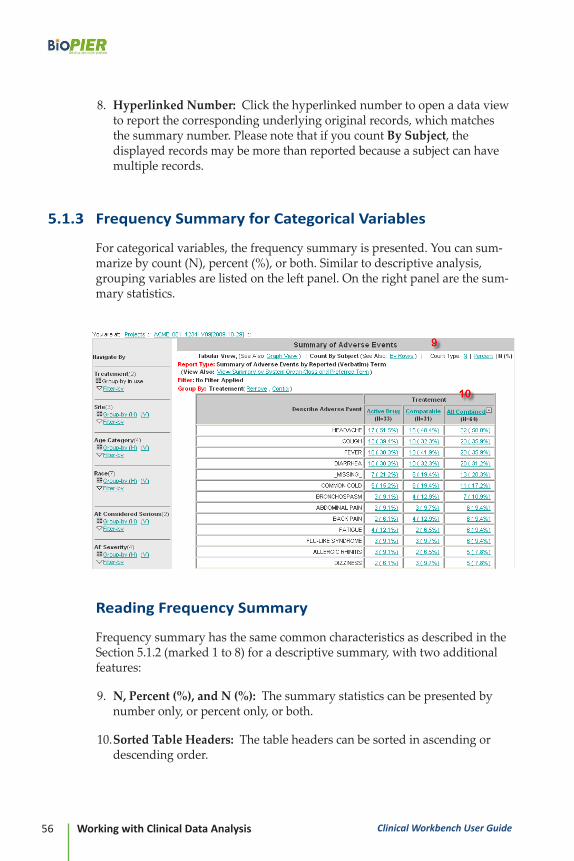
8. Hyperlinked Number: Click the hyperlinked number to open a data view to report the corresponding underlying original records, which matches the summary number. Please note that if you count By Subject, the displayed records may be more than reported because a subject can have multiple records.
5 .1 .3 Frequency Summary for Categorical Variables
For categorical variables, the frequency summary is presented. You can sum-marize by count (N), percent (%), or both. Similar to descriptive analysis, grouping variables are listed on the left panel. On the right panel are the sum-mary statistics.
Reading Frequency Summary
Frequency summary has the same common characteristics as described in the Section 5.1.2 (marked 1 to 8) for a descriptive summary, with two additional features:
9. N, Percent (%), and N (%): The summary statistics can be presented by number only, or percent only, or both.
10. Sorted Table Headers: The table headers can be sorted in ascending or descending order.

Clinical Workbench User Guide 57Working with Clinical Data Analysis
5 .1 .4 Prerequisites for Data Analysis
Study configuration is required before data analysis functions are enabled. Only data or system administrators can perform such functions. The study configuration can be accessed two ways:
From the Study Overview Page:
1. Click the Configure link
From the Study Administration Page:
1. Go to Settings > Manage Studies, locate a study, and then click Manage the Study.
2. Locate the data version/load and click Configure/Manage.
For data analysis function, configuration should include Core Mappings and Dataset Mappings.
After dataset mapping is done, click Set Parameters to register study param-eters for the dataset when you see the Set Parameters link on the dataset, and the dataset needs to be summarized
For more information, please refer to the Study Data Configuration section in the Data Administration Guide.
Clinical Workbench User Guide58 Working with Clinical Data Analysis
5 .2 Working with Clinical Data Analysis
5 .2 .1 Where to Access Data Analysis
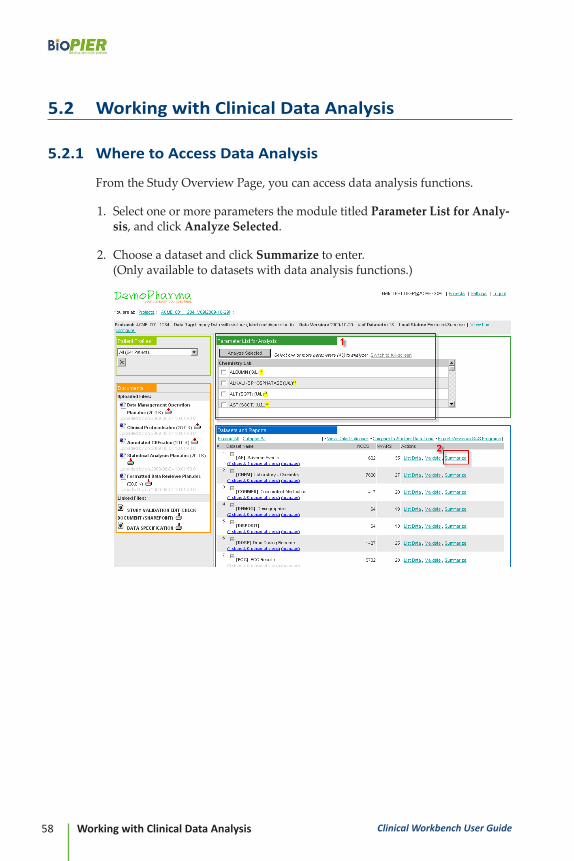
From the Study Overview Page, you can access data analysis functions.
1. Select one or more parameters the module titled Parameter List for Analy-sis, and click Analyze Selected.
2. Choose a dataset and click Summarize to enter.(Only available to datasets with data analysis functions.)

Clinical Workbench User Guide 59Working with Clinical Data Analysis
5 .2 .2 Parameter-based Analysis
From the Study Overview Page, and through the Parameter List for Analysis module, you can select one or more parameters to run data analysis. If the list is too long, you can select Top-Level Parameters to narrow the list down. Note the symbol ** on some parameters, which indicates the parameter is mea-sured multiple times by visit number. The trend-based data analysis for such parameters will be presented.
TIP:Single-visit and multiple-visit parameters cannot be selected together.

Clinical Workbench User Guide60 Working with Clinical Data Analysis
5 .2 .3 Domain-based Analysis
If a dataset is available for analysis, the Summarize link will be presented. The following domain-based analyses are presented:
1. Adverse Event Analysis: Summarize by AE term, SOC, preferred term. Also can be drilled down by relationship, severity, etc.
2. Concomitant Medications/Therapies Analysis: Similar to the adverse event summary, this domain summary is counted by medication treat-ment/therapy.
3. General Frequency and Descriptive Analysis for Other Datasets: The interface is a subset of the Parameter-based Analysis, and covers all other datasets. Accessed through the Set Parameters process within Study Con-figuration (See Data Administration Guide), the summary will be presented accordingly by their parameter classifications. Datasets such as demo-graphics, subject baseline, quality of life, physical examination, chemistry, hematology all belong to this category.

Clinical Workbench User Guide 61Working with Patient Files
Chapter 6Working with Patient Profiles
The patient profiling function can help you review and research clinical trial data at patient level, providing you with a different perspective to review clinical trial data. This chapter illustrates functions to view patient profiles, how to configure the patient profile view, and how to export patient profiles into a document for offline view.
6 .1 Patient Profiling Function Overview
Clinical Workbench has built-in functions to support patient profiles, including the following features:
• The patient profile module is on every study overview page. Select a subject to access its profile profiles.
• The patient profile function is integrated with every data listing view and is accessed by clicking a hyperlinked subject number while you review a data listing.
• The built-in All Data, All Column view presents complete subject data on one page, and is useful for data check.
• With rich data visualization features, you can toggle between data view and graphical chart by one click.
• You can configure your own patient profile template to present selected subject data (subset), and display in your own presentation format.
• The patient profile template can be created through a script method, allowing you to insert data views as the “blocks”, as well as free-text and paragraphs.
• The patient profile template definitions can be transferred to other data loads or studies.

Clinical Workbench User Guide62 Working with Patient Files
• With the Patient Profile Book feature, you can export patient profiles from a subject-list into a document (zip file) for offline view. The subject-list can be defined conveniently.
6 .1 .1 Patient Profile Visualization Features
Patient profiles contain one or more data views. A data view is presented in the following format (List) by default. If a data view can be rendered in chart format, then a Chart icon will be available, and you’ll be able to toggle between List and Chart.
Clinical Workbench has five types of built-in charts, described below.
TIP: About the Chart TimelineAll charts displayed on patient profiles are drawn on the same timeline using the same scale; events from different data sources can be compared and correlated. With this feature, you can easily associate an abnormal laboratory value to an adverse event, and a medication to the adverse event. The chart time label interval can be defined in study configuration.
Adverse Event Chart
Adverse events are drawn on a treatment timeline, in which serious, related, and serious related are marked in color. Treatment reference dates are drawn.
Clinical Workbench User Guide 63Working with Patient Files
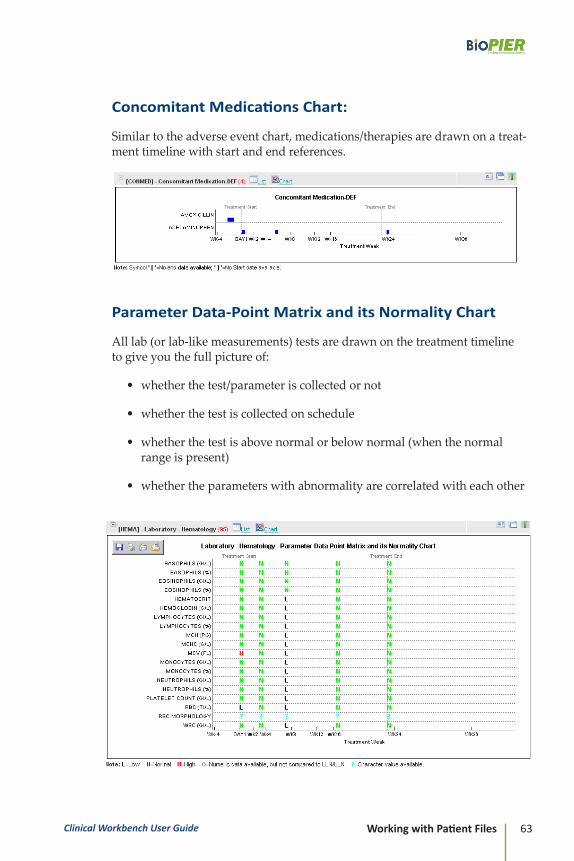
Concomitant Medications Chart:
Similar to the adverse event chart, medications/therapies are drawn on a treat-ment timeline with start and end references.
Parameter Data-Point Matrix and its Normality Chart
All lab (or lab-like measurements) tests are drawn on the treatment timeline to give you the full picture of:
• whether the test/parameter is collected or not
• whether the test is collected on schedule
• whether the test is above normal or below normal (when the normal range is present)
• whether the parameters with abnormality are correlated with each other

Clinical Workbench User Guide64 Working with Patient Files
Ratio of Parameter Value to its Upper Limit Normal (ULN)
All lab-like measurements are drawn on the treatment timeline by the percent change from baseline, and the ratio of change reference to ULN (upper limit normal).
Individual Parameter Value Trend
Each lab-like measurement is drawn on its own chart to inspect the value and trend. Reference lines such as treatment start/end, as well as the normal ranges (high, low) are drawn on the chart when available.

Clinical Workbench User Guide 65Working with Patient Files
6 .1 .2 Prerequisites for Patient Profile Functions
Study configuration is required to enable patient profile functions, and re-quires data administrator’s privilege to perform the task. The Core Mappings configuration will enable the basic patient profile functions, and the further Dataset Mappings enables advanced functions such as visualization. The study configuration can be accessed the following ways:
From the Study Overview Page:
1. Click the Configure link:
From the Study Administration Page:
1. Go to Settings > Manage Studies and locate a study.
2. Click Manage the Study, locate the data load, then Configure/Manage.
TIP:For more information, please refer to the StudyDataConfigurations section of the DataAdministrationGuide.
Clinical Workbench User Guide66 Working with Patient Files
6 .2 Working with a Patient Profile
6 .2 .1 Where to Access Patient Profiles
Clinical Workbench provides two ways to access patient profiles.
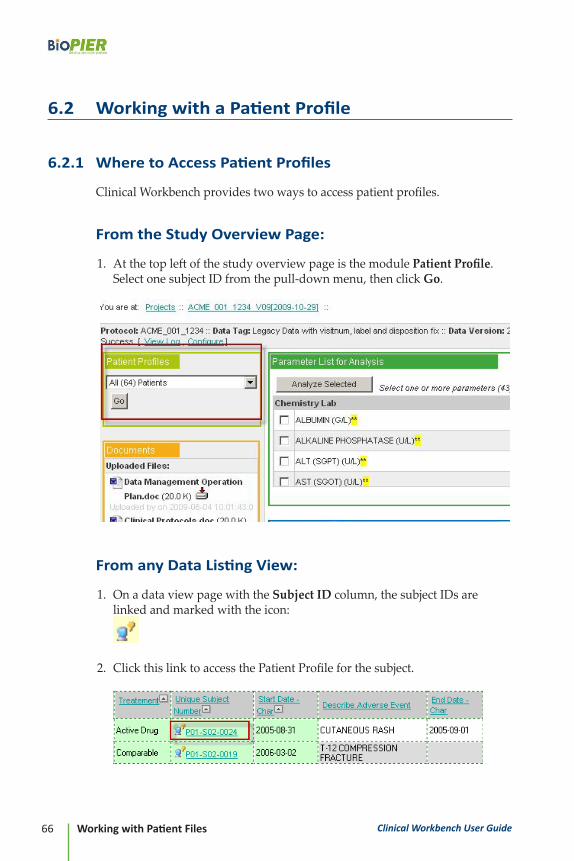
From the Study Overview Page:
1. At the top left of the study overview page is the module Patient Profile. Select one subject ID from the pull-down menu, then click Go.
From any Data Listing View:
1. On a data view page with the Subject ID column, the subject IDs are linked and marked with the icon:
2. Click this link to access the Patient Profile for the subject.

Clinical Workbench User Guide 67Working with Patient Files
6 .2 .2 Patient Profile Elements/Symbols Explained
The elements and symbols on a typical patient profile page are tagged and explained below:
1. Choose a Subject: Select a different subject from here.
2. Patient Profile: Views Selections and Command Box: Read Section 6.2.3 for more details.
3. Patient Profile Navigation Index: Like a table of contents, you can click to jump to a section.

Clinical Workbench User Guide68 Working with Patient Files
4. Data Listing View Layout Control: These options are only effective for default All-Column, All Data View.
5. Click Expand All Listings to switch views to all listings, and Expand All Charts to open all charts (if available), and Collapse All to close all views.
6. Number of Records: Shows the number of records in the data view/chart
7. Click to switch to data listing view (expand within the page)
8. Click to switch to full-screen data listing view containing this subject’s data only
9. Click to switch to data listing view with all subjects
10. Click to go to the top of the page
11. / Expand/collapse this section. (This option has no effect when Expand All Listings or Expand All Charts is used.)
12. Click to switch to chart view. This icon is only available for data view with charting capability after dataset mapping is completed
6 .2 .3 Patient Profile View Selection and Command Options
Every patient profile view has a pull-down list at the top of screen, which con-tains a list of shared and personal views for the study, and also the command options for the patient profile views.

Clinical Workbench User Guide 69Working with Patient Files
1. System View 1: Default View: If a study has defined a default view, then that view is selected. Otherwise, the view will be rendered as the All data, All Columns view.
2. System View 2: All Data, All Columns View: This view will list all datas-ets with subject ID column. For each dataset, all columns are displayed in original order. You can use Data Listing Layout Control to change view renderings.
3. Shared Patient Profile Views/Templates: These views are public to users who have access to the study.
4. Personal Patient Profile Views/Templates: These personal views are only visible to the login-user.
5. Create a New Patient Profile View: Choose this option to create a new patient profile view/template. (See section 6.3 for more details.)
6. Manage Patient Profile Views: Choose this option to edit patient profile view, delete, or set a profile view as a default view. (See Section 6.5 for more details.)
7. Create/Manage Patient Profile Book: Choose this option to export patient profiles to a Patient Profile Book for offline viewing. You can select a subject-list and a profile template to make the profile book. (See Section 6.4 for more details.)

Clinical Workbench User Guide70 Working with Patient Files
6 .3 Creating/Updating Patient Profile View/Tem-plate
6 .3 .1 Create a New Profile View
1. From the Patient Profile section (top left) of a Study Overview Page, select any subject to view its patient profile
2. Click the Create a New Patient Profile View link to open the profile tem-plate page.
6 .3 .2 Edit an Existing Profile View
To update an existing patient profile page, select Manage Patient Profile Views, then choose a profile view to edit.
Both creating a new profile view and editing an existing profile view will open a very similar interface, like the following:
Clinical Workbench User Guide 71Working with Patient Files
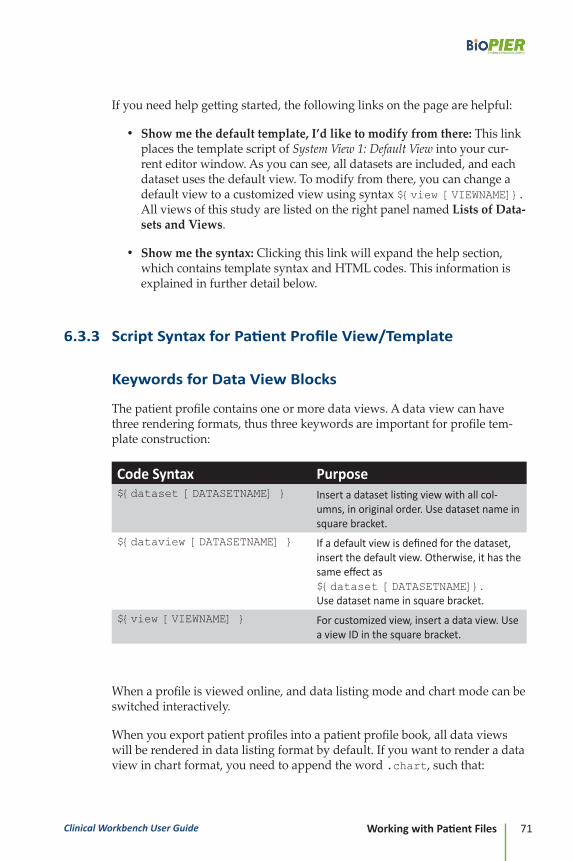
If you need help getting started, the following links on the page are helpful:
• Show me the default template, I’d like to modify from there: This link places the template script of System View 1: Default View into your cur-rent editor window. As you can see, all datasets are included, and each dataset uses the default view. To modify from there, you can change a default view to a customized view using syntax ${view [VIEWNAME]}. All views of this study are listed on the right panel named Lists of Data-sets and Views.
• Show me the syntax: Clicking this link will expand the help section, which contains template syntax and HTML codes. This information is explained in further detail below.
6 .3 .3 Script Syntax for Patient Profile View/Template
Keywords for Data View Blocks
The patient profile contains one or more data views. A data view can have three rendering formats, thus three keywords are important for profile tem-plate construction:
Code Syntax Purpose ${dataset [DATASETNAME] } Insertadatasetlistingviewwithallcol-
umns,inoriginalorder.Usedatasetnameinsquarebracket.
${dataview [DATASETNAME] } Ifadefaultviewisdefinedforthedataset,insertthedefaultview.Otherwise,ithasthesameeffectas${dataset [DATASETNAME]}.Usedatasetnameinsquarebracket.
${view [VIEWNAME] } Forcustomizedview,insertadataview.UseaviewIDinthesquarebracket.
When a profile is viewed online, and data listing mode and chart mode can be switched interactively.
When you export patient profiles into a patient profile book, all data views will be rendered in data listing format by default. If you want to render a data view in chart format, you need to append the word .chart, such that:
Clinical Workbench User Guide72 Working with Patient Files
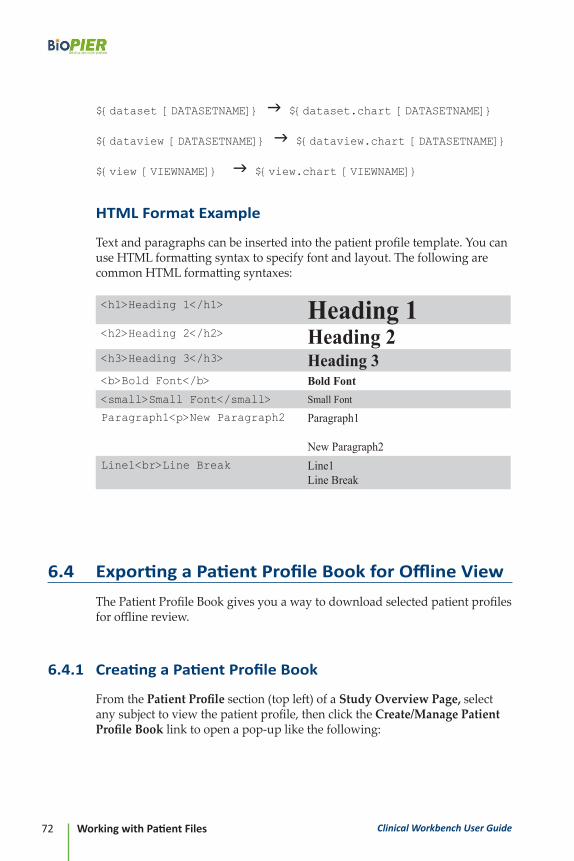
${dataset [DATASETNAME]} g ${dataset.chart [DATASETNAME]}
${dataview [DATASETNAME]} g ${dataview.chart [DATASETNAME]}
${view [VIEWNAME]} g ${view.chart [VIEWNAME]}
HTML Format Example
Text and paragraphs can be inserted into the patient profile template. You can use HTML formatting syntax to specify font and layout. The following are common HTML formatting syntaxes:
<h1>Heading 1</h1> Heading 1 <h2>Heading 2</h2> Heading 2<h3>Heading 3</h3> Heading 3<b>Bold Font</b> Bold Font<small>Small Font</small> Small Font
Paragraph1<p>New Paragraph2 Paragraph1 New Paragraph2
Line1<br>Line Break Line1 Line Break
6 .4 Exporting a Patient Profile Book for Offline View
The Patient Profile Book gives you a way to download selected patient profiles for offline review.
6 .4 .1 Creating a Patient Profile Book
From the Patient Profile section (top left) of a Study Overview Page, select any subject to view the patient profile, then click the Create/Manage Patient Profile Book link to open a pop-up like the following:

Clinical Workbench User Guide 73Working with Patient Files
If you see that the patient profile book already existed for your subject-list and profile view, click to download.
To create a new Patient Profile Book:
1. Locate a Subject-List. If you do not have the subject-list yet, create one by clicking Create a new Subject-list.
2. Choose a profile template by which the profile book is rendered.
3. Click the Create Profile Book button.
The job will be queued in the system for background processing. You will need to refresh the page to see if the job is completed or not. Once the job is done, the book (a zipped file) will be checked into the corresponding subject list .

Clinical Workbench User Guide74 Working with Patient Files
TIP:Depending on the size of each patient profile, it can take significant time and disk space to create a patient profile book. If you download all data points for all subjects, this is equivalent to downloading all datasets in one file! For that reason, please only run a profile book for subjects of special interest, and design your profile template so that it includes only the datasets/views you need.
6 .4 .2 Viewing Patient Profile Book
If you see that the patient profile book already existed, you click to download. The patient profile book will be exported as a zip file. The zip file contains many folders and each subject has a folder. You must Extract All into a local folder and keep the same folder structure.
TIP:You must use the Extract All command to unzip the profile book file (zip file) to keep the folder structure. Sometimes, if you simply select-and-dragfiles to your folder, the folder structure cannot be restored. If all files are in one folder (and not in the proper folder structure), then the profile book cannot be displayed properly.
Clinical Workbench User Guide 75Working with Patient Files
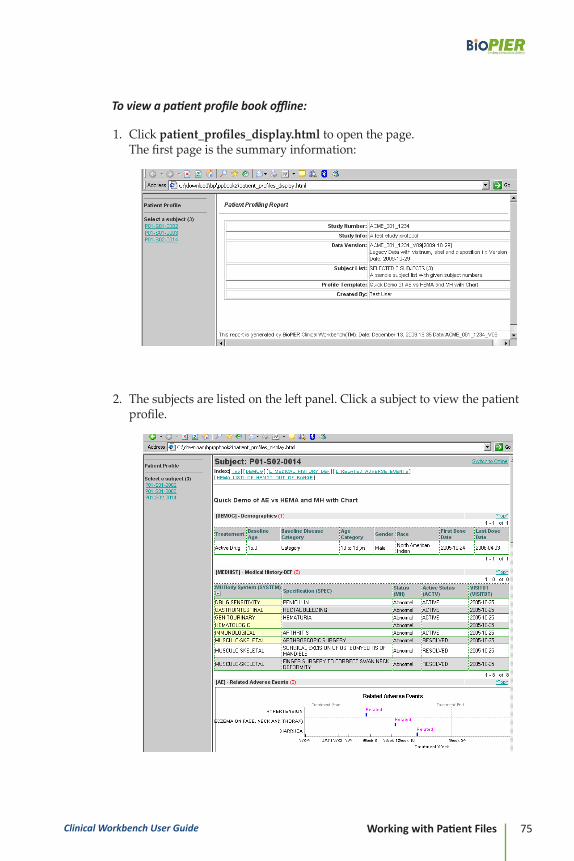
To view a patient profile book offline:
1. Click patient_profiles_display.html to open the page.The first page is the summary information:
2. The subjects are listed on the left panel. Click a subject to view the patient profile.

Clinical Workbench User Guide76 Working with Patient Files
6 .5 Managing Patient Profile Views
To manage patient profile views:
1. From the patient profile section (top left) of a Study Overview Page, select any subject to view its patient profile, then click the Manage Patient Pro-file Views link to open a page like the following:
You have the following options to manage filter/views:
• Edit: Edit the data view definition. The interface is the same as the Save this View interface.
• Clone: Clone this view as a new view and modify from there.
• Delete: Delete this view.
• Set Default View: The first column gives you the option to save a view as a default view. Only a shared view can be qualified as a default view. The qualified views are highlighted with an orange background in the first column.
Clinical Workbench User Guide 77Generating SAS Programs
Chapter 7Generating SAS Programs for
Paper-Trail Review
Traditionally, SAS Programmers produce data listings. Since each dataset requires programming individually, the programming of SAS listings requires a great deal of effort and time. The listings are formatted and printed on paper, then are reviewed by CDMs (Clinical Data Managers), medical directors, and other clinical teams. The process is often referred as Formatted Data Review (FDR). Clinical Workbench can transform online data views to SAS programs. The SAS programs can be executed using SAS software to produce traditional paper-trail data listings. With this feature, CDMs can produce data listings by SAS for For-matted Data Review (FDR). This chapter will describe the steps to produce SAS listings, and is intended for audiences not familiar with SAS programming.
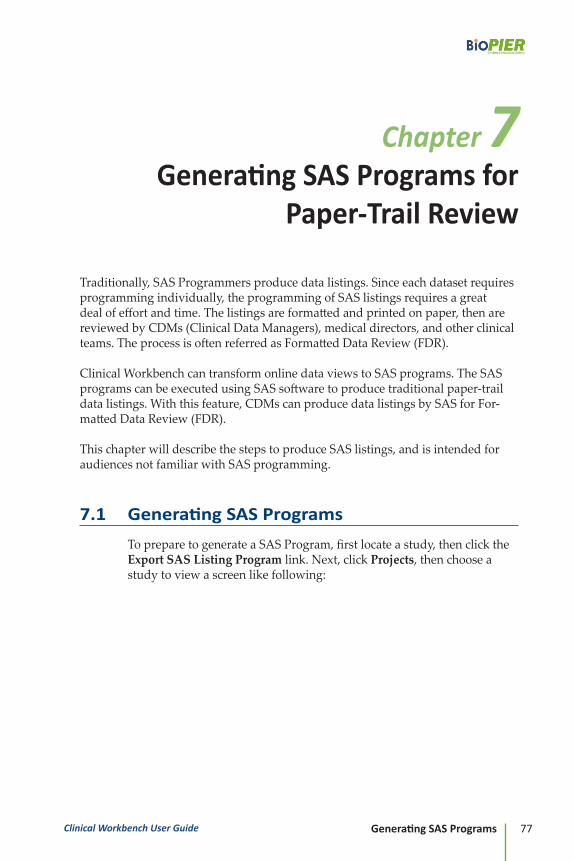
7 .1 Generating SAS Programs
To prepare to generate a SAS Program, first locate a study, then click the Export SAS Listing Program link. Next, click Projects, then choose a study to view a screen like following:

Clinical Workbench User Guide78 Generating SAS Programs
Click Export Views as SAS Programs on the study overview page to display the following.
1 . Select Data Views to Export
Expand all Dataset Views and Collapse All Dataset Views allow you to ex-pand/collapse data views, respectively. The two buttons at the bottom, Select All Views and Unselect All Views, allow you to select all or deselect all with one mouse click.
Under each dataset, the number of shared and personal data views is listed. Click the link or icon [+] to expand to data views, and click the checkbox to select the data views to export.
Data views starting with RAW_ (e.g., RAW_AE) are system views that include all variables and all data. The remaining data views are customized

Clinical Workbench User Guide 79Generating SAS Programs
views. Each data view has two parts: the first part is the SAS program file-name, and the second part is the view name. For example:
[AE_S1_Severe_Adverse_Events] Severe Adverse Events
In this example, the SAS program name is AE_S1_Severe_Adverse_Events.sas, and its listing program title is ‘Severe Adverse Events’.
2 . Specify Path of SAS Datasets and Exported SAS Pro-grams
The exported SAS programs will be executed on a local machine with SAS Software installed. The programs will read SAS datasets, so the location of SAS datasets and the location of generated programs are necessary informa-tion.
For example, if you have your datasets on Z:\acme-101\data directory, and your exported SAS programs are intended to be executed on Z:\acme-101\programs, you should fill the dataset and SAS program path fields as follows:
3 . Generate SAS Programs and Save
Click the Generate SAS Programs button at the right bottom corner of the page. The system then asks you for further operation about the zipped SAS program file.

Clinical Workbench User Guide80 Generating SAS Programs
Unzip the file and save all programs into the directory that you specified under Generated SAS Programs (Output).
A SAS program is generated from every selected data views. In addition, there are two utility programs:
formdoc.sas is a SAS utility macro to process page numbers and convert plain-text SAS outputs to RTF files. This macro is called by each SAS listing program.
batch_run.bat is a handy Windows DOS batch file to allow you to run all programs in a batch. It is assumed that you are running SAS on a Windows platform, and have SAS executable SAS.exe under your system path. In most cases, you will need to customize it. The file will be a good starting point to modify. If your system is a UNIX system, you’ll need to change it accordingly.
7 .2 Executing Generated SAS Programs
Once you have all SAS programs exported and saved on a local drive, the next step is to execute them and produce a SAS listing output.
7 .2 .1 If You are New to SAS®
SAS is known as a Statistical Analysis System. SAS software is mainly used for complex statistical calculation, and the user manuals are long. Mastering SAS requires significant time.
If you have never touched SAS software before, it could be overwhelming to read this chapter, and you might want to ask a SAS programmer to help you the first time. You’ll need very basic SAS knowledge to run SAS programs that are generated from Clinical Workbench. However, you can master that part quite easily.

Clinical Workbench User Guide 81Generating SAS Programs
For the basics, you need to:
• Know how to run SAS in Interactive Mode
• Know how un SAS Programs in a Batch Mode
• Know how to tell when a SAS program failed to run
• Know how to write a simple SAS Program to practice the above three skills
• Try to understand SAS ‘Proc Report’ Procedure
7 .2 .2 Test One SAS Program in SAS Interactive Mode
Before you run all programs in a big batch (by calling batch_run.bat), try at least one SAS program to make sure the generated program is in good condi-tion.
Open a SAS program in SAS Editor (see the following screenshots), then choose Submit to run. Check the log file for errors.

Clinical Workbench User Guide82 Generating SAS Programs
If the program is executed successfully, you will see the output file with the same name in Rich Text Format (with .rtf extension). When you open the .rtf file, you will see a format like the following:
Open the generated RTF file, and verify that the output look similar to the following:
If you do not see the file, check the execution log for errors. Consult a SAS programmer if necessary. It is suggested to check the path of datasets and the path of SAS programs to ensure their existence. In the example below, the path information is listed on line 16 and line 17.

Clinical Workbench User Guide 83Generating SAS Programs
7 .2 .3 Run All SAS Programs in a Batch
Once you have one program working, you can run all programs in a big batch. For the Windows platform, as the example, double click the batch pro-gram batch_run.bat to launch.
Each SAS program should have a .log file, .tmp file, and a .rtf file generated. Files with .log extensions are the SAS execution logs, and .tmp files are the plain-text SAS output files, and .rtf files are the rich text format files which are converted from corresponding .tmp files.
If you do not see .rtf files at all, or missed some of .rtf files, you need to check their corresponding .log files for errors. For debugging, follow the steps in section 7. 2. 2.
7 .3 Understanding a Generated SAS Listing Program
This section will use one example to digest typical SAS listing programs gen-erated through Clinical Workbench. The example program is exported from a data view called “Serious AE Listing”. We will explain in great detail, and use the program to help you to understand the SAS components.
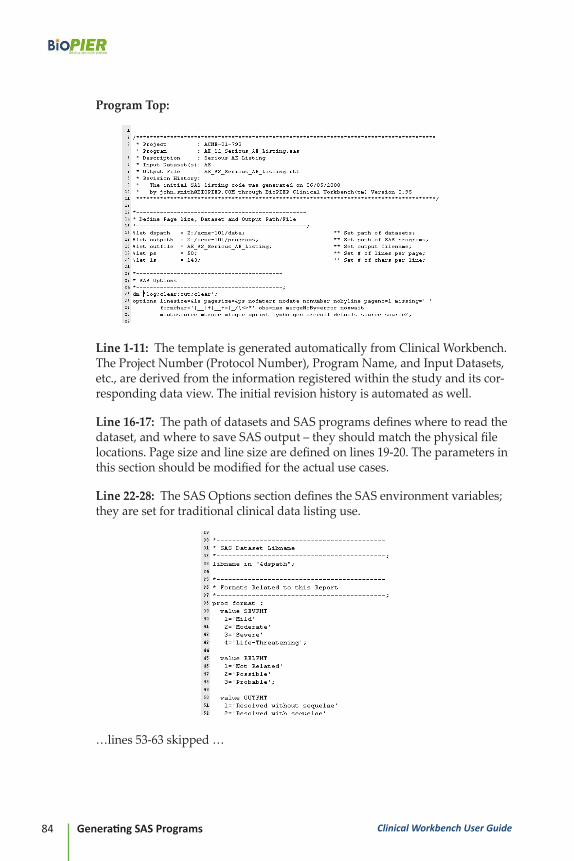
Clinical Workbench User Guide84 Generating SAS Programs
Program Top:
Line 1-11: The template is generated automatically from Clinical Workbench. The Project Number (Protocol Number), Program Name, and Input Datasets, etc., are derived from the information registered within the study and its cor-responding data view. The initial revision history is automated as well.
Line 16-17: The path of datasets and SAS programs defines where to read the dataset, and where to save SAS output – they should match the physical file locations. Page size and line size are defined on lines 19-20. The parameters in this section should be modified for the actual use cases.
Line 22-28: The SAS Options section defines the SAS environment variables; they are set for traditional clinical data listing use.
…lines 53-63 skipped …

Clinical Workbench User Guide 85Generating SAS Programs
Line 33: Define SAS libname to tell system where the datasets should be read. This refers to a macro variable defined on line 16.
Line 29-63: SAS format information is defined in this section. The system understands those formats are used by the listing and their format sources are generated. In this way, the SAS listing will not rely on a SAS Catalog dataset.
Line 64-74: Data steps. Because the data view is used to report Serious AEs, it reads SAS AE dataset, and sorts by Subject and AE term.
Line 76-96: This section prepares titles and footnotes. In SAS, titles and footnotes are center-aligned by default. Since the protocol information is left-aligned and on the right side, and the page number (xxx of yyy) is right aligned, this section has some SAS manipulations to make the alignments. Line 89-95 are for the same procedures, to make footnotes left aligned.

Clinical Workbench User Guide86 Generating SAS Programs
Line 98-133: The last section is to produce data listings using a special SAS procedure called “proc report”.
Line 181 and line 187: Save the output generated from the proc report to a designated external file. In this case, we save it as the same name as the SAS program and using .tmp as the extension. Line 181 and line 187 have to be paired. The keyword new in line 181 signifies file to overwrite (vs. append) when the output file has existed.
Line 104: The column statement is used to select variables (and its order) as a part of the listing. Those variables must exist within the temp SAS dataset final.
Line 106-116: The define statement section is to customize the listing display attributes. Each variable may have its own define statement. For line 106, as an example, the variable USUBJID will be sorted (/order) , left-aligned, will be wrapped (flow) when the column width won’t allow to display fully, the column is set with width of 12 chars, and the column heading is “Subject Number” .
Since the variable USUBJID and AETERM have the keyword id, these col-umns will appeared as the leading column(s) on every page when one row of the dataset has been displayed across multiple pages (when too many columns within a dataset).

Clinical Workbench User Guide 87Generating SAS Programs
Line 111 and 112: Since columns PT and LLT are collapsed on the original the data view, the generated listings has “/noprint” attribute. These two columns will not be shown on the listing. Sometimes you can use the feature to sort data by the column but not display the column.
Line 113-116 has format options, when a format is defined, the internal data value will be translated (decoded) according to the definition defined in line 28-63.
Line 119 – line 114 is the section for titles and footnotes. SAS allows a maxi-mum of 10 titles and 10 footnotes respectively. title4 is center aligned. The rest are displayed left-aligned. The title/footnote values are presented macro variables defined in line 79-96.
Line 129-133: Once the output file is generated (.tmp file), line 132 loads a utility program provided from Clinical \Workbench, then line 133 calls it to update page numbers, and transform the plain-text output to a rich text format (RTF) file. The benefit of RTF output is that it is printer friendly.
7 .4 Customizing SAS Programs for Better Output
It is expected that many generated outputs are not ideal, and require some cosmetic customizations. For example, some column headers are too wide, their labels should be defined better, etc. The following sections cover the techniques for customizing the SAS programs for better output.
7 .4 .1 Frequently Asked Questions
The following section covers the common tasks that are associated with customizing a SAS program for better output. For clarity, we present in the information in a FAQ format.
How do I change the dataset and program location?Change the “Define Page Size; Dataset and Output Path/File” section within the generated SAS program.
How do I change the page template, such as font, page and line size?Change the top “Define Page Size; Dataset and Output Path/File” Section. The default font size is hard coded with the utility macro formdoc.sas. In the sample program, line 19 and 20 are for this purpose.

Clinical Workbench User Guide88 Generating SAS Programs
How do I change the column layout, such as wrapping (flowing), width, heading, flow, repeated columns, etc., and how can I only display distin-guish values (no-repeat)?The columns statement in proc report defines columns that should be listed in the given order.
Each column may have a define statement. The following is an example:
define TRTCD /order left flow width=10 format=TRTFMT. ‘Treat-~ment’ id;
The options of the define statement are further explained in the following table:

Clinical Workbench User Guide 89Generating SAS Programs
Keyword Meaning Output Effect/order ThecolumnTRTCDwillbeordered,onlydistinct
valuesaredisplayed(seetheoutputontheright).
Sometimes,youmayusethefollowingkeywordforothersituations:
/display:Todisplayeveryrowwithoutorder-ing
/order noprint : keeprowsorderedbythecolumnbutthecolumnisnotdisplayed.
Left Thetextwillbeleftaligned.Otherchoices:cen-teredorright
Flow Makethetextwraparoundwhenthecolumnisnotwideenoughtoholdalltextinoneline.Withoutthe“flow”keywordthetextcouldbetruncated.
width=10 Thiskeyworddefinesthecolumnwidthincharac-ters(asunits).
format=TRTMT. DisplaystheTRTCDastext(label)usingSASformatTRTMT(whichisdefinedinthelines25-63).WhenTRTCDvalueiscodedas1,itwillbedisplayedas“ActiveDrug”.
‘Treat-~ment’ Thelabelofthecolumn(heading).Thechar‘~’isthesplitchardefinedinprocreportstatement.Itsplitsthecolumnheadinglikethis:
Id MarksthecolumnasaIDcolumn,whichmakesthecolumnrepeatedoneachpage.Forthere-port,thecolumnTreatment(TRTCD),SubjectID(USUBJID)andAETerm(AETERM)areidcolumns,andaredisplayedfirstandrepeatedoneverypage(everyrowneedsthreepagestocover).
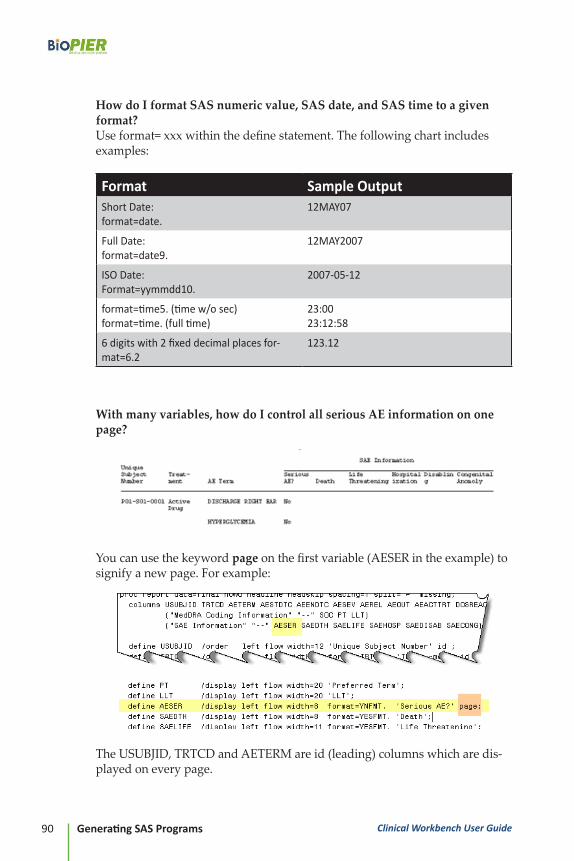
Clinical Workbench User Guide90 Generating SAS Programs
How do I format SAS numeric value, SAS date, and SAS time to a given format? Use format= xxx within the define statement. The following chart includes examples:
Format Sample OutputShortDate:format=date.
12MAY07
FullDate:format=date9.
12MAY2007
ISODate:Format=yymmdd10.
2007-05-12
format=time5.(timew/osec)format=time.(fulltime)
23:0023:12:58
6digitswith2fixeddecimalplacesfor-mat=6.2
123.12
With many variables, how do I control all serious AE information on one page?
You can use the keyword page on the first variable (AESER in the example) to signify a new page. For example:
The USUBJID, TRTCD and AETERM are id (leading) columns which are dis-played on every page.

Clinical Workbench User Guide 91Generating SAS Programs
When I display three MedDRA variables, how do I make them share a com-mon heading?
You can formulate a columns statement as highlighted below:
In data listing, we often need to insert a line break or a page break to distin-guish different subjects or treatments. How do I do that?
Within “proc report”, the break after or break before statement can serve this purpose. See the following examples:
Purpose Example Sample MeaningAddabreaklinebe-tweenvaluechanges
Leaveanewlinebreak(skipaline)betweendifferentsubjectIDs.Thestatementistypicallyin-sertedafterthelastdefinestatement.
Addapagebreakbetweenvaluechanges
breakafterTRTCD/page; Makeanewpageforanewtreatmentcode

Clinical Workbench User Guide92 Generating SAS Programs
How do I change/add titles or footnotes? Titles and footnotes are specified within the “Generate Report and Save to a File “section. You can add you own titles and footnotes there. You may have a maximum of 10 titles/footnotes respectively. The first title is title1, and the last possible title (if any) is title10.
For a center aligned title/footnote:
title6 ‘Full Analysis Dataset’;
For left-aligned titles/footnotes, it is more complex. They are prepared in “Create Titles and Footnotes” section (Line 76-96) using macro variables.
7 .4 .2 A Case Study of SAS Listing Customization
In this section, we will use one example to show you the customization pro-cess. By viewing screenshots, you can see changes between the online data view, the unmodified output, and the “tweaked” output . The unmodified output is created through the SAS program from Clinical Workbench without any modification, and the tweaked output is the improved output after some quick changes.
The following is a configured data view on the AE data set. It lists all treat-ment emergent AEs for a study. The columns and their headers have been crafted during the configuration step. The view displays the formatted (decoded) values and are sorted by Subject ID (USUBJID), TRTCD (Treatment ID), and AE Term (AETERM). The three columns are also served as “ID” col-umns as well. Since this has so many columns, we use the “wrapped” layout to allow all column values to display.
The Top Section of the Online Data View:

Clinical Workbench User Guide 93Generating SAS Programs
The Top Section of Data View Configuration:
In about one minute, you can export the data view as a SAS program, and execute the program to produce the following data listing. They are very de-cently formulated with all professional components such as titles, footnotes, and page numbers. Each row displays across four pages and each page has its leading columns. It just needs a very small effort to give it a finished look, such as some adjustments to the column widths, grouping some columns together, etc.

Clinical Workbench User Guide94 Generating SAS Programs
Screenshots of Paper-Trail SAS Listing Directly Generated by Clinical Workbench
Page 1:
Page 2:
Page 3:
Page 4:

Clinical Workbench User Guide 95Generating SAS Programs
The “Finished” Paper-Trail SAS Listing after Human Adjust-ments to the Generated SAS Program
Page 1:
Page 2:
Page 3:
For a clinical data listing, the look-and-feel aspect is processed by the SAS proc report procedure. The following gives you the before and after effect.

Clinical Workbench User Guide96 Generating SAS Programs
The SAS Proc Report Section Directly Generated by Clinical Workbench (Unmodified)
The SAS Proc Report Section after Some Human Adjustments
The SAS techniques for such steps have been covered in Section 7. 4.1. The changes (before vs. after) are very minimum. With the intelligence that Clinical Workbench provides, you can imagine how easy and productive producing clinical data listings can be. Should the job be exclusively done by statistical programmers, or can you do it?

Part 2 Clinical Workbench Data Administration
Guide


Clinical Workbench Data Administration Guide 99Overview
Chapter 1Data Administration
Overview
BioPIER Clinical Workbench allows you to combine clinical study datasets from different sources into one centralized repository, and provides one simple unified interface to allow the entire clinical team to review, validate, and analyze clinical data.
Chapter 2 describes how to set up study structures, organize all of your clinical studies into one repository, and how to set up access control so that only certain people can access certain studies, and maintain studies.
Chapter 3 explains how to upload and maintain dataset transfers for a study, how to upload and link study documents to provide integrated study view.
Chapter 4 covers study data configurations before the unified patient profiles, data review, and analysis engine can be applied.
Study data refers to study documents and study datasets. Study datasets in SAS® format is the in-take source for Clinical Workbench. Please note that SAS datasets cannot be directly uploaded. Instead, before SAS datasets can be uploaded, an intermediate “conversion” process is required, which transforms SAS proprietary data format to its textual data format in CSV and XML with the BioPIER SAS Macro Utility. Once the transformed datasets are uploaded into the system, SAS software is no longer needed within Clinical Workbench.
Study configuration may include:
Core Mappings – Define subject-level/demographics dataset name and common variables such as subject name, visit number, and their first and last reference date (such as the first/end dose date).
Dataset Mappings – Map each dataset to its corresponding domain (a dataset type), such as Adverse Events or Laboratory.

Clinical Workbench Data Administration Guide100 Overview
Setting Analysis Parameters – The parameter lists are a handy feature for data analy-sis. Once dataset mapping is done, the analysis parameters can be extracted systemati-cally. The system will prompt the list to you to review and select.
Subject List – A subject list is a subset of the subject population. You can write an ex-pression to define the subset. The list can be used for the patient profile book.
Data Views and Validation Checks – Data listing views can be defined and shared on a given dataset for team users, and the validation checks can be defined to generate the listing of data issues. This is a cumulative process, and the defining of such views is not the scope of data administration, and does not require the administrator’s role. However, the definition is a part of configuration data as well.
The study configurations can be exported or transferred from one study to another. A study only needs to be configured once.
If your datasets are CDISC compliant, very minimal configurations are needed. If your datasets are not in CDISC format, you will need a few steps of configurations to enable data analysis and patient profiles.
1 .1 Where and Who to PerformData Administration Tasks
The Data Administrator or System Administrator role is required to perform this function. All of the data administration functions can be accessed through the Settings menu, then click the Manage Studies link under the Study Data Administration Section.
Clinical Workbench Data Administration Guide 101Overview
1 .2 Study Data Administration Tasks At a Glance
All Data Administration tasks can be accessed through Settings > Manage Studies.
If this is the first time loading data to a study, you may need to Create a Prod-uct or Create a Study first. Otherwise, select a target study and click Manage the Study.
To load datasets:
1. Click Upload New Study Data, and first download the SAS Macro catalog.
2. Next, run the SAS macro against SAS datasets, and zip all the outputs (produced from the macro call) to one single zip file to upload.
3. The data upload process will create a new data load version for the study.
The next step is to configure/map the new data load version for the patient profile and data analysis.
4. Return to Manage the Study to locate the data load version, then click Configure/Manage.
If the study has a previous data load with a completed configuration, you can simply transfer using the Transfer Configurations link.
If this is the first load data version for a study, you’ll need to configure the study manually. If the datasets in the data load are CDISC compliant, you can take advantage of the One-Click CDISC Mapping approach to sim-plify the configuration process.
5. Before you perform configuration/mapping steps, open the Data Diction-ary to examine each dataset, and perform the following steps:
• If your dataset has SAS date/time variables, where the values are stored in a SAS numeric way, click the Map SAS Date/Time Variables link to map such variables. The program will analyze all datasets to locate such variables, propose the mapping, and let you to confirm.
• Indicate which dataset is a subject-level dataset. Also, identify discrete variables that can be used for group-by analysis/comparison.
• Identify variable names for Subject ID, Visit Number, and Visit Label.

Clinical Workbench Data Administration Guide102 Overview
• Identify the date value pattern in your datasets. For example, is the date coded as JAN/29/2008 or 2008-01-28?
• Pay special attention to whether the data is vertically aligned (the com-mon layout in CDISC dataset using TESTCD and test value way) or horizontally aligned (each parameter has a variable).
The manual configuration involves two mapping steps:
Core Mappings: Contains 5 sections for which you can follow the instruc-tions and example.
Dataset Mappings: Start with DM, AE, CM (Concomitant Med), LB-like datasets (including ECG, Vitals, and efficacy datasets), PE, MH, DS (Disposi-tion). These datasets have more analytic significance in patient profile and data analysis. Classify the dataset to its domain (dataset type) and map key variables within the respective domain. After dataset mapping is finished, if the dataset is suitable for parametric analysis, you will see a link named Set Parameters. Click this link to select parameters you want to single out for analysis.
Once the mapping is done, you can check back to see if patient profiles are available, check whether the patient profile graph on laboratory and adverse events can be displayed, and also perform data analysis through selection of parameters. You can also click the Summarize link on datasets section (use AE to verify).
Through the Settings > Manage Studies > Manage the Study interface, you can:
• Manage the access control for users on each study.
• Upload, link, and maintain documents to study, so that documents can be viewed on the study page.
• You can also maintain current data.
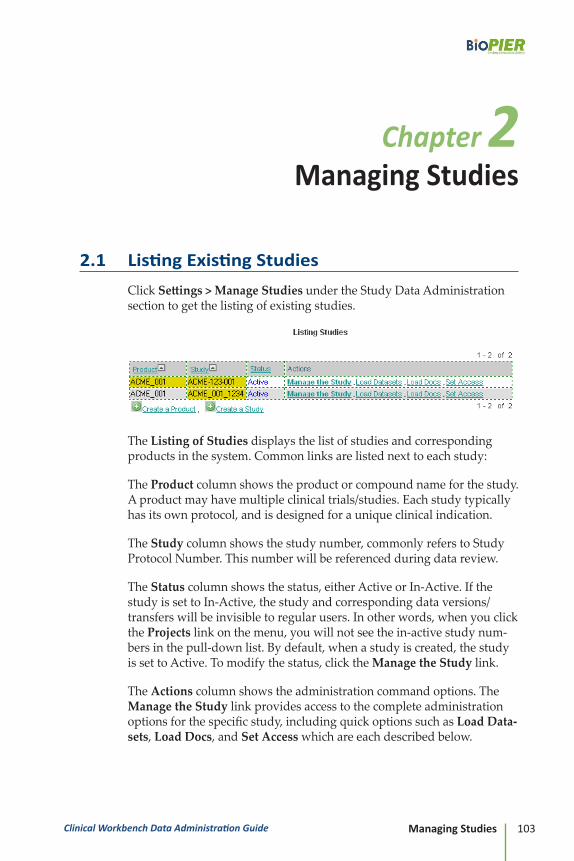
Clinical Workbench Data Administration Guide 103Managing Studies
Chapter 2Managing Studies
2 .1 Listing Existing Studies
Click Settings > Manage Studies under the Study Data Administration section to get the listing of existing studies.
The Listing of Studies displays the list of studies and corresponding products in the system. Common links are listed next to each study:
The Product column shows the product or compound name for the study. A product may have multiple clinical trials/studies. Each study typically has its own protocol, and is designed for a unique clinical indication.
The Study column shows the study number, commonly refers to Study Protocol Number. This number will be referenced during data review.
The Status column shows the status, either Active or In-Active. If the study is set to In-Active, the study and corresponding data versions/transfers will be invisible to regular users. In other words, when you click the Projects link on the menu, you will not see the in-active study num-bers in the pull-down list. By default, when a study is created, the study is set to Active. To modify the status, click the Manage the Study link.
The Actions column shows the administration command options. The Manage the Study link provides access to the complete administration options for the specific study, including quick options such as Load Data-sets, Load Docs, and Set Access which are each described below.

Clinical Workbench Data Administration Guide104 Managing Studies
At the bottom of the listing, two action links, Create a Product and Create a Study, allow you to create a new product or study, which will be covered in Section 2.2
2 .2 Creating a Study Structure
A study structure refers to the Product-Study structure.
The term Product in Clinical Workbench refers to a clinical compound or a study device for which the clinical trials are designed. A Study refers to a clini-cal trial project.
You can think of Product and Study as file-system folders where a Product is the parent folder of one or many studies. A study can only be created under a product, and study data and documents only can be stored under a study. Therefore, before you create a study, you need to ensure that its product is cre-ated in the system, and before you upload study datasets and documents into the system, you need to ensure that the study is created in the system.
Create a Product allows you to create a product/compound. When you create a study, you need only to choose a product to which the clinical study belongs.
Create a Study must be used when you load study data and documents the first time for a study. (Think of a study as the place-holder for clinical study data or documents.)

Clinical Workbench Data Administration Guide 105Managing Studies
2 .2 .1 Creating a Product
To create a product:
Click Create a Product. The following prompt will be displayed:
Product/Compound Code is the short term, such as ACME-001.
Product/Compound Name is the long term, such as “Chemical Compound ABC”.
2 .2 .2 Creating a Study
To create a study:
1. Click Create a Study. The following prompt will be displayed:
2. Select a Product from the list, then click Next. (If the product does not ex-ist, click Create a product first at the bottom.)
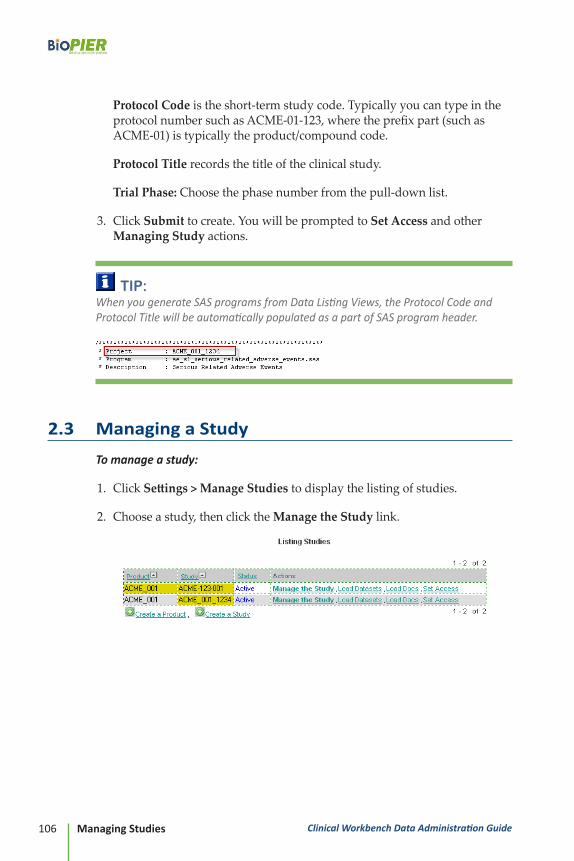
Clinical Workbench Data Administration Guide106 Managing Studies
Protocol Code is the short-term study code. Typically you can type in the protocol number such as ACME-01-123, where the prefix part (such as ACME-01) is typically the product/compound code.
Protocol Title records the title of the clinical study.
Trial Phase: Choose the phase number from the pull-down list.
3. Click Submit to create. You will be prompted to Set Access and other Managing Study actions.
TIP:When you generate SAS programs from Data Listing Views, the Protocol Code and Protocol Title will be automatically populated as a part of SAS program header.
2 .3 Managing a Study
To manage a study:
1. Click Settings > Manage Studies to display the listing of studies.
2. Choose a study, then click the Manage the Study link.

Clinical Workbench Data Administration Guide 107Managing Studies
2 .3 .1 Overview of Managing a Study
All options for managing a study are listed on the Managing Study page:
These options are covered fully in the following sections.
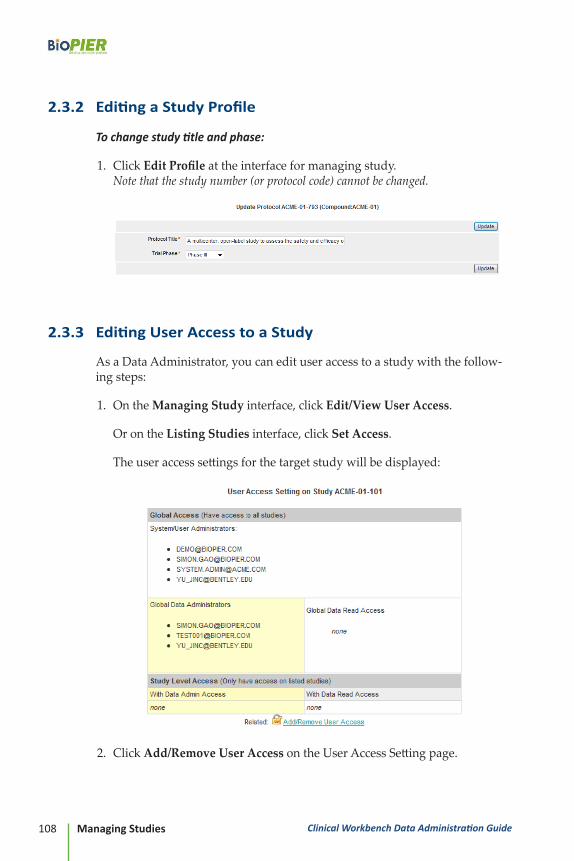
Clinical Workbench Data Administration Guide108 Managing Studies
2 .3 .2 Editing a Study Profile
To change study title and phase:
1. Click Edit Profile at the interface for managing study. Note that the study number (or protocol code) cannot be changed.
2 .3 .3 Editing User Access to a Study
As a Data Administrator, you can edit user access to a study with the follow-ing steps:
1. On the Managing Study interface, click Edit/View User Access.
Or on the Listing Studies interface, click Set Access.
The user access settings for the target study will be displayed:
2. Click Add/Remove User Access on the User Access Setting page.

Clinical Workbench Data Administration Guide 109Managing Studies
2 .3 .4 Disabling a Study
To disable a study from use temporarily:
Click Disable this Study from the Managing Study interface.
To verify the status of the disabled study:
Click Projects on the top menu, and verify that the study is not available in the pull-down list.
2 .3 .5 Deleting a Study
To delete a study from the system permanently:
Click Remove this Study from the Managing Study interface..
2 .3 .6 Uploading New Study Datasets
The topic is covered in Chapter 3.

Clinical Workbench Data Administration Guide110 Managing Studies
2 .3 .7 Managing Study Documents
All study documents are listed at the bottom of the interface for managing a study.
To delete a study document file:
1. Click the X (delete) icon following the icon of target document.
To upload study document files:
1. Click Upload New Documents at the lower left-hand side of the interface for managing study.
2. Select the target file in the following interface, and enter a note/label for the files if needed.
3. Click Upload to upload document files, and Save to upload linked files.

Clinical Workbench Data Administration Guide 111Uploading Study Data
Chapter 3Uploading Study Data
This chapter describes procedures for loading new study data into Clinical Work-bench.
3 .1 Overview
Clinical Workbench DOES NOT directly read SAS® data. To upload SAS® data to the system, run a SAS program to transform (pack) SAS® data into another format that is readable to Clinical Workbench.
Clinical Workbench provides a SAS utility program to pack SAS® Datasets. The SAS program will transform (pack) SAS® datasets into corresponding XML and CSV files. You can then use the Windows Data Compression Utility to zip all generated XML and CSV files into a zip (compressed) file. The zipped data file is what should be uploaded.
3 .1 .1 Factors to Consider When Uploading Datasets
1. The SAS dataset label is very important. If your dataset does not have a label, you may need to add the SAS dataset label to each dataset before they are uploaded.
2. The SAS formats catalog is also very important. If the variables inside the datasets are using formats (or code lists), for example if they use the codes:
1 = Male 2 = Female
then the formats catalog must be uploaded with the datasets. If you do not have one, you’ll need to make one.

Clinical Workbench Data Administration Guide112 Uploading Study Data
3. If you want to show patient profile charts in which all adverse events and laboratory points are drawn on the treatment timeline, it is vital for each subject to have a start reference date (such as first dose date) and an end reference date (last reference date). For CDISC dataset, this is in DM dataset by default. If you don’t have this information, you may need to determine and designate it first, before datasets are uploaded.
4. If you have CDISC datasets, many domains have their own SUPPQUAL datasets (such as SUPPAE, SUPPDS). Commonly, you may want to merge the domain with its SUPPQUAL first before datasets are uploaded.
3 .2 Loading Datasets to a Study
Clinical Workbench DOES NOT directly read SAS® datasets, but you need a SAS utility program to pack SAS® Datasets before they can be uploaded.
To load datasets to a study, do one of the following:
Click Settings, then click Load New Study Data at the bottom of the settings portal page.
OR
In the Listing Studies interface, click Load Datasets next to the target study.
OR
In the Managing Study interface, click Upload New Study Data.
3 .2 .1 Preparing SAS Datasets before Uploading
To upload study data from SAS datasets:
1. Create three directories on the machine running the SAS software. For example:
c:\demo\datasetsc:\demo\macrosc:\demo\output
2. Copy the SAS datasets including SAS formats catalog into the datasets directory.

Clinical Workbench Data Administration Guide 113Uploading Study Data
3. Download the SAS Utility Macro:
• Go to Settings > Load New Study Data
• Download sasmacr.sas7bcat, and save it to the macros sub-directory created on the Step 1.
TIP:Please place the mouse on the link, and right mouse click, choose Save Target As… to make sure the file is saved with sas7bcat extension.
4. Export the SAS Datasets. Clinical Workbench does not directly read SAS datasets. SAS datasets need to be transformed and exported into clear-text format. The Export_SAS Datasets macro will do this job.
Open SAS™ software, cut-paste the following code:
libname bpstore “c:\demo\macros”; options mstored sasmstore=bpstore; %EXPORT_SAS_DATASETS( SAS_DATASET_PATH = C:\demo\datasets, OUTPUT_PATH = C:\demo\output, SAS_FORMATS_NAME = formats, SAS_FORMATS_NAME2 =);
then choose Run > Submit from the menu: )
TIP:Make the changes for directory “c:\demo\” if your directory setup is different. Change SAS_FORMAT_NAME accordingly if your formats catalog is called by differ-ent name, or leave blank if you do not have one. If you have second FORMATS (such as a global formats), then assign SAS_FORMATS_NAME2 value.
The above procedure applies to all legacy datasets. Sometimes, if you have CDISC datasets, and want to integrate supplemental qualifier (SUPPQUAL) datasets with their corresponding domain datasets, the integrated datasets

Clinical Workbench Data Administration Guide114 Uploading Study Data
would be easier to review and manipulate. The following JOIN_DOMAINS_WITH_SUPPQUAL macro can do this. You will need to create another direc-tory, such as c:\demo\SDTM_merge
libname bpstore “c:\demo\macros”; options mstored sasmstore=bpstore; %JOIN_DOMAINS_WITH_SUPPQUAL( CDISC_SAS_DATASET_PATH = c:/demo/datasets, OUTPUT_PATH = c:/demo/SDTM_merge);
You can treat the integrated CDISC as datasets source, to run EXPORT_SAS_DATASETS macro.
%EXPORT_SAS_DATASETS( SAS_DATASET_PATH = C:\demo\SDTM_merge, OUTPUT_PATH = C:\demo\output, SAS_FORMATS_NAME = formats, SAS_FORMATS_NAME2 =);
5. Compress the output files into one zip file.The SAS program will produce one CSV file for each SAS dataset, and some XML files. You need to use the Window Compression utility to zip them to one file. Follow these steps:
First highlight all files in the output directory, then right-click your mouse and choose Send to “Compressed (zipped) Folder”. A zip file will be cre-ated. The zip file has all dataset information including the format catalog. This is the file you need to upload.

Clinical Workbench Data Administration Guide 115Uploading Study Data
3 .2 .2 Uploading Study Data
After the steps described in section 3.2.1 are completed, you will have the zip file ready for uploading.
1. Go to Settings > Upload New Study Data to display the Load Study Data-sets screen:
2. Fill out the fields as follows:
• The study protocol #: Choose the study number for the data load. If the target study does not appear in the list, create it by clicking the create one first link.
• Tag for this Data Load: Fill in the label or purpose for this data load. For example: “data cut for interim analysis” or “data cut for week 4 data”.
• Version Date for this Data Load: Fill in a date for this data version. For example, the data cut date, or data transfer date.
• Choose Zipped Data File: Click Browse to path to the zip file you made following the steps described in section 3.2.1. Note: do not path to the zipped SAS datasets.
3. After all fields are filled, click Submit Data Load Job to upload data. The job will be processed in the background.
TIP:It may take a while depending on the dataset size.

Clinical Workbench Data Administration Guide116 Uploading Study Data
3 .2 .3 Monitoring Uploading Status
After the job is submitted for processing, you can monitor the uploading status.
Check the status of the upload by doing one of the following:
• Click the Data Loading Status link.
• Click the View Log link on the study overview page.
• From Settings > Manage Studies, click Manage the Study, then select the dataset version you just submitted, and click Configure/Manage.
From the Job Log, you can monitor the job status.
If you notice that the job status does not change over time, or it stays in Queued status, this may indicate that the background data loader is not running correctly. Go to the bottom of the job status page to check the Back-ground Data Loader status to view the job queues.

Clinical Workbench Data Administration Guide 117Uploading Study Data
If this message indicates that the Background Data Loader stopped running, notify your system administrator to restart web application server. If you have Apache-Tomcat as your web application server, it runs under Windows and the Tomcat service can be restarted through the control panel.
3 .3 Uploading Documents to a Study
There are two types of documents you can make available to a clinical study.
If you have physical files, you can upload them using the To Upload Files sec-tion. Just browse and path to the file and attach, with a note if needed.
If you want to link a file from your documentation systems to the study, you can link the file through the To Link Files section.
The uploaded or linked files are displayed at the bottom of the screen. From there, you can remove a file, or download a file.
Please note that documents uploaded or linked to a study will appear on every data loads page (study overview page).
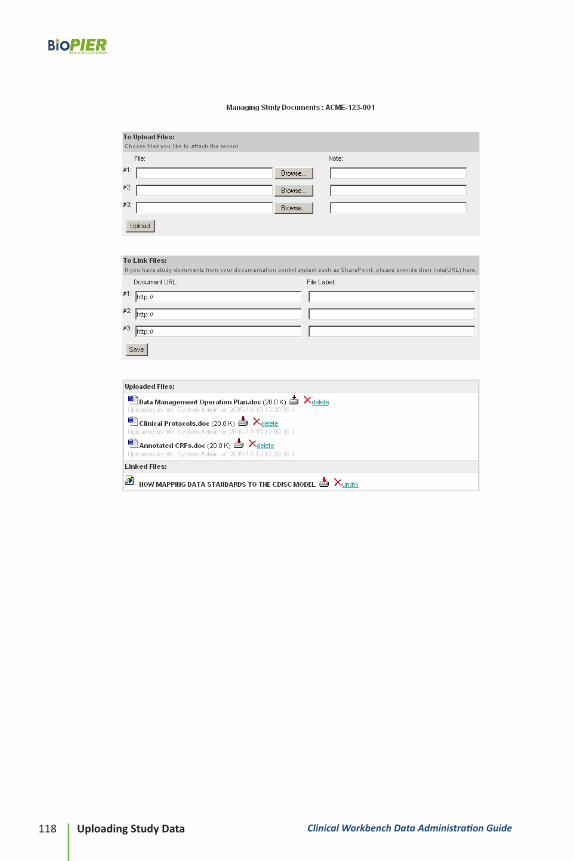
Clinical Workbench Data Administration Guide118 Uploading Study Data

Clinical Workbench Data Administration Guide 119Uploading Study Data
3 .4 SAS Tips for Data Upload
3 .4 .1 Running SAS Software
1. In your Windows Operation System such as Windows XP, go to Programs > SAS > [SAS Executable (such as SAS 9.1)] to open the SAS interactive window.
2. Copy the SAS code to SAS Editor Window.
3. Choose Run > Submit to run.
4. Check the log file from the Log Window (see Log tab) to make sure there are no ERROR, WARNING messages.
3 .4 .2 Creating SAS Formats Catalog
Sometimes you may not have a SAS Formats catalog; however, you do have the SAS proc formats file, such as formats.sas. In this case, you’ll need to make the formats catalog file on your own. Here is the procedure:
If you have a formats.sas file with the following contents:

Clinical Workbench Data Administration Guide120 Uploading Study Data
proc formats; value YN 1 = ‘Yes’ 2 = ‘No’; run;
you can modify the file to output the formats as a formats catalog (a physi-cal file on the disk), and the libname specifies the output directory, and the formats catalog name is called formats.
libname out “c:/sasproj/prot_xyz/data”;proc format library=out.formats; value YN 1 = ‘Yes’ 2 = ‘No’;Run;
After the SAS code is executed, you can expect to see a file such as formats.sas7bcat under the output directory. Place the catalog file in the same direc-tory as the other SAS dataset file.
3 .4 .3 Updating SAS Dataset Labels
The following SAS code is an example to update SAS dataset label.
** In = Input directory of Datasets without Label;** Out = Output directory of Dataset with Labels;******************************************************
libname in “c:/sasproj/prot_xyz/srcdata”; libname out “c:/sasproj/prot_xyz/withlabel”;
data out.demog(label=’Demographics’); set in.demog;run;
data out.chem(label=’Chemistry’); set in.chem;run;

Clinical Workbench Data Administration Guide 121Configuring Study Data
Chapter 4Configuring Study Data
After datasets are uploaded, study datasets need to be configured in order to make meaningful data views, to utilize data validation, data analysis, and patient profile functions. This chapter describes study data configurations.
4 .1 Study Configuration Overview
4 .1 .1 Where to Configure Study Data
There are two places where you can start configuring datasets:
• Click Settings > Manage Studies, select a study, click Manage the Study, then select a data load version, click Configure/Manage

Clinical Workbench Data Administration Guide122 Configuring Study Data
• From a Study Overview Page, click Configure.
4 .1 .2 Study Configuration Overview
The description of study configuration sections The Status of Core Mappings. Core mappings are required to perform data validation, patient profile and data analysis and command options:

Clinical Workbench Data Administration Guide 123Configuring Study Data
Data Load Information and Status Change
1a: ViewDataLoadingJobLog
1b:ChangeStatusofDataLoad–YoumaychangethestatustoCurrent,Archived,Inactive,orDeletethedataload
Core Mappings
2a: SetCoreMappings–Thelinktosetcoremappings.
Dataset Mappings
TheStatusofDatasetMappings.ThismappinghelpsClinicalWorkbenchtounderstandthedomainstowhichyourdatasetsbelong,andkeyvariablesexpectedfromeachdomain.Theyaretheprerequisitesfordomain-specficanalysis,suchaspatientprofiles,anddataanalysis.Thedatasetmappingsarealsotheprerequisitesforextractingstudyparameters.
3a: Set Mapping –Setmappingforeachtargetdatasettoapre-designateddataset/domaintype.
3b: Set Parameters –Set/extractanalysisparametersfromthedataset.Thisoptionisonlyapplicabletocertaindomains,andisavailableonlyafterstep3aiscomplete.
Quick Links for Study Data Mapping
4a: Edit/Manage Parameter-list – Manageanalysisparameters,groupparam-eterstogether,settop-levelparameters,andeditindividualparameter.
4b: Edit/Manage Subject-list – Create,edit,andmanagesubsetsofsubjectpopulationforanalysisandpatientprofiles.
4c: Options for Configurations – QuicklytransferconfigurationsfromonedatatransfertoanotherusingTransferConfigurationlink.ExportConfigura-tionstoanExcelfileforarchival,ImportConfigurationsfromanexportedconfigurationfile,orRemoveConfigurationstostartallover.
4d: Map SAS Date/Time Variables –Date/timevariablesfromSASdatasetsneedspecialmapping.ThislinkwillsearchandmapSASdate/timevariablesinthedatasets.Afterthemapping,SASdate/timevaluescanbedisplayedinyyyy-MM-ddformat.
Uploading Documents to this Data Load level
Commonly,studydocumentsareuploaded/linkedintoitsstudylevel,how-everifyouhavesomedocumentsthatareapplicableonlytothisdatasetversion.Thisistheplacetoupload.

Clinical Workbench Data Administration Guide124 Configuring Study Data
4 .2 Managing Study Load Status
In the top section of Study Configuration/Mapping page, information about the data load including the data version and tag is displayed.
1 . View Log
Click View Log to see the log of data loading in detail, and check for loading outcomes and error messages, if any.

Clinical Workbench Data Administration Guide 125Configuring Study Data
2 . Change Status of Data Load
You can change the data load status to any of the following:
• Current: A data load version is set to current when it is initially up-loaded. Users will see the current data load versions for a given study by default.
• Archived: For simplicity, older data versions can be archived. Users can still view archived versions from the Data Load Selection page by click-ing Current + Archived.
• Inactive: If you want to keep a data load invisible to general user, set the study load inactive. This is especially useful when a data version is under configuration and it is not yet ready for general use.
3 . Delete a Data Load
If a data load version is no longer needed, you may delete the data load from system.
TIP:Before you permanently delete a data load, please export the study configurations made on the data. The exported configuration (an Excel file) can be reused for up-coming data loads under the same study.
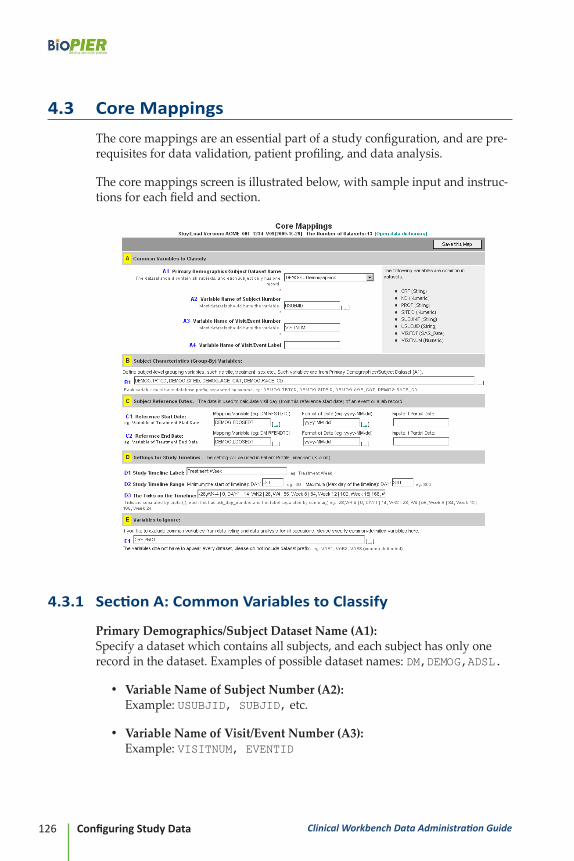
Clinical Workbench Data Administration Guide126 Configuring Study Data
4 .3 Core Mappings
The core mappings are an essential part of a study configuration, and are pre-requisites for data validation, patient profiling, and data analysis.
The core mappings screen is illustrated below, with sample input and instruc-tions for each field and section.
4 .3 .1 Section A: Common Variables to Classify
Primary Demographics/Subject Dataset Name (A1): Specify a dataset which contains all subjects, and each subject has only one record in the dataset. Examples of possible dataset names: DM,DEMOG,ADSL.
• Variable Name of Subject Number (A2): Example: USUBJID, SUBJID, etc.
• Variable Name of Visit/Event Number (A3): Example: VISITNUM, EVENTID
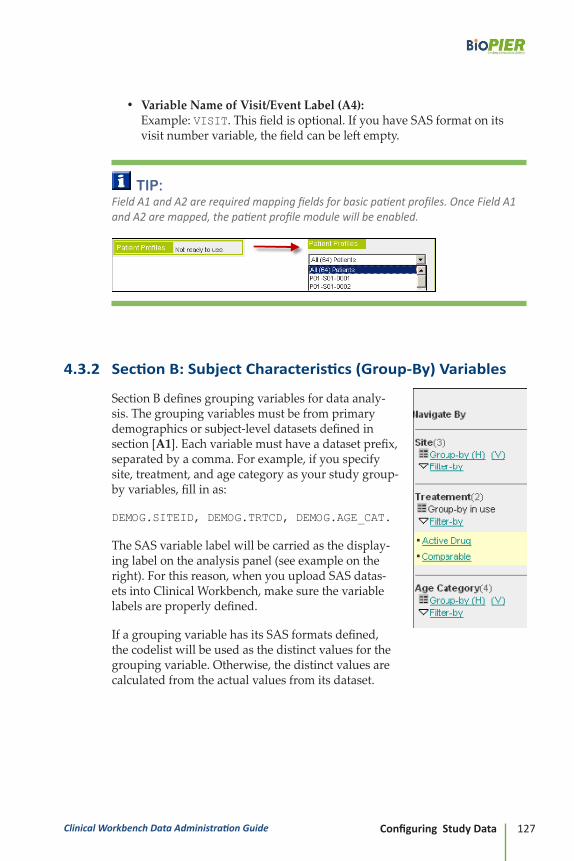
Clinical Workbench Data Administration Guide 127Configuring Study Data
• Variable Name of Visit/Event Label (A4): Example: VISIT. This field is optional. If you have SAS format on its visit number variable, the field can be left empty.
TIP:Field A1 and A2 are required mapping fields for basic patient profiles. Once Field A1 and A2 are mapped, the patient profile module will be enabled.
4 .3 .2 Section B: Subject Characteristics (Group-By) Variables
Section B defines grouping variables for data analy-sis. The grouping variables must be from primary demographics or subject-level datasets defined in section [A1]. Each variable must have a dataset prefix, separated by a comma. For example, if you specify site, treatment, and age category as your study group-by variables, fill in as:
DEMOG.SITEID, DEMOG.TRTCD, DEMOG.AGE_CAT.
The SAS variable label will be carried as the display-ing label on the analysis panel (see example on the right). For this reason, when you upload SAS datas-ets into Clinical Workbench, make sure the variable labels are properly defined.
If a grouping variable has its SAS formats defined, the codelist will be used as the distinct values for the grouping variable. Otherwise, the distinct values are calculated from the actual values from its dataset.

Clinical Workbench Data Administration Guide128 Configuring Study Data
4 .3 .3 Section C: Subject Reference Dates
Patient profile charting has two reference lines to mark treatment start and treatment end. This section allows you to define two date variables. In CDISC datasets, these two values are defined in the DM domain by two reference variables RFSTDTC and RFENDTC. The reference start date often refers to the first treatment/dose date. The start date is also used to calculate visit (offset) day of an event from this reference start date.
Each date variable needs three pieces of information:
• Mapping Variable: The date variable name; must include dataset prefix such as DM.RFSTDTC
• Format of Date Value: Use the date format chooser […] to get the correct format. Refer to date format syntax on the date format choose page for details.
• Impute Format: Define the imputation rule if date value is partially missing. For example, if an adverse event onset date is recorded as JAN/??/2008, a date part is missing. If an imputation rule is defined as JUN/15/????, indicating if the missing day part is imputed by 15, the missing month part will be imputed by June, and year part will not be imputed. (This feature will be available after Version 1.5)
C1 line defines the Reference Start Date and C2 line defines the Reference End Date.

Clinical Workbench Data Administration Guide 129Configuring Study Data
4 .3 .4 Section D: Settings for Study Timeline
Section D of core mapping defines the patient profile treatment timeline (X-Axis).
Study Timeline Label (D1):e.g.: Treatment Week
Study Timeline Range (D2):The fields defined the treatment timeline minimum and maximum range (unit in days) referenced to the start of treatment date (reference start date).
Minimum defines the start of the time, the minimum value (in days) of the timeline from the start of the treatment. For the example below, it is set to -30, and the chart starts from 30 days before the first treatment date.
Maximum defines the maximum days of the timeline from the start of the treatment. For the chart example below, it is set to 360, and the chart timeline will span 360 days after the first treatment date.
The Ticks on the Timeline ( D3):Ticks are separated by a pipe symbol (|), and each tick has tick-day-number and tick-label separated by comma (,). For example:
-28,WK-4|0,DAY1|14,WK2|28,W4|56,Week 8|84,Week 12|168,Week 24
defines the chart below:

Clinical Workbench Data Administration Guide130 Configuring Study Data
4 .3 .5 Section E: Variables to Ignore
Many EDC systems collect many system variables that are not clinically re-lated. If you want to exclude these system variables from data listing and data analysis for all occasions, you can use this section to exclude them by forming an ignore-list. Specify variables delimited by commas [,], and please do not include dataset prefix. Example of the variables can be:
VAR1, VAR2, VAR3, VAR4, VAR5
The ignore-list is applicable to all datasets in the study, and the variables do not have to exist in every dataset. If a variable from the ignore-list does not exist in a specific dataset, it will not cause errors.
4 .4 Dataset Mappings
This dataset mapping is a prerequisite for domain-specific data analysis and patient profiling. If you need to run a domain-specific report, you will need this step. For example, different EDC/CRO vendors may use different variable names for an AE preferred term. Some may call it PT, others may call it AEPT. This mapping will tell the system what variable to use when summarizing an AE report by preferred terms. After a dataset is mapped to a dataset/domain type, this function provides you with an option to further map the dataset variables to be adopted by Clinical Workbench.
4 .4 .1 Dataset Types /Domains
Clinical Workbench uses the CDISC SDTM as its domain and variable frame-work. It uses the framework to extend the analysis coverage to non-CDISC datasets by dataset mappings. A given dataset can be mapped into one of the following dataset types/domains:
AE - Adverse Events
CM - Prior or Concomitant Medications
CO - Comments (HV)
CT - Prior or Concomitant Therapies
DM - like: Demographics, ADSL, Subject Dataset (HV)

Clinical Workbench Data Administration Guide 131Configuring Study Data
DS - Disposition, Termination
DA - Drug Accountability (HV)
EG - ECG (HV)
EX - Exposure, Medication, or Treatment (MV)
IE - Inclusion/Exclusion Exceptions (HV)
LB-Like: Lab/Test, or Multi-Visit Finding Dataset (MV)
MH - Medical History (HV)
MB - Microbiology Specimen (HV)
MS - Microbiology Susceptibility (HV)
PE - Physical Examination (HV,MV)
PC - Pharmacokinetic Concentrations (HV,MV)
PP - Pharmacokinetic Parameters (HV,MV)
QS - Questionnaire Dataset, eg Quality of Life(HV,MV)
SU - Substance Use (HV,MV)
VS - Vital Signs (HV,MV)
Other Multi-Visit Finding Dataset (HV,MV)
Other Dataset
Note:
HV = Support both horizontal and vertical dataset layout. MV = Multiple-visit dataset

Clinical Workbench Data Administration Guide132 Configuring Study Data
4 .4 .2 Understanding Dataset Layout
Data records can be stored in horizontal layout or vertical layout in a dataset. The following example illustrates the differences:
In a vital sign dataset: Subject 1001 has Day 1 and Week 1 measurements rep-resented by the following variables:
PULSE - Pulse Rate
RESP - Respiratory Rate
DIABP - Diastolic Blood Pressure
SYSBP - Systolic Blood Pressure
TEMP - Temperature
Horizontal Layout
For a dataset with horizontal layout, each parameter is stored as a separate column like the following. If a parameter needs to store its unit, label, normal range low/high, etc, each parameter needs N variables to store the value. This layout has less data rows, but requires more columns.
SUBJECT VISIT PULSE RESP DIABP SYSBP TEMP
1001 Day1 89 14 70 120 37
1001 Week1 90 17 80 125 36.5
Vertical Layout
By contrast, a dataset with a vertical layout uses more fixed table columns. A parameter is defined by a unique test code (such as VSTESTCD). For the same data, each parameter is saved in a row. For this example, 5 rows of data are needed for the subject 1001 at Day 1. The advantage of this layout is that in addition to storing its value, its label (VSTEST), value (VALUE), and unit (UNIT) are stored as well. When a new parameter is added, the table structure does not change; instead, just add more data rows.
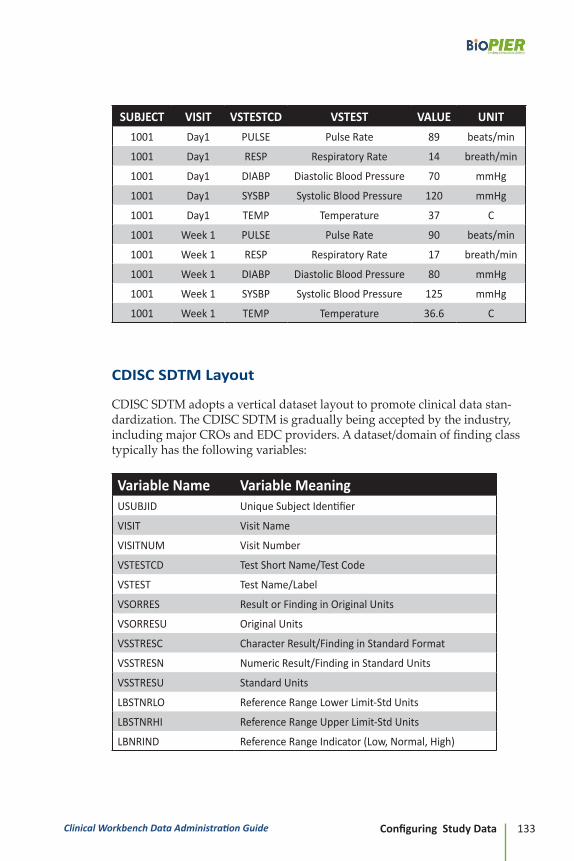
Clinical Workbench Data Administration Guide 133Configuring Study Data
SUBJECT VISIT VSTESTCD VSTEST VALUE UNIT
1001 Day1 PULSE PulseRate 89 beats/min
1001 Day1 RESP RespiratoryRate 14 breath/min
1001 Day1 DIABP DiastolicBloodPressure 70 mmHg
1001 Day1 SYSBP SystolicBloodPressure 120 mmHg
1001 Day1 TEMP Temperature 37 C
1001 Week1 PULSE PulseRate 90 beats/min
1001 Week1 RESP RespiratoryRate 17 breath/min
1001 Week1 DIABP DiastolicBloodPressure 80 mmHg
1001 Week1 SYSBP SystolicBloodPressure 125 mmHg
1001 Week1 TEMP Temperature 36.6 C
CDISC SDTM Layout
CDISC SDTM adopts a vertical dataset layout to promote clinical data stan-dardization. The CDISC SDTM is gradually being accepted by the industry, including major CROs and EDC providers. A dataset/domain of finding class typically has the following variables:
Variable Name Variable MeaningUSUBJID UniqueSubjectIdentifier
VISIT VisitName
VISITNUM VisitNumber
VSTESTCD TestShortName/TestCode
VSTEST TestName/Label
VSORRES ResultorFindinginOriginalUnits
VSORRESU OriginalUnits
VSSTRESC CharacterResult/FindinginStandardFormat
VSSTRESN NumericResult/FindinginStandardUnits
VSSTRESU StandardUnits
LBSTNRLO ReferenceRangeLowerLimit-StdUnits
LBSTNRHI ReferenceRangeUpperLimit-StdUnits
LBNRIND ReferenceRangeIndicator(Low,Normal,High)
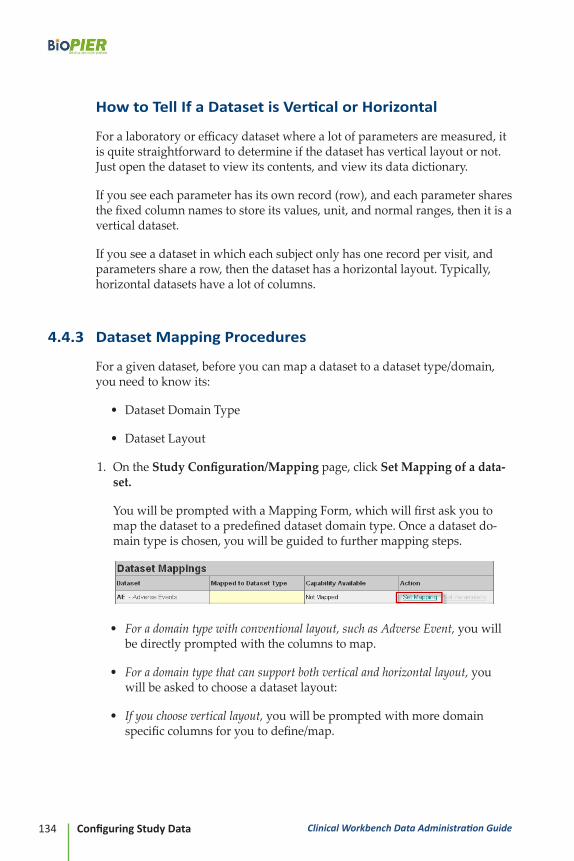
Clinical Workbench Data Administration Guide134 Configuring Study Data
How to Tell If a Dataset is Vertical or Horizontal
For a laboratory or efficacy dataset where a lot of parameters are measured, it is quite straightforward to determine if the dataset has vertical layout or not. Just open the dataset to view its contents, and view its data dictionary.
If you see each parameter has its own record (row), and each parameter shares the fixed column names to store its values, unit, and normal ranges, then it is a vertical dataset.
If you see a dataset in which each subject only has one record per visit, and parameters share a row, then the dataset has a horizontal layout. Typically, horizontal datasets have a lot of columns.
4 .4 .3 Dataset Mapping Procedures
For a given dataset, before you can map a dataset to a dataset type/domain, you need to know its:
• Dataset Domain Type
• Dataset Layout
1. On the Study Configuration/Mapping page, click Set Mapping of a data-set.
You will be prompted with a Mapping Form, which will first ask you to map the dataset to a predefined dataset domain type. Once a dataset do-main type is chosen, you will be guided to further mapping steps.
• For a domain type with conventional layout, such as Adverse Event, you will be directly prompted with the columns to map.
• For a domain type that can support both vertical and horizontal layout, you will be asked to choose a dataset layout:
• If you choose vertical layout, you will be prompted with more domain specific columns for you to define/map.

Clinical Workbench Data Administration Guide 135Configuring Study Data
• If you choose horizontal layout, you need to define the variables of measur-ing parameters.
2. After mapping is completed, click Save to save the configuration.
Mapping Example:Dataset Mapping for Adverse Event Datasets
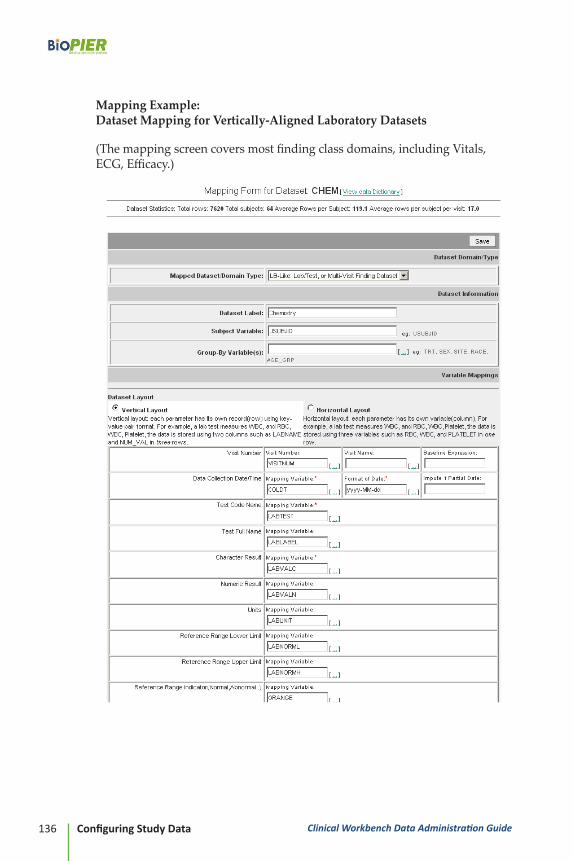
Clinical Workbench Data Administration Guide136 Configuring Study Data
Mapping Example: Dataset Mapping for Vertically-Aligned Laboratory Datasets
(The mapping screen covers most finding class domains, including Vitals, ECG, Efficacy.)

Clinical Workbench Data Administration Guide 137Configuring Study Data
Mapping Example: Dataset Mapping for Horizontally Aligned Datasets
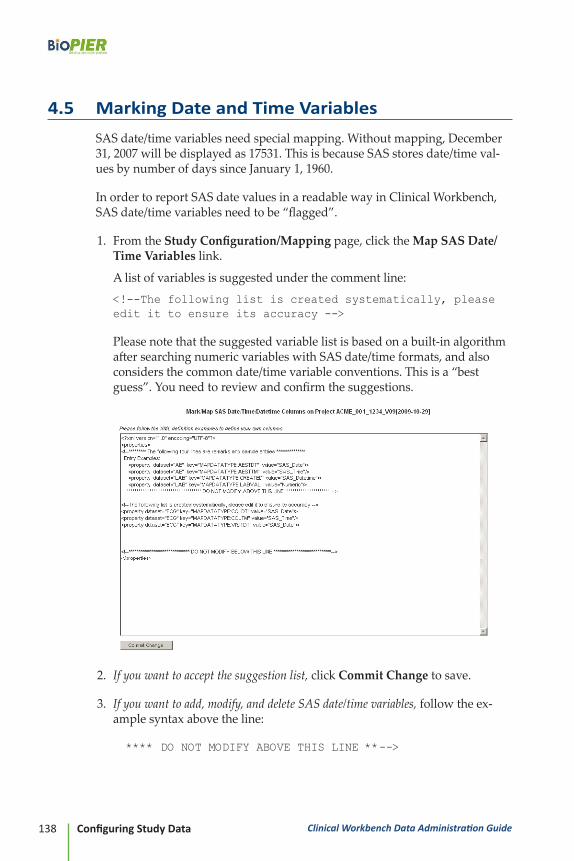
Clinical Workbench Data Administration Guide138 Configuring Study Data
4 .5 Marking Date and Time Variables
SAS date/time variables need special mapping. Without mapping, December 31, 2007 will be displayed as 17531. This is because SAS stores date/time val-ues by number of days since January 1, 1960.
In order to report SAS date values in a readable way in Clinical Workbench, SAS date/time variables need to be “flagged”.
1. From the Study Configuration/Mapping page, click the Map SAS Date/Time Variables link.
A list of variables is suggested under the comment line:<!--The following list is created systematically, please edit it to ensure its accuracy -->
Please note that the suggested variable list is based on a built-in algorithm after searching numeric variables with SAS date/time formats, and also considers the common date/time variable conventions. This is a “best guess”. You need to review and confirm the suggestions.
2. If you want to accept the suggestion list, click Commit Change to save.
3. If you want to add, modify, and delete SAS date/time variables, follow the ex-ample syntax above the line:
**** DO NOT MODIFY ABOVE THIS LINE **-->

Clinical Workbench Data Administration Guide 139Configuring Study Data
You can add the mapping by classifying a variable to SAS_DATE, SAS_TIME, or reverse a mapped SAS_DATETIME back to Numeric.
After the SAS date/time variable mapping is completed, you will be able to view date values as 2007-12-31 instead of 17531 in the data listing.
4 .6 Managing Analysis Parameters
Once a dataset is properly mapped, you can Set Parameters for some datas-ets. Currently, subject-level datasets, laboratory-like finding datasets such as (chemistry, hematology), efficacy measurements, vital signs, ECG, and dosing/exposure are the best candidates for parameter extraction. After the param-eters are extracted, they are automatically populated on the Study Overview page for analysis (see below). You can choose any of parameters for in-depth analysis, such as trend analysis, sub-group comparisons, and so on.
4 .6 .1 Creating New Analysis Parameters
To create new parameters from a given dataset:
1. Click the Set Parameters link in the Dataset Mappings section.
If Clinical Workbench finds possible parameter candidates from the dataset, you will be prompted with candidate choices. Review and select parameters (if any), then click Create Selected Parameters to save.

Clinical Workbench Data Administration Guide140 Configuring Study Data
The bottom half of the screen gives you the defined (existing) parameters for the dataset. You can edit or delete the parameter definition.
4 .6 .2 Modifying Analysis Parameters
To manage study-level parameters:
1. Click the Edit/Manage Parameter-list link in Manage Study Configura-tions section on the Study Configuration/Mapping page. You are able to:
• Set Group Name: Group related parameters together, and assign a name. For example: Liver Profile.
• Set Top Level: If there are too many parameters, set some parameters as top-level parameters, which will be marked in blue. To select top-level parameters only, click the Top-Level Parameters link
• Unset Top Level: Remove top-level parameter flag.
• Delete: Delete the parameter definition. This will not affect data in the dataset, and you can recreate the parameters at any time.
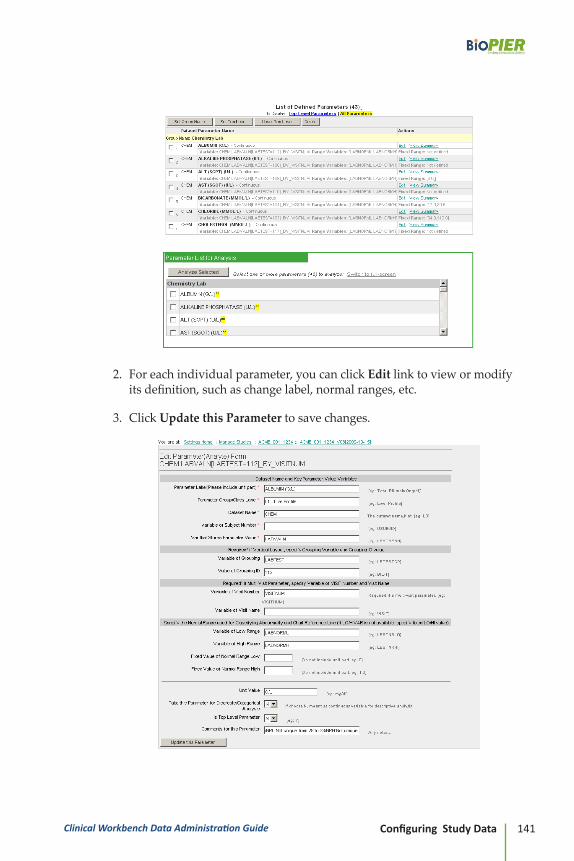
Clinical Workbench Data Administration Guide 141Configuring Study Data
2. For each individual parameter, you can click Edit link to view or modify its definition, such as change label, normal ranges, etc.
3. Click Update this Parameter to save changes.

Clinical Workbench Data Administration Guide142 Configuring Study Data
4 .7 Managing Subject Lists
Clinical Workbench introduces the concept of subject-list, a subset of the study subjects for analysis or patient profile functions.
4 .7 .1 Managing Subject Lists
To manage subject lists:
1. Click the Edit/Manage Subject-list link from the Study Configuration /Mapping page to open the listing of subject-list.
You can manage a subject using the following options:
• Activate/Deactivate: Change the subject-list status.
• Edit: Change the subject-list definition.
• Delete: Delete the subject-list definition. Note that deleting a subject-list does not affect the subject data. The deletion option only appears with the In-active status.
4 .7 .2 Creating a New Subject List
To create a subject list:
1. Click the Edit/Manage Subject-list link from the Study Configuration /Mapping page to open the listing of subject-list.
2. Click Create a New Subject-list to open the creation form.
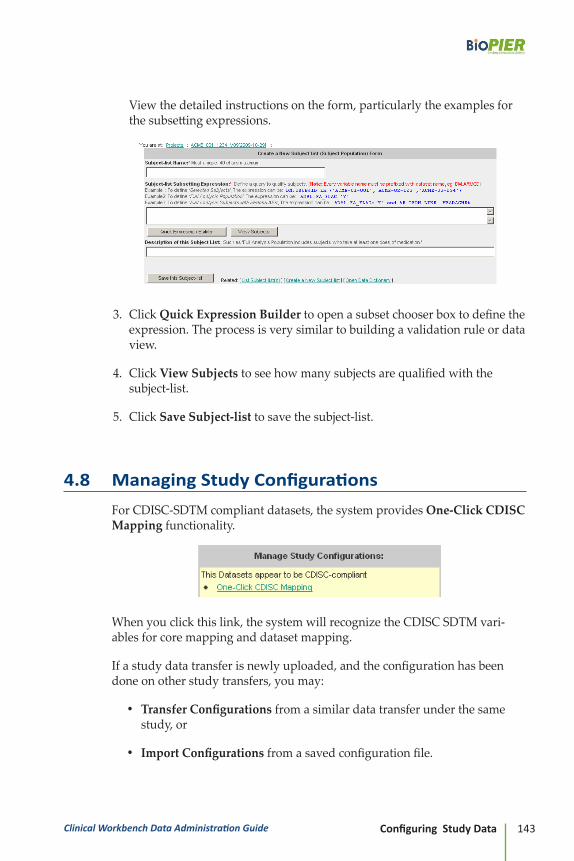
Clinical Workbench Data Administration Guide 143Configuring Study Data
View the detailed instructions on the form, particularly the examples for the subsetting expressions.
3. Click Quick Expression Builder to open a subset chooser box to define the expression. The process is very similar to building a validation rule or data view.
4. Click View Subjects to see how many subjects are qualified with the subject-list.
5. Click Save Subject-list to save the subject-list.
4 .8 Managing Study Configurations
For CDISC-SDTM compliant datasets, the system provides One-Click CDISC Mapping functionality.
When you click this link, the system will recognize the CDISC SDTM vari-ables for core mapping and dataset mapping.
If a study data transfer is newly uploaded, and the configuration has been done on other study transfers, you may:
• Transfer Configurations from a similar data transfer under the same study, or
• Import Configurations from a saved configuration file.
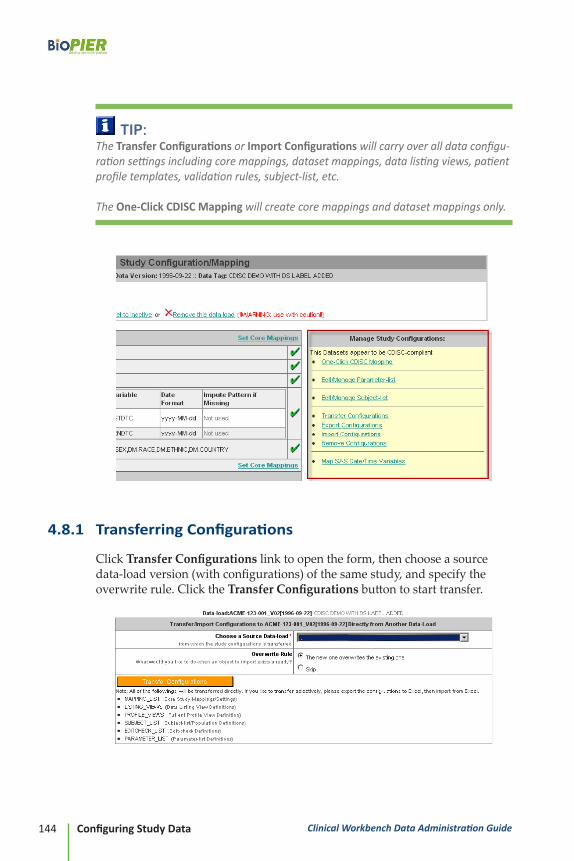
Clinical Workbench Data Administration Guide144 Configuring Study Data
TIP:The Transfer Configurations or Import Configurations will carry over all data configu-ration settings including core mappings, dataset mappings, data listing views, patient profile templates, validation rules, subject-list, etc. The One-Click CDISC Mapping will create core mappings and dataset mappings only.
4 .8 .1 Transferring Configurations
Click Transfer Configurations link to open the form, then choose a source data-load version (with configurations) of the same study, and specify the overwrite rule. Click the Transfer Configurations button to start transfer.

Clinical Workbench Data Administration Guide 145Configuring Study Data
4 .8 .2 Exporting Configurations
Click Export Configurations. You will be prompted to save the configura-tion file (Excel file). The Excel file contains several tabs to save configuration definitions.
4 .8 .3 Importing Configurations
Click Import Configurations. You will be prompted to input the configuration file. The input file must be in Excel file format, and must have been exported from a data-load of the same study. You can choose the types of objects to import and define the overwrite rules.
This command is very useful for power users, who can use the option to com-pose data views and validation rules on the Excel sheet, and directly import them into a data-load.
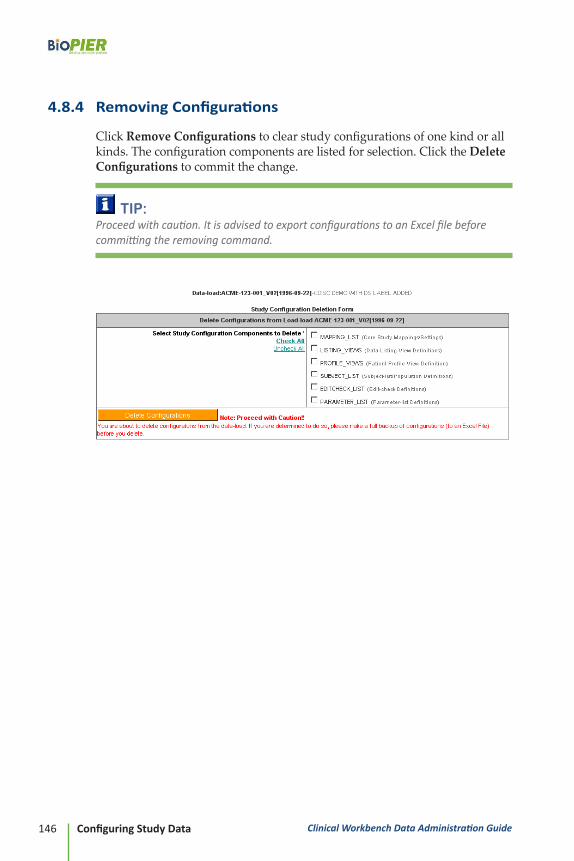
Clinical Workbench Data Administration Guide146 Configuring Study Data
4 .8 .4 Removing Configurations
Click Remove Configurations to clear study configurations of one kind or all kinds. The configuration components are listed for selection. Click the Delete Configurations to commit the change.
TIP:Proceed with caution. It is advised to export configurations to an Excel file before committing the removing command.

Part 3Clinical Workbench
System Administration Guide


Clinical Workbench System Administration Guide 149System Installation
Chapter 1System Installation
1 .1 System Requirements
1 .1 .1 Hardware and OS Platform Requirements
• A computer with Windows XP, Vista or later. Windows server is preferred
• CPU Minimum: 1.0 GHz processor or higher. 2.0GHz Xeon dual-core/quad-core, dual-processor is preferred
• Memory Minimum: 1GB, 4GB is preferred
• Hard Drive Minimum: 20GB
TIP:For evaluation or testing purpose, the Clinical Workbench software can be installed on regular desktop or laptop computers with Windows XP Pro or later, 1GB RAM, and 1.0GHz CPU. When the software is deployed for enterprise pro-duction use, it should be installed on an enterprise server-class computer with 4+ GB of RAM and multiple CPUs to ensure application performance and scalability. Windows Operation Systems are preferred installation platforms. Since the ap-plication is a J2EE-compliant application, the software can be installed on Unix and Linux platform as well. For simplicity, this installation guide does not cover Unix/Linux platform; please contact BioPIER technical support for installation instructions on Unix or Linux.

Clinical Workbench System Administration Guide150 System Installation
1 .1 .2 Networking Requirement
For intranet or internet access, the server needs to be assigned a static host-name, such that the application can be reached from the intranet or internet by URL. For example:
http://machinename.yourcompanydomain.com
1 .1 .3 SMTP Email Account
For password reset, information sharing, and system background agents, the system needs to send email notifications. A SMTP email account is needed. Please fill in the following information if you need to get support from your IT group.
SMTP account hostname= SMTP account username= SMTP account password=
1 .2 Clinical Workbench Core Software Installation
1 .2 .1 Instructions to System Administrator
Clinical Workbench is a web-based database application backed by J2EE ap-plication server and MySQL database. It requires a Java environment, Java application server, and a database engine. During our development and testing process, BioPIER has tested and qualified certain versions of third-party platform software including Java JDK/JRE, Java Application Server, and MySQL database. To expedite the installation, we provide a pre-packed software bundle, including the third-party software as well as the Clinical Workbench core software. To use this package, contact BioPIER technical sup-port to download the bundle, and then follow the step-by-step instructions described in this chapter.
You may also choose to install your own version of Java, MySQL, and Appli-cation Server. If you do, please verify each component to make sure they are working properly before you proceed to install Clinical Workbench software.
The personnel who perform the installation should be familiar with:

Clinical Workbench System Administration Guide 151System Installation
• Windows Operating Systems and is able to run Windows DOS com-mand and start and stop service
• Setting environment variables and setting path variable for Windows
• MySQL database/schema creation and deletion, create MySQL user, start and shutdown MySQL
• Application Server (such as Apache-Tomcat) start-up and shutdown through DOS command mode or control panel (service mode)
• The concept of basic networking and SMTP email account elements
1 .2 .2 Pre-Installation Steps
Clinical Workbench requires:
• Java JDK and JRE Environment
• Apache-Tomcat or other J2EE Compatible Application Server
• MySQL Database
Make sure you have these third-party applications installed and working properly.
1 .2 .3 Clinical Workbench Installation
To install Clinical Workbench:
1. Drop Clinical Workbench WAR file cw.war into your J2EE application home, such as:
C:\biopier\apache-tomcat-6.0.18\webapps\cw.war
2. Verify that your Application Server is running, and then run the Clinical Workbench Setup Program:
http://localhost:8080/cw/setup.jsp

Clinical Workbench System Administration Guide152 System Installation
TIP:The above URL can only be used on the local machine. When it is tested or deployed for organizational use, the URL should be accessed through a designated hostname and using default port, such as: http://machinename.companydomain.com/cw/setup.jsp
Screenshot of Clinical Workbench Initial Setup

Clinical Workbench System Administration Guide 153System Installation
The Instructions for Selected Setup Fields
Login Username/ Email Address
Account Password
Thisistheinitialusernameforthesystemadministrator.Inputtheemailaddressastheusername,andinputpassword.(Pleasemakeanoteofyourusernameandpassword.)
WebRoot URL
WebRoot Physical Path
WebRootURListherootURLtoaccessClinicalwork-bench.Itshouldbedesignedas:http://machinename.companydomain.com:port/cwForexample:http://www.acme.com/cw(forthiscase,theJavaapplicationporthasbeenadjustedto80)TheWebRootPhysicalPathisthedirectoryonthelocalmachine(mustuseforwardslash/).c:/biopier/apache-tomcat-5.5.17/we-bapps/cw
DB Connection String
DB Username DB Password
jdbc:mysql://localhost/cwdb?useUnicode=true &characterEncoding=UTF-8wherecwdbisthedatabasename.Ifyouhaveadifferentdatabasename,onlyreplacethatpart.DBUsernameistheMySQLloginname.Theusermusthavecreatedandupdatedtableprivilege.DBPasswordisthepasswordfortheusername.
File Store Directory (Full Path)
Afullpathtosaveuploadedfiles.(mustuseforwardslash/).Forexample: c:/biopier/filestore
Email Server Host
SMTP Account Username
SMTP Account Password
TheEmailSMTPServerHostname,suchas:mail.acme.com Or,uselocalhostifthelocalmachinehasitsownmailserver.SMTPAccountUsernameandSMTPAccountPasswordareself-explanatory.
Outgoing Mail From Address
OutgoingMailFromAddressisthesender’semailad-dress.Forexample:[email protected]

Clinical Workbench System Administration Guide154 System Installation
3. After the setup page is finished, place the product license file license.txt, in the directory of:
${APPHOME}/WEB-INF/classes
For example:
/biopier/apache-tomcat-6.0.18/webapps/cw/WEB-INF/classes/license.txt
4. Restart the Application Server. The installation is complete.
To verify that Clinical Workbench is working properly:
1. type:
http://localhost:8080/cw
or http://machinename.companydomain.com:port/cw
The login screen should appear.
The user can now log in using the username and password specified in the setup screen. After logging in, click Projects, Settings on the header area and About this Product on the footer area to verify that pages are dis-played properly.
1 .2 .4 Post-Installation Steps
After installation, you may select to update organization profiles and logo, create users, and set up study structures for study data. The following covers the basic steps. Please read respective chapters for detailed instructions.
Uploading Organization Profile and Logo
• Click Settings > Edit Organization Profile to set up your organization’s profile and upload your organization’s logo.

Clinical Workbench System Administration Guide 155System Installation
Creating Users and Set Privilege
• Click Settings > Manage Users and Access > Create a New User
• After each user is created, you can set his/her privilege. More informa-tion is covered in the Clinical Workbench User Guide.
Creating Product/Compound and Study Structure
• Click Settings > Manage Users and Access > Manage Studies
• You can create products and studies from there. Once product and study structures are created, you can load study datasets. More information is covered in the Study Data Administration Guide.
1 .2 .5 Step-by-Step Installation Script
The following is a step-by-step script for Installation Qualification (IQ). This is based on the package including the third-party components, as well as the Clinical Workbench Core file.
Please note that IQ1 to IQ4 are qualifications of third-party platform software on which Clinical Workbench software is operated. If you use your own ver-sion of Java, Tomcat or MySQL, the installation qualification of these steps (third-party software) are your own responsibility, the installation qualifica-tion (IQ) will be effective from the step IQ5.

Clinical Workbench System Administration Guide156 System Installation
Step No .
Procedure Steps Expected Result or Verify Steps Actual Result /Comment
Pass/Fail
IQ1 Third-PartySoftwarePackageandUnzip
IQ1 .1 CopyClinicalworkbenchanditsplatformsoftwaretoadirectory.
Inthisexample: c:/biopier thenthedirectorystructureshouldbe:c:\biopier\apache-tomcat-6.0.18 c:\biopier\java c:\biopier\mysql c:\biopier\filestore
Toverifyfiles/versionarecorrect:
/java JavaJDKandJRE(Version1.5.0_06)unzipped
/mysql -Mysql(Version4.1.22)binaryfilesunzipped-rootpasswordisroot(accessfromlocalhostonly)-auseriscreatedusername=dev,password=pass4dev-adatabaseiscreatedcalled‘cwdb’,notableshasbeencreated.-NObiopiertablesorschemaareinstalled.
/apache-tomcat-6 .0 .18 -Apache-tomcat(apache-tom-cat-6.0.18)
/filestore -anemptydirectoryreservedtobebiopierfilerepository
PassFail
IQ2 JavaEnvironment(SetPath,JAVA_HOME,JRE_HOME)
IQ2 .1 SetPath,JAVA_HOME,JRE_HOMEenvironmentvariables.Instructions:Click Start > Control Panel > System > Advanced > Environ-ment Variables .ChooseSystem Path variable .1.Add:C:\biopier\Java\jre1.5.0_06\bintoitsexistingsystemPATH.2.AddSystemvariables:JAVA_HOME=c:\biopier\Java\jdk1.5.0_063.AddSystemvariables:JRE_HOME= c:\biopier\Java\jre1.5.0_06
Toverify:ClickStart > Run..,thentype“cmd”toopena*NEW*DOSwindow:Type:“java–version”Expecttoseeoutputsimilartothis:C:\>java -version java version “1.5.0_06” Java(TM) 2 Runtime En-vironment, Standard Edi-tion (build 1.5.0_06-b05) Java HotSpot(TM) Client VM (build 1.5.0_06-b05, mixed mode)
PassFail

Clinical Workbench System Administration Guide 157System Installation
Step No .
Procedure Steps Expected Result or Verify Steps Actual Result /Comment
Pass/Fail
IQ3 ApplicationTomcat:InstallasaServiceandStartService
IQ3 .1 InstallTomcatService
ToinstallApacheTomcatservice,openaDOSwindow(Start>Run>thentype:cmd
C:\> c: c:\> cd \biopier\apache-tomcat-6.0.18\bin C:\> service.bat in-stall
Note:ByinstallingApacheTomcatService,theTomcatcanbestartedautomati-callywhenthemachineisbooted.
ExpecttoseeDOSoutput(orsimilaroutput)
Installing the service ‘Tomcat6’ ... Using CATALINA_HOME: C:\biopier\apache-tom-cat-6.0.18 Using CATALINA_BASE: C:\biopier\apache-tom-cat-6.0.18 Using JAVA_HOME: C:\biopier\Java\jdk1.5.0_06 Using JVM: C:\biopier\Java\jdk1.5.0_06\jre\bin\serv-er\jvm.dll The service ‘Tomcat6’ has been installed.
PassFail
IQ3 .2 StartTomcatService.
ClickStart > Control Panel > Administrative Tools > Services
Youshouldsee“ApacheTomcat”or“Tomcat6”.1.IftheservicetypeisStartupType:Manual,setitas“Automatic”2.TheserviceisnotStarted,thenhighlightandright-mouseclick,thenchooseStart.
Toverify:1.Apache-TomcatServiceexists.2.Apache-TomcatServicehasStart-upTypesettoAutomatic3.Apache-TomcatServiceisStarted.
PassFail
IQ3 .3 ToVerifyifTomcatisrun-ning,typeURL:http://local-host:8080/
ExpecttoseetheTomcatlogopage.
PassFail

Clinical Workbench System Administration Guide158 System Installation
Step No .
Procedure Steps Expected Result or Verify Steps Actual Result /Comment
Pass/Fail
IQ4 MYSQLDatabase:InstallasaServiceandStartService
IQ4 .1 1.CopythemySQLconfigu-rationfilefrom:C:\biopier\mysql\mysql_sample_my.inandsaveas${WINDOWS_ROOT}\my.ini
(Note:thetypicalWIN-DOWS_ROOT=c:\windows)
2.Open:${WINDOWS_ROOT}\my.ini
Modifythefollowingtwoparametersmatchesyouractualdirectory:
basedir=C:/biopier/mysql
datadir=C:/biopier/mysql/data(Note:basediristheMYSQLbinaryfilebasedirectory,anddatadiristhedatabasefilesstoragedirectory)
Verify:${WINDOWS_ROOT}\my.ini
Verify:Thefile:${WINDOWS_ROOT}\my.iniexists,andthebasediranddatadiraresettothedirecto-riesthatexist.
PassFail
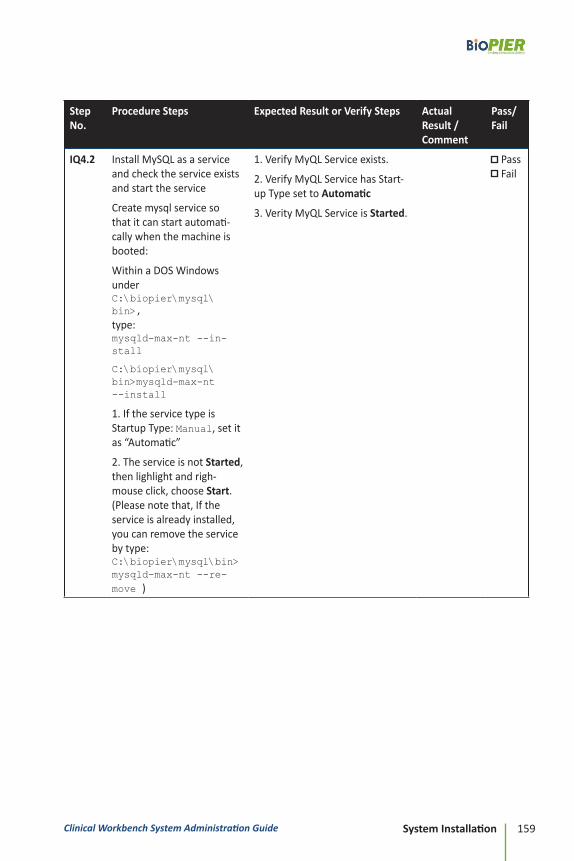
Clinical Workbench System Administration Guide 159System Installation
Step No .
Procedure Steps Expected Result or Verify Steps Actual Result /Comment
Pass/Fail
IQ4 .2 InstallMySQLasaserviceandchecktheserviceexistsandstarttheservice
Createmysqlservicesothatitcanstartautomati-callywhenthemachineisbooted:
WithinaDOSWindowsunderC:\biopier\mysql\bin>, type:mysqld-max-nt --in-stall
C:\biopier\mysql\bin>mysqld-max-nt --install
1.IftheservicetypeisStartupType:Manual,setitas“Automatic”
2.TheserviceisnotStarted,thenlighlightandrigh-mouseclick,chooseStart.(Pleasenotethat,Iftheserviceisalreadyinstalled,youcanremovetheservicebytype:C:\biopier\mysql\bin> mysqld-max-nt --re-move )
1.VerifyMyQLServiceexists.
2.VerifyMyQLServicehasStart-upTypesettoAutomatic
3.VerityMyQLServiceisStarted.
PassFail

Clinical Workbench System Administration Guide160 System Installation
Step No .
Procedure Steps Expected Result or Verify Steps Actual Result /Comment
Pass/Fail
IQ4 .3 CheckthattheMySQLdata-baseisworking
ToverifyifMySQLexists,openaDOSwindow,type:
mysql –u dev –p(enterpassword:pass4dev)
Onceitlogsin,typethecommand:
use cwdb;
Expecttosee(orsimilaroutput):C:\biopier\mysql\bin>mysql -u dev -p Enter password: ******** (type in password: pass-4dev) Welcome to the MySQL monitor. Commands end with ; or \g. Your MySQL connection id is 7 to server version: 4.1.22-community Welcome to the MySQL mon-itor. Commands end with ; or \g. Your MySQL connection id is 7 to server version: 4.1.22-community Type ‘help;’ or ‘\h’ for help. Type ‘\c’ to clear the buffer. mysql> use cwdb; Database changed
PassFail
IQ5 InstallandSetUpClinicalWorkbenchServerSoftware
IQ5 .1 Dropcw.war into:C:\biopier\apache-tomcat-6.0.18\webapps
VerifyApache-TomcatServiceitstarted(RefIQ3.2)VerifyTomcatisrunning.(RefIQ3.3)
PassFail
IQ5 .2 RunURL:http://localhost:8080/cw/setup.jsp
RemembertheUsernameandPassword(itwillbeneededtologin).
RefertoSection2.2.3 PassFail
IQ5 .3 RestartTomcat
ClickStart>ControlPanel>AdministrativeTools>Services
Youshouldsee“ApacheTomcat”or“Tomcat6”.IftheservicetypeisStarted,right-mouseclickandchooseRestart.
PassFail
IQ5 .4 TotestClinicalWorkbench,typeURL:http://localhost:8080/cw
LoginwiththeUsernameandPasswordspecifiedinIQ5.2
Verify:ClickProjects > Settings tomakesuremeaningfulpagesaredisplayed,andnotanerror.(Notethatdataisnotimportedyet.)
PassFail

Clinical Workbench System Administration Guide 161System Installation
Step No .
Procedure Steps Expected Result or Verify Steps Actual Result /Comment
Pass/Fail
IQ6 InstallProductLicense
IQ6 .1 Placelicense.txtinto:C:\biopier\apache-tomcat-6.0.18\we-bapps\cw\WEB-INF\classes
ThenrestartTomcat,followthestepsinIQ5.3.
Toverify:LoginClinicalWorkbench,andclicktheAbout Product linkinthepagefooter,ReadtheProductLicenseSection.EnsurethattheOrganization,LicenseNamedUserAmount,andExpirationDatearedisplayed.
PassFail
1 .3 Installing Product License
The product license file is issued by BioPIER technical support. The license file has encrypted information about the licensee company name, licensed products, expiration date, and the number of licensed users.
To install the product license file:
1. Place:
license.txt
in the directory of:
${APPHOME}/WEB-INF/classes
For example:
/biopier/apache-tomcat/webapps/cs/WEB-INF/classes/li-cense.txt
2. After a new license file is installed, restart the application server to take effect.

Clinical Workbench System Administration Guide162 System Installation
To verify installed license:
Log in to Clinical Workbench, the click the About Product link in the page footer. Information similar to the following should be displayed:
1 .4 Installation Frequently Ask Questions
1) How do I access the Clinical Workbench server from other computers?
If your URL is http://localhost:8080/cw, the URL is only accessible from the local server machine. To make the server accessible from other computers, you need to replace localhost by the server’s Full computer name.
To do this:
1. Go to Control Panel > Systems .
2. Click the Computer Name tab, take the Full computer name to replace the localhost.
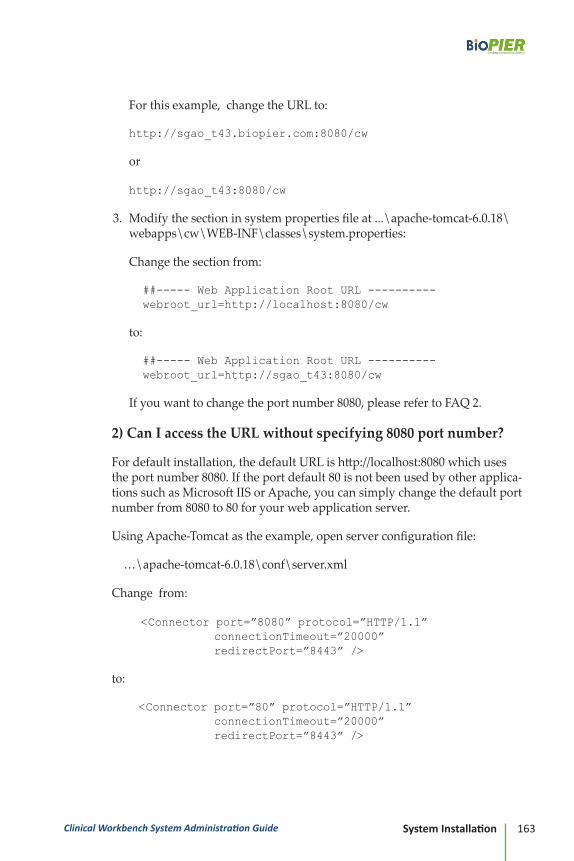
Clinical Workbench System Administration Guide 163System Installation
For this example, change the URL to:
http://sgao_t43.biopier.com:8080/cw
or
http://sgao_t43:8080/cw
3. Modify the section in system properties file at ...\apache-tomcat-6.0.18\webapps\cw\WEB-INF\classes\system.properties:
Change the section from:
##----- Web Application Root URL ---------- webroot_url=http://localhost:8080/cw
to:
##----- Web Application Root URL ---------- webroot_url=http://sgao_t43:8080/cw
If you want to change the port number 8080, please refer to FAQ 2.
2) Can I access the URL without specifying 8080 port number?
For default installation, the default URL is http://localhost:8080 which uses the port number 8080. If the port default 80 is not been used by other applica-tions such as Microsoft IIS or Apache, you can simply change the default port number from 8080 to 80 for your web application server.
Using Apache-Tomcat as the example, open server configuration file:
…\apache-tomcat-6.0.18\conf\server.xml
Change from:
<Connector port=”8080” protocol=”HTTP/1.1” connectionTimeout=”20000” redirectPort=”8443” />
to:
<Connector port=”80” protocol=”HTTP/1.1” connectionTimeout=”20000” redirectPort=”8443” />
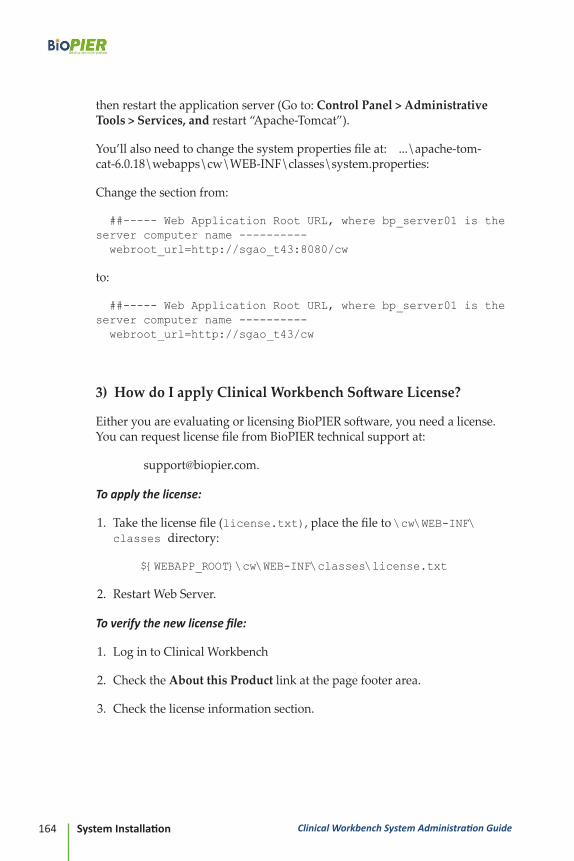
Clinical Workbench System Administration Guide164 System Installation
then restart the application server (Go to: Control Panel > Administrative Tools > Services, and restart “Apache-Tomcat”).
You’ll also need to change the system properties file at: ...\apache-tom-cat-6.0.18\webapps\cw\WEB-INF\classes\system.properties:
Change the section from:
##----- Web Application Root URL, where bp_server01 is the server computer name ---------- webroot_url=http://sgao_t43:8080/cw
to:
##----- Web Application Root URL, where bp_server01 is the server computer name ---------- webroot_url=http://sgao_t43/cw
3) How do I apply Clinical Workbench Software License?
Either you are evaluating or licensing BioPIER software, you need a license. You can request license file from BioPIER technical support at:
To apply the license:
1. Take the license file (license.txt), place the file to \cw\WEB-INF\classes directory:
${WEBAPP_ROOT}\cw\WEB-INF\classes\license.txt
2. Restart Web Server.
To verify the new license file:
1. Log in to Clinical Workbench
2. Check the About this Product link at the page footer area.
3. Check the license information section.

Clinical Workbench System Administration Guide 165System Installation
4) What is the initial username/password to log in?
After initial install, log in as
Username: [email protected] Password: sysadmin1
The username and password is not case insensitive. This is the default system administrator. Once you login, you can create more users from there, then dis-able the default account if you like.
5) How do I restart the Clinical Workbench Server Application?
In some cases, such as when the Clinical Workbench new software or patches are applied, Clinical Workbench background jobs (data loader, patient profile book maker etc. ) stop working, and you’ll need to restart the Web Applica-tion Server or Database.
For default installation, Apache-tomcat is the web application server, and MySQL is the database server. Their services are configured such that, when the server/machine is restarted, these two application services are started automatically.
To restart the services from local machine:
1. Go to Control Panel > Administrative Tools > Services.
2. Restart “Apache-Tomcat” and “Mysql”.
To restart the services through URL:
Tomcat server will allow you to restart the Tomcat from URL.
1. Open
…\apache-tomcat-6.0.18\conf\tomcat-users.xml
and make user entry as the following:
<?xml version=’1.0’ encoding=’utf-8’?> <tomcat-users> <user username=”cwmanager” password=”pass4cw” roles=”standard,manager”/> </tomcat-users>

Clinical Workbench System Administration Guide166 System Installation
2. Save the file and restart the server.
3. The Tomcat application can be controlled by the following URL command:
To stop the Apache Tomcat web service:
http://your_server_url/manager/stop?path=/cw
The manager’s username and password are defined in tomcat-users.xml
To start the Apache Tomcat web service:
http://your_server_url/manager/start?path=/cw
6) I cannot upload data, the Data Loader status says “Data Loader has stopped.” How do I fix that?
When you upload study data, or export patient profile book, you may see either of these two messages:
• “SAS Dataset Loader has stopped. Please notify your system administra-tor. “
• “The background job agent has stopped. Please notify your system administrator.”
These messages indicate that your background job is not working properly, and you need to restart web application (instruction in FAQ 5).

Clinical Workbench System Administration Guide 167User Administration Overview
Chapter 2User Administration Overview
This chapter briefly describes the user access and security control features in Clinical Workbench. There are five types of roles defined in the system. Only system administrators can administrate system security and users’ accesses. Therefore, this manual is designed for system administrators.
2 .1 User Access and Security Control Features
• Easy-to-view and easy-to-manage user access control
• Stratified user access control covering system level and study level
• Configurable password complexity and aging rules
• Account auto logout
• Lock-out account after consecutive login failures
• Prevent users from sharing login
• Full audit trails on modification and login/out
• Monitor online user activities

Clinical Workbench System Administration Guide168 User Administration Overview
2 .2 User Types and Privileges Overview
The system can assign one or more of following five roles to a user:
System Administrator: The highest power within an organization, includes full access. Only a system administrator can manage users and the organizational profile.
Data Administrator: Can manage study data and their structure (product/compound, clinical stud-ies), and can manage and load clinical datasets and documents to all studies.
Global Team User: User with read access to all studies within the organization; also can create personal data views.
Study Power User: A study-level role, can only access designated studies; can create shared data-view, and can create and run validation rules for the designated studies.
Study Team User: A study-level role, with limited access to designated studies; can read data and create private data views.
User Privilege Matrix Chart
All-Study Access
Study-Specific Access
Task Type
System
Administrator
Data
Administrator
Global Team User
Study Power User
Study Team User
ManageUsersandOrganizationalProfiles
X
ManageCompound/StudyStructures
X X
Manage/LoadStudyData X X
ManageSharedViews/Filters X X X
ManageValidationRules X X X
CreatePersonalView/Filters X X X X X

Clinical Workbench System Administration Guide 169Managing Users and Access
Chapter 3Managing Users and Access
This chapter describes how to create a new user and manage existing users:
3 .1 Listing Users
Click Settings > Manage User and Access. A list of registered users will be displayed.
Login Name: User’s login name, typically his/her initial email address
TIP:When a username is created, the username is the same as the email address. In the course of the account ownership, the user may change his/her email ad-dress. However, the username will remain the same. In other words, the email address used for login may be different from the email address on file.
Job Title: User’s job title within the organization.
Locked Out: Marked “Yes” only when the user is locked out after certain number of consecutive login failures. The number of allowed consecu-

Clinical Workbench System Administration Guide170 Managing Users and Access
tive login failures before locked-out is set and managed by the System Admin-istrator.
Status: Either Active or In-active. In-active users are disabled from logging in, but their information is kept in the database. A System Administrator can re-activate an inactive user at any time.
The number of licensed user names and actual consumed named users are displayed at the bottom of the screen, for informational purposes. Disabled (in-active) users are not counted as a consumed user against the licensed username count.
You may Create a New User or choose a user to Manage the User.
3 .2 Creating a New User
To create a new user:
1. Click Settings > Manage Users and Access > Create a New User.The following screen will appear:
2. Click Create to create a new user. You will be prompted to Set User Access like the following..

Clinical Workbench System Administration Guide 171Managing Users and Access
TIP:The password complexity rule is set by System Administrator. Refer to Chapter4-ManagingSystemSecurity for more details.
3 .3 Managing Existing Users
Through the Managing User Access interface, you can perform the following operations for existing users: edit user profile, change password, disable or remove the user, and modify user’s access to the system and data.
To manage existing users:
1. Choose Settings > Manage Users and Access.
2. Select a user from the list, then click on Manage the User.The following screen will appear:

Clinical Workbench System Administration Guide172 Managing Users and Access
3 .3 .1 Editing Profile
To edit an existing profile:
1. Choose Settings > Manage Users and Access. Select a user from the list, then click on Manage the User.
2. From the Managing User Access screen, click the Edit Profile link.
Here you can view or modify a user’s email address, salutation, first name, last name, and job title. The profile also lists access information, and whether the user is a part of System Administrators, Data Administrators, Global Us-ers, and access to specific study data.
3 .3 .2 Changing Password
To change a password:
1. Go to Settings > Manage Users and Access. Select a user from the list, then click on Manage the User.
2. From the Managing User Access screen, click the Change Password link.

Clinical Workbench System Administration Guide 173Managing Users and Access
The following screen will be displayed:
At the top of the page, the password change interval required by the sys-tem is displayed, as well as the password age of this user’s password.
For a newly created user, the user’s password age is 0 day.
In some cases, a user who is used for system background agent needs its password to be exempt from the password aging rule. For this case, click the Set this password ‘Never to Expire’ link. This user’s password will be exempt from the system password aging rule, and the message will indicate that the password will never expire. A new link Remove ‘Never to Expire’ privilege will added, and can be used to turn the password aging requirement back on.
3. Type the new password two times, in the two fields provided, then click Change Password.
TIP: Password requirements are displayed for your information.

Clinical Workbench System Administration Guide174 Managing Users and Access
3 .3 .3 Disabling a User
To disable a user:
1. Go to Settings > Manage Users and Access. Select a user from the list, then click on Manage the User.
2. From the Managing User Access screen, click the Disable this user link.
This resulting screen provides the option to deactivate a user from login. A disabled user will still appear on the user listing page with the status marked as in-active, his/her information is kept in the database. A System Administrator can re-activate a disabled user at any time.
TIP:Disabled users do not count as the licensed named users specified in the product license.
3 .3 .4 Removing a User
To remove a user:
1. Go to Settings > Manage Users and Access. Select a user from the list, then click on Manage the User.
2. From the Managing User Access screen, click the Remove this user link.
When a user is no longer valid, you can remove him/her from the system permanently. After the removal, the user will be removed from the organi-zation, and will no longer appear on the user listing page.
3 .3 .5 Unlocking User from Locked-Out Status
When a user is locked out from logging in due to consecutive failed login at-tempts, this information will be displayed as follows:
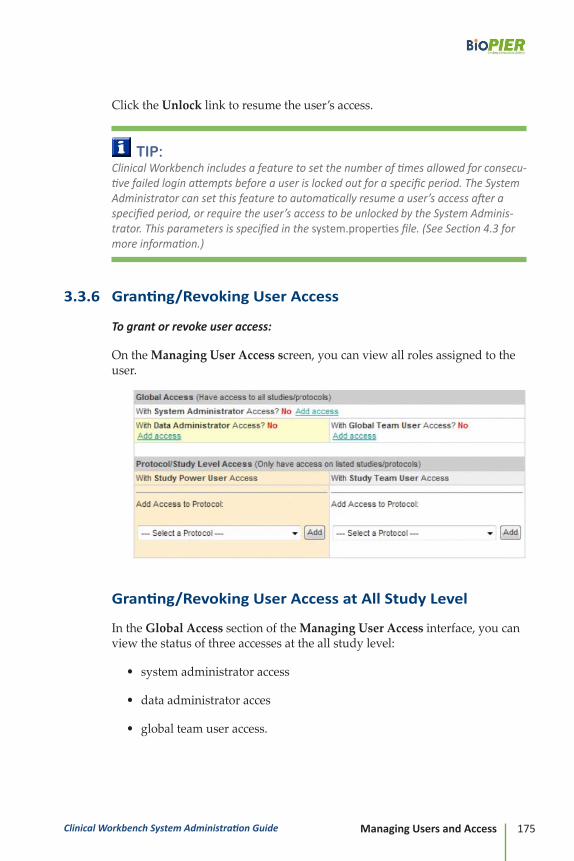
Clinical Workbench System Administration Guide 175Managing Users and Access
Click the Unlock link to resume the user’s access.
TIP:Clinical Workbench includes a feature to set the number of times allowed for consecu-tive failed login attempts before a user is locked out for a specific period. The System Administrator can set this feature to automatically resume a user’s access after a specified period, or require the user’s access to be unlocked by the System Adminis-trator. This parameters is specified in the system.properties file. (See Section 4.3 for more information.)
3 .3 .6 Granting/Revoking User Access
To grant or revoke user access:
On the Managing User Access screen, you can view all roles assigned to the user.
Granting/Revoking User Access at All Study Level
In the Global Access section of the Managing User Access interface, you can view the status of three accesses at the all study level:
• system administrator access
• data administrator acces
• global team user access.

Clinical Workbench System Administration Guide176 Managing Users and Access
To grant access to any of these roles:
When an access status is No, click Add Access.
To revoke access to any of these roles:
When an access status is Yes, click Remove Access.
Granting/Revoking User Access at A Specific Study Level
In the Study Level Access section of the Managing User Access screen, you can view the status of two types of access at specific study level:
• Study Power User Access
• Study Team User Access.
To grant either access type to a specific study to a user:
Select the target study in the pull-down list for the desired role, then click Add. The page will then display the new access in the appropriate column.
To revoke access to a study:
Click Remove access at the end of the study name displayed in the column, and the access to the study will be removed from the list.
Clinical Workbench System Administration Guide 177Managing System Security
Chapter 4Managing System Security
This chapter describes authentication and account measures, as well as audit-trail features to manage system security.
4 .1 System Security Feature Overview
Through parameters in the system.properties file, you can define follow-ing rules to restrict password and account behaviors:
Password Complexity Options
• Minimum characters required for password
• Whether the password must contain mixed alphabetic characters and numbers
• Whether the password must contain some special characters
TIP:Passwords are not case-sensitive.
Password Expiration Options
• Force password to expire in specified days
• Set specified days before user receives ‘password to expire’ warning (during login)

Clinical Workbench System Administration Guide178 Managing System Security
Reuse Password Options
• Set to forbid reusing the most recent passwords
Account Auto Lock-Out Options
• Set user account to be locked automatically when the user exceeds the specified number of consecutive password failures
• Option to remove password lockout automatically after a specific period of time.
TIP:If the setting is disabled and the auto lock-out feature is on, the System Administrator
must to remove the lock-out manually for the user.
Prevent Account Sharing Options
• Option to forbid a user login simultaneously at different locations.
TIP:If this setting is enabled, when a user is loggedin, and if another user tries to login at different location (different browser) using the same username, then the previous logged user will be ‘kicked out’.
Force User Logout/Timeout When Idle
• Option to force timeout/logout after a specified idle period.
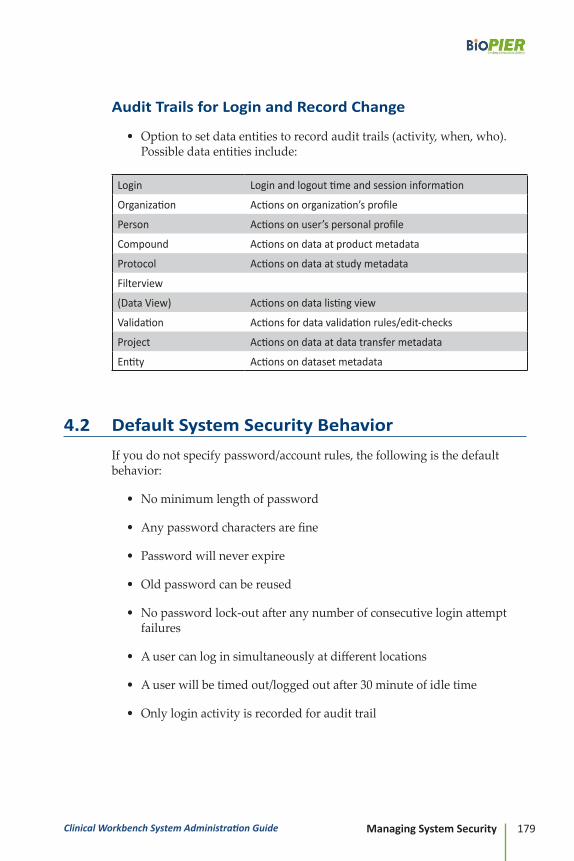
Clinical Workbench System Administration Guide 179Managing System Security
Audit Trails for Login and Record Change
• Option to set data entities to record audit trails (activity, when, who). Possible data entities include:
Login Loginandlogouttimeandsessioninformation
Organization Actionsonorganization’sprofile
Person Actionsonuser’spersonalprofile
Compound Actionsondataatproductmetadata
Protocol Actionsondataatstudymetadata
Filterview
(DataView) Actionsondatalistingview
Validation Actionsfordatavalidationrules/edit-checks
Project Actionsondataatdatatransfermetadata
Entity Actionsondatasetmetadata
4 .2 Default System Security Behavior
If you do not specify password/account rules, the following is the default behavior:
• No minimum length of password
• Any password characters are fine
• Password will never expire
• Old password can be reused
• No password lock-out after any number of consecutive login attempt failures
• A user can log in simultaneously at different locations
• A user will be timed out/logged out after 30 minute of idle time
• Only login activity is recorded for audit trail

Clinical Workbench System Administration Guide180 Managing System Security
4 .3 Setting/Changing System Security
System security settings are controlled at the system level, and are defined in the system.properties file on the web server:
${WEBAPP_HOME_PATH}/WEB-INF/classes/system.properties ,
where ${WEBAPP_HOME_PATH} is the physical path of your java applica-tion home, such as: c:/biopier/apache-tomcat-5.5.17/webapps/cw.
Important Notes:
• Changes will be made through the OS level, so please have your IT per-sonnel to assist you with the changes.
• Backup the system.properties file before you make any changes.
• The web server must be restarted before the change can take effort.
Parameter List in system .properties for Controlling System Security
Parameter Description Possible Values Defaultpassword.format.min_size
Requiredpasswordlength
0-32 0(unrestrict-ed)
password.format.extra_legal_chars
Astringofcharsallowedinpass-wordotherthanstandardones(a-z,A-Z,0-9),suchas:~!@#$%^&*()_
Visibleasciicharacterotherthana-zA-Z0-9
None
password.format.mixed_alphabetic_and_number_required
Whetherthepass-wordmustcontainbothnumberandalphabeticchars
true,false False
login.policy.password_expire.expire_days
Numberofdaysafterwhichauser’spass-wordwillexpire
0-365 0(neverexpire)

Clinical Workbench System Administration Guide 181Managing System Security
Parameter Description Possible Values Defaultlogin.policy.password_expire.warn_days
Whenuserlogsin,dis-playwarningmessageacertainnumberofdaysbeforethepass-wordexpires.(Thisparameterisnotvalidwhenpasswordissettoneverexpire.)
10-valueoflogin.policy
.password_expire.expire_days
30
login.policy.forbid_re-use_recent_passwords
Thenumberofthemostrecentpass-wordsthatcannotbereused.
0-10 0(nore-striction)
login.policy.failure.max_failed_login_at-tempts
Thenumberofconsecutivefailedloginattemptsallowedbeforetheaccountislocked.
0-10 0(neverlock)
login.policy.failure.auto_unlock_wait_time
Thetimeinminutesafterwhichalockedaccountisautomati-callyunlocked.
0oranyintegervalue,where0=neverunlock,manualresetisrequired
50
login.policy.multiple_login_allowed
Whetherausercanloginmultipletimes
True,false True
login.policy.session.timeout
Timeinminutesofnoactivity/idle,afterwhichauser’ssessionistimedout
0oranyintegervalue,where0=nevertimeout
30
audit_trail_types Possiblechoices:LOGIN,ORGANIZATION,PERSON,COMPOUND,PROTOCOL,FILTERVIEW,VALIDATOR,PROJECT,ENTITY
LOGIN
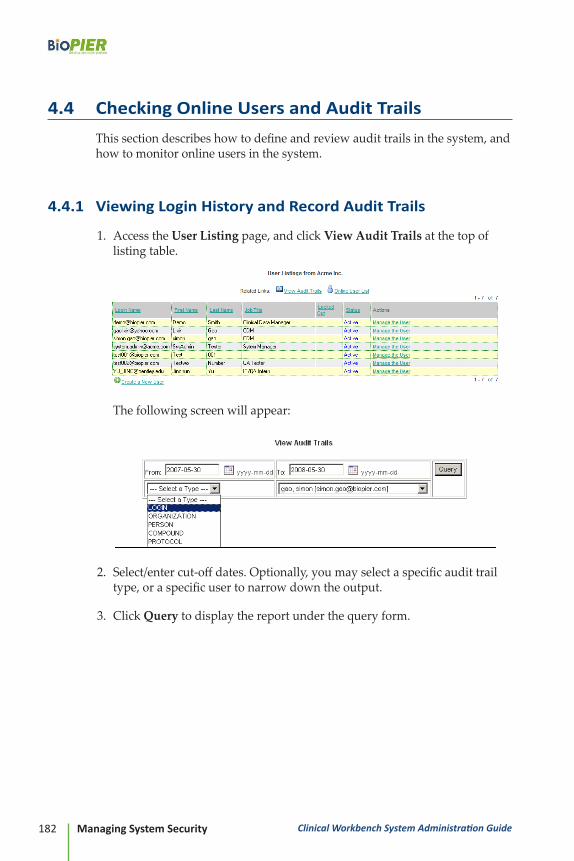
Clinical Workbench System Administration Guide182 Managing System Security
4 .4 Checking Online Users and Audit Trails
This section describes how to define and review audit trails in the system, and how to monitor online users in the system.
4 .4 .1 Viewing Login History and Record Audit Trails
1. Access the User Listing page, and click View Audit Trails at the top of listing table.
The following screen will appear:
2. Select/enter cut-off dates. Optionally, you may select a specific audit trail type, or a specific user to narrow down the output.
3. Click Query to display the report under the query form.
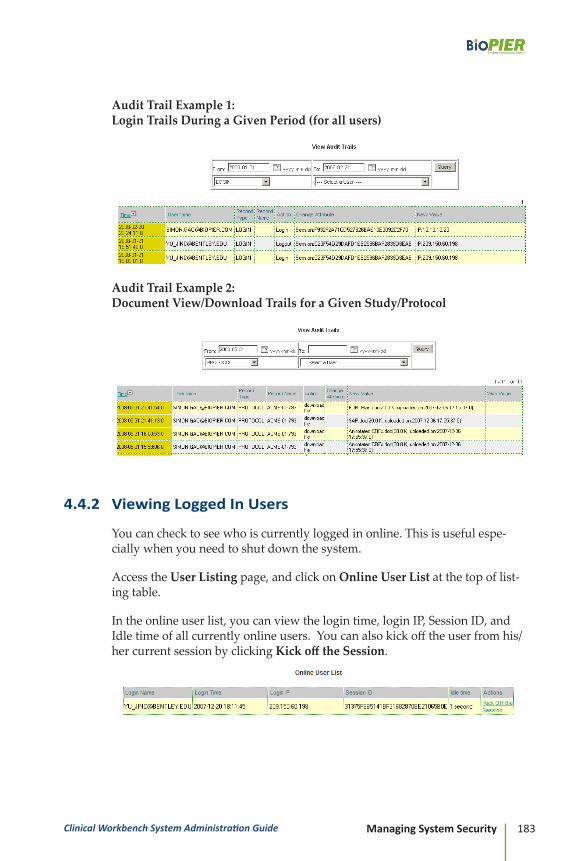
Clinical Workbench System Administration Guide 183Managing System Security
Audit Trail Example 1: Login Trails During a Given Period (for all users)
Audit Trail Example 2: Document View/Download Trails for a Given Study/Protocol
4 .4 .2 Viewing Logged In Users
You can check to see who is currently logged in online. This is useful espe-cially when you need to shut down the system.
Access the User Listing page, and click on Online User List at the top of list-ing table.
In the online user list, you can view the login time, login IP, Session ID, and Idle time of all currently online users. You can also kick off the user from his/her current session by clicking Kick off the Session.

Clinical Workbench System Administration Guide184 Managing System Security
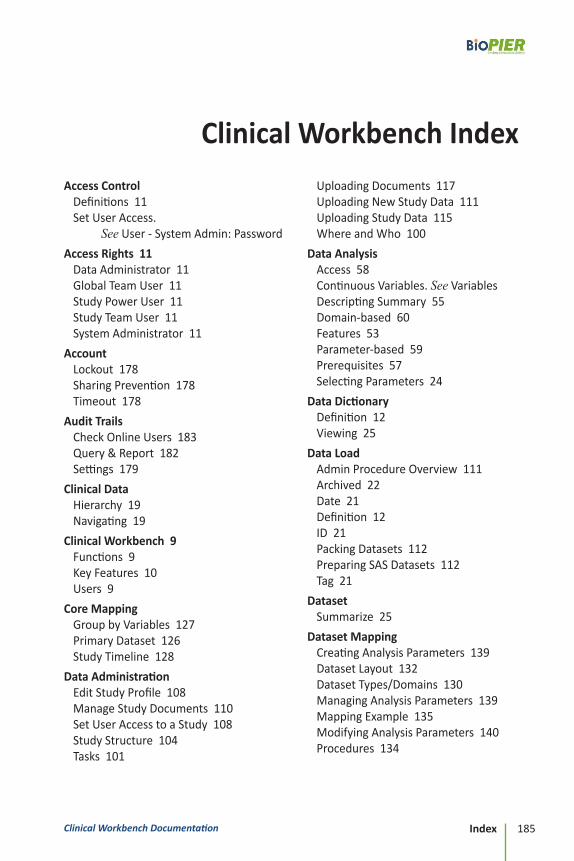
Clinical Workbench Documentation 185Index
Clinical Workbench Index
Access ControlDefinitions11SetUserAccess.
SeeUser-SystemAdmin:Password
Access Rights 11DataAdministrator11GlobalTeamUser11StudyPowerUser11StudyTeamUser11SystemAdministrator11
AccountLockout178SharingPrevention178Timeout178
Audit TrailsCheckOnlineUsers183Query&Report182Settings179
Clinical DataHierarchy19Navigating19
Clinical Workbench 9Functions9KeyFeatures10Users9
Core MappingGroupbyVariables127PrimaryDataset126StudyTimeline128
Data AdministrationEditStudyProfile108ManageStudyDocuments110SetUserAccesstoaStudy108StudyStructure104Tasks101
UploadingDocuments117UploadingNewStudyData111UploadingStudyData115WhereandWho100
Data AnalysisAccess58ContinuousVariables.SeeVariablesDescriptingSummary55Domain-based60Features53Parameter-based59Prerequisites57SelectingParameters24
Data DictionaryDefinition12Viewing25
Data LoadAdminProcedureOverview111Archived22Date21Definition12ID21PackingDatasets112PreparingSASDatasets112Tag21
DatasetSummarize25
Dataset MappingCreatingAnalysisParameters139DatasetLayout132DatasetTypes/Domains130ManagingAnalysisParameters139MappingExample135ModifyingAnalysisParameters140Procedures134

Clinical Workbench Documentation186 Index
Data TransfersCompareChanges26
Data Validation 25DownloadValidationReporttoExcel47Functions43Options&Statisics44ProducingReport46TerseValidationReport46VerboseValidationReport46
Data ViewAbout29ChooseSubset37Clone40CommandOptions34Create34Definition(Admin)100Definition(User)12Delete40DisplayOptions30DistinctValues31Enable/Disable40ExporttoSASPrograms27,41Formatted30Icons32Label30List33Manage40Personal25PersonalView12Raw30Repeatedheadings32SaveAs38SaveasEXCEL40SelectColumns35SelectMultipleValues38SetShared39SettoDefault40Shared25SharedView12SortMultipleColumns35Straight31
ToSASProgram77Update38Variable30Wrapped31
DocumentsManage110
Edit Check 45Create48ExportandImport50Expression48ExpressionSyntax50QuickExpressionBuilder49Save,Update49
Excel 40ValidationReport47
FeaturesUserAccess&Security167
FeedbackSubmitting18
Formatted Data Review 77
LicenseAbout17
License Installation 161
Login 14LoginTrails182
PasswordAging173Change16,172Complexity177Expiration177Reset14Reuse178SettoNeverExpire173
Patient Profile 61Access23,66Chart62CommandOptions68CreateaView70EditaView70

Clinical Workbench Documentation 187Index
Elements67HTMLFormatExample72Keywords71ManageViews76Overview61Prerequisites65Symbols67ViewSelection68Visualization62
Patient Profile BookCreate72Export72View74
ProductCreateStructure105
Projects 16
SAS 77Basics80CreateFormats119ProcReportOptions87TipstoUploadData119
SAS Date/Time Variable Mapping 138
SAS ProgramsBatchRun83CustomizationCaseStudy92CustomizeforBetterOutput87Executing80ExplainedinDetail83FrequentlyAskedQuestions87GeneratefromStudyDataViews77TestRun81
Settings 16
StudyCreateStructure105Definition12DeleteaStudy109DisableaStudy109Documents109EditProfile108Grant/RevokeAccess175
Listing103LoadingDatasetsProcedures112Managing106ManagingOverivew107Navigating20SASTipsinUploadingData119SetUserAccess108Uploading115UploadingDocuments117UploadingStatus116
Study ConfigurationCoreMapping126ExportingConfiguration145ImportingConfiguration145Managing143ManagingStudyLoadStatus124Overview122RemovingConfiguration146SASDate/TimeVariableMapping138TransferringConfiguration144WheretoAccess121
Study DataDefinition99
Study DocumentsLinkedFiles24UploadedFiles24Viewing24
Study LoadChangeStatus125Delete125ViewLog124
Subject ListCreate(Admin)142Create(User)73Definition100Manage142
System AdministrationIntroduction150SystemInstallation150
Clinical Workbench Documentation188 Index
System InstallationCreateUsers155FrequentlyAskedQuestions162InstallationScript155InstallationSteps151InstallingProductLicense161NetworkingRequirement150OrganizationProfileandLogo154Post-InstallationSteps154Pre-InstallationSteps151SMTPEmail150SystemRequirements149
System Security 177DefaultBehavior179Features177Set/ChangeParameters180
Terminology 11
User Access Control Features 167
User - System AdminCheckAccess175Create155,170Disable174
EditProfile172GrantAccess176List169Managing171OnlineUsers183Password16PasswordAging173RevokeAccess176Unlock174
ValidationDefinition13
Validation RuleDefinition13
Validation SyntaxDefinition13
VariablesCategorical56Continuous54

Clinical Workbench Documentation 189Index

BioPIER Inc .http://www.biopier.com
394LowellSt,Suite17Lexington,MA02420
Tel:(888)9-BIOPIERFax:(781)305-9366
Email:[email protected]