Embed Size (px)
Citation preview

!
!
"!
CLINICAL POLICIES FOR FIXED
PROSTODONTICS
NOTE: This Fixed Prosthodontics Clinic Policies manual is intended to be your guideline for successful completion of your fixed prosthodontics clinical course during your DSIII year. However, the Department of Fixed Prosthodontics reserves the right to modify the contents of this manual when it is determined by the Department that modifications are necessary to achieve the academic goals of the Department.
Digital Edition Revised by
Johnny L. Siler, D.D.S.
Digital Edition Edited by David Sather, D.D.S.
Revision applicable to the graduating class of 2016

2
TABLE OF CONTENTS
S E C T I O N P A G E S E C T I O N P A G E
1 Requirements 3 6.10.1 MCR Coping Design 13 1.1 DS III Fall Schedule 3 6.10.2 Lab Procedures for MCRs 13-14 1.2 Semesters Points 3 6.11 Resin-bonded Bridges 14 1.3 Minimum Semester Points 3 6.12 All-Ceramic Restorations 14 2 Grades 4 6.13 Diagnostic Wax-Ups 14 2.1 Procedure Grade 4 6.14 Assisting Other Students 14 2.2 Daily Grades 4 6.15 Emergencies 14-‐15 2.3 Composite Grade 4 7 Forms 16 3 Treatment Planning 5 7.1 Patient Records 16 3.1 Simple FPD Tx. Plans 5 7.2 Treatment Plan Worksheet 16 3.2 Complex Treatment Plans 5-6 7.3 Initial Restoration Grade Sheet 17 4 Treatment Prerequisites 7 7.3.1 Initial Fixed Partial Denture 17 4.1 Dowel-Cores 7 7.4 Procedure Grade Sheet 17-18 4.2 Initial Cast Restorations 7 7.4.1 Remakes 18 4.3 Patient Requirements 7 7.4.2 Exemptions 18 4.4 Student Requirements 7 7.5 Daily Evaluation Sheet (Blue) 19 4.5 Additional Restorations 7 7.6 Advanced Standing Procedure 4.6 Resin-Bonded Bridges 8 Grade Sheet 20 4.7 All-Ceramic Restorations 8 7.7 Laboratory Work Authorization 20-21 4.8 New Burs 8 7.8 Fixed Procedure Armamentarium21 5 Patient Scheduling 9 7.9 Treatment Plan Appointment 21 5.1 Instructor Selection 9 8 Armamentarium Lists 22 5.2 Budgeting Of Time 9 8.1 Crown Preparation And 5.3 All-Day Appointments 9 Provisional Restoration 22-24 5.4 Multiple Preparations 9 8.2 Impression For Crown 24-26 5.5 Limits On Units In Process 9 8.3 Metal Ceramic Coping Try-in 26-27 6 Rules For Treatment 10 8.4 Soldering Index 28 6.1 Existing Restorations 10 8.5 Dowel-Cores 28-29 6.2 Amalgam Cores 10 8.6 Cementation 29-30 6.3 Rubber Dam Usage 10 Attch. #1 FPD Common Codes 31 6.4 Pulp Exposures 10 Attch. #2 FPD Procedure Codes 32-37 6.4.1 Preparing The Wrong Tooth 10 Attch. #3 Laboratory Procedures38-39 6.4.2 Mutilation Of Adjacent Tooth 10 Attch. #4 DSIII Fall/Spring Clinical 6.5 Endodontically Tx. Teeth 10 Requirements 40-42 6.5.1 Endo Tx Teeth Requiring Crown 10 6.5.2 Endo Tx Not Requiring Dowel
And Crown 10 6.6 Provisional Restorations 10-11 6.7 Tissue Management 11 6.7.1 Retraction Cord 11 6.7.2 Electrosugery 11 6.8 Impression Trays 11-12 6.9 Casts And Dies 12 6.10 MCR Restorations 12-13

3
CLINICAL REQUIREMENTS FOR
FIXED PROSTHODONTICS
This booklet explains what is expected in the area of clinical Fixed Prosthodontics. Adherence to the policies outlined here will result in better treatment for your patients and a more effective learning experience for you. Any exceptions to the rules stated herein must have prior approval from the department chair. Armamentarium lists are provided in section 8 of the manual. You should consult the appropriate list before each appointment to be sure you have all the items you will need for that appointment. 1 REQUIREMENTS Above all, you are expected to deal with your patients, faculty and fellow students in an ethical, professional manner. 1.1 DS III Fall/Spring Semester: This is a yearlong course. At the very least, you should have finalized treatment plans for all of your current FPD patients and complete your initial crown by as early as possible in fall semester. 1.2 Semester Points: Semester Points are points from units initiated and completed during the semester. Cumulative Points are a running total of points earned in any semesters. Points are calculated by multiplying the value of a single unit by its difficulty factor. The difficulty factors are given in Attachment #4.
Clinical assisting = 1 point per 3-hour period; maximum of 10 points per Block Care Year are allowed. Attendance is recorded on the daily evaluation form (See section 7.5) All other procedures accomplished to facilitate treatment of teeth prepared are only counted after the minimum credit points have been obtained (e.g. if a cast dowel-core is required to be able to place the crown, the cast dowel core only counts for points after the minimum number of credits for a “C” are achieved in the course). No points will be given for restorations receiving an overall average lower than 7.2. The procedure grade card must be turned in to the department before credit will be given for the unit. This is your responsibility to make sure the instructor grades the form to be turned in for recording by the department secretary. 1.3 Minimum Semester Points: In order to be cleared by the Department Chair from Fixed Prosthodontics Block Clinic into senior Comprehensive Care Clinic with your Group Practice Director, you must maintain a passing grade of 72 or higher for a C and complete a minimum number of units. You will not be cleared for Comprehensive Care in Fixed Prosthodontics until this requirement is met. All units you have initiated must be completed or can be transferred for planned completion with your Group Practice Director in your Comprehensive Care Clinic.

4
2 GRADES Two types of grades are given: Procedure grades that are based upon the quality of your restorations. Daily grades are based on how you conduct yourself during each appointment. These are combined to determine your composite grade. 2.1 Procedure Grade: An instructor will grade each step on your procedure grade card on a 10-point scale (see sections 7.3, 7.4 and 7.6) 2.2.2 Remakes: There is no procedure grade penalty for the first remake of a restoration. However, for each additional time a restoration must be remade after reaching the untouched casting stage, the overall grade average for the unit will be reduced by 1.0. For example, an overall grade of 7.5 for a fixed partial denture with 2 remakes would be lowered to 6.5. Since this is below 7.2, no point or fixed partial denture credit would be given. On the remake grade sheet, grades are given only for the steps that have to be redone. All grades from both sheets are averaged together for the procedure grade. 2.2.3 Unauthorized lab work: Except for those procedures delegated to the College's Support Laboratory via a work authorization signed by a fulltime faculty member, the student must perform all laboratory work. Submitting work to be graded as your own, when someone else has done it is cheating and will be heavily penalized. 2.2 Daily Grades: At each appointment, your instructor will evaluate the manner in which you perform your treatment. This will be recorded on the Daily Evaluation form (“Blue sheet”, section 7.5) 2.2.1 Time Management: Clinic closing times are 12:00 noon and 4:00 p.m. If you finish late, your grade may be no higher than 72. You may be penalized one point for every minute you go past the clinic closing time. The most common cause for finishing late is not starting the provisional restoration soon enough. 2.2.2 Clinical Judgment: You will be expected to make a judgment as to whether your restoration is acceptable for cementation. If your instructor determines that the casting you have decided to cement cannot be made to fit satisfactorily, a grade of "0" will be given for your daily grade (Blue sheet). 2.3 Composite Grade and Block Care Requirements: (See Attachment #4) To determine your ranking for semester grade consideration, your Procedure Grades (PG) and Daily Grades (DG) will be combined to create a Composite Grade (CG).

5
3 TREATMENT PLANNING Fixed treatment plans are categorized as either simple or complex. 3.1 Simple FPD treatment Plans can be approved anytime with any fulltime Fixed Faculty members at scheduled appointments in Fixed Block care. Treatment is considered to be simple if it includes any of the following: - Gingivitis patient with adequate clinical attachment - Four fixed units or less (could include a 3-unit FPD) - No endodontics pending; no retreatments of endodontics, or referrals required for endodontics - No remakes of fixed prosthodontics units - No Implants The student should complete a Fixed Prosthodontic Treatment Plan Worksheet, which is available with instructions on how to fill it out on the OUCOD Web Site in the Current Students Section as the ClinTxPlan-FXPro-WORKSHEET. If no other coordination is required to complete simple treatment then the proposed treatment will be filled out in pencil on a Fixed Prosthodontic Treatment Plan Worksheet and presented to the supervising Block Care Faculty. This allows the student to present to the patient proposed treatment costs. If the patient is in agreement with the treatment plan the student can then finalize a Comprehensive Care Clinic Treatment Planning Worksheet that can be approved by the supervising Block Care Faculty and the student’s Group Practice Director as long as no other consults for treatment are required. The student can then enter the agreed upon final treatment plan as signed by the patient in axiUm and a printed Treatment Plan and Cost of Treatment is given to the patient. The finalized Comprehensive Care Clinic Treatment Planning Worksheet is then given to the Patient Scheduling Coordinator for that clinic to file for future reference while that patient is in his or her treatment group. 3.2 Complex FPD treatment plans: A treatment plan is considered to be a complex treatment plan if it includes any of the following: - More than four fixed prosthodontics units - Endodontic treatment required to treat tooth - Retreatments of endodontics required or referrals for outside endodontic treatment required - A removable partial denture option, either in combination with, or as alternative to fixed treatment - Periodontics patient and/or presence of severe attachment loss - Possibility of Implants as option for treatment - Disease control re-evaluation for comprehensive treatment In any of the above complex FPD Treatment Plan situations where multiple options for treatment are possible for the patient; e.g. if endodontics could not be performed and the tooth could be removed then additional forms are filled out (one for a Fixed partial denture replacing the lost tooth; one for an alternate treatment with removable partial denture, and one for an Implant to replace lost tooth.) A Fixed Prosthodontic Treatment Plan Worksheet will be filled out in pencil for each option of treatment possible for the patient. This allows the student to be prepared to discuss relevant costs of treatment with the patient to determine a patient’s ability to pay for treatment before asking your supervising faculty member to discuss the case and evaluate the patient with the student. Once the Fixed Prosthodontics Block Care supervising faculty member has discussed the various Fixed Prosthodontics Treatment Plan worksheets options with the student and the patient has been examined by the student and Supervising Block Faculty member the patient’s desires for treatment and ability to pay for the proposed treatment can be ascertained. Block Care Fixed prosthodontics faculty will review the fixed prosthodontics codes entered in axiUm. The proposed ideal treatment plan then will be transferred by the student onto the Comprehensive Care Clinic Treatment Planning Worksheet for any patient requiring coordination treatment with other departments. The Supervising Block Care faculty (Oral Diagnosis faculty) will sign for each listed proposed phasing and sequencing of treatment needed by tooth and procedure code on the Comprehensive Care Clinic Treatment Planning Worksheet. The student will then use this form to coordinate any necessary treatment planning consultations for this proposed treatment plan. Once all the coordinating signatures have been obtained for the proposed treatment plan and modifications requested by consulting departments identified, then the Comprehensive Care Clinic Treatment Planning Worksheet will be reevaluated by Dr. Mullaseril, Chair of the Division of Restorative Dentistry, for approval of entries placed by student and supervising department faculty members in the patient’s Electronic Health Record in AxiUm and signed by the patient as an approved Treatment Plan. Then the student’s Group Practice Director

6
should also review the plan. A Treatment Plan and Cost of Treatment is signed, printed and given to the patient. The final approved Comprehensive Care Clinic Treatment Planning Worksheet is given to the Patient Scheduling Coordinator for that clinic to file for future reference while that patient is in his or her treatment group. You should have the Fixed Prosthodontic Treatment Plan Worksheet (section 7.2) filled out before the instructor sees the patient. Teeth planned for inlays or onlays in Fixed Clinic (substituting for amalgam or resin definitive restorations or cores planned by operative department) should be removed from the Operative treatment plan to avoid conflicting treatment named in axiUm.

7
4 TREATMENT PREREQUISITES 4.1 Dowel-cores require a current axiUm master treatment plan. Provisional crowns will be cemented over cast dowel-cores until you and the patient are ready to begin the definitive treatment. 4.1.1 Caries control and patients whose treatment status is not cleared for periodontal concerns or limitations on removable care may be selectively treatment planned for limited treatment with provisionalization and dowel-cores on a case-by-case basis. 4.2 The Initial Cast Restoration (other than a cast dowel-core) should be a single full gold crown, onlay, or Class II inlay. Metal ceramic crowns should be postponed until you have gained experience with all-gold restorations. You should have close supervision and assistance from one full-time instructor for the entire case. You will use a special initial grade sheet (see section 7.3) which will· be issued on passing the clinic entrance exam. Following the successful completion of a final impression, an articulated working cast and dies must be presented to the faculty member with whom you are working within two weeks. Additional fixed procedures will not be started until this initial restoration is cemented or a successful coping try-in has occurred if the initial cast restoration was necessarily an MCR. (See Section 4.5) Both the patient and you must meet certain requirements before starting this and all subsequent restorations, as follows: 4.3 Patient readiness and limited treatment requirements: Limited treatment means you are limiting your delivery of service to a specific discipline or two instead of "comprehensively'' treatment planning the entire case. It does NOT mean you render this care in a "limited" or compromised manner. - (To perform limited treatment while you are a junior, the patient should be assigned or transferred to you with the approval of the Department Chair.) Prior to obtaining Fixed Department approval for limited treatment, you must assume ownership of the patient's current treatment (implying that you know the patient's master treatment plan and have re-evaluated their current hygiene and periodontal status). (Otherwise, patients may receive limited treatment only from seniors.) - Typed Master Treatment Plan, including final FPD plan, must be available with current mounted diagnostic casts and radiographs (periapical radiographs of teeth within 6 months and reflecting current condition, bite wings, and new full mouth series, if radiographs are over 3 years old). - All procedures preceding fixed prosthodontics on the master treatment plan must be identified as either "in-progress”, “completed", "deleted", or "planned". Exceptions: Small occlusal and board type Class II and III lesions may remain untreated, based on current radiographs (less than 1 year). - Periodontal patients must be current with their periodontal treatment, demonstrate acceptable oral hygiene, and have adequate remaining clinical attachment to be good candidates for definitive fixed prosthodontic treatment. Poor oral hygiene may preclude the placement of fixed restorations. - Patients who started in a limited treatment status (e.g. periodontal and operative only) may be reassessed. Their oral hygiene status must be acceptable and they must be in a periodontal maintenance status for consideration for definitive fixed prosthodontics restorations. 4.4 Student readiness requirements: A video is required to be viewed by all DS3 students before they can enter the Block Care Clinics in the junior year. This video is available on the OUCOD web site in the Current Student Section and is listed as the DS3-FX FPRO Clinical Introduction. Students are required to read and study The DS3 Clinic Manual that is available online on the OUCOD Web Site under the Current Students link in the Handbooks and Manuals link and listed as DS3 Clinic Manual under the Clinic Manuals. Each student must complete the Clinical Entrance Exam, which covers the video and the DS3 Clinic Manual, before they can schedule patients into the clinics. This test will be taken as a class in the first session of the FPD portion of the Restorative Course early in September using your laptop computer. The lowest passing grade for the exam is 75%. If failed, it can be re-taken only after 24 hours of intensive study, to be scheduled with the Fixed Secretary and taken in a monitored environment. 4.5 Occasionally additional restorations may be started before completion of the initial restoration. If for

8
some reason (e.g. detour to Endodontics or patient termination) the initial restoration cannot be completed within a reasonable time, you may obtain approval from the department chair to start a second "initial" restoration. 4.6 Resin-bonded bridges require, in addition to the above prerequisites, an acceptable practice preparation on a stone cast. (See section 6.11) 4.7 All-ceramic restorations (including veneers) are more technique sensitive than gold or metal-ceramic restorations; therefore, they are best done after you have gained more experience and these will not be done in Block Care. Even after significant experience, do not assume that you will automatically receive permission to do veneer restorations. Permission by your Group Practice Director (GPD) after you enter Comprehensive Care Clinic will be granted on a case-by-case basis, considering past student performance and the demands of the case being considered. 4.8 Preparation and laboratory burs used in pre-clinic courses must be replaced. They are no longer adequate after having outlived their efficiency in pre-clinic laboratory.

9
5 PATIENT SCHEDULING 5.1 Instructor Selection: For cases already in progress, schedule a chair in the area assigned to your instructor with whom you started the case. No more than two instructors should be involved on any one restoration. There may be a 1 point deduction taken from your overall grade on the unit if you have more than 2 instructor signatures on your grade sheet. The same instructor who graded the preparation must grade the cemented restoration. 5.2 Budgeting of Time: Do not attempt to do more work than you can complete comfortably in one appointment. Otherwise, you will finish late or your work will be hurried and sloppy, or both. Finishing late is an inconvenience for your patient, the dispensary personnel, and your instructor, plus a lowered clinic grade for you. Remember that the patient cannot be dismissed until a satisfactory provisional restoration has been placed. The preparation need not be totally completed before the provisional restoration is started, but there must be adequate occlusal clearance and retention. Do not expect yourself to be able to prepare both abutments for a fixed partial denture and fabricate the provisional bridge in one appointment. The recommended plan is to prepare one abutment and temporize it at the first appointment, then prepare the second abutment and fabricate the provisional fixed partial denture at the second appointment. The following rules will help keep you out of trouble: - Allow at least one hour for fabrication of a single provisional crown and 1.5 hours for a provisional fixed partial denture. - Always complete the provisional restoration before making the impression or dowel-core pattern. - Never make the final impression or dowel-core pattern until the preparation is graded. 5.3 All-day appointments are not ordinarily recommended because they cause undue stress on the patient. Some instances where they might be justified are: 1) when orthodontic appliances are being removed and a provisional restoration must be placed quickly to prevent relapse, and 2) when the patient must travel a great distance and wishes to minimize the number of visits. In these cases, the patient must be dismissed over the noon hour. Vital teeth should be coated with Copalite™or Gluma™ and the patient advised to avoid extremes of temperature. 5.4 Multiple Restorations: Because many complications can arise while fabricating multiple restorations at the same time they will not be done in Block Care. Even after you begin in Comprehensive Care, do not assume that permission to do this is automatic. These rules should be followed for every case: Previous consultation and work-up with the faculty is required. The student will work with a full-time instructor only. The student will work always with the same instructor. Multiple restorations may be allowed in rare circumstances to be started by a student if the faculty member working with the student feels the degree of difficulty of the case and the capability of the student are acceptable. 5.5 Limits on Units in Progress: So that patients will not have to wear provisional restorations for long periods of time, you should not have too many cases in progress at one time. Juniors may have no more than six units in progress.
10
6 RULES FOR TREATMENT 6.1 Existing restorations and bases not placed at this school usually are removed from teeth to be crowned. 6.2 Amalgam cores are usually placed in Operative, but may be done in FPD clinic if the need arises during crown preparation, or if the tooth is to be a fixed partial denture abutment. Teeth planned for MOD onlays should not have amalgam cores. (Usually, if a cavity needs an amalgam core, it is too extensive to be restored with an onlay.) When substituting an inlay or onlay for an amalgam, be sure to change the Operative treatment plan. 6.3 Rubber dam usage is mandatory for the following procedures: - Excavation of deep caries - Preparation and cementation of inlays 6.4 Pulp Exposures: If the pulp is exposed during crown preparation, endodontic therapy must be complete before the crown can be fabricated. Castings may never be cemented over direct pulp caps. If you create an avoidable mechanical exposure, you will receive a "0" for the preparation step. The tooth must be endodontically treated and you must fabricate a core for no credit. The patient will not be charged for the endodontic treatment or the core placement. It is prudent to ask an instructor for assistance when excavating caries dangerously close to the pulp so that you will not be unjustly blamed for a mechanical exposure. 6.4.1 Preparing the Wrong Tooth: If a tooth is wrongfully prepared, you will receive a "0" for the preparation and on your daily grade sheet. You must fabricate the crown for no credit, and the patient will not be charged unless the crown was previously treatment planned for that procedure. 6.4.2 If an adjacent tooth is mutilated while another tooth is being prepared, you will receive a "0" on your daily grade sheet, you must restore the mutilated tooth with the appropriate restoration for no credit, and the patient will not be charged for the restoration. 6.5 Cores for Endodontically Treated Teeth 6.5.1 Endodontically treated teeth requiring crowns must first have a core placed according to the following general rules:
- Anterior single-rooted teeth: Restore wi th a cast dowel-core. Invest the pattern in Beautycast™ with no ring liner, and cast it in Argenco 42™. - Two-canal premolars may be treated either in Fixed or in Endodontics Clinic with prefabricated dowels and amalgam cores. Smaller single-canal premolars sometimes are treated with a cast dowel-core or with a prefabricated dowel and resin core. - Molars with two or more sound cusps should be restored with pin-retained amalgam cores with amalgam extending a short distance into the canals. This may be done in Operative clinic. A cement base is contraindicated. - Molars with little or no coronal tooth structure: Restore with one or two prefabricated dowels ( e.g.Tri-R™, Parapost ™) and an amalgam core. - Molar fixed partial denture abutments: Restore with two prefabricated dowels (e.g. titanium Parapost Plus™) and an amalgam core.
6.5.2 Endodontically treated teeth that do not require dowel-cores and crowns:
- Non-vital anterior teeth with minimum destruction, no crown indicated: Place a simple composite restoration. - Non-vital posterior teeth with minimum destruction: Place an onlay over a cement base.
6.6 Provisional Restorations:

11
An instructor must approve a new provisional restoration before it is cemented. An instructor must be given the opportunity to check every cemented provisional restoration before the patient is dismissed. As a rule, custom acrylic provisional restorations will be used. This means that you must have a custom matrix ready. Provisional restorations should not be relined directly on vital teeth if acrylic resin is used (e.g. Dentsply Caulk Temporary Bridge Resin™). Every effort should be made to avoid leaving patients with provisional restorations over long periods of time. Exceptions to the above rules are: 1. Dowel-core preparations in esthetically non-critical areas (e.g. mandibular second premolars) may be temporized with only a cotton pellet and Cavit™. 2. Non-vital anterior teeth and premolars may be temporized with prefabricated polycarbonate crowns relined directly in the mouth. 3. The patient's old permanent restoration can sometimes be relined and used as a provisional; but have a custom matrix ready in case the old restoration is destroyed in removal. 4. BisAcrylic resin (e.g. Integrity™) may be used in a direct technique for single units and up to a 3-unit fixed partial denture only if it is pre-approved by the instructor with whom you are working. Plastic Triple-Tray™ is used to make the over impression. This is the ONLY use for the Triple TrayTM. (See figures below)
Figure 1 Plastic Quadrant Tray Figure 2 Integrity Cartridge and Gun
Figure 3 Sand paper disks and mandrel 6.7 Tissue Management 6.7.1 Retraction cord: For your first crown impression, the instructor will demonstrate the placement of cord. A non-epinephrine retraction cord is used normally. Epinephrine-containing retraction cord will only be used at the discretion of the attending faculty. The faculty must sign an appropriate entry requesting Epi-Cord before dispensing. Avoid contacting the cord with latex gloves as it could affect the polymerization of PVS. 6.7.2 Electrosurgery is useful for removing small amounts of tissue that interfere with crown preparation, impression making, or cementation. A unit must be checked out from the dispensary. The instructor will perform the procedure. You may not perform electrosurgery until after you have taken an elective or a postgraduate course on its use.

12
6.8 Impression trays: DSIII's must have a custom tray ready and should use a custom tray for all clinical situations unless indicated by faculty. There are several systems (at OUCOD) for making final impressions for fixed restorations: Custom Tray- Aquasil LV TM (light) (teal) and Reprosil TM Heavy (green). You may transfer the light body to a Kerr syringe with Centrix tips to improve access. Otherwise, use the standard yellow mixing tips that fit on the cartridge. Stock Tray (Coe green plastic disposable) - Putty (Kerr violet) and Aquasil TM LV. You may transfer the light body to Kerr syringe with Centrix TM tips to improve access. Otherwise, use the standard yellow mixing tips that fit on the cartridge. All putty PVS impression material must be mixed with non-latex gloves, as any latex residue can negatively affect polymerization. Hand mixing without gloves is also not acceptable as it violates infection control guidelines.
Figure 4 Coe Check-Bite Tray Figure 4A Clinician’s Choice Tray
Figure 5 Foster Spring Articulator
Block Care students may only use the Coe check-bite TM (Fig. 4) or Clinicians Choice TM (Fig.4A) impression technique after receiving instruction on the technique. You may use quadrant impressions with Aquasil TM by means of check-bite tray for single posterior units only (no multiple units). The patient must be able to close in centric with the tray in place. These impressions will be poured and mounted on a Foster Spring Correlator TM or rigid plastic quadrant articulator (Fig. 5). Mount the casts toward the anterior part of the Foster Spring Correlator TM; i.e. do not mount the cast close to the hinge of the articulator. This tray is not to be used for surveyed crowns for removable partial dentures or for 2nd molars. If you wish to use this technique, you must purchase the Coe Check-Bite Tray TM and Foster Spring Correlator TM. Your supervising clinical instructor may authorize this if they feel that the patient’s care can be expedited using this technique. 6.9 Casts and Dies: Both the working cast and opposing cast for a fixed restoration are to be poured in a die stone (e.g. violet Silky Rock or Jade Stone). Opposing casts must be current, i.e. made after the placement of major restorations. The patient's white diagnostic casts must be preserved as a legal record and are not to be used for fabricating trays diagnostic wax-ups, or as opposing casts for restorations. The types of casts and dies to be used are outlined below: - Type III gold restorations: Pour a solid working cast and two separate dies in violet Silky rock. The 1st pour is your master die; use die spacer on it. - Metal-ceramic restorations with porcelain shoulders: Pour two dies and a solid cast in Jade Stone. If you are having the lab do the restoration, they will Pindex the solid cast for you. Do not use the Pindexed die for

13
metal finishing. This will be your master die. Use the 2nd die for metal fitting and finishing only. If it is a fixed partial denture with porcelain shoulders, it must be poured in Jade Stone and Pindexed. Pour a solid cast for interproximal adjustments. The types of casts and dies to be used are outlined below: 6.10 Metal-Ceramic Restorations (MCR) You should not attempt a metal-ceramic crown until you have gained some experience with full cast crowns. The standard indications for an MCR are: - Maxilla: First molar through first molar. - Mandible: Second premolar through second premolar.
6.10.1 MCR Coping Design
Occlusal Coverage: Metal is functionally superior to porcelain, but porcelain provides better esthetics. The standard MCR is a compromise with metal supporting the heaviest contacts, and porcelain covering the most visible areas. Metal occlusal contacts are especially indicated on posterior maxillary MCRs if there is greater than normal tooth wear (bruxism, heavy musculature) or if there are posterior sliding contacts in excursive movements. If the restoration will occlude against resin denture teeth and there is space for the additional occlusal reduction required, the entire occlusal surface may be covered with porcelain. Like materials should oppose like materials, when feasible. With a normal mutually protected occlusion, the standard extent of porcelain occlusal coverage is shown on the drawings that you will receive from the Fixed Department.
If the patient desires more porcelain coverage than you and your instructor think advisable, explain the disadvantages (deeper tooth reduction, abrasion of opposing teeth, risk of porcelain fracture) and summarize in the treatment progress notes. Porcelain margin vs. metal collar: Porcelain margins are esthetically superior to metal collars; thus, they are routinely used on anterior teeth and maxillary premolars. Metal collars provide greater strength, are technically less demanding and are preferred on: - mandibular crowns distal to the canine - maxillary molars - weakened endodontically-treated teeth - preparations that extend apically well on to the root surface - long-span fixed partial dentures 6.10.2 Laboratory procedures for MCRs: Following the recommendation of your instructor the support lab will Pindex your master cast for you. You will trim the die and mount the casts. The shoulder area must be perfectly intact for stacking of a porcelain margin, so pour an extra die for finishing the casting. Note that there are THREE wax pattern checks: Full Contour, CUT BACK ON WORKING CAST, and Wax Pattern Margination. Further, if it is to be an RPD Abutment, there are two (2) checks required by RPD: full contour wax pattern and final restoration before cementation. Invest the pattern in Hi-Temp™ using a ring liner and special liquid and turn it in to the Support Lab to be cast in Argebond80. A lab authorization must accompany it and an alloy specified on an axiUm form signed by a Fixed faculty member. Normally, if the invested pattern is delivered to the lab by 4:00 p.m., it will be ready after 11:00 a.m. the next day. Pick up the coping for Untouched Casting check, preliminary finishing and try-in. After you have completed two cast units you may conduct the coping try-in for single-unit MCRs on a good die rather than in the patient’s mouth. In these cases, the shade must be selected at the impression appointment. An instructor must evaluate the untouched casting for these cases. If there are any questions regarding accuracy of the coping, die, working cast, or mounting, a try-in appointment will be necessary. A try-in appointment is still necessary for metal-ceramic bridge coping frameworks. After the casting has been tried in and approved, it is ready for final finishing and porcelain application. Finish

14
exposed metal surfaces with rubber polishing wheels and points, but use only designated burs (see section 8.3) on the areas to be veneered with porcelain. A fulltime instructor must sign the work authorization for porcelain application after metal finishing. Show the instructor all the models and guides you plan to present to the lab. These should include: - Finished coping on articulated casts - Extra dies with unblemished finish lines wherever porcelain margins are to be formed. - Putty index made on your full contour wax-up, or a stone cast duplicating the patient's dentition with esthetically correct provisionals in place. - Custom incisal guidance jig of hard acrylic (Triad TM transheet) on the plastic incisal guide table - to be used when the planned restoration will replace the patient's anterior guidance. - Work authorization in axiUm. For porcelain addition, check with lab for turn-around time. 6.11 Resin-Bonded Bridges: With the advent of implant-supported restorations, these bridges are seldom used. They are, however, still viable restorations in select circumstances. If you encounter one of these circumstances, you will need to work with a faculty member who is familiar with it, and supports the use of this restoration. You must meet with that faculty member to plan the restoration before the patient is scheduled. 6.12 All-Ceramic Restorations: These are indicated where esthetic demands are high (usually maxillary anterior teeth). Multiple simultaneous restorations are often necessary. Such cases should be planned and carried out working with the same fulltime instructor throughout the whole case. They are never to be used as RPD abutments. It may be necessary to utilize a laboratory outside the school - check with your instructor. Students planning to deliver resin-bonded fixed partial dentures or all-ceramic restorations should have another student assist them with delivery. Adhesive cementation is much more technique-sensitive than regular cementation. It can require a long period of time for multiple units. It is not fair to other students if one student keeps an assistant or instructor for the entire delivery procedure. Additionally, not every student will have the opportunity to place one of these restorations. Assisting can be a valuable learning experience regarding this type of restoration. Failure to have a student to assist you will result in your not receiving PTP for delivery of adhesive restorations. 6.13 Diagnostic Wax-ups: In certain circumstances it is necessary to make a wax-up of the proposed restoration and/or the opposing occlusion on diagnostic casts. But these are not to be white Silky Rock diagnostic casts – use other casts (Microstone is acceptable) made from new alginate impressions and cross-mounted against your original ones. This helps in designing restorations for optimum esthetics (use ivory wax) and occlusal harmony, and provides the basis for fabricating provisional restorations and tooth-reduction guides. Diagnostic wax-ups are indicated when: - the final restoration will differ significantly from the existing dentition in form, size or alignment - the shape of the opposing teeth will be altered later with restorations (wax the opposing teeth to ideal form), - the opposing teeth will be replaced by a fixed or removable partial denture. In the latter case, the actual denture teeth that will be used in the partial should be set on the opposing cast to occlude against the wax pattern. To receive point credit for a diagnostic wax-up, it must be specified as necessary on your Treatment Plan Worksheet. The maximum number of points that can be accrued for diagnostic wax-up of cases in the Fixed Block Clinic year will be 10 points. 6.14 Assisting Other Students: You will receive 1 point per 3-hour clinic period that you assist another student in Fixed Prosthodontic clinic. In order to receive assisting credit, you will need to fill out a Blue Daily Grade Sheet (making notation at the bottom who you assisted) and have the instructor sign it and turn it in. You will only be allowed a maximum of 10 points of assisting credit during your year in the Fixed Block Clinic.

15
6.15 Emergencies and Untoward Incidents: The procedure for handling and reporting untoward events (accidents) is described in detail in the Protocol for Clinic Practice. Briefly, you must assist the patient, send for help from the faculty, and make a report to the Director of Clinics. Emergency numbers and Procedures for Medical Emergencies are posted in all clinics next to the phones.

16
7. FORMS Good record keeping is an indispensable part of a dental education and will be equally necessary in your dental practice. Accurate records must be kept for purposes of diagnosis, treatment, evaluation, learning, financial and legal protection. Because the value of keeping accurate records is not always obvious to students, penalties are given for failure to do so. Needless to say, falsification of records is a serious matter. 7.1 Patient Records: You must not begin treatment on a patient until an instructor has approved Permission to Proceed (PTP) in the progress notes. PTP also is required for treatment planning appointments. 7.2 Treatment Plan Worksheet: The FPD Treatment Plan Worksheet should be completed before you ask the instructor to see the patient (see Section 3.1). If there are two reasonable treatment options, fill out two worksheets. Prepare fee estimates because cost may be a decisive factor. The optimum plan will then be selected through consultation with the faculty and the patient. Each tooth involved is listed on a separate line. If a tooth is to receive both a cast dowel-core and crown, list them individually. The "Tooth Number" is listed by number, in sequence. The "Sequence of Treatment" will vary. Note any factors that might complicate treatment in the Comments section. Also be sure to note any conditions from the patient's medical history that might influence the treatment plan. The final worksheet must be in ink and signed and stamped by the student. This form can be found on the OUCOD Web Site in the Current Students Tab (in the pull down menu select Course Materials. The form is Clin TxPlan-FXPro-WORKSHEET. When the form is opened it contains instructions for filling out the form and a sample filled out form. Clicking on the sample form will give you a blank form to print as many forms as your case may need. (For more information on Treatment Planning see section 3.0 on Treatment Planning).

7.3 Initial Clinical Restoration Grade Sheet: 17 For your first cast restoration other than a dowel-core, you will use this form, which will be issued to you after you pass the clinical entrance exam (see Section 4.4). Fill out the top section as shown on the example.
7.3.1 Initial Fixed Partial Denture: Before beginning your first FPD, you must have cemented at least three single crowns and passed your DS3 clinical competency exam. The Permission to Proceed and Instructor Number spaces will be filled in by your instructor. The instructor will take the top sheet. The second and third pages will be kept by the student for recording evaluations of the various steps. The same full-time faculty member ideally must initial all steps on your initial crown. Any skipped steps will result in a "0" for that step in computing your unit grade. Faculty will be available at various times outside of clinic to check off laboratory steps. Wax patterns can be checked by Fixed faculty during clinic, but students with patients will have priority. Do not disturb instructors in Faculty Practice or during lunch. After the restoration is cemented, give the completed grade card to your instructor or to the department Secretary, Julie Hall.
7.4 Procedure Grade Sheet: This form is used for all FPD restorations other than your initial restoration done in Block Clinic. Fill it out to the extent shown in the example below before asking for permission to proceed. For single units, use the Abutment A column. If there are more than three abutments, use a second
grade form. Note: the ADA procedure number for a crown used as a single tooth restoration is not the same as the number used for the same type of crown serving as a fixed partial denture retainer. Whenever possible, have the same instructor follow all the clinical steps on a procedure. On all units, the same instructor normally must grade the Preparation and Cementation steps. The same instructor, but not necessarily the one with whom you worked in clinic must grade all wax pattern steps. Untouched casting may be checked by any full time FPD faculty. A point will be deducted from your grade for having more than two instructor signatures on your grade Sheet. Never begin an impression or dowel-core pattern until the preparation has been graded. Normally the provisional restoration is made before the impression is begun. Gain permission from your instructor for an exception to this policy.

18
Notice that a crown to be used as an RPD abutment must be approved on the working cast by RPD faculty twice: once as the wax pattern, and once as the finished crown prior to cementation. Getting all steps graded and turned in to the department is your responsibility. Any step that is not checked off on the grade Sheet by an instructor will be counted as a "0" in calculating your unit grade. 7.4.1 Remakes: When it is necessary to remake a restoration, a new grade sheet is filled out. The number on the old grade sheet is recorded on the new one and vice versa. The instructor will take the yellow copy of the original and the top sheet from the new one. Only those steps that must be repeated are graded on the new form.
7.4.2 Exemptions: As you gain experience and skill, you will be exempted from having certain steps checked on the grade Sheet as outlined below. Skipping signatures before receiving departmental approval will result in a grade of "0" for each step skipped. - Those with two cemented units are exempted from the coping try-in appointment for single unit MCR copings. However,this step must be checked on the articulated working cast and on an unblemished die, however, and the untouched casting step must be checked. (See also 6.10.2)

19
7.5 Daily Evaluation Form ("Blue Sheet") This form is used to evaluate the manner in which you performed the treatment. Fill out the top part of the form at the beginning of each appointment.

20
7.6 Advanced Standing Procedure Grade Sheet: This form is to be used for FPD restorations on which you must have the lab perform all of the lab work. You must use this form for your 3rd unit. It is filled out to the same extent as the Procedure Grade Sheet (Section 7.4) before asking for permission to proceed. Inform the faculty member with whom you are working that this is your 3rd unit and the OUCOD Support Lab is to do all of the lab work. The faculty member will then initial the appropriate space(s).
You are still responsible for trimming the die(s), articulating the casts (except for Foster Spring CorrelatorTM cases), and marking the finish line(s) red.
Before turning your case in to the lab, place on both of the casts:
a. your name b. patient's name c. condylar settings d. side shift values When you have the OUCOD Support Lab do all of your lab work, then the following will apply as well: a. For a single unit MCR, there is normally no framework try-in (i.e. the MCR will be returned and ready for cementation). b. For a fixed partial denture, a framework try-in is required before porcelain application. c. Any fixed partial denture, or over 5 single MCR units to be made simultaneously will be fabricated by the OUCOD Dental Support Lab.
7.7 Laboratory Work Authorization Form: State law requires that all cases sent to a dental laboratory be accompanied by a work authorization signed by a licensed dentist. All lab requests are entered through the axiUm Electronic Health Record, or through the student’s Personal Planner. See your axiUm instructions for filling out the appropriate fixed prosthodontics

21
forms in axiUm in Attach #5 of this manual. All lab requests must be approved by Fixed Faculty and must include a signature by faculty member. Check with the lab to be sure they can meet your required completion date. Only full time FPD instructor signatures will be accepted. To save time, present the procedure grade form and a l l information for dental laboratory work authorization is normally written out so the faculty member can see what you are going to request on the axiUm Lab Form. Faculty will not sign a work authorization for porcelain application until he or she has approved the final fitting and finishing of the metal coping (see section 6.10.2). After you have the clean untouched casting checked by an instructor, separate the sprue from the button. Return the restoration and button to the Support Lab so that BOTH can be weighed. You will be charged for any loss of gold greater than 0.20 dwt. IF THE RESTORATION IS CEMENTED PRIOR TO WEIGHING-IN, THE TOTAL DIFFERENCE BETWEEN THE WEIGHT OF THE GOLD ISSUED AND THE BUTTON RETURNED WILL BE ENTERED AS DISCREPANCY. For clinical reasons, you should not use an alloy other than that issued by the support lab. 7.8 ARMAMENTARIUM FOR CLINICAL FIXED PROSTHODONTIC PROCEDURES On the following pages are lists of the instruments and materials you should have set up in the clinic for various procedures. Note especially the items you must bring with you to the clinic. Forms are stored in the rack in the laboratory area. Report any shortages or malfunctions to the dispensary personnel. Even though you may not use every item on a list at an appointment, it is much better to have available more items than you will use than to be forced to interrupt treatment in order to search for a needed item. There are other items that are available in the dispensary, but which are used too infrequently to be included on the lists. Instruments and supplies should be arranged in a neat and orderly manner at chair side so you can quickly lay your hands on them. Keep your burs in their proper holes in the bur block (Fig. 1). This will spare your patient, your instructor, and yourself needless delays. Keep unsightly toolboxes in the laboratory. How well your work area is organized has a · substantial effect on your performance evaluation. Instruments and burs must be cleaned of debris before sterilization. Missing or broken instruments and burs must be replaced. Dull, bent, or resin-embedded burs must be replaced (e.g. diamond burs from pre-clinic courses). 7.9 TREATMENT PLAN APPOINTMENT Patient must be present axiUm Electronic Health Record (EHR) and radiographs need to be available Mounted casts Examination kit FPD Treatment Plan Worksheet, filled out (see section 7.2) Daily Evaluation Form (see section 7.5)

22
8.0 ARMAMENTARIUM LISTS: 8.1 CROWN PREPARATION AND PROVISIONAL RESTORATION
Figure 6 FPD Bur and diamond kit Illustrations of Fixed Preparation Burs

23
Figure 6A FPD Clinic kit II Illustrations of Laboratory Burs
Figure 6B Svedopter (for tongue/moisture control Figure 6C Red rope utility wax for checking occlusal during mandibular posterior preparations) reduction
Bring with you: Alginate mixing bowl, spatula and trays Custom template for provisional Restorative Instrument Cassette

24
(The following are for all FPD treatment appointments) Grade Sheet for procedures in progress Mounted Casts FPD bur and diamond kit (Figure 6) Operative bur kit FPD Finishing Abrasives FPD Clinic Kit II (Figure 6A) High speed hand piece Low speed air motor Straight nose cone Friction Grip/Latch type contra-angle Toothbrush for scrubbing restorations Curing lights Thickness gauge – MiltexTM or IwansonTM (Figure 9) #25 Bard Parker blade and handle
Pick up in clinic lab: Procedure Grade Sheet for new procedures Daily evaluation Form (section 7.5)
Pick up from dispensary: Svedopter, or “Mr Thirsty” (for mandibular posteriors) (Figure 6B) Red rope utility wax (Figure 6C) Quadrant impression tray (Figure 1) Moores discs Prep and Provisional Tub containing: headrest cover anesthetic carpule suction tips anesthetic needle cotton rolls Temporary Bridge Resin TM
gauze sponges temporary cement cotton pellets paper mixing pad dental floss alginate small brush water measure dappen dish
Pick up from clinic supplies: Coe sepTM (dispense in plastic cup) Cotton-tipped Applicators Rubber bands Topical Anesthetic Gloves and mask
8.2 IMPRESSION FOR CROWN OR FIXED PARTIAL DENTURE Bring with you: Pick up from clinic supplies: Extruder gun (preferably two) Retraction cord Two custom Trays (CLEAN) (Figure 7A) HemodentTM Procedure Grade Sheet Gloves and mask Mounted Casts Cotton-tipped applicators FPD bur and diamond kit (Figure 6) Topical anesthetic FPD Finishing Abrasives Daily Evaluation Form

25
FPD Clinic kit II (Figure 6A) High speed hand piece Low speed hand piece Straight nose cone Friction Grip/Latch type contra-angle Toothbrush for scrubbing crowns Restorative Instrument Cassette
Pick up from the dispensary: Impression Tub containing: Anesthetic carpule and needle Polyvinylsiloxane adhesive Brush for Adhesives Polyvinylsiloxane, heavy bodied Patient napkin Polyvinylsiloxane, medium bodied Cotton rolls and pellets Paper mixing pad Gauze sponges Temporary cement Suction tips Impression syringe & tip Dental floss Syringe cleaning brush
These instruments are available in your instrument cassette and custom trays are needed for every impression appointment:
Figure 7 From Cassette: 6 ½ “ curved Kelly hemostat Figure 7A two custom trays for removing provisional restorations
Figure 7B NYU PF1-2 instrument for placing retraction cord. Figure 7C Coe check bite impression tray NOTE: THE BLUNT TIP ON THIS NYU PF 1-2 INSTRUMENT

26
Figure 7D Aquasil tray material cartridge & impression gun
8.3 METAL CERAMIC COPING TRY-IN
Bring with you: Coping, adjusted on working cast Shofu pink stone (Figure 9A) Thickness gauge (MiltexTM or IwansonTM Figure 9) Two custom impression trays (just in case) (Figure 9F) Procedure Grade Card Mounted casts FPD Bur and diamond kit (Figure 6) Operative bur kit Figure 8 H261EF.104.023 Or FPD Finishing Abrasives cutter HP (used for internal metal adjustment FPD Clinic kit II (Figure 6A) and metal prep on MCR’s) High speed hand piece Low speed air motor Straight nose cone Friction Grip/Latch type contra-angle Toothbrush for scrubbing restorations Restorative Instrument Cassette #25 Bard Parker blade and handle Figure 8 A H129E.103.023 “E” cutter HP bur Pick up from clinic supplies: Daily Evaluation Form Pick up from dispensary: Articulating ribbon (Figure 9C) Shim stock (Figure 9D) Coping try-in tub Coping try-in tub contents; Gauze sponges Saliva Ejector

27
Anesthetic Carpule and needle Dental floss (Figure 9E) Temporary cement Paper mixing pad Patient napkin Vita shade guide Headrest cover Articulating ribbon
Some items that are always needed for a coping try-in are shown below:
Figure 9 Iwanson or Miltex metal thickness Figure 9A Shofu pink stone cylinder gauge
Figure 9B Occlusal indicator wax Figure 9C Articulating ribbon Figure 9D Shim stock, microns
Figure 9E Dental Floss (individual package) Figure 9F Have two custom trays at each appointment

28
8.4 SOLDERING INDEX Bring with you: Pick up in dispensary: Mixing bowl and spatula DuralayTM resin Procedure grade Sheet Dappen dish Mounted Casts Benda-brush FPD bur and diamond kit (Figure 6A) Thin separating disks Operative bur kit Patient’s chart FPD fnishing Abrasives High speed hand piece Low speed air motor Straight nose cone Friction Grip/Latch type contra-angle
Pick up from clinic supplies: Tongue blade Daily Evaluation Form Gloves and mask Mounting Plaster Cotton-tipped applicators Topical Anesthetic 8.5 DOWEL-CORES Bring with you: Pick up from Dispensary: Mounted Casts Restorative Instrument Cassette FPD bur and diamond kit (Figure 6) Peezo reamers (Figure 10A) FPD Clinic kit II (Figure 6A) Temporary Bridge Resin TM Operative bur kit Polycarbonate crown FPD Finishing Abrasives (for anterior provisional; Figure 10B) High speed hand piece CavitTM to temporize not visible teeth) Low speed air motor System “B” TM Straight nose cone Para Post XP (Titanium Post) (Figure 10C) Friction Grip/Latch type contra-angle Dowel-core tub Dowel-core tub contents: Cotton rolls Plastic Dowel Patterns (Figure 10) Small brush Headrest cover Cotton pellets Millimeter ruler Dappen dish Dental floss Temporary cement Saliva ejector Duralay resin & Lubricant

29
Figure 10 Peeso drills Size #5, #6 and #7 Figure 10A Plastic dowel patterns
Figure 10B Polycarbonate crown Figure 10C Para Post XP Titanium Temporary Post (Arrow identifies a single temporary post on lid of box) Pick up from clinic supplies: Gloves and Mask Daily Evaluation Form 8.6 CEMENTATION Bring with you: Pick up from dispensary: Restoration adjusted on master cast Shim stock Die Articulating ribbon Restorative instrument cassette Gold soldering flux Soldering pliers Svedopter (if mandibular) BBC (Tripoli) Gold solder (if needed) Gold rouge Custom impression trays FPD bur and diamond kit (Figure 6) FPD Clinic kit II (Figure 6A) Operative bur kit FPD Finishing Abrasives High speed hand piece Low speed air motor

30
Straight nose cone Friction Grip/Latch type contra-angle Toothbrush for scrubbing restorations Procedure Grade Card
Cementation tub contents: Headrest cover Anesthetic carpule Saliva ejector Anesthetic needle Cotton pellets CopaliteTM varnish Cotton rolls Rely-X TM Gauze sponges Plastic bite wafers Dental Floss
31
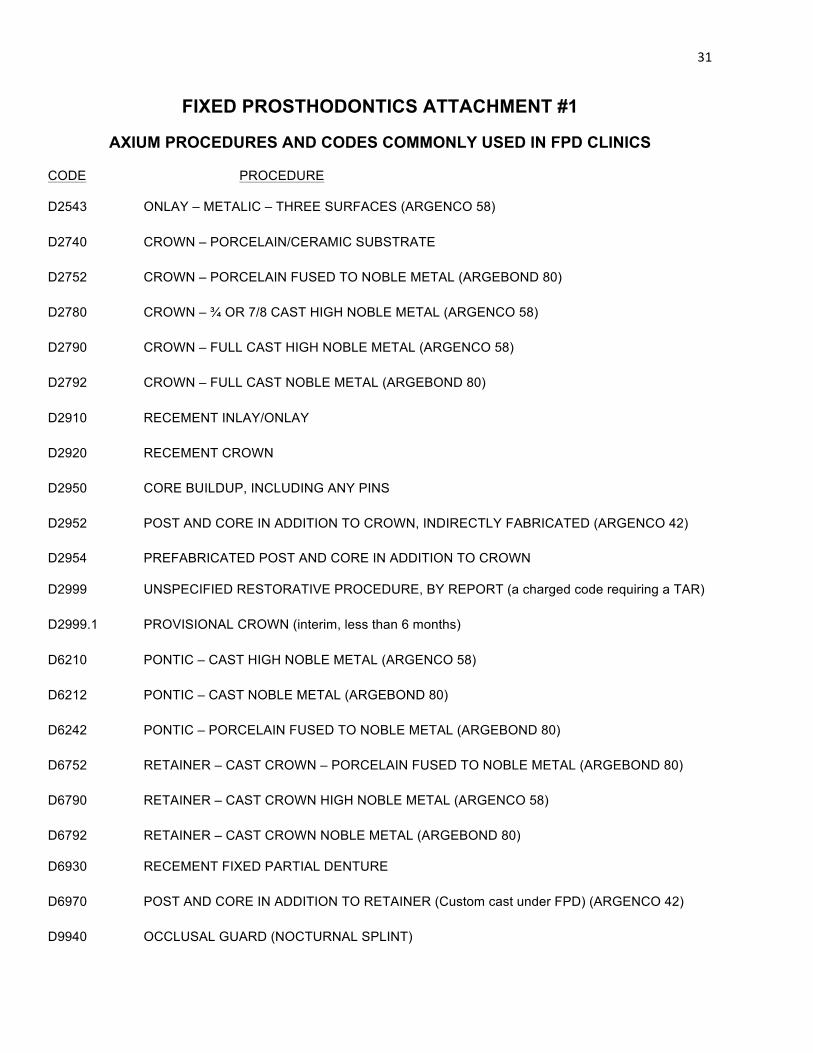
FIXED PROSTHODONTICS ATTACHMENT #1
AXIUM PROCEDURES AND CODES COMMONLY USED IN FPD CLINICS
CODE PROCEDURE
D2543 ONLAY – METALIC – THREE SURFACES (ARGENCO 58) D2740 CROWN – PORCELAIN/CERAMIC SUBSTRATE D2752 CROWN – PORCELAIN FUSED TO NOBLE METAL (ARGEBOND 80) D2780 CROWN – ¾ OR 7/8 CAST HIGH NOBLE METAL (ARGENCO 58) D2790 CROWN – FULL CAST HIGH NOBLE METAL (ARGENCO 58) D2792 CROWN – FULL CAST NOBLE METAL (ARGEBOND 80) D2910 RECEMENT INLAY/ONLAY D2920 RECEMENT CROWN D2950 CORE BUILDUP, INCLUDING ANY PINS D2952 POST AND CORE IN ADDITION TO CROWN, INDIRECTLY FABRICATED (ARGENCO 42) D2954 PREFABRICATED POST AND CORE IN ADDITION TO CROWN
D2999 UNSPECIFIED RESTORATIVE PROCEDURE, BY REPORT (a charged code requiring a TAR) D2999.1 PROVISIONAL CROWN (interim, less than 6 months) D6210 PONTIC – CAST HIGH NOBLE METAL (ARGENCO 58) D6212 PONTIC – CAST NOBLE METAL (ARGEBOND 80) D6242 PONTIC – PORCELAIN FUSED TO NOBLE METAL (ARGEBOND 80) D6752 RETAINER – CAST CROWN – PORCELAIN FUSED TO NOBLE METAL (ARGEBOND 80) D6790 RETAINER – CAST CROWN HIGH NOBLE METAL (ARGENCO 58) D6792 RETAINER – CAST CROWN NOBLE METAL (ARGEBOND 80)
D6930 RECEMENT FIXED PARTIAL DENTURE D6970 POST AND CORE IN ADDITION TO RETAINER (Custom cast under FPD) (ARGENCO 42) D9940 OCCLUSAL GUARD (NOCTURNAL SPLINT)

32
ATTACHMENT #2
PROCEDURE CODES IN AXIUM FOR FIXED PROSTHODONTIC CLINIC The following is a full FPROS listing available in axiUm.
CODE SINGLE UNIT RESTORATIONS
D2510 INLAY – METALIC – ONE SURFACE D2510.1 INLAY – METALIC – ONE SURFACE PREP D2510.2 INLAY – METALIC – ONE SURFACE IMPRESSION D2510.4 INLAY – METALIC – ONE SURFACE DELIVERY
D2510R REMAKE – INLAY – METALIC – ONE SURFACE D2510R.1 REMAKE – INLAY – METALIC – ONE SURFACE PREP D2510R.2 REMAKE – INLAY – METALIC – ONE SURFACE IMPRESSION D2510R.4 REMAKE – INLAY – METALIC – ONE SURFACE DELIVERY
D2520 INLAY – METALIC –TWO SURFACES D2520.1 INLAY – METALIC – TWO SURFACES PREP D2520.2 INLAY – METALIC – TWO SURFACES IMPRESSION D2520.4 INLAY – METALIC – TWO SURFACES DELIVERY
D2520R REMAKE – INLAY – METALIC –TWO SURFACES D2520R.1 REMAKE – INLAY – METALIC – TWO SURFACES PREP D2520R.2 REMAKE – INLAY – METALIC – TWO SURFACES IMPRESSION D2520R.4 REMAKE – INLAY – METALIC – TWO SURFACES DELIVERY D2543 ONLAY – METALIC – THREE SURFACES D2543.1 ONLAY – METALIC – THREE SURFACES PREP D2543.2 ONLAY – METALIC – THREE SURFACES IMPRESSION D2543.4 ONLAY – METALIC – THREE SURFACES DELIVERY D2543R REMAKE – ONLAY – METALIC – THREE SURFACES D2543R.1 REMAKE – ONLAY – METALIC – THREE SURFACES PREP D2543R.2 REMAKE – ONLAY – METALIC – THREE SURFACES IMPRESSION D2543R.4 REMAKE – ONLAY – METALIC – THREE SURFACES DELIVERY
D2544 ONLAY – METALIC – FOUR SURFACES D2544.1 ONLAY – METALIC – FOUR SURFACES PREP D2544.2 ONLAY – METALIC – FOUR SURFACES IMPRESSION D2544.4 ONLAY – METALIC – FOUR SURFACES DELIVERY D2544R REMAKE – ONLAY – METALIC – FOUR SURFACES D2544R.1 REMAKE – ONLAY – METALIC – FOUR SURFACES PREP D2544R.2 REMAKE – ONLAY – METALIC – FOUR SURFACES IMPRESSION D2544R.4 REMAKE – ONLAY – METALIC – FOUR SURFACES DELIVERY D2620 INLAY – PORCELAIN/CERAMIC – TWO SURFACES D2620.1 INLAY – PORCELAIN/CERAMIC – TWO SURFACES PREP

33
D2620.2 INLAY – PORCELAIN/CERAMIC – TWO SURFACES IMPRSSION D2620.4 INLAY – PORCELAIN/CERAMIC – TWO SURFACES DELIVERY
D2620R REMAKE – INLAY – PORCELAIN/CERAMIC – TWO SURFACES D2620R.1 REMAKE – INLAY – PORCELAIN/CERAMIC – TWO SURFACES PREP D2620R.2 REMAKE – INLAY – PORCELAIN/CERAMIC – TWO SURFACES IMPRSSION D2620R.4 REMAKE – INLAY – PORCELAIN/CERAMIC – TWO SURFACES DELIVERY D2643 ONLAY – PORCELAIN/CERAMIC – THREE SURFACES D2643.1 ONLAY – PORCELAIN/CERAMIC – THREE SURFACES PREP D2643.2 ONLAY – PORCELAIN/CERAMIC – THREE SURFACES IMPRESSION D2643.4 ONLAY – PORCELAIN/CERAMIC – THREE SURFACES DELIVERY
D2643R REMAKE – ONLAY – PORCELAIN/CERAMIC – THREE SURFACES D2643R.1 REMAKE – ONLAY – PORCELAIN/CERAMIC – THREE SURFACES PREP D2643R.2 REMAKE – ONLAY – PORCELAIN/CERAMIC – THREE SURFACES IMPRESSION D2643R.4 REMAKE – ONLAY – PORCELAIN/CERAMIC – THREE SURFACES DELIVERY
D2651 INLAY – RESIN-BASED COMPOSITE – TWO SURFACES D2651.1 INLAY – RESIN-BASED COMPOSITE – TWO SURFACES PREP D2651.2 INLAY – RESIN-BASED COMPOSITE – TWO SURFACES IMPRESSION D2651.4 INLAY – RESIN-BASED COMPOSITE – TWO SURFACES DELIVERY D2651R REMAKE – INLAY – RESIN-BASED COMPOSITE – TWO SURFACES D2651R.1 REMAKE – INLAY – RESIN-BASED COMPOSITE – TWO SURFACES PREP D2651R.2 REMAKE – INLAY – RESIN-BASED COMPOSITE – TWO SURFACES IMPRESSION D2651R.4 REMAKE – INLAY – RESIN-BASED COMPOSITE – TWO SURFACES DELIVERY
D2740 CROWN – PORCELAIN/CERAMIC SUBSTRATE D2740.1 CROWN – PORCELAIN/CERAMIC SUBSTRATE PREP D2740.4 CROWN – PORCELAIN/CERAMIC SUBSTRATE IMPRESSION D2740.4 CROWN – PORCELAIN/CERAMIC SUBSTRATE DELIVERY D2740R REMAKE – CROWN – PORCELAIN/CERAMIC SUBSTRATE D2740R.1 REMAKE – CROWN – PORCELAIN/CERAMIC SUBSTRATE PREP D2740R.4 REMAKE – CROWN – PORCELAIN/CERAMIC SUBSTRATE IMPRESSION D2740R.4 REMAKE – CROWN – PORCELAIN/CERAMIC SUBSTRATE DELIVERY
D2752 CROWN – PORCELAIN FUSED TO NOBLE METAL (ARGEBOND 80) D2752.1 CROWN – PORCELAIN FUSED TO NOBLE METAL PREP D2752.2 CROWN – PORCELAIN FUSED TO NOBLE METAL IMPRESSION D2752.3 CROWN – PORCELAIN FUSED TO NOBLE METAL COPING TRY-IN D2752.4 CROWN – PORCELAIN FUSED TO NOBLE METAL DELIVERY D2752R REMAKE CROWN – PORCELAIN FUSED TO NOBLE METAL D2752R.1 REMAKE CROWN – PORCELAIN FUSED TO NOBLE METAL PREP D2752R.2 REMAKE CROWN – PORCELAIN FUSED TO NOBLE METAL IMPRESSION D2752R.3 REMAKE CROWN – PORCELAIN FUSED TO NOBLE METAL COPING TRY-IN D2752R.4 REMAKE CROWN – PORCELAIN FUSED TO NOBLE METAL DELIVERY

34
D2780 CROWN – ¾ OR 7/8 CAST HIGH NOBLE METAL (ARGENCO 58) D2780.1 CROWN – ¾ OR 7/8 CAST HIGH NOBLE METAL PREP D2780.2 CROWN – ¾ OR 7/8 CAST HIGH NOBLE METAL IMPRESSION D2780.4 CROWN – ¾ OR 7/8 CAST HIGH NOBLE METAL DELIVERY
D2780R REMAKE CROWN – ¾ OR 7/8 CAST HIGH NOBLE METAL D2780R.1 REMAKE CROWN – ¾ OR 7/8 CAST HIGH NOBLE METAL D2780R.2 REMAKE CROWN – ¾ OR 7/8 CAST HIGH NOBLE METAL D2780R.4 REMAKE CROWN – ¾ OR 7/8 CAST HIGH NOBLE METAL
D2790 CROWN – FULL CAST HIGH NOBLE METAL (ARGENCO 58) D2790.1 CROWN – FULL CAST HIGH NOBLE METAL PREP D2790.2 CROWN – FULL CAST HIGH NOBLE METAL IMPESSION D2790.4 CROWN – FULL CAST HIGH NOBLE METAL DELIVERY D2790R REMAKE – CROWN – FULL CAST HIGH NOBLE METAL D2790R.1 REMAKE – CROWN – FULL CAST HIGH NOBLE METAL PREP D2790R.2 REMAKE – CROWN – FULL CAST HIGH NOBLE METAL IMPRESSION D2790R.4 REMAKE – CROWN – FULL CAST HIGH NOBLE METAL DELIVERY
D2792 CROWN – FULL CAST NOBLE METAL (ARGEBOND 80) D2792.1 CROWN – FULL CAST NOBLE METAL PREP D2792.2 CROWN – FULL CAST NOBLE METAL IMPRESSION D2792.4 CROWN – FULL CAST NOBLE METAL DELIVERY
D2792R REMAKE – CROWN – FULL CAST NOBLE METAL (ARGEBOND 80) D2792R.1 REMAKE – CROWN – FULL CAST NOBLE METAL PREP D2792R.2 REMAKE – CROWN – FULL CAST NOBLE METAL IMPRESSION D2792R.3 REMAKE – CROWN – FULL CAST NOBLE METAL COPING TRY-IN D2792R.4 REMAKE – CROWN – FULL CAST NOBLE METAL DELIVERY
D2910 RECEMNT INLAY/ONLAY D2920 RECEMENT CROWN D2930 RECEMENT FIXED PARTIAL DENTRUE D2930 PREFABRICATED STAINLESS STEEL CROWN – PRIMARY TOOTH D2931 PREFABRICATED STAINLESS STEEL CROWN – PERMANENT TOOTH D2932 PREFABRICATED RESIN CROWN D2933 PREFABRICATED STAINLESS STEEL CROWN – PERMANENT TOOTH D2940 PROTECTIVE RESTORATION D2950 CORE BUILDUP, INCLUDING ANY PINS D2951 PIN RETENTION – PER TOOTH, IN ADITION TO RESTORATION
D2952 POST AND CORE IN ADDITION TO CROWN, DIRECT OR INDIRECT (ARGENCO 42) D2952.1 POST AND CORE IN ADDITION TO CROWN PREP D2952.2 POST AND CORE IN ADDITION TO CROWN IMPRESSION D2952.4 POST AND CORE IN ADDITON TO CROWN DELIVER D2953 EACH ADDDITIONA INDIRECTLY FABRICATED POST – SAME TOOTH D2954 PREFABRICATED POST AND CORE IN ADDITION TO CROWN (e.g. TRI-R ™)

35
D2955 POST REMOVAL (NOT IN CONJUNCTION WITH ENDODONTIC THERAPY) D2957 EACH ADDITIONAL INDIRECTLY FABRICATED POST – SAME TOOTH (used with D2954)
D2960 LABIAL VENEER (RESIN LAMINATE) – CHAIRSIDE
D2962 LABIAL VENEER (PORCELAIN LAMINATE) – LABORATORY PROCESSED D2962.1 LABIAL VENEER (PORCELIAN LAMINATE) LABORATORY PREP D2962.2 LABIAL VENEER (PORCELAIN LAMINATE) LABORATORY IMPRESSION D2962.3 LABIAL VENEER (PORCELAIN LAMINATE) LABORATORY TRY-IN D2962.4 LABIAL VENEER (PORCELAIN LAMINATE) LABORATORY DELIVERY
D2970 TEMPORARY CROWN (FRACTURED TOOTH) D2971 ADDITIONAL PROCEDURES TO CONTSTRUCT NEW CROWN UNDER EXISTING D2980 CROWN REPAIR NECESSITATED BY RETORATIVE MATERIAL FAILURE D2998 QR - CROWN D2999 UNSPECIFIED RESTORATIVE PROCEDURE, BY REPORT D2999.1 PROVISIONAL CROWN (interim, less than 6 months)
MULTI-UNIT RESTORATIONS (FIXED PARTIAL DENTURES)
D6210 PONTIC – CAST HIGH NOBLE METAL (ARGENCO 58) D6211 PONTIC – CAST PREDOMINANTLY BASE METAL D6212 PONTIC – CAST NOBLE METAL (ARGEBOND 80) D6212R REMAKE – PONTIC – CAST NOBLE METAL D6242 PONTIC – PORCELAIN FUSED TO NOBLE METAL (ARGEBOND 80) D6242R REMAKE – PONTIC – PORCELAIN FUSED TO NOBLE METAL
D6245 PONTIC – PORCELAIN/CERAMIC D6245.1 PONTIC – PORCELAIN/CERAMIC PREP D6245.2 PONTIC – PORCELAIN/CERAMIC IMPRESSION D6245.3 PONTIC – PORCELAIN/CERAMIC COPING TRY-IN D6245.4 PONTIC – PORCELAIN/CERAMIC DELIVERY D6245R REMAKE – PONTIC – PORCELAIN/CERAMIC D6245R.1 REMAKE – PONTIC – PORCELAIN/CERAMIC PREP D6245R.2 REMAKE – PONTIC – PORCELAIN/CERAMIC IMPRESSION D6245R.3 REMAKE – PONTIC – PORCELAIN/CERAMIC COPING TRY-IN D6245R.4 REMAKE – PONTIC – PORCELAIN/CERAMIC DELIVERY
D6253 PROVISIONAL PONTIC D6299 QR BRIDGE D6545 RETAINER – CAST METAL FOR RESIN BONDED FIXED PROSTHESIS D6710 CROWN – INDIRECT RESIN BASED COMPOSITE D6740 CROWN – PORCELAIN/CERAMIC D6740.1 CROWN – PORCELAIN/CERAMIC PREP D6740.2 CROWN – PORCELAIN/CERAMIC IMPRESSION D6740.3 CROWN – PORCELAIN/CERAMIC COPING TRY-IN D6740.4 CROWN – PORCELAIN/CERAMIC DELIVERY

36
D6740R REMAKE – CROWN – PORCELAIN/CERAMIC D6740R.1 REMAKE – CROWN – PORCELAIN/CERAMIC PREP D6740R.2 REMAKE – CROWN – PORCELAIN/CERAMIC IMPRESSION D6740R.3 REMAKE – CROWN – PORCELAIN/CERAMIC COPING TRY-IN D6740R.4 REMAKE – CROWN – PORCELAIN/CERAMIC DELIVERY
D6752 RETAINER – PORCELAIN FUSED TO NOBLE METAL (ARGEBOND 80) D6752.1 RETAINER – PORCELAIN FUSED TO NOBLE METAL PREP D6752.2 RETAINER – PORCELAIN FUSED TO NOBLE METAL IMPRESSION D6752.3 RETAINER – PORCELAIN FUSED TO NOBLE METAL COPING TRY-IN D6752.4 RETAINER – PORCELAIN FUSED TO NOBLE METAL DELIVERY D6752R REMAKE – RETAINER – PORCELAIN FUSED TO NOBLE METAL D6752R.1 REMAKE – RETAINER – PORCELAIN FUSED TO NOBLE METAL PREP D6752R.2 REMAKE – RETAINER – PORCELAIN FUSED TO NOBLE METAL IMPRESSION D6752R3 REMAKE – RETAINER – PORCELAIN FUSED TO NOBLE METAL COPING TRY-IN D6752R.4 REMAKE – RETAINER – PORCELAIN FUSED TO NOBLE METAL DELIVERY D6780 RETAINER – CROWN -3/4 OR 7/8 CAST HIGH NOBLE (ARGENCO 58) D6780.1 RETAINER – CROWN – ¾ OR 7/8 CAST HIGH NOBLE PREP D6780.2 RETAINER – CROWN – ¾ OR 7/8 CAST HIGH NOBLE IMPRESSION D6780.3 RETAINER – CROWN – ¾ OR 7/8 CAST HIGH NOBLE COPING TRY-IN D6780.4 RETAINER – CROWN – ¾ OR 7/8 CAST HIGH NOBLE DELIVERY D6780R REMAKE – RETAINER – CROWN -3/4 OR 7/8 CAST HIGH NOBLE D6780R.1 REMAKE – RETAINER – CROWN – ¾ OR 7/8 CAST HIGH NOBLE PREP D6780R.2 REMAKE – RETAINER – CROWN – ¾ OR 7/8 CAST HIGH NOBLE IMPRESSION D6780R.3 REMAKE – RETAINER – CROWN – ¾ OR 7/8 CAST HIGH NOBLE COPING TRY-IN D6780R.4 REMAKE – RETAINER – CROWN – ¾ OR 7/8 CAST HIGH NOBLE DELIVERY
D6782 RETAINER – CROWN – ¾ or 7/8 CAST NOBLE D6782.1 RETAINER – CROWN – ¾ OR 7/8 CAST NOBLE PREP D6782.2 RETAINER – CROWN – ¾ OR 7/8 CAST NOBLE IMPRESSION D6782.3 RETAINER – CROWN – ¾ OR 7/8 CAST NOBLE COPING TRY-IN D6782.4 RETAINER – CROWN – ¾ OR 7/8 CAST NOBLE DELIVER D6782R REMAKE – RETAINER – CROWN – ¾ or 7/8 CAST NOBLE D6782R.1 REMAKE – RETAINER – CROWN – ¾ OR 7/8 CAST NOBLE PREP D6782R.2 REMAKE – RETAINER – CROWN – ¾ OR 7/8 CAST NOBLE IMPRESSION D6782R.3 REMAKE – RETAINER – CROWN – ¾ OR 7/8 CAST NOBLE COPING TRY-IN D6782R.4 REMAKE – RETAINER – CROWN – ¾ OR 7/8 CAST NOBLE DELIVER
D6790 RETAINER – FULL CAST CROWN HIGH NOBLE (ARGENCO 58) D6790.1 RETAINER – FULL CAST CROWN HIGH NOBLE PREP D6790.2 RETAINER – FULL CAST CROWN HIGH NOBLE IMPRESSION D6790.3 RETAINER – FULL CAST CROWN HIGH NOBLE COPING TRY-IN D6790.4 RETAINER – FULL CAST CROWN HIGH NOBLE DELIVERY
D6790R REMAKE – RETAINER – FULL CAST CROWN HIGH NOBLE (ARGENCO 58) D6790R.1 REMAKE – RETAINER – FULL CAST CROWN HIGH NOBLE PREP

37
D6790R.2 REMAKE – RETAINER – FULL CAST CROWN HIGH NOBLE IMPRESSION D6790R.3 REMAKE – RETAINER – FULL CAST CROWN HIGH NOBLE COPING TRY-IN D6790R.4 REMAKE – RETAINER – FULL CAST CROWN HIGH NOBLE DELIVERY D6792 RETAINER – CROWN FULL CAST HIGH NOBLE METAL D6792.1 RETAINER – CROWN FULL CAST HIGH NOBLE METAL PREP D6792.2 RETAINER – CROWN FULL CAST HIGH NOBLE METAL IMPRESSION D6792.3 RETAINER – CROWN FULL CAST HIGH NOBLE METAL COPING TRY-IN D6792.4 RETAINER – CROWN FULL CAST HIGH NOBLE METAL DELIVERY D6792R REMAKE – RETAINER – CROWN FULL CAST HIGH NOBLE METAL D6792R.1 REMAKE – RETAINER – CROWN FULL CAST HIGH NOBLE METAL PREP D6792R.2 REMAKE – RETAINER – CROWN FULL CAST HIGH NOBLE METAL IMPRESSION D6792R.3 REMAKE – RETAINER – CROWN FULL CAST HIGH NOBLE METAL COPING TRY-IN D6792R.4 REMAKE – RETAINER – CROWN FULL CAST HIGH NOBLE METAL DELIVERY
D6930 RECEMENT FIXED PARTIAL DENTURE
D6940 STRESS BREAKER ATTACHMENT (non-rigid connector) price $200
D6950 PRECISON ATTACHMENT D6970 POST AND CORE IN ADDITION TO FIXED RETAINER (custom cast under FPD retainer) D6970.1 POST AND CORE IN ADDITION TO FPD RETAINER PREP D6970.2 POST AND CORE IN ADDITION TO FPD RETAINER IMPRESSION D6970.3 POST AND CORE IN ADDITION TO FPD RETAINER DELIVERY
OTHER FPD SERVICES
D6059 ABUTMENT SUPPORTED PORCELAIN FUSED TO HIGH NOBLE METAL CROWN D6061 ABUTMENT SUPPORTED PORCELAIN FUSED TO NOBLE METAL CROWN D6262 ABUTMENT SUPPORTED CAST CROWN HIGH NOBLE METAL D6064 ABUTMENT SUPPORTED CAST CROWN NOBLE METAL D6066 IMPLANT SUPPORTED PORCELAIN FUSED TO METAL CROWN (TITANIUM ALLOY) D6067 IMPLANT SUPPORTED METAL CROWN (TITANIUM ALLOY) D6069 ABUTMENT SUPPORTED RETAINER FOR PORCELAIN FUSED TO METAL FPD D6071 ABUTMENT SUPPORTED RETAINER FOR PORCELAIN FUSED TO METAL FPD D6072 ABUTMENT SUPPORTED RETAINER FOR CAST FPD HIGH NOBLE METAL D6074 ABUTMENT SUPPORTED RETAINER FOR CASTMETAL FPD NOBLE METAL D6076 IMPLANT SUPPORTED RETAINER FOR PORCELAIN FUSED TO METAL FPD D6077 IMPLANT SUPPORTED RETAINER FOR CAST METAL FPD TITANIUM METAL D6078 IMPLANT/ABUTMENT SUPPORTED FPD FOR COMPLETE EDNTULUS ARCH D6080 IMPLANT MAINTENCE PROCEDURES, INCLUDING REMOVAL IF PROSTHESIS
D9120 FIXED PARTIAL DENTURE SECTIONING D9230 NITROUS OXIDE ANALGESIA D9940 OCCLUSAL GUARD (NOCTURNAL SPLINT) D9941 ATHLETIC MOUTHGUARD

38
ATTACHMENT #3
LABORATORY PROCEDURES
Any contaminated prosthesis, material, or equipment taken to or from a laboratory area must be disinfected. Mask, gloves, and protective eyewear are required whenever polishing or adjusting models or contaminated temporary or permanent prostheses. Individual pumice trays and sterile rag wheels must be used when making adjustments or polishing. If using the Dental Support Laboratory, all incoming cases should be taken to the laboratory’s disinfection room in a sealed plastic bag. Preparation and disinfection procedures for various prostheses, equipment, and other materials are discussed separately below. Fixed and Removable Prostheses
Any fixed or removable prosthesis that has been in the patient’s mouth must be rinsed under running water to remove excess blood and saliva. Do NOT SPLASH water excessively; droplet splatter can carry microorganisms. Place the prosthesis in an ultrasonic cleaner with Midwest Stain and Tartar Remover or a stone and plastic remover for the manufacturer’s recommended time. (Refer to the section on Cleaning Dentures). This is the pre-cleaning step of the disinfection procedure. Prior to adjustment or transport to the laboratory, disinfect the prosthesis as follows:
1. Rinse with water and place in a plastic bag and spray with Dispatch TM solution. (avoid contact with your skin) Allow 1 minute for disinfectant to work, and rinse under running water. 2. Place the prosthesis in a plastic bag and send it to the laboratory. Do not disinfect the bag. 3. If adjustments are to be made, use individual pumice trays and sterile rag wheels. Any adjusted acrylic prosthesis should be considered contaminated due to the porosity of the acrylic. 4. Appliances received from the laboratory will have been properly disinfected; merely rinse them in water before insertion in the mouth. 5. If possible, do polishing procedures at the operatory rather than in the clinical laboratory area. This will decrease possibility of cross contamination and will eliminate the disinfection step for both entering and leaving the laboratory areas.
Disinfecting Impressions Alginate: Rinse with water and spray with DIspatchTM solution. Place the impression in a plastic bag for one (1) minute, rinse under running water. Pour alginate impressions immediately. Polysulfide, silicone, polyvinylsiloxane, and polyether: Rinse the impression under running water, place in plastic bag and spray with DispatchTM; allow to set for one (1) minute. Remove and rinse again under running water. Pour polysulfide and silicone impressions within 15-60 minutes; pour polyvinylsiloxane impressions within 15 minutes to seven days. Cleaning/Disinfecting Prosthodontic Items Items contaminated only by handling or having minimal contact with oral fluids do not require sterilization for routine reuse, but should be cleaned and disinfected with an EPA-registered disinfectant. Such items include torches, face bows (not including the face bow fork), articulators, rulers, mixing spatulas, knives, rubber bowls,

39
shade guides, and mold guides. Any items such as impression trays and face bow forks that are placed in the mouth must be heat sterilized. Contaminated Stone Casts Contaminated stone casts transferred to or from a laboratory area or a clinic should be sprayed with Dispatch solution and allowed to set for 1 minute, before rinsing thoroughly with water. A protective mask must be worn when using a model trimmer. Other Work-Related Items All other work-related items (articulators, case pans, etc.) that are transferred from a clinic to a laboratory area or vice versa must be disinfected. Moving parts of the articulator should not be disinfected since this may impair function. The following items should be cleaned and heat-sterilized or chemically disinfected as indicated:
Clean and Heat Sterilize Clean and Chemically Disinfect All burs (including acrylic burs) Articulators Bristle brushes Casts Central bearing plates for articulators Compound heaters Compound heater trays Face bows (not including forks) Face bow forks Knives Metal-handle mixing spatulas Mixing bowls #7 Wax spatula Plastic mixing spatulas Rag Wheels Mold guides Stock impression trays Rulers Shade guides Torches Record bases
40
ATTACHMENT #4
DSIII FALL/SPRING FIXED PROSTHODONTICS
CLINICAL REQUIREMENTS
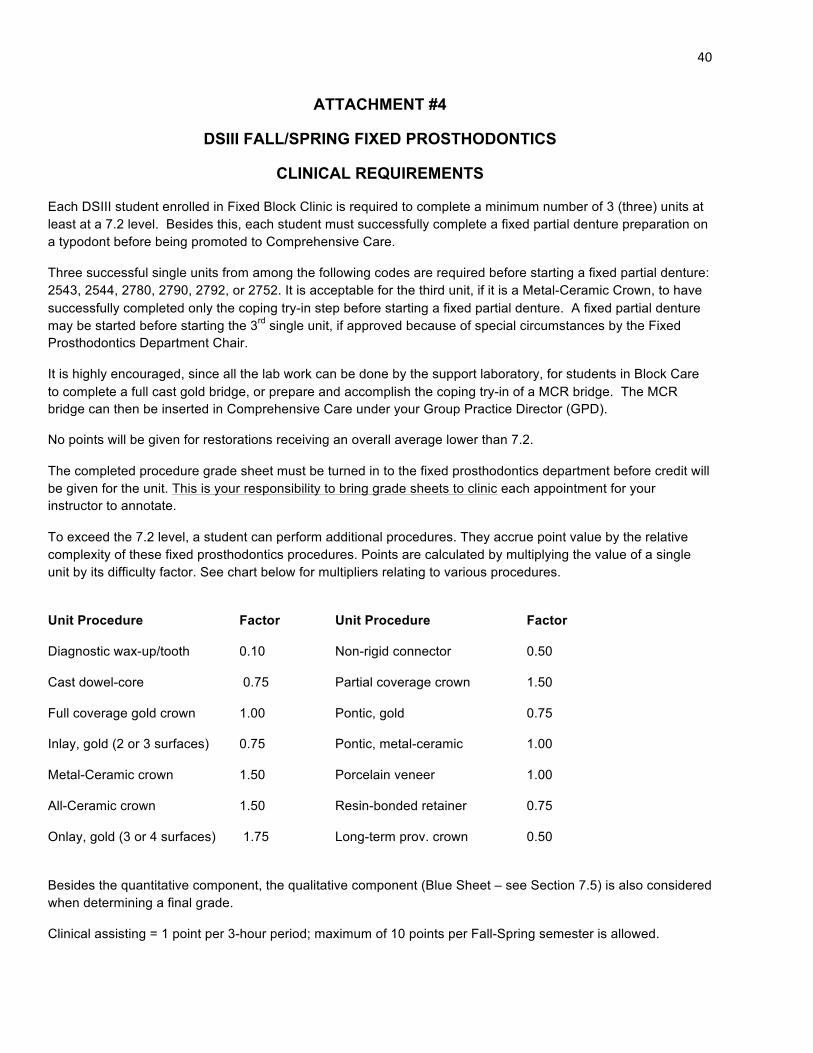
Each DSIII student enrolled in Fixed Block Clinic is required to complete a minimum number of 3 (three) units at least at a 7.2 level. Besides this, each student must successfully complete a fixed partial denture preparation on a typodont before being promoted to Comprehensive Care.
Three successful single units from among the following codes are required before starting a fixed partial denture: 2543, 2544, 2780, 2790, 2792, or 2752. It is acceptable for the third unit, if it is a Metal-Ceramic Crown, to have successfully completed only the coping try-in step before starting a fixed partial denture. A fixed partial denture may be started before starting the 3rd single unit, if approved because of special circumstances by the Fixed Prosthodontics Department Chair.
It is highly encouraged, since all the lab work can be done by the support laboratory, for students in Block Care to complete a full cast gold bridge, or prepare and accomplish the coping try-in of a MCR bridge. The MCR bridge can then be inserted in Comprehensive Care under your Group Practice Director (GPD).
No points will be given for restorations receiving an overall average lower than 7.2.
The completed procedure grade sheet must be turned in to the fixed prosthodontics department before credit will be given for the unit. This is your responsibility to bring grade sheets to clinic each appointment for your instructor to annotate.
To exceed the 7.2 level, a student can perform additional procedures. They accrue point value by the relative complexity of these fixed prosthodontics procedures. Points are calculated by multiplying the value of a single unit by its difficulty factor. See chart below for multipliers relating to various procedures.
Unit Procedure Factor Unit Procedure Factor
Diagnostic wax-up/tooth 0.10 Non-rigid connector 0.50
Cast dowel-core 0.75 Partial coverage crown 1.50
Full coverage gold crown 1.00 Pontic, gold 0.75
Inlay, gold (2 or 3 surfaces) 0.75 Pontic, metal-ceramic 1.00
Metal-Ceramic crown 1.50 Porcelain veneer 1.00
All-Ceramic crown 1.50 Resin-bonded retainer 0.75
Onlay, gold (3 or 4 surfaces) 1.75 Long-term prov. crown 0.50
Besides the quantitative component, the qualitative component (Blue Sheet – see Section 7.5) is also considered when determining a final grade.
Clinical assisting = 1 point per 3-hour period; maximum of 10 points per Fall-Spring semester is allowed.

41
Attendance is recorded on the Daily Evaluation Form (Blue Sheet). Assisting of fellow students is encouraged to gain insight into clinical procedures and working with axiUm.
Students that are told by their clinical instructors to create a Diagnostic Wax-Up will receive credit for up to 10 points for “wax-up” during the Fall-Spring semester. Permission to Proceed (for required diagnostic wax-ups) and Start Date are entered on a grade sheet and approved by your instructor. The “wax-ups” are graded in the “other” section of the procedure grade sheet.
It may be necessary to complete a cast dowel-core before completing a crown and, once the minimum required points are obtained, then the extra points earned from the cast dowel-core will be applied.
The value from assisting, wax-ups, cast dowel-cores, or other procedures can be added to the minimum semester points to improve your overall grade status. They cannot be used to move you up to the minimum level.
To determine your letter grade for FPD 8215 Clinical Prosthodontics course, your Procedure Grades and Daily Grades will be combined to create a Composite Grade: 75% of your composite grade will come from your procedure grades and 25% will come from your daily evaluations.
Subject to meeting the point requirements, semester grades are assigned according to the following scale:
Composite Grade Letter Grade
90-100 A
80-89.99 B
72-79.99 C
65-71.99 D*
Below 65 F
* A “D” is no longer a passing grade. It requires remediation. An “F” for the course will require repeating the course.
The following table shows the minimum number of semester points and average of composite grades required to be eligible to receive various letter grades at the end of the Fall-Spring semester. Both requirements must be met to be eligible for a particular grade. Whether or not you receive the grade your point count qualifies you for depends also upon your composite grade. Failure to meet the minimum requirements for a “C” will result in a semester grade of D, F, or I, as defined in the College of Dentistry Bulletin.
C B A
Sem. Pts. Comp. Grade Sem. Pts. Comp. Grade Sem. Pts. Comp. Grade
21.6 72.0 24.0 80.0 27.0 90.0

42
All students in Fixed Block Care are required to do all of their own lab work until a minimum of 2 units are completed (See Section 7.6), at which time the student should have the dental support laboratory process wax-up and casting of all single units. They must have the dental support laboratory wax-up and cast all fixed partial denture cases.
Students in Fixed Block Care are eligible to have the dental support laboratory Pindex their master casts once they have completed the summer FPDIII course (which includes Pindexing procedures).
Students in Fixed Block Care will always be required to trim their own dies and articulate their own casts.
Students in Fixed Block Care who are doing their own lab work are required to have all wax patterns checked for clinical cases at the FULL CONTOUR, CUT BACK ON WORKING CAST, AND WAX PATTERN MARGINATION steps.
Students in Fixed Block Care are required to complete these two (2) additional checks by Removable Prosthodontics Department (RPD) faculty on all surveyed crowns: FULL CONTOUR WAX PATTERN AND FINAL RESTORATION BEFORE CEMENTATION steps.
In Fixed Block Care the dental support laboratory will cast all Argebond 80TM castings, including single unit crowns. The student will invest the wax pattern using Hi-TempTM and special liquid using a ring liner. An axiUm lab authorization signed by the supervising fixed faculty must accompany the invested wax pattern to the dental support laboratory specifying Argebond 80TM alloy to have crown cast and returned to the student for fitting, polishing, and try-in. Normally, if the invested pattern is delivered to the lab by 4:00 p.m., it will be ready after 11:00 a.m. the next workday. The casting is brought to their supervising faculty for Untouched Casting check and then the student begins the preliminary finishing for patient try-in.
Students in Fixed Block Care may be exempted from having the Wax Pattern on Die (Margination) and Untouched Casting checks as long as their Block Care clinical instructor feels that the student possesses acceptable skills to do these steps.
Students in Fixed Block Care can conduct the coping try-in for single-unit Metal-Ceramic units on an intact master die rather than in the patient’s mouth if the supervising Fixed Department faculty approves this. In these cases, the shade must be selected at the impression appointment. The instructor still must evaluate the untouched casting for these cases. If there are any questions regarding accuracy of the coping, die, working cast, or mounting, a try-in appointment will be necessary. A try-in appointment is always necessary for metal-ceramic fixed partial denture coping frameworks.