Embed Size (px)
Citation preview
Custom Form Builder Guide
Version 1.0.2 6/16/08
Medfusion Implementation 877-599-5123 x2
www.medfusion.net/misyssupport

TABLE OF CONTENTS
Section 1 - Medfusion Custom Form Builder
A. Getting Started B. User Access C. Notifications
Section 2 - Create a Custom Form A. Your Custom Form B. Categories
C. Questions D. Form Layout E. Publish/Un-publish
Section 3 - Manage Your Forms

SECTION
Medfusion Custom Form Builder
A. Getting Started The Custom Form Builder is available as an added solution to the Virtual Office Suite which allows you to create, manage and publish your practice’s forms to your website for patients to complete and submit to you securely through the Practice Portal. This solution can only be activated by a Medfusion representative.
1) Organizing your paper forms – Before you begin, select which paper form(s)
you will create online, confirm the name or title of that form(s), confirm that it is the most up-to-date version, review and update the information fields you are requesting.
Organizing Hint: If you require several different forms to be completed by a new patient you may consider merging them into one continuous online form for the new patients; and name it New Patient Registration. While other individual forms like Medical Records Releases would remain as one separate page online.

B. User Access The Custom Form Builder solution may be accessed by all users that have access to the Site Generator™ for creation and management of forms. The access link is located on the main group page of your Site Generator™, under the “Interactive Solutions” grouping. (See Image below)
1) Access to completed forms by Personnel Type You may add/control which personnel type authorized to enter the Secure Practice Portal™ (staff login) and view the completed forms. a. Add/Control Custom Form Builder access by personnel type
i. Click Manage Available Personnel Types. ii. Edit an existing personnel type (or) highlight the appropriate personnel
type and click “Add Type”. iii. Check the box next to the solution, "Custom Form Builder". iv. Click “Add Your Choices”. v. Repeat this process for each personnel type that you want to gain
access. b. Add/Control Custom Form Builder access by user- once a particular personnel type is given access, you must activate the solution for each individual user of that personnel type.
i. Click Manage Non Physician Personnel. ii. Click Edit Personnel beside the appropriate user’s name. iii. Click User Functions at the top of that user’s page. iv. Click on the link Activate (it will then say Deactivate, once turned
on). v. In order to deactivate this solution for this user only, Click on the link
Deactivate (it will then appear as Activate).

vi. To exit this user: Click Here to Return to Personnel Management. vii. Repeat this process for each user.

C. Notifications
Now the solution needs to be configured for Notifications. Users will receive one notification per hour, regardless of how many forms have been completed. You can also login to the Secure Practice Portal™ at anytime to check for completed forms regardless of the notification system.
a. In the Site Generator™, under Interactive Solutions (See Image Above) click on Manage System Notifications.
b. Click on Settings next to Custom Form Builder. c. Select a recipient from the drop-down menu of users, this list is populated
from access given to individual users (see Section B.1.b above). d. Click on the Frequency drop down menu and select “hourly”. e. The “Subject” text box is available for you to type a custom subject title for
the email or fax notification if desired. For Example: “A custom form has been completed”.
f. “Style” is the method by which you wish to receive the notification, HTML & Text are via Email, and FAX is transmitted to your designated fax number. If you choose the Email Style, the email address entered in the user
profile for that user will be used as the notification inbox. If you choose the FAX style, Medfusion must configure this.
g. Click “Update Settings” and then “Finished Settings” to save.

SECTION
Create a Custom Form
A. Your Custom Form The form(s) that you are creating is for your website and your patients with a user name and password only. Access to the completed forms will be completely HIPAA compliant, as only the personnel you granted permissions to will be able to see them. As such, you may create any type of form online that you would have a patient complete on paper. 1) Once you have completed the “Getting Started” section above:
a. Click on the Custom Form Builder link in your Site Generator™. b. Click on Create a Custom Form.
c. Choose a Form Type from the drop down available:
i. "Custom Health Form" is the default form to choose if none of the other scenarios below apply. ii. VOV iii. PHR iv. Referral-forms to be used in the Medfusion Referral Portal. v. “Registration" – use this type if you want a form to show up immediately after the patients clicks on Create an Account, or as a requirement for another solution. (i.e. Appointment Request) **PLEASE NOTE THAT FOR THE

MISYS PATIENTLINK INTEGRATION INTO TIGER TO WORK PROPERLY YOU MUST USE THE STANDARD MISYS REGISTRATION FORM. vi. "Follow up" -When creating two forms, for example, this would be form two of two: the follow up form will only be presented once the first form is complete.
d. Type your form’s title in the text box- keep in mind this title will appear exactly as typed on the website for your patients to select and for your personnel to choose from in the Secure Practice Portal™. e. Next, type the form’s instructions to appear at the top of each page. f. Next, type the message you wish your patients to see upon completion. g. Next, you choose Yes or No to “Allow file attachments” to the form the patients are completing; (for ex. their medical records, an image, another form). h. Then, you choose whether or not you wish to “Share Form Across Practices” (This will allow all Custom Form Builder users to view your form; Most users should answer ‘No’ here.) i. Click SAVE to complete this page.
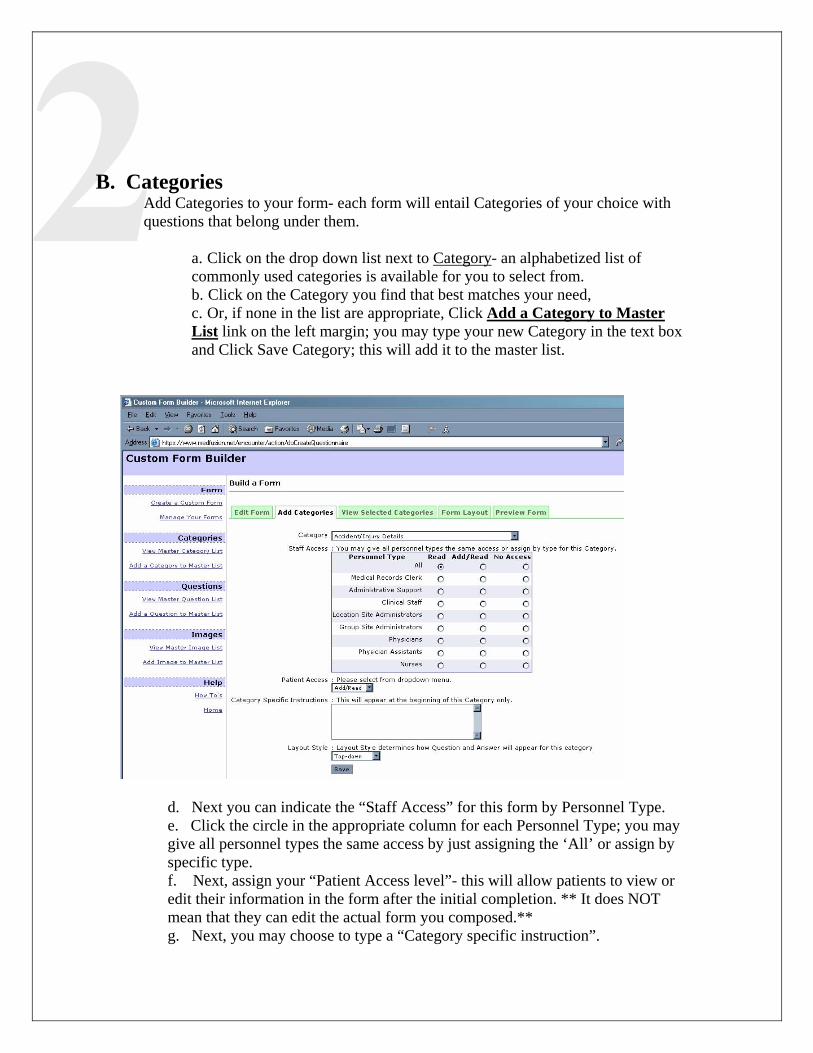
B. Categories Add Categories to your form- each form will entail Categories of your choice with questions that belong under them.
a. Click on the drop down list next to Category- an alphabetized list of
commonly used categories is available for you to select from. b. Click on the Category you find that best matches your need, c. Or, if none in the list are appropriate, Click Add a Category to Master
List link on the left margin; you may type your new Category in the text box and Click Save Category; this will add it to the master list.
d. Next you can indicate the “Staff Access” for this form by Personnel Type. e. Click the circle in the appropriate column for each Personnel Type; you may give all personnel types the same access by just assigning the ‘All’ or assign by specific type. f. Next, assign your “Patient Access level”- this will allow patients to view or edit their information in the form after the initial completion. ** It does NOT mean that they can edit the actual form you composed.** g. Next, you may choose to type a “Category specific instruction”.

h. Then you can choose the “Layout Style” of the questions & answers for this category; top down or side by side (see examples below) i. Click SAVE
“Side by Side”
First Name
* Middle Name
Last Name
* Address Line 1
* Address Line 2
City
* State
*
“Top Down”
Employer's name
Occupation
Work phone (like 999-999-9999)
Driver's license state and number
Note: you can change the layout style for each category of a form.

C. Questions **Please read the note in section CF below before beginning**
Once you save your Category above, you will then be directed to the page below to add Questions to that Category:
a. Click on the drop down list next to Question- an alphabetized list of commonly used questions is available for you to select from. b. Click on the question you find that best matches your need. (You must choose one in order to move on.) c. If the question is not worded exactly as you would like, then you may alter the wording of the question to your needs by typing the desired phrase in the Question Label box. Your new question will appear on the form in place of the one selected from the drop down. d. If none in the list are acceptable, then Click Add a Question to Master List link on the left margin; you may type your new Question in the text box and Click Save Question, which will add it to the master list. e. Next, you select a 'Display Format for Answer' from the drop down list. You may click the Display Format for Answer link for an explanation of each format: radio, text, checkbox, text area, select, date. f. Or choose from Standard Available answer sets* available to the right.

*Important Note!* If you plan to use the Standard Available answer sets for a question(s), this question MUST come first, at the top of the page before all the custom answer questions. A good suggestion of how to do this is to give each of these question(s) its own page of the Custom Form you are building or be sure it appears first. g. When choosing the Custom Answer format, you may designate the answers for the patient to choose from, if applicable. (See radio example below)
Emergency Contact Relationship to patient
Spouse Parent Guardian Partner Other *
d. Next, you indicate if this question is “Required” (Yes/No). Please note: the
patient will not be able to continue if a required question is skipped. e. Next, you indicate if this question is “Age Specific”. f. Next, you indicate if this question is for “New or Returning Patients”. g. Each Question page allows for 3 Questions to be added, you must repeat
the process above for each question, then Click SAVE QUESTIONS at the bottom of each page.
h. You may add an unlimited number of Questions to each Category; when you click save, the decision page below will appear, asking “What do you want to accomplish next?”
i. Add more Questions to that same Category- will pick up after the last
question you added. ii. View the Questions of Category- you may edit & delete and arrange the Question Sequence from the View page if necessary. iii. Add a new Category-brings you back to the beginning of the process. iv. Done with Categories and Questions- to proceed to the next step.

D. Form Layout Upon completion of all your Categories with Questions you will be arranging the ‘Pages’ and the ‘Sequence’ on the page the Categories will appear. Please Note: the “Page” refers to the webpage as viewed by the patient- not the output you see in the SG. a. Select the Page number from the drop down list for each Category. b. Then select the Category Sequence on that page. (See image example below- with one Category per Page). c. Click SAVE
E. Publish/Un-publish After arranging the Form Layout you will be directed to a Preview Form page. You may edit and repeat any of the steps above if you find any errors or omissions. Please Note: there is currently no spell check option, so please review carefully.
a. When the form is completed, you must “Publish” the form to have it appear on the website. b. You may leave the form “Unpublished” and return to it again for completion under Manage Your Forms any time. (See the Manage Your Forms section below). c. You may “Un-publish” a form at any time to remove it from the website, and “Publish” it again at any time.

SECTION Manage Your Forms
a. Once you have created a form, you can save it and return to it by under the Manage Your Forms link on the left margin.
b. The forms will be divided under either the Published or Unpublished tabs. c. You can view; add to, edit, delete, and change sequence and form layouts at
any time. (See Section 2 above for details under Categories or Questions.)
d. You do not need to ‘Un-publish’ the form to make changes. e. You must SAVE each change before exiting that screen.