Embed Size (px)
Citation preview

8/6/2019 Click2try Vtiger50 Tutorial
http://slidepdf.com/reader/full/click2try-vtiger50-tutorial 1/20
vTiger click2try™ Tutorial
8/6/2019 Click2try Vtiger50 Tutorial
http://slidepdf.com/reader/full/click2try-vtiger50-tutorial 2/20
click2trytm vTiger Tutorial
2 Copyright © 2008 Presage Technologies, LLC.
Copyright ©2008 Presage Technologies, LLC.

8/6/2019 Click2try Vtiger50 Tutorial
http://slidepdf.com/reader/full/click2try-vtiger50-tutorial 3/20
vTiger Tutorial click2trytm
Copyright © 2008 Presage Technologies, LLC. 3
Contents
Introduction ............................................................................................................................................ 5
Signing In to vTiger .................................................................................................................................. 6
Change vTiger Profiles and Settings ......................................................................................................... 6
Create a New User................................................................................................................................... 7
Add the User to a Group .......................................................................................................................... 8
View Inventory ...................................................................................................................................... 10
Create a Product Quote and Sales Order ............................................................... ................................ 11
Create an Account ................................................................................................................................. 11
Create a Contact ..................................................................................... ............................................... 13
Create a Marketing Campaign ............................................................................................................... 14
Create a Lead ........................................................................................................................................ 14
Create Notes ......................................................................................................................................... 16
Use the Tag Cloud and Create Tags ........................................................................................................ 17
Create a Trouble Ticket .......................................................................................................................... 17
View the Dashboard .............................................................................................................................. 18
Conclusion ............................................................................................................................................. 20
Resources .............................................................................................................................................. 20

8/6/2019 Click2try Vtiger50 Tutorial
http://slidepdf.com/reader/full/click2try-vtiger50-tutorial 4/20
click2trytm vTiger Tutorial
4 Copyright © 2008 Presage Technologies, LLC.
8/6/2019 Click2try Vtiger50 Tutorial
http://slidepdf.com/reader/full/click2try-vtiger50-tutorial 5/20
vTiger Tutorial click2trytm
Copyright © 2008 Presage Technologies, LLC. 5
Introduction
vTiger is an advanced customer relationship management (CRM) system that will help youmanage outbound communications, marketing campaigns, and sales efforts, along with yourongoing customer support program. With vTiger, you can make sure that everybody in yourcompany has access to the prospect and customer information they need.
You can configure vTiger to show employees only what you want them to see. For example, youmay not want your Marketing Team to see the Sales or Support functions. Or you might wantSales to have visibility into Marketing (to have some insight into what particular marketingcampaign influenced a particular prospect or buyer) and Support (to be able to work with Supportto fix a problem for an evaluator or a valued customer). vTiger gives you the flexibility to createworkflows that are tailored to your organization’s needs.
Just what does this mean for you?
• Access consistent, accurate customer data across the enterprise
• Coordinate and track marketing, sales, and support campaigns
• Encourage collaboration during evaluation and sales cycles
• Improve analysis of marketing requirements
• Expose areas of potential product improvement
• Compress sales cycle
When you’ve completed this tutorial, you’ll be able to navigate the vTiger application, understandhow the elements of the system fit together, and be able to investigate the application more fully.In this tutorial, you’ll learn how to:
• Sign in to vTiger.
• Change vTiger profiles and settings
• Create a new user
•Add the user to a group
• View inventory
• Create a product quote and sales order
• Create an account
• Create a contact
• Create a marketing campaign
• Create a lead
• Create notes
• Use the tag cloud and create tags
• Create a trouble ticket
• View the Dashboard
Let’s get started!

8/6/2019 Click2try Vtiger50 Tutorial
http://slidepdf.com/reader/full/click2try-vtiger50-tutorial 6/20
click2trytm vTiger Tutorial
6 Copyright © 2008 Presage Technologies, LLC.
Signing In to vTiger
Signing in to vTiger is simple.
To sign in: 1. Enter your click2try™ username and password.
2. Click the Sign In button.
The first page you’ll see is the vTiger Home page.
Change vTiger Profiles and Settings
You can completely customize vTiger profiles and settings to suit your own organizationalrequirements. In this example, we’ll change a role from “Sales Man” to “Sales Representative.”
To change profiles and settings:
1. Click Settings.
2. Click Roles. This displays the Roles & Hierarchy Tree.
3. Click the "Sales Man" link in the tree.
4. Click the Edit button.
5. Change the text in the Role Name field to "Sales Representative" and then click Save.
Next, let's change the Sales Profile to limit permissions. Currently, the Sales Profile allows
8/6/2019 Click2try Vtiger50 Tutorial
http://slidepdf.com/reader/full/click2try-vtiger50-tutorial 7/20
vTiger Tutorial click2trytm
Copyright © 2008 Presage Technologies, LLC. 7
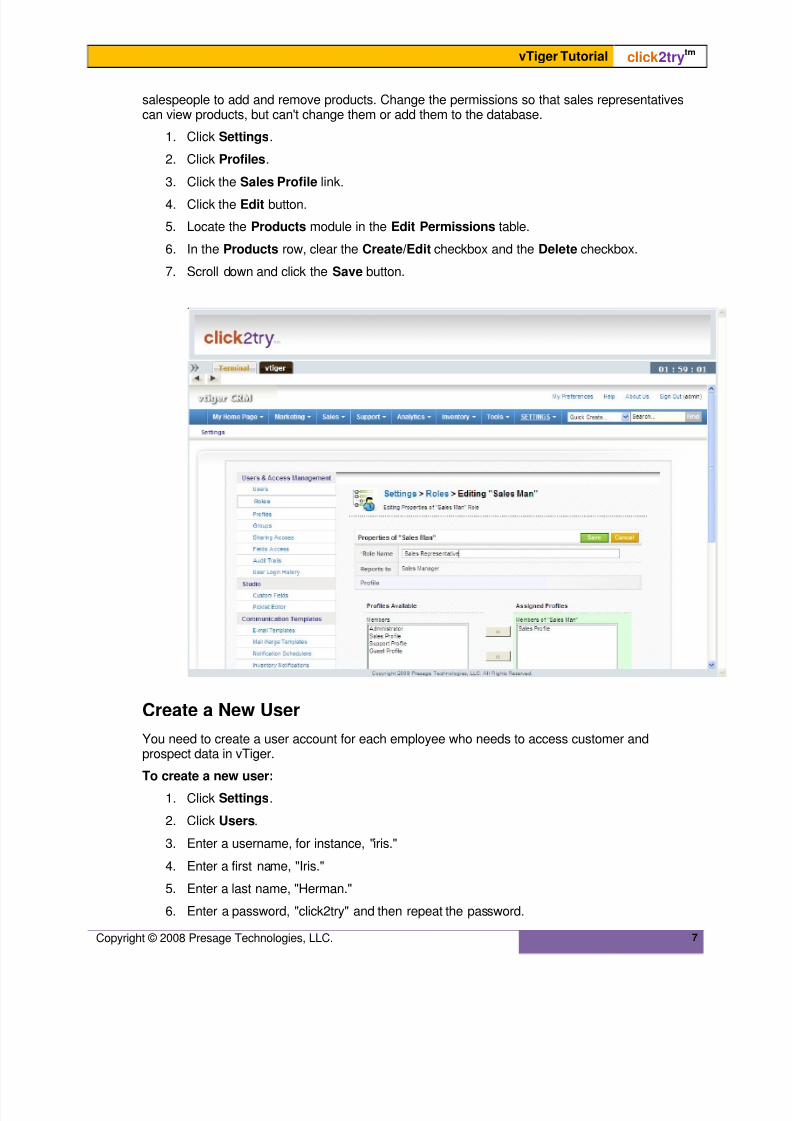
salespeople to add and remove products. Change the permissions so that sales representativescan view products, but can't change them or add them to the database.
1. Click Settings.
2. Click Profiles.
3. Click the Sales Profile link.
4. Click the Edit button.
5. Locate the Products module in the Edit Permissions table.
6. In the Products row, clear the Create/Edit checkbox and the Delete checkbox.
7. Scroll down and click the Save button.
Create a New User
You need to create a user account for each employee who needs to access customer andprospect data in vTiger.
To create a new user: 1. Click Settings.
2. Click Users.
3. Enter a username, for instance, "iris."
4. Enter a first name, "Iris."
5. Enter a last name, "Herman."
6. Enter a password, "click2try" and then repeat the password.

8/6/2019 Click2try Vtiger50 Tutorial
http://slidepdf.com/reader/full/click2try-vtiger50-tutorial 8/20
click2trytm vTiger Tutorial
8 Copyright © 2008 Presage Technologies, LLC.
7. Under the Role field, click the green plus sign (+). This displays the Assign Role window.
8. Click the Sales Representative label.
9. Enter Iris' email address in the Email field.
10. You can enter additional information if you like, but only fields with a red asterisk next tothem are required.
11. Click Save.
That’s it! Iris can now sign in to vTiger.
Add the User to a Group
Groups let you create categories of users in your organization. The simplest type of group wouldbe a department, such as Marketing, Sales, or Support. You might create additional groups totrack projects or campaigns. For example, if you have a small group of people from Marketingworking on a specific promotion, create a group and add those Marketing employees to that
group. The group enables group members to communicate and share data on their specific groupissues.
To add a user to a group: 1. Under the Users & Access Management section, click Groups.
2. To the left of the Team Selling label, click the note and pencil edit icon.
3. In the Entity drop-down menu, select Users.
4. In the Members of Entity list, select User::iris.

8/6/2019 Click2try Vtiger50 Tutorial
http://slidepdf.com/reader/full/click2try-vtiger50-tutorial 9/20
vTiger Tutorial click2trytm
Copyright © 2008 Presage Technologies, LLC. 9
5. Click the >> button to move User::iris to the Members of "Team Selling" list.
6. Click Save.
Iris Herman now belongs to the Team Selling group.

8/6/2019 Click2try Vtiger50 Tutorial
http://slidepdf.com/reader/full/click2try-vtiger50-tutorial 10/20
click2trytm vTiger Tutorial
10 Copyright © 2008 Presage Technologies, LLC.
View Inventory
Take a look at the sample inventory items in vTiger, just to get familiar with all of the propertiesyou can define for products and services your company sells.
To view inventory: 1. Click Inventory > Products.
2. Click the Edit link next to the first listed product.
3. Under Pricing Information, change the Unit Price.
4. Under Stock Information, change the Qty. in Stock.
5. Click Save. You'll be able to see your changes immediately.
8/6/2019 Click2try Vtiger50 Tutorial
http://slidepdf.com/reader/full/click2try-vtiger50-tutorial 11/20
vTiger Tutorial click2trytm
Copyright © 2008 Presage Technologies, LLC. 11
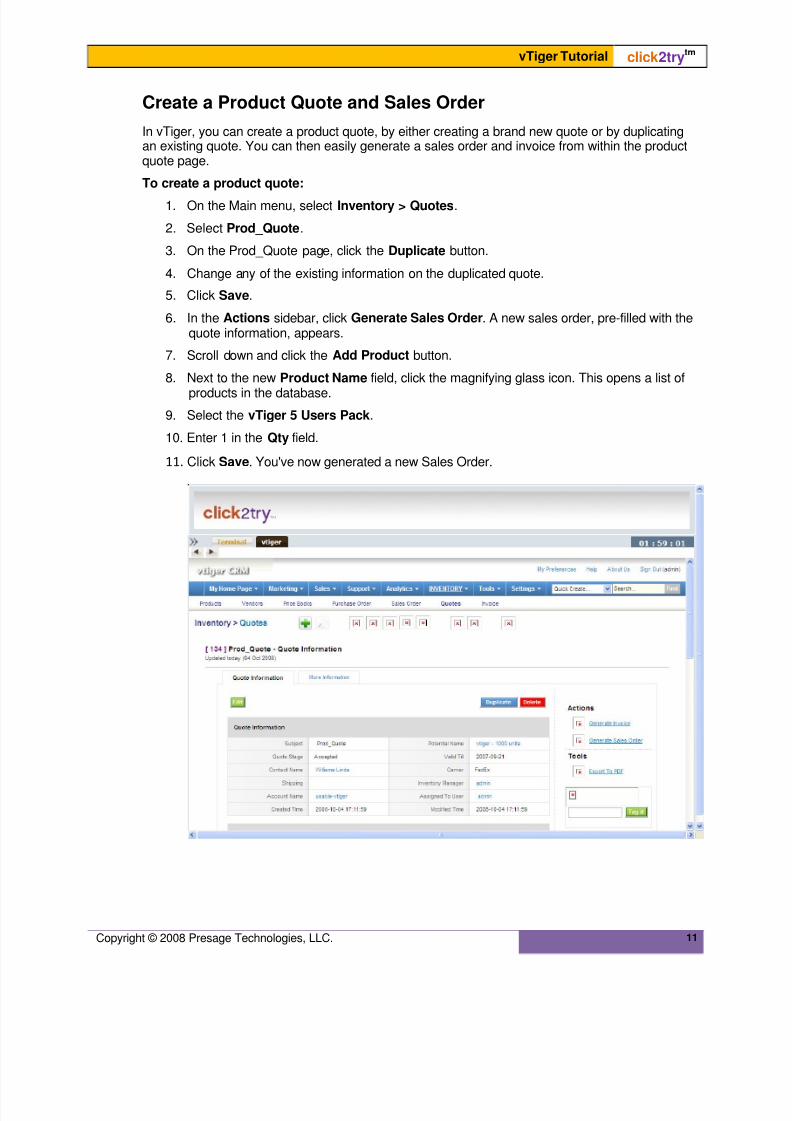
Create a Product Quote and Sales Order
In vTiger, you can create a product quote, by either creating a brand new quote or by duplicatingan existing quote. You can then easily generate a sales order and invoice from within the productquote page.
To create a product quote: 1. On the Main menu, select Inventory > Quotes.
2. Select Prod_Quote.
3. On the Prod_Quote page, click the Duplicate button.
4. Change any of the existing information on the duplicated quote.
5. Click Save.
6. In the Actions sidebar, click Generate Sales Order. A new sales order, pre-filled with thequote information, appears.
7. Scroll down and click the Add Product button.
8. Next to the new Product Name field, click the magnifying glass icon. This opens a list of
products in the database.
9. Select the vTiger 5 Users Pack.
10. Enter 1 in the Qty field.
11. Click Save. You've now generated a new Sales Order.

8/6/2019 Click2try Vtiger50 Tutorial
http://slidepdf.com/reader/full/click2try-vtiger50-tutorial 12/20
click2trytm vTiger Tutorial
12 Copyright © 2008 Presage Technologies, LLC.
Create an Account
Contacts are people outside of your company, whether customers, prospects, vendors, orpartners. Each contact must belong to an account. The account represents their organization.
To create an account: 1. From the Home page, select Marketing > Accounts. You can select Accounts from theSales and Support menus as well.
2. Click the plus sign (+) icon to create a new account record.
3. Enter the Account Name.
4. Under Assigned To, select Group.
5. Select Team Selling from the Assigned To drop-down menu.
6. Click Save.
An even easier way to create accounts is to Duplicate an account record. If you have otheraccounts that are already fully defined, and which are identical to your new account except for thename, try duplicating an account.
To duplicate an account:1. Double-click an account name from the Accounts list. This displays the account
information for that account.
2. Click the Duplicate button. This creates a new account record identical to the accountyou started with.
3. Change the Account Name and any other information that is specific to the new account.
4. Click Save.

8/6/2019 Click2try Vtiger50 Tutorial
http://slidepdf.com/reader/full/click2try-vtiger50-tutorial 13/20
vTiger Tutorial click2trytm
Copyright © 2008 Presage Technologies, LLC. 13
Create a Contact
Contacts are people outside of your company, whether customers, prospects, vendors, orpartners. Each contact must belong to an account. The account represents their organization.
To create a contact: 1. Select Sales > Contacts. You can actually create contacts from Marketing, Sales, orSupport. All contacts can be shared across your organization.
2. Click the plus sign (+) icon to create a new contact record.
3. Enter a First Name.
4. Enter a Last Name.
5. Click the green plus sign icon next to the Account field.
6. Select an Account Name.
7. Click Save. You've created a new contact. Take note of the various tools available to youfrom the Contact Information page. You can create To-Do items, Events, or associate thecontact with a specific Mail Merge template.

8/6/2019 Click2try Vtiger50 Tutorial
http://slidepdf.com/reader/full/click2try-vtiger50-tutorial 14/20
click2trytm vTiger Tutorial
14 Copyright © 2008 Presage Technologies, LLC.
Create a Marketing Campaign
The marketing campaign is essential for getting the message out to your prospects andcustomers about your product or service. vTiger lets you create and track unlimited campaigns. Inaddition to assigning campaigns to users or teams, you can easily track expectations and actualsin the areas of projected response rates, ROI, and expenses.
To create a marketing campaign: 1. On the Main menu, click Marketing > Campaigns.
2. Click the green plus sign icon (+) to create a new campaign record.
3. Provide a campaign name.
4. Assign the campaign to either a user or a group. For this example, choose Group, andthen select the Marketing Group.
5. Select Email for the Campaign Type.
6. Set the Campaign Status to Active.
7. Click the green plus sign icon to select a product from the Inventory database.
8. Enter data for any statistics you'd like to track.
9. Click Save.

8/6/2019 Click2try Vtiger50 Tutorial
http://slidepdf.com/reader/full/click2try-vtiger50-tutorial 15/20
vTiger Tutorial click2trytm
Copyright © 2008 Presage Technologies, LLC. 15
Create a Lead
You can create leads to keep track of contacts who are prospects or potential buyers of yourproducts or services.
To create a lead: 1. On the Main menu, click Sales > Leads.2. Click the green plus sign icon (+) to create a new lead record.
3. Enter the First Name and Last Name for the lead.
4. Enter the Company name.
5. Enter the lead's title.
6. Under Assigned To, select Group, and then select Team Selling from the drop-downmenu.
7. Select the Lead Source from the drop-down menu.
8. Select the Lead Status from the drop-down menu.
9. Click Save.
8/6/2019 Click2try Vtiger50 Tutorial
http://slidepdf.com/reader/full/click2try-vtiger50-tutorial 16/20
click2trytm vTiger Tutorial
16 Copyright © 2008 Presage Technologies, LLC.
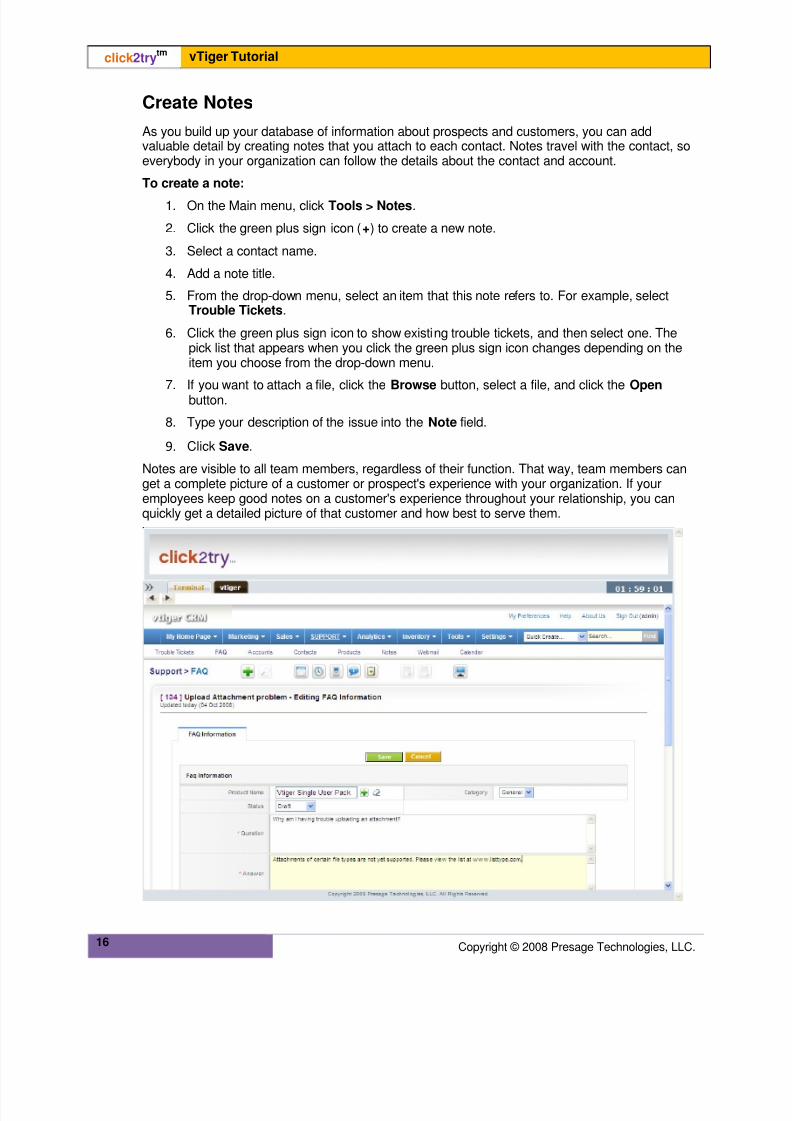
Create Notes
As you build up your database of information about prospects and customers, you can addvaluable detail by creating notes that you attach to each contact. Notes travel with the contact, soeverybody in your organization can follow the details about the contact and account.
To create a note: 1. On the Main menu, click Tools > Notes.
2. Click the green plus sign icon (+) to create a new note.
3. Select a contact name.
4. Add a note title.
5. From the drop-down menu, select an item that this note refers to. For example, selectTrouble Tickets.
6. Click the green plus sign icon to show existing trouble tickets, and then select one. Thepick list that appears when you click the green plus sign icon changes depending on theitem you choose from the drop-down menu.
7. If you want to attach a file, click the Browse button, select a file, and click the Open button.
8. Type your description of the issue into the Note field.
9. Click Save.
Notes are visible to all team members, regardless of their function. That way, team members canget a complete picture of a customer or prospect's experience with your organization. If youremployees keep good notes on a customer's experience throughout your relationship, you canquickly get a detailed picture of that customer and how best to serve them.

8/6/2019 Click2try Vtiger50 Tutorial
http://slidepdf.com/reader/full/click2try-vtiger50-tutorial 17/20
vTiger Tutorial click2trytm
Copyright © 2008 Presage Technologies, LLC. 17
Use the Tag Cloud and Create Tags
If you visit many blogs or social networking sites, you're probably already familiar with tags andtag clouds. You can tag many individual records in vTiger with your own tags. The tags provide avery quick shorthand way to create links that help you categorize accounts, contacts, and othervTiger elements.
To create a tag and use the tag cloud: 1. On the Main menu, click Sales > Contacts.
2. Click on a contact name,
3. When the contact record appears, enter "10-pack" into the Tag Cloud field, then pressthe Tag It button. This adds a clickable link at the bottom of the Tag Cloud widget.
4. Go back to the Contacts list and choose another contact.
5. Enter "10-pack" into the Tag Cloud field for this different contact, and then press the TagIt button.
6. Click the "10-pack" link. This displays a page listing the two contacts who you've tagged.As you can see, this is a powerful way to group similar contacts or items.
Create a Trouble Ticket
vTiger provides a solid trouble ticket function that lets you create trouble tickets for contacts inyour database. You can add attachments, categorize the ticket, prioritize the ticket, set a severity,and include detailed descriptions and comments about the problem and solution.
A great feature of the Support area in vTiger is the ability to turn a trouble ticket into an FAQ.Assume you've tracked a certain problem over its lifetime, from first diagnosis to workaround to
8/6/2019 Click2try Vtiger50 Tutorial
http://slidepdf.com/reader/full/click2try-vtiger50-tutorial 18/20
click2trytm vTiger Tutorial
18 Copyright © 2008 Presage Technologies, LLC.
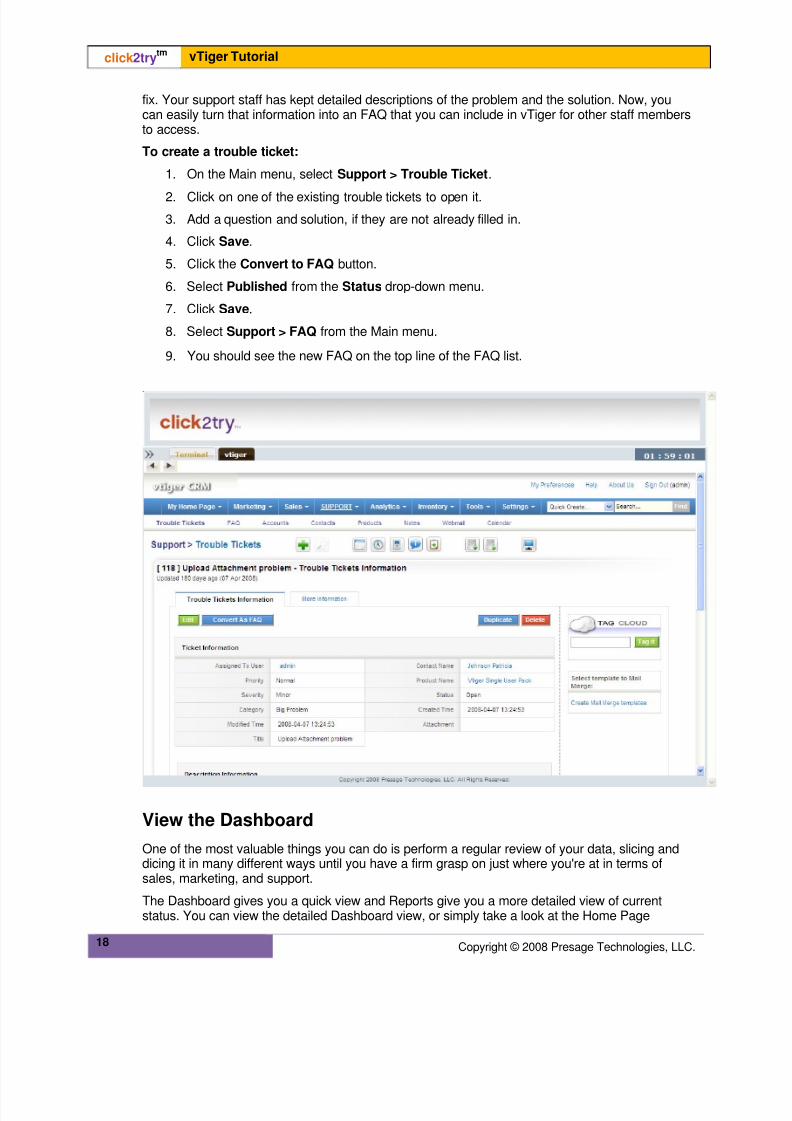
fix. Your support staff has kept detailed descriptions of the problem and the solution. Now, youcan easily turn that information into an FAQ that you can include in vTiger for other staff membersto access.
To create a trouble ticket: 1. On the Main menu, select Support > Trouble Ticket.
2. Click on one of the existing trouble tickets to open it.
3. Add a question and solution, if they are not already filled in.
4. Click Save.
5. Click the Convert to FAQ button.
6. Select Published from the Status drop-down menu.
7. Click Save.
8. Select Support > FAQ from the Main menu.
9. You should see the new FAQ on the top line of the FAQ list.
View the Dashboard
One of the most valuable things you can do is perform a regular review of your data, slicing anddicing it in many different ways until you have a firm grasp on just where you're at in terms ofsales, marketing, and support.
The Dashboard gives you a quick view and Reports give you a more detailed view of currentstatus. You can view the detailed Dashboard view, or simply take a look at the Home Page
8/6/2019 Click2try Vtiger50 Tutorial
http://slidepdf.com/reader/full/click2try-vtiger50-tutorial 19/20
vTiger Tutorial click2trytm
Copyright © 2008 Presage Technologies, LLC. 19
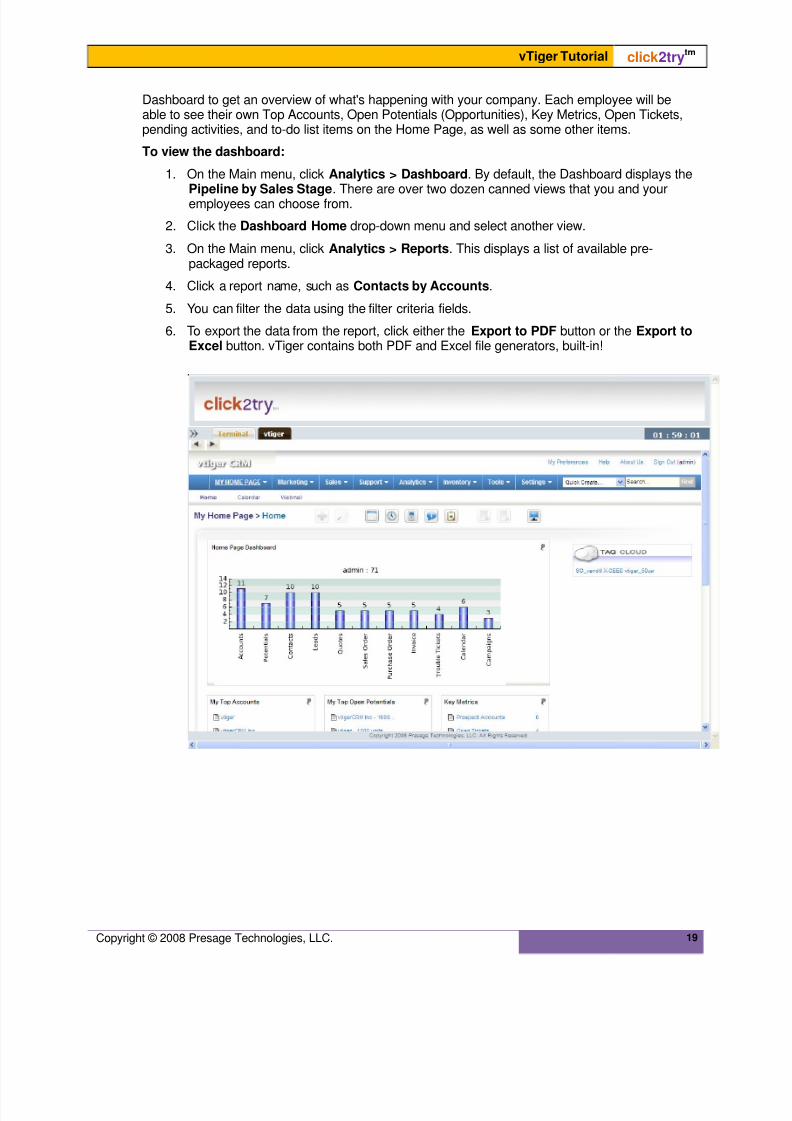
Dashboard to get an overview of what's happening with your company. Each employee will beable to see their own Top Accounts, Open Potentials (Opportunities), Key Metrics, Open Tickets,pending activities, and to-do list items on the Home Page, as well as some other items.
To view the dashboard: 1. On the Main menu, click Analytics > Dashboard. By default, the Dashboard displays the
Pipeline by Sales Stage. There are over two dozen canned views that you and youremployees can choose from.
2. Click the Dashboard Home drop-down menu and select another view.
3. On the Main menu, click Analytics > Reports. This displays a list of available pre-packaged reports.
4. Click a report name, such as Contacts by Accounts.
5. You can filter the data using the filter criteria fields.
6. To export the data from the report, click either the Export to PDF button or the Export toExcel button. vTiger contains both PDF and Excel file generators, built-in!

8/6/2019 Click2try Vtiger50 Tutorial
http://slidepdf.com/reader/full/click2try-vtiger50-tutorial 20/20
click2trytm vTiger Tutorial
20 Copyright © 2008 Presage Technologies, LLC.
Conclusion
This tutorial has just touched on the powerful capabilities of vTiger. In addition to what is coveredhere, vTiger provides a full Webmail program, a chat (IM) feature, a shared calendar, and theability to set up RSS feeds and create bookmarks to your favorite Web sites and visit them with abuilt-in browser.
Resources
For more information about vTiger and its included applications, see the following resources, anddon’t forget to check http://www.click2try.com for a complete list:
vTiger Forums – Extremely well-attended community forum site with sections for various topics.
vTiger Documentation – Full documentation on everything you ever wanted to know or need toknow about vTiger, including installation, implementation, configuration, and customizationdetails.