Embed Size (px)
Citation preview

Boldon James | Customer Confidential -- User documentation
Boldon James | Customer Confidential -- User documentation
3
Classifier Getting Started Guide for PowerShell
UM643900
May 2019
© Boldon James Ltd. All rights reserved.
Customer Documentation
This document is for informational purposes only, and Boldon James cannot guarantee the precision of any information supplied.
BOLDON JAMES MAKES NO WARRANTIES, EXPRESS OR IMPLIED, IN THIS DOCUMENT.
Boldon James | Customer Confidential -- User documentation
Boldon James | Customer Confidential -- User documentation
Classifier Getting Started Guide for PowerShell UM643900
boldonjames.com 2
Contents
1 Introduction ........................................................................................................................................... 3
2 Getting started ...................................................................................................................................... 3
2.1 Check that your environment is suitable. .................................................................................. 3
2.2 Install Classifier Administration Server ...................................................................................... 4
2.3 Install Email/Office Classifier ..................................................................................................... 5
2.4 Using the Classifier Administration Server PowerShell Module. ............................................... 5
2.4.1 Initial Steps 5
2.4.2 Naming Conventions 5 2.4.2.1 Common verbs ............................................................................................................. 5 2.4.2.2 Data verbs .................................................................................................................... 6 2.4.2.3 Security verbs .............................................................................................................. 6
2.4.3 Parameters 6
2.4.4 Tab Completion, Parameter Completion and IntelliSense 7
2.4.5 Pipelining 8
2.4.6 Cmdlet Specific Help 8
2.5 Licensing .................................................................................................................................... 8
2.5.1 Setting the License for this exercise 9
2.6 Establishing an Initial Configuration .......................................................................................... 9
3 Use test mode to View the effects of the Configuration on microsoft Outlook ............................. 9
3.1 Publish the Configuration as a Test Configuration .................................................................. 10
3.2 Invoke Test Mode Using the Test Mode Administration Utility ................................................ 10
3.3 Explore User Effects in Microsoft Outlook ............................................................................... 11
3.4 Terminate Test Mode .............................................................................................................. 12
3.5 Tidy up ..................................................................................................................................... 12
4 What Next ............................................................................................................................................ 13
4.1 Exploring Selectors .................................................................................................................. 13
4.2 Exploring Marking Formats ...................................................................................................... 13
4.3 Exploring Policies .................................................................................................................... 13
4.4 Experiment with the Test Configuration .................................................................................. 14
4.4.1 Exercise 1: Add a Selector Value 14
4.4.2 Exercise 2: Add a New Selector and Values 14
4.4.3 Exercise 3: Add a New Selector and Values 14
4.4.4 Exercise 4: Publish the Modifications as a Test Configuration 15
Boldon James | Customer Confidential -- User documentation
Boldon James | Customer Confidential -- User documentation
Classifier Getting Started Guide for PowerShell UM643900
boldonjames.com 3
1 INTRODUCTION
This document provides an initial understanding of the Classifier Administration Server’s PowerShell interface.
Users should be familiar with PowerShell Version 5 or later.
The Suite Overview document provides a description of Classifier terminology and an overview of the various
Classifier products and components. It should be noted, the Classifier Administration Server’s PowerShell
interface is extremely powerful. If an individual is unfamiliar with the web interface of Classifier Administration
Server and all aspects of Classifier configuration, using the PowerShell interface may prove challenging and
produce unintended results.
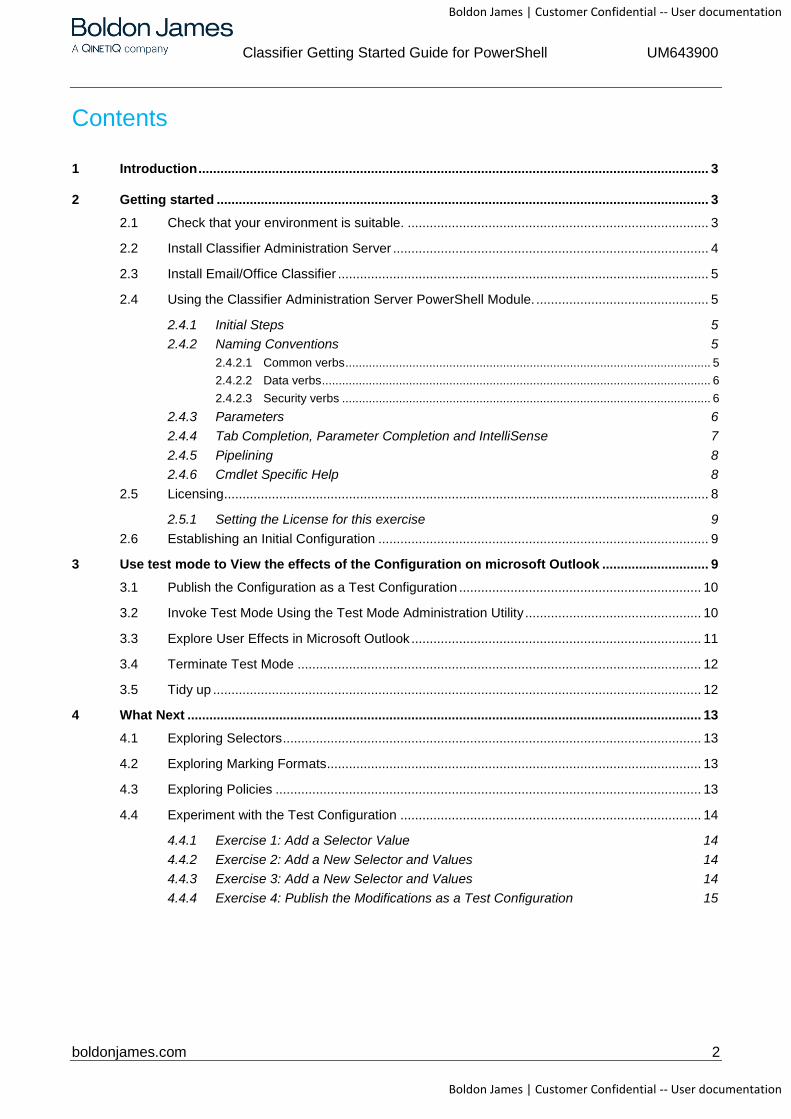
This guide has the following steps:
2 GETTING STARTED
2.1 Check that your environment is suitable.
The following framework is required to evaluate Boldon James Classifier PowerShell:
What
next?
Check that your environment is suitable
Install Classifier Administration Server software
Establish an initial Classifier configuration
Experiment
with the test
configuration
More
extensive
evaluation
Start to
develop your
configuration
Using the Classifier Administration cmdlets
Application test environment
Microsoft Office Applications
Email/Office Classifier
Classifier Test Mode Administration utility
Classifier Administration Service
Classifier Administration Server
Pre-requisites as defined in the Classifier Administration Server release notes.
Classifier PowerShell option
File store
Boldon James | Customer Confidential -- User documentation
Boldon James | Customer Confidential -- User documentation
Classifier Getting Started Guide for PowerShell UM643900
boldonjames.com 4
You can host all three environments (Classifier Administration Service, Classifier PowerShell and Application Test environment) on a single system, or on separate systems subject to the relevant pre-requisites.
This document assumes:
A single system hosts all three environments. In a live system, Boldon James recommends hosting the Classifier Administration Service on a separate server system.
Authorised administrators use the PowerShell interface to connect to this service.
A network location (or Active Directory) holds the published Configuration and installed Classifier Applications reference that location.
Classifier PowerShell supports a ‘Publish Test Configuration’ facility whereby the Administrator can publish a ‘Test Configuration.’ This document makes use of this ‘Publish Test Configuration’ mechanism to explore the effects of the Configuration on various Classifier enabled applications (e.g. Microsoft Word).
A suitable Microsoft Windows environment is required, along with the following:
Microsoft PowerShell 5
Note: consult the Classifier Administration Server Installation Guide and the Email & Office Classifier release notes for definitive information with regard to Windows and Microsoft Office versions supported.
2.2 Install Classifier Administration Server
The following instructions give a summary of the installation process for Classifier Administration Server. For
detailed information, refer to the Classifier Administration Server Installation Guide located in the
Classifier Documentation folder in the Classifier Base Bundle.
Note: It is important to refresh the cache when installing a new version of Classifier Administration Server PowerShell Module to ensure that all (new) commands provided in the new version are available. Use the following command:
Get-Module -ListAvailable -Refresh
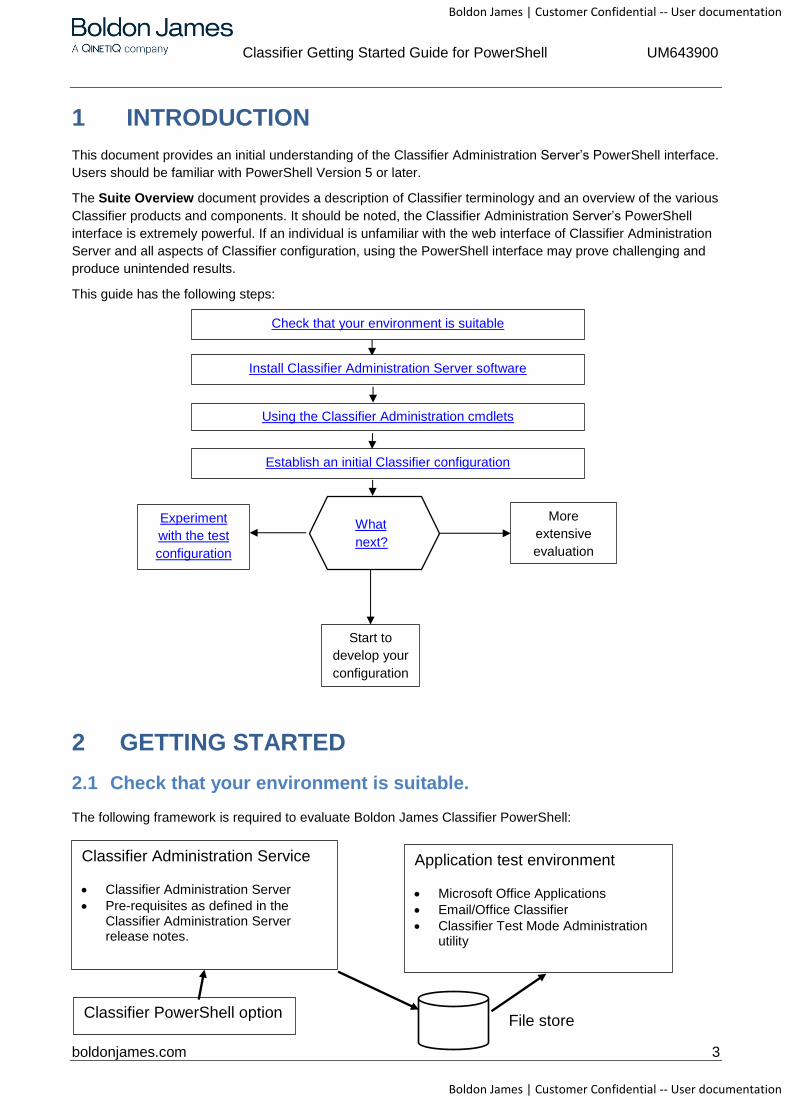
From the Classifier Base Bundle open the Classifier Administration Server folder and run ClassifierAdministrationServer.msi (or Setup.exe).
During installation, select the PowerShell module feature.
After installation, check that the Classifier Administration Service has started.
Figure 1: Classifier Administration Service

Boldon James | Customer Confidential -- User documentation
Boldon James | Customer Confidential -- User documentation
Classifier Getting Started Guide for PowerShell UM643900
boldonjames.com 5
2.3 Install Email/Office Classifier
If you would like to review the end user experience of the configuration then you will also need a Classifier Client Application. The following instructions assume the presence of Microsoft Office.
Email and Office Classifier software extends the relevant Microsoft Office applications (depending upon the Classifier licences applied).
From the Base Bundle open Email and Office Classifier. Open the x64 or x86 folder corresponding to the version of Microsoft Office installed and run Setup.exe.
Follow the wizard installation steps to complete the install.
2.4 Using the Classifier Administration Server PowerShell Module.
The Classifier Administration Server PowerShell Module supports the configuration of every Classifier feature. The module provides over two hundred cmdlets to fetch, create, modify or remove any aspect of the Classifier configuration.
Boldon James recommend the use of Microsoft Visual Studio Code (VSC), including the PowerShell plug-in when getting started with the Classifier Administration Server cmdlets. The VSC adds syntax colouring, tab completion, IntelliSense, visual debugging, and context sensitive Help.
2.4.1 Initial Steps
Ensure the Boldon James Classifier Administration Service is running with the following command:
PS C:\Users\Administrator> net start BoldonJamesClassifierManagementWcfService.exe
The Boldon James Classifier Administration Service service is starting.
The Boldon James Classifier Administration Service service was started successfully.
2.4.2 Naming Conventions
The Classifier Administration PowerShell Module follows Microsoft’s guidelines for the verbs of cmdlet
names. The following verbs appear in cmdlet names:
2.4.2.1 Common verbs
Verb Action
Add Adds a resource to a container, or attaches an item to another item
Copy Copies a resource to another name or to another container
Get Specifies an action that retrieves a resource.
Join Combines resources into one resource.
Lock Secures a resource. This verb is paired with Unlock.
New Creates a resource.
Remove Deletes a resource from a container.
Rename Changes the name of a resource.
Set Replaces data on an existing resource or creates a resource that contains some data
Unlock Releases a locked resource. This verb is paired with Lock.

Boldon James | Customer Confidential -- User documentation
Boldon James | Customer Confidential -- User documentation
Classifier Getting Started Guide for PowerShell UM643900
boldonjames.com 6
2.4.2.2 Data verbs
Verb Action
ConvertFrom Converts one primary type of input (the cmdlet noun indicates the input) to one or more supported output types.
ConvertTo Converts from one or more types of input to a primary output type (the cmdlet noun indicates the output type).
Publish Makes a resource available to others.
Restore Sets a resource to a predefined state
2.4.2.3 Security verbs
Verb Action
Block Restricts access to a resource.
Grant Allows access to a resource. This verb is paired with Revoke
Revoke Specifies an action that does not allow access to a resource. This verb is paired with Grant.
Unprotect Removes safeguards from a resource. This verb is paired with Unlock.
The nouns of cmdlet names refer to the entity that the action affects. Note that when the entity is part of a Classifier policy, the noun will have a prefix of Policy. For example, the cmdlet Get-SelectorValue obtains a Classifier selector value from the Selector Library whereas Get-PolicySelectorValue obtains the Classifier selector value associated with a specific Classifier policy.
2.4.3 Parameters
Describe the entity on which the action affects either by a friendly name or through a unique identifier (usually a GUID). The two parameters –Name and –Id are consistently used for this identification. When the cmdlet requires the identification of multiple entities then the entity type is used as a prefix to the parameters. For example, the cmdlet Get-PolicySelectorValue requires the identification of a Classifier policy, selector and value through parameters. In this instance, –PolicyName, –SelectorName and
–SelectorValue are the parameters that are used. The alternative identifying set of parameters for this cmdlet are –PolicyId, -SelectorId and –ValueId.
Where a cmdlet requires the identification of multiple entities, parameters are organised into parameter sets such that all entities must be identified either by a friendly name or through a unique identifier; a mixture of these cannot be used. For example, -PolicyName cannot be used with –SelectorId; either –PolicyName and –SelectorName or –PolicyId and –SelectorId can be combined.
In some cmdlets, dynamic parameters are used that will require a specific set of parameters depending on the value supplied for one of the parameters.
All cmdlets support the following general common parameters and risk-mitigation parameters
Parameter Description
-Debug Specifies whether programmer-level debugging messages are displayed
-ErrorAction Specifies what action should take place when an error occurs
-ErrorVariable Specifies the variable in which to place objects when an error occurs
-OutVariable Specifies the variable in which to place all output objects generated by the cmdlet.
-OutBuffer Defines the number of objects to store in the output buffer before any objects are passed down the pipeline.
-Verbose Specifies whether the cmdlet writes explanatory messages that can be displayed at the command line

Boldon James | Customer Confidential -- User documentation
Boldon James | Customer Confidential -- User documentation
Classifier Getting Started Guide for PowerShell UM643900
boldonjames.com 7
-WarningAction Specifies what action should take place when the cmdlet writes a warning message
-WarningVariable Save warning messages in the specified variable.
-Confirm Specifies whether the cmdlet displays a prompt that asks if the user is sure that they want to continue.
-WhatIf Specifies whether the cmdlet writes a message that describes the effects of running the cmdlet without actually performing any action.
2.4.4 Tab Completion, Parameter Completion and IntelliSense
Cmdlet name completion occurs as expected with PowerShell. For example, typing the partial cmdlet get-ser and then pressing the Tab key will auto-complete the cmdlet name. Pressing the Tab key subsequent times allows scrolling through every cmdlet that begins get-ser.
IntelliSense presents available parameters when entering the hyphen character after a cmdlet name. For example,
Parameter completion is available for most parameters. For example,
When a unique identifier (usually a GUID) describes the entity that the action affects, the parameter completion will show friendly names as a choice. On selection of a specific friendly name, the cmdlet completes the parameter value with the unique identifier. For example
Selecting the value All provides:
Boldon James | Customer Confidential -- User documentation
Boldon James | Customer Confidential -- User documentation
Classifier Getting Started Guide for PowerShell UM643900
boldonjames.com 8
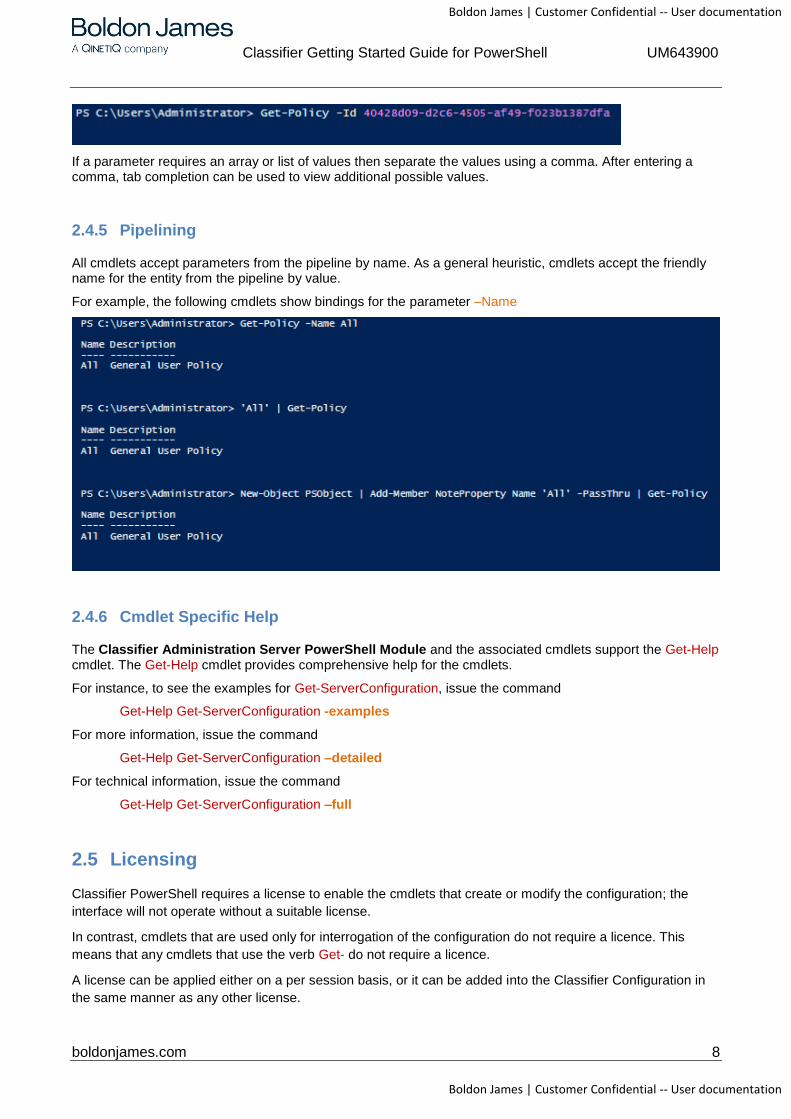
If a parameter requires an array or list of values then separate the values using a comma. After entering a comma, tab completion can be used to view additional possible values.
2.4.5 Pipelining
All cmdlets accept parameters from the pipeline by name. As a general heuristic, cmdlets accept the friendly name for the entity from the pipeline by value.
For example, the following cmdlets show bindings for the parameter –Name
2.4.6 Cmdlet Specific Help
The Classifier Administration Server PowerShell Module and the associated cmdlets support the Get-Help cmdlet. The Get-Help cmdlet provides comprehensive help for the cmdlets.
For instance, to see the examples for Get-ServerConfiguration, issue the command
Get-Help Get-ServerConfiguration -examples
For more information, issue the command
Get-Help Get-ServerConfiguration –detailed
For technical information, issue the command
Get-Help Get-ServerConfiguration –full
2.5 Licensing
Classifier PowerShell requires a license to enable the cmdlets that create or modify the configuration; the
interface will not operate without a suitable license.
In contrast, cmdlets that are used only for interrogation of the configuration do not require a licence. This
means that any cmdlets that use the verb Get- do not require a licence.
A license can be applied either on a per session basis, or it can be added into the Classifier Configuration in
the same manner as any other license.

Boldon James | Customer Confidential -- User documentation
Boldon James | Customer Confidential -- User documentation
Classifier Getting Started Guide for PowerShell UM643900
boldonjames.com 9
2.5.1 Setting the License for this exercise
At the start of each session, set a session variable as follows:
Set-SessionLicence –LicenceFile ‘C:\LicenceFiles\impCPA.lic’
2.6 Establishing an Initial Configuration
This section describes how to create an initial configuration to explore the PowerShell cmdlets. If you have an
existing configuration you can import that into Classifier Administration Server using the cmdlet
Get-ServerConfiguration –Location CustomFolder –Path ‘C:\Existing configuration’
If you choose to use an existing configuration, skip the rest of this section and read Use test mode.
To create an initial configuration from scratch:
A licence is required for a new label configuration. Navigate to the Licence folder in the Base Bundle and open a suitable folder (e.g. Email Classifier)
Use the cmdlet Add-Licence to add the licence file to the configuration, for example
Create a new Label Configuration using the cmdlet New-LabelConfiguration. A new Label Configuration requires an identifying name and a template to use as the basis of your configuration
For the purposes of this exercise, select the ‘Corporate Commercial’ template offered by IntelliSense and an arbitrary label configuration name of ‘Quick Start’.
You now have a complete configuration that can be explored or modified, and may also be used locally to demonstrate some of the end user experience as described later in this document.
3 USE TEST MODE TO VIEW THE EFFECTS OF THE CONFIGURATION ON MICROSOFT OUTLOOK
This section demonstrates how to review the end-user experience of the configuration.
Classifier Administration Server provides a Test Mode feature. This allows you to preview the effects of the configuration on the end-user experience prior to publication of the configuration to a user community.

Boldon James | Customer Confidential -- User documentation
Boldon James | Customer Confidential -- User documentation
Classifier Getting Started Guide for PowerShell UM643900
boldonjames.com 10
3.1 Publish the Configuration as a Test Configuration
You publish the configuration using the cmdlet Publish-ServerConfiguration This cmdlet persists the
configuration for use by Classifier applications. You can publish a configuration in test mode to a central
location that is then accessible to Classifier applications. There are a number of preliminary steps needed
before publishing a test configuration.
First, create a folder location accessible to your Classifier Application software.
Inform Classifier Administration Server of this folder using the Set-ConfigurationTestsFolder cmdlet
with parameter –Path. Supply the newly created folder path as the value for this parameter. The
default Test Configurations location created by the software installation is %programdata%\Boldon
James\TestMode Folder
Publish the configuration using the cmdlet Publish-ServerConfiguration –Location TestFolder
–TestName ‘Quick Start’ –Reason ‘Exploring Quick Start Configuration’
3.2 Invoke Test Mode Using the Test Mode Administration Utility
Classifier Test Mode Administration is a utility for applying a test configuration to the local machine.
It allows you to browse to a central shared location containing multiple test configurations. Upon selecting a specific test configuration, the Test Mode Administration utility deploys that configuration to the local machine and Classifier Applications enter Test Mode.
The Test Mode feature temporarily sets a local switch that directs the Classifier Application software to utilise a ‘test configuration’ rather the normal run time (deployed) configuration.
From the Classifier Base Bundle open the Classifier Administration Server folder and then the Test Mode Administration sub-folder. Run ClassifierTestModeAdministration.msi.
Ensure that none of the Microsoft Office applications, Word, Excel, Outlook and PowerPoint, are running.
Start the Classifier Test Mode Administration utility from the Start Menu and browse to the shared folder created in section 3.1
Select the test configuration name published in section 3.1, i.e. ‘Quick Start’. This is termed a test session.
Figure 2: Test Mode Administration
Choose Run Test.
This will show a Test Mode Applications dialog listing the Running Applications. Leave this dialog in place. Proceed to the next step that shows the effects within Microsoft Outlook.
Boldon James | Customer Confidential -- User documentation
Boldon James | Customer Confidential -- User documentation
Classifier Getting Started Guide for PowerShell UM643900
boldonjames.com 11
3.3 Explore User Effects in Microsoft Outlook
This section explores some of the effects within Outlook.
Start Outlook. This will present a warning dialog. Acknowledge this and proceed.
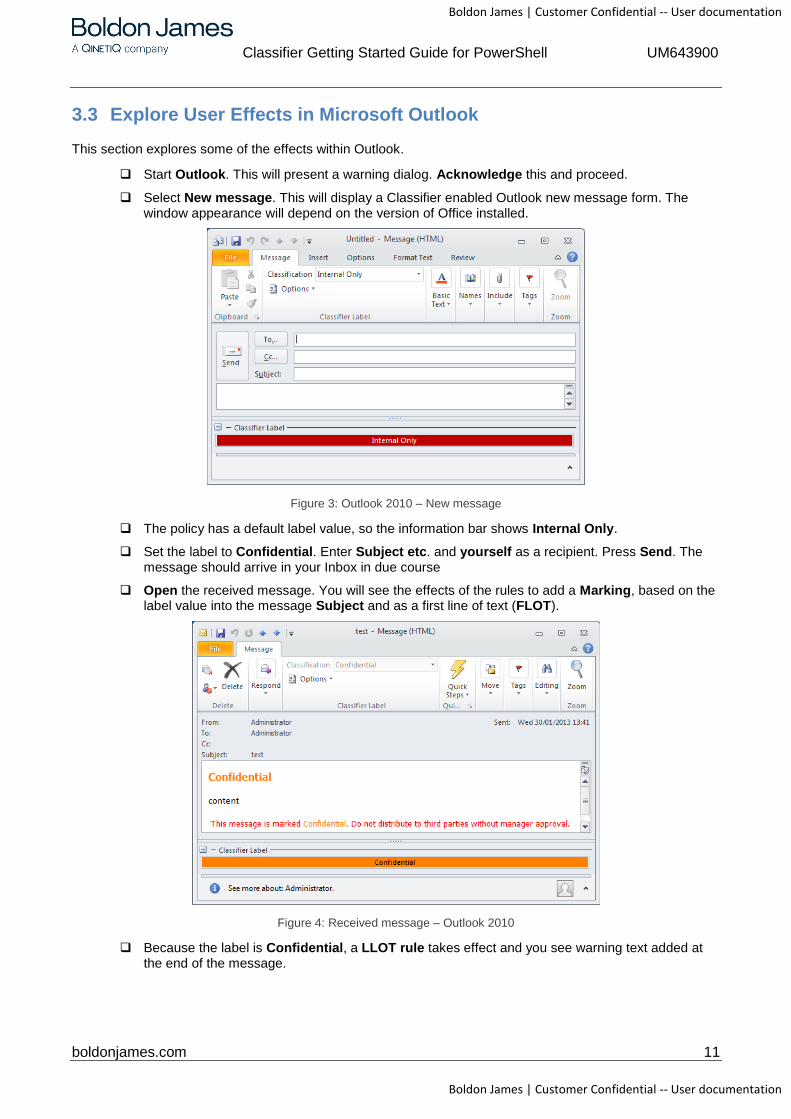
Select New message. This will display a Classifier enabled Outlook new message form. The window appearance will depend on the version of Office installed.
Figure 3: Outlook 2010 – New message
The policy has a default label value, so the information bar shows Internal Only.
Set the label to Confidential. Enter Subject etc. and yourself as a recipient. Press Send. The message should arrive in your Inbox in due course
Open the received message. You will see the effects of the rules to add a Marking, based on the label value into the message Subject and as a first line of text (FLOT).
Figure 4: Received message – Outlook 2010
Because the label is Confidential, a LLOT rule takes effect and you see warning text added at the end of the message.

Boldon James | Customer Confidential -- User documentation
Boldon James | Customer Confidential -- User documentation
Classifier Getting Started Guide for PowerShell UM643900
boldonjames.com 12
3.4 Terminate Test Mode
Ensure that all the Classifier enabled applications, Word, Excel, PowerPoint and Outlook, are closed. Click the End Test Mode button in the Classifier Test Mode Administration utility
3.5 Tidy up
You can explore further features as outlined in the next section. When you have finished exploring features,
you will need to remove this example configuration before proceeding to develop a configuration for your
environment.
Remove the ‘Quick Start’ Label Configuration and any licences in use with the cmdlet Remove-LabelConfiguration. Note a confirmation prompt appears.
Boldon James | Customer Confidential -- User documentation
Boldon James | Customer Confidential -- User documentation
Classifier Getting Started Guide for PowerShell UM643900
boldonjames.com 13
4 WHAT NEXT
You may find it informative to explore various areas of the configuration, and to look at some of the key items
within this example configuration. For example:
Feature Template Settings
Selector Library One selector named ‘Classification’ is defined with associated values:
[Non-business / Business / Confidential / Internal Only (Default)]
Marking Library Various marking formats are pre-configured.
Policies A single policy is defined called MyCompanyClassification so all users would be presented with the same user experience (e.g. the same label choices).
Includes the ‘Classification’ Selector and various values
Defines various rules including
Always add a First Line of Text (FLOT) to Outlook emails.
Add a particular Last Line of Text (LLOT) if the ‘Classification’ selector is ‘Confidential’
Various other rules are included that will only become active when a suitable licence (e.g. Office Classifier) is applied, or other options (e.g. Clearance Check email domains) are enabled and configured.
4.1 Exploring Selectors
Use the Get-Selector cmdlet without parameters to view all selectors in the selector library.
Use the Get-Selector cmdlet with the parameter –Name Classification to view the ‘Classification’
selector.
Use the Get-SelectorValue cmdlet with the parameter –SelectorName Classification to view all the
values for the ‘Classification’ selector.
Use the Get-SelectorValue cmdlet with the parameters –SelectorName Classification –ValueName
Non-Business to view the ‘Non-Business’ value for the ‘Classification’ selector.
Pipe the Get-Selector cmdlet with the parameter –Name Classification into Format-List –Property * to
view all the properties on the ‘Classification’ selector object.
4.2 Exploring Marking Formats
Use the Get-MarkingFormat cmdlet without parameters to view all marking formats in the marking
format library
Use the Get-MarkingFormat cmdlet with the parameter –Name FLOT to view the first line of text
marking format.
4.3 Exploring Policies
Use the Get-Policy cmdlet without parameters to view all policies for the configuration
Use the Get-Policy cmdlet with the parameter –Name MyCompanyClassification and pipe the result
into Format-List –Property * to view all the properties on the classifier policy object
Use the Get-PolicySelector cmdlet with the parameter –PolicyName MyCompanyClassification to view
all selectors associated with the policy.
Use the Get-PolicySelectorValue cmdlet with the parameters –PolicyName MyCompanyClassification
–SelectorName Classification to view all selector values associated with the policy.
Boldon James | Customer Confidential -- User documentation
Boldon James | Customer Confidential -- User documentation
Classifier Getting Started Guide for PowerShell UM643900
boldonjames.com 14
4.4 Experiment with the Test Configuration
Try the following exercises:
4.4.1 Exercise 1: Add a Selector Value
Task:
Add an additional value to the ‘Classification’ selector and make it available to the
‘MyCompanyClassification’ policy
Outline Steps:
Use the New-SelectorValue cmdlet to create a new value for the ‘Classification’ selector.
Verify the value has been added by using the Get-SelectorValue cmdlet with the parameter
–SelectorName Classification to view all the values for the ‘Classification’ selector.
Verify the value is unselected for the policy by using the Get-PolicySelectorValue cmdlet with the
parameters –PolicyName MyCompanyClassification –SelectorName Classification to view all
‘Classification’ selector values associated with the policy.
Enable the value within the policy by using the Set-PolicySelectorValue cmdlet with appropriate
parameters to identify the value along with the –Selected:$true parameter
Verify the value using the Get-PolicySelectorValue cmdlet with the parameters –PolicyName
MyCompanyClassification –SelectorName Classification to view all ‘Classification’ selector values
associated with the policy.
4.4.2 Exercise 2: Add a New Selector and Values
Task:
Add a second selector with a couple of values to the Selector Library and then make that available to
the ‘MyCompanyClassification’ policy.
Outline Steps:
Use the New-Selector cmdlet to create a new selector
Use the New-SelectorValue cmdlet to create two values for the selector just created
Verify the values by using the Get-SelectorValue cmdlet with a parameter identifying the new selector.
Add the new selector to the policy using the Add-PolicySelector cmdlet with parameters identifying the
policy and the new selector.
Verify the selector and values by using the Get-PolicySelectorValue cmdlet with the parameters
identifying the policy and the new selector.
4.4.3 Exercise 3: Add a New Selector and Values
Task:
Add a second selector with a couple of values to the Selector Library and then make that available to
the ‘MyCompanyClassification’ policy.
Outline Steps:
Use the New-Selector cmdlet to create a new selector
Use the New-SelectorValue cmdlet to create two values for the selector just created
Verify the values by using the Get-SelectorValue cmdlet with a parameter identifying the new selector.
Boldon James | Customer Confidential -- User documentation
Boldon James | Customer Confidential -- User documentation
Classifier Getting Started Guide for PowerShell UM643900
boldonjames.com 15
Add the new selector to the policy using the Add-PolicySelector cmdlet with parameters identifying the
policy and the new selector.
Verify the selector and values by using the Get-PolicySelectorValue cmdlet with the parameters identifying the policy and the new selector.
4.4.4 Exercise 4: Publish the Modifications as a Test Configuration
Task:
Publish the modified configuration as a Test Configuration and preview the effects of modified
configuration on the end-user experience.
Outline Steps:
Follow the steps provided in section 3.1 but this time publish the configuration with a different name,
e.g. Publish-ServerConfiguration –Location TestFolder –TestName ‘Quick Start Modified’ –Reason
‘Modifications to the Quick Start Configuration’
Follow the steps provided in section 3.2 to invoke the Classifier Test Mode Administration utility on
the machine that has your Classifier Applications
Follow the steps in Sections 3.3 and 3.4 to explore some of the effects of your modified configuration
within Outlook.


![[Webinar] PowerShell series part 3 – PowerShell and WMI](https://img.dokumen.tips/doc/110x75/559b61c31a28ab125f8b47a2/webinar-powershell-series-part-3-powershell-and-wmi.jpg)