Embed Size (px)
Citation preview

Clarius Ultrasound Scanner User Manual

Disclaimer:
This disclaimer extends to all printed matter accompanying the Clarius Ultrasound Scanner.
This manual is licensed under the Clarius software and maintenance agreement. You may not use this manual except in compliance with the license. The information contained in these materials is proprietary and confidential to Clarius Mobile Health Corp. (“Clarius“) and is provided for the sole use of the individual or entity to whom it is addressed and therefore these materials must be kept in the strictest confidence. No portion of this manual may be copied, reproduced, republished, modified, sold, disclosed, or distributed without the prior written permission of Clarius. Unauthorized copying or distribution of this manual, in addition to infringing copyright, may reduce the ability of Clarius to provide updates and current information to users.
Clarius has taken care to ensure the accuracy of this document, however, revisions may not be possible in all situations. Information in this document may be subject to change without notice, and Clarius assumes no liability for errors or omissions. Clarius reserves the right to make changes without further notice to any products herein to improve reliability, function, or design. Clarius may make improvements or changes in the products or programs described in this document at any time.
These materials may contain third-party copyright and/or trademark materials, the use of which has not always been specifically authorized by the intellectual property owner. All copyrights and/or trademarks contained in these materials are the sole and exclusive property of their respective owners.
The Clarius logo is a registered trademark and is the sole and exclusive property of Clarius.
All names used in Clarius (whether online, in print, or any other media) are fictitious and are used herein for the purposes of example and demonstration on how to use the Clarius Ultrasound Scanner. Any similarity to real people is a coincidence.
Copyright © 2017 Clarius. All rights reserved.
Published in Canada. 15-03-00001
Table of Contents
About This Manual ........................................................................................................ 1Target Audience...................................................................................................................1
Document Conventions .....................................................................................................2
Touch Gestures........................................................................................................................2
Icons...........................................................................................................................................3
Symbols.....................................................................................................................................3
Chapter 1: About the Clarius Ultrasound Scanner .....................................9
Scanner Description ................................................................................................ 10Scanner Dimensions................................................................................................ 11Product Usage........................................................................................................... 12
Indications for Use .........................................................................................................12
Contraindications...........................................................................................................20
Hardware.................................................................................................................... 20
Purchases & Upgrades ..................................................................................................20
Warranty...........................................................................................................................20
Disposal ............................................................................................................................20
Security ...................................................................................................................... 21
Information Security......................................................................................................21
Network Security ............................................................................................................21
Confidentiality ................................................................................................................22
Integrity ............................................................................................................................22
Availability.......................................................................................................................23
Accountability .................................................................................................................23
Technical Features................................................................................................... 23System Requirements............................................................................................. 23
Chapter 2: A Quick Tour ............................................................................25
Quick Start ................................................................................................................. 25Overview of the Interface...................................................................................... 26
Icons ..................................................................................................................................26
Menu Icons............................................................................................................................... 26
i

Clarius Ultrasound Scanner
Tools Icons................................................................................................................................27
Status Icons ..............................................................................................................................28
Menu Options..................................................................................................................29
Support......................................................................................................................................29
Settings......................................................................................................................................30
Exams.........................................................................................................................................31
About..........................................................................................................................................31
Sign Out.....................................................................................................................................32
Screen Overview.......................................................................................................32
Sign-in Page.....................................................................................................................32
Scanners Page.................................................................................................................33
Workflows Page..............................................................................................................34
Patient Demographics ..................................................................................................35
Indications Page .............................................................................................................36
Imaging Page...................................................................................................................37
Review Page ....................................................................................................................37
Impressions Page ...........................................................................................................38
System Capabilities..................................................................................................39
Status Lights....................................................................................................................39
Audible Notifications ....................................................................................................39
Sleep Mode......................................................................................................................40
Auto Shutdown ...............................................................................................................40
Scanner Locator..............................................................................................................40
Chapter 3: Using the Clarius Ultrasound Scanner ..................................... 42
Downloading the Clarius Ultrasound App ..........................................................42
Apple iOS .........................................................................................................................42
Android™ .........................................................................................................................43
Updating the Clarius Ultrasound Scanner ..........................................................43
Software Updates ..........................................................................................................43
Firmware Updates..........................................................................................................43
Inserting & Removing the Battery ........................................................................44
Inserting the Battery .....................................................................................................44
Removing the Battery ...................................................................................................44
Turning the System on & off..................................................................................44
Starting the Clarius Ultrasound App..........................................................................44
Exiting the Clarius Ultrasound App............................................................................45
Signing in & out ........................................................................................................45
Signing in .........................................................................................................................45
Version 2.1.0 January 18, 2017 ii

Clarius Ultrasound Scanner
Signing out.......................................................................................................................45
Connecting Your Smart Device to a Clarius Scanner .......................................45
Connecting Android™ Devices to Scanners ............................................................46
Connecting Apple iOS Devices to Scanners ............................................................47
Managing Exams .......................................................................................................47
Starting New Exams.......................................................................................................48
Pausing an Exam.............................................................................................................49
Ending an Exam ..............................................................................................................49
Resuming a Paused Exam.............................................................................................49
Managing Patient Information...............................................................................50
Entering Patient Information ......................................................................................50
Populating Indications..................................................................................................50
Selecting Scanning Modes......................................................................................50
B-Mode .............................................................................................................................50
Imaging .......................................................................................................................51
Adjusting Gain ................................................................................................................51
Turning Auto-Gain on & off ..................................................................................................51
Manually Adjusting Gain .......................................................................................................52
Using the Center Line....................................................................................................52
Freezing/Unfreezing Cineloops .................................................................................53
Saving Cineloops & Images .........................................................................................54
Cineloops ..................................................................................................................................54
Images........................................................................................................................................54
Zooming in & out ...........................................................................................................55
Changing Depth..............................................................................................................55
Rotating Images..............................................................................................................56
Using the Measuring Tools ..........................................................................................56
Measuring 2D Distance..........................................................................................................57
Measurement Accuracy .........................................................................................................58
Measurement Accuracy Table ..............................................................................................58
Review Findings........................................................................................................58
Reviewing Cineloops & Images ..................................................................................59
Deleting Items ................................................................................................................59
Populating Impressions...........................................................................................59Maintenance ..............................................................................................................59
Hardware Maintenance.................................................................................................60
Testing Scanners .....................................................................................................................60
Recharging Batteries ..............................................................................................................60
Storing Scanners .....................................................................................................................61
System Maintenance .....................................................................................................61
Version 2.1.0 January 18, 2017 iii
Clarius Ultrasound Scanner
Sending Activity Logs.............................................................................................................61
Help..............................................................................................................................62
Additional Training ........................................................................................................62
Error Messages ...............................................................................................................62
Need Help? ......................................................................................................................62
Chapter 4: Cleaning & Disinfecting .......................................................... 63
Cleaning the Clarius Scanner.................................................................................64Disinfecting the Clarius Scanner...........................................................................65
Intermediate Disinfection............................................................................................65
High-Level Disinfection................................................................................................66
Spaulding Classification .........................................................................................67
Classification Guidelines .............................................................................................67
Non-Critical Class...........................................................................................................67
Semi-Critical Class .........................................................................................................68
Chapter 5: Safety...................................................................................... 69
About Diagnostic Ultrasounds...............................................................................69
Interactions with Matter...............................................................................................69
History ..............................................................................................................................69
Studies..............................................................................................................................70
Benefits & Risks..............................................................................................................70
Safety Topics .............................................................................................................71
Product Safety ................................................................................................................71
Product Warnings....................................................................................................................71
Product Compatibility............................................................................................................72
Battery Safety .................................................................................................................72
Cleaning Safety ..............................................................................................................73
Cleaners & Disinfectants.......................................................................................................73
Minimizing the Effects of Residual Disinfectant ......................................................................73Factors Affecting Disinfectant Efficacy ......................................................................................74
Scanner Care ............................................................................................................................74
Clinical Safety .................................................................................................................75
Syringe Safety..........................................................................................................................75
Defibrillator Safety.................................................................................................................75
Biological Safety ............................................................................................................75
Latex...........................................................................................................................................75
Bioeffects..................................................................................................................................76
Thermal ...............................................................................................................................................76Mechanical (Non-Thermal) .............................................................................................................76
Version 2.1.0 January 18, 2017 iv

Clarius Ultrasound Scanner
ALARA Principle ..............................................................................................................77
Applying ALARA.......................................................................................................................78
Using System Controls to Implement ALARA ...................................................................78
Direct Controls ..................................................................................................................................78Indirect Controls ...............................................................................................................................78Receiver Controls .............................................................................................................................79User Responsibility ..........................................................................................................................79
Output Display.........................................................................................................................80
Display Standards ............................................................................................................................80Display Accuracy ..............................................................................................................................81Controls Affecting Display Indices ..............................................................................................82
Acoustics ...................................................................................................................................83
Acoustic Artifacts .............................................................................................................................84Acoustic Output & Measurement .................................................................................................84In Situ, Derated, & Water Value Intensities ...............................................................................84Conclusions Regarding Tissue Models & Equipment Survey ................................................85Acoustic Measurement Precision & Uncertainty ......................................................................86
Fire & Electrical Safety .................................................................................................87
Fire Safety.................................................................................................................................87
Electrical Safety.......................................................................................................................87
Electromagnetic Safety ................................................................................................88
Electromagnetic Compatibility............................................................................................88
Electrostatic Discharge Precautions...................................................................................89
Electromagnetic Emissions...................................................................................................89
Electromagnetic Immunity ...................................................................................................90
Electromagnetic Interference ..............................................................................................91
Separation Distance ...............................................................................................................91
Recommended Separation Distance ...........................................................................................91Avoiding Electromagnetic Interference .....................................................................................92
Chapter 6: References .............................................................................. 94
Compliance Statement............................................................................................94The Clarius Ultrasound Scanner ............................................................................94
Authorized Representative..........................................................................................94
Product Classification ...................................................................................................94
Product Serial Number..................................................................................................95
System Specifications...................................................................................................95
Scanner Specifications .................................................................................................96
Standards....................................................................................................................97
Acoustic ............................................................................................................................97
Biocompatibility.............................................................................................................97
Chemical ..........................................................................................................................97
Electrical Safety..............................................................................................................97
Labeling............................................................................................................................97
Version 2.1.0 January 18, 2017 v
Clarius Ultrasound Scanner
Quality ..............................................................................................................................98
Performance.............................................................................................................................98
Risk, Product Specification, Design Review, & Verification/Validation.....................98
Security & Privacy..........................................................................................................99
Wireless............................................................................................................................99
Acoustic Output Tables ...........................................................................................100
C3-45 Scanner ................................................................................................................100
C3-60 Scanner ................................................................................................................101
L7-38 Scanner.................................................................................................................102
Control Effects Guidance Documents..................................................................103Disinfectants & Cleaners ........................................................................................104
Compatibility Table Legend ........................................................................................104
Compatible Solutions for Scanners ...........................................................................104
Known Defects ..........................................................................................................105
Mobile App Software.....................................................................................................105
Embedded Software......................................................................................................106
Glossary of Terms.....................................................................................................106
Acoustic Outputs............................................................................................................106
Acoustic Artifacts ...........................................................................................................109
Version 2.1.0 January 18, 2017 vi
About This Manual
This document is licensed as part of the purchase of the Clarius Ultrasound Scanner and meetsinternational regulatory requirements such as the FDA. Use of this document by unauthorizedpersons is strictly prohibited.
This document contains the following information:
• About the Clarius Ultrasound Scanner: Describes the product, lists technical specifications, and its intended use.
• A Quick Tour: Shows you how to get started and begin scanning.
• Using the Clarius Ultrasound Scanner: Introduces you to the features and concepts, helps you set up your system, and explains the tasks you can perform.
• Cleaning & Disinfecting: Explains how to clean and disinfect your scanner.
• Safety: Outlines important safety standards, principles, and policies to follow when using the product.
• References: Offers information such as product standards, regulatory requirements, terms and conditions, glossary of terms, and acoustic output data.
Access to user documentation may be affected by: Internet availability and accessibility,website availability, and local electromagnetic interference.
Target Audience
This document is written for trained medical professionals who operate and maintain yourClarius Ultrasound Scanner. It contains instructions and reference material pertaining to theusage and maintenance of the product.
To obtain a printed copy of this manual at no additional cost, contact Clarius atwww.clarius.me/contact-us.
1
Clarius Ultrasound Scanner
Document Conventions
Touch Gestures
Gesture Title of gesture
Description
Drag Touch the screen with a finger and move the finger across the screen without lifting the finger.
Double tap Touch the screen briefly twice with the same finger.
Pinch Touch the screen with two fingers and move them toward each other.
Tap Touch a control with your finger.
Press and hold Touch the screen for a short time without moving your finger.
Spread Touch the screen with two fingers and move them apart.
Swipe Touch the screen with your finger and move the finger in a quick motion right, left, up, or down.
Version 2.1.0 January 18, 2017 2
Clarius Ultrasound Scanner
Icons
Symbols
You may see some of these symbols on your Clarius product, accessories, and packaging:
Icon Title of Icon Description
Alert Possible risks beyond the reasonable control of Clarius.
Do not do this This icon indicates actions to avoid.
Note This icon indicates informative material or helpful suggestions.
Symbol Title of Symbol
Description
Manufacturer Indicates the medical device manufacturer, as defined in EU Directives 90/385/EEC, 93/42/EEC and 98/79/EC.
Authorized representative in the European Community
Indicates the Authorized representative in the European Community.
Date of manufacture
Indicates the date when the medical device was manufactured.
Use-by date Indicates the date after which the medical device is not to be used.
Batch code Indicates the manufacturer's batch code so that the batch or lot can be identified.
Version 2.1.0 January 18, 2017 3
Clarius Ultrasound Scanner
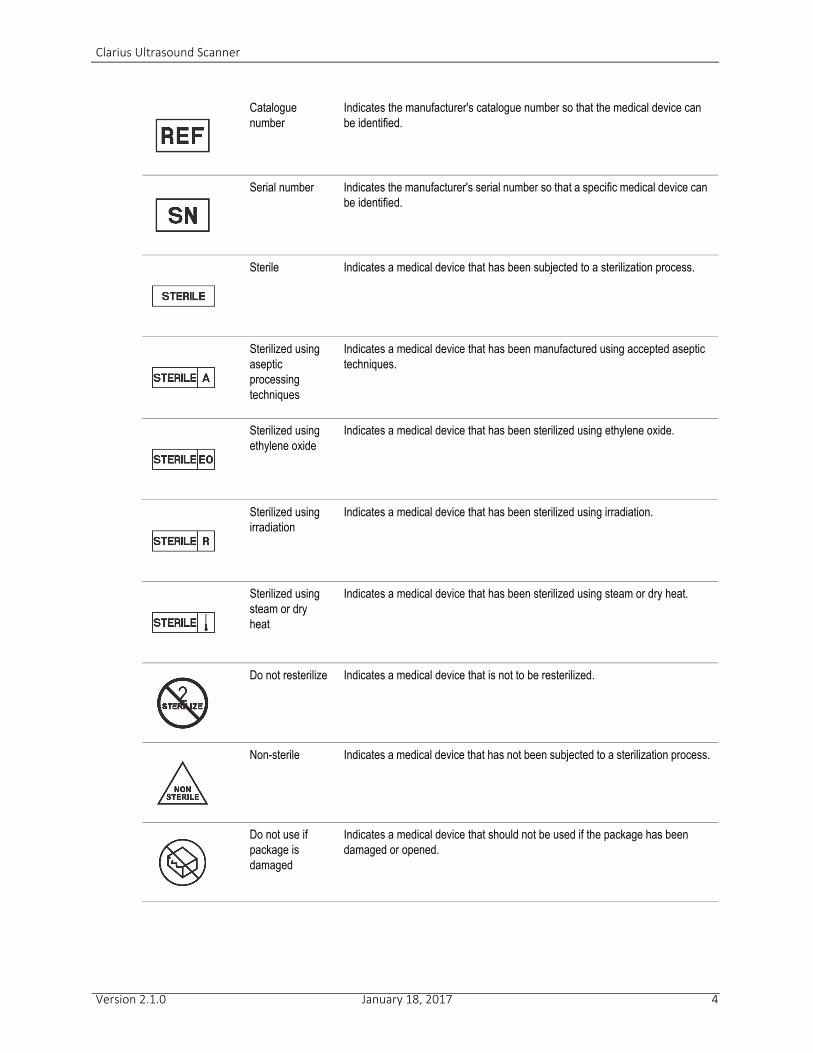
Catalogue number
Indicates the manufacturer's catalogue number so that the medical device can be identified.
Serial number Indicates the manufacturer's serial number so that a specific medical device can be identified.
Sterile Indicates a medical device that has been subjected to a sterilization process.
Sterilized using aseptic processing techniques
Indicates a medical device that has been manufactured using accepted aseptic techniques.
Sterilized using ethylene oxide
Indicates a medical device that has been sterilized using ethylene oxide.
Sterilized using irradiation
Indicates a medical device that has been sterilized using irradiation.
Sterilized using steam or dry heat
Indicates a medical device that has been sterilized using steam or dry heat.
Do not resterilize Indicates a medical device that is not to be resterilized.
Non-sterile Indicates a medical device that has not been subjected to a sterilization process.
Do not use if package is damaged
Indicates a medical device that should not be used if the package has been damaged or opened.
Version 2.1.0 January 18, 2017 4

Clarius Ultrasound Scanner
Sterile fluid path Indicates the presence of a sterile fluid path within the medical device in cases when other parts of the medical device, including the exterior, might not be supplied sterile.
Fragile, handle with care
Indicates a medical device that can be broken or damaged if not handled carefully.
Keep away from sunlight
Indicates a medical device that needs protection from light sources.
Protect from heat and radioactive sources
Indicates a medical device that needs protection from heat and radioactive sources.
Keep dry Indicates a medical device that needs to be protected from moisture.
Lower limit of temperature
Indicates the lower limit of temperature to which the medical device can be safely exposed.
Upper limit of temperature
Indicates the upper limit of temperature to which the medical device can be safely exposed.
Temperature limit
Indicates the temperature limits to which the medical device can be safely exposed.
Humidity limitation
Indicates the range of humidity to which the medical device can be safely exposed.
Atmospheric pressure limitation
Indicates the range of atmospheric pressure to which the medical device can be safely exposed.
Version 2.1.0 January 18, 2017 5
Clarius Ultrasound Scanner
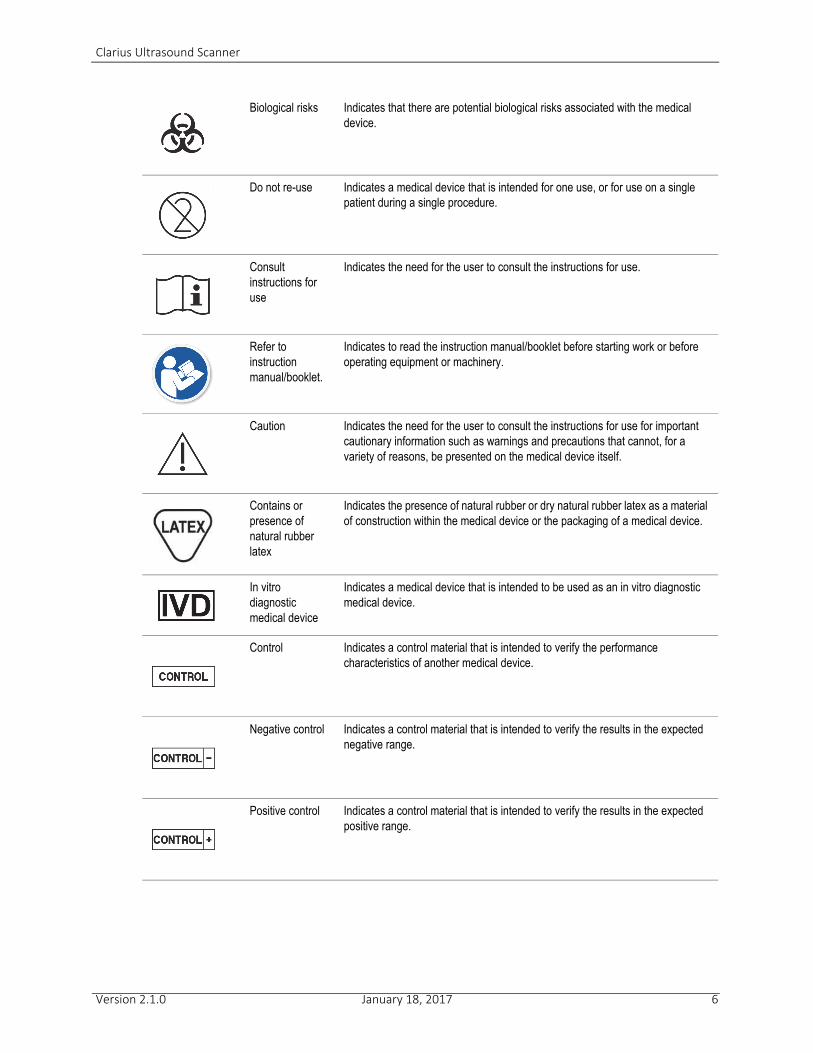
Biological risks Indicates that there are potential biological risks associated with the medical device.
Do not re-use Indicates a medical device that is intended for one use, or for use on a single patient during a single procedure.
Consult instructions for use
Indicates the need for the user to consult the instructions for use.
Refer to instruction manual/booklet.
Indicates to read the instruction manual/booklet before starting work or before operating equipment or machinery.
Caution Indicates the need for the user to consult the instructions for use for important cautionary information such as warnings and precautions that cannot, for a variety of reasons, be presented on the medical device itself.
Contains or presence of natural rubber latex
Indicates the presence of natural rubber or dry natural rubber latex as a material of construction within the medical device or the packaging of a medical device.
In vitro diagnostic medical device
Indicates a medical device that is intended to be used as an in vitro diagnostic medical device.
Control Indicates a control material that is intended to verify the performance characteristics of another medical device.
Negative control Indicates a control material that is intended to verify the results in the expected negative range.
Positive control Indicates a control material that is intended to verify the results in the expected positive range.
Version 2.1.0 January 18, 2017 6
Clarius Ultrasound Scanner
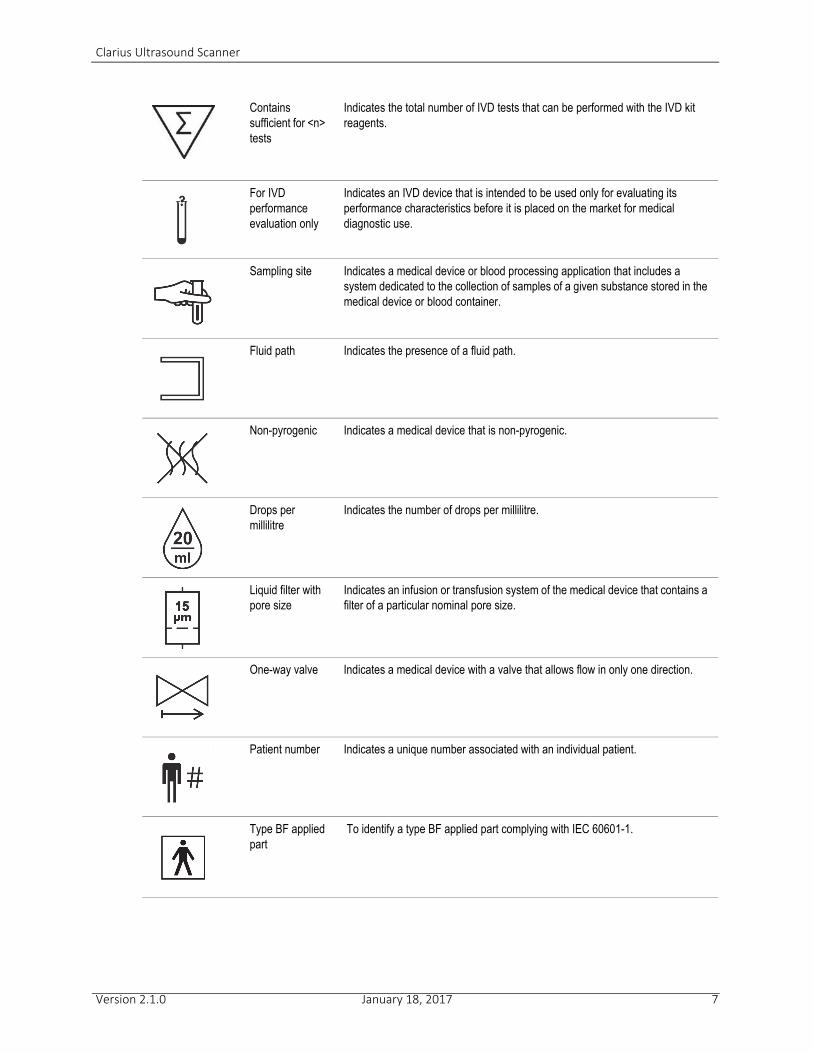
Contains sufficient for <n> tests
Indicates the total number of IVD tests that can be performed with the IVD kit reagents.
For IVD performance evaluation only
Indicates an IVD device that is intended to be used only for evaluating its performance characteristics before it is placed on the market for medical diagnostic use.
Sampling site Indicates a medical device or blood processing application that includes a system dedicated to the collection of samples of a given substance stored in the medical device or blood container.
Fluid path Indicates the presence of a fluid path.
Non-pyrogenic Indicates a medical device that is non-pyrogenic.
Drops per millilitre
Indicates the number of drops per millilitre.
Liquid filter with pore size
Indicates an infusion or transfusion system of the medical device that contains a filter of a particular nominal pore size.
One-way valve Indicates a medical device with a valve that allows flow in only one direction.
Patient number Indicates a unique number associated with an individual patient.
Type BF applied part
To identify a type BF applied part complying with IEC 60601-1.
Version 2.1.0 January 18, 2017 7

Clarius Ultrasound Scanner
Class II equipment
To identify equipment meeting the safety requirements specified for Class II equipment according to IEC 60536.
For indoor use only
To identify electrical equipment designed primarily for indoor use.
RoHS compliant To identify electrical and electronic equipment that meets the Restriction of Hazardous Substances (RoHS) Directive 2011/65/EU.
European Conformity
Conforms to European Council Directive 93/42/EEC.
Recyclable material
To indicate that the marked item or its material is part of a recovery or recycling process.
Waste Electrical and Electronic Equipment
Requires separate collection for electrical and electronic equipment in compliance with the Waste Electrical and Electronic Equipment (WEEE).
Directive. When accompanied by or , components of the device may contain lead or mercury, respectively, which must be recycled or disposed of in accordance with local, state, or federal laws. The backlight lamps in an LCD system monitor contain mercury.
Ingress protection rating
The equipment inside the enclosure is protected from tools and wires greater than 2.5 millimeters, and is also protected from immersion between 15 centimeters and 1 meter in depth.
Global Medical Device Nomenclature Code
A system of internationally agreed generic descriptors used to identify all medical device products.
Global Trade Item Number
An identifier to look up product information in a database, often by entering the number through a bar code scanner pointed at an actual product.
Model name Model name for the device.
Version 2.1.0 January 18, 2017 8

1
About the Clarius Ultrasound ScannerInstall, operate, and maintain this product according to the safety and operating procedures in this manual, and only for its intended purpose. Always use the information in this document with sound clinical judgment and best clinical procedures.
This product is subject to the law in the jurisdiction that the product is used. Install, use, and operate the product only in ways that adhere to applicable laws or regulations, which have the force of law.
• Using the product incorrectly, or for purposes other than those intended and expressly stated by Clarius, may relieve Clarius or its agents from all or some responsibility for resultant noncompliance, damage, or injury.
• Using portable and mobile radio-frequency (RF) communications equipment can affect the operation of medical equipment.
• Operating this system in the presence of flammable gases or anesthetics can cause an explosion.
• Install and operate medical equipment according to electromagnetic compatibility (EMC) guidelines.
• Users are responsible for image quality and diagnosis.
• This device complies with part 15 of the FCC rules. Operation is subject to the following two conditions: (1) this device may not cause harmful interference, and (2) this device must accept any interference received, including interference that may cause undesired operation.
• This product has demonstrated EMC compliance under conditions that included the use of compliant peripheral devices. It is important that you use compliant peripheral devices to reduce the possibility of causing interference to radios, televisions, and other electronic devices.
9
Clarius Ultrasound Scanner Scanner Description
Scanner Description
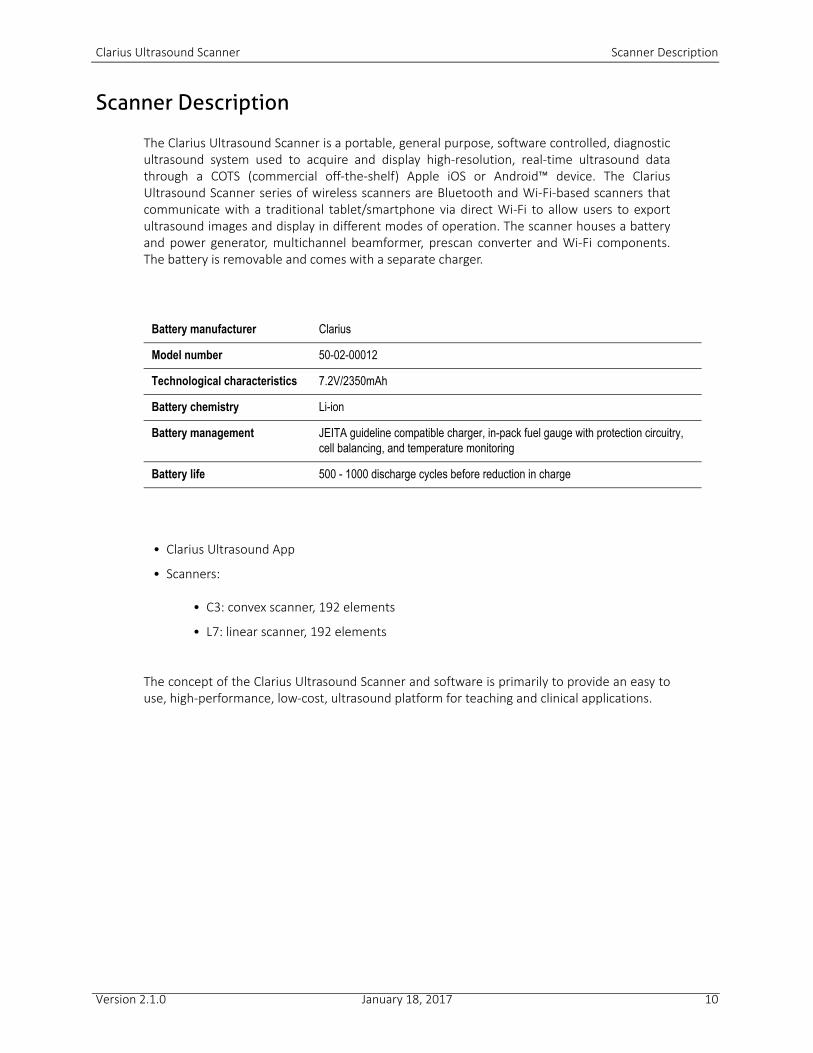
The Clarius Ultrasound Scanner is a portable, general purpose, software controlled, diagnostic ultrasound system used to acquire and display high-resolution, real-time ultrasound data through a COTS (commercial off-the-shelf) Apple iOS or Android™ device. The Clarius Ultrasound Scanner series of wireless scanners are Bluetooth and Wi-Fi-based scanners that communicate with a traditional tablet/smartphone via direct Wi-Fi to allow users to export ultrasound images and display in different modes of operation. The scanner houses a battery and power generator, multichannel beamformer, prescan converter and Wi-Fi components. The battery is removable and comes with a separate charger.
• Clarius Ultrasound App
• Scanners:
• C3: convex scanner, 192 elements
• L7: linear scanner, 192 elements
The concept of the Clarius Ultrasound Scanner and software is primarily to provide an easy to use, high-performance, low-cost, ultrasound platform for teaching and clinical applications.
Battery manufacturer Clarius
Model number 50-02-00012
Technological characteristics 7.2V/2350mAh
Battery chemistry Li-ion
Battery management JEITA guideline compatible charger, in-pack fuel gauge with protection circuitry, cell balancing, and temperature monitoring
Battery life 500 - 1000 discharge cycles before reduction in charge
Version 2.1.0 January 18, 2017 10
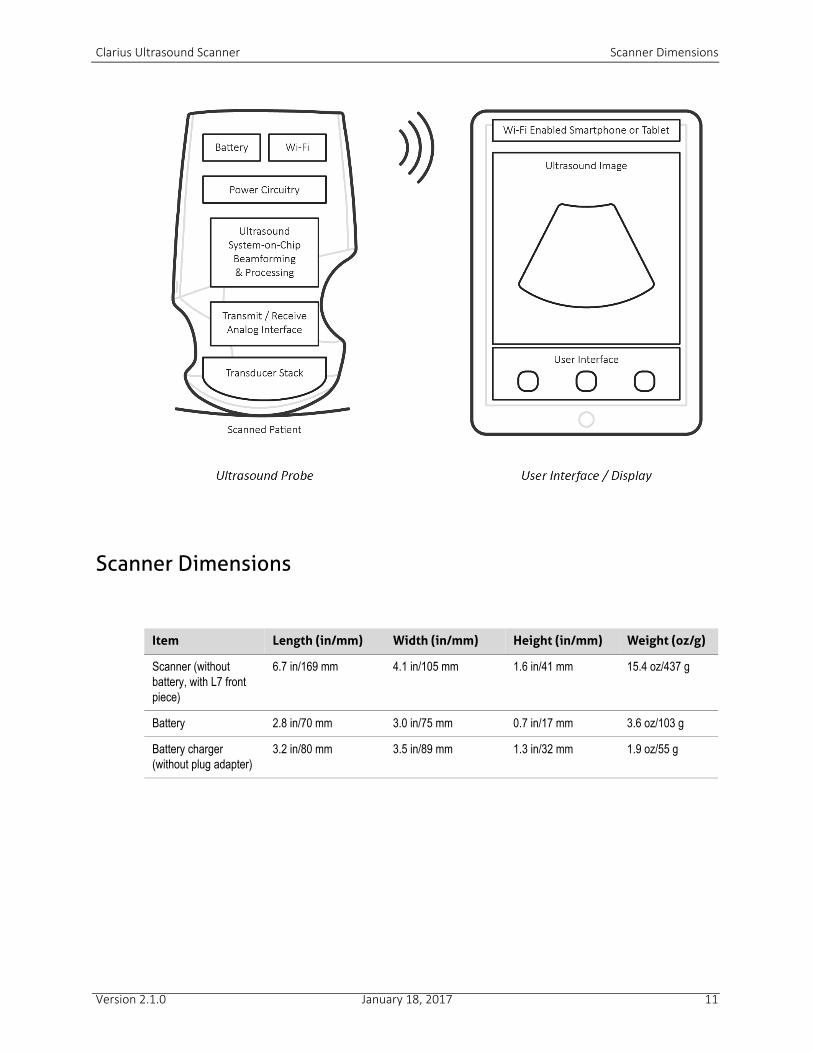
Clarius Ultrasound Scanner Scanner Dimensions
Scanner Dimensions
Item Length (in/mm) Width (in/mm) Height (in/mm) Weight (oz/g)
Scanner (without battery, with L7 front piece)
6.7 in/169 mm 4.1 in/105 mm 1.6 in/41 mm 15.4 oz/437 g
Battery 2.8 in/70 mm 3.0 in/75 mm 0.7 in/17 mm 3.6 oz/103 g
Battery charger (without plug adapter)
3.2 in/80 mm 3.5 in/89 mm 1.3 in/32 mm 1.9 oz/55 g
Version 2.1.0 January 18, 2017 11

Clarius Ultrasound Scanner Product Usage
Product Usage
Indications for Use
The Clarius Ultrasound Scanner is a software-based ultrasound imaging system and accessories intended for use in Point-of-Care Imaging of Medical Conditions on the general public.
Point-of-Care clinical applications include:
• Emergency triage exam to look at trauma conditions
• Procedure guidance to guide needles into the body; and
• Other targeted diagnostic and measurement applications: fetal, fetal echo, abdominal, small organ, musculo-skeletal (conventional), musculo-skeletal (superficial), urology, gynecology, cardiac adult, cardiac pediatric, peripheral vessel, pediatric, carotid
• The Clarius Ultrasound Scanner is intended for use in environments where healthcare is provided by trained medical professionals. The device is not intended for use in emergency medical service, ambulance, or aircraft.
Users will be trained medical professionals (e.g., doctors, nurses, technicians).
Targeted specialties shall include; Emergency Medicine, Anesthesia, Medical School Education, and Veterinary applications.1
1. Not applicable in US.
Version 2.1.0 January 18, 2017 12
Clarius Ultrasound Scanner Product Usage
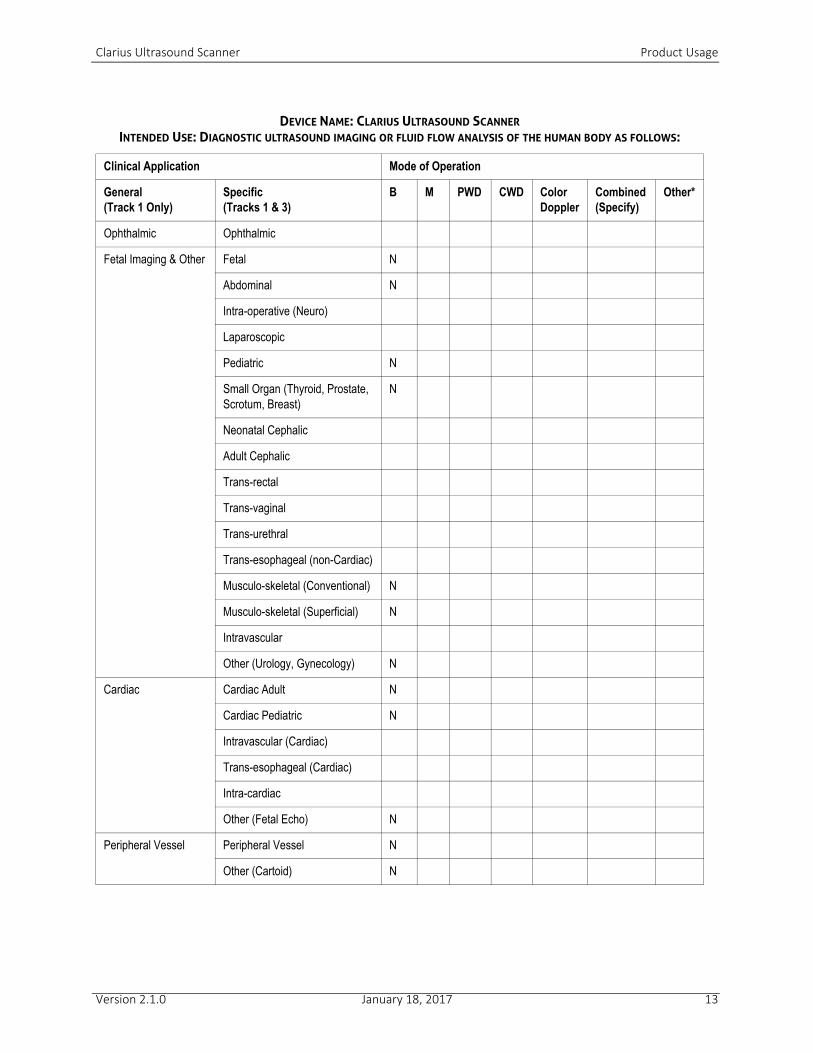
DEVICE NAME: CLARIUS ULTRASOUND SCANNER
INTENDED USE: DIAGNOSTIC ULTRASOUND IMAGING OR FLUID FLOW ANALYSIS OF THE HUMAN BODY AS FOLLOWS:
Clinical Application Mode of Operation
General (Track 1 Only)
Specific (Tracks 1 & 3)
B M PWD CWD Color Doppler
Combined (Specify)
Other*
Ophthalmic Ophthalmic
Fetal Imaging & Other Fetal N
Abdominal N
Intra-operative (Neuro)
Laparoscopic
Pediatric N
Small Organ (Thyroid, Prostate, Scrotum, Breast)
N
Neonatal Cephalic
Adult Cephalic
Trans-rectal
Trans-vaginal
Trans-urethral
Trans-esophageal (non-Cardiac)
Musculo-skeletal (Conventional) N
Musculo-skeletal (Superficial) N
Intravascular
Other (Urology, Gynecology) N
Cardiac Cardiac Adult N
Cardiac Pediatric N
Intravascular (Cardiac)
Trans-esophageal (Cardiac)
Intra-cardiac
Other (Fetal Echo) N
Peripheral Vessel Peripheral Vessel N
Other (Cartoid) N
Version 2.1.0 January 18, 2017 13
Clarius Ultrasound Scanner Product Usage
N = new indication; P = previously cleared by FDA; E = added under this appendix
* Examples of other modes of operation may include: A-mode, Amplitude Doppler, 3-D Imaging, Harmonic Imaging, Tissue Motion Doppler, and Color Velocity Imaging
Additional Comments: Includes imaging to assist in the placement of needles and catheters in vascular or other anatomical structures and imaging guidance for nerve block procedures.
DEVICE NAME: CLARIUS ULTRASOUND SCANNER
INTENDED USE: DIAGNOSTIC ULTRASOUND IMAGING OR FLUID FLOW ANALYSIS OF THE HUMAN BODY AS FOLLOWS:
Version 2.1.0 January 18, 2017 14
Clarius Ultrasound Scanner Product Usage
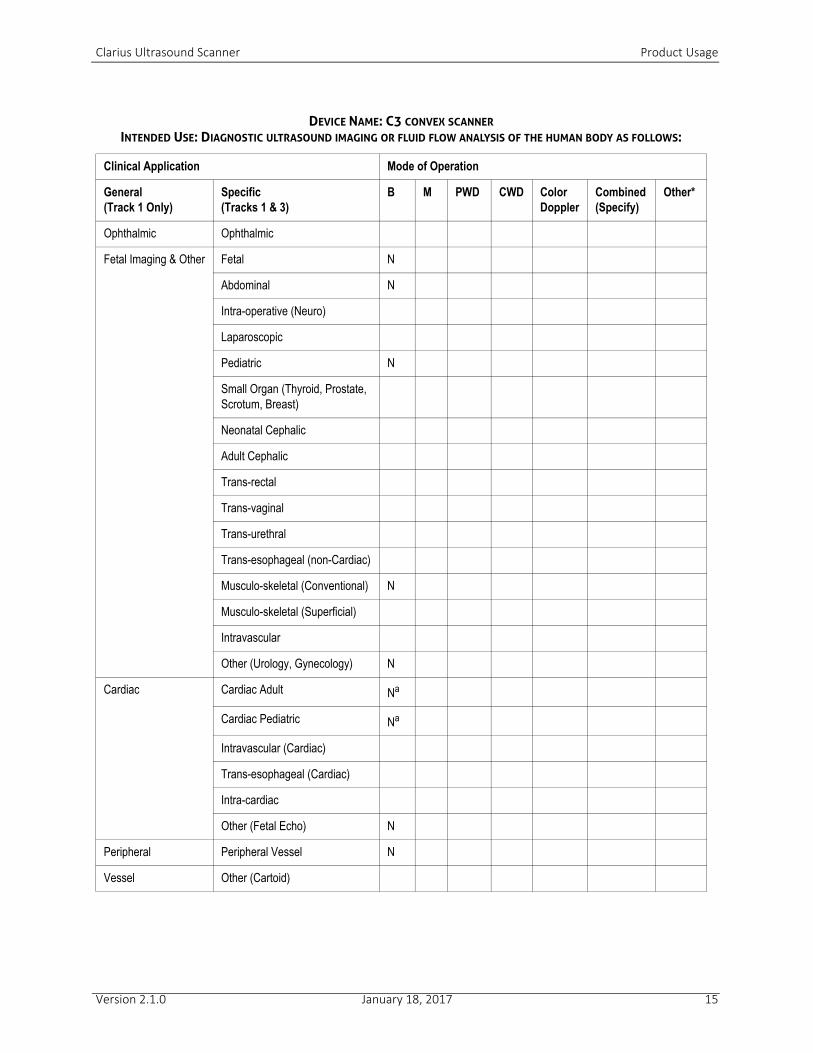
DEVICE NAME: C3 CONVEX SCANNER
INTENDED USE: DIAGNOSTIC ULTRASOUND IMAGING OR FLUID FLOW ANALYSIS OF THE HUMAN BODY AS FOLLOWS:
Clinical Application Mode of Operation
General (Track 1 Only)
Specific (Tracks 1 & 3)
B M PWD CWD Color Doppler
Combined (Specify)
Other*
Ophthalmic Ophthalmic
Fetal Imaging & Other Fetal N
Abdominal N
Intra-operative (Neuro)
Laparoscopic
Pediatric N
Small Organ (Thyroid, Prostate, Scrotum, Breast)
Neonatal Cephalic
Adult Cephalic
Trans-rectal
Trans-vaginal
Trans-urethral
Trans-esophageal (non-Cardiac)
Musculo-skeletal (Conventional) N
Musculo-skeletal (Superficial)
Intravascular
Other (Urology, Gynecology) N
Cardiac Cardiac Adult Na
Cardiac Pediatric Na
Intravascular (Cardiac)
Trans-esophageal (Cardiac)
Intra-cardiac
Other (Fetal Echo) N
Peripheral Peripheral Vessel N
Vessel Other (Cartoid)
Version 2.1.0 January 18, 2017 15
Clarius Ultrasound Scanner Product Usage
N = new indication; P = previously cleared by FDA; E = added under this appendix
* Examples of other modes of operation may include: A-mode, Amplitude Doppler, 3-D Imaging, Harmonic Imaging, Tissue Motion Doppler, and Color Velocity Imaging
Additional Comments: Includes imaging to assist in the placement of needles and catheters in vascular or other anatomical structures and imaging guidance for nerve block procedures.
a. Not applicable in US.
DEVICE NAME: C3 CONVEX SCANNER
INTENDED USE: DIAGNOSTIC ULTRASOUND IMAGING OR FLUID FLOW ANALYSIS OF THE HUMAN BODY AS FOLLOWS:
Version 2.1.0 January 18, 2017 16

Clarius Ultrasound Scanner Product Usage
SYSTEM: L7: LINEAR SCANNER
INTENDED USE: DIAGNOSTIC ULTRASOUND IMAGING OR FLUID FLOW ANALYSIS OF THE HUMAN BODY AS FOLLOWS:
Clinical Application Mode of Operation
General (Track 1 Only)
Specific (Tracks 1 & 3)
B M PWD CWD Color Doppler
Combined (Specify)
Other*
Ophthalmic Ophthalmic
Fetal Imaging & Other Fetal
Abdominal N
Intra-operative (Neuro)
Laparoscopic
Pediatric N
Small Organ (Thyroid, Prostate, Scrotum, Breast)
N
Neonatal Cephalic
Adult Cephalic
Trans-rectal
Trans-vaginal
Trans-urethral
Trans-esophageal (non-Cardiac)
Musculo-skeletal (Conventional) N
Musculo-skeletal (Superficial) N
Intravascular
Other (Urology, Gynecology)
Cardiac Cardiac Adult N
Cardiac Pediatric N
Intravascular (Cardiac)
Trans-esophageal (Cardiac)
Intra-cardiac
Other (Fetal Echo)
Peripheral Peripheral Vessel N
Vessel Other (Cartoid) N
Version 2.1.0 January 18, 2017 17

Clarius Ultrasound Scanner Product Usage
N = new indication; P = previously cleared by FDA; E = added under this appendix
* Examples of other modes of operation may include: A-mode, Amplitude Doppler, 3-D Imaging, Harmonic Imaging, Tissue Motion Doppler, and Color Velocity Imaging
Additional Comments: Includes imaging to assist in the placement of needles and catheters in vascular or other anatomical structures and imaging guidance for nerve block procedures.
SYSTEM: L7: LINEAR SCANNER
INTENDED USE: DIAGNOSTIC ULTRASOUND IMAGING OR FLUID FLOW ANALYSIS OF THE HUMAN BODY AS FOLLOWS:
Version 2.1.0 January 18, 2017 18
Clarius Ultrasound Scanner Product Usage
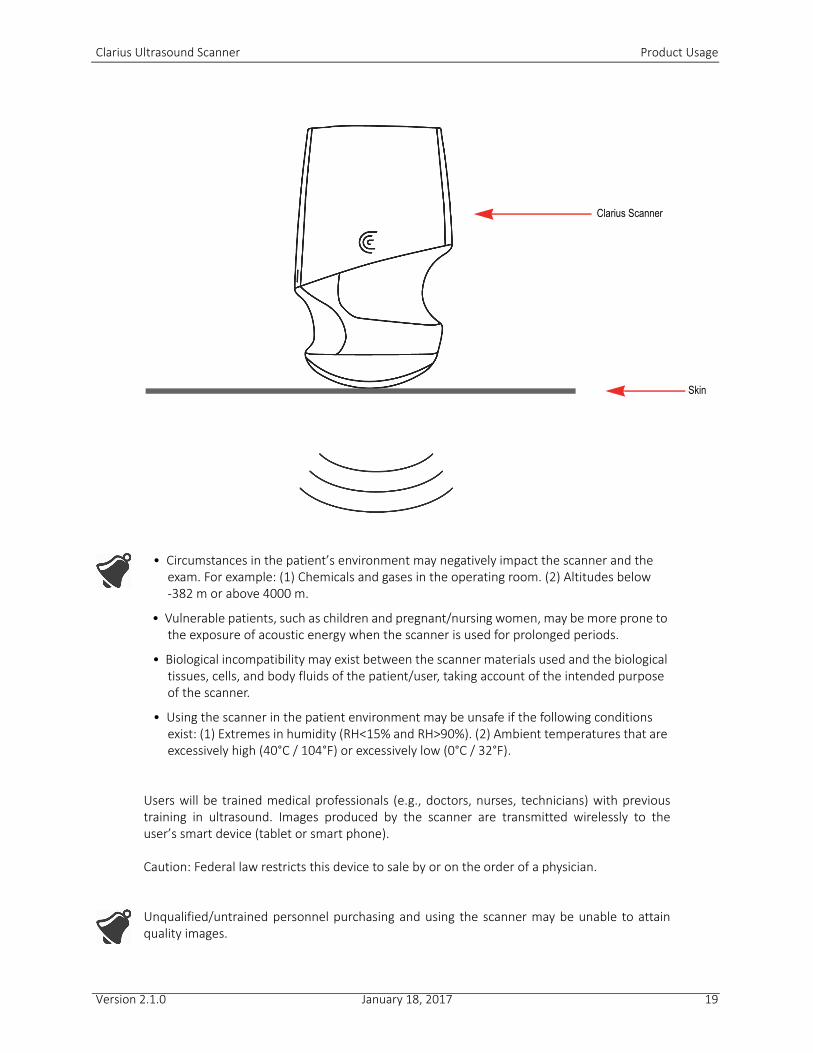
• Circumstances in the patient’s environment may negatively impact the scanner and the exam. For example: (1) Chemicals and gases in the operating room. (2) Altitudes below -382 m or above 4000 m.
• Vulnerable patients, such as children and pregnant/nursing women, may be more prone to the exposure of acoustic energy when the scanner is used for prolonged periods.
• Biological incompatibility may exist between the scanner materials used and the biological tissues, cells, and body fluids of the patient/user, taking account of the intended purpose of the scanner.
• Using the scanner in the patient environment may be unsafe if the following conditions exist: (1) Extremes in humidity (RH<15% and RH>90%). (2) Ambient temperatures that are excessively high (40°C / 104°F) or excessively low (0°C / 32°F).
Users will be trained medical professionals (e.g., doctors, nurses, technicians) with previous training in ultrasound. Images produced by the scanner are transmitted wirelessly to the user’s smart device (tablet or smart phone).
Caution: Federal law restricts this device to sale by or on the order of a physician.
Unqualified/untrained personnel purchasing and using the scanner may be unable to attain quality images.
Skin
Clarius Scanner
Version 2.1.0 January 18, 2017 19
Clarius Ultrasound Scanner Hardware
Contraindications
Do not use the Clarius Ultrasound Scanner in the following situations. Doing so may produce images with inaccurate results:
• Patients who have had surgery, which may have changed the composition of the examining tissue (for example, a mastectomy), as this could skew or alter the measured density.
• Patients whose bodies contain foreign artifacts (for example, implants), in the examining tissue.
• Ophthalmic use or any use causing the acoustic beam to pass through the eye.
• Intra-operative use (e.g., defined as introducing a scanner into a surgical incision or burr hole).
• Endocavitary use; (i.e., defined as introducing a scanner within a (body) cavity or organ. E.g. an atrium, esophagus, rectum or vagina).
• Imaging an open wound.
• During transportation of a patient to a professional healthcare facility, or between professional healthcare facilities.
• At the scene of an emergency outside of a professional healthcare facility.
Hardware
Purchases & Upgrades
Your scanner has a lifetime of five years.
To order additional supplies and accessories, go to www.clarius.me/contact-us and contact Clarius.
Warranty
The Clarius Ultrasound Scanner includes a one-year warranty. To purchase extended warranty programs, go to www.clarius.me/contact-us and contact Clarius.
Disposal
Clarius is an active participant in the protection of the natural environment. The equipment is designed and manufactured according to environmental protection guidelines, and the disposal of this equipment is intended to follow the same principles. The equipment materials
Version 2.1.0 January 18, 2017 20
Clarius Ultrasound Scanner Security
that are essential for functionality are also harmful to the natural environment, therefore, you must dispose these materials appropriately.
For proper disposal of the scanner or any of its parts, dispose it in accordance with local, state, and federal regulations. Alternatively, you can return it to Clarius.
The improper disposal of scanners (when the battery is no longer working or the scanner has exceeded its shelf life) adds hazardous materials to our landfills.
Security
Information Security
When entering data using the Clarius Ultrasound App, it is your responsibility to protect your security credentials (e.g. passwords) and the personal information of patients (e.g. names).
Network Security
When connecting your smart device, use a network that supports Wi-Fi 802.11n. We recommend that you secure this network using WPA (Wi-Fi Protected Access) or WPA2 (Wi-Fi Protected Access II) as your security protocol.
For information on setting up your wireless network security, refer to your network equipment’s documentation.
You may run into situations where no wireless access point is available. Using an untrusted wireless access point may allow malicious parties to see your Wi-Fi signals, perform harmful actions, and view communications between the two smart devices. When no secure access point is available, operate the Clarius Ultrasound App in Wi-Fi Direct mode, and it will automatically set up encryption.
For security purposes:
• Use secure passwords.
• Use secure wireless equipment using the latest firmware and software, and secure protocols.
• Lock your smart devices.
Version 2.1.0 January 18, 2017 21

Clarius Ultrasound Scanner Security
The following actions could introduce new risks to patients, operators, and third parties. It is your organization's responsibility to identify, analyze, evaluate, and control these risks:
• Changing network configurations.
• Connecting to additional networks or disconnecting from existing networks.
• Upgrading to new equipment or updating existing equipment.
Confidentiality
Confidentiality of information is assured as follows:
• The scanner contains no patient-identifiable information.
• When the scanner connects to a wireless network, it encrypts and stores the Wi-Fi password.
• The data transferred between the smart device and the Clarius Ultrasound App is encrypted.
• Image data contains no patient- or user-identifiable information, and is transmitted in unencrypted form. If you want this data encrypted, connect to a:
• Wi-Fi network where only trusted parties are permitted. The Wi-Fi network encrypts all image data sent from other Wi-Fi networks.
• Wi-Fi Direct network. The Wi-Fi Direct network encrypts all image data, and because no other users are on the Wi-Fi Direct network, the image data is confidential.
• The smart device stores no patient or user data on disk.
Integrity
Integrity of the data transmitted between the smart device and the Clarius Ultrasound App is assured as follows:
• Authenticated encryption prevents malicious users from intercepting and modifying data.
• Integrity checks ensure completion and validity of data received. If any data is incomplete or invalid, it is discarded.
• TCP channels used over Wi-Fi ensures that data is delivered correctly. For transmitting image data, a UDP channel is used.
Version 2.1.0 January 18, 2017 22
Clarius Ultrasound Scanner Technical Features
Availability
If Wi-Fi connection is unattainable (e.g. Wi-Fi access points are unavailable or the network is down), use Wi-Fi Direct network, which is managed by the smart device. Because Wi-Fi Direct network is a peer-to-peer connection using the Wi-Fi protocol, it disallows other users from connecting, thereby reducing DDOS (Distributed Denial of Service) attacks.
If the Wi-Fi Direct network is disrupted, the smart device continues to monitor itself, and shuts down after a period of inactivity. This reduces acoustic energy transmission and battery usage.
Accountability
The concept of accountability does not apply to the Clarius Ultrasound Scanner. However, ownership (i.e. the active user) of a smart device is assigned to one user at a time. Once you begin using the smart device, no other user can connect to the same smart device. All data transmitted between the smart device and the Clarius Ultrasound App is owned by the active user.
Technical Features
The following list describes some of the technical aspects of the system:
• Supports Bluetooth LE v4.0+
• Supports Wi-Fi 802.11n and Wi-Fi Direct
• 8 GB of hard-drive (on-board)
• 512 MB of memory
System Requirements
Using the Clarius Ultrasound Scanner on a smart device that does not meet the minimum requirements may result in low-quality images, unexpected results, and possible misdiagnoses.
To run the Clarius Ultrasound App, a smart device must meet or exceed the following minimum specifications:
Operating System:
• Android™ 4.4.2 (API 19)+ or Apple iOS 9.0+
Processor:
Version 2.1.0 January 18, 2017 23
Clarius Ultrasound Scanner System Requirements
• Dual core processor (CPU)
• ARM-based CPU architecture (for Android™-based devices)
Display:
• Resolution (in pixels) of 960x640 (or 640x960)
• Contrast ratio of 800:1
• Supports OpenGL ES 2.0
Supported smart devices:
Apple iOS:
• iPad 3rd generation+
• iPad Air+
• iPad Mini+
• iPhone 5S (iPhone 4S partially supports Wi-Fi 802.11n at 2.4GHz, but not at 5GHz)
• iPod Touch 5th generation+
Android™ 4.1+:
• Devices with Wi-Fi 802.11n
• Devices with BLE 4.1
Note: Performance of BLE (Bluetooth low energy) varies by model.
• Access to user documentation is dependent on the proper download and installation of the Clarius Ultrasound Scanner on your smart device.
• Using a smart device that is too small may not have the necessary resolution for viewing small structures.
Version 2.1.0 January 18, 2017 24
2
A Quick TourQuick Start
You've just received your Clarius Scanner. Now let's get you set up.
Always have full battery power on your smart device by charging itregularly.
If this is the first time that this scanner is being used, follow theinstructions in Cleaning & Disinfecting on page 63 before usage.
1. Open your email invitation from Clarius to register to the Clarius Cloud and set your password. If you haven't seen this message, check your spam folder or contact [email protected].
For more information on registering, refer to the ClariusCloud User Manual.
2. Please download the Clarius Ultrasound App from the iOS or Android App store.
For more information, see Downloading the ClariusUltrasound App on page 42.
3. Insert battery. The Clarius Scanner flashes blue and then green, and then turns off. Now Clarius Scanner is on standby waiting for the Clarius Ultrasound App to start.
For more information, see Inserting the Battery onpage 44.
4. Start the Clarius Ultrasound App.
For more information, see Starting the Clarius UltrasoundApp on page 44.
5. Enter the email and password you used to register with Clarius.
25
Clarius Ultrasound Scanner Overview of the Interface
For more information, see Signing in on page 45.
6. Press Sign-in. You must be connected to the Internet the first time you sign in so the Clarius Ultrasound App can retrieve your permissions.
7. Select your Clarius Scanner. The scanner light will flash blue, then become solid blue within 10 seconds. The wheel at the top right shows the connection status.
8. Connect your Clarius Scanner to your smart device.
For more information, see Connecting Your Smart Device to a Clarius Scanner onpage 45.
9. Return to the Clarius Ultrasound App. If the Clarius Ultrasound App has been updated since you last signed in, the system will prompt you to update your Clarius Scanner software.
For more information, see Updating the Clarius Ultrasound Scanner on page 43.
10. Calibrate the brightness of your smart device’s screen.
Go to the Settings page and use the horizontal grayscale calibration slider to adjustthe screen’s contrast to provide optimal viewing for your current operatingenvironment.
11. Select the type of examination you want to perform.
For more information, see Starting New Exams on page 48.
12. Enter patient demographics and indication, or press the arrow at the bottom right to go to the next step. Now you're ready to image.
For more information, see Entering Patient Information on page 50, PopulatingIndications on page 50, and Imaging on page 51.
Overview of the Interface
Icons
Menu Icons
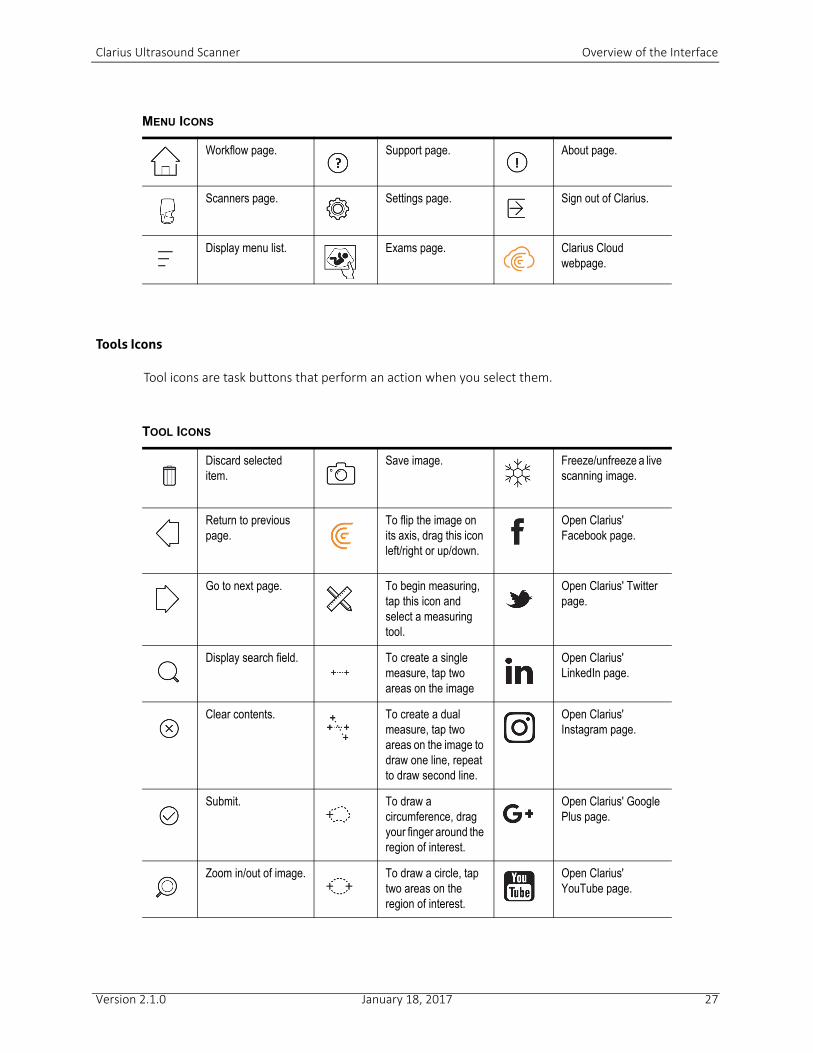
Menu icons are navigational tools at the top of the screen that takes you to a different page.
Version 2.1.0 January 18, 2017 26
Clarius Ultrasound Scanner Overview of the Interface
Tools Icons
Tool icons are task buttons that perform an action when you select them.
MENU ICONS
Workflow page. Support page. About page.
Scanners page. Settings page. Sign out of Clarius.
Display menu list. Exams page. Clarius Cloud webpage.
TOOL ICONS
Discard selected item.
Save image. Freeze/unfreeze a live scanning image.
Return to previous page.
To flip the image on its axis, drag this icon left/right or up/down.
Open Clarius' Facebook page.
Go to next page. To begin measuring, tap this icon and select a measuring tool.
Open Clarius' Twitter page.
Display search field. To create a single measure, tap two areas on the image
Open Clarius' LinkedIn page.
Clear contents. To create a dual measure, tap two areas on the image to draw one line, repeat to draw second line.
Open Clarius' Instagram page.
Submit. To draw a circumference, drag your finger around the region of interest.
Open Clarius' Google Plus page.
Zoom in/out of image. To draw a circle, tap two areas on the region of interest.
Open Clarius' YouTube page.
Version 2.1.0 January 18, 2017 27
Clarius Ultrasound Scanner Overview of the Interface
Status Icons
Status icons are view-only indicators that animate or change color to show the status of acomponent.
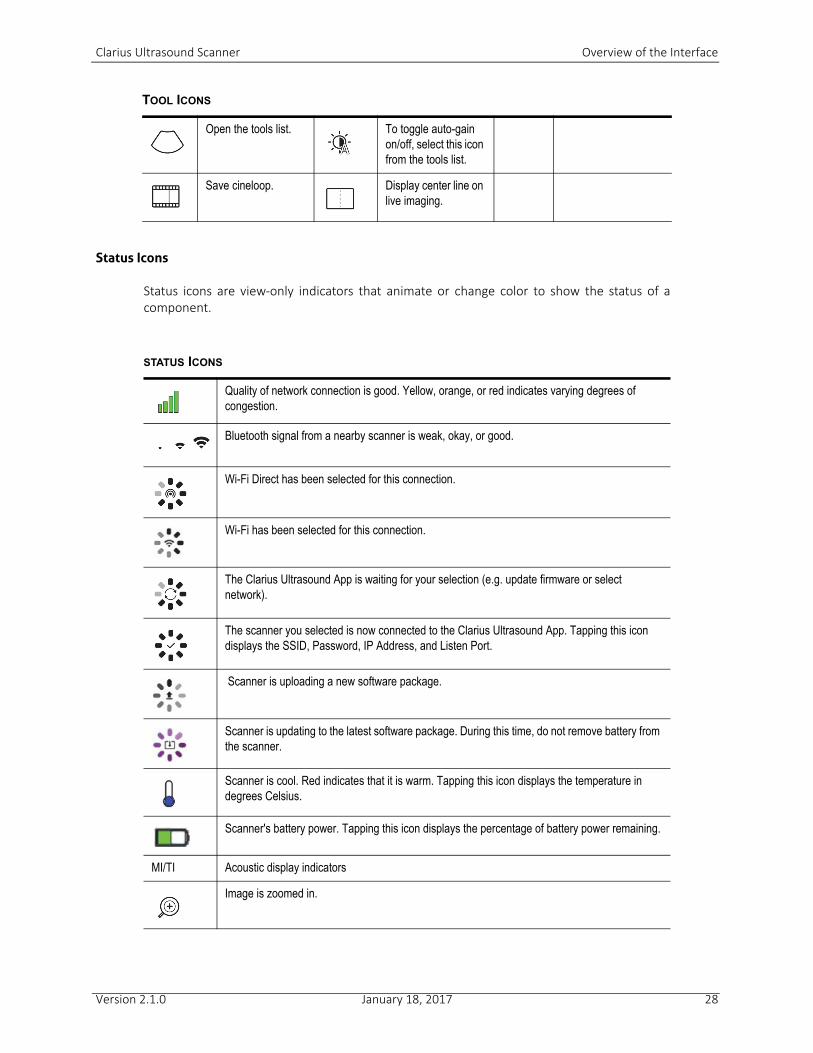
Open the tools list. To toggle auto-gain on/off, select this icon from the tools list.
Save cineloop. Display center line on live imaging.
STATUS ICONS
Quality of network connection is good. Yellow, orange, or red indicates varying degrees of congestion.
Bluetooth signal from a nearby scanner is weak, okay, or good.
Wi-Fi Direct has been selected for this connection.
Wi-Fi has been selected for this connection.
The Clarius Ultrasound App is waiting for your selection (e.g. update firmware or select network).
The scanner you selected is now connected to the Clarius Ultrasound App. Tapping this icon displays the SSID, Password, IP Address, and Listen Port.
Scanner is uploading a new software package.
Scanner is updating to the latest software package. During this time, do not remove battery from the scanner.
Scanner is cool. Red indicates that it is warm. Tapping this icon displays the temperature in degrees Celsius.
Scanner's battery power. Tapping this icon displays the percentage of battery power remaining.
MI/TI Acoustic display indicators
Image is zoomed in.
TOOL ICONS
Version 2.1.0 January 18, 2017 28
Clarius Ultrasound Scanner Overview of the Interface
Menu Options
Support
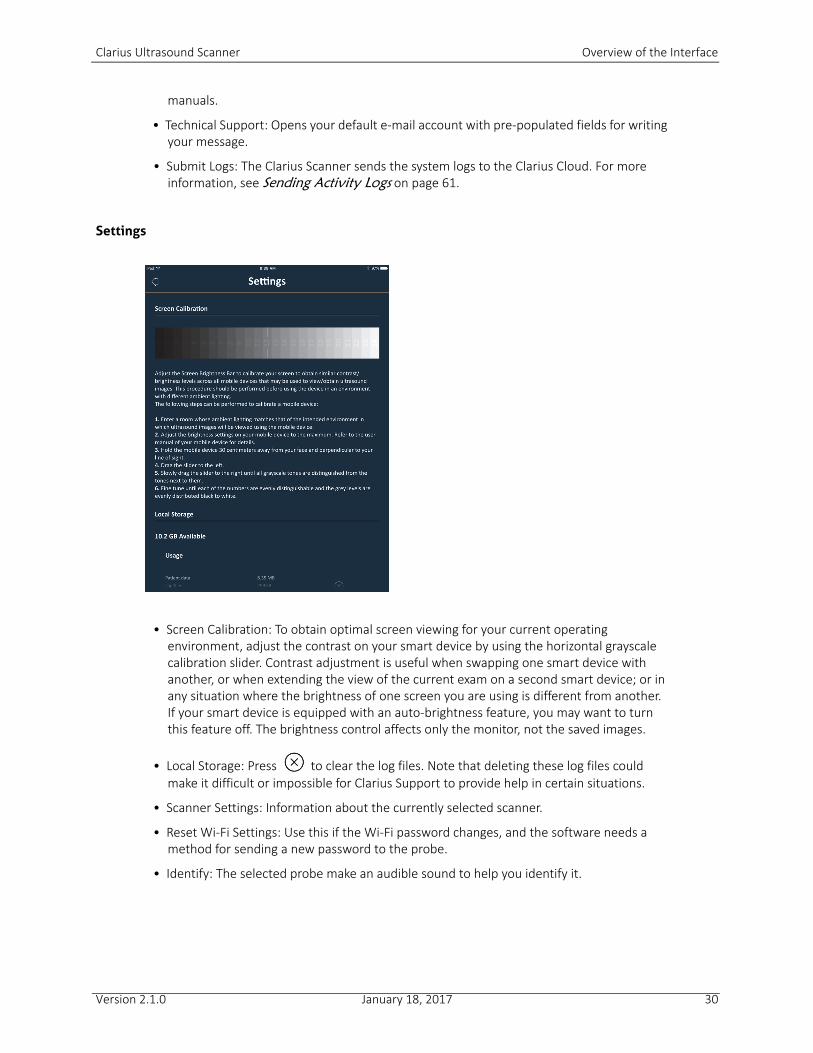
Displays the following buttons:
• Tutorials: Opens the Clarius website and takes you to the page containing tutorials.
• User Manual: Opens the Clarius website and takes you to the page containing the user
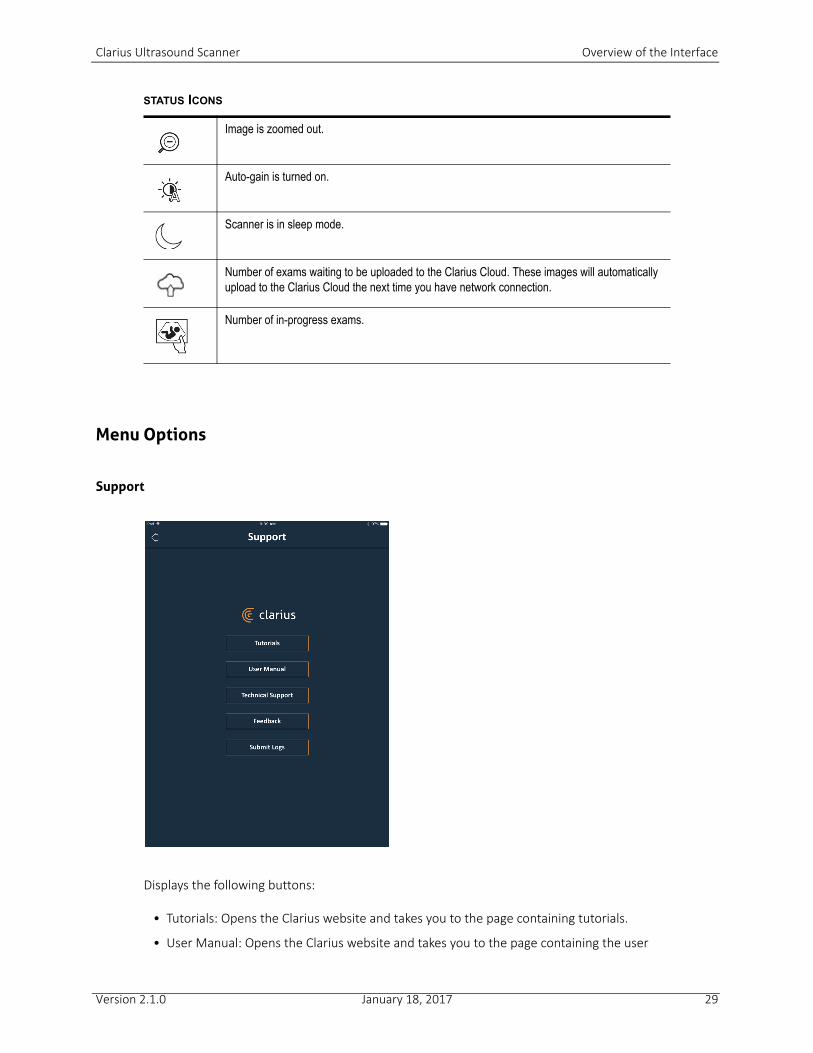
Image is zoomed out.
Auto-gain is turned on.
Scanner is in sleep mode.
Number of exams waiting to be uploaded to the Clarius Cloud. These images will automatically upload to the Clarius Cloud the next time you have network connection.
Number of in-progress exams.
STATUS ICONS
Version 2.1.0 January 18, 2017 29
Clarius Ultrasound Scanner Overview of the Interface
manuals.
• Technical Support: Opens your default e-mail account with pre-populated fields for writing your message.
• Submit Logs: The Clarius Scanner sends the system logs to the Clarius Cloud. For more information, see Sending Activity Logs on page 61.
Settings
• Screen Calibration: To obtain optimal screen viewing for your current operating environment, adjust the contrast on your smart device by using the horizontal grayscale calibration slider. Contrast adjustment is useful when swapping one smart device with another, or when extending the view of the current exam on a second smart device; or in any situation where the brightness of one screen you are using is different from another. If your smart device is equipped with an auto-brightness feature, you may want to turn this feature off. The brightness control affects only the monitor, not the saved images.
• Local Storage: Press to clear the log files. Note that deleting these log files could make it difficult or impossible for Clarius Support to provide help in certain situations.
• Scanner Settings: Information about the currently selected scanner.
• Reset Wi-Fi Settings: Use this if the Wi-Fi password changes, and the software needs a method for sending a new password to the probe.
• Identify: The selected probe make an audible sound to help you identify it.
Version 2.1.0 January 18, 2017 30
Clarius Ultrasound Scanner Overview of the Interface
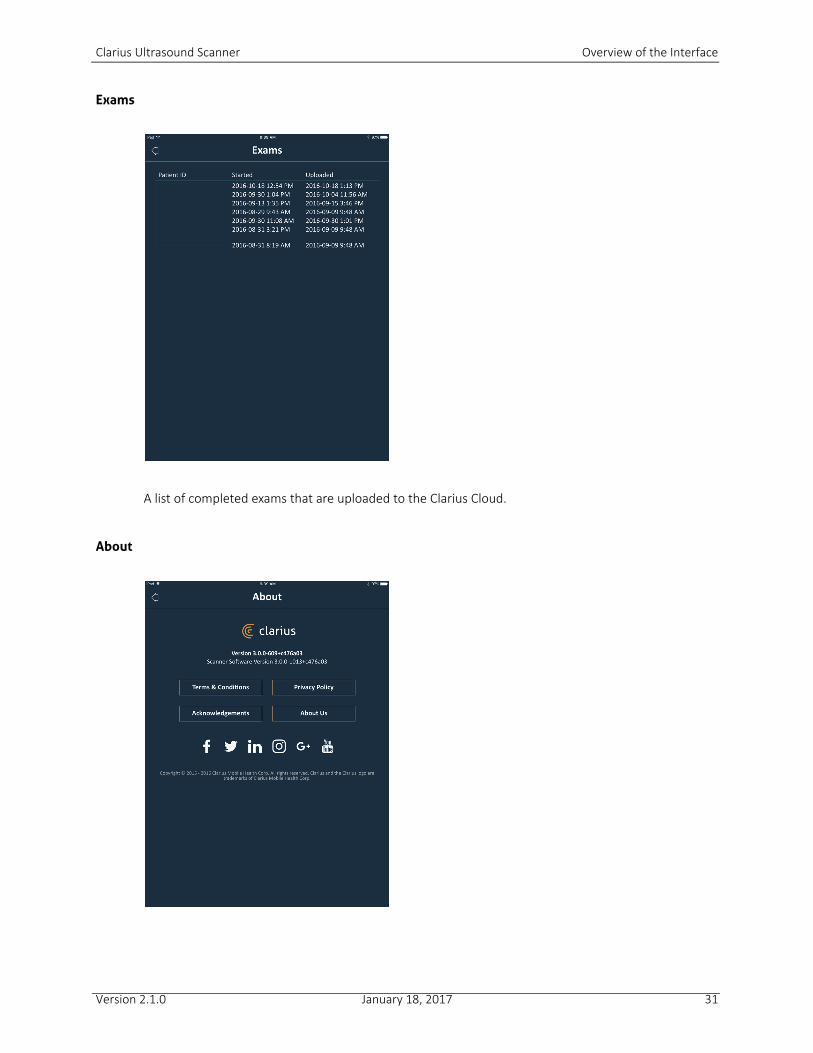
Exams
A list of completed exams that are uploaded to the Clarius Cloud.
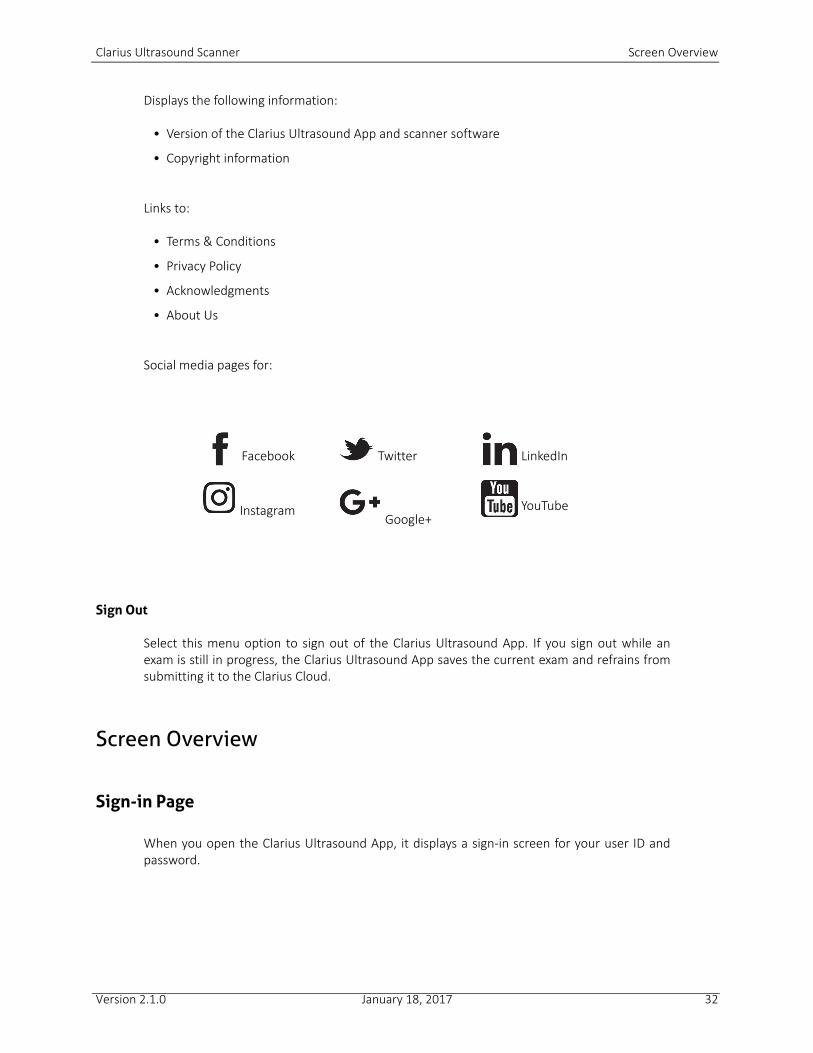
About
Version 2.1.0 January 18, 2017 31
Clarius Ultrasound Scanner Screen Overview
Displays the following information:
• Version of the Clarius Ultrasound App and scanner software
• Copyright information
Links to:
• Terms & Conditions
• Privacy Policy
• Acknowledgments
• About Us
Social media pages for:
Sign Out
Select this menu option to sign out of the Clarius Ultrasound App. If you sign out while anexam is still in progress, the Clarius Ultrasound App saves the current exam and refrains fromsubmitting it to the Clarius Cloud.
Screen Overview
Sign-in Page
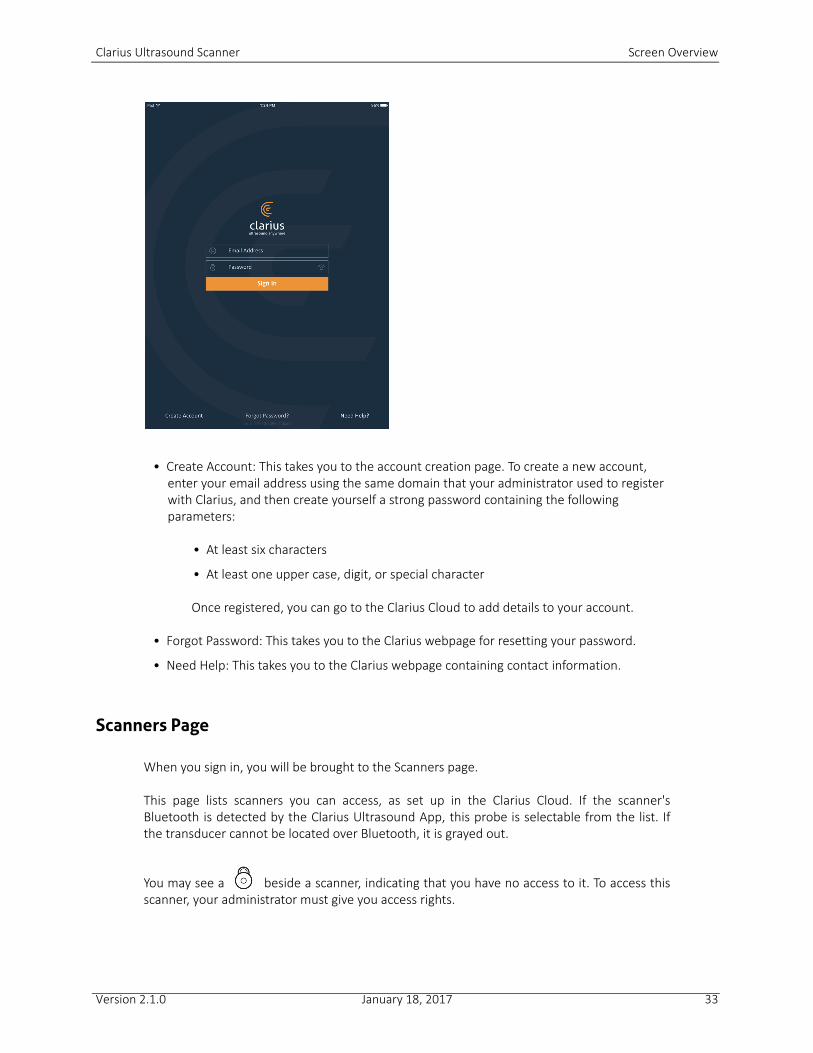
When you open the Clarius Ultrasound App, it displays a sign-in screen for your user ID andpassword.
Facebook Twitter LinkedIn
Instagram Google+
YouTube
Version 2.1.0 January 18, 2017 32
Clarius Ultrasound Scanner Screen Overview
• Create Account: This takes you to the account creation page. To create a new account, enter your email address using the same domain that your administrator used to register with Clarius, and then create yourself a strong password containing the following parameters:
• At least six characters
• At least one upper case, digit, or special character
Once registered, you can go to the Clarius Cloud to add details to your account.
• Forgot Password: This takes you to the Clarius webpage for resetting your password.
• Need Help: This takes you to the Clarius webpage containing contact information.
Scanners Page
When you sign in, you will be brought to the Scanners page.
This page lists scanners you can access, as set up in the Clarius Cloud. If the scanner'sBluetooth is detected by the Clarius Ultrasound App, this probe is selectable from the list. Ifthe transducer cannot be located over Bluetooth, it is grayed out.
You may see a beside a scanner, indicating that you have no access to it. To access thisscanner, your administrator must give you access rights.
Version 2.1.0 January 18, 2017 33
Clarius Ultrasound Scanner Screen Overview
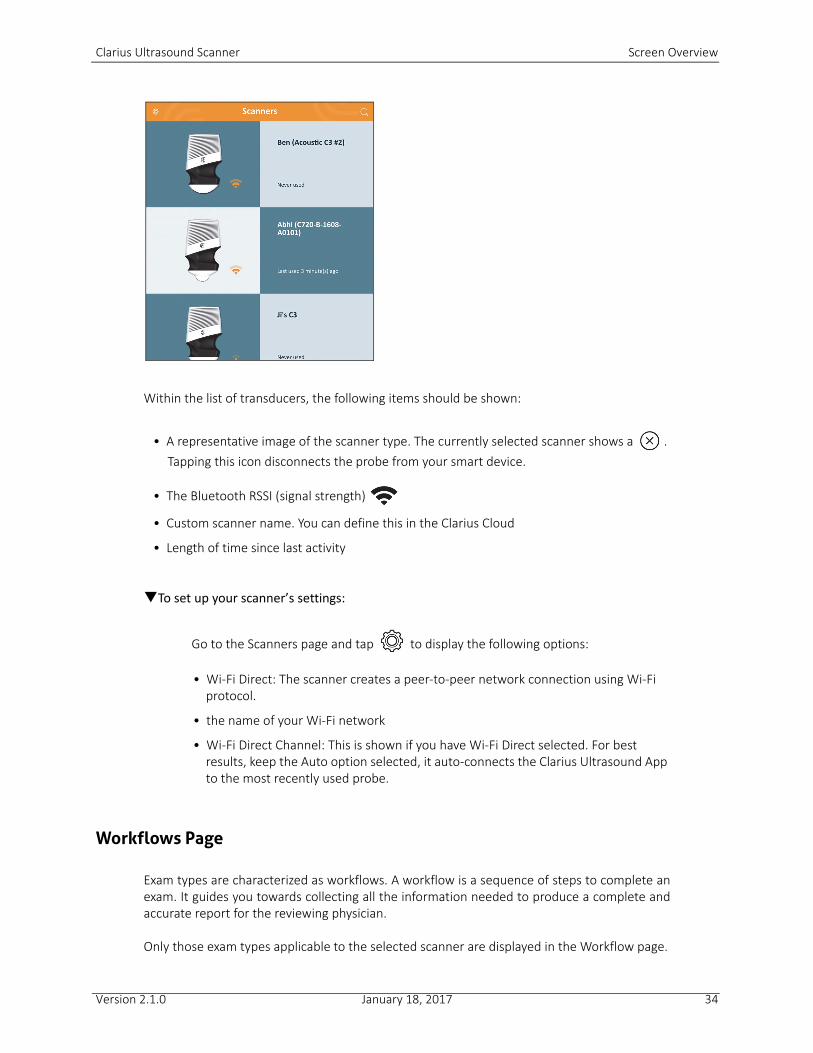
Within the list of transducers, the following items should be shown:
• A representative image of the scanner type. The currently selected scanner shows a . Tapping this icon disconnects the probe from your smart device.
• The Bluetooth RSSI (signal strength)
• Custom scanner name. You can define this in the Clarius Cloud
• Length of time since last activity
To set up your scanner’s settings:
Go to the Scanners page and tap to display the following options:
• Wi-Fi Direct: The scanner creates a peer-to-peer network connection using Wi-Fi protocol.
• the name of your Wi-Fi network
• Wi-Fi Direct Channel: This is shown if you have Wi-Fi Direct selected. For best results, keep the Auto option selected, it auto-connects the Clarius Ultrasound App to the most recently used probe.
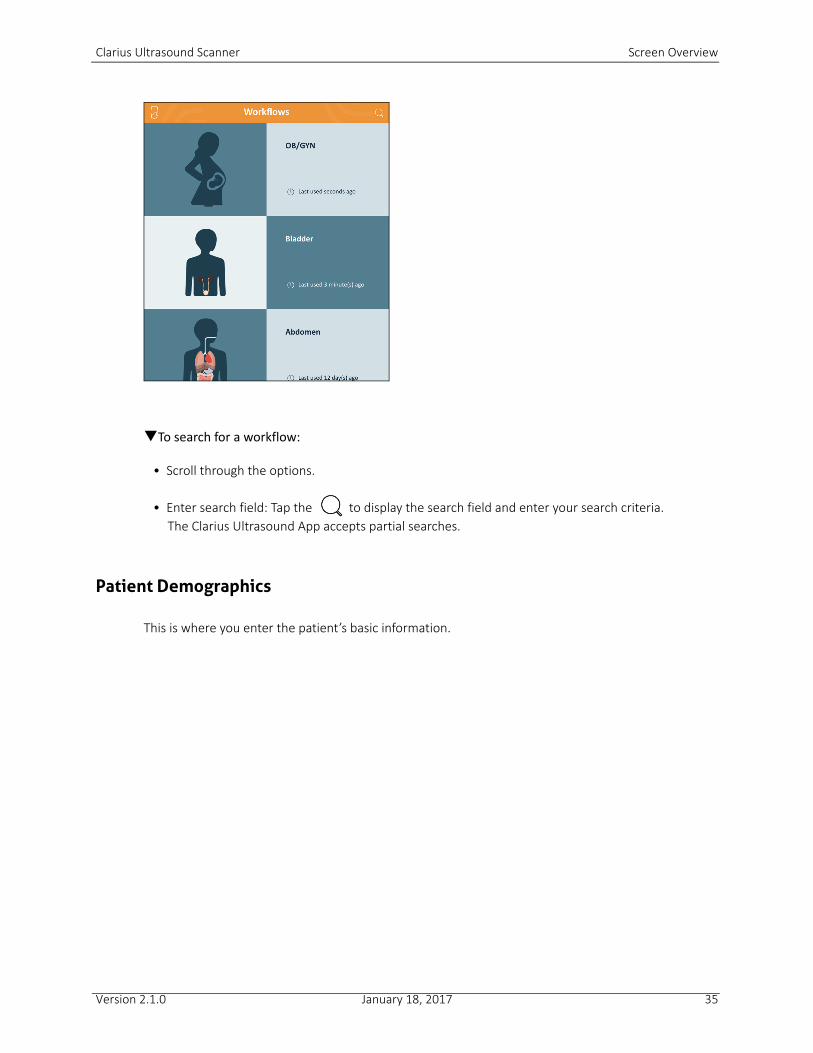
Workflows Page
Exam types are characterized as workflows. A workflow is a sequence of steps to complete anexam. It guides you towards collecting all the information needed to produce a complete andaccurate report for the reviewing physician.
Only those exam types applicable to the selected scanner are displayed in the Workflow page.
Version 2.1.0 January 18, 2017 34
Clarius Ultrasound Scanner Screen Overview
To search for a workflow:
• Scroll through the options.
• Enter search field: Tap the to display the search field and enter your search criteria. The Clarius Ultrasound App accepts partial searches.
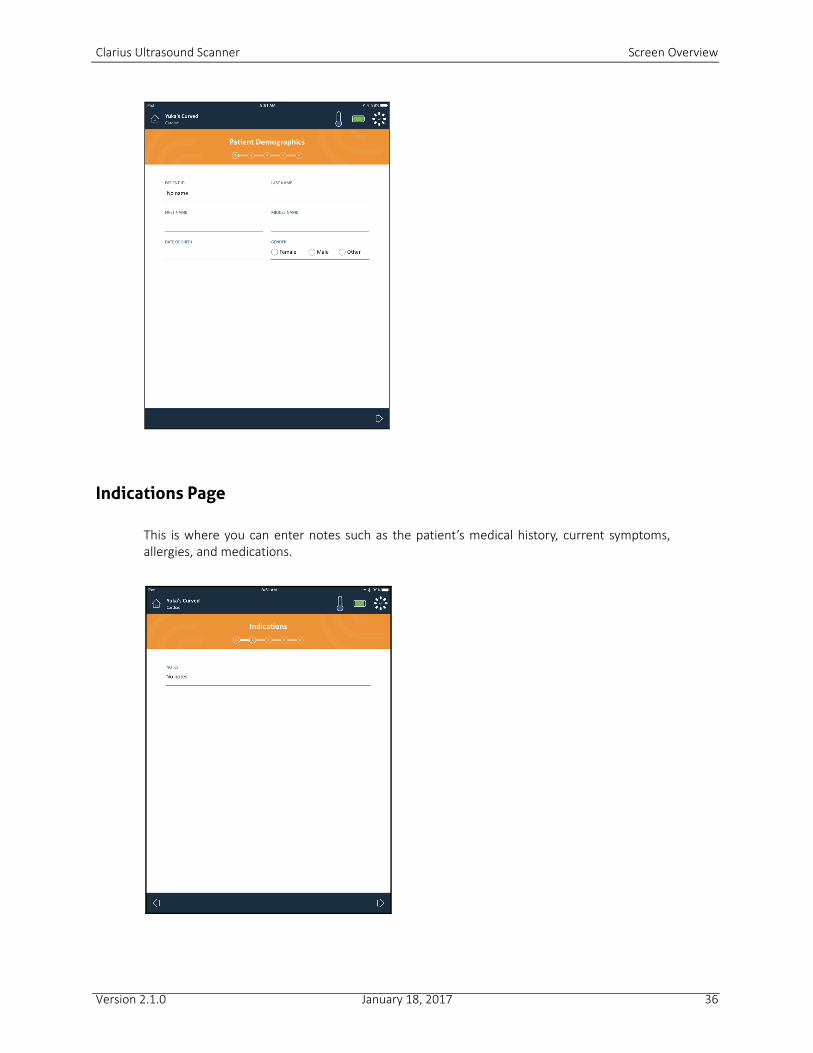
Patient Demographics
This is where you enter the patient’s basic information.
Version 2.1.0 January 18, 2017 35
Clarius Ultrasound Scanner Screen Overview
Indications Page
This is where you can enter notes such as the patient’s medical history, current symptoms,allergies, and medications.
Version 2.1.0 January 18, 2017 36
Clarius Ultrasound Scanner Screen Overview
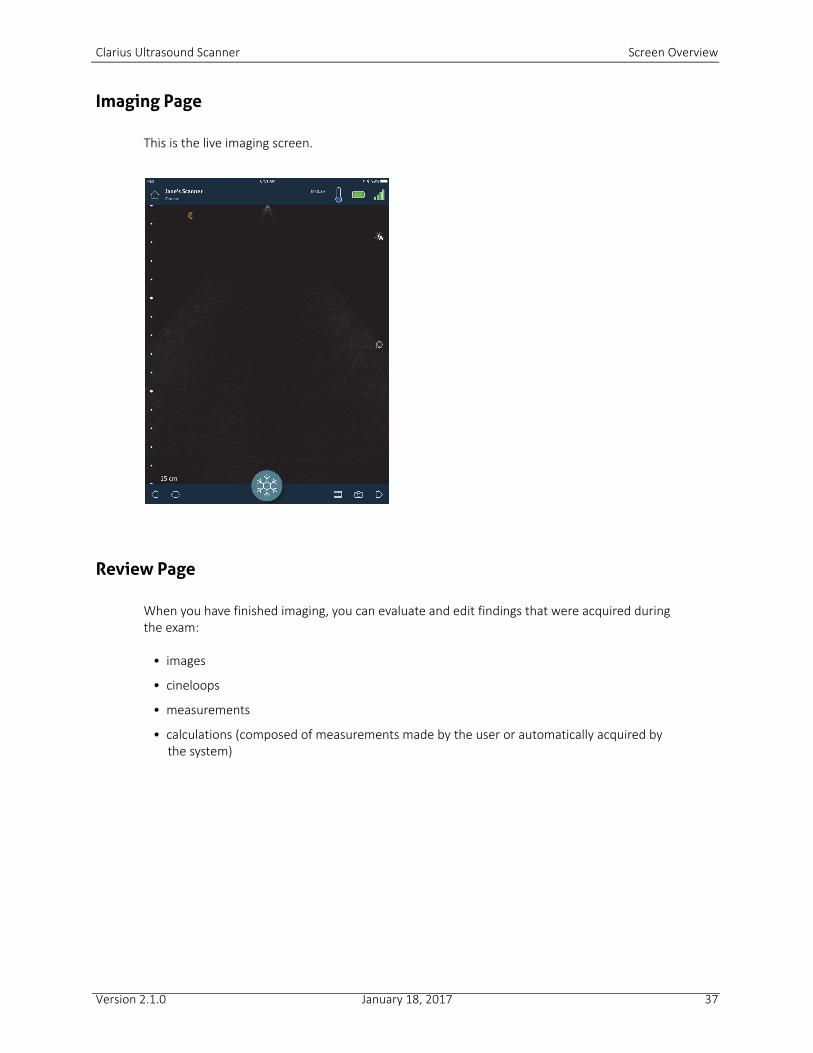
Imaging Page
This is the live imaging screen.
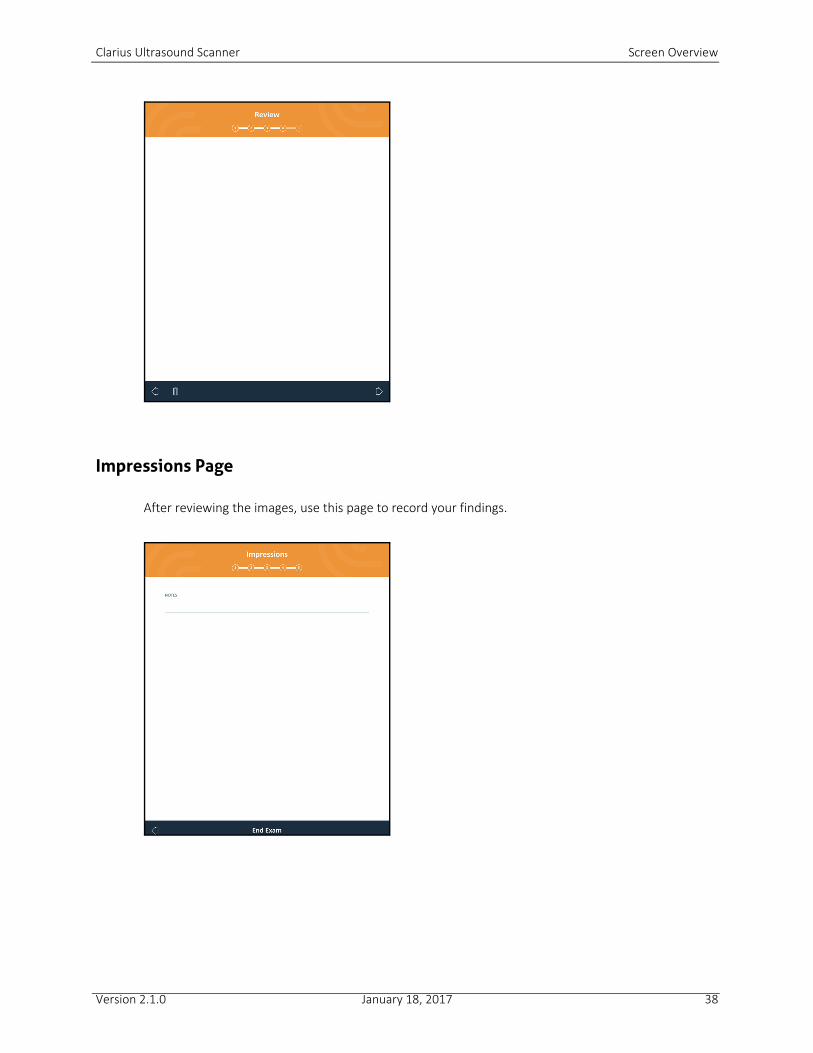
Review Page
When you have finished imaging, you can evaluate and edit findings that were acquired duringthe exam:
• images
• cineloops
• measurements
• calculations (composed of measurements made by the user or automatically acquired by the system)
Version 2.1.0 January 18, 2017 37
Clarius Ultrasound Scanner Screen Overview
Impressions Page
After reviewing the images, use this page to record your findings.
Version 2.1.0 January 18, 2017 38
Clarius Ultrasound Scanner System Capabilities
System Capabilities
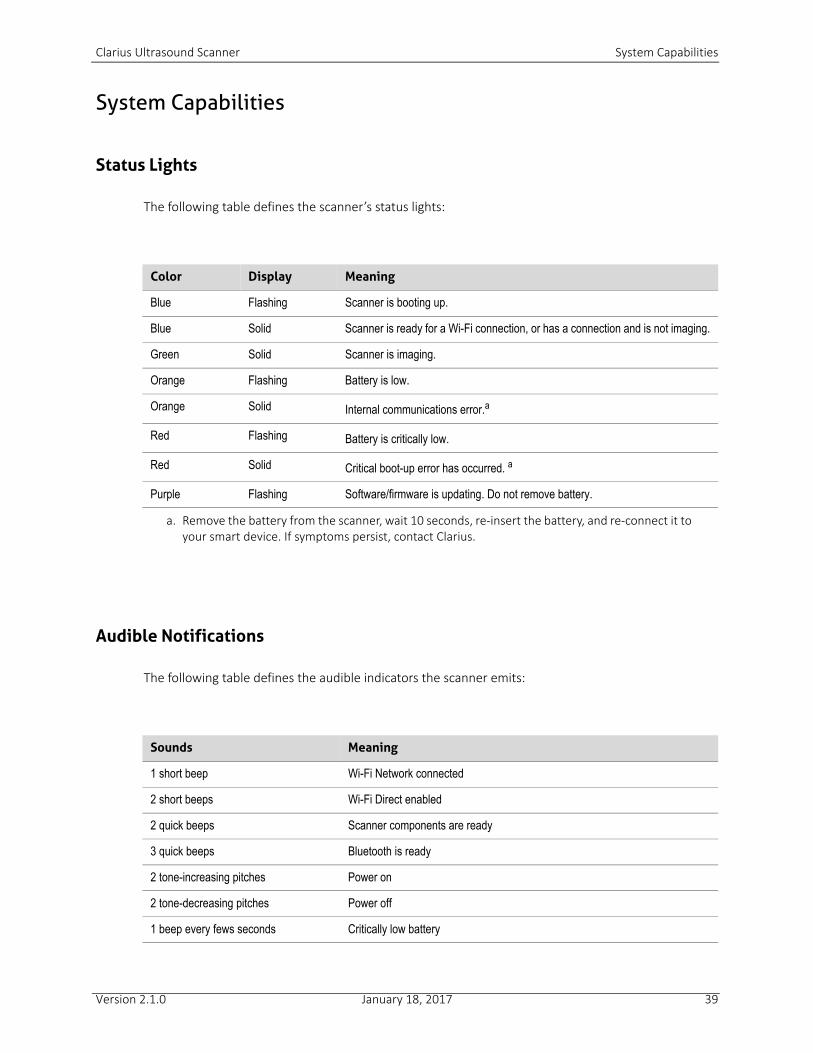
Status Lights
The following table defines the scanner’s status lights:
Audible Notifications
The following table defines the audible indicators the scanner emits:
Color Display Meaning
Blue Flashing Scanner is booting up.
Blue Solid Scanner is ready for a Wi-Fi connection, or has a connection and is not imaging.
Green Solid Scanner is imaging.
Orange Flashing Battery is low.
Orange Solid Internal communications error.a
Red Flashing Battery is critically low.
Red Solid Critical boot-up error has occurred. a
a. Remove the battery from the scanner, wait 10 seconds, re-insert the battery, and re-connect it to your smart device. If symptoms persist, contact Clarius.
Purple Flashing Software/firmware is updating. Do not remove battery.
Sounds Meaning
1 short beep Wi-Fi Network connected
2 short beeps Wi-Fi Direct enabled
2 quick beeps Scanner components are ready
3 quick beeps Bluetooth is ready
2 tone-increasing pitches Power on
2 tone-decreasing pitches Power off
1 beep every fews seconds Critically low battery
Version 2.1.0 January 18, 2017 39
Clarius Ultrasound Scanner System Capabilities
Sleep Mode
Sleep mode turns off the display on your smart device while pausing all current functions. Thisis to help save the Clarius Scanner’s battery power when the Clarius Ultrasound App is not inuse.
After 5 minutes of dormancy (no live scanning), the system prepares itself for sleep mode. TheClarius Ultrasound App displays a 30-second countdown, with the following options:
• Doing nothing will let the Clarius Scanner to go to sleep. The connection status area displays and the live imaging page is in freeze mode.
• Selecting Cancel prevents the Clarius Scanner from entering sleep mode.
To awaken the scanner:
• Unfreeze the live imaging page.
• Return to the Scanners page and re-selecting the scanner.
Auto Shutdown
If there is no connection between the Clarius Scanner and the Clarius Ultrasound App for twominutes (e.g. you signed out of the Clarius Ultrasound App but left the Clarius Scannerrunning), the Clarius Ultrasound App automatically turns off to save battery power.
Scanner Locator
If you have misplaced the Clarius Scanner, the Clarius Ultrasound App can signal the scanner toemit an audible response.
4 long alerts Embedded processor is preparing for software update
4 short beeps No network connected
4 quick beeps App Find Request (based on selected ringtone)
8 long alerts App Find Request (important)
Version 2.1.0 January 18, 2017 40

Clarius Ultrasound Scanner System Capabilities
To locate your Clarius Scanner:
Go to the Settings menu and select the Identify button. You will hear an audiblesound.
Version 2.1.0 January 18, 2017 41
3
Using the Clarius Ultrasound ScannerThis chapter explains how to install and use your Clarius UltrasoundScanner safely and effectively.
Refer to Safety on page 69 before handling the Clarius UltrasoundScanner.
Your scanner is already activated and ready for use. You just need todownload the Clarius Ultrasound App on an Apple iOS device or anAndroid™-based device.
Downloading the Clarius Ultrasound App
Apple iOS
You must have an iTunes account and create a password.
1. On your smart device, go to http://www.apple.com/ca/itunes/
This opens the iTunes website.
2. Search for the Clarius Ultrasound App.
If you cannot find Clarius, your smart device may not bemeeting minimum specifications.
3. Tap the Install button and follow the instructions on your screen.
This downloads the application.
4. Tap the Open button.
This opens the Clarius Ultrasound App.
42
Clarius Ultrasound Scanner Updating the Clarius Ultrasound Scanner
Android™
The Clarius Ultrasound App is available from the Google Play Store, a Google-operated digitalmedia store where you can download applications for your smart device. Before installing theClarius Ultrasound App, make sure your smart device meets the minimum requirements.
You must have a Google account and create a password.
1. On your smart device, go to https://play.google.com
This opens the Google Play Store.
2. Search for the Clarius Ultrasound App.
If you cannot find Clarius, your smart device may not be meeting minimumspecifications.
3. Tap the Install button and follow the instructions on your screen.
This downloads the application.
4. Tap the Open button.
This opens the Clarius Ultrasound App.
Updating the Clarius Ultrasound Scanner
Software Updates
When an app update becomes available, you will receive an email notification.
1. Open the message and tap the Download & Install button.
2. Tap the Download icon and follow the instructions on the screen.
Firmware Updates
If a scanner software update is required, the Clarius Ultrasound App will notify and promptyou.
1. Tap Update.
During the updating process, do not remove the battery. If the battery level is toolow, the system will decline the update.
Version 2.1.0 January 18, 2017 43
Clarius Ultrasound Scanner Inserting & Removing the Battery
During the update, the scanner light flashes purple. Also, a purple indicator displayson the top right of the screen. Once the update is complete, the scanner's light turnsblue.
2. Reconnect to the Clarius Scanner's Wi-Fi Direct network.
Inserting & Removing the Battery
If the battery is low or empty, recharge it by following the instructions on RechargingBatteries on page 60.
Inserting the Battery
To insert the battery into the scanner:
1. Make sure that the battery contacts are facing downward and that the battery label is facing the scanner.
2. Slide the battery into the scanner until it locks into place.
When the battery contacts are detected, the scanner will emit a sound.
Removing the Battery
To remove the battery from the scanner:
1. Pull back on the latch located at the top of the scanner.
This unlocks the battery.
2. Slide the battery out of the scanner.
Turning the System on & off
Starting the Clarius Ultrasound App
Before you begin using the Clarius Ultrasound Scanner, make sure you have the scanner, andalso your smart device with the Clarius Ultrasound App installed on it.
Version 2.1.0 January 18, 2017 44
Clarius Ultrasound Scanner Signing in & out
To open the Clarius Ultrasound App on your smart device:
Go to your smart device’s home screen and tap .
The Clarius Ultrasound App opens to the sign-in screen.
Next, you can select a scanner.
Exiting the Clarius Ultrasound App
To turn off the system:
• Close the Clarius Ultrasound App by swiping the screen up.
• Disconnect from the Wi-Fi.
If you close the Clarius Ultrasound App without ending the exam, the system pauses the exam.
Signing in & out
Signing in
When you open the Clarius Ultrasound App, it displays a sign-in screen for your user ID andpassword.
Signing out
To sign out:
Select the Sign Out menu option, then select Yes.
If you want to remain signed in, select No.
Connecting Your Smart Device to a Clarius Scanner
If this is the first time opening the Clarius Ultrasound App, it displays a list of scanners you canselect. If the Clarius Ultrasound App has been used before, it selects the last-used scanner bydefault.
Version 2.1.0 January 18, 2017 45
Clarius Ultrasound Scanner Connecting Your Smart Device to a Clarius Scanner
Connecting Android™ Devices to Scanners
To connect your Android™ device to a scanner:
1. From the Scanners page, tap the image or the name of the scanner you want to select.
This activates the selected scanner and attempts to connect it to your smart device’sWi-Fi. When the scanner emits an audible beep and the scanner light flashes blue, theWi-Fi Direct is enabled. When you hear another audible beep and the scanner light issolid blue, the scanner is ready for Wi-Fi connection.
2. Once the checkmark appears in the status circle, press Connect to link Wi-Fi Direct to the Clarius Scanner. This takes you to the Wi-Fi Settings.
3. Select the scanner's Direct Wi-Fi name. You need the Clarius Scanner's Wi-Fi password the first time you connect. You can paste to enter it.
It will ask if you allow Clarius to access your location. Select either Never or WhileUsing.
4. Press Join.
5. At top-left choose Back to Clarius. If the Clarius Ultrasound App has been updated since you last signed in, the system will prompt you to update your Clarius Scanner software.
The status light on the selected scanner turns blue, indicating its connection to yoursmart device. All other scanners remain in standby mode.
Workflows that apply to the selected scanner become enabled.
Next, select a workflow. For information, see Starting New Exams on page 48.
If the status light shows nothing (empty battery), or shows orange (lowbattery), recharge the battery.
Version 2.1.0 January 18, 2017 46
Clarius Ultrasound Scanner Managing Exams
Connecting Apple iOS Devices to Scanners
To connect your Apple iOS device to a scanner:
1. From the Scanners page, tap the image or the name of the scanner you want to select.
This activates the selected scanner and attempts to connect it to your smart device’sWi-Fi. When the scanner emits an audible beep and the scanner light flashes blue, theWi-Fi Direct is enabled. When you hear another audible beep and the scanner light issolid blue, the scanner is ready for Wi-Fi connection.
Once the checkmark appears in the status circle, the Clarius Ultrasound App displaysthe name of the selected scanner’s Wi-Fi network and the password. Remember thenetwork name. The Clarius Ultrasound App has copied the password, so you do notneed to memorize it.
2. Go to your smart device’s Settings page, select the Wi-Fi section, and tap on the name of your scanner’s Wi-Fi network. This automatically pastes the password in the field (this happens in the background).
3. Return to the Clarius Ultrasound App.
The status light on the selected scanner turns blue, indicating its connection to yoursmart device. All other scanners remain in standby mode.
Workflows that apply to the selected scanner become enabled.
Next, select a workflow. For information, see Starting New Exams on page 48.
Managing Exams
• Notifications and alerts from third-party applications may interrupt you or the Clarius Ultrasound App, thereby interfering with the exam. Configure your smart device in accordance with your institution's security policies.
• Vibration range that is too high for the scanner may cause the scanner to malfunction during an exam.
If the status light shows nothing (empty battery), or it is orange (lowbattery), recharge the battery.
Version 2.1.0 January 18, 2017 47
Clarius Ultrasound Scanner Managing Exams
For proper transmission of the acoustic beam, use only Aquasonic 100, and use it only beforeits expiry date. Download the usage instructions from www.parkerlabs.com/ and read all theinformation before operating the device.
Do not use:
• Lotion-based products or gels that contain mineral oil.
• Hand-sanitizing gels.
• Scanners left soaking in gel.
Using improper gel type or combining different gel types may expose patients to risks andproduce poor-quality images.
Starting New Exams
Before you begin a new exam, make sure you have selected a scanner. For information onselecting a scanner, see Connecting Your Smart Device to a Clarius Scanner on page 45.
To begin a new exam:
From the Live Imaging page, select one of the following workflows:
• Abdomen
• Bladder
• Breast
• Cardiac
• Difficult
• Lung
• MSK
• Nerve
• OB/GYN
• Small Parts
• Vascular
The Clarius Ultrasound App displays the last-used workflow at the top of the screen.
Once you have selected a workflow, you can enter the patient’s information. See EnteringPatient Information on page 50.
Version 2.1.0 January 18, 2017 48
Clarius Ultrasound Scanner Managing Exams
Pausing an Exam
If there is data entry that does not require the patient's presence (for example, performingmeasurements on captured images), you can mark it as incomplete by pausing the exam, andthen return to it at a later time.
An exam is paused when you:
• Exit the Clarius Ultrasound App
• Tap
Ending an Exam
Once you have finished entering your impressions, you can end the exam. If you have notfinished entering all the data, the Clarius Ultrasound App marks it as complete. Once an examis marked as complete, you cannot re-open it or resume the exam.
To end the exam:
From the Impressions page, tap End Exam, then select one of the following options:
• Discard: This permanently deletes the current exam, including all images. The Clarius Ultrasound App takes you to the Workflows page for selecting another exam type.
• Submit: This ends the exam and marks it as complete, even if you have not provided all the information on the worksheet, and prepares it for export to the Clarius Cloud. The Clarius Ultrasound App places the images in queue to upload to your Clarius Cloud account the next time network connection is made.
• Cancel: This cancels the action so that you can continue the current exam.
Resuming a Paused Exam
When you return to this exam, you can no longer continue imaging, but all other pages areaccessible.
To continue an in-progress exam:
1. Go to either the Scanners page or the Workflows page.
2. Tap on .
Version 2.1.0 January 18, 2017 49
Clarius Ultrasound Scanner Managing Patient Information
3. Select Open Exam.
The application takes you to the Patient Demographics page.
To discard an in-progress exam:
1. Go to either the Scanners page or the Workflows page.
2. Tap on .
3. Select End Exam.
Managing Patient Information
Entering Patient Information
Once you have selected a workflow, you will see the Patient Demographics page.
Before you begin scanning, enter the fields provided.
When you have entered all required patient information, tap to go to the next page topopulate the indications. For information on populating indications, see PopulatingIndications on page 50.
Populating Indications
The Indications page contains a series of checkboxes or fields to indicate the reasons for theexamination.
When you have entered all the indications, tap to go to the next page to begin imaging.For information on imaging, see Imaging on page 51.
Selecting Scanning Modes
B-Mode
When you start an exam, it defaults to B-Mode (brightness mode). Sometimes referred to as2D Mode, this two-dimensional imaging mode displays in grayscale.
Version 2.1.0 January 18, 2017 50
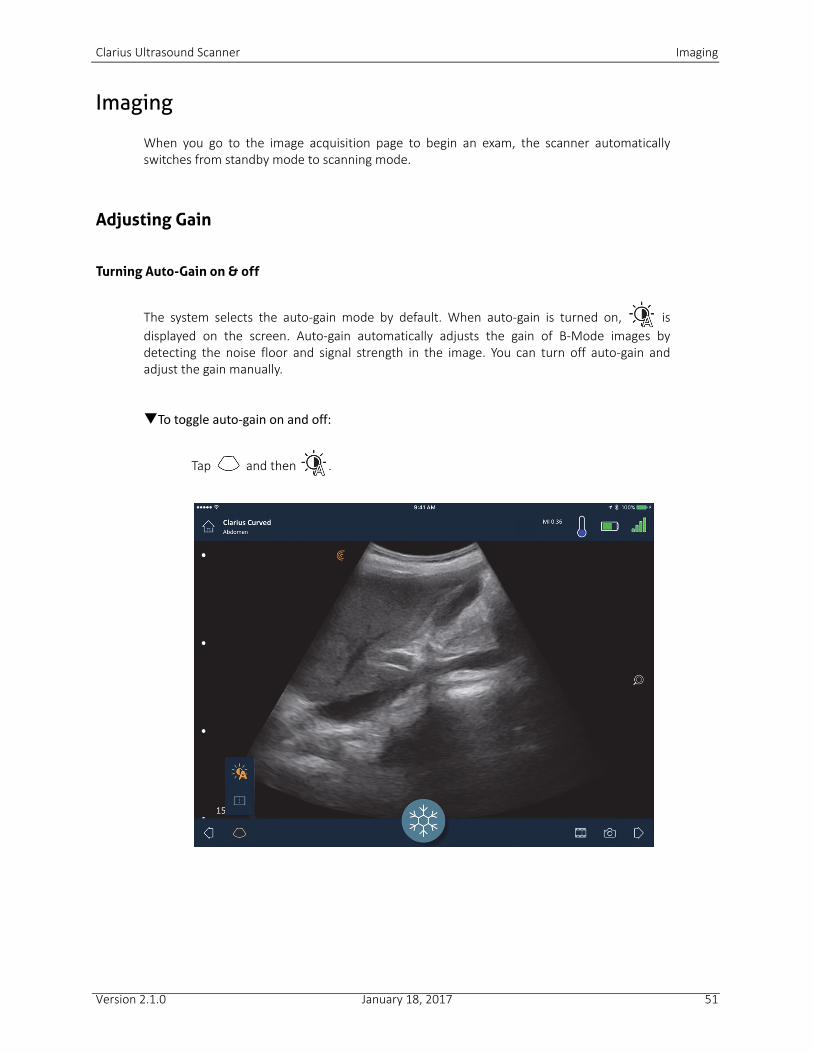
Clarius Ultrasound Scanner Imaging
Imaging
When you go to the image acquisition page to begin an exam, the scanner automaticallyswitches from standby mode to scanning mode.
Adjusting Gain
Turning Auto-Gain on & off
The system selects the auto-gain mode by default. When auto-gain is turned on, isdisplayed on the screen. Auto-gain automatically adjusts the gain of B-Mode images bydetecting the noise floor and signal strength in the image. You can turn off auto-gain andadjust the gain manually.
To toggle auto-gain on and off:
Tap and then .
Version 2.1.0 January 18, 2017 51
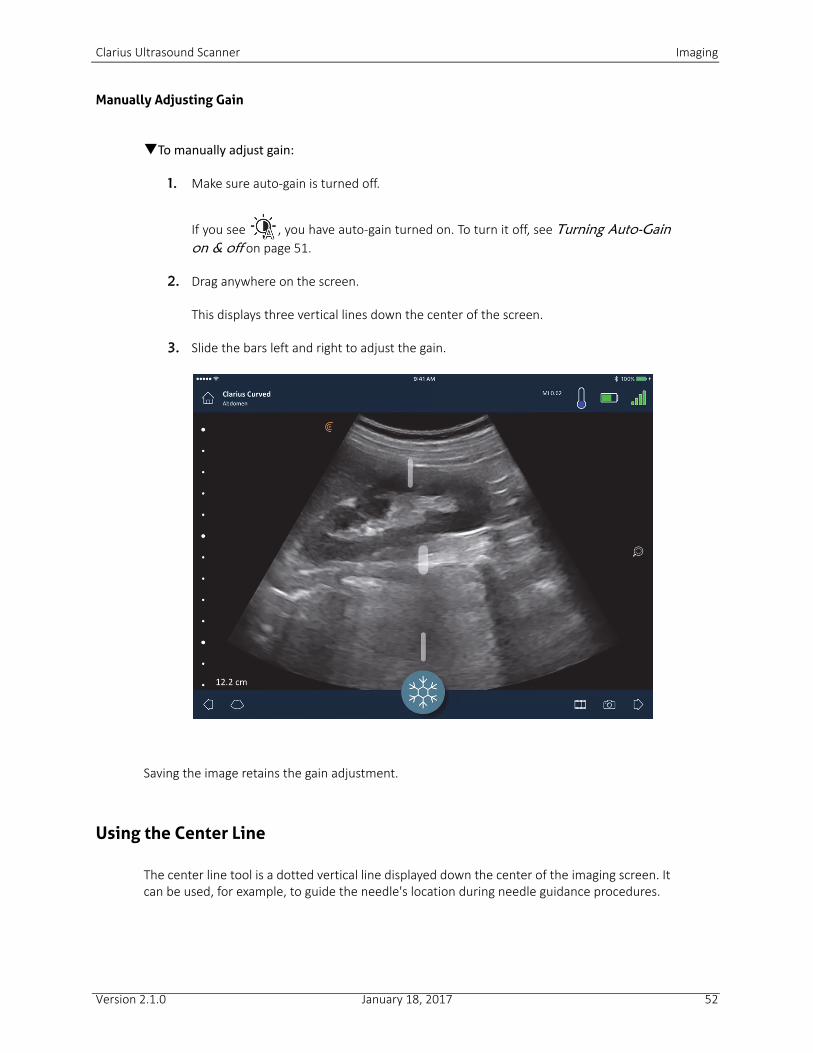
Clarius Ultrasound Scanner Imaging
Manually Adjusting Gain
To manually adjust gain:
1. Make sure auto-gain is turned off.
If you see , you have auto-gain turned on. To turn it off, see Turning Auto-Gainon & off on page 51.
2. Drag anywhere on the screen.
This displays three vertical lines down the center of the screen.
3. Slide the bars left and right to adjust the gain.
Saving the image retains the gain adjustment.
Using the Center Line
The center line tool is a dotted vertical line displayed down the center of the imaging screen. Itcan be used, for example, to guide the needle's location during needle guidance procedures.
Version 2.1.0 January 18, 2017 52
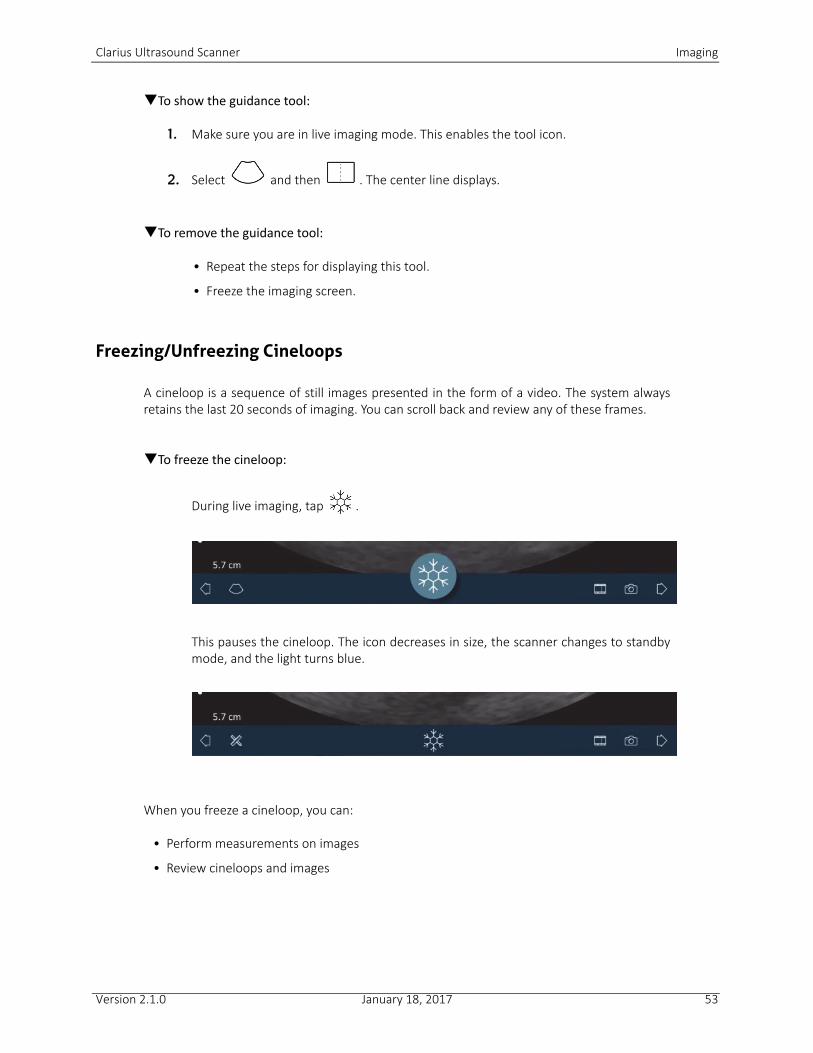
Clarius Ultrasound Scanner Imaging
To show the guidance tool:
1. Make sure you are in live imaging mode. This enables the tool icon.
2. Select and then . The center line displays.
To remove the guidance tool:
• Repeat the steps for displaying this tool.
• Freeze the imaging screen.
Freezing/Unfreezing Cineloops
A cineloop is a sequence of still images presented in the form of a video. The system alwaysretains the last 20 seconds of imaging. You can scroll back and review any of these frames.
To freeze the cineloop:
During live imaging, tap .
This pauses the cineloop. The icon decreases in size, the scanner changes to standbymode, and the light turns blue.
When you freeze a cineloop, you can:
• Perform measurements on images
• Review cineloops and images
Version 2.1.0 January 18, 2017 53
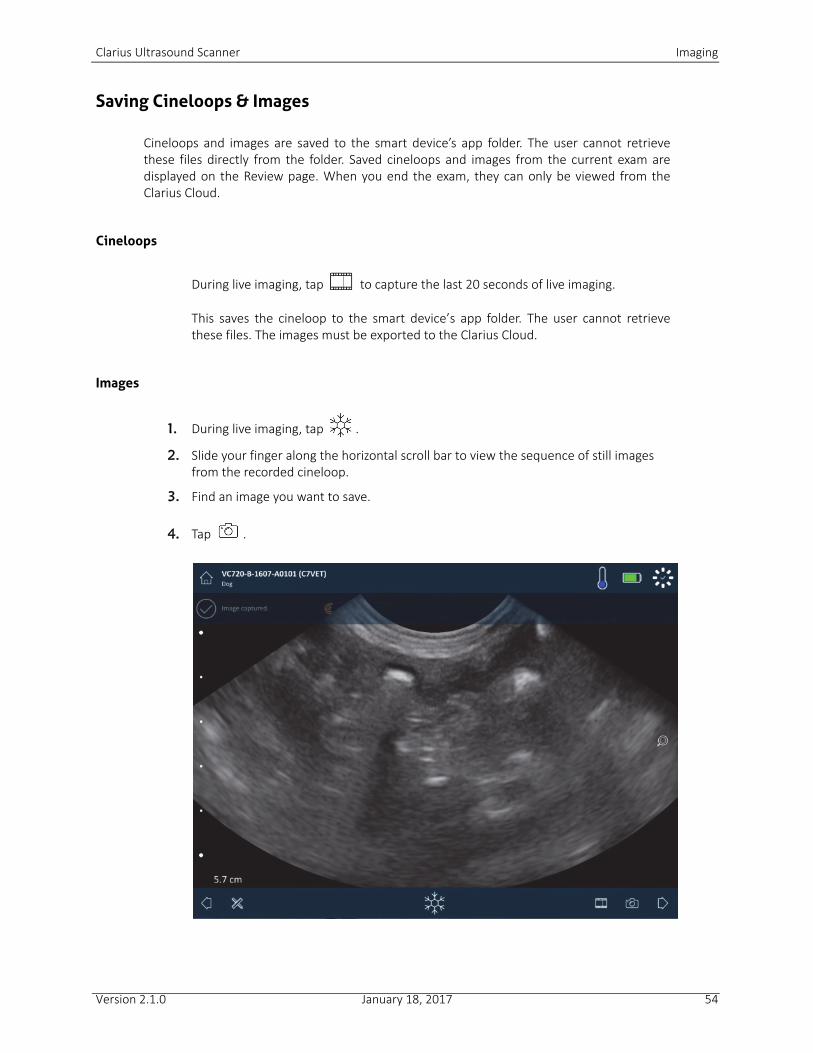
Clarius Ultrasound Scanner Imaging
Saving Cineloops & Images
Cineloops and images are saved to the smart device’s app folder. The user cannot retrievethese files directly from the folder. Saved cineloops and images from the current exam aredisplayed on the Review page. When you end the exam, they can only be viewed from theClarius Cloud.
Cineloops
During live imaging, tap to capture the last 20 seconds of live imaging.
This saves the cineloop to the smart device’s app folder. The user cannot retrievethese files. The images must be exported to the Clarius Cloud.
Images
1. During live imaging, tap .
2. Slide your finger along the horizontal scroll bar to view the sequence of still images from the recorded cineloop.
3. Find an image you want to save.
4. Tap .
Version 2.1.0 January 18, 2017 54
Clarius Ultrasound Scanner Imaging
Zooming in & out
To expand (zoom in) an area of the image:
Spread the image.
Alternatively, tap and drag up to the plus sign (“ + “).
To reduce (zoom out) an area of the image:
Pinch the image.
Alternatively, tap and drag down to the minus sign (“ -“).
To return to the default:
Tap and drag to .
To pan or move the magnified image:
Tap the image and drag it.
Changing Depth
You can adjust the depth in B-mode when the image is:
• not frozen
• not zoomed
A vertical depth scale is displayed on the left, showing depth in centimeter increments. Theincrements depend on the depth and size of the display.
To change depth:
Drag your finger up and down the left vertical bar to increase and decrease the depth.
Version 2.1.0 January 18, 2017 55
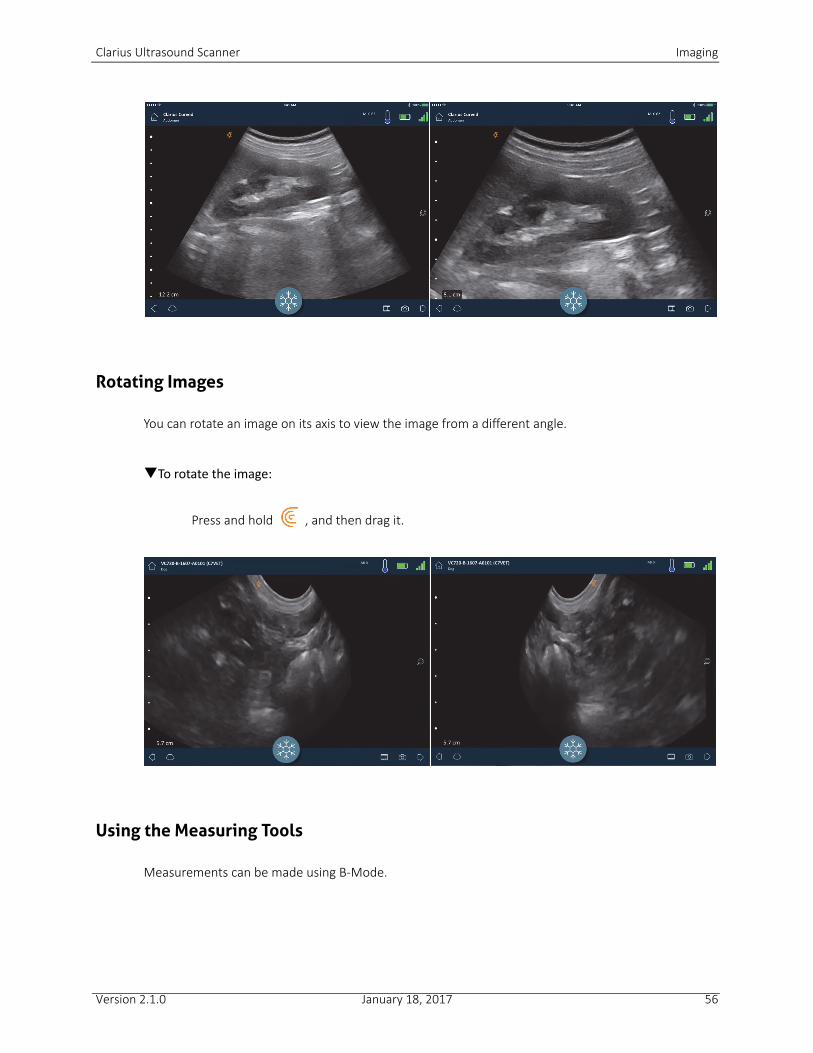
Clarius Ultrasound Scanner Imaging
Rotating Images
You can rotate an image on its axis to view the image from a different angle.
To rotate the image:
Press and hold , and then drag it.
Using the Measuring Tools
Measurements can be made using B-Mode.
Version 2.1.0 January 18, 2017 56
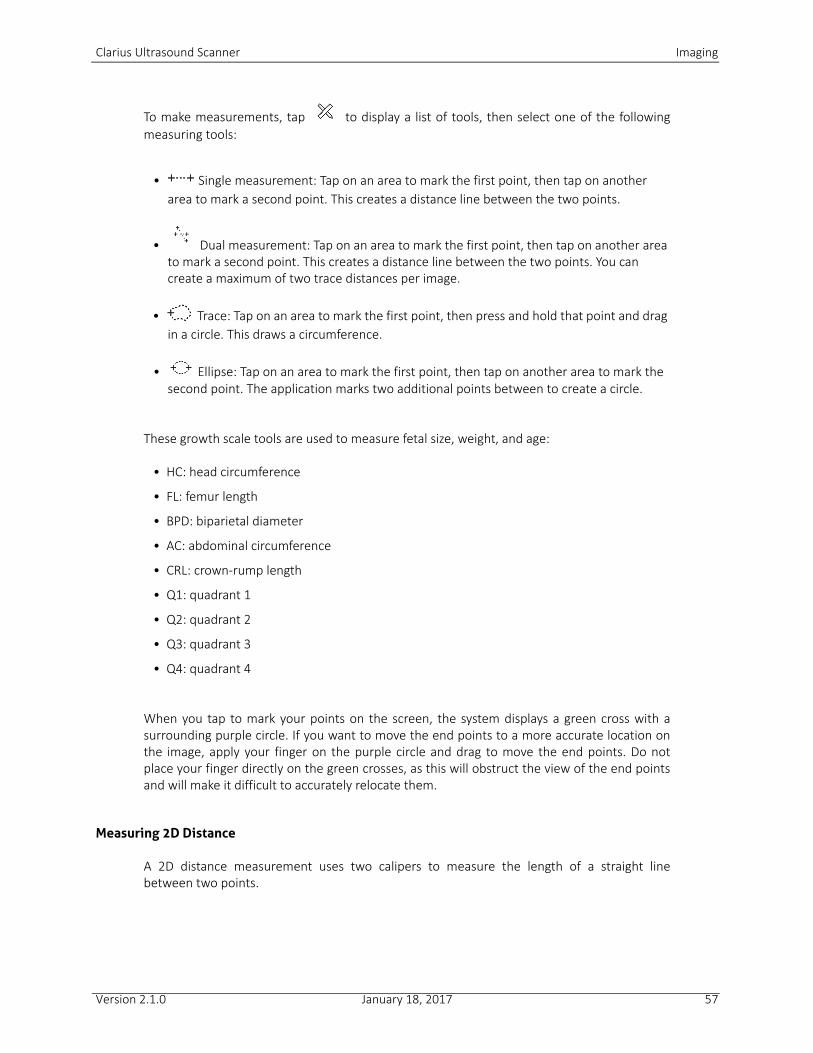
Clarius Ultrasound Scanner Imaging
To make measurements, tap to display a list of tools, then select one of the followingmeasuring tools:
• Single measurement: Tap on an area to mark the first point, then tap on another area to mark a second point. This creates a distance line between the two points.
• Dual measurement: Tap on an area to mark the first point, then tap on another area to mark a second point. This creates a distance line between the two points. You can create a maximum of two trace distances per image.
• Trace: Tap on an area to mark the first point, then press and hold that point and drag in a circle. This draws a circumference.
• Ellipse: Tap on an area to mark the first point, then tap on another area to mark the second point. The application marks two additional points between to create a circle.
These growth scale tools are used to measure fetal size, weight, and age:
• HC: head circumference
• FL: femur length
• BPD: biparietal diameter
• AC: abdominal circumference
• CRL: crown-rump length
• Q1: quadrant 1
• Q2: quadrant 2
• Q3: quadrant 3
• Q4: quadrant 4
When you tap to mark your points on the screen, the system displays a green cross with asurrounding purple circle. If you want to move the end points to a more accurate location onthe image, apply your finger on the purple circle and drag to move the end points. Do notplace your finger directly on the green crosses, as this will obstruct the view of the end pointsand will make it difficult to accurately relocate them.
Measuring 2D Distance
A 2D distance measurement uses two calipers to measure the length of a straight linebetween two points.
Version 2.1.0 January 18, 2017 57
Clarius Ultrasound Scanner Review Findings
You cannot zoom into an image while using the 2D distance measurement tool. The systemremoves measurements from the image when you release it from freeze mode or when theexam ends. To retain the measurement, save the image.
Measurement Accuracy
You can use the ultrasound system to make measurements on ultrasound images. Themeasurements are then used with other clinical data to make a diagnosis.
Never make a diagnosis based solely on measurements. When quantifying data, considerother factors. The accuracy of each measurement is highly dependent on image quality, whichin turn is highly dependent on system design, operator scanning technique, familiarity withsystem controls, and patient echogenicity.
You are responsible for image quality and diagnosis. Ensure that the data used for inspectionand diagnosis is sufficient, both spatially and temporally, for the measurement method.
Selecting an incorrect or hazardous imaging mode may deliver excessive acoustic energy tothe patient during the exam.
Measurement Accuracy Table
Inaccurate measurements or misinterpretation of results taken from an exam may lead tomisdiagnosis.
Review Findings
When you have finished imaging, you can evaluate and edit findings acquired during the exam:
• images
• cineloops
• measurements
• calculations relevant to the current mode or application. These calculations are composed of measurements made by the user (or automatically acquired by the system) on images.
2D MEASUREMENT RANGE & ACCURACY
Measurement Relative Error Minimum Range Maximum Range
Axial Distance < ± 2% ≤ 0.2 mm ≥ 24.0 cm
Lateral Distance < ± 2% ≤ 0. 2 mm ≥ 24.0 cm
Version 2.1.0 January 18, 2017 58
Clarius Ultrasound Scanner Populating Impressions
Reviewing Cineloops & Images
To view cineloops and images during an exam:
Go to the Review section.
To view thumbnail images and videos:
Swipe left and right, or up and down.
Deleting Items
You can delete unwanted images and cineloops from the Review page by tapping next tothe item.
When you are done reviewing, tap to go to the next page of the application to populateimpressions. For information on populating impressions, see Populating Impressions onpage 59.
Populating Impressions
Once you have reviewed the images, record your findings from the exam.
Once you have entered your impressions, you can end the exam. For information on endingthe exam, see Ending an Exam on page 49.
Maintenance
The only maintenance required is to clean and disinfect the scanner and battery according tothe instructions in Cleaning & Disinfecting on page 63.
Perform maintenance regularly and as needed. The system must be serviced by trainedpersonnel only.
Failing to regularly maintain or verify the Clarius Ultrasound Scanner may lead to undetectedperformance errors.
Version 2.1.0 January 18, 2017 59
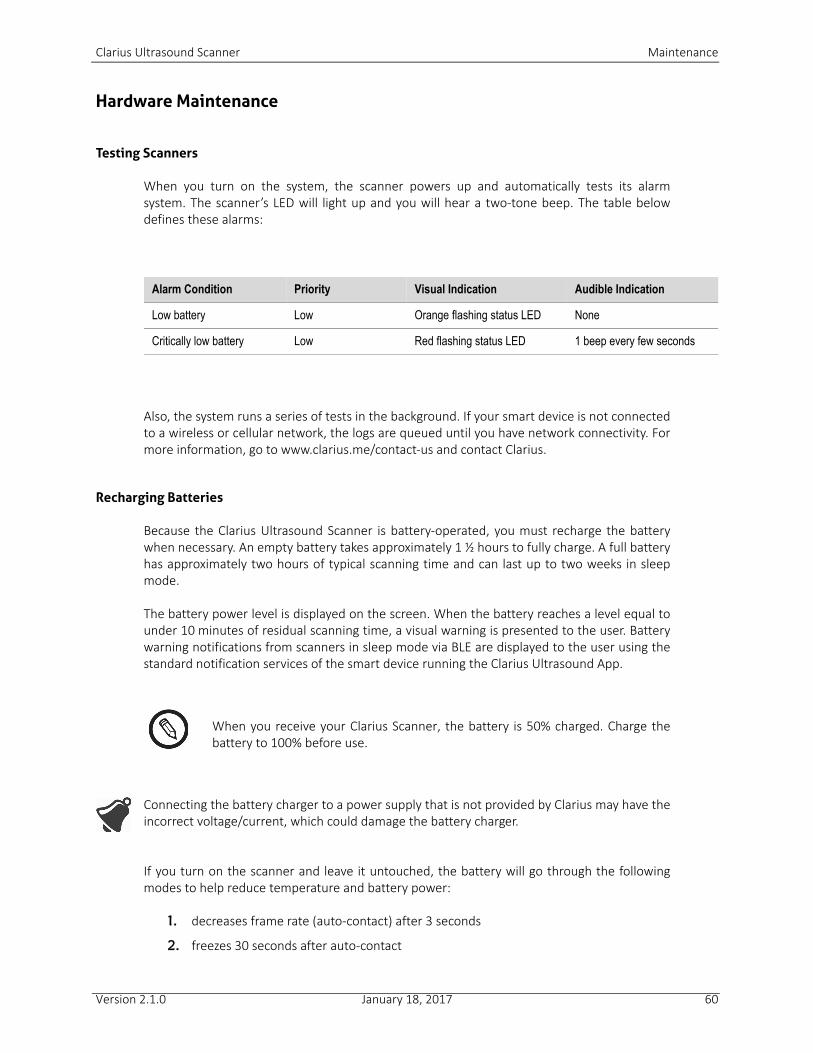
Clarius Ultrasound Scanner Maintenance
Hardware Maintenance
Testing Scanners
When you turn on the system, the scanner powers up and automatically tests its alarmsystem. The scanner’s LED will light up and you will hear a two-tone beep. The table belowdefines these alarms:
Also, the system runs a series of tests in the background. If your smart device is not connectedto a wireless or cellular network, the logs are queued until you have network connectivity. Formore information, go to www.clarius.me/contact-us and contact Clarius.
Recharging Batteries
Because the Clarius Ultrasound Scanner is battery-operated, you must recharge the batterywhen necessary. An empty battery takes approximately 1 ½ hours to fully charge. A full batteryhas approximately two hours of typical scanning time and can last up to two weeks in sleepmode.
The battery power level is displayed on the screen. When the battery reaches a level equal tounder 10 minutes of residual scanning time, a visual warning is presented to the user. Batterywarning notifications from scanners in sleep mode via BLE are displayed to the user using thestandard notification services of the smart device running the Clarius Ultrasound App.
Connecting the battery charger to a power supply that is not provided by Clarius may have theincorrect voltage/current, which could damage the battery charger.
If you turn on the scanner and leave it untouched, the battery will go through the followingmodes to help reduce temperature and battery power:
1. decreases frame rate (auto-contact) after 3 seconds
2. freezes 30 seconds after auto-contact
Alarm Condition Priority Visual Indication Audible Indication
Low battery Low Orange flashing status LED None
Critically low battery Low Red flashing status LED 1 beep every few seconds
When you receive your Clarius Scanner, the battery is 50% charged. Charge thebattery to 100% before use.
Version 2.1.0 January 18, 2017 60
Clarius Ultrasound Scanner Maintenance
3. idles 10 seconds after freeze
4. shuts down monitor after five minutes of idle time
The scanner can run approximately 45 minutes of continuous scanning.
To charge the battery:
1. Connect the line cord of the AC power adapter to an indoor electrical outlet.
2. Connect the AC power adapter to the receptacle on the battery charger.
3. Remove the battery from the Clarius Scanner by following the instructions on Removing the Battery on page 44.
4. Insert the battery into a slot on the battery charger.
The charger displays the following status lights:
• Orange: Battery is currently charging.
• Green: Battery is fully charged.
Storing Scanners
To protect your scanner:
• Dry them thoroughly before storage.
• Avoid storing them in extreme temperatures.
• Avoid placing them under direct sunlight for prolonged periods of time. This will not impact the scanner’s safety and performance but may discolor the housing's finish.
• Store them separately from other equipment.
The scanner may degrade in performance or become unusable if stored or transported inambient temperatures below -20°C (-4°F) or above 50°C (122°F).
System Maintenance
Sending Activity Logs
Select the Support menu option to go to the Support page and select the Submit logs button.This downloads logs from the scanner, then combines them with the logs from the ClariusUltrasound App. This bundle is then sent to the Clarius Cloud where they can be retrieved by aClarius Support staff. The log files contain diagnostic information.
Version 2.1.0 January 18, 2017 61
Clarius Ultrasound Scanner Help
If the log files grow large in size, you may want to delete them to save space on your smartdevice. To delete the log files, go to the Settings menu.
Help
Additional Training
If you require more training on the Clarius Ultrasound Scanner, see the tutorials onwww.clarius.me/category/education/.
Error Messages
The Clarius Ultrasound Scanner displays no error messages. Instead, the scanner presentsvisual and audible notifications.
• For a list of visual notifications, see Status Lights on page 39.
• For a list of audible notifications, see Audible Notifications on page 39.
Need Help?
If you require additional assistance, contact Customer Service at phone number 1-778-800-9975.
Version 2.1.0 January 18, 2017 62
4
Cleaning & DisinfectingIt is important to clean and disinfect the Clarius Scanner immediatelyafter use. This chapter will guide you through the cleaning anddisinfecting process.
The classification of cleaning and disinfecting you select will dependon the type of tissue the Clarius Scanner comes into contact with. Tofind the correct classification, refer to Spaulding Classification onpage 67.
When cleaning and disinfecting:
• Follow the procedures in the order they are described in this guide, without skipping steps.
• Use only solutions approved by Clarius Mobile Health. Other solutions may be incompatible with the system and could damage the scanner.
• Follow the manufacturer's instructions, recommendations, and guidelines for cleaners and disinfectants, as well as your regional regulations.
• Check expiry dates, concentration, and efficacy of the chemicals used.
• Wear the appropriate personal protective equipment (PPE), such as eyewear and gloves, as recommended by the chemical manufacturer.
• Repeated use and cleaning over the course of the scanner’s life may deteriorate its cleanliness.
• Using incompatible solutions to clean the scanner may damage its surface.
• The scanner and its parts (including accessories) may not withstand the cleaning or disinfecting processes (including repetitive process) specified in this manual, and may damage or deteriorate its safety provisions.
63
Clarius Ultrasound Scanner Cleaning the Clarius Scanner
• Cleaning or disinfecting the scanner while the battery is installed may cause the battery to short-circuit and overheat, causing an electric shock or burn.
• Cleaning or disinfecting the scanner using IPA (isopropyl alcohol) may damage it.
During an emergency where the scanner is used to examine multiple patients in a short periodof time, the lack of proper cleaning and disinfecting between patients may spread infectionsto other patients and users.
Cleaning the Clarius Scanner
Before cleaning, visually inspect the scanner to determine that it is free of any unacceptabledeterioration, such as corrosion, discoloration, pitting, or cracked seals. If damage is evident,discontinue use and contact Clarius Mobile Health.
Cleaning the scanner requires that you select the proper cleaning level. Before you begin,determine the level of cleaning by referring to Spaulding Classification on page 67. Once youhave determined the level, have the cleaning solution ready and follow the procedure below.
1. Make sure the Clarius Scanner is turned off.
2. Remove the battery from the scanner.
3. To clean the scanner, dampen a soft cloth using a compatible cleaner. Alternatively, use a premoistened disinfectant wipe.
• For non-critical cleaners, see Non-Critical Cleaners & Disinfectants on page 67.
• For semi-critical cleaners, see Semi-Critical Cleaners & Disinfectants on page 68.
4. Start at the top of the scanner and wipe toward the scan head. Be sure to remove any gels or particulate matter.
5. Clean the heat sink (the grooves along the body of the scanner) using a thin, disposable instrument, such as a swab, to push a soft cloth lightly dampened with a cleaning solution (or use a premoistened wipe) across the slot. Move the cloth back and forth from one side of the heat sink to the other.
6. Dispose the cloth and the instrument used to insert the cloth.
7. Verify that all gel, particulate matter, and bodily fluids have been removed.
8. Repeat with new cleaning material if necessary.
9. To clean the battery, dampen another soft cloth using a compatible cleaner or disinfectant. Alternatively, use a premoistened disinfectant wipe.
10. Remove all gel, particulate matter, and bodily fluids from the battery.
11. Repeat with new cleaning material if necessary.
It is important that you clean the two pieces separately.
Version 2.1.0 January 18, 2017 64
Clarius Ultrasound Scanner Disinfecting the Clarius Scanner
When you are done, keep the two parts separate. You will be disinfecting themindividually.
Due to particulate matter (for example, biological agents, ultrasound gel, and dirt) in thescanner crevasses, openings, and/or cavities, there is the possibility that the scanner is notcleaned easily or correctly.
Disinfecting the Clarius Scanner
Before you begin disinfecting, make sure you have cleaned the scanner (see Cleaning theClarius Scanner on page 64).
Disinfecting requires that you choose the proper disinfecting level. Determine the necessarydisinfection level by referring to Spaulding Classification on page 67. Once you havedetermined the required disinfecting level, have the disinfectant ready and follow one of theappropriate procedures below. Note that different levels of disinfection requires differentsteps, not just different solutions (as was the case with cleaning).
Scanner is not designed for sterilization, therefore it cannot be sterilized before or betweenuse.
Intermediate Disinfection
Refer to Non-Critical Cleaners & Disinfectants on page 67 for a list of disinfectantsrecommended for intermediate disinfection of the scanner.
If the scanner has come into contact with broken skin, mucosal membranes, or blood, it isclassified as semi-critical, and you must perform a high-level disinfection. See High-LevelDisinfection on page 66 for steps.
1. Make sure the battery still remains detached from the scanner.
2. Disinfect the scanner by wiping with a cloth moistened with a compatible disinfectant. Alternatively, use a premoistened disinfectant wipe.
3. Disinfect the heat sink (the grooves along the body of the scanner) using a thin, disposable instrument, such as a swab, to push a soft cloth lightly dampened with a disinfectant (or use a premoistened wipe) across the slot. Move the cloth back and forth from one side of the slot to the other.
It is important that you disinfect the two pieces individually.
Version 2.1.0 January 18, 2017 65
Clarius Ultrasound Scanner Disinfecting the Clarius Scanner
4. Remove the disinfecting wipe from the slot.
5. Air-dry. Alternatively, towel-dry with a clean, non-linting cloth.
6. Examine the scanner for damage, such as cracks or splitting where fluid can enter. If damage is evident, do not use the scanner and contact Clarius Mobile Health.
7. Disinfect the battery and the battery connector by wiping with a cloth moistened with a compatible disinfectant. Alternatively, use a premoistened disinfectant wipe.
8. Air-dry. Alternatively, towel-dry with a clean, non-linting cloth.
9. Examine the battery for damage, such as cracks or splitting where fluid can enter. If damage is evident, do not use the scanner and contact Clarius Mobile Health.
High-Level Disinfection
Refer to Semi-Critical Cleaners & Disinfectants on page 68 for a list of disinfectantsrecommended for high-level disinfection of the scanner.
1. Make sure the battery still remains detached from the scanner.
2. Mix the disinfectant solution by following the disinfectant label instructions for solution strength and disinfectant contact duration.
3. Using the disinfectant Cidex® OPA, at a temperature of 23°C (73°F), immerse the scanner and the battery in the disinfectant solution for 45 minutes.
4. Using the instructions on the disinfectant label, rinse both the scanner and the battery.
5. Air-dry both pieces. Alternatively, towel-dry with a clean, non-linting cloth.
6. Examine the parts for damage, such as cracks or splitting where fluid can enter. If damage is evident, discontinue use of the scanner and contact Clarius Mobile Health.
The battery connector is delicate. Handle gently.
It is important that you disinfect the two pieces individually.
It is important that you immerse the two pieces individually, detachedfrom each other.
Version 2.1.0 January 18, 2017 66
Clarius Ultrasound Scanner Spaulding Classification
Spaulding Classification
The level of cleaning and disinfecting required for your Clarius Scanner is based on theSpaulding classification system. Following the correct classification will help reduce cross-contamination and infection.
Classification Guidelines
Each Spaulding classification mandates a specific level of cleaning and disinfecting of theequipment before it can be used in the next exam. Determine the Spaulding classificationbased on your scanner’s usage.
Non-Critical Class
The materials listed in the table below are chemically compatible and have also been testedfor efficacy with the scanner.
The products listed below can be used for both cleaning and disinfecting.
SPAULDING CLASSIFICATION
Class Use Method
Non-Critical Class Touches intact skin Cleaning followed by intermediate disinfection
Semi-Critical Class Touches mucous membranes and non-intact skin
Cleaning followed by high-level disinfection (HLD)
NON-CRITICAL CLEANERS & DISINFECTANTS
Product Scanner
Cidex® OPA
CaviWipes
Version 2.1.0 January 18, 2017 67
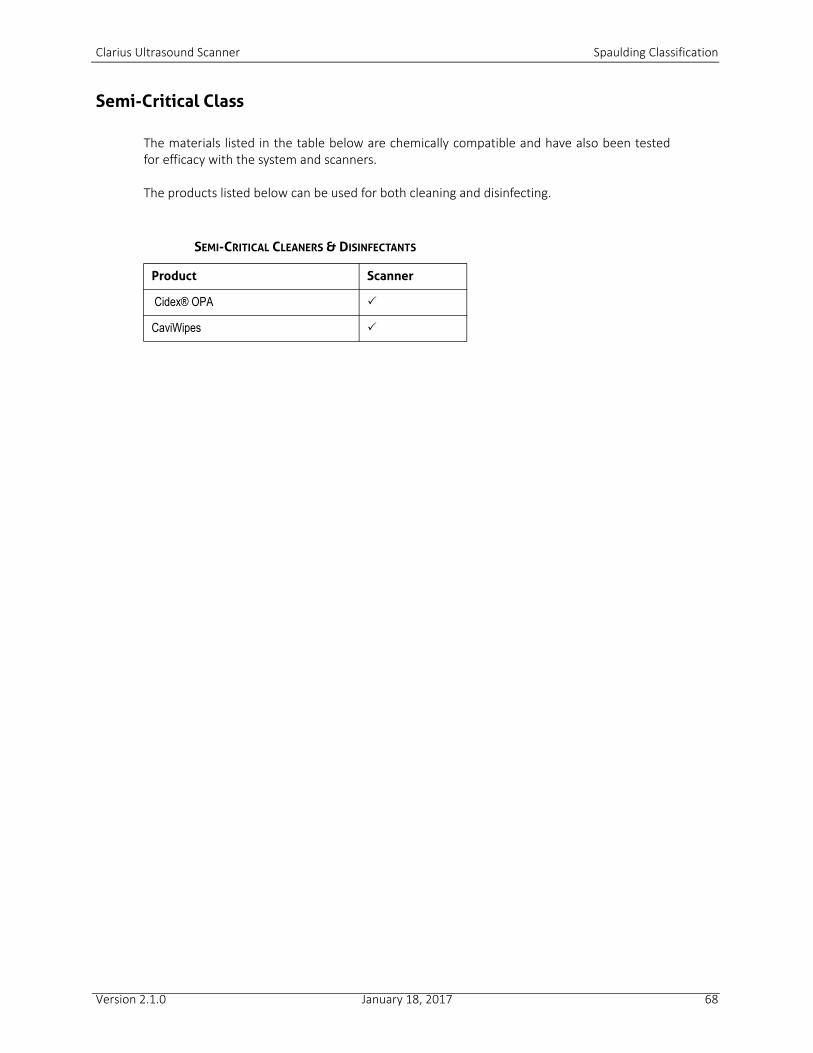
Clarius Ultrasound Scanner Spaulding Classification
Semi-Critical Class
The materials listed in the table below are chemically compatible and have also been testedfor efficacy with the system and scanners.
The products listed below can be used for both cleaning and disinfecting.
SEMI-CRITICAL CLEANERS & DISINFECTANTS
Product Scanner
Cidex® OPA
CaviWipes
Version 2.1.0 January 18, 2017 68
5
SafetyThis chapter provides instructions on the product's safe usage andoffers information on safety guidelines. Pay special attention towarnings and cautions, and follow them before, during, and afteroperating the product:
• Warnings indicate information vital to the safety of you, the operator, and the patient.
• Cautions highlight possible damages to the product that may void your warranty or service contract, or lose patient or system data.
About Diagnostic Ultrasounds
Interactions with Matter
When using diagnostic ultrasound, the sound waves are directedtowards an area of interest, which then interacts with any matteralong its path. This interaction is determined by the characteristicsof the ultrasound wave, as well as the physical properties of thematter through which the sound wave passes. Diagnostic ultrasoundfrequencies range from 2 MHz to 15 MHz.
History
Ultrasonic energy was first applied to the human body for medicalpurposes by Dr. George Ludwig at the Naval Medical ResearchInstitute, Bethesda, Maryland in the late 1940s. English-bornphysicist John Wild (1914–2009) first used ultrasound to assess thethickness of bowel tissue as early as 1949; he has been described asthe “father of medical ultrasound”. Subsequent advances in the fieldtook place concurrently in several countries.
69
Clarius Ultrasound Scanner About Diagnostic Ultrasounds
Studies
Exposure-effect studies have been performed at intensity levels much higher than those indiagnostic ultrasound practice, which revealed two mechanisms known to alter biologicalsystems:
• Thermal mechanism: Heating of soft tissue and bone.
• Non-thermal mechanism: Mechanical phenomena, such as cavitation.
These mechanisms are discussed later.
Benefits & Risks
Ultrasound is widely used because it provides many clinical benefits to the patient and has anoutstanding safety record. In more than three decades of use, there has been no known long-term negative side-effects associated to this technology.
The question of safety is being discussed more because more and more applications are beingfound, and the industry is producing technically sophisticated scanners that provide morediagnostic information. Dialogue among the medical community, manufacturers, and the FDAhas resulted in a standard that allows higher outputs for greater diagnostic capability.
Ultrasound benefits:
• Multiple diagnostic uses
• Immediate results with high-quality information
• Replacement or complimentary or used with other procedures
• Cost-effectiveness
• Portability
• Patient acceptance
• Safety record
Ultrasound risks:
The potential for adverse bioeffects caused by heating or cavitation.
“… the benefits to patients of the prudent use of diagnostic ultrasound outweigh the risks, ifany, that may be present.” -- AIUM
Version 2.1.0 January 18, 2017 70
Clarius Ultrasound Scanner Safety Topics
Safety Topics
Use the Clarius Ultrasound Scanner only if you have read and understood all the information inthis section. Operating the system without proper safety awareness could lead to fatal orserious personal injury.
This section covers general safety information. Safety information applicable to specific tasksare noted in the procedure. The Clarius Ultrasound Scanner is intended for use by a trainedmedical professional, or by the direction and supervision of a licensed physician qualified toinstruct its usage.
“Diagnostic ultrasound is recognized as a safe, effective, and highly flexible imaging modalitycapable of providing clinically relevant information about most parts of the body in a rapid andcost-effective fashion.” -- WHO (World Health Organization)
Product Safety
Clarius is responsible for the safety of the scanners. The safety of your smart device is yourresponsibility. Always follow the safety guidelines provided with your smart device before,during and after use.
Product Warnings
The following actions may cause fatal or other serious injury:
• Using the system for any application until you are trained on its safe and effective operation. If you are unsure of your ability to operate the system safely and effectively, do not use it.
• Attempting to remove, modify, override, or frustrate any safety provisions on the system.
• Using the system with any product that Clarius does not recognize as compatible with the system, or operate the product for unintended purposes.
• If the system or the scanner appear to be malfunctioning, stop use immediately. Go to www.clarius.me/contact-us and contact Clarius.
• To avoid exposing you and the patient to safety hazards, if any part of the system is known or suspected to be defective or incorrectly adjusted, do not use the system until it is repaired.
• To avoid compromising the effectiveness of the system and the safety of the patient, the user, and others, do not operate the system with patients unless you have an adequate understanding of its capabilities and functions.
• Configure your smart device in compliance with your institution's security policies. For example, notifications and alerts from third-party applications may interfere with an exam.
Version 2.1.0 January 18, 2017 71
Clarius Ultrasound Scanner Safety Topics
Product Compatibility
The Clarius Ultrasound Scanner comes with a battery, a battery charger, and a power supplyfor the charger. Depending on the country of purchase, the product may also include a one-time-use sachet for the ultrasound gel. Do not use your system in combination with otherproducts or components not made by Clarius, unless Clarius expressly recognizes those otherproducts or components as compatible.
Changes and additions to the system can be made only by Clarius or by third parties expresslyauthorized by Clarius to do so. Such changes and additions must comply with all applicablelaws and regulations that have the force of law within the jurisdictions concerned, and bestengineering practices. System changes and additions that are made without the appropriatetraining or by using unapproved spare parts may carry risks of system damage and personalinjury.
Battery Safety
If the battery fails to charge fully, replace it.
• Keep the battery away from heat sources. For example, do not charge the battery near a fire or heater.
• If the battery leaks or emits an odor, remove it from the scanner and contact Clarius Technical Support.
• If the battery emits an odor or heat, is deformed or discolored, or in any way appears abnormal during use, recharging or storage, immediately remove it and stop using it. If you have any questions about the battery, go to www.clarius.me/contact-us and contact Clarius.
• If the battery will remain unused for over a month, keep it at 50% charge level to prolong its life.
• If the battery will remain unused for over a month, keep it between -20°C (-4°F) and 20°C (68°F).
The following actions may damage the battery:
• Returning a damaged battery without instructions from Clarius Technical Support.
• Short-circuiting the battery by connecting the positive and negative terminals directly to metal objects.
• Using the battery in temperatures below -20°C (-4°F) or above 60°C (140°F).
• Charging the battery in temperatures below 10°C (50°F) or above 45°C (113°F).
• Forcing the battery into the system. The polarity of the battery terminals are fixed and cannot be reversed.
• Connecting the battery to an electrical power outlet.
• Charging the battery using non-Clarius equipment. Always charge the battery using the
Version 2.1.0 January 18, 2017 72
Clarius Ultrasound Scanner Safety Topics
battery charger provided by Clarius.
• Do not touch battery contacts.
• Do not leave the battery in direct sunlight.
Cleaning Safety
It is important to clean and maintain the ultrasound system and peripherals. Thoroughcleaning is particularly important for pieces of peripheral equipment, because they containelectromechanical parts. If exposed to constant and excessive sunlight and humidity, thescanner will suffer in both performance and reliability.
It is your responsibility to clean and disinfect your scanner in accordance with the cleaning anddisinfecting instructions in this manual. For instructions on cleaning and disinfecting theClarius Scanner, refer Cleaning the Clarius Scanner on page 64.
Cleaners & Disinfectants
• Use only cleaners and disinfectants recommended by Clarius. Avoid acetone, Methyl ethyl ketone (MEK), paint thinner, or other strong solvents and abrasive cleaners.
• Always use protective eyewear and gloves when cleaning and disinfecting equipment.
• Disinfectants are recommended based on their chemical compatibility (not their biological effectiveness) with product materials. For the biological effectiveness of a disinfectant, see the guidelines and recommendations of the disinfectant manufacturer, the U.S. Food and Drug Administration, and the U.S. Centers for Disease Control.
• If a pre-mixed solution is used, check the expiry date.
• The level of disinfection required for a scanner is determined by the type of tissue it contacts. Ensure the disinfectant is appropriate for the scanner and its application. Also, read the disinfectant label instructions and the recommendations of the Association for Professionals in Infection Control, the U.S. Food and Drug Administration, and the U.S. Centers for Disease Control.
• Clean the scanner after each use. This is an essential step before disinfection.
• When disinfecting a scanner, ensure that the solution's strength and duration of contact are appropriate for disinfection.
• Selecting a non-recommended solution, using an incorrect solution strength, or immersing a scanner deeper or longer than recommended can damage the scanner.
• Follow the manufacturer's recommendations and instructions when using cleaners and disinfectants.
Minimizing the Effects of Residual Disinfectant
If you use an OPA-based disinfectant, residual solution may remain on your scanners if you donot carefully follow the manufacturer's instructions.
Version 2.1.0 January 18, 2017 73
Clarius Ultrasound Scanner Safety Topics
To minimize the effects from residual OPA, or any other disinfectant, Clarius recommends thefollowing:
• Follow the disinfectant manufacturer's instructions very carefully.
• Limit the time that scanners are soaked in the disinfectant solution to the minimum time recommended by the disinfectant manufacturer.
Factors Affecting Disinfectant Efficacy
The following factors will affect the efficacy of a disinfectant solution:
• Number and location of microorganisms
• Innate resistance of microorganisms
• Concentration and potency of disinfectants
• Physical and chemical factors
• Organic and inorganic matter
• Duration of exposure
• Biofilms
Scanner Care
• Avoid sharp objects, such as scissors, scalpels, or cauterizing knives, from touching the scanners.
• Avoid bumping the scanner on hard surfaces.
• Avoid surgeon's brushes when cleaning scanners. Even soft brushes can damage scanners.
• Before storing scanners, make sure they are completely dry. If it is necessary to dry the scanner lens or acoustic window, apply a soft cloth to the area, and blot rather than wipe.
• Use only liquid solutions to disinfect scanners.
• Regularly check the lens of the scanner’s acoustic window for degradation, as described in Cleaning the Clarius Scanner on page 64, to prevent degradation of image quality and abrasions to the patient’s skin.
The following actions may damage your scanner:
• Cleaning or disinfecting a scanner using methods unapproved by Clarius.
• Using paper or abrasive products. They damage the soft lens of the scanner's acoustic window. If the lens is damaged to the point that the scanner elements are exposed, stop using the scanner and go to www.clarius.me/contact-us and contact Clarius immediately. Exposed scanner elements may cause burns or electric shock to the patient.
• Soaking the scanner for extended periods. Use soaking time and depth recommended by the disinfectant manufacturer.
Version 2.1.0 January 18, 2017 74
Clarius Ultrasound Scanner Safety Topics
Clinical Safety
Syringe Safety
• If the needle is not visible, do not perform the needle procedure.
• Thin needles can bend when entering tissue. Verify the needle's position by identifying the echoes from the needle.
• Make sure you are not using a false needle image to locate the needle. False needle images caused by reverberation or other tissue artifacts can misguide you.
Defibrillator Safety
If you are using the Clarius Ultrasound Scanner and defibrillation is required, use defibrillatorsthat do not have grounded patient circuits. To determine whether a defibrillator patient circuitis grounded, see the defibrillator service guide, or consult a biomedical engineer.
Before defibrillation, remove any part of the system that is in contact with the patient.
Biological Safety
• Do not use a system that exhibits erratic or inconsistent image updates. This indicates a hardware failure that must be corrected before continuing use.
• Follow the ALARA (as low as reasonably achievable) principle.
Latex
Clarius Ultrasound Scanners do not contain natural rubber latex.
The following are FDA recommendations on latex awareness:
• When taking general histories of patients, include questions about latex sensitivity. For surgical and radiology patients, spina bifida patients and health care workers, this recommendation is especially important. Questions about itching, rashes, or wheezing after wearing latex gloves or inflating a toy balloon may be useful. For patients with positive histories, flag their charts.
• If latex sensitivity is suspected, consider wearing a non-latex glove over the latex glove if the patient is sensitive. If both the health professional and the patient are sensitive, a latex middle glove could be used. (Latex gloves labeled “Hypoallergenic” may not always prevent adverse reactions.)
• Whenever latex comes in contact with mucous membranes, be alert to the possibility of an allergic reaction.
• If an allergic reaction does occur and latex is suspected, advise the patient of a possible latex sensitivity and consider an immunologic evaluation.
Version 2.1.0 January 18, 2017 75
Clarius Ultrasound Scanner Safety Topics
• Advise the patient to tell health professionals and emergency personnel about any known latex sensitivity before undergoing medical procedures. Consider advising patients with severe latex sensitivity to wear a medical identification bracelet.
Bioeffects
Thermal
Thermal bioeffects refers to heat generated whenever ultrasound energy is absorbed, andamount of heat produced depends on the ultrasound's intensity, exposure time, and thetissue's absorption characteristics.
Tissue absorbs ultrasound energy to varying degrees depending on the tissue's absorptioncharacteristics. Absorption characteristics are quantified by the absorption coefficient:
• Fluids: Their absorption coefficient is almost zero. Fluids such as amniotic fluid, blood, and urine absorb very little ultrasonic energy. That means the ultrasound goes through the fluid with very little decrease. And there's little temperature elevation in the fluid.
• Bone: Its absorption coefficient is very high. Dense bone absorbs the energy very quickly and causes the temperature to rise rapidly. Adult bone absorbs nearly all of the acoustic energy impinging on it. Fetal bone absorption coefficients vary greatly depending on the degree of ossification.
• Soft tissue: Soft tissue varies in density depending on the organ, but the density does not vary much within an organ. We call it soft tissue to distinguish it from hard tissue such as bone. Also, the tissue density within a particular organ is not always the same. But for our purposes, we assume that attenuation is uniform throughout the organ. We call this a homogeneous soft tissue model.
Attenuation is caused by:
• Absorption: Energy converted to heat.
• Scattering: Redirection of ultrasound.
Mechanical (Non-Thermal)
Mechanical bioeffects are threshold phenomena, such as cavitation, that occur when theoutput exceeds a certain level. This threshold varies by tissue type.
Cavitation is the interaction of ultrasound with gas bubbles, causing rapid and potentially largechanges in bubble size. These bubbles originate within materials at locations termednucleation sites, the exact nature and source of which are not well understood in a complexmedium such as tissue or blood. The change in bubble size may increase temperature andpressure within the bubble, causing mechanical stress on surrounding tissues, precipitate fluidmicrojet formation, and generate free radicals. Gas-containing structures, such as lungs, aremost susceptible to the effects of acoustic cavitation; however, such higher frequencyultrasounds do not provide sufficient time for significant bubble growth; therefore, cavitation
Version 2.1.0 January 18, 2017 76
Clarius Ultrasound Scanner Safety Topics
is unlikely to occur under these circumstances. Factors that produce cavitation include:pressure (compressional, rarefactional), frequency, focused/unfocused beam, pulsed/continuous waves, degree of standing waves, boundaries, and the nature and state ofmaterial.
Scientific evidence suggests that the onset of transient cavitation is a threshold phenomenon.There's a combination of rarefactional pressure values, ultrasonic frequency, and cavitationnuclei that are required for inertial cavitation to occur. If inertial cavitation is a thresholdphenomenon, then exposure to pressure levels below the threshold will never induce suchevents, regardless of the length of exposure.
There are two categories of cavitation:
• Stable: Stable cavitation is associated with vibrating gas bodies. In stable cavitation, a gas body oscillates or pulsates continuously around its equilibrium size. As the oscillations become established, the liquid-like medium around the gas body begins to flow or stream; we call this microstreaming. Microstreaming has been shown to produce stress sufficient to disrupt cell membranes.
• Inertial: During inertial (transient) cavitation, pre-existing bubbles or cavitation nuclei expand because of the rarefactional pressure of the ultrasonic field and then collapse in a violent implosion. The whole process takes place in a time span on the order of microseconds. The implosion can produce huge local temperature rises that may be thousands of degrees Celsius and pressures equal to hundreds of atmospheres, all in a volume of less than 1 µm3. The implosion can damage cells and tissue, ultimately leading to cell death. In addition, bubble implosion can generate highly reactive chemical species. All of these effects, microstreaming, implosion, and generation of reactive chemicals, occur in a very small space around the bubble, affecting only a few cells.
Exposure of the lung can produce small, localized hemorrhages under some conditions inlaboratory animals. These lesions resolve naturally and are without lasting effects in normalsubjects, but their possible significance in compromised individuals has not been studied.
ALARA Principle
The guiding principle for the use of diagnostic ultrasound is defined by the ALARA (as low asreasonably achievable) principle. The threshold for diagnostic ultrasound bioeffects isundetermined, and the definition of “reasonable” is left to the judgment and insight ofqualified personnel. No set of rules can be formulated that would be sufficiently complete todictate the correct response to every circumstance. By keeping ultrasound exposure as low asreasonably achievable as you obtain diagnostic images, you can minimize ultrasonic bioeffects.
Output display indices are designed to provide more quality information, to help guide thesonographers using ultrasound technology, in applying the ALARA principle. Some variablesthat affect the way output display indices can be used to implement the ALARA principle:
• index values
• body size
Version 2.1.0 January 18, 2017 77
Clarius Ultrasound Scanner Safety Topics
• location of the bone relative to the focal point
• attenuation in the body
• ultrasound exposure time (an especially useful variable, as it is controlled by the user).
Applying ALARA
The system's imaging mode you select depends on the information needed. Understandingthe nature of the imaging mode used, the scanner frequency, system setup values, scanningtechniques, exposure time, system and scanner capabilities, and operator experience allowsthe sonographer to apply the ALARA principle with informed judgment and meet thedefinition of the ALARA principle.
The amount of acoustic output is up to the system operator. This decision must be based onthe following factors: type of patient, type of exam, patient history, ease or difficulty ofobtaining diagnostically useful information, and the potential localized heating of the patientdue to scanner surface temperatures. The objective is to limit patient exposure to the lowestindex reading for the shortest amount of time achieving acceptable diagnostic results.
A high index reading does not necessarily indicate the occurrence of a bioeffect, however, itmust be taken seriously. It is your responsibility to make every effort to reduce the possibleeffects of a high index reading by limiting exposure time.
System controls (direct, indirect, and receiver) can be used to adjust the image quality andlimit the acoustic intensity, and are related to the techniques that an operator could use toimplement ALARA.
Using System Controls to Implement ALARA
Direct Controls
The system has no direct control for output, therefore the sonographer must control exposuretime and scanning technique to implement the ALARA principle. To ensure that acoustic andthermal limits are not exceeded for all imaging modes, the Clarius system is designed toautomatically adjust output.
The system does not exceed a spatial peak temporal average intensity (ISPTA) of 720 mW/cm2
for all imaging modes. The scanner’s mechanical index (MI) and thermal index (TI) does notexceed values greater than 1.0.
Indirect Controls
Controls affecting imaging mode, freeze, and depth indirectly affect output. The imagingmode determines the nature of the ultrasound beam. Because freeze stops all ultrasoundoutput but keeps the last image displayed on screen, you can use it to limit exposure timewhile studying an image and maintaining scanner position during a scan. Some controls, suchas depth, show a rough correspondence with output, and may be used as a general means forindirectly reducing MI or TI.
Version 2.1.0 January 18, 2017 78
Clarius Ultrasound Scanner Safety Topics
Controls indirectly affecting intensity:
• Pulse repetition frequency: The higher the PRF, the more output pulses per second, increasing the temporal-average intensity.
• Focusing depth: Setting the scanner focus at the proper depth improves the resolution of that structure, without the need to increase intensity to see it better.
• Pulse length: Generally, the longer the pulse, the greater the temporal-average intensity value, which both raises the temperature in the tissue and slightly increases the likelihood for cavitation.
• Dwell time: Scanned modes, such as B-mode imaging, distribute the energy over a large volume. In scanned modes (equipment keeps the beam stationary), the highest temperature is frequently at the surface where the ultrasound enters the body.
Receiver Controls
The receiver controls have no output effect. The following receiver controls affect imagesonly:
• Gain or time-gain control (TGC)
• Dynamic range
• Post-processing
User Responsibility
The various operating modes and output levels mean that more responsibility must beassumed by the users. This is a point that is very often neglected: many assume that if aninstrument is “FDA cleared,” then there is no risk of bioeffects. This notion is inaccuratebecause changing the mode of operation or manipulating controls has the potential to causemajor changes in output and hence in exposure. In other words, there is a shift inresponsibility for patient safety from the manufacturer to the user.
To obtain good diagnostic information, a high return signal amplitude is needed. This can beattained either by higher output, similar to talking louder, or by higher receiver gain, similar toa hearing aid with a volume control. You must attain the best diagnostic information withminimal exposure to the patient. The threshold at which ultrasound energy causes bioeffectsfor each individual patient is unknown, therefore, you must get the most information at thelowest possible output level by adjusting the output intensity of the equipment.
As a general guideline:
1. Select the correct scanner frequency and application.
2. Start with a low output level.
3. Optimize the image by using focus, receiver gain, and other imaging controls.
4. If the image is still not diagnostically useful, increase output.
Version 2.1.0 January 18, 2017 79
Clarius Ultrasound Scanner Safety Topics
Additional considerations:
• Minimize scan time by performing only medically required ones.
• Use diagnostic ultrasounds efficiently and effectively, as all other medical tools.
• Compromising the exam's quality by rushing the exam could result in a poor exam, which could require follow-up exams, which then adds exposure time.
• Select the appropriate TI and MI range for the task at hand.
• Note that output is affected by frequency, focus, pulse length, and dwell time.
Output Display
The output display provides the user with an indication of the potential for bioeffects thatmight be caused by the ultrasound energy being emitted. With this information, users canbetter control the diagnostic ultrasound equipment and examination to ensure that neededdiagnostic information is obtained with a minimum of risk to the patient.
Display Standards
The system output display consists of the following exposure indices to indicate the potentialthermal and mechanical effects:
• TI: This is continuously displayed over the range of 0.0 to maximum output, based on the scanner and application, in increments of 0.1, and consists of the following indices:
• thermal index for soft tissue (TIS)
• thermal index for bone (TIB)
• thermal index for cranial bone (TIC)
Keep output display indices to a minimum. Select a TI based on:
• Approximate index for the application: TIS is used for imaging soft tissue, TIB for a focus at or near bone, and TIC for imaging through bone near the surface (for example, a cranial exam).
• Mitigating factors that might create artificially high or low TI readings: Location of fluid or bone, or blood flow. For example, is there a highly attenuating tissue path so that the actual potential for local zone heating is less than the TI displays?
• Scanned modes versus unscanned modes of operation that affect the TI: For scanned modes (such as B-Mode), heating tends to be near the surface. For unscanned modes (such as M-Mode), the potential for heating tends to be deeper in the focal zone.
• MI: This is continuously displayed over the range of 0.0 to 1.9, in increments of 0.1.
TI Display
Version 2.1.0 January 18, 2017 80
Clarius Ultrasound Scanner Safety Topics
The TI indicates any conditions that may lead to temperature increase on the surface of thebody, within the body tissue, or at the point of focus of the ultrasound beam on bone. TIinforms you of a potential rise in temperature of body tissue, by estimating temperatureincreases in those body tissue with specific properties. The actual temperature increase isinfluenced by factors such as tissue type, vascularity, and mode of operation. Use the TI as aguide for implementing the ALARA principle.
You can choose to display one of the following types of TI indices:
• TIS: Indicates potential for heating within soft homogeneous tissue.
• TIB: Indicates potential for heating at or near the focus after the ultrasound beam has passed through soft tissue or fluid. For example, at or near second- or third-trimester fetal bone.
• TIC: Indicates potential for heating of bone at or near the surface. For example, cranial bone.
MI Display
The higher the MI value, the greater the likelihood of mechanical bioeffects occurring. Thepotential for mechanical bioeffects varies by peak rarefactional pressure and ultrasoundfrequency. The MI accounts for these two factors. There is no specific MI value that indicatesthe occurrence of a mechanical effect. Use the MI as a guide for implementing the ALARAprinciple.
When interpreting the MI, remember that it is intended to estimate the potential formechanical bioeffects. The higher the index reading, the greater the potential. However,neither MI = 1 nor any other level indicates that a bioeffect is actually occurring. We shouldnot be alarmed by the reading, but we should use it to implement the ALARA principle.
Display Accuracy
The MI and TI have a precision of 0.1 unit on the system.
Estimates of the MI and TI display accuracies are shown in the Acoustic Output Tables. Anumber of factors are considered when estimating the accuracy of the displayed values:
• hardware variations
Variability among scanners and systems is a result of piezoelectric crystal efficiencies,process-related impedance differences, and sensitive lens-focusing parametervariations.
• estimation algorithm accuracy
Differences in system pulser voltage control and efficiencies are also contributor tovariability. There are inherent uncertainties in the algorithms used to estimateacoustic output values over the range of possible system operating conditions andpulser voltages.
Version 2.1.0 January 18, 2017 81
Clarius Ultrasound Scanner Safety Topics
• measurement variability
Inaccuracies in laboratory measurements can be caused by hydrophone calibrationand performance, positioning, alignment, and digitization tolerances, and variabilityamong test operators.
Controls Affecting Display Indices
Use system controls to change the TI and MI values.
Power Controls
Two real-time output values are on the display: TI and MI. These change as the systemresponds to power-control adjustments. In combined modes, the individual modes each addto the total TI. One mode will be the dominant contributor to this total. The displayed MI willbe from the mode with the largest MI value.
B-Mode Controls
• Focus:
When the focal depth is near the natural focus of the scanner, the MI may be higher.
• Zoom:
Increasing the zoom magnification by spreading the display may increase frame rate,thereby increasing the TI. The number of focal zones may also increase automaticallyto improve resolution. This action may change the MI, because the peak MI can occurat a different depth.
Other Control Effects
• B-Mode Depth:
An increase in two-dimensional depth will automatically decrease the B-Mode framerate, thereby decreasing the TI. The system may also automatically choose a deepertwo-dimensional focal depth. A change of focal depth may change the MI. The MIdisplayed is that of the zone with the largest MI value.
• Application:
Acoustic output defaults are set when you select an application. Factory defaults varywith scanner, application, and mode. Defaults have been chosen below the FDA limitsfor intended use.
• Imaging Mode Controls:
Version 2.1.0 January 18, 2017 82
Clarius Ultrasound Scanner Safety Topics
When a new imaging mode is selected, both the TI and MI may change to defaultsettings. Each mode has a corresponding pulse repetition frequency and maximumintensity point. In combined or simultaneous modes, the TI is the sum of thecontribution from the modes enabled, and the displayed MI is the largest of the MIvalues associated with each mode and focal zone enabled. The system will return tothe previously selected state if a mode is turned off and then reselected.
• Scanner:
Each scanner type has unique specifications for contact area, beam shape, and centerfrequency. Selecting a scanner initializes its default settings, which varies by scanner,application, and selected mode. These defaults are set below the FDA limits forintended use.
Example of reducing output:
Imagine we are getting ready to do a liver scan. The first thing we need to do is select theappropriate scanner frequency. Next, we adjust the output intensity (or power) transmitsetting. We check to make sure that it is positioned at the lowest possible setting to producean image. We adjust the focus to the area of interest and then increase the receiver gain toproduce a uniform representation of the tissue. If we can obtain a good image by increasingthe gain, we can lower the output and continue to increase the gain. Only after making theseadjustments and if tissue penetration or echo amplitude levels are inadequate should weincrease the output to the next higher level.
Acoustics
The scanner is the most important factor in image quality. Optimal imaging cannot beobtained without the correct scanner. The system is optimized for use based on your scannerselection.
The system limits patient contact temperature to 43°C (109°F), and acoustic output values totheir respective U.S. Food and Drug Administration limits. A power-protection circuit protectsagainst over-current conditions. If the power monitor protection circuit senses an over-current condition, then the drive voltage to the scanner is shut off immediately, preventingoverheating of the scanner surface and limiting acoustic output. Validation of the powerprotection circuit is done under normal system operation.
A temperature elevation of less than 1.5°C (2.7°F) is considered harmless to human tissue(including embryo or fetus). Temperatures in excess of this may cause harm, depending on thelength of time maintained. A temperature elevation of 4°C (7.2°F), maintained for five minutesor more, is considered to be potentially hazardous to a fetus or embryo.
Version 2.1.0 January 18, 2017 83
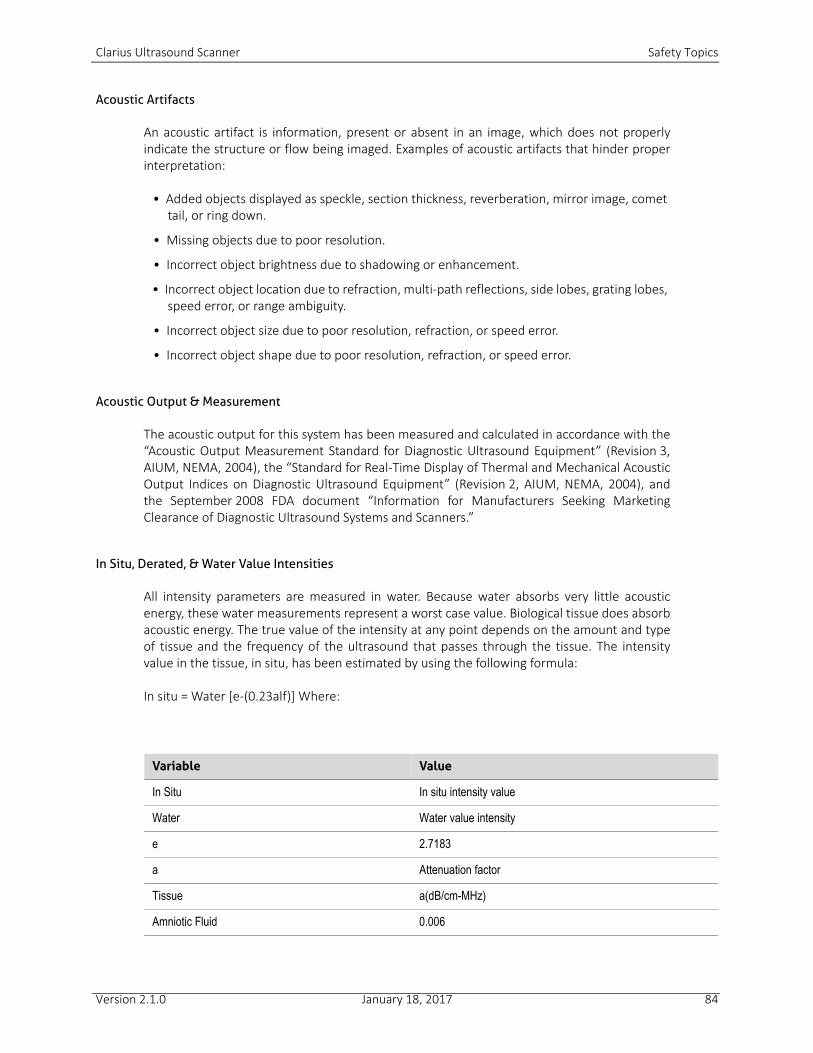
Clarius Ultrasound Scanner Safety Topics
Acoustic Artifacts
An acoustic artifact is information, present or absent in an image, which does not properlyindicate the structure or flow being imaged. Examples of acoustic artifacts that hinder properinterpretation:
• Added objects displayed as speckle, section thickness, reverberation, mirror image, comet tail, or ring down.
• Missing objects due to poor resolution.
• Incorrect object brightness due to shadowing or enhancement.
• Incorrect object location due to refraction, multi-path reflections, side lobes, grating lobes, speed error, or range ambiguity.
• Incorrect object size due to poor resolution, refraction, or speed error.
• Incorrect object shape due to poor resolution, refraction, or speed error.
Acoustic Output & Measurement
The acoustic output for this system has been measured and calculated in accordance with the“Acoustic Output Measurement Standard for Diagnostic Ultrasound Equipment” (Revision 3,AIUM, NEMA, 2004), the “Standard for Real-Time Display of Thermal and Mechanical AcousticOutput Indices on Diagnostic Ultrasound Equipment” (Revision 2, AIUM, NEMA, 2004), andthe September 2008 FDA document “Information for Manufacturers Seeking MarketingClearance of Diagnostic Ultrasound Systems and Scanners.”
In Situ, Derated, & Water Value Intensities
All intensity parameters are measured in water. Because water absorbs very little acousticenergy, these water measurements represent a worst case value. Biological tissue does absorbacoustic energy. The true value of the intensity at any point depends on the amount and typeof tissue and the frequency of the ultrasound that passes through the tissue. The intensityvalue in the tissue, in situ, has been estimated by using the following formula:
In situ = Water [e-(0.23alf)] Where:
Variable Value
In Situ In situ intensity value
Water Water value intensity
e 2.7183
a Attenuation factor
Tissue a(dB/cm-MHz)
Amniotic Fluid 0.006
Version 2.1.0 January 18, 2017 84
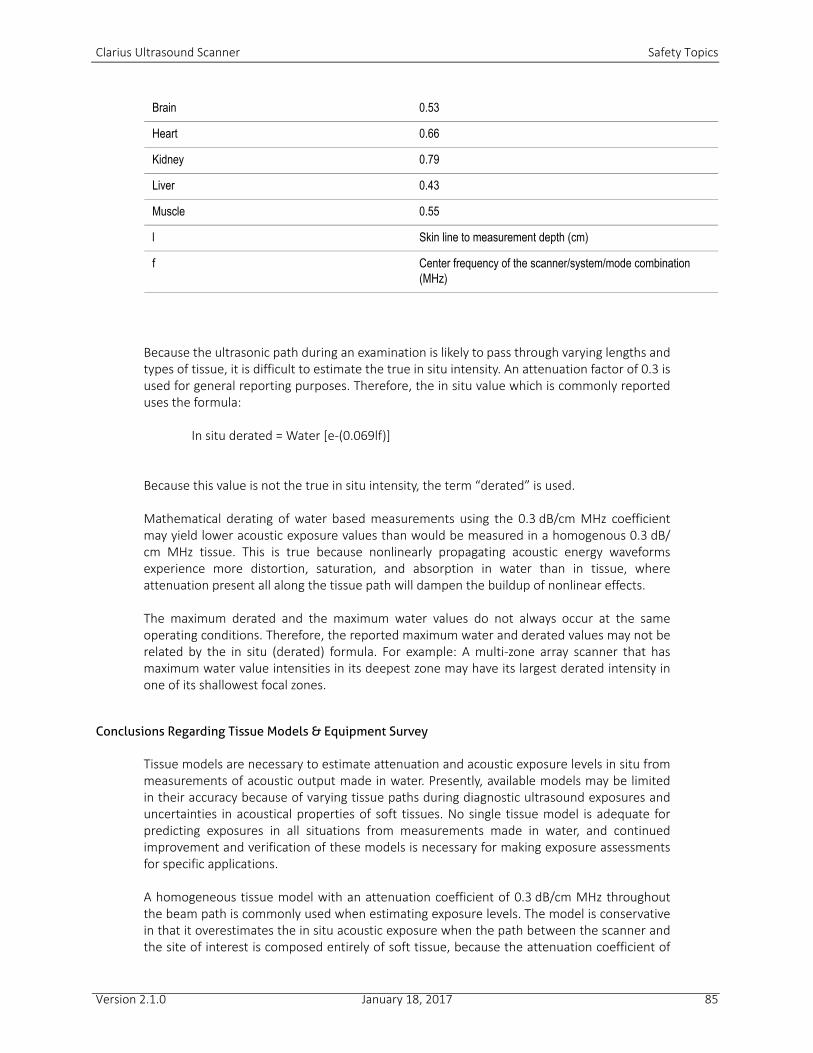
Clarius Ultrasound Scanner Safety Topics
Because the ultrasonic path during an examination is likely to pass through varying lengths andtypes of tissue, it is difficult to estimate the true in situ intensity. An attenuation factor of 0.3 isused for general reporting purposes. Therefore, the in situ value which is commonly reporteduses the formula:
In situ derated = Water [e-(0.069lf)]
Because this value is not the true in situ intensity, the term “derated” is used.
Mathematical derating of water based measurements using the 0.3 dB/cm MHz coefficientmay yield lower acoustic exposure values than would be measured in a homogenous 0.3 dB/cm MHz tissue. This is true because nonlinearly propagating acoustic energy waveformsexperience more distortion, saturation, and absorption in water than in tissue, whereattenuation present all along the tissue path will dampen the buildup of nonlinear effects.
The maximum derated and the maximum water values do not always occur at the sameoperating conditions. Therefore, the reported maximum water and derated values may not berelated by the in situ (derated) formula. For example: A multi-zone array scanner that hasmaximum water value intensities in its deepest zone may have its largest derated intensity inone of its shallowest focal zones.
Conclusions Regarding Tissue Models & Equipment Survey
Tissue models are necessary to estimate attenuation and acoustic exposure levels in situ frommeasurements of acoustic output made in water. Presently, available models may be limitedin their accuracy because of varying tissue paths during diagnostic ultrasound exposures anduncertainties in acoustical properties of soft tissues. No single tissue model is adequate forpredicting exposures in all situations from measurements made in water, and continuedimprovement and verification of these models is necessary for making exposure assessmentsfor specific applications.
A homogeneous tissue model with an attenuation coefficient of 0.3 dB/cm MHz throughoutthe beam path is commonly used when estimating exposure levels. The model is conservativein that it overestimates the in situ acoustic exposure when the path between the scanner andthe site of interest is composed entirely of soft tissue, because the attenuation coefficient of
Brain 0.53
Heart 0.66
Kidney 0.79
Liver 0.43
Muscle 0.55
l Skin line to measurement depth (cm)
f Center frequency of the scanner/system/mode combination (MHz)
Version 2.1.0 January 18, 2017 85

Clarius Ultrasound Scanner Safety Topics
soft tissue is generally higher than 0.3 dB/cm MHz. When the path contains significantamounts of fluid, as in many first- and second-trimester pregnancies scannedtransabdominally, this model may underestimate the in situ acoustical exposure. The amountof underestimation depends on each specific situation. For example, when the beam path islonger than 3 cm and the propagation medium is predominantly fluid (conditions that mayexist during transabdominal OB scans), a more accurate value for the derating term is 0.1 dB/cm MHz.
Fixed-path tissue models, in which soft tissue thickness is held constant, sometimes are usedto estimate in situ acoustical exposures when the beam path is longer than 3 cm and consistslargely of fluid. When this model is used to estimate maximum exposure to the fetus duringtransabdominal scans, a value of 1 dB/cm MHz may be used during all trimesters.
The maximum acoustic output levels of diagnostic ultrasound scanners extend over a broadrange of values:
• A survey of 1990-equipment models yielded MI values between 0.1 and 1 at their highest output settings. Maximum MI values of approximately 2 are known to occur for currently available equipment. Maximum MI values are similar for real-time B-Mode.
• Computed estimates of upper limits to temperature elevations during transabdominal scans were obtained in a survey of 1988 and 1990 Doppler equipment. The vast majority of models yielded upper limits less than 1°C and 4°C (1.8°F and 7.2°F) for exposures of first-trimester fetal tissue and second-trimester fetal bone, respectively. The largest values obtained were approximately 1.5°C (2.7°F) for first-trimester fetal tissue and 7°C (12.6°F) for second-trimester fetal bone. Estimated maximum temperature elevations given here are for a “fixed-path” tissue model and are for scanners having Ispta (derated)
values greater than 500 mW/cm2. The temperature elevations for fetal bone and tissue were computed based on calculation procedures given in Sections 4.3.2.1 through 4.3.2.6 in “Bioeffects and Safety of Diagnostic Ultrasound” (AIUM Report, January 28, 1993).
Acoustic Measurement Precision & Uncertainty
All table entries have been obtained at the same operating conditions that give rise to themaximum index value in the first column of the tables. Measurement precision anduncertainty for power, pressure, intensity, and center frequency are listed in the followingtables.
Measurement precision on the following quantities is determined by makingrepeated measurements and stating the standard deviation as a percentage.
ACOUSTIC MEASUREMENT PRECISION
Quantity Precision(Percentage Standard Deviation)
Pr is the underated peak rarefactional pressure measured in megapascals (MPa)
Pr: 5.4%
Version 2.1.0 January 18, 2017 86
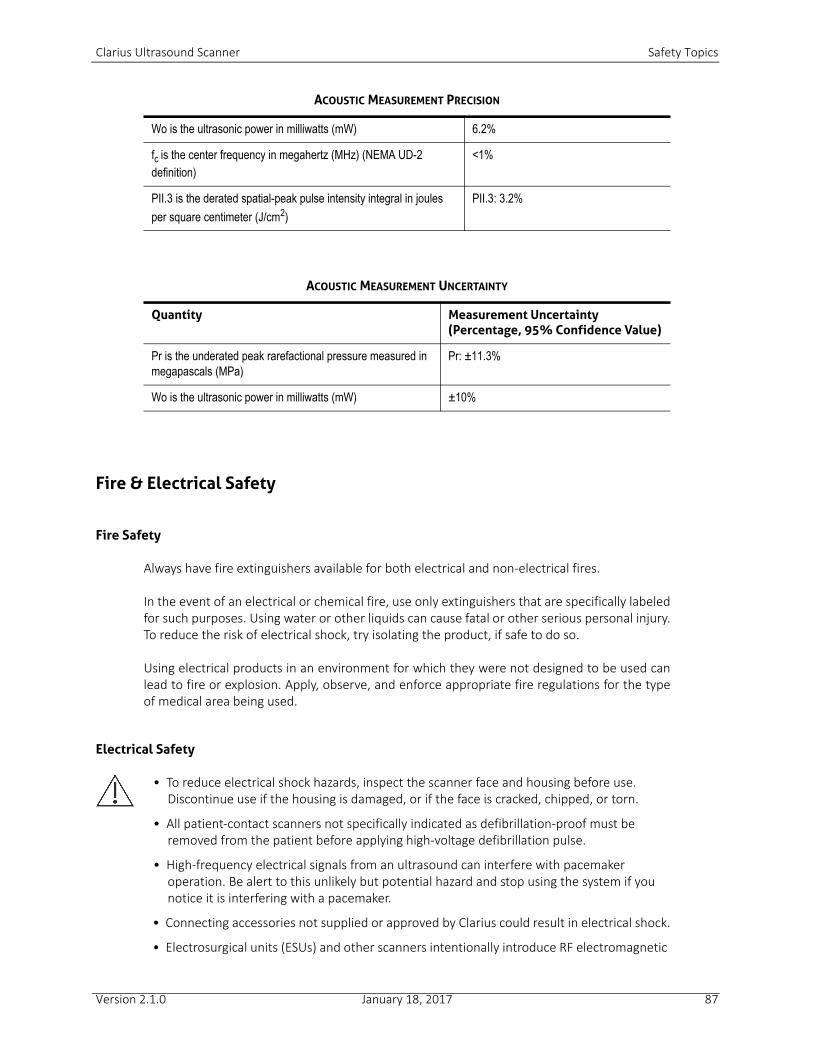
Clarius Ultrasound Scanner Safety Topics
Fire & Electrical Safety
Fire Safety
Always have fire extinguishers available for both electrical and non-electrical fires.
In the event of an electrical or chemical fire, use only extinguishers that are specifically labeledfor such purposes. Using water or other liquids can cause fatal or other serious personal injury.To reduce the risk of electrical shock, try isolating the product, if safe to do so.
Using electrical products in an environment for which they were not designed to be used canlead to fire or explosion. Apply, observe, and enforce appropriate fire regulations for the typeof medical area being used.
Electrical Safety
• To reduce electrical shock hazards, inspect the scanner face and housing before use. Discontinue use if the housing is damaged, or if the face is cracked, chipped, or torn.
• All patient-contact scanners not specifically indicated as defibrillation-proof must be removed from the patient before applying high-voltage defibrillation pulse.
• High-frequency electrical signals from an ultrasound can interfere with pacemaker operation. Be alert to this unlikely but potential hazard and stop using the system if you notice it is interfering with a pacemaker.
• Connecting accessories not supplied or approved by Clarius could result in electrical shock.
• Electrosurgical units (ESUs) and other scanners intentionally introduce RF electromagnetic
Wo is the ultrasonic power in milliwatts (mW) 6.2%
fc is the center frequency in megahertz (MHz) (NEMA UD-2 definition)
<1%
PII.3 is the derated spatial-peak pulse intensity integral in joules
per square centimeter (J/cm2)
PII.3: 3.2%
ACOUSTIC MEASUREMENT UNCERTAINTY
Quantity Measurement Uncertainty(Percentage, 95% Confidence Value)
Pr is the underated peak rarefactional pressure measured in megapascals (MPa)
Pr: ±11.3%
Wo is the ultrasonic power in milliwatts (mW) ±10%
ACOUSTIC MEASUREMENT PRECISION
Version 2.1.0 January 18, 2017 87
Clarius Ultrasound Scanner Safety Topics
fields (currents) into patients. Because imaging ultrasound frequencies are within the RF range, ultrasound scanner circuits are susceptible to RF interference.
• A burn hazard may result from a surgical equipment with a defect in the high-frequency surgical neutral electrode connection. Do not use scanners with high-frequency surgical equipment.
• Using accessories other than those specified for use with the Clarius Ultrasound Scanner may result in increased emissions of the system.
Electromagnetic Safety
The Clarius Scanner uses wireless technology to communicate with your smart device.Wireless communication can be affected by severe weather conditions and radio frequencyinterference. Such environments will not cause the safety of the Clarius Ultrasound Scanner todeteriorate, but the captured image may show signs of unwanted noise and/or artifacts. Thetechnology used in the Clarius Ultrasound Scanner is designed to minimize these affects butmay not eliminate them entirely.
Electromagnetic Compatibility
The Clarius Ultrasound Scanner has been manufactured with existing electromagneticcompatibility requirements and have been tested and found to comply with electromagneticcompatibility standards to provide reasonable protection against harmful interference in atypical medical installation.
When this status icon is green, it indicates good wireless network connection. If it isyellow, orange, or red, it indicates varying degrees of congestion. This status icon is displayedon the Clarius Ultrasound App’s live imaging page.
Use of this system in the presence of an electromagnetic field can cause momentarilydegraded image quality. If this occurs frequently, review the environment surrounding thesystem and identify possible sources of radiated emissions. These emissions could be causedby other electrical equipment from:
• The same or adjacent room.
• Portable or mobile RF communications equipment (such as cellular phones and pagers).
• Radio, TV, or microwave transmission equipment located nearby.
The scanner’s built-in radio operates in the 2.4 GHz and 5 GHz bands, and supports:
• Bluetooth 4.1 as well as CSA2.
• IEEE Std 802.11a, 802.11b/g, and IEEE Std 802.11n data rates with 20 MHz or 40 MHz SISO and 20 MHz MIMO.
Version 2.1.0 January 18, 2017 88

Clarius Ultrasound Scanner Safety Topics
Caution:
• Using parts and accessories not recommended by Clarius may result in increased emissions or decreased immunity of the system. Doing so may increase electromagnetic emissions or decreased immunity. Use only accessories and peripherals recommended by Clarius.
• EMC precautions for medical equipment must be followed according to the EMC information provided in that system's accompanying documents.
• The AC power supply cable is limited to 1.5 m (4.9 feet).
Electrostatic Discharge Precautions
Electrostatic discharge (ESD), or static shock, results from the flow of an electrical charge froma person or object of a higher charge to that of a lower charge. ESD is most prevalent in low-humidity environments, often caused by heating or air-conditioning.
To reduce ESD:
• Use anti-static spray on carpets, linoleum, and mats. Or use a ground wire connection between the system and the patient table or bed.
• Do not touch the connector pins on the battery.
Electromagnetic Emissions
Ensure that the Clarius Ultrasound Scanner is used only in those operating environmentsindicated in the following table. Operating the system in an environment that does not meetthese conditions may degrade system performance.
DECLARATION OF ELECTROMAGNETIC EMISSIONS
Emissions Test Compliance Electromagnetic Environment
RF emissions, CISPR 11 Group 1 The system uses RF energy only for its internal function. Therefore, its RF emissions are very low and are not likely to cause any interference in nearby electronic equipment.
RF emissions, CISPR 11 Class A The system is suitable for use in all establishments, except domestic establishments and those directly connected to the public low-voltage power supply network that supplies buildings used for domestic purposes
Harmonic emissions, IEC 61000-3-2 Class A
Voltage fluctuations/flicker emissions, IEC 61000-3-3
Complies
Version 2.1.0 January 18, 2017 89
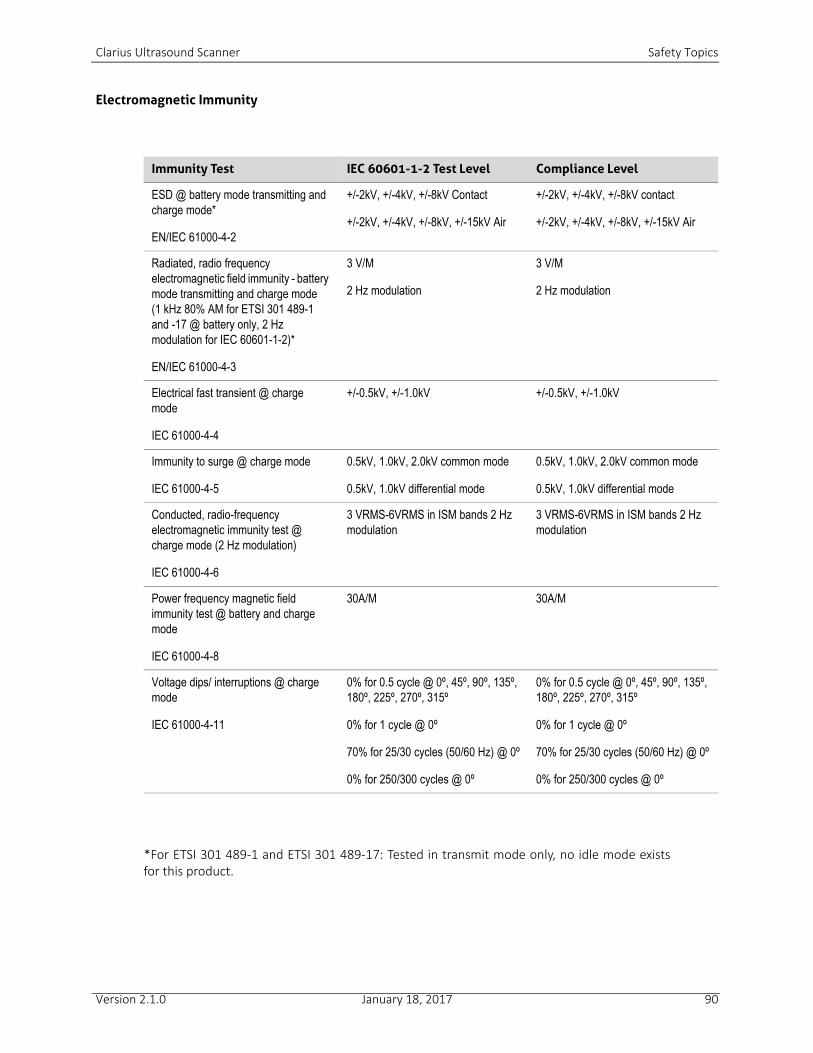
Clarius Ultrasound Scanner Safety Topics
Electromagnetic Immunity
*For ETSI 301 489-1 and ETSI 301 489-17: Tested in transmit mode only, no idle mode existsfor this product.
Immunity Test IEC 60601-1-2 Test Level Compliance Level
ESD @ battery mode transmitting and charge mode*
EN/IEC 61000-4-2
+/-2kV, +/-4kV, +/-8kV Contact
+/-2kV, +/-4kV, +/-8kV, +/-15kV Air
+/-2kV, +/-4kV, +/-8kV contact
+/-2kV, +/-4kV, +/-8kV, +/-15kV Air
Radiated, radio frequency electromagnetic field immunity - battery mode transmitting and charge mode (1 kHz 80% AM for ETSI 301 489-1 and -17 @ battery only, 2 Hz modulation for IEC 60601-1-2)*
EN/IEC 61000-4-3
3 V/M
2 Hz modulation
3 V/M
2 Hz modulation
Electrical fast transient @ charge mode
IEC 61000-4-4
+/-0.5kV, +/-1.0kV +/-0.5kV, +/-1.0kV
Immunity to surge @ charge mode
IEC 61000-4-5
0.5kV, 1.0kV, 2.0kV common mode
0.5kV, 1.0kV differential mode
0.5kV, 1.0kV, 2.0kV common mode
0.5kV, 1.0kV differential mode
Conducted, radio-frequency electromagnetic immunity test @ charge mode (2 Hz modulation)
IEC 61000-4-6
3 VRMS-6VRMS in ISM bands 2 Hz modulation
3 VRMS-6VRMS in ISM bands 2 Hz modulation
Power frequency magnetic field immunity test @ battery and charge mode
IEC 61000-4-8
30A/M 30A/M
Voltage dips/ interruptions @ charge mode
IEC 61000-4-11
0% for 0.5 cycle @ 0º, 45º, 90º, 135º, 180º, 225º, 270º, 315º
0% for 1 cycle @ 0º
70% for 25/30 cycles (50/60 Hz) @ 0º
0% for 250/300 cycles @ 0º
0% for 0.5 cycle @ 0º, 45º, 90º, 135º, 180º, 225º, 270º, 315º
0% for 1 cycle @ 0º
70% for 25/30 cycles (50/60 Hz) @ 0º
0% for 250/300 cycles @ 0º
Version 2.1.0 January 18, 2017 90
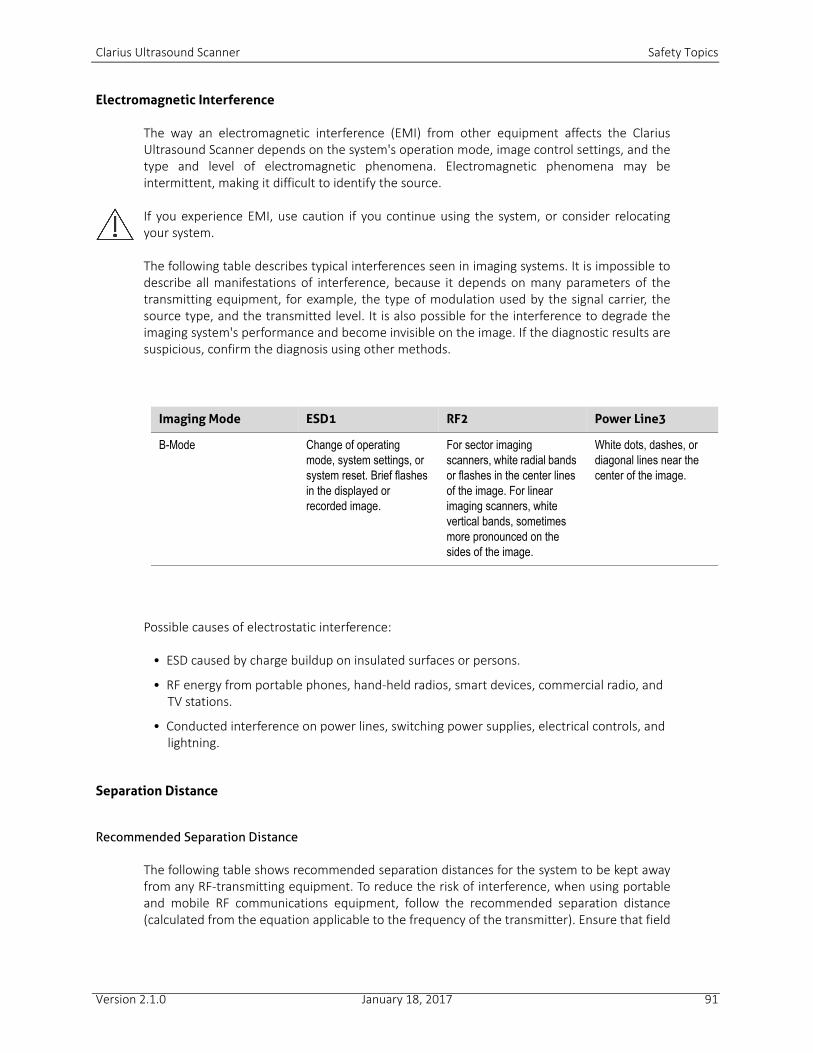
Clarius Ultrasound Scanner Safety Topics
Electromagnetic Interference
The way an electromagnetic interference (EMI) from other equipment affects the ClariusUltrasound Scanner depends on the system's operation mode, image control settings, and thetype and level of electromagnetic phenomena. Electromagnetic phenomena may beintermittent, making it difficult to identify the source.
If you experience EMI, use caution if you continue using the system, or consider relocatingyour system.
The following table describes typical interferences seen in imaging systems. It is impossible todescribe all manifestations of interference, because it depends on many parameters of thetransmitting equipment, for example, the type of modulation used by the signal carrier, thesource type, and the transmitted level. It is also possible for the interference to degrade theimaging system's performance and become invisible on the image. If the diagnostic results aresuspicious, confirm the diagnosis using other methods.
Possible causes of electrostatic interference:
• ESD caused by charge buildup on insulated surfaces or persons.
• RF energy from portable phones, hand-held radios, smart devices, commercial radio, and TV stations.
• Conducted interference on power lines, switching power supplies, electrical controls, and lightning.
Separation Distance
Recommended Separation Distance
The following table shows recommended separation distances for the system to be kept awayfrom any RF-transmitting equipment. To reduce the risk of interference, when using portableand mobile RF communications equipment, follow the recommended separation distance(calculated from the equation applicable to the frequency of the transmitter). Ensure that field
Imaging Mode ESD1 RF2 Power Line3
B-Mode Change of operating mode, system settings, or system reset. Brief flashes in the displayed or recorded image.
For sector imaging scanners, white radial bands or flashes in the center lines of the image. For linear imaging scanners, white vertical bands, sometimes more pronounced on the sides of the image.
White dots, dashes, or diagonal lines near the center of the image.
Version 2.1.0 January 18, 2017 91
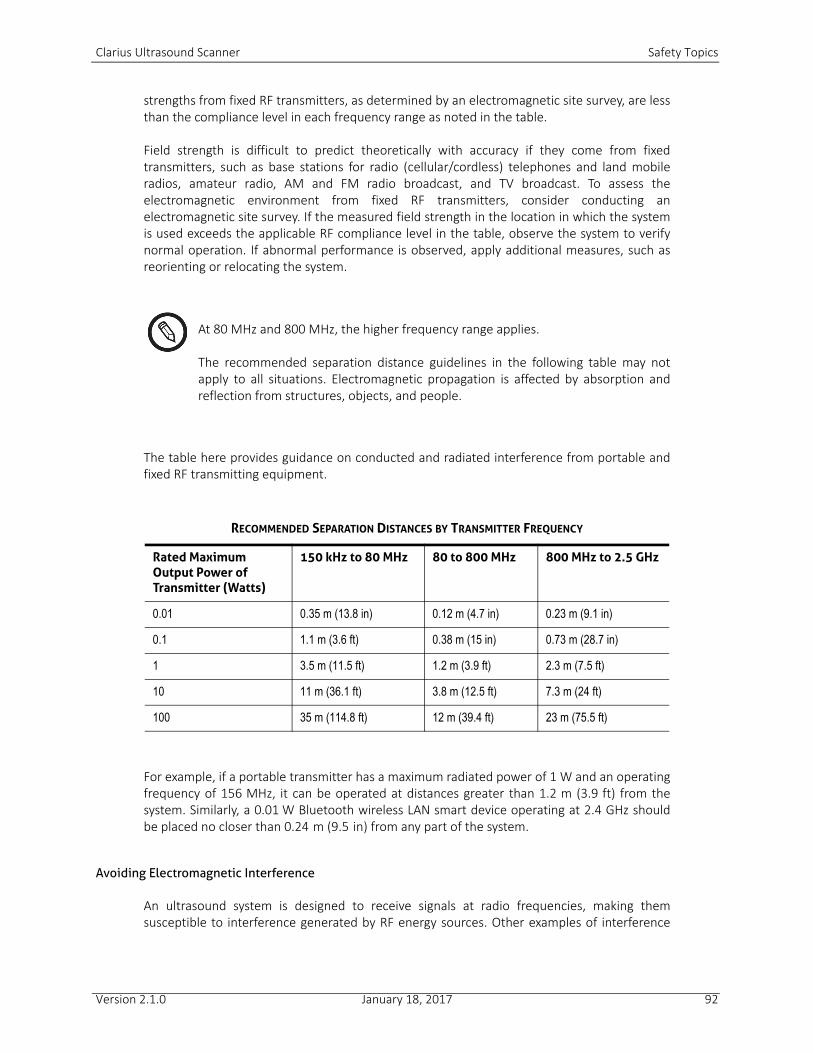
Clarius Ultrasound Scanner Safety Topics
strengths from fixed RF transmitters, as determined by an electromagnetic site survey, are lessthan the compliance level in each frequency range as noted in the table.
Field strength is difficult to predict theoretically with accuracy if they come from fixedtransmitters, such as base stations for radio (cellular/cordless) telephones and land mobileradios, amateur radio, AM and FM radio broadcast, and TV broadcast. To assess theelectromagnetic environment from fixed RF transmitters, consider conducting anelectromagnetic site survey. If the measured field strength in the location in which the systemis used exceeds the applicable RF compliance level in the table, observe the system to verifynormal operation. If abnormal performance is observed, apply additional measures, such asreorienting or relocating the system.
The table here provides guidance on conducted and radiated interference from portable andfixed RF transmitting equipment.
For example, if a portable transmitter has a maximum radiated power of 1 W and an operatingfrequency of 156 MHz, it can be operated at distances greater than 1.2 m (3.9 ft) from thesystem. Similarly, a 0.01 W Bluetooth wireless LAN smart device operating at 2.4 GHz shouldbe placed no closer than 0.24 m (9.5 in) from any part of the system.
Avoiding Electromagnetic Interference
An ultrasound system is designed to receive signals at radio frequencies, making themsusceptible to interference generated by RF energy sources. Other examples of interference
At 80 MHz and 800 MHz, the higher frequency range applies.
The recommended separation distance guidelines in the following table may notapply to all situations. Electromagnetic propagation is affected by absorption andreflection from structures, objects, and people.
RECOMMENDED SEPARATION DISTANCES BY TRANSMITTER FREQUENCY
Rated Maximum Output Power of Transmitter (Watts)
150 kHz to 80 MHz 80 to 800 MHz 800 MHz to 2.5 GHz
0.01 0.35 m (13.8 in) 0.12 m (4.7 in) 0.23 m (9.1 in)
0.1 1.1 m (3.6 ft) 0.38 m (15 in) 0.73 m (28.7 in)
1 3.5 m (11.5 ft) 1.2 m (3.9 ft) 2.3 m (7.5 ft)
10 11 m (36.1 ft) 3.8 m (12.5 ft) 7.3 m (24 ft)
100 35 m (114.8 ft) 12 m (39.4 ft) 23 m (75.5 ft)
Version 2.1.0 January 18, 2017 92
Clarius Ultrasound Scanner Safety Topics
are medical equipment, information technology products, and radio and televisiontransmission towers.
To locate the source, find out if the problem resides with the system or the scanningenvironment:
• Is the interference intermittent or constant?
• Does the interference show up only with one scanner or with several scanners?
• Do two different scanners operating at the same frequency have the same problem?
• Is the interference present if the system is moved to a different location in the facility?
• Can the EMC coupling path be attenuated? For example, placement of a scanner or printer close to an ECG cable can increase electromagnetic interference. Moving the cable or other medical equipment away from the location of the scanner or printer can result in reduced electromagnetic interference.
If you find the interference's source, go to www.clarius.me/contact-us and contact Clarius.
Version 2.1.0 January 18, 2017 93
6
ReferencesCompliance Statement
Clarius products comply with international and national standardsand laws. Users are responsible for ensuring that the chosen smartdevice and scanner are compliant with the law in the jurisdictionwhere the product is used. Clarius meets all regulatory standardslisted in this chapter.
The Clarius Ultrasound Scanner
Authorized Representative
European Authorized Representative (AR) Name: Emergo Europe,The Hague, Netherlands
Product Classification
Classification:
• Device with scanners (internally powered ME equipment):
• Health Canada: Class III
• US FDA: Class II
• EU: Class IIa
• Scanners: Type BF applied parts, IP37
• Ordinary Equipment/Continuous Operation
• Non-AP/APG
94
Clarius Ultrasound Scanner The Clarius Ultrasound Scanner
Product Serial Number
Clarius has assigned a unique serial number on each scanner. This serial number, displayed inthe format PT-R-YYMM-zXXXX, is used to track quality control. We will use the serial numberC360-A-1703-A0100 as an example to explain how to interpret this.
PT
Probe type. In our example, this is “C360”.
R
Revision. In our example, this is “A”.
YY
Two-digit year of manufacture. In our example, this is “17”, meaning the year 2017.
MM
Two-digit month of manufacture. In our example, this is “03”, meaning the month of March.
z
Alphabetical counter, from A to Z, resetting to A on the first day of each calendar year. In ourexample, this is “A”.
XXXX
Four-digit numerical counter starting from 0001, resetting to 0001 on first day of eachcalendar year. In our example, this is “0100”, meaning the 100th scanner manufactured in thisseries.
System Specifications
The Clarius Ultrasound Scanner conforms to the following specifications:
• Gray shades: 256 in B-Mode
• Scan lines: Up to 1,024 scan lines
• Pressure, humidity, and temperature limits: These limits apply only to the Clarius Scanner, not to the smart device. It is your responsibility to select a Clarius-compatible smart device that meets the needs of your clinical environment.
Operating Limits Storage Limits
Pressure 620 hPa to 1060 hPa n/a
Version 2.1.0 January 18, 2017 95
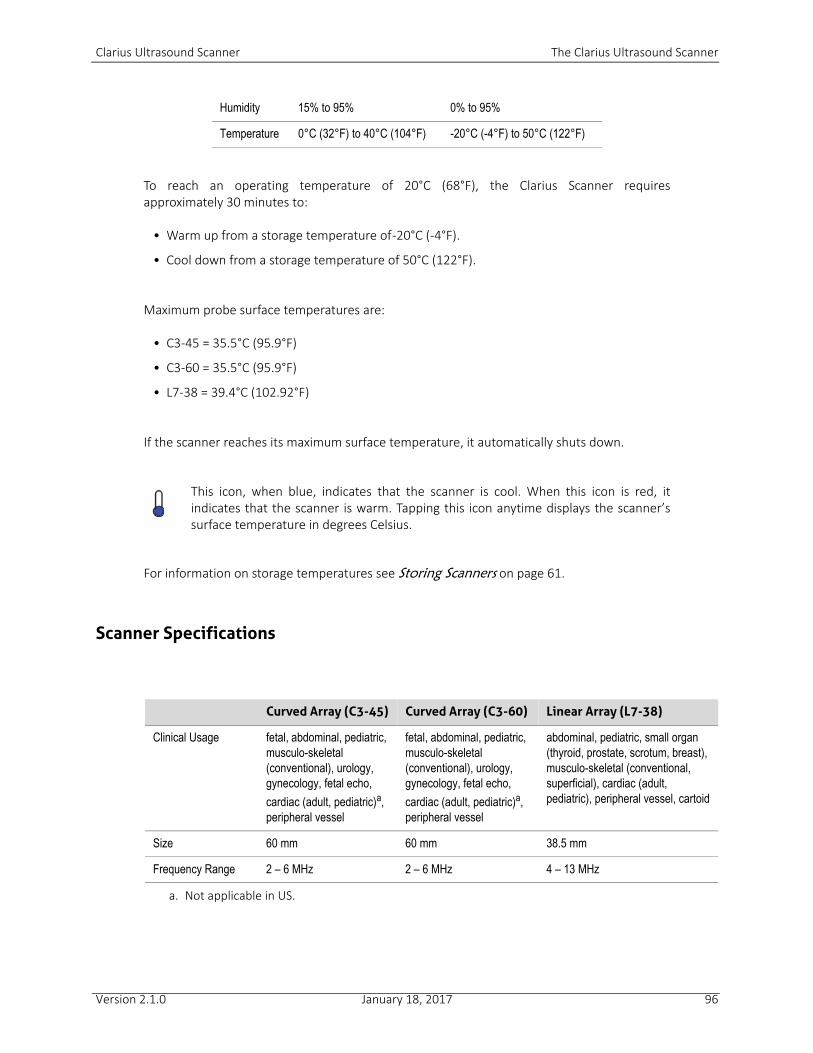
Clarius Ultrasound Scanner The Clarius Ultrasound Scanner
To reach an operating temperature of 20°C (68°F), the Clarius Scanner requiresapproximately 30 minutes to:
• Warm up from a storage temperature of -20°C (-4°F).
• Cool down from a storage temperature of 50°C (122°F).
Maximum probe surface temperatures are:
• C3-45 = 35.5°C (95.9°F)
• C3-60 = 35.5°C (95.9°F)
• L7-38 = 39.4°C (102.92°F)
If the scanner reaches its maximum surface temperature, it automatically shuts down.
For information on storage temperatures see Storing Scanners on page 61.
Scanner Specifications
Humidity 15% to 95% 0% to 95%
Temperature 0°C (32°F) to 40°C (104°F) -20°C (-4°F) to 50°C (122°F)
This icon, when blue, indicates that the scanner is cool. When this icon is red, itindicates that the scanner is warm. Tapping this icon anytime displays the scanner’ssurface temperature in degrees Celsius.
Curved Array (C3-45) Curved Array (C3-60) Linear Array (L7-38)
Clinical Usage fetal, abdominal, pediatric, musculo-skeletal (conventional), urology, gynecology, fetal echo,
cardiac (adult, pediatric)a, peripheral vessel
a. Not applicable in US.
fetal, abdominal, pediatric, musculo-skeletal (conventional), urology, gynecology, fetal echo,
cardiac (adult, pediatric)a, peripheral vessel
abdominal, pediatric, small organ (thyroid, prostate, scrotum, breast), musculo-skeletal (conventional, superficial), cardiac (adult, pediatric), peripheral vessel, cartoid
Size 60 mm 60 mm 38.5 mm
Frequency Range 2 – 6 MHz 2 – 6 MHz 4 – 13 MHz
Version 2.1.0 January 18, 2017 96
Clarius Ultrasound Scanner Standards
Standards
Acoustic
IEC 60601-2-37:2007 - Medical electrical equipment - Part 2-37: Particular requirements forthe basic safety and essential performance of ultrasonic medical diagnostic and monitoringequipment
Biocompatibility
ANSI/ISO 10993-1:2009 - Biological evaluation of medical devices - Part 1: Evaluation andtesting within a risk management process.
Chemical
REACH 02006R1907:2015-03-23 - REGULATION (EC) No 1907/2006 OF THE EUROPEANPARLIAMENT AND OF THE COUNCIL of 18 December 2006 concerning the Registration,Evaluation, Authorization and Restriction of Chemicals (REACH), establishing a EuropeanChemicals Agency
The Clarius Ultrasound Scanner meets the minimum requirements for compliance with theEuropean Union’s Restriction of Hazardous Substances (RoHS) Directive 2011/65/EU and itsamendments.
Electrical Safety
ST/SG/AC.10/11/Rev.5:2009 - Recommendations on the Transport of Dangerous Goods -Manual of Tests and Criteria
IEC 61157:2013 - Standard Means for the Reporting of the Acoustic Output of MedicalDiagnostic Ultrasonic Equipment
IEC 62133:2012 - Secondary cells and batteries containing alkaline or other non-acidelectrolytes - Safety requirements for portable sealed secondary cells, and for batteries madefrom them, for use in portable applications.
Labeling
ISO 60417:2014 - Graphical symbols for use on equipment.
Version 2.1.0 January 18, 2017 97
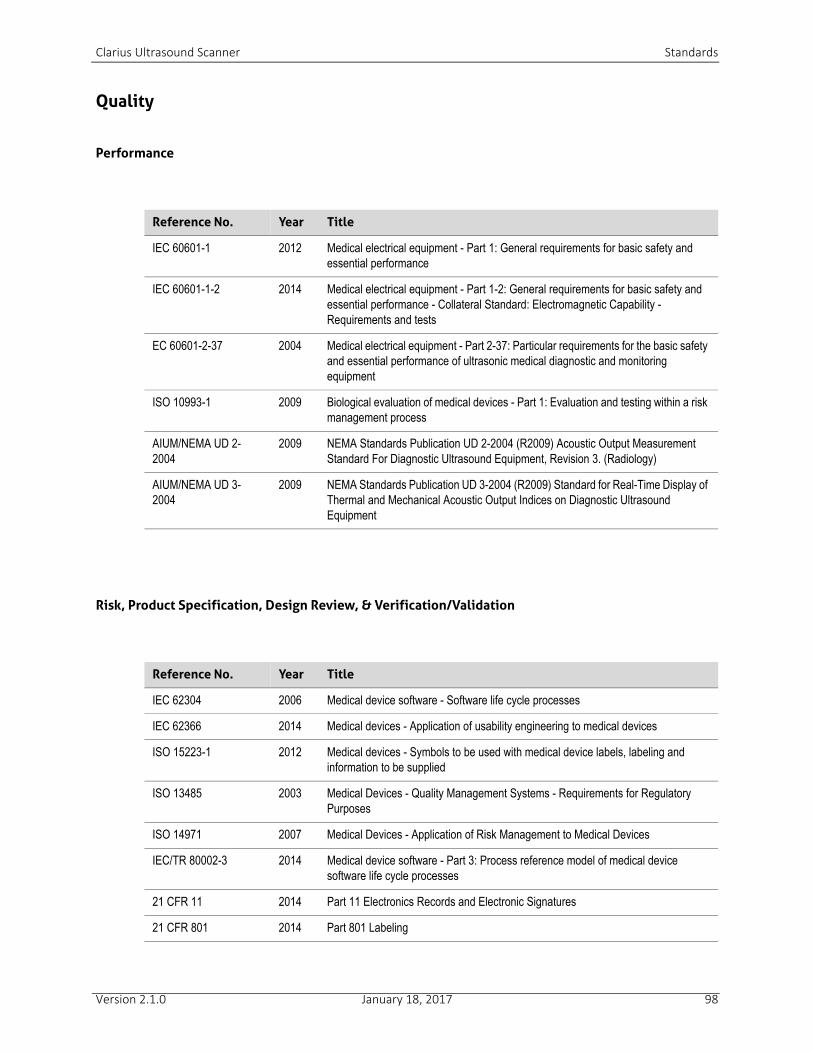
Clarius Ultrasound Scanner Standards
Quality
Performance
Risk, Product Specification, Design Review, & Verification/Validation
Reference No. Year Title
IEC 60601-1 2012 Medical electrical equipment - Part 1: General requirements for basic safety and essential performance
IEC 60601-1-2 2014 Medical electrical equipment - Part 1-2: General requirements for basic safety and essential performance - Collateral Standard: Electromagnetic Capability - Requirements and tests
EC 60601-2-37 2004 Medical electrical equipment - Part 2-37: Particular requirements for the basic safety and essential performance of ultrasonic medical diagnostic and monitoring equipment
ISO 10993-1 2009 Biological evaluation of medical devices - Part 1: Evaluation and testing within a risk management process
AIUM/NEMA UD 2-2004
2009 NEMA Standards Publication UD 2-2004 (R2009) Acoustic Output Measurement Standard For Diagnostic Ultrasound Equipment, Revision 3. (Radiology)
AIUM/NEMA UD 3-2004
2009 NEMA Standards Publication UD 3-2004 (R2009) Standard for Real-Time Display of Thermal and Mechanical Acoustic Output Indices on Diagnostic Ultrasound Equipment
Reference No. Year Title
IEC 62304 2006 Medical device software - Software life cycle processes
IEC 62366 2014 Medical devices - Application of usability engineering to medical devices
ISO 15223-1 2012 Medical devices - Symbols to be used with medical device labels, labeling and information to be supplied
ISO 13485 2003 Medical Devices - Quality Management Systems - Requirements for Regulatory Purposes
ISO 14971 2007 Medical Devices - Application of Risk Management to Medical Devices
IEC/TR 80002-3 2014 Medical device software - Part 3: Process reference model of medical device software life cycle processes
21 CFR 11 2014 Part 11 Electronics Records and Electronic Signatures
21 CFR 801 2014 Part 801 Labeling
Version 2.1.0 January 18, 2017 98
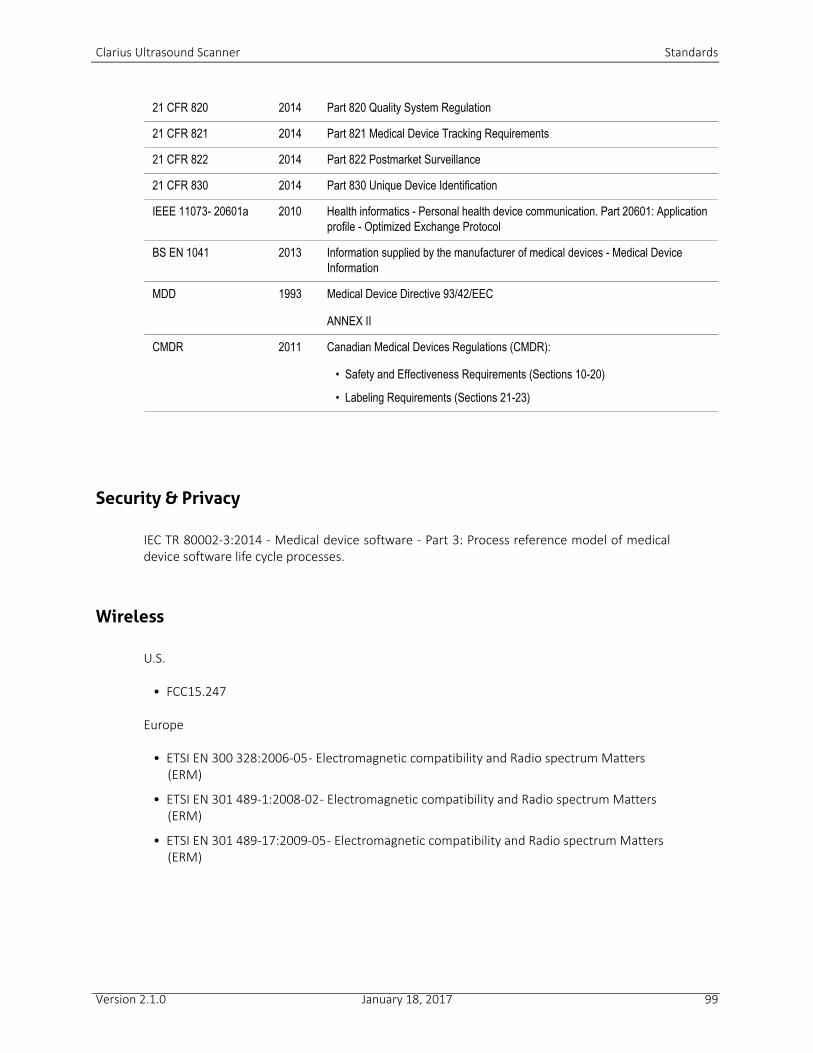
Clarius Ultrasound Scanner Standards
Security & Privacy
IEC TR 80002-3:2014 - Medical device software - Part 3: Process reference model of medicaldevice software life cycle processes.
Wireless
U.S.
• FCC15.247
Europe
• ETSI EN 300 328:2006-05 - Electromagnetic compatibility and Radio spectrum Matters (ERM)
• ETSI EN 301 489-1:2008-02 - Electromagnetic compatibility and Radio spectrum Matters (ERM)
• ETSI EN 301 489-17:2009-05 - Electromagnetic compatibility and Radio spectrum Matters (ERM)
21 CFR 820 2014 Part 820 Quality System Regulation
21 CFR 821 2014 Part 821 Medical Device Tracking Requirements
21 CFR 822 2014 Part 822 Postmarket Surveillance
21 CFR 830 2014 Part 830 Unique Device Identification
IEEE 11073- 20601a 2010 Health informatics - Personal health device communication. Part 20601: Application profile - Optimized Exchange Protocol
BS EN 1041 2013 Information supplied by the manufacturer of medical devices - Medical Device Information
MDD 1993 Medical Device Directive 93/42/EEC
ANNEX II
CMDR 2011 Canadian Medical Devices Regulations (CMDR):
• Safety and Effectiveness Requirements (Sections 10-20)
• Labeling Requirements (Sections 21-23)
Version 2.1.0 January 18, 2017 99
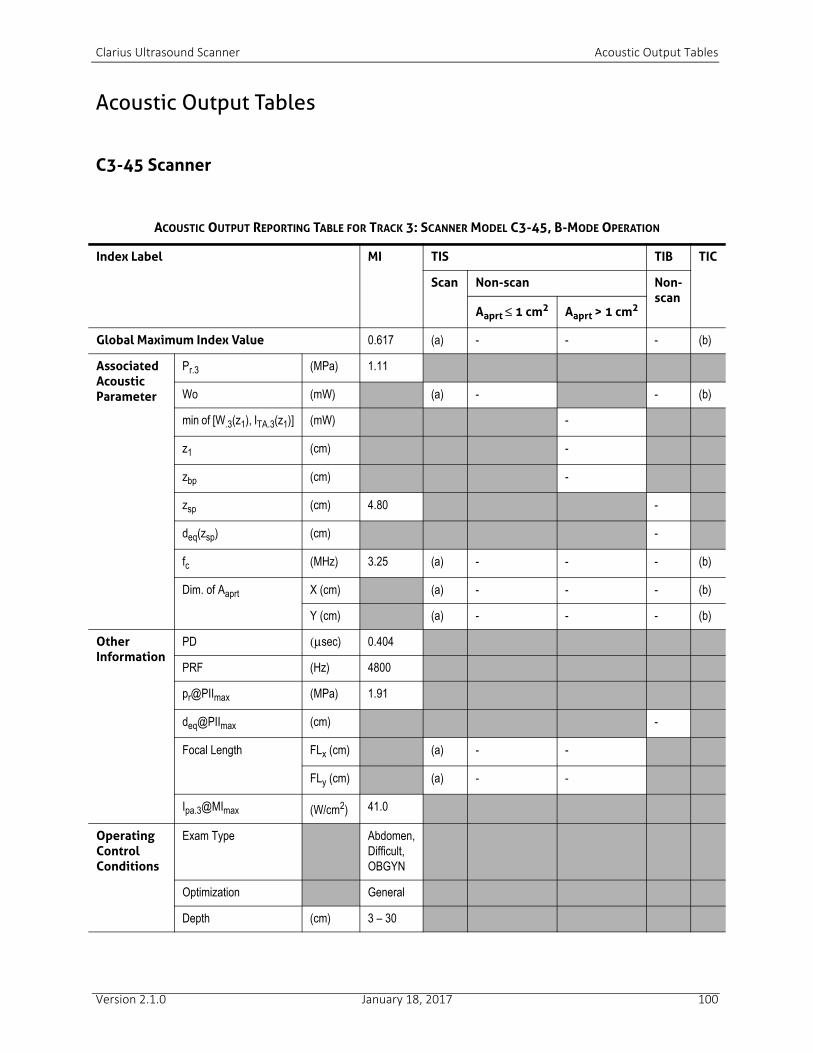
Clarius Ultrasound Scanner Acoustic Output Tables
Acoustic Output Tables
C3-45 Scanner
ACOUSTIC OUTPUT REPORTING TABLE FOR TRACK 3: SCANNER MODEL C3-45, B-MODE OPERATION
Index Label MI TIS TIB TIC
Scan Non-scan Non-scan
Aaprt ≤ 1 cm2 Aaprt > 1 cm2
Global Maximum Index Value 0.617 (a) - - - (b)
Associated Acoustic Parameter
Pr.3 (MPa) 1.11
Wo (mW) (a) - - (b)
min of [W.3(z1), ITA.3(z1)] (mW) -
z1 (cm) -
zbp (cm) -
zsp (cm) 4.80 -
deq(zsp) (cm) -
fc (MHz) 3.25 (a) - - - (b)
Dim. of Aaprt X (cm) (a) - - - (b)
Y (cm) (a) - - - (b)
Other Information
PD (μsec) 0.404
PRF (Hz) 4800
pr@PIImax (MPa) 1.91
deq@PIImax (cm) -
Focal Length FLx (cm) (a) - -
FLy (cm) (a) - -
Ipa.3@MImax (W/cm2) 41.0
Operating Control Conditions
Exam Type Abdomen,Difficult,OBGYN
Optimization General
Depth (cm) 3 – 30
Version 2.1.0 January 18, 2017 100
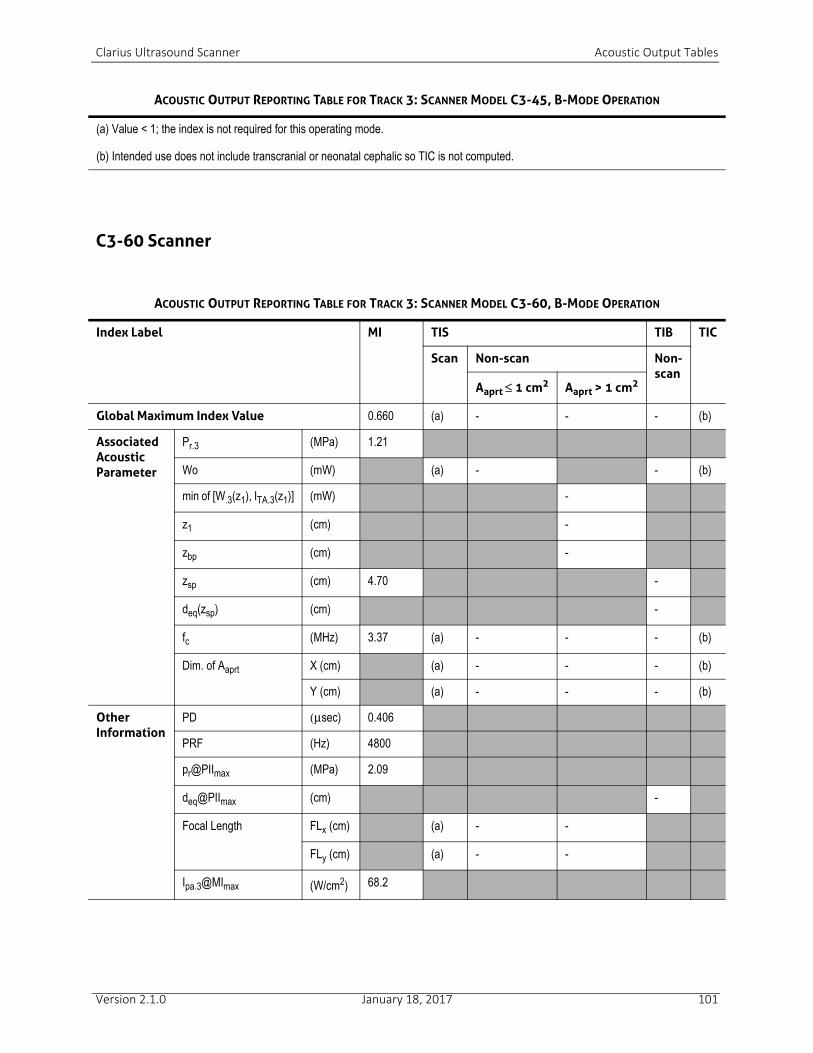
Clarius Ultrasound Scanner Acoustic Output Tables
C3-60 Scanner
(a) Value < 1; the index is not required for this operating mode.
(b) Intended use does not include transcranial or neonatal cephalic so TIC is not computed.
ACOUSTIC OUTPUT REPORTING TABLE FOR TRACK 3: SCANNER MODEL C3-60, B-MODE OPERATION
Index Label MI TIS TIB TIC
Scan Non-scan Non-scan
Aaprt ≤ 1 cm2 Aaprt > 1 cm2
Global Maximum Index Value 0.660 (a) - - - (b)
Associated Acoustic Parameter
Pr.3 (MPa) 1.21
Wo (mW) (a) - - (b)
min of [W.3(z1), ITA.3(z1)] (mW) -
z1 (cm) -
zbp (cm) -
zsp (cm) 4.70 -
deq(zsp) (cm) -
fc (MHz) 3.37 (a) - - - (b)
Dim. of Aaprt X (cm) (a) - - - (b)
Y (cm) (a) - - - (b)
Other Information
PD (μsec) 0.406
PRF (Hz) 4800
pr@PIImax (MPa) 2.09
deq@PIImax (cm) -
Focal Length FLx (cm) (a) - -
FLy (cm) (a) - -
Ipa.3@MImax (W/cm2) 68.2
ACOUSTIC OUTPUT REPORTING TABLE FOR TRACK 3: SCANNER MODEL C3-45, B-MODE OPERATION
Version 2.1.0 January 18, 2017 101
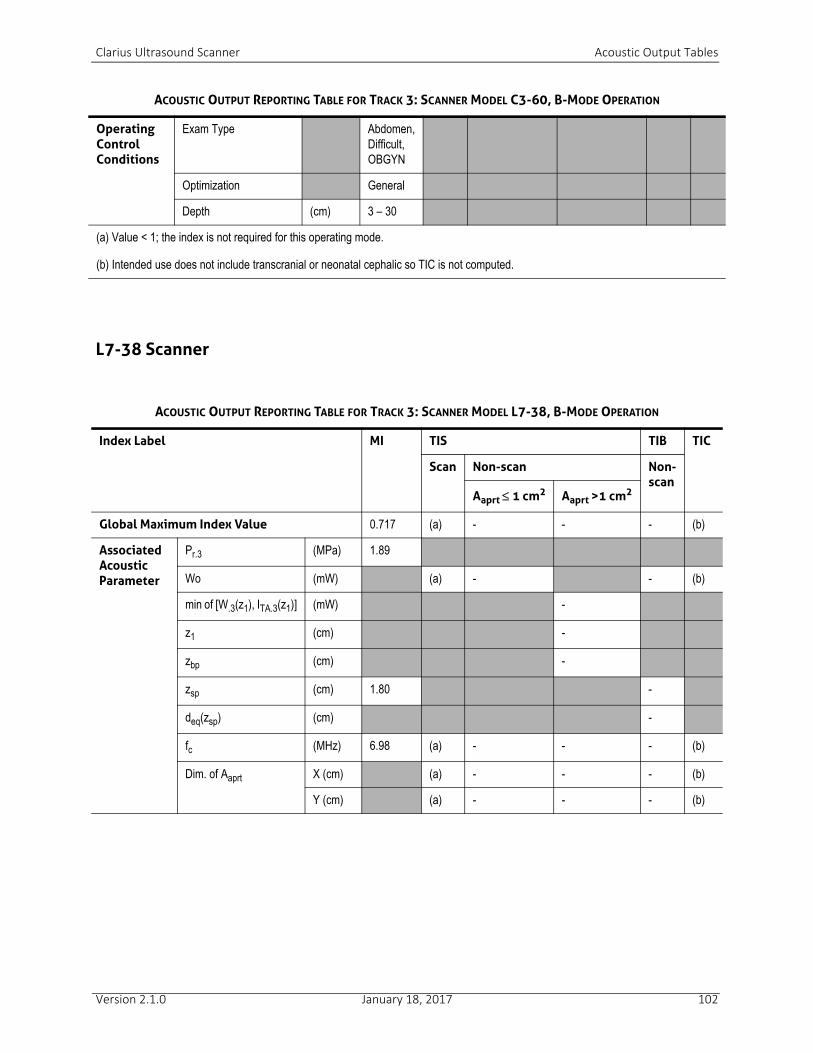
Clarius Ultrasound Scanner Acoustic Output Tables
L7-38 Scanner
Operating Control Conditions
Exam Type Abdomen, Difficult, OBGYN
Optimization General
Depth (cm) 3 – 30
(a) Value < 1; the index is not required for this operating mode.
(b) Intended use does not include transcranial or neonatal cephalic so TIC is not computed.
ACOUSTIC OUTPUT REPORTING TABLE FOR TRACK 3: SCANNER MODEL L7-38, B-MODE OPERATION
Index Label MI TIS TIB TIC
Scan Non-scan Non-scan
Aaprt ≤ 1 cm2 Aaprt >1 cm2
Global Maximum Index Value 0.717 (a) - - - (b)
Associated Acoustic Parameter
Pr.3 (MPa) 1.89
Wo (mW) (a) - - (b)
min of [W.3(z1), ITA.3(z1)] (mW) -
z1 (cm) -
zbp (cm) -
zsp (cm) 1.80 -
deq(zsp) (cm) -
fc (MHz) 6.98 (a) - - - (b)
Dim. of Aaprt X (cm) (a) - - - (b)
Y (cm) (a) - - - (b)
ACOUSTIC OUTPUT REPORTING TABLE FOR TRACK 3: SCANNER MODEL C3-60, B-MODE OPERATION
Version 2.1.0 January 18, 2017 102
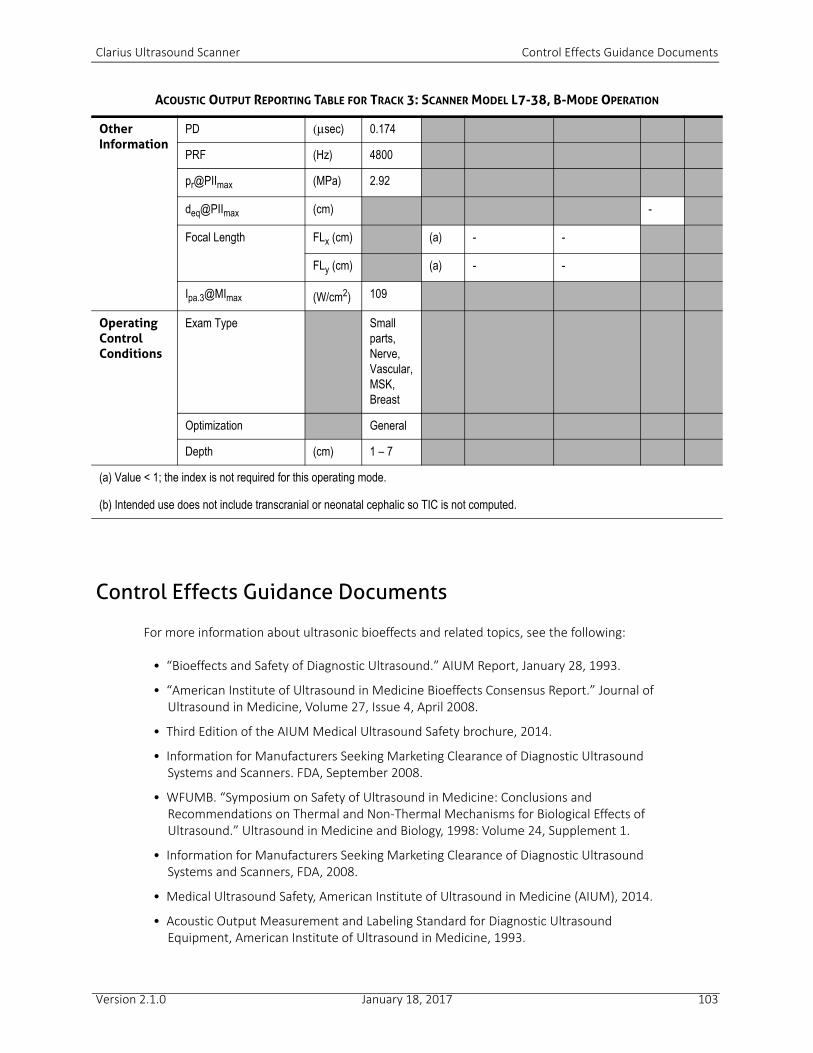
Clarius Ultrasound Scanner Control Effects Guidance Documents
Control Effects Guidance Documents
For more information about ultrasonic bioeffects and related topics, see the following:
• “Bioeffects and Safety of Diagnostic Ultrasound.” AIUM Report, January 28, 1993.
• “American Institute of Ultrasound in Medicine Bioeffects Consensus Report.” Journal of Ultrasound in Medicine, Volume 27, Issue 4, April 2008.
• Third Edition of the AIUM Medical Ultrasound Safety brochure, 2014.
• Information for Manufacturers Seeking Marketing Clearance of Diagnostic Ultrasound Systems and Scanners. FDA, September 2008.
• WFUMB. “Symposium on Safety of Ultrasound in Medicine: Conclusions and Recommendations on Thermal and Non-Thermal Mechanisms for Biological Effects of Ultrasound.” Ultrasound in Medicine and Biology, 1998: Volume 24, Supplement 1.
• Information for Manufacturers Seeking Marketing Clearance of Diagnostic Ultrasound Systems and Scanners, FDA, 2008.
• Medical Ultrasound Safety, American Institute of Ultrasound in Medicine (AIUM), 2014.
• Acoustic Output Measurement and Labeling Standard for Diagnostic Ultrasound Equipment, American Institute of Ultrasound in Medicine, 1993.
Other Information
PD (μsec) 0.174
PRF (Hz) 4800
pr@PIImax (MPa) 2.92
deq@PIImax (cm) -
Focal Length FLx (cm) (a) - -
FLy (cm) (a) - -
Ipa.3@MImax (W/cm2) 109
Operating Control Conditions
Exam Type Small parts, Nerve, Vascular, MSK, Breast
Optimization General
Depth (cm) 1 – 7
(a) Value < 1; the index is not required for this operating mode.
(b) Intended use does not include transcranial or neonatal cephalic so TIC is not computed.
ACOUSTIC OUTPUT REPORTING TABLE FOR TRACK 3: SCANNER MODEL L7-38, B-MODE OPERATION
Version 2.1.0 January 18, 2017 103
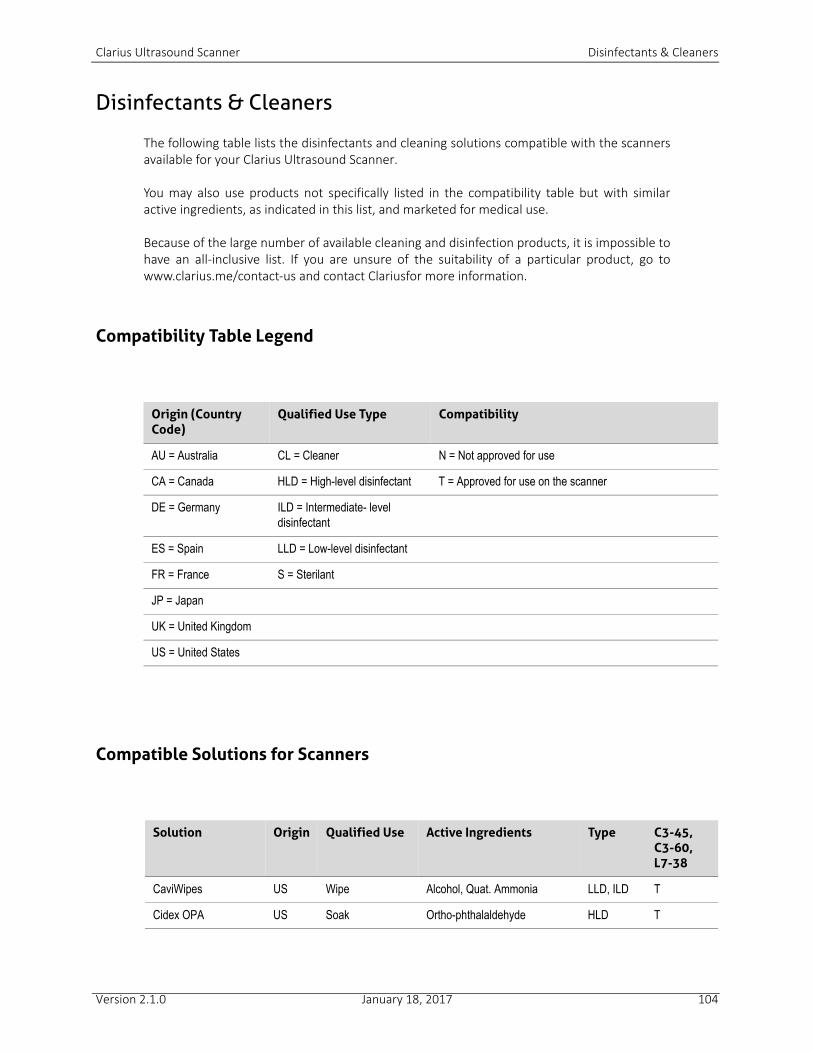
Clarius Ultrasound Scanner Disinfectants & Cleaners
Disinfectants & Cleaners
The following table lists the disinfectants and cleaning solutions compatible with the scannersavailable for your Clarius Ultrasound Scanner.
You may also use products not specifically listed in the compatibility table but with similaractive ingredients, as indicated in this list, and marketed for medical use.
Because of the large number of available cleaning and disinfection products, it is impossible tohave an all-inclusive list. If you are unsure of the suitability of a particular product, go towww.clarius.me/contact-us and contact Clariusfor more information.
Compatibility Table Legend
Compatible Solutions for Scanners
Origin (Country Code)
Qualified Use Type Compatibility
AU = Australia CL = Cleaner N = Not approved for use
CA = Canada HLD = High-level disinfectant T = Approved for use on the scanner
DE = Germany ILD = Intermediate- level disinfectant
ES = Spain LLD = Low-level disinfectant
FR = France S = Sterilant
JP = Japan
UK = United Kingdom
US = United States
Solution Origin Qualified Use Active Ingredients Type C3-45, C3-60, L7-38
CaviWipes US Wipe Alcohol, Quat. Ammonia LLD, ILD T
Cidex OPA US Soak Ortho-phthalaldehyde HLD T
Version 2.1.0 January 18, 2017 104
Clarius Ultrasound Scanner Known Defects
Known Defects
This section lists anomalies in the system that are known to Clarius in this version, but whichdo not impact the Clarius Ultrasound Scanner’s overall safety and effectiveness, or breach anyregulations. The issues listed here pose little risk to the user or the patient, therefore nomitigation is required.
Mobile App Software
• On Android™ devices, automatic reconnection may fail to occur. If this happens, remove the scanner battery and re-insert it.
• After signing in, the keyboard may remain open (unless your login credentials are cached). You can manually select to hide the keyboard.
• On Android™ devices, if you disable Bluetooth and re-enable it, the scanner is unable to reconnect to the Clarius Ultrasound App. If this occurs, close the Clarius Ultrasound App and reopen it, or restart your Android™ device.
• Changing the image's depth from minimum to maximum causes the acquisition depth to display incorrectly (the measured depth remains correct). To correct the display of the acquisition depth, change either the depth or gain slightly.
• On Android™ devices, connecting to both Wi-Fi Direct and cellular (LTE) causes the scanner's connection to fail or take a long time. To work around this, before selecting to use Wi-Fi Direct, disable your Android™ device's LTE connection. Alternatively, select to use Wi-Fi and connect to a Wi-Fi network that has Internet access.
• On Android™ devices with auto-dictionaries, if you search for a workflow by selecting an item from the dictionary, a space is inserted at the end of the dictionary item, causing the search result to return nothing. You must manually delete the extra space before running the search.
• On Android™ 7.0+ devices, selecting your Wi-Fi displays a question mark instead of the standard checkmark.
• For Android™ devices, the spacing between two calipers drawn on an image is scaled incorrectly, causing the dots to appear larger (the measurements reported by the Clarius Ultrasound App remains correct).
• When you update the scanner firmware, the Clarius Ultrasound App displays the previous version number of the scanner. To refresh the display, restart the Clarius Ultrasound App.
• If you capture a cineloop shorter than two seconds and then attempt to scroll the cine, the frames show a black screen. To avoid this, capture a cineloop longer than two seconds.
• On some Android™ devices, when the Clarius Ultrasound App is suspended for longer than 10 seconds, and you reactivate the Clarius Ultrasound App, it takes a few seconds to reconnect. When this occurs, you can wait 30 seconds for the Clarius Ultrasound App to reconnect, or manually reconnect to the scanner.
• On Android™ devices, if you disconnect Bluetooth by removing the scanner battery, the
Version 2.1.0 January 18, 2017 105
Clarius Ultrasound Scanner Glossary of Terms
Clarius Ultrasound App does not immediately indicate this.
• Some Android™ devices display unstable Bluetooth connection behaviour. If you encounter this, close the Clarius Ultrasound App, disable Bluetooth, wait 30 seconds, re-open the Clarius Ultrasound App, and re-enable Bluetooth. Alternatively, reboot your Android™ device.
• If you increase the magnification of an image to its maximum extent, then draw calipers close together, and then decrease this magnification to its fullest extent, the Clarius Ultrasound App crashes. To prevent this crash, avoid drawing tiny measurements on fully magnified images.
Embedded Software
• Devices supporting 802.11ac may experience intermittent frame lag for < 1 second. This corrects itself if you continue scanning.
• If the scanner is idle for an extended period of time (e.g. overnight), it may no longer be detected by the Clarius Ultrasound App. If this occurs, remove the scanner battery and re-insert it.
• In rare cases, twinkling artifacts may be visible on the ultrasound image. To remove these artifacts, freeze and unfreeze the image.
• When setting up Wi-Fi connection via Wi-Fi Direct for the first time, the Clarius Ultrasound App may report a blank Wi-Fi Direct password. If you encounter this behaviour, select the Reset Scanner Wi-Fi Settings button located in the Clarius Ultrasound App's Settings page and then re-insert the scanner battery.
• In rare cases, reconnecting a scanner causes the indicator light on the scanner to turn orange. To fix this crash, disconnect the scanner, either through the Clarius Ultrasound App or by removing the scanner battery and re-inserting it, and then reconnect the scanner.
Glossary of Terms
For ultrasound terms not included in this glossary, refer to Recommended UltrasoundTerminology, Third Edition, published by AIUM.
Acoustic Outputs
Aaprt
Area of the active aperture measured in cm2.
Version 2.1.0 January 18, 2017 106
Clarius Ultrasound Scanner Glossary of Terms
deq(z)
Equivalent beam diameter as a function of axial distance z, and is equal to [(4/π)(Wo/ITA(z))]0.5,where ITA(z) is the temporal-average intensity as a function of z in centimeters.
deq@PIImax
Equivalent beam diameter at the point where the free-field, spatial-peak pulse intensityintegral is a maximum in centimeters.
depth
Refers to the depth of the display. A constant speed of sound of 1538.5 meters/second isassumed in the calculation of echo position in the image.
Dim. of Aaprt
Active aperture dimensions for the azimuthal (x) and elevational (y) planes in centimeters.
fc
The center frequency (MHz). For MI, fc is the center frequency associated with the transmitpattern giving rise to the global maximum reported value of MI. For TI, for combined modesinvolving transmit patterns of unequal center frequency, fc is defined as the overall range ofcenter frequencies of the respective transmit patterns.
in situ
In the natural or original position.
FL
Focal length, or azimuthal (x) and elevational (y) lengths, if different measured in centimeters.
Ipa.3@MImax
Derated pulse average intensity at the maximum MI in units of W/cm2.
ISPTA.3
Derated spatial peak, temporal average intensity in units of milliwatts/cm2.
ISPTA.3z1
Derated spatial-peak temporal-average intensity at axial distance z1 in units of milliwatts/cm2.
ITA.3(z1)
The derated spatial-peak temporal-average intensity at axial distance in units of milliwatts/cm2.
Version 2.1.0 January 18, 2017 107
Clarius Ultrasound Scanner Glossary of Terms
MI (mechanical index)
An indication of the likelihood of mechanical bioeffects occurring. The higher the MI, thegreater the likelihood of mechanical bioeffects.
PD
Pulse duration (microseconds) associated with the transmit pattern giving rise to the reportedvalue of MI.
Pr.3
Derated peak rarefactional pressure associated with the transmit pattern giving rise to thevalue reported under MI in units of megapascals.
pr@PIImax
Peak rarefactional pressure at the point where the free-field, spatial-peak pulse intensityintegral is a maximum in units of megapascals.
PRF
Pulse repetition frequency associated with the transmit pattern giving rise to the reportedvalue of MI in Hertz.
TI (thermal index)
The ratio of total acoustic power to the acoustic power required to raise tissue temperatureby 1°C (1.8°F) under defined assumptions.
TI type
Applicable thermal index for the scanner, imaging mode, and exam type.
TI value
Thermal index value for the scanner, imaging mode, and exam type.
TIB (bone thermal index)
A thermal index for applications in which the ultrasound beam passes through soft tissue anda focal region is in the immediate vicinity of bone. TIB non-scan is the bone thermal index inthe non-autoscanning mode.
TIC (cranial bone thermal index)
A thermal index for applications in which the ultrasound beam passes through bone near thebeam entrance into the body.
TIS (soft tissue thermal index)
A thermal index related to soft tissues.
TISscan
The soft tissue thermal index in an auto-scanning mode.
Version 2.1.0 January 18, 2017 108
Clarius Ultrasound Scanner Glossary of Terms
TISnon-scan
The soft tissue thermal index in the non-autoscanning mode.
W3(z1)
Derated ultrasonic power at axial distance z1 in units of milliwatts.
Wo
Ultrasonic power, except for TISscan, in which case it is the ultrasonic power passing through aone-centimeter window in units of milliwatts.
z1
Axial distance corresponding to the location of maximum [min(W3(z), ITA.3(z) x 1 cm2)], wherez ≥ zbp in centimeters.
Zbp
1.69 (Aaprt) in centimeters.
zsp
For MI, the axial distance at which pr.3 is measured. For TIB, the axial distance at which TIB is aglobal maximum (for example, zsp = zb.3) in centimeters.
The axial distance corresponding to the maximum of the derated spatial-peak pulse intensityintegral (megapascals).
Acoustic Artifacts
Acoustic saturation
Occurs when received signals reach a system's high-amplitude limit. At that point the systembecomes unable to distinguish or display signal intensities. At the point of saturation,increased input will not increase output.
Comet tail
A form of reverberation artifact produced when two or more strong reflectors are closetogether and have a high propagation speed. In this case, sound does not travel directly to areflector and back to the scanner, and a strong linear echo appears at the reflector andextends deeper than the reflector.
Enhancement
An increased relative amplitude of echoes caused by an intervening structure of lowattenuation.
Version 2.1.0 January 18, 2017 109
Clarius Ultrasound Scanner Glossary of Terms
Focal enhancement (focal banding)
The increased intensity in the focal region that appears as a brightening of the echoes on thedisplay.
Mirror imaging artifact
Most commonly seen around the diaphragm. This artifact results from sound reflecting offanother reflector and back.
Mirroring
The appearance of artifacts on a spectral display when there is improper separation offorward and reverse signal processing channels. Consequently, strong signals from onechannel mirror into the other.
Multi-path positioning and refraction
Artifacts that describe the situation in which the paths to and from a reflector are different.The longer the sound takes traveling to or from a reflector, the greater the axial error inreflector positioning (increased range). Refraction and multi-path positioning errors arenormally relatively small and contribute to general degradation of the image rather than togross errors in object location.
Propagation speed errors
Occur when the assumed value for propagation speed by the ultrasound system is incorrect. Ifthe actual speed is greater than that assumed, the calculated distance to a reflector is toosmall, and the reflector will be displayed too far from the scanner. Speed error can cause astructure to be displayed with incorrect size and shape.
Range ambiguity
Can occur when reflections are received after the next pulse is transmitted. In ultrasoundimaging, it is assumed that for each pulse produced, all reflections are received before thenext pulse is sent out. The ultrasound system calculates the distance to a reflector from theecho arrival time assuming that all echoes were generated by the last emitted pulse. Themaximum depth to be imaged unambiguously by the system determines its maximum pulserepetition frequency.
Reverberation
The continuing reception of a particular signal because of reverberation rather than reflectionfrom a particular acoustic interface. This phenomenon is analogous to the effect created bymirrors positioned on opposite walls when an object, a head for instance, is placed betweenthe mirrors. The image of the head is reflected back and forth infinitely between the twomirrors, creating the optical illusion of multiple heads. Reverberations are easily identifiable,because they are equally spaced on the display.
Scattering
Is the diffuse, low-amplitude sound waves that occur when acoustic energy reflects off tissueinterfaces smaller than a wavelength. In diagnostic ultrasound, Doppler signals come primarilyfrom acoustic energy back-scattered from red blood cells.
Version 2.1.0 January 18, 2017 110
Clarius Ultrasound Scanner Glossary of Terms
Shadowing
Is the reduction in echo amplitude from reflectors that lie behind a strongly reflecting orattenuating structure. This phenomenon occurs when scanning a lesion or structure with anattenuation rate higher than that of the surrounding tissue. The lesion causes a decrease inbeam intensity, which results in decreased echo signals from the structures beyond the lesion.Consequently, a dark cloud behind the lesion image forms on the display. This cloud, orshadow, is useful as a diagnostic clue.
Side lobes (from single-element scanners) and grating lobes (from array scanners)
Cause objects that are not directly in front of the scanner to be displayed incorrectly in lateralposition.
Speckle
Appears as tissue texture close to the scanner but does not correspond to scatterers in tissue.It is produced by ultrasound wave interference and results in general image degradation.
Spectral broadening
A display phenomenon that occurs when the number of energy-bearing Fourier frequencycomponents increases at any given point in time. As a consequence, the spectral display isbroadened. Spectral broadening can indicate the disturbed flow caused by a lesion, andtherefore it is important diagnostically. However, broadening can also result from interactionbetween flow and sample volume size, in which case it is an artifact.
Speed of sound artifacts
Occur if the sound propagation path to a reflector is partially through bone, and the speed ofsound is greater than in the average soft tissue. Echo position registration artifacts will beproduced. Reflectors appear closer to the scanner than their actual distance because of thisgreater speed of sound, resulting in a shorter echo transit time than for paths not containingbone.
Version 2.1.0 January 18, 2017 111
Manufacturer's address:
Clarius Mobile Health Corp. #350 - 3605 Gilmore Way Burnaby, BC V5G 4X5 Canada
www.clarius.me
(778) 800-9975
0086
© 2017 Clarius Mobile Health Corp.
All rights are reserved. Reproduction or transmission in whole or in part, in any form or by any means, electronic, mechanical or otherwise, is prohibited without the prior written consent of the copyright owner.
Published in Canada. 15-03-00001
REVISION HISTORY
Version Revision Date Description of changes.
2.1.0 January 18, 2017 First official release.