Embed Size (px)
Citation preview
Online Banking CitiDirect®
CitiDirect Basics: Comprehensive Guide
Table of Contents Overview .......................................................................................................................................1 Additional Resources ....................................................................................................................1
Basics Guides........................................................................................................................1 Online Help ............................................................................................................................1 CitiDirect Customer Support ..................................................................................................2
Local Language Availability ..........................................................................................................2 Installation Requirements .............................................................................................................2 Sign-on Requirements ..................................................................................................................3 Optimizing Your CitiDirect Experience..........................................................................................3
Change Your Screen Resolution...............................................................................................3 Registration, Check My PC, and Installation.................................................................................6
Registration ...............................................................................................................................6 Check My PC ............................................................................................................................8
Install CitiDirect with Sun Microsystems® Java Software (JRE) ............................................8 Initial Sign-on to CitiDirect® Online Banking............................................................................11 Secured Password Users........................................................................................................15
Subsequent Sign-on to CitiDirect................................................................................................18 SafeWord Card Users .............................................................................................................19
Secured Password Users ...........................................................................................................21 Log-out Procedures ....................................................................................................................23
CitiDirect Log-out.....................................................................................................................24 Internet Explorer Log-out.........................................................................................................25 Closing Active Windows Versus Logging Out .........................................................................26
Closing www.citidirect.com ..................................................................................................26 Closing Additional Windows ................................................................................................26
The CitiDirect® Online Banking Web Site ...................................................................................27 Accessing The Web Site .........................................................................................................28
Access Through the CitiDirect Application...........................................................................28 Go to www.citidirect.com .....................................................................................................28
Navigation Overview ...................................................................................................................33 CitiDirect Welcome Screen .....................................................................................................33
Familiarization with the Main Screen ..........................................................................................34 Main Screen Features .............................................................................................................35
Inbox ....................................................................................................................................36 CitiDirect Support Website...................................................................................................37 Close....................................................................................................................................37 Preferences .........................................................................................................................37 Online Help ..........................................................................................................................38 Administrator Contacts ........................................................................................................38
Search Button ......................................................................................................................40 Print Button ..........................................................................................................................40
Forms..........................................................................................................................................41 Summary Level Forms ............................................................................................................41
Right-Click Menu .................................................................................................................41 Detail Level Forms ..................................................................................................................48 Additional Form Features ........................................................................................................49
More Button .........................................................................................................................49 Action Buttons......................................................................................................................49 Date Spinner and Calendar Buttons ....................................................................................50 Library Look Up ...................................................................................................................51
Online Help .................................................................................................................................54 Accessing Online Help................................................................................................................54 Navigating Online Help ...............................................................................................................56 The Contents Tab .......................................................................................................................57
Helpful Hints ........................................................................................................................58 The Index Tab.............................................................................................................................59 The Search Tab ..........................................................................................................................60 Additional Online Help Functionality ...........................................................................................61
Copying Help Text Into Another Application............................................................................61 Moving or Sizing a Help Window.............................................................................................61 Printing Online Help Content...................................................................................................62
Printing Help Text from a Help Window...............................................................................62 Printing Information from a Pop-up Window ........................................................................65 Printing a Portion of the Help Text.......................................................................................66
Using Browse Sequence Buttons............................................................................................68 Setting Your Preferences Overview............................................................................................69
CitiDirect Customer Support ................................................................................................70 My Preferences...........................................................................................................................70
Viewing Your Current Preferences Settings............................................................................71 Specifying Your Preference Settings.......................................................................................72
CitiDirect Welcome Screen..................................................................................................75 My Preferences Criteria for Global Settings................................................................................79 Customizer..................................................................................................................................80
Troubleshooting and the Custom Menu ..................................................................................80 Customizing Your CitiDirect Navigation Bar............................................................................81
Adding a CitiDirect Category or Service Class to Your Custom Menu ................................81 Adding a New Folder to Your Custom Menu .......................................................................82 Renaming Items in Your Custom Menu...............................................................................83 Removing a Category, Folder, or Item From Your Custom Menu .......................................83 Moving a Category, Folder, or Item to Another Category or Folder.....................................84 Clearing Recent Changes and Keeping Your Existing Custom Menu.................................84 Saving Your Custom Menu and Switching to Your New Navigation Bar .............................85
Change Password.......................................................................................................................88 Changing Your Secured Password .........................................................................................88
Password Maintenance ...........................................................................................................89 Favorite Reports .........................................................................................................................89
The Report Assistant...............................................................................................................90 Reporting and Inquiry Overview..................................................................................................91
Report vs. Inquiry ....................................................................................................................92 Signing On to CitiDirect Online Banking ..............................................................................92
Setting Preferences for Reports and Inquiries ............................................................................93 Reports .......................................................................................................................................96
Report Service Classes...........................................................................................................96 Viewing the List of Available Reports ......................................................................................97 The Report Summary Form.....................................................................................................98
The View Reports Tab .........................................................................................................99 The Criteria Tab.................................................................................................................100
Common Report Criteria .......................................................................................................101 Running Reports ...................................................................................................................102 Creating and Saving Reports ................................................................................................103
The Save/Save As Dialog Box...........................................................................................107 Specifying Common Report Criteria......................................................................................108
Report Formats..................................................................................................................108 Additional Report Format Run Options..............................................................................111 Sharing Reports.................................................................................................................112 Selecting Date Criteria for Your Report .............................................................................113 Deleting Page Breaks ........................................................................................................115
Running Reports and Viewing Report Output .......................................................................117 Viewing Report Output in Actuate™ Format......................................................................119 Viewing Detailed Information .............................................................................................120 Using the Table of Contents ..............................................................................................121
Viewing Report Output in Different Formats..........................................................................122 Deleting and Resetting Report Criteria..................................................................................123 Deleting Report Output..........................................................................................................125 Deleting Reports....................................................................................................................126 Generating Reports in Different Formats ..............................................................................127
Printing Adobe® Acrobat® Reader® (.pdf) Reports .............................................................128 Printing Rich Text Format (.rtf) Reports .............................................................................129 Saving Adobe® Acrobat® Reader® (.pdf) Reports...............................................................130 Saving Rich Text Format (.rtf) Reports ..............................................................................132
Automating Reports...............................................................................................................134 Automatic Printing and Saving of Reports to Local Directories/Drives ..............................135
The Report Assistant.............................................................................................................136 The Favorite Reports Tab..................................................................................................137 The Viewable Reports Tab ................................................................................................138
Adding a Report to Your Favorite Reports List......................................................................139 From the Report Summary Form.......................................................................................139 From the Edit Criteria Form ...............................................................................................141
Inquiries ....................................................................................................................................143 Submitting an Inquiry.............................................................................................................143
Components of the Criteria Tab.........................................................................................145 Viewing Your Inquiry Results Summary ................................................................................146 Viewing the Details of Selected Summary Records ..............................................................147

Viewing Your Inquiry in Split View.........................................................................................148 Disclaimer..............................................................................................................................149
CitiDirect Basics: Comprehensive Guide 1 Citigroup Corporate and Investment Banking
Overview CitiDirect® Online Banking puts all of your corporate banking functions in one security-protected place, giving you around the globe, centralized access to your account information in real time, right from your desktop.
Getting started with CitiDirect Online Banking involves three procedures: • Registering at the CitiDirect Web site (www.citidirect.com);
• After Web site registration, running the Check My PC program to determine if your computer meets the minimum software requirements to run CitiDirect;
• Installing the CitiDirect software directly from www.citidirect.com. This Guide provides the step-by-step instructions for these procedures. In addition, this Guide covers: • Initial Sign-on to CitiDirect
• Subsequent Sign-on to CitiDirect
• Log out Procedures By registering at www.citidirect.com, you can also access a wide range of information to assist you in using CitiDirect services. The Web site contains information such as the Learning Center, which provides Guides to help you work more efficiently and effectively in CitiDirect. For more information on www.citidirect.com, refer to the CitiDirect Online Banking Web Site section of this Guide.
Additional Resources
Basics Guides This Basics Guide is the compilation of a series of CitiDirect Online Banking Basics Guides that cover features and functionality across all CitiDirect services. You can access the individual Basics Guides in the Learning Center at www.citidirect.com.
Online Help For general questions while working in CitiDirect Online Banking, you can use Online Help. A comprehensive self-service capability, Online Help contains detailed information and descriptions of terms for all functionality and services offered through CitiDirect. You can access Online Help by clicking the icon in the lower left corner of your CitiDirect navigation bar or by pressing the F1 key on your keyboard. Online Help is displayed in English only.
CitiDirect Basics: Comprehensive Guide 2 Citigroup Corporate and Investment Banking
CitiDirect Customer Support In addition to Online Help, the CitiDirect Customer Support resources described below are available to you. www.citidirect.com Our Web Site contains FAQs, which address both the use of the application and the Web site. The Web site also offers the Learning Center, referenced in this Guide, where you can access training support materials at anytime – 24 hours a day, 7 days a week. Customer Service You can contact our CitiDirect Online Banking Service Representatives who are available to support your technical needs, as well as to assist you with general CitiDirect questions. For a list of representatives in your area, go to the Contacts section of www.citidirect.com.
Local Language Availability
CitiDirect Online Banking enables you to view details, execute transactions, produce information reports, and perform inquiries in many local languages. You can select a language other than English anytime you sign-on to CitiDirect. For more information on working in a language other than English, refer to the Initial Sign-on to CitiDirect section of this Guide. A complete list of the local languages supported by CitiDirect is available on www.citidirect.com under the About CitiDirect tab in the CitiDirect Platform section.
Installation Requirements For a successful installation of CitiDirect Online Banking, ensure that you have the following: • Microsoft ® Internet Explorer (IE) version 5.0 Service Pack 1 or higher installed on your
computer.
• If you are a Windows NT®, 2000, XP or Vista user, you will need Administrator Rights to your personal computer (PC) if updates/installs to Sun Microsystems® Java Software (JRE) are needed to run CitiDirect Online Banking. Administrator Rights are also required to download CitiDirect application updates.
Note: If you have any issues installing CitiDirect, you may not have Administrator Rights to
your PC. In that case, please contact your technical support staff.
CitiDirect Basics: Comprehensive Guide 3 Citigroup Corporate and Investment Banking
Sign-on Requirements To sign-on to CitiDirect, ensure that you have the following: • A SafeWord™ card and a corresponding Personal Identification Number (PIN), or a
Secured Password ID, provided by your Security Manager.
• If you are using a new SafeWord card to sign on to CitiDirect, you will also need to enter your Client ID, which should be provided by your Security Manager. Please contact your Security Manager if you need assistance with sign-on credentials.
• Successful installation of the CitiDirect Online Banking software. Optimizing Your CitiDirect Experience CitiDirect® Online Banking is designed to operate on the minimum system requirements listed on www.citidirect.com. However, there are screen settings on your computer that, when modified, may enhance your CitiDirect experience.
Change Your Screen Resolution Screen resolution is the sharpness and clarity of an image displayed on a monitor. The higher the screen resolution, the sharper the image will appear on your monitor. The minimum required screen resolution to view CitiDirect is 800 x 600 pixels. If your monitor can support a resolution of 1024 x 768 pixels or higher, we recommend increasing the output resolution to your computer monitor. In addition to the benefit of sharpening the image display, increasing the screen resolution will improve the amount of available display space on your screen and reduce the amount of horizontal and vertical scrolling required. A few items to be aware of before you make this change: • A higher screen resolution reduces the size of items on your screen and increases the
relative space on your desktop. Altering the screen resolution will affect your entire system display.
• Your monitor, video hardware, and video control software will ultimately determine whether you can modify your screen resolution. You may not be able to increase the resolution above a certain level.
• Changes to screen resolution affect all users that log on to the computer.
CitiDirect Basics: Comprehensive Guide 4 Citigroup Corporate and Investment Banking
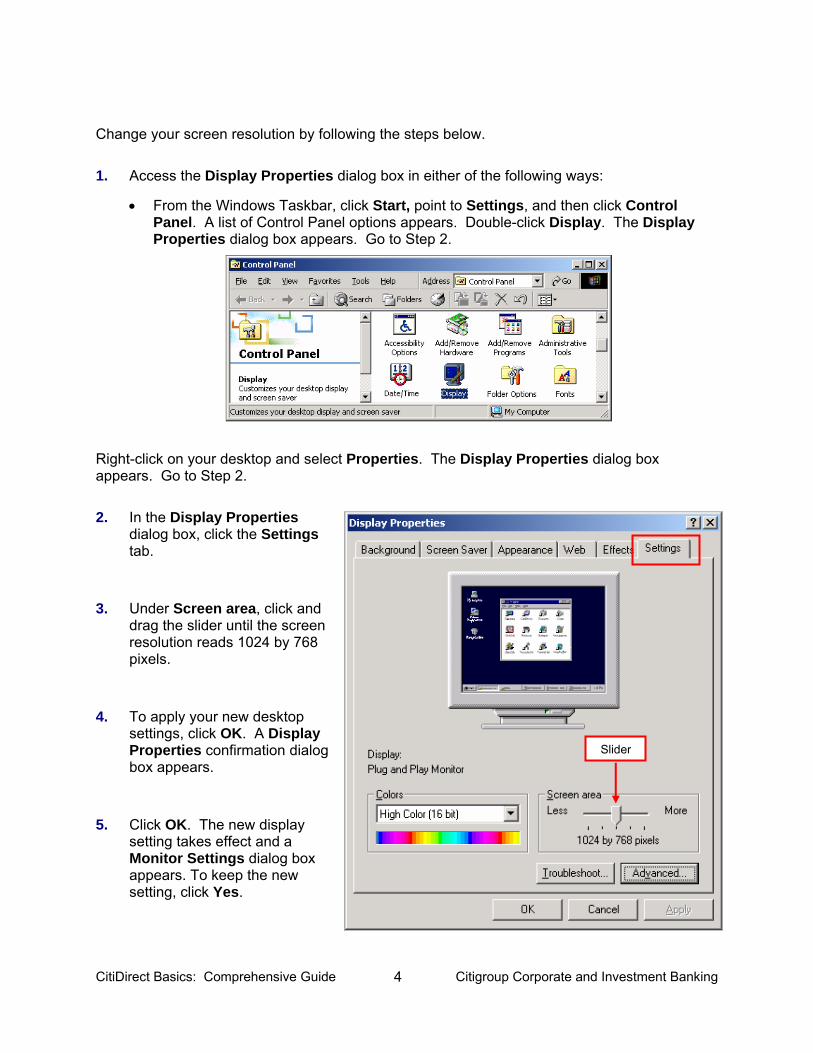
Change your screen resolution by following the steps below.
1. Access the Display Properties dialog box in either of the following ways:
• From the Windows Taskbar, click Start, point to Settings, and then click Control Panel. A list of Control Panel options appears. Double-click Display. The Display Properties dialog box appears. Go to Step 2.
Right-click on your desktop and select Properties. The Display Properties dialog box appears. Go to Step 2.
2. In the Display Properties dialog box, click the Settings tab.
3. Under Screen area, click and drag the slider until the screen resolution reads 1024 by 768 pixels.
4. To apply your new desktop settings, click OK. A Display Properties confirmation dialog box appears.
5. Click OK. The new display setting takes effect and a Monitor Settings dialog box appears. To keep the new setting, click Yes.
Slider
CitiDirect Basics: Comprehensive Guide 5 Citigroup Corporate and Investment Banking
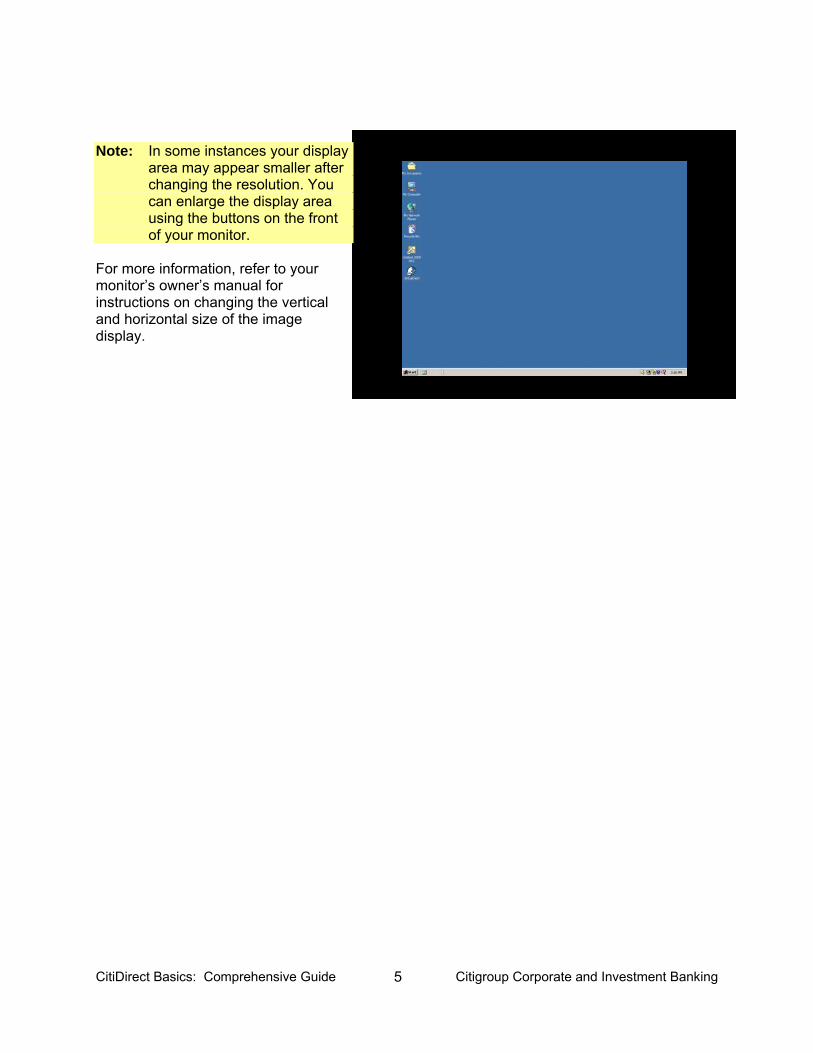
Note: In some instances your display
area may appear smaller after changing the resolution. You can enlarge the display area using the buttons on the front of your monitor.
For more information, refer to your monitor’s owner’s manual for instructions on changing the vertical and horizontal size of the image display.
CitiDirect Basics: Comprehensive Guide 6 Citigroup Corporate and Investment Banking
Registration, Check My PC, and Installation Getting started in CitiDirect® Online Banking is a three-step process: Registration, Check My PC, and Installation. This section describes the process starting with Registration at the CitiDirect Web site (www.citidirect.com). You must be registered at the Web site to run Check My PC and install CitiDirect. Register at the CitiDirect Web site by following the steps below.
Registration
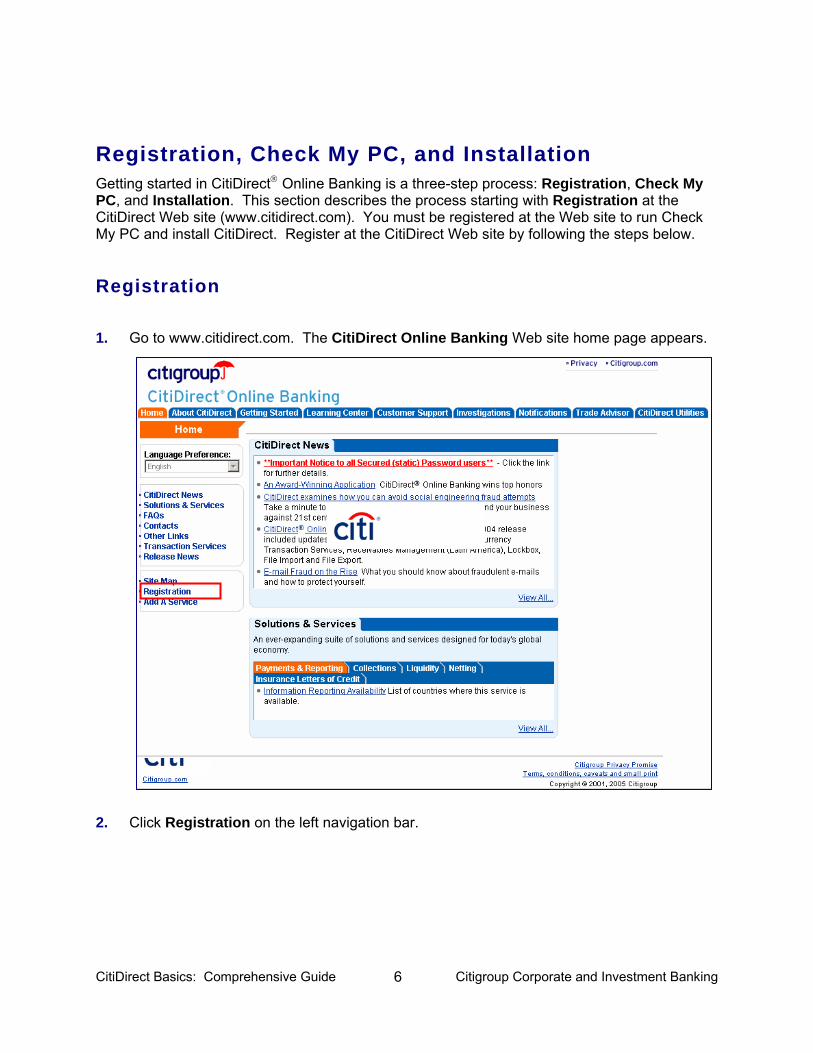
1. Go to www.citidirect.com. The CitiDirect Online Banking Web site home page appears.
2. Click Registration on the left navigation bar.
CitiDirect Basics: Comprehensive Guide 7 Citigroup Corporate and Investment Banking
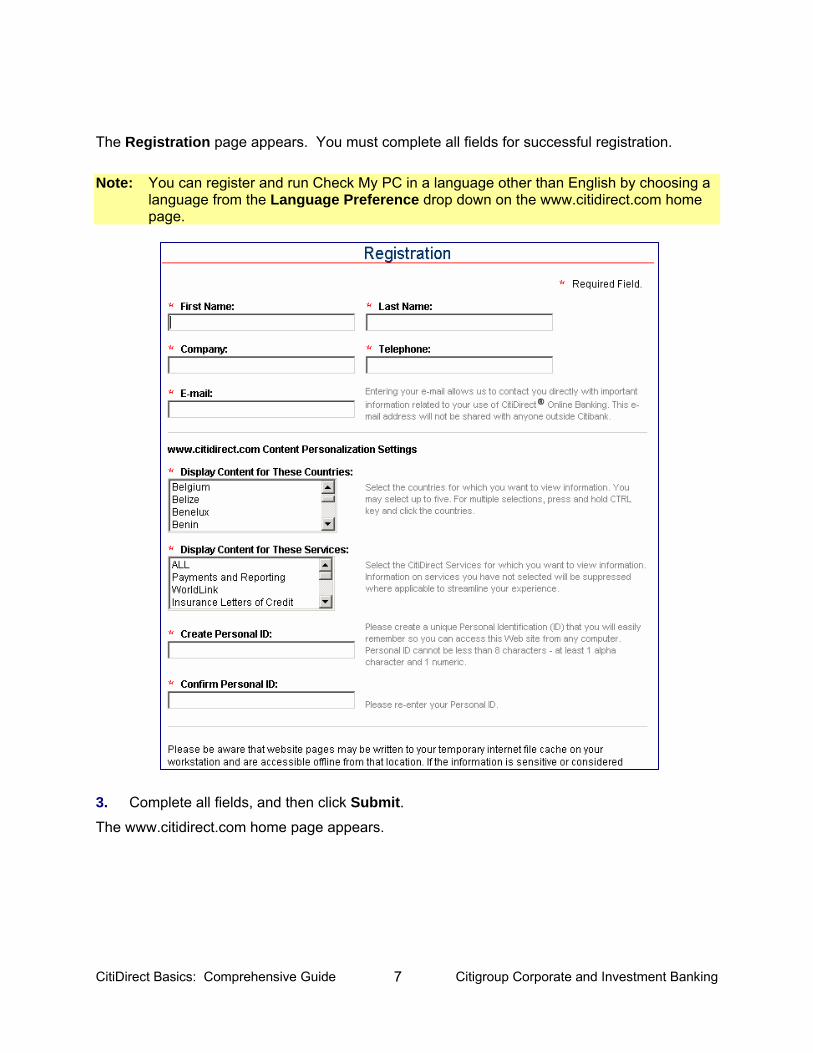
The Registration page appears. You must complete all fields for successful registration.
Note: You can register and run Check My PC in a language other than English by choosing a language from the Language Preference drop down on the www.citidirect.com home page.
3. Complete all fields, and then click Submit. The www.citidirect.com home page appears.
CitiDirect Basics: Comprehensive Guide 8 Citigroup Corporate and Investment Banking
Check My PC The Check My PC with Sun Java Software program determines if your Personal Computer (PC) meets the minimum software requirements to run CitiDirect®Online Banking.
Installation
Install CitiDirect with Sun Microsystems® Java Software (JRE)
Note: Administrator Rights Required
You must have Administrator Rights to Windows® NT, 2000, XP and Vista systems in order to install and run CitiDirect® Online Banking and to update and install any third-party components needed to run CitiDirect. They are also needed to download CitiDirect application updates. If you are unsure as to your access rights, please contact the IT group in your organization.
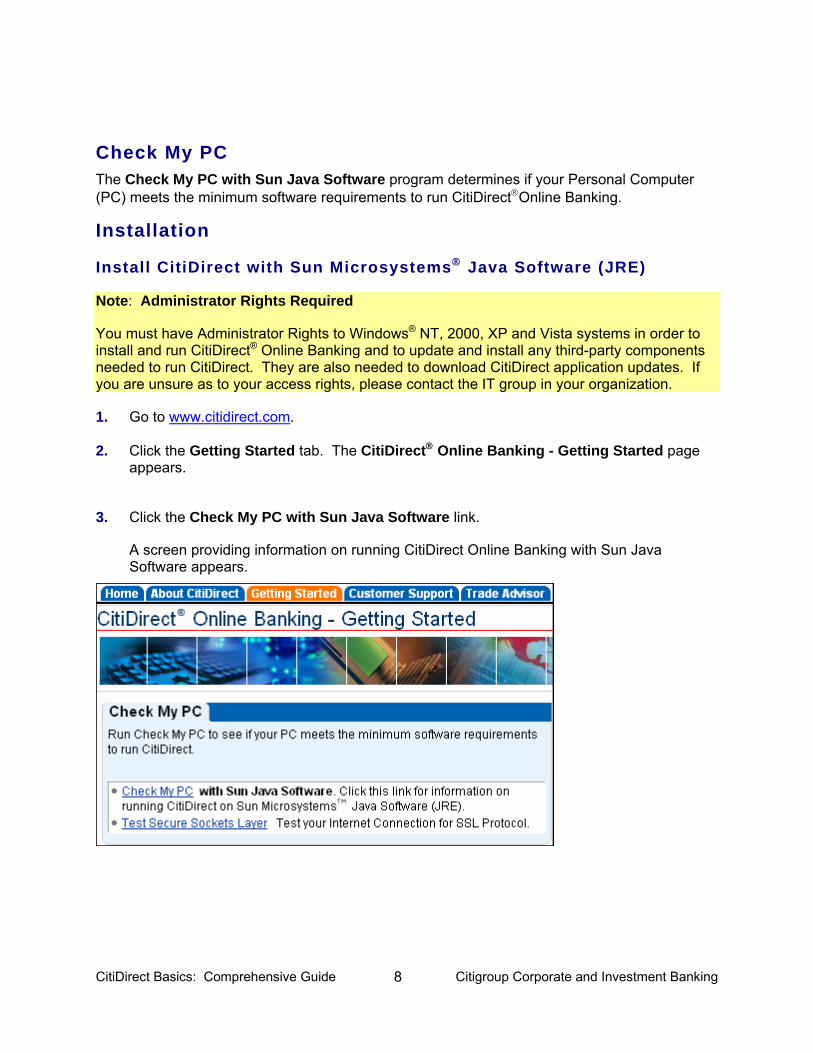
1. Go to www.citidirect.com.
2. Click the Getting Started tab. The CitiDirect® Online Banking - Getting Started page appears.
3. Click the Check My PC with Sun Java Software link.
A screen providing information on running CitiDirect Online Banking with Sun Java Software appears.
CitiDirect Basics: Comprehensive Guide 9 Citigroup Corporate and Investment Banking
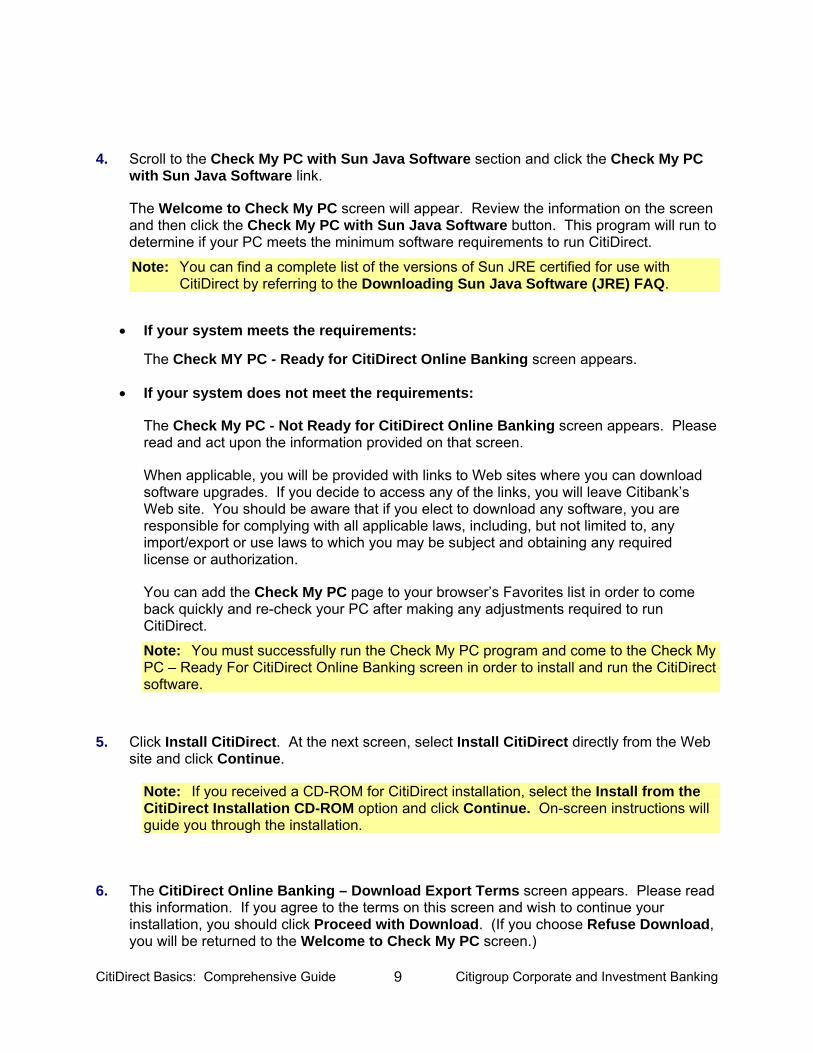
4. Scroll to the Check My PC with Sun Java Software section and click the Check My PC with Sun Java Software link.
The Welcome to Check My PC screen will appear. Review the information on the screen and then click the Check My PC with Sun Java Software button. This program will run to determine if your PC meets the minimum software requirements to run CitiDirect.
Note: You can find a complete list of the versions of Sun JRE certified for use with CitiDirect by referring to the Downloading Sun Java Software (JRE) FAQ.
• If your system meets the requirements:
The Check MY PC - Ready for CitiDirect Online Banking screen appears.
• If your system does not meet the requirements:
The Check My PC - Not Ready for CitiDirect Online Banking screen appears. Please read and act upon the information provided on that screen.
When applicable, you will be provided with links to Web sites where you can download software upgrades. If you decide to access any of the links, you will leave Citibank’s Web site. You should be aware that if you elect to download any software, you are responsible for complying with all applicable laws, including, but not limited to, any import/export or use laws to which you may be subject and obtaining any required license or authorization.
You can add the Check My PC page to your browser’s Favorites list in order to come back quickly and re-check your PC after making any adjustments required to run CitiDirect.
Note: You must successfully run the Check My PC program and come to the Check My PC – Ready For CitiDirect Online Banking screen in order to install and run the CitiDirect software.
5. Click Install CitiDirect. At the next screen, select Install CitiDirect directly from the Web site and click Continue.
Note: If you received a CD-ROM for CitiDirect installation, select the Install from the CitiDirect Installation CD-ROM option and click Continue. On-screen instructions will guide you through the installation.
6. The CitiDirect Online Banking – Download Export Terms screen appears. Please read this information. If you agree to the terms on this screen and wish to continue your installation, you should click Proceed with Download. (If you choose Refuse Download, you will be returned to the Welcome to Check My PC screen.)

CitiDirect Basics: Comprehensive Guide 10 Citigroup Corporate and Investment Banking
The Installing CitiDirect Online Banking Software screen appears.
When the software download is complete, the CitiDirect Online Banking – Software Installation Complete screen appears.
Note: Click the CitiDirect Online Banking link and add the CitiDirect Sign-on page to your
browser’s Favorites list for a convenient way to sign on later. To set CitiDirect as a favorite, click Favorites on your browser menu and then click Add to Favorites.
7. You can now proceed to the Initial Sign-on to CitiDirect Online Banking section of this Guide.

CitiDirect Basics: Comprehensive Guide 11 Citigroup Corporate and Investment Banking
Initial Sign-on to CitiDirect® Online Banking To ensure successful initial sign-on to CitiDirect® Online Banking, you must have a SafeWord™
card and a corresponding Personal Identification Number (PIN), or a Secured Password ID, provided by your Security Manager. If you are using a new SafeWord card to sign on to CitiDirect, you will also need to enter your Client ID, which should be provided by your Security Manager. Please contact your Security Manager if you need assistance with sign-on credentials. Sign on to CitiDirect Online Banking using a SafeWord card by following the steps below.
1. Go to your CitiDirect Sign-on link in your browser’s Favorites list or type https://citidirect-eb.citicorp.com in your browser address bar.
2. The CitiDirect Sign-on screen appears.
3. In the Sign-on Name field, select New User and then click Submit.
Note: If you prefer to work in CitiDirect Online Banking in a language other than English, select your preferred language from the list of languages at the top of the CitiDirect Sign-on screen.
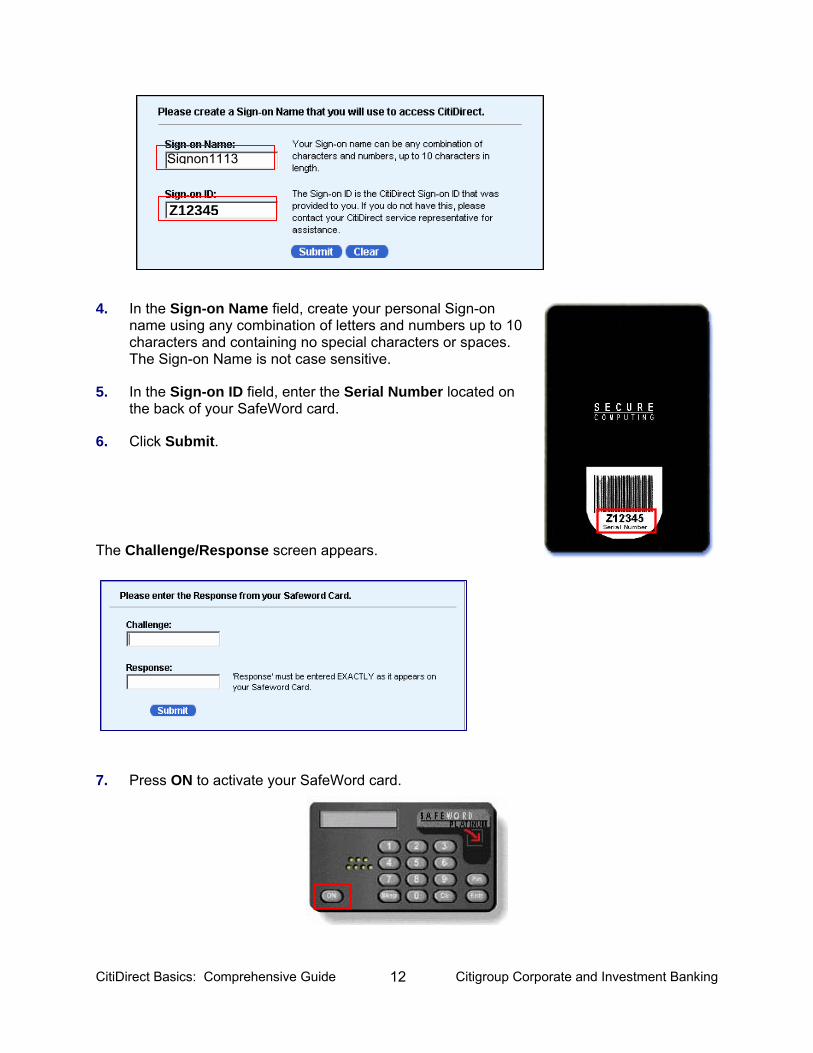
The Please create a Sign-on Name that you will use to access CitiDirect screen appears.
CitiDirect Basics: Comprehensive Guide 12 Citigroup Corporate and Investment Banking
4. In the Sign-on Name field, create your personal Sign-on name using any combination of letters and numbers up to 10 characters and containing no special characters or spaces. The Sign-on Name is not case sensitive.
5. In the Sign-on ID field, enter the Serial Number located on the back of your SafeWord card.
6. Click Submit. The Challenge/Response screen appears.
7. Press ON to activate your SafeWord card.
Z12345
Signon1113
CitiDirect Basics: Comprehensive Guide 13 Citigroup Corporate and Investment Banking
8. At the ENTR PIN prompt, enter your 4-digit PIN that is printed in the PIN envelope provided by your Security Manager.
9. At the HOST? prompt, enter the number “9.”
10. At the CHALLNG? prompt, enter the Challenge (excluding the first “9”) that appears in the Challenge field of the Challenge/Response window on your computer screen.
CitiDirect Basics: Comprehensive Guide 14 Citigroup Corporate and Investment Banking
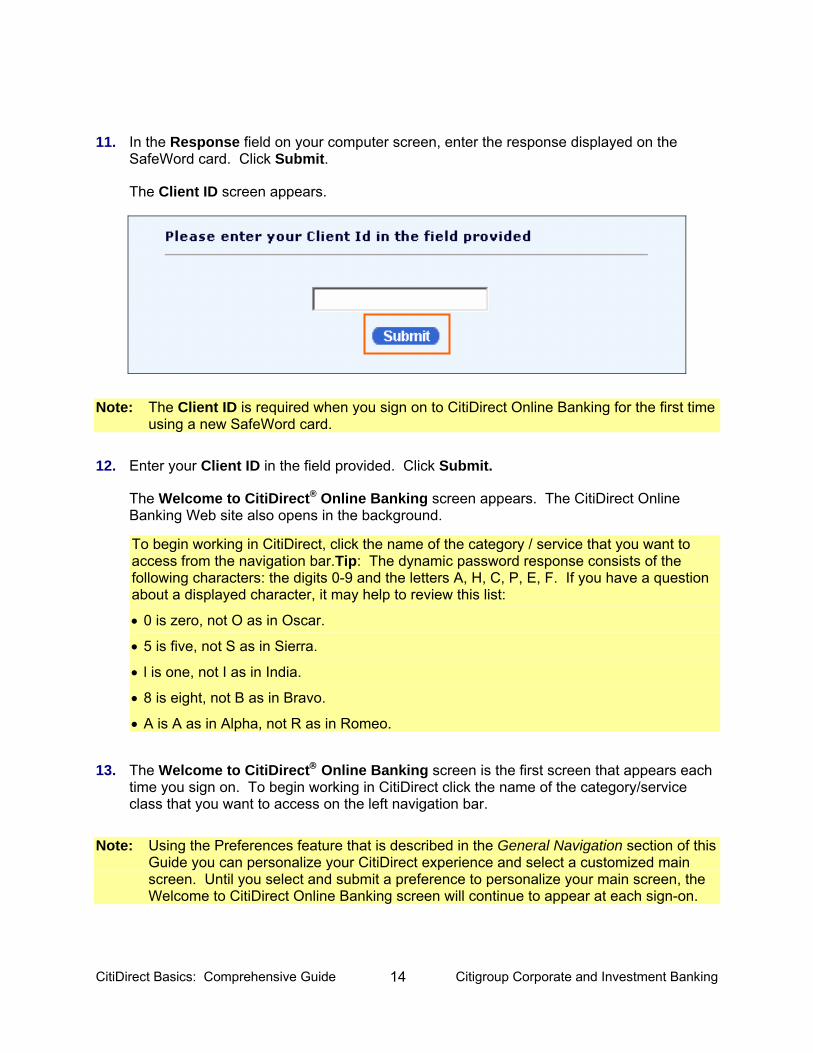
11. In the Response field on your computer screen, enter the response displayed on the SafeWord card. Click Submit.
The Client ID screen appears.
Note: The Client ID is required when you sign on to CitiDirect Online Banking for the first time
using a new SafeWord card.
12. Enter your Client ID in the field provided. Click Submit.
The Welcome to CitiDirect® Online Banking screen appears. The CitiDirect Online Banking Web site also opens in the background.
To begin working in CitiDirect, click the name of the category / service that you want to access from the navigation bar.Tip: The dynamic password response consists of the following characters: the digits 0-9 and the letters A, H, C, P, E, F. If you have a question about a displayed character, it may help to review this list:
• 0 is zero, not O as in Oscar.
• 5 is five, not S as in Sierra.
• l is one, not I as in India.
• 8 is eight, not B as in Bravo.
• A is A as in Alpha, not R as in Romeo.
13. The Welcome to CitiDirect® Online Banking screen is the first screen that appears each time you sign on. To begin working in CitiDirect click the name of the category/service class that you want to access on the left navigation bar.
Note: Using the Preferences feature that is described in the General Navigation section of this
Guide you can personalize your CitiDirect experience and select a customized main screen. Until you select and submit a preference to personalize your main screen, the Welcome to CitiDirect Online Banking screen will continue to appear at each sign-on.
CitiDirect Basics: Comprehensive Guide 15 Citigroup Corporate and Investment Banking
The Welcome to CitiDirect® Online Banking screen is the first screen that appears each time you sign on. To begin working in CitiDirect click the name of the category/service class that you want to access from the left navigation bar.
Customize Your Main Screen To personalize your CitiDirect experience and work more efficiently, you can select a customized main screen. This customized main screen will then appear each time you sign-on to CitiDirect, replacing the Welcome to CitiDirect Online Banking screen. You can make this change using the Preferences feature. Until you select and submit a preference to personalize your main screen, the Welcome to CitiDirect Online Banking screen will continue to appear. Note: For complete details on setting your preferences, see the CitiDirect Basics: Setting Your
Preferences Guide available in the Learning Center at www.citidirect.com.
Secured Password Users Sign on to CitiDirect Online Banking using a Secured Password by following the steps below.
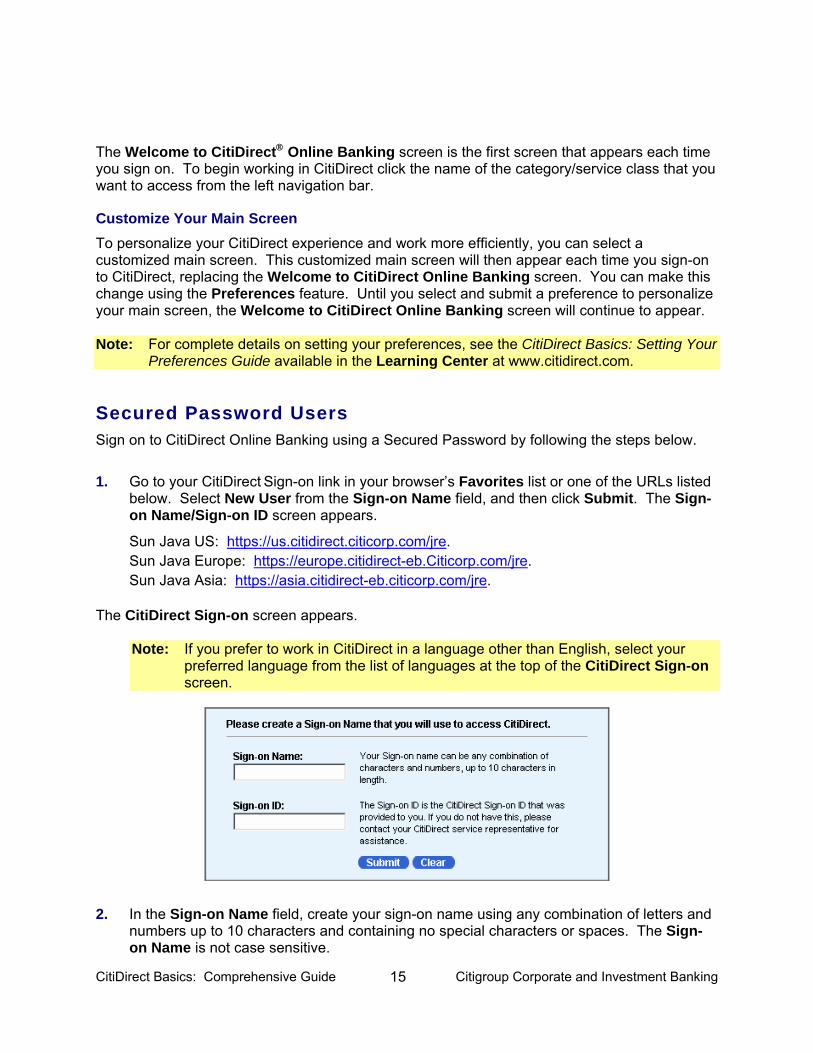
1. Go to your CitiDirect Sign-on link in your browser’s Favorites list or one of the URLs listed below. Select New User from the Sign-on Name field, and then click Submit. The Sign-on Name/Sign-on ID screen appears.
Sun Java US: https://us.citidirect.citicorp.com/jre. Sun Java Europe: https://europe.citidirect-eb.Citicorp.com/jre. Sun Java Asia: https://asia.citidirect-eb.citicorp.com/jre.
The CitiDirect Sign-on screen appears.
Note: If you prefer to work in CitiDirect in a language other than English, select your preferred language from the list of languages at the top of the CitiDirect Sign-on screen.
2. In the Sign-on Name field, create your sign-on name using any combination of letters and numbers up to 10 characters and containing no special characters or spaces. The Sign-on Name is not case sensitive.
CitiDirect Basics: Comprehensive Guide 16 Citigroup Corporate and Investment Banking
3. In the Sign-on ID field, enter the Secured Password ID provided by your Security Manager.
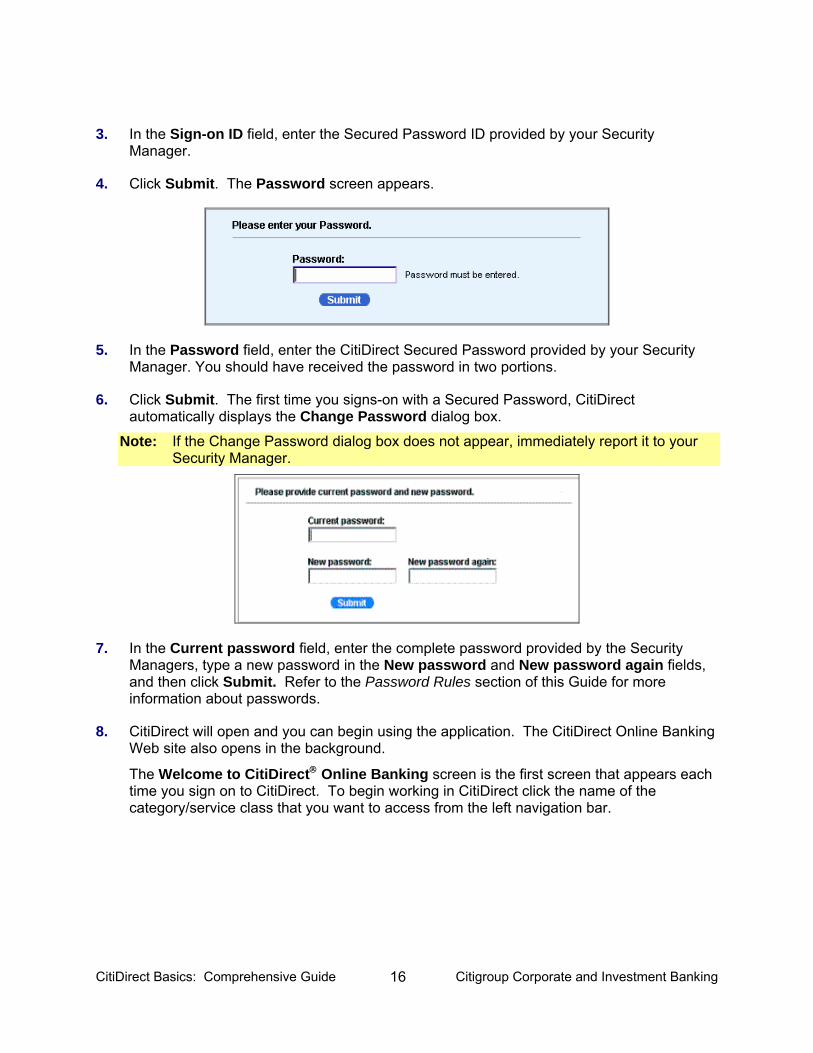
4. Click Submit. The Password screen appears.
5. In the Password field, enter the CitiDirect Secured Password provided by your Security Manager. You should have received the password in two portions.
6. Click Submit. The first time you signs-on with a Secured Password, CitiDirect automatically displays the Change Password dialog box.
Note: If the Change Password dialog box does not appear, immediately report it to your Security Manager.
7. In the Current password field, enter the complete password provided by the Security Managers, type a new password in the New password and New password again fields, and then click Submit. Refer to the Password Rules section of this Guide for more information about passwords.
8. CitiDirect will open and you can begin using the application. The CitiDirect Online Banking Web site also opens in the background.
The Welcome to CitiDirect® Online Banking screen is the first screen that appears each time you sign on to CitiDirect. To begin working in CitiDirect click the name of the category/service class that you want to access from the left navigation bar.
CitiDirect Basics: Comprehensive Guide 17 Citigroup Corporate and Investment Banking
Use the following rules as a guideline for choosing a password.
Password Rules Your Secured Password must: • Not be the same as your User ID.
• Consist of a minimum of six characters and mixed alphabetic and numeric characters.
• Contain no more than two consecutive, identical characters.
• Be changed at least every 30 days.
Customize Your Main Screen To personalize your CitiDirect experience and work more efficiently, you can select a customized main screen. This customized main screen will then appear each time you sign-on to CitiDirect, replacing the Welcome to CitiDirect Online Banking screen. You can make this change using the Preferences feature. Until you select and submit a preference to personalize your main screen, the Welcome to CitiDirect Online Banking screen will continue to appear. Note: For complete details on setting your preferences, see the CitiDirect Basics: Setting Your
Preferences Guide available in the Learning Center at www.citidirect.com.
Password Maintenance
• Re-use of passwords is prohibited for a minimum of six consecutive changes. After more than six consecutive failed sign-on attempts, your Security Manager must reset User IDs associated with the password.
• If you believe that your Secured Password has become known to anyone, you must change it immediately.
• Password resets are restricted to one per 24-hour period, unless you are a Security Manager.
• If your Security Manager has reset your Secured Password, the Change Password dialog box appears. You are required to change your password before further activity.
• You are responsible for any activities that occur with the use of your User ID and Secured Password.
CitiDirect Basics: Comprehensive Guide 18 Citigroup Corporate and Investment Banking
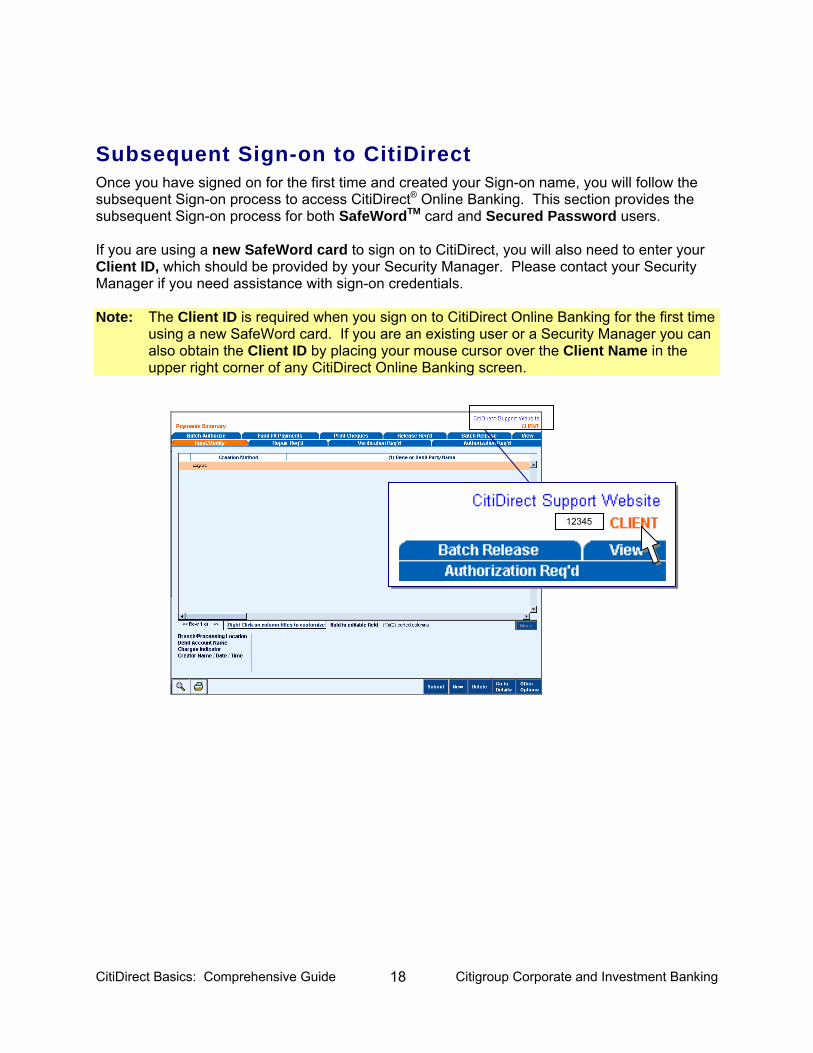
Subsequent Sign-on to CitiDirect Once you have signed on for the first time and created your Sign-on name, you will follow the subsequent Sign-on process to access CitiDirect® Online Banking. This section provides the subsequent Sign-on process for both SafeWordTM card and Secured Password users. If you are using a new SafeWord card to sign on to CitiDirect, you will also need to enter your Client ID, which should be provided by your Security Manager. Please contact your Security Manager if you need assistance with sign-on credentials. Note: The Client ID is required when you sign on to CitiDirect Online Banking for the first time
using a new SafeWord card. If you are an existing user or a Security Manager you can also obtain the Client ID by placing your mouse cursor over the Client Name in the upper right corner of any CitiDirect Online Banking screen.
12345 12345
CitiDirect Basics: Comprehensive Guide 19 Citigroup Corporate and Investment Banking
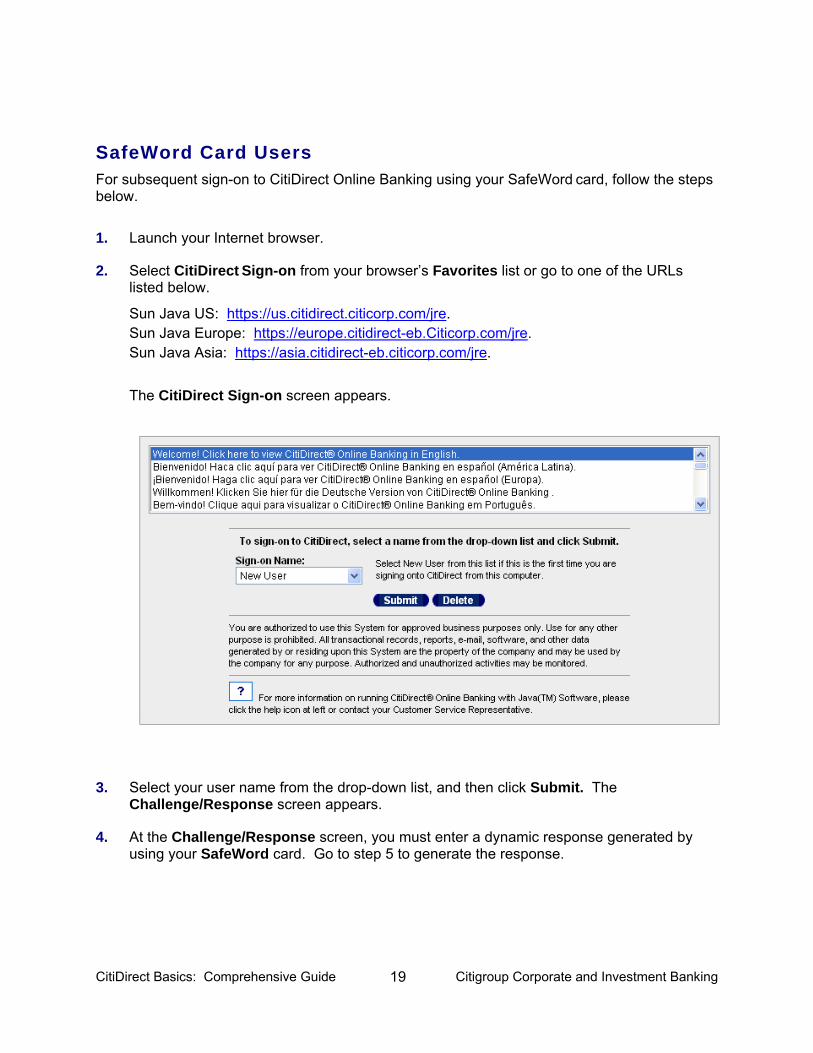
SafeWord Card Users For subsequent sign-on to CitiDirect Online Banking using your SafeWord card, follow the steps below.
1. Launch your Internet browser.
2. Select CitiDirect Sign-on from your browser’s Favorites list or go to one of the URLs listed below.
Sun Java US: https://us.citidirect.citicorp.com/jre. Sun Java Europe: https://europe.citidirect-eb.Citicorp.com/jre. Sun Java Asia: https://asia.citidirect-eb.citicorp.com/jre.
The CitiDirect Sign-on screen appears.
3. Select your user name from the drop-down list, and then click Submit. The Challenge/Response screen appears.
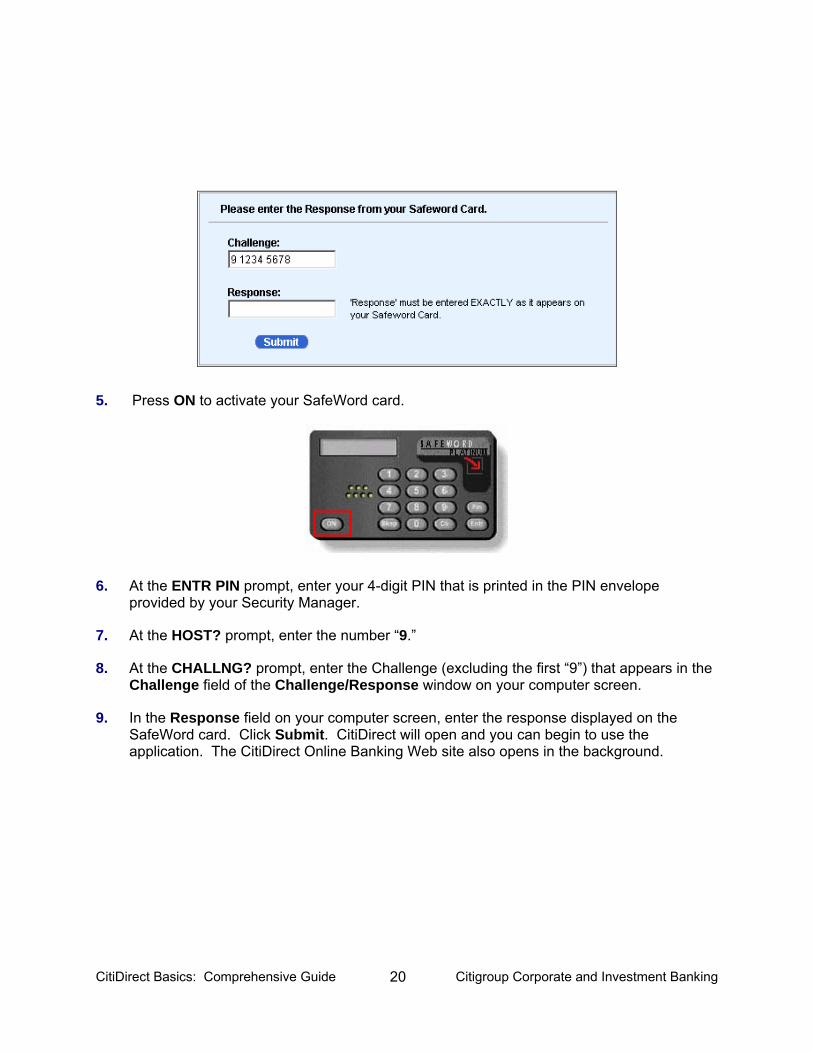
4. At the Challenge/Response screen, you must enter a dynamic response generated by using your SafeWord card. Go to step 5 to generate the response.
CitiDirect Basics: Comprehensive Guide 20 Citigroup Corporate and Investment Banking
5. Press ON to activate your SafeWord card.
6. At the ENTR PIN prompt, enter your 4-digit PIN that is printed in the PIN envelope provided by your Security Manager.
7. At the HOST? prompt, enter the number “9.”
8. At the CHALLNG? prompt, enter the Challenge (excluding the first “9”) that appears in the Challenge field of the Challenge/Response window on your computer screen.
9. In the Response field on your computer screen, enter the response displayed on the SafeWord card. Click Submit. CitiDirect will open and you can begin to use the application. The CitiDirect Online Banking Web site also opens in the background.

CitiDirect Basics: Comprehensive Guide 21 Citigroup Corporate and Investment Banking
Secured Password Users For subsequent sign-on to CitiDirect Online Banking using your Secured Password, follow the steps below.
1. Launch your Internet browser.
2. Select CitiDirect Sign-on from your browser’s Favorites list or go to one of the URLs listed below.
Sun Java US: https://us.citidirect.citicorp.com/jre. Sun Java Europe: https://europe.citidirect-eb.Citicorp.com/jre. Sun Java Asia: https://asia.citidirect-eb.citicorp.com/jre.
The CitiDirect Sign-on screen appears.
3. Select your user name from the drop down list, and click Submit. The Secured Password screen appears.
CitiDirect Basics: Comprehensive Guide 22 Citigroup Corporate and Investment Banking
4. Enter your CitiDirect Secured Password, and then click Submit. You will be signed on to CitiDirect.

CitiDirect Basics: Comprehensive Guide 23 Citigroup Corporate and Investment Banking
Log-out Procedures When you sign on to CitiDirect® Online Banking, the CitiDirect Web site (www.citidirect.com) automatically opens in the background. While working in CitiDirect, you may have also opened additional windows. The impact of logging-out of CitiDirect while other windows are open or closing other windows while still signed on to CitiDirect varies. The following section describes CitiDirect Log-out, Microsoft® Internet Explorer Log-out, and “close-out” scenarios. To successfully log out of CitiDirect Online Banking, follow either of the following log-out procedures. • CitiDirect Log-out
• Microsoft Internet Explorer Log-out Important: About Browser Sessions and CitiDirect
• A browser is short for Web browser, a software application used to locate and display Web pages.
• A browser session begins every time you launch the Microsoft Internet Explorer browser and ends when you close it. When you log on to CitiDirect Online Banking, www.citidirect.com opens as a separate Web page within the same browser session.
• Any windows opened through any method and running simultaneously with the CitiDirect application are considered part of the current browser session. This includes any windows opened by selecting a Favorite, by clicking CTRL- N on your keyboard, or as a pop-up.
• When you log out of the CitiDirect Online Banking application, all windows opened during the session will close.
• If you launch a separate Internet Explorer browser session while your first session is still in progress, two sessions will run concurrently. This second session is unrelated to the first. When you close the CitiDirect Online Banking application launched in the first browser session, all windows associated with the second browser session will remain open.
CitiDirect Basics: Comprehensive Guide 24 Citigroup Corporate and Investment Banking
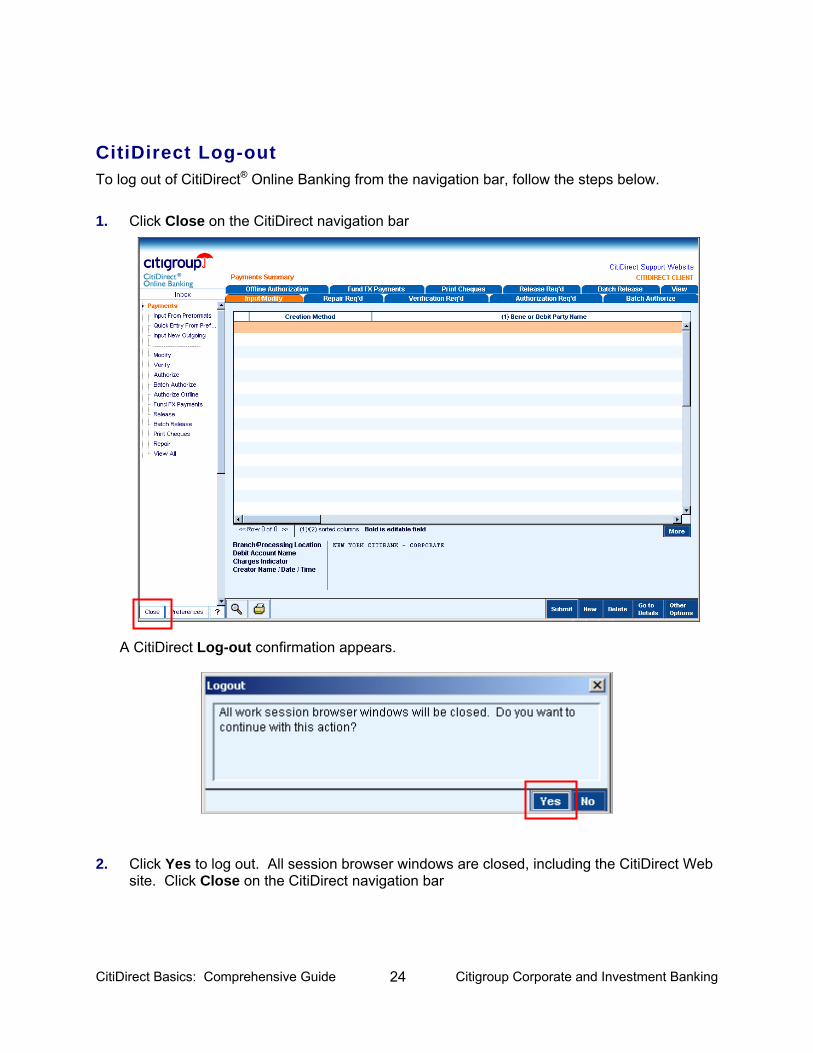
CitiDirect Log-out To log out of CitiDirect® Online Banking from the navigation bar, follow the steps below.
1. Click Close on the CitiDirect navigation bar
A CitiDirect Log-out confirmation appears.
2. Click Yes to log out. All session browser windows are closed, including the CitiDirect Web site. Click Close on the CitiDirect navigation bar
CitiDirect Basics: Comprehensive Guide 25 Citigroup Corporate and Investment Banking
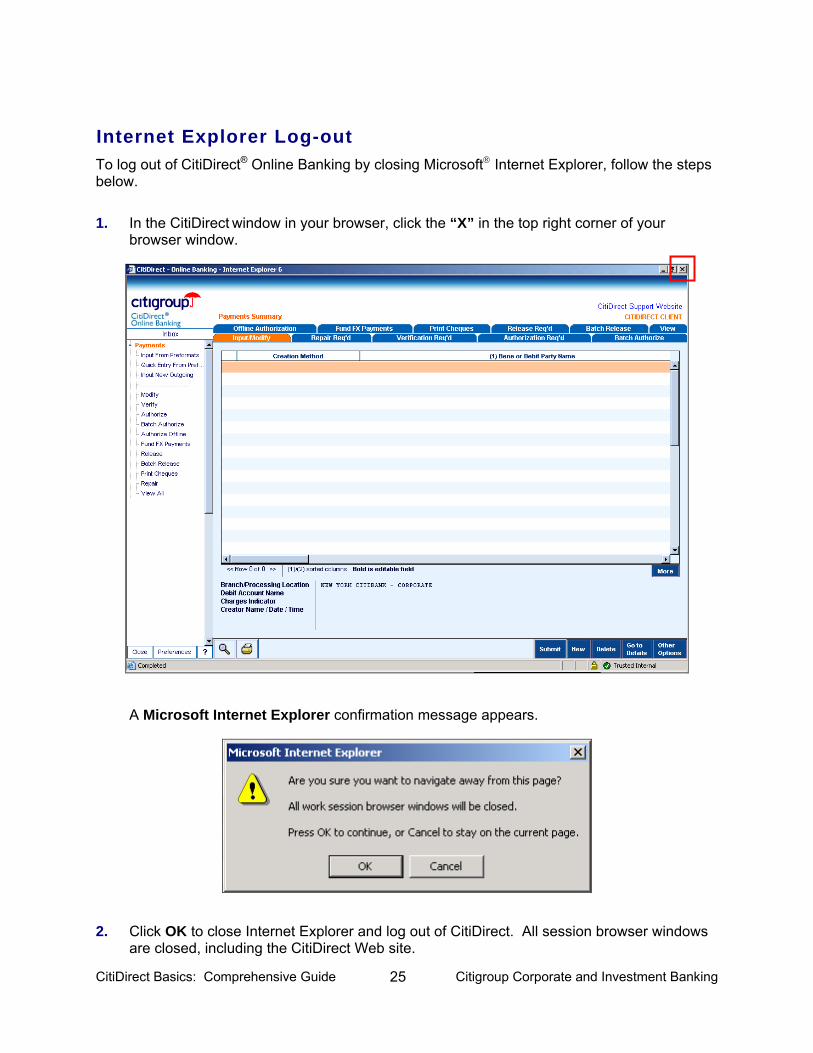
Internet Explorer Log-out To log out of CitiDirect® Online Banking by closing Microsoft® Internet Explorer, follow the steps below.
1. In the CitiDirect window in your browser, click the “X” in the top right corner of your browser window.
A Microsoft Internet Explorer confirmation message appears.
2. Click OK to close Internet Explorer and log out of CitiDirect. All session browser windows are closed, including the CitiDirect Web site.
CitiDirect Basics: Comprehensive Guide 26 Citigroup Corporate and Investment Banking
Closing Active Windows Versus Logging Out The following section describes the scenarios that occur when you close active windows while the CitiDirect Online Banking application is running.
Closing www.citidirect.com If you are at www.citidirect.com or any other Web site, while the CitiDirect application is running in the background, closing www.citidirect.com will not close the CitiDirect Online Banking application; it will continue to run.
Closing Additional Windows Occasionally Citibank will send a Broadcast Message or a “Did You Know?” message through the CitiDirect Online Banking application or www.citidirect.com. Closing a Broadcast Message, a “Did You Know?”, or any pop-up window, will not close the CitiDirect Online Banking application.
CitiDirect Basics: Comprehensive Guide 27 Citigroup Corporate and Investment Banking
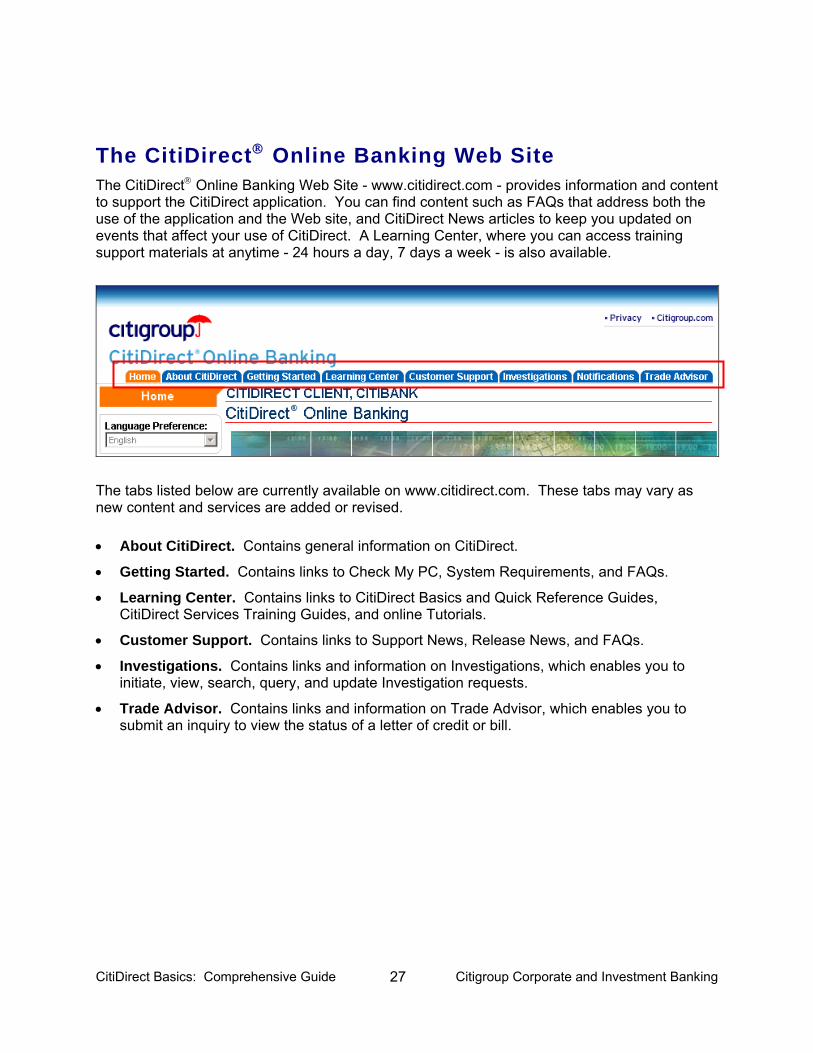
The CitiDirect® Online Banking Web Site The CitiDirect® Online Banking Web Site - www.citidirect.com - provides information and content to support the CitiDirect application. You can find content such as FAQs that address both the use of the application and the Web site, and CitiDirect News articles to keep you updated on events that affect your use of CitiDirect. A Learning Center, where you can access training support materials at anytime - 24 hours a day, 7 days a week - is also available.
The tabs listed below are currently available on www.citidirect.com. These tabs may vary as new content and services are added or revised. • About CitiDirect. Contains general information on CitiDirect.
• Getting Started. Contains links to Check My PC, System Requirements, and FAQs.
• Learning Center. Contains links to CitiDirect Basics and Quick Reference Guides, CitiDirect Services Training Guides, and online Tutorials.
• Customer Support. Contains links to Support News, Release News, and FAQs.
• Investigations. Contains links and information on Investigations, which enables you to initiate, view, search, query, and update Investigation requests.
• Trade Advisor. Contains links and information on Trade Advisor, which enables you to submit an inquiry to view the status of a letter of credit or bill.
CitiDirect Basics: Comprehensive Guide 28 Citigroup Corporate and Investment Banking
Accessing The Web Site You can access the CitiDirect Web site through the CitiDirect application or by going directly to www.citidirect.com.
Access Through the CitiDirect Application You can access the CitiDirect Web site through the CitiDirect application as follows:
1. Click the window that has opened behind the application, or click the CitiDirect Support Website link on the upper right of the screen. The Web site appears on your desktop as the active browser window. When you sign on to CitiDirect, the Web site home page automatically opens in a separate browser window behind the application.
2. Click the tab that you are interested in viewing.
Notes:
• If you exit the CitiDirect application, the www.citidirect.com window will also close.
• If you exit www.citidirect.com, the CitiDirect application will remain open.
• For more information on Logging out, refer to the Log-out Procedures section of this Guide.
Go to www.citidirect.com You can access the CitiDirect Web site without being signed on to the CitiDirect application by going directly to www.citidirect.com however, we suggest that you register with an Access Code should you use this method. Registering with an Access Code will enable you to view content on the Web site such as the Learning Center and Release News, which is available to entitled CitiDirect users only. Your local Implementation Manager provides Access Codes. Note: If you go to www.citidirect.com from the CitiDirect application, you will automatically see
an entitled user’s view of the Web site.
Register Using An Access Code Follow the steps below if you have already registered at www.citidirect.com and created a Personal ID. If you have not, please refer to the Registration, Check My PC, and Installation section in this Guide.
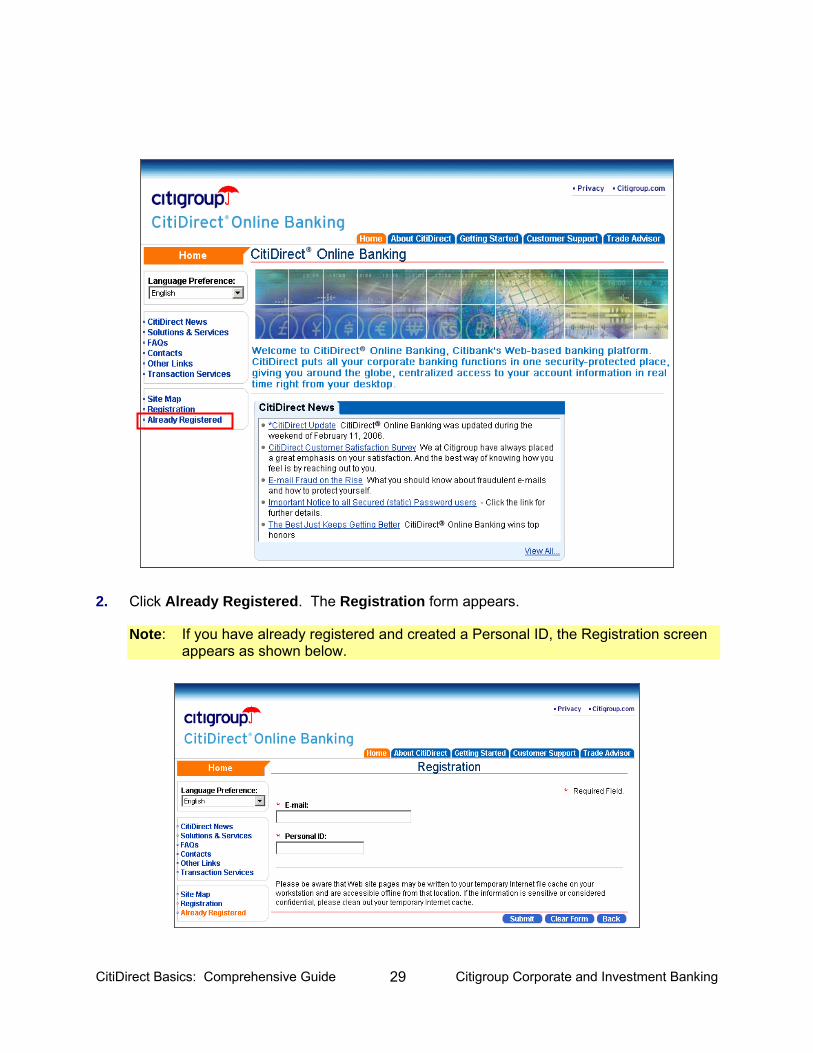
1. From your Internet browser, go to www.citidirect.com.
The CitiDirect Online Banking Web site home page appears.
CitiDirect Basics: Comprehensive Guide 29 Citigroup Corporate and Investment Banking
2. Click Already Registered. The Registration form appears.
Note: If you have already registered and created a Personal ID, the Registration screen appears as shown below.
CitiDirect Basics: Comprehensive Guide 30 Citigroup Corporate and Investment Banking
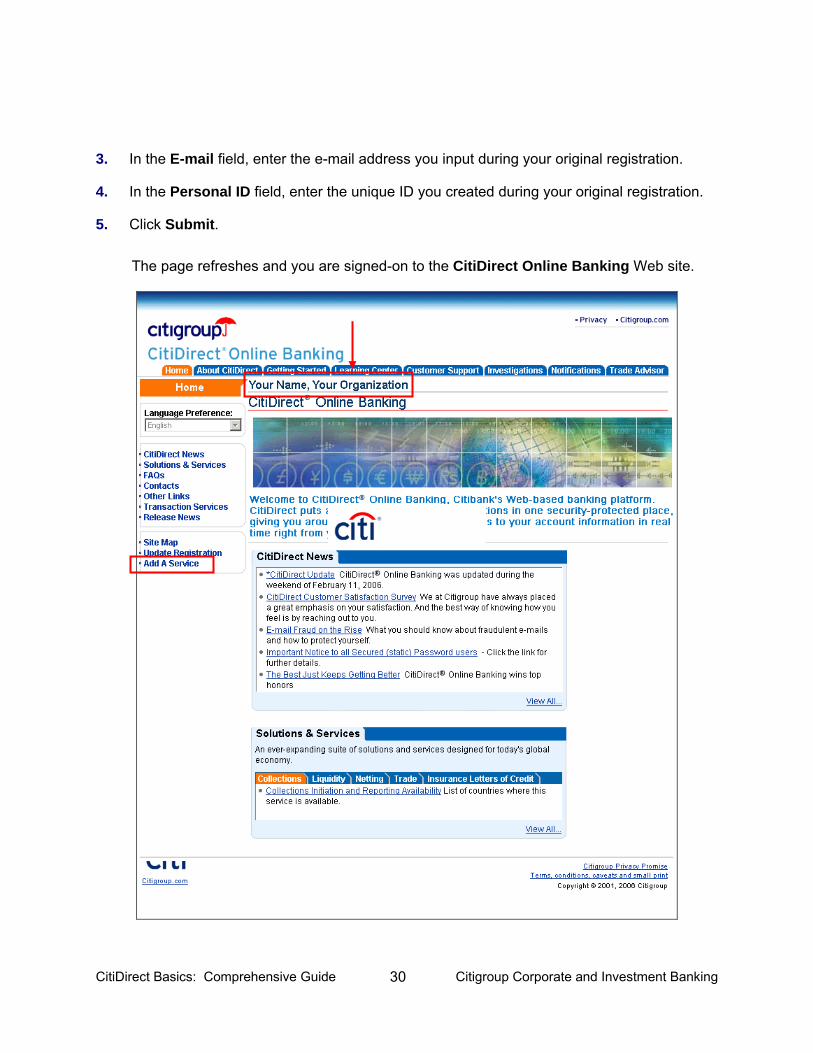
3. In the E-mail field, enter the e-mail address you input during your original registration.
4. In the Personal ID field, enter the unique ID you created during your original registration.
5. Click Submit. The page refreshes and you are signed-on to the CitiDirect Online Banking Web site.
CitiDirect Basics: Comprehensive Guide 31 Citigroup Corporate and Investment Banking
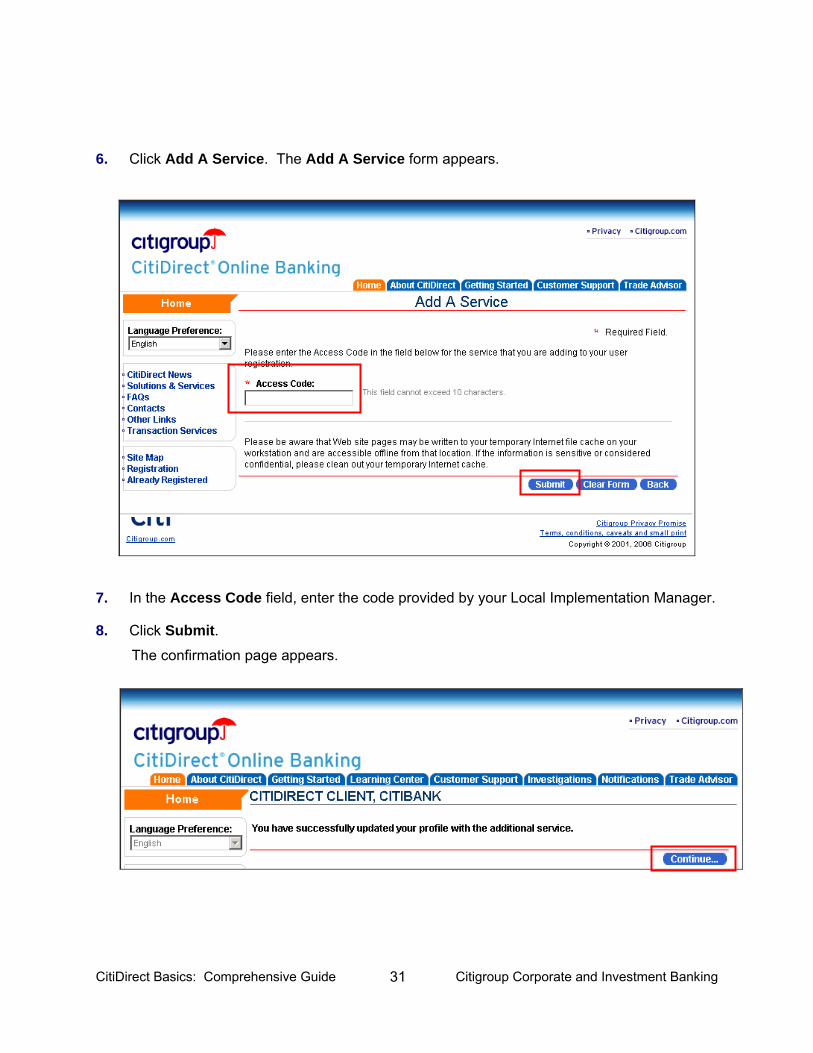
6. Click Add A Service. The Add A Service form appears.
7. In the Access Code field, enter the code provided by your Local Implementation Manager.
8. Click Submit. The confirmation page appears.
CitiDirect Basics: Comprehensive Guide 32 Citigroup Corporate and Investment Banking
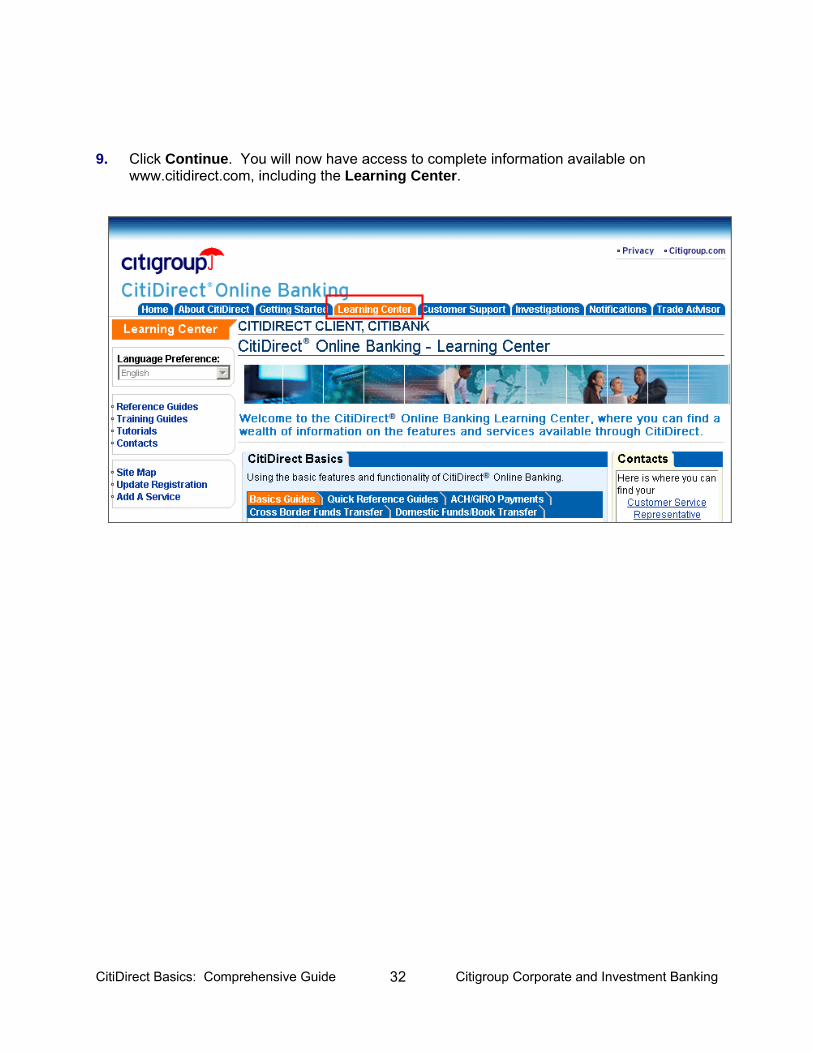
9. Click Continue. You will now have access to complete information available on www.citidirect.com, including the Learning Center.
CitiDirect Basics: Comprehensive Guide 33 Citigroup Corporate and Investment Banking
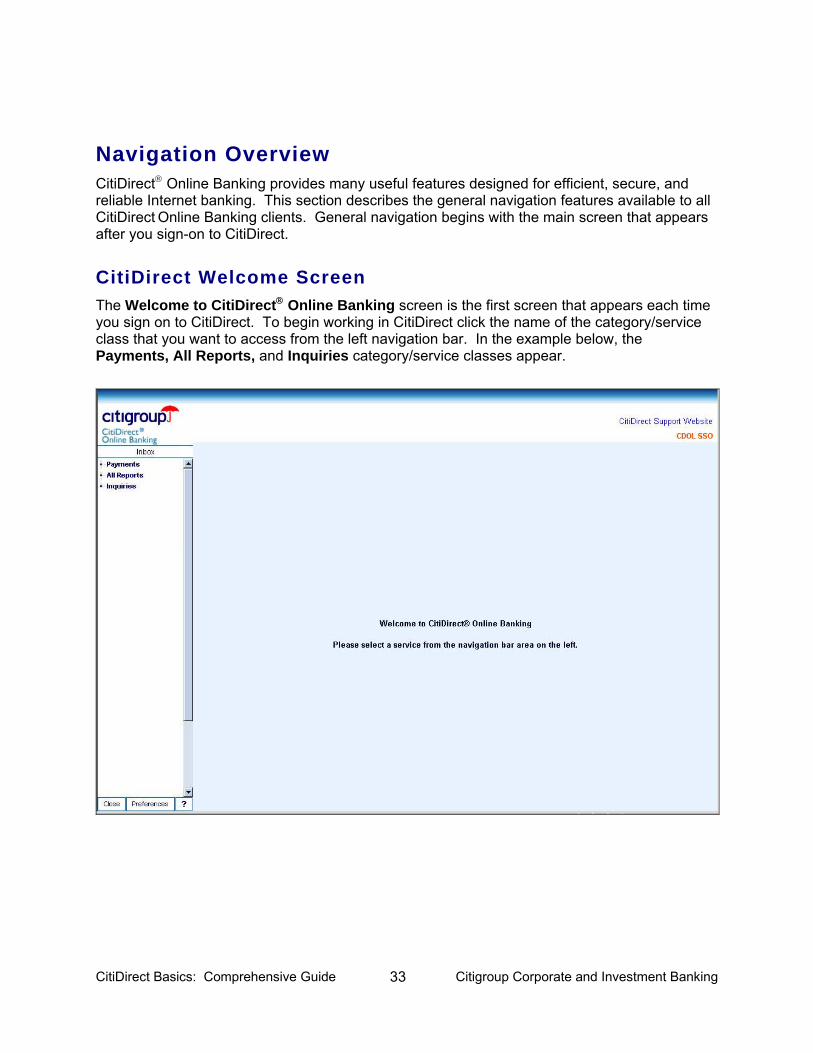
Navigation Overview CitiDirect® Online Banking provides many useful features designed for efficient, secure, and reliable Internet banking. This section describes the general navigation features available to all CitiDirect Online Banking clients. General navigation begins with the main screen that appears after you sign-on to CitiDirect.
CitiDirect Welcome Screen The Welcome to CitiDirect® Online Banking screen is the first screen that appears each time you sign on to CitiDirect. To begin working in CitiDirect click the name of the category/service class that you want to access from the left navigation bar. In the example below, the Payments, All Reports, and Inquiries category/service classes appear.
CitiDirect Basics: Comprehensive Guide 34 Citigroup Corporate and Investment Banking
To personalize your CitiDirect experience and work more efficiently, you can select a customized main screen. This customized main screen will appear each time you sign-on to CitiDirect, replacing the Welcome to CitiDirect Online Banking screen. You can make this change using the Preferences feature. The Welcome to CitiDirect Online Banking screen continues to appear until you select and submit a preference to personalize your main screen,. Note: For complete details on setting your preferences, see the Setting Your Preferences
section of this Guide.
Familiarization with the Main Screen The CitiDirect® Online Banking main screen offers features designed to make your banking experience easy. Features available to all CitiDirect users appear in the corners of the main screen. Specific features assigned to you through your Access Profile are listed on the left navigation bar.
CitiDirect Basics: Comprehensive Guide 35 Citigroup Corporate and Investment Banking
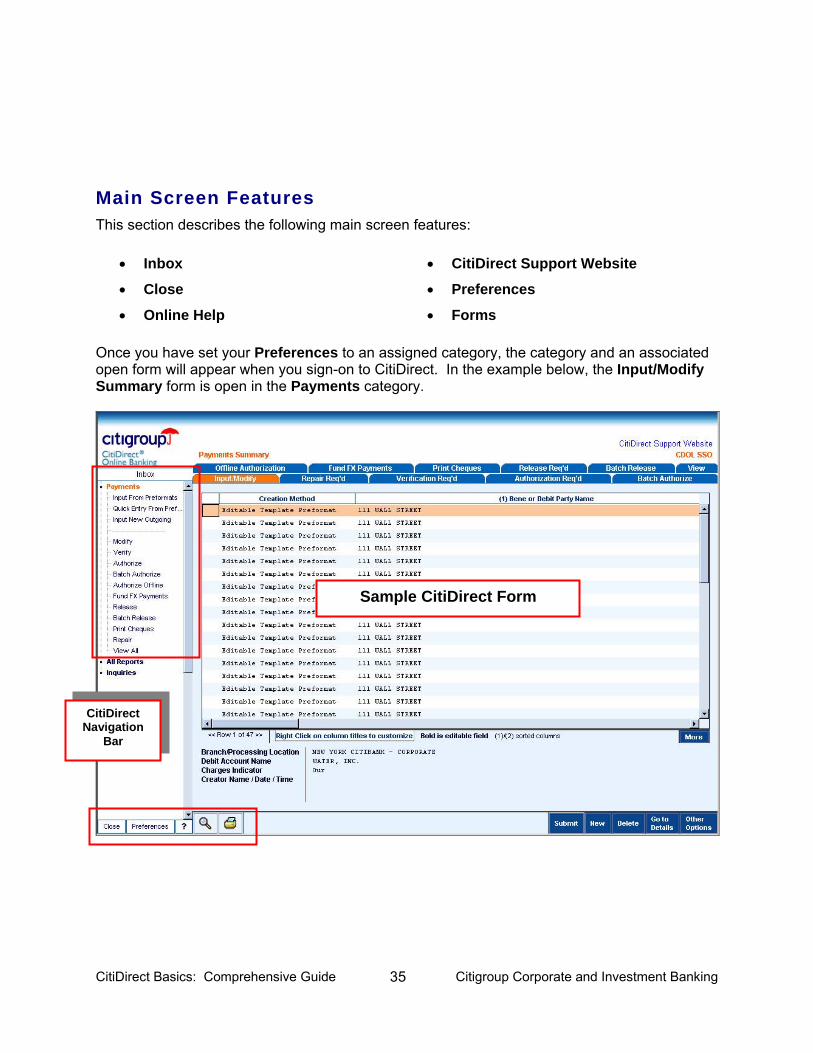
Main Screen Features This section describes the following main screen features:
• Inbox • CitiDirect Support Website
• Close • Preferences
• Online Help • Forms Once you have set your Preferences to an assigned category, the category and an associated open form will appear when you sign-on to CitiDirect. In the example below, the Input/Modify Summary form is open in the Payments category.
CitiDirect Navigation
Bar
Sample CitiDirect Form

CitiDirect Basics: Comprehensive Guide 36 Citigroup Corporate and Investment Banking
Inbox When you click Inbox at the top of your CitiDirect navigation bar, you have access to the tabs listed below. • To Do. The To Do tab lists items in your workflow queue that require action before Citibank
can process them, indicates where the items came from, shows any comments associated with the items, and provides each item’s priority and status.
• News. The News tab lists messages from Citibank and other information sources. The screen is divided into summary and detail sections. All messages are listed in the summary section in the top half of the screen, which also displays the source of the message, comments associated with the message, and its priority and status.
• Status. The Status tab lists all of your current and open CitiDirect items and their related status. The items on this tab are listed for informational viewing purposes only.
Notes:
• All transactions with CB Failed status appear individually, and will remain in your Inbox for nine calendar days.
• To refresh the To Do, News, or Status tabs with the most recent data at any time, click the Update Screen action button on the lower right portion of your screen.
To take action on an item on the To Do list:
1. Perform either of the following actions:
• Select the item you wish to act on. Click Go To.
• Double click the item you wish to act on.
2. The CitiDirect form needed for the selected item appears and the appropriate process tab is active.
To view the details of a message listed on the News tab:
• Click a message. The Details section in the bottom half of the screen contains the details of any selected message.
CitiDirect Basics: Comprehensive Guide 37 Citigroup Corporate and Investment Banking
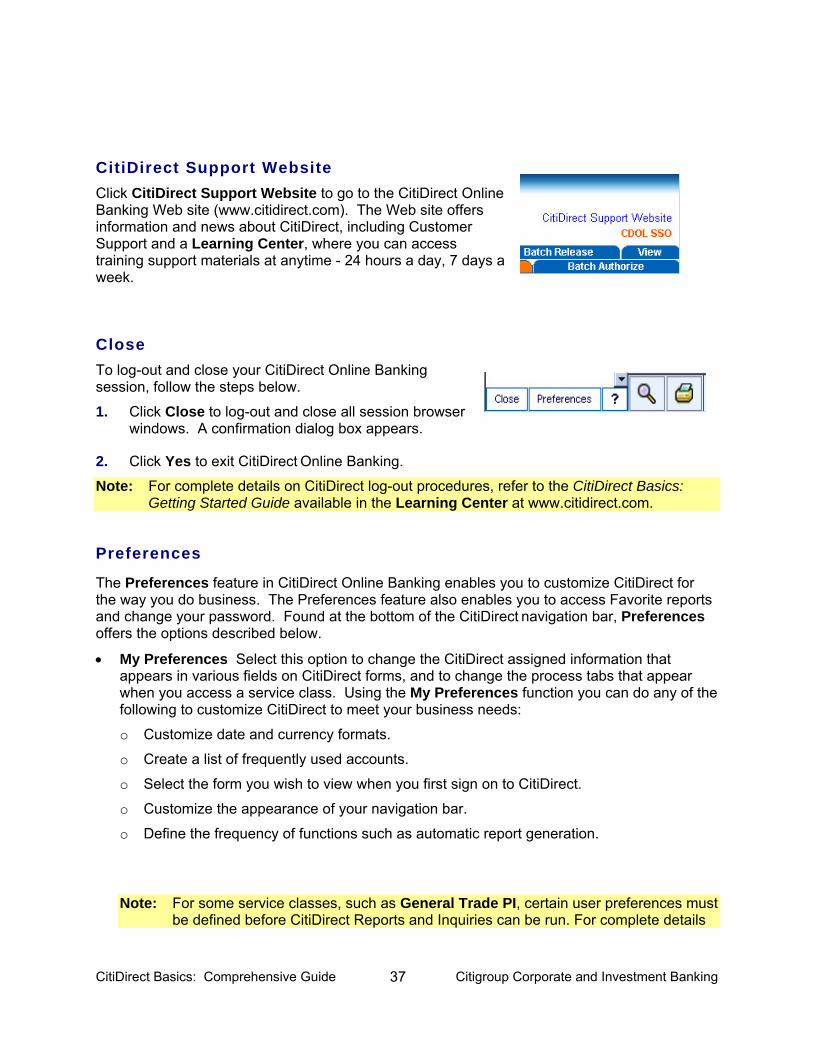
CitiDirect Support Website Click CitiDirect Support Website to go to the CitiDirect Online Banking Web site (www.citidirect.com). The Web site offers information and news about CitiDirect, including Customer Support and a Learning Center, where you can access training support materials at anytime - 24 hours a day, 7 days a week.
Close To log-out and close your CitiDirect Online Banking session, follow the steps below.
1. Click Close to log-out and close all session browser windows. A confirmation dialog box appears.
2. Click Yes to exit CitiDirect Online Banking.
Note: For complete details on CitiDirect log-out procedures, refer to the CitiDirect Basics: Getting Started Guide available in the Learning Center at www.citidirect.com.
Preferences
The Preferences feature in CitiDirect Online Banking enables you to customize CitiDirect for the way you do business. The Preferences feature also enables you to access Favorite reports and change your password. Found at the bottom of the CitiDirect navigation bar, Preferences offers the options described below.
• My Preferences Select this option to change the CitiDirect assigned information that appears in various fields on CitiDirect forms, and to change the process tabs that appear when you access a service class. Using the My Preferences function you can do any of the following to customize CitiDirect to meet your business needs:
o Customize date and currency formats.
o Create a list of frequently used accounts.
o Select the form you wish to view when you first sign on to CitiDirect.
o Customize the appearance of your navigation bar.
o Define the frequency of functions such as automatic report generation.
Note: For some service classes, such as General Trade PI, certain user preferences must be defined before CitiDirect Reports and Inquiries can be run. For complete details
CitiDirect Basics: Comprehensive Guide 38 Citigroup Corporate and Investment Banking
on setting your Preferences, see the CitiDirect Basics: Setting Your Preferences Guide available in the Learning Center at www.citidirect.com.
• Customizer Select this option to customize the CitiDirect Online Banking navigation bar to your specifications.
• Change Password Select this option to change your CitiDirect password. This option is available only if you are using a Secured Password.
• Favorite Reports Select this option to view a list of reports that you have designated as Favorites. For complete details on Favorite Reports, refer to the CitiDirect Basics: Reports and Inquiry Guide available in the Learning Center at www.citidirect.com.
Online Help CitiDirect Online Help is available to provide you with detailed and helpful information about using CitiDirect, including step-by-step instructions that guide you through basic functionality.
To access Online Help, click the question mark icon in the lower left corner of your navigation bar and select Online Help or press the F1 key on your keyboard.
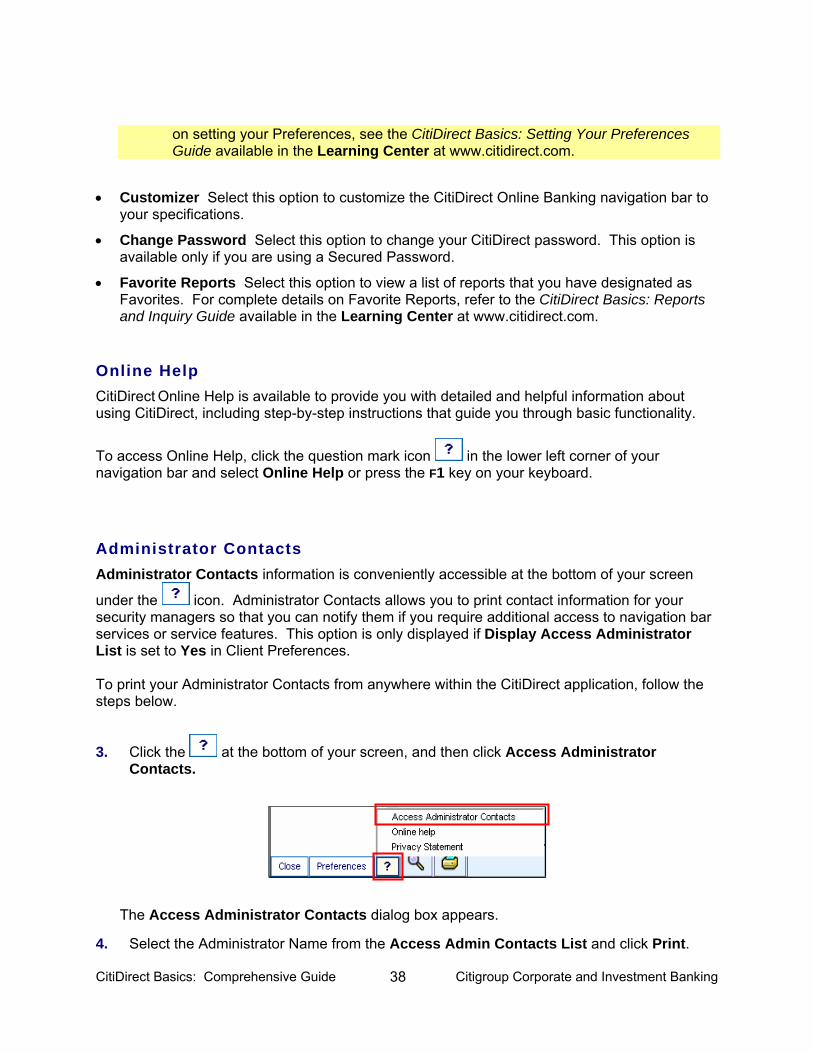
Administrator Contacts Administrator Contacts information is conveniently accessible at the bottom of your screen
under the icon. Administrator Contacts allows you to print contact information for your security managers so that you can notify them if you require additional access to navigation bar services or service features. This option is only displayed if Display Access Administrator List is set to Yes in Client Preferences. To print your Administrator Contacts from anywhere within the CitiDirect application, follow the steps below.
3. Click the at the bottom of your screen, and then click Access Administrator Contacts.
The Access Administrator Contacts dialog box appears.
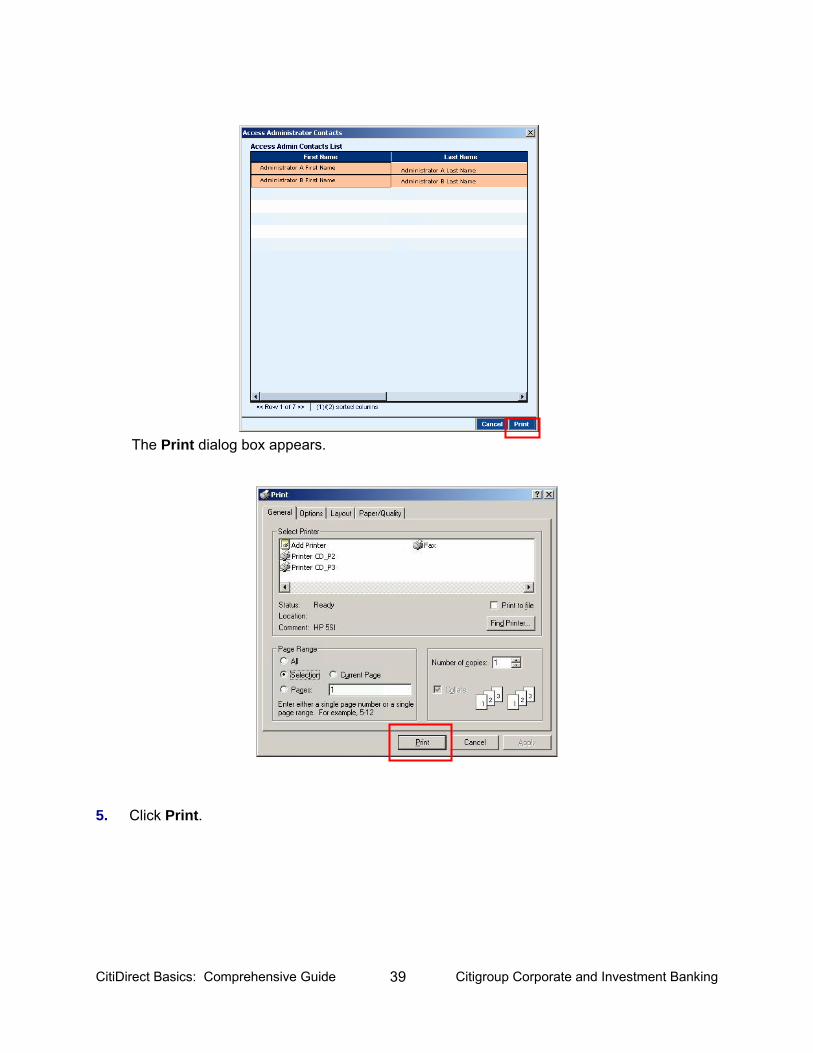
4. Select the Administrator Name from the Access Admin Contacts List and click Print.
CitiDirect Basics: Comprehensive Guide 39 Citigroup Corporate and Investment Banking
The Print dialog box appears.
5. Click Print.

CitiDirect Basics: Comprehensive Guide 40 Citigroup Corporate and Investment Banking
Search Button To perform a search on the current summary detail, follow the steps below.
1. On the CitiDirect Summary form, click the search icon to find specific records. The Search Definition Dialog box appears
2. Enter your search criteria. Click Run Search. Your search results appear.
Note: For more information on how to perform a search, refer to the Right-Click On A Summary Form section of this Guide.
Print Button
On the CitiDirect Summary form, select records and click the print icon to print a summary list of the selected records, including column headings and some details. This button provides easy access to the same functionality as Print on the Other Options menu.
CitiDirect Basics: Comprehensive Guide 41 Citigroup Corporate and Investment Banking
Forms There are two main form types in CitiDirect® Online Banking: 1. Summary Level
2. Detail Level
Summary Level Forms CitiDirect Online Banking summary forms show summary level details for groups of records within service classes. Summary forms vary based on service class, but most contain tabs and action buttons that provide functionality. You can change the way information is presented on most CitiDirect summary forms. For example, you can sort records, reposition columns, hide columns, change default settings, and save your settings. The availability of each tab on summary forms is determined by your Access Profile, which details the actions you are authorized to perform within CitiDirect.
To sort all records on the summary form by column:
1. Click the heading of the column by which you want to sort the records.
2. All information on the summary form is sorted in ascending order (A to Z), based on the data in that column. For example, if you click the column labeled Value Date, all records in the summary list will be sorted from the earliest to the latest Value Date.
Note: If there are more than 400 items on a summary form, a notice appears to remind you to click the More button to view the additional items.
To move columns on the summary form:
1. Position the cursor on the heading of the column you want to move. Click and hold the mouse button.
2. Drag the column to its new location and then release the mouse button.
Right-Click Menu The right-click menu available from your mouse provides many features designed to conveniently streamline your workflow. This section provides an overview of the features available on the right-click menu. Note: When you right-click a summary form, the items available to you on the shortcut menu
depend on where your cursor is positioned.
CitiDirect Basics: Comprehensive Guide 42 Citigroup Corporate and Investment Banking
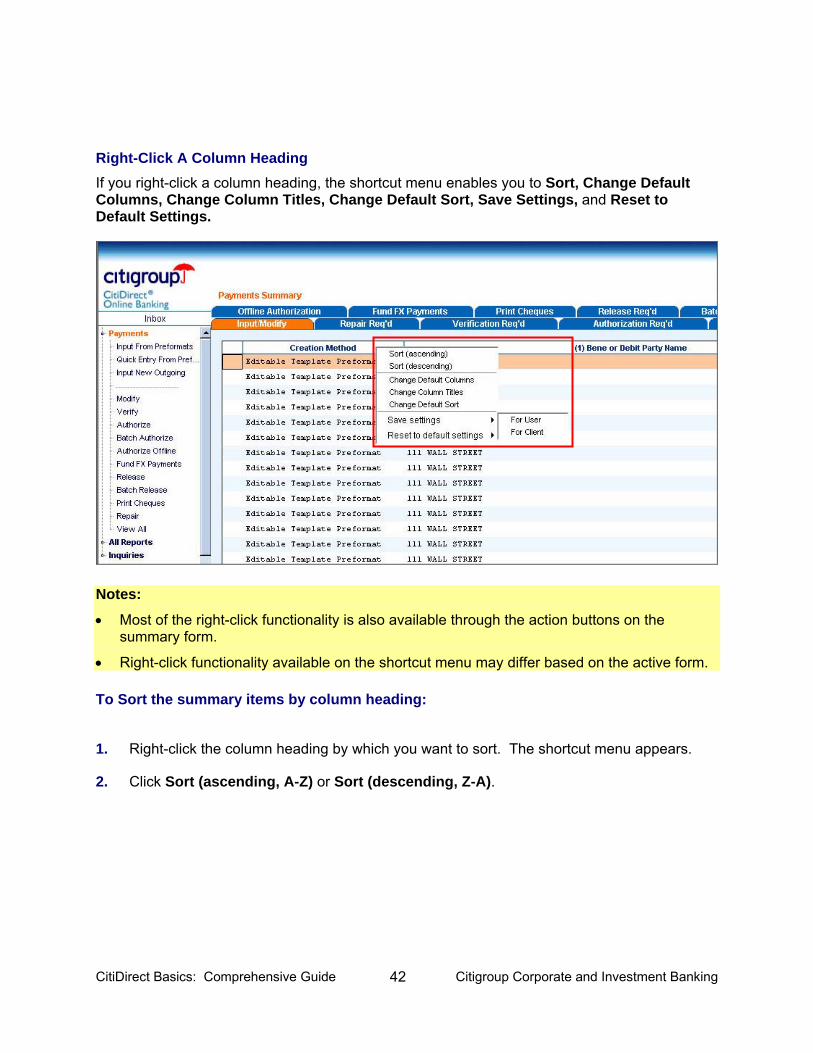
Right-Click A Column Heading If you right-click a column heading, the shortcut menu enables you to Sort, Change Default Columns, Change Column Titles, Change Default Sort, Save Settings, and Reset to Default Settings.
Notes:
• Most of the right-click functionality is also available through the action buttons on the summary form.
• Right-click functionality available on the shortcut menu may differ based on the active form.
To Sort the summary items by column heading:
1. Right-click the column heading by which you want to sort. The shortcut menu appears.
2. Click Sort (ascending, A-Z) or Sort (descending, Z-A).
CitiDirect Basics: Comprehensive Guide 43 Citigroup Corporate and Investment Banking
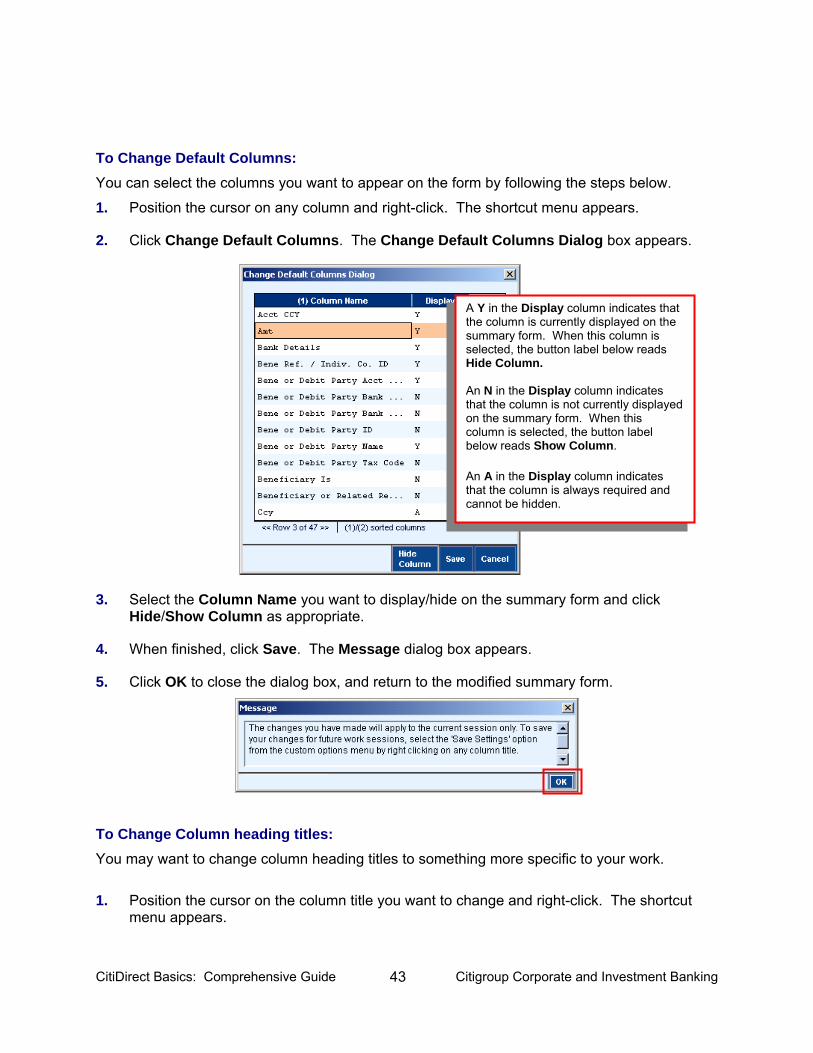
To Change Default Columns: You can select the columns you want to appear on the form by following the steps below.
1. Position the cursor on any column and right-click. The shortcut menu appears.
2. Click Change Default Columns. The Change Default Columns Dialog box appears.
3. Select the Column Name you want to display/hide on the summary form and click Hide/Show Column as appropriate.
4. When finished, click Save. The Message dialog box appears.
5. Click OK to close the dialog box, and return to the modified summary form.
To Change Column heading titles: You may want to change column heading titles to something more specific to your work.
1. Position the cursor on the column title you want to change and right-click. The shortcut menu appears.
A Y in the Display column indicates that the column is currently displayed on the summary form. When this column is selected, the button label below reads Hide Column. An N in the Display column indicates that the column is not currently displayed on the summary form. When this column is selected, the button label below reads Show Column. An A in the Display column indicates that the column is always required and cannot be hidden.

CitiDirect Basics: Comprehensive Guide 44 Citigroup Corporate and Investment Banking
2. Click Change Column Titles. The Change Titles Dialog box appears.
3. Enter the new column title in the appropriate fields. Click Save. Note: Any changed titles will appear in the language you selected during sign-on to CitiDirect.
To Change Default Sort order:
1. Position the cursor on a column heading and right-click. The shortcut menu appears.
2. Select Change Default Sort. The Change Default Sort Dialog box appears. In this example, Primary Sort Order is ascending (A to Z).
3. Select your Primary and Secondary Sorts, and Sort Orders. Click Save. Your new Sort Order will be used for your current session. To make your new Sort Order your default feature every time you enter the Service Class, use the Save Settings feature. For more information on saving settings, refer to the To save your settings section on the next page.
CitiDirect Basics: Comprehensive Guide 45 Citigroup Corporate and Investment Banking
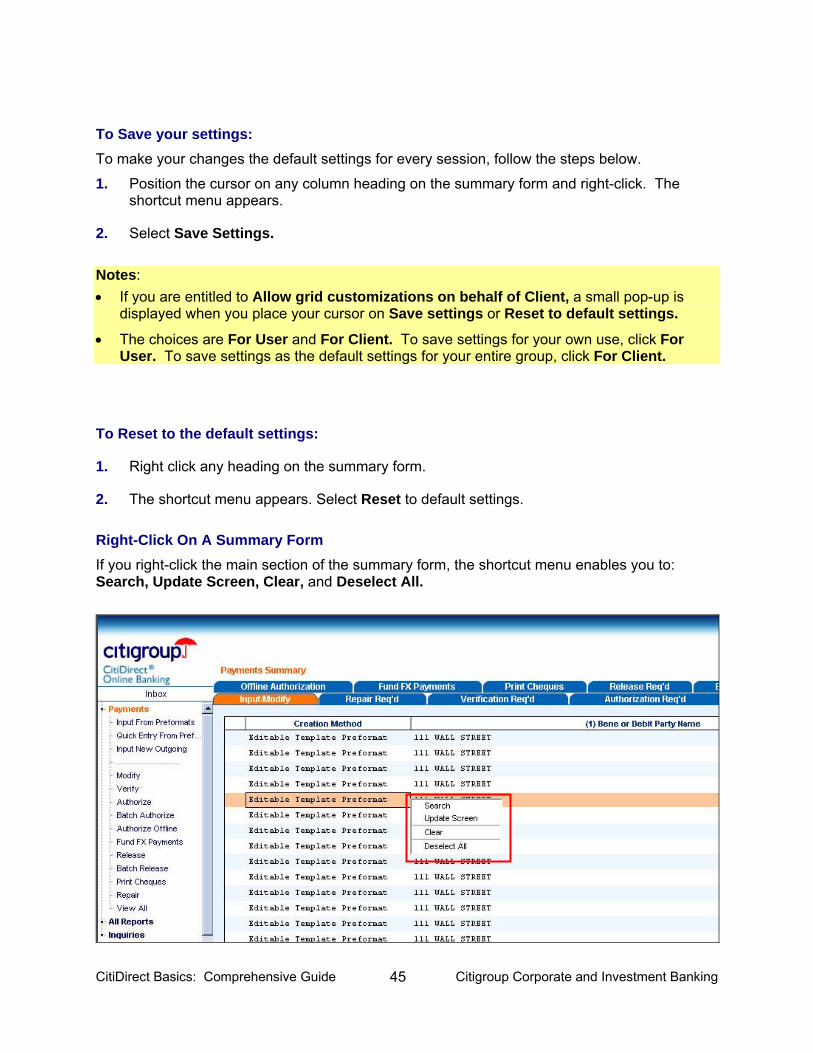
To Save your settings: To make your changes the default settings for every session, follow the steps below.
1. Position the cursor on any column heading on the summary form and right-click. The shortcut menu appears.
2. Select Save Settings. Notes: • If you are entitled to Allow grid customizations on behalf of Client, a small pop-up is
displayed when you place your cursor on Save settings or Reset to default settings.
• The choices are For User and For Client. To save settings for your own use, click For User. To save settings as the default settings for your entire group, click For Client.
To Reset to the default settings:
1. Right click any heading on the summary form.
2. The shortcut menu appears. Select Reset to default settings.
Right-Click On A Summary Form If you right-click the main section of the summary form, the shortcut menu enables you to: Search, Update Screen, Clear, and Deselect All.
CitiDirect Basics: Comprehensive Guide 46 Citigroup Corporate and Investment Banking
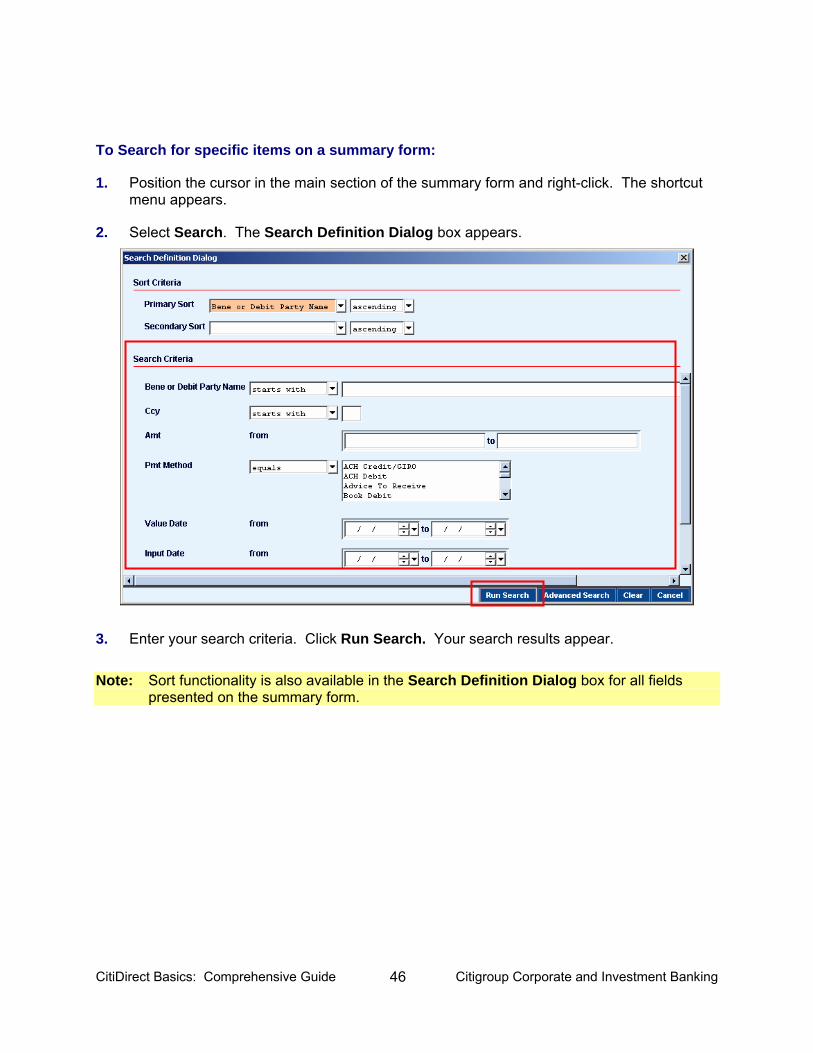
To Search for specific items on a summary form:
1. Position the cursor in the main section of the summary form and right-click. The shortcut menu appears.
2. Select Search. The Search Definition Dialog box appears.
3. Enter your search criteria. Click Run Search. Your search results appear.
Note: Sort functionality is also available in the Search Definition Dialog box for all fields
presented on the summary form.
CitiDirect Basics: Comprehensive Guide 47 Citigroup Corporate and Investment Banking
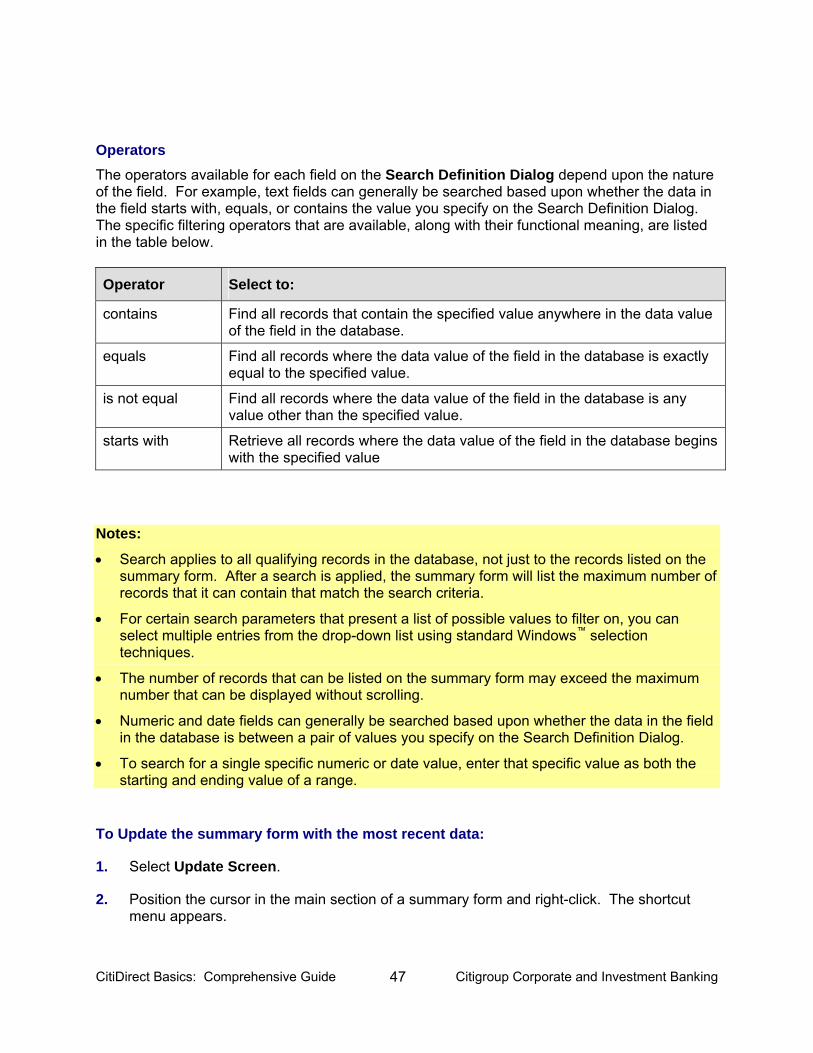
Operators The operators available for each field on the Search Definition Dialog depend upon the nature of the field. For example, text fields can generally be searched based upon whether the data in the field starts with, equals, or contains the value you specify on the Search Definition Dialog. The specific filtering operators that are available, along with their functional meaning, are listed in the table below.
Operator Select to:
contains Find all records that contain the specified value anywhere in the data value of the field in the database.
equals Find all records where the data value of the field in the database is exactly equal to the specified value.
is not equal Find all records where the data value of the field in the database is any value other than the specified value.
starts with Retrieve all records where the data value of the field in the database begins with the specified value
Notes:
• Search applies to all qualifying records in the database, not just to the records listed on the summary form. After a search is applied, the summary form will list the maximum number of records that it can contain that match the search criteria.
• For certain search parameters that present a list of possible values to filter on, you can select multiple entries from the drop-down list using standard Windows™ selection techniques.
• The number of records that can be listed on the summary form may exceed the maximum number that can be displayed without scrolling.
• Numeric and date fields can generally be searched based upon whether the data in the field in the database is between a pair of values you specify on the Search Definition Dialog.
• To search for a single specific numeric or date value, enter that specific value as both the starting and ending value of a range.
To Update the summary form with the most recent data:
1. Select Update Screen.
2. Position the cursor in the main section of a summary form and right-click. The shortcut menu appears.
CitiDirect Basics: Comprehensive Guide 48 Citigroup Corporate and Investment Banking
To Clear a summary form: To work in another type of form or with new data, you may want to clear a summary form by following the steps below.
1. Position the cursor in the main section of the summary form and right-click. The shortcut menu appears.
2. Click Clear.
To Deselect All records on a summary form:
1. Position the cursor in the main section of the summary form and right-click the mouse. The shortcut menu appears.
2. Click Deselect All.
To select a sequential group of items on a summary form: You can select more than one item to perform various functions at once on all those items, including view details and delete.
1. Click the first item and hold the SHIFT key while clicking the last item.
2. The first and last items, as well as all items in between, are selected.
To select a non-sequential group of items on a summary form: You can select more than one item to perform various functions at once on those items, including View Details and Delete. 1. Click the first item and hold the CTRL key as you click each subsequent item.
2. Each item you click is selected.
Detail Level Forms Detail forms can only be accessed from within summary forms. Detail forms: • Show all details of one record – library entry, transaction, report criteria.
• Show any corresponding actions that you need to perform.
• Allow you to manage and act on a single item or record at a time.
CitiDirect Basics: Comprehensive Guide 49 Citigroup Corporate and Investment Banking
Additional Form Features
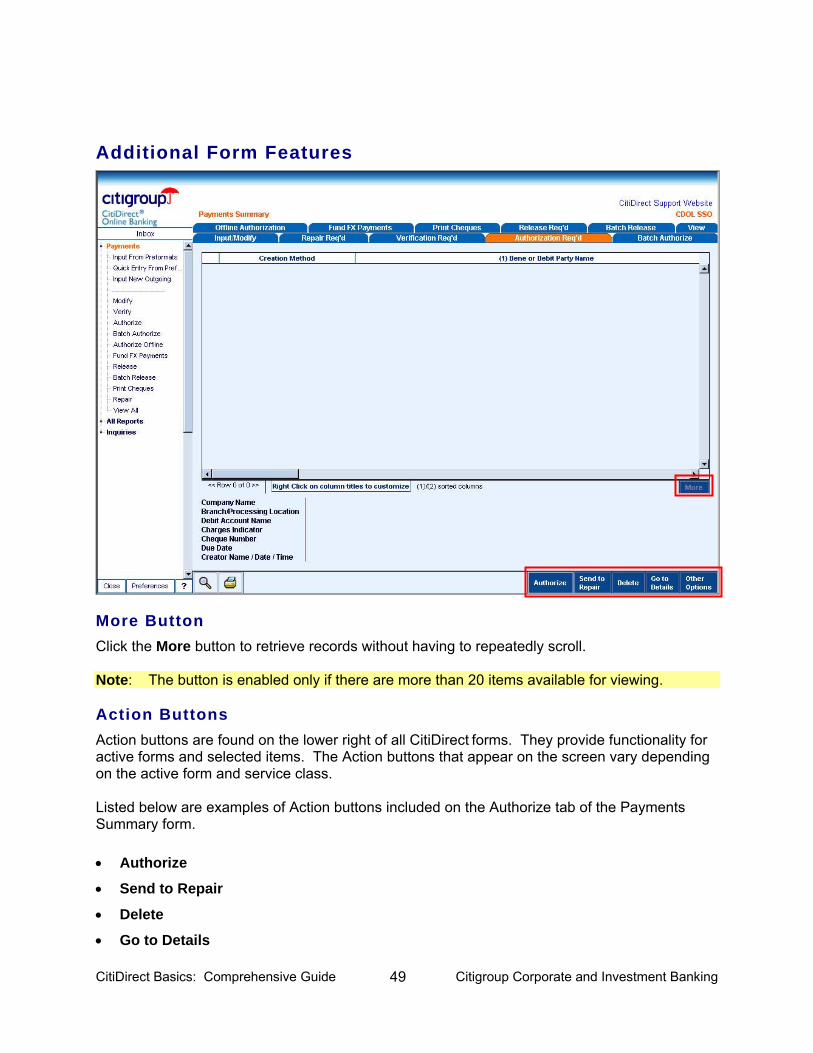
More Button Click the More button to retrieve records without having to repeatedly scroll. Note: The button is enabled only if there are more than 20 items available for viewing. Action Buttons Action buttons are found on the lower right of all CitiDirect forms. They provide functionality for active forms and selected items. The Action buttons that appear on the screen vary depending on the active form and service class. Listed below are examples of Action buttons included on the Authorize tab of the Payments Summary form. • Authorize
• Send to Repair
• Delete
• Go to Details
CitiDirect Basics: Comprehensive Guide 50 Citigroup Corporate and Investment Banking
• Other Options
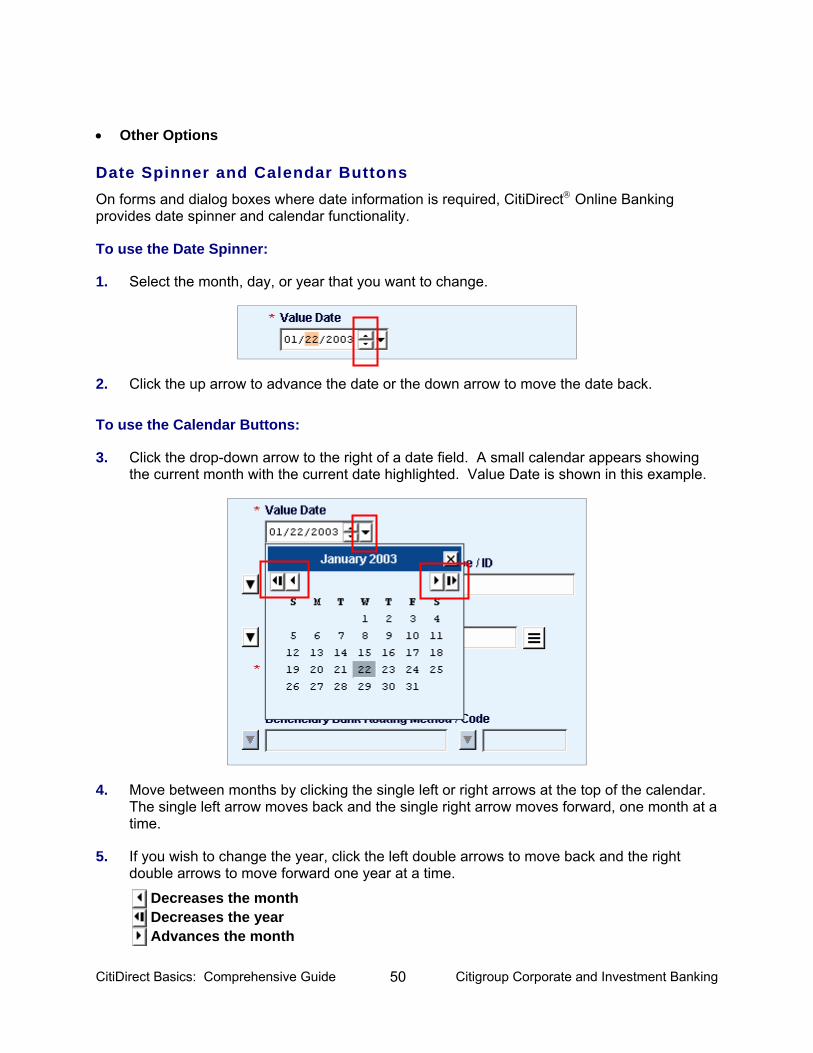
Date Spinner and Calendar Buttons On forms and dialog boxes where date information is required, CitiDirect® Online Banking provides date spinner and calendar functionality.
To use the Date Spinner:
1. Select the month, day, or year that you want to change.
2. Click the up arrow to advance the date or the down arrow to move the date back.
To use the Calendar Buttons:
3. Click the drop-down arrow to the right of a date field. A small calendar appears showing the current month with the current date highlighted. Value Date is shown in this example.
4. Move between months by clicking the single left or right arrows at the top of the calendar. The single left arrow moves back and the single right arrow moves forward, one month at a time.
5. If you wish to change the year, click the left double arrows to move back and the right double arrows to move forward one year at a time.
Decreases the month Decreases the year Advances the month
CitiDirect Basics: Comprehensive Guide 51 Citigroup Corporate and Investment Banking
Advances the year 6. When you have reached the correct month and year, click a day. The full date appears in
the date field.
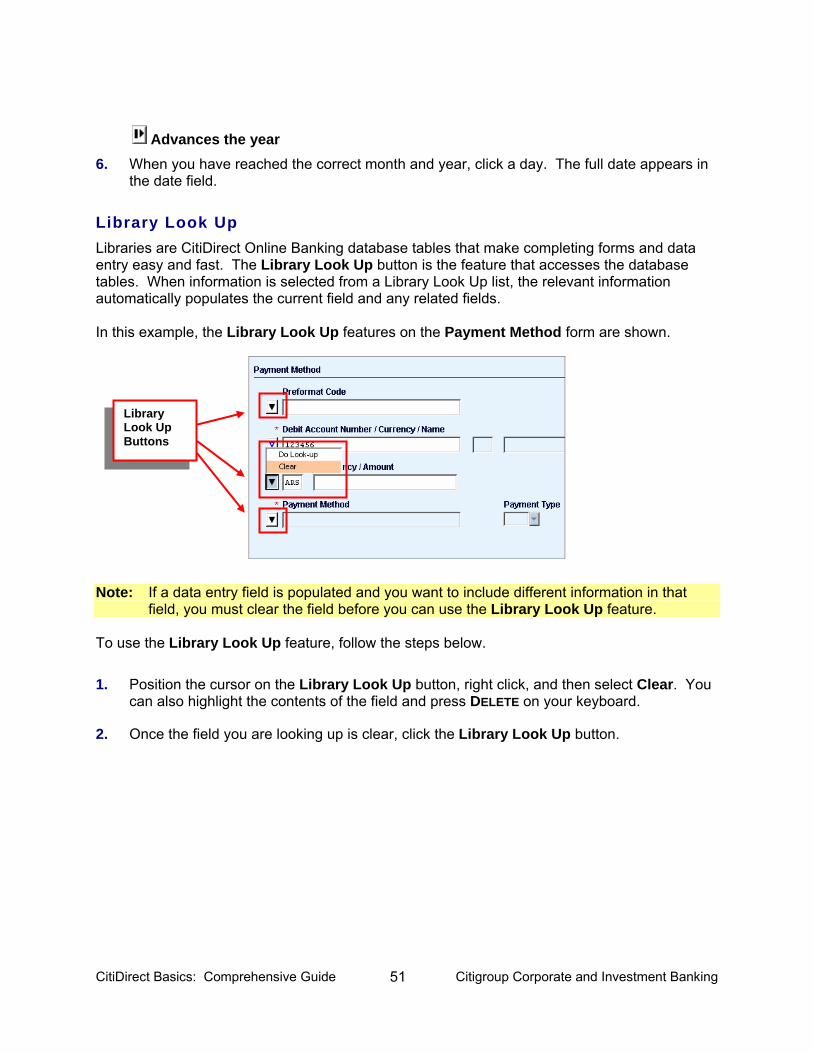
Library Look Up Libraries are CitiDirect Online Banking database tables that make completing forms and data entry easy and fast. The Library Look Up button is the feature that accesses the database tables. When information is selected from a Library Look Up list, the relevant information automatically populates the current field and any related fields. In this example, the Library Look Up features on the Payment Method form are shown.
Note: If a data entry field is populated and you want to include different information in that
field, you must clear the field before you can use the Library Look Up feature. To use the Library Look Up feature, follow the steps below.
1. Position the cursor on the Library Look Up button, right click, and then select Clear. You can also highlight the contents of the field and press DELETE on your keyboard.
2. Once the field you are looking up is clear, click the Library Look Up button.
Library Look Up Buttons
CitiDirect Basics: Comprehensive Guide 52 Citigroup Corporate and Investment Banking
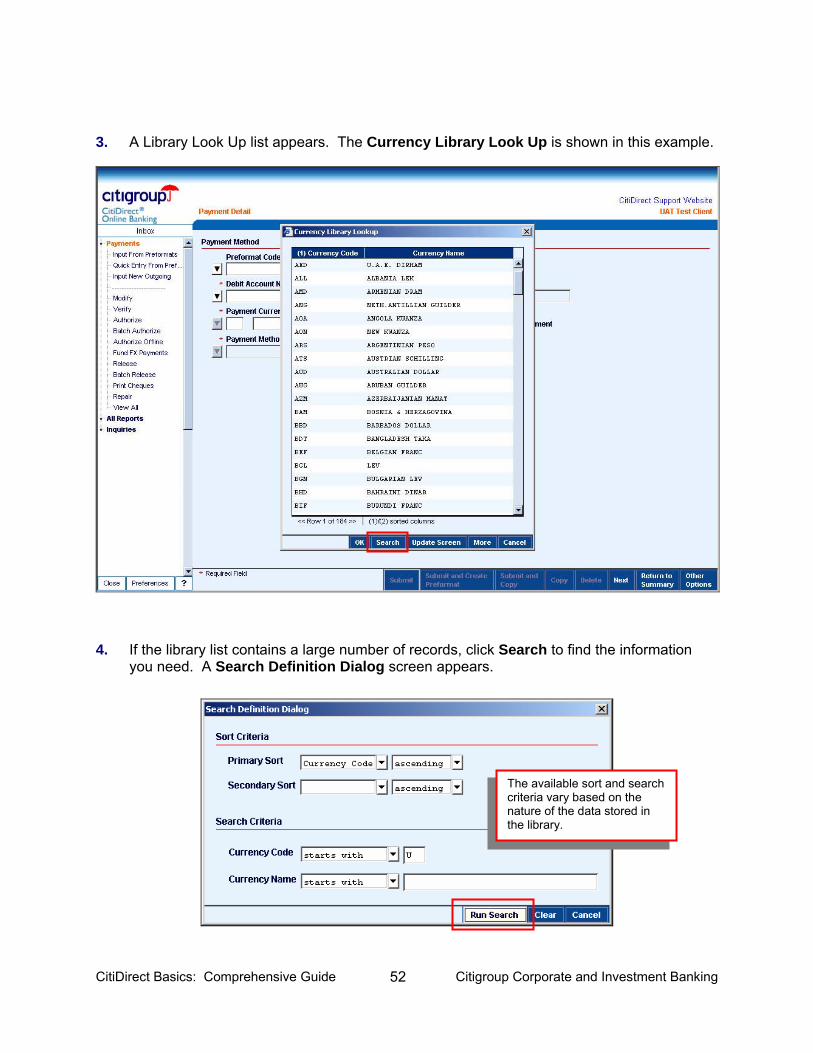
3. A Library Look Up list appears. The Currency Library Look Up is shown in this example.
4. If the library list contains a large number of records, click Search to find the information you need. A Search Definition Dialog screen appears.
The available sort and search criteria vary based on the nature of the data stored in the library.

CitiDirect Basics: Comprehensive Guide 53 Citigroup Corporate and Investment Banking
5. Enter your Search Criteria. Click Run Search.
The Currency Library Lookup appears.
6. Select the currency you wish to use from the library. Click OK.
The field you looked up is populated with the selection from the library. Any related fields, such as description or address, are also populated as applicable.
CitiDirect Basics: Comprehensive Guide 54 Citigroup Corporate and Investment Banking
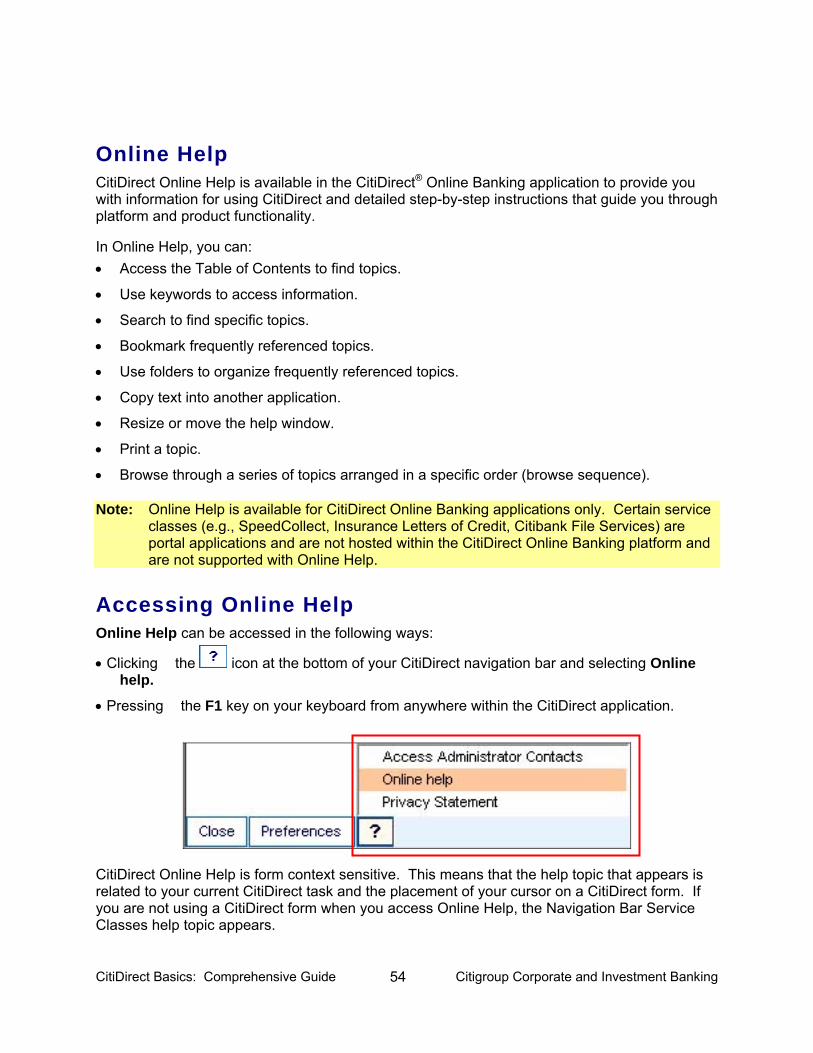
Online Help CitiDirect Online Help is available in the CitiDirect® Online Banking application to provide you with information for using CitiDirect and detailed step-by-step instructions that guide you through platform and product functionality. In Online Help, you can: • Access the Table of Contents to find topics.
• Use keywords to access information.
• Search to find specific topics.
• Bookmark frequently referenced topics.
• Use folders to organize frequently referenced topics.
• Copy text into another application.
• Resize or move the help window.
• Print a topic.
• Browse through a series of topics arranged in a specific order (browse sequence). Note: Online Help is available for CitiDirect Online Banking applications only. Certain service
classes (e.g., SpeedCollect, Insurance Letters of Credit, Citibank File Services) are portal applications and are not hosted within the CitiDirect Online Banking platform and are not supported with Online Help.
Accessing Online Help Online Help can be accessed in the following ways:
• Clicking the icon at the bottom of your CitiDirect navigation bar and selecting Online help.
• Pressing the F1 key on your keyboard from anywhere within the CitiDirect application.
CitiDirect Online Help is form context sensitive. This means that the help topic that appears is related to your current CitiDirect task and the placement of your cursor on a CitiDirect form. If you are not using a CitiDirect form when you access Online Help, the Navigation Bar Service Classes help topic appears.
CitiDirect Basics: Comprehensive Guide 55 Citigroup Corporate and Investment Banking
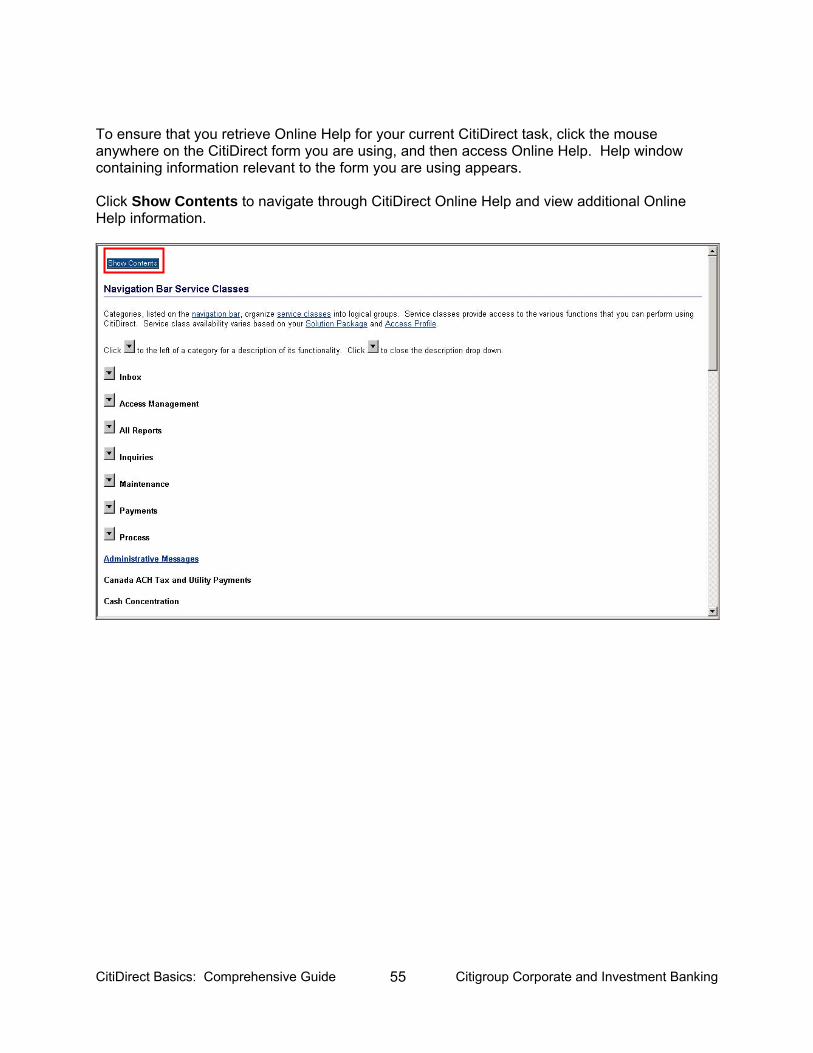
To ensure that you retrieve Online Help for your current CitiDirect task, click the mouse anywhere on the CitiDirect form you are using, and then access Online Help. Help window containing information relevant to the form you are using appears. Click Show Contents to navigate through CitiDirect Online Help and view additional Online Help information.
CitiDirect Basics: Comprehensive Guide 56 Citigroup Corporate and Investment Banking
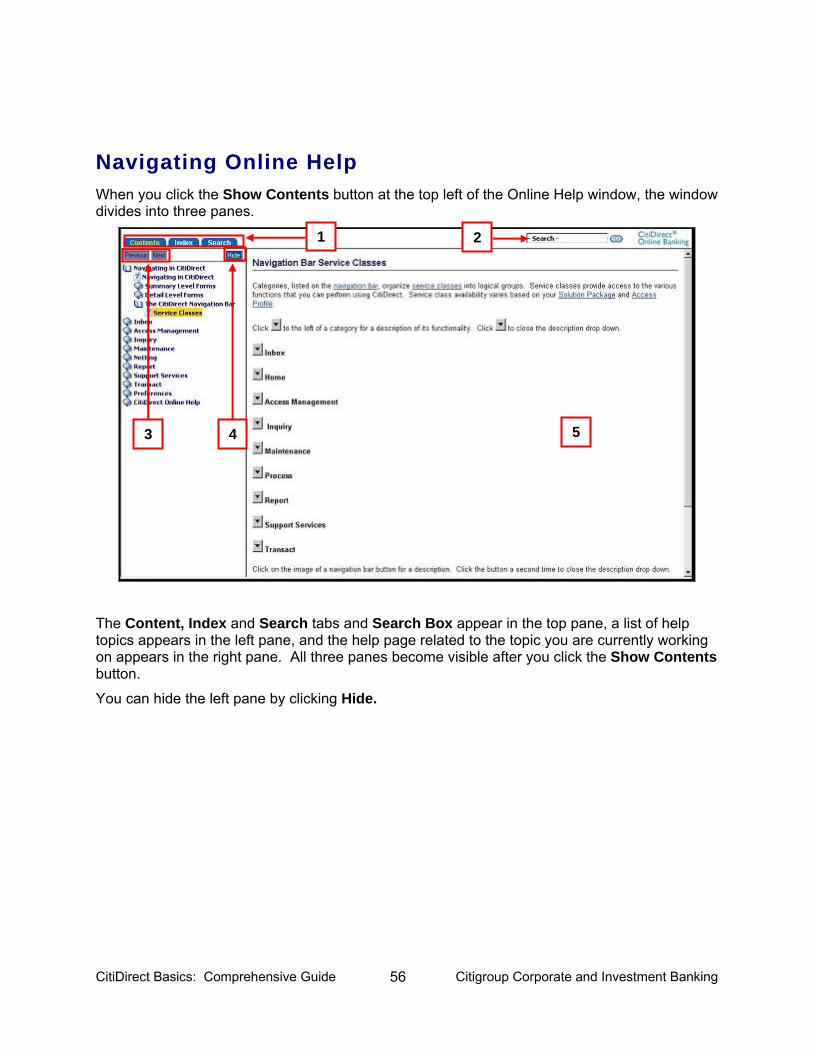
Navigating Online Help When you click the Show Contents button at the top left of the Online Help window, the window divides into three panes.
The Content, Index and Search tabs and Search Box appear in the top pane, a list of help topics appears in the left pane, and the help page related to the topic you are currently working on appears in the right pane. All three panes become visible after you click the Show Contents button.
You can hide the left pane by clicking Hide.
2 1
5 4 3
CitiDirect Basics: Comprehensive Guide 57 Citigroup Corporate and Investment Banking
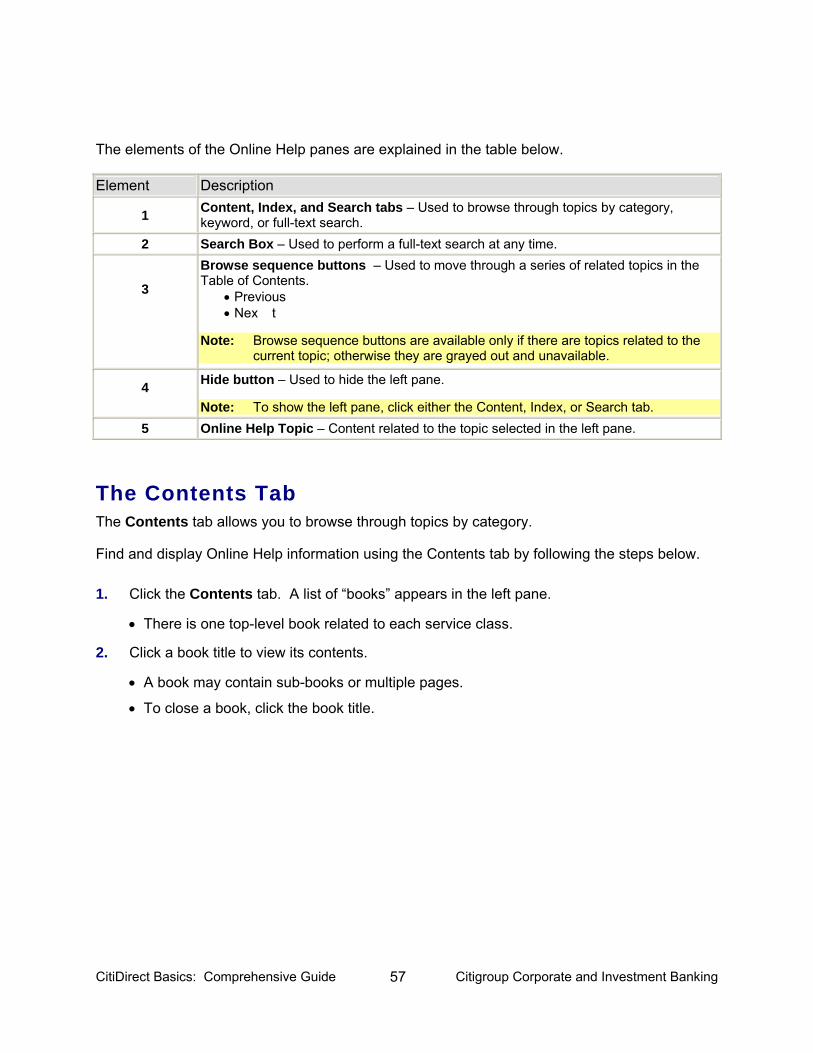
The elements of the Online Help panes are explained in the table below. Element Description
1 Content, Index, and Search tabs – Used to browse through topics by category, keyword, or full-text search.
2 Search Box – Used to perform a full-text search at any time.
3
Browse sequence buttons – Used to move through a series of related topics in the Table of Contents.
• Previous • Nex t
Note: Browse sequence buttons are available only if there are topics related to the
current topic; otherwise they are grayed out and unavailable.
4 Hide button – Used to hide the left pane. Note: To show the left pane, click either the Content, Index, or Search tab.
5 Online Help Topic – Content related to the topic selected in the left pane.
The Contents Tab The Contents tab allows you to browse through topics by category. Find and display Online Help information using the Contents tab by following the steps below.
1. Click the Contents tab. A list of “books” appears in the left pane.
• There is one top-level book related to each service class.
2. Click a book title to view its contents.
• A book may contain sub-books or multiple pages.
• To close a book, click the book title.
CitiDirect Basics: Comprehensive Guide 58 Citigroup Corporate and Investment Banking
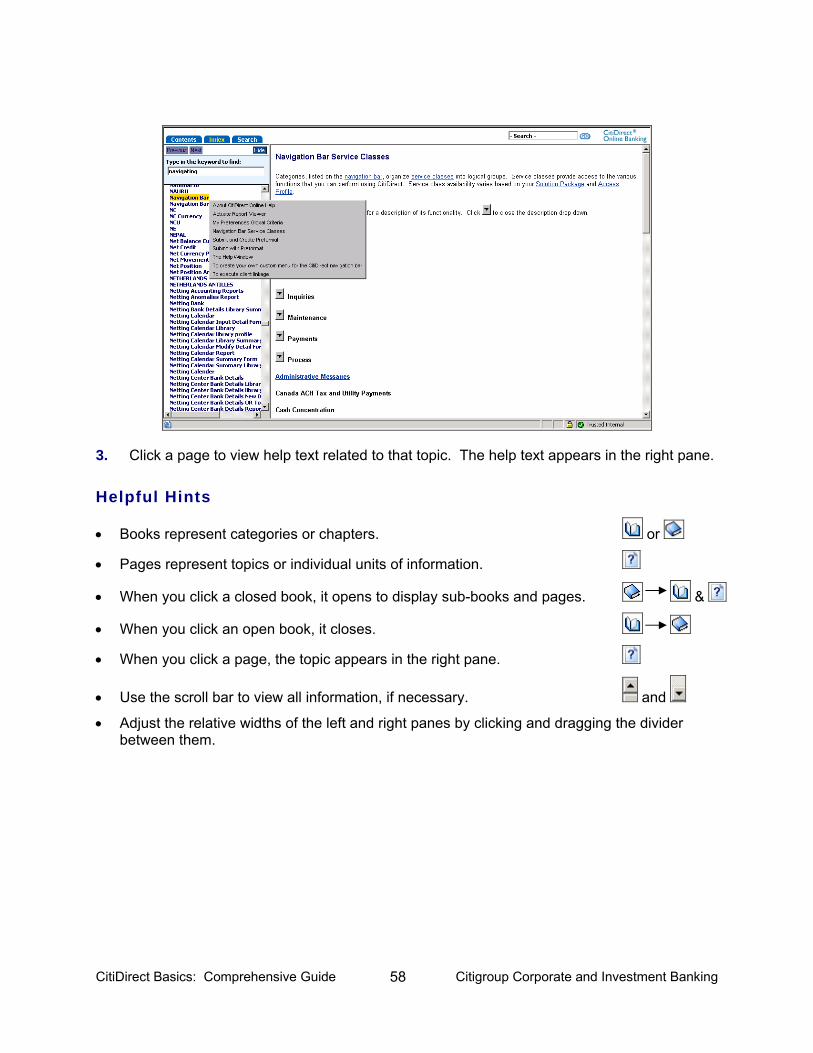
3. Click a page to view help text related to that topic. The help text appears in the right pane.
Helpful Hints
• Books represent categories or chapters. or
• Pages represent topics or individual units of information.
• When you click a closed book, it opens to display sub-books and pages. &
• When you click an open book, it closes.
• When you click a page, the topic appears in the right pane.
• Use the scroll bar to view all information, if necessary. and
• Adjust the relative widths of the left and right panes by clicking and dragging the divider between them.
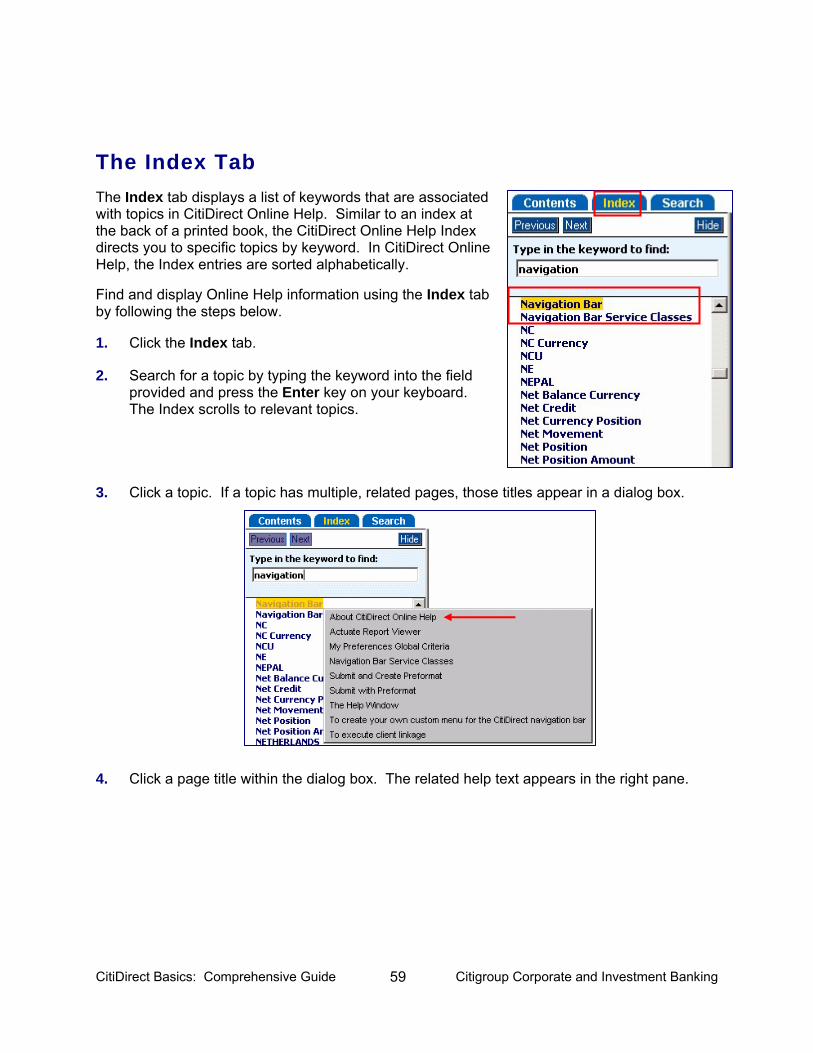
CitiDirect Basics: Comprehensive Guide 59 Citigroup Corporate and Investment Banking
The Index Tab The Index tab displays a list of keywords that are associated with topics in CitiDirect Online Help. Similar to an index at the back of a printed book, the CitiDirect Online Help Index directs you to specific topics by keyword. In CitiDirect Online Help, the Index entries are sorted alphabetically.
Find and display Online Help information using the Index tab by following the steps below.
1. Click the Index tab.
2. Search for a topic by typing the keyword into the field provided and press the Enter key on your keyboard. The Index scrolls to relevant topics.
3. Click a topic. If a topic has multiple, related pages, those titles appear in a dialog box.
4. Click a page title within the dialog box. The related help text appears in the right pane.
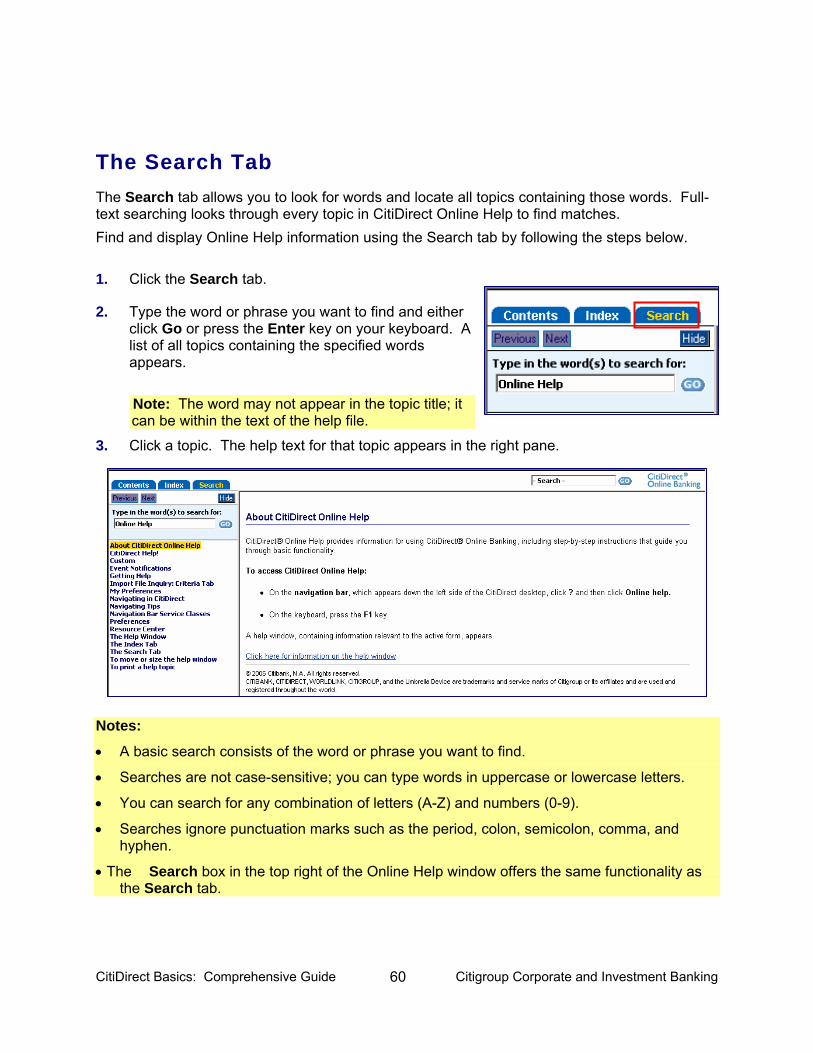
CitiDirect Basics: Comprehensive Guide 60 Citigroup Corporate and Investment Banking
The Search Tab The Search tab allows you to look for words and locate all topics containing those words. Full-text searching looks through every topic in CitiDirect Online Help to find matches. Find and display Online Help information using the Search tab by following the steps below.
1. Click the Search tab.
2. Type the word or phrase you want to find and either click Go or press the Enter key on your keyboard. A list of all topics containing the specified words appears.
Note: The word may not appear in the topic title; it can be within the text of the help file.
3. Click a topic. The help text for that topic appears in the right pane.
Notes:
• A basic search consists of the word or phrase you want to find.
• Searches are not case-sensitive; you can type words in uppercase or lowercase letters.
• You can search for any combination of letters (A-Z) and numbers (0-9).
• Searches ignore punctuation marks such as the period, colon, semicolon, comma, and hyphen.
• The Search box in the top right of the Online Help window offers the same functionality as the Search tab.
CitiDirect Basics: Comprehensive Guide 61 Citigroup Corporate and Investment Banking
Additional Online Help Functionality CitiDirect Online Help provides additional functionality. The following section tells you how to: • Copy a help text into another application.
• Move or adjust the size of the Online Help page.
• Adjust the size of the panes of the Online Help page.
• Print Online Help content.
• Use browser sequence buttons.
Copying Help Text Into Another Application
1. Make sure that the help content you want to copy is displayed in the help window.
2. Using the mouse, highlight the text you want to copy. To select all of the text, position the cursor on the help text, right-click, and then click Select All.
3. Right-click the highlighted text and select Copy. The topic is now copied to the clipboard.
4. Open the file where you want to paste the text.
5. Position the cursor where you want the text to appear, right-click, and then click Paste.
Moving or Sizing a Help Window
To resize an Online Help window:
1. Place the mouse pointer on any edge of the help window. The mouse pointer becomes a double-headed arrow.
2. Drag the edge with the double-headed arrow until the window is the desired size.
To resize the panes of an Online Help window:
1. Place the mouse pointer on the window divider between the panes. The mouse pointer changes to a double-headed arrow.
2. Drag the divider with the double-headed arrow until the panes are the desired size.
Note: Resizing one pane affects the size of the other pane. For example, if you enlarge the
left pane, the right pane becomes smaller.
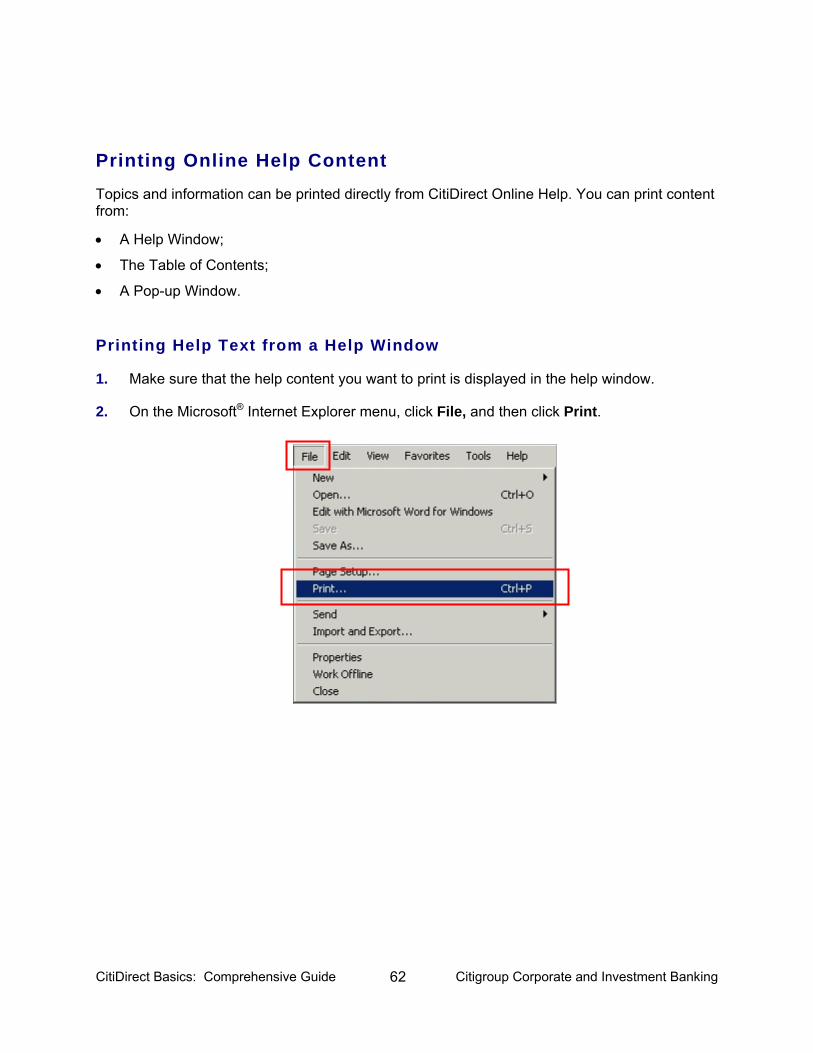
CitiDirect Basics: Comprehensive Guide 62 Citigroup Corporate and Investment Banking
Printing Online Help Content
Topics and information can be printed directly from CitiDirect Online Help. You can print content from:
• A Help Window;
• The Table of Contents;
• A Pop-up Window.
Printing Help Text from a Help Window
1. Make sure that the help content you want to print is displayed in the help window.
2. On the Microsoft® Internet Explorer menu, click File, and then click Print.
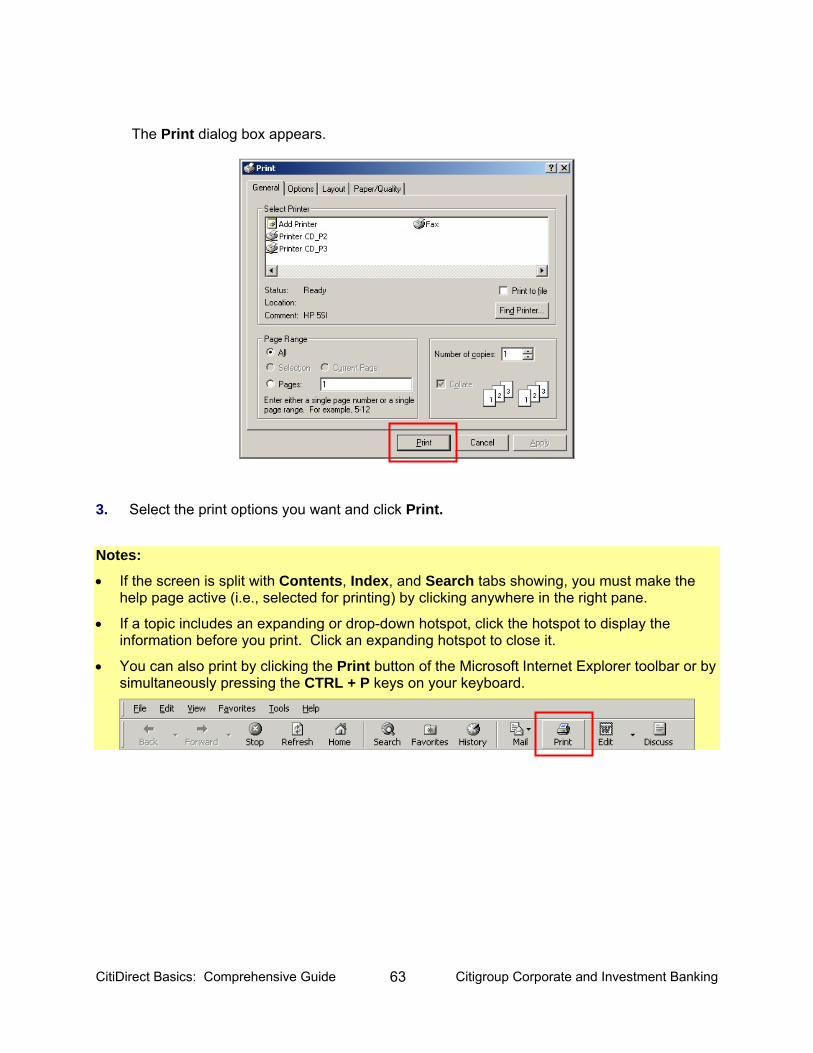
CitiDirect Basics: Comprehensive Guide 63 Citigroup Corporate and Investment Banking
The Print dialog box appears.
3. Select the print options you want and click Print. Notes:
• If the screen is split with Contents, Index, and Search tabs showing, you must make the help page active (i.e., selected for printing) by clicking anywhere in the right pane.
• If a topic includes an expanding or drop-down hotspot, click the hotspot to display the information before you print. Click an expanding hotspot to close it.
• You can also print by clicking the Print button of the Microsoft Internet Explorer toolbar or by simultaneously pressing the CTRL + P keys on your keyboard.

CitiDirect Basics: Comprehensive Guide 64 Citigroup Corporate and Investment Banking
Printing Help Text From the Table of Contents
1. In the left pane, position the cursor on the topic you want to print, right-click, and then select Print Target. The topic does not have to be displayed in the right pane.
The Print dialog box appears.
2. Select the print options you want and click Print.
Notes:
• If a topic includes an expanding or drop-down hotspot, click the hotspot to display the information before you print. Click an expanding hotspot to close it.
• You can also print by clicking the Print button of the Microsoft® Internet Explorer toolbar or by simultaneously pressing the CTRL + P keys on your keyboard.
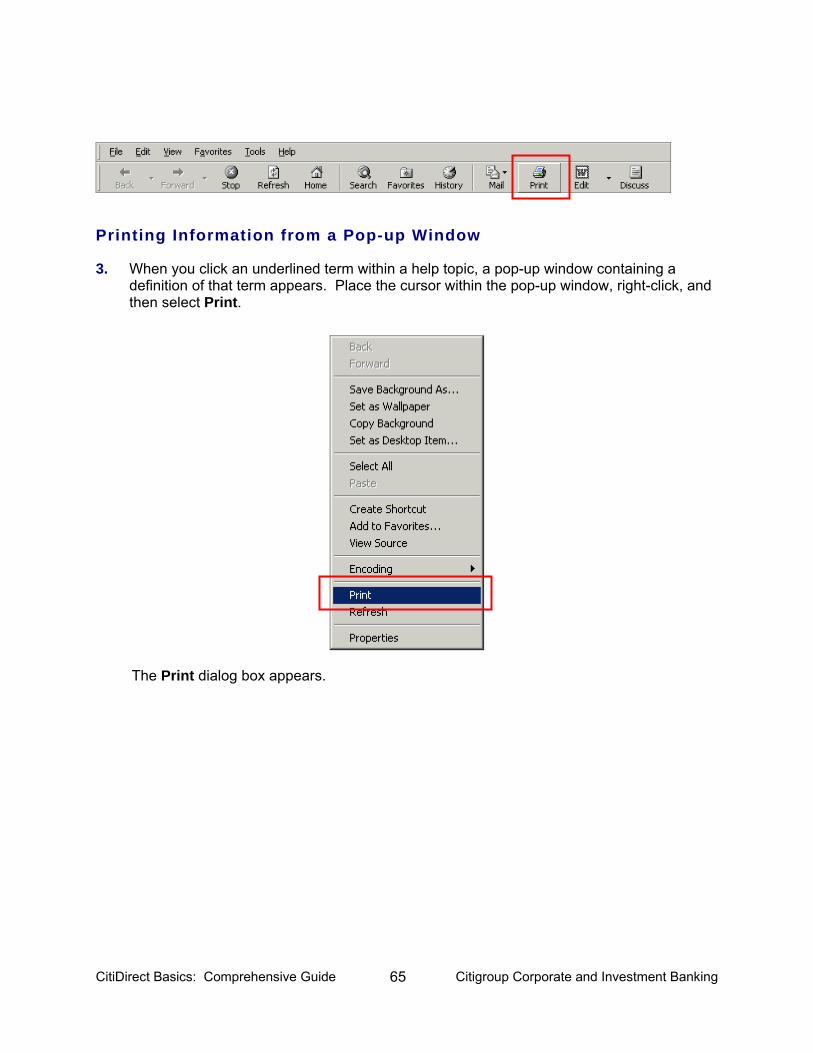
CitiDirect Basics: Comprehensive Guide 65 Citigroup Corporate and Investment Banking
Printing Information from a Pop-up Window
3. When you click an underlined term within a help topic, a pop-up window containing a definition of that term appears. Place the cursor within the pop-up window, right-click, and then select Print.
The Print dialog box appears.
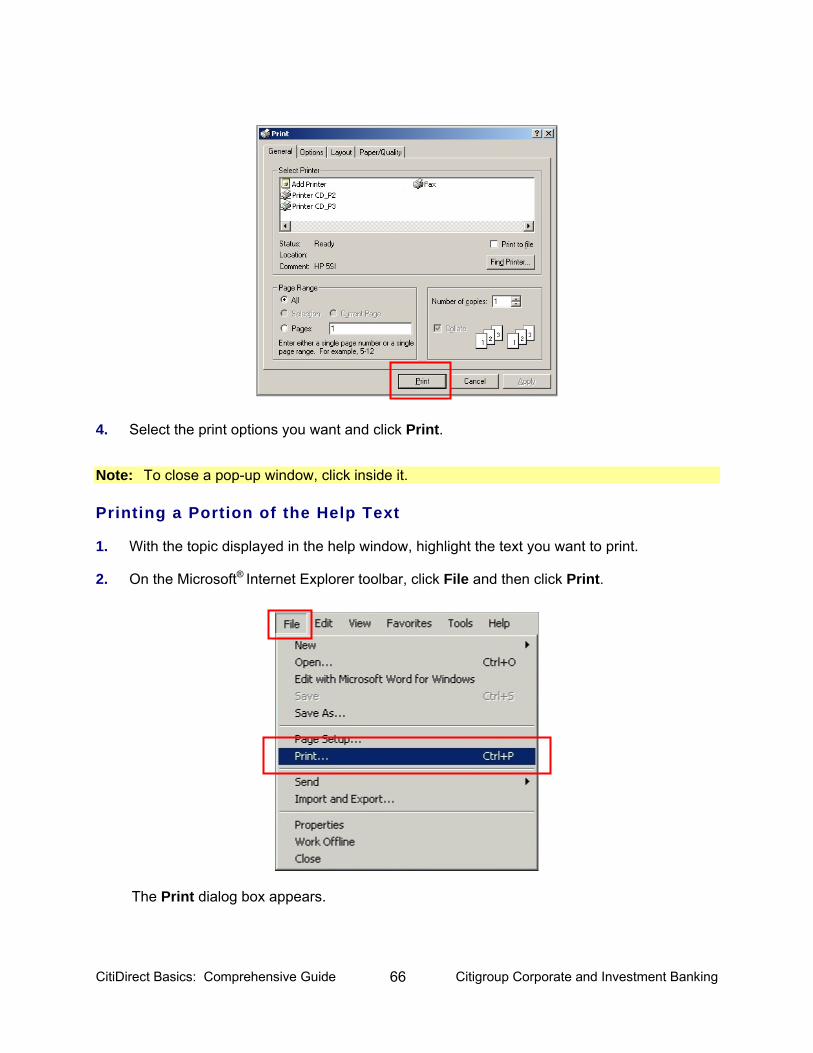
CitiDirect Basics: Comprehensive Guide 66 Citigroup Corporate and Investment Banking
4. Select the print options you want and click Print. Note: To close a pop-up window, click inside it.
Printing a Portion of the Help Text
1. With the topic displayed in the help window, highlight the text you want to print.
2. On the Microsoft® Internet Explorer toolbar, click File and then click Print.
The Print dialog box appears.
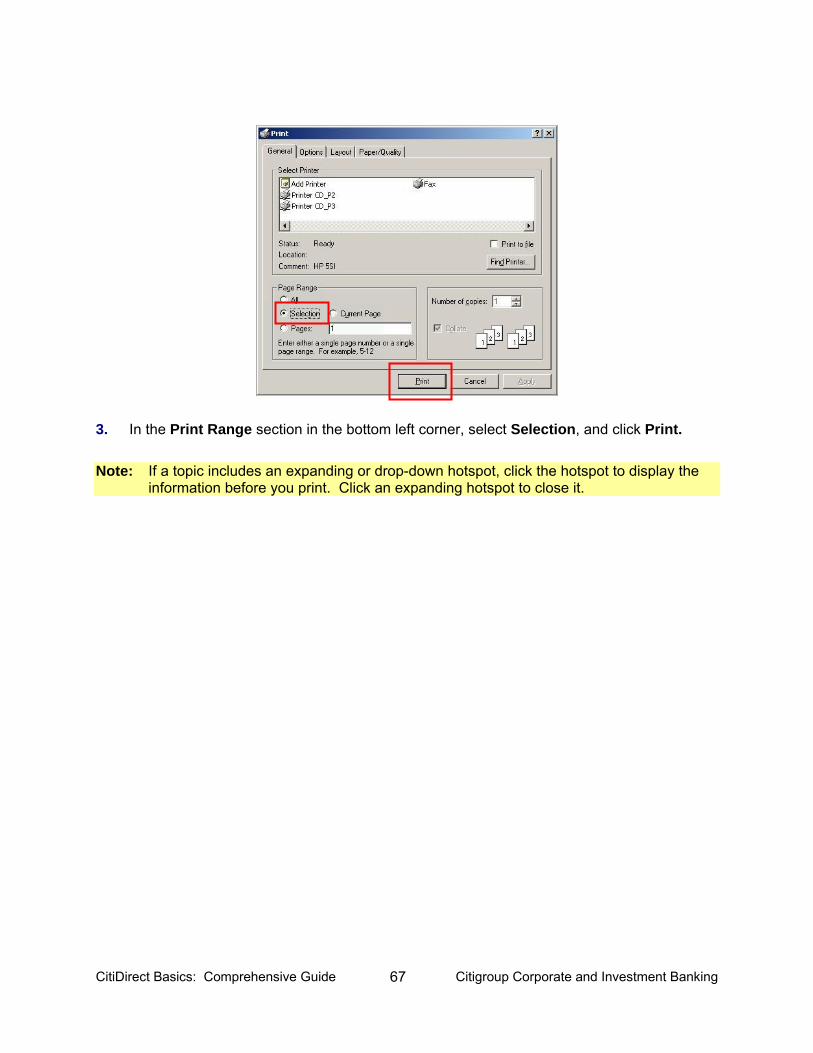
CitiDirect Basics: Comprehensive Guide 67 Citigroup Corporate and Investment Banking
3. In the Print Range section in the bottom left corner, select Selection, and click Print. Note: If a topic includes an expanding or drop-down hotspot, click the hotspot to display the
information before you print. Click an expanding hotspot to close it.

CitiDirect Basics: Comprehensive Guide 68 Citigroup Corporate and Investment Banking
Using Browse Sequence Buttons
The Previous and Next browse sequence buttons appear in the left pane just below the Contents, Index, and Search tabs. Use the buttons to move through a series of related topics in the Table of Contents.
• To go to the next topic in the series, click the Next button.
• To go to the previous topic in the series, click the Previous button.
Note: Browse sequence buttons are available only if there are topics related to the current
topic.
CitiDirect Basics: Comprehensive Guide 69 Citigroup Corporate and Investment Banking
Setting Your Preferences Overview The Preferences functionality in CitiDirect® Online Banking allows you to customize CitiDirect for the way you do business.
Found at the bottom of the CitiDirect navigation bar, Preferences consists of the following options:
• My Preferences: Select this option to specify information that appears in various fields on CitiDirect forms and the process tabs that appear when you access a service class.
• Customizer: Select this option to customize the CitiDirect navigation bar to your specifications.
• Change Password: Select this option to change your CitiDirect password. This option is available to users with Secured Password access only.
• Favorite Reports: Select this option to manage recently run reports, as well as to schedule and run frequently used reports. For complete details on Favorite Reports, refer to the: Reports and Inquiry sections of this Guide available in the Learning Center at www.citidirect.com.
CitiDirect Online Banking provides some pre-defined user preference settings for the values that appear on CitiDirect forms, which you can change to reflect your personal preferences. For some service classes, such as General Trade PI, specific user preferences must be defined before CitiDirect Reports and Inquiries can be run. Information on these required settings can be found in the individual product Guides available in the Learning Center at www.citidirect.com.
CitiDirect Basics: Comprehensive Guide 70 Citigroup Corporate and Investment Banking
CitiDirect Customer Support In addition to Online Help, the CitiDirect Customer Support resources described below are available to you. www.citidirect.com Our Web site contains FAQs, which address both the use of the application and the Web site. The Web site also offers the Learning Center, referenced in this Guide, where you can access training support materials at anytime – 24 hours a day, 7 days a week. Customer Service You can contact our CitiDirect Online Banking Service Representatives who are available to support your technical needs, as well as to assist you with general CitiDirect questions. For a list of representatives in your area, go to the Contacts section of www.citidirect.com.
My Preferences The My Preferences function can be used to do any of the following in order to customize the CitiDirect Online Banking application to meet your business needs: • Customize date and currency formats;
• Create a list of frequently used accounts;
• Select the form you see once you have signed on to CitiDirect;
• Customize the appearance of your navigation bar;
• Define the frequency of functions such as automatic report generation. Note: User-defined preferences can be set at a global or service class level. Global level
changes are applied to all forms. The amount format and the date format are examples of Global preferences. Service class level changes affect only a particular service class, such as setting your preferred debit or credit account or the ordering party for Payments.
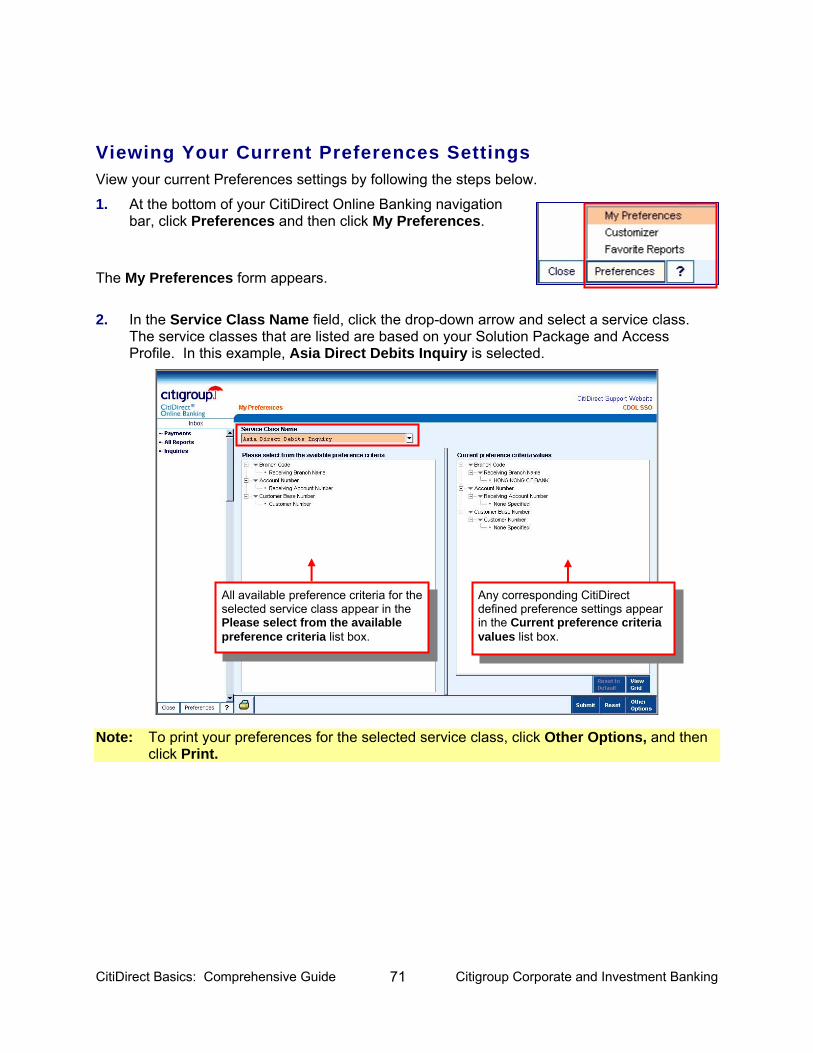
CitiDirect Basics: Comprehensive Guide 71 Citigroup Corporate and Investment Banking
Viewing Your Current Preferences Settings View your current Preferences settings by following the steps below.
1. At the bottom of your CitiDirect Online Banking navigation bar, click Preferences and then click My Preferences.
The My Preferences form appears.
2. In the Service Class Name field, click the drop-down arrow and select a service class. The service classes that are listed are based on your Solution Package and Access Profile. In this example, Asia Direct Debits Inquiry is selected.
Note: To print your preferences for the selected service class, click Other Options, and then
click Print.
All available preference criteria for the selected service class appear in the Please select from the available preference criteria list box.
Any corresponding CitiDirect defined preference settings appear in the Current preference criteria values list box.
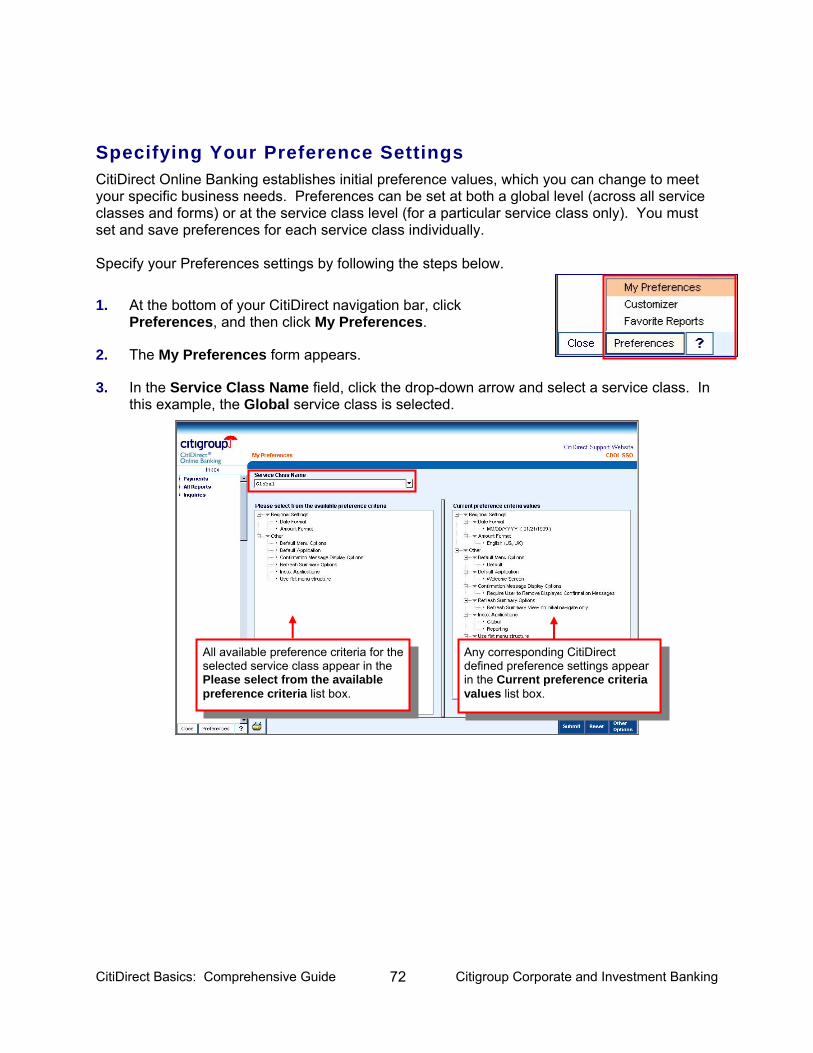
CitiDirect Basics: Comprehensive Guide 72 Citigroup Corporate and Investment Banking
Specifying Your Preference Settings CitiDirect Online Banking establishes initial preference values, which you can change to meet your specific business needs. Preferences can be set at both a global level (across all service classes and forms) or at the service class level (for a particular service class only). You must set and save preferences for each service class individually. Specify your Preferences settings by following the steps below.
1. At the bottom of your CitiDirect navigation bar, click Preferences, and then click My Preferences.
2. The My Preferences form appears.
3. In the Service Class Name field, click the drop-down arrow and select a service class. In this example, the Global service class is selected.
All available preference criteria for the selected service class appear in the Please select from the available preference criteria list box.
Any corresponding CitiDirect defined preference settings appear in the Current preference criteria values list box.
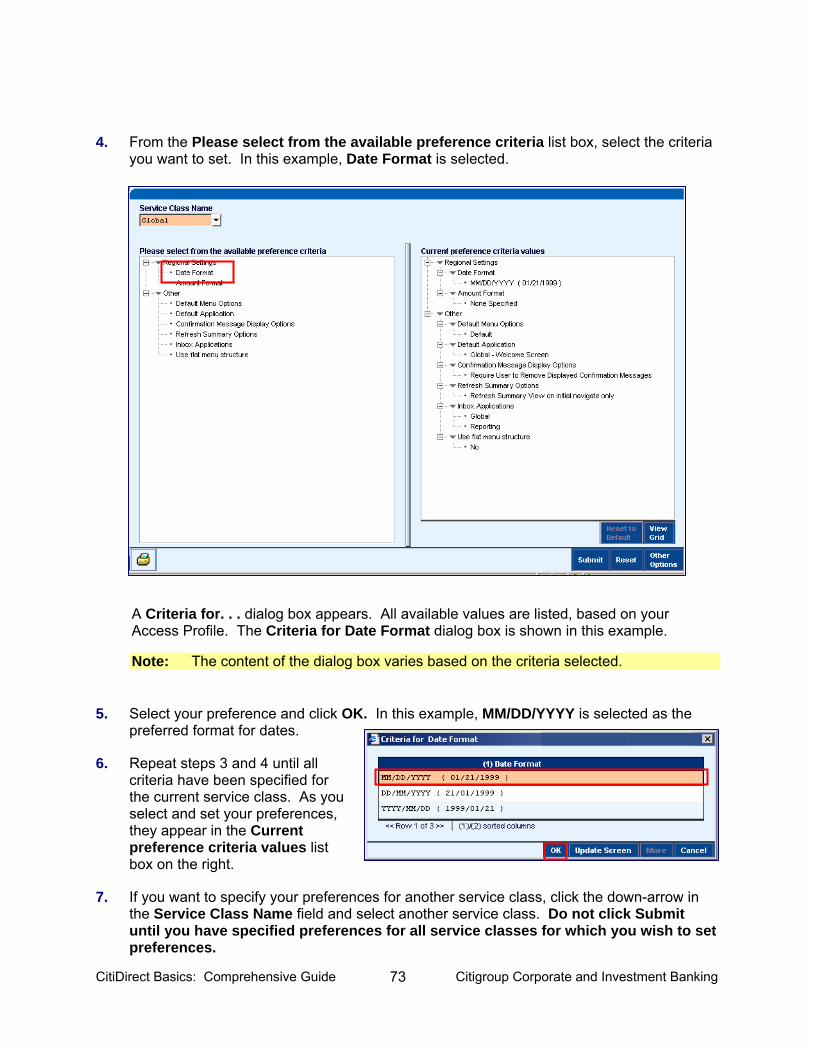
CitiDirect Basics: Comprehensive Guide 73 Citigroup Corporate and Investment Banking
4. From the Please select from the available preference criteria list box, select the criteria you want to set. In this example, Date Format is selected.
A Criteria for. . . dialog box appears. All available values are listed, based on your Access Profile. The Criteria for Date Format dialog box is shown in this example. Note: The content of the dialog box varies based on the criteria selected.
5. Select your preference and click OK. In this example, MM/DD/YYYY is selected as the preferred format for dates.
6. Repeat steps 3 and 4 until all criteria have been specified for the current service class. As you select and set your preferences, they appear in the Current preference criteria values list box on the right.
7. If you want to specify your preferences for another service class, click the down-arrow in the Service Class Name field and select another service class. Do not click Submit until you have specified preferences for all service classes for which you wish to set preferences.
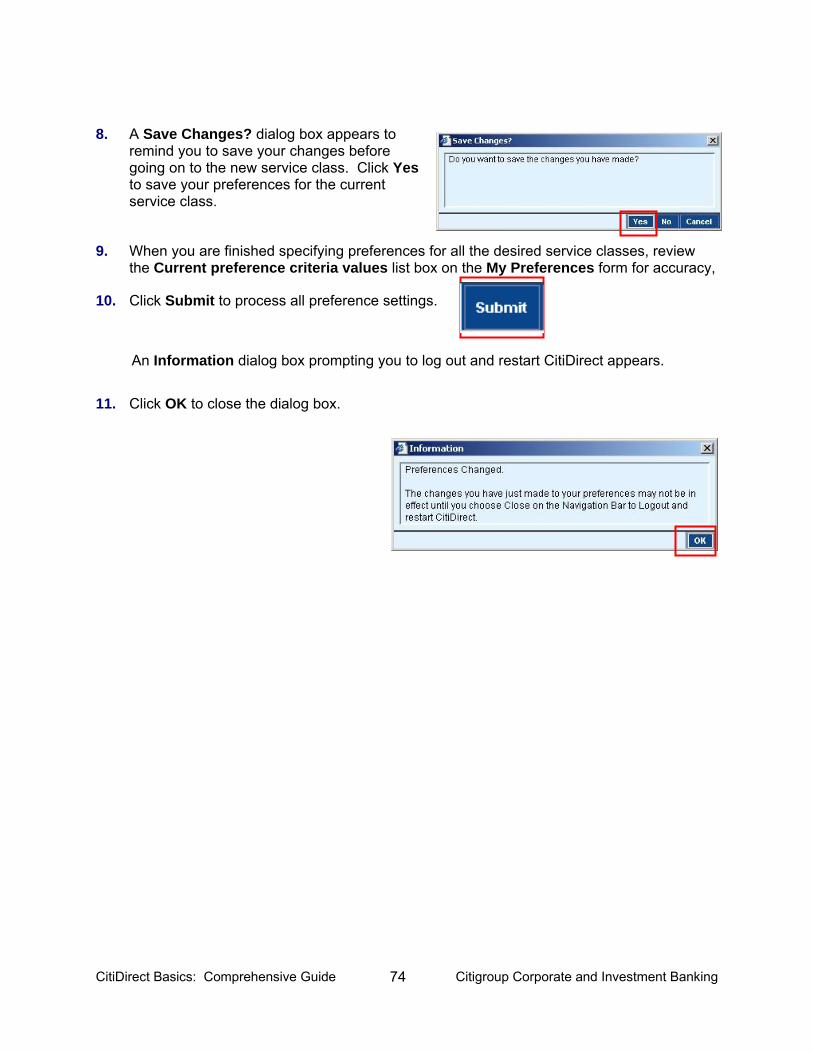
CitiDirect Basics: Comprehensive Guide 74 Citigroup Corporate and Investment Banking
8. A Save Changes? dialog box appears to remind you to save your changes before going on to the new service class. Click Yes to save your preferences for the current service class.
9. When you are finished specifying preferences for all the desired service classes, review the Current preference criteria values list box on the My Preferences form for accuracy,
10. Click Submit to process all preference settings.
An Information dialog box prompting you to log out and restart CitiDirect appears. 11. Click OK to close the dialog box.
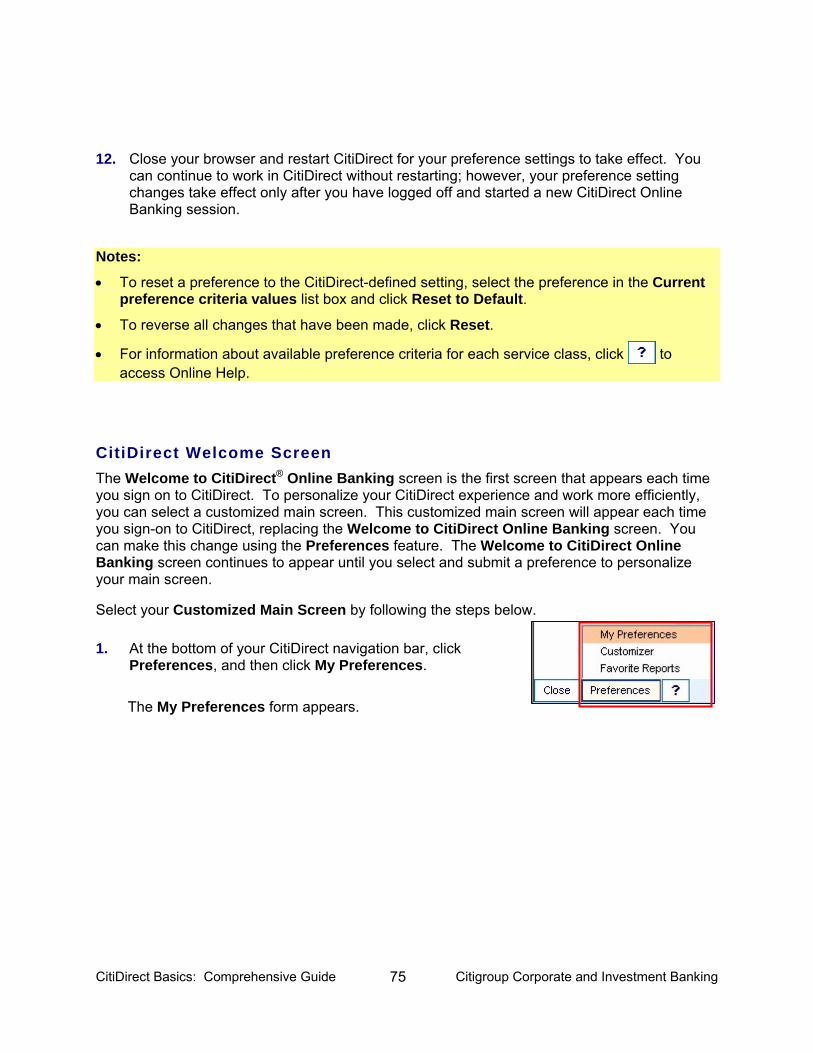
CitiDirect Basics: Comprehensive Guide 75 Citigroup Corporate and Investment Banking
12. Close your browser and restart CitiDirect for your preference settings to take effect. You can continue to work in CitiDirect without restarting; however, your preference setting changes take effect only after you have logged off and started a new CitiDirect Online Banking session.
Notes:
• To reset a preference to the CitiDirect-defined setting, select the preference in the Current preference criteria values list box and click Reset to Default.
• To reverse all changes that have been made, click Reset.
• For information about available preference criteria for each service class, click to access Online Help.
CitiDirect Welcome Screen The Welcome to CitiDirect® Online Banking screen is the first screen that appears each time you sign on to CitiDirect. To personalize your CitiDirect experience and work more efficiently, you can select a customized main screen. This customized main screen will appear each time you sign-on to CitiDirect, replacing the Welcome to CitiDirect Online Banking screen. You can make this change using the Preferences feature. The Welcome to CitiDirect Online Banking screen continues to appear until you select and submit a preference to personalize your main screen. Select your Customized Main Screen by following the steps below.
1. At the bottom of your CitiDirect navigation bar, click Preferences, and then click My Preferences.
The My Preferences form appears.
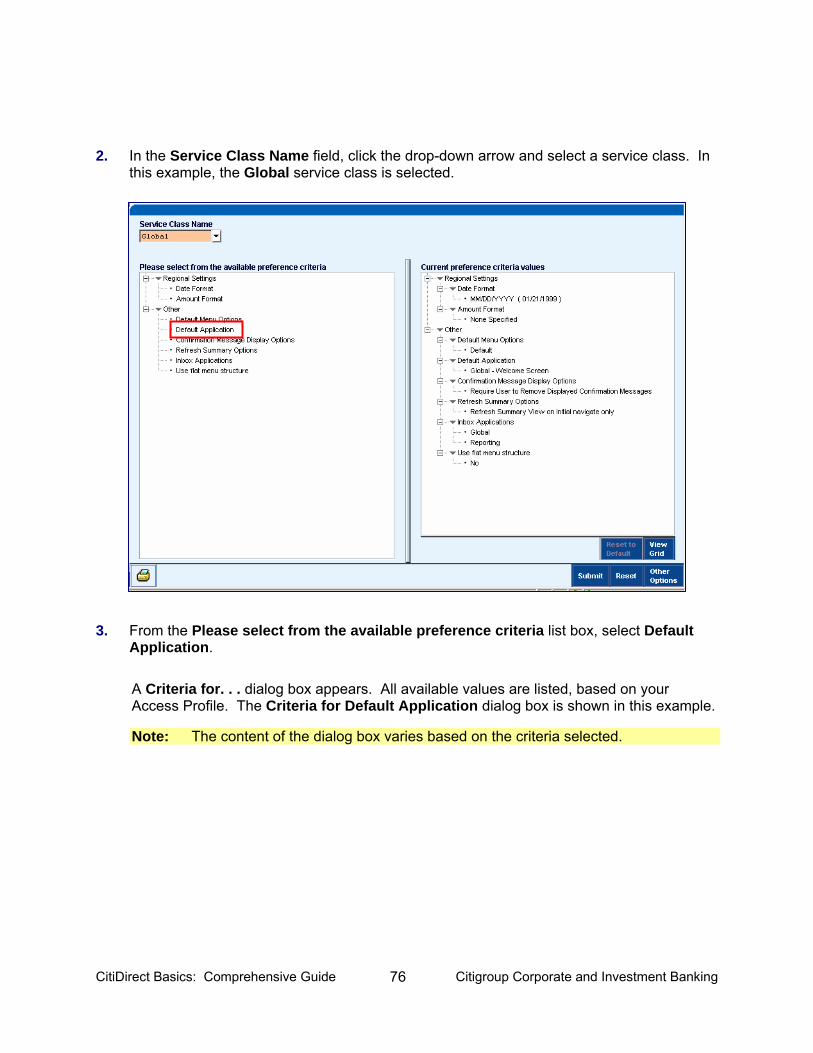
CitiDirect Basics: Comprehensive Guide 76 Citigroup Corporate and Investment Banking
2. In the Service Class Name field, click the drop-down arrow and select a service class. In this example, the Global service class is selected.
3. From the Please select from the available preference criteria list box, select Default Application.
A Criteria for. . . dialog box appears. All available values are listed, based on your Access Profile. The Criteria for Default Application dialog box is shown in this example. Note: The content of the dialog box varies based on the criteria selected.
All available preference criteria for the selected service class appear in the Please select from the available preference criteria list box.
Any corresponding CitiDirect defined preference settings appear in the Current preference criteria values list box.
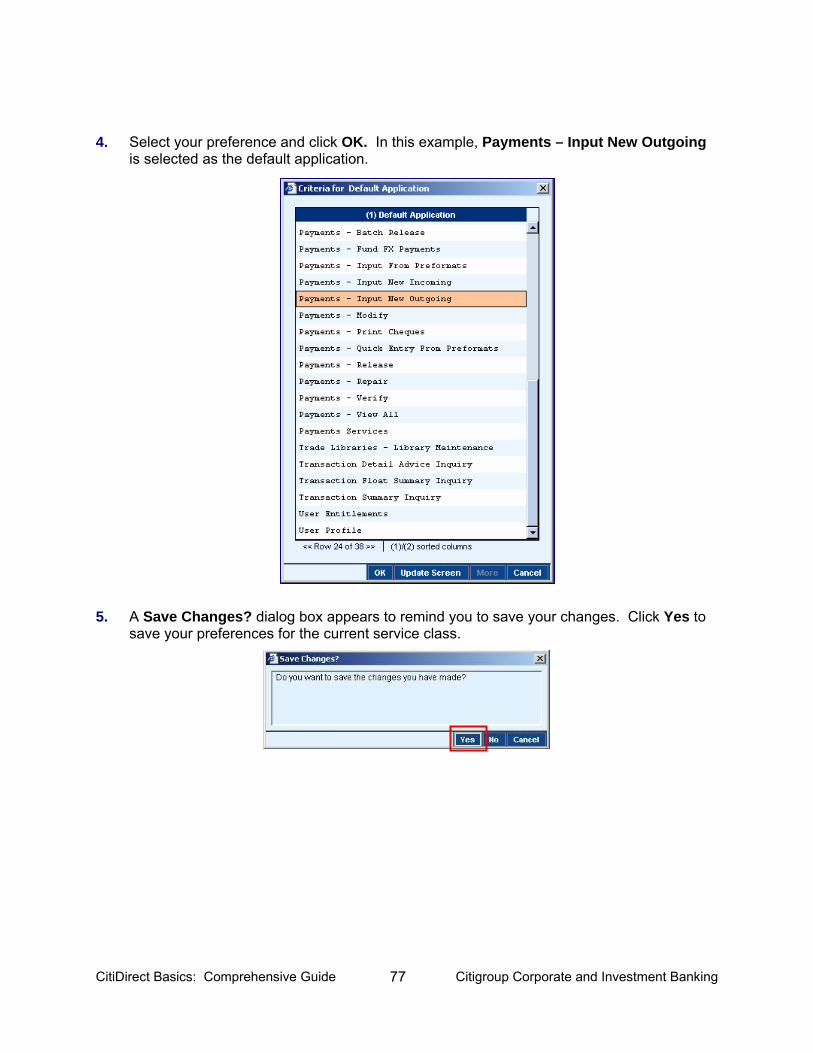
CitiDirect Basics: Comprehensive Guide 77 Citigroup Corporate and Investment Banking
4. Select your preference and click OK. In this example, Payments – Input New Outgoing is selected as the default application.
5. A Save Changes? dialog box appears to remind you to save your changes. Click Yes to save your preferences for the current service class.
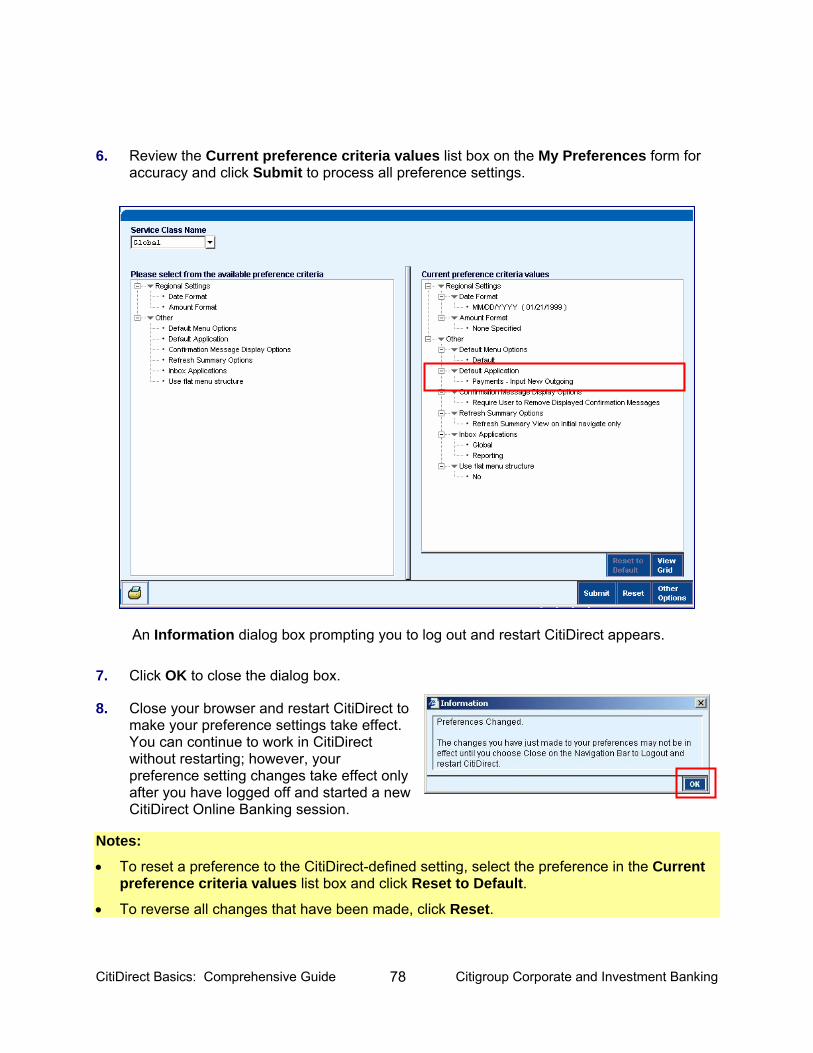
CitiDirect Basics: Comprehensive Guide 78 Citigroup Corporate and Investment Banking
6. Review the Current preference criteria values list box on the My Preferences form for accuracy and click Submit to process all preference settings.
An Information dialog box prompting you to log out and restart CitiDirect appears.
7. Click OK to close the dialog box.
8. Close your browser and restart CitiDirect to make your preference settings take effect. You can continue to work in CitiDirect without restarting; however, your preference setting changes take effect only after you have logged off and started a new CitiDirect Online Banking session.
Notes:
• To reset a preference to the CitiDirect-defined setting, select the preference in the Current preference criteria values list box and click Reset to Default.
• To reverse all changes that have been made, click Reset.
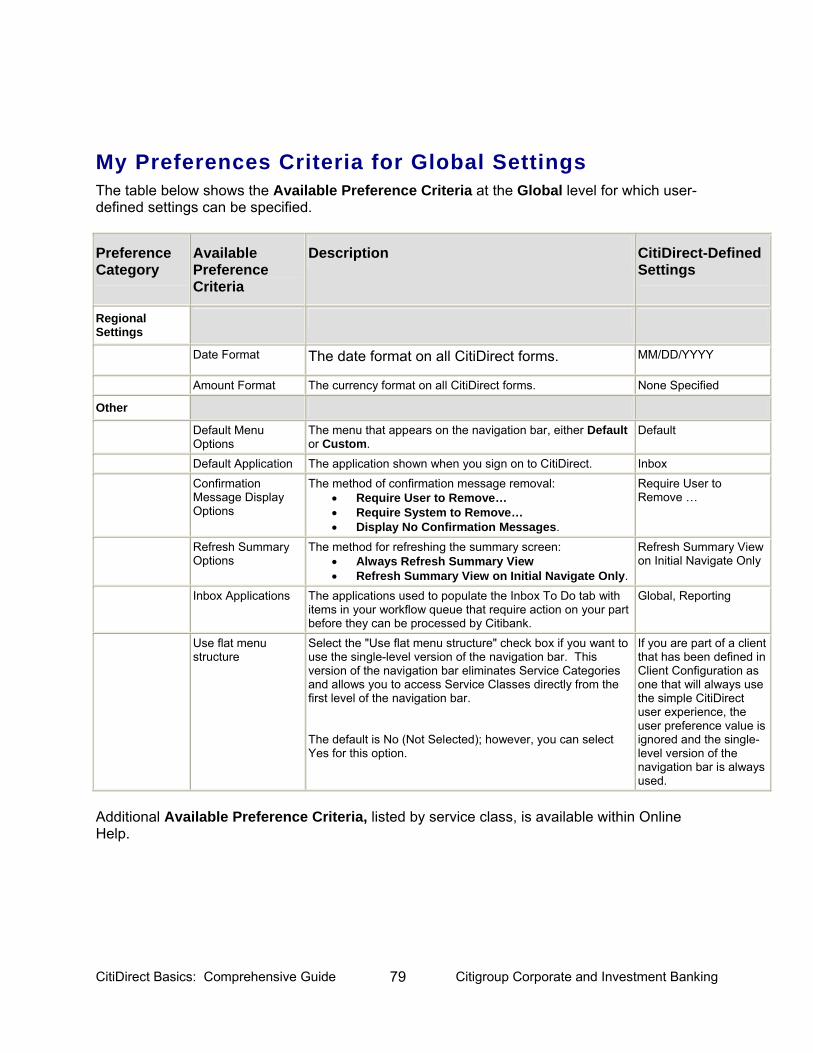
CitiDirect Basics: Comprehensive Guide 79 Citigroup Corporate and Investment Banking
My Preferences Criteria for Global Settings The table below shows the Available Preference Criteria at the Global level for which user-defined settings can be specified.
Preference Category
Available Preference Criteria
Description CitiDirect-Defined Settings
Regional Settings
Date Format The date format on all CitiDirect forms. MM/DD/YYYY
Amount Format The currency format on all CitiDirect forms. None Specified
Other
Default Menu Options
The menu that appears on the navigation bar, either Default or Custom.
Default
Default Application The application shown when you sign on to CitiDirect. Inbox Confirmation
Message Display Options
The method of confirmation message removal: • Require User to Remove… • Require System to Remove… • Display No Confirmation Messages.
Require User to Remove …
Refresh Summary Options
The method for refreshing the summary screen: • Always Refresh Summary View • Refresh Summary View on Initial Navigate Only.
Refresh Summary View on Initial Navigate Only
Inbox Applications The applications used to populate the Inbox To Do tab with items in your workflow queue that require action on your part before they can be processed by Citibank.
Global, Reporting
Use flat menu structure
Select the "Use flat menu structure" check box if you want to use the single-level version of the navigation bar. This version of the navigation bar eliminates Service Categories and allows you to access Service Classes directly from the first level of the navigation bar. The default is No (Not Selected); however, you can select Yes for this option.
If you are part of a client that has been defined in Client Configuration as one that will always use the simple CitiDirect user experience, the user preference value is ignored and the single-level version of the navigation bar is always used.
Additional Available Preference Criteria, listed by service class, is available within Online Help.
CitiDirect Basics: Comprehensive Guide 80 Citigroup Corporate and Investment Banking
Customizer Use the Customizer feature to tailor the CitiDirect® Online Banking navigation bar to meet your business needs. A customized navigation bar enables easier access to the service classes that you use most frequently. With Customizer, you can: • View only those service classes you use.
• Arrange the list of service classes in an order that is convenient for you.
• Create your own categories to group service classes.
• Rename service classes and categories to meet your needs. Notes:
• Your Custom Menu is unique to your Sign-on ID.
• You can create only one Custom Menu, which is named Custom View.
• Your Access Profile determines which service classes are available to you.
Troubleshooting and the Custom Menu If you are using a Custom Menu, you should change your preferences back to the Default Menu before you contact the CitiDirect Online Banking Help Desk to troubleshoot any CitiDirect Online Banking issues. If you do not change back to the Default Menu, the Support Technician will not be able to reference the same navigation bar during your session. For more information on restoring the Default Menu, please refer to the Returning Your Navigation Bar to the CitiDirect-defined Menu section in this Guide.
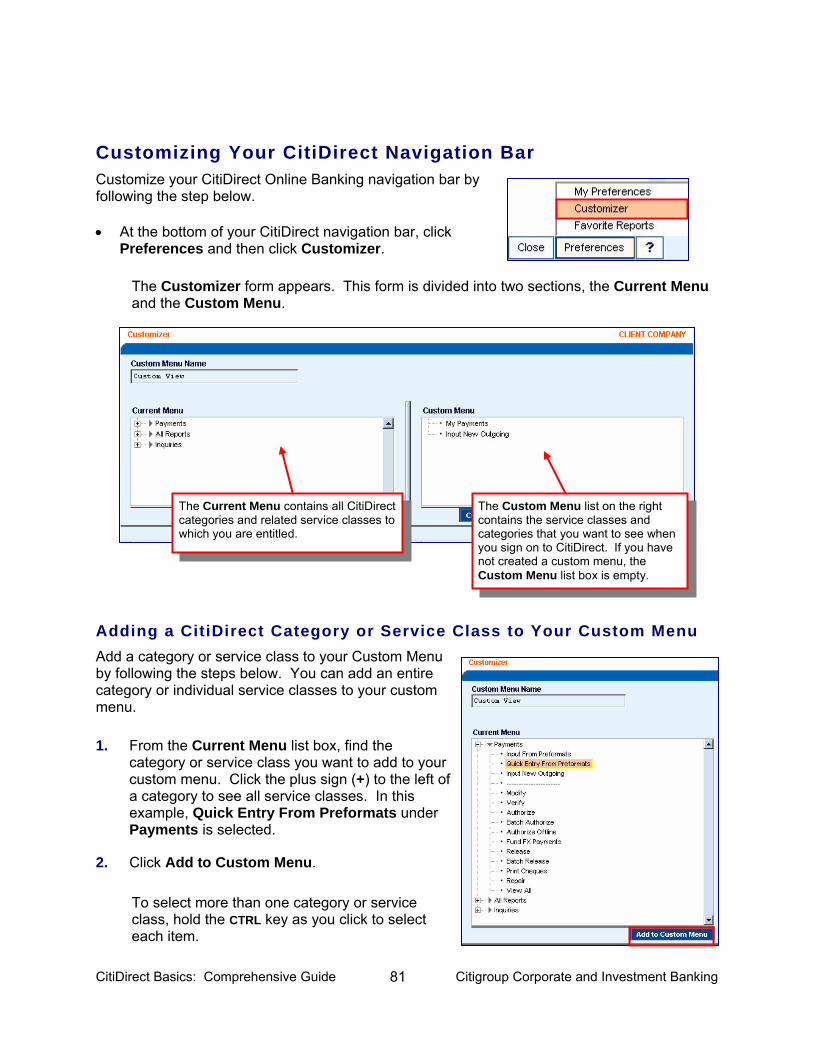
CitiDirect Basics: Comprehensive Guide 81 Citigroup Corporate and Investment Banking
Customizing Your CitiDirect Navigation Bar Customize your CitiDirect Online Banking navigation bar by following the step below.
• At the bottom of your CitiDirect navigation bar, click Preferences and then click Customizer.
The Customizer form appears. This form is divided into two sections, the Current Menu and the Custom Menu.
Adding a CitiDirect Category or Service Class to Your Custom Menu Add a category or service class to your Custom Menu by following the steps below. You can add an entire category or individual service classes to your custom menu.
1. From the Current Menu list box, find the category or service class you want to add to your custom menu. Click the plus sign (+) to the left of a category to see all service classes. In this example, Quick Entry From Preformats under Payments is selected.
2. Click Add to Custom Menu.
To select more than one category or service class, hold the CTRL key as you click to select each item.
The Current Menu contains all CitiDirect categories and related service classes to which you are entitled.
The Custom Menu list on the right contains the service classes and categories that you want to see when you sign on to CitiDirect. If you have not created a custom menu, the Custom Menu list box is empty.
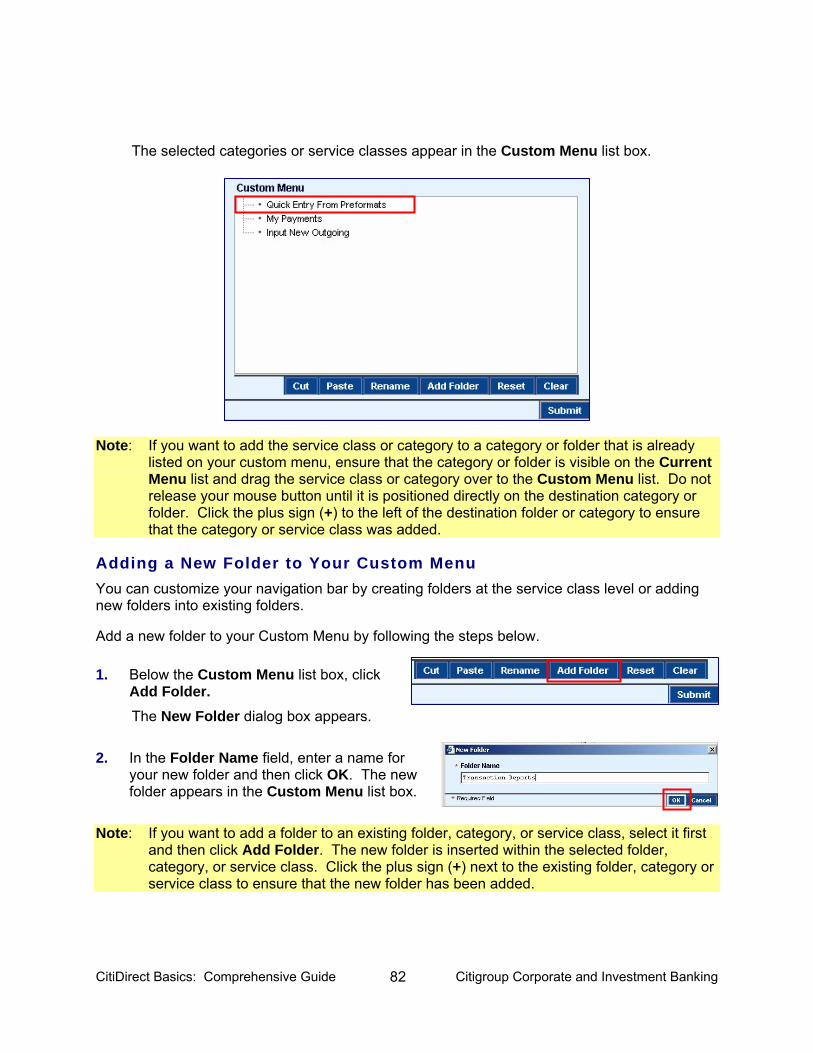
CitiDirect Basics: Comprehensive Guide 82 Citigroup Corporate and Investment Banking
The selected categories or service classes appear in the Custom Menu list box.
Note: If you want to add the service class or category to a category or folder that is already
listed on your custom menu, ensure that the category or folder is visible on the Current Menu list and drag the service class or category over to the Custom Menu list. Do not release your mouse button until it is positioned directly on the destination category or folder. Click the plus sign (+) to the left of the destination folder or category to ensure that the category or service class was added.
Adding a New Folder to Your Custom Menu You can customize your navigation bar by creating folders at the service class level or adding new folders into existing folders. Add a new folder to your Custom Menu by following the steps below.
1. Below the Custom Menu list box, click Add Folder. The New Folder dialog box appears.
2. In the Folder Name field, enter a name for your new folder and then click OK. The new folder appears in the Custom Menu list box.
Note: If you want to add a folder to an existing folder, category, or service class, select it first
and then click Add Folder. The new folder is inserted within the selected folder, category, or service class. Click the plus sign (+) next to the existing folder, category or service class to ensure that the new folder has been added.
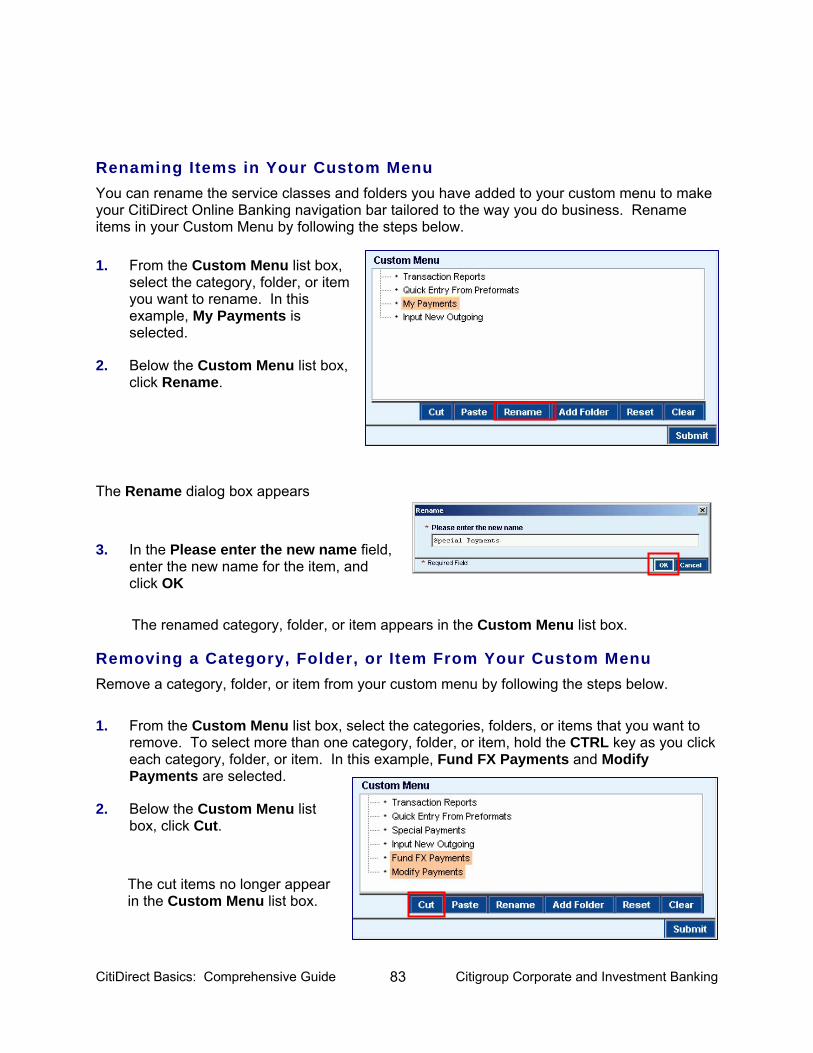
CitiDirect Basics: Comprehensive Guide 83 Citigroup Corporate and Investment Banking
Renaming Items in Your Custom Menu You can rename the service classes and folders you have added to your custom menu to make your CitiDirect Online Banking navigation bar tailored to the way you do business. Rename items in your Custom Menu by following the steps below.
1. From the Custom Menu list box, select the category, folder, or item you want to rename. In this example, My Payments is selected.
2. Below the Custom Menu list box, click Rename.
The Rename dialog box appears
3. In the Please enter the new name field, enter the new name for the item, and click OK
The renamed category, folder, or item appears in the Custom Menu list box.
Removing a Category, Folder, or Item From Your Custom Menu Remove a category, folder, or item from your custom menu by following the steps below.
1. From the Custom Menu list box, select the categories, folders, or items that you want to remove. To select more than one category, folder, or item, hold the CTRL key as you click each category, folder, or item. In this example, Fund FX Payments and Modify Payments are selected.
2. Below the Custom Menu list box, click Cut.
The cut items no longer appear in the Custom Menu list box.

CitiDirect Basics: Comprehensive Guide 84 Citigroup Corporate and Investment Banking
Note: A confirmation message does not appear when you remove a category, folder, or item
from your Custom Menu.
Moving a Category, Folder, or Item to Another Category or Folder Move a category, folder, or item to another category or folder in your Custom Menu by following the steps below.
1. From the Custom Menu list box, select the category, folder, or item that you want to move. If necessary, click the plus sign (+) to the left of a category or folder to locate the item to be moved.
2. Below the Custom Menu list box, click Cut.
3. Select the destination folder or category and then click Paste. In this example, Transaction Reports is selected as the destination folder or category.
4. If you have moved the item to a new folder or category, a plus sign (+) now appears to the left of the new folder. Click the plus sign (+) to the left of folder to see folder contents.
Clearing Recent Changes and Keeping Your Existing Custom Menu Clear all changes made in the current session and keep your existing Custom Menu by following the step below.
• Below the Custom Menu list box, click Reset.
All changes from this session disappear and the Custom Menu returns to the existing format as illustrated below.
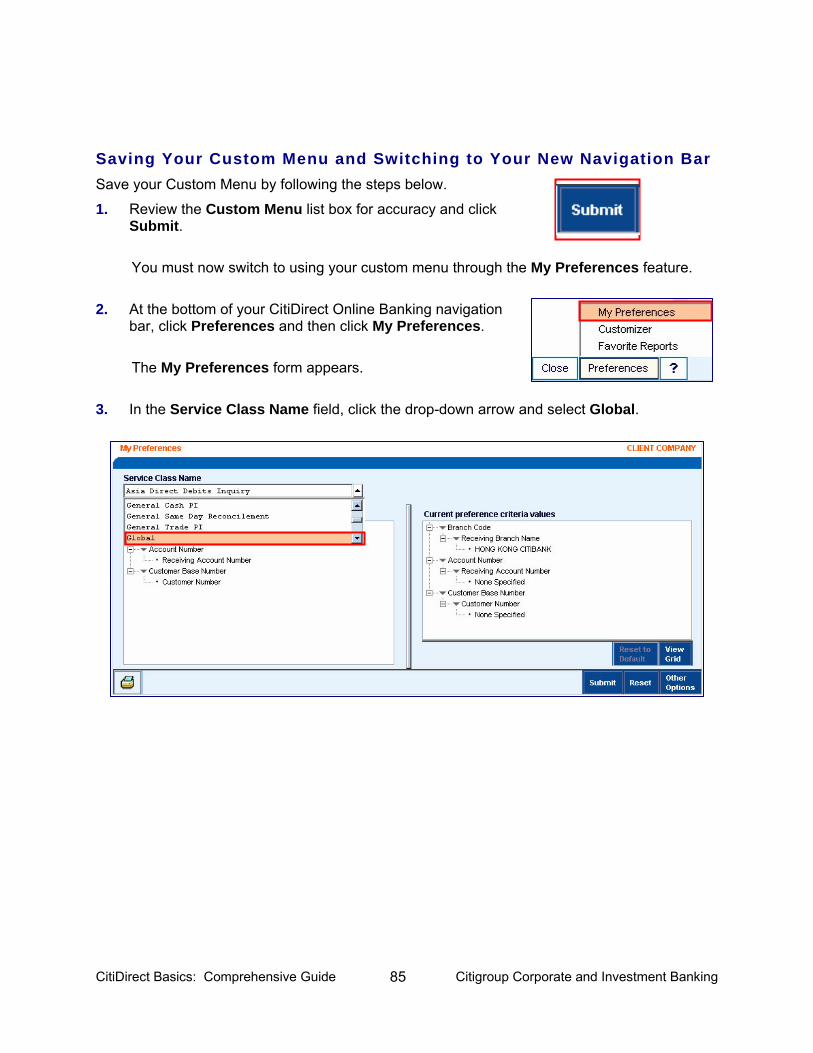
CitiDirect Basics: Comprehensive Guide 85 Citigroup Corporate and Investment Banking
Saving Your Custom Menu and Switching to Your New Navigation Bar Save your Custom Menu by following the steps below.
1. Review the Custom Menu list box for accuracy and click Submit.
You must now switch to using your custom menu through the My Preferences feature.
2. At the bottom of your CitiDirect Online Banking navigation bar, click Preferences and then click My Preferences.
The My Preferences form appears.
3. In the Service Class Name field, click the drop-down arrow and select Global.
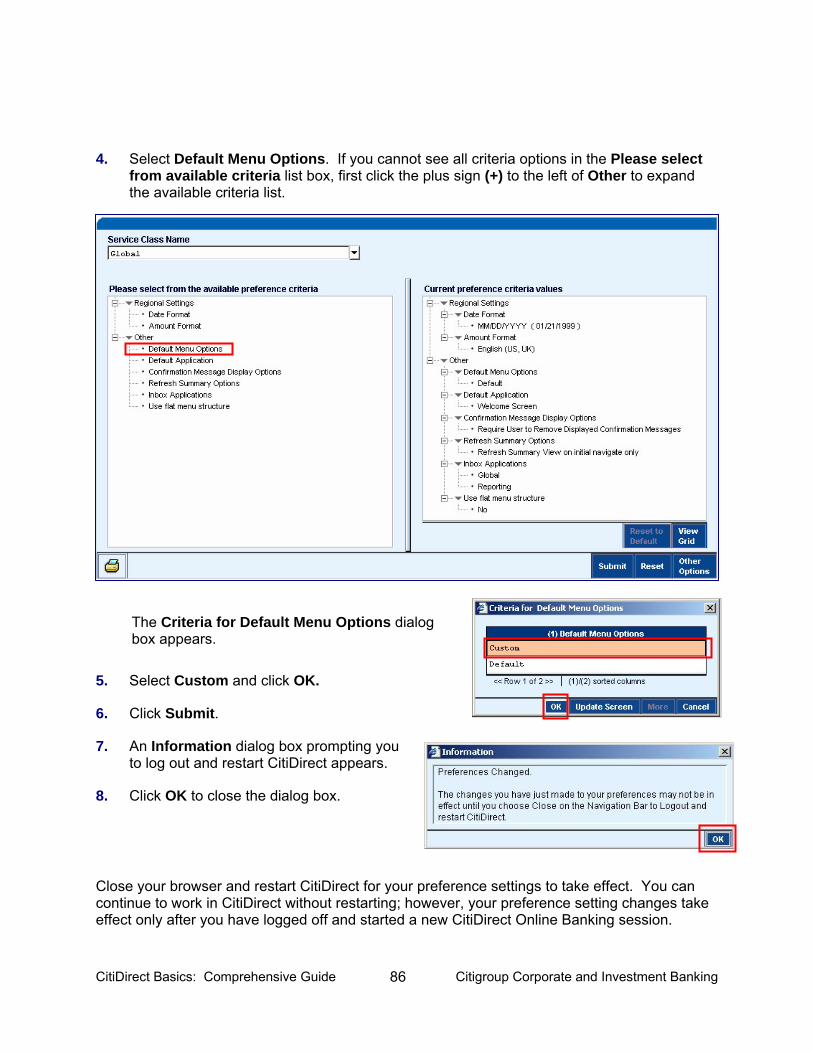
CitiDirect Basics: Comprehensive Guide 86 Citigroup Corporate and Investment Banking
4. Select Default Menu Options. If you cannot see all criteria options in the Please select from available criteria list box, first click the plus sign (+) to the left of Other to expand the available criteria list.
The Criteria for Default Menu Options dialog box appears.
5. Select Custom and click OK.
6. Click Submit.
7. An Information dialog box prompting you to log out and restart CitiDirect appears.
8. Click OK to close the dialog box.
Close your browser and restart CitiDirect for your preference settings to take effect. You can continue to work in CitiDirect without restarting; however, your preference setting changes take effect only after you have logged off and started a new CitiDirect Online Banking session.
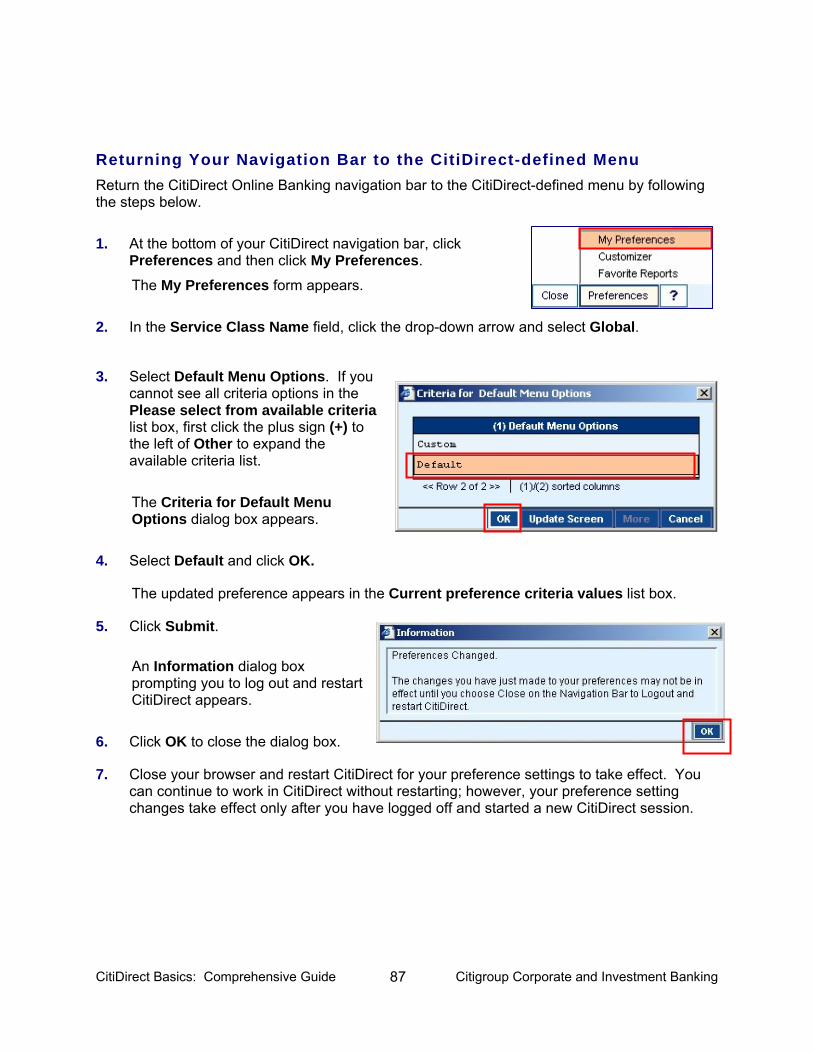
CitiDirect Basics: Comprehensive Guide 87 Citigroup Corporate and Investment Banking
Returning Your Navigation Bar to the CitiDirect-defined Menu Return the CitiDirect Online Banking navigation bar to the CitiDirect-defined menu by following the steps below.
1. At the bottom of your CitiDirect navigation bar, click Preferences and then click My Preferences.
The My Preferences form appears.
2. In the Service Class Name field, click the drop-down arrow and select Global.
3. Select Default Menu Options. If you cannot see all criteria options in the Please select from available criteria list box, first click the plus sign (+) to the left of Other to expand the available criteria list.
The Criteria for Default Menu Options dialog box appears.
4. Select Default and click OK.
The updated preference appears in the Current preference criteria values list box.
5. Click Submit.
An Information dialog box prompting you to log out and restart CitiDirect appears.
6. Click OK to close the dialog box.
7. Close your browser and restart CitiDirect for your preference settings to take effect. You can continue to work in CitiDirect without restarting; however, your preference setting changes take effect only after you have logged off and started a new CitiDirect session.
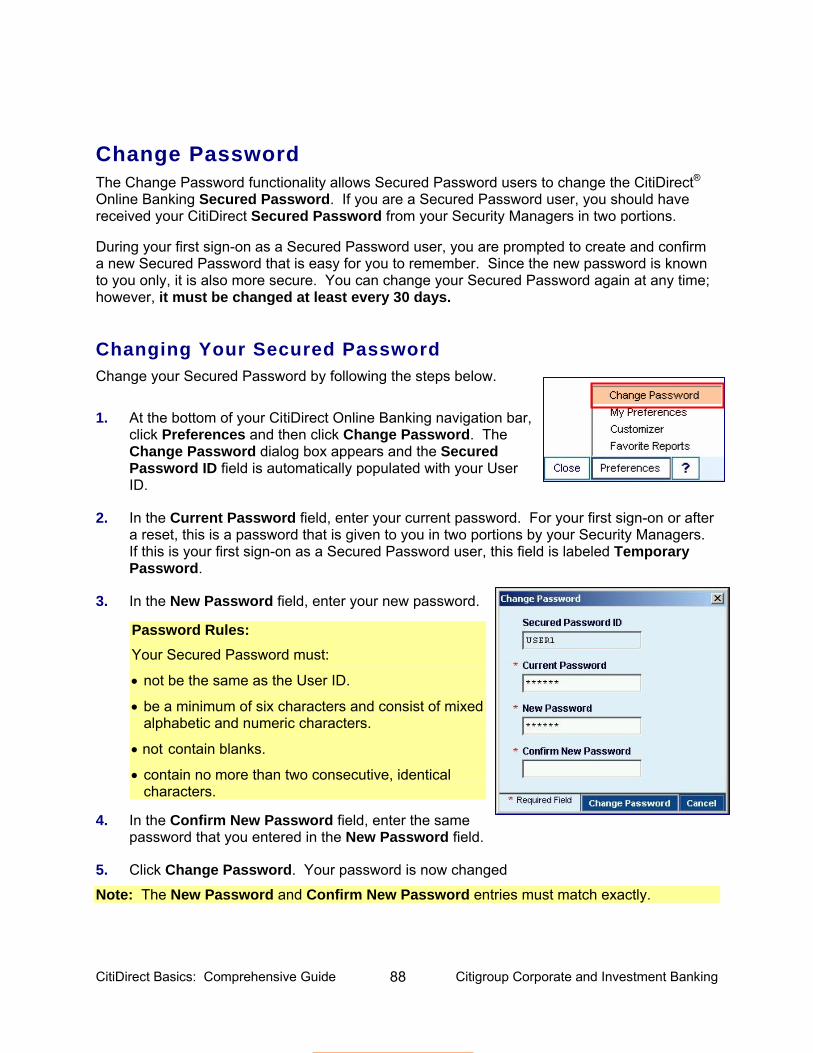
CitiDirect Basics: Comprehensive Guide 88 Citigroup Corporate and Investment Banking
Change Password The Change Password functionality allows Secured Password users to change the CitiDirect® Online Banking Secured Password. If you are a Secured Password user, you should have received your CitiDirect Secured Password from your Security Managers in two portions. During your first sign-on as a Secured Password user, you are prompted to create and confirm a new Secured Password that is easy for you to remember. Since the new password is known to you only, it is also more secure. You can change your Secured Password again at any time; however, it must be changed at least every 30 days.
Changing Your Secured Password Change your Secured Password by following the steps below.
1. At the bottom of your CitiDirect Online Banking navigation bar, click Preferences and then click Change Password. The Change Password dialog box appears and the Secured Password ID field is automatically populated with your User ID.
2. In the Current Password field, enter your current password. For your first sign-on or after a reset, this is a password that is given to you in two portions by your Security Managers. If this is your first sign-on as a Secured Password user, this field is labeled Temporary Password.
3. In the New Password field, enter your new password.
Password Rules: Your Secured Password must:
• not be the same as the User ID.
• be a minimum of six characters and consist of mixed alphabetic and numeric characters.
• not contain blanks.
• contain no more than two consecutive, identical characters.
4. In the Confirm New Password field, enter the same password that you entered in the New Password field.
5. Click Change Password. Your password is now changed Note: The New Password and Confirm New Password entries must match exactly.
CitiDirect Basics: Comprehensive Guide 89 Citigroup Corporate and Investment Banking
Password Maintenance • If you believe that your Secured Password has become known to anyone, change it.
• Re-use of passwords is prohibited for a minimum of six consecutive changes. After more than six consecutive failed sign-on attempts, your Security Manager must reset User IDs associated with a password.
• If your Security Manager has reset your Secured Password, the Change Password dialog box appears when you sign on. You are required to change your password.
• Password resets are restricted to one per 24-hour period, unless you are the Security Manager.
• You are responsible for any activities that use your User ID and Secured Password.
Favorite Reports The Favorite Reports functionality allows you to: • Schedule reports and view scheduled reports.
• Run Favorite Reports.
• View reports run in the past 24 hours. You can identify a report as a Favorite when you select it from the Report Summary list to run it, or by including Favorite as you select criteria on the Edit Criteria form to create a new report.

CitiDirect Basics: Comprehensive Guide 90 Citigroup Corporate and Investment Banking
The Report Assistant The Report Assistant allows you to efficiently manage the reports you have designated as Favorites as well as access any scheduled reports and reports that you have run in the past 24 hours. To provide faster access to the reports you run on a regular basis, the Report Assistant appears as a pop-up window on top of the active CitiDirect application. While the Report Assistant is open, CitiDirect Online Banking is disabled, and you are prevented from doing any other actions except those in the pop-up window. There are two ways to access Report Assistant: • At the bottom of your CitiDirect Online Banking navigation
bar, click Preferences and then click Favorite Reports.
• Press the Alt + R keys on your keyboard anywhere in CitiDirect.
The Report Assistant dialog box appears. The Report Assistant has two tabs: • Favorite Reports: displays a
list of all reports that you have identified as a Favorite. This tab is active when you access the Report Assistant.
• Active Reports: displays a list of all reports that have been run in the last 24 hours, including reports that are currently running and any reports scheduled to run in the future.
Note: For complete details on Report Assistant, refer to the Report Assistant section of this
guide.
CitiDirect Basics: Comprehensive Guide 91 Citigroup Corporate and Investment Banking
Reporting and Inquiry Overview This section of the Comprehensive Guide describes the All Reports and Inquiries categories, available on the CitiDirect® Online Banking navigation bar, which allow you to run Reports and submit Inquiries regarding your accounts and transactions. You can choose to run a Report or submit an Inquiry based on your business needs. Both can display the same information in different ways.
All account and transaction related information you need for Reports and Inquiries is available through CitiDirect. The Reports and Inquiries available to you and the information you can access are determined by the entitlements in your Access Profile.
The CitiDirect Reporting functionality enables you to:
• Select from a variety of customizable reports and view real-time information. • Customize reports to retrieve the information you need. • Save your customized reports to run as often as needed. • View your reports in a separate browser window in a format you specify. • Print report output and save the output file on your system. • Deliver reports to a secure server location via a secure HTTPS Internet connection. • Deliver reports to an e-mail address via encrypted e-mail. • Use Automated File and Report Delivery (AFRD) to save time and improve efficiency. The CitiDirect Inquiry functionality enables you to:
• Gain immediate access to information for a specific point in time. • View information displayed on your screen while you are signed on to CitiDirect. • Print inquiry results, which are less detailed than report printouts.
Note: Inquiries do not allow you to save criteria; once an Inquiry is closed, the information is no longer available.
CitiDirect Basics: Comprehensive Guide 92 Citigroup Corporate and Investment Banking
Report vs. Inquiry CitiDirect Reports provide you with real-time information to support your decision-making processes. When a report is printed, the end result is a formal document that includes all of the information you need. • All reports can be printed in their entirety; on a page-by-page basis; as a range of pages; or
as one specific page.
• In addition to printing a report, you can elect to send it to a secure server location using an HTTPS Internet connection or to an e-mail address using encrypted e-mail.
Typically, a CitiDirect Inquiry is run for real-time reporting, when you prefer to view the information on your screen. An Inquiry is generally faster than a report, and is usually submitted when you want a crucial piece of information immediately. • Inquiries can be printed, but the end result is similar to a basic spreadsheet, with gridlines.
• If you need to access information fast, and you do not have the requirement to store the retrieved information or secure a printout that may also be used as a legal document, an Inquiry will serve your purpose.
Signing On to CitiDirect Online Banking All procedures assume that you have successfully signed on to CitiDirect Online Banking using your SafeWord™ Platinum Card or a Secured Password. For complete details on sign-on procedures, refer to the Getting Started section of this Guide.
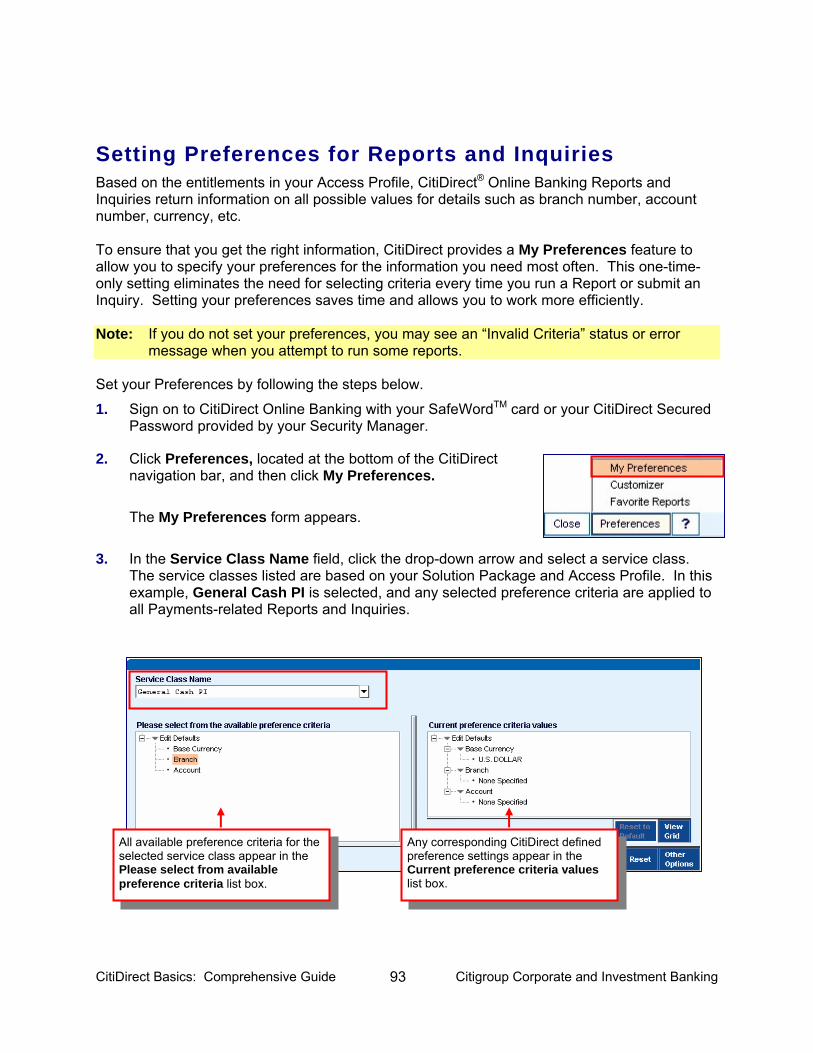
CitiDirect Basics: Comprehensive Guide 93 Citigroup Corporate and Investment Banking
Setting Preferences for Reports and Inquiries Based on the entitlements in your Access Profile, CitiDirect® Online Banking Reports and Inquiries return information on all possible values for details such as branch number, account number, currency, etc. To ensure that you get the right information, CitiDirect provides a My Preferences feature to allow you to specify your preferences for the information you need most often. This one-time-only setting eliminates the need for selecting criteria every time you run a Report or submit an Inquiry. Setting your preferences saves time and allows you to work more efficiently. Note: If you do not set your preferences, you may see an “Invalid Criteria” status or error
message when you attempt to run some reports. Set your Preferences by following the steps below.
1. Sign on to CitiDirect Online Banking with your SafeWordTM card or your CitiDirect Secured Password provided by your Security Manager.
2. Click Preferences, located at the bottom of the CitiDirect navigation bar, and then click My Preferences.
The My Preferences form appears.
3. In the Service Class Name field, click the drop-down arrow and select a service class. The service classes listed are based on your Solution Package and Access Profile. In this example, General Cash PI is selected, and any selected preference criteria are applied to all Payments-related Reports and Inquiries.
All available preference criteria for the selected service class appear in the Please select from available preference criteria list box.
Any corresponding CitiDirect defined preference settings appear in the Current preference criteria values list box.
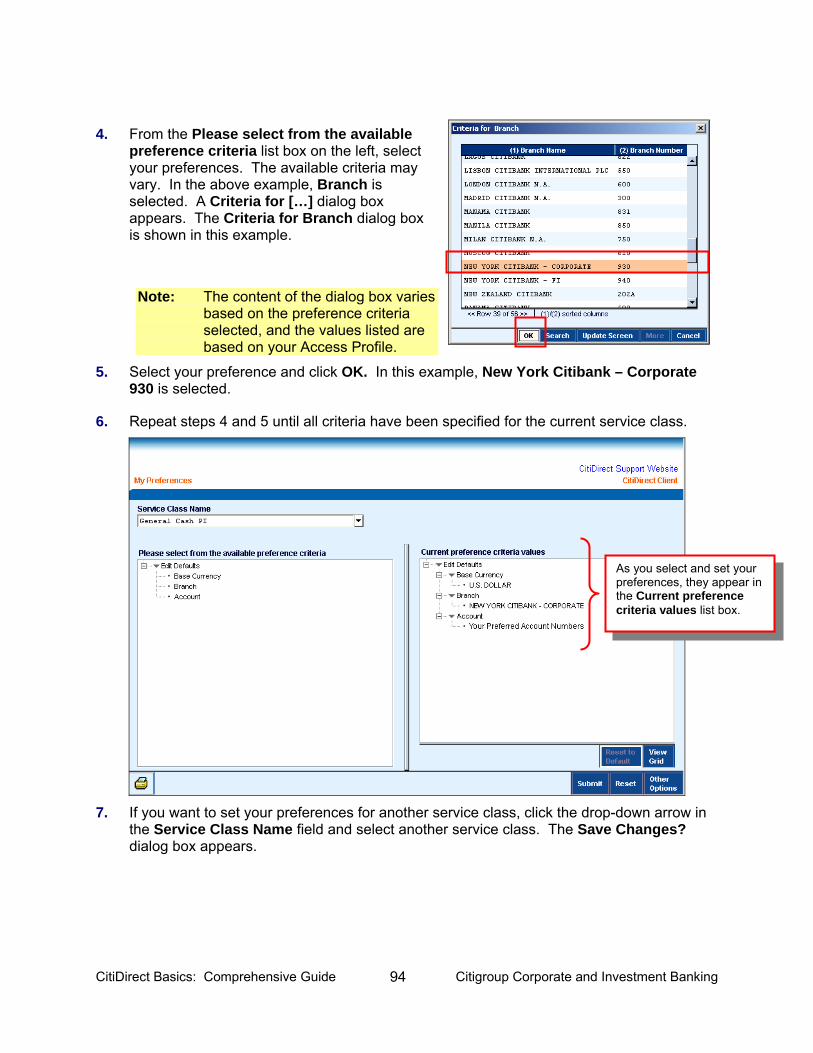
CitiDirect Basics: Comprehensive Guide 94 Citigroup Corporate and Investment Banking
4. From the Please select from the available preference criteria list box on the left, select your preferences. The available criteria may vary. In the above example, Branch is selected. A Criteria for […] dialog box appears. The Criteria for Branch dialog box is shown in this example.
Note: The content of the dialog box varies based on the preference criteria selected, and the values listed are based on your Access Profile.
5. Select your preference and click OK. In this example, New York Citibank – Corporate 930 is selected.
6. Repeat steps 4 and 5 until all criteria have been specified for the current service class.
7. If you want to set your preferences for another service class, click the drop-down arrow in
the Service Class Name field and select another service class. The Save Changes? dialog box appears.
As you select and set your preferences, they appear in the Current preference criteria values list box.
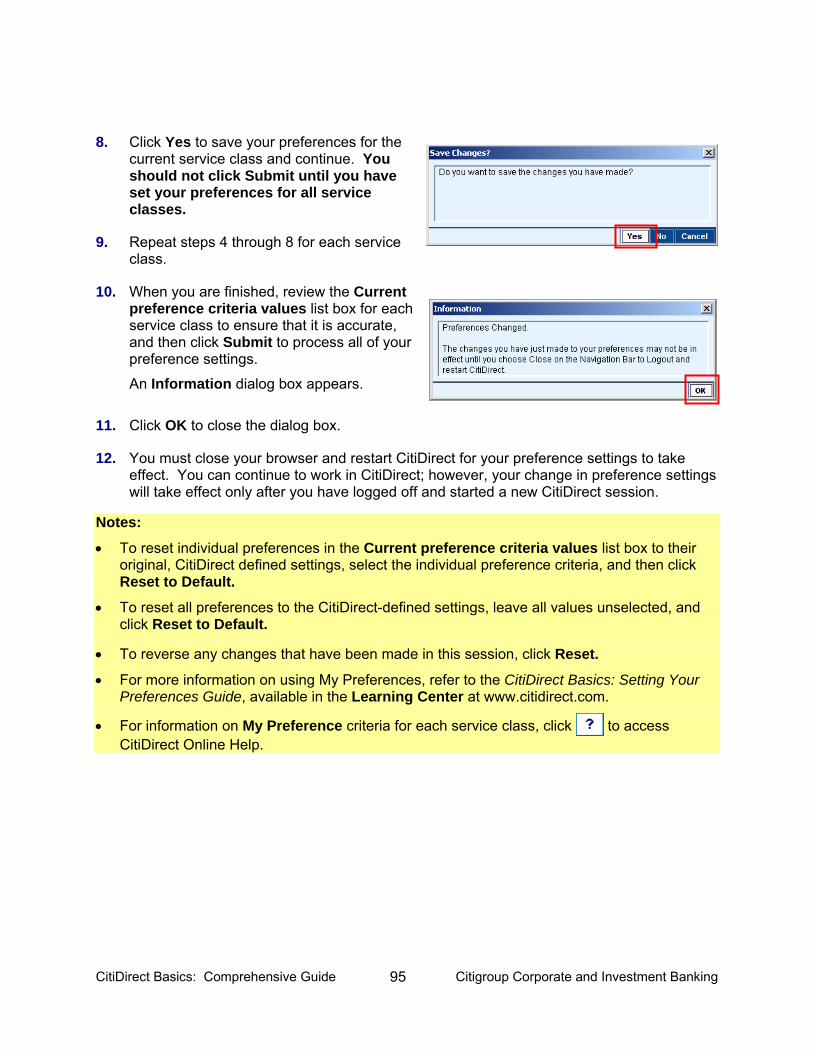
CitiDirect Basics: Comprehensive Guide 95 Citigroup Corporate and Investment Banking
8. Click Yes to save your preferences for the current service class and continue. You should not click Submit until you have set your preferences for all service classes.
9. Repeat steps 4 through 8 for each service class.
10. When you are finished, review the Current preference criteria values list box for each service class to ensure that it is accurate, and then click Submit to process all of your preference settings.
An Information dialog box appears.
11. Click OK to close the dialog box.
12. You must close your browser and restart CitiDirect for your preference settings to take effect. You can continue to work in CitiDirect; however, your change in preference settings will take effect only after you have logged off and started a new CitiDirect session.
Notes:
• To reset individual preferences in the Current preference criteria values list box to their original, CitiDirect defined settings, select the individual preference criteria, and then click Reset to Default.
• To reset all preferences to the CitiDirect-defined settings, leave all values unselected, and click Reset to Default.
• To reverse any changes that have been made in this session, click Reset.
• For more information on using My Preferences, refer to the CitiDirect Basics: Setting Your Preferences Guide, available in the Learning Center at www.citidirect.com.
• For information on My Preference criteria for each service class, click to access CitiDirect Online Help.
CitiDirect Basics: Comprehensive Guide 96 Citigroup Corporate and Investment Banking
Reports To meet your information needs, CitiDirect® Online Banking offers you the capability to create customized reports in a wide variety of formats. With this capability: • You benefit by having real-time access to balances, end-of-day and intra-day account
statements, and transaction details from anywhere in the world.
• You can generate transaction summaries by account number, value date, type, and currency.
• You can view your report output in a separate browser window in a format you specify.
• You can deliver your reports through a secure HTTPS Internet connection or through encrypted e-mail.
• You can save time and improve managerial efficiency by using the CitiDirect Online Banking Automated File and Report Delivery (AFRD) feature to run unattended reports. Once scheduled, these events take place outside of an online CitiDirect session.
Report Service Classes The All Reports category on the CitiDirect Online Banking navigation bar contains service classes that group individual reports by their specific business purpose. A service class for reporting is defined as a common set of data elements that are logically linked and from which one or more sub-reports can be generated. For example, Cash Balances Reports display a summary of all accounts with either their ledger balances, available balances, or balances consolidated by a specified currency; Cash Statements Reports display summary and detailed information on cash transactions moving across an account. Two types of CitiDirect reports can be found in a service class: • Base reports that contain Citibank-defined criteria, reflecting the information you are most
likely to require in the report. Base reports are available to anyone using CitiDirect Online Banking. Your assigned Access Profile determines which base reports are available to you.
• User-defined reports are new reports you create by modifying existing reports to meet your specific business needs. User-defined reports that you create are available for your use only, unless you choose to share them with other users in your organization.
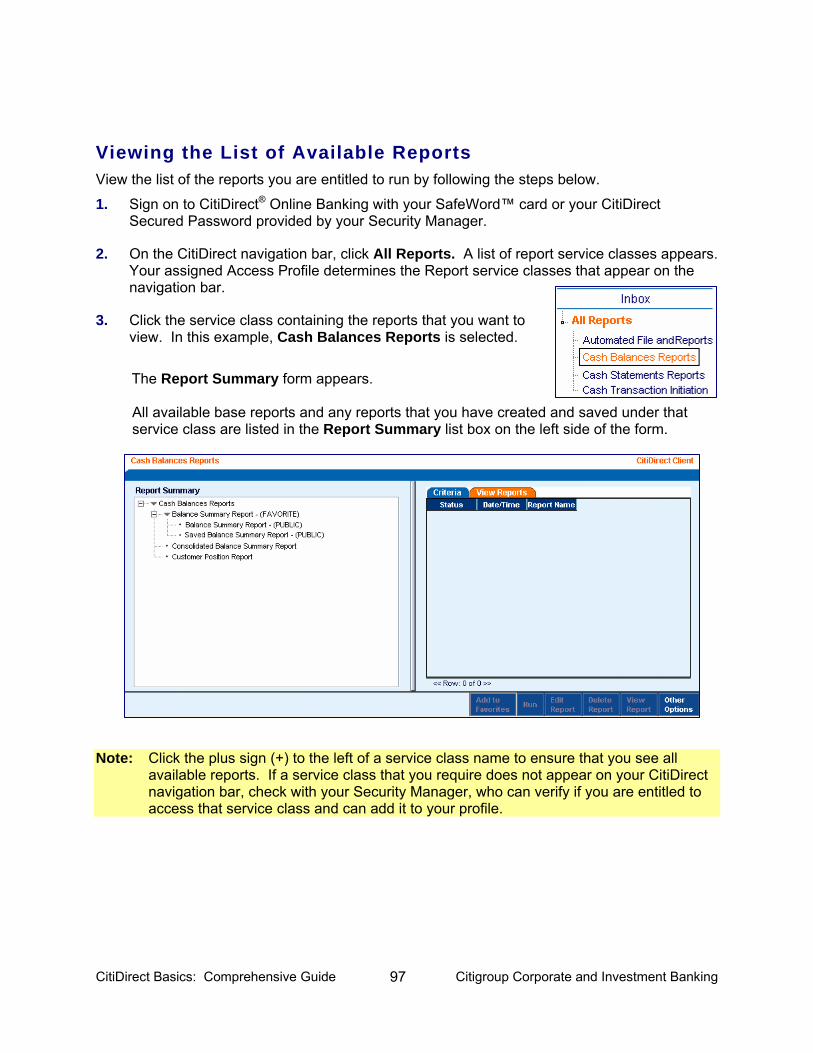
CitiDirect Basics: Comprehensive Guide 97 Citigroup Corporate and Investment Banking
Viewing the List of Available Reports View the list of the reports you are entitled to run by following the steps below.
1. Sign on to CitiDirect® Online Banking with your SafeWord™ card or your CitiDirect Secured Password provided by your Security Manager.
2. On the CitiDirect navigation bar, click All Reports. A list of report service classes appears. Your assigned Access Profile determines the Report service classes that appear on the navigation bar.
3. Click the service class containing the reports that you want to view. In this example, Cash Balances Reports is selected.
The Report Summary form appears.
All available base reports and any reports that you have created and saved under that service class are listed in the Report Summary list box on the left side of the form.
Note: Click the plus sign (+) to the left of a service class name to ensure that you see all available reports. If a service class that you require does not appear on your CitiDirect navigation bar, check with your Security Manager, who can verify if you are entitled to access that service class and can add it to your profile.
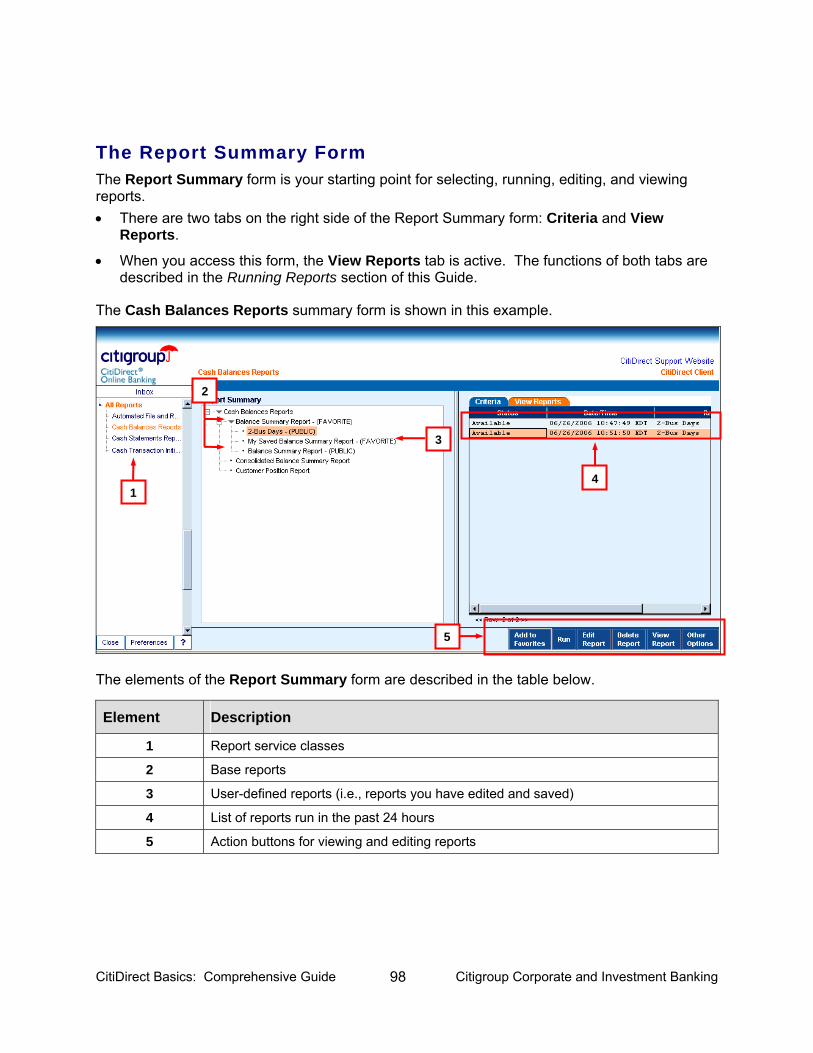
CitiDirect Basics: Comprehensive Guide 98 Citigroup Corporate and Investment Banking
The Report Summary Form The Report Summary form is your starting point for selecting, running, editing, and viewing reports. • There are two tabs on the right side of the Report Summary form: Criteria and View
Reports.
• When you access this form, the View Reports tab is active. The functions of both tabs are described in the Running Reports section of this Guide.
The Cash Balances Reports summary form is shown in this example.
The elements of the Report Summary form are described in the table below.
Element Description
1 Report service classes
2 Base reports
3 User-defined reports (i.e., reports you have edited and saved)
4 List of reports run in the past 24 hours
5 Action buttons for viewing and editing reports
1
5
4
3
2
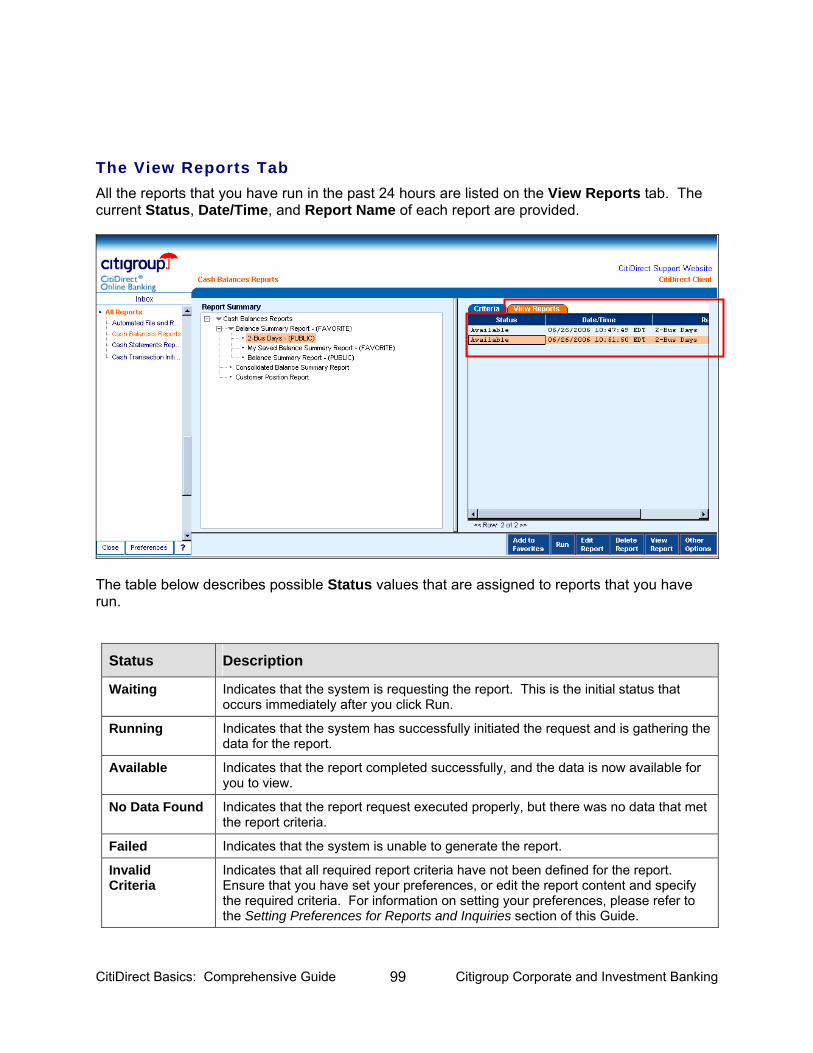
CitiDirect Basics: Comprehensive Guide 99 Citigroup Corporate and Investment Banking
The View Reports Tab All the reports that you have run in the past 24 hours are listed on the View Reports tab. The current Status, Date/Time, and Report Name of each report are provided.
The table below describes possible Status values that are assigned to reports that you have run.
Status Description
Waiting Indicates that the system is requesting the report. This is the initial status that occurs immediately after you click Run.
Running Indicates that the system has successfully initiated the request and is gathering the data for the report.
Available Indicates that the report completed successfully, and the data is now available for you to view.
No Data Found Indicates that the report request executed properly, but there was no data that met the report criteria.
Failed Indicates that the system is unable to generate the report.
Invalid Criteria
Indicates that all required report criteria have not been defined for the report. Ensure that you have set your preferences, or edit the report content and specify the required criteria. For information on setting your preferences, please refer to the Setting Preferences for Reports and Inquiries section of this Guide.
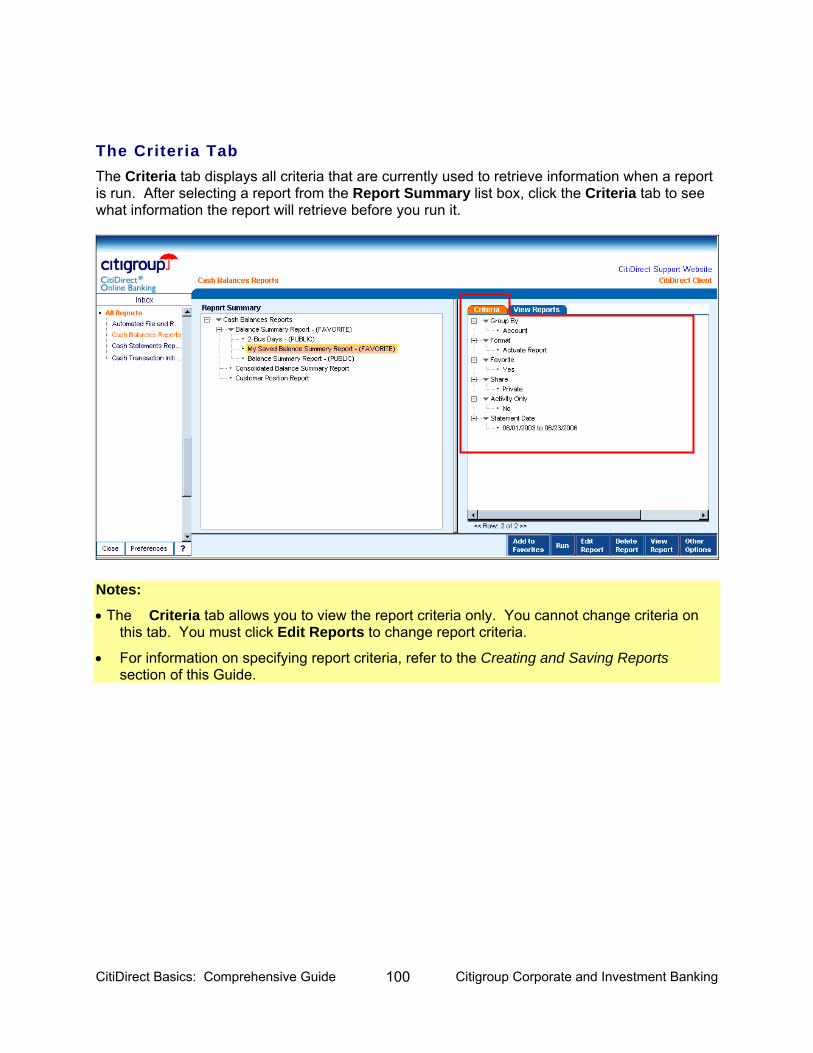
CitiDirect Basics: Comprehensive Guide 100 Citigroup Corporate and Investment Banking
The Criteria Tab The Criteria tab displays all criteria that are currently used to retrieve information when a report is run. After selecting a report from the Report Summary list box, click the Criteria tab to see what information the report will retrieve before you run it.
Notes:
• The Criteria tab allows you to view the report criteria only. You cannot change criteria on this tab. You must click Edit Reports to change report criteria.
• For information on specifying report criteria, refer to the Creating and Saving Reports section of this Guide.
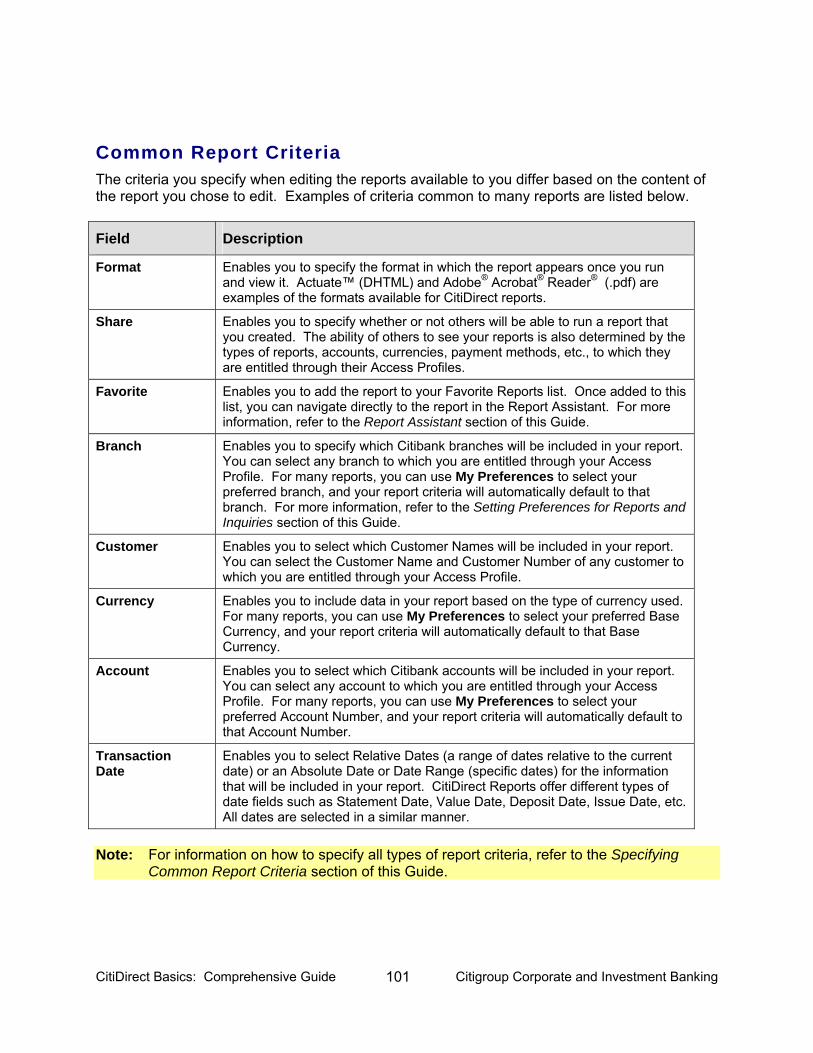
CitiDirect Basics: Comprehensive Guide 101 Citigroup Corporate and Investment Banking
Common Report Criteria The criteria you specify when editing the reports available to you differ based on the content of the report you chose to edit. Examples of criteria common to many reports are listed below.
Field Description
Format Enables you to specify the format in which the report appears once you run and view it. Actuate™ (DHTML) and Adobe® Acrobat® Reader® (.pdf) are examples of the formats available for CitiDirect reports.
Share Enables you to specify whether or not others will be able to run a report that you created. The ability of others to see your reports is also determined by the types of reports, accounts, currencies, payment methods, etc., to which they are entitled through their Access Profiles.
Favorite Enables you to add the report to your Favorite Reports list. Once added to this list, you can navigate directly to the report in the Report Assistant. For more information, refer to the Report Assistant section of this Guide.
Branch Enables you to specify which Citibank branches will be included in your report. You can select any branch to which you are entitled through your Access Profile. For many reports, you can use My Preferences to select your preferred branch, and your report criteria will automatically default to that branch. For more information, refer to the Setting Preferences for Reports and Inquiries section of this Guide.
Customer Enables you to select which Customer Names will be included in your report. You can select the Customer Name and Customer Number of any customer to which you are entitled through your Access Profile.
Currency Enables you to include data in your report based on the type of currency used. For many reports, you can use My Preferences to select your preferred Base Currency, and your report criteria will automatically default to that Base Currency.
Account Enables you to select which Citibank accounts will be included in your report. You can select any account to which you are entitled through your Access Profile. For many reports, you can use My Preferences to select your preferred Account Number, and your report criteria will automatically default to that Account Number.
Transaction Date
Enables you to select Relative Dates (a range of dates relative to the current date) or an Absolute Date or Date Range (specific dates) for the information that will be included in your report. CitiDirect Reports offer different types of date fields such as Statement Date, Value Date, Deposit Date, Issue Date, etc. All dates are selected in a similar manner.
Note: For information on how to specify all types of report criteria, refer to the Specifying
Common Report Criteria section of this Guide.
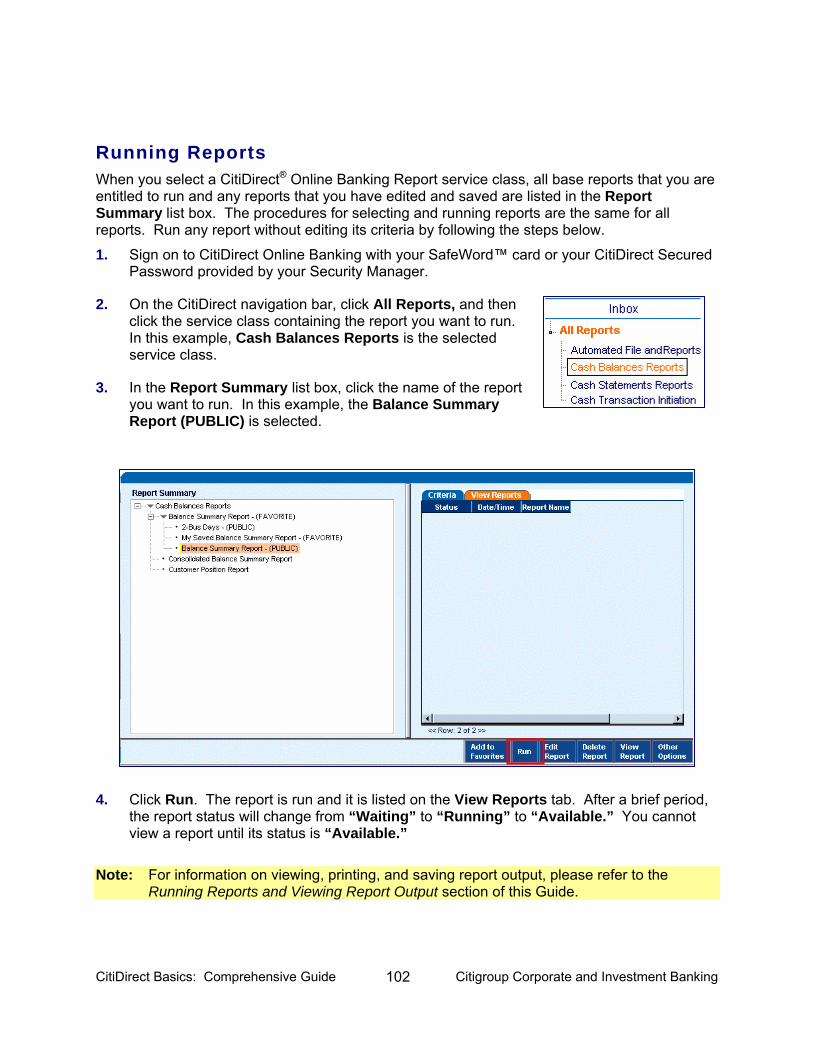
CitiDirect Basics: Comprehensive Guide 102 Citigroup Corporate and Investment Banking
Running Reports When you select a CitiDirect® Online Banking Report service class, all base reports that you are entitled to run and any reports that you have edited and saved are listed in the Report Summary list box. The procedures for selecting and running reports are the same for all reports. Run any report without editing its criteria by following the steps below.
1. Sign on to CitiDirect Online Banking with your SafeWord™ card or your CitiDirect Secured Password provided by your Security Manager.
2. On the CitiDirect navigation bar, click All Reports, and then click the service class containing the report you want to run. In this example, Cash Balances Reports is the selected service class.
3. In the Report Summary list box, click the name of the report you want to run. In this example, the Balance Summary Report (PUBLIC) is selected.
4. Click Run. The report is run and it is listed on the View Reports tab. After a brief period, the report status will change from “Waiting” to “Running” to “Available.” You cannot view a report until its status is “Available.”
Note: For information on viewing, printing, and saving report output, please refer to the
Running Reports and Viewing Report Output section of this Guide.
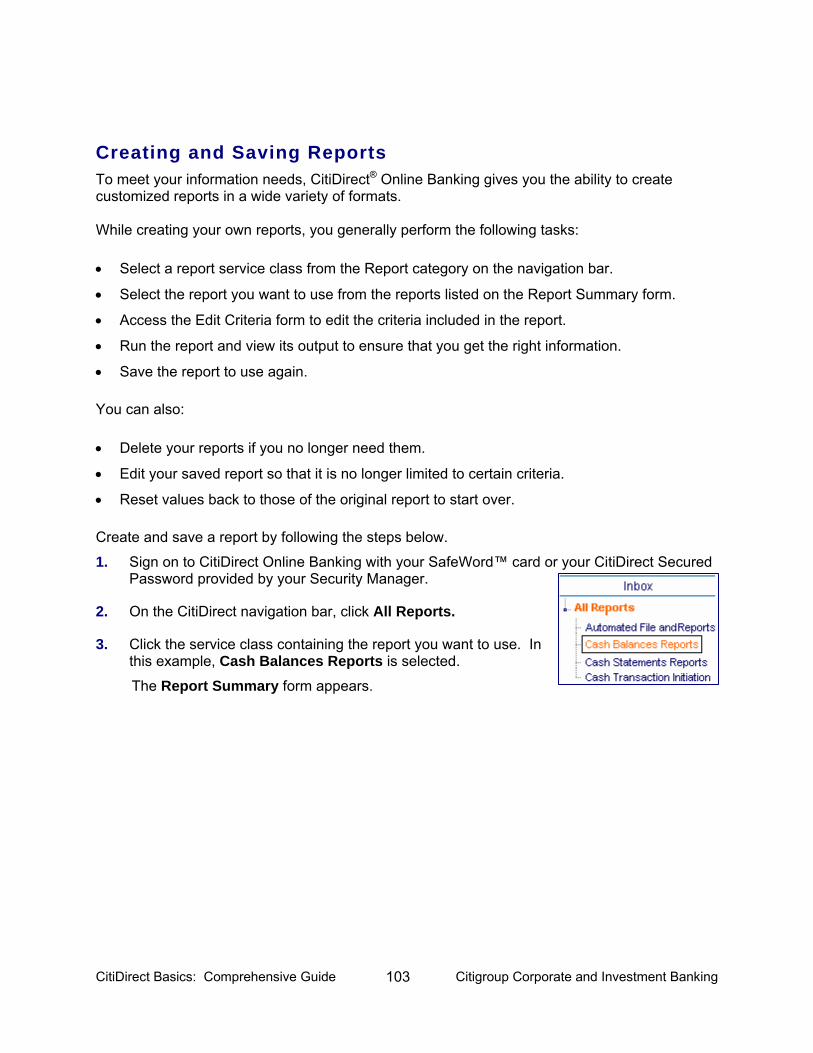
CitiDirect Basics: Comprehensive Guide 103 Citigroup Corporate and Investment Banking
Creating and Saving Reports To meet your information needs, CitiDirect® Online Banking gives you the ability to create customized reports in a wide variety of formats. While creating your own reports, you generally perform the following tasks: • Select a report service class from the Report category on the navigation bar.
• Select the report you want to use from the reports listed on the Report Summary form.
• Access the Edit Criteria form to edit the criteria included in the report.
• Run the report and view its output to ensure that you get the right information.
• Save the report to use again. You can also: • Delete your reports if you no longer need them.
• Edit your saved report so that it is no longer limited to certain criteria.
• Reset values back to those of the original report to start over. Create and save a report by following the steps below.
1. Sign on to CitiDirect Online Banking with your SafeWord™ card or your CitiDirect Secured Password provided by your Security Manager.
2. On the CitiDirect navigation bar, click All Reports.
3. Click the service class containing the report you want to use. In this example, Cash Balances Reports is selected. The Report Summary form appears.
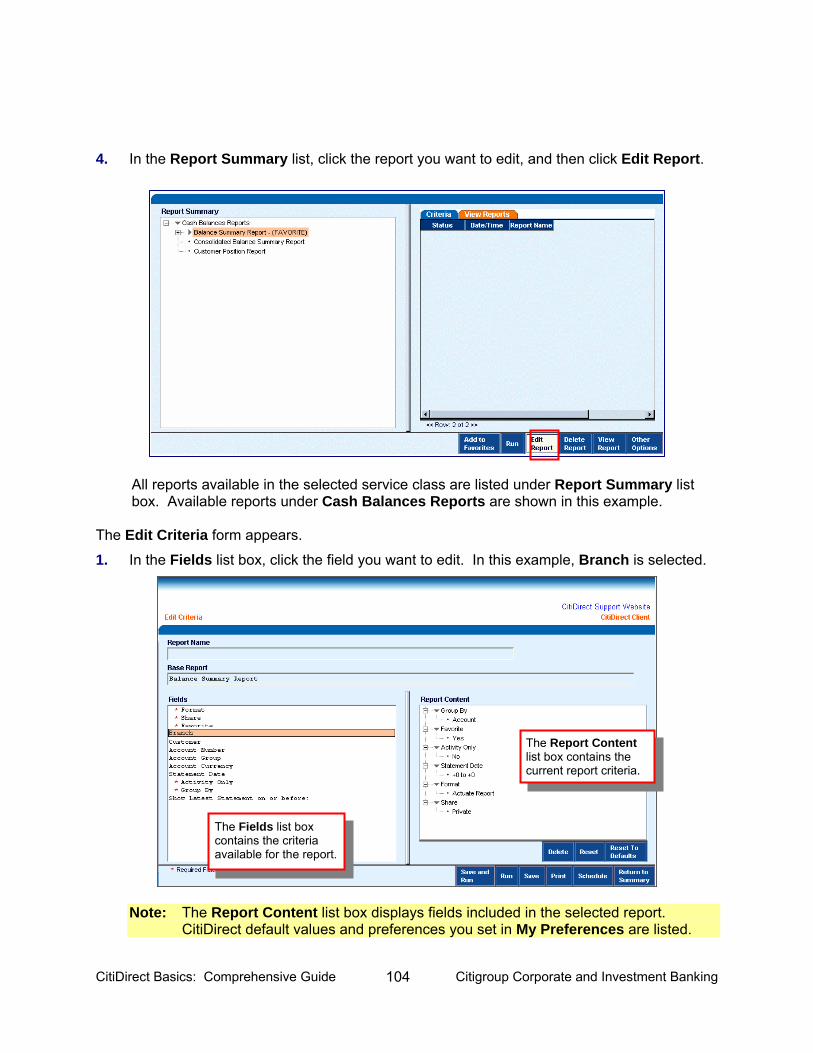
CitiDirect Basics: Comprehensive Guide 104 Citigroup Corporate and Investment Banking
4. In the Report Summary list, click the report you want to edit, and then click Edit Report.
All reports available in the selected service class are listed under Report Summary list box. Available reports under Cash Balances Reports are shown in this example.
The Edit Criteria form appears.
1. In the Fields list box, click the field you want to edit. In this example, Branch is selected.
Note: The Report Content list box displays fields included in the selected report. CitiDirect default values and preferences you set in My Preferences are listed.
The Report Content list box contains the current report criteria.
The Fields list box contains the criteria available for the report.
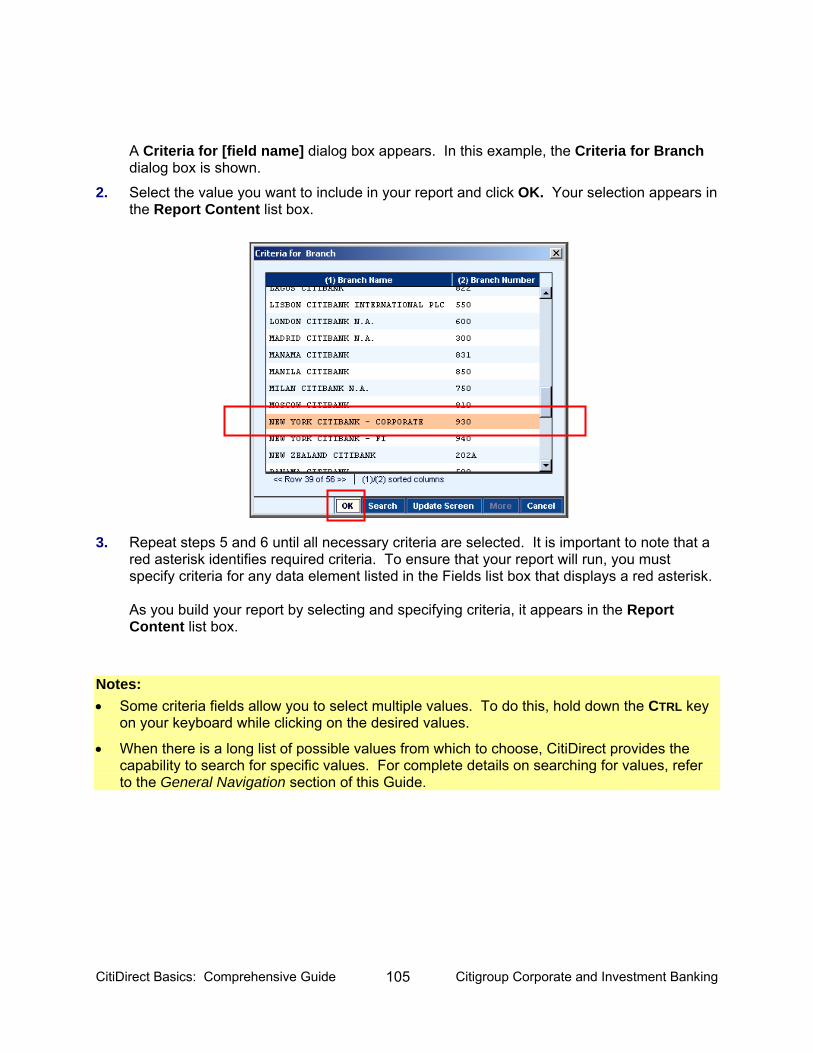
CitiDirect Basics: Comprehensive Guide 105 Citigroup Corporate and Investment Banking
A Criteria for [field name] dialog box appears. In this example, the Criteria for Branch dialog box is shown.
2. Select the value you want to include in your report and click OK. Your selection appears in the Report Content list box.
3. Repeat steps 5 and 6 until all necessary criteria are selected. It is important to note that a red asterisk identifies required criteria. To ensure that your report will run, you must specify criteria for any data element listed in the Fields list box that displays a red asterisk. As you build your report by selecting and specifying criteria, it appears in the Report Content list box.
Notes: • Some criteria fields allow you to select multiple values. To do this, hold down the CTRL key
on your keyboard while clicking on the desired values.
• When there is a long list of possible values from which to choose, CitiDirect provides the capability to search for specific values. For complete details on searching for values, refer to the General Navigation section of this Guide.
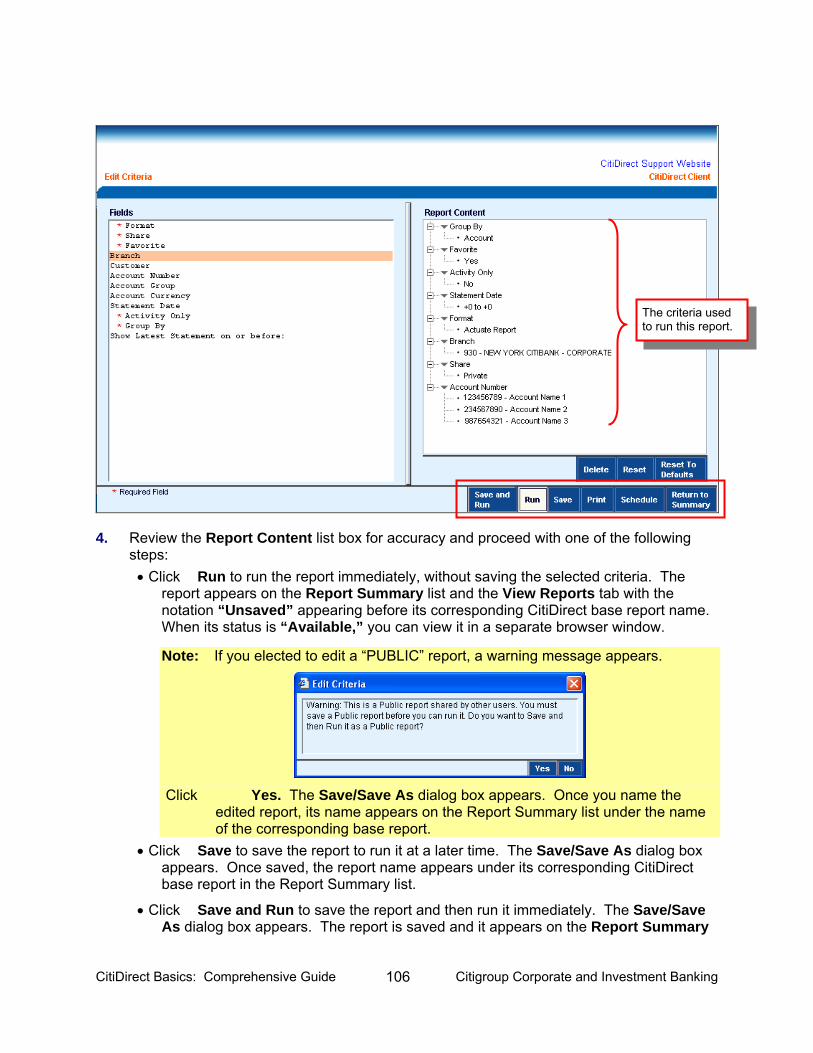
CitiDirect Basics: Comprehensive Guide 106 Citigroup Corporate and Investment Banking
4. Review the Report Content list box for accuracy and proceed with one of the following steps: • Click Run to run the report immediately, without saving the selected criteria. The
report appears on the Report Summary list and the View Reports tab with the notation “Unsaved” appearing before its corresponding CitiDirect base report name. When its status is “Available,” you can view it in a separate browser window.
Note: If you elected to edit a “PUBLIC” report, a warning message appears.
Click Yes. The Save/Save As dialog box appears. Once you name the
edited report, its name appears on the Report Summary list under the name of the corresponding base report.
• Click Save to save the report to run it at a later time. The Save/Save As dialog box appears. Once saved, the report name appears under its corresponding CitiDirect base report in the Report Summary list.
• Click Save and Run to save the report and then run it immediately. The Save/Save As dialog box appears. The report is saved and it appears on the Report Summary
The criteria used to run this report.
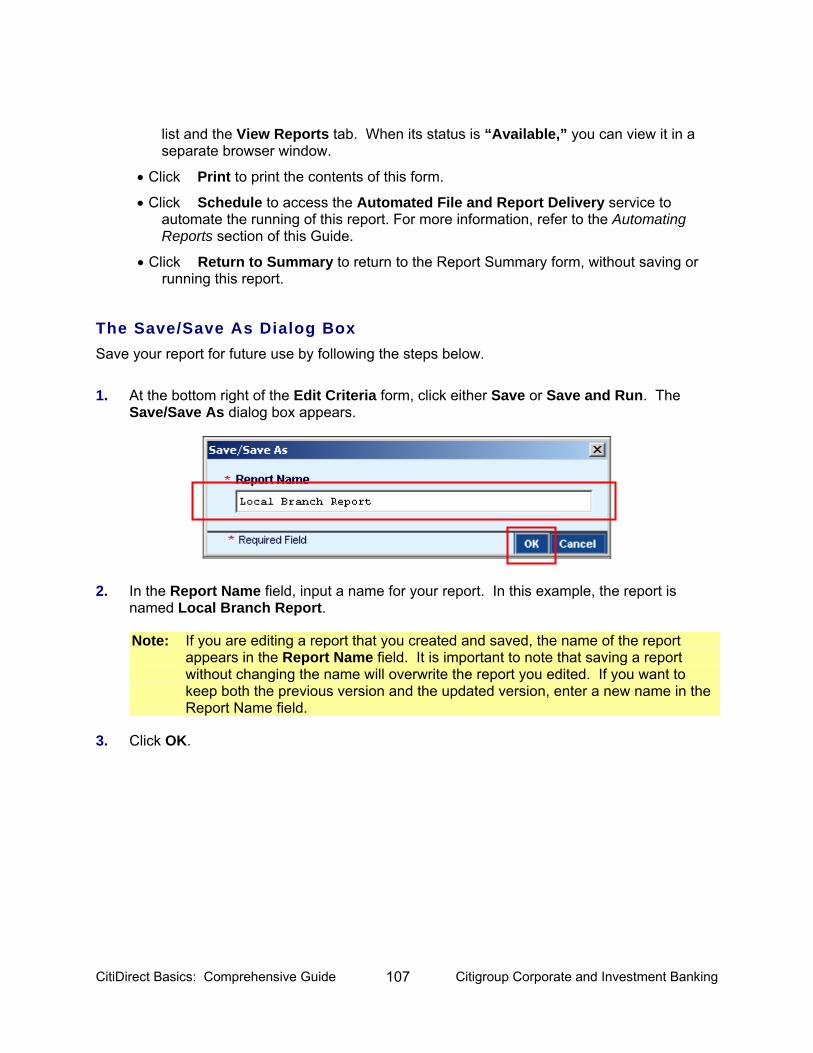
CitiDirect Basics: Comprehensive Guide 107 Citigroup Corporate and Investment Banking
list and the View Reports tab. When its status is “Available,” you can view it in a separate browser window.
• Click Print to print the contents of this form.
• Click Schedule to access the Automated File and Report Delivery service to automate the running of this report. For more information, refer to the Automating Reports section of this Guide.
• Click Return to Summary to return to the Report Summary form, without saving or running this report.
The Save/Save As Dialog Box Save your report for future use by following the steps below.
1. At the bottom right of the Edit Criteria form, click either Save or Save and Run. The Save/Save As dialog box appears.
2. In the Report Name field, input a name for your report. In this example, the report is named Local Branch Report.
Note: If you are editing a report that you created and saved, the name of the report appears in the Report Name field. It is important to note that saving a report without changing the name will overwrite the report you edited. If you want to keep both the previous version and the updated version, enter a new name in the Report Name field.
3. Click OK.
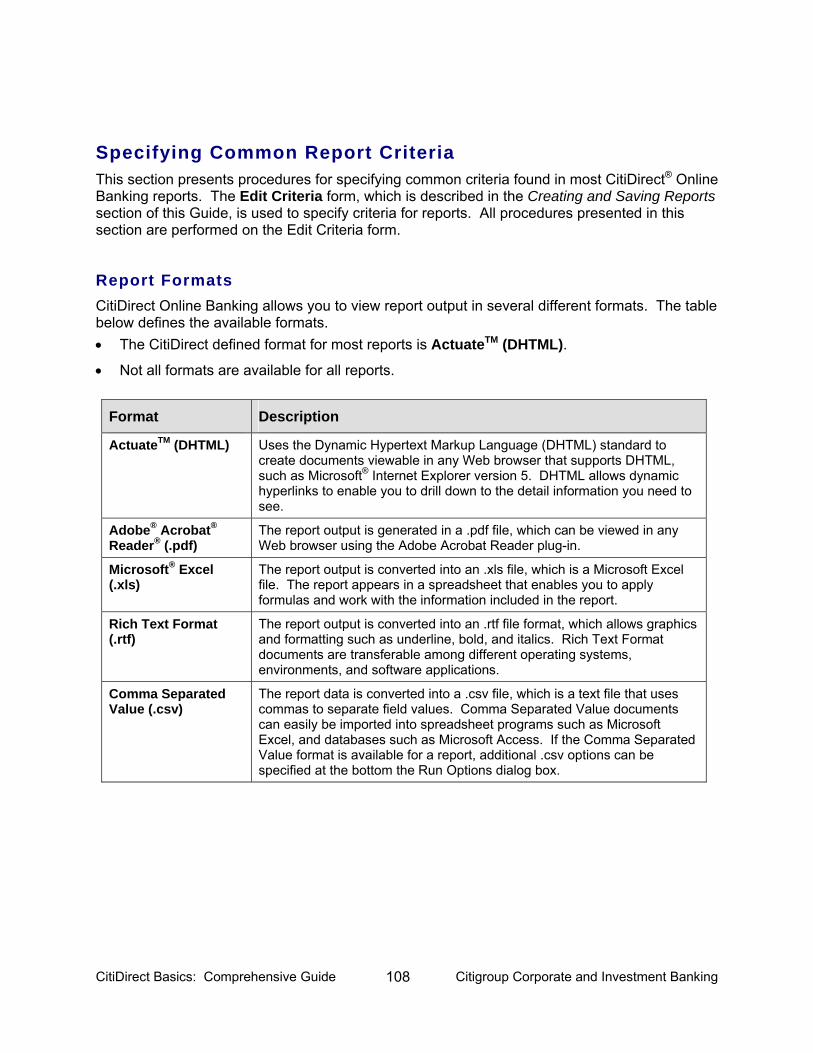
CitiDirect Basics: Comprehensive Guide 108 Citigroup Corporate and Investment Banking
Specifying Common Report Criteria This section presents procedures for specifying common criteria found in most CitiDirect® Online Banking reports. The Edit Criteria form, which is described in the Creating and Saving Reports section of this Guide, is used to specify criteria for reports. All procedures presented in this section are performed on the Edit Criteria form.
Report Formats CitiDirect Online Banking allows you to view report output in several different formats. The table below defines the available formats. • The CitiDirect defined format for most reports is ActuateTM (DHTML).
• Not all formats are available for all reports.
Format Description
ActuateTM (DHTML) Uses the Dynamic Hypertext Markup Language (DHTML) standard to create documents viewable in any Web browser that supports DHTML, such as Microsoft® Internet Explorer version 5. DHTML allows dynamic hyperlinks to enable you to drill down to the detail information you need to see.
Adobe® Acrobat® Reader® (.pdf)
The report output is generated in a .pdf file, which can be viewed in any Web browser using the Adobe Acrobat Reader plug-in.
Microsoft® Excel (.xls)
The report output is converted into an .xls file, which is a Microsoft Excel file. The report appears in a spreadsheet that enables you to apply formulas and work with the information included in the report.
Rich Text Format (.rtf)
The report output is converted into an .rtf file format, which allows graphics and formatting such as underline, bold, and italics. Rich Text Format documents are transferable among different operating systems, environments, and software applications.
Comma Separated Value (.csv)
The report data is converted into a .csv file, which is a text file that uses commas to separate field values. Comma Separated Value documents can easily be imported into spreadsheet programs such as Microsoft Excel, and databases such as Microsoft Access. If the Comma Separated Value format is available for a report, additional .csv options can be specified at the bottom the Run Options dialog box.
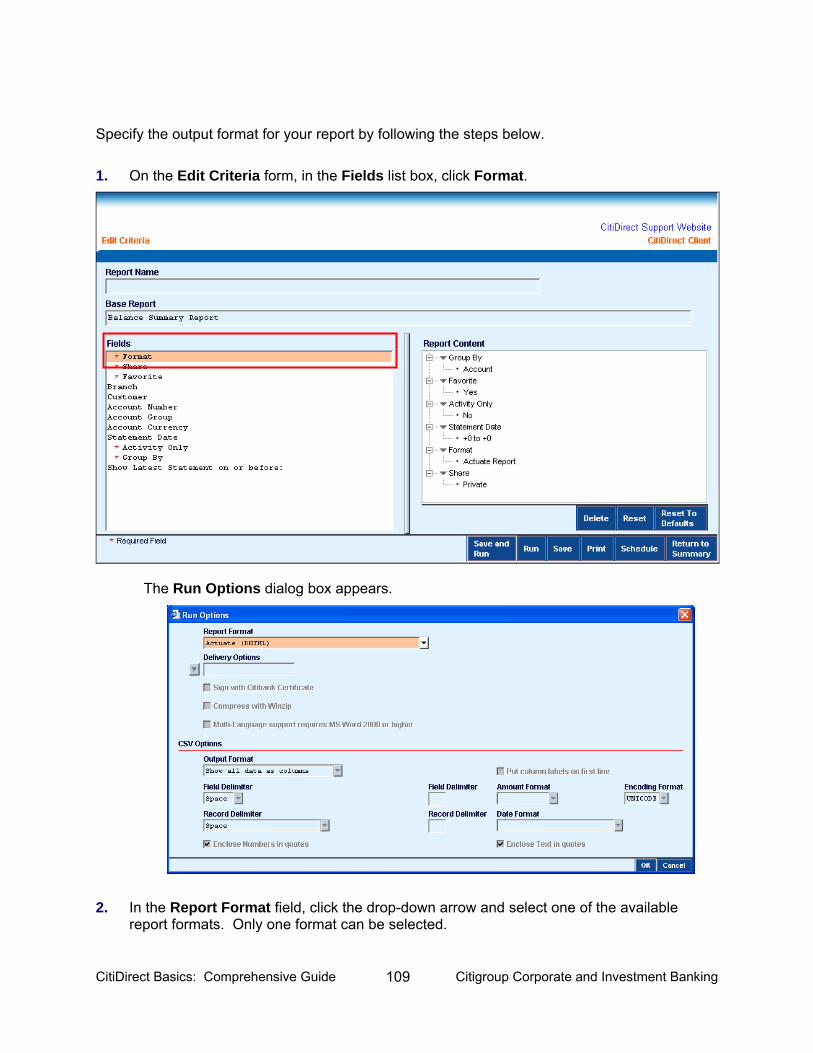
CitiDirect Basics: Comprehensive Guide 109 Citigroup Corporate and Investment Banking
Specify the output format for your report by following the steps below.
1. On the Edit Criteria form, in the Fields list box, click Format.
The Run Options dialog box appears.
2. In the Report Format field, click the drop-down arrow and select one of the available report formats. Only one format can be selected.
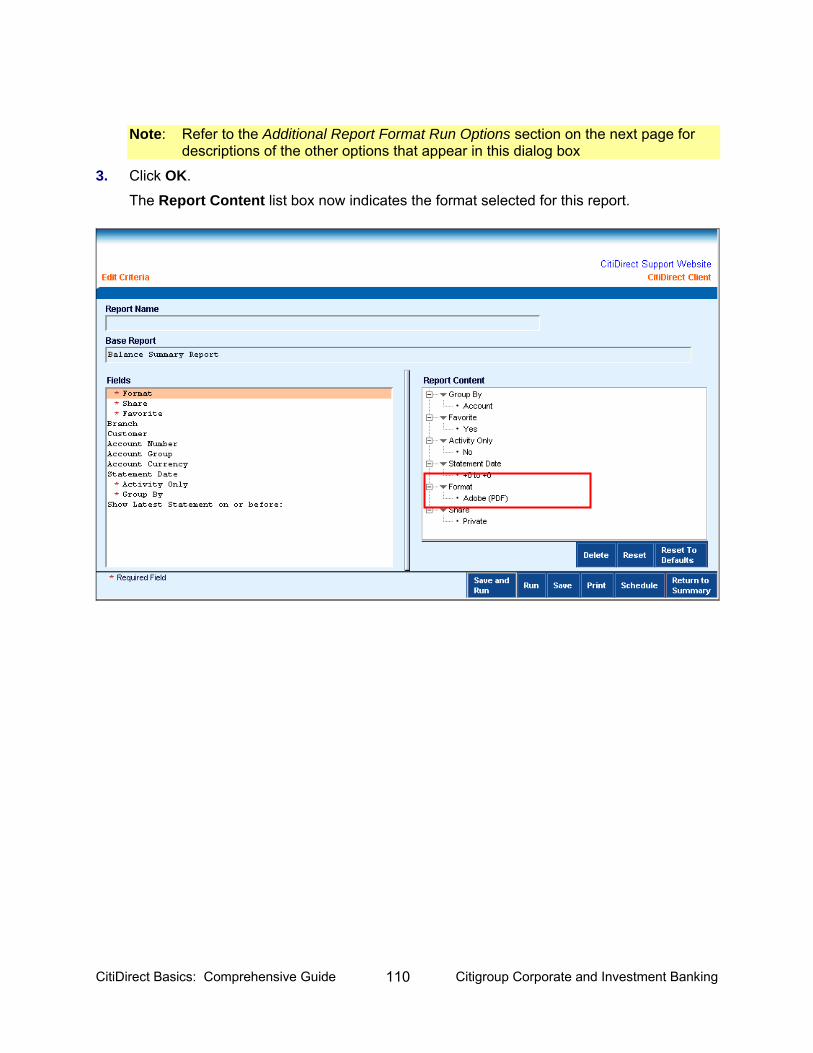
CitiDirect Basics: Comprehensive Guide 110 Citigroup Corporate and Investment Banking
Note: Refer to the Additional Report Format Run Options section on the next page for descriptions of the other options that appear in this dialog box
3. Click OK.
The Report Content list box now indicates the format selected for this report.
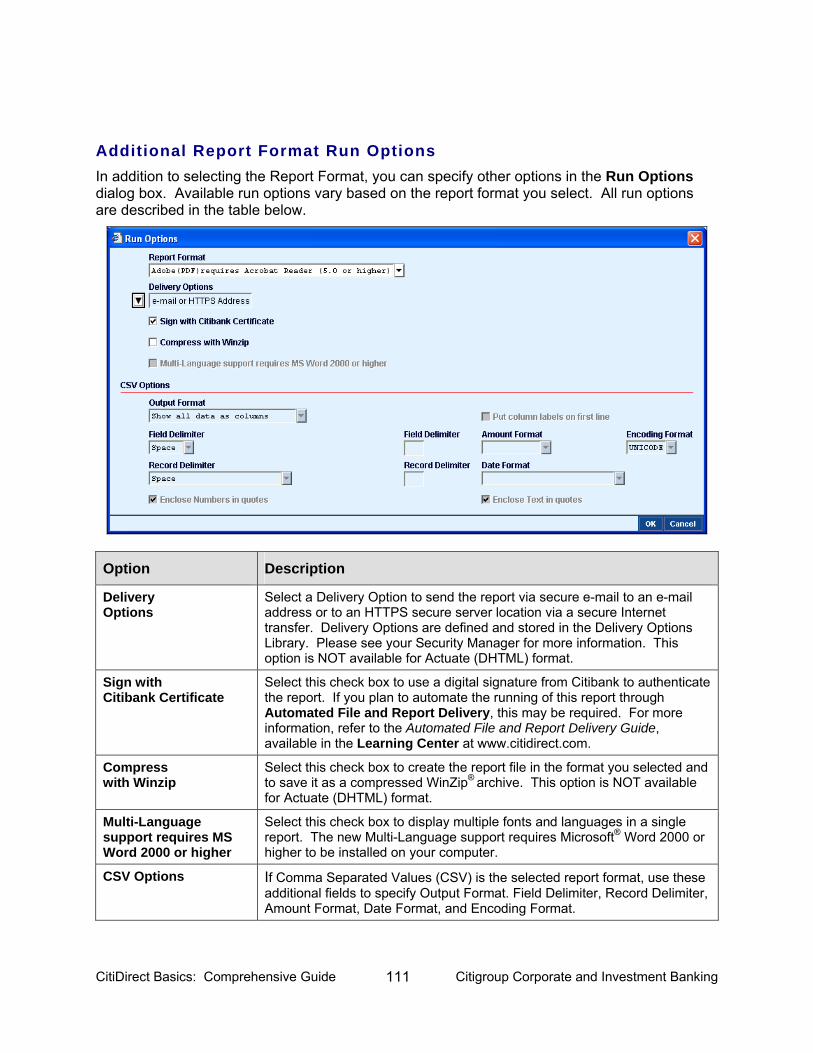
CitiDirect Basics: Comprehensive Guide 111 Citigroup Corporate and Investment Banking
Additional Report Format Run Options In addition to selecting the Report Format, you can specify other options in the Run Options dialog box. Available run options vary based on the report format you select. All run options are described in the table below.
Option Description
Delivery Options
Select a Delivery Option to send the report via secure e-mail to an e-mail address or to an HTTPS secure server location via a secure Internet transfer. Delivery Options are defined and stored in the Delivery Options Library. Please see your Security Manager for more information. This option is NOT available for Actuate (DHTML) format.
Sign with Citibank Certificate
Select this check box to use a digital signature from Citibank to authenticate the report. If you plan to automate the running of this report through Automated File and Report Delivery, this may be required. For more information, refer to the Automated File and Report Delivery Guide, available in the Learning Center at www.citidirect.com.
Compress with Winzip
Select this check box to create the report file in the format you selected and to save it as a compressed WinZip® archive. This option is NOT available for Actuate (DHTML) format.
Multi-Language support requires MS Word 2000 or higher
Select this check box to display multiple fonts and languages in a single report. The new Multi-Language support requires Microsoft® Word 2000 or higher to be installed on your computer.
CSV Options If Comma Separated Values (CSV) is the selected report format, use these additional fields to specify Output Format. Field Delimiter, Record Delimiter, Amount Format, Date Format, and Encoding Format.
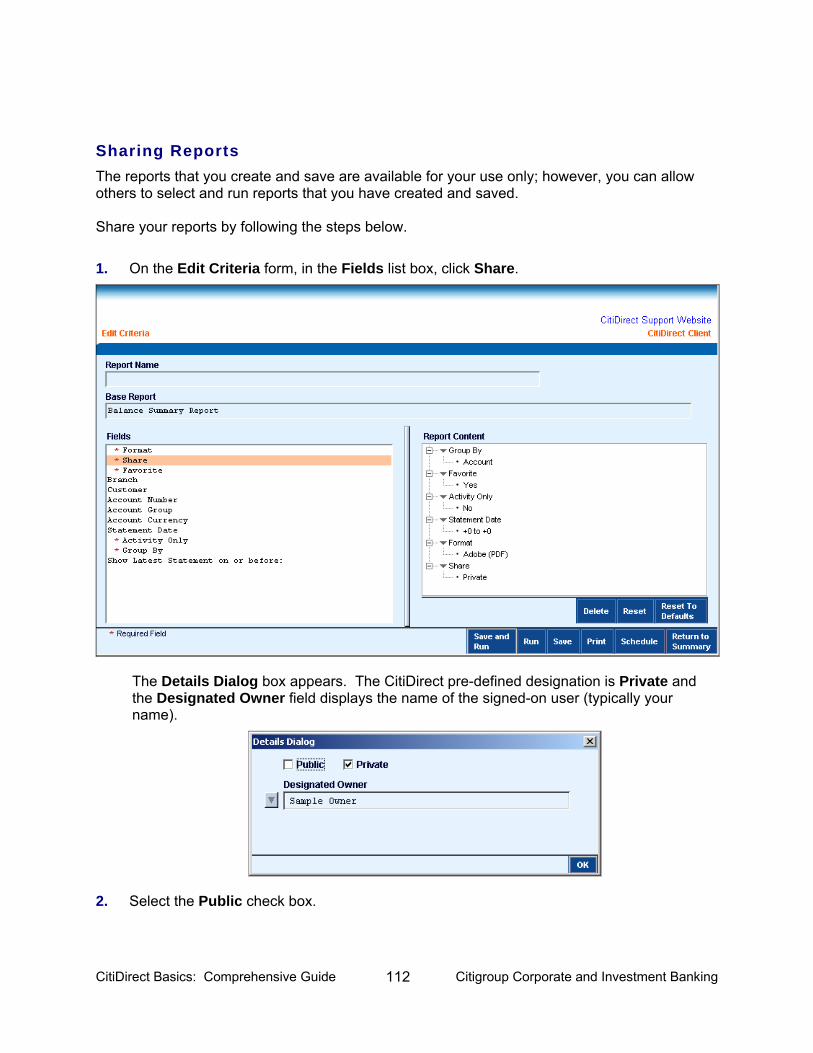
CitiDirect Basics: Comprehensive Guide 112 Citigroup Corporate and Investment Banking
Sharing Reports The reports that you create and save are available for your use only; however, you can allow others to select and run reports that you have created and saved. Share your reports by following the steps below.
1. On the Edit Criteria form, in the Fields list box, click Share.
The Details Dialog box appears. The CitiDirect pre-defined designation is Private and the Designated Owner field displays the name of the signed-on user (typically your name).
2. Select the Public check box.
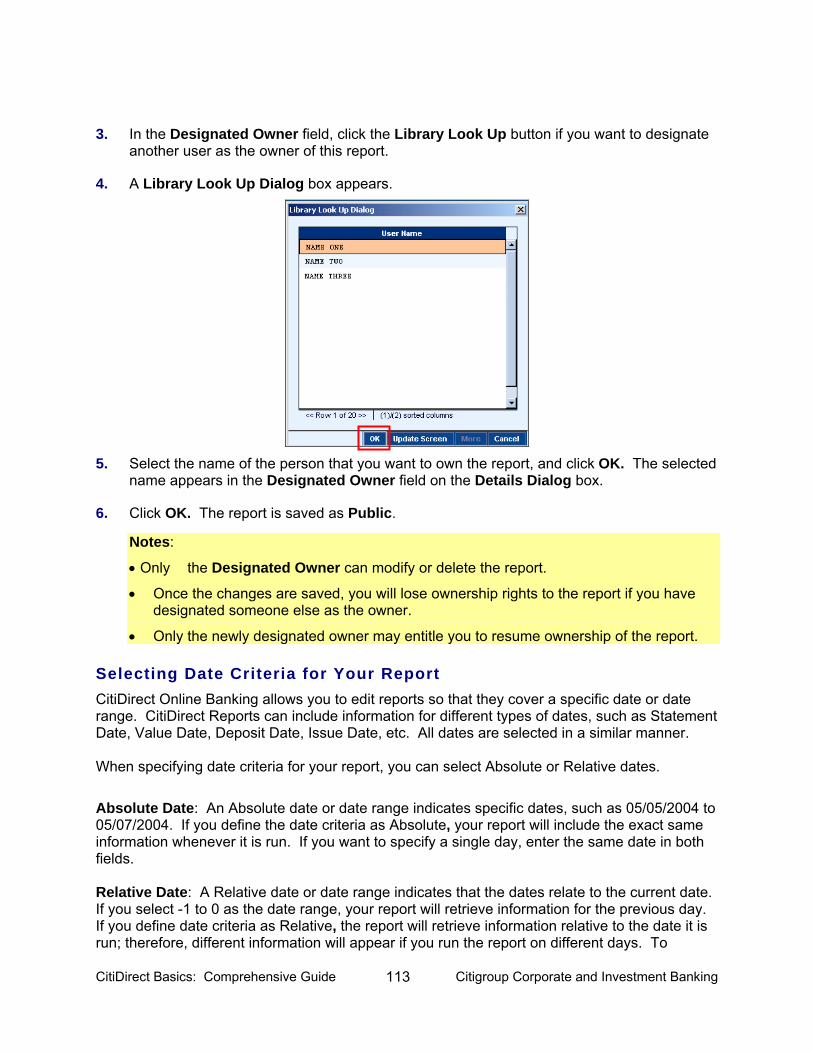
CitiDirect Basics: Comprehensive Guide 113 Citigroup Corporate and Investment Banking
3. In the Designated Owner field, click the Library Look Up button if you want to designate another user as the owner of this report.
4. A Library Look Up Dialog box appears.
5. Select the name of the person that you want to own the report, and click OK. The selected
name appears in the Designated Owner field on the Details Dialog box.
6. Click OK. The report is saved as Public.
Notes:
• Only the Designated Owner can modify or delete the report.
• Once the changes are saved, you will lose ownership rights to the report if you have designated someone else as the owner.
• Only the newly designated owner may entitle you to resume ownership of the report.
Selecting Date Criteria for Your Report CitiDirect Online Banking allows you to edit reports so that they cover a specific date or date range. CitiDirect Reports can include information for different types of dates, such as Statement Date, Value Date, Deposit Date, Issue Date, etc. All dates are selected in a similar manner. When specifying date criteria for your report, you can select Absolute or Relative dates. Absolute Date: An Absolute date or date range indicates specific dates, such as 05/05/2004 to 05/07/2004. If you define the date criteria as Absolute, your report will include the exact same information whenever it is run. If you want to specify a single day, enter the same date in both fields. Relative Date: A Relative date or date range indicates that the dates relate to the current date. If you select -1 to 0 as the date range, your report will retrieve information for the previous day. If you define date criteria as Relative, the report will retrieve information relative to the date it is run; therefore, different information will appear if you run the report on different days. To

CitiDirect Basics: Comprehensive Guide 114 Citigroup Corporate and Investment Banking
eliminate the need for specifying criteria each time you run the same report, specify Relative dates and date ranges. Select date criteria for your report by following the steps below:
1. In the Fields list box, select the date field you want to specify. The Date Range [date type] dialog box appears. In this example, Statement Date is selected.
2. Proceed with one of the following steps.
• Click the Absolute tab, enter the date range by clicking the drop-down arrow or using the date spinner, and then click OK. If you want to specify one date, select the same date for both fields. You can also type the date into each field.
The Date Range – Statement Date dialog box is shown in this example.
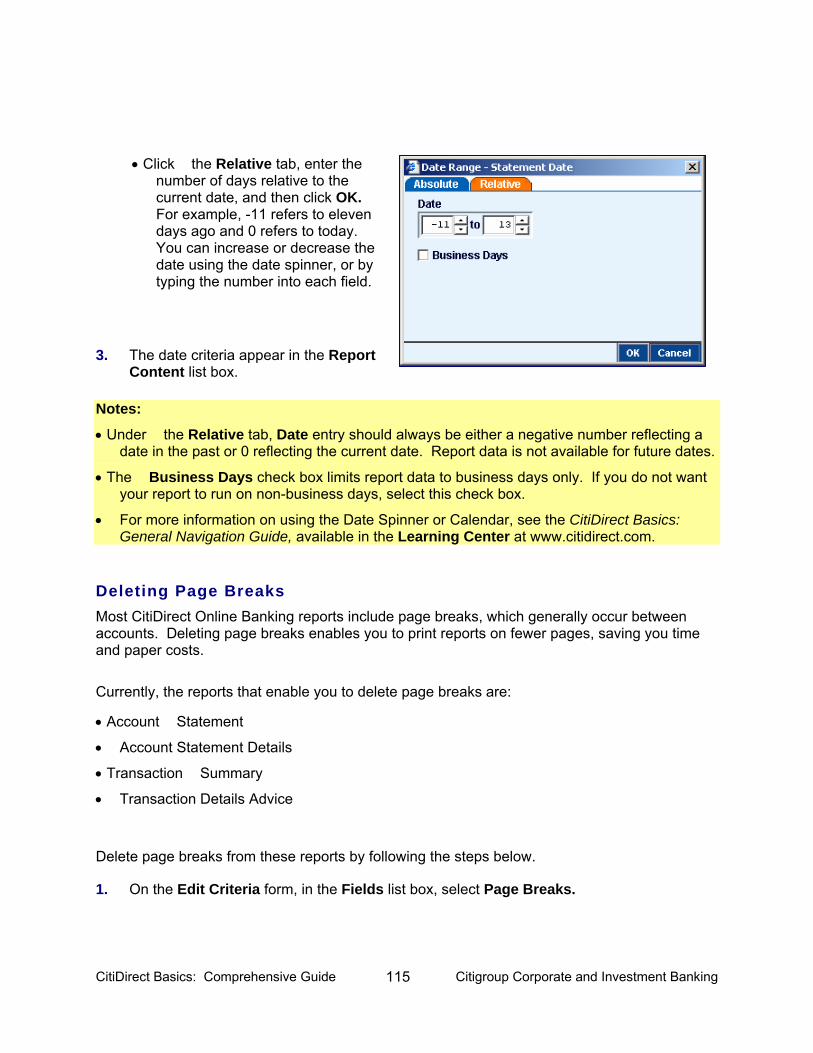
CitiDirect Basics: Comprehensive Guide 115 Citigroup Corporate and Investment Banking
• Click the Relative tab, enter the number of days relative to the current date, and then click OK. For example, -11 refers to eleven days ago and 0 refers to today. You can increase or decrease the date using the date spinner, or by typing the number into each field.
3. The date criteria appear in the Report Content list box.
Notes:
• Under the Relative tab, Date entry should always be either a negative number reflecting a date in the past or 0 reflecting the current date. Report data is not available for future dates.
• The Business Days check box limits report data to business days only. If you do not want your report to run on non-business days, select this check box.
• For more information on using the Date Spinner or Calendar, see the CitiDirect Basics: General Navigation Guide, available in the Learning Center at www.citidirect.com.
Deleting Page Breaks Most CitiDirect Online Banking reports include page breaks, which generally occur between accounts. Deleting page breaks enables you to print reports on fewer pages, saving you time and paper costs.
Currently, the reports that enable you to delete page breaks are:
• Account Statement
• Account Statement Details
• Transaction Summary
• Transaction Details Advice
Delete page breaks from these reports by following the steps below.
1. On the Edit Criteria form, in the Fields list box, select Page Breaks.
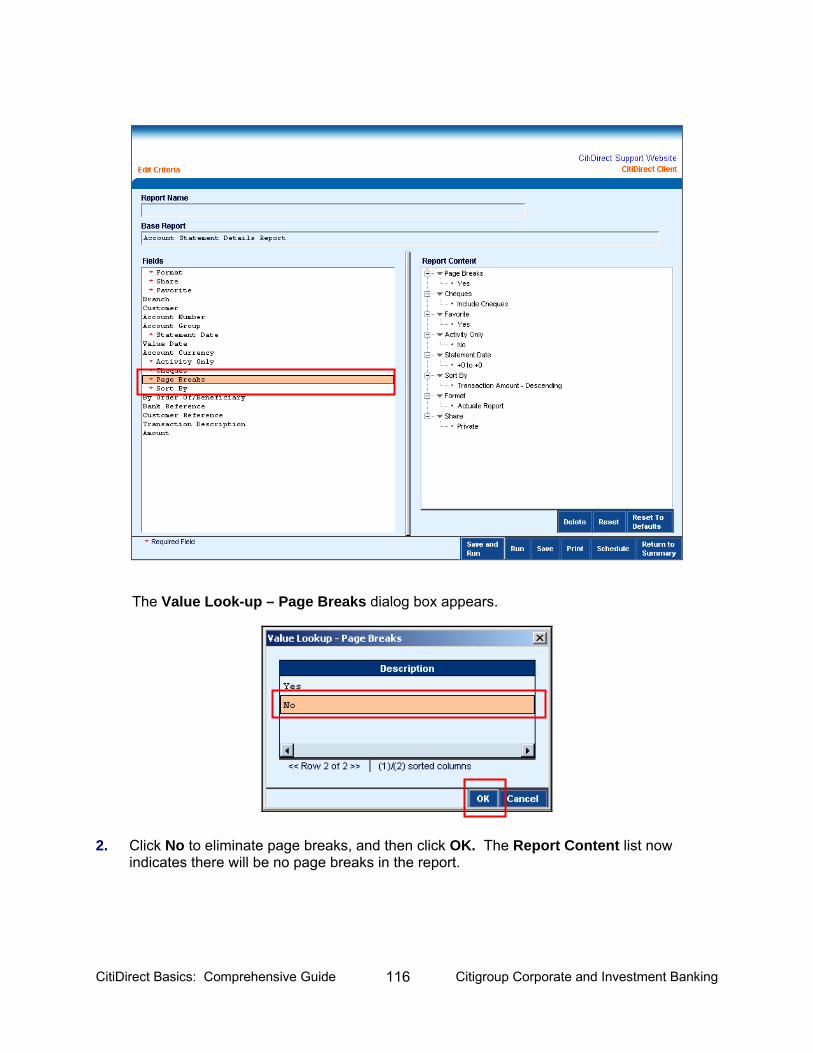
CitiDirect Basics: Comprehensive Guide 116 Citigroup Corporate and Investment Banking
The Value Look-up – Page Breaks dialog box appears.
2. Click No to eliminate page breaks, and then click OK. The Report Content list now indicates there will be no page breaks in the report.

CitiDirect Basics: Comprehensive Guide 117 Citigroup Corporate and Investment Banking
Running Reports and Viewing Report Output CitiDirect® Online Banking will store and list all reports that you have run in the past 24 hours. You can view the output of reports with an “Available” status only. For descriptions of possible report status assignments, refer to The View Reports Tab section of this Guide. • Once successfully run, CitiDirect Reports appear in a separate browser window in the format
specified in the report criteria.
• The CitiDirect-defined format for most reports is ActuateTM. For information on viewing reports in other formats, see the Viewing Report Output in Different Formats section of this Guide.
Run your report and view the report output by following the steps below.
1. Sign on to CitiDirect Online Banking with your SafeWord™ card or your CitiDirect Secured Password provided by your Security Manager.
2. On the CitiDirect navigation bar, click All Reports.
3. Click the service class containing the report you want to view. In this example, Cash Balances Reports is selected.
The Report Summary form appears.
All reports available in the selected service class are listed in the Report Summary list box on the left. All instances of the running of the selected report within the past 24 hours appear on the View Reports tab on the right.
CitiDirect Basics: Comprehensive Guide 118 Citigroup Corporate and Investment Banking
4. In the Report Summary list box, make sure that the name of the report you want to view is highlighted. In this example, the 2-Bus Days (PUBLIC) is selected.
5. Proceed with one of the following steps:
• On the View Reports tab, select the instance of the report run, and then click View Report. The status assigned to the instance of the report run must be “Available.”
• If the Report is not listed on the View Reports tab, select it on the Report Summary list, and then click Run. The report appears on the View Reports tab. After a brief period, its status changes from Waiting to Running to Available. When the status is “Available,” click View Report.
6. The report appears in a separate browser window in the format specified.
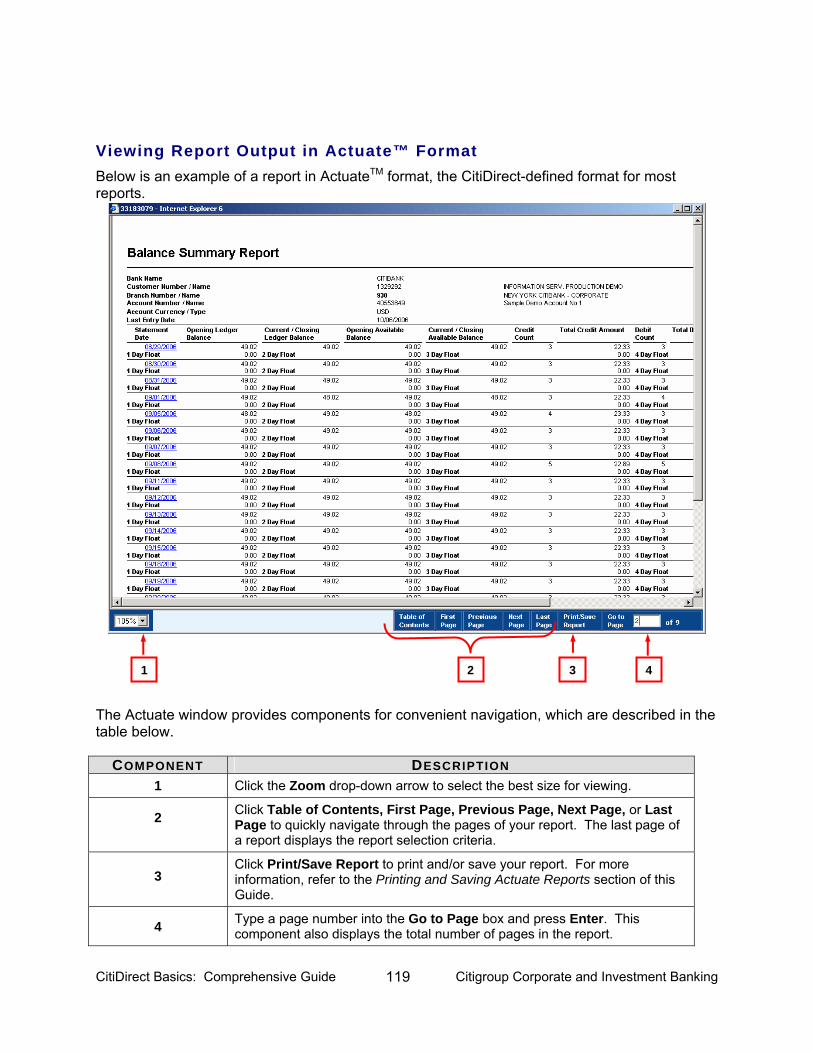
CitiDirect Basics: Comprehensive Guide 119 Citigroup Corporate and Investment Banking
Viewing Report Output in Actuate™ Format Below is an example of a report in ActuateTM format, the CitiDirect-defined format for most reports.
The Actuate window provides components for convenient navigation, which are described in the table below.
COMPONENT DESCRIPTION 1 Click the Zoom drop-down arrow to select the best size for viewing.
2 Click Table of Contents, First Page, Previous Page, Next Page, or Last Page to quickly navigate through the pages of your report. The last page of a report displays the report selection criteria.
3 Click Print/Save Report to print and/or save your report. For more information, refer to the Printing and Saving Actuate Reports section of this Guide.
4 Type a page number into the Go to Page box and press Enter. This component also displays the total number of pages in the report.
21 4 3
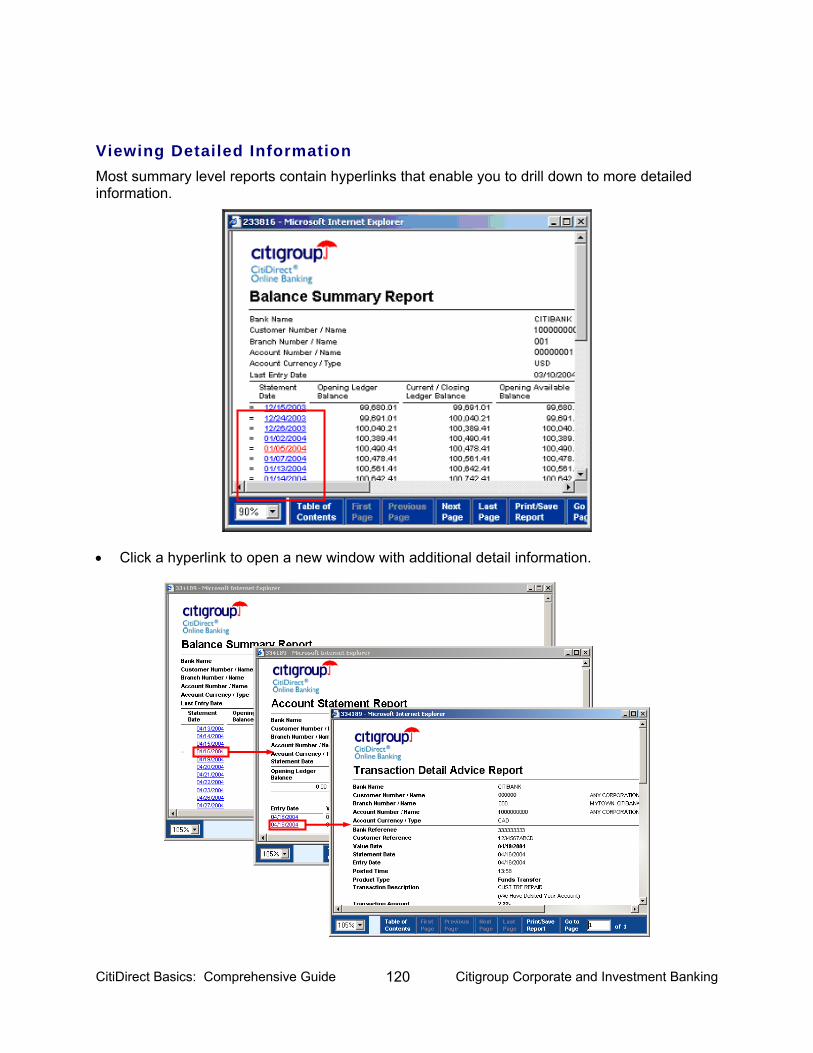
CitiDirect Basics: Comprehensive Guide 120 Citigroup Corporate and Investment Banking
Viewing Detailed Information Most summary level reports contain hyperlinks that enable you to drill down to more detailed information.
• Click a hyperlink to open a new window with additional detail information.
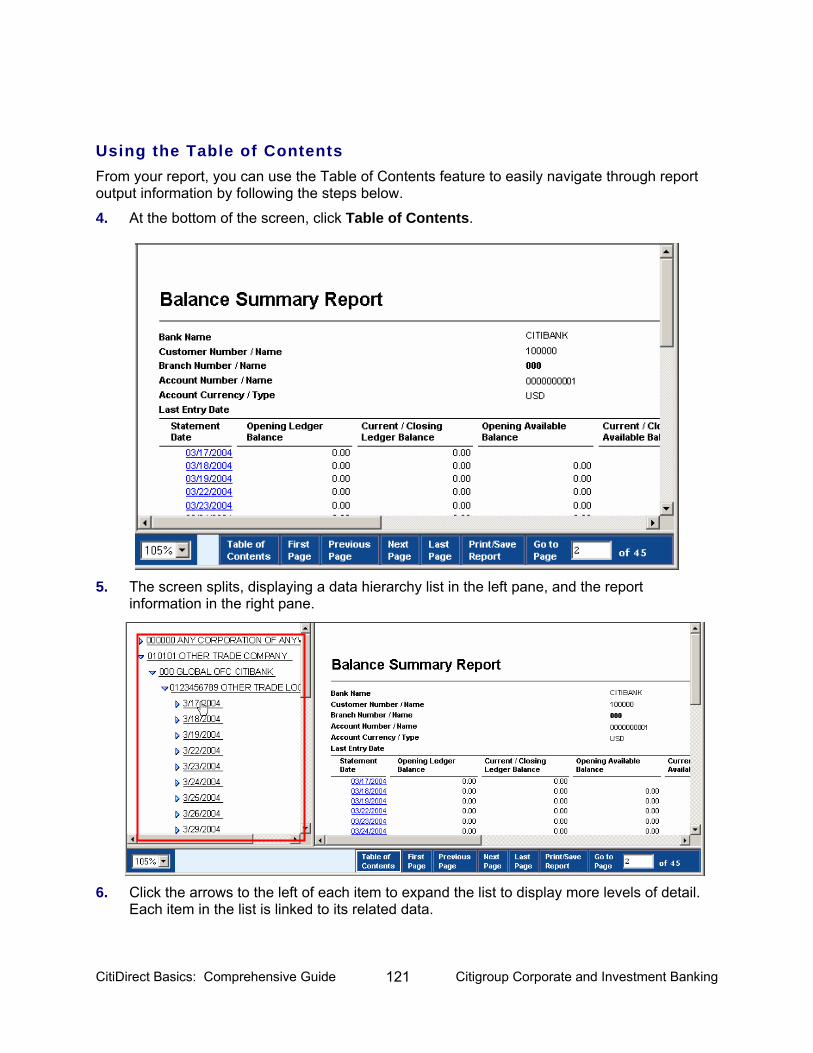
CitiDirect Basics: Comprehensive Guide 121 Citigroup Corporate and Investment Banking
Using the Table of Contents From your report, you can use the Table of Contents feature to easily navigate through report output information by following the steps below.
4. At the bottom of the screen, click Table of Contents.
5. The screen splits, displaying a data hierarchy list in the left pane, and the report information in the right pane.
6. Click the arrows to the left of each item to expand the list to display more levels of detail. Each item in the list is linked to its related data.
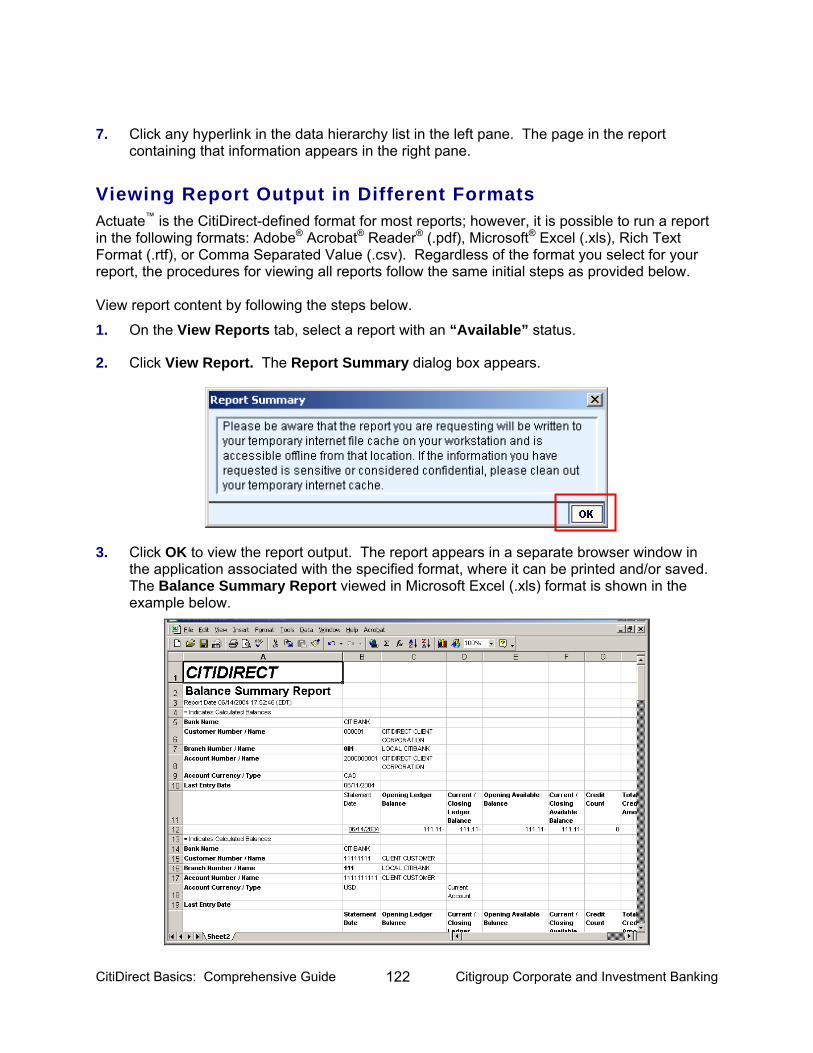
CitiDirect Basics: Comprehensive Guide 122 Citigroup Corporate and Investment Banking
7. Click any hyperlink in the data hierarchy list in the left pane. The page in the report containing that information appears in the right pane.
Viewing Report Output in Different Formats Actuate™ is the CitiDirect-defined format for most reports; however, it is possible to run a report in the following formats: Adobe® Acrobat® Reader® (.pdf), Microsoft® Excel (.xls), Rich Text Format (.rtf), or Comma Separated Value (.csv). Regardless of the format you select for your report, the procedures for viewing all reports follow the same initial steps as provided below. View report content by following the steps below.
1. On the View Reports tab, select a report with an “Available” status.
2. Click View Report. The Report Summary dialog box appears.
3. Click OK to view the report output. The report appears in a separate browser window in the application associated with the specified format, where it can be printed and/or saved. The Balance Summary Report viewed in Microsoft Excel (.xls) format is shown in the example below.
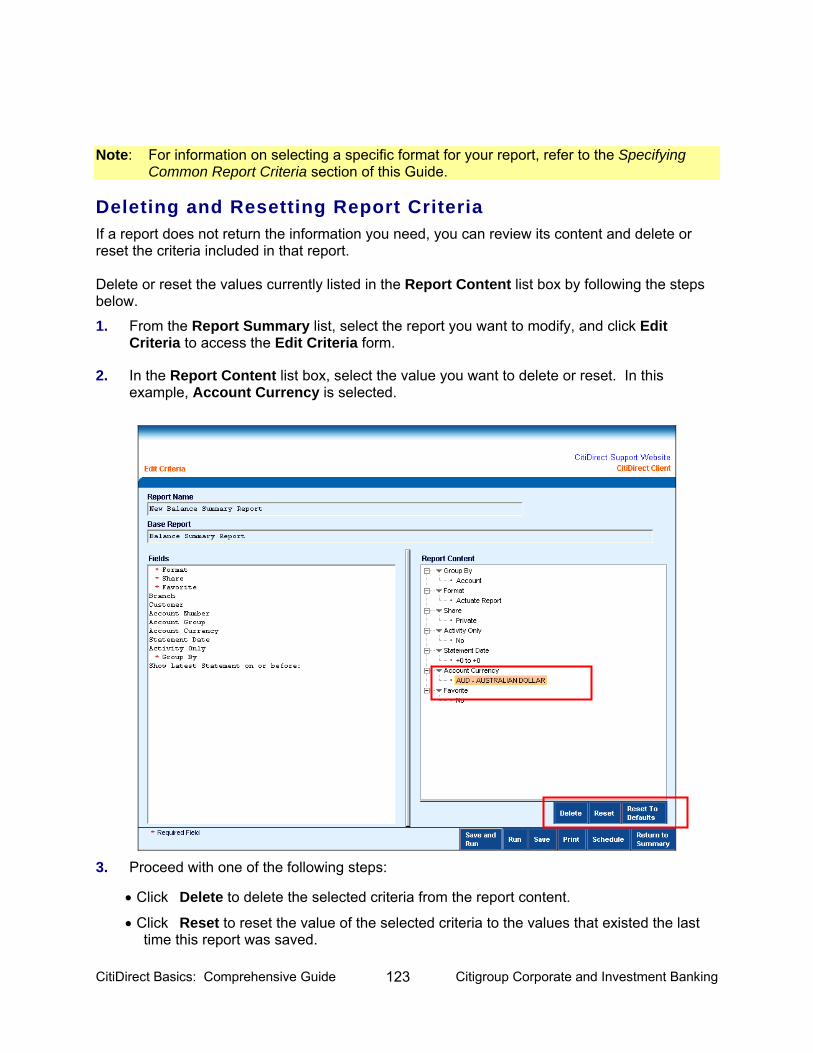
CitiDirect Basics: Comprehensive Guide 123 Citigroup Corporate and Investment Banking
Note: For information on selecting a specific format for your report, refer to the Specifying
Common Report Criteria section of this Guide.
Deleting and Resetting Report Criteria If a report does not return the information you need, you can review its content and delete or reset the criteria included in that report. Delete or reset the values currently listed in the Report Content list box by following the steps below.
1. From the Report Summary list, select the report you want to modify, and click Edit Criteria to access the Edit Criteria form.
2. In the Report Content list box, select the value you want to delete or reset. In this example, Account Currency is selected.
3. Proceed with one of the following steps:
• Click Delete to delete the selected criteria from the report content.
• Click Reset to reset the value of the selected criteria to the values that existed the last time this report was saved.
CitiDirect Basics: Comprehensive Guide 124 Citigroup Corporate and Investment Banking
• Click Reset To Defaults to reset all selected criteria to the CitiDirect-defined values of the base report.
Note: To run a report successfully, all criteria identified with a red asterisk must be included in the Report Content.
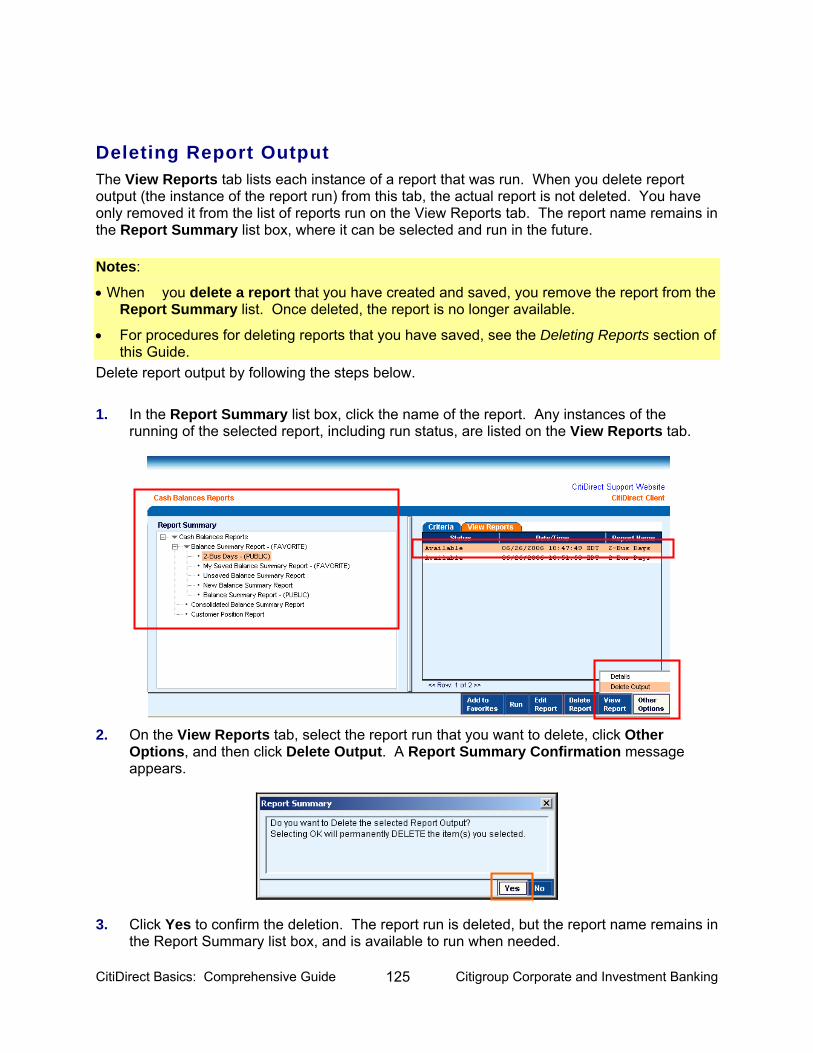
CitiDirect Basics: Comprehensive Guide 125 Citigroup Corporate and Investment Banking
Deleting Report Output The View Reports tab lists each instance of a report that was run. When you delete report output (the instance of the report run) from this tab, the actual report is not deleted. You have only removed it from the list of reports run on the View Reports tab. The report name remains in the Report Summary list box, where it can be selected and run in the future.
Notes:
• When you delete a report that you have created and saved, you remove the report from the Report Summary list. Once deleted, the report is no longer available.
• For procedures for deleting reports that you have saved, see the Deleting Reports section of this Guide.
Delete report output by following the steps below.
1. In the Report Summary list box, click the name of the report. Any instances of the running of the selected report, including run status, are listed on the View Reports tab.
2. On the View Reports tab, select the report run that you want to delete, click Other Options, and then click Delete Output. A Report Summary Confirmation message appears.
3. Click Yes to confirm the deletion. The report run is deleted, but the report name remains in the Report Summary list box, and is available to run when needed.

CitiDirect Basics: Comprehensive Guide 126 Citigroup Corporate and Investment Banking
Deleting Reports CitiDirect® Online Banking allows you to delete your reports.
• You can delete only reports that you have created and saved.
• You cannot delete CitiDirect base reports.
Delete a report that you created and saved by following the steps below.
1. In the Report Summary list box, select the report you want to delete. In this example, 2-Bus Days is selected.
2. Click Delete Report. The Report Summary dialog box appears.
3. Click Yes to confirm the deletion of the selected report. The report name is removed from the Report Summary list box and is no longer available to run.
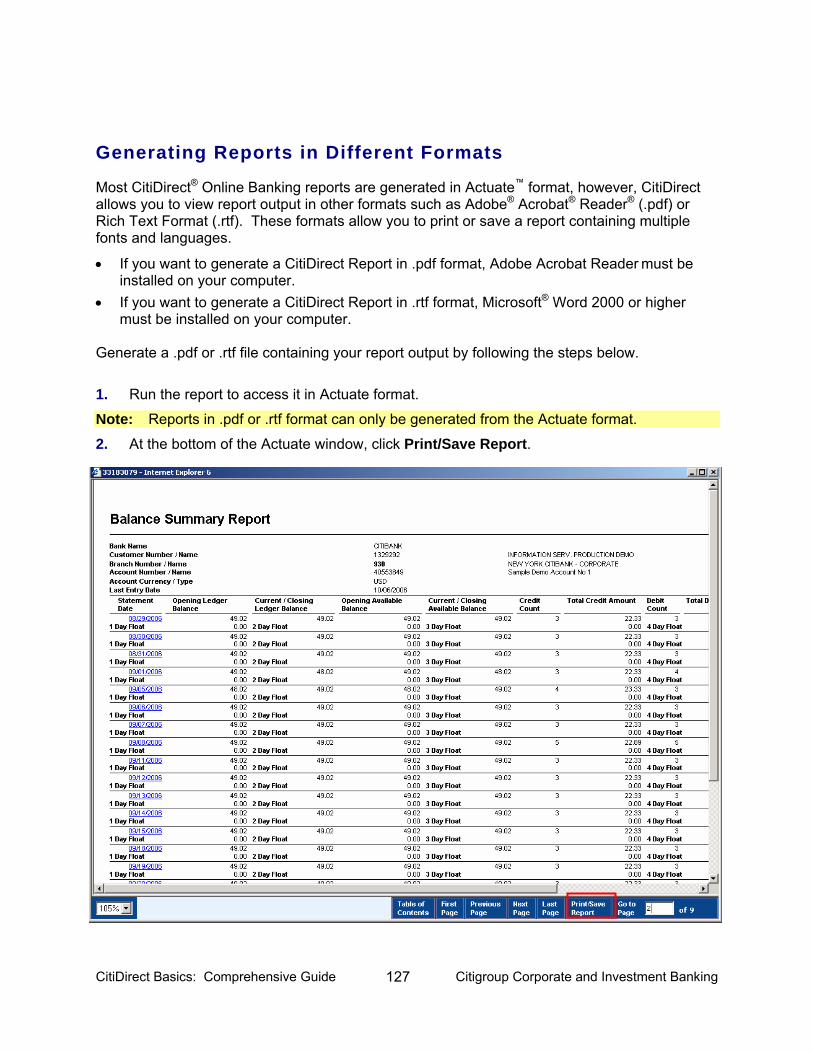
CitiDirect Basics: Comprehensive Guide 127 Citigroup Corporate and Investment Banking
Generating Reports in Different Formats
Most CitiDirect® Online Banking reports are generated in Actuate™ format, however, CitiDirect allows you to view report output in other formats such as Adobe® Acrobat® Reader® (.pdf) or Rich Text Format (.rtf). These formats allow you to print or save a report containing multiple fonts and languages.
• If you want to generate a CitiDirect Report in .pdf format, Adobe Acrobat Reader must be installed on your computer.
• If you want to generate a CitiDirect Report in .rtf format, Microsoft® Word 2000 or higher must be installed on your computer.
Generate a .pdf or .rtf file containing your report output by following the steps below.
1. Run the report to access it in Actuate format. Note: Reports in .pdf or .rtf format can only be generated from the Actuate format.
2. At the bottom of the Actuate window, click Print/Save Report.
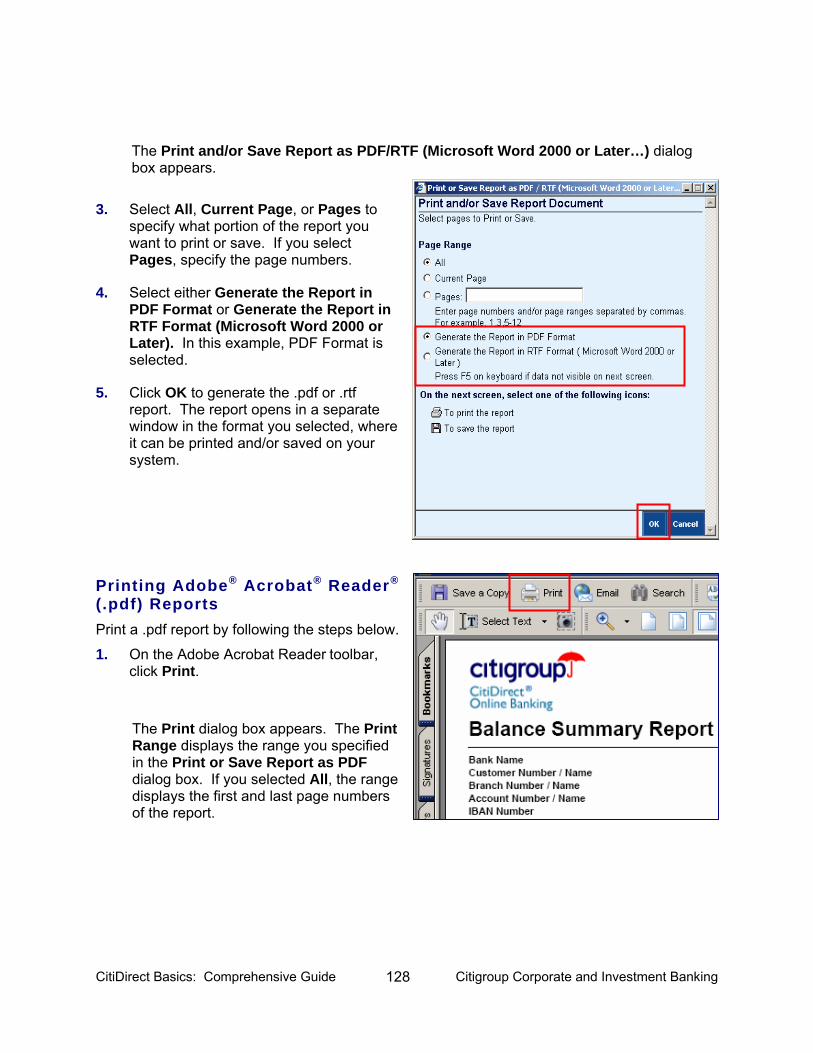
CitiDirect Basics: Comprehensive Guide 128 Citigroup Corporate and Investment Banking
The Print and/or Save Report as PDF/RTF (Microsoft Word 2000 or Later…) dialog box appears.
3. Select All, Current Page, or Pages to specify what portion of the report you want to print or save. If you select Pages, specify the page numbers.
4. Select either Generate the Report in PDF Format or Generate the Report in RTF Format (Microsoft Word 2000 or Later). In this example, PDF Format is selected.
5. Click OK to generate the .pdf or .rtf report. The report opens in a separate window in the format you selected, where it can be printed and/or saved on your system.
Printing Adobe® Acrobat® Reader®
(.pdf) Reports Print a .pdf report by following the steps below.
1. On the Adobe Acrobat Reader toolbar, click Print.
The Print dialog box appears. The Print Range displays the range you specified in the Print or Save Report as PDF dialog box. If you selected All, the range displays the first and last page numbers of the report.
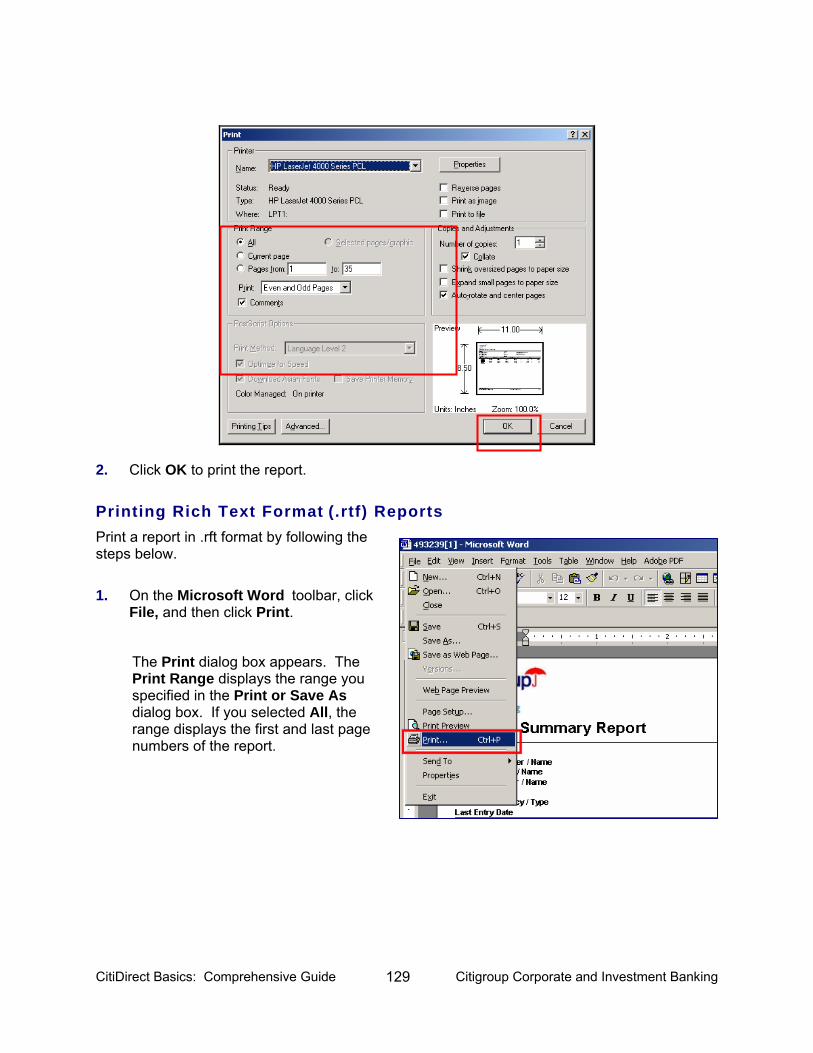
CitiDirect Basics: Comprehensive Guide 129 Citigroup Corporate and Investment Banking
2. Click OK to print the report.
Printing Rich Text Format (.rtf) Reports Print a report in .rft format by following the steps below.
1. On the Microsoft Word toolbar, click File, and then click Print.
The Print dialog box appears. The Print Range displays the range you specified in the Print or Save As dialog box. If you selected All, the range displays the first and last page numbers of the report.
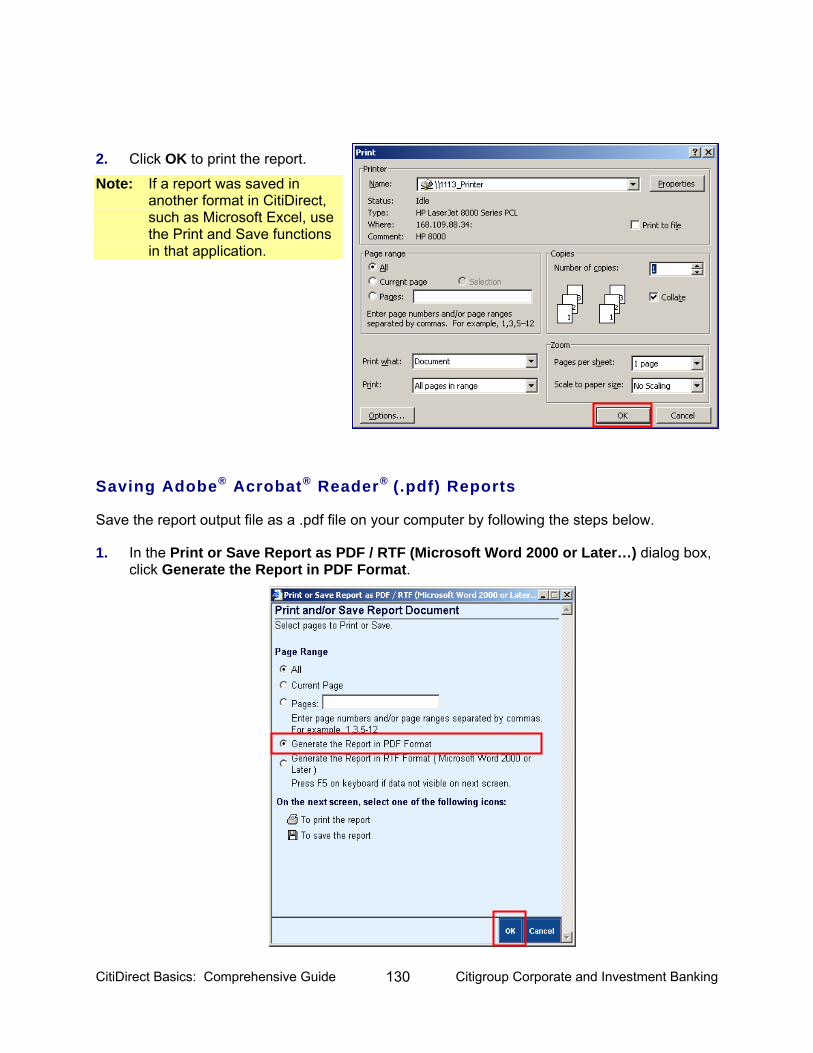
CitiDirect Basics: Comprehensive Guide 130 Citigroup Corporate and Investment Banking
2. Click OK to print the report.
Note: If a report was saved in another format in CitiDirect, such as Microsoft Excel, use the Print and Save functions in that application.
Saving Adobe® Acrobat® Reader® (.pdf) Reports
Save the report output file as a .pdf file on your computer by following the steps below.
1. In the Print or Save Report as PDF / RTF (Microsoft Word 2000 or Later…) dialog box, click Generate the Report in PDF Format.
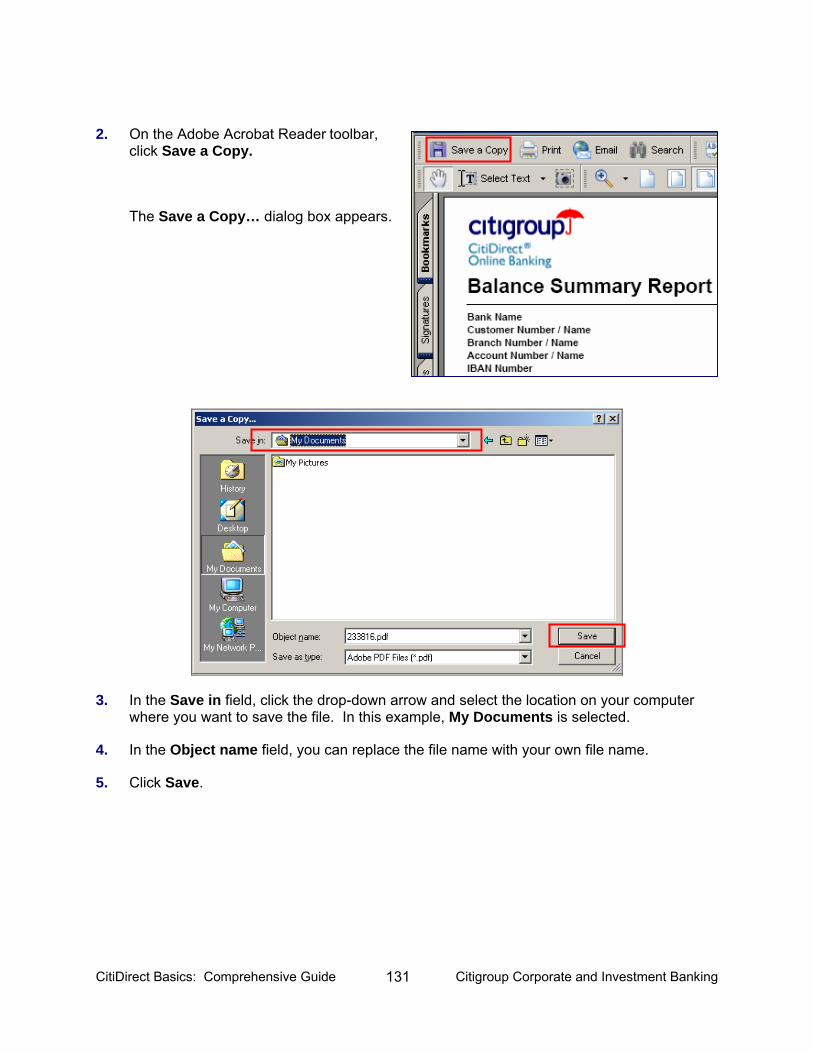
CitiDirect Basics: Comprehensive Guide 131 Citigroup Corporate and Investment Banking
2. On the Adobe Acrobat Reader toolbar, click Save a Copy.
The Save a Copy… dialog box appears.
3. In the Save in field, click the drop-down arrow and select the location on your computer where you want to save the file. In this example, My Documents is selected.
4. In the Object name field, you can replace the file name with your own file name.
5. Click Save.

CitiDirect Basics: Comprehensive Guide 132 Citigroup Corporate and Investment Banking
Saving Rich Text Format (.rtf) Reports
Save the report output file as an .rtf file on your computer by following the steps below.
1. In the Print or Save Report as PDF / RTF (Microsoft Word 2000 or Later…) dialog box, click Generate the Report in RTF Format (Microsoft Word 2000 or Later).
2. Click OK.
3. On the File Download dialog box, click Save.
The Save As dialog box appears.

CitiDirect Basics: Comprehensive Guide 133 Citigroup Corporate and Investment Banking
4. In the Save in field, click the drop-down arrow and select the location on your computer where you want to save the file. In this example, My Documents is selected.
5. In the File name field, you can replace the file name with your own file name.
6. Click Save.
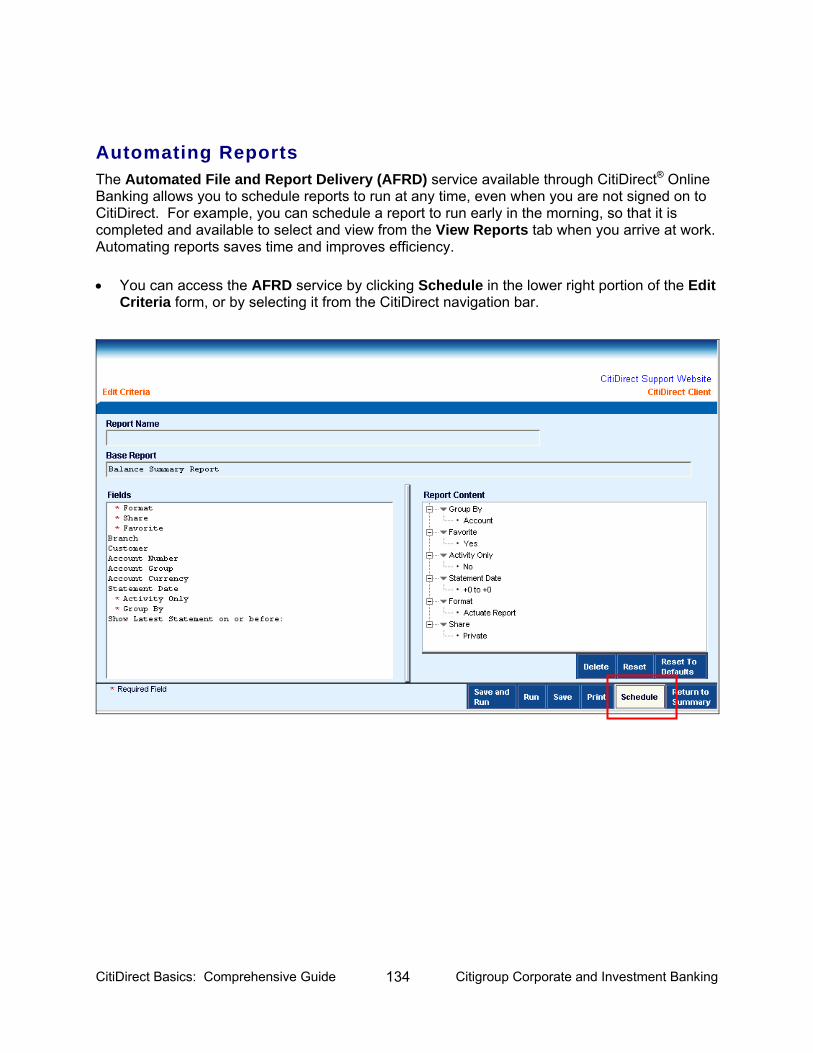
CitiDirect Basics: Comprehensive Guide 134 Citigroup Corporate and Investment Banking
Automating Reports The Automated File and Report Delivery (AFRD) service available through CitiDirect® Online Banking allows you to schedule reports to run at any time, even when you are not signed on to CitiDirect. For example, you can schedule a report to run early in the morning, so that it is completed and available to select and view from the View Reports tab when you arrive at work. Automating reports saves time and improves efficiency. • You can access the AFRD service by clicking Schedule in the lower right portion of the Edit
Criteria form, or by selecting it from the CitiDirect navigation bar.
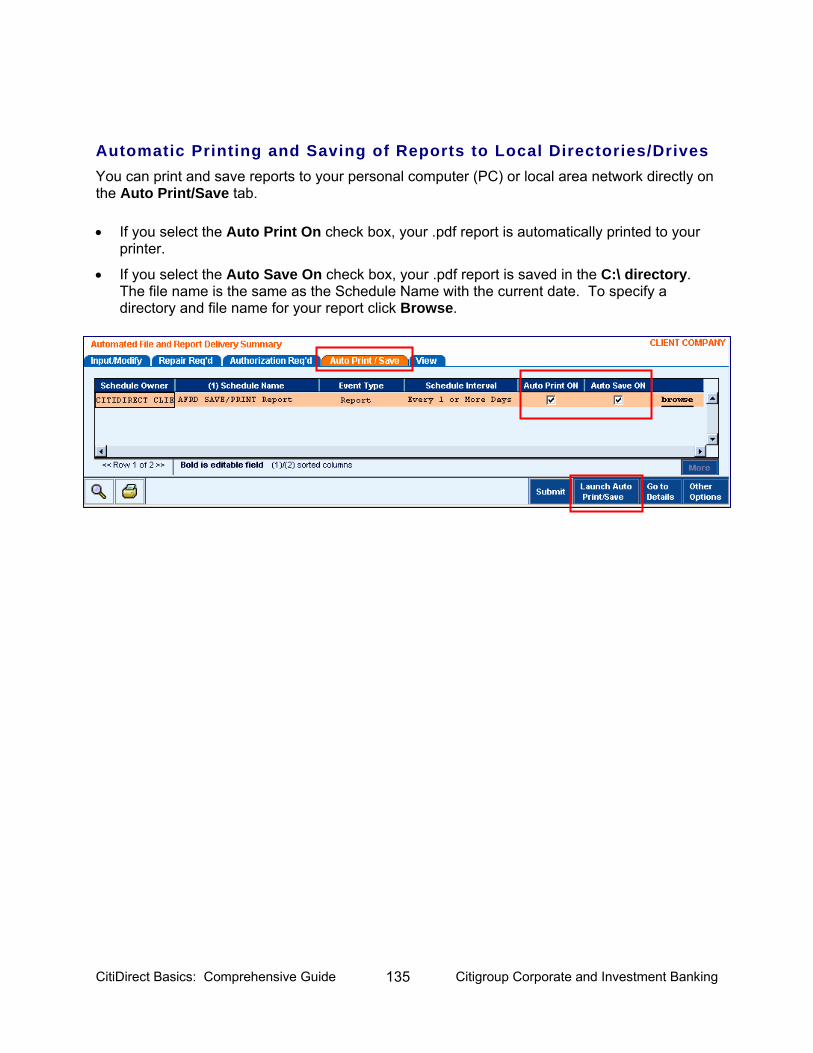
CitiDirect Basics: Comprehensive Guide 135 Citigroup Corporate and Investment Banking
Automatic Printing and Saving of Reports to Local Directories/Drives You can print and save reports to your personal computer (PC) or local area network directly on the Auto Print/Save tab. • If you select the Auto Print On check box, your .pdf report is automatically printed to your
printer.
• If you select the Auto Save On check box, your .pdf report is saved in the C:\ directory. The file name is the same as the Schedule Name with the current date. To specify a directory and file name for your report click Browse.
Note: For more information on AFRD and Delivery Options, refer to the Automated File and
Report Delivery: Auto Print and Auto Save Features Guide, available in the Learning Center at www.citidirect.com.
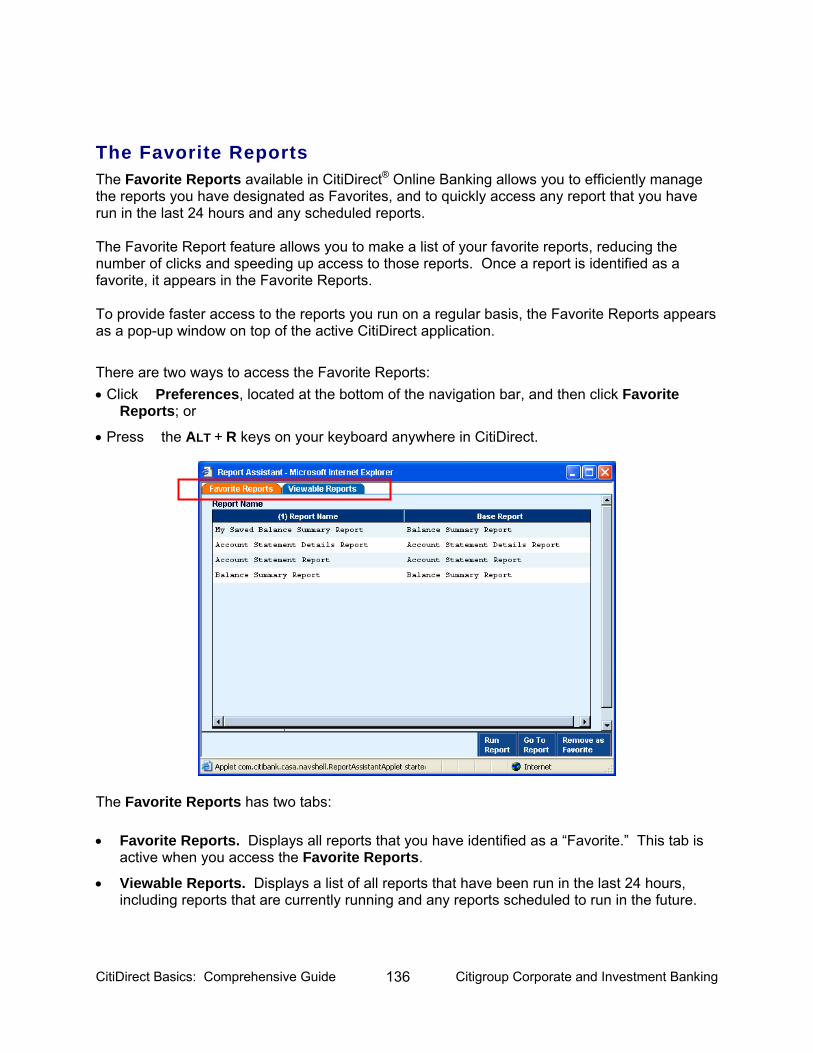
CitiDirect Basics: Comprehensive Guide 136 Citigroup Corporate and Investment Banking
The Favorite Reports The Favorite Reports available in CitiDirect® Online Banking allows you to efficiently manage the reports you have designated as Favorites, and to quickly access any report that you have run in the last 24 hours and any scheduled reports. The Favorite Report feature allows you to make a list of your favorite reports, reducing the number of clicks and speeding up access to those reports. Once a report is identified as a favorite, it appears in the Favorite Reports. To provide faster access to the reports you run on a regular basis, the Favorite Reports appears as a pop-up window on top of the active CitiDirect application. There are two ways to access the Favorite Reports: • Click Preferences, located at the bottom of the navigation bar, and then click Favorite
Reports; or
• Press the ALT + R keys on your keyboard anywhere in CitiDirect.
The Favorite Reports has two tabs: • Favorite Reports. Displays all reports that you have identified as a “Favorite.” This tab is
active when you access the Favorite Reports.
• Viewable Reports. Displays a list of all reports that have been run in the last 24 hours, including reports that are currently running and any reports scheduled to run in the future.

CitiDirect Basics: Comprehensive Guide 137 Citigroup Corporate and Investment Banking
Note: While the Favorite Reports is open, CitiDirect Online Banking is disabled, and you are prevented from performing any other actions except those in the pop-up window.
The Favorite Reports Tab The Favorite Reports tab lists all reports that you have identified as Favorites. The Report Name and its corresponding Base Report are displayed in the example below.
Once you select a report from the list, you can perform any of the actions listed in the table below.
Button Click to:
Run Report Run the selected report.
Go To Report Go to the Report Summary form. The report you selected in the Favorite Reports is also selected in the Report Summary list, and the View Reports tab is active. Click Run to run your report.
Remove as Favorite Remove the selected report from your Favorite Reports list. Notes: • The list updates automatically when you designate a report as a “Favorite.”
• For procedures on adding reports to your Favorite Reports list, refer to the Adding a Report to Your Favorite Reports List section of this Guide.
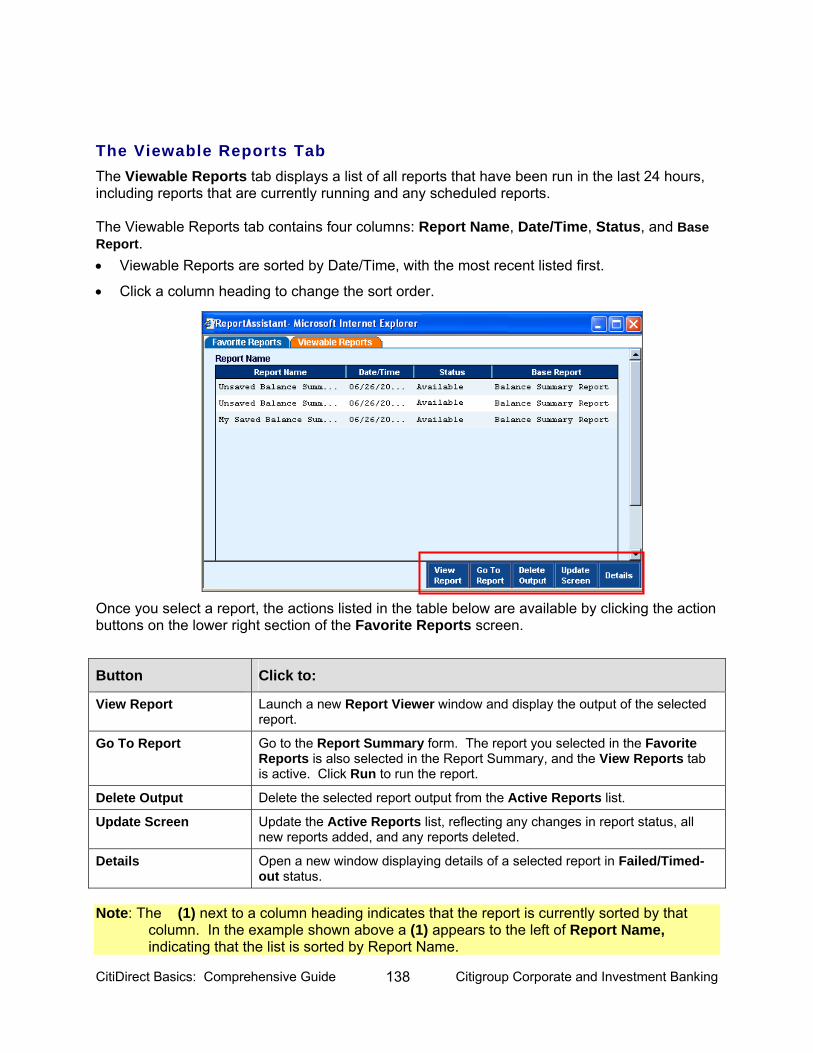
CitiDirect Basics: Comprehensive Guide 138 Citigroup Corporate and Investment Banking
The Viewable Reports Tab The Viewable Reports tab displays a list of all reports that have been run in the last 24 hours, including reports that are currently running and any scheduled reports. The Viewable Reports tab contains four columns: Report Name, Date/Time, Status, and Base Report. • Viewable Reports are sorted by Date/Time, with the most recent listed first.
• Click a column heading to change the sort order.
Once you select a report, the actions listed in the table below are available by clicking the action buttons on the lower right section of the Favorite Reports screen.
Button Click to:
View Report Launch a new Report Viewer window and display the output of the selected report.
Go To Report Go to the Report Summary form. The report you selected in the Favorite Reports is also selected in the Report Summary, and the View Reports tab is active. Click Run to run the report.
Delete Output Delete the selected report output from the Active Reports list.
Update Screen Update the Active Reports list, reflecting any changes in report status, all new reports added, and any reports deleted.
Details Open a new window displaying details of a selected report in Failed/Timed-out status.
Note: The (1) next to a column heading indicates that the report is currently sorted by that column. In the example shown above a (1) appears to the left of Report Name, indicating that the list is sorted by Report Name.

CitiDirect Basics: Comprehensive Guide 139 Citigroup Corporate and Investment Banking
Adding a Report to Your Favorite Reports List If you run a report frequently, you can add it to your list of Report Favorites for easy access. There are two ways to add reports to the Report Favorites list: • from the Report Summary form when you are running your report; or
• from the Edit Criteria form when you are creating your report.
From the Report Summary Form Add a report to your Report Favorites list from the Report Summary form by following the steps below.
1. Sign on to CitiDirect® Online Banking with your SafeWord™ card or your CitiDirect Secured Password provided by your Security Manager.
2. On the CitiDirect navigation bar, click All Reports.
3. Click the service class containing the report you want to add to as a Favorite. In this example, Cash Balances Reports is selected.
The Report Summary form appears. All reports available in the selected service class are listed.
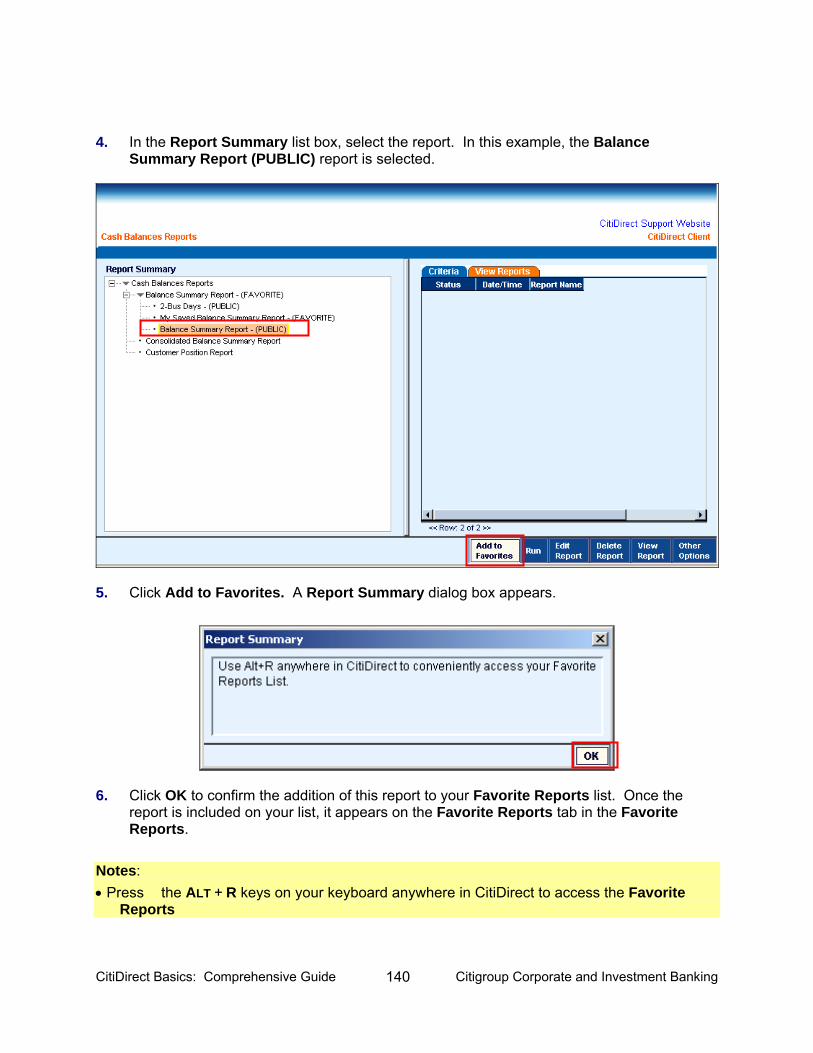
CitiDirect Basics: Comprehensive Guide 140 Citigroup Corporate and Investment Banking
4. In the Report Summary list box, select the report. In this example, the Balance Summary Report (PUBLIC) report is selected.
5. Click Add to Favorites. A Report Summary dialog box appears.
6. Click OK to confirm the addition of this report to your Favorite Reports list. Once the report is included on your list, it appears on the Favorite Reports tab in the Favorite Reports.
Notes: • Press the ALT + R keys on your keyboard anywhere in CitiDirect to access the Favorite
Reports
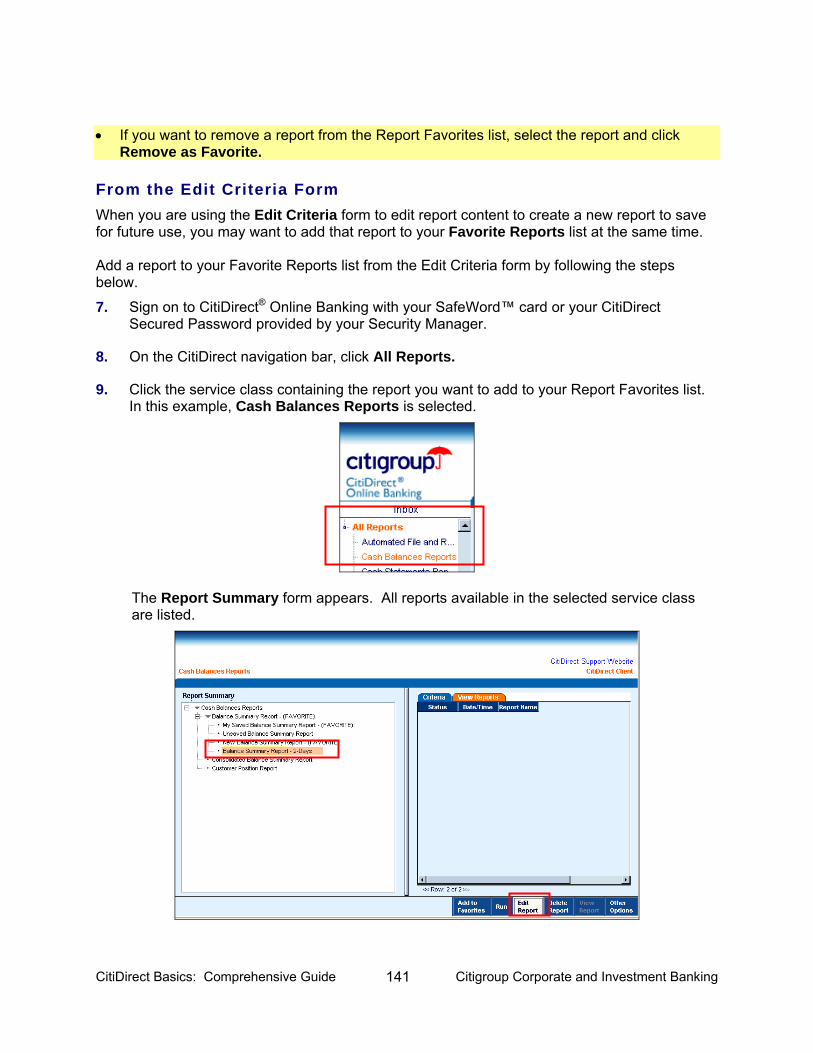
CitiDirect Basics: Comprehensive Guide 141 Citigroup Corporate and Investment Banking
• If you want to remove a report from the Report Favorites list, select the report and click Remove as Favorite.
From the Edit Criteria Form When you are using the Edit Criteria form to edit report content to create a new report to save for future use, you may want to add that report to your Favorite Reports list at the same time. Add a report to your Favorite Reports list from the Edit Criteria form by following the steps below.
7. Sign on to CitiDirect® Online Banking with your SafeWord™ card or your CitiDirect Secured Password provided by your Security Manager.
8. On the CitiDirect navigation bar, click All Reports.
9. Click the service class containing the report you want to add to your Report Favorites list. In this example, Cash Balances Reports is selected.
The Report Summary form appears. All reports available in the selected service class are listed.
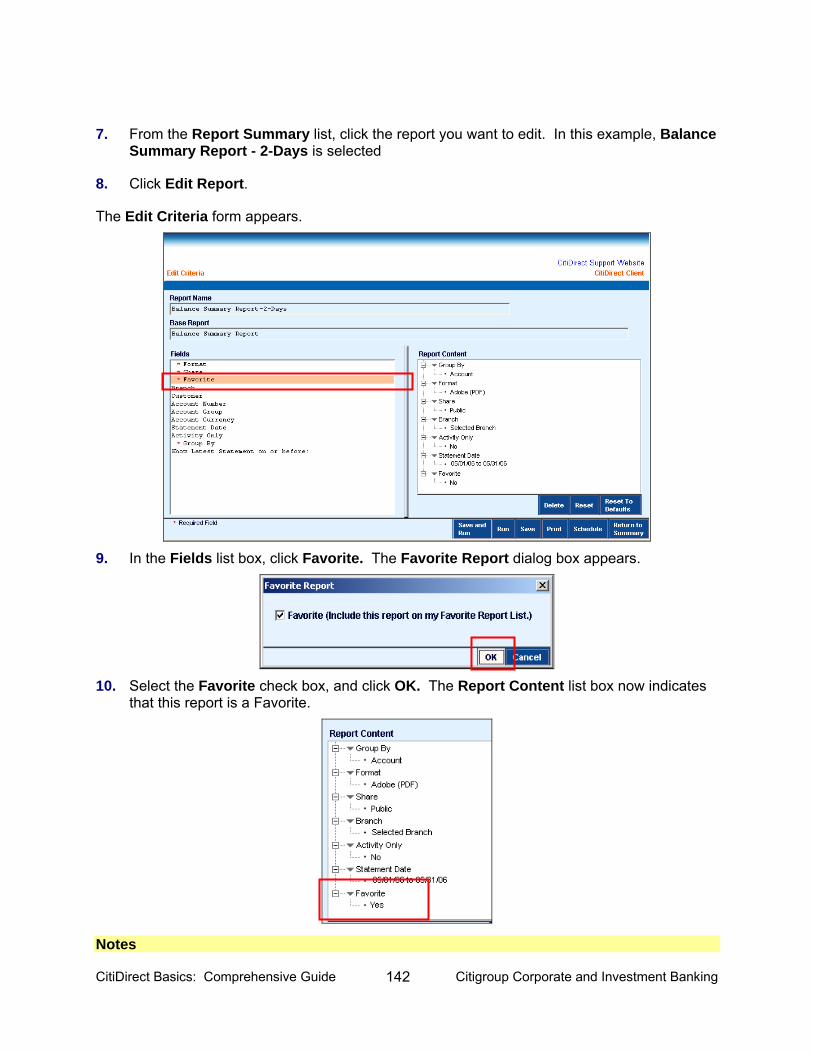
CitiDirect Basics: Comprehensive Guide 142 Citigroup Corporate and Investment Banking
7. From the Report Summary list, click the report you want to edit. In this example, Balance Summary Report - 2-Days is selected
8. Click Edit Report.
The Edit Criteria form appears.
9. In the Fields list box, click Favorite. The Favorite Report dialog box appears.
10. Select the Favorite check box, and click OK. The Report Content list box now indicates
that this report is a Favorite.
Notes
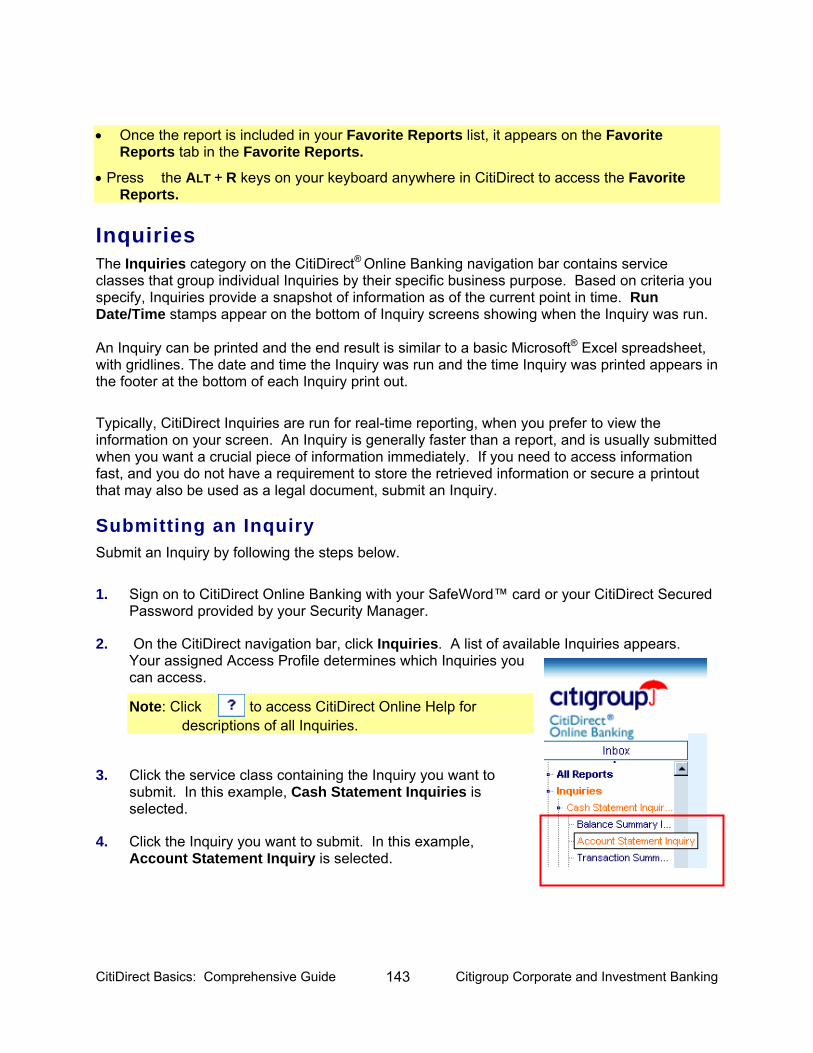
CitiDirect Basics: Comprehensive Guide 143 Citigroup Corporate and Investment Banking
• Once the report is included in your Favorite Reports list, it appears on the Favorite Reports tab in the Favorite Reports.
• Press the ALT + R keys on your keyboard anywhere in CitiDirect to access the Favorite Reports.
Inquiries The Inquiries category on the CitiDirect® Online Banking navigation bar contains service classes that group individual Inquiries by their specific business purpose. Based on criteria you specify, Inquiries provide a snapshot of information as of the current point in time. Run Date/Time stamps appear on the bottom of Inquiry screens showing when the Inquiry was run. An Inquiry can be printed and the end result is similar to a basic Microsoft® Excel spreadsheet, with gridlines. The date and time the Inquiry was run and the time Inquiry was printed appears in the footer at the bottom of each Inquiry print out. Typically, CitiDirect Inquiries are run for real-time reporting, when you prefer to view the information on your screen. An Inquiry is generally faster than a report, and is usually submitted when you want a crucial piece of information immediately. If you need to access information fast, and you do not have a requirement to store the retrieved information or secure a printout that may also be used as a legal document, submit an Inquiry.
Submitting an Inquiry Submit an Inquiry by following the steps below.
1. Sign on to CitiDirect Online Banking with your SafeWord™ card or your CitiDirect Secured Password provided by your Security Manager.
2. On the CitiDirect navigation bar, click Inquiries. A list of available Inquiries appears. Your assigned Access Profile determines which Inquiries you can access.
Note: Click to access CitiDirect Online Help for descriptions of all Inquiries.
3. Click the service class containing the Inquiry you want to submit. In this example, Cash Statement Inquiries is selected.
4. Click the Inquiry you want to submit. In this example, Account Statement Inquiry is selected.
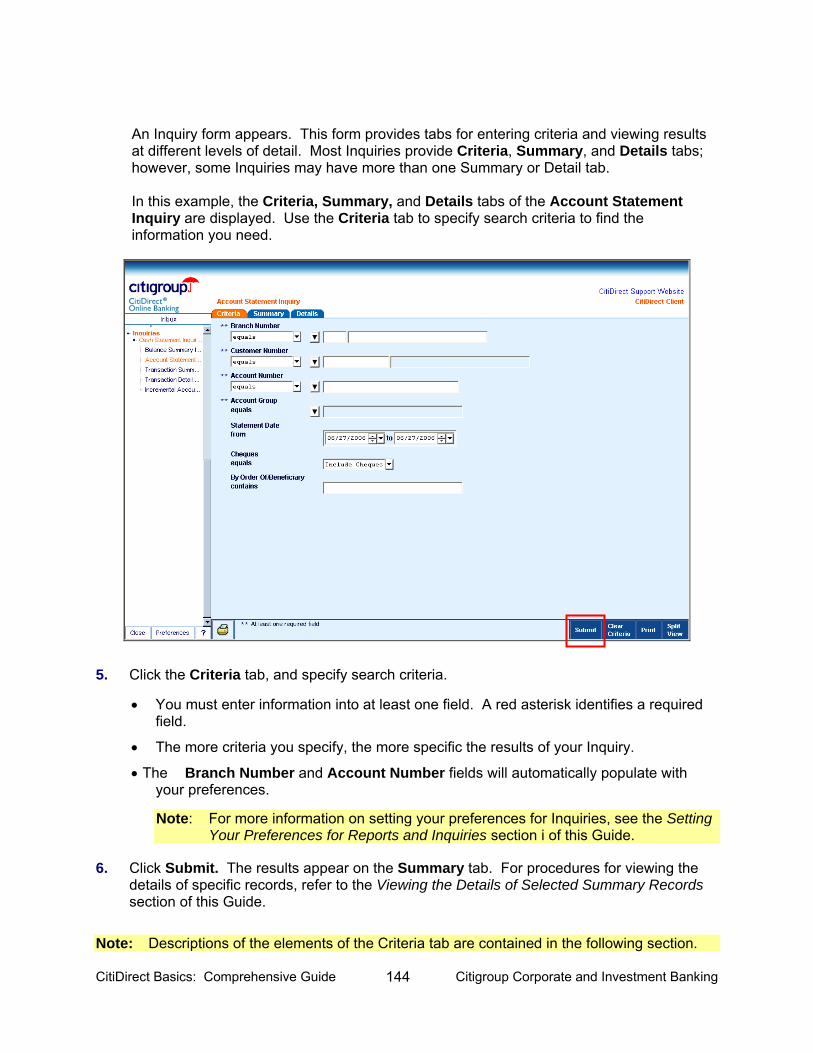
CitiDirect Basics: Comprehensive Guide 144 Citigroup Corporate and Investment Banking
An Inquiry form appears. This form provides tabs for entering criteria and viewing results at different levels of detail. Most Inquiries provide Criteria, Summary, and Details tabs; however, some Inquiries may have more than one Summary or Detail tab. In this example, the Criteria, Summary, and Details tabs of the Account Statement Inquiry are displayed. Use the Criteria tab to specify search criteria to find the information you need.
5. Click the Criteria tab, and specify search criteria.
• You must enter information into at least one field. A red asterisk identifies a required field.
• The more criteria you specify, the more specific the results of your Inquiry.
• The Branch Number and Account Number fields will automatically populate with your preferences.
Note: For more information on setting your preferences for Inquiries, see the Setting Your Preferences for Reports and Inquiries section i of this Guide.
6. Click Submit. The results appear on the Summary tab. For procedures for viewing the details of specific records, refer to the Viewing the Details of Selected Summary Records section of this Guide.
Note: Descriptions of the elements of the Criteria tab are contained in the following section.
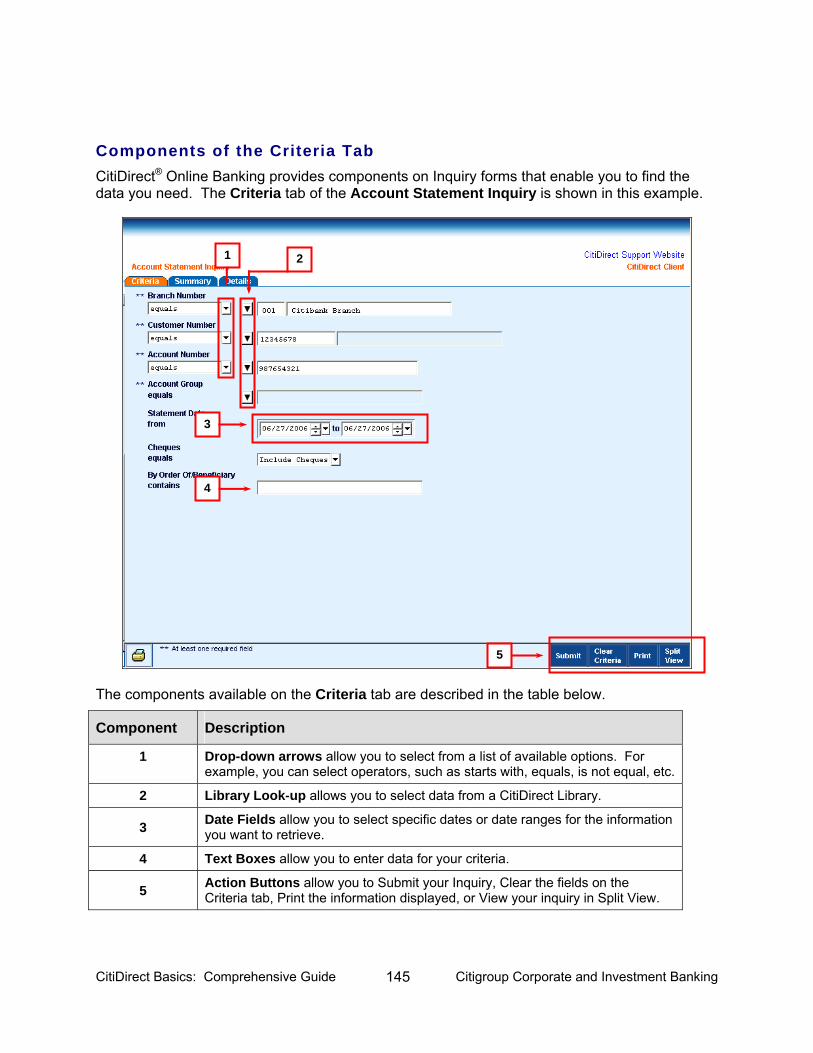
CitiDirect Basics: Comprehensive Guide 145 Citigroup Corporate and Investment Banking
Components of the Criteria Tab CitiDirect® Online Banking provides components on Inquiry forms that enable you to find the data you need. The Criteria tab of the Account Statement Inquiry is shown in this example.
The components available on the Criteria tab are described in the table below.
Component Description
1 Drop-down arrows allow you to select from a list of available options. For example, you can select operators, such as starts with, equals, is not equal, etc.
2 Library Look-up allows you to select data from a CitiDirect Library.
3 Date Fields allow you to select specific dates or date ranges for the information you want to retrieve.
4 Text Boxes allow you to enter data for your criteria.
5 Action Buttons allow you to Submit your Inquiry, Clear the fields on the Criteria tab, Print the information displayed, or View your inquiry in Split View.
1
4
3
2
5
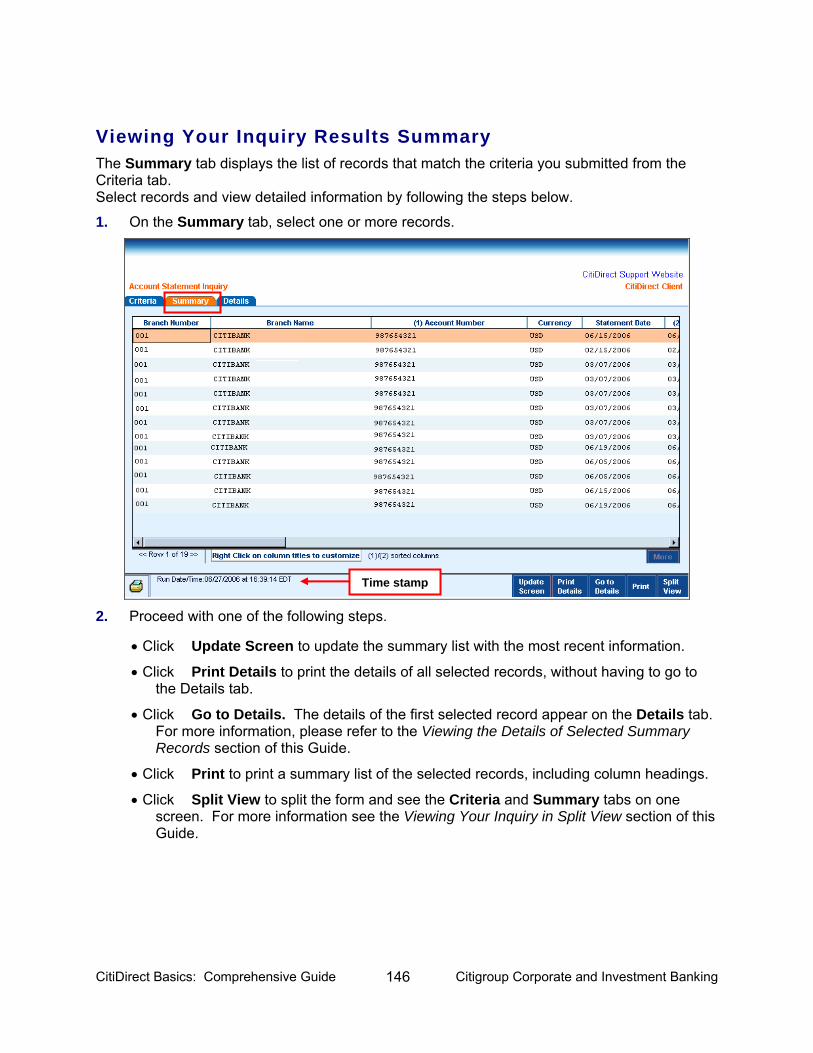
CitiDirect Basics: Comprehensive Guide 146 Citigroup Corporate and Investment Banking
Viewing Your Inquiry Results Summary The Summary tab displays the list of records that match the criteria you submitted from the Criteria tab. Select records and view detailed information by following the steps below.
1. On the Summary tab, select one or more records.
2. Proceed with one of the following steps.
• Click Update Screen to update the summary list with the most recent information.
• Click Print Details to print the details of all selected records, without having to go to the Details tab.
• Click Go to Details. The details of the first selected record appear on the Details tab. For more information, please refer to the Viewing the Details of Selected Summary Records section of this Guide.
• Click Print to print a summary list of the selected records, including column headings.
• Click Split View to split the form and see the Criteria and Summary tabs on one screen. For more information see the Viewing Your Inquiry in Split View section of this Guide.
Time stamp
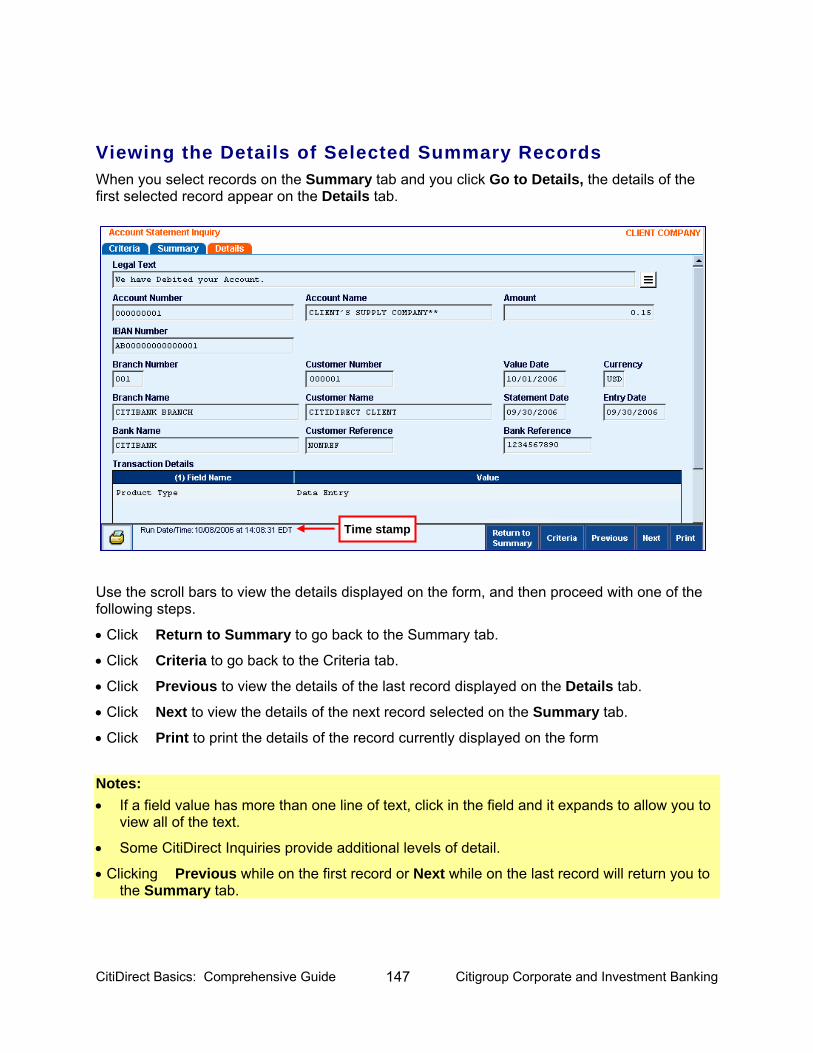
CitiDirect Basics: Comprehensive Guide 147 Citigroup Corporate and Investment Banking
Viewing the Details of Selected Summary Records When you select records on the Summary tab and you click Go to Details, the details of the first selected record appear on the Details tab.
Use the scroll bars to view the details displayed on the form, and then proceed with one of the following steps.
• Click Return to Summary to go back to the Summary tab.
• Click Criteria to go back to the Criteria tab.
• Click Previous to view the details of the last record displayed on the Details tab.
• Click Next to view the details of the next record selected on the Summary tab.
• Click Print to print the details of the record currently displayed on the form
Notes: • If a field value has more than one line of text, click in the field and it expands to allow you to
view all of the text.
• Some CitiDirect Inquiries provide additional levels of detail.
• Clicking Previous while on the first record or Next while on the last record will return you to the Summary tab.
Time stamp
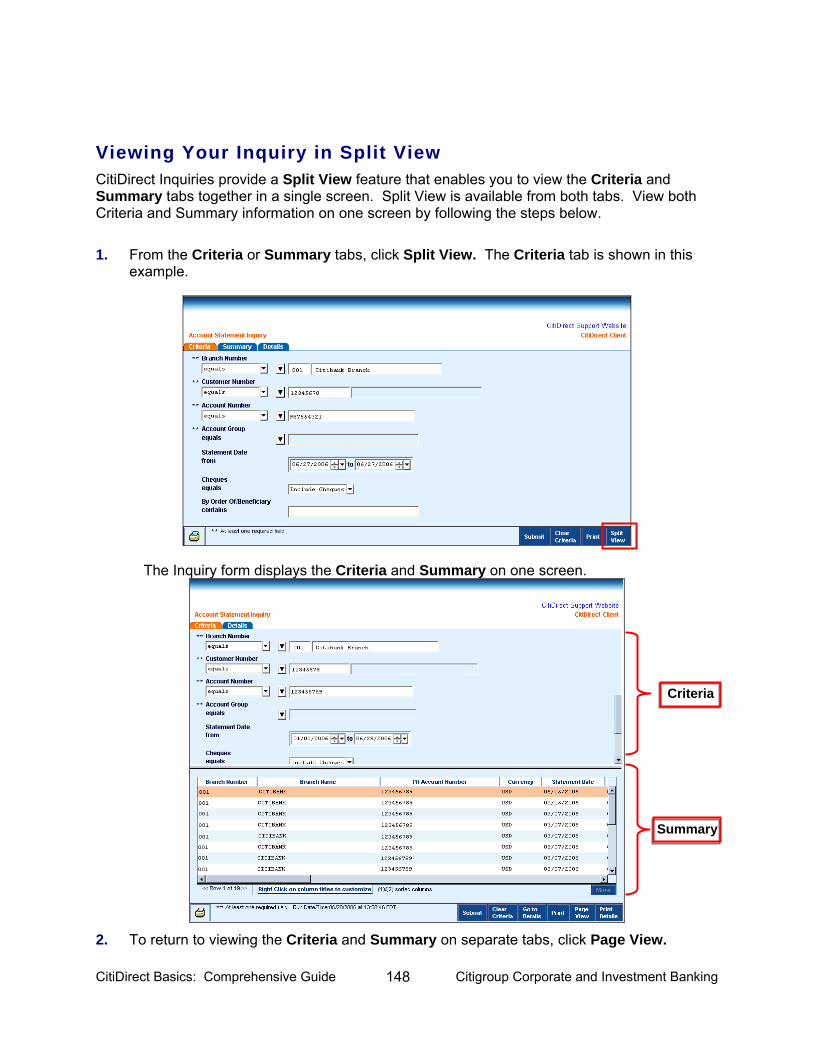
CitiDirect Basics: Comprehensive Guide 148 Citigroup Corporate and Investment Banking
Viewing Your Inquiry in Split View CitiDirect Inquiries provide a Split View feature that enables you to view the Criteria and Summary tabs together in a single screen. Split View is available from both tabs. View both Criteria and Summary information on one screen by following the steps below.
1. From the Criteria or Summary tabs, click Split View. The Criteria tab is shown in this example.
The Inquiry form displays the Criteria and Summary on one screen.
2. To return to viewing the Criteria and Summary on separate tabs, click Page View.
Criteria
Summary

CitiDirect Basics: Comprehensive Guide 149 Citigroup Corporate and Investment Banking
Disclaimer The authoritative and official text of this CitiDirect® Online Banking documentation shall be in the English language as used in the United States of America. Any translation of any CitiDirect documentation from English to another language is done solely for the convenience of the reader, and any inconsistencies, or inaccuracies between the English text and that translation shall be resolved in favor of the English text. These materials are proprietary and confidential to Citibank, N.A., and are intended for the exclusive use of CitiDirect Online Banking customers. The foregoing statement shall appear on all copies of these materials made by you in whatever form and by whatever means, electronic or mechanical, including photocopying or in any information storage system. In addition, no copy of these materials shall be disclosed to third parties without express written authorization of Citibank, N.A. Customer shall be solely responsible for the use of any User identifications, passwords and authentication codes that may be provided to it, from time to time, in connection with CitiDirect Online Banking (collectively, "User IDs"). Customer agrees to keep all User IDs strictly confidential at all times. Customer shall immediately cease use of CitiDirect Online Banking if it receives notification from Citibank, or otherwise becomes aware of, or suspects, a technical failure or security breach. Customer shall immediately notify Citibank if it becomes aware of, or suspects, a technical failure or security breach. www.citidirect.com © 2012 Citibank, N.A. All rights reserved. Citi and Arc Design are registered service marks of Citigroup Inc.