Embed Size (px)
Citation preview

Citi® Payment Analytics User Guide
Treasury and Trade Services | Global Payments
2
Table of Contents
1. Accessing Payment Analytics
2. Dashboard Overview• Getting to the Citi® Payment Analytics Dashboard
• Overview of the Citi® Payment Analytics Dashboard
• Using the Filter Panel
• Payment Transactions Overview Panel
• Payments Comparisons and Trending Panel
• Payments Statistics Panel
3. Reporting Capabilities
• Drill Down Reports
• Navigating the Report Window
• Tool Bars
• Report Objects
• Building you analytics report
• Data Pivoting
• Using report filters
• Exporting Reports
• Saving Reports
• Scheduling Reports

1. Accessing Citi® Payment Analytics
Payment Analytics applications are accessible from CitiDirect BESM
To access CitiDirect BE, you will need: – A computer with Internet Explorer (version 7.0 and above) installed
– Internet access (broadband Internet recommended)
– The proper user privileges to access CitiDirect BE
– A valid SafeWord™ card
4
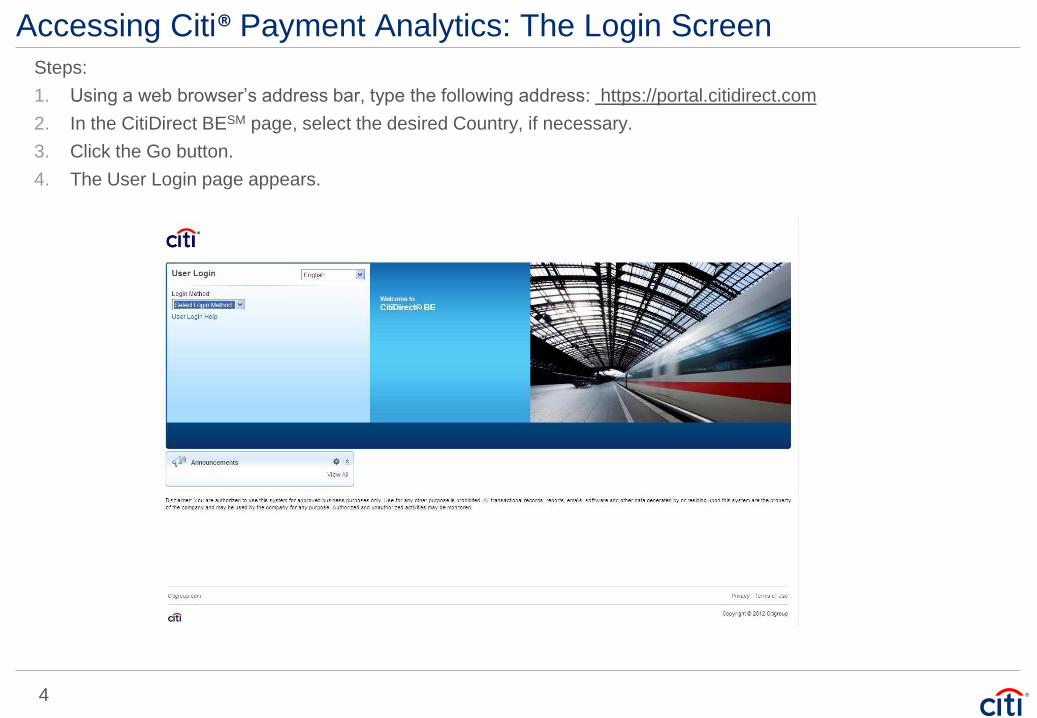
Accessing Citi® Payment Analytics: The Login Screen
Steps:
1. Using a web browser’s address bar, type the following address: https://portal.citidirect.com
2. In the CitiDirect BESM page, select the desired Country, if necessary.
3. Click the Go button.
4. The User Login page appears.

5
Accessing Citi®Payment Analytics: User Log-In
Steps:
1. Click the Login Method drop-down arrow:
2. Login Method: Choose SafeWord.
3. User ID: Input your User ID.
4. Password: Login to SafeWord card using your PIN. When HOST? appears, press 2 and enter the results in the
Password field.
5. Select “Remember my Login ID on this computer” checkbox.
6. Click the Login button.
6
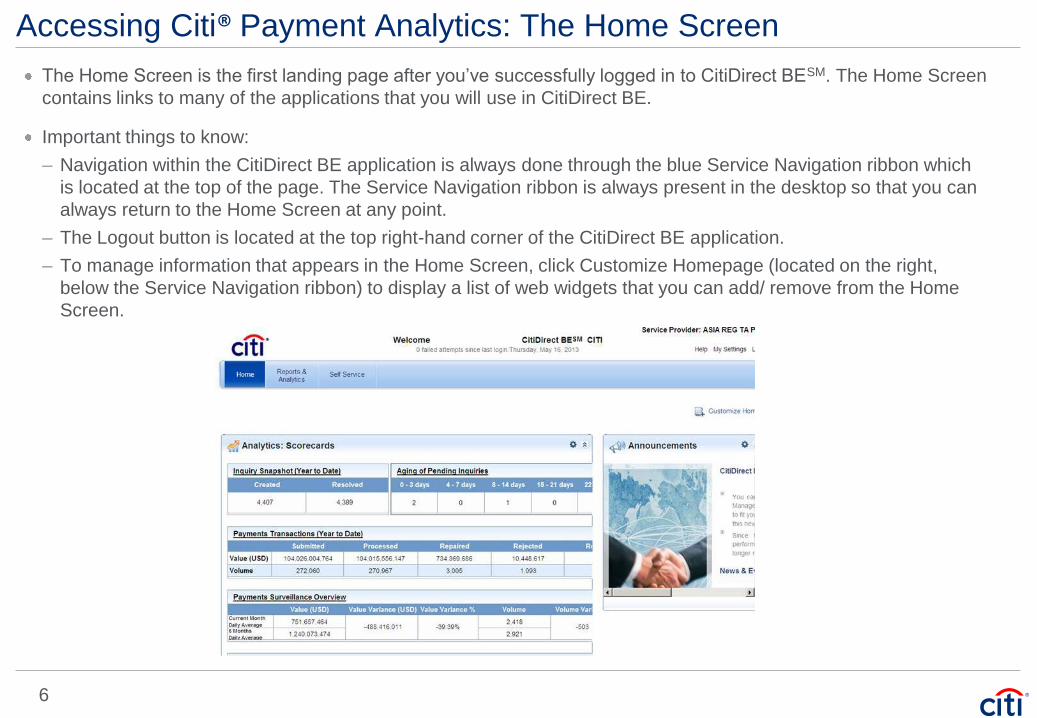
Accessing Citi® Payment Analytics: The Home Screen
The Home Screen is the first landing page after you’ve successfully logged in to CitiDirect BESM. The Home Screen
contains links to many of the applications that you will use in CitiDirect BE.
Important things to know:
– Navigation within the CitiDirect BE application is always done through the blue Service Navigation ribbon which
is located at the top of the page. The Service Navigation ribbon is always present in the desktop so that you can
always return to the Home Screen at any point.
– The Logout button is located at the top right-hand corner of the CitiDirect BE application.
– To manage information that appears in the Home Screen, click Customize Homepage (located on the right,
below the Service Navigation ribbon) to display a list of web widgets that you can add/ remove from the Home
Screen.

2. Dashboard Overview
Navigating the Citi® Payment Analytics Dashboard
This section will cover:– Getting to the Payment Analytics Dashboard
– Overview of the Payment Analytics Dashboard
– Using the Filter Panel
– Payment Transactions Overview Panel
– Payments Comparisons and Trending Panel
– Payments Statistics Panel

8
Dashboard Overview: Getting thereTo navigate to the Payments Overview dashboard:
1. Log in to the CitiDirect BESM portal, and mouse over the Scorecards menu.
2. Click the Go button.
3. Click the Payments Overview menu option OR client on “Payments Transaction (Year to Date)”

9
Dashboard Overview: Payment Overview DashboardThe Payments Overview dashboard is made up of four sections:
1. Filters (Criteria)
2. Payments Transaction Overview panel
3. Payments Comparisons and Trending panel
4. Payments Statistics panel
Filters
Payments Transaction
Overview panel
Payments Comparisons
and Trending panel
Payments Statistics
panel

10
Dashboard Overview: FiltersThe Filters or Criteria section allows user to change the parameters for the data displayed in the rest of the
Dashboard. The Filters can be changed at any time to view different cuts of data.
This section is made up of four parts:
1. Legal Entity/Branch selectors
• The Legal Entity/Branch buttons allow you to display the information on the dashboard by legal entity or by branch.
2. Currency selector
• The Transaction Currency (Settlement) field allows you to display only the transactions for a specific settlement currency (there are
twenty seven currencies available for selection).
• The Convert Currency to field allows you to display the data on the dashboard in one of eight available currencies.
3. Time Period filters
• The Time Period fields allow you to filter the data on the dashboard by Year, Quarter, Month, or Week.
4. Additional filters
• The Additional filters section includes the following criteria: Region, Country, Legal Entity (or Branch as selected in the Legal
Entity/Branch Selectors) and Account
Legal Entity/Branch selectors
Time Period
filters
Currency selector
Additional
filters

11
Dashboard Overview: Payments Transaction Overview
The Payments Transaction Overview panel displays values and volumes for transactions that have been
submitted, processed, repaired, rejected, and returned during the selected time period and geographical region.
The panel also displays the STP rate.
• The Filters section can be used to change the data in the Payments Transactions Overview panel at any time.
• You can drill down to see a detailed report by clicking the numbers with the hyperlink.

12
Dashboard Overview: Payments Comparisons and Trending
The Payments Trending tab displays the trend of the transactions for the data specified in the Filters section. The
Payments Comparisons and Trending panel is made up of two tabs:
1. The Payments Comparisons tab
• The Payments Comparisons tab displays the data for variables over time and geographic region as a
horizontal bar chart.
• Selectors on the tab allow you to determine what information is displayed. The information can be displayed by Transaction
Type, Country or Sub Payment Type.
2. The Payments Trending tab
• The Payments Trending tab displays the trend of the data for the selected time period and geographic
region as a line chart.
• Selectors allow you to determine what data is displayed. The information can be displayed by Status, Transaction Type or
Country.
Payments Comparisons Payments Trending
Selectors Selectors
13
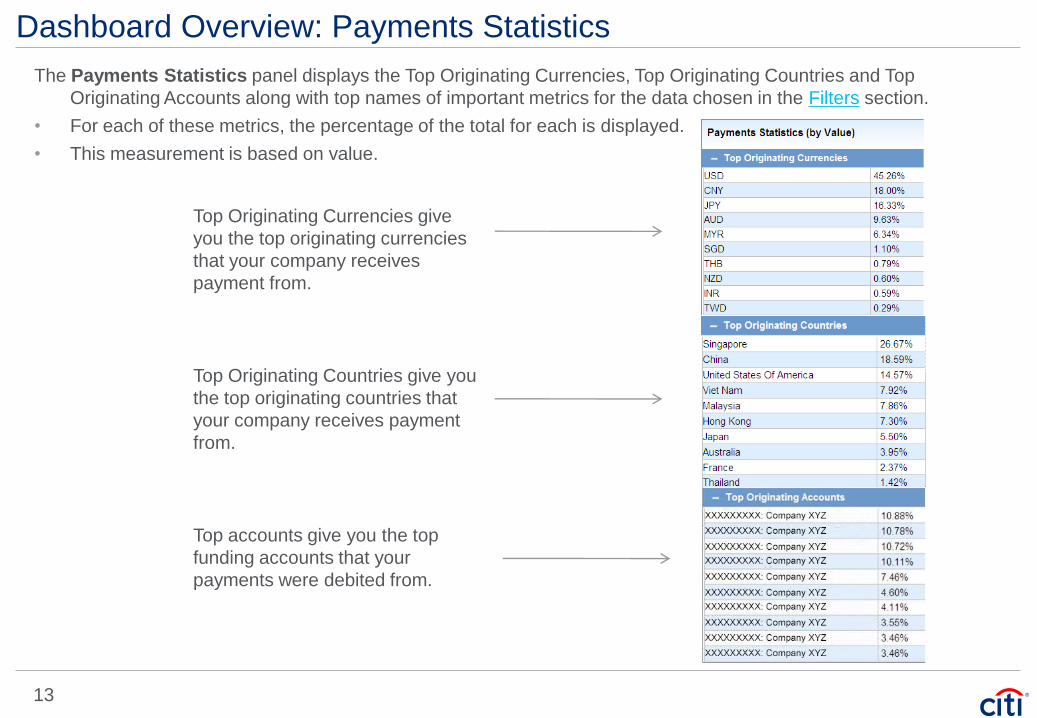
Dashboard Overview: Payments Statistics
The Payments Statistics panel displays the Top Originating Currencies, Top Originating Countries and Top
Originating Accounts along with top names of important metrics for the data chosen in the Filters section.
• For each of these metrics, the percentage of the total for each is displayed.
• This measurement is based on value.
Top Originating Currencies give
you the top originating currencies
that your company receives
payment from.
Top Originating Countries give you
the top originating countries that
your company receives payment
from.
Top accounts give you the top
funding accounts that your
payments were debited from.
3. Reporting Capabilities OverviewUsing Citi® Payment Analytics to create detailed reports
This Section will Cover:– Drill Down Reports
– Navigating the Report Window
– Tool Bars
– Report Objects
– Building you analytics report
– Data Pivoting
– Using report filters
– Exporting Reports
– Saving Reports
– Scheduling Reports

15
Reporting Capabilities: Dashboard Drill-down Summary Reports
You can create reports directly from the dashboard by clicking any hyperlink on the Payments Transaction
Overview panel. By clicking an underlined number for value or volume, a Report Window will pop up with a
summary report aggregating transactions at the account level.

16
Reporting Capabilities: Report Window
The Report Window includes the
following features:
1. Report Name: The name of the
report that is currently being
displayed in the Report window
2. The Toolbar: Provides access to
many of the actions you will use to
create and build your analysis.
3. Report Objects: Located on the
left, provides a list of attributes and
metrics available for this report. You
will use the report objects to add or
remove attributes from the Report
window.
4. Drill down (shown as
underlined): Click on the Total
Transaction Amount or Total
Transaction Count rows to drill down
to the next related report.
5. Report Page-By Panel: Shows
Page-By attributes (displayed as a
drop-down panel) currently being
applied to the analysis.
6. View Filter Panel: Displays the current view filter being applied to the analysis. You can also add or remove filters from this panel.
1
2
3
4
5
6

17
Reporting Capabilities: Tool Bars
4
The View Tool Bar
• The View Tool Bar allows you to Save a Report, Change the
report view (Grid or Graph OR Grid and Graph), Add/Schedule a
report, Export a report to File or PDF
Toolbars give you one-click access to many of the actions you’ll use when working on your analysis
The Option Tool Bar
The Data Tool Bar
The Grid Tool Bar
The Format Tool Bar
• The Option Tool Bar allows you to Show/Hide Report Objects,
Show/Hide Report Page-By, Show/Hide Report View Filters, Show
Pivot Buttons, Show Sort Buttons.
• The Data Tool Bar allows you to Add View Filter Condition, Sort,
Drill, Swap Rows and Columns
• The Grid Tool Bar allows you to add Banding to the grid, Outline
the grid, Merge column/row headers, Lock row/column headers
• The Grid Tool Bar allows you to Change the font, font style, font size, Align selected columns/text, Change the numbers style, Change the
cell fill, line and font color, Change the borders/border style, access Advanced Grid Formatting.

18
Reporting Capabilities: Report Objects
What is a report object? An object is a data container that holds information to build your analysis. In the Report
Objects panel, an object can either be an attribute or a metric.
This icon represents a metric. Also known as the continuous variable.
This icon represents an attribute. Also known as the discrete variable.

19
Reporting Capabilities: Build your analytics report
In Payment Analytics, there are three key tools that you will need to learn to build a comprehensive analysis:
1. Data Pivoting: Rearrange the columns and rows in the grid, so you can view and segment data from different
perspectives.
2. View Filters: A view filter enables you to further narrow down a report view, using only those objects in the
Report Objects window.
3. Page-By: Enables you to select and display subsets of your analysis results as separate views.

20
Reporting Capabilities: Data Pivoting (Drag and Drop)Data pivoting refers to the process of rotating the view of data. In databases where there is a high volume of data, it
is often very difficult to get a view of a particular data or report for analysis. Data pivoting helps overcome this by
displaying the data in a compact format that allows you to find relationships within the data that are otherwise difficult
to see because of the amount of detail.
You can pivot data in a report using any of the following methods:
1. Drag and drop objects (from the Report Objects panel) to move them within the report window.
2. Right-click an object in the report window, point to Move and select an option from the menu.
To perform a drag and drop action:
1. Move the mouse or other pointing
device to the object (e.g., Month
attribute).
2. Press, and hold down, the button
on the mouse or other pointing
device to “grab” the object.
3. “Drag” the object to the desired
location.
4. “Drop” the object by releasing the
button.
5. The result is shown. Adding the
Month attributes allows
receivables analytics to expand
the data and show you the
transaction count by Month.

21
Reporting Capabilities: Data Pivoting (Contextual Menu)In addition to the “Drag-and-Drop” ability, users can also utilize the contextual menu when selecting row headings
(shown below)
To bring up the contextual menu:
1. In the Report Window, move the
mouse or other pointing device to
the desired row heading.
2. Press the left button on the mouse
or other pointing device to select
the object.
3. Press the right button on the
mouse or other pointing device to
bring up the contextual menu.
Here is what each option does:
• To Page-by Axis: Moves the selected object to the Page-By axis (see Using Page-By).
• To Columns: Moves the selected object to the column heading.
• Left: Moves the selected object to the left of the current position.
• Right: Moves the selected object to the right of the current position.
22
Reporting Capabilities: Using FiltersFilters are used to narrow the results of an analysis to a subset of data. For example, one might apply a filter to show
only CHECK transactions or transaction amounts greater than 100,000. To apply a filter to an analysis, users must
first create the filter criteria.
You can create filter criteria in a report using any of the following methods:
1. In the Data Toolbar, click the “Add View Filter condition” icon
2. Right-click an object in the report window, point to “Filter On…”.
3. In the report window, click “Add Condition” in the View Filter panel.

23
Reporting Capabilities: Building Filter Criteria
Example of building filter criteria: Build a simple filter criteria using the grid to the right as an example. The report
below shows transaction count by Year.
1. Initiate a View Filter command using any of the methods outlined above.
2. Select the attribute to filter from the “Filter On:” drop-down. Select Year.

24
Reporting Capabilities: Building Filter Criteria (con’t)
3. Define the criteria using the “Select In List” option. Choose any value(s) from the
Available panel and move them to the Selected panel by pressing the move arrow
button . In this example, we will select “2012.”
4.
4. Execute the view filter by pressing the checkbox button. The analysis will filter the
data and show the transaction count for “Year (2012)” only.

25
Reporting Capabilities: Creating Dynamic Filter Criteria
In some scenarios, selecting values in the list may not be sufficient, especially if you want the filter to be dynamic. For
example, show transaction count by Year greater than or equal to 2011.
To achieve this condition, we will use the “Qualify” method.
1. Follow Step 1.
2. Follow Step 2.
3. Select the “Qualify” option and choose the proper Operators (“Greater than or equal
to”) and input “2011” in the value box.
4. Execute the view filter by pressing the checkbox button. The analysis will filter the
data and show the transaction count for “Year Greater Than Or Equal To 2011” only.

26
Reporting Capabilities: Exporting Reports
Exporting your analysis
Here are ways to export the current
analysis:
1. Click View in the toolbar and
choose the Export icon
2. Click View in the toolbar and
choose the PDF icon

27
Reporting Capabilities: Saving Reports as Private and Public Reports
• Once a report is created, you can save it as a private report that only the user who created the report can
access, or a public report. Public reports are shared with other persons in the same user group.
• The Private and Public Reports functionality allows you to save reports that you create to be available only to
you or to be shared with your team.
How To Create a Public or Private Report:
1. On the report output screen, click “view” then click
“Save As” button
2. The Save As dialog box opens. Notice that the default
Save location is the Private Reports folder. Any report
already created and saved appears on the Save As
page. If no reports have been created, a message tells
you that this folder is empty.
3. Select Private Reports or Public Reports based on
where you want to save the report.
4. Enter the report name in the Name field.
5. You can enter a short description in the Description
field.
6. Click the OK button to save the report.

28
Reporting Capabilities: Scheduling A Report
The Scheduled Reports functionality allows you to save reports that you create to run at a scheduled time.

29
Reporting Capabilities: Scheduling A Report Con’t
1.) To schedule the report, click the Private
Reports option from the Analytics menu.
2.) The Private Reports page opens and
displays your saved reports. Click the
Subscriptions link for the report you want
to schedule.
3.) On the Scheduled Reports page, click the
Add report subscription link. Update the
name of the subscription and select the
frequency of the report, then click OK.

30
Reporting Capabilities: Scheduling A Report Con’t
4.) Update the name of the subscription and
select the frequency of the report, then
click OK.

31
Citi believes that sustainability is good business practice. We work closely with our clients, peer financial institutions, NGOs and other partners to finance solutions to climate change, develop industry standards, reduce our own environmental
footprint, and engage with stakeholders to advance shared learning and solutions. Highlights of Citi’s unique role in promoting sustainability include: (a) releasing in 2007 a Climate Change Position Statement, the first US financial institution to do
so; (b) targeting $50 billion over 10 years to address global climate change: includes significant increases in investment and financing of renewable energy, clean technology, and other carbon-emission reduction activities; (c) committing to an
absolute reduction in GHG emissions of all Citi owned and leased properties around the world by 10% by 2011; (d) purchasing more than 234,000 MWh of carbon neutral power for our operations over the last three years; (e) establishing in
2008 the Carbon Principles; a framework for banks and their U.S. power clients to evaluate and address carbon risks in the financing of electric power projects; (f) producing equity research related to climate issues that helps to inform investors
on risks and opportunities associated with the issue; and (g) engaging with a broad range of stakeholders on the issue of climate change to help advance understanding and solutions.
Citi works with its clients in greenhouse gas intensive industries to evaluate emerging risks from climate change and, where appropriate, to mitigate those risks.
efficiency, renewable energy and mitigation
[© 2013 Citibank, N.A. All rights reserved. Citi and Citi and Arc Design are trademarks and service marks of Citigroup Inc. or its affiliates and are used and registered throughout the world.
.
IRS Circular 230 Disclosure: Citigroup Inc. and its affiliates do not provide tax or legal advice. Any discussion of tax matters in these materials (i) is not intended or written to be used, and cannot be used or relied upon, by
you for the purpose of avoiding any tax penalties and (ii) may have been written in connection with the "promotion or marketing" of any transaction contemplated hereby ("Transaction"). Accordingly, you should seek advice
based on your particular circumstances from an independent tax advisor.
In any instance where distribution of this communication is subject to the rules of the US Commodity Futures Trading Commission (“CFTC”), this communication constitutes an invitation to consider entering into a derivatives
transaction under U.S. CFTC Regulations §§ 1.71 and 23.605, where applicable, but is not a binding offer to buy/sell any financial instrument.
However, this is not a recommendation to enter into any swap with any counterparty or a recommendation of a trading strategy involving a swap. Prior to recommending a swap or a trading strategy involving a swap to you,
Citigroup would need to undertake diligence in order to have a reasonable basis to believe that the recommended swap or swap trading strategy is suitable for you, obtain written representations from you that you are
exercising independent judgment in evaluating any such recommendation, and make certain disclosures to you. Furthermore, nothing in this pitch book is, or should be construed to be, an offer to enter into a swap.
Any terms set forth herein are intended for discussion purposes only and are subject to the final terms as set forth in separate definitive written agreements. This presentation is not a commitment to lend, syndicate a financing, underwrite or
purchase securities, or commit capital nor does it obligate us to enter into such a commitment, nor are we acting as a fiduciary to you. By accepting this presentation, subject to applicable law or regulation, you agree to keep confidential the
information contained herein and the existence of and proposed terms for any Transaction.
Prior to entering into any Transaction, you should determine, without reliance upon us or our affiliates, the economic risks and merits (and independently determine that you are able to assume these risks) as well as the legal, tax and accounting
characterizations and consequences of any such Transaction. In this regard, by accepting this presentation, you acknowledge that (a) we are not in the business of providing (and you are not relying on us for) legal, tax or accounting advice, (b)
there may be legal, tax or accounting risks associated with any Transaction, (c) you should receive (and rely on) separate and qualified legal, tax and accounting advice and (d) you should apprise senior management in your organization as to
such legal, tax and accounting advice (and any risks associated with any Transaction) and our disclaimer as to these matters. By acceptance of these materials, you and we hereby agree that from the commencement of discussions with
respect to any Transaction, and notwithstanding any other provision in this presentation, we hereby confirm that no participant in any Transaction shall be limited from disclosing the U.S. tax treatment or U.S. tax structure of such Transaction.
We are required to obtain, verify and record certain information that identifies each entity that enters into a formal business relationship with us. We will ask for your complete name, street address, and taxpayer ID number. We may also
request corporate formation documents, or other forms of identification, to verify information provided.
Any prices or levels contained herein are preliminary and indicative only and do not represent bids or offers. These indications are provided solely for your information and consideration, are subject to change at any time without notice and are
not intended as a solicitation with respect to the purchase or sale of any instrument. The information contained in this presentation may include results of analyses from a quantitative model which represent potential future events that may or
may not be realized, and is not a complete analysis of every material fact representing any product. Any estimates included herein constitute our judgment as of the date hereof and are subject to change without any notice. We and/or our
affiliates may make a market in these instruments for our customers and for our own account. Accordingly, we may have a position in any such instrument at any time.
Although this material may contain publicly available information about Citi corporate bond research, fixed income strategy or economic and market analysis, Citi policy (i) prohibits employees from offering, directly or indirectly, a favorable or
negative research opinion or offering to change an opinion as consideration or inducement for the receipt of business or for compensation; and (ii) prohibits analysts from being compensated for specific recommendations or views contained in
research reports. So as to reduce the potential for conflicts of interest, as well as to reduce any appearance of conflicts of interest, Citi has enacted policies and procedures designed to limit communications between its investment banking and
research personnel to specifically prescribed circumstances.