Embed Size (px)
Citation preview

Cisco CLI Analyzer Help Guide
Version 3.1
September 21, 2016
Americas Headquarters Cisco Systems, Inc. 170 West Tasman Drive San Jose, CA 95134-1706 http://www.cisco.com Tel: 408 526-4000 800 553-NETS(6387) Fax: 408 527-0883

CCDE, CCENT, CCSI, Cisco Eos, Cisco Explorer, Cisco HealthPresence, Cisco IronPort, the Cisco logo, Cisco Nurse Connect, Cisco Pulse, Cisco SensorBase, Cisco StackPower, Cisco StadiumVision, Cisco TelePresence, Cisco TrustSec, Cisco Unified Computing System, Cisco WebEx, DCE, Flip Channels, Flip for Good, Flip Mino, Flipshare (Design), Flip Ultra, Flip Video, Flip Video (Design), Instant Broadband, and Welcome to the Human Network are trademarks; Changing the Way We Work, Live, Play, and Learn, Cisco Capital, Cisco Capital (Design), Cisco:Financed (Stylized), Cisco Store, Flip Gift Card, and One Million Acts of Green are service marks; and Access Registrar, Aironet, AllTouch, AsyncOS, Bringing the Meeting To You, Catalyst, CCDA, CCDP, CCIE, CCIP, CCNA, CCNP, CCSP, CCVP, Cisco, the Cisco Certified Internetwork Expert logo, Cisco IOS, Cisco Lumin, Cisco Nexus, Cisco Press, Cisco Systems, Cisco Systems Capital, the Cisco Systems logo, Cisco Unity, Collaboration Without Limitation, Continuum, EtherFast, EtherSwitch, Event Center, Explorer, Follow Me Browsing, GainMaker, iLYNX, IOS, iPhone, IronPort, the IronPort logo, Laser Link, LightStream, Linksys, MeetingPlace, MeetingPlace Chime Sound, MGX, Networkers, Networking Academy, PCNow, PIX, PowerKEY, PowerPanels, PowerTV, PowerTV (Design), PowerVu, Prisma, ProConnect, ROSA, SenderBase, SMARTnet, Spectrum Expert, StackWise, WebEx, and the WebEx logo are registered trademarks of Cisco and/or its affiliates in the United States and certain other countries.
All other trademarks mentioned in this document or website are the property of their respective owners. The use of the word partner does not imply a partnership relationship between Cisco and any other company. (1002R)
Any Internet Protocol (IP) addresses and phone numbers used in this document are not intended to be actual addresses and phone numbers. Any examples, command display output, network topology diagrams, and other figures included in the document are shown for illustrative purposes only. Any use of actual IP addresses or phone numbers in illustrative content is unintentional and coincidental.
Cisco CLI Analyzer User Guide
© 2016 Cisco Systems, Inc. All rights reserved.

i
Table of Contents
New Features ................................................................................................................................................................. 1
Get Started ..................................................................................................................................................................... 1
About the Cisco CLI Analyzer .................................................................................................................................. 1
System Requirements ................................................................................................................................................ 2
Download and Install the Cisco CLI Analyzer .......................................................................................................... 3
Access the Cisco CLI Analyzer ................................................................................................................................. 6 Configure Application Settings ..................................................................................................................................... 7
General Tab ............................................................................................................................................................... 7
Console Preferences .............................................................................................................................................. 7
Device Identification ............................................................................................................................................. 8
Logging .................................................................................................................................................................. 8
Security Tab ............................................................................................................................................................... 8 Display Tab ............................................................................................................................................................... 9
Console Appearance .............................................................................................................................................. 9
Contextual Help and Highlighting ......................................................................................................................... 9
Advanced Tab .......................................................................................................................................................... 10
Proxy.................................................................................................................................................................... 10 Serial Connection Defaults .................................................................................................................................. 10
Session Sharing.................................................................................................................................................... 11
Manage Your Devices ................................................................................................................................................. 12
Locate Devices ........................................................................................................................................................ 12
Filters ................................................................................................................................................................... 12
Searches ............................................................................................................................................................... 12 Sort Devices ......................................................................................................................................................... 12
Add a Device to the Device List .............................................................................................................................. 13
Import Devices from a CSV File ............................................................................................................................. 15
Import Devices from PuTTY ................................................................................................................................... 16
Automatic Import ................................................................................................................................................ 16
Manual Import ..................................................................................................................................................... 16 Import Devices from SecureCRT ............................................................................................................................ 18
Create a CSV File of Devices .................................................................................................................................. 19
Export Devices ........................................................................................................................................................ 19
Connect to a Device (SSH or Telnet) ...................................................................................................................... 20

ii
Initiate an SSH Session from the Command Line ............................................................................................... 21
Connect to a Device (Serial) .................................................................................................................................... 22
Send Break ........................................................................................................................................................... 22
Shared Device Sessions ........................................................................................................................................... 23 Create and Manage a Shared Session .................................................................................................................. 23
Join a Shared Session .......................................................................................................................................... 24
Features........................................................................................................................................................................ 25
Keyboard Shortcuts ................................................................................................................................................. 25
Submit Comments and Questions ............................................................................................................................ 25
Log Your Current Session ....................................................................................................................................... 26 Add Tags to Devices ................................................................................................................................................ 27
Run CLI Commands ................................................................................................................................................ 28
Run Cisco CLI Analyzer Scripts ............................................................................................................................. 28
CCO Login .......................................................................................................................................................... 28
Tool Descriptions ................................................................................................................................................ 29
Run Scripts .......................................................................................................................................................... 31 Search the Command Output ................................................................................................................................... 33
Analyze Offline Files ............................................................................................................................................... 34
Contextual Help and Highlighting ........................................................................................................................... 35
Context Menu Options ............................................................................................................................................. 41
Frequently Asked Questions ........................................................................................................................................ 42 Why do I need to log in with my Cisco.com account for some features? ................................................................ 42
Why am I still unable to access the Cisco CLI Analyzer after I have entered my CCO account information? ....... 42
Why am I unable to log in to my CCO account? ..................................................................................................... 42
How do I request features or provide product feedback? ........................................................................................ 42
Why does ASA Traceback Decoder state that the crash.txt file cannot be found? .................................................. 42
Which operating systems are supported in the Cisco CLI Analyzer? ...................................................................... 43 What terminal emulation is supported in the Cisco CLI Analyzer? ........................................................................ 43
What protocols are supported in the Cisco CLI Analyzer? ...................................................................................... 43
Why did File Analysis report no results or state that it was unable to determine the output provided? .................. 43
Which expressions and characters are supported in the RegEx search feature? ...................................................... 43
New Features Cisco CLI Analyzer Help Guide
1
New Features These features are new in this version of the Cisco CLI Analyzer:
Shared Device Sessions: Multiple users can connect to a device session. This is a useful tool when you conduct internal troubleshooting and training.
New Analysis Tools:
o The IP Route Analysis tool provides an analysis of the global IPv4 routing table.
o The ASA Unused Policy Detector finds unused configuration policies such as unused access-lists, object-groups, and objects.
Credential Profiles: Store user credentials in a security profile, and then use the profile when you log in to a device. You can specify the devices that accept global credentials.
Serial Connections: Open a session to a device that is connected through a COM port.
Contextual Help and Highlighting for UCS: Many UCS commands now have contextual help and highlighting available.
Basic Proxy Authentication: You can now set up a username and password for proxy authentication.
Device Identification Frequency: You can choose how often to run the show version (or appropriate) command upon connection to a device.
Themes: New console appearance themes have been added.
Other Improvements: You can now delete sessions from the Recent Sessions list. You can see at a glance the number of devices with a particular tag. The tool identifies Cisco FirePOWER devices upon connection. New bulk actions allow you to check device coverage and delete devices, and new sort order options allow you to sort devices by additional properties. You can choose whether to name a newly added device based on its IP address or its hostname, and the file names of log files can similarly be based on either IP address or hostname.
Get Started
About the Cisco CLI Analyzer The Cisco CLI Analyzer is a smart SSH/Telnet client designed to help troubleshoot and check the overall health of your supported device. Features include:
ASA, IOS, IOS-XE, and IOS-XR System Diagnostics: Utilizes Cisco TAC knowledge in order to analyze the ASA and detect known problems such as system problems, configuration mistakes, and best practice violations.
ASA Traceback Analyzer: Attempts to match the root cause of a crash to a known bug if the ASA has experienced a system traceback. If a match is found, the ASA version or versions in which the bug is fixed are provided.
ASA Packet Tracer: Allows administrators to send simulated packets through the ASA as a test. If the packet is dropped, the ASA configuration portion or feature that could have contributed to the packet drop is identified.
ASA Firewall Top Talkers: Identifies the connections that pass traffic through your ASA that have the highest bit rates.
ASA Unused Policy Detector: Looks for unused configuration policies such as unused access-lists, object-groups, and objects. Some of these could also indicate misconfigurations. This tool collects the output of

Get Started Cisco CLI Analyzer Help Guide
2
the commands show run and show access-list | excl ^ |elem. The output is uploaded to Cisco for analysis. Full tool functionality is available in ASA releases 9.x and above.
IP Route Analysis (IOS and IOS-XE): Provides analysis of your IPv4 routing table and reports on route instability, route summaries, subnet prefix distribution, and summary of administrative distances for all protocols.
Note: Analysis is limited to 100,000 routes. If this limit is exceeded, the tool will not work.
IOS-XR BGP Top Talkers: Helps determine which BGP peers have the highest rates of messages sent or received.
IOS-XR L2VPN Top Talkers: Helps determine which Layer 2 VPN point-to-point circuits and Bridge-Domains have the highest packet rates.
IOS-XR LPTS Top Talkers: Helps determine the types of traffic that are handed off from hardware to software processing and their rates.
Contextual Help and Highlighting: Provides information based on command outputs in an interactive way. Highlights enable real-time search capabilities in the console window.
Note: You must have a valid Cisco.com account in order to use the Cisco CLI Analyzer. If you do not have a valid Cisco.com account, you must register on the Cisco.com Registration page and associate a Service Contract to your Cisco.com profile.
System Requirements The minimum software and hardware required in order to run the Cisco CLI Analyzer are as follows.
Software
Windows 7 (32-bit or 64-bit)
Mac OS X versions 10.9 (Mavericks) or later
Hardware
2 gigabytes (GB) of RAM
512 megabytes (MB) of available space on the hard disk

Get Started Cisco CLI Analyzer Help Guide
3
Download and Install the Cisco CLI Analyzer Complete these steps in order to download and install the Cisco CLI Analyzer:
1. Open the Cisco Tools & Resources page in your browser and click Cisco CLI Analyzer.
2. On the Cisco CLI Analyzer web page, read the Beta Terms, and click Try the Cisco CLI Analyzer.
The Cisco End User License Agreement page appears.
3. Click Accept.
The Cisco File Exchange page appears.
4. On the Cisco File Exchange page, click the link that corresponds to your operating system.
5. After the file is downloaded, double-click the executable in order to begin installation.
The Cisco CLI Analyzer Setup Wizard appears.
Get Started Cisco CLI Analyzer Help Guide
4
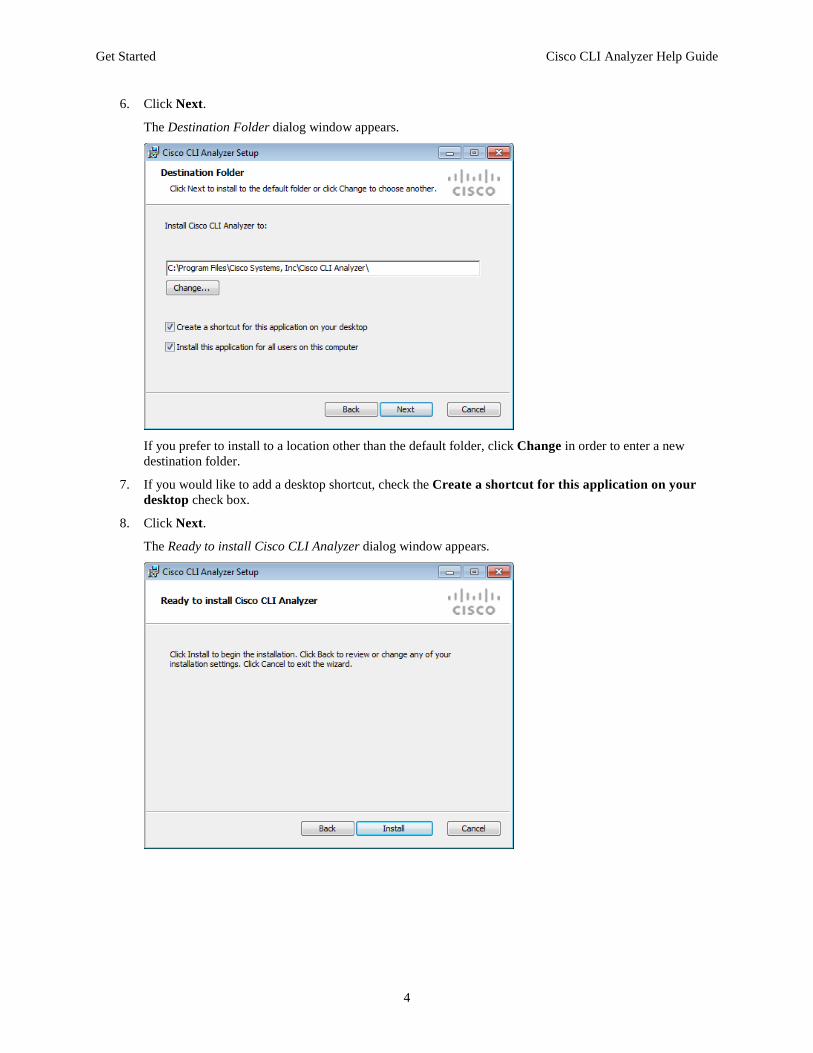
6. Click Next.
The Destination Folder dialog window appears.
If you prefer to install to a location other than the default folder, click Change in order to enter a new destination folder.
7. If you would like to add a desktop shortcut, check the Create a shortcut for this application on your desktop check box.
8. Click Next.
The Ready to install Cisco CLI Analyzer dialog window appears.

Get Started Cisco CLI Analyzer Help Guide
5
9. On the Ready to install Cisco CLI Analyzer dialog window, click Install.
After installation is complete, the Completed the Cisco CLI Analyzer Setup Wizard dialog window appears.
10. If you want to launch the application on exit, check the Launch application when complete check box.
11. Click Finish in order to exit the Cisco CLI Analyzer Setup Wizard.
Note: After installation is complete, you can run the Cisco CLI Analyzer executable again in order to repair or remove the application.

Get Started Cisco CLI Analyzer Help Guide
6
Access the Cisco CLI Analyzer After the Cisco CLI Analyzer is installed, click the Cisco CLI Analyzer icon in order to open the Cisco CLI Analyzer interface.
The Cisco CLI Analyzer interface appears with the Devices tab selected.
Devices Tab Features:
Current Sessions: Click a device in order to switch to the console window for that device. A green circle appears beside devices with an active connection; a red circle appears beside disconnected devices. Click the X beside a device in order to close the current session and remove it from the list.
Recent Sessions: Click a device in order to open the Session Login screen. Hover the pointer over a device in order to show the time and date of the last active session with that device. Click the X beside a device in order to remove the recent session from the list.
Toolbar: The toolbar provides options that allow you to search and sort the device list, to perform bulk actions on selected devices, and to add, import, and export devices.
Filters: Check filter check boxes in order to hide devices that do not match the filter criteria. Filters can be based on the devices that are marked as favorites or on tags added to devices.

Configure Application Settings Cisco CLI Analyzer Help Guide
7
Configure Application Settings Click the Settings tab in order to access global console settings. These settings apply across all device sessions.
The settings appear on four tabs: General, Security, Display, and Advanced.
General Tab These settings affect multiple areas of functionality.
Console Preferences Scrollback Buffer: You can configure the number of command lines that are retained in memory. In order
to configure the scrollback buffer, enter a number between 100 and 50,000.
Preferred Protocol: Choose the protocol (SSH or Telnet) that you use most frequently. This protocol is selected by default when you create a new connection.
Console Selection Behavior: Choose your preferred experience when you use the mouse in order to select text within the console window. In addition to the default text selection behavior, you can choose to emulate the behavior of PuTTY or SecureCRT.
Prompt before Closing Tab/Session: Click the toggle button in order to enable or disable the End Session dialog window. This window displays when you close the tab for a current session and prompts you to confirm whether you want to close the session.
Tools Display on Connect: Click the toggle button in order to show or hide the analysis tools in a new device session. If the tools are hidden by default when the session opens, you can click the Tools button
( ) in order to show them.

Configure Application Settings Cisco CLI Analyzer Help Guide
8
Device Identification Recheck Time: Choose the number of days to wait between automatic executions of the show version
(or appropriate) command. (Default = 30 days.) If you choose Always Check, the command runs automatically at the beginning of every device session.
Device Name: Choose whether new devices that you add to the list are named by IP address or by the device name from the router.
Logging Logs Directory: By default, log files are saved in these locations:
o Windows: C:\Users\<userid>\Cisco-CLI-Analyzer_Session_Logs
o Mac OS X: /Users/<userid>/Cisco-CLI-Analyzer_Session_Logs
In order to choose a different folder, click the path that is currently displayed. Browse to the desired folder, select it, and click OK.
Automatically Enable Session Logging: Click the toggle button in order to enable or disable automatic session logs. When enabled, activity is logged by default when you connect to a device, and a log file is saved automatically when you disconnect. You can still start and stop logging sessions manually from within the console. For more information, see Log Your Current Session.
Log Filename Scheme: Choose whether to name log files by the device’s IP address or by the device name from the router.
Security Tab These settings affect the credentials that are used to connect to devices.
Reconnect with Credentials: Click the toggle button in order to enable or disable the ability to reconnect
with the login credentials that you previously entered. When enabled, login credentials for each session tab persist until the session tab is closed.
Master Password: Check the check box in order to allow the Cisco CLI Analyzer to save a master password. The master password allows you to store credentials for individual devices so that you do not have to enter them every time. The application uses Secure Hash Algorithm 3 (SHA-3) in order to securely store the password as a hash value in the database.
If this feature is enabled, when you open the Cisco CLI Analyzer, the application prompts you to enter the master password. If you do not enter the master password, you must enter credentials for each individual device session.
In order to change the password, click Change Password. Enter the old master password and the new one.

Configure Application Settings Cisco CLI Analyzer Help Guide
9
Global Device Credentials: Create and manage user profiles that you can use to initiate device sessions. In order to create a profile, click Add Profile and enter a name for the profile and the credentials to use in order to access the device. In order to enable a device to use the profile, edit the device and choose the credential profile that the device accepts.
Note: You can also use the Bulk Actions feature in order to assign credential profiles to multiple devices. Select the devices, click the Bulk Actions button, and select Apply Credential Profile.
Default Credential Profile: Choose a profile to use as the default. If you choose Per Device, there is no default profile, and devices that are configured to accept the default profile will accept only their own individual credentials instead.
Display Tab These settings affect the appearance of text, background colors, and highlights.
Console Appearance Font: Choose the font type that you prefer from the drop-down list.
Font Size: Click inside the field and enter a font size between 8 and 20, or click the up and down arrows in order to change the font size.
Theme: Choose a predefined color theme, or click Customize in order to choose your own colors.
If you choose Customize, a set of Text and Background color buttons appears. Click a color button in order to display the color palette, from which you can choose a color. A preview of your current theme or color selection is displayed in the Preview window.
Note: Search terms use their own text and background colors. For information on how to search, see Search the Command Output.
Contextual Help and Highlighting Enabled: Click the toggle button in order to enable or disable contextual help and highlighting. This
feature is enabled by default. For more information, see Contextual Help and Highlighting.
Display Levels: Select the notification types (Danger, Warning, and Info) that you want to display. Uncheck the check boxes beside notification types that you want to filter out (disable).

Configure Application Settings Cisco CLI Analyzer Help Guide
10
Advanced Tab These settings apply to proxy servers, serial connections, and shared sessions.
Proxy Enabled: Click the toggle button in order to enable the use of a proxy server for outbound web
connections.
The Enable Proxy Settings window opens automatically. Complete these fields:
o Protocol: Click inside the field and choose a protocol from the drop-down list. The supported protocols include HTTP, HTTPS, Socks, and Socks5.
o Host: Enter the IP address of the proxy server.
o Port: Enter the port number to use.
Note: You must restart the application before Proxy settings become active.
Credentials Enabled: Click the toggle button and enter the user name and password for the proxy server.
Serial Connection Defaults
Note: TAC tools are not available in device sessions that use a serial connection.
Port Name: Choose the COM port to use for serial connections or enter a port number manually. The drop-down list shows only active COM ports that are detected on the system.
Baud Rate: Choose the baud rate to use for serial connections. If the console window does not display its contents correctly, you might need to adjust this value.
Data Bits: Enter the number of data bits to use, or click the up and down arrows in order to adjust the number of bits.

Configure Application Settings Cisco CLI Analyzer Help Guide
11
Stop Bits: Enter the number of stop bits to use, or click the up and down arrows in order to adjust the number of bits.
Parity: Choose the parity type to use for serial connections.
Flow Control: Choose the flow control type(s) to use for serial connections.
Session Sharing
Note: Session sharing uses AES-256 encryption.
Enabled: Click the toggle button in order to enable shared device sessions.
Port: Enter the port number to use for shared device sessions. (Session Sharing must be disabled in order to change the port number.) You must provide this port number to remote users who want to connect to a shared session.
Remote Logging Enabled: When enabled, remote users have the option to log the device session.

Manage Your Devices Cisco CLI Analyzer Help Guide
12
Manage Your Devices
Locate Devices Use filters and searches in order to locate specific devices in the device list.
Filters Filters are based on tags and favorites. Check the filter boxes on the left side of the device list in order to display only devices with the selected tags or the selected favorite status (either favorites or non-favorites).
In order to remove all of the active filters, click Clear Filters above the filter check boxes. The device list displays all of the devices.
Searches Enter a keyword in the Search box and press Enter in order to filter the device list to show devices whose properties include the keyword.
The keyword is displayed in a bubble below the Search box and remains an active filter that can be combined with other filter selections. In order to remove the keyword as an active filter, click the X on the keyword bubble.
Sort Devices When the List View is displayed, you can click a column header in order to sort the list by that property. Click the column header again in order to switch between ascending and descending order.
When either the List View or the Grid View is displayed, you can click the Sort By button ( ) in order to choose a sort order from the drop-down list. Click the Sort button ( ) in order to switch between ascending and descending order.

Manage Your Devices Cisco CLI Analyzer Help Guide
13
Add a Device to the Device List Complete these steps in order to add a device to the Devices list:
1. In the Cisco CLI Analyzer, click the Devices tab, and click the Add Device button ( ) on the Device List toolbar, located below the Quick Connect box.
The Add Device dialog window appears.
2. Enter a name for the device in the Device Name field.
3. Enter the IP address or host name in the IP/Hostname field.
4. Enter the physical location of the device in the Location field.
5. Click the radio button for the connection type (SSH, TELNET, or SHARED) that you want to use.
6. If you use a non-standard port number, enter it in the Port field.
7. Choose Cisco Device or Non-Cisco Device in the Manufacturer field.
8. In the Device Identification Recheck Time field, choose how frequently the show version command should run upon connection to the device. You can choose to use the global setting defined on the General tab of the Settings page, or choose an individual value for this device.
9. In the Credential Profile field, choose the profile that can be used to connect to this device. If you do not want the device to accept a user credential profile, choose Per Device.
10. Assign one or more Tags to describe your device. Click Add a tag... and type a tag, then click the button.
11. Optionally, enter additional information about the device in the Notes field.
12. Click Add.
The device is added to the Devices list.

Manage Your Devices Cisco CLI Analyzer Help Guide
14
After the device is added to the Devices list, you can perform these actions:
Click the Connect button ( ) below a device in order to connect to that device.
Click the Tools button ( ) below a device in order to view the tool results for the device in the Tools Results window.
Click the Edit button ( ) below a device in order to open the Edit Device window, where you can update device information.
Click the Favorites button ( ) below a device in order to mark the device as a Favorite. The button icon changes to an orange star ( ). Click the button again in order to remove the device from Favorites.
Click the hyperlinked serial number of a device in order to check the service contract status of the device. The Cisco Device Coverage Checker tool opens in a browser window.
After additional devices are added to the Devices list, you can use these actions in order to navigate the list.
Hover the pointer over a device and click the Select button ( ) in order to select the device. The device is highlighted and the Bulk Actions button becomes available. In order to deselect the device, click anywhere on the device.
Click the Select All button ( ) in order to select all devices in the list. The button icon changes ( ) in order to show that all devices are selected. The Bulk Actions button becomes available.
With one or more devices selected, click the Bulk Actions button ( ) and then click an option in the drop-down list in order to perform that action (Connect, Check Coverage, Apply Credential Profile, Delete Selected Devices, Delete All Devices, Add Tags, or Delete Tags).
Click the Sort By button ( ) and choose a property from the drop-down list in order to sort the list of devices by the selected property.

Manage Your Devices Cisco CLI Analyzer Help Guide
15
Click the Sort button ( ) in order to change the sort order of the list from descending to ascending. The button icon changes in order to show an ascending sort order ( ).
Check a filter check box in order to show only devices that match your selected filter. (For example, select the No Favorites check box in order to show only devices that are not marked as Favorites.)
Enter a search term in the Search Devices field and press Enter in order to search the device list.
Import Devices from a CSV File You can import devices to the Device List from a CSV file.
Note: Imported devices are configured to accept the default credential profile that is selected on the Security tab of the Settings page. If the default credential profile setting is Per Device, the imported devices will accept only their own individual credentials.
Complete these steps in order to import a CSV file.
1. On the Devices tab of the Cisco CLI Analyzer, click the Upload button ( ) on the Device List toolbar (located below the Quick Connect area). On the drop-down menu, choose Import from CSV.
The Device File Upload dialog window appears.
2. Complete one of these steps:
o Click Click or drop file to upload. In the Open dialog, navigate to the CSV file you want to import, choose it, and click Open.
o Drag the CSV file from a separate window onto the text “Click or drop file to upload.” Be sure that the icon below the pointer indicates that the file will be moved before you release the mouse button to drop the file.
3. Click Upload.
The devices imported from the CSV file appear in the Device List.

Manage Your Devices Cisco CLI Analyzer Help Guide
16
Import Devices from PuTTY You can import devices to the Device List from a PuTTY export file. There are two options: to import automatically with settings from the Windows Registry, or to import manually with a configuration file that you create.
Note: Imported devices are configured to accept the default credential profile that is selected on the Security tab of the Settings page. If the default credential profile setting is Per Device, the imported devices will accept only their own individual credentials.
Use the steps for the automatic or manual import process as needed.
Automatic Import 1. On the Devices tab of the Cisco CLI Analyzer, click the Upload button ( ) on the Device List toolbar
(located below the Quick Connect area). On the drop-down menu, choose Import from PuTTY.
The Device Import - PuTTY dialog window appears.
2. Choose the connection type(s) to import: SSH and/or Telnet. Both check boxes are checked by default.
3. Click Upload and wait for the upload process to complete. Any errors during the upload are displayed in the bottom right corner of the application.
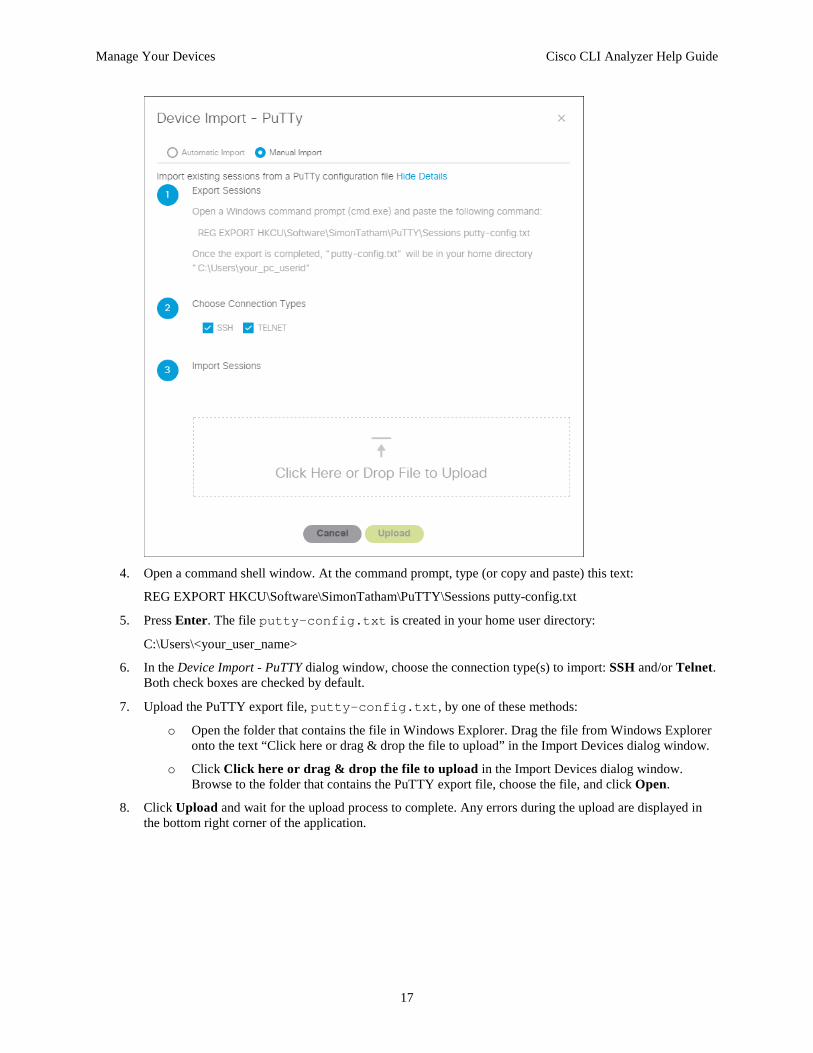
Manual Import 1. On the Devices tab of the Cisco CLI Analyzer, click the Upload button ( ) on the Device List toolbar
(located below the Quick Connect area). On the drop-down menu, choose Import from PuTTY.
The Device Import - PuTTY dialog window appears.
2. Select Manual Import at the top of the window.
3. Click View Details in order to expand the window and show step-by-step instructions.
Manage Your Devices Cisco CLI Analyzer Help Guide
17
4. Open a command shell window. At the command prompt, type (or copy and paste) this text:
REG EXPORT HKCU\Software\SimonTatham\PuTTY\Sessions putty-config.txt
5. Press Enter. The file putty-config.txt is created in your home user directory:
C:\Users\<your_user_name>
6. In the Device Import - PuTTY dialog window, choose the connection type(s) to import: SSH and/or Telnet. Both check boxes are checked by default.
7. Upload the PuTTY export file, putty-config.txt, by one of these methods:
o Open the folder that contains the file in Windows Explorer. Drag the file from Windows Explorer onto the text “Click here or drag & drop the file to upload” in the Import Devices dialog window.
o Click Click here or drag & drop the file to upload in the Import Devices dialog window. Browse to the folder that contains the PuTTY export file, choose the file, and click Open.
8. Click Upload and wait for the upload process to complete. Any errors during the upload are displayed in the bottom right corner of the application.

Manage Your Devices Cisco CLI Analyzer Help Guide
18
Import Devices from SecureCRT You can import devices to the Device List from a SecureCRT export file.
Note: Imported devices are configured to accept the default credential profile that is selected on the Security tab of the Settings page. If the default credential profile setting is Per Device, the imported devices will accept only their own individual credentials.
Complete these steps in order to create and import the file.
1. On the Devices tab of the Cisco CLI Analyzer, click the Upload button ( ) on the Device List toolbar (located below the Quick Connect area). On the drop-down menu, choose Import from SecureCRT.
The Device Import - SecureCRT dialog window appears.
2. Click View Details in order to expand the window and show step-by-step instructions.
3. Open SecureCRT. On the Tools menu, choose Export Settings. Complete the export process and note the
location of the export file.
4. In the Device Import - SecureCRT dialog window, choose the connection type(s) to import: SSH and/or Telnet. Both check boxes are checked by default.
5. Upload the SecureCRT export file by one of these methods:
o Open the folder that contains the file in Windows Explorer. Drag the file from Windows Explorer onto the text “Click here or drag & drop the file to upload” in the Import Devices dialog window.
o Click Click here or drag & drop the file to upload in the Import Devices dialog window. Browse to the folder that contains the SecureCRT export file, choose the file, and click Open.
6. Click Upload and wait for the upload process to complete. Any errors during the upload are displayed in the bottom right corner of the application.

Manage Your Devices Cisco CLI Analyzer Help Guide
19
Create a CSV File of Devices You can create a CSV file with device information that can be imported to the Cisco CLI Analyzer on any workstation.
Complete these steps in order to create a CSV file:
1. On the Devices tab of the Cisco CLI Analyzer, click the Upload button ( ) on the Device List toolbar (located below the Quick Connect area).
The Device File Upload dialog window appears.
2. Click Download Template.
The Save As dialog window appears.
3. Navigate to the location where you want to save the CSV template and click Save.
4. Open the CSV file in your preferred application.
5. Enter the information for each device on a separate row. This information is required:
IP Address OR Hostname (DNS)
Protocol
Other device information is optional and can be added from within the Cisco CLI Analyzer.
6. When you are finished, click Save.
Export Devices You can export information about the devices in your Device List to a CSV file. This allows you to import the information on another workstation.
Complete these steps in order to export device information to a CSV file:
1. On the Devices tab of the Cisco CLI Analyzer, click the Export button ( ) on the Device List toolbar (located below the Quick Connect area).
The Save As dialog window appears.
2. Navigate to a location on your computer, optionally change the file name of the CSV file, and click Save.

Manage Your Devices Cisco CLI Analyzer Help Guide
20
Connect to a Device (SSH or Telnet) Complete these steps in order to use the SSH or Telnet connection type to connect to a device:
1. On the Devices tab, complete one of these actions in order to start a new session:
o Click New Session in the left panel.
o Click a device in the Recent Sessions list.
o Click the button on the device entry in the Devices list.
A new session tab appears, and the Session Login screen opens.
2. If you are prompted for basic connectivity information for the device, enter the requested information and click Next. Otherwise, skip this step and continue to step 3.
o Enter the IP address or hostname of the device in the IP/Hostname field. You can also click the arrow beside the field and choose a device to which you have connected in a recent session.
o Choose the connection type (SSH or TELNET) that you want to use.
o Enter the appropriate port number in the Port field.
The Cisco CLI Analyzer checks for a connection to the device. If the device is found, the screen changes in order to accept login information.
3. In the fields provided, enter the user name and password that are required in order to access the device.
4. Optionally, enter the password for Enable access in the Enable Password field. If you leave the field empty, you will be required to enter the enable command and the password manually at the command prompt before you run scripts that require Enable access.

Manage Your Devices Cisco CLI Analyzer Help Guide
21
5. Click Connect.
A session window opens and the session tab icon displays green in order to indicate an active session.
Note: The status bar at the bottom of the window displays row and column count, as well as connection protocol, start time, elapsed time, and the device type.
By default, the show version (or appropriate) command runs at every session. You can change how frequently this command runs on the General tab of the Settings page. You can also edit the frequency on individual devices.
After you are connected, you can perform these actions:
Log your current session
Run CLI commands
Run Cisco CLI Analyzer scripts
Search the command output
Note: Click Disconnect in order to disconnect from the device. If your session times out and you are automatically disconnected, click Reconnect. You can also double-click the session in the Current Sessions list on the Devices tab in order to reconnect.
Initiate an SSH Session from the Command Line When you open the Cisco CLI Analyzer from the command line, you can add arguments in order to initiate an SSH device session immediately when the application opens.
Note: Ensure that no other instances of the CLI Analyzer are open before you proceed.
Windows: C:\Program Files\Cisco Systems, Inc\Cisco CLI Analyzer\nw.exe "--ssh <username>@<deviceIP>"
Mac OS: open "/Applications/Cisco CLI Analyzer.app" --args "--ssh <username>@<deviceIP>"
Note: The <username> is the account to use to log in to the device, and the <deviceIP> is the IP address of the device.

Manage Your Devices Cisco CLI Analyzer Help Guide
22
Connect to a Device (Serial) You can connect your PC to a COM port on the device. (Bluetooth wireless serial adapters are not supported.)
Serial connections differ from SSH/Telnet connections in these ways:
Serial connections do not create entries in the Devices list for the connected devices.
Serial connections do not support device identification, system diagnostic tools, or hardware flow control.
Complete these steps in order to use the Serial connection type to connect to a device:
1. On the Devices tab, complete one of these actions in order to start a new session:
o Click New Session in the left panel.
o Click a device in the Recent Sessions list.
A new session tab appears, and the Session Login screen opens.
2. Skip the IP/Hostname field. In the Type field, choose SERIAL from the drop-down list.
The screen displays a different set of fields.
3. Choose the COM port to use for the connection.
4. Enter information in the remaining fields: baud rate, data bits, stop bits, parity type and flow control.
5. Click Connect.
A session window opens.
6. Enter your user credentials at the command prompt. (These credentials are not stored; you must enter them every time you open a serial device connection.)
Send Break While the serial connection is active, you can enter a "send break" command by one of these methods:
Press CTRL+SHIFT+s
Right-click inside the console window and choose Send BREAK from the context menu
Note: This functionality requires a USB/serial adapter and a Cisco device that both support Send Break. You must also trigger a Send Break at the correct time during the reboot of a Cisco device.

Manage Your Devices Cisco CLI Analyzer Help Guide
23
Shared Device Sessions Shared device sessions provide the ability to train multiple users or help troubleshoot problems when peer-to-peer connections are available (IP to IP connectivity).
The session initiator retains control of the session and can grant read/write permissions to one remote user at a time. Other remote users are limited to read-only access.
Note: Shared sessions are only supported on internal networks. Shared session connections via the Internet or through NATs and firewalls are not yet supported.
Note: Shared sessions use AES-256 encryption.
Create and Manage a Shared Session Complete these steps in order to create a shared device session:
1. Ensure that shared sessions are enabled on the Advanced tab of the Settings page.
2. Connect to a device normally. Choose the SSH or Telnet connection type.
3. In the session window, click the button in order to show the Shared Session toolbar.
4. Click Share Session.
The toolbar displays the IP address of the device and the session key.
5. Provide this information to remote users who want to join:
o IP address of the PC on which you have initiated the shared session
o Port number
o Session key
6. When a remote user joins the session, a confirmation dialog prompts you to authorize the connection. Click Authorize.
The remote user’s name appears in a button on the toolbar. Click the button in order to access session options for the remote user.
While the shared session is active, you can perform these actions:
Give write permissions to a remote user: Click the user’s button and choose Give Write Permissions. If another remote user already has this permission level, it is transferred to the new user.
Revoke write permissions: This option only appears for a remote user with write permission. Click the user’s button and choose Revoke Write Permissions.
Disconnect a remote user: Click the user’s button and choose Disconnect User.

Manage Your Devices Cisco CLI Analyzer Help Guide
24
Stop sharing the session: Click the Stop Sharing button on the toolbar. If you subsequently share the same session again, a new session key is generated that you must provide to remote users.
Work in other device sessions: You can leave the shared session open and switch to a different session. A remote user with write permissions can continue to work in the shared session. The Current Sessions list displays [Shared] beside each active shared session.
Join a Shared Session In order to join a shared session, you must have this information (provided by the session initiator):
IP address of the PC where the CLI Analyzer shared session has been initiated
Port number (this is the port number that the session initiator has on the Advanced tab of the Settings page; the default port is 8090)
Session key
Complete these steps in order to create a shared device session:
1. On the Devices tab, complete one of these actions in order to start a new session:
o Click New Session in the left panel.
o Click a device in the Recent Sessions list.
o Click the button on the device entry in the Devices list.
A new session tab appears, and the Session Login screen opens.
2. If you are prompted for basic connectivity information for the device, enter the requested information and click Next. Otherwise, skip this step and continue to step 3.
o Enter the IP address or hostname of the device in the IP/Hostname field. You can also click the arrow beside the field and choose a device to which you have connected in a recent session.
o Choose the Shared connection type.
o Enter the port number that the session initiator provided.
3. Click Next.
4. Enter a name by which to identify yourself in the shared session.
5. Enter the session key that the session initiator provided.
6. Click Connect.
After the session initiator authorizes your connection, the session window opens.
If the session initiator gives you write permissions, you can run commands and use analysis tools in the shared session. (Results for the analysis tools that you run appear only on your client; the session initiator does not see them.)

Features Cisco CLI Analyzer Help Guide
25
Features
Keyboard Shortcuts The table below shows the keyboard shortcuts that are supported on the Windows and OS X platforms. If no operating system is specified, the shortcut works on all supported platforms. Some functions have a shortcut that works on all platforms as well as additional shortcuts for specific operating systems.
Function Shortcut
Start new session ALT-Q
Copy selected item to clipboard Windows: CTRL-C OS X: Command-C
Search console Windows: CTRL-F OS X: Command-F
Select all text All platforms: CTRL-SHIFT-A OS X: Command-A
Copy and paste CTRL-SHIFT-B
Switch to previous tab CTRL-SHIFT-TAB
Switch to next tab CTRL-TAB
Paste clipboard contents Windows: CTRL-V OS X: Command-V
Scroll down one page Page Down
Scroll up one page Page Up
Toggle full screen All platforms: SHIFT-F Windows: F11 OS X: Command-F
Submit Comments and Questions In order to submit comments and questions about the Cisco CLI Analyzer tool, click Feedback in the left panel in order to open the Feedback form. Enter your comments in the field that is provided. Optionally, select a star rating. When you are finished, click Submit in order to send your feedback.
Features Cisco CLI Analyzer Help Guide
26
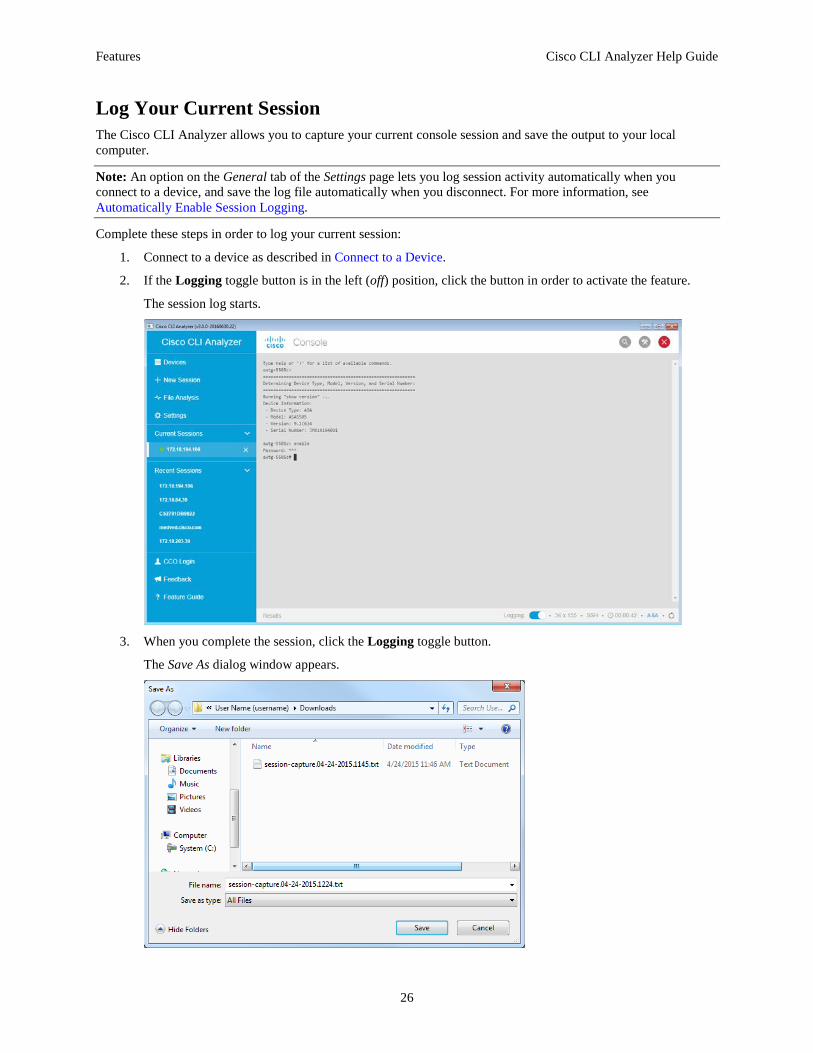
Log Your Current Session The Cisco CLI Analyzer allows you to capture your current console session and save the output to your local computer.
Note: An option on the General tab of the Settings page lets you log session activity automatically when you connect to a device, and save the log file automatically when you disconnect. For more information, see Automatically Enable Session Logging.
Complete these steps in order to log your current session:
1. Connect to a device as described in Connect to a Device.
2. If the Logging toggle button is in the left (off) position, click the button in order to activate the feature.
The session log starts.
3. When you complete the session, click the Logging toggle button.
The Save As dialog window appears.

Features Cisco CLI Analyzer Help Guide
27
By default, log files are saved in these locations:
o Windows: C:\Users\<userid>\Cisco-CLI-Analyzer_Session_Logs
o Mac OS X: /Users/<userid>/Cisco-CLI-Analyzer_Session_Logs
4. Navigate to a location on your computer, and click Save.
Add Tags to Devices Assign tags (text references) to your devices in order to locate them easily without the need to navigate hierarchical trees. Apply tags to groups of devices in order to organize and quickly filter the Devices tab.
Tags can include these character types:
Lowercase letters (uppercase letters are automatically converted to lowercase)
Numbers
Spaces
Hyphens ( - )and underscores ( _ )
Complete these steps in order to add device tags:
1. On the Devices tab, click the Select button ( ) on each device you want to tag.
2. Click the Bulk Actions button ( ). On the drop-down menu, click Add Tags.
3. In the Add Tags window, click Add a tag... and type the tag that you want to add to the selected devices. Click the button. Repeat this step for each tag that you want to add.
4. Click Save.
Complete these steps in order to remove device tags:
1. On the Devices tab, click the Select button ( ) on each device from which you want to remove tags.
2. Click the Bulk Actions button ( ). On the drop-down menu, choose Delete Tags.
3. In the Delete Tags window, click the X on each tag that you want to delete.
4. Click Save.

Features Cisco CLI Analyzer Help Guide
28
Run CLI Commands In order to run CLI commands, connect to a device as described in Connect to a Device, enter a command at the command prompt, and press Enter.
Run Cisco CLI Analyzer Scripts The Cisco CLI Analyzer allows you to run scripts that help identify, troubleshoot, and resolve problems that you might experience in support of your ASA, IOS, IOS-XE, or IOS-XR device. These scripts appear in the Tools panel of a device session window.
CCO Login Many script operations require you to log in with your Cisco account. You can log in when prompted to do so, or click Login in the top right corner of the Cisco CLI Analyzer window and enter your user credentials at any time.
Note: Your profile must be associated with an active Customer or Partner contract in order to use these tools.
If you experience problems with your CCO login, see Why am I unable to log in to my CCO account? in the Frequently Asked Questions section.

Features Cisco CLI Analyzer Help Guide
29
Tool Descriptions In order to submit ideas for new tools or suggestions to enhance these tools, send us feedback as described in Submit Comments and Questions.
System Diagnostics for ASA, IOS, IOS-XE, and IOS-XR
This tool utilizes Cisco TAC knowledge in order to analyze a Cisco supported device and detect known problems such as system problems, configuration mistakes, and best practice violations.
Note: This analysis requires the output of the show tech-support command and is sent to Cisco in order to be processed. IOS-XR analysis will vary in the use of “show” commands.
ASA Firewall Top Talkers
This tool helps determine which connections that pass traffic through an ASA might have the highest bit rate during a certain period of time.
The tool compares two separate outputs of show conn or show conn all, taken a few seconds apart. It calculates the difference in the “bytes” value in order to see how much traffic each connection passed during the time between the first and second outputs. It also identifies new connections (those found in the second output but not the first).
The tool then displays a list of the connections of interest, sorted by amount of traffic. You can export the results in JSON or CSV format.
ASA Traceback Analyzer
This tool attempts to match the root cause of a crash to a known bug if the ASA has experienced a system traceback. If a match is found, the ASA version or versions in which the bug is fixed are provided.
Note: This analysis requires the output of the show crashinfo command and is sent to Cisco to be processed. All ASA software versions are supported.
ASA Packet Tracer
This tool allows administrators to send simulated packets through the ASA as a test. If the packet is dropped, the ASA configuration portion or feature that could have contributed to the packet drop is identified.
Note: ASA version 7.2 (the first version to include the command) and later are supported.
ASA Unused Policy Detector
This tool looks for unused configuration policies such as unused access-lists, object-groups, and objects. Some of these could also indicate misconfigurations. This tool collects the output of the commands show run and show access-list | excl ^ |elem. The output is uploaded to Cisco for analysis. Full tool functionality is available in ASA releases 9.x and above.

Features Cisco CLI Analyzer Help Guide
30
IP Route Analysis (IOS and IOS-XE)
This tool provides four different reports based on the analysis of IPv4 routes.
Route instability: checks for routing changes within a 60 second interval
Route summary with next hop
Routing table subnet prefix distribution
Summary of administrative distances for all protocols
Note: If the routing table has 100,000 routes or more, this tool will not work.
BGP Top Talkers
(IOS-XR devices only) This tool helps determine which Border Gateway Protocol peers have the highest rates of messages sent or received during a certain period of time.
L2VPN Top Talkers
(IOS-XR devices only) This tool helps determine which Layer 2 VPN point-to-point circuits and Bridge-Domains have the highest packet rates during a certain period of time.
LPTS Top Talkers
(IOS-XR devices only) This tool helps determine the types of traffic that are handed off from hardware to software processing and their rates. Local Packet Transport Services (LPTS) is the router feature that decides which traffic (such as Telnet, SSH, and SNMP) must be handed off, and limits rates in order not to overload the software.
Features Cisco CLI Analyzer Help Guide
31
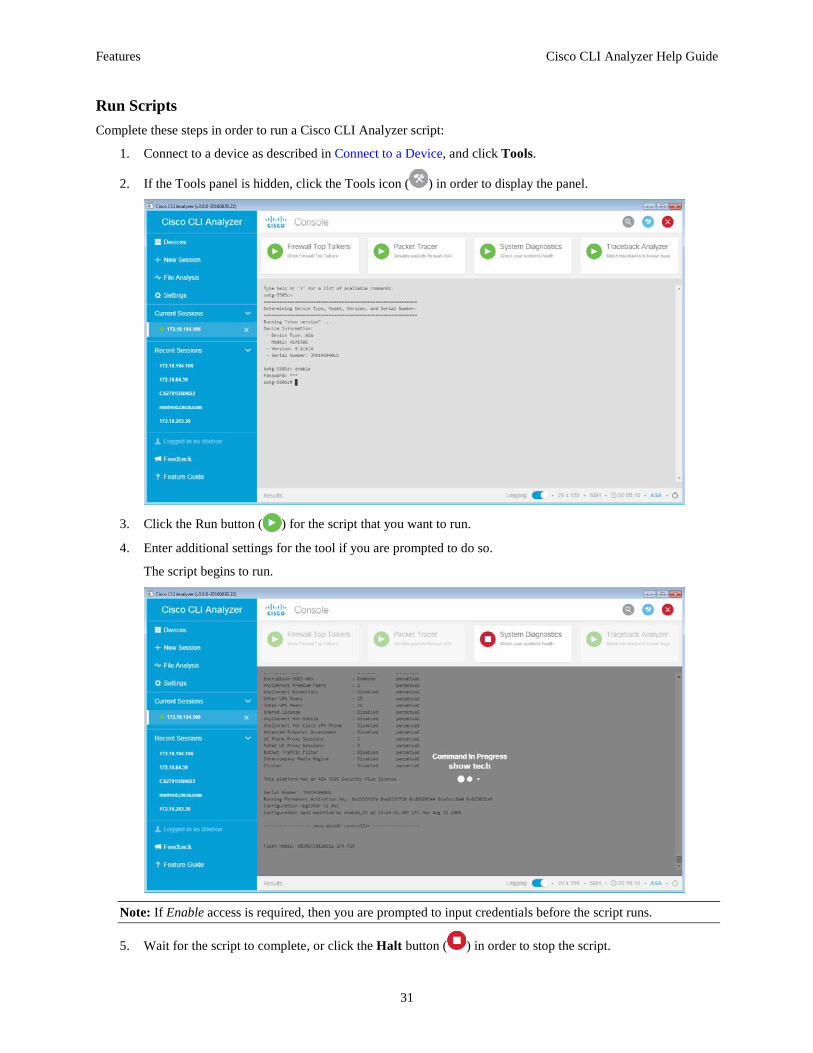
Run Scripts Complete these steps in order to run a Cisco CLI Analyzer script:
1. Connect to a device as described in Connect to a Device, and click Tools.
2. If the Tools panel is hidden, click the Tools icon ( ) in order to display the panel.
3. Click the Run button ( ) for the script that you want to run.
4. Enter additional settings for the tool if you are prompted to do so.
The script begins to run.
Note: If Enable access is required, then you are prompted to input credentials before the script runs.
5. Wait for the script to complete, or click the Halt button ( ) in order to stop the script.

Features Cisco CLI Analyzer Help Guide
32
6. After the script completes, the session is listed in the Tool Results window. If the Tool Results window is not open, click Results in the bottom left corner of the session tab in order to open it.
The Tool Results window displays the most recent 25 results per device. This information is retained even if you close the Tool Results window or the Cisco CLI Analyzer window.
7. Click an item in the Results list to expand and view additional details.
8. Click the icon beside an item in the Results list in order to scroll to and highlight the associated text in the session window. Notes: This feature applies ONLY to System Diagnostic tools. If you are connected to an IOS-XR device, the text highlighting feature is not available and the icon is not present.
9. Click json in the top right corner of the Results area in order to export the results to a .json file.

Features Cisco CLI Analyzer Help Guide
33
Search the Command Output The Cisco CLI Analyzer includes a highlight feature that enables real-time search capabilities in the console window in order to search command output.
Complete these steps in order to search the command output:
1. Point to the Highlight button ( ) and check the tooltip in order to ensure that search result highlights are enabled. If highlights are disabled, click the button in order to enable highlights.
2. Enter a search term in the field provided, and press Enter or Tab. You can repeat this step in order to enter up to five (5) search terms.
The specified search term or terms appear beside the search field along with the number of results for each term. Search results appear highlighted in the command window.
Note: Results appear highlighted in accordance with the colors assigned to each search term on the Display tab of the Settings page. The search term that is currently selected is highlighted in red. For information on how to assign custom colors to your search terms, see Theme.
3. In order to navigate the search results, use these buttons: Previous ( ): Go to the previous match for the term. Next ( ): Go to the next occurrence for the matched term. First ( ): Go to the first occurrence of the matched term within the output. Last ( ): Go to the last occurrence of the matched term within the output.
4. In order to restrict search results to case sensitive matches, click the Case Sensitive button ( ). 5. In order to enable or disable regular expressions, click the RegEx button ( ).
Note: RegEx is used in order to create wildcards or substitutions in your searches. For information on which expressions are supported, see Which expressions and characters are supported in the RegEx search feature?
6. In order to remove a search term, click the X for the search term in the search field.

Features Cisco CLI Analyzer Help Guide
34
Analyze Offline Files The Cisco CLI Analyzer can analyze a text file (with an extension of .text or .txt) that contains the command output from a previous device session.
Include this content in the text file:
The command (such as '# show version') that generated each output in the file
Output from the show version command
(Optional) Output from the show tech-support command; this is required in order to perform a full analysis
(Optional) Output from other supported commands
Complete these steps in order to analyze a command output file:
1. If you have not logged in using your Cisco account, log in now.
2. Click the File Analysis tab.
3. Perform one of the following steps in order to provide the text to analyze:
Drag the text file onto the Click Here or Drop File to Analyze area.
Click inside the Click Here or Drop File to Analyze area, browse to and select the text file, select it, and click Open.
Copy the command output text, click inside the Command Output area, and paste the copied text.
4. Click Start Analysis.
Analysis results appear in the Tool Results window.

Features Cisco CLI Analyzer Help Guide
35
Contextual Help and Highlighting The Cisco CLI Analyzer provides a Contextual Help and Highlighting feature for certain commands. This feature highlights certain text in the CLI output and provides additional information about that text. In order to view contextual help, click the link that corresponds to the text for which you want to view additional information.
Contextual Help and Highlighting is supported for these commands:
ASA Commands
packet-tracer
show access-list
show asp drop
show blocks
show capture
show conn
show console-output
show counters
show cpu detailed
show cpu usage
show crypto ikev2 stats
show crypto ipsec sa
show crypto isakmp sa
show crypto isakmp stats
show failover
show failover history
show interface
show kernel cgroup-controller detail
show logging
show memory
show memory detail
show nat
show nat detail
show process
show process cpu-hog
show process cpu-usage
show running-config
show scansafe statistics
show tech-support
show version
write memory
write standby

Features Cisco CLI Analyzer Help Guide
36
IOS Commands
show aaa servers show access-session show ap capwap summary show ap config general show ap dot11 24ghz coverage show ap dot11 24ghz network show ap dot11 24ghz summary show ap dot11 24ghz txpower show ap dot11 5ghz coverage show ap dot11 5ghz network show ap dot11 5ghz summary show ap dot11 5ghz txpower show ap groups show ap join stats summary show ap mac-address H.H.H join stats detailed show ap summary show arp show async status show atm interface atm show atm pvc show atm traffic show atm vc show authentication sessions show bgp show bgp () X show bgp (*) (vrf vrf-name)? show bgp a.b.c.d show bgp internal show bgp neighbors show bgp summary show bridge-domain show buffers show call active voice show call active voice brief show call-manager-fallback show capwap client rcb show ccm-manager show ccm-manager music-on-hold show cdp neighbors detail show cellular
show controllers vdsl show crypto (gdoi|gkm) gm acl show crypto call admission statistics show crypto eli show crypto gdoi show crypto gdoi gm show crypto gdoi ks show crypto gdoi ks coop show crypto gdoi ks policy show crypto ikev2 sa show crypto ikev2 stats show crypto ipsec sa show crypto isakmp sa show crypto key mypubkey (rsa|ec|all) show crypto session show diagnostic show diagnostic events show diagnostic results show dial-peer voice summary show dialer show domain (name) (master|border) site-prefix show domain (name) (vrf (vrf name)) (master|border) status show dot11 association all show dot1x show dspfarm all show eigrp address-family ipv4 events show eigrp address-family ipv4 topology show eigrp address-family ipv6 events show eigrp address-family ipv6 topology show environment show environment status show etherchannel summary show fabric show fex show fex detail show frame-relay lmi show frame-relay map show frame-relay pvc
show ip device tracking show ip eigrp accounting show ip eigrp events show ip eigrp interfaces show ip eigrp interfaces detail show ip eigrp neighbors show ip eigrp topology show ip eigrp traffic show ip interface show ip interface brief show ip nat statistics show ip nat translations show ip nat translations verbose show ip ospf database show ip ospf database asbr-summary show ip database external show ip database network show ip database nssa-external show ip database opaque-area show ip database router show ip database summary show ip ospf interface show ip ospf neighbors show ip ospf statistics show ip ospf statistics detail show ip route summary show ip traffic show ip wccp show ip(v6) eigrp traffic show ip(v6) ospf interface show ip(v6) ospf neighbor detail show ip(v6) protocols show ip(v6) route show ipv6 eigrp events show ipv6 eigrp interfaces show ipv6 eigrp neighbors show ipv6 eigrp topology show ipv6 interface show ipv6 ospf neighbor show ipv6 ospf statistic show ipv6 ospf statistic detail show isdn service show isdn status show issu state
show ospfv3 neighbor show ospfv3 neighbor detail show ospfv3 statistic show ospfv3 statistic detail show otv show otv isis rib redistribution mac show OTV VLAN show platform show policy-firewall config show policy-firewall session show policy-map interface show policy-map type inspect zone-pair sessions show ppp multilink show processes cpu show processes memory show redundancy show redundancy states show route-map show run interface cellular show running-config show sccp connections show sip-ua calls show sip-ua status show spanning-tree show spanning-tree summary show stacks show standby show stcapp device summary show switch show switch stack-ports summary show tech-support show tech-support wireless show telephony-service show telephony-service all show version show vlan show voice call status show voice dsp group all show voice port summary show voice register global show voip rtp connections show vpdn tunnel show vslp lmp neighbors show vtp password

Features Cisco CLI Analyzer Help Guide
37
IOS Commands
show cellular intf num radio show cellular profile show cem circuit show clock (detail) show controllers show controllers cellular show controllers dot11Radio 0 show controllers e1 show controllers e3 show controllers ethernet-controller(fastethernet |gigabitethernet) show controllers pos show controllers serial show controllers SHDSL show controllers t1 show controllers t3
show interface atm show interface multilink show interface status show interfaces show interfaces counters show interfaces counters error show interfaces INT counters show interfaces switching show ip bgp show ip bgp ? show ip bgp a.b.c.d show ip bgp internal show ip bgp neighbors show ip bgp summary show ip cef
show line show lisp dynamic-eid show logging show mab show mac address-table show mac-address-table show macsec show memory show memory statistics show mgcp show mls cef exception status show module show netdr captured-packets show network-clocks sync show ntp associations detail show ospfv3 interface
show vtp status show wireless client mac-address H.H.H detail show wireless client summary show wireless country configured show wireless detail show wireless mobility summary show wireless multicast show wireless summary show wireless wps summary show zone-pair security
IOS-XE Commands
show aaa servers show access-session show ap capwap summary show ap config general show ap dot11 24ghz coverage show ap dot11 24ghz network show ap dot11 24ghz summary show ap dot11 24ghz txpower show ap dot11 5ghz coverage show ap dot11 5ghz network show ap dot11 5ghz summary show ap dot11 5ghz txpower show ap groups show ap join stats summary show ap mac-address H.H.H join stats detailed show ap summary show arp show async status show atm interface atm show atm pvc
show crypto gdoi show crypto gdoi gm show crypto gdoi ks show crypto gdoi ks coop show crypto gdoi ks policy show crypto ikev2 sa show crypto ikev2 stats show crypto ipsec sa show crypto isakmp sa show crypto key mypubkey (rsa|ec|all) show crypto session show diagnostic show diagnostic events show diagnostic results show dial-peer voice summary show dialer show domain (name) (master|border) site-prefix show domain (name) (vrf (vrf name)) (master|border) status show dot11 association all show dot1x show dspfarm all
show ip nat translations show ip nat translations verbose show ip ospf database show ip ospf database asbr-summary show ip database external show ip database network show ip database nssa-external show ip database opaque-area show ip database router show ip database summary show ip ospf interface show ip ospf neighbors show ip ospf statistics show ip ospf statistics detail show ip route summary show ip traffic show ip wccp show ip(v6) eigrp traffic show ip(v6) ospf interface show ip(v6) ospf neighbor detail show ip(v6) protocols show ip(v6) route show ipv6 eigrp events
show platform hardware qfp active feature firewall drop show platform hardware qfp active feature ipsec datapath drops show platform hardware qfp active feature nat datapath stats show platform hardware qfp active infrastructure exmem statistics show platform hardware qfp active statistics drop show platform hardware qfp active tcam resource-manager usage show platform hardware slot (#) serdes statistics show platform health show platform ptp all show platform punt client show platform software status control-processor brief show policy-firewall config show policy-firewall session show policy-map interface show policy-map type inspect zone-pair sessions

Features Cisco CLI Analyzer Help Guide
38
IOS-XE Commands
show atm traffic show atm vc show authentication sessions show bgp show bgp () X show bgp (*) (vrf vrf-name)? show bgp a.b.c.d show bgp internal show bgp neighbors show bgp summary show bridge-domain show buffers show call active voice show call active voice brief show call-manager-fallback show capwap client rcb show ccm-manager show ccm-manager music-on-hold show cdp neighbors detail show cellular show cellular intf num radio show cellular profile show cem circuit show clock (detail) show controllers show controllers cellular show controllers dot11Radio 0 show controllers e1 show controllers e3 show controllers ethernet-controller(fastethernet |gigabitethernet) show controllers pos show controllers serial show controllers SHDSL show controllers t1 show controllers t3 show controllers vdsl show crypto (gdoi|gkm) gm acl show crypto call admission statistics show crypto eli
show eigrp address-family ipv4 events show eigrp address-family ipv4 topology show eigrp address-family ipv6 events show eigrp address-family ipv6 topology show environment show environment status show etherchannel summary show fabric show fex show fex detail show frame-relay lmi show frame-relay map show frame-relay pvc show interface atm show interface multilink show interface status show interfaces show interfaces counters show interfaces counters error show interfaces INT counters show interfaces switching show ip bgp show ip bgp ? show ip bgp a.b.c.d show ip bgp internal show ip bgp neighbors show ip bgp summary show ip cef show ip device tracking show ip eigrp accounting show ip eigrp events show ip eigrp interfaces show ip eigrp interfaces detail show ip eigrp neighbors show ip eigrp topology show ip eigrp traffic show ip interface show ip interface brief show ip nat statistics
show ipv6 eigrp interfaces show ipv6 eigrp neighbors show ipv6 eigrp topology show ipv6 interface show ipv6 ospf neighbor show ipv6 ospf statistic show ipv6 ospf statistic detail show isdn service show isdn status show issu state show line show lisp dynamic-eid show logging show mab show mac address-table show mac-address-table show macsec show memory show memory statistics show mgcp show mls cef exception status show module show netdr captured-packets show network-clocks sync show ntp associations detail show ospfv3 interface show ospfv3 neighbor show ospfv3 neighbor detail show ospfv3 statistic show ospfv3 statistic detail show otv show otv isis rib redistribution mac show OTV VLAN show platform show platform cpu packet buffered show platform cpu packet driver show platform cpu packet statistics show platform hardware cef exception status show platform hardware qfp active feature erspan state
show ppp multilink show processes cpu show processes memory show redundancy show redundancy states show route-map show run interface cellular show running-config show sccp connections show sip-ua calls show sip-ua status show spanning-tree show spanning-tree summary show stacks show standby show stcapp device summary show switch show switch stack-ports summary show tech-support show tech-support wireless show telephony-service show telephony-service all show version show vlan show voice call status show voice dsp group all show voice port summary show voice register global show voip rtp connections show vpdn tunnel show vslp lmp neighbors show vtp password show vtp status show wireless client mac-address H.H.H detail show wireless client summary show wireless country configured show wireless detail show wireless mobility summary show wireless multicast show wireless summary show wireless wps summary show zone-pair security

Features Cisco CLI Analyzer Help Guide
39
IOS-XR Commands
admin show install
admin show version
show bgp all all summary
show bgp ipv4 unicast summary
show bgp ipv4 unicast summary
show bgp ipv6 unicast summary
show bgp summary
show bgp vpnv4 unicast summary
show bgp vpnv6 unicast summary
show controllers FortyGigE
show controllers GigabitEthernet
show controllers SONET
show controllers TenGigE
show controllers fabric fia stats
show controllers hundredGigE
show controllers np counters
show controllers pse statistics
show install
show interfaces
show logging
show platform
show processes
show processes blocked
show redundancy
show snmp
show snmp
show snmp request drop summary
show version
NX-OS Commands
show accounting log
show copp status
show diagnostic content module
show diagnostic content module all
show diagnostic result module
show diagnostic result module all
show environment
show errdisable detect
show errdisable recovery
show fabricpath isis adjacency
show fabricpath isis route
show fcoe
show fex
show hardware internal forwarding rate-limiter usage
show hardware internal interface indiscard-stats front-port
show hardware ip verify
show hardware profile forwarding-mode
show hardware rate-limiter
show hsrp
show hsrp brief
show interface
show interface counters errors
show interface counters storm-control
show interface ethernet
show interface fc
show interface fex-fabric
show interface status err-disabled
show interface trunk
show interface vfc
show ip igmp groups
show ip igmp route
show ip traffic
show license usage
show logging log
show logging logfile
show module
show monitor
show monitor session
show otv
show otv isis adjacency
show otv site
show platform fwm info asic-errors
show platform fwm info pif
show platform software fcoe_mgr event-history errors
show policy-map interface
show policy-map interface control-plane
show policy-map interface type queuing
show port-channel database
show port-channel summary
show processes cpu
show processes log
show redundancy status
show spanning-tree
show spanning-tree detail
show switching-mode
show system internal forwarding ipv4 route summary
show system internal l2fm l2dbg macdb
show system internal l2fm l2dbg portdb
show system redundancy status
show system reset-reason
show user-account
show vdc
show version
show version
show vpc
show vrrp
show vtp status

Features Cisco CLI Analyzer Help Guide
40
UCS Commands
Command Context Scope
show fault UCSM monitoring
show diagnostic result module NX-OS
show ip igmp groups NX-OS
show interface trunk NX-OS
show interface ethernet NX-OS
show interface counters errors NX-OS
show running-config NX-OS
show interface status err-disabled NX-OS
show processes cpu NX-OS
show cluster extended-state local-mgmt
show interface NX-OS
show version NX-OS
show fault detail UCSM monitoring
show diagnostic result module all NX-OS
show processes log NX-OS
show logging logfile NX-OS
show diagnostic content module all NX-OS
show system reset-reason NX-OS
show ip igmp route NX-OS
show module NX-OS
show pmon state local-mgmt
show diagnostic content module NX-OS
show system internal flash NX-OS
show system internal mts buffers details NX-OS

Features Cisco CLI Analyzer Help Guide
41
Context Menu Options The Cisco CLI Analyzer provides right-click menu options appropriate to the console text you highlight.
These options are available when you highlight and right-click any text in the console:
Copy: Copies the selected text to the clipboard.
Paste: Pastes text copied to the clipboard at the command prompt.
Copy & Paste: Copies the selected text and pastes it into the command prompt as a single action.
Select All & Copy: Copies all of the text in the console window.
Add Search Term: Adds the selected text as a search term and highlights it.
Search Cisco.com: Searches the Cisco.com web site for information about the highlighted text.
Check Device Coverage: Opens the Cisco Device Coverage Checker tool in a browser window after you select a valid serial number.
Request CHH Content: Opens the Request Contextual Help and Highlighting Content dialog window, which you can use in order to submit a request for additional CHH content.
These additional options are available when you highlight and right-click an IP address:
Ping: Runs the ping command on the selected IP address.
Traceroute: Runs the traceroute command on the selected IP address.
Open SSH Session: Creates a new connection to the selected IP address with the SSH protocol.
Open Telnet Session: Creates a new connection to the selected IP address with the Telnet protocol.
Note: You can double-click a term or IP address in the console to select it quickly, so you do not have to drag the cursor across the text you want to highlight.

Frequently Asked Questions Cisco CLI Analyzer Help Guide
42
Frequently Asked Questions
Why do I need to log in with my Cisco.com account for some features? You must have a valid Cisco.com account in order to use the Cisco CLI Analyzer. If you do not have a valid Cisco.com account, you must register on the Cisco.com Registration page and associate a Service Contract to your Cisco.com profile.
Why am I still unable to access the Cisco CLI Analyzer after I have entered my CCO account information? Ensure your user name and password are correct and that you have an active support contract associated with your Cisco.com account. If you have verified these items and you are still unable to access the Cisco CLI Analyzer, use the Feedback form as described in Submit Comments and Questions.
Why am I unable to log in to my CCO account? If you are unable to log in, use this information in order to help diagnose and resolve the issue:
Your account might not have sufficient privileges. Contact Support if you are unsure what level of access your account has.
Try to perform a CCO login via the Cisco CLI Analyzer on an open Internet connection. If you are able to log in, the issue might be related to proxy settings on your network.
If your network has a proxy server (such as Cisco WSA), these hosts must be added to the proxy server:
cloudsso.cisco.com sso.cisco.com api.cisco.com cway.cisco.com
After these hosts are added to the proxy server, try again to log in to the Cisco CLI Analyzer and use the tools.
How do I request features or provide product feedback? In order to request additional features or provide product feedback, use the Feedback form as described in Submit Comments and Questions.
Why does ASA Traceback Decoder state that the crash.txt file cannot be found? If your ASA appears to have crashed and rebooted, ASA Traceback Decoder might state that the crash.txt file cannot be found.
By default, an ASA saves crash information to the flash memory unless crashinfo save disable is added to the ASA config file. When this command is added to the config file, the file cannot be saved. In order to resolve this issue, ensure that the command is not enabled.
Note: In order to set the default behavior, add no crashinfo save disable. If a crash file is present, it will be stored in the local flash as “crash.txt.”

Frequently Asked Questions Cisco CLI Analyzer Help Guide
43
Which operating systems are supported in the Cisco CLI Analyzer? For information on which operating systems are supported in the Cisco CLI Analyzer, see System Requirements.
What terminal emulation is supported in the Cisco CLI Analyzer? The Cisco CLI Analyzer supports terminal emulator VT100.
What protocols are supported in the Cisco CLI Analyzer? The Cisco CLI Analyzer supports Telnet and SSH version 2.
Why did File Analysis report no results or state that it was unable to determine the output provided? Please ensure that the text file you want to analyze includes this content:
The command (such as '# show version') that generated each output in the file
Output from the show version command
(Optional) Output from the show tech-support command; this is required in order to perform a full analysis
(Optional) Output from other supported commands
Which expressions and characters are supported in the RegEx search feature? The Cisco CLI Analyzer RegEx search feature supports Javascript RegExp brackets, metacharacters, and quantifiers.
Brackets Description
[abc] Find any character that is specified between the brackets
[^abc] Find any character that is NOT specified between the brackets
[0-9] Find any digit within the range specified between the brackets
[^0-9] Find any digit NOT within the range specified between the brackets
(x|y) Find the specified characters
Metacharacter Description
. Find a single character (except newline or line terminator)
\w Find a word character
\W Find a non-word character
\d Find a digit
\D Find a non-digit character

Frequently Asked Questions Cisco CLI Analyzer Help Guide
44
\s Find a whitespace character
\S Find a non-whitespace character
\b Find a match at the beginning/end of a word
\B Find a match not at the beginning/end of a word
\0 Find a NUL character
\n Find a new line character
\f Find a form feed character
\r Find a carriage return character
\t Find a tab character
\v Find a vertical tab character
\xxx Find the character specified by an octal number xxx
\xdd Find the character specified by a hexadecimal number dd
\uxxxx Find the Unicode character specified by a hexadecimal number xxxx
Quantifier Description
n+ Matches any string that contains at least one n
n* Matches any string that contains zero or more occurrences of n
n? Matches any string that contains zero or one occurrences of n
n{X} Matches any string that contains a sequence of X n's
n{X,Y} Matches any string that contains a sequence of X to Y n's
n{X,} Matches any string that contains a sequence of at least X n's
n$ Matches any string with n at the end of it
^n Matches any string with n at the beginning of it
?=n Matches any string that is followed by a specific string n
!=n Matches any string that is not followed by a specific string n

![HP Networking and Cisco CLI Reference Guide [2010]€¦ · HP Networking and Cisco CLI Reference Guide Introduction This CLI Reference Guide is designed to help HP partners and customers](https://img.dokumen.tips/doc/110x75/5b1506e47f8b9a54488d748e/hp-networking-and-cisco-cli-reference-guide-2010-hp-networking-and-cisco-cli.jpg)


![HP Networking and Cisco CLI Reference Guide [2010] · PDF file7 HP Networking and Cisco CLI Reference Guide Introduction This CLI Reference Guide is designed to help HP partners and](https://img.dokumen.tips/doc/110x75/5a924e987f8b9af27f8e87b0/hp-networking-and-cisco-cli-reference-guide-2010-hp-networking-and-cisco-cli-reference.jpg)