Embed Size (px)
Citation preview

(c) 2003-2010 Bicom Systems
Cisco 7960 How To


All rights reserved. No parts of this work may be reproduced in any form or by any means - graphic, electronic, ormechanical, including photocopying, recording, taping, or information storage and retrieval systems - without thewritten permission of the publisher.
Products that are referred to in this document may be either trademarks and/or registered trademarks of therespective owners. The publisher and the author make no claim to these trademarks.
While every precaution has been taken in the preparation of this document, the publisher and the author assume noresponsibility for errors or omissions, or for damages resulting from the use of information contained in thisdocument or from the use of programs and source code that may accompany it. In no event shall the publisher andthe author be liable for any loss of profit or any other commercial damage caused or alleged to have been causeddirectly or indirectly by this document.
Printed: avgust 2010
Cisco 7960 How To
(c) 2003-2010 Bicom Systems
PublisherSpecial thanks to:
Managing Editor
Technical Editors
Cover Designer
...
...
...
...
...
Production
...
Team Coordinator
...
Cisco 7960 How ToI
(c) 2003-2010 Bicom Systems
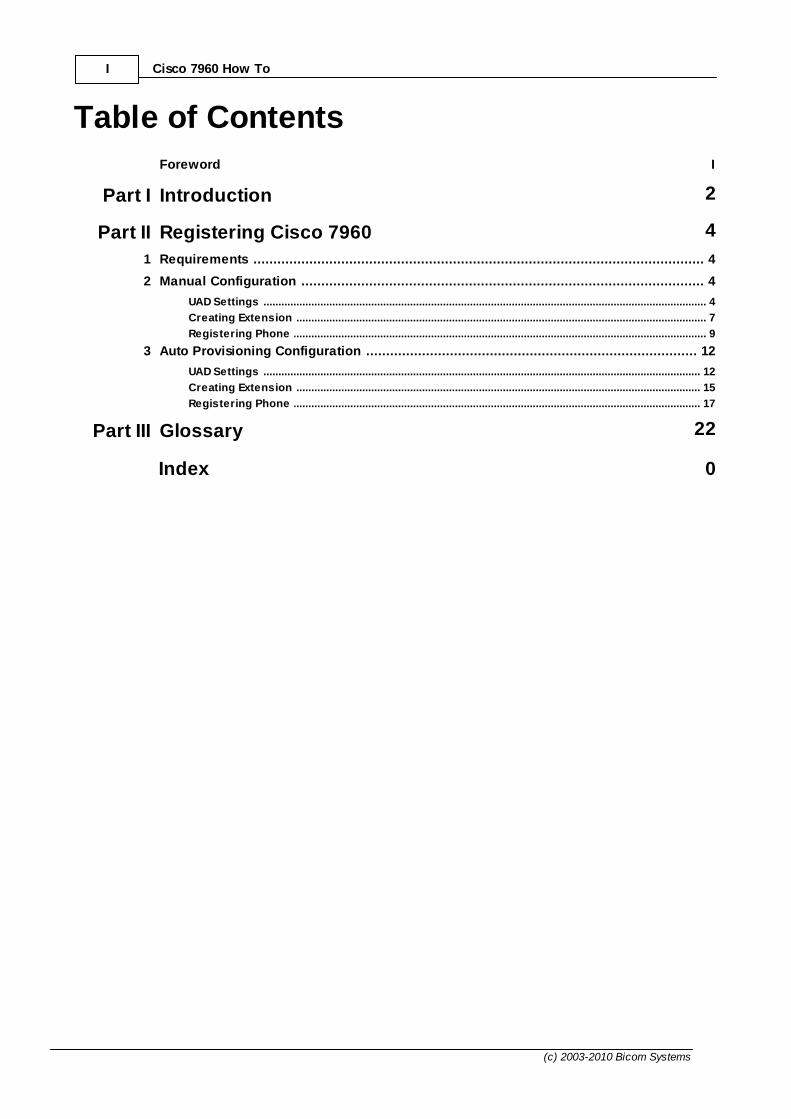
Table of Contents
Foreword I
Part I Introduction 2
Part II Registering Cisco 7960 4
................................................................................................................................... 41 Requirements
................................................................................................................................... 42 Manual Configuration
......................................................................................................................................................... 4UAD Settings
......................................................................................................................................................... 7Creating Extension
......................................................................................................................................................... 9Registering Phone
................................................................................................................................... 123 Auto Provisioning Configuration
......................................................................................................................................................... 12UAD Settings
......................................................................................................................................................... 15Creating Extension
......................................................................................................................................................... 17Registering Phone
Part III Glossary 22
Index 0

Foreword
...
(c) 2003-2010 Bicom Systems
I

Part
I

2Introduction
(c) 2003-2010 Bicom Systems
1 Introduction
Cisco 7960How to use Cisco 7960 with PBXware
This "How to" is written as general guide on how to use Cisco 7960 with PBXware usingSIP 7.1 Cisco 7960 firmware. It covers the most common tasks that are required to
have your Cisco 7960 working efficiently.

Part
II

4Registering Cisco 7960
(c) 2003-2010 Bicom Systems
2 Registering Cisco 7960- Requirements- Manual Configuration- Auto Provisioning Configuration
2.1 Requirements
1. Cisco 7960 firmware.
- Make sure that the device is loaded with SIP 7.1 firmware.
2. DHCP server.
- Fully configured and operational DHCP server.
2.2 Manual Configuration
- UAD Settings- Creating Extension- Registering Phone
2.2.1 UAD Settings
STEP ONE: PBXware IP address.
1. Find out the IP address of PBXware server.
STEP TWO: Login to PBXware.
1. Open a new browser window and enter the IP address to access the PBXwareadministration interface login screen.
Example: http://192.168.1.2
an example with IP address
2. Hit "Enter" on your keyboard.
3. Login into PBXware with your e-mail address and password.
5 Cisco 7960 How To
(c) 2003-2010 Bicom Systems
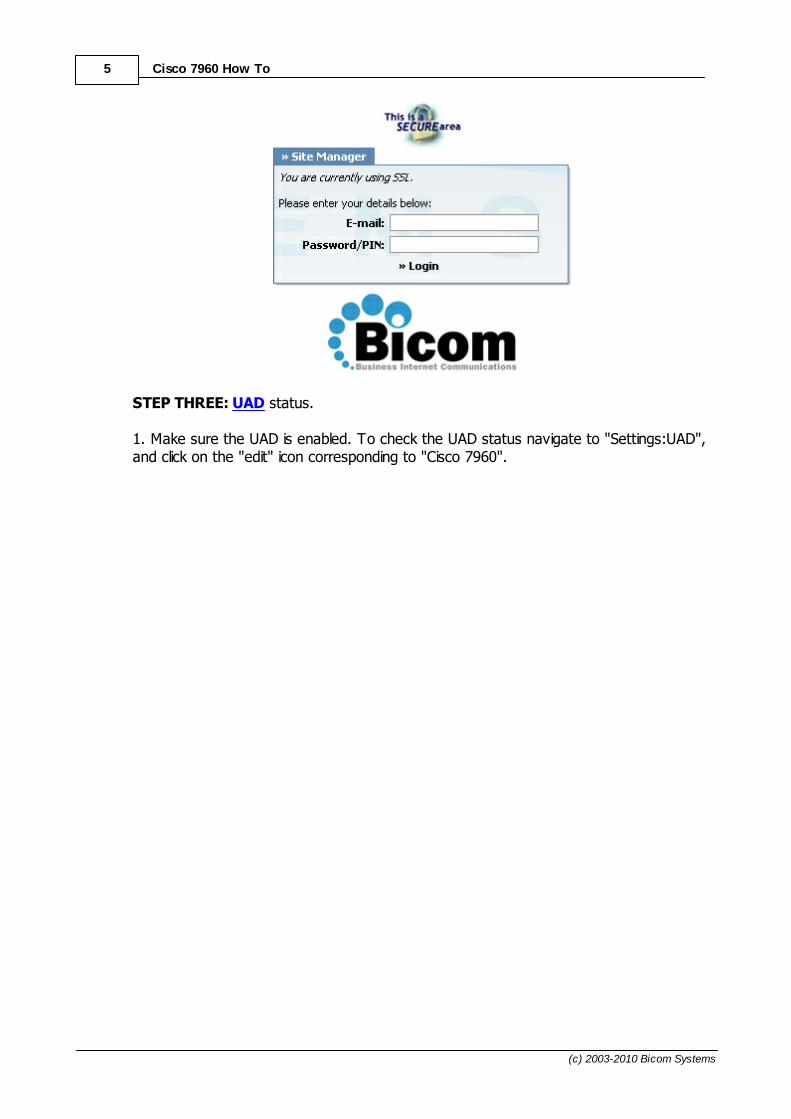
STEP THREE: UAD status.
1. Make sure the UAD is enabled. To check the UAD status navigate to "Settings:UAD",and click on the "edit" icon corresponding to "Cisco 7960".

6Registering Cisco 7960
(c) 2003-2010 Bicom Systems
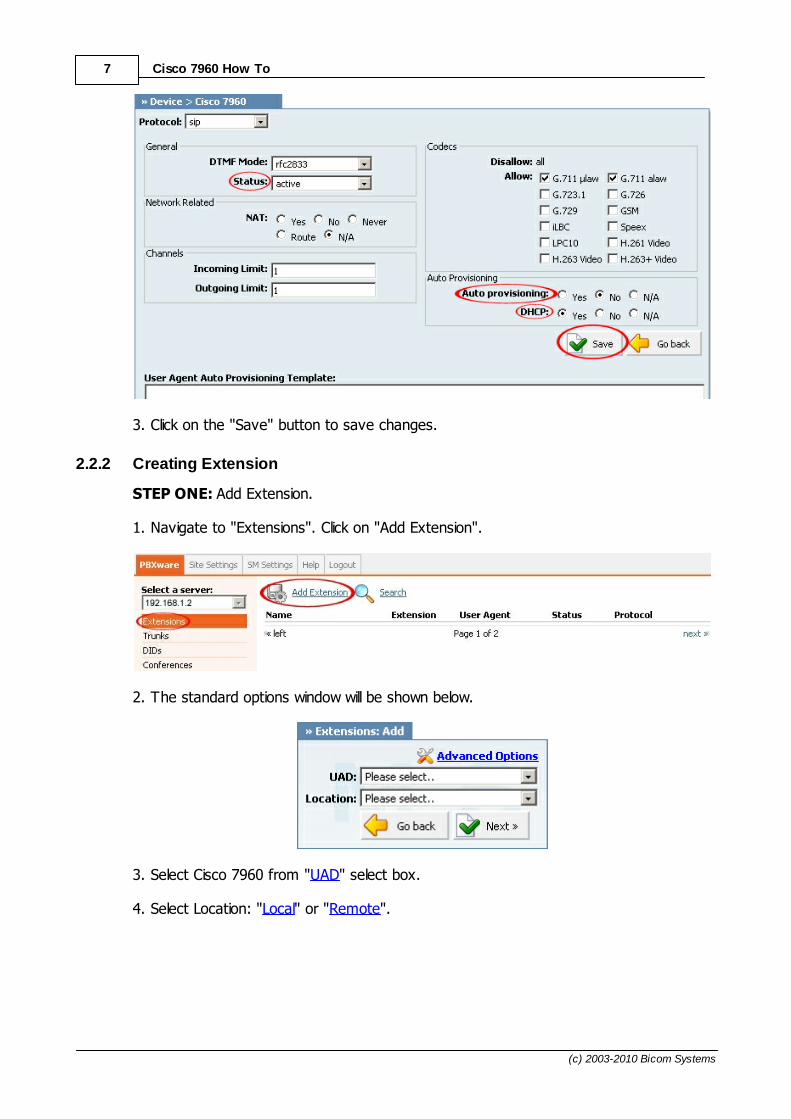
2. Make sure "Status" is set to "active", "Auto provisioning" is set to "No" and "DHCP" isset to "Yes".
7 Cisco 7960 How To
(c) 2003-2010 Bicom Systems
3. Click on the "Save" button to save changes.
2.2.2 Creating Extension
STEP ONE: Add Extension.
1. Navigate to "Extensions". Click on "Add Extension".
2. The standard options window will be shown below.
3. Select Cisco 7960 from "UAD" select box.
4. Select Location: "Local" or "Remote".

8Registering Cisco 7960
(c) 2003-2010 Bicom Systems
Note:
-"Local" is for all extensions registered on LAN.
-"Remote" is for all extensions registered from remote networks, WAN, Internet etc.
5. Click on the "Next" button.
STEP TWO: Extension values.
1. Enter values into the required field text boxes.
REQUIRED FIELDS:
Name:Enter a name for the extension being created. Example: John Smith. E-mail:Enter the e-mail address associated with this extension. This e-mail address willreceive all system notification messages. Example: [email protected].
an example with details filled in
2. Click on the "Save" button.

9 Cisco 7960 How To
(c) 2003-2010 Bicom Systems
an example with details filled in
3. Click on the "Save & E-mail" button. Account details will be sent to the e-mail addressassociated with this extension.
OPTIONAL FIELDS:
Extension:An auto-generated extension number based on the next available sequentialnumber. An extension value can be changed. Example: 1000. Username:Username is auto generated/populated and cannot be changed since it allows thesystem to use this value for other important operations. Secret:A secret value associated with the UAD is auto-generated in order to allow the UADto successfully register with the system. The secret value can be changed. PIN:An auto-generated PIN will allow access to voicemail and online self care.
2.2.3 Registering Phone
STEP ONE: Electricity and Ethernet.
Note: Phone electricity can be supplied by power adaptor or power over ethernetinjector.
A) Power adapter.
1. Plug the power adapter into a power jack then connect it to the electricity network.
2. Connect the ethernet port to a hub, router or switch as to access LAN.

10Registering Cisco 7960
(c) 2003-2010 Bicom Systems
B) Power over ethernet.
1. Connect the ethernet port to a "POE Passive Power over Ethernet injector".
2. Connect "POE Passive Power over Ethernet injector" to a hub, router or switch asto access LAN.
After successfully connecting the Cisco 7960 to the electricity and data networks, it is

11 Cisco 7960 How To
(c) 2003-2010 Bicom Systems
time to register it to PBXware.
STEP TWO: Cisco 7960 settings configuration.
Unlock configuration:
1. Press the "settings" button.
2. Use the "navigation" button and navigate down to "Unlock Config".
3. Press the "Select" button.
4. Enter password (Default factory password is "cisco").
5. Press the "Accept" button to unlock configuration.
SIP Configuration
1. Use the "navigation" button and navigate up to "SIP Configuration".
2. Press the "Select" button.
3. Press the "Select" button to enter into "Line 1 Settings".
4. Enter the details into:
REQUIRED FIELDS
12Registering Cisco 7960
(c) 2003-2010 Bicom Systems
NameCisco 7960 extension number. Example: 1000.
Authentication NameUsually the same number as "Name".
Authentication PasswordThe Secret of the extension as received in the e-mail associated with this extension. Example: 3dX3r5
Proxy AddressIP address of PBXware server. Example: 192.168.1.2
OPTIONAL FIEDS
ShortnameExample: John Smith, Reception, Entrance Main, Agent One etc.
Display NameExample: John Smith, Reception, Entrance Main, Agent One etc.
Proxy PortBy default 5060
5. Press the accept button and reboot Cisco 7960.
- Conclusion: If everything is done as above described you should have successfullyregistered your Cisco 7960 to PBXware. Dial *123 to verify registration.
- For further information, please contact the manufacturer or check their web site www.cisco.com.
2.3 Auto Provisioning Configuration
- UAD Settings- Creating Extension- Registering Phone
2.3.1 UAD Settings
STEP ONE: PBXware IP address.
1. Find out the IP address of PBXware server.
STEP TWO: Login into PBXware.
1. Open a new browser window and enter the IP address to access the PBXware

13 Cisco 7960 How To
(c) 2003-2010 Bicom Systems
administration interface login screen.
Example: http://192.168.1.2
an example with IP address
2. Hit "Enter" on your keyboard.
3. Login to PBXware with your e-mail address and password.
STEP THREE: UAD status.
1. Make sure the UAD is enabled. To check the UAD status navigate to "Settings:UAD",and click on the "edit" icon corresponding to "Cisco 7960".

14Registering Cisco 7960
(c) 2003-2010 Bicom Systems
2. Make sure "Status" is set to "active", "Auto provisioning" is set to "Yes" and "DHCP"is set to "Yes".

15 Cisco 7960 How To
(c) 2003-2010 Bicom Systems
3. Click on the "Save" button to save changes.
2.3.2 Creating Extension
STEP ONE: Add Extension.
1. Navigate to "Extensions". Click on "Add Extension".
2. The standard options window will be shown below.
3. Select Cisco 7960 from "UAD" select box.
4. Select Location: "Local" or "Remote".

16Registering Cisco 7960
(c) 2003-2010 Bicom Systems
Note:
-"Local" is for all extensions registered on LAN.
-"Remote" is for all extensions registered from remote networks, WAN, Internet etc.
5. Click on "Next" button.
STEP TWO: Extension values.
1. Enter values into required field text boxes.
REQUIRED FIELDS:
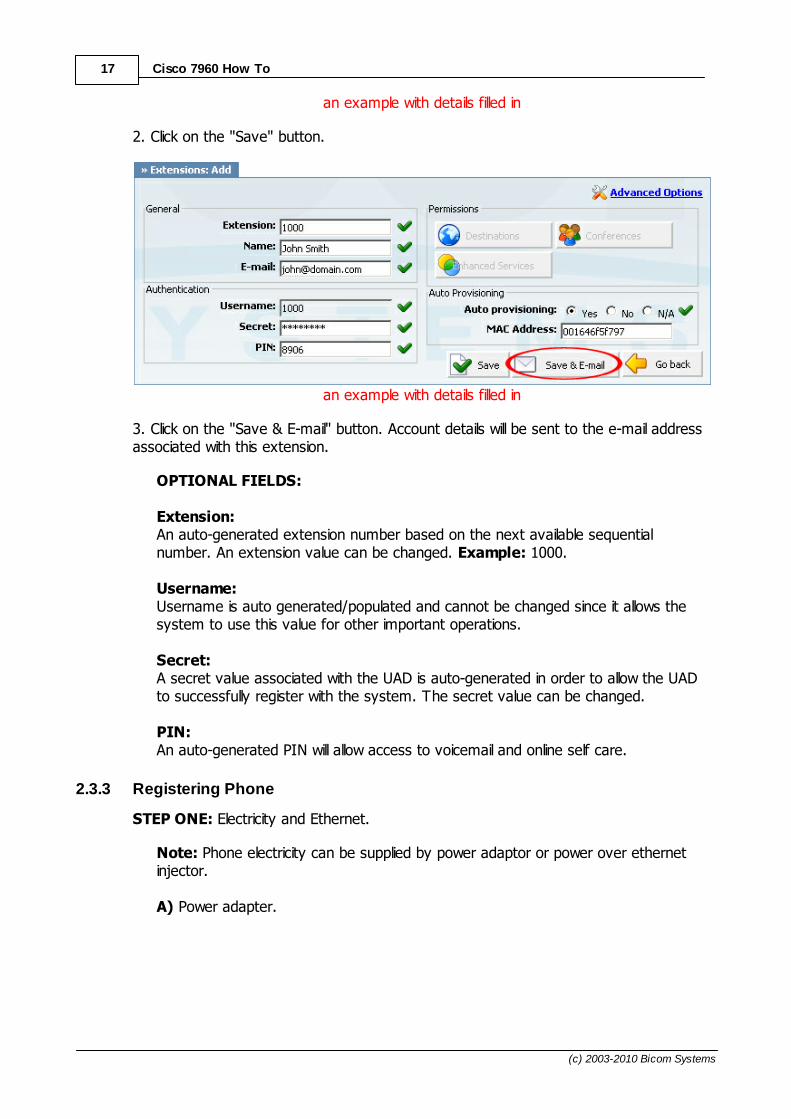
Name:Enter a name for the extension being created. Example: John Smith. E-mail:Enter the e-mail address associated with this extension. This e-mail address willreceive all system notification messages. Example: [email protected]
Auto provisioning:Set to "Yes".
MAC Address:Cisco 7960 MAC address. Example: 001646f5f797
17 Cisco 7960 How To
(c) 2003-2010 Bicom Systems
an example with details filled in
2. Click on the "Save" button.
an example with details filled in
3. Click on the "Save & E-mail" button. Account details will be sent to the e-mail addressassociated with this extension.
OPTIONAL FIELDS:
Extension:An auto-generated extension number based on the next available sequentialnumber. An extension value can be changed. Example: 1000. Username:Username is auto generated/populated and cannot be changed since it allows thesystem to use this value for other important operations. Secret:A secret value associated with the UAD is auto-generated in order to allow the UADto successfully register with the system. The secret value can be changed. PIN:An auto-generated PIN will allow access to voicemail and online self care.
2.3.3 Registering Phone
STEP ONE: Electricity and Ethernet.
Note: Phone electricity can be supplied by power adaptor or power over ethernetinjector.
A) Power adapter.

18Registering Cisco 7960
(c) 2003-2010 Bicom Systems
1. Plug the power adapter into a power jack then connect it to the electricity network.
2. Connect the ethernet port to a hub, router or switch as to access LAN.
B) Power over ethernet.
1. Connect the ethernet port to a "POE Passive Power over Ethernet injector".
2. Connect "POE Passive Power over Ethernet injector" to a hub, router or switch asto access LAN.

19 Cisco 7960 How To
(c) 2003-2010 Bicom Systems
"TFTP Server" must be set with TFTP server value.
STEP TWO: Cisco 7960 TFTP configuration.
Unlock configuration:
1. Press the "settings" button.

20Registering Cisco 7960
(c) 2003-2010 Bicom Systems
2. Use the "navigation" button and navigate down to "Unlock Config".
3. Press the "Select" button.
4. Enter password (Default factory password is "cisco").
5. Press the "Accept" button to unlock configuration.
SIP Configuration
1. Use the "navigation" button and navigate up to "Network Configuration".
2. Press the "Select" button.
3. Navigate down to "TFTP server".
4. Press the "Select" button to edit TFTP value.
5. Enter details into TFTP value field.
6. Press accept button and reboot Cisco 7960.
- Conclusion: If everything is done as above described you should have successfullyregistered Cisco 7960 to PBXware. Dial *123 to verify registration.
- For further information, please contact the manufacturer or check their web site www.cisco.com.

Part
III

22Glossary
(c) 2003-2010 Bicom Systems
3 Glossary- DHCP = Dynamic Host Configuration Protocol (DHCP) is a communications protocolthat lets network administrators manage and automate the assignment of Internet.- HUB = A common connection point for devices in a network.- IP Address = Internet Protocol address.- Local = A local area network (LAN) is a computer network covering a local area, like ahome, office or small group of buildings such as a college.- LAN = Local Area Network.- PIN = Personal Identification Number.- Remote = Network devices that are managed or controlled from a network systemother than the system to which they are directly connected.- Router = A device that forwards data packets from one local area network (LAN) orwide area network (WAN) to another.- Switch = Network device that selects a path or circuit for sending a unit of data to itsnext destination.- TFTP = Trivial File Transfer Protocol. A very simple form of the File TransferProtocol. TFTP provides no security features.- UAD = User Agent Device.- VoiceMail = The electronic transmission of voice messages over the Internet. Themessages are stored on a computer until the recipient accesses and listens to them.- WAN = Wide Area Network.- Web Interface = A web interface is the system of controls with which the usercontrols a device.

...
23 Cisco 7960 How To
(c) 2003-2010 Bicom Systems