Embed Size (px)
Citation preview

1 | P a g e
CHIEF EXAMINER MANUAL
Prepared by
ASYCUDA World Project Unit

Contents 1.0 Examiner/ Chief Examiner Activation and Suspension ............................................................. 1
2.0 Assigning an Examiner or Chief Examiner to a section ............................................................. 5
3.0 Section or Examiner Reassignment ........................................................................................... 7
1 | P a g e
1.0 Examiner/ Chief Examiner Activation and Suspension
The following procedure should be used to activate or suspend an Examiner or Chief
Examiner.
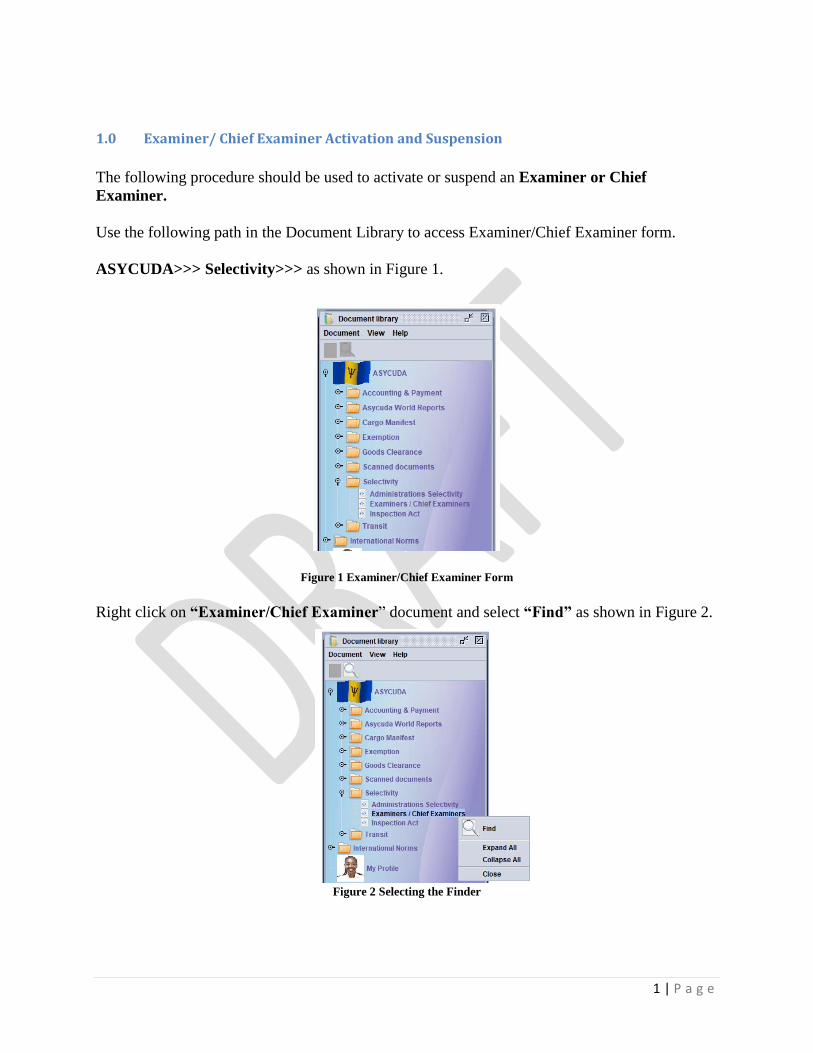
Use the following path in the Document Library to access Examiner/Chief Examiner form.
ASYCUDA>>> Selectivity>>> as shown in Figure 1.
Figure 1 Examiner/Chief Examiner Form
Right click on “Examiner/Chief Examiner” document and select “Find” as shown in Figure 2.
Figure 2 Selecting the Finder

2 | P a g e
The “Examiner/Chief Examiner” finder will be displayed as shown in Figure 3
Figure 3 Examiners/Chief Examiners Finder.
Complete the criteria fields in the Finder as required and click “search” as indicated in Figure 4.
Figure 4 Examiner/Chief Examiner Finder
Click on
search

3 | P a g e
Table 1 illustrates examples how criteria can be used in the finder.
Table 1 Example of using criteria in the Finder
The example above allows the Examiner to search for all available officers within the section
code (EPU).
The system displayed the results shown in Figure 5
Figure 5 Finder result.
The user may now suspend or activate the officer by right clicking on the appropriate officer and
selecting the option. The officers highlighted in red have been suspended and can either be
“updated”, “deleted” or “activated” as shown in Figure 6.
Name Criteria Value #1 Value #2
Examining Officer all
Section Code equals EPU
Office Code equals BBBBP

4 | P a g e
Figure 6 Options for officers highlighted in red
The officers highlighted in blue are active and can only be suspended as shown in Figure 7.
Figure 7 Options for officers highlighted in blue

5 | P a g e
2.0 Assigning an Examiner or Chief Examiner to a Section
The following path should be used to assign an examiner to a Section.
Document library >>> Selectivity>>>Examiners/Chief Examiners
Right Click and select New as shown in Figure 8.
Figure 8 Select “New” to find Examiners/Chief Examiner form
The Examiner/Chief Examiner form is displayed as in Figure 9.
Figure 9 Examiners/Chief Examiners form

6 | P a g e
The form should be completed as follows:
Customs Office – Insert the office code.
Section code – Insert the section code e.g. [EPU].
Examining Officer – Insert the examiner’s user name
Extended Name – Insert the full name of the examiner
Status – System defaults to [suspend]. This must be changed to active after completing
the procedure.
Number of Declarations – System default.
Current workload – System default.
Receive Warning – Tick the check box. When ticked the system will inform the examiner
whenever a declaration is assigned.
Chief – This option is selected if the individual is to be a chief examiner
A completed form is shown in Figure 10.
Figure 10 Figure: New examiner/chief examiner assignment.

7 | P a g e
3.0 Section or Examiner Reassignment
Use the following path to access a declaration to be re-assigned.
ASYCUDA>>> Goods Clearance >>>Detailed Declaration’
Right on “Detailed Declaration” and select on “Find Examiner and Section” as shown in
Figure 11.
Figure 11 Finding the Examiner and Section
Click
Here

8 | P a g e
The “Examiner and Section” finder is displayed. Complete the finder and click search. Figure
12 illustrates the results of the “Finder”.
Figure 12 Finder results
Right click on the declaration to be re-assigned and select “Manual Examiner Assigment”. The
results of the search is displayed in Figure 13.
Figure 13 Manual section/examiners assignment window.

9 | P a g e
The screen shows the current section, chief examiner and examiners name. If necessary change
the following fields to re-assign either:
Section code – Insert the section code.
Chief Examiner – Insert the new Chief Examiner.
Examiner – Insert the new Examiner.
Click the icon to complete the process.
Figure 14 illustrates that the manual assignment has been completed.
Figure 14 Transaction completed box
Click on the to complete the process.
Click on the to view assignment.
Click on the to start another assignment.