Embed Size (px)
Citation preview

1
HeadMaster: Setting Up HeadMaster Part II

HeadMaster Set Up Part II
2
Copyright
Copyright © 2014 ACS Technologies Group, Inc. All rights reserved. Reproduction of any part of
this publication by mechanical or electronic means, including facsimile transmission and e-mail,
without the express permission of ACS Technologies Group, Inc. is strictly prohibited.
Version 11.5
Last Updated 2/24/2014 2:56 PM

Contents
3
Contents Introduction to This Guide .......................................................................................................... 4
Unit 1: Before You Begin ............................................................................................................. 5
Unit 2: Setting Up Grading Scales ................................................................................................ 6
Unit 3: Setting Up Grading Periods .............................................................................................. 9
Unit 4: Setting Up Class Periods ................................................................................................ 12
Unit 5: Setting Up Subjects ........................................................................................................ 13
Unit 6: Setting Up Classes.......................................................................................................... 16
Unit 7: Creating Student Schedules ........................................................................................... 23
Unit 8: Student Schedule Transfers ........................................................................................... 29
Unit 9: Posting School Attendance ............................................................................................ 30
Unit 10: Posting Class Attendance ............................................................................................. 32

HeadMaster Set Up Part II
4
Introduction to This Guide This document covers the second part of the initial set up of the Headmaster Software.
This guide includes the following concepts:
Setting Up Grading Scales
Setting Up Grading Periods
Setting Up Class Periods
Setting Up Subjects
Setting Up Classes
Creating Student Schedules
Posting School Attendance
Posting Class Attendance

HeadMaster Set Up Part II
5
Unit 1: Before You Begin Please have the following items completed before setting up classes and taking attendance:
Usernames and passwords for all HeadMaster and Classroom Manager users
Grade levels
School Information
Custom Fields (if needed)
Teachers
Staff
Student information
Homeroom Assignments
If you have one or more of the above items incomplete, please refer to the HeadMaster Set Up
Part I document and video or contact the ACS Technologies HeadMaster Support Department at
1-800-669-2509.

HeadMaster Set Up Part II
6
Unit 2: Setting Up Grading Scales HeadMaster enables you to set up different class structures such as a 1st Grade class with
multiple subjects. Before setting up subjects and classes, you need to set up your Grading Scales
and Grading Periods.
To set up Grading Scales:
Useful Information
HeadMaster allows for multiple grading scales. For example, you can add one for elementary,
one for junior high, and one for senior high.
1. On the Home screen, click Options.
2. Click Grading Scales.
3. Click Create New.
4. Enter Name.
5. Click OK.
Figure 1: Creating a Grading Scale
6. Click Set as default (if applicable).
7. Click Add.
8. Enter Numeric, Letter Grade 1, Letter Grade 2, and Grade Points.

HeadMaster Set Up Part II
7
Useful Information
Numeric is the only grade that is required.
Letter Grade 1 = A, B, C, D, F
Letter Grade 2 = O, S, N, U or whatever letters you use
Grade Points = GPA
Figure 2: Adding Grades
Repeat steps 7 & 8 until you have entered all of your grades.
To create another grading scale, repeat steps 3-8.
Other Grading Options:
Extra grade points for honors: enter extra points to be automatically added to the students’
GPA when they take a class marked as honors.
Extra grade points for AP: enter extra points to be automatically added to the students’ GPA
when they take a class marked as AP.
Failing Grade: enter the number that designates what students have failed an assignment or
class. This grade displays in red.
HeadMaster Set Up Part II
8
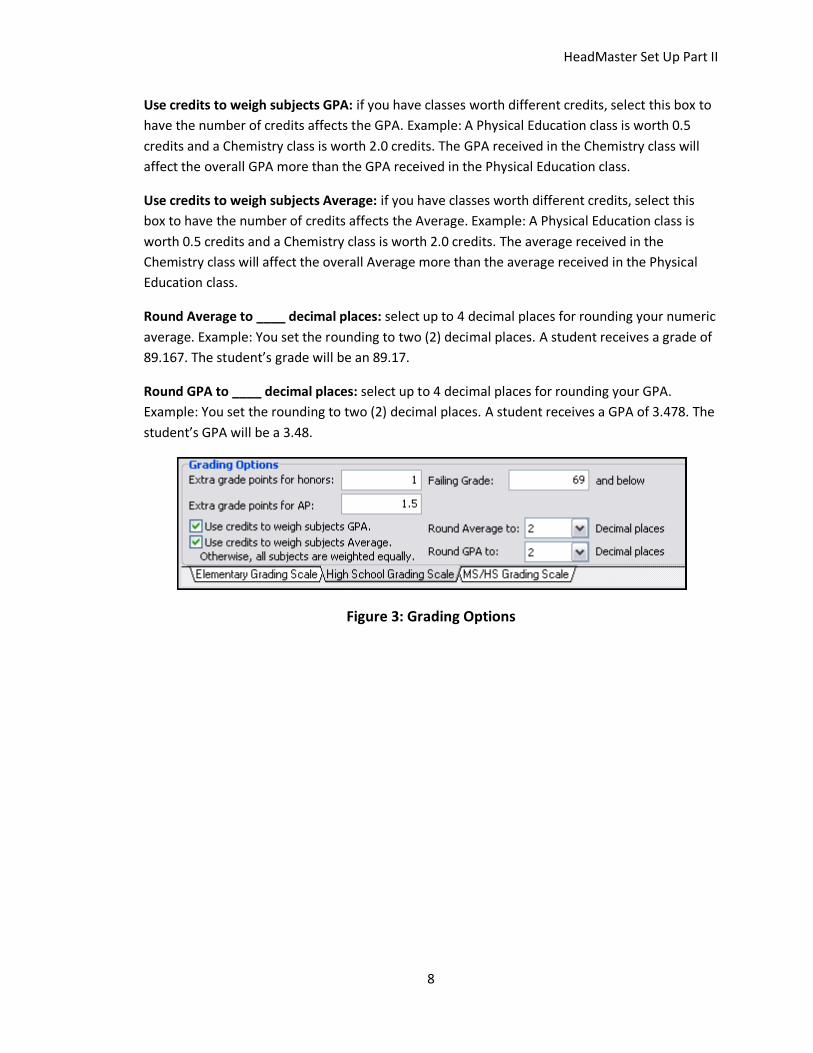
Use credits to weigh subjects GPA: if you have classes worth different credits, select this box to
have the number of credits affects the GPA. Example: A Physical Education class is worth 0.5
credits and a Chemistry class is worth 2.0 credits. The GPA received in the Chemistry class will
affect the overall GPA more than the GPA received in the Physical Education class.
Use credits to weigh subjects Average: if you have classes worth different credits, select this
box to have the number of credits affects the Average. Example: A Physical Education class is
worth 0.5 credits and a Chemistry class is worth 2.0 credits. The average received in the
Chemistry class will affect the overall Average more than the average received in the Physical
Education class.
Round Average to ____ decimal places: select up to 4 decimal places for rounding your numeric
average. Example: You set the rounding to two (2) decimal places. A student receives a grade of
89.167. The student’s grade will be an 89.17.
Round GPA to ____ decimal places: select up to 4 decimal places for rounding your GPA.
Example: You set the rounding to two (2) decimal places. A student receives a GPA of 3.478. The
student’s GPA will be a 3.48.
Figure 3: Grading Options

HeadMaster Set Up Part II
9
Unit 3: Setting Up Grading Periods HeadMaster allows for multiple grading periods. For example, you can add one for elementary,
one for junior high and one for senior high.
Useful Information
Elementary: Quarter 1, Quarter 2, Quarter 3, Quarter 4
Middle: Sem 1 = Quarter 1, Quarter 2 Sem 2 = Quarter 3, Quarter 4
Upper: Sem 1 = Quarter 1, Quarter 2, Sem 1 Exam Sem 2 = Quarter 3, Quarter 4, Sem 2 Exam
To set up Grading Periods:
1. On the Home screen, click Options.
2. Click Grading Periods.
3. Click Create New (a new window opens).
4. Enter Grading Period Name.
5. Enter Number of Semesters.
6. Enter Number of Periods Per Semester.
7. Enter Number of Weeks Per Period.
8. Click Next.
Figure 4: Creating a Grading Period

HeadMaster Set Up Part II
10
9. Enter the Start Date and End Date for each grading period.
10. When finished, click Close.
Figure 5: Entering Grading Period dates
To create more grading periods, repeat steps 3-10.
To change the names and weights for grading periods:
1. Highlight the grading period name.
2. Enter the new name. Example: 1st 9 weeks changes to 1st Quarter.
3. Highlight the grading period weight.
4. Enter the new weight. Example: 50% changes to 40%. See “Figure 6: Changing Grading
Period Information” on page 11.

HeadMaster Set Up Part II
11
Figure 6: Changing Grading Period Information

HeadMaster Set Up Part II
12
Unit 4: Setting Up Class Periods You have an opportunity to set up class periods. You enter a start and end time for each period
and then assign classes to a specific period. This is not a required item.
To set up Class Periods:
1. On the Home screen, click Options.
2. Click Period Setup.
3. Click Add.
4. Enter the Code.
5. Enter the Description.
6. Enter the Start Time.
7. Enter the End Time.
8. Click OK.
To create more class periods, repeat steps 2-7.
Figure 7: Setting Up Class Periods

HeadMaster Set Up Part II
13
Unit 5: Setting Up Subjects HeadMaster can accommodate middle and high school classes as well as self-contained
elementary classes. The first step in class creation is to create subjects. Depending on the size
and needs of your school, you may want to create a set of subjects for elementary, middle and
high school. Each level will have different subject attributes selected.
To create Subjects:
1. On the Home screen, click Subjects.
2. Click New.
3. Enter Subject Code.
4. Enter Credits if applicable.
5. Select how credits are earned.
Useful Information
Earn credits based on:
Year: A student is a taking a math class for one credit, the subject is set to earn
the credit for the entire year. When you view this student’s total credits at
the end of the 1st Semester, it will show one credit earned for the math class.
Semester/Quarter: A student is taking a math class for one credit; the subject is
set to earn credit for Semester/Quarter. When you view this
student’s total credits at the end of the 1st Semester, it will
show .5 credits earned for the math class.
6. Enter Description.
7. Select Grade Type: Numeric, Letter Grade 1, Letter Grade 2, Points, Numeric/Letter
Grade 1 or Numeric/Letter Grade 2. This is what appears on report cards.
8. Select other subject options.
9. Click OK.
Figure 8: Creating a Subject
To create more subjects, repeat steps 2-9.

HeadMaster Set Up Part II
14
Examples of Elementary, Middle, and High School subjects:
Useful Information
When creating separate sets of subjects for each area, it is helpful to enter a “1-“ before an
elementary subject code. Enter a “2-“ before a middle school subject code. Enter a “3-“ before a
high school subject code. This makes it easier to sort through subjects when creating classes.
See examples below.
Elementary Subject:
Figure 9: Elementary Subject
Middle School Subject:
Figure 10: Middle School Subject

HeadMaster Set Up Part II
15
High School Subject:
Figure 11: High School Subject
HeadMaster Set Up Part II
16
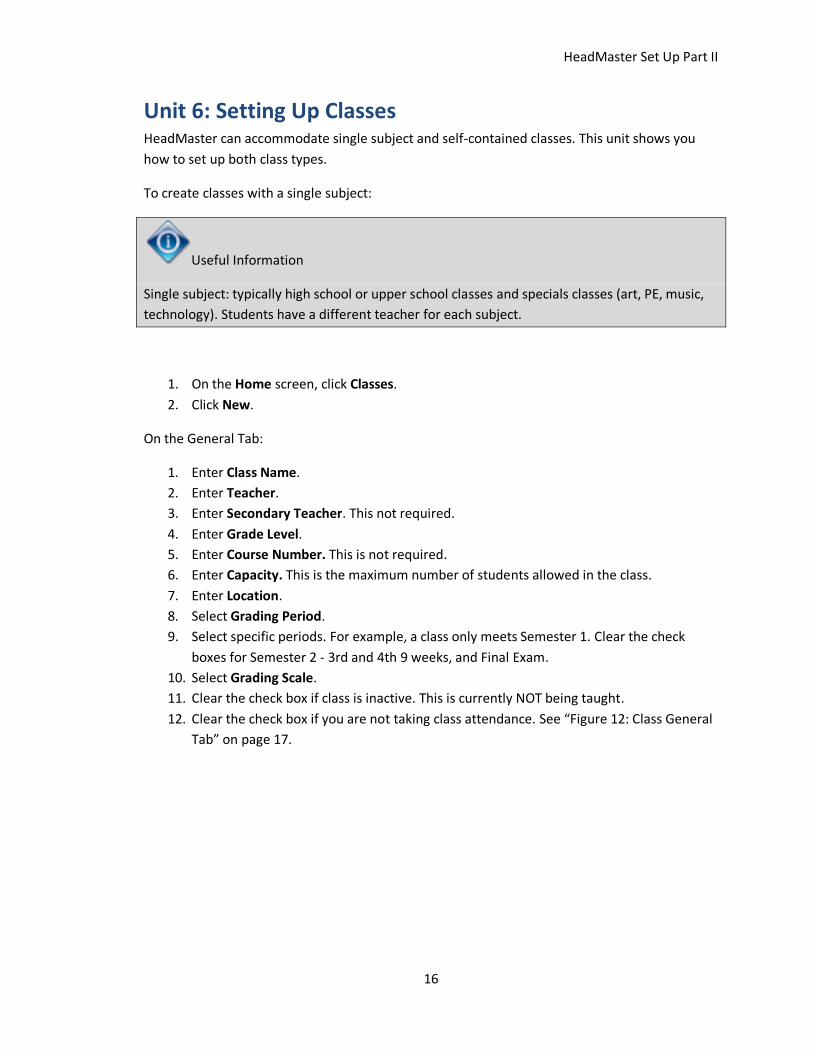
Unit 6: Setting Up Classes HeadMaster can accommodate single subject and self-contained classes. This unit shows you
how to set up both class types.
To create classes with a single subject:
Useful Information
Single subject: typically high school or upper school classes and specials classes (art, PE, music,
technology). Students have a different teacher for each subject.
1. On the Home screen, click Classes.
2. Click New.
On the General Tab:
1. Enter Class Name.
2. Enter Teacher.
3. Enter Secondary Teacher. This not required.
4. Enter Grade Level.
5. Enter Course Number. This is not required.
6. Enter Capacity. This is the maximum number of students allowed in the class.
7. Enter Location.
8. Select Grading Period.
9. Select specific periods. For example, a class only meets Semester 1. Clear the check
boxes for Semester 2 - 3rd and 4th 9 weeks, and Final Exam.
10. Select Grading Scale.
11. Clear the check box if class is inactive. This is currently NOT being taught.
12. Clear the check box if you are not taking class attendance. See “Figure 12: Class General
Tab” on page 17.

HeadMaster Set Up Part II
17
Figure 12: Class General Tab
On the Subject Tab:
1. Select the Subject.
2. Enter a Section.
Useful Information
You must enter a Section. Typically, Section is used if you are teaching more than one section of
the same class. If you only have one section of a class, enter the grade level of the students
being taught.
3. Description: automatically populated when you select a subject and section. See “Figure
13: Class Subject Tab” on page 18.
Useful Information
All other information regarding the subject is populated from prior entry of the subject.

HeadMaster Set Up Part II
18
Figure 13: Class Subject Tab
On the Schedule Tab:
1. Select the days the class is taught.
2. In the first day, enter a Start and End time or select a Period. This will populate the
times/periods for the rest of the days the class is taught.
3. To save the class, click OK.
Figure 14: Class Schedule Tab

HeadMaster Set Up Part II
19
To create classes with multiple subjects:
Useful Information
Multiple subjects: typically used in elementary, lower, or primary school. Students have the
same teacher for multiple subjects.
1. On the Home screen, click Classes.
2. Click New.
On the General Tab:
1. Enter Class Name.
2. Enter Teacher.
3. Enter Secondary Teacher. This not required.
4. Enter Grade Level.
5. Enter Course Number. This is not required.
6. Enter Capacity. This is the maximum number of students allowed in the class.
7. Enter Location.
8. Select Grading Period.
9. Select specific periods. For example, a class only meets Semester 1. Clear the check
boxes for Semester 2 - 3rd and 4th 9 weeks, and Final Exam.
10. Select Grading Scale.
11. Clear the check box if class is inactive. This is currently NOT being taught.
12. Clear the check box if you are not taking class attendance.
Figure 15: Class General Tab

HeadMaster Set Up Part II
20
On the Subject Tab:
1. Select the Subject.
2. Enter a Section.
Useful Information
You must enter a Section. Typically Section is used if you are teaching more than one section of
the same class. If you only have one section of a class, enter the grade level of the students
being taught.
3. Description: automatically populated when you select a subject and section.
Useful Information
All other information regarding the Subject is populated from prior entry of the subject.
4. To select another subject, click Select Subject.
Figure 16: Class Subject Tab

HeadMaster Set Up Part II
21
5. Select a subject.
6. Enter a Section.
7. Description: automatically populated when you select a subject and section
8. Click OK.
To add other subjects to this class, use steps 4-6.
Once you have added all of the subjects that are taught by the selected teacher, your Subject
tab should look similar to this:
Figure 17: Class Subject Tab for Multiple subject classes
On the Schedule Tab:
1. Select the days the class is taught.
2. In the first day, enter a Start and End time or select a Period. This will populate the
times/periods for the rest of the days the class is taught.
3. To save the class, click OK. See “Figure 18: Class Schedule Tab” on page 22.

HeadMaster Set Up Part II
22
Figure 18: Class Schedule Tab

HeadMaster Set Up Part II
23
Unit 7: Creating Student Schedules HeadMaster offers three ways to schedule students in to classes:
1. Student Schedule Assistant
2. Class Roll Tab
3. Student record Schedule tab
To schedule students using the Student Schedule Assistant:
1. On the Home screen, click Student Schedule.
2. Select the scheduling option.
Option #1: Add one class or multiple classes to a single student or group of students.
Option #2: Add one class or multiple classes to an entire grade level. Option #3: Add one class or multiple classes to the entire database. For this step, we are using option #1.
3. Click Next.
4. Select the students you want to create schedules for. There are three options available.
Option #1: Select multiple students by pressing and holding the Ctrl key.
Option #2: Click Grade Level to sort student by grade level.
Option #3: Click a grade level. Then click the Filter Icon.
For this step, we are using option #1.
5. Click Add.
6. Click Next.
Figure 19: Student Schedule Assistant

HeadMaster Set Up Part II
24
7. Select the classes you want to add to the student schedules (three options available).
Option #1: select multiple classes by pressing and holding the Ctrl key. Option #2: click Grade Level to sort classes by grade level. Option #3: Click a grade level. Then click the Filter Icon. For this step, we are using Option #1.
8. Click Add. 9. Click Save.
Figure 20: Student Schedule Assistant
1. Click Yes or No to continue adding classes.
The selected classes are now added to the students’ schedules.

HeadMaster Set Up Part II
25
To print multiple student schedules:
2. On the Home screen, click Reports.
3. Click the “+” beside the Schedules book.
4. Click Student Schedules.
5. Select sorting/filtering options.
6. Click Print or Preview.
Figure 21: Printing Student Schedules

HeadMaster Set Up Part II
26
An example of a student schedule:
Figure 22: Student Schedule
To create a schedule for an individual student:
Useful Information
You may have a student who transfers to your school mid-year. You can use the Student
Schedule Assistant, or you can create the schedule through the student’s individual record.
1. On the Home screen, click Students.
2. Double-click the student’s record.
3. Click the Schedule Tab.
4. Click Add.
5. To select classes, click each class name you want to add.
6. Click Add.
7. Click Close. See “Figure 23: Adding Individual Student Schedule” on page 27.

HeadMaster Set Up Part II
27
Figure 23: Adding Individual Student Schedule
8. To view the schedule, click Preview.
9. To print the schedule, click Print.
Figure 24: Preview/Print Individual Student Schedule

HeadMaster Set Up Part II
28
To print a single student’s or multiple students’ grid schedules:
1. On the Home screen, click Students.
2. Select the student or students for whom you would like to print schedules.
3. In the Icon Tool Bar, click the View Student Schedule icon.
Figure 25: View Student Schedule icon
4. Click the Printer icon.
Figure 26: Student Grid Schedule

HeadMaster Set Up Part II
29
Unit 8: Student Schedule Transfers Sometimes students need to be transferred from class to another for a variety of reasons: class
size balance, skill level, discipline issues. HeadMaster offers an easy way to transfer a student
from one class to another while keeping current averages and class attendance totals.
To transfer a student from one class to another:
1. On the Home screen, click Students.
2. Double-click the student you want to transfer.
3. Click the Schedule tab.
4. Single-click the class you want to transfer the student out of.
5. Click Transfer.
6. Select you want to transfer the student in to.
7. Click Next.
Figure 27: Transfer Student Classes
8. Grades display in the corresponding grading periods.
Useful Information
If the classes are different subjects: transferring from Math to English, you need to enter the
period grades manually. Class Attendance transfers automatically.
9. Click Finish.
10. When transfer is complete, click OK.
11. To close the Transfer window, click Close.
12. To save the student record, click OK.
HeadMaster Set Up Part II
30
Unit 9: Posting School Attendance School Attendance is usually taken at the beginning of the day for the entire school. Then, you
can edit the attendance as needed when students are tardy.
School attendance is based on the Homeroom teacher.
To mark school attendance:
1. On the Home screen, click School Attendance.
Useful Information
When School Attendance opens, it displays the entire school enrollment. You can view the
children for a specific teacher or grade level.
2. Select a date.
3. Mark students absent, tardy, unexcused absent, unexcused tardy, or half day.
Useful Information
You have two options for marking attendance:
Option #1: Click the correct attendance code. Then double-click the student.
Option #2: Right-click on the student and select the correct attendance code.
4. Add a Reason code.
Useful Information
Reason codes enable you to track the reasons given for an absent or tardy mark. You can print
an Attendance Detail report that lists dates and reasons given for the attendance mark.
5. Click OK to save attendance or select another teacher or grade level. See “Figure 28:
Marking School Attendance” on page 31.
Useful Information
You can enter attendance for any date. If you were unable to enter attendance from the day
before, you can select the appropriate date and mark attendance.

HeadMaster Set Up Part II
31
Figure 28: Marking School Attendance
To print attendance reports:
1. On the Home screen, click Reports.
2. Click the “+” beside the Attendance book.
3. Select a report.
4. Select sorting/filtering options. Click Preview or Print.
Popular School Attendance Reports:
School Attendance Daily Absence: displays absences and tardies for the day. School Attendance Detail: displays dates and reason codes for absences and
tardies for a date range. School Attendance Summary: displays totals for all attendance codes for a date range.

HeadMaster Set Up Part II
32
Unit 10: Posting Class Attendance With HeadMaster Plus, Pro and Classroom Manager, you can track class attendance. This mainly
applies to upper grade students who switch teachers for each subject.
To post Class Attendance:
1. On the Home screen, click Class Attendance.
2. Select the appropriate date.
3. Click OK.
4. Choose the class you want to post attendance for.
5. Mark students absent or tardy and record a reason code.
6. Click OK.
Figure 29: Marking Class Attendance
Mark class attendance using the seating chart.
1. On the Home screen, click Classes.
2. Select the class that you would like to take attendance for.
3. Click Seating Chart.
4. Click the Attendance icon.
5. Click the student that is absent or tardy. Click through until you find the appropriate
attendance code.
6. Click Close. See “Figure 30: Class Attendance by Seating Chart” on page 33.

HeadMaster Set Up Part II
33
Figure 30: Class Attendance by Seating Chart
To access Class Attendance Reports:
1. On the Home screen, click Reports.
2. Click the “+” beside the Attendance book.
3. Choose the appropriate Class Attendance report. See “Figure 31: Class Attendance
Reports” on page 34.

HeadMaster Set Up Part II
34
Figure 31: Class Attendance Reports
Popular Class Attendance reports:
Student Attendance Detail: displays absences and tardies by date per class Student Attendance Summary: displays total absences and tardies by date
range per class.