Embed Size (px)
Citation preview
P/N 260442-G11/2015
CheckPoint IIUser Guide

Dansensor A/S COPYRIGHT © P/N 260442-G 11/2015
CheckPoint II EN User Guide
CheckPoint IIUser Guide
Published by:
Dansensor A/SRønnedevej 18, DK-4100 Ringsted
DenmarkTel.: +45 57 66 00 88Fax: +45 57 66 00 99
E-mail: [email protected]: www.dansensor.com

P/N 260442-G 11/2015 COPYRIGHT © Dansensor A/S
2 User Guide EN CheckPoint II

Dansensor A/S COPYRIGHT © P/N 260442-G 11/2015
CheckPoint II EN User Guide 3
Table of Contents
1. Introduction . . . . . . . . . . . . . . . . . . . . . . . . . . . . . . . . . . . . . . . . . . . .7Register your product . . . . . . . . . . . . . . . . . . . . . . . . . . . . . . . . . . . . . . . . . . . . . . 7About this Manual . . . . . . . . . . . . . . . . . . . . . . . . . . . . . . . . . . . . . . . . . . . . . . . . . 7
Intended Use of this Manual . . . . . . . . . . . . . . . . . . . . . . . . . . . . . . . . . . . . . . . . . . . . . . . . . . . . 7Reservations. . . . . . . . . . . . . . . . . . . . . . . . . . . . . . . . . . . . . . . . . . . . . . . . . . . . . . . . . . . . . . . . 7
Important! . . . . . . . . . . . . . . . . . . . . . . . . . . . . . . . . . . . . . . . . . . . . . . . . . . . . . . . 7Safety and Use . . . . . . . . . . . . . . . . . . . . . . . . . . . . . . . . . . . . . . . . . . . . . . . . . . . . . . . . . . . . . . 7
Notes, cautions and warnings! . . . . . . . . . . . . . . . . . . . . . . . . . . . . . . . . . . . . . . . 8Explanation. . . . . . . . . . . . . . . . . . . . . . . . . . . . . . . . . . . . . . . . . . . . . . . . . . . . . . . . . . . . . . . . . 8
2. Unpacking & Setting up . . . . . . . . . . . . . . . . . . . . . . . . . . . . . . . . . .11Unpacking . . . . . . . . . . . . . . . . . . . . . . . . . . . . . . . . . . . . . . . . . . . . . . . . . . . . . . 11Installation of the “CheckPoint II PC Software”. . . . . . . . . . . . . . . . . . . . . . . . . 12Setting Up. . . . . . . . . . . . . . . . . . . . . . . . . . . . . . . . . . . . . . . . . . . . . . . . . . . . . . . 15
3. Functional Description. . . . . . . . . . . . . . . . . . . . . . . . . . . . . . . . . . .17General . . . . . . . . . . . . . . . . . . . . . . . . . . . . . . . . . . . . . . . . . . . . . . . . . . . . . . . . . 17CheckPoint II Overview . . . . . . . . . . . . . . . . . . . . . . . . . . . . . . . . . . . . . . . . . . . . 19Display/Menu . . . . . . . . . . . . . . . . . . . . . . . . . . . . . . . . . . . . . . . . . . . . . . . . . . . . 21Key functions . . . . . . . . . . . . . . . . . . . . . . . . . . . . . . . . . . . . . . . . . . . . . . . . . . . . 22
4. Operation . . . . . . . . . . . . . . . . . . . . . . . . . . . . . . . . . . . . . . . . . . . . .23Modes . . . . . . . . . . . . . . . . . . . . . . . . . . . . . . . . . . . . . . . . . . . . . . . . . . . . . . . . . . 23Daily Start-Up. . . . . . . . . . . . . . . . . . . . . . . . . . . . . . . . . . . . . . . . . . . . . . . . . . . . 24Measuring . . . . . . . . . . . . . . . . . . . . . . . . . . . . . . . . . . . . . . . . . . . . . . . . . . . . . . 25
Getting the best measurement performance . . . . . . . . . . . . . . . . . . . . . . . . . . . . . . . . . . . . . . . 25Dynamic Sample Time (DST) . . . . . . . . . . . . . . . . . . . . . . . . . . . . . . . . . . . . . . . . . . . . . . . . . . 25Explanation of the “Response time (T95)” . . . . . . . . . . . . . . . . . . . . . . . . . . . . . . . . . . . . . . . . . 26O2 offset calibration . . . . . . . . . . . . . . . . . . . . . . . . . . . . . . . . . . . . . . . . . . . . . . . . . . . . . . . . . 27O2 sensor temperature sensitivity . . . . . . . . . . . . . . . . . . . . . . . . . . . . . . . . . . . . . . . . . . . . . . . 27CO2 sensor temperature sensitivity . . . . . . . . . . . . . . . . . . . . . . . . . . . . . . . . . . . . . . . . . . . . . . 27The Measuring screen . . . . . . . . . . . . . . . . . . . . . . . . . . . . . . . . . . . . . . . . . . . . . . . . . . . . . . . 28Selecting a product for measuring . . . . . . . . . . . . . . . . . . . . . . . . . . . . . . . . . . . . . . . . . . . . . . 28Performing a measurement . . . . . . . . . . . . . . . . . . . . . . . . . . . . . . . . . . . . . . . . . . . . . . . . . . . 29
Offset (20.9%) calibration . . . . . . . . . . . . . . . . . . . . . . . . . . . . . . . . . . . . . . . . . . 31Daily Shut-down . . . . . . . . . . . . . . . . . . . . . . . . . . . . . . . . . . . . . . . . . . . . . . . . . 33
Battery charging. . . . . . . . . . . . . . . . . . . . . . . . . . . . . . . . . . . . . . . . . . . . . . . . . . . . . . . . . . . . 33

P/N 260442-G 11/2015 COPYRIGHT © Dansensor A/S
4 User Guide EN CheckPoint II
5. Cleaning and Maintenance . . . . . . . . . . . . . . . . . . . . . . . . . . . . . . .35General . . . . . . . . . . . . . . . . . . . . . . . . . . . . . . . . . . . . . . . . . . . . . . . . . . . . . . . . . 35Cleaning . . . . . . . . . . . . . . . . . . . . . . . . . . . . . . . . . . . . . . . . . . . . . . . . . . . . . . . . 35Replacing measuring gas hose, filter and needle . . . . . . . . . . . . . . . . . . . . . . . 36
6. Errors . . . . . . . . . . . . . . . . . . . . . . . . . . . . . . . . . . . . . . . . . . . . . . . .37User errors . . . . . . . . . . . . . . . . . . . . . . . . . . . . . . . . . . . . . . . . . . . . . . . . . . . . . . 37Device errors . . . . . . . . . . . . . . . . . . . . . . . . . . . . . . . . . . . . . . . . . . . . . . . . . . . . 38
7. The CheckPoint II PC Software . . . . . . . . . . . . . . . . . . . . . . . . . . . .41Starting the application . . . . . . . . . . . . . . . . . . . . . . . . . . . . . . . . . . . . . . . . . . . . 41Login. . . . . . . . . . . . . . . . . . . . . . . . . . . . . . . . . . . . . . . . . . . . . . . . . . . . . . . . . . . 42Application Overview . . . . . . . . . . . . . . . . . . . . . . . . . . . . . . . . . . . . . . . . . . . . . . 43Data Synchronization. . . . . . . . . . . . . . . . . . . . . . . . . . . . . . . . . . . . . . . . . . . . . . 45Application User Management . . . . . . . . . . . . . . . . . . . . . . . . . . . . . . . . . . . . . . 47
Create User . . . . . . . . . . . . . . . . . . . . . . . . . . . . . . . . . . . . . . . . . . . . . . . . . . . . . . . . . . . . . . . 47Edit/Delete User . . . . . . . . . . . . . . . . . . . . . . . . . . . . . . . . . . . . . . . . . . . . . . . . . . . . . . . . . . . . 48
Database Management . . . . . . . . . . . . . . . . . . . . . . . . . . . . . . . . . . . . . . . . . . . . 49Backup of measurement database . . . . . . . . . . . . . . . . . . . . . . . . . . . . . . . . . . . . . . . . . . . . . . 49Restoring the database. . . . . . . . . . . . . . . . . . . . . . . . . . . . . . . . . . . . . . . . . . . . . . . . . . . . . . . 50
Device list. . . . . . . . . . . . . . . . . . . . . . . . . . . . . . . . . . . . . . . . . . . . . . . . . . . . . . . 51Edit device . . . . . . . . . . . . . . . . . . . . . . . . . . . . . . . . . . . . . . . . . . . . . . . . . . . . . . . . . . . . . . . . 51Removing Device . . . . . . . . . . . . . . . . . . . . . . . . . . . . . . . . . . . . . . . . . . . . . . . . . . . . . . . . . . . 52
Device Settings . . . . . . . . . . . . . . . . . . . . . . . . . . . . . . . . . . . . . . . . . . . . . . . . . . 53Using Master list. . . . . . . . . . . . . . . . . . . . . . . . . . . . . . . . . . . . . . . . . . . . . . . . . . . . . . . . . . . . 54
Product Setup. . . . . . . . . . . . . . . . . . . . . . . . . . . . . . . . . . . . . . . . . . . . . . . . . . . . 55Using Master list. . . . . . . . . . . . . . . . . . . . . . . . . . . . . . . . . . . . . . . . . . . . . . . . . . . . . . . . . . . . 55Create/Edit Product. . . . . . . . . . . . . . . . . . . . . . . . . . . . . . . . . . . . . . . . . . . . . . . . . . . . . . . . . . 56Delete Product . . . . . . . . . . . . . . . . . . . . . . . . . . . . . . . . . . . . . . . . . . . . . . . . . . . . . . . . . . . . . 56Wildcard function . . . . . . . . . . . . . . . . . . . . . . . . . . . . . . . . . . . . . . . . . . . . . . . . . . . . . . . . . . . 57
Device User Setup . . . . . . . . . . . . . . . . . . . . . . . . . . . . . . . . . . . . . . . . . . . . . . . . 58Using Master list. . . . . . . . . . . . . . . . . . . . . . . . . . . . . . . . . . . . . . . . . . . . . . . . . . . . . . . . . . . . 58Create/Edit User . . . . . . . . . . . . . . . . . . . . . . . . . . . . . . . . . . . . . . . . . . . . . . . . . . . . . . . . . . . . 59Delete User. . . . . . . . . . . . . . . . . . . . . . . . . . . . . . . . . . . . . . . . . . . . . . . . . . . . . . . . . . . . . . . . 59
Measurement data . . . . . . . . . . . . . . . . . . . . . . . . . . . . . . . . . . . . . . . . . . . . . . . . 60Searching/Sorting Data. . . . . . . . . . . . . . . . . . . . . . . . . . . . . . . . . . . . . . . . . . . . . . . . . . . . . . . 60Exporting Data . . . . . . . . . . . . . . . . . . . . . . . . . . . . . . . . . . . . . . . . . . . . . . . . . . . . . . . . . . . . . 61Printing Data . . . . . . . . . . . . . . . . . . . . . . . . . . . . . . . . . . . . . . . . . . . . . . . . . . . . . . . . . . . . . . 61Statistics . . . . . . . . . . . . . . . . . . . . . . . . . . . . . . . . . . . . . . . . . . . . . . . . . . . . . . . . . . . . . . . . . 62

Dansensor A/S COPYRIGHT © P/N 260442-G 11/2015
CheckPoint II EN User Guide 5
8. Technical Specifications. . . . . . . . . . . . . . . . . . . . . . . . . . . . . . . . .63Electrical specifications . . . . . . . . . . . . . . . . . . . . . . . . . . . . . . . . . . . . . . . . . . . 63Connectivity . . . . . . . . . . . . . . . . . . . . . . . . . . . . . . . . . . . . . . . . . . . . . . . . . . . . . 63Mechanical specifications. . . . . . . . . . . . . . . . . . . . . . . . . . . . . . . . . . . . . . . . . . 63Sensors. . . . . . . . . . . . . . . . . . . . . . . . . . . . . . . . . . . . . . . . . . . . . . . . . . . . . . . . . 64
O2 Sensor . . . . . . . . . . . . . . . . . . . . . . . . . . . . . . . . . . . . . . . . . . . . . . . . . . . . . . . . . . . . . . . . . 64CO2 Sensor. . . . . . . . . . . . . . . . . . . . . . . . . . . . . . . . . . . . . . . . . . . . . . . . . . . . . . . . . . . . . . . . 64
Sampling . . . . . . . . . . . . . . . . . . . . . . . . . . . . . . . . . . . . . . . . . . . . . . . . . . . . . . . 64User Interface. . . . . . . . . . . . . . . . . . . . . . . . . . . . . . . . . . . . . . . . . . . . . . . . . . . . 65Products . . . . . . . . . . . . . . . . . . . . . . . . . . . . . . . . . . . . . . . . . . . . . . . . . . . . . . . . 65Data logging . . . . . . . . . . . . . . . . . . . . . . . . . . . . . . . . . . . . . . . . . . . . . . . . . . . . . 65Barcode Scanner (Option) . . . . . . . . . . . . . . . . . . . . . . . . . . . . . . . . . . . . . . . . . . 65DockIn . . . . . . . . . . . . . . . . . . . . . . . . . . . . . . . . . . . . . . . . . . . . . . . . . . . . . . . . . 66
Electrical specifications . . . . . . . . . . . . . . . . . . . . . . . . . . . . . . . . . . . . . . . . . . . . . . . . . . . . . . 66Connectivity . . . . . . . . . . . . . . . . . . . . . . . . . . . . . . . . . . . . . . . . . . . . . . . . . . . . . . . . . . . . . . . 66Mechanical specifications. . . . . . . . . . . . . . . . . . . . . . . . . . . . . . . . . . . . . . . . . . . . . . . . . . . . . 66
Options . . . . . . . . . . . . . . . . . . . . . . . . . . . . . . . . . . . . . . . . . . . . . . . . . . . . . . . . . 66Conformity . . . . . . . . . . . . . . . . . . . . . . . . . . . . . . . . . . . . . . . . . . . . . . . . . . . . . . 66
9. Consumables and Options . . . . . . . . . . . . . . . . . . . . . . . . . . . . . . . .67Important! . . . . . . . . . . . . . . . . . . . . . . . . . . . . . . . . . . . . . . . . . . . . . . . . . . . . . . 67Ordering items . . . . . . . . . . . . . . . . . . . . . . . . . . . . . . . . . . . . . . . . . . . . . . . . . . . 67
Consumables . . . . . . . . . . . . . . . . . . . . . . . . . . . . . . . . . . . . . . . . . . . . . . . . . . . . . . . . . . . . . . 67Options. . . . . . . . . . . . . . . . . . . . . . . . . . . . . . . . . . . . . . . . . . . . . . . . . . . . . . . . . . . . . . . . . . . 67
Appendix. . . . . . . . . . . . . . . . . . . . . . . . . . . . . . . . . . . . . . . . . . . . . . . . .69Software End User License Agreement (EULA). . . . . . . . . . . . . . . . . . . . . . . . . . 69
End-user License Agreement for “CheckPoint II PC Software” . . . . . . . . . . . . . . . . . . . . . . . . . 69
Toxic and Hazardous Substances or Elements. . . . . . . . . . . . . . . . . . . . . . . . . . 71

P/N 260442-G 11/2015 COPYRIGHT © Dansensor A/S
6 User Guide EN CheckPoint II

Dansensor A/S COPYRIGHT © P/N 260442-G 11/2015
CheckPoint II EN User Guide 7
1. Introduction
Register your productThank you for purchasing a Dansensor product, we hope that the product will fulfill your needs.
In order to learn more about our customers and the markets we serve, we kindly ask you to fill out the product registration form available on-line at
www.dansensor.com/register
In return we can offer to send important product information to you, i.e. news about software upgrades and similar.
About this Manual
Intended Use of this Manual• This manual describes the common use and maintenance procedures of the CheckPoint II device.
It is intended for the daily users and should be kept with the equipment for reference at all times.
Reservations• This manual was written and illustrated using the best possible information available at the time of
publication.• Any differences between this manual and the equipment reflect improvements introduced after the
publication of the manual.• Changes, technical inaccuracies and typographic errors will be corrected in subsequent editions.• As a part of our policy of continuous improvement, we reserve the right to alter design and
specifications without further notice.
Important!
Safety and UseTo promote safety awareness you must read and understand the Safety Instructions delivered with the device before performing any installation, operation or maintenance of the device.
P/N 260442-G 11/2015 COPYRIGHT © Dansensor A/S
8 User Guide EN CheckPoint II
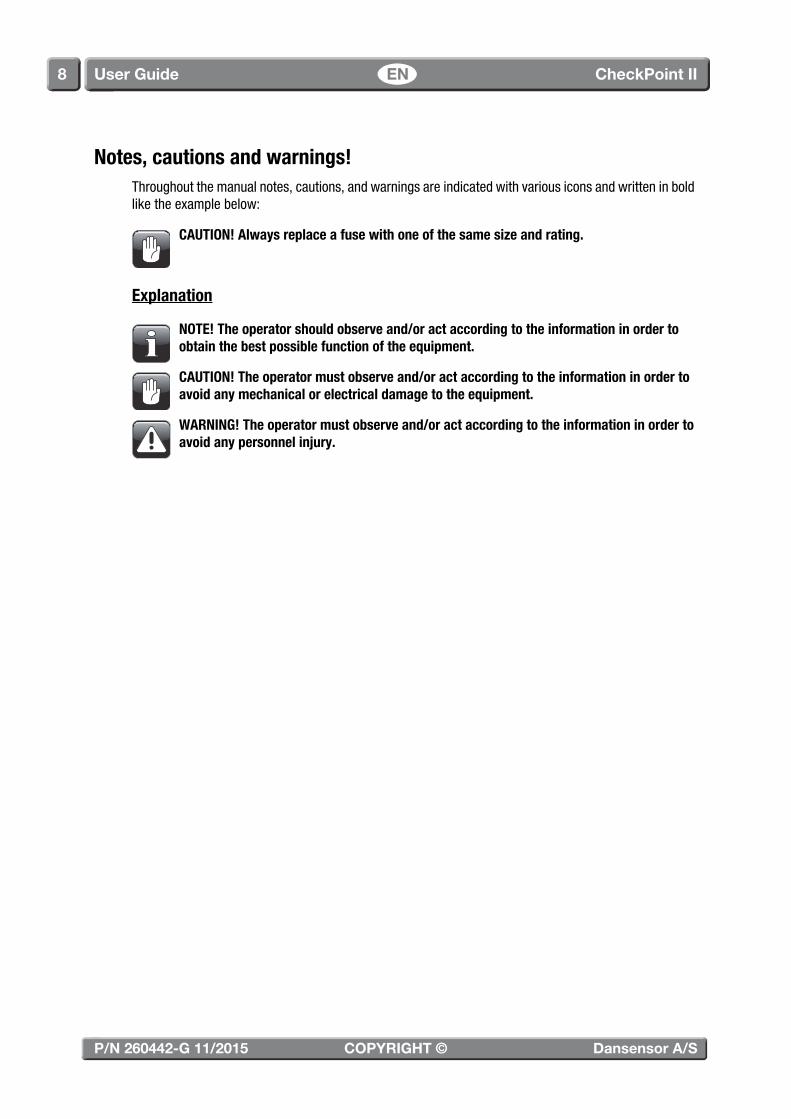
Notes, cautions and warnings!Throughout the manual notes, cautions, and warnings are indicated with various icons and written in bold like the example below:
CAUTION! Always replace a fuse with one of the same size and rating.
Explanation
NOTE! The operator should observe and/or act according to the information in order to obtain the best possible function of the equipment.
CAUTION! The operator must observe and/or act according to the information in order to avoid any mechanical or electrical damage to the equipment.
WARNING! The operator must observe and/or act according to the information in order to avoid any personnel injury.

Dansensor A/S COPYRIGHT © P/N 260442-G 11/2015
CheckPoint II EN User Guide 9

P/N 260442-G 11/2015 COPYRIGHT © Dansensor A/S
10 User Guide EN CheckPoint II

Dansensor A/S COPYRIGHT © P/N 260442-G 11/2015
CheckPoint II EN User Guide 11
2. Unpacking & Setting up
Unpacking(See illustration opposite)
Unpack the case and check that all parts are present (according to enclosed packing list) and in good condition:
Packing list .............................................. Check when unpacking - enclosed parts have been marked up.
Calibration Certificate
Declaration of Conformity
Safety Instructions .................................. Read before using the device.
Getting Started guide
SmartPen Instruction .............................. Only if device is delivered with SmartPen .
CD - “PC Software & User Guides”
CheckPoint II
SmartPen (option) ................................... If device is delivered with the SmartPen, this has already been mounted on the device and the Sampling Kit is packed separately.
Sampling Kit ............................................ Already mounted on device - packed separately if device is delivered with SmartPen .
DockIn
Power Supply
Power Cable
USB Cable
Septum Kit
Kit, filter, water trap (10 pcs.)
Hose, Sample Gas
Needle Kit, 0.8 mm (10 pcs.) ................... An extra is supplied if device is delivered with the SmartPen .

P/N 260442-G 11/2015 COPYRIGHT © Dansensor A/S
12 User Guide EN CheckPoint II
Installation of the “CheckPoint II PC Software”
IMPORTANT! Please read the terms and conditions of the software license agreement on page 69 carefully before installation.
IMPORTANT! Install the software before the CheckPoint II device is connected to the PC as it includes necessary device drivers.
NOTE! Earlier versions of the programs must be removed prior to the installation. To remove program select Control Panel -> Add/Remove Programs -> CheckPoint II software.
• The installation starts automatically when the CD is inserted in the PC’s CD drive.If not it can be started manually following below procedure:- Select My Computer from the Start menu.- In the appearing window locate the CD drive and double-click it.- In the appearing window locate the file CheckPointII_PC_software.exe and double-click it to start
the installation.
• Click Next.
• Accept License Agreement and click Next.

Dansensor A/S COPYRIGHT © P/N 260442-G 11/2015
CheckPoint II EN User Guide 13
• We recommend that you install the program in the folder proposed by the installer.Click Next.
• Click Next to start the installation.

P/N 260442-G 11/2015 COPYRIGHT © Dansensor A/S
14 User Guide EN CheckPoint II
• When this window appears...
...click Finish.• Software has been successfully installed.• Verify that an application short-cut has been placed on your desktop.

Dansensor A/S COPYRIGHT © P/N 260442-G 11/2015
CheckPoint II EN User Guide 15
Setting Up(See illustration below)
1. Connect a USB cable between a PC and the DockIn device .
2. Connect the power supply to the DockIn device .
3. Connect an appropriate power cable between the power supply and the main power outlet.
4. Place the CheckPoint II onto the DockIn device using a firm push to ensure a proper connection.
CheckP
ointII
Main Power
Outlet
2
6
5
31
4

P/N 260442-G 11/2015 COPYRIGHT © Dansensor A/S
16 User Guide EN CheckPoint II

Dansensor A/S COPYRIGHT © P/N 260442-G 11/2015
CheckPoint II EN User Guide 17
3. Functional Description
General
The CheckPoint II is a portable quality control instrument for modified atmosphere packaging.
The easy-to-use “CheckPoint II PC software” delivered with the device enables the control of several CheckPoint II units in a production environment.The PC software makes it easy to create and manage users and products and to set up product measurement details and general device settings.
During the day all measurement data can continuously be transferred from the analyzer to the application’s database and at the end of the day all collected data can be exported for further analysis.
For detailed descriptions of how to use the application, see "7. The CheckPoint II PC Software" on page 41.

P/N 260442-G 11/2015 COPYRIGHT © Dansensor A/S
18 User Guide EN CheckPoint II
CheckP
ointII
4
5
89
2
7
1
6
10
3
11

Dansensor A/S COPYRIGHT © P/N 260442-G 11/2015
CheckPoint II EN User Guide 19
CheckPoint II Overview(See illustration opposite)
Display - see "Display/Menu" on page 21 for details
Operation keys - see "Key functions" on page 22 for details
Sample gas hose w/needle
SmartPen (option) - needle retainer/measuring gas extractor with built-in protection and lock
Barcode scanner (option)
Sample gas outlet
DockIn docking station
USB B port for PC communication
12VDC Power supply connection
Multi-connector for power supply/PC connection (Docking station)
Multi-connector for power supply/PC connection (CheckPoint II)

P/N 260442-G 11/2015 COPYRIGHT © Dansensor A/S
20 User Guide EN CheckPoint II
O :2
O :2
CO :2
CO :2
20.95%0.00%0.00%
100.00%
0.828.5
O2
CO2
%
%
7: Ham 200 gr.Ready
CheckPoint II
O / CO2 2
V.X.XX
7: Ham 200 gr.
1: Walter2: John3: Bill
Log in
1: Cheese 400 gr.2: Meat 200 gr.3: Sausage4: Filet 300 gr.5: Meat 500 gr.6: Bacon 120 gr.7: Ham 200 gr.
Main menu
Main menu
Main menu
O : 20.95%2
20.9
Calibrate: Yes
Bal%CO2
1:2: 20.8 0.0 79.2
%O2
20.9 0.0 79.1
1: Cheese 400 gr.7: Ham 200 gr.2: Meat 200 gr.3: Sausage4: Filet 300 gr.5: Meat 500 gr.6: Bacon 120 gr.
0.828.5
O2
CO2
%
%
7: Ham 200 gr.
1
2
3
5
6
7
8
10
11
12
9
4
4
DST: Yes
Restart/Extend

Dansensor A/S COPYRIGHT © P/N 260442-G 11/2015
CheckPoint II EN User Guide 21
Display/MenuThe illustration opposite shows the menu structure and the keys for navigating through the menu. See also "Key functions" on page 22 for references.
Device in “Off” or “Idle” mode - see "Modes" on page 23 for details.
“Power up” screen
Log in screen
Measuring screen - see "The Measuring screen" on page 28 for details.
Product list
Measurement data
Selection of product for which you want to view collected measurement data.
Measurement data for selected product
Calibration - see "Offset (20.9%) calibration" on page 31 for details.
Selection of gas for which you want to perform calibration.
Calibration screen
DST setting - see "Dynamic Sample Time (DST)" on page 25 for details.

P/N 260442-G 11/2015 COPYRIGHT © Dansensor A/S
22 User Guide EN CheckPoint II
Key functions
I/O key Switches the device ON/OFF.
Barcode key Starts the built-in barcode reader.Only on models with built-in barcode reader.
ESC key Returns to previous menu without selecting/saving.Pressing the key while measuring will stop the operation.
Sample key Starts a measurement using settings for the currently selectedproduct.Pressing the key while measuring extends the measuring time.
Up/Down keys Scrolls up/down through menu items and Yes/No selections.Pressing either key from the measuring screen brings up the products list.
Enter key Selects a menu item and confirms a Yes/No selection.Pressing the key from the measuring screen brings up theicon-based main menu.
3
4
1
6
2
5
0.828.5
O2
CO2
%
%
7: Ham 200 gr.Ready
0.828.5
O2
CO2
%
%
7: Ham 200 gr.Ready

Dansensor A/S COPYRIGHT © P/N 260442-G 11/2015
CheckPoint II EN User Guide 23
4. Operation
ModesThe device can be in one of 4 modes:
Shut down Device is switched completely off with no functions active.
Device automatically shuts down after 8 hours of inactivity.
To shut down the device manually, press and hold the key for approx. 5 secs. until device has beeped twice.
Starting up the device from here will take approx. 30 secs. as the device needs to restart the operating system.
NOTE! Shutting down is not possible when device is connected to the DockIn station.
Off mode Device automatically switches into “Off” mode after approx. 10 mins. of inactivity.
To manually switch the device into “Off” mode,
press and hold the key for approx. 1 sec. until device beeps.
The display is blank but if device is connected to power supply either by means of the Charging/USB-cable or via the DockIn station, the device will be charging and the display will show the battery indicator.
Starting up the device from “Off” mode will take only a few seconds as the operating system still runs in the background.
Ready mode Display will normally show the measuring screen with the result of the most recent measurement.
Measuring mode Measuring has been started on the key.
While measuring the display will continuously show measurement values and a progress bar at the bottom.
O2
CO27: Ham 200 gr.
Ready
O2
CO27: Ham 200 gr.

P/N 260442-G 11/2015 COPYRIGHT © Dansensor A/S
24 User Guide EN CheckPoint II
Daily Start-UpAt the start of the working day the device will normally be either Shut down or in Off mode.
Starting the device from either of the modes is described in the following:
1. Push the key.2. While initializing, the device will show the “Power up” screen.
If device is started from Off mode it will be ready within a few seconds, otherwise it can take up to 30 secs. as the device needs to restart the operating system.
3. When initialization finishes, the display changes to show the “User selection” screen.
If device is equipped with a barcode scanner, simply scan the appropriate user barcode by pressing
the key, otherwise use and keys to select user then press key to confirm.4. The device changes to show the measuring screen with the most recent selected product and
measurement values.
5. If display says “Ready” (bottom line), the device is ready to begin measuring.
CheckPoint IIO / CO2 2
V.X.XX
7: Ham 200 gr.
1: Walter
3: Bill2: John
Log in
O2
CO27: Ham 200 gr.
Ready

Dansensor A/S COPYRIGHT © P/N 260442-G 11/2015
CheckPoint II EN User Guide 25
Measuring
Getting the best measurement performanceThere are a number of factors to take into consideration when measuring O2 and CO2 gasses.The following guidelines should help you to obtain the best possible measurement accuracy and performance from the CheckPoint II device.
The O2 sensor is based on an electrochemical (EC) construction.
The CO2 sensor (if installed) is of the Non Dispersive Infrared (NDIR) type. As this sensor type has great dependency of especially gas temperature, the CheckPoint II software provides an advanced temperature compensation scheme which are factory calibrated for each device separately.
Both sensors are temperature- and pressure compensated in software. However temperature compensation requires stabilizing internally for some time.
In spite of the above efforts there are still limitations to what can be physically achieved.To get the most out of your device, we strongly recommend that you read these next pages to familiarize yourself with the various conditions, which may have impact on the measurements.
Dynamic Sample Time (DST)The DST function uses a variable measuring time to ensure that all measurements are as accurate as possible. Especially when measuring on packages with very different oxygen contents, it may be necessary to extend the measuring time to ensure that the measurement is correct.
Via the PC software you can choose a nominal measuring time and basically this is the applied measuring time. If CheckPoint II detects a large change in the oxygen concentration, it will automatically extend the measuring time, considering the oxygen sensor’s response time. The extended measuring time can not exceed twice the nominal measurement time.
If the additional measuring time is not acceptable (e.g. due to lack of headspace), the use of DST can be disabled. If DST is disabled, we recommend to extend the measuring time to achieve the same accuracy.
DST is enabled by default but setting can be changed as follows:
• Switch on CheckPoint II and log in if necessary.
• Press key to enter the Main menu.
• Press key twice and then press key.
• Now use keys to change DST setting to required setting (Yes/No) and confirm by pressing
key.
• Press key to return to the measuring screen.
NOTE! Do not disable DST function on the device without consulting an authorised Dansensor Service Point. Disabling DST has great influence on the measuring accuracy!

P/N 260442-G 11/2015 COPYRIGHT © Dansensor A/S
26 User Guide EN CheckPoint II
Explanation of the “Response time (T95)”According to the specifications the O2 sensor has a Response time (T95) of 9 sec.
This means that when performing consecutive measurements in areas with large differences in the O2 concentrations, the device will as a minimum reach 95% of the “true” value during the first measurement (9 sec.).
Example:(See illustration below):
• Last measurement was performed in i.e. 20.9% O2
• The following value to be measured is 1.0% O2
• Difference is:20.9 - 1.0 = 19.9% O2
• The expected read-out value after first measuring is:20.9 - (0.95 * 19.9) = 2.0% O2
Consequently this means that if there is a large difference in the O2 concentrations between two consecutive measurements, multiple measurements must be performed to obtain a more accurate result.
O reading2[%]
time [sec]
T=0
Start value Difference = Start "True" valuevalue
T value = Start value (0.95*Difference)95
T value95"True" value
T=9
(1. measurement) (2. measurement)
T=18
Difference

Dansensor A/S COPYRIGHT © P/N 260442-G 11/2015
CheckPoint II EN User Guide 27
O2 offset calibrationAn electrochemical sensor is to be treated as a wearing part as the chemistry inside wears proportionally to the amount of O2 seen during its lifetime.We therefore recommend that you perform daily offset (20.9%) calibrations before starting measurements.
See "Offset (20.9%) calibration" on page 31 for details.
NOTE! As a minimum weekly offset calibration is required to ensure correct measuring results!
NOTE! If device is mainly used at very high O2 concentrations above 20.9%, the sensor lifetime will be reduced proportionally.
O2 sensor temperature sensitivityDue to the sensor design the readout will be affected when moving the device from cold to warm temperatures or vice versa. Normally for compensation to work properly the device must be stabilized at the current ambient temperature for some time (up to 1-2 hours)
However if you cannot wait for this time, use short stabilizing time, for example 10-15 min., and perform an offset (20.9%) calibration of the O2 sensor right before each measurement series until device has stabilized. This will bring the calibration back in line with current response.
NOTE! When entering another ambient temperature area, the device must again be offset calibrated before use to ensure proper accuracy.
The sensor is also slower in response in cold environments so for better accuracy you should measure the values twice and skip first measurement (though the first measurement will comply with T95). Alternatively select longer measuring periods in the product setup for the particular measurements.
NOTE! Do not select lower measuring times than 6 seconds when configuring products in PC software as this will greatly compromise the accuracy of the device.
CO2 sensor temperature sensitivityThe CO2 measurements however has faster response when changing ambient temperature zones so if you are only interested in measuring the CO2 values, you need not recalibrate O2 offset but can start the CO2 measurements right away.

P/N 260442-G 11/2015 COPYRIGHT © Dansensor A/S
28 User Guide EN CheckPoint II
The Measuring screen
Measurement section This section displays the result of the recent measurement.
Only values selected for display in the product set-up are displayed - see "Product Setup" on page 55 for details.
The arrow symbols ( and ) to the right of the value indicates if measurement lies outside the set alarm limits and whether it is below “Low” alarm setting or above “High” alarm setting.
Selected product Up to 25 different products can be created.See "Product Setup" on page 55 for details about product setup.
Status/messages The bottom line of the display shows the device status, either “Ready” or a progress bar while measuring.It also displays the required user intervention such as “Login”, “Transfer log data” or “Save log data: Yes” etc.
Battery status Shows battery level and charging progress during charging.
Selecting a product for measuring
1. Product is selected from the measuring screen.
If device is equipped with a barcode scanner simply scan the appropriate product barcode by
pressing the key, otherwise press or key to go to the available products list.
O2O2
CO2
CO2
7: Ham 200 gr.7: Ham 200 gr.Ready
2 3 4
BalO2
7: Ham 200 gr.Ready
1
O2
CO27: Ham 200 gr.
Ready

Dansensor A/S COPYRIGHT © P/N 260442-G 11/2015
CheckPoint II EN User Guide 29
2. In the products list...
...use and keys to select product then press key to confirm.3. Now measuring screen shows the product selected for measuring.
Performing a measurement
1. Place a septum on the product/package to be measured/analysed. This ensures leak-free gas extraction and thus accurate measuring.
2. Make sure that the device is in Ready mode - see "Modes" on page 23.3. Select appropriate product - see "Selecting a product for measuring" on page 28.
4. If device setting requires scanning of ID strings (up to 3) the bottom line of the display will show the required information together with a flashing symbol.Scan required barcode(s) until bottom line says “Ready”.
1: Cheese 400 gr.2: Meat 200 gr.3: Sausage4: Filet 300 gr.5: Meat 500 gr.
7: Ham 200 gr.6: Bacon 120 gr.
O2
CO26: Bacon 120 gr.
Ready

P/N 260442-G 11/2015 COPYRIGHT © Dansensor A/S
30 User Guide EN CheckPoint II
5. Penetrate the septum with the needle so that the gas can be sucked in from the package through the tip.
CAUTION! Do not let the needle touch the product, fluid or anything else in the package, as this could soil the needle, hose or filter.If this happens, the needle, hose and filter must be replaced to avoid destroying sensors or other items inside the unit.
6. Press the key to start the measuring.
7. Measuring starts. The display continuously shows measuring values and the progress bar shows the measuring progress.
If necessary press key to abort measuring or key to extend measuring time. 8. When measuring finishes the final measuring result is displayed. If measurement lies outside the set
alarm limits an acoustic signal sounds and an arrow symbol ( or ) is displayed to the right of the value indicating whether it is below “Low” alarm setting or above “High” alarm setting.
9. The measuring data will automatically be saved to the data log unless device is set up to ask for confirmation after each measurement. In this case the bottom line of the display will say “Save log
data: Yes” and you should use and keys to select “Yes” or “No” and then press key to confirm.
10. When finished the needle should be removed from the product package and placed in the needle holder on the side of device.

Dansensor A/S COPYRIGHT © P/N 260442-G 11/2015
CheckPoint II EN User Guide 31
Offset (20.9%) calibrationIt is recommended to perform an offset (20.9%) calibration of the O2 sensor every day before starting measurements. This is to compensate for sensor wear.
NOTE! As a minimum, a weekly offset calibration is required to ensure correct measuring results!
Also when moving the device from cold to warm temperatures or vice versa, you should allow the device to stabilize - see "O2 sensor temperature sensitivity" on page 27 for details.
To make offset (20.9%) calibration do the following:
1. Place needle on the table next to the device to make sure that it measures the surrounding O2 content.
2. From the measuring screen...
...press key to enter the Main menu.
3. Use or key to scroll to the Calibration screen.
4. Press to enter calibration function.
5. Use or key to select O2: 20.95% calibration.
O2
CO27: Ham 200 gr.
Ready
Main menu
Main menu
O :2O :2
CO :2CO :2
20.95%0.00%0.00%
100.00%

P/N 260442-G 11/2015 COPYRIGHT © Dansensor A/S
32 User Guide EN CheckPoint II
6. Press to start calibration.
The pump will start and the display will continuously show the measured O2 content.
7. When measurement has stabilized, press to calibrate sensor to the current conditions.
8. Press key twice to return to the measuring screen.
O : 20.95%2
20.9
Calibrate: Yes

Dansensor A/S COPYRIGHT © P/N 260442-G 11/2015
CheckPoint II EN User Guide 33
Daily Shut-downAt the end of the working day you have various options to shut the device down:
Switch device to “Off” mode Device automatically switches into “Off” mode after approx. 10 mins. of inactivity.
To manually switch the device into “Off” mode, press and hold the key for approx. 1 sec. until device beeps.
Shut down Device automatically shuts down after 8 hours of inactivity.
To shut down the device manually press and hold key for approx. 5 secs. until device has beeped twice.
NOTE! Shutting down is not possible when device is connected to the power supply via the DockIn station.
For a detailed description of the various modes - see "Modes" on page 23.
Battery charging1. Connect the power supply between the DockIn station and the main power outlet .
2. Switch ON the main power outlet .
3. Place the CheckPoint II onto the DockIn station (use a firm push to ensure a proper connection).
When charging, the battery indicator in the lower right corner of the display will show the charging progress.
1
3
2
CheckP
ointII
4

P/N 260442-G 11/2015 COPYRIGHT © Dansensor A/S
34 User Guide EN CheckPoint II

Dansensor A/S COPYRIGHT © P/N 260442-G 11/2015
CheckPoint II EN User Guide 35
5. Cleaning and Maintenance
General
CAUTION! Personnel performing any maintenance or cleaning must familiarize themselves with the “Safety Instructions” before attempting any of these procedures.
CleaningAll of the device’s surfaces must only be cleaned using a mild soap solution and a soft wrung cloth.
CAUTION! Never use hard tools or abrasive materials when cleaning any part of the device.
WARNING! Never use cleaning agents containing any kind of acid.These constitute a health hazard and could damage the instrument.
P/N 260442-G 11/2015 COPYRIGHT © Dansensor A/S
36 User Guide EN CheckPoint II
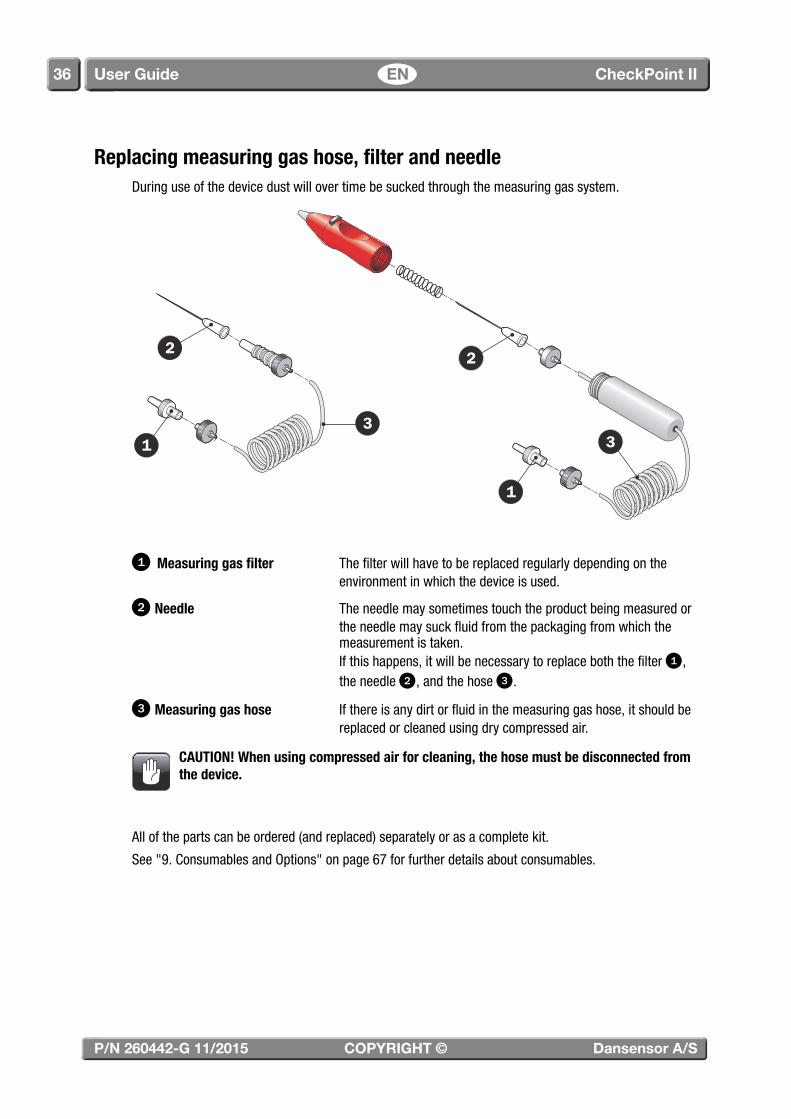
Replacing measuring gas hose, filter and needleDuring use of the device dust will over time be sucked through the measuring gas system.
Measuring gas filter The filter will have to be replaced regularly depending on the environment in which the device is used.
Needle The needle may sometimes touch the product being measured orthe needle may suck fluid from the packaging from which themeasurement is taken.If this happens, it will be necessary to replace both the filter ,the needle , and the hose .
Measuring gas hose If there is any dirt or fluid in the measuring gas hose, it should bereplaced or cleaned using dry compressed air.
CAUTION! When using compressed air for cleaning, the hose must be disconnected from the device.
All of the parts can be ordered (and replaced) separately or as a complete kit.
See "9. Consumables and Options" on page 67 for further details about consumables.
1
2
3
1
2
3

Dansensor A/S COPYRIGHT © P/N 260442-G 11/2015
CheckPoint II EN User Guide 37
6. Errors
If an error occurs during operation or calibration, an error screen appears:
An error is identified by the number (ex. 2801).
Few of the errors may be caused by the user. These are listed below as "User errors".
All other errors are divided into groups and listed as “Device errors” - see page 38.
User errors
No. Error Remedy
502 O2 sensor calibration failed.Calibration result is not stored.The sensor output indicates that a gas far away from 20.9% O2 is supplied, e.g. pure N2 or 80%O2.
• Make sure that the needle sucks only atmospheric air when performing a 20.9%O2 calibration.
• If the error repeats, turn device completely off (remove device from power supply and press I/O for approx. 5 sec).
• If the error occurs again when calibrating, the device must be send in for service.
2801 CO2 sensor calibration failed. The 0.0% CO2 calibration failed. Cali-bration result is not stored. The sensor output indicates that a gas with a concentration above 25% CO2 is supplied.
• Make sure that the needle sucks only the correct gas when performing a 0.0% CO2 calibration.
• If the error repeats, turn device completely off (remove device from power supply and press I/O for approx. 5 sec).
• If it the error occurs again when calibrating, the device must be send in for service.
2802 CO2 sensor calibration failed. The 100.0% CO2 calibration failed. Calibration result is not stored. The sensor output indicates that a gas with a concentration below 50% CO2 supplied.
• Make sure that the needle sucks only the correct gas when performing a 100.0% CO2 calibration.
• If the error repeats, turn device completely off (remove device from power supply and press I/O for approx. 5 sec).
• If it the error occurs again when calibrating, the device must be send in for service.
Error
Number: 2801Press

P/N 260442-G 11/2015 COPYRIGHT © Dansensor A/S
38 User Guide EN CheckPoint II
Device errorsGenerally when an error occurs you should shut down the device (press and hold the key for approx. 5 secs. until device has beeped twice) and then restart it.If this does not fix the error, you should contact a service technician.
No. Error
101 to 199 Product errorAll errors in this range may cause that products are not handled correct.Alarm limits, measuring time, and also the product list displayed in the CPII may be affected.
501 to 599 O2 sensor errorCheck the "User errors" on page 37. Other errors indicate other problems with calibration data for the O2 sensor.These errors may have influence on O2 (and CO2) readings.
601 to 699 Pressure gauge errorThe pressure sensor is used for compensation of O2 sensor reading (and CO2 sensor if installed).These errors may have influence on O2 (and CO2) readings.
701 to 799 Pump errorThe pump sucks gas to the gas sensor(s). If the pump is not running, CPII reading will be faulty.
901 to 999 Internal memory errorMemory used for storing hour counters and the like is not working.These errors have no influence on O2 (and CO2) readings.
1101 to 1199 Keyboard errorThe software which encodes key presses has detected an error. Some or all of the
keys may not work. If key is not working, you must wait until CPII runs out of battery (or the battery may be disconnected to restart CPII).These errors have no influence on O2 (and CO2) readings.
1600 to 1699 Real time clock errorBattery backed Real-time clock is not working. Every log (data collection) is stored with a timestamp. This may be incorrect.When transferring data collections to CPII PC Software, collected data may be inserted into the data base with wrong timestamps, thus corrupting correct historical order of logged data.These errors have no influence on O2 (and CO2) readings.
2001 to 2199 Beep errorBeeper may not work correct.These errors have no influence on O2 (and CO2) readings.
Dansensor A/S COPYRIGHT © P/N 260442-G 11/2015
CheckPoint II EN User Guide 39
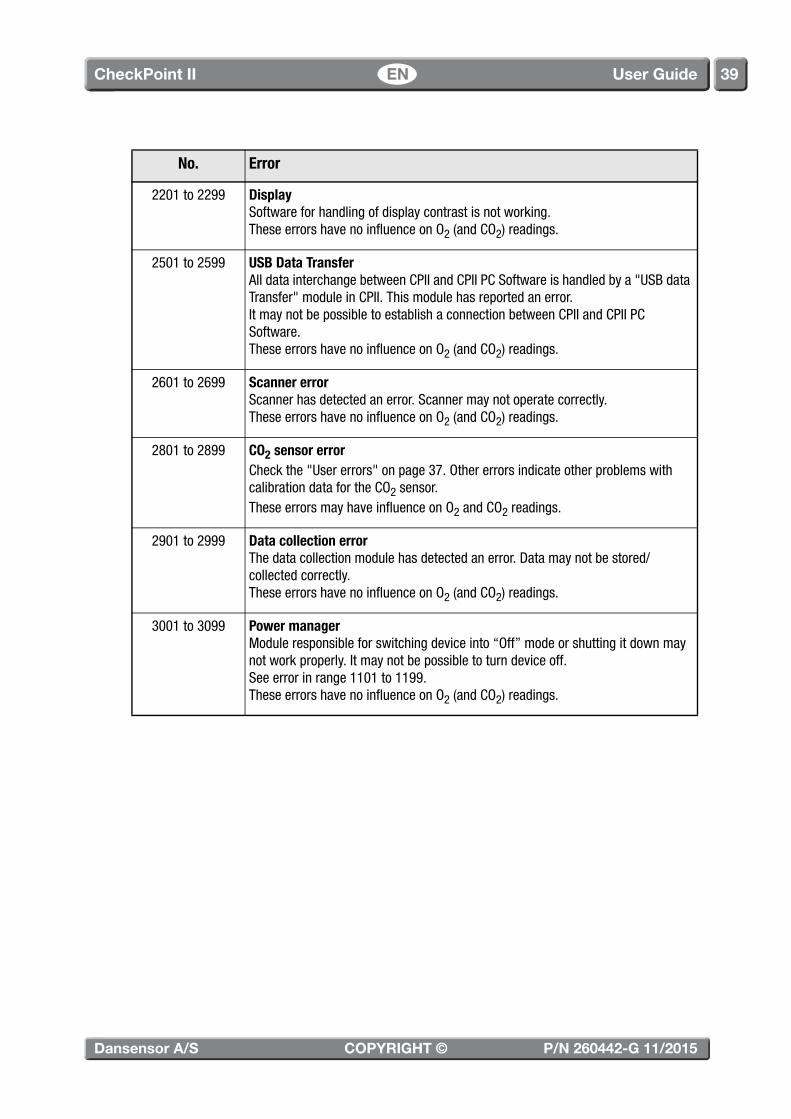
2201 to 2299 DisplaySoftware for handling of display contrast is not working.These errors have no influence on O2 (and CO2) readings.
2501 to 2599 USB Data TransferAll data interchange between CPII and CPII PC Software is handled by a "USB data Transfer" module in CPII. This module has reported an error.It may not be possible to establish a connection between CPII and CPII PC Software.These errors have no influence on O2 (and CO2) readings.
2601 to 2699 Scanner errorScanner has detected an error. Scanner may not operate correctly.These errors have no influence on O2 (and CO2) readings.
2801 to 2899 CO2 sensor errorCheck the "User errors" on page 37. Other errors indicate other problems with calibration data for the CO2 sensor.These errors may have influence on O2 and CO2 readings.
2901 to 2999 Data collection errorThe data collection module has detected an error. Data may not be stored/collected correctly.These errors have no influence on O2 (and CO2) readings.
3001 to 3099 Power managerModule responsible for switching device into “Off” mode or shutting it down may not work properly. It may not be possible to turn device off.See error in range 1101 to 1199.These errors have no influence on O2 (and CO2) readings.
No. Error

P/N 260442-G 11/2015 COPYRIGHT © Dansensor A/S
40 User Guide EN CheckPoint II

Dansensor A/S COPYRIGHT © P/N 260442-G 11/2015
CheckPoint II EN User Guide 41
7. The CheckPoint II PC Software
The setup of products and users and the administration of measuring data is performed from the CheckPoint II PC software.
The following issues are described in this section:
• PC User/Login setup• Device setup• Products setup• Users setup• Management of measurement data• Database maintenance
Starting the applicationTo start the application simply double-click the CheckPoint II PC Software icon on your desktop or select Start -> All Programs -> PBI-Dansensor -> CheckPoint II -> CheckPoint II PC Software.
The application starts and if a CheckPoint II device has been connected the following message will appear:
Click Yes to start synchronization.

P/N 260442-G 11/2015 COPYRIGHT © Dansensor A/S
42 User Guide EN CheckPoint II
When synchronization has completed...
... click Finished.
LoginTo be able to perform any changes to the device settings, product setup or user setup, you must be logged in.The default user must be used the first time at login. The default user has the following login properties:User: administratorPassword: password
To log in click Login in the upper menu bar. In the appearing login window...
...enter the required User and Password and click OK.
As indicated in the application’s lower right corner you are now logged in as administrator.
Now you are able to create one or more new users and set up different user rights if required. See "Data Synchronization" on page 45 for details.

Dansensor A/S COPYRIGHT © P/N 260442-G 11/2015
CheckPoint II EN User Guide 43
Application Overview
FileThe File menu holds the following entries:
Synchronize All Devices... Upload all product and user settings to the connected device(s) and download all measurement data from the devices - see "Data Synchronization" on page 45 for details.
Exit Closes the application.
ToolsThe Tools menu holds the following entries:
Language Select application language.
PC Login Setup... Create PC application users and set up different user rights if required. See "Application User Management" on page 47 for details.
Database Setup... Creating and backing up of databases containing measurement data.See "Database Management" on page 49 for details.
1 2 3 6 8 9 10 114
5
7

P/N 260442-G 11/2015 COPYRIGHT © Dansensor A/S
44 User Guide EN CheckPoint II
HelpThe Help menu holds only the About CheckPoint II PC Software item which displays the currently installed version of the software.
Login/LogoutLog in to the application to be able to perform any changes to the device settings or the product or user setups.
To change user first click Logout and then Login again.
Not logged in/Logged in as...Display of current login status.
Measurements tabManaging of measurement data - see "Measurement data" on page 60 for details.
Product list tabManaging of products - see "Product Setup" on page 55 for details.
User list tabManaging of device users - see "Device User Setup" on page 58 for details.
Device settings tabGeneral settings for connected devices - see "Device list" on page 51 for details.
Device list tabOverview of and information about currently and previously connected devices - see "Device list" on page 51 for details.
Synchronize DeviceSynchronization of the data on the currently selected tab with the connected device(s)See "Data Synchronization" on page 45 for details.

Dansensor A/S COPYRIGHT © P/N 260442-G 11/2015
CheckPoint II EN User Guide 45
Data SynchronizationNormally when starting the application it will automatically detect if a CheckPoint II device is connected and thereby request for synchronization.
Click Yes to start synchronization.
The application will synchronize all data with the connected device.
When synchronization is complete...
...click Finished.

P/N 260442-G 11/2015 COPYRIGHT © Dansensor A/S
46 User Guide EN CheckPoint II
Alternatively you can manually synchronize all data by selecting File -> Synchronize All Devices...
In the appearing window select device required for synchronization.
Click Synchronize.
Clicking Synchronize Device in the upper right corner of a selected tab will synchronize only data from the selected tab.

Dansensor A/S COPYRIGHT © P/N 260442-G 11/2015
CheckPoint II EN User Guide 47
Application User ManagementSeveral users with various levels of access rights can be created.The default user must be used the first time at login - see "Login" on page 42 for details.
Create UserTo create a new user and set up the respective user rights do the following:
1. Select Tools -> PC Login setup...This will open the PC Users Setup window.
2. Click New to create a new user and the PC login setup window appears.
Select new user’s access rights by marking the respective check boxes in the User rights section.Enter required user information in the User properties section and finally click OK to create user.
P/N 260442-G 11/2015 COPYRIGHT © Dansensor A/S
48 User Guide EN CheckPoint II
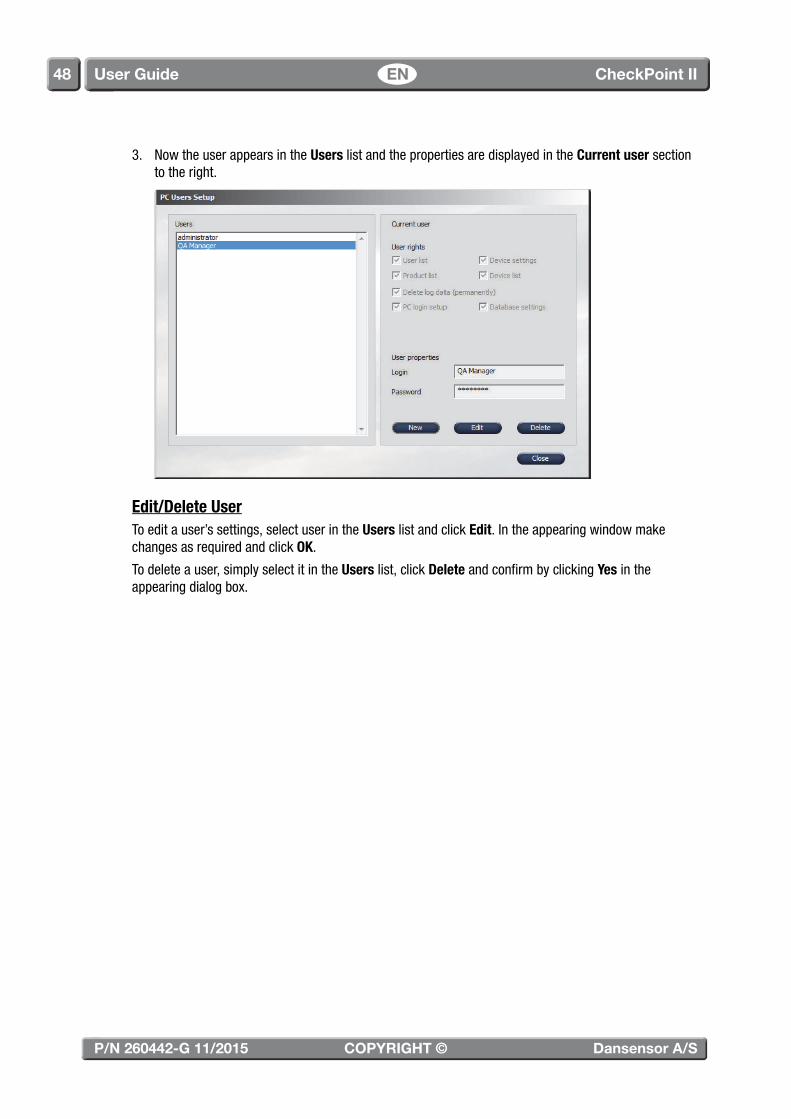
3. Now the user appears in the Users list and the properties are displayed in the Current user section to the right.
Edit/Delete UserTo edit a user’s settings, select user in the Users list and click Edit. In the appearing window make changes as required and click OK.
To delete a user, simply select it in the Users list, click Delete and confirm by clicking Yes in the appearing dialog box.

Dansensor A/S COPYRIGHT © P/N 260442-G 11/2015
CheckPoint II EN User Guide 49
Database ManagementThe normal installation of the CheckPoint II PC software also creates databases used for the program.Data is separated into two databases, one containing all the program setup data, products and user information and another containing the measurement data captured from the CheckPoint II.
Backup of measurement databaseThe PC software has a built-in support for creating backup of the measurement database:
1. Select Tools -> Database setup... This will bring up the below pop-up screen.
2. Click Backup. This brings up a window where you can choose the location of the backup file.
The default path is in the Backups folder in the CheckPoint II program installation folder. The default file name is BACKUP_meas_db_XXXXXXXX.mdb where the last 8 digits are the current date. You are free to choose another location and file name.Click Save to save backup file.

P/N 260442-G 11/2015 COPYRIGHT © Dansensor A/S
50 User Guide EN CheckPoint II
3. Click OK in the Backup complete window and Close to quit and close the Database Settings window.
Restoring the database
CAUTION! If you are not familiar with file copying and renaming you should ask your local IT support function to help with this as wrong operation may lead to data loss.
To restore the database do the following:
1. Close application (if application is running, the current database is locked and cannot be replaced).2. Now use the Windows Explorer to browse to the database folder in the CheckPoint II program
installation folder.
Carefully delete or rename ONLY the existing database file named CPII_meas_db.mdb.3. Now from your Backups folder (see "Backup of measurement database" on page 49 for details)
copy the database backup file to be restored into the database folder and rename it to the exact same file name: CPII_meas_db.mdb.
4. When restarting the application the measurement data from the restored file will now appear in the Measurements tab.

Dansensor A/S COPYRIGHT © P/N 260442-G 11/2015
CheckPoint II EN User Guide 51
Device listThe Device list shows an overview of devices which is or previously have been connected to the application.
The device window holds data for each device such as device info, setup, diagnostics, and calibration information.
The currently connected device can be recognized as the one with a date and time indication in the Setup section.
Edit deviceThe device setup can be edited by clicking the Edit button below the device.
In the appearing window you can make changes to the device setup.

P/N 260442-G 11/2015 COPYRIGHT © Dansensor A/S
52 User Guide EN CheckPoint II
Please observe the following when making changes to the device setup:
• Changing the device name will change the device’s name throughout the application except for the device indications for the measurements on the Measurements tab.
• When changing the device’s display language, you must first synchronize with device and then turn device off and then on again before language has been changed on device.
Removing DeviceTo remove device from list click Remove button below the device you wish to remove.
In the appearing Remove device dialog click OK to confirm.
The device will be removed from the various tabs throughout the application but measurements performed using the device are maintained on the Measurements tab.

Dansensor A/S COPYRIGHT © P/N 260442-G 11/2015
CheckPoint II EN User Guide 53
Device SettingsThe CheckPoint II device has been designed to be as simple as possible for the user with a limited number of operator menus. This is why the general device settings are performed from the PC software.
The Device settings tab holds the following device settings:
NOTE! When making changes in the settings, make sure to press “Synchronize Device” in the upper right corner when finished to commit changes to selected device.
• User has to log on (for identification) to use CPIISelect whether user must log in or if the device is ready for use instantly.Turn device OFF (Idle) then ON to get list of users after setting this flag!- Function enabled: Select user from user list or scan user barcode ID.- Function disabled: Device is ready for use instantly.
• User has to scan “User ID” to log onSelect whether login (if selected) requires scanning of a barcode ID or if login can be done simply by selecting user from the users list.- Function enabled: User MUST use an existing barcode ID to login.- Function disabled: User can login using a barcode ID or by selecting a user from the users list.

P/N 260442-G 11/2015 COPYRIGHT © Dansensor A/S
54 User Guide EN CheckPoint II
• Log measurementsSelect whether or not measurement data should be saved to the device’s memory.- Function enabled: Measurement data is saved to the device’s memory.- Function Disabled: Measurement data is not saved.
• Do not ask user to log individual measurementsSelect whether or not user should be asked to save measurements.- Function enabled: Each measurement is saved.- Function disabled: After each measurement user is asked if measurement should be saved
(Yes/No).• Stop for further measuring if the log is full
Select whether or not device should be able to perform measurements even though log memory is full.- Function enabled: Log memory must be emptied before another measurement can be
performed.- Function disabled: Measurements can be performed but no data is saved to the log memory.
• User must scan ID1...ID3 before measuringSelect whether or not user must scan ID strings 1 - 3 before each measurement. The ID strings prompt text is setup in separate fields.- Function enabled: User must scan ID X before measurement can start.- Function disabled: ID strings are not used.
• ID1...ID3These fields hold the text shown by the device if it has been setup to ask before each measurement.
NOTE! We recommend to use as few characters as possible as there is only one line available on the device display.
NOTE! The ID1...ID3 settings is valid for the device and thereby for all products.
Using Master listAll device settings can be set for each device individually or if you want settings to be the same for all devices you can choose to make required settings in the Master list only and then check the Use master list check box for each device.Now all changes to the settings in the Master list will automatically be assigned to all devices.

Dansensor A/S COPYRIGHT © P/N 260442-G 11/2015
CheckPoint II EN User Guide 55
Product SetupProduct setup is performed on the Product list tab. The product database on the PC can hold up to 250 different products and up to 100 different products can be assigned to each device.
NOTE! Only 25 products can be assigned to devices with firmware V.1.10 or earlier.
NOTE! When making changes in the product settings, make sure to press “Synchronize Device” in the upper right corner when finished to apply changes to selected device(s).
Using Master listAll products can be assigned for each device individually, but if you want to assign the same products to all devices, you can assign these products to the Master list only and then check the Use master list check box for each device.Now all changes made to the Master list will automatically apply to all devices.

P/N 260442-G 11/2015 COPYRIGHT © Dansensor A/S
56 User Guide EN CheckPoint II
Create/Edit ProductFrom the start 25 default products (Product_1....Product_25) have been created.To create a new product you can either edit one of the default products or you can create a new.
To create or edit a product do the following:
• Select product you want to edit in the list and click Edit or click New to create a new product.The Product setup window appears.
• Now name the product and assign it with a barcode ID - please note that all barcode ID’s must be unique. On devices with a built-in barcode scanner it is possible to transfer the product’s barcode ID to the application by clicking Scan while holding the product in front of the scanner. For associated products you can also use the Wildcard function - see "Wildcard function" on page 57 for details.
• In the bottom of the window select which gasses you want to measure and the measuring time, then specify the high and low alarm limits for each gas in the Alarm values section.
• When finished click OK to save product.
Delete ProductTo delete a product, first make sure that the product has been removed from the device otherwise the product will be downloaded from the device when synchronizing:
1. Remove check mark for the product for all devices.2. Synchronize devices to update product list on the devices.3. Select product in Product list, click Delete and confirm by clicking Yes in the appearing dialog box.

Dansensor A/S COPYRIGHT © P/N 260442-G 11/2015
CheckPoint II EN User Guide 57
Wildcard functionThe function can be used for products having the same product measuring setups and only differ in weight for example. If they use the same barcode they can of course select the same product setup for measuring, however if the barcodes are different only on some digits indicating f.ex. the weight, the Wildcard function applies.
In the Product setup window mark the part of the product’s barcode which differs from one package size to another (indicating f.ex. the weight).
Click Wildcard to replace the marked digits with asterisks (*).
Now when scanning a product with 7003546 as the first digits, the application will select the same product disregarding the last four digits (being the weight indication).
NOTE! Barcodes must be of same length for products using the Wildcard function, otherwise they will be treated as separate products.
B rcode IDa :
7003 546 0250
B rcode IDa :
17003 546 0 25
Ham 250 gr. Ham 125 gr.

P/N 260442-G 11/2015 COPYRIGHT © Dansensor A/S
58 User Guide EN CheckPoint II
Device User SetupDevice users are managed on the User list tab. Up to 250 different users can be created.
NOTE! When making changes in the user settings, make sure to press “Synchronize Device” in the upper right corner when finished to apply changes to selected device(s).
Using Master listAll users can be assigned to each device individually, but if you want to assign the same users to all devices, you can assign these users to the Master list only and then check the Use master list check box for each device.Now all changes made to the Master list will automatically apply to all devices.

Dansensor A/S COPYRIGHT © P/N 260442-G 11/2015
CheckPoint II EN User Guide 59
Create/Edit UserFrom the start 25 default users (User_1....User_25) have been created.To create a new user you can either edit one of the default users or you can create a new.
To create or edit a user do the following:
• Select the user you want to edit in the list and click Edit or click New to create a new user.The User setup window appears.
• Now name the user and assign it with a barcode ID - please note that all barcode ID’s must be unique. On devices with a built-in barcode scanner it is possible to transfer the user’s barcode ID to the application by clicking Scan while holding the barcode in front of the scanner.
• When finished click OK to save user.
Delete UserTo delete a user simply select it in the User list, click Delete and confirm by clicking Yes in the appearing dialog box.
Click Synchronize Device in the upper right corner to update user list on device.
P/N 260442-G 11/2015 COPYRIGHT © Dansensor A/S
60 User Guide EN CheckPoint II
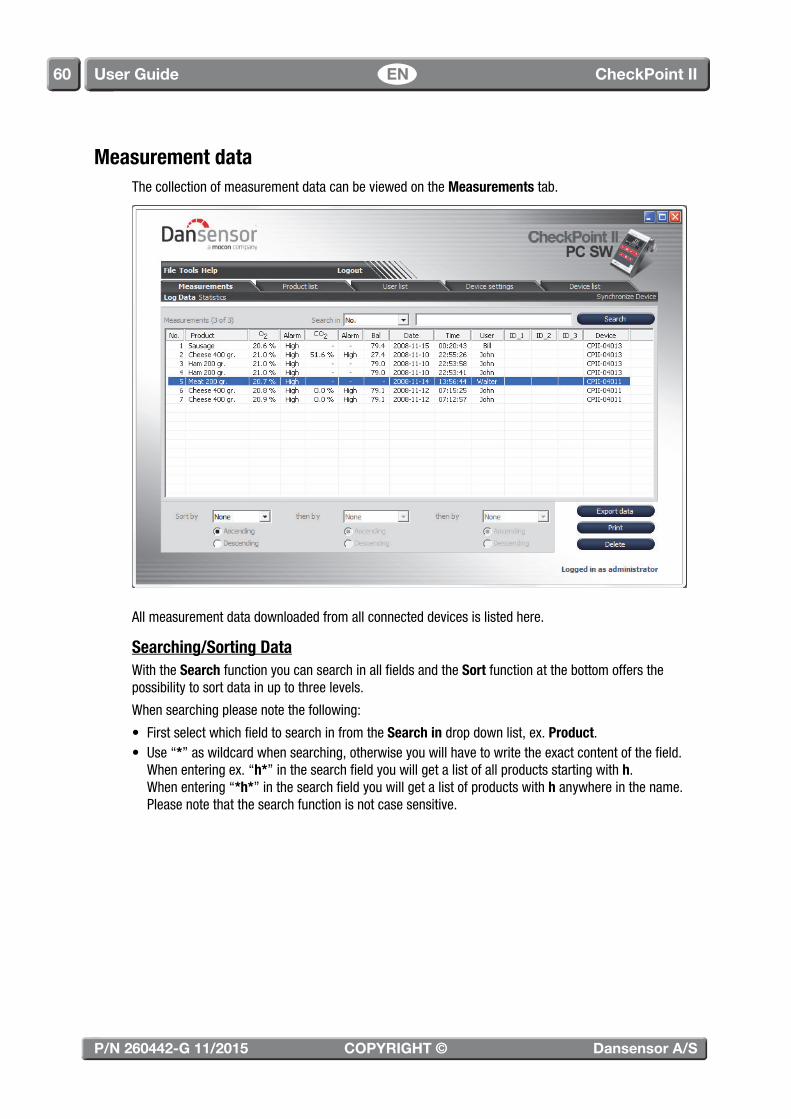
Measurement dataThe collection of measurement data can be viewed on the Measurements tab.
All measurement data downloaded from all connected devices is listed here.
Searching/Sorting DataWith the Search function you can search in all fields and the Sort function at the bottom offers the possibility to sort data in up to three levels.
When searching please note the following:
• First select which field to search in from the Search in drop down list, ex. Product.• Use “*” as wildcard when searching, otherwise you will have to write the exact content of the field.
When entering ex. “h*” in the search field you will get a list of all products starting with h.When entering “*h*” in the search field you will get a list of products with h anywhere in the name.Please note that the search function is not case sensitive.

Dansensor A/S COPYRIGHT © P/N 260442-G 11/2015
CheckPoint II EN User Guide 61
Exporting DataYou can export selected data to either a comma separated file (CSV) or to a MS Access database to present data in other applications.
To export data do the following:
1. Select data to be exported from the list and click Export data.2. The Export log data dialog window appears.
3. Choose target folder by clicking the ... button to the right of the Save in field.4. Name the file in the File name field.5. Select export format in the Save as type drop-down list.6. Click Save.
Printing DataTo print data do the following:
1. Select data to be printed from the list.
2. Click Print.

P/N 260442-G 11/2015 COPYRIGHT © Dansensor A/S
62 User Guide EN CheckPoint II
3. The Print Preview window appears.
4. Make required page setup settings and click Print to open a standard print dialog window for selecting of printer etc.
StatisticsSelecting Statistics at the top of the Measurements tab displays a statistical overview of the selected data such as minimum and maximum measured values, number of alarms etc.
The data can be printed by clicking Print - see "Printing Data" on page 61 for printing details.

Dansensor A/S COPYRIGHT © P/N 260442-G 11/2015
CheckPoint II EN User Guide 63
8. Technical Specifications
Electrical specifications
Power supply External (IP: Not classified)
Supply voltage 100 - 240 VAC, 50 - 60 Hz
Power consumption Max. 20 W
Battery Type: Lithium-Ion (LiOn)7.2V/2200 mA
Expected life 1: Approx. 1½ yearMeasurements per recharge: Approx. 2000Recharge cycle: Approx. 1.5 hours
1 At 10 hours daily use
Connectivity
USB Connection: USB 2.0 Connector type AMax current: 100mA
Functions: Data transfer between device and PCsoftware
Mechanical specifications
Dimensions Unpacked: 65 x 130 x 160 mm (H x W x D)Packed: 295 x 135 x 355 mm (H x W x D)
Weight Unpacked: Approx. 1 kgPacked: Approx. 2.1 kg
IP Class IP53
Ambient conditions Operation: 0 to 40 °C, < 85% RH, non condensingStorage: - 20 to 45 °C, < 85% RH, non condensing

P/N 260442-G 11/2015 COPYRIGHT © Dansensor A/S
64 User Guide EN CheckPoint II
Sensors
O2 Sensor
Sensor type Electrochemical fuel cell type
Range 0 - 100%
Resolution 0.1% absolute
Accuracy ±(0.25% absolute + 2% relative)
Response time (T95) 9 seconds
Service calibration interval 6 monthsRequires 20.9% offset calibration daily or weekly minimum!
Expected sensor lifetime Typically 9 months at O2 levels up to 20.9%, de-rating applies whenused at higher concentrations!
CO2 Sensor
Sensor type Non Dispersive Infra Red (NDIR), temperature compensated
Range 0-100%
Resolution 0.1% absolute
Accuracy ±2.0% absolute in range 0 to 20%±3.0% absolute in range 20 to 100%
Response time (T95) 6 seconds
Service calibration interval 12 months
Expected sensor lifetime > 5 years
Sampling
Flow 48 - 64 ml/min
Sample pressure range Atmospheric pressure +0 mbar, -250 mbarFlow will be lower than 48 ml/min when sample pressure islower than atmospheric pressure
Standard measuring time 6 seconds
Typical sample volume1 6 cc
Sample humidity <95% RH non condensing
1Manual spot, Flow = 56 ml/min

Dansensor A/S COPYRIGHT © P/N 260442-G 11/2015
CheckPoint II EN User Guide 65
User Interface
Display type 3.1“ monochrome display (128x64 pixels) with back light
Functions Multi language text and iconsSupported languages: EN, DE, FR, ES, IT, DAMembrane keys on front for easy menu navigation
Products
No. of products Up to 250 in PC database selectable from PC softwareFirmware V.1.10 or older: Up to 25 products can be
assigned to the deviceFirmware V.2.00 or newer: Up to 100 products can be
assigned to the device
Product settings Name up to 20 charactersBarcode up to 30 characters lengthUp to 2 programmable alarms: high and low level for eachgas
Data logging
Type Product individual
Capacity Max. 99 logs per product
Barcode Scanner (Option)
Decode range 60 - 200 mm
Pitch and screw angle Max. 45°
Roll angle Max. 20°
Readable barcode types UPC-A, UPC-E, EAN 8, EAN 13, EAN 128, Code 39, Code 128

P/N 260442-G 11/2015 COPYRIGHT © Dansensor A/S
66 User Guide EN CheckPoint II
DockIn
Electrical specifications
Power supply External (IP: Not classified)
Supply voltage 100 - 240 VAC, 50 - 60 Hz
Power consumption Max. 48 W (when charging)
Connectivity
USB Connection: USB 2.0 Connector type AMax current: 100mA
Functions: Data transfer between device and PCsoftware
Mechanical specifications
Dimensions Unpacked: 75 x 130 x 130 mm (H x W x D)Packed: 270 x 320 x 240 mm (H x W x D)
Weight Unpacked: Approx. 1 kgPacked: Approx. 1.7 kg
IP Class IP53
Ambient conditions Operation: 0 to 40 °C, < 95% RH, non condensingStorage: - 20 to 60 °C, < 95% RH, non condensing
Options• SmartPen
Conformity• CE• WEEE• RoHS• China RoHS

Dansensor A/S COPYRIGHT © P/N 260442-G 11/2015
CheckPoint II EN User Guide 67
9. Consumables and Options
Important!When ordering consumables you should be aware that the device can have a 0.2μ or a 0.45μ flow system.
Devices with the 0.2μ flow system can be recognized by the red in- and outlet fittings and devices with the 0.45μ flow system can be recognized by the black in- and outlet fittings .
Make sure that you order the appropriate parts for your specific device.
Ordering itemsWhen ordering any of the below listed items please state carefully the item number, the item specification and the number of items wanted and send the order to your spare parts dealer.
Consumables• Needle kit Ø0,8mm (10 pcs.) Ser. Cpl.. . . . . . . . . . . . . . . . . . . . . . . . . . . . . . . . . . . . . . P/N 220078• Septum, ø15mm (10,000 pcs.) Ser. Cpl. . . . . . . . . . . . . . . . . . . . . . . . . . . . . . . . . . . . . P/N 220157• Septum, ø15mm white/hard (100 pcs) Ser. Cpl. . . . . . . . . . . . . . . . . . . . . . . . . . . . . . . P/N 220235• Septum, ø15mm white/hard (1,000 pcs) Ser. Cpl. . . . . . . . . . . . . . . . . . . . . . . . . . . . . . P/N 220236• Kit, filter water trap 0.45μ (10 pcs) Ser. Cpl. . . . . . . . . . . . . . . . . . . . . . . . . . . . . . . . . . P/N 251395• Kit, filter water trap 0.2μ (10 pcs) Ser. Cpl. . . . . . . . . . . . . . . . . . . . . . . . . . . . . . . . . . . P/N 280206• Needle kit Ø0,8mm (100 pcs.) ser. cpl . . . . . . . . . . . . . . . . . . . . . . . . . . . . . . . . . . . . . P/N 280204• Kit, filter water trap 0.45μ (100 pcs) Ser. Cpl. . . . . . . . . . . . . . . . . . . . . . . . . . . . . . . . . P/N 280208• Kit, filter water trap 0.2μ (100 pcs) Ser. Cpl. . . . . . . . . . . . . . . . . . . . . . . . . . . . . . . . . . P/N 280207• Kit, standard consumable (0.45μ), CPII . . . . . . . . . . . . . . . . . . . . . . . . . . . . . . . . . . . . . P/N 280243
- Needle kit Ø0,8mm (10 pcs.) Ser. Cpl. . . . . . . . . . . . . . . . . . . . . . . . . . . . . . . . . . . . . P/N 220078- Kit, filter water trap 0.45μ (10 pcs) Ser. Cpl. . . . . . . . . . . . . . . . . . . . . . . . . . . . . . . . . P/N 251395- Sampling kit spot check, 0.45μ . . . . . . . . . . . . . . . . . . . . . . . . . . . . . . . . . . . . . . . . . P/N 260450- Septum, ø15mm (1,000 pcs.) Ser. Cpl. . . . . . . . . . . . . . . . . . . . . . . . . . . . . . . . . . . . . P/N 940301
• Kit, standard consumable (0.2μ), CPII . . . . . . . . . . . . . . . . . . . . . . . . . . . . . . . . . . . . . . P/N 301316- Needle kit Ø0,8mm (10 pcs.) Ser. Cpl. . . . . . . . . . . . . . . . . . . . . . . . . . . . . . . . . . . . . P/N 220078- Kit, filter water trap 0.2μ (10 pcs) Ser. Cpl. . . . . . . . . . . . . . . . . . . . . . . . . . . . . . . . . . P/N 280206- Sampling kit spot check, 0.2μ (3 pcs.) . . . . . . . . . . . . . . . . . . . . . . . . . . . . . . . . . . . . P/N 301323- Septum, ø15mm (1,000 pcs.) Ser. Cpl. . . . . . . . . . . . . . . . . . . . . . . . . . . . . . . . . . . . . P/N 940301
• Septum, ø15mm (100 pcs.) Ser. Cpl.. . . . . . . . . . . . . . . . . . . . . . . . . . . . . . . . . . . . . . . P/N 940296• Septum, ø15mm (1,000 pcs.) Ser. Cpl. . . . . . . . . . . . . . . . . . . . . . . . . . . . . . . . . . . . . . P/N 940301
Options• Option, Sample kit, SmartPen 0,45μ, CP II. . . . . . . . . . . . . . . . . . . . . . . . . . . . . . . . . . . P/N 260486• Option, Sample kit, SmartPen 0,2μ, CP II. . . . . . . . . . . . . . . . . . . . . . . . . . . . . . . . . . . . P/N 300792
1

P/N 260442-G 11/2015 COPYRIGHT © Dansensor A/S
68 User Guide EN CheckPoint II

Dansensor A/S COPYRIGHT © P/N 260442-G 11/2015
CheckPoint II EN User Guide 69
Appendix
Software End User License Agreement (EULA)
End-user License Agreement for “CheckPoint II PC Software”
IMPORTANT! Please read the terms and conditions of this license agreement carefully before installing the software.
This End-User License Agreement (EULA) is a legal agreement between you (either an individual or a single entity) and Dansensor A/S for the Dansensor A/S software product(s) identified above which may include associated software components, media, printed materials, and "online" or electronic documentation.By installing, copying, or otherwise using the “CheckPoint II PC Software”, you agree to be bound by the terms of this EULA. This license agreement represents the entire agreement concerning the program between you and Dansensor A/S, (referred to as "licenser"), and it supersedes any prior proposal, representation, or understanding between the parties.If you do not agree to the terms of this EULA, do not install or use the "CheckPoint II PC Software".
The "CheckPoint II PC Software" is protected by copyright laws and international copyright treaties, as well as other intellectual property laws and treaties.
1. GRANT OF LICENSEThe "CheckPoint II PC Software" is licensed as follows:
(a) Installation and UseDansensor A/S grants you the right to install and use any number of copies of the "CheckPoint II PC Software" on your computers running a validly licensed copy of the operating system for which the "CheckPoint II PC Software" was designed (e.g. Windows XP or Windows Vista).
(b) Backup CopiesYou may also make copies of the "CheckPoint II PC Software" as may be necessary for backup and archival purposes.
2. DESCRIPTION OF OTHER RIGHTS AND LIMITATIONS(a) Maintenance of Copyright NoticesYou must not remove or alter any copyright notices on any copy of the "CheckPoint II PC Software".
(b) DistributionYou may not distribute registered copies of the "CheckPoint II PC Software" to third parties.
(c) Prohibition on Reverse Engineering, Decompilation, and DisassemblyYou may not reverse engineer, decompile, or disassemble the "CheckPoint II PC Software", except and only to the extent that such activity is expressly permitted by applicable law notwithstanding this limitation.

P/N 260442-G 11/2015 COPYRIGHT © Dansensor A/S
70 User Guide EN CheckPoint II
(d) RentalYou may not rent, lease, or lend the "CheckPoint II PC Software".
(e) Support ServicesDansensor A/S may provide you with support services related to the "CheckPoint II PC Software" ("Support Services"). Any supplemental software code provided to you as part of the Support Services shall be considered part of the "CheckPoint II PC Software" and subject to the terms and conditions of this EULA.
(f) Compliance with Applicable LawsYou must comply with all applicable laws regarding use of the "CheckPoint II PC Software".
3. TERMINATION Without prejudice to any other rights, Dansensor A/S may terminate this EULA if you fail to comply with the terms and conditions of this EULA. In such event, you must destroy all copies of the "CheckPoint II PC Software" in your possession.
4. COPYRIGHTAll title, including but not limited to copyrights, in and to the "CheckPoint II PC Software" and any copies thereof are owned by Dansensor A/S or its suppliers. All title and intellectual property rights in and to the content which may be accessed through use of the "CheckPoint II PC Software" is the property of the respective content owner and may be protected by applicable copyright or other intellectual property laws and treaties.This EULA grants you no rights to use such content. All rights not expressly granted are reserved by Dansensor A/S.
5. NO WARRANTIESDansensor A/S expressly disclaims any warranty for the "CheckPoint II PC Software". The "CheckPoint II PC Software" is provided "As Is" without any express or implied warranty of any kind, including but not limited to any warranties of merchantability, non infringement, or fitness of a particular purpose. Dansensor A/S does not warrant or assume responsibility for the accuracy or completeness of any information, text, graphics, links or other items contained within the "CheckPoint II PC Software". Dansensor A/S makes no warranties respecting any harm that may be caused by the transmission of a computer virus, worm, time bomb, logic bomb, or other such computer program. Dansensor A/S further expressly disclaims any warranty or representation to Authorized Users or to any third party.
6. LIMITATION OF LIABILITYIn no event shall Dansensor A/S be liable for any damages (including, without limitation, lost profits, business interruption, or lost information) rising out of Authorized Users' use of or inability to use the "CheckPoint II PC Software", even if Dansensor A/S has been advised of the possibility of such damages. In no event will Dansensor A/S be liable for loss of data or for indirect, special, incidental, consequential (including lost profit), or other damages based in contract, tort or otherwise. Dansensor A/S shall have no liability with respect to the content of the "CheckPoint II PC Software" or any part thereof, including but not limited to errors or omissions contained therein, libel, infringements of rights of publicity, privacy, trademark rights, business interruption, personal injury, loss of privacy, moral rights or the disclosure of confidential information.

Dansensor A/S COPYRIGHT © P/N 260442-G 11/2015
CheckPoint II EN User Guide 71
Toxic and Hazardous Substances or Elements(For China RoHS compliance)
See table on the next page.

P/N 260442-G 11/2015 COPYRIGHT © Dansensor A/S
72 User Guide EN CheckPoint II
Com
pone
nt N
ame
Lead
(Pb)
Mer
cury
(Hg)
Cadm
ium
(Cd)
Hexa
vale
ntCh
rom
ium
(Cr6
+)
Poly
brom
inat
edBi
phen
yls
(PBB
)
Poly
brom
inat
edDi
phen
yls
Ethe
rs
(PBD
E)M
etal
enc
losu
re w
ith k
eypa
dO
OO
OO
OPr
inte
d ci
rcui
t boa
rd a
ssem
bly (
Mai
n PC
B)O
OO
OO
ODi
spla
yO
OO
OO
OSe
nsor
Ele
ctro
chem
ical
O2
OO
OO
OO
Barc
ode
scan
ner
OO
OO
OO
Pum
pO
OO
OO
OLi
thiu
m b
atte
ryO
OO
OO
OPo
wer S
uppl
y Uni
t (PS
U) W
all a
dapt
erO
OO
OO
OIn
tern
al c
able
sO
OO
OO
OEx
tern
al in
terc
onne
ct c
able
OO
OO
OO
Mou
ntin
g ha
rdwa
re (s
crew
s, s
tuds
)O
OO
OO
O
Chec
kPoi
nt II
Toxi
c or
Haz
ardo
us S
ubst
ance
s or
Ele
men
ts
O: In
dica
tes
that
the
toxi
c su
bsta
nce
cont
aine
d in
all
the
hom
ogen
ous
mat
eria
ls fo
r thi
s co
mpo
nent
is b
elow
the
limit
requ
irem
ents
in S
J/T1
1363
-200
6
S
J/T1
1363
-200
6
X: In
dica
tes
that
the
toxi
c su
bsta
nce
cont
aine
d in
at l
east
one
of t
he h
omog
enou
s m
ater
ials
for t
his
com
pone
nt e
xcee
ds th
e lim
it re
quirm
ents
in S
J/T1
1363
-200
6
S
J/T1
1363
-200
6