Embed Size (px)
Citation preview
David Lemming - Children’s Library Asst.
Parkersburg & Wood Co. Public Library
3100 Emerson Ave
Parkersburg, WV 26104
Cheap & Easy Crafts for Everyone
Phone: 304-420-4587 ext. 504
Fax: 304-420-4589
Email: [email protected]
Work Blog: parkwoodlibyrr.blogspot.com
Cheap
& Easy
Crafts
For Everyo
ne
Presented By
David Lemming Children’s Library Asst.-Parkersburg & Wood Co. Public Library
Page 2
When working with children’s or young adult programming,
there is always that opportunity that crafts can be used to give
them something to take home, develop skills, or just to have
fun with. One big problem is that so many times crafts can
seem like an expensive option when designing a program,
such as during SRP. Many of you have spent a big hunk of
your programming budget on crafts from catalogs and then
wondered “why?”
I wanted to come up with some things that would use items
already in most library children’s departments (such as
crayons, markers, paint, glue, etc.) or would be very
inexpensive to buy. For example there are lots of crafts that
use toilet paper or paper towel tubes, paper plates, and more. I
also wanted to find some things that could be used for
different themes or holidays and not be just a one time deal.
I love to use Pintrest to find ideas for crafts among other
things and there are some really great boards out there devoted
to library crafts (general, children’s, and YA), kids crafts, and
crafts in general that it can take forever to go through them all.
But I searched through quite a number of boards as well as
used some ideas that I have already done in my job. On every
page I have included the picture and website for where I got
the idea if it is not one I have used before and included a
picture of my attempt at the craft as well.
I hope that these ideas help you in your programming and that
you can get some ideas from them that inspire other crafts.
David Lemming
Page 31
Th
is bo
ok
let can b
e fou
nd
on
Scib
d:
http
://ww
w.scrib
d.co
m/d
oc/1
74
132
81
8/C
heap
-Easy
-Crafts-fo
r-Ev
eryo
ne
Page 30
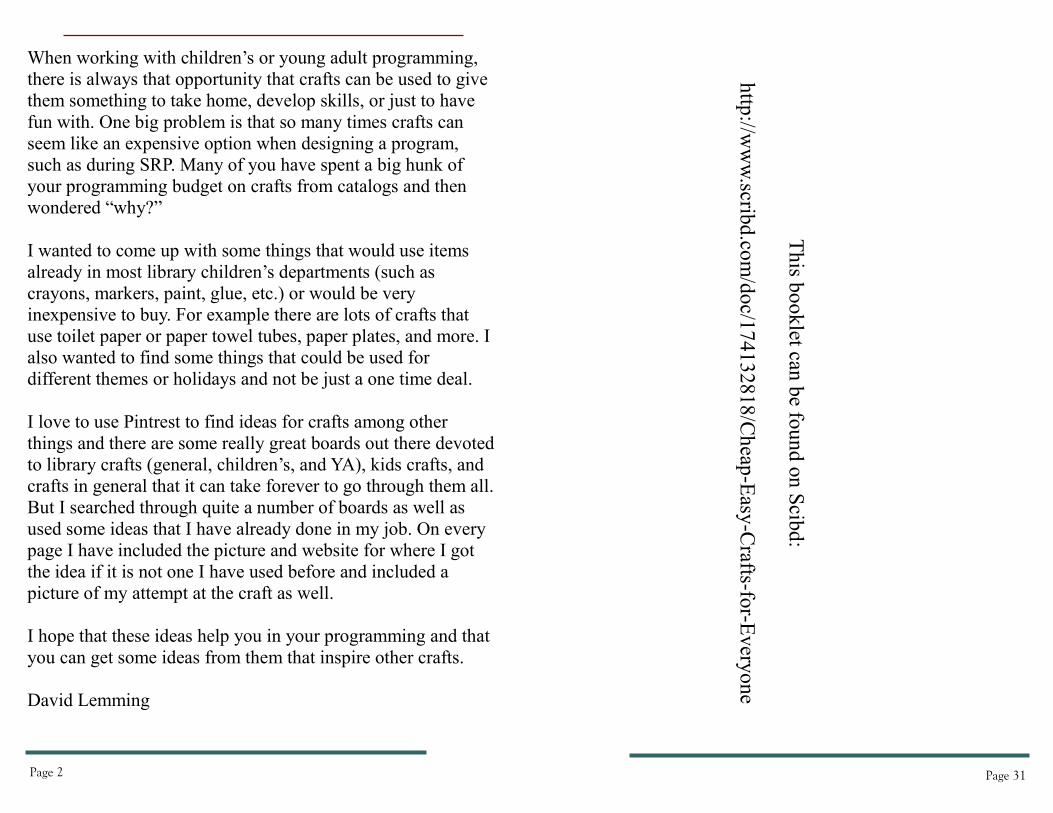
Toilet Paper Tube Flowers
Supplies
1. Toilet Paper Tubes
2. Scissors
3. Glue
4. Paper clips
1. Cut tubes into about 1/2” strips by squeezing
them and then cutting across the tube. DO
NOT cut tube lengthwise it needs to make
circles when done.
2. Pinch opposing sides of each circle to make
more of a leaf shape.
3. Glue ends together to form a flower shape
4. You can combine multiple flowers into
artwork, picture frames, and more
Cheap & Easy Crafts for Everyone
Page 3
Table of Contents
Paper Plate Hats 4
Sharpie Tie-Dye Shirts 5
Easy Stained Glass 6
Shadow Puppets 7
Eye Spy Jars 8
Rainbow Rice 9
Christmas Tree Garland 10
Toilet Paper Tube Monster 11
Toilet Paper Tube Race Cars 12
Paper Plate Dinosaurs + Patterns 13-16
Paper Plate Fish 17
Rock Monster Magnets 18
Paper Bag Houses 19
Snow Globe Postcards 20
Spring/Mother’s Day Craft 21
Toilet Paper Tube Painting 22
Toilet Paper Tube Bird Feeder 23
Jelly Fish 24
Craft Stick Bookworms 25
Paper Plate Dream Catcher 26
Heart Shaped Origami Bookmark 27-28
Toilet Paper Tube Flowers 29

Page 4
Paper Plate Hats These are easy to make and as you can see can be adapted to almost any
holiday or theme that you want. Kids can color them, paint them, or
decorate them with stickers and other materials. Very simple and quick
project that can be used for ages 2-11. Younger kids will need the plates
cut ahead of time, older kids can cut and/or design their own.
Images from: http://www.duitang.com/people/mblog/75898644/detail/
Page 29
13
14
15
16
17
Page 28
5 6
7 8
9 10
12
Continued on next page!
11
Page 5
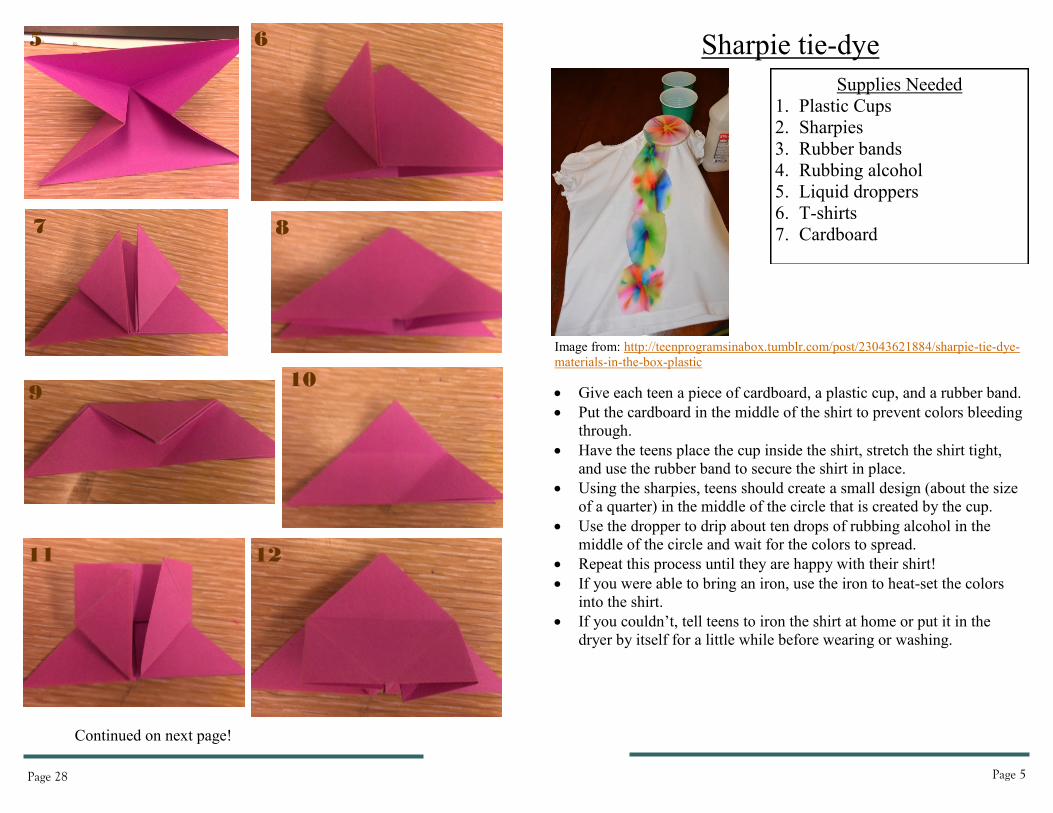
Sharpie tie-dye
Supplies Needed
1. Plastic Cups
2. Sharpies
3. Rubber bands
4. Rubbing alcohol
5. Liquid droppers
6. T-shirts
7. Cardboard
Give each teen a piece of cardboard, a plastic cup, and a rubber band.
Put the cardboard in the middle of the shirt to prevent colors bleeding
through.
Have the teens place the cup inside the shirt, stretch the shirt tight,
and use the rubber band to secure the shirt in place.
Using the sharpies, teens should create a small design (about the size
of a quarter) in the middle of the circle that is created by the cup.
Use the dropper to drip about ten drops of rubbing alcohol in the
middle of the circle and wait for the colors to spread.
Repeat this process until they are happy with their shirt!
If you were able to bring an iron, use the iron to heat-set the colors
into the shirt.
If you couldn’t, tell teens to iron the shirt at home or put it in the
dryer by itself for a little while before wearing or washing.
Image from: http://teenprogramsinabox.tumblr.com/post/23043621884/sharpie-tie-dye-
materials-in-the-box-plastic
Page 6
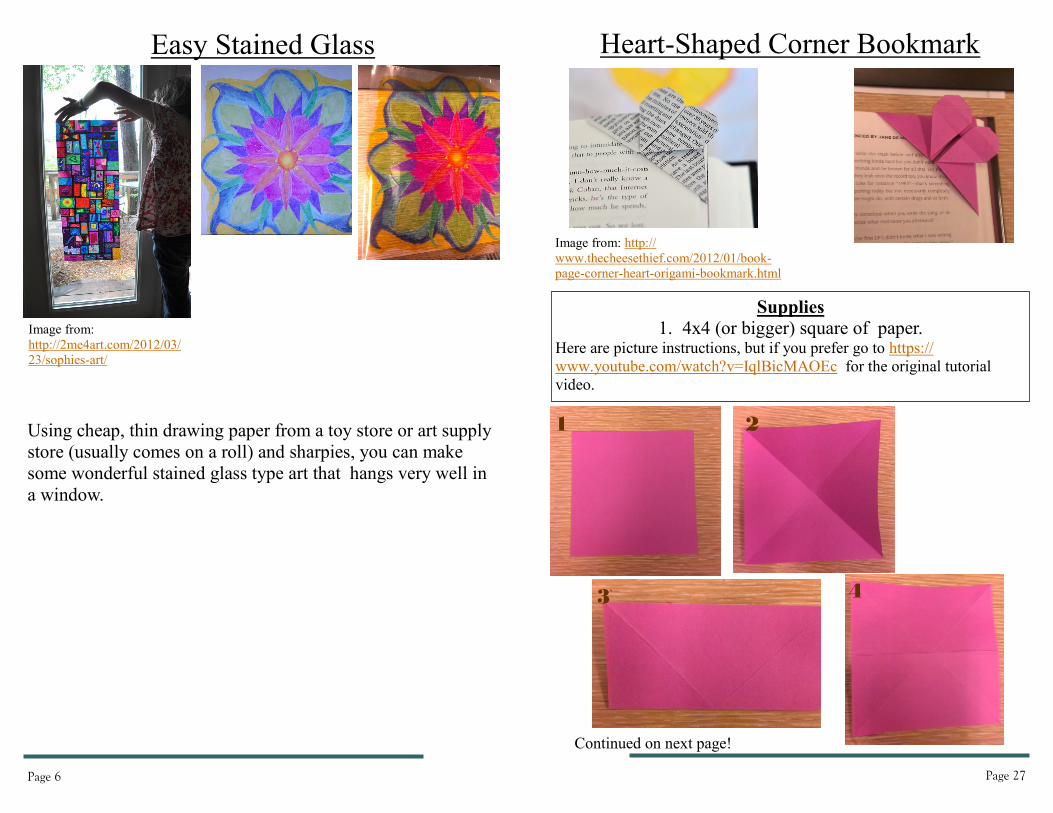
Easy Stained Glass
Image from:
http://2me4art.com/2012/03/
23/sophies-art/
Using cheap, thin drawing paper from a toy store or art supply
store (usually comes on a roll) and sharpies, you can make
some wonderful stained glass type art that hangs very well in
a window.
Page 27
Heart-Shaped Corner Bookmark
Image from: http://
www.thecheesethief.com/2012/01/book-
page-corner-heart-origami-bookmark.html
Supplies 1. 4x4 (or bigger) square of paper.
Here are picture instructions, but if you prefer go to https://
www.youtube.com/watch?v=IqlBicMAOEc for the original tutorial
video.
1 2
3 4
Continued on next page!

Page 26
Paper Plate Dream Catchers
Supplies 1. Paper plates
2. Hole punch
3. Crayons, markers, paint
4. Yarn
5. Feathers, beads, puff balls
1. Cut center of plate out and save for another craft if desired.
2. Use hole punch to put at least 8 holes around center area.
3. Make a hole where top should be along outer edge of plate.
4. Along outer edge of plate opposite the hole just made make
three more holes positioned similar to in picture.
5. Allow kids to color and decorate the plate.
6. String should be tied in first hole, then strung across plate
at angles to make a web pattern (always pull string thru
from back of plate to make neater.).
7. Tie feathers to ends of pieces of yarn and then string
through the three bottom holes.
8. Tie piece of yarn to top hole to be used for hanging.
Page 7
Shadow Puppets
1. Use black construction paper or card stock.
2. Trace character onto two pieces of paper.
3. Cut characters out
4. Place straw, stick, or dowel rod in between pieces and glue
together with glue or glue stick.
5. Shine a light and let kids put on a play.

Page 8
Eye Spy Bottles
Supplies
1. Plastic bottles
2. Colored Rice (see next page)
3. Misc. items of your or children’s
choosing
4. Hot glue gun (for sealing lid)
Page 25
Craft Stick Bookworms
Supplies
1. Craft sticks
2. Yarn, different colors, 8” strips
3. Beads or other things for eyes
4. Glue
To attach the strings:
1. Fold the yarn in half and place the stick
on top.
2. Push the ends into the folded side and
pull.
3. Take your next string and make another
slip-knot on the opposite side.
4. Keep alternating sides until your little
worm is full up with legs!

Page 24
Jellyfish
Image from: http://www.scrapbooksetc.com/blogs/iscrapuscrap/2011/06/15/how-to-
make-your-own-jellyfish/
Supplies
1. Paper bowls
2. Paint, markers, or crayons
3. String or yarn
4. Ribbon, pieces of yarn or
other long materials
5. Glue
1. Color one bowl and add eyes
2. Poke two holes in top of bowl and string fishing line
or yarn through and make loop to hang jellyfish with.
3. Use glue to attach “stingers” to inside of painted bowl
4. Cut hole just big enough for “stingers” to be pulled
through second bowl
5. Slide second bowl into first bowl and glue in place
Page 9
Rainbow Rice
Supplies
1. Rice
2. Food coloring or liquid water
colors
3. Rubbing alcohol
4. Zip-loc bags
5. Pans or wax paper for drying
6. Plastic storage bin
1. Mix 4 Cups rice, 2T coloring, and 3T
rubbing alcohol in zip-loc bag.
2. Seal bag, shake and get rice completely
covered in color
3. Spread out on pans or wax paper to dry
(preferably in the sun)
4. Store and use at will.

Page 10
Christmas Tree Garland
Supplies
1. Paper plates
2. Green paint or markers
3. Yellow stars from foam or construction paper
4. Assorted colors and shapes for ornaments
5. String or yarn
1. Cut plates in 1/4’s or 1/3’s whichever looks
better to you.
2. Have kids paint plate green.
3. Decorate tree with star and other ornaments.
4. Glue to string, let dry.
5. Hang up.
Image from: http://1pureheart.blogspot.com/2011/12/paper-plate-christmas-tree-
garland.html
Page 23
Toilet Paper Tube Bird Feeder
Image from: http://moffattgirls.blogspot.com/2011/02/toiletpaper-roll-bird-feeders.html
Supplies
1. TP tubes
2. Peanut butter
3. Bird seed
4. String if desired
1. Cut hole into one end of tube if hanging
by string is desired
2. Spread PB generously over tube (avoiding
holes if you made them)
3. Roll tube in bird seed (on plate)
4. Thread string into holes and make loop if
desired.
5. Hang in tree and watch birds eat.
Page 22
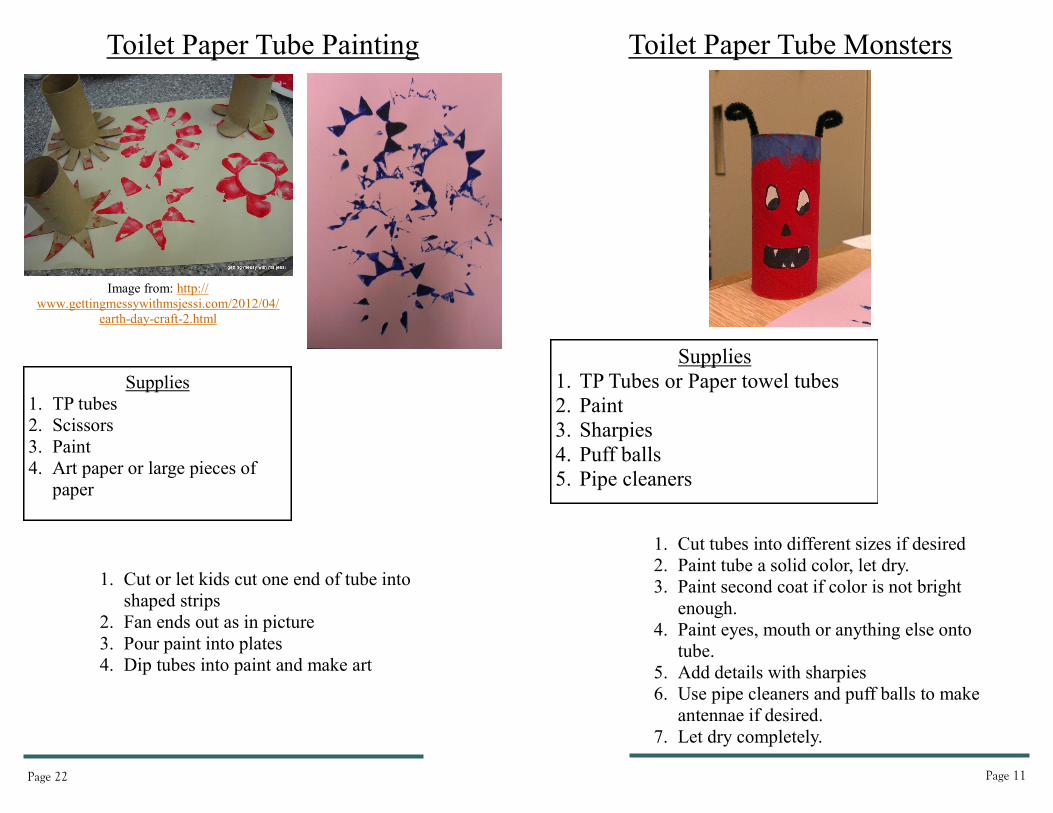
Toilet Paper Tube Painting
Image from: http://
www.gettingmessywithmsjessi.com/2012/04/
earth-day-craft-2.html
Supplies
1. TP tubes
2. Scissors
3. Paint
4. Art paper or large pieces of
paper
1. Cut or let kids cut one end of tube into
shaped strips
2. Fan ends out as in picture
3. Pour paint into plates
4. Dip tubes into paint and make art
Page 11
Toilet Paper Tube Monsters
Supplies
1. TP Tubes or Paper towel tubes
2. Paint
3. Sharpies
4. Puff balls
5. Pipe cleaners
1. Cut tubes into different sizes if desired
2. Paint tube a solid color, let dry.
3. Paint second coat if color is not bright
enough.
4. Paint eyes, mouth or anything else onto
tube.
5. Add details with sharpies
6. Use pipe cleaners and puff balls to make
antennae if desired.
7. Let dry completely.
Page 12
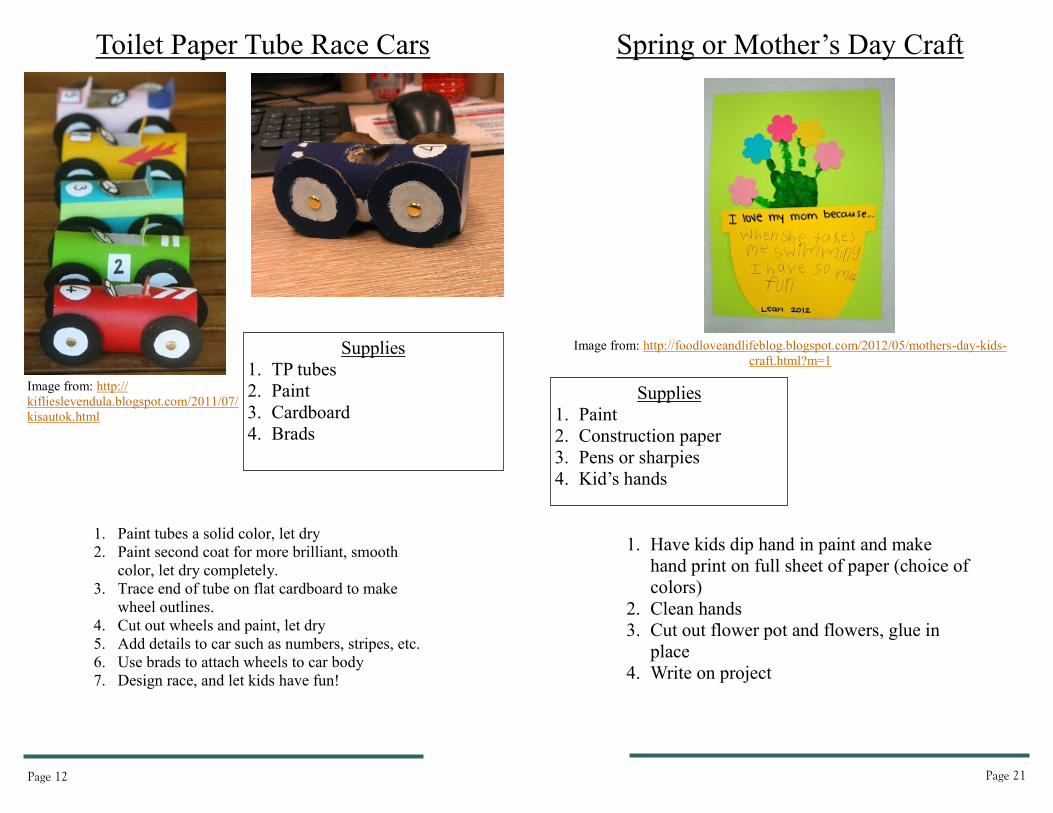
Toilet Paper Tube Race Cars
Image from: http://
kiflieslevendula.blogspot.com/2011/07/
kisautok.html
Supplies
1. TP tubes
2. Paint
3. Cardboard
4. Brads
1. Paint tubes a solid color, let dry
2. Paint second coat for more brilliant, smooth
color, let dry completely.
3. Trace end of tube on flat cardboard to make
wheel outlines.
4. Cut out wheels and paint, let dry
5. Add details to car such as numbers, stripes, etc.
6. Use brads to attach wheels to car body
7. Design race, and let kids have fun!
Page 21
Spring or Mother’s Day Craft
Image from: http://foodloveandlifeblog.blogspot.com/2012/05/mothers-day-kids-
craft.html?m=1
Supplies
1. Paint
2. Construction paper
3. Pens or sharpies
4. Kid’s hands
1. Have kids dip hand in paint and make
hand print on full sheet of paper (choice of
colors)
2. Clean hands
3. Cut out flower pot and flowers, glue in
place
4. Write on project
Page 20
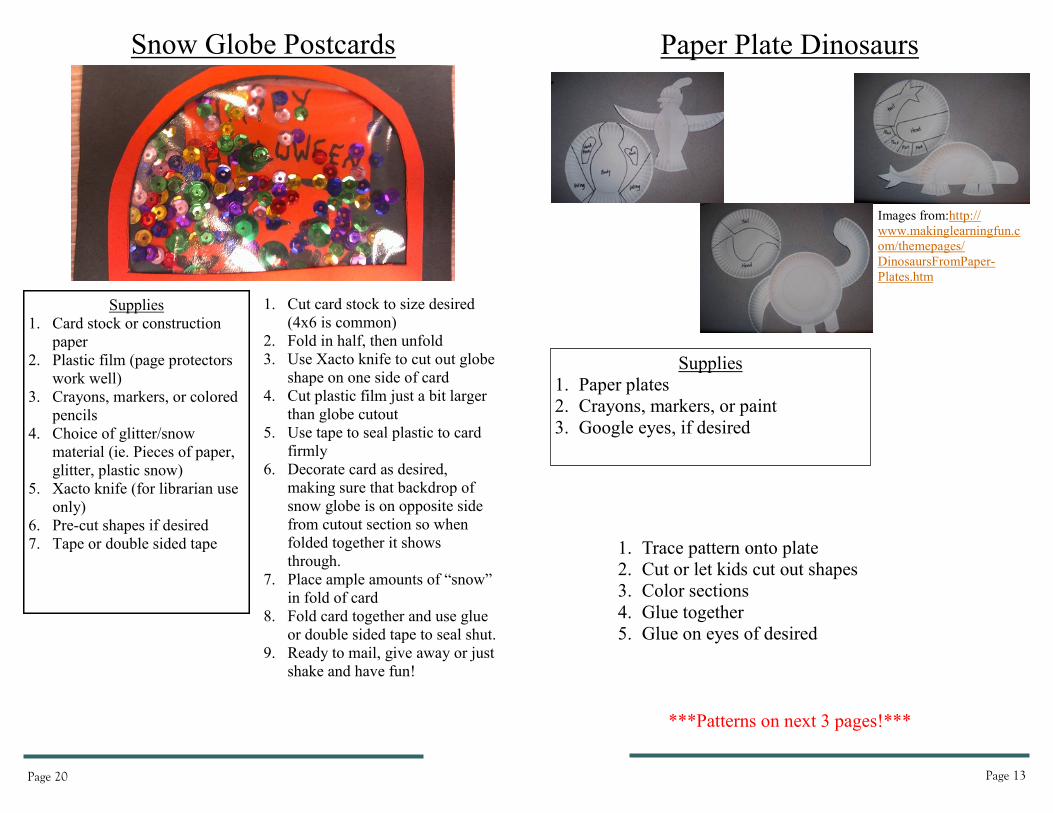
Snow Globe Postcards
Supplies
1. Card stock or construction
paper
2. Plastic film (page protectors
work well)
3. Crayons, markers, or colored
pencils
4. Choice of glitter/snow
material (ie. Pieces of paper,
glitter, plastic snow)
5. Xacto knife (for librarian use
only)
6. Pre-cut shapes if desired
7. Tape or double sided tape
1. Cut card stock to size desired
(4x6 is common)
2. Fold in half, then unfold
3. Use Xacto knife to cut out globe
shape on one side of card
4. Cut plastic film just a bit larger
than globe cutout
5. Use tape to seal plastic to card
firmly
6. Decorate card as desired,
making sure that backdrop of
snow globe is on opposite side
from cutout section so when
folded together it shows
through.
7. Place ample amounts of “snow”
in fold of card
8. Fold card together and use glue
or double sided tape to seal shut.
9. Ready to mail, give away or just
shake and have fun!
Page 13
Supplies
1. Paper plates
2. Crayons, markers, or paint
3. Google eyes, if desired
1. Trace pattern onto plate
2. Cut or let kids cut out shapes
3. Color sections
4. Glue together
5. Glue on eyes of desired
***Patterns on next 3 pages!***
Paper Plate Dinosaurs
Images from:http://
www.makinglearningfun.c
om/themepages/
DinosaursFromPaper-
Plates.htm

Page 14 Page 19
Paper Bag Houses
Image from: http://
snippetygib-
bet.blogspot.com/2011/02/first-
grade-architecture.html
Image from: http://
funart4kids.blogspot.com/2010/11/
gingerbread-house-architecture.html
Supplies
1. Brown paper bags
2. Construction paper
3. Crayons or markers
4. Glue
5. Pre-designed candy shapes (if doing
gingerbread house)
This is a great idea for letting kids design their own houses or
gingerbread houses. They can add yards, roads, or anything
else they like. Bump it up a notch and challenge them to create
a city street or neighborhood.
Page 18
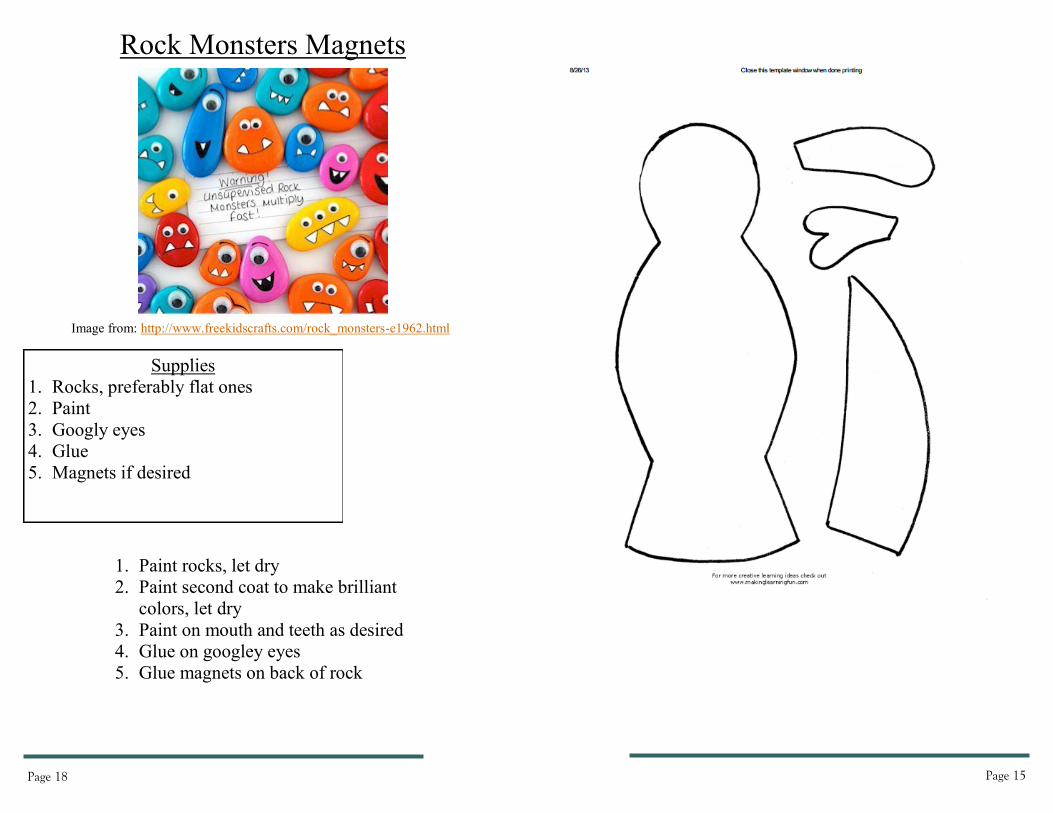
Rock Monsters Magnets
Image from: http://www.freekidscrafts.com/rock_monsters-e1962.html
Supplies
1. Rocks, preferably flat ones
2. Paint
3. Googly eyes
4. Glue
5. Magnets if desired
1. Paint rocks, let dry
2. Paint second coat to make brilliant
colors, let dry
3. Paint on mouth and teeth as desired
4. Glue on googley eyes
5. Glue magnets on back of rock
Page 15

Page 16 Page 17
Paper Plate Fish
Image from: http://www.makeandtakes.com/
paper-plate-tropical-fish
Supplies
1. Paper plates
2. Paint, markers, or crayons
3. Googley Eyes
1. Let kids color one whole plate
2. Cut fin shapes from another plate
3. Color fins
4. Glue eyes and fins to fish body