Embed Size (px)
Citation preview

Beamer Tutorial
A Beamer Tutorial in Beamer
Charles T. Batts
April 4, 2007Department of Computer Science
The University of North Carolina at Greensboro
Foundations of Computer Science

Beamer Tutorial
Outline
Outline
1 About Beamer2 Templates3 Frames4 Sections and Subsections5 Text6 Alignment and Spacing7 Lists8 Overlays9 Tables
10 Frame Structures11 Graphics12 Themes13 Transitions14 More Information

Beamer Tutorial
Outline
Outline
1 About Beamer2 Templates3 Frames4 Sections and Subsections5 Text6 Alignment and Spacing7 Lists8 Overlays9 Tables
10 Frame Structures11 Graphics12 Themes13 Transitions14 More Information

Beamer Tutorial
Outline
Outline
1 About Beamer2 Templates3 Frames4 Sections and Subsections5 Text6 Alignment and Spacing7 Lists8 Overlays9 Tables
10 Frame Structures11 Graphics12 Themes13 Transitions14 More Information

Beamer Tutorial
Outline
Outline
1 About Beamer2 Templates3 Frames4 Sections and Subsections5 Text6 Alignment and Spacing7 Lists8 Overlays9 Tables
10 Frame Structures11 Graphics12 Themes13 Transitions14 More Information

Beamer Tutorial
Outline
Outline
1 About Beamer2 Templates3 Frames4 Sections and Subsections5 Text6 Alignment and Spacing7 Lists8 Overlays9 Tables
10 Frame Structures11 Graphics12 Themes13 Transitions14 More Information

Beamer Tutorial
Outline
Outline
1 About Beamer2 Templates3 Frames4 Sections and Subsections5 Text6 Alignment and Spacing7 Lists8 Overlays9 Tables
10 Frame Structures11 Graphics12 Themes13 Transitions14 More Information

Beamer Tutorial
Outline
Outline
1 About Beamer2 Templates3 Frames4 Sections and Subsections5 Text6 Alignment and Spacing7 Lists8 Overlays9 Tables
10 Frame Structures11 Graphics12 Themes13 Transitions14 More Information

Beamer Tutorial
Outline
Outline
1 About Beamer2 Templates3 Frames4 Sections and Subsections5 Text6 Alignment and Spacing7 Lists8 Overlays9 Tables
10 Frame Structures11 Graphics12 Themes13 Transitions14 More Information

Beamer Tutorial
Outline
Outline
1 About Beamer2 Templates3 Frames4 Sections and Subsections5 Text6 Alignment and Spacing7 Lists8 Overlays9 Tables
10 Frame Structures11 Graphics12 Themes13 Transitions14 More Information

Beamer Tutorial
Outline
Outline
1 About Beamer2 Templates3 Frames4 Sections and Subsections5 Text6 Alignment and Spacing7 Lists8 Overlays9 Tables
10 Frame Structures11 Graphics12 Themes13 Transitions14 More Information

Beamer Tutorial
Outline
Outline
1 About Beamer2 Templates3 Frames4 Sections and Subsections5 Text6 Alignment and Spacing7 Lists8 Overlays9 Tables
10 Frame Structures11 Graphics12 Themes13 Transitions14 More Information

Beamer Tutorial
Outline
Outline
1 About Beamer2 Templates3 Frames4 Sections and Subsections5 Text6 Alignment and Spacing7 Lists8 Overlays9 Tables
10 Frame Structures11 Graphics12 Themes13 Transitions14 More Information

Beamer Tutorial
Outline
Outline
1 About Beamer2 Templates3 Frames4 Sections and Subsections5 Text6 Alignment and Spacing7 Lists8 Overlays9 Tables
10 Frame Structures11 Graphics12 Themes13 Transitions14 More Information

Beamer Tutorial
Outline
Outline
1 About Beamer2 Templates3 Frames4 Sections and Subsections5 Text6 Alignment and Spacing7 Lists8 Overlays9 Tables
10 Frame Structures11 Graphics12 Themes13 Transitions14 More Information

Beamer Tutorial
About Beamer
Outline
1 About Beamer2 Templates3 Frames4 Sections and Subsections5 Text6 Alignment and Spacing7 Lists8 Overlays9 Tables
10 Frame Structures11 Graphics12 Themes13 Transitions14 More Information

Beamer Tutorial
About Beamer
Advanages of Beamer
The standard commands of LATEX also work in Beamer. If you canwrite basic LATEX, you can easily make a Beamer presentation.A table of contents will automatically be created, complete withclickable links to each section and subsection you create in yourpresentation.You can easily create overlays and dynamic effects.Themes allow you to change the appearance of yourpresentation to suit you purposes.Each theme is designed to be highly usable and readable. Thismakes the presentation easier for the audience to follow andmore professional looking overall.

Beamer Tutorial
About Beamer
More Advanages of Beamer
The layout, colors, and fonts used in a presentation can easily bechanged globally, but you still also have control over the mostminute detail.You can create presentations using the same source you wrotefor your LATEX articles.The final output is typically a pdf-file. Viewer applications for thisformat exist for virtually every platform.Your presentation will look exactly the same no matter whichcomputer or viewer program is being used.

Beamer Tutorial
About Beamer
Where Can I Get Beamer?
Beamer is available as a Free download from:http://latex-beamer.sourceforge.net
It is very well documented in theBeamer User Guide
which is included in the Beamer package.

Beamer Tutorial
Templates
Outline
1 About Beamer2 Templates3 Frames4 Sections and Subsections5 Text6 Alignment and Spacing7 Lists8 Overlays9 Tables
10 Frame Structures11 Graphics12 Themes13 Transitions14 More Information
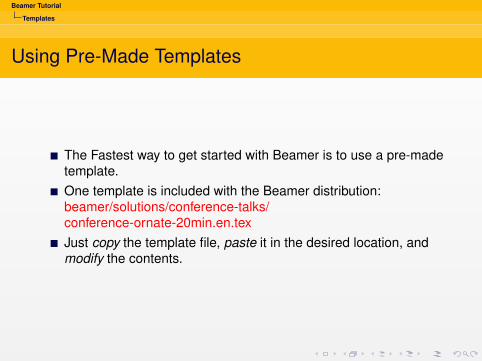
Beamer Tutorial
Templates
Using Pre-Made Templates
The Fastest way to get started with Beamer is to use a pre-madetemplate.One template is included with the Beamer distribution:beamer/solutions/conference-talks/conference-ornate-20min.en.texJust copy the template file, paste it in the desired location, andmodify the contents.

Beamer Tutorial
Templates
Test Your Template
If you are using the template provided with the beamer class, itwill already be complete with example information.To see how the example presentation looks, compile your LATEXcode twice.Open your favorite PDF viewer (ie: Adobe Reader) and open thenewly created .pdf file located in the same directory as yourtemplate file. Change your view to ”Full Screen”.Notice that a table of contents is automatically created, thesections and subsections are hyper-linked, and there is a row ofnavigational buttons in the bottom-right corner.

Beamer Tutorial
Templates
Insert Title Information
The first commands you should modify will identify some keyinformation about your presentation. These commands will be foundin the preamble at the top of the .tex file. Other commands may bemodified or commented out with a % to suit your needs.
Commands To Change
\title[short title]{long title}
\subtitle[short subtitle]{long subtitle}
\author[short name]{long name}
\date[short date]{long date}
\institution[short name]{long name}

Beamer Tutorial
Frames
Outline
1 About Beamer2 Templates3 Frames4 Sections and Subsections5 Text6 Alignment and Spacing7 Lists8 Overlays9 Tables
10 Frame Structures11 Graphics12 Themes13 Transitions14 More Information

Beamer Tutorial
Frames
Frames
Each Beamer project is made up of a series of frames. Each frameproduces one or more slides, depending on the slide’s overlays,which will be discussed later.
A Basic Frame
\begin{frame}[<alignment>]\frametitle{Frame Title Goes Here}Frame body text and/or LATEX code
\end{frame}

Beamer Tutorial
Frames
Frames
Frames are very simple to make. Simply fill in between the begin/endframe commands with your own text or LATEX code.
The alignment option is centered [c] by default. The values [t] (topalign) and [b] (bottom align) are also accepted.
A Basic Frame
\begin{frame}[t]\frametitle{Algorithmic Combinatorics on Words}\textit{Words}, or strings of symbols over..
\end{frame}
Beamer Tutorial
Frames
Frames
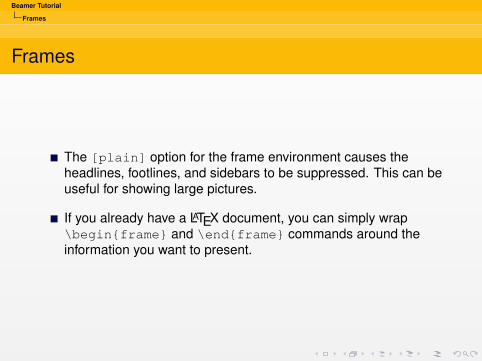
The [plain] option for the frame environment causes theheadlines, footlines, and sidebars to be suppressed. This can beuseful for showing large pictures.
If you already have a LATEX document, you can simply wrap\begin{frame} and \end{frame} commands around theinformation you want to present.

Beamer Tutorial
Frames
Special Frame - Title Page
The Title Page Frame simply displays a title page which containsmuch of the information your entered at the beginning of thedocument:
Title Page
\begin{frame}\titlepage\end{frame}

Beamer Tutorial
Frames
Special Frames - Title Page
By default, the \frametitle{title} command creates a titlepage that includes:
TitleAuthorHis or Her AffiliationThe DateTitle Graphic
If any of these values are missing in the preamble, they will not beincluded on the title page.
Beamer Tutorial
Frames
Special Frames - Table of Contents
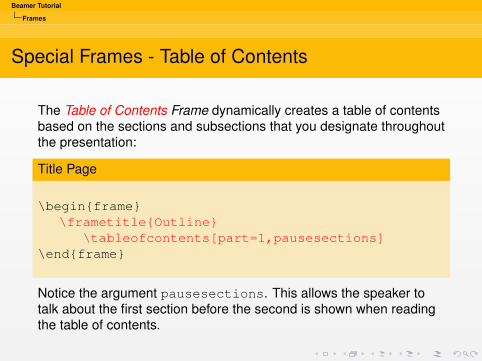
The Table of Contents Frame dynamically creates a table of contentsbased on the sections and subsections that you designate throughoutthe presentation:
Title Page
\begin{frame}\frametitle{Outline}
\tableofcontents[part=1,pausesections]\end{frame}
Notice the argument pausesections. This allows the speaker totalk about the first section before the second is shown when readingthe table of contents.
Beamer Tutorial
Frames
Putting Frames Together
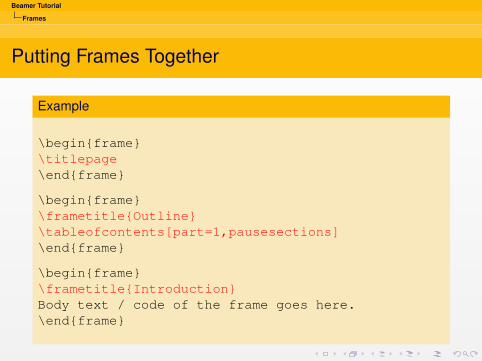
Example
\begin{frame}\titlepage\end{frame}
\begin{frame}\frametitle{Outline}\tableofcontents[part=1,pausesections]\end{frame}
\begin{frame}\frametitle{Introduction}Body text / code of the frame goes here.\end{frame}

Beamer Tutorial
Sections and Subsections
Outline
1 About Beamer2 Templates3 Frames4 Sections and Subsections5 Text6 Alignment and Spacing7 Lists8 Overlays9 Tables
10 Frame Structures11 Graphics12 Themes13 Transitions14 More Information

Beamer Tutorial
Sections and Subsections
Sections and Subsections
Presentations are divided into Sections, Subsections, andSub-Subsections.Each call to the \section{section name},\subsection{subsection name}, or\subsubsection{sub-subsection name} command:
1 Inserts a new entry into the Table of Contents atthe appropriate tree-level.
2 Inserts a new entry into the navigation bars.3 Does not create a frame heading.
Another version of the command,\subsection*{section name}, only adds an entry in thenavigation bars, not the Table of Contents.

Beamer Tutorial
Sections and Subsections
Sections and Subsections
Section specifications are declared between the frames, so they haveno direct effect on what is shown inside each frame.
Example
...\end{frame}
\section{Fine and Wilf’s Theorem}\subsection{The Case of Two or Three Holes}\subsubsection{Definition 3.7}
\begin{frame}...

Beamer Tutorial
Text
Outline
1 About Beamer2 Templates3 Frames4 Sections and Subsections5 Text6 Alignment and Spacing7 Lists8 Overlays9 Tables
10 Frame Structures11 Graphics12 Themes13 Transitions14 More Information

Beamer Tutorial
Text
Common Text Commands and Environments
You can use the same text commands and environments in Beameras you do in LATEX to change the way your text is displayed.
Common Text Commands\emph{Sample Text} Sample Text\textbf{Sample Text} Sample Text\textit{Sample Text} Sample Text\textsl{Sample Text} Sample Text\alert{Sample Text} Sample Text\textrm{Sample Text} Sample Text\textsf{Sample Text} Sample Text\color{green} Sample Text Sample Text\structure{Sample Text} Sample Text

Beamer Tutorial
Text
Verbatim Text
Often it is helpful to write code or formulas as Verbatim Text, whichshows the text exactly as you type it, without any LATEX formatting.There are two ways to achieve this:
For inline verbatim text, such as This, use the text command:
\verb|sample text|
The verbatim environment is also available in beamer and can beused in the same way as it is in LATEX:\begin{verbatim}Sample text\end{verbatim}
NOTE: For either of these methods to work, the [fragile] optionmust be added to the frame environment.(i.e. \begin{frame}[fragile])

Beamer Tutorial
Text
Semiverbatim Text
Beamer also defines the environment semiverbatim, which workslike verbatim except that \ , {, and } retain their meaning.
This allows you to access beamer formatting commands. If you wantthe command or environment to be ignored, you simply put a \ infront of it.
Example
Using the semiverbatim environment, you canstill format verbatim text with beamercommands or you can display commands\alert{like this}.

Beamer Tutorial
Text
Font Themes
Font Themes change the attributes of the fonts used in thepresentation. Each font theme has its own set of options, so to fullytake advantage of the font theme, you should look up the options inthe Beamer User Guide. To use a Font Theme, use the command:
\usefonttheme{serif}
You can choose from these font themes:
serif structureboldstructureitalicserif structuresmallcapsserif

Beamer Tutorial
Text
Font Sizes
Choosing the font size for normal text is quite easy. You must locatethe line in the header of your tex document that looks like this:
\documentclass{beamer}
and add the appropriate option so it looks like this:
\documentclass[10pt]{beamer}
Instead of using 10pt, you could use 11pt (default size), or 12pt(slightly larger). Other options are also available but require additionalpackages to be installed. More information can be found in theBeamer User Guide.

Beamer Tutorial
Text
Font Families
Different Font Families can be chosen to personalize yourpresentation. Each font family resides in a separate package. To usea different font family, add the following command to your preamble.
\usepackage{helvet}
All font families are not available in every Beamer installation, buttypically, at least some of the following families will be available:
serif avant bookman chancery chartereuler helvet mathtime mathptm mathptmx
newcent palatino pifont utopia

Beamer Tutorial
Alignment and Spacing
Outline
1 About Beamer2 Templates3 Frames4 Sections and Subsections5 Text6 Alignment and Spacing7 Lists8 Overlays9 Tables
10 Frame Structures11 Graphics12 Themes13 Transitions14 More Information

Beamer Tutorial
Alignment and Spacing
Alignment
A frame can be assigned a left, center, or right alignment with theflushleft, center, and flushright environments. For example:
\begin{center}The center-aligned text goes here.
\end{center}
Center Aligned Example
The center-aligned text goes here.
Beamer Tutorial
Alignment and Spacing
Spacing
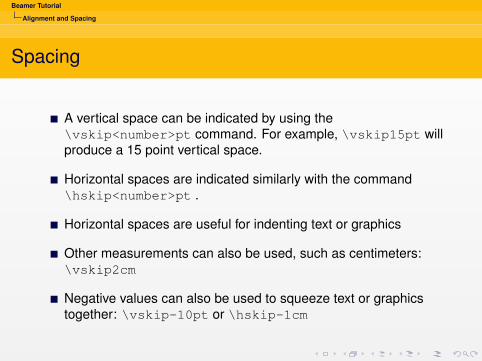
A vertical space can be indicated by using the\vskip<number>pt command. For example, \vskip15pt willproduce a 15 point vertical space.
Horizontal spaces are indicated similarly with the command\hskip<number>pt .
Horizontal spaces are useful for indenting text or graphics
Other measurements can also be used, such as centimeters:\vskip2cm
Negative values can also be used to squeeze text or graphicstogether: \vskip-10pt or \hskip-1cm

Beamer Tutorial
Lists
Outline
1 About Beamer2 Templates3 Frames4 Sections and Subsections5 Text6 Alignment and Spacing7 Lists8 Overlays9 Tables
10 Frame Structures11 Graphics12 Themes13 Transitions14 More Information

Beamer Tutorial
Lists
Lists
Lists are often used in presentations to organize information in amatter that is easier for the audience to follow. Beamer includes threemethods for displaying lists:
Itemize Used to display a list of items that do not have a specialordering.
Enumerate Used to display a list of numbered, ordered items.Description Used to display a list that explains or defines labels.

Beamer Tutorial
Lists
Lists - Itemize
Each list environment is structured in a very similar way. Each newitem is indicated by the \item command.
Example of Itemize
\begin{itemize}\item The first item\item The second item\item The third item\item The fourth item\end{itemize}
The first itemThe second itemThe third itemThe forth item

Beamer Tutorial
Lists
Lists - Enumerate
By using the enumerate environment instead of the itemizeenvironment, the items are displayed in a numbered list.
Example of Enumerate
\begin{enumerate}\item The first item\item The second item\item The third item\item The fourth item\end{enumerate}
1 The first item2 The second item3 The third item4 The forth item

Beamer Tutorial
Lists
Lists - Description
The description environment is slightly different. Each item takesthe term being described as an option. The environment itself takesan option as well, which should be the longest term being described.This will set the indentation so the descriptions line up with eachother.
Example of Description
\begin{description}[Second Item]\item[First Item] Description of first item\item[Second Item] Description of second item\item[Third Item] Description of third item\item[Forth Item] Description of forth item\end{description}

Beamer Tutorial
Lists
Lists - Description
As you can see, the terms are on the left and are correctly indentedso that their descriptions line up. The terms are also assigned adifferent color to set them apart from the descriptions.
Example of Description - Result
First Item Description of first itemSecond Item Description of second item
Third Item Description of third itemForth Item Description of forth item

Beamer Tutorial
Overlays
Outline
1 About Beamer2 Templates3 Frames4 Sections and Subsections5 Text6 Alignment and Spacing7 Lists8 Overlays9 Tables
10 Frame Structures11 Graphics12 Themes13 Transitions14 More Information

Beamer Tutorial
Overlays
Overlays
Having parts of your slides appear incrementally aids theaudience by bringing their attention to the information that iscurrently being discussed.
In Beamer, Overlays control the order in which parts of the frameappear.

Beamer Tutorial
Overlays
Overlays
Having parts of your slides appear incrementally aids theaudience by bringing their attention to the information that iscurrently being discussed.
In Beamer, Overlays control the order in which parts of the frameappear.

Beamer Tutorial
Overlays
Overlays - Pause
An easy way to implement an Overlay is to place the \pausecommand between the parts you want to show up separately.
For example, you could separate three items like this:
\textbf{Step1:} Compute the maximal suffix of $w$with respect to $\preceq_l$ (say $v$) and themaximal suffix of $w$ with respect to $\preceq_r$(say $v’$).\pause
\textbf{Step 2:} Find words $u$, $u’$ such that$w = uv = u’v’$.\pause
\textbf{Step 3:} If $|v| \le |v’|$, then output$(u,v)$. Otherwise, output$(u’,v’)$.

Beamer Tutorial
Overlays
Overlays - Pause
Step1: Compute the maximal suffix of w with respect to �l (say v )and the maximal suffix of w with respect to �r (say v ′).
Step 2: Find words u, u′ such that w = uv = u′v ′.
Step 3: If |v | ≤ |v ′|, then output (u, v). Otherwise, output(u′, v ′).

Beamer Tutorial
Overlays
Overlays - Pause
Step1: Compute the maximal suffix of w with respect to �l (say v )and the maximal suffix of w with respect to �r (say v ′).
Step 2: Find words u, u′ such that w = uv = u′v ′.
Step 3: If |v | ≤ |v ′|, then output (u, v). Otherwise, output(u′, v ′).

Beamer Tutorial
Overlays
Overlays - Pause
Step1: Compute the maximal suffix of w with respect to �l (say v )and the maximal suffix of w with respect to �r (say v ′).
Step 2: Find words u, u′ such that w = uv = u′v ′.
Step 3: If |v | ≤ |v ′|, then output (u, v). Otherwise, output(u′, v ′).

Beamer Tutorial
Overlays
Overlay Specifications
For more advanced overlays, many commands and environmentsincorporate Overlay Specifications.
To understand overlay specifications, we must first understand how aframe is displayed in the presentation.
Most often, a frame will represent a single slide in the presentation.However, to display effects such as appearing text, multiple slides arerevealed in succession to give the illusion of more material appearingin the same slide.
For example, \pause creates multiple separate slides. The first slidedisplays the information contained above the first \pause, the secondslide displays the information down to the second \pause, and so on.

Beamer Tutorial
Overlays
Overlay Specifications
Overlay specifications are given in pointed brackets (<,>)andindicate which slide the corresponding information should appearon.The specification <1-> means ”display from slide 1 on.” <1-3>means ”display from slide 1 to slide 3. <-3,5-6,8-> means”display on all slides except slides 4 and 7.”Here is an example:
\begin{itemize}\item<1> $abcadcabc$\item<1-2> $abcabcabc$\item<1-2> $accaccacc$\item<1> $bacbccbac$\item<1,3> $cacdaccac$\item<1-2> $caccaccac$
\end{itemize}

Beamer Tutorial
Overlays
Overlay Specifications - Example
In this example, a multiple choice question is asked and only thecorrect answers will appear on the second and third slides.
Which of these words u have p(u) = 3? What about p(u) = 4?
abcadcabcaabcabcabcaaccaccaccabacabacabcacdaccacccaccaccacc

Beamer Tutorial
Overlays
Overlay Specifications
Overlay Specifications can also be used to make certain textcommands take effect at different times. For example, this codeapplies the alert command only on specified slides:
Example Code
\alert{Alert on all slides}\alert<2>{Alert on slide 2}\alert<3>{Alert on slide 3}\alert<1,3>{Alert on slides 1 and 3}\alert<-2,4>{Alert on slides 1,2 and 4}
Note: If you want each item of a list to appear in order, use the[<+->] option. (i.e. \begin{itemize}[<+->] )

Beamer Tutorial
Overlays
Overlay Specifications - Example
Result of Code
Alert on all slides
Alert on slide 2
Alert on slide 3
Alert on slides 1 and 3
Alert on slides 1,2 and 4

Beamer Tutorial
Overlays
Overlay Specifications - Example
Result of Code
Alert on all slides
Alert on slide 2
Alert on slide 3
Alert on slides 1 and 3
Alert on slides 1,2 and 4

Beamer Tutorial
Overlays
Overlay Specifications - Example
Result of Code
Alert on all slides
Alert on slide 2
Alert on slide 3
Alert on slides 1 and 3
Alert on slides 1,2 and 4

Beamer Tutorial
Overlays
Overlay Specifications - Example
Result of Code
Alert on all slides
Alert on slide 2
Alert on slide 3
Alert on slides 1 and 3
Alert on slides 1,2 and 4

Beamer Tutorial
Overlays
Overlay Specifications
Overlay Specifications can be used with these commands to achievethe default effect:
\textbf<2>{Sample} Sample\textit<2>{Sample} Sample\textsl<2>{Sample} Sample\alert<2>{Sample} Sample\textrm<2>{Sample} Sample\textsf<2>{Sample} Sample\color<2>{green} Sample Sample\structure<2>{Sample} Sample
Note: The effect will only appear on the second slide.

Beamer Tutorial
Overlays
Overlay Specifications - Special Commands
Some commands have special overlay specification effects:
\onslide<1,2> Text given as argument only appears onspecified slides. If no text is given, any textfollowing the command will only appear onthe specified slides.
\only<1,2> Text argument only appears on specifiedslides. When the text is hidden, it will occupyno space.
\visible<1,2> Text appears on specified slides and iscompletely transparent, but still occupiesspace.
\invisible<1,2> The opposite of visible.

Beamer Tutorial
Overlays
Overlay Specifications - Special Commands
\alt<1,2> Takes two arguments: one for the default textand a second for the alternate text. Thedefault text shows up on the specified slides.The alternate text shows up on all unspecifiedslides.
\temporal<1,2> This command takes three text argument.The first text will appear if the current slidecomes before the specified slides, the nexttext appears while currently on the specifiedslides, the last text appears after the specifiedslides have appeared.
\uncover<1,2> The text will only be ”uncovered” on thespecified slides. On other slides, the text willstill be typeset and will appear transparent.

Beamer Tutorial
Overlays
Overlay Specifications - Environments
Environments can also be overlay specification aware. For mostenvironments, the entire environment will only appear on thespecified slides.
Example
\begin{frame}\begin{theorem}<1->There exists an infinite set.
\end{theorem}
\begin{proof}<2->This follows from the axiom of infinity.
\end{proof}\end{frame}

Beamer Tutorial
Overlays
Overlay Specifications - Environments
For each of the basic commands that take overlay specifications,there is an equivalent environment that will also take overlayspecifications.
Command Corresponding Environment\only onlyenv\alt altenv\visible visibleenv\uncover uncoverenv\invisible invisibleenv

Beamer Tutorial
Tables
Outline
1 About Beamer2 Templates3 Frames4 Sections and Subsections5 Text6 Alignment and Spacing7 Lists8 Overlays9 Tables
10 Frame Structures11 Graphics12 Themes13 Transitions14 More Information

Beamer Tutorial
Tables
Tables
Simple tables can be created in beamer with the tabularenvironment. We will begin with a simple graph and add more detailas we go along.
Tables start with the command \begin{tabular}{ccc} .{ccc} tells us the number of columns as well as the alignmentof each column. This table has three columns, each column iscenter aligned.Columns can be aligned to the left {l}, center {c}, or right {r}.Alignments can be mixed up. For example, {lcrrr}.Tables are constructed in rows. A & divides each cell and eachrow must end with \\.\end{tabular} closes the table.

Beamer Tutorial
Tables
Tables
A typical beamer table will start out like this:
Example Beamer Table
\begin{tabular}{ccc}cell 1 & cell 2 & cell 3 \\cell 4 & cell 5 & cell 6 \\
\end{tabular}
cell 1 cell 2 cell 3cell 4 cell 5 cell 6

Beamer Tutorial
Tables
Tables
We can add \hline between rows to divide rows more clearly:
Example Beamer Table
\begin{tabular}{ccc}\hlinecell 1 & cell 2 & cell 3 \\\hlinecell 4 & cell 5 & cell 6 \\\hline
\end{tabular}
cell 1 cell 2 cell 3cell 4 cell 5 cell 6

Beamer Tutorial
Tables
Tables
We can add a ”I” between column indicators to divide columns moreclearly:
Example Beamer Table
\begin{tabular}{|c|c|c|}cell 1 & cell 2 & cell 3 \\cell 4 & cell 5 & cell 6 \\
\end{tabular}
cell 1 cell 2 cell 3cell 4 cell 5 cell 6

Beamer Tutorial
Tables
Tables
Use \textbf and multiple \hline commands to create a header:
Example Beamer Table
\begin{tabular}{c||c|c|c|}& \textbf{header 1} &\textbf{header 2} & \textbf{header 4} \\\hline\hline\textbf{header 4} &cell 1 & cell 2 & cell 3 \\\hline\textbf{header 5} & cell 4 & cell 5 & cell 6 \\
\end{tabular}
header 1 header2 header 3header 4 cell 1 cell 2 cell 3header 5 cell 4 cell 5 cell 6

Beamer Tutorial
Frame Structures
Outline
1 About Beamer2 Templates3 Frames4 Sections and Subsections5 Text6 Alignment and Spacing7 Lists8 Overlays9 Tables
10 Frame Structures11 Graphics12 Themes13 Transitions14 More Information

Beamer Tutorial
Frame Structures
Structuring a Frame
Beamer provides many ways to structure your frames so they appearwell organized and are easy for the audience to follow. This sectionwill focus on:
ColumnsBlocksBoxes (Borders)

Beamer Tutorial
Frame Structures
Columns
The column environment is called as shown below:
\begin{columns}\column{.xx\textwidth}First column text and/or code
\column{.xx\textwidth}Second column text and/or code
\end{columns}
where .xx is the a percentage of the width of the slide.

Beamer Tutorial
Frame Structures
Columns - Example
Here is a simple example:
\begin{columns}\column{.5\textwidth}Column Number 1
\column{.5\textwidth}Column Number 2
\end{columns}
Which gives us:
Column Number 1 Column Number 2

Beamer Tutorial
Frame Structures
Blocks
Blocks can be used to separate a specific section of text or graphicsfrom the rest of the frame:
\begin{block}{Introduction to {\LaTeX}}
"Beamer is a {\LaTeX}class for creating presentationsthat are held using a projector..."
\end{block}
Introduction to LATEX
”Beamer is a LATEX class for creating presentations that are held usinga projector...”

Beamer Tutorial
Frame Structures
Blocks
Other block environments are also available. Each environment canbe used in place of block and has its own color scheme to keep yourexamples well organized.
Other Block Environments
Content Type Corresponding EnvironmentGeneric blockTheorems theoremLemmas lemmaProofs proofCorollaries corollaryExamples exampleHilighted Title alertblock

Beamer Tutorial
Frame Structures
Columns and Blocks
We can combine columns and blocks to make a much cleaner lookingpresentation.
\begin{columns}[t]\column{.5\textwidth}
\begin{block}{Column 1 Header}Column 1 Body Text
\end{block}\column{.5\textwidth}
\begin{block}{Column 2 Header}Column 2 Body Text
\end{block}\end{columns}
Gives us...

Beamer Tutorial
Frame Structures
Columns and Blocks
Column 1 Header
Column 1 Body Text
Column 2 Header
Column 2 Body Text
Notice that the [t] argument to the columns command top-alignedour blocks so they are vertically even as opposed to verticallycentered on the slide.

Beamer Tutorial
Frame Structures
Text Boxes
Borders can also be used to add structure and organization to yourpresentation. To access these commands, you must first add\usepackage{fancybox} to the preamble of your file. Here aresome examples.
Text Border Examples
\shadowbox{Sample Text}Sample Text
\fbox{Sample Text} Sample Text
\doublebox{Sample Text} Sample Text
\ovalbox{Sample Text}�� ��Sample Text
\Ovalbox{Sample Text}�� ��Sample Text
Beamer Tutorial
Graphics
Outline
1 About Beamer2 Templates3 Frames4 Sections and Subsections5 Text6 Alignment and Spacing7 Lists8 Overlays9 Tables
10 Frame Structures11 Graphics12 Themes13 Transitions14 More Information

Beamer Tutorial
Graphics
Graphics
Including graphics in a LATEX presentation is fairly simple althoughlimited.There are multiple packages with varying ease of use andgraphic quality.For this tutorial, we will use the graphics package. Be sure toadd \usepackage{graphics} to the preamble of your LATEXfile.The graphics package supports the most common graphicformats .pdf, .jpg, .jpeg, and .png. Other formats must beconverted to a supported format in an external editor.

Beamer Tutorial
Graphics
Graphics
A graphic can be added in the same way it is added in a LATEXprogram, by invoking the \includegraphics command.
Example Graphic
\includegraphics[height=3cm]{beamerss.png}

Beamer Tutorial
Themes
Outline
1 About Beamer2 Templates3 Frames4 Sections and Subsections5 Text6 Alignment and Spacing7 Lists8 Overlays9 Tables
10 Frame Structures11 Graphics12 Themes13 Transitions14 More Information

Beamer Tutorial
Themes
Themes
Themes can change the entire look and feel of your presentation.Different themes can be selected by changing the
\usetheme{Warsaw}
command so that it uses a different theme name:
Antibes Bergen Berkeley BerlinBoadilla Copenhagen Darmstadt DresdenFrankfurt Goettingen Hannover IlmenauJuanlespins Madrid Malmoe MarburgMontpellier Paloalto Pittsburgh RochesterSingapore

Beamer Tutorial
Themes
Color Themes
If you like the layout of a certain theme but dislike the color, you caneasily invoke a Color Theme, which is a set of complimentary colorsfor all the elements of your presentation. To use a Color Theme place
\usecolortheme{default}
in the preamble of your .tex document and replace default with thetheme of your choice:
albatross crane beetle dovefly seagull wolverine beaver
Beamer Tutorial
Themes
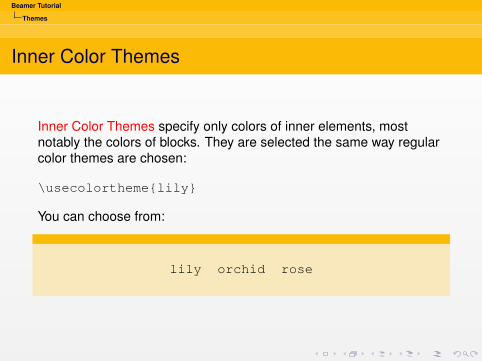
Inner Color Themes
Inner Color Themes specify only colors of inner elements, mostnotably the colors of blocks. They are selected the same way regularcolor themes are chosen:
\usecolortheme{lily}
You can choose from:
lily orchid rose

Beamer Tutorial
Themes
Outter Color Themes
Outter Color Themes change the palette colors, which are the colorsthe headline, footline, and sidebar are based on. They are selectedthe same way regular color themes are chosen:
\usecolortheme{whale}
You can choose from:
whale seahorse dolphin

Beamer Tutorial
Transitions
Outline
1 About Beamer2 Templates3 Frames4 Sections and Subsections5 Text6 Alignment and Spacing7 Lists8 Overlays9 Tables
10 Frame Structures11 Graphics12 Themes13 Transitions14 More Information

Beamer Tutorial
Transitions
Slide Transitions
The PDF format offers a standardized way of defining transitioneffects from one slide to the next. For example, whatever wasshown before the slide with the transition effect may dissolve touncover the new slide.
These effects should be used sparingly as to not distract fromthe content of the presentation.
Be forewarned, different PDF viewers have differentinterpretations and levels of support for these effects.

Beamer Tutorial
Transitions
Slide Transitions
A slide transition is composed of a single command. This commandspecifies which transitions should be used when the frame isdisplayed. We can include the transboxin transition by placing thecommand anywhere in the effected frame.
Transboxin Slide Transition
\begin{frame}\frametitle{Example of Transboxin}\transboxinFrame Body Text
\end{frame}

Beamer Tutorial
Transitions
Slide Transitions
Slide transitions are overlay specification aware, so\transboxin<2> will cause the second slide of the frame touse the transboxin effect.
There are two possible options for each transition:1 duration=<seconds> Specifies the number of seconds the
transitions effect needs.2 direction=<degree> For directed effects, this option specifies
the direction.

Beamer Tutorial
Transitions
Slide Transition Commands
These transitions are available.
\transblindshorizontal Horizontal blinds pulled away\transblindsvertical Vertical blinds pulled away
\transboxin Move to center from all sides\transboxout Move to all sides from center
\transdissolve Slowly dissolve what was shown before\transglitter Glitter sweeps in specified direction
\transslipverticalin Sweeps two vertical lines in\transslipverticalout Sweeps two vertical lines out
\transhorizontalin Sweeps two horizontal lines in\transhorizontalout Sweeps two horizontal lines out
\transwipe Sweeps single line in specified direction\transduration{2} Show slide specified number of seconds

Beamer Tutorial
More Information
Outline
1 About Beamer2 Templates3 Frames4 Sections and Subsections5 Text6 Alignment and Spacing7 Lists8 Overlays9 Tables
10 Frame Structures11 Graphics12 Themes13 Transitions14 More Information

Beamer Tutorial
More Information
More Information
Thank you for taking the time to read through this LATEX Beamertutorial. You should now have the basic knowledge you need to makeelegant, professional-looking presentations.
If you have any questions regarding the contents of this tutorial orLATEX Beamer, please refer to the Beamer User Guide, which isincluded with the Beamer package, or follow this link:
http://www.ctan.org/tex-archive/macros/latex/contrib/beamer/doc/