Embed Size (px)
Citation preview

Hyperion Strings Micro is our introductory orchestral string library for Native Instruments’ free
Kontakt Player, Komplete Kontrol and S-Series Keyboards. This library is the perfect starter
pack for songwriters and musicians just getting into orchestral writing, as well as seasoned
composers wanting new colors in their orchestral palette. No matter what your creative needs
are, you’ll discover the powerful toolset and outstanding audio quality that you’re looking for
in this convenient and extraordinarily flexible virtual instrument library.
Hyperion Strings Micro has a forward and robust sound unlike any other. We recorded our
string ensemble sections up close on a dry sound-stage — the historic Studio A at Fantasy
Studios in Berkeley, CA — and then equipped the interface with plenty of spatialization,
environment simulation and positioning controls and options to let you dial in the sound and
1
character you need. It’s perfect for any musical style from rock, pop and EDM, to fully
orchestral compositions. The interface is detailed, configurable and feature-rich to allow total
customization. However, for all of the bells and whistles we’ve designed into Hyperion Micro,
we’ve carefully refined every feature to be intuitive and naturally simple to use, with virtually
no learning curve.
Hyperion Strings Micro includes a combined full ensemble preset, as well as 4 main section
presets for our 8 Violins, 6 Violas, 5 Cellos and 4 Double Basses. For this Micro Edition, we’ve
included the most essential core articulations for each section: multi-dynamic sustains both
with and without natural vibrato, staccatos, spiccatos and pizzicatos, as well as two basic
dynamic expressions: long crescendos and decrescendos.
The multi-dynamic sustain, staccato, spiccato and pizzicato articulations allow smooth
crossfading across dynamic layers, from piano to forte with the Swell control. In addition to
dynamic layering, you can also choose rich, natural vibrato or clean non-vibrato sustain types
or seamlessly blend between them with the sustain blend control.
You can also instantly switch the staccatos, spiccatos and pizzicatos to velocity sensitivity
mode and control dynamics directly as you play. The pizzicatos also allow manual or automatic
switching between naturally loose flams and precise tight plucks that adapt to your speed.
Each of these short articulation types also features two “round-robin” variations per note.
The Crescendo and Decrescendo expressions allow real-time dynamically-aware release
sample triggering, tempo-synching and time-stretching. These are a great introduction to our
broader “Expressions” concept for modular arrangement.
When you’re ready to move up to a more powerful and complete palette, you can upgrade
seamlessly to the vastly larger Elements and full Symphonic Editions of our Hyperion Strings
product line (coming soon). In both, you’ll find other specialized sustain types as well, such as
fingered, glissed and bow-change true-legato styles, trills, ponticello, harmonics, flautando,
runs and more. The Elements and Symphonic tiers also include additional staccato and
spiccato types, as well as more exotic short note styles like col legno, Bartok pizzicatos,
ponticello and flautando, along with even more round robin variations per note for a truly life-
like playing experience. You’ll also find a huge number of different dynamic expressions and
specialized bow strokes in all lengths, dynamics, styles and intensities to make emotive,
realistic and dynamic scoring a breeze. The full Symphonic edition also provides even more
specialized bow strokes, articulations and special effects for advanced users, as well as
multiple microphone positions for custom and surround mixing, including a startlingly life-like
and profoundly robust player perspective.
Welcome to the first volume of Soundiron’s Hyperion Universal Orchestra! We hope Hyperion
Strings Micro serves you well and you enjoy playing it as much as we’ve enjoyed creating it for
you!
2

All sounds, images and text © Soundiron 2018. All Rights Reserved. Soundiron is a Registered Trademark of Soundiron LLC.
Symphonic strings for everyone.
• 5 master section presets: Ensemble, Violins, Violas, Cellos, Basses
• Multi-sampled multi-dynamic acoustic articulations: Sustains Con Vibrato, Sustains Sans Vibrato,
Staccatos, Spiccatos, Pizzicatos, Crescendos and Decrescendos
• 2,950 Stereo Samples
• 2.5 GB Installed
• 24-bit, 48 kHz Stereo Lossless NCW Format
• A flexible, intuitive user interface with pro features, deep customizability and simple workflow
• Free soundstage positioning for each section within dozens of custom rooms, halls, chambers and
special effects environments
• Special note: Hyperion Strings Micro owners can apply their full purchase credit toward future
upgrades to Hyperion Strings Elements and Hyperion Symphonic Strings.
Hyperion Strings Micro has been licensed for use in the free Kontakt Player, virtual
instrument engine. It can be used in Kontakt Player or the full retail version of Kontakt
(version 5.7.3 or later) for VST, AU or AAX instrument plugin formats. You can add this
product to the Kontakt “Libraries” browser. It requires online serial number
registration through Native Instruments’ Native Access app. This library is fully
compatible with Komplete Kontrol and all S-Series Keyboards by Native Instruments.
Buying Hyperion Strings Micro also automatically qualifies you for a great cross-grade
discount toward the full unlocked version of Kontakt through Native Instruments!
3
Version
1.0
TABLE OF CONTENTS
1 3 4 6 7
10 11 12 13 14 15 16 20 21 22
Introduction Overview Installation Kontakt UI Main Interface Articulation Browser Ensemble Mixer Panel Effects Panel Space Panel Play Assist Panel Arpeggiator Panel Production Gallery License Credits Thanks

4
SYSTEM REQUIREMENTS
This library requires Native Instruments Kontakt Player version 5.7.3 or later, or the full retail version of Kontakt version 5.7.3 or later. The sample files are compressed to lossless 48kHz and 24 bit NCW audio format. Please read all instrument specs and software requirements before purchasing this or any other Soundiron products. You must have at least Windows version 7 or later, or Apple OSX 10.10 or later.
Many instrument presets in this library are extremely system resource intensive. We highly recommend that you have a 64-bit operating system (Windows or OSX) with at least 3GB of system ram, a multi-core cpu and a 7200 rpm SATA or SSD hard disk before purchasing this particular Soundiron library. Large sample sets like those found in this library may load slowly and may cause system instability on some older machines and audio devices.
FIDELITY
This library was recorded at 96kHz / 24bit, in a dry recording studio using Sound devices preamps and Neumann large-diaphragm studio microphones. Natural sonic impurities from body and clothing movement by the performer sounds may be present in some samples. These performance sounds are natural and unavoidable. Therefore, please keep in mind that this library isn’t designed to provide perfectly sterile results.
Our goal is to preserve and accentuate the natural live qualities in our instruments without sucking all of the life out of them for the sake of clinical perfection.
KONTAKT PRESET LOADING
Once installation is complete, you can browse and load the included .nki presets using the Libraries window, Files Browser or Quick Load Window in
Kontakt. You can load Kontakt as a virtual instrument plugin inside your host sequencer or as a stand-alone application.
CONTROL AUTOMATION
Most knobs, buttons and sliders in this library can be automated by midi continuous controller or by using host automation envelopes in your DAW. To assign any interactive control knob, button or the Sound Selection Menu to a midi CC, you can right-click the control (command-click on OSX) and select the “Learn MIDI CC# Automation” button that appears. Then move your desired midi hardware control to link it.
To assign the control to a host automation ID, use the “Auto” automation routing window in the left side Kontakt browser area to drag-drop an automation routing number onto the control you wish to lock it to.
LIBRARY ACTIVATION
1. If you don't already have Kontakt 5 or the Kontakt Player installed, download the Free Kontakt Player (WIN / OSX) from the Native Instruments website. You need Kontakt or Kontakt Player version 5.7.3 or later to use this library:
https://www.native-instruments.com/en/products/komplete/samplers/kontakt-5-player/
2. Please download the library from our server and unpack it completely before trying to install it. You can find full instructions in the download email we send you after your purchase.
3. Make sure all instances of Kontakt are closed and launch Native Access. It is a special program that is automatically installed by Kontakt. Once it is open, find the “Add a serial” button and click it.

5
4. Next, copy your serial number from the download or serial number email we sent you after your purchase. This registration process is necessary to allow Kontakt and the NI Native Access to activate the product. You usually only need to do this the first time you add and activate this Library.
5. On the next screen after registering your serial number, click the Browse button to the right of the library name. This will allow you to select the folder location that you chose to install this library on your hard drive. Select the folder and then press INSTALL on the next screen to complete the process.
6. Exit Native Access and launch Kontakt. Go to the "Libraries" tab in the Kontakt browser window, located in the upper left area of Kontakt window, just to the right of the "files" tab. You should see this library as a new tile in the Libraries window.
7. You can find the instrument presets by clicking the Instruments button on this library's tile in the Libraries window. You can also browse and load the included .nki presets using the Files, Quickload or Database browser windows in Kontakt, or through the main File load/save menu.
8. Please allow any current preset to finish loading completely before loading a new one.
TROUBLE-SHOOTING
If you have trouble activating and registering the library, make sure that you have full unrestricted Administrator account permissions to change your system registry.
Also check to make sure that your security software is not preventing Kontakt from freely accessing the internet and your registry. You may also need to manually set a full exception and/or special access permissions in your security suite or operating system for Kontakt and Native Access.

6
KONTAKT INSTRUMENT HEADER
The top area of the user interface includes default instrument controls that are common to all Kontakt instruments.
2
3 4
1
5 7 6 8 9 10 11
12
13
14 15 16 17 18 19 20
1 - OPEN INSTRUMENT EDITOR button
Click on this to view and edit the internal settings and programming of this instrument. Be careful making internal changes unless you’re an experienced Kontakt user, as changes here can easily disable the entire instrument.
2 - CLOSE MAIN CONTROL AREA button
Click the S icon to collapse the “Performance View” and just show the Kontakt instrument header bar, as seen above.
3 - MIDI INPUT menu
Click the down arrow to route the audio from this instrument to select a midi input source. By default, you can choose Omni to allow the instrument to respond to midi messages and notes on any midi channel, or you can choose a specific midi channel number to control the instrument.
4 - OUTPUT menu
Click the down arrow to route the audio from this instrument to any available Kontakt plugin output. You can adjust Output mix and Insert FX settings by showing the main Output window in Kontakt at the bottom of Kontakt (Press F2).
5 - MEMORY USE display
This displays the amount of system RAM used by the samples and other data required by this instrument.
6 - VOICE COUNT AND MAX LIMIT values
This displays the number of voices currently playing on the left and the maximum number of voices that can play before voices are automatically culled. High voice counts can slow down your CPU and cause crackling, popping and other issues. The safe number of voices will vary greatly based on other programs running, the core count and speed of your CPU, available ram, hard drive speed and other factors.
7 - PURGE menu
This menu allows you to purge samples from RAM or reload them.
8 - MUTE button
This mutes the instrument.
9 - PAN slider
This pans the output left or right in the stereo field.
10 - MAIN VOLUME slider
This controls the output volume for the instrument.
11 - PERFORMANCE VIEW button
This button collapses the “Performance View” to just show the instrument header bar, as seen above.
12 - AUXILLARY SENDS button
This opens the Auxiliary Send mixer, allowing you to route signal to the Aux Sends in the main Kontakt Mixer window (Press F2).
13 - MINIMIZE ALL button
This collapses the entire instrument UI down to a thin strip.
14 - CLOSE button
This closes and removes the instrument from the rack.
15 - SIGNAL METERS
This displays the current signal level during playback.
16 - TUNE knob
This controls the global pitch, by semitone increments up to +/- 36. Hold the shift key down while dragging the knob to adjust pitch in 1 cents (1/100th of a semitone). This is separate from the layer pitch settings in the instrument UI.
17 - SOLO button
This solos the instrument and mutes all others in the rack.
18 - SNAPSHOTS button
This allows you to save and load snapshot presets for this instrument. Click the “ i ” button to close the menu.
19 - PREVIOUS / NEXT PRESET buttons
These arrows let you skip to the previous or next available preset within the same folder. Be aware that any settings you’ve changed will be lost, so we recommend saving a snapshot after making any changes if you wish to be able to load them again later.
20 - PRESET NAME value
This shows the currently loaded preset name.

7
MASTER CONTROL
The main user interface provides you with a complete set of sound-shaping, layering and articulation controls, including 12 independently assignable articulation layers that can be mixed, stacked, cross-faded or key-switched in real-time. Master controls include Swell, Body, Attack, Offset, Release, Release Volume and Vibrato. These global controls are accessible at the top of the UI window at all times.
In the Ensemble preset, you can choose from Sustains, Staccatos, Spiccatos, Pizzicatos, Crescendos and Decrescendos. In the individual section presets, you can also load individual dynamic layers for each multi-dynamic articulation, giving you even more precise control. Each layer can have its own independent gain, pan, velocity range and key-switch assignments.
Each articulation type has its own core controls, located in the lower left area: Sustains offer simulated legato and smooth dynamic expression across p, mf and forte sample layers using the Swell knob, and between natural vibrato and non-vib layers in real-time using Blend.
Staccatos and Spiccatos have 2 round robins and 3 dynamics per note, with optional velocity control at the push of a button. Pizzicatos have p and f dynamics, with optional loose—tight auto-switching based on how quickly you play, for greater realism.
The Crescendo and Decrescendo expressions both offer Auto-Release and play-through modes, so you can let go whenever you like, or let the sample play through to the end. In the individual section presets, you can also tempo-synch them to your host or stretch them to your or desired length.
See next page for more info about these controls...

8
1 - BODY knob
This controls the bass and presence . Higher settings produce a fuller, punchier sound. Lower values are best for simulating distance.
2 - ATTACK knob
This controls the note attack shape. Turning this up causes the sound to fade in more gradually. This is useful for softening hard transients and taming aggressive articulations.
3 - OFFSET knob
This cuts into the sample start, allowing sample playback to skip past the beginning of the sound. You can use this to make the sound more pad-like or to remove hard transient starts, especially when combined with the Attack knob.
4 - SWELL knob
This controls the volume of the layer, with smooth real-time tonal and dynamic attenuation. When using multi-dynamic articulations in standard mode, the Swell knob cross-fades smoothly between dynamic sound layers, from pianissimo to
fortissimo. When using single-layered articulations or dynamic articulations in Velocity mode, the Swell knob provides direct volume and tone attenuation. The Mod-wheel (CC1) also controls this knob by default.
5 - RELEASE knob
This controls the duration of the release fade out once you let go of a key. Lower values cause the sound to fade out more quickly after a note is released, while higher values fade the sound out more slowly.
6 - REL VOL knob
This controls the volume of the release in articulations that have release samples. Higher values are good for adding punch to a note release, while lower values are good for crafting more subtle releases.
7 - VIBRATO knob
This applies basic simulated vibrato to the sound. For articulations recorded with natural vibrato, such as the main vibrato sustains, this knob applies additional simulated vibrato to allow more intense vibrato.
GLOBAL CONTROLS
1 2 3 4 5 6 7
LAYER SETTINGS The settings for each layer are located in the lower middle area of the main control window. To edit the settings for a layer, select it in the main articulation area in the center of the main UI. When selected, a layer’s current articulation assignment, pan position, velocity range and key switch activation settings are displayed.
1
2
3
4
1 - ARTICULATION menu
This displays the currently selected articulation layer assignment. You can change the articulation currently loaded into the selected layer slot by clicking on the articulation name and selecting a new articulation from the menu.
2 - PAN slider
This sets the left-right stereo pan position for the articulation. Each articulation layer slot can have its own custom pan setting.
3 - VELOCITY RANGE values
These text boxes set the minimum and maximum velocity trigger thresholds. Incoming midi notes with a velocity below the MIN or above the MAX for the selected layer slot will not trigger the layer.
4 - KEY switch value
Key switches are midi notes assigned to turn an articulation on and off. This text box sets the trigger key that must be pressed to activate the slot. Only one key switch can be active at a time, but you can assign multiple layers to the same key switch.

9
STACCATOS & SPICCATOS
RESET button — This resets the round robin counter to the first sample in the sample repetition series.
VEL SENSITIVE button — This switches the articulation to velocity sensitive mode. When this is active, your midi velocity controls the dynamic layering for staccato, spiccato and pizzicato articulations, rather than the Swell knob.
PIZZICATOS
RESET button — This resets the round robin counter to the first sample in the sample repetition series.
VEL SENSITIVE button — This switches the articulation to velocity sensitive mode. When this is active, your midi velocity controls the dynamic layering for staccato, spiccato and pizzicato articulations, rather than the Swell knob.
STYLE selector — Loose mode provides naturally looser pizzicato attacks for slower passages and a more natural ensemble sound. Tight mode provides more tightly synchronized attacks for faster passages and a more precise sound. Time mode automatically switches between Loose and Tight modes, depending on how quickly you play new notes. This allows for a natural attack on slow passages and more precise attacks during faster passages.
CRESCENDOS & DECRESCENDOS
AUTO-RELEASE / PLAY-THRU selector — When Auto-Release is enabled, a dynamically-aware release sample will play if you release the note before the expression has ended. In Play-Thru mode, the entire crescendo or decrescendo will play out each time a note is played, using the Release knob to control fade-out time.
PROGRESS display — This shows the current playback position of the crescendo or decrescendo as it is played.
PLAYBACK selector & slider — This feature is only in the section presets due to the ram and CPU requirements of the time-stretching engine. Normal mode plays the note back a normal speed. Sync mode locks playback speed to your host tempo. Variable mode lets you freely stretch playback speed with the use of the slider located just below it.
VIBRATO & NON-VIBRATO SUSTAINS
LEGATO button — This enables simulated legato. When active, notes will smoothly transition from one to the next as long as you keep the old note held down briefly after triggering the new note.
RESPONSE slider — This controls the interval transition speed when legato is on. Lower values provide smoother, more gradual transitions, while higher values produce more transient, distinct intervals.
SOLO / DUET selector — This toggles between monophonic mode and semi-polyphonic mode. Solo mode triggers legato transitions between any two played notes across the section’s entire key-range. Duet mode limits legato transitions to intervals within 1/2-octave from the current note, but allows two independent legato melodies to be played simultaneously, as long as they are farther than 1/2-octave apart.
BLEND selector & slider — This allows you to switch between natural vibrato and non-vibrato sustain types, or you can choose Blend to smoothly transition between them in real-time using the slider next to it. This slider is also controlled by the Expression Pedal (CC11) by default.
LAYER CONTROLS

10
ARTICULATION SLOT BROWSER
The Articulation Slot browser in the middle of the main GUI window provides you with up to 12 active
articulation slots that you can freely assign to any of the included instrument articulations. Each layer can
have its own articulation, pan, volume and keyswitch settings, independent of the global controls.
1 - ARTICULATION menu
This displays the currently selected articulation layer assignment. You can change the articulation currently loaded into the selected the layer slot by clicking on the articulation name and selecting a new articulation from the menu. You can load multiple instances of the same articulation into different layer slots and then customize settings and trigger conditions.
2 - KEY SWITCH display
This value displays the currently assigned midi key switch to turn an articulation slot on and off via midi control. Simply play the designated midi note to enable or disable a layer.
3 - SLOT VOLUME knob
These knobs control the gain for each individual articulation
layer slot.
1
2
3
4 5
6 7
4 - EDIT button
This opens the Articulations selection window.
5 - MACRO MENU
This opens the macro function menu. The “Empty All Slots” macro lets you instantly empty all slots to return them to their empty default state. The “Reset all start conditions” macro resets velocity and keyswitch settings to default. “Set ascending keys from first slot” automatically assigns each slot to sequential keyswitches based on slot order from low to high, in a continuous block of keyswitches. “Distribute velocity range equally on active slots” assigns the slots to
non-overlapping velocity ranges, so you can use midi note velocity to switch between articulations.
6 - ARTICULATION TILES
Use the category headings at the top of this area to select different articulation types. Then click on the tile for the specific articulation you want to load into the current slot.
7 - EMPTY SLOT button
This unloads any articulation assigned to the current slot.

11
ENSEMBLE MIXER PANEL
The Ensemble Mixer panel is included in the main Ensemble preset to allow you fine individual control over
the midi key range, volume and pan position of each section. The controls are simple, with visual
representations to show you everything at a glance, including live signal meters and a color-coded key range
display along the bottom. You can also switch off any section you don’t need or limit their key ranges to fit
your needs.
The total extended playable range of each section is as follows:
Basses (4 players): Maximum Range C0 to C3
Cellos (5 players): Maximum Range C1 to F4
Violas (6 players): Maximum Range C2 to F5
Violins (8 players): Maximum Range G2 to E6
2
3
1
4
5
6
1 - SECTION ON/OFF buttons This turns the individual string sections on and off. When a section is off, it does not use voices and its samples are unloaded from ram. 2 - PAN sliders This sets the left-right stereo pan position for each string section.
3 - VOL sliders This main volume slider sets the volume for each string section independently. There is a signal meter to the right of each section’s volume slider that displays the current signal level in real-time.
4 - KEY RANGE LIMIT values These pairs of text boxes set the lowest and highest midi note that each section covers. Allowing multiple sections to overlap will result in higher voice counts,
and greater CPU use, but can allow a smoother tonal blend from section to section across the key range. Please be aware of system resource limits when setting your preferred section key ranges. 5 - LINK buttons These 3 buttons snap the key ranges to non-overlapping defaults. When the boundary for one section is moved while the Link is enabled between it and an adjoining section, the key range for both sections is adjusted automatically. 5 - KEY RANGE DISPLAY bars These 4 colored bars show the current midi key range of each section. Orange is for Basses, Light Green is for Cellos, Blue-Green is for Violas and Dark Blue is for Violins.

12
EFFECTS PANEL
The Effects panel includes Filter, Compressor and Equalizer modules that can be turned on and off
individually, with plenty of factory FX chain presets that can be loaded from the Preset drop-down
menu.
2
3
1 6
7
4
5
8
9
10 11
12
13
14
15
1 - PRESET menu This menu lets you load any of our custom FX presets. You can save and reload your own custom presets with the Export and Import options at the bottom of the drop-down menu. The left and right arrow buttons also allow you to quickly cycle through the presets without opening the menu.
FILTER 2 - FILTER ON/OFF button This turns the filter effect on and off. 3 - FILTER TYPE menu Use this menu to select the filter type that you want to apply, from a choice of 12 common filters. 4 - CUTOFF knob This controls the filter cutoff frequency. 5 - RES knob This controls the filter resonance level.
EQUALIZER
6 - EQUALIZER ON/OFF button This turns the EQ effect on and off. 7 - LOW BAND knobs The LOW knob sets the low frequency band gain. The Q knob controls the bandwidth of the low band. The FREQ knob controls the low band’s frequency center. 8 - MID BAND knobs The MID knob sets the mid frequency band gain. The
Q knob controls the bandwidth of the mid band. The FREQ knob controls the mid band’s frequency center. 9 - HIGH BAND knobs The HIGH knob sets the high frequency band gain. The Q knob controls the bandwidth of the high band. The FREQ knob controls the high band’s frequency center.
COMPRESSOR
10 - COMPRESSOR ON/OFF button This turns the Compressor effect on and off. 11 - THRESHOLD knob This controls the compressor signal threshold, above which dynamic compression will be applied. 12 - ATTACK knob This controls the compression attack time, with higher values resulting in a slower attack. 13 - RATIO knob This controls the compression ratio, with higher values applying stronger compression. 14 - RELEASE knob This controls the compression release time, with higher values resulting in a longer release. 15 - MAKEUP knob This applies or reduces output gain after the compression has been applied.

13
SPACE PANEL
The Space panel provides convolution reverb and a stage position mapping. This feature gives you the
ability to place and position the strings in a huge variety of different environments and even create
otherworldly atmospheric and ambient special effects. You can also adjust the roll-off for low and high
reflections, adjust wet/dry mix and the perceived size of the environment. The possibilities are endless.
1 - PRESET menu This menu lets you load any of our custom Space presets. You can save and reload your own custom presets with the Export and Import options at the bottom of the drop-down menu. The left and right arrow buttons also allow you to quickly cycle through the presets without opening the menu. 2 - ON/OFF button This turns the convolution reverb effect on and off. You can still use the Position map to spatialize the instruments even when the reverb effect is off. 3 - CATEGORY menu Use this menu to select the environment category that you want to model. You can choose from 119 distinct real-world cathedrals and halls, chambers, large rooms, small rooms, hallways and stairwells, underground environments, fields and forests and a selection of more unusual sound-designed and special effect impulses, in both long and short sub-categories. 4 - IMPULSE menu This menu selects the specific convolution reverb impulse that you wish to load from the your selected category.
5 - POSITION map The stage mapping window allows you to freely place each section where you would like it in the sound stage, from left to right and from close to distant. Just click and drag the instrument icon. 6 - WET knob This controls the wet/dry mix for the convolution reverb effect. It’s only active when reverb is on and is not a real-time automatable control. 7 - HI knob This controls the high frequency roll-off for reverb reflections. It’s only active when reverb is on and is not a real-time automatable control. 8 - SIZE knob This controls the perceived size of the reverb environment. It’s only active when reverb is on and is not a real-time automatable control. 9 - LO knob This controls the low frequency roll-off for reverb reflections. It’s only active when reverb is on and is not a real-time automatable control.
2
3
1
5
8
6
4
7
9
14
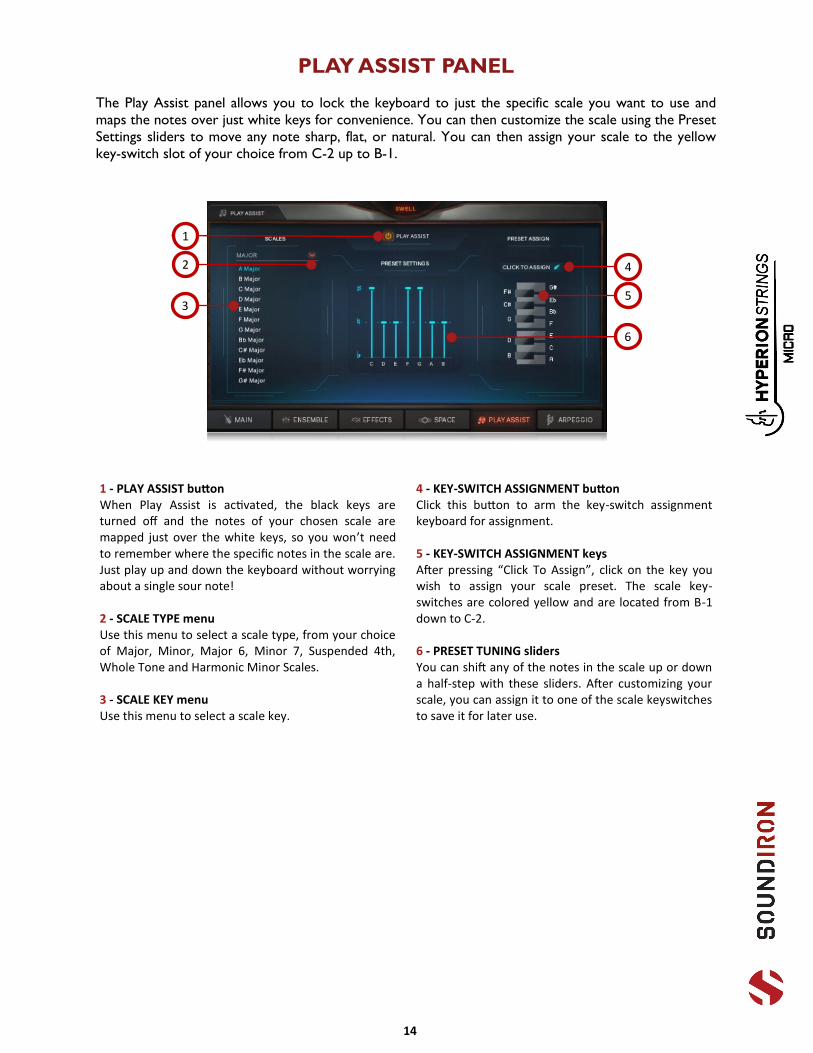
PLAY ASSIST PANEL
The Play Assist panel allows you to lock the keyboard to just the specific scale you want to use and
maps the notes over just white keys for convenience. You can then customize the scale using the Preset
Settings sliders to move any note sharp, flat, or natural. You can then assign your scale to the yellow
key-switch slot of your choice from C-2 up to B-1.
2
3
1
5
6
4
1 - PLAY ASSIST button When Play Assist is activated, the black keys are turned off and the notes of your chosen scale are mapped just over the white keys, so you won’t need to remember where the specific notes in the scale are. Just play up and down the keyboard without worrying about a single sour note! 2 - SCALE TYPE menu Use this menu to select a scale type, from your choice of Major, Minor, Major 6, Minor 7, Suspended 4th, Whole Tone and Harmonic Minor Scales. 3 - SCALE KEY menu Use this menu to select a scale key.
4 - KEY-SWITCH ASSIGNMENT button Click this button to arm the key-switch assignment keyboard for assignment. 5 - KEY-SWITCH ASSIGNMENT keys After pressing “Click To Assign”, click on the key you wish to assign your scale preset. The scale key-switches are colored yellow and are located from B-1 down to C-2. 6 - PRESET TUNING sliders You can shift any of the notes in the scale up or down a half-step with these sliders. After customizing your scale, you can assign it to one of the scale keyswitches to save it for later use.

15
ARPEGGIO PANEL
The Arpeggio panel allows you to create instant rhythmic and melodic patterns. You can draw the
velocity in for each note in the pattern by using the graph table, or simply use the velocities that you
play in real-time. You can choose your note length in the Rhythm menu. The mode menu lets you select
Trill, Arpeggio, or Run modes. The Direction menu gives you a range of pattern options, from simple
up/down patterns to complex cascades. You can also add swing and variation to your rhythm for a
more natural flow.
1 - ARPEGGIATOR ON/OFF button
This turns the arpeggiator on and off.
2 - VELOCITY ON/OFF button
This enables the velocity graph. When this graph is off, the pattern will use the actual velocities of the incoming midi notes as you play or sequence them.
3 - TABLE STEPS value
This setting determines the number of velocity steps that will be cycled through in the sequence, from 2 to 32 steps in length. You can change the value by double clicking the number or clicking and dragging it up or down.
4 - VELOCITY GRAPH table
Use the graph to draw the velocity for each step in your desired arpeggio sequence. The table plays from left to right.
5 - RHYTHM menu
This menu lets you choose the note time, with half note, half triplet, quarter note, quarter triplet, 8th note, 8th triplet, 16th note, 16th triplet, 32nd note and 32nd triplet.
6 - MODE menu
This menu controls the Arpeggiator mode. Trill mode alternates between two notes continuously, with selectable intervals of up to an octave using the Range Menu. In Arpeggio mode, it cycles between the notes you’re currently holding. You can select the number of steps to cycle through using the Range menu, from 2 to 8 steps or choose Run to continuously arpeggiate as long as you are holding down notes. In Run mode, playing a single key will trigger a melodic run across the scale, depending on your Direction
and Range menu settings, and whether you’re also using the Play Assist scale constraint system at the same time.
7 - HUMANIZE knob
The Random knob applies natural variability to the speed and velocity values.
8 - SWING knob
This adds pre-beat or post-beat swing to the arpeggiated rhythm.
9 - DIRECTION menu
The Direction menu controls the arp direction and behavior, with 14 different patterns to choose from: Up, Down, Up-Down, Down-Up, Zig-Zag Up, Zig-Zag Down, Zig-Zag Up-Down, Zig-Zag Down-Up, Move-In, Move-Out, In & Out, Out & In, EZ-Roll, Random and As Played.
10 - RANGE menu
This menu selects the number of repeated arpeggio steps that will play. For example, 2X means that only two notes will play each time a key is triggered, while 8X cycles through the pattern for 8 consecutive steps. Selecting “Run” will sustain the arpeggio cycle for as long as you hold down a note.
11 - SAVE & LOAD buttons
This “disk” icon button allows you to save and export your ARP settings to an nka preset file. The “folder” icon button allows you to import and load your previously saved Arp panel settings from an nka file.
2
3
1
4
5
6
9
8
7
10
11

16
GALLERY

17
GALLERY

18
GALLERY

19
GALLERY

20
SOUNDIRON END USER LICENSING AGREEMENT
SOFTWARE LICENSE AGREEMENT
By purchasing and installing the product, you the
Customer accept the following product terms.
LICENSE GRANT
The license for this product is granted only to a
single individual user. No unlicensed use is
permitted. All sounds, samples, programming,
images, scripting, designs and text contained in
this product are copyrights of Soundiron, LLC.
This software is licensed, but not sold, to
Customer by Soundiron, for commercial and non-
commercial use in music, sound-effect creation,
audio/video post-production, performance,
broadcast or similar finished content-creation and
production use. Individual license holders are
permitted to install this library on multiple
computers or other equipment only if they are
the sole owner and only user of all equipment this
software is installed or used on.
Soundiron LLC allows Customer to use any of the
sounds and samples in library(s) that Customer
has purchased for the creation and production of
commercial recordings, music, sound design, post
production, or other content creation without
paying any additional license fees or providing
source attribution to Soundiron. This license
expressly forbids any unauthorized inclusion of
any raw or unmixed content contained within this
product into any other commercial or non-
commercial sample instrument, sound effect
library, synthesizer sound bank, or loop or effect
library of any kind, without our express prior
written consent.
This license also forbids any unauthorized transfer,
resale or any other form of re-distribution of this
product, or its constituent sounds or code,
through any means, including but not limited to re
-sampling, reverse engineering, decompiling,
remixing, processing, isolating, or embedding into
software or hardware of any kind, except where
fully rendered and integrated into the finished
soundtrack or audio mix of an audio, visual or
interactive multimedia production, broadcast, live
performance or finished work of sound design,
with a running time no less than 8 seconds in total
length. Licenses cannot be transferred or sold to
another entity, without written consent of
Soundiron LLC.
RIGHTS
Soundiron retains full copyright privileges and
complete ownership of all recorded sounds,
instrument programming, documentation and
musical performances included within this
product. All past and future versions of this
product, including any versions published or
distributed by any other entity are fully bound and
covered by the terms of this agreement.
REFUNDS
Downloaded libraries can't be returned, so we do
not provide refunds or exchanges. Be aware that
as soon as the product has been downloaded from
our servers or physically sent to the Customer, it
can not be returned, exchanged or refunded.
RESPONSIBILITY
Using this product and any supplied software is at
the Customer’s own risk. Soundiron LLC holds no
responsibility for any direct or indirect loss, harm
or damage of any kind arising from any form of
use of this product.
TERMS
This license agreement is effective from the
moment the product is purchased or acquired by
any means. The license will remain in full effect
until termination by Soundiron, LLC. The license
is terminated if Customer breaks any of the terms
or conditions of this agreement. Upon termination
you agree to destroy all copies and contents of
the product at your own expense. All past,
present and future versions of this
product, including versions sold by companies
other than Soundiron LLC, are covered under the
terms of this agreement.
VIOLATION
Soundiron LLC reserves the right to prosecute
piracy and defend its copyrighted works to the
fullest extent of US and International civil and
criminal law.

21
CREDITS
Production & Recording
Mike Peaslee
Gregg Stephens
Chris Marshall
Scripting & Development
Chris Marshall
Editing, Mixing, Mastering
Mike Peaslee
Gregg Stephens
Sample Programming
Mike Peaslee
Gregg Stephens
Chris Marshall
GUI Design
Chris Marshall
Scott Kane
Artwork
Scott Kane
Darin Leach
Additional Editing & QA
Nathan Boler
Spencer Nunamaker
Craig Peters
Cory Pelizzari
Dominik Spychalski
Photography & Video
Gregg Stephens
Craig Peters
Documentation
Mike Peaslee
Session Coordinator
Alan Kleinschmidt
Recorded At
Fantasy Studios, Berkeley, CA
Conductors
Eugene Chukhlov
Mike Peaslee
Spencer Nunamaker
Violins
Alise Ewan
Cole Perez
Constance Millecan
Emanuela Nikiforova
George Hayes
Jory Funkuchen
Liana Berube
Matthea Rile-Schmidt
Natasha Makhijani
Niki Fukada
Raphael Gold
Sarah Wood
Stephanie Bibbo
Tatiana Freedland
Violas
Clio Tilton
Ilana Matfis
Ivo Bokulic
Jory Funkuchen
Matthea Rile-Schmidt
Melinda Rayne
Nathan Yamamoto
Raphael Gold
Sarah Wood
Cellos
David Wishnia
Hannah Addario-Berry
Leighton Fong
Michelle Kwon
Monica Scott
Basses
Alden Cohen
David Horn
Michael Graham
Robert Ashley

22
Soundiron is a virtual instrument and sound library developer founded in 2011 by sound artists and
instrument designers Mike Peaslee, Gregg Stephens and Chris Marshall. We are based in the San
Francisco Bay area, in California. We are driven every day to capture all of the sonic flavors that this
world has to offer. Our mission is to record them in deep detail and carefully craft them into living-
breathing virtual instruments that inspire you to play and create the music and sound you hear in your
heart. Each library is crafted to deliver the greatest possible realism, outstanding acoustic quality, natural
real-time playability, and intuitive and flexible controls and unique sound-shaping options. We hope
these tools make your composition and sound design work a breeze, so you can spend more time
creating. If you enjoy this instrument, we hope you’ll check out some of our other awesome sound
libraries. If you have any questions or need anything at all, just let us know. We’re always happy to hear
from you at [email protected]!
Thanks from the whole Soundiron team!
THANK YOU!