Embed Size (px)
Citation preview

Chapter01Grasshopper Introduction
Basic ConceptGrasshopper is a graphical algorithm editor. We work on real 2D/3D geometries with Rhino. With Grasshopper, we work on the algo-rithm behind those real geometries.
Basic Concept : Apple Making ProcessIn Rhino
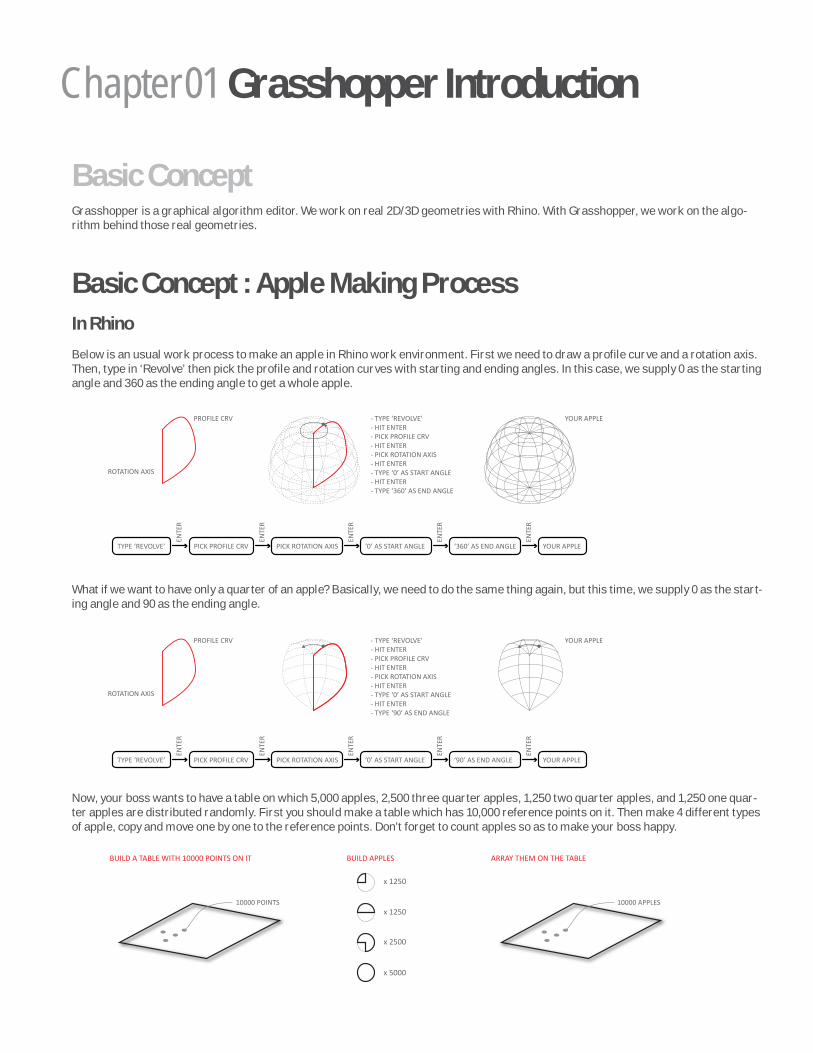
Below is an usual work process to make an apple in Rhino work environment. First we need to draw a profile curve and a rotation axis. Then, type in ‘Revolve’ then pick the profile and rotation curves with starting and ending angles. In this case, we supply 0 as the starting angle and 360 as the ending angle to get a whole apple.
PROFILE CRV - TYPE ‘REVOLVE’- HIT ENTER- PICK PROFILE CRV- HIT ENTER- PICK ROTATION AXIS- HIT ENTER- TYPE ‘0’ AS START ANGLE- HIT ENTER- TYPE ‘360’ AS END ANGLE
ROTATION AXIS
YOUR APPLE
PROFILE CRV - TYPE ‘REVOLVE’- HIT ENTER- PICK PROFILE CRV- HIT ENTER- PICK ROTATION AXIS- HIT ENTER- TYPE ‘0’ AS START ANGLE- HIT ENTER- TYPE ‘90’ AS END ANGLE
ROTATION AXIS
BUILD A TABLE WITH 10000 POINTS ON IT
DO IT AGAIN, OR KILL YOUR BOSS AND GET A NEW JOB
BUILD APPLES
10000 POINTS
x 1250
x 1250
x 2500
x 5000
YOUR APPLE
ARRAY THEM ON THE TABLE
10000 APPLES
TYPE ‘REVOLVE’ YOUR APPLEPICK PROFILE CRV
ENTE
R
ENTE
R
PICK ROTATION AXIS
ENTE
R
‘0’ AS START ANGLE
ENTE
R
‘360’ AS END ANGLE
ENTE
R
TYPE ‘REVOLVE’ YOUR APPLEPICK PROFILE CRV
ENTE
R
ENTE
R
PICK ROTATION AXIS
ENTE
R
‘0’ AS START ANGLE
ENTE
R
‘90’ AS END ANGLE
ENTE
R
What if we want to have only a quarter of an apple? Basically, we need to do the same thing again, but this time, we supply 0 as the start-ing angle and 90 as the ending angle.
PROFILE CRV - TYPE ‘REVOLVE’- HIT ENTER- PICK PROFILE CRV- HIT ENTER- PICK ROTATION AXIS- HIT ENTER- TYPE ‘0’ AS START ANGLE- HIT ENTER- TYPE ‘360’ AS END ANGLE
ROTATION AXIS
YOUR APPLE
PROFILE CRV - TYPE ‘REVOLVE’- HIT ENTER- PICK PROFILE CRV- HIT ENTER- PICK ROTATION AXIS- HIT ENTER- TYPE ‘0’ AS START ANGLE- HIT ENTER- TYPE ‘90’ AS END ANGLE
ROTATION AXIS
BUILD A TABLE WITH 10000 POINTS ON IT
DO IT AGAIN, OR KILL YOUR BOSS AND GET A NEW JOB
BUILD APPLES
10000 POINTS
x 1250
x 1250
x 2500
x 5000
YOUR APPLE
ARRAY THEM ON THE TABLE
10000 APPLES
TYPE ‘REVOLVE’ YOUR APPLEPICK PROFILE CRV
ENTE
R
ENTE
R
PICK ROTATION AXIS
ENTE
R
‘0’ AS START ANGLE
ENTE
R
‘360’ AS END ANGLE EN
TER
TYPE ‘REVOLVE’ YOUR APPLEPICK PROFILE CRV
ENTE
R
ENTE
R
PICK ROTATION AXIS
ENTE
R
‘0’ AS START ANGLE
ENTE
R
‘90’ AS END ANGLE
ENTE
R
Now, your boss wants to have a table on which 5,000 apples, 2,500 three quarter apples, 1,250 two quarter apples, and 1,250 one quar-ter apples are distributed randomly. First you should make a table which has 10,000 reference points on it. Then make 4 different types of apple, copy and move one by one to the reference points. Don’t forget to count apples so as to make your boss happy.
PROFILE CRV - TYPE ‘REVOLVE’- HIT ENTER- PICK PROFILE CRV- HIT ENTER- PICK ROTATION AXIS- HIT ENTER- TYPE ‘0’ AS START ANGLE- HIT ENTER- TYPE ‘360’ AS END ANGLE
ROTATION AXIS
YOUR APPLE
PROFILE CRV - TYPE ‘REVOLVE’- HIT ENTER- PICK PROFILE CRV- HIT ENTER- PICK ROTATION AXIS- HIT ENTER- TYPE ‘0’ AS START ANGLE- HIT ENTER- TYPE ‘90’ AS END ANGLE
ROTATION AXIS
BUILD A TABLE WITH 10000 POINTS ON IT
DO IT AGAIN, OR KILL YOUR BOSS AND GET A NEW JOB
BUILD APPLES
10000 POINTS
x 1250
x 1250
x 2500
x 5000
YOUR APPLE
ARRAY THEM ON THE TABLE
10000 APPLES
TYPE ‘REVOLVE’ YOUR APPLEPICK PROFILE CRV
ENTE
R
ENTE
R
PICK ROTATION AXIS
ENTE
R
‘0’ AS START ANGLE
ENTE
R
‘360’ AS END ANGLE
ENTE
R
TYPE ‘REVOLVE’ YOUR APPLEPICK PROFILE CRV
ENTE
R
ENTE
R
PICK ROTATION AXIS
ENTE
R
‘0’ AS START ANGLE
ENTE
R
‘90’ AS END ANGLE
ENTE
R
Chapter01 Grasshopper Introduction

Your boss is not happy with this. He wants to change the mixing ratio of apples. You have two choices; do it again, or find another job.
PROFILE CRV - TYPE ‘REVOLVE’- HIT ENTER- PICK PROFILE CRV- HIT ENTER- PICK ROTATION AXIS- HIT ENTER- TYPE ‘0’ AS START ANGLE- HIT ENTER- TYPE ‘360’ AS END ANGLE
ROTATION AXIS
YOUR APPLE
PROFILE CRV - TYPE ‘REVOLVE’- HIT ENTER- PICK PROFILE CRV- HIT ENTER- PICK ROTATION AXIS- HIT ENTER- TYPE ‘0’ AS START ANGLE- HIT ENTER- TYPE ‘90’ AS END ANGLE
ROTATION AXIS
BUILD A TABLE WITH 10000 POINTS ON IT
DO IT AGAIN, OR KILL YOUR BOSS AND GET A NEW JOB
BUILD APPLES
10000 POINTS
x 1250
x 1250
x 2500
x 5000
YOUR APPLE
ARRAY THEM ON THE TABLE
10000 APPLES
TYPE ‘REVOLVE’ YOUR APPLEPICK PROFILE CRV
ENTE
R
ENTE
R
PICK ROTATION AXIS
ENTE
R
‘0’ AS START ANGLE
ENTE
R
‘360’ AS END ANGLE
ENTE
R
TYPE ‘REVOLVE’ YOUR APPLEPICK PROFILE CRV
ENTE
R
ENTE
R
PICK ROTATION AXIS
ENTE
R
‘0’ AS START ANGLE
ENTE
R
‘90’ AS END ANGLE
ENTE
R
In Grasshopper
In Grasshopper, you don’t work on the real geometries. Rather, you work on the logic behind the geometries. Once the apple making logic has been set up, you can change parameters such as starting and ending angles. Also you can change the shape of apples by sup-plying different profile curves as well as rotation axis. Or you can make multiple apples out of just one definition by supplying multiple angle values and/or profile/rotation curves to the definition.
PROFILE CRV - TYPE ‘REVOLVE’- HIT ENTER- PICK PROFILE CRV- HIT ENTER- PICK ROTATION AXIS- HIT ENTER- TYPE ‘0’ AS START ANGLE- HIT ENTER- TYPE ‘360’ AS END ANGLE
ROTATION AXIS
YOUR APPLE
TYPE ‘REVOLVE’ YOUR APPLEPICK PROFILE CRV
ENTE
R
ENTE
R
PICK ROTATION AXIS
ENTE
R
‘0’ AS START ANGLEEN
TER
‘360’ AS END ANGLE
ENTE
R
INPUTS
OUTPUTS
PARAMETERS
INPUTS
OUTPUTS
PARAMETERS
SUPLY MULTIPLE INPUTSMODIFY INPUTS
10000 APPLES ARE UNDER YOUR CONTROL
SUPLY MULTIPLE PARAMSMODIFY PARAMS
GRASSHOPPER LEARNING MATERIALCH01.3

Chapter02Interface / Basic Knowledge

InterfaceGrasshopper’s workspace is pretty similar to other windows applications. However, as a history/algorithm editor, it has some unique features like components/parameters, which eventually will be linked to each other to make a working definition.
Interface : WorkspaceMain Menu
File handling, copy/paste, undo/redo, interface/display setting, realtime solution toggle, etc..
Shelves
Shelves are where all Grasshopper objects are listed by categories. Each shelve has its sub tabs which show limited numbers of items. To access to all available components/parameters, click on black title bar at the bottom.
Canvas Tool Bar
Short cuts for some frequently used commands such as ‘zoom extend’, ‘realtime solution on/off toggle’, ‘show/hide toggle’, ‘component on/off toggle’, and ‘bake command button’.
Chapter02 Interface / Basic Knowledge

Canvas
Canvas is the main workspace where you work with lots of component/parameter to make an actual definition. To activate a compo-nent/parameter, click the component/parameter icon on a shelve and drop it on canvas by clicking somewhere on canvas. Once you drop it, you can move, delete, copy or paste as you do in other windows applications. You can also pan/zoom your working canvas with mouse button as you do in Rhino.
Status Bar
Displays information such as errors, warnings, etc..
GRASSHOPPER LEARNING MATERIALCH02.3
Interface : Grasshopper ObjectsGrasshopper objects fall into two major categories, components and parameters, which will be covered later on this tutorial. However, before we move on, it is important to understand how Grasshopper objects are structured.
Structure & Types of Grasshopper Objects
INPUT TAB + INPUT OPTION + BODY + OUTPUT OPTION + OUTPUT TAB
INPUT TAB + BODY + OUTPUT TAB
BODY + OUTPUT OPTION + OUTPUT TAB
INPUT TAB + INPUT OPTION + BODY
INPU
T O
PTIO
NRI
GH
T CL
ICK
TO C
HA
NG
E O
PTIO
NS
INPU
T TA
BIN
PUT
FRO
M O
THER
CO
MPO
NEN
TS
RIG
HT
CLIC
K TO
CH
AN
GE
OPT
ION
SBO
DY
RIG
HT
CLIC
K TO
CH
AN
GE
OPT
ION
SO
UTP
UT
OPT
ION
OU
TPU
T TO
OTH
ER C
OM
PON
ENTS
OU
TPU
T TA
B
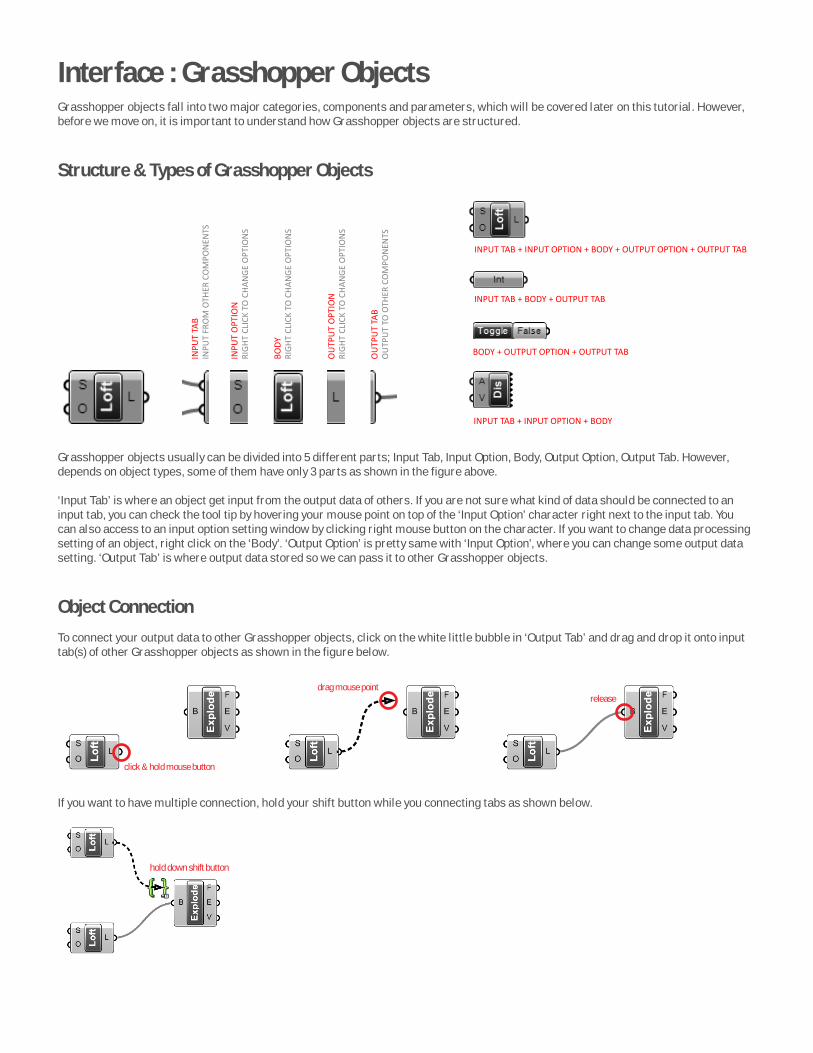
Grasshopper objects usually can be divided into 5 different parts; Input Tab, Input Option, Body, Output Option, Output Tab. However, depends on object types, some of them have only 3 parts as shown in the figure above.
‘Input Tab’ is where an object get input from the output data of others. If you are not sure what kind of data should be connected to an input tab, you can check the tool tip by hovering your mouse point on top of the ‘Input Option’ character right next to the input tab. You can also access to an input option setting window by clicking right mouse button on the character. If you want to change data processing setting of an object, right click on the ‘Body’. ‘Output Option’ is pretty same with ‘Input Option’, where you can change some output data setting. ‘Output Tab’ is where output data stored so we can pass it to other Grasshopper objects.
Object Connection
To connect your output data to other Grasshopper objects, click on the white little bubble in ‘Output Tab’ and drag and drop it onto input tab(s) of other Grasshopper objects as shown in the figure below.
click & hold mouse button
drag mouse pointrelease
If you want to have multiple connection, hold your shift button while you connecting tabs as shown below.
hold down shift button

Object Status
There are couple of different object colors which indicate the status of object.
default status without data
object selected
default status with data
error
preview on
preview off
object on
object off (do not process data)
Basic KnowledgeThere are some background knowledge you should understand before we move on.
Basic Knowledge : Coordination SystemsGrasshopper provides couple of different coordination systems, some of which are familiar with Rhino users.
A. XYZ (WORLD)
X Y
Z
B. UVW (SURFACE)
U
V
W (SURFACE NORMAL)
(0,0,0)
t = 0.0 t = 12.5
t = 37.5
C. L (CURVE/CURVE ON SURFACE)
L = 0.0 L = 0.25
L = 0.75
L = 1.0
CURVE LENGTH = 1 (UNITIZED)
D. t (CURVE/CURVE ON SURFACE)
t = 50
CURVE LENGTH = 50 (REAL SCALE)
GRASSHOPPER LEARNING MATERIALCH02.5

Basic Knowledge : Data MatchingData matching is one of key concepts of most parametric tools. Since a Grasshopper object deal with multiple data from different input sources, we need to have a clear logic on how to match data.
For example, let’s say that we have a Grasshopper object which draws a line out of two input points like below.
We can also supply multiple points to get multiple lines at the same time as below.
What if we have different numbers of points for each input? This may cause problem in drawing lines because the number of input points are not matching. If we set the data matching option as ‘Shortest list’ in option window, Grasshopper will draw lines based on short input list.
Else if we set the data matching option as ‘Longest list’ in option window, Grasshopper will draw lines based on longest input list.
Or we can set the data matching option as ‘Cross reference’ in option window, in case we want to have crazy data matching.

Basic Knowledge : Data Structure (Tree / Branch / List / Item)Grasshopper provides multi-dimensional data structure, which we call ‘Tree’. ‘Tree’ is composed of multiple ‘Branches’. Branches can have sub branches. Only the branches at the lowest hierarchy can have ‘List’. A list is a one-dimensional array containing items with index number.
Let’s say that we have 4 lists, and each of them has 3 items in it. Numbers in round bracket in the figure below is item index number.
(2)
( 2)(2)
(1)
(1)(1)
(2)
(1)
(0)
(0)
(0)
(0)
{0:3}
{0:2}{0:1}
{0:0}
{0}
(2)
( 2)(2)
(1)
(1)(1)
(2)
(1)
(0)
(0)
(0)
(0)
{0:3}
{0:2}{0:1}
{0:0}
{0}
{0}
{0:0}
{0:1}
{0:2}
{0:3}
(0)
(0)
(0)
(0)
(1)
(1)
(1)(1)
(2)
{0:0}(2)
{0:1}(2)
{0:2}(2)
{0:3}(2)
{0:0}(1)
{0:1}(1)
{0:2}(1){0:3}(1)
{0:0}(0)
{0:1}(0)
{0:2}(0)
{0:3}(0)
(2)
(2)
(2)
(2)
( 2)(2)
(1)
(1)(1)
(2)
(1)
(0)
(0)
(0)
(0)
{0:3}
{0:2}{0:1}
{0:0}
{0}
(2)
( 2)(2)
(1)
(1)(1)
(2)
(1)
(0)
(0)
(0)
(0)
{0:3}
{0:2}{0:1}
{0:0}
{0}
Branch is represented as form of numbers separated by semicolons in braces. Numbers in braces represent hierarchy, which means a branch can have any numbers of sub branches. The 4 lists from the diagram above can be mapped onto 4 branches as shown in the figure below like {0;0}, {0;1}, {0;2}, {0;3}. And these branches can be merged as another branch which is represented as {0}.
(2)
( 2)(2)
(1)
(1)(1)
(2)
(1)
(0)
(0)
(0)
(0)
{0:3}
{0:2}{0:1}
{0:0}
{0}
(2)
( 2)(2)
(1)
(1)(1)
(2)
(1)
(0)
(0)
(0)
(0)
{0:3}
{0:2}{0:1}
{0:0}
{0}
{0}
{0:0}
{0:1}
{0:2}
{0:3}
(0)
(0)
(0)
(0)
(1)
(1)
(1)(1)
(2)
{0:0}(2)
{0:1}(2)
{0:2}(2)
{0:3}(2)
{0:0}(1)
{0:1}(1)
{0:2}(1){0:3}(1)
{0:0}(0)
{0:1}(0)
{0:2}(0)
{0:3}(0)
(2)
(2)
(2)
(2)
( 2)(2)
(1)
(1)(1)
(2)
(1)
(0)
(0)
(0)
(0)
{0:3}
{0:2}{0:1}
{0:0}
{0}
(2)
( 2)(2)
(1)
(1)(1)
(2)
(1)
(0)
(0)
(0)
(0)
{0:3}
{0:2}{0:1}
{0:0}
{0}
(2)
( 2)(2)
(1)
(1)(1)
(2)
(1)
(0)
(0)
(0)
(0)
{0:3}
{0:2}{0:1}
{0:0}
{0}
(2)
( 2)(2)
(1)
(1)(1)
(2)
(1)
(0)
(0)
(0)
(0)
{0:3}
{0:2}{0:1}
{0:0}
{0}
{0}
{0:0}
{0:1}
{0:2}
{0:3}
(0)
(0)
(0)
(0)
(1)
(1)
(1)(1)
(2)
{0:0}(2)
{0:1}(2)
{0:2}(2)
{0:3}(2)
{0:0}(1)
{0:1}(1)
{0:2}(1){0:3}(1)
{0:0}(0)
{0:1}(0)
{0:2}(0)
{0:3}(0)
(2)
(2)
(2)
(2)
( 2)(2)
(1)
(1)(1)
(2)
(1)
(0)
(0)
(0)
(0)
{0:3}
{0:2}{0:1}
{0:0}
{0}
(2)
( 2)(2)
(1)
(1)(1)
(2)
(1)
(0)
(0)
(0)
(0)
{0:3}
{0:2}{0:1}
{0:0}
{0}
Below is complete map of data tree structure with one main branch, 4 sub branches, 4 lists, and 12 items.
(2)
( 2)(2)
(1)
(1)(1)
(2)
(1)
(0)
(0)
(0)
(0)
{0:3}
{0:2}{0:1}
{0:0}
{0}
(2)
( 2)(2)
(1)
(1)(1)
(2)
(1)
(0)
(0)
(0)
(0)
{0:3}
{0:2}{0:1}
{0:0}
{0}
{0}
{0:0}
{0:1}
{0:2}
{0:3}
(0)
(0)
(0)
(0)
(1)
(1)
(1)(1)
(2)
{0:0}(2)
{0:1}(2)
{0:2}(2)
{0:3}(2)
{0:0}(1)
{0:1}(1)
{0:2}(1){0:3}(1)
{0:0}(0)
{0:1}(0)
{0:2}(0)
{0:3}(0)
(2)
(2)
(2)
(2)
( 2)(2)
(1)
(1)(1)
(2)
(1)
(0)
(0)
(0)
(0)
{0:3}
{0:2}{0:1}
{0:0}
{0}
(2)
( 2)(2)
(1)
(1)(1)
(2)
(1)
(0)
(0)
(0)
(0)
{0:3}
{0:2}{0:1}
{0:0}
{0}
GRASSHOPPER LEARNING MATERIALCH02.7

Chapter03Parameters / Components
ParametersThere are two major object types in Grasshopper; parameters and components. Parameters usually store data, while components do some action such as creating curves, surfaces, etc. For example, we need at least two curves to make a loft surface. Those curves are stored as form of parameter in Grasshopper, so we can do loft action out of the curves.
Parameters : Geometry / Primitive
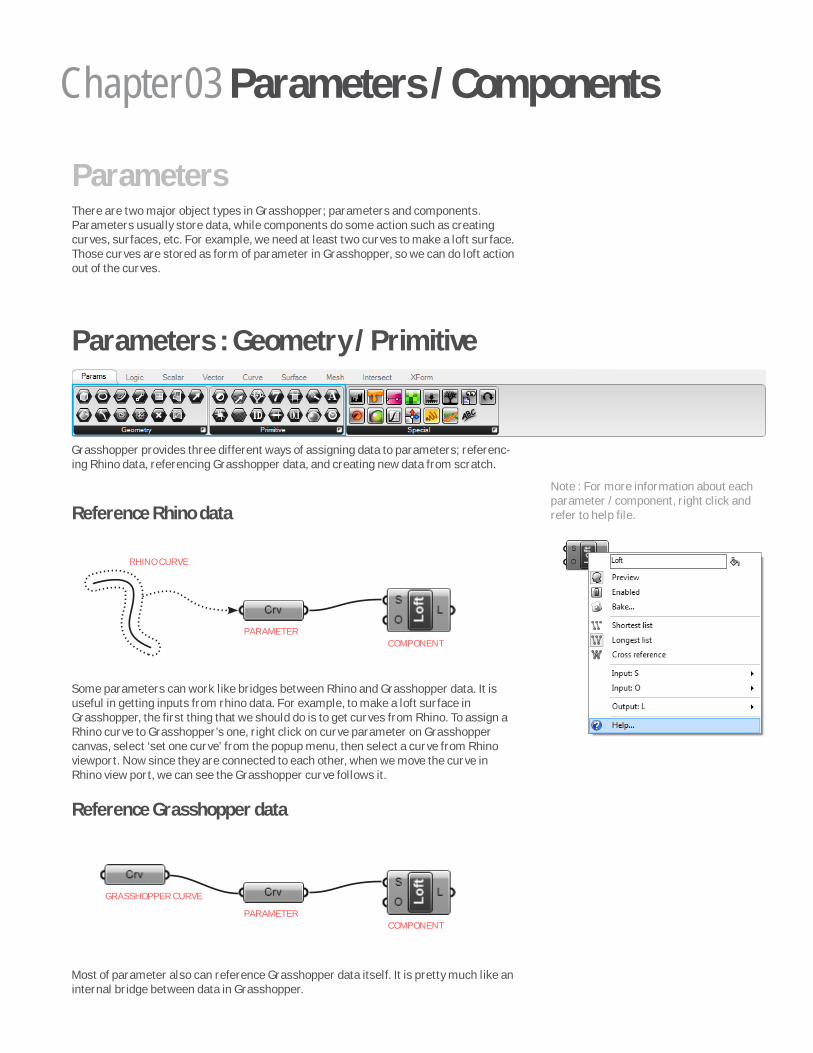
Grasshopper provides three different ways of assigning data to parameters; referenc-ing Rhino data, referencing Grasshopper data, and creating new data from scratch.
Reference Rhino data
RHINO CURVE
PARAMETERCOMPONENT
Some parameters can work like bridges between Rhino and Grasshopper data. It is useful in getting inputs from rhino data. For example, to make a loft surface in Grasshopper, the first thing that we should do is to get curves from Rhino. To assign a Rhino curve to Grasshopper’s one, right click on curve parameter on Grasshopper canvas, select ‘set one curve’ from the popup menu, then select a curve from Rhino viewport. Now since they are connected to each other, when we move the curve in Rhino view port, we can see the Grasshopper curve follows it.
Reference Grasshopper data
PARAMETER
GRASSHOPPER CURVE
COMPONENT
Most of parameter also can reference Grasshopper data itself. It is pretty much like an internal bridge between data in Grasshopper.
Chapter03 Parameters / Components
Note : For more information about each parameter / component, right click and refer to help file.
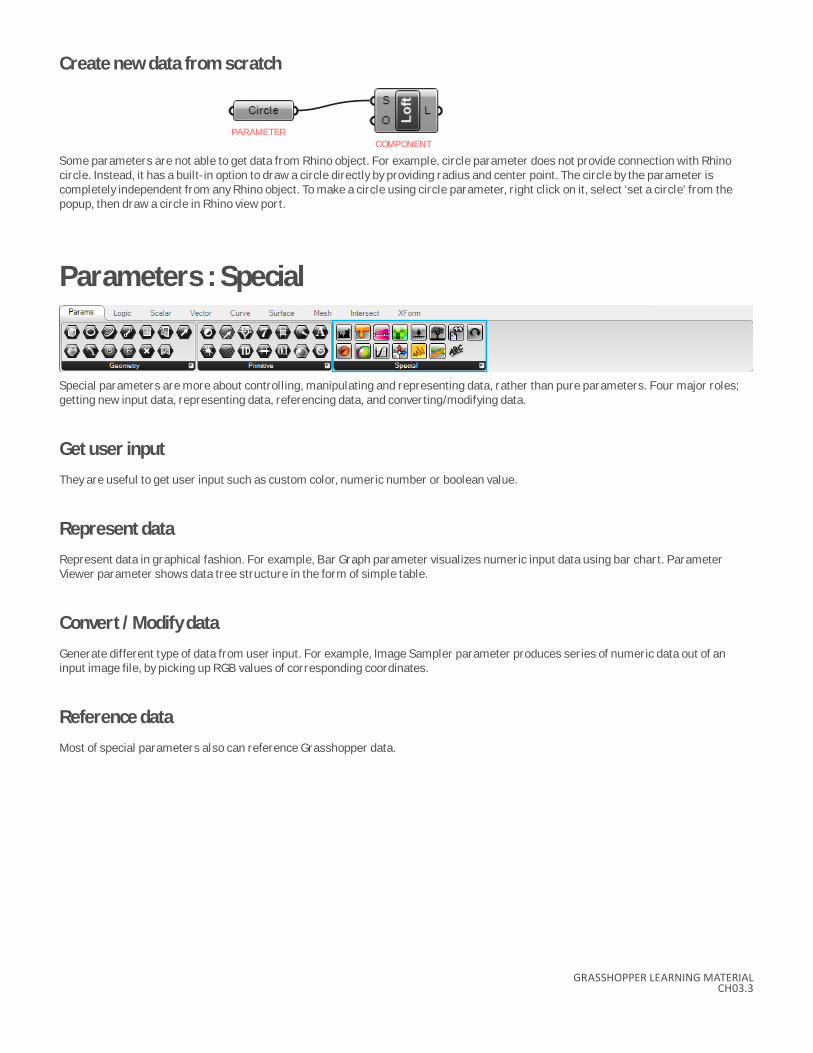
Create new data from scratch
PARAMETERCOMPONENT
Some parameters are not able to get data from Rhino object. For example, circle parameter does not provide connection with Rhino circle. Instead, it has a built-in option to draw a circle directly by providing radius and center point. The circle by the parameter is completely independent from any Rhino object. To make a circle using circle parameter, right click on it, select ‘set a circle’ from the popup, then draw a circle in Rhino view port.
Parameters : Special
Special parameters are more about controlling, manipulating and representing data, rather than pure parameters. Four major roles; getting new input data, representing data, referencing data, and converting/modifying data.
Get user input
They are useful to get user input such as custom color, numeric number or boolean value.
Represent data
Represent data in graphical fashion. For example, Bar Graph parameter visualizes numeric input data using bar chart. Parameter Viewer parameter shows data tree structure in the form of simple table.
Convert / Modify data
Generate different type of data from user input. For example, Image Sampler parameter produces series of numeric data out of an input image file, by picking up RGB values of corresponding coordinates.
Reference data
Most of special parameters also can reference Grasshopper data.
GRASSHOPPER LEARNING MATERIALCH03.3

ComponentsUnlike parameters, components usually do something with input data from parameters or from other components. There are two major actions that components do; data manipulation and geometry creation. For example, some components calculate numeric data operations such as addition, subtraction, multiplication, or division. While some other components do some physical works like creating points, curves or surfaces.
Components : Logic
Logic components are pretty much about data manipulation rather than physical works. They fall into four different categories; List/Sets, Tree, Script, and Boolean. List and Sets components manipulate list data. List data exist in the form of one dimensional array with item index numbers (refer to data tree section). Tree components control data tree itself rather than individual data item in the list (also refer to data tree section). Script components let users to make customized functions as well as components with VB.net / C# lan-guage. Boolean components provide stream control like gate and filters.
List data handling (List / Sets)
List / Sets components deal with list data, one dimensional array of individual items. Every item in the list data has its own item index number starting from 0. For example, let say that we have 4 lists consisting of 3 items. We can retrieve every 2nd items from those lists by ‘List Item’ component. We can also cull every 3rd items from those lists by ‘Cull Nth’ component.
(2)
( 2)(2)
(1)
2nd ITEM INDEX = 1
(1)(1)
(2)
(1)
(0)
(0)
(0)
(0)
{0:3}
{0:2}{0:1}
{0:0}
{0}
(2)
( 2)(2)
(1)
(1)(1)
(2)
(1)
(0)
(0)
(0)
(0)
{0:3}
{0:2}{0:1}
{0:0}
{0}
Tree structure handling (Tree)
Most of tree components deal with tree structure itself. In the previous example, if we want to retrieve 2nd branch, we can do that with ‘Tree Branch’ component.

2nd BRANCH = {0:1}
(2)
( 2)(2)
(1)
(1)(1)
(2)
(1)
(0)
(0)
(0)
(0)
{0:3}
{0:2}{0:1}
{0:0}
{0}
(2)
( 2)(2)
(1)
(1)(1)
(2)
(1)
(0)
(0)
(0)
(0)
{0:3}
{0:2}{0:1}
{0:0}
{0}
Components : Scalar
Scalar components calculate scalar operations such as addition, subtraction, multiplication, and division. Also some of them provide built-in functions like Log, Sine, Max, etc. We can also find some useful constants such as Pi in this shelf. However, the most important ones here is Interval (Domain in the later version of GH).
Interval (Domain)
Interval or domain is usually numeric data which has a starting and ending value. In Grasshopper, all objects with coordinate systems can be seen as domain or interval. For now, Grasshopper provides up to two dimensional domain. Curves could be treated as one dimensional objects which have t or L parameters (refer to the coordinate system section). Also, surfaces could be though of as two dimensional domain with U and V value (also refer to the coordinate system section).
For example, a surface can be subdivided into several pieces by domains. Assume that the dimension of a surface is 10 in U direction and 8 in V direction. Grasshopper recognizes the surface as two dimensional domain; U:0~10 / V:0~8. If we split each domain into two sub domains like U:0~5,5~10 and V:0~4,4~8, we can subdivide the surface into 4 patches.
U DOMAIN : 0 ~ 10
V DOMAIN : 0 ~ 8
U DOMAIN : 0 ~ 10
0 ~ 5
5 ~ 10
V DOMAIN : 0 ~ 8
0 ~ 4
4 ~ 8
GRASSHOPPER LEARNING MATERIALCH03.5

Components : Vector
Vector components create and control vectors, points and planes. This might sound weird because a point does not have direction or magnitude which vectors have in common. However, Grasshopper recognize a point as a vector, precisely as an ending point of a vector. A plane is a vector because it defines origine and three unit vectors (x,y,z) enabling us to use a plane as a sub coordinate system.
POINT (4,2,3)
SUB COORDINATE SYSTEM@ (4,2,3)
X Y
Z
X Y
Z
X’
Y’
Z’
Components : Curve
Curve components fall into three categories; Primitive/Spline, Analysis/Division, and Util. Primitive/Spline components create different types of curve out of input data. Analysis/Division components get points or planes out of curves. Util components modify the property of curves.
Primitive / Spline
Primitive/spline components create curves based on user input. For example, with ‘Curve’ component, we can define a curve out of 4 input points from Rhino.
Analysis / Division
Analysis/Division components produce points or planes as the product of curve analysis/division processes. For example, by supplying a number and an input curve, we can get equidistant points along with the curve.

Util
Utility components do some special operations on curves. For example, we can invert the direction of a curve by ‘Flip Curve’ compo-nent.
Components : Surface
Surface components also fall into three categories; Freeform/Primitive, Analysis, and Util. Freeform/Primitive components create different types of surfaces out of input data such as points, curves, etc.. Analysis components get points or curves out of surfaces. Util components modify the property of surfaces.
Freeform / Primitive
Freeform/Primitive components create surfaces based on user input. For example, with ‘Loft’ component, we can define a surface between multiple curves from Rhino.
Analysis
Analysis components produce points or curves as the product of surface analysis processes. For example, by supplying an UV coordi-nation of a point on a surface, we can get the normal vector of the surface on that point.
Util
Utility components do some special operations on surfaces. For example, we can invert the direction of a surface by ‘Flip’ component.
GRASSHOPPER LEARNING MATERIALCH03.7

Components : Intersect
Intersect components fall into three categories; Boolean, Mathematical/Physical, and Region. Boolean components do boolean opera-tions between closed planar curves as well as Breps. Mathematical/Physical components get points or curves between geometries where they intersect with each other. Region components do trim or split curves with any given geometries.
Boolean
Boolean components are pretty much same as the compound path commands of Adobe Illustrator such as union, intersection and subtraction (difference). They works with only closed planar curves or closed Breps.
Mathematical / Physical
Mathematical and Physical components are basically same in that they get intersecting geometries such as curves or points. However, Physical calculate the intersection based on purely physical characteristics, while Mathematical do it based on the mathematical defini-tion of the geometries. For example, there are a line and a cylinder, and they meet at a point. Physically speaking, they meet at point A. However, mathematically, they intersect at two points. This is because the line is an infinite with a specific inclination when mathemati-cally defined.
Mathematically Defined Linewith Imaginary Line
MATHEMATICAL INTERSECTIONPHYSICAL INTERSECTION
Physically Defined Linewithout Imaginary Line
Region
Region components split/trim curves with closed Breps or curves.

Components : Xform
Xform components fall into two categories; Affine/Euclidian and Morph. These components either transform or deform any given geometries. Affine/Euclidian do basic transform/deform actions such as scaling, rotating or moving geometries. Morph literally deform geometries.
Affine / Euclidian
Besides the difference between Affine and Euclidian transform, they are basic transforming tools available in Grasshopper. They usu-ally need reference points or vector for their 3D operations.
Morph
Morph is one of the most powerful transformation/deformation tools in Grasshopper. For example, we can morph a pre-defined com-ponent into a twisted box on/in between surface(s). If you are familiar with the concept of Rhino Paneling Tools, you will see most of Morph components are pretty much about it.
GRASSHOPPER LEARNING MATERIALCH03.9