Embed Size (px)
Citation preview

Chapter Three
Designing The File System

Chapter Objectives• Describe the components of the NetWare file system
• Describe the purpose of each NetWare-created directory and Novell-suggested directories
• Apply directory design concepts to developing and documenting a directory structure for Universal Aerospace
• Use NetWare Administrator to work with files and directories in the NetWare file system
• Describe drive pointer types and their purpose
• Use Windows along with the MAP command to establish network drive pointers

File System Benefits
• Five Categories– Centralized management of data and backups– Improved security– Improved reliability and fault tolerance– Shared and private storage areas– Access to data by many different operating
system platforms

File System Components
• Volumes
• Directories and subdirectories
• Files

File System Components

Volumes
• With NSS, balanced tress (B-trees) have replaced the File Allocation Table (FAT).
• Data is stored on NetWare volumes in blocks.
• Suballocation allows data from multiple files to be stored in the same block.

Volume Disk Space Options

Block Suballocation

Volumes
• When file compression is enabled, the server will compress all files that haven’t been used for a specified time period.
• Expand an existing volume by adding a disk drive to the system and spanning the volume.

Viewing Volume Information
• Three methods– Server Console commands (described later)– DOS Commands
• NLIST
• NDIR
– NetWare Administrator

Viewing Volume Information
• Using NDIR

Activities - Using NDIR
• In the first activity you will use the NLIST command to list volume information stored in the NDS tree.
• In the second activity you will use the NDIR command to view physical volume information.

Viewing Volume Information
• NDS and the File System are two separate environments.
• Using NetWare Administrator you can view and work either NDS tree objects or file system objects. – File system objects are access through volume objects.
– It is important to be aware of which environment you are working with when using NetWare Administrator.
Activity - View Volume Information
• In this activity you will use NetWare Administrator to view both NDS and physical volume information.

Directories and Subdirectories
• Required Directories– LOGIN
• Files available before logging in
– PUBLIC• Files available after logging in
– SYSTEM• Files available only to the network supervisor

Directories and Subdirectories
• Other System Directories– ETC– DOC– MAIL– DELETED.SAV

Directories and Subdirectories
• Suggested Directories– Application Directories– Shared Directories– User home Directories– DOS Directories

DOS Directories

Establishing the Directory Structure
• Define Processing Needs

Establishing the Directory Structure
• Designing the Volume Directory Structure

Establishing the Directory Structure
• Designing the Detailed Directory Structure

Application Oriented Structure

Establishing the Directory Structure
• Create the Structure– Create Directories with NetWare Administrator– Create Directories from Windows Explorer– Create Directories from the DOS prompt
• Establish Space Limitations– Prevents a directory and its subdirectories from
exceeding the space planned for it.

Activity - Creating Directories
• In this activity you will use NetWare Administrator to create the directories shown in figures 3-10 and 3-11.

Activity - Setting Space Limitations
• In this activity you will use NetWare Administrator to establish the space limitations defined in Table 3-1 for each of the directories you have created.

Working with Network Files
• Copying Files– NetWare Administrator– Windows 95/98– The NCOPY Command
• Moving Directories
• Copying and Removing Directories
• Renaming Directories

Activities - Working with Files
• In the first three activities you will learn how to copy files using NetWare Administrator, Windows Explorer, and the NCOPY command.
• In the fourth activity you will use NetWare Administrator to move a directory structure.
• In the last two activities you will learn how to use NetWare Administrator to copy, remove, and rename directories.

Viewing File Information
• You can view NetWare file system information using in a number of ways.– Network Neighborhood
• Double-click the server and volume objects.
• Right-click the directory or file and select Properties.
– Windows Explorer• Double-click the network drive letter.
• Right-click the directory or file and select Properties.
– NetWare Administrator
– The NDIR command line utility

The NetWare Info tab
• From the Properties window of Network Neighborhood or Explorer you can click the NetWare tab to access NetWare file dates and attributes.

The NetWare Rights tab
• From the Properties window of Network Neighborhood or Explorer you can click the NetWare Rights tab to access view or change a user’s rights to a directory or file..

File System Rights
• Read (R) - Open and read data or run a program.
• Write (W) - Change the contents of data in existing files.
• Delete (E) - delete files or remove folders.
• Create (C) - Create new files or folders.
• Modify (M)- Rename files and change attributes.
• File Scan (F)- See directory and file names.
• Access Control (A)- Assign access rights to users.
• Supervisor (S)- All of above. Applies to all folders.

Activity - Accessing File Info
• In this activity you will use Windows Network Neighborhood to view statistics about the NetWare file system as well as change user access rights in your folders.

Using NDIR
• Access File System Information using Windows or DOS-based NDIR command– Print Directory Information
• NDIR [path] [/S] > PRN
– Sort File Information• NDIR [path] [/SORT [SI AC OW]]
– List Selected Files• NDIR [path] [/SI GR value] [/AC BEF date]

Activities - Using NDIR
• Printing Directory Information– In this activity you will use options to view a directory structure, access
rights and the amount of space used by a directory structure.
• Printing File Information– In this activity you will use options of the NDIR command to viewdate
information and find a file.
• Sorting File Information– In this activity you will use the SORT option of the NDIR command to sort
file lists by name, access date, and owner.
• Listing Selected Files– In this activity you will use options to list files selected by access date, size,
owner, or a combination of parameters.

Activity - Salvage Files
• When files are deleted from a NetWare server there contents are kept until the server needs the disk space and are then used in a last deleted last used order.
• In these activities you will learn how to use the salvage option of Network Neighborhood to restore deleted files.– In the first activity you will delete all files with the .FRM
extension from your Forms directory.
– In the second activity you will use Network Neighborhood to browse to your ##Corp directory and then Right-click forms and select the Salvage Option.

Activity - Purging Files
• For security purposes or to more quickly make disk space available to the server, you can choose to purge directories and files.
• In this activity you will use the Purge Files option from Network Neighborhood to purge all deleted files from your Utility directory.

Drive Pointers
• Local Drive Pointers are usually designated A-E
• Network Drive Pointers are usually designated F-Z
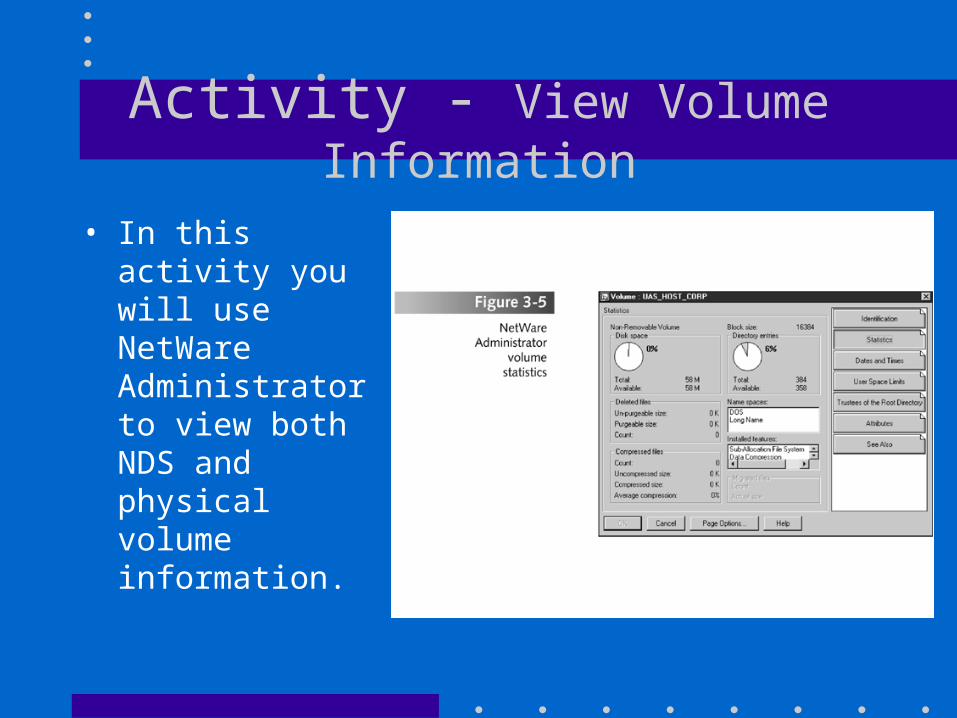
Network Drive Pointers
• Regular Drive Pointer– Shows all directories and subdirectories leading
to the storage area.
• Root Drive Pointer– The path does not show.– The drive letter appears as if it starts at the root
of the volume.

Regular and Root Drive Pointers

Search Drives
• Regular or Root Drive Pointers that have been added to the DOS path. Search drives are used to find software that is not located in the workstation’s current default directory.

Drive Letter Usage

Planning Drive Mappings
• Typical drive pointers for each user should include the following (usually no more than five)– Drive pointer to the root of each volume– Root drive pointer to the user’s home directory– Root drive pointer to the user’s workgroup
directory– Application drive pointers

Universal Aerospace Pointer Usage

Suggested Drive Pointer Assignments
• F drive pointer to the SYS volume
• G drive pointer to the root of the CORP volume
• H drive pointer to the user’s home directory
• L drive pointer to each user’s workgroup
• Search drive pointers for the SYS:Public directory and utility programs

Establishing Drive Pointers
• From login scripts.– Use the MAP command.
• From Windows.– Use Windows Explorer or Network
Neighborhood.– Reconnect at login
• From the DOS command prompt or batch files.

Activity - Mapping From Windows
• In this activity you will practice using Windows to assign drive pointers by assuming you are at Kellie’s workstation and applying the drive pointer usage chart developed in Table 3-2.

Specifying Network Paths
• Physical volume name contains the NetWare server name, a backslash, and the volume name
• A Relative Path begins from the current directory and leads to the desired file or subdirectory

The MAP Command
• A command-line utility used to create, modify, and delete regular and search drive pointers.– MAP [root] drive:=[path]
• Use [root] option to make the drive a root mapping.
– MAP NEXT [path]• Assigns the next available drive letter to the path.
– MAP [ins] S#:=[path]• Search drive mapping, replace # with value 1-16

Activities - Using MAP Commands
• In the first activity you will learn how to use the MAP command to view, create, and remove regular and root drive pointers.
• In the second activity you will use the MAP command to insert and delete search drives.

Directory Map Objects• An NDS object used to stores the physical path to a
directory in the NDS tree.
• Makes path available to multiple user and container login scripts.
• Provides simplified maintenance of drive mappings by allowing changes to the path to be made in only one location.
• Users must be given file system access rights to the directory as well as NDS rights to read the path property of the Directory Map Object.

Activity - Using Directory Map Objects
• In this activity you will use NetWare Administrator to create a directory map object named EngData that points to the Engineering shared directory. You will then use the Directory Map object along with a MAP command to map a drive letter to the Engineering shared directory.

Activity - Using Login Scripts
• A major use of login scripts is to establish drive mappings.
• In this activity you will user NetWare Administrator to establish a login script for your username and then log in and verify that the drive mappings you specified are established.

Chapter Summary
• The volume is the physical storage medium on the network and is comparable to a file cabinet
• Each server is required to have a minimum of one volume named SYS consisting of at least 300 MB

Chapter Summary
• The Login, Public, and System directories are created by NetWare during installation
• Login directory contains files necessary to log into the network
• Public directory contains program commands and utilities that can be used after logging on

Chapter Summary
• Files are used to store network data and software
• NetWare Administrator, Windows Explorer, and the NDIR command may be used to list file information
• One of the jobs of a network administrator is to plan the directory structure

Chapter Summary
• Many network administrators use multiple volumes to provide space for many directories
• Local drive pointers, such as those for hard disks and CD-ROMS, use letters A-E
• Network drive pointers use letters F-Z

Chapter Summary
• It is important to establish standards for drive pointer usage

![NetWare 6.5 オペレーティングシステムのインストールIslandcenter.jp [ ] Customized NetWare Server [※]Basic NetWare File Server [ ]Pre-Migration Server [ ]DNS/DHCP](https://img.dokumen.tips/doc/110x75/60d32e68047fd6547244d3a6/netware-65-fffffffffff-islandcenterjp.jpg)