Embed Size (px)
Citation preview
Impress Guide
Chapter 9 Slide ShowsTransitions, animations, and more

Copyright
This document is Copyright © 2010–2014 by the LibreOffice Documentation Team. Contributors are listed below. You may distribute or modify it under the terms of either the GNU General Public License (http://www.gnu.org/licenses/gpl.html), version 3 or later, or the Creative Commons Attribution License (http://creativecommons.org/licenses/by/4.0/), version 4.0 or later.
All trademarks within this guide belong to their legitimate owners.
ContributorsElliot Turner Jean Hollis Weber Peter Schofield
FeedbackPlease direct any comments or suggestions about this document to the Documentation Team’s mailing list: [email protected]
Note: Everything you send to a mailing list, including your email address and any other personal information that is written in the message, is publicly archived and cannot be deleted.
AcknowledgmentsThis chapter is based on Chapter 9 of the OpenOffice.org 3.3 Impress Guide. The contributors to that chapter are:
Peter Hillier-Brook Nicole Cairns Jean Hollis WeberClaire Wood Michele Zarri
Publication date and software versionPublished 14 August 2014. Based on LibreOffice 4.2.
Note for Mac users
Some keystrokes and menu items are different on a Mac from those used in Windows and Linux. The table below gives some common substitutions for the instructions in this chapter. For a more detailed list, see the application Help.
Windows or Linux Mac equivalent Effect
Tools > Options menu selection
LibreOffice > Preferences Access setup options
Right-click Control+click and/or right-click depending on computer setup
Open a context menu
Ctrl (Control) ⌘ (Command) Used with other keys
F5 Shift+⌘+F5 Open the Navigator
F11 ⌘+T Open the Styles and Formatting window
Documentation for LibreOffice is available at http://www.libreoffice.org/get-help/documentation

Contents
Copyright.............................................................................................................................. 2Contributors................................................................................................................................. 2
Feedback..................................................................................................................................... 2
Acknowledgments........................................................................................................................ 2
Publication date and software version......................................................................................... 2
Note for Mac users...............................................................................................................2
Creating a slide show.......................................................................................................... 4Basic settings............................................................................................................................... 4
Slide Show options.................................................................................................................. 5
Hiding slides................................................................................................................................ 6
Showing slides in a different order............................................................................................... 7Custom slide show.................................................................................................................. 7Editing, deleting, or copying a custom slide show................................................................... 8
Using slide transitions.........................................................................................................8Adding transitions........................................................................................................................ 8
Removing transitions................................................................................................................. 10
Setting timing of automatic slide changes.................................................................................. 10Default timing........................................................................................................................ 10Variable timing....................................................................................................................... 10Auto repeat............................................................................................................................10
Playing sounds........................................................................................................................... 11
Using animation effects.....................................................................................................11Applying animation effects......................................................................................................... 11
Changing animation effects........................................................................................................13
Removing animation effects....................................................................................................... 14
Additional options for animation effects......................................................................................14Effect page options................................................................................................................14Timing page options.............................................................................................................. 15Text animation page options.................................................................................................. 16
Examples of animation effects................................................................................................... 16Using multiple animation effects............................................................................................ 16Setting up a motion path....................................................................................................... 18
Using interactions..............................................................................................................18
Slide shows........................................................................................................................ 19Running a slide show................................................................................................................. 19
Right-click navigation and options..............................................................................................20
Using the Presenter Console..................................................................................................... 20
Slide Shows 3

Creating a slide show
LibreOffice Impress gives you the tools to organize and display a slide show, including:
• Which slides to show and in what sequence
• Whether to run the show automatically or manually
• Transitions between slides
• Animations on individual slides
• Interactions: what happens when you click a button or link
• A presenter console
Most tasks associated with putting together a slide show are best done in Slide Sorter view. Go to View > Slide Sorter on the main menu bar or click the Slide Sorter tab at the top of the Workspace pane. All of your slides appear in the workspace.
Basic settingsBasic settings for a slide show include which slide to start from, the way you advance the slides, the type of presentation, and pointer options.
1) Go to View > Slide Sorter on the main menu bar, or click on the Slide Sorter tab in the Workspace.
2) Go to Slide Show > Slide Show Settings on the main menu bar to open the Slide Show dialog (Figure 1).
Figure 1: Slide Show dialog
3) Select the options you want to use for your slide show. See “Slide Show options” on page 5for more information on options.
4) Click OK to save your changes and close the dialog.
4 Slide Shows

Slide Show optionsIn the Range section, select which slides to include in the slide show:
• All slides – includes all slides except for those slides marked Hidden (see “Hiding slides” on page 6). Slides are shown in the sequence they occur in the file. To change the sequence, either rearrange the slides in the slide sorter or choose a custom slide show (see below).
• From – starts the show at a slide other than the first slide. For example, you might have several slides at the beginning that describe you and your company, but when you present this show to your work colleagues, you may want to skip that introduction.
• Custom Slide Show – shows the slides in a different sequence that you have previously set up. This setting is not available until you have set up a custom slide show (see “Showing slides in a different order” on page 7). You can set up as many different custom shows as you wish from one set of slides and they will appear in the drop-down list under this option.
In the Type section, select how the slides will be displayed:
• Default – shows the slides full screen without the LibreOffice program controls visible and exits the show after the last slide.
• Window – runs the slide show in the Impress window and exits the show after the last slide.
• Auto – restarts the slide show after the last slide. A pause slide is displayed between the last slide and the start slide. Press the Esc key to stop the show. In the box, specify the length of time before the show restarts. If you enter zero, the show restarts immediately without showing a pause slide. The Show Logo option shows the LibreOffice logo on the pause slide.
In the Options section:
• Change slides manually – prevents slides from changing automatically even if an automatic transition has been set up.
• Mouse pointer visible – shows the mouse pointer during a slide show. If you do not have a laser pointer or other device to highlight items of interest during the show, this can be useful.
• Mouse pointer as pen – enables you to write or draw on slides during the presentation. Anything you write with the pen is not saved when you exit the slide show. The color of the pen cannot be changed.
• Navigator visible – displays the Navigator during the slide show. For more information on the Navigator, see Chapter 1 Introducing Impress in this guide.
• Animations allowed – displays all frames of animated GIF files during the slide show. If this option is not selected, only the first frame of an animated GIF file is displayed. This hasnothing to do with the slide animations described in “Using animation effects” on page 11.
• Change slides by clicking on background – advances to the next slide when you click on the background of a slide. You can also press the spacebar on the keyboard to advanceto the next slide.
• Presentation always on top – prevents any other program window from appearing on top of the presentation.
In the Multiple displays section:
• You can select which display to use for full screen slide show mode. Only available if the current computer desktop is displayed on more than one monitor.
• If the current desktop is displayed on only one monitor, or if the multiple-display feature is not supported on the current system, you cannot select another display.
• By default the primary display is used for slide show mode.
Creating a slide show 5

• Presentation Monitor – select a monitor to use for full screen slide show mode. If the system allows to span a window over all available monitors, you can also select All monitors and the presentation spans over all available monitors.
Note
The multiple displays setting is not an option saved with the presentation file, but is instead saved as a local setting in the user configuration. This means that if you openthe presentation on a different computer the local settings for that computer are applied.
Hiding slidesYou may not want to show all of the slides in a particular slide show. You can either hide some of the slides or set up a custom slide show; whichever method suits your requirements. For example, you may have draft slides that you do not want to show until they are finished, or you may have some slides that contain information for yourself, but not your audience.
To hide a slide:
1) In the Slides pane, or in Slide Sorter view, select the slides that you want to hide.
2) Click the Hide Slide icon on the Slide View toolbar (Figure 2), or right-click and select Hide Slide from the context menu, or go to Slide Show > Hide Slide on the main menu bar. The slide is now displayed grayed out to indicate that it is hidden (Figure 3). The slide is not deleted and remains in the file. The Hide Slide icon is only active when a slide is selected in your presentation.
Figure 2: Slide View toolbar
Figure 3: Slide 2 is hidden
To show a hidden slide:
1) In the Slides pane, or in Slide Sorter view, select the hidden slides that you want to show.
2) Click the Show Slide icon on the Slide View toolbar (Figure 2), or right-click and selectShow Slide from the context menu, or go to Slide Show > Show Slide on the main menu bar. The Slide Show icon is only active when the hidden slides are selected in your presentation.
6 Slide Shows

Showing slides in a different orderTo show the slides in a different order, you can either rearrange them in the slide sorter, or set up acustom slide show. You can define as many custom slide shows as you require from one set of slides.
In a custom slide show, you can select which slides to include as well as the order in which they are shown. Any hidden slides will not appear in a custom show.
Custom slide showTo set up a new custom slide show:
1) Go to Slide Show > Custom Slide Show on the main menu bar to open the Custom Slide Shows dialog (Figure 4).
Figure 4: Custom Slide Shows dialog
2) Click on New and the Define Custom Slide Show dialog opens (Figure 5).
Figure 5: Define Custom Show dialog
3) Type a name for the new custom show in the Name text box.
4) In the Existing slides list, select the slides to include in the show. Click the >> button to include the slides in the Selected slides list. In Figure 5, the first two slides have been selected.
5) You can select and include several slides at the same time. Hold down the Shift key and click the first and last slide in a group to select that group, or hold down the Ctrl key and click on individual slides to select them.
Creating a slide show 7

6) When you have finished arranging the order of the slides, click OK to save this custom show and return to the Custom Slide Shows dialog.
7) To activate a custom show, select it in the list in the Custom Slide Shows dialog box and then select the Use Custom Slide Show option.
Note
If you include several slides at the same time, they are added to the Selected slides list in the order they appear in your presentation regardless of the order in which you selected them. To put the selected slides in a different order, either select and includeeach slide individually or select a slide and drag it up or down in the selected slide list. You can also use the Slide Sorter view to rearrange the order of slides before making your selection.
Tip
Slides are added to the Selected slides list after the slide that is currently highlighted in the list. By default, the last slide added is highlighted unless you have selected a different one. For example, in Figure 5, to add the slide Final Slide Example after the First Slide Example and before Slide2, make sure that First Slide Example is highlighted before moving Final Slide Example into Selected slides list.
Editing, deleting, or copying a custom slide show1) To edit a custom slide show (add, remove, or change the order of slides, or change the
name of the show), select it in the Custom Slide Shows dialog (Figure 4) and click Edit.
2) To delete a custom slide show, select it in the Custom Slide Shows dialog and click Delete. Deletion is immediate and no confirmation message appears.
3) To create a copy of a slide show, select it in the Custom Slide Shows dialog and click Copy.You can now edit the copy by renaming and adding, removing, or changing the order of slides in it.
4) You can preview your custom slide show from the Custom Slide Shows dialog if the Use Custom Slide Show option is selected. Select the slide show from the list and click on Start.
5) When you have finished working with custom slide shows, click OK to save all changes and close the Custom Slide Shows dialog.
Using slide transitions
Slide transitions are the effects that take place between slides when slides change in a presentation. Transitions can add a professional look to a slide show, smoothing the change over between slides.
Adding transitions
1) In the Sidebar, select the Slide Transition icon to open the Slide Transition section (Figure 6).
2) In the Slides pane or Slide Sorter view, select the slides to which you want to apply the transition. If you want the transition to apply to all slides, do not select any slides.
3) In the Apply to selected slides list, select a transition.
8 Slide Shows

Figure 6: Sidebar Slide Transition section
4) Modify the selected transition by changing the speed or adding a sound, in the Modify transition section. If you decide to play a sound during transitions, select a sound from the Sound list.
5) If a sound is selected, the Loop until next sound option becomes active. Select this option to play the sound repeatedly until another sound starts. If there are no subsequent sounds in your slide show, the selected sound will play continuously for the remainder of the show.
6) Select how to advance to the next slide: manually (On mouse click) or automatically (Automatically after). If you select an automatic advance, you can specify how long the slide remains visible before it automatically advances to the next slide.
7) If you want the transition to apply to all slides, click Apply to All Slides.
8) To start the slide show from the current slide so you can check your transitions, click Slide Show.
9) If the Automatic preview checkbox is marked, the effect of a selected transition is immediately displayed in the work area. You can replay the effect at any time by clicking Play.
Using slide transitions 9

Tip
You can apply a single type of transition to all slides in the presentation or apply a different transition to any single slide in the slide show. While using many different transitions may be fun to do, it may not give your slide show a professional appearance.
TipIf you want most of the slides in your slide show to have the same transition and only use a few different transitions, you may find it easier to apply one transition to all slides and then change only the ones you want to be different.
Removing transitions1) Select the slides from where you want to remove the transitions.
2) Select No Transition in the Slide Transition list on the Tasks pane.
Setting timing of automatic slide changesYou can set up a slide show to run automatically, either unattended or while you speak.
Default timingTo set the default time for slides to be displayed before changing to the next slide:
1) In the Sidebar, select the Slide Transition icon to open the Slide Transition section (Figure 6).
2) Leave the transition effect set to No Transition.
3) Select Automatically after in the Advance slide section.
4) Set a time and click Apply to All Slides.
Variable timingTo vary the timing for some of the slides in your slide show:
1) Select Slide Show > Rehearse Timings from the main menu, or click the Rehearse
Timings icon on the Slide Show toolbar. The slide show begins in full-screen mode and a timer appears in the lower left corner of the display.
2) When you want to advance to the next slide, click the timer. To keep the default setting for this slide, click the slide and not the timer.
3) Continue until you have set the timing for all slides in your presentation. Impress records the display time for each slide. When you next look at the time set under Automatically after, you will see that the times have changed to match what you set when rehearsing.
4) To exit from the rehearsal, press the Esc key or right-click on the slide and select End Show from the context menu.
Auto repeatIf you want the whole presentation to auto-repeat:
1) Open the Slide Show dialog (Figure 1) by going to Slide Show > Slide Show Settings on the main menu bar.
2) Click Auto and set the timing for the pause between slide shows.
3) Select Show logo if you want the LibreOffice logo to show during the pause between slide shows.
10 Slide Shows

4) Click OK to save the settings and close the dialog.
Playing soundsYou can use the Slide Transition pane to select a sound or song that is played throughout your presentation.
1) Select the slide where you want the sound to start.
2) In the Sidebar, select the Slide Transition icon to open the Slide Transition section (Figure 6).
3) In the Modify transition section, select Other sound from the Sound drop-down list.
4) Navigate to where the sound file is located in the Open dialog that opens.
5) Select the sound file you want to use and click Play to check if the sound file is suitable.
6) If the sound file is suitable, click Open.
7) Select Loop until next sound if you want the sound to restart once it is finished.
NoteDo not click the Apply to all button; otherwise your selected sound will restart at every slide.
Note
The sound file is linked to a presentation rather than embedded. Therefore if you planto display the presentation on a different computer, remember that you also have to make the sound file available on the computer where the presentation will be played, and re-establish the link to the sound file before starting the slide show.
Using animation effects
Slide animations are similar to transitions, but they are applied to individual elements in a single slide: title, chart, shape, or individual bullet point. Animations can make a presentation more lively and memorable. Just as with transitions, heavy use of animations can be fun, but distracting and even annoying for an audience expecting a professional presentation.
Animation effects are applied from Normal view so that you can select individual objects on a single slide.
Note
At present it is not possible to apply animation effects to the slide master elements. This means that if you want to display the items in a text box one by one, and use thesame animation on more than one slide, you need to apply the effects to each slide, or alternatively copy the text box from one slide to another.
Applying animation effectsIn Normal view, display the desired slide and then select the text or object you want to animate. An object such as a graphic or an entire text box will have selection handles around it when selected. If you choose only a portion of the text in a text box, you may not see any selection handles.
1) Go to View > Normal on the main menu bar, or click on the Normal tab in the Workspace.
Using animation effects 11

Figure 7: Sidebar Custom Animation section
2) Select the slide and the object you want to apply the animation effect to.
3) In the Sidebar, select Custom Animation icon to open the Custom Animation section(Figure 7).
4) Click Add to open the Custom Animation dialog (Figure 8).
5) Select the animation effect types from one of the tabbed pages on the Custom Animation dialog. More than one type of animation effect can be applied to an object.
a) Use the Entrance page to be apply an animation effect when an object is placed on the screen.
b) Use the Emphasis page to apply an animation effect to an object, for example changingfont color, or adding special effects such as blinking text.
c) Use the Exit page to apply an animation effect when an object leaves the screen.
d) If you want the object to move along a line or curve, select an animation effect from the Motion Paths page. An example of this type of animation is provided in “Setting up a motion path” on page 18.
6) Select the duration of the animation effect from the Speed drop down list.
7) If required, select Automatic preview so you can check the animation effect on the object.
12 Slide Shows

Figure 8: Custom Animation dialog
8) Click OK to apply the animation effect and close the dialog. Each object that has had an animation effect applied to it appears in the list on the Custom Animation section on the Sidebar.
9) Select an animated object in the list and then select from the Start drop list how the animation effect starts.
a) On click − the animation does not start until you click the mouse.
b) With previous − the animation runs at the same time as the previous animation.
c) After previous − the animation runs as soon as the previous animation ends.
10) With the animated object still selected in the list, select a direction on how the object appears on the slide from the Direction drop list. The options available in this drop down list may change depending on the type of animation effect being used.
11) If necessary and with the animated object still selected in the list, change the speed of the animation effect using the Speed drop list.
12) If necessary, change the order of the animation list by selecting an animated object and click on the Move Down or Move Up arrows.
13) Click Play to check how the animation effect looks on the slide.
14) Click Slide Show to check how your presentation runs and looks.
Changing animation effects1) On the Custom Animation section on the Tasks pane, select the animation effect.
2) Click Change, then follow “Applying animation effects” above.
Using animation effects 13

Removing animation effects1) On the Custom Animation section on the Tasks pane, select the animation effect.
2) Click Remove.
Additional options for animation effectsMany animation effects have properties or options that you can set or change. That actual properties or options that will be available will depend on which animation effect you have selected.
1) On the Custom Animation section on the sidebar, select an animated object from the list.
2) Click the Effect Options icon to the right of the Direction drop down list to open the Effect Options dialog.
3) Click on a tab to open the options for the type of effect options you want to change and use.
a) Effect – Specifies the settings and enhancements of the selected animation effect (Figure 9).
b) Timing – specifies the timing for the selected animation effect (Figure 10).
c) Text Animation – specifies how the text is animated for the selected animation effect (Figure 11).
4) Click OK to save your changes and close the dialog.
Figure 9: Effect Options dialog – Effect page
Effect page optionsSpecifies the settings and enhancements for the current effect (Figure 9).
• Direction – specifies the direction for the effect.
• Sound – select a sound from the drop down list or select one of the special entries.
– (No sound) – no sound is played during animation of the effect.
– (Stop previous sound) – the sound of the previous effect is stopped as soon as the current effect runs.
– Other sound – displays a file open dialog to select a sound file.
• Play sound – clicking on this icon to the right of the Sound drop down list to play the selected sound file.
14 Slide Shows

• After animation – select a color to be shown after the animation ends, or select another after-effect from the list.
– Dim with color – after the animation a dim color fills the shape.
– Don't dim – no after-effect runs.
– Hide after animation – hides the shape after the animation ends.
– Hide on next animation – hides the shape on the next animation.
• Dim color – select the dim color. Only available if Dim with color has been selected.
• Text animation – select the animation mode for the text of the current shape:
– All at once – animates the text all at once.
– Word by word – animates the text word by word.
– Letter by letter – animates the text letter by letter.
• Delay between characters – specifies the percentage of delay between animations if Word by word or Letter by letter has been selected for text animation.
Figure 10: Effect Options dialog – Timing page
Timing page optionsSpecifies the timing for the current effect (Figure 10).
• Start – displays the start property of the selected animation effect.
– On click – the animation stops at this effect until the next mouse click.
– With previous – the animation runs immediately.
– After previous – the animation runs as soon as the previous animation ends.
• Delay – specifies an additional delay of n seconds until the effect starts.
• Speed – specifies the duration of the effect.
• Repeat – specifies whether and how to repeat the current effect. Enter the number of repeats, or select from the list:
– none – the effect is not repeated.
– Until next click – the animation is repeated until the next mouse click.
– Until end of slide – the animation repeats as long as the slide is displayed.
• Rewind when done playing – specifies whether to let the animated shape return to its starting state after the animation ends.
Using animation effects 15
• Animate as part of click sequence – specifies whether to let the animation start in the normal click sequence.
• Start effect on click of – specifies whether to let the animation start when a specified shape is clicked. Select the shape by its name from the list box.
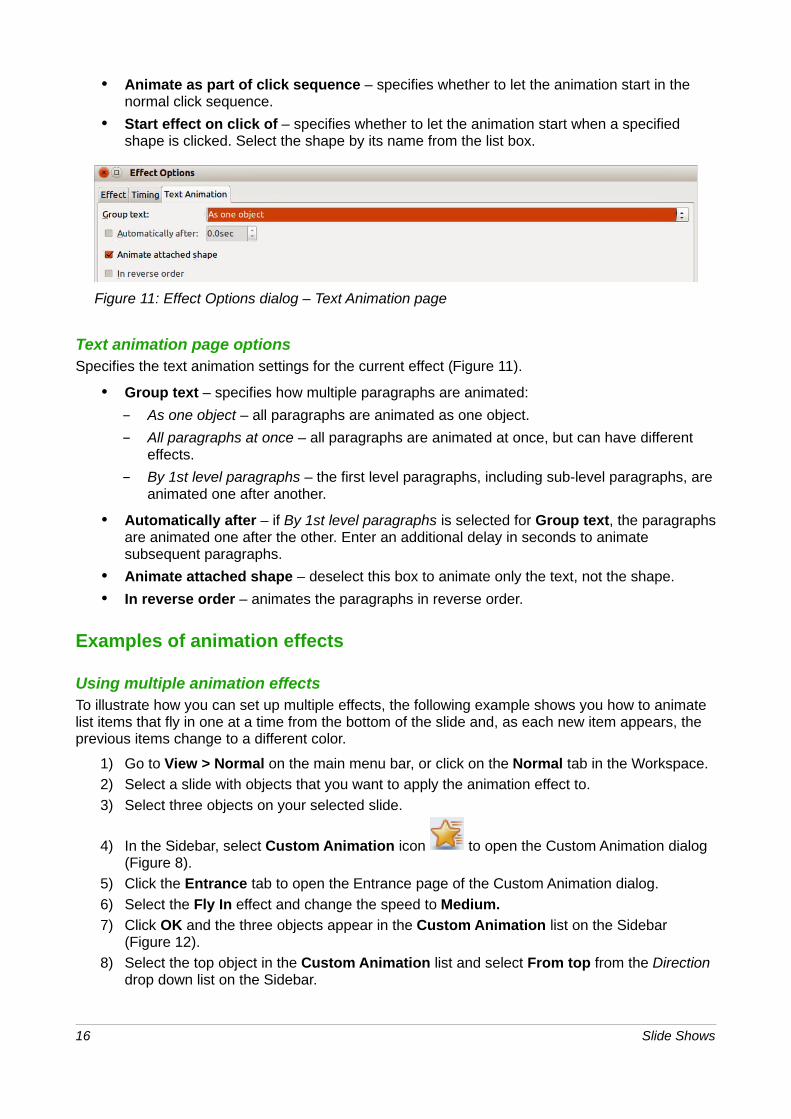
Figure 11: Effect Options dialog – Text Animation page
Text animation page optionsSpecifies the text animation settings for the current effect (Figure 11).
• Group text – specifies how multiple paragraphs are animated:
– As one object – all paragraphs are animated as one object.
– All paragraphs at once – all paragraphs are animated at once, but can have different effects.
– By 1st level paragraphs – the first level paragraphs, including sub-level paragraphs, areanimated one after another.
• Automatically after – if By 1st level paragraphs is selected for Group text, the paragraphsare animated one after the other. Enter an additional delay in seconds to animate subsequent paragraphs.
• Animate attached shape – deselect this box to animate only the text, not the shape.
• In reverse order – animates the paragraphs in reverse order.
Examples of animation effects
Using multiple animation effectsTo illustrate how you can set up multiple effects, the following example shows you how to animate list items that fly in one at a time from the bottom of the slide and, as each new item appears, the previous items change to a different color.
1) Go to View > Normal on the main menu bar, or click on the Normal tab in the Workspace.
2) Select a slide with objects that you want to apply the animation effect to.
3) Select three objects on your selected slide.
4) In the Sidebar, select Custom Animation icon to open the Custom Animation dialog (Figure 8).
5) Click the Entrance tab to open the Entrance page of the Custom Animation dialog.
6) Select the Fly In effect and change the speed to Medium.
7) Click OK and the three objects appear in the Custom Animation list on the Sidebar (Figure 12).
8) Select the top object in the Custom Animation list and select From top from the Direction drop down list on the Sidebar.
16 Slide Shows

Figure 12: Example of animated points
9) Select the second object in the Custom Animation list and select From right from the Direction drop down list on the Sidebar.
10) Select the last object in the Custom Animation list and select From bottom from the Direction drop down list on the Sidebar.
11) With the last object still selected, click on the Add Effect icon on the Sidebar to open the Custom Animation dialog (Figure 8).
12) Click the Emphasis tab to open the Emphasis page of the Custom Animation dialog.
13) Select Change Font Color and click OK to save this animated effect.
14) From the Start drop down list on the Sidebar, select After previous.
15) From the Font color drop list on the Sidebar, select the color you want to use for the emphasis.
16) In Figure 12, the three animation effects are now indicated with icons and these indicator show what type of animated effect has been added to thee objects.
17) To test the animation effects, make sure all the objects are selected and click on the
Preview Effect icon on the Sidebar.
Using animation effects 17

Setting up a motion pathA motion path effect moves an object along a path consisting of a combination of straight and curved lines. Several pre-packaged motion paths are provided in LibreOffice, but it is not difficult tocreate your own custom path as follows. You can also combine a motion path with other animation effects such as spinning or changing of size or colors to create dramatic effects.
1) Select the object you want to animate.
2) Click on the Add Effect icon in the Sidebar to open the Custom Animation dialog (Figure 8).
3) Click the Motion Paths tab to open the Motion Paths page of the Custom Animation dialog.
4) Select a pre-packaged motion path animation that is similar to the effect you want to obtain.Alternatively use the Polygon or Curve animation effect to create a new motion path.
5) Select the object to show the animation path, which is displayed as a thin gray line with triangles showing the end points of the motion path.
6) Click on the animation path so that selection handles are displayed around it. When the selection handles are shown, you can move or resize the path the same way you would perform these operations on an object.
NoteWhen moving a path, remember to also move the object on that path; otherwise the animation will start with a jump. Currently it is not possible to rotate a path.
7) While the path is selected. select the Points icon on the Drawing toolbar or press the F8 key to display the Edit Points toolbar (Figure 13). If is not displayed, go to View > Toolbars > Edit Points on the main menu bar. The number of icons available in the Edit Points toolbar will depend on the type of motion path and object selected.
Figure 13: Edit Points toolbar and icons
8) Once a point is selected, you can delete the point, move the point, or add another point andso on. For a detailed explanation on how to manipulate the points on a curve, see the DrawGuide.
9) When you are satisfied with the shape of the curve and its speed, click anywhere on the screen to deselect the object and continue normal editing.
10) To test the motion path, click Preview Effect icon on the Sidebar to start the animation.
Using interactions
Interactions are things that happen when you click on an object in a slide. They are typically used with buttons or images, but text objects can also have interactions.
To apply an interaction to an object (or change an interaction applied to an object):
1) Select the object, then right-click on the object and select Interaction from the context menu, or go to Slide Show > Interaction on the main menu bar to open the Interaction dialog (Figure 14).
2) Select an interaction from the Action at mouse click drop-down list. With some interactions, the Interaction dialog changes to offer more options.
18 Slide Shows

3) Click OK to save your changes and close the dialog.
Figure 14: Interaction dialog
TipA sound interaction can be also applied using the Effect Options dialog See “Additional options for animation effects” on page 14 for more information.
Slide shows
Running a slide showTo run a slide show:
1) Open your presentation using LibreOffice Impress.
2) Press the F5 key, or go to Slide Show > Slide Show on the main menu bar, or click the Slide Show icon on the Presentation toolbar or the Slide Sorter toolbar.
3) If the slide transition is set to Automatically after x seconds, let the slide show run by itself.
4) If the slide transition is set to On mouse click, press the down arrow key, the right arrow key, or the Page Down key on the keyboard, click the left mouse button, or press the Spacebar.
5) To navigate backwards through the slide show one slide at a time, press the up arrow key, the left arrow key, or the Page Up key.
6) For more complex navigation during the slide show, use the right-click navigation (see “Right-click navigation and options” below).
7) When you advance past the last slide, the message Click to exit presentation... appears. Click the left mouse button or press any key to exit the presentation.
8) To exit the slide show and return to the Impress workspace at any time, including at the endof the slide show, press the Esc key.
NoteAny custom animations on a slide are run in the specified order when performing oneof the above actions while running the slide show.
Slide shows 19

Right-click navigation and optionsIf your presentation consists of more than one slide, right-clicking anywhere on the screen brings up a context menu. The options are as follows:
• Next – moves to the next slide in the defined sequence.
• Previous – moves to the previous slide in the defined sequence.
• Go to Slide – displays a submenu allowing to quickly select and navigate to any slide in the presentation. Options on the submenu include First slide, Last Slide, or any slide in the presentation and illustrates why giving the slides meaningful names, rather than leaving them at the default Slide 1, Slide 2, and so on, can be very helpful.
• Mouse pointer as Pen – allows you to use the cursor as a pen and draw on a slide to emphasize or explain a point.
• Pen Width – adjusts the width of any lines drawn when using the cursor as a pen.
• Change pen Color – allows you to change the color of any line when using the cursor as apen.
• Erase all ink on Slide – deletes all lines drawn after you have finished using the cursor as a pen.
• Screen – displays a submenu with two options. Each option blanks the screen, showing it as either all black or all white. This can be useful if you want to pause the show for awhile, perhaps during a break or to demonstrate something on another computer.
• End Show – ends the presentation and returns you to the Impress workspace. This is the same effect as pressing the Esc key.
Using the Presenter ConsoleMost installations of LibreOffice Impress come with the Presenter Console extension built in. If it is not included, you can also get the extension and install it as described in Chapter 11, Setting up and Customizing Impress.
The Presenter Console (Figure 15) provides extra control over slide shows when using dual displays for a slide show, such as a laptop for yourself and large display or projector for your audience.
The view you see on your computer display includes the current slide that can be seen by the audience, the next slide in your presentation, any slide notes, and a presentation timer.
NoteThe Presenter Console works only on operating systems that support two displays, and only when two displays are connected (one may be the laptop display).
20 Slide Shows
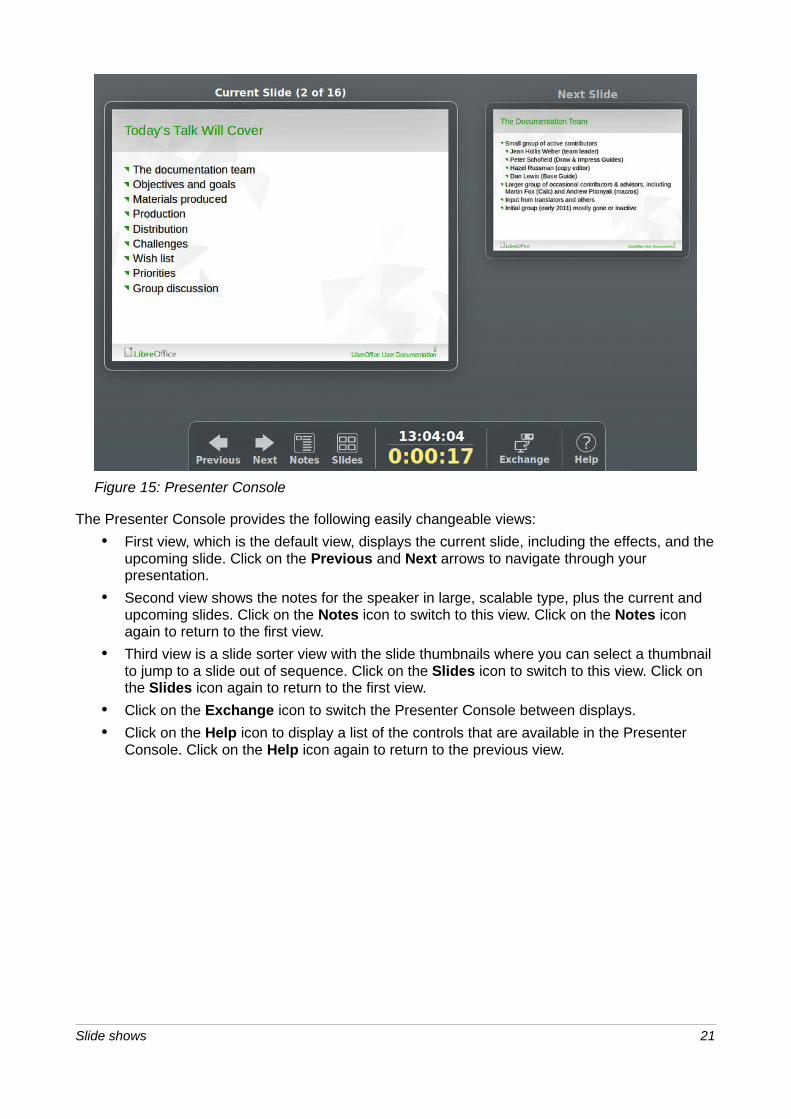
Figure 15: Presenter Console
The Presenter Console provides the following easily changeable views:
• First view, which is the default view, displays the current slide, including the effects, and theupcoming slide. Click on the Previous and Next arrows to navigate through your presentation.
• Second view shows the notes for the speaker in large, scalable type, plus the current and upcoming slides. Click on the Notes icon to switch to this view. Click on the Notes icon again to return to the first view.
• Third view is a slide sorter view with the slide thumbnails where you can select a thumbnail to jump to a slide out of sequence. Click on the Slides icon to switch to this view. Click on the Slides icon again to return to the first view.
• Click on the Exchange icon to switch the Presenter Console between displays.
• Click on the Help icon to display a list of the controls that are available in the Presenter Console. Click on the Help icon again to return to the previous view.
Slide shows 21