Embed Size (px)
Citation preview

Chapter 9
Client-Side Scripting: Javascript
For a Web page, HTML supplies document content and structure while CSS provides pre-
sentation styling. In addition, client-side scripts can control browser actions associated with
a Web page. Scripts are programs written in a simple and easy-to-use language to specify
control of other programs. Client-side scripts are almost always written in the Javascript
language to control browsers actions.
Tasks performed with client-side scripts include:
• Asking the browser to display information
• Making the Web page different depending on the browser and browser features
• Monitoring user events and specifying reactions
• Generating HTML code for parts of the page
• Modifying a page in response to events
• Checking correctness of user input
• Replacing and updating parts of a page
• Changing the style and position of displayed elements dynamically
395
396 CHAPTER 9. CLIENT-SIDE SCRIPTING: JAVASCRIPT
Client-side scripting can make Web pages more dynamic and more responsive. We will see
how Javascript is used in combination with other Web constructs for user interface purposes.
The emphasis is in applying Javascript in practice rather than studying it as a programming
language.
What Is Javascript?
Javascript is a widely used scripting language originally developed by Netscape for both
client-side and server-side scripting. The language is becoming an international standard,
approved by the European standards body ECMA (ECMA-262) in 1997 and later by the
ISO in 1998. Client-side Javascript is used widely and supported well by major browsers
including NN, IE, AOL, MOZILLA, and Opera. We shall present client-side Javascript for
adding dynamism and interactivity to Web pages and will refer to it simply as Javascript.
Contrary to what the name might suggest, Javascript programs are not written in Java
which is actually another programming language. Javascript programs are embedded in Web
pages and executed by browsers that provide the host environment or execution context.
Javascript code can generate HTML code to be included in the page and perform tasks
in reaction to certain events. The host environment supplies document objects, browser
objects, and Javascript built-in objects for script manipulation. These objects can represent
the entire document and well-defined parts in it, for example, windows, buttons, menus, pop-
ups, dialog boxes, text areas, anchors, frames, history, cookies, and input/output. Objects
provide useful methods, functions contained in the objects, for various purposes.
The host environment also provides a means to connect scripting code with events such
as focus and mouse actions, page and image loading, form input and submission, error and
abort. Scripting code can also perform computation as the page is loading. Thus, the
displayed page is the result of a combination of HTML, CSS, and Javascript actions.
Brooks/Cole book/January 28, 2003

9.1. GETTING STARTED 397
Figure 9.1: Javascript Generated Page
9.1 Getting Started
Javascript is an object-oriented language and many constructs are similar to those in C++
or Java.
Let’s look at our first Javascript program (Ex: Date) which generates some simple HTML
code for a page.
<head><title>Javascript Demo</title>
<link rel="stylesheet" href="date.css" type="text/css" />
</head><body>
<p>Go <em>Web Design and Programming</em> teams!</p>
<p>You are using <span class="blue">
<script type="text/javascript"> // (1)
var d = new Date(); // (2)
var time = d.getHours() +":"+ d.getMinutes()+"."; // (3)
var agent = navigator.userAgent; // (4)
document.write(agent + " and the time is "
+ time + "</p>"); // (5)
</script></span></p>
<p>Do you know where your project is?</p>
</body></html>
The <script> element (line 1) contains the Javascript code and the type attribute is re-
quired. Text lines enclosed in the <script> element are treated as program code of the given
type and not to be displayed.
The variable d is set to a Date object (line 2) created by the operator new followed by
the constructor call Date(). A constructor is a function you call to obtain new objects. The
Brooks/Cole book/January 28, 2003

398 CHAPTER 9. CLIENT-SIDE SCRIPTING: JAVASCRIPT
getHours and getMinutes methods of Date are used to construct the time string (line 3).
Simple Javascript statements are terminated by a semicolon (;). Comments are either from
// to end of line or enclosed by /* and */.
In Javascript a string literal is given inside double quotes (lines 3 and 5). The operator
+ concatenates strings and objects, such as numbers, to stings. The variable agent is set to
the name of the user agent (browser) executing this program and the name is obtained from
the userAgent attribute of the built-in navigator object (line 4).
The write method of the document object inserts the given string into the HTML code
of the document where the <script> element is located (line 5). The Javascript generated
content is displayed in blue (Figure 9.1).
This simple example gives an idea of Javascript programming. Learning Javascript in-
volves understanding its syntax, semantics, objects and methods, the host environment
provided by the browser, events and even handling, and effective applications in practice.
Let’s first look at how Javascript code are deployed in a Web page.
9.2 Embedding Javascript in a Web Page
A Javascript program usually consists of various code parts that cooperate to do the job.
Where and how to place code in a Web page depend on the purpose of the code. But
generally, the code can appear either in <script> elements or as values of event-handling
attributes of HTML tags. Any number of script elements can be placed in head, body,
block and inline elements. Place a script in the head element unless it generates document
content, as in Ex: Date.
• Code for defining functions or creating data structures are placed in <script> elements
inside the page’s <head> element.
• Code for generating HTML to be displayed as part of the page are placed in <script>
elements inside the <body> where the generated code will be inserted.
Brooks/Cole book/January 28, 2003

9.2. EMBEDDING JAVASCRIPT IN A WEB PAGE 399
• Code for actions triggered by events are given as values of event attributes of HTML
tags. The code is usually a function call or a few short statements. The onfocus,
onblur, onclick, onmouseover, and onmouseout are examples of event attributes.
A Javascript program often works for not one but a set of pages. In that case, it is better
to place the code in a separate file. The file can then be attached to a Web page as follows:
<script type="text/javascript" src="file.js"></script>
The src attribute of <script> gives the URL of the program file. Note we used the conven-
tional .js file name suffix.
With file inclusion, any corrections or improvements in the .js file will be reflected in
multiple pages automatically. Furthermore, a browser will download the program only once,
reducing download time for these pages. Older browsers that do not support client-side
scripting will ignore the <script> tag and the program file will not be included. If the code
is placed in the <script> tag, then the following construct is often used to avoid the code
being mistaken as page content by older browsers:
<script type="text/javascript">
<!--
var d = new Date;
...
// -->
</script>
Few modern browsers do not support Javascript. To make code easier to read, examples in
this text do not employ this code hiding technique.
The <noscript> ... </noscript> element can be given after the <script> element to
supply alternative content for non-scripting browsers. But it is seldom useful.
Brooks/Cole book/January 28, 2003

400 CHAPTER 9. CLIENT-SIDE SCRIPTING: JAVASCRIPT
9.3 A Brief History of Javascript
In 1995, Netscape initiated an effort to create a language to make the Java support in its
browsers more accessible to non-programmers. The easy-to-use scripting language developed
by Brendan Eich and his group at Netscape was first named “LiveScript” and then changed
to “JavaScript” as it was released in December 1995. The name is a source of confusion for
many years to come.
Javascript got popular and widely used by Web designers mainly to add interactivity
to pages through image swapping (rollovers). Microsoft responded to Javascript in part by
releasing its own VBScript language. Microsoft also released an ill-fated Windows port of
Javascript called “JScript”, in July 1996.
As the popularity of Javascript grew, the problem of cross-platform compatibility becomes
a big issue. In November 1996, Netscape and Sun began to standardize the language with
the help of ECMA, the European Computer Manufacturers Association. The ECMAScript
(ECMA-262), approved by ECMA in 1997, standardized the core Javascript language and
leaves its host environment to provide browser and document objects. ECMAScript was also
approved by ISO in 1998.
Now the only thing that stands in the way of a powerful, easy-to-use, and platform inde-
pendent client-side scripting language is incompatible object models in host environments.
Browser vendors and others, working with the W3C, are converging to the W3C DOM (Doc-
ument Object Model) as the standard for implementing objects to represent documents in
applications (Section 10.5).
With standardized core language features and host environments, Javascript promises to
be the language of choice, in combination with XHTML, CSS, and DOM (Chapter 10), to
deliver dynamism and interactivity for the Web.
Brooks/Cole book/January 28, 2003

9.4. ROLLOVERS 401
Figure 9.2: Image Rollover
9.4 Rollovers
One of the most frequent applications of Javascript is to switch images on mouseover events.
It provides a nice responsiveness to Web pages and users like the effect. A basic oollover
is simple. Take two images (Figure 9.2), dragon1.jpg on the left and dragon2.jpg on the
right. We want to display the first image, the base image, in a page, switch it to the second
image, the mouseover image, when the mouse is over the image, then switch back to the
base image when the mouse leaves the image.
Most often, rollovers are used to enliven a hyperlink. To achieve the effect, we define
actions connected to the onmouseover and onmouseout events of a hyperlink element <a>
anchored on an image or text to be rolled over. For example (Ex: Rollover),
<a href="index.html"
onmouseover="document.getElementById(’icon’).src=’dragon2.jpg’" (A)
onmouseout="document.getElementById(’icon’).src=’dragon1.jpg’" (B)
><img src="dragon1.jpg" id="icon" (C)
style="border: none" width="225" height="42"
alt="Entry Icon" />
</a>
The action for onmouseover (line A) is a Javascript expression that sets the source at-
tribute for the icon element in the document object to dragon2.jpg, the second image.
The getElementById method of the document object is handy to obtain any element by
giving its id. The name icon is the id (line C) we have given to the image element1 The
onmouseout action simply switches the images again. Clicking on the image leads to the
target page.
1XHTML has no name attribute for img which old browsers may still use for naming an image.
Brooks/Cole book/January 28, 2003
402 CHAPTER 9. CLIENT-SIDE SCRIPTING: JAVASCRIPT
In general, you can give one or more Javascript statements (separated by ;) inside double
quotes to define the action in response to an event.
onSomeEvent="st1; st2; ... "
To avoid long Javascript code in an element tag, it is good practice to define an event
handling function and simply call that funciton.
To achieve the rollover on an image that may or may not be a link, simply put the
onmouseover and onmouseout attributes in the img tag instead2 (Ex: ImgRoll).
<img onmouseover="this.src=’dragon2.jpg’" (D)
onmouseout="this.src=’dragon1.jpg’" (E)
src="dragon1.jpg" id="icon"
style="border: none" width="225" height="42"
alt="Dragon Icon" />
Note the use of the symbol this to refer to the img element itself (lines D and E).
9.5 Preloading Images
The responsiveness of a rollover depends on the speed the images are swapped. The loading
of the second image is triggered by the mouseover event and can cause a significant delay
when it happens for the first time. To avoid this annoying sluggishness, we should keep
rollover image files small and also preload them right after the page is loaded.
To load an image is simple with Javascript. Simply create a new Image object and set
its src attribute to the image URL. This causes the image to download across the Internet.
Once loaded, an image displays immediately upon request. When called, loadImage loads
the image given by the url:
<script type="text/javascript">
function loadImage(url)
{ if (document.images) // if browser supports images
{ img = new Image(); // obtains a new image object
2Older browsers do not support event handling attributes for the img tag.
Brooks/Cole book/January 28, 2003
9.6. ACTIVE NAVIGATION BARS 403
img.src = url; // downloads the image
return img;
}
}
</script>
The script is placed inside the <head> element.
The loadImage function is triggered by the onload event on body which occurs immedi-
ately after page loading completes. of the body element:
<body onload="loadImage(’dragon2.jpg’)"> (F)
The call (lines F) download the mouseover image for the rollover (Ex: Preload). Because
the mouseout image dragon1.jpg has already been loaded as part of page loading, it does
not need to loaded again. With image preloading, the HTML code in Section 9.4 remain
working, only faster. The effect of preloading is increased when more than one mouseover
images are involved.
9.6 Active Navigation Bars
A well-designed navigation system is essential for any website with more than just a few
pages. Designing a handsome and functional main navigation bar for major pages can help
the site’s usability, visual appeal, and unity.
Such a navigation bar often involves image-based links. Making these rollovers provides
much appreciated interactivity. But, we need to do more than putting the same navigation
bar on selected pages. If there is a link on the bar pointing to the current page, that link
must be deactivated and appear distinctive. Users can be confused or annoyed if clicking
on a link leads to the same page, as if something was wrong. The distinct looking link also
serves as an identifier for the current page, clearly marking the page being displayed. We
shall refer to this as the page-id image. Thus, a rollover navigation link normally involves a
set of three images: base, mouseover, and page-id.
Brooks/Cole book/January 28, 2003
404 CHAPTER 9. CLIENT-SIDE SCRIPTING: JAVASCRIPT
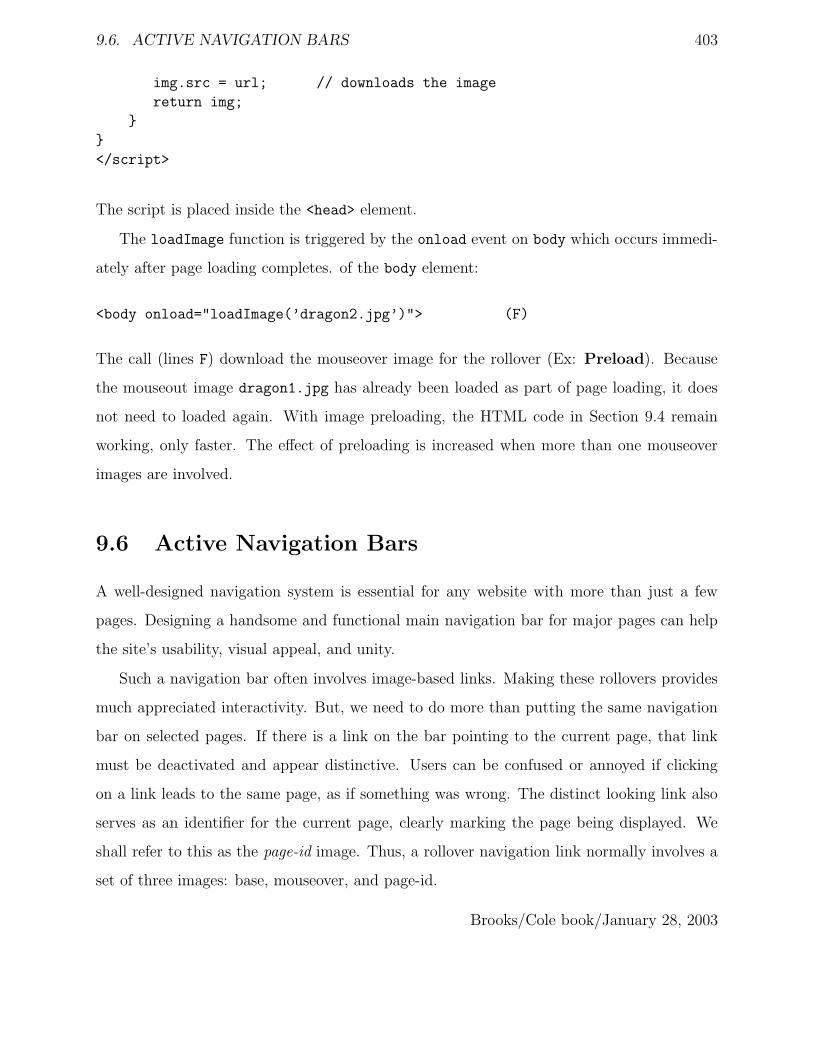
Figure 9.3: Main Page Navbar Actions
With Javascript rollovers, we present a solution that is simple and effective. Figure 9.3
shows how the olive background marks the current page, how it follows the mouse cursor in
the navbar, and how it disappears when the cursor reaches Main page, a self-link purposely
rendered inactive.
The implementation of this navbar (Ex: StdNavbar) makes it easily customizable and
reusable for your Web projects:
• Each page linked on the navbar is given a pageId and is placed in a file pageId .html.
• Each entry on the navbar is an anchored image whose id attribute is set to its pageId .
The image rolls over with a mouseover and a mouseout image whose names are directly
derived from the pageId , such as pageId over.gif and pageId out.gif.
The navbar itself is a one-column table where each row entry has the same structure and
represents an image anchored link. The entry for the main.html page is:
<tr><td align="left" valign="top">
<a href="javascript:toPage(’main’);" (1)
onmouseover="over(’main’)" (2)
onmouseout="out(’main’)"> (3)
<img id="main" alt="main" (4)
src="images/mainout.gif" width="130"
height="25" style="border: none" />
</a>
</td></tr>
Brooks/Cole book/January 28, 2003

9.6. ACTIVE NAVIGATION BARS 405
We see the pageId main (line 1) is passed to the mouseover event handler over (line 2),
and the mouseout event handler out (line 3) defined in the file stdnavbar.js which also
contains the function toPage called by the hyperlink (line 1):
function toPage(pageid)
{ if ( pageid != myid )
{ window.location = pageid + ".html"; }
}
where the variable myid has been set to the pageId of the current page. Thus, this function
loads the destination page only if it is not the page itself. The browser built-in window object
represents the current Web page and contains its URL location as well as other elements
(Section 9.12). In general, the code
window.location = url;
loads a new page given by the url. The toPage function assumes that these pages are in the
same directory. It is a simple matter to generalize this program to allow pages located in
different directories.
The row navbar entry for the service.html page is the same as the preceding entry
with the character sequence main replaced by service everywhere. The row entries for
other pages on the navbar table are made the same way.
File stdnavbar.js
Code in the file stdnavbar.js enable the desired rollover actions to work. It is included in
each page with
<script type="text/javascript" src="stdnavbar.js"></script>
inside the <head> element.
The stdnavbar.js is our first substantial Javascript program. We will go through this
example carefully to explain the Javascript code and how the program makes the navbar
work.
The Javascript file begins with customizable constants and functions:
Brooks/Cole book/January 28, 2003

406 CHAPTER 9. CLIENT-SIDE SCRIPTING: JAVASCRIPT
/////// stdnavbar.js ///////
// Customize imgDir, pageIds, imgSuffix,
// and image file names
// imgDir: relative URL of image dir constant
const imgDir="images/";
// imgSuffix: image file suffix constant
const imgSuffix = ".gif";
// pageIds: a constant array of page ids
const pageIds= [ "home", "main", "service", "contact" ];
// Image file names
// overImg returns a mouseover image URL
function overImg(pageid)
{ return imgDir + pageid + "over." + imgSuffix;
}
// outImg returns a mouseoout image URL
function outImg(pageid)
{ return imgDir + pageid + "out." + imgSuffix;
}
/////// No customization necessary beyond this line ///////
Edit the values of these variables and the definition of the overImg and outImg functions to
suit your Web project.
Arrays
The pageIds is an array. Javascript arrays can be created in the following ways:
var a = new Array(arrayLength);
var b = new Array(element0 , element1 , ..., elementN );
var c = [element0 , element1 , ..., elementN ];
where c is a read-only array. The length of an array is recorded in its length attribute (for
example c.length). Array elements can be set and retrieved with
Brooks/Cole book/January 28, 2003

9.6. ACTIVE NAVIGATION BARS 407
a[0] = "first";
a[1] = "second";
var value = b[6];
The index runs from 0 to length − 1. Accessing an undefined array entry gives the value
undefined. Assigning to an element beyond the end of the array increases its length. Array
methods include:
pop() (removes and returns last element)
shift() (removes and returns 1st element, ex: e=a.shift())
unshift(e1,e2,...) (inserts elements in front and returns new length)
push(e1,e2,...) (inserts elements at end and returns new length)
concat(arr2, ...) (joins the given arrays to the array and returns a new array)
reverse() (changes the array itself to go backwards)
Document Images
The document object represents aWeb page and contains elements in it. The document.images
is an array of Image objects each representing an image introduced by an img element
in the document source code. If the browser does not support images (very few), then
document.images is undefined. The src attribute of an Image object records the URL of
the image file for this image. An image will be loaded when its src is set to an URL. This
is how the loadImage function works.
function loadImage(url)
{ if ( document.images ) // (5)
{ img = new Image(); // (6)
img.src = url; // (7)
return img;
}
}
The function causes image downloading by creating a new image object (line 6) and setting
its src attribute (line 7). The function also returns the image object. But, it does all this
Brooks/Cole book/January 28, 2003

408 CHAPTER 9. CLIENT-SIDE SCRIPTING: JAVASCRIPT
only if the browser supports images (line 5). If document.images is null (or undefined),
and the Web page is known to contain images, then the browser does not support images.
Javascript considers null or undefined to be false in logical tests.
The next function calls loadImage on each mouseover image (line 9) to preload it so the
navbar is ready to rollover. The for loop (line 8) works in the usual C++/Java fashion.
var imgLoaded = false; // flag
function preloadImages()
{ if (document.images) // if defined
{ for (var i=0; i < pageIds.length; i++) // (8)
{ loadImage(overImg(pageIds[i])); // (9)
}
imgLoaded = true;
}
if (document.images[myid])
{ document.images[myid].src = overImg(myid); // (10)
}
}
The function also sets the imgLoaded flag and makes the current-page link stand out with
its mouseover image (line 10). Note how an image is accessed with its name attribute as
the images array index (line 10). Image preloading is triggered by the onload event of the
<body> element:
<body onload="preloadImages()" ... >
The over and out functions for the rollover effect are provided by:
function over(pageid)
{ if (document.images && imgLoaded == true) // (11)
{ if ( pageid != myid ) // (12)
{ document.images[pageid].src =
overImg(pageid); // (13)
}
document.images[myid].src = outImg(myid); // (14)
}
}
Brooks/Cole book/January 28, 2003
9.6. ACTIVE NAVIGATION BARS 409
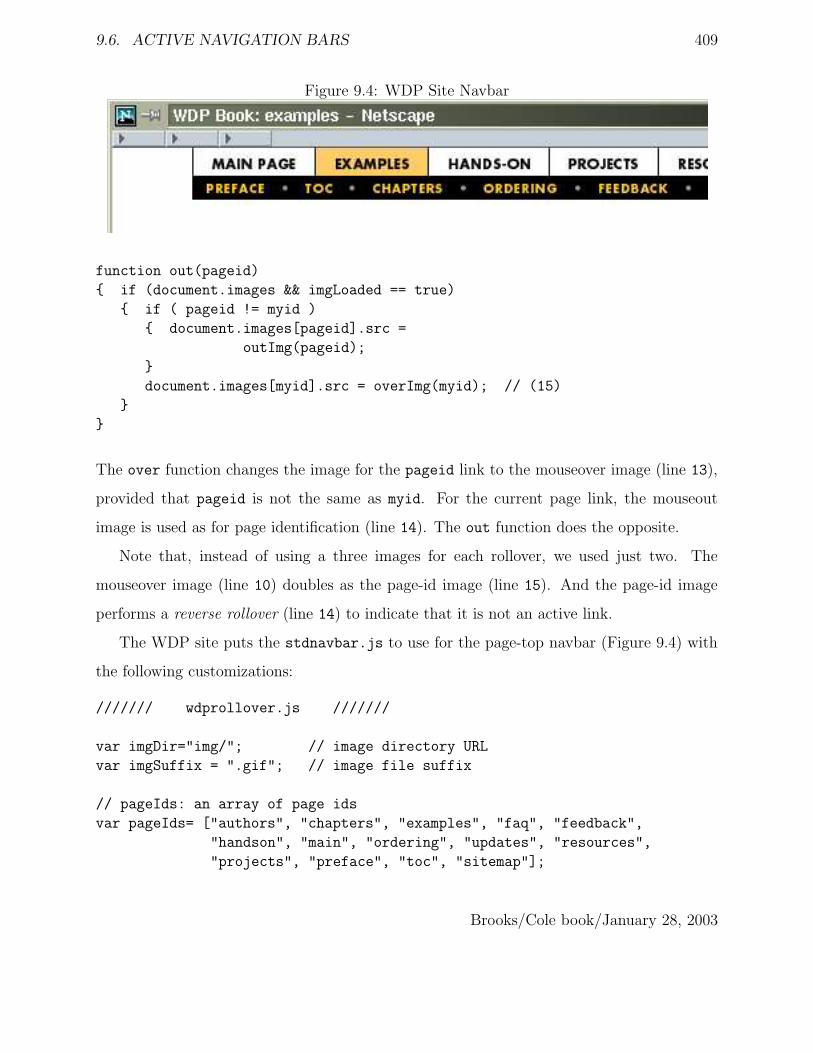
Figure 9.4: WDP Site Navbar
function out(pageid)
{ if (document.images && imgLoaded == true)
{ if ( pageid != myid )
{ document.images[pageid].src =
outImg(pageid);
}
document.images[myid].src = overImg(myid); // (15)
}
}
The over function changes the image for the pageid link to the mouseover image (line 13),
provided that pageid is not the same as myid. For the current page link, the mouseout
image is used as for page identification (line 14). The out function does the opposite.
Note that, instead of using a three images for each rollover, we used just two. The
mouseover image (line 10) doubles as the page-id image (line 15). And the page-id image
performs a reverse rollover (line 14) to indicate that it is not an active link.
The WDP site puts the stdnavbar.js to use for the page-top navbar (Figure 9.4) with
the following customizations:
/////// wdprollover.js ///////
var imgDir="img/"; // image directory URL
var imgSuffix = ".gif"; // image file suffix
// pageIds: an array of page ids
var pageIds= ["authors", "chapters", "examples", "faq", "feedback",
"handson", "main", "ordering", "updates", "resources",
"projects", "preface", "toc", "sitemap"];
Brooks/Cole book/January 28, 2003
410 CHAPTER 9. CLIENT-SIDE SCRIPTING: JAVASCRIPT
function overImg(pageid) // image for mouseover
{ return imgDir + "o_" + pageid + imgSuffix; }
function outImg(pageid) // image for mouseout
{ return imgDir + "u_" + pageid + imgSuffix; }
// mouseover image double as page identification
function selfImg(pageid)
{ return imgDir + "o_" + pageid + imgSuffix; }
9.7 Making Comparisons
Javascript uses the usual set of comparison operators
== != > >= < <=
for comparing strings, numbers, and objects returning a true or false Boolean value (line 11
and 12). The comparison is straight-forward if the two operands being compared are of the
same type. When they are not, the following rules apply:
• When comparing a number to a string, the string is automatically converted to a
number.
• When only one of the operand is a Boolean, it is converted to 1 (for true) and 0 for
false.
• When comparing an object to a string or number, the object is converted to a string
(via its toString method) or number (via its valueOf method). Failure to convert
generates a run-time error.
The strict equality operators === and !== can be used if the operands must be of the same
type.
You can also use the build-in value undefined
if ( var== undefined )
to see if a variable has been assigned a value.
Brooks/Cole book/January 28, 2003

9.8. BUILT-IN FUNCTIONS 411
9.8 Built-in Functions
In Javascript you can use strings and numbers interchangeably in most situations. You
can also explicitly convert a string to a nubmer and visa versa. The Javascript built-in
functions Number( arg ) and String( arg ) convert their arguments to a number and a
string respectively.
The functions parseInt( str ) and parseFloat( str ) returns the integer and floating
values of the argument str respectively.
The function encodeURI( url ) (decodeURI( url )) takes a complete URL and perform
the URL-encoding (decoding). The function eval( str ) execute str as a piece of Javascript
code.
In Javascript strings are objects and have many useful fields and methods including
• str.length—the length of the string
• str.charAt(i )—char at position i, 0 1st char
• str.substr(i, length)—substring starting at index i till the end of string or with the
optional length
• str.indexOf(substr)—first index of substr in str or -1 if not found
• str.lastIndexOf(substr)—last index of substr in str or -1
String methods related to pattern matching are described in the next section.
9.9 Matching Patterns
The myid variable is critical in the entire setup of our rollover navbar. It is computed from
the URL of a page by the myPageId function:
function myPageId()
{ var str = document.URL; // (13)
var re = /([^\/]+)\.html$/; // (14)
Brooks/Cole book/January 28, 2003

412 CHAPTER 9. CLIENT-SIDE SCRIPTING: JAVASCRIPT
var found = str.match(re); // (15)
if ( found ) return found[1]; // (16)
else return null;
}
var myid = myPageId();
The URL of the current page is obtained from the document.URL attribute (line 13). A
regular expression pattern (Section 9.10) is constructed (line 14) to pick the name part in
the name.html or name.htm suffix of the URL. The match method of the String object is
used to apply the pattern to the string and obtain parts in the string that match the pattern
(line 15). The matching results are stored in an array and assigned to the variable found.
If no part of the string matches the pattern, found is null. converts to false in an if test.
Generally, Javascript converts an empty string, zero, undefined, or null to false in a test.
All other values converts to true in a test. If the match is successful, the returned array is
organized as follows:
found[0] // the matched string ($0)
found[1] // the first substring remembered ($1)
found[2] // the next substring remembered ($2)
...
Without assigning a name to the array, the same results can be accessed using the built-in
variables $0, ..., $9 as indicated. You request remembering of substrings in a pattern match
with parenthesis in the regular expression. The regular expression
var re0 = /[^\/]+\.html$/;
matches a sequence of one or more (+) characters that is not a slach ([^\/]) followed by
.html at the end of the string ($). And it will match the tail end of strings such as
var str ="http://wonderful.com/services/index.html";
Thus, the following tests return true.
str.search(re0) // returns index, or -1 for no match
re0.test(str_obj) // returns true, or false for no match
Brooks/Cole book/January 28, 2003

9.10. PATTERNS 413
The pattern
var re = /([^\/]+)\.html$/;
adds parenthesis to remember the substring preceding .html when the pattern matches. For
the preceding example, the string remembered is index. Thus either one of the following
two statements
var found = url.match(re);
var found = re.exec(url);
returns an array where
found[0] // is index.html
found[1] // is index
9.10 Patterns
A pattern refers to a characterization of a string. Strings that fit the characterization are
said to match the pattern. For example, “containing ABC” is a pattern. Any string that
contains the three-character sequence ABC matches it. “Ending with .html” is another
pattern. When you define a pattern, you divide all strings into two disjoint sets: strings that
match the pattern and those that don’t.
A pattern is expressed using regular expressions in the form:
/regex/
where regex can be a fixed string such as /xyz/ to match only the three characters or a
regular expression involving special characters.
The character ^($) when used as the first (last) character of a regular expression matches
the beginning (end) of a string or line. The regular expression \d matches any digit (0-9).
Additional single-character expressions include: \n (newline), \f (formfeed), \t (tab),
\r (return), \v (vertical tab), \s (a white space character, same as [ \f\n\r\t\v]),
Brooks/Cole book/January 28, 2003
414 CHAPTER 9. CLIENT-SIDE SCRIPTING: JAVASCRIPT
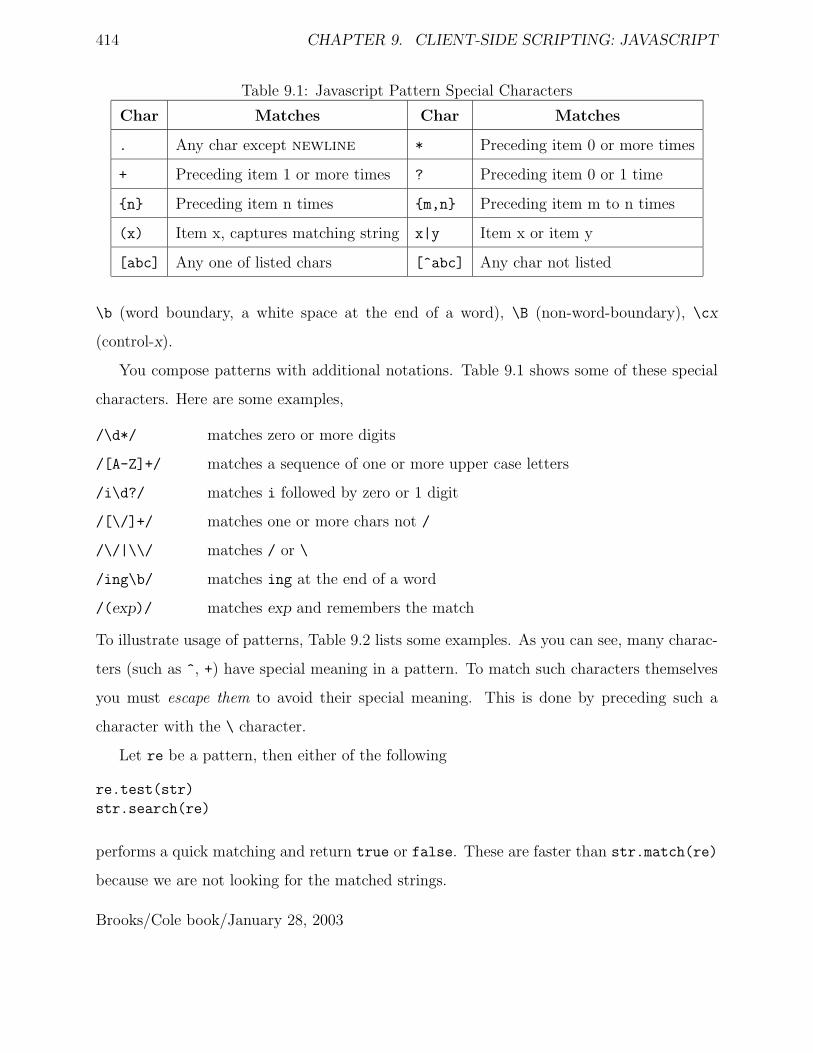
Table 9.1: Javascript Pattern Special Characters
Char Matches Char Matches
. Any char except newline * Preceding item 0 or more times
+ Preceding item 1 or more times ? Preceding item 0 or 1 time
{n} Preceding item n times {m,n} Preceding item m to n times
(x) Item x, captures matching string x|y Item x or item y
[abc] Any one of listed chars [^abc] Any char not listed
\b (word boundary, a white space at the end of a word), \B (non-word-boundary), \cx
(control-x).
You compose patterns with additional notations. Table 9.1 shows some of these special
characters. Here are some examples,
/\d*/ matches zero or more digits
/[A-Z]+/ matches a sequence of one or more upper case letters
/i\d?/ matches i followed by zero or 1 digit
/[\/]+/ matches one or more chars not /
/\/|\\/ matches / or \
/ing\b/ matches ing at the end of a word
/(exp)/ matches exp and remembers the match
To illustrate usage of patterns, Table 9.2 lists some examples. As you can see, many charac-
ters (such as ^, +) have special meaning in a pattern. To match such characters themselves
you must escape them to avoid their special meaning. This is done by preceding such a
character with the \ character.
Let re be a pattern, then either of the following
re.test(str)
str.search(re)
performs a quick matching and return true or false. These are faster than str.match(re)
because we are not looking for the matched strings.
Brooks/Cole book/January 28, 2003

9.10. PATTERNS 415
Table 9.2: Pattern Examples
Pattern Matching Strings
/l.ve/ love, live, lxve, l+ve
/^http/ http at the beginning of a string
/edu$/ edu at the end of a string
/L+/ L, LL, LLL, LLLL, ...
/BK*/ B, BK, BKK, ...
/D+HD/ DHD, DDHD, DDDHD, ...
/.*G/ Any string ending in G
/G?G/ G or GG
/^$/ Empty string
/[a-z]9/ a9, b9, ..., or z9
Adding the character i to the end of a pattern makes the pattern case insensitive. For
example,
/#ddeeff/i (matches #ddeeff, #DDEEFF, #dDeEfF, ...)
You can also use patterns to replace substrings within another string. The replace
method of String is used this way:
str.replace(re, newStr)
For example, we can compute the over image from the out image with
outimg = "images/mainout.gif";
overimg = outimg.replace(/out/, "over");
Replacement is made for the first occurrence of a match. To replace all occurrences, add the
flag g to the end of the pattern. For example,
line.replace(/ +/g, " ")
Brooks/Cole book/January 28, 2003

416 CHAPTER 9. CLIENT-SIDE SCRIPTING: JAVASCRIPT
replaces all sequence of one or more spaces with a single space.
Often the replacement string is computed from the matched substring. You can use
$0, $1,...,$9 in the replacement string. And you can use a function call to compute the
replacement string.
The method split method takes a fixed or patterned delimiter and breaks up a string
into an array of several substrings at the delimited positions. The following example breaks
up a string where a space is found
str = "<p> Chapter Introduction </p>";
arr = str.split(" "); // delimiter is space
// arr[0] is "<p>", arr[1] is "Chapter", and so on
But there are extra spaces between the words, this simple split results in many empty
substrings in the result array. In such a case, you can use a pattern for splitting:
arr = str.split(/ +/);
For a full reference to regular expressions and patterns see Javascript documentation on
the Web at
developer.netscape.com/docs/manuals/javascript.html
9.11 Javascript Objects
Javascript provides access to language objects (Array, Boolean, Date, Function, Math,
Number, RegExp, String) for programming, and browser objects (navigator, window, document,
location, history, frame, Image, Form, etc.) for access and manipulation of the browser
and the displayed document. Complete Reference information for these objects can be found
on the Web (See the WDP site).
The language objects make writing programs easy. We have used a Date object in our
first Javascript program (Section 9.1). The pageIds used in the rollover navbar example
Brooks/Cole book/January 28, 2003

9.12. WINDOWS 417
(Section 9.6) is an Array object. String objects are commonplace and the search and
match methods have been discussed.
In Section 9.1 we also used the navigator object to obtain the name of the browser
(navigator.appName), Netsacep or Microsoft Internet Explorer for example. Addi-
tional navigator attributes include: appVersion (browser version), appName (browser name),
language (language used, e.g. en or en-US), mimeTypes (array of all MIME types supported),
platform (computer on which the browser is running), plugins (array of plug-ins installed),
userAgent (the HTTP user-agent header to use).
For example, you may use code such as
if ( /^en/i.test(navigator.language) )
window.location = "english/index.html";
if ( /^fr/i.test(navigator.language) )
window.location = "french/index.html";
...
to direct browsers to the correct language entries on your site, using the test method of the
regular expression object. It is also a good idea to check for the availability of plugins when
a page contains audio, video, or other multimedia content (Chaptercite12 and Section 12.16
in particular).
The links listed at the WDP site will lead you to official documentation for Javascript
built-in objects.
9.12 Windows
The window is the top-level object for each Web page loaded. It contains all other objects
related to the page and many attributes (data values) including:
• document—the object that represents the structure and content of the Web page
(HTML code)
• location—the current URL
Brooks/Cole book/January 28, 2003

418 CHAPTER 9. CLIENT-SIDE SCRIPTING: JAVASCRIPT
Figure 9.5: Alert Window
• history—a sequence of URLs visited previously
• frames—an array of frames in the window
The window history can be used to go back and forth on the list of visited pages. For
example,
history.back(); // reloads the previous page
history.forward(); // reloads the next page
history.go(-3); // goes back three pages
Note that history is a shorthand for window.history. Because Javascript code work in
the context of the current window, you can use method and attribute names in the current
window directly.
For a frames page, a page with a frameset element, each frame is also represented by its
own window object. These objects are kept on the frames array. Thus
frames["top"]
frames["left"]
frames["right"]
give you the window objects for the frames using their name or id attributes.
Dialog Windows
The window object’s alert, confirm (Ex: Confirm) and prompt methods pops up a dialog
window. The user usually must respond to the dialog before proceeding.
Brooks/Cole book/January 28, 2003

9.12. WINDOWS 419
Figure 9.6: Prompt Window
The alert method of window displays a warning message. For example (Ex: Alert),
a function that checks the validity of credit card numbers can easily display a warning
(Figure 9.5):
function checkCC(number)
{ if ( credit card number invalid )
{ window.alert("The credit card number is invalid.");
return false;
}
else return true;
}
Use a prompt box to collect user input interactively. The call
window.prompt(message , default-string )
displays a prompt dialog with the given message and the optional default input string in an
input box. For example (Ex: Prompt),
var email = window.prompt(’Please enter your email address:’);
window.confirm("Email is: " + email);
obtains an email address (Figure 9.6) and displays a confirmation dialog (Figure 9.7). The
prompt method returns either the input or null if the user cancels the dialog. The confirm
method returns true or false.
Brooks/Cole book/January 28, 2003

420 CHAPTER 9. CLIENT-SIDE SCRIPTING: JAVASCRIPT
Figure 9.7: Confirmation Window
Opening New Windows
To open a new window, use
window.open("URL", "window-name", "options")
If window-name is an existing window, it will be used to display the page identified by the
given URL. Otherwise, a new window to display the given page will be made. If the URL is
an empty string, a blank window is displayed. For example:
window.open("http://www.abc.org","Abc") // (1)
window.open("http://www.abc.org","Abc", // (2)
"scrollbars=yes,toolbar=no")
opens a new full-size full-featured browser window (line 1) or one without any toolbars
(line 2). See Figure 9.8.
If you use pop-up windows for off-site links then users can close that window to return
to your site. To make it less likely for users to wonder off to the other site, and to make it
perfectly clear that it is a side-trip, you may decide to omit the toolbars for the new window.
Thus, off-site links may be given as follows (Ex: PopupWindow):
<a href="javascript:window.open(’http://www.abc.org’)">
The function:
Brooks/Cole book/January 28, 2003

9.12. WINDOWS 421
Figure 9.8: A Pop-Up Picture
function popWindow(URL, w, h)
{ window.open(URL, "", "toolbar=no" +
",dependent=yes" +
",innerwidth="+ w +
",innerheight="+ h);
}
opens a new window for the given URL, without any toolbars, and with a content area
specified by w and h. Such windows are also useful to display a pop-up picture (Figure 9.8),
some product data, or other auxiliary information. The WDP site uses pop-up windows for
examples, figures, and resource links. Use width and height instead, if you wish to set the
outer dimensions of the popup window.
Some yes-no options for window.open are:
• dependent—making the new window a child of the current window so it will close
automatically if the current window closes
• location—displaying the location entry or not
• menubar—adding the menubar or not
Brooks/Cole book/January 28, 2003

422 CHAPTER 9. CLIENT-SIDE SCRIPTING: JAVASCRIPT
• resizable—allowing resizing or not
• screenX,screenY—positioning the upper-left corner relative to the screen
• scrollbars—enabling scrollbars or not
• status—adding bottom status bar or not
• toolbar—including the toolbar or not
Opening a new window with no options sets all yes/no options to yes. But, if you sup-
ply some options, then most unspecified yes/no options are set to no. Some features of
window.open() are still not standardized across all browsers.
Descriptions here apply to traditional window objects in Javascript. DOM inspired win-
dow objects are discussed in Section 10.18).
9.13 Creating User Interactions
By connecting Javascript code to user-generated events, many kinds of interactions can be
added to a Web page. Many elements support the onmouseover, onmouseout, onclick,
onfocus, and onblur (lost focus) events.
Slide Show
We can use link generated events to make a slide show (Figure 9.9). Nice pictures of mouth-
watering food are displayed one-by-one. Users control the display with a next and a previous
button (Ex: Slides).
The HTML for the page can be coded as follows:
<head><title>Slide Demo</title>
<script type="text/javascript" src="slide.js">
</script></head>
<body style="background-color: #000"
onload="changeSlide()"> (a)
Brooks/Cole book/January 28, 2003

9.13. CREATING USER INTERACTIONS 423
Figure 9.9: Javascript Slide Show
<p style="text-align: center">
<img src="" id="myimg" alt="slide" /><br /><br /> (b)
<a href="javascript:prevSlide()"><img src="prev.gif" (c)
style="border: none"
alt="previous slide" /></a>
<a href=
"javascript:nextSlide()"><img src="next.gif" (d)
style="border: none" alt="next slide" /></a></p>
</body>
The centered image with id="myimg" is the display area where the image src is left empty
(line b). It’s image source is set with the onload event handler of the body element (line a).
Clicking on the next (previous) button calls the nextSlide() (prevSlide()) function (lines c
and d). Modern browsers support the onclick event for images and you may use that event
to change the slides instead.
The slide.js file contains the code for loading and changing the images. The pic array
contains the pictures to be displayed and is the only quantity you need to customize for your
Brooks/Cole book/January 28, 2003

424 CHAPTER 9. CLIENT-SIDE SCRIPTING: JAVASCRIPT
own slide show. Make sure all images are of the same size.
const pic = [ "pancake.jpg", "desert.jpg",
"meat.jpg", "cake.jpg", "pasta.jpg" ];
var slide = new Array();
var index = 0; // current slide index
function loadImage(url)
{ if (document.images)
{ rslt = new Image();
rslt.src = url;
return rslt;
}
}
if ( document.images ) // preloading all images
{ for (var n=0; n < pic.length; n++)
{ slide[n] = loadImage(pic[n]); }
}
The images are preloaded into the slide array indexed by index the global variable that
controls which image is showing through a call to changeslide().
function changeSlide()
{
document.getElementById(’myimg’).src = slide[index].src;
}
Going forward and backward on the slides is just a matter of incrementing and decrementing
index in a circular fashion.
function prevSlide()
{ if(--index < 0)
{ index = pic.length-1;
}
changeSlide();
}
function nextSlide()
{ if( ++index >= pic.length)
Brooks/Cole book/January 28, 2003

9.14. A CONVERSION CALCULATOR 425
Figure 9.10: A Javascript-based Conversion Calculator
{ index = 0
}
changeSlide();
}
9.14 A Conversion Calculator
HTML input controls also provide many opportunities for user interaction. Let’s see how
input elements can be used outside of a form to construct an inch-centimeter conversion
calculator supported by client-side Javascript (Figure 9.10).
The HTML code for the conversion calculator example (Ex: Convert) is
<head><title>Inch Centimeter Converter</title>
<script type="text/javascript" src="convert.js">
</script></head><body onload="init()"> (1)
<p>Enter either value then click the convert button:</p>
<table cellspacing="6">
<tr valign="top">
<td><input id="inch" size="20" onfocus="reset()" /> (2)
<br />Inches</td>
<td><input type="button" value="Convert"
onclick="convert()" /></td>
<td><input id="cm" size="20" onfocus="reset()" /> (3)
<br />Centimeters</td>
</tr></table></body>
Brooks/Cole book/January 28, 2003

426 CHAPTER 9. CLIENT-SIDE SCRIPTING: JAVASCRIPT
Events from the three input elements are connected to event handling functions. The inch
(line 2) and cm (line 3) text input fields will reset themselves when focus is gained. A button
click triggers the actual conversion (line 4).
The Javascript is initialized onload (line 1) by calling the function init():
var inf, cmf;
function init()
{ inf = document.getElementById(’inch’);
cmf = document.getElementById(’cm’);
}
which sets up two global variables inf (the inch input element) and cmf (the cm input
element). These makes the convert and reseet operations easy to program:
function reset()
{ inf.value = ""; cmf.value = ""; } // (5)
function convert()
{ var i = inf.value.replace(/ /,""); // (6)
if ( i ) // (7)
{ cmf.value = i * 2.54; } // (8)
var c = cmf.value.replace(/ /,"");
if ( c )
{ inf.value = c / 2.54; } // (9)
}
Both elements are set to contain no input when either one gains focus (line 5).
After entering a number in either field, the user clicks the Convert button (line 4) which
calls the convert function to display the conversion results.
The input string from the inch field is obtained (line 6) and any unintentional spaces
are removed. If this input is not empty (line 7) the centimeter conversion is computed and
displayed (line 8) and the function returns. Here again, you can see how strings and numbers
are used interchangeably in Javascript. If the inch field has no input, then the cm field is
processed exactly the same way.
Brooks/Cole book/January 28, 2003

9.15. FORM CHECKING 427
Javascript allows you to use strings (i) in arithmetic computations (line 8 and 9). Note,
unlike in Java or C++, the Javascript / operator always performs a floating-point division
and returns a floating-poing result.
9.15 Form Checking
When using forms to collect information, it is important to check the correctness of the data
entered by Web users. The programs considered in Chapter 8 demonstrate how to check the
input data as the first step in server-side form processing. But if such checks are made on
the client-side, users can make immediate corrections as they fill out the forms. Client-side
form input validation is fast and responsive and can make form-filling more pleasant and
less confusing for users.
By connecting event handlers to form elements, we can write Javascript programs to
check form input on the client side. This does not mean that we can move form input
checking from the server side to the client side because savvy users and Web developers can
submit input to the server-side through other means without going through the form with
the client-side checks. Hence, client-side checks are primarily to enhance the user interface
and to largely avoid invalid data being sent to the server side. It is a good idea to use
client-side checks, but they are not replacements for server-side checks.
Let us consider an example (Ex: EmailCheck) where we check the validity of an email
address entered on a form (Figure 9.11). The HTML code for the form is typical but with
added event handlers so that form submission is through Javascript.
<head><title>Email Validation</title>
<script type="text/javascript" src="emailcheck.js"> </script>
</head><body>
<form method="post" id="myform"
action="/cgi-bin/wb/joinclub.cgi">
<table cellspacing="3" style="margin: auto">
<tr>
<td><p style="text-align: right; font-weight: bold">
Your Name:</p>
Brooks/Cole book/January 28, 2003

428 CHAPTER 9. CLIENT-SIDE SCRIPTING: JAVASCRIPT
Figure 9.11: Client-Side Form Validation
</td>
<td><input id="name" name="name" size="30" />
</td>
</tr><tr>
<td><p style="text-align: right; font-weight: bold">
Your email:</p>
</td>
<td><input id="email" name="email" size="30"
onchange="checkEmail(this)" /> // (1)
</td>
</tr><tr><td></td>
<td><input type="button" value="Submit"
onclick="checkForm()" /> // (2)
</td>
</tr>
</table></form></body>
The onclick handler for a button is set to checkForm (line 2) which checks all input data
in the form and proceeds to submit only if all input data are correct. Otherwise the form
will not be submitted and the user gets a chance to make corrections right away without
leaving the form page.
To make form filling even more user friendly, onchange handlers (line 1) can be attached
to individual input fields so the particular input can be checked as soon as it is entered. Here
the notation this represents the object for the input element with id="email".
The checkForm function is as follows
function checkForm()
Brooks/Cole book/January 28, 2003

9.15. FORM CHECKING 429
{ if ( checkEmail(document.getElementById(’email’)) // valid email
&& checkName(document.getElementById(’name’)) // and name given
)
{ document.getElementById(’myform’).submit(); // submit form
}
}
function checkName(nm)
{ if ( nm.value )
return true;
else
return formErr(nm, " empty string ");
}
The checkEmail function is called from checkForm as well as triggered by the change event
(line 1). The formErr function is used to alert users on incorrect data.
function formErr(entry, msg)
{ alert(entry.id + ": " + msg + " is invalid."); // (3)
entry.focus(); // (4)
entry.select(); // (5)
return false;
}
An alert window is used to display the form entry id, and the given message msg. Then it
gives the form entry input focus (line 4) and selects the text for editing (line 5).
The checkEmail function is called with the email input entry (em). The actual checking
of em.value as an email address involves many technical details. The following check will
catch malformed email addresses most of the time.
Basically, we check to see if the email is in the form user@host then check the user and
host separately for validity. Here is an outline of the steps taken:
1. Check the user@host form. Only one @ is allowed. Any trailing period (.) as well as
leading and trailing spaces are removed. The twoPart pattern (line 6) performs this
check and matches the user and host parts (line 7–8). The email address with possible
leading and trailing characters removed is stored (line 9).
Brooks/Cole book/January 28, 2003
430 CHAPTER 9. CLIENT-SIDE SCRIPTING: JAVASCRIPT
2. Each of user and host is a dot (.) separated list of atoms (the pattern dotPat on
line 11) that do not contain disallowed characters (\s ( ) < > @ , " \ : / ; . [ ]).
The string atom help define a pattern for a sequence of allowed characters–an atom
(line 10). If user does not match dotPt (line 12), then it must be a quoted name
(line 13) in a form such as "Mary Jane". Otherwise, the user part cannot be accepted
(line 14).
3. After checking user , host is checked. It may be an IP address in the form [123.45.94.33].
The brackets are necessary and each part is a number less then 256 (lines 15–16).
4. Otherwise host must be a domain name with atoms separated by dots (line 17). There
ought to be two or more atoms (line 18–19) and the last atom is a top-level domain
which has two or more characters (line 20).
function checkEmail(em)
{ var str = em.value;
var twoPart=/^ *([^ @][^@]*)@([^@]+[^@\. ]+)\.* *$/; // (6)
var part=str.match(twoPart); // (7)
if ( part==null ) return formErr(em, "’"+str+"’");
var user=part[1];
var host=part[2]; // (8)
em.value = user+"@"+host; // (9)
var atom ="[^\\s \\( \\) < > @ , \" \\\\" + // (10)
"\\/ : ; \\. \\[ \\] ]+";
var dotPt=new RegExp("^" + "(" + atom + // (11)
")(\\." + atom + ")*$");
// See if "user" is valid
if ( user.match(dotPt)==null ) // (12)
{ if (! user.match(/^"[^"]+"$/)) // (13)
return formErr(em, "The username ’" + user+"’"); // (14)
}
var ipPt= /^\[(\d+)\.(\d+)\.(\d+)\.(\d+)\]$/; // (15)
var ipArr=host.match(ipPt)
if ( ipArr!=null )
Brooks/Cole book/January 28, 2003

9.16. MENU ACTIONS 431
{ for (var i=1;i<=4;i++)
{ if (ipArr[i]>255) // (16)
return formErr(em, "The IP ’"+ host +"’");
}
return true
}
// Host is domain name
if ( host.match(dotPt)==null ) // (17)
return formErr(em, "The domain ’" + host +"’");
var atomPt=new RegExp(atom,"g");
var dArr=host.match(atomPt); // (18)
var len=dArr.length;
if (len<2) // (19)
return formErr(em, "The domain ’" + host +"’");
var tld =dArr[len-1];
if (tld.length<2) // (20)
return formErr(em, "The ending ’" + tld+"’");
return true;
}
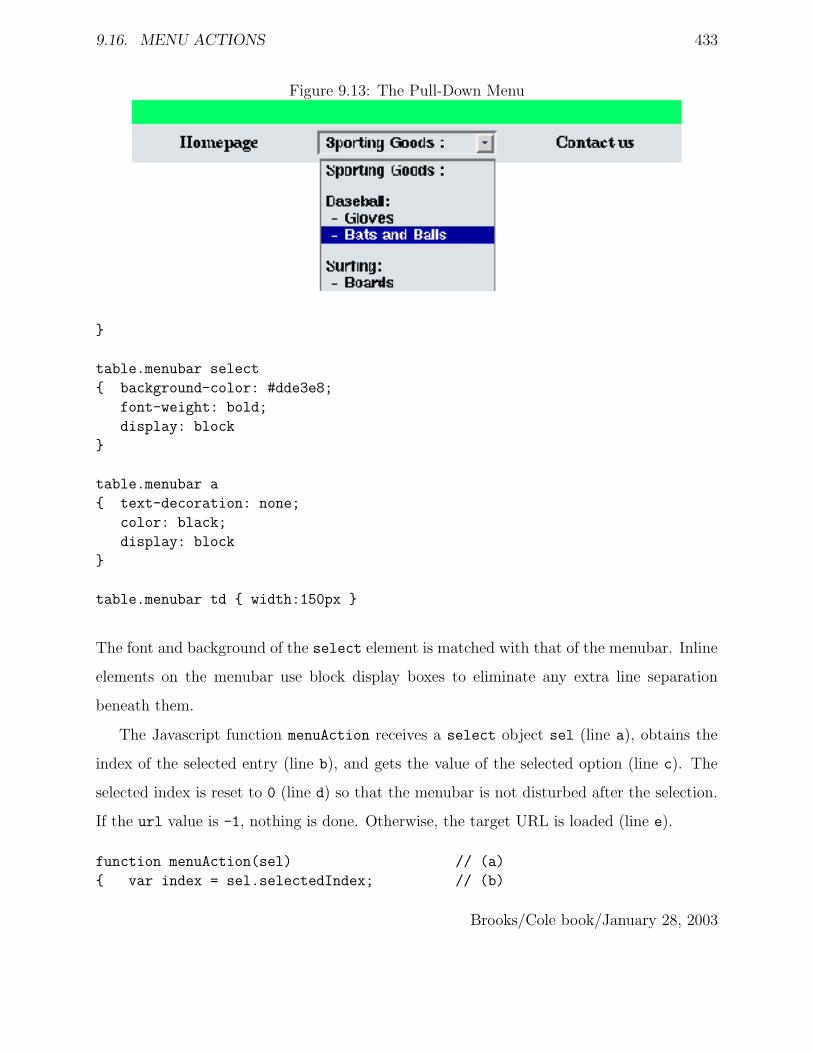
9.16 Menu Actions
By connecting Javascript functions to a pull-down menu (select), we can define actions in
response to user selections. For example, a pull-down menu can present different services
or products of a company on a navigation bar. Selecting a product can lead directly to a
page for that product. This technique can simplify complicated navigation bars with many
target pages. The ability to tie any Javascript actions to any set of user selections presents
limitless other possibilities. Figure 9.12 shows a navigation bar with a pull-down menu for
Sporting Goods (Ex: MenuAction). The HTML code shows the pull-down menu defined
by a select element (line A).
<head><title>Pulldown Menu of Links</title>
<link rel="stylesheet" href="menuaction.css"
type="text/css" title="menu action" />
Brooks/Cole book/January 28, 2003

432 CHAPTER 9. CLIENT-SIDE SCRIPTING: JAVASCRIPT
Figure 9.12: Pull-Down Navigation Menu
<script type="text/javascript" src="menuaction.js"></script>
<table class="menubar" cellspacing="5">
<tr valign="middle" align="center">
<td><a href="home.html">Homepage</a></td>
<td><select name="selurl" id="selurl" size="1" (A)
onchange="menuAction(this)">
<option value="-1">Sporting Goods :</option>
<option value="-1"></option>
<option value="baseball/index.html">Baseball:</option>
<option value="baseball/gloves.html"> - Gloves</option>
<option value="baseball/bats.html"> - Bats and Balls</option>
<option value="-1"></option>
<option value="surfing/index.html">Surfing:</option>
<option value="surfing/boards.html"> - Boards</option>
<option value="surfing/suits.html"> - Wet Suits</option>
<option value="-1"></option>
<option value="tennis/index.html">Tennis:</option>
<option value="tennis/racquets.html"> - Racquets</option>
<option value="tennis/shoes.html"> - Shoes</option>
<option value="tennis/misc.html"> - Strings and Grips</option>
</select></td>
<td><a href="contact.html">Contact Us</a></td>
</tr></table>
The value of options are target URLs or -1 for spacers. The onchange event handler is
called when an option is selected. The pull-down menu can be seen in Figure 9.13.
The presentation is defined by the following style code:
table.menubar
{ border-top: solid #0f6 20px;
background-color: #dde3e8;
font-weight: bold;
Brooks/Cole book/January 28, 2003
9.16. MENU ACTIONS 433
Figure 9.13: The Pull-Down Menu
}
table.menubar select
{ background-color: #dde3e8;
font-weight: bold;
display: block
}
table.menubar a
{ text-decoration: none;
color: black;
display: block
}
table.menubar td { width:150px }
The font and background of the select element is matched with that of the menubar. Inline
elements on the menubar use block display boxes to eliminate any extra line separation
beneath them.
The Javascript function menuAction receives a select object sel (line a), obtains the
index of the selected entry (line b), and gets the value of the selected option (line c). The
selected index is reset to 0 (line d) so that the menubar is not disturbed after the selection.
If the url value is -1, nothing is done. Otherwise, the target URL is loaded (line e).
function menuAction(sel) // (a)
{ var index = sel.selectedIndex; // (b)
Brooks/Cole book/January 28, 2003
434 CHAPTER 9. CLIENT-SIDE SCRIPTING: JAVASCRIPT
var url = sel.options[index].value; // (c)
sel.selectedIndex = 0; // (d)
if ( url != -1)
{ window.location=url; } // (e)
}
This example shows how HTML, CSS, and Javascript combine to achieve form and function
for websites.
9.17 Events and Event Objects
The preceding sections illustrate the application of Javascript in many useful ways and, at the
same time, provide examples of Javascript programming. The basic technique is simple–you
define event handling functions and attach them to events associated with HTML elements.
A general description of event handling and the available objects can help you create other
effects for Web users with Javascript.
Following HTML 4.0 and the “DOM3 Level 2 Event Model”, XHTML specifies event
attributes for elements that are used to connect events to handlers.
• Window Events—onload (page loaded) and onunload (page unloaded) attributes are
available in body and frameset elements.
• Mouse Events—onclick (left mouse button clicked), ondblclick (left mouse button
double clicked), onmousedown (left mouse button pressed), onmouseup (left mouse but-
ton released), onmousemove (mouse moved), onmouseover (mouse over element), and
onmouseout (mouse left element) attributes are common to most HTML 4.0 elements.
But some versions of Javascript may only support these in form elements and links.
• Form Element Events—onfocus (the element gained focus), onblur (the element lost
focus), onchange (content of element changed), onsubmit (form submitted), onreset
3See Chapter 10.
Brooks/Cole book/January 28, 2003

9.18. SCROLLING TEXT 435
(form reset), and onselect (element content is selected) attributes are for all
form related elements.
• Keyboard Events—onkeydown (a keyboard key is being pressed), onkeypress (a key
is pressed), and onkeyup (a key is released) are common to most HTML 4.0 elements.
But some versions of Javascript may only support these in images, links, text areas.
HTML elements are represented by objects (Chapter 10) that can be accessed and manipu-
lated by Javascript. Setting the onevent attribute records an event handler function for that
event in the object for that HTML element.
For each Web page there is a window object that contains all other objects for the page
(Section 9.12). If the page has frames, each frame has a frame object and its own window
object too. We have seen many methods for window in Section 9.12. Additional window
methods include:
• scrollTo—scrolls a window to a given position.
• setTimeout("expression", delay)—schedules a one-time evaluation of the quoted ex-
pression, which can be a function call, after the specified delay in milliseconds. If you
use any variables or function arguments in expression, make sure they are global.
• setInterval("expression", interval)—repeatedly evaluates an expression or calls a
function each time the given time interval, in milliseconds, passes.
9.18 Scrolling Text
As an example (Ex: Scroll), let’s look at how a text-scrolling window is achieved. The
text window in Figure 9.14 scrolls continually after the page is loaded. It can also stop and
resume the scrolling when the user clicks on the window.
The HTML code is as follows:
<head><title>Text Scrolling</title>
Brooks/Cole book/January 28, 2003

436 CHAPTER 9. CLIENT-SIDE SCRIPTING: JAVASCRIPT
Figure 9.14: Scrolling Window
<link rel="stylesheet" href="scroll.css"
type="text/css" title="scroll" />
<script type="text/javascript" src="scroll.js">
</script></head>
<body onload="scrollInit(document.getElementById(’region’))"> (1)
<p><input id="region" class="scroll" size="50" value=""
onfocus="pause(this)" /> </p> (2)
</body>
After the page is loaded, the scrollInit function is called (line 1) with the object repre-
senting the form input element with id="region". The method getElementById is very
convenient and will be used extensively in Chapter 10. The init function sets up the scrolling
message and other control parameters and starts the scrolling. Clicking on the scrolling win-
dow generates focus events that, through the function pause, stop and resume the scrolling.
The style sheet
body { background-color: cyan; }
input.scroll
{ color: rgb(100%,84%,12%);
background-color: rgb(6%,45%,5%);
font-weight:bold;
font-size: larger;
}
gives the dark green background and the amber colored boldface font for the scrolling window.
The Javascript function scrollInit sets up the scrolling:
// customization begin
var myMessage=
" This message scrolls continually. " +
"Use this Javascript program for Ads, news, " +
Brooks/Cole book/January 28, 2003

9.18. SCROLLING TEXT 437
"announcements and so on.";
var speed=150;
// customization end
function scrollInit(field)
{ message=myMessage;
inputField=field;
if ( message.length == 0 ) return;
while ( message.length <
myMessage.length+3*field.size ) // (a)
message += myMessage;
start = 0; pauseFlag=false;
end = myMessage.length;
scroll(); // (b)
}
To perform scrolling the steps are simple:
1. Make a long enough scrolled string by repeating the given message.
2. At predetermined intervals, display a substring of the scrolled string starting at the
next character position.
3. When the starting point reaches the end of the given message, go back to the beginning
again.
The scrolled string message is built to be at least as long as the original message (myMessage)
plus 3 times the size of the scrolling field. Because we do not know exactly how many
characters an input field of a given size can display, we assume it will not be long enough to
hold 3×size characters.
The scroll function actually performs the scrolling display.
function scroll()
{ if ( pauseFlag ) return;
inputField.value=message.substring(start);
if ( ++start == end ) start=0;
setTimeout("scroll()",speed); // (c)
}
Brooks/Cole book/January 28, 2003
438 CHAPTER 9. CLIENT-SIDE SCRIPTING: JAVASCRIPT
If pauseFlag is not true, a substring of message starting at index start is displayed. The
start is incremented and set back to 0 if it reaches end. The setTimeout method of window
is called to trigger the next call to scroll (line c).
By setting pauseFlag to true the scrolling is stopped. To resume the scrolling, simply
set the flag to false and call scroll() (line d). The pause function always calls the blur()
method of the scrolling field so it loses focus and is able to receive another focus event.
Thus, the same event alternately stops and resumes scrolling.
function pause(field)
{ if ( pauseFlag )
{ pauseFlag=false;
scroll(); // (d)
}
else pauseFlag = true;
field.blur(); // (e)
}
Event Objects
When an event takes place, an event object is created to represent information related to the
particular event. This event object event is available for event handlers to extract event-
related information such as which key is pressed, which mouse button is clicked, or what are
the x and y coordinates of the mouse event, and so on.
Consider the slide show example, Ex: Slides in Section 9.13. It would be nice to be able
to use the left and right arrow keys on the keyboard to go back and forth on the slides. This
can easily be done with key events.
Add the key event handler (Ex: KeyEvent) to the body element:
onkeydown="keyGo(event)"
Note we transmit the event object to the handler function keyGo.
Brooks/Cole book/January 28, 2003
9.19. TESTING AND DEBUGGING 439
function keyGo(e)
{ if ( e.keyCode == 39 )
nextSlide();
else if ( e.keyCode == 37 )
prevSlide();
}
The keyCode property of an event object gives the Javascript value of the key involved. The
value 39 (right-arrow) goes to the next slide and the value 37 (left-arrow) leads to
the previous slide. See the WDP site for hands-on experiments to find values of Javascript
keyCodes.
The W3C recommended “DOM Level 2 Event Model” begins to standardize event names,
event objects, their properties and methods (See WDP site).
9.19 Testing and Debugging
Much time can be spent on testing and debugging programs. Javascript programs are no
exception. After writing a Javascript program, always test it in the HTML page where it
needs to work. If something is wrong, the problem may be one of
• Syntax errors—typos, spelling mistakes, missing quote marks, strings across multiple
lines, missing/unmatched brackets, or incorrect object names or IDs. JavaScript is
case-sensitive: myObject is not the same as myobject. Incorrect syntax is the most
common problem.
• Runtime errors—problems that only occur when the script is executing. Accessing a
non-existing object attribute, using a null or undefined without first checking the
quantity are examples.
• Logical errors—mistakes in the solution logic making the script do the wrong thing or
display wrong information.
Brooks/Cole book/January 28, 2003

440 CHAPTER 9. CLIENT-SIDE SCRIPTING: JAVASCRIPT
Figure 9.15: Javascript Console
It pays to use a good editor that can display the code structure and will automatically
show balancing brackets etc. Tools such as the Borland IntraBuilder and NetObjects Script-
Builder for developing Javascript are also available.
When you load a page containing Javascript, any syntax or run-time errors are dis-
played in the Javascript Console (Figure 9.15), a window you can display by selecting
the Tools/Javascrpt Console option on the Tasks menu (Netscape 6.x) or by entering
javascript: in the Location box (earlier Netscape). Errors are listed with source code line
numbers so you can find them easily. By enabling the display of Javascript errors, Internet
Explorer will display any errors in an alert dialog window.
To isolate problems in your code, you can put alert calls in various key points in your
script to trace its progress through the code and display values of variables and function
arguments.
You can build your own error reporting window
function errorWindow()
{ errWindow = window.open("", "Javascript Errors",
"toolbar=0,scrollbar=1,width=400,
height=300");
}
and display your own error messages in it:
errWindow.document.writeln( "value of email is " + email );
For hard to find bugs, you may need to use the Netscape Javascript Debugger called
Venkman. It works well with Netscape version ≥ 7.0 and supports break points, backtrac-
Brooks/Cole book/January 28, 2003

9.20. FOR MORE INFORMATION 441
Figure 9.16: Venkman Javascript Debugger
ing, stepping and so on. Venkman offers a visual environment and works on Windows, Mac,
and Unix platforms and, after installation, can be started from the Tools>Web Development
menu (Figure 9.16). You can download the debugger from the Web:
developer.netscape.com/software/jsdebug.html
9.20 For More Information
An introduction to Javascript and its application is provided. For more information on the
syntax and semantics of Javascript, its standardization, events, object model, and tools see
related websites and the resource pages on the WDP site.
Our coverage continues in Chapter 10 where the Javascript interface to the Document
Object Model and application in DHTML are presented.
9.21 Summary
Javascript is a standard scripting language to manipulate browser, window, and document
objects. Javascript programs is responsive because they are executed by the browser on the
Brooks/Cole book/January 28, 2003
442 CHAPTER 9. CLIENT-SIDE SCRIPTING: JAVASCRIPT
client side.
Javascript programs can be placed in its own file and imported into any Web page with
the code
<script type="text/javascript" src="filename.js"> </script>
Or they may be placed directly in an HTML file with
<script type="text/javascript">
... </script>
Javascript syntax is similar to Java and C++. It is actually easier because you may use
strings and numbers interchangeably, and concatenate strings with numbers and other ob-
jects by the + operator. Built-in objects, such as Date and Math and functions, such as eval,
encodeURI, and decodeURI make programming easier.
To create arrays, you have two ways:
var b = new Array(element0 , element1 , ..., elementN );
var c = [element0 , element1 , ..., elementN ];
You use zero-based indexing, b[0], to use array cells. Because Javascript will mostly deal
with textual materials, a strong pattern matching ability is built-in. You may use either of
these notations for string matching.
str.search(re)
re0.test(str)
Javascript can make a page more interactive and dynamic by responding to events gen-
erated by the user. Applications range from rollovers, creating new windows, to scrolling
texts.
When creating rollovers for a navigation bar, it is not enough to simply change a base
image to a mouseover image. We must also make sure that the link becomes inactive and
appears distinctive when it is sitting in its own page. This is the page-id image. Thus, each
Brooks/Cole book/January 28, 2003
EXERCISES 443
navigation rollover usually involves three images: base, mouseover, and page-id. Sometimes
it is practical to make the mouseover image double as the page-id image. In that case, we
recommend that the page-id image do a reverse rollover on mouseover.
Further, you can coordinate the names for the rollover images and the .html files so
exactly the same HTML and Javascript code for the navigation bar will work in any target
page.
Another important application is checking the validity of form input and so users may
correct mistakes immediately.
Exercises
Review Questions
1. What are the ways to create arrays in Javascript? How are array cells indexed? as-
signed?
2. What is the difference between the window.url and the document.URL quantities?
3. In Javascript, how is a pattern specified and matched?
4. What is a regular expression? What is the regular expression that matches the string
Netscape at the beginning of a string? at the end of a string? as a separate word?
5. Write a Javascript pattern that picks the parts before and after the decimal point of
a number. Write another pattern that will only match any valid CSS color notation
that begins with a #.
6. When specifying patterns, what does escaping a special character mean?
7. What is a dialog window? How do you use dialog windows in Javascript?
8. How are new windows created in Javascript? What options control the features of the
window to be created.
Brooks/Cole book/January 28, 2003

444 CLIENT-SIDE SCRIPTING: JAVASCRIPT
9. How do you concatenate strings in Javascript? In Perl?
10. Describe in your own words conditions for a valid email address. Are there TLDs with
more than 3 characters?
11. How does one go about debugging Javascript programs?
12. Start NN and launch the Javascript Console. Test Javascript code in the evaluation
input field.
Assignments
1. Write a simple Web page that displays the userAgent, appName, and appVersion.
2. Follow Section 9.4 and create a text rollover by changing the color and/or background-color
styles of the text.
3. Modify the code for Ex: StdNavbar (Section 9.6) and move the mouse event handling
from the links to the img elements.
4. Make the Ex: StdNavbar (Section 9.6) more general by employing a set of three
equal-size images for each roll-over: a mouseout image, a mouseover image, and a self-
id image. The self-id image is used to indicate the current page which becomes an
inactive link on the navbar. Make sure to test the visual effect of your rollover design.
The user ought to have a feel of the control is following the mouse.
5. Further improve the Ex: StdNavbar (Section 9.6) by adding a mousedown event
handler. Usually this handler can perform the same actions as the mouseover handler.
6. Further automate the Ex: StdNavbar (Section 9.6) by generating its code with
document.write. This can be done by implementing a Javascript function genNavbar()
which takes as arguments a list of pageIDs and the ID of the current page.
Brooks/Cole book/January 28, 2003

EXERCISES 445
7. Write a Javascript pattern that picks the parts before and after the decimal point of a
number.
8. The Ex: StdNavbar uses a fixed document file suffix (.html). Make this customizable
with a configuration variable:
var pageSuffix = "htm"; // page suffix
Note also that Section 9.9 (line 14) fails to pick up the pageid if the document.url
has an htm ending or an in-page anchor ending (stocks.html#ibm for example). Fix
this problem as well.
9. Consider the slide show in Section 9.13. Remove the hyperlinks on the previous and
next images and use the onclick event to change slides.
10. Follow the inch-centimeter conversion program (Section 9.14) and write a Fahrenheit-
Celsius conversion calculator.
11. Follow the inch-centimeter conversion program (Section 9.14) and the RGB to HSB
conversion function (Section 7.10) and write a two-way RGB-HSB conversion calcula-
tor.
12. Take the menu-based navigation program in Section 9.16 and modify it to use onclick
events on the option elements.
13. It has been reported that IE:
• Encounters an error when window.open is given a window title that contains
white space.
• Does not recognize the standard Javascript const declaration.
Find out if your IE has these problems.
Brooks/Cole book/January 28, 2003

446 CLIENT-SIDE SCRIPTING: JAVASCRIPT
Brooks/Cole book/January 28, 2003