Embed Size (px)
Citation preview

A-CR-CCP-802/PF-001
CHAPTER 6
PO 206 – FIRE THE CADET AIR RIFLE DURING RECREATIONAL MARKSMANSHIP


A-CR-CCP-802/PF-001
6-1-1
COMMON TRAINING
INSTRUCTIONAL GUIDE
SECTION 1
EO M206.01 – PARTICIPATE IN A RECREATIONALMARKSMANSHIP ACTIVITY USING THE CADET AIR RIFLE
Total Time: 90 min
PREPARATION
PRE-LESSON INSTRUCTIONS
Resources needed for the delivery of this lesson are listed in the lesson specification located in A-CR-CCP-802/PG-001, Chapter 4. Specific uses for said resources are identified throughout the Instructional Guide withinthe TP for which they are required.
Review the lesson content, and become familiar with the material, prior to delivery of the lesson. Set up air riflerange in accordance with Annex A.
Review Unit Standing Range Orders (see sample at Annex A)
Review and photocopy required targets and diagrams found in Annexes C to L.
Review the Cadet Air Rifle Handling Test in A-CR-CCP-811/PG-001, Chapter 3, Annex C.
PRE-LESSON ASSIGNMENT
N/A.
APPROACH
This interactive lecture was chosen for TP1 and TP2 to provide direction on procedures and to illustrateapplication of rules, principle and concepts.
The practical activity was selected for TP3 as an interactive setting to provide the cadets the experience of arecreational marksmanship air rifle activity in a safe and controlled environment. This recreational activity willcontribute to creating and maintaining an interest the marksmanship program.
INTRODUCTION
REVIEW
The review for this lesson will be from EO M106.02 (Cadet Air Rifle Handling Test). Ensure all cadets havecompleted the Cadet Air Rifle Handling Test.
SUGGESTED QUESTIONS
Q1. Why do we follow safety regulations?

A-CR-CCP-802/PF-001
6-1-2
Q2. How would you verify the safety catch is ON?
Q3. What are the four “ACTS” of firearm safety?
ANTICIPATED ANSWERS
A1. To help prevent accidents with the cadet air rifle.
A2. No red can be seen.
A3. The mnemonic “ACTS” stands for:
Assume every firearm is loaded;
Control the muzzle direction at all times;
Trigger finger must be kept off the trigger and out of the trigger guard; and
See that the firearm is unloaded (prove it safe).
OBJECTIVES
By the end of this lesson, the cadets shall have participated in a recreational marksmanship activity using thecadet air rifle.
IMPORTANCE
It is important for cadets to practice the skills learned in PO 106. CA (Participate in a FamiliarizationMarksmanship Activity). This activity is essential for creating, developing and maintaining an interest in thecadet marksmanship program.
Teaching Point 1 Conduct a Range Briefing
Time: 10 min Method: Interactive Lecture
Review the following information with the cadets.
REMOVING A RIFLE FROM THE CASE
The rifle case should be clearly marked on the outside with an arrow, indicating the direction the rifle inside ispointing. This will ensure that, when the case is opened, the rifle is pointing in a safe direction. The followingsteps must be followed when removing a rifle from its case:
1. Place the rifle case on a flat surface and ensure the arrow is pointing in a safe direction.
2. Open the case.
3. Cock the action (leave the bolt to the rear).
4. Confirm that the safety catch is ON.
5. Confirm that the pumping lever is partially open.
6. Slide the safety rod in the barrel towards the bolt until it can be seen in the feed track.

A-CR-CCP-802/PF-001
6-1-3
7. Remove the rifle from the case.
8. Remove the safety rod when you are on the firing line.
SAFETY CATCH AND SECURITY MEASURES
The safety catch is a mechanism that, once engaged, prevents a rifle from firing by locking its trigger in place. Itis located just in front of the trigger, on the trigger guard. To engage the safety catch it must be pushed towardsthe right so no red can be seen. To fire, the safety catch must be pushed towards the left in the OFF positionand a red mark must be seen on it. For maximum security, it is recommended that the safety catch be keptengaged until the rifle is ready for firing.
Daisy Outdoor Products, Operational Manual – Avanti Legend SX Model 853C, Daisy Outdoor Products
Figure 6-1-1 Safety Catch
Daisy Outdoor Products, Operational Manual – Avanti Legend SX Model 853C, Daisy Outdoor Products
Figure 6-1-2 Safety Catch
SAFETY ROD
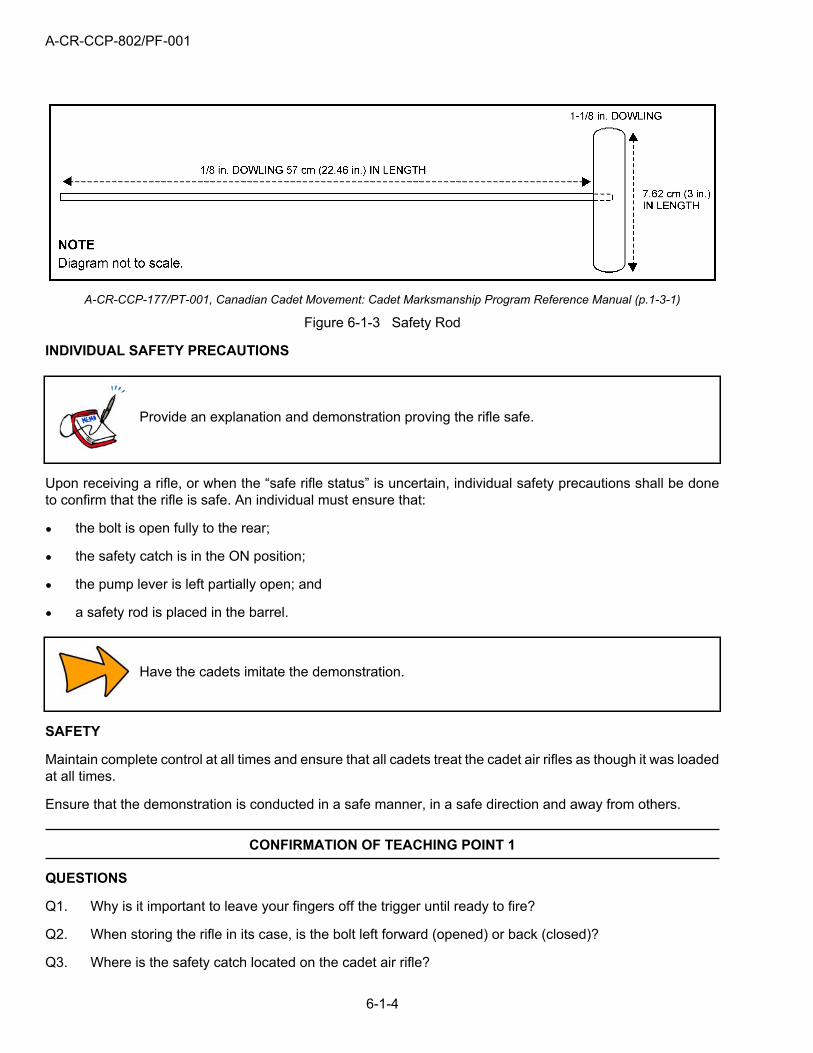
To ensure that air rifles are not removed from the firing point or stored with a pellet in the chamber or barrel, asafety rod is to be inserted in the barrel from the muzzle end. It consists of two (2) sections of doweling joinedtogether in a “T” shape, and may be made of varying materials. Dimensions are detailed in the diagram below.The tip of the safety rod is to be coloured red so that it is visible in the feed track with the bolt fully to the rear.
A-CR-CCP-802/PF-001
6-1-4
A-CR-CCP-177/PT-001, Canadian Cadet Movement: Cadet Marksmanship Program Reference Manual (p.1-3-1)
Figure 6-1-3 Safety Rod
INDIVIDUAL SAFETY PRECAUTIONS
Provide an explanation and demonstration proving the rifle safe.
Upon receiving a rifle, or when the “safe rifle status” is uncertain, individual safety precautions shall be doneto confirm that the rifle is safe. An individual must ensure that:
the bolt is open fully to the rear;
the safety catch is in the ON position;
the pump lever is left partially open; and
a safety rod is placed in the barrel.
Have the cadets imitate the demonstration.
SAFETY
Maintain complete control at all times and ensure that all cadets treat the cadet air rifles as though it was loadedat all times.
Ensure that the demonstration is conducted in a safe manner, in a safe direction and away from others.
CONFIRMATION OF TEACHING POINT 1
QUESTIONS
Q1. Why is it important to leave your fingers off the trigger until ready to fire?
Q2. When storing the rifle in its case, is the bolt left forward (opened) or back (closed)?
Q3. Where is the safety catch located on the cadet air rifle?
A-CR-CCP-802/PF-001
6-1-5
ANTICIPATED ANSWERS
A1. To prevent accidental discharge of a pellet.
A2. When the rifle is being stored in its case, the bolt is always left foreword.
A3. Within the trigger guard, forward of the trigger.
Teaching Point 2 Explain Rules and Range Commands
Time: 15 min Method: Interactive Lecture
Review range commands with an explanation and demonstration for each command.
All loading/firing is to be simulated. No pellets are to be fired.
RANGE COMMANDS CADETS MUST FOLLOW
Command Action To Be Taken
Cover off your firing point Stand up, move behind the firing point and await further commands.
Place your equipment downand stand back
Lay the equipment down on the mat and stand back when finished.
Adopt the prone position Adopt the prone position, pick up the rifle, ready the equipment and put onhearing and eye protection.
Type of firing – “G.R.I.T.” "G.R.I.T” is the acronym for:
Group (relay);
Range (distance);
Indication (number of rounds); and
Type (grouping, scored).
Relay, load, commencefiring
1. Pick up and hold the rifle with the left hand.
2. Ensure the safety catch is in the ON position.
3. Pump the rifle, observing a 3 second pause.
4. Load a pellet (flat end forward).
5. Close the bolt.
Relay, fire 1. Place the safety catch in the OFF position.
2. Aim the rifle at the target.
3. Squeeze the trigger.
4. Open the bolt.
5. Repeat the sequence for each shot.
6. Place the safety in the ON position.
7. Partially open the pump lever.
A-CR-CCP-802/PF-001
6-1-6
Command Action To Be Taken
8. Lay down the rifle.
ACTIVITY LAYOUT
As illustrated in Figure 6A-1 for Range Layout Diagram.
ACTIVITY INSTRUCTIONS
Conduct a recreational marksmanship activity according to the instructions in Annexes C to L.
SAFETY
All standard range safety procedures will apply in accordance with Local Range Standing Orders.
CONFIRMATION OF TEACHING POINT 2
The cadets’ participation in the recreational marksmanship activity will serve as confirmation of this TP.
Teaching Point 3 Participate in a Recreational Marksmanship Activity
Time: 60 min Method: Performance
ACTIVITY
OBJECTIVE
The objective of this recreational marksmanship activity is to stimulate an interest in marksmanship in theCanadian Cadet Movement (CCM).
RESOURCES
Cadet air rifles,
Cadet air rifle safety rods,
Safety glasses/goggles,
Targets,
Pellets (70 per cadet),
Cleaning Pellets (11 per cadet),
Pellet receptacle,
Shooting mats (one per firing lane),
Marking devices to record names on targets,
Grouping template,
Scoring template,
Scoring Magnifier (e.g. Eagle Eye),
Spotting scope with tripod,

A-CR-CCP-802/PF-001
6-1-7
Thumb tacks/tape,
Target frames/back stops,
Red and green range flags, and
Hand washing facilities.
ACTIVITY LAYOUT
As illustrated in Figure 6A-1 for Range Layout Diagram.
For detailed specifications refer to A-CR-CCP-177/PT-001.
ACTIVITY INSTRUCTIONS
Conduct a recreational marksmanship activity according to the instructions located at Annex C.
SAFETY
All standard range safety procedures will apply in accordance with Local Range Standing Orders.
CONFIRMATION OF TEACHING POINT 3
The cadets’ participation in the marksmanship activity will serve as confirmation of this TP.
END OF LESSON CONFIRMATION
Confirmation of this lesson is inherent in the cadets’ participation in the recreational marksmanship activity.
CONCLUSION
HOMEWORK/READING/PRACTICE
N/A.
METHOD OF EVALUATION
N/A.
CLOSING STATEMENT
In order to become more familiar with the cadet air rifle, and participate in a recreational marksmanship activity,cadets are provided a fun and safe way to practice their marksmanship skills.
INSTRUCTOR NOTES/REMARKS
Cadets are allowed to view their targets after they have been scored; the RSO will then select the targets thatmay qualify for marksmanship qualification levels, if applicable.
A-CR-CCP-802/PF-001
6-1-8
REFERENCES
A0-027 A-CR-CCP-177/PT-001 D Cdts (2001). Canadian Cadet Movement: Cadet MarksmanshipProgram Reference Manual. Ottawa ON: Department of National Defence.
A0-028 CATO 14-41 D Cdts (2005). Annex E Appendix 1 Marksmanship, Rifles, and Ammunitions. (Vol 1,8 pages). Ottawa ON: Department of National Defence.
C0-085 Daisy Outdoor Products (2006). Operational Manual – Avanti Legend EX Model 853C. Rogers,AR: Daisy Outdoor Products.

A-CR-CCP-802/PF-001
6-2-1
COMMON TRAINING
INSTRUCTIONAL GUIDE
SECTION 2
EO C206.01 – PRACTICE HOLDING TECHNIQUES
Total Time: 30 min
PREPARATION
PRE-LESSON INSTRUCTIONS
Resources needed for the delivery of this lesson are listed in the lesson specification located in A-CR-CCP-802/PG-001, Chapter 4. Specific uses for said resources are identified throughout the Instructional Guide withinthe TP for which they are required.
Review the lesson content and become familiar with the material prior to delivering the lesson.
For comfort during this class, it is recommended that cadets be dressed in PT gear.
Ensure all cadet air rifle slings are properly assembled (except one for demonstration).
PRE-LESSON ASSIGNMENT
N/A.
APPROACH
Demonstration was chosen for TP1 and TP2 as it allows the instructor to explain and demonstrate the holdingtechniques that the cadet is expected to acquire.
Performance was chosen for TP3 as it provides an opportunity for the cadets to practice holding techniquesunder supervision.
INTRODUCTION
REVIEW
The review for this lesson is from EO M106.03 (Apply Basic Marksmanship Techniques), specifically adoptingthe prone position.
Have an assistant instructor lie down on a mat and assume the prone position without thecadet air rifle sling. Allow the cadets two minutes to identify and/or correct aspects of theposition.
A-CR-CCP-802/PF-001
6-2-2
OBJECTIVES
By the end of this lesson the cadet shall have practiced holding techniques.
IMPORTANCE
It is important for cadets to practice holding techniques using the cadet air rifle sling, as it will enhance thecadets’ marksmanship skills through added stability of the firing position.
Teaching Point 1 Explain and Demonstrate Adopting the Prone Position
Time: 5 min Method: Demonstration
An assistant instructor may be used to demonstrate as the instructor explains the proneposition.
THE PRONE POSITION
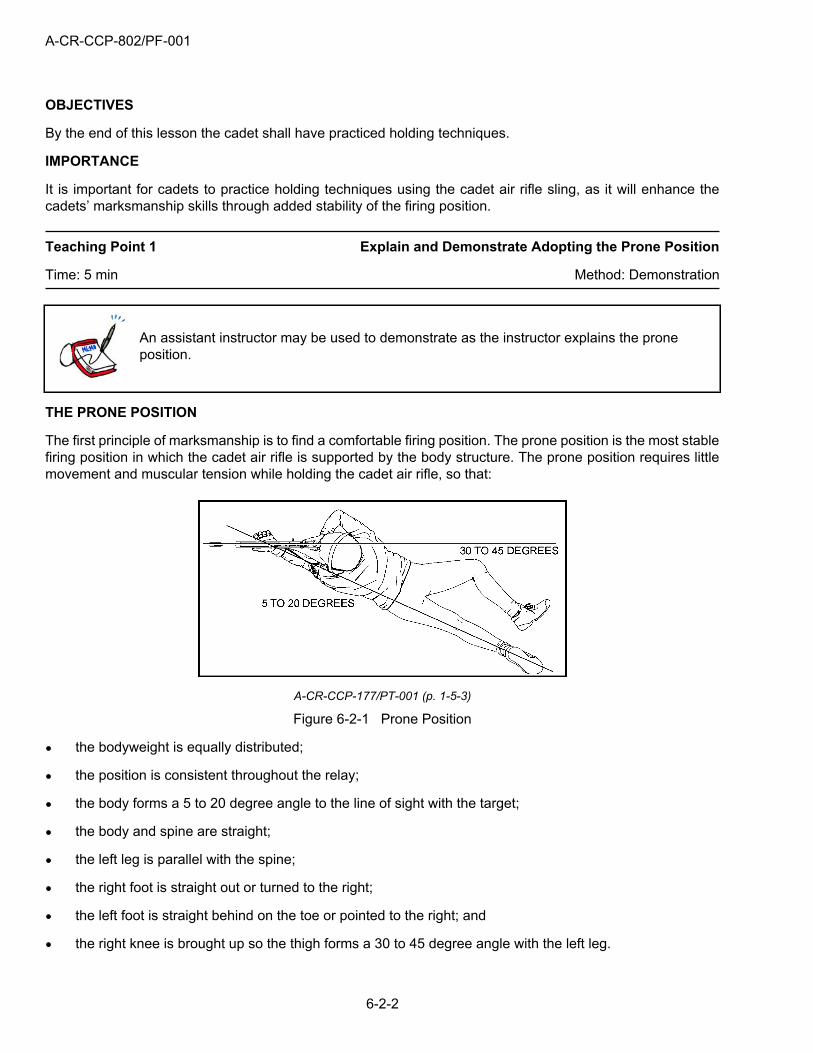
The first principle of marksmanship is to find a comfortable firing position. The prone position is the most stablefiring position in which the cadet air rifle is supported by the body structure. The prone position requires littlemovement and muscular tension while holding the cadet air rifle, so that:
A-CR-CCP-177/PT-001 (p. 1-5-3)
Figure 6-2-1 Prone Position
the bodyweight is equally distributed;
the position is consistent throughout the relay;
the body forms a 5 to 20 degree angle to the line of sight with the target;
the body and spine are straight;
the left leg is parallel with the spine;
the right foot is straight out or turned to the right;
the left foot is straight behind on the toe or pointed to the right; and
the right knee is brought up so the thigh forms a 30 to 45 degree angle with the left leg.
A-CR-CCP-802/PF-001
6-2-3
By bending the right knee, stability is improved. This causes the body to roll slightly, raisingthe chest off the ground to improve breathing and to minimize body movement caused by anormal heartbeat.
CONFIRMATION OF TEACHING POINT 1
The cadets’ participation in the holding technique activity in TP3 will serve as the confirmation of this TP.
Teaching Point 2 Explain and Demonstrate Holding Techniques Using theCadet Air Rifle Sling
Time: 10 min Method: Demonstration
The cadet air rifle sling helps the cadet maintain a comfortable and stable position, improving the ability to holdthe cadet air rifle. It also allows the right hand to be free to load the air rifle while the rifle remains in position.
Arrange the cadets so they can all hear the explanation and see the demonstration.
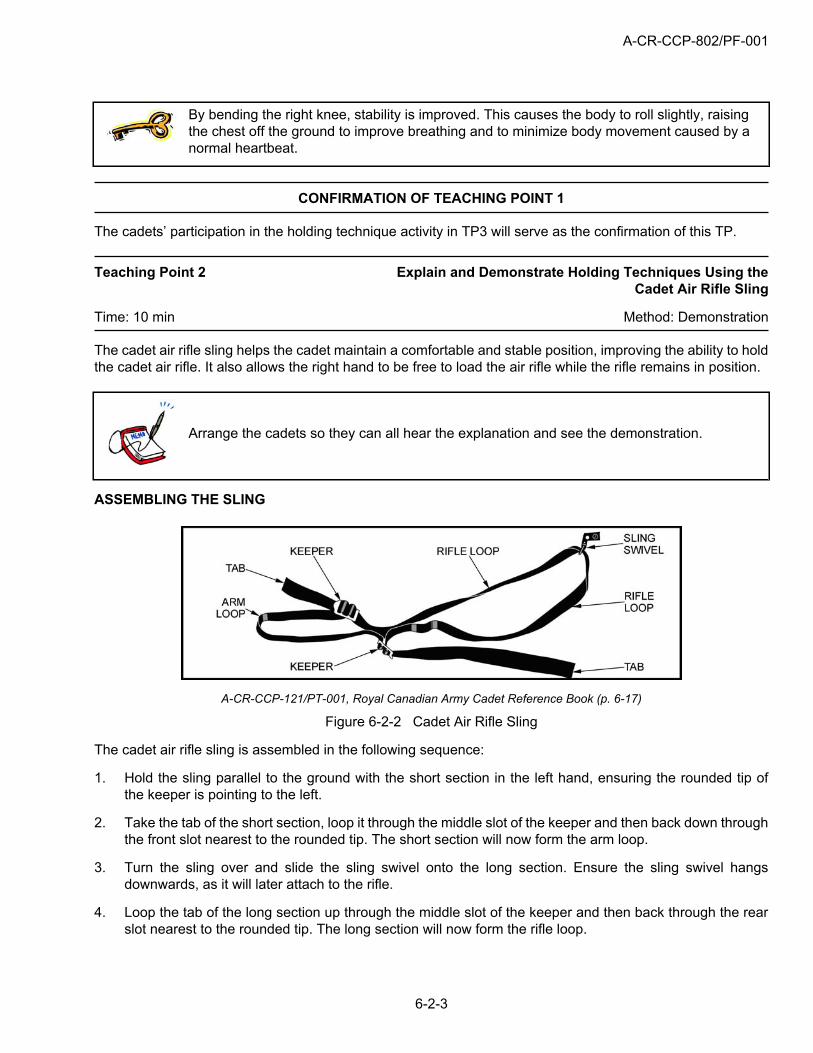
ASSEMBLING THE SLING
A-CR-CCP-121/PT-001, Royal Canadian Army Cadet Reference Book (p. 6-17)
Figure 6-2-2 Cadet Air Rifle Sling
The cadet air rifle sling is assembled in the following sequence:
1. Hold the sling parallel to the ground with the short section in the left hand, ensuring the rounded tip ofthe keeper is pointing to the left.
2. Take the tab of the short section, loop it through the middle slot of the keeper and then back down throughthe front slot nearest to the rounded tip. The short section will now form the arm loop.
3. Turn the sling over and slide the sling swivel onto the long section. Ensure the sling swivel hangsdownwards, as it will later attach to the rifle.
4. Loop the tab of the long section up through the middle slot of the keeper and then back through the rearslot nearest to the rounded tip. The long section will now form the rifle loop.

A-CR-CCP-802/PF-001
6-2-4
An assistant instructor can be used to demonstrate as the instructor explains wearing,adjusting and attaching the cadet air rifle sling.
POSITIONING THE SLING ON THE ARM
Daisy Outdoor Products, Operational Manual – Avanti Legend EX Model 853C, Daisy Outdoor Products (p. 7)
Figure 6-2-3 Positioning Sling
The sling arm loop should be positioned on the upper part of the arm, above the bicep muscle near the shoulder.The sling can be held in place by the rubber pad on a shooting jacket. When a shooting jacket is not worn,the sling can be kept in place using a safety pin. This will prevent the sling from slipping down the arm whilein the prone position.
ADJUSTING THE ARM LOOP
Daisy Outdoor Products, Operational Manual – Avanti Legend EX Model 853C, Daisy Outdoor Products (p. 8)
Figure 6-2-4 Adjusting Arm Loop
To adjust the arm loop, pull the tab away from the keeper. If the sling is too loose, it will not fully support thecadet air rifle and it will have to be kept in place using muscles. If the sling is too tight, it will restrict the bloodflow to the arm and can cause discomfort, numbness, or a more pronounced feel of the body’s pulse. Therefore,the sling must be comfortable without pinching the arm, while providing maximum support of the cadet air rifle.
A-CR-CCP-802/PF-001
6-2-5
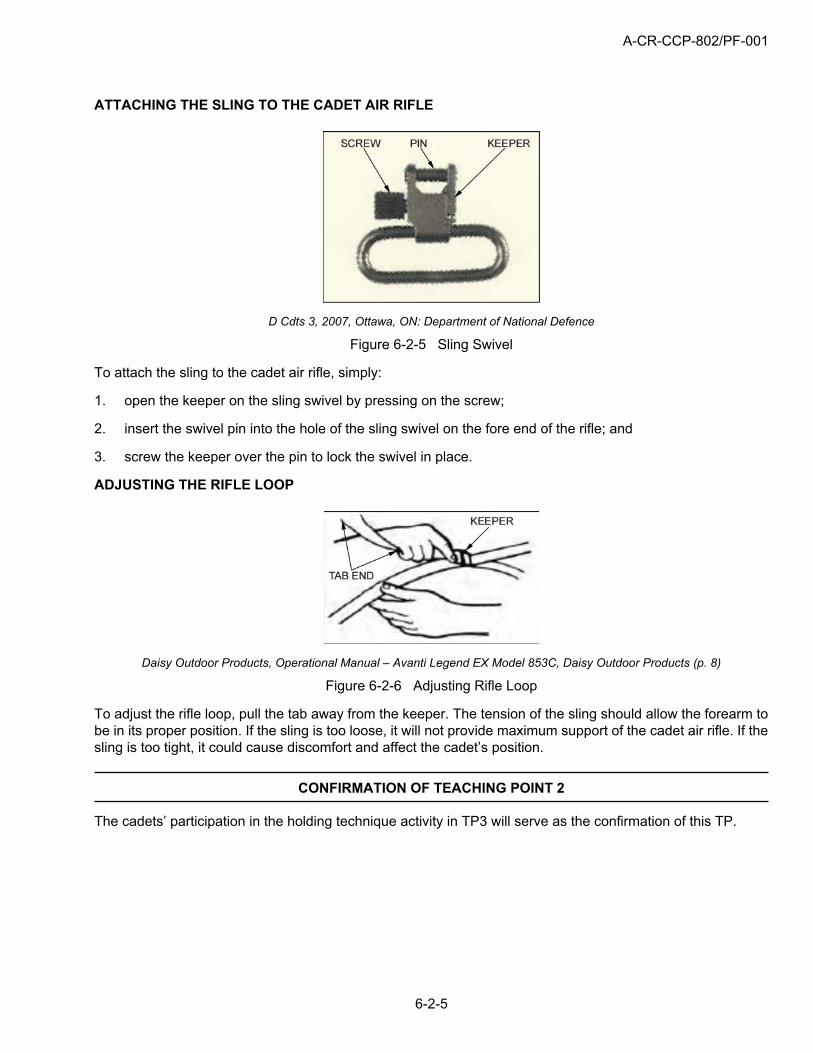
ATTACHING THE SLING TO THE CADET AIR RIFLE
D Cdts 3, 2007, Ottawa, ON: Department of National Defence
Figure 6-2-5 Sling Swivel
To attach the sling to the cadet air rifle, simply:
1. open the keeper on the sling swivel by pressing on the screw;
2. insert the swivel pin into the hole of the sling swivel on the fore end of the rifle; and
3. screw the keeper over the pin to lock the swivel in place.
ADJUSTING THE RIFLE LOOP
Daisy Outdoor Products, Operational Manual – Avanti Legend EX Model 853C, Daisy Outdoor Products (p. 8)
Figure 6-2-6 Adjusting Rifle Loop
To adjust the rifle loop, pull the tab away from the keeper. The tension of the sling should allow the forearm tobe in its proper position. If the sling is too loose, it will not provide maximum support of the cadet air rifle. If thesling is too tight, it could cause discomfort and affect the cadet’s position.
CONFIRMATION OF TEACHING POINT 2
The cadets’ participation in the holding technique activity in TP3 will serve as the confirmation of this TP.

A-CR-CCP-802/PF-001
6-2-6
Teaching Point 3 Conduct a Holding Technique Activity
Time: 10 min Method: Performance
ACTIVITY
OBJECTIVE
The objective of this activity is to have cadets adopt the prone position, positioning the sling on the arm, adjustingthe arm loop, attaching the sling to the air rifle, and adjusting the rifle loop.
RESOURCES
Cadet air rifle (one per firing lane).
Cadet air rifle sling (one per air rifle).
Shooting mat (one per firing lane).
ACTIVITY LAYOUT
An air rifle range constructed IAW A-CR-CCP-177/PT-001, Chapter 1, Section 8. If a range is not available,set up the training area to have a defined mock firing point. The assistant instructor shall be used to confirmthe cadet’s position.
ACTIVITY INSTRUCTIONS
1. Divide cadets into equal groups according to the number of cadet air rifles.
2. Have each group of cadets take turns lying down on mats and assume the prone position.
3. With assistance, allow the cadets to practice the prone position as taught.
4. Have cadets position the sling on the arm and adjust the arm loop.
5. Have cadets attach the sling to the air rifle and put the cadet air rifle into the shoulder.
6. Have cadets adjust the rifle loop of the sling.
7. Have cadets adjust their prone position.
8. Inspect each cadet for proper placement of the sling on the arm and tension of the sling loops.
9. Repeat steps as required, within the allotted time.
SAFETY
Ensure that the cadet air rifles are pointed in a safe direction at all times. Cadets will treat air rifles as thoughthey are loaded.
CONFIRMATION OF TEACHING POINT 3
The cadets’ participation in the holding technique activity will serve as the confirmation of this TP.

A-CR-CCP-802/PF-001
6-2-7
END OF LESSON CONFIRMATION
The cadets’ participation in the holding technique activity in TP3 will serve as the confirmation of this lesson.
CONCLUSION
HOMEWORK/READING/PRACTICE
N/A.
METHOD OF EVALUATION
N/A.
CLOSING STATEMENT
The prone position and the cadet air rifle sling are essential to improving marksmanship techniques. Withpractice using the sling in the prone position, cadets can improve their technique and their marksmanship score.
INSTRUCTOR NOTES/REMARKS
Instructions may be modified for left-handed cadets (e.g. switching left hand/foot when instructions call for righthand/foot).
This EO is intended to enhance and further develop techniques taught in EO M106.03 (Apply BasicMarksmanship Techniques).
REFERENCES
A0-027 A-CR-CCP-177/PT-001 D Cdts 3. (2001). Canadian Cadet Movement: Cadet MarksmanshipProgram Reference Manual. Ottawa, ON: Department of National Defence.

A-CR-CCP-802/PF-001
THIS PAGE INTENTIONALLY LEFT BLANK
6-2-8
A-CR-CCP-802/PF-001
6-3-1
COMMON TRAINING
INSTRUCTIONAL GUIDE
SECTION 3
EO C206.02 – PRACTICE AIMING TECHNIQUES
Total Time: 60 min
PREPARATION
PRE-LESSON INSTRUCTIONS
Resources needed for the delivery of this lesson are listed in the lesson specification located in A-CR-CCP-802/PG-001, Chapter 4. Specific uses for said resources are identified throughout the Instructional Guide withinthe TP for which they are required.
Review the lesson content and become familiar with the material prior to delivering the lesson.
PRE-LESSON ASSIGNMENT
N/A.
APPROACH
Demonstration and performance was chosen for TP1 and TP3 as it allows the instructor to explain anddemonstrate aiming techniques while providing an opportunity for the cadets to practice these skills undersupervision.
An interactive lecture was chosen for TP2 to introduce the aspects of aiming.
INTRODUCTION
REVIEW
Review the following points from EO M106.03 (Apply Basic Marksmanship Techniques).
The aiming process is achieved by adopting a comfortable prone position and ensuring body alignmentwith the target.
Sight alignment is the alignment of the eye, the rear sight, and the front sight.
The sight picture is obtained by keeping the bull’s-eye centred with the circles of the front sight and rearsight.
OBJECTIVES
By the end of this lesson the cadet shall have practiced aiming techniques.
A-CR-CCP-802/PF-001
6-3-2
IMPORTANCE
It is important for cadets to practice aiming techniques while wearing the cadet air rifle sling as it will enhancethe cadets’ marksmanship skills through added stability of the firing position.
Teaching Point 1 Explain, Demonstrate and Have Cadets Practice Proper EyeUsage
Time: 15 min Method: Demonstration and Performance
Before completing a manual task, it must first be determined which hand or foot to use. Is one left or right-handed? The same is true for sight; it must first be determined the proper eye to use when aiming the cadet airrifle. To do this cadets’ must determine their master eye, learn to fire with both eyes open and avoid fixed vision.
DETERMINING THE MASTER EYE
Everyone has a master eye, which is the brain’s main source for the visual image of what we see. The non-master eye is used by the brain for depth perception or sense of direction. The master eye is the eye to beused when aiming the cadet air rifle.
The master eye is usually on the same side of the body as the dominate hand. If yourmaster eye is opposite from your dominate hand, you should try firing on the side of yourmaster eye.
ACTIVITY
OBJECTIVE
The objective of this activity is to have the cadets determine their master eye.
RESOURCES
N/A.
ACTIVITY LAYOUT
N/A.
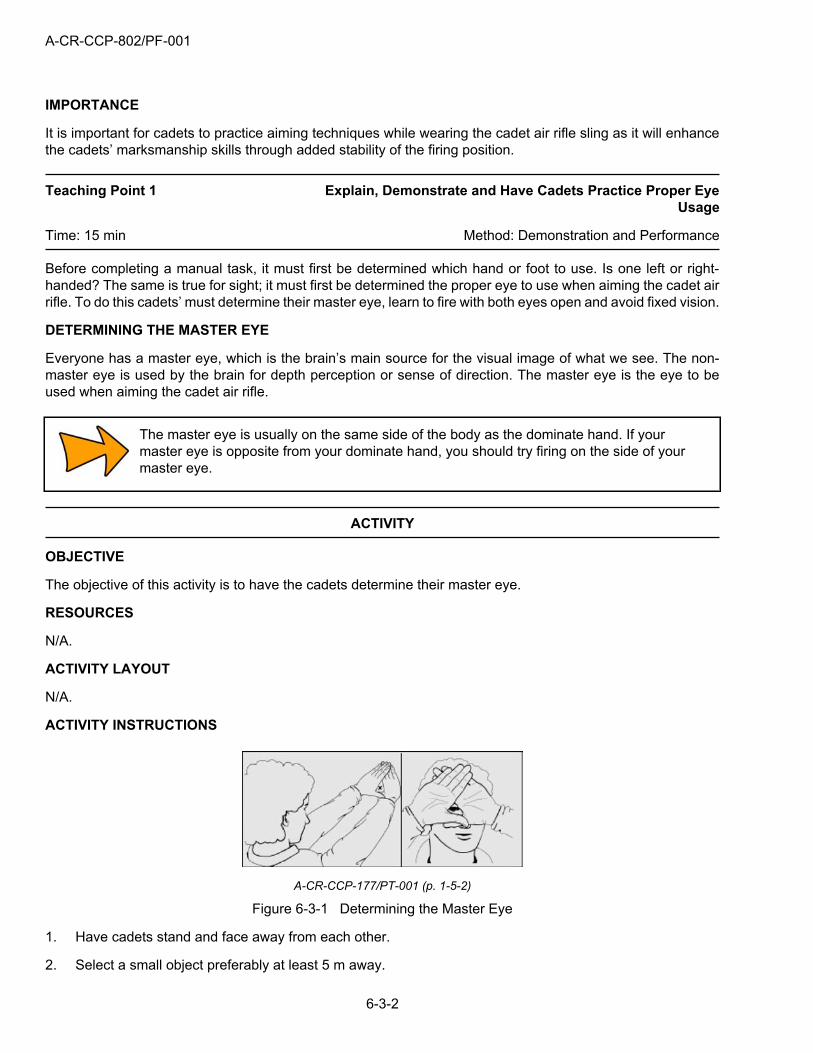
ACTIVITY INSTRUCTIONS
A-CR-CCP-177/PT-001 (p. 1-5-2)
Figure 6-3-1 Determining the Master Eye
1. Have cadets stand and face away from each other.
2. Select a small object preferably at least 5 m away.
A-CR-CCP-802/PF-001
6-3-3
3. Face the object and extend both arms in front of the face.
4. Form a small triangle opening around the object with both hands.
5. Look through the opening at the object, and draw the hands back towards the face.
6. Ensure the object remains centred through the opening of the hands.
7. Cadets should be looking at the object through the opening with one single eye (the stronger of the two).This is their master eye.
SAFETY
N/A.
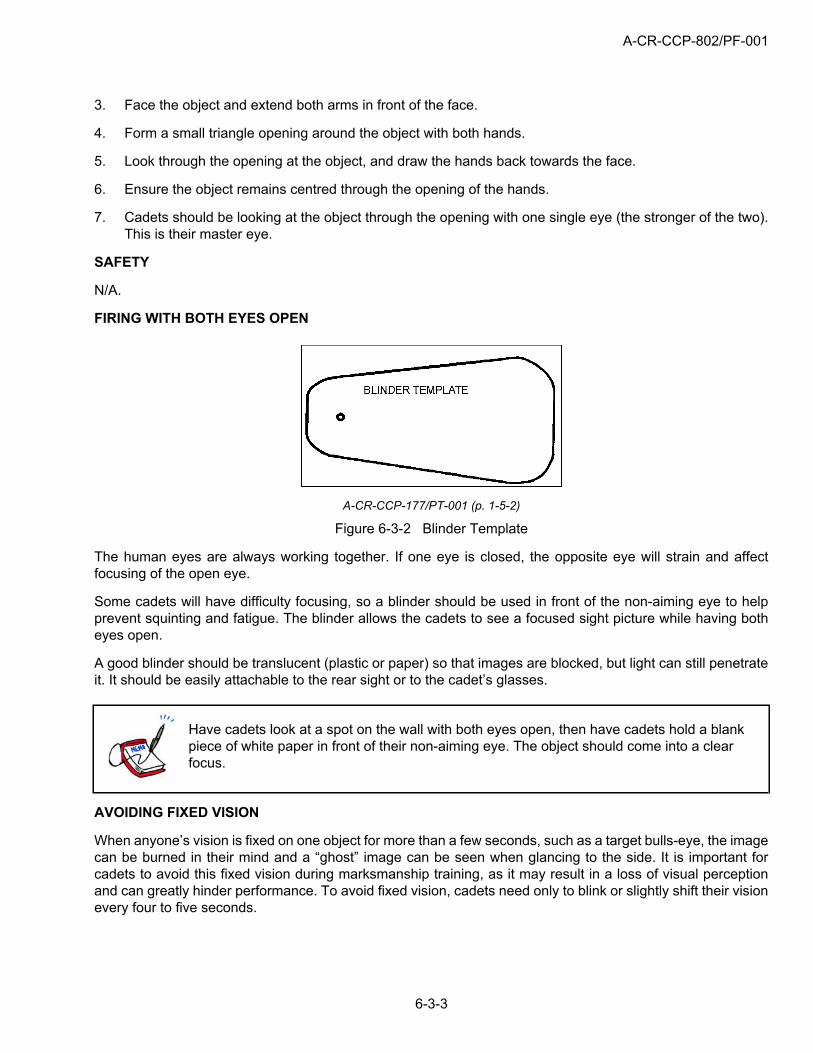
FIRING WITH BOTH EYES OPEN
A-CR-CCP-177/PT-001 (p. 1-5-2)
Figure 6-3-2 Blinder Template
The human eyes are always working together. If one eye is closed, the opposite eye will strain and affectfocusing of the open eye.
Some cadets will have difficulty focusing, so a blinder should be used in front of the non-aiming eye to helpprevent squinting and fatigue. The blinder allows the cadets to see a focused sight picture while having botheyes open.
A good blinder should be translucent (plastic or paper) so that images are blocked, but light can still penetrateit. It should be easily attachable to the rear sight or to the cadet’s glasses.
Have cadets look at a spot on the wall with both eyes open, then have cadets hold a blankpiece of white paper in front of their non-aiming eye. The object should come into a clearfocus.
AVOIDING FIXED VISION
When anyone’s vision is fixed on one object for more than a few seconds, such as a target bulls-eye, the imagecan be burned in their mind and a “ghost” image can be seen when glancing to the side. It is important forcadets to avoid this fixed vision during marksmanship training, as it may result in a loss of visual perceptionand can greatly hinder performance. To avoid fixed vision, cadets need only to blink or slightly shift their visionevery four to five seconds.

A-CR-CCP-802/PF-001
6-3-4
CONFIRMATION OF TEACHING POINT 1
The cadets’ participation in determining the master eye will serve as the confirmation of this TP.
Teaching Point 2 Identify and Explain Aspects of Aiming
Time: 25 min Method: Interactive Lecture
Before cadets can aim the cadet air rifle with accuracy, they must first identify aspects of aiming. To do thiscadets must understand that the sight system of the cadet air rifle, natural head position, and eye relief all worktogether when aiming.
SIGHT SYSTEM OF THE CADET AIR RIFLE
The sight system of the cadet air rifle is made up of two main components – the front sight and the rear sight.
Explain to the cadets that the front and rear sights of the cadet air rifle must be usedtogether when acquiring a sight picture.
A-CR-CCP-177/PT-001 (p. 1-5-5)
Figure 6-3-3 Front Sight
Front Sight. The front sight of the cadet air rifle is made of a short tube, which is called a hood. The hoodis designed to shield the front sight from overhead and side light. The most common front sights used for thecadet air rifle is the aperture or circle sight. The aperture is inserted in the hood through a slit on the top.
The adjusting of the sights on the cadet air rifle will be covered in Year Three. Instruct thecadets that they are not to make any adjustments to the sights.

A-CR-CCP-802/PF-001
6-3-5
A-CR-CCP-177/PT-001 (p. 1-5-5)
Figure 6-3-4 Rear Sight
Rear Sight. The adjustable rear sight of the cadet air rifle has three main parts; peep sight, elevation knob,and windage knob.
Peep Sight. The peep sight is the penny-sized dish-shaped part at the rear of the sight. It has a smallhole in the centre to look through.
Elevation Knob. The elevation knob is on the top of the sight and moves the point of impact on the targetup or down.
Windage Knob. The windage knob is on the side of the sight and moves the point of impact on the targetleft or right.
NATURAL HEAD POSITION
The head should be kept as close as possible to a natural position, allowing the eyes to look straight forwardfrom the eye socket. It is perfectly normal to tilt the head forward slightly, but cadets must resist allowing it totilt to the left or right as this may affect their sense of balance.
EYE RELIEF
A-CR-CCP-177/PT-001 (p. 1-5-6)
Figure 6-3-5 Eye Relief
Eye relief is the distance between the eye and the peep sight on the rear sight. Depending on an individual’sbuild and position, the distance is usually 5 to 15 cm. Eye relief should be comfortable, natural and allow thehead to be as erect as possible during the firing process. It is important to maintain the same eye relief fromshot to shot and to find an eye relief that allows a circle of light to be seen around the front sight while lookingthrough the rear sight. If the eye relief is less than 5 cm, the line of white around the front sight becomes larger,making the sight picture more difficult to keep aligned.
CONFIRMATION OF TEACHING POINT 2
QUESTIONS
Q1. What are the two main components of the cadet air rifle sight system?
A-CR-CCP-802/PF-001
6-3-6
Q2. What are the three parts of the rear sight?
Q3. What is the usual distance for eye relief?
ANTICIPATED ANSWERS
A1. The front and rear sights.
A2. The peep sight, elevation knob and windage knob.
A3. 5 to 15 cm.
Teaching Point 3 Explain, Demonstrate and Have Cadets PracticeMarksmanship-related Breathing
Time: 15 min Method: Demonstration and Performance
Breathing supplies the blood stream with oxygen and eliminates waste elements (such as carbon dioxide) fromthe blood. While breathing, the oxygen inhaled is used to supply muscles with energy, ensuring optimal potentialof the muscles. Just like in sports, controlled breathing can affect marksmanship outcomes.
CONTROLLED BREATHING
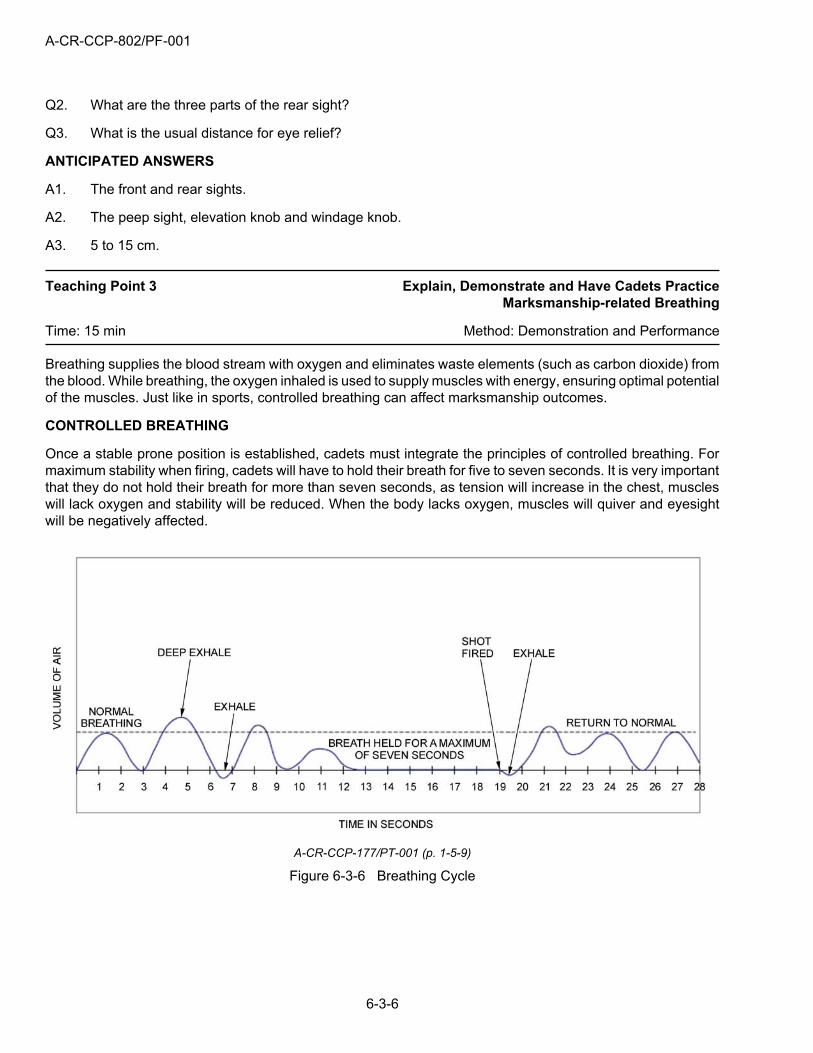
Once a stable prone position is established, cadets must integrate the principles of controlled breathing. Formaximum stability when firing, cadets will have to hold their breath for five to seven seconds. It is very importantthat they do not hold their breath for more than seven seconds, as tension will increase in the chest, muscleswill lack oxygen and stability will be reduced. When the body lacks oxygen, muscles will quiver and eyesightwill be negatively affected.
A-CR-CCP-177/PT-001 (p. 1-5-9)
Figure 6-3-6 Breathing Cycle
A-CR-CCP-802/PF-001
6-3-7
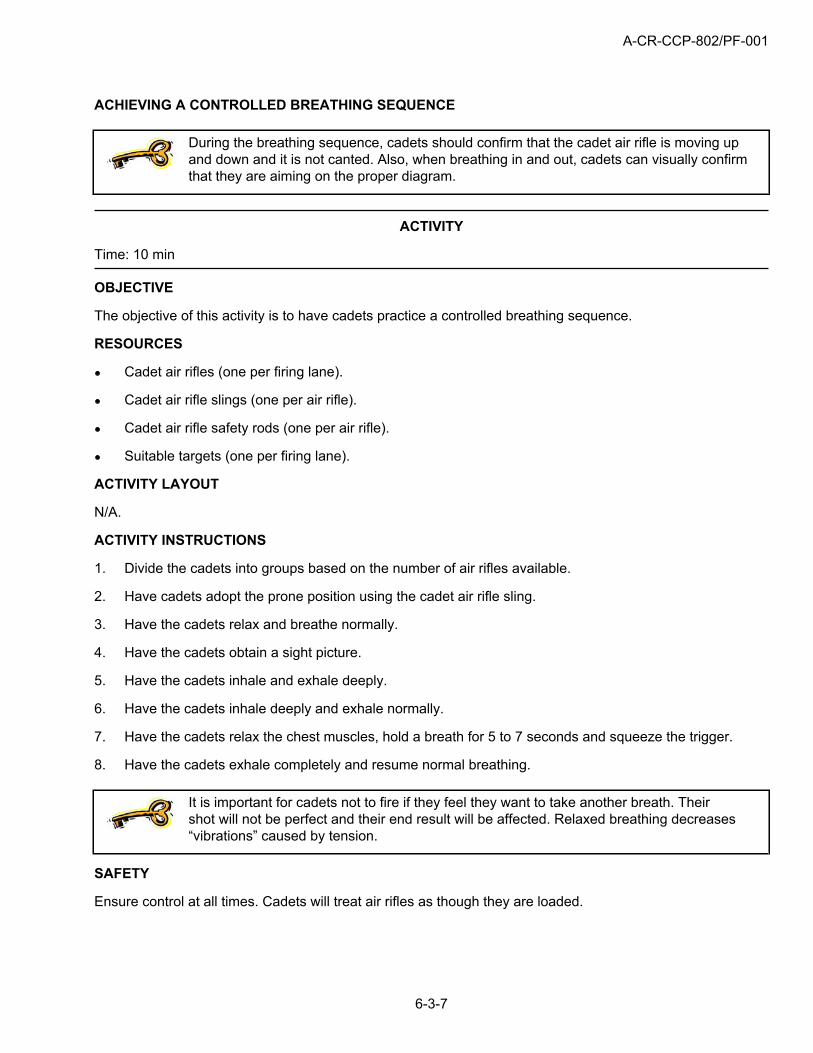
ACHIEVING A CONTROLLED BREATHING SEQUENCE
During the breathing sequence, cadets should confirm that the cadet air rifle is moving upand down and it is not canted. Also, when breathing in and out, cadets can visually confirmthat they are aiming on the proper diagram.
ACTIVITY
Time: 10 min
OBJECTIVE
The objective of this activity is to have cadets practice a controlled breathing sequence.
RESOURCES
Cadet air rifles (one per firing lane).
Cadet air rifle slings (one per air rifle).
Cadet air rifle safety rods (one per air rifle).
Suitable targets (one per firing lane).
ACTIVITY LAYOUT
N/A.
ACTIVITY INSTRUCTIONS
1. Divide the cadets into groups based on the number of air rifles available.
2. Have cadets adopt the prone position using the cadet air rifle sling.
3. Have the cadets relax and breathe normally.
4. Have the cadets obtain a sight picture.
5. Have the cadets inhale and exhale deeply.
6. Have the cadets inhale deeply and exhale normally.
7. Have the cadets relax the chest muscles, hold a breath for 5 to 7 seconds and squeeze the trigger.
8. Have the cadets exhale completely and resume normal breathing.
It is important for cadets not to fire if they feel they want to take another breath. Theirshot will not be perfect and their end result will be affected. Relaxed breathing decreases“vibrations” caused by tension.
SAFETY
Ensure control at all times. Cadets will treat air rifles as though they are loaded.
A-CR-CCP-802/PF-001
6-3-8
CONFIRMATION OF TEACHING POINT 3
The cadets’ participation in the controlled breathing activity will serve as the confirmation of this TP.
END OF LESSON CONFIRMATION
QUESTIONS
Q1. What is the master eye used for in marksmanship?
Q2. How much eye relief is between the eye and the rear sight?
Q3. During a controlled breathing sequence, what direction should the cadet air rifle move?
ANTICIPATED ANSWERS
A1. To aim the cadet air rifle.
A2. 5 to 15 cm.
A3. Up and down.
CONCLUSION
HOMEWORK/READING/PRACTICE
N/A.
METHOD OF EVALUATION
N/A.
CLOSING STATEMENT
Breathing is essential to marksmanship as it supplies the muscles with oxygen and helps the cadet to maintainthe prone position. With practice using the controlled breathing sequence, cadets can improve their aiming ofthe cadet air rifle and marksmanship scores can improve.
INSTRUCTOR NOTES/REMARKS
N/A.
REFERENCES
A0-027 A-CR-CCP-177/PT-001 D Cdts 3. (2001). Canadian Cadet Movement: Cadet MarksmanshipProgram Reference Manual. Ottawa, ON: Department of National Defence.

A-CR-CCP-802/PF-001
6-4-1
COMMON TRAINING
INSTRUCTIONAL GUIDE
SECTION 4
EO C206.03 – PRACTICE FIRING TECHNIQUES
Total Time: 30 min
PREPARATION
PRE-LESSON INSTRUCTIONS
Resources needed for the delivery of this lesson are listed in the lesson specification located in A-CR-CCP-802/PG-001, Chapter 4. Specific uses for said resources are identified throughout the Instructional Guide withinthe TP for which they are required.
Review the lesson content and become familiar with the material prior to delivering the lesson.
For comfort during this class, it is recommended that cadets be dressed in PT gear.
PRE-LESSON ASSIGNMENT
N/A.
APPROACH
Demonstration and performance was chosen for TP1 as it allows the instructor to explain and demonstratefiring techniques while providing an opportunity for the cadets to practice these skills under supervision.
Demonstration was chosen for TP2 as it allows the instructor to explain and demonstrate trigger control.
An interactive lecture was chosen for TP3 to present basic material on follow-through.
INTRODUCTION
REVIEW
The review for this lesson is from EO M106.03 (Apply Basic Marksmanship Techniques). The sequencerequired to fire the cadet air rifle when the RSO gives the command “Fire”, will include:
1. place safety catch in the OFF position;
2. aim the cadet air rifle at the target;
3. squeeze the trigger;
4. open the bolt, pump the rifle, reload, aim and fire;
5. repeat the last step until firing is complete;
6. upon completion, place the safety catch in the ON position and partially open the pump lever; and
A-CR-CCP-802/PF-001
6-4-2
7. lay down the cadet air rifle.
OBJECTIVES
By the end of this lesson the cadet shall have practiced firing techniques.
IMPORTANCE
It is important for cadets to practice natural alignment, trigger control and follow-through when firing the cadetair rifle, as it helps cadets achieve a stable prone position and sight picture.
Teaching Point 1 Explain, Demonstrate and Have the Cadets Practice NaturalAlignment
Time: 15 min Method: Demonstration and Performance
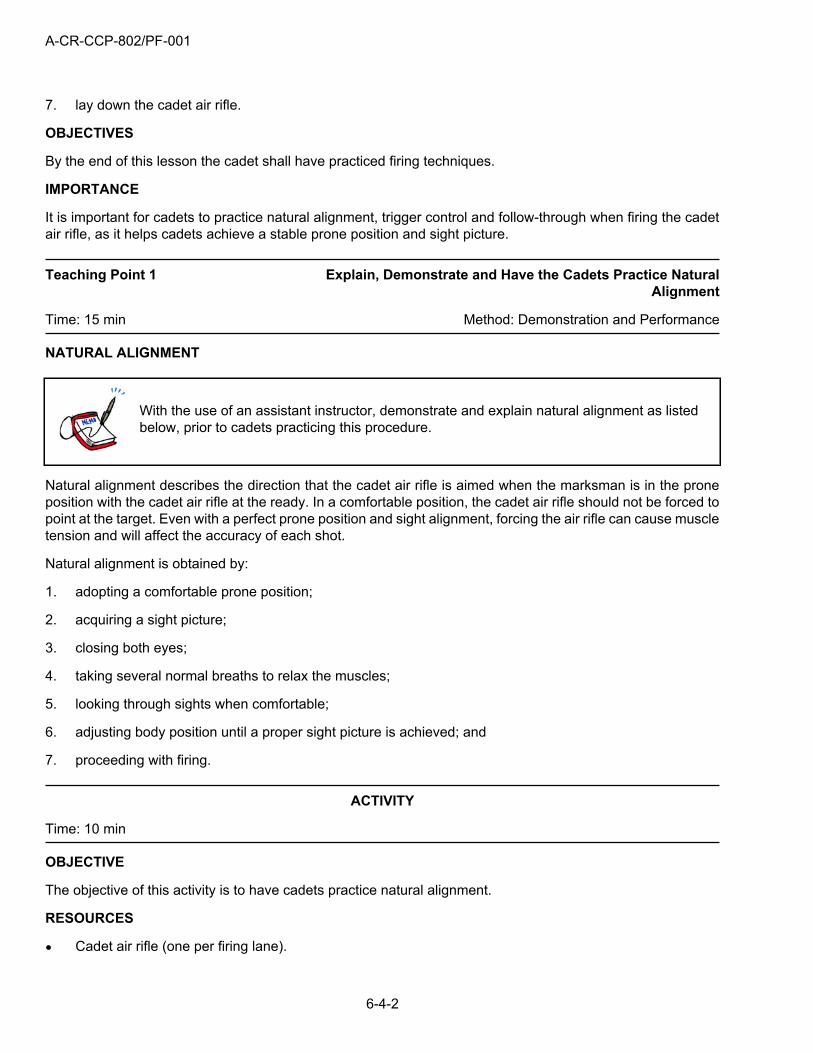
NATURAL ALIGNMENT
With the use of an assistant instructor, demonstrate and explain natural alignment as listedbelow, prior to cadets practicing this procedure.
Natural alignment describes the direction that the cadet air rifle is aimed when the marksman is in the proneposition with the cadet air rifle at the ready. In a comfortable position, the cadet air rifle should not be forced topoint at the target. Even with a perfect prone position and sight alignment, forcing the air rifle can cause muscletension and will affect the accuracy of each shot.
Natural alignment is obtained by:
1. adopting a comfortable prone position;
2. acquiring a sight picture;
3. closing both eyes;
4. taking several normal breaths to relax the muscles;
5. looking through sights when comfortable;
6. adjusting body position until a proper sight picture is achieved; and
7. proceeding with firing.
ACTIVITY
Time: 10 min
OBJECTIVE
The objective of this activity is to have cadets practice natural alignment.
RESOURCES
Cadet air rifle (one per firing lane).
A-CR-CCP-802/PF-001
6-4-3
Cadet air rifle safety rod (one per rifle).
Shooting mat (one per firing lane).
Suitable target (one per firing lane).
ACTIVITY LAYOUT
Construct an air rifle range IAW A-CR-CCP-177/PT-001, Chapter 1, Section 8. If a range is not available, setup the training area to have a defined mock firing point. Ensure that the air rifles are pointed in a safe directionat all times.
ACTIVITY INSTRUCTIONS
1. Divide cadets into equal groups according to the number of cadet air rifles available.
2. Have cadets lie on the mats and assume the prone position using the cadet air rifle and sling.
3. Cadets will acquire a sight picture by aligning the eye, rear sight, front sight, and the target bull’s eye.
4. When cadets have a sight picture, have them close their eyes.
5. Have cadets relax by taking 3 to 4 normal breaths.
6. After approximately 10 seconds, have cadets open their eyes and inspect their sight picture.
7. Cadets shall adjust their bodies to re-acquire an accurate sight picture.
8. Repeat steps 4 to 9, as required, within the allotted time.
SAFETY
Ensure control at all times. Cadets will treat cadet air rifles as though they are loaded.
CONFIRMATION OF TEACHING POINT 1
The cadets’ participation in the natural alignment activity will serve as the confirmation of this TP.
Teaching Point 2 Demonstrate and Explain Trigger Control
Time: 5 min Method: Demonstration
TRIGGER CONTROL
With the use of an assistant instructor, allow the cadets to observe the demonstration andhear the explanation for each aspect of trigger control as listed below.
Trigger control is the handling of the trigger in such a way that there is no disturbance. It must be constant,controlled, slow and deliberate.
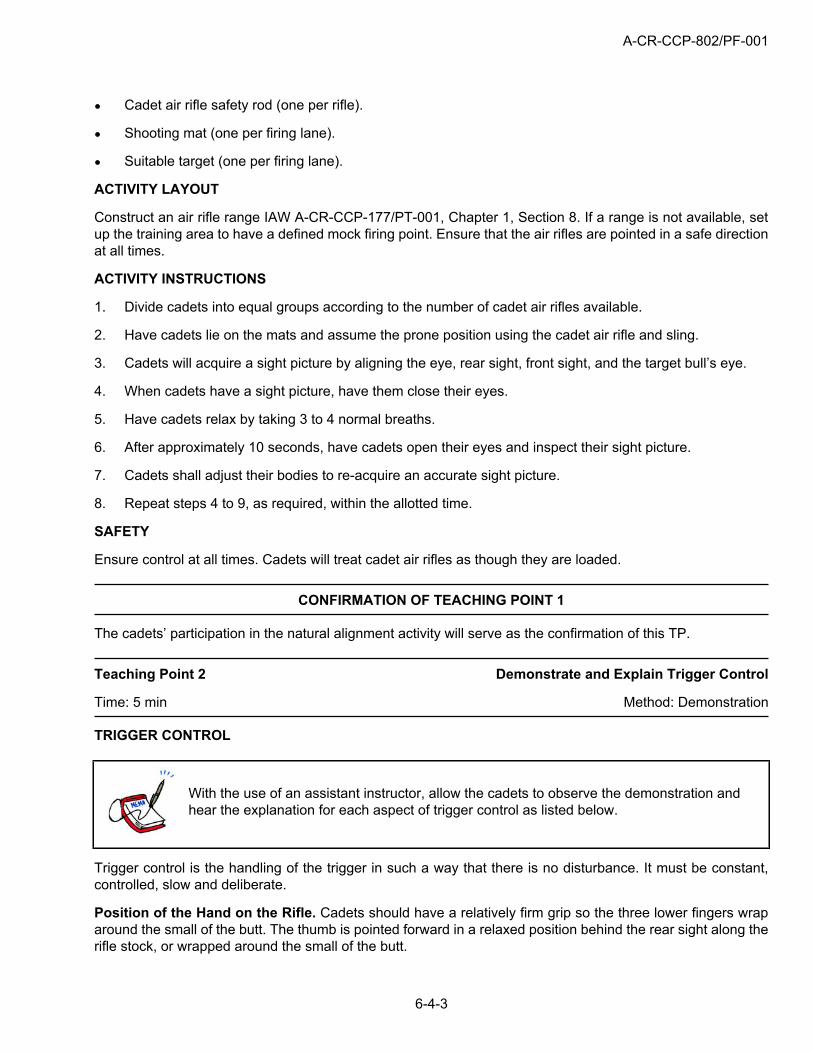
Position of the Hand on the Rifle. Cadets should have a relatively firm grip so the three lower fingers wraparound the small of the butt. The thumb is pointed forward in a relaxed position behind the rear sight along therifle stock, or wrapped around the small of the butt.
A-CR-CCP-802/PF-001
6-4-4
D Cdts 5, Royal Canadian Army Cadets Visual Aids Rifle Shooting Figures, Department of National Defence (p. 11)
Figure 6-4-1 Position of the Hand on the Rifle
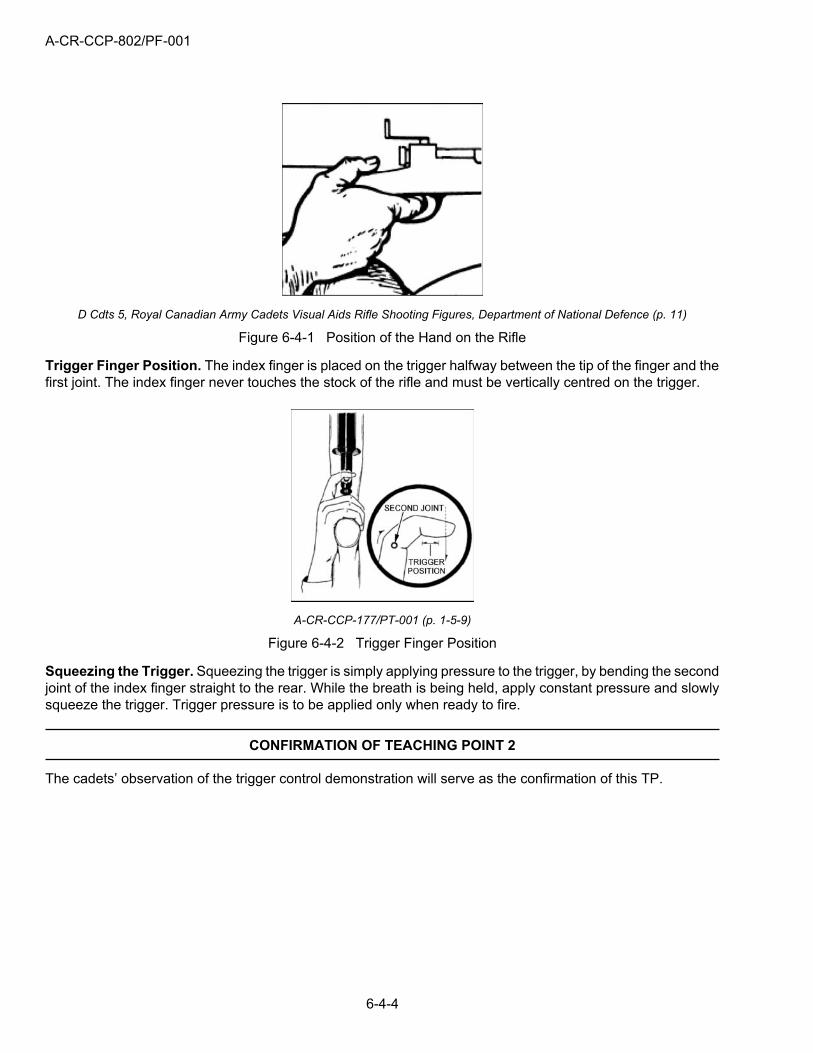
Trigger Finger Position. The index finger is placed on the trigger halfway between the tip of the finger and thefirst joint. The index finger never touches the stock of the rifle and must be vertically centred on the trigger.
A-CR-CCP-177/PT-001 (p. 1-5-9)
Figure 6-4-2 Trigger Finger Position
Squeezing the Trigger. Squeezing the trigger is simply applying pressure to the trigger, by bending the secondjoint of the index finger straight to the rear. While the breath is being held, apply constant pressure and slowlysqueeze the trigger. Trigger pressure is to be applied only when ready to fire.
CONFIRMATION OF TEACHING POINT 2
The cadets’ observation of the trigger control demonstration will serve as the confirmation of this TP.
A-CR-CCP-802/PF-001
6-4-5
Teaching Point 3 Define Follow-through
Time: 5 min Method: Interactive Lecture
FOLLOW-THROUGH
Since no pellets will be fired, position the cadets so they may observe an assistant instructorperform a simulation and hear the explanation of follow-through.
Follow-through is defined as the act of remaining in a stable prone position for two seconds and reacquiringthe sight picture after firing the air rifle. Follow-through is critical to ensuring there is no movement as the cadetair rifle is being fired. If the cadet moves the cadet air rifle during firing, the pellet will not hit the target in thespot that it was aimed. Ensuring proper follow-through allows cadets to improve their skills, and their score.
CONFIRMATION OF TEACHING POINT 3
QUESTIONS
Q1. How long must a stable position be held after firing the cadet air rifle?
Q2. What will happen to a pellet during follow-through?
Q3. If the rifle moves before the pellet leaves the muzzle, how will it affect the target?
ANTICIPATED ANSWERS
A1. A stable position must be held for two seconds.
A2. It will leave the muzzle.
A3. The pellet will not hit the target in the spot that it was aimed.
END OF LESSON CONFIRMATION
The cadets’ participation in marksmanship activities using natural alignment, trigger control and follow-through,will serve as the confirmation of this lesson.
CONCLUSION
HOMEWORK/READING/PRACTICE
N/A.
METHOD OF EVALUATION
N/A.
A-CR-CCP-802/PF-001
6-4-6
CLOSING STATEMENT
Natural alignment, trigger control and follow-through are essential to developing marksmanship skills. Theyhelp cadets maintain a stable position and sight picture when firing the cadet air rifle. With practice using thesefiring techniques, cadets can improve their skills and their score.
INSTRUCTOR NOTES/REMARKS
N/A.
REFERENCES
A0-027 A-CR-CCP-177/PT-001 D Cdts 3. (2001). Canadian Cadet Movement: Cadet MarksmanshipProgram Reference Manual. Ottawa, ON: Department of National Defence.
A-CR-CCP-802/PF-001Chapter 6, Annex A
6A-1
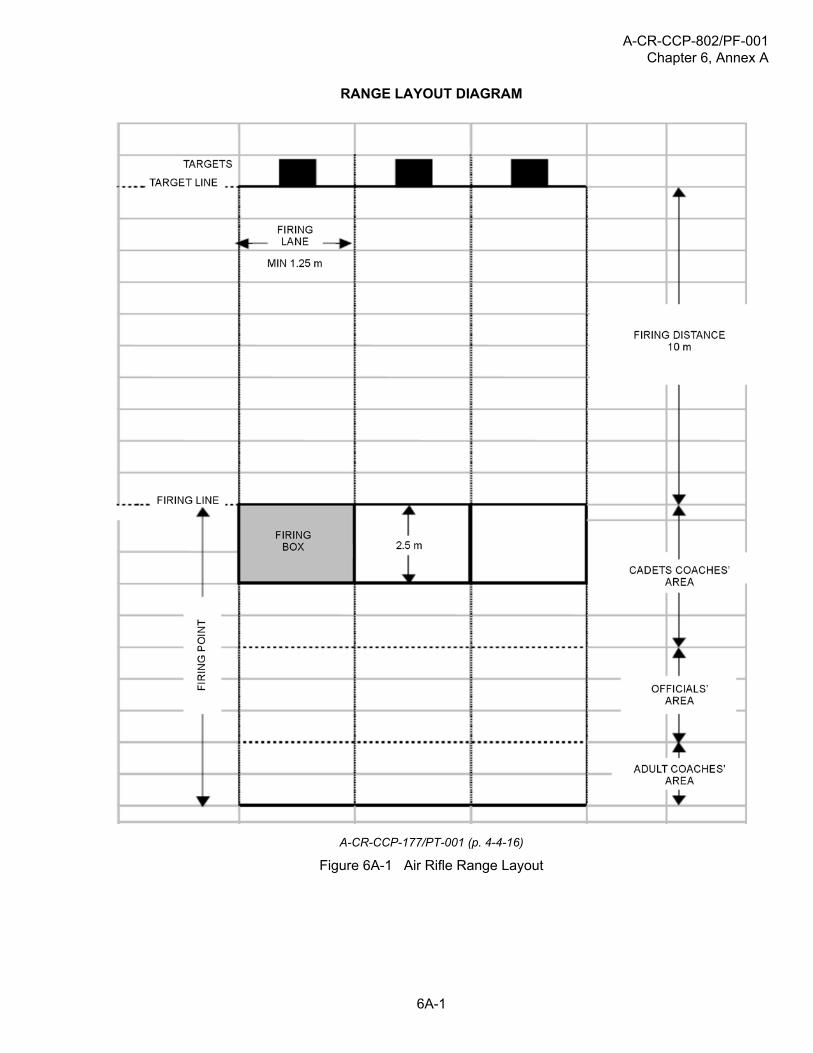
RANGE LAYOUT DIAGRAM
A-CR-CCP-177/PT-001 (p. 4-4-16)
Figure 6A-1 Air Rifle Range Layout

A-CR-CCP-802/PF-001Chapter 6, Annex A
THIS PAGE INTENTIONALLY LEFT BLANK
6A-2

A-CR-CCP-802/PF-001Chapter 6, Annex B
6B-1
SAMPLE RANGE STANDING ORDERS
GENERAL
These Range Standing Orders shall apply to all personnel participating in any air rifle firing conducted on a 10-metre indoor “Portable Indoor Air Rifle Range”.
LOCATION
The 10-metre “Portable Indoor Air Rifle Range” is to be set up IAW A-CR-CCP-177/PT-001.
DESCRIPTION OF AN INDOOR RANGE
The portable air rifle range is set-up and then dismantled once the activity is completed.
Target stands used will be those provided by DND. Once the range practice is finished, they shall beneatly stored.
Shooting mats/gym mats will be used on the firing line.
A table and chairs may be set up behind the firing point to be used by range staff, ammunition, scoring, etc.
The set-up of the range will be as illustrated in Figure 6A-1.
In all cases, the firing distance will be 10 metres.
Backstops (Hesin curtain/blankets) will be used to protect the back of the range. They will be set up soas to minimize damage to the walls and doors.
The sides of the range will be indicated and access to those areas should be limited. There is norequirement for physical barriers in those areas.
DESCRIPTION OF BACKSTOPS (TARGET FRAMES)
Target frames for the prone position may be constructed of either wood frame with steel backer plates or woodframe with a ballistic nylon curtain (Herculite or other brand name) to catch the pellets. The size of the framesshall be large enough to accommodate two 10-metre air rifle targets (CCT2001AR853) horizontally or vertically.The target stands provided by RCSU and/or other authorized DND sources shall be the only ones used.
Biathlon air rifle falling plate targets (BT 100) may be attached to the target frame by fixing a piece of woodenmaterial (1” by 6”) to the frame and providing two screws to hang the BT 100 falling plate target.
Target frames for the standing position may be the frames described in part “a” provided that the frames areelevated to a height of 1.4 m to the centre of the target. Should a mechanical target retrievable pulley systembe used, the system may be attached to the frame by fixing a piece of wooden material 1” by 6” to the frame toattach the pulley system. A means of counter balance must be used to prevent the frames from being pulledover due to the tension and strain of the pulley system. The frames should be clamped to a table or stand andweight in the form of concrete blocks be hung from the table to give the system stability.
Moving targets are prohibited.
When conducting air rifle training in any other position (kneeling and standing) the RSO shall ensure that thebackstops provide adequate surface area to accommodate the target being used and stop stray pellets.
AIR RIFLES/PELLETS
Notwithstanding the limitations set out in CATO 14-41, Marksmanship, Rifles and Ammunitions, regarding thetypes of air rifles that may be used for approved cadet activities:
A-CR-CCP-802/PF-001Chapter 6, Annex B
6B-2
Air Rifles:
Daisy 853-C Air Rifle
Avanti 853-C Air Rifle
Pellets: 4.56 mm (.177 cal) air rifle pellets as provided by DND.
RESTRICTIONS
When the air rifle range is in use, doors leading directly into the active range area shall be locked and a signshall be posted indicating: “Live air rifle range is in progress – DO NOT ENTER”. The following are areasof concern:
Main access doors should be secured from the inside. The RSO is to verify that the doors are locked andcannot be opened from the outside.
All pellets fired must be directed towards the stop butts (target frames).
COMMUNICATIONS
All communication on this range shall be made verbally or with range signal flags. Depending on the size ofthe range a megaphone (loud hailer) may be necessary.
SUPERVISION AND RANGE SAFETY OFFICERS
A qualified Range Safety Officer (RSO) shall be appointed to conduct the range practice by the cadet squadronCommanding Officer. Furthermore, only those individuals who have a valid Air Rifle RSO certificate areauthorized to supervise the range.
The RSO is responsible for all aspects of the range exercise.
The RSO is to ensure the range area is strictly controlled.
The RSO is to ensure that all personnel have been instructed in the safe use and operation of the air rifle beingused prior to firing.
The RSO will carry out an inspection of the range area and equipment to ensure serviceability.
Adult coaches and cadet coaches are permitted on the range; however, they shall be under the control of theRSO and follow all range rules and etiquette.
RANGE CONTROL FLAGS/LIGHTS/SIGNS
To indicate the range is in use:
Range Control Flags at the entrance to the range area. The flag will be red when firing practice is beingconducted and green when no firing is taking place
Warning signs to all entrances to the range area will be posted so that they are visible to anyone attemptingto enter.
FIRING POSITIONS
These range standing orders apply to the prone position only.
MEDICAL REQUIREMENTS
During all range exercises a suitable first aid kit shall be available and if possible, a qualified first aid personpresent. All range users are to be familiar with the location and contents of the First Aid Kit.

A-CR-CCP-802/PF-001Chapter 6, Annex B
6B-3
All personnel on the range shall wear safety goggles, or their own prescription safety glasses IAW A-CR-CCP-177/PT-001.
EMERGENCY CEASE FIRE
The RSO will ensure that all personnel understand the method of signalling a “CEASE FIRE”.
Once a “CEASE FIRE” has been ordered, the rifle’s safety catch is to be applied and the finger is to be removedfrom the trigger. The rifle is to be placed down and cadets are to wait for further instructions.
EMERGENCY PROCEDURES
1. In the case of serious injury to personnel:
2. The OIC/RSO of the range exercise shall immediately order a “CEASE FIRE” and shut down the range.The appointed first aid person will administer first aid.
3. Contact by phone will be made to emergency services or 911, depending on your local area provider.
4. The cadet squadrons’ Commanding Officer and applicable SO2 shall be notified immediately in the eventof any range related accident. If the Commanding Officer is not available, the RSO shall notify the nextperson in the cadet corps chain of command, including the escort officer.
5. An incident or accident report (CF98/CF 2299 as applicable) shall be completed and forwarded to thecadet squadrons ‘Commanding Officer.
6. Safety personnel (fire, ambulance, police) are to be notified prior to entering the building that a rangeexercise was in progress at the time of the emergency and evacuation of the building.
RANGE LIGHTING
If overhead lights are not adequate, additional lighting may be provided by means of halogen lamps. Theselamps shall be protected from the impact and deflection of pellets and as well as positioned on both sides ofeach firing lane as not to be in the direct line of fire of the pellets.
TARGETS
Only 10 metre approved air rifle targets will be used. These include grouping or application targets.
Cadets are authorized to fire on any to the following targets:
Geometric shapes or silhouettes,
CCT2001AR853 Competition Targets,
CCT2000GRTD Air Rifle Grouping Target, and
BT110’s.
SAFETY PRECAUTIONS
Rifles will be proved when picked up, handed to or received from another person.
Rifles are never to be pointed at another person.
Horseplay is forbidden on or near the range.
Rifles, whether loaded or not, will always be pointed down range.

A-CR-CCP-802/PF-001Chapter 6, Annex B
6B-4
The RSO and the range staff have the authority to remove rifles from the firing line and conduct inspections,adjustments or repairs as required. Any rifles handled off the range must be unloaded and proved prior tohandling.
Smoking is not permitted in the building.
Eating is not permitted on or near the range or around pellets.
All personnel shall either read or be briefed on the contents of the Unit Range Standing Orders.
All persons having come into contact with lead pellets shall wash their hand thoroughly when finished firing.
The RSO’s directions and orders are to be obeyed at all times.
ARCS OF FIRE AND ELEVATION
Rifles shall not be elevated above 30 degrees to eliminate arcs of fire.
RANGE CLEARANCE
All rifles are to be unloaded and proved by the RSO. The RSO may delegate this task to firing point assistants,but the overall responsibility for clearing rifles remains with the RSO.
A verbal declaration is to be made by all personnel who fired or worked during the exercise to confirm thatno personnel have any pellets in their possession. The phrase to use is “I have no pellets in my possession,Sir/Ma’am”.
All remaining unfired pellets are to be returned to the RSO or range assistants responsible for ammunitionaccounting.
The range area will be cleaned and returned to its proper setting.
CHANGE TO REGULATIONS
Should there be a change in DND, CF, GGFG or CCM regulations concerning any aspect of these orders,changes shall be made in accordance with established procedures.
These orders may be reviewed and subject to change with the approval of the squadron Commanding Officer,in accordance with references stated above.
AUTHORITY
The Range Standing Orders for the “Indoor Air Rifle Range” located at local squadron of the squadronCommanding Officer.
Date: Commanding Officer (Include full signature block)

A-CR-CCP-802/PF-001Chapter 6, Annex C
6C-1
ACTIVITY
STAR
Time: 60 min
OBJECTIVE
The objective of this activity is to generate and maintain interest in the Cadet Marksmanship Program.
RESOURCES
Photocopies of star diagram.
ACTIVITY LAYOUT
Air Rifle Range in accordance with Unit Range Standing Orders.
ACTIVITY GUIDELINES
1. Distribute one (1) photocopy of star diagram to each cadet.
2. Have each cadet write their name and rank on the star diagram.
3. Cadets will fire in relays following the range commands by the RSO.
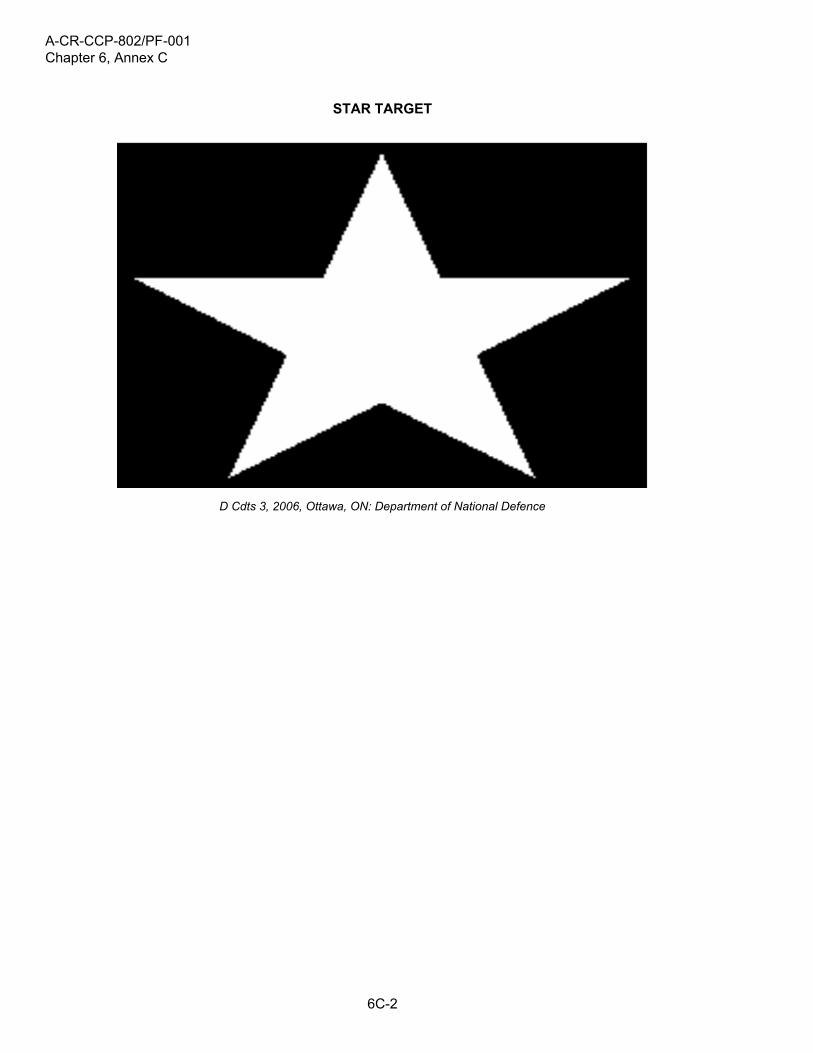
4. Cadets will fire one pellet into each point of the star.
5. Give cadets five (5) minutes to fire the pellets.
6. On completion of activity or as time allows, place star diagrams out for all the cadets to review.
7. After viewing, all star diagrams they will be collected by the RSO to record results then return to the cadets.
SAFETY
In accordance with Unit Range Standing Orders.
A-CR-CCP-802/PF-001Chapter 6, Annex C
6C-2
STAR TARGET
D Cdts 3, 2006, Ottawa, ON: Department of National Defence
A-CR-CCP-802/PF-001Chapter 6, Annex D
6D-1
ACTIVITY
BEACH BALLTime: 60 min
OBJECTIVE
The objective of the activity is to generate and maintain interest in the Cadet Marksmanship Program.
RESOURCES
Photocopies of beach ball diagram.
ACTIVITY LAYOUT
Air Rifle Range in accordance with Unit Range Standing Orders.
ACTIVITY GUIDELINES
1. Distribute one photocopy of beach ball diagram to each cadet.
2. Have each cadet write their name and rank on the beach ball diagram.
3. Cadets will fire in relays following the range commands by the RSO.
4. Cadets will be given ten pellets, to fire at the black circle.
5. Give cadets ten minutes to fire the pellets.
6. On completion of activity or as time allows, place beach ball diagram out for all the cadets to review.
7. After viewing, all beach ball diagrams, they will be collected by the RSO to record results. Return all beachball diagrams to the cadets.
SAFETY
In accordance with Unit Range Standing Orders.

A-CR-CCP-802/PF-001Chapter 6, Annex D
6D-2
BEACH BALL TARGET
D Cdts 3, 2006, Ottawa, ON: Department of National Defence
A-CR-CCP-802/PF-001Chapter 6, Annex E
6E-1
ACTIVITY
NUMBER BLOCKTime: 60 min
OBJECTIVE
The objective of this activity is to generate and maintain interest in the Cadet Marksmanship Program.
RESOURCES
Photocopies of number block diagram.
ACTIVITY LAYOUT
Air Rifle Range in accordance with Unit Range Standing Orders.
ACTIVITY GUIDELINES
1. Distribute one photocopy of number block diagram to each cadet.
2. Have each cadet write their name and rank on the number block diagram.
3. Cadets will fire in relays following the range commands by the RSO.
4. Cadets will be given six pellets to fire at the number(s) called by the RSO into the appropriate numericalNumber Block.
5. Give cadets six minutes to fire pellets.
6. Cadets are only to fire once at each number and only when the RSO calls the number block.
7. On completion of activity or as time allows place number block diagrams out for all the cadets to review.
8. After viewing, all number block diagrams, they will be collected by the RSO to record results. Return allnumber block diagrams to the cadets.
SAFETY
In accordance with Unit Range Standing Orders.

A-CR-CCP-802/PF-001Chapter 6, Annex E
6E-2
NUMBER BLOCK TARGET
D Cdts 3, 2006, Ottawa, ON: Department of National Defence

A-CR-CCP-802/PF-001Chapter 6, Annex F
6F-1
ACTIVITY
CCT2001AR853Time: 60 min
OBJECTIVE
The objective of this activity is to generate and maintain interest in the Cadet Marksmanship Program.
RESOURCES
Use the CCT2001AR853 target.
ACTIVITY LAYOUT
Air Rifle Range in accordance with Unit Range Standing Orders.
ACTIVITY GUIDELINES
1. Distribute one CCT2001AR853 target.
2. Have each cadet write their name and rank on the front CCT2001AR853 target.
3. When placing the target on the backstop the target will be placed so the diagrams can not be seen by thecadet. (This is a memory sighting drill.)
4. Cadets will fire in relays following the Range Commands by the RSO.
5. Cadets will be given twenty pellets to fire at their own time at the reverse target.
6. Only two pellets per diagram will be counted.
7. Give cadets fifteen minutes to fire pellets.
8. After viewing, all CCT2001AR853 targets, they will be collected by the RSO to record results. Return allCCT2001AR853 targets to the cadets.
SAFETY
In accordance with Unit Range Standing Orders.

A-CR-CCP-802/PF-001Chapter 6, Annex F
THIS PAGE INTENTIONALLY LEFT BLANK
6F-2

A-CR-CCP-802/PF-001Chapter 6, Annex G
6G-1
ACTIVITY
UNO CARDSTime: 60 min
OBJECTIVE
The objective of this activity is to generate and maintain interest in the Cadet Marksmanship Program.
RESOURCES
Six decks of uno cards.
ACTIVITY LAYOUT
Air Rifle Range in accordance with Unit Range Standing Orders.
ACTIVITY GUIDELINES
1. Distribute ten uno cards to each cadet.
2. Have cadets write their name and rank on the back of the uno cards.
3. Cadets will fire in relays following the range commands by the RSO.
4. Cadets are given twenty pellets to fire at the uno cards.
5. Cadets may only fire at the colour and number of card called by the RSO once. If they do not have thecard, they do not fire a pellet. (RSO to ensure you call all numbers/colours of cards distributed.
6. Give cadets five minutes to fire pellets.
7. On completion of activity or as time allows place all uno cards out for all the cadets to review.
8. After viewing, all uno cards, they will be collected by the RSO to record results. Return the uno cards tothe cadets.
SAFETY
In accordance with Unit Range Standing Orders.

A-CR-CCP-802/PF-001Chapter 6, Annex G
THIS PAGE INTENTIONALLY LEFT BLANK
6G-2

A-CR-CCP-802/PF-001Chapter 6, Annex H
6H-1
ACTIVITY
PYRAMID (TRIANGLE)Time: 60 min
OBJECTIVE
The objective of this activity is to generate and maintain interest in the Cadet Marksmanship Program.
RESOURCES
Photocopies of pyramid (triangle) target.
ACTIVITY LAYOUT
Air Rifle Range in accordance with Unit Range Standing Orders.
ACTIVITY GUIDELINES
1. Distribute one pyramid target to each cadet.
2. Have each cadet write their name and rank on the pyramid target.
3. Cadets will fire in relays following the range commands by the RSO.
4. Cadets will be given three pellets to fire one (1) pellet into each point of the pyramid.
5. Give cadets three (3) minutes to fire pellets.
6. On completion of activity or as time allows place all pyramid targets out for the cadets to review.
7. After viewing, all pyramid targets, will be collected by the RSO to record results. Return all pyramiddiagrams to cadets.
SAFETY
In accordance with Unit Range Standing Orders.

A-CR-CCP-802/PF-001Chapter 6, Annex H
6H-2
PYRAMID TARGET
D Cdts 3, 2006, Ottawa, ON: Department of National Defence

A-CR-CCP-802/PF-001Chapter 6, Annex I
6I-1
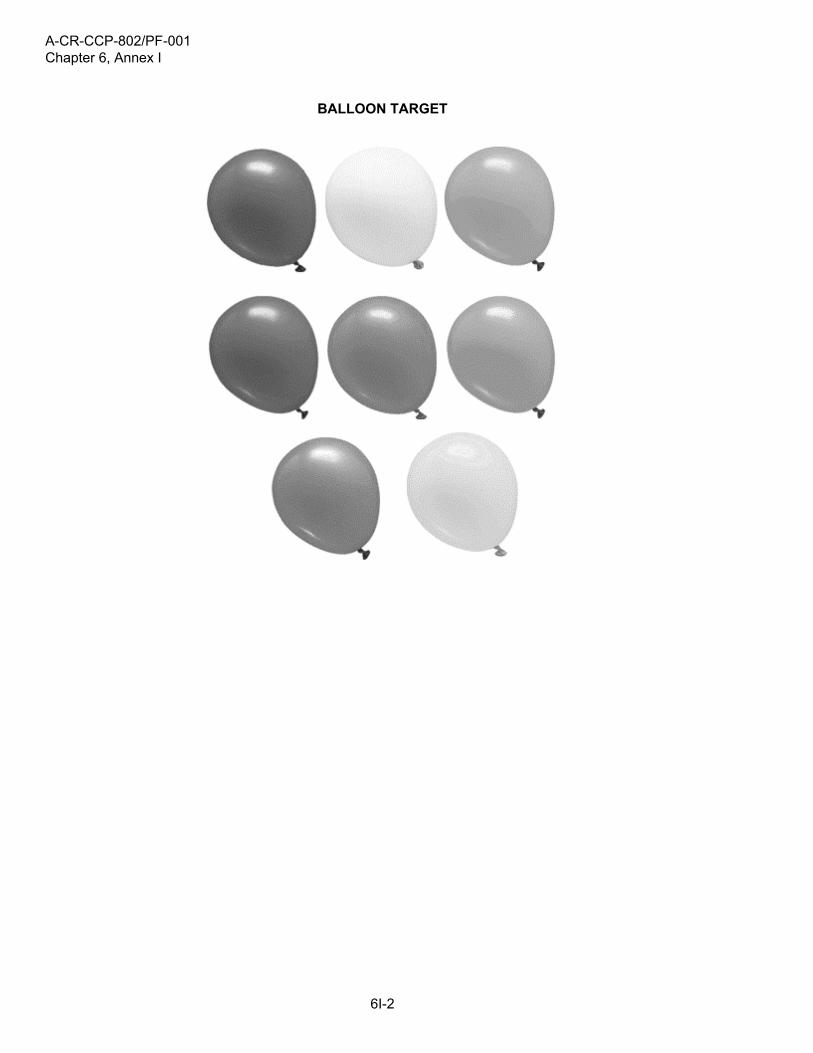
ACTIVITY
BALLOONTime: 60 min
OBJECTIVE
The objective of this activity is to increase and maintain interest in the Cadet Marksmanship Program.
RESOURCES
Photocopies of balloon diagram targets, or
Purchase twenty packages of various shaped balloons for target shapes. When using real balloons blowthem up prior to recreational marksmanship activity.
ACTIVITY LAYOUT
Air Rifle Range in accordance with Unit Range Standing Orders.
ACTIVITY GUIDELINES
1. Distribute five balloons or one balloon paper targets to each cadet.
2. Have each cadet write their name and rank on blank paper (score sheets to record number of hits) orballoon paper targets.
3. Cadets will fire in relays following the range commands by the RSO.
4. Cadets will be given ten pellets to fire on their on time at the balloon targets.
5. Give cadets five (5) minutes to fire pellets.
6. On completion of activity or as time allows place score sheets or balloon targets out for review for all cadets.
7. After viewing, all score sheets or paper targets, will be collected by the RSO to record results. Returnscore sheets or paper targets to cadet.
SAFETY
In accordance with Unit Range Standing Orders.
A-CR-CCP-802/PF-001Chapter 6, Annex I
6I-2
BALLOON TARGET

A-CR-CCP-802/PF-001Chapter 6, Annex J
6J-1
ACTIVITY
BT 100’sTime: 60 min
OBJECTIVE
The objective of this activity is to generate and maintain interest in the Cadet Marksmanship Program.
RESOURCES
Position the required number of BT 100’s for each lane on the range.
ACTIVITY LAYOUT
Air Rifle Range in accordance with Unit Range Standing Orders.
ACTIVITY GUIDELINES
1. Designate firing lanes for each cadet.
2. Have cadets write their name and rank on the blank paper (score sheets) to record number of hits.
3. Cadets will fire in relays following the range commands by the RSO.
4. Cadets will be given an unlimited supply of pellets.
5. Give cadets ten (10) minutes to make all the plates fall on the BT 100.
6. On completion of activity or as time allows place all score sheets out for the cadets to review.
7. After viewing, all score sheets will be collected by the RSO to record results. Return score sheets to thecadets.
SAFETY
In accordance with Unit Range Standing Orders.

A-CR-CCP-802/PF-001Chapter 6, Annex J
THIS PAGE INTENTIONALLY LEFT BLANK
6J-2
A-CR-CCP-802/PF-001Chapter 6, Annex K
6K-1
ACTIVITY
BEAT THE CLOCKTime: 60 min
OBJECTIVE
The objective of this activity is to increase and maintain interest in the Cadet Marksmanship Program.
RESOURCES
Photocopies beat the clock diagram.
ACTIVITY LAYOUT
Air Rifle Range in accordance with Unit Range Standing Orders.
ACTIVITY GUIDELINES
1. Distribute one photocopy of beat the clock diagram to each cadet.
2. Have each cadet write their name and rank on the beat the clock diagram.
3. Cadets will fire in relays following the range commands by the RSO.
4. Cadets will only fire at the hour number called by the RSO.
5. Cadets will be given six pellets, one pellet at each hour number designation called by the RSO. (Exampleif 1300 was called the cadets fires only at the 1 on the clock face.)
6. Give cadets six minutes to fire pellets.
7. On completion of activity or as time allows place all beat the clock diagrams out for cadets to review.
8. After viewing, all beat the clock diagram will be collected by the RSO to record results. Return all beatthe clock diagrams to the cadets.
SAFETY
In accordance with Unit Range Standing Orders.

A-CR-CCP-802/PF-001Chapter 6, Annex K
6K-2
BEAT THE CLOCK TARGET
A-CR-CCP-802/PF-001Chapter 6, Annex L
6L-1
ACTIVITY
TIN CANTime: 60 min
OBJECTIVE
The objective of this activity is to increase and maintain interest in the Cadet Marksmanship Program.
RESOURCES
Photocopies of tin can diagram.
ACTIVITY LAYOUT
Air Rifle Range in accordance with Unit Range Standing Orders.
ACTIVITY GUIDELINES
1. Distribute one photocopy of tin can diagram to each cadet.
2. Have cadets write their name and rank on the tin can target.
3. Cadets will fire in relays following the range commands by the RSO.
4. Cadets will be given eight pellets to fire pellets into black circles on tin can.
5. Give cadet eight minutes to complete this diagram.
6. On completion of activity or as time allows place tin can targets out for all the cadets to review.
7. After viewing, all tin can targets will be collected by the RSO to record results. Return all tin can diagrams.
SAFETY
In accordance with Unit Range Standing Orders.

A-CR-CCP-802/PF-001Chapter 6, Annex L
6L-2
TIN CAN TARGET
Cdts 3, 2006, Ottawa, ON: Department of National Defence