Embed Size (px)
Citation preview

Configuration Management
OL-25941-01
C H A P T E R 6
Archiving Configurations and Managing them using Configuration ArchiveConfiguration Archive maintains an active archive of the configuration of devices managed by LMS. It enables you to perform the following tasks:
• Fetch, archive, and deploy device configurations
• Search and generate reports on archived data
• Compare and label configurations, compare configurations with a baseline, and check for compliance.
You can also perform some of the Configuration Archive tasks using command line utility cwcli config.
You can also export the configuration data using the cwcli export config command.
Note Device configuration archive file size should be less than or equal to 2.5 MB.
See CLI Utilities for further details on cwcli config and cwcli export config commands.
This chapter gives information on performing Configuration Archive tasks (see Performing Configuration Archive Tasks for details).
This chapter contains:
• Performing Configuration Archive Tasks
• Checking Configuration Archival Status
• Scheduling Sync Archive Job
• Using the Config Fetch Protocol Usage Report
• Generating an Out-of-Sync Report
• Scheduling Sync on Device Job
• Using the Configuration Version Tree
• Understanding the Config Viewer Window
• Viewing the Configuration Version Summary
6-1with Cisco Prime LAN Management Solution 4.2

Chapter 6 Archiving Configurations and Managing them using Configuration Archive Performing Configuration Archive Tasks
• Configuration Quick Deploy
• Configuring Labels
• Using Search Archive
• Comparing Configurations
• Using Configuration Archive Job Browser
Performing Configuration Archive TasksConfiguration Archive allows you to:
• Check archival status
You can check the overall status of the configuration archive (For example, Successful, Partially Successful, etc.).
See Checking Configuration Archival Status for further details.
• Update the archive
In addition to scheduling configuration archive update, you can also update the archive manually. This ensures that you have the latest configurations.
See Scheduling Sync Archive Job for more details. To define the Configuration Collection Settings, see Administration of Cisco Prime LAN Management Solution 4.2.
• Determine Configuration Protocol usage details
You can view the protocol usage details for successful configuration fetches for devices. You can also change the transport protocol order after analyzing the protocol usage trends.
See Using the Config Fetch Protocol Usage Report for more details.
• Determine out-of-sync configuration files
You can list the devices for which running configurations are out-of-sync- with the startup configuration.
See Generating an Out-of-Sync Report and Scheduling Sync on Device Job for further details.
• View Version Tree
You can view all configuration versions of selected devices in the form of a graphical display.
See Using the Configuration Version Tree for further details.
• View Version Summary
You can view the latest three archived configurations for selected devices. It also has a link to view a particular configuration running on the device and to generate differences between versions in the archive.
See Viewing the Configuration Version Summary for further details.
• Search for device configuration files
You can search the archive for configuration containing text patterns for selected devices.
See Using Search Archive for further details.
6-2Configuration Management with Cisco Prime LAN Management Solution 4.2
OL-25941-01

Chapter 6 Archiving Configurations and Managing them using Configuration Archive Checking Configuration Archival Status
• Create custom configuration queries (See Creating a Custom Query.)
You can create and run custom queries that generate reports. These reports display device configuration files from the archive for the devices you specify. You can use custom queries while searching archives.
• Compare configurations
You can compare the following:
– Startup and running configurations
– Running and latest archived configurations
– Two configuration versions of the same device
– Two configuration versions of different devices
– Base configuration and latest version of different devices
See Comparing Configurations for further details.
• Configuration Quick Deploy
You can create an immediate job to deploy the version of configuration that you are viewing on the device. You can deploy the configuration either in the Overwrite or Merge mode. You can also use job-based password.
See Configuration Quick Deploy for further details.
• Configuration Archive Job Browser
You can see the status of your Configuration Archive jobs.
See Using Configuration Archive Job Browser for further details.
• Label Configuration
You can select configuration files from different managed devices and then group and label them.
See Configuring Labels for further details.
• Set the debug mode for Configuration Archive
You can set the debug mode for Configuration Archive feature in the Log Level Settings dialog box (Admin > System > Debug Settings).
See Administration of Cisco Prime LAN Management Solution 4.2 for more details.
Checking Configuration Archival StatusAfter you add devices, their configurations are gathered and stored in the configuration archive. You can check the overall status of the configuration archive (Successful, Partially Successful, and Failed). It provides the status of the last archival attempt.
Note View Permission Report (Reports > System > Users > Permission) to check if you have the required privileges to perform this task.
Refresh
(Icon)
Click on this icon to refresh the configuration archive status window.
6-3Configuration Management with Cisco Prime LAN Management Solution 4.2
OL-25941-01

Chapter 6 Archiving Configurations and Managing them using Configuration Archive Checking Configuration Archival Status
To check the configuration archive status:
Step 1 Select Configuration > Configuration Archive > Summary.
The Configuration Archival Summary dialog window appears with the following information.
Step 2 Select one or all of the Config Archival Status and click Sync Archive to schedule an immediate job to update the archive status.
You can check the status of your scheduled Sync Archive job by selecting Configuration > Job Browsers > Configuration Archive.
Configuration Archival Reports
The following are the Config Archival reports:
• Successful Devices Report
• Failed Devices Report
• Partially Successful Devices Report
• Configuration Never Collected Devices Report
Archival Status Description
Successful Number of devices for which all supported configurations have been fetched successfully.
Click No.of Devices to see the Successful Devices Report.
Failed Number of devices for which fetch of all supported configurations has failed.
Click No.of Devices to see the Failed Devices Report.
Partial Successful Number of devices for which fetch of any one of the supported configurations has failed.
Number of Catalyst 5000 devices for which sub-modules were not pulled into archive. Only the main configuration of supervisor engine module is archived for Catalyst 5000 devices.
Click No.of Devices to see the Partially Successful Devices Report.
Configuration Never Collected
Number of devices for which the supported configurations has never been collected.
Click No.of Devices to see the Configuration Never Collected Devices Report.
6-4Configuration Management with Cisco Prime LAN Management Solution 4.2
OL-25941-01
Chapter 6 Archiving Configurations and Managing them using Configuration Archive Checking Configuration Archival Status
Successful Devices Report
A device appears in this report if all supported configurations have been fetched successfully.
Note These dates do not necessarily reflect when the archive was last updated.
This report contains the following information:
Failed Devices Report
A device appears in this report if fetch for all of the supported configurations has failed. This report also contains the reasons configuration could not be pulled.
This report contains the following information:
Column Names Description
Device Name Device Name as entered in Device and Credential Repository.
Click on the device name to launch the Troubleshooting page.
Config Type Defines the type of configuration PRIMARY, SECONDARY, or VLAN.
• PRIMARY/SECONDARY—Contains the Running and Startup configuration files information.
• VLAN—Contains running vlan.dat configuration file information. This config type does not contain Startup configuration file information.
For ONS devices, the PRIMARY configuration type displays the configuration information from the active CPU, at that instance.
File Type Defines the configuration file type as either Running or Startup configuration.
Accessed At Date and time at which LMS pulled running configuration from device in an attempt to archive. The configuration is archived only if there has been a change.
Description Displays the archival status.
Column Names Description
Device Name Device Name as entered in Device and Credential Repository.
Click on the device name to launch the Troubleshooting page.
Config Type Defines the type of configuration as PRIMARY, SECONDARY, or VLAN.
• PRIMARY/SECONDARY—Contains information about the Running and Startup configuration files.
• VLAN—Contains running vlan.dat configuration file information. This configuration type does not contain Startup configuration file information.
For ONS devices, the PRIMARY configuration type displays the configuration information from the active CPU, at that instance.
File Type Defines the configuration file type as either Running or Startup configuration.
Accessed At Date and time that LMS pulled running configuration from device in an attempt to archive. The configuration is archived only if there has been a change.
Description Reason why LMS could not pull running and startup configuration from device.
6-5Configuration Management with Cisco Prime LAN Management Solution 4.2
OL-25941-01

Chapter 6 Archiving Configurations and Managing them using Configuration Archive Checking Configuration Archival Status
If you have enabled TACACS for a device and configured custom TACACS login and passwords prompts, you may experience Telnet problems, since LMS may not recognize the prompts.
To make your prompts recognizable, you must edit the TacacsPrompts.ini file in:
• NMSROOT\objects\cmf\data\TacacsPrompts.ini (On Windows)
• NMSROOT/objects/cmf/data/TacacsPrompts.ini (On Solaris and Soft Appliance)
NMSROOT is the LMS install directory. For Solaris and Soft Appliance, it will be /opt/CSCOpx.
Partially Successful Devices Report
A device shows up in this report if fetch for any one of the supported configurations has failed.
The Partially Successful Devices report lists the Catalyst 5000 family devices for which sub-module information could not be pulled from the device. Only the main configuration of the supervisory module is archived for Catalyst 5000 devices.
This report contains the following information:
Configuration Never Collected Devices Report
A device appears in this report if fetch for the supported configuration has never been collected.
Column Names Description
Device Name Device Name as entered in Device and Credential Repository.
Click on the device name to launch the Troubleshooting page.
Config Type Defines the type of configuration as PRIMARY, SECONDARY, or VLAN.
• PRIMARY/SECONDARY—Contains the Running and Startup configuration files information.
• VLAN—Contains running vlan.dat configuration file information. This configuration type does not contain Startup configuration file information.
For ONS devices, the PRIMARY configuration type displays the configuration information from the active CPU, at that instance.
File Type Defines the configuration file type as either Running or Startup configuration.
Accessed At Date and time that LMS pulled running configuration from device in an attempt to archive. The configuration is archived only if there has been a change.
Description Reason why LMS could not pull running or startup configuration from device.
6-6Configuration Management with Cisco Prime LAN Management Solution 4.2
OL-25941-01

Chapter 6 Archiving Configurations and Managing them using Configuration Archive Scheduling Sync Archive Job
This report contains the following information:
Scheduling Sync Archive JobYou can schedule a job to update the configuration archive for a selected group of devices.
You have an option to poll device configuration before updating the archive and to fetch Startup configuration.
Note View Permission Report (Reports > System > Users > Permission) to check if you have the required privileges to perform this task.
Note When config collection is fetched via TFTP protocol, ensure Read-Write Community String is configured in DCR under SNMP credential section.
To schedule a job to update the device configuration:
Step 1 Select Configuration > Configuration Archive > Synchronization.
The Sync Archive dialog box appears.
Step 2 Select either:
• Device Selector — To schedule a job for a static set of devices.
The sync archive job fails if devices are removed from the DCR. For example, a sync archive job is scheduled to run for all the devices that are part of the selected group in Device Selector. If a device, part of the selected group in Device Selector, is deleted from DCR while the job is running then the job fails for that particular device. However, the job succeeds for the remaining devices in the group, but the status of the job still remains failed.
Or
• Group Selector — To schedule a job for a dynamic group of devices.
Column Names Description
Device Name Device Name as entered in Device and Credential Repository.
Click on the device name to launch the Troubleshooting page.
Config Type Defines the type of configuration as PRIMARY, SECONDARY, or VLAN.
• PRIMARY/SECONDARY—Contains the Running and Startup configuration files information.
• VLAN—Contains running vlan.dat configuration file information. This configuration type does not contain Startup configuration file information.
For ONS devices, the PRIMARY configuration type displays the configuration information from the active CPU, at that instance.
File Type Defines the configuration file type as either Running or Startup configuration.
Accessed At Date and time that LMS pulled running configuration from device in an attempt to archive. The configuration is archived only if there has been a change.
Description Reason why LMS could not pull running or startup configuration from device.
6-7Configuration Management with Cisco Prime LAN Management Solution 4.2
OL-25941-01
Chapter 6 Archiving Configurations and Managing them using Configuration Archive Scheduling Sync Archive Job
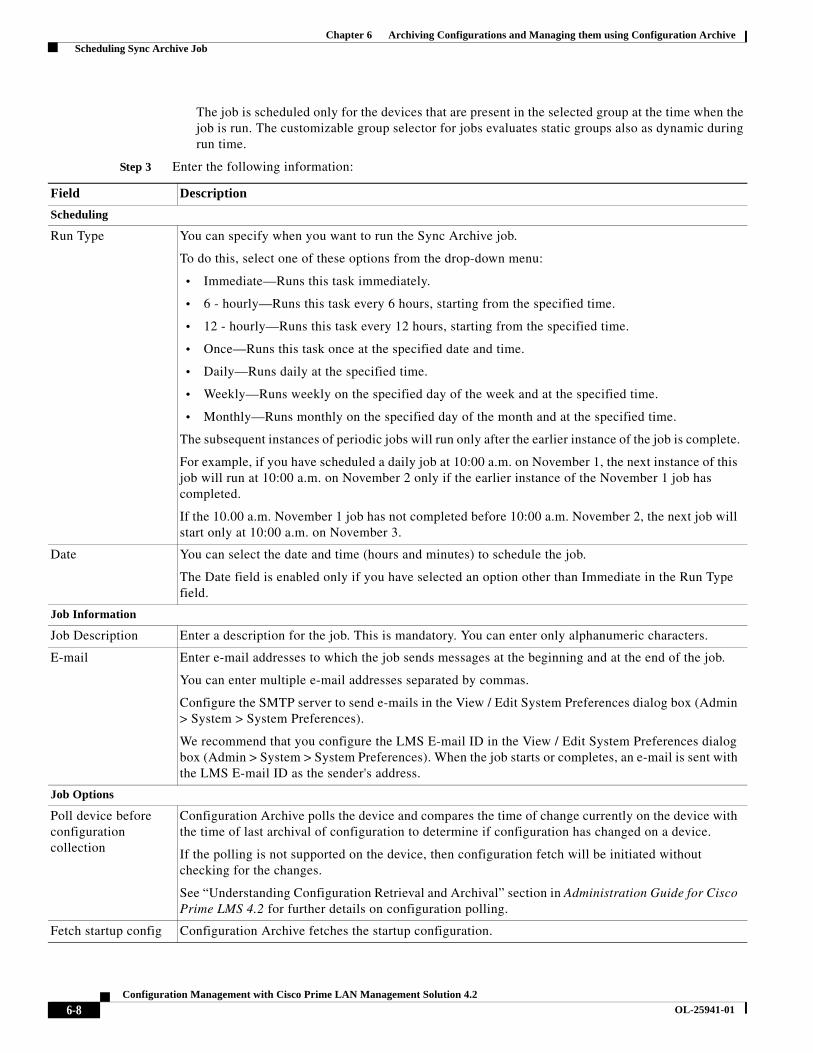
The job is scheduled only for the devices that are present in the selected group at the time when the job is run. The customizable group selector for jobs evaluates static groups also as dynamic during run time.
Step 3 Enter the following information:
Field Description
Scheduling
Run Type You can specify when you want to run the Sync Archive job.
To do this, select one of these options from the drop-down menu:
• Immediate—Runs this task immediately.
• 6 - hourly—Runs this task every 6 hours, starting from the specified time.
• 12 - hourly—Runs this task every 12 hours, starting from the specified time.
• Once—Runs this task once at the specified date and time.
• Daily—Runs daily at the specified time.
• Weekly—Runs weekly on the specified day of the week and at the specified time.
• Monthly—Runs monthly on the specified day of the month and at the specified time.
The subsequent instances of periodic jobs will run only after the earlier instance of the job is complete.
For example, if you have scheduled a daily job at 10:00 a.m. on November 1, the next instance of this job will run at 10:00 a.m. on November 2 only if the earlier instance of the November 1 job has completed.
If the 10.00 a.m. November 1 job has not completed before 10:00 a.m. November 2, the next job will start only at 10:00 a.m. on November 3.
Date You can select the date and time (hours and minutes) to schedule the job.
The Date field is enabled only if you have selected an option other than Immediate in the Run Type field.
Job Information
Job Description Enter a description for the job. This is mandatory. You can enter only alphanumeric characters.
E-mail Enter e-mail addresses to which the job sends messages at the beginning and at the end of the job.
You can enter multiple e-mail addresses separated by commas.
Configure the SMTP server to send e-mails in the View / Edit System Preferences dialog box (Admin > System > System Preferences).
We recommend that you configure the LMS E-mail ID in the View / Edit System Preferences dialog box (Admin > System > System Preferences). When the job starts or completes, an e-mail is sent with the LMS E-mail ID as the sender's address.
Job Options
Poll device before configuration collection
Configuration Archive polls the device and compares the time of change currently on the device with the time of last archival of configuration to determine if configuration has changed on a device.
If the polling is not supported on the device, then configuration fetch will be initiated without checking for the changes.
See “Understanding Configuration Retrieval and Archival” section in Administration Guide for Cisco Prime LMS 4.2 for further details on configuration polling.
Fetch startup config Configuration Archive fetches the startup configuration.
6-8Configuration Management with Cisco Prime LAN Management Solution 4.2
OL-25941-01
Chapter 6 Archiving Configurations and Managing them using Configuration Archive Using the Config Fetch Protocol Usage Report
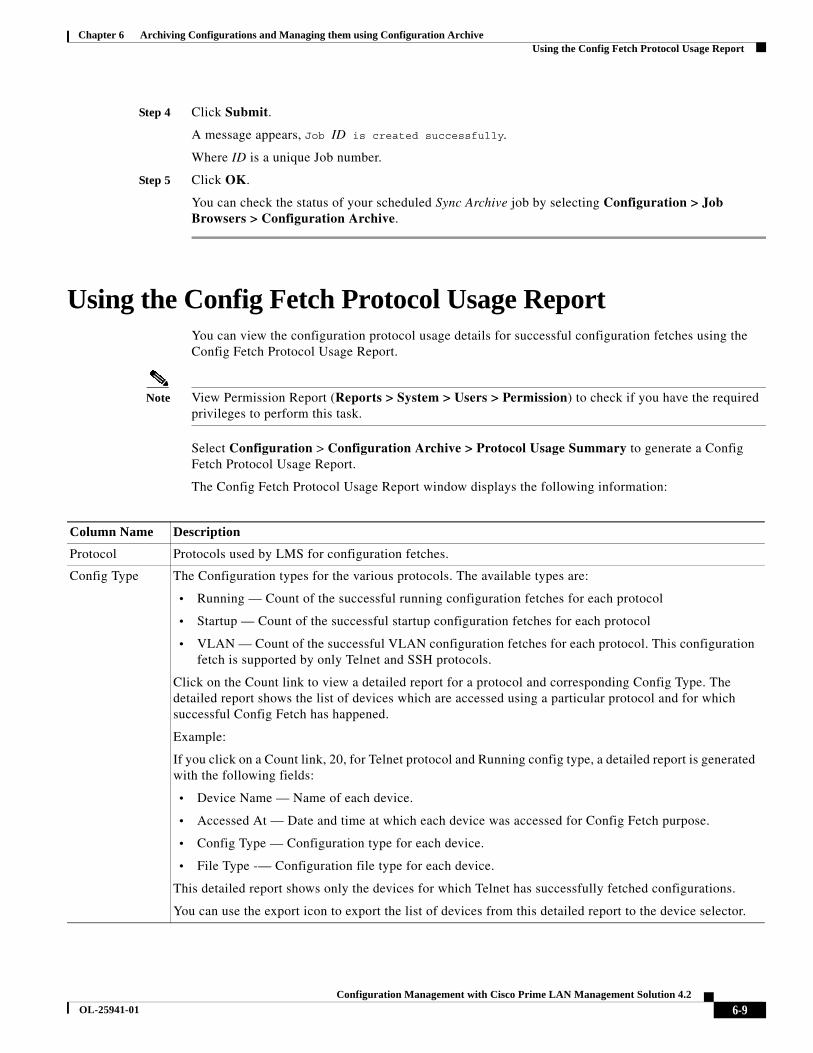
Step 4 Click Submit.
A message appears, Job ID is created successfully.
Where ID is a unique Job number.
Step 5 Click OK.
You can check the status of your scheduled Sync Archive job by selecting Configuration > Job Browsers > Configuration Archive.
Using the Config Fetch Protocol Usage ReportYou can view the configuration protocol usage details for successful configuration fetches using the Config Fetch Protocol Usage Report.
Note View Permission Report (Reports > System > Users > Permission) to check if you have the required privileges to perform this task.
Select Configuration > Configuration Archive > Protocol Usage Summary to generate a Config Fetch Protocol Usage Report.
The Config Fetch Protocol Usage Report window displays the following information:
Column Name Description
Protocol Protocols used by LMS for configuration fetches.
Config Type The Configuration types for the various protocols. The available types are:
• Running — Count of the successful running configuration fetches for each protocol
• Startup — Count of the successful startup configuration fetches for each protocol
• VLAN — Count of the successful VLAN configuration fetches for each protocol. This configuration fetch is supported by only Telnet and SSH protocols.
Click on the Count link to view a detailed report for a protocol and corresponding Config Type. The detailed report shows the list of devices which are accessed using a particular protocol and for which successful Config Fetch has happened.
Example:
If you click on a Count link, 20, for Telnet protocol and Running config type, a detailed report is generated with the following fields:
• Device Name — Name of each device.
• Accessed At — Date and time at which each device was accessed for Config Fetch purpose.
• Config Type — Configuration type for each device.
• File Type -— Configuration file type for each device.
This detailed report shows only the devices for which Telnet has successfully fetched configurations.
You can use the export icon to export the list of devices from this detailed report to the device selector.
6-9Configuration Management with Cisco Prime LAN Management Solution 4.2
OL-25941-01

Chapter 6 Archiving Configurations and Managing them using Configuration Archive Generating an Out-of-Sync Report
Generating an Out-of-Sync ReportYou can generate an Out-of-Sync report for the group of devices for which running configurations are not synchronized with the startup configuration.
Note View Permission Report (Reports > System > Users > Permission) to check if you have the required privileges to perform this task.
Select Configuration > Compliance > Out-of-Sync Summary to generate an Out-of-sync report. The Startup and Running Out-Of-Sync Summary window displays the following information:
Scheduling Sync on Device JobYou can schedule a Sync on device job using the Sync on Device button on Startup and Running Out-Of-Sync Summary window.
Note View Permission Report (Reports > System > Users > Permission) to check if you have the required privileges to perform this task.
Edit Settings
(Button)
Click this button, if you want to change the transport protocol order.
For more information, see Administration of Cisco Prime LAN Management Solution 4.2 for further details.
Refresh
(Icon)
Refreshes the Config Fetch Protocol Usage Report.
Column Name Description
Column Name Description
Device Name Device Name as entered in Device and Credential Repository.
Startup Startup configuration of the device. This configuration is fetched from the configuration archive.
Click on the displayed date to view the configuration.
Diff Difference between the archived Startup and archived Running configurations.
Click on the icon to see the difference between the archived Startup and archived Running configurations.
Running Running configuration of the device. This configuration is fetched from the configuration archive.
Click on the displayed date to see detailed information on the Running configuration.
Sync on Device
(Button)
Use this button to schedule a Sync on device job.
You can schedule a Sync on device job to copy the running configuration of a device to the startup configuration.
For more information see, Scheduling Sync on Device Job.
6-10Configuration Management with Cisco Prime LAN Management Solution 4.2
OL-25941-01

Chapter 6 Archiving Configurations and Managing them using Configuration Archive Scheduling Sync on Device Job
To schedule a Sync on device job:
Step 1 Select Configuration > Compliance > Out-of-Sync Summary.
The Startup and Running Out-Of-Sync Summary dialog box appears.
Step 2 Select a device.
Step 3 Click Sync on Device.
The Job Schedule and Options dialog box appears.
Step 4 Enter the following information:
Field Description
Scheduling
Run Type You can specify when you want to run the Startup and Running Out-Of-Sync Summary report.
To do this, select one of these options from the drop-down menu:
• Immediate—Runs the report immediately.
• Once—Runs the report once at the specified date and time.
• Daily—Runs daily at the specified time.
• Weekly—Runs weekly on the specified day of the week and at the specified time.
• Monthly—Runs monthly on the specified day of the month and at the specified time.
The subsequent instances of periodic jobs will run only after the earlier instance of the job is complete.
For example, if you have scheduled a daily job at 10:00 a.m. on November 1, the next instance of this job will run at 10:00 a.m. on November 2 only if the earlier instance of the November 1 job has completed.
If the 10.00 a.m. November 1 job has not completed before 10:00 a.m. November 2, the next job will start only at 10:00 a.m. on November 3.
Date You can select the date and time (hours and minutes) to schedule the job.
The Date field is enabled only if you have selected an option other than Immediate in the Run Type field.
Job Information
Job Description Enter a description for the job. This is mandatory. You can enter only alphanumeric characters.
E-mail Enter e-mail addresses to which the job sends messages at the beginning and at the end of the job.
You can enter multiple e-mail addresses separated by commas.
Configure the SMTP server to send e-mails in the View / Edit System Preferences dialog box (Admin > System > System Preferences).
We recommend that you configure the LMS E-mail ID in the View / Edit System Preferences dialog box (Admin > System > System Preferences). When the job starts or completes, an e-mail is sent with the LMS E-mail ID as the sender's address.
Approver Comments Enter comments for the job approver.
This field appears only if you have enabled Job Approval for Configuration Archive.
Maker E-Mail Enter the e-mail-ID of the job creator. This is a mandatory field.
This field appears only if you have enabled Job Approval for Configuration Archive.
6-11Configuration Management with Cisco Prime LAN Management Solution 4.2
OL-25941-01

Chapter 6 Archiving Configurations and Managing them using Configuration Archive Using the Configuration Version Tree
Step 5 Click Submit.
A message appears, Job ID is created successfully.
Where ID is a unique Job number.
Step 6 Click OK.
You can check the status of your scheduled Copy Running Config to Startup job by selecting Configuration > Job Browsers > Configuration Archive.
Using the Configuration Version TreeYou can view all configuration versions of the selected devices in the form of a graphical display. You can also perform a configuration quick deploy for a selected device.
Note View Permission Report (Reports > System > Users > Permission) to check if you have the required privileges to perform this task.
To view the configuration Version Tree:
Step 1 Select Configuration > Configuration Archive > Views > Version Tree
The Device Selection dialog box appears.
Step 2 Select a device. See Inventory Management with Cisco Prime LAN Management Solution 4.2 for information on how to use the Device Selector.
Job Options
Job Password • If you have enabled the Enable Job Password option and disabled the User Configurable option in the Job Policy dialog box (Admin > Network > Configuration Job Settings > Config Job Policies) enter the device login user name and password and device Enable password.
• If you have enabled the Enable Job Password option and enabled the User Configurable option in the Job Policy dialog box (Admin > Network > Configuration Job Settings > Config Job Policies) either:
– Enter the device login user name and password and device Enable password
or
– Disable the Job Password option in the Job Schedule and Options dialog box.
Field Description
6-12Configuration Management with Cisco Prime LAN Management Solution 4.2
OL-25941-01

Chapter 6 Archiving Configurations and Managing them using Configuration Archive Understanding the Config Viewer Window
Step 3 Click OK.
The Config Version Tree dialog box appears.
Step 4 Click either the configuration version which is a hyper link or select the radio button for the configuration version.
To expand the configuration version folder, click on the plus icon and select the configuration version to view the configuration.
The Config Viewer dialog box appears. See Understanding the Config Viewer Window for further information.
If you want to perform a configuration quick deploy (Configuration Quick Deploy), click the Deploy button.
Understanding the Config Viewer WindowThe Config Viewer is a HTML-based window that displays the configurations of specified devices.
You can specify how you want to view the contents of the configurations by selecting one of the options under Show:
• Click Raw to view data exactly as it appears in the configuration file.
• Click Processed to view data with the commands ordered and grouped.
The Config Viewer window contains two columns.
Column Description
Configlets Click on any configlets to display the corresponding information. The available configlets vary from device to device; the following are examples:
• All—Entire contents of the configuration files.
• SNMP—SNMP configuration commands. For example, snmp-server community public RO.
• IP Routing—IP routing configuration commands. For example, router abcd 100.
• Interface folder—The different interface configuration commands. For example, Interface Ethernet0 and Interface TokenRing.
• Global—Global configuration commands. For example no ip address.
• Line con 0—configuration commands for line console 0.
• IP—IP configuration commands. For example, ip http server.
Configuration file name
View the contents of the configuration file.
6-13Configuration Management with Cisco Prime LAN Management Solution 4.2
OL-25941-01

Chapter 6 Archiving Configurations and Managing them using Configuration Archive Understanding the Config Viewer Window
The buttons on the Config Viewer are:
Button Description
Download Config
(Icon)
Downloads the configuration file to the client machine.
This option to download the configuration file is available only in the Raw mode. The configuration file will be downloaded through the Web browser with the file name convention as DeviceName-Version_Number.txt.
You can download the configuration file only if you have the privileges of a Network Administrator.
Note The Credentials in the configuration file will be exposed and shown as clear text.
Export
(Icon)
Export the configuration file.
• If you are using the Raw mode then the exported file format is cfg. The file name convention is DeviceName-VersionNumber.cfg.
• If you are using the Processed mode then the exported file format is XML. The file name convention is DeviceName-VersionNumber.xml.
Where DeviceName is the device name as entered in Device and Credential Repository and VersionNumber is the device configuration version.
The default directory to which Configuration Archive file is exported is:
On Solaris and Soft Appliance server,
/var/adm/CSCOpx/files/rme/dcma/configexport
On Windows server,
NMSROOT\files\rme\dcma\configexport
6-14Configuration Management with Cisco Prime LAN Management Solution 4.2
OL-25941-01

Chapter 6 Archiving Configurations and Managing them using Configuration Archive Understanding the Config Viewer Window
Export (continue) To export a file:
1. Click on the icon.
The Export Config File dialog box appears.
2. Enter the folder name on the LMS server.
You must enter the default export directory. You cannot enter any other directory.
or
Browse to select a folder on the LMSserver.
The Server Side File Browser dialog box appears.
a. Select a folder on the LMS server.
b. Click OK.
The Browse button takes you to the default directory. It does not allow you to change this default export directory.
3. Click OK.
If you have exported configuration in the Raw mode, the notification message displays, Config file exported as ExportedFolder\DeviceName-VersionNumber.cfg
If you have exported configuration in the Processed mode, the notification message displays, Config file exported as ExportedFolder\DeviceName-VersionNumber.XML
Where ExportedFolder is the location where configuration file is exported.
4. Click OK.
(Icon)
Generates a format that can be printed.
Compare with previous version
Compares configuration with previous version. When you click on this button, a new window Config Diff Viewer opens to show configurations side by side.
See Understanding the Config Diff Viewer Window for further details.
This button gets activated only if you have a previous version of the configuration.
Compare with next version
Compares configuration with next version. When you click on this button, a new window Config Diff Viewer opens to show configurations side by side.
See Understanding the Config Diff Viewer Window for further details.
This button gets activated only if you have a next version of configuration.
Edit Launches Config Editor window.
This button is active only if you are viewing the configuration version from the archive.
See Editing and Deploying Configurations Using Config Editor for further details.
Deploy Perform a quick configuration deploy.
This button is active only if you are viewing the configuration version from the archive.
See Configuration Quick Deploy.
Button Description
6-15Configuration Management with Cisco Prime LAN Management Solution 4.2
OL-25941-01
Chapter 6 Archiving Configurations and Managing them using Configuration Archive Viewing the Configuration Version Summary
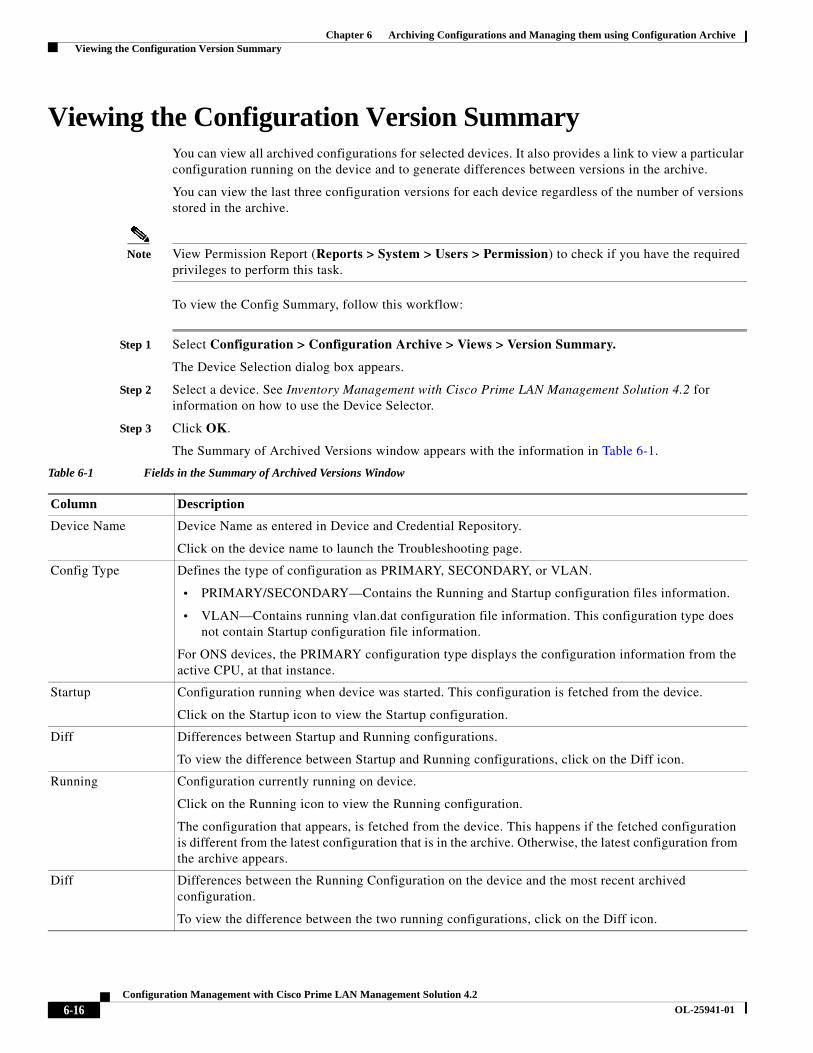
Viewing the Configuration Version SummaryYou can view all archived configurations for selected devices. It also provides a link to view a particular configuration running on the device and to generate differences between versions in the archive.
You can view the last three configuration versions for each device regardless of the number of versions stored in the archive.
Note View Permission Report (Reports > System > Users > Permission) to check if you have the required privileges to perform this task.
To view the Config Summary, follow this workflow:
Step 1 Select Configuration > Configuration Archive > Views > Version Summary.
The Device Selection dialog box appears.
Step 2 Select a device. See Inventory Management with Cisco Prime LAN Management Solution 4.2 for information on how to use the Device Selector.
Step 3 Click OK.
The Summary of Archived Versions window appears with the information in Table 6-1.
Table 6-1 Fields in the Summary of Archived Versions Window
Column Description
Device Name Device Name as entered in Device and Credential Repository.
Click on the device name to launch the Troubleshooting page.
Config Type Defines the type of configuration as PRIMARY, SECONDARY, or VLAN.
• PRIMARY/SECONDARY—Contains the Running and Startup configuration files information.
• VLAN—Contains running vlan.dat configuration file information. This configuration type does not contain Startup configuration file information.
For ONS devices, the PRIMARY configuration type displays the configuration information from the active CPU, at that instance.
Startup Configuration running when device was started. This configuration is fetched from the device.
Click on the Startup icon to view the Startup configuration.
Diff Differences between Startup and Running configurations.
To view the difference between Startup and Running configurations, click on the Diff icon.
Running Configuration currently running on device.
Click on the Running icon to view the Running configuration.
The configuration that appears, is fetched from the device. This happens if the fetched configuration is different from the latest configuration that is in the archive. Otherwise, the latest configuration from the archive appears.
Diff Differences between the Running Configuration on the device and the most recent archived configuration.
To view the difference between the two running configurations, click on the Diff icon.
6-16Configuration Management with Cisco Prime LAN Management Solution 4.2
OL-25941-01

Chapter 6 Archiving Configurations and Managing them using Configuration Archive Configuration Quick Deploy
Configuration Quick DeployYou can create an immediate job to deploy the version of configuration being viewed on the device. You can deploy the configuration either in overwrite or merge mode.
Features of Configuration Quick Deploy
The following are the features of Configuration Quick Deploy:
• It can be performed for both running and startup configurations of all categories of devices.
• The job is executed immediately. Therefore Job approval should not be enabled at the time of Configuration Quick Deploy.
• The jobs cannot be rolled back.
• The jobs use TFTP, Telnet, SSH, SCP, RCP, HTTPs transport protocols.
• It provides an option to select either merge or overwrite mode when you deploy configuration on a device.
• It cannot be performed for VLAN configurations. However, you can deploy VLAN configurations using the CLI command, cwcli config put. See Overview: cwcli config Command for more information.
• It is supported for configuration versions in the archive only. That is, you cannot deploy for configuration version available on a device.
• The jobs use the same protocol order that you have specified in the Config Transport Settings (Admin > Collection Settings > Config > Config Transport Settings).
Latest Displays date and time of most recent configuration archive. The time shown here is the time when the file was actually archived. If the file was archived on 03/07/2004 5.00 PM PST, that's the time that will appear in this report. Time will be shown based on the client's time zone.
To view the device configuration, click on Date and Time.
The Archived At fields that appear in other configuration reports shows the last time the configuration was taken from the device in an attempt to archive. The system archives the configuration only if there is a change in the newly obtained configuration when compared with the archived one. So there could be different time values.
Diff Differences between the most recent and the second most recent archived configurations.
To view the difference between the two running configurations, click on the Diff icon.
Latest-1 Date and time the second most recent configuration was archived.
To view the device configuration, click on Date and Time.
Diff Differences between the second most recent and third most recent configurations in archive.
To view the difference between the two running configurations, click on the Diff icon.
Latest-2 Date and time the third most recent configuration was archived.
To view the device configuration, click on Date and Time.
Table 6-1 Fields in the Summary of Archived Versions Window (continued)
Column Description
6-17Configuration Management with Cisco Prime LAN Management Solution 4.2
OL-25941-01

Chapter 6 Archiving Configurations and Managing them using Configuration Archive Configuration Quick Deploy
Performing a Configuration Quick Deploy
You can perform a configuration quick deploy using the Config Viewer window.
For example, you can launch Config Viewer window by clicking on Startup configuration or Running Configuration links while performing tasks such as generating Out-Of-Sync Summary report, viewing the Version Summary report etc.
Note View Permission Report (Reports > System > Users > Permission) to check if you have the required privileges to perform this task.
Step 1 Click Deploy on the Config Viewer (Understanding the Config Viewer Window) window.
The Job Option Details dialog box appears.
Step 2 Enter the following information:
Field Description
Job Information
E-mail Enter e-mail addresses to which the job sends messages at the beginning and at the end of the job.
You can enter multiple e-mail addresses separated by commas.
Configure the SMTP server to send e-mails in the View / Edit System Preferences dialog box (Admin > System > System Preferences).
We recommend that you configure the LMS E-mail ID in the View / Edit System Preferences dialog box (Admin > System > System Preferences). When the job starts or completes, an e-mail is sent with the LMS E-mail ID as the sender's address.
Job Options
Job Password • If you have enabled the Enable Job Password option and disabled the User Configurable option in the Job Policy dialog box (Admin > Network > Configuration Job Settings > Config Job Policies) enter the device login user name and password and device Enable password.
• If you have enabled the Enable Job Password option and enabled the User Configurable option in the Job Policy dialog box (Admin > Network > Configuration Job Settings > Config Job Policies) either:
– Enter the device login user name and password and device Enable password
or
– Disable the Job Password option in the Job Schedule and Options dialog box.
6-18Configuration Management with Cisco Prime LAN Management Solution 4.2
OL-25941-01

Chapter 6 Archiving Configurations and Managing them using Configuration Archive Configuration Quick Deploy
Step 3 Click Submit.
An immediate Quick Deploy of Configuration on Device job will be scheduled.
A message appears, Job ID is created successfully.
Where ID is a unique Job number.
Step 4 Click OK.
You can check the status of your scheduled Config Quick Deploy job by selecting Configuration > Job Browsers > Configuration Archive.
What Happens During Configuration Quick Deploy
Before Configuration Management deploys the configuration on the device, it verifies whether the device is locked.
The deploy process follows the configured transport protocol order and the fallback option is active.
At end of this task, Configuration Management will:
• Unlock the device
• Check in the new version of configuration if the deploy completes successfully.
After uploading the configuration on the device, Configuration Management writes to the Change Audit log.
Deploy Mode
Overwrite Select the Overwrite option, if you want to replace the existing running configuration on the device, with the selected configuration.
This is the default option for the configuration deployment.
The configuration that you have selected is compared with the latest running configuration in the Configuration Archive. (LMS assumes that the latest running configuration in the archive is the same as the configuration currently running on the device.)
The Overwrite mode ensures that the running configuration on the device is overwritten with the selected configuration. This means, after the configuration is successfully deployed, the selected configuration and the running configuration on the device are the same.
Merge Select the Merge option, if you want to add incremental configuration to the device.
The configuration that you have selected is deployed on to the device as is. This means, the existing running configuration of the device is updated incrementally with the commands in the selected configuration.
The selected running configuration is not compared with the running configuration in the Configuration Archive.
We recommend that you use this option on newly deployed devices. This is because, the Merge option effectively deploys the entire configuration from the archive, on to the device.
Field Description
6-19Configuration Management with Cisco Prime LAN Management Solution 4.2
OL-25941-01
Chapter 6 Archiving Configurations and Managing them using Configuration Archive Configuring Labels
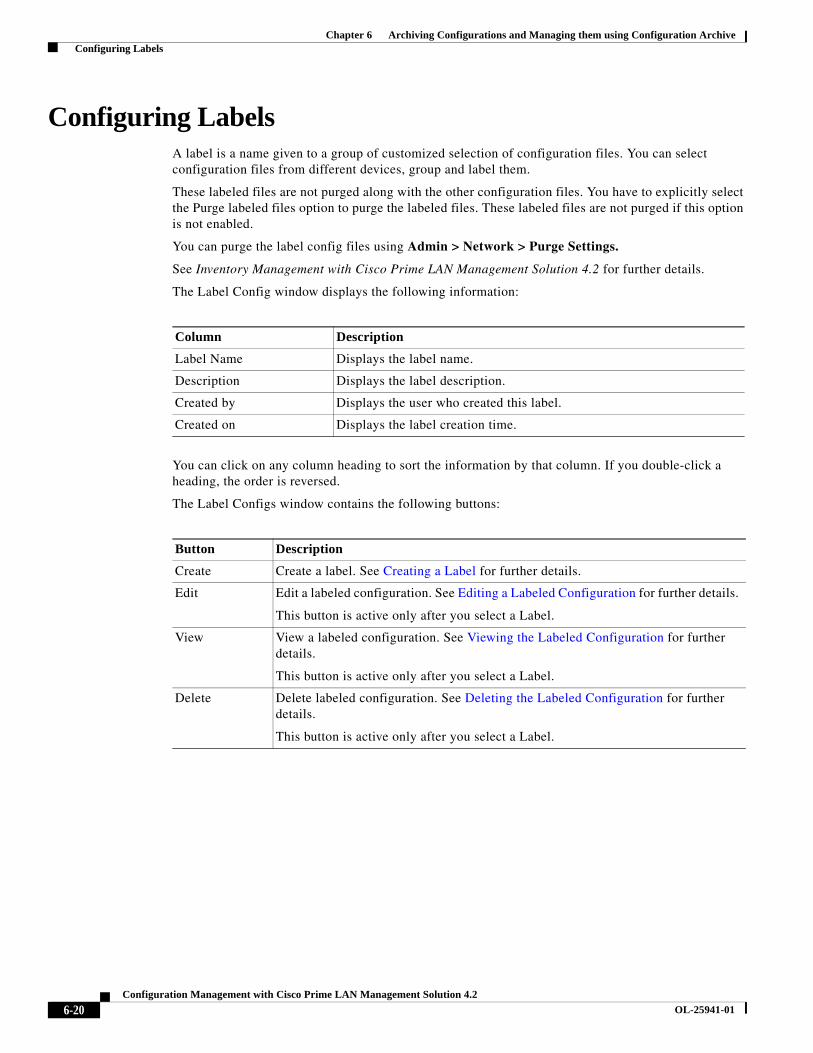
Configuring LabelsA label is a name given to a group of customized selection of configuration files. You can select configuration files from different devices, group and label them.
These labeled files are not purged along with the other configuration files. You have to explicitly select the Purge labeled files option to purge the labeled files. These labeled files are not purged if this option is not enabled.
You can purge the label config files using Admin > Network > Purge Settings.
See Inventory Management with Cisco Prime LAN Management Solution 4.2 for further details.
The Label Config window displays the following information:
You can click on any column heading to sort the information by that column. If you double-click a heading, the order is reversed.
The Label Configs window contains the following buttons:
Column Description
Label Name Displays the label name.
Description Displays the label description.
Created by Displays the user who created this label.
Created on Displays the label creation time.
Button Description
Create Create a label. See Creating a Label for further details.
Edit Edit a labeled configuration. See Editing a Labeled Configuration for further details.
This button is active only after you select a Label.
View View a labeled configuration. See Viewing the Labeled Configuration for further details.
This button is active only after you select a Label.
Delete Delete labeled configuration. See Deleting the Labeled Configuration for further details.
This button is active only after you select a Label.
6-20Configuration Management with Cisco Prime LAN Management Solution 4.2
OL-25941-01

Chapter 6 Archiving Configurations and Managing them using Configuration Archive Configuring Labels
Creating a Label
You can use Label Configuration to create a group of configuration files from selected devices.
Note View Permission Report (Reports > System > Users > Permission) to check if you have the required privileges to perform this task.
You can create a label file using the following workflow:
Step 1 Select Configuration > Configuration Archive > Label Configs.
The Label Configs dialog box appears.
Step 2 Click Create.
The Device Selection dialog box appears.
Step 3 In Device Selector pane, select the devices. See Inventory Management with Cisco Prime LAN Management Solution 4.2 for information on how to use the Device Selector.
Step 4 Go to the Label selection pane and:
• Enter the Label Name. You can enter up to 64 characters.
• Enter the Label Description. You can enter up to 128 characters.
Step 5 Go to the Config Type pane and select Primary or VLAN.
Step 6 Go to the Version pane and select Latest to include the most recent configuration only, or All to view all configuration versions.
• If you have selected Latest, you can click Finish button in the Select Devices page and complete the Label creation.
• If you have selected All, go to Step 7.
Step 7 Click Next.
The Select Configs to be Labelled dialog box appears.
• To view the configuration, select a configuration version file from the left pane and click View. The Config Viewer (Understanding the Config Viewer Window) window appears.
• To add the selected configuration, select a configuration version file from the left pane and click Add.
• To remove the selected configuration, select a configuration version file from the right pane and click Remove.
Option Description
Primary Contains the Running and Startup configuration files information.
VLAN Contains running vlan.dat configuration file information. This configuration type does not contain Startup configuration file information.
6-21Configuration Management with Cisco Prime LAN Management Solution 4.2
OL-25941-01

Chapter 6 Archiving Configurations and Managing them using Configuration Archive Configuring Labels
Step 8 Click Finish.
A message appears, Label LabelName created successfully.
Where LabelName is the name of the label that you entered.
Step 9 Click OK.
Editing a Labeled Configuration
You can make the following changes to a label:
• Modify the Label Description.
• Remove configuration files from the Selected Versions list.
• Add new configuration files from the Devices list.
Note View Permission Report (Reports > System > Users > Permission) to check if you have the required privileges to perform this task.
You can edit a label file using the following workflow:
Step 1 Select Configuration > Configuration Archive > Label Configs.
The Label Configs dialog box appears.
Step 2 Select a label and click Edit.
The Device Selection dialog box appears. The devices that are already part of the labeled file are selected.
Step 3 Go to the Device Selector pane and select a new device or deselect a device. See Inventory Management with Cisco Prime LAN Management Solution 4.2 for information on how to use the Device Selector.
Step 4 Go to the Version pane and select Latest to include the most recent configuration only, or All to view all configuration versions.
Step 5 Click Next.
The Label Details dialog box appears with the current details of the label.
Step 6 Do either of the following:
• Change the Label Description. You can enter up to 128 characters.
• Select a configuration version file from the left pane, click Add to add the selected configuration file.
– If you selected Latest in the previous dialog box, the left pane will show devices and the latest archived configuration file. The right pane contains labeled configuration.
– If you selected All in the previous dialog box, the left pane will show devices and all available archived configuration files. The right pane contains labeled configuration.
Note You can select only one configuration file for a device.
6-22Configuration Management with Cisco Prime LAN Management Solution 4.2
OL-25941-01
Chapter 6 Archiving Configurations and Managing them using Configuration Archive Configuring Labels
• To remove the selected configuration, select a configuration version file from the right pane and click Remove.
• To view the configuration, select a configuration version file from the left pane and click View. The Config Viewer (Understanding the Config Viewer Window) window appears.
Step 7 Click Finish.
A message appears, Label LabelName updated.
Where LabelName is the name of the label as entered by you.
Step 8 Click OK.
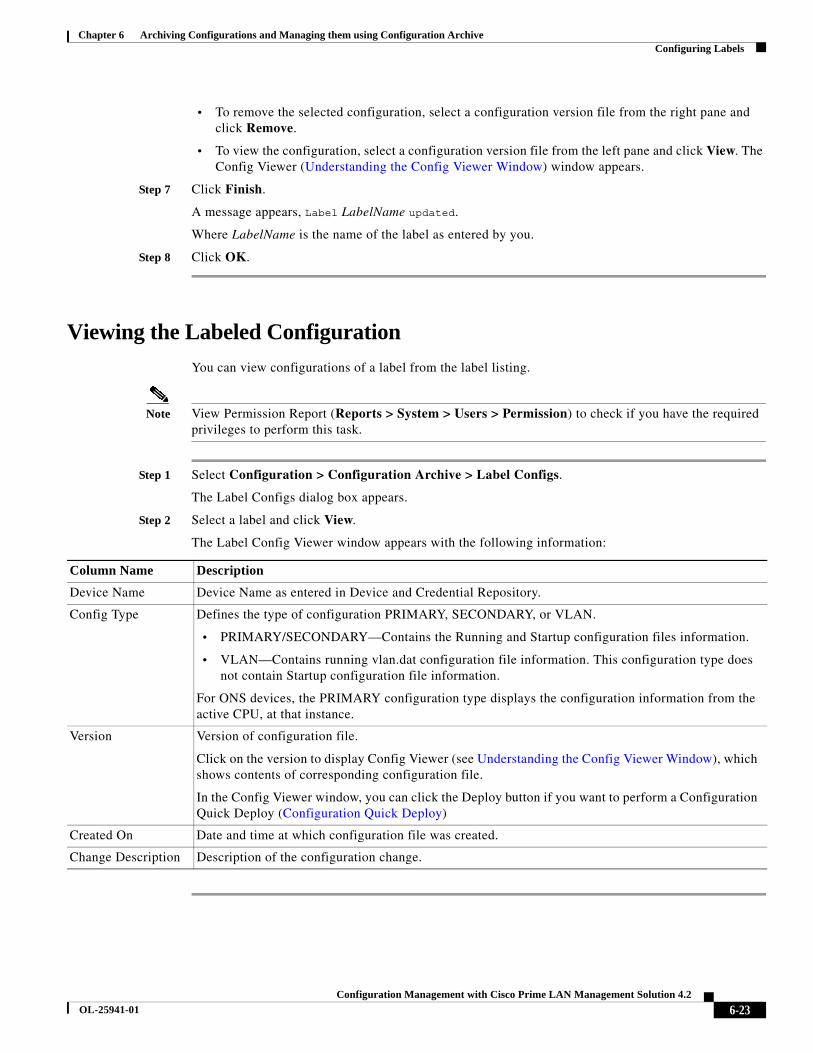
Viewing the Labeled Configuration
You can view configurations of a label from the label listing.
Note View Permission Report (Reports > System > Users > Permission) to check if you have the required privileges to perform this task.
Step 1 Select Configuration > Configuration Archive > Label Configs.
The Label Configs dialog box appears.
Step 2 Select a label and click View.
The Label Config Viewer window appears with the following information:
Column Name Description
Device Name Device Name as entered in Device and Credential Repository.
Config Type Defines the type of configuration PRIMARY, SECONDARY, or VLAN.
• PRIMARY/SECONDARY—Contains the Running and Startup configuration files information.
• VLAN—Contains running vlan.dat configuration file information. This configuration type does not contain Startup configuration file information.
For ONS devices, the PRIMARY configuration type displays the configuration information from the active CPU, at that instance.
Version Version of configuration file.
Click on the version to display Config Viewer (see Understanding the Config Viewer Window), which shows contents of corresponding configuration file.
In the Config Viewer window, you can click the Deploy button if you want to perform a Configuration Quick Deploy (Configuration Quick Deploy)
Created On Date and time at which configuration file was created.
Change Description Description of the configuration change.
6-23Configuration Management with Cisco Prime LAN Management Solution 4.2
OL-25941-01

Chapter 6 Archiving Configurations and Managing them using Configuration Archive Using Search Archive
Deleting the Labeled Configuration
You can delete a label from the list of labels in the label configuration dialog box:
Note View Permission Report (Reports > System > Users > Permission) to check if you have the required privileges to perform this task.
Step 1 Select Configuration > Configuration Archive > Label Configs.
The Label Configs dialog box appears.
Step 2 Select the labels and click Delete.
A message appears, Are you sure you want to delete the label(s)?
Step 3 Click OK to delete the labels.
Using Search ArchiveYou can search the archive for configuration containing text patterns for selected devices. You can specify ten different combinations of patterns or strings as part of search criteria.
For example:
• Search all devices for configurations having pattern set banner motd and set banner exec.
• Search all devices for configurations having pattern set banner motd and set banner exec and set password.
You can also specify an option to ignore or consider the case sensitive property.
You can create a custom configuration query that searches information about the specified configuration files.
If you monitor devices X, Y, and Z every morning, you can create a custom query on them. When you run the query, LMS quickly gathers all the archived configuration files for these devices and displays them in a report.
The Custom Queries window displays the following information:
You can click on any column heading to sort the information by that column. If you double-click a heading, the order is reversed.
Column Description
Query Name Custom Query name.
Description Custom Query description.
Created By User who created this Custom Query.
Created On Custom Query creation time.
6-24Configuration Management with Cisco Prime LAN Management Solution 4.2
OL-25941-01

Chapter 6 Archiving Configurations and Managing them using Configuration Archive Using Search Archive
The Custom Queries window contains the following buttons:
The user who creates the custom query has full permission to perform tasks such as edit and run on the Custom Queries.
See Searching Archive for the procedure to search the configuration with and without a search pattern.
Creating a Custom Query
To create a custom query:
Note View Permission Report (Reports > System > Users > Permission) to check if you have the required privileges to perform this task.
Step 1 Select Configuration > Configuration Archive > Views > Custom Queries.
The Custom Queries dialog box appears
Step 2 Click Create.
Step 3 Do any of the following:
• Enter the Custom Query name. You can enter up to 64 characters.
• Enter the Custom Query description. You can enter up to 128 characters.
• Enter patterns to search for, for example, http server. You can enter text patterns up to 64 characters.
To search for more than one pattern, enter the second and third patterns in the Pattern 2 and Pattern 3 fields. You can specify ten different combinations of patterns as part of search criteria.
You cannot search for special characters or regular expressions, for example, Control-C, boot*, etc.
• Select the search criteria Contains/Does Not Contain.
• If you have entered string as a search pattern, you can select Match Any to search for any given pattern string or Match All to search for all pattern strings.
• Click Match Case to perform a case-sensitive search, which is more efficient when you know the exact pattern you want to match. By default, Match Case is disabled.
Button Description
Create Create a custom query. See Creating a Custom Query for further details.
Edit Edit a custom query. See Editing a Custom Query for further details.
This button is active only after you select a custom query.
Run Run a custom query. See Running a Custom Query for further details.
This button is active only after you select a custom query.
Delete Delete custom queries. See Deleting the Custom Queries for further details.
This button is active only after you select a custom query.
6-25Configuration Management with Cisco Prime LAN Management Solution 4.2
OL-25941-01

Chapter 6 Archiving Configurations and Managing them using Configuration Archive Using Search Archive
Step 4 Click OK.
A message appears, Custom Query CustomQueryName created successfully.
Where CustomQueryName is the name of the custom query as entered by you.
Step 5 Click OK.
Running a Custom Query
To run a custom query:
Note View Permission Report (Reports > System > Users > Permission) to check if you have the required privileges to perform this task.
Step 1 Select Configuration > Configuration Archive > Views > Custom Queries.
The Custom Queries dialog box appears.
Step 2 Select a Custom Query and click Run.
The Device Selection dialog box appears.
Step 3 Select the devices. See Inventory Management with Cisco Prime LAN Management Solution 4.2 for information on how to use the Device Selector.
Step 4 Click OK.
The Custom Query Search Result window appears with the following information:
You can perform the following tasks from this window:
• Select the devices and click NetConfig to make any changes to the device configuration using NetConfig templates.
• Select a device and click Edit to edit the device configuration using the Config Editor application.
Column Name Description
Device Name Device Name as entered in Device and Credential Repository.
Click on the device name to launch the Troubleshooting page.
Version Versions of configuration file.
Click on the version to display Config Viewer (see Understanding the Config Viewer Window), which shows contents of corresponding configuration file.
In the Config Viewer window, you can click on the Deploy button if you want to perform a configuration quick deploy (Configuration Quick Deploy)
Created On Date and time at which the configuration file was created.
6-26Configuration Management with Cisco Prime LAN Management Solution 4.2
OL-25941-01

Chapter 6 Archiving Configurations and Managing them using Configuration Archive Using Search Archive
Editing a Custom Query
You can edit the Custom Query description and modify the search patterns and their criteria. To edit a custom query:
Note View Permission Report (Reports > System > Users > Permission) to check if you have the required privileges to perform this task.
Step 1 Select Configuration > Configuration Archive > Views > Custom Queries.
The Custom Queries dialog box appears.
Step 2 Select a Custom Query and click Edit.
The Custom Query Window appears.
Step 3 Do any of the following:
• Update the Custom Query description. You can enter up to 128 characters.
• Either add a new search pattern or delete or update an existing search pattern and its criteria. You can enter up to 64 characters.
• Modify the string search option Match Any to Match All or vice versa.
• Enable or Disable the case-sensitive search.
Step 4 Click OK.
A message appears, Custom Query CustomQueryName updated successfully.
Where CustomQueryName is the name of the Custom Query.
Step 5 Click OK.
Deleting the Custom Queries
To delete the custom queries:
Note View Permission Report (Reports > System > Users > Permission) to check if you have the required privileges to perform this task.
Step 1 Select Configuration > Configuration Archive > Views > Custom Queries.
The Custom Queries dialog box appears.
Step 2 Select a Custom Query and click Delete.
A message appears, The query will be deleted.
Step 3 Click OK.
6-27Configuration Management with Cisco Prime LAN Management Solution 4.2
OL-25941-01

Chapter 6 Archiving Configurations and Managing them using Configuration Archive Using Search Archive
Searching Archive
You can search the device configuration file with or without the search pattern. You can also narrow down your search using Label Configuration files and Custom Queries.
You can view the search report in two ways:
• Search Archive Result
• Device Configuration Quick View Report
Note View Permission Report (Reports > System > Users > Permission) to check if you have the required privileges to perform this task.
To search the configuration archive:
Step 1 Select Configuration > Configuration Archive > Views > Search Archive.
The Search Archive dialog box appears.
Step 2 Enter the following:
Field Description
Left Pane
Label Config Enable this option and select a label name.
The configuration version options Latest and All are disabled.
Device Selector Select the devices. See Inventory Management with Cisco Prime LAN Management Solution 4.2 for information on how to use the Device Selector.
If you have selected Label Config, you need not select devices. If you have selected any devices, only the devices that are specified in the label configuration are searched. Other devices are ignored.
Version Select Latest to search the most recent configuration only or All to search all configuration versions.
If you have selected Label Config, then you cannot specify the versions.
View Type Select one of these view types:
• Version to view the Device Configuration Version Report. This displays all versions of the configuration, the time and date the configurations were archived, and reason for archival.
• Quick View to view the Device Configuration Quick View Report. This displays the contents of the configuration files.
Right Pane
Custom Query Select a Custom Query.
The search patterns that are defined in the Custom Query appear in the Pattern Details text boxes.
In addition to Custom Query search patterns, you can also add additional search patterns.
6-28Configuration Management with Cisco Prime LAN Management Solution 4.2
OL-25941-01

Chapter 6 Archiving Configurations and Managing them using Configuration Archive Using Search Archive
Step 3 Click Search.
Based on your View type selection, either Search Archive Result or Device Configuration Quick View Report appears.
Pattern Details Perform the following tasks:
• Enter patterns to search for, for example, http server. You can enter text patterns up to 64 characters.
To search for more than one pattern, enter the second and third patterns in the Pattern 2 and Pattern 3 fields. You can specify ten different combinations of patterns as part of search criteria.
You cannot search for special characters, for example, Control-C, boot*.
You can also search the device configuration file without the search pattern. The search will list all archived configuration for all selected devices.
– If you have selected the version as Latest, the search will list latest archived configuration for all selected devices.
– If you have selected the version as All, the search will list all archived configurations for all selected devices
• Select the search criteria Contains/Does Not Contain.
• If you have entered string as a search pattern, you can select Match Any to search for any given pattern string or Match All to search for all pattern strings
• Click Match Case to perform a case-sensitive search, which is more efficient when you know the exact pattern you want to match. By default, Match Case is disabled.
Date Range Select any of the following Date Range types:
• As on—Search config archives on or before the specified date and time.
• From—Search config archives for the specified period.
• Last—Search config archives for the last N number of days, weeks, months or years; where N is the value entered for the number of days, weeks, months or years.
The following maximum values for N can be specified:
– Days—The maximum number of days that can be specified is 999.
– Weeks—The maximum number of weeks that can be specified is 999.
– Months—The maximum number of months that can be specified is 99.
– Years—The maximum number of years that can be specified is 9.
If you have selected Latest as the version, the Date Range option searches for the most recent config archives.
Field Description
6-29Configuration Management with Cisco Prime LAN Management Solution 4.2
OL-25941-01

Chapter 6 Archiving Configurations and Managing them using Configuration Archive Using Search Archive
Search Archive Result
The Search Archive Result displays information about the device configurations. The Search Archive Result contains the following details of the selected configurations:
You can perform the following tasks from this window:
• Select the devices and click NetConfig to make changes to the device configuration using NetConfig templates.
• Select a device and click Edit to edit the device configuration using the Config Editor application.
Device Configuration Quick View Report
The Device Configuration Quick View report lists the devices, configuration version numbers, and configuration details of the device configuration version you specified.
You can specify how you want to view the contents of the configurations by selecting one of the options under Show:
• Click Raw to view data exactly as it appears in the configuration file. There are two panes, one lists all devices and the other displays the configuration.
• Click Processed to view data with the commands ordered and grouped. There are three panes, one lists all devices, the second pane lists all configlets, and the third pane displays the configuration.
Column Name Description
Device Name Device Name as entered in Device and Credential Repository.
Click on the device name to launch the Troubleshooting page.
Config Type Defines the type of configuration PRIMARY, SECONDARY, or VLAN.
• PRIMARY/SECONDARY—Contains the Running and Startup configuration files information.
• VLAN—Contains running vlan.dat configuration file information. This config type does not contain Startup configuration file information.
For ONS devices, the PRIMARY config type displays the configuration information from the active CPU, at that instance.
Version Versions of configuration file.
Click on the version to display Config Viewer (see Understanding the Config Viewer Window), which shows contents of the corresponding configuration file.
Created On Date and time at which the configuration file was created.
Change Description Cause of configuration change.
6-30Configuration Management with Cisco Prime LAN Management Solution 4.2
OL-25941-01

Chapter 6 Archiving Configurations and Managing them using Configuration Archive Using Search Archive
The following buttons are available on the Config Viewer:
Column Description
Devices Device Name as entered in Device and Credential Repository.
Click on the device name to launch the Troubleshooting page.
Configlets You can click on any configlets to display the corresponding information. The available configlets vary from device to device. The following are examples:
• All—The entire contents of the configuration files.
• SNMP—SNMP configuration commands. For example, snmp-server community public RO.
• IP Routing—IP routing configuration commands. For example, router abcd 100.
• Interface folder—The different interface configuration commands. For example, Interface Ethernet0 and Interface TokenRing.
• Global—Global configuration commands. For example no ip address.
• Line con 0—Configuration commands for line console 0.
• IP—IP configuration commands. For example, ip http server.
Configuration file name
You can view the contents of configuration file.
Button Description
Export
(Icon)
Exports the configuration file.
• If you are using the Raw mode then the exported file format is cfg. The file name convention is DeviceName-VersionNumber.cfg.
• If you are using the Processed mode then the exported file format is XML and the file name convention is DeviceName-VersionNumber.xml.
Where DeviceName is the Device Name as entered in Device and Credential Repository and VersionNumber is the device configuration version.
The default directory where Configuration Archive file is exported is:
On Solaris and Soft Appliance server,
/var/adm/CSCOpx/files/rme/dcma/configexport
On Windows server,
NMSROOT\files\rme\dcma\configexport
6-31Configuration Management with Cisco Prime LAN Management Solution 4.2
OL-25941-01
Chapter 6 Archiving Configurations and Managing them using Configuration Archive Using Search Archive
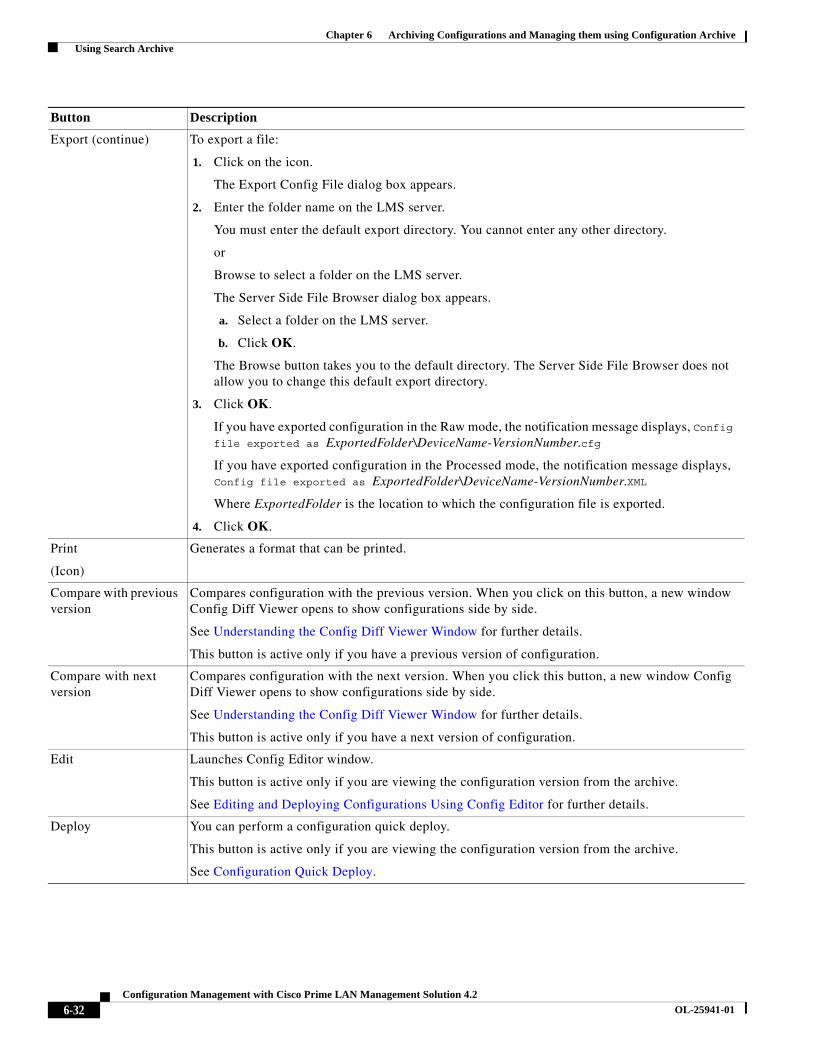
Export (continue) To export a file:
1. Click on the icon.
The Export Config File dialog box appears.
2. Enter the folder name on the LMS server.
You must enter the default export directory. You cannot enter any other directory.
or
Browse to select a folder on the LMS server.
The Server Side File Browser dialog box appears.
a. Select a folder on the LMS server.
b. Click OK.
The Browse button takes you to the default directory. The Server Side File Browser does not allow you to change this default export directory.
3. Click OK.
If you have exported configuration in the Raw mode, the notification message displays, Config file exported as ExportedFolder\DeviceName-VersionNumber.cfg
If you have exported configuration in the Processed mode, the notification message displays, Config file exported as ExportedFolder\DeviceName-VersionNumber.XML
Where ExportedFolder is the location to which the configuration file is exported.
4. Click OK.
(Icon)
Generates a format that can be printed.
Compare with previous version
Compares configuration with the previous version. When you click on this button, a new window Config Diff Viewer opens to show configurations side by side.
See Understanding the Config Diff Viewer Window for further details.
This button is active only if you have a previous version of configuration.
Compare with next version
Compares configuration with the next version. When you click this button, a new window Config Diff Viewer opens to show configurations side by side.
See Understanding the Config Diff Viewer Window for further details.
This button is active only if you have a next version of configuration.
Edit Launches Config Editor window.
This button is active only if you are viewing the configuration version from the archive.
See Editing and Deploying Configurations Using Config Editor for further details.
Deploy You can perform a configuration quick deploy.
This button is active only if you are viewing the configuration version from the archive.
See Configuration Quick Deploy.
Button Description
6-32Configuration Management with Cisco Prime LAN Management Solution 4.2
OL-25941-01

Chapter 6 Archiving Configurations and Managing them using Configuration Archive Comparing Configurations
Comparing ConfigurationsYou can compare two device configuration files from version to version or from device to device. You can also compare the configuration when a device was started with the current configuration, and the current configuration with the most recently archived configuration.
You can list the commands that have to be excluded while comparing configurations.
To do this select Admin > Collection Settings > Config > Config Compare Exclude Commands Configuration.
You can compare the configurations in these ways:
• Startup vs. Running—Compares the configuration when the device was started with the current configuration. These configurations are fetched from the device.
See Comparing Startup vs. Running Configurations.
• Running vs. Latest Archived—Compares the running configuration with the most recently archived configuration. The Running configuration is fetched from the device.
See Comparing Running vs. Latest Archived Configurations.
• Two Versions of the Same Device—Compares two archived configuration versions.
See Comparing Two Configuration Versions of the Same Device.
• Two Versions of Different Devices—Compares any two configurations in the configuration archive.
See Compare Two Configuration Versions of Different Devices.
• Base Config vs. Latest Version of Different Devices—Compares the base configuration of a device with the latest configuration of other devices.. These configurations are fetched from the device.
See Compare Base Config vs. Latest Configuration Version of Multiple Devices.
Comparing Startup vs. Running Configurations
You can compare the configuration when a device was started with the current configuration. These configurations are fetched from the device.
Note View Permission Report (Reports > System > Users > Permission) to check if you have the required privileges to perform this task.
6-33Configuration Management with Cisco Prime LAN Management Solution 4.2
OL-25941-01
Chapter 6 Archiving Configurations and Managing them using Configuration Archive Comparing Configurations
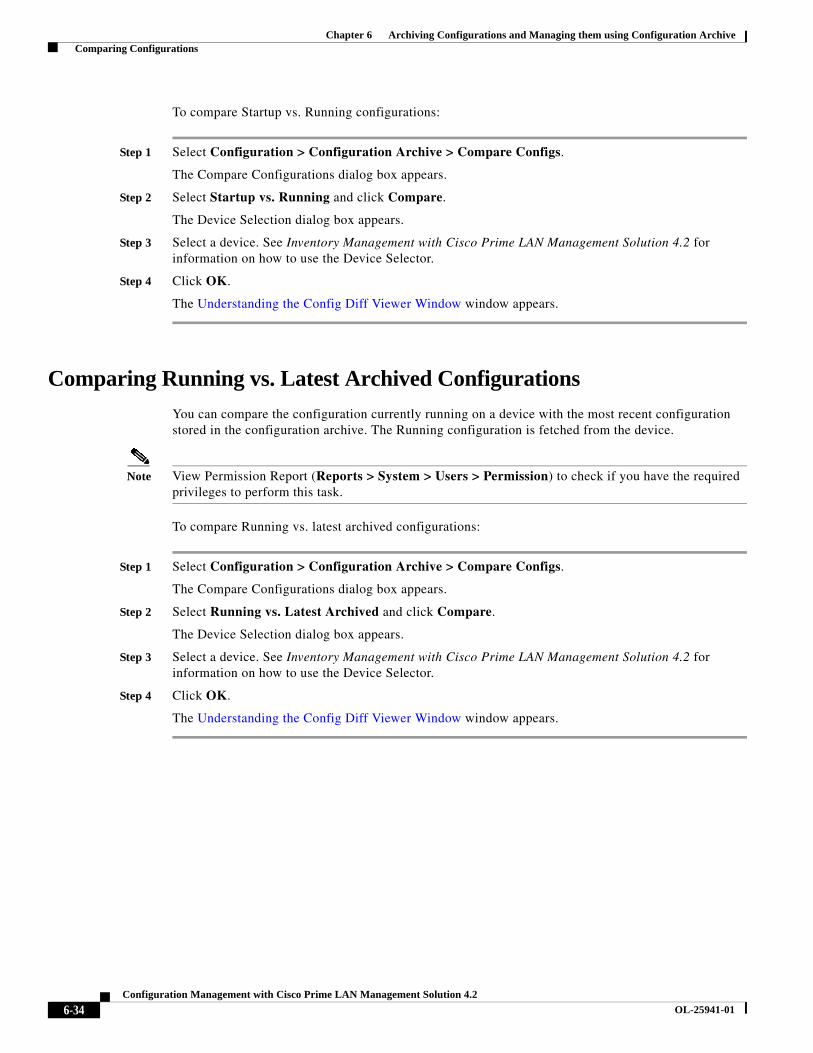
To compare Startup vs. Running configurations:
Step 1 Select Configuration > Configuration Archive > Compare Configs.
The Compare Configurations dialog box appears.
Step 2 Select Startup vs. Running and click Compare.
The Device Selection dialog box appears.
Step 3 Select a device. See Inventory Management with Cisco Prime LAN Management Solution 4.2 for information on how to use the Device Selector.
Step 4 Click OK.
The Understanding the Config Diff Viewer Window window appears.
Comparing Running vs. Latest Archived Configurations
You can compare the configuration currently running on a device with the most recent configuration stored in the configuration archive. The Running configuration is fetched from the device.
Note View Permission Report (Reports > System > Users > Permission) to check if you have the required privileges to perform this task.
To compare Running vs. latest archived configurations:
Step 1 Select Configuration > Configuration Archive > Compare Configs.
The Compare Configurations dialog box appears.
Step 2 Select Running vs. Latest Archived and click Compare.
The Device Selection dialog box appears.
Step 3 Select a device. See Inventory Management with Cisco Prime LAN Management Solution 4.2 for information on how to use the Device Selector.
Step 4 Click OK.
The Understanding the Config Diff Viewer Window window appears.
6-34Configuration Management with Cisco Prime LAN Management Solution 4.2
OL-25941-01

Chapter 6 Archiving Configurations and Managing them using Configuration Archive Comparing Configurations
Comparing Two Configuration Versions of the Same Device
You can compare two different archived configurations of the same device.
Note View Permission Report (Reports > System > Users > Permission) to check if you have the required privileges to perform this task.
To compare two versions of the same device:
Step 1 Select Configuration > Configuration Archive > Compare Configs.
The Compare Configurations dialog box appears.
Step 2 Select Two Versions of the Same Device and click Compare.
The Device Selection dialog box appears.
Step 3 Select a device. See Inventory Management with Cisco Prime LAN Management Solution 4.2 for information on how to use the Device Selector.
Step 4 Click Next.
The Select First Configuration dialog box appears with the following information:
Step 5 Click on the first configuration to compare and click Next.
The Select Second Configuration dialog box appears with the same information as the Select First Configuration window.
Step 6 Click on the second configuration to compare it with first configuration and click Finish.
The Understanding the Config Diff Viewer Window appears.
Column Name Description
Config Version Versions of configuration file.
File Type Defines the configuration file type as either Running or Startup configuration.
Config Type Defines the type of configuration PRIMARY, SECONDARY, or VLAN.
• PRIMARY/SECONDARY—Contains the Running and Startup configuration files information.
• VLAN—Contains running vlan.dat configuration file information. This configuration type does not contain Startup configuration file information.
For ONS devices, the PRIMARY configuration type displays the configuration information from the active CPU, at that instance.
Created On Date and time at which the configuration file was created.
6-35Configuration Management with Cisco Prime LAN Management Solution 4.2
OL-25941-01
Chapter 6 Archiving Configurations and Managing them using Configuration Archive Comparing Configurations
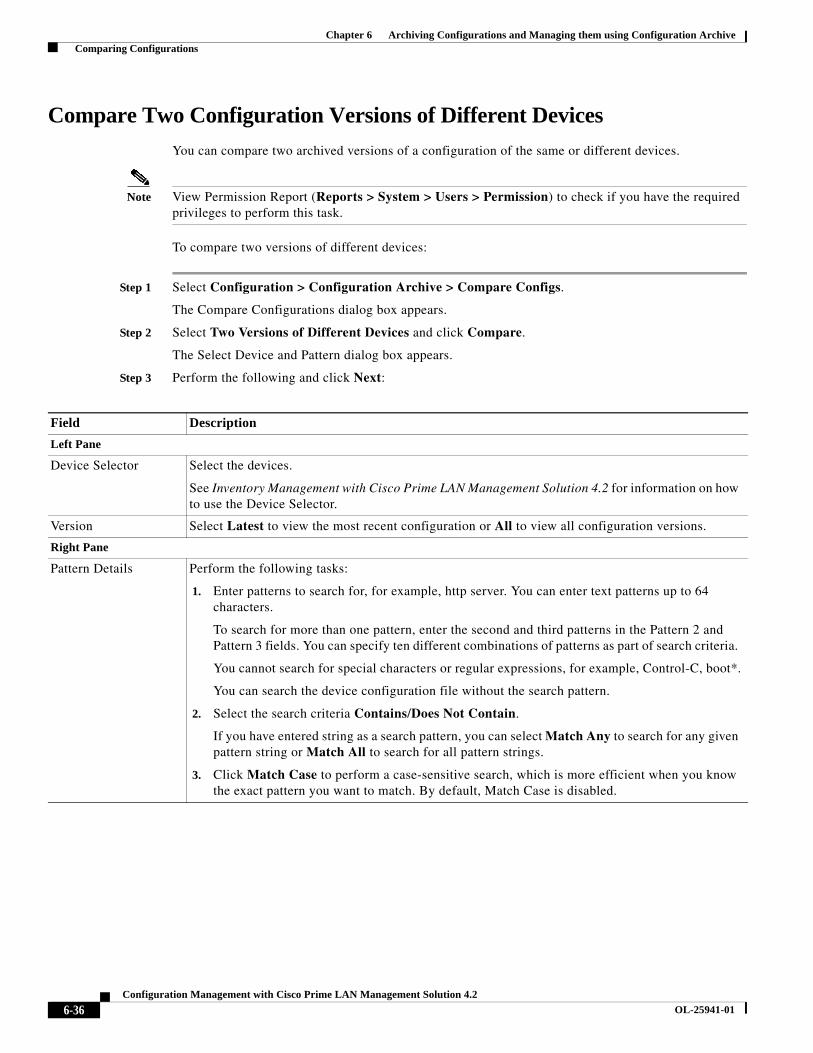
Compare Two Configuration Versions of Different Devices
You can compare two archived versions of a configuration of the same or different devices.
Note View Permission Report (Reports > System > Users > Permission) to check if you have the required privileges to perform this task.
To compare two versions of different devices:
Step 1 Select Configuration > Configuration Archive > Compare Configs.
The Compare Configurations dialog box appears.
Step 2 Select Two Versions of Different Devices and click Compare.
The Select Device and Pattern dialog box appears.
Step 3 Perform the following and click Next:
Field Description
Left Pane
Device Selector Select the devices.
See Inventory Management with Cisco Prime LAN Management Solution 4.2 for information on how to use the Device Selector.
Version Select Latest to view the most recent configuration or All to view all configuration versions.
Right Pane
Pattern Details Perform the following tasks:
1. Enter patterns to search for, for example, http server. You can enter text patterns up to 64 characters.
To search for more than one pattern, enter the second and third patterns in the Pattern 2 and Pattern 3 fields. You can specify ten different combinations of patterns as part of search criteria.
You cannot search for special characters or regular expressions, for example, Control-C, boot*.
You can search the device configuration file without the search pattern.
2. Select the search criteria Contains/Does Not Contain.
If you have entered string as a search pattern, you can select Match Any to search for any given pattern string or Match All to search for all pattern strings.
3. Click Match Case to perform a case-sensitive search, which is more efficient when you know the exact pattern you want to match. By default, Match Case is disabled.
6-36Configuration Management with Cisco Prime LAN Management Solution 4.2
OL-25941-01

Chapter 6 Archiving Configurations and Managing them using Configuration Archive Comparing Configurations
The Select First Configuration dialog box appears with the following information:
Step 4 Click on the first configuration to compare and click Next.
The Select Second Configuration dialog box appears with the same information as the Select First Configuration window.
Step 5 Click on the second configuration to compare with first configuration and click Finish.
The Understanding the Config Diff Viewer Window window appears.
Column Name Description
Device Name Device Name as entered in Device and Credential Repository.
Config Version Versions of configuration file.
File Type Defines the configuration file type as either Running or Startup configuration.
Config Type Defines the type of configuration PRIMARY, SECONDARY, or VLAN.
• PRIMARY/SECONDARY—Contains the Running and Startup configuration files information.
• VLAN—Contains running vlan.dat configuration file information. This configuration type does not contain Startup configuration file information.
For ONS devices, the PRIMARY configuration type displays the configuration information from the active CPU, at that instance.
Created On Date and time at which the configuration file was created.
6-37Configuration Management with Cisco Prime LAN Management Solution 4.2
OL-25941-01
Chapter 6 Archiving Configurations and Managing them using Configuration Archive Comparing Configurations
Compare Base Config vs. Latest Configuration Version of Multiple Devices
You can compare and sync the base configuration of a device with the latest configuration version of multiple devices. The base configuration can be Running, Startup, or User archives.
Note View Permission Report (Reports > System > Users > Permission) to check if you have the required privileges to perform this task.
To compare the base configuration with the latest configuration version of different devices:
Step 1 Select Configuration > Configuration Archive > Compare Configs.
The Compare Configurations dialog box appears.
Step 2 Select Base Config vs. Latest Version of Multiple Devices and click Compare.
The Select a Base Device dialog box appears.
Step 3 Select a base device. See Inventory Management with Cisco Prime LAN Management Solution 4.2 for information on how to use the Device Selector.
Step 4 Click Next.
The Select Config Version of the Base Device to Compare dialog box appears.
Step 5 Select the configuration version of the base device from the Config Version tree.
• If you check Filter Same Device Category Devices, it displays devices that belong to the base device category. These devices are displayed in the Select Other Devices to Compare page.
• If you uncheck Filter Same Device Category Devices, it displays all devices that belong to other device categories that are managed by LMS. These devices are displayed in the Select Other Devices to Compare page.
Step 6 Click Next.
The Select Other Devices to Compare dialog box appears.
Step 7 Select the devices to compare with the configuration of the base device.
You can select devices using the Device Selector. See Inventory Management with Cisco Prime LAN Management Solution 4.2 for information on how to use the Device Selector.
Step 8 Click Next.
The Add Exclude Commands dialog box appears
Step 9 Do the following in the Add Exclude Commands dialog box:
6-38Configuration Management with Cisco Prime LAN Management Solution 4.2
OL-25941-01

Chapter 6 Archiving Configurations and Managing them using Configuration Archive Comparing Configurations
Step 10 Click Finish.
The Compare Config window appears, displaying the following details:
Field/Button Description
Exclude Commands Enter the exclude commands one in each line.
For example,
ip address.*,
end.*,
exec-timeout.*,
length.*,
ntp clock-period.*
The commands will be excluded while comparing configuration.
You can enter multiple commands separated by commas.
For more information, see Examples for Exclude Commands.
View Base Config
(Button)
Click View Base Config to launch the Config Viewer window.
See Understanding the Config Viewer Window for further information.
Field Name/Buttons Description
Summary
Total No.of Device(s) selected for comparison
Number of devices selected for comparision.
Number of Compliant devices
Number of devices that comply with the base configuration.
Number of Non-Compliant devices
Number of devices that do not comply with the base configuration.
Number of Excluded devices
Number of devices excluded from comparision.
Base Device Name of the base device.
Base Config Type Configuration type of the base device.
Base Config Branch Configuration branch version of the base device. For example, DeviceArchive.
Non-Compliant Devices
Device Name Device Name as entered in Device and Credential Repository.
Latest Version Version of configuration file against which the compliance was checked.
Click on the version to display Config Viewer (see Understanding the Config Viewer Window). This shows the contents of corresponding configuration file against which the compliance was checked.
Diff Differences between base configuration and the lastest configuration version of mutiple devices.
To view the difference between the base configuration and the latest configuration version of other devices, click on the Diff icon. The Config Diff Viewer window appears. For more information, see Understanding the Config Diff Viewer Window.
6-39Configuration Management with Cisco Prime LAN Management Solution 4.2
OL-25941-01

Chapter 6 Archiving Configurations and Managing them using Configuration Archive Comparing Configurations
Step 11 Click Diff to view the differences between base configuration and the lastest configuration version of multiple devices.
The Config Diff Viewer window appears. For more information, see Understanding the Config Diff Viewer Window.
Step 12 Click Deploy to sync the base configuration with the latest configuration.
The Job Options Details pop-up window appears, displaying the following details:
Step 13 Enter the Job Information and Job Option details.
Step 14 Click Submit to run the job.
Examples for Exclude Commands
This section contains examples for exclude commands:
Excluded Devices
Device Name Device Name as entered in Device and Credential Repository.
Reason for Exclusion Displays the cause for exclusion.
Buttons
Export
(Icon)
Exports the data to a file of PDF or CSV format.
(Icon)
Generates a format that can be printed.
Field Name/Buttons Description
Field Description
Job Information
E-mail Enter the e-mail address.
Retain new config additions in <<config version>>
Check to retain new config additions in the configuration file.
Job Options
Job Password Check to enable Job Password option
Login username Enter the login username.
Password Enter the login password.
Enable password Enter the enable password.
Submit
(button)
Click Submit to run the job.
6-40Configuration Management with Cisco Prime LAN Management Solution 4.2
OL-25941-01
Chapter 6 Archiving Configurations and Managing them using Configuration Archive Comparing Configurations
For more information, see the regex API guide for Java 1.4.2 from Oracle http://download.oracle.com/javase/1.4.2/docs/api/java/util/regex/Pattern.html for other patterns.
Understanding the Config Diff Viewer Window
The Configuration Version Compare report shows the differences between the two selected configurations. You can access the Configuration Version Compare report by comparing device configurations.
You can specify how you want to view the differences between the configurations by selecting one of the options under Show:
• Click Raw to view the differences between the two raw configurations.
• Click Processed to view the differences with the commands ordered and grouped.
The color conventions that are used on Config Diff Viewer are:
• Black—All unchanged text.
• Red—Lines that have changed from one version to another.
• Blue—Lines that have been added or deleted from one of the versions.
Scenario Command Type (Examples)
To exclude anything after IP Address ip address .*
To exclude IP address range from 172.20.115.1 to 255
ip address 172\\.20\\.115\\.(25[0-5]|2[0-4][0-9]|[01]?[0-9][0-9]?) 255.255.255.128
To exclude SNMP host that contain either inside or outside characters
snmp host \\b(inside|outside) 10.77.203.176 community public
6-41Configuration Management with Cisco Prime LAN Management Solution 4.2
OL-25941-01

Chapter 6 Archiving Configurations and Managing them using Configuration Archive Comparing Configurations
The Configuration Versions Compare report has three columns:
The buttons on the Config Diff Viewer are:
Column Description
Configlets You can click on any configlet to display the corresponding information. The available configlets vary from device to device. The following are examples:
• Diffs—Displays the differences between the two configuration files (if you selected more than one).
• All—The entire contents of the configuration files.
• SNMP—SNMP configuration commands. For example, snmp-server community public RO.
• IP Routing—IP routing configuration commands. For example, router abcd 100.
• Interface folder—The different interface configuration commands. For example, Interface Ethernet0 and Interface TokenRing.
• Global—Displays global configuration commands. For example no ip address.
• Line con 0—Displays configuration commands for line console 0.
• IP—Displays IP configuration commands. For example, ip http server.
First configuration file Contains the contents of the first configuration file.
Second configuration file
Contains the contents of the second configuration file.
Button Description
Export
(Icon)
Export the configuration file.
• If you are using the Raw mode then the exported file format is cfg. The file name convention is DeviceName-VersionNumber.cfg.
• If you are using the Processed mode then the exported file format is XML. The file name convention is DeviceName-VersionNumber.xml.
Where DeviceName is the device name as entered in Device and Credential Repository and VersionNumber is the device configuration version.
The default directory where Configuration Archive file is exported is:
On Solaris and Soft Appliance server,
/var/adm/CSCOpx/files/rme/dcma/configexport
On Windows server,
NMSROOT\files\rme\dcma\configexport
6-42Configuration Management with Cisco Prime LAN Management Solution 4.2
OL-25941-01

Chapter 6 Archiving Configurations and Managing them using Configuration Archive Comparing Configurations
Export (continue) To export a file:
1. Click on the icon.
The Export Config File dialog box appears.
2. Enter the folder name on the LMS server.
You must enter the default export directory. You cannot enter any other directory.
or
Browse to select a folder on the LMS server.
The Server Side File Browser dialog box appears.
a. Select a folder on the LMS server.
b. Click OK.
The Browse button takes you to the default directory. It does not allow you to change this default export directory.
3. Click OK.
If you have exported configuration in the Raw mode, the notification message displays, Config file exported as ExportedFolder\DeviceName-VersionNumber.cfg
If you have exported configuration in the Processed mode, the notification message displays, Config file exported as ExportedFolder\DeviceName-VersionNumber.XML
Where ExportedFolder is the location where configuration file is exported.
4. Click OK.
This option is not available in the Config Diff Viewer page when you compare Base Config vs. Latest Version of Different Devices.
(Icon)
Generates a format that can be printed.
This option is not available in the Config Diff Viewer page when you compare Base Config vs. Latest Version of Different Devices.
Button Description
6-43Configuration Management with Cisco Prime LAN Management Solution 4.2
OL-25941-01
Chapter 6 Archiving Configurations and Managing them using Configuration Archive Using Configuration Archive Job Browser
Using Configuration Archive Job BrowserYou can browse the Configuration Archive jobs that are registered on the system. From the Archive Management Jobs dialog box you can also retry, delete, stop jobs and view a job's details.
This section details:
• Retrying a Config Job
• Stopping a Config Job
• Deleting the Config Jobs
• Viewing the Configuration Archive Job Details
The Archive Management Jobs window displays the following information:
Column Name Description
Job ID Unique number assigned to the job when it is created.
For periodic jobs such as Daily, Weekly, etc., the job IDs are in the number.x format. The x represents the number of instances of the job. For example, 1001.3 indicates that this is the third instance of the job ID 1001.
Click on the Job ID to view the Configuration Archive job details (see Viewing the Configuration Archive Job Details).
Job Type Type of the configuration job.
• Sync Archive—Appears if you had scheduled a Sync Archive job (Configuration > Configuration Archive > Synchronization).
• Get Config—Appears if you had scheduled a configuration fetch job using the CLI command, cwcli config get.
• Put Config—Appears if you had scheduled a configuration retrieve job using the CLI command, cwcli config put.
• Import Config—Appears if you had scheduled a job that retrieved the configuration from a file and if you had transferred it to the device using the CLI command, cwcli config import.
• Write to Running Config—Appears if you had scheduled a job that downloaded the differences between the specified configuration file and the latest configuration version in the archive for the specified device, using the CLI command, cwcli config write2run.
6-44Configuration Management with Cisco Prime LAN Management Solution 4.2
OL-25941-01

Chapter 6 Archiving Configurations and Managing them using Configuration Archive Using Configuration Archive Job Browser
Job Type
(Continue)
• Write to Startup Config—Appears if you had scheduled a job that erased the contents of the device Startup configuration and if you wrote contents of a specified file as new Startup configuration, using the CLI command, cwcli config write2start.
• Copy Running Config to Startup—Appears if you had scheduled a job that overwrote with the Startup configuration of the device with the Running configuration, using the CLI command, cwcli config run2start.
• Copy Startup Config to Running—Appears if you had scheduled a job that merged the Startup configuration with the Running configuration, using the CLI command, cwcli config start2run.
• Reload Device—Appears if you had scheduled a job that rebooted the devices, using the CLI command cwcli config reload.
• Config Quick Deploy—Appears if you had created an immediate Configuration Quick Deploy job, using the Config Viewer window.
• Compliance Check—Appears if you had scheduled a Compliance Check job (Configuration > Compliance > Compliance Templates > Compliance Check and click the Compliance Check button).
• Check Compliance and Deploy—Appears if you had scheduled a Compliance Check job with the job option, Check compliance and deploy enabled (Configuration > Compliance > Compliance Templates > Compliance Check and click the Compliance Check button).
• Deploy Baseline template—Appears if you had scheduled a Baseline Template deploy job (Configuration > Compliance > Compliance Templates > Direct Deploy and click the Deploy button).
• Deploy Compliance Results—Appears if you had scheduled a Deploy job on the non-complaint devices (Configuration > Compliance > Compliance Templates > Jobs and click the Deploy button).
Status Job states:
• Cancelled—Running job stopped by you.
• Failed—Failed job. Click on the Job ID to view the job details.
The number, within brackets, next to Failed status indicates the count of the devices that had failed for that job. This count is displayed only if the status is Failed.
For example, If the status displays Failed(5), then the count of devices that had failed is 5.
• Running—Job still running.
• Scheduled—Job scheduled to run.
• Rejected—Job rejected by an approver. Click on the Job ID to view the rejection details.
• Successful—Job completed successfully
• Waiting for Approval—Job waiting for approval.
Description Job description entered during job definition
Owner User who created this job.
Scheduled at Date and time at which the job is scheduled to run.
Completed at Date and time at which job was completed.
Schedule Type Run type of the job: Immediate, Once, 6 - hourly, 12 - hourly, Daily, Weekly, and Monthly.
Column Name Description
6-45Configuration Management with Cisco Prime LAN Management Solution 4.2
OL-25941-01
Chapter 6 Archiving Configurations and Managing them using Configuration Archive Using Configuration Archive Job Browser
You can click on any column heading to sort information by that column. If you double-click on a heading, the order is reversed.
You can use the Filter button to do a quick search on the Configuration Archive jobs. You can perform filters by using these options:
You can perform the following tasks on this window:
• Retrying a Config Job
• Stopping a Config Job
• Deleting the Config Jobs
Retrying a Config Job
You can retry only a failed job. You cannot retry a job that is scheduled to run periodically (Daily, Weekly, and Monthly).
Note View Permission Report (Reports > System > Users > Permission) to check if you have the required privileges to perform this task.
To retry a job:
Step 1 Select Configuration > Job Browsers > Configuration Archive.
The Archive Management Jobs dialog box appears.
Step 2 Select a failed job and click Retry.
The Job Schedule and Options dialog box appears.
Filter Options Description
Job ID Unique number assigned to the job when it is created.
For periodic jobs such as Daily, Weekly, etc., the job IDs are in the number.x format. The x represents the number of instances of the job.
For example, 1001.3 indicates that this is the third instance of the job ID 1001.
Job Type Types of Configuration Archive jobs.
For example: Sync Archive, Write to Running Config.
Status Status of the job.
For example: Successful, Failed.
Description Job description.
Owner Owner of the job.
Schedule Type Job schedule Type.
For example: Immediate, Weekly.
Refresh
(Icon)
Click on this icon to refresh the Configuration Archive Job Browser.
6-46Configuration Management with Cisco Prime LAN Management Solution 4.2
OL-25941-01

Chapter 6 Archiving Configurations and Managing them using Configuration Archive Using Configuration Archive Job Browser
Step 3 Enter the following information:
Based on your retry job selection, some of the options may not be visible.
For example, 6 - hourly and 12 -hourly Run Type options are visible only if you are retrying a Sync Archive job. This is not visible for other types of Configuration Archive jobs.
Field Description
Scheduling
Run Type You can specify when you want to run the selected Retry job.
To do this, select one of these options from the drop-down menu:
• 6 - hourly—Runs this task every 6 hours, starting from the specified time.
• 12 - hourly—Runs this task every 12 hours, starting from the specified time.
• Immediate—Runs this task immediately.
• Once—Runs this task once at the specified date and time.
• Daily—Runs daily at the specified time.
• Weekly—Runs weekly on the specified day of the week and at the specified time.
• Monthly—Runs monthly on the specified day of the month and at the specified time.
The subsequent instances of periodic jobs will run only after the earlier instance of the job is complete.
For example, if you have scheduled a daily job at 10:00 a.m. on November 1, the next instance of this job will run at 10:00 a.m. on November 2 only if the earlier instance of the November 1 job has completed.
If the 10.00 a.m. November 1 job has not been completed before 10:00 a.m. November 2, the next job will start only at 10:00 a.m. on November 3.
Date You can select the date and time (hours and minutes) at which to schedule a job.
The Date field is enabled only if you have selected an option other than Immediate in the Run Type field.
6-47Configuration Management with Cisco Prime LAN Management Solution 4.2
OL-25941-01

Chapter 6 Archiving Configurations and Managing them using Configuration Archive Using Configuration Archive Job Browser
Step 4 Click Submit.
A message appears, Job resubmitted successfully.
Step 5 Click OK.
Stopping a Config Job
You can stop the following running job types (See Using Configuration Archive Job Browser for details on the job types):
• Put Config
• Import Config
• Write to Running Config
• Write to Startup Config
• Copy Running Config to Startup
• Copy Startup Config to Running
• Reload Device
Job Information
Approver Comments Enter comments for the job approver.
This field appears only if you have enabled job approval for Configuration Archive.
Maker E-Mail Enter the e-mail-ID of the job creator. This is a mandatory field.
This field appears only if you have enabled job approval for Configuration Archive.
Job Password • If you have enabled the Enable Job Password option and disabled the User Configurable option in the Job Policy dialog box (Admin > Network > Configuration Job Settings > Config Job Policies) enter the device login user name and password and device Enable password.
• If you have enabled the Enable Job Password option and enabled the User Configurable option in the Job Policy dialog box (Admin > Network > Configuration Job Settings > Config Job Policies) either:
– Enter the device login user name and password and device Enable password
Or
– Disable the Job Password option in the Job Schedule and Options dialog box.
E-mail Enter e-mail addresses to which the job sends messages at the beginning and at the end of the job.
You can enter multiple e-mail addresses separated by commas.
Configure the SMTP server to send e-mails in the View / Edit System Preferences dialog box (Admin > System > System Preferences).
We recommend that you configure the LMS E-mail ID in the View / Edit System Preferences dialog box (Admin > System > System Preferences). When the job starts or completes, an e-mail is sent with the LMS e-mail ID as the sender's address.
Field Description
6-48Configuration Management with Cisco Prime LAN Management Solution 4.2
OL-25941-01

Chapter 6 Archiving Configurations and Managing them using Configuration Archive Using Configuration Archive Job Browser
• Config Quick Deploy
• Check Compliance and Deploy
• Deploy Baseline template
• Compliance check
Note View Permission Report (Reports > System > Users > Permission) to check if you have the required privileges to perform this task.
To stop an Configuration Archive job:
Step 1 Select Configuration > Job Browsers > Configuration Archive.
The Archive Management Jobs dialog box appears.
Step 2 Select a running job and click Stop.
A message appears, Selected job(s) will be stopped.
Step 3 Click OK.
Deleting the Config Jobs
You can delete jobs with status:
• Cancelled
• Failed
• Scheduled
• Rejected
• Successful
• Waiting for Approval
You cannot delete a running job.
Note View Permission Report (Reports > System > Users > Permission) to check if you have the required privileges to perform this task.
To delete jobs:
Step 1 Select Configuration > Job Browsers > Configuration Archive.
The Archive Management Jobs dialog box appears.
Step 2 Select a running job and click Delete.
A message appears, Selected job(s) will be deleted.
Step 3 Click OK.
6-49Configuration Management with Cisco Prime LAN Management Solution 4.2
OL-25941-01
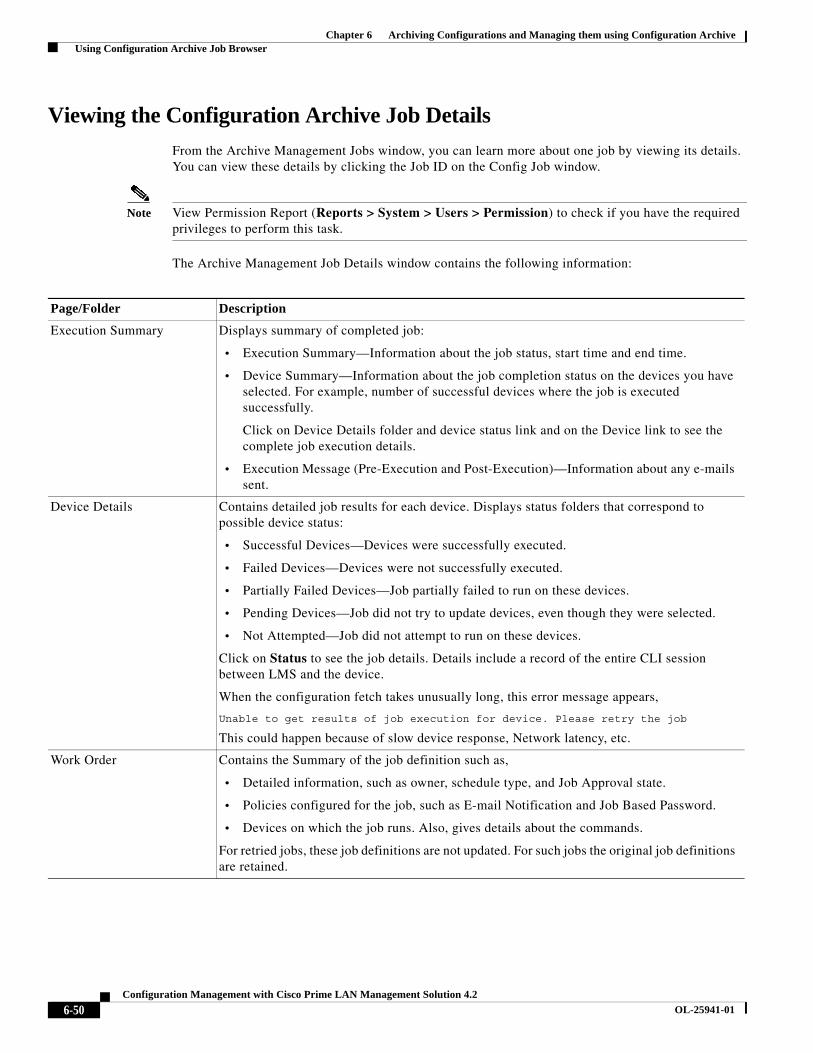
Chapter 6 Archiving Configurations and Managing them using Configuration Archive Using Configuration Archive Job Browser
Viewing the Configuration Archive Job Details
From the Archive Management Jobs window, you can learn more about one job by viewing its details. You can view these details by clicking the Job ID on the Config Job window.
Note View Permission Report (Reports > System > Users > Permission) to check if you have the required privileges to perform this task.
The Archive Management Job Details window contains the following information:
Page/Folder Description
Execution Summary Displays summary of completed job:
• Execution Summary—Information about the job status, start time and end time.
• Device Summary—Information about the job completion status on the devices you have selected. For example, number of successful devices where the job is executed successfully.
Click on Device Details folder and device status link and on the Device link to see the complete job execution details.
• Execution Message (Pre-Execution and Post-Execution)—Information about any e-mails sent.
Device Details Contains detailed job results for each device. Displays status folders that correspond to possible device status:
• Successful Devices—Devices were successfully executed.
• Failed Devices—Devices were not successfully executed.
• Partially Failed Devices—Job partially failed to run on these devices.
• Pending Devices—Job did not try to update devices, even though they were selected.
• Not Attempted—Job did not attempt to run on these devices.
Click on Status to see the job details. Details include a record of the entire CLI session between LMS and the device.
When the configuration fetch takes unusually long, this error message appears,
Unable to get results of job execution for device. Please retry the job
This could happen because of slow device response, Network latency, etc.
Work Order Contains the Summary of the job definition such as,
• Detailed information, such as owner, schedule type, and Job Approval state.
• Policies configured for the job, such as E-mail Notification and Job Based Password.
• Devices on which the job runs. Also, gives details about the commands.
For retried jobs, these job definitions are not updated. For such jobs the original job definitions are retained.
6-50Configuration Management with Cisco Prime LAN Management Solution 4.2
OL-25941-01
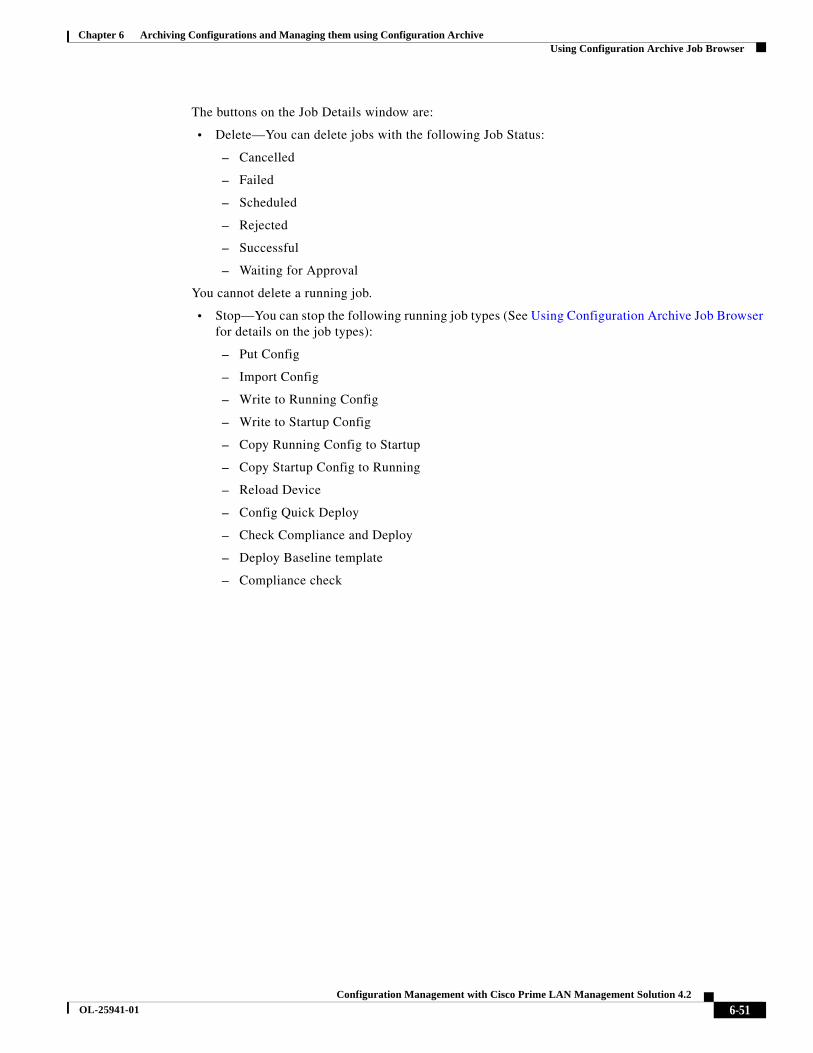
Chapter 6 Archiving Configurations and Managing them using Configuration Archive Using Configuration Archive Job Browser
The buttons on the Job Details window are:
• Delete—You can delete jobs with the following Job Status:
– Cancelled
– Failed
– Scheduled
– Rejected
– Successful
– Waiting for Approval
You cannot delete a running job.
• Stop—You can stop the following running job types (See Using Configuration Archive Job Browser for details on the job types):
– Put Config
– Import Config
– Write to Running Config
– Write to Startup Config
– Copy Running Config to Startup
– Copy Startup Config to Running
– Reload Device
– Config Quick Deploy
– Check Compliance and Deploy
– Deploy Baseline template
– Compliance check
6-51Configuration Management with Cisco Prime LAN Management Solution 4.2
OL-25941-01

Chapter 6 Archiving Configurations and Managing them using Configuration Archive Using Configuration Archive Job Browser
6-52Configuration Management with Cisco Prime LAN Management Solution 4.2
OL-25941-01