Embed Size (px)
Citation preview

Word 2007 - Full manual
CHAPTER 59 TRACKING CHANGES
© Watsonia Publishing Page 673 Chapter 59 - Tracking Changes
In this session you will: gain an understanding of tracking changes
learn how to turn tracking on and off
learn how to set tracking options
learn how to show revisions in balloons
learn how to show revisions inline
learn how to switch between final and revision
learn how to specify what revision marks to show
learn how to display the reviewing pane
learn how to accept revisions
learn how to reject revisions.
If you work on documents that need to undergo a reviewing process, you will find the Microsoft Word Tracking feature indispensible. Word is able to record the editing changes made to a document and then enables you, or someone else, to review these changes which can either be accepted or rejected.
FOCUSIn
WPL_W776

Word 2007 - Full manual
UNDERSTANDING TRACKING CHANGES
© Watsonia Publishing Page 674 Chapter 59 - Tracking Changes
When you are collaborating on a document, it is easy to forget who did what and when. There are tools in Word that enable you to work as part of a team with relative ease (at least with respect to documents!) and one of these tools is Revision Tracking. This feature enables a document to be marked up with revisions, without losing track of the original text, until the revision is dealt with.1
2
What is Revision Tracking?Revision tracking enables you to revise a document in electronic form and then review those changes, either accepting or rejecting them. As the name suggests, revision tracking does not remove the original text from the document initially – it simply marks it and leaves it in place. In this way, you are able to review the changes and decide if you want to keep the change or ignore it.
Why Would I Use Revision Tracking?Revision tracking is a fantastic tool for those who work as part of a team. A document can be written by one individual and then sent to another person to edit. The editor’s revision marks are stored as part of the original document and the writer can then consider each revision and whether to accept or reject it.If you accept a revision, Word will remove the original text and incorporate the revision as a part of the document. If you reject a revision, Word will remove the revision and reinstate the original text.Revision tracking also enables more than one person to edit a document and each person’s revisions can be distinguished from another’s. You are able to display all reviewer’s marks simultaneously or select individual reviewer’s marks to be displayed at any one time.

Word 2007 - Full manual
TURNING TRACKING ON AND OFF
© Watsonia Publishing Page 675 Chapter 59 - Tracking Changes
Word is able to track a number of changes made to a document, including deletions, insertions and even, formatting. To track changes in a document, you must first enable the option. Tracking is controlled by a tool which is toggled on and off. Once the option is activated, you will see the revisions appear on the screen at the point of editing.Try This Yourself:Open
FileBefore starting this exercise you MUST open the file W776
Tracking_1.docx...Click on the Review tab on the ribbon then click on the top half of Track Changes in
the Tracking groupMove the mouse pointer into the document – you will see that Track Changes is highlighted indicating that the option
is on
You can also activate a Tracking indicator in the status bar – this enables you to turn tracking on and off, without
the Review tab...Right-click on the status bar to display the shortcut menu
Note that Track Changes is
On...Select Track Changes then press to hide the menu
An additional button now appears
in the status bar...Click on Track Changes in the status bar – the status changes to
OffClick on Track Changes in the status bar to switch it On
againRepeat steps 3 and 4 to
hide the status bar button
For Your Reference…To turn tracking on and off:
1. Click on the Review tab on the ribbon
2. Click on the top half of Track Changes in the Tracking group
Handy to Know…If you turn on Tracking and then make some changes to that document, the revisions will not be lost if you turn Tracking off – you must accept or reject changes before they are removed.
2
4
3
Word 2007 - Full manual
SETTING TRACKING OPTIONS
© Watsonia Publishing Page 676 Chapter 59 - Tracking Changes
Word is able to track text that has been deleted, inserted, moved or formatted. But can you imagine the confusion on your page if all of the amendments were marked up the same way? And what if you were not interested in marking the formatting changes made to a document? Luckily, Word enables you to set the Tracking options to suit your individual needs.Try This Yourself:Same
FileContinue using the previous file with this exercise, or open the file
W776 Tracking_1.docx...Ensure that the Review tab is active then click on the bottom half of Track
Changes in the Tracking group to
display the menuSelect Change Tracking Options to display the
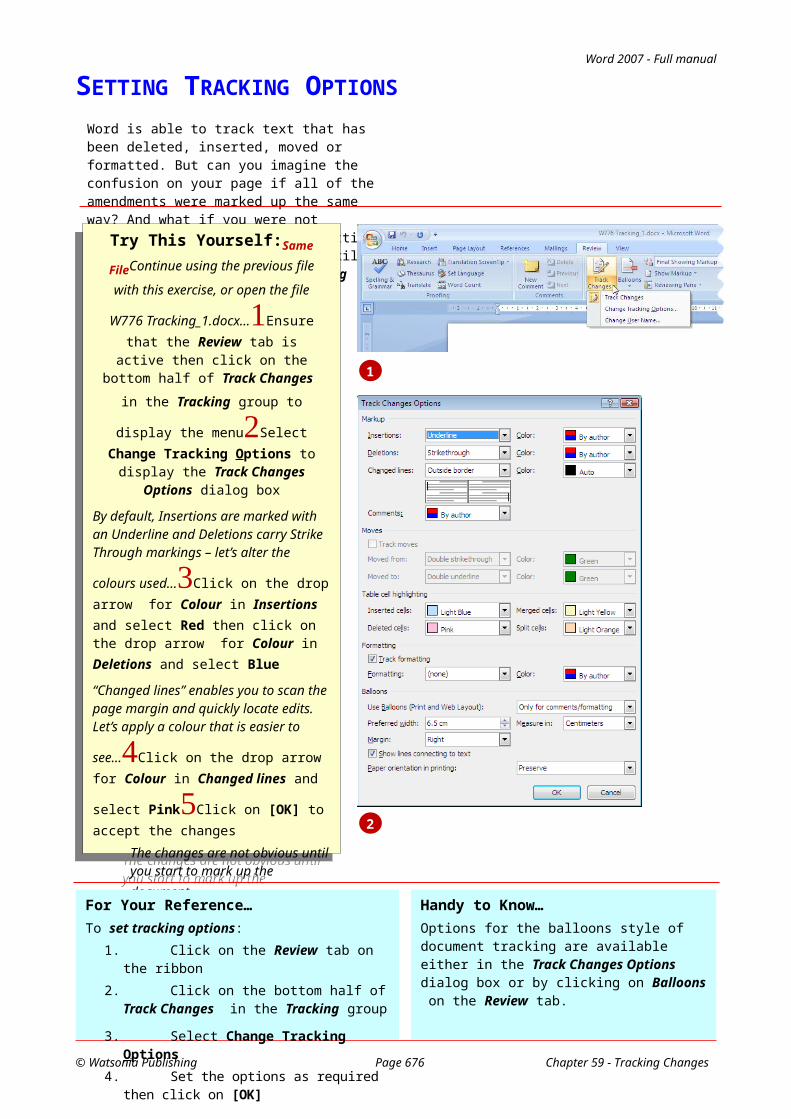
Track Changes Options dialog box
By default, Insertions are marked with an Underline and Deletions carry Strike Through markings – let’s alter the
colours used...Click on the drop arrow for Colour in Insertions and select Red then click on the drop arrow for Colour in Deletions and select Blue“Changed lines” enables you to scan the page margin and quickly locate edits. Let’s apply a colour that is easier to
see...Click on the drop arrow for Colour in Changed lines and select
PinkClick on [OK] to accept the changes
The changes are not obvious until you start to mark up the document
For Your Reference…To set tracking options:
1. Click on the Review tab on the ribbon
2. Click on the bottom half of Track Changes in the Tracking group
3. Select Change Tracking Options4. Set the options as required then click
on [OK]
Handy to Know…Options for the balloons style of document tracking are available either in the Track Changes Options dialog box or by clicking on Balloons on the Review tab.
1
2

Word 2007 - Full manual
SHOWING REVISIONS IN BALLOONS
© Watsonia Publishing Page 677 Chapter 59 - Tracking Changes
There are two ways that you can display revisions: you can either display them inline or in balloons. A balloon is simply a small box displayed in an area beside the right margin and connected to the revised text with a line. Text inside the box indicates the type of edit made (e.g. deletion, insertion etc) and the actual text that was edited.Try This Yourself:Same
FileContinue using the previous file with this exercise, or open the file
W776 Tracking_2.docx. Ensure that the Markup colours are set as
follows: Insertions - Red; Deletions - Blue; Changed lines -
Pink...Ensure that the Review tab is active then click on Balloons in
the Tracking group and select Show Revisions in Balloons
This will activate the option and place a tick alongside it. Now let’s make a
revision...Double-click on the word and in the heading to select it, then type &The text will be replaced and a balloon details the changes made – in this way you can keep track of the changed,
and the original, text...Click at the end of the first paragraph to position the insertion point, press then type the following
The inserted text is underlined – a balloon is not inserted in this instance, as the original text was not amended. Notice also the pink vertical lines marking the position of the revisions
For Your Reference…To show revisions in balloons:
1. Click on the Review tab on the ribbon
2. Click on Balloons in the Tracking group
3. Select Show Revisions in Balloons
Handy to Know…When you select to use balloons for tracking revisions, not all revisions will have an associated balloon – they will only appear where original text is revised, enabling you to compare the changes made. That is, inserted text will not display a balloon, as it does not alter any original text.
2
3
1
Note: A section was cut from these images to offer a clearer impression of the revisions and balloon.

Word 2007 - Full manual
SHOWING REVISIONS INLINE
© Watsonia Publishing Page 678 Chapter 59 - Tracking Changes
Rather than displaying your document revisions in balloons that appear alongside the right margin, you can alternatively display the revisions inline. In this case, the revisions will appear within the document text and the options set in the Tracking Changes Options dialog box come into effect to indicate where original document text has been altered.Try This Yourself:Same
FileContinue using the previous file with this exercise, or open the file
W776 Tracking_3.docx...Ensure that the Review tab is active, then click on Balloons in the Tracking
group and select Show All Revisions Inline
Now that Inline is selected, you will see that the balloon disappears and the revised text is shown in the document in its original position (crossed out, if it has been deleted). Let’s make some
more changes...Move to the end of the word enters in the third paragraph, as shown
This should read: entering...Press to delete the letter s then type ingThe revisions will be marked in line
with the original text...Select the
bullet point ShadingPress to delete it
The revised text appears crossed out in blue, as per the settings in the Tracking Changes Options dialog box
For Your Reference…To show revisions inline:
1. Click on the Review tab on the ribbon
2. Click on Balloons in the Tracking group
3. Select Show All Revisions Inline
Handy to Know…By using the ribbon to change the way you will display document revisions (i.e. in balloons or inline etc), you automatically change the corresponding Balloon option in the Tracking Changes Options dialog box.
1
2
3
5

Word 2007 - Full manual
SWITCHING BETWEEN FINAL AND REVISION
© Watsonia Publishing Page 679 Chapter 59 - Tracking Changes
When viewing a document that contains revision marks, it can become quite cluttered and difficult to see the document text. Word overcomes this by enabling you to switch the revision marks on and off. This is also particularly useful when you are not the first person to review the document and do not want your thoughts to be compromised by what other reviewers have marked up.
Try This Yourself:Same
FileContinue using the previous file with this exercise, or open the file
W776 Tracking_4.docx...Ensure that the Review tab is active then
click on the drop arrow for Display for Review in the Tracking group to
display the menu
You will see that Final Showing Markup is currently
highlighted...Click on Final to switch to this option
The revision marks are hidden from view, but further revisions that you
make will still be marked up...Click at the end of the heading High Efficiency Motors to position the
insertion pointPress then type
(HEM)Select the text High efficiency motors in the next line and type HEMs to replace the text
Let’s turn revision marks back
on...Click on the drop arrow for Display for Review in the Tracking group and click on Final Showing Markup to show the revisions
For Your Reference…To switch between final and revision:
1. Click on the Review tab on the ribbon
2. Click on the drop arrow for Display for Review in the Tracking group
3. Click on Final to hide revisions OR click on Final Showing Markup to show revisions
Handy to Know…You can choose to display the original document without revisions to make it easier to revise a document that has another author’s revisions already marked.
4
5
6

Word 2007 - Full manual
SPECIFYING WHAT TO SHOW
© Watsonia Publishing Page 680 Chapter 59 - Tracking Changes
There are several types of revisions marks that you can apply to a document. These marks indicate insertions, deletions and formatting changes and it is also possible for a document to have multiple reviewers; each identified by their initials. Word enables you to specify what revisions you want to show, thereby customising the level of detail on the screen.Try This Yourself:Same
FileContinue using the previous file with this exercise, or open the file
W776 Tracking_5.docx...Select the heading Air Conditioning then press the keyboard shortcut + to
apply italic formatting
A pink vertical line appears to the left to mark where the revision was made – let’s now hide formatting
revisions...Ensure that the Review tab is active then click on Show Markup in the Tracking group to display the list of options
As you can see, all of the options are currently ticked and therefore on
display...Select Formatting
This option is now toggled off and the pink line beside the heading
disappears...Repeat steps 2 and 3 until Formatting appears with a tick
You can also show and hide
other revisions...Repeat steps 2 and 3 to first hide and then show the marks for Insertions and Deletions
For Your Reference…To specify what to show:
1. Click on the Review tab on the ribbon
2. Click on Show Markup in the Tracking group and select an option from the list to reverse the current setting
3. Repeat for each required mark up option
Handy to Know…Any number of authors can mark up a document using the Tracking options – each being distinguished by their initials. To review the mark ups of only certain authors, click on Show Markup in the Tracking group, point to Reviewers and select the names from the list.
1
3
5

Word 2007 - Full manual
DISPLAYING THE REVIEWING PANE
© Watsonia Publishing Page 681 Chapter 59 - Tracking Changes
The Reviewing pane is a narrow, separate area of the screen that can be displayed either vertically or horizontally, and summarises the revisions made to a document. Each revision is categorised according to the area of the document in which it was made (e.g. Main Document, Header & footer, Footnote etc) and a count of each revision type is also displayed.Try This Yourself:Same
FileContinue using the previous file with this exercise, or open the file
W776 Tracking_6.docx...Ensure that the Review tab is active then
click on the drop arrow for Reviewing Pane in the Tracking
group
There are two placement options for
the pane...Select Reviewing Pane Vertical to display the pane on the left side of the screen
The revisions for the current document are summarised in
the pane...Click on Reviewing Pane in the Tracking group to hide the
paneRepeat step 1 and select Reviewing Pane Horizontal to display the pane at the bottom of the
windowRepeat step 3 to
hide the pane once more
For Your Reference…To show and hide the Reviewing pane:
1. Click on the Review tab on the ribbon
2. Click on the drop arrow for Reviewing Pane in the Tracking group
3. Select an option from the list
Handy to Know…To hide the Reviewing pane, you can also click on close in the top, right corner of the pane.
Click on the drop arrow for Reviewing Pane to change the pane’s position, but click on the tool’s text to hide and show the pane.
1
2

Word 2007 - Full manual
ACCEPTING CHANGES
© Watsonia Publishing Page 682 Chapter 59 - Tracking Changes
One obvious benefit of tracking changes is that you can browse the revisions and choose to either accept or reject those changes. Once a revision is accepted, it is incorporated into the document and the existing revision marks are removed, making the change permanent upon saving the document. After accepting a revision, Word will, by default, move to the next revision.Try This Yourself:Same
FileContinue using the previous file with this exercise, or open
the file W776
Tracking_6.docx...Click on the revised text the following to
position the insertion point within the text
This indicates to Word which revision you want to
accept...Ensure that the Review tab is active then click on the bottom half of Accept in the Changes group
This will display the menu of
options...Select Accept and Move to Next
Word will make the change, indicated by the revision and then move to the next
revision...Repeat steps 2 and 3 for the revisions up to and including (HEM)
For Your Reference…To accept a revision:
1. Click on the revision2. Click on the Review tab on the
ribbon3. Click on the bottom half of Accept
in the Changes group4. Select an option
Handy to Know…When accepting document revisions, although the bottom half of Accept displays a number of accept options, the default option if you simply click on the top half is Accept and Move to Next.
1
3
2

Word 2007 - Full manual
REJECTING CHANGES
© Watsonia Publishing Page 683 Chapter 59 - Tracking Changes
More often than not, you will probably be inclined to accept the changes suggested by reviewers. However, there will no doubt be plenty of opportunity to also reject some changes. Upon rejecting a change, the original text is restored and the corresponding revision marks are removed from the document. These changes will be made permanent upon saving the document.Try This Yourself:Same
FileContinue using the previous file with this exercise, or open the file
W776 Tracking_7.docx...Press + to move the insertion point to the top
of the documentClick on the revised text and to reposition the
insertion point
This indicates to Word which revisions
you want to reject...Ensure that the Review tab is active then click on the bottom half of Reject in the Changes group
This will display the menu of
options...Select Reject and Move to Next
Word will reject the change indicated by the revision (i.e. the deletion) by reinstating the text, then remove the revision marks and move to the next
one...Repeat steps 3 and 4 until a message box is displayed informing you that there are no
more revisionsClick on [OK] to close the message box and return to the document
For Your Reference…To reject a revision:
1. Click on the revision2. Click on the Review tab on the
ribbon3. Click on the bottom half of Reject in
the Changes group4. Select an option
Handy to Know…You can also quickly accept or reject a revision, by right-clicking on the revision to display the shortcut menu, and then selecting Accept or Reject.Select a portion of the document containing multiple revisions, then right-click and select Accept or Reject to accept or reject all.
2
3
4
5

Word 2007 - Full manual
NOTES:
© Watsonia Publishing Page 684 Chapter 59 - Tracking Changes
1
4