Embed Size (px)
Citation preview
Chapter 5: Operating SystemsChapter 5: Operating Systems
Sabbir M SalehLecturer
Department of Computer Science & EngineeringUniversity of South Asia
Computer Fundamentals &
Programming Technique
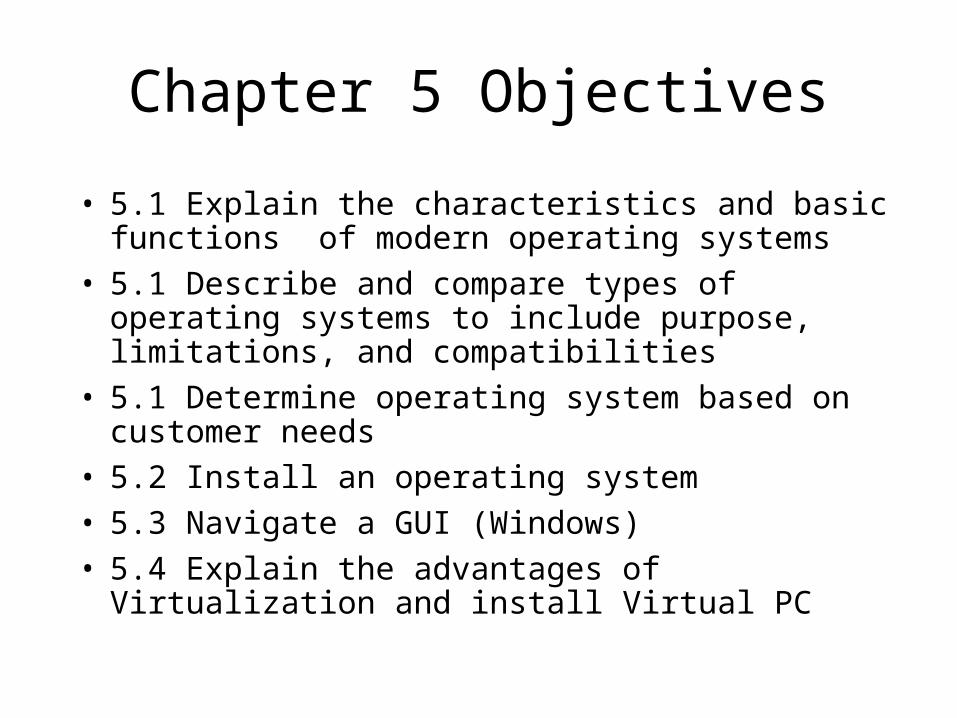
Chapter 5 Objectives
• 5.1 Explain the characteristics and basic functions of modern operating systems
• 5.1 Describe and compare types of operating systems to include purpose, limitations, and compatibilities
• 5.1 Determine operating system based on customer needs
• 5.2 Install an operating system• 5.3 Navigate a GUI (Windows)• 5.4 Explain the advantages of Virtualization and
install Virtual PC
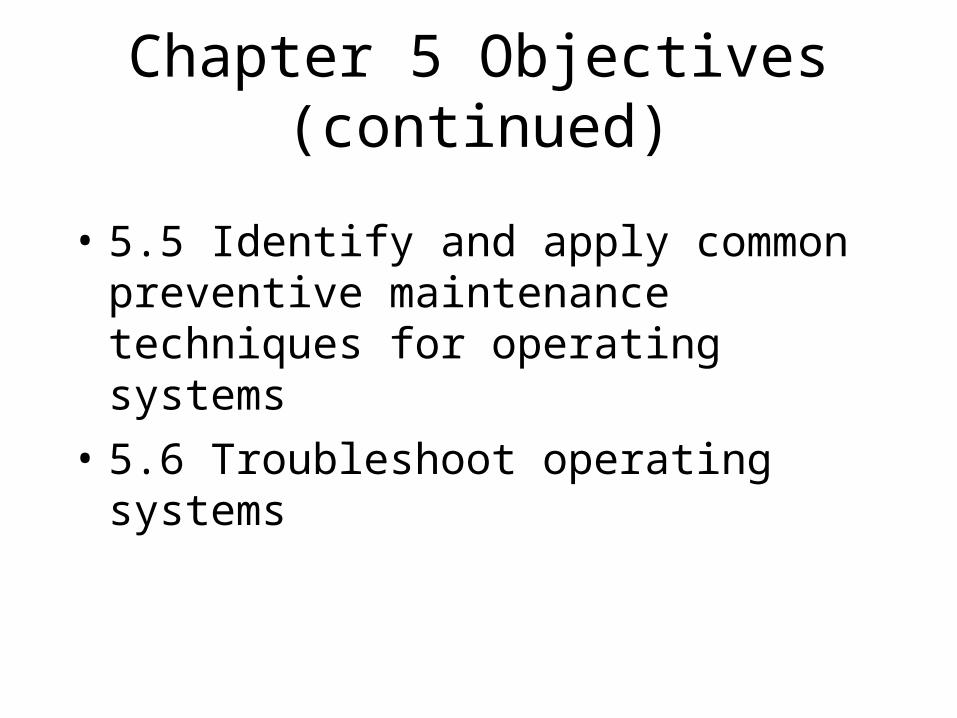
Chapter 5 Objectives (continued)
• 5.5 Identify and apply common preventive maintenance techniques for operating systems
• 5.6 Troubleshoot operating systems
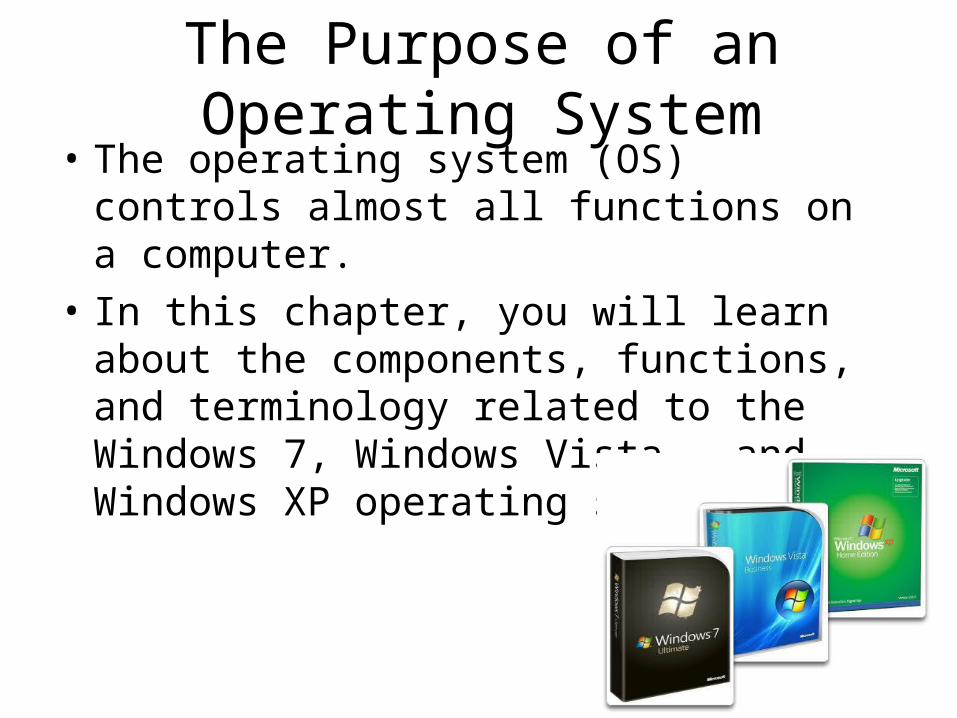
The Purpose of an Operating System• The operating system (OS) controls almost
all functions on a computer.• In this chapter, you will learn about the
components, functions, and terminology related to the Windows 7, Windows Vista , and Windows XP operating systems.
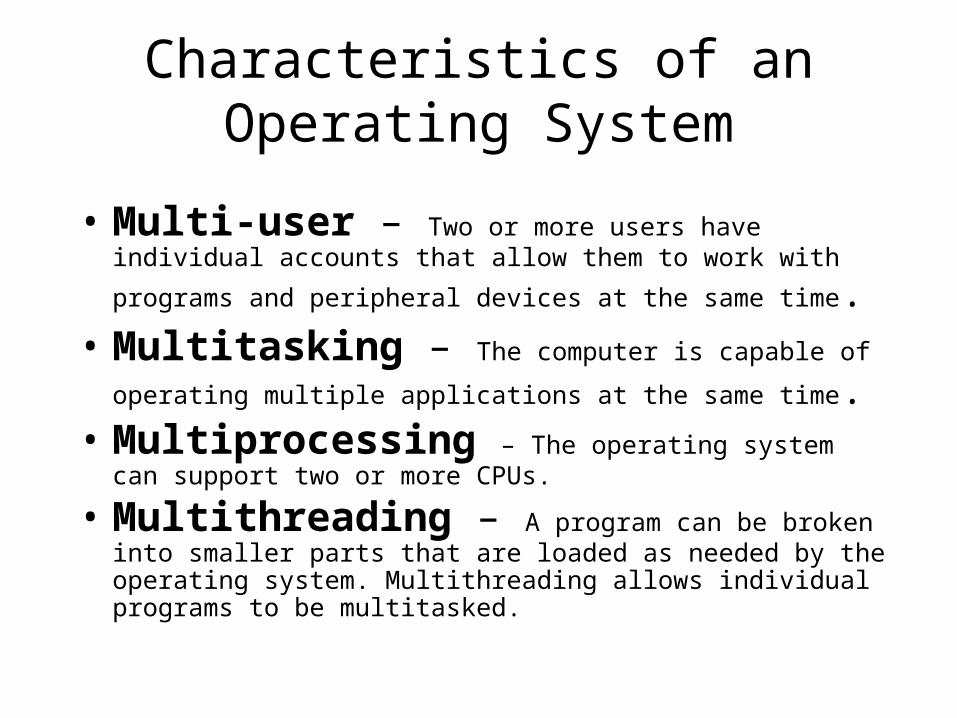
Characteristics of an Operating System
• Multi-user – Two or more users have individual accounts that allow them to work with programs and peripheral devices at the same
time. • Multitasking – The computer is capable of operating multiple
applications at the same time. • Multiprocessing – The operating system can support two or
more CPUs.
• Multithreading – A program can be broken into smaller parts that are loaded as needed by the operating system. Multithreading allows individual programs to be multitasked.

Basic Function of an Operating System• All computers rely on an operating system
(OS) to provide the interface for interaction between users, applications, and hardware.
• The operating system boots the computer and manages the file system.
• The operating system has four main roles:• Control hardware access
• Manage files and folders
• Provide user interface
• Manage applications

Processor Architecture
• 32-bit Windows Operating System and x86 Processor Architecture• Capable of addressing 4 GB of RAM
• x86 uses a Complex Instruction Set Computer (CISC)
• x86 processors use fewer registers than x64 processors
• 64-bit Windows Operating System and x64 Processor Architecture• Capable of addressing 128+ GB of RAM
• Enhanced performance for memory management
• Additional security features
• x64 architecture is backward compatible with x86
• Process much more complex instructions at a much higher rate

32-bit and 64-bit Compatibility in Windows OS
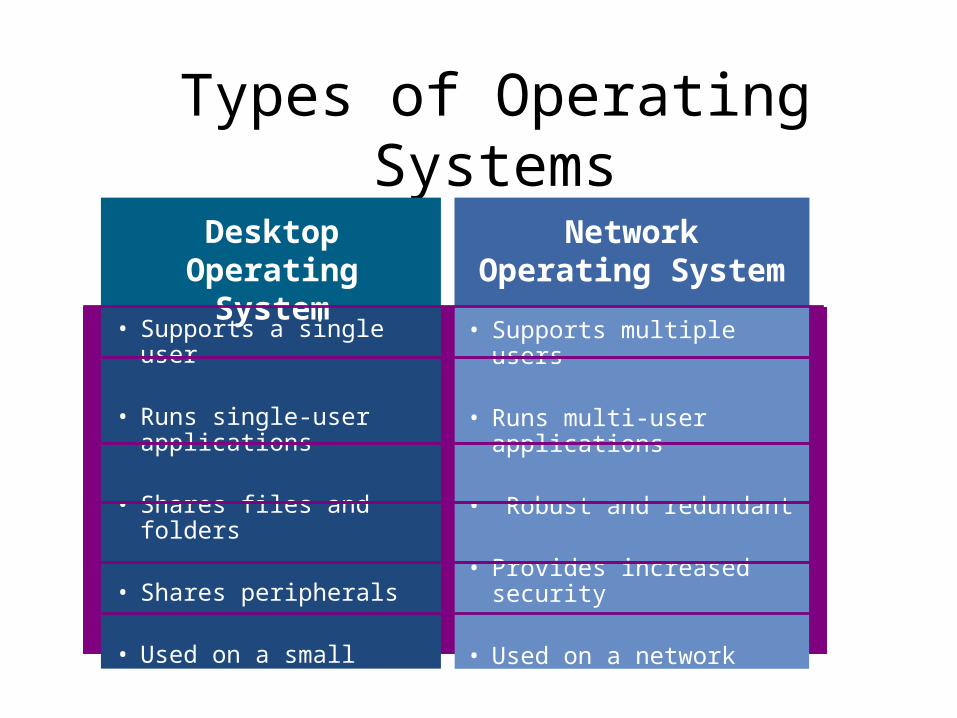
Types of Operating Systems
Desktop Operating System
• Supports a single user
• Runs single-user applications
• Shares files and folders
• Shares peripherals
• Used on a small network
• Supports multiple users
• Runs multi-user applications
• Robust and redundant
• Provides increased security
• Used on a network
Network Operating System

Types of Operating Systems
• Desktop operating systems:• Microsoft Windows: Windows 7
• Macintosh: Mac OS X
• Linux
• UNIX
• A desktop OS has the following characteristics: • Supports a single user
• Runs single-user applications
• Shares files and folders on a small network with limited security

Network Operating Systems (NOS)
• Common NOS include:• Microsoft Windows Server
• Linux
• UNIX
• Mac OS X Server
• NOS has the following characteristics:• Supports multiple users
• Runs multi-user applications
• Robust and redundant
• Provides increased security compared to desktop operating systems

Customer Requirements for an OS
• To select the proper operating system for a customer first determine:• Budget constraints• Compatibility with current hardware• Compatibility with new hardware• How the computers will be used• Compatibility with existing applications• Types of new applications to be used

Identify Minimum Hardware Requirements
• Customer may need to upgrade or purchase additional hardware to support the required applications and OS.
• A cost analysis will indicate if purchasing new equipment is a better idea than upgrading.
• Possible hardware upgrades:•RAM capacity•Hard drive size•CPU•Video card memory and speed•Motherboard
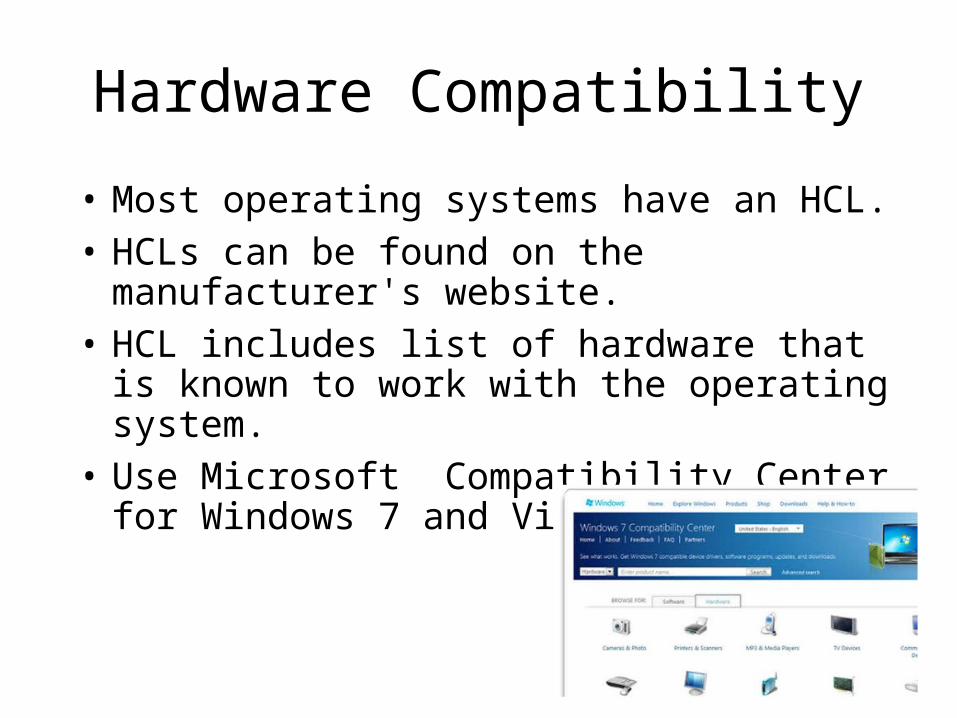
Hardware Compatibility
• Most operating systems have an HCL.• HCLs can be found on the manufacturer's
website.• HCL includes list of hardware that is known to
work with the operating system.• Use Microsoft Compatibility Center for
Windows 7 and Vista.

Operating System Upgrades
• Operating systems must be upgraded periodically.• To remain compatible with the latest hardware and software.
• Because support for older OS is eventually withdrawn.
• Ensure that the new OS is compatible with the computer.• Use Microsoft Upgrade Advisor to scan the system for incompatibility
issues before upgrading. Upgrade Advisor is free and downloadable from the Microsoft Windows website.
• Backup all data prior to beginning the upgrade.

Data Migration
One of the following tools can be used to migrate data and settings:
• User State Migration Tool migrates all user files and settings to the new OS.
• Windows Easy Transfer migrates personal files and settings when switching from an old computer to new.Note: Windows Easy Transfer replaced the Windows XP File and Settings Transfer Wizard.
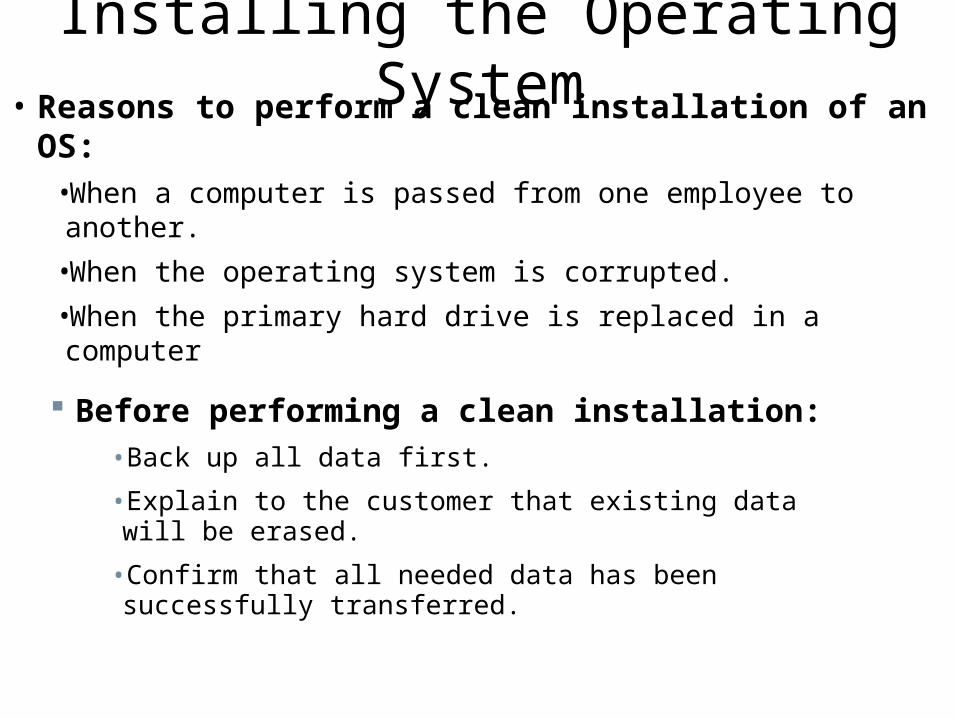
Installing the Operating System• Reasons to perform a clean installation of an OS:
•When a computer is passed from one employee to another.
•When the operating system is corrupted.•When the primary hard drive is replaced in a computer
Before performing a clean installation:•Back up all data first.
•Explain to the customer that existing data will be erased.
•Confirm that all needed data has been successfully transferred.

Hard Drive Setup Procedures
• Operating system setup methods:• Install an OS over a network from a server.• Install from OS files stored on CDs or DVDs.
• Partitioning and Formatting:• Hard drive must be logically divided (partitioned).
• File system must be created on the hard drive.
• During the installation phase, most operating systems will automatically partition and format the hard drive.

Hard Drive Formatting
• The first portion of the installation process deals with formatting and partitioning the hard drive.
• The second portion prepares the disk to accept the file system.
• The file system provides the directory structure that organizes the user's operating system, application, configuration, and data files.
• Examples of file systems:•The New Technology File System (NTFS) - Supports partition sizes up to 16 exabytes
•The FAT32 file system - Supports partition sizes up to 2 TB. Used by Windows XP and earlier OS versions.

Install the Operating System
• When a computer boots up with the Windows installation CD, the Windows 7 installation process starts with three options: • Install now - Sets up and installs the Windows 7 OS. • What to know before installing Windows - Opens Help.• Repair your computer - Opens the System Recovery Options.
• Under Install now three options are available: • Upgrade - Upgrades Windows but keeps your current files, settings, and
programs. You can use this option to repair an installation.• Custom (advanced) - Installs a clean copy of Windows in your choice of
location and allows you to change disks and partitions. It is also known as a clean installation.
• Quit - Exits Setup.

Account Creation
• Windows 7 has three types of user accounts: Administrator, Standard, and Guest.
• The Administrator Account must be created when Windows 7 is installed.
• To create or remove a user account in Windows 7 use the following path :
– Start > Control Panel > User Accounts > Add or remove user accounts

Complete the Installation
• When Windows 7 installation completes:
•Computer will reboot•Prompts to create user account•Register Windows 7 and verify that you are using a legal copy of the OS
•Verification enables you to download patches and service packs
• Use Microsoft Update Manager to scan for new software.
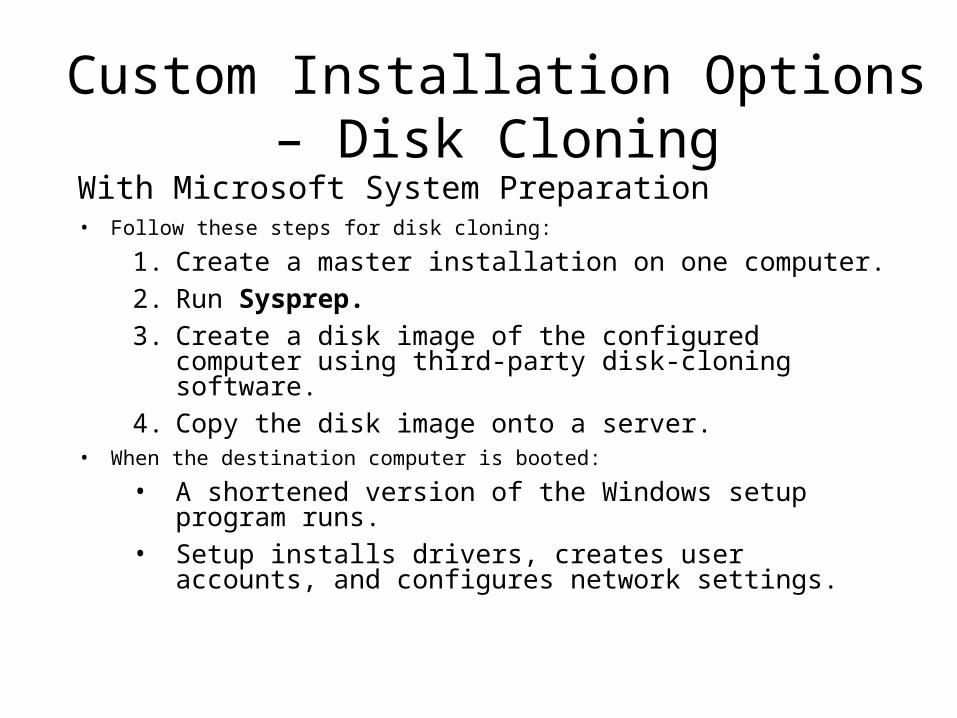
Custom Installation Options – Disk Cloning
• Follow these steps for disk cloning:
1. Create a master installation on one computer.2. Run Sysprep.3. Create a disk image of the configured computer using third-
party disk-cloning software.4. Copy the disk image onto a server.
• When the destination computer is booted:
• A shortened version of the Windows setup program runs.• Setup installs drivers, creates user accounts, and configures
network settings.
With Microsoft System Preparation

Custom Installation Options• Windows 7 has several different types of custom installations.
• Network Installation - Requires all setup files to be copied to a network server.
• Preboot Execution Environment (PXE) Installation - Uses a PXE boot program and a client’s network card to access the setup files.
• Unattended Installation - Uses a network distribution point that uses an answer file.
• Image-based Installation - Uses Sysprep and a disk-imaging program, that copies an image of the OS directly to the hard drive with no user intervention.
• Remote Installation - Downloads the installation across the network.

System Recovery Options
• Repair Disc- For Windows 7. Use the system repair disc to boot the computer
• System Image Recovery – For Windows 7. It allows users to back up the contents of their hard drive, including personal files and settings.
• Factory Recovery Partition – Some computers with Windows 7 preinstalled from the factory contain a hidden recovery partition with an image of the bootable partition.
• Automated System Recovery (Windows XP Professional only) – The ASR is a backup of the system state, services, and OS components. Used with Windows installation disc to recover computer.
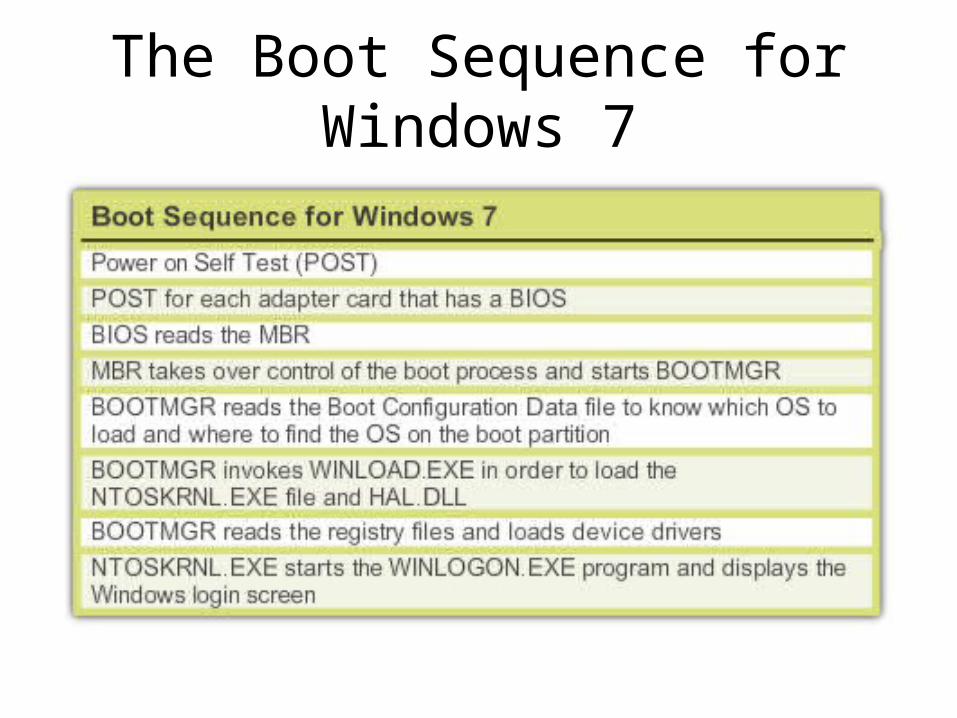
The Boot Sequence for Windows 7

Startup Modes
Pressing the F8 key during the boot process opens the Windows Advanced Startup Options menu, which allows you to select how to boot Windows.
• Safe Mode – Starts Windows but only loads drivers for basic components, such as the keyboard and display.
• Safe Mode with Networking Support – Starts Windows identically to Safe Mode and also loads the drivers for network components.
• Safe Mode with Command Prompt – Starts Windows and loads the command prompt instead of the GUI interface.
• Last Known Good Configuration – Enables a user to load the configurations settings of Windows that was used the last time that Windows successfully started. It does this by accessing a copy of the registry that is created for this purpose.
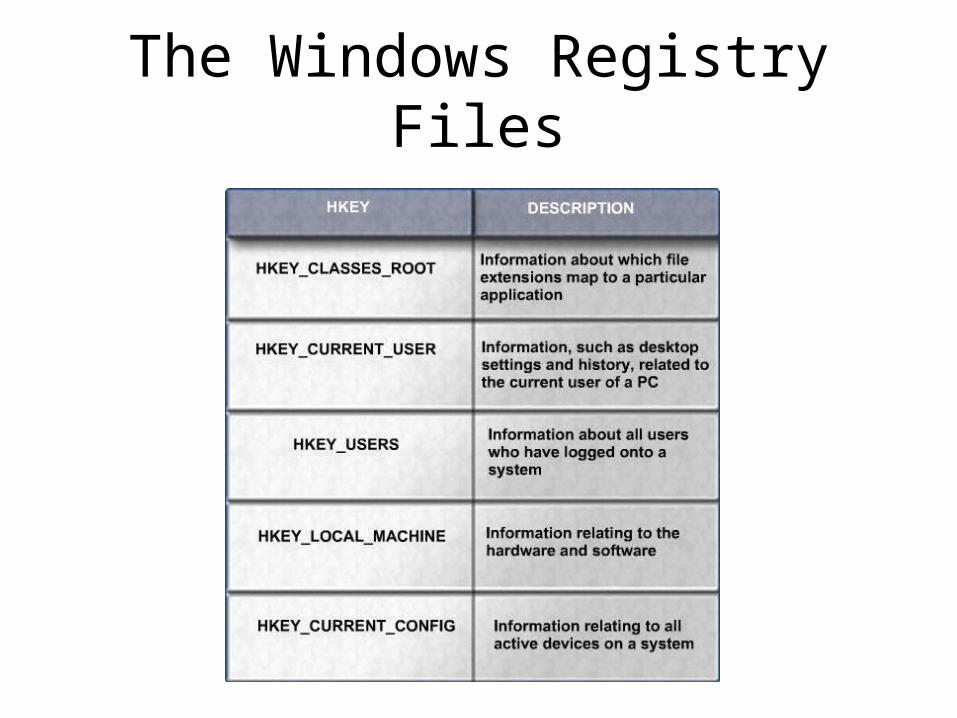
The Windows Registry Files
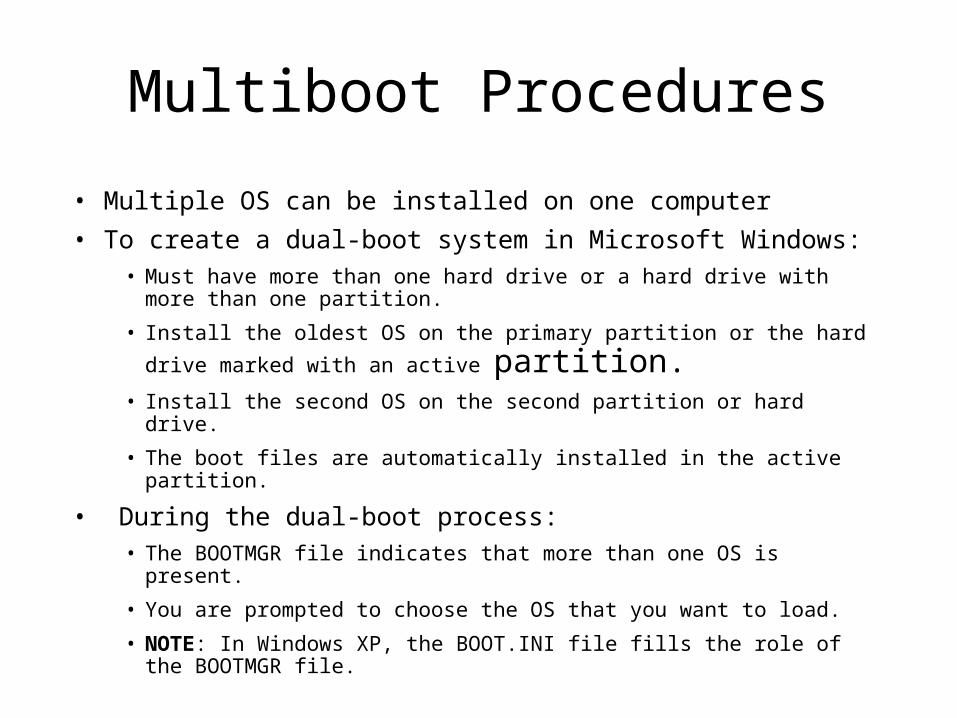
Multiboot Procedures
• Multiple OS can be installed on one computer• To create a dual-boot system in Microsoft Windows:
• Must have more than one hard drive or a hard drive with more than one partition.
• Install the oldest OS on the primary partition or the hard drive marked
with an active partition.• Install the second OS on the second partition or hard drive.
• The boot files are automatically installed in the active partition.
• During the dual-boot process:• The BOOTMGR file indicates that more than one OS is present.
• You are prompted to choose the OS that you want to load.
• NOTE: In Windows XP, the BOOT.INI file fills the role of the BOOTMGR file.
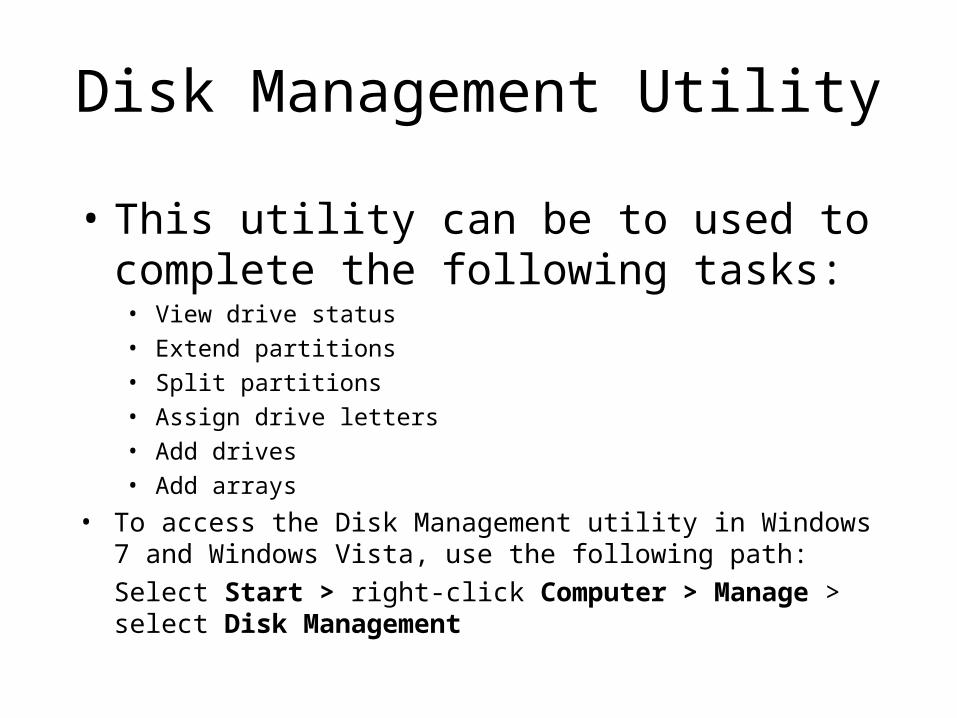
Disk Management Utility
• This utility can be to used to complete the following tasks:• View drive status• Extend partitions• Split partitions• Assign drive letters• Add drives • Add arrays
• To access the Disk Management utility in Windows 7 and Windows Vista, use the following path:Select Start > right-click Computer > Manage > select Disk Management

Directory Structures
• The root level of the Windows directory structure, the partition, is usually labeled drive C.• Contains a set of standardized directories, called folders,
for the operating system, applications, configuration information, and data files.
• Directories may contain subdirectories. Subdirectories are commonly called subfolders.
• Drive Mapping - letters are used to name physical or logical drives.
• Mounting a Volume - mapping a drive to an empty folder on a volume. Mounted drives are assigned drive paths instead of letters.

File Extensions and Attributes• Windows file system naming conventions:
•Maximum of 255 characters may be used.•Characters such as a period (.) or a slash (\ /) are not allowed.•An extension of three or four letters is added to the filename to identify the file type.
•Filenames are not case sensitive.• Windows filename extension examples:
•.docx- Microsoft Word•.txt - ASCII text only•.jpg - graphics format•.pptx - Microsoft PowerPoint•.zip - compression format
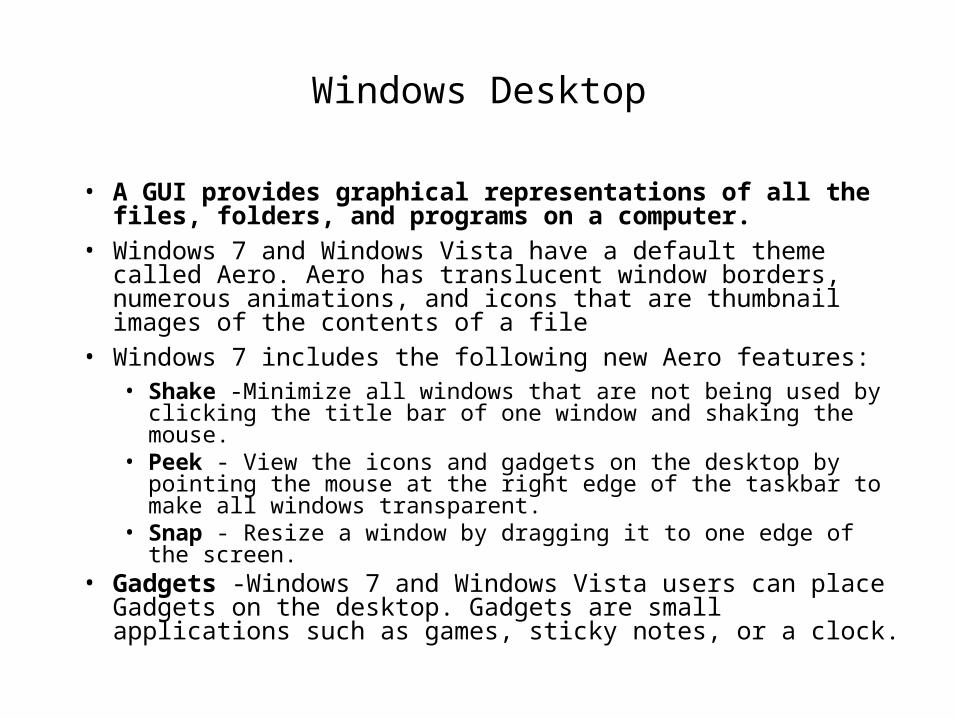
Windows Desktop
• A GUI provides graphical representations of all the files, folders, and programs on a computer.
• Windows 7 and Windows Vista have a default theme called Aero. Aero has translucent window borders, numerous animations, and icons that are thumbnail images of the contents of a file
• Windows 7 includes the following new Aero features:• Shake -Minimize all windows that are not being used by clicking the
title bar of one window and shaking the mouse. • Peek - View the icons and gadgets on the desktop by pointing the
mouse at the right edge of the taskbar to make all windows transparent.
• Snap - Resize a window by dragging it to one edge of the screen. • Gadgets -Windows 7 and Windows Vista users can place Gadgets
on the desktop. Gadgets are small applications such as games, sticky notes, or a clock.
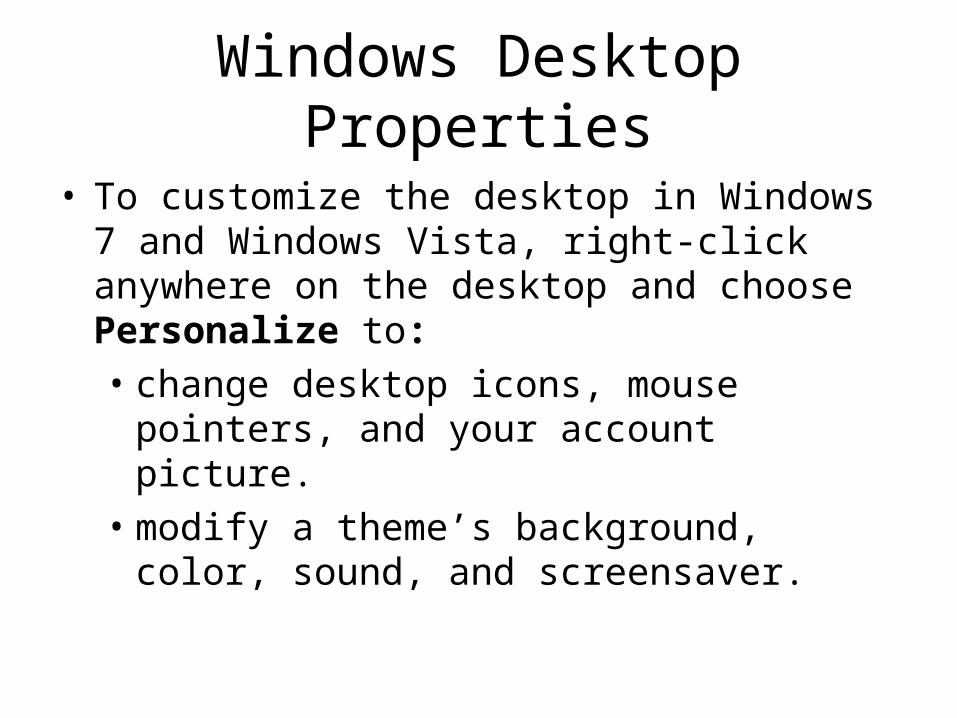
Windows Desktop Properties
• To customize the desktop in Windows 7 and Windows Vista, right-click anywhere on the desktop and choose Personalize to:• change desktop icons, mouse pointers, and your
account picture. • modify a theme’s background, color, sound, and
screensaver.
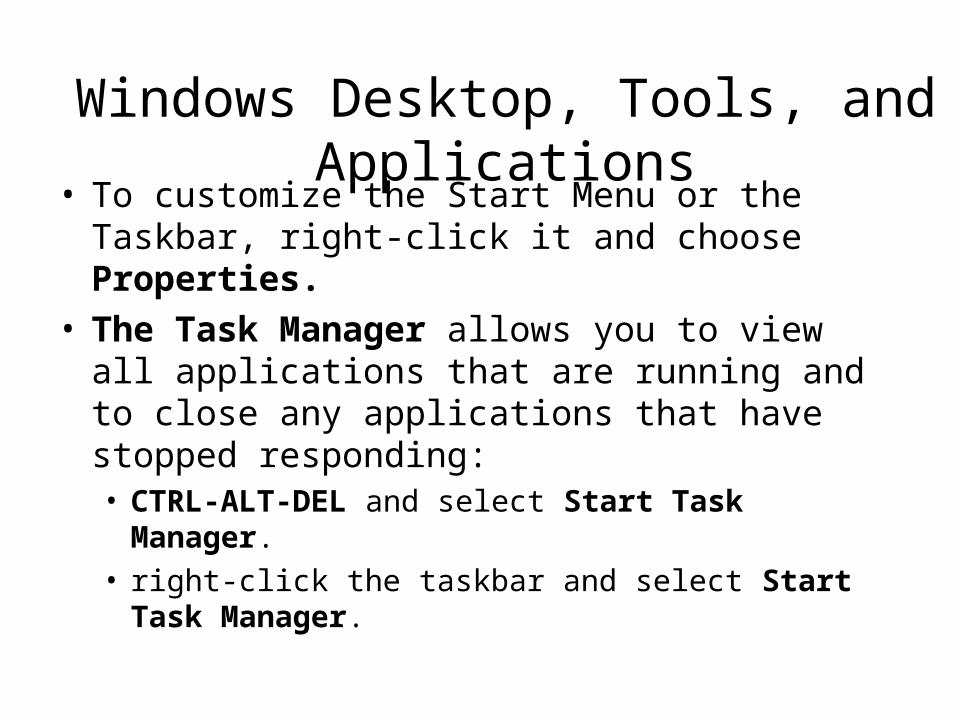
Windows Desktop, Tools, and Applications
• To customize the Start Menu or the Taskbar, right-click it and choose Properties.
• The Task Manager allows you to view all applications that are running and to close any applications that have stopped responding:• CTRL-ALT-DEL and select Start Task Manager.• right-click the taskbar and select Start Task Manager.

Computer and Windows Explorer
• Computer allows access to the various installed drives (My Computer in Windows XP)
• Windows Explorer - used to navigate the file system includes:• Search box - Access previous searches. Filter search results.
• New folder button - Create new folders with one click.• Arrange by - Organize items easily according to different criteria.• Preview pane button - Turn the preview pane on or off.
• Applications can be launched in several ways:• Click the application on the Start menu or Taskbar.
• Double-click the application shortcut icon on the desktop.
• Double-click the application executable on the desktop or in Windows Explorer.
• Launch the application from the Run window or command line.
Windows 7 Libraries
• Allows for easy organization of content from storage devices on local computer and network.
• Are virtual folders that present content from different locations within the same view.
• Include four default Libraries - Documents, Music, Pictures, and Videos.
• To add a file to a library, right-click it, select Include in library, and then choose which library to add the item.
• To create a new library, open a folder and select Include in Library > Create new library

Control Panel Utilities
• System and Security - To configure system and security settings• Network and Internet - To configure network connection types• Hardware and Sound - To configure devices connected to the computer and
settings for sound• Programs - To remove, change, and repair applications• User Accounts and Family Safety - To create and remove user accounts and
set up parental controls• Appearance and Personalization - To control the look and feel of the
Windows GUI• Clock, Language, and Region - To specify location and language• Ease of Access - To configure Windows for vision, hearing, and mobility needs

User Accounts
• User Accounts Utility:• Create a user account.• Manage password, change picture, change account
name and type, manage another account, and change User Account Control (UAC) settings.
• Start > Control Panel> select User Accounts
• User Account Control (UAC):• Monitors programs on a computer and warns users
when an action might present a threat to the system.

Internet Options
• To access Internet Options select Start > Control Panel > Internet Options

Action Center
• Used to configure security settings in Windows 7 and Vista.
• Select Start > Control Panel > Action Center.

Windows Firewall
• The Windows Firewall Utility implements a security policy by adjusting the following settings:• Allow a program or feature through Windows Firewall• Change notification settings• Turn Windows Firewall on or off• Restore defaults• Advanced settings
• Start > Control Panel > Windows Firewall.
The System Utility• View basic system information, access tools and configure advanced
settings including:• Computer Name -View or modify the name and workgroup settings for a
computer, as well as change the domain or workgroup.• Hardware - Access the Device Manager or adjust the device installation
settings.• Advanced -Configure settings for performance, user profiles, startup, and
recovery.• System Protection - Access System restore and configure protection
settings.• Remote -Adjust settings for Remote Assistance and Remote Desktop.
• Start > Control Panel > System
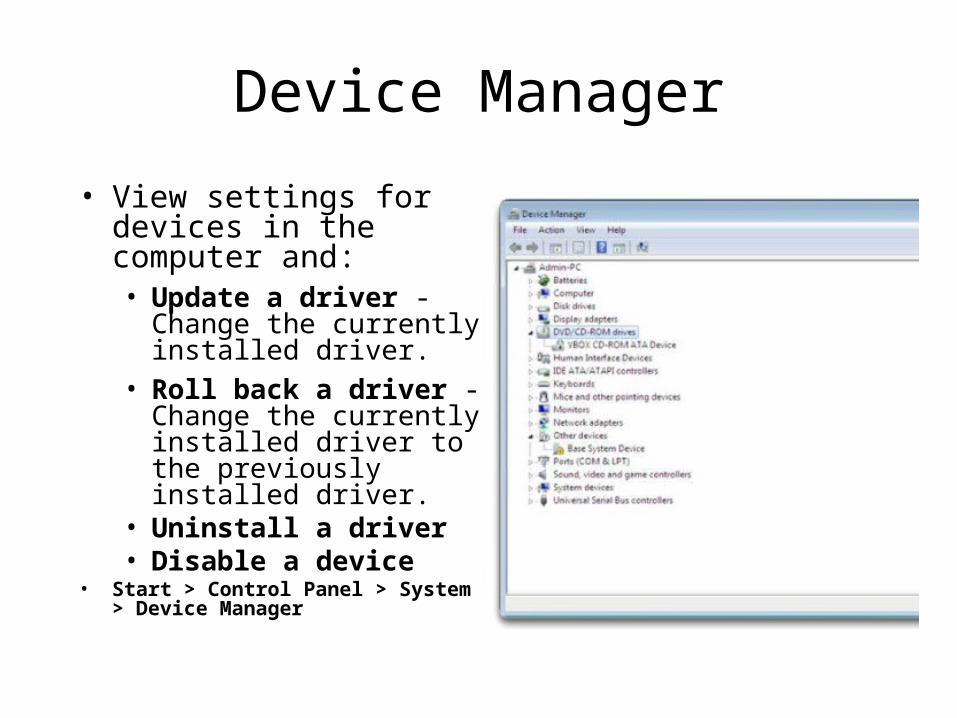
Device Manager
• View settings for devices in the computer and:• Update a driver - Change
the currently installed driver.
• Roll back a driver - Change the currently installed driver to the previously installed driver.
• Uninstall a driver • Disable a device
• Start > Control Panel > System > Device Manager
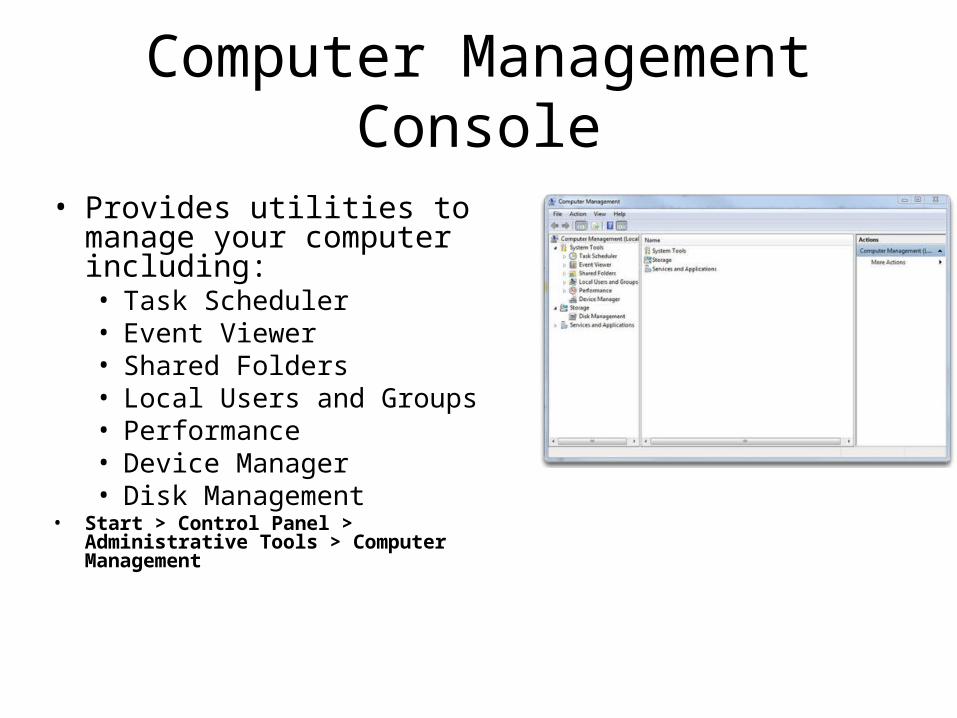
Computer Management Console
• Provides utilities to manage your computer including:• Task Scheduler• Event Viewer• Shared Folders• Local Users and Groups• Performance• Device Manager• Disk Management
• Start > Control Panel > Administrative Tools > Computer Management
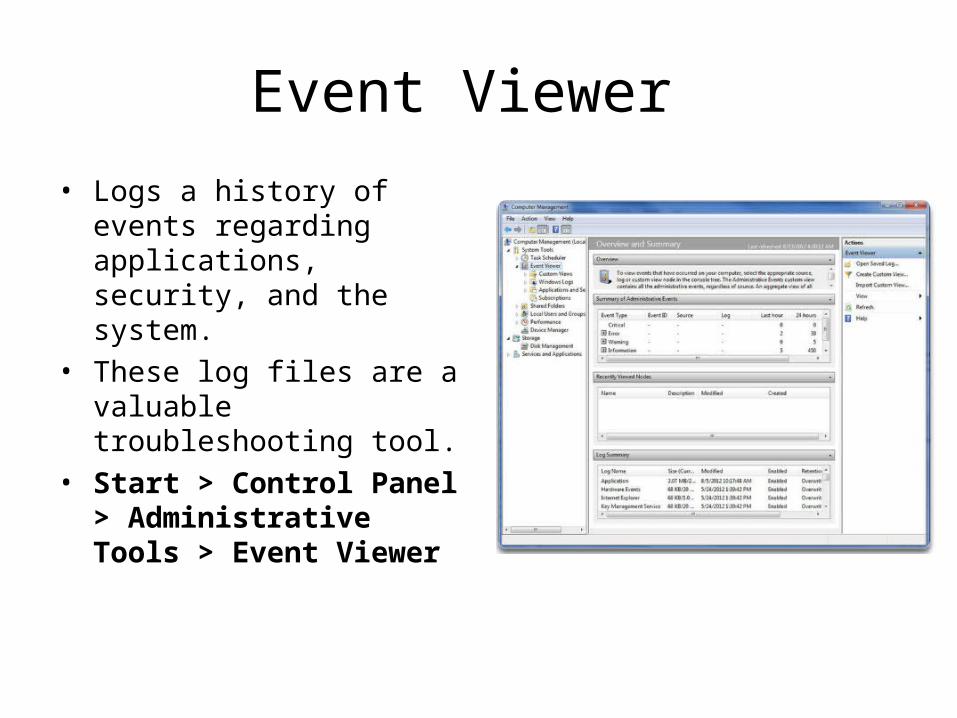
Event Viewer • Logs a history of events
regarding applications, security, and the system.
• These log files are a valuable troubleshooting tool.
• Start > Control Panel > Administrative Tools > Event Viewer

Services and Performance Monitor
Performance Monitor:•Record performance data and configure alerts.•Start > Control Panel > Administrative Tools > Performance Monitor
Services:•Start, stop, or disable services. •Start > Control Panel > Administrative Tools > Services.

Disk Defragmenter and Disk Error- Checking Tool
• Disk Defragmenter makes files on the hard drive contiguous and speeds up the reading of files.
• To access the Disk Defragmenter in Windows 7, select Start > All Programs > Accessories > System Tools > Disk Defragmenter.
• CHKDSK checks the integrity of files and folders by scanning the hard disk surface for physical errors.
• Access CHKDSK from within the Disk Defragmenter or enter CHKDSK in command line to detect and repair disk errors.
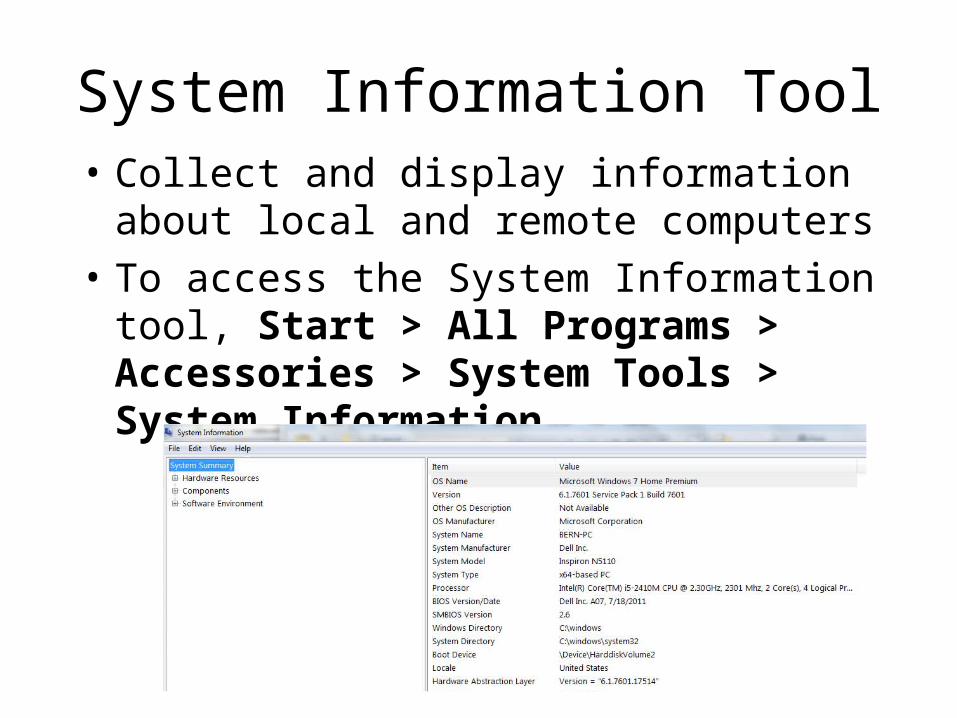
System Information Tool• Collect and display information about local
and remote computers• To access the System Information tool, Start
> All Programs > Accessories > System Tools > System Information

Remote Desktop
• Remote Desktop• View and control a computer from a remote location.
• Remote Assistance • Also allows user to view what the remote technician is
doing to the computer.
• To access in Windows 7 or Windows Vista, select Start > All Programs > Accessories > Remote Desktop Connection
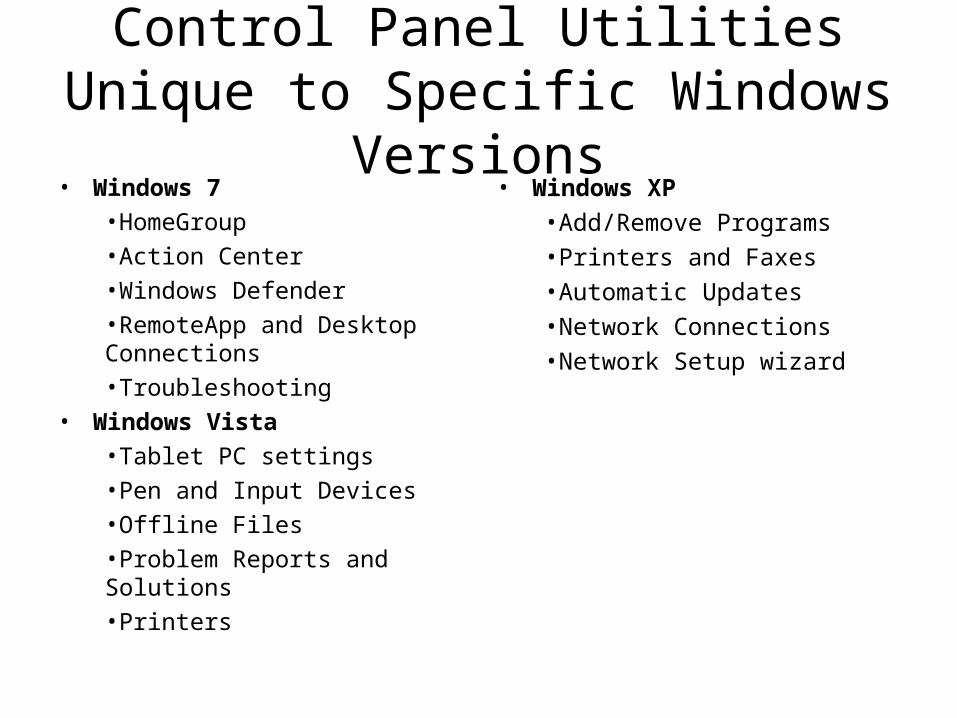
Control Panel Utilities Unique to Specific Windows Versions
• Windows 7•HomeGroup•Action Center•Windows Defender•RemoteApp and Desktop Connections•Troubleshooting
• Windows Vista•Tablet PC settings•Pen and Input Devices•Offline Files•Problem Reports and Solutions•Printers
• Windows XP•Add/Remove Programs•Printers and Faxes•Automatic Updates•Network Connections•Network Setup wizard
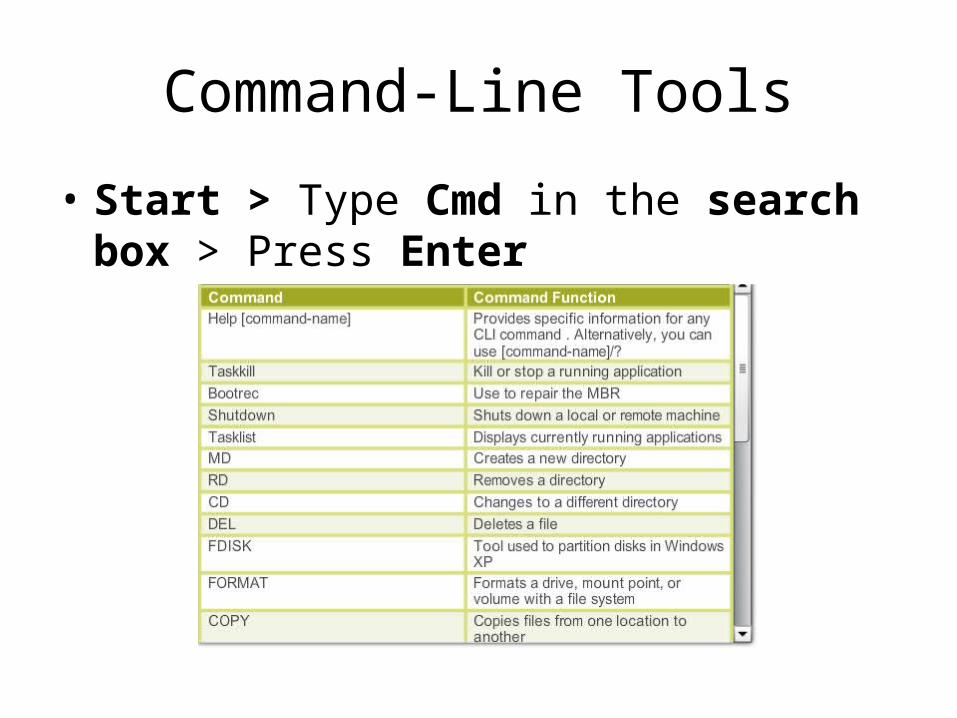
Command-Line Tools
• Start > Type Cmd in the search box > Press Enter
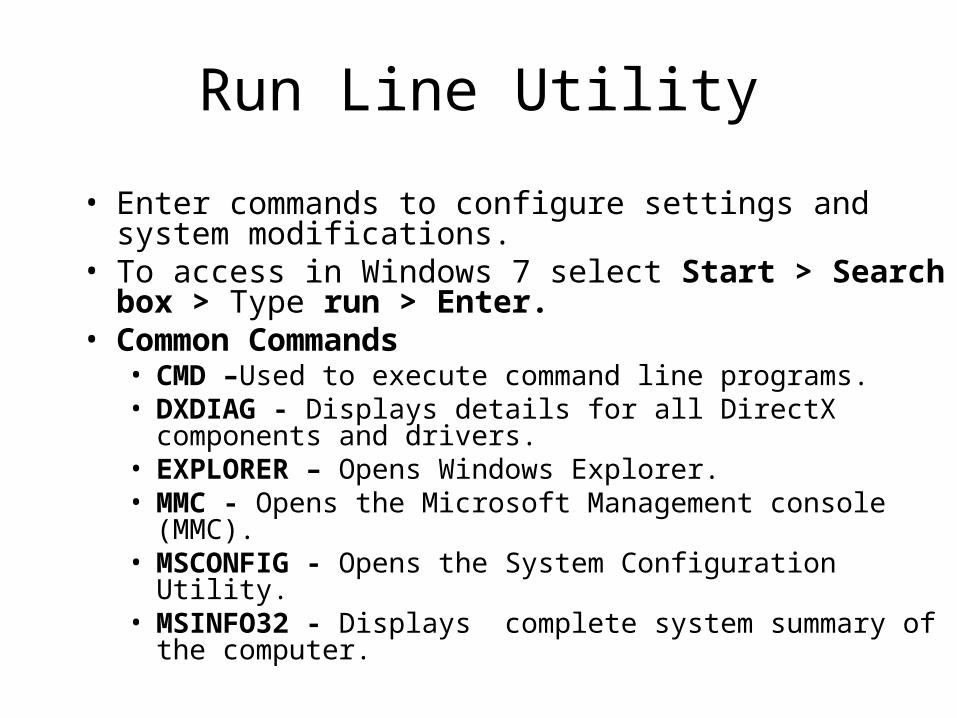
Run Line Utility
• Enter commands to configure settings and system modifications.
• To access in Windows 7 select Start > Search box > Type run > Enter.
• Common Commands• CMD –Used to execute command line programs. • DXDIAG - Displays details for all DirectX components and drivers. • EXPLORER – Opens Windows Explorer.• MMC - Opens the Microsoft Management console (MMC).• MSCONFIG - Opens the System Configuration Utility.• MSINFO32 - Displays complete system summary of the computer.

Virtualization
• Host machine uses its system resources to host a virtual machine.
• Hosting a virtual machine allows users to access the functionality and resources provided by an OS that is not on the local PC.
• Provides access to applications, file-sharing services, and other productivity tools.
• Users can further increases the functionality of their system by running multiple virtual machines.

Virtualization
• The software that creates and manages a virtual machine on a host machine is called the hypervisor, or Virtual Machine Manager (VMM).• Allocates the physical system resources, such as CPU,
RAM, and hard drive, to each virtual machine as needed.
• Windows Virtual PC is the virtualization platform for Windows 7• Allows you to partition system resources for a
Window OS among virtual machines .
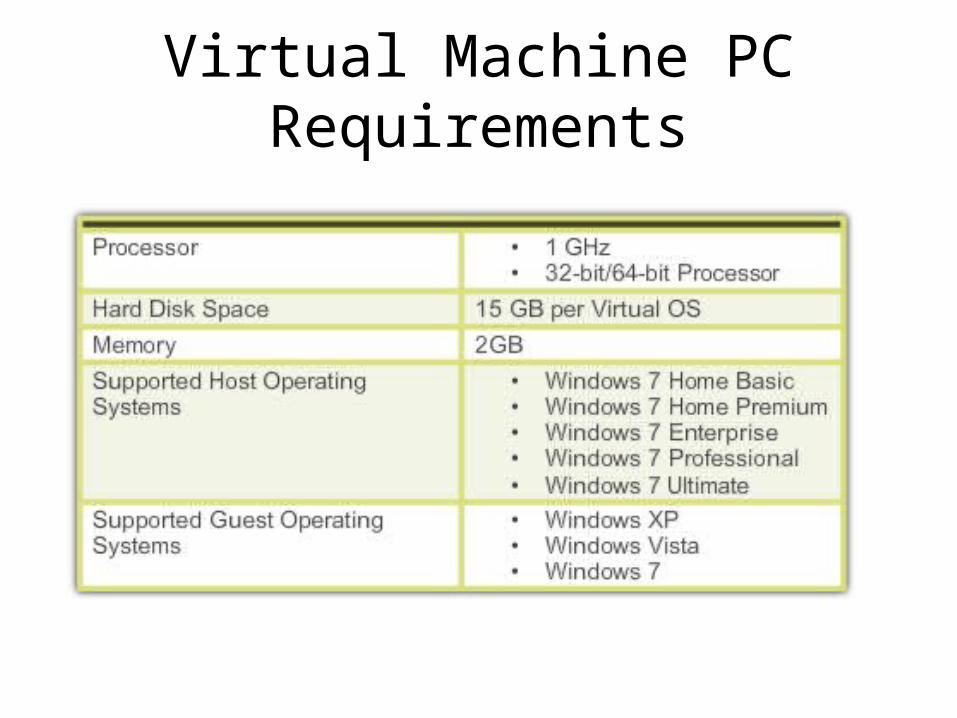
Virtual Machine PC Requirements
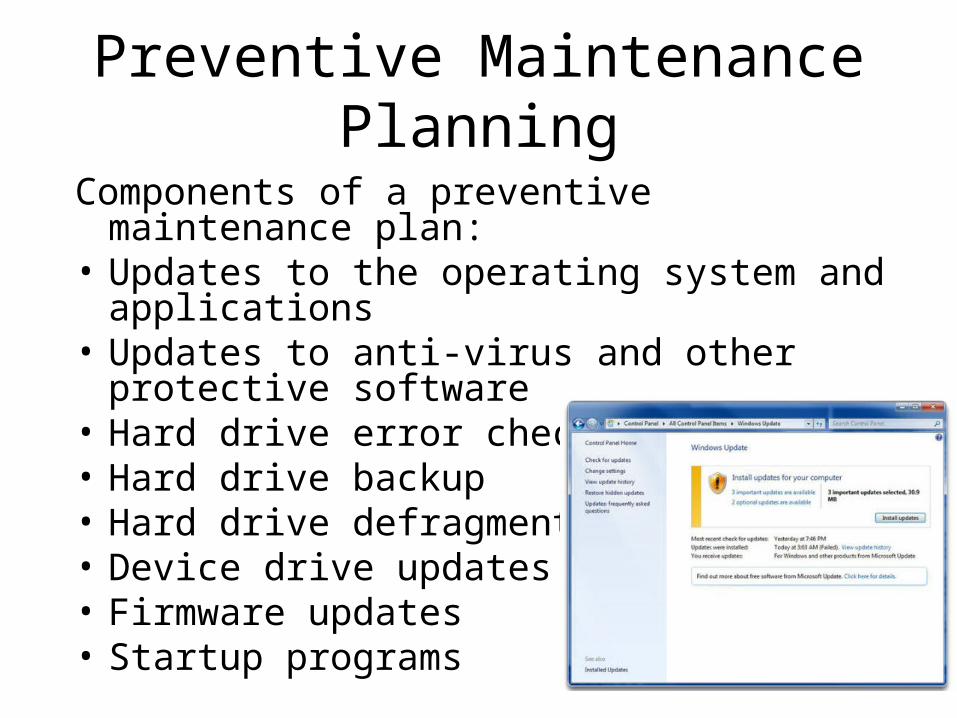
Preventive Maintenance Planning
Components of a preventive maintenance plan:• Updates to the operating system and
applications• Updates to anti-virus and other protective
software• Hard drive error checking• Hard drive backup• Hard drive defragmentation • Device drive updates• Firmware updates• Startup programs

Schedule Tasks
• The CLI at command launches tasks at a specified time using the command line interface.
• The Windows Task Scheduler launches tasks at a specified time using a graphical interface.
• To access the Windows Task Scheduler in Windows 7 and Windows Vista, select Start > All Programs > Accessories > System Tools > Task Scheduler.
• Both of these tools allow users to set commands to run at a certain time just once, or to repeat at selected days or times.

Restore Point
• If a computer crashes, the OS can roll back to a restore point using the System Restore Utility.
•The restore utility only operates on OS and application files. •Anti-virus software should be run to remove malware before creating a restore point.
When to create a restore point:
•Before updating or replacing the OS.
•When installing or updating hardware.
•When an application or driver is installed.
Start > All Programs > Accessories > System Tools > System Restore

Backup the Hard Drive
• Use the Microsoft Backup Tool to perform backups.• Establish a backup strategy that will allow for the
recovery of data. • Decide how often the data must be backed up and
the type of backup to perform.• It is only necessary to make copies of the files that
have changed since the last backup.• To access the backup utility in Windows 7, select
Start > Control Panel > Backup and Restore.
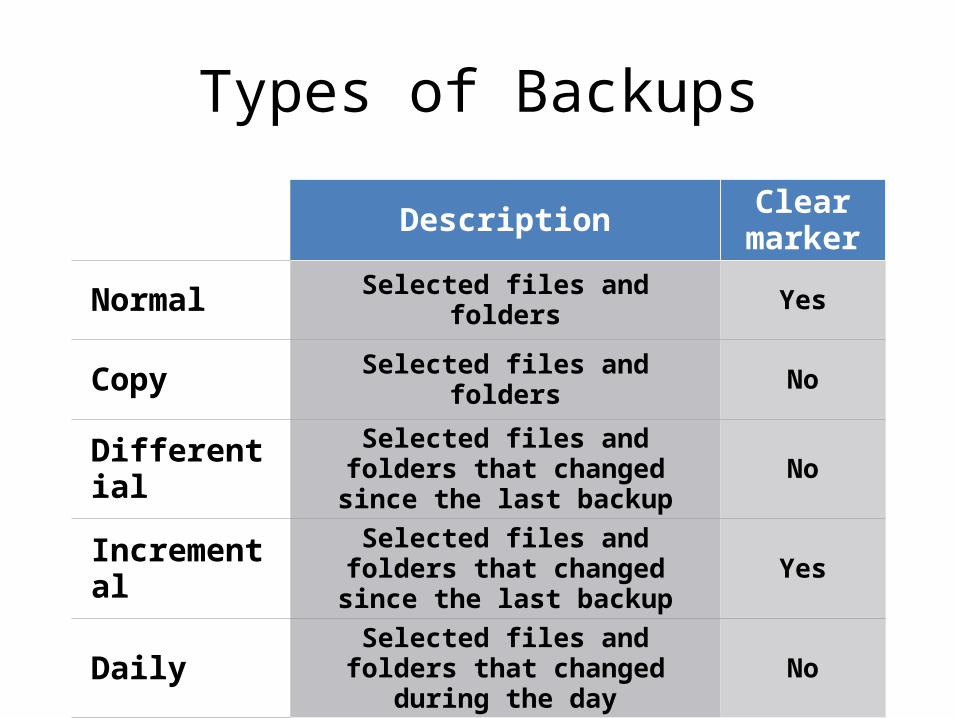
Types of Backups
DescriptionClear
marker
Normal Selected files and folders Yes
Copy Selected files and folders No
Differential Selected files and folders that changed since the last backup
No
Incremental Selected files and folders that changed since the last backup
Yes
Daily Selected files and folders that changed during the day
No

Step 1 Identify the problem
Step 2 Establish a Theory of Probable Cause
Step 3 Test the Theory to Determine Cause
Step 4 Establish a Plan of Action to Resolve the Problem and Implement the Solution
Step 5 Verify Full System Functionality and Implement Preventive Measures
Step 6 Document Findings, Actions, and Outcomes
Troubleshooting Process
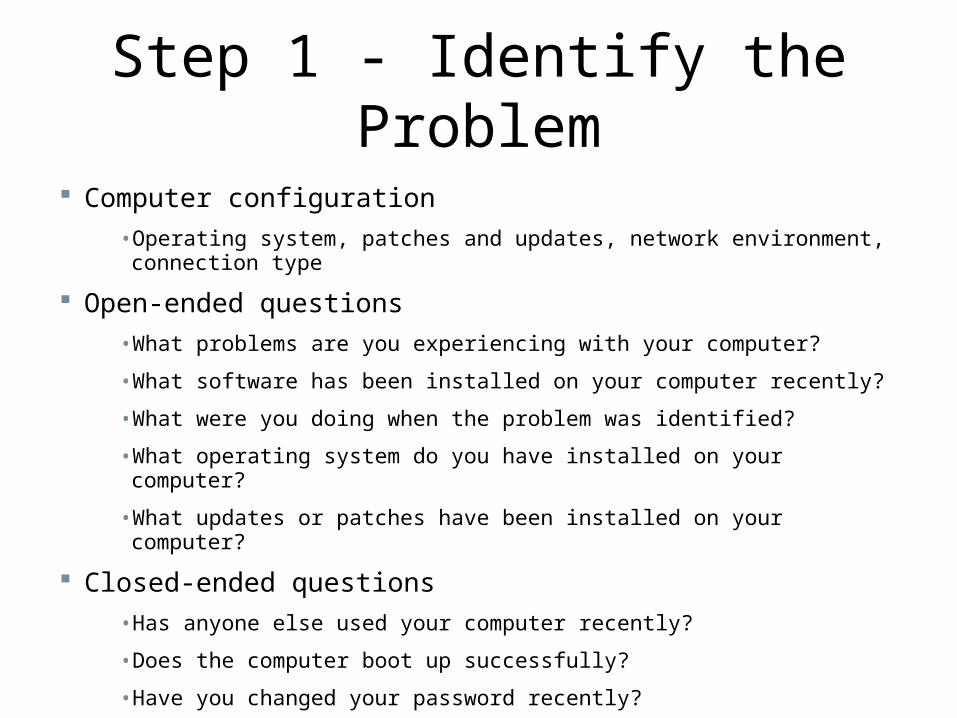
Step 1 - Identify the Problem
Computer configuration
• Operating system, patches and updates, network environment, connection type
Open-ended questions
• What problems are you experiencing with your computer?
• What software has been installed on your computer recently?
• What were you doing when the problem was identified?
• What operating system do you have installed on your computer?
• What updates or patches have been installed on your computer?
Closed-ended questions
• Has anyone else used your computer recently?
• Does the computer boot up successfully?
• Have you changed your password recently?
• Have you received any error messages on your computer?
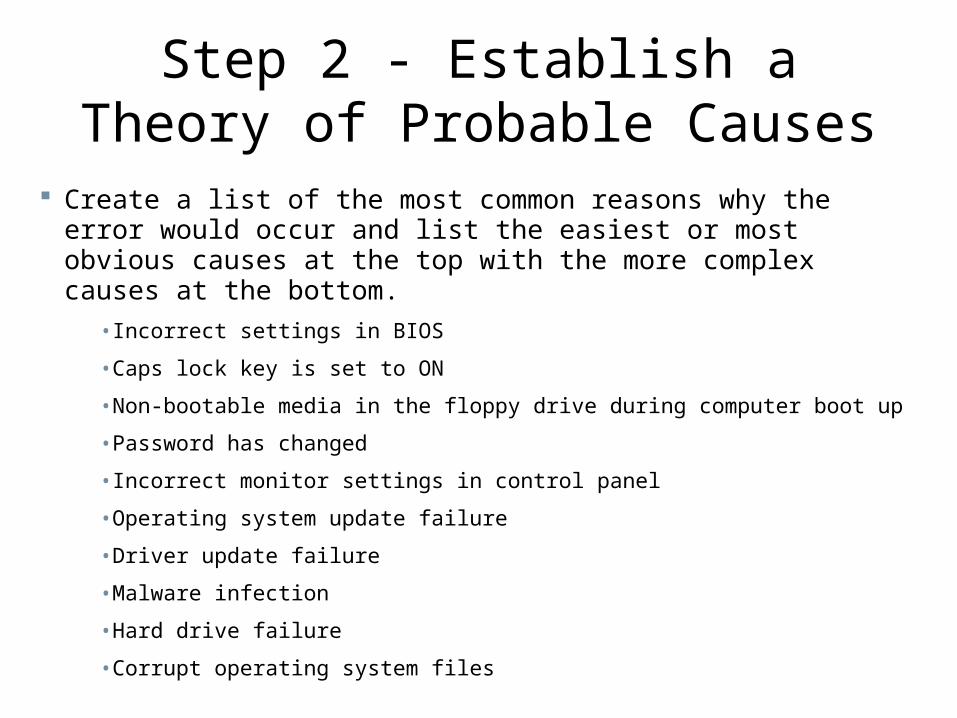
Step 2 - Establish a Theory of Probable Causes
Create a list of the most common reasons why the error would occur and list the easiest or most obvious causes at the top with the more complex causes at the bottom.
• Incorrect settings in BIOS
• Caps lock key is set to ON
• Non-bootable media in the floppy drive during computer boot up
• Password has changed
• Incorrect monitor settings in control panel
• Operating system update failure
• Driver update failure
• Malware infection
• Hard drive failure
• Corrupt operating system files

Step 3 - Test the Theory to Determine Cause
Testing your theories of probable causes one at a time, starting with the quickest and easiest.
• Log in as a different user.
• Use third party diagnostic software.
• New software or software updates have just been installed.
• Uninstall recently installed applications.
• Boot into safe mode to determine if the problem is driver-related.
• Roll back newly updated drivers.
• Examine Device Manager for device conflicts.
• Examine event logs for warnings or errors.
• Check the hard drive for errors and fix file system issues.
• Use the system file checker to recover corrupt system files.
• Use system restore if a system update or service pack has been installed.
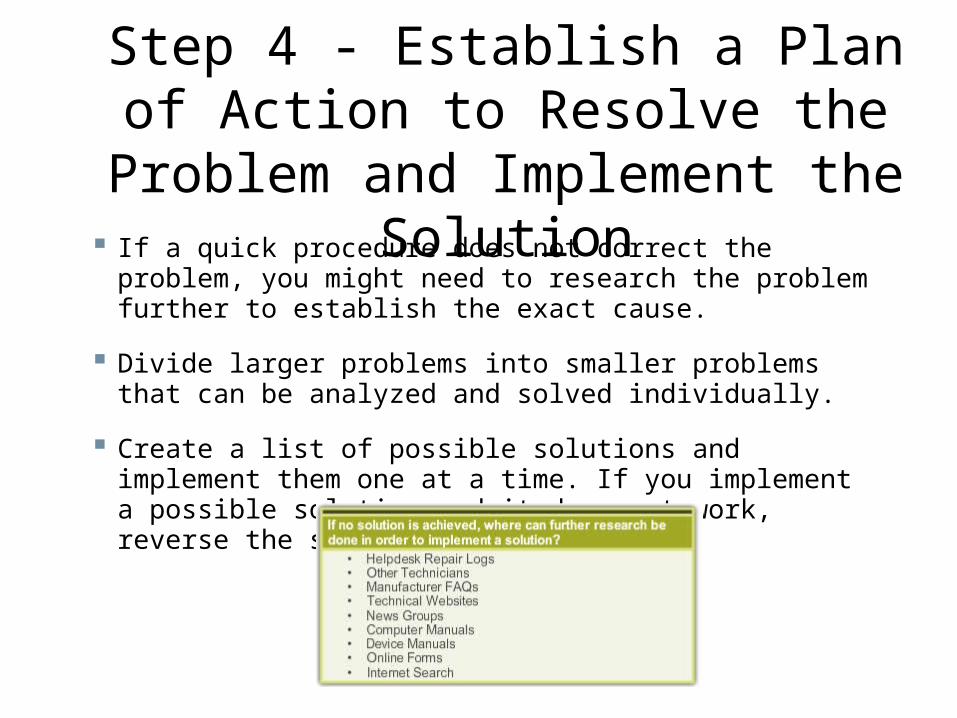
Step 4 - Establish a Plan of Action to Resolve the Problem and Implement
the Solution If a quick procedure does not correct the problem, you might need to
research the problem further to establish the exact cause.
Divide larger problems into smaller problems that can be analyzed and solved individually.
Create a list of possible solutions and implement them one at a time. If you implement a possible solution and it does not work, reverse the solution and try another.
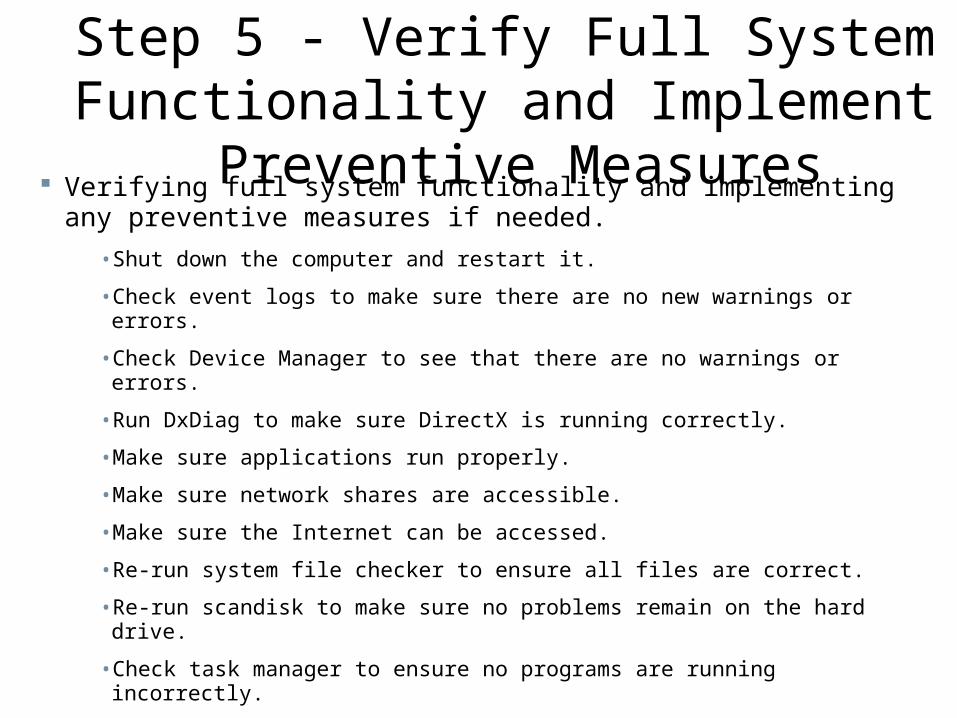
Step 5 - Verify Full System Functionality and Implement Preventive Measures
Verifying full system functionality and implementing any preventive measures if needed.
• Shut down the computer and restart it.
• Check event logs to make sure there are no new warnings or errors.
• Check Device Manager to see that there are no warnings or errors.
• Run DxDiag to make sure DirectX is running correctly.
• Make sure applications run properly.
• Make sure network shares are accessible.
• Make sure the Internet can be accessed.
• Re-run system file checker to ensure all files are correct.
• Re-run scandisk to make sure no problems remain on the hard drive.
• Check task manager to ensure no programs are running incorrectly.
• Re-run any third party diagnostic tools.
Have the customer verify the solution and system functionality.
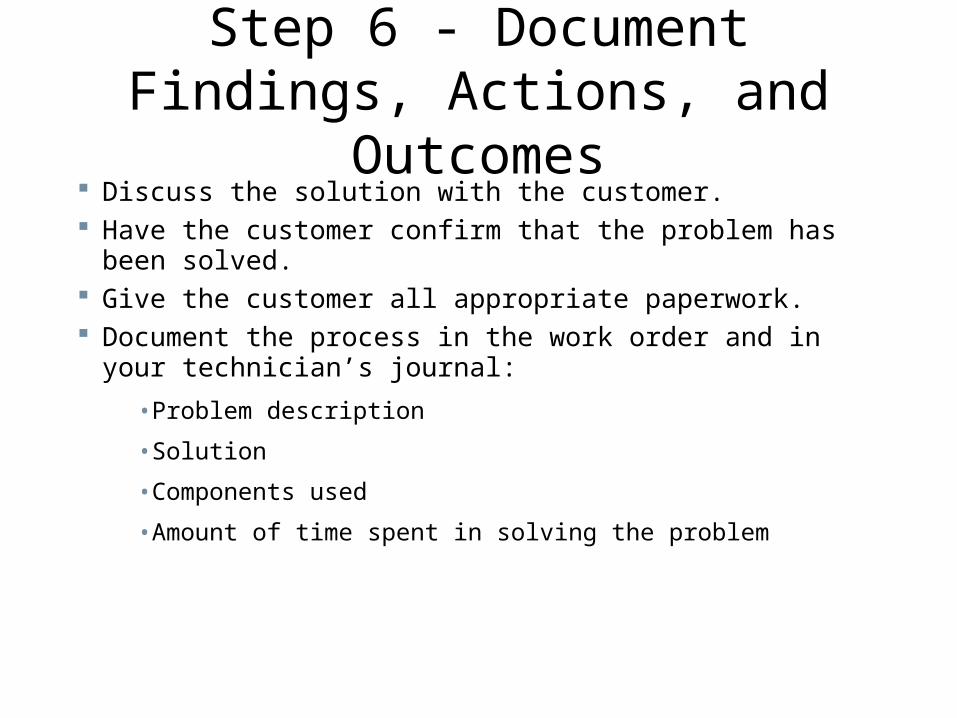
Step 6 - Document Findings, Actions, and Outcomes
Discuss the solution with the customer. Have the customer confirm that the problem has been solved. Give the customer all appropriate paperwork. Document the process in the work order and in your technician’s
journal:
•Problem description
•Solution
•Components used
•Amount of time spent in solving the problem

Common Problems and Solutions Operating system problems can be attributed to
hardware, application, or configuration issues, or to some combination of the three.
See chart of common OS problems and solutions in curriculum 5.6.2.1

Chapter 5 Summary
• Several different operating systems are available, and you must consider the customer's needs and environment when choosing an operating system.
• The main steps in setting up a customer's computer include preparing the hard drive, installing an operating system, creating user accounts, and configuring installation options.
• A GUI shows icons of all files, folders, and applications on the computer. A pointing device, such as a mouse, is used to navigate in a GUI desktop.
• A CLI uses commands to complete tasks and navigate the file system.

Chapter 5 Summary (Continued)
• Establish a backup strategy that allows for the recovery of data. Normal, copy, differential, incremental, and daily backups are all available in Windows operating systems.
• Virtualization has become a popular method of providing staff with critical resources, such as applications, file-sharing services, and other productivity tools.
• Preventive maintenance techniques help to ensure optimal operation of the operating system.
• Some of the tools available for troubleshooting an OS problem include administrative tools, system tools, and CLI commands.