Embed Size (px)
Citation preview

Chapter 5: Interactions and Document Management
132
CHAPTER 5: INTERACTIONS AND DOCUMENT MANAGEMENT
Objectives
The objectives for this chapter are:
Set up interactions.
Create interaction templates.
Set up interaction groups.
Manage interaction attachments.
Use the Create Interaction wizard for creating interactions.
Record phone calls as interactions.
Record e-mails as interactions.
Work with automatically recorded interactions.
Manage postponed interactions.
Cancel and delete interaction log entries.
View interaction statistics.
Chapter 5: Interactions and Document Management
133
Introduction
The Sales & Marketing application area of Microsoft Dynamics® NAV offers a
possibility to create a record for all the types of communications you have with
your contacts, for example, correspondence, meetings, sales and purchase
documents, and so on. This enables you to effectively keep track of the sales and
marketing documentation that you send to your contacts, and thus improve the
quality of your business interactions.
This chapter explains setting up and managing interactions and such interaction
elements as interaction templates, interaction groups, and attachments.
Setting Up Interactions
The program can create interactions entries of information about specific actions
you performed involving contacts in the program. Once an interaction is recorded
you can refer to it later if you need, for example, to retrieve some details of it.
Interactions can be created for your contacts and salespeople and can be linked to
to-dos, campaigns, segments, and opportunities.
To be able to create interactions, it is necessary to set up the following
parameters:
Interaction templates
Interaction groups
Interaction attachments
Interaction templates are used for creating interactions. Using these templates
allows you to indicate the type of interaction you are dealing with, in addition to
a variety of additional attributes of an interaction (for example communication
type, language, information flow direction etc.). Interaction templates can belong
to interaction groups and can contain attachments.
Interaction groups are collections of interaction templates grouped for the same
usage purpose. Interaction groups are used to
View statistics for a group of interaction templates - you can see how
many times you have used a particular interaction template or
interaction group to create interactions.
Group the interaction templates that you use to create interactions -
one for storing all your letters, another one for your price lists, and so
on.
Several interaction templates can be assigned to one interaction group.
Interaction attachments are documents created in Microsoft® Office Word
®,
Microsoft® Office Excel
®, or any other application, and imported to an

Chapter 5: Interactions and Document Management
134
interaction template. You may need to have an attachment for sending invitations
or business letters, for example.
Creating Interaction Templates
When dealing with your contacts, you can have the program create interactions
for them. To make the program do this, you must specify an interaction template
while creating an interaction to indicate its type.
To specify an interaction template, first it is necessary to set it up, performing the
following steps:
1. In the navigation pane, click Departments > Administration >
Application Setup > Sales & Marketing > Marketing, and in
Lists, click Interaction Templates. The program displays the list of
the interaction templates.
2. In the Action Pane, click New to create an interaction template. The
program opens the Interaction Templates window with an empty
line created for the new interaction template.
FIGURE 5.1 CREATING AN INTERACTION TEMPLATE
3. Fill in the Code and Description fields.
4. If you want to assign the interaction template to an interaction group
(for viewing statistics at a later stage, for example), click the
AssistButton next to the Interaction Group Code field and select
the interaction group that you want the interaction template to belong
to.
5. In the Wizard Action field, select what action on the attachment you
want the program to perform when you click Next on the second
page of the Create Interaction wizard. You can select among three
options: Blank, Open, and Import. For more information about

Chapter 5: Interactions and Document Management
135
working with attachments, refer to the “Managing Attachments of
Interaction Templates” topic in this chapter.
6. To be able to interact with a contact in his or her preferred language,
you can set a language code for the interaction. To do this, click the
AssistButton next to the Language Code (Default) field. The
Interact. Tmpl. Languages window appears. Click the AssistButton
next to the Language Code field and select the appropriate language
from the list.
7. In the Interact. Tmpl. Languages window, you can also insert
attachments in different languages into the interaction templates. Do
this by clicking Related Information > Attachment > Create. The
program creates a Microsoft Office Word document that you can
insert as an attachment into the current interaction template.
You can create as many interaction template attachments in different languages
as you need. The procedure of creating, importing, exporting, or copying an
attachment in the Interact. Tmpl. Languages window is the same as the one for
the Interaction Templates window. For more information about managing an
attachment, refer to the “Managing Attachments of Interaction Templates” topic
in this chapter.
8. If you want the program to use the correspondence type you select in
the Correspondence Type (Default) field, and not the one selected
on the contact card, select the Ignore Contact Corres. Type check
box.
9. In the Unit Cost (LCY) field, enter the usual cost for this type of
interaction.
10. In the Unit Duration (Min.) field, enter the usual duration for this
type of interaction.
11. In the Initiated By field, specify who usually initiates this type of
interaction. There are two options: Us and Them.
a. Select Us if the interaction is usually initiated by your company.
b. Select Them if the interaction is usually initiated by your
contacts.
12. In the Information Flow field, specify the direction of information
flow for this type of interaction. There are two options: Outbound
and Inbound.
a. Select Outbound if the information is usually sent by your
company.
b. Select Inbound if the information is usually received by your
company.
Entering Campaign-Specific Information
If you always use the same interaction template to create interactions linked to a
specific campaign, you can link the interaction template to that campaign. Do this
by specifying a campaign code in the Campaign No. field in the Interaction
Chapter 5: Interactions and Document Management
136
Templates window. The program will then link the interactions you create to the
specified campaign, using the interaction template.
If the contacts involved in the interactions are usually the target of a campaign,
select the Campaign Target check box.
If you intend to use the interaction template to record interactions that are a
response to a campaign, select the Campaign Response check box.
Now that an interaction template has been set up, you can use it for creating
interactions.
Setting Up Interaction Groups
Interaction groups help you collect several interaction templates for the same
usage. Interaction groups are set up in the Interaction Groups window. Setting
up an interaction group involves creating a group code and assigning interaction
templates to it.
To set up a new interaction group, do the following:
1. In the navigation pane, click Departments > Administrations >
Application Setup > Sales & Marketing > Marketing, and in
Lists, click Interaction Groups. A list of interaction groups
appears.
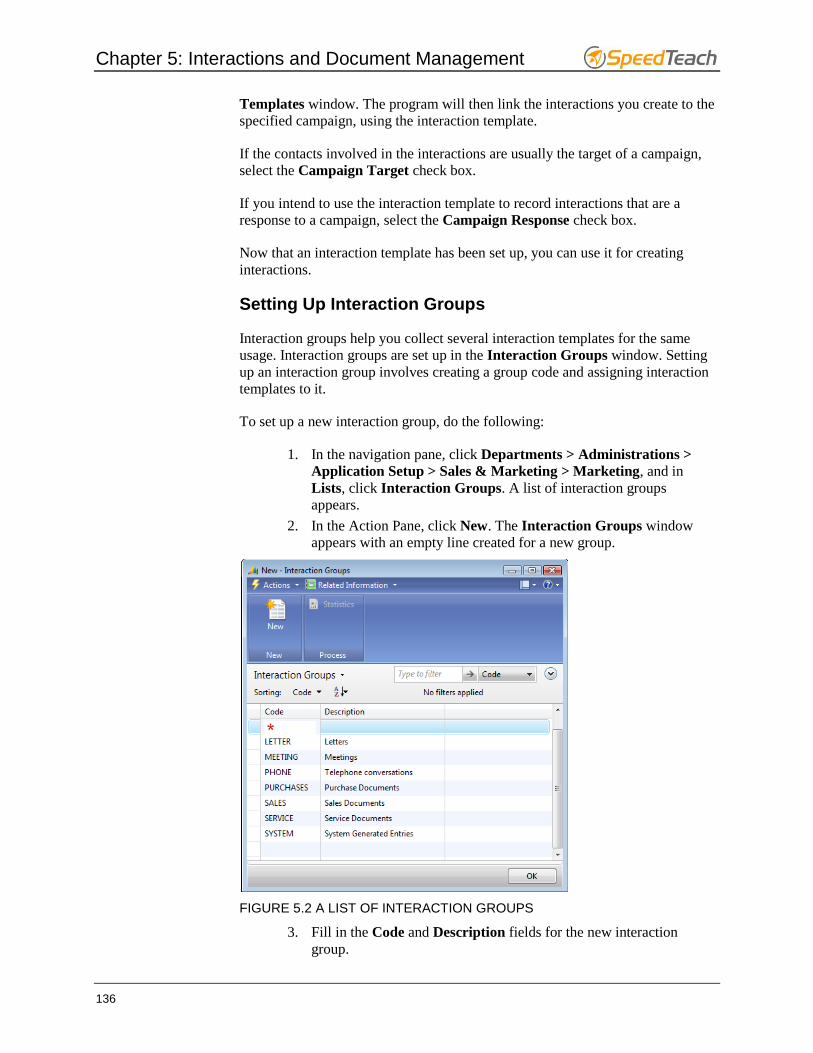
2. In the Action Pane, click New. The Interaction Groups window
appears with an empty line created for a new group.
FIGURE 5.2 A LIST OF INTERACTION GROUPS
3. Fill in the Code and Description fields for the new interaction
group.

Chapter 5: Interactions and Document Management
137
The interaction group code is created. To continue setting up an interaction
group, assign interaction templates to it. To accomplish this, do the following:
1. Click Related Information > Interaction Group > Interaction
Templates.
2. In the Action Pane of the Interaction Templates window, click
New.
FIGURE 5.3 INTERACTION TEMPLATES
3. In the Code field, enter a code for the interaction template.
4. Click the AssistButton next to the Interaction Group Code field,
and from the interaction groups list, select an interaction group you
want to assign the interaction template to. The program
automatically fills in this field with the interaction group you opened
the Interaction Templates window for.
5. In the Description field, enter a brief description of the template you
just added.
6. If you need, fill in other fields for the interaction template.
NOTE: Descriptions of the fields in the Interaction Templates window and their
options can be found in the “Creating Interaction Templates” topic.
Repeat steps 2-6 for all the interaction templates you want to assign to the
interaction group.
7. When finished with assigning templates to the group, click OK.
This finishes creating an interaction group. You can create as many interaction
groups as you need.

Chapter 5: Interactions and Document Management
138
Managing Attachments to Interaction Templates
Interaction templates can use attachments. An attachment can be, for example, a
letter to a contact. When an interaction template with an attachment is used for
creating an interaction, the attachment can be sent to one or several contacts as
the interaction is created. Attachments can be any type of a document, for
example, Microsoft Word document, Microsoft Excel file, text file, and so on.
However, Microsoft Dynamics NAV is only fully integrated with Microsoft
Word. This means that you can only create Microsoft Word documents from
within Microsoft Dynamics NAV; you cannot create Microsoft Excel files or
other types of attachments directly from within Microsoft Dynamics NAV.
There are several ways of attaching a file to an interaction template. You can:
Create Microsoft Word documents directly from the Interaction
Templates window.
Import any type of a document.
Copy an existing attachment from another interaction template.
Creating Microsoft Word Documents
If you have Microsoft Word 2002, Microsoft Word 2003, or Microsoft Word
2007 installed, you can create attachments (Microsoft Word documents only)
directly from Microsoft Dynamics NAV, in particular from the Interaction
Templates window. When creating attachments from within Microsoft
Dynamics NAV, a new Microsoft Word document opens.
In the Microsoft Word document, you can add merge fields. Merge fields are
fields in a Microsoft Word document that are to be substituted with values from
Microsoft Dynamics NAV when the attachment is sent to a contact. To add a
merge field:
1. Go to the Mailings tab in Microsoft Word and click Insert Merge
Field.
2. From the list of fields, select the one you want to add to the
attachment.
The merge fields cannot be modified as the list of available merge fields is
supplied by Microsoft Dynamics NAV. When the attachment is sent to the
contact(s) and an interaction being is created, Microsoft Dynamics NAV fills in
the fields with the relevant information from the Contact Card, Interaction Log
Entries, Salesperson/Purchaser Card, and/or Company Information windows
and sends the modified attachment to the contact(s).
To create a standard letter and make it an attachment for an interaction template,
follow this procedure:
1. Open the list of interaction templates.

Chapter 5: Interactions and Document Management
139
2. Select the interaction template you want to create an attachment for
and click Related Information > Attachment > Create. Make sure
that Attachment field for this interaction template contains No.
The program automatically launches Microsoft Word and opens a new document.
3. In the new Microsoft Word document, enter the main text for your
document, and insert the relevant merge fields.
4. Close the document. In the dialog box that appears asking you
whether you want to import the attachment, click Yes to continue.
Only the Microsoft Word document that you have opened from within Microsoft
Dynamics NAV can use merge fields to be filled in by the program. A Microsoft
Word document created outside Microsoft Dynamics NAV is not linked to the
application and therefore and cannot have merge fields filled in with the relevant
values. To link a document created outside Microsoft Dynamics NAV to an
interaction template or an interaction, you must import this new document. For
more information about importing an attachment, refer to the “Importing
Attachments” subtopic in this chapter.
NOTE: Only one attachment can be inserted in an interaction template. If you
try to create an attachment for an interaction template already containing an
attachment, the program will suggest replacing the existing attachment.
To open an attachment to the interaction template, click the Yes option in the
Attachment field on the interaction template list.
Saving Microsoft Word Documents
When the Microsoft Word document linked to Microsoft Dynamics NAV is
open, clicking the Save button in Microsoft Word will save the changes in the
document. When you close Microsoft Word, the program will ask if you want to
save the changes and import the document into the program.
If you do not import the document into Microsoft Dynamics NAV, the changes
you have made will not be saved in the attachment.
NOTE: When you are working in the Interaction Templates window, if two or
more users open and modify an interaction template attachment (a Microsoft
Word document) simultaneously, the program will only save the changes made
by the first user to import the document into Microsoft Dynamics NAV. The
changes made by the other user(s) will not be taken into account.
NOTE: When you are working in a Microsoft Word document opened from
within Microsoft Dynamics NAV, you cannot return to work in the program
before you have closed Microsoft Word.

Chapter 5: Interactions and Document Management
140

Chapter 5: Interactions and Document Management
141
Lab 5.1 – Create an Interaction Template with an Attachment
In this lab, you will practice creating an interaction template and inserting an
attachment with merge fields in it.
Scenario
You need to create an interaction template for the follow-up letters. For this
template, you need to insert a Microsoft Word document as an attachment and
assign this interaction template to the Letter interaction group. Include the
following merge fields in the attachment: the contact’s name, e-mail address, the
salesperson’s name and telephone number.
Challenge Yourself
1. Create an interaction template.
2. Assign this template to the Letter interaction group.
3. Create an attachment with the merge fields.
Need a Little Help?
1. Create an interaction template with the FOLLOWUP code using the
following information:
Code: FOLLOWUP
Unit Cost: 10 LCY
Unit duration: 10 min
Correspondence Type: E-Mail
2. Assign the FOLLOWUP interaction template to the Letter
interaction group.
3. Create an attachment with the contact’s name and e-mail address, the
salesperson’s name and telephone number as merge fields and insert
it in the template.
Step by Step
Create an interaction template with the FOLLOWUP code.
1. In the navigation pane, click Departments > Administration >
Application Setup > Sales & Marketing > Marketing, and in
Lists, click Interaction Templates.
2. In the Action Pane, click New to create a new template.
3. In the Code field, enter “FOLLOWUP”.
4. In the Unit Cost (LCY) field, enter “10”.
5. In the Unit Duration (Min.) field, enter “10”.
6. In the Correspondence Type field, select E-Mail.

Chapter 5: Interactions and Document Management
142
Assign the FOLLOWUP interaction template to the Letter interaction group.
Click the AssistButton next to the Interaction Group Code field, and select
LETTER.
Create an attachment with the contact’s name and e-mail address, the
salesperson’s name and telephone number as merge fields and insert it in the
template.
1. Click Related Information > Attachment > Create. In the
Microsoft Word document, click Mailings > Insert Merge Field.
From the list of merge fields, select the following fields:
o «Contact_Name»
o «Contact_Mail_Address»
o «SalespersonPurchaser_Name»
o «SalespersonPurchaser_Phone»
2. Click Insert and then click Close.
3. Save and close the Microsoft Word document. Now the interaction
template has an attachment with the contact’s information.

Chapter 5: Interactions and Document Management
143
Importing Attachments
Instead of creating a new document, you can import an existing one to Microsoft
Dynamics NAV. For example, you may want to attach a Microsoft Excel file to
an interaction template. To do that, you must create the file and save it on a disk
first, and then import it into Microsoft Dynamics NAV.
To import an attachment to an interaction template, in the Interaction
Templates window, click Related Information > Attachment > Import. The
Import Attachment window appears.
FIGURE 5.4 BROWSING FOR A FILE TO IMPORT
Browse to the file you want to import as an attachment and click Open. The
program will import the document.
Copying Attachments
You can also insert attachments in an interaction template by copying the
attachment assigned to another interaction template. To copy an attachment from
one interaction template to another, follow this procedure:
1. In the Interaction Templates window, select the interaction
template you want to copy an attachment to.
2. Click Related Information > Attachment, and then Copy from.
The Interact. Tmpl. Languages window appears, showing a list of all the
interaction templates that contain attachments.

Chapter 5: Interactions and Document Management
144
FIGURE 5.5 LIST OF TEMPLATES WITH ATTACHMENTS
3. Select the interaction template containing the attachment that you
want to copy and then click OK.
Once the attachment is copied, the program sets the Attachment field to Yes for
the selected interaction template in the Interaction Template window.
Attachment-Specific Information in the Interaction Templates Window
If an interaction template contains an attachment, in the Interaction Template
window, the Attachment field contains Yes. This field is not editable. Clicking
Yes makes the program open the attached document.
In the Correspondence Type field, you can specify how the attachment of the
interaction template will be sent to contacts. There are three options: Fax, E-
Mail, and Hard Copy. If you fill in this field, next time when you create an
interaction the program will automatically fill in the Correspondence Type field
in the Create Interaction wizard or in the Segment window and select the
appropriate way to send the attachment.
In the Wizard Action field, you specify the action that you want the program to
perform as you click Next on the second page of the Create Interaction wizard.
There are three options:
Blank: If you select this option, the program immediately displays
the second page of the wizard as you click Next.
Open: If you select this option, the program will open the attachment
as you click Next.

Chapter 5: Interactions and Document Management
145
Import: If you select this option, the program will import the
attachment as you click Next.
Removing Attachments from Interaction Templates
You can remove an attachment assigned to an interaction template. It may be
necessary, for example, if the document is not used anymore, and you want to
replace it.
To remove an attachment from an interaction template, follow this procedure:
1. Open the list of the interaction templates.
2. Browse to the interaction template containing the attachment that
you want to delete and click Related Information > Attachment >
Remove.
FIGURE 5.6 REMOVING AN ATTACHMENT
3. Confirm your intention to delete the attachment.
The program will remove the attachment.
NOTE: Removing the attachment from the interaction template does not affect
the attachments for interactions created based on that interaction template
previously. You can still open these attachments from the Interaction Log
Entries window by clicking Yes for each interaction log entry.
Exporting Attachments
You can export the attachments contained in interaction templates to a disk. You
may want to do this, for example, if the attachment is a Microsoft® PowerPoint
presentation that you want to be stored on a disk.
To export an attachment, follow this procedure:
1. In the Interaction Templates window, select the interaction
template containing the attachment you want to export.
2. Click Related Information > Attachment and then Export. The
Export Attachment window appears.

Chapter 5: Interactions and Document Management
146
FIGURE 5.7 SELECTING A PATH FOR EXPORTING AN ATTACHMENT
3. Select a path and give the attachment a name to store it as a file.
Click OK.
The program will export the attachment.
Using the Create Interaction Wizard
The program offers several ways of creating interactions:
Using the Create Interaction wizard for a single contact or
salesperson.
Using the Segment window for one or several contacts. Creating
interactions from this window is covered in the “Campaign and
Segmentation” chapter.
Automatically when you perform specific actions in Microsoft
Dynamics NAV. The list of such actions is presented in the
“Automatically Recorded Interactions” section in this chapter.
NOTE: In terms of Microsoft Dynamics NAV, creating interactions means
recording or logging them in the Interaction Log Entries window.
Create Interaction Wizard
Open the Create Interaction wizard from the contact card or the
salesperson/purchaser card by clicking the Create Interact button in the Action
Pane.

Chapter 5: Interactions and Document Management
147
FIGURE 5.8 CREATING AN INTERACTION WITH THE WIZARD
Mandatory Information
On the pages of the Create Interaction wizard, specify the following information:
The interaction template to indicate the type of the interaction you
are creating and make the program record an interaction log entry.
The name of the contact involved in the interaction.
The salesperson/purchaser responsible for the interaction.
The description of the interaction.
The date of the interaction.
The program automatically enters the values specified for the selected interaction
template, but you can change them.
The following table lists the optional fields that can be found on the pages of the
Create Interaction wizard.
Field Description
Correspondence
type
If the interaction contains an attachment, in this field, you
can specify the way the program will handle an attached
document. There are four options: Blank, Hard Copy, E-
Mail, and Fax.
If you select Hard Copy, then when you click Finish,
the program will automatically print the attachment.
If you select E-Mail, then when you click Finish, the
program will automatically send the attachment by e-
mail.
If you select Fax and the program is integrated with a
fax, the attachment will be sent automatically by fax.

Chapter 5: Interactions and Document Management
148
If you leave this field blank, the program will not send
or print the attachment. You can use this option, for
example, if you have already printed or sent the
attachment before recording the interaction.
Date In these fields, you can specify the date and time when the
interaction was created. Time of
Interaction
Direction of
Information Flow
In this field, you can specify the direction the information
flows. You can select among the Inbound and Outbound
options.
Initiated by In this field, you can specify who was an initiator of the
interaction. You can select among Us and Them.
Evaluation of the
interaction
In this field, specify how you evaluate this interaction. You
can select among five options: Very Positive, Positive,
Neutral, Negative, and Very Negative.
It is also possible to evaluate the interaction in the
Interaction Log Entries window after it was logged.
Interaction cost In this field, you can specify estimated value of the
interaction.
Interaction
duration
In this field, you can specify, how long the interaction will
last.
Campaign code By specifying a campaign code in this field, you can link
the interaction to a campaign. If the interaction is linked to
a campaign, when you click Finish, the program will
automatically record the interaction as a campaign entry for
the specified campaign.
Opportunity code By specifying an opportunity code in this field, you can
link the interaction to an opportunity.
The following screen shots show the fields described.

Chapter 5: Interactions and Document Management
149
FIGURE 5.9 SPECIFYING THE INTERACTION DETAILS
FIGURE 5.10 SPECIFYING COST AND DURATION FOR THE INTERACTION
Chapter 5: Interactions and Document Management
150
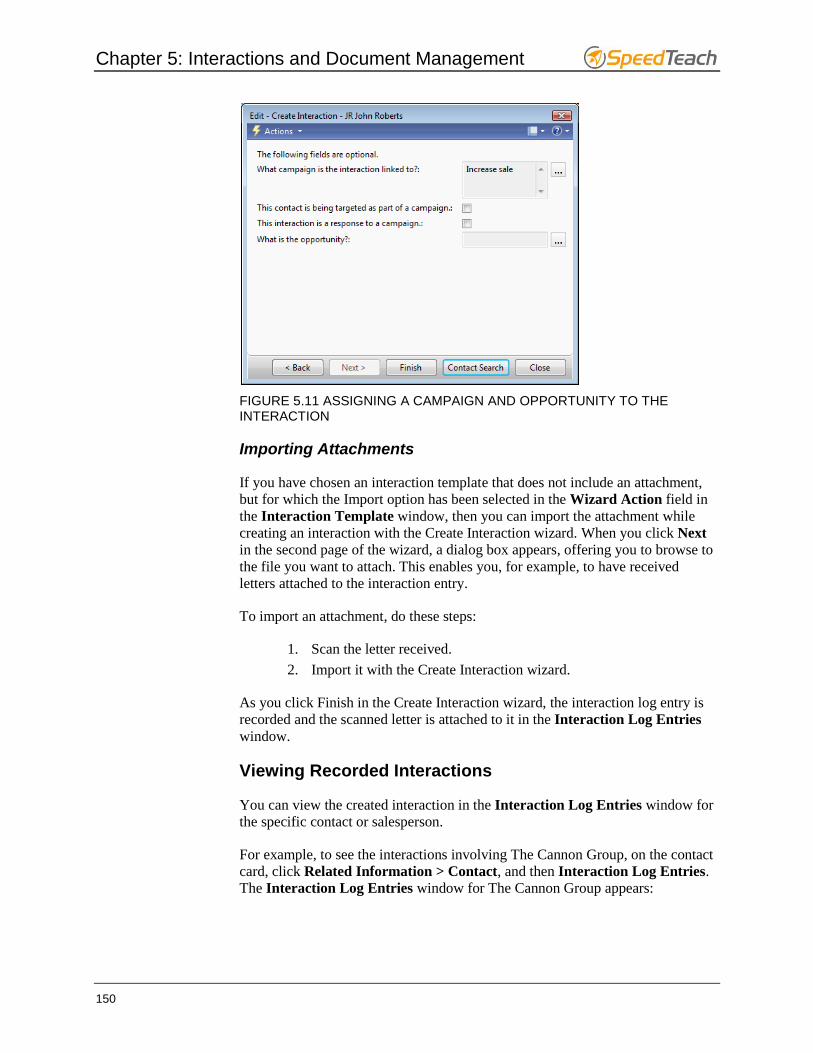
FIGURE 5.11 ASSIGNING A CAMPAIGN AND OPPORTUNITY TO THE INTERACTION
Importing Attachments
If you have chosen an interaction template that does not include an attachment,
but for which the Import option has been selected in the Wizard Action field in
the Interaction Template window, then you can import the attachment while
creating an interaction with the Create Interaction wizard. When you click Next
in the second page of the wizard, a dialog box appears, offering you to browse to
the file you want to attach. This enables you, for example, to have received
letters attached to the interaction entry.
To import an attachment, do these steps:
1. Scan the letter received.
2. Import it with the Create Interaction wizard.
As you click Finish in the Create Interaction wizard, the interaction log entry is
recorded and the scanned letter is attached to it in the Interaction Log Entries
window.
Viewing Recorded Interactions
You can view the created interaction in the Interaction Log Entries window for
the specific contact or salesperson.
For example, to see the interactions involving The Cannon Group, on the contact
card, click Related Information > Contact, and then Interaction Log Entries.
The Interaction Log Entries window for The Cannon Group appears:

Chapter 5: Interactions and Document Management
151
FIGURE 5.12 VIEWING INTERACTION LOG ENTRIES FOR CANNON GROUP
The Interaction Log Entries window contains a list of all the interactions
involving the contact, presenting the details for each interaction, such as cost,
duration, and the salesperson that handled them. If the interaction contains an
attachment (for example, a letter or another document sent), you can view it by
clicking Yes in the Attachment field or clicking Show in the Action Pane.
NOTE: For interactions that do not contain an attachment clicking Show opens
the document in NAV the interactions are created for. Clicking No for such
interactions does not lead to any results.
The Interaction Log Entry window can also be accessed from a salesperson
card, a to-do card, a contact card, a campaign card or a list of opportunities. In
each case, it will display interactions recorded for the respective entity.
Postponing the Interaction
While creating an interaction, you may decide to interrupt this process by closing
the Create Interaction wizard, for example, if you need to add some details to a
salesperson or campaign card, or simply to postpone creating an interaction. You
can close the wizard in several ways:
By clicking the Close button.
By pressing the ESC key.
If you close the wizard, a message appears asking whether you want to finish this
interaction later. Click Yes if you want to postpone the creation of this interaction
and finish it later. When you click Yes, the program automatically stores the
newly created interaction in the Postponed Interactions window. If you have
linked the interaction to a campaign, the program does not insert a new entry in
the Campaign Entry window yet. It will be inserted when the interaction is
logged in Interaction Log Entries.

Chapter 5: Interactions and Document Management
152
If a postponed interaction contains an attachment, it will be stored in Microsoft
Dynamics NAV. To view an attachment stored for a contact, do the following:
1. Open the list of the contacts.
2. Select the contact which you want to view an attachment for the
postponed interaction for.
3. Click Related Information > Contact > Postpones Interactions.
4. In the Postponed Interactions window, select the interaction with
the attachment you want to view, and click Show. You can continue
editing the attachment only in the Create Interaction wizard when
you resume the interaction.
Finishing and Deleting Postponed Interactions
You can finish or delete a postponed interaction from any location it is created –
a contact, salesperson, and to-do cards, or a list of opportunities.
To finish a postponed interaction:
1. In the navigation pane, click the Administration Sales/Purchase
button, and then click Salespeople/Purchasers. Select a salesperson
you want to finish an interaction for and click Related Information
> Salesperson > Postponed Interactions.
2. Select the interaction you want to finish, and in the Action Pane,
click Resume.
3. Fill in the remaining fields in the wizard and modify the attachment,
if necessary.
4. Click Finish.
Now the interaction is logged to the interaction log, and if you have linked the
interaction to a campaign, a record also appears in the Campaign Entry window.
5. To view this record, on the list of campaigns, select a campaign you
want to view entries for and click Related Information >
Campaign Entries. For information about campaign entries, refer to
the “Campaign and Segmentation” chapter.
NOTE: You can postpone and resume creation of an interaction as many times
as you want.
To delete a postponed interaction:
1. In the navigation pane, click the Administration Sales/Purchase
button, and then click Salespeople/Purchasers. Select a salesperson
you want to delete an interaction for and click Related Information
> Salesperson > Postponed Interactions.
2. Select the interaction you want to delete, and click Actions >
Functions > Delete or click Actions > Delete.

Chapter 5: Interactions and Document Management
153
3. To confirm the deletion, click Yes in the message that appears.

Chapter 5: Interactions and Document Management
154
Lab 5.2 – Record Interactions
In this lab, you will practice recording an interaction for one of your contacts.
Scenario
You have just come back from a meeting with John Smith at MultiSport, where
you presented your new line of bicycles to him. The meeting went well.
Challenge Yourself
1. Record the interaction.
2. Evaluate the meeting during recording the interaction.
Need a Little Help
1. For contact John Smith, record an interaction using the BUS
interaction template. Its correspondence type is hard copy, which
makes the program automatically print the letter as the interaction is
recorded.
2. Specify your evaluation of the interaction as a very positive one.
3. Indicate a successful attempt of the interaction.
Step by Step
For contact John Smith, create an interaction using the Business Letter
interaction template.
1. Open the list of the contacts and browse to John Smith from
MultiSport.
2. In the Action Pane, click Create Interact.
3. In the Create Interaction wizard, click the AssistButton next to the
What is the type of interaction? field and select BUS for Business
Letter.
4. In the Description field, enter description of the meeting.
Specify your evaluation of the interaction as a very positive one.
Click Next. Click the AssistButton next to the Enter the evaluation of the
interaction here field and select Very Positive.
Indicate a successful attempt of the interaction.
Select the The interaction attempt was successful check box.
As you click Finish, a record about this interaction is created in the interaction
log and a letter is printed.

Chapter 5: Interactions and Document Management
155
Making Phone Calls
You can have the program create interaction entries as you make a phone call to
your contacts.
Before you can record phone calls as interactions in the program, you must
ensure that the interaction template code for outgoing phone calls has been
selected in the Outgoing Calls field on the General FastTab in the Interaction
Template Setup window.
NOTE: Making phone calls is only recorded as interaction when working with
the Classic client of Microsoft Dynamics NAV. For performing the procedures
described in this section, be sure to open the Classic client.
When you want to make a call, follow this procedure:
1. In the navigation pane, click Sales & Marketing > Marketing >
Contacts.
2. Browse to the contact you want to call to.
3. Go to the Communication tab. Click the button next to the
Phone No. field. Make sure the phone number for the contact is
specified. As you click this button, the Make Phone Call wizard
appears.
FIGURE 5.13 THE MAKING PHONE CALL WIZARD
4. Fill in the Description field. Other fields on this page are filled in by
the program.
5. Select the Dial Contact on Next check box, if you want to start
calling the contact once you click Next in the wizard. In this case,
the Phone Dialer application opens with the contact phone number
specified. Click Dial to perform a call. You will continue working
with the wizard after performing a call.

Chapter 5: Interactions and Document Management
156
FIGURE 5.14 PHONE DIALER
6. If you do not select the Dial Contact on Next check box, clicking
Next moves you to the next page of the wizard.
7. Fill in the What is your evaluation of the phone call? field with
either of the available options: Very Positive, Positive, Neutral,
Negative, and Very Negative.
FIGURE 5.15 EVALUATING THE CALL
8. Click Next. On this page, you can specify a campaign and/or an
opportunity to link them to the call.

Chapter 5: Interactions and Document Management
157
FIGURE 5.16 SPECIFY A CAMPAIGN OR AN OPPORTUNITY TO LINK TO THE INTERACTION
9. Click Finish.
As the interaction is recorded, you can view it in the Interaction Log Entries
window, opened from the contact card for the contact who you called to. To open
the Interaction Log Entries window, on the contact card, click Contact >
Interaction Log Entries. The window contains a new entry for the phone call.
FIGURE 5.17 THE INTERACTION LOG ENTRY RECORDED THE PHONE CALL
NOTE: In the RoleTailored client of Microsoft Dynamics NAV, to be able to
make phone calls, you must have Microsoft Office Communicator installed.

Chapter 5: Interactions and Document Management
158
E-Mails
You can have the program create interaction entries as you send e-mails to your
contacts.
NOTE: Sending and receiving e-mails are only recorded as interactions in the
Classic client of Microsoft Dynamics NAV. For performing the procedures
described in this section, be sure to open the Classic client.
If you have Microsoft® Office Outlook
® installed, you can send your e-mails
from Microsoft Dynamics NAV. This is an easy and quick way to communicate
with your contacts (customers, vendors, and so on).
As your e-mails are logged as interaction log entries, you can share the
information about any e-mail correspondence going on with your external
contacts. This allows other members of the organization to follow up on e-mail
correspondence.
From the Interaction Log Entries window, you can open mails and view their
contents. To do this, select the entry for the mail in question, and then click the
Show button.
Before you can send e-mails, set up
The interaction template code in the E-Mails field on the General
tab in the Interaction Template Setup window.
The E-Mail Logging feature on the E-Mail Logging tab of the
Marketing Setup window.
To read about setting up interaction templates and the E-Mail Logging feature,
refer to the “Setup Procedure” chapter.
The section below describes how you send e-mails and have them logged in
Microsoft Dynamics NAV.
Sending E-Mails
There are two ways to send e-mails to your contacts from Microsoft Dynamics
NAV:
By clicking the envelope button to the right of the E-Mail field
on the Communication tab on the contact card and going through
the process of creating an e-mail message with the Create Mail
wizard.
By using the Create Interaction wizard, and selecting e-mail as a
correspondence type. For more information about sending e-mails
with the Create Interaction wizard, refer to the “Using the Create
Interaction Wizard” section in this chapter.

Chapter 5: Interactions and Document Management
159
To send an e-mail with the Create Mail wizard and create an interaction log
entry, follow these steps:
1. Open the contact card for the contact you want to send an e-mail
message to. Go to the Communication tab.
2. Make sure an e-mail address is specified for the contact. Click the
envelope button to the right of the E-Mail field. The Create Mail
wizard appears.
FIGURE 5.18 THE CREATE MAIL WIZARD
3. Fill in the Description field. Other fields are filled in by the
program.
4. Select the Mail contact on Next check box, if you want to start
writing an e-mail message as you click Next.
In this case, a standard Microsoft Office Outlook window opens
where you can write a message. Clicking Send will send your
message to the contact. You will continue working with the wizard
after sending a message.
If you do not select the Mail contact on Next check box, clicking
Next moves you to the next page of the wizard.

Chapter 5: Interactions and Document Management
160
FIGURE 5.19 EVALUATING THE MAIL
5. Fill in the What is your evaluation of the mail? field with either of
the available options: Very Positive, Positive, Neutral, Negative, and
Very Negative.
You may want to link the mail to a campaign and/or an opportunity, or change
the mail initiator, cost, or duration. You can do it in the relevant fields of this
page in the wizard.
6. Click Finish.
As you click Finish in the wizard, an interaction log entry about the message sent
is created for the contact.
FIGURE 5.20 THE INTERACTION LOG ENTRY FOR THE MAIL CREATED

Chapter 5: Interactions and Document Management
161
NOTE: The procedure of logging received e-mails is the same as for e-mails
sent. For further details about the E-Mail Logging feature, refer to the section
“E-Mail Logging for MS Exchange Server” in the Sales & Marketing–Navision
Technical White Paper.
Automatically Recorded Interactions
You can have the program automatically record the sales, purchase, and service
documents that you create and print for your contacts as interactions. You can do
this only if the contact in question is also recorded in the program as a customer,
vendor, or bank.
For example, if a contact is also recorded as a customer, you can create a sales
quote from the contact’s customer card, and you can have the program
automatically record an interaction when you print the sales quote.
When you perform certain sales, purchase, and service actions in Microsoft
Dynamics NAV for a customer or vendor that is also recorded as a contact, the
program automatically records the action as an interaction for the contact in the
Sales & Marketing application area.
The program records interactions when you do the following:
Print sales and purchase quotes.
Print sales and purchase orders.
Print sales and purchase invoices.
Print sales and purchase blanket orders.
Print sales reminders.
Print sales statements.
Print sales and purchase credit memos.
Print sales shipment notes.
Print purchase receipts.
Create service orders.
Print sales return orders and return receipts.
Print sales finance charge memos.
Print purchase return shipments and return order confirmations.
Print service contracts, contract quotes, and quotes.
NOTE: The current version of Microsoft Dynamics NAV does not create an
interaction log entry when a service order is posted.
If a service order had been logged during creation and then posted, the program
does not allow opening a service order from the log.

Chapter 5: Interactions and Document Management
162
You can see the interactions that the program has automatically created for a
contact in the contact’s interaction log.
Demonstration – Create and Print Sales Quotes for Customers
In this demonstration, you will see that a sales quote created and printed for a
customer can be recorded as an interaction. If a contact is registered in the
program and linked with that customer – the program will create an interaction
entry for a sales quote created and printed.
1. Open the list of the contacts and browse to the contact you want to
create a sale quote for. A contact must not be an independent contact.
2. To be able to create a sales quote, the contact you selected must be
linked to a customer, vendor, and/or bank account. To find out what
the contact is linked to, click Related Information > Contact >
Customer/Vendor/Bank Acc. As any of the three cards may appear,
for the sake of the example, suppose that the customer card appears.
NOTE: If a contact is not linked to a customer, vendor, and/or bank account yet,
you must link it to any of them. For information about linking a contact to a
customer, vendor, and/or bank account, refer to the “Contacts” chapter.
3. Before creating a sales quote, ensure that the posting groups are
specified for a customer. To do this, on the Invoicing FastTab of the
customer card, verify that the Gen. Bus. Posting Group, VAT Bus.
Posting Group, and Customer Posting Group fields are filled in
with appropriate posting groups.
4. On the customer card, click Related Information > Sales > Quotes.
The Sales Quotes window with the list of the sales quotes appears.
5. In the Action Pane, click New to create a new sales quote.
6. Press ENTER to have the program automatically enter the next
available sales quote number. The program also fills in the fields for
the customer and the linked contact.
7. Enter the quote details.
8. In the Action Pane, click Print to print the sales quote. The Sales -
Quote window appears.
9. On the Options FastTab, choose whether you want to show internal
information, archive a document, and specify the number of copies
you want to be printed. Make sure the Log Interaction check box is
selected.
10. Click Print.
The program will automatically record the sales quote as an interaction for the
contact though it was created for the customer also. You can view the interaction
entry by selecting the line with the quote and clicking Show in the Interaction
Log Entries window opened for the contact.

Chapter 5: Interactions and Document Management
163
Printing a Contact Cover Sheet
The program can automatically create an interaction entry when you print cover
sheets to send to your contacts. To have the program do it, select the Log
Interaction check box in the Contact – Cover Sheet window. By default, this
check box is selected. An interaction log entry is not created if this check box is
clear.
To create log entries and print cover sheets for a contact, follow these steps:
1. On the contact card for your contact, click Actions > Functions >
Print Cover Sheet. The Contact - Cover Sheet window appears.
2. Go to the Options FastTab.
FIGURE 5.21 GETTING READY TO PRINT COVER SHEET
3. Fill in the Text field with the relevant text and select any check
boxes in the Remarks area according to your needs.
4. Click Print.
The program will print cover sheets and create a new interaction entry for the
contact. You can view it in the Interaction Log Entries window for this contact.

Chapter 5: Interactions and Document Management
164
Lab 5.3 – Create an Automatically Recorded Interaction
In this lab, you will practice performing actions that make the program
automatically create an interaction.
Scenario
In his letter, John Drave, a new contact, told you that he is interested in buying
50 bicycles (item number 1000). Since you have not signed a contract with John,
you decide to register him as a contact and create and print a sales quote for him.
Challenge Yourself
1. Create a new contact card for John Drave and link it to a customer.
2. Create a sales quote for John for 50 bicycles and print it.
3. Verify that the interaction log entry is created.
Step by Step
Create a new contact card for John Drave.
1. On the list of the contacts, click New.
2. Press ENTER to let the program enter the next available number for
a customer.
3. In the Type field, click the AssistButton and select Company.
4. In the Name field, enter “John Drave”.
5. Click the AssistButton next to the Salesperson Code field and select
PS as a salesperson who will handle John.
6. Click Actions > Functions > Link with existing > Customer.
7. In the Customer No. field of the Customer Link window, click the
AssistButton and select customer to link with John.
Create a quote for John for 50 bicycles and print it.
1. In the Action Pane of the contact card, click Sales Quotes.
2. In the Action Pane of the Sales Quotes window that appears, click
New to create a new quote.
3. On the Lines FastTab, click the AssistButton next to the Type field,
and select Item.
4. Click the AssistButton next to the No. field, and select 1000,
Bicycle. In the Quantity field, enter “50”.
5. In the Action Pane of the sales quote, click Print. Make sure the Log
Interaction check box.
6. Click Print.
Verify that the interaction log entry is created.

Chapter 5: Interactions and Document Management
165
1. From the contact card, click Related Information > Contact >
Interaction Log Entries.
2. Browse to the entry that relates to printing of the sales quote.

Chapter 5: Interactions and Document Management
166
Canceling and Deleting Interaction Log Entries
You can manage interaction log entries by canceling or deleting them. You may
want to cancel an interaction entry if, for example, it records an interaction that
has never been performed. Deleting interaction log entries may be needed if the
list of interaction entries is overloaded with records.
Canceling Interaction Log Entries
To cancel an interaction log entry, follow these steps:
1. Open the Interaction Log Entries window.
2. Select the interaction log entry you want to cancel and click Actions
> Functions > Switch Checkmark in Canceled.
3. Confirm cancellation in the subsequent message.
NOTE: You can cancel several interactions at once by selecting them in the
Interaction Log Entries window and using the Switch Checkmark in Canceled
function.
Deleting Interaction Log Entries
As you canceled an interaction log entry, it can be deleted. Only canceled
interaction log entries can be deleted. To delete canceled interaction log entries,
follow this procedure:
1. Click Departments > Administration > IT Administration > Data
Deletion > Tasks, and then under Marketing Activities, click
Delete Canceled Interaction Log Entries. The Delete Interaction
Log Entries window appears.
FIGURE 5.22 DELETION OF CANCELED INTERACTION LOG ENTRIES

Chapter 5: Interactions and Document Management
167
2. To the right of the Entry No. field, click the AssistButton and select
the interaction log entry or the range of them that you want to delete.
NOTE: You can specify any other parameter to indicate which of the canceled
interaction log entries you want to delete. If no parameters are specified, the
program will delete all canceled interaction entries.
3. Click OK.
The program deletes the interaction log entries you have specified.
Interaction Statistics
You can view statistics about your interactions in the Interaction Tmpl.
Statistics window and the Interaction Group Statistics window.
Interaction Template Statistics
In the Interaction Tmpl. Statistics window, you can view information about the
interaction templates, such as the number of interactions created using the
interaction templates, the total cost, and total duration of these interactions.
To open the Interaction Tmpl. Statistics window, do the following:
1. Open the list of interaction templates.
2. Select the interaction template that you want to view statistics for.
3. In the Action Pane, click Statistics.
FIGURE 5.23 THE INTERACTION TEMPLATE STATISTICS
To see the details about the interactions created with the interaction template, in
the Interaction Tmpl. Statistics window, click the number next to the No. of
Interactions, Cost (LCY), or Duration (Min.) field. In either case, the
Interaction Log Entries window appears displaying a list of interactions. To
view detailed information of each interaction, select an interaction entry and click
Show. If an interaction does not contain an attachment, a corresponding card
appears (an order, quote, or another one). If yes, the attachment opens.

Chapter 5: Interactions and Document Management
168
Interaction Group Statistics
In the Interaction Group Statistics window, you can view information about
interaction groups. The window displays the statistics for interaction templates
assigned to one or another group. For example, for the LETTER interaction
group, you can see how many interactions were created using interaction
templates from this group, and their total cost and duration.
To open the Interaction Group Statistics window, follow this procedure:
1. Open the list of the interaction groups.
2. Select the interaction group that you want to view statistics for.
3. In the Action Pane click Statistics.
FIGURE 5.24 THE INTERACTION GROUP STATISTICS
To see details about the interactions created using interaction templates from the
interaction group, in the Interaction Group Statistics window, click the number
next to the No. of Interactions, Cost (LCY), or Duration (Min.) fields. In either
case, the Interaction Log Entries window appears displaying a list of
interactions. To view detailed information of each interaction, select an
interaction entry and click Show. If an interaction does not contain an
attachment, a corresponding card appears (an order, quote, or another one). If
yes, the attachment opens.
Chapter 5: Interactions and Document Management
169
Summary
Microsoft Dynamics NAV offers you a possibility of recording interactions for
all types of communications you have with your business partners. You can
create interaction entries manually by using the Create Interaction wizard, or you
can have the program record interactions when you
Make a phone call or send an e-mail message.
Perform specific actions in the program such as print a sales quote.
Interactions you create can have attachments which can be created directly from
Microsoft Dynamics NAV or saved on a disk and then imported to the program.
During creation of an interaction, you can postpone the interaction and resume
and finish it later. You can manage interaction entries by canceling and deleting
them.
You can also view interactions statistics by interaction templates and interaction
groups. From statistics, you can learn how many interactions an interaction
template participated in, interaction cost, and duration.

Chapter 5: Interactions and Document Management
170
Test Your Knowledge
1. What must you do to delete an interaction log entry?
2. True or False:
You can send e-mails to your contacts only by clicking the envelope icon
next to the E-Mail field on the Communication FastTab on a contact card.
3. Complete the following sentence:
You can ______________ and _________________ creation of an
interaction as many times as you need.
4. You can insert attachments in interaction templates by (select all that apply):
( ) Copying the attachments assigned to other interaction templates
( ) Creating a new attachment
( ) Modifying a document stored in the Attachments folder
( ) Importing a created document into Microsoft Dynamics NAV
5. Your attachment contains merge fields. Where is information taken for filling
them in?

Chapter 5: Interactions and Document Management
171

Chapter 5: Interactions and Document Management
172
Quick Interaction: Lessons Learned
Take a moment to write down three Key Points you have learned from this
chapter:
1.
2.
3.

Chapter 5: Interactions and Document Management
173
Solutions
Test Your Knowledge
1. What must you do to delete an interaction log entry?
MODEL ANSWER:
You must first cancel it because only canceled log entries can be deleted.
2. True or False:
You can send e-mails to your contacts only by clicking the envelope icon
next to the E-Mail field on the Communication FastTab on a contact card.
False: There are two ways of sending e-mails to your contacts from Microsoft
Dynamics NAV: you can click the envelope icon to the right of the E-Mail field
on the Communication FastTab on the contact card. Or you can use the Create
Interaction wizard, and select E-Mail in the Correspondence Type field.
3. Complete the following sentence:
You can ______________ and _________________ creation of an
interaction as many times as you need.
MODEL ANSWER:
You can postpone and resume creation of an interaction as many times as you
need.
4. You can insert attachments in interaction templates by:
(√) Copying the attachments assigned to other interaction templates
(√) Creating a new attachment
( ) Modifying a document stored in the Attachments folder
(√) Importing a created document into Microsoft Dynamics NAV
5. Your attachment contains merge fields. Where is information taken for filling
them in?
MODEL ANSWER:
Microsoft Dynamics NAV fills in the merge fields with the information from the
Contact Card, Interaction Log Entries, Salesperson/Purchaser Card, and
Company Information windows.