Embed Size (px)
Citation preview

Chapter 3 Residential Dwelling Units
Real Property Assessment Guidelines Page 1
Contents
Overview of the Data Collection Procedure 4
Task 1-Gathering General Information 4
Task 2-Gathering Information About
the Interior 5
Task 3-Measuring the Dwelling 5
Task 4-Assessing the General
Characteristics of the Dwelling and
Neighborhood 6
Task 5-Reviewing the Data 6
Measuring and Calculating Areas 6
Determining the Story Description 8
Categorizing the Garage or Carport 10
Labeling the Sketch Grid 12
Completing a Property Record Card 15
Providing Descriptive Data 15
Task 1-Completing the Sketch Grid 17
Task 2-Recording General
Characteristics 19
Task 3-Recording Information About
the Construction and Floor Areas 24
Completing the Replacement Cost
Pricing Ladder 31
Task 1-Determining the Base Price 31
Task 2-Determining and Applying the
Row-Type Adjustments 38
Task 3-Determining and Applying the
Interior Feature Adjustments 40
Task 4-Determining and Applying the
Exterior Features Adjustments 49
Task 5-Recording and Applying the
Grade 52
Task 6-Determining and Applying the
Location Cost Multiplier 54
Completing the Summary of Residential
Improvements Section 54
Solar Heating and Cooling Systems 59
Chapter 3 Residential Dwelling Units
Real Property Assessment Guidelines Page 2
Solar Heating and Cooling System Definitions 59
Solar Heating and Cooling System Types 60
Collecting Data for Solar Systems 61
Collecting Data for Residential Solar Energy
Systems 62
Collecting Data for Commercial Solar Energy
Systems 62
Pricing Solar Systems 63
Depreciating Solar Systems 64
Geothermal Heating and Cooling Systems 64
Geothermal Heating and Cooling System
Definitions 64
Geothermal Heating and Cooling System
Types 65
Collecting Data for Geothermal Systems 66
Tonnage Ratings for Geothermal Systems 67
Structures With Two or More Geothermal
Systems 68
Pricing Geothermal Systems 68
Depreciating Geothermal Systems 69
Tables
Table 3-1. Story Descriptions .................................8
Table 3-2. Garage/Carport Types ..........................11
Table 3-3. Abbreviations for Use on the
Sketch Grid ......................................................12
Table 3-4. Source of Property Data Options .........19
Table 3-5. Occupancy Options ..............................21
Table 3-6. Story Height Options ...........................23
Table 3-7. Attic Options .......................................23
Table 3-8. Basement Options ................................23
Table 3-9. Crawl Space Options ...........................24
Table 3-10. Mixed Frame and Masonry Wall
Construction Codes ..........................................26

Chapter 3 Residential Dwelling Units
Real Property Assessment Guidelines Page 3
Table 3-11. Basement Recreation Room
Codes................................................................28
Table 3-12. Condition Ratings ..............................57
Table 3-13. Solar Heating and Cooling
Systems ............................................................60
Table 3-14. Data Collection Codes for
Geothermal Systems ........................................67
Figures
Figure 3-1. Floor Plan .............................................7
Figure 3-2. Measurements .......................................8
Figure 3-3. Sketch Grid .........................................16
Figure 3-4. Sketch Grid .........................................18
Figure 3-5. Providing a General Description of
the Dwelling .....................................................20
Figure 3-6. Describing the Construction and
Providing Floor Area Information ...................25
Figure 3-7. Cells Used to Determine Base
Price .................................................................32
Figure 3-8. Cells Used to Determine
Row-Type Adjustments ...................................39
Figure 3-9. Cells Used to Determine the
Interior Features Adjustments ..........................42
Figure 3-10. Cells Used to Determine the
Exterior Features Adjustments .........................50
Figure 3-11. Cells Used to Record the Grade
and Location Multiplier to Calculate the
Replacement Cost ............................................53
Figure 3-12. Summary of Residential
Improvements Section......................................56

Chapter 3 Residential Dwelling Units
Real Property Assessment Guidelines Page 4
This chapter describes the process of valuing residential dwelling units. It begins
with an overview of the data collection procedure for dwelling units. In order to
understand the process of valuing residential dwelling units, you need to
understand the following concepts, which are described in this chapter:
measuring and calculating floor areas for dwelling units
determining the story description for dwelling units
categorizing a dwelling unit’s garage or carport
labeling the sketch of a dwelling unit.
The rest of the chapter provides step-by-step instructions for completing the
relevant sections of the Residential Property Record Card and for determining the
true tax value for a dwelling unit.
Overview of the Data Collection Procedure
When gathering data to assess a residential dwelling unit, you need to
gather general information with the occupant’s assistance, if possible
gather information about the interior
take the necessary measurements
assess the general characteristics
review the data before you leave.
The steps below describe a recommended approach for performing each of these
tasks. The section Completing a Property Record Card in this chapter provides
detailed instructions for completing each area of the Property Record Card when
assessing a dwelling.
Task 1—Gathering General Information
Step 1 Record the address of the dwelling and check the exterior components,
such as the foundation, walls, and roof.
Step 2 Greet the occupant, present an identification card, and explain the purpose
of the visit in a brief, courteous manner.
If the occupant is not there, estimate the interior information.
If the occupant refuses to admit you to the property, do not argue. Leave
immediately and estimate the assessment data. Note on the card that
admittance was refused, and record the date and time.
Step 3 Determine the age of the dwelling. If the occupant does not know, estimate
the date of construction and indicate the date estimated with a +/- after the
date.
Step 4 Determine the number of rooms per floor, the total number of bathrooms,
and whether there is a basement and/or an attic.
Step 5 If there is a finished attic, determine the extent of the finish.

Chapter 3 Residential Dwelling Units
Real Property Assessment Guidelines Page 5
Task 2—Gathering Information About the Interior
Step 1 If the dwelling is more than one-story, inspect the upper floor to determine
the extent to which it is finished.
Step 2 Note the quality of construction and other features that affect the
determination of grade, such as the quality of each aspect of the interior
finish.
Step 3 Note the general condition of the dwelling for the determination of
depreciation. For example, look for signs of wear and tear, as well as
deterioration, such as cracked walls and sagging floors.
Step 4 If there is a basement, determine its size and whether there are any
improvements, such as installation of extra plumbing fixtures or creation
of a recreation room. If areas are finished, evaluate the quality of the finish
and size of the finished area. While in the basement, determine the size
and type of floor joists.
Step 5 If there is a crawl space, determine the size.
Step 6 Determine the type of heating and the number of plumbing fixtures.
Step 7 Double check the interior features noted on the property record card. Be
sure to note any unusual conditions that are not visible from the outside,
such as recent remodeling or severe deterioration of the interior.
Remember to mark the card clearly so the feature can be priced properly.
Step 8 If you have no further questions, thank the occupant and begin your
exterior inspection.
Task 3—Measuring the Dwelling
Step 1 Measure the dwelling and sketch it neatly on the property record card in its
approximate proportions. Also,
Be sure the measurements are complete and accurate.
Note any offsets or additions.
Indicate separate story heights and show additions to the base of the
dwelling.
Indicate the location of any basement and crawl space.
Make sure that the total measurements of opposite sides are equal.
Step 2 If the dwelling has any exterior features such as a porch, deck, patio, or
balcony, indicate the dimensions in the sketch area and label the
improvement.
Step 3 Provide information about the garage.
If there is an attached carport or garage, indicate the type of construction,
story height, and area inside the sketch area of the property record card.

Chapter 3 Residential Dwelling Units
Real Property Assessment Guidelines Page 6
If there is a detached garage, enter its measurements in the appropriate
blocks on the card. Note whether the grade and condition of the garage are
similar to the dwelling.
If there is a basement garage or integral garage, label its car capacity or
area, if possible.
If the dwelling does not have a garage or carport, note this fact on the
property record card.
Task 4—Assessing the General Characteristics of the Dwelling and Neighborhood
Step 1 From the beginning of your review, establish an idea of the proper grade.
See Appendix A, Assigning Grades to Dwellings.
Step 2 Determine the property condition rating for the dwelling. This rating is a
judgment of the physical condition and functional usefulness of the
dwelling in relation to other properties in the neighborhood. See Appendix
B, Understanding Property Condition Ratings.
Step 3 Before you finalize your determination of the grade for the dwelling, go to
a position where there is a good overall view of the dwelling. Then,
determine the grade based on your inspection of the dwelling in addition to
the procedures identified in Appendix A.
Note: The pricing schedules do not reflect added cost for the increased perimeter
of an irregular wall outline, expansive roof structures with wide
overhangs, and elaborate trim and built-in features. The grade factor is
used to reflect these attributes, as well as other factors.
Step 4 Determine the total depreciation of the dwelling. Total depreciation for
residential property is obtained by reviewing the grade, property condition,
and age. Information about determining depreciation is provided in
Appendix B.
Task 5—Reviewing the Data
Before you leave, be sure to review all the data about the dwelling to ensure that it
is complete and accurate.
Measuring and Calculating Areas
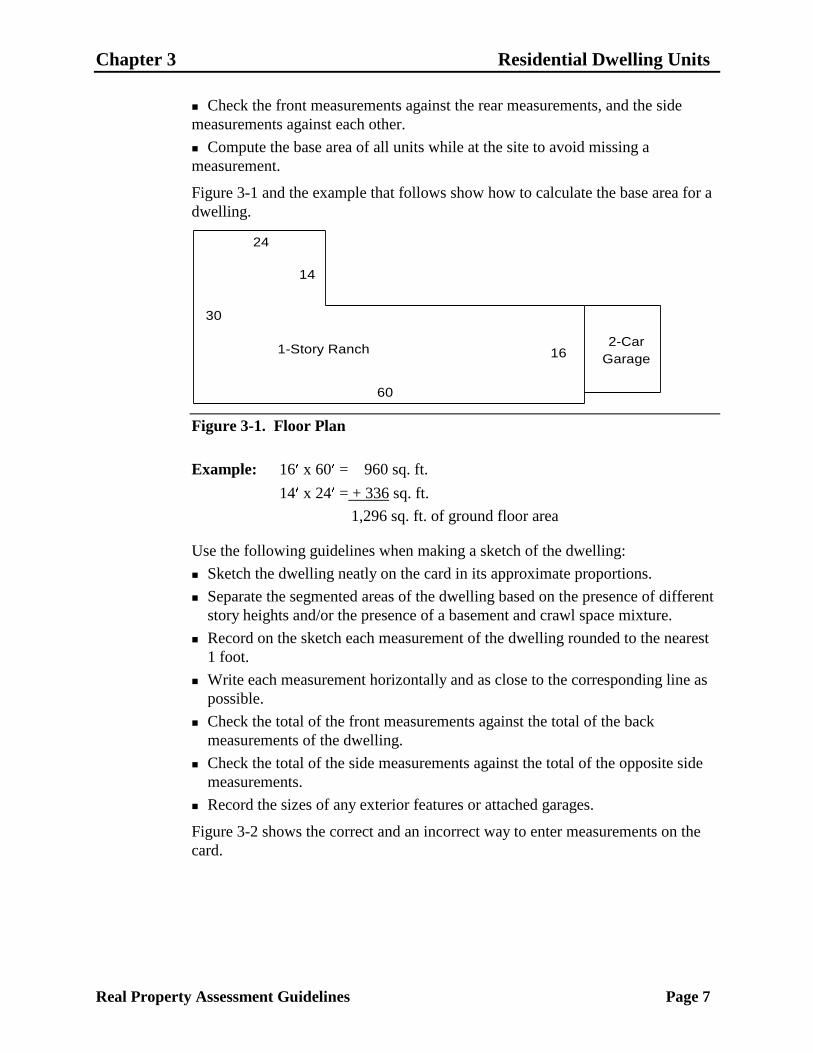
Use the following guidelines to determine the base area of the dwelling unit:
Measure the exterior of each full or partial floor, but do not include
measurements for exterior features such as porches and stoops.
Enter all measurements on the sketch area of the Property Record Card.
Chapter 3 Residential Dwelling Units
Real Property Assessment Guidelines Page 7
Check the front measurements against the rear measurements, and the side
measurements against each other.
Compute the base area of all units while at the site to avoid missing a
measurement.
Figure 3-1 and the example that follows show how to calculate the base area for a
dwelling.
2-Car
Garage
24
14
30
60
161-Story Ranch
Figure 3-1. Floor Plan
Example: 16 x 60 = 960 sq. ft.
14 x 24 = + 336 sq. ft.
1,296 sq. ft. of ground floor area
Use the following guidelines when making a sketch of the dwelling:
Sketch the dwelling neatly on the card in its approximate proportions.
Separate the segmented areas of the dwelling based on the presence of different
story heights and/or the presence of a basement and crawl space mixture.
Record on the sketch each measurement of the dwelling rounded to the nearest
1 foot.
Write each measurement horizontally and as close to the corresponding line as
possible.
Check the total of the front measurements against the total of the back
measurements of the dwelling.
Check the total of the side measurements against the total of the opposite side
measurements.
Record the sizes of any exterior features or attached garages.
Figure 3-2 shows the correct and an incorrect way to enter measurements on the
card.

Chapter 3 Residential Dwelling Units
Real Property Assessment Guidelines Page 8
Figure 3-2. Measurements
Determining the Story Description
The base residential cost schedules used to calculate the replacement cost of a
dwelling are listed by floors. Use the explanations in Table 3-1 to determine
which story description is appropriate for a dwelling.
Table 3-1. Story Descriptions
Story Description Figure
One-story dwelling, generally referred to as a ranch
style home, has the following characteristics:
all rooms on one floor
all rooms located below the square of the house at
the eave line
low-pitch roof with a slope of about 1/6.
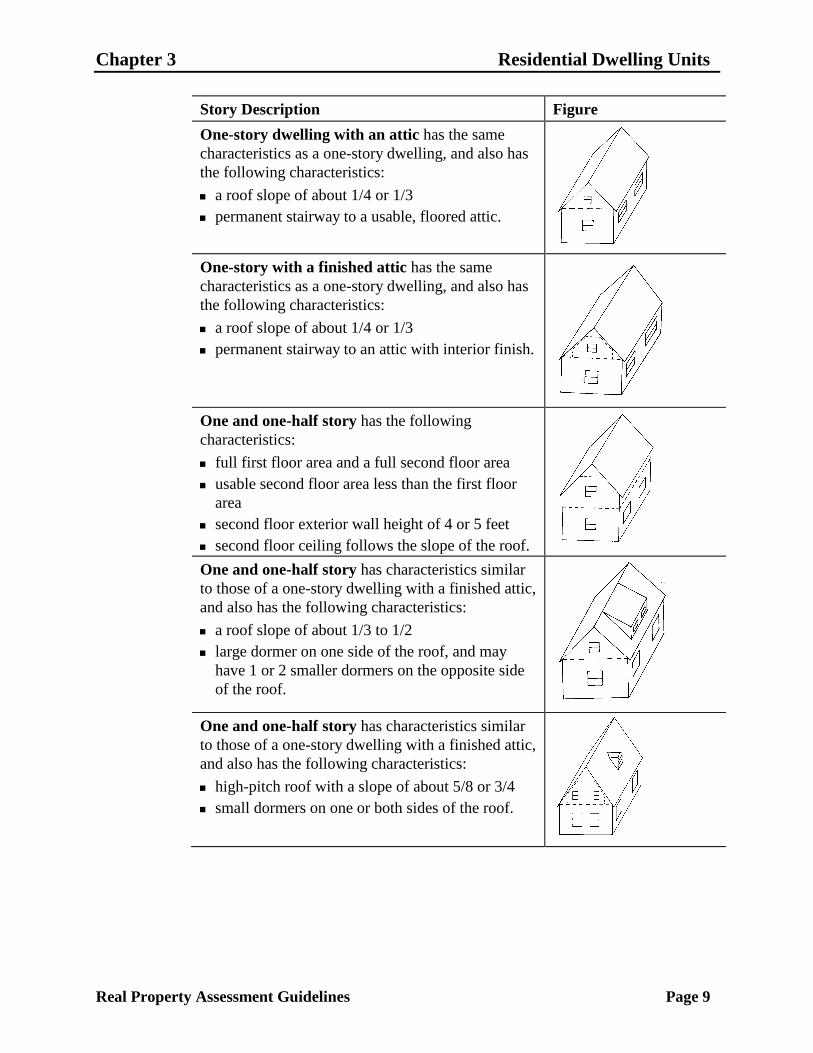
Chapter 3 Residential Dwelling Units
Real Property Assessment Guidelines Page 9
Story Description Figure
One-story dwelling with an attic has the same
characteristics as a one-story dwelling, and also has
the following characteristics:
a roof slope of about 1/4 or 1/3
permanent stairway to a usable, floored attic.
One-story with a finished attic has the same
characteristics as a one-story dwelling, and also has
the following characteristics:
a roof slope of about 1/4 or 1/3
permanent stairway to an attic with interior finish.
One and one-half story has the following
characteristics:
full first floor area and a full second floor area
usable second floor area less than the first floor
area
second floor exterior wall height of 4 or 5 feet
second floor ceiling follows the slope of the roof.
One and one-half story has characteristics similar
to those of a one-story dwelling with a finished attic,
and also has the following characteristics:
a roof slope of about 1/3 to 1/2
large dormer on one side of the roof, and may
have 1 or 2 smaller dormers on the opposite side
of the roof.
One and one-half story has characteristics similar
to those of a one-story dwelling with a finished attic,
and also has the following characteristics:
high-pitch roof with a slope of about 5/8 or 3/4
small dormers on one or both sides of the roof.

Chapter 3 Residential Dwelling Units
Real Property Assessment Guidelines Page 10
Story Description Figure
One and three-fourths story has the following
characteristics:
full first floor area
second floor exterior wall height of 6 or 7 feet
part of the second floor ceiling follows the slope
of the roof.
Two-story has the following characteristics:
two full floors of living area
first floor usually at grade level.
Bi-level has the following characteristics:
2-level design
first floor partially below grade
entry or foyer at a level between the first and
second floor.
Tri-level has the following characteristics:
split-level design of 3 levels or more, exclusive of
any basement
first floor partially below grade and partially at
grade level
second floor on top of the first floor level.
Categorizing the Garage or Carport
Many dwelling units have garages or carports attached to, or incorporated into the
design of the dwelling. Use the following explanations in Table 3-2 to determine a
dwelling’s garage type.

Chapter 3 Residential Dwelling Units
Real Property Assessment Guidelines Page 11
Table 3-2. Garage/Carport Types
Garage/Carport Types Figure
Attached garage has the following
characteristics:
completely enclosed structure
one or more walls in common with the
dwelling
measurable dimensions.
Integral garage has the following
characteristics:
part of the dwelling with living area on two
or more surfaces
dimensions that are not easily measurable
from the exterior.
Note: Many homes have garages with
dimensions that are not easily measurable
from the exterior because the area
immediately behind the garage is a finished
living space. In other types of homes, the
living space may be on the floor above the
garage. In either case, the garage is included
in the base area calculation. After the
dwelling is priced, the area of the integral
garage is estimated using its car capacity and
is deducted from the base area of the
dwelling.
Basement garage has the following
characteristics:
located on the basement level
entrance on the basement level.
Shed-type carport has the following
characteristics:
flat roof, independent of the dwelling’s roof
open sides and ends

Chapter 3 Residential Dwelling Units
Real Property Assessment Guidelines Page 12
Garage/Carport Types Figure
Integral roof extension type carport has the
following characteristics:
roof that is a continuation of the basic roof
structure of the dwelling
open sides and ends.
Labeling the Sketch Grid
When you record the physical characteristics of the dwelling on the sketch grid of
the property record card, use abbreviations and symbols to identify such elements
as:
base area components
construction materials
story heights
exterior features.
Table 3-3 lists the abbreviations, and the examples that follow demonstrate how to
record the abbreviations on the sketch grid.
Table 3-3. Abbreviations for Use on the Sketch Grid
Base Area Components
For this component Use this abbreviation
Attic A
Basement B
Bay; a wall projection that
extends beyond the normal
line of the dwelling
Bay
Crawl space C
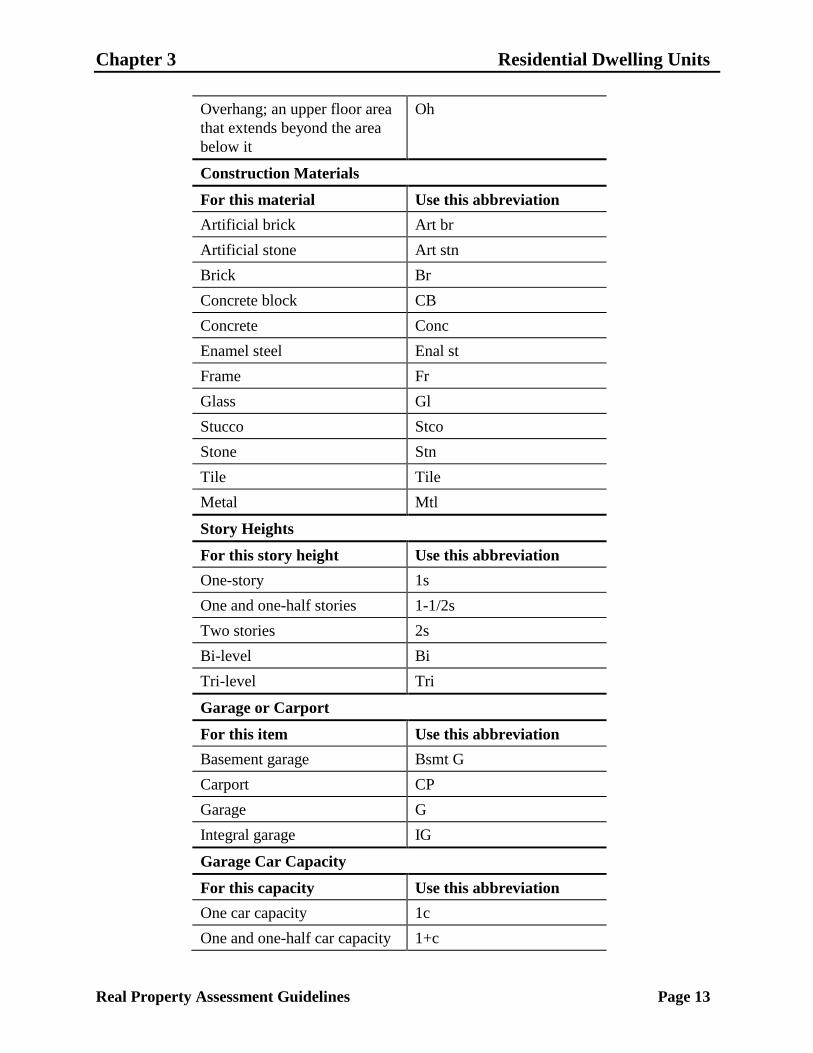
Chapter 3 Residential Dwelling Units
Real Property Assessment Guidelines Page 13
Overhang; an upper floor area
that extends beyond the area
below it
Oh
Construction Materials
For this material Use this abbreviation
Artificial brick Art br
Artificial stone Art stn
Brick Br
Concrete block CB
Concrete Conc
Enamel steel Enal st
Frame Fr
Glass Gl
Stucco Stco
Stone Stn
Tile Tile
Metal Mtl
Story Heights
For this story height Use this abbreviation
One-story 1s
One and one-half stories 1-1/2s
Two stories 2s
Bi-level Bi
Tri-level Tri
Garage or Carport
For this item Use this abbreviation
Basement garage Bsmt G
Carport CP
Garage G
Integral garage IG
Garage Car Capacity
For this capacity Use this abbreviation
One car capacity 1c
One and one-half car capacity 1+c
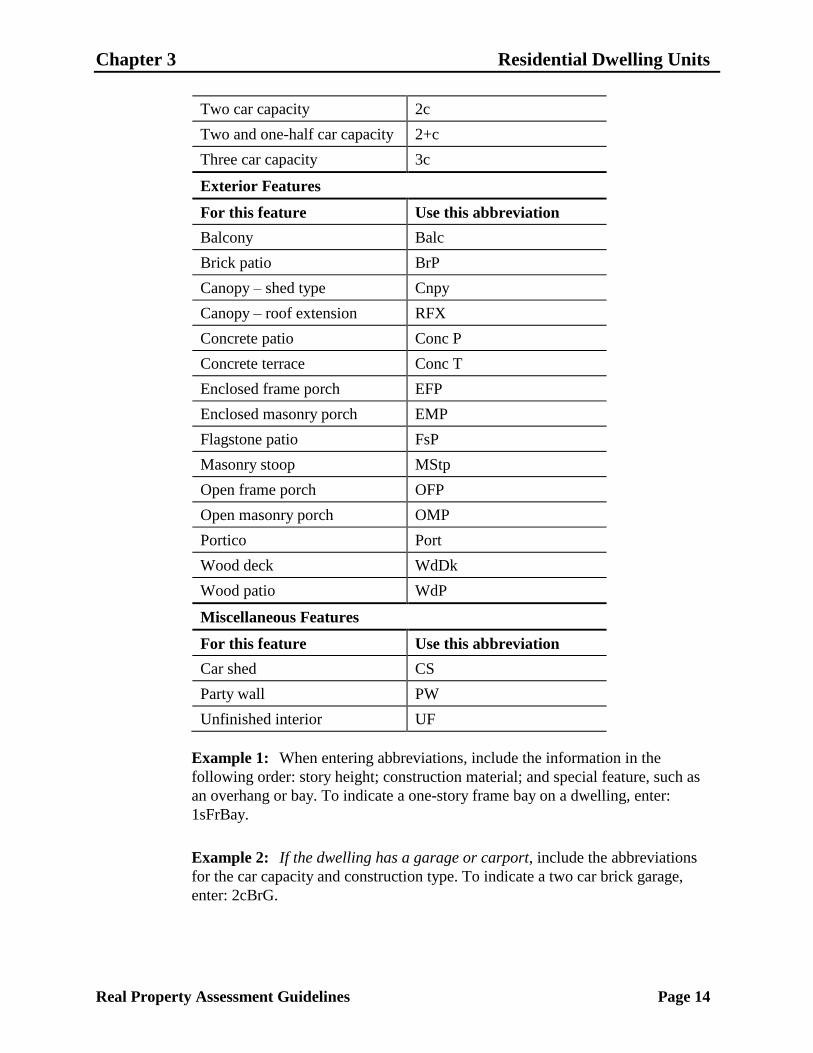
Chapter 3 Residential Dwelling Units
Real Property Assessment Guidelines Page 14
Two car capacity 2c
Two and one-half car capacity 2+c
Three car capacity 3c
Exterior Features
For this feature Use this abbreviation
Balcony Balc
Brick patio BrP
Canopy – shed type Cnpy
Canopy – roof extension RFX
Concrete patio Conc P
Concrete terrace Conc T
Enclosed frame porch EFP
Enclosed masonry porch EMP
Flagstone patio FsP
Masonry stoop MStp
Open frame porch OFP
Open masonry porch OMP
Portico Port
Wood deck WdDk
Wood patio WdP
Miscellaneous Features
For this feature Use this abbreviation
Car shed CS
Party wall PW
Unfinished interior UF
Example 1: When entering abbreviations, include the information in the
following order: story height; construction material; and special feature, such as
an overhang or bay. To indicate a one-story frame bay on a dwelling, enter:
1sFrBay.
Example 2: If the dwelling has a garage or carport, include the abbreviations
for the car capacity and construction type. To indicate a two car brick garage,
enter: 2cBrG.
Chapter 3 Residential Dwelling Units
Real Property Assessment Guidelines Page 15
Example 3: If the dwelling has an attic, enter the abbreviation for the attic over
the abbreviation for the base component, and separate them by a horizontal line.
To indicate a two-story brick dwelling with an attic, enter:
A
2sBr
Example 4: If the dwelling has basement or crawl space, enter the abbreviation
for the basement or crawl space under the abbreviation for the base component,
and separate them by a horizontal line. To indicate a one-story frame dwelling
with a 1/2 crawl space, enter:
1sFr
½C
Example 5: If the dwelling has mixed construction features, the abbreviation for
the construction material of the upper story is entered over the abbreviation for the
lower story. To indicate a two-story dwelling with upper story frame construction
and lower story brick construction, enter:
1sFr
1sBr
Completing a Property Record Card
The sections below describe in detail how to complete each relevant section of the
state’s version of the Residential Property Record Card for a dwelling unit.
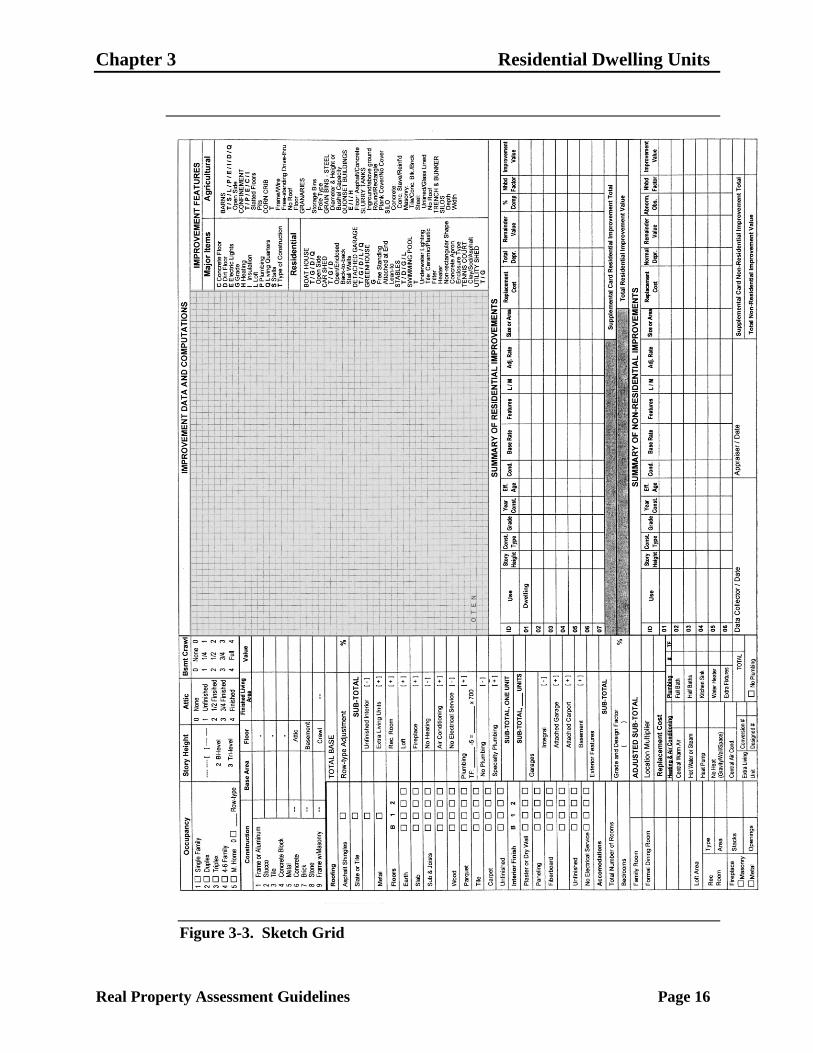
Figure 3-3 shows the side of the property record card that you complete for a
dwelling. As you read these instructions, keep in mind that your county’s property
record card may be slightly different.
Note: If the parcel has two or more free-standing dwellings, or row-type
dwellings that are different from each other, record the data for each dwelling on a
separate property record card.
Providing Descriptive Data
Before you can determine the replacement cost of a dwelling, you need to describe
its features and construction. The steps for recording descriptive data about a
dwelling are grouped into the following tasks, described in the sections below:
Task 1—Complete the sketch grid.
Task 2—Record the dwelling’s general characteristics.
Task 3—Record information about the dwelling’s construction and floor areas.
Chapter 3 Residential Dwelling Units
Real Property Assessment Guidelines Page 16
Figure 3-3. Sketch Grid
Chapter 3 Residential Dwelling Units
Real Property Assessment Guidelines Page 17
Task 1—Completing the Sketch Grid
You record the physical characteristics of the dwelling and yard improvements on
the parcel on the back of the property record card. A sketch grid, shown in
Figure 3-4, is provided on the property record card to make a plain view sketch of
the dwelling on the property. On the sketch grid, you also indicate the source of
the data collected for the property.
To complete the sketch grid on the property record card, perform these steps:
Step 1 Draw the dwelling to scale as closely as possible. Orient the dwelling with
the side facing the street toward the bottom of the sketch grid.
Step 2 On your sketch, enter all outside dimensions of the dwelling required to
compute the gross square foot ground area. Guidelines are provided in the
section Measuring and Calculating Areas in this chapter.
Step 3 Compute the gross square foot ground area of the dwelling.
Step 4 Enter the story height of the dwelling. Information about determining story
height is provided in the section Determining the Story Description in this
chapter.
Step 5 Identify all additions to the dwelling, such as porches, canopies, decks, and
other exterior features, and their
outside dimensions
computed gross square foot ground area
story height.
Step 6 Use abbreviations and symbols to label components of the dwelling in the
sketch area. Guidelines are provided in the section Labeling the Sketch
Grid in this chapter.
Chapter 3 Residential Dwelling Units
Real Property Assessment Guidelines Page 18
Figure 3-4. Sketch Grid

Chapter 3 Residential Dwelling Units
Real Property Assessment Guidelines Page 19
Step 7 To indicate the source of the property data, circle the appropriate letter or
letters listed in the bottom left of the sketch grid. Table 3-4 describes the
options.
Table 3-4. Source of Property Data Options
This option Indicates
O Owner
T Tenant
E Estimated
N Dwelling was not entered, information
was obtained at the door.
Task 2—Recording General Characteristics
The property record card provides space, shown in Figure 3-5, to record a general
description of the dwelling.
Chapter 3 Residential Dwelling Units
Real Property Assessment Guidelines Page 20
Figure 3-5. Providing a General Description of the Dwelling

Chapter 3 Residential Dwelling Units
Real Property Assessment Guidelines Page 21
To record a general description of the dwelling, perform the following steps:
Step 1 In the ―Occupancy‖ section, place a check in the check box
corresponding to the occupancy for which the dwelling was designed. If
the dwelling is free standing, check only one of the options. If the
dwelling consists of row type or attached units, check more than one
option. Table 3-5 describes the occupancy options.
Note: When determining the occupancy for which the dwelling was
designed, always treat basement and attic living units as conversion units,
regardless of whether they were incorporated into the original design.
Table 3-5. Occupancy Options
This option Indicates
1 A dwelling designed for occupancy by one family with one
living unit. If the dwelling has been converted for occupancy by
two or more families, enter the number of current living units in
the check box instead of a check.
2 A two-story dwelling designed for occupancy by two families,
with one living unit on each floor. If the dwelling has been
converted for occupancy by three or more families, enter the
number of living units in the check box instead of a check.
3 A three-story family dwelling designed for occupancy by three
families, with one living unit on each floor. If the dwelling has
been converted for occupancy by four or more families, enter
the number of living units in the check box instead of a check.
4 A detached, free-standing two or three-story dwelling, with two
living units on each floor that are accessed by a center hall. If
the dwelling has been converted for occupancy by five or more
families in the case of a four-family design, or seven or more
families in the case of a six-family design, enter the number of
living units in the check box instead of a check.
5 A dwelling unit designed as a manufactured home or a mobile
home. Instructions for valuing a manufactured home or a
mobile home as real property are provided in Chapter 4.

Chapter 3 Residential Dwelling Units
Real Property Assessment Guidelines Page 22
This option Indicates
6 Dwelling units separated by vertical common walls, such as
two-family doubles or townhouses. Row-types are generally a
series of single-family dwelling units. Follow these guidelines:
Place a check in the ―Row-Type‖ check box.
On the line provided to the left of ―Row-Type,‖ enter the
total number of row-type units in the entire building, even if
the other dwelling units are different in appearance from the
unit that you sketched.
If there are two to three units, the units have single
ownership, the same square footage, and the same physical
characteristics, list and record the data, except exterior
features, for one unit. The replacement cost of the building is
computed by multiplying the cost of one unit by the number
of units within the building.
If there are two to three units, the units have single
ownership, different square footage or physical
characteristics, sketch, list, and record the data for each style
unit on individual property record cards. The replacement
cost of the building is computed by totaling the cost of all the
units contained within the building.
If the units have individual ownership, sketch, list, and
record the data for each individual unit on a separate property
record card. The replacement cost of each unit is calculated
and assessed separately. This procedure applies to all
individually-owned platted row-type units regardless of the
number of units contained within the structure. Such units
are found in horizontal property regime or planned unit
development properties.
If there are four or more units and the units have single
ownership, the structure is considered commercial and priced
from the commercial pricing guidelines as an apartment
building.
Step 2 In the ―Story Height‖ section, identify the story height of the dwelling.
Table 3-6 describes the story height options. Circle one-story height
option for the dwelling.
If neither the bi-level nor tri-level description applies to the dwelling,
enter the most representative story height in the space provided at the top
of the Story Height. The space appears as
. [ ]
Enter the information as follows:

Chapter 3 Residential Dwelling Units
Real Property Assessment Guidelines Page 23
In the first two character positions, enter the story height, excluding the
basement. Record the story height in half-story increments. For
example, enter 1.0 for one-story, 1.5 for one and one-half stories, 2.0
for two stories, and so forth. There is no limit to the number of stories.
In the bracket and the character positions to the right, enter the wall
height adjustment to account for intermediate wall heights, if
necessary. Enter ―+‖ or ―–‖ in the bracket, and ―1‖ in the character
position to indicate plus or minus one-half, the difference between the
given story height and the next one-half story increment.
Table 3-6. Story Height Options
This option Indicates
2 A two-level (bi-level) design in which the first floor is
partially below grade and the entry or foyer is on a level
between the first and second floors. This design also is
referred to as a ―raised ranch.‖
3 A split-level (tri-level) design of three or more levels,
not including the basement.
Step 3 In the ―Attic‖ section, circle the code that best describes the attic.
Table 3-7 describes the attic options.
Table 3-7. Attic Options
This option Indicates
0 No attic
1 An unfinished attic with only a subfloor and stairs
2 A divided attic with approximately one-half of the
area finished and one-half unfinished
3 Either a divided attic with approximately
three-fourths of the area finished and one-fourth
unfinished, or an undivided attic that is fully
finished
4 A divided and fully finished attic
Step 4 In the ―Bsmt‖ section, circle the code that best describes the basement.
Table 3-8 describes the basement options.
Table 3-8. Basement Options
This option Indicates
0 No basement

Chapter 3 Residential Dwelling Units
Real Property Assessment Guidelines Page 24
This option Indicates
1 Basement is approximately 1/4
of the first floor base area
2 Basement is approximately 1/2
of the first floor base area
3 Basement is approximately 3/4
of the first floor base area
4 Basement is approximately all of
the first floor base area
Step 5 In the ―Crawl‖ section, circle the code that best describes the crawl space.
Table 3-9 describes the crawl space options.
Table 3-9. Crawl Space Options
This option Indicates
0 No crawl space
1 Crawl space is approximately
1/4 of the first floor base area
2 Crawl space is approximately
1/2 of the first floor base area
3 Crawl space is approximately
3/4 of the first floor base area
4 Crawl space is approximately all
of the first floor base area
Task 3—Recording Information About the Construction and Floor Areas
The property record card provides space, shown in Figure 3-6, to record
information about the construction of the dwelling unit, as well as the floor area
information necessary to determine the total base price for the dwelling unit.
Chapter 3 Residential Dwelling Units
Real Property Assessment Guidelines Page 25
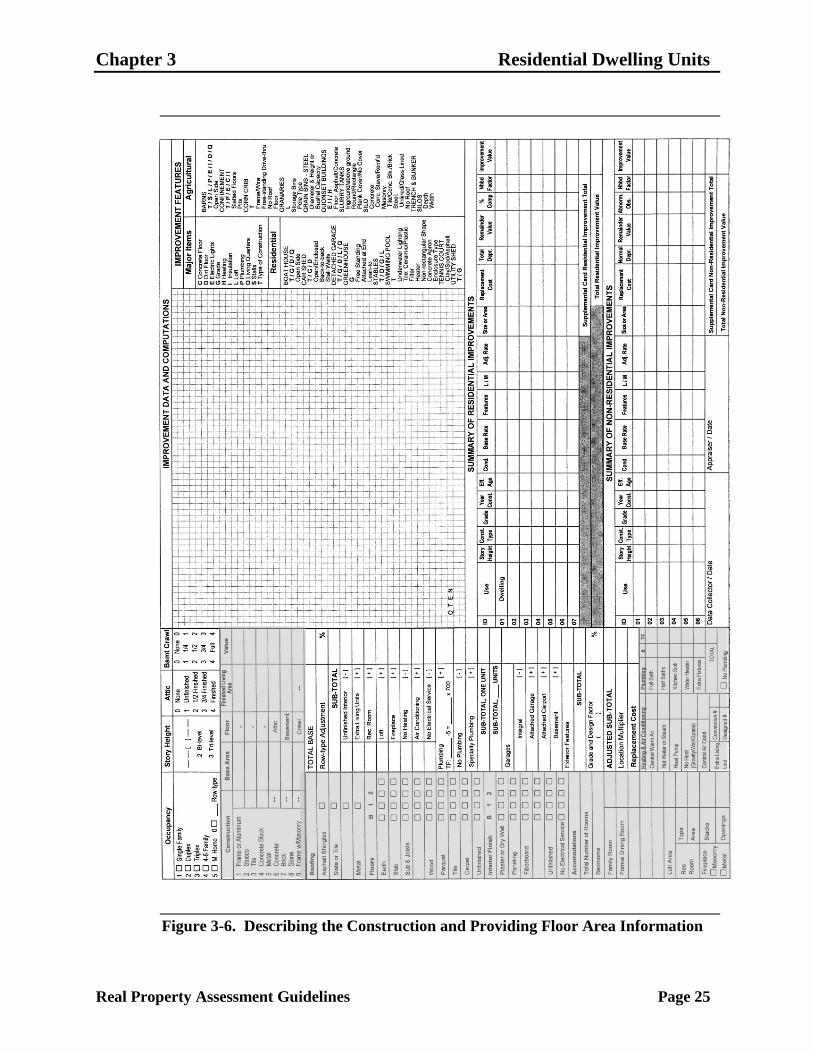
Figure 3-6. Describing the Construction and Providing Floor Area Information

Chapter 3 Residential Dwelling Units
Real Property Assessment Guidelines Page 26
To complete this section of the property record card, perform these steps:
Step 1 In the ―Construction‖ section, record the base area for each floor, the
exterior wall construction, the story height, and the amount of finished
living area:
a. Enter the area of each floor on a separate row in the ―Base Area‖
column.
If the dwelling has an attic, basement, or crawl space, enter each area
in the appropriate row.
b. Determine the dwelling’s exterior wall type for each story and enter
the corresponding code in the column to the left of the ―Base Area‖
column. Follow these guidelines.
If a story has a mixture of similar exterior wall type materials such
as frame (codes 1 through 5) or masonry (codes 6 through 8),
record the exterior wall type code that represents the majority
material of the story.
Code 9 applies only to mixed frame and masonry exterior wall
construction, and requires a two-digit code. This code represents a
1/6 increment interpolation procedure between the cost difference
for frame and masonry construction. Table 3-10 describes the
two-digit codes.
Table 3-10. Mixed Frame and Masonry Wall Construction Codes
This code Indicates
91 Frame construction with masonry on approximately
half of the surface area of one side, or the full
surface area of one end
92 Frame construction with masonry on approximately
the full surface area of one side, or the full surface
area of both ends
93 Half frame construction and half masonry
construction
94 Predominantly masonry construction in which the
full surface of both sides, or one side and both ends
are masonry
95 Predominantly masonry construction in which the
full surface of both sides, and one end are masonry
c. In the ―Floor‖ column, record each story height in half story
increments. For intermediate story heights, record a ―+1‖ or a ―–1‖ to
record the difference of a half story.

Chapter 3 Residential Dwelling Units
Real Property Assessment Guidelines Page 27
d. In the ―Finished Living Area‖ column, record the total finished area
for each floor, as well as for the attic and basement.
The square foot area of an unfinished utility area or an integral garage
is not included in the ―Finished Living Area‖ square footage.
Note: This column is optional unless there is finished area in the
basement or attic. Then you must enter the finished area in those
rows.
Step 2 In the ―Roofing‖ section, place a check in the check box corresponding to
the dwelling’s predominant roofing material. If more than one material is
used, indicate the other materials by entering ―p‖ for part in the check
box instead of a check. A blank line is provided to record any roofing
material other than those listed.
Step 3 In the ―Floors‖ section, check the floor construction and the finish
flooring for each floor. Follow these guidelines:
The column heading ―B‖ indicates basement, ―1‖ indicates first floor,
―2‖ indicates second floor, and the undesignated column can be used to
indicate a third floor or attic.
If there is more than one upper floor and the construction or finish is
not consistent, enter the floor level ―2‖, ―3‖, ―4‖, or ―A‖ for attic in the
check box instead of a check.
If there is more than one type of floor construction or finish on one
floor, enter ―p‖ for part in the check box instead of a check.
Step 4 In the ―Interior Finish‖ section, check the finish for each floor, as well as
the basement and the attic, if applicable. Follow these guidelines:
The column heading ―B‖ indicates basement, ―1‖ indicates first floor,
―2‖ indicates second floor, and the undesignated column can be used to
indicate a third floor or attic.
If the finish of any of the floors is not consistent, enter the number of
rooms to which the finish applies in the check box instead of a check.
If no electrical service is supplied to any individual floor levels, place
a check in the appropriate floor level check box in the ―No Electrical
Service‖ row.
Step 5 In the ―Accommodations‖ section, enter the number of specific rooms
and fireplaces in the dwelling:
a. In the ―Total Number of Rooms‖ cell, enter the total number of
finished rooms, bathrooms, and utility rooms. When counting rooms,
a kitchen-dining or living-dining combination is considered one
room.
b. In the ―Bedrooms‖ cell, enter the total number of rooms specifically
designed as bedrooms, regardless of use.
Chapter 3 Residential Dwelling Units
Real Property Assessment Guidelines Page 28
c. In the ―Family Room‖ cell, enter the total number of family rooms
and informal living rooms with a quality of finish consistent with the
general finish of the dwelling. There is a separate entry for basement
recreation rooms.
d. In the ―Formal Dining Room‖ cell, enter the total number of rooms
specifically designed for dining, regardless of use.
e. If there are any rooms used for commercial purposes, such as a
commercial office, beauty salon, or any other room not typical of
residential dwellings, list the room(s) in the blank space provided
below ―Formal Dining Room‖. To the right of this cell, enter the total
number of these rooms. In the ―Memorandum‖ section, enter a brief
description of the commercial activity and the approximate
commercial square footage.
f. In the ―Loft Area‖ cell, enter the approximate square footage of the
loft’s floor area. A loft is a finished platform-type area overlooking
the first floor. A loft usually appears in a structure with cathedral type
ceilings and is not to be confused with areas of a dwelling that have
partial or full exterior walls that make the dwelling a one and one-half
story to a two-story dwelling.
g. If there are any basement recreation rooms that add value to the
dwelling, use Table 3-11 to determine the appropriate code for the
basement recreation room, and enter the code in the ―Type‖ cell.
Record the approximate area in the ―Area‖ cell.
Table 3-11. Basement Recreation Room Codes
This code Indicates the presence of
Rec 1 Flooring and ceiling finish
Rec 2 Flooring, ceiling, and interior wall finish
Rec 3 Flooring, ceiling, interior wall finish, and
partitioning
Rec 4 Flooring, ceiling, interior wall finish, partitioning,
and built-ins
h. If there are any fireplaces, indicate the construction type, number of
stacks, and number of openings. Follow these guidelines:
If the fireplace is a prefabricated metal type, ventless gas, or
vent-free gas place a check in the ―Metal‖ check box. In the
―Stacks‖ cell, enter the total number of stacks. In the ―Openings‖
cell, enter the total number of fire openings.
If the fireplace is the traditional masonry type, place a check in the
―Masonry‖ check box. In the ―Stacks‖ cell, enter the total number

Chapter 3 Residential Dwelling Units
Real Property Assessment Guidelines Page 29
of stacks. In the ―Openings‖ cell, enter the total number of
openings.
Step 6 In the ―Heating & Air Conditioning‖ section, indicate the type of heating
system that the dwelling has. Follow these guidelines:
Place a check in the cell corresponding to the type of heating that the
dwelling has.
If the dwelling has a heating system other than those listed, write a
description in the blank space provided and place a check in the
corresponding cell.
If a dwelling has a geothermal or solar heating system as its sole
central heating system, place a check in the ―No Heat‖ cell and write
―geothermal heating only‖ or ―solar heating only‖ in the blank space
provided.
If the dwelling has no central heating system, place a check in the ―No
Heat‖ cell, and circle ―Gravity‖, ―Wall‖, or ―Space‖.
If there is central heating for a portion of a finished living area, enter
those floors or that area instead of a check. A partial adjustment to the
base price is made when a portion of the dwelling does not have a
central heating system.
Step 7 Also in the ―Heating & Air Conditioning‖ section, place a check in the
―Central Air Cond.‖ cell to indicate that the dwelling has either a separate
or combined central air conditioning system. Follow these guidelines:
If there is central air conditioning for only a portion of a finished
living area, enter those floors or that area instead of a check.
If the dwelling has a heat pump listed as the heating system, place a
check in the ―Central Air Cond.‖ cell.
If the dwelling has a geothermal or solar cooling system as its sole
central cooling system, do not enter a check in the ―Central Air Cond.‖
cell. Geothermal and solar systems are priced in the ―Summary of
Improvements‖ section of the Property Record Card from schedules
included in Appendix C.
Step 8 In the ―Extra Living Unit‖ cell, enter the number of either conversion
living units or designed living units over and above the base unit
included in the residential model. For example, a three-story dwelling
designed for occupancy by three families would have one unit included in
the residential model and the number 2 recorded in the designed extra
living unit cell.
Note: All basement and attic living units are to be considered as
conversion units.
Step 9 In the ―Plumbing‖ section, enter the number of full and half baths,
kitchen sinks, water heaters, and extra fixtures in the ―#‖ column. In the

Chapter 3 Residential Dwelling Units
Real Property Assessment Guidelines Page 30
―TF‖ column, enter the total number of plumbing fixtures in each
category. Follow these guidelines:
If the dwelling does not have plumbing, place a check in the ―No
Plumbing‖ check box.
A full bath has three plumbing fixtures and a one-half bath has two
fixtures.
A total of more or fewer than five fixtures requires an adjustment in
the dwelling’s base price. The following five plumbing fixtures are
included in the base price:
— kitchen sink
— water heater
— bathroom sink
— bathroom stool
— bathtub or shower unit.
The presence of a designed or conversion living unit accounts for
five plumbing fixtures within the dwelling. These five fixtures are not
recorded in the ―Plumbing‖ section. Any extra living unit plumbing
fixtures above or below the included five should be recorded in the
―Plumbing‖ section.

Chapter 3 Residential Dwelling Units
Real Property Assessment Guidelines Page 31
Completing the Replacement Cost Pricing Ladder
This section describes how to determine the replacement cost of the dwelling
using the section of the Residential Property Record Card commonly referred to as
the replacement cost pricing ladder. The steps for completing this section of the
property record card are grouped into the following tasks, described in the
sections below:
Task 1—Determine the dwelling’s base price.
Task 2—Determine and apply any necessary row-type adjustments to the
dwelling’s base price.
Task 3—Determine and apply any interior feature adjustments to the dwelling’s
base price.
Task 4—Determine and apply any exterior feature adjustments to the
dwelling’s base price.
Task 5—Record and apply the dwelling’s grade to calculate the adjusted sub-
total.
Task 6—Determine and apply the location cost multiplier adjustment to
calculate the dwelling’s replacement cost.
Task 1—Determining the Base Price
Cells are provided on the Residential Property Record Card to determine the base
price of the dwelling, as shown in Figure 3-7.

Chapter 3 Residential Dwelling Units
Real Property Assessment Guidelines Page 32
Figure 3-7. Cells Used to Determine Base Price

Chapter 3 Residential Dwelling Units
Real Property Assessment Guidelines Page 33
Use Schedule A–Dwelling Base Prices, provided in Appendix C, to determine the
base price of the dwelling. The schedule consists of two parts:
prices that are based on the size of the single-family dwelling, type of exterior
walls, and the number of story heights
prices for unfinished attics, finished attics, unfinished basements, finished
basements, and crawl spaces.
The procedure for developing the total base price from Schedule A is to select the
base price for the main living area of the dwelling and add the appropriate
amounts for attics, basements, and crawl spaces.
Schedule A includes prices for areas ranging from 100 to 5,000 square feet.
Within this range, the price is listed in two different increments, depending on the
area:
For an area of 100 to 4,000 square feet, the prices are listed in intervals of
25 square feet.
For an area of 4,000 to 5,000 square feet, the prices are listed in intervals of
250 square feet.
To determine the base price of a dwelling, perform the following steps:
Step 1 Use Schedule A to determine the base price of the dwelling’s first floor:
a. In the ―Area‖ column, locate the row corresponding to the area
closest to the first floor’s area.
b. Locate the appropriate column below the heading ―First Floor.‖ If the
primary wall type is Type 1, 2, 3, 4, or 5, use the column ―1-5‖. If the
primary wall type is Type 6, 7, or 8, use the column ―6-8‖.
c. Find the intersection of the selected row (area in square feet) and the
selected column. Note the number that you find.
d. If the area is between 4,000 and 5,000 square feet, interpolate the
base price between the prices for the two closest areas. Each interval
of 25 square feet is equal to 10% of the increment price. Note this
number instead of the number found in Step c.
If the area is over 5,000 square feet, use the difference between the
base price for 4,750 square feet and for 5000 square feet to calculate
the amount to add to the base price for 5000 square feet for the
additional square footage. Note this number instead of the number
found in Step c.
e. If the first floor has an exterior wall code of 91 through 95, locate the
―+‖ column below the heading ―First Floor‖ and perform Step f
through Step h.
f. Find the intersection of the selected row (area in square feet) and the
selected column. Note the number that you find.
Chapter 3 Residential Dwelling Units
Real Property Assessment Guidelines Page 34
g. Multiply the number found in Step f by the number of increments of
masonry identified for the dwelling. If the wall code is 92, multiply
the number from Step f by 2.
Add the result to the number found in Step c or Step d. Note this
number.
h. Calculate the base price for the first floor by multiplying the number
by $100, round the number to the nearest $10, and enter it in the first
row of the ―Value‖ column on the property record card.
Step 2 If the dwelling has one and one-half stories, use Schedule A to determine
the base price of the one-half story:
a. In the ―Area‖ column, locate the row corresponding to the area
closest to the half story’s area.
b. Locate the appropriate column below the heading ―Half Upper Story‖
using the explanation in Step 1b.
c. Find the intersection of the selected row (area in square feet) and the
selected column. Note the number that you find.
d. If the area is larger than 4,000 square feet, interpolate the base price
following the guidelines in Step 1d.
e. If the half story has an exterior wall type code of 91 through 95,
locate the ―+‖ column below the heading ―Half Upper Story‖, and
determine the adjustment by performing Steps 1f through 1h.
f. Calculate the base price for the one-half story by multiplying the
number by $100, and enter it in the appropriate row of the ―Value‖
column on the property record card.
Step 3 If the dwelling has an intermediate story height, use Schedule A to
determine the base price of the intermediate story:
a. In the ―Area‖ column, locate the row corresponding to the area
closest to the half story’s area.
b. Locate the appropriate column below the heading ―(+/-1)‖ using the
explanation in Step 1b.
c. Find the intersection of the selected row (area in square feet) and the
selected column. Note the number that you find.
d. If the area is larger than 4,000 square feet, interpolate the base price
following the guidelines in Step 1d.
e. Calculate the base price for the intermediate story by multiplying the
number by $100 to arrive at the dollar amount of the base price, and
enter it in the appropriate row of the ―Value‖ column on the property
record card.
Chapter 3 Residential Dwelling Units
Real Property Assessment Guidelines Page 35
Step 4 If the dwelling has two stories, use Schedule A to determine the base
price of the second story:
a. In the ―Area‖ column, locate the row corresponding to the area
closest to the second story’s area.
b. Locate the appropriate column below the heading ―Full Upper Story‖
using the explanation in Step 1b.
c. Find the intersection of the selected row (area in square feet) and the
selected column. Note the number that you find.
d. If the area is larger than 4,000 square feet, interpolate the base price
following the guidelines in Step 1d.
e. If the second story has an exterior wall code of 91 through 95, locate
the ―+‖ column below the heading ―Full Upper Story‖, and determine
the adjustment by performing Steps 1f through 1h.
f. Calculate the base price for the second story by multiplying the
number by $100, and enter it in the appropriate row of the ―Value‖
column on the property record card.
Step 5 If the dwelling has an unfinished attic, use Schedule A to determine the
base price of the attic:
Note: The square foot area used in the calculation for an attic is the base
ground floor area and not the actual attic floor. The attic cost schedules
included in Schedule A consider the loss of floor area and wall height in
typical attic construction.
a. In the ―Area‖ column, locate the row corresponding to the area
closest to the attic area.
b. Locate the ―Unfin Attic‖ column.
c. Find the intersection of the selected row (area in square feet) and the
―Unfin Attic‖ column. Note the number that you find.
d. Calculate the base price for the unfinished attic by multiplying the
number found in Step c by $100, and enter it in the appropriate row
of the ―Value‖ column on the property record card.
Step 6 If the dwelling has an attic with finished area, use Schedule A to
determine the base price of the attic:
a. Determine the base price of the unfinished attic area by performing
Step 5.
b. In the ―Area‖ column, locate the row corresponding to the area
closest to the finished attic area.
c. Locate the ―Attic Fin‖ column.

Chapter 3 Residential Dwelling Units
Real Property Assessment Guidelines Page 36
d. Find the intersection of the selected row (area in square feet) and the
―Attic Fin‖ column. Note the number that you find.
e. Calculate the base price for the finished area of the attic by
multiplying the number found in Step d by $100. Note the result.
f. Calculate the base price for the attic by summing the base price for
the unfinished area (calculated in Step a) and the base price for the
finished area (calculated in Step e), and enter it in the appropriate row
of the ―Value‖ column on the property record card.
Step 7 If the dwelling has an unfinished basement, use Schedule A to determine
the base price of the basement:
a. In the ―Area‖ column, locate the row corresponding to the area
closest to the basement area.
b. Locate the ―Unfin Bsmt‖ column.
c. Find the intersection of the selected row (area in square feet) and the
―Unfin Bsmt‖ column. Note the number that you find.
d. Calculate the base price for the basement by multiplying the number
found in Step c by $100, and enter it in the appropriate row of the
―Value‖ column on the property record card.
Step 8 If the dwelling has a basement with a finished area, use Schedule A to
determine the base price of the basement:
Note: A basement containing finish consistent with the remainder of the
dwelling is considered as a finished basement. This is normally defined
as basement living quarters. An area having finish inconsistent with the
remainder of the dwelling is considered as a basement recreation room.
a. Determine the base price of the unfinished basement area by
performing Step 7a through 7c.
b. In the ―Area‖ column, locate the row corresponding to the area
closest to the finished basement area.
c. Locate the ―Bsmt Fin‖ column.
d. Find the intersection of the selected row (area in square feet) and the
―Bsmt Fin‖ column. Note the number that you find.
e. Calculate the base price for the finished area multiplying the number
found in Step d by $100. Note the result.
f. Calculate the base price for the basement by summing the base price
for the unfinished area (calculated in Step a) and the base price for the
finished area (calculated in Step e), and enter it in the appropriate row
of the ―Value‖ column on the property record card.
Chapter 3 Residential Dwelling Units
Real Property Assessment Guidelines Page 37
Step 9 If the dwelling has a crawl space, use Schedule A to determine the base
price of the crawl space:
a. In the ―Area‖ column, locate the row corresponding to the area
closest to the crawl space area.
b. Locate the ―Crawl‖ column.
c. Find the intersection of the selected row (area in square feet) and the
―Crawl‖ column. Note the number that you find.
d. Calculate the base price for the crawl space by multiplying the
number found in Step c by $100, and enter it in the appropriate row
of the ―Value‖ column on the property record card.
Step 10 Calculate the total base price by summing the numbers from the first six
rows of the ―Value‖ column, and enter the sum in the ―Total Base‖ cell.
Step 11 If the dwelling is not a row-type dwelling, transfer the value in the ―Total
Base‖ cell to the ―Sub-Total‖ cell.
Example 1: To determine the base price for a dwelling with 4,628 square feet of
area, round to the nearest 25 square feet, or 4,625 square feet. To determine the
number of 25 square foot intervals between 4,500 and 4,625, subtract 4,500 from
4625 to obtain 125 square feet. Divide 125 by 25 to obtain five 10% intervals or
50%. Multiply 50% by the difference between the two prices (provided in
Schedule A). Add this incremental price to the price provided for 4500 square
feet.
Example 2: To determine the base price for a dwelling with 5,650 square feet of
area, use the increment difference between 4,750 square feet and 5,000 square feet
for the next 250 square feet and each 250 square feet thereafter. When
interpolation becomes necessary within the 250 square feet interval, repeat the
procedures described in ―example 1‖ above. Add the incremental price to the
price provided for 5000 square feet.
Example 3: To determine the base price for a two-story dwelling with a base
floor area of 800 square feet at each floor level, locate the row for 800 in the
―Area‖ column. Then note the numbers in this row for the ―First Floor‖ and ―Full
Upper Story‖ columns. Multiply the two numbers by $100 and record the result in
the corresponding pricing ladder cells.
Example 4: To determine the base price for a two-story dwelling with a base
floor area of 800 square feet and the an upper floor area of 920 square feet, locate
the row for 800 in the ―Area‖ column. Note the number for this row in the ―First
Floor‖ column. Locate the row that falls closest to 920, which is 925. Note the
number for this row in the ―Full Upper Story‖ column. Multiply the two numbers
by $100 and record the results in the corresponding pricing ladder cells.

Chapter 3 Residential Dwelling Units
Real Property Assessment Guidelines Page 38
Example 5: To determine the base price for a one-story dwelling, 50 feet by
22 feet, with aluminum siding exterior wall construction and a one-half brick
front, first find the base price for a one-story dwelling with aluminum siding and
then add the adjustment for brick. Locate the row for 1,100 in the ―Area‖ column,
and locate the column for ―1-5‖ under the ―First Floor‖ heading. Find the
intersection of the selected row and column, and note the number that you find.
To determine the adjustment for brick, locate the row for 1,100 in the ―Area‖
column, and locate the column for ―+‖ under the ―First Floor‖ heading. Find the
intersection of the selected row and column, and note the number that you find.
Add the two numbers together and multiply by $100 to arrive at the base price for
the dwelling.
Example 6: To determine the value of the basement in a 1,200 square foot
dwelling with a one-half basement that has 400 square feet of finished area, locate
the row for 600 in the ―Area‖ column. Locate the ―Unfin Bsmt‖ column, find the
intersection of the selected row and column, and note the number that you find.
Locate the row for 400 in the ―Area‖ column and the ―Bsmt Fin‖ column. Find the
intersection of the selected row and column, and note the number that you find.
Add the two numbers together and multiply by $100 to arrive at the value of the
basement.
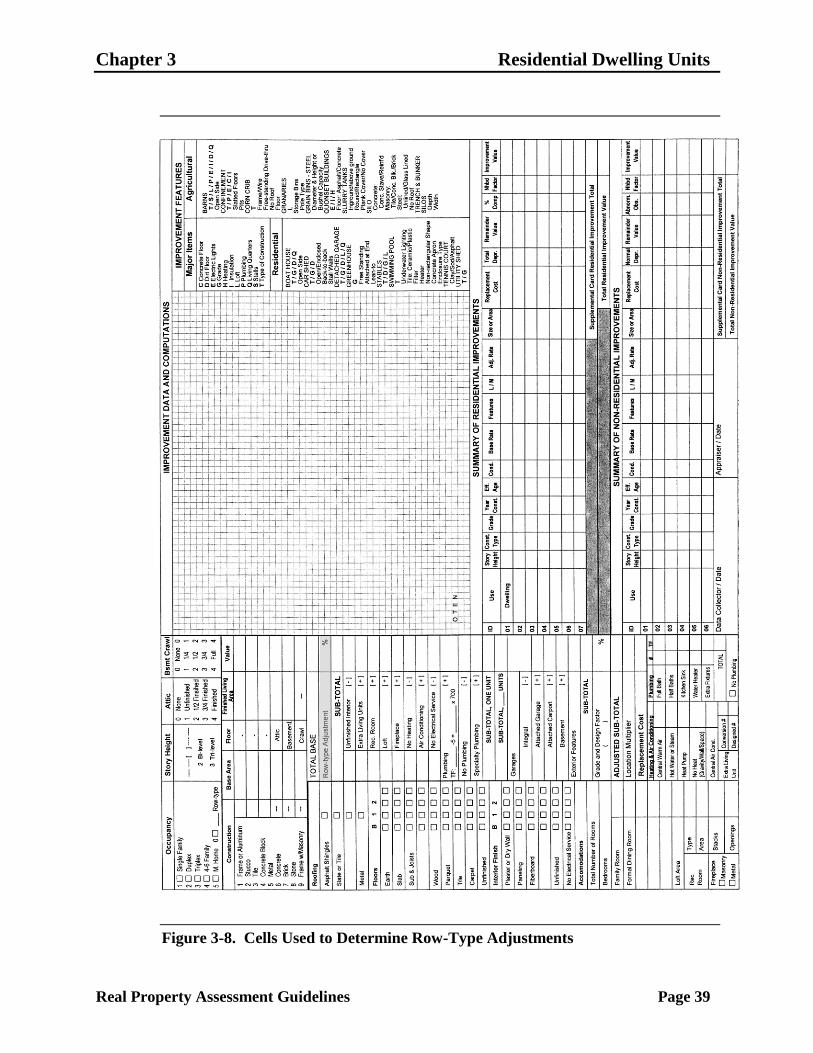
Task 2—Determining and Applying the Row-Type Adjustments
If the dwelling is a residential row-type dwelling, use Schedule B—Row-Type
Adjustments, provided in Appendix C, to determine the appropriate adjustment to
the base price, calculated in Task 1. This schedule lists percentage adjustments
based on the wall type and number of units within the dwelling.
Cells are provided on the Residential Property Record Card to determine the row-
type adjustment of the dwelling, as shown in Figure 3-8.
Chapter 3 Residential Dwelling Units
Real Property Assessment Guidelines Page 39
Figure 3-8. Cells Used to Determine Row-Type Adjustments

Chapter 3 Residential Dwelling Units
Real Property Assessment Guidelines Page 40
Follow these guidelines to determine whether one or more property record cards
must be completed for the row-type dwelling units:
If there are two or three units, the units have single ownership, the same square
footage, and the same physical characteristics, list and record the data, except
exterior features, for one unit. The replacement cost of the building is computed
by multiplying the cost of one unit by the number of units within the building.
If there are two or three units, the units have single ownership, different square
footage or physical characteristics, sketch, list, and record the data for each
style unit on individual property record cards. The replacement cost of the
building is computed by totaling the cost of all the units contained within the
building.
If the units have individual ownership, sketch, list, and record the data for each
individual unit on a separate property record card. The replacement cost of each
unit is calculated and assessed separately. This procedure applies to all
individually owned platted row-type units regardless of the number of units
contained within the structure. Such units are found in horizontal property
regime or planned unit development properties.
Note: Single ownership wood joist buildings containing 4 or more row-type units
are considered as commercial row-type structures and valued from the GCR
apartment schedule.
To determine the adjustment for a row-type dwelling, use Schedule B and perform
these steps:
Step 1 In the wall type column, locate the row corresponding to the wall type of
the dwelling.
Step 2 Locate the column below the heading ―Total Number of Units‖ that
corresponds to the total number of units in the building.
Step 3 Find the intersection of the selected row (wall type) and the selected
column (number of units). Enter the number that you find in the
―Row-type Adjustment‖ cell on the property record card.
Step 4 Apply the adjustment for a row-type dwelling by multiplying the value in
the ―Total Base‖ cell by the value in the ―Row-type Adjustment‖ cell and
enter the result, rounded to the nearest $10, in the ―Sub-Total‖ cell.
Example: To determine the base price for an all brick row-type dwelling with
1,200 square feet, and two equally-sized units, first compute the base price of one
unit. Then determine the adjustment using Schedule B. Locate the ―Brick of Equal
Wall Types‖ row and the ―2‖ column. Find the intersection of the selected row
and column, and enter the number that you find in the ―Row-type Adjustment‖
cell on the property record card. Multiply the value in the ―Total Base‖ cell by the
value in the ―Row-type Adjustment‖ cell and enter the result in the ―Sub-Total‖
cell.
Chapter 3 Residential Dwelling Units
Real Property Assessment Guidelines Page 41
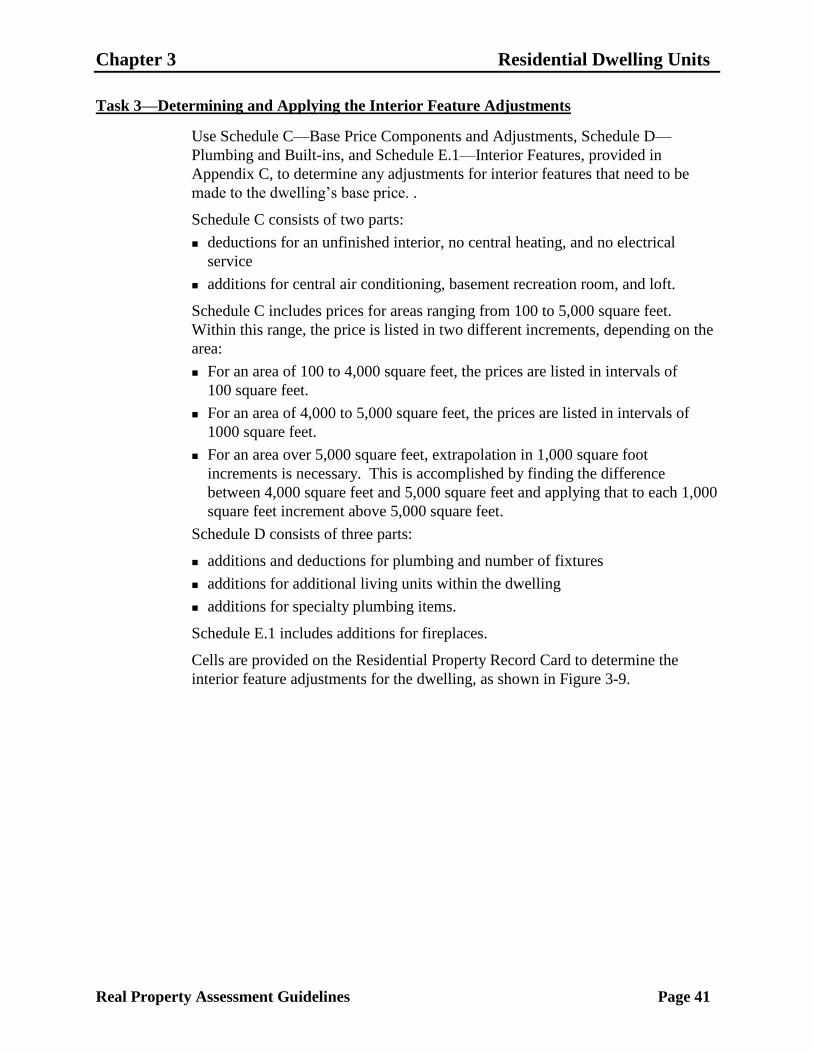
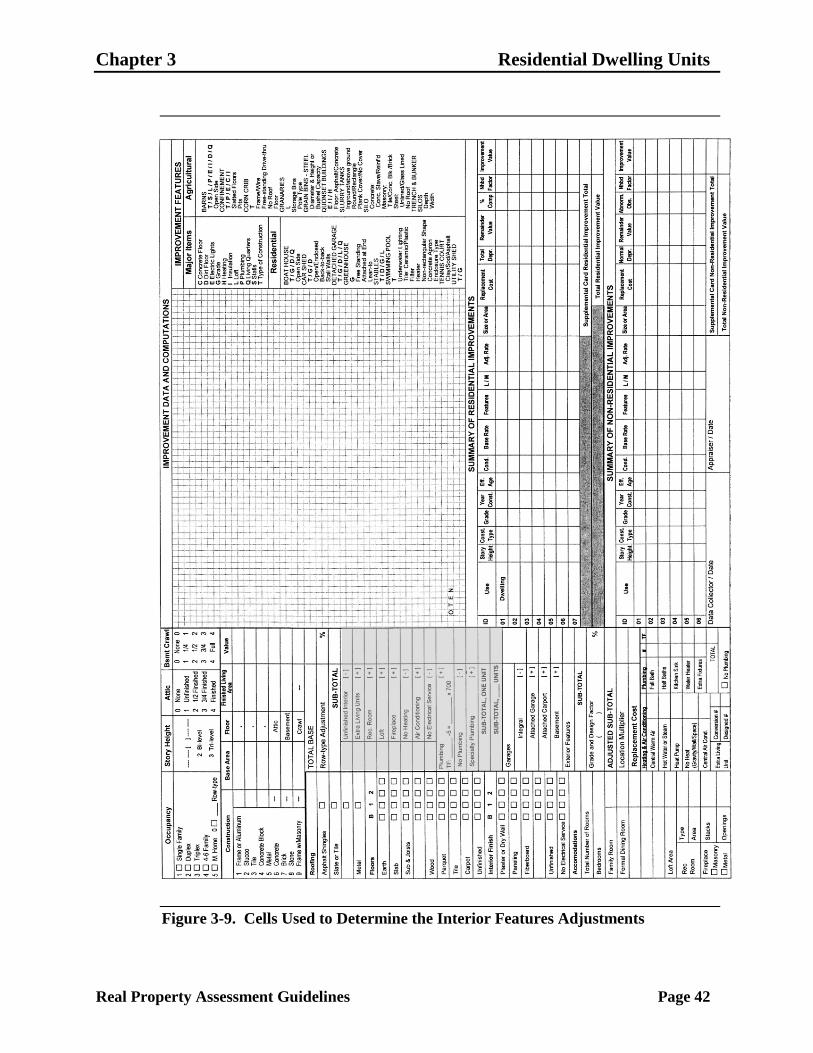
Task 3—Determining and Applying the Interior Feature Adjustments
Use Schedule C—Base Price Components and Adjustments, Schedule D—
Plumbing and Built-ins, and Schedule E.1—Interior Features, provided in
Appendix C, to determine any adjustments for interior features that need to be
made to the dwelling’s base price. .
Schedule C consists of two parts:
deductions for an unfinished interior, no central heating, and no electrical
service
additions for central air conditioning, basement recreation room, and loft.
Schedule C includes prices for areas ranging from 100 to 5,000 square feet.
Within this range, the price is listed in two different increments, depending on the
area:
For an area of 100 to 4,000 square feet, the prices are listed in intervals of
100 square feet.
For an area of 4,000 to 5,000 square feet, the prices are listed in intervals of
1000 square feet.
For an area over 5,000 square feet, extrapolation in 1,000 square foot
increments is necessary. This is accomplished by finding the difference
between 4,000 square feet and 5,000 square feet and applying that to each 1,000
square feet increment above 5,000 square feet.
Schedule D consists of three parts:
additions and deductions for plumbing and number of fixtures
additions for additional living units within the dwelling
additions for specialty plumbing items.
Schedule E.1 includes additions for fireplaces.
Cells are provided on the Residential Property Record Card to determine the
interior feature adjustments for the dwelling, as shown in Figure 3-9.
Chapter 3 Residential Dwelling Units
Real Property Assessment Guidelines Page 42
Figure 3-9. Cells Used to Determine the Interior Features Adjustments

Chapter 3 Residential Dwelling Units
Real Property Assessment Guidelines Page 43
To determine the interior feature adjustments to make to the base price for the
dwelling, perform the following steps:
Step 1 If the dwelling has an unfinished interior, use Schedule C to determine
the appropriate deduction from the base price for the dwelling
a. If the unfinished area is on the first story, locate the row in the
―Area‖ column corresponding to the square footage of the area with
an unfinished interior on the first floor, if any.
Find the intersection of the selected row (area in square feet) and the
―Full Story‖ column below the heading ―Unfinished Interior‖. Note
the number that you find.
b. If the dwelling is a one and one-half story dwelling and there is
unfinished area on the half story, locate the row in the ―Area‖ column
corresponding to the square footage of the unfinished area on the half
story.
Find the intersection of the selected row (area in square feet) and the
―Half Story‖ column below the heading ―Unfinished Interior‖. Note
the number that you find.
c. If the dwelling is a two-story dwelling and there is unfinished area on
the second story, locate the row in the ―Area‖ column corresponding
to the square footage of the unfinished area on the second story.
Find the intersection of the selected row (area in square feet) and the
―Full Story‖ column below the heading ―Unfinished Interior‖. Note
the number that you find.
d. Sum the numbers found in Step a through Step c.
e. Calculate the adjustment for an unfinished interior by multiplying the
number found in Step d by $100, and enter it in the ―Unfinished
Interior‖ cell.
Note: This deduction includes an adjustment for heating, so you do not
need to make a separate deduction for heating.
Example 1: To determine the deduction for a bi-level, two-story
dwelling with 300 square feet of unfinished interior on the lower level,
locate the row for 300 in the ―Area‖ column. Then note the number in
this row for the ―Full Story‖ column. Multiply the number by $100.
Example 2: To determine the deduction for a one and one-half story
dwelling with a ground floor base area of 1,000 square feet and an
unfinished second floor, locate the row for 1,000 in the ―Area‖ column.
Then note the number in this row for the ―Half Story‖ column. Multiply
the number by $100.

Chapter 3 Residential Dwelling Units
Real Property Assessment Guidelines Page 44
Example 3: To determine the deduction for a one and one-half story
dwelling with a ground floor base area of 1,000 square feet with 50% of
the second floor unfinished, determine that the unfinished area is
500 square feet (1,000 x .50 = 500). Locate the row for 500 in the ―Area‖
column. Then note the number in this row for the ―Half Story‖ column.
Multiply the number by $100.
Step 2 If the dwelling does not have a central heating system, use Schedule C to
determine the appropriate deduction from the base price for the dwelling:
Note: Central heating systems include forced air, electric baseboard, hot
water, and steam heating systems. Types of systems not considered to be
central heating systems are space heaters, wall furnaces, and gravity flow
floor furnaces. The no central heating deduction also applies to a
dwelling that has a solar or geothermal heating system as its sole source
of heat. If a dwelling has a solar or geothermal heating system and a
backup or reserve system, the no central heating deduction does not
apply.
a. In the ―Area‖ column, locate the row corresponding to the square
footage of the area without central heating on the first floor, if any.
Find the intersection of the selected row (area in square feet) and the
―First Floor‖ column. Note the number that you find.
b. If the dwelling is a one and one-half story dwelling and there is space
without central heating on the half story, locate the row in the ―Area‖
column corresponding to the square footage of the area without
central heating on the half story.
Find the intersection of the selected row (area in square feet) and the
―Half Upper‖ column below the heading ―No Central Heating‖. Note
the number that you find.
c. If the dwelling is a two-story dwelling and there is space without
central heating on the second story, locate the row in the ―Area‖
column corresponding to the square footage of the area without
central heating on the second story.
Find the intersection of the selected row (area in square feet) and the
―Full Upper‖ column. Note the number that you find.
d. If the dwelling has finished attic space without central heating, locate
the row in the ―Area‖ column corresponding to the amount of square
footage used to calculate the finished attic.
Find the intersection of the selected row (area in square feet) and the
―Attic‖ column. Note the number that you find.
e. Sum the numbers found in Step a through Step d.

Chapter 3 Residential Dwelling Units
Real Property Assessment Guidelines Page 45
f. Calculate the adjustment for no central heating by multiplying the
number found in Step e by $100, and enter the amount in the ―No
Heating‖ cell on the property record card.
Example 1: To determine the deduction for a one and one-half story
dwelling with a ground floor base area of 1,000 square feet, an upper
floor the same size, and no central heating on either floor, first locate the
row for 1,000 in the ―Area‖ column (the area on the first floor with no
central heating). Then note the number in this row for the ―First Floor‖
column. Second, locate the row for 1,000 in the ―Area‖ column (the area
of the upper floor with no central heating). Then note the number in this
row for the ―Half Upper‖ column. Add the two numbers together and
multiply their sum by $100.
Example 2: To determine the deduction for a one and one-half story
dwelling with a ground floor base area of 1,000 square feet, an upper
floor the same size, and a central heating system on the first floor only,
locate the row for 1,000 in the ―Area‖ column (the area of the upper floor
with no central heating). Then note the number in this row for the ―Half
Upper‖ column. Multiply the number by $100.
Example 3: To determine the deduction for a partial one-story and
partial two-story dwelling with a ground floor base area of 1,200 square
feet, an upper floor of 800 square feet, and no central heating on either
floor, first locate the row for 1,200 in the ―Area‖ column (the area on the
first floor with no central heating). Then note the number in this row for
the ―First Floor‖ column. Second, locate the row for 800 in the ―Area‖
column (the area of the upper floor with no central heating). Then note
the number in this row for the ―Full Upper‖ column. Add the two
numbers together and multiply their sum by $100.
Example 4: To determine the deduction for a two-story dwelling with a
ground floor base area of 1,000 square feet, a full finished attic, and no
central heating system in the attic, locate the row for 1,000 in the ―Area‖
column (the area of the upper floor with no central heating). Then note
the number in this row for the ―Attic‖ column. Multiply the number by
$100.
Step 3 If the dwelling does not have electrical service, use Schedule C to
determine the appropriate deduction from the base price for the dwelling:
a. In the ―Area‖ column, locate the row corresponding to the square
footage of the area without electrical service on the first floor, if any.
Find the intersection of the selected row (area in square feet) and the
―First Floor‖ column. Note the number that you find.

Chapter 3 Residential Dwelling Units
Real Property Assessment Guidelines Page 46
b. If the dwelling is a two-story dwelling and there is no electrical
service on the second story, locate the row in the ―Area‖ column
corresponding to the square footage of the second story.
Find the intersection of the selected row (area in square feet) and the
―Upper Floor‖ column. Note the number that you find.
c. Sum the numbers found in Step a and Step b.
d. Calculate the adjustment for no electrical service by multiplying the
sum found in Step C by $100, and enter the amount in the
―No Electrical Service‖ cell on the property record card.
Step 4 If the dwelling has a central air conditioning system, use Schedule C to
determine the appropriate addition to the base price for the dwelling:
a. In the ―Area‖ column, locate the row corresponding to the square
footage of the area with central air conditioning on the first floor, if
any.
Find the intersection of the selected row (area in square feet) and the
―First Floor‖ column. Note the number that you find.
b. If the dwelling is a one and one-half-story dwelling and there is space
with central air conditioning on the half story, locate the row in the
―Area‖ column corresponding to the square footage of the area with
central air conditioning on the half story.
Find the intersection of the selected row (area in square feet) and the
―Half Upper/Loft‖ column below the heading ―Central Air
Conditioning‖. Note the number that you find.
c. If the dwelling is a two-story dwelling and there is space with central
air conditioning on the second story, locate the row in the ―Area‖
column corresponding to the square footage of the area with central
air conditioning on the second story.
Find the intersection of the selected row (area in square feet) and the
―Full Upper‖ column. Note the number that you find.
d. If the dwelling has finished attic space with central air conditioning,
locate the row in the ―Area‖ column corresponding to the square
footage of the area with central air conditioning in the attic.
Find the intersection of the selected row (area in square feet) and the
―Attic‖ column. Note the number that you find.
e. Sum the numbers found in Step a through Step d.
f. Calculate the adjustment for central air conditioning by multiplying
the number found in Step e by $100, and enter the amount in the ―Air
Conditioning‖ cell on the property record card.
Chapter 3 Residential Dwelling Units
Real Property Assessment Guidelines Page 47
Example 1: To determine the addition for a one and one-half story
dwelling with a ground floor base area of 1,000 square feet, an upper
floor the same size, and central air conditioning on both floors, first
locate the row for 1,000 in the ―Area‖ column (the area on the first floor
with central air conditioning). Then note the number in this row for the
―First Floor‖ column. Second, locate the row for 1000 in the ―Area‖
column (the area of the upper floor with central air conditioning). Then
note the number in this row for the ―Half Upper‖ column. Add the two
numbers together and multiply their sum by $100.
Example 2: To determine the addition for a one and one-half story
dwelling with a ground floor base area of 1,000 square feet, an upper
floor the same size, and a central air conditioning system on the first floor
only, locate the row for 1,000 in the ―Area‖ column (the area of the first
floor with central air conditioning). Then note the number in this row for
the ―First Floor‖ column. Multiply the number by $100.
Example 3: To determine the addition for a tri-level dwelling with a
ground floor base area of 1,200 square feet, a second floor of 950 square
feet, and central air conditioning throughout, first locate the row for
1,200 in the ―Area‖ column (the area on the first floor with central air
conditioning). Then note the number in this row for the ―First Floor‖
column under the heading ―Central Air Conditioning‖. Second, locate the
row for 1,000 in the ―Area‖ column (the entry in the table closest to the
area of the upper floor with central air conditioning). Then note the
number in this row for the ―Full Upper‖ column. Add the two numbers
together and multiply their sum by $100.
Step 5 If the dwelling has a basement recreation room, use Schedule C to
determine the appropriate addition to the base price for the dwelling:
a. In the ―Area‖ column, locate the row corresponding to the square
footage of the basement recreation room.
b. Locate the column below the heading ―Basement Recreation Room‖
that corresponds to the type of the basement recreation room.
c. Find the intersection of the selected row (area in square feet) and the
selected column (recreation room type). Note the number that you
find.
d. Calculate the adjustment for a basement recreation room by
multiplying the number found in Step c by $100, and enter the
amount in the ―Rec. Room‖ cell.
Step 6 If the dwelling has a loft, use Schedule C to determine the appropriate
addition to the base price for the dwelling:

Chapter 3 Residential Dwelling Units
Real Property Assessment Guidelines Page 48
a. In the ―Area‖ column, locate the row corresponding to the square
footage of the loft.
b. Locate the ―Loft‖ column.
c. Find the intersection of the selected row (area in square feet) and the
―Loft‖ column. Note the number that you find.
d. Calculate the adjustment for a loft by multiplying the number found
in Step c by $100, and enter the amount in the ―Loft‖ cell.
Step 7 If the dwelling does not have plumbing, use Schedule D to determine the
appropriate deduction:
a. Find the value that corresponds to ―Deduct for no plumbing per living
unit‖ and multiply it by $100 to arrive at the dollar amount of the
deduction.
b. Enter the result in the ―No Plumbing‖ cell.
Step 8 If the dwelling has water service only, use Schedule D to determine the
appropriate deduction:
a. Find the value that corresponds to ―Deduct for water only‖ and
multiply it by $100 to arrive at the dollar amount of the deduction.
b. Enter the result in the ―No Plumbing‖ cell.
Step 9 If the dwelling has more or fewer than five plumbing fixtures, use
Schedule D to determine the appropriate addition or deduction:
a. In the ―Plumbing‖ cell label, enter the dwelling’s total number of
plumbing fixtures on the line to the right of ―TF:‖.
b. Subtract 5 from the total number of fixtures.
c. Calculate the adjustment by multiplying the number found in Step b
by the per fixture cost.
.
If there are specialty plumbing fixtures, note the result and perform
Step 10.
Step 10 If a bathtub has a jet or a steam conversion, or there is a sauna bath,
steam bath, or whirlpool, use Schedule D to determine the appropriate
addition:
a. Find the value corresponding to the type of specialty item and
multiply it by $100.
b. Add the result to the number found in Step 9c and enter the amount in
the ―Specialty Plumbing‖ cell.
Step 11 If there is an extra living unit in the dwelling, use Schedule D to
determine the appropriate addition to the base price of the dwelling:

Chapter 3 Residential Dwelling Units
Real Property Assessment Guidelines Page 49
a. If the living unit was originally designed as an individual family unit,
find the value that corresponds to ―Designed‖.
b. If the living unit was a space converted to accommodate an
additional family, find the value that corresponds to ―Conversion‖.
c. Calculate the adjustment for an extra living unit by multiplying the
appropriate value from Schedule D by $100, and enter the amount in
the ―Extra Living Units‖ cell.
Step 12 If the dwelling has fireplaces, use Schedule E.1 to determine the
appropriate addition to the base price of the dwelling:
a. Locate the ―First Opening‖ row and the column that best describes
the fireplace type.
b. Find the intersection of the selected row (first opening) and the
selected column. Note the number that you find.
c. If there are any additional openings, locate the ―Each Additional
Opening‖ row and the column that best describes the fireplace type.
d. Find the intersection of the selected row and the selected column.
Note the number that you find. Multiply the number by the amount of
additional openings in the dwelling.
e. Calculate the adjustment for fireplaces by summing the number for
the first fireplace (found in Step b) and the number for any additional
fireplace openings (found in Step d), and multiplying the result by
$100. Enter the result in the ―Fireplace‖ cell.
Step 13 Locate the sub-total amount found in Task 1, Step 4 and apply the
additions and deductions determined in Step 1 through Step 12 above.
Enter the result in the ―Sub-Total, One Unit‖ cell.
Step 14 If the dwelling is a row-type dwelling, enter the number of units in the
―Sub-Total, _Units‖ cell label. Multiply the number of units by the
number in the ―Sub-Total, One Unit‖ cell and enter the result in the
―Sub-Total, Units‖ cell.
Task 4—Determining and Applying the Exterior Features Adjustments
Use Schedule E.2—Garages & Carports and Schedule E.2—Exterior Features,
provided in Appendix C, to determine the adjustments for exterior features that
need to be made to the dwelling’s base price.
Cells are provided on the Residential Property Record Card to determine the
exterior features adjustments for the dwelling, as shown in Figure 3-10.

Chapter 3 Residential Dwelling Units
Real Property Assessment Guidelines Page 50
Figure 3-10. Cells Used to Determine the Exterior Features Adjustments
Chapter 3 Residential Dwelling Units
Real Property Assessment Guidelines Page 51
To determine the exterior feature adjustment, perform the following steps:
Step 1 If the dwelling has an attached, basement or integral garage, or an
attached carport, use Schedule E.2—Garages & Carports and perform
the following steps to determine the addition or deduction:
Note: Detached garages and carports are considered residential yard
structures and are valued in the ―Summary of Improvements‖ section of
the property record card. Additional information is provided in Chapter 5.
a. Find the area of the garage to the nearest 50 square feet. It is not
necessary to interpolate. Enter the area in the cell to the left of the
garage type cell label on the property record card.
b. Locate the row that corresponds to the garage type.
c. Locate the column that corresponds to the area and car capacity of the
garage.
d. Find the intersection of the selected row (garage type) and the
selected column (area in square feet and car capacity). Note the
number that you find.
If the garage is larger than 1,200 square feet, first find the
adjustment for 1,200 square feet. Then find the intersection of the
selected row (garage type) and the ―+50‖ column to determine the
amount to add to that adjustment for each additional 50 square feet.
e. Calculate the adjustment for a garage by multiplying the number
found in Step d by $100, and enter the amount in the appropriate cell
in the Garages section of the property record card.
Step 2 If the dwelling has an exterior feature such as a patio, canopy, portico,
stoop, porch, bay window, deck, balcony, or solarium, use Schedule
E.2—Exterior Features to determine the addition:
a. Locate the row that corresponds to the exterior feature.
b. Locate the column that corresponds to the closest area of the exterior
feature.
c. Find the intersection of the selected row (exterior feature type) and
the selected column (area in square feet). Note the number that you
find.
If the feature is larger than 400 square feet, first find the adjustment
for 400 square feet. Then find the intersection of the selected row and
the ―Per 100‖ column to determine the amount to add to that
adjustment for each additional 100 square feet.
d. Repeat Step a through Step c for each exterior feature. Add together
the values found for all exterior features.

Chapter 3 Residential Dwelling Units
Real Property Assessment Guidelines Page 52
e. Calculate the adjustment for exterior features by multiplying the sum
found in Step d by $100, and enter the amount in the ―Exterior
Features‖ cell on the property record card.
Step 3 Locate the sub-total amount found in Task 3, Step 13 or Step 14 and
apply the additions and deductions determined in Step 1 and Step 2
above. Enter the result in the ―Sub-Total‖ cell.
Task 5—Recording and Applying the Grade
The adjusted sub-total of a dwelling is the base price of the dwelling, adjusted to
take into account any relevant features identified for the dwelling and the
dwelling’s grade. Use Schedule F, provided in Appendix C, to determine the
percentage adjustment to be made to the base price, based on the grade
assignment. Cells are provided to record and apply the grade assigned to the
dwelling and to determine the dwelling’s adjusted sub-total, as shown in
Figure 3-11.

Chapter 3 Residential Dwelling Units
Real Property Assessment Guidelines Page 53
Figure 3-11. Cells Used to Record the Grade and Location Multiplier to
Calculate the Replacement Cost

Chapter 3 Residential Dwelling Units
Real Property Assessment Guidelines Page 54
To determine the grade adjustment and to calculate the adjusted sub-total of the
dwelling, perform the following steps:
Step 1 Next to the ―Grade and Design Factor‖ cell label on the property record
card, enter the letter grade assigned to the dwelling. Information about
determining the grade for a dwelling is provided in Appendix A.
Step 2 In the ―Grade and Design Factor‖ cell, enter the grade factor percentage
corresponding to the dwelling’s grade. Instructions for determining the
grade factor percentage for a dwelling using Schedule F are provided in
the section Assigning Grades to Dwelling Units in Appendix A.
Step 3 Divide the grade factor percentage corresponding to the dwelling’s grade
by 100 to arrive at a multiplier.
Step 4 Calculate the dwelling’s adjusted sub-total by multiplying the amount in
the ―Sub-Total‖ cell (entered in Task 4, Step 3) by the multiplier obtained
in Step 3. Enter the result in the ―Adjusted Sub-Total‖ cell.
Task 6—Determining and Applying the Location Cost Multiplier
The cell labeled ―Location Multiplier‖ is used to make an adjustment to the costs
found in Appendix C. Due to the fact that costs are relative to location, we have
included location cost multipliers, by county, to account for these differences.
The table indicating the multiplier for your county and a more detailed
explanation of location cost multipliers can be found in Appendix C.
Step 1 Locate the multiplier in Table C-1 for your county.
Step 2 Place the multiplier from Table C-1 in the ―Location Multiplier‖ cell on
the property record card.
Step 3 Calculate the adjustment for location by multiplying the location cost
multiplier by the ―Adj. Sub Total‖ cell.
Step 4 Place the product of Step 3 in the ―Replacement Cost‖ cell, rounded to
the nearest $10.
Completing the Summary of Residential Improvements Section
The ―Summary of Residential Improvements‖ section of the property record card,
shown in Figure 3-12, provides space to record information about:
the dwelling
a detached garage (if it is the sole garage)
improvements to the dwelling during non-reassessment years.
The addition schedule is designed to value stick-built room additions to mobile
and manufactured homes during the general reassessment and to value room
additions to dwellings in the interim years between general reassessment years.
Room additions added to existing dwellings before March 2, 2011, must be

Chapter 3 Residential Dwelling Units
Real Property Assessment Guidelines Page 55
calculated as part of the original structure and depreciated based on the age or the
effective age in combination with the main structure.
The addition schedule is divided into three distinct sections depending on the type
of addition constructed. Each section is based on the square footage of the
addition and the type of construction. The sections are interpreted as follows:
Three-wall addition attached at one end. An addition in which the common
wall between the dwelling and the room addition is the smallest dimension of a
rectangular structure.
Three-wall addition attached at one side. An addition in which the common
wall between the dwelling and the room addition is either the longest
dimension of a rectangular structure or one side of a square structure.
Two-wall addition. An addition in which only two walls are needed to enclose
the structure.
Each section lists either frame or masonry type walls with values to be added for
additions that contain half or full upper stories, basements, or crawl spaces. The
schedule is similar to other schedules in that the construction type and square
footage of the addition must be known to arrive at the base cost. Adjustments to
this cost are made using Schedule A, Schedule C, Schedule D (to add for
plumbing), Schedule E, and Schedule F.
This section describes how to complete the ―Summary of Residential
Improvements‖ section for a dwelling. Enter the information for the dwelling in
the ―01 Dwelling‖ row.
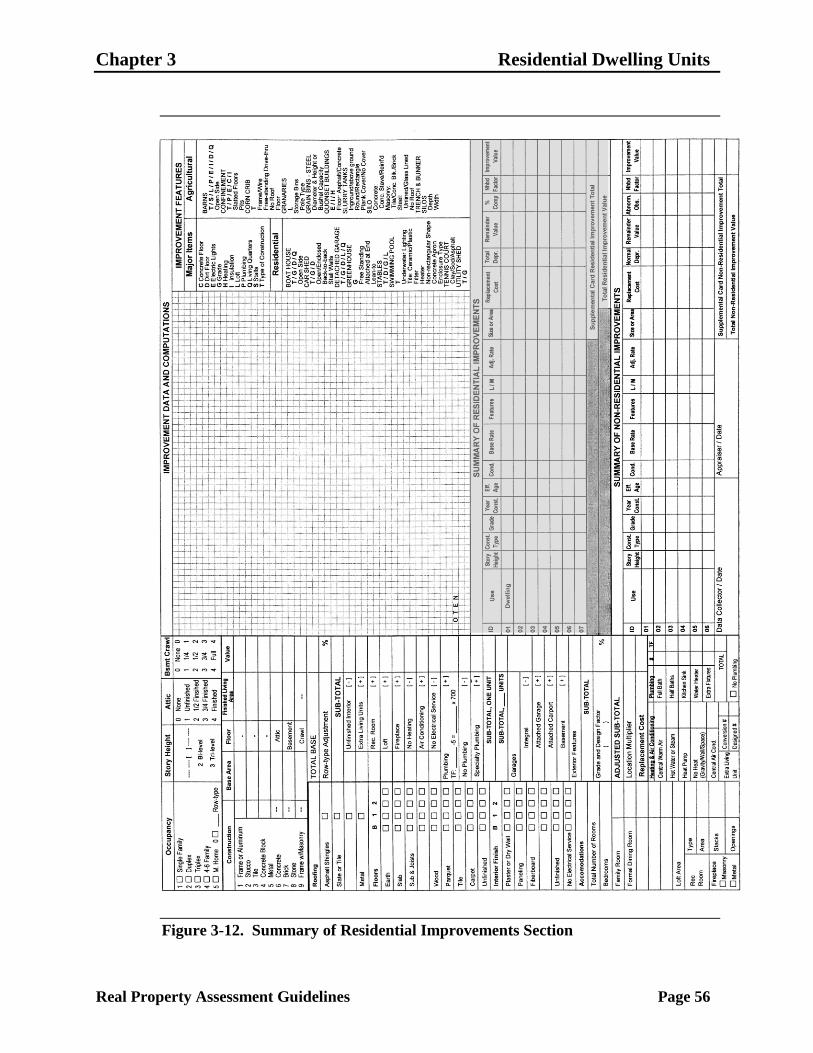
Chapter 3 Residential Dwelling Units
Real Property Assessment Guidelines Page 56
Figure 3-12. Summary of Residential Improvements Section

Chapter 3 Residential Dwelling Units
Real Property Assessment Guidelines Page 57
To complete the ―Summary of Residential Improvements‖ section for the
dwelling, perform these steps:
Step 1 In the ―Story Height‖ column, enter the story height of the dwelling as it
appears in the sketch grid.
Step 2 In the ―Year Const.‖ column, indicate when the dwelling was originally
constructed. Follow these guidelines:
If you are sure of the date, enter just the date, for example ―1990‖.
If you (the assessor) must estimate the date, enter the date followed by
a question mark, for example ―1985?‖.
If the owner estimates the date, enter the date followed by ―+/-‖, (for
example ―1985+/-‖).
If the dwelling was constructed prior to 1941, enter ―Old‖.
Step 3 In the ―Cond.‖ column, enter the code indicating the assigned condition
rating of the dwelling. Table 3-12 describes the codes for this column.
For information on assigning the condition rating, see Appendix B.
Table 3-12. Condition Ratings
CONDITIO
N RATING
EXPLANATION OF CHARACTERISTICS
Excellent The structure is in near perfect condition. It is very attractive and is highly
desirable. It meets all current design requirements as set forth by the buyers
and sellers in the market. Generally, any item that could be or would be
normally repaired or refurbished has been corrected. There are generally no
functional inadequacies of any consequence and all of the short-lived items are
in like new condition.
Good Minor deterioration visible in the building. It is more attractive and more
desirable than the average building of its chronological age. Generally, all
items are well maintained and many of them have been overhauled and
repaired as they have shown signs of wear. There is very little deterioration or
obsolescence evident and there is a high degree of functional utility in the
parcel and in the structure.
Average Normal wear and tear is apparent in the building. It has average attractiveness
and desirability. There are typically minor repairs that are needed along with
some refinishing. In this condition, most of the major components are still
viable and are contributing to the overall utility and value of the property.
Fair Marked deterioration is evident in the structure. It is rather unattractive or
undesirable but still quite useful. This condition indicates that there are a
substantial number of repairs that are needed. Many items need to be
refurbished, overhauled, or improved. There is deferred maintenance that is
obvious.
Poor Definite deterioration is obvious in the structure. It is definitely undesirable or

Chapter 3 Residential Dwelling Units
Real Property Assessment Guidelines Page 58
barely useable. Extensive repair and maintenance are needed on painted
surfaces, the roof, and the plumbing and heating systems. There may be some
functional inadequacies or substandard utilities. There is extensive deferred
maintenance.
Very Poor Conditions in the structure render it unusable. It is extremely unfit for human
habitation or use. There is extremely limited market value in use and it is
approaching abandonment. The structure needs major reconstruction to have
any effective economic value.
Note: Instructions for determining the condition rating for a dwelling are
provided in Appendix B.
Step 4 In the ―Replacement Cost‖ cell, enter the replacement cost calculated for
the dwelling (also entered in the ―Replacement Cost‖ cell in Task 6,
Step 4), rounded to the nearest $10.
Step 5 In the ―Total Depr.‖ column, enter the percentage of reduction in value
due to total depreciation. Information about determining total
depreciation for a dwelling is provided in Appendix B.
Step 6 Determine the remainder value:
a. Subtract the percentage determined for total depreciation (entered in
the ―Total Depr.‖ column) from 100%.
b. Divide the result obtained in Step a by 100 to arrive at a multiplier.
c. Calculate the remainder value by multiplying the replacement cost of
the structure (entered in the ―Replacement Cost‖ column) by the
multiplier obtained in Step b:
Remainder
value
= Replacement
cost
x Multiplier
obtained
in Step b
d. Enter the remainder value in the ―Remainder Value‖ column, rounded
to the nearest $10.
Example: The replacement cost of a dwelling is $80,000. The total
depreciation percentage for the dwelling is 30%. The remainder value is:
100% – 30% = 70% 100 = .70 x $80,000 = $56,000.

Chapter 3 Residential Dwelling Units
Real Property Assessment Guidelines Page 59
Step 7 If the improvement being valued is less than 100% complete on the
assessment date, enter the percentage complete in the ―% Comp‖ cell.
Information on percentage completion can be found in Appendix C.
Step 8 Calculate the neighborhood factor and enter the result in the ―Nhbd
Factor‖ cell. Information on neighborhood factors can be found in
Appendix B.
Step 9 The improvement value is the remainder value of the dwelling, adjusted
for % complete and neighborhood factor (if necessary), rounded to the
nearest $100. Enter this amount in the ―Improvement Value‖ column on
the property record card.
Step 10 If the property has a detached garage (secondary to an attached garage),
yard structures, or other improvements to describe, follow the
instructions in Chapter 5 to complete the ―Summary of Non-Residential
Improvements‖ section.
Note: If the property has a detached garage as it’s only garage it must be
valued as a residential improvement in order to receive the homestead
credit (if applicable).
If the property has no other improvements to describe, sum the entries in
the ―Improvement Value‖ column and enter the total in the ―Total
Residential Improvement Value‖ cell.
Solar Heating and Cooling Systems
This section describes identifying and valuing solar energy heating and cooling
systems that are valued as real property improvements or as personal property
mobile homes that are assessed on an annual basis. Any qualifying solar energy
heating and cooling systems valued from the cost schedules in Appendix C of this
book or Appendix G in Book 2 are eligible for an assessed valuation deduction as
prescribed in IC 6-1.1-12-26. To qualify as a solar energy heating and cooling
system, the system must contain a collection unit, a storage medium, and a
distribution unit. A passive solar system does not quality as a solar energy
heating or cooling system.
Solar Heating and Cooling System Definitions
The following definitions are associated with solar energy heating and cooling
systems.
air system A qualifying system that uses various gases as the
transfer agent between the solar collection unit and
the storage medium. Normally, this type of system
uses pebbles and rocks as the storage medium.

Chapter 3 Residential Dwelling Units
Real Property Assessment Guidelines Page 60
Control devices All switches and wiring necessary to operate the
solar system.
depreciation date March 1, 2011
energy transfer
equipment
The equipment that transfers thermal energy from
the collection source to the storage medium.
insulated containment
vessel
The apparatus that insulates the storage medium
from its surroundings to limit the loss of energy.
liquid system A qualifying system that uses a liquid as the
transfer agent between the solar collector unit and
the storage medium. Normally this type system
uses a liquid storage tank as the storage medium.
passive solar system A greenhouse type enclosure that does not meet the
qualification standards of a collection unit, a
storage medium, and a distribution unit.
solar collector An assembly or structure designed to gather,
concentrate, or absorb direct and indirect solar
energy.
solar distribution unit The portion of the solar unit that distributes the
final product to its destination. Items normally
associated with the solar distribution units are:
ductwork
fans
heat exchangers
pumps
plumbing necessary to interconnect the solar
system.
solar medium The material in which energy is stored.
Solar Heating and Cooling System Types
Table 3-13 lists the types of solar heating and cooling systems.
Table 3-13. Solar Heating and Cooling Systems
This type Indicates
Type A A solar collection unit of thirty (30) square feet, a storage
medium consisting of either a one hundred twenty (120)
gallon tank for a liquid system or a storage vessel with a
rock surface area of four hundred (400) square feet for an
air system, and an elaborate contractor installed
distribution unit that requires minimum occupant

Chapter 3 Residential Dwelling Units
Real Property Assessment Guidelines Page 61
involvement on a day-to-day basis. This type of system
virtually runs itself through the use of sophisticated
monitoring equipment. This type of system is normally
designed for and incorporated into the structure at the
time of construction.
Type B A solar collection unit of twenty-five (25) square feet, a
storage medium consisting of either an eighty (80) gallon
tank for a liquid system or a storage vessel with a rock
surface area of three hundred (300) square feet for an air
system, and a contractor installed distribution unit that
requires limited occupant involvement in the day-to-day
operation of the system.
Type C A solar collection unit of twenty (20) square feet, a
storage medium consisting of either a sixty (60) gallon
tank for a liquid system or a storage vessel with a rock
surface area of two hundred (200) square feet for an air
system, and a contractor installed distribution unit that
relies on the occupant to make internal adjustments
within the system during the day-to-day operation of the
system.
Type D A homemade solar collection unit of less than twenty
(20) square feet and a storage medium of either a forty
(40) gallon tank for a liquid system or a storage vessel
with a rock surface area of two hundred (200) square feet
or less for an air system. The Type D system uses the
structure’s existing base heating and cooling system as
the distribution unit for the system. The Type D
distribution unit’s cost included in the cost schedules
reflect the additional cost incurred to hook-up the solar
portion of the system to the base heating system included
in the structure’s calculation of replacement cost.
Collecting Data for Solar Systems
The solar heating and cooling system cost schedules contain rates for a collection
unit, a distribution unit, and a storage medium. The general reassessment has
identified the structures that contain a solar heating and cooling system. The solar
cost schedules in Appendix C pertain to the pricing of a solar system that is
separate from the base heating system. It is important to remember that structures
containing a base or reserve heating system and a separate solar system must be
charged for both systems. A solar heating and cooling system that uses the
distribution unit of an existing base heating system is charged for only those
components that are necessary to make the system a solar system.
Chapter 3 Residential Dwelling Units
Real Property Assessment Guidelines Page 62
A qualifying solar heating and cooling system must have a collection unit, a
storage medium, and a distribution unit. The basic principle of a solar system is
to collect the sun’s energy as heat, transfer this heat to a specific medium for
storage, and disperse the heat throughout a structure at a future time for the
comfort of the occupants. There are two basic types of solar systems:
A liquid solar system uses liquid as the transfer agent between the various
components of the system. The solar collection unit, normally located on the
roof of the structure, is connected to the remainder of the system by a series of
pipes. The liquid contained within the system is pumped through the collection
unit where heat collected from the sun’s rays is transferred to the liquid. This
heated liquid is periodically pumped to the storage medium—an insulated
storage tank in a liquid system. As the liquid is pumped through a heat
exchanger, which removes heat from the liquid, the heat is transferred to air or
water for distribution throughout the structure.
An air system operates in a similar manner to a liquid system but the transfer
agent is warm air and the storage medium is pebbles or rocks. Through the use
of a system of pipes, air is blown through the collection unit where heat is
transferred to the air. The heated air is blown through a series of pipes to the
storage vessel that contains pebbles or rocks. Heat, transferred to the rocks
from the circulated air, is stored within the rocks for future use. This heat is
then transferred to either air or water by a series of pipes for distribution
throughout the structure.
Collecting Data for Residential Solar Energy Systems
The cost schedules for residential solar systems in Appendix C contain base rates
for an independent system and the component costs that make up the independent
system. The schedules are arranged to value the system either as a system type or
to value the various components when identified by the type of components.
When collecting data for a solar heating and cooling system, you must select a
valuation method and record the method in the ―Summary of Improvements‖
section of the property record card:
If the solar system is being valued on a system basis, record the system type in
the ―Use‖ column and the type of storage medium in the ―Construction‖
column.
If the solar system is being valued on an individual component basis, record
each type of collection unit, distribution unit, and the type of storage medium,
including the variables of either liquid or rock, as separate line entries within
the section.
Collecting Data for Commercial Solar Energy Systems
For commercial solar energy systems, the principle factor necessary in data
collection is the total surface square foot area of the system’s collection unit. The
applicable square foot rate includes all equipment associated with the system. To
identify the system in the ―Summary of Improvements‖ section of the Commercial

Chapter 3 Residential Dwelling Units
Real Property Assessment Guidelines Page 63
and Industrial property record card, you must record ―Com. solar system‖ in the
―Use‖ column and the total square foot area of the collection unit in the ―Size‖
column.
Pricing Solar Systems
Pricing of Residential Solar Systems
A residential solar system or the individual components of a residential solar
system must be valued as real property in the ―Summary of Improvements‖
section of the Property Record Card’s ―Summary of Improvement‖ section:
If the pricing is on a system basis, record only the type of system as an
individual line entry. For example, record ―Type A solar system‖ in the ―Use‖
column, the codes, ―Liq‖ or ―Roc‖ in the ―Construction Type‖ column, and the
corresponding base rate for the type of system identified in the ―Base Rate‖
column. Then multiply the ―Base Rate‖ times the location multiplier and enter
the result in the ―Adjusted Rate‖, and ―Replacement Cost‖ columns.
If the pricing is on a component basis, record each type of component as an
individual line entry. For example, to record the system components:
In the first available row in the ―Summary of Improvements‖ section, record
―Type B collector‖ in the ―Use‖ column with the corresponding component
rate appearing in the ―Base Rate‖ column. Then multiply the ―Base Rate‖
times the location multiplier and enter the result in the ―Adjusted Rate‖, and
―Replacement Cost‖ columns.
In the next row, record ―Type C storage medium‖ in the ―Use‖ column, the
codes ―Liq‖ or ―Roc‖ in the ―Construction Type‖ column, and the
corresponding rates in the ―Base Rate‖ column. Then multiply the ―Base
Rate‖ times the location multiplier and enter the result in the ―Adjusted
Rate‖, and ―Replacement Cost‖ columns.
In the next row, record ―Type C distribution unit‖ in the ―Use‖ column and
the corresponding component rate in the ―Base Rate‖. Then multiply the
―Base Rate‖ times the location multiplier and enter the result in the
―Adjusted Rate‖, and ―Replacement Cost‖ columns.
Pricing Commercial Solar Systems
To calculate the value of a commercial solar system, identify the total square
footage of the system’s collection unit and multiply that square footage by the
applicable base rate (adjusted for location) identified in the cost schedule in
Appendix G. Select the rate that is closest to the subject’s square footage. Do not
interpolate between rates.

Chapter 3 Residential Dwelling Units
Real Property Assessment Guidelines Page 64
Depreciating Solar Systems
Depreciating Residential Solar Systems
Use the Residential Dwelling Depreciation Table for the appropriate grade found
in Appendix B to adjust the replacement cost of a residential solar system. These
depreciation tables are based on age and condition. The age of the system will be
unique for each separate system.
Age is determined by finding the difference between the year of construction of
the solar system and the depreciation date, defined earlier in this section.
Condition is the same as the dwelling that it serves.
Depreciating Commercial Solar Systems
Use Chart 3 found in Appendix F to adjust the replacement cost of a commercial
solar system. This table combines the variables of age and condition to arrive at
the normal depreciation percentage for the system. The condition ratings and age
variables of the system are judged in the same manner as for a residential system.
Geothermal Heating and Cooling Systems
This section provides instructions for identifying and valuing geothermal heating
and cooling systems that are valued as real property improvements. Any
qualifying geothermal heating and cooling system valued from Appendix C in this
book and Appendix G in Book 2 is eligible for an assessed valuation deduction as
prescribed in IC 6-1.1-12-34. To qualify for a deduction under IC 6-1.1-12-34, a
geothermal heating and cooling device must be certified by the Indiana
Department of Environmental Management as prescribed in IC 6-1.1-12-35.5.
Geothermal Heating and Cooling System Definitions
The following definitions are associated with geothermal systems.
closed loop system A geothermal heat pump system that uses a
continuous sealed loop of buried plastic pipe as the
heat exchanger. Loops can be buried horizontally
or vertically.
geothermal heat pump An electrically powered device that uses the natural
heat storage ability of the earth or the earth’s
ground water to heat or cool a structure.

Chapter 3 Residential Dwelling Units
Real Property Assessment Guidelines Page 65
geothermal heating and
cooling device
A device that was installed after December 31,
1981 and designed to use the natural heat cooling
device from the earth to provide hot water, produce
electricity, or generate heating and cooling.
heat exchanger A device designed to transfer heat between two (2)
physically separated fluids or mediums of different
temperatures.
liquid medium Ground water or an acceptable antifreeze solution.
open loop system A geothermal heat pump system that uses ground
water from a conventional water well as the heat
source for the system. The water is returned to the
environment as either open discharge or a return
well.
Geothermal Heating and Cooling System Types
The geothermal heating and cooling system cost schedules contain rates for both
closed loop and open loop geothermal systems:
“Closed loop” system is a geothermal heating and cooling system that uses a
continuous loop of special pipe that is buried in the ground or sunken into a
pond or river. This pipe, that contains a liquid medium of a pressurized
antifreeze solution, is connected to the indoor geothermal heat pump to form a
sealed, underground loop. The antifreeze solution is circulated throughout the
loop where low temperature heat is transferred from the ground or water to the
antifreeze solution. This low temperature heat is used by the geothermal heat
pump to warm the refrigerant within the unit. The two (2) variations of a
closed loop system are:
Horizontal loop systems consist of a series of trenches that are dug
throughout the land surrounding the structure. These trenches are normally
four (4) to six (6) feet deep and up to four hundred (400) feet long,
depending upon how many pipes are located within the trench. The normal
placement of pipe within the trench is to install a run of pipe at the five (5)
foot level and cover it up with dirt. At the three (3) foot level of the trench,
a second run of pipe is looped back over the first run and another layer of
soil is added to fill-in the trench. This overlapping method allows more
length of pipe to be used per linear foot of excavated trench. As a general
rule for horizontal loop systems, it requires approximately five hundred
(500) to six hundred (600) linear feet of underground piping to service one
(1) ton of system capacity.
“Vertical” loop systems are similar to horizontal loop systems except that
the loop is installed downward instead of horizontally throughout the yard.
In a vertical loop, holes are bored into the ground and U-shaped loops of
pipes are inserted into the holes. After the installation of the system is
Chapter 3 Residential Dwelling Units
Real Property Assessment Guidelines Page 66
complete, the created holes are backfilled with a sealing solution. As a
general rule for vertical loop systems, it requires approximately one
hundred twenty five (125) to one hundred fifty (150) linear feet of
underground piping to service one (1) ton of system capacity.
Open loop system is a geothermal heating and cooling system that uses ground
water from a conventional well as the heat source for the system. The water is
pumped into the geothermal heat pump unit where heat is extracted. The
extracted heat is used by the heat exchanger to warm the refrigerant with the
unit. This extracted heat is used by the heat exchanger to warm the refrigerant
within the unit. After the water has passed through the geothermal heat pump
unit, it is discharged in one (1) of the following ways:
The open discharge system simply involves releasing the water into a
river, stream, pond, ditch, or drainage tile.
The return well system involves the drilling of a second well that is used
to return the ground water to the ground aquifer.
Many geothermal heat pump units are equipped with an internal auxiliary electric
heat plant to ensure that the heat is sufficient during periods of repair or extremely
cold weather. The unit is designed as an integral part of a geothermal heating and
cooling system, and the presence of this small auxiliary heat plant within the
geothermal heat pump unit does not alter the qualifications for a deduction as a
geothermal heating and cooling device.
Certain types of geothermal heat pump units are installed in conjunction with
existing fossil fuel furnaces located within a structure. These types of
configurations are commonly referred to as split systems. The geothermal heat
pump unit uses the existing furnace’s distribution system to distribute hot and
cold air throughout the structure. The geothermal portion of a split system may
qualify for the geothermal deduction under IC 6-1.1-12-34. However, the
structure’s base furnace and its distribution system shall be valued and assessed as
part of the real property assessment. The ―no heat‖ adjustment for geothermal
heating described in Chapter 3 does not apply for a split system. If a split system
exists in a particular structure, the applicable rates to value the geothermal portion
of the system are taken from the cost schedules labeled ―without distribution
system‖.
Collecting Data for Geothermal Systems
The technology associated with a geothermal heating and cooling system is based
on the same principles as a standard air heat pump furnace. Both types of systems
rely on a process of elevating the low temperature heat acquired from the
environment and transferring it indoors through a cycle of evaporation,
compression, condensation, and expansion of a refrigerant gas contained within
the heat pump unit.
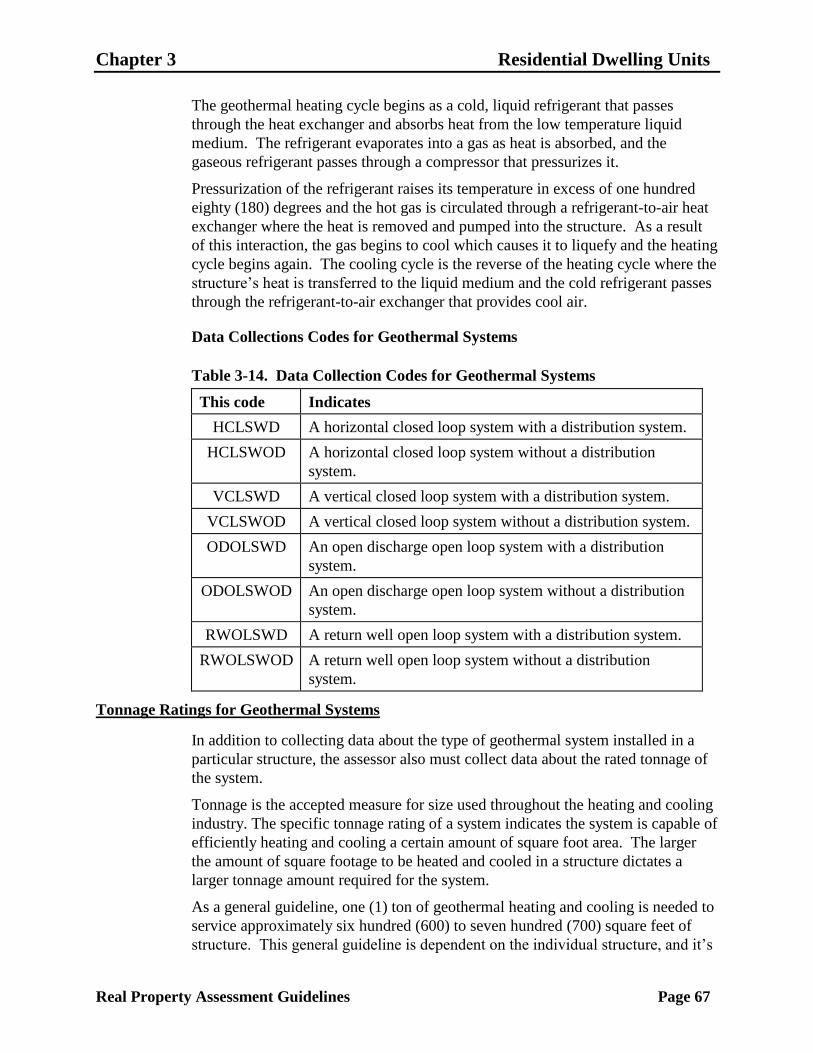
Chapter 3 Residential Dwelling Units
Real Property Assessment Guidelines Page 67
The geothermal heating cycle begins as a cold, liquid refrigerant that passes
through the heat exchanger and absorbs heat from the low temperature liquid
medium. The refrigerant evaporates into a gas as heat is absorbed, and the
gaseous refrigerant passes through a compressor that pressurizes it.
Pressurization of the refrigerant raises its temperature in excess of one hundred
eighty (180) degrees and the hot gas is circulated through a refrigerant-to-air heat
exchanger where the heat is removed and pumped into the structure. As a result
of this interaction, the gas begins to cool which causes it to liquefy and the heating
cycle begins again. The cooling cycle is the reverse of the heating cycle where the
structure’s heat is transferred to the liquid medium and the cold refrigerant passes
through the refrigerant-to-air exchanger that provides cool air.
Data Collections Codes for Geothermal Systems
Table 3-14. Data Collection Codes for Geothermal Systems
This code Indicates
HCLSWD A horizontal closed loop system with a distribution system.
HCLSWOD A horizontal closed loop system without a distribution
system.
VCLSWD A vertical closed loop system with a distribution system.
VCLSWOD A vertical closed loop system without a distribution system.
ODOLSWD An open discharge open loop system with a distribution
system.
ODOLSWOD An open discharge open loop system without a distribution
system.
RWOLSWD A return well open loop system with a distribution system.
RWOLSWOD A return well open loop system without a distribution
system.
Tonnage Ratings for Geothermal Systems
In addition to collecting data about the type of geothermal system installed in a
particular structure, the assessor also must collect data about the rated tonnage of
the system.
Tonnage is the accepted measure for size used throughout the heating and cooling
industry. The specific tonnage rating of a system indicates the system is capable of
efficiently heating and cooling a certain amount of square foot area. The larger
the amount of square footage to be heated and cooled in a structure dictates a
larger tonnage amount required for the system.
As a general guideline, one (1) ton of geothermal heating and cooling is needed to
service approximately six hundred (600) to seven hundred (700) square feet of
structure. This general guideline is dependent on the individual structure, and it’s

Chapter 3 Residential Dwelling Units
Real Property Assessment Guidelines Page 68
history of measured heat loss and gain before the installation of the geothermal
system. The cost schedules in Appendix C include the following tonnage ratings:
two (2) tons
two and five-tenths (2.5) tons
three tons (3)
three and five-tenths (3.5) tons
four (4) tons
five (5) tons
six (6) tons
Structures With Two or More Geothermal Systems
In certain instances, a structure could contain two (2) or more separate geothermal
heating and cooling systems. This normally occurs when a structure contains a
very large amount of square footage or there is a limited amount of yard area to
support a complex closed loop geothermal system. The data collection procedures
are as follows:
If a structure contains two (2) or more separate geothermal heating and cooling
systems and shares the same distribution system throughout the structure,
record the largest rated tonnage system as having the distribution system and
the remaining system or systems as having no distribution system.
Example: A structure has two (2) separate horizontal closed loop geothermal
systems. The first system is rated at four (4) tons and the second is rated at two
(2) tons. When collecting data, the assessor must list the four (4) ton system as
a horizontal closed loop system with distribution, ―HCLSWD‖, and the second
system as a horizontal closed loop system without distribution, ―HCLSWOD‖.
For structures that contain two (2) or more separate geothermal heating and
cooling systems with their own distribution systems, list both systems
separately as having distribution systems.
Example: There are two (2) separate horizontal closed loop systems. Both
systems are rated at three (3) tons. The assessor must list both systems
separately as a horizontal closed loop system with distribution, ―HCLSWD‖.
Note: Data for geothermal heating and cooling systems used in commercial
structures must be collected and priced in the same manner as comparable
residential systems.
Pricing Geothermal Systems
The cost schedules for pricing geothermal heating and cooling systems in
Appendix C are formatted by type of system, tonnage rating of the system, and
whether the system maintains a separate distribution system.

Chapter 3 Residential Dwelling Units
Real Property Assessment Guidelines Page 69
The correct system pricing is obtained by selecting the geothermal system type as
either horizontal closed loop, vertical closed loop, open discharge open loop, or
return well open loop, selecting the system’s rated tonnage size, and selecting the
appropriate base rate (adjusted for location) from either the ―w/ distribution‖
column or the ―w/o distribution‖ column.
Depreciating Geothermal Systems
Depreciating Residential Geothermal Systems
Use the Residential Dwelling Depreciation Table for the appropriate grade found
in Appendix B to adjust the replacement cost of geothermal heating and cooling
systems. These depreciation tables rely on the variables of age and condition.
The age of the system will be unique for each separate system.
Age is determined by finding the difference between the year of construction of
the geothermal system and the depreciation date as defined earlier in this
section.
Condition is the same as the dwelling it serves.
Depreciating Commercial Geothermal Systems
Use Chart 3 found in Appendix F to adjust the replacement cost of a commercial
geothermal heating and cooling system. This table combines age and condition to
determine the normal depreciation percentage for the system. The condition
ratings and age variables of the system are determined in the same manner as for
general geothermal heating and cooling systems, described earlier.