Embed Size (px)
Citation preview

HIGHWAY DESIGN MANUAL 200-1 January 4, 2007
CHAPTER 200 GEOMETRIC DESIGN AND STRUCTURE STANDARDS
Topic 201 - Sight Distance
Index 201.1 - General Sight distance is the continuous length of highway ahead visible to the driver. Four types of sight distance are considered here: passing, stopping, decision, and corner. Passing sight distance is used where use of an opposing lane can provide passing opportunities (see Index 201.2). Stopping sight distance is the minimum sight distance to be provided on multilane highways and on 2-lane roads when passing sight distance is not economically obtainable. Stopping sight distance also is to be provided for all elements of interchanges and intersections at grade, including private road connections (see Topic 504, Index 405.1, & Figure 405.7). Decision sight distance is used at major decision points (see Indexes 201.7 and 504.2). Corner sight distance is used at intersections (see Index 405.1, Figure 405.7, and Figure 504.3J).
Table 201.1 shows the standards for stopping sight distance related to design speed, and these shall be the minimum values used in design. Also shown are the values for use in providing passing sight distance.
Chapter 3 of "A Policy on Geometric Design of Highways and Streets," AASHTO, contains a thorough discussion of the derivation of stopping sight distance.
201.2 Passing Sight Distance Passing sight distance is the minimum sight distance required for the driver of one vehicle to pass another vehicle safely and comfortably. Passing must be accomplished assuming an oncoming vehicle comes into view and maintains the design speed, without reduction, after the overtaking maneuver is started.
Table 201.1 Sight Distance Standards
Design Speed(1)
(mph) Stopping(2)
(ft) Passing
(ft)
20 125 800
25 150 950
30 200 1,100
35 250 1,300
40 300 1,500
45 360 1,650
50 430 1,800
55 500 1,950
60 580 2,100
65 660 2,300
70 750 2,500
75 840 2,600
80 930 2,700
(1) See Topic 101 for selection of design speed. (2) For sustained downgrades, refer to advisory standard in
Index 201.3
The sight distance available for passing at any place is the longest distance at which a driver whose eyes are 3 ½ feet above the pavement surface can see the top of an object 4 ¼ feet high on the road. See Table 201.1 for the calculated values that are associated with various design speeds.
In general, 2-lane highways should be designed to provide for passing where possible, especially those routes with high volumes of trucks or recreational vehicles. Passing should be done on tangent horizontal alignments with constant grades or a slight sag vertical curve. Not only are drivers reluctant to pass on a long crest vertical curve, but it is impracticable to design crest vertical curves to provide for passing sight distance because of high cost where crest cuts are involved. Passing sight distance for crest vertical curves is 7 to 17 times longer than the stopping sight distance.
Ordinarily, passing sight distance is provided at locations where combinations of alignment and

200-2 HIGHWAY DESIGN MANUAL July 24, 2009 profile do not require the use of crest vertical curves.
Passing sight distance is considered only on 2-lane roads. At critical locations, a stretch of 3- or 4-lane passing section with stopping sight distance is sometimes more economical than two lanes with passing sight distance.
Passing on sag vertical curves can be accomplished both day and night because headlights can be seen through the entire curve.
See Part 3 of the California Manual on Uniform Traffic Control Devices (California MUTCD) for criteria relating to the placement of barrier striping for no-passing zones. Note, that the passing sight distances shown in the California MUTCD are based on traffic operational criteria. Traffic operational criteria are different from the design characteristics used to develop the values provided in Table 201.1 and Chapter 3 of AASHTO, A Policy on Geometric Design of Highways and Streets. The aforementioned table and AASHTO reference are also used to design the vertical profile and horizontal alignment of the highway. Consult the Headquarters (HQ) Traffic Liaison when using the California MUTCD criteria for traffic operating-control needs.
Other means for providing passing opportunities, such as climbing lanes or turnouts, are discussed in Index 204.5. Chapter 3 of AASHTO, A Policy on Geometric Design of Highways and Streets, contains a thorough discussion of the derivation of passing sight distance.
201.3 Stopping Sight Distance The minimum stopping sight distance is the distance required by the driver of a vehicle, traveling at a given speed, to bring the vehicle to a stop after an object on the road becomes visible. Stopping sight distance is measured from the driver's eyes, which are assumed to be 3 ½ feet above the pavement surface, to an object ½-foot high on the road. See Index 1003.1(9) for bicycle stopping sight distance guidance.
The stopping sight distances in Table 201.1 should be increased by 20 percent on sustained downgrades steeper than 3 percent and longer than one mile.
201.4 Stopping Sight Distance at Grade Crests Figure 201.4 shows graphically the relationships between length of crest vertical curve, design speed, and algebraic difference in grades. Any one factor can be determined when the other two are known.
201.5 Stopping Sight Distance at Grade Sags From the curves in Figure 201.5, the minimum length of vertical curve which provides headlight sight distance in grade sags for a given design speed can be obtained.
If headlight sight distance is not obtainable at grade sags, lighting may be considered. The Design Coordinator and the HQ Traffic Liaison shall be contacted to review proposed grade sag lighting to determine if such use is appropriate.
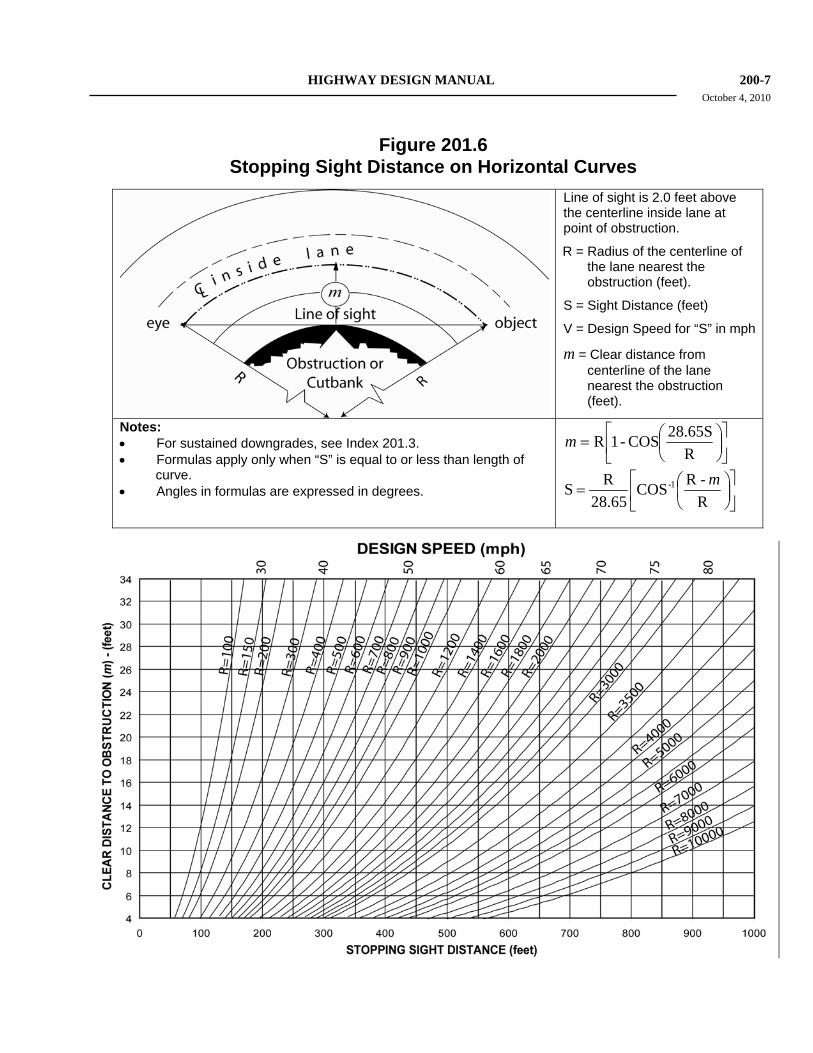
201.6 Stopping Sight Distance on Horizontal Curves Where an object off the pavement such as a bridge pier, building, cut slope, or natural growth restricts sight distance, the minimum radius of curvature is determined by the stopping sight distance.
Available stopping sight distance on horizontal curves is obtained from Figure 201.6. It is assumed that the driver's eye is 3 ½ feet above the center of the inside lane (inside with respect to curve) and the object is ½-foot high. The line of sight is assumed to intercept the view obstruction at the midpoint of the sight line and 2 feet above the center of the inside lane when the road profile is flat (i.e. no vertical curve). Crest vertical curves can cause additional reductions in sight distance. The clear distance (m) is measured from the center of the inside lane to the obstruction.
The design objective is to determine the required clear distance from centerline of inside lane to a retaining wall, bridge pier, abutment, cut slope, or other obstruction for a given design speed. Using radius of curvature and minimum sight distance for that design speed, Figure 201.6 gives the clear distance (m) from centerline of inside lane to the obstruction.

HIGHWAY DESIGN MANUAL 200-3 July 24, 2009 When the radius of curvature and the clear distance to a fixed obstruction are known, Figure 201.6 also gives the sight distance for these conditions.
See Index 101.1 for technical reductions in design speed caused by partial or momentary horizontal sight distance restrictions. See Index 203.2 for additional comments on glare screens.
Cuts may be widened where vegetation restricting horizontal sight distance is expected to grow on finished slopes. Widening is an economic trade-off that must be evaluated along with other options. See Index 902.2 for sight distance requirements on landscape projects.
201.7 Decision Sight Distance At certain locations, sight distance greater than stopping sight distance is desirable to allow drivers time for decisions without making last minute erratic maneuvers (see Chapter III of AASHTO, A Policy on Geometric Design of Highways and Streets, for a thorough discussion of the derivation of decision sight distance.)
On freeways and expressways the decision sight distance values in Table 201.7 should be used at lane drops and at off-ramp noses to interchanges, branch connections, roadside rests, vista points, and inspection stations. When determining decision sight distance on horizontal and vertical curves, Figures 201.4, 201.5, and 201.6 can be used. Figure 201.7 is an expanded version of Figure 201.4 and gives the relationship among length of crest vertical curve, design speed, and algebraic difference in grades for much longer vertical curves than Figure 201.4.
Decision sight distance is measured using the 3 ½-foot eye height and ½-foot object height. See Index 504.2 for sight distance at secondary exits on a collector-distributor road.
Table 201.7
Decision Sight Distance Design Speed
(mph) Decision Sight
Distance (ft)
30 450
35 525
40 600
45 675
50 750
55 865
60 990
65 1,050
70 1,105
75 1,180
80 1,260
Topic 202 - Superelevation
202.1 Basic Criteria According to the laws of mechanics, when a vehicle travels on a curve it is forced outward by centrifugal force.
On a superelevated highway, this force is resisted by the vehicle weight component parallel to the superelevated surface and side friction between the tires and pavement. It is impractical to balance centrifugal force by superelevation alone, because for any given curve radius a certain superelevation rate is exactly correct for only one driving speed. At all other speeds there will be a side thrust either outward or inward, relative to the curve center, which must be offset by side friction.
If the vehicle is not skidding, these forces are in equilibrium as represented by the following equation, which is used to design a curve for a comfortable operation at a particular speed:
15RV
R0.067Vfe Factor lCentrifuga
22==+=

200-4 HIGHWAY DESIGN MANUAL September 1, 2006 Where:
e = Superelevation slope in feet per foot
emax = Maximum superelevation rate for a given condition
f = Side friction factor R = Curve radius in feet V = Velocity in miles per hour
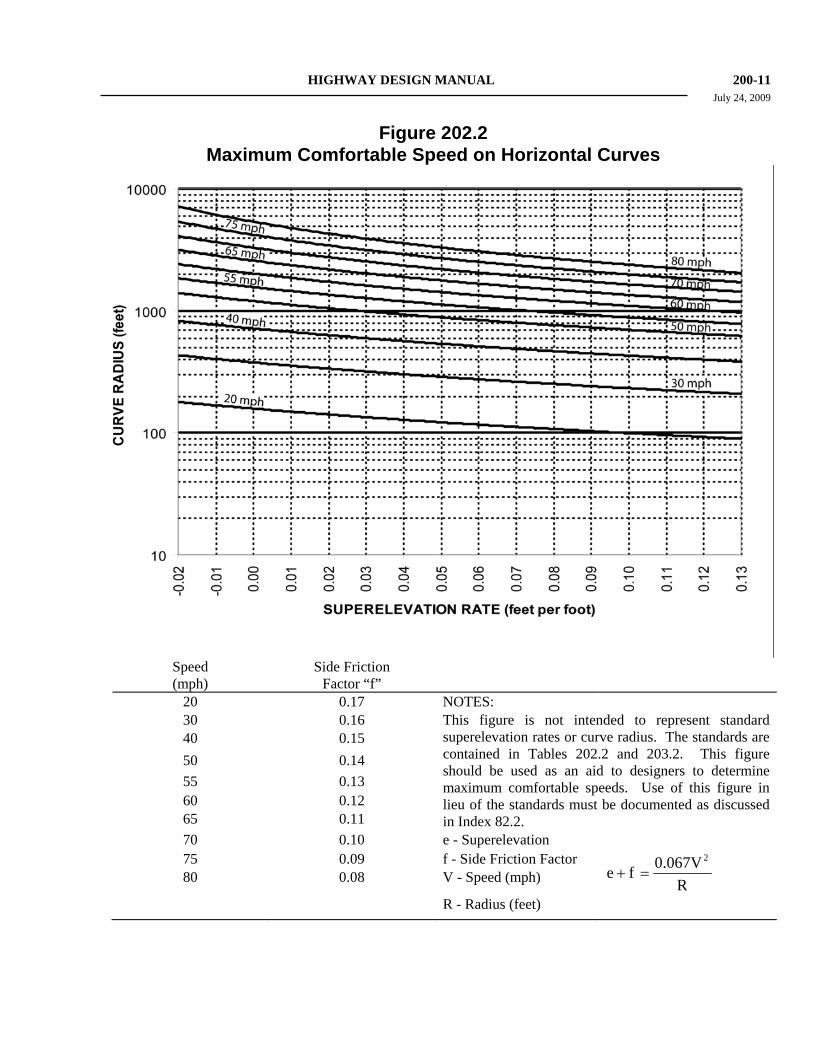
Standard superelevation rates are designed to hold the portion of the centrifugal force that must be taken up by tire friction within allowable limits. Friction factors as related to speed are shown on Figure 202.2. The factors apply equally to portland cement concrete and bituminous pavements.
202.2 Standards for Superelevation Maximum superelevation rates for various highway conditions are shown on Table 202.2.
Based on an emax selected by the designer for one of the conditions, superelevation rates from Table 202.2 shall be used within the given range of curve radii. If less than standard supereleva-tion rates are approved (see Index 82.1), Figure 202.2 shall be used to determine superelevation based on the curve radius and maximum comfortable speed.
Maximum comfortable speed is determined by the formula given on Figure 202.2. It represents the speed on a curve where discomfort caused by centrifugal force is evident to a driver. Side friction factors tabulated on Figure 202.2 are recommended by AASHTO for design purposes. AASHTO, A Policy on Geometric Design of Highways and Streets, states, "In general, studies show that the maximum side friction factors developed between new tires and wet concrete pavements range from about 0.5 at 20 mph to approximately 0.35 at 60 mph." The design side friction factors are, therefore, about one-third the values that occur when side skidding is imminent.
To use Figure 202.2, the designer must decide on the relative importance among three variables. Normally, when a nonstandard superelevation rate is approved, Figure 202.2 will be entered with the rate and a desired curve radius. It must then be determined whether the resulting maximum comfortable speed is adequate for the conditions or
whether further adjustments to radius and superelevation may be needed.
Except for short radius curves, the standard superelevation rate results in very little side thrust at speeds less than 45 miles per hour. This provides maximum comfort for most drivers.
Superelevation for horizontal curves with radii of 10,000 feet and greater may be deleted in those situations where the combination of a flat grade and a superelevation transition would create undesirable drainage conditions on the pavement.
Superelevated cross slopes on curves extend the full width of the traveled way and shoulders, except that the shoulder slope on the low side should be not less than the minimum shoulder slope used on the tangents (see Index 304.3 for cross slopes under cut widening conditions).
On rural 2-lane roads, superelevation should be on the same plane for the full width of traveled way and shoulders, except on transitions (see Index 304.3 for cut widening conditions).
202.3 Restrictive Conditions Lower superelevation rates than those given in either Table 202.2 or Figure 202.2 may be necessary in areas where restricted speed zones or ramp/street intersections are controlling factors. Other typical locations are short radius curves on ramps near the local road juncture, either at an intersection or where a loop connects with an overcrossing structure. Often, established street grades, curbs, or drainage may prove difficult to alter and/or superelevation transition lengths would be undesirably short.
Such conditions may justify a reduction in the superelevation rate, different rates for each half of the roadbed, or both. In any case, the superelevation rate provided should be appropriate for the conditions allowing for a smooth transition while providing the maximum level of comfort to the driver. Where standard superelevation rates cannot be attained, discussions should be held with the Design Reviewer and/or the Design Coordinator to determine the proper solution and the necessity of preparing a design exception fact sheet. In warping street or ramp surface areas for

HIGHWAY DESIGN MANUAL 200-5 October 4, 2010
Figure 201.4 Stopping Sight Distance on Crest Vertical Curves
Drivers eye height is 3 ½ feet. Object height is ½-foot.
L = Curve Length (feet)
A = Algebraic Grade Difference (%)
S = Sight Distance (feet)
V = Design Speed for “S” in mph
K = Distance in feet required to achieve a 1% change in grade. K value as shown on graph is valid when S < L.
Notes: • Before using this figure for intersections, branch connections and exits, see Indexes 201.7 and 405.1, and
Topic 504. • See Figure 204.4 for vertical curve formulas. • See Index 204.4 for minimum length of vertical curve
When S > L
L = 2S – 1329/A
When S < L
L = AS2 /1329

200-6 HIGHWAY DESIGN MANUAL October 4, 2010
Figure 201.5 Stopping Sight Distance on Sag Vertical Curves
L = Curve Length (feet) A = Algebraic Grade Difference (%) S = Sight Distance (feet) V = Design Speed for “S” in mph K = Distance in feet required to
achieve a 1% change in grade. K value as shown on graph is valid when S < L.
Notes: • For sustained downgrades, see Index 201.3. • Before using this figure for intersections, branch connections and exits, see Indexes 201.7 and 405.1, and
Topic 504. • See Figure 204.4 for vertical curve formulas. • See Index 204.4 for minimum length of vertical curve.
When S > L
L = 2S - (400 + 3.5S)/A
When S < L
L = AS2 /(400 + 3.5S)
HIGHWAY DESIGN MANUAL 200-7 October 4, 2010
Figure 201.6 Stopping Sight Distance on Horizontal Curves
Line of sight is 2.0 feet above the centerline inside lane at point of obstruction.
R = Radius of the centerline of the lane nearest the obstruction (feet).
S = Sight Distance (feet)
V = Design Speed for “S” in mph
m = Clear distance from centerline of the lane nearest the obstruction (feet).
Notes: • For sustained downgrades, see Index 201.3. • Formulas apply only when “S” is equal to or less than length of
curve. • Angles in formulas are expressed in degrees.
⎥⎦
⎤⎢⎣
⎡⎟⎠⎞
⎜⎝⎛=
R28.65SCOS-1Rm
⎥⎦
⎤⎢⎣
⎡⎟⎠⎞
⎜⎝⎛=
R-RCOS
28.65RS 1- m

200-8 HIGHWAY DESIGN MANUAL October 4, 2010
Figure 201.7 Decision Sight Distance on Crest Vertical Curves
Drivers eye height is 3½ feet. Object height is ½-foot.
L = Curve Length (feet)
A = Algebraic Grade Difference (%)
S = Sight Distance (feet)
V = Design Speed for “S” in mph
K = Distance in feet required to achieve a 1% change in grade. K value as shown on graph is valid when S < L.
Notes: • Before using this figure for intersections, branch connections and exits, see Indexes 201.7 and 405.1,
and Topic 504. • See Figure 204.4 for vertical curve formulas. • See Index 204.4 for minimum length of vertical curve.
When S > L
L = 2S – 1329/A
When S < L
L = AS2 /1329

HIGHWAY DESIGN MANUAL 200-9 September 1, 2006 drainage, adverse superelevation should be avoided (see Figure 202.2).
202.4 Axis of Rotation (1) Undivided Highways. For undivided highways
the axis of rotation for superelevation is usually the centerline of the roadbed. However, in special cases such as desert roads where curves are preceded by long relatively level tangents, the plane of superelevation may be rotated about the inside edge of traveled way to improve perception of the curve. In flat country, drainage pockets caused by superelevation may be avoided by changing the axis of rotation from the centerline to the inside edge of traveled way.
(2) Ramps and Freeway-to-freeway Connections. The axis of rotation may be about either edge of traveled way or centerline if multilane. Appearance and drainage considerations should always be taken into account in selection of the axis of rotation.
(3) Divided Highways.
(a) Freeways--Where the initial median width is 65 feet or less, the axis of rotation should be at the centerline.
Where the initial median width is greater than 65 feet and the ultimate median width is 65 feet or less, the axis of rotation should be at the centerline, except where the resulting initial median slope would be steeper than 10:1. In the latter case, the axis of rotation should be at the ultimate median edges of traveled way.
Where the ultimate median width is greater than 65 feet, the axis of rotation should normally be at the ultimate median edges of traveled way.
To avoid sawtooth on bridges with decked medians, the axis of rotation, if not already on centerline, should be shifted to the centerline.
(b) Conventional Highways--The axis of rotation should be considered on an individual project basis and the most appropriate case for the conditions should be selected.
Aesthetics, grade distortion, superelevation transitions, drainage, and driver perception should be considered when selecting the axis of rotation (see Index 204.2).
202.5 Superelevation Transition (1) General. The superelevation transition
generally consists of the crown runoff and the superelevation runoff as shown on Figure 202.5A and 202.5B.
A superelevation transition should be designed in accordance with the diagram and tabular data shown in Figure 202.5A to satisfy the requirements of safety, comfort and pleasing appearance. The length of superelevation transition should be based upon the combination of superelevation rate and width of rotated plane in accordance with the tabulated superelevation runoff lengths on the bottom of Figure 202.5A.
Edge of traveled way and shoulder profiles should be plotted and irregularities resulting from interactions between the superelevation transition and vertical alignment of the roadway should be eliminated by introducing smooth curves. Edge of traveled way and shoulder profiles also will reveal flat areas which are undesirable from a drainage standpoint and should be avoided.
(2) Runoff. Two-thirds of the superelevation runoff should be on the tangent and one-third within the curve. This results in two-thirds of the full superelevation rate at the beginning or ending of a curve. This may be altered as required to adjust for flat spots or unsightly sags and humps, or when conforming to existing roadway.
(3) Restrictive Situations. In restrictive situations, such as on two lane highways in mountainous terrain, interchange ramps, collector roads, frontage roads, etc., where curve radius and length and tangents between curves are short, standard superelevation rates and/or transitions may not be attainable. In such situations the highest possible superelevation rate(s) and transition length should be used, but the rate of change of cross slope should not exceed 6 percent per 100 feet.

200-10 HIGHWAY DESIGN MANUAL September 1, 2006
Table 202.2
Standard Superelevation Rates (Superelevation in Feet per Foot for Curve Radius in Feet)
Ramps, 2-Lane Conventional Highways, Frontage
Roads(1)
Freeways, Expressways,
Multilane Conventional Highways
When Snow & Ice Conditions Prevail
(Usually over 3,000 ft elevation)
Urban Roads (35 – 45 mph)
Urban Roads (less than 35 mph)
For emax = 0.12 For emax = 0.10 For emax = 0.08 For emax = 0.06 For emax = 0.04
Range of e Range of e Range of e Range of e Range of e
Curve Radii Rate Curve Radii Rate Curve Radii Rate Curve Radii Rate Curve Radii Rate
Under 625 0.12
625 – 849 0.11
850 – 1,099 0.10 Under 1,100 0.10
1,100 – 1,349 0.09 1,100 – 1,349 0.09
1,350 – 1,599 0.08 1,350 – 1,599 0.08 Under 1,600 0.08
1,600 – 1,899 0.07 1,600 – 1,899 0.07 1,600 – 1,899 0.07
1,900 – 2,199 0.06 1,900 – 2,199 0.06 1,900 – 2,199 0.06 Under 600 0.06
2,200 – 2,699 0.05 2,200 – 2,699 0.05 2,200 – 2,699 0.05 600 – 999 0.05
2,700 – 3,499 0.04 2,700 – 3,499 0.04 2,700 – 3,499 0.04 1,000 – 1,499 0.04 Under 500 0.04
3,500 – 4,499 0.03 3,500 – 4,499 0.03 3,500 – 4,499 0.03 1,500 – 1,999 0.03 500 – 999 0.03
4,500 – 19,999 0.02 4,500 – 19,999 0.02 4,500 – 19,999 0.02 2,000 – 6,999 0.02 1,000 – 4,999 0.02
20,000 & over (2) 20,000 & over (2) 20,000 & over (2) 7,000 & over (2) 5,000 & over (2)
Notes:
(1) For frontage roads under other jurisdictions see Index 202.7.
(2) Use standard crown section.
HIGHWAY DESIGN MANUAL 200-11 July 24, 2009
Figure 202.2 Maximum Comfortable Speed on Horizontal Curves
Speed (mph)
Side Friction Factor “f”
20 0.17 NOTES: This figure is not intended to represent standard superelevation rates or curve radius. The standards are contained in Tables 202.2 and 203.2. This figure should be used as an aid to designers to determine maximum comfortable speeds. Use of this figure in lieu of the standards must be documented as discussed in Index 82.2.
30 0.16 40 0.15 50 0.14 55 0.13 60 0.12 65 0.11 70 0.10 e - Superelevation 75 0.09 f - Side Friction Factor
R0.067Vfe
2
=+ 80 0.08 V - Speed (mph)
R - Radius (feet)

200-12 HIGHWAY DESIGN MANUAL September 1, 2006 (4) Superelevation Transitions on Bridges.
Superelevation transitions on bridges should be avoided whenever possible (See Index 203.9).
(5) Shoulder Transitions. The shoulder plane rotates about the adjacent edge of traveled way as well as the rotational axis of the traveled way. Shoulder superelevation transitions should be smooth and compatible with the transition of the adjacent pavements.
202.6 Superelevation of Compound Curves Superelevation of compound curves should follow the procedure as shown in Figure 202.6. Where feasible, the criteria in Index 202.5 should apply.
202.7 Superelevation on City Streets and County Roads Superelevation rates of local streets and roads which are within the State right of way (with or without connection to State facilities) shall conform to AASHTO standards, for the functional classification of the facility in question. If the local agency having jurisdiction over the local facility in question maintains standards that exceed AASHTO standards, then the local agency standards should prevail.
See Index 202.2 and Table 202.2 for Frontage Roads within the State right of way. Frontage roads that will be relinquished after construction should follow AASHTO or local standards as stated above.
Topic 203 - Horizontal Alignment
203.1 General Controls Horizontal alignment should provide for safe and continuous operation at a uniform design speed for substantial lengths of highway. The standards which follow apply to curvature on both 2-lane and multilane highways except when otherwise noted. These standards also apply to portions of local streets and roads within the State right of way which connect directly to a freeway or expressway, or are expected to do so in the foreseeable future. For local facilities which are within the State right of way and where there is no connection or
the connection is to a non-controlled access facility (conventional highway), AASHTO standards shall prevail. If the local agency having jurisdiction over the local facility in question maintains standards that exceed AASHTO standards, then the local agency standards should prevail.
The major considerations in horizontal alignment design are safety, profile, type of facility, design speed, geotechnical features, topography, right of way cost and construction cost. In design, safety is always considered, either directly or indirectly. On freeways in metropolitan areas, alternative studies often indicate that right of way considerations influence alignment more than any other single factor. Topography controls both curve radius and design speed to a large extent. The design speed, in turn, controls sight distance, but sight distance must be considered concurrently with topography because it often demands a larger radius than the design speed. All these factors must be balanced to produce an alignment which optimizes the achievement of various objectives such as safety, cost, harmony with the natural contour of the land, and at the same time adequate for the design classification of the highway.
Horizontal alignment shall provide at least the minimum stopping sight distance for the chosen design speed at all points on the highway, as given in Table 201.1 and explained in Index 201.3. See Index 101.1 for technical reductions in design speed.
203.2 Standards for Curvature Table 203.2 shall be the minimum radius of curve for specific design speeds. This table is based upon speed alone; it ignores the sight distance factor. If the minimum radius indicated in Table 203.2 does not provide the desired lateral clearance to an obstruction, Figure 201.6 shall govern.

HIGHWAY DESIGN MANUAL 200-13 July 24, 2009
Figure 202.5A Superelevation Transition

200-14 HIGHWAY DESIGN MANUAL October 4, 2010
Figure 202.5B Superelevation Transition Terms & Definitions
Term Definition Crown Runoff
The distance from the station where the high side of the superelevating section surfaces are at a cross slope of 2% to where the high side of the section surfaces reaches a cross slope of 0%.
Superelevation Runoff(L)
The distance from the station where the high side of the superelevating section surfaces are at a cross slope of 0% to the station where the entire cross section is at full superelevation.
Superelevation Transition
The distance from the station where the high side of the superelevating sections are crowned at a cross slope of 2% to the station where the entire cross section is at full superelevation. The Crown Runoff Length plus the Superelevation Runoff Length (L) equals the Superelevation Transition Length.
% On tangent The percentage of the superelevation runoff length (L) that is outside of the curve (2/3L). See Index 202.5(2).
% On curve The percentage of the superelevation runoff length (L) that is within the curve (1/3L). See Index 202.5(2). The % On Tangent and % On curve values must total 100%.
2 3
63
2 6
Elements of a Superelevation Transition (Right Curve)

HIGHWAY DESIGN MANUAL 200-15 September 1, 2006
Figure 202.6
Superelevation of Compound Curves

200-16 HIGHWAY DESIGN MANUAL September 1, 2006 Every effort should be made to exceed minimum values, and such minimum radii should be used only when the cost or other adverse effects of realizing a higher standard are inconsistent with the benefits. As an aid to designers, Figure 202.2 displays the maximum comfortable speed for various curve radii and superelevation rates. Use of Figure 202.2, in lieu of the above standards must be documented as discussed in Index 82.2.
The recommended minimum radii for freeways are 5,000 feet in rural areas and 3,000 feet in urban areas.
If a glare screen or a median barrier is contemplated, either initially or ultimately, adjustments may be necessary to maintain the required sight distance on curves on divided highways. In such cases, a larger curve radius or a wider median may be required throughout the length of the curve. For design purposes, a planting screen is presumed to be 8 feet wide. See Chapter 7 of the Traffic Manual for glare screen criteria.
Table 203.2
Standards for Curve Radius Design Speed
mph Minimum Radius
of Curve (ft)
20 130 30 300 40 550 50 850 60 1,150 70 2,100 80 3,900
203.3 Alignment Consistency Sudden reductions in alignment standards should be avoided. Where physical restrictions on curve radius cannot be overcome and it becomes necessary to introduce curvature of lower standard than the design speed for the project, the design speed between successive curves should change not
more than 10 miles per hour. Introduction of curves with lower design speeds should be avoided at the end of long tangents, steep downgrades, or at other locations where high approach speeds may be anticipated.
The horizontal and vertical alignments should be coordinated such that horizontal curves are not hidden behind crest vertical curves. Sharp horizontal curves should not follow long tangents because some drivers tend to develop higher speeds on the tangent and could over drive the curve.
See “Combination of Horizontal and Vertical Alignment” in Chapter III of AASHTO, A Policy on Geometric Design of Highways and Streets, for further guidance on alignment consistency.
203.4 Curve Length and Central Angle The minimum curve length for central angles less than 10 degrees should be 800 feet to avoid the appearance of a kink. For central angles smaller than 30 minutes, no curve is required. Above a 20,000 -foot radius, a parabolic curve may be used. In no event should sight distance or other safety considerations be sacrificed to meet the above requirements.
On 2-lane roads a curve should not exceed a length of one-half mile and should be no shorter than 500 feet.
203.5 Compound Curves Compound curves should be avoided because drivers who have adjusted to the first curve could over drive the second curve if the second curve has a smaller radius than the first. Exceptions can occur in mountainous terrain or other situations where use of a simple curve would result in excessive cost. Where compound curve is necessary, the shorter radius should be at least two-thirds the longer radius when the shorter radius is 1,000 feet or less. On one-way roads, the larger radius should follow the smaller radius.
The total arc length of a compound curve should be not less than 500 feet.
HIGHWAY DESIGN MANUAL 200-17 September 1, 2006
203.6 Reversing Curves When horizontal curves reverse direction the connecting tangents should be long enough to accommodate the standard superelevation runoffs given on Figure 202.5. If this is not possible, the 6 percent per 100 feet rate of change should govern (see Index 202.5(3)). When feasible, a minimum of 400 feet of tangent should be considered.
203.7 Broken Back Curves A broken back curve consists of two curves in the same direction joined by a short tangent. Broken back curves are unsightly and undesirable.
203.8 Spiral Transition Spiral transition curves are not standard practice.
203.9 Alignment at Bridges Due to the difficulty in constructing bridges with superelevation rates greater than 10 percent, the curve radii on bridges should be designed to accommodate superelevation rates of 10 percent or less. See Index 202.2 for standard superelevation rates.
Superelevation transitions on bridges are difficult to construct and almost always result in an unsightly appearance of the bridge and the bridge railing. Therefore, if possible, horizontal curves should begin and end a sufficient distance from the bridge so that no part of the superelevation transition extends onto the bridge.
Alignment and safety considerations, however, are paramount and must not be sacrificed to meet the above criteria.
Topic 204 - Grade
204.1 General Controls The grade line is a reference line by which the elevation of the pavement and other features of the highway are established. It is controlled mainly by topography, type of highway, horizontal alignment, performance of heavy vehicles, right of way costs, safety, sight distance, construction costs, cultural development, drainage, and pleasing appearance.
All portions of the grade line must meet sight distance requirements for the design speed classification of the road.
In flat terrain, the elevation of the grade line is often controlled by drainage considerations. In rolling terrain, some undulation in the grade line is often advantageous for construction economy. This should be done with appearance in mind; for example, a grade line on tangent alignment exhibiting a series of humps visible for some distance ahead should be avoided whenever possible. In rolling hills or mountainous terrain, however, the grade line usually is more closely dependent upon physical controls.
In considering alternative profiles, economic comparisons involving earthwork quantities and/or retaining walls should be made. A balanced earthwork design is most cost effective. When long or steep grades are involved, economic comparisons should include vehicle operating costs.
The standards in Topic 204 also apply to portions of local streets and roads within the State right of way which connect directly to a freeway or expressway, or are expected to do so in the foreseeable future. For local facilities which are within the State right of way and where there is no connection or the connection is to a non-controlled access facility (conventional highway), AASHTO standards shall prevail. If the local agency having jurisdiction over the local facility in question maintains standards that exceed AASHTO standards, then the local agency standards should prevail.
204.2 Position With Respect to Cross Section The grade line should generally coincide with the axis of rotation for superelevation (see Index 202.4). Its relation to the cross section should be as follows:
(1) Undivided Highways. The grade line should coincide with the highway centerline.
(2) Ramps and Freeway-to-freeway Connections. Although the grade line is usually positioned at the left edge of traveled way, either edge of traveled way or centerline may be used on multilane facilities.

200-18 HIGHWAY DESIGN MANUAL September 1, 2006
(3) Divided Highways. The grade line should be positioned at the centerline of the median for paved medians 65 feet wide or less, thus avoiding a “saw tooth” section, which can reduce horizontal stopping sight distance.
The grade line may be positioned at the ultimate median edge of traveled way when:
(a) The median edges of traveled way of the two roadways are at equal elevation.
(b) The two roadways are at different elevations as described in Index 204.8.
(c) The width of median is nonuniform (see Index 305.6).
204.3 Standards for Grade Table 204.3 shows the maximum grades which shall not be exceeded for the condition indicated.
Steep grades affect truck speeds and overall capacity. They also cause operational problems at intersections. For these reasons it is desirable to provide the flattest grades practicable (see Index 204.5 for information on truck issues with grades).
Table 204.3
Maximum Grades for Type of Highway and Terrain Conditions Type of Terrain
Freeways and Expressways
Rural Highways
Urban Highways
Level 3% 4% 6% Rolling 4% 5% 7% Mountainous 6% 7% 9%
Minimum grades should be 0.5 percent in snow country and 0.3 percent at other locations. Except for conventional highways in urban or suburban areas, a level grade line is permissible in level terrain where side fill slopes are 4:1 or flatter and dikes are not needed to carry water in the roadbed. Flat grades are not permissible in superelevation transitions due to flat spots which cause ponding on the roadbed.
Ramp grades should not exceed 8 percent. On descending on-ramps and ascending off-ramps, one percent steeper is allowed (see Index 504.2(5)).
204.4 Vertical Curves Properly designed vertical curves should provide adequate sight distance, safety, comfortable driving, good drainage, and pleasing appearance.
A parabolic vertical curve is used. Figure 204.4 gives all necessary mathematical relations for computing a vertical curve, either at crests or sags. For algebraic grade differences of 2 percent and greater, and design speeds equal to or greater than 40 miles per hour, the minimum length of vertical curve in feet should be equal to 10V, where V = design speed. As an example, a 65 miles per hour design speed would require a 650-foot minimum vertical curve length. For algebraic grade differences of less than 2 percent, or design speeds less than 40 miles per hour, the vertical curve length should be a minimum of 200 feet. Vertical curves are not required where the algebraic difference in grades is 0.5 percent or less. Grade breaks should not be closer together than 50 feet and a total of all grade breaks within 200 feet should not exceed 0.5 percent.
Since flat vertical curves may develop poor drainage at the level section, adjusting the gutter grade or shortening the vertical curve may overcome any drainage problems.
On 2-lane roads, extremely long crest vertical curves, over one-half mile, should be avoided, since many drivers refuse to pass on such curves despite adequate sight distance. It is sometimes more economical to construct passing lanes than to obtain passing sight distance by the use of a long vertical curve.
Broken-back vertical curves consist of two vertical curves in the same direction separated by a short grade tangent. A profile with such curvature normally should be avoided, particularly in sags where the view of both curves is not pleasing.

HIGHWAY DESIGN MANUAL 200-19 September 1, 2006
Figure 204.4 Vertical Curves

200-20 HIGHWAY DESIGN MANUAL September 1, 2006
204.5 Sustained Grades (1) General. Maximum grade is not a complete
design control. The length of an uphill grade is important as well, because it affects capacity, level of service, and delay when slow moving trucks, buses, and recreational vehicles are present.
A common criterion for all types of highways is to consider the addition of a climbing lane where the running speed of trucks falls 10 miles per hour or more below the running speed of remaining traffic. Figure 204.5 shows the speed reduction curves for a 200 lb/hp truck, which is representative of large trucks operating near maximum gross weight. The 10 miles per hour reduction criterion may be used as one method of determining need, however the Highway Capacity Manual should be consulted for detailed analysis.
(2) Freeway Climbing Lanes. If design year traffic volumes are expected to be near capacity, right of way acquisition and grading for a future lane should be considered at locations where the upgrade exceeds 2 percent and the total rise exceeds 50 feet.
Regardless of traffic volumes, the need for a climbing lane should be investigated on sustained upgrades greater than 2 percent if the total rise is greater than 250 feet. Refer to the Highway Capacity Manual for passenger car equivalent factors and sample calculations.
Decision sight distance (Table 201.7) should be provided at climbing lane drops on freeways.
(3) Two-lane Road Climbing and Passing Lanes. Climbing and passing lanes are most effective on uphill grades and curving alignment where the speed differential among vehicles is significant. Climbing and passing lanes should normally not be constructed on tangent sections where the length of tangent equals or exceeds the passing sight distance, because passing will occur at such locations without a passing lane and the double barrier stripe increases delay for opposing traffic. Where
the ADT exceeds 5000, 4-lane passing sections may be considered. See Index 305.1(2) for median width standards.
The Headquarters Division of Traffic Operations should be consulted regarding the length of climbing and passing lanes, which will vary with the design speed of the highway, the traffic volume, and other factors.
(4) Turnouts
(a) General. On a two-lane highway where passing is limited, Section 21656 of the California Vehicle Code requires slow-moving vehicles followed by five or more vehicles to turn off at designated turnouts or wherever sufficient area for a safe turnout exists. Designated turnouts may be constructed in hilly or mountainous terrain or on winding roads in other areas.
(b) Length. Designated turnouts should be from 200 feet to 500 feet long including a short taper (usually 50 feet) at each end. Approach speeds, grades, traffic volumes, and available space are some factors to be considered in determining the length. The Headquarters Traffic Liaison should be consulted if longer turnouts are desired.
(c) Width. Paved widths of at least 15 feet in fill sections and 12 feet in cut sections are recommended. Width is measured from the edge of traveled way. On the outside of curves along steep fill slopes or dropoffs, greater width or the installation of guardrail should be considered.
(d) Location. Turnouts should be located where there is stopping sight distance for approaching drivers to see vehicles leaving and re-entering the through lanes.

HIGHWAY DESIGN MANUAL 200-21 September 1, 2006
Figure 204.5
Critical Lengths of Grade for Design
ASSUMED TYPICAL HEAVY TRUCK
OF 200 lb/hp
200-22 HIGHWAY DESIGN MANUAL September 1, 2006
204.6 Coordination of Horizontal and Vertical Alignment
A proper balance between curvature and grades should be sought. When possible, vertical curves should be superimposed on horizontal curves. This reduces the number of sight restrictions on the project, makes changes in profile less apparent, particularly in rolling country, and results in a pleasing appearance. Where the change in horizontal alignment at a grade summit is moderate, a pleasing appearance may be attained by making the vertical curve overlap the horizontal curve.
When horizontal and vertical curves are superimposed, the combination of superelevation and profile grades may cause distortion in the outer pavement edges which could create drainage concerns or confuse drivers at night. In such situations edge of pavement profiles should be plotted and smooth curves introduced to eliminate any irregularities or distortion.
On highways in mountainous or rolling terrain where horizontal and vertical curves are superimposed at a grade summit or sag, the design speed of the horizontal curve should be at least equal to that of the crest or sag, and not more than 10 miles per hour less than the measured or estimated running (85th percentile) speed of vehicles on the approach roadway.
On long open curves, a uniform grade line should be used because a rolling profile makes for a poor appearance.
Horizontal and vertical curvature at intersections should be as flat as physical conditions permit.
See “Combination of Horizontal and Vertical Alignment” in Chapter III of AASHTO, A Policy on Geometric Design of Highways and Streets, for further guidance on a alignment consistency.
204.7 Separate Grade Lines Separate or independent grade lines are appropriate in some cases for freeways and expressways.
They are not normally considered appropriate where medians are less than 65 feet wide (see Index 305.6). Exceptions to this may be minor
differences between opposing grade lines in special situations.
In addition, for either interim or ultimate expressways, any appreciable grade differential between roadbeds should be avoided in the vicinity of at-grade intersections. For traffic entering from the crossroad, confusion and wrong-way movements could result if the pavement of the far roadway is obscured because of excessive grade differential.
204.8 Grade Line of Structures (1) Structure Depth. The depth to span ratio for
each structure is dependent on many factors. Some of these are: span, type of construction, aesthetics, cost, falsework limitations, and vertical clearance limitations. For purposes of preliminary planning and design, the depth to span ratios listed below may be used in setting grade lines at grade separations.
(a) Railroad Underpass Structures.
• Single track, through girder type structures: use 5-foot depth from top of rail to structure soffit (bottom of girder).
• Deck-type structures: for simple spans use d/s (depth to span ratio)= 0.08; for continuous multiple span structures use d/s= 0.07. These ratios do not include the additional 2 feet required above the deck for ballast and rail height.
(b) Highway Structures.
• Structures with single spans of 100 feet or less, use d/s= 0.06.
• Structures with single spans between 100 feet and 180 feet use d/s= 0.045.
• Continuous structures with multiple spans of 100 feet or less, use d/s= 0.055.
• Continuous structures with multiple spans of more than 100 feet, use d/s= 0.04.

HIGHWAY DESIGN MANUAL 200-23 September 1, 2006
Table 204.8
Falsework Span and Depth Requirements
Depth of Superstructure(4)
Minimum Normal
Width of
ResultingFalsework
Up to 6 feet
Up to 8 feet
Up to 10 feet
Up to 12 feet
Facility to be Spanned
Traffic Opening
Opening Width Provides for
Normal Span(1)
Minimum Falsework Depth
Freeway 25' 1 Lane + 8' & 5' Shoulders 33' 1'-10½" 2'-1' 2'-1' 2'-8½"
37' 2 Lanes + 8' & 5' Shoulders 45' 2'-9" 2'-11½" 3'-0" 3'-3"
49' 3 Lanes + 8' & 5' Shoulders 57' 3'-3" 3'-3½" 3'-3½" 3'-3½"
61' 4 Lanes + 8' & 5' Shoulders 69' 3'-4" 3'-5" 3'-7" 3'-7½"
Nonfreeway 20' 1 Lane + 2-4' Shoulders 28' 1'-9" 1'-10" 1'-10" 1'-10½"
32' 2 Lanes + 2-4' Shoulders 40' 2'-0" 2'-8½" 2'-9" 3'-0"
40' 2 Lanes + 2-8' Shoulders 48' 3'-0" 3'-0" 3'-2½" 3'-3"
52' 3 Lanes + 2-8' Shoulders 60' 3'-3" 3'-3½" 3'-3½" 3'-4"
64' 4 Lanes + 2-8' Shoulders 72' 3'-5" 3'-7½" 3'-7½" 3'-8"
Special 20' 1 Lane + 2-4' Shoulders 20' (3) 1'-9" 1'-10" 1'-10" 1'-10½"
Roadways(2) 32' 2 Lanes + 2-4' Shoulders 32' (3) 2'-0" 2'-8½" 2'-9" 3'-0"
Notes:
(1) Includes 8' for 2 temporary K-rails and deflection space. (2) Uses such as fire or utility access or quasi-public roads with very light traffic.
(3) No temporary K-rail provided.
(4) See Index 204.8 for preliminary depth to span ratios. For more detailed information, contact the Division of Engineering Services, Structure Design and refer to the Bridge Design Aids.
Geometric plans should be submitted to the DOS prior to preparation of the Project Report so that preliminary studies can be prepared. Preliminary bridge type selection should be a joint effort between the DOS and the District.
(2) Steel or Precast Concrete Structures. Steel and precast concrete girders in lieu of cast-in-place concrete eliminate falsework, and may
permit lower grade lines and reduced approach fill heights. Potential cost savings from elimination of falsework, lowered grade lines, and the ability to accomodate settlement beneath the abutments should be considered in structure type selection along with unit price, aesthetics, uniformity, and any other relevant factors. Note that grade lines at grade separations frequently need to be adjusted after final structure depths are determined (see

200-24 HIGHWAY DESIGN MANUAL October 4, 2010
Index 309.2(3)). Details of traffic handling and stage construction should be provided when the bridge site plan is submitted to the DOS if the design or construction of the structure is affected (see Drafting and Plans Manual, Section 3-3.2).
(3) Depressed Grade Line Under Structures. Bridge and drainage design will frequently be simplified if the low point in the grade line is set a sufficient distance from the intersection of the centerlines of the structure and the highway so that drainage structures clear the structure footings.
(4) Grade Line on Bridge Decks. Vertical curves on bridge decks should provide a minimum fall of 0.05-foot per station. This fall should not extend over a length greater than 100 feet. The flattest allowable tangent grade should be 0.3 percent.
(5) Falsework. In many cases, it is economically justified to have falsework over traffic during construction in order to have a support-free open area beneath the permanent structure. The elimination of permanent obstructions usually outweighs objections to the temporary inconvenience of falsework during construction.
Because the width of traffic openings through falsework can, and oftentimes does, significantly affect costs, special care should be given to determining opening widths. The following should be considered: staging and traffic handling requirements, the width of approach roadbed that will exist at the time the bridge is constructed, traffic volumes, desires of the local agencies, controls in the form of existing facilities, and the practical problems of falsework construction.
The normal minimum width of traffic openings and required falsework spans for various lane and shoulder combinations should be as shown in Table 204.8.
When temporary K-rail is used to protect the falsework, space must be provided for its deflection. The normal spans shown in Table 204.8 provide 2 feet for this deflection.
In special cases, where existing constraints make it impractical to comply with the minimum widths of traffic openings set forth in Table 204.8, a lesser width may be approved by the District Director with concurrence from the Headquarters Design Coordinator.
The minimum vertical falsework clearance over freeways and nonfreeways shall be 15 feet. The following items should be considered:
• Mix, volume, and speed of traffic.
• Effect of increased vertical clearance on the grade of adjacent sections.
• Closing local streets to all traffic or trucks only during construction.
• Detours.
• Carrying local traffic through construction on subgrade.
• Temporary or permanent lowering of the existing facility.
• Cost of higher clearance versus cost of traffic control.
• Desires of local agency.
Worker safety should be considered when determining vertical falsework clearance. Requests for approval of temporary vertical clearances less than 15 feet should discuss the impact on worker safety.
Temporary horizontal clearances less than shown in Table 204.8 or temporary vertical clearances less than 15 feet should be noted in the PS&E Transmittal Report.
To establish the grade of a structure to be constructed with a falsework opening, allowance must be made for the depth of the falsework. The minimum depths required for various widths of traffic opening are shown in Table 204.8.
Where vertical clearances, either temporary or permanent are critical, the District and the DOS should work in close conjunction during the early design stage when the preliminary

HIGHWAY DESIGN MANUAL 200-25 October 4, 2010
grades, structure depths, and falsework depths can be adjusted without incurring major design changes.
Where the vertical falsework clearance is less than 15 feet, advance warning devices are to be specified or shown on the plans. Such devices may consist of flashing lights, overhead signs, over-height detectors, or a combination of these or other devices.
Warning signs on the cross road or in advance of the previous off-ramp may be required for overheight permit loads. Check with the Regional Permit Manager.
After establishing the opening requirements, a field review of the bridge site should be made by the District designer to ensure that existing facilities (drainage, other bridges, or road-ways) will not conflict with the falsework.
The placement and removal of falsework requires special consideration. During these operations, traffic should either be stopped for short intervals or diverted away from the span where the placement or removal operations are being performed. The method of traffic handling during these operations is to be included in the Special Provisions.
Topic 205 - Road Connections and Driveways
205.1 Access Openings on Expressways Access openings are used only on expressways. The term access opening applies to openings through the right of way line which serve abutting land ownerships whose remaining access rights have been acquired by the State.
(1) Criteria for Location. Access openings should not be spaced closer than one-half mile to an adjacent public road intersection or to another private access opening that is wider than 30 feet. When several access openings are closely spaced, a frontage road should be considered (see Index 104.3). To discourage wrong-way movements, access openings should be located directly opposite, or at least 300 feet from a median opening.
Sight distance equivalent to that required for public road intersections shall be provided (see Index 405.1).
(2) Width. The normal access opening width should be 30 feet. A greater width may result in large savings in right of way costs in some instances, but should be considered with caution because of the possibility that public use might develop. Conversion of a private opening into a public road connection requires the consent of the CTC, which cannot be committed in advance (see the Project Development Procedures Manual).
(3) Recessed Access Openings. Recessed access openings, as shown on Figure 205.1, are desirable at all points where private access is permitted and should be provided whenever they can be obtained without requiring alterations to existing adjacent improvements. When recessed openings are required, the opening should be located a minimum distance of 75 feet from the nearest edge of the traveled way.
(4) Joint Openings. A joint access opening serving two or more parcels of land is desirable whenever feasible. If the property

200-26 HIGHWAY DESIGN MANUAL July 24, 2009
line is not normal to the right of way line, care should be taken in designing the joint opening so that both owners are adequately served.
(5) Surfacing. All points of private access should be surfaced with adequate width and depth of pavement to serve the anticipated traffic. The surfacing should extend from the edge of the traveled way to the right of way line.
Figure 205.1
Access Openings on Expressways
RECESSED OPENING NOTES:
• By widening the expressway shoulder, deceleration lanes may be provided where justified.
• This detail, without the recess, may be used on conventional highways.
205.2 Private Road Connections The minimum private road connection design is shown on Figure 205.1. Sight distance requirements for the minimum private road connection are shown on Figure 405.7 (see Index 405.1(2)(c)).
205.3 Urban Driveways These instructions apply to the design of driveways to serve property abutting on State highways in cities or where urban type development is encountered.
Details for driveway construction are shown on the Standard Plans. Corner sight distance requirements
are not applied to urban driveways. See Index 405.1(2) for further information.
(1) Correlation with Local Standards. Where there is a local requirement regulating driveway construction, the higher standard will normally govern.
(2) Driveway Width. The width of driveways for both residential and commercial usage is measured at the throat, exclusive of any flares. (“W” as shown in Standard Plan A87A).
(3) Residential Driveways. The width of single residential driveways should be 12 feet minimum and 20 feet maximum. The width of a double residential driveway such as used for multiple dwellings should be 20 feet minimum and 30 feet maximum. The width selected should be based on an analysis of the anticipated volume, type and speed of traffic, location of buildings and garages, width of street, etc.
(4) Commercial Driveways. Commercial driveways should be limited to the following maximum widths:
(a) When the driveway is used for one-way traffic, the maximum width should be 25 feet. If the driveway serves a large parcel, where large volumes of vehicles or large vehicles are expected, the entrance maximum width should be 40 feet and the exit maximum width should be 35 feet.
(b) When the driveway is used for two-way traffic, the maximum width should be 35 feet. If the driveway serves a large parcel, where large volumes of vehicles or large vehicles are expected, then the maximum width should be 45 feet.
(c) When only one driveway serves a given property, in no case should the width of the driveway including the side slope distances exceed the property frontage.
(d) When more than one driveway is to serve a given property, the total width of all driveways should not exceed 70 percent of the frontage where such a frontage is 100 feet or less. Where the frontage is more than 100 feet, the total driveway

HIGHWAY DESIGN MANUAL 200-27 July 24, 2009
width should not exceed 60 percent of the frontage. In either case, the width of the individual driveway should not exceed those given in the preceding paragraphs. Where more than one driveway is necessary to serve any one property, not less than 20 feet of full height curb should be provided between driveways. This distance between driveways also applies to projects where curbs and gutters are not to be placed.
(e) Certain urban commercial driveways may need to accommodate the maximum legal vehicle. The width will be determined by the use of truck turn templates.
(5) Surfacing. Where curbs, gutters, and sidewalks are to be placed, driveways should be constructed of portland cement concrete. Where only curbs and gutters are to be placed and pedestrian traffic or adjacent improvements do not warrant concrete driveway construction, the driveway may be paved with the same materials used for existing surfacing on the property to be served.
(6) Pedestrian and Disabled Persons Access. Where sidewalks traverse driveways, accessibility regulations require that a relatively level (2 percent max. cross fall) path, at least 4 feet wide, is provided. Provision of this feature, as indicated in the Standard Plans, may require the acquisition of a construction easement or additional right of way. Assessment of these needs must be performed early enough in the design to allow time for acquiring any necessary permits or right of way. Additionally, designers should consider the following:
• Where restricted parking zones have been established (either blue or white painted zones) adjacent to driveways, but no reasonably close ramp access to the sidewalk exists, consideration should be given to reducing the maximum slope of the driveway from 10 percent to 8.33 percent to provide sidewalk access to the disabled.
• In many cases providing the pathway along the back of the driveway will lower the elevation at the back of the sidewalk. Depending on grades behind the sidewalk the potential may exist for roadway generated runoff to enter private property. The need for features such as low berms within the construction easement, or installation of catch basins upstream of the driveway should be determined.
When pedestrian activity is neither present, nor expected to be present within the reasonable future, the designer may develop driveway details that eliminate the flatter portion along the back edge in lieu of using the Standard Plans for driveways. Refer to Topic 105 for additional information related to pedestrian facilities.
205.4 Driveways on Frontage Roads and in Rural Areas On frontage roads and in rural areas where the maximum legal vehicle must be accommodated, standard truck-turn templates should be used to determine driveway widths where the curb or edge of traveled way is so close to the right of way line that a usable connection cannot be provided within the standard limits.
Where county or city regulations differ from the State's, it may be desirable to follow their regulations, particularly where jurisdiction of the frontage road will ultimately be in their hands.
Details for driveway construction are shown on the Standard Plans. For corner sight distance, see Index 405.1(2)(c).
205.5 Financial Responsibility Reconstructing or relocating any access openings, private road connections, or driveways required by revisions to the State highway facility should be done at State expense by the State or its agents. Reconstruction or relocation requested by others should be paid for by the requesting party.

200-28 HIGHWAY DESIGN MANUAL October 4, 2010
Topic 206 - Pavement Transitions 206.1 General Transition Standards Pavement transition and detour standards should be consistent with the section having the features built to the highest design standards. The transition should be made on a tangent section whenever possible and should avoid locations with horizontal and vertical sight distance restrictions. Whenever feasible, the entire transition should be visible to the driver of a vehicle approaching the narrower section. The design should be such that intersections at grade within the transition area are avoided. For decision sight distance at lane drops, see Index 201.7.
206.2 Pavement Widenings (1) Through Lane Additions. Where through
lanes, climbing lanes, or passing lanes are added, the minimum recommended distance over which to transition traffic onto the additional width is 250 feet per lane. Figure 206.2 shows several examples of acceptable methods for adding a lane in each direction to a two-lane highway.
(2) Turning, Ramp, and Speed Change Lanes. Transitions for lane additions, either for left or right turns or to add a lane to a ramp, should typically occur over a length of 120 feet. Lengths shorter than 120 feet are acceptable where design speeds are below 45 miles per hour or for conditions as stated in Index 405.2(2)(c).
Where insufficient median width is available to provide for left turn lanes, through traffic will have to be shifted to the outside. See Figures 405.2A, B and C for acceptable methods of widening pavement to provide for median turn lanes.
(3) Lane Widening. An increase in lane width can occur at short radius curves which are widened for truck off-tracking, at ramp terminals with large truck turning volumes, or when new construction matches existing roadways with narrow lane widths. Extensive transition lengths are not necessary as the widening does not restrict the drivers expectations. Transition tapers for these types
of situations should be at 10:1 (longitudinal to lateral).
(4) Shoulder Widening. Shoulder widening should normally be accomplished in a manner that provides a smooth transition, but can be accomplished without a taper if necessary.
206.3 Pavement Reductions (1) Through Lane Drops. When a lane is to be
dropped, it should be done by tapering over a distance equal to WV, where W = Width of lane to be dropped and V = Design Speed. In general, the transition should be on the right so that traffic merges to the left. Figure 206.2 provides several examples of acceptable lane drops at 4-lane to 2-lane transitions. The exception to using the WV criteria is for the lane drop/freeway merge movement on a branch connection which is accomplished using a 50:1 taper.
(2) Ramp and Speed Change Lanes. As shown in Figures 504.2A and 504.3L, the standard taper for a ramp merge into a through traffic lane is 50:1 (longitudinal to lateral). Where ramp lanes are dropped prior to the merge with the through facility, the recommended taper is 50:1 for design speeds over 45 miles per hour, and the taper distance should be equal to WV for speeds below 45 miles per hour.
The "Ramp Meter Design Guidelines" also provide information on recommended and minimum tapers for ramp lane merges. These guideline values are typically used in retrofit or restricted right-of-way situations, and are acceptable for the specific conditions stated in the guidelines.
Figure 405.9 shows the standard taper to be used for dropping an acceleration lane at a signalized intersection. This taper can also be used when transitioning median acceleration lanes.
Figures 405.2A, B and C show the recommended methods of transitioning pavement back into the median area on conventional highways after the elimination of left-turn lanes.

HIGHWAY DESIGN MANUAL 200-29 September 1, 2006
Figure 206.2
Typical Two-lane to Four-lane Transitions

200-30 HIGHWAY DESIGN MANUAL January 4, 2007
(3) Lane Reductions. At any location where lane widths are being reduced, the minimum length over which to accomplish the transition should be equal to WV. See Index 504.6 for mainline lane reductions at interchanges.
(4) Shoulder Reduction. Shoulder reductions should typically occur over a length equal to ¾WV. However, when shoulder widths are being reduced in conjunction with a lane addition or widening (as in Alt. A of Figure 504.3K), the shoulder reduction should be accomplished over the same distance as the addition or widening.
206.4 Temporary Freeway Transitions It is highly desirable that the design standards for a temporary transition between the end of a freeway construction unit and an existing highway should not change abruptly from the freeway standards. Temporary freeway transitions must be reviewed by the Design Coordinator.
Topic 207 - Airway-Highway Clearances
207.1 Introduction (1) Objects Affecting Navigable Airspace. An
object is considered an obstruction to air navigation if any portion of that object is of a height greater than the approach and transverse surfaces extending outward and upward from the airport runway. These objects include overhead signs, light standards, moving vehicles on the highway and overcrossing structures, equipment used during construction, and plants.
(2) Reference. The Federal Aviation Administra-tion (FAA) has published a Federal Aviation Regulation (FAR) relative to airspace clearance entitled, “FAR Part 77, Obstructions Affecting Navigable Airspace”, dated March 1993. This is an approved reference to be used in conjunction with this manual.
207.2 Clearances (a) Civil Airports--See Figure 207.2A.
(b) Heliports--See Figure 207.2B.
(c) Military Airports--See Figure 207.2C.
(d) Navy Carrier Landing Practice Fields--See Figure 207.2D.
207.3 Submittal of Airway-Highway Clearance Data The following procedure must be observed in connection with airway-highway clearances in the vicinity of airports and heliports.
Notice to the FAA is required when highway construction is planned near an airport (civil or military) or a heliport. A "Notice of Proposed Construction or Alteration" should be submitted to the FAA Administrator when required under criteria listed in Paragraph 77.13 of the latest Federal Aviation Regulations, Part 77. Such notice should be given as soon as highway alignment and grade are firmly established. It should be noted that these requirements apply to both permanent objects and construction equipment. When required, four copies of FAA Form 7460-1, “Notice of Proposed Construction”, and accompanying scaled maps must be sent to the FAA, Western-Pacific Regional Office, Chief-Air Traffic Division, AWP-520, 15000 Aviation Boulevard, Hawthorne, CA 90260. Copies of FAA Form 7460-1 may be obtained from the FAA, Western-Pacific Regional Office or Caltrans, Division of Aeronautics.
The scaled maps accompanying FAA Form 7460-1 should contain the following minimum information.
• Distance from project to nearest runway.
• Elevation of runway thresholds.
• Relationship between the proposed highway horizontal alignment and vertical profile to the nearest runway or heliport primary surface. Include elevations of objects referenced to the elevation of the end of the runway, such as overhead lights, signs, structures, landscaping, and vehicles.

HIGHWAY DESIGN MANUAL 200-31 September 1, 2006
Figure 207.2A
Airway-Highway Clearance Requirements (Civil Airports)

200-32 HIGHWAY DESIGN MANUAL September 1, 2006
Figure 207.2B
Airway-Highway Clearance Requirements (Heliport)

HIGHWAY DESIGN MANUAL 200-33 September 1, 2006
Figure 207.2C
Airway-Highway Clearance Requirements (Military Airports)

200-34 HIGHWAY DESIGN MANUAL September 1, 2006
Figure 207.2D
Airway-Highway Clearance Requirements (Navy Carrier Landing Practice Field)

HIGHWAY DESIGN MANUAL 200-35 September 1, 2006
One copy of FAA form 7460-1 should be forwarded to the Division of Design for information and one copy to the Division of Aeronautics for information and land use compatibility review.
Topic 208 – Bridges, Grade Separation Structures, and
Structure Approach Embankment
208.1 Bridge Width (1) State Highways. The clear width of all
bridges, including grade separation structures, shall equal the full width of the traveled way and paved shoulders on the approaches with the following exceptions:
(a) Bridges to be constructed as replacements on existing 2-lane, 2-way roads shall not have less than a 32-foot wide roadbed for ADT less than 400, and not less than 40-foot wide roadbed for ADT greater than 400. (see Index 307.2).
(b) When the approach shoulder width is less than 4 feet, the minimum offset on each side shall be 4 feet, and shall be documented in accordance with Index 82.2.
The width should be measured normal to the center line between faces of curb or railing measured at the gutter line. For offsets to safety shape barriers see Figure 208.1.
For horizontal and vertical clearances, see Topic 309.
(2) Roads Under Other Jurisdictions.
(a) Overcrossing Widths--(See Index 308.1.)
(b) Undercrossing Span Lengths--Initial construction should provide for the ultimate requirements. In areas where the local jurisdiction has a definite plan of development, the ultimate right of way width or at least that portion needed for the roadbed and sidewalks should be spanned.
If the undercrossing street or road has no median, one should be provided where necessary to accommodate left-turn lanes or the center piers of the undercrossing structure.
Where it appears that a 2-lane road will be adequate for the foreseeable future, but no right of way width has been established, a minimum span length sufficient for a 40-foot roadbed should be provided. Additional span length should be provided to permit future sidewalks where there is a foreseeable need. If it is reasonably foreseeable that more than two lanes will be required ultimately, a greater width should be spanned.
(c) For horizontal and vertical clearances, see Topic 309.
208.2 Cross Slope The crown is normally centered on the bridge except for one-way bridges where a straight cross slope in one direction should be used. The cross slope should be the same as for the approach pavement (see Index 301.2).
208.3 Median On multilane divided highways a bridge median that is 36 feet wide or less should be decked. Exceptions require individual analysis. See Chapter 7 of the Traffic Manual for median barrier warrants.
208.4 Bridge Sidewalks Bridge sidewalks should be provided where justified by pedestrian traffic (see Figure 208.10B).
208.5 Open End Structures Embankment end slopes at open end structures should be no steeper than 1½:1 for all highways.
208.6 Pedestrian Overcrossings and Undercrossings The minimum width of walkway for pedestrian overcrossings should be 8 feet.

200-36 HIGHWAY DESIGN MANUAL September 1, 2006
Figure 208.1 Offsets to Safety-Shape Barriers

HIGHWAY DESIGN MANUAL 200-37 September 1, 2006
Determination of the width and height of pedestrian undercrossings requires individual analysis to insure adequate visibility through the structure and approaches (see Index 105.2).
Pedestrian ramps should be provided on all pedestrian separation structures. The ramp should have a maximum longitudinal slope of 8.33 percent with a maximum rise of 30 inches between landings. The landing should be a minimum of 5 feet in length. See Topic 309 for vertical clearances.
208.7 Equestrian Undercrossings Such structures should normally provide a clear opening 10 feet high and 10 feet wide. Skewed crossings should be avoided. The structure should be straight so the entire length can be seen from each end. Sustained grades should be a maximum of 10 percent. Decomposed granite or similar material should be used for the trail surface. While flexible pavement is permissible, a rigid pavement should be avoided.
208.8 Cattle Passes, Equipment, and Deer Crossings Private cattle passes and equipment crossings may be constructed when economically justified by a right of way appraisal, as outlined in Section 7.09.09.00 of the Right of Way Manual.
The standard cattle pass should consist of either a standard box culvert with an opening 8 feet wide and 8 feet high or a metal pipe 120 inches in diameter. The invert of metal pipe should be paved with concrete or bituminous paving material.
If equestrian traffic is expected to use the culvert a minimum 10 feet wide by 10 feet high structure may be provided. However, the user of the facility should be contacted to determine the specific requirements.
If conditions indicate a reasonable need for a larger than standard cattle pass, it may be provided if economically justified by the right of way appraisal.
In some cases the installation of equipment or deer crossings is justified on the basis of public interest or need rather than economics. Examples are:
(a) A deer crossing or other structure for environmental protection purposes.
(b) Equipment crossings for the Forest Service or other governmental agencies or as a right of way obligation.
These facilities should be installed where necessary as determined by consultation with the appropriate affected entities.
A clear line of sight should be provided through the structure.
208.9 Railroad Underpasses and Overheads Generally, it is desirable to construct overheads rather than underpasses whenever it is necessary for a highway and railroad to cross. Railroads should be carried over highways only when there is no other reasonable alternative.
Some undesirable features of underpasses are:
(a) They create bottlenecks for railroad operations.
(b) It is difficult to widen the highway.
(c) Pumping plants are often required to drain the highway.
(d) They are likely to lead to cost participation controversies for initial and future construction.
(e) Shooflies (temporary tracks) are generally required during construction.
(f) Railroads are concerned about the structure maintenance and liability costs they incur.
Advantages of overheads are:
(a) Railroads can use most of their right of way for maintenance.
(b) Overheads can be widened at a relatively low cost and with little difficulty.
(c) Less damage may be incurred in the event of a derailment.
(d) Agreements for design and maintenance can be reached more easily with railroads.
(e) Initial costs are generally lower.

200-38 HIGHWAY DESIGN MANUAL September 1, 2006
The State, the railroads, and the public in general can usually benefit from the construction of an overhead structure rather than an underpass.
See Topic 309 for vertical clearances.
208.10 Bridge Barriers and Railings (1) General. There are four classes of railings,
each intended to perform a different function.
(a) Vehicular Barrier Railings--The primary function of these railings is to retain and redirect errant vehicles.
(b) Combination Vehicular Barrier and Pedes-trian Railings--These railings perform the dual function of retaining both vehicles and pedestrians on the bridge. They consist of two parts--A concrete parapet barrier, generally with a sidewalk, and metal handrailing or fence-type railing.
(c) Pedestrian Railings--These railings pre-vent pedestrians from accidentally falling from the structure and, in the case of fence-type railing, reduce the risk of objects being dropped on the roadway below. Where the facility is accessible to disabled persons and the profile grade exceeds 5 percent, a handrail for use by the disabled meeting both the State and Federal regulations must be provided.
(d) Bicycle Railings--These railings retain bicycles and riders on the structure. They may be specifically designed for bicycles, or may be a combination type consisting of a vehicular barrier surmounted by a fence or metal handrail.
(2) Policies. To reduce the risk of objects being dropped or thrown upon vehicles, protective screening in the form of fence-type railings should be installed along new overcrossing structure sidewalks in urban areas (Sec.92.6 California Streets and Highways Code). Screening should be considered for the opposite side of structures having one sidewalk. Screening should be installed at such other locations determined to be appropriate.
Railings and barriers with sidewalks should not be used on structures with posted speeds greater than 45 miles per hour without barrier separation. All structure railings with a sidewalk in the Standard Plans are approved for posted speeds up to 45 miles per hour. Any use of railings and barriers with sidewalks on structures with posted speeds greater than 45 miles per hour shall have a barrier separation between the roadway and the sidewalk. The barrier separation type and the bridge rail selection requires approval by the HQ Traffic Liaison.
The approved types of railings for use on bridge structures are listed below and illustrated in Figures 208.10A, B, and C. Railing types not listed are no longer in general use; however, they may be specified in those cases where it is desirable to match an existing condition.
The District should specify in the bridge site data submittal the rail type to be used after consideration has been given to the recommendations of the local agency (where applicable) and the DES-SD.
(3) Vehicular Barriers. See Figure 208.10A.
(a) Concrete Barrier Type 732 and 736-- These vehicular barriers are for general use adjacent to traffic. Figure 208.1 illustrates the position of the barrier relative to the edge of traveled way.
(b) Concrete Barrier Type 80--Use of this barrier requires approval by the HQ Traffic Liaison. It is intended for use in lower speed scenic areas where more see-through area is desired than is provided by a solid concrete parapet.
(4) Combination Railings. See Figure 208.10B.
(a) Barrier Railing Type 26--This is the barrier railing for general use when sidewalks are provided on a bridge. It must be accompanied with a tubular handrailing or a fence-type railing. The minimum sidewalk width is 5 feet, however, this width may be varied as circumstances require.

HIGHWAY DESIGN MANUAL 200-39 January 4, 2007
(b) Barrier Railing Type 80SW--Similar to the Type 80, modified with a raised sidewalk and tubular handrailing. Use of this barrier requires approval by the HQ Traffic Liaison. It is intended for use in lower speed scenic areas where more see-through area is desired than is provided by a solid concrete parapet.
(c) Chain Link Railing Type 7--This is the fence-type railing for general use with Type 26 barrier railing with sidewalk to reduce the risk of objects being dropped on the roadway below. When a sidewalk (Type 26 railing) is provided on one side of a bridge and Type 732 barrier railing on the other side, Type 7 railing may be placed on top of the Type 732 as additional protection from dropped objects. Consideration should be given to the effect of the Type 7 railing on sight distance at the bridge ends and view over the side of the bridge. Lighting fixtures may be provided with Type 7 railings.
(d) Chain Link Railing Type 6--This railing may be used in lieu of Type 7 when special architectural treatment is required. It should not be used on curved alignment because of fabrication difficulties.
(e) Tubular Handrailing--This railing is used with Type 26 and Type 80SW to increase the combined rail height for the safety of pedestrians. It should be used in lieu of Type 7 where object dropping will not be a problem or at the ends of bridges to increase sight distance if fence-type railing would restrict sight distance.
(5) Pedestrian Railings. See Figure 208.10C
(a) Chain Link Railing Type 3--This railing is used on pedestrian structures to reduce the risk of objects being dropped on the roadway below.
(b) Chain Link Railing Type 7 (Modified)--This railing is similar to Type 7 except that it is mounted on the structure at the sidewalk level.
(c) Chain Link Railing --This railing is not as high as Types 3 or 7 and therefore, its use
is restricted to those locations where object dropping or throwing will not be a problem.
(d) Chain Link Railing (Modification)--Existing railing may be modified for screening under the protective screening policy. The DES-SD should be contacted for details.
(6) Bicycle Railing. The minimum height of bicycle rail is 54 inches above the deck surface. Pedestrian railings and combination railings consisting of a concrete barrier surmounted by a fence or tubular railing are satisfactory for bicycles, if at least 54 inches high. Bicycles are not considered to operate on a sidewalk, except in special cases where signs specifically direct cyclists to use the sidewalk.
As a general policy, bicycle railings should be installed at the following locations:
(a) On a Class I bikeway, except that a lower rail may be used if a curbed sidewalk, not signed for bicycle use, separates the bikeway from the rail or a shoulder at least 8 feet wide exists on the other side of the rail.
(b) On the outside of a Class II or III bikeway, unless a curbed sidewalk, not signed for bicycle use, separates the bikeway from the rail.
(c) In other locations where the designer deems it reasonable and appropriate.
(7) Bridge Approach Railings. Approach railings shall be installed at the ends of bridge railings exposed to approach traffic.
Refer to Chapter 7 of the Traffic Manual for placement and design criteria of guardrail.
208.11 Structure Approach Embankment (1) General. Structure approach embankment is
that portion of the fill material within approximately 150 feet longitudinally of the structure. Refer to Figure 208.11A for limits, the Standard Specifications, and Standard Special Provisions for more information.

200-40 HIGHWAY DESIGN MANUAL September 1, 2006
Quality requirements for embankment material are normally specified only in the case of imported borrow. When select material or local borrow for use in structure abutment embankments is shown on the plans, the Resident Engineer (RE) is responsible for assuring the adequacy of the quantity and quality of the specified material. The Project Engineer should include adequate information and guidance in the RE File to assist the RE in fulfilling this responsibility.
(2) Foundations and Embankment Design. Overall performance of the highway approach to the bridge depends, to a significant degree, upon the long-term settlement/consolidation of the approach foundation and structure abutment embankment. A design that minimizes this post construction settlement/consolidation is essential. Factors that influence settlement/consolidation include soil types and depths, static and dynamic loads, ground water level, adjacent operations, and changes in any of the above. The PE must follow the foundation and embankment recommendations by the Division of Engineering Services, Geotechnical Services (DES-GS) and District Materials Engineer (DME). The DME and/or DES-GS must approve any deviations from their recommendations including Construction Change Orders (CCO’s).
The relative compaction of material within the embankment limits must be at least 95 percent, except for the outer 5 feet of embankment measured horizontally from the side slope (see Figure 208.11A). The DME and/or OSF may recommend using select material, local and/or imported borrow to assure that the compaction requirements are met and that shrink/swell problems are avoided. They may also recommend a height and duration of embankment surcharge to accelerate foundation consolidation.
Poor quality material, such as expansive soils, must be precluded from structure abutment embankments unless treated. If sufficient quality roadway excavation material is unavailable for constructing of structure
abutment embankments, the designer may specify select material, local borrow, or imported borrow to satisfy the design requirements.
(3) Abutment Drainage. Special attention must be given to providing a positive drainage system that minimizes the potential for water damage to the structure approach embankment, see Chapter 870 for further details. The Division of Engineering Services (DES), Structures Design (DES-SD) is responsible for the design of the structure approach drainage system, which includes:
• A geocomposite drain covered with filter fabric placed behind both the abutment wall and wingwalls, as indicated in Figure 208.11B.
• A slotted plastic pipe drain, encapsulated with treated permeable material, placed along the base of the inside face of the abutment wall as illustrated in Figure 208.11B.
(4) Slope Treatment. See Topic 707, Slope Treatment Under Structures, for guidance regarding the treatment of bridge approach end slopes.
The District Hydraulic Engineer or Project Engineer must design a pipe outlet that ties into the structure approach drainage system as it exits the structure. A pipe outlet system should carry the collected water to a location where it will not cause erosion. Storm Water Best Management Practices should be incorporated. For further information on Storm Water Management, visit the Division of Design Storm Water website.
Coordination with DES is necessary for the exit location of the pipe system. The outlet type should be chosen from the standard edge drain outlet types shown in the Standard Plans or tied into an underground drainage system. The PE must review the drainage design to ensure the adequacy of the drainage ties between the structure approach drainage system and either new or existing drainage facilities. For alternative details, see Bridge Design Aids.

HIGHWAY DESIGN MANUAL 200-41 September 1, 2006
Figure 208.10A
Vehicular Railings for Bridge Structures

200-42 HIGHWAY DESIGN MANUAL September 1, 2006
Figure 208.10B
Combination Railings for Bridge Structures

HIGHWAY DESIGN MANUAL 200-43 September 1, 2006
Figure 208.10C
Pedestrian Railings for Bridge Structures

200-44 HIGHWAY DESIGN MANUAL September 1, 2006
Figure 208.11A
Limits of Structure Approach Embankment Material

HIGHWAY DESIGN MANUAL 200-45 September 1, 2006
Figure 208.11B
Abutment Drainage Details

200-46 HIGHWAY DESIGN MANUAL September 1, 2006
Topic 209 – (currently not in use)
Topic 210 - Reinforced Earth Slopes and Earth Retaining
Systems
210.1 Introduction Constructing roadways on new alignments, widening roadways on an existing alignment, or repairing earth slopes damaged by landslides are situations that may require the use of reinforced earth slopes or earth retaining systems. Using cut and embankment slopes that are configured at slope ratios that are stable without using reinforcement is usually preferred; however, topography, environmental concerns, and right of way (R/W) limitations may require the need for reinforced earth slopes or an earth retaining system.
The need for reinforced earth slopes or an earth retaining system should be identified as early in the project development process as possible, preferably during the Project Initiation Document (PID) phase.
210.2 Construction Methods and Types (1) Construction Methods.
Both reinforced earth slopes and earth retaining systems can be classified by the method in which they are constructed, either top-down or bottom-up.
• “Top-down” construction –This method of construction begins at the top of the reinforced slope or earth retaining system and proceeds in lifts to the bottom of the reinforced slope or earth retaining system.
If required, reinforcement is inserted into the in situ material during excavation.
• “Bottom-up” construction – This method of construction begins at the bottom of the reinforced slope or earth retaining system, where a footing/leveling pad is constructed, construction then proceeds towards the top of the reinforced slope or earth retaining system. If required,
reinforcement is placed behind the face of the reinforced slope or earth retaining system. It should be noted that if a “Retaining Wall” earth retaining system is to be used in a cut situation, a temporary back cut or shoring system is required behind the wall.
The District Project Engineer (PE) should conduct an initial site visit and assessment to determine all potential construction limitations. The preferred construction method is top-down due to the reduced shoring, excavation and backfilling. However, this method is not always available or appropriate based on the physical and geotechnical site conditions. The site should also be examined for R/W or utility constraints that would restrict the type of excavation or limit the use of some equipment. In addition, the accessibility to the site for construction and contractor staging areas should be considered.
Table 210.2 summarizes the various reinforced earth slopes and earth retaining systems that are currently available for use, along with the method in which they are constructed.
(2) Reinforced Earth Slopes (PS&E by District PE)
Reinforced earth slopes incorporate metallic or non-metallic reinforcement in construction of embankments and cut slopes with a slope angle flatter than 70 degrees from the horizontal plane. Reinforced earth slopes should be used in conjunction with erosion mitigation measures to minimize future maintenance costs. The slope face is typically erosion protected with the use of systems such as geo-synthetics, bio-stabilization, rock slope protection, or reinforced concrete facing.
(3) Earth Retaining Systems
Earth retaining systems can be divided into five major categories depending upon the nature of the design and whether they are designed by the owner (State designed), a Proprietary vendor or a combination thereof. The term “State designed” as referenced

HIGHWAY DESIGN MANUAL 200-47 September 1, 2006
herein is utilized to encompass earth retaining systems that are designed by the State or by Local or Private entities on behalf of the State. No assignment of roles and responsibilities is intended. The five categories are as follows:
(a) State Designed Earth Retaining Systems which utilize Standard Plans (PS&E by District PE).
Standard Plans are available for a variety of earth retaining systems (retaining walls). Loading conditions and foundation requirements are as shown on the Standard Plans. For sites with requirements that are not covered by the Standard Plans, a special design is required. To assure conformance with the specific Standard Plan conditions and requirements, and subsequent completion of the PS&E in a timely fashion, the District PE should request a foundation investigation for each location where a retaining wall is being considered. Retaining walls that utilize Standard Plans are as follows:
• Retaining Wall Types 1, 1A and 2 (Concrete Cantilever). These walls have design heights up to 36 feet, 12 feet and 122 feet, respectively, but are most economical below 20 feet. Concrete cantilever walls can accommodate traffic barriers, and drainage facilities efficiently. See Standard Plans B3-1, B3-2, B3-3, B3-4, B3-8 and B3-9 for further details.
• Retaining Wall Types 3 and 4 (Concrete Counterfort). These walls have design heights up to 36 feet and 30 feet respectively. These walls may be used where minimum horizontal wall deflection is desired. When used in conjunction with concrete cantilever walls, there should be an offset in the plane of the wall faces to mask the difference in deflection between the two wall types. The cost of these walls is generally more than for concrete cantilever walls of similar
height. See Standard Plans B3-5 and B3-6 for further details.
• Retaining Wall Type 5 (Concrete L-Type Cantilever). This wall has a design height up to 12 feet. Although more costly than cantilever walls, these walls may be required where site restrictions do not allow for a footing projection beyond the face of the wall stem. See Standard Plan B3-7 for further details.
• Retaining Wall Type 6 (Concrete Masonry Walls). These walls may be used where the design height of the wall does not exceed 6 feet. These walls are generally less costly than all other standard design walls or gravity walls. Where traffic is adjacent to the top of the wall, guardrail should be set back as noted in the Standard Plans. See Standard Plan B3-11 for further details.
• Crib Walls. The following types are available:
Concrete Crib Wall - This type of crib wall may be used for design heights up to 50 feet. Concrete crib walls are suited to coastal areas and higher elevations where salt air and deicing salts may limit the service life of other types of crib walls. See Standard Plans C7A to C7G for further details.
Steel Crib Wall - This type of crib wall may be used for design heights up to 36 feet. Steel crib walls are light in weight; easily transported and installed; and, therefore, suited for relatively inaccessible installations and for emergency repairs. See Standard Plans C8A to C8C for further details.
Timber Crib Wall - This type of crib wall may be used for design heights up to 22 feet. Timber crib walls have a rustic appearance

200-48 HIGHWAY DESIGN MANUAL September 1, 2006
which makes them suitable for use in rural environments. When all of the wood members are pressure preservative treated, the service life of timber crib walls is comparable to that of concrete or steel crib walls. See Standard Plans C9A and C9B for further details.
Timber and concrete crib walls constructed on horizontal alignments with curves or angle points require special details, particularly when the wall face is battered. Because crib wall faces can be climbed, they are not recommended for use in urban locations where they may be accessible to the public.
(b) State Designed Earth Retaining Systems which requires Special Designs.
Some locations will require a special design to accommodate ground contours, traffic, utilities, man-made features, site geology, economics, or aesthetics.
Some special design earth retaining systems are as follows:
• Standard Plan Walls (PS&E by Structure PE). The design loadings, heights, and types of walls in the Standard Plans cover frequent applications for earth retaining systems. However, special designs are necessary if the imposed loading exceeds that shown on the Standard Plan. Railroad live loads; building surcharge; loads imposed by sign structures, electroliers, or noise barriers are examples of loading conditions that will require special designs. Foundation conditions that require pile support for the wall and angle points in the wall geometry necessitate a special design.
• Non-Gravity Cantilevered Walls (PS&E by Structure PE). These walls include sheet pile walls, soldier pile walls with lagging, tangent soldier pile
walls, secant soldier pile walls, slurry diaphragm walls, and deep soil mixing walls. These walls are most practical in cut sections and are best suited for situations where excavation for a retaining wall with a footing is impractical because of traffic, utilities, existing buildings, or R/W restrictions. In embankment sections, a non-gravity cantilevered wall is a practical solution for a roadway widening where design heights are less that 15 feet. They are also practical for slip-out corrections. Non-gravity cantilevered walls can consist of concrete, steel, timber, or cemented soil piles that may be either driven into place or placed in drilled holes and trenches.
• Anchored Walls (PS&E by Structure PE). These walls are typically composed of the same elements as non-gravity cantilevered walls, but derive additional lateral resistance from ground anchors (tiebacks), concrete anchors, or pile anchors. These anchors are located behind the potential failure surfaces in the retained soil and are connected to the wall structurally. The method of support and anchorage depends on site conditions, design height, and loading imposed. The cost of these walls is variable depending on earth retaining requirements, site geology, aesthetic consideration, and site restraints, but is generally higher than “Standard Design Walls” for the same wall geometry and loading conditions. Anchored walls may be used to stabilize an unstable site provided that adequate material exists at the site for the anchors. Economical wall heights up to 80 feet are feasible.
• Gravity Wall Systems that require special designs are Concrete Gravity, Rock Gravity, and Gabion Basket Walls.
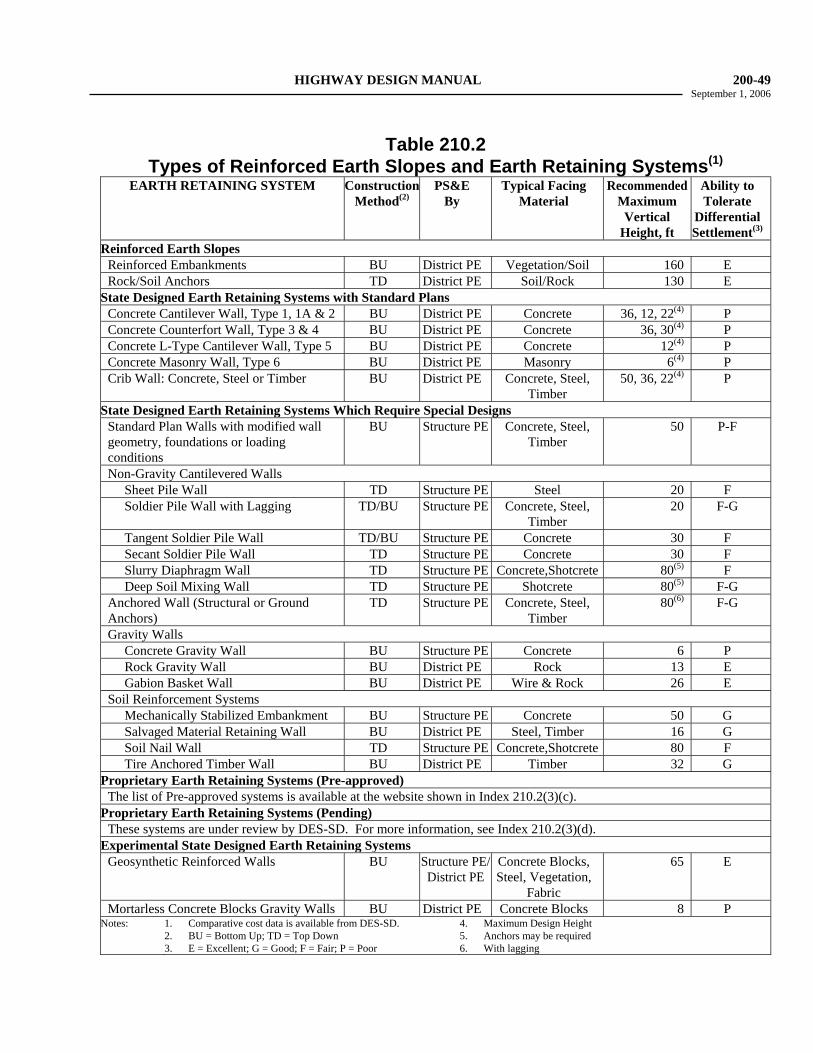
HIGHWAY DESIGN MANUAL 200-49 September 1, 2006
Table 210.2 Types of Reinforced Earth Slopes and Earth Retaining Systems(1)
EARTH RETAINING SYSTEM ConstructionMethod(2)
PS&E By
Typical Facing Material
RecommendedMaximum
Vertical Height, ft
Ability to Tolerate
Differential Settlement(3)
Reinforced Earth Slopes Reinforced Embankments BU District PE Vegetation/Soil 160 E Rock/Soil Anchors TD District PE Soil/Rock 130 E
State Designed Earth Retaining Systems with Standard Plans Concrete Cantilever Wall, Type 1, 1A & 2 BU District PE Concrete 36, 12, 22(4) P Concrete Counterfort Wall, Type 3 & 4 BU District PE Concrete 36, 30(4) P Concrete L-Type Cantilever Wall, Type 5 BU District PE Concrete 12(4) P Concrete Masonry Wall, Type 6 BU District PE Masonry 6(4) P Crib Wall: Concrete, Steel or Timber BU District PE Concrete, Steel,
Timber 50, 36, 22(4) P
State Designed Earth Retaining Systems Which Require Special Designs Standard Plan Walls with modified wall
geometry, foundations or loading conditions
BU Structure PE Concrete, Steel, Timber
50 P-F
Non-Gravity Cantilevered Walls Sheet Pile Wall TD Structure PE Steel 20 F Soldier Pile Wall with Lagging TD/BU Structure PE Concrete, Steel,
Timber 20 F-G
Tangent Soldier Pile Wall TD/BU Structure PE Concrete 30 F Secant Soldier Pile Wall TD Structure PE Concrete 30 F Slurry Diaphragm Wall TD Structure PE Concrete,Shotcrete 80(5) F Deep Soil Mixing Wall TD Structure PE Shotcrete 80(5) F-G Anchored Wall (Structural or Ground
Anchors) TD Structure PE Concrete, Steel,
Timber 80(6) F-G
Gravity Walls Concrete Gravity Wall BU Structure PE Concrete 6 P Rock Gravity Wall BU District PE Rock 13 E Gabion Basket Wall BU District PE Wire & Rock 26 E
Soil Reinforcement Systems Mechanically Stabilized Embankment BU Structure PE Concrete 50 G Salvaged Material Retaining Wall BU District PE Steel, Timber 16 G Soil Nail Wall TD Structure PE Concrete,Shotcrete 80 F Tire Anchored Timber Wall BU District PE Timber 32 G
Proprietary Earth Retaining Systems (Pre-approved) The list of Pre-approved systems is available at the website shown in Index 210.2(3)(c). Proprietary Earth Retaining Systems (Pending) These systems are under review by DES-SD. For more information, see Index 210.2(3)(d). Experimental State Designed Earth Retaining Systems
Geosynthetic Reinforced Walls BU Structure PE/ District PE
Concrete Blocks, Steel, Vegetation,
Fabric
65 E
Mortarless Concrete Blocks Gravity Walls BU District PE Concrete Blocks 8 P Notes:
1. Comparative cost data is available from DES-SD. 2. BU = Bottom Up; TD = Top Down 3. E = Excellent; G = Good; F = Fair; P = Poor
4. Maximum Design Height 5. Anchors may be required 6. With lagging

200-50 HIGHWAY DESIGN MANUAL September 1, 2006
Concrete Gravity Walls (PS&E by Structure PE). Concrete gravity walls are most economical at design heights below 4 feet. However, they may be constructed at heights up to 6 feet. These walls can be used in connection with a cantilever wall if long lengths of wall with design heights of less than 4 feet are required. A Type 50C concrete barrier, see Standard Plans, can serve as a gravity retaining wall at locations where the differential height between the adjoining roadway grades is equal to or less than 3 feet.
Rock Gravity Walls (PS&E by District PE). Rock gravity walls consist of rocks that are 100 pounds to 200 pounds, stacked on top of each other at slight batter. These walls are typically used in areas where a rock appearance is desirable for aesthetic reasons. Wall heights range from 1 foot 6 inches to 15 feet, but are most economical for heights less than 10 feet.
Gabion Basket Walls (PS&E by District PE). Gabion basket walls use compartmented units filled with stones and can be constructed up to 26 feet in height. Each unit is a rectangular basket made of galvanized steel wire. The stone fill is 4 inches to 16 inches in size. Gabion basket walls are typically used for soil and stream bank stabilization. Service life of the gabion basket wall is highly dependent on the environment in which they are placed. Corrosion, abrasion, rock impact, fire and vandalism are examples of site-specific factors that would influence the service life of the wall and should be taken into consideration by the District PE during the design of the project. See Standard Plans D100A and D100B for further details.
• Soil Reinforcement Systems. Soil reinforcement systems consist of facing elements and soil reinforcing elements incorporated into a compacted or in
situ soil mass. The reinforced soil mass functions similar to a gravity wall.
Soil reinforcing elements can be any material that provides tensile strength and pullout resistance, and possesses satisfactory creep characteristics and service life. Generally, reinforcing elements are steel, but polymeric and fiberglass systems may be used.
Facing elements for most systems are either reinforced concrete, light guage steel, or treated wood. Polymeric reinforced walls may be faced with masonry-like elements or even planted with local vegetation. Selection of facing type is governed by aesthetics and service life.
Wall heights of soil reinforcement systems are controlled mainly by bearing capacity of the foundation material and site stability. Wall heights in excess of 60 feet are feasible where conditions permit. Foundation investigations for soil reinforcement systems are similar to investigations for conventional retaining walls.
Special details are required when drainage structures, overhead sign supports or noise barriers on piles are within the reinforced soil mass. Concrete traffic barriers require a special design support slab when used at the top of the facing of these systems. These systems cannot be used where site restrictions do not allow necessary excavation or placement of the soil reinforcing elements.
Soil reinforcement systems that require special design are as follows:
• Mechanically Stabilized Embankment (MSE) (PS&E by Structure PE). This system uses welded steel wire mats, steel strips or polymeric materials as soil reinforcing elements. The facing elements are precast concrete. In many
HIGHWAY DESIGN MANUAL 200-51 September 1, 2006
cases, this system can be constructed using on-site backfill materials.
When the bottom-up construction method is possible and other conditions permit their use, these systems are generally the most economical choice for wall heights greater than 20 feet. They may also be the most economical system for wall heights in the 10-foot to 20-foot range, depending on the specific project requirements.
Because of the articulated nature of the facing elements these systems use, they can tolerate greater differential settlement than can monolithic conventional rigid retaining walls, such as concrete cantilever retaining walls.
Steel elements used in this method are sized to provide sacrificial steel to compensate for anticipated corrosion; and may be galvanized to provide additional protection.
• Salvaged Material Retaining Wall (PS&E by District PE). This system utilizes C-channel sections as soil reinforcement. Galvanized metal beam guardrail, timber posts or concrete panels are used as facing elements. Often these materials can be salvaged from projects. The District Recycle Coordinator should be consulted as to the availability of salvaged materials.
• Soil Nail Wall (PS&E by Structure PE). This system reinforces either the original ground or an existing embankment during the excavation process. Soil nailing is always accomplished from the top-down in stages that are typically 4 feet to 6 feet in height. After each stage of excavation, corrosion protected soil reinforcing elements, "soil nails", are placed and grouted into holes which have been drilled at angles into the in situ material. The face of each stage of excavation is protected by a layer of reinforced shotcrete. After the full
height of wall has been excavated and reinforced, a finish layer of concrete facing is placed either by the shotcreting method or by casting within a face form.
When top-down construction is possible and conditions permit its use, soil nail wall systems are generally the most economical choice for wall heights greater than 10 feet. Wall heights in excess of 80 feet are feasible in specific locations.
Because soil nailing is accomplished concurrent with excavation, and thus results in an unloading of the foundation, there is typically no significant differential settlement.
Steel "soil nails" used in this method are protected against corrosion either by being epoxy coated or encapsulated within a grout filled corrugated plastic sheath, and surrounded by portland cement grout placed during construction. Soil nail lengths typically range from 80 to 100 percent of the wall height, the actual length depends on the nail spacing used and the competency of the in situ soil.
• Recycled Tire Anchor Timber (TAT) Walls (PS&E by District PE). This system utilizes steel bars with recycled tire sidewalls attached by cross bars as soil reinforcing elements. The facing elements are treated timber. TAT walls have a rustic appearance, which makes them suitable in rural environments. The length of commercially available timber post generally controls the height of wall but heights up to 32 feet are feasible.
(c) Proprietary Earth Retaining Systems (Pre-approved).
These conventional retaining walls, cribwalls, and soil reinforcement systems are designed, manufactured, and marketed by vendors. These systems are termed

200-52 HIGHWAY DESIGN MANUAL September 1, 2006
“proprietary” because they are patented. “Pre-approval” status means that these systems may be listed in the Special Provisions of the project as an Alternative Earth Retaining System (AERS), see Index 210.3, when considered appropriate for a particular location. For a proprietary system to be given “pre-approval” status, the vendor must submit standard plans and design calculations to the Division of Engineering Services – Structure Design (DES-SD) for their review and approval. The Proprietary earth retaining systems that have been pre-approved are included in the Department’s Pre-Qualified Products List, located on the following website: www.dot.ca.gov/hq/ esc/approved_products_list/ .
Design details and specifications of “pre-approved” proprietary earth retaining systems may be found on the vendor websites listed in the Pre-Qualified Products List. New systems are added to the website list once they are pre-approved for use.
(d) Proprietary Earth Retaining Systems (Pending).
The systems in this category have been submitted by vendors to DES-SD for evaluation. Upon approval of DES-SD, pending systems are added to the website list of “pre-approved” proprietary earth retaining systems and included in the project specific Special Provisions.
If a proprietary system is the only retaining system deemed appropriate for use at a specific location, the construction of that system must be justified or designated an experimental construction feature in accordance with existing Departmental Policy concerning sole source purchases. See Index 110.10 for additional guidance on the use of proprietary items.
(e) Experimental State Designed Earth Retaining Systems.
Every earth retaining system is evaluated before being approved for routine use by the Department. Newly introduced designs, unproven combinations of proprietary and non-proprietary designs or products, are considered experimental. Once an experimental system has been evaluated and approved, it will be made available for routine use. The use of these systems is only permitted upon consultation with the Division of Engineering Services – Geotechnical Services (DES-GS).
Some earth retaining systems which are currently considered experimental follow:
• Geo-synthetic Reinforced Walls (PS&E by District PE). These systems utilize geo-synthetic material as the soil reinforcing elements. The face of these walls can be left exposed if the geo-synthetic material has been treated to prevent decay from ultra-violet rays. Concrete panels, mortarless masonry, tar emulsion, or air blown mortar may be used as facing materials or the face may be seeded if a more aesthetic treatment is preferred. Design is by DES-GS.
• Mortarless Concrete Block Gravity Walls (PS&E by District PE). These wall types consist of vertically stacked, dry cast, concrete blocks. This system utilizes the friction and shear developed between the blocks and the combined weight of the blocks to retain the backfill. Some of these walls have been used as erosion protection at abutments and on embankments. They can be used as an aesthetic treatment for geo-synthetic material reinforced walls. All of these walls require a batter. Design is by the DES-GS.
210.3 Alternative Earth Retaining Systems (AERS) Using the Alternative Earth Retaining Systems (AERS) procedure encourages competitive bidding and potentially results in project cost savings.
HIGHWAY DESIGN MANUAL 200-53 September 1, 2006
Therefore, AERS must be considered in all projects where earth retaining systems are required.
The AERS procedure may result in one or more earth retaining systems being included in the contract bid package. Under this procedure, a fully detailed State designed earth retaining system will be provided for each location, and will be used as the basis for payment. Additional systems may be presented in the contract documents as alternatives to the fully detailed State design and can be considered for use at specified locations. The fully detailed State designed earth retaining system may be either a Standard Plan system or a special design system. Alternative systems may also be State designed systems, “pre-approved” proprietary systems or experimental systems, as appropriate. The State designed alternative systems, both Standard Plan walls and special design systems, are to be completely designed and specified in the PS&E. Alternative systems are to be listed in the Special Provisions as AERS.
The AERS procedure requires the involvement of the District PE, DES-SD, and the DES-GS. The District PE should submit pertinent site information (site plans, typical sections, etc.) to DES-GS for a feasibility study as early as possible in the project development process.
Under the AERS procedure, parts of the PS&E package which pertain to the earth retaining systems will be prepared as follows:
• Contract plans for State designed systems can be prepared by the District PE (Standard Plan systems), the DES-GS (special design soil reinforcement systems and experimental systems), or the Structure PE (Standard Plan systems and special design systems).
• “Pre-approved” proprietary systems that are determined, based on consultation with DES-SD, to be appropriate alternatives to the State designed earth retaining system, are to be listed in the Special Provisions.
• Specifications and Estimates shall be developed for the fully detailed State designed system, which will be used as the basis for payment.
The earth retaining systems utilizing this procedure are to be measured and paid for by the square yard area of the face of the earth retaining system. Should an AERS be constructed, payment will be made based on the measurements of the State designed system which was designated as the basis of payment. The contract price paid per square yard is for all items of work involved and includes excavation, backfill, drainage system, reinforcing steel, concrete, soil reinforcement, and facing. Any barrier, fence, or railing involved is measured and paid for as separate contract cost items.
210.4 Cost Reduction Incentive Proposals (CRIP) Sometimes Contractors submit proposals for an earth retaining system under Section 5-1.14 of the Standard Specifications, “Cost Reduction Incentive.” The Contractor proposed system may modify or replace the earth retaining system permitted by the contract. The CRIP process allows vendors of proprietary earth retaining systems an alternative method for having their systems used prior to obtaining “pre-approval” (see Index 210.2(c)). CRIP submittals are administered by the Resident Engineer. However, Contract Change Orders are not to be processed until the CRIP is approved by Headquarters Construction with review assistance provided by the District or Structure PE as appropriate.
210.5 Aesthetic Consideration The profile of the top of wall should be designed to be as pleasing as the site conditions permit. All changes in the slope at the top of cast-in-place concrete walls should be rounded with vertical curves at least 20 feet in length. Abrupt changes in the top of the wall profile should be avoided by using vertical curves, slopes, steps, or combinations thereof. Side slopes may be flattened or other adjustments made to provide a pleasing profile.
Where walls are highly visible, special surface treatments or provisions for landscaping should be considered. The aesthetic treatment of walls should be discussed with the District Landscape Architect and when necessary referred to DES Structure Design Services & Earthquake Engineering for

200-54 HIGHWAY DESIGN MANUAL September 1, 2006
additional study by the Office of Transportation Architecture.
The wall area between the grade line and 6 feet above it shall be free of any designed indentations or protrusions that may snag errant vehicles
When alternative wall types are provided on projects with more than one wall site, any restrictions as to the combination of wall types should be specified in the Special Provisions.
210.6 Safety Railing, Fences, and Concrete Barriers Cable railing shall be installed for employee protection in areas where employees may work adjacent to and above vertical faces of retaining walls, wingwalls, abutments, etc. where the vertical fall is 4 feet or more.
If cable railing is required on a wall which is less than 4 feet 6 inches tall and that wall is located within the clear recovery zone, then the cable railing should be placed behind the wall. See Standard Plan B11-47 for details of cable railing.
Special designs for safety railing may be considered where aesthetic values of the area warrant special treatment. In addition, if the retaining wall is accessible to the public and will have pedestrians or bicycles either above or below the retaining wall, then the provisions of Index 208.10 shall apply.
Concrete barriers may be mounted on top of retaining walls. Details for concrete barriers mounted on top of retaining walls Type 1 through 5 are shown in the Standard Plans. A concrete barrier slab is required if a concrete barrier is to be used at the top of a special design earth retaining system. DES-SD should be contacted for preparation of the plans involved in the special design.
Retaining walls joining right of way fences should be a minimum of 6 feet clear height.
The District PE should examine the proposed retaining wall location in relation to the provisions of Index 309.1 to ensure adequate horizontal clearances to the structure or to determine the type and placement of the appropriate roadside safety devices.
210.7 Design Responsibility The Structure PE has primary responsibility for the structural design and preparation of the contract documents (PS&E) for special design earth retaining systems involving Standard Plans non-gravity cantilevered walls, anchored walls, concrete and rock gravity walls, mechanically stabilized embankment, and soil nail walls. The DES-GS has primary responsibility for the geotechnical design of all reinforced earth slopes and earth retaining systems. DES-SD will prepare the Specifications and Engineer's Estimate for contracts when the AERS procedure is used. DES-SD reviews and approves standard plan submittals for proprietary earth retaining systems submitted by vendors. DES-SD and DES-GS assist Headquarters Construction in evaluating the CRIP submitted by contractors.
Districts may prepare contract plans, specifications, and engineer's estimate for Standard Plan retaining walls provided the foundation conditions and site requirements permit their use. A foundation investigation is required for all reinforced earth slopes and earth retaining systems. PS&E’s for slurry walls, deep soil mixing walls, gabion walls, tire anchored timber walls, salvaged material walls, and experimental walls will be prepared by the District PE with assistance from DES-GS. Earth retaining systems may be included in the PS&E as either highway or structure items.
The time required for DES-SD to provide the special design of a retaining system is site and project dependent. Therefore, the request for a special design should be submitted by the District PE to DES-SD as far in advance as possible, but not less than 20 feetonths prior to PS&E delivery. At least 3 months is required to conduct a foundation investigation for an earth retaining system. A site plan, index map, cross sections, vertical and horizontal alignment, and utility and drainage requirements should be sent along with the request.
DES-GS has the responsibility for preparing a feasibility study for AERS. The District PE should submit project site information (site plans, typical sections, etc.) as early in the planning stage as possible so that determination of the most

HIGHWAY DESIGN MANUAL 200-55 September 1, 2006
appropriate earth retaining system to use can be made.
210.8 Guidelines for Type Selection and Plan Preparation (1) Type Selection. Type selection for reinforced
earth slopes and earth retaining systems should be based on considerations set forth in Index 210.2.
The District PE should request a feasibility study for a reinforced slope or earth retaining system from DES-GS as early as possible in the project development process. After the feasibility study, the District PE should request an Advanced Planning Study (APS) from DES-SD for all special design earth retaining systems that DES-SD may be required to include in the PS&E.
If the District PE decides that the course of action favors an earth retaining system in which the PS&E will be delivered by DES-SD, then a Bridge Site Data Submittal – Non-Standard Retaining Wall/Noise Barrier must be submitted to DES-Structure Design Services & Earthquake Engineering –Preliminary Investgations (PI) Branch. A copy of this submittal will be forwarded to DES-SD and DES-GS by PI.
The Structure PE, with input from DES-GS and the District PE, will then type select the appropriate earth retaining system for the site and project. After an earth retaining system has been type selected, then DES-GS will prepare a Geotechnical Design Report.
The process for type selecting and developing the PS&E for reinforced earth slopes and earth retaining systems is set forth in Figure 210.8.
All appropriate State designed and proprietary earth retaining systems should be considered for inclusion in the contract documents to promote competitive bidding, which can result in cost savings.
(2) Foundation Investigations. DES-GS should be requested to provide a foundation recommendation for all sites involving a reinforced slope or an earth retaining system.
Any log of test boring sheets accompanying the foundation reports must be included with the contract plans as project information, for the bidders use.
(3) Earth Retaining Systems with Standard Plans. The following guidelines should be used to prepare the contract plans for earth retaining systems, which are found in the Standard Plans:
(a) Loads. All wall types selected must be capable of supporting the field surcharge conditions. The design surcharges can be found in the Standard Plans. Deviance from these loadings will require a special design
(b) Footing Steps. For economy and ease of construction of wall Types 1 through 6, the following criteria should be used for layout of footing steps.
• Distance between steps should be in multiples of 8 feet.
• A minimum number of steps should be used even if a slightly higher wall is necessary. Small steps, less than 1 foot in height, should be avoided unless the distance between steps is 96 feet or more. The maximum height of steps should be held to 4 feet. If the footing thickness changes between steps, the bottom of footing elevation should be adjusted so that the top of footing remains at the same elevation.
(c) Sloping Footings. The following criteria should be used for layout of sloping footings.
• The maximum permissible slope for reinforced concrete retaining walls is 3 percent. Maximum footing slope for masonry walls is 2 percent.
• When sloping footings are used, form and joint lines are permitted to be perpendicular and parallel to the footing for ease of construction.
• In cases where vertical electroliers or fence posts are required on top of a

200-56 HIGHWAY DESIGN MANUAL January 4, 2007
wall, the form and joint lines must also be vertical. A sloping footing should not be used in this situation since efficiency of construction would be lost.
Sloping footing grades should be constant for the entire length of the wall. Breaks in footing grade will complicate forming and result in loss of economy. If breaks in footing grade are necessary, a level stepped footing should be used for the entire wall.
• When the top of wall profile of crib walls is constant for the entire length, the bottom of wall profile may be sloped to avoid steps in the top of wall. In this case, all steps to compensate for changes of wall height and original ground profile would be made in the bottom of wall. The maximum permissible slope is 6 percent. If vertical electroliers or fence posts are required on top of the wall, the crib wall should not be sloped. Sloping crib walls are permissible with guard railing with vertical posts.
(d) Wall Joints. General details for required wall joints on wall Types 1, 1A, 2, and 5 are shown on Standard Plan B0-3. Expansion joints, Bridge Detail 3-3, should be shown at maximum intervals of 96 feet. Shorter spaces should be in multiples of 8 feet. Expansion joints generally should be placed near angle points in the wall alignment. When concrete barriers are used on top of retaining walls, the waterstop in the expansion joint must be extended 6 inches into the barrier. This detail should be shown or noted on the wall plans. Weakened plane joints, Bridge Detail 3-2, should be shown at nearly equal spaces between joints.
(e) Drainage. Gutters should be used behind walls in areas where it is necessary to carry off surface water or to prevent scour. Low points in wall vertical
alignment or areas between return walls must be drained by downspouts passing through the walls. Standard Plan B3-9 shows typical drainage details. Special design of surface water drainage facilities may be necessary depending on the amount of surface water anticipated. Where ground water is likely to occur in any quantity, special provisions must be made to intercept the flow to prevent inundation of the backfill and unsightly continuous flow through weep holes.
(f) Quantities. When the AERS procedure is not utilized, quantities for each wall item of work are usually developed for payment. The quantities for concrete, expansion joint waterstop, structure excavation, structure backfill, pervious backfill material, concrete barrier or railing, and gutter concrete must also be tabulated. Quantities should be tabulated on the plans for each wall.
(4) Soil Reinforcement Systems. The following guidelines should be used to prepare the contract plans for soil reinforcement systems:
(a) Leveling Pads. Most soil reinforcement systems do not require extensive foundation preparation. It may be necessary, however, to design a concrete leveling pad on which to construct the face elements. A reinforced concrete leveling pad will be required in areas prone to consolidation or frost disturbance.
• Steps in the leveling pad should be the same height as the height of the facing elements or thickness of the soil layer between the soil reinforcement.
• Distance between steps in the leveling pad should be in increments equivalent to the length of individual facing elements.
• A minimum number of steps should be used even if a slightly higher wall is necessary.
(b) Drainage. Gutters should be used behind walls in areas where it is necessary to carry off surface water or to prevent

HIGHWAY DESIGN MANUAL 200-57 September 1, 2006
scour. Low points in wall vertical alignment or areas between return walls must be drained by downspouts passing through the walls. Special design of surface water drainage facilities will be necessary and should be prepared by DES-SD. Where ground water is likely to occur in any quantity, special provisions must be made to intercept the flow to prevent inundation of the backfill.
(c) Quantities. When the AERS procedure is not utilized, quantities for each item of work are usually developed for payment. Bid items must include, but not be limited to: excavation and backfill for the embedment depth, soil reinforcement, facing elements, and concrete for leveling pad construction. Additional bid items for inclusion are any drainage system, pervious backfill, concrete barrier, railings, and concrete gutters. Quantities should be tabulated on the plans for each wall.
(5) Earth Retaining Systems. The following miscellaneous details are applicable to all earth retaining systems:
(a) Utilities. Provisions must be made to relocate or otherwise accommodate utilities conflicting with the retaining wall. A utility opening for a Type 1 wall is shown on Standard Plan B3-9. Any other utility openings will require special design details and should be reviewed by DES-SD.
(b) Electroliers and Signs. Details for mounting electroliers and signs on earth retaining systems are designed by DES-SD. Requests for preparation of details should be made at least 3 months in advance of the PS&E submittal to District Officer Engineer date. To accommodate the base plates for overhead signs, a local enlargement may affect the horizontal clearance to both the edge of pavement and the right of way line. This type of enlargement should be considered at the time of establishing the wall layout and a need for a Mandatory Design Exception determined. For mounting details, furnish
DES-SD a complete cross section of the roadway at the sign and the layout and profile of the earth retaining system.
(c) Fence and Railing Post Pockets. Post pocket details shown for cable railing in the Standard Plans may also be used for mounting chain link fence on top of retaining walls. Special details may be necessary to accommodate the reinforce-ment in soil reinforcement systems.
(d) Return Walls. Return walls should be considered for use on the ends of the walls to provide a finished appearance. Return walls are necessary when wall offsets are used or when the top of wall is stepped. Return walls for soil reinforcement systems will require special designs to accommodate the overlapping of soil reinforcing elements.
All special wall details such as sign bases, utility openings, drainage features, fences, and concrete barriers should be shown on the plan sheet of the wall concerned or included on a separate sheet with the wall plan sheets. Details should be cross-referenced on the wall sheets to the sheets on which they are shown.

200-58 HIGHWAY DESIGN MANUAL September 1, 2006
Figure 210.8 Type Selection and PS&E Process for Reinforced Earth Slopes
and Earth Retaining Systems