Embed Size (px)
Citation preview

Microsoft Official Training Materials for Microsoft Dynamics ™ Your use of this content is subject to your current services agreement
Chapter 2: Sales Order Management
Page 11
CHAPTER 2: SALES ORDER MANAGEMENT Objectives
The objectives are:
• Provide an overview of the Sales Order Management process • Set up Sales Order Management, Customers and Shipping Options • Set up Reservation Rules, Customer Posting Groups, and Sales
People • Manage the Sales Transactions flow • Create Quotations, Blanket Orders, and Sales Orders • Perform Drop Shipments • Create Item Reservations • Post Orders • Perform Partial and Combined shipments • Process Prepayment
Introduction The sales handling process is the cornerstone in all companies in order to achieve a high customer service level. Microsoft Dynamics� NAV supports companies in managing all the steps in the sales order management process from creating the blanket order to shipping and invoicing the order. Sales Order Management provides an overview of background and set up information. The main focus is put on common aspects of sales transaction handling and all aspects of the flow is described in details. Examples are given in comprehensive demonstrations. A list of sales batch jobs, reports, and sales documents is included in Appendix A.
Microsoft Official Training Materials for Microsoft Dynamics ™ Your use of this content is subject to your current services agreement
Trade in Microsoft Dynamics NAV 5.0
Page 12
Sales Order Management Overview For companies to survive, they must keep customers satisfied. An instant and accurate response to inquiries, such as delivery time or the price of the product, is a key factor contributing to customer satisfaction. In addition, efficiently handling special customer requests about shipping arrangements and invoicing preferences is likely to ensure repeat orders. Typical examples of these requests include:
• Receiving shipments in parts or to different addresses • Receiving the orders before they are invoiced • Being invoiced for several shipped orders at the same time
Companies must also ensure they can easily register sales transaction information. For example, adjusting customer balance and updating inventory availability and values are tasks that must always be performed when handling sales. Additionally, companies may want to keep a record of the salespeople performing the sale. As aspects of a future sales agreements are negotiated and agreed upon in the presales stage, it is helpful for salespeople to record relevant agreement details once and then reuse this information when creating an actual sales order. There is a lot of functionality in Microsoft Dynamics� NAV that supports efficient sales transaction handling, such as:
• Sales Order Management: This functionality includes documents (quotes, blanket orders, and sales orders) that support the order processor in efficiently managing sales. The functionality supports partial order shipment, separation between shipping and invoicing, and combined invoicing.
• Alternative Ship-Tos: This facilitates handling sales orders for customers who have several alternative shipping addresses.
• Drop Shipments: This enables the order processor to efficiently handle orders shipped directly from the vendor to the customer without involving the company's operations.
• Order processors/purchasing agents: This enables collection of sales statistics at the salesperson level.
• Shipping agents: This facilitates the management of carriers (shipping agents) and related information.

Microsoft Official Training Materials for Microsoft Dynamics ™ Your use of this content is subject to your current services agreement
Chapter 2: Sales Order Management
Page 13
Setting Up Sales Order Management This chapter contains setup options that define the functionality of sales order management, focusing on the physical handling rather than financial aspects of a sales transaction. Setup options that support additional sales practices and tasks (for example, sales and invoice discounts, and return management) are discussed in separate chapters. The sales setup consists of the following elements:
• Sales & Receivables setup: Based on their established practices, companies must specify how they want the program to support them in managing different aspects of their sales transactions. These are general setup options the program applies to all sales transactions, regardless of the item or customer.
• Customer setup: Basic information such as name and address, in addition to invoicing details (for example, credit limit, invoicing, discount and payment terms, currencies, shipping schemes, and reservation rules, and so on) are recorded for each customer on a customer card. The setup of customer posting groups defines the connection between a customer and accounts in the general ledger. This is done by assigning a customer to a posting group for which balance sheet and income statement accounts are set up.
• Salesperson setup: Companies can set up codes to identify and describe salespeople. This is done to establish a link between a salesperson and the performance in terms of, for example, the number of sales transactions (orders, invoices, or returns) handled.
Demonstration − Setting Up Sales Order Management At Cronus, management wants to notify the order processor about a customer's credit and balance every time the customer places an order. Because management wants to ensure that orders are delivered on time, they want the program's feedback on item availability when a sales order is entered. They also require the program to create shipment and return receipt documents when posting invoices, credit memos or both.
Steps These business requirements have led to the following Sales & Receivables setup for Cronus:
1. On the Sales & Marketing menu, click SETUP→SALES & RECEIVABLES SETUP. The Sales & Receivables Setup window appears.
2. Check the different fields that are explained in the following.
Microsoft Official Training Materials for Microsoft Dynamics ™ Your use of this content is subject to your current services agreement
Trade in Microsoft Dynamics NAV 5.0
Page 14
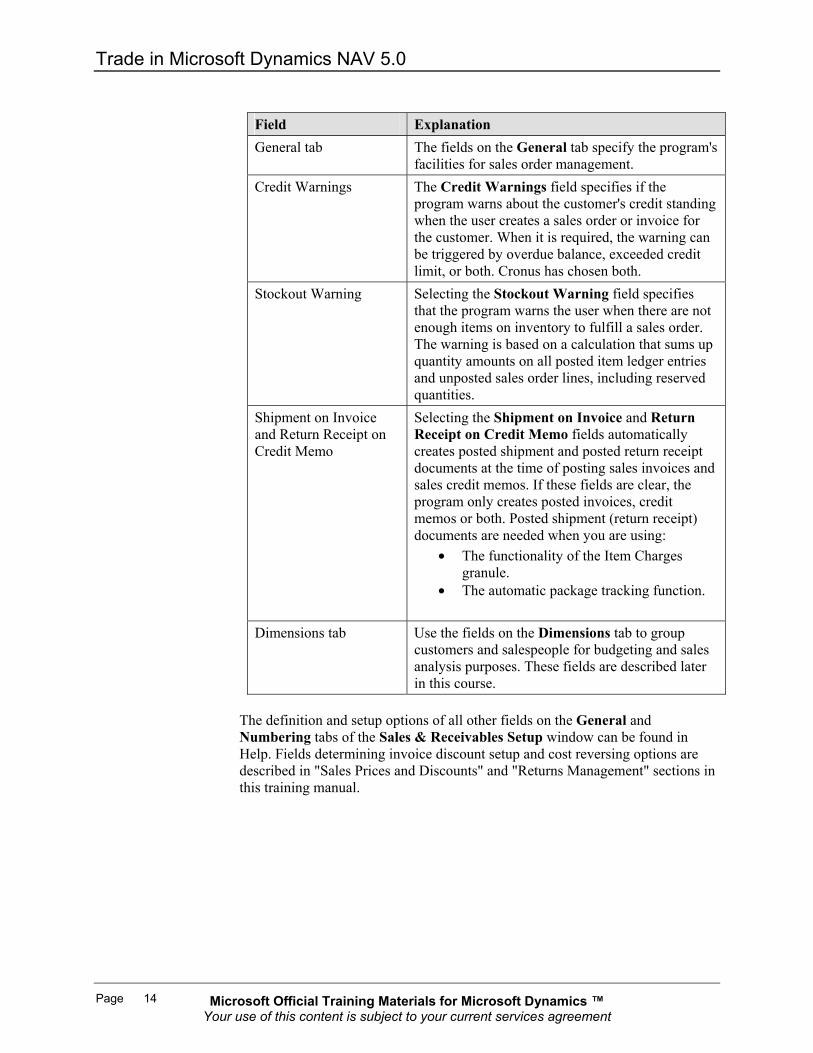
Field Explanation General tab The fields on the General tab specify the program's
facilities for sales order management. Credit Warnings The Credit Warnings field specifies if the
program warns about the customer's credit standing when the user creates a sales order or invoice for the customer. When it is required, the warning can be triggered by overdue balance, exceeded credit limit, or both. Cronus has chosen both.
Stockout Warning Selecting the Stockout Warning field specifies that the program warns the user when there are not enough items on inventory to fulfill a sales order. The warning is based on a calculation that sums up quantity amounts on all posted item ledger entries and unposted sales order lines, including reserved quantities.
Shipment on Invoice and Return Receipt on Credit Memo
Selecting the Shipment on Invoice and Return Receipt on Credit Memo fields automatically creates posted shipment and posted return receipt documents at the time of posting sales invoices and sales credit memos. If these fields are clear, the program only creates posted invoices, credit memos or both. Posted shipment (return receipt) documents are needed when you are using:
• The functionality of the Item Charges granule.
• The automatic package tracking function.
Dimensions tab Use the fields on the Dimensions tab to group customers and salespeople for budgeting and sales analysis purposes. These fields are described later in this course.
The definition and setup options of all other fields on the General and Numbering tabs of the Sales & Receivables Setup window can be found in Help. Fields determining invoice discount setup and cost reversing options are described in "Sales Prices and Discounts" and "Returns Management" sections in this training manual.

Microsoft Official Training Materials for Microsoft Dynamics ™ Your use of this content is subject to your current services agreement
Chapter 2: Sales Order Management
Page 15
Setting Up Customers and Shipping Options Basic customer setup is covered in other courses. This topic explains additional setup options for customer data management. These options manage shipping-related information and processes and control item reservation rules. The set up information is followed by the explanation of the customer posting group setup considerations. Customers often have alternative sites in addition to the main business address for shipping items. For example, a subcontractor may require deliveries to several construction sites. Companies may have warehousing and production sites that have addresses different from the main office address. The Alternative Ship-To's functionality supports those customers that have alternative shipping sites. If a customer wants the orders shipped to different addresses, addresses can be recorded as alternative ship-to addresses and chosen by the order processor when creating an order/invoice. Ship-to addresses are entered in the Ship-to Address table. This can contain unlimited number of addresses for each customer. A code representing information such as customer number and name is linked to each address.
Demonstration − Setting Up Shipping Options Cronus' customer 10000 has two alternative ship-to addresses.
Steps Perform the following steps:
1. Open the customer card for customer 10000 by selecting ORDER PROCESSING→CUSTOMERS from the Sales & Marketing menu.
2. Click CUSTOMER→SHIP-TO ADDRESSES and press F5. The list of ship-to addresses is displayed.
3. Select the second address line, and then click OK to review address details.
When the code for this ship-to address (found on the upper-left of the card) is selected in the Ship-to Code field on orders (invoices and credit memos), the ship-to information appears on document printouts. Ship-to codes are available on purchase orders that are drop-shipped to a customer. All other shipping setup options are located on the Shipping tab of a customer card.
4. Click the Shipping tab on the Customer Card. The shipping options are displayed.
Microsoft Official Training Materials for Microsoft Dynamics ™ Your use of this content is subject to your current services agreement
Trade in Microsoft Dynamics NAV 5.0
Page 16
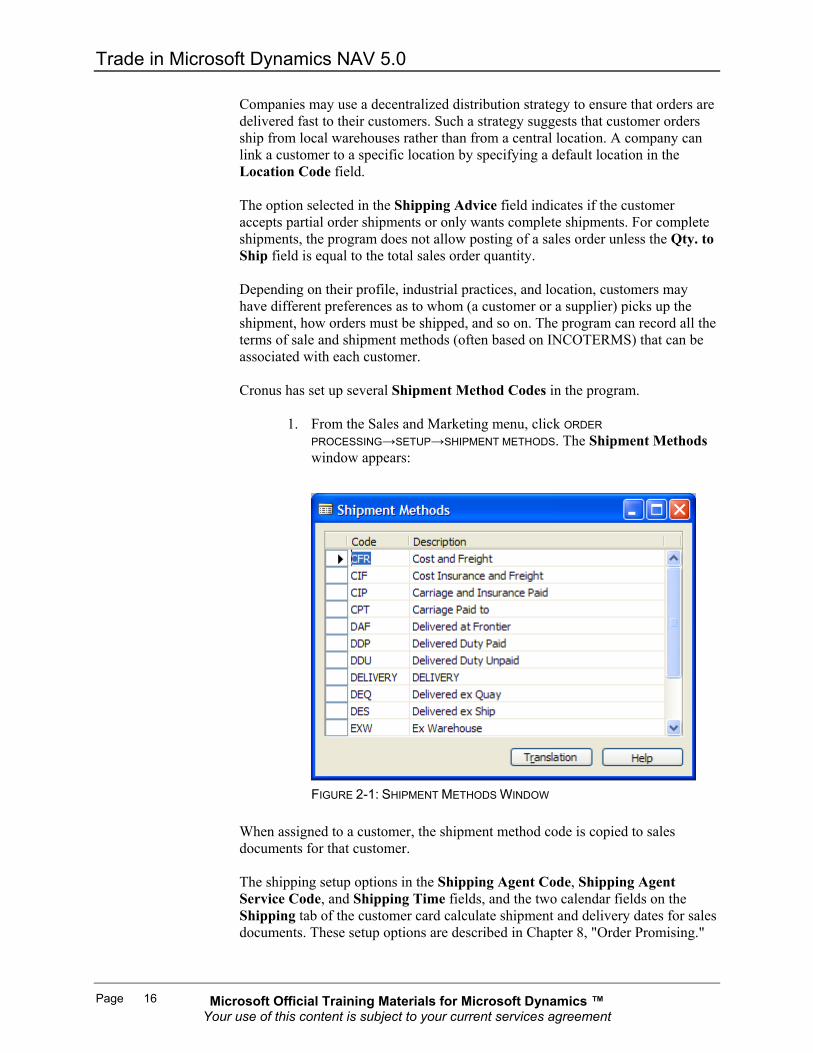
Companies may use a decentralized distribution strategy to ensure that orders are delivered fast to their customers. Such a strategy suggests that customer orders ship from local warehouses rather than from a central location. A company can link a customer to a specific location by specifying a default location in the Location Code field. The option selected in the Shipping Advice field indicates if the customer accepts partial order shipments or only wants complete shipments. For complete shipments, the program does not allow posting of a sales order unless the Qty. to Ship field is equal to the total sales order quantity. Depending on their profile, industrial practices, and location, customers may have different preferences as to whom (a customer or a supplier) picks up the shipment, how orders must be shipped, and so on. The program can record all the terms of sale and shipment methods (often based on INCOTERMS) that can be associated with each customer. Cronus has set up several Shipment Method Codes in the program.
1. From the Sales and Marketing menu, click ORDER PROCESSING→SETUP→SHIPMENT METHODS. The Shipment Methods window appears:
FIGURE 2-1: SHIPMENT METHODS WINDOW
When assigned to a customer, the shipment method code is copied to sales documents for that customer. The shipping setup options in the Shipping Agent Code, Shipping Agent Service Code, and Shipping Time fields, and the two calendar fields on the Shipping tab of the customer card calculate shipment and delivery dates for sales documents. These setup options are described in Chapter 8, "Order Promising."
Microsoft Official Training Materials for Microsoft Dynamics ™ Your use of this content is subject to your current services agreement
Chapter 2: Sales Order Management
Page 17
The combine shipments option using the Combine Shipments field is selected when invoicing or debiting a customer for several shipments or return receipts in one invoice or credit memo. This field is selected by default in the order header, but can be changed if it is required. The Combine Shipments or Return Receipts batch job combines the posted shipment or return receipt documents into one invoice or credit memo and includes the orders selected in the Combine Shipments field.
Setting Up Reservation Rules Companies can make and manage item reservations between sales and purchase orders, and they can decide whether reservations are made in relation to a specific customer. This decision is determined by selecting one of the options: Never, Optional, or Always in the Reserve field on the Shipping tab of the customer card. The selected option is copied to the Reserve field on the header of a sales document created for the customer, where it, in combination with the contents of the Reserve field on the item card, determine the reservation option for individual sales lines in the document. To complete customer setup, the following demonstration describes the setup details of customer posting groups.
Demonstration − Setting Up Customer Posting Groups The financial value of a sales transaction is posted to dedicated accounts in the general ledger. When companies do not want to establish accounts for each customer, they can put several customers into one posting group and specify accounts per group. After the company decides on criteria for how its customers are grouped, the groups must be set up in the Customer Posting Group table. In this table, the user can assign a code to each posting group and specify general ledger accounts for categories, such as receivables, service charges, payment discount amounts, interest, additional fees, and so on.
Microsoft Official Training Materials for Microsoft Dynamics ™ Your use of this content is subject to your current services agreement
Trade in Microsoft Dynamics NAV 5.0
Page 18
Steps Cronus' accountants have set up two customer posting groups, domestic and foreign:
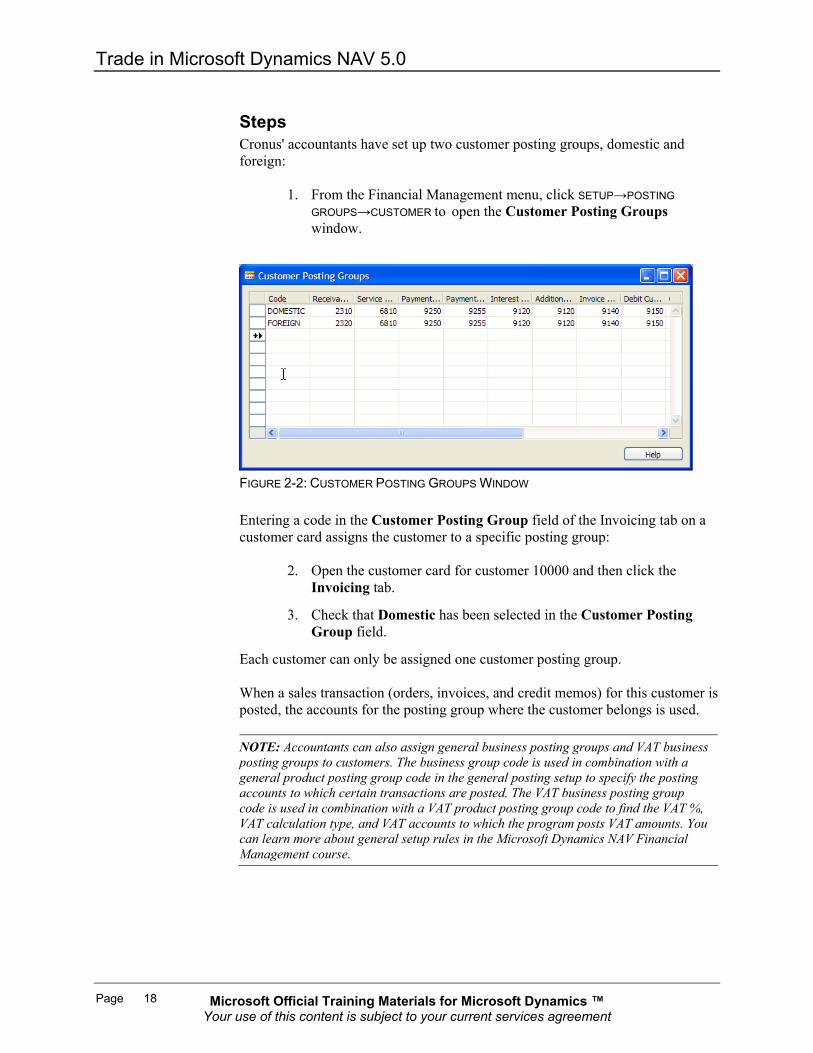
1. From the Financial Management menu, click SETUP→POSTING GROUPS→CUSTOMER to open the Customer Posting Groups window.
FIGURE 2-2: CUSTOMER POSTING GROUPS WINDOW Entering a code in the Customer Posting Group field of the Invoicing tab on a customer card assigns the customer to a specific posting group:
2. Open the customer card for customer 10000 and then click the Invoicing tab.
3. Check that Domestic has been selected in the Customer Posting Group field.
Each customer can only be assigned one customer posting group. When a sales transaction (orders, invoices, and credit memos) for this customer is posted, the accounts for the posting group where the customer belongs is used. NOTE: Accountants can also assign general business posting groups and VAT business posting groups to customers. The business group code is used in combination with a general product posting group code in the general posting setup to specify the posting accounts to which certain transactions are posted. The VAT business posting group code is used in combination with a VAT product posting group code to find the VAT %, VAT calculation type, and VAT accounts to which the program posts VAT amounts. You can learn more about general setup rules in the Microsoft Dynamics NAV Financial Management course.
Microsoft Official Training Materials for Microsoft Dynamics ™ Your use of this content is subject to your current services agreement
Chapter 2: Sales Order Management
Page 19
Each customer posting group can have different general ledger accounts or the same accounts set up for it. An advantage of having different groups that have the same accounts is that it gives accountants flexibility in grouping customers for reporting and analysis purposes. For example, a total receivables amount can be presented and analyzed with two groups representing domestic and foreign customers.
Demonstration − Setting Up Salespeople When companies want to monitor sales performance, they can record volume achieved by salespeople and produce statistics.
Steps To set up salespeople, a company assigns a code to each salesperson. Cronus has set up several codes for their employees in the sales department:
1. From the Sales & Marketing menu, click SALES→SALESPEOPLE. A Salesperson card appears.
Details such as job title, commission percent, and other dimensions can be specified on each salesperson card.
2. To create a new salesperson, press F3.
3. To view a list of all salespeople in the program, click SALESPERSON→LIST, or press F5.
NOTE: Apart from two default dimensions (department and project) selected on the Invoicing tab of the salesperson card, companies can also assign additional default dimensions. This can be done for a single salesperson or the whole group. This setup option is found in the Salespeople/Purchasers window, by clicking SALESPERSON→DIMENSIONS→DIMENSIONS-SINGLE/DIMENSIONS-MULTIPLE. Selecting a salesperson code as the default on a customer card or directly in the sales documents makes sure that sales statistics are created at the salesperson level. Based on this, the overall performance of salespeople can be calculated and presented in a report.
Microsoft Official Training Materials for Microsoft Dynamics ™ Your use of this content is subject to your current services agreement
Trade in Microsoft Dynamics NAV 5.0
Page 20
Managing Sales Transactions Managing Sales Transations elaborates on the program's facilities that support common tasks in sales transaction management. The workflow includes the following steps:
• Registering a blanket agreement with a customer • Converting the agreement into a sales order • Drop shipping • Reserving the ordered quantity for the sales order
Sales Quotes A sales quote can be considered a "draft order" that the order processor gives to a customer that specifies price, terms of sale, and description of items. If the customer wants to buy the items on the quote, the quote can be converted to a sales order. Because the functionality in quotes is also available in sales orders (addressed in detail later in this section), sales quotes are not described here.
Blanket Orders A blanket sales order represents a framework for a long-term agreement between the company and a customer. The order processor makes a blanket order when the customer has committed to buying large quantities to be delivered in several shipments over a period of time. Often, blanket orders cover only one item with predetermined delivery dates. Quantities on a blanket order do not affect item availability and can be used as a worksheet for monitoring, forecasting, and planning. On the blanket order, each shipment can be set up as an order line. This can then be converted into a sales order at the time of shipping. The following demonstration shows how to create a blanket order.
Microsoft Official Training Materials for Microsoft Dynamics ™ Your use of this content is subject to your current services agreement
Chapter 2: Sales Order Management
Page 21
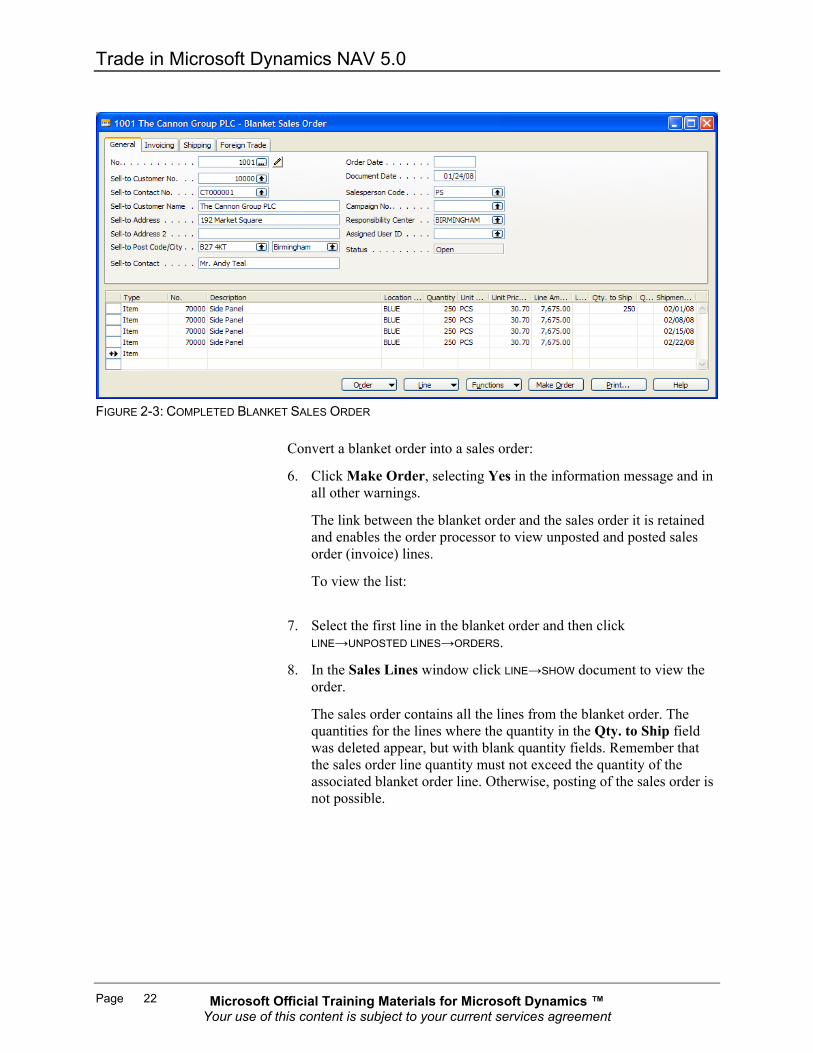
Demonstration − Creating a Blanket Order A representative from customer 10000 calls the order processor at Cronus to order 1000 units of item 70000. The customer wants the items to be delivered in 250 units every week over the next month.
Steps Create a blanket order for 1000 units of item 70000 for customer 10000:
1. From the Sales & Marketing menu, select ORDER PROCESSING→BLANKET ORDER. Press F3 to make a new order and enter the customer information in the blanket order header.
2. Leave the Order Date field blank.
When separate sales orders are created from the blanket order, the order date of the sales order is equal to the actual work date.
Notice that the Salesperson Code field on the order header contains the default code for the salesperson assigned to the customer 10000. This code is retrieved from the customer card.
Create four lines of 250 units of item 70000:
3. On each line, in the Type field, select Item. In the No. field select
70000. In the Quantity field, enter 250.
4. In the Shipment Date field, enter the shipment dates of 02/01/08, 02/08/08, 02/15/08, and 02/22/08 respectively.
Notice that the Qty. to Ship field is filled in automatically to indicate the quantity to be listed on the sales orders for the respective shipment dates.
Create the order for the first shipment of 250 units:
5. In the Qty. to Ship field, leave the quantity of 250 for the first line
and delete the quantity to ship in the three other lines.
The completed blanket order looks as follows:
Microsoft Official Training Materials for Microsoft Dynamics ™ Your use of this content is subject to your current services agreement
Trade in Microsoft Dynamics NAV 5.0
Page 22
FIGURE 2-3: COMPLETED BLANKET SALES ORDER
Convert a blanket order into a sales order:
6. Click Make Order, selecting Yes in the information message and in all other warnings.
The link between the blanket order and the sales order it is retained and enables the order processor to view unposted and posted sales order (invoice) lines.
To view the list:
7. Select the first line in the blanket order and then click
LINE→UNPOSTED LINES→ORDERS.
8. In the Sales Lines window click LINE→SHOW document to view the order.
The sales order contains all the lines from the blanket order. The quantities for the lines where the quantity in the Qty. to Ship field was deleted appear, but with blank quantity fields. Remember that the sales order line quantity must not exceed the quantity of the associated blanket order line. Otherwise, posting of the sales order is not possible.

Microsoft Official Training Materials for Microsoft Dynamics ™ Your use of this content is subject to your current services agreement
Chapter 2: Sales Order Management
Page 23
9. Delete the last three lines in the sales order.
When the sales order is posted as shipped, invoiced, or both, the Quantity Shipped and Quantity Invoiced fields are updated on the related blanket order.
As soon as the sales order(s) has been created for the total quantity of a blanket order line, no other sales order(s) is created for the same line.
The blanket order number and line number are recorded as properties of the sales lines when created from a blanket order.
10. Zoom in on the lines of the sales order created earlier or press CTRL
+ F8.
The Blanket Order No. and the Blanket Order Line No. fields have corresponding references.
NOTE: Where sales orders are not created directly from the blanket order but are still relate to it, a link between a sales order and a blanket order is established by selecting the number of the blanket order in the Blanket Order No. field on the sales line.
Demonstration − Creating a Sales Order This demonstration is a continuation of the previous demonstration: "Creating a Blanket Order." The order processor at Cronus is about to ship 250 units of item 70000 to customer 10000. This is the first shipment out of four on the blanket order. The shipment needs to be delivered to the customer's subsidiary address instead of to the main address. The shipping agent is DHL, who provides the option of package tracking.
Steps Perform the following steps:
1. Locate the sales order created earlier from the blanket order.
The General tab of the sales header specifies default customer details and additional information for the customer. These are copied from the customer card when the order is created. The document dates and delivery dates are addressed in detail later in this training manual.
Microsoft Official Training Materials for Microsoft Dynamics ™ Your use of this content is subject to your current services agreement
Trade in Microsoft Dynamics NAV 5.0
Page 24
NOTE: Links to more information about the customer, such as alternative shipping addresses, comments, contacts, and credit, can be found on the right pane of the sales order, across from the sales order header. When the salesperson clicks on the Sales History link, a list of previous sales transactions appears. Lines can be copied to the current sales order by clicking the Copy to Doc button at the bottom of the sales history form. Links to information about the item are located across from the sales lines. The salesperson can link directly to the item card and can access information about item availability, substitutions, sales prices, and sales line discounts by clicking the available fields.
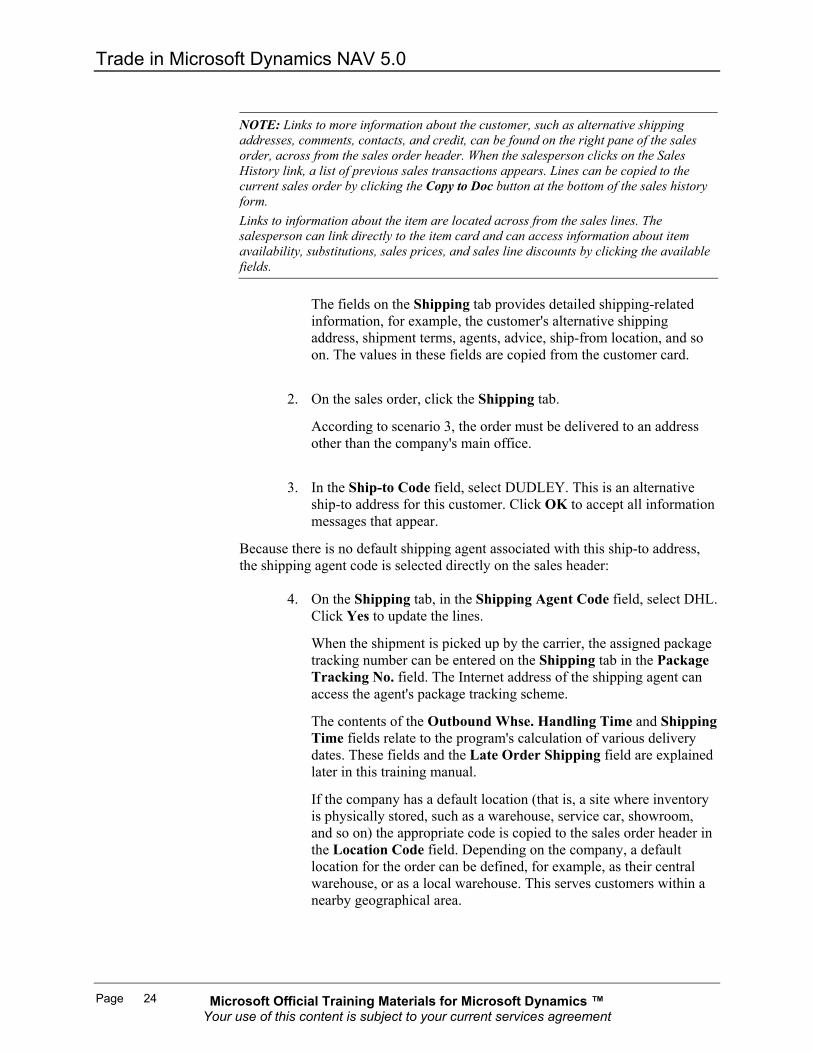
The fields on the Shipping tab provides detailed shipping-related information, for example, the customer's alternative shipping address, shipment terms, agents, advice, ship-from location, and so on. The values in these fields are copied from the customer card.
2. On the sales order, click the Shipping tab.
According to scenario 3, the order must be delivered to an address other than the company's main office.
3. In the Ship-to Code field, select DUDLEY. This is an alternative
ship-to address for this customer. Click OK to accept all information messages that appear.
Because there is no default shipping agent associated with this ship-to address, the shipping agent code is selected directly on the sales header:
4. On the Shipping tab, in the Shipping Agent Code field, select DHL. Click Yes to update the lines.
When the shipment is picked up by the carrier, the assigned package tracking number can be entered on the Shipping tab in the Package Tracking No. field. The Internet address of the shipping agent can access the agent's package tracking scheme.
The contents of the Outbound Whse. Handling Time and Shipping Time fields relate to the program's calculation of various delivery dates. These fields and the Late Order Shipping field are explained later in this training manual.
If the company has a default location (that is, a site where inventory is physically stored, such as a warehouse, service car, showroom, and so on) the appropriate code is copied to the sales order header in the Location Code field. Depending on the company, a default location for the order can be defined, for example, as their central warehouse, or as a local warehouse. This serves customers within a nearby geographical area.

Microsoft Official Training Materials for Microsoft Dynamics ™ Your use of this content is subject to your current services agreement
Chapter 2: Sales Order Management
Page 25
When the sales order header is complete, the order processor can continue with entering details that relates to the contents of the order and the items. The major aspects and properties of the order lines are described in the following topics.
Sales Order Processing A sales order can be used to register both a physical and financial transaction. The choice of transaction is defined by one of the following line type options:
• G/L Account • Item • Resource • Fixed Asset • Charge (Item)
The line type Item represents a sale of physical goods. Sales defined by G/L Account, Resource, and Fixed Asset type are addressed in the Financial Management training manual. Transactions of a Charge (Item) type are explained later in this manual.
Location Selecting a location code on the order line will start the features that support an employee's tasks. The order processor can:
• Check the item availability in a specified location (including the blank location).
• Get an overview of item availability per specified location or on other locations at the same time.
Inventory management employees and planners can:
• Use the requisition planning facility when considering replenishment and planning parameters set up on the item stockkeeping units.
• Perform transfers of inventory between locations. • Create inventory statistics per location.
Accountants can calculate inventory value and cost of goods sold per location. Warehouse managers can use the bin management functionality associated with a location.

Microsoft Official Training Materials for Microsoft Dynamics ™ Your use of this content is subject to your current services agreement
Trade in Microsoft Dynamics NAV 5.0
Page 26
Quantity Entering the quantity amount in the Quantity field causes the program to check for sufficient inventory in the location to fulfill the sales order. If this is not the case, the program gives a stockout warning (the Stockout Warning field in the Sales & Receivables Setup window must be selected). The program's mechanism of calculating item availability is explained in the Inventory Management training manual. NOTE: The program supports the practice of creating sales lines with negative quantity. A negative sales line implies a reverse transaction to the sales document. A negative line in a sales order means a sales return. Handling sales lines with negative quantity is supported throughout all functional areas.
Unit of Measures The program automatically fills in the Unit of Measure Code field when the sales line is created. The value is copied from the Sales Unit of Measure field on the item card. The unit of measure code is used:
• When checking item availability. • To determine the unit price amount. • To validate if there are any alternative prices, line discounts, or both,
for the sale based on the unit of measure.
Unit Price Selecting the item in the No. field automatically fills in the Unit Price field. The unit price is calculated and copied from the item card or the alternative sales prices applicable to the item and customer. The setup options and the mechanism of alternative sale prices are addressed in more detail later in this manual. When companies sell to retail consumers, they may want sales document prices to include VAT information when printed. To enable this option, the Prices Including VAT field on the Invoicing tab on the document header must be selected. If the field is clear, Unit Price and Line Amount will exclude VAT amounts, and the field names reflect this choice. The Financials training manuals provide an in-depth setup description and explanation of VAT functionality.

Microsoft Official Training Materials for Microsoft Dynamics ™ Your use of this content is subject to your current services agreement
Chapter 2: Sales Order Management
Page 27
Item Tracking and Warehousing For many companies, registration of a sales order must also include inventory management related information. These are the records of item serial/lot numbers and item physical placement (bin code) in a warehouse. These aspects of a sales transaction are not directly associated with the customer interface but characterize the company's internal processes, and are addressed in the Inventory Management manual.
Drop Shipments A drop shipment is the shipment of an item or a consignment of items from a company's vendor directly to a customer. Drop shipments are used when a company wants to avoid handling an order, such as stocking and delivering, but wants to fulfill the customer's request and include the transaction in a calculation of cost of goods sold and profit. Companies can use the Drop Shipments functionality to ensure drop shipped orders are handled efficiently. In addition to making a process easier that involves many tasks and people, it makes sure that the correct inventory value and item costs are calculated. Although the sales and purchase transactions of the drop shipment are registered, the drop shipped items do not physically enter the company's inventory. Handling of a drop shipment is illustrated in Figure 2-4:
FIGURE 2-4: DROP SHIPMENTS

Microsoft Official Training Materials for Microsoft Dynamics ™ Your use of this content is subject to your current services agreement
Trade in Microsoft Dynamics NAV 5.0
Page 28
Specifically, drop shipping includes the following tasks:
1. The customer places a sales order with the company.
2. The company places a purchase order with the vendor.
3. The vendor delivers the ordered items directly to the customer.
4. The vendor invoices the company for the shipment.
5. The company invoices the customer.
The following demonstration illustrates this process.
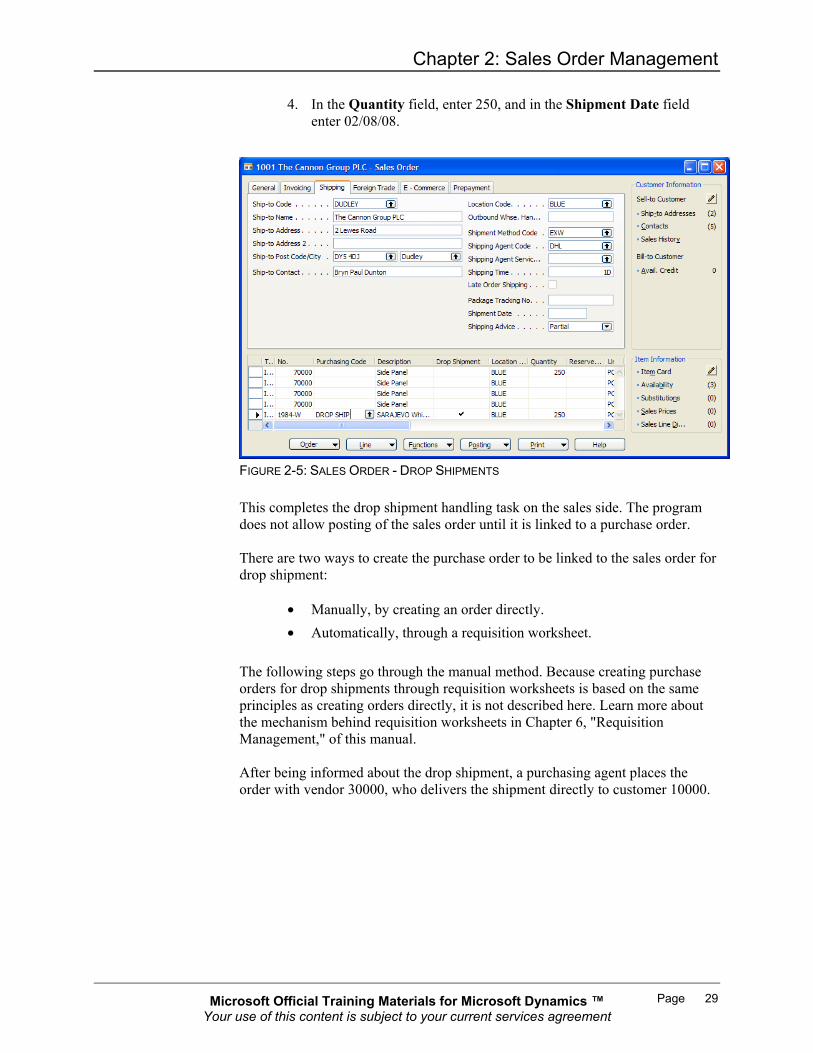
Demonstration − Creating Drop Shipments This demonstration is a continuation of the previous demonstration, "Creating a Sales Order." The current work date is 02/01/08. When Cronus' order processor is ready to post the first shipment from the blanket order, the representative for customer 10000 calls and orders 250 units of item 1984-W. The salesperson at Cronus notices that there is not enough quantity in stock, and knowing that Cronus will stop stocking it, decides to tell the vendor to ship directly to customer 10000. Item 1984-W is ordered from vendor 30000.
Steps Enter the order details on the blanket order (according to the previous demonstration, "Creating a Sales Order").
1. Create a new sales line for item 1984-W, and enter 250 in the Quantity field.
2. In the Purchasing Code field, click the AssistButton to open a list of purchasing codes. (Use the Show Column function to make the Purchasing Code and Drop Shipment fields visible.)
The window contains a list of purchasing codes the company sets up to distinguish different purchase transactions.
Notice the special order code with the Special Order field selected. This is the purchase transaction type companies use for handling non-stock items. Non-stock items are items that are rarely ordered, or items where there is a small variation compared to the regular item; for example, color, stickers, and so on. (Read the appropriate topic in the online Help for more information about the individual fields in this window.)
3. In the Purchasing Codes window, select the DROP SHIP code with
the Drop Shipment field selected and then click OK.
The program places a check mark in the Drop Shipment field on the sales order line.
Microsoft Official Training Materials for Microsoft Dynamics ™ Your use of this content is subject to your current services agreement
Chapter 2: Sales Order Management
Page 29
4. In the Quantity field, enter 250, and in the Shipment Date field enter 02/08/08.
FIGURE 2-5: SALES ORDER - DROP SHIPMENTS This completes the drop shipment handling task on the sales side. The program does not allow posting of the sales order until it is linked to a purchase order. There are two ways to create the purchase order to be linked to the sales order for drop shipment:
• Manually, by creating an order directly. • Automatically, through a requisition worksheet.
The following steps go through the manual method. Because creating purchase orders for drop shipments through requisition worksheets is based on the same principles as creating orders directly, it is not described here. Learn more about the mechanism behind requisition worksheets in Chapter 6, "Requisition Management," of this manual. After being informed about the drop shipment, a purchasing agent places the order with vendor 30000, who delivers the shipment directly to customer 10000.
Microsoft Official Training Materials for Microsoft Dynamics ™ Your use of this content is subject to your current services agreement
Trade in Microsoft Dynamics NAV 5.0
Page 30
Steps To create the purchase order:
1. Select the Purchase menu option and then click ORDER PROCESSING→ORDERS.
2. Press F3 to create a new purchase order.
3. Fill in the order details on the purchase header by selecting vendor 30000 in the Buy-from Vendor No. field.
Make a reference to the customer for a drop shipment:
4. On the Shipping tab, in the Sell-to Customer No. field, select customer 10000.
The purchasing agent must establish a link between the purchase order and the sales order, and copy the sales lines to be drop shipped into the purchase order:
5. Click ORDER→DROP SHIPMENT→GET SALES ORDERS. The Order �
Sales List window appears.
This sales list contains all the sales orders for customer 10000 that the customer specified in the Sell-to Customer No. field on the purchase header.
6. Select the relevant order (the first one on the list) and then click OK.
Before the purchasing agent can continue, the program indicates that the purchase order must be shipped to a different ship-to address (instead of the customer's regular address). This is the address specified on the associated sales order.
7. Click OK to the information message. On the Shipping tab of the
purchase order, in the Ship-to Code field, select DUDLEY.
8. Repeat steps 3 and 4. The sales line selected for drop shipment is now transferred to a purchase line.
After being informed that the purchase order has been shipped to the customer, the purchasing agent can post the order as received. Posting the purchase order as invoiced can only occur after the linked sales order is invoiced. Upon posting the purchase order as received, the program automatically posts the associated sales order as shipped. The salesperson can post the sales order as invoiced. Posting the purchase order as invoiced completes the drop shipment handling.

Microsoft Official Training Materials for Microsoft Dynamics ™ Your use of this content is subject to your current services agreement
Chapter 2: Sales Order Management
Page 31
NOTE: The posting process can also start from the sales order. Identical to the purchase order, when the sales order is posted as shipped, the program automatically posts the associated purchase order. Remember that before either the sales or purchase order is invoiced, the purchasing agent can retrieve sales orders for a drop shipment from the purchase order by clicking ORDER→DROP SHIPMENT→SALES ORDER. Similarly, the salesperson can view the related purchase order for a drop shipped sales order by clicking ORDER→DROP SHIPMENT→PURCHASE ORDER on the sales order. In both cases, the documents are shown in uneditable mode. To ensure that the transactions involved in drop shipment do not affect inventory quantity and value, the program:
• Creates the item ledger entries representing the sale and purchase in question at the same time.
• Links them by automatically creating a fixed application between them.
NOTE: If serial/lot numbers are assigned on the corresponding sales order, the Get Sales Order function also copies the item tracking lines to the newly created purchase order. When a sales order does not have item tracking lines assigned, but they are assigned to the associated purchase order, the program offers the option of creating and synchronizing the lines on the sales order. Learn more about item tracking functionality in Microsoft Dynamics NAV in the Inventory Management manual.
Microsoft Official Training Materials for Microsoft Dynamics ™ Your use of this content is subject to your current services agreement
Trade in Microsoft Dynamics NAV 5.0
Page 32
Item Reservation In sales situations, for example, those with a high volume of transactions, there may be a need to ensure that the required item quantity for a sales order is available to be shipped on the agreed date. There is a need to allocate existing or future inventory to the sale until the order shipment date so that it is not used to fill other orders in the meantime. In Microsoft Dynamics NAV, this allocation is performed through reservations. The user assigns the reservation because it is considered a conscious and intentional decision. By reserving quantities, the user gains full ownership of and responsibility for these items. Reserved quantities are not included during planning routines.
Demonstration − Reserving Items The representative for customer 10000 informs Cronus' order processor that the customer wants to order 250 units of item 80100. The customer stresses the importance of receiving the order on 02/08/08. Since there is a risk of running out of stock, the salesperson at Cronus reserves 250 items for this order.
Steps Create a sales order for 250 units of item 80100. Use the order created in the previous demonstration and add an extra sales line:
1. Make a new line for item 80100. In the Location Code field, select GREEN (the location where the item is stocked), and in the Shipment Date field, enter 02/08/08.
2. Enter 250 in the Quantity field.
Notice that the right pane shows the availability for the item on the selected line. This is the availability for the Shipping Date indicated and the Location Code selected, in this case, for the Green warehouse on 02/08/08.
NOTE: The Availability quantity shown in the right pane is in the Base Unit of Measure. This may not be the same as the Sales Unit of Measure. This is found on the Sales Order line. To view the Base, Sales, and Purchase units of measure for this item, click the Item Card in the right pane. NOTE: As soon as you enter a quantity for the item on the selected line, the Availability amount is reduced by that quantity. The Availability is the amount remaining after the quantity on the line is filled.
Microsoft Official Training Materials for Microsoft Dynamics ™ Your use of this content is subject to your current services agreement
Chapter 2: Sales Order Management
Page 33
The order processor makes a reservation of this sales line in the existing or future inventory:
2. Click FUNCTIONS→RESERVE to open the Reservation window:
The window shows the quantities of item 80100 available to reserve.
Items can be reserved either from:
� Existing stock (represented as item ledger entries on the line). � Open purchase orders. � Other inbound orders, such as transfer orders or production
orders. In the Reservation window, each option is represented by the corresponding line, summarizing the total unreserved and reserved quantities of all item ledger entries and all open purchase order lines respectively. It is possible to view the list of individual entries that make up the total quantity:
3. In the Reservation window, select the line representing purchase orders and then click LINE→AVAILABLE TO RESERVE. (Alternatively press CTRL + F5)
The Available � Purchase Lines window is displayed. This window contains general information about the purchase line and quantity details on unposted line quantity and existing reservations made for the purchase line. The Current Reserved Quantity field contains the quantity currently reserved.
4. Close the Available � Purchase Lines window to return to the
Reservation window.
The Quantity to Reserve field on the header contains the quantity copied from the Quantity field on the line for the reservation. If a partial shipment has occurred, the quantity to reserve corresponds with the Outstanding Quantity field.
Notice that the Quantity to Reserve field contains 50 units instead of the 250 specified on the sales line. For reservations, the program operates with the base unit of measure � which are boxes in this case � and not the sales unit of measure (packs), specified on the sales order. Recalculation is based on one box that contains five packs.
There are three options when reserving items:
� Auto Reserve � Automatically reserve items in the Reservation window.
� Reserve from Current Line � Reserve the items from the selected reservation line. This is a manual reservation option.
� Cancel Reservation from Current Line � Cancel reservation of the items from the selected reservation line.

Microsoft Official Training Materials for Microsoft Dynamics ™ Your use of this content is subject to your current services agreement
Trade in Microsoft Dynamics NAV 5.0
Page 34
5. In the Reservation window, click FUNCTION→AUTO RESERVE.
The program updates the Reserved and Available Quantity fields to reflect the reservation. When the automatic reservation function is used, the program reserves items from item ledger entries before it reserves items from the purchase order lines.
NOTE: For better control over inventory, select the items using the Reserve from Current Line option instead of letting the program do it.
When a reservation is made, the program creates a reservation entry.
6. On the sales order, select the line for item 80100 and then click LINE→RESERVATION ENTRIES.
The window that appears shows that the quantity has been reserved from the specified location. This completes handling the tasks associated with reserving items.
Document Status The Status field on a document indicates whether the document is still open or released. When the document is Open, it implies that it is still undergoing changes and has not been released to the next stage of processing, for example, the warehouse handling. The order processor can set up batch posting to post only released orders. This enables separating the order entry and posting tasks. The Released status indicates that the salesperson has completed entering the order details, and the order is now ready for the next stage of processing. Information (price, currency, quantity, and so on) in the released order cannot be changed without reopening the order. An order can be released in two ways:
• Automatically, when a single shipment has been posted for the order. • Manually, by using the release function (or alternatively, CTRL +
F11). Typically, releasing manually is relevant for companies with a separate warehousing environment. NOTE: The order document status is not connected to the availability calculations for the item on the order. Although an order has not been released, it is included in overall availability calculations.

Microsoft Official Training Materials for Microsoft Dynamics ™ Your use of this content is subject to your current services agreement
Chapter 2: Sales Order Management
Page 35
Posting Orders Posting an order implies forwarding the financial value of a transaction to dedicated accounts in the general ledger. Additionally, quantity and financial information about the transaction is forwarded to subsidiary ledgers, such as customer and item entry ledgers (with associated value entries) that calculate various sales and inventory statistics. Because all sales transactions involving selling items to a customer include quantity and value (price and cost) information, the posting function is divided into two parts: Shipment (quantity change) and invoice (value change) posting. When posting an invoice, the two parts occur at the same time, without an option of separation. Posting an order, however, can be done by registering the order shipment first, while the order invoicing can occur later. This gives companies operational flexibility and enables them to benefit from the functionality that supports this process. This functionality includes:
• Combining several shipments in one invoice. • Undoing a quantity record for a posted but not yet invoiced
shipment.
Shipping The Qty. to Ship and the Qty. to Invoice fields on a sales order represent the posting quantities. The values in these fields are filled in automatically by the program at the time when the quantity is entered in the Quantity field for a sales line. NOTE: When a location for a sales line uses the warehouse management functionality (such as, for example, inventory/warehouse pick and put-away documents), the Qty. to Ship and the Qty. to Invoice fields are blank and posting is not possible. This relates to shipping and invoicing tasks performed in the warehouse, and it is from there that the order posting occurs. To continue with posting from the sales order, enter the quantities manually. If it is required, the order processor can reduce the quantities in the Qty. to Ship and Qty. to Invoice fields before posting, and thereby shipping and invoicing the order partially. To post a partial shipment (invoicing), the Shipping Advice field on the order header must contain Partial. An order can have as many shipments and invoices as necessary. In partial order posting, the Quantity Shipped and Quantity Invoiced fields indicate the completed part of the order.

Microsoft Official Training Materials for Microsoft Dynamics ™ Your use of this content is subject to your current services agreement
Trade in Microsoft Dynamics NAV 5.0
Page 36
Demonstration − Performing a Partial Shipment As a result of handling tasks described in the previous demonstrations, the sales order for customer 10000 is ready to be shipped. At the last minute, however, the representative for the customer calls Cronus to say that they only want half of the shipment of item 70000 delivered now.
Steps The order processor must now do a partial shipment of the line. The other order lines are shipped as arranged.
1. Locate the sales order for customer 10000 created earlier.
2. In the Qty. to Ship field for the first line, change the quantity from 250 to 25 (entered by mistake, instead of 125). In the Qty. to Ship field for the third line, enter 250 (to enable posting from the order instead of through a warehouse). Click OK to accept the warning message that appears.
Post the sales order as shipped, not invoiced:
3. Click POSTING→POST and select Ship.
Upon posting, the program creates a posted shipment document that contains all the shipping details of the sales order.
4. From the Sales & Marketing menu, click HISTORY→POSTED
SHIPMENTS and locate the new document.
Realizing the mistake of entering and posting the incorrect quantity for the first sales line, the order processor can undo the wrongly posted quantity.
To correct the wrongly posted quantity:
5. In the posted sales shipment, select the line for item 70000 and then click FUNCTIONS→UNDO SHIPMENT. Click Yes to confirm the action.
The program inserts a corrective line with the same negative quantity as the one being corrected in the posted shipment document and selects both lines as corrective using the Correction field. (Use the Show Column function to make the Correction field visible.)
At the same time, the quantity in the Quantity Shipped field on the sales order in question is set to zero, while the Qty. to Ship field contains the same value as the Quantity field. This implies that the posting process for this line can be repeated.

Microsoft Official Training Materials for Microsoft Dynamics ™ Your use of this content is subject to your current services agreement
Chapter 2: Sales Order Management
Page 37
6. Locate the sales order. In the Qty. to Ship field for the first line, change the quantity from 250 to 125.
7. Post the order as shipped.
The program updates the Qty. to Ship field for the partially shipped line to indicate the remaining quantity. Posting a shipment recognizes that a certain item quantity has left the company's inventory. The financial value of the corresponding transaction is not registered until the sales order is posted as invoiced. This implies that no G/L and customer ledger entries have yet been created, and the cost and price amounts on the created item ledger entries equal zero. Learn more about inventory costing in the Inventory Costing manual.
Invoicing a Combined Shipment In some cases, it is most efficient to combine several shipments into one invoice. Sometimes the customer requires this procedure. Posting orders as invoiced follows the same principles as posting order shipments:
• An order can be invoiced completely or partially. • When posted as invoiced, order information transfers to a separate
document � a posted invoice. Additionally:
• G/L, customer, and VAT entries are created. • When completely invoiced (no outstanding quantity to invoice on
any of the order lines) the order is deleted automatically. This is with the exception of when an order is invoiced through a combined shipment.
• Several shipments can be combined into one invoice. The following demonstration shows how several shipments for one customer are combined into one invoice.
Microsoft Official Training Materials for Microsoft Dynamics ™ Your use of this content is subject to your current services agreement
Trade in Microsoft Dynamics NAV 5.0
Page 38
Demonstration − Invoicing a Combined Shipment A bookkeeper at Cronus wants to invoice all the orders recently shipped to customer 10000. The shipments are combined into one invoice.
Steps The bookkeeper performs the following steps:
1. To create a new invoice, select the Sales & Marketing menu and then click ORDER PROCESSING→INVOICES. Press F3.
2. Enter the customer details on the header.
To retrieve all the posted shipment lines for the customer:
3. In the sales invoice, click FUNCTION→GET SHIPMENT LINES
4. Select all the lines and then click OK.
The program copies the shipment lines to the invoice.
5. Post the invoice.
The program updates the Quantity Invoiced fields on the lines of related sales orders. When an order is completely invoiced using a combined shipment function, it is not deleted automatically. This is done manually or with the Delete Invoiced Sales Order batch job. This batch job, and other sales-related batch jobs, is described in an appendix. If bookkeepers post a large number of sales documents, consider batch posting the documents instead of posting the documents individually. Access the Batch Post option by clicking Posting on the sales document. Refer to online Help for more information.

Microsoft Official Training Materials for Microsoft Dynamics ™ Your use of this content is subject to your current services agreement
Chapter 2: Sales Order Management
Page 39
Process Prepayment Prepayment is a new functionality in Microsoft Dynamics NAV available from version 5.0 and onward for both sales and purchases. Prepayments enable a company to require customers to pay a part of the total amount of their order, specified as an amount or a percentage, in advance of the final invoice. On the Purchases side, prepayments enable a company to document and process prepayments that are required by vendors.
Prepayments Set Up Using the new prepayments functionality requires that special general ledger accounts, posting groups, payment terms and number series are set up for this purpose. In addition, the prepayment percentages for selected vendors and customers in combination with special items need to be defined. Refer to the Finance training material for additional information.
Using Prepayments Prepayment invoices are created from a sales or purchase order, using the new prepayment invoice option. The prepayment amount on the order is calculated based on the prepayment percentage populated from item, customer, or vendor cards. Users can edit the prepayment percentage or amount. Instead of using a percentage, a specific amount can be defined for the entire sales or purchase order. Prepayment amounts are set in the Sales Order Statistics window and the Purchase Order Statistics window in the Prepayment tab. For prepayment sales orders, the following steps list the typical process flow:
1. Create a sales order with a prepayment requirement.
2. Send a prepayment invoice for the prepayment amount to the customer.
3. The customer pays the prepayment amount.
4. Apply the prepayment amount to the sales order.
5. Ship the order to the customer.
6. Create a sales invoice for the total amount of the sales order minus the prepayment amount.
7. Receive payment from the customer and post the payment to the sales order.
Microsoft Official Training Materials for Microsoft Dynamics ™ Your use of this content is subject to your current services agreement
Trade in Microsoft Dynamics NAV 5.0
Page 40
For prepayment purchase orders, the following steps list the typical process flow:
1. Create a purchase order with a prepayment requirement.
2. Post a prepayment invoice for the prepayment amount.
3. Send the prepayment amount to the vendor.
4. Apply the prepayment amount to the purchase order.
5. The vendor ships the order.
6. Create a purchase invoice for the total amount of the purchase order minus the prepayment amount.
7. Send the payment to the vendor and post the payment to the purchase order.
The following demonstration presents the typical flow for a sales order with prepayment specified as a percentage.
Demonstration − Creating Sales Order with Prepayment Percentage
Creating prepayment orders is similar to creating other sales and purchase orders.
Steps To create a prepayment order, follow these steps:
1. Create a new sales or purchase order and fill in the header.
2. Click the Prepayment tab.
Microsoft Official Training Materials for Microsoft Dynamics ™ Your use of this content is subject to your current services agreement
Chapter 2: Sales Order Management
Page 41
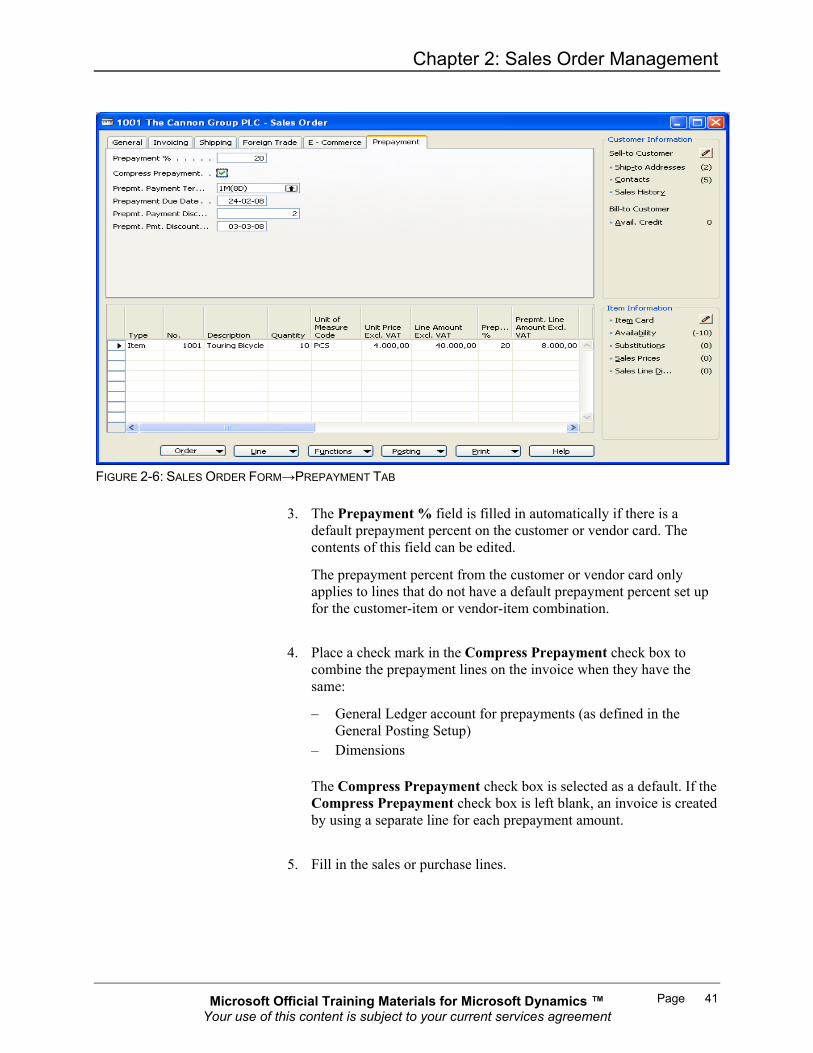
FIGURE 2-6: SALES ORDER FORM→PREPAYMENT TAB
3. The Prepayment % field is filled in automatically if there is a
default prepayment percent on the customer or vendor card. The contents of this field can be edited.
The prepayment percent from the customer or vendor card only applies to lines that do not have a default prepayment percent set up for the customer-item or vendor-item combination.
4. Place a check mark in the Compress Prepayment check box to
combine the prepayment lines on the invoice when they have the same:
� General Ledger account for prepayments (as defined in the General Posting Setup)
� Dimensions
The Compress Prepayment check box is selected as a default. If the Compress Prepayment check box is left blank, an invoice is created by using a separate line for each prepayment amount.
5. Fill in the sales or purchase lines.
Microsoft Official Training Materials for Microsoft Dynamics ™ Your use of this content is subject to your current services agreement
Trade in Microsoft Dynamics NAV 5.0
Page 42
6. For each order line, the contents of the Prepayment % field are determined as follows:
� If a default prepayment percent is set up for the item on the line, it is automatically copied into the Prepayment % field.
� If no default prepayment percent is set up for the item, the prepayment percent from the customer or vendor card is copied from the order header.
� The Prepayment % field can be entered or changed manually on a line-by-line basis.
Although there can be different prepayment percents for each of the order lines, a single prepayment percent can be applied to the whole order. This is done after all the order lines are completed. To enter one prepayment percent that applies to all the order lines:
7. On the Prepayment tab in the order header, enter the prepayment percent in the Prepayment % field.
8. The program displays a warning message. Click OK.
The prepayment percentage on all the lines is updated to match the header. NOTE: As soon as a number is entered into the Prepayment % field on the header and the lines are updated, users cannot revert to the individual prepayment percents that existed for each line. To return to the individual prepayment percents, either delete and re-enter the lines or manually type the prepayment percent on the lines.
Microsoft Official Training Materials for Microsoft Dynamics ™ Your use of this content is subject to your current services agreement
Chapter 2: Sales Order Management
Page 43
Conclusion Sales Order Management involves all the steps from creating a quotation or blanket order to shipping and invoicing the sales order. The accurate management of the sales transaction flow can help companies to ensure a high level of customer service. The section titled "Sales Prices and Discounts" will detail how to establish sales prices and discounts, and other important aspects of customer service.
Microsoft Official Training Materials for Microsoft Dynamics ™ Your use of this content is subject to your current services agreement
Trade in Microsoft Dynamics NAV 5.0
Page 44
Lab 2.1 − Handling Sales Scenario: You are the order processor at Cronus. Customer 20000 orders 1200 units of item 70003. The customer requests that the order be delivered with 300 units every week during the month of February (starting on 02/01/08). The delivery is shipped to the customer's subsidiary in Manchester. At the time of shipping the first delivery of item 70003, the customer also orders 25 units of item 1968-W and 50 units of item 80100. Because of several considerations, the order processor decides to drop ship the order for item 1968-W (from vendor 30000) and confirm that the 50 units of item 80100 are reserved for this sales order. The customer also only wants half of the ordered quantity of item 70003 in this shipment.
Challenge Yourself! Handle this scenario using the sales management functionality. Assume 01/28/08 is the work date, that the order for item 70003 is to be shipped from the Blue location, and that the order for item 80100 is to be shipped from the Green location.
Need a Little Help? The solution is provided in Appendix C.
Microsoft Official Training Materials for Microsoft Dynamics ™ Your use of this content is subject to your current services agreement
Chapter 2: Sales Order Management
Page 45
Quick Interaction: Lessons Learned Take a moment and write down three key points you have learned from this chapter: 1.
2.
3.
Microsoft Official Training Materials for Microsoft Dynamics ™ Your use of this content is subject to your current services agreement
Trade in Microsoft Dynamics NAV 5.0
Page 46