Embed Size (px)
Citation preview

1
Chapter 16. Interactive Images
Table of Contents
Objectives .............................................................................................................................................. 2 16.1 Introduction .............................................................................................................................. 2
16.1.1 Introduction to Image maps ........................................................................................... 2 16.1.2 The user's viewpoint of image maps .............................................................................. 2 16.1.3 An example of user interaction with an image map ....................................................... 2
16.2 Server-side and client-side image maps ................................................................................... 4 16.2.1 Server-side image maps ................................................................................................. 4 16.2.2 Client-side image maps .................................................................................................. 5
16.3 Implementing client-side image maps in HTML ..................................................................... 5 16.3.1 Images ............................................................................................................................ 5 16.3.2 Relating a map and an image ......................................................................................... 6 16.3.3 Overview of HTML <MAP> tags ................................................................................. 6 16.3.4 The <area> tag ............................................................................................................... 6 16.3.5 Shape ............................................................................................................................. 7 16.3.6 Coordinates .................................................................................................................... 7 16.3.7 Hyperlink ....................................................................................................................... 8 16.3.8 Title text ......................................................................................................................... 8
16.4 Reacting to mouse pointer location: onMouseOver and onMouseOut ..................................... 9 16.4.1 Changing the contents of a text box ............................................................................. 10
16.5 Summary exercise .................................................................................................................. 11 16.6 Application and further work ................................................................................................. 11
16.6.1 Activity 4: Creating a rectangular area in an image map ............................................. 11 16.6.2 Activity 5 — Creating a default hyperlink................................................................... 11 16.6.3 Activity 6: Creating an image map for geometric shapes ............................................ 12 16.6.4 Activity 7: Responding to onMouseOver events ........................................................ 12 16.6.5 Activity 8: Controlling frame content from image maps ............................................. 13
16.7 Review Questions .................................................................................................................. 15 16.8 Frame hierarchies ................................................................................................................... 15 16.9 Loading Multiple Documents ................................................................................................ 16
16.9.1 Loading two frames from one link............................................................................... 16 16.9.2 Loading more than two frames from one link ............................................................. 17
16.10 Answers.................................................................................................................................. 21 16.10.1 Discussions of Exercise 1 .......................................................................................... 21 16.10.2 Discussions of Exercise 2 .......................................................................................... 21 16.10.3 Discussions of Activity 1 ........................................................................................... 22 16.10.4 Discussions of Activity 2 ........................................................................................... 22 16.10.5 Discussions of Activity 3 .......................................................................................... 22 16.10.6 Discussions of Activity 4 ........................................................................................... 23 16.10.7 Discussions of Activity 5 ........................................................................................... 24 16.10.8 Discussions of Activity 6 ........................................................................................... 25 16.10.9 Discussions of Activity 7 ........................................................................................... 26 16.10.10 Discussions of Activity 8 ......................................................................................... 26 16.10.11 Discussions of Activity 9 ......................................................................................... 27 16.10.12 Discussions of the Review Questions ..................................................................... 28
Advanced HTML
2
Objectives At the end of this unit you will be able to:
• Use image maps in HTML files; • Implement client-side image maps; • Implement mouse events.
16.1 Introduction
16.1.1 Introduction to Image maps Image maps provide a way for users to interact with graphically presented information in a natural way. If you have spent time browsing websites with graphics you have probably navigated using image maps.
Definition
Image maps provide a mechanism for specified areas of GIF images to act as a hypertext link, and so link to other HTML pages or resources.
It is straightforward to create a hypertext reference for an entire image. For example:
<a href=index.html><img src=house.gif></a>
While code as the above is sufficient for images that act as buttons, there are times when navigation can be simplified, and made more intuitive and interesting by defining different areas of images to link to different hypertext anchors. Consider the following Web page navigation techniques:
• clicking on a city plan or country map to indicate where you live, and then being linked to a page showing
details of the stores nearest to your area.
• using an information terminal in a shopping complex to click on the store you wish to visit, and then being taken to a page giving directions from the terminal location to the desired store.
• being presented with the shelves of a virtual, on-line grocery store (i.e. pictures of carrots, apples, bananas,
grapes etc.), and clicking on the apples; and then being presented with pictures of different apple varieties, their quantities and available prices.
• being presented with a diagram of the product life cycle stages supported by an industry management consultancy
firm, and clicking on the life cycle stage you are considering contracting them for. Then being presented with case studies, service/pricing examples and contact details.
The above scenarios require the browser/server to respond differently depending on which area of an image is clicked by the user. All these scenarios, and many more, can be implemented through the use of image maps.
16.1.2 The user's viewpoint of image maps The user's experience of image maps is simple and intuitive: an image is shown on a Web page; the user clicks the part of the image that interests them, and a relevant hyperlink is followed.
16.1.3 An example of user interaction with an image map
Consider the following scenario:
A user wishes to purchase a spare part for their car.
Advanced HTML
3
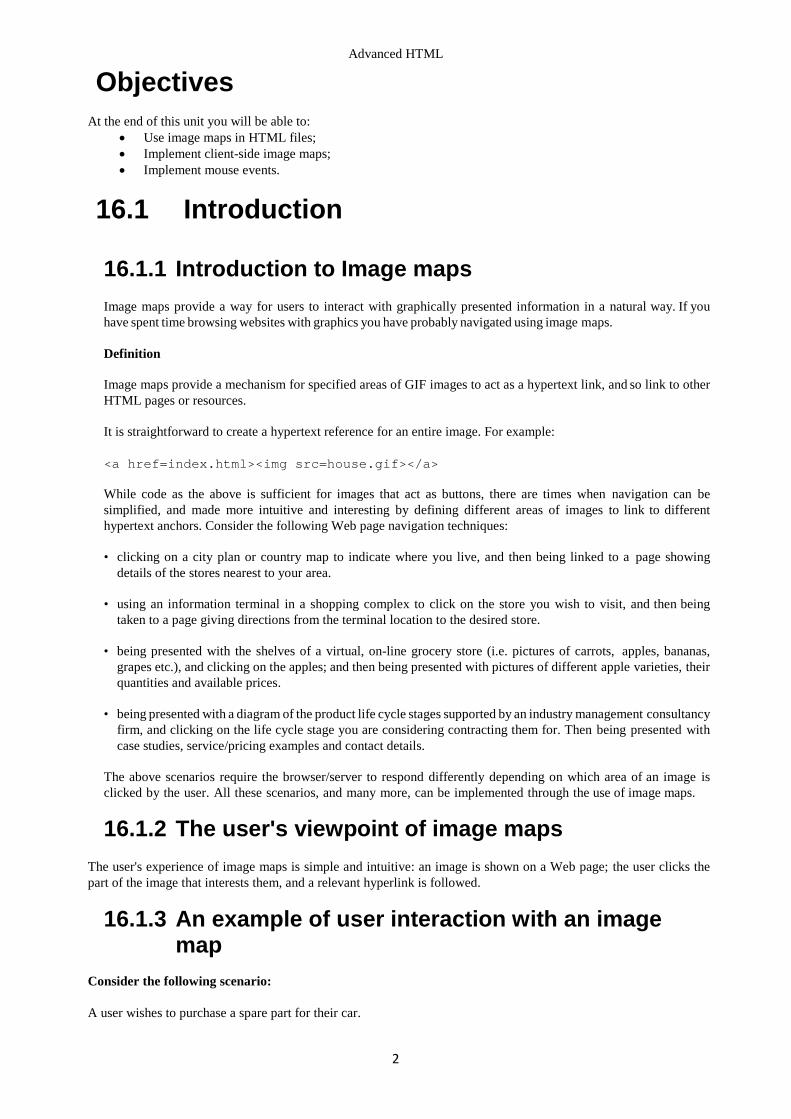
The user visits the website for a national chain of car maintenance stores. The user wishes to order and reserve the part in advance, and then pick up the part in person (to save delivery charges, and also to check that it fits their car while they are at the store) from their nearest store. The user has a clear task to first locate the nearest store before both attempting to identify if the part is in stock and reserving/ordering it. This location task can be straightforward if the user can simply select the area they live in on a national map to be shown the location of the stores in the area. In the figure below we see the user being presented with a map of South Africa and being invited to click where they live:
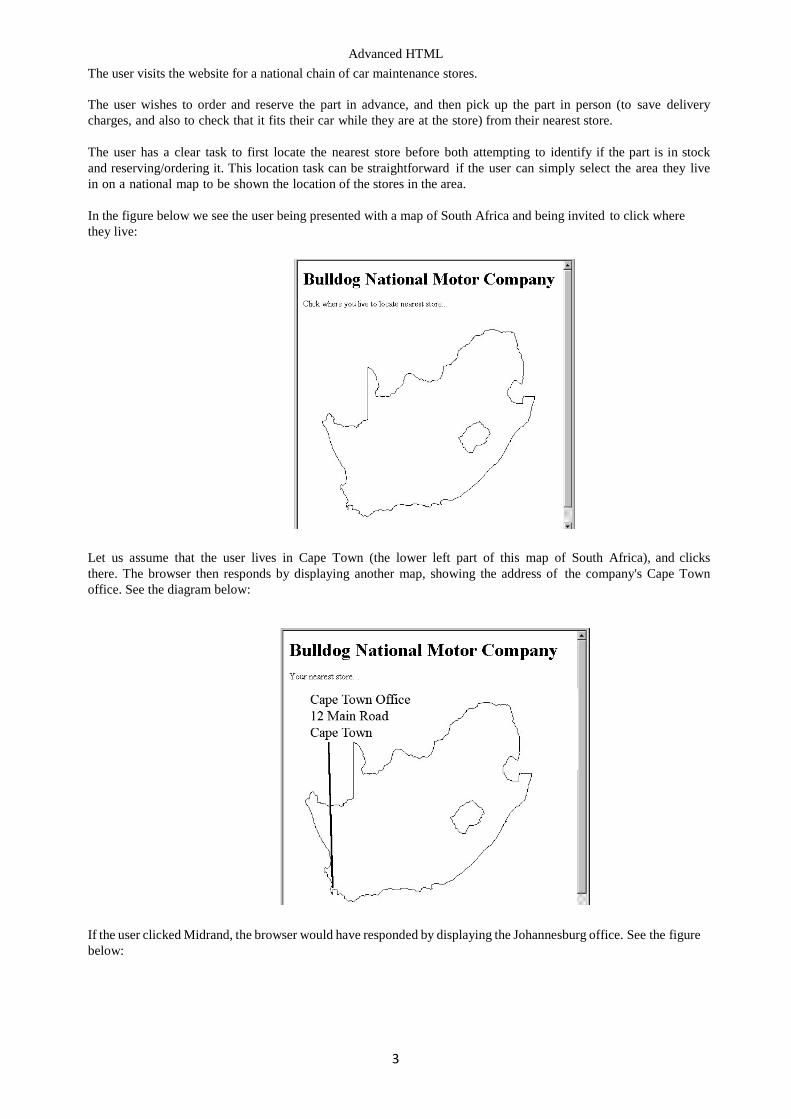
Let us assume that the user lives in Cape Town (the lower left part of this map of South Africa), and clicks there. The browser then responds by displaying another map, showing the address of the company's Cape Town office. See the diagram below:
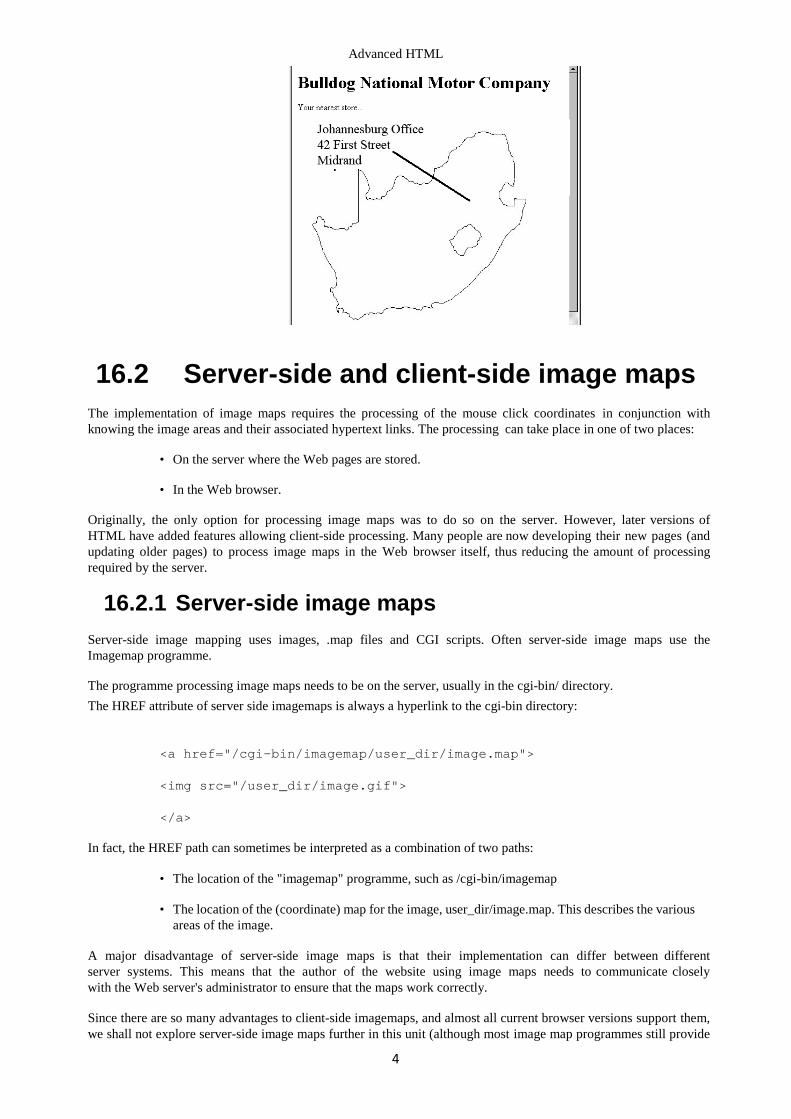
If the user clicked Midrand, the browser would have responded by displaying the Johannesburg office. See the figure below:
Advanced HTML
4
16.2 Server-side and client-side image maps The implementation of image maps requires the processing of the mouse click coordinates in conjunction with knowing the image areas and their associated hypertext links. The processing can take place in one of two places:
• On the server where the Web pages are stored.
• In the Web browser. Originally, the only option for processing image maps was to do so on the server. However, later versions of HTML have added features allowing client-side processing. Many people are now developing their new pages (and updating older pages) to process image maps in the Web browser itself, thus reducing the amount of processing required by the server.
16.2.1 Server-side image maps Server-side image mapping uses images, .map files and CGI scripts. Often server-side image maps use the Imagemap programme. The programme processing image maps needs to be on the server, usually in the cgi-bin/ directory. The HREF attribute of server side imagemaps is always a hyperlink to the cgi-bin directory:
<a href="/cgi-bin/imagemap/user_dir/image.map">
<img src="/user_dir/image.gif">
</a> In fact, the HREF path can sometimes be interpreted as a combination of two paths:
• The location of the "imagemap" programme, such as /cgi-bin/imagemap
• The location of the (coordinate) map for the image, user_dir/image.map. This describes the various areas of the image.
A major disadvantage of server-side image maps is that their implementation can differ between different server systems. This means that the author of the website using image maps needs to communicate closely with the Web server's administrator to ensure that the maps work correctly. Since there are so many advantages to client-side imagemaps, and almost all current browser versions support them, we shall not explore server-side image maps further in this unit (although most image map programmes still provide
Advanced HTML
5
features to output/edit server-side map files).
16.2.2 Client-side image maps Clients-side image maps have a number of advantages over server-side maps.
• Reduced server load, since the mapping is done on the client.
• There is no need to communicate with server side scripts.
• The user can see the image maps associated hypertext URLs in the status bar of their browser before clicking.
16.3 Implementing client-side image maps in HTML
Two things are need in order to implement client-side image maps:
• An image.
• A map of the image areas and associated hyperlinks.
16.3.1 Images Most images created for Web pages are in either in JPEG or PNG format. The first step to developing an image map is to ensure that you have a version of your image in a format supported by imagemaps for the browsers you are using. The old GIF image format is widely supported by image maps, but all modern browsers also support newer formats, such as PNG. If the image is not already in the format you wish to use (such as PNG), you will need to convert it. The GIMP [www.gimp.org] is a Free Software image editor, similar to Adobe's Photoshop, that will allow you to not only convert images to the format you require, but to also edit the images. The software is free for both commercial and non-commercial use. Preparation activities
You may find it useful to perform the following activities in preparation for the next sections: Activity 1: Creating a PNG image
Mr. Green's Grocery Company wishes to start trading on-line.
Locate or create a picture of three or four different vegetables in a single PNG image (e.g. an area of carrots, apples and bananas). This PNG file will be needed for some of the later activities.
Store this image in a directory called "on_line_grocer".
You can find a discussion of this activity at the end of the unit.
Activity 2: An HTML file to display an image
Create an HTML file called food.html that displays your vegetables image. Use the heading "Mr Green's On-line Groceries", and display the text "Click on the food you wish to order."
You can find a discussion of this activity at the end of the unit.
Activity 3: Creating an "out of stock" HTML page
Create an HTML file called "out_of_stock.html".
Advanced HTML
6
Make this a simple page that has the same "Mr Green's On-Line Grocery" heading as previously, and then the message: "Sorry we are presently out of stock of your selected food." (this page is required as part of a later activity)
You can find a discussion of this activity at the end of the unit.
16.3.2 Relating a map and an image The HTML IMG tag is used to display the image: <IMG src="foods.gif" > To associate an image with a particular imagemap, more attributes are provided to the IMG tag. This code associates the foods.gif image with an imagemap named fruit_and_veg: <IMG src="foods.gif" usemap="#fruit_and_veg"> The border is often set to zero (i.e. so there is no outline), and an alternative text message for the image is defined as well: <IMG src="foods.gif" alt="foods for purchase" usemap="#fruit_and_veg" border="0
Note
Note that the hash '#'symbol precedes the image map filename in the IMG tag.
16.3.3 Overview of HTML <MAP> tags An imagemap needs to be associated with the image. A <map> is an HTML tag defining the active image areas and corresponding hypertext links (and other attributes of the areas). The generic form of a map is as follows:
<map name="MAPNAME" > <area shape="SHAPE" cords="X1, Y1, ..." href="HYPERLINK" ...> <area ... > <area ... > </map >
where:
• "MAPNAME" is the map's chosen name (to be specified in the IMG tag that displays your image).
• "SHAPE" is one of "rect", "circle" and "poly" — specifying the shape being defined.
• "X1, Y1, ..." is the set of coordinates defining an image area.
• "HYPERLINK" is a standard hyperlink, and is the hyperlink that is followed when the user clicks inside the defined image area.
An example of a map is:
<map name="geometry" > <area shape="rect" cords="10,10,50,50" href="square.html" > <area shape="circle" cords="100,100,40" href="circle.html" > <area shape="poly" cords="100,200,200,200,200,300,100,200" href="triangle </map >
16.3.4 The <area> tag
Advanced HTML
7
As you can see from the previous section, a map consists of a set of areas. Each area can have following attributes defined:
• the shape of the area being defined.
• the coordinates (cord) that define the boundaries of the area.
• the hyperlink (href) to be followed when the user clicks inside the area.
• title text (title) to be displayed next to the mouse pointer when over the area.
The Javascript actions to execute when the mouse pointer moves over the area (onMouseOver) or moves away from the area (onMouseOut)
We shall consider each of these in turn.
16.3.5 Shape Consider the example map again:
<map name="geometry" >
<area shape="rect" cords="10,10,50,50" href="square.html" >
<area shape="circle" cords="100,100,40" href="circle.html" >
<area shape="poly" cords="100,200,200,200,200,300,100,200" href="triangle.html" >
</map >
This example illustrates the three different shapes possible with the area tag:
• rectangles rect
• circles circle
• polygons poly Note
Some browsers accept other versions of these shape names, such as circ, rectangle, polygon. Any other kind of shape can be approximated by creating a polygon with many edges. The shape is defined by providing the shape name in quotation marks. For example, to define a circular area one would write the following: <area shape="circle" ... >
16.3.6 Coordinates Each shape type requires a different set of coordinates to define the area boundaries. The coordinates are provided in quotation marks, and separated by commas. For example the values to define a rectangle might be: cords="10,10,50,50" Exercise 1: coordinates required for defining area shapes
Advanced HTML
8
Notice in the example how the number of coordinates is different for each shape: • 4 coordinates for the "rect" • 3 coordinates for the "circle" • 8 coordinates for the "poly" Why is this? What do you think the three coordinates for the circle define? You can find the answers to this exercise
at the end of the unit.
16.3.7 Hyperlink The hyperlink to be followed when the user clicks within an area is defined just as any other hyperlink. For example a link to a page "products.html" would be defined as follows:
href="products.html"
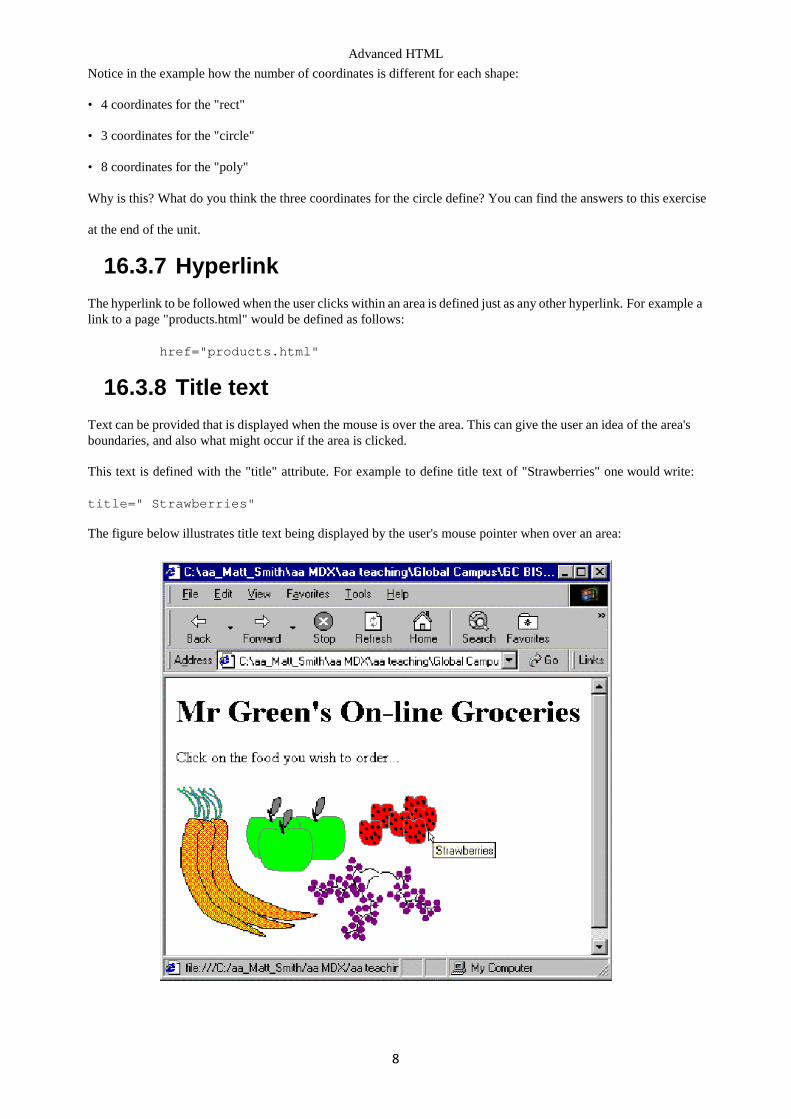
16.3.8 Title text Text can be provided that is displayed when the mouse is over the area. This can give the user an idea of the area's boundaries, and also what might occur if the area is clicked. This text is defined with the "title" attribute. For example to define title text of "Strawberries" one would write: title=" Strawberries" The figure below illustrates title text being displayed by the user's mouse pointer when over an area:
Advanced HTML
9
16.4 Reacting to mouse pointer location: onMouseOver and onMouseOut
It is possible to execute JavaScript commands when the mouse pointer moves over the area, and also when the mouse pointer moves from the area to another part of the image. An image changing when a mouse pointer moves over or away from it is called image rollover; This feature can be used to create a number of different interaction effects. Examples of the kinds of actions performed when these events are detected include; • the status bar text can display information about the area the pointer is over; • some other part of a page can be changed to display information (e.g. the contexts of a text box); • in a framed system, the page displayed in the frame can be changed without the user having to click; • in a non-framed system the page (or image) displayed can be changed as the mouse moves over different areas. Setting the status bar
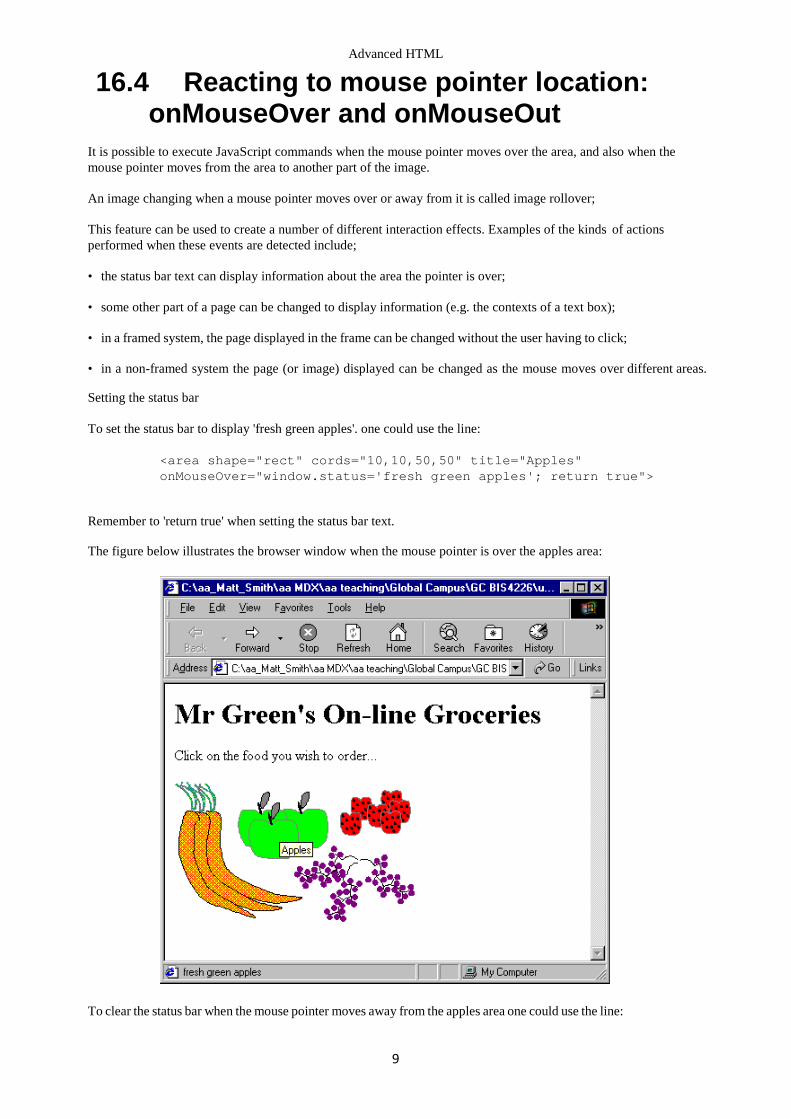
To set the status bar to display 'fresh green apples'. one could use the line:
<area shape="rect" cords="10,10,50,50" title="Apples" onMouseOver="window.status='fresh green apples'; return true">
Remember to 'return true' when setting the status bar text. The figure below illustrates the browser window when the mouse pointer is over the apples area:
To clear the status bar when the mouse pointer moves away from the apples area one could use the line:

Advanced HTML
10
<area shape="rect" cords="10,10,50,50" title="Apples" onMouseOver="window.status='fresh green apples'; return true"
onMouseOut="window.status=''; return true">
Again, remember to 'return true' when setting the status bar text.
16.4.1 Changing the contents of a text box If we extend the on-line grocery example by adding a text box at the bottom of the page, we can set the text in this box using onMouseOver and onMouseOut events.
We add the text box by adding code for a very simple form:
<form name=myform> <input type=text name=food_details size=50> </form>
We can now add the following onMouseOver and onMouseOut actions:
onMouseOver="document.myform.food.value='Fresh green apples'" onMouseOut="document.myform.food.value=''"
The screen looks as follows when the mouse is over the apples area:
Advanced HTML
11
16.5 Summary exercise Exercise 2: Summary of Image Maps
Complete the following statements that summarize the concepts explored in this unit: Image maps allow a Web page
designer to make of an to behave differently. Each defined area can be ,
circular or a many-sided shape defined by a . A area is defined with 4 coordinates.
A area is defined with 3 coordinates.
A area is defined with an even number of values, representing coordinates for each
point defining its boundaries.
The attribute of <area...> tags can be used to make a piece of text appear next to the mouse pointer when it is over a defined area.
An area can be made to execute a line of in response to and onMouseOut event.
In the early days image maps were implemented using techniques. These days most people write client-side image maps.
An image changing when a mouse pointer moves over or away from it is called image .
You can find the answers to this exercise at the end of the unit.
16.6 Application and further work
16.6.1 Activity 4: Creating a rectangular area in an image map
Inside your food.html file create an image map called "fruit_and_veg". In your "fruit_and_veg" image map, create a rectangular area around one of your groups of vegetables (for example in the "foods.gif" image the red strawberries seem to lend themselves to a rectangular area. Hint
You can either estimate the coordinates if you know the image size, or use freely available software such as the GIMP (previously mentioned). Make your defined area hyperlink to your HTML page "out_of_stock.html". Hint
Remember to extend your IMG tag to state that the "fruit_and_veg" map should be used. You can find a discussion of this activity at the end of the unit.
16.6.2 Activity 5 — Creating a default hyperlink Edit your map so that title text is displayed when the mouse pointer is over your area. So, for example, for our foods.gif image and the rectangle around the strawberries the title text chosen is "Strawberries".
Advanced HTML
12
You can find a discussion of this activity at the end of the unit.
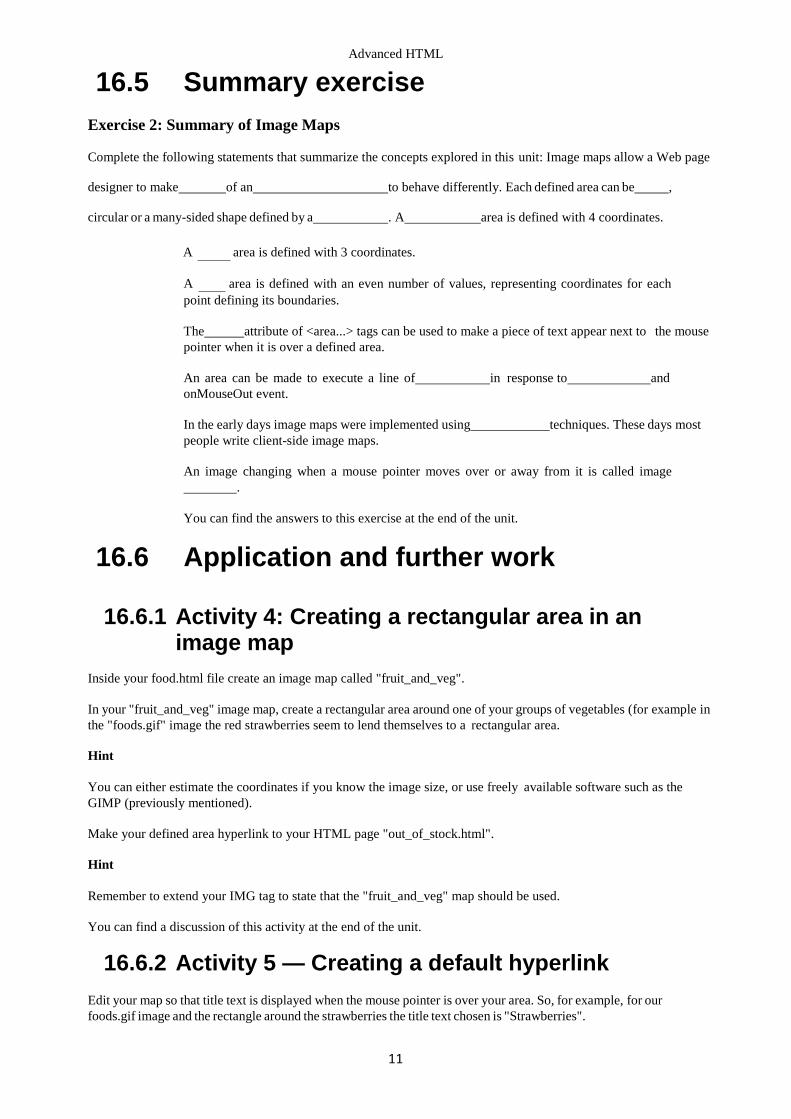
16.6.3 Activity 6: Creating an image map for geometric shapes
Create an image map for the following image (shapes.gif):
Set appropriate title text for each area you define: so the title text for the red rectangle should be 'Red Rectangle', and for the blue circle should be 'Blue Circle' and so on. Hint If you do not have the use of an image map tool, the top left of the image is, as always, (0, 0); the bottom right will be the height and width of the image. You can find a discussion of this activity at the end of the unit.
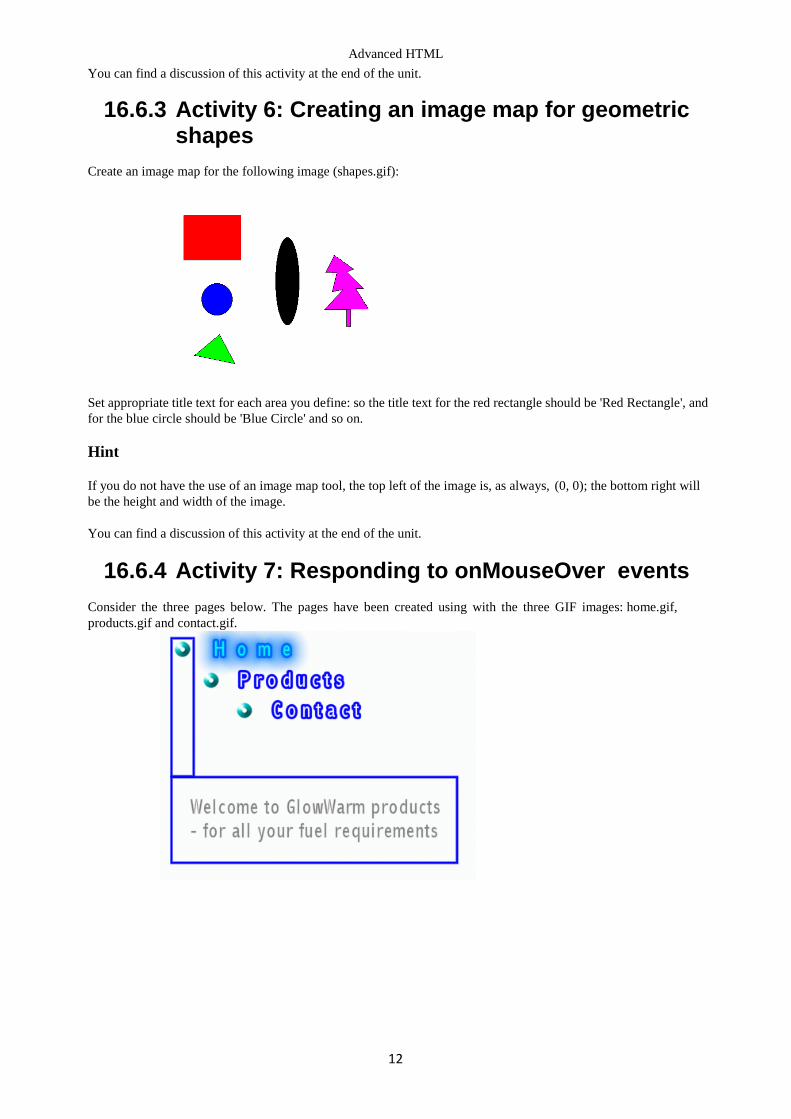
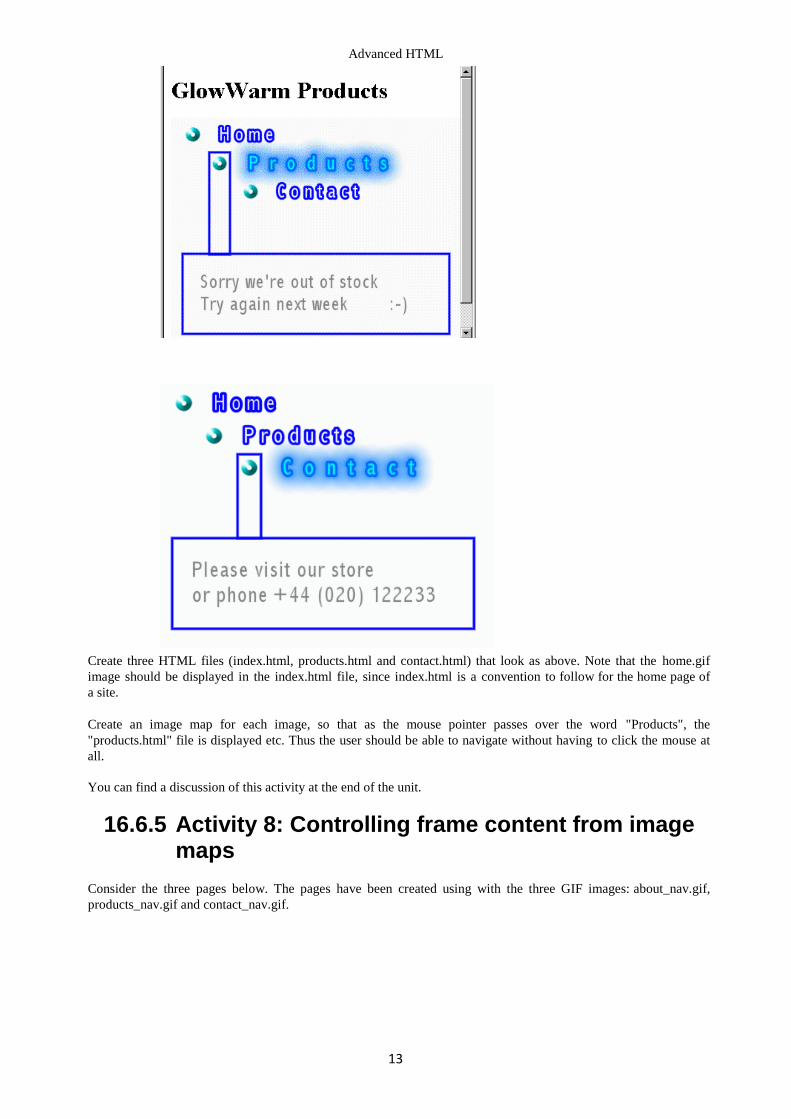
16.6.4 Activity 7: Responding to onMouseOver events Consider the three pages below. The pages have been created using with the three GIF images: home.gif, products.gif and contact.gif.
Advanced HTML
13
Create three HTML files (index.html, products.html and contact.html) that look as above. Note that the home.gif image should be displayed in the index.html file, since index.html is a convention to follow for the home page of a site. Create an image map for each image, so that as the mouse pointer passes over the word "Products", the "products.html" file is displayed etc. Thus the user should be able to navigate without having to click the mouse at all. You can find a discussion of this activity at the end of the unit.
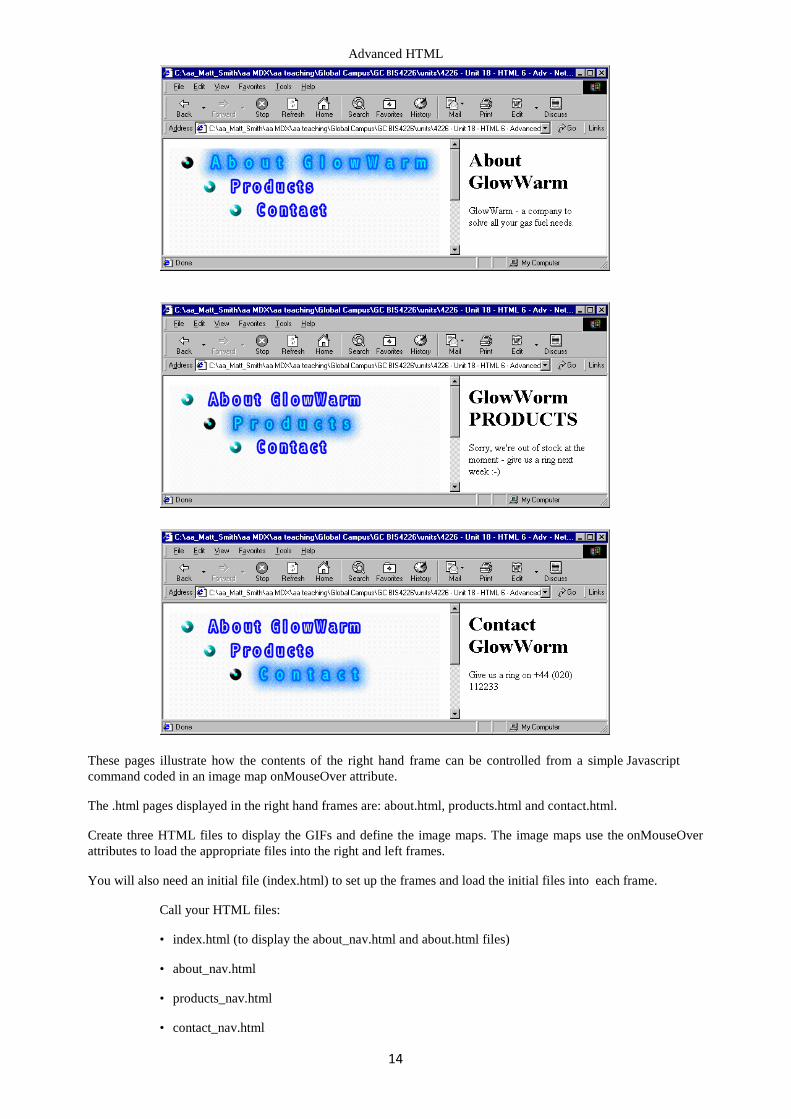
16.6.5 Activity 8: Controlling frame content from image maps
Consider the three pages below. The pages have been created using with the three GIF images: about_nav.gif, products_nav.gif and contact_nav.gif.
Advanced HTML
14
These pages illustrate how the contents of the right hand frame can be controlled from a simple Javascript command coded in an image map onMouseOver attribute. The .html pages displayed in the right hand frames are: about.html, products.html and contact.html. Create three HTML files to display the GIFs and define the image maps. The image maps use the onMouseOver attributes to load the appropriate files into the right and left frames. You will also need an initial file (index.html) to set up the frames and load the initial files into each frame.
Call your HTML files:
• index.html (to display the about_nav.html and about.html files)
• about_nav.html
• products_nav.html
• contact_nav.html
Advanced HTML
15
You can find a discussion of this activity at the end of the unit.
16.7 Review Questions 1. What are the different image map shapes that can be defined?
2. Which are more 'portable': server-side or client-side image maps?
3. Discuss this statement: You should keep things consistent and simple by always defining all areas as polygons.
4. Discuss this statement: You should always define contiguous (physically touching) areas for all parts of an
image, so wherever the user clicks, the nearest relevant hyperlink is followed.
You can find the discussions on these review questions at the end of the unit.
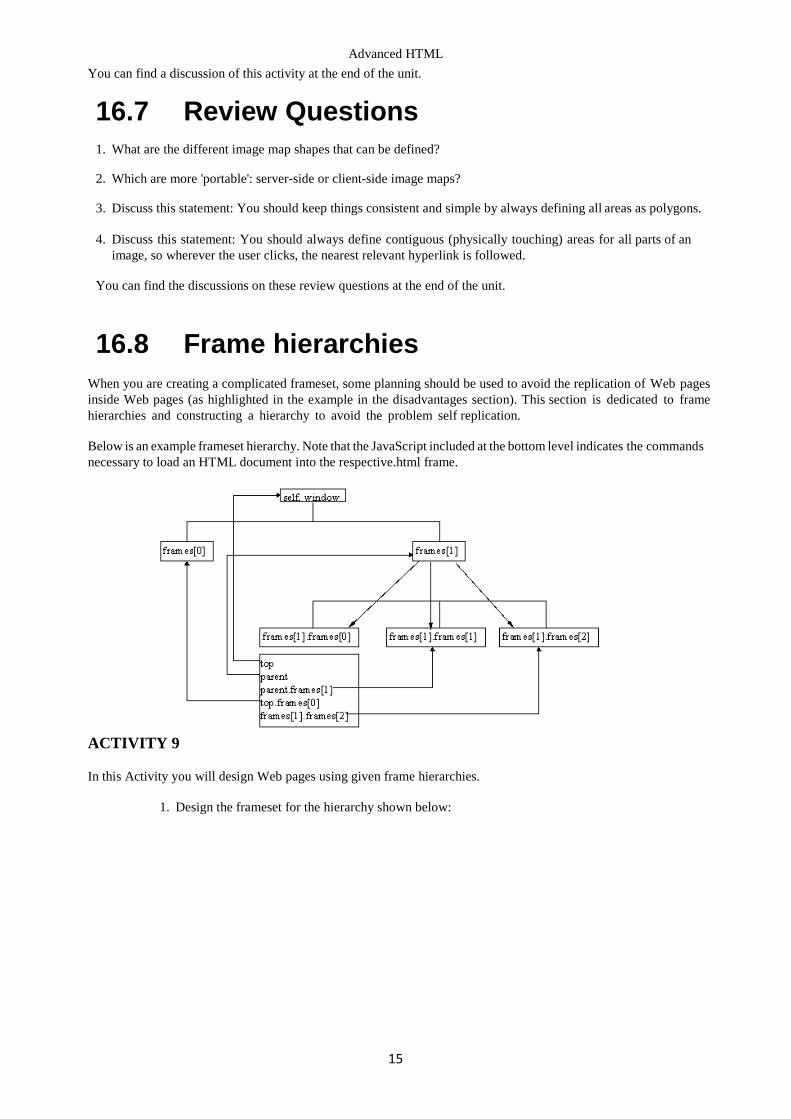
16.8 Frame hierarchies When you are creating a complicated frameset, some planning should be used to avoid the replication of Web pages inside Web pages (as highlighted in the example in the disadvantages section). This section is dedicated to frame hierarchies and constructing a hierarchy to avoid the problem self replication. Below is an example frameset hierarchy. Note that the JavaScript included at the bottom level indicates the commands necessary to load an HTML document into the respective.html frame.
ACTIVITY 9
In this Activity you will design Web pages using given frame hierarchies.
1. Design the frameset for the hierarchy shown below:

Advanced HTML
16
2. Design the frameset for the hierarchy shown below:
You can find a discussion of this activity at the end of the unit.
16.9 Loading Multiple Documents
16.9.1 Loading two frames from one link This section will look at how to load two documents with one click of a button. Take a look at Frames Example No 5, which will once again load in a new browser. In this example, the contents of both frames change with the click of one button. This occurs when the user interacts with the user interface. In order to explain how to do this, some terminology has to be introduced and defined in the table below:
Term Definition Example Object An object is an entity in the rea
world, or, as in our case, an entity on a Web page. It has both stat and behaviour.
link, button, image, frame, from, window, text
Advanced HTML
17
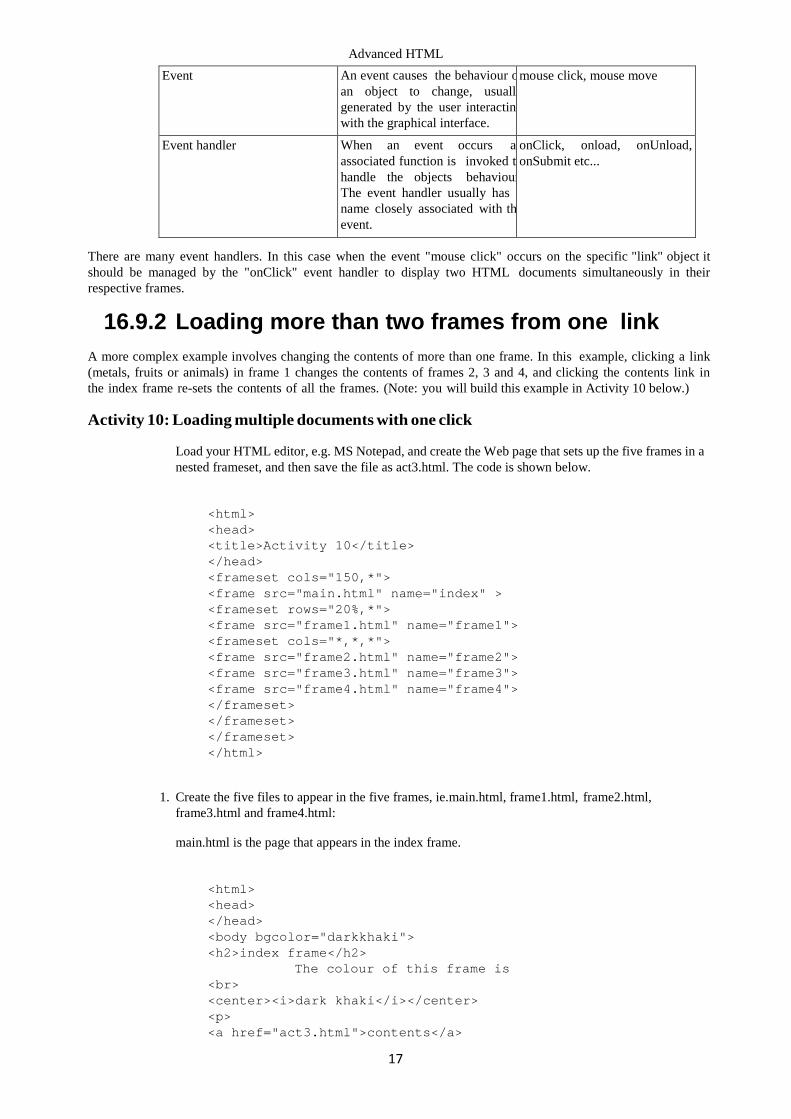
Event An event causes the behaviour o an object to change, usually generated by the user interactin with the graphical interface.
mouse click, mouse move
Event handler When an event occurs an associated function is invoked t handle the objects behaviour The event handler usually has name closely associated with th event.
onClick, onload, onUnload, onSubmit etc...
There are many event handlers. In this case when the event "mouse click" occurs on the specific "link" object it should be managed by the "onClick" event handler to display two HTML documents simultaneously in their respective frames.
16.9.2 Loading more than two frames from one link A more complex example involves changing the contents of more than one frame. In this example, clicking a link (metals, fruits or animals) in frame 1 changes the contents of frames 2, 3 and 4, and clicking the contents link in the index frame re-sets the contents of all the frames. (Note: you will build this example in Activity 10 below.) Activity 10: Loading multiple documents with one click
Load your HTML editor, e.g. MS Notepad, and create the Web page that sets up the five frames in a nested frameset, and then save the file as act3.html. The code is shown below.
<html> <head> <title>Activity 10</title> </head> <frameset cols="150,*"> <frame src="main.html" name="index" > <frameset rows="20%,*"> <frame src="frame1.html" name="frame1"> <frameset cols="*,*,*"> <frame src="frame2.html" name="frame2"> <frame src="frame3.html" name="frame3"> <frame src="frame4.html" name="frame4"> </frameset> </frameset> </frameset> </html>
1. Create the five files to appear in the five frames, ie.main.html, frame1.html, frame2.html, frame3.html and frame4.html:
main.html is the page that appears in the index frame.
<html> <head> </head> <body bgcolor="darkkhaki"> <h2>index frame</h2>
The colour of this frame is <br> <center><i>dark khaki</i></center> <p> <a href="act3.html">contents</a>
Advanced HTML
18
</body> </html>
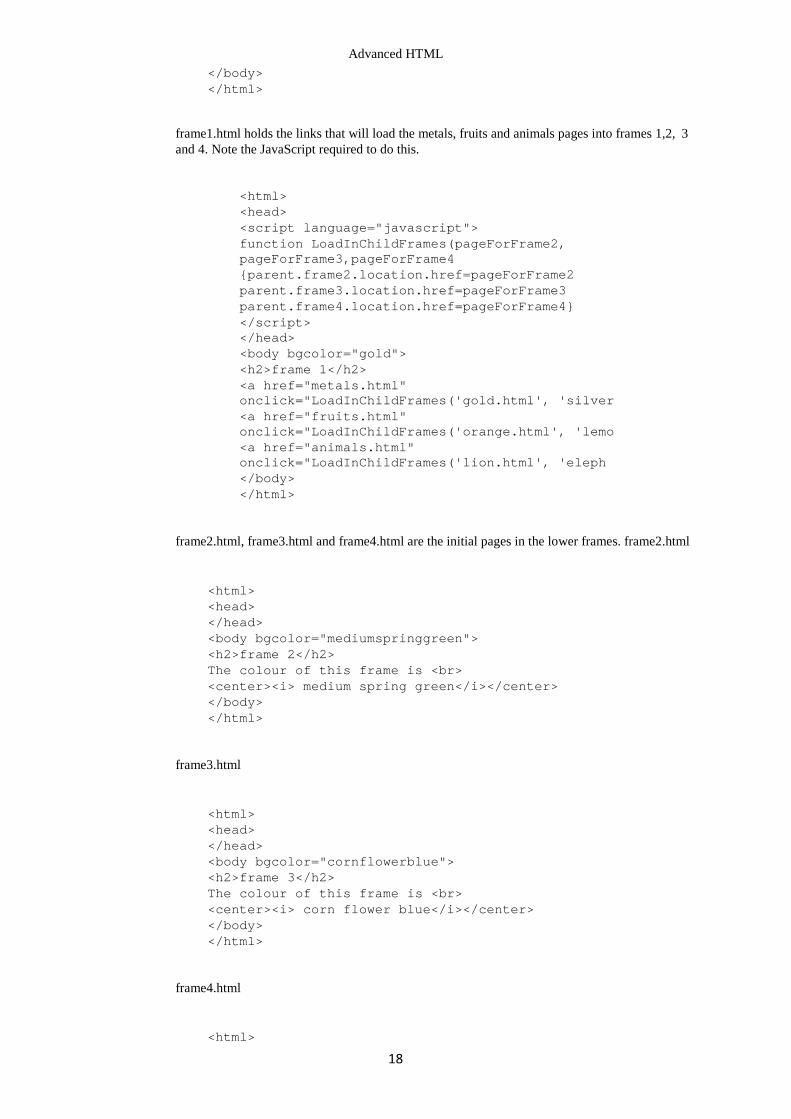
frame1.html holds the links that will load the metals, fruits and animals pages into frames 1,2, 3 and 4. Note the JavaScript required to do this.
<html> <head> <script language="javascript"> function LoadInChildFrames(pageForFrame2, pageForFrame3,pageForFrame4 {parent.frame2.location.href=pageForFrame2 parent.frame3.location.href=pageForFrame3 parent.frame4.location.href=pageForFrame4} </script> </head> <body bgcolor="gold"> <h2>frame 1</h2> <a href="metals.html" onclick="LoadInChildFrames('gold.html', 'silver <a href="fruits.html" onclick="LoadInChildFrames('orange.html', 'lemo <a href="animals.html" onclick="LoadInChildFrames('lion.html', 'eleph </body> </html>
frame2.html, frame3.html and frame4.html are the initial pages in the lower frames. frame2.html
<html> <head> </head> <body bgcolor="mediumspringgreen"> <h2>frame 2</h2> The colour of this frame is <br> <center><i> medium spring green</i></center> </body> </html>
frame3.html
<html> <head> </head> <body bgcolor="cornflowerblue"> <h2>frame 3</h2> The colour of this frame is <br> <center><i> corn flower blue</i></center> </body> </html>
frame4.html
<html>
Advanced HTML
19
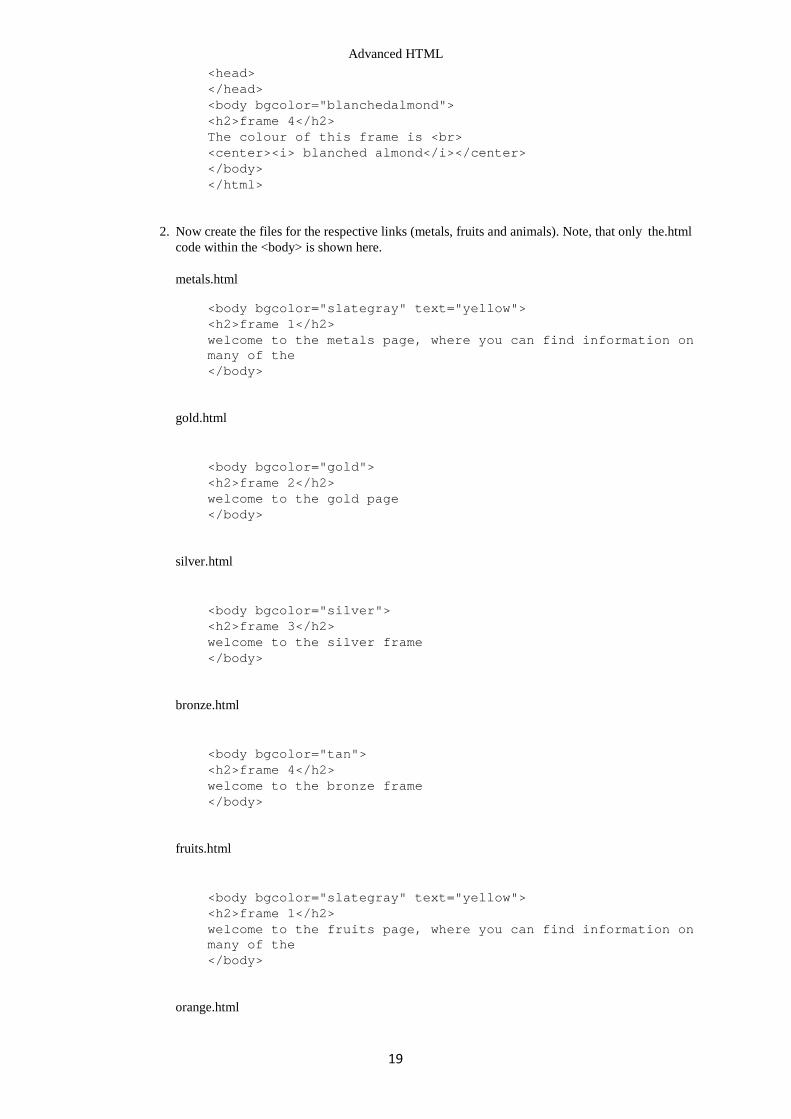
<head> </head> <body bgcolor="blanchedalmond"> <h2>frame 4</h2> The colour of this frame is <br> <center><i> blanched almond</i></center> </body> </html>
2. Now create the files for the respective links (metals, fruits and animals). Note, that only the.html code within the <body> is shown here.
metals.html
<body bgcolor="slategray" text="yellow"> <h2>frame 1</h2> welcome to the metals page, where you can find information on many of the </body>
gold.html
<body bgcolor="gold"> <h2>frame 2</h2> welcome to the gold page </body>
silver.html
<body bgcolor="silver"> <h2>frame 3</h2> welcome to the silver frame </body>
bronze.html
<body bgcolor="tan"> <h2>frame 4</h2> welcome to the bronze frame </body>
fruits.html
<body bgcolor="slategray" text="yellow"> <h2>frame 1</h2> welcome to the fruits page, where you can find information on many of the </body>
orange.html
Advanced HTML
20
<body bgcolor="orange"> <h2>frame 2</h2> welcome to the orange page </body>
lemon.html
<body bgcolor="yellow"> <h2>frame 3</h2> welcome to the lemon page </body>
lime.html
<body bgcolor="lime"> <h2>frame 4</h2> welcome to the lime page </body>
animals.html
<body bgcolor="slategray" text="yellow"> <h2>frame 1</h2> welcome to the animals page, where you can find information on many of th </body>
lion.html
<body bgcolor="goldenrod"> <h2>frame 2</h2> welcome to the lion page </body>
elephant.html
<body bgcolor="ivory"> <h2>frame 3</h2> welcome to the elephant page </body>
camel.html
<body bgcolor="palegoldenrod"> <h2>frame 3</h2> welcome to the camel page </body>
3. Load act3.html and test the metals, links and fruits links in frame 1. You may notice that if you click
Advanced HTML
21
on the contents link in the index frame, the entire page loads itself inside the frame. This problem can be resolved by adding JavaScript to ensure that the contents page (main.html) loads in the top frame. The script checks if the window containing the link is the top window. If it is not, then the top location is changed. Add the following JavaScript in the <head> section of act3.html
<script language="javascript"> if(top!=self)
top.location.href = location.href </script>
4. Finally, test the file again in your browser.
16.10 Answers
16.10.1 Discussions of Exercise 1 Different shapes are defined in different ways.
Remember the origin of an image on a Web page is the top left, not bottom left as you may be used to with graphs on paper and in mathematics classes.
A RECTANGLE can be defined in many different ways, the most common two methods are to state the X and Y coordinates of the corner closest to the origin (0,0), and then to either state the coordinates of the opposite corner, or to state the width and height of the rectangle. The developers of HTML decided to define rectangles with four coordinates, where the first two are the X and Y values for the top left corner, and then the X and Y coordinates for the bottom right corner.
A CIRCLE can be defined easily defined using three values, the X and Y coordinates of the centre of the circle, and the radius of the circle.
A POLYGON is a shape whose edges are defined by a set of straight lines: squares, rectangles, triangles, hexagons are all examples of polygons. Since different polygons can have different numbers of sides, polygon areas for maps are defined simply by a sequence of pairs of (X, Y) coordinates for the end points of each straight line.
It is possible to use polygons to define rectangles, and even to approximate circles: some people just use polygons for all areas, although for rectangles and circles this results in more points being defined than necessary.
16.10.2 Discussions of Exercise 2 Suggested completed summary statements are as follows:
Image maps allow a Web page designer to make areas of an image to behave differently. Each defined
area can be rectangular, circular or a many-sided shape defined by a polygon. A rect area is defined
with 4 coordinates.
A circle area is defined with 3 coordinates.
A poly area is defined with an even number of values, representing coordinates for each point defining its boundries.
The title attribute of <area...> tags can be used to make a piece of text appear next to the mouse pointer when it is over a defined area.
An area can be made to execute a line of Javascript in response to onMouseOver and onMouseOut event.
In the early days image maps were implemented using server-side techniques. These days most people write client-side image maps.

Advanced HTML
22
An image changing when a mouse pointer moves over or away from it is called image rollover.
16.10.3 Discussions of Activity 1 You will have created or located a picture (or perhaps a photograph) of different vegetables. This file should be copied to a directory you have created called "on_line_grocer".
16.10.4 Discussions of Activity 2 You will have created an HTML file that when displayed looks something like the following:
The source of your HTML file will look something like the following (although you will more than likely be using a PNG image rather than a GIF):
<HTML> <BODY> <H1>Mr Green's On-line Groceries</H1> <p>Click on the food you wish to order... <p> <IMG src="foods.gif" > </BODY> </HTML>
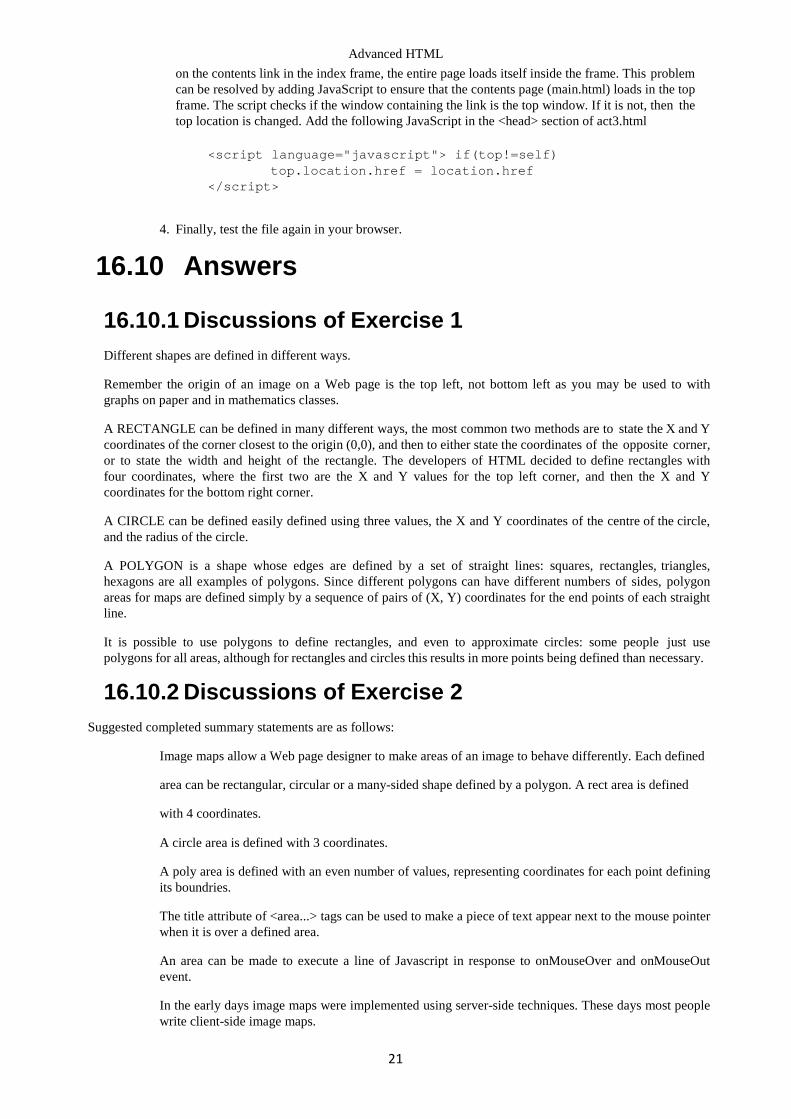
16.10.5 Discussions of Activity 3 You will have created an HTML file that, when displayed, looks something like the following:
Advanced HTML
23
The source of your HTML file will look something like the following:
<HTML> <BODY> <H1>Mr Green's On-line Groceries</H1>
Sorry we are presently out of stock of your selected food </BODY> </HTML>
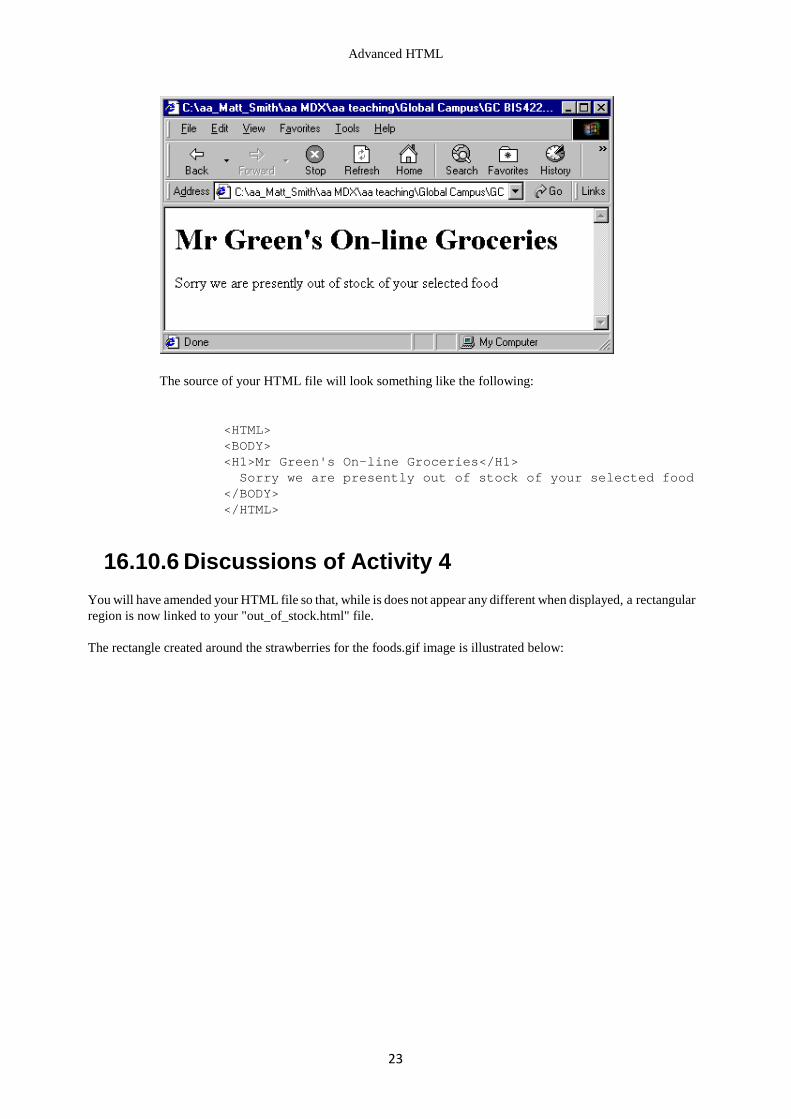
16.10.6 Discussions of Activity 4 You will have amended your HTML file so that, while is does not appear any different when displayed, a rectangular region is now linked to your "out_of_stock.html" file. The rectangle created around the strawberries for the foods.gif image is illustrated below:
Advanced HTML
24
Your HTML code should look similar to the following (this complete.html file can be found in the file food2.html):
<HTML>
<BODY>
<H1>Mr Green's On-line Groceries</H1> Click on the food you wish to
order...
<p>
<IMG src="foods.gif" alt="foods for purchase" usemap="#fruit_and_veg" border="0
<map name="fruit_and_veg">
<area shape="rect" coords="178,0,271,62" href="out_of_stock.html">
</map>
</BODY>
</HTML>
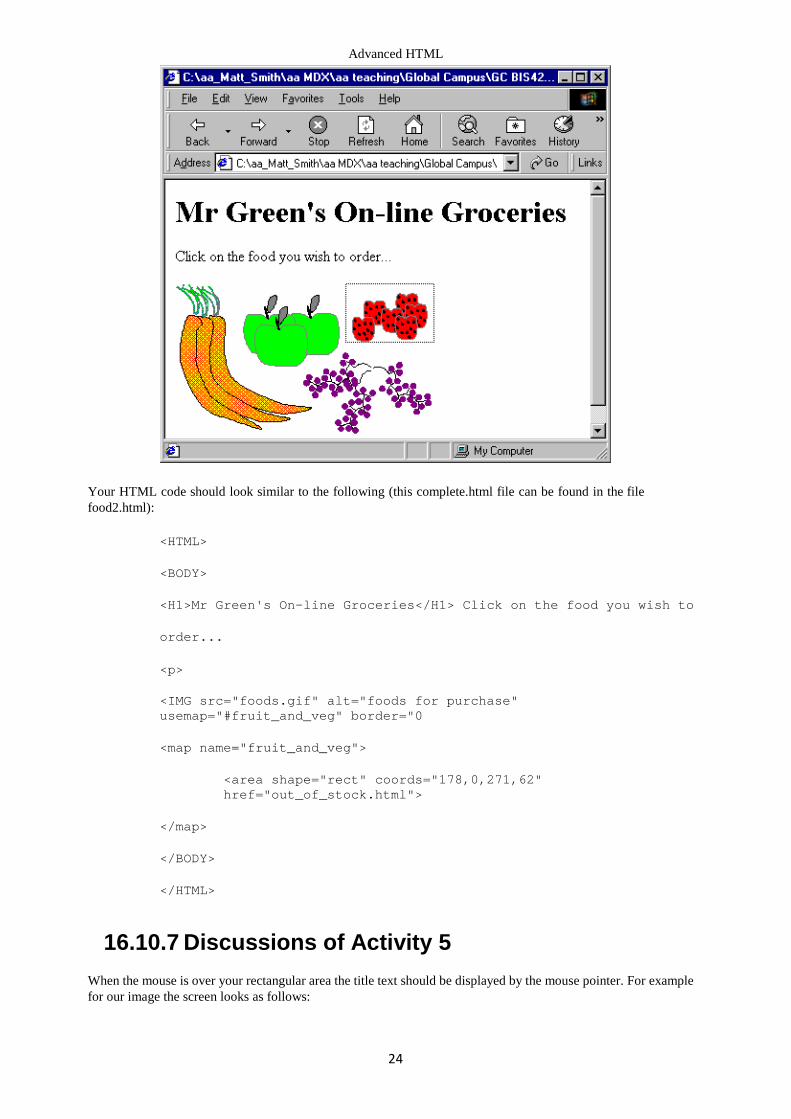
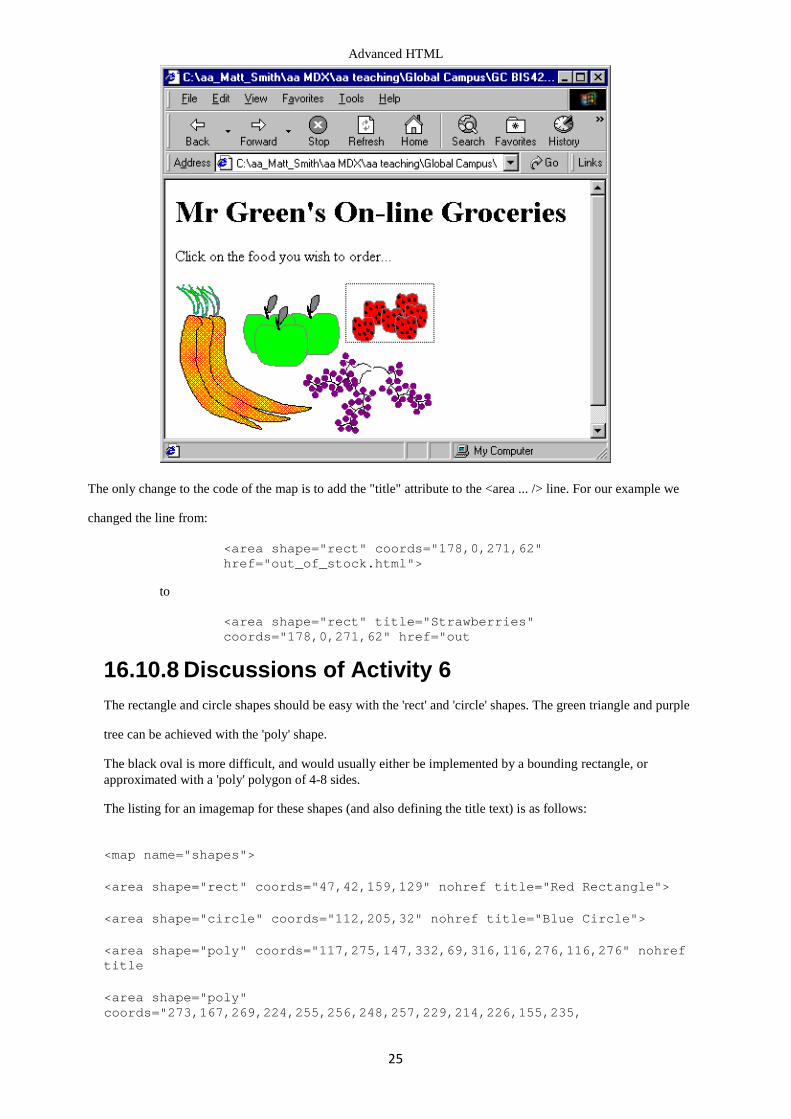
16.10.7 Discussions of Activity 5 When the mouse is over your rectangular area the title text should be displayed by the mouse pointer. For example for our image the screen looks as follows:
Advanced HTML
25
The only change to the code of the map is to add the "title" attribute to the <area ... /> line. For our example we
changed the line from:
<area shape="rect" coords="178,0,271,62" href="out_of_stock.html">
to
<area shape="rect" title="Strawberries" coords="178,0,271,62" href="out
16.10.8 Discussions of Activity 6 The rectangle and circle shapes should be easy with the 'rect' and 'circle' shapes. The green triangle and purple
tree can be achieved with the 'poly' shape.
The black oval is more difficult, and would usually either be implemented by a bounding rectangle, or approximated with a 'poly' polygon of 4-8 sides.
The listing for an imagemap for these shapes (and also defining the title text) is as follows:
<map name="shapes">
<area shape="rect" coords="47,42,159,129" nohref title="Red Rectangle">
<area shape="circle" coords="112,205,32" nohref title="Blue Circle">
<area shape="poly" coords="117,275,147,332,69,316,116,276,116,276" nohref title
<area shape="poly" coords="273,167,269,224,255,256,248,257,229,214,226,155,235,
Advanced HTML
26
<area shape="poly" coords="374,259,375,226,409,226,385,185,398,185,368,150,379,
</map>
As can be seen, for shapes like the oval and tree, many sided polygons are needed, and effective image map creation requires the use of tools, since hand calculation and coding of such lists of coordinates is very time consuming.
16.10.9 Discussions of Activity 7 The.html files simply have to display the heading "GlowWarm" products and the appropriate image. The index.html
file, including image map, should look something like the following:
<html>
<h1>GlowWarm Products<h1>
<img src=home.gif usemap="#home" border="0">
<map name="home">
<area shape="rect" coords="47,41,249,79" href="products.html"
title="Link to pr onMouseOver="parent.location.href='products.html'
">
<area shape="rect" coords="86,80,272,118" href="contact.html"
title="Link to co onMouseOver="parent.location.href='contact.html'
">
<area shape="default" nohref>
</map> For each file, there should be two active areas defined in the image map — for the two other files. So in the index.html file there are image map areas defined to link to products.html and contact.html. For the products.html file there are links to index.html and contact.html, and so on.
16.10.10 Discussions of Activity 8 The index.html file needs to load the about_nav.html file into the left hand frame and the about.html file into the right hand frame:
<html>
<frameset cols="480,*" border=1>
<frame src="about_nav.html" name="navbar">
<frame src="about.html" name="content">
</frameset>
</html> The about_nav.html file simple needs to display the about_nav.gif image, and set up the image map:
Advanced HTML
27
<html>
<img src="about_nav.gif" usemap="#about_nav" border="0">
<map name="about_nav">
<area shape="rect" coords="38,43,249,79" nohref title="" onMouseOver="parent.fr
<area shape="rect" coords="83,80,264,118" nohref title="" onMouseOver="parent.f
</map>
</html>
As you can see in the code above, there are two areas defined, one for products and one for contact. For each area there are two Javascript lines for the onMouseOver attribute. For example when the mouse pointer goes over the products area:
onMouseOver="
parent.frames[1].location.href='products.html' ;
parent.frames[0].location.href ">
First the products.html file is loaded into the right hand frame (frames[1]) then the products_nav.html file is loaded into the left hand frame (frames[0]). The semi-colon allows more than one Javascript statement to be defined for an onMouseOver or onMouseOut attribute.
16.10.11 Discussions of Activity 9
1. <FRAMESET ROWS = "18%,72%"> <FRAME src="a.html"> <FRAMESET COLS="33%,33%,33%"> <FRAME src="b.html"> <FRAMESET ROWS="20%,80%"> <FRAME src=c.html> <FRAME src=d.html> </FRAMESET> <FRAME src=e.html> </FRAMESET> </FRAMESET> </HTML>
2. <FRAMESET ROWS = "10%,90%"> <FRAME src="a.html"> <FRAMESET COLS="80%,20%"> <FRAMESET ROWS="20%,80%"> <FRAME src=b.html> <FRAME src=c.html> </FRAMESET> <FRAME src=d.html>
Advanced HTML
28
</FRAMESET> </FRAMESET> </HTML>
16.10.12 Discussions of the Review Questions 1. There are three kinds of shape: rectangular (rect), circular (circle) and polygon (poly).
Any shape that is not rectangular or circular can be approximated with a many-sided polygon. 2. Client-side image maps are more portable, since all that is required is the image and the Web page that
displays the image and contains the image map. Server side image maps require CGI programmes like imagemap, and the map stays located on the server.
Client-side image maps can be stored on non-CGI devices, like at set of Web pages on a static CD- ROM for example.
3. We shall consider the answer separately for rectangular areas (rect) and for circular areas (circle).
It is possible to define rectangular areas with polygons. This takes a little more code in the.html file (since four points need to be defined, not just two). But there is significantly more processing involved in deciding if the mouse is inside a polygon, compared to whether the mouse cursor is inside a rectangle.
Circular areas can be approximated with polygons (in fact in any digital imaging system circles must always be approximated). A circle can be defined with three values using circle, but to approximate a curve with a polygon can take 10s or even 100s of lines, depending on the size of the circle. Also, the algorithm to determine if a mouse pointer is within a circular area can sometimes be written simpler than the one to determine if a cursor is inside a polygon (depending on the number of sides in the polygon).
So, there are both HTML file size, and algorithmic processing efficiency reasons, for using rect and circle wherever possible.
4. There are times when such an approach is useful. For example recall the Bulldog South Africa map, where the user
does desire the location of the nearest store to where they click.
However, for images made up of several visual components, it can be frustrating to users to clearly click away from one visual object, but to be taken to that object's hyperlink. Better in these cases to define areas around each visual object, and leave the other parts of the image inactive.
Many Web designers give some leeway, so where one object in an image is not right next to another, the area defined is a little out from the visual object itself — if using rectangles or circles to approximate the shapes of objects, you should err on the side of caution, and ensure the whole object is inside your area. What should be avoided wherever possible is creating pages where a user clearly clicks on a part of an object, but that part of the object is outside of the defined area, and so nothing happens.