Chapter 10 - NAVY BMR Navy Wide Advancement Exam Prepnavybmr.com/study...
61
Chapter 10 - NAVY BMR Navy Wide Advancement Exam Prepnavybmr.com/study material/14234a/14234A_ch10.pdf · and will provide you with an explanation of the first aid measures that you
This chapter will help you understand the importance of first aid to an injured person and will provide you with an explanation of the first aid measures that you can apply to yourself and to others before trained medical personnel arrive How-to instructions in lifesaving measures are provided for clearing the upper airway giving artificial ventilation stopping bleeding controlling shock and protecting the wound In addition the fundamentals of field sanitation and water purification are presented
Objectives
When you have completed this chapter you will be able to 1 Define first aid and identify the general first aid rules 2 Define basic life support 3 Recognize the signs of airway obstruction and describe the steps necessary to
clear the airway 4 Recognize and describe the steps necessary to perform artificial ventilation 5 Describe the methods used to control bleeding 6 Define shock and identify its signs symptoms and treatment 7 Identify the cause and treatment of injuries caused by exposure to heat or cold 8 Identify the treatment of first aid to victims of various types of burns 9 Recognize the steps in treating and immobilizing a fracture 10 Identify field sanitation methods used to dispose of human waste and garbage 11 Identify the procedures taken to purify drinking water
Prerequisites
There are no prerequisites for completing this manual
10-1
null
29858173
null
2011-05-16T105246-0500
32904
Features of This Manual
This manual has several features which make it easy to use online
Figure and table numbers are italicized within the handbook text Figure and table reference numbers are conveniently located next to (or near) the applicable handbook text
Audio and video clips are included in the text with italicized instructions telling you where to click to activate the appropriate link
Review questions are included at the end of this chapter as the chapter assignment To submit assignments log into httpswwwcoursesnetcnavymil go to ldquoStudent Servicesrdquo in the drop down click on ldquoActive Coursesrdquo go to ViewSubmit Answers next to the course you wish to submit answers for Assignments may be submitted to the above Web site as they are completed and instant scoring is available Your completion letter is available as soon as you pass all assignments
A form at the end of each chapter allows your input for improving the manual or correcting errors to be brought to the attention of CSFErsquos Technical Review Committee Your input is important and will help keep this manual up to date and free of technical errors
100 BASIC FIRST AID
First aid is the emergency care given to the sick injured or wounded before and until they can be treated by medical personnel There are some fundamental concepts to keep in mind as you learn basic first aid techniques First of all you need to realize that first aid knowledge and skills can and do save lives You can save a casualtyrsquos life and prevent permanent disability if you know what to do what not to do and when to seek trained medical assistance The three basic reasons for first aid are to save lives prevent further injuries and prevent infection Most injured or ill service members are able to return to their units to fight or support primarily because they are given appropriate and timely first aid followed by the best medical care possible How you attend to sick or injured fellow Seabees may be the difference between life and death Before you learn the specific treatments for various types of injuries you should have an understanding of the following general rules of administering first aid
Continuity - First and foremost as a non-medical person you should seek medical assistance as soon as possible but not interrupt your first aid efforts When available you should send a fellow Seabee for help After administering any necessary first aid treatment you should continue to monitor the casualty for the development of any conditions which may require further treatment or lifesaving measures until relieved by properly trained medical personnel
10-2
Attitude - You should remain calm and act quickly but efficiently Reassure the casualty that his or her injuries are understood and that proper medical attention is forthcoming The casualtyrsquos confidence and positive attitude can be very helpful
Positioning the Casualty - In most cases the casualty should be lying down with his or her head level with the body until you have determined the type and extent of his or her injuries The exceptions to this are the following
o If the casualty is in danger of choking on blood or vomited matter place the casualty on his or her side or on the back with the head turned to one side and lower than the feet
o When the casualty has a chest injury or difficulty breathing place him or her in a sitting or semi-sitting position
o If the casualty is in shock place him or her on the back with the head slightly lower than the feet When injuries allow raise and support the casualtyrsquos feet approximately 6 to 12 inches off the ground
NOTE
If a bone is broken or you suspect one is broken do not move the casualty until you have immobilized the break An exception to this rule is when the casualty is in danger from fire flood or hostile fire
Clothing - Although you should move the casualty no more than necessary you may have to remove clothing in order to determine the extent of his or her injuries Remove only the clothing necessary for examination and treatment being especially careful with fractures and areas where the clothing may be stuck to the wound If necessary clothing can be cut off or ripped along the seams Shoes may also have to be cut off to avoid pain or complicating an injury When removal of clothing is necessary ensure the casualty does not become chilled
Infection - Do not touch any open wounds or burns with your fingers hands or other non-sterile objects unless absolutely necessary to stop severe bleeding
Food or Drink - An unconscious person should never be given food or drink This could cause the casualty to choke from unsuccessful vomiting or even cause death
110 Vital Functions
Before you learn how to evaluate a casualty and the various treatments you should have a basic understanding of the bodyrsquos vital functions the breathing process respiration and blood circulation As the term implies these functions are vital to the continuance of life and therefore the most important
10-3
Figure 10-1 mdash The Breathing Process
Figure 10-2 mdash Respiratory System
111 The Breathing Process
All human beings must have oxygen to survive Through the breathing process your lungs draw in oxygen and put it into your blood stream (Figure 10-1) Your heart then pumps this oxygen-rich blood throughout your body to supply your cells with the required oxygen If brain cells are deprived of oxygen they will die within 4 to 6 minutes and will never regenerate unlike some of the bodyrsquos other cells As brain cells die permanent brain damage occurs followed by paralysis and finally death
112 Respiration
Respiration occurs when you inhale to take in oxygen and then exhale to expel carbon dioxide (Figure 10-2) This process uses your airway which is comprised of your nose mouth and throat your lungs including the bronchial tree and your rib cage when your diaphragm and rib muscles contract and relax This cycle occurs 12 to 18 times per minute supplying oxygen-rich blood to your heart
10-4
Figure 10-3 mdash Points on the body for
detecting a pulse
113 Circulation
The pulse that can be felt at various points on the body is caused by the rhythmic expansion and contraction of the arteries A casualtyrsquos pulse can be felt at the carotid artery on the side of the neck the femoral artery in the groin area the radial artery on each wrist and the posterior tibial artery at each ankle Refer to Figure 10-3 to see each arteryrsquos location on the body
NOTE Do not use your thumb to check a casualtyrsquos pulse because you may confuse the beat of your own pulse with that of the casualty
10-5
120 Evaluating a Casualty
There are eight steps in properly evaluating a casualty They should be performed in order and the results used to apply the proper corrective treatment or action In most cases the treatment indicated by each step will be explained in detail later in this chapter
121 Step 1 ndash Check for Responsiveness
Step one in evaluating a casualty is to check for responsiveness Shake the casualty gently and ask him or her if he or she is ok If you get no response go to Step 2 If the casualty is conscious but choking begin measures to open their airway as described in the next section Ask the casualty where he or she hurts or has unusual feelings such as numbness Have the casualty indicate where the pain or numbness is located
NOTE If you suspect he or she has a broken back or neck DO NOT shake or move the casualty unless located in an area of immediate danger
122 Step 2 ndash Check for Breathing
Step two is to check for breathing Use your senses to look for the rise and fall of their chest listen for the sounds of breathing and feel for breath on the side of your face If the casualty is breathing continue to Step 3 If not stop and attempt to ventilate or open his or her airway The methods for ventilation and clearing the airway are covered in detail in the following section After successful ventilation continue with Step 3
123 Step 3 ndash Check for Pulse
Check for a pulse is Step 3 Use the method previously described under blood circulation If a pulse is present and the casualty is breathing continue to Step 4 If a pulse is present but the casualty is not breathing begin rescue breathing as described in the next section If no pulse is present seek medical personnel immediately
124 Step 4 ndash Check for Bleeding
Check for bleeding is Step 4 Look for spurts of blood or blood on the casualtyrsquos clothing If the bleeding is from an open wound on the arm or leg apply a field or pressure dressing as described later in this chapter If bleeding is from a partial or complete amputation apply a dressing as described later in this section or apply a tourniquet IF bleeding persists If the casualty is bleeding from an open head wound chest wound or abdominal wound apply a dressing as described later
NOTE If the casualty is located in a chemically contaminated area do not expose the wound Apply a field and pressure dressing and evacuate the casualty
10-6
125 Step 5 ndash Check for Shock
Step five is to check for shock Look for the following signs or symptoms
Sweaty but cool skin
Paleness of the skin Note that darker-skinned service members will appear grayish
Restlessness or nervousness
Thirst
Loss of blood
Confusion or lack of awareness
Rapid breathing
Blotchy or bluish skin
Nausea or vomiting If these signs or symptoms are present begin the treatment for shock described later in this chapter
126 Step 6 ndash Check for Fractures
Check for fractures is Step six Look for the signs or symptoms of back or neck injuries
Pain or tenderness of the back or neck
Cuts or bruises on the back or neck
Inability to move or numbness (Check this by asking about the ability to move or by touching the arms and legs and asking about how he or she is feeling)
Unusual body or limb position Immobilize the casualty if a back or neck injury is suspected Tell the casualty not to move If you suspect a back injury place padding under the arch of his or her back If you suspect a neck injury manually immobilize the casualty with padding under the neck and weighted boots on each side of the head Check the casualtyrsquos arms and legs for open fractures by noting bleeding or bones sticking out and check his or her pulse Check for closed fractures by looking for swelling discoloration deformity and unusual position of the extremity Remember to check for a pulse If you suspect a fracture begin the first aid measures for fractures described later in this chapter
127 Step 7 ndash Check for Burns
Step seven is to check for burns Look for reddened blistered or charred skin Check for singed clothing Burns to the upper torso may cause respiratory problems so look for singed nose hair soot around the nostrils abnormal breathing sounds or breathing difficulty If burns are found begin the first aid measures described later
10-7
Figure 10-4 mdash Illustration of
arteries veins and capillaries
128 Step 8 ndash Check for Head Injury
The final step Step eight is to check for a possible head injury Look for the following signs or symptoms
Unequal pupils
Fluid from ear nose mouth or the head injury itself
Slurred speech
Confusion
Sleepiness
Loss of memory or consciousness
Staggering
Headache
Dizziness
Nausea or vomiting
Paralysis
Convulsions or twitching
Bruising around the eyes or behind the ears If a head injury is suspected watch for signs requiring rescue breathing treatment for shock or control of bleeding and seek medical help
200 FIRST AID MEASURES
210 Controlling Bleeding
211 General
Recognizing the types of bleeding and using the proper methods to control bleeding are critical first aid skills From a minor cut to a sucking chest wound the Seabee needs to be familiar with all types of bleeding and how to apply a battle dressing and other methods of controlling bleeding
Properly and promptly stopping bleeding will save lives
Blood circulates throughout the body by means of three different kinds of blood vessels arteries veins and capillaries See Figure 10-4 Arteries are the large vessels that carry blood from the heart Arterial blood is usually bright red in color If an artery near the skin surface is cut the blood gushes out in spurts that are synchronized with the heart beat However if the artery is deeply buried the bleeding may appear in a
10-8
steady stream Veins are the vessels that return blood to the heart Blood from veins is dark red in color If a vein is cut the blood escapes in a steady stream Capillaries form a connecting network of smaller vessels between the veins and arteries Capillary blood is usually brick red in color If capillaries are cut the blood oozes out slowly To begin controlling bleeding cut or tear any clothing necessary to expose the wound and observe the extent of the injury If clothing is stuck to the wound leave it alone Do not touch the wound Always check for entry and exit wounds Exit wounds are usually larger While treating any wound continually monitor vital signs breathing and pulse and take action accordingly Do not attempt to remove bullets or other objects from the wound If the wound is impaled by an object do not remove the object just apply the dressing putting padding around the object to stabilize it When bleeding is from a leg or arm wound elevate the extremity slightly above the casualtyrsquos heart This is because the amount of blood entering is decreased by the uphill gravitational effect
CAUTION Do not elevate a limb until it is certain that no bones are broken or until broken bones are properly splinted
212 Methods to Control Bleeding
There are several methods for controlling bleeding We will look at applying a battle dressing using direct pressure applying a pressure dressing the use of pressure points and lastly applying a tourniquet
2121 Applying a Battle Dressing
Before you go into the field you will normally receive an individual first aid kit Among the items in this kit are battle dressings A battle dressing is a combination compress and bandage in which a sterile pad is fastened to a gauze muslin or adhesive bandage Most Navy first aid kits contain both large and small size battle dressings of this kind When applying a battle dressing always use the casualtyrsquos first not your own You may need your own You will see that each dressing has two tails used to secure the dressing when you are treating the injured On the outer side of the dressing is written ldquoPut other side next to woundrdquo This helps to make sure the sterile side is placed on the wound First remove the wrapper and grasp the tails with both hands (Figure 10-5 frame 1) Hold the dressing over the wound white side down and pull it open (Figure 10-5 frame 2) Place it directly over the wound and hold it in place with one hand With the other hand wrap one tail around and half way over the wound leaving enough to tie a knot (Figure 10-5 frames 3 and 4) Wrap the other tail in the opposite direction and then tie the tails at the edge of the dressing not over the wound (Figure 10-5 frame 5) Tie it firmly but not tourniquet-like
Figure 10-6 mdash Applying Direct or Manual Pressure
You can reinforce dressings by applying additional sterile dressings over the battle dressing and covering the entire dressing with an elastic bandage 2122 Using Direct Pressure
If bleeding doesnrsquot stop after applying a battle dressing your next technique should be direct or manual pressure Place your hand over the battle dressing and apply firm pressure for 5 to 10 minutes If the casualty is conscious he or she can do this In almost all cases bleeding can be stopped by direct pressure on the wound See Figure 10-6
10-10
Figure 10-7 mdash Applying a Pressure Dressing
2123 Applying a Pressure Dressing
If bleeding persists apply a pressure dressing over the battle dressing This will aid in blood clotting and compress the open blood vessel Do this by placing a wad of padding over the dressing at the wound location keeping the extremity elevated if applicable Secure the padding using a bandage or cravat tying the ends directly over the wound using a nonslip knot Improvised pressure dressings can be strips of cloth made from T-shirts socks or other clothing See Figure 10-7 frames 1 thru 4
2124 Using Digital Pressure
If bleeding continues try digital pressure also known as pressure points Digital pressure is applying pressure using your fingers thumb or hand to the appropriate pressure point A pressure point is a spot where a main artery lies near the skin surface and over a bone or firm tissue The objective of applying pressure is to compress the artery against the bone thus shutting off the flow of blood from the heart to the wound There are 10 principal pressure points on each side of the body Refer to Figure 10-8 while reading the following The first pressure point wersquoll look at is the superficial temporal artery If the bleeding is in the region of the temple or scalp use the finger to compress the main artery to the temple against the skull bone This pressure point is just in front of the ear The next pressure point is the facial artery Use this if bleeding occurs on the face below the level of the eyes Apply pressure to the point on the lower jaw To find this pressure point start at the angle of the jaw and run your finger forward along the lower edge of the lower jaw until you feel a small notch The pressure point is in the notch The common carotid artery is the pressure point you will use if the neck is bleeding Apply pressure below the wound just in front of the prominent neck muscle Press inward and slightly backward compressing the main artery of that side of the neck against the bones of the spinal column Do not apply pressure at this point unless it is absolutely essential This is because there is a danger of pressing on the windpipe and thus choking the victim
10-11
Figure 10-8 mdash Pressure Points (Roll over to view details)
10-12
Look now at the pressure point at the subclavian artery If the bleeding is in the shoulder or in the upper part of the arm apply pressure with the fingers behind the collarbone Press down against the first rib or forward against the collarbone The brachial artery is where you should apply pressure when bleeding is between the middle part of the upper arm and the elbow The blood flow should be controlled by applying pressure in the inner side of the armmdashthat is toward the bodymdash about halfway between the shoulder and the elbow The radial and ulnar arteries are the spots to press to control bleeding from the hand To do this apply pressure at the wrist If it is possible to hold the arm up in the air the bleeding will be relatively easy to stop At the iliac artery apply pressure to the middle of the groin to control bleeding in the thigh Bleeding in the upper part of the thigh can be controlled by applying pressure to the femoral artery or the iliac artery At the femoral artery bleeding in the upper part of the thigh can be controlled by applying pressure with the closed fist of one hand and using the other hand to give additional pressure The artery at this point is deeply buried in some of the heaviest muscle of the body so you must use a great deal of pressure to push the artery against the bone The next pressure point to consider is the popliteal artery Control bleeding between the knee and the foot by applying firm pressure against the knee Sometimes pressure at the side of the knee doesnrsquot stop the bleeding In this case hold the front of the knee with one hand and thrust the fist hard against the artery behind the knee The last pressure point wersquoll discuss is the anterior and posterior arteries Apply pressure to these arteries to stop bleeding from the foot Use digital pressure in combination with previously described techniques or when dressings are not available
2125 Applying a Tourniquet
CAUTION A tourniquet can be dangerous Its application can cause tissue injury or even loss of a limb
If bleeding continues after using other techniques as a last resort use a tourniquet A tourniquet is a constricting band placed around an arm or leg to control bleeding and as previously mentioned should only be applied as a last resort or if a limb has been severed Once applied the tourniquet must stay in place and the casualty must be taken to the nearest Medical Treatment Facility (MTF) as soon as possible Do not loosen or release a tourniquet once it has been applied See Figure 10-9 In the absence of a specially designed tourniquet use a strong pliable material such as gauze or muslin bandages clothing or a cravat Use this material with a rigid stick-like object and ensure the improvised tourniquet material is at least two inches wide DO NOT use wire or a shoestring for a tourniquet band Place the tourniquet material around the limb between the extremity and the torso or between the wound and the heart Never place a tourniquet directly over a wound fracture or joint For maximum effectiveness place it on the upper arm or above the
10-13
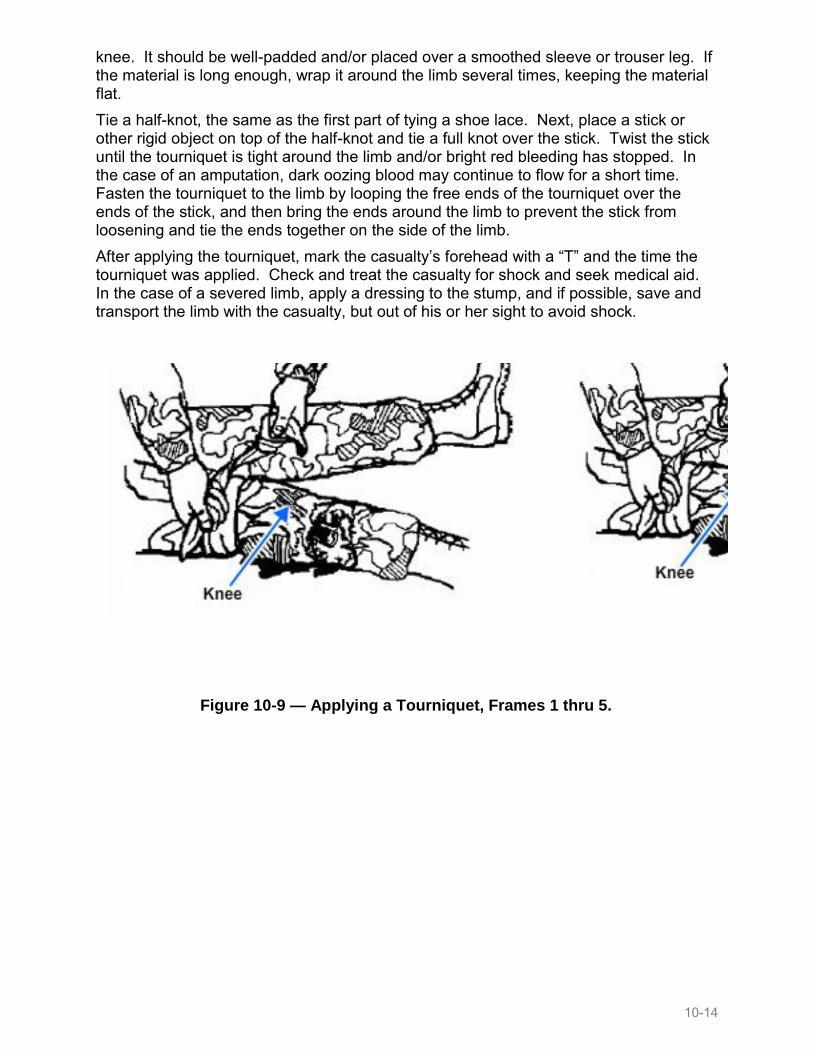
Figure 10-9 mdash Applying a Tourniquet Frames 1 thru 5
knee It should be well-padded andor placed over a smoothed sleeve or trouser leg If the material is long enough wrap it around the limb several times keeping the material flat Tie a half-knot the same as the first part of tying a shoe lace Next place a stick or other rigid object on top of the half-knot and tie a full knot over the stick Twist the stick until the tourniquet is tight around the limb andor bright red bleeding has stopped In the case of an amputation dark oozing blood may continue to flow for a short time Fasten the tourniquet to the limb by looping the free ends of the tourniquet over the ends of the stick and then bring the ends around the limb to prevent the stick from loosening and tie the ends together on the side of the limb After applying the tourniquet mark the casualtyrsquos forehead with a ldquoTrdquo and the time the tourniquet was applied Check and treat the casualty for shock and seek medical aid In the case of a severed limb apply a dressing to the stump and if possible save and transport the limb with the casualty but out of his or her sight to avoid shock
10-14
Figure 10-10 mdash Positioning the Casualty for a Preliminary Assessment
220 Opening the Airway and Restoring Breathing
An inadequate airway and lack of breathing are two of the most critical situations in first aid You must have oxygen to continue living The third critical situation is the loss of blood circulation or stoppage of the heart Before attempting to clear a casualtyrsquos airway or restore breathing you should check the casualty for a pulse using one of the checkpoints on the wrist neck or ankle as described under Evaluating a Casualty If no pulse is present you should immediately call for medical personnel unless you have been properly trained in cardiopulmonary resuscitation or CPR
221 Preliminary Assessment
Check the casualty for responsiveness or consciousness by gently shaking him or her and asking ldquoAre you OKrdquo If you get no response kneel beside the casualty and gently roll him or her onto the back by placing one hand under his or her head and neck for support then grasp the far arm and roll him or her toward you See Figure 10-10
NOTE
If you suspect he or she has a broken back or neck DO NOT shake or move the casualty unless located in an area of immediate danger
10-15
Figure 10-11 ndash Using the crossed-finger method to open the casualtyrsquos mouth
Figure 10-12 ndash Using the finger to dislodge foreign matter
Place the casualtyrsquos arms at the sides and straighten out his or her legs Next you need to check for breathing Look for the rise and fall of the chest listen for the sounds of breathing and feel his or her breath on the side of your face If the casualty is not breathing or appears to be having difficulty breathing you will need to perform a finger sweep of his or her mouth Open the casualtyrsquos mouth using your crossed thumb and finger to exert pressure upwards on the upper teeth and downwards on the lower (Figure 10-11) Crook the index finger on your other hand insert it against the inside of
the casualtyrsquos cheek and sweep across to the other side of the mouth Remove any foreign matter you find but do not spend too much time doing so (Figure 10-12)
WARNING Take care not to force an object deeper into the airway by pushing it with your finger
If the casualty is still not breathing or you are unsure you will need to perform one of the methods of rescue breathing Performing rescue breathing on a casualty that is breathing on their own can do no harm
10-16
Figure 10-14 ndash Jaw-thrust technique of opening the airway
Figure 10-13 ndash Head-tiltChin-lift technique of opening the airway
222 Opening the Airway
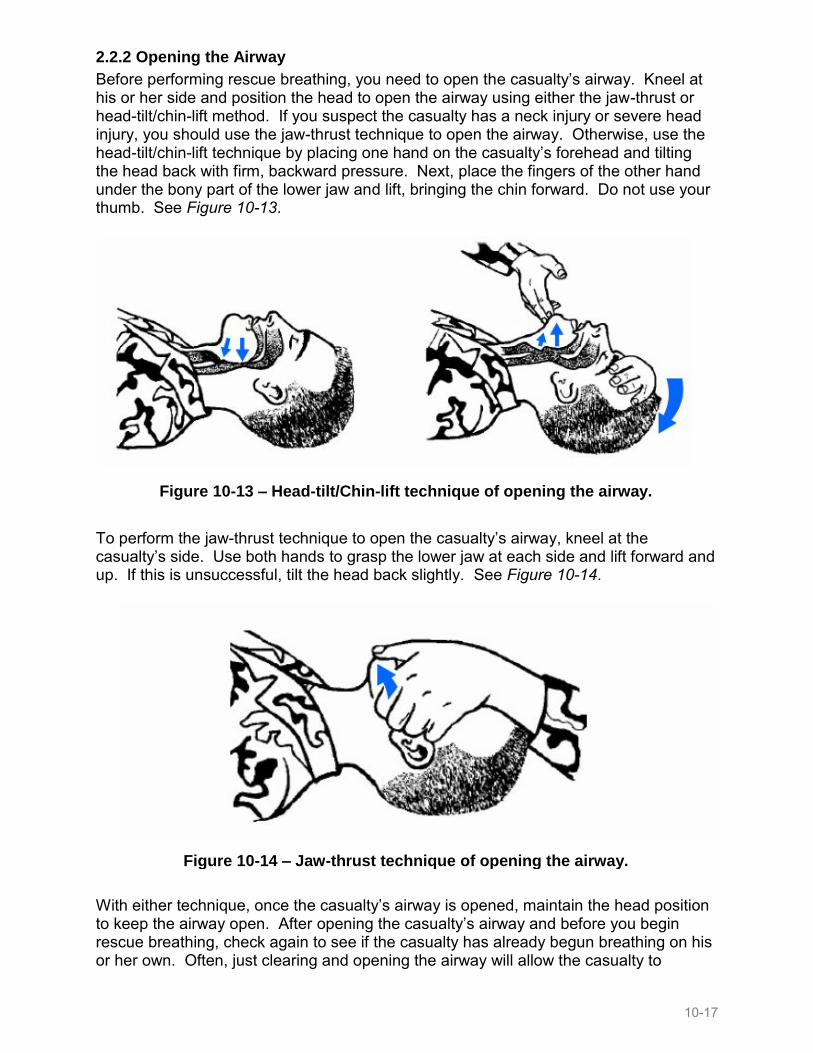
Before performing rescue breathing you need to open the casualtyrsquos airway Kneel at his or her side and position the head to open the airway using either the jaw-thrust or head-tiltchin-lift method If you suspect the casualty has a neck injury or severe head injury you should use the jaw-thrust technique to open the airway Otherwise use the head-tiltchin-lift technique by placing one hand on the casualtyrsquos forehead and tilting the head back with firm backward pressure Next place the fingers of the other hand under the bony part of the lower jaw and lift bringing the chin forward Do not use your thumb See Figure 10-13
To perform the jaw-thrust technique to open the casualtyrsquos airway kneel at the casualtyrsquos side Use both hands to grasp the lower jaw at each side and lift forward and up If this is unsuccessful tilt the head back slightly See Figure 10-14
With either technique once the casualtyrsquos airway is opened maintain the head position to keep the airway open After opening the casualtyrsquos airway and before you begin rescue breathing check again to see if the casualty has already begun breathing on his or her own Often just clearing and opening the airway will allow the casualty to
10-17
breathe properly If the casualty does begin breathing on his or her own continue to monitor the casualty and transport him or her to an MTF as soon as possible
223 Rescue Breathing
If the casualty is still not breathing you need to begin rescue breathing There are two basic methods mouth-to-mouth and mouth-to-nose Mouth-to-mouth is the preferred method but you should use the mouth-to-nose method if the casualty has a severe jaw fracture a wound to the mouth or the jaws are clamped shut by spasms
2231 Mouth-to-Mouth Method
To perform mouth-to-mouth rescue breathing place the casualty on his or her back face up Next place one hand on the forehead and pinch the nostrils closed Place the fingertips of the other hand on the bony part of the chin and lift If you suspect the casualty has a neck injury and used the jaw-thrust technique for clearing the airway close the nostrils by placing your cheek against them Now take a deep breath place your mouth around the casualtyrsquos mouth and blow two full breaths into the mouth one to one and a half seconds per breath taking a breath of fresh air before each breath If the casualty is too small as with a child cover both the nose and mouth with your mouth Watch for the casualtyrsquos chest to rise If the chest does not rise reestablish an open airway ensure no leakage and try again If the chest still isnrsquot rising clear the obstruction from the mouth or throat using one of the methods described in the next section After each two breaths check for a pulse at the neck If you find a pulse and the casualty appears to be breathing on his or her own STOP If a pulse is found but the casualty is still not breathing on his or her own continue rescue breathing If no pulse is found seek medical help immediately
2232 Mouth-to-Nose Method
The mouth-to-nose method of rescue breathing is performed in the same manner as the mouth-to-mouth method except that you blow into the nose while holding the lips closed with one hand under the chin Remove your mouth after each breath to allow the casualty to exhale It may be necessary to part the lips to allow the casualty to exhale Check for a pulse after each two breaths taking action as described for the mouth-to-mouth method
224 Clearing an Obstructed Airway
If the casualty is not breathing or appears to be choking ensure they have a clear unobstructed airway A casualtyrsquos upper airway may be obstructed for a number of reasons including the casualtyrsquos tongue falling back into his or her throat while he or she is unconscious foreign matter becoming lodged in the throat regurgitation of stomach contents into the throat or blood clots due to head or facial injuries If a casualty is conscious but choking do not interfere Encourage the casualty to cough up the obstruction If coughing doesnrsquot work or the casualty is unconscious but hasnrsquot responded to rescue breathing you need to clear the obstructed airway using either the abdominal thrust or chest thrust method Use the abdominal thrust method unless the casualty is in the advanced stages of pregnancy is markedly obese or has a significant abdominal wound In these cases use the chest thrust method
10-18
2241 Abdominal Thrust on a Conscious Casualty Standing or Sitting
To perform the abdominal thrust (or Heimlich maneuver) on a conscious casualty who is standing or sitting (Figure 10-15)
Stand behind the casualty
Wrap your arms around the casualtyrsquos waist
Make a fist with one hand and grasp it with the other
The thumb side of your fist should be against the abdomen in the midline and slightly above the navel but well below the breastbone
Press your fists into the abdomen with a quick backward and upward motion
Each thrust should be a separate and distinct movement Continue until the obstruction is expelled or the casualty becomes unresponsive
NOTE
If the casualty becomes unresponsive call for help and begin rescue breathing after positioning the casualty to open the airway
Figure 10-15 mdash Anatomical and profile views of the abdominal thrust on a conscious casualty sitting or standing
10-19
Figure 10-16 ndash Profile view of a the chest thrust on a conscious
casualty sitting or standing
2242 Chest Thrust on a Conscious Casualty Standing or Sitting
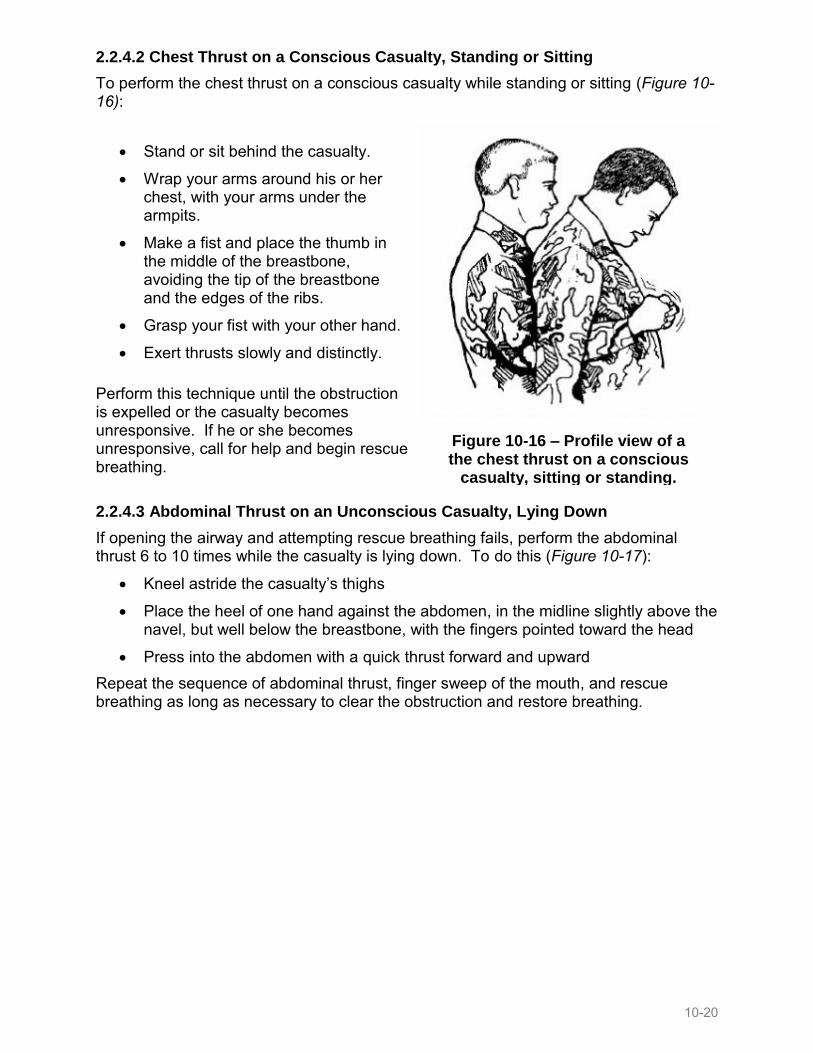
To perform the chest thrust on a conscious casualty while standing or sitting (Figure 10-16)
Stand or sit behind the casualty
Wrap your arms around his or her chest with your arms under the armpits
Make a fist and place the thumb in the middle of the breastbone avoiding the tip of the breastbone and the edges of the ribs
Grasp your fist with your other hand
Exert thrusts slowly and distinctly Perform this technique until the obstruction is expelled or the casualty becomes unresponsive If he or she becomes unresponsive call for help and begin rescue breathing
2243 Abdominal Thrust on an Unconscious Casualty Lying Down
If opening the airway and attempting rescue breathing fails perform the abdominal thrust 6 to 10 times while the casualty is lying down To do this (Figure 10-17)
Kneel astride the casualtyrsquos thighs
Place the heel of one hand against the abdomen in the midline slightly above the navel but well below the breastbone with the fingers pointed toward the head
Press into the abdomen with a quick thrust forward and upward Repeat the sequence of abdominal thrust finger sweep of the mouth and rescue breathing as long as necessary to clear the obstruction and restore breathing
10-20
Figure 10-17 mdash Performing the abdominal thrust on an unconscious or unresponsive casualty
2244 Chest Thrust on an Unconscious Casualty Lying Down
If the casualty does not respond to rescue breathing perform the chest thrust with the casualty on his or her back face up and mouth open (Figure 10-18)
Kneel close to the casualtyrsquos side
Locate the lower edge of the ribs with your fingers and run your fingers up along the center of the rib cage to the notch (Figure 10-18 view A)
Place your middle finger on the notch and your index finger next to it on the lower edge of the breastbone
Place the heel of your other hand on the lower half of the breastbone next to your two fingers (Figure 10-18 view B)
Remove your two fingers and place that hand on top of the hand positioned on the breastbone extending or interlocking your fingers (Figure 10-18 view C)
Straighten and lock your elbows with your shoulders directly above your hands
Apply enough downward pressure to depress the breastbone 1 frac12 to 2 inches then release the pressure completely See Figures 10-18 view D and 10-19
Do this 6 to 10 times delivering each thrust quickly and distinctly Repeat the sequence of chest thrust finger sweep of the mouth and rescue breathing as long as necessary to clear the obstruction and restore breathing
10-21
Figure 10-18 mdash Hand placement for performing the chest thrust on an unconscious or unresponsive casualty
Figure 10-19 mdash Showing breastbone depression when performing the chest thrust on an unconscious or unresponsive casualty
10-22
230 Recognizing and Treating Shock
Shock is the collapse of the bodyrsquos cardiovascular system including an inadequate supply of blood to the bodyrsquos tissue Shock stuns and weakens the body Recognizing shock and applying the proper first aid measures in a timely manner can save a fellow Seabeersquos life The three basic mechanisms associated with shock are heart damage blood loss causing insufficient volume of blood and inadequate circulation of blood caused by the blood vessels opening too wide Shock may result from dehydration allergic reactions significant blood loss reaction to the sight of blood or a wound or traumatic injuries such as burns gunshot wounds crush injuries etc
231 Signs and Symptoms
As the one administering first aid itrsquos important that you be able to recognize the signs of shock They do not always appear at the onset of the injury Some of these signs are the following
The casualtyrsquos pulse tends to be weak and rapid
The face and skin may be very pale or ashen gray
Breathing is likely faster than normal
The skin feels cool and clammy and is covered in sweat
The casualtyrsquos skin may be blotchy or bluish especially around the mouth and lips
Another way to assess a case of shock is to look for symptoms Symptoms are things the casualty feels The symptoms of shock are direct or indirect evidence that circulation has been disturbed Look for feelings of restlessness or nervousness He or she may be thirsty There may be nausea or vomiting and the casualty may be confused and lack awareness of his or her surroundings
232 First Aid Measures
When treating a casualty for any injury or illness you should assume he or she is already suffering from shock or that shock will soon occur Since the first aid measures to apply for shock are the same as those for preventing it you should begin treating for shock and not wait for signs to appear First move the casualty to cover if feasible Lay the casualty on his or her back unless he or she is experiencing difficulty breathing in which case allow the casualty to sit upright but monitor closely Elevate the feet higher than the heart using a stable object such as a field pack
WARNING DO NOT elevate the feet if there is an unsplinted broken leg head injury or abdominal injury If the casualty has an abdominal injury bend his or her legs at the knee
Next loosen the casualtyrsquos clothing around the neck waist and any place it seems binding It is important to maintain the casualtyrsquos body temperature In hot weather
10-23
Figure 10-20 mdash Types of fractures
place the casualty in the shade and protect him or her from becoming chilled In cold weather place blankets over and under the casualty to keep him or her warm You should reassure and keep the casualty calm by sounding authoritative and self-confident Assure the casualty you are there to help
WARNING DO NOT give the casualty food or drink If he or she is unconscious or you need to leave the casualty unattended turn the head to the side to prevent choking if he or she vomits
Seek medical aid as soon as possible and continually monitor the casualtyrsquos condition until medical personnel arrive or the casualty is transported
240 Fractures
Many kinds of accidents cause injuries to the bones joints and muscles In providing first aid to injured people you must always look for signs of fractures A fracture is any break in the continuity of a bone a dislocation is when a joint is not in the proper position and a sprain is when the connecting tissues of joints have been torn This section will be concerned mostly with fractures There are two types of fractures closed and open A closed fracture is one where the injury is completely internalmdashno broken skin (Figure 10-20 view A) An open fracture is where there is a break in the skin and tissues caused by the broken bone protruding (Figure 10-20 view B) or a missile that broke the bone (Figure 10-20 view C) leaving an opening Open fractures should always be considered contaminated and subject to infection
10-24
241 Signs and Symptoms
You may not always be able to actually see the broken bone but there are signs and symptoms to look for in a casualty that can tip you off You might see deformity in the area of the injury There may be pain or swelling The casualty will be unable to move that portion of the body or there may be unnatural movement of the injured part The casualty may also feel a grating sensation at the point of injury If you are unsure if the casualty has a fracture treat the injury as a fracture Medical professionals can make a firm diagnosis later
WARNING Do not have the casualty move the injured parts in order to identify a fracture as any movement could cause further injury
242 General Rules
Follow these general rules in treatment of a fracture Treat the open fracture tissue wound immediately by covering all wounds with a dressing That means before you treat the fracture You should also always treat a fracture victim for shock Splint the casualty in the position you find him or her Do not attempt to straighten out the limb Do not attempt to push the bone of an open fracture back under the skin Do not attempt to set the fracturemdashjust splint it You immobilize the suspected fracture to prevent sharp edges of the bone from causing more damage It will also reduce pain and help prevent or control shock If it is a closed fracture immobilization will prevent an open wound and possible infection
243 Splinting Procedures
To prepare for splinting reassure the casualty loosen any tight or binding clothing and remove all jewelry from the injured limb Do not remove boots unless you need to stabilize a neck injury or the foot is bleeding Next gather splinting materials and padding improvising as needed
10-25
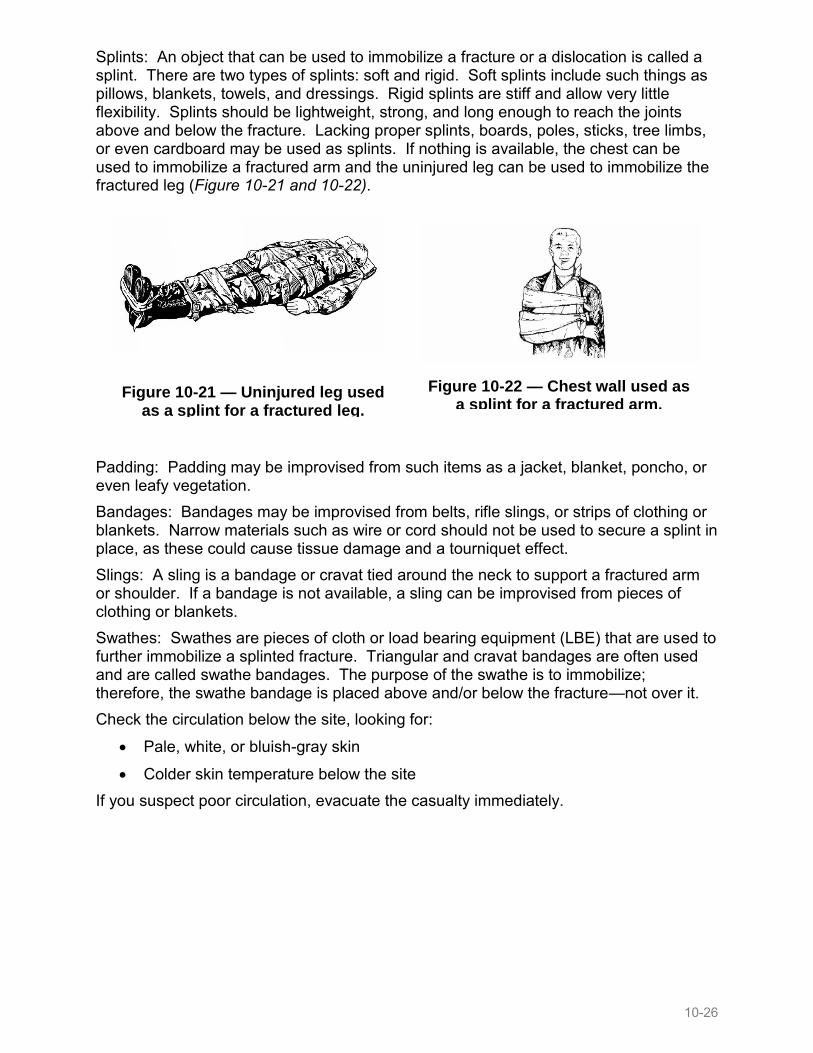
Figure 10-21 mdash Uninjured leg used as a splint for a fractured leg
Figure 10-22 mdash Chest wall used as a splint for a fractured arm
Splints An object that can be used to immobilize a fracture or a dislocation is called a splint There are two types of splints soft and rigid Soft splints include such things as pillows blankets towels and dressings Rigid splints are stiff and allow very little flexibility Splints should be lightweight strong and long enough to reach the joints above and below the fracture Lacking proper splints boards poles sticks tree limbs or even cardboard may be used as splints If nothing is available the chest can be used to immobilize a fractured arm and the uninjured leg can be used to immobilize the fractured leg (Figure 10-21 and 10-22) Padding Padding may be improvised from such items as a jacket blanket poncho or even leafy vegetation Bandages Bandages may be improvised from belts rifle slings or strips of clothing or blankets Narrow materials such as wire or cord should not be used to secure a splint in place as these could cause tissue damage and a tourniquet effect Slings A sling is a bandage or cravat tied around the neck to support a fractured arm or shoulder If a bandage is not available a sling can be improvised from pieces of clothing or blankets Swathes Swathes are pieces of cloth or load bearing equipment (LBE) that are used to further immobilize a splinted fracture Triangular and cravat bandages are often used and are called swathe bandages The purpose of the swathe is to immobilize therefore the swathe bandage is placed above andor below the fracturemdashnot over it Check the circulation below the site looking for
Pale white or bluish-gray skin
Colder skin temperature below the site If you suspect poor circulation evacuate the casualty immediately
10-26
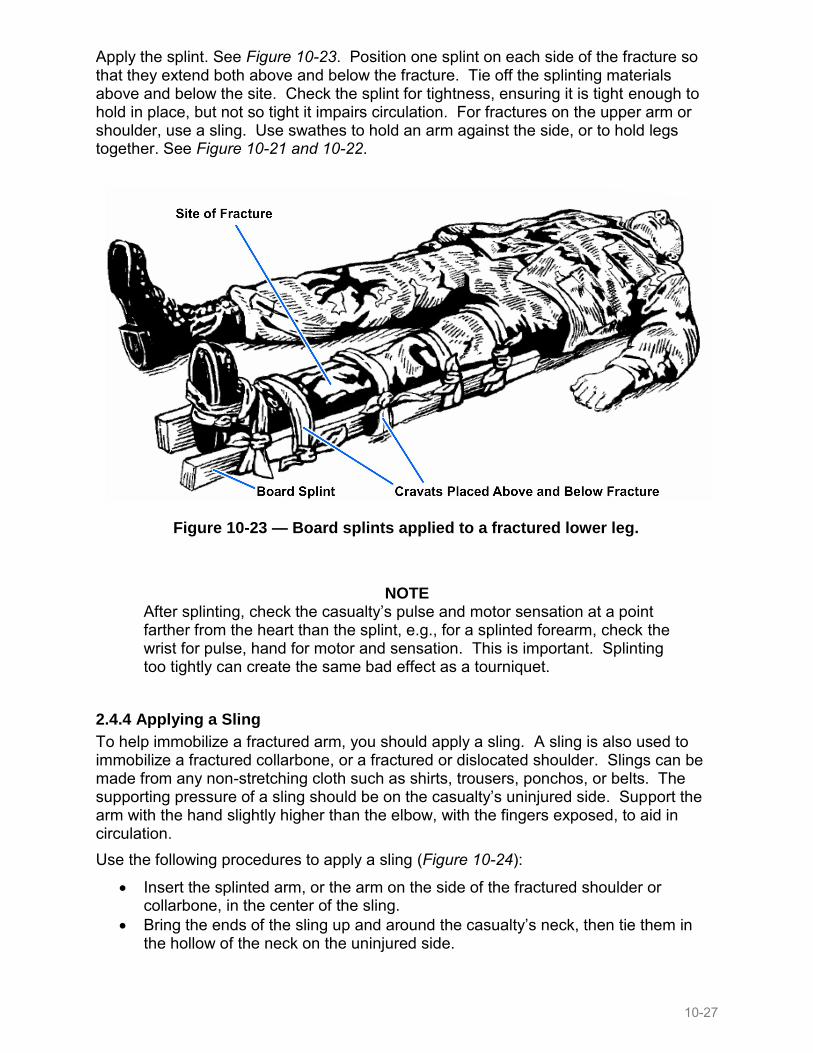
Figure 10-23 mdash Board splints applied to a fractured lower leg
Apply the splint See Figure 10-23 Position one splint on each side of the fracture so that they extend both above and below the fracture Tie off the splinting materials above and below the site Check the splint for tightness ensuring it is tight enough to hold in place but not so tight it impairs circulation For fractures on the upper arm or shoulder use a sling Use swathes to hold an arm against the side or to hold legs together See Figure 10-21 and 10-22
NOTE
After splinting check the casualtyrsquos pulse and motor sensation at a point farther from the heart than the splint eg for a splinted forearm check the wrist for pulse hand for motor and sensation This is important Splinting too tightly can create the same bad effect as a tourniquet
244 Applying a Sling
To help immobilize a fractured arm you should apply a sling A sling is also used to immobilize a fractured collarbone or a fractured or dislocated shoulder Slings can be made from any non-stretching cloth such as shirts trousers ponchos or belts The supporting pressure of a sling should be on the casualtyrsquos uninjured side Support the arm with the hand slightly higher than the elbow with the fingers exposed to aid in circulation Use the following procedures to apply a sling (Figure 10-24)
Insert the splinted arm or the arm on the side of the fractured shoulder or collarbone in the center of the sling
Bring the ends of the sling up and around the casualtyrsquos neck then tie them in the hollow of the neck on the uninjured side
10-27
Figure 10-24 ndash Application of a triangular bandage to form a sling
Figure 10-25 mdash Applying a cravat bandage for a fractured jaw
Roll the corner of the sling at the elbow and tuck it in
245 Treatment for Specific Fractures
2451 Jaw Collarbone and Shoulder Fractures
If a casualty has a fractured jaw you need to immobilize it (Figure 10-25) To do so apply a cravat vertically around the head and under the jaw then add another cravat
around the top of the head to secure the first one Do not apply the cravat to the back of the neck Do not lay the casualty on his or her back as this may cause an obstruction of the airway
10-28
Figure 10-26 ndash Immobilizing a fractured collarbone
Figure 10-27 ndash Immobilizing a fractured or dislocated shoulder
In the case of a fractured collarbone apply two belts a sling and a cravat to immobilize the area as in Figure 10-26 With a fractured or dislocated shoulder apply a sling and a cravat or swathe See Figure 10-27
2452 Spinal Column Fractures
It is impossible to be sure if a casualty has suffered a spinal column fracture A fracture is likely if the casualty has fallen his or her back has been sharply struck or bent or there is no feeling in the legs or the legs canrsquot move If the spine is fractured bending it can cause the sharp bone fragments to bruise or cut the spinal cord and result in permanent paralysis or death
10-29
Figure 10-28 ndash Maintaining a normal spinal position
While you are waiting for transport and medical assistance maintain a normal spinal position at the lower back (Figure 10-28) Caution the casualty not to move and leave the casualty in the position he or she was found Do not move any part of the body If the casualty is face up you can slip a blanket under the arch of the lower back If found face down do not put anything under him or her If the casualty must be moved a four man team will be needed to do so safely
2453 Neck Fractures
When treating neck fractures caution the casualty not to move and leave the casualty in the position he or she was found If the neck or head is in an abnormal position and the casualty is lying face up raise the shoulders slightly and slip a roll of bath towel or something of similar bulk under the neck Do not bend the head or neck forward and do not raise or twist the head Immobilize the head using boots or heavy objects on each side of it (Figure 10-29)
10-30
Figure 10-29 mdash Immobilizing a fractured neck
If the head or neck is in an abnormal position and the casualty is lying face down do not move the casualty Immobilize the head with boots or heavy objects on each side of it but do not put a roll under the neck Do not bend the head or neck or attempt to roll the casualty onto his or her back If transportation is necessary at least two people will be required
250 Burn Injuries
Burns are injuries that most commonly result from exposure to fire chemicals or electricity The severity of burns depends on the depth size and location Burns are most serious when they are located on the face neck hands and feet Also they are dangerous when combined with fractures There are four types of burns you should learn to recognize and treat thermal electrical chemical and laser Thermal burns are caused by fire hot objects liquids or gases Electrical burns are caused by electrical wires current and lightning Chemical burns are caused by coming in contact with wet or dry chemicals or white phosphorous Laser burns are burns to the eye causing an ocular injury
251 Eliminate the Source
The first step to take with all types of burns is to eliminate the source of the burn After eliminating the source you can evaluate the casualty and provide appropriate first aid measures You should take the following actions to eliminate the source of the burn injury
With thermal burns remove the casualty from danger cover him or her with non-synthetic material and if still on fire roll him or her on the ground to extinguish the fire
In the case of an electrical burn remove the source of current by turning it off if it is close enough Wrap non-conductive material around the casualtyrsquos back and
10-31
shoulders and drag the casualty away Do not make direct contact with the casualty or touch any wires
When the casualty has been exposed to chemicals remove liquid chemicals by flushing the casualty with large amounts of water
Remove dry chemicals by brushing off the particles from the casualty but do not use your bare hands Afterwards flush the casualty with either large amounts of water or none at all as insufficient amounts of water may cause a chemical reaction and make matters worse
If the burn is from white phosphorous smother the chemical with wet clothes or mud and keep the casualty covered
In the case of a laser burn remove the casualty from the beam and make sure you do not look directly at the beam yourself
252 First Aid Measures
After removing the source of the burn evaluate the casualty for other conditions requiring first aid such as problems with breathing weak or no pulse or other wounds Expose the burn by removing any clothing over the burn unless it is stuck to the wound If the casualtyrsquos hands or wrists are burned remove any jewelry Next apply a field dressing For electrical burns check for both entry and exit burns The exit burn may be anywhere on the body With wet or dry chemical burns flush the burns with large amounts of water first then cover with a dry dressing In the case of white phosphorous burns flush the burn with large amounts of water then cover them with wet material or mud For laser burns apply a field dressing over the affected eye or eyes When applying a field dressing take the following precautions
Do NOT place the dressing over the face or genital area
Do NOT break the blisters
Do NOT apply grease or ointments to the burns In all cases seek medical assistance
300 HEAT AND COLD INJURIES
310 Introduction
Climatic injuries are caused by extreme hot or cold environments The human body needs time to adapt to any extremes of temperature The Seabeersquos physical condition will to some extent determine how long it takes to become acclimated There are other factors that contribute to an individualrsquos health and therefore susceptibility such as proper diet or nutrition sufficient sleep and rest proper exercise and suitable clothing While serving in extremes of climate individuals who are trying to lose weight should be supervised by properly trained medical personnel Most climatic injuries are preventable
10-32
320 Heat Injuries
321 General
Sometimes the heat of the environment causes injuries that need to be treated in the field Heat injuries are caused by exposure to extreme heat improper clothing wearing of Mission Oriented Protective Posture (MOPP) gear enclose spaces and wearing body armor The prevention of heat exposure injuries is a command responsibility All hands must be educated about medical dangers and environmental health in the field There are three categories of heat injuries heat cramps heat exhaustion and heatstroke
WARNING The heat casualty should be continually monitored for development of conditions which may require the performance of necessary basic lifesaving measures
CAUTION Do not use salt solutions in first aid procedures for heat injuries
322 Heat Cramps
Heat cramps are caused by an imbalance of electrolytes in the body from excessive sweating The signs and symptoms of heat cramps are
Cramping in the arms or legs
Stomach cramps
Excessive sweating To treat a casualty for heat cramps first move him or her to a cool shady area Loosen his or her clothing and slowly give the casualty a canteen of water Cool water is absorbed more quickly than warm water If the condition is unabated or continues seek medical assistance
323 Heat Exhaustion
Heat exhaustion is caused by a loss of fluids in the body The signs and symptoms of heat exhaustion include the following
Excessive sweating
Pale moist cool skin
Headaches
Weakness
Dizziness
Loss of appetite
Cramping 10-33
Nausea with or without vomiting
Chills or goosebumps
An urge to defecate
Rapid breathing
Tingling in the hands or feet
Confusion To treat for heat exhaustion first move the casualty to a cool shady area Loosen or remove his or her clothing and boots Pour water over the casualty and fan him or her while slowly giving the casualty a canteen of water Elevate the legs and keep the casualty from doing any strenuous activities for the rest of the day Monitor the casualty until the symptoms are gone or provide medical assistance
324 Heatstroke
Heatstroke is a failure of the bodyrsquos cooling mechanism The signs and symptoms of heatstroke are
Unconsciousness or sudden collapse Use the following procedures to treat heatstroke
Move the casualty to a cool shady area
Loosen or remove the casualtyrsquos clothing
Spray or pour water over him or her and fan him or her
Massage the extremities and skin
Elevate the legs
Slowly give the casualty a canteen of water This is a more severe heat injury than heat cramps or heat exhaustion so you should seek medical assistance immediately while monitoring the casualty for necessary lifesaving measures
330 Cold Injuries
331 General
Cold injuries are most likely to occur when it is moderately cold but wet andor windy It is important to understand what to do to prevent cold injuries First maintain good personal hygiene get sufficient exercise take care of your feet and hands and use protective clothing There are many contributing factors to cold injuries Humidity precipitation and wind increase the likelihood of injury Stationary activities such as standing guard increase
10-34
an individualrsquos vulnerability especially if that individual is in contact with the ground for extended periods or standing in water Inadequate diet and rest increase susceptibility and lower defenses Physical fatigue leads to apathy neglect and carelessness Studies show that previous cold injuries also increase your risk Depressed and unresponsive personnel tend to be less active Finally excessive use of alcohol or drugs impairs your judgment and is likely to cause carelessness or overconfidence Seabees may be suffering from cold injuries without knowing it They may simply feel uncomfortable and not notice that extremities are already numb from the cold The general signs and symptoms of cold injuries include
Numbness or tingling sensations which may be relieved by simply loosening boots or clothing and exercising to rewarm yourself
Discoloration of the skin o With lighter-skinned individuals skin becomes red then pale or waxy
white o With darker-skinned individuals skin will be grayish
Affected area may feel cold to the touch
Swelling may occur with deeper injuries
Blisters may occur after rewarming You should use the buddy system to check each other for signs of cold injuries The treatment for cold injuries varies with the severity of the injury First and foremost an individual suffering any cold injury should be removed from the cold environment With superficial injuries you can rewarm the affected part with body heat With more serious life-threatening injuries you should seek medical assistance immediately
WARNING Do not massage the injured part Do not expose the casualty directly to fire or a stove Do not rub the injured part with snow Do not slap or chafe injured parts or soak them in cold water Avoid walking on injured feet if at all possible
The primary injuries caused by cold environments are chilblain immersion syndrome frostbite snow blindness dehydration and hypothermia
332 Specific Cold InjuriesConditions
3321 Chilblain
Chilblain is caused by repeated exposure of bare skin to temperatures from 32 to 60 degrees Fahrenheit The symptoms of chilblain are acutely swollen red tender hot or itchy skin Treat chilblain by rewarming the affected part using firm steady pressure with your hands or by placing the affected parts under your arms or against your buddyrsquos stomach Do not rub or massage the affected parts Have medical personnel evaluate you for any damage
10-35
3322 Immersion Syndrome
Immersion syndrome also known as immersion foot or trench foot results from long exposure of the feet to wet conditions in temperatures ranging from 32 to 50 degrees Fahrenheit Inactive feet in damp or wet socks and boots are more susceptible The signs of immersion syndrome occur in stages with exposure At first the feet are cold but painless The pulse may be weak and the feet may be somewhat numb Next the feet feel hot with burning or shooting pain Later the skin becomes pale with a bluish tint and the pulse decreases In the later stages the feet may blister swell bleed or even become gangrenous Treatment is required for all stages of immersion syndrome
Gradually warm the affected part and protect it from trauma and infection
Apply dry loose clothing or layers of warm coverings
Elevate the feet to reduce swelling
Transport the casualty to a medical facility as soon as possible
Do not massage the feet moisten the skin or apply direct heat or ice 3323 Frostbite
Frostbite is caused by exposure to cold temperatures usually below 32 degrees Fahrenheit Individuals with a history of cold injuries are more likely to get frostbite The most easily frostbitten parts of the body are the cheeks nose ears chin forehead wrists hands and feet Deep frostbite is very serious and can result in amputation of appendages The signs or symptoms of frostbite include
Loss of sensation or numbness
Sudden blanching of the skin then brief tingling
Redness of the skin or grayish in darker-skinned individuals
Blisters swelling or tender parts
Loss of previous pain sensation
Pale yellowish waxy-looking skin
Frozen tissue that feels solid or wooden Treat frostbite of the face ears or nose by covering them with bare hands until sensation and natural skin color returns Place frostbitten hands under the armpits To treat frostbitten feet remove boots and socks and place the feet under clothing against a buddyrsquos body General treatment of frostbite is as follows
Keep the affected parts warm and covered
Remove or loosen restrictive clothing
Cover affected parts to protect them from further injury
Exercise if possible to warm up
Seek medical treatment
Do not rub the injured part with snow or apply cold water 10-36
Do not massage
Do not expose to an open fire
Do not use ointments or salves
Do not manipulate the affected part to increase circulation
Do not use alcohol or tobacco 3324 Snow Blindness
Snow blindness is the effect that the glare from ice or snow has on the eyes It is more likely to occur in hazy cloudy weather The signs and symptoms of snow blindness are
The sensation of grit in the eyes
Pain in or over the eyes
Eye watering or redness
Headache
Pain with exposure to light To treat a casualty for snow blindness blindfold or cover the eyes with dark cloth Complete rest is desirable for quicker recovery If necessary and possible evacuate the casualty to a medical facility Snow blindness usually heals by itself in a few days if there is no repeated exposure 3325 Dehydration
Dehydration occurs when the body loses too much fluid It is just as prevalent in cold weather as in hot In colder temperatures sweating is not as noticeable since it evaporates and is quickly absorbed The signs and symptoms of dehydration are
Mouth tongue throat parched or dry
Difficulty swallowing
Nausea with or without vomiting
Extreme dizziness and fainting
General fatigue and weakness
Muscle cramps
Difficulty focusing the eyes To treat for dehydration keep the individual warm and loosen his or her clothing Shelter the individual from the wind and cold and begin fluid replacement immediately Transport the casualty to a medical treatment facility as soon as possible 3326 Hypothermia
Hypothermia or general cooling of the body occurs when the body loses heat faster than it can produce heat It can occur with temperatures above or below freezing and causes cooling of the core body temperature below 95 degrees Fahrenheit Hypothermia can be caused by fatigue poor physical condition dehydration faulty blood circulation alcohol or drug use trauma or immersion in cold water The signs and symptoms of hypothermia are progressive and include
10-37
Shivering
Faint pulse
Drowsiness and mental slowness
Hampered stiff and uncoordinated movement
Slurred speech
Slow and shallow breathing
Frozen extremities
Irregular heart action To treat mild hypothermia rewarm the body evenly and as soon as possible You must provide a heat source as the casualty will be unable to produce the needed heat Keep the casualty dry and protected from the elements Give the casualty warm liquids gradually if he or she is conscious Be prepared to provide life support measures and seek medical assistance immediately Severe hypothermia is treated by stabilizing the bodyrsquos core temperature and avoiding further heat loss Handle the casualty gently and evacuate to a medical facility as soon as possible Do not expose the body to an open fire Wrap any hot water bottles or canteens in cloth to avoid scalding Rewarming in the field is dangerous and resuscitation is difficult if not impossible in the field
400 FIELD SANITATION
410 General Information
Field waste disposal is performed to prevent flies from spreading germs from waste to your food and to keep unwanted animals out of your bivouac area Use the following as a guide to performing proper field waste disposal Step 1 Determine the type of field waste disposal to use
The proper type of device to use depends upon the mission length of stay terrain and weather conditions but you should use Table 10-1 as a guideline
When on bivouac o Chemical toilets are the preferred method o Burn-out latrines are preferred as an improvised method when chemical
toilets are not available
When on the march o Individual waste collection bags are preferred o Personal cat-holes are used as an alternative
NOTE
Check local state federal and host-nation regulations for applicable restrictions and for prohibition on burning or burying waste Garbage and rubbish may have to be transported to a waste disposal facility
Human waste disposal should be as far from food services as possible but at least 100 meters
Garbage and soakage pits should be at least 30 meters from food service
Locate downwind and downslope if possible
Locate downslope of all wells springs streams and other water sources at least 30 meters
Step 3 Set up construct and maintain latrines garbage pits and soakage pitstrenches
As soon as unit moves into area detail members to set up chemical toilets andor dig latrines
Assign members to clean latrines on a daily basis
Instruct the Field Sanitation Team to spray latrines with insecticide
Install handwashing facilities at food service and latrines
Cover transport burn or bury waste daily depending on regulations Step 4 Inspect daily to ensure
Waste is collected and transported when possible
Straddle-trench latrines and garbage pits are covered with dirt
Pail latrines are emptied and cleaned
Burn-out latrine containers are rotated and contents burned
Facility not contents are sprayed with insecticide as needed Step 5 Close out improvised latrines and garbage pits when filled within 1 foot of surface by
Spraying with residual insecticide
Packing earth in successive 3-inch layers until mounded one foot above surface
Spraying again with insecticide 10-39
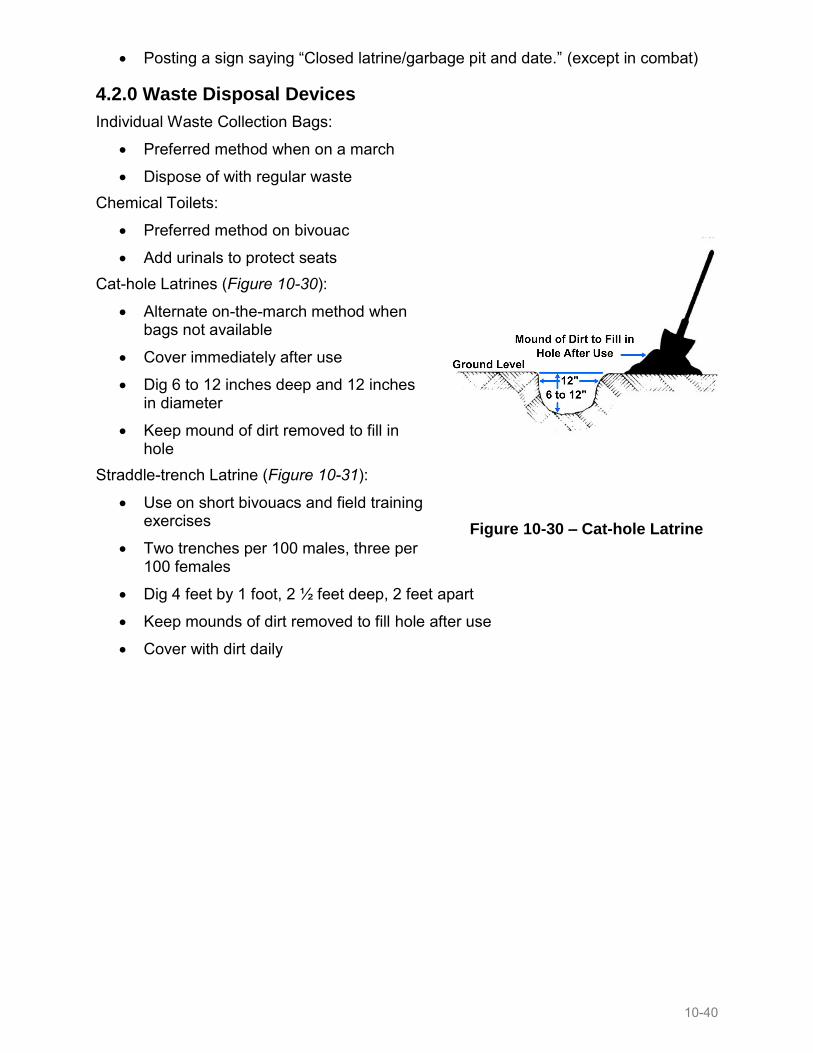
Figure 10-30 ndash Cat-hole Latrine
Posting a sign saying ldquoClosed latrinegarbage pit and daterdquo (except in combat)
420 Waste Disposal Devices
Individual Waste Collection Bags
Preferred method when on a march
Dispose of with regular waste Chemical Toilets
Preferred method on bivouac
Add urinals to protect seats Cat-hole Latrines (Figure 10-30)
Alternate on-the-march method when bags not available
Cover immediately after use
Dig 6 to 12 inches deep and 12 inches in diameter
Keep mound of dirt removed to fill in hole
Straddle-trench Latrine (Figure 10-31)
Use on short bivouacs and field training exercises
Two trenches per 100 males three per 100 females
Dig 4 feet by 1 foot 2 frac12 feet deep 2 feet apart
Keep mounds of dirt removed to fill hole after use
Cover with dirt daily
10-40
Figure 10-31 ndash Straddle-trench Latrine
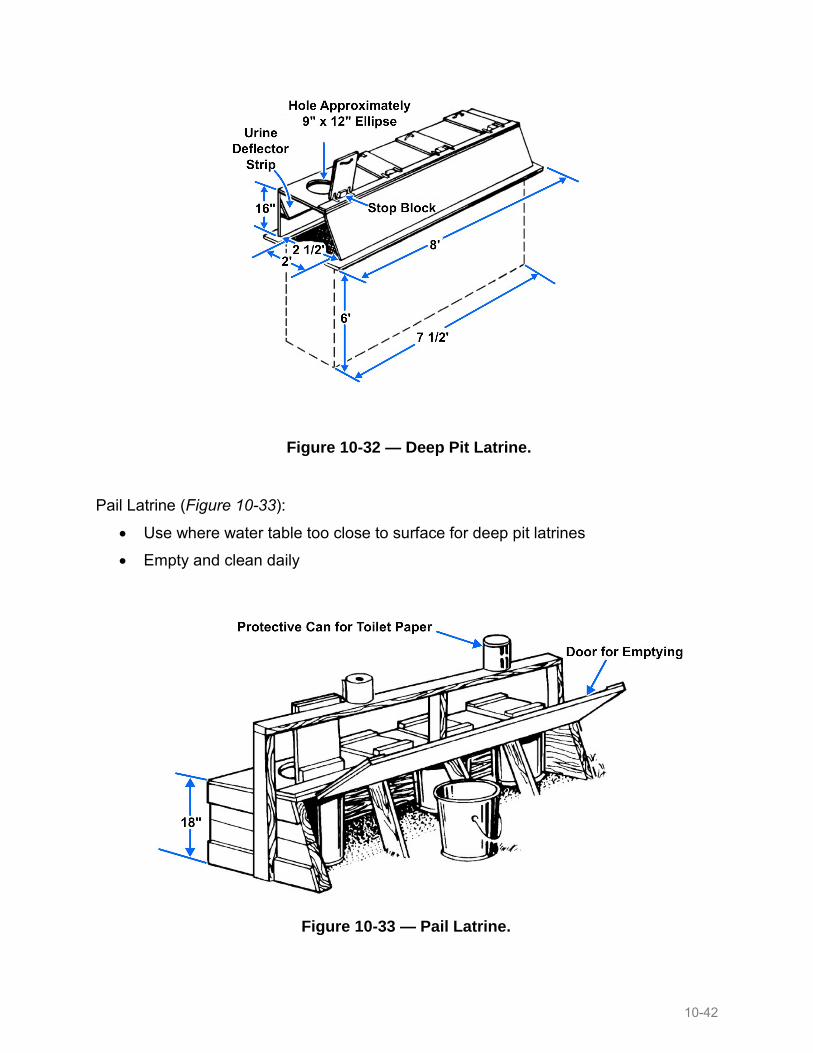
Deep Pit Latrine (Figure 10-32)
Use for longer periods and built-up areas
Collapsible two-seat boxes available in supply system
Add urinals to protect seats in male latrines
Enough for 6 percent of Seabees
Cover with dirt daily Garbage Pit
Locate near dining facility but no closer than 30 meters
One pit per 100 Seabees served per day
Transport to approved landfill or cover with dirt after each meal and close daily
For longer periods burn and bury ashes
10-41
Figure 10-32 mdash Deep Pit Latrine
Figure 10-33 mdash Pail Latrine
Pail Latrine (Figure 10-33)
Use where water table too close to surface for deep pit latrines
Empty and clean daily
10-42
Figure 10-34 ndash Burn-out Latrine
Figure 10-35 ndash Other urinals Trough Pipe and Urinoil
Grease Trap ndash Use with soakage pits and trenches to prevent clogging of soil Burn-out Latrine (Figure 10-34)
Use where water table too close to surface or extended stays
Rotate containers daily and burn contents
Other Urinals
Trough (Figure 10-35 frame A)
Pipe (Figure 10-35 frame B)
Urinoil (Figure 10-35 frame C)
10-43
Figure 10-36 ndash Food Services Soakage Pit
Soakage Pit - Food Service (Figure 10-36)
Locate near dining facility to prevent accumulation of liquid waste from kitchens
Need at least two to alternate daily
Fill with loose rocks
Add grease trap for dining facility waste to prevent clogging of soil Soakage Pit (Other)
Provide for urinals showers Lyster bags mess kits laundry handwashing facilities
Prevents accumulation of liquid waste
10-44
500 WATER PURIFICATION
510 Overview
Infectious diarrhea results from contamination of water and food by bacteria viruses and parasites Water- and foodborne diarrheal diseases are of particular concern to the military because they can be spread to large numbers of service members simultaneously with disastrous consequences for combat readiness Diarrhea especially when vomiting or fever is present can cause dehydration Fill your canteen with treated water at every chance When treated water is not available you must disinfect the water in your canteen using one of the following methods Using iodine tablets is the preferred way to individually purify water There are several alternate techniques for making drinking water clean if iodine tablets are not available You can use chlorine ampoules which are small sealed glass vials You can also use an emergency water treatment kit with Chlor-Flocreg tablets household bleach or boiling to purify water
520 Water Purification Using Iodine Tablets ndash Preferred Method
The following are the procedures for purifying water with iodine tablets the preferred method There are variations depending on the amount of water yoursquore purifying whether it is cold or not and whether it is cloudy or clear
Fill your canteen with the cleanest water available
Put one iodine tablet into clear water or two iodine tablets into cold or cloudy water If you are using two-quart canteens double those amounts Use two tablets for clear water and four tablets for cold or cloudy water
Place the cap on your canteen
Shake canteen to dissolve tablets
Wait 5 minutes
Loosen the cap and tip the canteen over to allow leakage around the canteen threads
Tighten the cap and wait an additional 25 minutes before drinking
530 Water Purification Using Chlorine Ampoules
The following are the procedures for purifying water with chlorine ampoules
Fill your canteen with the cleanest water available
Mix one ampoule of chlorine with one-half canteen cup of water
Stir that mixture with a clean utensil until the contents are dissolved
After stirring the mixture pour one-half of a plastic canteen capful or one Nuclear Biological Chemical (NBC) canteen capful of chlorine solution into your canteen of water
Place the cap on your canteen and shake
Slightly loosen the cap and tip the canteen over to allow leakage around the threads
10-45
Tighten the cap and wait 30 minutes before drinking
NOTE
By wearing gloves or wrapping the ampoule in paper or cloth you can avoid cutting your hands when breaking open the glass ampoule
540 Water Purification Using An Emergency Water Treatment Kit (Chlor-Flocreg Tablets)
The following are the procedures for purifying water with an emergency water treatment kit with Chlor-Flocreg tablets
Tear off the top of the plastic water treatment bag at the perforation (first time use)
Fill the treatment bag one-half full with the cleanest water available
Add one tablet
Fold the bag tightly three times and fold the tabs in
Hold the bag firmly and shake until the tablet dissolves
Swirl for 10 seconds
Let the bag sit for 4 minutes
Swirl again for 10 seconds
Let the bag sit for an additional 15 minutes
Insert the filter pouch into the neck of the canteen
Pour water from bag through the filter into the canteen Avoid pouring sediment into the filter
Rinse the filter with treated water after use Always filter through the same side of the filter
Rinse sediment from the treatment bag and save the bag for water treatment only
CAUTION Do not drink from the treatment bag The water is still contaminated and must be filtered before drinking Drinking non filtered water may cause stomach and intestinal disorders
550 Water Purification Using Household Bleach
The following are the procedures for purifying water with household bleach
NOTE
Ensure bleach is unscented
10-46
Fill your canteen with the cleanest water possible
Read the label on the bleach bottle to determine the amount of available chlorine Liquid chlorine laundry bleach usually has about 5 to 6 percent available chlorine Based upon the strength of the household bleach add the chlorine to the canteen as directed in Table 10-2
Table 10-2 mdash Drops of Household Bleach to be Added to a One-Quart Canteen
AVAILABLE CHLORINE TO CLEAR WATER TO COLDCLOUDY WATER 1 PERCENT 10 drops 20 drops
Slightly loosen the cap and tip the canteen over to allow leakage around threads
Tighten the cap and wait 30 minutes before drinking the water
560 Water Purification by Boiling
You may find yourself in a situation where iodine or other purification methods are not available In this case you can boil water using the following procedures to make it safe for drinking
Bring water to a rolling boil for 5 minutes
In an emergency boiling water for just 15 seconds will help
Protect boiled water from recontamination
CAUTION If water is suspected of NBC contamination do not attempt to treat Seek a quartermaster water supply
Summary In this chapter you were introduced to the importance of providing first aid to an injured person and the explanation and descriptions of first aid measures that you can apply to yourself and to others before trained medical personnel arrive This chapter provided how-to instructions in lifesaving measures to include clearing the upper airway giving artificial ventilation stopping bleeding controlling shock and protecting the wound Additionally this chapter discussed fundamentals of field sanitation and water purification
10-47
Assignment 10
Objectives
1 Define first aid and identify the general first aid rules 2 Define basic life support 3 Recognize the signs of airway obstruction and describe the steps necessary to
clear the airway 4 Recognize and describe the steps necessary to perform artificial ventilation 5 Describe the methods used to control bleeding 6 Define shock and identify its signs symptoms and treatment 7 Identify the cause and treatment of injuries caused by exposure to heat or cold 8 Identify the treatment of first aid to victims of various types of burns 9 Recognize the steps in treating and immobilizing a fracture 10 Identify field sanitation methods used to dispose of human waste and garbage 11 Identify the procedures taken to purify drinking water
Questions 1 True or False The three reasons for performing first aid are to save lives
prevent further injuries and prevent infection
1 True 2 False
2 There are how many vital functions
1 1 2 2 3 3 4 4
3 True or False The vital functions consist of the breathing process respiration
and blood circulation
1 True 2 False
4 Brain cells when deprived of oxygen will die within what period of time
1 2 to 4 minutes 2 4 to 6 minutes 3 12 to 18 minutes 4 30 minutes to an hour
10-48
5 Respiration involves inhaling oxygen and exhaling which of the following
39 When performing rescue breathing how many breaths should you blow into their
mouth or nose before checking for a pulse or re-establishing airway and seal
1 1 2 2 3 3 4 4
40 Which of the following is a correct statement concerning treatment for bleeding
1 Do not remove objects from the wound 2 Pressure points should be used as a last resort 3 Tails of the standard field dressing should be tied over the wound 4 You should use your field dressing first
41 Which of the following is a correct statement concerning treatment for bleeding
1 If an object is impaled in the wound remove it quickly 2 Remove any visible foreign objects from the wound 3 Tie the tails of the dressing at the edges of the wound 4 You should use your field dressing first
42 When using manual or direct pressure to stop bleeding firm pressure should be
applied for how many minutes
1 2 to 4 2 5 to 10 3 15 to 30 4 Until bleeding stops
43 When applying a tourniquet which of the following statements is correct
1 It should be applied directly over the wound 2 Loosen and retighten every 5 to 10 minutes 3 Once applied do not loosen 4 Wire or shoestring may be used
44 A burn from a hot liquid is considered which type of burn
1 Chemical 2 Electrical 3 Laser 4 Thermal
10-54
45 Which of the following types of burns should be kept moist
1 Dry chemical 2 Laser 3 Wet chemical 4 White Phosphorous
46 True of False When treating either heat exhaustion or heatstroke you should
elevate the casualtyrsquos legs
1 True 2 False
47 Which of the following injuries is caused by an imbalance of electrolytes in the
60 Which of the following human waste disposal methods should be used on patrol
1 Burn-out 2 Cat-hole 3 Pail 4 Straddle-trench
61 When using straddle-trench latrines how many trenches do you need for 100
females
1 1 2 2 3 3 4 4
10-57
ASSIGNMENT 10
First Aid and Field Sanitation
Directions Select the correct answer from the list of alternates below each question in the end of chapter assignment Write in the answer next to the corresponding question number below Use this answer sheet as a reference to completing the online assignment related to this assignment
1
2
3
4
5
6
7
8
9
10
11
12
13
14
15
16
17
18
19
20
21
22
23
24
25
26
27
28
29
30
31
32
33
34
35
36
37
38
39
40
41
42
43
44
45
46
47
48
49
50
51
52
53
54
55
56
57
58
59
60
61
10-58
Additional Resources and References
This chapter is intended to present thorough resources for task training The following reference works are suggested for further study This is optional material for continued education rather than for task training First Aid FM 4-2511 (FM 21-11)NTRP 4-0211AFMAN 44-163(I)MCRP 3-02G Field Hygiene and Sanitation FM 21-10MCRP 4-111D
10-59
Trainee Feedback
Center for Seabees and Facilities Engineering (CSFE) makes every effort to keep their courses up-to-date and free of technical errors If you have a suggestion found an error or inaccuracy please write FAX or email us by using the form below Use one form for each comment and be sure to fill in the information as accurately and detailed as possible Thank you for your assistance Write CSFE
NCF Training Division (N7B) 3502 Goodspeed St Port Hueneme CA 93043-4337
Course Seabee Combat Handbook Volume ____ NAVEDTRA __________ Course Date ________ Chapter Number ______ Page ______ Paragraph _____ Sentence ______ Figure ______ FrameView ______ Description ____________________________________________________ ______________________________________________________________ ______________________________________________________________ ____________________________________________________________________________________________________________________________ ______________________________________________________________ (optional) Corrective action _______________________________________ ______________________________________________________________ ______________________________________________________________ (optional) Supporting reference(s) __________________________________ ______________________________________________________________ Your email address if a response is requested ________________________
10-60
Chapter 10
First Aid and Field Sanitation
Overview
Objectives
Prerequisites
Features of This Manual
100 BASIC FIRST AID
Attitude - You should remain calm and act quickly but efficiently Reassure the casualty that his or her injuries are understood and that proper medical attention is forthcoming The casualtyrsquos confidence and positive attitude can be very helpful
Positioning the Casualty - In most cases the casualty should be lying down with his or her head level with the body until you have determined the type and extent of his or her injuries The exceptions to this are the following
Clothing - Although you should move the casualty no more than necessary you may have to remove clothing in order to determine the extent of his or her injuries Remove only the clothing necessary for examination and treatment being especially car
Infection - Do not touch any open wounds or burns with your fingers hands or other non-sterile objects unless absolutely necessary to stop severe bleeding
110 Vital Functions
111 The Breathing Process
112 Respiration
113 Circulation
120 Evaluating a Casualty
121 Step 1 ndash Check for Responsiveness
122 Step 2 ndash Check for Breathing
123 Step 3 ndash Check for Pulse
124 Step 4 ndash Check for Bleeding
125 Step 5 ndash Check for Shock
126 Step 6 ndash Check for Fractures
127 Step 7 ndash Check for Burns
128 Step 8 ndash Check for Head Injury
200 FIRST AID MEASURES
210 Controlling Bleeding
211 General
212 Methods to Control Bleeding
2121 Applying a Battle Dressing
2125 Applying a Tourniquet
220 Opening the Airway and Restoring Breathing
221 Preliminary Assessment
222 Opening the Airway
223 Rescue Breathing
2231 Mouth-to-Mouth Method
2232 Mouth-to-Nose Method
224 Clearing an Obstructed Airway
2241 Abdominal Thrust on a Conscious Casualty Standing or Sitting
2242 Chest Thrust on a Conscious Casualty Standing or Sitting
230 Recognizing and Treating Shock
231 Signs and Symptoms
232 First Aid Measures
240 Fractures
241 Signs and Symptoms
242 General Rules
243 Splinting Procedures
244 Applying a Sling
245 Treatment for Specific Fractures
2453 Neck Fractures
250 Burn Injuries
251 Eliminate the Source
252 First Aid Measures
300 HEAT AND COLD INJURIES
310 Introduction
320 Heat Injuries
321 General
322 Heat Cramps
323 Heat Exhaustion
324 Heatstroke
330 Cold Injuries
331 General
332 Specific Cold InjuriesConditions
3321 Chilblain
3322 Immersion Syndrome
400 FIELD SANITATION
410 General Information
420 Waste Disposal Devices
500 WATER PURIFICATION
510 Overview
520 Water Purification Using Iodine Tablets ndash Preferred Method
530 Water Purification Using Chlorine Ampoules
540 Water Purification Using An Emergency Water Treatment Kit (Chlor-Flocreg Tablets)
550 Water Purification Using Household Bleach
560 Water Purification by Boiling
Summary
Assignment 10
Objectives
Questions
First Aid and Field Sanitation
Additional Resources and References
Trainee Feedback
animationAvailable1
Button1
Features of This Manual
This manual has several features which make it easy to use online
Figure and table numbers are italicized within the handbook text Figure and table reference numbers are conveniently located next to (or near) the applicable handbook text
Audio and video clips are included in the text with italicized instructions telling you where to click to activate the appropriate link
Review questions are included at the end of this chapter as the chapter assignment To submit assignments log into httpswwwcoursesnetcnavymil go to ldquoStudent Servicesrdquo in the drop down click on ldquoActive Coursesrdquo go to ViewSubmit Answers next to the course you wish to submit answers for Assignments may be submitted to the above Web site as they are completed and instant scoring is available Your completion letter is available as soon as you pass all assignments
A form at the end of each chapter allows your input for improving the manual or correcting errors to be brought to the attention of CSFErsquos Technical Review Committee Your input is important and will help keep this manual up to date and free of technical errors
100 BASIC FIRST AID
First aid is the emergency care given to the sick injured or wounded before and until they can be treated by medical personnel There are some fundamental concepts to keep in mind as you learn basic first aid techniques First of all you need to realize that first aid knowledge and skills can and do save lives You can save a casualtyrsquos life and prevent permanent disability if you know what to do what not to do and when to seek trained medical assistance The three basic reasons for first aid are to save lives prevent further injuries and prevent infection Most injured or ill service members are able to return to their units to fight or support primarily because they are given appropriate and timely first aid followed by the best medical care possible How you attend to sick or injured fellow Seabees may be the difference between life and death Before you learn the specific treatments for various types of injuries you should have an understanding of the following general rules of administering first aid
Continuity - First and foremost as a non-medical person you should seek medical assistance as soon as possible but not interrupt your first aid efforts When available you should send a fellow Seabee for help After administering any necessary first aid treatment you should continue to monitor the casualty for the development of any conditions which may require further treatment or lifesaving measures until relieved by properly trained medical personnel
10-2
Attitude - You should remain calm and act quickly but efficiently Reassure the casualty that his or her injuries are understood and that proper medical attention is forthcoming The casualtyrsquos confidence and positive attitude can be very helpful
Positioning the Casualty - In most cases the casualty should be lying down with his or her head level with the body until you have determined the type and extent of his or her injuries The exceptions to this are the following
o If the casualty is in danger of choking on blood or vomited matter place the casualty on his or her side or on the back with the head turned to one side and lower than the feet
o When the casualty has a chest injury or difficulty breathing place him or her in a sitting or semi-sitting position
o If the casualty is in shock place him or her on the back with the head slightly lower than the feet When injuries allow raise and support the casualtyrsquos feet approximately 6 to 12 inches off the ground
NOTE
If a bone is broken or you suspect one is broken do not move the casualty until you have immobilized the break An exception to this rule is when the casualty is in danger from fire flood or hostile fire
Clothing - Although you should move the casualty no more than necessary you may have to remove clothing in order to determine the extent of his or her injuries Remove only the clothing necessary for examination and treatment being especially careful with fractures and areas where the clothing may be stuck to the wound If necessary clothing can be cut off or ripped along the seams Shoes may also have to be cut off to avoid pain or complicating an injury When removal of clothing is necessary ensure the casualty does not become chilled
Infection - Do not touch any open wounds or burns with your fingers hands or other non-sterile objects unless absolutely necessary to stop severe bleeding
Food or Drink - An unconscious person should never be given food or drink This could cause the casualty to choke from unsuccessful vomiting or even cause death
110 Vital Functions
Before you learn how to evaluate a casualty and the various treatments you should have a basic understanding of the bodyrsquos vital functions the breathing process respiration and blood circulation As the term implies these functions are vital to the continuance of life and therefore the most important
10-3
Figure 10-1 mdash The Breathing Process
Figure 10-2 mdash Respiratory System
111 The Breathing Process
All human beings must have oxygen to survive Through the breathing process your lungs draw in oxygen and put it into your blood stream (Figure 10-1) Your heart then pumps this oxygen-rich blood throughout your body to supply your cells with the required oxygen If brain cells are deprived of oxygen they will die within 4 to 6 minutes and will never regenerate unlike some of the bodyrsquos other cells As brain cells die permanent brain damage occurs followed by paralysis and finally death
112 Respiration
Respiration occurs when you inhale to take in oxygen and then exhale to expel carbon dioxide (Figure 10-2) This process uses your airway which is comprised of your nose mouth and throat your lungs including the bronchial tree and your rib cage when your diaphragm and rib muscles contract and relax This cycle occurs 12 to 18 times per minute supplying oxygen-rich blood to your heart
10-4
Figure 10-3 mdash Points on the body for
detecting a pulse
113 Circulation
The pulse that can be felt at various points on the body is caused by the rhythmic expansion and contraction of the arteries A casualtyrsquos pulse can be felt at the carotid artery on the side of the neck the femoral artery in the groin area the radial artery on each wrist and the posterior tibial artery at each ankle Refer to Figure 10-3 to see each arteryrsquos location on the body
NOTE Do not use your thumb to check a casualtyrsquos pulse because you may confuse the beat of your own pulse with that of the casualty
10-5
120 Evaluating a Casualty
There are eight steps in properly evaluating a casualty They should be performed in order and the results used to apply the proper corrective treatment or action In most cases the treatment indicated by each step will be explained in detail later in this chapter
121 Step 1 ndash Check for Responsiveness
Step one in evaluating a casualty is to check for responsiveness Shake the casualty gently and ask him or her if he or she is ok If you get no response go to Step 2 If the casualty is conscious but choking begin measures to open their airway as described in the next section Ask the casualty where he or she hurts or has unusual feelings such as numbness Have the casualty indicate where the pain or numbness is located
NOTE If you suspect he or she has a broken back or neck DO NOT shake or move the casualty unless located in an area of immediate danger
122 Step 2 ndash Check for Breathing
Step two is to check for breathing Use your senses to look for the rise and fall of their chest listen for the sounds of breathing and feel for breath on the side of your face If the casualty is breathing continue to Step 3 If not stop and attempt to ventilate or open his or her airway The methods for ventilation and clearing the airway are covered in detail in the following section After successful ventilation continue with Step 3
123 Step 3 ndash Check for Pulse
Check for a pulse is Step 3 Use the method previously described under blood circulation If a pulse is present and the casualty is breathing continue to Step 4 If a pulse is present but the casualty is not breathing begin rescue breathing as described in the next section If no pulse is present seek medical personnel immediately
124 Step 4 ndash Check for Bleeding
Check for bleeding is Step 4 Look for spurts of blood or blood on the casualtyrsquos clothing If the bleeding is from an open wound on the arm or leg apply a field or pressure dressing as described later in this chapter If bleeding is from a partial or complete amputation apply a dressing as described later in this section or apply a tourniquet IF bleeding persists If the casualty is bleeding from an open head wound chest wound or abdominal wound apply a dressing as described later
NOTE If the casualty is located in a chemically contaminated area do not expose the wound Apply a field and pressure dressing and evacuate the casualty
10-6
125 Step 5 ndash Check for Shock
Step five is to check for shock Look for the following signs or symptoms
Sweaty but cool skin
Paleness of the skin Note that darker-skinned service members will appear grayish
Restlessness or nervousness
Thirst
Loss of blood
Confusion or lack of awareness
Rapid breathing
Blotchy or bluish skin
Nausea or vomiting If these signs or symptoms are present begin the treatment for shock described later in this chapter
126 Step 6 ndash Check for Fractures
Check for fractures is Step six Look for the signs or symptoms of back or neck injuries
Pain or tenderness of the back or neck
Cuts or bruises on the back or neck
Inability to move or numbness (Check this by asking about the ability to move or by touching the arms and legs and asking about how he or she is feeling)
Unusual body or limb position Immobilize the casualty if a back or neck injury is suspected Tell the casualty not to move If you suspect a back injury place padding under the arch of his or her back If you suspect a neck injury manually immobilize the casualty with padding under the neck and weighted boots on each side of the head Check the casualtyrsquos arms and legs for open fractures by noting bleeding or bones sticking out and check his or her pulse Check for closed fractures by looking for swelling discoloration deformity and unusual position of the extremity Remember to check for a pulse If you suspect a fracture begin the first aid measures for fractures described later in this chapter
127 Step 7 ndash Check for Burns
Step seven is to check for burns Look for reddened blistered or charred skin Check for singed clothing Burns to the upper torso may cause respiratory problems so look for singed nose hair soot around the nostrils abnormal breathing sounds or breathing difficulty If burns are found begin the first aid measures described later
10-7
Figure 10-4 mdash Illustration of
arteries veins and capillaries
128 Step 8 ndash Check for Head Injury
The final step Step eight is to check for a possible head injury Look for the following signs or symptoms
Unequal pupils
Fluid from ear nose mouth or the head injury itself
Slurred speech
Confusion
Sleepiness
Loss of memory or consciousness
Staggering
Headache
Dizziness
Nausea or vomiting
Paralysis
Convulsions or twitching
Bruising around the eyes or behind the ears If a head injury is suspected watch for signs requiring rescue breathing treatment for shock or control of bleeding and seek medical help
200 FIRST AID MEASURES
210 Controlling Bleeding
211 General
Recognizing the types of bleeding and using the proper methods to control bleeding are critical first aid skills From a minor cut to a sucking chest wound the Seabee needs to be familiar with all types of bleeding and how to apply a battle dressing and other methods of controlling bleeding
Properly and promptly stopping bleeding will save lives
Blood circulates throughout the body by means of three different kinds of blood vessels arteries veins and capillaries See Figure 10-4 Arteries are the large vessels that carry blood from the heart Arterial blood is usually bright red in color If an artery near the skin surface is cut the blood gushes out in spurts that are synchronized with the heart beat However if the artery is deeply buried the bleeding may appear in a
10-8
steady stream Veins are the vessels that return blood to the heart Blood from veins is dark red in color If a vein is cut the blood escapes in a steady stream Capillaries form a connecting network of smaller vessels between the veins and arteries Capillary blood is usually brick red in color If capillaries are cut the blood oozes out slowly To begin controlling bleeding cut or tear any clothing necessary to expose the wound and observe the extent of the injury If clothing is stuck to the wound leave it alone Do not touch the wound Always check for entry and exit wounds Exit wounds are usually larger While treating any wound continually monitor vital signs breathing and pulse and take action accordingly Do not attempt to remove bullets or other objects from the wound If the wound is impaled by an object do not remove the object just apply the dressing putting padding around the object to stabilize it When bleeding is from a leg or arm wound elevate the extremity slightly above the casualtyrsquos heart This is because the amount of blood entering is decreased by the uphill gravitational effect
CAUTION Do not elevate a limb until it is certain that no bones are broken or until broken bones are properly splinted
212 Methods to Control Bleeding
There are several methods for controlling bleeding We will look at applying a battle dressing using direct pressure applying a pressure dressing the use of pressure points and lastly applying a tourniquet
2121 Applying a Battle Dressing
Before you go into the field you will normally receive an individual first aid kit Among the items in this kit are battle dressings A battle dressing is a combination compress and bandage in which a sterile pad is fastened to a gauze muslin or adhesive bandage Most Navy first aid kits contain both large and small size battle dressings of this kind When applying a battle dressing always use the casualtyrsquos first not your own You may need your own You will see that each dressing has two tails used to secure the dressing when you are treating the injured On the outer side of the dressing is written ldquoPut other side next to woundrdquo This helps to make sure the sterile side is placed on the wound First remove the wrapper and grasp the tails with both hands (Figure 10-5 frame 1) Hold the dressing over the wound white side down and pull it open (Figure 10-5 frame 2) Place it directly over the wound and hold it in place with one hand With the other hand wrap one tail around and half way over the wound leaving enough to tie a knot (Figure 10-5 frames 3 and 4) Wrap the other tail in the opposite direction and then tie the tails at the edge of the dressing not over the wound (Figure 10-5 frame 5) Tie it firmly but not tourniquet-like
Figure 10-6 mdash Applying Direct or Manual Pressure
You can reinforce dressings by applying additional sterile dressings over the battle dressing and covering the entire dressing with an elastic bandage 2122 Using Direct Pressure
If bleeding doesnrsquot stop after applying a battle dressing your next technique should be direct or manual pressure Place your hand over the battle dressing and apply firm pressure for 5 to 10 minutes If the casualty is conscious he or she can do this In almost all cases bleeding can be stopped by direct pressure on the wound See Figure 10-6
10-10
Figure 10-7 mdash Applying a Pressure Dressing
2123 Applying a Pressure Dressing
If bleeding persists apply a pressure dressing over the battle dressing This will aid in blood clotting and compress the open blood vessel Do this by placing a wad of padding over the dressing at the wound location keeping the extremity elevated if applicable Secure the padding using a bandage or cravat tying the ends directly over the wound using a nonslip knot Improvised pressure dressings can be strips of cloth made from T-shirts socks or other clothing See Figure 10-7 frames 1 thru 4
2124 Using Digital Pressure
If bleeding continues try digital pressure also known as pressure points Digital pressure is applying pressure using your fingers thumb or hand to the appropriate pressure point A pressure point is a spot where a main artery lies near the skin surface and over a bone or firm tissue The objective of applying pressure is to compress the artery against the bone thus shutting off the flow of blood from the heart to the wound There are 10 principal pressure points on each side of the body Refer to Figure 10-8 while reading the following The first pressure point wersquoll look at is the superficial temporal artery If the bleeding is in the region of the temple or scalp use the finger to compress the main artery to the temple against the skull bone This pressure point is just in front of the ear The next pressure point is the facial artery Use this if bleeding occurs on the face below the level of the eyes Apply pressure to the point on the lower jaw To find this pressure point start at the angle of the jaw and run your finger forward along the lower edge of the lower jaw until you feel a small notch The pressure point is in the notch The common carotid artery is the pressure point you will use if the neck is bleeding Apply pressure below the wound just in front of the prominent neck muscle Press inward and slightly backward compressing the main artery of that side of the neck against the bones of the spinal column Do not apply pressure at this point unless it is absolutely essential This is because there is a danger of pressing on the windpipe and thus choking the victim
10-11
Figure 10-8 mdash Pressure Points (Roll over to view details)
10-12
Look now at the pressure point at the subclavian artery If the bleeding is in the shoulder or in the upper part of the arm apply pressure with the fingers behind the collarbone Press down against the first rib or forward against the collarbone The brachial artery is where you should apply pressure when bleeding is between the middle part of the upper arm and the elbow The blood flow should be controlled by applying pressure in the inner side of the armmdashthat is toward the bodymdash about halfway between the shoulder and the elbow The radial and ulnar arteries are the spots to press to control bleeding from the hand To do this apply pressure at the wrist If it is possible to hold the arm up in the air the bleeding will be relatively easy to stop At the iliac artery apply pressure to the middle of the groin to control bleeding in the thigh Bleeding in the upper part of the thigh can be controlled by applying pressure to the femoral artery or the iliac artery At the femoral artery bleeding in the upper part of the thigh can be controlled by applying pressure with the closed fist of one hand and using the other hand to give additional pressure The artery at this point is deeply buried in some of the heaviest muscle of the body so you must use a great deal of pressure to push the artery against the bone The next pressure point to consider is the popliteal artery Control bleeding between the knee and the foot by applying firm pressure against the knee Sometimes pressure at the side of the knee doesnrsquot stop the bleeding In this case hold the front of the knee with one hand and thrust the fist hard against the artery behind the knee The last pressure point wersquoll discuss is the anterior and posterior arteries Apply pressure to these arteries to stop bleeding from the foot Use digital pressure in combination with previously described techniques or when dressings are not available
2125 Applying a Tourniquet
CAUTION A tourniquet can be dangerous Its application can cause tissue injury or even loss of a limb
If bleeding continues after using other techniques as a last resort use a tourniquet A tourniquet is a constricting band placed around an arm or leg to control bleeding and as previously mentioned should only be applied as a last resort or if a limb has been severed Once applied the tourniquet must stay in place and the casualty must be taken to the nearest Medical Treatment Facility (MTF) as soon as possible Do not loosen or release a tourniquet once it has been applied See Figure 10-9 In the absence of a specially designed tourniquet use a strong pliable material such as gauze or muslin bandages clothing or a cravat Use this material with a rigid stick-like object and ensure the improvised tourniquet material is at least two inches wide DO NOT use wire or a shoestring for a tourniquet band Place the tourniquet material around the limb between the extremity and the torso or between the wound and the heart Never place a tourniquet directly over a wound fracture or joint For maximum effectiveness place it on the upper arm or above the
10-13
Figure 10-9 mdash Applying a Tourniquet Frames 1 thru 5
knee It should be well-padded andor placed over a smoothed sleeve or trouser leg If the material is long enough wrap it around the limb several times keeping the material flat Tie a half-knot the same as the first part of tying a shoe lace Next place a stick or other rigid object on top of the half-knot and tie a full knot over the stick Twist the stick until the tourniquet is tight around the limb andor bright red bleeding has stopped In the case of an amputation dark oozing blood may continue to flow for a short time Fasten the tourniquet to the limb by looping the free ends of the tourniquet over the ends of the stick and then bring the ends around the limb to prevent the stick from loosening and tie the ends together on the side of the limb After applying the tourniquet mark the casualtyrsquos forehead with a ldquoTrdquo and the time the tourniquet was applied Check and treat the casualty for shock and seek medical aid In the case of a severed limb apply a dressing to the stump and if possible save and transport the limb with the casualty but out of his or her sight to avoid shock
10-14
Figure 10-10 mdash Positioning the Casualty for a Preliminary Assessment
220 Opening the Airway and Restoring Breathing
An inadequate airway and lack of breathing are two of the most critical situations in first aid You must have oxygen to continue living The third critical situation is the loss of blood circulation or stoppage of the heart Before attempting to clear a casualtyrsquos airway or restore breathing you should check the casualty for a pulse using one of the checkpoints on the wrist neck or ankle as described under Evaluating a Casualty If no pulse is present you should immediately call for medical personnel unless you have been properly trained in cardiopulmonary resuscitation or CPR
221 Preliminary Assessment
Check the casualty for responsiveness or consciousness by gently shaking him or her and asking ldquoAre you OKrdquo If you get no response kneel beside the casualty and gently roll him or her onto the back by placing one hand under his or her head and neck for support then grasp the far arm and roll him or her toward you See Figure 10-10
NOTE
If you suspect he or she has a broken back or neck DO NOT shake or move the casualty unless located in an area of immediate danger
10-15
Figure 10-11 ndash Using the crossed-finger method to open the casualtyrsquos mouth
Figure 10-12 ndash Using the finger to dislodge foreign matter
Place the casualtyrsquos arms at the sides and straighten out his or her legs Next you need to check for breathing Look for the rise and fall of the chest listen for the sounds of breathing and feel his or her breath on the side of your face If the casualty is not breathing or appears to be having difficulty breathing you will need to perform a finger sweep of his or her mouth Open the casualtyrsquos mouth using your crossed thumb and finger to exert pressure upwards on the upper teeth and downwards on the lower (Figure 10-11) Crook the index finger on your other hand insert it against the inside of
the casualtyrsquos cheek and sweep across to the other side of the mouth Remove any foreign matter you find but do not spend too much time doing so (Figure 10-12)
WARNING Take care not to force an object deeper into the airway by pushing it with your finger
If the casualty is still not breathing or you are unsure you will need to perform one of the methods of rescue breathing Performing rescue breathing on a casualty that is breathing on their own can do no harm
10-16
Figure 10-14 ndash Jaw-thrust technique of opening the airway
Figure 10-13 ndash Head-tiltChin-lift technique of opening the airway
222 Opening the Airway
Before performing rescue breathing you need to open the casualtyrsquos airway Kneel at his or her side and position the head to open the airway using either the jaw-thrust or head-tiltchin-lift method If you suspect the casualty has a neck injury or severe head injury you should use the jaw-thrust technique to open the airway Otherwise use the head-tiltchin-lift technique by placing one hand on the casualtyrsquos forehead and tilting the head back with firm backward pressure Next place the fingers of the other hand under the bony part of the lower jaw and lift bringing the chin forward Do not use your thumb See Figure 10-13
To perform the jaw-thrust technique to open the casualtyrsquos airway kneel at the casualtyrsquos side Use both hands to grasp the lower jaw at each side and lift forward and up If this is unsuccessful tilt the head back slightly See Figure 10-14
With either technique once the casualtyrsquos airway is opened maintain the head position to keep the airway open After opening the casualtyrsquos airway and before you begin rescue breathing check again to see if the casualty has already begun breathing on his or her own Often just clearing and opening the airway will allow the casualty to
10-17
breathe properly If the casualty does begin breathing on his or her own continue to monitor the casualty and transport him or her to an MTF as soon as possible
223 Rescue Breathing
If the casualty is still not breathing you need to begin rescue breathing There are two basic methods mouth-to-mouth and mouth-to-nose Mouth-to-mouth is the preferred method but you should use the mouth-to-nose method if the casualty has a severe jaw fracture a wound to the mouth or the jaws are clamped shut by spasms
2231 Mouth-to-Mouth Method
To perform mouth-to-mouth rescue breathing place the casualty on his or her back face up Next place one hand on the forehead and pinch the nostrils closed Place the fingertips of the other hand on the bony part of the chin and lift If you suspect the casualty has a neck injury and used the jaw-thrust technique for clearing the airway close the nostrils by placing your cheek against them Now take a deep breath place your mouth around the casualtyrsquos mouth and blow two full breaths into the mouth one to one and a half seconds per breath taking a breath of fresh air before each breath If the casualty is too small as with a child cover both the nose and mouth with your mouth Watch for the casualtyrsquos chest to rise If the chest does not rise reestablish an open airway ensure no leakage and try again If the chest still isnrsquot rising clear the obstruction from the mouth or throat using one of the methods described in the next section After each two breaths check for a pulse at the neck If you find a pulse and the casualty appears to be breathing on his or her own STOP If a pulse is found but the casualty is still not breathing on his or her own continue rescue breathing If no pulse is found seek medical help immediately
2232 Mouth-to-Nose Method
The mouth-to-nose method of rescue breathing is performed in the same manner as the mouth-to-mouth method except that you blow into the nose while holding the lips closed with one hand under the chin Remove your mouth after each breath to allow the casualty to exhale It may be necessary to part the lips to allow the casualty to exhale Check for a pulse after each two breaths taking action as described for the mouth-to-mouth method
224 Clearing an Obstructed Airway
If the casualty is not breathing or appears to be choking ensure they have a clear unobstructed airway A casualtyrsquos upper airway may be obstructed for a number of reasons including the casualtyrsquos tongue falling back into his or her throat while he or she is unconscious foreign matter becoming lodged in the throat regurgitation of stomach contents into the throat or blood clots due to head or facial injuries If a casualty is conscious but choking do not interfere Encourage the casualty to cough up the obstruction If coughing doesnrsquot work or the casualty is unconscious but hasnrsquot responded to rescue breathing you need to clear the obstructed airway using either the abdominal thrust or chest thrust method Use the abdominal thrust method unless the casualty is in the advanced stages of pregnancy is markedly obese or has a significant abdominal wound In these cases use the chest thrust method
10-18
2241 Abdominal Thrust on a Conscious Casualty Standing or Sitting
To perform the abdominal thrust (or Heimlich maneuver) on a conscious casualty who is standing or sitting (Figure 10-15)
Stand behind the casualty
Wrap your arms around the casualtyrsquos waist
Make a fist with one hand and grasp it with the other
The thumb side of your fist should be against the abdomen in the midline and slightly above the navel but well below the breastbone
Press your fists into the abdomen with a quick backward and upward motion
Each thrust should be a separate and distinct movement Continue until the obstruction is expelled or the casualty becomes unresponsive
NOTE
If the casualty becomes unresponsive call for help and begin rescue breathing after positioning the casualty to open the airway
Figure 10-15 mdash Anatomical and profile views of the abdominal thrust on a conscious casualty sitting or standing
10-19
Figure 10-16 ndash Profile view of a the chest thrust on a conscious
casualty sitting or standing
2242 Chest Thrust on a Conscious Casualty Standing or Sitting
To perform the chest thrust on a conscious casualty while standing or sitting (Figure 10-16)
Stand or sit behind the casualty
Wrap your arms around his or her chest with your arms under the armpits
Make a fist and place the thumb in the middle of the breastbone avoiding the tip of the breastbone and the edges of the ribs
Grasp your fist with your other hand
Exert thrusts slowly and distinctly Perform this technique until the obstruction is expelled or the casualty becomes unresponsive If he or she becomes unresponsive call for help and begin rescue breathing
2243 Abdominal Thrust on an Unconscious Casualty Lying Down
If opening the airway and attempting rescue breathing fails perform the abdominal thrust 6 to 10 times while the casualty is lying down To do this (Figure 10-17)
Kneel astride the casualtyrsquos thighs
Place the heel of one hand against the abdomen in the midline slightly above the navel but well below the breastbone with the fingers pointed toward the head
Press into the abdomen with a quick thrust forward and upward Repeat the sequence of abdominal thrust finger sweep of the mouth and rescue breathing as long as necessary to clear the obstruction and restore breathing
10-20
Figure 10-17 mdash Performing the abdominal thrust on an unconscious or unresponsive casualty
2244 Chest Thrust on an Unconscious Casualty Lying Down
If the casualty does not respond to rescue breathing perform the chest thrust with the casualty on his or her back face up and mouth open (Figure 10-18)
Kneel close to the casualtyrsquos side
Locate the lower edge of the ribs with your fingers and run your fingers up along the center of the rib cage to the notch (Figure 10-18 view A)
Place your middle finger on the notch and your index finger next to it on the lower edge of the breastbone
Place the heel of your other hand on the lower half of the breastbone next to your two fingers (Figure 10-18 view B)
Remove your two fingers and place that hand on top of the hand positioned on the breastbone extending or interlocking your fingers (Figure 10-18 view C)
Straighten and lock your elbows with your shoulders directly above your hands
Apply enough downward pressure to depress the breastbone 1 frac12 to 2 inches then release the pressure completely See Figures 10-18 view D and 10-19
Do this 6 to 10 times delivering each thrust quickly and distinctly Repeat the sequence of chest thrust finger sweep of the mouth and rescue breathing as long as necessary to clear the obstruction and restore breathing
10-21
Figure 10-18 mdash Hand placement for performing the chest thrust on an unconscious or unresponsive casualty
Figure 10-19 mdash Showing breastbone depression when performing the chest thrust on an unconscious or unresponsive casualty
10-22
230 Recognizing and Treating Shock
Shock is the collapse of the bodyrsquos cardiovascular system including an inadequate supply of blood to the bodyrsquos tissue Shock stuns and weakens the body Recognizing shock and applying the proper first aid measures in a timely manner can save a fellow Seabeersquos life The three basic mechanisms associated with shock are heart damage blood loss causing insufficient volume of blood and inadequate circulation of blood caused by the blood vessels opening too wide Shock may result from dehydration allergic reactions significant blood loss reaction to the sight of blood or a wound or traumatic injuries such as burns gunshot wounds crush injuries etc
231 Signs and Symptoms
As the one administering first aid itrsquos important that you be able to recognize the signs of shock They do not always appear at the onset of the injury Some of these signs are the following
The casualtyrsquos pulse tends to be weak and rapid
The face and skin may be very pale or ashen gray
Breathing is likely faster than normal
The skin feels cool and clammy and is covered in sweat
The casualtyrsquos skin may be blotchy or bluish especially around the mouth and lips
Another way to assess a case of shock is to look for symptoms Symptoms are things the casualty feels The symptoms of shock are direct or indirect evidence that circulation has been disturbed Look for feelings of restlessness or nervousness He or she may be thirsty There may be nausea or vomiting and the casualty may be confused and lack awareness of his or her surroundings
232 First Aid Measures
When treating a casualty for any injury or illness you should assume he or she is already suffering from shock or that shock will soon occur Since the first aid measures to apply for shock are the same as those for preventing it you should begin treating for shock and not wait for signs to appear First move the casualty to cover if feasible Lay the casualty on his or her back unless he or she is experiencing difficulty breathing in which case allow the casualty to sit upright but monitor closely Elevate the feet higher than the heart using a stable object such as a field pack
WARNING DO NOT elevate the feet if there is an unsplinted broken leg head injury or abdominal injury If the casualty has an abdominal injury bend his or her legs at the knee
Next loosen the casualtyrsquos clothing around the neck waist and any place it seems binding It is important to maintain the casualtyrsquos body temperature In hot weather
10-23
Figure 10-20 mdash Types of fractures
place the casualty in the shade and protect him or her from becoming chilled In cold weather place blankets over and under the casualty to keep him or her warm You should reassure and keep the casualty calm by sounding authoritative and self-confident Assure the casualty you are there to help
WARNING DO NOT give the casualty food or drink If he or she is unconscious or you need to leave the casualty unattended turn the head to the side to prevent choking if he or she vomits
Seek medical aid as soon as possible and continually monitor the casualtyrsquos condition until medical personnel arrive or the casualty is transported
240 Fractures
Many kinds of accidents cause injuries to the bones joints and muscles In providing first aid to injured people you must always look for signs of fractures A fracture is any break in the continuity of a bone a dislocation is when a joint is not in the proper position and a sprain is when the connecting tissues of joints have been torn This section will be concerned mostly with fractures There are two types of fractures closed and open A closed fracture is one where the injury is completely internalmdashno broken skin (Figure 10-20 view A) An open fracture is where there is a break in the skin and tissues caused by the broken bone protruding (Figure 10-20 view B) or a missile that broke the bone (Figure 10-20 view C) leaving an opening Open fractures should always be considered contaminated and subject to infection
10-24
241 Signs and Symptoms
You may not always be able to actually see the broken bone but there are signs and symptoms to look for in a casualty that can tip you off You might see deformity in the area of the injury There may be pain or swelling The casualty will be unable to move that portion of the body or there may be unnatural movement of the injured part The casualty may also feel a grating sensation at the point of injury If you are unsure if the casualty has a fracture treat the injury as a fracture Medical professionals can make a firm diagnosis later
WARNING Do not have the casualty move the injured parts in order to identify a fracture as any movement could cause further injury
242 General Rules
Follow these general rules in treatment of a fracture Treat the open fracture tissue wound immediately by covering all wounds with a dressing That means before you treat the fracture You should also always treat a fracture victim for shock Splint the casualty in the position you find him or her Do not attempt to straighten out the limb Do not attempt to push the bone of an open fracture back under the skin Do not attempt to set the fracturemdashjust splint it You immobilize the suspected fracture to prevent sharp edges of the bone from causing more damage It will also reduce pain and help prevent or control shock If it is a closed fracture immobilization will prevent an open wound and possible infection
243 Splinting Procedures
To prepare for splinting reassure the casualty loosen any tight or binding clothing and remove all jewelry from the injured limb Do not remove boots unless you need to stabilize a neck injury or the foot is bleeding Next gather splinting materials and padding improvising as needed
10-25
Figure 10-21 mdash Uninjured leg used as a splint for a fractured leg
Figure 10-22 mdash Chest wall used as a splint for a fractured arm
Splints An object that can be used to immobilize a fracture or a dislocation is called a splint There are two types of splints soft and rigid Soft splints include such things as pillows blankets towels and dressings Rigid splints are stiff and allow very little flexibility Splints should be lightweight strong and long enough to reach the joints above and below the fracture Lacking proper splints boards poles sticks tree limbs or even cardboard may be used as splints If nothing is available the chest can be used to immobilize a fractured arm and the uninjured leg can be used to immobilize the fractured leg (Figure 10-21 and 10-22) Padding Padding may be improvised from such items as a jacket blanket poncho or even leafy vegetation Bandages Bandages may be improvised from belts rifle slings or strips of clothing or blankets Narrow materials such as wire or cord should not be used to secure a splint in place as these could cause tissue damage and a tourniquet effect Slings A sling is a bandage or cravat tied around the neck to support a fractured arm or shoulder If a bandage is not available a sling can be improvised from pieces of clothing or blankets Swathes Swathes are pieces of cloth or load bearing equipment (LBE) that are used to further immobilize a splinted fracture Triangular and cravat bandages are often used and are called swathe bandages The purpose of the swathe is to immobilize therefore the swathe bandage is placed above andor below the fracturemdashnot over it Check the circulation below the site looking for
Pale white or bluish-gray skin
Colder skin temperature below the site If you suspect poor circulation evacuate the casualty immediately
10-26
Figure 10-23 mdash Board splints applied to a fractured lower leg
Apply the splint See Figure 10-23 Position one splint on each side of the fracture so that they extend both above and below the fracture Tie off the splinting materials above and below the site Check the splint for tightness ensuring it is tight enough to hold in place but not so tight it impairs circulation For fractures on the upper arm or shoulder use a sling Use swathes to hold an arm against the side or to hold legs together See Figure 10-21 and 10-22
NOTE
After splinting check the casualtyrsquos pulse and motor sensation at a point farther from the heart than the splint eg for a splinted forearm check the wrist for pulse hand for motor and sensation This is important Splinting too tightly can create the same bad effect as a tourniquet
244 Applying a Sling
To help immobilize a fractured arm you should apply a sling A sling is also used to immobilize a fractured collarbone or a fractured or dislocated shoulder Slings can be made from any non-stretching cloth such as shirts trousers ponchos or belts The supporting pressure of a sling should be on the casualtyrsquos uninjured side Support the arm with the hand slightly higher than the elbow with the fingers exposed to aid in circulation Use the following procedures to apply a sling (Figure 10-24)
Insert the splinted arm or the arm on the side of the fractured shoulder or collarbone in the center of the sling
Bring the ends of the sling up and around the casualtyrsquos neck then tie them in the hollow of the neck on the uninjured side
10-27
Figure 10-24 ndash Application of a triangular bandage to form a sling
Figure 10-25 mdash Applying a cravat bandage for a fractured jaw
Roll the corner of the sling at the elbow and tuck it in
245 Treatment for Specific Fractures
2451 Jaw Collarbone and Shoulder Fractures
If a casualty has a fractured jaw you need to immobilize it (Figure 10-25) To do so apply a cravat vertically around the head and under the jaw then add another cravat
around the top of the head to secure the first one Do not apply the cravat to the back of the neck Do not lay the casualty on his or her back as this may cause an obstruction of the airway
10-28
Figure 10-26 ndash Immobilizing a fractured collarbone
Figure 10-27 ndash Immobilizing a fractured or dislocated shoulder
In the case of a fractured collarbone apply two belts a sling and a cravat to immobilize the area as in Figure 10-26 With a fractured or dislocated shoulder apply a sling and a cravat or swathe See Figure 10-27
2452 Spinal Column Fractures
It is impossible to be sure if a casualty has suffered a spinal column fracture A fracture is likely if the casualty has fallen his or her back has been sharply struck or bent or there is no feeling in the legs or the legs canrsquot move If the spine is fractured bending it can cause the sharp bone fragments to bruise or cut the spinal cord and result in permanent paralysis or death
10-29
Figure 10-28 ndash Maintaining a normal spinal position
While you are waiting for transport and medical assistance maintain a normal spinal position at the lower back (Figure 10-28) Caution the casualty not to move and leave the casualty in the position he or she was found Do not move any part of the body If the casualty is face up you can slip a blanket under the arch of the lower back If found face down do not put anything under him or her If the casualty must be moved a four man team will be needed to do so safely
2453 Neck Fractures
When treating neck fractures caution the casualty not to move and leave the casualty in the position he or she was found If the neck or head is in an abnormal position and the casualty is lying face up raise the shoulders slightly and slip a roll of bath towel or something of similar bulk under the neck Do not bend the head or neck forward and do not raise or twist the head Immobilize the head using boots or heavy objects on each side of it (Figure 10-29)
10-30
Figure 10-29 mdash Immobilizing a fractured neck
If the head or neck is in an abnormal position and the casualty is lying face down do not move the casualty Immobilize the head with boots or heavy objects on each side of it but do not put a roll under the neck Do not bend the head or neck or attempt to roll the casualty onto his or her back If transportation is necessary at least two people will be required
250 Burn Injuries
Burns are injuries that most commonly result from exposure to fire chemicals or electricity The severity of burns depends on the depth size and location Burns are most serious when they are located on the face neck hands and feet Also they are dangerous when combined with fractures There are four types of burns you should learn to recognize and treat thermal electrical chemical and laser Thermal burns are caused by fire hot objects liquids or gases Electrical burns are caused by electrical wires current and lightning Chemical burns are caused by coming in contact with wet or dry chemicals or white phosphorous Laser burns are burns to the eye causing an ocular injury
251 Eliminate the Source
The first step to take with all types of burns is to eliminate the source of the burn After eliminating the source you can evaluate the casualty and provide appropriate first aid measures You should take the following actions to eliminate the source of the burn injury
With thermal burns remove the casualty from danger cover him or her with non-synthetic material and if still on fire roll him or her on the ground to extinguish the fire
In the case of an electrical burn remove the source of current by turning it off if it is close enough Wrap non-conductive material around the casualtyrsquos back and
10-31
shoulders and drag the casualty away Do not make direct contact with the casualty or touch any wires
When the casualty has been exposed to chemicals remove liquid chemicals by flushing the casualty with large amounts of water
Remove dry chemicals by brushing off the particles from the casualty but do not use your bare hands Afterwards flush the casualty with either large amounts of water or none at all as insufficient amounts of water may cause a chemical reaction and make matters worse
If the burn is from white phosphorous smother the chemical with wet clothes or mud and keep the casualty covered
In the case of a laser burn remove the casualty from the beam and make sure you do not look directly at the beam yourself
252 First Aid Measures
After removing the source of the burn evaluate the casualty for other conditions requiring first aid such as problems with breathing weak or no pulse or other wounds Expose the burn by removing any clothing over the burn unless it is stuck to the wound If the casualtyrsquos hands or wrists are burned remove any jewelry Next apply a field dressing For electrical burns check for both entry and exit burns The exit burn may be anywhere on the body With wet or dry chemical burns flush the burns with large amounts of water first then cover with a dry dressing In the case of white phosphorous burns flush the burn with large amounts of water then cover them with wet material or mud For laser burns apply a field dressing over the affected eye or eyes When applying a field dressing take the following precautions
Do NOT place the dressing over the face or genital area
Do NOT break the blisters
Do NOT apply grease or ointments to the burns In all cases seek medical assistance
300 HEAT AND COLD INJURIES
310 Introduction
Climatic injuries are caused by extreme hot or cold environments The human body needs time to adapt to any extremes of temperature The Seabeersquos physical condition will to some extent determine how long it takes to become acclimated There are other factors that contribute to an individualrsquos health and therefore susceptibility such as proper diet or nutrition sufficient sleep and rest proper exercise and suitable clothing While serving in extremes of climate individuals who are trying to lose weight should be supervised by properly trained medical personnel Most climatic injuries are preventable
10-32
320 Heat Injuries
321 General
Sometimes the heat of the environment causes injuries that need to be treated in the field Heat injuries are caused by exposure to extreme heat improper clothing wearing of Mission Oriented Protective Posture (MOPP) gear enclose spaces and wearing body armor The prevention of heat exposure injuries is a command responsibility All hands must be educated about medical dangers and environmental health in the field There are three categories of heat injuries heat cramps heat exhaustion and heatstroke
WARNING The heat casualty should be continually monitored for development of conditions which may require the performance of necessary basic lifesaving measures
CAUTION Do not use salt solutions in first aid procedures for heat injuries
322 Heat Cramps
Heat cramps are caused by an imbalance of electrolytes in the body from excessive sweating The signs and symptoms of heat cramps are
Cramping in the arms or legs
Stomach cramps
Excessive sweating To treat a casualty for heat cramps first move him or her to a cool shady area Loosen his or her clothing and slowly give the casualty a canteen of water Cool water is absorbed more quickly than warm water If the condition is unabated or continues seek medical assistance
323 Heat Exhaustion
Heat exhaustion is caused by a loss of fluids in the body The signs and symptoms of heat exhaustion include the following
Excessive sweating
Pale moist cool skin
Headaches
Weakness
Dizziness
Loss of appetite
Cramping 10-33
Nausea with or without vomiting
Chills or goosebumps
An urge to defecate
Rapid breathing
Tingling in the hands or feet
Confusion To treat for heat exhaustion first move the casualty to a cool shady area Loosen or remove his or her clothing and boots Pour water over the casualty and fan him or her while slowly giving the casualty a canteen of water Elevate the legs and keep the casualty from doing any strenuous activities for the rest of the day Monitor the casualty until the symptoms are gone or provide medical assistance
324 Heatstroke
Heatstroke is a failure of the bodyrsquos cooling mechanism The signs and symptoms of heatstroke are
Unconsciousness or sudden collapse Use the following procedures to treat heatstroke
Move the casualty to a cool shady area
Loosen or remove the casualtyrsquos clothing
Spray or pour water over him or her and fan him or her
Massage the extremities and skin
Elevate the legs
Slowly give the casualty a canteen of water This is a more severe heat injury than heat cramps or heat exhaustion so you should seek medical assistance immediately while monitoring the casualty for necessary lifesaving measures
330 Cold Injuries
331 General
Cold injuries are most likely to occur when it is moderately cold but wet andor windy It is important to understand what to do to prevent cold injuries First maintain good personal hygiene get sufficient exercise take care of your feet and hands and use protective clothing There are many contributing factors to cold injuries Humidity precipitation and wind increase the likelihood of injury Stationary activities such as standing guard increase
10-34
an individualrsquos vulnerability especially if that individual is in contact with the ground for extended periods or standing in water Inadequate diet and rest increase susceptibility and lower defenses Physical fatigue leads to apathy neglect and carelessness Studies show that previous cold injuries also increase your risk Depressed and unresponsive personnel tend to be less active Finally excessive use of alcohol or drugs impairs your judgment and is likely to cause carelessness or overconfidence Seabees may be suffering from cold injuries without knowing it They may simply feel uncomfortable and not notice that extremities are already numb from the cold The general signs and symptoms of cold injuries include
Numbness or tingling sensations which may be relieved by simply loosening boots or clothing and exercising to rewarm yourself
Discoloration of the skin o With lighter-skinned individuals skin becomes red then pale or waxy
white o With darker-skinned individuals skin will be grayish
Affected area may feel cold to the touch
Swelling may occur with deeper injuries
Blisters may occur after rewarming You should use the buddy system to check each other for signs of cold injuries The treatment for cold injuries varies with the severity of the injury First and foremost an individual suffering any cold injury should be removed from the cold environment With superficial injuries you can rewarm the affected part with body heat With more serious life-threatening injuries you should seek medical assistance immediately
WARNING Do not massage the injured part Do not expose the casualty directly to fire or a stove Do not rub the injured part with snow Do not slap or chafe injured parts or soak them in cold water Avoid walking on injured feet if at all possible
The primary injuries caused by cold environments are chilblain immersion syndrome frostbite snow blindness dehydration and hypothermia
332 Specific Cold InjuriesConditions
3321 Chilblain
Chilblain is caused by repeated exposure of bare skin to temperatures from 32 to 60 degrees Fahrenheit The symptoms of chilblain are acutely swollen red tender hot or itchy skin Treat chilblain by rewarming the affected part using firm steady pressure with your hands or by placing the affected parts under your arms or against your buddyrsquos stomach Do not rub or massage the affected parts Have medical personnel evaluate you for any damage
10-35
3322 Immersion Syndrome
Immersion syndrome also known as immersion foot or trench foot results from long exposure of the feet to wet conditions in temperatures ranging from 32 to 50 degrees Fahrenheit Inactive feet in damp or wet socks and boots are more susceptible The signs of immersion syndrome occur in stages with exposure At first the feet are cold but painless The pulse may be weak and the feet may be somewhat numb Next the feet feel hot with burning or shooting pain Later the skin becomes pale with a bluish tint and the pulse decreases In the later stages the feet may blister swell bleed or even become gangrenous Treatment is required for all stages of immersion syndrome
Gradually warm the affected part and protect it from trauma and infection
Apply dry loose clothing or layers of warm coverings
Elevate the feet to reduce swelling
Transport the casualty to a medical facility as soon as possible
Do not massage the feet moisten the skin or apply direct heat or ice 3323 Frostbite
Frostbite is caused by exposure to cold temperatures usually below 32 degrees Fahrenheit Individuals with a history of cold injuries are more likely to get frostbite The most easily frostbitten parts of the body are the cheeks nose ears chin forehead wrists hands and feet Deep frostbite is very serious and can result in amputation of appendages The signs or symptoms of frostbite include
Loss of sensation or numbness
Sudden blanching of the skin then brief tingling
Redness of the skin or grayish in darker-skinned individuals
Blisters swelling or tender parts
Loss of previous pain sensation
Pale yellowish waxy-looking skin
Frozen tissue that feels solid or wooden Treat frostbite of the face ears or nose by covering them with bare hands until sensation and natural skin color returns Place frostbitten hands under the armpits To treat frostbitten feet remove boots and socks and place the feet under clothing against a buddyrsquos body General treatment of frostbite is as follows
Keep the affected parts warm and covered
Remove or loosen restrictive clothing
Cover affected parts to protect them from further injury
Exercise if possible to warm up
Seek medical treatment
Do not rub the injured part with snow or apply cold water 10-36
Do not massage
Do not expose to an open fire
Do not use ointments or salves
Do not manipulate the affected part to increase circulation
Do not use alcohol or tobacco 3324 Snow Blindness
Snow blindness is the effect that the glare from ice or snow has on the eyes It is more likely to occur in hazy cloudy weather The signs and symptoms of snow blindness are
The sensation of grit in the eyes
Pain in or over the eyes
Eye watering or redness
Headache
Pain with exposure to light To treat a casualty for snow blindness blindfold or cover the eyes with dark cloth Complete rest is desirable for quicker recovery If necessary and possible evacuate the casualty to a medical facility Snow blindness usually heals by itself in a few days if there is no repeated exposure 3325 Dehydration
Dehydration occurs when the body loses too much fluid It is just as prevalent in cold weather as in hot In colder temperatures sweating is not as noticeable since it evaporates and is quickly absorbed The signs and symptoms of dehydration are
Mouth tongue throat parched or dry
Difficulty swallowing
Nausea with or without vomiting
Extreme dizziness and fainting
General fatigue and weakness
Muscle cramps
Difficulty focusing the eyes To treat for dehydration keep the individual warm and loosen his or her clothing Shelter the individual from the wind and cold and begin fluid replacement immediately Transport the casualty to a medical treatment facility as soon as possible 3326 Hypothermia
Hypothermia or general cooling of the body occurs when the body loses heat faster than it can produce heat It can occur with temperatures above or below freezing and causes cooling of the core body temperature below 95 degrees Fahrenheit Hypothermia can be caused by fatigue poor physical condition dehydration faulty blood circulation alcohol or drug use trauma or immersion in cold water The signs and symptoms of hypothermia are progressive and include
10-37
Shivering
Faint pulse
Drowsiness and mental slowness
Hampered stiff and uncoordinated movement
Slurred speech
Slow and shallow breathing
Frozen extremities
Irregular heart action To treat mild hypothermia rewarm the body evenly and as soon as possible You must provide a heat source as the casualty will be unable to produce the needed heat Keep the casualty dry and protected from the elements Give the casualty warm liquids gradually if he or she is conscious Be prepared to provide life support measures and seek medical assistance immediately Severe hypothermia is treated by stabilizing the bodyrsquos core temperature and avoiding further heat loss Handle the casualty gently and evacuate to a medical facility as soon as possible Do not expose the body to an open fire Wrap any hot water bottles or canteens in cloth to avoid scalding Rewarming in the field is dangerous and resuscitation is difficult if not impossible in the field
400 FIELD SANITATION
410 General Information
Field waste disposal is performed to prevent flies from spreading germs from waste to your food and to keep unwanted animals out of your bivouac area Use the following as a guide to performing proper field waste disposal Step 1 Determine the type of field waste disposal to use
The proper type of device to use depends upon the mission length of stay terrain and weather conditions but you should use Table 10-1 as a guideline
When on bivouac o Chemical toilets are the preferred method o Burn-out latrines are preferred as an improvised method when chemical
toilets are not available
When on the march o Individual waste collection bags are preferred o Personal cat-holes are used as an alternative
NOTE
Check local state federal and host-nation regulations for applicable restrictions and for prohibition on burning or burying waste Garbage and rubbish may have to be transported to a waste disposal facility
Human waste disposal should be as far from food services as possible but at least 100 meters
Garbage and soakage pits should be at least 30 meters from food service
Locate downwind and downslope if possible
Locate downslope of all wells springs streams and other water sources at least 30 meters
Step 3 Set up construct and maintain latrines garbage pits and soakage pitstrenches
As soon as unit moves into area detail members to set up chemical toilets andor dig latrines
Assign members to clean latrines on a daily basis
Instruct the Field Sanitation Team to spray latrines with insecticide
Install handwashing facilities at food service and latrines
Cover transport burn or bury waste daily depending on regulations Step 4 Inspect daily to ensure
Waste is collected and transported when possible
Straddle-trench latrines and garbage pits are covered with dirt
Pail latrines are emptied and cleaned
Burn-out latrine containers are rotated and contents burned
Facility not contents are sprayed with insecticide as needed Step 5 Close out improvised latrines and garbage pits when filled within 1 foot of surface by
Spraying with residual insecticide
Packing earth in successive 3-inch layers until mounded one foot above surface
Spraying again with insecticide 10-39
Figure 10-30 ndash Cat-hole Latrine
Posting a sign saying ldquoClosed latrinegarbage pit and daterdquo (except in combat)
420 Waste Disposal Devices
Individual Waste Collection Bags
Preferred method when on a march
Dispose of with regular waste Chemical Toilets
Preferred method on bivouac
Add urinals to protect seats Cat-hole Latrines (Figure 10-30)
Alternate on-the-march method when bags not available
Cover immediately after use
Dig 6 to 12 inches deep and 12 inches in diameter
Keep mound of dirt removed to fill in hole
Straddle-trench Latrine (Figure 10-31)
Use on short bivouacs and field training exercises
Two trenches per 100 males three per 100 females
Dig 4 feet by 1 foot 2 frac12 feet deep 2 feet apart
Keep mounds of dirt removed to fill hole after use
Cover with dirt daily
10-40
Figure 10-31 ndash Straddle-trench Latrine
Deep Pit Latrine (Figure 10-32)
Use for longer periods and built-up areas
Collapsible two-seat boxes available in supply system
Add urinals to protect seats in male latrines
Enough for 6 percent of Seabees
Cover with dirt daily Garbage Pit
Locate near dining facility but no closer than 30 meters
One pit per 100 Seabees served per day
Transport to approved landfill or cover with dirt after each meal and close daily
For longer periods burn and bury ashes
10-41
Figure 10-32 mdash Deep Pit Latrine
Figure 10-33 mdash Pail Latrine
Pail Latrine (Figure 10-33)
Use where water table too close to surface for deep pit latrines
Empty and clean daily
10-42
Figure 10-34 ndash Burn-out Latrine
Figure 10-35 ndash Other urinals Trough Pipe and Urinoil
Grease Trap ndash Use with soakage pits and trenches to prevent clogging of soil Burn-out Latrine (Figure 10-34)
Use where water table too close to surface or extended stays
Rotate containers daily and burn contents
Other Urinals
Trough (Figure 10-35 frame A)
Pipe (Figure 10-35 frame B)
Urinoil (Figure 10-35 frame C)
10-43
Figure 10-36 ndash Food Services Soakage Pit
Soakage Pit - Food Service (Figure 10-36)
Locate near dining facility to prevent accumulation of liquid waste from kitchens
Need at least two to alternate daily
Fill with loose rocks
Add grease trap for dining facility waste to prevent clogging of soil Soakage Pit (Other)
Provide for urinals showers Lyster bags mess kits laundry handwashing facilities
Prevents accumulation of liquid waste
10-44
500 WATER PURIFICATION
510 Overview
Infectious diarrhea results from contamination of water and food by bacteria viruses and parasites Water- and foodborne diarrheal diseases are of particular concern to the military because they can be spread to large numbers of service members simultaneously with disastrous consequences for combat readiness Diarrhea especially when vomiting or fever is present can cause dehydration Fill your canteen with treated water at every chance When treated water is not available you must disinfect the water in your canteen using one of the following methods Using iodine tablets is the preferred way to individually purify water There are several alternate techniques for making drinking water clean if iodine tablets are not available You can use chlorine ampoules which are small sealed glass vials You can also use an emergency water treatment kit with Chlor-Flocreg tablets household bleach or boiling to purify water
520 Water Purification Using Iodine Tablets ndash Preferred Method
The following are the procedures for purifying water with iodine tablets the preferred method There are variations depending on the amount of water yoursquore purifying whether it is cold or not and whether it is cloudy or clear
Fill your canteen with the cleanest water available
Put one iodine tablet into clear water or two iodine tablets into cold or cloudy water If you are using two-quart canteens double those amounts Use two tablets for clear water and four tablets for cold or cloudy water
Place the cap on your canteen
Shake canteen to dissolve tablets
Wait 5 minutes
Loosen the cap and tip the canteen over to allow leakage around the canteen threads
Tighten the cap and wait an additional 25 minutes before drinking
530 Water Purification Using Chlorine Ampoules
The following are the procedures for purifying water with chlorine ampoules
Fill your canteen with the cleanest water available
Mix one ampoule of chlorine with one-half canteen cup of water
Stir that mixture with a clean utensil until the contents are dissolved
After stirring the mixture pour one-half of a plastic canteen capful or one Nuclear Biological Chemical (NBC) canteen capful of chlorine solution into your canteen of water
Place the cap on your canteen and shake
Slightly loosen the cap and tip the canteen over to allow leakage around the threads
10-45
Tighten the cap and wait 30 minutes before drinking
NOTE
By wearing gloves or wrapping the ampoule in paper or cloth you can avoid cutting your hands when breaking open the glass ampoule
540 Water Purification Using An Emergency Water Treatment Kit (Chlor-Flocreg Tablets)
The following are the procedures for purifying water with an emergency water treatment kit with Chlor-Flocreg tablets
Tear off the top of the plastic water treatment bag at the perforation (first time use)
Fill the treatment bag one-half full with the cleanest water available
Add one tablet
Fold the bag tightly three times and fold the tabs in
Hold the bag firmly and shake until the tablet dissolves
Swirl for 10 seconds
Let the bag sit for 4 minutes
Swirl again for 10 seconds
Let the bag sit for an additional 15 minutes
Insert the filter pouch into the neck of the canteen
Pour water from bag through the filter into the canteen Avoid pouring sediment into the filter
Rinse the filter with treated water after use Always filter through the same side of the filter
Rinse sediment from the treatment bag and save the bag for water treatment only
CAUTION Do not drink from the treatment bag The water is still contaminated and must be filtered before drinking Drinking non filtered water may cause stomach and intestinal disorders
550 Water Purification Using Household Bleach
The following are the procedures for purifying water with household bleach
NOTE
Ensure bleach is unscented
10-46
Fill your canteen with the cleanest water possible
Read the label on the bleach bottle to determine the amount of available chlorine Liquid chlorine laundry bleach usually has about 5 to 6 percent available chlorine Based upon the strength of the household bleach add the chlorine to the canteen as directed in Table 10-2
Table 10-2 mdash Drops of Household Bleach to be Added to a One-Quart Canteen
AVAILABLE CHLORINE TO CLEAR WATER TO COLDCLOUDY WATER 1 PERCENT 10 drops 20 drops
Slightly loosen the cap and tip the canteen over to allow leakage around threads
Tighten the cap and wait 30 minutes before drinking the water
560 Water Purification by Boiling
You may find yourself in a situation where iodine or other purification methods are not available In this case you can boil water using the following procedures to make it safe for drinking
Bring water to a rolling boil for 5 minutes
In an emergency boiling water for just 15 seconds will help
Protect boiled water from recontamination
CAUTION If water is suspected of NBC contamination do not attempt to treat Seek a quartermaster water supply
Summary In this chapter you were introduced to the importance of providing first aid to an injured person and the explanation and descriptions of first aid measures that you can apply to yourself and to others before trained medical personnel arrive This chapter provided how-to instructions in lifesaving measures to include clearing the upper airway giving artificial ventilation stopping bleeding controlling shock and protecting the wound Additionally this chapter discussed fundamentals of field sanitation and water purification
10-47
Assignment 10
Objectives
1 Define first aid and identify the general first aid rules 2 Define basic life support 3 Recognize the signs of airway obstruction and describe the steps necessary to
clear the airway 4 Recognize and describe the steps necessary to perform artificial ventilation 5 Describe the methods used to control bleeding 6 Define shock and identify its signs symptoms and treatment 7 Identify the cause and treatment of injuries caused by exposure to heat or cold 8 Identify the treatment of first aid to victims of various types of burns 9 Recognize the steps in treating and immobilizing a fracture 10 Identify field sanitation methods used to dispose of human waste and garbage 11 Identify the procedures taken to purify drinking water
Questions 1 True or False The three reasons for performing first aid are to save lives
prevent further injuries and prevent infection
1 True 2 False
2 There are how many vital functions
1 1 2 2 3 3 4 4
3 True or False The vital functions consist of the breathing process respiration
and blood circulation
1 True 2 False
4 Brain cells when deprived of oxygen will die within what period of time
1 2 to 4 minutes 2 4 to 6 minutes 3 12 to 18 minutes 4 30 minutes to an hour
10-48
5 Respiration involves inhaling oxygen and exhaling which of the following
39 When performing rescue breathing how many breaths should you blow into their
mouth or nose before checking for a pulse or re-establishing airway and seal
1 1 2 2 3 3 4 4
40 Which of the following is a correct statement concerning treatment for bleeding
1 Do not remove objects from the wound 2 Pressure points should be used as a last resort 3 Tails of the standard field dressing should be tied over the wound 4 You should use your field dressing first
41 Which of the following is a correct statement concerning treatment for bleeding
1 If an object is impaled in the wound remove it quickly 2 Remove any visible foreign objects from the wound 3 Tie the tails of the dressing at the edges of the wound 4 You should use your field dressing first
42 When using manual or direct pressure to stop bleeding firm pressure should be
applied for how many minutes
1 2 to 4 2 5 to 10 3 15 to 30 4 Until bleeding stops
43 When applying a tourniquet which of the following statements is correct
1 It should be applied directly over the wound 2 Loosen and retighten every 5 to 10 minutes 3 Once applied do not loosen 4 Wire or shoestring may be used
44 A burn from a hot liquid is considered which type of burn
1 Chemical 2 Electrical 3 Laser 4 Thermal
10-54
45 Which of the following types of burns should be kept moist
1 Dry chemical 2 Laser 3 Wet chemical 4 White Phosphorous
46 True of False When treating either heat exhaustion or heatstroke you should
elevate the casualtyrsquos legs
1 True 2 False
47 Which of the following injuries is caused by an imbalance of electrolytes in the
60 Which of the following human waste disposal methods should be used on patrol
1 Burn-out 2 Cat-hole 3 Pail 4 Straddle-trench
61 When using straddle-trench latrines how many trenches do you need for 100
females
1 1 2 2 3 3 4 4
10-57
ASSIGNMENT 10
First Aid and Field Sanitation
Directions Select the correct answer from the list of alternates below each question in the end of chapter assignment Write in the answer next to the corresponding question number below Use this answer sheet as a reference to completing the online assignment related to this assignment
1
2
3
4
5
6
7
8
9
10
11
12
13
14
15
16
17
18
19
20
21
22
23
24
25
26
27
28
29
30
31
32
33
34
35
36
37
38
39
40
41
42
43
44
45
46
47
48
49
50
51
52
53
54
55
56
57
58
59
60
61
10-58
Additional Resources and References
This chapter is intended to present thorough resources for task training The following reference works are suggested for further study This is optional material for continued education rather than for task training First Aid FM 4-2511 (FM 21-11)NTRP 4-0211AFMAN 44-163(I)MCRP 3-02G Field Hygiene and Sanitation FM 21-10MCRP 4-111D
10-59
Trainee Feedback
Center for Seabees and Facilities Engineering (CSFE) makes every effort to keep their courses up-to-date and free of technical errors If you have a suggestion found an error or inaccuracy please write FAX or email us by using the form below Use one form for each comment and be sure to fill in the information as accurately and detailed as possible Thank you for your assistance Write CSFE
NCF Training Division (N7B) 3502 Goodspeed St Port Hueneme CA 93043-4337
Course Seabee Combat Handbook Volume ____ NAVEDTRA __________ Course Date ________ Chapter Number ______ Page ______ Paragraph _____ Sentence ______ Figure ______ FrameView ______ Description ____________________________________________________ ______________________________________________________________ ______________________________________________________________ ____________________________________________________________________________________________________________________________ ______________________________________________________________ (optional) Corrective action _______________________________________ ______________________________________________________________ ______________________________________________________________ (optional) Supporting reference(s) __________________________________ ______________________________________________________________ Your email address if a response is requested ________________________
10-60
Chapter 10
First Aid and Field Sanitation
Overview
Objectives
Prerequisites
Features of This Manual
100 BASIC FIRST AID
Attitude - You should remain calm and act quickly but efficiently Reassure the casualty that his or her injuries are understood and that proper medical attention is forthcoming The casualtyrsquos confidence and positive attitude can be very helpful
Positioning the Casualty - In most cases the casualty should be lying down with his or her head level with the body until you have determined the type and extent of his or her injuries The exceptions to this are the following
Clothing - Although you should move the casualty no more than necessary you may have to remove clothing in order to determine the extent of his or her injuries Remove only the clothing necessary for examination and treatment being especially car
Infection - Do not touch any open wounds or burns with your fingers hands or other non-sterile objects unless absolutely necessary to stop severe bleeding
110 Vital Functions
111 The Breathing Process
112 Respiration
113 Circulation
120 Evaluating a Casualty
121 Step 1 ndash Check for Responsiveness
122 Step 2 ndash Check for Breathing
123 Step 3 ndash Check for Pulse
124 Step 4 ndash Check for Bleeding
125 Step 5 ndash Check for Shock
126 Step 6 ndash Check for Fractures
127 Step 7 ndash Check for Burns
128 Step 8 ndash Check for Head Injury
200 FIRST AID MEASURES
210 Controlling Bleeding
211 General
212 Methods to Control Bleeding
2121 Applying a Battle Dressing
2125 Applying a Tourniquet
220 Opening the Airway and Restoring Breathing
221 Preliminary Assessment
222 Opening the Airway
223 Rescue Breathing
2231 Mouth-to-Mouth Method
2232 Mouth-to-Nose Method
224 Clearing an Obstructed Airway
2241 Abdominal Thrust on a Conscious Casualty Standing or Sitting
2242 Chest Thrust on a Conscious Casualty Standing or Sitting
230 Recognizing and Treating Shock
231 Signs and Symptoms
232 First Aid Measures
240 Fractures
241 Signs and Symptoms
242 General Rules
243 Splinting Procedures
244 Applying a Sling
245 Treatment for Specific Fractures
2453 Neck Fractures
250 Burn Injuries
251 Eliminate the Source
252 First Aid Measures
300 HEAT AND COLD INJURIES
310 Introduction
320 Heat Injuries
321 General
322 Heat Cramps
323 Heat Exhaustion
324 Heatstroke
330 Cold Injuries
331 General
332 Specific Cold InjuriesConditions
3321 Chilblain
3322 Immersion Syndrome
400 FIELD SANITATION
410 General Information
420 Waste Disposal Devices
500 WATER PURIFICATION
510 Overview
520 Water Purification Using Iodine Tablets ndash Preferred Method
530 Water Purification Using Chlorine Ampoules
540 Water Purification Using An Emergency Water Treatment Kit (Chlor-Flocreg Tablets)
550 Water Purification Using Household Bleach
560 Water Purification by Boiling
Summary
Assignment 10
Objectives
Questions
First Aid and Field Sanitation
Additional Resources and References
Trainee Feedback
animationAvailable1
Button1
Attitude - You should remain calm and act quickly but efficiently Reassure the casualty that his or her injuries are understood and that proper medical attention is forthcoming The casualtyrsquos confidence and positive attitude can be very helpful
Positioning the Casualty - In most cases the casualty should be lying down with his or her head level with the body until you have determined the type and extent of his or her injuries The exceptions to this are the following
o If the casualty is in danger of choking on blood or vomited matter place the casualty on his or her side or on the back with the head turned to one side and lower than the feet
o When the casualty has a chest injury or difficulty breathing place him or her in a sitting or semi-sitting position
o If the casualty is in shock place him or her on the back with the head slightly lower than the feet When injuries allow raise and support the casualtyrsquos feet approximately 6 to 12 inches off the ground
NOTE
If a bone is broken or you suspect one is broken do not move the casualty until you have immobilized the break An exception to this rule is when the casualty is in danger from fire flood or hostile fire
Clothing - Although you should move the casualty no more than necessary you may have to remove clothing in order to determine the extent of his or her injuries Remove only the clothing necessary for examination and treatment being especially careful with fractures and areas where the clothing may be stuck to the wound If necessary clothing can be cut off or ripped along the seams Shoes may also have to be cut off to avoid pain or complicating an injury When removal of clothing is necessary ensure the casualty does not become chilled
Infection - Do not touch any open wounds or burns with your fingers hands or other non-sterile objects unless absolutely necessary to stop severe bleeding
Food or Drink - An unconscious person should never be given food or drink This could cause the casualty to choke from unsuccessful vomiting or even cause death
110 Vital Functions
Before you learn how to evaluate a casualty and the various treatments you should have a basic understanding of the bodyrsquos vital functions the breathing process respiration and blood circulation As the term implies these functions are vital to the continuance of life and therefore the most important
10-3
Figure 10-1 mdash The Breathing Process
Figure 10-2 mdash Respiratory System
111 The Breathing Process
All human beings must have oxygen to survive Through the breathing process your lungs draw in oxygen and put it into your blood stream (Figure 10-1) Your heart then pumps this oxygen-rich blood throughout your body to supply your cells with the required oxygen If brain cells are deprived of oxygen they will die within 4 to 6 minutes and will never regenerate unlike some of the bodyrsquos other cells As brain cells die permanent brain damage occurs followed by paralysis and finally death
112 Respiration
Respiration occurs when you inhale to take in oxygen and then exhale to expel carbon dioxide (Figure 10-2) This process uses your airway which is comprised of your nose mouth and throat your lungs including the bronchial tree and your rib cage when your diaphragm and rib muscles contract and relax This cycle occurs 12 to 18 times per minute supplying oxygen-rich blood to your heart
10-4
Figure 10-3 mdash Points on the body for
detecting a pulse
113 Circulation
The pulse that can be felt at various points on the body is caused by the rhythmic expansion and contraction of the arteries A casualtyrsquos pulse can be felt at the carotid artery on the side of the neck the femoral artery in the groin area the radial artery on each wrist and the posterior tibial artery at each ankle Refer to Figure 10-3 to see each arteryrsquos location on the body
NOTE Do not use your thumb to check a casualtyrsquos pulse because you may confuse the beat of your own pulse with that of the casualty
10-5
120 Evaluating a Casualty
There are eight steps in properly evaluating a casualty They should be performed in order and the results used to apply the proper corrective treatment or action In most cases the treatment indicated by each step will be explained in detail later in this chapter
121 Step 1 ndash Check for Responsiveness
Step one in evaluating a casualty is to check for responsiveness Shake the casualty gently and ask him or her if he or she is ok If you get no response go to Step 2 If the casualty is conscious but choking begin measures to open their airway as described in the next section Ask the casualty where he or she hurts or has unusual feelings such as numbness Have the casualty indicate where the pain or numbness is located
NOTE If you suspect he or she has a broken back or neck DO NOT shake or move the casualty unless located in an area of immediate danger
122 Step 2 ndash Check for Breathing
Step two is to check for breathing Use your senses to look for the rise and fall of their chest listen for the sounds of breathing and feel for breath on the side of your face If the casualty is breathing continue to Step 3 If not stop and attempt to ventilate or open his or her airway The methods for ventilation and clearing the airway are covered in detail in the following section After successful ventilation continue with Step 3
123 Step 3 ndash Check for Pulse
Check for a pulse is Step 3 Use the method previously described under blood circulation If a pulse is present and the casualty is breathing continue to Step 4 If a pulse is present but the casualty is not breathing begin rescue breathing as described in the next section If no pulse is present seek medical personnel immediately
124 Step 4 ndash Check for Bleeding
Check for bleeding is Step 4 Look for spurts of blood or blood on the casualtyrsquos clothing If the bleeding is from an open wound on the arm or leg apply a field or pressure dressing as described later in this chapter If bleeding is from a partial or complete amputation apply a dressing as described later in this section or apply a tourniquet IF bleeding persists If the casualty is bleeding from an open head wound chest wound or abdominal wound apply a dressing as described later
NOTE If the casualty is located in a chemically contaminated area do not expose the wound Apply a field and pressure dressing and evacuate the casualty
10-6
125 Step 5 ndash Check for Shock
Step five is to check for shock Look for the following signs or symptoms
Sweaty but cool skin
Paleness of the skin Note that darker-skinned service members will appear grayish
Restlessness or nervousness
Thirst
Loss of blood
Confusion or lack of awareness
Rapid breathing
Blotchy or bluish skin
Nausea or vomiting If these signs or symptoms are present begin the treatment for shock described later in this chapter
126 Step 6 ndash Check for Fractures
Check for fractures is Step six Look for the signs or symptoms of back or neck injuries
Pain or tenderness of the back or neck
Cuts or bruises on the back or neck
Inability to move or numbness (Check this by asking about the ability to move or by touching the arms and legs and asking about how he or she is feeling)
Unusual body or limb position Immobilize the casualty if a back or neck injury is suspected Tell the casualty not to move If you suspect a back injury place padding under the arch of his or her back If you suspect a neck injury manually immobilize the casualty with padding under the neck and weighted boots on each side of the head Check the casualtyrsquos arms and legs for open fractures by noting bleeding or bones sticking out and check his or her pulse Check for closed fractures by looking for swelling discoloration deformity and unusual position of the extremity Remember to check for a pulse If you suspect a fracture begin the first aid measures for fractures described later in this chapter
127 Step 7 ndash Check for Burns
Step seven is to check for burns Look for reddened blistered or charred skin Check for singed clothing Burns to the upper torso may cause respiratory problems so look for singed nose hair soot around the nostrils abnormal breathing sounds or breathing difficulty If burns are found begin the first aid measures described later
10-7
Figure 10-4 mdash Illustration of
arteries veins and capillaries
128 Step 8 ndash Check for Head Injury
The final step Step eight is to check for a possible head injury Look for the following signs or symptoms
Unequal pupils
Fluid from ear nose mouth or the head injury itself
Slurred speech
Confusion
Sleepiness
Loss of memory or consciousness
Staggering
Headache
Dizziness
Nausea or vomiting
Paralysis
Convulsions or twitching
Bruising around the eyes or behind the ears If a head injury is suspected watch for signs requiring rescue breathing treatment for shock or control of bleeding and seek medical help
200 FIRST AID MEASURES
210 Controlling Bleeding
211 General
Recognizing the types of bleeding and using the proper methods to control bleeding are critical first aid skills From a minor cut to a sucking chest wound the Seabee needs to be familiar with all types of bleeding and how to apply a battle dressing and other methods of controlling bleeding
Properly and promptly stopping bleeding will save lives
Blood circulates throughout the body by means of three different kinds of blood vessels arteries veins and capillaries See Figure 10-4 Arteries are the large vessels that carry blood from the heart Arterial blood is usually bright red in color If an artery near the skin surface is cut the blood gushes out in spurts that are synchronized with the heart beat However if the artery is deeply buried the bleeding may appear in a
10-8
steady stream Veins are the vessels that return blood to the heart Blood from veins is dark red in color If a vein is cut the blood escapes in a steady stream Capillaries form a connecting network of smaller vessels between the veins and arteries Capillary blood is usually brick red in color If capillaries are cut the blood oozes out slowly To begin controlling bleeding cut or tear any clothing necessary to expose the wound and observe the extent of the injury If clothing is stuck to the wound leave it alone Do not touch the wound Always check for entry and exit wounds Exit wounds are usually larger While treating any wound continually monitor vital signs breathing and pulse and take action accordingly Do not attempt to remove bullets or other objects from the wound If the wound is impaled by an object do not remove the object just apply the dressing putting padding around the object to stabilize it When bleeding is from a leg or arm wound elevate the extremity slightly above the casualtyrsquos heart This is because the amount of blood entering is decreased by the uphill gravitational effect
CAUTION Do not elevate a limb until it is certain that no bones are broken or until broken bones are properly splinted
212 Methods to Control Bleeding
There are several methods for controlling bleeding We will look at applying a battle dressing using direct pressure applying a pressure dressing the use of pressure points and lastly applying a tourniquet
2121 Applying a Battle Dressing
Before you go into the field you will normally receive an individual first aid kit Among the items in this kit are battle dressings A battle dressing is a combination compress and bandage in which a sterile pad is fastened to a gauze muslin or adhesive bandage Most Navy first aid kits contain both large and small size battle dressings of this kind When applying a battle dressing always use the casualtyrsquos first not your own You may need your own You will see that each dressing has two tails used to secure the dressing when you are treating the injured On the outer side of the dressing is written ldquoPut other side next to woundrdquo This helps to make sure the sterile side is placed on the wound First remove the wrapper and grasp the tails with both hands (Figure 10-5 frame 1) Hold the dressing over the wound white side down and pull it open (Figure 10-5 frame 2) Place it directly over the wound and hold it in place with one hand With the other hand wrap one tail around and half way over the wound leaving enough to tie a knot (Figure 10-5 frames 3 and 4) Wrap the other tail in the opposite direction and then tie the tails at the edge of the dressing not over the wound (Figure 10-5 frame 5) Tie it firmly but not tourniquet-like
Figure 10-6 mdash Applying Direct or Manual Pressure
You can reinforce dressings by applying additional sterile dressings over the battle dressing and covering the entire dressing with an elastic bandage 2122 Using Direct Pressure
If bleeding doesnrsquot stop after applying a battle dressing your next technique should be direct or manual pressure Place your hand over the battle dressing and apply firm pressure for 5 to 10 minutes If the casualty is conscious he or she can do this In almost all cases bleeding can be stopped by direct pressure on the wound See Figure 10-6
10-10
Figure 10-7 mdash Applying a Pressure Dressing
2123 Applying a Pressure Dressing
If bleeding persists apply a pressure dressing over the battle dressing This will aid in blood clotting and compress the open blood vessel Do this by placing a wad of padding over the dressing at the wound location keeping the extremity elevated if applicable Secure the padding using a bandage or cravat tying the ends directly over the wound using a nonslip knot Improvised pressure dressings can be strips of cloth made from T-shirts socks or other clothing See Figure 10-7 frames 1 thru 4
2124 Using Digital Pressure
If bleeding continues try digital pressure also known as pressure points Digital pressure is applying pressure using your fingers thumb or hand to the appropriate pressure point A pressure point is a spot where a main artery lies near the skin surface and over a bone or firm tissue The objective of applying pressure is to compress the artery against the bone thus shutting off the flow of blood from the heart to the wound There are 10 principal pressure points on each side of the body Refer to Figure 10-8 while reading the following The first pressure point wersquoll look at is the superficial temporal artery If the bleeding is in the region of the temple or scalp use the finger to compress the main artery to the temple against the skull bone This pressure point is just in front of the ear The next pressure point is the facial artery Use this if bleeding occurs on the face below the level of the eyes Apply pressure to the point on the lower jaw To find this pressure point start at the angle of the jaw and run your finger forward along the lower edge of the lower jaw until you feel a small notch The pressure point is in the notch The common carotid artery is the pressure point you will use if the neck is bleeding Apply pressure below the wound just in front of the prominent neck muscle Press inward and slightly backward compressing the main artery of that side of the neck against the bones of the spinal column Do not apply pressure at this point unless it is absolutely essential This is because there is a danger of pressing on the windpipe and thus choking the victim
10-11
Figure 10-8 mdash Pressure Points (Roll over to view details)
10-12
Look now at the pressure point at the subclavian artery If the bleeding is in the shoulder or in the upper part of the arm apply pressure with the fingers behind the collarbone Press down against the first rib or forward against the collarbone The brachial artery is where you should apply pressure when bleeding is between the middle part of the upper arm and the elbow The blood flow should be controlled by applying pressure in the inner side of the armmdashthat is toward the bodymdash about halfway between the shoulder and the elbow The radial and ulnar arteries are the spots to press to control bleeding from the hand To do this apply pressure at the wrist If it is possible to hold the arm up in the air the bleeding will be relatively easy to stop At the iliac artery apply pressure to the middle of the groin to control bleeding in the thigh Bleeding in the upper part of the thigh can be controlled by applying pressure to the femoral artery or the iliac artery At the femoral artery bleeding in the upper part of the thigh can be controlled by applying pressure with the closed fist of one hand and using the other hand to give additional pressure The artery at this point is deeply buried in some of the heaviest muscle of the body so you must use a great deal of pressure to push the artery against the bone The next pressure point to consider is the popliteal artery Control bleeding between the knee and the foot by applying firm pressure against the knee Sometimes pressure at the side of the knee doesnrsquot stop the bleeding In this case hold the front of the knee with one hand and thrust the fist hard against the artery behind the knee The last pressure point wersquoll discuss is the anterior and posterior arteries Apply pressure to these arteries to stop bleeding from the foot Use digital pressure in combination with previously described techniques or when dressings are not available
2125 Applying a Tourniquet
CAUTION A tourniquet can be dangerous Its application can cause tissue injury or even loss of a limb
If bleeding continues after using other techniques as a last resort use a tourniquet A tourniquet is a constricting band placed around an arm or leg to control bleeding and as previously mentioned should only be applied as a last resort or if a limb has been severed Once applied the tourniquet must stay in place and the casualty must be taken to the nearest Medical Treatment Facility (MTF) as soon as possible Do not loosen or release a tourniquet once it has been applied See Figure 10-9 In the absence of a specially designed tourniquet use a strong pliable material such as gauze or muslin bandages clothing or a cravat Use this material with a rigid stick-like object and ensure the improvised tourniquet material is at least two inches wide DO NOT use wire or a shoestring for a tourniquet band Place the tourniquet material around the limb between the extremity and the torso or between the wound and the heart Never place a tourniquet directly over a wound fracture or joint For maximum effectiveness place it on the upper arm or above the
10-13
Figure 10-9 mdash Applying a Tourniquet Frames 1 thru 5
knee It should be well-padded andor placed over a smoothed sleeve or trouser leg If the material is long enough wrap it around the limb several times keeping the material flat Tie a half-knot the same as the first part of tying a shoe lace Next place a stick or other rigid object on top of the half-knot and tie a full knot over the stick Twist the stick until the tourniquet is tight around the limb andor bright red bleeding has stopped In the case of an amputation dark oozing blood may continue to flow for a short time Fasten the tourniquet to the limb by looping the free ends of the tourniquet over the ends of the stick and then bring the ends around the limb to prevent the stick from loosening and tie the ends together on the side of the limb After applying the tourniquet mark the casualtyrsquos forehead with a ldquoTrdquo and the time the tourniquet was applied Check and treat the casualty for shock and seek medical aid In the case of a severed limb apply a dressing to the stump and if possible save and transport the limb with the casualty but out of his or her sight to avoid shock
10-14
Figure 10-10 mdash Positioning the Casualty for a Preliminary Assessment
220 Opening the Airway and Restoring Breathing
An inadequate airway and lack of breathing are two of the most critical situations in first aid You must have oxygen to continue living The third critical situation is the loss of blood circulation or stoppage of the heart Before attempting to clear a casualtyrsquos airway or restore breathing you should check the casualty for a pulse using one of the checkpoints on the wrist neck or ankle as described under Evaluating a Casualty If no pulse is present you should immediately call for medical personnel unless you have been properly trained in cardiopulmonary resuscitation or CPR
221 Preliminary Assessment
Check the casualty for responsiveness or consciousness by gently shaking him or her and asking ldquoAre you OKrdquo If you get no response kneel beside the casualty and gently roll him or her onto the back by placing one hand under his or her head and neck for support then grasp the far arm and roll him or her toward you See Figure 10-10
NOTE
If you suspect he or she has a broken back or neck DO NOT shake or move the casualty unless located in an area of immediate danger
10-15
Figure 10-11 ndash Using the crossed-finger method to open the casualtyrsquos mouth
Figure 10-12 ndash Using the finger to dislodge foreign matter
Place the casualtyrsquos arms at the sides and straighten out his or her legs Next you need to check for breathing Look for the rise and fall of the chest listen for the sounds of breathing and feel his or her breath on the side of your face If the casualty is not breathing or appears to be having difficulty breathing you will need to perform a finger sweep of his or her mouth Open the casualtyrsquos mouth using your crossed thumb and finger to exert pressure upwards on the upper teeth and downwards on the lower (Figure 10-11) Crook the index finger on your other hand insert it against the inside of
the casualtyrsquos cheek and sweep across to the other side of the mouth Remove any foreign matter you find but do not spend too much time doing so (Figure 10-12)
WARNING Take care not to force an object deeper into the airway by pushing it with your finger
If the casualty is still not breathing or you are unsure you will need to perform one of the methods of rescue breathing Performing rescue breathing on a casualty that is breathing on their own can do no harm
10-16
Figure 10-14 ndash Jaw-thrust technique of opening the airway
Figure 10-13 ndash Head-tiltChin-lift technique of opening the airway
222 Opening the Airway
Before performing rescue breathing you need to open the casualtyrsquos airway Kneel at his or her side and position the head to open the airway using either the jaw-thrust or head-tiltchin-lift method If you suspect the casualty has a neck injury or severe head injury you should use the jaw-thrust technique to open the airway Otherwise use the head-tiltchin-lift technique by placing one hand on the casualtyrsquos forehead and tilting the head back with firm backward pressure Next place the fingers of the other hand under the bony part of the lower jaw and lift bringing the chin forward Do not use your thumb See Figure 10-13
To perform the jaw-thrust technique to open the casualtyrsquos airway kneel at the casualtyrsquos side Use both hands to grasp the lower jaw at each side and lift forward and up If this is unsuccessful tilt the head back slightly See Figure 10-14
With either technique once the casualtyrsquos airway is opened maintain the head position to keep the airway open After opening the casualtyrsquos airway and before you begin rescue breathing check again to see if the casualty has already begun breathing on his or her own Often just clearing and opening the airway will allow the casualty to
10-17
breathe properly If the casualty does begin breathing on his or her own continue to monitor the casualty and transport him or her to an MTF as soon as possible
223 Rescue Breathing
If the casualty is still not breathing you need to begin rescue breathing There are two basic methods mouth-to-mouth and mouth-to-nose Mouth-to-mouth is the preferred method but you should use the mouth-to-nose method if the casualty has a severe jaw fracture a wound to the mouth or the jaws are clamped shut by spasms
2231 Mouth-to-Mouth Method
To perform mouth-to-mouth rescue breathing place the casualty on his or her back face up Next place one hand on the forehead and pinch the nostrils closed Place the fingertips of the other hand on the bony part of the chin and lift If you suspect the casualty has a neck injury and used the jaw-thrust technique for clearing the airway close the nostrils by placing your cheek against them Now take a deep breath place your mouth around the casualtyrsquos mouth and blow two full breaths into the mouth one to one and a half seconds per breath taking a breath of fresh air before each breath If the casualty is too small as with a child cover both the nose and mouth with your mouth Watch for the casualtyrsquos chest to rise If the chest does not rise reestablish an open airway ensure no leakage and try again If the chest still isnrsquot rising clear the obstruction from the mouth or throat using one of the methods described in the next section After each two breaths check for a pulse at the neck If you find a pulse and the casualty appears to be breathing on his or her own STOP If a pulse is found but the casualty is still not breathing on his or her own continue rescue breathing If no pulse is found seek medical help immediately
2232 Mouth-to-Nose Method
The mouth-to-nose method of rescue breathing is performed in the same manner as the mouth-to-mouth method except that you blow into the nose while holding the lips closed with one hand under the chin Remove your mouth after each breath to allow the casualty to exhale It may be necessary to part the lips to allow the casualty to exhale Check for a pulse after each two breaths taking action as described for the mouth-to-mouth method
224 Clearing an Obstructed Airway
If the casualty is not breathing or appears to be choking ensure they have a clear unobstructed airway A casualtyrsquos upper airway may be obstructed for a number of reasons including the casualtyrsquos tongue falling back into his or her throat while he or she is unconscious foreign matter becoming lodged in the throat regurgitation of stomach contents into the throat or blood clots due to head or facial injuries If a casualty is conscious but choking do not interfere Encourage the casualty to cough up the obstruction If coughing doesnrsquot work or the casualty is unconscious but hasnrsquot responded to rescue breathing you need to clear the obstructed airway using either the abdominal thrust or chest thrust method Use the abdominal thrust method unless the casualty is in the advanced stages of pregnancy is markedly obese or has a significant abdominal wound In these cases use the chest thrust method
10-18
2241 Abdominal Thrust on a Conscious Casualty Standing or Sitting
To perform the abdominal thrust (or Heimlich maneuver) on a conscious casualty who is standing or sitting (Figure 10-15)
Stand behind the casualty
Wrap your arms around the casualtyrsquos waist
Make a fist with one hand and grasp it with the other
The thumb side of your fist should be against the abdomen in the midline and slightly above the navel but well below the breastbone
Press your fists into the abdomen with a quick backward and upward motion
Each thrust should be a separate and distinct movement Continue until the obstruction is expelled or the casualty becomes unresponsive
NOTE
If the casualty becomes unresponsive call for help and begin rescue breathing after positioning the casualty to open the airway
Figure 10-15 mdash Anatomical and profile views of the abdominal thrust on a conscious casualty sitting or standing
10-19
Figure 10-16 ndash Profile view of a the chest thrust on a conscious
casualty sitting or standing
2242 Chest Thrust on a Conscious Casualty Standing or Sitting
To perform the chest thrust on a conscious casualty while standing or sitting (Figure 10-16)
Stand or sit behind the casualty
Wrap your arms around his or her chest with your arms under the armpits
Make a fist and place the thumb in the middle of the breastbone avoiding the tip of the breastbone and the edges of the ribs
Grasp your fist with your other hand
Exert thrusts slowly and distinctly Perform this technique until the obstruction is expelled or the casualty becomes unresponsive If he or she becomes unresponsive call for help and begin rescue breathing
2243 Abdominal Thrust on an Unconscious Casualty Lying Down
If opening the airway and attempting rescue breathing fails perform the abdominal thrust 6 to 10 times while the casualty is lying down To do this (Figure 10-17)
Kneel astride the casualtyrsquos thighs
Place the heel of one hand against the abdomen in the midline slightly above the navel but well below the breastbone with the fingers pointed toward the head
Press into the abdomen with a quick thrust forward and upward Repeat the sequence of abdominal thrust finger sweep of the mouth and rescue breathing as long as necessary to clear the obstruction and restore breathing
10-20
Figure 10-17 mdash Performing the abdominal thrust on an unconscious or unresponsive casualty
2244 Chest Thrust on an Unconscious Casualty Lying Down
If the casualty does not respond to rescue breathing perform the chest thrust with the casualty on his or her back face up and mouth open (Figure 10-18)
Kneel close to the casualtyrsquos side
Locate the lower edge of the ribs with your fingers and run your fingers up along the center of the rib cage to the notch (Figure 10-18 view A)
Place your middle finger on the notch and your index finger next to it on the lower edge of the breastbone
Place the heel of your other hand on the lower half of the breastbone next to your two fingers (Figure 10-18 view B)
Remove your two fingers and place that hand on top of the hand positioned on the breastbone extending or interlocking your fingers (Figure 10-18 view C)
Straighten and lock your elbows with your shoulders directly above your hands
Apply enough downward pressure to depress the breastbone 1 frac12 to 2 inches then release the pressure completely See Figures 10-18 view D and 10-19
Do this 6 to 10 times delivering each thrust quickly and distinctly Repeat the sequence of chest thrust finger sweep of the mouth and rescue breathing as long as necessary to clear the obstruction and restore breathing
10-21
Figure 10-18 mdash Hand placement for performing the chest thrust on an unconscious or unresponsive casualty
Figure 10-19 mdash Showing breastbone depression when performing the chest thrust on an unconscious or unresponsive casualty
10-22
230 Recognizing and Treating Shock
Shock is the collapse of the bodyrsquos cardiovascular system including an inadequate supply of blood to the bodyrsquos tissue Shock stuns and weakens the body Recognizing shock and applying the proper first aid measures in a timely manner can save a fellow Seabeersquos life The three basic mechanisms associated with shock are heart damage blood loss causing insufficient volume of blood and inadequate circulation of blood caused by the blood vessels opening too wide Shock may result from dehydration allergic reactions significant blood loss reaction to the sight of blood or a wound or traumatic injuries such as burns gunshot wounds crush injuries etc
231 Signs and Symptoms
As the one administering first aid itrsquos important that you be able to recognize the signs of shock They do not always appear at the onset of the injury Some of these signs are the following
The casualtyrsquos pulse tends to be weak and rapid
The face and skin may be very pale or ashen gray
Breathing is likely faster than normal
The skin feels cool and clammy and is covered in sweat
The casualtyrsquos skin may be blotchy or bluish especially around the mouth and lips
Another way to assess a case of shock is to look for symptoms Symptoms are things the casualty feels The symptoms of shock are direct or indirect evidence that circulation has been disturbed Look for feelings of restlessness or nervousness He or she may be thirsty There may be nausea or vomiting and the casualty may be confused and lack awareness of his or her surroundings
232 First Aid Measures
When treating a casualty for any injury or illness you should assume he or she is already suffering from shock or that shock will soon occur Since the first aid measures to apply for shock are the same as those for preventing it you should begin treating for shock and not wait for signs to appear First move the casualty to cover if feasible Lay the casualty on his or her back unless he or she is experiencing difficulty breathing in which case allow the casualty to sit upright but monitor closely Elevate the feet higher than the heart using a stable object such as a field pack
WARNING DO NOT elevate the feet if there is an unsplinted broken leg head injury or abdominal injury If the casualty has an abdominal injury bend his or her legs at the knee
Next loosen the casualtyrsquos clothing around the neck waist and any place it seems binding It is important to maintain the casualtyrsquos body temperature In hot weather
10-23
Figure 10-20 mdash Types of fractures
place the casualty in the shade and protect him or her from becoming chilled In cold weather place blankets over and under the casualty to keep him or her warm You should reassure and keep the casualty calm by sounding authoritative and self-confident Assure the casualty you are there to help
WARNING DO NOT give the casualty food or drink If he or she is unconscious or you need to leave the casualty unattended turn the head to the side to prevent choking if he or she vomits
Seek medical aid as soon as possible and continually monitor the casualtyrsquos condition until medical personnel arrive or the casualty is transported
240 Fractures
Many kinds of accidents cause injuries to the bones joints and muscles In providing first aid to injured people you must always look for signs of fractures A fracture is any break in the continuity of a bone a dislocation is when a joint is not in the proper position and a sprain is when the connecting tissues of joints have been torn This section will be concerned mostly with fractures There are two types of fractures closed and open A closed fracture is one where the injury is completely internalmdashno broken skin (Figure 10-20 view A) An open fracture is where there is a break in the skin and tissues caused by the broken bone protruding (Figure 10-20 view B) or a missile that broke the bone (Figure 10-20 view C) leaving an opening Open fractures should always be considered contaminated and subject to infection
10-24
241 Signs and Symptoms
You may not always be able to actually see the broken bone but there are signs and symptoms to look for in a casualty that can tip you off You might see deformity in the area of the injury There may be pain or swelling The casualty will be unable to move that portion of the body or there may be unnatural movement of the injured part The casualty may also feel a grating sensation at the point of injury If you are unsure if the casualty has a fracture treat the injury as a fracture Medical professionals can make a firm diagnosis later
WARNING Do not have the casualty move the injured parts in order to identify a fracture as any movement could cause further injury
242 General Rules
Follow these general rules in treatment of a fracture Treat the open fracture tissue wound immediately by covering all wounds with a dressing That means before you treat the fracture You should also always treat a fracture victim for shock Splint the casualty in the position you find him or her Do not attempt to straighten out the limb Do not attempt to push the bone of an open fracture back under the skin Do not attempt to set the fracturemdashjust splint it You immobilize the suspected fracture to prevent sharp edges of the bone from causing more damage It will also reduce pain and help prevent or control shock If it is a closed fracture immobilization will prevent an open wound and possible infection
243 Splinting Procedures
To prepare for splinting reassure the casualty loosen any tight or binding clothing and remove all jewelry from the injured limb Do not remove boots unless you need to stabilize a neck injury or the foot is bleeding Next gather splinting materials and padding improvising as needed
10-25
Figure 10-21 mdash Uninjured leg used as a splint for a fractured leg
Figure 10-22 mdash Chest wall used as a splint for a fractured arm
Splints An object that can be used to immobilize a fracture or a dislocation is called a splint There are two types of splints soft and rigid Soft splints include such things as pillows blankets towels and dressings Rigid splints are stiff and allow very little flexibility Splints should be lightweight strong and long enough to reach the joints above and below the fracture Lacking proper splints boards poles sticks tree limbs or even cardboard may be used as splints If nothing is available the chest can be used to immobilize a fractured arm and the uninjured leg can be used to immobilize the fractured leg (Figure 10-21 and 10-22) Padding Padding may be improvised from such items as a jacket blanket poncho or even leafy vegetation Bandages Bandages may be improvised from belts rifle slings or strips of clothing or blankets Narrow materials such as wire or cord should not be used to secure a splint in place as these could cause tissue damage and a tourniquet effect Slings A sling is a bandage or cravat tied around the neck to support a fractured arm or shoulder If a bandage is not available a sling can be improvised from pieces of clothing or blankets Swathes Swathes are pieces of cloth or load bearing equipment (LBE) that are used to further immobilize a splinted fracture Triangular and cravat bandages are often used and are called swathe bandages The purpose of the swathe is to immobilize therefore the swathe bandage is placed above andor below the fracturemdashnot over it Check the circulation below the site looking for
Pale white or bluish-gray skin
Colder skin temperature below the site If you suspect poor circulation evacuate the casualty immediately
10-26
Figure 10-23 mdash Board splints applied to a fractured lower leg
Apply the splint See Figure 10-23 Position one splint on each side of the fracture so that they extend both above and below the fracture Tie off the splinting materials above and below the site Check the splint for tightness ensuring it is tight enough to hold in place but not so tight it impairs circulation For fractures on the upper arm or shoulder use a sling Use swathes to hold an arm against the side or to hold legs together See Figure 10-21 and 10-22
NOTE
After splinting check the casualtyrsquos pulse and motor sensation at a point farther from the heart than the splint eg for a splinted forearm check the wrist for pulse hand for motor and sensation This is important Splinting too tightly can create the same bad effect as a tourniquet
244 Applying a Sling
To help immobilize a fractured arm you should apply a sling A sling is also used to immobilize a fractured collarbone or a fractured or dislocated shoulder Slings can be made from any non-stretching cloth such as shirts trousers ponchos or belts The supporting pressure of a sling should be on the casualtyrsquos uninjured side Support the arm with the hand slightly higher than the elbow with the fingers exposed to aid in circulation Use the following procedures to apply a sling (Figure 10-24)
Insert the splinted arm or the arm on the side of the fractured shoulder or collarbone in the center of the sling
Bring the ends of the sling up and around the casualtyrsquos neck then tie them in the hollow of the neck on the uninjured side
10-27
Figure 10-24 ndash Application of a triangular bandage to form a sling
Figure 10-25 mdash Applying a cravat bandage for a fractured jaw
Roll the corner of the sling at the elbow and tuck it in
245 Treatment for Specific Fractures
2451 Jaw Collarbone and Shoulder Fractures
If a casualty has a fractured jaw you need to immobilize it (Figure 10-25) To do so apply a cravat vertically around the head and under the jaw then add another cravat
around the top of the head to secure the first one Do not apply the cravat to the back of the neck Do not lay the casualty on his or her back as this may cause an obstruction of the airway
10-28
Figure 10-26 ndash Immobilizing a fractured collarbone
Figure 10-27 ndash Immobilizing a fractured or dislocated shoulder
In the case of a fractured collarbone apply two belts a sling and a cravat to immobilize the area as in Figure 10-26 With a fractured or dislocated shoulder apply a sling and a cravat or swathe See Figure 10-27
2452 Spinal Column Fractures
It is impossible to be sure if a casualty has suffered a spinal column fracture A fracture is likely if the casualty has fallen his or her back has been sharply struck or bent or there is no feeling in the legs or the legs canrsquot move If the spine is fractured bending it can cause the sharp bone fragments to bruise or cut the spinal cord and result in permanent paralysis or death
10-29
Figure 10-28 ndash Maintaining a normal spinal position
While you are waiting for transport and medical assistance maintain a normal spinal position at the lower back (Figure 10-28) Caution the casualty not to move and leave the casualty in the position he or she was found Do not move any part of the body If the casualty is face up you can slip a blanket under the arch of the lower back If found face down do not put anything under him or her If the casualty must be moved a four man team will be needed to do so safely
2453 Neck Fractures
When treating neck fractures caution the casualty not to move and leave the casualty in the position he or she was found If the neck or head is in an abnormal position and the casualty is lying face up raise the shoulders slightly and slip a roll of bath towel or something of similar bulk under the neck Do not bend the head or neck forward and do not raise or twist the head Immobilize the head using boots or heavy objects on each side of it (Figure 10-29)
10-30
Figure 10-29 mdash Immobilizing a fractured neck
If the head or neck is in an abnormal position and the casualty is lying face down do not move the casualty Immobilize the head with boots or heavy objects on each side of it but do not put a roll under the neck Do not bend the head or neck or attempt to roll the casualty onto his or her back If transportation is necessary at least two people will be required
250 Burn Injuries
Burns are injuries that most commonly result from exposure to fire chemicals or electricity The severity of burns depends on the depth size and location Burns are most serious when they are located on the face neck hands and feet Also they are dangerous when combined with fractures There are four types of burns you should learn to recognize and treat thermal electrical chemical and laser Thermal burns are caused by fire hot objects liquids or gases Electrical burns are caused by electrical wires current and lightning Chemical burns are caused by coming in contact with wet or dry chemicals or white phosphorous Laser burns are burns to the eye causing an ocular injury
251 Eliminate the Source
The first step to take with all types of burns is to eliminate the source of the burn After eliminating the source you can evaluate the casualty and provide appropriate first aid measures You should take the following actions to eliminate the source of the burn injury
With thermal burns remove the casualty from danger cover him or her with non-synthetic material and if still on fire roll him or her on the ground to extinguish the fire
In the case of an electrical burn remove the source of current by turning it off if it is close enough Wrap non-conductive material around the casualtyrsquos back and
10-31
shoulders and drag the casualty away Do not make direct contact with the casualty or touch any wires
When the casualty has been exposed to chemicals remove liquid chemicals by flushing the casualty with large amounts of water
Remove dry chemicals by brushing off the particles from the casualty but do not use your bare hands Afterwards flush the casualty with either large amounts of water or none at all as insufficient amounts of water may cause a chemical reaction and make matters worse
If the burn is from white phosphorous smother the chemical with wet clothes or mud and keep the casualty covered
In the case of a laser burn remove the casualty from the beam and make sure you do not look directly at the beam yourself
252 First Aid Measures
After removing the source of the burn evaluate the casualty for other conditions requiring first aid such as problems with breathing weak or no pulse or other wounds Expose the burn by removing any clothing over the burn unless it is stuck to the wound If the casualtyrsquos hands or wrists are burned remove any jewelry Next apply a field dressing For electrical burns check for both entry and exit burns The exit burn may be anywhere on the body With wet or dry chemical burns flush the burns with large amounts of water first then cover with a dry dressing In the case of white phosphorous burns flush the burn with large amounts of water then cover them with wet material or mud For laser burns apply a field dressing over the affected eye or eyes When applying a field dressing take the following precautions
Do NOT place the dressing over the face or genital area
Do NOT break the blisters
Do NOT apply grease or ointments to the burns In all cases seek medical assistance
300 HEAT AND COLD INJURIES
310 Introduction
Climatic injuries are caused by extreme hot or cold environments The human body needs time to adapt to any extremes of temperature The Seabeersquos physical condition will to some extent determine how long it takes to become acclimated There are other factors that contribute to an individualrsquos health and therefore susceptibility such as proper diet or nutrition sufficient sleep and rest proper exercise and suitable clothing While serving in extremes of climate individuals who are trying to lose weight should be supervised by properly trained medical personnel Most climatic injuries are preventable
10-32
320 Heat Injuries
321 General
Sometimes the heat of the environment causes injuries that need to be treated in the field Heat injuries are caused by exposure to extreme heat improper clothing wearing of Mission Oriented Protective Posture (MOPP) gear enclose spaces and wearing body armor The prevention of heat exposure injuries is a command responsibility All hands must be educated about medical dangers and environmental health in the field There are three categories of heat injuries heat cramps heat exhaustion and heatstroke
WARNING The heat casualty should be continually monitored for development of conditions which may require the performance of necessary basic lifesaving measures
CAUTION Do not use salt solutions in first aid procedures for heat injuries
322 Heat Cramps
Heat cramps are caused by an imbalance of electrolytes in the body from excessive sweating The signs and symptoms of heat cramps are
Cramping in the arms or legs
Stomach cramps
Excessive sweating To treat a casualty for heat cramps first move him or her to a cool shady area Loosen his or her clothing and slowly give the casualty a canteen of water Cool water is absorbed more quickly than warm water If the condition is unabated or continues seek medical assistance
323 Heat Exhaustion
Heat exhaustion is caused by a loss of fluids in the body The signs and symptoms of heat exhaustion include the following
Excessive sweating
Pale moist cool skin
Headaches
Weakness
Dizziness
Loss of appetite
Cramping 10-33
Nausea with or without vomiting
Chills or goosebumps
An urge to defecate
Rapid breathing
Tingling in the hands or feet
Confusion To treat for heat exhaustion first move the casualty to a cool shady area Loosen or remove his or her clothing and boots Pour water over the casualty and fan him or her while slowly giving the casualty a canteen of water Elevate the legs and keep the casualty from doing any strenuous activities for the rest of the day Monitor the casualty until the symptoms are gone or provide medical assistance
324 Heatstroke
Heatstroke is a failure of the bodyrsquos cooling mechanism The signs and symptoms of heatstroke are
Unconsciousness or sudden collapse Use the following procedures to treat heatstroke
Move the casualty to a cool shady area
Loosen or remove the casualtyrsquos clothing
Spray or pour water over him or her and fan him or her
Massage the extremities and skin
Elevate the legs
Slowly give the casualty a canteen of water This is a more severe heat injury than heat cramps or heat exhaustion so you should seek medical assistance immediately while monitoring the casualty for necessary lifesaving measures
330 Cold Injuries
331 General
Cold injuries are most likely to occur when it is moderately cold but wet andor windy It is important to understand what to do to prevent cold injuries First maintain good personal hygiene get sufficient exercise take care of your feet and hands and use protective clothing There are many contributing factors to cold injuries Humidity precipitation and wind increase the likelihood of injury Stationary activities such as standing guard increase
10-34
an individualrsquos vulnerability especially if that individual is in contact with the ground for extended periods or standing in water Inadequate diet and rest increase susceptibility and lower defenses Physical fatigue leads to apathy neglect and carelessness Studies show that previous cold injuries also increase your risk Depressed and unresponsive personnel tend to be less active Finally excessive use of alcohol or drugs impairs your judgment and is likely to cause carelessness or overconfidence Seabees may be suffering from cold injuries without knowing it They may simply feel uncomfortable and not notice that extremities are already numb from the cold The general signs and symptoms of cold injuries include
Numbness or tingling sensations which may be relieved by simply loosening boots or clothing and exercising to rewarm yourself
Discoloration of the skin o With lighter-skinned individuals skin becomes red then pale or waxy
white o With darker-skinned individuals skin will be grayish
Affected area may feel cold to the touch
Swelling may occur with deeper injuries
Blisters may occur after rewarming You should use the buddy system to check each other for signs of cold injuries The treatment for cold injuries varies with the severity of the injury First and foremost an individual suffering any cold injury should be removed from the cold environment With superficial injuries you can rewarm the affected part with body heat With more serious life-threatening injuries you should seek medical assistance immediately
WARNING Do not massage the injured part Do not expose the casualty directly to fire or a stove Do not rub the injured part with snow Do not slap or chafe injured parts or soak them in cold water Avoid walking on injured feet if at all possible
The primary injuries caused by cold environments are chilblain immersion syndrome frostbite snow blindness dehydration and hypothermia
332 Specific Cold InjuriesConditions
3321 Chilblain
Chilblain is caused by repeated exposure of bare skin to temperatures from 32 to 60 degrees Fahrenheit The symptoms of chilblain are acutely swollen red tender hot or itchy skin Treat chilblain by rewarming the affected part using firm steady pressure with your hands or by placing the affected parts under your arms or against your buddyrsquos stomach Do not rub or massage the affected parts Have medical personnel evaluate you for any damage
10-35
3322 Immersion Syndrome
Immersion syndrome also known as immersion foot or trench foot results from long exposure of the feet to wet conditions in temperatures ranging from 32 to 50 degrees Fahrenheit Inactive feet in damp or wet socks and boots are more susceptible The signs of immersion syndrome occur in stages with exposure At first the feet are cold but painless The pulse may be weak and the feet may be somewhat numb Next the feet feel hot with burning or shooting pain Later the skin becomes pale with a bluish tint and the pulse decreases In the later stages the feet may blister swell bleed or even become gangrenous Treatment is required for all stages of immersion syndrome
Gradually warm the affected part and protect it from trauma and infection
Apply dry loose clothing or layers of warm coverings
Elevate the feet to reduce swelling
Transport the casualty to a medical facility as soon as possible
Do not massage the feet moisten the skin or apply direct heat or ice 3323 Frostbite
Frostbite is caused by exposure to cold temperatures usually below 32 degrees Fahrenheit Individuals with a history of cold injuries are more likely to get frostbite The most easily frostbitten parts of the body are the cheeks nose ears chin forehead wrists hands and feet Deep frostbite is very serious and can result in amputation of appendages The signs or symptoms of frostbite include
Loss of sensation or numbness
Sudden blanching of the skin then brief tingling
Redness of the skin or grayish in darker-skinned individuals
Blisters swelling or tender parts
Loss of previous pain sensation
Pale yellowish waxy-looking skin
Frozen tissue that feels solid or wooden Treat frostbite of the face ears or nose by covering them with bare hands until sensation and natural skin color returns Place frostbitten hands under the armpits To treat frostbitten feet remove boots and socks and place the feet under clothing against a buddyrsquos body General treatment of frostbite is as follows
Keep the affected parts warm and covered
Remove or loosen restrictive clothing
Cover affected parts to protect them from further injury
Exercise if possible to warm up
Seek medical treatment
Do not rub the injured part with snow or apply cold water 10-36
Do not massage
Do not expose to an open fire
Do not use ointments or salves
Do not manipulate the affected part to increase circulation
Do not use alcohol or tobacco 3324 Snow Blindness
Snow blindness is the effect that the glare from ice or snow has on the eyes It is more likely to occur in hazy cloudy weather The signs and symptoms of snow blindness are
The sensation of grit in the eyes
Pain in or over the eyes
Eye watering or redness
Headache
Pain with exposure to light To treat a casualty for snow blindness blindfold or cover the eyes with dark cloth Complete rest is desirable for quicker recovery If necessary and possible evacuate the casualty to a medical facility Snow blindness usually heals by itself in a few days if there is no repeated exposure 3325 Dehydration
Dehydration occurs when the body loses too much fluid It is just as prevalent in cold weather as in hot In colder temperatures sweating is not as noticeable since it evaporates and is quickly absorbed The signs and symptoms of dehydration are
Mouth tongue throat parched or dry
Difficulty swallowing
Nausea with or without vomiting
Extreme dizziness and fainting
General fatigue and weakness
Muscle cramps
Difficulty focusing the eyes To treat for dehydration keep the individual warm and loosen his or her clothing Shelter the individual from the wind and cold and begin fluid replacement immediately Transport the casualty to a medical treatment facility as soon as possible 3326 Hypothermia
Hypothermia or general cooling of the body occurs when the body loses heat faster than it can produce heat It can occur with temperatures above or below freezing and causes cooling of the core body temperature below 95 degrees Fahrenheit Hypothermia can be caused by fatigue poor physical condition dehydration faulty blood circulation alcohol or drug use trauma or immersion in cold water The signs and symptoms of hypothermia are progressive and include
10-37
Shivering
Faint pulse
Drowsiness and mental slowness
Hampered stiff and uncoordinated movement
Slurred speech
Slow and shallow breathing
Frozen extremities
Irregular heart action To treat mild hypothermia rewarm the body evenly and as soon as possible You must provide a heat source as the casualty will be unable to produce the needed heat Keep the casualty dry and protected from the elements Give the casualty warm liquids gradually if he or she is conscious Be prepared to provide life support measures and seek medical assistance immediately Severe hypothermia is treated by stabilizing the bodyrsquos core temperature and avoiding further heat loss Handle the casualty gently and evacuate to a medical facility as soon as possible Do not expose the body to an open fire Wrap any hot water bottles or canteens in cloth to avoid scalding Rewarming in the field is dangerous and resuscitation is difficult if not impossible in the field
400 FIELD SANITATION
410 General Information
Field waste disposal is performed to prevent flies from spreading germs from waste to your food and to keep unwanted animals out of your bivouac area Use the following as a guide to performing proper field waste disposal Step 1 Determine the type of field waste disposal to use
The proper type of device to use depends upon the mission length of stay terrain and weather conditions but you should use Table 10-1 as a guideline
When on bivouac o Chemical toilets are the preferred method o Burn-out latrines are preferred as an improvised method when chemical
toilets are not available
When on the march o Individual waste collection bags are preferred o Personal cat-holes are used as an alternative
NOTE
Check local state federal and host-nation regulations for applicable restrictions and for prohibition on burning or burying waste Garbage and rubbish may have to be transported to a waste disposal facility
Human waste disposal should be as far from food services as possible but at least 100 meters
Garbage and soakage pits should be at least 30 meters from food service
Locate downwind and downslope if possible
Locate downslope of all wells springs streams and other water sources at least 30 meters
Step 3 Set up construct and maintain latrines garbage pits and soakage pitstrenches
As soon as unit moves into area detail members to set up chemical toilets andor dig latrines
Assign members to clean latrines on a daily basis
Instruct the Field Sanitation Team to spray latrines with insecticide
Install handwashing facilities at food service and latrines
Cover transport burn or bury waste daily depending on regulations Step 4 Inspect daily to ensure
Waste is collected and transported when possible
Straddle-trench latrines and garbage pits are covered with dirt
Pail latrines are emptied and cleaned
Burn-out latrine containers are rotated and contents burned
Facility not contents are sprayed with insecticide as needed Step 5 Close out improvised latrines and garbage pits when filled within 1 foot of surface by
Spraying with residual insecticide
Packing earth in successive 3-inch layers until mounded one foot above surface
Spraying again with insecticide 10-39
Figure 10-30 ndash Cat-hole Latrine
Posting a sign saying ldquoClosed latrinegarbage pit and daterdquo (except in combat)
420 Waste Disposal Devices
Individual Waste Collection Bags
Preferred method when on a march
Dispose of with regular waste Chemical Toilets
Preferred method on bivouac
Add urinals to protect seats Cat-hole Latrines (Figure 10-30)
Alternate on-the-march method when bags not available
Cover immediately after use
Dig 6 to 12 inches deep and 12 inches in diameter
Keep mound of dirt removed to fill in hole
Straddle-trench Latrine (Figure 10-31)
Use on short bivouacs and field training exercises
Two trenches per 100 males three per 100 females
Dig 4 feet by 1 foot 2 frac12 feet deep 2 feet apart
Keep mounds of dirt removed to fill hole after use
Cover with dirt daily
10-40
Figure 10-31 ndash Straddle-trench Latrine
Deep Pit Latrine (Figure 10-32)
Use for longer periods and built-up areas
Collapsible two-seat boxes available in supply system
Add urinals to protect seats in male latrines
Enough for 6 percent of Seabees
Cover with dirt daily Garbage Pit
Locate near dining facility but no closer than 30 meters
One pit per 100 Seabees served per day
Transport to approved landfill or cover with dirt after each meal and close daily
For longer periods burn and bury ashes
10-41
Figure 10-32 mdash Deep Pit Latrine
Figure 10-33 mdash Pail Latrine
Pail Latrine (Figure 10-33)
Use where water table too close to surface for deep pit latrines
Empty and clean daily
10-42
Figure 10-34 ndash Burn-out Latrine
Figure 10-35 ndash Other urinals Trough Pipe and Urinoil
Grease Trap ndash Use with soakage pits and trenches to prevent clogging of soil Burn-out Latrine (Figure 10-34)
Use where water table too close to surface or extended stays
Rotate containers daily and burn contents
Other Urinals
Trough (Figure 10-35 frame A)
Pipe (Figure 10-35 frame B)
Urinoil (Figure 10-35 frame C)
10-43
Figure 10-36 ndash Food Services Soakage Pit
Soakage Pit - Food Service (Figure 10-36)
Locate near dining facility to prevent accumulation of liquid waste from kitchens
Need at least two to alternate daily
Fill with loose rocks
Add grease trap for dining facility waste to prevent clogging of soil Soakage Pit (Other)
Provide for urinals showers Lyster bags mess kits laundry handwashing facilities
Prevents accumulation of liquid waste
10-44
500 WATER PURIFICATION
510 Overview
Infectious diarrhea results from contamination of water and food by bacteria viruses and parasites Water- and foodborne diarrheal diseases are of particular concern to the military because they can be spread to large numbers of service members simultaneously with disastrous consequences for combat readiness Diarrhea especially when vomiting or fever is present can cause dehydration Fill your canteen with treated water at every chance When treated water is not available you must disinfect the water in your canteen using one of the following methods Using iodine tablets is the preferred way to individually purify water There are several alternate techniques for making drinking water clean if iodine tablets are not available You can use chlorine ampoules which are small sealed glass vials You can also use an emergency water treatment kit with Chlor-Flocreg tablets household bleach or boiling to purify water
520 Water Purification Using Iodine Tablets ndash Preferred Method
The following are the procedures for purifying water with iodine tablets the preferred method There are variations depending on the amount of water yoursquore purifying whether it is cold or not and whether it is cloudy or clear
Fill your canteen with the cleanest water available
Put one iodine tablet into clear water or two iodine tablets into cold or cloudy water If you are using two-quart canteens double those amounts Use two tablets for clear water and four tablets for cold or cloudy water
Place the cap on your canteen
Shake canteen to dissolve tablets
Wait 5 minutes
Loosen the cap and tip the canteen over to allow leakage around the canteen threads
Tighten the cap and wait an additional 25 minutes before drinking
530 Water Purification Using Chlorine Ampoules
The following are the procedures for purifying water with chlorine ampoules
Fill your canteen with the cleanest water available
Mix one ampoule of chlorine with one-half canteen cup of water
Stir that mixture with a clean utensil until the contents are dissolved
After stirring the mixture pour one-half of a plastic canteen capful or one Nuclear Biological Chemical (NBC) canteen capful of chlorine solution into your canteen of water
Place the cap on your canteen and shake
Slightly loosen the cap and tip the canteen over to allow leakage around the threads
10-45
Tighten the cap and wait 30 minutes before drinking
NOTE
By wearing gloves or wrapping the ampoule in paper or cloth you can avoid cutting your hands when breaking open the glass ampoule
540 Water Purification Using An Emergency Water Treatment Kit (Chlor-Flocreg Tablets)
The following are the procedures for purifying water with an emergency water treatment kit with Chlor-Flocreg tablets
Tear off the top of the plastic water treatment bag at the perforation (first time use)
Fill the treatment bag one-half full with the cleanest water available
Add one tablet
Fold the bag tightly three times and fold the tabs in
Hold the bag firmly and shake until the tablet dissolves
Swirl for 10 seconds
Let the bag sit for 4 minutes
Swirl again for 10 seconds
Let the bag sit for an additional 15 minutes
Insert the filter pouch into the neck of the canteen
Pour water from bag through the filter into the canteen Avoid pouring sediment into the filter
Rinse the filter with treated water after use Always filter through the same side of the filter
Rinse sediment from the treatment bag and save the bag for water treatment only
CAUTION Do not drink from the treatment bag The water is still contaminated and must be filtered before drinking Drinking non filtered water may cause stomach and intestinal disorders
550 Water Purification Using Household Bleach
The following are the procedures for purifying water with household bleach
NOTE
Ensure bleach is unscented
10-46
Fill your canteen with the cleanest water possible
Read the label on the bleach bottle to determine the amount of available chlorine Liquid chlorine laundry bleach usually has about 5 to 6 percent available chlorine Based upon the strength of the household bleach add the chlorine to the canteen as directed in Table 10-2
Table 10-2 mdash Drops of Household Bleach to be Added to a One-Quart Canteen
AVAILABLE CHLORINE TO CLEAR WATER TO COLDCLOUDY WATER 1 PERCENT 10 drops 20 drops
Slightly loosen the cap and tip the canteen over to allow leakage around threads
Tighten the cap and wait 30 minutes before drinking the water
560 Water Purification by Boiling
You may find yourself in a situation where iodine or other purification methods are not available In this case you can boil water using the following procedures to make it safe for drinking
Bring water to a rolling boil for 5 minutes
In an emergency boiling water for just 15 seconds will help
Protect boiled water from recontamination
CAUTION If water is suspected of NBC contamination do not attempt to treat Seek a quartermaster water supply
Summary In this chapter you were introduced to the importance of providing first aid to an injured person and the explanation and descriptions of first aid measures that you can apply to yourself and to others before trained medical personnel arrive This chapter provided how-to instructions in lifesaving measures to include clearing the upper airway giving artificial ventilation stopping bleeding controlling shock and protecting the wound Additionally this chapter discussed fundamentals of field sanitation and water purification
10-47
Assignment 10
Objectives
1 Define first aid and identify the general first aid rules 2 Define basic life support 3 Recognize the signs of airway obstruction and describe the steps necessary to
clear the airway 4 Recognize and describe the steps necessary to perform artificial ventilation 5 Describe the methods used to control bleeding 6 Define shock and identify its signs symptoms and treatment 7 Identify the cause and treatment of injuries caused by exposure to heat or cold 8 Identify the treatment of first aid to victims of various types of burns 9 Recognize the steps in treating and immobilizing a fracture 10 Identify field sanitation methods used to dispose of human waste and garbage 11 Identify the procedures taken to purify drinking water
Questions 1 True or False The three reasons for performing first aid are to save lives
prevent further injuries and prevent infection
1 True 2 False
2 There are how many vital functions
1 1 2 2 3 3 4 4
3 True or False The vital functions consist of the breathing process respiration
and blood circulation
1 True 2 False
4 Brain cells when deprived of oxygen will die within what period of time
1 2 to 4 minutes 2 4 to 6 minutes 3 12 to 18 minutes 4 30 minutes to an hour
10-48
5 Respiration involves inhaling oxygen and exhaling which of the following
39 When performing rescue breathing how many breaths should you blow into their
mouth or nose before checking for a pulse or re-establishing airway and seal
1 1 2 2 3 3 4 4
40 Which of the following is a correct statement concerning treatment for bleeding
1 Do not remove objects from the wound 2 Pressure points should be used as a last resort 3 Tails of the standard field dressing should be tied over the wound 4 You should use your field dressing first
41 Which of the following is a correct statement concerning treatment for bleeding
1 If an object is impaled in the wound remove it quickly 2 Remove any visible foreign objects from the wound 3 Tie the tails of the dressing at the edges of the wound 4 You should use your field dressing first
42 When using manual or direct pressure to stop bleeding firm pressure should be
applied for how many minutes
1 2 to 4 2 5 to 10 3 15 to 30 4 Until bleeding stops
43 When applying a tourniquet which of the following statements is correct
1 It should be applied directly over the wound 2 Loosen and retighten every 5 to 10 minutes 3 Once applied do not loosen 4 Wire or shoestring may be used
44 A burn from a hot liquid is considered which type of burn
1 Chemical 2 Electrical 3 Laser 4 Thermal
10-54
45 Which of the following types of burns should be kept moist
1 Dry chemical 2 Laser 3 Wet chemical 4 White Phosphorous
46 True of False When treating either heat exhaustion or heatstroke you should
elevate the casualtyrsquos legs
1 True 2 False
47 Which of the following injuries is caused by an imbalance of electrolytes in the
60 Which of the following human waste disposal methods should be used on patrol
1 Burn-out 2 Cat-hole 3 Pail 4 Straddle-trench
61 When using straddle-trench latrines how many trenches do you need for 100
females
1 1 2 2 3 3 4 4
10-57
ASSIGNMENT 10
First Aid and Field Sanitation
Directions Select the correct answer from the list of alternates below each question in the end of chapter assignment Write in the answer next to the corresponding question number below Use this answer sheet as a reference to completing the online assignment related to this assignment
1
2
3
4
5
6
7
8
9
10
11
12
13
14
15
16
17
18
19
20
21
22
23
24
25
26
27
28
29
30
31
32
33
34
35
36
37
38
39
40
41
42
43
44
45
46
47
48
49
50
51
52
53
54
55
56
57
58
59
60
61
10-58
Additional Resources and References
This chapter is intended to present thorough resources for task training The following reference works are suggested for further study This is optional material for continued education rather than for task training First Aid FM 4-2511 (FM 21-11)NTRP 4-0211AFMAN 44-163(I)MCRP 3-02G Field Hygiene and Sanitation FM 21-10MCRP 4-111D
10-59
Trainee Feedback
Center for Seabees and Facilities Engineering (CSFE) makes every effort to keep their courses up-to-date and free of technical errors If you have a suggestion found an error or inaccuracy please write FAX or email us by using the form below Use one form for each comment and be sure to fill in the information as accurately and detailed as possible Thank you for your assistance Write CSFE
NCF Training Division (N7B) 3502 Goodspeed St Port Hueneme CA 93043-4337
Course Seabee Combat Handbook Volume ____ NAVEDTRA __________ Course Date ________ Chapter Number ______ Page ______ Paragraph _____ Sentence ______ Figure ______ FrameView ______ Description ____________________________________________________ ______________________________________________________________ ______________________________________________________________ ____________________________________________________________________________________________________________________________ ______________________________________________________________ (optional) Corrective action _______________________________________ ______________________________________________________________ ______________________________________________________________ (optional) Supporting reference(s) __________________________________ ______________________________________________________________ Your email address if a response is requested ________________________
10-60
Chapter 10
First Aid and Field Sanitation
Overview
Objectives
Prerequisites
Features of This Manual
100 BASIC FIRST AID
Attitude - You should remain calm and act quickly but efficiently Reassure the casualty that his or her injuries are understood and that proper medical attention is forthcoming The casualtyrsquos confidence and positive attitude can be very helpful
Positioning the Casualty - In most cases the casualty should be lying down with his or her head level with the body until you have determined the type and extent of his or her injuries The exceptions to this are the following
Clothing - Although you should move the casualty no more than necessary you may have to remove clothing in order to determine the extent of his or her injuries Remove only the clothing necessary for examination and treatment being especially car
Infection - Do not touch any open wounds or burns with your fingers hands or other non-sterile objects unless absolutely necessary to stop severe bleeding
110 Vital Functions
111 The Breathing Process
112 Respiration
113 Circulation
120 Evaluating a Casualty
121 Step 1 ndash Check for Responsiveness
122 Step 2 ndash Check for Breathing
123 Step 3 ndash Check for Pulse
124 Step 4 ndash Check for Bleeding
125 Step 5 ndash Check for Shock
126 Step 6 ndash Check for Fractures
127 Step 7 ndash Check for Burns
128 Step 8 ndash Check for Head Injury
200 FIRST AID MEASURES
210 Controlling Bleeding
211 General
212 Methods to Control Bleeding
2121 Applying a Battle Dressing
2125 Applying a Tourniquet
220 Opening the Airway and Restoring Breathing
221 Preliminary Assessment
222 Opening the Airway
223 Rescue Breathing
2231 Mouth-to-Mouth Method
2232 Mouth-to-Nose Method
224 Clearing an Obstructed Airway
2241 Abdominal Thrust on a Conscious Casualty Standing or Sitting
2242 Chest Thrust on a Conscious Casualty Standing or Sitting
230 Recognizing and Treating Shock
231 Signs and Symptoms
232 First Aid Measures
240 Fractures
241 Signs and Symptoms
242 General Rules
243 Splinting Procedures
244 Applying a Sling
245 Treatment for Specific Fractures
2453 Neck Fractures
250 Burn Injuries
251 Eliminate the Source
252 First Aid Measures
300 HEAT AND COLD INJURIES
310 Introduction
320 Heat Injuries
321 General
322 Heat Cramps
323 Heat Exhaustion
324 Heatstroke
330 Cold Injuries
331 General
332 Specific Cold InjuriesConditions
3321 Chilblain
3322 Immersion Syndrome
400 FIELD SANITATION
410 General Information
420 Waste Disposal Devices
500 WATER PURIFICATION
510 Overview
520 Water Purification Using Iodine Tablets ndash Preferred Method
530 Water Purification Using Chlorine Ampoules
540 Water Purification Using An Emergency Water Treatment Kit (Chlor-Flocreg Tablets)
550 Water Purification Using Household Bleach
560 Water Purification by Boiling
Summary
Assignment 10
Objectives
Questions
First Aid and Field Sanitation
Additional Resources and References
Trainee Feedback
animationAvailable1
Button1
120 Evaluating a Casualty
There are eight steps in properly evaluating a casualty They should be performed in order and the results used to apply the proper corrective treatment or action In most cases the treatment indicated by each step will be explained in detail later in this chapter
121 Step 1 ndash Check for Responsiveness
Step one in evaluating a casualty is to check for responsiveness Shake the casualty gently and ask him or her if he or she is ok If you get no response go to Step 2 If the casualty is conscious but choking begin measures to open their airway as described in the next section Ask the casualty where he or she hurts or has unusual feelings such as numbness Have the casualty indicate where the pain or numbness is located
NOTE If you suspect he or she has a broken back or neck DO NOT shake or move the casualty unless located in an area of immediate danger
122 Step 2 ndash Check for Breathing
Step two is to check for breathing Use your senses to look for the rise and fall of their chest listen for the sounds of breathing and feel for breath on the side of your face If the casualty is breathing continue to Step 3 If not stop and attempt to ventilate or open his or her airway The methods for ventilation and clearing the airway are covered in detail in the following section After successful ventilation continue with Step 3
123 Step 3 ndash Check for Pulse
Check for a pulse is Step 3 Use the method previously described under blood circulation If a pulse is present and the casualty is breathing continue to Step 4 If a pulse is present but the casualty is not breathing begin rescue breathing as described in the next section If no pulse is present seek medical personnel immediately
124 Step 4 ndash Check for Bleeding
Check for bleeding is Step 4 Look for spurts of blood or blood on the casualtyrsquos clothing If the bleeding is from an open wound on the arm or leg apply a field or pressure dressing as described later in this chapter If bleeding is from a partial or complete amputation apply a dressing as described later in this section or apply a tourniquet IF bleeding persists If the casualty is bleeding from an open head wound chest wound or abdominal wound apply a dressing as described later
NOTE If the casualty is located in a chemically contaminated area do not expose the wound Apply a field and pressure dressing and evacuate the casualty
10-6
125 Step 5 ndash Check for Shock
Step five is to check for shock Look for the following signs or symptoms
Sweaty but cool skin
Paleness of the skin Note that darker-skinned service members will appear grayish
Restlessness or nervousness
Thirst
Loss of blood
Confusion or lack of awareness
Rapid breathing
Blotchy or bluish skin
Nausea or vomiting If these signs or symptoms are present begin the treatment for shock described later in this chapter
126 Step 6 ndash Check for Fractures
Check for fractures is Step six Look for the signs or symptoms of back or neck injuries
Pain or tenderness of the back or neck
Cuts or bruises on the back or neck
Inability to move or numbness (Check this by asking about the ability to move or by touching the arms and legs and asking about how he or she is feeling)
Unusual body or limb position Immobilize the casualty if a back or neck injury is suspected Tell the casualty not to move If you suspect a back injury place padding under the arch of his or her back If you suspect a neck injury manually immobilize the casualty with padding under the neck and weighted boots on each side of the head Check the casualtyrsquos arms and legs for open fractures by noting bleeding or bones sticking out and check his or her pulse Check for closed fractures by looking for swelling discoloration deformity and unusual position of the extremity Remember to check for a pulse If you suspect a fracture begin the first aid measures for fractures described later in this chapter
127 Step 7 ndash Check for Burns
Step seven is to check for burns Look for reddened blistered or charred skin Check for singed clothing Burns to the upper torso may cause respiratory problems so look for singed nose hair soot around the nostrils abnormal breathing sounds or breathing difficulty If burns are found begin the first aid measures described later
10-7
Figure 10-4 mdash Illustration of
arteries veins and capillaries
128 Step 8 ndash Check for Head Injury
The final step Step eight is to check for a possible head injury Look for the following signs or symptoms
Unequal pupils
Fluid from ear nose mouth or the head injury itself
Slurred speech
Confusion
Sleepiness
Loss of memory or consciousness
Staggering
Headache
Dizziness
Nausea or vomiting
Paralysis
Convulsions or twitching
Bruising around the eyes or behind the ears If a head injury is suspected watch for signs requiring rescue breathing treatment for shock or control of bleeding and seek medical help
200 FIRST AID MEASURES
210 Controlling Bleeding
211 General
Recognizing the types of bleeding and using the proper methods to control bleeding are critical first aid skills From a minor cut to a sucking chest wound the Seabee needs to be familiar with all types of bleeding and how to apply a battle dressing and other methods of controlling bleeding
Properly and promptly stopping bleeding will save lives
Blood circulates throughout the body by means of three different kinds of blood vessels arteries veins and capillaries See Figure 10-4 Arteries are the large vessels that carry blood from the heart Arterial blood is usually bright red in color If an artery near the skin surface is cut the blood gushes out in spurts that are synchronized with the heart beat However if the artery is deeply buried the bleeding may appear in a
10-8
steady stream Veins are the vessels that return blood to the heart Blood from veins is dark red in color If a vein is cut the blood escapes in a steady stream Capillaries form a connecting network of smaller vessels between the veins and arteries Capillary blood is usually brick red in color If capillaries are cut the blood oozes out slowly To begin controlling bleeding cut or tear any clothing necessary to expose the wound and observe the extent of the injury If clothing is stuck to the wound leave it alone Do not touch the wound Always check for entry and exit wounds Exit wounds are usually larger While treating any wound continually monitor vital signs breathing and pulse and take action accordingly Do not attempt to remove bullets or other objects from the wound If the wound is impaled by an object do not remove the object just apply the dressing putting padding around the object to stabilize it When bleeding is from a leg or arm wound elevate the extremity slightly above the casualtyrsquos heart This is because the amount of blood entering is decreased by the uphill gravitational effect
CAUTION Do not elevate a limb until it is certain that no bones are broken or until broken bones are properly splinted
212 Methods to Control Bleeding
There are several methods for controlling bleeding We will look at applying a battle dressing using direct pressure applying a pressure dressing the use of pressure points and lastly applying a tourniquet
2121 Applying a Battle Dressing
Before you go into the field you will normally receive an individual first aid kit Among the items in this kit are battle dressings A battle dressing is a combination compress and bandage in which a sterile pad is fastened to a gauze muslin or adhesive bandage Most Navy first aid kits contain both large and small size battle dressings of this kind When applying a battle dressing always use the casualtyrsquos first not your own You may need your own You will see that each dressing has two tails used to secure the dressing when you are treating the injured On the outer side of the dressing is written ldquoPut other side next to woundrdquo This helps to make sure the sterile side is placed on the wound First remove the wrapper and grasp the tails with both hands (Figure 10-5 frame 1) Hold the dressing over the wound white side down and pull it open (Figure 10-5 frame 2) Place it directly over the wound and hold it in place with one hand With the other hand wrap one tail around and half way over the wound leaving enough to tie a knot (Figure 10-5 frames 3 and 4) Wrap the other tail in the opposite direction and then tie the tails at the edge of the dressing not over the wound (Figure 10-5 frame 5) Tie it firmly but not tourniquet-like
Figure 10-6 mdash Applying Direct or Manual Pressure
You can reinforce dressings by applying additional sterile dressings over the battle dressing and covering the entire dressing with an elastic bandage 2122 Using Direct Pressure
If bleeding doesnrsquot stop after applying a battle dressing your next technique should be direct or manual pressure Place your hand over the battle dressing and apply firm pressure for 5 to 10 minutes If the casualty is conscious he or she can do this In almost all cases bleeding can be stopped by direct pressure on the wound See Figure 10-6
10-10
Figure 10-7 mdash Applying a Pressure Dressing
2123 Applying a Pressure Dressing
If bleeding persists apply a pressure dressing over the battle dressing This will aid in blood clotting and compress the open blood vessel Do this by placing a wad of padding over the dressing at the wound location keeping the extremity elevated if applicable Secure the padding using a bandage or cravat tying the ends directly over the wound using a nonslip knot Improvised pressure dressings can be strips of cloth made from T-shirts socks or other clothing See Figure 10-7 frames 1 thru 4
2124 Using Digital Pressure
If bleeding continues try digital pressure also known as pressure points Digital pressure is applying pressure using your fingers thumb or hand to the appropriate pressure point A pressure point is a spot where a main artery lies near the skin surface and over a bone or firm tissue The objective of applying pressure is to compress the artery against the bone thus shutting off the flow of blood from the heart to the wound There are 10 principal pressure points on each side of the body Refer to Figure 10-8 while reading the following The first pressure point wersquoll look at is the superficial temporal artery If the bleeding is in the region of the temple or scalp use the finger to compress the main artery to the temple against the skull bone This pressure point is just in front of the ear The next pressure point is the facial artery Use this if bleeding occurs on the face below the level of the eyes Apply pressure to the point on the lower jaw To find this pressure point start at the angle of the jaw and run your finger forward along the lower edge of the lower jaw until you feel a small notch The pressure point is in the notch The common carotid artery is the pressure point you will use if the neck is bleeding Apply pressure below the wound just in front of the prominent neck muscle Press inward and slightly backward compressing the main artery of that side of the neck against the bones of the spinal column Do not apply pressure at this point unless it is absolutely essential This is because there is a danger of pressing on the windpipe and thus choking the victim
10-11
Figure 10-8 mdash Pressure Points (Roll over to view details)
10-12
Look now at the pressure point at the subclavian artery If the bleeding is in the shoulder or in the upper part of the arm apply pressure with the fingers behind the collarbone Press down against the first rib or forward against the collarbone The brachial artery is where you should apply pressure when bleeding is between the middle part of the upper arm and the elbow The blood flow should be controlled by applying pressure in the inner side of the armmdashthat is toward the bodymdash about halfway between the shoulder and the elbow The radial and ulnar arteries are the spots to press to control bleeding from the hand To do this apply pressure at the wrist If it is possible to hold the arm up in the air the bleeding will be relatively easy to stop At the iliac artery apply pressure to the middle of the groin to control bleeding in the thigh Bleeding in the upper part of the thigh can be controlled by applying pressure to the femoral artery or the iliac artery At the femoral artery bleeding in the upper part of the thigh can be controlled by applying pressure with the closed fist of one hand and using the other hand to give additional pressure The artery at this point is deeply buried in some of the heaviest muscle of the body so you must use a great deal of pressure to push the artery against the bone The next pressure point to consider is the popliteal artery Control bleeding between the knee and the foot by applying firm pressure against the knee Sometimes pressure at the side of the knee doesnrsquot stop the bleeding In this case hold the front of the knee with one hand and thrust the fist hard against the artery behind the knee The last pressure point wersquoll discuss is the anterior and posterior arteries Apply pressure to these arteries to stop bleeding from the foot Use digital pressure in combination with previously described techniques or when dressings are not available
2125 Applying a Tourniquet
CAUTION A tourniquet can be dangerous Its application can cause tissue injury or even loss of a limb
If bleeding continues after using other techniques as a last resort use a tourniquet A tourniquet is a constricting band placed around an arm or leg to control bleeding and as previously mentioned should only be applied as a last resort or if a limb has been severed Once applied the tourniquet must stay in place and the casualty must be taken to the nearest Medical Treatment Facility (MTF) as soon as possible Do not loosen or release a tourniquet once it has been applied See Figure 10-9 In the absence of a specially designed tourniquet use a strong pliable material such as gauze or muslin bandages clothing or a cravat Use this material with a rigid stick-like object and ensure the improvised tourniquet material is at least two inches wide DO NOT use wire or a shoestring for a tourniquet band Place the tourniquet material around the limb between the extremity and the torso or between the wound and the heart Never place a tourniquet directly over a wound fracture or joint For maximum effectiveness place it on the upper arm or above the
10-13
Figure 10-9 mdash Applying a Tourniquet Frames 1 thru 5
knee It should be well-padded andor placed over a smoothed sleeve or trouser leg If the material is long enough wrap it around the limb several times keeping the material flat Tie a half-knot the same as the first part of tying a shoe lace Next place a stick or other rigid object on top of the half-knot and tie a full knot over the stick Twist the stick until the tourniquet is tight around the limb andor bright red bleeding has stopped In the case of an amputation dark oozing blood may continue to flow for a short time Fasten the tourniquet to the limb by looping the free ends of the tourniquet over the ends of the stick and then bring the ends around the limb to prevent the stick from loosening and tie the ends together on the side of the limb After applying the tourniquet mark the casualtyrsquos forehead with a ldquoTrdquo and the time the tourniquet was applied Check and treat the casualty for shock and seek medical aid In the case of a severed limb apply a dressing to the stump and if possible save and transport the limb with the casualty but out of his or her sight to avoid shock
10-14
Figure 10-10 mdash Positioning the Casualty for a Preliminary Assessment
220 Opening the Airway and Restoring Breathing
An inadequate airway and lack of breathing are two of the most critical situations in first aid You must have oxygen to continue living The third critical situation is the loss of blood circulation or stoppage of the heart Before attempting to clear a casualtyrsquos airway or restore breathing you should check the casualty for a pulse using one of the checkpoints on the wrist neck or ankle as described under Evaluating a Casualty If no pulse is present you should immediately call for medical personnel unless you have been properly trained in cardiopulmonary resuscitation or CPR
221 Preliminary Assessment
Check the casualty for responsiveness or consciousness by gently shaking him or her and asking ldquoAre you OKrdquo If you get no response kneel beside the casualty and gently roll him or her onto the back by placing one hand under his or her head and neck for support then grasp the far arm and roll him or her toward you See Figure 10-10
NOTE
If you suspect he or she has a broken back or neck DO NOT shake or move the casualty unless located in an area of immediate danger
10-15
Figure 10-11 ndash Using the crossed-finger method to open the casualtyrsquos mouth
Figure 10-12 ndash Using the finger to dislodge foreign matter
Place the casualtyrsquos arms at the sides and straighten out his or her legs Next you need to check for breathing Look for the rise and fall of the chest listen for the sounds of breathing and feel his or her breath on the side of your face If the casualty is not breathing or appears to be having difficulty breathing you will need to perform a finger sweep of his or her mouth Open the casualtyrsquos mouth using your crossed thumb and finger to exert pressure upwards on the upper teeth and downwards on the lower (Figure 10-11) Crook the index finger on your other hand insert it against the inside of
the casualtyrsquos cheek and sweep across to the other side of the mouth Remove any foreign matter you find but do not spend too much time doing so (Figure 10-12)
WARNING Take care not to force an object deeper into the airway by pushing it with your finger
If the casualty is still not breathing or you are unsure you will need to perform one of the methods of rescue breathing Performing rescue breathing on a casualty that is breathing on their own can do no harm
10-16
Figure 10-14 ndash Jaw-thrust technique of opening the airway
Figure 10-13 ndash Head-tiltChin-lift technique of opening the airway
222 Opening the Airway
Before performing rescue breathing you need to open the casualtyrsquos airway Kneel at his or her side and position the head to open the airway using either the jaw-thrust or head-tiltchin-lift method If you suspect the casualty has a neck injury or severe head injury you should use the jaw-thrust technique to open the airway Otherwise use the head-tiltchin-lift technique by placing one hand on the casualtyrsquos forehead and tilting the head back with firm backward pressure Next place the fingers of the other hand under the bony part of the lower jaw and lift bringing the chin forward Do not use your thumb See Figure 10-13
To perform the jaw-thrust technique to open the casualtyrsquos airway kneel at the casualtyrsquos side Use both hands to grasp the lower jaw at each side and lift forward and up If this is unsuccessful tilt the head back slightly See Figure 10-14
With either technique once the casualtyrsquos airway is opened maintain the head position to keep the airway open After opening the casualtyrsquos airway and before you begin rescue breathing check again to see if the casualty has already begun breathing on his or her own Often just clearing and opening the airway will allow the casualty to
10-17
breathe properly If the casualty does begin breathing on his or her own continue to monitor the casualty and transport him or her to an MTF as soon as possible
223 Rescue Breathing
If the casualty is still not breathing you need to begin rescue breathing There are two basic methods mouth-to-mouth and mouth-to-nose Mouth-to-mouth is the preferred method but you should use the mouth-to-nose method if the casualty has a severe jaw fracture a wound to the mouth or the jaws are clamped shut by spasms
2231 Mouth-to-Mouth Method
To perform mouth-to-mouth rescue breathing place the casualty on his or her back face up Next place one hand on the forehead and pinch the nostrils closed Place the fingertips of the other hand on the bony part of the chin and lift If you suspect the casualty has a neck injury and used the jaw-thrust technique for clearing the airway close the nostrils by placing your cheek against them Now take a deep breath place your mouth around the casualtyrsquos mouth and blow two full breaths into the mouth one to one and a half seconds per breath taking a breath of fresh air before each breath If the casualty is too small as with a child cover both the nose and mouth with your mouth Watch for the casualtyrsquos chest to rise If the chest does not rise reestablish an open airway ensure no leakage and try again If the chest still isnrsquot rising clear the obstruction from the mouth or throat using one of the methods described in the next section After each two breaths check for a pulse at the neck If you find a pulse and the casualty appears to be breathing on his or her own STOP If a pulse is found but the casualty is still not breathing on his or her own continue rescue breathing If no pulse is found seek medical help immediately
2232 Mouth-to-Nose Method
The mouth-to-nose method of rescue breathing is performed in the same manner as the mouth-to-mouth method except that you blow into the nose while holding the lips closed with one hand under the chin Remove your mouth after each breath to allow the casualty to exhale It may be necessary to part the lips to allow the casualty to exhale Check for a pulse after each two breaths taking action as described for the mouth-to-mouth method
224 Clearing an Obstructed Airway
If the casualty is not breathing or appears to be choking ensure they have a clear unobstructed airway A casualtyrsquos upper airway may be obstructed for a number of reasons including the casualtyrsquos tongue falling back into his or her throat while he or she is unconscious foreign matter becoming lodged in the throat regurgitation of stomach contents into the throat or blood clots due to head or facial injuries If a casualty is conscious but choking do not interfere Encourage the casualty to cough up the obstruction If coughing doesnrsquot work or the casualty is unconscious but hasnrsquot responded to rescue breathing you need to clear the obstructed airway using either the abdominal thrust or chest thrust method Use the abdominal thrust method unless the casualty is in the advanced stages of pregnancy is markedly obese or has a significant abdominal wound In these cases use the chest thrust method
10-18
2241 Abdominal Thrust on a Conscious Casualty Standing or Sitting
To perform the abdominal thrust (or Heimlich maneuver) on a conscious casualty who is standing or sitting (Figure 10-15)
Stand behind the casualty
Wrap your arms around the casualtyrsquos waist
Make a fist with one hand and grasp it with the other
The thumb side of your fist should be against the abdomen in the midline and slightly above the navel but well below the breastbone
Press your fists into the abdomen with a quick backward and upward motion
Each thrust should be a separate and distinct movement Continue until the obstruction is expelled or the casualty becomes unresponsive
NOTE
If the casualty becomes unresponsive call for help and begin rescue breathing after positioning the casualty to open the airway
Figure 10-15 mdash Anatomical and profile views of the abdominal thrust on a conscious casualty sitting or standing
10-19
Figure 10-16 ndash Profile view of a the chest thrust on a conscious
casualty sitting or standing
2242 Chest Thrust on a Conscious Casualty Standing or Sitting
To perform the chest thrust on a conscious casualty while standing or sitting (Figure 10-16)
Stand or sit behind the casualty
Wrap your arms around his or her chest with your arms under the armpits
Make a fist and place the thumb in the middle of the breastbone avoiding the tip of the breastbone and the edges of the ribs
Grasp your fist with your other hand
Exert thrusts slowly and distinctly Perform this technique until the obstruction is expelled or the casualty becomes unresponsive If he or she becomes unresponsive call for help and begin rescue breathing
2243 Abdominal Thrust on an Unconscious Casualty Lying Down
If opening the airway and attempting rescue breathing fails perform the abdominal thrust 6 to 10 times while the casualty is lying down To do this (Figure 10-17)
Kneel astride the casualtyrsquos thighs
Place the heel of one hand against the abdomen in the midline slightly above the navel but well below the breastbone with the fingers pointed toward the head
Press into the abdomen with a quick thrust forward and upward Repeat the sequence of abdominal thrust finger sweep of the mouth and rescue breathing as long as necessary to clear the obstruction and restore breathing
10-20
Figure 10-17 mdash Performing the abdominal thrust on an unconscious or unresponsive casualty
2244 Chest Thrust on an Unconscious Casualty Lying Down
If the casualty does not respond to rescue breathing perform the chest thrust with the casualty on his or her back face up and mouth open (Figure 10-18)
Kneel close to the casualtyrsquos side
Locate the lower edge of the ribs with your fingers and run your fingers up along the center of the rib cage to the notch (Figure 10-18 view A)
Place your middle finger on the notch and your index finger next to it on the lower edge of the breastbone
Place the heel of your other hand on the lower half of the breastbone next to your two fingers (Figure 10-18 view B)
Remove your two fingers and place that hand on top of the hand positioned on the breastbone extending or interlocking your fingers (Figure 10-18 view C)
Straighten and lock your elbows with your shoulders directly above your hands
Apply enough downward pressure to depress the breastbone 1 frac12 to 2 inches then release the pressure completely See Figures 10-18 view D and 10-19
Do this 6 to 10 times delivering each thrust quickly and distinctly Repeat the sequence of chest thrust finger sweep of the mouth and rescue breathing as long as necessary to clear the obstruction and restore breathing
10-21
Figure 10-18 mdash Hand placement for performing the chest thrust on an unconscious or unresponsive casualty
Figure 10-19 mdash Showing breastbone depression when performing the chest thrust on an unconscious or unresponsive casualty
10-22
230 Recognizing and Treating Shock
Shock is the collapse of the bodyrsquos cardiovascular system including an inadequate supply of blood to the bodyrsquos tissue Shock stuns and weakens the body Recognizing shock and applying the proper first aid measures in a timely manner can save a fellow Seabeersquos life The three basic mechanisms associated with shock are heart damage blood loss causing insufficient volume of blood and inadequate circulation of blood caused by the blood vessels opening too wide Shock may result from dehydration allergic reactions significant blood loss reaction to the sight of blood or a wound or traumatic injuries such as burns gunshot wounds crush injuries etc
231 Signs and Symptoms
As the one administering first aid itrsquos important that you be able to recognize the signs of shock They do not always appear at the onset of the injury Some of these signs are the following
The casualtyrsquos pulse tends to be weak and rapid
The face and skin may be very pale or ashen gray
Breathing is likely faster than normal
The skin feels cool and clammy and is covered in sweat
The casualtyrsquos skin may be blotchy or bluish especially around the mouth and lips
Another way to assess a case of shock is to look for symptoms Symptoms are things the casualty feels The symptoms of shock are direct or indirect evidence that circulation has been disturbed Look for feelings of restlessness or nervousness He or she may be thirsty There may be nausea or vomiting and the casualty may be confused and lack awareness of his or her surroundings
232 First Aid Measures
When treating a casualty for any injury or illness you should assume he or she is already suffering from shock or that shock will soon occur Since the first aid measures to apply for shock are the same as those for preventing it you should begin treating for shock and not wait for signs to appear First move the casualty to cover if feasible Lay the casualty on his or her back unless he or she is experiencing difficulty breathing in which case allow the casualty to sit upright but monitor closely Elevate the feet higher than the heart using a stable object such as a field pack
WARNING DO NOT elevate the feet if there is an unsplinted broken leg head injury or abdominal injury If the casualty has an abdominal injury bend his or her legs at the knee
Next loosen the casualtyrsquos clothing around the neck waist and any place it seems binding It is important to maintain the casualtyrsquos body temperature In hot weather
10-23
Figure 10-20 mdash Types of fractures
place the casualty in the shade and protect him or her from becoming chilled In cold weather place blankets over and under the casualty to keep him or her warm You should reassure and keep the casualty calm by sounding authoritative and self-confident Assure the casualty you are there to help
WARNING DO NOT give the casualty food or drink If he or she is unconscious or you need to leave the casualty unattended turn the head to the side to prevent choking if he or she vomits
Seek medical aid as soon as possible and continually monitor the casualtyrsquos condition until medical personnel arrive or the casualty is transported
240 Fractures
Many kinds of accidents cause injuries to the bones joints and muscles In providing first aid to injured people you must always look for signs of fractures A fracture is any break in the continuity of a bone a dislocation is when a joint is not in the proper position and a sprain is when the connecting tissues of joints have been torn This section will be concerned mostly with fractures There are two types of fractures closed and open A closed fracture is one where the injury is completely internalmdashno broken skin (Figure 10-20 view A) An open fracture is where there is a break in the skin and tissues caused by the broken bone protruding (Figure 10-20 view B) or a missile that broke the bone (Figure 10-20 view C) leaving an opening Open fractures should always be considered contaminated and subject to infection
10-24
241 Signs and Symptoms
You may not always be able to actually see the broken bone but there are signs and symptoms to look for in a casualty that can tip you off You might see deformity in the area of the injury There may be pain or swelling The casualty will be unable to move that portion of the body or there may be unnatural movement of the injured part The casualty may also feel a grating sensation at the point of injury If you are unsure if the casualty has a fracture treat the injury as a fracture Medical professionals can make a firm diagnosis later
WARNING Do not have the casualty move the injured parts in order to identify a fracture as any movement could cause further injury
242 General Rules
Follow these general rules in treatment of a fracture Treat the open fracture tissue wound immediately by covering all wounds with a dressing That means before you treat the fracture You should also always treat a fracture victim for shock Splint the casualty in the position you find him or her Do not attempt to straighten out the limb Do not attempt to push the bone of an open fracture back under the skin Do not attempt to set the fracturemdashjust splint it You immobilize the suspected fracture to prevent sharp edges of the bone from causing more damage It will also reduce pain and help prevent or control shock If it is a closed fracture immobilization will prevent an open wound and possible infection
243 Splinting Procedures
To prepare for splinting reassure the casualty loosen any tight or binding clothing and remove all jewelry from the injured limb Do not remove boots unless you need to stabilize a neck injury or the foot is bleeding Next gather splinting materials and padding improvising as needed
10-25
Figure 10-21 mdash Uninjured leg used as a splint for a fractured leg
Figure 10-22 mdash Chest wall used as a splint for a fractured arm
Splints An object that can be used to immobilize a fracture or a dislocation is called a splint There are two types of splints soft and rigid Soft splints include such things as pillows blankets towels and dressings Rigid splints are stiff and allow very little flexibility Splints should be lightweight strong and long enough to reach the joints above and below the fracture Lacking proper splints boards poles sticks tree limbs or even cardboard may be used as splints If nothing is available the chest can be used to immobilize a fractured arm and the uninjured leg can be used to immobilize the fractured leg (Figure 10-21 and 10-22) Padding Padding may be improvised from such items as a jacket blanket poncho or even leafy vegetation Bandages Bandages may be improvised from belts rifle slings or strips of clothing or blankets Narrow materials such as wire or cord should not be used to secure a splint in place as these could cause tissue damage and a tourniquet effect Slings A sling is a bandage or cravat tied around the neck to support a fractured arm or shoulder If a bandage is not available a sling can be improvised from pieces of clothing or blankets Swathes Swathes are pieces of cloth or load bearing equipment (LBE) that are used to further immobilize a splinted fracture Triangular and cravat bandages are often used and are called swathe bandages The purpose of the swathe is to immobilize therefore the swathe bandage is placed above andor below the fracturemdashnot over it Check the circulation below the site looking for
Pale white or bluish-gray skin
Colder skin temperature below the site If you suspect poor circulation evacuate the casualty immediately
10-26
Figure 10-23 mdash Board splints applied to a fractured lower leg
Apply the splint See Figure 10-23 Position one splint on each side of the fracture so that they extend both above and below the fracture Tie off the splinting materials above and below the site Check the splint for tightness ensuring it is tight enough to hold in place but not so tight it impairs circulation For fractures on the upper arm or shoulder use a sling Use swathes to hold an arm against the side or to hold legs together See Figure 10-21 and 10-22
NOTE
After splinting check the casualtyrsquos pulse and motor sensation at a point farther from the heart than the splint eg for a splinted forearm check the wrist for pulse hand for motor and sensation This is important Splinting too tightly can create the same bad effect as a tourniquet
244 Applying a Sling
To help immobilize a fractured arm you should apply a sling A sling is also used to immobilize a fractured collarbone or a fractured or dislocated shoulder Slings can be made from any non-stretching cloth such as shirts trousers ponchos or belts The supporting pressure of a sling should be on the casualtyrsquos uninjured side Support the arm with the hand slightly higher than the elbow with the fingers exposed to aid in circulation Use the following procedures to apply a sling (Figure 10-24)
Insert the splinted arm or the arm on the side of the fractured shoulder or collarbone in the center of the sling
Bring the ends of the sling up and around the casualtyrsquos neck then tie them in the hollow of the neck on the uninjured side
10-27
Figure 10-24 ndash Application of a triangular bandage to form a sling
Figure 10-25 mdash Applying a cravat bandage for a fractured jaw
Roll the corner of the sling at the elbow and tuck it in
245 Treatment for Specific Fractures
2451 Jaw Collarbone and Shoulder Fractures
If a casualty has a fractured jaw you need to immobilize it (Figure 10-25) To do so apply a cravat vertically around the head and under the jaw then add another cravat
around the top of the head to secure the first one Do not apply the cravat to the back of the neck Do not lay the casualty on his or her back as this may cause an obstruction of the airway
10-28
Figure 10-26 ndash Immobilizing a fractured collarbone
Figure 10-27 ndash Immobilizing a fractured or dislocated shoulder
In the case of a fractured collarbone apply two belts a sling and a cravat to immobilize the area as in Figure 10-26 With a fractured or dislocated shoulder apply a sling and a cravat or swathe See Figure 10-27
2452 Spinal Column Fractures
It is impossible to be sure if a casualty has suffered a spinal column fracture A fracture is likely if the casualty has fallen his or her back has been sharply struck or bent or there is no feeling in the legs or the legs canrsquot move If the spine is fractured bending it can cause the sharp bone fragments to bruise or cut the spinal cord and result in permanent paralysis or death
10-29
Figure 10-28 ndash Maintaining a normal spinal position
While you are waiting for transport and medical assistance maintain a normal spinal position at the lower back (Figure 10-28) Caution the casualty not to move and leave the casualty in the position he or she was found Do not move any part of the body If the casualty is face up you can slip a blanket under the arch of the lower back If found face down do not put anything under him or her If the casualty must be moved a four man team will be needed to do so safely
2453 Neck Fractures
When treating neck fractures caution the casualty not to move and leave the casualty in the position he or she was found If the neck or head is in an abnormal position and the casualty is lying face up raise the shoulders slightly and slip a roll of bath towel or something of similar bulk under the neck Do not bend the head or neck forward and do not raise or twist the head Immobilize the head using boots or heavy objects on each side of it (Figure 10-29)
10-30
Figure 10-29 mdash Immobilizing a fractured neck
If the head or neck is in an abnormal position and the casualty is lying face down do not move the casualty Immobilize the head with boots or heavy objects on each side of it but do not put a roll under the neck Do not bend the head or neck or attempt to roll the casualty onto his or her back If transportation is necessary at least two people will be required
250 Burn Injuries
Burns are injuries that most commonly result from exposure to fire chemicals or electricity The severity of burns depends on the depth size and location Burns are most serious when they are located on the face neck hands and feet Also they are dangerous when combined with fractures There are four types of burns you should learn to recognize and treat thermal electrical chemical and laser Thermal burns are caused by fire hot objects liquids or gases Electrical burns are caused by electrical wires current and lightning Chemical burns are caused by coming in contact with wet or dry chemicals or white phosphorous Laser burns are burns to the eye causing an ocular injury
251 Eliminate the Source
The first step to take with all types of burns is to eliminate the source of the burn After eliminating the source you can evaluate the casualty and provide appropriate first aid measures You should take the following actions to eliminate the source of the burn injury
With thermal burns remove the casualty from danger cover him or her with non-synthetic material and if still on fire roll him or her on the ground to extinguish the fire
In the case of an electrical burn remove the source of current by turning it off if it is close enough Wrap non-conductive material around the casualtyrsquos back and
10-31
shoulders and drag the casualty away Do not make direct contact with the casualty or touch any wires
When the casualty has been exposed to chemicals remove liquid chemicals by flushing the casualty with large amounts of water
Remove dry chemicals by brushing off the particles from the casualty but do not use your bare hands Afterwards flush the casualty with either large amounts of water or none at all as insufficient amounts of water may cause a chemical reaction and make matters worse
If the burn is from white phosphorous smother the chemical with wet clothes or mud and keep the casualty covered
In the case of a laser burn remove the casualty from the beam and make sure you do not look directly at the beam yourself
252 First Aid Measures
After removing the source of the burn evaluate the casualty for other conditions requiring first aid such as problems with breathing weak or no pulse or other wounds Expose the burn by removing any clothing over the burn unless it is stuck to the wound If the casualtyrsquos hands or wrists are burned remove any jewelry Next apply a field dressing For electrical burns check for both entry and exit burns The exit burn may be anywhere on the body With wet or dry chemical burns flush the burns with large amounts of water first then cover with a dry dressing In the case of white phosphorous burns flush the burn with large amounts of water then cover them with wet material or mud For laser burns apply a field dressing over the affected eye or eyes When applying a field dressing take the following precautions
Do NOT place the dressing over the face or genital area
Do NOT break the blisters
Do NOT apply grease or ointments to the burns In all cases seek medical assistance
300 HEAT AND COLD INJURIES
310 Introduction
Climatic injuries are caused by extreme hot or cold environments The human body needs time to adapt to any extremes of temperature The Seabeersquos physical condition will to some extent determine how long it takes to become acclimated There are other factors that contribute to an individualrsquos health and therefore susceptibility such as proper diet or nutrition sufficient sleep and rest proper exercise and suitable clothing While serving in extremes of climate individuals who are trying to lose weight should be supervised by properly trained medical personnel Most climatic injuries are preventable
10-32
320 Heat Injuries
321 General
Sometimes the heat of the environment causes injuries that need to be treated in the field Heat injuries are caused by exposure to extreme heat improper clothing wearing of Mission Oriented Protective Posture (MOPP) gear enclose spaces and wearing body armor The prevention of heat exposure injuries is a command responsibility All hands must be educated about medical dangers and environmental health in the field There are three categories of heat injuries heat cramps heat exhaustion and heatstroke
WARNING The heat casualty should be continually monitored for development of conditions which may require the performance of necessary basic lifesaving measures
CAUTION Do not use salt solutions in first aid procedures for heat injuries
322 Heat Cramps
Heat cramps are caused by an imbalance of electrolytes in the body from excessive sweating The signs and symptoms of heat cramps are
Cramping in the arms or legs
Stomach cramps
Excessive sweating To treat a casualty for heat cramps first move him or her to a cool shady area Loosen his or her clothing and slowly give the casualty a canteen of water Cool water is absorbed more quickly than warm water If the condition is unabated or continues seek medical assistance
323 Heat Exhaustion
Heat exhaustion is caused by a loss of fluids in the body The signs and symptoms of heat exhaustion include the following
Excessive sweating
Pale moist cool skin
Headaches
Weakness
Dizziness
Loss of appetite
Cramping 10-33
Nausea with or without vomiting
Chills or goosebumps
An urge to defecate
Rapid breathing
Tingling in the hands or feet
Confusion To treat for heat exhaustion first move the casualty to a cool shady area Loosen or remove his or her clothing and boots Pour water over the casualty and fan him or her while slowly giving the casualty a canteen of water Elevate the legs and keep the casualty from doing any strenuous activities for the rest of the day Monitor the casualty until the symptoms are gone or provide medical assistance
324 Heatstroke
Heatstroke is a failure of the bodyrsquos cooling mechanism The signs and symptoms of heatstroke are
Unconsciousness or sudden collapse Use the following procedures to treat heatstroke
Move the casualty to a cool shady area
Loosen or remove the casualtyrsquos clothing
Spray or pour water over him or her and fan him or her
Massage the extremities and skin
Elevate the legs
Slowly give the casualty a canteen of water This is a more severe heat injury than heat cramps or heat exhaustion so you should seek medical assistance immediately while monitoring the casualty for necessary lifesaving measures
330 Cold Injuries
331 General
Cold injuries are most likely to occur when it is moderately cold but wet andor windy It is important to understand what to do to prevent cold injuries First maintain good personal hygiene get sufficient exercise take care of your feet and hands and use protective clothing There are many contributing factors to cold injuries Humidity precipitation and wind increase the likelihood of injury Stationary activities such as standing guard increase
10-34
an individualrsquos vulnerability especially if that individual is in contact with the ground for extended periods or standing in water Inadequate diet and rest increase susceptibility and lower defenses Physical fatigue leads to apathy neglect and carelessness Studies show that previous cold injuries also increase your risk Depressed and unresponsive personnel tend to be less active Finally excessive use of alcohol or drugs impairs your judgment and is likely to cause carelessness or overconfidence Seabees may be suffering from cold injuries without knowing it They may simply feel uncomfortable and not notice that extremities are already numb from the cold The general signs and symptoms of cold injuries include
Numbness or tingling sensations which may be relieved by simply loosening boots or clothing and exercising to rewarm yourself
Discoloration of the skin o With lighter-skinned individuals skin becomes red then pale or waxy
white o With darker-skinned individuals skin will be grayish
Affected area may feel cold to the touch
Swelling may occur with deeper injuries
Blisters may occur after rewarming You should use the buddy system to check each other for signs of cold injuries The treatment for cold injuries varies with the severity of the injury First and foremost an individual suffering any cold injury should be removed from the cold environment With superficial injuries you can rewarm the affected part with body heat With more serious life-threatening injuries you should seek medical assistance immediately
WARNING Do not massage the injured part Do not expose the casualty directly to fire or a stove Do not rub the injured part with snow Do not slap or chafe injured parts or soak them in cold water Avoid walking on injured feet if at all possible
The primary injuries caused by cold environments are chilblain immersion syndrome frostbite snow blindness dehydration and hypothermia
332 Specific Cold InjuriesConditions
3321 Chilblain
Chilblain is caused by repeated exposure of bare skin to temperatures from 32 to 60 degrees Fahrenheit The symptoms of chilblain are acutely swollen red tender hot or itchy skin Treat chilblain by rewarming the affected part using firm steady pressure with your hands or by placing the affected parts under your arms or against your buddyrsquos stomach Do not rub or massage the affected parts Have medical personnel evaluate you for any damage
10-35
3322 Immersion Syndrome
Immersion syndrome also known as immersion foot or trench foot results from long exposure of the feet to wet conditions in temperatures ranging from 32 to 50 degrees Fahrenheit Inactive feet in damp or wet socks and boots are more susceptible The signs of immersion syndrome occur in stages with exposure At first the feet are cold but painless The pulse may be weak and the feet may be somewhat numb Next the feet feel hot with burning or shooting pain Later the skin becomes pale with a bluish tint and the pulse decreases In the later stages the feet may blister swell bleed or even become gangrenous Treatment is required for all stages of immersion syndrome
Gradually warm the affected part and protect it from trauma and infection
Apply dry loose clothing or layers of warm coverings
Elevate the feet to reduce swelling
Transport the casualty to a medical facility as soon as possible
Do not massage the feet moisten the skin or apply direct heat or ice 3323 Frostbite
Frostbite is caused by exposure to cold temperatures usually below 32 degrees Fahrenheit Individuals with a history of cold injuries are more likely to get frostbite The most easily frostbitten parts of the body are the cheeks nose ears chin forehead wrists hands and feet Deep frostbite is very serious and can result in amputation of appendages The signs or symptoms of frostbite include
Loss of sensation or numbness
Sudden blanching of the skin then brief tingling
Redness of the skin or grayish in darker-skinned individuals
Blisters swelling or tender parts
Loss of previous pain sensation
Pale yellowish waxy-looking skin
Frozen tissue that feels solid or wooden Treat frostbite of the face ears or nose by covering them with bare hands until sensation and natural skin color returns Place frostbitten hands under the armpits To treat frostbitten feet remove boots and socks and place the feet under clothing against a buddyrsquos body General treatment of frostbite is as follows
Keep the affected parts warm and covered
Remove or loosen restrictive clothing
Cover affected parts to protect them from further injury
Exercise if possible to warm up
Seek medical treatment
Do not rub the injured part with snow or apply cold water 10-36
Do not massage
Do not expose to an open fire
Do not use ointments or salves
Do not manipulate the affected part to increase circulation
Do not use alcohol or tobacco 3324 Snow Blindness
Snow blindness is the effect that the glare from ice or snow has on the eyes It is more likely to occur in hazy cloudy weather The signs and symptoms of snow blindness are
The sensation of grit in the eyes
Pain in or over the eyes
Eye watering or redness
Headache
Pain with exposure to light To treat a casualty for snow blindness blindfold or cover the eyes with dark cloth Complete rest is desirable for quicker recovery If necessary and possible evacuate the casualty to a medical facility Snow blindness usually heals by itself in a few days if there is no repeated exposure 3325 Dehydration
Dehydration occurs when the body loses too much fluid It is just as prevalent in cold weather as in hot In colder temperatures sweating is not as noticeable since it evaporates and is quickly absorbed The signs and symptoms of dehydration are
Mouth tongue throat parched or dry
Difficulty swallowing
Nausea with or without vomiting
Extreme dizziness and fainting
General fatigue and weakness
Muscle cramps
Difficulty focusing the eyes To treat for dehydration keep the individual warm and loosen his or her clothing Shelter the individual from the wind and cold and begin fluid replacement immediately Transport the casualty to a medical treatment facility as soon as possible 3326 Hypothermia
Hypothermia or general cooling of the body occurs when the body loses heat faster than it can produce heat It can occur with temperatures above or below freezing and causes cooling of the core body temperature below 95 degrees Fahrenheit Hypothermia can be caused by fatigue poor physical condition dehydration faulty blood circulation alcohol or drug use trauma or immersion in cold water The signs and symptoms of hypothermia are progressive and include
10-37
Shivering
Faint pulse
Drowsiness and mental slowness
Hampered stiff and uncoordinated movement
Slurred speech
Slow and shallow breathing
Frozen extremities
Irregular heart action To treat mild hypothermia rewarm the body evenly and as soon as possible You must provide a heat source as the casualty will be unable to produce the needed heat Keep the casualty dry and protected from the elements Give the casualty warm liquids gradually if he or she is conscious Be prepared to provide life support measures and seek medical assistance immediately Severe hypothermia is treated by stabilizing the bodyrsquos core temperature and avoiding further heat loss Handle the casualty gently and evacuate to a medical facility as soon as possible Do not expose the body to an open fire Wrap any hot water bottles or canteens in cloth to avoid scalding Rewarming in the field is dangerous and resuscitation is difficult if not impossible in the field
400 FIELD SANITATION
410 General Information
Field waste disposal is performed to prevent flies from spreading germs from waste to your food and to keep unwanted animals out of your bivouac area Use the following as a guide to performing proper field waste disposal Step 1 Determine the type of field waste disposal to use
The proper type of device to use depends upon the mission length of stay terrain and weather conditions but you should use Table 10-1 as a guideline
When on bivouac o Chemical toilets are the preferred method o Burn-out latrines are preferred as an improvised method when chemical
toilets are not available
When on the march o Individual waste collection bags are preferred o Personal cat-holes are used as an alternative
NOTE
Check local state federal and host-nation regulations for applicable restrictions and for prohibition on burning or burying waste Garbage and rubbish may have to be transported to a waste disposal facility
Human waste disposal should be as far from food services as possible but at least 100 meters
Garbage and soakage pits should be at least 30 meters from food service
Locate downwind and downslope if possible
Locate downslope of all wells springs streams and other water sources at least 30 meters
Step 3 Set up construct and maintain latrines garbage pits and soakage pitstrenches
As soon as unit moves into area detail members to set up chemical toilets andor dig latrines
Assign members to clean latrines on a daily basis
Instruct the Field Sanitation Team to spray latrines with insecticide
Install handwashing facilities at food service and latrines
Cover transport burn or bury waste daily depending on regulations Step 4 Inspect daily to ensure
Waste is collected and transported when possible
Straddle-trench latrines and garbage pits are covered with dirt
Pail latrines are emptied and cleaned
Burn-out latrine containers are rotated and contents burned
Facility not contents are sprayed with insecticide as needed Step 5 Close out improvised latrines and garbage pits when filled within 1 foot of surface by
Spraying with residual insecticide
Packing earth in successive 3-inch layers until mounded one foot above surface
Spraying again with insecticide 10-39
Figure 10-30 ndash Cat-hole Latrine
Posting a sign saying ldquoClosed latrinegarbage pit and daterdquo (except in combat)
420 Waste Disposal Devices
Individual Waste Collection Bags
Preferred method when on a march
Dispose of with regular waste Chemical Toilets
Preferred method on bivouac
Add urinals to protect seats Cat-hole Latrines (Figure 10-30)
Alternate on-the-march method when bags not available
Cover immediately after use
Dig 6 to 12 inches deep and 12 inches in diameter
Keep mound of dirt removed to fill in hole
Straddle-trench Latrine (Figure 10-31)
Use on short bivouacs and field training exercises
Two trenches per 100 males three per 100 females
Dig 4 feet by 1 foot 2 frac12 feet deep 2 feet apart
Keep mounds of dirt removed to fill hole after use
Cover with dirt daily
10-40
Figure 10-31 ndash Straddle-trench Latrine
Deep Pit Latrine (Figure 10-32)
Use for longer periods and built-up areas
Collapsible two-seat boxes available in supply system
Add urinals to protect seats in male latrines
Enough for 6 percent of Seabees
Cover with dirt daily Garbage Pit
Locate near dining facility but no closer than 30 meters
One pit per 100 Seabees served per day
Transport to approved landfill or cover with dirt after each meal and close daily
For longer periods burn and bury ashes
10-41
Figure 10-32 mdash Deep Pit Latrine
Figure 10-33 mdash Pail Latrine
Pail Latrine (Figure 10-33)
Use where water table too close to surface for deep pit latrines
Empty and clean daily
10-42
Figure 10-34 ndash Burn-out Latrine
Figure 10-35 ndash Other urinals Trough Pipe and Urinoil
Grease Trap ndash Use with soakage pits and trenches to prevent clogging of soil Burn-out Latrine (Figure 10-34)
Use where water table too close to surface or extended stays
Rotate containers daily and burn contents
Other Urinals
Trough (Figure 10-35 frame A)
Pipe (Figure 10-35 frame B)
Urinoil (Figure 10-35 frame C)
10-43
Figure 10-36 ndash Food Services Soakage Pit
Soakage Pit - Food Service (Figure 10-36)
Locate near dining facility to prevent accumulation of liquid waste from kitchens
Need at least two to alternate daily
Fill with loose rocks
Add grease trap for dining facility waste to prevent clogging of soil Soakage Pit (Other)
Provide for urinals showers Lyster bags mess kits laundry handwashing facilities
Prevents accumulation of liquid waste
10-44
500 WATER PURIFICATION
510 Overview
Infectious diarrhea results from contamination of water and food by bacteria viruses and parasites Water- and foodborne diarrheal diseases are of particular concern to the military because they can be spread to large numbers of service members simultaneously with disastrous consequences for combat readiness Diarrhea especially when vomiting or fever is present can cause dehydration Fill your canteen with treated water at every chance When treated water is not available you must disinfect the water in your canteen using one of the following methods Using iodine tablets is the preferred way to individually purify water There are several alternate techniques for making drinking water clean if iodine tablets are not available You can use chlorine ampoules which are small sealed glass vials You can also use an emergency water treatment kit with Chlor-Flocreg tablets household bleach or boiling to purify water
520 Water Purification Using Iodine Tablets ndash Preferred Method
The following are the procedures for purifying water with iodine tablets the preferred method There are variations depending on the amount of water yoursquore purifying whether it is cold or not and whether it is cloudy or clear
Fill your canteen with the cleanest water available
Put one iodine tablet into clear water or two iodine tablets into cold or cloudy water If you are using two-quart canteens double those amounts Use two tablets for clear water and four tablets for cold or cloudy water
Place the cap on your canteen
Shake canteen to dissolve tablets
Wait 5 minutes
Loosen the cap and tip the canteen over to allow leakage around the canteen threads
Tighten the cap and wait an additional 25 minutes before drinking
530 Water Purification Using Chlorine Ampoules
The following are the procedures for purifying water with chlorine ampoules
Fill your canteen with the cleanest water available
Mix one ampoule of chlorine with one-half canteen cup of water
Stir that mixture with a clean utensil until the contents are dissolved
After stirring the mixture pour one-half of a plastic canteen capful or one Nuclear Biological Chemical (NBC) canteen capful of chlorine solution into your canteen of water
Place the cap on your canteen and shake
Slightly loosen the cap and tip the canteen over to allow leakage around the threads
10-45
Tighten the cap and wait 30 minutes before drinking
NOTE
By wearing gloves or wrapping the ampoule in paper or cloth you can avoid cutting your hands when breaking open the glass ampoule
540 Water Purification Using An Emergency Water Treatment Kit (Chlor-Flocreg Tablets)
The following are the procedures for purifying water with an emergency water treatment kit with Chlor-Flocreg tablets
Tear off the top of the plastic water treatment bag at the perforation (first time use)
Fill the treatment bag one-half full with the cleanest water available
Add one tablet
Fold the bag tightly three times and fold the tabs in
Hold the bag firmly and shake until the tablet dissolves
Swirl for 10 seconds
Let the bag sit for 4 minutes
Swirl again for 10 seconds
Let the bag sit for an additional 15 minutes
Insert the filter pouch into the neck of the canteen
Pour water from bag through the filter into the canteen Avoid pouring sediment into the filter
Rinse the filter with treated water after use Always filter through the same side of the filter
Rinse sediment from the treatment bag and save the bag for water treatment only
CAUTION Do not drink from the treatment bag The water is still contaminated and must be filtered before drinking Drinking non filtered water may cause stomach and intestinal disorders
550 Water Purification Using Household Bleach
The following are the procedures for purifying water with household bleach
NOTE
Ensure bleach is unscented
10-46
Fill your canteen with the cleanest water possible
Read the label on the bleach bottle to determine the amount of available chlorine Liquid chlorine laundry bleach usually has about 5 to 6 percent available chlorine Based upon the strength of the household bleach add the chlorine to the canteen as directed in Table 10-2
Table 10-2 mdash Drops of Household Bleach to be Added to a One-Quart Canteen
AVAILABLE CHLORINE TO CLEAR WATER TO COLDCLOUDY WATER 1 PERCENT 10 drops 20 drops
Slightly loosen the cap and tip the canteen over to allow leakage around threads
Tighten the cap and wait 30 minutes before drinking the water
560 Water Purification by Boiling
You may find yourself in a situation where iodine or other purification methods are not available In this case you can boil water using the following procedures to make it safe for drinking
Bring water to a rolling boil for 5 minutes
In an emergency boiling water for just 15 seconds will help
Protect boiled water from recontamination
CAUTION If water is suspected of NBC contamination do not attempt to treat Seek a quartermaster water supply
Summary In this chapter you were introduced to the importance of providing first aid to an injured person and the explanation and descriptions of first aid measures that you can apply to yourself and to others before trained medical personnel arrive This chapter provided how-to instructions in lifesaving measures to include clearing the upper airway giving artificial ventilation stopping bleeding controlling shock and protecting the wound Additionally this chapter discussed fundamentals of field sanitation and water purification
10-47
Assignment 10
Objectives
1 Define first aid and identify the general first aid rules 2 Define basic life support 3 Recognize the signs of airway obstruction and describe the steps necessary to
clear the airway 4 Recognize and describe the steps necessary to perform artificial ventilation 5 Describe the methods used to control bleeding 6 Define shock and identify its signs symptoms and treatment 7 Identify the cause and treatment of injuries caused by exposure to heat or cold 8 Identify the treatment of first aid to victims of various types of burns 9 Recognize the steps in treating and immobilizing a fracture 10 Identify field sanitation methods used to dispose of human waste and garbage 11 Identify the procedures taken to purify drinking water
Questions 1 True or False The three reasons for performing first aid are to save lives
prevent further injuries and prevent infection
1 True 2 False
2 There are how many vital functions
1 1 2 2 3 3 4 4
3 True or False The vital functions consist of the breathing process respiration
and blood circulation
1 True 2 False
4 Brain cells when deprived of oxygen will die within what period of time
1 2 to 4 minutes 2 4 to 6 minutes 3 12 to 18 minutes 4 30 minutes to an hour
10-48
5 Respiration involves inhaling oxygen and exhaling which of the following
39 When performing rescue breathing how many breaths should you blow into their
mouth or nose before checking for a pulse or re-establishing airway and seal
1 1 2 2 3 3 4 4
40 Which of the following is a correct statement concerning treatment for bleeding
1 Do not remove objects from the wound 2 Pressure points should be used as a last resort 3 Tails of the standard field dressing should be tied over the wound 4 You should use your field dressing first
41 Which of the following is a correct statement concerning treatment for bleeding
1 If an object is impaled in the wound remove it quickly 2 Remove any visible foreign objects from the wound 3 Tie the tails of the dressing at the edges of the wound 4 You should use your field dressing first
42 When using manual or direct pressure to stop bleeding firm pressure should be
applied for how many minutes
1 2 to 4 2 5 to 10 3 15 to 30 4 Until bleeding stops
43 When applying a tourniquet which of the following statements is correct
1 It should be applied directly over the wound 2 Loosen and retighten every 5 to 10 minutes 3 Once applied do not loosen 4 Wire or shoestring may be used
44 A burn from a hot liquid is considered which type of burn
1 Chemical 2 Electrical 3 Laser 4 Thermal
10-54
45 Which of the following types of burns should be kept moist
1 Dry chemical 2 Laser 3 Wet chemical 4 White Phosphorous
46 True of False When treating either heat exhaustion or heatstroke you should
elevate the casualtyrsquos legs
1 True 2 False
47 Which of the following injuries is caused by an imbalance of electrolytes in the
60 Which of the following human waste disposal methods should be used on patrol
1 Burn-out 2 Cat-hole 3 Pail 4 Straddle-trench
61 When using straddle-trench latrines how many trenches do you need for 100
females
1 1 2 2 3 3 4 4
10-57
ASSIGNMENT 10
First Aid and Field Sanitation
Directions Select the correct answer from the list of alternates below each question in the end of chapter assignment Write in the answer next to the corresponding question number below Use this answer sheet as a reference to completing the online assignment related to this assignment
1
2
3
4
5
6
7
8
9
10
11
12
13
14
15
16
17
18
19
20
21
22
23
24
25
26
27
28
29
30
31
32
33
34
35
36
37
38
39
40
41
42
43
44
45
46
47
48
49
50
51
52
53
54
55
56
57
58
59
60
61
10-58
Additional Resources and References
This chapter is intended to present thorough resources for task training The following reference works are suggested for further study This is optional material for continued education rather than for task training First Aid FM 4-2511 (FM 21-11)NTRP 4-0211AFMAN 44-163(I)MCRP 3-02G Field Hygiene and Sanitation FM 21-10MCRP 4-111D
10-59
Trainee Feedback
Center for Seabees and Facilities Engineering (CSFE) makes every effort to keep their courses up-to-date and free of technical errors If you have a suggestion found an error or inaccuracy please write FAX or email us by using the form below Use one form for each comment and be sure to fill in the information as accurately and detailed as possible Thank you for your assistance Write CSFE
NCF Training Division (N7B) 3502 Goodspeed St Port Hueneme CA 93043-4337
Course Seabee Combat Handbook Volume ____ NAVEDTRA __________ Course Date ________ Chapter Number ______ Page ______ Paragraph _____ Sentence ______ Figure ______ FrameView ______ Description ____________________________________________________ ______________________________________________________________ ______________________________________________________________ ____________________________________________________________________________________________________________________________ ______________________________________________________________ (optional) Corrective action _______________________________________ ______________________________________________________________ ______________________________________________________________ (optional) Supporting reference(s) __________________________________ ______________________________________________________________ Your email address if a response is requested ________________________
10-60
Chapter 10
First Aid and Field Sanitation
Overview
Objectives
Prerequisites
Features of This Manual
100 BASIC FIRST AID
Attitude - You should remain calm and act quickly but efficiently Reassure the casualty that his or her injuries are understood and that proper medical attention is forthcoming The casualtyrsquos confidence and positive attitude can be very helpful
Positioning the Casualty - In most cases the casualty should be lying down with his or her head level with the body until you have determined the type and extent of his or her injuries The exceptions to this are the following
Clothing - Although you should move the casualty no more than necessary you may have to remove clothing in order to determine the extent of his or her injuries Remove only the clothing necessary for examination and treatment being especially car
Infection - Do not touch any open wounds or burns with your fingers hands or other non-sterile objects unless absolutely necessary to stop severe bleeding
110 Vital Functions
111 The Breathing Process
112 Respiration
113 Circulation
120 Evaluating a Casualty
121 Step 1 ndash Check for Responsiveness
122 Step 2 ndash Check for Breathing
123 Step 3 ndash Check for Pulse
124 Step 4 ndash Check for Bleeding
125 Step 5 ndash Check for Shock
126 Step 6 ndash Check for Fractures
127 Step 7 ndash Check for Burns
128 Step 8 ndash Check for Head Injury
200 FIRST AID MEASURES
210 Controlling Bleeding
211 General
212 Methods to Control Bleeding
2121 Applying a Battle Dressing
2125 Applying a Tourniquet
220 Opening the Airway and Restoring Breathing
221 Preliminary Assessment
222 Opening the Airway
223 Rescue Breathing
2231 Mouth-to-Mouth Method
2232 Mouth-to-Nose Method
224 Clearing an Obstructed Airway
2241 Abdominal Thrust on a Conscious Casualty Standing or Sitting
2242 Chest Thrust on a Conscious Casualty Standing or Sitting
230 Recognizing and Treating Shock
231 Signs and Symptoms
232 First Aid Measures
240 Fractures
241 Signs and Symptoms
242 General Rules
243 Splinting Procedures
244 Applying a Sling
245 Treatment for Specific Fractures
2453 Neck Fractures
250 Burn Injuries
251 Eliminate the Source
252 First Aid Measures
300 HEAT AND COLD INJURIES
310 Introduction
320 Heat Injuries
321 General
322 Heat Cramps
323 Heat Exhaustion
324 Heatstroke
330 Cold Injuries
331 General
332 Specific Cold InjuriesConditions
3321 Chilblain
3322 Immersion Syndrome
400 FIELD SANITATION
410 General Information
420 Waste Disposal Devices
500 WATER PURIFICATION
510 Overview
520 Water Purification Using Iodine Tablets ndash Preferred Method
530 Water Purification Using Chlorine Ampoules
540 Water Purification Using An Emergency Water Treatment Kit (Chlor-Flocreg Tablets)
550 Water Purification Using Household Bleach
560 Water Purification by Boiling
Summary
Assignment 10
Objectives
Questions
First Aid and Field Sanitation
Additional Resources and References
Trainee Feedback
animationAvailable1
Button1
125 Step 5 ndash Check for Shock
Step five is to check for shock Look for the following signs or symptoms
Sweaty but cool skin
Paleness of the skin Note that darker-skinned service members will appear grayish
Restlessness or nervousness
Thirst
Loss of blood
Confusion or lack of awareness
Rapid breathing
Blotchy or bluish skin
Nausea or vomiting If these signs or symptoms are present begin the treatment for shock described later in this chapter
126 Step 6 ndash Check for Fractures
Check for fractures is Step six Look for the signs or symptoms of back or neck injuries
Pain or tenderness of the back or neck
Cuts or bruises on the back or neck
Inability to move or numbness (Check this by asking about the ability to move or by touching the arms and legs and asking about how he or she is feeling)
Unusual body or limb position Immobilize the casualty if a back or neck injury is suspected Tell the casualty not to move If you suspect a back injury place padding under the arch of his or her back If you suspect a neck injury manually immobilize the casualty with padding under the neck and weighted boots on each side of the head Check the casualtyrsquos arms and legs for open fractures by noting bleeding or bones sticking out and check his or her pulse Check for closed fractures by looking for swelling discoloration deformity and unusual position of the extremity Remember to check for a pulse If you suspect a fracture begin the first aid measures for fractures described later in this chapter
127 Step 7 ndash Check for Burns
Step seven is to check for burns Look for reddened blistered or charred skin Check for singed clothing Burns to the upper torso may cause respiratory problems so look for singed nose hair soot around the nostrils abnormal breathing sounds or breathing difficulty If burns are found begin the first aid measures described later
10-7
Figure 10-4 mdash Illustration of
arteries veins and capillaries
128 Step 8 ndash Check for Head Injury
The final step Step eight is to check for a possible head injury Look for the following signs or symptoms
Unequal pupils
Fluid from ear nose mouth or the head injury itself
Slurred speech
Confusion
Sleepiness
Loss of memory or consciousness
Staggering
Headache
Dizziness
Nausea or vomiting
Paralysis
Convulsions or twitching
Bruising around the eyes or behind the ears If a head injury is suspected watch for signs requiring rescue breathing treatment for shock or control of bleeding and seek medical help
200 FIRST AID MEASURES
210 Controlling Bleeding
211 General
Recognizing the types of bleeding and using the proper methods to control bleeding are critical first aid skills From a minor cut to a sucking chest wound the Seabee needs to be familiar with all types of bleeding and how to apply a battle dressing and other methods of controlling bleeding
Properly and promptly stopping bleeding will save lives
Blood circulates throughout the body by means of three different kinds of blood vessels arteries veins and capillaries See Figure 10-4 Arteries are the large vessels that carry blood from the heart Arterial blood is usually bright red in color If an artery near the skin surface is cut the blood gushes out in spurts that are synchronized with the heart beat However if the artery is deeply buried the bleeding may appear in a
10-8
steady stream Veins are the vessels that return blood to the heart Blood from veins is dark red in color If a vein is cut the blood escapes in a steady stream Capillaries form a connecting network of smaller vessels between the veins and arteries Capillary blood is usually brick red in color If capillaries are cut the blood oozes out slowly To begin controlling bleeding cut or tear any clothing necessary to expose the wound and observe the extent of the injury If clothing is stuck to the wound leave it alone Do not touch the wound Always check for entry and exit wounds Exit wounds are usually larger While treating any wound continually monitor vital signs breathing and pulse and take action accordingly Do not attempt to remove bullets or other objects from the wound If the wound is impaled by an object do not remove the object just apply the dressing putting padding around the object to stabilize it When bleeding is from a leg or arm wound elevate the extremity slightly above the casualtyrsquos heart This is because the amount of blood entering is decreased by the uphill gravitational effect
CAUTION Do not elevate a limb until it is certain that no bones are broken or until broken bones are properly splinted
212 Methods to Control Bleeding
There are several methods for controlling bleeding We will look at applying a battle dressing using direct pressure applying a pressure dressing the use of pressure points and lastly applying a tourniquet
2121 Applying a Battle Dressing
Before you go into the field you will normally receive an individual first aid kit Among the items in this kit are battle dressings A battle dressing is a combination compress and bandage in which a sterile pad is fastened to a gauze muslin or adhesive bandage Most Navy first aid kits contain both large and small size battle dressings of this kind When applying a battle dressing always use the casualtyrsquos first not your own You may need your own You will see that each dressing has two tails used to secure the dressing when you are treating the injured On the outer side of the dressing is written ldquoPut other side next to woundrdquo This helps to make sure the sterile side is placed on the wound First remove the wrapper and grasp the tails with both hands (Figure 10-5 frame 1) Hold the dressing over the wound white side down and pull it open (Figure 10-5 frame 2) Place it directly over the wound and hold it in place with one hand With the other hand wrap one tail around and half way over the wound leaving enough to tie a knot (Figure 10-5 frames 3 and 4) Wrap the other tail in the opposite direction and then tie the tails at the edge of the dressing not over the wound (Figure 10-5 frame 5) Tie it firmly but not tourniquet-like
Figure 10-6 mdash Applying Direct or Manual Pressure
You can reinforce dressings by applying additional sterile dressings over the battle dressing and covering the entire dressing with an elastic bandage 2122 Using Direct Pressure
If bleeding doesnrsquot stop after applying a battle dressing your next technique should be direct or manual pressure Place your hand over the battle dressing and apply firm pressure for 5 to 10 minutes If the casualty is conscious he or she can do this In almost all cases bleeding can be stopped by direct pressure on the wound See Figure 10-6
10-10
Figure 10-7 mdash Applying a Pressure Dressing
2123 Applying a Pressure Dressing
If bleeding persists apply a pressure dressing over the battle dressing This will aid in blood clotting and compress the open blood vessel Do this by placing a wad of padding over the dressing at the wound location keeping the extremity elevated if applicable Secure the padding using a bandage or cravat tying the ends directly over the wound using a nonslip knot Improvised pressure dressings can be strips of cloth made from T-shirts socks or other clothing See Figure 10-7 frames 1 thru 4
2124 Using Digital Pressure
If bleeding continues try digital pressure also known as pressure points Digital pressure is applying pressure using your fingers thumb or hand to the appropriate pressure point A pressure point is a spot where a main artery lies near the skin surface and over a bone or firm tissue The objective of applying pressure is to compress the artery against the bone thus shutting off the flow of blood from the heart to the wound There are 10 principal pressure points on each side of the body Refer to Figure 10-8 while reading the following The first pressure point wersquoll look at is the superficial temporal artery If the bleeding is in the region of the temple or scalp use the finger to compress the main artery to the temple against the skull bone This pressure point is just in front of the ear The next pressure point is the facial artery Use this if bleeding occurs on the face below the level of the eyes Apply pressure to the point on the lower jaw To find this pressure point start at the angle of the jaw and run your finger forward along the lower edge of the lower jaw until you feel a small notch The pressure point is in the notch The common carotid artery is the pressure point you will use if the neck is bleeding Apply pressure below the wound just in front of the prominent neck muscle Press inward and slightly backward compressing the main artery of that side of the neck against the bones of the spinal column Do not apply pressure at this point unless it is absolutely essential This is because there is a danger of pressing on the windpipe and thus choking the victim
10-11
Figure 10-8 mdash Pressure Points (Roll over to view details)
10-12
Look now at the pressure point at the subclavian artery If the bleeding is in the shoulder or in the upper part of the arm apply pressure with the fingers behind the collarbone Press down against the first rib or forward against the collarbone The brachial artery is where you should apply pressure when bleeding is between the middle part of the upper arm and the elbow The blood flow should be controlled by applying pressure in the inner side of the armmdashthat is toward the bodymdash about halfway between the shoulder and the elbow The radial and ulnar arteries are the spots to press to control bleeding from the hand To do this apply pressure at the wrist If it is possible to hold the arm up in the air the bleeding will be relatively easy to stop At the iliac artery apply pressure to the middle of the groin to control bleeding in the thigh Bleeding in the upper part of the thigh can be controlled by applying pressure to the femoral artery or the iliac artery At the femoral artery bleeding in the upper part of the thigh can be controlled by applying pressure with the closed fist of one hand and using the other hand to give additional pressure The artery at this point is deeply buried in some of the heaviest muscle of the body so you must use a great deal of pressure to push the artery against the bone The next pressure point to consider is the popliteal artery Control bleeding between the knee and the foot by applying firm pressure against the knee Sometimes pressure at the side of the knee doesnrsquot stop the bleeding In this case hold the front of the knee with one hand and thrust the fist hard against the artery behind the knee The last pressure point wersquoll discuss is the anterior and posterior arteries Apply pressure to these arteries to stop bleeding from the foot Use digital pressure in combination with previously described techniques or when dressings are not available
2125 Applying a Tourniquet
CAUTION A tourniquet can be dangerous Its application can cause tissue injury or even loss of a limb
If bleeding continues after using other techniques as a last resort use a tourniquet A tourniquet is a constricting band placed around an arm or leg to control bleeding and as previously mentioned should only be applied as a last resort or if a limb has been severed Once applied the tourniquet must stay in place and the casualty must be taken to the nearest Medical Treatment Facility (MTF) as soon as possible Do not loosen or release a tourniquet once it has been applied See Figure 10-9 In the absence of a specially designed tourniquet use a strong pliable material such as gauze or muslin bandages clothing or a cravat Use this material with a rigid stick-like object and ensure the improvised tourniquet material is at least two inches wide DO NOT use wire or a shoestring for a tourniquet band Place the tourniquet material around the limb between the extremity and the torso or between the wound and the heart Never place a tourniquet directly over a wound fracture or joint For maximum effectiveness place it on the upper arm or above the
10-13
Figure 10-9 mdash Applying a Tourniquet Frames 1 thru 5
knee It should be well-padded andor placed over a smoothed sleeve or trouser leg If the material is long enough wrap it around the limb several times keeping the material flat Tie a half-knot the same as the first part of tying a shoe lace Next place a stick or other rigid object on top of the half-knot and tie a full knot over the stick Twist the stick until the tourniquet is tight around the limb andor bright red bleeding has stopped In the case of an amputation dark oozing blood may continue to flow for a short time Fasten the tourniquet to the limb by looping the free ends of the tourniquet over the ends of the stick and then bring the ends around the limb to prevent the stick from loosening and tie the ends together on the side of the limb After applying the tourniquet mark the casualtyrsquos forehead with a ldquoTrdquo and the time the tourniquet was applied Check and treat the casualty for shock and seek medical aid In the case of a severed limb apply a dressing to the stump and if possible save and transport the limb with the casualty but out of his or her sight to avoid shock
10-14
Figure 10-10 mdash Positioning the Casualty for a Preliminary Assessment
220 Opening the Airway and Restoring Breathing
An inadequate airway and lack of breathing are two of the most critical situations in first aid You must have oxygen to continue living The third critical situation is the loss of blood circulation or stoppage of the heart Before attempting to clear a casualtyrsquos airway or restore breathing you should check the casualty for a pulse using one of the checkpoints on the wrist neck or ankle as described under Evaluating a Casualty If no pulse is present you should immediately call for medical personnel unless you have been properly trained in cardiopulmonary resuscitation or CPR
221 Preliminary Assessment
Check the casualty for responsiveness or consciousness by gently shaking him or her and asking ldquoAre you OKrdquo If you get no response kneel beside the casualty and gently roll him or her onto the back by placing one hand under his or her head and neck for support then grasp the far arm and roll him or her toward you See Figure 10-10
NOTE
If you suspect he or she has a broken back or neck DO NOT shake or move the casualty unless located in an area of immediate danger
10-15
Figure 10-11 ndash Using the crossed-finger method to open the casualtyrsquos mouth
Figure 10-12 ndash Using the finger to dislodge foreign matter
Place the casualtyrsquos arms at the sides and straighten out his or her legs Next you need to check for breathing Look for the rise and fall of the chest listen for the sounds of breathing and feel his or her breath on the side of your face If the casualty is not breathing or appears to be having difficulty breathing you will need to perform a finger sweep of his or her mouth Open the casualtyrsquos mouth using your crossed thumb and finger to exert pressure upwards on the upper teeth and downwards on the lower (Figure 10-11) Crook the index finger on your other hand insert it against the inside of
the casualtyrsquos cheek and sweep across to the other side of the mouth Remove any foreign matter you find but do not spend too much time doing so (Figure 10-12)
WARNING Take care not to force an object deeper into the airway by pushing it with your finger
If the casualty is still not breathing or you are unsure you will need to perform one of the methods of rescue breathing Performing rescue breathing on a casualty that is breathing on their own can do no harm
10-16
Figure 10-14 ndash Jaw-thrust technique of opening the airway
Figure 10-13 ndash Head-tiltChin-lift technique of opening the airway
222 Opening the Airway
Before performing rescue breathing you need to open the casualtyrsquos airway Kneel at his or her side and position the head to open the airway using either the jaw-thrust or head-tiltchin-lift method If you suspect the casualty has a neck injury or severe head injury you should use the jaw-thrust technique to open the airway Otherwise use the head-tiltchin-lift technique by placing one hand on the casualtyrsquos forehead and tilting the head back with firm backward pressure Next place the fingers of the other hand under the bony part of the lower jaw and lift bringing the chin forward Do not use your thumb See Figure 10-13
To perform the jaw-thrust technique to open the casualtyrsquos airway kneel at the casualtyrsquos side Use both hands to grasp the lower jaw at each side and lift forward and up If this is unsuccessful tilt the head back slightly See Figure 10-14
With either technique once the casualtyrsquos airway is opened maintain the head position to keep the airway open After opening the casualtyrsquos airway and before you begin rescue breathing check again to see if the casualty has already begun breathing on his or her own Often just clearing and opening the airway will allow the casualty to
10-17
breathe properly If the casualty does begin breathing on his or her own continue to monitor the casualty and transport him or her to an MTF as soon as possible
223 Rescue Breathing
If the casualty is still not breathing you need to begin rescue breathing There are two basic methods mouth-to-mouth and mouth-to-nose Mouth-to-mouth is the preferred method but you should use the mouth-to-nose method if the casualty has a severe jaw fracture a wound to the mouth or the jaws are clamped shut by spasms
2231 Mouth-to-Mouth Method
To perform mouth-to-mouth rescue breathing place the casualty on his or her back face up Next place one hand on the forehead and pinch the nostrils closed Place the fingertips of the other hand on the bony part of the chin and lift If you suspect the casualty has a neck injury and used the jaw-thrust technique for clearing the airway close the nostrils by placing your cheek against them Now take a deep breath place your mouth around the casualtyrsquos mouth and blow two full breaths into the mouth one to one and a half seconds per breath taking a breath of fresh air before each breath If the casualty is too small as with a child cover both the nose and mouth with your mouth Watch for the casualtyrsquos chest to rise If the chest does not rise reestablish an open airway ensure no leakage and try again If the chest still isnrsquot rising clear the obstruction from the mouth or throat using one of the methods described in the next section After each two breaths check for a pulse at the neck If you find a pulse and the casualty appears to be breathing on his or her own STOP If a pulse is found but the casualty is still not breathing on his or her own continue rescue breathing If no pulse is found seek medical help immediately
2232 Mouth-to-Nose Method
The mouth-to-nose method of rescue breathing is performed in the same manner as the mouth-to-mouth method except that you blow into the nose while holding the lips closed with one hand under the chin Remove your mouth after each breath to allow the casualty to exhale It may be necessary to part the lips to allow the casualty to exhale Check for a pulse after each two breaths taking action as described for the mouth-to-mouth method
224 Clearing an Obstructed Airway
If the casualty is not breathing or appears to be choking ensure they have a clear unobstructed airway A casualtyrsquos upper airway may be obstructed for a number of reasons including the casualtyrsquos tongue falling back into his or her throat while he or she is unconscious foreign matter becoming lodged in the throat regurgitation of stomach contents into the throat or blood clots due to head or facial injuries If a casualty is conscious but choking do not interfere Encourage the casualty to cough up the obstruction If coughing doesnrsquot work or the casualty is unconscious but hasnrsquot responded to rescue breathing you need to clear the obstructed airway using either the abdominal thrust or chest thrust method Use the abdominal thrust method unless the casualty is in the advanced stages of pregnancy is markedly obese or has a significant abdominal wound In these cases use the chest thrust method
10-18
2241 Abdominal Thrust on a Conscious Casualty Standing or Sitting
To perform the abdominal thrust (or Heimlich maneuver) on a conscious casualty who is standing or sitting (Figure 10-15)
Stand behind the casualty
Wrap your arms around the casualtyrsquos waist
Make a fist with one hand and grasp it with the other
The thumb side of your fist should be against the abdomen in the midline and slightly above the navel but well below the breastbone
Press your fists into the abdomen with a quick backward and upward motion
Each thrust should be a separate and distinct movement Continue until the obstruction is expelled or the casualty becomes unresponsive
NOTE
If the casualty becomes unresponsive call for help and begin rescue breathing after positioning the casualty to open the airway
Figure 10-15 mdash Anatomical and profile views of the abdominal thrust on a conscious casualty sitting or standing
10-19
Figure 10-16 ndash Profile view of a the chest thrust on a conscious
casualty sitting or standing
2242 Chest Thrust on a Conscious Casualty Standing or Sitting
To perform the chest thrust on a conscious casualty while standing or sitting (Figure 10-16)
Stand or sit behind the casualty
Wrap your arms around his or her chest with your arms under the armpits
Make a fist and place the thumb in the middle of the breastbone avoiding the tip of the breastbone and the edges of the ribs
Grasp your fist with your other hand
Exert thrusts slowly and distinctly Perform this technique until the obstruction is expelled or the casualty becomes unresponsive If he or she becomes unresponsive call for help and begin rescue breathing
2243 Abdominal Thrust on an Unconscious Casualty Lying Down
If opening the airway and attempting rescue breathing fails perform the abdominal thrust 6 to 10 times while the casualty is lying down To do this (Figure 10-17)
Kneel astride the casualtyrsquos thighs
Place the heel of one hand against the abdomen in the midline slightly above the navel but well below the breastbone with the fingers pointed toward the head
Press into the abdomen with a quick thrust forward and upward Repeat the sequence of abdominal thrust finger sweep of the mouth and rescue breathing as long as necessary to clear the obstruction and restore breathing
10-20
Figure 10-17 mdash Performing the abdominal thrust on an unconscious or unresponsive casualty
2244 Chest Thrust on an Unconscious Casualty Lying Down
If the casualty does not respond to rescue breathing perform the chest thrust with the casualty on his or her back face up and mouth open (Figure 10-18)
Kneel close to the casualtyrsquos side
Locate the lower edge of the ribs with your fingers and run your fingers up along the center of the rib cage to the notch (Figure 10-18 view A)
Place your middle finger on the notch and your index finger next to it on the lower edge of the breastbone
Place the heel of your other hand on the lower half of the breastbone next to your two fingers (Figure 10-18 view B)
Remove your two fingers and place that hand on top of the hand positioned on the breastbone extending or interlocking your fingers (Figure 10-18 view C)
Straighten and lock your elbows with your shoulders directly above your hands
Apply enough downward pressure to depress the breastbone 1 frac12 to 2 inches then release the pressure completely See Figures 10-18 view D and 10-19
Do this 6 to 10 times delivering each thrust quickly and distinctly Repeat the sequence of chest thrust finger sweep of the mouth and rescue breathing as long as necessary to clear the obstruction and restore breathing
10-21
Figure 10-18 mdash Hand placement for performing the chest thrust on an unconscious or unresponsive casualty
Figure 10-19 mdash Showing breastbone depression when performing the chest thrust on an unconscious or unresponsive casualty
10-22
230 Recognizing and Treating Shock
Shock is the collapse of the bodyrsquos cardiovascular system including an inadequate supply of blood to the bodyrsquos tissue Shock stuns and weakens the body Recognizing shock and applying the proper first aid measures in a timely manner can save a fellow Seabeersquos life The three basic mechanisms associated with shock are heart damage blood loss causing insufficient volume of blood and inadequate circulation of blood caused by the blood vessels opening too wide Shock may result from dehydration allergic reactions significant blood loss reaction to the sight of blood or a wound or traumatic injuries such as burns gunshot wounds crush injuries etc
231 Signs and Symptoms
As the one administering first aid itrsquos important that you be able to recognize the signs of shock They do not always appear at the onset of the injury Some of these signs are the following
The casualtyrsquos pulse tends to be weak and rapid
The face and skin may be very pale or ashen gray
Breathing is likely faster than normal
The skin feels cool and clammy and is covered in sweat
The casualtyrsquos skin may be blotchy or bluish especially around the mouth and lips
Another way to assess a case of shock is to look for symptoms Symptoms are things the casualty feels The symptoms of shock are direct or indirect evidence that circulation has been disturbed Look for feelings of restlessness or nervousness He or she may be thirsty There may be nausea or vomiting and the casualty may be confused and lack awareness of his or her surroundings
232 First Aid Measures
When treating a casualty for any injury or illness you should assume he or she is already suffering from shock or that shock will soon occur Since the first aid measures to apply for shock are the same as those for preventing it you should begin treating for shock and not wait for signs to appear First move the casualty to cover if feasible Lay the casualty on his or her back unless he or she is experiencing difficulty breathing in which case allow the casualty to sit upright but monitor closely Elevate the feet higher than the heart using a stable object such as a field pack
WARNING DO NOT elevate the feet if there is an unsplinted broken leg head injury or abdominal injury If the casualty has an abdominal injury bend his or her legs at the knee
Next loosen the casualtyrsquos clothing around the neck waist and any place it seems binding It is important to maintain the casualtyrsquos body temperature In hot weather
10-23
Figure 10-20 mdash Types of fractures
place the casualty in the shade and protect him or her from becoming chilled In cold weather place blankets over and under the casualty to keep him or her warm You should reassure and keep the casualty calm by sounding authoritative and self-confident Assure the casualty you are there to help
WARNING DO NOT give the casualty food or drink If he or she is unconscious or you need to leave the casualty unattended turn the head to the side to prevent choking if he or she vomits
Seek medical aid as soon as possible and continually monitor the casualtyrsquos condition until medical personnel arrive or the casualty is transported
240 Fractures
Many kinds of accidents cause injuries to the bones joints and muscles In providing first aid to injured people you must always look for signs of fractures A fracture is any break in the continuity of a bone a dislocation is when a joint is not in the proper position and a sprain is when the connecting tissues of joints have been torn This section will be concerned mostly with fractures There are two types of fractures closed and open A closed fracture is one where the injury is completely internalmdashno broken skin (Figure 10-20 view A) An open fracture is where there is a break in the skin and tissues caused by the broken bone protruding (Figure 10-20 view B) or a missile that broke the bone (Figure 10-20 view C) leaving an opening Open fractures should always be considered contaminated and subject to infection
10-24
241 Signs and Symptoms
You may not always be able to actually see the broken bone but there are signs and symptoms to look for in a casualty that can tip you off You might see deformity in the area of the injury There may be pain or swelling The casualty will be unable to move that portion of the body or there may be unnatural movement of the injured part The casualty may also feel a grating sensation at the point of injury If you are unsure if the casualty has a fracture treat the injury as a fracture Medical professionals can make a firm diagnosis later
WARNING Do not have the casualty move the injured parts in order to identify a fracture as any movement could cause further injury
242 General Rules
Follow these general rules in treatment of a fracture Treat the open fracture tissue wound immediately by covering all wounds with a dressing That means before you treat the fracture You should also always treat a fracture victim for shock Splint the casualty in the position you find him or her Do not attempt to straighten out the limb Do not attempt to push the bone of an open fracture back under the skin Do not attempt to set the fracturemdashjust splint it You immobilize the suspected fracture to prevent sharp edges of the bone from causing more damage It will also reduce pain and help prevent or control shock If it is a closed fracture immobilization will prevent an open wound and possible infection
243 Splinting Procedures
To prepare for splinting reassure the casualty loosen any tight or binding clothing and remove all jewelry from the injured limb Do not remove boots unless you need to stabilize a neck injury or the foot is bleeding Next gather splinting materials and padding improvising as needed
10-25
Figure 10-21 mdash Uninjured leg used as a splint for a fractured leg
Figure 10-22 mdash Chest wall used as a splint for a fractured arm
Splints An object that can be used to immobilize a fracture or a dislocation is called a splint There are two types of splints soft and rigid Soft splints include such things as pillows blankets towels and dressings Rigid splints are stiff and allow very little flexibility Splints should be lightweight strong and long enough to reach the joints above and below the fracture Lacking proper splints boards poles sticks tree limbs or even cardboard may be used as splints If nothing is available the chest can be used to immobilize a fractured arm and the uninjured leg can be used to immobilize the fractured leg (Figure 10-21 and 10-22) Padding Padding may be improvised from such items as a jacket blanket poncho or even leafy vegetation Bandages Bandages may be improvised from belts rifle slings or strips of clothing or blankets Narrow materials such as wire or cord should not be used to secure a splint in place as these could cause tissue damage and a tourniquet effect Slings A sling is a bandage or cravat tied around the neck to support a fractured arm or shoulder If a bandage is not available a sling can be improvised from pieces of clothing or blankets Swathes Swathes are pieces of cloth or load bearing equipment (LBE) that are used to further immobilize a splinted fracture Triangular and cravat bandages are often used and are called swathe bandages The purpose of the swathe is to immobilize therefore the swathe bandage is placed above andor below the fracturemdashnot over it Check the circulation below the site looking for
Pale white or bluish-gray skin
Colder skin temperature below the site If you suspect poor circulation evacuate the casualty immediately
10-26
Figure 10-23 mdash Board splints applied to a fractured lower leg
Apply the splint See Figure 10-23 Position one splint on each side of the fracture so that they extend both above and below the fracture Tie off the splinting materials above and below the site Check the splint for tightness ensuring it is tight enough to hold in place but not so tight it impairs circulation For fractures on the upper arm or shoulder use a sling Use swathes to hold an arm against the side or to hold legs together See Figure 10-21 and 10-22
NOTE
After splinting check the casualtyrsquos pulse and motor sensation at a point farther from the heart than the splint eg for a splinted forearm check the wrist for pulse hand for motor and sensation This is important Splinting too tightly can create the same bad effect as a tourniquet
244 Applying a Sling
To help immobilize a fractured arm you should apply a sling A sling is also used to immobilize a fractured collarbone or a fractured or dislocated shoulder Slings can be made from any non-stretching cloth such as shirts trousers ponchos or belts The supporting pressure of a sling should be on the casualtyrsquos uninjured side Support the arm with the hand slightly higher than the elbow with the fingers exposed to aid in circulation Use the following procedures to apply a sling (Figure 10-24)
Insert the splinted arm or the arm on the side of the fractured shoulder or collarbone in the center of the sling
Bring the ends of the sling up and around the casualtyrsquos neck then tie them in the hollow of the neck on the uninjured side
10-27
Figure 10-24 ndash Application of a triangular bandage to form a sling
Figure 10-25 mdash Applying a cravat bandage for a fractured jaw
Roll the corner of the sling at the elbow and tuck it in
245 Treatment for Specific Fractures
2451 Jaw Collarbone and Shoulder Fractures
If a casualty has a fractured jaw you need to immobilize it (Figure 10-25) To do so apply a cravat vertically around the head and under the jaw then add another cravat
around the top of the head to secure the first one Do not apply the cravat to the back of the neck Do not lay the casualty on his or her back as this may cause an obstruction of the airway
10-28
Figure 10-26 ndash Immobilizing a fractured collarbone
Figure 10-27 ndash Immobilizing a fractured or dislocated shoulder
In the case of a fractured collarbone apply two belts a sling and a cravat to immobilize the area as in Figure 10-26 With a fractured or dislocated shoulder apply a sling and a cravat or swathe See Figure 10-27
2452 Spinal Column Fractures
It is impossible to be sure if a casualty has suffered a spinal column fracture A fracture is likely if the casualty has fallen his or her back has been sharply struck or bent or there is no feeling in the legs or the legs canrsquot move If the spine is fractured bending it can cause the sharp bone fragments to bruise or cut the spinal cord and result in permanent paralysis or death
10-29
Figure 10-28 ndash Maintaining a normal spinal position
While you are waiting for transport and medical assistance maintain a normal spinal position at the lower back (Figure 10-28) Caution the casualty not to move and leave the casualty in the position he or she was found Do not move any part of the body If the casualty is face up you can slip a blanket under the arch of the lower back If found face down do not put anything under him or her If the casualty must be moved a four man team will be needed to do so safely
2453 Neck Fractures
When treating neck fractures caution the casualty not to move and leave the casualty in the position he or she was found If the neck or head is in an abnormal position and the casualty is lying face up raise the shoulders slightly and slip a roll of bath towel or something of similar bulk under the neck Do not bend the head or neck forward and do not raise or twist the head Immobilize the head using boots or heavy objects on each side of it (Figure 10-29)
10-30
Figure 10-29 mdash Immobilizing a fractured neck
If the head or neck is in an abnormal position and the casualty is lying face down do not move the casualty Immobilize the head with boots or heavy objects on each side of it but do not put a roll under the neck Do not bend the head or neck or attempt to roll the casualty onto his or her back If transportation is necessary at least two people will be required
250 Burn Injuries
Burns are injuries that most commonly result from exposure to fire chemicals or electricity The severity of burns depends on the depth size and location Burns are most serious when they are located on the face neck hands and feet Also they are dangerous when combined with fractures There are four types of burns you should learn to recognize and treat thermal electrical chemical and laser Thermal burns are caused by fire hot objects liquids or gases Electrical burns are caused by electrical wires current and lightning Chemical burns are caused by coming in contact with wet or dry chemicals or white phosphorous Laser burns are burns to the eye causing an ocular injury
251 Eliminate the Source
The first step to take with all types of burns is to eliminate the source of the burn After eliminating the source you can evaluate the casualty and provide appropriate first aid measures You should take the following actions to eliminate the source of the burn injury
With thermal burns remove the casualty from danger cover him or her with non-synthetic material and if still on fire roll him or her on the ground to extinguish the fire
In the case of an electrical burn remove the source of current by turning it off if it is close enough Wrap non-conductive material around the casualtyrsquos back and
10-31
shoulders and drag the casualty away Do not make direct contact with the casualty or touch any wires
When the casualty has been exposed to chemicals remove liquid chemicals by flushing the casualty with large amounts of water
Remove dry chemicals by brushing off the particles from the casualty but do not use your bare hands Afterwards flush the casualty with either large amounts of water or none at all as insufficient amounts of water may cause a chemical reaction and make matters worse
If the burn is from white phosphorous smother the chemical with wet clothes or mud and keep the casualty covered
In the case of a laser burn remove the casualty from the beam and make sure you do not look directly at the beam yourself
252 First Aid Measures
After removing the source of the burn evaluate the casualty for other conditions requiring first aid such as problems with breathing weak or no pulse or other wounds Expose the burn by removing any clothing over the burn unless it is stuck to the wound If the casualtyrsquos hands or wrists are burned remove any jewelry Next apply a field dressing For electrical burns check for both entry and exit burns The exit burn may be anywhere on the body With wet or dry chemical burns flush the burns with large amounts of water first then cover with a dry dressing In the case of white phosphorous burns flush the burn with large amounts of water then cover them with wet material or mud For laser burns apply a field dressing over the affected eye or eyes When applying a field dressing take the following precautions
Do NOT place the dressing over the face or genital area
Do NOT break the blisters
Do NOT apply grease or ointments to the burns In all cases seek medical assistance
300 HEAT AND COLD INJURIES
310 Introduction
Climatic injuries are caused by extreme hot or cold environments The human body needs time to adapt to any extremes of temperature The Seabeersquos physical condition will to some extent determine how long it takes to become acclimated There are other factors that contribute to an individualrsquos health and therefore susceptibility such as proper diet or nutrition sufficient sleep and rest proper exercise and suitable clothing While serving in extremes of climate individuals who are trying to lose weight should be supervised by properly trained medical personnel Most climatic injuries are preventable
10-32
320 Heat Injuries
321 General
Sometimes the heat of the environment causes injuries that need to be treated in the field Heat injuries are caused by exposure to extreme heat improper clothing wearing of Mission Oriented Protective Posture (MOPP) gear enclose spaces and wearing body armor The prevention of heat exposure injuries is a command responsibility All hands must be educated about medical dangers and environmental health in the field There are three categories of heat injuries heat cramps heat exhaustion and heatstroke
WARNING The heat casualty should be continually monitored for development of conditions which may require the performance of necessary basic lifesaving measures
CAUTION Do not use salt solutions in first aid procedures for heat injuries
322 Heat Cramps
Heat cramps are caused by an imbalance of electrolytes in the body from excessive sweating The signs and symptoms of heat cramps are
Cramping in the arms or legs
Stomach cramps
Excessive sweating To treat a casualty for heat cramps first move him or her to a cool shady area Loosen his or her clothing and slowly give the casualty a canteen of water Cool water is absorbed more quickly than warm water If the condition is unabated or continues seek medical assistance
323 Heat Exhaustion
Heat exhaustion is caused by a loss of fluids in the body The signs and symptoms of heat exhaustion include the following
Excessive sweating
Pale moist cool skin
Headaches
Weakness
Dizziness
Loss of appetite
Cramping 10-33
Nausea with or without vomiting
Chills or goosebumps
An urge to defecate
Rapid breathing
Tingling in the hands or feet
Confusion To treat for heat exhaustion first move the casualty to a cool shady area Loosen or remove his or her clothing and boots Pour water over the casualty and fan him or her while slowly giving the casualty a canteen of water Elevate the legs and keep the casualty from doing any strenuous activities for the rest of the day Monitor the casualty until the symptoms are gone or provide medical assistance
324 Heatstroke
Heatstroke is a failure of the bodyrsquos cooling mechanism The signs and symptoms of heatstroke are
Unconsciousness or sudden collapse Use the following procedures to treat heatstroke
Move the casualty to a cool shady area
Loosen or remove the casualtyrsquos clothing
Spray or pour water over him or her and fan him or her
Massage the extremities and skin
Elevate the legs
Slowly give the casualty a canteen of water This is a more severe heat injury than heat cramps or heat exhaustion so you should seek medical assistance immediately while monitoring the casualty for necessary lifesaving measures
330 Cold Injuries
331 General
Cold injuries are most likely to occur when it is moderately cold but wet andor windy It is important to understand what to do to prevent cold injuries First maintain good personal hygiene get sufficient exercise take care of your feet and hands and use protective clothing There are many contributing factors to cold injuries Humidity precipitation and wind increase the likelihood of injury Stationary activities such as standing guard increase
10-34
an individualrsquos vulnerability especially if that individual is in contact with the ground for extended periods or standing in water Inadequate diet and rest increase susceptibility and lower defenses Physical fatigue leads to apathy neglect and carelessness Studies show that previous cold injuries also increase your risk Depressed and unresponsive personnel tend to be less active Finally excessive use of alcohol or drugs impairs your judgment and is likely to cause carelessness or overconfidence Seabees may be suffering from cold injuries without knowing it They may simply feel uncomfortable and not notice that extremities are already numb from the cold The general signs and symptoms of cold injuries include
Numbness or tingling sensations which may be relieved by simply loosening boots or clothing and exercising to rewarm yourself
Discoloration of the skin o With lighter-skinned individuals skin becomes red then pale or waxy
white o With darker-skinned individuals skin will be grayish
Affected area may feel cold to the touch
Swelling may occur with deeper injuries
Blisters may occur after rewarming You should use the buddy system to check each other for signs of cold injuries The treatment for cold injuries varies with the severity of the injury First and foremost an individual suffering any cold injury should be removed from the cold environment With superficial injuries you can rewarm the affected part with body heat With more serious life-threatening injuries you should seek medical assistance immediately
WARNING Do not massage the injured part Do not expose the casualty directly to fire or a stove Do not rub the injured part with snow Do not slap or chafe injured parts or soak them in cold water Avoid walking on injured feet if at all possible
The primary injuries caused by cold environments are chilblain immersion syndrome frostbite snow blindness dehydration and hypothermia
332 Specific Cold InjuriesConditions
3321 Chilblain
Chilblain is caused by repeated exposure of bare skin to temperatures from 32 to 60 degrees Fahrenheit The symptoms of chilblain are acutely swollen red tender hot or itchy skin Treat chilblain by rewarming the affected part using firm steady pressure with your hands or by placing the affected parts under your arms or against your buddyrsquos stomach Do not rub or massage the affected parts Have medical personnel evaluate you for any damage
10-35
3322 Immersion Syndrome
Immersion syndrome also known as immersion foot or trench foot results from long exposure of the feet to wet conditions in temperatures ranging from 32 to 50 degrees Fahrenheit Inactive feet in damp or wet socks and boots are more susceptible The signs of immersion syndrome occur in stages with exposure At first the feet are cold but painless The pulse may be weak and the feet may be somewhat numb Next the feet feel hot with burning or shooting pain Later the skin becomes pale with a bluish tint and the pulse decreases In the later stages the feet may blister swell bleed or even become gangrenous Treatment is required for all stages of immersion syndrome
Gradually warm the affected part and protect it from trauma and infection
Apply dry loose clothing or layers of warm coverings
Elevate the feet to reduce swelling
Transport the casualty to a medical facility as soon as possible
Do not massage the feet moisten the skin or apply direct heat or ice 3323 Frostbite
Frostbite is caused by exposure to cold temperatures usually below 32 degrees Fahrenheit Individuals with a history of cold injuries are more likely to get frostbite The most easily frostbitten parts of the body are the cheeks nose ears chin forehead wrists hands and feet Deep frostbite is very serious and can result in amputation of appendages The signs or symptoms of frostbite include
Loss of sensation or numbness
Sudden blanching of the skin then brief tingling
Redness of the skin or grayish in darker-skinned individuals
Blisters swelling or tender parts
Loss of previous pain sensation
Pale yellowish waxy-looking skin
Frozen tissue that feels solid or wooden Treat frostbite of the face ears or nose by covering them with bare hands until sensation and natural skin color returns Place frostbitten hands under the armpits To treat frostbitten feet remove boots and socks and place the feet under clothing against a buddyrsquos body General treatment of frostbite is as follows
Keep the affected parts warm and covered
Remove or loosen restrictive clothing
Cover affected parts to protect them from further injury
Exercise if possible to warm up
Seek medical treatment
Do not rub the injured part with snow or apply cold water 10-36
Do not massage
Do not expose to an open fire
Do not use ointments or salves
Do not manipulate the affected part to increase circulation
Do not use alcohol or tobacco 3324 Snow Blindness
Snow blindness is the effect that the glare from ice or snow has on the eyes It is more likely to occur in hazy cloudy weather The signs and symptoms of snow blindness are
The sensation of grit in the eyes
Pain in or over the eyes
Eye watering or redness
Headache
Pain with exposure to light To treat a casualty for snow blindness blindfold or cover the eyes with dark cloth Complete rest is desirable for quicker recovery If necessary and possible evacuate the casualty to a medical facility Snow blindness usually heals by itself in a few days if there is no repeated exposure 3325 Dehydration
Dehydration occurs when the body loses too much fluid It is just as prevalent in cold weather as in hot In colder temperatures sweating is not as noticeable since it evaporates and is quickly absorbed The signs and symptoms of dehydration are
Mouth tongue throat parched or dry
Difficulty swallowing
Nausea with or without vomiting
Extreme dizziness and fainting
General fatigue and weakness
Muscle cramps
Difficulty focusing the eyes To treat for dehydration keep the individual warm and loosen his or her clothing Shelter the individual from the wind and cold and begin fluid replacement immediately Transport the casualty to a medical treatment facility as soon as possible 3326 Hypothermia
Hypothermia or general cooling of the body occurs when the body loses heat faster than it can produce heat It can occur with temperatures above or below freezing and causes cooling of the core body temperature below 95 degrees Fahrenheit Hypothermia can be caused by fatigue poor physical condition dehydration faulty blood circulation alcohol or drug use trauma or immersion in cold water The signs and symptoms of hypothermia are progressive and include
10-37
Shivering
Faint pulse
Drowsiness and mental slowness
Hampered stiff and uncoordinated movement
Slurred speech
Slow and shallow breathing
Frozen extremities
Irregular heart action To treat mild hypothermia rewarm the body evenly and as soon as possible You must provide a heat source as the casualty will be unable to produce the needed heat Keep the casualty dry and protected from the elements Give the casualty warm liquids gradually if he or she is conscious Be prepared to provide life support measures and seek medical assistance immediately Severe hypothermia is treated by stabilizing the bodyrsquos core temperature and avoiding further heat loss Handle the casualty gently and evacuate to a medical facility as soon as possible Do not expose the body to an open fire Wrap any hot water bottles or canteens in cloth to avoid scalding Rewarming in the field is dangerous and resuscitation is difficult if not impossible in the field
400 FIELD SANITATION
410 General Information
Field waste disposal is performed to prevent flies from spreading germs from waste to your food and to keep unwanted animals out of your bivouac area Use the following as a guide to performing proper field waste disposal Step 1 Determine the type of field waste disposal to use
The proper type of device to use depends upon the mission length of stay terrain and weather conditions but you should use Table 10-1 as a guideline
When on bivouac o Chemical toilets are the preferred method o Burn-out latrines are preferred as an improvised method when chemical
toilets are not available
When on the march o Individual waste collection bags are preferred o Personal cat-holes are used as an alternative
NOTE
Check local state federal and host-nation regulations for applicable restrictions and for prohibition on burning or burying waste Garbage and rubbish may have to be transported to a waste disposal facility
Human waste disposal should be as far from food services as possible but at least 100 meters
Garbage and soakage pits should be at least 30 meters from food service
Locate downwind and downslope if possible
Locate downslope of all wells springs streams and other water sources at least 30 meters
Step 3 Set up construct and maintain latrines garbage pits and soakage pitstrenches
As soon as unit moves into area detail members to set up chemical toilets andor dig latrines
Assign members to clean latrines on a daily basis
Instruct the Field Sanitation Team to spray latrines with insecticide
Install handwashing facilities at food service and latrines
Cover transport burn or bury waste daily depending on regulations Step 4 Inspect daily to ensure
Waste is collected and transported when possible
Straddle-trench latrines and garbage pits are covered with dirt
Pail latrines are emptied and cleaned
Burn-out latrine containers are rotated and contents burned
Facility not contents are sprayed with insecticide as needed Step 5 Close out improvised latrines and garbage pits when filled within 1 foot of surface by
Spraying with residual insecticide
Packing earth in successive 3-inch layers until mounded one foot above surface
Spraying again with insecticide 10-39
Figure 10-30 ndash Cat-hole Latrine
Posting a sign saying ldquoClosed latrinegarbage pit and daterdquo (except in combat)
420 Waste Disposal Devices
Individual Waste Collection Bags
Preferred method when on a march
Dispose of with regular waste Chemical Toilets
Preferred method on bivouac
Add urinals to protect seats Cat-hole Latrines (Figure 10-30)
Alternate on-the-march method when bags not available
Cover immediately after use
Dig 6 to 12 inches deep and 12 inches in diameter
Keep mound of dirt removed to fill in hole
Straddle-trench Latrine (Figure 10-31)
Use on short bivouacs and field training exercises
Two trenches per 100 males three per 100 females
Dig 4 feet by 1 foot 2 frac12 feet deep 2 feet apart
Keep mounds of dirt removed to fill hole after use
Cover with dirt daily
10-40
Figure 10-31 ndash Straddle-trench Latrine
Deep Pit Latrine (Figure 10-32)
Use for longer periods and built-up areas
Collapsible two-seat boxes available in supply system
Add urinals to protect seats in male latrines
Enough for 6 percent of Seabees
Cover with dirt daily Garbage Pit
Locate near dining facility but no closer than 30 meters
One pit per 100 Seabees served per day
Transport to approved landfill or cover with dirt after each meal and close daily
For longer periods burn and bury ashes
10-41
Figure 10-32 mdash Deep Pit Latrine
Figure 10-33 mdash Pail Latrine
Pail Latrine (Figure 10-33)
Use where water table too close to surface for deep pit latrines
Empty and clean daily
10-42
Figure 10-34 ndash Burn-out Latrine
Figure 10-35 ndash Other urinals Trough Pipe and Urinoil
Grease Trap ndash Use with soakage pits and trenches to prevent clogging of soil Burn-out Latrine (Figure 10-34)
Use where water table too close to surface or extended stays
Rotate containers daily and burn contents
Other Urinals
Trough (Figure 10-35 frame A)
Pipe (Figure 10-35 frame B)
Urinoil (Figure 10-35 frame C)
10-43
Figure 10-36 ndash Food Services Soakage Pit
Soakage Pit - Food Service (Figure 10-36)
Locate near dining facility to prevent accumulation of liquid waste from kitchens
Need at least two to alternate daily
Fill with loose rocks
Add grease trap for dining facility waste to prevent clogging of soil Soakage Pit (Other)
Provide for urinals showers Lyster bags mess kits laundry handwashing facilities
Prevents accumulation of liquid waste
10-44
500 WATER PURIFICATION
510 Overview
Infectious diarrhea results from contamination of water and food by bacteria viruses and parasites Water- and foodborne diarrheal diseases are of particular concern to the military because they can be spread to large numbers of service members simultaneously with disastrous consequences for combat readiness Diarrhea especially when vomiting or fever is present can cause dehydration Fill your canteen with treated water at every chance When treated water is not available you must disinfect the water in your canteen using one of the following methods Using iodine tablets is the preferred way to individually purify water There are several alternate techniques for making drinking water clean if iodine tablets are not available You can use chlorine ampoules which are small sealed glass vials You can also use an emergency water treatment kit with Chlor-Flocreg tablets household bleach or boiling to purify water
520 Water Purification Using Iodine Tablets ndash Preferred Method
The following are the procedures for purifying water with iodine tablets the preferred method There are variations depending on the amount of water yoursquore purifying whether it is cold or not and whether it is cloudy or clear
Fill your canteen with the cleanest water available
Put one iodine tablet into clear water or two iodine tablets into cold or cloudy water If you are using two-quart canteens double those amounts Use two tablets for clear water and four tablets for cold or cloudy water
Place the cap on your canteen
Shake canteen to dissolve tablets
Wait 5 minutes
Loosen the cap and tip the canteen over to allow leakage around the canteen threads
Tighten the cap and wait an additional 25 minutes before drinking
530 Water Purification Using Chlorine Ampoules
The following are the procedures for purifying water with chlorine ampoules
Fill your canteen with the cleanest water available
Mix one ampoule of chlorine with one-half canteen cup of water
Stir that mixture with a clean utensil until the contents are dissolved
After stirring the mixture pour one-half of a plastic canteen capful or one Nuclear Biological Chemical (NBC) canteen capful of chlorine solution into your canteen of water
Place the cap on your canteen and shake
Slightly loosen the cap and tip the canteen over to allow leakage around the threads
10-45
Tighten the cap and wait 30 minutes before drinking
NOTE
By wearing gloves or wrapping the ampoule in paper or cloth you can avoid cutting your hands when breaking open the glass ampoule
540 Water Purification Using An Emergency Water Treatment Kit (Chlor-Flocreg Tablets)
The following are the procedures for purifying water with an emergency water treatment kit with Chlor-Flocreg tablets
Tear off the top of the plastic water treatment bag at the perforation (first time use)
Fill the treatment bag one-half full with the cleanest water available
Add one tablet
Fold the bag tightly three times and fold the tabs in
Hold the bag firmly and shake until the tablet dissolves
Swirl for 10 seconds
Let the bag sit for 4 minutes
Swirl again for 10 seconds
Let the bag sit for an additional 15 minutes
Insert the filter pouch into the neck of the canteen
Pour water from bag through the filter into the canteen Avoid pouring sediment into the filter
Rinse the filter with treated water after use Always filter through the same side of the filter
Rinse sediment from the treatment bag and save the bag for water treatment only
CAUTION Do not drink from the treatment bag The water is still contaminated and must be filtered before drinking Drinking non filtered water may cause stomach and intestinal disorders
550 Water Purification Using Household Bleach
The following are the procedures for purifying water with household bleach
NOTE
Ensure bleach is unscented
10-46
Fill your canteen with the cleanest water possible
Read the label on the bleach bottle to determine the amount of available chlorine Liquid chlorine laundry bleach usually has about 5 to 6 percent available chlorine Based upon the strength of the household bleach add the chlorine to the canteen as directed in Table 10-2
Table 10-2 mdash Drops of Household Bleach to be Added to a One-Quart Canteen
AVAILABLE CHLORINE TO CLEAR WATER TO COLDCLOUDY WATER 1 PERCENT 10 drops 20 drops
Slightly loosen the cap and tip the canteen over to allow leakage around threads
Tighten the cap and wait 30 minutes before drinking the water
560 Water Purification by Boiling
You may find yourself in a situation where iodine or other purification methods are not available In this case you can boil water using the following procedures to make it safe for drinking
Bring water to a rolling boil for 5 minutes
In an emergency boiling water for just 15 seconds will help
Protect boiled water from recontamination
CAUTION If water is suspected of NBC contamination do not attempt to treat Seek a quartermaster water supply
Summary In this chapter you were introduced to the importance of providing first aid to an injured person and the explanation and descriptions of first aid measures that you can apply to yourself and to others before trained medical personnel arrive This chapter provided how-to instructions in lifesaving measures to include clearing the upper airway giving artificial ventilation stopping bleeding controlling shock and protecting the wound Additionally this chapter discussed fundamentals of field sanitation and water purification
10-47
Assignment 10
Objectives
1 Define first aid and identify the general first aid rules 2 Define basic life support 3 Recognize the signs of airway obstruction and describe the steps necessary to
clear the airway 4 Recognize and describe the steps necessary to perform artificial ventilation 5 Describe the methods used to control bleeding 6 Define shock and identify its signs symptoms and treatment 7 Identify the cause and treatment of injuries caused by exposure to heat or cold 8 Identify the treatment of first aid to victims of various types of burns 9 Recognize the steps in treating and immobilizing a fracture 10 Identify field sanitation methods used to dispose of human waste and garbage 11 Identify the procedures taken to purify drinking water
Questions 1 True or False The three reasons for performing first aid are to save lives
prevent further injuries and prevent infection
1 True 2 False
2 There are how many vital functions
1 1 2 2 3 3 4 4
3 True or False The vital functions consist of the breathing process respiration
and blood circulation
1 True 2 False
4 Brain cells when deprived of oxygen will die within what period of time
1 2 to 4 minutes 2 4 to 6 minutes 3 12 to 18 minutes 4 30 minutes to an hour
10-48
5 Respiration involves inhaling oxygen and exhaling which of the following
39 When performing rescue breathing how many breaths should you blow into their
mouth or nose before checking for a pulse or re-establishing airway and seal
1 1 2 2 3 3 4 4
40 Which of the following is a correct statement concerning treatment for bleeding
1 Do not remove objects from the wound 2 Pressure points should be used as a last resort 3 Tails of the standard field dressing should be tied over the wound 4 You should use your field dressing first
41 Which of the following is a correct statement concerning treatment for bleeding
1 If an object is impaled in the wound remove it quickly 2 Remove any visible foreign objects from the wound 3 Tie the tails of the dressing at the edges of the wound 4 You should use your field dressing first
42 When using manual or direct pressure to stop bleeding firm pressure should be
applied for how many minutes
1 2 to 4 2 5 to 10 3 15 to 30 4 Until bleeding stops
43 When applying a tourniquet which of the following statements is correct
1 It should be applied directly over the wound 2 Loosen and retighten every 5 to 10 minutes 3 Once applied do not loosen 4 Wire or shoestring may be used
44 A burn from a hot liquid is considered which type of burn
1 Chemical 2 Electrical 3 Laser 4 Thermal
10-54
45 Which of the following types of burns should be kept moist
1 Dry chemical 2 Laser 3 Wet chemical 4 White Phosphorous
46 True of False When treating either heat exhaustion or heatstroke you should
elevate the casualtyrsquos legs
1 True 2 False
47 Which of the following injuries is caused by an imbalance of electrolytes in the
60 Which of the following human waste disposal methods should be used on patrol
1 Burn-out 2 Cat-hole 3 Pail 4 Straddle-trench
61 When using straddle-trench latrines how many trenches do you need for 100
females
1 1 2 2 3 3 4 4
10-57
ASSIGNMENT 10
First Aid and Field Sanitation
Directions Select the correct answer from the list of alternates below each question in the end of chapter assignment Write in the answer next to the corresponding question number below Use this answer sheet as a reference to completing the online assignment related to this assignment
1
2
3
4
5
6
7
8
9
10
11
12
13
14
15
16
17
18
19
20
21
22
23
24
25
26
27
28
29
30
31
32
33
34
35
36
37
38
39
40
41
42
43
44
45
46
47
48
49
50
51
52
53
54
55
56
57
58
59
60
61
10-58
Additional Resources and References
This chapter is intended to present thorough resources for task training The following reference works are suggested for further study This is optional material for continued education rather than for task training First Aid FM 4-2511 (FM 21-11)NTRP 4-0211AFMAN 44-163(I)MCRP 3-02G Field Hygiene and Sanitation FM 21-10MCRP 4-111D
10-59
Trainee Feedback
Center for Seabees and Facilities Engineering (CSFE) makes every effort to keep their courses up-to-date and free of technical errors If you have a suggestion found an error or inaccuracy please write FAX or email us by using the form below Use one form for each comment and be sure to fill in the information as accurately and detailed as possible Thank you for your assistance Write CSFE
NCF Training Division (N7B) 3502 Goodspeed St Port Hueneme CA 93043-4337
Course Seabee Combat Handbook Volume ____ NAVEDTRA __________ Course Date ________ Chapter Number ______ Page ______ Paragraph _____ Sentence ______ Figure ______ FrameView ______ Description ____________________________________________________ ______________________________________________________________ ______________________________________________________________ ____________________________________________________________________________________________________________________________ ______________________________________________________________ (optional) Corrective action _______________________________________ ______________________________________________________________ ______________________________________________________________ (optional) Supporting reference(s) __________________________________ ______________________________________________________________ Your email address if a response is requested ________________________
10-60
Chapter 10
First Aid and Field Sanitation
Overview
Objectives
Prerequisites
Features of This Manual
100 BASIC FIRST AID
Attitude - You should remain calm and act quickly but efficiently Reassure the casualty that his or her injuries are understood and that proper medical attention is forthcoming The casualtyrsquos confidence and positive attitude can be very helpful
Positioning the Casualty - In most cases the casualty should be lying down with his or her head level with the body until you have determined the type and extent of his or her injuries The exceptions to this are the following
Clothing - Although you should move the casualty no more than necessary you may have to remove clothing in order to determine the extent of his or her injuries Remove only the clothing necessary for examination and treatment being especially car
Infection - Do not touch any open wounds or burns with your fingers hands or other non-sterile objects unless absolutely necessary to stop severe bleeding
110 Vital Functions
111 The Breathing Process
112 Respiration
113 Circulation
120 Evaluating a Casualty
121 Step 1 ndash Check for Responsiveness
122 Step 2 ndash Check for Breathing
123 Step 3 ndash Check for Pulse
124 Step 4 ndash Check for Bleeding
125 Step 5 ndash Check for Shock
126 Step 6 ndash Check for Fractures
127 Step 7 ndash Check for Burns
128 Step 8 ndash Check for Head Injury
200 FIRST AID MEASURES
210 Controlling Bleeding
211 General
212 Methods to Control Bleeding
2121 Applying a Battle Dressing
2125 Applying a Tourniquet
220 Opening the Airway and Restoring Breathing
221 Preliminary Assessment
222 Opening the Airway
223 Rescue Breathing
2231 Mouth-to-Mouth Method
2232 Mouth-to-Nose Method
224 Clearing an Obstructed Airway
2241 Abdominal Thrust on a Conscious Casualty Standing or Sitting
2242 Chest Thrust on a Conscious Casualty Standing or Sitting
230 Recognizing and Treating Shock
231 Signs and Symptoms
232 First Aid Measures
240 Fractures
241 Signs and Symptoms
242 General Rules
243 Splinting Procedures
244 Applying a Sling
245 Treatment for Specific Fractures
2453 Neck Fractures
250 Burn Injuries
251 Eliminate the Source
252 First Aid Measures
300 HEAT AND COLD INJURIES
310 Introduction
320 Heat Injuries
321 General
322 Heat Cramps
323 Heat Exhaustion
324 Heatstroke
330 Cold Injuries
331 General
332 Specific Cold InjuriesConditions
3321 Chilblain
3322 Immersion Syndrome
400 FIELD SANITATION
410 General Information
420 Waste Disposal Devices
500 WATER PURIFICATION
510 Overview
520 Water Purification Using Iodine Tablets ndash Preferred Method
530 Water Purification Using Chlorine Ampoules
540 Water Purification Using An Emergency Water Treatment Kit (Chlor-Flocreg Tablets)
550 Water Purification Using Household Bleach
560 Water Purification by Boiling
Summary
Assignment 10
Objectives
Questions
First Aid and Field Sanitation
Additional Resources and References
Trainee Feedback
animationAvailable1
Button1
steady stream Veins are the vessels that return blood to the heart Blood from veins is dark red in color If a vein is cut the blood escapes in a steady stream Capillaries form a connecting network of smaller vessels between the veins and arteries Capillary blood is usually brick red in color If capillaries are cut the blood oozes out slowly To begin controlling bleeding cut or tear any clothing necessary to expose the wound and observe the extent of the injury If clothing is stuck to the wound leave it alone Do not touch the wound Always check for entry and exit wounds Exit wounds are usually larger While treating any wound continually monitor vital signs breathing and pulse and take action accordingly Do not attempt to remove bullets or other objects from the wound If the wound is impaled by an object do not remove the object just apply the dressing putting padding around the object to stabilize it When bleeding is from a leg or arm wound elevate the extremity slightly above the casualtyrsquos heart This is because the amount of blood entering is decreased by the uphill gravitational effect
CAUTION Do not elevate a limb until it is certain that no bones are broken or until broken bones are properly splinted
212 Methods to Control Bleeding
There are several methods for controlling bleeding We will look at applying a battle dressing using direct pressure applying a pressure dressing the use of pressure points and lastly applying a tourniquet
2121 Applying a Battle Dressing
Before you go into the field you will normally receive an individual first aid kit Among the items in this kit are battle dressings A battle dressing is a combination compress and bandage in which a sterile pad is fastened to a gauze muslin or adhesive bandage Most Navy first aid kits contain both large and small size battle dressings of this kind When applying a battle dressing always use the casualtyrsquos first not your own You may need your own You will see that each dressing has two tails used to secure the dressing when you are treating the injured On the outer side of the dressing is written ldquoPut other side next to woundrdquo This helps to make sure the sterile side is placed on the wound First remove the wrapper and grasp the tails with both hands (Figure 10-5 frame 1) Hold the dressing over the wound white side down and pull it open (Figure 10-5 frame 2) Place it directly over the wound and hold it in place with one hand With the other hand wrap one tail around and half way over the wound leaving enough to tie a knot (Figure 10-5 frames 3 and 4) Wrap the other tail in the opposite direction and then tie the tails at the edge of the dressing not over the wound (Figure 10-5 frame 5) Tie it firmly but not tourniquet-like
Figure 10-6 mdash Applying Direct or Manual Pressure
You can reinforce dressings by applying additional sterile dressings over the battle dressing and covering the entire dressing with an elastic bandage 2122 Using Direct Pressure
If bleeding doesnrsquot stop after applying a battle dressing your next technique should be direct or manual pressure Place your hand over the battle dressing and apply firm pressure for 5 to 10 minutes If the casualty is conscious he or she can do this In almost all cases bleeding can be stopped by direct pressure on the wound See Figure 10-6
10-10
Figure 10-7 mdash Applying a Pressure Dressing
2123 Applying a Pressure Dressing
If bleeding persists apply a pressure dressing over the battle dressing This will aid in blood clotting and compress the open blood vessel Do this by placing a wad of padding over the dressing at the wound location keeping the extremity elevated if applicable Secure the padding using a bandage or cravat tying the ends directly over the wound using a nonslip knot Improvised pressure dressings can be strips of cloth made from T-shirts socks or other clothing See Figure 10-7 frames 1 thru 4
2124 Using Digital Pressure
If bleeding continues try digital pressure also known as pressure points Digital pressure is applying pressure using your fingers thumb or hand to the appropriate pressure point A pressure point is a spot where a main artery lies near the skin surface and over a bone or firm tissue The objective of applying pressure is to compress the artery against the bone thus shutting off the flow of blood from the heart to the wound There are 10 principal pressure points on each side of the body Refer to Figure 10-8 while reading the following The first pressure point wersquoll look at is the superficial temporal artery If the bleeding is in the region of the temple or scalp use the finger to compress the main artery to the temple against the skull bone This pressure point is just in front of the ear The next pressure point is the facial artery Use this if bleeding occurs on the face below the level of the eyes Apply pressure to the point on the lower jaw To find this pressure point start at the angle of the jaw and run your finger forward along the lower edge of the lower jaw until you feel a small notch The pressure point is in the notch The common carotid artery is the pressure point you will use if the neck is bleeding Apply pressure below the wound just in front of the prominent neck muscle Press inward and slightly backward compressing the main artery of that side of the neck against the bones of the spinal column Do not apply pressure at this point unless it is absolutely essential This is because there is a danger of pressing on the windpipe and thus choking the victim
10-11
Figure 10-8 mdash Pressure Points (Roll over to view details)
10-12
Look now at the pressure point at the subclavian artery If the bleeding is in the shoulder or in the upper part of the arm apply pressure with the fingers behind the collarbone Press down against the first rib or forward against the collarbone The brachial artery is where you should apply pressure when bleeding is between the middle part of the upper arm and the elbow The blood flow should be controlled by applying pressure in the inner side of the armmdashthat is toward the bodymdash about halfway between the shoulder and the elbow The radial and ulnar arteries are the spots to press to control bleeding from the hand To do this apply pressure at the wrist If it is possible to hold the arm up in the air the bleeding will be relatively easy to stop At the iliac artery apply pressure to the middle of the groin to control bleeding in the thigh Bleeding in the upper part of the thigh can be controlled by applying pressure to the femoral artery or the iliac artery At the femoral artery bleeding in the upper part of the thigh can be controlled by applying pressure with the closed fist of one hand and using the other hand to give additional pressure The artery at this point is deeply buried in some of the heaviest muscle of the body so you must use a great deal of pressure to push the artery against the bone The next pressure point to consider is the popliteal artery Control bleeding between the knee and the foot by applying firm pressure against the knee Sometimes pressure at the side of the knee doesnrsquot stop the bleeding In this case hold the front of the knee with one hand and thrust the fist hard against the artery behind the knee The last pressure point wersquoll discuss is the anterior and posterior arteries Apply pressure to these arteries to stop bleeding from the foot Use digital pressure in combination with previously described techniques or when dressings are not available
2125 Applying a Tourniquet
CAUTION A tourniquet can be dangerous Its application can cause tissue injury or even loss of a limb
If bleeding continues after using other techniques as a last resort use a tourniquet A tourniquet is a constricting band placed around an arm or leg to control bleeding and as previously mentioned should only be applied as a last resort or if a limb has been severed Once applied the tourniquet must stay in place and the casualty must be taken to the nearest Medical Treatment Facility (MTF) as soon as possible Do not loosen or release a tourniquet once it has been applied See Figure 10-9 In the absence of a specially designed tourniquet use a strong pliable material such as gauze or muslin bandages clothing or a cravat Use this material with a rigid stick-like object and ensure the improvised tourniquet material is at least two inches wide DO NOT use wire or a shoestring for a tourniquet band Place the tourniquet material around the limb between the extremity and the torso or between the wound and the heart Never place a tourniquet directly over a wound fracture or joint For maximum effectiveness place it on the upper arm or above the
10-13
Figure 10-9 mdash Applying a Tourniquet Frames 1 thru 5
knee It should be well-padded andor placed over a smoothed sleeve or trouser leg If the material is long enough wrap it around the limb several times keeping the material flat Tie a half-knot the same as the first part of tying a shoe lace Next place a stick or other rigid object on top of the half-knot and tie a full knot over the stick Twist the stick until the tourniquet is tight around the limb andor bright red bleeding has stopped In the case of an amputation dark oozing blood may continue to flow for a short time Fasten the tourniquet to the limb by looping the free ends of the tourniquet over the ends of the stick and then bring the ends around the limb to prevent the stick from loosening and tie the ends together on the side of the limb After applying the tourniquet mark the casualtyrsquos forehead with a ldquoTrdquo and the time the tourniquet was applied Check and treat the casualty for shock and seek medical aid In the case of a severed limb apply a dressing to the stump and if possible save and transport the limb with the casualty but out of his or her sight to avoid shock
10-14
Figure 10-10 mdash Positioning the Casualty for a Preliminary Assessment
220 Opening the Airway and Restoring Breathing
An inadequate airway and lack of breathing are two of the most critical situations in first aid You must have oxygen to continue living The third critical situation is the loss of blood circulation or stoppage of the heart Before attempting to clear a casualtyrsquos airway or restore breathing you should check the casualty for a pulse using one of the checkpoints on the wrist neck or ankle as described under Evaluating a Casualty If no pulse is present you should immediately call for medical personnel unless you have been properly trained in cardiopulmonary resuscitation or CPR
221 Preliminary Assessment
Check the casualty for responsiveness or consciousness by gently shaking him or her and asking ldquoAre you OKrdquo If you get no response kneel beside the casualty and gently roll him or her onto the back by placing one hand under his or her head and neck for support then grasp the far arm and roll him or her toward you See Figure 10-10
NOTE
If you suspect he or she has a broken back or neck DO NOT shake or move the casualty unless located in an area of immediate danger
10-15
Figure 10-11 ndash Using the crossed-finger method to open the casualtyrsquos mouth
Figure 10-12 ndash Using the finger to dislodge foreign matter
Place the casualtyrsquos arms at the sides and straighten out his or her legs Next you need to check for breathing Look for the rise and fall of the chest listen for the sounds of breathing and feel his or her breath on the side of your face If the casualty is not breathing or appears to be having difficulty breathing you will need to perform a finger sweep of his or her mouth Open the casualtyrsquos mouth using your crossed thumb and finger to exert pressure upwards on the upper teeth and downwards on the lower (Figure 10-11) Crook the index finger on your other hand insert it against the inside of
the casualtyrsquos cheek and sweep across to the other side of the mouth Remove any foreign matter you find but do not spend too much time doing so (Figure 10-12)
WARNING Take care not to force an object deeper into the airway by pushing it with your finger
If the casualty is still not breathing or you are unsure you will need to perform one of the methods of rescue breathing Performing rescue breathing on a casualty that is breathing on their own can do no harm
10-16
Figure 10-14 ndash Jaw-thrust technique of opening the airway
Figure 10-13 ndash Head-tiltChin-lift technique of opening the airway
222 Opening the Airway
Before performing rescue breathing you need to open the casualtyrsquos airway Kneel at his or her side and position the head to open the airway using either the jaw-thrust or head-tiltchin-lift method If you suspect the casualty has a neck injury or severe head injury you should use the jaw-thrust technique to open the airway Otherwise use the head-tiltchin-lift technique by placing one hand on the casualtyrsquos forehead and tilting the head back with firm backward pressure Next place the fingers of the other hand under the bony part of the lower jaw and lift bringing the chin forward Do not use your thumb See Figure 10-13
To perform the jaw-thrust technique to open the casualtyrsquos airway kneel at the casualtyrsquos side Use both hands to grasp the lower jaw at each side and lift forward and up If this is unsuccessful tilt the head back slightly See Figure 10-14
With either technique once the casualtyrsquos airway is opened maintain the head position to keep the airway open After opening the casualtyrsquos airway and before you begin rescue breathing check again to see if the casualty has already begun breathing on his or her own Often just clearing and opening the airway will allow the casualty to
10-17
breathe properly If the casualty does begin breathing on his or her own continue to monitor the casualty and transport him or her to an MTF as soon as possible
223 Rescue Breathing
If the casualty is still not breathing you need to begin rescue breathing There are two basic methods mouth-to-mouth and mouth-to-nose Mouth-to-mouth is the preferred method but you should use the mouth-to-nose method if the casualty has a severe jaw fracture a wound to the mouth or the jaws are clamped shut by spasms
2231 Mouth-to-Mouth Method
To perform mouth-to-mouth rescue breathing place the casualty on his or her back face up Next place one hand on the forehead and pinch the nostrils closed Place the fingertips of the other hand on the bony part of the chin and lift If you suspect the casualty has a neck injury and used the jaw-thrust technique for clearing the airway close the nostrils by placing your cheek against them Now take a deep breath place your mouth around the casualtyrsquos mouth and blow two full breaths into the mouth one to one and a half seconds per breath taking a breath of fresh air before each breath If the casualty is too small as with a child cover both the nose and mouth with your mouth Watch for the casualtyrsquos chest to rise If the chest does not rise reestablish an open airway ensure no leakage and try again If the chest still isnrsquot rising clear the obstruction from the mouth or throat using one of the methods described in the next section After each two breaths check for a pulse at the neck If you find a pulse and the casualty appears to be breathing on his or her own STOP If a pulse is found but the casualty is still not breathing on his or her own continue rescue breathing If no pulse is found seek medical help immediately
2232 Mouth-to-Nose Method
The mouth-to-nose method of rescue breathing is performed in the same manner as the mouth-to-mouth method except that you blow into the nose while holding the lips closed with one hand under the chin Remove your mouth after each breath to allow the casualty to exhale It may be necessary to part the lips to allow the casualty to exhale Check for a pulse after each two breaths taking action as described for the mouth-to-mouth method
224 Clearing an Obstructed Airway
If the casualty is not breathing or appears to be choking ensure they have a clear unobstructed airway A casualtyrsquos upper airway may be obstructed for a number of reasons including the casualtyrsquos tongue falling back into his or her throat while he or she is unconscious foreign matter becoming lodged in the throat regurgitation of stomach contents into the throat or blood clots due to head or facial injuries If a casualty is conscious but choking do not interfere Encourage the casualty to cough up the obstruction If coughing doesnrsquot work or the casualty is unconscious but hasnrsquot responded to rescue breathing you need to clear the obstructed airway using either the abdominal thrust or chest thrust method Use the abdominal thrust method unless the casualty is in the advanced stages of pregnancy is markedly obese or has a significant abdominal wound In these cases use the chest thrust method
10-18
2241 Abdominal Thrust on a Conscious Casualty Standing or Sitting
To perform the abdominal thrust (or Heimlich maneuver) on a conscious casualty who is standing or sitting (Figure 10-15)
Stand behind the casualty
Wrap your arms around the casualtyrsquos waist
Make a fist with one hand and grasp it with the other
The thumb side of your fist should be against the abdomen in the midline and slightly above the navel but well below the breastbone
Press your fists into the abdomen with a quick backward and upward motion
Each thrust should be a separate and distinct movement Continue until the obstruction is expelled or the casualty becomes unresponsive
NOTE
If the casualty becomes unresponsive call for help and begin rescue breathing after positioning the casualty to open the airway
Figure 10-15 mdash Anatomical and profile views of the abdominal thrust on a conscious casualty sitting or standing
10-19
Figure 10-16 ndash Profile view of a the chest thrust on a conscious
casualty sitting or standing
2242 Chest Thrust on a Conscious Casualty Standing or Sitting
To perform the chest thrust on a conscious casualty while standing or sitting (Figure 10-16)
Stand or sit behind the casualty
Wrap your arms around his or her chest with your arms under the armpits
Make a fist and place the thumb in the middle of the breastbone avoiding the tip of the breastbone and the edges of the ribs
Grasp your fist with your other hand
Exert thrusts slowly and distinctly Perform this technique until the obstruction is expelled or the casualty becomes unresponsive If he or she becomes unresponsive call for help and begin rescue breathing
2243 Abdominal Thrust on an Unconscious Casualty Lying Down
If opening the airway and attempting rescue breathing fails perform the abdominal thrust 6 to 10 times while the casualty is lying down To do this (Figure 10-17)
Kneel astride the casualtyrsquos thighs
Place the heel of one hand against the abdomen in the midline slightly above the navel but well below the breastbone with the fingers pointed toward the head
Press into the abdomen with a quick thrust forward and upward Repeat the sequence of abdominal thrust finger sweep of the mouth and rescue breathing as long as necessary to clear the obstruction and restore breathing
10-20
Figure 10-17 mdash Performing the abdominal thrust on an unconscious or unresponsive casualty
2244 Chest Thrust on an Unconscious Casualty Lying Down
If the casualty does not respond to rescue breathing perform the chest thrust with the casualty on his or her back face up and mouth open (Figure 10-18)
Kneel close to the casualtyrsquos side
Locate the lower edge of the ribs with your fingers and run your fingers up along the center of the rib cage to the notch (Figure 10-18 view A)
Place your middle finger on the notch and your index finger next to it on the lower edge of the breastbone
Place the heel of your other hand on the lower half of the breastbone next to your two fingers (Figure 10-18 view B)
Remove your two fingers and place that hand on top of the hand positioned on the breastbone extending or interlocking your fingers (Figure 10-18 view C)
Straighten and lock your elbows with your shoulders directly above your hands
Apply enough downward pressure to depress the breastbone 1 frac12 to 2 inches then release the pressure completely See Figures 10-18 view D and 10-19
Do this 6 to 10 times delivering each thrust quickly and distinctly Repeat the sequence of chest thrust finger sweep of the mouth and rescue breathing as long as necessary to clear the obstruction and restore breathing
10-21
Figure 10-18 mdash Hand placement for performing the chest thrust on an unconscious or unresponsive casualty
Figure 10-19 mdash Showing breastbone depression when performing the chest thrust on an unconscious or unresponsive casualty
10-22
230 Recognizing and Treating Shock
Shock is the collapse of the bodyrsquos cardiovascular system including an inadequate supply of blood to the bodyrsquos tissue Shock stuns and weakens the body Recognizing shock and applying the proper first aid measures in a timely manner can save a fellow Seabeersquos life The three basic mechanisms associated with shock are heart damage blood loss causing insufficient volume of blood and inadequate circulation of blood caused by the blood vessels opening too wide Shock may result from dehydration allergic reactions significant blood loss reaction to the sight of blood or a wound or traumatic injuries such as burns gunshot wounds crush injuries etc
231 Signs and Symptoms
As the one administering first aid itrsquos important that you be able to recognize the signs of shock They do not always appear at the onset of the injury Some of these signs are the following
The casualtyrsquos pulse tends to be weak and rapid
The face and skin may be very pale or ashen gray
Breathing is likely faster than normal
The skin feels cool and clammy and is covered in sweat
The casualtyrsquos skin may be blotchy or bluish especially around the mouth and lips
Another way to assess a case of shock is to look for symptoms Symptoms are things the casualty feels The symptoms of shock are direct or indirect evidence that circulation has been disturbed Look for feelings of restlessness or nervousness He or she may be thirsty There may be nausea or vomiting and the casualty may be confused and lack awareness of his or her surroundings
232 First Aid Measures
When treating a casualty for any injury or illness you should assume he or she is already suffering from shock or that shock will soon occur Since the first aid measures to apply for shock are the same as those for preventing it you should begin treating for shock and not wait for signs to appear First move the casualty to cover if feasible Lay the casualty on his or her back unless he or she is experiencing difficulty breathing in which case allow the casualty to sit upright but monitor closely Elevate the feet higher than the heart using a stable object such as a field pack
WARNING DO NOT elevate the feet if there is an unsplinted broken leg head injury or abdominal injury If the casualty has an abdominal injury bend his or her legs at the knee
Next loosen the casualtyrsquos clothing around the neck waist and any place it seems binding It is important to maintain the casualtyrsquos body temperature In hot weather
10-23
Figure 10-20 mdash Types of fractures
place the casualty in the shade and protect him or her from becoming chilled In cold weather place blankets over and under the casualty to keep him or her warm You should reassure and keep the casualty calm by sounding authoritative and self-confident Assure the casualty you are there to help
WARNING DO NOT give the casualty food or drink If he or she is unconscious or you need to leave the casualty unattended turn the head to the side to prevent choking if he or she vomits
Seek medical aid as soon as possible and continually monitor the casualtyrsquos condition until medical personnel arrive or the casualty is transported
240 Fractures
Many kinds of accidents cause injuries to the bones joints and muscles In providing first aid to injured people you must always look for signs of fractures A fracture is any break in the continuity of a bone a dislocation is when a joint is not in the proper position and a sprain is when the connecting tissues of joints have been torn This section will be concerned mostly with fractures There are two types of fractures closed and open A closed fracture is one where the injury is completely internalmdashno broken skin (Figure 10-20 view A) An open fracture is where there is a break in the skin and tissues caused by the broken bone protruding (Figure 10-20 view B) or a missile that broke the bone (Figure 10-20 view C) leaving an opening Open fractures should always be considered contaminated and subject to infection
10-24
241 Signs and Symptoms
You may not always be able to actually see the broken bone but there are signs and symptoms to look for in a casualty that can tip you off You might see deformity in the area of the injury There may be pain or swelling The casualty will be unable to move that portion of the body or there may be unnatural movement of the injured part The casualty may also feel a grating sensation at the point of injury If you are unsure if the casualty has a fracture treat the injury as a fracture Medical professionals can make a firm diagnosis later
WARNING Do not have the casualty move the injured parts in order to identify a fracture as any movement could cause further injury
242 General Rules
Follow these general rules in treatment of a fracture Treat the open fracture tissue wound immediately by covering all wounds with a dressing That means before you treat the fracture You should also always treat a fracture victim for shock Splint the casualty in the position you find him or her Do not attempt to straighten out the limb Do not attempt to push the bone of an open fracture back under the skin Do not attempt to set the fracturemdashjust splint it You immobilize the suspected fracture to prevent sharp edges of the bone from causing more damage It will also reduce pain and help prevent or control shock If it is a closed fracture immobilization will prevent an open wound and possible infection
243 Splinting Procedures
To prepare for splinting reassure the casualty loosen any tight or binding clothing and remove all jewelry from the injured limb Do not remove boots unless you need to stabilize a neck injury or the foot is bleeding Next gather splinting materials and padding improvising as needed
10-25
Figure 10-21 mdash Uninjured leg used as a splint for a fractured leg
Figure 10-22 mdash Chest wall used as a splint for a fractured arm
Splints An object that can be used to immobilize a fracture or a dislocation is called a splint There are two types of splints soft and rigid Soft splints include such things as pillows blankets towels and dressings Rigid splints are stiff and allow very little flexibility Splints should be lightweight strong and long enough to reach the joints above and below the fracture Lacking proper splints boards poles sticks tree limbs or even cardboard may be used as splints If nothing is available the chest can be used to immobilize a fractured arm and the uninjured leg can be used to immobilize the fractured leg (Figure 10-21 and 10-22) Padding Padding may be improvised from such items as a jacket blanket poncho or even leafy vegetation Bandages Bandages may be improvised from belts rifle slings or strips of clothing or blankets Narrow materials such as wire or cord should not be used to secure a splint in place as these could cause tissue damage and a tourniquet effect Slings A sling is a bandage or cravat tied around the neck to support a fractured arm or shoulder If a bandage is not available a sling can be improvised from pieces of clothing or blankets Swathes Swathes are pieces of cloth or load bearing equipment (LBE) that are used to further immobilize a splinted fracture Triangular and cravat bandages are often used and are called swathe bandages The purpose of the swathe is to immobilize therefore the swathe bandage is placed above andor below the fracturemdashnot over it Check the circulation below the site looking for
Pale white or bluish-gray skin
Colder skin temperature below the site If you suspect poor circulation evacuate the casualty immediately
10-26
Figure 10-23 mdash Board splints applied to a fractured lower leg
Apply the splint See Figure 10-23 Position one splint on each side of the fracture so that they extend both above and below the fracture Tie off the splinting materials above and below the site Check the splint for tightness ensuring it is tight enough to hold in place but not so tight it impairs circulation For fractures on the upper arm or shoulder use a sling Use swathes to hold an arm against the side or to hold legs together See Figure 10-21 and 10-22
NOTE
After splinting check the casualtyrsquos pulse and motor sensation at a point farther from the heart than the splint eg for a splinted forearm check the wrist for pulse hand for motor and sensation This is important Splinting too tightly can create the same bad effect as a tourniquet
244 Applying a Sling
To help immobilize a fractured arm you should apply a sling A sling is also used to immobilize a fractured collarbone or a fractured or dislocated shoulder Slings can be made from any non-stretching cloth such as shirts trousers ponchos or belts The supporting pressure of a sling should be on the casualtyrsquos uninjured side Support the arm with the hand slightly higher than the elbow with the fingers exposed to aid in circulation Use the following procedures to apply a sling (Figure 10-24)
Insert the splinted arm or the arm on the side of the fractured shoulder or collarbone in the center of the sling
Bring the ends of the sling up and around the casualtyrsquos neck then tie them in the hollow of the neck on the uninjured side
10-27
Figure 10-24 ndash Application of a triangular bandage to form a sling
Figure 10-25 mdash Applying a cravat bandage for a fractured jaw
Roll the corner of the sling at the elbow and tuck it in
245 Treatment for Specific Fractures
2451 Jaw Collarbone and Shoulder Fractures
If a casualty has a fractured jaw you need to immobilize it (Figure 10-25) To do so apply a cravat vertically around the head and under the jaw then add another cravat
around the top of the head to secure the first one Do not apply the cravat to the back of the neck Do not lay the casualty on his or her back as this may cause an obstruction of the airway
10-28
Figure 10-26 ndash Immobilizing a fractured collarbone
Figure 10-27 ndash Immobilizing a fractured or dislocated shoulder
In the case of a fractured collarbone apply two belts a sling and a cravat to immobilize the area as in Figure 10-26 With a fractured or dislocated shoulder apply a sling and a cravat or swathe See Figure 10-27
2452 Spinal Column Fractures
It is impossible to be sure if a casualty has suffered a spinal column fracture A fracture is likely if the casualty has fallen his or her back has been sharply struck or bent or there is no feeling in the legs or the legs canrsquot move If the spine is fractured bending it can cause the sharp bone fragments to bruise or cut the spinal cord and result in permanent paralysis or death
10-29
Figure 10-28 ndash Maintaining a normal spinal position
While you are waiting for transport and medical assistance maintain a normal spinal position at the lower back (Figure 10-28) Caution the casualty not to move and leave the casualty in the position he or she was found Do not move any part of the body If the casualty is face up you can slip a blanket under the arch of the lower back If found face down do not put anything under him or her If the casualty must be moved a four man team will be needed to do so safely
2453 Neck Fractures
When treating neck fractures caution the casualty not to move and leave the casualty in the position he or she was found If the neck or head is in an abnormal position and the casualty is lying face up raise the shoulders slightly and slip a roll of bath towel or something of similar bulk under the neck Do not bend the head or neck forward and do not raise or twist the head Immobilize the head using boots or heavy objects on each side of it (Figure 10-29)
10-30
Figure 10-29 mdash Immobilizing a fractured neck
If the head or neck is in an abnormal position and the casualty is lying face down do not move the casualty Immobilize the head with boots or heavy objects on each side of it but do not put a roll under the neck Do not bend the head or neck or attempt to roll the casualty onto his or her back If transportation is necessary at least two people will be required
250 Burn Injuries
Burns are injuries that most commonly result from exposure to fire chemicals or electricity The severity of burns depends on the depth size and location Burns are most serious when they are located on the face neck hands and feet Also they are dangerous when combined with fractures There are four types of burns you should learn to recognize and treat thermal electrical chemical and laser Thermal burns are caused by fire hot objects liquids or gases Electrical burns are caused by electrical wires current and lightning Chemical burns are caused by coming in contact with wet or dry chemicals or white phosphorous Laser burns are burns to the eye causing an ocular injury
251 Eliminate the Source
The first step to take with all types of burns is to eliminate the source of the burn After eliminating the source you can evaluate the casualty and provide appropriate first aid measures You should take the following actions to eliminate the source of the burn injury
With thermal burns remove the casualty from danger cover him or her with non-synthetic material and if still on fire roll him or her on the ground to extinguish the fire
In the case of an electrical burn remove the source of current by turning it off if it is close enough Wrap non-conductive material around the casualtyrsquos back and
10-31
shoulders and drag the casualty away Do not make direct contact with the casualty or touch any wires
When the casualty has been exposed to chemicals remove liquid chemicals by flushing the casualty with large amounts of water
Remove dry chemicals by brushing off the particles from the casualty but do not use your bare hands Afterwards flush the casualty with either large amounts of water or none at all as insufficient amounts of water may cause a chemical reaction and make matters worse
If the burn is from white phosphorous smother the chemical with wet clothes or mud and keep the casualty covered
In the case of a laser burn remove the casualty from the beam and make sure you do not look directly at the beam yourself
252 First Aid Measures
After removing the source of the burn evaluate the casualty for other conditions requiring first aid such as problems with breathing weak or no pulse or other wounds Expose the burn by removing any clothing over the burn unless it is stuck to the wound If the casualtyrsquos hands or wrists are burned remove any jewelry Next apply a field dressing For electrical burns check for both entry and exit burns The exit burn may be anywhere on the body With wet or dry chemical burns flush the burns with large amounts of water first then cover with a dry dressing In the case of white phosphorous burns flush the burn with large amounts of water then cover them with wet material or mud For laser burns apply a field dressing over the affected eye or eyes When applying a field dressing take the following precautions
Do NOT place the dressing over the face or genital area
Do NOT break the blisters
Do NOT apply grease or ointments to the burns In all cases seek medical assistance
300 HEAT AND COLD INJURIES
310 Introduction
Climatic injuries are caused by extreme hot or cold environments The human body needs time to adapt to any extremes of temperature The Seabeersquos physical condition will to some extent determine how long it takes to become acclimated There are other factors that contribute to an individualrsquos health and therefore susceptibility such as proper diet or nutrition sufficient sleep and rest proper exercise and suitable clothing While serving in extremes of climate individuals who are trying to lose weight should be supervised by properly trained medical personnel Most climatic injuries are preventable
10-32
320 Heat Injuries
321 General
Sometimes the heat of the environment causes injuries that need to be treated in the field Heat injuries are caused by exposure to extreme heat improper clothing wearing of Mission Oriented Protective Posture (MOPP) gear enclose spaces and wearing body armor The prevention of heat exposure injuries is a command responsibility All hands must be educated about medical dangers and environmental health in the field There are three categories of heat injuries heat cramps heat exhaustion and heatstroke
WARNING The heat casualty should be continually monitored for development of conditions which may require the performance of necessary basic lifesaving measures
CAUTION Do not use salt solutions in first aid procedures for heat injuries
322 Heat Cramps
Heat cramps are caused by an imbalance of electrolytes in the body from excessive sweating The signs and symptoms of heat cramps are
Cramping in the arms or legs
Stomach cramps
Excessive sweating To treat a casualty for heat cramps first move him or her to a cool shady area Loosen his or her clothing and slowly give the casualty a canteen of water Cool water is absorbed more quickly than warm water If the condition is unabated or continues seek medical assistance
323 Heat Exhaustion
Heat exhaustion is caused by a loss of fluids in the body The signs and symptoms of heat exhaustion include the following
Excessive sweating
Pale moist cool skin
Headaches
Weakness
Dizziness
Loss of appetite
Cramping 10-33
Nausea with or without vomiting
Chills or goosebumps
An urge to defecate
Rapid breathing
Tingling in the hands or feet
Confusion To treat for heat exhaustion first move the casualty to a cool shady area Loosen or remove his or her clothing and boots Pour water over the casualty and fan him or her while slowly giving the casualty a canteen of water Elevate the legs and keep the casualty from doing any strenuous activities for the rest of the day Monitor the casualty until the symptoms are gone or provide medical assistance
324 Heatstroke
Heatstroke is a failure of the bodyrsquos cooling mechanism The signs and symptoms of heatstroke are
Unconsciousness or sudden collapse Use the following procedures to treat heatstroke
Move the casualty to a cool shady area
Loosen or remove the casualtyrsquos clothing
Spray or pour water over him or her and fan him or her
Massage the extremities and skin
Elevate the legs
Slowly give the casualty a canteen of water This is a more severe heat injury than heat cramps or heat exhaustion so you should seek medical assistance immediately while monitoring the casualty for necessary lifesaving measures
330 Cold Injuries
331 General
Cold injuries are most likely to occur when it is moderately cold but wet andor windy It is important to understand what to do to prevent cold injuries First maintain good personal hygiene get sufficient exercise take care of your feet and hands and use protective clothing There are many contributing factors to cold injuries Humidity precipitation and wind increase the likelihood of injury Stationary activities such as standing guard increase
10-34
an individualrsquos vulnerability especially if that individual is in contact with the ground for extended periods or standing in water Inadequate diet and rest increase susceptibility and lower defenses Physical fatigue leads to apathy neglect and carelessness Studies show that previous cold injuries also increase your risk Depressed and unresponsive personnel tend to be less active Finally excessive use of alcohol or drugs impairs your judgment and is likely to cause carelessness or overconfidence Seabees may be suffering from cold injuries without knowing it They may simply feel uncomfortable and not notice that extremities are already numb from the cold The general signs and symptoms of cold injuries include
Numbness or tingling sensations which may be relieved by simply loosening boots or clothing and exercising to rewarm yourself
Discoloration of the skin o With lighter-skinned individuals skin becomes red then pale or waxy
white o With darker-skinned individuals skin will be grayish
Affected area may feel cold to the touch
Swelling may occur with deeper injuries
Blisters may occur after rewarming You should use the buddy system to check each other for signs of cold injuries The treatment for cold injuries varies with the severity of the injury First and foremost an individual suffering any cold injury should be removed from the cold environment With superficial injuries you can rewarm the affected part with body heat With more serious life-threatening injuries you should seek medical assistance immediately
WARNING Do not massage the injured part Do not expose the casualty directly to fire or a stove Do not rub the injured part with snow Do not slap or chafe injured parts or soak them in cold water Avoid walking on injured feet if at all possible
The primary injuries caused by cold environments are chilblain immersion syndrome frostbite snow blindness dehydration and hypothermia
332 Specific Cold InjuriesConditions
3321 Chilblain
Chilblain is caused by repeated exposure of bare skin to temperatures from 32 to 60 degrees Fahrenheit The symptoms of chilblain are acutely swollen red tender hot or itchy skin Treat chilblain by rewarming the affected part using firm steady pressure with your hands or by placing the affected parts under your arms or against your buddyrsquos stomach Do not rub or massage the affected parts Have medical personnel evaluate you for any damage
10-35
3322 Immersion Syndrome
Immersion syndrome also known as immersion foot or trench foot results from long exposure of the feet to wet conditions in temperatures ranging from 32 to 50 degrees Fahrenheit Inactive feet in damp or wet socks and boots are more susceptible The signs of immersion syndrome occur in stages with exposure At first the feet are cold but painless The pulse may be weak and the feet may be somewhat numb Next the feet feel hot with burning or shooting pain Later the skin becomes pale with a bluish tint and the pulse decreases In the later stages the feet may blister swell bleed or even become gangrenous Treatment is required for all stages of immersion syndrome
Gradually warm the affected part and protect it from trauma and infection
Apply dry loose clothing or layers of warm coverings
Elevate the feet to reduce swelling
Transport the casualty to a medical facility as soon as possible
Do not massage the feet moisten the skin or apply direct heat or ice 3323 Frostbite
Frostbite is caused by exposure to cold temperatures usually below 32 degrees Fahrenheit Individuals with a history of cold injuries are more likely to get frostbite The most easily frostbitten parts of the body are the cheeks nose ears chin forehead wrists hands and feet Deep frostbite is very serious and can result in amputation of appendages The signs or symptoms of frostbite include
Loss of sensation or numbness
Sudden blanching of the skin then brief tingling
Redness of the skin or grayish in darker-skinned individuals
Blisters swelling or tender parts
Loss of previous pain sensation
Pale yellowish waxy-looking skin
Frozen tissue that feels solid or wooden Treat frostbite of the face ears or nose by covering them with bare hands until sensation and natural skin color returns Place frostbitten hands under the armpits To treat frostbitten feet remove boots and socks and place the feet under clothing against a buddyrsquos body General treatment of frostbite is as follows
Keep the affected parts warm and covered
Remove or loosen restrictive clothing
Cover affected parts to protect them from further injury
Exercise if possible to warm up
Seek medical treatment
Do not rub the injured part with snow or apply cold water 10-36
Do not massage
Do not expose to an open fire
Do not use ointments or salves
Do not manipulate the affected part to increase circulation
Do not use alcohol or tobacco 3324 Snow Blindness
Snow blindness is the effect that the glare from ice or snow has on the eyes It is more likely to occur in hazy cloudy weather The signs and symptoms of snow blindness are
The sensation of grit in the eyes
Pain in or over the eyes
Eye watering or redness
Headache
Pain with exposure to light To treat a casualty for snow blindness blindfold or cover the eyes with dark cloth Complete rest is desirable for quicker recovery If necessary and possible evacuate the casualty to a medical facility Snow blindness usually heals by itself in a few days if there is no repeated exposure 3325 Dehydration
Dehydration occurs when the body loses too much fluid It is just as prevalent in cold weather as in hot In colder temperatures sweating is not as noticeable since it evaporates and is quickly absorbed The signs and symptoms of dehydration are
Mouth tongue throat parched or dry
Difficulty swallowing
Nausea with or without vomiting
Extreme dizziness and fainting
General fatigue and weakness
Muscle cramps
Difficulty focusing the eyes To treat for dehydration keep the individual warm and loosen his or her clothing Shelter the individual from the wind and cold and begin fluid replacement immediately Transport the casualty to a medical treatment facility as soon as possible 3326 Hypothermia
Hypothermia or general cooling of the body occurs when the body loses heat faster than it can produce heat It can occur with temperatures above or below freezing and causes cooling of the core body temperature below 95 degrees Fahrenheit Hypothermia can be caused by fatigue poor physical condition dehydration faulty blood circulation alcohol or drug use trauma or immersion in cold water The signs and symptoms of hypothermia are progressive and include
10-37
Shivering
Faint pulse
Drowsiness and mental slowness
Hampered stiff and uncoordinated movement
Slurred speech
Slow and shallow breathing
Frozen extremities
Irregular heart action To treat mild hypothermia rewarm the body evenly and as soon as possible You must provide a heat source as the casualty will be unable to produce the needed heat Keep the casualty dry and protected from the elements Give the casualty warm liquids gradually if he or she is conscious Be prepared to provide life support measures and seek medical assistance immediately Severe hypothermia is treated by stabilizing the bodyrsquos core temperature and avoiding further heat loss Handle the casualty gently and evacuate to a medical facility as soon as possible Do not expose the body to an open fire Wrap any hot water bottles or canteens in cloth to avoid scalding Rewarming in the field is dangerous and resuscitation is difficult if not impossible in the field
400 FIELD SANITATION
410 General Information
Field waste disposal is performed to prevent flies from spreading germs from waste to your food and to keep unwanted animals out of your bivouac area Use the following as a guide to performing proper field waste disposal Step 1 Determine the type of field waste disposal to use
The proper type of device to use depends upon the mission length of stay terrain and weather conditions but you should use Table 10-1 as a guideline
When on bivouac o Chemical toilets are the preferred method o Burn-out latrines are preferred as an improvised method when chemical
toilets are not available
When on the march o Individual waste collection bags are preferred o Personal cat-holes are used as an alternative
NOTE
Check local state federal and host-nation regulations for applicable restrictions and for prohibition on burning or burying waste Garbage and rubbish may have to be transported to a waste disposal facility
Human waste disposal should be as far from food services as possible but at least 100 meters
Garbage and soakage pits should be at least 30 meters from food service
Locate downwind and downslope if possible
Locate downslope of all wells springs streams and other water sources at least 30 meters
Step 3 Set up construct and maintain latrines garbage pits and soakage pitstrenches
As soon as unit moves into area detail members to set up chemical toilets andor dig latrines
Assign members to clean latrines on a daily basis
Instruct the Field Sanitation Team to spray latrines with insecticide
Install handwashing facilities at food service and latrines
Cover transport burn or bury waste daily depending on regulations Step 4 Inspect daily to ensure
Waste is collected and transported when possible
Straddle-trench latrines and garbage pits are covered with dirt
Pail latrines are emptied and cleaned
Burn-out latrine containers are rotated and contents burned
Facility not contents are sprayed with insecticide as needed Step 5 Close out improvised latrines and garbage pits when filled within 1 foot of surface by
Spraying with residual insecticide
Packing earth in successive 3-inch layers until mounded one foot above surface
Spraying again with insecticide 10-39
Figure 10-30 ndash Cat-hole Latrine
Posting a sign saying ldquoClosed latrinegarbage pit and daterdquo (except in combat)
420 Waste Disposal Devices
Individual Waste Collection Bags
Preferred method when on a march
Dispose of with regular waste Chemical Toilets
Preferred method on bivouac
Add urinals to protect seats Cat-hole Latrines (Figure 10-30)
Alternate on-the-march method when bags not available
Cover immediately after use
Dig 6 to 12 inches deep and 12 inches in diameter
Keep mound of dirt removed to fill in hole
Straddle-trench Latrine (Figure 10-31)
Use on short bivouacs and field training exercises
Two trenches per 100 males three per 100 females
Dig 4 feet by 1 foot 2 frac12 feet deep 2 feet apart
Keep mounds of dirt removed to fill hole after use
Cover with dirt daily
10-40
Figure 10-31 ndash Straddle-trench Latrine
Deep Pit Latrine (Figure 10-32)
Use for longer periods and built-up areas
Collapsible two-seat boxes available in supply system
Add urinals to protect seats in male latrines
Enough for 6 percent of Seabees
Cover with dirt daily Garbage Pit
Locate near dining facility but no closer than 30 meters
One pit per 100 Seabees served per day
Transport to approved landfill or cover with dirt after each meal and close daily
For longer periods burn and bury ashes
10-41
Figure 10-32 mdash Deep Pit Latrine
Figure 10-33 mdash Pail Latrine
Pail Latrine (Figure 10-33)
Use where water table too close to surface for deep pit latrines
Empty and clean daily
10-42
Figure 10-34 ndash Burn-out Latrine
Figure 10-35 ndash Other urinals Trough Pipe and Urinoil
Grease Trap ndash Use with soakage pits and trenches to prevent clogging of soil Burn-out Latrine (Figure 10-34)
Use where water table too close to surface or extended stays
Rotate containers daily and burn contents
Other Urinals
Trough (Figure 10-35 frame A)
Pipe (Figure 10-35 frame B)
Urinoil (Figure 10-35 frame C)
10-43
Figure 10-36 ndash Food Services Soakage Pit
Soakage Pit - Food Service (Figure 10-36)
Locate near dining facility to prevent accumulation of liquid waste from kitchens
Need at least two to alternate daily
Fill with loose rocks
Add grease trap for dining facility waste to prevent clogging of soil Soakage Pit (Other)
Provide for urinals showers Lyster bags mess kits laundry handwashing facilities
Prevents accumulation of liquid waste
10-44
500 WATER PURIFICATION
510 Overview
Infectious diarrhea results from contamination of water and food by bacteria viruses and parasites Water- and foodborne diarrheal diseases are of particular concern to the military because they can be spread to large numbers of service members simultaneously with disastrous consequences for combat readiness Diarrhea especially when vomiting or fever is present can cause dehydration Fill your canteen with treated water at every chance When treated water is not available you must disinfect the water in your canteen using one of the following methods Using iodine tablets is the preferred way to individually purify water There are several alternate techniques for making drinking water clean if iodine tablets are not available You can use chlorine ampoules which are small sealed glass vials You can also use an emergency water treatment kit with Chlor-Flocreg tablets household bleach or boiling to purify water
520 Water Purification Using Iodine Tablets ndash Preferred Method
The following are the procedures for purifying water with iodine tablets the preferred method There are variations depending on the amount of water yoursquore purifying whether it is cold or not and whether it is cloudy or clear
Fill your canteen with the cleanest water available
Put one iodine tablet into clear water or two iodine tablets into cold or cloudy water If you are using two-quart canteens double those amounts Use two tablets for clear water and four tablets for cold or cloudy water
Place the cap on your canteen
Shake canteen to dissolve tablets
Wait 5 minutes
Loosen the cap and tip the canteen over to allow leakage around the canteen threads
Tighten the cap and wait an additional 25 minutes before drinking
530 Water Purification Using Chlorine Ampoules
The following are the procedures for purifying water with chlorine ampoules
Fill your canteen with the cleanest water available
Mix one ampoule of chlorine with one-half canteen cup of water
Stir that mixture with a clean utensil until the contents are dissolved
After stirring the mixture pour one-half of a plastic canteen capful or one Nuclear Biological Chemical (NBC) canteen capful of chlorine solution into your canteen of water
Place the cap on your canteen and shake
Slightly loosen the cap and tip the canteen over to allow leakage around the threads
10-45
Tighten the cap and wait 30 minutes before drinking
NOTE
By wearing gloves or wrapping the ampoule in paper or cloth you can avoid cutting your hands when breaking open the glass ampoule
540 Water Purification Using An Emergency Water Treatment Kit (Chlor-Flocreg Tablets)
The following are the procedures for purifying water with an emergency water treatment kit with Chlor-Flocreg tablets
Tear off the top of the plastic water treatment bag at the perforation (first time use)
Fill the treatment bag one-half full with the cleanest water available
Add one tablet
Fold the bag tightly three times and fold the tabs in
Hold the bag firmly and shake until the tablet dissolves
Swirl for 10 seconds
Let the bag sit for 4 minutes
Swirl again for 10 seconds
Let the bag sit for an additional 15 minutes
Insert the filter pouch into the neck of the canteen
Pour water from bag through the filter into the canteen Avoid pouring sediment into the filter
Rinse the filter with treated water after use Always filter through the same side of the filter
Rinse sediment from the treatment bag and save the bag for water treatment only
CAUTION Do not drink from the treatment bag The water is still contaminated and must be filtered before drinking Drinking non filtered water may cause stomach and intestinal disorders
550 Water Purification Using Household Bleach
The following are the procedures for purifying water with household bleach
NOTE
Ensure bleach is unscented
10-46
Fill your canteen with the cleanest water possible
Read the label on the bleach bottle to determine the amount of available chlorine Liquid chlorine laundry bleach usually has about 5 to 6 percent available chlorine Based upon the strength of the household bleach add the chlorine to the canteen as directed in Table 10-2
Table 10-2 mdash Drops of Household Bleach to be Added to a One-Quart Canteen
AVAILABLE CHLORINE TO CLEAR WATER TO COLDCLOUDY WATER 1 PERCENT 10 drops 20 drops
Slightly loosen the cap and tip the canteen over to allow leakage around threads
Tighten the cap and wait 30 minutes before drinking the water
560 Water Purification by Boiling
You may find yourself in a situation where iodine or other purification methods are not available In this case you can boil water using the following procedures to make it safe for drinking
Bring water to a rolling boil for 5 minutes
In an emergency boiling water for just 15 seconds will help
Protect boiled water from recontamination
CAUTION If water is suspected of NBC contamination do not attempt to treat Seek a quartermaster water supply
Summary In this chapter you were introduced to the importance of providing first aid to an injured person and the explanation and descriptions of first aid measures that you can apply to yourself and to others before trained medical personnel arrive This chapter provided how-to instructions in lifesaving measures to include clearing the upper airway giving artificial ventilation stopping bleeding controlling shock and protecting the wound Additionally this chapter discussed fundamentals of field sanitation and water purification
10-47
Assignment 10
Objectives
1 Define first aid and identify the general first aid rules 2 Define basic life support 3 Recognize the signs of airway obstruction and describe the steps necessary to
clear the airway 4 Recognize and describe the steps necessary to perform artificial ventilation 5 Describe the methods used to control bleeding 6 Define shock and identify its signs symptoms and treatment 7 Identify the cause and treatment of injuries caused by exposure to heat or cold 8 Identify the treatment of first aid to victims of various types of burns 9 Recognize the steps in treating and immobilizing a fracture 10 Identify field sanitation methods used to dispose of human waste and garbage 11 Identify the procedures taken to purify drinking water
Questions 1 True or False The three reasons for performing first aid are to save lives
prevent further injuries and prevent infection
1 True 2 False
2 There are how many vital functions
1 1 2 2 3 3 4 4
3 True or False The vital functions consist of the breathing process respiration
and blood circulation
1 True 2 False
4 Brain cells when deprived of oxygen will die within what period of time
1 2 to 4 minutes 2 4 to 6 minutes 3 12 to 18 minutes 4 30 minutes to an hour
10-48
5 Respiration involves inhaling oxygen and exhaling which of the following
39 When performing rescue breathing how many breaths should you blow into their
mouth or nose before checking for a pulse or re-establishing airway and seal
1 1 2 2 3 3 4 4
40 Which of the following is a correct statement concerning treatment for bleeding
1 Do not remove objects from the wound 2 Pressure points should be used as a last resort 3 Tails of the standard field dressing should be tied over the wound 4 You should use your field dressing first
41 Which of the following is a correct statement concerning treatment for bleeding
1 If an object is impaled in the wound remove it quickly 2 Remove any visible foreign objects from the wound 3 Tie the tails of the dressing at the edges of the wound 4 You should use your field dressing first
42 When using manual or direct pressure to stop bleeding firm pressure should be
applied for how many minutes
1 2 to 4 2 5 to 10 3 15 to 30 4 Until bleeding stops
43 When applying a tourniquet which of the following statements is correct
1 It should be applied directly over the wound 2 Loosen and retighten every 5 to 10 minutes 3 Once applied do not loosen 4 Wire or shoestring may be used
44 A burn from a hot liquid is considered which type of burn
1 Chemical 2 Electrical 3 Laser 4 Thermal
10-54
45 Which of the following types of burns should be kept moist
1 Dry chemical 2 Laser 3 Wet chemical 4 White Phosphorous
46 True of False When treating either heat exhaustion or heatstroke you should
elevate the casualtyrsquos legs
1 True 2 False
47 Which of the following injuries is caused by an imbalance of electrolytes in the
60 Which of the following human waste disposal methods should be used on patrol
1 Burn-out 2 Cat-hole 3 Pail 4 Straddle-trench
61 When using straddle-trench latrines how many trenches do you need for 100
females
1 1 2 2 3 3 4 4
10-57
ASSIGNMENT 10
First Aid and Field Sanitation
Directions Select the correct answer from the list of alternates below each question in the end of chapter assignment Write in the answer next to the corresponding question number below Use this answer sheet as a reference to completing the online assignment related to this assignment
1
2
3
4
5
6
7
8
9
10
11
12
13
14
15
16
17
18
19
20
21
22
23
24
25
26
27
28
29
30
31
32
33
34
35
36
37
38
39
40
41
42
43
44
45
46
47
48
49
50
51
52
53
54
55
56
57
58
59
60
61
10-58
Additional Resources and References
This chapter is intended to present thorough resources for task training The following reference works are suggested for further study This is optional material for continued education rather than for task training First Aid FM 4-2511 (FM 21-11)NTRP 4-0211AFMAN 44-163(I)MCRP 3-02G Field Hygiene and Sanitation FM 21-10MCRP 4-111D
10-59
Trainee Feedback
Center for Seabees and Facilities Engineering (CSFE) makes every effort to keep their courses up-to-date and free of technical errors If you have a suggestion found an error or inaccuracy please write FAX or email us by using the form below Use one form for each comment and be sure to fill in the information as accurately and detailed as possible Thank you for your assistance Write CSFE
NCF Training Division (N7B) 3502 Goodspeed St Port Hueneme CA 93043-4337
Course Seabee Combat Handbook Volume ____ NAVEDTRA __________ Course Date ________ Chapter Number ______ Page ______ Paragraph _____ Sentence ______ Figure ______ FrameView ______ Description ____________________________________________________ ______________________________________________________________ ______________________________________________________________ ____________________________________________________________________________________________________________________________ ______________________________________________________________ (optional) Corrective action _______________________________________ ______________________________________________________________ ______________________________________________________________ (optional) Supporting reference(s) __________________________________ ______________________________________________________________ Your email address if a response is requested ________________________
10-60
Chapter 10
First Aid and Field Sanitation
Overview
Objectives
Prerequisites
Features of This Manual
100 BASIC FIRST AID
Attitude - You should remain calm and act quickly but efficiently Reassure the casualty that his or her injuries are understood and that proper medical attention is forthcoming The casualtyrsquos confidence and positive attitude can be very helpful
Positioning the Casualty - In most cases the casualty should be lying down with his or her head level with the body until you have determined the type and extent of his or her injuries The exceptions to this are the following
Clothing - Although you should move the casualty no more than necessary you may have to remove clothing in order to determine the extent of his or her injuries Remove only the clothing necessary for examination and treatment being especially car
Infection - Do not touch any open wounds or burns with your fingers hands or other non-sterile objects unless absolutely necessary to stop severe bleeding
110 Vital Functions
111 The Breathing Process
112 Respiration
113 Circulation
120 Evaluating a Casualty
121 Step 1 ndash Check for Responsiveness
122 Step 2 ndash Check for Breathing
123 Step 3 ndash Check for Pulse
124 Step 4 ndash Check for Bleeding
125 Step 5 ndash Check for Shock
126 Step 6 ndash Check for Fractures
127 Step 7 ndash Check for Burns
128 Step 8 ndash Check for Head Injury
200 FIRST AID MEASURES
210 Controlling Bleeding
211 General
212 Methods to Control Bleeding
2121 Applying a Battle Dressing
2125 Applying a Tourniquet
220 Opening the Airway and Restoring Breathing
221 Preliminary Assessment
222 Opening the Airway
223 Rescue Breathing
2231 Mouth-to-Mouth Method
2232 Mouth-to-Nose Method
224 Clearing an Obstructed Airway
2241 Abdominal Thrust on a Conscious Casualty Standing or Sitting
2242 Chest Thrust on a Conscious Casualty Standing or Sitting
230 Recognizing and Treating Shock
231 Signs and Symptoms
232 First Aid Measures
240 Fractures
241 Signs and Symptoms
242 General Rules
243 Splinting Procedures
244 Applying a Sling
245 Treatment for Specific Fractures
2453 Neck Fractures
250 Burn Injuries
251 Eliminate the Source
252 First Aid Measures
300 HEAT AND COLD INJURIES
310 Introduction
320 Heat Injuries
321 General
322 Heat Cramps
323 Heat Exhaustion
324 Heatstroke
330 Cold Injuries
331 General
332 Specific Cold InjuriesConditions
3321 Chilblain
3322 Immersion Syndrome
400 FIELD SANITATION
410 General Information
420 Waste Disposal Devices
500 WATER PURIFICATION
510 Overview
520 Water Purification Using Iodine Tablets ndash Preferred Method
530 Water Purification Using Chlorine Ampoules
540 Water Purification Using An Emergency Water Treatment Kit (Chlor-Flocreg Tablets)
550 Water Purification Using Household Bleach
560 Water Purification by Boiling
Summary
Assignment 10
Objectives
Questions
First Aid and Field Sanitation
Additional Resources and References
Trainee Feedback
animationAvailable1
Button1
2241 Abdominal Thrust on a Conscious Casualty Standing or Sitting
To perform the abdominal thrust (or Heimlich maneuver) on a conscious casualty who is standing or sitting (Figure 10-15)
Stand behind the casualty
Wrap your arms around the casualtyrsquos waist
Make a fist with one hand and grasp it with the other
The thumb side of your fist should be against the abdomen in the midline and slightly above the navel but well below the breastbone
Press your fists into the abdomen with a quick backward and upward motion
Each thrust should be a separate and distinct movement Continue until the obstruction is expelled or the casualty becomes unresponsive
NOTE
If the casualty becomes unresponsive call for help and begin rescue breathing after positioning the casualty to open the airway
Figure 10-15 mdash Anatomical and profile views of the abdominal thrust on a conscious casualty sitting or standing
10-19
Figure 10-16 ndash Profile view of a the chest thrust on a conscious
casualty sitting or standing
2242 Chest Thrust on a Conscious Casualty Standing or Sitting
To perform the chest thrust on a conscious casualty while standing or sitting (Figure 10-16)
Stand or sit behind the casualty
Wrap your arms around his or her chest with your arms under the armpits
Make a fist and place the thumb in the middle of the breastbone avoiding the tip of the breastbone and the edges of the ribs
Grasp your fist with your other hand
Exert thrusts slowly and distinctly Perform this technique until the obstruction is expelled or the casualty becomes unresponsive If he or she becomes unresponsive call for help and begin rescue breathing
2243 Abdominal Thrust on an Unconscious Casualty Lying Down
If opening the airway and attempting rescue breathing fails perform the abdominal thrust 6 to 10 times while the casualty is lying down To do this (Figure 10-17)
Kneel astride the casualtyrsquos thighs
Place the heel of one hand against the abdomen in the midline slightly above the navel but well below the breastbone with the fingers pointed toward the head
Press into the abdomen with a quick thrust forward and upward Repeat the sequence of abdominal thrust finger sweep of the mouth and rescue breathing as long as necessary to clear the obstruction and restore breathing
10-20
Figure 10-17 mdash Performing the abdominal thrust on an unconscious or unresponsive casualty
2244 Chest Thrust on an Unconscious Casualty Lying Down
If the casualty does not respond to rescue breathing perform the chest thrust with the casualty on his or her back face up and mouth open (Figure 10-18)
Kneel close to the casualtyrsquos side
Locate the lower edge of the ribs with your fingers and run your fingers up along the center of the rib cage to the notch (Figure 10-18 view A)
Place your middle finger on the notch and your index finger next to it on the lower edge of the breastbone
Place the heel of your other hand on the lower half of the breastbone next to your two fingers (Figure 10-18 view B)
Remove your two fingers and place that hand on top of the hand positioned on the breastbone extending or interlocking your fingers (Figure 10-18 view C)
Straighten and lock your elbows with your shoulders directly above your hands
Apply enough downward pressure to depress the breastbone 1 frac12 to 2 inches then release the pressure completely See Figures 10-18 view D and 10-19
Do this 6 to 10 times delivering each thrust quickly and distinctly Repeat the sequence of chest thrust finger sweep of the mouth and rescue breathing as long as necessary to clear the obstruction and restore breathing
10-21
Figure 10-18 mdash Hand placement for performing the chest thrust on an unconscious or unresponsive casualty
Figure 10-19 mdash Showing breastbone depression when performing the chest thrust on an unconscious or unresponsive casualty
10-22
230 Recognizing and Treating Shock
Shock is the collapse of the bodyrsquos cardiovascular system including an inadequate supply of blood to the bodyrsquos tissue Shock stuns and weakens the body Recognizing shock and applying the proper first aid measures in a timely manner can save a fellow Seabeersquos life The three basic mechanisms associated with shock are heart damage blood loss causing insufficient volume of blood and inadequate circulation of blood caused by the blood vessels opening too wide Shock may result from dehydration allergic reactions significant blood loss reaction to the sight of blood or a wound or traumatic injuries such as burns gunshot wounds crush injuries etc
231 Signs and Symptoms
As the one administering first aid itrsquos important that you be able to recognize the signs of shock They do not always appear at the onset of the injury Some of these signs are the following
The casualtyrsquos pulse tends to be weak and rapid
The face and skin may be very pale or ashen gray
Breathing is likely faster than normal
The skin feels cool and clammy and is covered in sweat
The casualtyrsquos skin may be blotchy or bluish especially around the mouth and lips
Another way to assess a case of shock is to look for symptoms Symptoms are things the casualty feels The symptoms of shock are direct or indirect evidence that circulation has been disturbed Look for feelings of restlessness or nervousness He or she may be thirsty There may be nausea or vomiting and the casualty may be confused and lack awareness of his or her surroundings
232 First Aid Measures
When treating a casualty for any injury or illness you should assume he or she is already suffering from shock or that shock will soon occur Since the first aid measures to apply for shock are the same as those for preventing it you should begin treating for shock and not wait for signs to appear First move the casualty to cover if feasible Lay the casualty on his or her back unless he or she is experiencing difficulty breathing in which case allow the casualty to sit upright but monitor closely Elevate the feet higher than the heart using a stable object such as a field pack
WARNING DO NOT elevate the feet if there is an unsplinted broken leg head injury or abdominal injury If the casualty has an abdominal injury bend his or her legs at the knee
Next loosen the casualtyrsquos clothing around the neck waist and any place it seems binding It is important to maintain the casualtyrsquos body temperature In hot weather
10-23
Figure 10-20 mdash Types of fractures
place the casualty in the shade and protect him or her from becoming chilled In cold weather place blankets over and under the casualty to keep him or her warm You should reassure and keep the casualty calm by sounding authoritative and self-confident Assure the casualty you are there to help
WARNING DO NOT give the casualty food or drink If he or she is unconscious or you need to leave the casualty unattended turn the head to the side to prevent choking if he or she vomits
Seek medical aid as soon as possible and continually monitor the casualtyrsquos condition until medical personnel arrive or the casualty is transported
240 Fractures
Many kinds of accidents cause injuries to the bones joints and muscles In providing first aid to injured people you must always look for signs of fractures A fracture is any break in the continuity of a bone a dislocation is when a joint is not in the proper position and a sprain is when the connecting tissues of joints have been torn This section will be concerned mostly with fractures There are two types of fractures closed and open A closed fracture is one where the injury is completely internalmdashno broken skin (Figure 10-20 view A) An open fracture is where there is a break in the skin and tissues caused by the broken bone protruding (Figure 10-20 view B) or a missile that broke the bone (Figure 10-20 view C) leaving an opening Open fractures should always be considered contaminated and subject to infection
10-24
241 Signs and Symptoms
You may not always be able to actually see the broken bone but there are signs and symptoms to look for in a casualty that can tip you off You might see deformity in the area of the injury There may be pain or swelling The casualty will be unable to move that portion of the body or there may be unnatural movement of the injured part The casualty may also feel a grating sensation at the point of injury If you are unsure if the casualty has a fracture treat the injury as a fracture Medical professionals can make a firm diagnosis later
WARNING Do not have the casualty move the injured parts in order to identify a fracture as any movement could cause further injury
242 General Rules
Follow these general rules in treatment of a fracture Treat the open fracture tissue wound immediately by covering all wounds with a dressing That means before you treat the fracture You should also always treat a fracture victim for shock Splint the casualty in the position you find him or her Do not attempt to straighten out the limb Do not attempt to push the bone of an open fracture back under the skin Do not attempt to set the fracturemdashjust splint it You immobilize the suspected fracture to prevent sharp edges of the bone from causing more damage It will also reduce pain and help prevent or control shock If it is a closed fracture immobilization will prevent an open wound and possible infection
243 Splinting Procedures
To prepare for splinting reassure the casualty loosen any tight or binding clothing and remove all jewelry from the injured limb Do not remove boots unless you need to stabilize a neck injury or the foot is bleeding Next gather splinting materials and padding improvising as needed
10-25
Figure 10-21 mdash Uninjured leg used as a splint for a fractured leg
Figure 10-22 mdash Chest wall used as a splint for a fractured arm
Splints An object that can be used to immobilize a fracture or a dislocation is called a splint There are two types of splints soft and rigid Soft splints include such things as pillows blankets towels and dressings Rigid splints are stiff and allow very little flexibility Splints should be lightweight strong and long enough to reach the joints above and below the fracture Lacking proper splints boards poles sticks tree limbs or even cardboard may be used as splints If nothing is available the chest can be used to immobilize a fractured arm and the uninjured leg can be used to immobilize the fractured leg (Figure 10-21 and 10-22) Padding Padding may be improvised from such items as a jacket blanket poncho or even leafy vegetation Bandages Bandages may be improvised from belts rifle slings or strips of clothing or blankets Narrow materials such as wire or cord should not be used to secure a splint in place as these could cause tissue damage and a tourniquet effect Slings A sling is a bandage or cravat tied around the neck to support a fractured arm or shoulder If a bandage is not available a sling can be improvised from pieces of clothing or blankets Swathes Swathes are pieces of cloth or load bearing equipment (LBE) that are used to further immobilize a splinted fracture Triangular and cravat bandages are often used and are called swathe bandages The purpose of the swathe is to immobilize therefore the swathe bandage is placed above andor below the fracturemdashnot over it Check the circulation below the site looking for
Pale white or bluish-gray skin
Colder skin temperature below the site If you suspect poor circulation evacuate the casualty immediately
10-26
Figure 10-23 mdash Board splints applied to a fractured lower leg
Apply the splint See Figure 10-23 Position one splint on each side of the fracture so that they extend both above and below the fracture Tie off the splinting materials above and below the site Check the splint for tightness ensuring it is tight enough to hold in place but not so tight it impairs circulation For fractures on the upper arm or shoulder use a sling Use swathes to hold an arm against the side or to hold legs together See Figure 10-21 and 10-22
NOTE
After splinting check the casualtyrsquos pulse and motor sensation at a point farther from the heart than the splint eg for a splinted forearm check the wrist for pulse hand for motor and sensation This is important Splinting too tightly can create the same bad effect as a tourniquet
244 Applying a Sling
To help immobilize a fractured arm you should apply a sling A sling is also used to immobilize a fractured collarbone or a fractured or dislocated shoulder Slings can be made from any non-stretching cloth such as shirts trousers ponchos or belts The supporting pressure of a sling should be on the casualtyrsquos uninjured side Support the arm with the hand slightly higher than the elbow with the fingers exposed to aid in circulation Use the following procedures to apply a sling (Figure 10-24)
Insert the splinted arm or the arm on the side of the fractured shoulder or collarbone in the center of the sling
Bring the ends of the sling up and around the casualtyrsquos neck then tie them in the hollow of the neck on the uninjured side
10-27
Figure 10-24 ndash Application of a triangular bandage to form a sling
Figure 10-25 mdash Applying a cravat bandage for a fractured jaw
Roll the corner of the sling at the elbow and tuck it in
245 Treatment for Specific Fractures
2451 Jaw Collarbone and Shoulder Fractures
If a casualty has a fractured jaw you need to immobilize it (Figure 10-25) To do so apply a cravat vertically around the head and under the jaw then add another cravat
around the top of the head to secure the first one Do not apply the cravat to the back of the neck Do not lay the casualty on his or her back as this may cause an obstruction of the airway
10-28
Figure 10-26 ndash Immobilizing a fractured collarbone
Figure 10-27 ndash Immobilizing a fractured or dislocated shoulder
In the case of a fractured collarbone apply two belts a sling and a cravat to immobilize the area as in Figure 10-26 With a fractured or dislocated shoulder apply a sling and a cravat or swathe See Figure 10-27
2452 Spinal Column Fractures
It is impossible to be sure if a casualty has suffered a spinal column fracture A fracture is likely if the casualty has fallen his or her back has been sharply struck or bent or there is no feeling in the legs or the legs canrsquot move If the spine is fractured bending it can cause the sharp bone fragments to bruise or cut the spinal cord and result in permanent paralysis or death
10-29
Figure 10-28 ndash Maintaining a normal spinal position
While you are waiting for transport and medical assistance maintain a normal spinal position at the lower back (Figure 10-28) Caution the casualty not to move and leave the casualty in the position he or she was found Do not move any part of the body If the casualty is face up you can slip a blanket under the arch of the lower back If found face down do not put anything under him or her If the casualty must be moved a four man team will be needed to do so safely
2453 Neck Fractures
When treating neck fractures caution the casualty not to move and leave the casualty in the position he or she was found If the neck or head is in an abnormal position and the casualty is lying face up raise the shoulders slightly and slip a roll of bath towel or something of similar bulk under the neck Do not bend the head or neck forward and do not raise or twist the head Immobilize the head using boots or heavy objects on each side of it (Figure 10-29)
10-30
Figure 10-29 mdash Immobilizing a fractured neck
If the head or neck is in an abnormal position and the casualty is lying face down do not move the casualty Immobilize the head with boots or heavy objects on each side of it but do not put a roll under the neck Do not bend the head or neck or attempt to roll the casualty onto his or her back If transportation is necessary at least two people will be required
250 Burn Injuries
Burns are injuries that most commonly result from exposure to fire chemicals or electricity The severity of burns depends on the depth size and location Burns are most serious when they are located on the face neck hands and feet Also they are dangerous when combined with fractures There are four types of burns you should learn to recognize and treat thermal electrical chemical and laser Thermal burns are caused by fire hot objects liquids or gases Electrical burns are caused by electrical wires current and lightning Chemical burns are caused by coming in contact with wet or dry chemicals or white phosphorous Laser burns are burns to the eye causing an ocular injury
251 Eliminate the Source
The first step to take with all types of burns is to eliminate the source of the burn After eliminating the source you can evaluate the casualty and provide appropriate first aid measures You should take the following actions to eliminate the source of the burn injury
With thermal burns remove the casualty from danger cover him or her with non-synthetic material and if still on fire roll him or her on the ground to extinguish the fire
In the case of an electrical burn remove the source of current by turning it off if it is close enough Wrap non-conductive material around the casualtyrsquos back and
10-31
shoulders and drag the casualty away Do not make direct contact with the casualty or touch any wires
When the casualty has been exposed to chemicals remove liquid chemicals by flushing the casualty with large amounts of water
Remove dry chemicals by brushing off the particles from the casualty but do not use your bare hands Afterwards flush the casualty with either large amounts of water or none at all as insufficient amounts of water may cause a chemical reaction and make matters worse
If the burn is from white phosphorous smother the chemical with wet clothes or mud and keep the casualty covered
In the case of a laser burn remove the casualty from the beam and make sure you do not look directly at the beam yourself
252 First Aid Measures
After removing the source of the burn evaluate the casualty for other conditions requiring first aid such as problems with breathing weak or no pulse or other wounds Expose the burn by removing any clothing over the burn unless it is stuck to the wound If the casualtyrsquos hands or wrists are burned remove any jewelry Next apply a field dressing For electrical burns check for both entry and exit burns The exit burn may be anywhere on the body With wet or dry chemical burns flush the burns with large amounts of water first then cover with a dry dressing In the case of white phosphorous burns flush the burn with large amounts of water then cover them with wet material or mud For laser burns apply a field dressing over the affected eye or eyes When applying a field dressing take the following precautions
Do NOT place the dressing over the face or genital area
Do NOT break the blisters
Do NOT apply grease or ointments to the burns In all cases seek medical assistance
300 HEAT AND COLD INJURIES
310 Introduction
Climatic injuries are caused by extreme hot or cold environments The human body needs time to adapt to any extremes of temperature The Seabeersquos physical condition will to some extent determine how long it takes to become acclimated There are other factors that contribute to an individualrsquos health and therefore susceptibility such as proper diet or nutrition sufficient sleep and rest proper exercise and suitable clothing While serving in extremes of climate individuals who are trying to lose weight should be supervised by properly trained medical personnel Most climatic injuries are preventable
10-32
320 Heat Injuries
321 General
Sometimes the heat of the environment causes injuries that need to be treated in the field Heat injuries are caused by exposure to extreme heat improper clothing wearing of Mission Oriented Protective Posture (MOPP) gear enclose spaces and wearing body armor The prevention of heat exposure injuries is a command responsibility All hands must be educated about medical dangers and environmental health in the field There are three categories of heat injuries heat cramps heat exhaustion and heatstroke
WARNING The heat casualty should be continually monitored for development of conditions which may require the performance of necessary basic lifesaving measures
CAUTION Do not use salt solutions in first aid procedures for heat injuries
322 Heat Cramps
Heat cramps are caused by an imbalance of electrolytes in the body from excessive sweating The signs and symptoms of heat cramps are
Cramping in the arms or legs
Stomach cramps
Excessive sweating To treat a casualty for heat cramps first move him or her to a cool shady area Loosen his or her clothing and slowly give the casualty a canteen of water Cool water is absorbed more quickly than warm water If the condition is unabated or continues seek medical assistance
323 Heat Exhaustion
Heat exhaustion is caused by a loss of fluids in the body The signs and symptoms of heat exhaustion include the following
Excessive sweating
Pale moist cool skin
Headaches
Weakness
Dizziness
Loss of appetite
Cramping 10-33
Nausea with or without vomiting
Chills or goosebumps
An urge to defecate
Rapid breathing
Tingling in the hands or feet
Confusion To treat for heat exhaustion first move the casualty to a cool shady area Loosen or remove his or her clothing and boots Pour water over the casualty and fan him or her while slowly giving the casualty a canteen of water Elevate the legs and keep the casualty from doing any strenuous activities for the rest of the day Monitor the casualty until the symptoms are gone or provide medical assistance
324 Heatstroke
Heatstroke is a failure of the bodyrsquos cooling mechanism The signs and symptoms of heatstroke are
Unconsciousness or sudden collapse Use the following procedures to treat heatstroke
Move the casualty to a cool shady area
Loosen or remove the casualtyrsquos clothing
Spray or pour water over him or her and fan him or her
Massage the extremities and skin
Elevate the legs
Slowly give the casualty a canteen of water This is a more severe heat injury than heat cramps or heat exhaustion so you should seek medical assistance immediately while monitoring the casualty for necessary lifesaving measures
330 Cold Injuries
331 General
Cold injuries are most likely to occur when it is moderately cold but wet andor windy It is important to understand what to do to prevent cold injuries First maintain good personal hygiene get sufficient exercise take care of your feet and hands and use protective clothing There are many contributing factors to cold injuries Humidity precipitation and wind increase the likelihood of injury Stationary activities such as standing guard increase
10-34
an individualrsquos vulnerability especially if that individual is in contact with the ground for extended periods or standing in water Inadequate diet and rest increase susceptibility and lower defenses Physical fatigue leads to apathy neglect and carelessness Studies show that previous cold injuries also increase your risk Depressed and unresponsive personnel tend to be less active Finally excessive use of alcohol or drugs impairs your judgment and is likely to cause carelessness or overconfidence Seabees may be suffering from cold injuries without knowing it They may simply feel uncomfortable and not notice that extremities are already numb from the cold The general signs and symptoms of cold injuries include
Numbness or tingling sensations which may be relieved by simply loosening boots or clothing and exercising to rewarm yourself
Discoloration of the skin o With lighter-skinned individuals skin becomes red then pale or waxy
white o With darker-skinned individuals skin will be grayish
Affected area may feel cold to the touch
Swelling may occur with deeper injuries
Blisters may occur after rewarming You should use the buddy system to check each other for signs of cold injuries The treatment for cold injuries varies with the severity of the injury First and foremost an individual suffering any cold injury should be removed from the cold environment With superficial injuries you can rewarm the affected part with body heat With more serious life-threatening injuries you should seek medical assistance immediately
WARNING Do not massage the injured part Do not expose the casualty directly to fire or a stove Do not rub the injured part with snow Do not slap or chafe injured parts or soak them in cold water Avoid walking on injured feet if at all possible
The primary injuries caused by cold environments are chilblain immersion syndrome frostbite snow blindness dehydration and hypothermia
332 Specific Cold InjuriesConditions
3321 Chilblain
Chilblain is caused by repeated exposure of bare skin to temperatures from 32 to 60 degrees Fahrenheit The symptoms of chilblain are acutely swollen red tender hot or itchy skin Treat chilblain by rewarming the affected part using firm steady pressure with your hands or by placing the affected parts under your arms or against your buddyrsquos stomach Do not rub or massage the affected parts Have medical personnel evaluate you for any damage
10-35
3322 Immersion Syndrome
Immersion syndrome also known as immersion foot or trench foot results from long exposure of the feet to wet conditions in temperatures ranging from 32 to 50 degrees Fahrenheit Inactive feet in damp or wet socks and boots are more susceptible The signs of immersion syndrome occur in stages with exposure At first the feet are cold but painless The pulse may be weak and the feet may be somewhat numb Next the feet feel hot with burning or shooting pain Later the skin becomes pale with a bluish tint and the pulse decreases In the later stages the feet may blister swell bleed or even become gangrenous Treatment is required for all stages of immersion syndrome
Gradually warm the affected part and protect it from trauma and infection
Apply dry loose clothing or layers of warm coverings
Elevate the feet to reduce swelling
Transport the casualty to a medical facility as soon as possible
Do not massage the feet moisten the skin or apply direct heat or ice 3323 Frostbite
Frostbite is caused by exposure to cold temperatures usually below 32 degrees Fahrenheit Individuals with a history of cold injuries are more likely to get frostbite The most easily frostbitten parts of the body are the cheeks nose ears chin forehead wrists hands and feet Deep frostbite is very serious and can result in amputation of appendages The signs or symptoms of frostbite include
Loss of sensation or numbness
Sudden blanching of the skin then brief tingling
Redness of the skin or grayish in darker-skinned individuals
Blisters swelling or tender parts
Loss of previous pain sensation
Pale yellowish waxy-looking skin
Frozen tissue that feels solid or wooden Treat frostbite of the face ears or nose by covering them with bare hands until sensation and natural skin color returns Place frostbitten hands under the armpits To treat frostbitten feet remove boots and socks and place the feet under clothing against a buddyrsquos body General treatment of frostbite is as follows
Keep the affected parts warm and covered
Remove or loosen restrictive clothing
Cover affected parts to protect them from further injury
Exercise if possible to warm up
Seek medical treatment
Do not rub the injured part with snow or apply cold water 10-36
Do not massage
Do not expose to an open fire
Do not use ointments or salves
Do not manipulate the affected part to increase circulation
Do not use alcohol or tobacco 3324 Snow Blindness
Snow blindness is the effect that the glare from ice or snow has on the eyes It is more likely to occur in hazy cloudy weather The signs and symptoms of snow blindness are
The sensation of grit in the eyes
Pain in or over the eyes
Eye watering or redness
Headache
Pain with exposure to light To treat a casualty for snow blindness blindfold or cover the eyes with dark cloth Complete rest is desirable for quicker recovery If necessary and possible evacuate the casualty to a medical facility Snow blindness usually heals by itself in a few days if there is no repeated exposure 3325 Dehydration
Dehydration occurs when the body loses too much fluid It is just as prevalent in cold weather as in hot In colder temperatures sweating is not as noticeable since it evaporates and is quickly absorbed The signs and symptoms of dehydration are
Mouth tongue throat parched or dry
Difficulty swallowing
Nausea with or without vomiting
Extreme dizziness and fainting
General fatigue and weakness
Muscle cramps
Difficulty focusing the eyes To treat for dehydration keep the individual warm and loosen his or her clothing Shelter the individual from the wind and cold and begin fluid replacement immediately Transport the casualty to a medical treatment facility as soon as possible 3326 Hypothermia
Hypothermia or general cooling of the body occurs when the body loses heat faster than it can produce heat It can occur with temperatures above or below freezing and causes cooling of the core body temperature below 95 degrees Fahrenheit Hypothermia can be caused by fatigue poor physical condition dehydration faulty blood circulation alcohol or drug use trauma or immersion in cold water The signs and symptoms of hypothermia are progressive and include
10-37
Shivering
Faint pulse
Drowsiness and mental slowness
Hampered stiff and uncoordinated movement
Slurred speech
Slow and shallow breathing
Frozen extremities
Irregular heart action To treat mild hypothermia rewarm the body evenly and as soon as possible You must provide a heat source as the casualty will be unable to produce the needed heat Keep the casualty dry and protected from the elements Give the casualty warm liquids gradually if he or she is conscious Be prepared to provide life support measures and seek medical assistance immediately Severe hypothermia is treated by stabilizing the bodyrsquos core temperature and avoiding further heat loss Handle the casualty gently and evacuate to a medical facility as soon as possible Do not expose the body to an open fire Wrap any hot water bottles or canteens in cloth to avoid scalding Rewarming in the field is dangerous and resuscitation is difficult if not impossible in the field
400 FIELD SANITATION
410 General Information
Field waste disposal is performed to prevent flies from spreading germs from waste to your food and to keep unwanted animals out of your bivouac area Use the following as a guide to performing proper field waste disposal Step 1 Determine the type of field waste disposal to use
The proper type of device to use depends upon the mission length of stay terrain and weather conditions but you should use Table 10-1 as a guideline
When on bivouac o Chemical toilets are the preferred method o Burn-out latrines are preferred as an improvised method when chemical
toilets are not available
When on the march o Individual waste collection bags are preferred o Personal cat-holes are used as an alternative
NOTE
Check local state federal and host-nation regulations for applicable restrictions and for prohibition on burning or burying waste Garbage and rubbish may have to be transported to a waste disposal facility
Human waste disposal should be as far from food services as possible but at least 100 meters
Garbage and soakage pits should be at least 30 meters from food service
Locate downwind and downslope if possible
Locate downslope of all wells springs streams and other water sources at least 30 meters
Step 3 Set up construct and maintain latrines garbage pits and soakage pitstrenches
As soon as unit moves into area detail members to set up chemical toilets andor dig latrines
Assign members to clean latrines on a daily basis
Instruct the Field Sanitation Team to spray latrines with insecticide
Install handwashing facilities at food service and latrines
Cover transport burn or bury waste daily depending on regulations Step 4 Inspect daily to ensure
Waste is collected and transported when possible
Straddle-trench latrines and garbage pits are covered with dirt
Pail latrines are emptied and cleaned
Burn-out latrine containers are rotated and contents burned
Facility not contents are sprayed with insecticide as needed Step 5 Close out improvised latrines and garbage pits when filled within 1 foot of surface by
Spraying with residual insecticide
Packing earth in successive 3-inch layers until mounded one foot above surface
Spraying again with insecticide 10-39
Figure 10-30 ndash Cat-hole Latrine
Posting a sign saying ldquoClosed latrinegarbage pit and daterdquo (except in combat)
420 Waste Disposal Devices
Individual Waste Collection Bags
Preferred method when on a march
Dispose of with regular waste Chemical Toilets
Preferred method on bivouac
Add urinals to protect seats Cat-hole Latrines (Figure 10-30)
Alternate on-the-march method when bags not available
Cover immediately after use
Dig 6 to 12 inches deep and 12 inches in diameter
Keep mound of dirt removed to fill in hole
Straddle-trench Latrine (Figure 10-31)
Use on short bivouacs and field training exercises
Two trenches per 100 males three per 100 females
Dig 4 feet by 1 foot 2 frac12 feet deep 2 feet apart
Keep mounds of dirt removed to fill hole after use
Cover with dirt daily
10-40
Figure 10-31 ndash Straddle-trench Latrine
Deep Pit Latrine (Figure 10-32)
Use for longer periods and built-up areas
Collapsible two-seat boxes available in supply system
Add urinals to protect seats in male latrines
Enough for 6 percent of Seabees
Cover with dirt daily Garbage Pit
Locate near dining facility but no closer than 30 meters
One pit per 100 Seabees served per day
Transport to approved landfill or cover with dirt after each meal and close daily
For longer periods burn and bury ashes
10-41
Figure 10-32 mdash Deep Pit Latrine
Figure 10-33 mdash Pail Latrine
Pail Latrine (Figure 10-33)
Use where water table too close to surface for deep pit latrines
Empty and clean daily
10-42
Figure 10-34 ndash Burn-out Latrine
Figure 10-35 ndash Other urinals Trough Pipe and Urinoil
Grease Trap ndash Use with soakage pits and trenches to prevent clogging of soil Burn-out Latrine (Figure 10-34)
Use where water table too close to surface or extended stays
Rotate containers daily and burn contents
Other Urinals
Trough (Figure 10-35 frame A)
Pipe (Figure 10-35 frame B)
Urinoil (Figure 10-35 frame C)
10-43
Figure 10-36 ndash Food Services Soakage Pit
Soakage Pit - Food Service (Figure 10-36)
Locate near dining facility to prevent accumulation of liquid waste from kitchens
Need at least two to alternate daily
Fill with loose rocks
Add grease trap for dining facility waste to prevent clogging of soil Soakage Pit (Other)
Provide for urinals showers Lyster bags mess kits laundry handwashing facilities
Prevents accumulation of liquid waste
10-44
500 WATER PURIFICATION
510 Overview
Infectious diarrhea results from contamination of water and food by bacteria viruses and parasites Water- and foodborne diarrheal diseases are of particular concern to the military because they can be spread to large numbers of service members simultaneously with disastrous consequences for combat readiness Diarrhea especially when vomiting or fever is present can cause dehydration Fill your canteen with treated water at every chance When treated water is not available you must disinfect the water in your canteen using one of the following methods Using iodine tablets is the preferred way to individually purify water There are several alternate techniques for making drinking water clean if iodine tablets are not available You can use chlorine ampoules which are small sealed glass vials You can also use an emergency water treatment kit with Chlor-Flocreg tablets household bleach or boiling to purify water
520 Water Purification Using Iodine Tablets ndash Preferred Method
The following are the procedures for purifying water with iodine tablets the preferred method There are variations depending on the amount of water yoursquore purifying whether it is cold or not and whether it is cloudy or clear
Fill your canteen with the cleanest water available
Put one iodine tablet into clear water or two iodine tablets into cold or cloudy water If you are using two-quart canteens double those amounts Use two tablets for clear water and four tablets for cold or cloudy water
Place the cap on your canteen
Shake canteen to dissolve tablets
Wait 5 minutes
Loosen the cap and tip the canteen over to allow leakage around the canteen threads
Tighten the cap and wait an additional 25 minutes before drinking
530 Water Purification Using Chlorine Ampoules
The following are the procedures for purifying water with chlorine ampoules
Fill your canteen with the cleanest water available
Mix one ampoule of chlorine with one-half canteen cup of water
Stir that mixture with a clean utensil until the contents are dissolved
After stirring the mixture pour one-half of a plastic canteen capful or one Nuclear Biological Chemical (NBC) canteen capful of chlorine solution into your canteen of water
Place the cap on your canteen and shake
Slightly loosen the cap and tip the canteen over to allow leakage around the threads
10-45
Tighten the cap and wait 30 minutes before drinking
NOTE
By wearing gloves or wrapping the ampoule in paper or cloth you can avoid cutting your hands when breaking open the glass ampoule
540 Water Purification Using An Emergency Water Treatment Kit (Chlor-Flocreg Tablets)
The following are the procedures for purifying water with an emergency water treatment kit with Chlor-Flocreg tablets
Tear off the top of the plastic water treatment bag at the perforation (first time use)
Fill the treatment bag one-half full with the cleanest water available
Add one tablet
Fold the bag tightly three times and fold the tabs in
Hold the bag firmly and shake until the tablet dissolves
Swirl for 10 seconds
Let the bag sit for 4 minutes
Swirl again for 10 seconds
Let the bag sit for an additional 15 minutes
Insert the filter pouch into the neck of the canteen
Pour water from bag through the filter into the canteen Avoid pouring sediment into the filter
Rinse the filter with treated water after use Always filter through the same side of the filter
Rinse sediment from the treatment bag and save the bag for water treatment only
CAUTION Do not drink from the treatment bag The water is still contaminated and must be filtered before drinking Drinking non filtered water may cause stomach and intestinal disorders
550 Water Purification Using Household Bleach
The following are the procedures for purifying water with household bleach
NOTE
Ensure bleach is unscented
10-46
Fill your canteen with the cleanest water possible
Read the label on the bleach bottle to determine the amount of available chlorine Liquid chlorine laundry bleach usually has about 5 to 6 percent available chlorine Based upon the strength of the household bleach add the chlorine to the canteen as directed in Table 10-2
Table 10-2 mdash Drops of Household Bleach to be Added to a One-Quart Canteen
AVAILABLE CHLORINE TO CLEAR WATER TO COLDCLOUDY WATER 1 PERCENT 10 drops 20 drops
Slightly loosen the cap and tip the canteen over to allow leakage around threads
Tighten the cap and wait 30 minutes before drinking the water
560 Water Purification by Boiling
You may find yourself in a situation where iodine or other purification methods are not available In this case you can boil water using the following procedures to make it safe for drinking
Bring water to a rolling boil for 5 minutes
In an emergency boiling water for just 15 seconds will help
Protect boiled water from recontamination
CAUTION If water is suspected of NBC contamination do not attempt to treat Seek a quartermaster water supply
Summary In this chapter you were introduced to the importance of providing first aid to an injured person and the explanation and descriptions of first aid measures that you can apply to yourself and to others before trained medical personnel arrive This chapter provided how-to instructions in lifesaving measures to include clearing the upper airway giving artificial ventilation stopping bleeding controlling shock and protecting the wound Additionally this chapter discussed fundamentals of field sanitation and water purification
10-47
Assignment 10
Objectives
1 Define first aid and identify the general first aid rules 2 Define basic life support 3 Recognize the signs of airway obstruction and describe the steps necessary to
clear the airway 4 Recognize and describe the steps necessary to perform artificial ventilation 5 Describe the methods used to control bleeding 6 Define shock and identify its signs symptoms and treatment 7 Identify the cause and treatment of injuries caused by exposure to heat or cold 8 Identify the treatment of first aid to victims of various types of burns 9 Recognize the steps in treating and immobilizing a fracture 10 Identify field sanitation methods used to dispose of human waste and garbage 11 Identify the procedures taken to purify drinking water
Questions 1 True or False The three reasons for performing first aid are to save lives
prevent further injuries and prevent infection
1 True 2 False
2 There are how many vital functions
1 1 2 2 3 3 4 4
3 True or False The vital functions consist of the breathing process respiration
and blood circulation
1 True 2 False
4 Brain cells when deprived of oxygen will die within what period of time
1 2 to 4 minutes 2 4 to 6 minutes 3 12 to 18 minutes 4 30 minutes to an hour
10-48
5 Respiration involves inhaling oxygen and exhaling which of the following
39 When performing rescue breathing how many breaths should you blow into their
mouth or nose before checking for a pulse or re-establishing airway and seal
1 1 2 2 3 3 4 4
40 Which of the following is a correct statement concerning treatment for bleeding
1 Do not remove objects from the wound 2 Pressure points should be used as a last resort 3 Tails of the standard field dressing should be tied over the wound 4 You should use your field dressing first
41 Which of the following is a correct statement concerning treatment for bleeding
1 If an object is impaled in the wound remove it quickly 2 Remove any visible foreign objects from the wound 3 Tie the tails of the dressing at the edges of the wound 4 You should use your field dressing first
42 When using manual or direct pressure to stop bleeding firm pressure should be
applied for how many minutes
1 2 to 4 2 5 to 10 3 15 to 30 4 Until bleeding stops
43 When applying a tourniquet which of the following statements is correct
1 It should be applied directly over the wound 2 Loosen and retighten every 5 to 10 minutes 3 Once applied do not loosen 4 Wire or shoestring may be used
44 A burn from a hot liquid is considered which type of burn
1 Chemical 2 Electrical 3 Laser 4 Thermal
10-54
45 Which of the following types of burns should be kept moist
1 Dry chemical 2 Laser 3 Wet chemical 4 White Phosphorous
46 True of False When treating either heat exhaustion or heatstroke you should
elevate the casualtyrsquos legs
1 True 2 False
47 Which of the following injuries is caused by an imbalance of electrolytes in the
60 Which of the following human waste disposal methods should be used on patrol
1 Burn-out 2 Cat-hole 3 Pail 4 Straddle-trench
61 When using straddle-trench latrines how many trenches do you need for 100
females
1 1 2 2 3 3 4 4
10-57
ASSIGNMENT 10
First Aid and Field Sanitation
Directions Select the correct answer from the list of alternates below each question in the end of chapter assignment Write in the answer next to the corresponding question number below Use this answer sheet as a reference to completing the online assignment related to this assignment
1
2
3
4
5
6
7
8
9
10
11
12
13
14
15
16
17
18
19
20
21
22
23
24
25
26
27
28
29
30
31
32
33
34
35
36
37
38
39
40
41
42
43
44
45
46
47
48
49
50
51
52
53
54
55
56
57
58
59
60
61
10-58
Additional Resources and References
This chapter is intended to present thorough resources for task training The following reference works are suggested for further study This is optional material for continued education rather than for task training First Aid FM 4-2511 (FM 21-11)NTRP 4-0211AFMAN 44-163(I)MCRP 3-02G Field Hygiene and Sanitation FM 21-10MCRP 4-111D
10-59
Trainee Feedback
Center for Seabees and Facilities Engineering (CSFE) makes every effort to keep their courses up-to-date and free of technical errors If you have a suggestion found an error or inaccuracy please write FAX or email us by using the form below Use one form for each comment and be sure to fill in the information as accurately and detailed as possible Thank you for your assistance Write CSFE
NCF Training Division (N7B) 3502 Goodspeed St Port Hueneme CA 93043-4337
Course Seabee Combat Handbook Volume ____ NAVEDTRA __________ Course Date ________ Chapter Number ______ Page ______ Paragraph _____ Sentence ______ Figure ______ FrameView ______ Description ____________________________________________________ ______________________________________________________________ ______________________________________________________________ ____________________________________________________________________________________________________________________________ ______________________________________________________________ (optional) Corrective action _______________________________________ ______________________________________________________________ ______________________________________________________________ (optional) Supporting reference(s) __________________________________ ______________________________________________________________ Your email address if a response is requested ________________________
10-60
Chapter 10
First Aid and Field Sanitation
Overview
Objectives
Prerequisites
Features of This Manual
100 BASIC FIRST AID
Attitude - You should remain calm and act quickly but efficiently Reassure the casualty that his or her injuries are understood and that proper medical attention is forthcoming The casualtyrsquos confidence and positive attitude can be very helpful
Positioning the Casualty - In most cases the casualty should be lying down with his or her head level with the body until you have determined the type and extent of his or her injuries The exceptions to this are the following
Clothing - Although you should move the casualty no more than necessary you may have to remove clothing in order to determine the extent of his or her injuries Remove only the clothing necessary for examination and treatment being especially car
Infection - Do not touch any open wounds or burns with your fingers hands or other non-sterile objects unless absolutely necessary to stop severe bleeding
110 Vital Functions
111 The Breathing Process
112 Respiration
113 Circulation
120 Evaluating a Casualty
121 Step 1 ndash Check for Responsiveness
122 Step 2 ndash Check for Breathing
123 Step 3 ndash Check for Pulse
124 Step 4 ndash Check for Bleeding
125 Step 5 ndash Check for Shock
126 Step 6 ndash Check for Fractures
127 Step 7 ndash Check for Burns
128 Step 8 ndash Check for Head Injury
200 FIRST AID MEASURES
210 Controlling Bleeding
211 General
212 Methods to Control Bleeding
2121 Applying a Battle Dressing
2125 Applying a Tourniquet
220 Opening the Airway and Restoring Breathing
221 Preliminary Assessment
222 Opening the Airway
223 Rescue Breathing
2231 Mouth-to-Mouth Method
2232 Mouth-to-Nose Method
224 Clearing an Obstructed Airway
2241 Abdominal Thrust on a Conscious Casualty Standing or Sitting
2242 Chest Thrust on a Conscious Casualty Standing or Sitting
230 Recognizing and Treating Shock
231 Signs and Symptoms
232 First Aid Measures
240 Fractures
241 Signs and Symptoms
242 General Rules
243 Splinting Procedures
244 Applying a Sling
245 Treatment for Specific Fractures
2453 Neck Fractures
250 Burn Injuries
251 Eliminate the Source
252 First Aid Measures
300 HEAT AND COLD INJURIES
310 Introduction
320 Heat Injuries
321 General
322 Heat Cramps
323 Heat Exhaustion
324 Heatstroke
330 Cold Injuries
331 General
332 Specific Cold InjuriesConditions
3321 Chilblain
3322 Immersion Syndrome
400 FIELD SANITATION
410 General Information
420 Waste Disposal Devices
500 WATER PURIFICATION
510 Overview
520 Water Purification Using Iodine Tablets ndash Preferred Method
530 Water Purification Using Chlorine Ampoules
540 Water Purification Using An Emergency Water Treatment Kit (Chlor-Flocreg Tablets)
550 Water Purification Using Household Bleach
560 Water Purification by Boiling
Summary
Assignment 10
Objectives
Questions
First Aid and Field Sanitation
Additional Resources and References
Trainee Feedback
animationAvailable1
Button1
230 Recognizing and Treating Shock
Shock is the collapse of the bodyrsquos cardiovascular system including an inadequate supply of blood to the bodyrsquos tissue Shock stuns and weakens the body Recognizing shock and applying the proper first aid measures in a timely manner can save a fellow Seabeersquos life The three basic mechanisms associated with shock are heart damage blood loss causing insufficient volume of blood and inadequate circulation of blood caused by the blood vessels opening too wide Shock may result from dehydration allergic reactions significant blood loss reaction to the sight of blood or a wound or traumatic injuries such as burns gunshot wounds crush injuries etc
231 Signs and Symptoms
As the one administering first aid itrsquos important that you be able to recognize the signs of shock They do not always appear at the onset of the injury Some of these signs are the following
The casualtyrsquos pulse tends to be weak and rapid
The face and skin may be very pale or ashen gray
Breathing is likely faster than normal
The skin feels cool and clammy and is covered in sweat
The casualtyrsquos skin may be blotchy or bluish especially around the mouth and lips
Another way to assess a case of shock is to look for symptoms Symptoms are things the casualty feels The symptoms of shock are direct or indirect evidence that circulation has been disturbed Look for feelings of restlessness or nervousness He or she may be thirsty There may be nausea or vomiting and the casualty may be confused and lack awareness of his or her surroundings
232 First Aid Measures
When treating a casualty for any injury or illness you should assume he or she is already suffering from shock or that shock will soon occur Since the first aid measures to apply for shock are the same as those for preventing it you should begin treating for shock and not wait for signs to appear First move the casualty to cover if feasible Lay the casualty on his or her back unless he or she is experiencing difficulty breathing in which case allow the casualty to sit upright but monitor closely Elevate the feet higher than the heart using a stable object such as a field pack
WARNING DO NOT elevate the feet if there is an unsplinted broken leg head injury or abdominal injury If the casualty has an abdominal injury bend his or her legs at the knee
Next loosen the casualtyrsquos clothing around the neck waist and any place it seems binding It is important to maintain the casualtyrsquos body temperature In hot weather
10-23
Figure 10-20 mdash Types of fractures
place the casualty in the shade and protect him or her from becoming chilled In cold weather place blankets over and under the casualty to keep him or her warm You should reassure and keep the casualty calm by sounding authoritative and self-confident Assure the casualty you are there to help
WARNING DO NOT give the casualty food or drink If he or she is unconscious or you need to leave the casualty unattended turn the head to the side to prevent choking if he or she vomits
Seek medical aid as soon as possible and continually monitor the casualtyrsquos condition until medical personnel arrive or the casualty is transported
240 Fractures
Many kinds of accidents cause injuries to the bones joints and muscles In providing first aid to injured people you must always look for signs of fractures A fracture is any break in the continuity of a bone a dislocation is when a joint is not in the proper position and a sprain is when the connecting tissues of joints have been torn This section will be concerned mostly with fractures There are two types of fractures closed and open A closed fracture is one where the injury is completely internalmdashno broken skin (Figure 10-20 view A) An open fracture is where there is a break in the skin and tissues caused by the broken bone protruding (Figure 10-20 view B) or a missile that broke the bone (Figure 10-20 view C) leaving an opening Open fractures should always be considered contaminated and subject to infection
10-24
241 Signs and Symptoms
You may not always be able to actually see the broken bone but there are signs and symptoms to look for in a casualty that can tip you off You might see deformity in the area of the injury There may be pain or swelling The casualty will be unable to move that portion of the body or there may be unnatural movement of the injured part The casualty may also feel a grating sensation at the point of injury If you are unsure if the casualty has a fracture treat the injury as a fracture Medical professionals can make a firm diagnosis later
WARNING Do not have the casualty move the injured parts in order to identify a fracture as any movement could cause further injury
242 General Rules
Follow these general rules in treatment of a fracture Treat the open fracture tissue wound immediately by covering all wounds with a dressing That means before you treat the fracture You should also always treat a fracture victim for shock Splint the casualty in the position you find him or her Do not attempt to straighten out the limb Do not attempt to push the bone of an open fracture back under the skin Do not attempt to set the fracturemdashjust splint it You immobilize the suspected fracture to prevent sharp edges of the bone from causing more damage It will also reduce pain and help prevent or control shock If it is a closed fracture immobilization will prevent an open wound and possible infection
243 Splinting Procedures
To prepare for splinting reassure the casualty loosen any tight or binding clothing and remove all jewelry from the injured limb Do not remove boots unless you need to stabilize a neck injury or the foot is bleeding Next gather splinting materials and padding improvising as needed
10-25
Figure 10-21 mdash Uninjured leg used as a splint for a fractured leg
Figure 10-22 mdash Chest wall used as a splint for a fractured arm
Splints An object that can be used to immobilize a fracture or a dislocation is called a splint There are two types of splints soft and rigid Soft splints include such things as pillows blankets towels and dressings Rigid splints are stiff and allow very little flexibility Splints should be lightweight strong and long enough to reach the joints above and below the fracture Lacking proper splints boards poles sticks tree limbs or even cardboard may be used as splints If nothing is available the chest can be used to immobilize a fractured arm and the uninjured leg can be used to immobilize the fractured leg (Figure 10-21 and 10-22) Padding Padding may be improvised from such items as a jacket blanket poncho or even leafy vegetation Bandages Bandages may be improvised from belts rifle slings or strips of clothing or blankets Narrow materials such as wire or cord should not be used to secure a splint in place as these could cause tissue damage and a tourniquet effect Slings A sling is a bandage or cravat tied around the neck to support a fractured arm or shoulder If a bandage is not available a sling can be improvised from pieces of clothing or blankets Swathes Swathes are pieces of cloth or load bearing equipment (LBE) that are used to further immobilize a splinted fracture Triangular and cravat bandages are often used and are called swathe bandages The purpose of the swathe is to immobilize therefore the swathe bandage is placed above andor below the fracturemdashnot over it Check the circulation below the site looking for
Pale white or bluish-gray skin
Colder skin temperature below the site If you suspect poor circulation evacuate the casualty immediately
10-26
Figure 10-23 mdash Board splints applied to a fractured lower leg
Apply the splint See Figure 10-23 Position one splint on each side of the fracture so that they extend both above and below the fracture Tie off the splinting materials above and below the site Check the splint for tightness ensuring it is tight enough to hold in place but not so tight it impairs circulation For fractures on the upper arm or shoulder use a sling Use swathes to hold an arm against the side or to hold legs together See Figure 10-21 and 10-22
NOTE
After splinting check the casualtyrsquos pulse and motor sensation at a point farther from the heart than the splint eg for a splinted forearm check the wrist for pulse hand for motor and sensation This is important Splinting too tightly can create the same bad effect as a tourniquet
244 Applying a Sling
To help immobilize a fractured arm you should apply a sling A sling is also used to immobilize a fractured collarbone or a fractured or dislocated shoulder Slings can be made from any non-stretching cloth such as shirts trousers ponchos or belts The supporting pressure of a sling should be on the casualtyrsquos uninjured side Support the arm with the hand slightly higher than the elbow with the fingers exposed to aid in circulation Use the following procedures to apply a sling (Figure 10-24)
Insert the splinted arm or the arm on the side of the fractured shoulder or collarbone in the center of the sling
Bring the ends of the sling up and around the casualtyrsquos neck then tie them in the hollow of the neck on the uninjured side
10-27
Figure 10-24 ndash Application of a triangular bandage to form a sling
Figure 10-25 mdash Applying a cravat bandage for a fractured jaw
Roll the corner of the sling at the elbow and tuck it in
245 Treatment for Specific Fractures
2451 Jaw Collarbone and Shoulder Fractures
If a casualty has a fractured jaw you need to immobilize it (Figure 10-25) To do so apply a cravat vertically around the head and under the jaw then add another cravat
around the top of the head to secure the first one Do not apply the cravat to the back of the neck Do not lay the casualty on his or her back as this may cause an obstruction of the airway
10-28
Figure 10-26 ndash Immobilizing a fractured collarbone
Figure 10-27 ndash Immobilizing a fractured or dislocated shoulder
In the case of a fractured collarbone apply two belts a sling and a cravat to immobilize the area as in Figure 10-26 With a fractured or dislocated shoulder apply a sling and a cravat or swathe See Figure 10-27
2452 Spinal Column Fractures
It is impossible to be sure if a casualty has suffered a spinal column fracture A fracture is likely if the casualty has fallen his or her back has been sharply struck or bent or there is no feeling in the legs or the legs canrsquot move If the spine is fractured bending it can cause the sharp bone fragments to bruise or cut the spinal cord and result in permanent paralysis or death
10-29
Figure 10-28 ndash Maintaining a normal spinal position
While you are waiting for transport and medical assistance maintain a normal spinal position at the lower back (Figure 10-28) Caution the casualty not to move and leave the casualty in the position he or she was found Do not move any part of the body If the casualty is face up you can slip a blanket under the arch of the lower back If found face down do not put anything under him or her If the casualty must be moved a four man team will be needed to do so safely
2453 Neck Fractures
When treating neck fractures caution the casualty not to move and leave the casualty in the position he or she was found If the neck or head is in an abnormal position and the casualty is lying face up raise the shoulders slightly and slip a roll of bath towel or something of similar bulk under the neck Do not bend the head or neck forward and do not raise or twist the head Immobilize the head using boots or heavy objects on each side of it (Figure 10-29)
10-30
Figure 10-29 mdash Immobilizing a fractured neck
If the head or neck is in an abnormal position and the casualty is lying face down do not move the casualty Immobilize the head with boots or heavy objects on each side of it but do not put a roll under the neck Do not bend the head or neck or attempt to roll the casualty onto his or her back If transportation is necessary at least two people will be required
250 Burn Injuries
Burns are injuries that most commonly result from exposure to fire chemicals or electricity The severity of burns depends on the depth size and location Burns are most serious when they are located on the face neck hands and feet Also they are dangerous when combined with fractures There are four types of burns you should learn to recognize and treat thermal electrical chemical and laser Thermal burns are caused by fire hot objects liquids or gases Electrical burns are caused by electrical wires current and lightning Chemical burns are caused by coming in contact with wet or dry chemicals or white phosphorous Laser burns are burns to the eye causing an ocular injury
251 Eliminate the Source
The first step to take with all types of burns is to eliminate the source of the burn After eliminating the source you can evaluate the casualty and provide appropriate first aid measures You should take the following actions to eliminate the source of the burn injury
With thermal burns remove the casualty from danger cover him or her with non-synthetic material and if still on fire roll him or her on the ground to extinguish the fire
In the case of an electrical burn remove the source of current by turning it off if it is close enough Wrap non-conductive material around the casualtyrsquos back and
10-31
shoulders and drag the casualty away Do not make direct contact with the casualty or touch any wires
When the casualty has been exposed to chemicals remove liquid chemicals by flushing the casualty with large amounts of water
Remove dry chemicals by brushing off the particles from the casualty but do not use your bare hands Afterwards flush the casualty with either large amounts of water or none at all as insufficient amounts of water may cause a chemical reaction and make matters worse
If the burn is from white phosphorous smother the chemical with wet clothes or mud and keep the casualty covered
In the case of a laser burn remove the casualty from the beam and make sure you do not look directly at the beam yourself
252 First Aid Measures
After removing the source of the burn evaluate the casualty for other conditions requiring first aid such as problems with breathing weak or no pulse or other wounds Expose the burn by removing any clothing over the burn unless it is stuck to the wound If the casualtyrsquos hands or wrists are burned remove any jewelry Next apply a field dressing For electrical burns check for both entry and exit burns The exit burn may be anywhere on the body With wet or dry chemical burns flush the burns with large amounts of water first then cover with a dry dressing In the case of white phosphorous burns flush the burn with large amounts of water then cover them with wet material or mud For laser burns apply a field dressing over the affected eye or eyes When applying a field dressing take the following precautions
Do NOT place the dressing over the face or genital area
Do NOT break the blisters
Do NOT apply grease or ointments to the burns In all cases seek medical assistance
300 HEAT AND COLD INJURIES
310 Introduction
Climatic injuries are caused by extreme hot or cold environments The human body needs time to adapt to any extremes of temperature The Seabeersquos physical condition will to some extent determine how long it takes to become acclimated There are other factors that contribute to an individualrsquos health and therefore susceptibility such as proper diet or nutrition sufficient sleep and rest proper exercise and suitable clothing While serving in extremes of climate individuals who are trying to lose weight should be supervised by properly trained medical personnel Most climatic injuries are preventable
10-32
320 Heat Injuries
321 General
Sometimes the heat of the environment causes injuries that need to be treated in the field Heat injuries are caused by exposure to extreme heat improper clothing wearing of Mission Oriented Protective Posture (MOPP) gear enclose spaces and wearing body armor The prevention of heat exposure injuries is a command responsibility All hands must be educated about medical dangers and environmental health in the field There are three categories of heat injuries heat cramps heat exhaustion and heatstroke
WARNING The heat casualty should be continually monitored for development of conditions which may require the performance of necessary basic lifesaving measures
CAUTION Do not use salt solutions in first aid procedures for heat injuries
322 Heat Cramps
Heat cramps are caused by an imbalance of electrolytes in the body from excessive sweating The signs and symptoms of heat cramps are
Cramping in the arms or legs
Stomach cramps
Excessive sweating To treat a casualty for heat cramps first move him or her to a cool shady area Loosen his or her clothing and slowly give the casualty a canteen of water Cool water is absorbed more quickly than warm water If the condition is unabated or continues seek medical assistance
323 Heat Exhaustion
Heat exhaustion is caused by a loss of fluids in the body The signs and symptoms of heat exhaustion include the following
Excessive sweating
Pale moist cool skin
Headaches
Weakness
Dizziness
Loss of appetite
Cramping 10-33
Nausea with or without vomiting
Chills or goosebumps
An urge to defecate
Rapid breathing
Tingling in the hands or feet
Confusion To treat for heat exhaustion first move the casualty to a cool shady area Loosen or remove his or her clothing and boots Pour water over the casualty and fan him or her while slowly giving the casualty a canteen of water Elevate the legs and keep the casualty from doing any strenuous activities for the rest of the day Monitor the casualty until the symptoms are gone or provide medical assistance
324 Heatstroke
Heatstroke is a failure of the bodyrsquos cooling mechanism The signs and symptoms of heatstroke are
Unconsciousness or sudden collapse Use the following procedures to treat heatstroke
Move the casualty to a cool shady area
Loosen or remove the casualtyrsquos clothing
Spray or pour water over him or her and fan him or her
Massage the extremities and skin
Elevate the legs
Slowly give the casualty a canteen of water This is a more severe heat injury than heat cramps or heat exhaustion so you should seek medical assistance immediately while monitoring the casualty for necessary lifesaving measures
330 Cold Injuries
331 General
Cold injuries are most likely to occur when it is moderately cold but wet andor windy It is important to understand what to do to prevent cold injuries First maintain good personal hygiene get sufficient exercise take care of your feet and hands and use protective clothing There are many contributing factors to cold injuries Humidity precipitation and wind increase the likelihood of injury Stationary activities such as standing guard increase
10-34
an individualrsquos vulnerability especially if that individual is in contact with the ground for extended periods or standing in water Inadequate diet and rest increase susceptibility and lower defenses Physical fatigue leads to apathy neglect and carelessness Studies show that previous cold injuries also increase your risk Depressed and unresponsive personnel tend to be less active Finally excessive use of alcohol or drugs impairs your judgment and is likely to cause carelessness or overconfidence Seabees may be suffering from cold injuries without knowing it They may simply feel uncomfortable and not notice that extremities are already numb from the cold The general signs and symptoms of cold injuries include
Numbness or tingling sensations which may be relieved by simply loosening boots or clothing and exercising to rewarm yourself
Discoloration of the skin o With lighter-skinned individuals skin becomes red then pale or waxy
white o With darker-skinned individuals skin will be grayish
Affected area may feel cold to the touch
Swelling may occur with deeper injuries
Blisters may occur after rewarming You should use the buddy system to check each other for signs of cold injuries The treatment for cold injuries varies with the severity of the injury First and foremost an individual suffering any cold injury should be removed from the cold environment With superficial injuries you can rewarm the affected part with body heat With more serious life-threatening injuries you should seek medical assistance immediately
WARNING Do not massage the injured part Do not expose the casualty directly to fire or a stove Do not rub the injured part with snow Do not slap or chafe injured parts or soak them in cold water Avoid walking on injured feet if at all possible
The primary injuries caused by cold environments are chilblain immersion syndrome frostbite snow blindness dehydration and hypothermia
332 Specific Cold InjuriesConditions
3321 Chilblain
Chilblain is caused by repeated exposure of bare skin to temperatures from 32 to 60 degrees Fahrenheit The symptoms of chilblain are acutely swollen red tender hot or itchy skin Treat chilblain by rewarming the affected part using firm steady pressure with your hands or by placing the affected parts under your arms or against your buddyrsquos stomach Do not rub or massage the affected parts Have medical personnel evaluate you for any damage
10-35
3322 Immersion Syndrome
Immersion syndrome also known as immersion foot or trench foot results from long exposure of the feet to wet conditions in temperatures ranging from 32 to 50 degrees Fahrenheit Inactive feet in damp or wet socks and boots are more susceptible The signs of immersion syndrome occur in stages with exposure At first the feet are cold but painless The pulse may be weak and the feet may be somewhat numb Next the feet feel hot with burning or shooting pain Later the skin becomes pale with a bluish tint and the pulse decreases In the later stages the feet may blister swell bleed or even become gangrenous Treatment is required for all stages of immersion syndrome
Gradually warm the affected part and protect it from trauma and infection
Apply dry loose clothing or layers of warm coverings
Elevate the feet to reduce swelling
Transport the casualty to a medical facility as soon as possible
Do not massage the feet moisten the skin or apply direct heat or ice 3323 Frostbite
Frostbite is caused by exposure to cold temperatures usually below 32 degrees Fahrenheit Individuals with a history of cold injuries are more likely to get frostbite The most easily frostbitten parts of the body are the cheeks nose ears chin forehead wrists hands and feet Deep frostbite is very serious and can result in amputation of appendages The signs or symptoms of frostbite include
Loss of sensation or numbness
Sudden blanching of the skin then brief tingling
Redness of the skin or grayish in darker-skinned individuals
Blisters swelling or tender parts
Loss of previous pain sensation
Pale yellowish waxy-looking skin
Frozen tissue that feels solid or wooden Treat frostbite of the face ears or nose by covering them with bare hands until sensation and natural skin color returns Place frostbitten hands under the armpits To treat frostbitten feet remove boots and socks and place the feet under clothing against a buddyrsquos body General treatment of frostbite is as follows
Keep the affected parts warm and covered
Remove or loosen restrictive clothing
Cover affected parts to protect them from further injury
Exercise if possible to warm up
Seek medical treatment
Do not rub the injured part with snow or apply cold water 10-36
Do not massage
Do not expose to an open fire
Do not use ointments or salves
Do not manipulate the affected part to increase circulation
Do not use alcohol or tobacco 3324 Snow Blindness
Snow blindness is the effect that the glare from ice or snow has on the eyes It is more likely to occur in hazy cloudy weather The signs and symptoms of snow blindness are
The sensation of grit in the eyes
Pain in or over the eyes
Eye watering or redness
Headache
Pain with exposure to light To treat a casualty for snow blindness blindfold or cover the eyes with dark cloth Complete rest is desirable for quicker recovery If necessary and possible evacuate the casualty to a medical facility Snow blindness usually heals by itself in a few days if there is no repeated exposure 3325 Dehydration
Dehydration occurs when the body loses too much fluid It is just as prevalent in cold weather as in hot In colder temperatures sweating is not as noticeable since it evaporates and is quickly absorbed The signs and symptoms of dehydration are
Mouth tongue throat parched or dry
Difficulty swallowing
Nausea with or without vomiting
Extreme dizziness and fainting
General fatigue and weakness
Muscle cramps
Difficulty focusing the eyes To treat for dehydration keep the individual warm and loosen his or her clothing Shelter the individual from the wind and cold and begin fluid replacement immediately Transport the casualty to a medical treatment facility as soon as possible 3326 Hypothermia
Hypothermia or general cooling of the body occurs when the body loses heat faster than it can produce heat It can occur with temperatures above or below freezing and causes cooling of the core body temperature below 95 degrees Fahrenheit Hypothermia can be caused by fatigue poor physical condition dehydration faulty blood circulation alcohol or drug use trauma or immersion in cold water The signs and symptoms of hypothermia are progressive and include
10-37
Shivering
Faint pulse
Drowsiness and mental slowness
Hampered stiff and uncoordinated movement
Slurred speech
Slow and shallow breathing
Frozen extremities
Irregular heart action To treat mild hypothermia rewarm the body evenly and as soon as possible You must provide a heat source as the casualty will be unable to produce the needed heat Keep the casualty dry and protected from the elements Give the casualty warm liquids gradually if he or she is conscious Be prepared to provide life support measures and seek medical assistance immediately Severe hypothermia is treated by stabilizing the bodyrsquos core temperature and avoiding further heat loss Handle the casualty gently and evacuate to a medical facility as soon as possible Do not expose the body to an open fire Wrap any hot water bottles or canteens in cloth to avoid scalding Rewarming in the field is dangerous and resuscitation is difficult if not impossible in the field
400 FIELD SANITATION
410 General Information
Field waste disposal is performed to prevent flies from spreading germs from waste to your food and to keep unwanted animals out of your bivouac area Use the following as a guide to performing proper field waste disposal Step 1 Determine the type of field waste disposal to use
The proper type of device to use depends upon the mission length of stay terrain and weather conditions but you should use Table 10-1 as a guideline
When on bivouac o Chemical toilets are the preferred method o Burn-out latrines are preferred as an improvised method when chemical
toilets are not available
When on the march o Individual waste collection bags are preferred o Personal cat-holes are used as an alternative
NOTE
Check local state federal and host-nation regulations for applicable restrictions and for prohibition on burning or burying waste Garbage and rubbish may have to be transported to a waste disposal facility
Human waste disposal should be as far from food services as possible but at least 100 meters
Garbage and soakage pits should be at least 30 meters from food service
Locate downwind and downslope if possible
Locate downslope of all wells springs streams and other water sources at least 30 meters
Step 3 Set up construct and maintain latrines garbage pits and soakage pitstrenches
As soon as unit moves into area detail members to set up chemical toilets andor dig latrines
Assign members to clean latrines on a daily basis
Instruct the Field Sanitation Team to spray latrines with insecticide
Install handwashing facilities at food service and latrines
Cover transport burn or bury waste daily depending on regulations Step 4 Inspect daily to ensure
Waste is collected and transported when possible
Straddle-trench latrines and garbage pits are covered with dirt
Pail latrines are emptied and cleaned
Burn-out latrine containers are rotated and contents burned
Facility not contents are sprayed with insecticide as needed Step 5 Close out improvised latrines and garbage pits when filled within 1 foot of surface by
Spraying with residual insecticide
Packing earth in successive 3-inch layers until mounded one foot above surface
Spraying again with insecticide 10-39
Figure 10-30 ndash Cat-hole Latrine
Posting a sign saying ldquoClosed latrinegarbage pit and daterdquo (except in combat)
420 Waste Disposal Devices
Individual Waste Collection Bags
Preferred method when on a march
Dispose of with regular waste Chemical Toilets
Preferred method on bivouac
Add urinals to protect seats Cat-hole Latrines (Figure 10-30)
Alternate on-the-march method when bags not available
Cover immediately after use
Dig 6 to 12 inches deep and 12 inches in diameter
Keep mound of dirt removed to fill in hole
Straddle-trench Latrine (Figure 10-31)
Use on short bivouacs and field training exercises
Two trenches per 100 males three per 100 females
Dig 4 feet by 1 foot 2 frac12 feet deep 2 feet apart
Keep mounds of dirt removed to fill hole after use
Cover with dirt daily
10-40
Figure 10-31 ndash Straddle-trench Latrine
Deep Pit Latrine (Figure 10-32)
Use for longer periods and built-up areas
Collapsible two-seat boxes available in supply system
Add urinals to protect seats in male latrines
Enough for 6 percent of Seabees
Cover with dirt daily Garbage Pit
Locate near dining facility but no closer than 30 meters
One pit per 100 Seabees served per day
Transport to approved landfill or cover with dirt after each meal and close daily
For longer periods burn and bury ashes
10-41
Figure 10-32 mdash Deep Pit Latrine
Figure 10-33 mdash Pail Latrine
Pail Latrine (Figure 10-33)
Use where water table too close to surface for deep pit latrines
Empty and clean daily
10-42
Figure 10-34 ndash Burn-out Latrine
Figure 10-35 ndash Other urinals Trough Pipe and Urinoil
Grease Trap ndash Use with soakage pits and trenches to prevent clogging of soil Burn-out Latrine (Figure 10-34)
Use where water table too close to surface or extended stays
Rotate containers daily and burn contents
Other Urinals
Trough (Figure 10-35 frame A)
Pipe (Figure 10-35 frame B)
Urinoil (Figure 10-35 frame C)
10-43
Figure 10-36 ndash Food Services Soakage Pit
Soakage Pit - Food Service (Figure 10-36)
Locate near dining facility to prevent accumulation of liquid waste from kitchens
Need at least two to alternate daily
Fill with loose rocks
Add grease trap for dining facility waste to prevent clogging of soil Soakage Pit (Other)
Provide for urinals showers Lyster bags mess kits laundry handwashing facilities
Prevents accumulation of liquid waste
10-44
500 WATER PURIFICATION
510 Overview
Infectious diarrhea results from contamination of water and food by bacteria viruses and parasites Water- and foodborne diarrheal diseases are of particular concern to the military because they can be spread to large numbers of service members simultaneously with disastrous consequences for combat readiness Diarrhea especially when vomiting or fever is present can cause dehydration Fill your canteen with treated water at every chance When treated water is not available you must disinfect the water in your canteen using one of the following methods Using iodine tablets is the preferred way to individually purify water There are several alternate techniques for making drinking water clean if iodine tablets are not available You can use chlorine ampoules which are small sealed glass vials You can also use an emergency water treatment kit with Chlor-Flocreg tablets household bleach or boiling to purify water
520 Water Purification Using Iodine Tablets ndash Preferred Method
The following are the procedures for purifying water with iodine tablets the preferred method There are variations depending on the amount of water yoursquore purifying whether it is cold or not and whether it is cloudy or clear
Fill your canteen with the cleanest water available
Put one iodine tablet into clear water or two iodine tablets into cold or cloudy water If you are using two-quart canteens double those amounts Use two tablets for clear water and four tablets for cold or cloudy water
Place the cap on your canteen
Shake canteen to dissolve tablets
Wait 5 minutes
Loosen the cap and tip the canteen over to allow leakage around the canteen threads
Tighten the cap and wait an additional 25 minutes before drinking
530 Water Purification Using Chlorine Ampoules
The following are the procedures for purifying water with chlorine ampoules
Fill your canteen with the cleanest water available
Mix one ampoule of chlorine with one-half canteen cup of water
Stir that mixture with a clean utensil until the contents are dissolved
After stirring the mixture pour one-half of a plastic canteen capful or one Nuclear Biological Chemical (NBC) canteen capful of chlorine solution into your canteen of water
Place the cap on your canteen and shake
Slightly loosen the cap and tip the canteen over to allow leakage around the threads
10-45
Tighten the cap and wait 30 minutes before drinking
NOTE
By wearing gloves or wrapping the ampoule in paper or cloth you can avoid cutting your hands when breaking open the glass ampoule
540 Water Purification Using An Emergency Water Treatment Kit (Chlor-Flocreg Tablets)
The following are the procedures for purifying water with an emergency water treatment kit with Chlor-Flocreg tablets
Tear off the top of the plastic water treatment bag at the perforation (first time use)
Fill the treatment bag one-half full with the cleanest water available
Add one tablet
Fold the bag tightly three times and fold the tabs in
Hold the bag firmly and shake until the tablet dissolves
Swirl for 10 seconds
Let the bag sit for 4 minutes
Swirl again for 10 seconds
Let the bag sit for an additional 15 minutes
Insert the filter pouch into the neck of the canteen
Pour water from bag through the filter into the canteen Avoid pouring sediment into the filter
Rinse the filter with treated water after use Always filter through the same side of the filter
Rinse sediment from the treatment bag and save the bag for water treatment only
CAUTION Do not drink from the treatment bag The water is still contaminated and must be filtered before drinking Drinking non filtered water may cause stomach and intestinal disorders
550 Water Purification Using Household Bleach
The following are the procedures for purifying water with household bleach
NOTE
Ensure bleach is unscented
10-46
Fill your canteen with the cleanest water possible
Read the label on the bleach bottle to determine the amount of available chlorine Liquid chlorine laundry bleach usually has about 5 to 6 percent available chlorine Based upon the strength of the household bleach add the chlorine to the canteen as directed in Table 10-2
Table 10-2 mdash Drops of Household Bleach to be Added to a One-Quart Canteen
AVAILABLE CHLORINE TO CLEAR WATER TO COLDCLOUDY WATER 1 PERCENT 10 drops 20 drops
Slightly loosen the cap and tip the canteen over to allow leakage around threads
Tighten the cap and wait 30 minutes before drinking the water
560 Water Purification by Boiling
You may find yourself in a situation where iodine or other purification methods are not available In this case you can boil water using the following procedures to make it safe for drinking
Bring water to a rolling boil for 5 minutes
In an emergency boiling water for just 15 seconds will help
Protect boiled water from recontamination
CAUTION If water is suspected of NBC contamination do not attempt to treat Seek a quartermaster water supply
Summary In this chapter you were introduced to the importance of providing first aid to an injured person and the explanation and descriptions of first aid measures that you can apply to yourself and to others before trained medical personnel arrive This chapter provided how-to instructions in lifesaving measures to include clearing the upper airway giving artificial ventilation stopping bleeding controlling shock and protecting the wound Additionally this chapter discussed fundamentals of field sanitation and water purification
10-47
Assignment 10
Objectives
1 Define first aid and identify the general first aid rules 2 Define basic life support 3 Recognize the signs of airway obstruction and describe the steps necessary to
clear the airway 4 Recognize and describe the steps necessary to perform artificial ventilation 5 Describe the methods used to control bleeding 6 Define shock and identify its signs symptoms and treatment 7 Identify the cause and treatment of injuries caused by exposure to heat or cold 8 Identify the treatment of first aid to victims of various types of burns 9 Recognize the steps in treating and immobilizing a fracture 10 Identify field sanitation methods used to dispose of human waste and garbage 11 Identify the procedures taken to purify drinking water
Questions 1 True or False The three reasons for performing first aid are to save lives
prevent further injuries and prevent infection
1 True 2 False
2 There are how many vital functions
1 1 2 2 3 3 4 4
3 True or False The vital functions consist of the breathing process respiration
and blood circulation
1 True 2 False
4 Brain cells when deprived of oxygen will die within what period of time
1 2 to 4 minutes 2 4 to 6 minutes 3 12 to 18 minutes 4 30 minutes to an hour
10-48
5 Respiration involves inhaling oxygen and exhaling which of the following
39 When performing rescue breathing how many breaths should you blow into their
mouth or nose before checking for a pulse or re-establishing airway and seal
1 1 2 2 3 3 4 4
40 Which of the following is a correct statement concerning treatment for bleeding
1 Do not remove objects from the wound 2 Pressure points should be used as a last resort 3 Tails of the standard field dressing should be tied over the wound 4 You should use your field dressing first
41 Which of the following is a correct statement concerning treatment for bleeding
1 If an object is impaled in the wound remove it quickly 2 Remove any visible foreign objects from the wound 3 Tie the tails of the dressing at the edges of the wound 4 You should use your field dressing first
42 When using manual or direct pressure to stop bleeding firm pressure should be
applied for how many minutes
1 2 to 4 2 5 to 10 3 15 to 30 4 Until bleeding stops
43 When applying a tourniquet which of the following statements is correct
1 It should be applied directly over the wound 2 Loosen and retighten every 5 to 10 minutes 3 Once applied do not loosen 4 Wire or shoestring may be used
44 A burn from a hot liquid is considered which type of burn
1 Chemical 2 Electrical 3 Laser 4 Thermal
10-54
45 Which of the following types of burns should be kept moist
1 Dry chemical 2 Laser 3 Wet chemical 4 White Phosphorous
46 True of False When treating either heat exhaustion or heatstroke you should
elevate the casualtyrsquos legs
1 True 2 False
47 Which of the following injuries is caused by an imbalance of electrolytes in the
60 Which of the following human waste disposal methods should be used on patrol
1 Burn-out 2 Cat-hole 3 Pail 4 Straddle-trench
61 When using straddle-trench latrines how many trenches do you need for 100
females
1 1 2 2 3 3 4 4
10-57
ASSIGNMENT 10
First Aid and Field Sanitation
Directions Select the correct answer from the list of alternates below each question in the end of chapter assignment Write in the answer next to the corresponding question number below Use this answer sheet as a reference to completing the online assignment related to this assignment
1
2
3
4
5
6
7
8
9
10
11
12
13
14
15
16
17
18
19
20
21
22
23
24
25
26
27
28
29
30
31
32
33
34
35
36
37
38
39
40
41
42
43
44
45
46
47
48
49
50
51
52
53
54
55
56
57
58
59
60
61
10-58
Additional Resources and References
This chapter is intended to present thorough resources for task training The following reference works are suggested for further study This is optional material for continued education rather than for task training First Aid FM 4-2511 (FM 21-11)NTRP 4-0211AFMAN 44-163(I)MCRP 3-02G Field Hygiene and Sanitation FM 21-10MCRP 4-111D
10-59
Trainee Feedback
Center for Seabees and Facilities Engineering (CSFE) makes every effort to keep their courses up-to-date and free of technical errors If you have a suggestion found an error or inaccuracy please write FAX or email us by using the form below Use one form for each comment and be sure to fill in the information as accurately and detailed as possible Thank you for your assistance Write CSFE
NCF Training Division (N7B) 3502 Goodspeed St Port Hueneme CA 93043-4337
Course Seabee Combat Handbook Volume ____ NAVEDTRA __________ Course Date ________ Chapter Number ______ Page ______ Paragraph _____ Sentence ______ Figure ______ FrameView ______ Description ____________________________________________________ ______________________________________________________________ ______________________________________________________________ ____________________________________________________________________________________________________________________________ ______________________________________________________________ (optional) Corrective action _______________________________________ ______________________________________________________________ ______________________________________________________________ (optional) Supporting reference(s) __________________________________ ______________________________________________________________ Your email address if a response is requested ________________________
10-60
Chapter 10
First Aid and Field Sanitation
Overview
Objectives
Prerequisites
Features of This Manual
100 BASIC FIRST AID
Attitude - You should remain calm and act quickly but efficiently Reassure the casualty that his or her injuries are understood and that proper medical attention is forthcoming The casualtyrsquos confidence and positive attitude can be very helpful
Positioning the Casualty - In most cases the casualty should be lying down with his or her head level with the body until you have determined the type and extent of his or her injuries The exceptions to this are the following
Clothing - Although you should move the casualty no more than necessary you may have to remove clothing in order to determine the extent of his or her injuries Remove only the clothing necessary for examination and treatment being especially car
Infection - Do not touch any open wounds or burns with your fingers hands or other non-sterile objects unless absolutely necessary to stop severe bleeding
110 Vital Functions
111 The Breathing Process
112 Respiration
113 Circulation
120 Evaluating a Casualty
121 Step 1 ndash Check for Responsiveness
122 Step 2 ndash Check for Breathing
123 Step 3 ndash Check for Pulse
124 Step 4 ndash Check for Bleeding
125 Step 5 ndash Check for Shock
126 Step 6 ndash Check for Fractures
127 Step 7 ndash Check for Burns
128 Step 8 ndash Check for Head Injury
200 FIRST AID MEASURES
210 Controlling Bleeding
211 General
212 Methods to Control Bleeding
2121 Applying a Battle Dressing
2125 Applying a Tourniquet
220 Opening the Airway and Restoring Breathing
221 Preliminary Assessment
222 Opening the Airway
223 Rescue Breathing
2231 Mouth-to-Mouth Method
2232 Mouth-to-Nose Method
224 Clearing an Obstructed Airway
2241 Abdominal Thrust on a Conscious Casualty Standing or Sitting
2242 Chest Thrust on a Conscious Casualty Standing or Sitting
230 Recognizing and Treating Shock
231 Signs and Symptoms
232 First Aid Measures
240 Fractures
241 Signs and Symptoms
242 General Rules
243 Splinting Procedures
244 Applying a Sling
245 Treatment for Specific Fractures
2453 Neck Fractures
250 Burn Injuries
251 Eliminate the Source
252 First Aid Measures
300 HEAT AND COLD INJURIES
310 Introduction
320 Heat Injuries
321 General
322 Heat Cramps
323 Heat Exhaustion
324 Heatstroke
330 Cold Injuries
331 General
332 Specific Cold InjuriesConditions
3321 Chilblain
3322 Immersion Syndrome
400 FIELD SANITATION
410 General Information
420 Waste Disposal Devices
500 WATER PURIFICATION
510 Overview
520 Water Purification Using Iodine Tablets ndash Preferred Method
530 Water Purification Using Chlorine Ampoules
540 Water Purification Using An Emergency Water Treatment Kit (Chlor-Flocreg Tablets)
550 Water Purification Using Household Bleach
560 Water Purification by Boiling
Summary
Assignment 10
Objectives
Questions
First Aid and Field Sanitation
Additional Resources and References
Trainee Feedback
animationAvailable1
Button1
241 Signs and Symptoms
You may not always be able to actually see the broken bone but there are signs and symptoms to look for in a casualty that can tip you off You might see deformity in the area of the injury There may be pain or swelling The casualty will be unable to move that portion of the body or there may be unnatural movement of the injured part The casualty may also feel a grating sensation at the point of injury If you are unsure if the casualty has a fracture treat the injury as a fracture Medical professionals can make a firm diagnosis later
WARNING Do not have the casualty move the injured parts in order to identify a fracture as any movement could cause further injury
242 General Rules
Follow these general rules in treatment of a fracture Treat the open fracture tissue wound immediately by covering all wounds with a dressing That means before you treat the fracture You should also always treat a fracture victim for shock Splint the casualty in the position you find him or her Do not attempt to straighten out the limb Do not attempt to push the bone of an open fracture back under the skin Do not attempt to set the fracturemdashjust splint it You immobilize the suspected fracture to prevent sharp edges of the bone from causing more damage It will also reduce pain and help prevent or control shock If it is a closed fracture immobilization will prevent an open wound and possible infection
243 Splinting Procedures
To prepare for splinting reassure the casualty loosen any tight or binding clothing and remove all jewelry from the injured limb Do not remove boots unless you need to stabilize a neck injury or the foot is bleeding Next gather splinting materials and padding improvising as needed
10-25
Figure 10-21 mdash Uninjured leg used as a splint for a fractured leg
Figure 10-22 mdash Chest wall used as a splint for a fractured arm
Splints An object that can be used to immobilize a fracture or a dislocation is called a splint There are two types of splints soft and rigid Soft splints include such things as pillows blankets towels and dressings Rigid splints are stiff and allow very little flexibility Splints should be lightweight strong and long enough to reach the joints above and below the fracture Lacking proper splints boards poles sticks tree limbs or even cardboard may be used as splints If nothing is available the chest can be used to immobilize a fractured arm and the uninjured leg can be used to immobilize the fractured leg (Figure 10-21 and 10-22) Padding Padding may be improvised from such items as a jacket blanket poncho or even leafy vegetation Bandages Bandages may be improvised from belts rifle slings or strips of clothing or blankets Narrow materials such as wire or cord should not be used to secure a splint in place as these could cause tissue damage and a tourniquet effect Slings A sling is a bandage or cravat tied around the neck to support a fractured arm or shoulder If a bandage is not available a sling can be improvised from pieces of clothing or blankets Swathes Swathes are pieces of cloth or load bearing equipment (LBE) that are used to further immobilize a splinted fracture Triangular and cravat bandages are often used and are called swathe bandages The purpose of the swathe is to immobilize therefore the swathe bandage is placed above andor below the fracturemdashnot over it Check the circulation below the site looking for
Pale white or bluish-gray skin
Colder skin temperature below the site If you suspect poor circulation evacuate the casualty immediately
10-26
Figure 10-23 mdash Board splints applied to a fractured lower leg
Apply the splint See Figure 10-23 Position one splint on each side of the fracture so that they extend both above and below the fracture Tie off the splinting materials above and below the site Check the splint for tightness ensuring it is tight enough to hold in place but not so tight it impairs circulation For fractures on the upper arm or shoulder use a sling Use swathes to hold an arm against the side or to hold legs together See Figure 10-21 and 10-22
NOTE
After splinting check the casualtyrsquos pulse and motor sensation at a point farther from the heart than the splint eg for a splinted forearm check the wrist for pulse hand for motor and sensation This is important Splinting too tightly can create the same bad effect as a tourniquet
244 Applying a Sling
To help immobilize a fractured arm you should apply a sling A sling is also used to immobilize a fractured collarbone or a fractured or dislocated shoulder Slings can be made from any non-stretching cloth such as shirts trousers ponchos or belts The supporting pressure of a sling should be on the casualtyrsquos uninjured side Support the arm with the hand slightly higher than the elbow with the fingers exposed to aid in circulation Use the following procedures to apply a sling (Figure 10-24)
Insert the splinted arm or the arm on the side of the fractured shoulder or collarbone in the center of the sling
Bring the ends of the sling up and around the casualtyrsquos neck then tie them in the hollow of the neck on the uninjured side
10-27
Figure 10-24 ndash Application of a triangular bandage to form a sling
Figure 10-25 mdash Applying a cravat bandage for a fractured jaw
Roll the corner of the sling at the elbow and tuck it in
245 Treatment for Specific Fractures
2451 Jaw Collarbone and Shoulder Fractures
If a casualty has a fractured jaw you need to immobilize it (Figure 10-25) To do so apply a cravat vertically around the head and under the jaw then add another cravat
around the top of the head to secure the first one Do not apply the cravat to the back of the neck Do not lay the casualty on his or her back as this may cause an obstruction of the airway
10-28
Figure 10-26 ndash Immobilizing a fractured collarbone
Figure 10-27 ndash Immobilizing a fractured or dislocated shoulder
In the case of a fractured collarbone apply two belts a sling and a cravat to immobilize the area as in Figure 10-26 With a fractured or dislocated shoulder apply a sling and a cravat or swathe See Figure 10-27
2452 Spinal Column Fractures
It is impossible to be sure if a casualty has suffered a spinal column fracture A fracture is likely if the casualty has fallen his or her back has been sharply struck or bent or there is no feeling in the legs or the legs canrsquot move If the spine is fractured bending it can cause the sharp bone fragments to bruise or cut the spinal cord and result in permanent paralysis or death
10-29
Figure 10-28 ndash Maintaining a normal spinal position
While you are waiting for transport and medical assistance maintain a normal spinal position at the lower back (Figure 10-28) Caution the casualty not to move and leave the casualty in the position he or she was found Do not move any part of the body If the casualty is face up you can slip a blanket under the arch of the lower back If found face down do not put anything under him or her If the casualty must be moved a four man team will be needed to do so safely
2453 Neck Fractures
When treating neck fractures caution the casualty not to move and leave the casualty in the position he or she was found If the neck or head is in an abnormal position and the casualty is lying face up raise the shoulders slightly and slip a roll of bath towel or something of similar bulk under the neck Do not bend the head or neck forward and do not raise or twist the head Immobilize the head using boots or heavy objects on each side of it (Figure 10-29)
10-30
Figure 10-29 mdash Immobilizing a fractured neck
If the head or neck is in an abnormal position and the casualty is lying face down do not move the casualty Immobilize the head with boots or heavy objects on each side of it but do not put a roll under the neck Do not bend the head or neck or attempt to roll the casualty onto his or her back If transportation is necessary at least two people will be required
250 Burn Injuries
Burns are injuries that most commonly result from exposure to fire chemicals or electricity The severity of burns depends on the depth size and location Burns are most serious when they are located on the face neck hands and feet Also they are dangerous when combined with fractures There are four types of burns you should learn to recognize and treat thermal electrical chemical and laser Thermal burns are caused by fire hot objects liquids or gases Electrical burns are caused by electrical wires current and lightning Chemical burns are caused by coming in contact with wet or dry chemicals or white phosphorous Laser burns are burns to the eye causing an ocular injury
251 Eliminate the Source
The first step to take with all types of burns is to eliminate the source of the burn After eliminating the source you can evaluate the casualty and provide appropriate first aid measures You should take the following actions to eliminate the source of the burn injury
With thermal burns remove the casualty from danger cover him or her with non-synthetic material and if still on fire roll him or her on the ground to extinguish the fire
In the case of an electrical burn remove the source of current by turning it off if it is close enough Wrap non-conductive material around the casualtyrsquos back and
10-31
shoulders and drag the casualty away Do not make direct contact with the casualty or touch any wires
When the casualty has been exposed to chemicals remove liquid chemicals by flushing the casualty with large amounts of water
Remove dry chemicals by brushing off the particles from the casualty but do not use your bare hands Afterwards flush the casualty with either large amounts of water or none at all as insufficient amounts of water may cause a chemical reaction and make matters worse
If the burn is from white phosphorous smother the chemical with wet clothes or mud and keep the casualty covered
In the case of a laser burn remove the casualty from the beam and make sure you do not look directly at the beam yourself
252 First Aid Measures
After removing the source of the burn evaluate the casualty for other conditions requiring first aid such as problems with breathing weak or no pulse or other wounds Expose the burn by removing any clothing over the burn unless it is stuck to the wound If the casualtyrsquos hands or wrists are burned remove any jewelry Next apply a field dressing For electrical burns check for both entry and exit burns The exit burn may be anywhere on the body With wet or dry chemical burns flush the burns with large amounts of water first then cover with a dry dressing In the case of white phosphorous burns flush the burn with large amounts of water then cover them with wet material or mud For laser burns apply a field dressing over the affected eye or eyes When applying a field dressing take the following precautions
Do NOT place the dressing over the face or genital area
Do NOT break the blisters
Do NOT apply grease or ointments to the burns In all cases seek medical assistance
300 HEAT AND COLD INJURIES
310 Introduction
Climatic injuries are caused by extreme hot or cold environments The human body needs time to adapt to any extremes of temperature The Seabeersquos physical condition will to some extent determine how long it takes to become acclimated There are other factors that contribute to an individualrsquos health and therefore susceptibility such as proper diet or nutrition sufficient sleep and rest proper exercise and suitable clothing While serving in extremes of climate individuals who are trying to lose weight should be supervised by properly trained medical personnel Most climatic injuries are preventable
10-32
320 Heat Injuries
321 General
Sometimes the heat of the environment causes injuries that need to be treated in the field Heat injuries are caused by exposure to extreme heat improper clothing wearing of Mission Oriented Protective Posture (MOPP) gear enclose spaces and wearing body armor The prevention of heat exposure injuries is a command responsibility All hands must be educated about medical dangers and environmental health in the field There are three categories of heat injuries heat cramps heat exhaustion and heatstroke
WARNING The heat casualty should be continually monitored for development of conditions which may require the performance of necessary basic lifesaving measures
CAUTION Do not use salt solutions in first aid procedures for heat injuries
322 Heat Cramps
Heat cramps are caused by an imbalance of electrolytes in the body from excessive sweating The signs and symptoms of heat cramps are
Cramping in the arms or legs
Stomach cramps
Excessive sweating To treat a casualty for heat cramps first move him or her to a cool shady area Loosen his or her clothing and slowly give the casualty a canteen of water Cool water is absorbed more quickly than warm water If the condition is unabated or continues seek medical assistance
323 Heat Exhaustion
Heat exhaustion is caused by a loss of fluids in the body The signs and symptoms of heat exhaustion include the following
Excessive sweating
Pale moist cool skin
Headaches
Weakness
Dizziness
Loss of appetite
Cramping 10-33
Nausea with or without vomiting
Chills or goosebumps
An urge to defecate
Rapid breathing
Tingling in the hands or feet
Confusion To treat for heat exhaustion first move the casualty to a cool shady area Loosen or remove his or her clothing and boots Pour water over the casualty and fan him or her while slowly giving the casualty a canteen of water Elevate the legs and keep the casualty from doing any strenuous activities for the rest of the day Monitor the casualty until the symptoms are gone or provide medical assistance
324 Heatstroke
Heatstroke is a failure of the bodyrsquos cooling mechanism The signs and symptoms of heatstroke are
Unconsciousness or sudden collapse Use the following procedures to treat heatstroke
Move the casualty to a cool shady area
Loosen or remove the casualtyrsquos clothing
Spray or pour water over him or her and fan him or her
Massage the extremities and skin
Elevate the legs
Slowly give the casualty a canteen of water This is a more severe heat injury than heat cramps or heat exhaustion so you should seek medical assistance immediately while monitoring the casualty for necessary lifesaving measures
330 Cold Injuries
331 General
Cold injuries are most likely to occur when it is moderately cold but wet andor windy It is important to understand what to do to prevent cold injuries First maintain good personal hygiene get sufficient exercise take care of your feet and hands and use protective clothing There are many contributing factors to cold injuries Humidity precipitation and wind increase the likelihood of injury Stationary activities such as standing guard increase
10-34
an individualrsquos vulnerability especially if that individual is in contact with the ground for extended periods or standing in water Inadequate diet and rest increase susceptibility and lower defenses Physical fatigue leads to apathy neglect and carelessness Studies show that previous cold injuries also increase your risk Depressed and unresponsive personnel tend to be less active Finally excessive use of alcohol or drugs impairs your judgment and is likely to cause carelessness or overconfidence Seabees may be suffering from cold injuries without knowing it They may simply feel uncomfortable and not notice that extremities are already numb from the cold The general signs and symptoms of cold injuries include
Numbness or tingling sensations which may be relieved by simply loosening boots or clothing and exercising to rewarm yourself
Discoloration of the skin o With lighter-skinned individuals skin becomes red then pale or waxy
white o With darker-skinned individuals skin will be grayish
Affected area may feel cold to the touch
Swelling may occur with deeper injuries
Blisters may occur after rewarming You should use the buddy system to check each other for signs of cold injuries The treatment for cold injuries varies with the severity of the injury First and foremost an individual suffering any cold injury should be removed from the cold environment With superficial injuries you can rewarm the affected part with body heat With more serious life-threatening injuries you should seek medical assistance immediately
WARNING Do not massage the injured part Do not expose the casualty directly to fire or a stove Do not rub the injured part with snow Do not slap or chafe injured parts or soak them in cold water Avoid walking on injured feet if at all possible
The primary injuries caused by cold environments are chilblain immersion syndrome frostbite snow blindness dehydration and hypothermia
332 Specific Cold InjuriesConditions
3321 Chilblain
Chilblain is caused by repeated exposure of bare skin to temperatures from 32 to 60 degrees Fahrenheit The symptoms of chilblain are acutely swollen red tender hot or itchy skin Treat chilblain by rewarming the affected part using firm steady pressure with your hands or by placing the affected parts under your arms or against your buddyrsquos stomach Do not rub or massage the affected parts Have medical personnel evaluate you for any damage
10-35
3322 Immersion Syndrome
Immersion syndrome also known as immersion foot or trench foot results from long exposure of the feet to wet conditions in temperatures ranging from 32 to 50 degrees Fahrenheit Inactive feet in damp or wet socks and boots are more susceptible The signs of immersion syndrome occur in stages with exposure At first the feet are cold but painless The pulse may be weak and the feet may be somewhat numb Next the feet feel hot with burning or shooting pain Later the skin becomes pale with a bluish tint and the pulse decreases In the later stages the feet may blister swell bleed or even become gangrenous Treatment is required for all stages of immersion syndrome
Gradually warm the affected part and protect it from trauma and infection
Apply dry loose clothing or layers of warm coverings
Elevate the feet to reduce swelling
Transport the casualty to a medical facility as soon as possible
Do not massage the feet moisten the skin or apply direct heat or ice 3323 Frostbite
Frostbite is caused by exposure to cold temperatures usually below 32 degrees Fahrenheit Individuals with a history of cold injuries are more likely to get frostbite The most easily frostbitten parts of the body are the cheeks nose ears chin forehead wrists hands and feet Deep frostbite is very serious and can result in amputation of appendages The signs or symptoms of frostbite include
Loss of sensation or numbness
Sudden blanching of the skin then brief tingling
Redness of the skin or grayish in darker-skinned individuals
Blisters swelling or tender parts
Loss of previous pain sensation
Pale yellowish waxy-looking skin
Frozen tissue that feels solid or wooden Treat frostbite of the face ears or nose by covering them with bare hands until sensation and natural skin color returns Place frostbitten hands under the armpits To treat frostbitten feet remove boots and socks and place the feet under clothing against a buddyrsquos body General treatment of frostbite is as follows
Keep the affected parts warm and covered
Remove or loosen restrictive clothing
Cover affected parts to protect them from further injury
Exercise if possible to warm up
Seek medical treatment
Do not rub the injured part with snow or apply cold water 10-36
Do not massage
Do not expose to an open fire
Do not use ointments or salves
Do not manipulate the affected part to increase circulation
Do not use alcohol or tobacco 3324 Snow Blindness
Snow blindness is the effect that the glare from ice or snow has on the eyes It is more likely to occur in hazy cloudy weather The signs and symptoms of snow blindness are
The sensation of grit in the eyes
Pain in or over the eyes
Eye watering or redness
Headache
Pain with exposure to light To treat a casualty for snow blindness blindfold or cover the eyes with dark cloth Complete rest is desirable for quicker recovery If necessary and possible evacuate the casualty to a medical facility Snow blindness usually heals by itself in a few days if there is no repeated exposure 3325 Dehydration
Dehydration occurs when the body loses too much fluid It is just as prevalent in cold weather as in hot In colder temperatures sweating is not as noticeable since it evaporates and is quickly absorbed The signs and symptoms of dehydration are
Mouth tongue throat parched or dry
Difficulty swallowing
Nausea with or without vomiting
Extreme dizziness and fainting
General fatigue and weakness
Muscle cramps
Difficulty focusing the eyes To treat for dehydration keep the individual warm and loosen his or her clothing Shelter the individual from the wind and cold and begin fluid replacement immediately Transport the casualty to a medical treatment facility as soon as possible 3326 Hypothermia
Hypothermia or general cooling of the body occurs when the body loses heat faster than it can produce heat It can occur with temperatures above or below freezing and causes cooling of the core body temperature below 95 degrees Fahrenheit Hypothermia can be caused by fatigue poor physical condition dehydration faulty blood circulation alcohol or drug use trauma or immersion in cold water The signs and symptoms of hypothermia are progressive and include
10-37
Shivering
Faint pulse
Drowsiness and mental slowness
Hampered stiff and uncoordinated movement
Slurred speech
Slow and shallow breathing
Frozen extremities
Irregular heart action To treat mild hypothermia rewarm the body evenly and as soon as possible You must provide a heat source as the casualty will be unable to produce the needed heat Keep the casualty dry and protected from the elements Give the casualty warm liquids gradually if he or she is conscious Be prepared to provide life support measures and seek medical assistance immediately Severe hypothermia is treated by stabilizing the bodyrsquos core temperature and avoiding further heat loss Handle the casualty gently and evacuate to a medical facility as soon as possible Do not expose the body to an open fire Wrap any hot water bottles or canteens in cloth to avoid scalding Rewarming in the field is dangerous and resuscitation is difficult if not impossible in the field
400 FIELD SANITATION
410 General Information
Field waste disposal is performed to prevent flies from spreading germs from waste to your food and to keep unwanted animals out of your bivouac area Use the following as a guide to performing proper field waste disposal Step 1 Determine the type of field waste disposal to use
The proper type of device to use depends upon the mission length of stay terrain and weather conditions but you should use Table 10-1 as a guideline
When on bivouac o Chemical toilets are the preferred method o Burn-out latrines are preferred as an improvised method when chemical
toilets are not available
When on the march o Individual waste collection bags are preferred o Personal cat-holes are used as an alternative
NOTE
Check local state federal and host-nation regulations for applicable restrictions and for prohibition on burning or burying waste Garbage and rubbish may have to be transported to a waste disposal facility
Human waste disposal should be as far from food services as possible but at least 100 meters
Garbage and soakage pits should be at least 30 meters from food service
Locate downwind and downslope if possible
Locate downslope of all wells springs streams and other water sources at least 30 meters
Step 3 Set up construct and maintain latrines garbage pits and soakage pitstrenches
As soon as unit moves into area detail members to set up chemical toilets andor dig latrines
Assign members to clean latrines on a daily basis
Instruct the Field Sanitation Team to spray latrines with insecticide
Install handwashing facilities at food service and latrines
Cover transport burn or bury waste daily depending on regulations Step 4 Inspect daily to ensure
Waste is collected and transported when possible
Straddle-trench latrines and garbage pits are covered with dirt
Pail latrines are emptied and cleaned
Burn-out latrine containers are rotated and contents burned
Facility not contents are sprayed with insecticide as needed Step 5 Close out improvised latrines and garbage pits when filled within 1 foot of surface by
Spraying with residual insecticide
Packing earth in successive 3-inch layers until mounded one foot above surface
Spraying again with insecticide 10-39
Figure 10-30 ndash Cat-hole Latrine
Posting a sign saying ldquoClosed latrinegarbage pit and daterdquo (except in combat)
420 Waste Disposal Devices
Individual Waste Collection Bags
Preferred method when on a march
Dispose of with regular waste Chemical Toilets
Preferred method on bivouac
Add urinals to protect seats Cat-hole Latrines (Figure 10-30)
Alternate on-the-march method when bags not available
Cover immediately after use
Dig 6 to 12 inches deep and 12 inches in diameter
Keep mound of dirt removed to fill in hole
Straddle-trench Latrine (Figure 10-31)
Use on short bivouacs and field training exercises
Two trenches per 100 males three per 100 females
Dig 4 feet by 1 foot 2 frac12 feet deep 2 feet apart
Keep mounds of dirt removed to fill hole after use
Cover with dirt daily
10-40
Figure 10-31 ndash Straddle-trench Latrine
Deep Pit Latrine (Figure 10-32)
Use for longer periods and built-up areas
Collapsible two-seat boxes available in supply system
Add urinals to protect seats in male latrines
Enough for 6 percent of Seabees
Cover with dirt daily Garbage Pit
Locate near dining facility but no closer than 30 meters
One pit per 100 Seabees served per day
Transport to approved landfill or cover with dirt after each meal and close daily
For longer periods burn and bury ashes
10-41
Figure 10-32 mdash Deep Pit Latrine
Figure 10-33 mdash Pail Latrine
Pail Latrine (Figure 10-33)
Use where water table too close to surface for deep pit latrines
Empty and clean daily
10-42
Figure 10-34 ndash Burn-out Latrine
Figure 10-35 ndash Other urinals Trough Pipe and Urinoil
Grease Trap ndash Use with soakage pits and trenches to prevent clogging of soil Burn-out Latrine (Figure 10-34)
Use where water table too close to surface or extended stays
Rotate containers daily and burn contents
Other Urinals
Trough (Figure 10-35 frame A)
Pipe (Figure 10-35 frame B)
Urinoil (Figure 10-35 frame C)
10-43
Figure 10-36 ndash Food Services Soakage Pit
Soakage Pit - Food Service (Figure 10-36)
Locate near dining facility to prevent accumulation of liquid waste from kitchens
Need at least two to alternate daily
Fill with loose rocks
Add grease trap for dining facility waste to prevent clogging of soil Soakage Pit (Other)
Provide for urinals showers Lyster bags mess kits laundry handwashing facilities
Prevents accumulation of liquid waste
10-44
500 WATER PURIFICATION
510 Overview
Infectious diarrhea results from contamination of water and food by bacteria viruses and parasites Water- and foodborne diarrheal diseases are of particular concern to the military because they can be spread to large numbers of service members simultaneously with disastrous consequences for combat readiness Diarrhea especially when vomiting or fever is present can cause dehydration Fill your canteen with treated water at every chance When treated water is not available you must disinfect the water in your canteen using one of the following methods Using iodine tablets is the preferred way to individually purify water There are several alternate techniques for making drinking water clean if iodine tablets are not available You can use chlorine ampoules which are small sealed glass vials You can also use an emergency water treatment kit with Chlor-Flocreg tablets household bleach or boiling to purify water
520 Water Purification Using Iodine Tablets ndash Preferred Method
The following are the procedures for purifying water with iodine tablets the preferred method There are variations depending on the amount of water yoursquore purifying whether it is cold or not and whether it is cloudy or clear
Fill your canteen with the cleanest water available
Put one iodine tablet into clear water or two iodine tablets into cold or cloudy water If you are using two-quart canteens double those amounts Use two tablets for clear water and four tablets for cold or cloudy water
Place the cap on your canteen
Shake canteen to dissolve tablets
Wait 5 minutes
Loosen the cap and tip the canteen over to allow leakage around the canteen threads
Tighten the cap and wait an additional 25 minutes before drinking
530 Water Purification Using Chlorine Ampoules
The following are the procedures for purifying water with chlorine ampoules
Fill your canteen with the cleanest water available
Mix one ampoule of chlorine with one-half canteen cup of water
Stir that mixture with a clean utensil until the contents are dissolved
After stirring the mixture pour one-half of a plastic canteen capful or one Nuclear Biological Chemical (NBC) canteen capful of chlorine solution into your canteen of water
Place the cap on your canteen and shake
Slightly loosen the cap and tip the canteen over to allow leakage around the threads
10-45
Tighten the cap and wait 30 minutes before drinking
NOTE
By wearing gloves or wrapping the ampoule in paper or cloth you can avoid cutting your hands when breaking open the glass ampoule
540 Water Purification Using An Emergency Water Treatment Kit (Chlor-Flocreg Tablets)
The following are the procedures for purifying water with an emergency water treatment kit with Chlor-Flocreg tablets
Tear off the top of the plastic water treatment bag at the perforation (first time use)
Fill the treatment bag one-half full with the cleanest water available
Add one tablet
Fold the bag tightly three times and fold the tabs in
Hold the bag firmly and shake until the tablet dissolves
Swirl for 10 seconds
Let the bag sit for 4 minutes
Swirl again for 10 seconds
Let the bag sit for an additional 15 minutes
Insert the filter pouch into the neck of the canteen
Pour water from bag through the filter into the canteen Avoid pouring sediment into the filter
Rinse the filter with treated water after use Always filter through the same side of the filter
Rinse sediment from the treatment bag and save the bag for water treatment only
CAUTION Do not drink from the treatment bag The water is still contaminated and must be filtered before drinking Drinking non filtered water may cause stomach and intestinal disorders
550 Water Purification Using Household Bleach
The following are the procedures for purifying water with household bleach
NOTE
Ensure bleach is unscented
10-46
Fill your canteen with the cleanest water possible
Read the label on the bleach bottle to determine the amount of available chlorine Liquid chlorine laundry bleach usually has about 5 to 6 percent available chlorine Based upon the strength of the household bleach add the chlorine to the canteen as directed in Table 10-2
Table 10-2 mdash Drops of Household Bleach to be Added to a One-Quart Canteen
AVAILABLE CHLORINE TO CLEAR WATER TO COLDCLOUDY WATER 1 PERCENT 10 drops 20 drops
Slightly loosen the cap and tip the canteen over to allow leakage around threads
Tighten the cap and wait 30 minutes before drinking the water
560 Water Purification by Boiling
You may find yourself in a situation where iodine or other purification methods are not available In this case you can boil water using the following procedures to make it safe for drinking
Bring water to a rolling boil for 5 minutes
In an emergency boiling water for just 15 seconds will help
Protect boiled water from recontamination
CAUTION If water is suspected of NBC contamination do not attempt to treat Seek a quartermaster water supply
Summary In this chapter you were introduced to the importance of providing first aid to an injured person and the explanation and descriptions of first aid measures that you can apply to yourself and to others before trained medical personnel arrive This chapter provided how-to instructions in lifesaving measures to include clearing the upper airway giving artificial ventilation stopping bleeding controlling shock and protecting the wound Additionally this chapter discussed fundamentals of field sanitation and water purification
10-47
Assignment 10
Objectives
1 Define first aid and identify the general first aid rules 2 Define basic life support 3 Recognize the signs of airway obstruction and describe the steps necessary to
clear the airway 4 Recognize and describe the steps necessary to perform artificial ventilation 5 Describe the methods used to control bleeding 6 Define shock and identify its signs symptoms and treatment 7 Identify the cause and treatment of injuries caused by exposure to heat or cold 8 Identify the treatment of first aid to victims of various types of burns 9 Recognize the steps in treating and immobilizing a fracture 10 Identify field sanitation methods used to dispose of human waste and garbage 11 Identify the procedures taken to purify drinking water
Questions 1 True or False The three reasons for performing first aid are to save lives
prevent further injuries and prevent infection
1 True 2 False
2 There are how many vital functions
1 1 2 2 3 3 4 4
3 True or False The vital functions consist of the breathing process respiration
and blood circulation
1 True 2 False
4 Brain cells when deprived of oxygen will die within what period of time
1 2 to 4 minutes 2 4 to 6 minutes 3 12 to 18 minutes 4 30 minutes to an hour
10-48
5 Respiration involves inhaling oxygen and exhaling which of the following
39 When performing rescue breathing how many breaths should you blow into their
mouth or nose before checking for a pulse or re-establishing airway and seal
1 1 2 2 3 3 4 4
40 Which of the following is a correct statement concerning treatment for bleeding
1 Do not remove objects from the wound 2 Pressure points should be used as a last resort 3 Tails of the standard field dressing should be tied over the wound 4 You should use your field dressing first
41 Which of the following is a correct statement concerning treatment for bleeding
1 If an object is impaled in the wound remove it quickly 2 Remove any visible foreign objects from the wound 3 Tie the tails of the dressing at the edges of the wound 4 You should use your field dressing first
42 When using manual or direct pressure to stop bleeding firm pressure should be
applied for how many minutes
1 2 to 4 2 5 to 10 3 15 to 30 4 Until bleeding stops
43 When applying a tourniquet which of the following statements is correct
1 It should be applied directly over the wound 2 Loosen and retighten every 5 to 10 minutes 3 Once applied do not loosen 4 Wire or shoestring may be used
44 A burn from a hot liquid is considered which type of burn
1 Chemical 2 Electrical 3 Laser 4 Thermal
10-54
45 Which of the following types of burns should be kept moist
1 Dry chemical 2 Laser 3 Wet chemical 4 White Phosphorous
46 True of False When treating either heat exhaustion or heatstroke you should
elevate the casualtyrsquos legs
1 True 2 False
47 Which of the following injuries is caused by an imbalance of electrolytes in the
60 Which of the following human waste disposal methods should be used on patrol
1 Burn-out 2 Cat-hole 3 Pail 4 Straddle-trench
61 When using straddle-trench latrines how many trenches do you need for 100
females
1 1 2 2 3 3 4 4
10-57
ASSIGNMENT 10
First Aid and Field Sanitation
Directions Select the correct answer from the list of alternates below each question in the end of chapter assignment Write in the answer next to the corresponding question number below Use this answer sheet as a reference to completing the online assignment related to this assignment
1
2
3
4
5
6
7
8
9
10
11
12
13
14
15
16
17
18
19
20
21
22
23
24
25
26
27
28
29
30
31
32
33
34
35
36
37
38
39
40
41
42
43
44
45
46
47
48
49
50
51
52
53
54
55
56
57
58
59
60
61
10-58
Additional Resources and References
This chapter is intended to present thorough resources for task training The following reference works are suggested for further study This is optional material for continued education rather than for task training First Aid FM 4-2511 (FM 21-11)NTRP 4-0211AFMAN 44-163(I)MCRP 3-02G Field Hygiene and Sanitation FM 21-10MCRP 4-111D
10-59
Trainee Feedback
Center for Seabees and Facilities Engineering (CSFE) makes every effort to keep their courses up-to-date and free of technical errors If you have a suggestion found an error or inaccuracy please write FAX or email us by using the form below Use one form for each comment and be sure to fill in the information as accurately and detailed as possible Thank you for your assistance Write CSFE
NCF Training Division (N7B) 3502 Goodspeed St Port Hueneme CA 93043-4337
Course Seabee Combat Handbook Volume ____ NAVEDTRA __________ Course Date ________ Chapter Number ______ Page ______ Paragraph _____ Sentence ______ Figure ______ FrameView ______ Description ____________________________________________________ ______________________________________________________________ ______________________________________________________________ ____________________________________________________________________________________________________________________________ ______________________________________________________________ (optional) Corrective action _______________________________________ ______________________________________________________________ ______________________________________________________________ (optional) Supporting reference(s) __________________________________ ______________________________________________________________ Your email address if a response is requested ________________________
10-60
Chapter 10
First Aid and Field Sanitation
Overview
Objectives
Prerequisites
Features of This Manual
100 BASIC FIRST AID
Attitude - You should remain calm and act quickly but efficiently Reassure the casualty that his or her injuries are understood and that proper medical attention is forthcoming The casualtyrsquos confidence and positive attitude can be very helpful
Positioning the Casualty - In most cases the casualty should be lying down with his or her head level with the body until you have determined the type and extent of his or her injuries The exceptions to this are the following
Clothing - Although you should move the casualty no more than necessary you may have to remove clothing in order to determine the extent of his or her injuries Remove only the clothing necessary for examination and treatment being especially car
Infection - Do not touch any open wounds or burns with your fingers hands or other non-sterile objects unless absolutely necessary to stop severe bleeding
110 Vital Functions
111 The Breathing Process
112 Respiration
113 Circulation
120 Evaluating a Casualty
121 Step 1 ndash Check for Responsiveness
122 Step 2 ndash Check for Breathing
123 Step 3 ndash Check for Pulse
124 Step 4 ndash Check for Bleeding
125 Step 5 ndash Check for Shock
126 Step 6 ndash Check for Fractures
127 Step 7 ndash Check for Burns
128 Step 8 ndash Check for Head Injury
200 FIRST AID MEASURES
210 Controlling Bleeding
211 General
212 Methods to Control Bleeding
2121 Applying a Battle Dressing
2125 Applying a Tourniquet
220 Opening the Airway and Restoring Breathing
221 Preliminary Assessment
222 Opening the Airway
223 Rescue Breathing
2231 Mouth-to-Mouth Method
2232 Mouth-to-Nose Method
224 Clearing an Obstructed Airway
2241 Abdominal Thrust on a Conscious Casualty Standing or Sitting
2242 Chest Thrust on a Conscious Casualty Standing or Sitting
230 Recognizing and Treating Shock
231 Signs and Symptoms
232 First Aid Measures
240 Fractures
241 Signs and Symptoms
242 General Rules
243 Splinting Procedures
244 Applying a Sling
245 Treatment for Specific Fractures
2453 Neck Fractures
250 Burn Injuries
251 Eliminate the Source
252 First Aid Measures
300 HEAT AND COLD INJURIES
310 Introduction
320 Heat Injuries
321 General
322 Heat Cramps
323 Heat Exhaustion
324 Heatstroke
330 Cold Injuries
331 General
332 Specific Cold InjuriesConditions
3321 Chilblain
3322 Immersion Syndrome
400 FIELD SANITATION
410 General Information
420 Waste Disposal Devices
500 WATER PURIFICATION
510 Overview
520 Water Purification Using Iodine Tablets ndash Preferred Method
530 Water Purification Using Chlorine Ampoules
540 Water Purification Using An Emergency Water Treatment Kit (Chlor-Flocreg Tablets)
550 Water Purification Using Household Bleach
560 Water Purification by Boiling
Summary
Assignment 10
Objectives
Questions
First Aid and Field Sanitation
Additional Resources and References
Trainee Feedback
animationAvailable1
Button1
320 Heat Injuries
321 General
Sometimes the heat of the environment causes injuries that need to be treated in the field Heat injuries are caused by exposure to extreme heat improper clothing wearing of Mission Oriented Protective Posture (MOPP) gear enclose spaces and wearing body armor The prevention of heat exposure injuries is a command responsibility All hands must be educated about medical dangers and environmental health in the field There are three categories of heat injuries heat cramps heat exhaustion and heatstroke
WARNING The heat casualty should be continually monitored for development of conditions which may require the performance of necessary basic lifesaving measures
CAUTION Do not use salt solutions in first aid procedures for heat injuries
322 Heat Cramps
Heat cramps are caused by an imbalance of electrolytes in the body from excessive sweating The signs and symptoms of heat cramps are
Cramping in the arms or legs
Stomach cramps
Excessive sweating To treat a casualty for heat cramps first move him or her to a cool shady area Loosen his or her clothing and slowly give the casualty a canteen of water Cool water is absorbed more quickly than warm water If the condition is unabated or continues seek medical assistance
323 Heat Exhaustion
Heat exhaustion is caused by a loss of fluids in the body The signs and symptoms of heat exhaustion include the following
Excessive sweating
Pale moist cool skin
Headaches
Weakness
Dizziness
Loss of appetite
Cramping 10-33
Nausea with or without vomiting
Chills or goosebumps
An urge to defecate
Rapid breathing
Tingling in the hands or feet
Confusion To treat for heat exhaustion first move the casualty to a cool shady area Loosen or remove his or her clothing and boots Pour water over the casualty and fan him or her while slowly giving the casualty a canteen of water Elevate the legs and keep the casualty from doing any strenuous activities for the rest of the day Monitor the casualty until the symptoms are gone or provide medical assistance
324 Heatstroke
Heatstroke is a failure of the bodyrsquos cooling mechanism The signs and symptoms of heatstroke are
Unconsciousness or sudden collapse Use the following procedures to treat heatstroke
Move the casualty to a cool shady area
Loosen or remove the casualtyrsquos clothing
Spray or pour water over him or her and fan him or her
Massage the extremities and skin
Elevate the legs
Slowly give the casualty a canteen of water This is a more severe heat injury than heat cramps or heat exhaustion so you should seek medical assistance immediately while monitoring the casualty for necessary lifesaving measures
330 Cold Injuries
331 General
Cold injuries are most likely to occur when it is moderately cold but wet andor windy It is important to understand what to do to prevent cold injuries First maintain good personal hygiene get sufficient exercise take care of your feet and hands and use protective clothing There are many contributing factors to cold injuries Humidity precipitation and wind increase the likelihood of injury Stationary activities such as standing guard increase
10-34
an individualrsquos vulnerability especially if that individual is in contact with the ground for extended periods or standing in water Inadequate diet and rest increase susceptibility and lower defenses Physical fatigue leads to apathy neglect and carelessness Studies show that previous cold injuries also increase your risk Depressed and unresponsive personnel tend to be less active Finally excessive use of alcohol or drugs impairs your judgment and is likely to cause carelessness or overconfidence Seabees may be suffering from cold injuries without knowing it They may simply feel uncomfortable and not notice that extremities are already numb from the cold The general signs and symptoms of cold injuries include
Numbness or tingling sensations which may be relieved by simply loosening boots or clothing and exercising to rewarm yourself
Discoloration of the skin o With lighter-skinned individuals skin becomes red then pale or waxy
white o With darker-skinned individuals skin will be grayish
Affected area may feel cold to the touch
Swelling may occur with deeper injuries
Blisters may occur after rewarming You should use the buddy system to check each other for signs of cold injuries The treatment for cold injuries varies with the severity of the injury First and foremost an individual suffering any cold injury should be removed from the cold environment With superficial injuries you can rewarm the affected part with body heat With more serious life-threatening injuries you should seek medical assistance immediately
WARNING Do not massage the injured part Do not expose the casualty directly to fire or a stove Do not rub the injured part with snow Do not slap or chafe injured parts or soak them in cold water Avoid walking on injured feet if at all possible
The primary injuries caused by cold environments are chilblain immersion syndrome frostbite snow blindness dehydration and hypothermia
332 Specific Cold InjuriesConditions
3321 Chilblain
Chilblain is caused by repeated exposure of bare skin to temperatures from 32 to 60 degrees Fahrenheit The symptoms of chilblain are acutely swollen red tender hot or itchy skin Treat chilblain by rewarming the affected part using firm steady pressure with your hands or by placing the affected parts under your arms or against your buddyrsquos stomach Do not rub or massage the affected parts Have medical personnel evaluate you for any damage
10-35
3322 Immersion Syndrome
Immersion syndrome also known as immersion foot or trench foot results from long exposure of the feet to wet conditions in temperatures ranging from 32 to 50 degrees Fahrenheit Inactive feet in damp or wet socks and boots are more susceptible The signs of immersion syndrome occur in stages with exposure At first the feet are cold but painless The pulse may be weak and the feet may be somewhat numb Next the feet feel hot with burning or shooting pain Later the skin becomes pale with a bluish tint and the pulse decreases In the later stages the feet may blister swell bleed or even become gangrenous Treatment is required for all stages of immersion syndrome
Gradually warm the affected part and protect it from trauma and infection
Apply dry loose clothing or layers of warm coverings
Elevate the feet to reduce swelling
Transport the casualty to a medical facility as soon as possible
Do not massage the feet moisten the skin or apply direct heat or ice 3323 Frostbite
Frostbite is caused by exposure to cold temperatures usually below 32 degrees Fahrenheit Individuals with a history of cold injuries are more likely to get frostbite The most easily frostbitten parts of the body are the cheeks nose ears chin forehead wrists hands and feet Deep frostbite is very serious and can result in amputation of appendages The signs or symptoms of frostbite include
Loss of sensation or numbness
Sudden blanching of the skin then brief tingling
Redness of the skin or grayish in darker-skinned individuals
Blisters swelling or tender parts
Loss of previous pain sensation
Pale yellowish waxy-looking skin
Frozen tissue that feels solid or wooden Treat frostbite of the face ears or nose by covering them with bare hands until sensation and natural skin color returns Place frostbitten hands under the armpits To treat frostbitten feet remove boots and socks and place the feet under clothing against a buddyrsquos body General treatment of frostbite is as follows
Keep the affected parts warm and covered
Remove or loosen restrictive clothing
Cover affected parts to protect them from further injury
Exercise if possible to warm up
Seek medical treatment
Do not rub the injured part with snow or apply cold water 10-36
Do not massage
Do not expose to an open fire
Do not use ointments or salves
Do not manipulate the affected part to increase circulation
Do not use alcohol or tobacco 3324 Snow Blindness
Snow blindness is the effect that the glare from ice or snow has on the eyes It is more likely to occur in hazy cloudy weather The signs and symptoms of snow blindness are
The sensation of grit in the eyes
Pain in or over the eyes
Eye watering or redness
Headache
Pain with exposure to light To treat a casualty for snow blindness blindfold or cover the eyes with dark cloth Complete rest is desirable for quicker recovery If necessary and possible evacuate the casualty to a medical facility Snow blindness usually heals by itself in a few days if there is no repeated exposure 3325 Dehydration
Dehydration occurs when the body loses too much fluid It is just as prevalent in cold weather as in hot In colder temperatures sweating is not as noticeable since it evaporates and is quickly absorbed The signs and symptoms of dehydration are
Mouth tongue throat parched or dry
Difficulty swallowing
Nausea with or without vomiting
Extreme dizziness and fainting
General fatigue and weakness
Muscle cramps
Difficulty focusing the eyes To treat for dehydration keep the individual warm and loosen his or her clothing Shelter the individual from the wind and cold and begin fluid replacement immediately Transport the casualty to a medical treatment facility as soon as possible 3326 Hypothermia
Hypothermia or general cooling of the body occurs when the body loses heat faster than it can produce heat It can occur with temperatures above or below freezing and causes cooling of the core body temperature below 95 degrees Fahrenheit Hypothermia can be caused by fatigue poor physical condition dehydration faulty blood circulation alcohol or drug use trauma or immersion in cold water The signs and symptoms of hypothermia are progressive and include
10-37
Shivering
Faint pulse
Drowsiness and mental slowness
Hampered stiff and uncoordinated movement
Slurred speech
Slow and shallow breathing
Frozen extremities
Irregular heart action To treat mild hypothermia rewarm the body evenly and as soon as possible You must provide a heat source as the casualty will be unable to produce the needed heat Keep the casualty dry and protected from the elements Give the casualty warm liquids gradually if he or she is conscious Be prepared to provide life support measures and seek medical assistance immediately Severe hypothermia is treated by stabilizing the bodyrsquos core temperature and avoiding further heat loss Handle the casualty gently and evacuate to a medical facility as soon as possible Do not expose the body to an open fire Wrap any hot water bottles or canteens in cloth to avoid scalding Rewarming in the field is dangerous and resuscitation is difficult if not impossible in the field
400 FIELD SANITATION
410 General Information
Field waste disposal is performed to prevent flies from spreading germs from waste to your food and to keep unwanted animals out of your bivouac area Use the following as a guide to performing proper field waste disposal Step 1 Determine the type of field waste disposal to use
The proper type of device to use depends upon the mission length of stay terrain and weather conditions but you should use Table 10-1 as a guideline
When on bivouac o Chemical toilets are the preferred method o Burn-out latrines are preferred as an improvised method when chemical
toilets are not available
When on the march o Individual waste collection bags are preferred o Personal cat-holes are used as an alternative
NOTE
Check local state federal and host-nation regulations for applicable restrictions and for prohibition on burning or burying waste Garbage and rubbish may have to be transported to a waste disposal facility
Human waste disposal should be as far from food services as possible but at least 100 meters
Garbage and soakage pits should be at least 30 meters from food service
Locate downwind and downslope if possible
Locate downslope of all wells springs streams and other water sources at least 30 meters
Step 3 Set up construct and maintain latrines garbage pits and soakage pitstrenches
As soon as unit moves into area detail members to set up chemical toilets andor dig latrines
Assign members to clean latrines on a daily basis
Instruct the Field Sanitation Team to spray latrines with insecticide
Install handwashing facilities at food service and latrines
Cover transport burn or bury waste daily depending on regulations Step 4 Inspect daily to ensure
Waste is collected and transported when possible
Straddle-trench latrines and garbage pits are covered with dirt
Pail latrines are emptied and cleaned
Burn-out latrine containers are rotated and contents burned
Facility not contents are sprayed with insecticide as needed Step 5 Close out improvised latrines and garbage pits when filled within 1 foot of surface by
Spraying with residual insecticide
Packing earth in successive 3-inch layers until mounded one foot above surface
Spraying again with insecticide 10-39
Figure 10-30 ndash Cat-hole Latrine
Posting a sign saying ldquoClosed latrinegarbage pit and daterdquo (except in combat)
420 Waste Disposal Devices
Individual Waste Collection Bags
Preferred method when on a march
Dispose of with regular waste Chemical Toilets
Preferred method on bivouac
Add urinals to protect seats Cat-hole Latrines (Figure 10-30)
Alternate on-the-march method when bags not available
Cover immediately after use
Dig 6 to 12 inches deep and 12 inches in diameter
Keep mound of dirt removed to fill in hole
Straddle-trench Latrine (Figure 10-31)
Use on short bivouacs and field training exercises
Two trenches per 100 males three per 100 females
Dig 4 feet by 1 foot 2 frac12 feet deep 2 feet apart
Keep mounds of dirt removed to fill hole after use
Cover with dirt daily
10-40
Figure 10-31 ndash Straddle-trench Latrine
Deep Pit Latrine (Figure 10-32)
Use for longer periods and built-up areas
Collapsible two-seat boxes available in supply system
Add urinals to protect seats in male latrines
Enough for 6 percent of Seabees
Cover with dirt daily Garbage Pit
Locate near dining facility but no closer than 30 meters
One pit per 100 Seabees served per day
Transport to approved landfill or cover with dirt after each meal and close daily
For longer periods burn and bury ashes
10-41
Figure 10-32 mdash Deep Pit Latrine
Figure 10-33 mdash Pail Latrine
Pail Latrine (Figure 10-33)
Use where water table too close to surface for deep pit latrines
Empty and clean daily
10-42
Figure 10-34 ndash Burn-out Latrine
Figure 10-35 ndash Other urinals Trough Pipe and Urinoil
Grease Trap ndash Use with soakage pits and trenches to prevent clogging of soil Burn-out Latrine (Figure 10-34)
Use where water table too close to surface or extended stays
Rotate containers daily and burn contents
Other Urinals
Trough (Figure 10-35 frame A)
Pipe (Figure 10-35 frame B)
Urinoil (Figure 10-35 frame C)
10-43
Figure 10-36 ndash Food Services Soakage Pit
Soakage Pit - Food Service (Figure 10-36)
Locate near dining facility to prevent accumulation of liquid waste from kitchens
Need at least two to alternate daily
Fill with loose rocks
Add grease trap for dining facility waste to prevent clogging of soil Soakage Pit (Other)
Provide for urinals showers Lyster bags mess kits laundry handwashing facilities
Prevents accumulation of liquid waste
10-44
500 WATER PURIFICATION
510 Overview
Infectious diarrhea results from contamination of water and food by bacteria viruses and parasites Water- and foodborne diarrheal diseases are of particular concern to the military because they can be spread to large numbers of service members simultaneously with disastrous consequences for combat readiness Diarrhea especially when vomiting or fever is present can cause dehydration Fill your canteen with treated water at every chance When treated water is not available you must disinfect the water in your canteen using one of the following methods Using iodine tablets is the preferred way to individually purify water There are several alternate techniques for making drinking water clean if iodine tablets are not available You can use chlorine ampoules which are small sealed glass vials You can also use an emergency water treatment kit with Chlor-Flocreg tablets household bleach or boiling to purify water
520 Water Purification Using Iodine Tablets ndash Preferred Method
The following are the procedures for purifying water with iodine tablets the preferred method There are variations depending on the amount of water yoursquore purifying whether it is cold or not and whether it is cloudy or clear
Fill your canteen with the cleanest water available
Put one iodine tablet into clear water or two iodine tablets into cold or cloudy water If you are using two-quart canteens double those amounts Use two tablets for clear water and four tablets for cold or cloudy water
Place the cap on your canteen
Shake canteen to dissolve tablets
Wait 5 minutes
Loosen the cap and tip the canteen over to allow leakage around the canteen threads
Tighten the cap and wait an additional 25 minutes before drinking
530 Water Purification Using Chlorine Ampoules
The following are the procedures for purifying water with chlorine ampoules
Fill your canteen with the cleanest water available
Mix one ampoule of chlorine with one-half canteen cup of water
Stir that mixture with a clean utensil until the contents are dissolved
After stirring the mixture pour one-half of a plastic canteen capful or one Nuclear Biological Chemical (NBC) canteen capful of chlorine solution into your canteen of water
Place the cap on your canteen and shake
Slightly loosen the cap and tip the canteen over to allow leakage around the threads
10-45
Tighten the cap and wait 30 minutes before drinking
NOTE
By wearing gloves or wrapping the ampoule in paper or cloth you can avoid cutting your hands when breaking open the glass ampoule
540 Water Purification Using An Emergency Water Treatment Kit (Chlor-Flocreg Tablets)
The following are the procedures for purifying water with an emergency water treatment kit with Chlor-Flocreg tablets
Tear off the top of the plastic water treatment bag at the perforation (first time use)
Fill the treatment bag one-half full with the cleanest water available
Add one tablet
Fold the bag tightly three times and fold the tabs in
Hold the bag firmly and shake until the tablet dissolves
Swirl for 10 seconds
Let the bag sit for 4 minutes
Swirl again for 10 seconds
Let the bag sit for an additional 15 minutes
Insert the filter pouch into the neck of the canteen
Pour water from bag through the filter into the canteen Avoid pouring sediment into the filter
Rinse the filter with treated water after use Always filter through the same side of the filter
Rinse sediment from the treatment bag and save the bag for water treatment only
CAUTION Do not drink from the treatment bag The water is still contaminated and must be filtered before drinking Drinking non filtered water may cause stomach and intestinal disorders
550 Water Purification Using Household Bleach
The following are the procedures for purifying water with household bleach
NOTE
Ensure bleach is unscented
10-46
Fill your canteen with the cleanest water possible
Read the label on the bleach bottle to determine the amount of available chlorine Liquid chlorine laundry bleach usually has about 5 to 6 percent available chlorine Based upon the strength of the household bleach add the chlorine to the canteen as directed in Table 10-2
Table 10-2 mdash Drops of Household Bleach to be Added to a One-Quart Canteen
AVAILABLE CHLORINE TO CLEAR WATER TO COLDCLOUDY WATER 1 PERCENT 10 drops 20 drops
Slightly loosen the cap and tip the canteen over to allow leakage around threads
Tighten the cap and wait 30 minutes before drinking the water
560 Water Purification by Boiling
You may find yourself in a situation where iodine or other purification methods are not available In this case you can boil water using the following procedures to make it safe for drinking
Bring water to a rolling boil for 5 minutes
In an emergency boiling water for just 15 seconds will help
Protect boiled water from recontamination
CAUTION If water is suspected of NBC contamination do not attempt to treat Seek a quartermaster water supply
Summary In this chapter you were introduced to the importance of providing first aid to an injured person and the explanation and descriptions of first aid measures that you can apply to yourself and to others before trained medical personnel arrive This chapter provided how-to instructions in lifesaving measures to include clearing the upper airway giving artificial ventilation stopping bleeding controlling shock and protecting the wound Additionally this chapter discussed fundamentals of field sanitation and water purification
10-47
Assignment 10
Objectives
1 Define first aid and identify the general first aid rules 2 Define basic life support 3 Recognize the signs of airway obstruction and describe the steps necessary to
clear the airway 4 Recognize and describe the steps necessary to perform artificial ventilation 5 Describe the methods used to control bleeding 6 Define shock and identify its signs symptoms and treatment 7 Identify the cause and treatment of injuries caused by exposure to heat or cold 8 Identify the treatment of first aid to victims of various types of burns 9 Recognize the steps in treating and immobilizing a fracture 10 Identify field sanitation methods used to dispose of human waste and garbage 11 Identify the procedures taken to purify drinking water
Questions 1 True or False The three reasons for performing first aid are to save lives
prevent further injuries and prevent infection
1 True 2 False
2 There are how many vital functions
1 1 2 2 3 3 4 4
3 True or False The vital functions consist of the breathing process respiration
and blood circulation
1 True 2 False
4 Brain cells when deprived of oxygen will die within what period of time
1 2 to 4 minutes 2 4 to 6 minutes 3 12 to 18 minutes 4 30 minutes to an hour
10-48
5 Respiration involves inhaling oxygen and exhaling which of the following
39 When performing rescue breathing how many breaths should you blow into their
mouth or nose before checking for a pulse or re-establishing airway and seal
1 1 2 2 3 3 4 4
40 Which of the following is a correct statement concerning treatment for bleeding
1 Do not remove objects from the wound 2 Pressure points should be used as a last resort 3 Tails of the standard field dressing should be tied over the wound 4 You should use your field dressing first
41 Which of the following is a correct statement concerning treatment for bleeding
1 If an object is impaled in the wound remove it quickly 2 Remove any visible foreign objects from the wound 3 Tie the tails of the dressing at the edges of the wound 4 You should use your field dressing first
42 When using manual or direct pressure to stop bleeding firm pressure should be
applied for how many minutes
1 2 to 4 2 5 to 10 3 15 to 30 4 Until bleeding stops
43 When applying a tourniquet which of the following statements is correct
1 It should be applied directly over the wound 2 Loosen and retighten every 5 to 10 minutes 3 Once applied do not loosen 4 Wire or shoestring may be used
44 A burn from a hot liquid is considered which type of burn
1 Chemical 2 Electrical 3 Laser 4 Thermal
10-54
45 Which of the following types of burns should be kept moist
1 Dry chemical 2 Laser 3 Wet chemical 4 White Phosphorous
46 True of False When treating either heat exhaustion or heatstroke you should
elevate the casualtyrsquos legs
1 True 2 False
47 Which of the following injuries is caused by an imbalance of electrolytes in the
60 Which of the following human waste disposal methods should be used on patrol
1 Burn-out 2 Cat-hole 3 Pail 4 Straddle-trench
61 When using straddle-trench latrines how many trenches do you need for 100
females
1 1 2 2 3 3 4 4
10-57
ASSIGNMENT 10
First Aid and Field Sanitation
Directions Select the correct answer from the list of alternates below each question in the end of chapter assignment Write in the answer next to the corresponding question number below Use this answer sheet as a reference to completing the online assignment related to this assignment
1
2
3
4
5
6
7
8
9
10
11
12
13
14
15
16
17
18
19
20
21
22
23
24
25
26
27
28
29
30
31
32
33
34
35
36
37
38
39
40
41
42
43
44
45
46
47
48
49
50
51
52
53
54
55
56
57
58
59
60
61
10-58
Additional Resources and References
This chapter is intended to present thorough resources for task training The following reference works are suggested for further study This is optional material for continued education rather than for task training First Aid FM 4-2511 (FM 21-11)NTRP 4-0211AFMAN 44-163(I)MCRP 3-02G Field Hygiene and Sanitation FM 21-10MCRP 4-111D
10-59
Trainee Feedback
Center for Seabees and Facilities Engineering (CSFE) makes every effort to keep their courses up-to-date and free of technical errors If you have a suggestion found an error or inaccuracy please write FAX or email us by using the form below Use one form for each comment and be sure to fill in the information as accurately and detailed as possible Thank you for your assistance Write CSFE
NCF Training Division (N7B) 3502 Goodspeed St Port Hueneme CA 93043-4337
Course Seabee Combat Handbook Volume ____ NAVEDTRA __________ Course Date ________ Chapter Number ______ Page ______ Paragraph _____ Sentence ______ Figure ______ FrameView ______ Description ____________________________________________________ ______________________________________________________________ ______________________________________________________________ ____________________________________________________________________________________________________________________________ ______________________________________________________________ (optional) Corrective action _______________________________________ ______________________________________________________________ ______________________________________________________________ (optional) Supporting reference(s) __________________________________ ______________________________________________________________ Your email address if a response is requested ________________________
10-60
Chapter 10
First Aid and Field Sanitation
Overview
Objectives
Prerequisites
Features of This Manual
100 BASIC FIRST AID
Attitude - You should remain calm and act quickly but efficiently Reassure the casualty that his or her injuries are understood and that proper medical attention is forthcoming The casualtyrsquos confidence and positive attitude can be very helpful
Positioning the Casualty - In most cases the casualty should be lying down with his or her head level with the body until you have determined the type and extent of his or her injuries The exceptions to this are the following
Clothing - Although you should move the casualty no more than necessary you may have to remove clothing in order to determine the extent of his or her injuries Remove only the clothing necessary for examination and treatment being especially car
Infection - Do not touch any open wounds or burns with your fingers hands or other non-sterile objects unless absolutely necessary to stop severe bleeding
110 Vital Functions
111 The Breathing Process
112 Respiration
113 Circulation
120 Evaluating a Casualty
121 Step 1 ndash Check for Responsiveness
122 Step 2 ndash Check for Breathing
123 Step 3 ndash Check for Pulse
124 Step 4 ndash Check for Bleeding
125 Step 5 ndash Check for Shock
126 Step 6 ndash Check for Fractures
127 Step 7 ndash Check for Burns
128 Step 8 ndash Check for Head Injury
200 FIRST AID MEASURES
210 Controlling Bleeding
211 General
212 Methods to Control Bleeding
2121 Applying a Battle Dressing
2125 Applying a Tourniquet
220 Opening the Airway and Restoring Breathing
221 Preliminary Assessment
222 Opening the Airway
223 Rescue Breathing
2231 Mouth-to-Mouth Method
2232 Mouth-to-Nose Method
224 Clearing an Obstructed Airway
2241 Abdominal Thrust on a Conscious Casualty Standing or Sitting
2242 Chest Thrust on a Conscious Casualty Standing or Sitting
230 Recognizing and Treating Shock
231 Signs and Symptoms
232 First Aid Measures
240 Fractures
241 Signs and Symptoms
242 General Rules
243 Splinting Procedures
244 Applying a Sling
245 Treatment for Specific Fractures
2453 Neck Fractures
250 Burn Injuries
251 Eliminate the Source
252 First Aid Measures
300 HEAT AND COLD INJURIES
310 Introduction
320 Heat Injuries
321 General
322 Heat Cramps
323 Heat Exhaustion
324 Heatstroke
330 Cold Injuries
331 General
332 Specific Cold InjuriesConditions
3321 Chilblain
3322 Immersion Syndrome
400 FIELD SANITATION
410 General Information
420 Waste Disposal Devices
500 WATER PURIFICATION
510 Overview
520 Water Purification Using Iodine Tablets ndash Preferred Method
530 Water Purification Using Chlorine Ampoules
540 Water Purification Using An Emergency Water Treatment Kit (Chlor-Flocreg Tablets)
550 Water Purification Using Household Bleach
560 Water Purification by Boiling
Summary
Assignment 10
Objectives
Questions
First Aid and Field Sanitation
Additional Resources and References
Trainee Feedback
animationAvailable1
Button1
Nausea with or without vomiting
Chills or goosebumps
An urge to defecate
Rapid breathing
Tingling in the hands or feet
Confusion To treat for heat exhaustion first move the casualty to a cool shady area Loosen or remove his or her clothing and boots Pour water over the casualty and fan him or her while slowly giving the casualty a canteen of water Elevate the legs and keep the casualty from doing any strenuous activities for the rest of the day Monitor the casualty until the symptoms are gone or provide medical assistance
324 Heatstroke
Heatstroke is a failure of the bodyrsquos cooling mechanism The signs and symptoms of heatstroke are
Unconsciousness or sudden collapse Use the following procedures to treat heatstroke
Move the casualty to a cool shady area
Loosen or remove the casualtyrsquos clothing
Spray or pour water over him or her and fan him or her
Massage the extremities and skin
Elevate the legs
Slowly give the casualty a canteen of water This is a more severe heat injury than heat cramps or heat exhaustion so you should seek medical assistance immediately while monitoring the casualty for necessary lifesaving measures
330 Cold Injuries
331 General
Cold injuries are most likely to occur when it is moderately cold but wet andor windy It is important to understand what to do to prevent cold injuries First maintain good personal hygiene get sufficient exercise take care of your feet and hands and use protective clothing There are many contributing factors to cold injuries Humidity precipitation and wind increase the likelihood of injury Stationary activities such as standing guard increase
10-34
an individualrsquos vulnerability especially if that individual is in contact with the ground for extended periods or standing in water Inadequate diet and rest increase susceptibility and lower defenses Physical fatigue leads to apathy neglect and carelessness Studies show that previous cold injuries also increase your risk Depressed and unresponsive personnel tend to be less active Finally excessive use of alcohol or drugs impairs your judgment and is likely to cause carelessness or overconfidence Seabees may be suffering from cold injuries without knowing it They may simply feel uncomfortable and not notice that extremities are already numb from the cold The general signs and symptoms of cold injuries include
Numbness or tingling sensations which may be relieved by simply loosening boots or clothing and exercising to rewarm yourself
Discoloration of the skin o With lighter-skinned individuals skin becomes red then pale or waxy
white o With darker-skinned individuals skin will be grayish
Affected area may feel cold to the touch
Swelling may occur with deeper injuries
Blisters may occur after rewarming You should use the buddy system to check each other for signs of cold injuries The treatment for cold injuries varies with the severity of the injury First and foremost an individual suffering any cold injury should be removed from the cold environment With superficial injuries you can rewarm the affected part with body heat With more serious life-threatening injuries you should seek medical assistance immediately
WARNING Do not massage the injured part Do not expose the casualty directly to fire or a stove Do not rub the injured part with snow Do not slap or chafe injured parts or soak them in cold water Avoid walking on injured feet if at all possible
The primary injuries caused by cold environments are chilblain immersion syndrome frostbite snow blindness dehydration and hypothermia
332 Specific Cold InjuriesConditions
3321 Chilblain
Chilblain is caused by repeated exposure of bare skin to temperatures from 32 to 60 degrees Fahrenheit The symptoms of chilblain are acutely swollen red tender hot or itchy skin Treat chilblain by rewarming the affected part using firm steady pressure with your hands or by placing the affected parts under your arms or against your buddyrsquos stomach Do not rub or massage the affected parts Have medical personnel evaluate you for any damage
10-35
3322 Immersion Syndrome
Immersion syndrome also known as immersion foot or trench foot results from long exposure of the feet to wet conditions in temperatures ranging from 32 to 50 degrees Fahrenheit Inactive feet in damp or wet socks and boots are more susceptible The signs of immersion syndrome occur in stages with exposure At first the feet are cold but painless The pulse may be weak and the feet may be somewhat numb Next the feet feel hot with burning or shooting pain Later the skin becomes pale with a bluish tint and the pulse decreases In the later stages the feet may blister swell bleed or even become gangrenous Treatment is required for all stages of immersion syndrome
Gradually warm the affected part and protect it from trauma and infection
Apply dry loose clothing or layers of warm coverings
Elevate the feet to reduce swelling
Transport the casualty to a medical facility as soon as possible
Do not massage the feet moisten the skin or apply direct heat or ice 3323 Frostbite
Frostbite is caused by exposure to cold temperatures usually below 32 degrees Fahrenheit Individuals with a history of cold injuries are more likely to get frostbite The most easily frostbitten parts of the body are the cheeks nose ears chin forehead wrists hands and feet Deep frostbite is very serious and can result in amputation of appendages The signs or symptoms of frostbite include
Loss of sensation or numbness
Sudden blanching of the skin then brief tingling
Redness of the skin or grayish in darker-skinned individuals
Blisters swelling or tender parts
Loss of previous pain sensation
Pale yellowish waxy-looking skin
Frozen tissue that feels solid or wooden Treat frostbite of the face ears or nose by covering them with bare hands until sensation and natural skin color returns Place frostbitten hands under the armpits To treat frostbitten feet remove boots and socks and place the feet under clothing against a buddyrsquos body General treatment of frostbite is as follows
Keep the affected parts warm and covered
Remove or loosen restrictive clothing
Cover affected parts to protect them from further injury
Exercise if possible to warm up
Seek medical treatment
Do not rub the injured part with snow or apply cold water 10-36
Do not massage
Do not expose to an open fire
Do not use ointments or salves
Do not manipulate the affected part to increase circulation
Do not use alcohol or tobacco 3324 Snow Blindness
Snow blindness is the effect that the glare from ice or snow has on the eyes It is more likely to occur in hazy cloudy weather The signs and symptoms of snow blindness are
The sensation of grit in the eyes
Pain in or over the eyes
Eye watering or redness
Headache
Pain with exposure to light To treat a casualty for snow blindness blindfold or cover the eyes with dark cloth Complete rest is desirable for quicker recovery If necessary and possible evacuate the casualty to a medical facility Snow blindness usually heals by itself in a few days if there is no repeated exposure 3325 Dehydration
Dehydration occurs when the body loses too much fluid It is just as prevalent in cold weather as in hot In colder temperatures sweating is not as noticeable since it evaporates and is quickly absorbed The signs and symptoms of dehydration are
Mouth tongue throat parched or dry
Difficulty swallowing
Nausea with or without vomiting
Extreme dizziness and fainting
General fatigue and weakness
Muscle cramps
Difficulty focusing the eyes To treat for dehydration keep the individual warm and loosen his or her clothing Shelter the individual from the wind and cold and begin fluid replacement immediately Transport the casualty to a medical treatment facility as soon as possible 3326 Hypothermia
Hypothermia or general cooling of the body occurs when the body loses heat faster than it can produce heat It can occur with temperatures above or below freezing and causes cooling of the core body temperature below 95 degrees Fahrenheit Hypothermia can be caused by fatigue poor physical condition dehydration faulty blood circulation alcohol or drug use trauma or immersion in cold water The signs and symptoms of hypothermia are progressive and include
10-37
Shivering
Faint pulse
Drowsiness and mental slowness
Hampered stiff and uncoordinated movement
Slurred speech
Slow and shallow breathing
Frozen extremities
Irregular heart action To treat mild hypothermia rewarm the body evenly and as soon as possible You must provide a heat source as the casualty will be unable to produce the needed heat Keep the casualty dry and protected from the elements Give the casualty warm liquids gradually if he or she is conscious Be prepared to provide life support measures and seek medical assistance immediately Severe hypothermia is treated by stabilizing the bodyrsquos core temperature and avoiding further heat loss Handle the casualty gently and evacuate to a medical facility as soon as possible Do not expose the body to an open fire Wrap any hot water bottles or canteens in cloth to avoid scalding Rewarming in the field is dangerous and resuscitation is difficult if not impossible in the field
400 FIELD SANITATION
410 General Information
Field waste disposal is performed to prevent flies from spreading germs from waste to your food and to keep unwanted animals out of your bivouac area Use the following as a guide to performing proper field waste disposal Step 1 Determine the type of field waste disposal to use
The proper type of device to use depends upon the mission length of stay terrain and weather conditions but you should use Table 10-1 as a guideline
When on bivouac o Chemical toilets are the preferred method o Burn-out latrines are preferred as an improvised method when chemical
toilets are not available
When on the march o Individual waste collection bags are preferred o Personal cat-holes are used as an alternative
NOTE
Check local state federal and host-nation regulations for applicable restrictions and for prohibition on burning or burying waste Garbage and rubbish may have to be transported to a waste disposal facility
Human waste disposal should be as far from food services as possible but at least 100 meters
Garbage and soakage pits should be at least 30 meters from food service
Locate downwind and downslope if possible
Locate downslope of all wells springs streams and other water sources at least 30 meters
Step 3 Set up construct and maintain latrines garbage pits and soakage pitstrenches
As soon as unit moves into area detail members to set up chemical toilets andor dig latrines
Assign members to clean latrines on a daily basis
Instruct the Field Sanitation Team to spray latrines with insecticide
Install handwashing facilities at food service and latrines
Cover transport burn or bury waste daily depending on regulations Step 4 Inspect daily to ensure
Waste is collected and transported when possible
Straddle-trench latrines and garbage pits are covered with dirt
Pail latrines are emptied and cleaned
Burn-out latrine containers are rotated and contents burned
Facility not contents are sprayed with insecticide as needed Step 5 Close out improvised latrines and garbage pits when filled within 1 foot of surface by
Spraying with residual insecticide
Packing earth in successive 3-inch layers until mounded one foot above surface
Spraying again with insecticide 10-39
Figure 10-30 ndash Cat-hole Latrine
Posting a sign saying ldquoClosed latrinegarbage pit and daterdquo (except in combat)
420 Waste Disposal Devices
Individual Waste Collection Bags
Preferred method when on a march
Dispose of with regular waste Chemical Toilets
Preferred method on bivouac
Add urinals to protect seats Cat-hole Latrines (Figure 10-30)
Alternate on-the-march method when bags not available
Cover immediately after use
Dig 6 to 12 inches deep and 12 inches in diameter
Keep mound of dirt removed to fill in hole
Straddle-trench Latrine (Figure 10-31)
Use on short bivouacs and field training exercises
Two trenches per 100 males three per 100 females
Dig 4 feet by 1 foot 2 frac12 feet deep 2 feet apart
Keep mounds of dirt removed to fill hole after use
Cover with dirt daily
10-40
Figure 10-31 ndash Straddle-trench Latrine
Deep Pit Latrine (Figure 10-32)
Use for longer periods and built-up areas
Collapsible two-seat boxes available in supply system
Add urinals to protect seats in male latrines
Enough for 6 percent of Seabees
Cover with dirt daily Garbage Pit
Locate near dining facility but no closer than 30 meters
One pit per 100 Seabees served per day
Transport to approved landfill or cover with dirt after each meal and close daily
For longer periods burn and bury ashes
10-41
Figure 10-32 mdash Deep Pit Latrine
Figure 10-33 mdash Pail Latrine
Pail Latrine (Figure 10-33)
Use where water table too close to surface for deep pit latrines
Empty and clean daily
10-42
Figure 10-34 ndash Burn-out Latrine
Figure 10-35 ndash Other urinals Trough Pipe and Urinoil
Grease Trap ndash Use with soakage pits and trenches to prevent clogging of soil Burn-out Latrine (Figure 10-34)
Use where water table too close to surface or extended stays
Rotate containers daily and burn contents
Other Urinals
Trough (Figure 10-35 frame A)
Pipe (Figure 10-35 frame B)
Urinoil (Figure 10-35 frame C)
10-43
Figure 10-36 ndash Food Services Soakage Pit
Soakage Pit - Food Service (Figure 10-36)
Locate near dining facility to prevent accumulation of liquid waste from kitchens
Need at least two to alternate daily
Fill with loose rocks
Add grease trap for dining facility waste to prevent clogging of soil Soakage Pit (Other)
Provide for urinals showers Lyster bags mess kits laundry handwashing facilities
Prevents accumulation of liquid waste
10-44
500 WATER PURIFICATION
510 Overview
Infectious diarrhea results from contamination of water and food by bacteria viruses and parasites Water- and foodborne diarrheal diseases are of particular concern to the military because they can be spread to large numbers of service members simultaneously with disastrous consequences for combat readiness Diarrhea especially when vomiting or fever is present can cause dehydration Fill your canteen with treated water at every chance When treated water is not available you must disinfect the water in your canteen using one of the following methods Using iodine tablets is the preferred way to individually purify water There are several alternate techniques for making drinking water clean if iodine tablets are not available You can use chlorine ampoules which are small sealed glass vials You can also use an emergency water treatment kit with Chlor-Flocreg tablets household bleach or boiling to purify water
520 Water Purification Using Iodine Tablets ndash Preferred Method
The following are the procedures for purifying water with iodine tablets the preferred method There are variations depending on the amount of water yoursquore purifying whether it is cold or not and whether it is cloudy or clear
Fill your canteen with the cleanest water available
Put one iodine tablet into clear water or two iodine tablets into cold or cloudy water If you are using two-quart canteens double those amounts Use two tablets for clear water and four tablets for cold or cloudy water
Place the cap on your canteen
Shake canteen to dissolve tablets
Wait 5 minutes
Loosen the cap and tip the canteen over to allow leakage around the canteen threads
Tighten the cap and wait an additional 25 minutes before drinking
530 Water Purification Using Chlorine Ampoules
The following are the procedures for purifying water with chlorine ampoules
Fill your canteen with the cleanest water available
Mix one ampoule of chlorine with one-half canteen cup of water
Stir that mixture with a clean utensil until the contents are dissolved
After stirring the mixture pour one-half of a plastic canteen capful or one Nuclear Biological Chemical (NBC) canteen capful of chlorine solution into your canteen of water
Place the cap on your canteen and shake
Slightly loosen the cap and tip the canteen over to allow leakage around the threads
10-45
Tighten the cap and wait 30 minutes before drinking
NOTE
By wearing gloves or wrapping the ampoule in paper or cloth you can avoid cutting your hands when breaking open the glass ampoule
540 Water Purification Using An Emergency Water Treatment Kit (Chlor-Flocreg Tablets)
The following are the procedures for purifying water with an emergency water treatment kit with Chlor-Flocreg tablets
Tear off the top of the plastic water treatment bag at the perforation (first time use)
Fill the treatment bag one-half full with the cleanest water available
Add one tablet
Fold the bag tightly three times and fold the tabs in
Hold the bag firmly and shake until the tablet dissolves
Swirl for 10 seconds
Let the bag sit for 4 minutes
Swirl again for 10 seconds
Let the bag sit for an additional 15 minutes
Insert the filter pouch into the neck of the canteen
Pour water from bag through the filter into the canteen Avoid pouring sediment into the filter
Rinse the filter with treated water after use Always filter through the same side of the filter
Rinse sediment from the treatment bag and save the bag for water treatment only
CAUTION Do not drink from the treatment bag The water is still contaminated and must be filtered before drinking Drinking non filtered water may cause stomach and intestinal disorders
550 Water Purification Using Household Bleach
The following are the procedures for purifying water with household bleach
NOTE
Ensure bleach is unscented
10-46
Fill your canteen with the cleanest water possible
Read the label on the bleach bottle to determine the amount of available chlorine Liquid chlorine laundry bleach usually has about 5 to 6 percent available chlorine Based upon the strength of the household bleach add the chlorine to the canteen as directed in Table 10-2
Table 10-2 mdash Drops of Household Bleach to be Added to a One-Quart Canteen
AVAILABLE CHLORINE TO CLEAR WATER TO COLDCLOUDY WATER 1 PERCENT 10 drops 20 drops
Slightly loosen the cap and tip the canteen over to allow leakage around threads
Tighten the cap and wait 30 minutes before drinking the water
560 Water Purification by Boiling
You may find yourself in a situation where iodine or other purification methods are not available In this case you can boil water using the following procedures to make it safe for drinking
Bring water to a rolling boil for 5 minutes
In an emergency boiling water for just 15 seconds will help
Protect boiled water from recontamination
CAUTION If water is suspected of NBC contamination do not attempt to treat Seek a quartermaster water supply
Summary In this chapter you were introduced to the importance of providing first aid to an injured person and the explanation and descriptions of first aid measures that you can apply to yourself and to others before trained medical personnel arrive This chapter provided how-to instructions in lifesaving measures to include clearing the upper airway giving artificial ventilation stopping bleeding controlling shock and protecting the wound Additionally this chapter discussed fundamentals of field sanitation and water purification
10-47
Assignment 10
Objectives
1 Define first aid and identify the general first aid rules 2 Define basic life support 3 Recognize the signs of airway obstruction and describe the steps necessary to
clear the airway 4 Recognize and describe the steps necessary to perform artificial ventilation 5 Describe the methods used to control bleeding 6 Define shock and identify its signs symptoms and treatment 7 Identify the cause and treatment of injuries caused by exposure to heat or cold 8 Identify the treatment of first aid to victims of various types of burns 9 Recognize the steps in treating and immobilizing a fracture 10 Identify field sanitation methods used to dispose of human waste and garbage 11 Identify the procedures taken to purify drinking water
Questions 1 True or False The three reasons for performing first aid are to save lives
prevent further injuries and prevent infection
1 True 2 False
2 There are how many vital functions
1 1 2 2 3 3 4 4
3 True or False The vital functions consist of the breathing process respiration
and blood circulation
1 True 2 False
4 Brain cells when deprived of oxygen will die within what period of time
1 2 to 4 minutes 2 4 to 6 minutes 3 12 to 18 minutes 4 30 minutes to an hour
10-48
5 Respiration involves inhaling oxygen and exhaling which of the following
39 When performing rescue breathing how many breaths should you blow into their
mouth or nose before checking for a pulse or re-establishing airway and seal
1 1 2 2 3 3 4 4
40 Which of the following is a correct statement concerning treatment for bleeding
1 Do not remove objects from the wound 2 Pressure points should be used as a last resort 3 Tails of the standard field dressing should be tied over the wound 4 You should use your field dressing first
41 Which of the following is a correct statement concerning treatment for bleeding
1 If an object is impaled in the wound remove it quickly 2 Remove any visible foreign objects from the wound 3 Tie the tails of the dressing at the edges of the wound 4 You should use your field dressing first
42 When using manual or direct pressure to stop bleeding firm pressure should be
applied for how many minutes
1 2 to 4 2 5 to 10 3 15 to 30 4 Until bleeding stops
43 When applying a tourniquet which of the following statements is correct
1 It should be applied directly over the wound 2 Loosen and retighten every 5 to 10 minutes 3 Once applied do not loosen 4 Wire or shoestring may be used
44 A burn from a hot liquid is considered which type of burn
1 Chemical 2 Electrical 3 Laser 4 Thermal
10-54
45 Which of the following types of burns should be kept moist
1 Dry chemical 2 Laser 3 Wet chemical 4 White Phosphorous
46 True of False When treating either heat exhaustion or heatstroke you should
elevate the casualtyrsquos legs
1 True 2 False
47 Which of the following injuries is caused by an imbalance of electrolytes in the
60 Which of the following human waste disposal methods should be used on patrol
1 Burn-out 2 Cat-hole 3 Pail 4 Straddle-trench
61 When using straddle-trench latrines how many trenches do you need for 100
females
1 1 2 2 3 3 4 4
10-57
ASSIGNMENT 10
First Aid and Field Sanitation
Directions Select the correct answer from the list of alternates below each question in the end of chapter assignment Write in the answer next to the corresponding question number below Use this answer sheet as a reference to completing the online assignment related to this assignment
1
2
3
4
5
6
7
8
9
10
11
12
13
14
15
16
17
18
19
20
21
22
23
24
25
26
27
28
29
30
31
32
33
34
35
36
37
38
39
40
41
42
43
44
45
46
47
48
49
50
51
52
53
54
55
56
57
58
59
60
61
10-58
Additional Resources and References
This chapter is intended to present thorough resources for task training The following reference works are suggested for further study This is optional material for continued education rather than for task training First Aid FM 4-2511 (FM 21-11)NTRP 4-0211AFMAN 44-163(I)MCRP 3-02G Field Hygiene and Sanitation FM 21-10MCRP 4-111D
10-59
Trainee Feedback
Center for Seabees and Facilities Engineering (CSFE) makes every effort to keep their courses up-to-date and free of technical errors If you have a suggestion found an error or inaccuracy please write FAX or email us by using the form below Use one form for each comment and be sure to fill in the information as accurately and detailed as possible Thank you for your assistance Write CSFE
NCF Training Division (N7B) 3502 Goodspeed St Port Hueneme CA 93043-4337
Course Seabee Combat Handbook Volume ____ NAVEDTRA __________ Course Date ________ Chapter Number ______ Page ______ Paragraph _____ Sentence ______ Figure ______ FrameView ______ Description ____________________________________________________ ______________________________________________________________ ______________________________________________________________ ____________________________________________________________________________________________________________________________ ______________________________________________________________ (optional) Corrective action _______________________________________ ______________________________________________________________ ______________________________________________________________ (optional) Supporting reference(s) __________________________________ ______________________________________________________________ Your email address if a response is requested ________________________
10-60
Chapter 10
First Aid and Field Sanitation
Overview
Objectives
Prerequisites
Features of This Manual
100 BASIC FIRST AID
Attitude - You should remain calm and act quickly but efficiently Reassure the casualty that his or her injuries are understood and that proper medical attention is forthcoming The casualtyrsquos confidence and positive attitude can be very helpful
Positioning the Casualty - In most cases the casualty should be lying down with his or her head level with the body until you have determined the type and extent of his or her injuries The exceptions to this are the following
Clothing - Although you should move the casualty no more than necessary you may have to remove clothing in order to determine the extent of his or her injuries Remove only the clothing necessary for examination and treatment being especially car
Infection - Do not touch any open wounds or burns with your fingers hands or other non-sterile objects unless absolutely necessary to stop severe bleeding
110 Vital Functions
111 The Breathing Process
112 Respiration
113 Circulation
120 Evaluating a Casualty
121 Step 1 ndash Check for Responsiveness
122 Step 2 ndash Check for Breathing
123 Step 3 ndash Check for Pulse
124 Step 4 ndash Check for Bleeding
125 Step 5 ndash Check for Shock
126 Step 6 ndash Check for Fractures
127 Step 7 ndash Check for Burns
128 Step 8 ndash Check for Head Injury
200 FIRST AID MEASURES
210 Controlling Bleeding
211 General
212 Methods to Control Bleeding
2121 Applying a Battle Dressing
2125 Applying a Tourniquet
220 Opening the Airway and Restoring Breathing
221 Preliminary Assessment
222 Opening the Airway
223 Rescue Breathing
2231 Mouth-to-Mouth Method
2232 Mouth-to-Nose Method
224 Clearing an Obstructed Airway
2241 Abdominal Thrust on a Conscious Casualty Standing or Sitting
2242 Chest Thrust on a Conscious Casualty Standing or Sitting
230 Recognizing and Treating Shock
231 Signs and Symptoms
232 First Aid Measures
240 Fractures
241 Signs and Symptoms
242 General Rules
243 Splinting Procedures
244 Applying a Sling
245 Treatment for Specific Fractures
2453 Neck Fractures
250 Burn Injuries
251 Eliminate the Source
252 First Aid Measures
300 HEAT AND COLD INJURIES
310 Introduction
320 Heat Injuries
321 General
322 Heat Cramps
323 Heat Exhaustion
324 Heatstroke
330 Cold Injuries
331 General
332 Specific Cold InjuriesConditions
3321 Chilblain
3322 Immersion Syndrome
400 FIELD SANITATION
410 General Information
420 Waste Disposal Devices
500 WATER PURIFICATION
510 Overview
520 Water Purification Using Iodine Tablets ndash Preferred Method
530 Water Purification Using Chlorine Ampoules
540 Water Purification Using An Emergency Water Treatment Kit (Chlor-Flocreg Tablets)
550 Water Purification Using Household Bleach
560 Water Purification by Boiling
Summary
Assignment 10
Objectives
Questions
First Aid and Field Sanitation
Additional Resources and References
Trainee Feedback
animationAvailable1
Button1
3322 Immersion Syndrome
Immersion syndrome also known as immersion foot or trench foot results from long exposure of the feet to wet conditions in temperatures ranging from 32 to 50 degrees Fahrenheit Inactive feet in damp or wet socks and boots are more susceptible The signs of immersion syndrome occur in stages with exposure At first the feet are cold but painless The pulse may be weak and the feet may be somewhat numb Next the feet feel hot with burning or shooting pain Later the skin becomes pale with a bluish tint and the pulse decreases In the later stages the feet may blister swell bleed or even become gangrenous Treatment is required for all stages of immersion syndrome
Gradually warm the affected part and protect it from trauma and infection
Apply dry loose clothing or layers of warm coverings
Elevate the feet to reduce swelling
Transport the casualty to a medical facility as soon as possible
Do not massage the feet moisten the skin or apply direct heat or ice 3323 Frostbite
Frostbite is caused by exposure to cold temperatures usually below 32 degrees Fahrenheit Individuals with a history of cold injuries are more likely to get frostbite The most easily frostbitten parts of the body are the cheeks nose ears chin forehead wrists hands and feet Deep frostbite is very serious and can result in amputation of appendages The signs or symptoms of frostbite include
Loss of sensation or numbness
Sudden blanching of the skin then brief tingling
Redness of the skin or grayish in darker-skinned individuals
Blisters swelling or tender parts
Loss of previous pain sensation
Pale yellowish waxy-looking skin
Frozen tissue that feels solid or wooden Treat frostbite of the face ears or nose by covering them with bare hands until sensation and natural skin color returns Place frostbitten hands under the armpits To treat frostbitten feet remove boots and socks and place the feet under clothing against a buddyrsquos body General treatment of frostbite is as follows
Keep the affected parts warm and covered
Remove or loosen restrictive clothing
Cover affected parts to protect them from further injury
Exercise if possible to warm up
Seek medical treatment
Do not rub the injured part with snow or apply cold water 10-36
Do not massage
Do not expose to an open fire
Do not use ointments or salves
Do not manipulate the affected part to increase circulation
Do not use alcohol or tobacco 3324 Snow Blindness
Snow blindness is the effect that the glare from ice or snow has on the eyes It is more likely to occur in hazy cloudy weather The signs and symptoms of snow blindness are
The sensation of grit in the eyes
Pain in or over the eyes
Eye watering or redness
Headache
Pain with exposure to light To treat a casualty for snow blindness blindfold or cover the eyes with dark cloth Complete rest is desirable for quicker recovery If necessary and possible evacuate the casualty to a medical facility Snow blindness usually heals by itself in a few days if there is no repeated exposure 3325 Dehydration
Dehydration occurs when the body loses too much fluid It is just as prevalent in cold weather as in hot In colder temperatures sweating is not as noticeable since it evaporates and is quickly absorbed The signs and symptoms of dehydration are
Mouth tongue throat parched or dry
Difficulty swallowing
Nausea with or without vomiting
Extreme dizziness and fainting
General fatigue and weakness
Muscle cramps
Difficulty focusing the eyes To treat for dehydration keep the individual warm and loosen his or her clothing Shelter the individual from the wind and cold and begin fluid replacement immediately Transport the casualty to a medical treatment facility as soon as possible 3326 Hypothermia
Hypothermia or general cooling of the body occurs when the body loses heat faster than it can produce heat It can occur with temperatures above or below freezing and causes cooling of the core body temperature below 95 degrees Fahrenheit Hypothermia can be caused by fatigue poor physical condition dehydration faulty blood circulation alcohol or drug use trauma or immersion in cold water The signs and symptoms of hypothermia are progressive and include
10-37
Shivering
Faint pulse
Drowsiness and mental slowness
Hampered stiff and uncoordinated movement
Slurred speech
Slow and shallow breathing
Frozen extremities
Irregular heart action To treat mild hypothermia rewarm the body evenly and as soon as possible You must provide a heat source as the casualty will be unable to produce the needed heat Keep the casualty dry and protected from the elements Give the casualty warm liquids gradually if he or she is conscious Be prepared to provide life support measures and seek medical assistance immediately Severe hypothermia is treated by stabilizing the bodyrsquos core temperature and avoiding further heat loss Handle the casualty gently and evacuate to a medical facility as soon as possible Do not expose the body to an open fire Wrap any hot water bottles or canteens in cloth to avoid scalding Rewarming in the field is dangerous and resuscitation is difficult if not impossible in the field
400 FIELD SANITATION
410 General Information
Field waste disposal is performed to prevent flies from spreading germs from waste to your food and to keep unwanted animals out of your bivouac area Use the following as a guide to performing proper field waste disposal Step 1 Determine the type of field waste disposal to use
The proper type of device to use depends upon the mission length of stay terrain and weather conditions but you should use Table 10-1 as a guideline
When on bivouac o Chemical toilets are the preferred method o Burn-out latrines are preferred as an improvised method when chemical
toilets are not available
When on the march o Individual waste collection bags are preferred o Personal cat-holes are used as an alternative
NOTE
Check local state federal and host-nation regulations for applicable restrictions and for prohibition on burning or burying waste Garbage and rubbish may have to be transported to a waste disposal facility
Human waste disposal should be as far from food services as possible but at least 100 meters
Garbage and soakage pits should be at least 30 meters from food service
Locate downwind and downslope if possible
Locate downslope of all wells springs streams and other water sources at least 30 meters
Step 3 Set up construct and maintain latrines garbage pits and soakage pitstrenches
As soon as unit moves into area detail members to set up chemical toilets andor dig latrines
Assign members to clean latrines on a daily basis
Instruct the Field Sanitation Team to spray latrines with insecticide
Install handwashing facilities at food service and latrines
Cover transport burn or bury waste daily depending on regulations Step 4 Inspect daily to ensure
Waste is collected and transported when possible
Straddle-trench latrines and garbage pits are covered with dirt
Pail latrines are emptied and cleaned
Burn-out latrine containers are rotated and contents burned
Facility not contents are sprayed with insecticide as needed Step 5 Close out improvised latrines and garbage pits when filled within 1 foot of surface by
Spraying with residual insecticide
Packing earth in successive 3-inch layers until mounded one foot above surface
Spraying again with insecticide 10-39
Figure 10-30 ndash Cat-hole Latrine
Posting a sign saying ldquoClosed latrinegarbage pit and daterdquo (except in combat)
420 Waste Disposal Devices
Individual Waste Collection Bags
Preferred method when on a march
Dispose of with regular waste Chemical Toilets
Preferred method on bivouac
Add urinals to protect seats Cat-hole Latrines (Figure 10-30)
Alternate on-the-march method when bags not available
Cover immediately after use
Dig 6 to 12 inches deep and 12 inches in diameter
Keep mound of dirt removed to fill in hole
Straddle-trench Latrine (Figure 10-31)
Use on short bivouacs and field training exercises
Two trenches per 100 males three per 100 females
Dig 4 feet by 1 foot 2 frac12 feet deep 2 feet apart
Keep mounds of dirt removed to fill hole after use
Cover with dirt daily
10-40
Figure 10-31 ndash Straddle-trench Latrine
Deep Pit Latrine (Figure 10-32)
Use for longer periods and built-up areas
Collapsible two-seat boxes available in supply system
Add urinals to protect seats in male latrines
Enough for 6 percent of Seabees
Cover with dirt daily Garbage Pit
Locate near dining facility but no closer than 30 meters
One pit per 100 Seabees served per day
Transport to approved landfill or cover with dirt after each meal and close daily
For longer periods burn and bury ashes
10-41
Figure 10-32 mdash Deep Pit Latrine
Figure 10-33 mdash Pail Latrine
Pail Latrine (Figure 10-33)
Use where water table too close to surface for deep pit latrines
Empty and clean daily
10-42
Figure 10-34 ndash Burn-out Latrine
Figure 10-35 ndash Other urinals Trough Pipe and Urinoil
Grease Trap ndash Use with soakage pits and trenches to prevent clogging of soil Burn-out Latrine (Figure 10-34)
Use where water table too close to surface or extended stays
Rotate containers daily and burn contents
Other Urinals
Trough (Figure 10-35 frame A)
Pipe (Figure 10-35 frame B)
Urinoil (Figure 10-35 frame C)
10-43
Figure 10-36 ndash Food Services Soakage Pit
Soakage Pit - Food Service (Figure 10-36)
Locate near dining facility to prevent accumulation of liquid waste from kitchens
Need at least two to alternate daily
Fill with loose rocks
Add grease trap for dining facility waste to prevent clogging of soil Soakage Pit (Other)
Provide for urinals showers Lyster bags mess kits laundry handwashing facilities
Prevents accumulation of liquid waste
10-44
500 WATER PURIFICATION
510 Overview
Infectious diarrhea results from contamination of water and food by bacteria viruses and parasites Water- and foodborne diarrheal diseases are of particular concern to the military because they can be spread to large numbers of service members simultaneously with disastrous consequences for combat readiness Diarrhea especially when vomiting or fever is present can cause dehydration Fill your canteen with treated water at every chance When treated water is not available you must disinfect the water in your canteen using one of the following methods Using iodine tablets is the preferred way to individually purify water There are several alternate techniques for making drinking water clean if iodine tablets are not available You can use chlorine ampoules which are small sealed glass vials You can also use an emergency water treatment kit with Chlor-Flocreg tablets household bleach or boiling to purify water
520 Water Purification Using Iodine Tablets ndash Preferred Method
The following are the procedures for purifying water with iodine tablets the preferred method There are variations depending on the amount of water yoursquore purifying whether it is cold or not and whether it is cloudy or clear
Fill your canteen with the cleanest water available
Put one iodine tablet into clear water or two iodine tablets into cold or cloudy water If you are using two-quart canteens double those amounts Use two tablets for clear water and four tablets for cold or cloudy water
Place the cap on your canteen
Shake canteen to dissolve tablets
Wait 5 minutes
Loosen the cap and tip the canteen over to allow leakage around the canteen threads
Tighten the cap and wait an additional 25 minutes before drinking
530 Water Purification Using Chlorine Ampoules
The following are the procedures for purifying water with chlorine ampoules
Fill your canteen with the cleanest water available
Mix one ampoule of chlorine with one-half canteen cup of water
Stir that mixture with a clean utensil until the contents are dissolved
After stirring the mixture pour one-half of a plastic canteen capful or one Nuclear Biological Chemical (NBC) canteen capful of chlorine solution into your canteen of water
Place the cap on your canteen and shake
Slightly loosen the cap and tip the canteen over to allow leakage around the threads
10-45
Tighten the cap and wait 30 minutes before drinking
NOTE
By wearing gloves or wrapping the ampoule in paper or cloth you can avoid cutting your hands when breaking open the glass ampoule
540 Water Purification Using An Emergency Water Treatment Kit (Chlor-Flocreg Tablets)
The following are the procedures for purifying water with an emergency water treatment kit with Chlor-Flocreg tablets
Tear off the top of the plastic water treatment bag at the perforation (first time use)
Fill the treatment bag one-half full with the cleanest water available
Add one tablet
Fold the bag tightly three times and fold the tabs in
Hold the bag firmly and shake until the tablet dissolves
Swirl for 10 seconds
Let the bag sit for 4 minutes
Swirl again for 10 seconds
Let the bag sit for an additional 15 minutes
Insert the filter pouch into the neck of the canteen
Pour water from bag through the filter into the canteen Avoid pouring sediment into the filter
Rinse the filter with treated water after use Always filter through the same side of the filter
Rinse sediment from the treatment bag and save the bag for water treatment only
CAUTION Do not drink from the treatment bag The water is still contaminated and must be filtered before drinking Drinking non filtered water may cause stomach and intestinal disorders
550 Water Purification Using Household Bleach
The following are the procedures for purifying water with household bleach
NOTE
Ensure bleach is unscented
10-46
Fill your canteen with the cleanest water possible
Read the label on the bleach bottle to determine the amount of available chlorine Liquid chlorine laundry bleach usually has about 5 to 6 percent available chlorine Based upon the strength of the household bleach add the chlorine to the canteen as directed in Table 10-2
Table 10-2 mdash Drops of Household Bleach to be Added to a One-Quart Canteen
AVAILABLE CHLORINE TO CLEAR WATER TO COLDCLOUDY WATER 1 PERCENT 10 drops 20 drops
Slightly loosen the cap and tip the canteen over to allow leakage around threads
Tighten the cap and wait 30 minutes before drinking the water
560 Water Purification by Boiling
You may find yourself in a situation where iodine or other purification methods are not available In this case you can boil water using the following procedures to make it safe for drinking
Bring water to a rolling boil for 5 minutes
In an emergency boiling water for just 15 seconds will help
Protect boiled water from recontamination
CAUTION If water is suspected of NBC contamination do not attempt to treat Seek a quartermaster water supply
Summary In this chapter you were introduced to the importance of providing first aid to an injured person and the explanation and descriptions of first aid measures that you can apply to yourself and to others before trained medical personnel arrive This chapter provided how-to instructions in lifesaving measures to include clearing the upper airway giving artificial ventilation stopping bleeding controlling shock and protecting the wound Additionally this chapter discussed fundamentals of field sanitation and water purification
10-47
Assignment 10
Objectives
1 Define first aid and identify the general first aid rules 2 Define basic life support 3 Recognize the signs of airway obstruction and describe the steps necessary to
clear the airway 4 Recognize and describe the steps necessary to perform artificial ventilation 5 Describe the methods used to control bleeding 6 Define shock and identify its signs symptoms and treatment 7 Identify the cause and treatment of injuries caused by exposure to heat or cold 8 Identify the treatment of first aid to victims of various types of burns 9 Recognize the steps in treating and immobilizing a fracture 10 Identify field sanitation methods used to dispose of human waste and garbage 11 Identify the procedures taken to purify drinking water
Questions 1 True or False The three reasons for performing first aid are to save lives
prevent further injuries and prevent infection
1 True 2 False
2 There are how many vital functions
1 1 2 2 3 3 4 4
3 True or False The vital functions consist of the breathing process respiration
and blood circulation
1 True 2 False
4 Brain cells when deprived of oxygen will die within what period of time
1 2 to 4 minutes 2 4 to 6 minutes 3 12 to 18 minutes 4 30 minutes to an hour
10-48
5 Respiration involves inhaling oxygen and exhaling which of the following
39 When performing rescue breathing how many breaths should you blow into their
mouth or nose before checking for a pulse or re-establishing airway and seal
1 1 2 2 3 3 4 4
40 Which of the following is a correct statement concerning treatment for bleeding
1 Do not remove objects from the wound 2 Pressure points should be used as a last resort 3 Tails of the standard field dressing should be tied over the wound 4 You should use your field dressing first
41 Which of the following is a correct statement concerning treatment for bleeding
1 If an object is impaled in the wound remove it quickly 2 Remove any visible foreign objects from the wound 3 Tie the tails of the dressing at the edges of the wound 4 You should use your field dressing first
42 When using manual or direct pressure to stop bleeding firm pressure should be
applied for how many minutes
1 2 to 4 2 5 to 10 3 15 to 30 4 Until bleeding stops
43 When applying a tourniquet which of the following statements is correct
1 It should be applied directly over the wound 2 Loosen and retighten every 5 to 10 minutes 3 Once applied do not loosen 4 Wire or shoestring may be used
44 A burn from a hot liquid is considered which type of burn
1 Chemical 2 Electrical 3 Laser 4 Thermal
10-54
45 Which of the following types of burns should be kept moist
1 Dry chemical 2 Laser 3 Wet chemical 4 White Phosphorous
46 True of False When treating either heat exhaustion or heatstroke you should
elevate the casualtyrsquos legs
1 True 2 False
47 Which of the following injuries is caused by an imbalance of electrolytes in the
60 Which of the following human waste disposal methods should be used on patrol
1 Burn-out 2 Cat-hole 3 Pail 4 Straddle-trench
61 When using straddle-trench latrines how many trenches do you need for 100
females
1 1 2 2 3 3 4 4
10-57
ASSIGNMENT 10
First Aid and Field Sanitation
Directions Select the correct answer from the list of alternates below each question in the end of chapter assignment Write in the answer next to the corresponding question number below Use this answer sheet as a reference to completing the online assignment related to this assignment
1
2
3
4
5
6
7
8
9
10
11
12
13
14
15
16
17
18
19
20
21
22
23
24
25
26
27
28
29
30
31
32
33
34
35
36
37
38
39
40
41
42
43
44
45
46
47
48
49
50
51
52
53
54
55
56
57
58
59
60
61
10-58
Additional Resources and References
This chapter is intended to present thorough resources for task training The following reference works are suggested for further study This is optional material for continued education rather than for task training First Aid FM 4-2511 (FM 21-11)NTRP 4-0211AFMAN 44-163(I)MCRP 3-02G Field Hygiene and Sanitation FM 21-10MCRP 4-111D
10-59
Trainee Feedback
Center for Seabees and Facilities Engineering (CSFE) makes every effort to keep their courses up-to-date and free of technical errors If you have a suggestion found an error or inaccuracy please write FAX or email us by using the form below Use one form for each comment and be sure to fill in the information as accurately and detailed as possible Thank you for your assistance Write CSFE
NCF Training Division (N7B) 3502 Goodspeed St Port Hueneme CA 93043-4337
Course Seabee Combat Handbook Volume ____ NAVEDTRA __________ Course Date ________ Chapter Number ______ Page ______ Paragraph _____ Sentence ______ Figure ______ FrameView ______ Description ____________________________________________________ ______________________________________________________________ ______________________________________________________________ ____________________________________________________________________________________________________________________________ ______________________________________________________________ (optional) Corrective action _______________________________________ ______________________________________________________________ ______________________________________________________________ (optional) Supporting reference(s) __________________________________ ______________________________________________________________ Your email address if a response is requested ________________________
10-60
Chapter 10
First Aid and Field Sanitation
Overview
Objectives
Prerequisites
Features of This Manual
100 BASIC FIRST AID
Attitude - You should remain calm and act quickly but efficiently Reassure the casualty that his or her injuries are understood and that proper medical attention is forthcoming The casualtyrsquos confidence and positive attitude can be very helpful
Positioning the Casualty - In most cases the casualty should be lying down with his or her head level with the body until you have determined the type and extent of his or her injuries The exceptions to this are the following
Clothing - Although you should move the casualty no more than necessary you may have to remove clothing in order to determine the extent of his or her injuries Remove only the clothing necessary for examination and treatment being especially car
Infection - Do not touch any open wounds or burns with your fingers hands or other non-sterile objects unless absolutely necessary to stop severe bleeding
110 Vital Functions
111 The Breathing Process
112 Respiration
113 Circulation
120 Evaluating a Casualty
121 Step 1 ndash Check for Responsiveness
122 Step 2 ndash Check for Breathing
123 Step 3 ndash Check for Pulse
124 Step 4 ndash Check for Bleeding
125 Step 5 ndash Check for Shock
126 Step 6 ndash Check for Fractures
127 Step 7 ndash Check for Burns
128 Step 8 ndash Check for Head Injury
200 FIRST AID MEASURES
210 Controlling Bleeding
211 General
212 Methods to Control Bleeding
2121 Applying a Battle Dressing
2125 Applying a Tourniquet
220 Opening the Airway and Restoring Breathing
221 Preliminary Assessment
222 Opening the Airway
223 Rescue Breathing
2231 Mouth-to-Mouth Method
2232 Mouth-to-Nose Method
224 Clearing an Obstructed Airway
2241 Abdominal Thrust on a Conscious Casualty Standing or Sitting
2242 Chest Thrust on a Conscious Casualty Standing or Sitting
230 Recognizing and Treating Shock
231 Signs and Symptoms
232 First Aid Measures
240 Fractures
241 Signs and Symptoms
242 General Rules
243 Splinting Procedures
244 Applying a Sling
245 Treatment for Specific Fractures
2453 Neck Fractures
250 Burn Injuries
251 Eliminate the Source
252 First Aid Measures
300 HEAT AND COLD INJURIES
310 Introduction
320 Heat Injuries
321 General
322 Heat Cramps
323 Heat Exhaustion
324 Heatstroke
330 Cold Injuries
331 General
332 Specific Cold InjuriesConditions
3321 Chilblain
3322 Immersion Syndrome
400 FIELD SANITATION
410 General Information
420 Waste Disposal Devices
500 WATER PURIFICATION
510 Overview
520 Water Purification Using Iodine Tablets ndash Preferred Method
530 Water Purification Using Chlorine Ampoules
540 Water Purification Using An Emergency Water Treatment Kit (Chlor-Flocreg Tablets)
550 Water Purification Using Household Bleach
560 Water Purification by Boiling
Summary
Assignment 10
Objectives
Questions
First Aid and Field Sanitation
Additional Resources and References
Trainee Feedback
animationAvailable1
Button1
Shivering
Faint pulse
Drowsiness and mental slowness
Hampered stiff and uncoordinated movement
Slurred speech
Slow and shallow breathing
Frozen extremities
Irregular heart action To treat mild hypothermia rewarm the body evenly and as soon as possible You must provide a heat source as the casualty will be unable to produce the needed heat Keep the casualty dry and protected from the elements Give the casualty warm liquids gradually if he or she is conscious Be prepared to provide life support measures and seek medical assistance immediately Severe hypothermia is treated by stabilizing the bodyrsquos core temperature and avoiding further heat loss Handle the casualty gently and evacuate to a medical facility as soon as possible Do not expose the body to an open fire Wrap any hot water bottles or canteens in cloth to avoid scalding Rewarming in the field is dangerous and resuscitation is difficult if not impossible in the field
400 FIELD SANITATION
410 General Information
Field waste disposal is performed to prevent flies from spreading germs from waste to your food and to keep unwanted animals out of your bivouac area Use the following as a guide to performing proper field waste disposal Step 1 Determine the type of field waste disposal to use
The proper type of device to use depends upon the mission length of stay terrain and weather conditions but you should use Table 10-1 as a guideline
When on bivouac o Chemical toilets are the preferred method o Burn-out latrines are preferred as an improvised method when chemical
toilets are not available
When on the march o Individual waste collection bags are preferred o Personal cat-holes are used as an alternative
NOTE
Check local state federal and host-nation regulations for applicable restrictions and for prohibition on burning or burying waste Garbage and rubbish may have to be transported to a waste disposal facility
Human waste disposal should be as far from food services as possible but at least 100 meters
Garbage and soakage pits should be at least 30 meters from food service
Locate downwind and downslope if possible
Locate downslope of all wells springs streams and other water sources at least 30 meters
Step 3 Set up construct and maintain latrines garbage pits and soakage pitstrenches
As soon as unit moves into area detail members to set up chemical toilets andor dig latrines
Assign members to clean latrines on a daily basis
Instruct the Field Sanitation Team to spray latrines with insecticide
Install handwashing facilities at food service and latrines
Cover transport burn or bury waste daily depending on regulations Step 4 Inspect daily to ensure
Waste is collected and transported when possible
Straddle-trench latrines and garbage pits are covered with dirt
Pail latrines are emptied and cleaned
Burn-out latrine containers are rotated and contents burned
Facility not contents are sprayed with insecticide as needed Step 5 Close out improvised latrines and garbage pits when filled within 1 foot of surface by
Spraying with residual insecticide
Packing earth in successive 3-inch layers until mounded one foot above surface
Spraying again with insecticide 10-39
Figure 10-30 ndash Cat-hole Latrine
Posting a sign saying ldquoClosed latrinegarbage pit and daterdquo (except in combat)
420 Waste Disposal Devices
Individual Waste Collection Bags
Preferred method when on a march
Dispose of with regular waste Chemical Toilets
Preferred method on bivouac
Add urinals to protect seats Cat-hole Latrines (Figure 10-30)
Alternate on-the-march method when bags not available
Cover immediately after use
Dig 6 to 12 inches deep and 12 inches in diameter
Keep mound of dirt removed to fill in hole
Straddle-trench Latrine (Figure 10-31)
Use on short bivouacs and field training exercises
Two trenches per 100 males three per 100 females
Dig 4 feet by 1 foot 2 frac12 feet deep 2 feet apart
Keep mounds of dirt removed to fill hole after use
Cover with dirt daily
10-40
Figure 10-31 ndash Straddle-trench Latrine
Deep Pit Latrine (Figure 10-32)
Use for longer periods and built-up areas
Collapsible two-seat boxes available in supply system
Add urinals to protect seats in male latrines
Enough for 6 percent of Seabees
Cover with dirt daily Garbage Pit
Locate near dining facility but no closer than 30 meters
One pit per 100 Seabees served per day
Transport to approved landfill or cover with dirt after each meal and close daily
For longer periods burn and bury ashes
10-41
Figure 10-32 mdash Deep Pit Latrine
Figure 10-33 mdash Pail Latrine
Pail Latrine (Figure 10-33)
Use where water table too close to surface for deep pit latrines
Empty and clean daily
10-42
Figure 10-34 ndash Burn-out Latrine
Figure 10-35 ndash Other urinals Trough Pipe and Urinoil
Grease Trap ndash Use with soakage pits and trenches to prevent clogging of soil Burn-out Latrine (Figure 10-34)
Use where water table too close to surface or extended stays
Rotate containers daily and burn contents
Other Urinals
Trough (Figure 10-35 frame A)
Pipe (Figure 10-35 frame B)
Urinoil (Figure 10-35 frame C)
10-43
Figure 10-36 ndash Food Services Soakage Pit
Soakage Pit - Food Service (Figure 10-36)
Locate near dining facility to prevent accumulation of liquid waste from kitchens
Need at least two to alternate daily
Fill with loose rocks
Add grease trap for dining facility waste to prevent clogging of soil Soakage Pit (Other)
Provide for urinals showers Lyster bags mess kits laundry handwashing facilities
Prevents accumulation of liquid waste
10-44
500 WATER PURIFICATION
510 Overview
Infectious diarrhea results from contamination of water and food by bacteria viruses and parasites Water- and foodborne diarrheal diseases are of particular concern to the military because they can be spread to large numbers of service members simultaneously with disastrous consequences for combat readiness Diarrhea especially when vomiting or fever is present can cause dehydration Fill your canteen with treated water at every chance When treated water is not available you must disinfect the water in your canteen using one of the following methods Using iodine tablets is the preferred way to individually purify water There are several alternate techniques for making drinking water clean if iodine tablets are not available You can use chlorine ampoules which are small sealed glass vials You can also use an emergency water treatment kit with Chlor-Flocreg tablets household bleach or boiling to purify water
520 Water Purification Using Iodine Tablets ndash Preferred Method
The following are the procedures for purifying water with iodine tablets the preferred method There are variations depending on the amount of water yoursquore purifying whether it is cold or not and whether it is cloudy or clear
Fill your canteen with the cleanest water available
Put one iodine tablet into clear water or two iodine tablets into cold or cloudy water If you are using two-quart canteens double those amounts Use two tablets for clear water and four tablets for cold or cloudy water
Place the cap on your canteen
Shake canteen to dissolve tablets
Wait 5 minutes
Loosen the cap and tip the canteen over to allow leakage around the canteen threads
Tighten the cap and wait an additional 25 minutes before drinking
530 Water Purification Using Chlorine Ampoules
The following are the procedures for purifying water with chlorine ampoules
Fill your canteen with the cleanest water available
Mix one ampoule of chlorine with one-half canteen cup of water
Stir that mixture with a clean utensil until the contents are dissolved
After stirring the mixture pour one-half of a plastic canteen capful or one Nuclear Biological Chemical (NBC) canteen capful of chlorine solution into your canteen of water
Place the cap on your canteen and shake
Slightly loosen the cap and tip the canteen over to allow leakage around the threads
10-45
Tighten the cap and wait 30 minutes before drinking
NOTE
By wearing gloves or wrapping the ampoule in paper or cloth you can avoid cutting your hands when breaking open the glass ampoule
540 Water Purification Using An Emergency Water Treatment Kit (Chlor-Flocreg Tablets)
The following are the procedures for purifying water with an emergency water treatment kit with Chlor-Flocreg tablets
Tear off the top of the plastic water treatment bag at the perforation (first time use)
Fill the treatment bag one-half full with the cleanest water available
Add one tablet
Fold the bag tightly three times and fold the tabs in
Hold the bag firmly and shake until the tablet dissolves
Swirl for 10 seconds
Let the bag sit for 4 minutes
Swirl again for 10 seconds
Let the bag sit for an additional 15 minutes
Insert the filter pouch into the neck of the canteen
Pour water from bag through the filter into the canteen Avoid pouring sediment into the filter
Rinse the filter with treated water after use Always filter through the same side of the filter
Rinse sediment from the treatment bag and save the bag for water treatment only
CAUTION Do not drink from the treatment bag The water is still contaminated and must be filtered before drinking Drinking non filtered water may cause stomach and intestinal disorders
550 Water Purification Using Household Bleach
The following are the procedures for purifying water with household bleach
NOTE
Ensure bleach is unscented
10-46
Fill your canteen with the cleanest water possible
Read the label on the bleach bottle to determine the amount of available chlorine Liquid chlorine laundry bleach usually has about 5 to 6 percent available chlorine Based upon the strength of the household bleach add the chlorine to the canteen as directed in Table 10-2
Table 10-2 mdash Drops of Household Bleach to be Added to a One-Quart Canteen
AVAILABLE CHLORINE TO CLEAR WATER TO COLDCLOUDY WATER 1 PERCENT 10 drops 20 drops
Slightly loosen the cap and tip the canteen over to allow leakage around threads
Tighten the cap and wait 30 minutes before drinking the water
560 Water Purification by Boiling
You may find yourself in a situation where iodine or other purification methods are not available In this case you can boil water using the following procedures to make it safe for drinking
Bring water to a rolling boil for 5 minutes
In an emergency boiling water for just 15 seconds will help
Protect boiled water from recontamination
CAUTION If water is suspected of NBC contamination do not attempt to treat Seek a quartermaster water supply
Summary In this chapter you were introduced to the importance of providing first aid to an injured person and the explanation and descriptions of first aid measures that you can apply to yourself and to others before trained medical personnel arrive This chapter provided how-to instructions in lifesaving measures to include clearing the upper airway giving artificial ventilation stopping bleeding controlling shock and protecting the wound Additionally this chapter discussed fundamentals of field sanitation and water purification
10-47
Assignment 10
Objectives
1 Define first aid and identify the general first aid rules 2 Define basic life support 3 Recognize the signs of airway obstruction and describe the steps necessary to
clear the airway 4 Recognize and describe the steps necessary to perform artificial ventilation 5 Describe the methods used to control bleeding 6 Define shock and identify its signs symptoms and treatment 7 Identify the cause and treatment of injuries caused by exposure to heat or cold 8 Identify the treatment of first aid to victims of various types of burns 9 Recognize the steps in treating and immobilizing a fracture 10 Identify field sanitation methods used to dispose of human waste and garbage 11 Identify the procedures taken to purify drinking water
Questions 1 True or False The three reasons for performing first aid are to save lives
prevent further injuries and prevent infection
1 True 2 False
2 There are how many vital functions
1 1 2 2 3 3 4 4
3 True or False The vital functions consist of the breathing process respiration
and blood circulation
1 True 2 False
4 Brain cells when deprived of oxygen will die within what period of time
1 2 to 4 minutes 2 4 to 6 minutes 3 12 to 18 minutes 4 30 minutes to an hour
10-48
5 Respiration involves inhaling oxygen and exhaling which of the following
39 When performing rescue breathing how many breaths should you blow into their
mouth or nose before checking for a pulse or re-establishing airway and seal
1 1 2 2 3 3 4 4
40 Which of the following is a correct statement concerning treatment for bleeding
1 Do not remove objects from the wound 2 Pressure points should be used as a last resort 3 Tails of the standard field dressing should be tied over the wound 4 You should use your field dressing first
41 Which of the following is a correct statement concerning treatment for bleeding
1 If an object is impaled in the wound remove it quickly 2 Remove any visible foreign objects from the wound 3 Tie the tails of the dressing at the edges of the wound 4 You should use your field dressing first
42 When using manual or direct pressure to stop bleeding firm pressure should be
applied for how many minutes
1 2 to 4 2 5 to 10 3 15 to 30 4 Until bleeding stops
43 When applying a tourniquet which of the following statements is correct
1 It should be applied directly over the wound 2 Loosen and retighten every 5 to 10 minutes 3 Once applied do not loosen 4 Wire or shoestring may be used
44 A burn from a hot liquid is considered which type of burn
1 Chemical 2 Electrical 3 Laser 4 Thermal
10-54
45 Which of the following types of burns should be kept moist
1 Dry chemical 2 Laser 3 Wet chemical 4 White Phosphorous
46 True of False When treating either heat exhaustion or heatstroke you should
elevate the casualtyrsquos legs
1 True 2 False
47 Which of the following injuries is caused by an imbalance of electrolytes in the
60 Which of the following human waste disposal methods should be used on patrol
1 Burn-out 2 Cat-hole 3 Pail 4 Straddle-trench
61 When using straddle-trench latrines how many trenches do you need for 100
females
1 1 2 2 3 3 4 4
10-57
ASSIGNMENT 10
First Aid and Field Sanitation
Directions Select the correct answer from the list of alternates below each question in the end of chapter assignment Write in the answer next to the corresponding question number below Use this answer sheet as a reference to completing the online assignment related to this assignment
1
2
3
4
5
6
7
8
9
10
11
12
13
14
15
16
17
18
19
20
21
22
23
24
25
26
27
28
29
30
31
32
33
34
35
36
37
38
39
40
41
42
43
44
45
46
47
48
49
50
51
52
53
54
55
56
57
58
59
60
61
10-58
Additional Resources and References
This chapter is intended to present thorough resources for task training The following reference works are suggested for further study This is optional material for continued education rather than for task training First Aid FM 4-2511 (FM 21-11)NTRP 4-0211AFMAN 44-163(I)MCRP 3-02G Field Hygiene and Sanitation FM 21-10MCRP 4-111D
10-59
Trainee Feedback
Center for Seabees and Facilities Engineering (CSFE) makes every effort to keep their courses up-to-date and free of technical errors If you have a suggestion found an error or inaccuracy please write FAX or email us by using the form below Use one form for each comment and be sure to fill in the information as accurately and detailed as possible Thank you for your assistance Write CSFE
NCF Training Division (N7B) 3502 Goodspeed St Port Hueneme CA 93043-4337
Course Seabee Combat Handbook Volume ____ NAVEDTRA __________ Course Date ________ Chapter Number ______ Page ______ Paragraph _____ Sentence ______ Figure ______ FrameView ______ Description ____________________________________________________ ______________________________________________________________ ______________________________________________________________ ____________________________________________________________________________________________________________________________ ______________________________________________________________ (optional) Corrective action _______________________________________ ______________________________________________________________ ______________________________________________________________ (optional) Supporting reference(s) __________________________________ ______________________________________________________________ Your email address if a response is requested ________________________
10-60
Chapter 10
First Aid and Field Sanitation
Overview
Objectives
Prerequisites
Features of This Manual
100 BASIC FIRST AID
Attitude - You should remain calm and act quickly but efficiently Reassure the casualty that his or her injuries are understood and that proper medical attention is forthcoming The casualtyrsquos confidence and positive attitude can be very helpful
Positioning the Casualty - In most cases the casualty should be lying down with his or her head level with the body until you have determined the type and extent of his or her injuries The exceptions to this are the following
Clothing - Although you should move the casualty no more than necessary you may have to remove clothing in order to determine the extent of his or her injuries Remove only the clothing necessary for examination and treatment being especially car
Infection - Do not touch any open wounds or burns with your fingers hands or other non-sterile objects unless absolutely necessary to stop severe bleeding
110 Vital Functions
111 The Breathing Process
112 Respiration
113 Circulation
120 Evaluating a Casualty
121 Step 1 ndash Check for Responsiveness
122 Step 2 ndash Check for Breathing
123 Step 3 ndash Check for Pulse
124 Step 4 ndash Check for Bleeding
125 Step 5 ndash Check for Shock
126 Step 6 ndash Check for Fractures
127 Step 7 ndash Check for Burns
128 Step 8 ndash Check for Head Injury
200 FIRST AID MEASURES
210 Controlling Bleeding
211 General
212 Methods to Control Bleeding
2121 Applying a Battle Dressing
2125 Applying a Tourniquet
220 Opening the Airway and Restoring Breathing
221 Preliminary Assessment
222 Opening the Airway
223 Rescue Breathing
2231 Mouth-to-Mouth Method
2232 Mouth-to-Nose Method
224 Clearing an Obstructed Airway
2241 Abdominal Thrust on a Conscious Casualty Standing or Sitting
2242 Chest Thrust on a Conscious Casualty Standing or Sitting
230 Recognizing and Treating Shock
231 Signs and Symptoms
232 First Aid Measures
240 Fractures
241 Signs and Symptoms
242 General Rules
243 Splinting Procedures
244 Applying a Sling
245 Treatment for Specific Fractures
2453 Neck Fractures
250 Burn Injuries
251 Eliminate the Source
252 First Aid Measures
300 HEAT AND COLD INJURIES
310 Introduction
320 Heat Injuries
321 General
322 Heat Cramps
323 Heat Exhaustion
324 Heatstroke
330 Cold Injuries
331 General
332 Specific Cold InjuriesConditions
3321 Chilblain
3322 Immersion Syndrome
400 FIELD SANITATION
410 General Information
420 Waste Disposal Devices
500 WATER PURIFICATION
510 Overview
520 Water Purification Using Iodine Tablets ndash Preferred Method
530 Water Purification Using Chlorine Ampoules
540 Water Purification Using An Emergency Water Treatment Kit (Chlor-Flocreg Tablets)
550 Water Purification Using Household Bleach
560 Water Purification by Boiling
Summary
Assignment 10
Objectives
Questions
First Aid and Field Sanitation
Additional Resources and References
Trainee Feedback
animationAvailable1
Button1
500 WATER PURIFICATION
510 Overview
Infectious diarrhea results from contamination of water and food by bacteria viruses and parasites Water- and foodborne diarrheal diseases are of particular concern to the military because they can be spread to large numbers of service members simultaneously with disastrous consequences for combat readiness Diarrhea especially when vomiting or fever is present can cause dehydration Fill your canteen with treated water at every chance When treated water is not available you must disinfect the water in your canteen using one of the following methods Using iodine tablets is the preferred way to individually purify water There are several alternate techniques for making drinking water clean if iodine tablets are not available You can use chlorine ampoules which are small sealed glass vials You can also use an emergency water treatment kit with Chlor-Flocreg tablets household bleach or boiling to purify water
520 Water Purification Using Iodine Tablets ndash Preferred Method
The following are the procedures for purifying water with iodine tablets the preferred method There are variations depending on the amount of water yoursquore purifying whether it is cold or not and whether it is cloudy or clear
Fill your canteen with the cleanest water available
Put one iodine tablet into clear water or two iodine tablets into cold or cloudy water If you are using two-quart canteens double those amounts Use two tablets for clear water and four tablets for cold or cloudy water
Place the cap on your canteen
Shake canteen to dissolve tablets
Wait 5 minutes
Loosen the cap and tip the canteen over to allow leakage around the canteen threads
Tighten the cap and wait an additional 25 minutes before drinking
530 Water Purification Using Chlorine Ampoules
The following are the procedures for purifying water with chlorine ampoules
Fill your canteen with the cleanest water available
Mix one ampoule of chlorine with one-half canteen cup of water
Stir that mixture with a clean utensil until the contents are dissolved
After stirring the mixture pour one-half of a plastic canteen capful or one Nuclear Biological Chemical (NBC) canteen capful of chlorine solution into your canteen of water
Place the cap on your canteen and shake
Slightly loosen the cap and tip the canteen over to allow leakage around the threads
10-45
Tighten the cap and wait 30 minutes before drinking
NOTE
By wearing gloves or wrapping the ampoule in paper or cloth you can avoid cutting your hands when breaking open the glass ampoule
540 Water Purification Using An Emergency Water Treatment Kit (Chlor-Flocreg Tablets)
The following are the procedures for purifying water with an emergency water treatment kit with Chlor-Flocreg tablets
Tear off the top of the plastic water treatment bag at the perforation (first time use)
Fill the treatment bag one-half full with the cleanest water available
Add one tablet
Fold the bag tightly three times and fold the tabs in
Hold the bag firmly and shake until the tablet dissolves
Swirl for 10 seconds
Let the bag sit for 4 minutes
Swirl again for 10 seconds
Let the bag sit for an additional 15 minutes
Insert the filter pouch into the neck of the canteen
Pour water from bag through the filter into the canteen Avoid pouring sediment into the filter
Rinse the filter with treated water after use Always filter through the same side of the filter
Rinse sediment from the treatment bag and save the bag for water treatment only
CAUTION Do not drink from the treatment bag The water is still contaminated and must be filtered before drinking Drinking non filtered water may cause stomach and intestinal disorders
550 Water Purification Using Household Bleach
The following are the procedures for purifying water with household bleach
NOTE
Ensure bleach is unscented
10-46
Fill your canteen with the cleanest water possible
Read the label on the bleach bottle to determine the amount of available chlorine Liquid chlorine laundry bleach usually has about 5 to 6 percent available chlorine Based upon the strength of the household bleach add the chlorine to the canteen as directed in Table 10-2
Table 10-2 mdash Drops of Household Bleach to be Added to a One-Quart Canteen
AVAILABLE CHLORINE TO CLEAR WATER TO COLDCLOUDY WATER 1 PERCENT 10 drops 20 drops
Slightly loosen the cap and tip the canteen over to allow leakage around threads
Tighten the cap and wait 30 minutes before drinking the water
560 Water Purification by Boiling
You may find yourself in a situation where iodine or other purification methods are not available In this case you can boil water using the following procedures to make it safe for drinking
Bring water to a rolling boil for 5 minutes
In an emergency boiling water for just 15 seconds will help
Protect boiled water from recontamination
CAUTION If water is suspected of NBC contamination do not attempt to treat Seek a quartermaster water supply
Summary In this chapter you were introduced to the importance of providing first aid to an injured person and the explanation and descriptions of first aid measures that you can apply to yourself and to others before trained medical personnel arrive This chapter provided how-to instructions in lifesaving measures to include clearing the upper airway giving artificial ventilation stopping bleeding controlling shock and protecting the wound Additionally this chapter discussed fundamentals of field sanitation and water purification
10-47
Assignment 10
Objectives
1 Define first aid and identify the general first aid rules 2 Define basic life support 3 Recognize the signs of airway obstruction and describe the steps necessary to
clear the airway 4 Recognize and describe the steps necessary to perform artificial ventilation 5 Describe the methods used to control bleeding 6 Define shock and identify its signs symptoms and treatment 7 Identify the cause and treatment of injuries caused by exposure to heat or cold 8 Identify the treatment of first aid to victims of various types of burns 9 Recognize the steps in treating and immobilizing a fracture 10 Identify field sanitation methods used to dispose of human waste and garbage 11 Identify the procedures taken to purify drinking water
Questions 1 True or False The three reasons for performing first aid are to save lives
prevent further injuries and prevent infection
1 True 2 False
2 There are how many vital functions
1 1 2 2 3 3 4 4
3 True or False The vital functions consist of the breathing process respiration
and blood circulation
1 True 2 False
4 Brain cells when deprived of oxygen will die within what period of time
1 2 to 4 minutes 2 4 to 6 minutes 3 12 to 18 minutes 4 30 minutes to an hour
10-48
5 Respiration involves inhaling oxygen and exhaling which of the following
39 When performing rescue breathing how many breaths should you blow into their
mouth or nose before checking for a pulse or re-establishing airway and seal
1 1 2 2 3 3 4 4
40 Which of the following is a correct statement concerning treatment for bleeding
1 Do not remove objects from the wound 2 Pressure points should be used as a last resort 3 Tails of the standard field dressing should be tied over the wound 4 You should use your field dressing first
41 Which of the following is a correct statement concerning treatment for bleeding
1 If an object is impaled in the wound remove it quickly 2 Remove any visible foreign objects from the wound 3 Tie the tails of the dressing at the edges of the wound 4 You should use your field dressing first
42 When using manual or direct pressure to stop bleeding firm pressure should be
applied for how many minutes
1 2 to 4 2 5 to 10 3 15 to 30 4 Until bleeding stops
43 When applying a tourniquet which of the following statements is correct
1 It should be applied directly over the wound 2 Loosen and retighten every 5 to 10 minutes 3 Once applied do not loosen 4 Wire or shoestring may be used
44 A burn from a hot liquid is considered which type of burn
1 Chemical 2 Electrical 3 Laser 4 Thermal
10-54
45 Which of the following types of burns should be kept moist
1 Dry chemical 2 Laser 3 Wet chemical 4 White Phosphorous
46 True of False When treating either heat exhaustion or heatstroke you should
elevate the casualtyrsquos legs
1 True 2 False
47 Which of the following injuries is caused by an imbalance of electrolytes in the
60 Which of the following human waste disposal methods should be used on patrol
1 Burn-out 2 Cat-hole 3 Pail 4 Straddle-trench
61 When using straddle-trench latrines how many trenches do you need for 100
females
1 1 2 2 3 3 4 4
10-57
ASSIGNMENT 10
First Aid and Field Sanitation
Directions Select the correct answer from the list of alternates below each question in the end of chapter assignment Write in the answer next to the corresponding question number below Use this answer sheet as a reference to completing the online assignment related to this assignment
1
2
3
4
5
6
7
8
9
10
11
12
13
14
15
16
17
18
19
20
21
22
23
24
25
26
27
28
29
30
31
32
33
34
35
36
37
38
39
40
41
42
43
44
45
46
47
48
49
50
51
52
53
54
55
56
57
58
59
60
61
10-58
Additional Resources and References
This chapter is intended to present thorough resources for task training The following reference works are suggested for further study This is optional material for continued education rather than for task training First Aid FM 4-2511 (FM 21-11)NTRP 4-0211AFMAN 44-163(I)MCRP 3-02G Field Hygiene and Sanitation FM 21-10MCRP 4-111D
10-59
Trainee Feedback
Center for Seabees and Facilities Engineering (CSFE) makes every effort to keep their courses up-to-date and free of technical errors If you have a suggestion found an error or inaccuracy please write FAX or email us by using the form below Use one form for each comment and be sure to fill in the information as accurately and detailed as possible Thank you for your assistance Write CSFE
NCF Training Division (N7B) 3502 Goodspeed St Port Hueneme CA 93043-4337
Course Seabee Combat Handbook Volume ____ NAVEDTRA __________ Course Date ________ Chapter Number ______ Page ______ Paragraph _____ Sentence ______ Figure ______ FrameView ______ Description ____________________________________________________ ______________________________________________________________ ______________________________________________________________ ____________________________________________________________________________________________________________________________ ______________________________________________________________ (optional) Corrective action _______________________________________ ______________________________________________________________ ______________________________________________________________ (optional) Supporting reference(s) __________________________________ ______________________________________________________________ Your email address if a response is requested ________________________
10-60
Chapter 10
First Aid and Field Sanitation
Overview
Objectives
Prerequisites
Features of This Manual
100 BASIC FIRST AID
Attitude - You should remain calm and act quickly but efficiently Reassure the casualty that his or her injuries are understood and that proper medical attention is forthcoming The casualtyrsquos confidence and positive attitude can be very helpful
Positioning the Casualty - In most cases the casualty should be lying down with his or her head level with the body until you have determined the type and extent of his or her injuries The exceptions to this are the following
Clothing - Although you should move the casualty no more than necessary you may have to remove clothing in order to determine the extent of his or her injuries Remove only the clothing necessary for examination and treatment being especially car
Infection - Do not touch any open wounds or burns with your fingers hands or other non-sterile objects unless absolutely necessary to stop severe bleeding
110 Vital Functions
111 The Breathing Process
112 Respiration
113 Circulation
120 Evaluating a Casualty
121 Step 1 ndash Check for Responsiveness
122 Step 2 ndash Check for Breathing
123 Step 3 ndash Check for Pulse
124 Step 4 ndash Check for Bleeding
125 Step 5 ndash Check for Shock
126 Step 6 ndash Check for Fractures
127 Step 7 ndash Check for Burns
128 Step 8 ndash Check for Head Injury
200 FIRST AID MEASURES
210 Controlling Bleeding
211 General
212 Methods to Control Bleeding
2121 Applying a Battle Dressing
2125 Applying a Tourniquet
220 Opening the Airway and Restoring Breathing
221 Preliminary Assessment
222 Opening the Airway
223 Rescue Breathing
2231 Mouth-to-Mouth Method
2232 Mouth-to-Nose Method
224 Clearing an Obstructed Airway
2241 Abdominal Thrust on a Conscious Casualty Standing or Sitting
2242 Chest Thrust on a Conscious Casualty Standing or Sitting
230 Recognizing and Treating Shock
231 Signs and Symptoms
232 First Aid Measures
240 Fractures
241 Signs and Symptoms
242 General Rules
243 Splinting Procedures
244 Applying a Sling
245 Treatment for Specific Fractures
2453 Neck Fractures
250 Burn Injuries
251 Eliminate the Source
252 First Aid Measures
300 HEAT AND COLD INJURIES
310 Introduction
320 Heat Injuries
321 General
322 Heat Cramps
323 Heat Exhaustion
324 Heatstroke
330 Cold Injuries
331 General
332 Specific Cold InjuriesConditions
3321 Chilblain
3322 Immersion Syndrome
400 FIELD SANITATION
410 General Information
420 Waste Disposal Devices
500 WATER PURIFICATION
510 Overview
520 Water Purification Using Iodine Tablets ndash Preferred Method
530 Water Purification Using Chlorine Ampoules
540 Water Purification Using An Emergency Water Treatment Kit (Chlor-Flocreg Tablets)
550 Water Purification Using Household Bleach
560 Water Purification by Boiling
Summary
Assignment 10
Objectives
Questions
First Aid and Field Sanitation
Additional Resources and References
Trainee Feedback
animationAvailable1
Button1
Assignment 10
Objectives
1 Define first aid and identify the general first aid rules 2 Define basic life support 3 Recognize the signs of airway obstruction and describe the steps necessary to
clear the airway 4 Recognize and describe the steps necessary to perform artificial ventilation 5 Describe the methods used to control bleeding 6 Define shock and identify its signs symptoms and treatment 7 Identify the cause and treatment of injuries caused by exposure to heat or cold 8 Identify the treatment of first aid to victims of various types of burns 9 Recognize the steps in treating and immobilizing a fracture 10 Identify field sanitation methods used to dispose of human waste and garbage 11 Identify the procedures taken to purify drinking water
Questions 1 True or False The three reasons for performing first aid are to save lives
prevent further injuries and prevent infection
1 True 2 False
2 There are how many vital functions
1 1 2 2 3 3 4 4
3 True or False The vital functions consist of the breathing process respiration
and blood circulation
1 True 2 False
4 Brain cells when deprived of oxygen will die within what period of time
1 2 to 4 minutes 2 4 to 6 minutes 3 12 to 18 minutes 4 30 minutes to an hour
10-48
5 Respiration involves inhaling oxygen and exhaling which of the following
39 When performing rescue breathing how many breaths should you blow into their
mouth or nose before checking for a pulse or re-establishing airway and seal
1 1 2 2 3 3 4 4
40 Which of the following is a correct statement concerning treatment for bleeding
1 Do not remove objects from the wound 2 Pressure points should be used as a last resort 3 Tails of the standard field dressing should be tied over the wound 4 You should use your field dressing first
41 Which of the following is a correct statement concerning treatment for bleeding
1 If an object is impaled in the wound remove it quickly 2 Remove any visible foreign objects from the wound 3 Tie the tails of the dressing at the edges of the wound 4 You should use your field dressing first
42 When using manual or direct pressure to stop bleeding firm pressure should be
applied for how many minutes
1 2 to 4 2 5 to 10 3 15 to 30 4 Until bleeding stops
43 When applying a tourniquet which of the following statements is correct
1 It should be applied directly over the wound 2 Loosen and retighten every 5 to 10 minutes 3 Once applied do not loosen 4 Wire or shoestring may be used
44 A burn from a hot liquid is considered which type of burn
1 Chemical 2 Electrical 3 Laser 4 Thermal
10-54
45 Which of the following types of burns should be kept moist
1 Dry chemical 2 Laser 3 Wet chemical 4 White Phosphorous
46 True of False When treating either heat exhaustion or heatstroke you should
elevate the casualtyrsquos legs
1 True 2 False
47 Which of the following injuries is caused by an imbalance of electrolytes in the
60 Which of the following human waste disposal methods should be used on patrol
1 Burn-out 2 Cat-hole 3 Pail 4 Straddle-trench
61 When using straddle-trench latrines how many trenches do you need for 100
females
1 1 2 2 3 3 4 4
10-57
ASSIGNMENT 10
First Aid and Field Sanitation
Directions Select the correct answer from the list of alternates below each question in the end of chapter assignment Write in the answer next to the corresponding question number below Use this answer sheet as a reference to completing the online assignment related to this assignment
1
2
3
4
5
6
7
8
9
10
11
12
13
14
15
16
17
18
19
20
21
22
23
24
25
26
27
28
29
30
31
32
33
34
35
36
37
38
39
40
41
42
43
44
45
46
47
48
49
50
51
52
53
54
55
56
57
58
59
60
61
10-58
Additional Resources and References
This chapter is intended to present thorough resources for task training The following reference works are suggested for further study This is optional material for continued education rather than for task training First Aid FM 4-2511 (FM 21-11)NTRP 4-0211AFMAN 44-163(I)MCRP 3-02G Field Hygiene and Sanitation FM 21-10MCRP 4-111D
10-59
Trainee Feedback
Center for Seabees and Facilities Engineering (CSFE) makes every effort to keep their courses up-to-date and free of technical errors If you have a suggestion found an error or inaccuracy please write FAX or email us by using the form below Use one form for each comment and be sure to fill in the information as accurately and detailed as possible Thank you for your assistance Write CSFE
NCF Training Division (N7B) 3502 Goodspeed St Port Hueneme CA 93043-4337
Course Seabee Combat Handbook Volume ____ NAVEDTRA __________ Course Date ________ Chapter Number ______ Page ______ Paragraph _____ Sentence ______ Figure ______ FrameView ______ Description ____________________________________________________ ______________________________________________________________ ______________________________________________________________ ____________________________________________________________________________________________________________________________ ______________________________________________________________ (optional) Corrective action _______________________________________ ______________________________________________________________ ______________________________________________________________ (optional) Supporting reference(s) __________________________________ ______________________________________________________________ Your email address if a response is requested ________________________
10-60
Chapter 10
First Aid and Field Sanitation
Overview
Objectives
Prerequisites
Features of This Manual
100 BASIC FIRST AID
Attitude - You should remain calm and act quickly but efficiently Reassure the casualty that his or her injuries are understood and that proper medical attention is forthcoming The casualtyrsquos confidence and positive attitude can be very helpful
Positioning the Casualty - In most cases the casualty should be lying down with his or her head level with the body until you have determined the type and extent of his or her injuries The exceptions to this are the following
Clothing - Although you should move the casualty no more than necessary you may have to remove clothing in order to determine the extent of his or her injuries Remove only the clothing necessary for examination and treatment being especially car
Infection - Do not touch any open wounds or burns with your fingers hands or other non-sterile objects unless absolutely necessary to stop severe bleeding
110 Vital Functions
111 The Breathing Process
112 Respiration
113 Circulation
120 Evaluating a Casualty
121 Step 1 ndash Check for Responsiveness
122 Step 2 ndash Check for Breathing
123 Step 3 ndash Check for Pulse
124 Step 4 ndash Check for Bleeding
125 Step 5 ndash Check for Shock
126 Step 6 ndash Check for Fractures
127 Step 7 ndash Check for Burns
128 Step 8 ndash Check for Head Injury
200 FIRST AID MEASURES
210 Controlling Bleeding
211 General
212 Methods to Control Bleeding
2121 Applying a Battle Dressing
2125 Applying a Tourniquet
220 Opening the Airway and Restoring Breathing
221 Preliminary Assessment
222 Opening the Airway
223 Rescue Breathing
2231 Mouth-to-Mouth Method
2232 Mouth-to-Nose Method
224 Clearing an Obstructed Airway
2241 Abdominal Thrust on a Conscious Casualty Standing or Sitting
2242 Chest Thrust on a Conscious Casualty Standing or Sitting
230 Recognizing and Treating Shock
231 Signs and Symptoms
232 First Aid Measures
240 Fractures
241 Signs and Symptoms
242 General Rules
243 Splinting Procedures
244 Applying a Sling
245 Treatment for Specific Fractures
2453 Neck Fractures
250 Burn Injuries
251 Eliminate the Source
252 First Aid Measures
300 HEAT AND COLD INJURIES
310 Introduction
320 Heat Injuries
321 General
322 Heat Cramps
323 Heat Exhaustion
324 Heatstroke
330 Cold Injuries
331 General
332 Specific Cold InjuriesConditions
3321 Chilblain
3322 Immersion Syndrome
400 FIELD SANITATION
410 General Information
420 Waste Disposal Devices
500 WATER PURIFICATION
510 Overview
520 Water Purification Using Iodine Tablets ndash Preferred Method
530 Water Purification Using Chlorine Ampoules
540 Water Purification Using An Emergency Water Treatment Kit (Chlor-Flocreg Tablets)
550 Water Purification Using Household Bleach
560 Water Purification by Boiling
Summary
Assignment 10
Objectives
Questions
First Aid and Field Sanitation
Additional Resources and References
Trainee Feedback
animationAvailable1
Button1
12 The human pulse is caused by the rhythmic expansion and contraction of which of the following
1 Arteries 2 Capillaries 3 Muscles 4 Veins
13 Which of the following is the artery at the side of the neck that can be used to
detect a casualtyrsquos pulse
1 Carotid 2 Femoral 3 Posterior tibial 4 Radial
14 Which of the following is the artery near the groin that can be used to detect a
casualtyrsquos pulse
1 Carotid 2 Femoral 3 Posterior tibial 4 Radial
15 Which of the following is the artery on the wrist that can be used to detect a
casualtyrsquos pulse
1 Carotid 2 Femoral 3 Posterior tibial 4 Radial
16 Which of the following is the artery at the ankles that can be used to detect a
casualtyrsquos pulse
1 Carotid 2 Femoral 3 Posterior tibial 4 Radial
17 The carotid artery that can be used to detect a pulse is located in which of the
following places on the human body
1 Ankle 2 Groin 3 Side of the neck 4 Wrist
10-50
18 The femoral artery that can be used to detect a pulse is located in which of the following places on the human body
1 Ankle 2 Groin 3 Side of the neck 4 Wrist
19 The radial artery that can be used to detect a pulse is located in which of the
following places on the human body
1 Ankle 2 Groin 3 Side of the neck 4 Wrist
20 The posterior tibial artery that can be used to detect a pulse is located in which of
the following places on the human body
1 Ankle 2 Groin 3 Side of the neck 4 Wrist
21 Your first step in evaluating a casualty should be which of the following
1 Check for bleeding 2 Check for breathing 3 Check for pulse 4 Check for responsiveness
22 If the casualty is breathing which of the following should be your next step in
evaluating a casualty
1 Check for bleeding 2 Check for pulse 3 Check for responsiveness 4 Check for shock
23 If when evaluating a casualty you can not detect a pulse what should be your
next action
1 Check for breathing 2 Check for responsiveness 3 Perform rescue breathing 4 Seek immediate medical help
10-51
24 When evaluating a casualty if the casualty has a pulse and is breathing on their own your next step should be which of the following
1 Check for bleeding 2 Check for fractures 3 Check for responsiveness 4 Check for shock
25 Which of the following is a sign of shock
1 Hot dry skin 2 Slurred speech 3 Sweaty cool skin 4 Tingling in handsfeet
26 Which of the following is a sign of shock
1 Loss of appetite 2 Rapid breathing 3 Tingling in handsfeet 4 Unequal pupil size
27 A fracture with bleeding and bone protruding is known as which of the following
types of fractures
1 Closed 2 Open 3 Primary 4 Simple
28 Which of the following is a sign of a possible head injury
39 When performing rescue breathing how many breaths should you blow into their
mouth or nose before checking for a pulse or re-establishing airway and seal
1 1 2 2 3 3 4 4
40 Which of the following is a correct statement concerning treatment for bleeding
1 Do not remove objects from the wound 2 Pressure points should be used as a last resort 3 Tails of the standard field dressing should be tied over the wound 4 You should use your field dressing first
41 Which of the following is a correct statement concerning treatment for bleeding
1 If an object is impaled in the wound remove it quickly 2 Remove any visible foreign objects from the wound 3 Tie the tails of the dressing at the edges of the wound 4 You should use your field dressing first
42 When using manual or direct pressure to stop bleeding firm pressure should be
applied for how many minutes
1 2 to 4 2 5 to 10 3 15 to 30 4 Until bleeding stops
43 When applying a tourniquet which of the following statements is correct
1 It should be applied directly over the wound 2 Loosen and retighten every 5 to 10 minutes 3 Once applied do not loosen 4 Wire or shoestring may be used
44 A burn from a hot liquid is considered which type of burn
1 Chemical 2 Electrical 3 Laser 4 Thermal
10-54
45 Which of the following types of burns should be kept moist
1 Dry chemical 2 Laser 3 Wet chemical 4 White Phosphorous
46 True of False When treating either heat exhaustion or heatstroke you should
elevate the casualtyrsquos legs
1 True 2 False
47 Which of the following injuries is caused by an imbalance of electrolytes in the
60 Which of the following human waste disposal methods should be used on patrol
1 Burn-out 2 Cat-hole 3 Pail 4 Straddle-trench
61 When using straddle-trench latrines how many trenches do you need for 100
females
1 1 2 2 3 3 4 4
10-57
ASSIGNMENT 10
First Aid and Field Sanitation
Directions Select the correct answer from the list of alternates below each question in the end of chapter assignment Write in the answer next to the corresponding question number below Use this answer sheet as a reference to completing the online assignment related to this assignment
1
2
3
4
5
6
7
8
9
10
11
12
13
14
15
16
17
18
19
20
21
22
23
24
25
26
27
28
29
30
31
32
33
34
35
36
37
38
39
40
41
42
43
44
45
46
47
48
49
50
51
52
53
54
55
56
57
58
59
60
61
10-58
Additional Resources and References
This chapter is intended to present thorough resources for task training The following reference works are suggested for further study This is optional material for continued education rather than for task training First Aid FM 4-2511 (FM 21-11)NTRP 4-0211AFMAN 44-163(I)MCRP 3-02G Field Hygiene and Sanitation FM 21-10MCRP 4-111D
10-59
Trainee Feedback
Center for Seabees and Facilities Engineering (CSFE) makes every effort to keep their courses up-to-date and free of technical errors If you have a suggestion found an error or inaccuracy please write FAX or email us by using the form below Use one form for each comment and be sure to fill in the information as accurately and detailed as possible Thank you for your assistance Write CSFE
NCF Training Division (N7B) 3502 Goodspeed St Port Hueneme CA 93043-4337
Course Seabee Combat Handbook Volume ____ NAVEDTRA __________ Course Date ________ Chapter Number ______ Page ______ Paragraph _____ Sentence ______ Figure ______ FrameView ______ Description ____________________________________________________ ______________________________________________________________ ______________________________________________________________ ____________________________________________________________________________________________________________________________ ______________________________________________________________ (optional) Corrective action _______________________________________ ______________________________________________________________ ______________________________________________________________ (optional) Supporting reference(s) __________________________________ ______________________________________________________________ Your email address if a response is requested ________________________
10-60
Chapter 10
First Aid and Field Sanitation
Overview
Objectives
Prerequisites
Features of This Manual
100 BASIC FIRST AID
Attitude - You should remain calm and act quickly but efficiently Reassure the casualty that his or her injuries are understood and that proper medical attention is forthcoming The casualtyrsquos confidence and positive attitude can be very helpful
Positioning the Casualty - In most cases the casualty should be lying down with his or her head level with the body until you have determined the type and extent of his or her injuries The exceptions to this are the following
Clothing - Although you should move the casualty no more than necessary you may have to remove clothing in order to determine the extent of his or her injuries Remove only the clothing necessary for examination and treatment being especially car
Infection - Do not touch any open wounds or burns with your fingers hands or other non-sterile objects unless absolutely necessary to stop severe bleeding
110 Vital Functions
111 The Breathing Process
112 Respiration
113 Circulation
120 Evaluating a Casualty
121 Step 1 ndash Check for Responsiveness
122 Step 2 ndash Check for Breathing
123 Step 3 ndash Check for Pulse
124 Step 4 ndash Check for Bleeding
125 Step 5 ndash Check for Shock
126 Step 6 ndash Check for Fractures
127 Step 7 ndash Check for Burns
128 Step 8 ndash Check for Head Injury
200 FIRST AID MEASURES
210 Controlling Bleeding
211 General
212 Methods to Control Bleeding
2121 Applying a Battle Dressing
2125 Applying a Tourniquet
220 Opening the Airway and Restoring Breathing
221 Preliminary Assessment
222 Opening the Airway
223 Rescue Breathing
2231 Mouth-to-Mouth Method
2232 Mouth-to-Nose Method
224 Clearing an Obstructed Airway
2241 Abdominal Thrust on a Conscious Casualty Standing or Sitting
2242 Chest Thrust on a Conscious Casualty Standing or Sitting
230 Recognizing and Treating Shock
231 Signs and Symptoms
232 First Aid Measures
240 Fractures
241 Signs and Symptoms
242 General Rules
243 Splinting Procedures
244 Applying a Sling
245 Treatment for Specific Fractures
2453 Neck Fractures
250 Burn Injuries
251 Eliminate the Source
252 First Aid Measures
300 HEAT AND COLD INJURIES
310 Introduction
320 Heat Injuries
321 General
322 Heat Cramps
323 Heat Exhaustion
324 Heatstroke
330 Cold Injuries
331 General
332 Specific Cold InjuriesConditions
3321 Chilblain
3322 Immersion Syndrome
400 FIELD SANITATION
410 General Information
420 Waste Disposal Devices
500 WATER PURIFICATION
510 Overview
520 Water Purification Using Iodine Tablets ndash Preferred Method
530 Water Purification Using Chlorine Ampoules
540 Water Purification Using An Emergency Water Treatment Kit (Chlor-Flocreg Tablets)
550 Water Purification Using Household Bleach
560 Water Purification by Boiling
Summary
Assignment 10
Objectives
Questions
First Aid and Field Sanitation
Additional Resources and References
Trainee Feedback
animationAvailable1
Button1
31 Which of the following methods is the preferred method of clearing an obstruction from the throat of a casualty
39 When performing rescue breathing how many breaths should you blow into their
mouth or nose before checking for a pulse or re-establishing airway and seal
1 1 2 2 3 3 4 4
40 Which of the following is a correct statement concerning treatment for bleeding
1 Do not remove objects from the wound 2 Pressure points should be used as a last resort 3 Tails of the standard field dressing should be tied over the wound 4 You should use your field dressing first
41 Which of the following is a correct statement concerning treatment for bleeding
1 If an object is impaled in the wound remove it quickly 2 Remove any visible foreign objects from the wound 3 Tie the tails of the dressing at the edges of the wound 4 You should use your field dressing first
42 When using manual or direct pressure to stop bleeding firm pressure should be
applied for how many minutes
1 2 to 4 2 5 to 10 3 15 to 30 4 Until bleeding stops
43 When applying a tourniquet which of the following statements is correct
1 It should be applied directly over the wound 2 Loosen and retighten every 5 to 10 minutes 3 Once applied do not loosen 4 Wire or shoestring may be used
44 A burn from a hot liquid is considered which type of burn
1 Chemical 2 Electrical 3 Laser 4 Thermal
10-54
45 Which of the following types of burns should be kept moist
1 Dry chemical 2 Laser 3 Wet chemical 4 White Phosphorous
46 True of False When treating either heat exhaustion or heatstroke you should
elevate the casualtyrsquos legs
1 True 2 False
47 Which of the following injuries is caused by an imbalance of electrolytes in the
60 Which of the following human waste disposal methods should be used on patrol
1 Burn-out 2 Cat-hole 3 Pail 4 Straddle-trench
61 When using straddle-trench latrines how many trenches do you need for 100
females
1 1 2 2 3 3 4 4
10-57
ASSIGNMENT 10
First Aid and Field Sanitation
Directions Select the correct answer from the list of alternates below each question in the end of chapter assignment Write in the answer next to the corresponding question number below Use this answer sheet as a reference to completing the online assignment related to this assignment
1
2
3
4
5
6
7
8
9
10
11
12
13
14
15
16
17
18
19
20
21
22
23
24
25
26
27
28
29
30
31
32
33
34
35
36
37
38
39
40
41
42
43
44
45
46
47
48
49
50
51
52
53
54
55
56
57
58
59
60
61
10-58
Additional Resources and References
This chapter is intended to present thorough resources for task training The following reference works are suggested for further study This is optional material for continued education rather than for task training First Aid FM 4-2511 (FM 21-11)NTRP 4-0211AFMAN 44-163(I)MCRP 3-02G Field Hygiene and Sanitation FM 21-10MCRP 4-111D
10-59
Trainee Feedback
Center for Seabees and Facilities Engineering (CSFE) makes every effort to keep their courses up-to-date and free of technical errors If you have a suggestion found an error or inaccuracy please write FAX or email us by using the form below Use one form for each comment and be sure to fill in the information as accurately and detailed as possible Thank you for your assistance Write CSFE
NCF Training Division (N7B) 3502 Goodspeed St Port Hueneme CA 93043-4337
Course Seabee Combat Handbook Volume ____ NAVEDTRA __________ Course Date ________ Chapter Number ______ Page ______ Paragraph _____ Sentence ______ Figure ______ FrameView ______ Description ____________________________________________________ ______________________________________________________________ ______________________________________________________________ ____________________________________________________________________________________________________________________________ ______________________________________________________________ (optional) Corrective action _______________________________________ ______________________________________________________________ ______________________________________________________________ (optional) Supporting reference(s) __________________________________ ______________________________________________________________ Your email address if a response is requested ________________________
10-60
Chapter 10
First Aid and Field Sanitation
Overview
Objectives
Prerequisites
Features of This Manual
100 BASIC FIRST AID
Attitude - You should remain calm and act quickly but efficiently Reassure the casualty that his or her injuries are understood and that proper medical attention is forthcoming The casualtyrsquos confidence and positive attitude can be very helpful
Positioning the Casualty - In most cases the casualty should be lying down with his or her head level with the body until you have determined the type and extent of his or her injuries The exceptions to this are the following
Clothing - Although you should move the casualty no more than necessary you may have to remove clothing in order to determine the extent of his or her injuries Remove only the clothing necessary for examination and treatment being especially car
Infection - Do not touch any open wounds or burns with your fingers hands or other non-sterile objects unless absolutely necessary to stop severe bleeding
110 Vital Functions
111 The Breathing Process
112 Respiration
113 Circulation
120 Evaluating a Casualty
121 Step 1 ndash Check for Responsiveness
122 Step 2 ndash Check for Breathing
123 Step 3 ndash Check for Pulse
124 Step 4 ndash Check for Bleeding
125 Step 5 ndash Check for Shock
126 Step 6 ndash Check for Fractures
127 Step 7 ndash Check for Burns
128 Step 8 ndash Check for Head Injury
200 FIRST AID MEASURES
210 Controlling Bleeding
211 General
212 Methods to Control Bleeding
2121 Applying a Battle Dressing
2125 Applying a Tourniquet
220 Opening the Airway and Restoring Breathing
221 Preliminary Assessment
222 Opening the Airway
223 Rescue Breathing
2231 Mouth-to-Mouth Method
2232 Mouth-to-Nose Method
224 Clearing an Obstructed Airway
2241 Abdominal Thrust on a Conscious Casualty Standing or Sitting
2242 Chest Thrust on a Conscious Casualty Standing or Sitting
230 Recognizing and Treating Shock
231 Signs and Symptoms
232 First Aid Measures
240 Fractures
241 Signs and Symptoms
242 General Rules
243 Splinting Procedures
244 Applying a Sling
245 Treatment for Specific Fractures
2453 Neck Fractures
250 Burn Injuries
251 Eliminate the Source
252 First Aid Measures
300 HEAT AND COLD INJURIES
310 Introduction
320 Heat Injuries
321 General
322 Heat Cramps
323 Heat Exhaustion
324 Heatstroke
330 Cold Injuries
331 General
332 Specific Cold InjuriesConditions
3321 Chilblain
3322 Immersion Syndrome
400 FIELD SANITATION
410 General Information
420 Waste Disposal Devices
500 WATER PURIFICATION
510 Overview
520 Water Purification Using Iodine Tablets ndash Preferred Method
530 Water Purification Using Chlorine Ampoules
540 Water Purification Using An Emergency Water Treatment Kit (Chlor-Flocreg Tablets)
550 Water Purification Using Household Bleach
560 Water Purification by Boiling
Summary
Assignment 10
Objectives
Questions
First Aid and Field Sanitation
Additional Resources and References
Trainee Feedback
animationAvailable1
Button1
38 Which method of rescue breathing should be performed on a casualty whose jaws are clamped shut from spasms
39 When performing rescue breathing how many breaths should you blow into their
mouth or nose before checking for a pulse or re-establishing airway and seal
1 1 2 2 3 3 4 4
40 Which of the following is a correct statement concerning treatment for bleeding
1 Do not remove objects from the wound 2 Pressure points should be used as a last resort 3 Tails of the standard field dressing should be tied over the wound 4 You should use your field dressing first
41 Which of the following is a correct statement concerning treatment for bleeding
1 If an object is impaled in the wound remove it quickly 2 Remove any visible foreign objects from the wound 3 Tie the tails of the dressing at the edges of the wound 4 You should use your field dressing first
42 When using manual or direct pressure to stop bleeding firm pressure should be
applied for how many minutes
1 2 to 4 2 5 to 10 3 15 to 30 4 Until bleeding stops
43 When applying a tourniquet which of the following statements is correct
1 It should be applied directly over the wound 2 Loosen and retighten every 5 to 10 minutes 3 Once applied do not loosen 4 Wire or shoestring may be used
44 A burn from a hot liquid is considered which type of burn
1 Chemical 2 Electrical 3 Laser 4 Thermal
10-54
45 Which of the following types of burns should be kept moist
1 Dry chemical 2 Laser 3 Wet chemical 4 White Phosphorous
46 True of False When treating either heat exhaustion or heatstroke you should
elevate the casualtyrsquos legs
1 True 2 False
47 Which of the following injuries is caused by an imbalance of electrolytes in the
60 Which of the following human waste disposal methods should be used on patrol
1 Burn-out 2 Cat-hole 3 Pail 4 Straddle-trench
61 When using straddle-trench latrines how many trenches do you need for 100
females
1 1 2 2 3 3 4 4
10-57
ASSIGNMENT 10
First Aid and Field Sanitation
Directions Select the correct answer from the list of alternates below each question in the end of chapter assignment Write in the answer next to the corresponding question number below Use this answer sheet as a reference to completing the online assignment related to this assignment
1
2
3
4
5
6
7
8
9
10
11
12
13
14
15
16
17
18
19
20
21
22
23
24
25
26
27
28
29
30
31
32
33
34
35
36
37
38
39
40
41
42
43
44
45
46
47
48
49
50
51
52
53
54
55
56
57
58
59
60
61
10-58
Additional Resources and References
This chapter is intended to present thorough resources for task training The following reference works are suggested for further study This is optional material for continued education rather than for task training First Aid FM 4-2511 (FM 21-11)NTRP 4-0211AFMAN 44-163(I)MCRP 3-02G Field Hygiene and Sanitation FM 21-10MCRP 4-111D
10-59
Trainee Feedback
Center for Seabees and Facilities Engineering (CSFE) makes every effort to keep their courses up-to-date and free of technical errors If you have a suggestion found an error or inaccuracy please write FAX or email us by using the form below Use one form for each comment and be sure to fill in the information as accurately and detailed as possible Thank you for your assistance Write CSFE
NCF Training Division (N7B) 3502 Goodspeed St Port Hueneme CA 93043-4337
Course Seabee Combat Handbook Volume ____ NAVEDTRA __________ Course Date ________ Chapter Number ______ Page ______ Paragraph _____ Sentence ______ Figure ______ FrameView ______ Description ____________________________________________________ ______________________________________________________________ ______________________________________________________________ ____________________________________________________________________________________________________________________________ ______________________________________________________________ (optional) Corrective action _______________________________________ ______________________________________________________________ ______________________________________________________________ (optional) Supporting reference(s) __________________________________ ______________________________________________________________ Your email address if a response is requested ________________________
10-60
Chapter 10
First Aid and Field Sanitation
Overview
Objectives
Prerequisites
Features of This Manual
100 BASIC FIRST AID
Attitude - You should remain calm and act quickly but efficiently Reassure the casualty that his or her injuries are understood and that proper medical attention is forthcoming The casualtyrsquos confidence and positive attitude can be very helpful
Positioning the Casualty - In most cases the casualty should be lying down with his or her head level with the body until you have determined the type and extent of his or her injuries The exceptions to this are the following
Clothing - Although you should move the casualty no more than necessary you may have to remove clothing in order to determine the extent of his or her injuries Remove only the clothing necessary for examination and treatment being especially car
Infection - Do not touch any open wounds or burns with your fingers hands or other non-sterile objects unless absolutely necessary to stop severe bleeding
110 Vital Functions
111 The Breathing Process
112 Respiration
113 Circulation
120 Evaluating a Casualty
121 Step 1 ndash Check for Responsiveness
122 Step 2 ndash Check for Breathing
123 Step 3 ndash Check for Pulse
124 Step 4 ndash Check for Bleeding
125 Step 5 ndash Check for Shock
126 Step 6 ndash Check for Fractures
127 Step 7 ndash Check for Burns
128 Step 8 ndash Check for Head Injury
200 FIRST AID MEASURES
210 Controlling Bleeding
211 General
212 Methods to Control Bleeding
2121 Applying a Battle Dressing
2125 Applying a Tourniquet
220 Opening the Airway and Restoring Breathing
221 Preliminary Assessment
222 Opening the Airway
223 Rescue Breathing
2231 Mouth-to-Mouth Method
2232 Mouth-to-Nose Method
224 Clearing an Obstructed Airway
2241 Abdominal Thrust on a Conscious Casualty Standing or Sitting
2242 Chest Thrust on a Conscious Casualty Standing or Sitting
230 Recognizing and Treating Shock
231 Signs and Symptoms
232 First Aid Measures
240 Fractures
241 Signs and Symptoms
242 General Rules
243 Splinting Procedures
244 Applying a Sling
245 Treatment for Specific Fractures
2453 Neck Fractures
250 Burn Injuries
251 Eliminate the Source
252 First Aid Measures
300 HEAT AND COLD INJURIES
310 Introduction
320 Heat Injuries
321 General
322 Heat Cramps
323 Heat Exhaustion
324 Heatstroke
330 Cold Injuries
331 General
332 Specific Cold InjuriesConditions
3321 Chilblain
3322 Immersion Syndrome
400 FIELD SANITATION
410 General Information
420 Waste Disposal Devices
500 WATER PURIFICATION
510 Overview
520 Water Purification Using Iodine Tablets ndash Preferred Method
530 Water Purification Using Chlorine Ampoules
540 Water Purification Using An Emergency Water Treatment Kit (Chlor-Flocreg Tablets)
550 Water Purification Using Household Bleach
560 Water Purification by Boiling
Summary
Assignment 10
Objectives
Questions
First Aid and Field Sanitation
Additional Resources and References
Trainee Feedback
animationAvailable1
Button1
52 Frozen tissue with a sold or wooden feeling are signs of the later stages of which of the following cold injuries
60 Which of the following human waste disposal methods should be used on patrol
1 Burn-out 2 Cat-hole 3 Pail 4 Straddle-trench
61 When using straddle-trench latrines how many trenches do you need for 100
females
1 1 2 2 3 3 4 4
10-57
ASSIGNMENT 10
First Aid and Field Sanitation
Directions Select the correct answer from the list of alternates below each question in the end of chapter assignment Write in the answer next to the corresponding question number below Use this answer sheet as a reference to completing the online assignment related to this assignment
1
2
3
4
5
6
7
8
9
10
11
12
13
14
15
16
17
18
19
20
21
22
23
24
25
26
27
28
29
30
31
32
33
34
35
36
37
38
39
40
41
42
43
44
45
46
47
48
49
50
51
52
53
54
55
56
57
58
59
60
61
10-58
Additional Resources and References
This chapter is intended to present thorough resources for task training The following reference works are suggested for further study This is optional material for continued education rather than for task training First Aid FM 4-2511 (FM 21-11)NTRP 4-0211AFMAN 44-163(I)MCRP 3-02G Field Hygiene and Sanitation FM 21-10MCRP 4-111D
10-59
Trainee Feedback
Center for Seabees and Facilities Engineering (CSFE) makes every effort to keep their courses up-to-date and free of technical errors If you have a suggestion found an error or inaccuracy please write FAX or email us by using the form below Use one form for each comment and be sure to fill in the information as accurately and detailed as possible Thank you for your assistance Write CSFE
NCF Training Division (N7B) 3502 Goodspeed St Port Hueneme CA 93043-4337
Course Seabee Combat Handbook Volume ____ NAVEDTRA __________ Course Date ________ Chapter Number ______ Page ______ Paragraph _____ Sentence ______ Figure ______ FrameView ______ Description ____________________________________________________ ______________________________________________________________ ______________________________________________________________ ____________________________________________________________________________________________________________________________ ______________________________________________________________ (optional) Corrective action _______________________________________ ______________________________________________________________ ______________________________________________________________ (optional) Supporting reference(s) __________________________________ ______________________________________________________________ Your email address if a response is requested ________________________
10-60
Chapter 10
First Aid and Field Sanitation
Overview
Objectives
Prerequisites
Features of This Manual
100 BASIC FIRST AID
Attitude - You should remain calm and act quickly but efficiently Reassure the casualty that his or her injuries are understood and that proper medical attention is forthcoming The casualtyrsquos confidence and positive attitude can be very helpful
Positioning the Casualty - In most cases the casualty should be lying down with his or her head level with the body until you have determined the type and extent of his or her injuries The exceptions to this are the following
Clothing - Although you should move the casualty no more than necessary you may have to remove clothing in order to determine the extent of his or her injuries Remove only the clothing necessary for examination and treatment being especially car
Infection - Do not touch any open wounds or burns with your fingers hands or other non-sterile objects unless absolutely necessary to stop severe bleeding
110 Vital Functions
111 The Breathing Process
112 Respiration
113 Circulation
120 Evaluating a Casualty
121 Step 1 ndash Check for Responsiveness
122 Step 2 ndash Check for Breathing
123 Step 3 ndash Check for Pulse
124 Step 4 ndash Check for Bleeding
125 Step 5 ndash Check for Shock
126 Step 6 ndash Check for Fractures
127 Step 7 ndash Check for Burns
128 Step 8 ndash Check for Head Injury
200 FIRST AID MEASURES
210 Controlling Bleeding
211 General
212 Methods to Control Bleeding
2121 Applying a Battle Dressing
2125 Applying a Tourniquet
220 Opening the Airway and Restoring Breathing
221 Preliminary Assessment
222 Opening the Airway
223 Rescue Breathing
2231 Mouth-to-Mouth Method
2232 Mouth-to-Nose Method
224 Clearing an Obstructed Airway
2241 Abdominal Thrust on a Conscious Casualty Standing or Sitting
2242 Chest Thrust on a Conscious Casualty Standing or Sitting
230 Recognizing and Treating Shock
231 Signs and Symptoms
232 First Aid Measures
240 Fractures
241 Signs and Symptoms
242 General Rules
243 Splinting Procedures
244 Applying a Sling
245 Treatment for Specific Fractures
2453 Neck Fractures
250 Burn Injuries
251 Eliminate the Source
252 First Aid Measures
300 HEAT AND COLD INJURIES
310 Introduction
320 Heat Injuries
321 General
322 Heat Cramps
323 Heat Exhaustion
324 Heatstroke
330 Cold Injuries
331 General
332 Specific Cold InjuriesConditions
3321 Chilblain
3322 Immersion Syndrome
400 FIELD SANITATION
410 General Information
420 Waste Disposal Devices
500 WATER PURIFICATION
510 Overview
520 Water Purification Using Iodine Tablets ndash Preferred Method
530 Water Purification Using Chlorine Ampoules
540 Water Purification Using An Emergency Water Treatment Kit (Chlor-Flocreg Tablets)
550 Water Purification Using Household Bleach
560 Water Purification by Boiling
Summary
Assignment 10
Objectives
Questions
First Aid and Field Sanitation
Additional Resources and References
Trainee Feedback
animationAvailable1
Button1
58 How many chlorine ampoules should you add to a half canteen cup of clear water to purify it
1 1 2 2 3 3 4 4
59 Which of the following is the preferred improvised method of human waste
60 Which of the following human waste disposal methods should be used on patrol
1 Burn-out 2 Cat-hole 3 Pail 4 Straddle-trench
61 When using straddle-trench latrines how many trenches do you need for 100
females
1 1 2 2 3 3 4 4
10-57
ASSIGNMENT 10
First Aid and Field Sanitation
Directions Select the correct answer from the list of alternates below each question in the end of chapter assignment Write in the answer next to the corresponding question number below Use this answer sheet as a reference to completing the online assignment related to this assignment
1
2
3
4
5
6
7
8
9
10
11
12
13
14
15
16
17
18
19
20
21
22
23
24
25
26
27
28
29
30
31
32
33
34
35
36
37
38
39
40
41
42
43
44
45
46
47
48
49
50
51
52
53
54
55
56
57
58
59
60
61
10-58
Additional Resources and References
This chapter is intended to present thorough resources for task training The following reference works are suggested for further study This is optional material for continued education rather than for task training First Aid FM 4-2511 (FM 21-11)NTRP 4-0211AFMAN 44-163(I)MCRP 3-02G Field Hygiene and Sanitation FM 21-10MCRP 4-111D
10-59
Trainee Feedback
Center for Seabees and Facilities Engineering (CSFE) makes every effort to keep their courses up-to-date and free of technical errors If you have a suggestion found an error or inaccuracy please write FAX or email us by using the form below Use one form for each comment and be sure to fill in the information as accurately and detailed as possible Thank you for your assistance Write CSFE
NCF Training Division (N7B) 3502 Goodspeed St Port Hueneme CA 93043-4337
Course Seabee Combat Handbook Volume ____ NAVEDTRA __________ Course Date ________ Chapter Number ______ Page ______ Paragraph _____ Sentence ______ Figure ______ FrameView ______ Description ____________________________________________________ ______________________________________________________________ ______________________________________________________________ ____________________________________________________________________________________________________________________________ ______________________________________________________________ (optional) Corrective action _______________________________________ ______________________________________________________________ ______________________________________________________________ (optional) Supporting reference(s) __________________________________ ______________________________________________________________ Your email address if a response is requested ________________________
10-60
Chapter 10
First Aid and Field Sanitation
Overview
Objectives
Prerequisites
Features of This Manual
100 BASIC FIRST AID
Attitude - You should remain calm and act quickly but efficiently Reassure the casualty that his or her injuries are understood and that proper medical attention is forthcoming The casualtyrsquos confidence and positive attitude can be very helpful
Positioning the Casualty - In most cases the casualty should be lying down with his or her head level with the body until you have determined the type and extent of his or her injuries The exceptions to this are the following
Clothing - Although you should move the casualty no more than necessary you may have to remove clothing in order to determine the extent of his or her injuries Remove only the clothing necessary for examination and treatment being especially car
Infection - Do not touch any open wounds or burns with your fingers hands or other non-sterile objects unless absolutely necessary to stop severe bleeding
110 Vital Functions
111 The Breathing Process
112 Respiration
113 Circulation
120 Evaluating a Casualty
121 Step 1 ndash Check for Responsiveness
122 Step 2 ndash Check for Breathing
123 Step 3 ndash Check for Pulse
124 Step 4 ndash Check for Bleeding
125 Step 5 ndash Check for Shock
126 Step 6 ndash Check for Fractures
127 Step 7 ndash Check for Burns
128 Step 8 ndash Check for Head Injury
200 FIRST AID MEASURES
210 Controlling Bleeding
211 General
212 Methods to Control Bleeding
2121 Applying a Battle Dressing
2125 Applying a Tourniquet
220 Opening the Airway and Restoring Breathing
221 Preliminary Assessment
222 Opening the Airway
223 Rescue Breathing
2231 Mouth-to-Mouth Method
2232 Mouth-to-Nose Method
224 Clearing an Obstructed Airway
2241 Abdominal Thrust on a Conscious Casualty Standing or Sitting
2242 Chest Thrust on a Conscious Casualty Standing or Sitting
230 Recognizing and Treating Shock
231 Signs and Symptoms
232 First Aid Measures
240 Fractures
241 Signs and Symptoms
242 General Rules
243 Splinting Procedures
244 Applying a Sling
245 Treatment for Specific Fractures
2453 Neck Fractures
250 Burn Injuries
251 Eliminate the Source
252 First Aid Measures
300 HEAT AND COLD INJURIES
310 Introduction
320 Heat Injuries
321 General
322 Heat Cramps
323 Heat Exhaustion
324 Heatstroke
330 Cold Injuries
331 General
332 Specific Cold InjuriesConditions
3321 Chilblain
3322 Immersion Syndrome
400 FIELD SANITATION
410 General Information
420 Waste Disposal Devices
500 WATER PURIFICATION
510 Overview
520 Water Purification Using Iodine Tablets ndash Preferred Method
530 Water Purification Using Chlorine Ampoules
540 Water Purification Using An Emergency Water Treatment Kit (Chlor-Flocreg Tablets)
550 Water Purification Using Household Bleach
560 Water Purification by Boiling
Summary
Assignment 10
Objectives
Questions
First Aid and Field Sanitation
Additional Resources and References
Trainee Feedback
animationAvailable1
Button1
Additional Resources and References
This chapter is intended to present thorough resources for task training The following reference works are suggested for further study This is optional material for continued education rather than for task training First Aid FM 4-2511 (FM 21-11)NTRP 4-0211AFMAN 44-163(I)MCRP 3-02G Field Hygiene and Sanitation FM 21-10MCRP 4-111D
10-59
Trainee Feedback
Center for Seabees and Facilities Engineering (CSFE) makes every effort to keep their courses up-to-date and free of technical errors If you have a suggestion found an error or inaccuracy please write FAX or email us by using the form below Use one form for each comment and be sure to fill in the information as accurately and detailed as possible Thank you for your assistance Write CSFE
NCF Training Division (N7B) 3502 Goodspeed St Port Hueneme CA 93043-4337
Course Seabee Combat Handbook Volume ____ NAVEDTRA __________ Course Date ________ Chapter Number ______ Page ______ Paragraph _____ Sentence ______ Figure ______ FrameView ______ Description ____________________________________________________ ______________________________________________________________ ______________________________________________________________ ____________________________________________________________________________________________________________________________ ______________________________________________________________ (optional) Corrective action _______________________________________ ______________________________________________________________ ______________________________________________________________ (optional) Supporting reference(s) __________________________________ ______________________________________________________________ Your email address if a response is requested ________________________
10-60
Chapter 10
First Aid and Field Sanitation
Overview
Objectives
Prerequisites
Features of This Manual
100 BASIC FIRST AID
Attitude - You should remain calm and act quickly but efficiently Reassure the casualty that his or her injuries are understood and that proper medical attention is forthcoming The casualtyrsquos confidence and positive attitude can be very helpful
Positioning the Casualty - In most cases the casualty should be lying down with his or her head level with the body until you have determined the type and extent of his or her injuries The exceptions to this are the following
Clothing - Although you should move the casualty no more than necessary you may have to remove clothing in order to determine the extent of his or her injuries Remove only the clothing necessary for examination and treatment being especially car
Infection - Do not touch any open wounds or burns with your fingers hands or other non-sterile objects unless absolutely necessary to stop severe bleeding
110 Vital Functions
111 The Breathing Process
112 Respiration
113 Circulation
120 Evaluating a Casualty
121 Step 1 ndash Check for Responsiveness
122 Step 2 ndash Check for Breathing
123 Step 3 ndash Check for Pulse
124 Step 4 ndash Check for Bleeding
125 Step 5 ndash Check for Shock
126 Step 6 ndash Check for Fractures
127 Step 7 ndash Check for Burns
128 Step 8 ndash Check for Head Injury
200 FIRST AID MEASURES
210 Controlling Bleeding
211 General
212 Methods to Control Bleeding
2121 Applying a Battle Dressing
2125 Applying a Tourniquet
220 Opening the Airway and Restoring Breathing
221 Preliminary Assessment
222 Opening the Airway
223 Rescue Breathing
2231 Mouth-to-Mouth Method
2232 Mouth-to-Nose Method
224 Clearing an Obstructed Airway
2241 Abdominal Thrust on a Conscious Casualty Standing or Sitting
2242 Chest Thrust on a Conscious Casualty Standing or Sitting
230 Recognizing and Treating Shock
231 Signs and Symptoms
232 First Aid Measures
240 Fractures
241 Signs and Symptoms
242 General Rules
243 Splinting Procedures
244 Applying a Sling
245 Treatment for Specific Fractures
2453 Neck Fractures
250 Burn Injuries
251 Eliminate the Source
252 First Aid Measures
300 HEAT AND COLD INJURIES
310 Introduction
320 Heat Injuries
321 General
322 Heat Cramps
323 Heat Exhaustion
324 Heatstroke
330 Cold Injuries
331 General
332 Specific Cold InjuriesConditions
3321 Chilblain
3322 Immersion Syndrome
400 FIELD SANITATION
410 General Information
420 Waste Disposal Devices
500 WATER PURIFICATION
510 Overview
520 Water Purification Using Iodine Tablets ndash Preferred Method
530 Water Purification Using Chlorine Ampoules
540 Water Purification Using An Emergency Water Treatment Kit (Chlor-Flocreg Tablets)
550 Water Purification Using Household Bleach
560 Water Purification by Boiling
Summary
Assignment 10
Objectives
Questions
First Aid and Field Sanitation
Additional Resources and References
Trainee Feedback
animationAvailable1
Button1
Trainee Feedback
Center for Seabees and Facilities Engineering (CSFE) makes every effort to keep their courses up-to-date and free of technical errors If you have a suggestion found an error or inaccuracy please write FAX or email us by using the form below Use one form for each comment and be sure to fill in the information as accurately and detailed as possible Thank you for your assistance Write CSFE
NCF Training Division (N7B) 3502 Goodspeed St Port Hueneme CA 93043-4337
Course Seabee Combat Handbook Volume ____ NAVEDTRA __________ Course Date ________ Chapter Number ______ Page ______ Paragraph _____ Sentence ______ Figure ______ FrameView ______ Description ____________________________________________________ ______________________________________________________________ ______________________________________________________________ ____________________________________________________________________________________________________________________________ ______________________________________________________________ (optional) Corrective action _______________________________________ ______________________________________________________________ ______________________________________________________________ (optional) Supporting reference(s) __________________________________ ______________________________________________________________ Your email address if a response is requested ________________________
10-60
Chapter 10
First Aid and Field Sanitation
Overview
Objectives
Prerequisites
Features of This Manual
100 BASIC FIRST AID
Attitude - You should remain calm and act quickly but efficiently Reassure the casualty that his or her injuries are understood and that proper medical attention is forthcoming The casualtyrsquos confidence and positive attitude can be very helpful
Positioning the Casualty - In most cases the casualty should be lying down with his or her head level with the body until you have determined the type and extent of his or her injuries The exceptions to this are the following
Clothing - Although you should move the casualty no more than necessary you may have to remove clothing in order to determine the extent of his or her injuries Remove only the clothing necessary for examination and treatment being especially car
Infection - Do not touch any open wounds or burns with your fingers hands or other non-sterile objects unless absolutely necessary to stop severe bleeding
110 Vital Functions
111 The Breathing Process
112 Respiration
113 Circulation
120 Evaluating a Casualty
121 Step 1 ndash Check for Responsiveness
122 Step 2 ndash Check for Breathing
123 Step 3 ndash Check for Pulse
124 Step 4 ndash Check for Bleeding
125 Step 5 ndash Check for Shock
126 Step 6 ndash Check for Fractures
127 Step 7 ndash Check for Burns
128 Step 8 ndash Check for Head Injury
200 FIRST AID MEASURES
210 Controlling Bleeding
211 General
212 Methods to Control Bleeding
2121 Applying a Battle Dressing
2125 Applying a Tourniquet
220 Opening the Airway and Restoring Breathing
221 Preliminary Assessment
222 Opening the Airway
223 Rescue Breathing
2231 Mouth-to-Mouth Method
2232 Mouth-to-Nose Method
224 Clearing an Obstructed Airway
2241 Abdominal Thrust on a Conscious Casualty Standing or Sitting
2242 Chest Thrust on a Conscious Casualty Standing or Sitting
230 Recognizing and Treating Shock
231 Signs and Symptoms
232 First Aid Measures
240 Fractures
241 Signs and Symptoms
242 General Rules
243 Splinting Procedures
244 Applying a Sling
245 Treatment for Specific Fractures
2453 Neck Fractures
250 Burn Injuries
251 Eliminate the Source
252 First Aid Measures
300 HEAT AND COLD INJURIES
310 Introduction
320 Heat Injuries
321 General
322 Heat Cramps
323 Heat Exhaustion
324 Heatstroke
330 Cold Injuries
331 General
332 Specific Cold InjuriesConditions
3321 Chilblain
3322 Immersion Syndrome
400 FIELD SANITATION
410 General Information
420 Waste Disposal Devices
500 WATER PURIFICATION
510 Overview
520 Water Purification Using Iodine Tablets ndash Preferred Method
530 Water Purification Using Chlorine Ampoules
540 Water Purification Using An Emergency Water Treatment Kit (Chlor-Flocreg Tablets)