Embed Size (px)
Citation preview
Changing Your Profile You may customize your profile settings in Lighthouse Transaction Manager (LTM) to fit your personal preferences. To change your profile, complete the following steps:
1. From the menu, select User > Change Profile. 2. The Change Profile page will be displayed. 3. All LTM user accounts are encouraged to use two-factor authentication, especially administrator-type user
accounts. For additional information, see the Managing Two-Factor Authentication section. 4. To configure LTM’s color scheme and font, select the desired option from the Theme list:
• Default – LTM will use Shift4 Payments’ branding (black, gray, and blue). • Old Shift4 Purple – LTM will use Shift4’s previous branding (purple, gray, and blue).
5. To configure which page LTM opens to, select an option from the Home Page list:
• What’s New? – LTM will open to the What’s New page, displaying new features and the Where to Start and Did You Know areas.
• Admin Quick Links – LTM will open to the Administration Quick Links page, displaying links to many of the most used features and pages.
• Current Transactions – LTM will open to the Current Transactions page. • Current Transactions in Grid – LTM will open to the Current Transactions in Grid page. • Online Entry – LTM will open to the Online Entry page.
Note: If Current Transactions, Current Transactions in Grid, or Online Entry is selected, and you have access to multiple merchants, you will be directed to the Select Merchant page first.
6. To allow a sales draft to be printed to a standard receipt printer after LTM generates it, select an option from the Draft Printing list:
• Detect - IE only – LTM will automatically detect the Shift4 Draft Printer program and only print a sales draft when Internet Explorer is in use.
• Always – LTM will automatically detect the Shift4 Draft Printer program and always print a sales draft (regardless of which web browser is in use).
• Never – LTM will never print a sales draft.
Note: The Shift4 Draft Printer program must be downloaded and installed. If needed, the Draft Printer Installation Guide contains additional information and is available on www.shift4.com.
© 2019 Shift4 Payments, LLC. All rights reserved. External Use NDA
Version 2.1 Page 1 of 13

7. To change the way amounts are displayed, select an option from the Locale list.
Note: If English (United States) is selected, the amount will be displayed as 2,500.00; if French (Canada) is selected, the amount will be displayed as 2 500,00.
The default setting is English (United States) to process in US Dollars.
8. In the Default to Auth Only area, select which merchant types (if any) you would like to default to an Authorization Only transaction type (instead of a Sales transaction type) when generating new transactions on the Online and Offline Entry pages in LTM:
• Auto Rental • Restaurant/Food • Hotels • Mail Order/Telephone Order and E-Commerce • Retail
Note: These settings help prevent accidentally generating a Sales transaction instead of an Authorization Only transaction, and they are commonly used by Auto Rental and Hotel merchants. When editing existing transactions, the transaction type of the source transaction will be preserved.
9. In the Terminal ID Override area, to override the Account Administrator’s settings regarding terminal ID use and set your own, select Yes and the applicable options:
• Use Terminal ID – If selected, a Terminal ID column will be displayed on the Current Transactions and Archived Transactions pages and be populated with the data (if provided during transaction processing).
• Use Terminal ID Subtotals – If selected, a Terminal Totals table will be displayed on the Current Transactions and Archived Transactions pages when a Sort By option includes “Terminal ID” in the name, and the table will include a subtotal per terminal ID.
Note: Use Terminal ID Subtotals works in conjunction with Use Terminal ID; therefore, if it is selected, Use Terminal ID will be automatically selected for you. However, Use Terminal ID can be used by itself. In addition, if you would like to use the Account Administrator’s settings, leave No selected in the Terminal ID Override area.
Changing Your Profile
© 2019 Shift4 Payments, LLC. All rights reserved. External Use NDA
Version 2.1 Page 2 of 13

10. To customize and interact with the information displayed in LTM, select the desired options in the Other Options area:
• Multi-MID selection – Allows you to select multiple merchants for auditing on the Select Merchant page. Shift4 Payments recommends enabling this option if more than one merchant is available to you for auditing to facilitate the simultaneous review and reconciliation of transactions.
• Persistent clerk filter – Each time you sign in to LTM, it will recall the clerk filter settings you configured in your viewing options rather than reverting to the default settings.
• Display currency symbol for my local currency – LTM will display the currency symbol with transaction amounts, like the “$” symbol. The symbol is based on the Merchant ID.
• Display currency abbreviation – LTM will display the currency abbreviation with transaction amounts, like “USD” for United States Dollar. The abbreviation is based on the Merchant ID.
• Batch selected transactions – LTM will allow you to batch selected transactions instead of batching all transactions that correspond to your selected business date and viewing options. (This option will only be displayed if the Batch submittals permission is enabled on your account.)
• Highlight modified transactions – LTM will highlight transactions that have been edited on the Current Transactions and Archived Transactions pages by displaying to the left of the Transaction Type. This setting is helpful to auditors because it allows them to see which transactions have been modified by users in LTM. (For example, if a sale transaction was voided, it would be highlighted.)
• Show audit trail – LTM will display the communication between the point-of-sale (POS) or property management system (PMS) and the Shift4 Payments data center on the View Transaction page.
• Show CC history – This feature is used in conjunction with Fraud Sentry®. LTM will display every time the payment card was used for the selected merchant and the transaction’s corresponding details in the Transaction History section on the View Transaction page. Information displayed corresponds to the retention period, which is typically 24 months.
• Display archive card subtotals – LTM will include an icon to expand and display subtotals of archived cards on the Archived Batches - Month View page (when multiple merchants are selected) and Archived Batches - Date View page (when one or more merchants are selected).
• PDF spawns new window – Printer-friendly reports will open in a new window where they can be viewed and printed.
Note: Your web browser’s pop-up blocker can interfere with new windows; ensure it is disabled if PDF spawns new window is enabled. In addition, some web browsers, like Firefox, will open the report in a new window without having to enable this setting.
• Use enhanced editor – LTM will include a simple text editor to format notes entered on the View Transaction page. It provides HTML-compatible formatting options, instead of plain text, and allows for special characters.
• Use card groupings on current transactions and archived transactions pages – LTM will use the card grouping settings configured by the Account Administrator in your sub and grand total areas.
Changing Your Profile
© 2019 Shift4 Payments, LLC. All rights reserved. External Use NDA
Version 2.1 Page 3 of 13

Note: For additional information on the previous two settings, see the Auditing Transactions Guide in Lighthouse Transaction Manager Help.
• Automatically detect encrypted swipes – LTM will automatically detect encrypted swipes on the Online Entry, Offline Entry, IYC Sales, and IYC Order Fulfillment pages. (You can disable this setting if you are getting invalid swipe errors while typing.)
Changing Your Profile
© 2019 Shift4 Payments, LLC. All rights reserved. External Use NDA
Version 2.1 Page 4 of 13
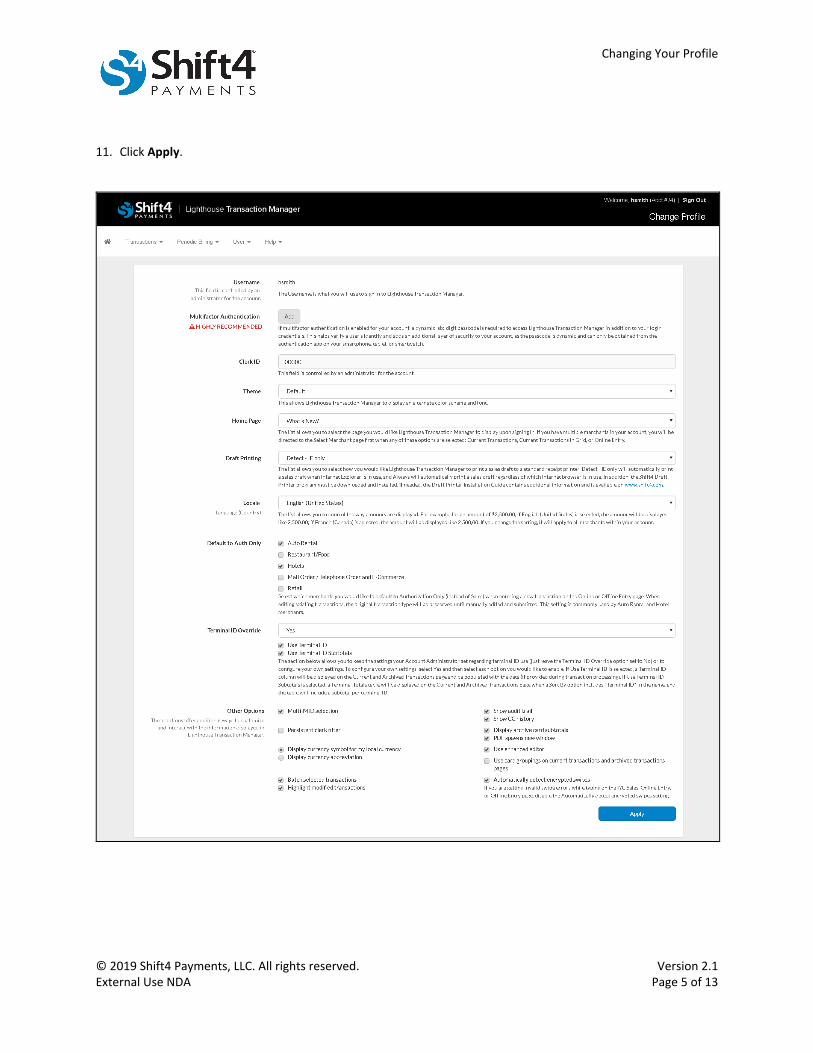
11. Click Apply.
Changing Your Profile
© 2019 Shift4 Payments, LLC. All rights reserved. External Use NDA
Version 2.1 Page 5 of 13

Managing Two-Factor Authentication Two-factor authentication requires separate methods of authentication from different sources to verify a user’s identity.
If enabled on your LTM account, a dynamic, six-digit passcode is required to access it. (This is in addition to your LTM login credentials.) If you are using an iOS or watchOS device, the passcode is generated by the Shift4 Authenticator app downloaded and installed on your device. If you have an Android device, use the Google Authenticator app downloaded and installed on your smartphone or tablet.
Consequently, this is a more secure way to verify your identity as the passcode is dynamic and can only be obtained from an authenticator app on your device.
Changing Your Profile
© 2019 Shift4 Payments, LLC. All rights reserved. External Use NDA
Version 2.1 Page 6 of 13

Adding an Authenticator To add an authenticator to your LTM account, complete the following steps:
Requirement: You must first download an authenticator app on your smartphone or tablet.
1. On the Change Profile page, click Add. 2. In the Add Multifactor Authentication window, complete the following steps:
• In the Password field, enter your LTM password. • Follow the directions to generate the six-digit passcode, and then enter it in the Passcode field. • Click Activate.
Changing Your Profile
© 2019 Shift4 Payments, LLC. All rights reserved. External Use NDA
Version 2.1 Page 7 of 13

3. Your reset code will be displayed in the Important window. Write the code down and store it in a secure location, like a safe or vault.
Requirement: You must write the reset code down and store it in a secure location. Do not store the reset code on your device because you will be required to provide it to remove the authenticator if your device is damaged, lost, or stolen.
4. After you have written the code down and stored it in a secure location, the process is complete. Click Ok, I Wrote the Code Down to close the window.
Changing Your Profile
© 2019 Shift4 Payments, LLC. All rights reserved. External Use NDA
Version 2.1 Page 8 of 13

Moving an Authenticator to a New Device After adding an authenticator to your LTM account, you can move it to any smart device that supports an authenticator. For example, if you get a new smartphone, you can move the authenticator from the old smartphone to the new smartphone.
To move an authenticator, complete the following steps:
Requirement: You must first download an authenticator app on your new smartphone or tablet.
1. On the Change Profile page, click Move to a New Device.
2. In the Add Multifactor Authentication window, complete the following steps:
• In the Password field, enter your LTM password. • Follow the directions to generate the six-digit passcode, and then enter it in the Passcode field. • Click Activate.
Changing Your Profile
© 2019 Shift4 Payments, LLC. All rights reserved. External Use NDA
Version 2.1 Page 9 of 13

3. Your reset code will be displayed in the Important window. Write the code down and store it in a secure location, like a safe or vault.
Requirement: You must write the reset code down and store it in a secure location, such as a safe or vault. Do not store the reset code on your smart device.
4. After you have written the code down and stored it in a secure location, the process is complete. Click Ok, I Wrote the Code Down to close the window.
Changing Your Profile
© 2019 Shift4 Payments, LLC. All rights reserved. External Use NDA
Version 2.1 Page 10 of 13

Removing an Authenticator To remove an authenticator from your LTM account, complete the following steps:
1. On the Change Profile page, click Remove.
2. In the Manage Authenticator window, enter your LTM password, and then click Remove Authenticator.
Changing Your Profile
© 2019 Shift4 Payments, LLC. All rights reserved. External Use NDA
Version 2.1 Page 11 of 13
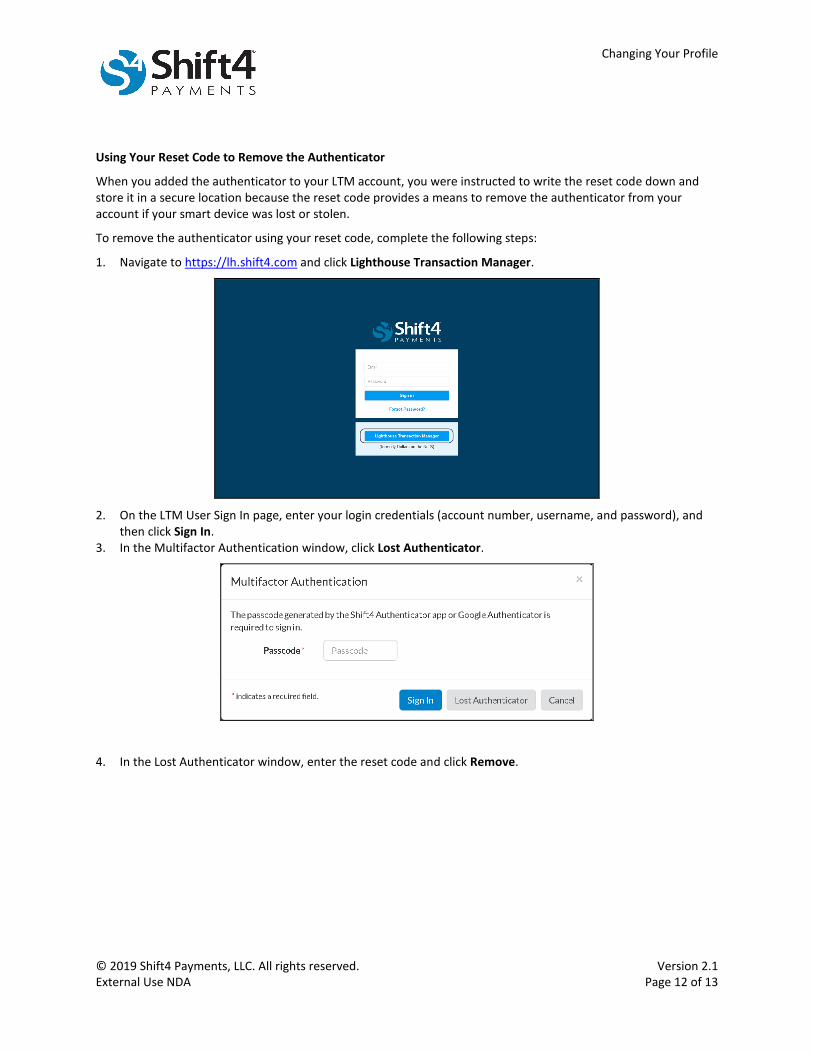
Using Your Reset Code to Remove the Authenticator
When you added the authenticator to your LTM account, you were instructed to write the reset code down and store it in a secure location because the reset code provides a means to remove the authenticator from your account if your smart device was lost or stolen.
To remove the authenticator using your reset code, complete the following steps:
1. Navigate to https://lh.shift4.com and click Lighthouse Transaction Manager.
2. On the LTM User Sign In page, enter your login credentials (account number, username, and password), and
then click Sign In. 3. In the Multifactor Authentication window, click Lost Authenticator.
4. In the Lost Authenticator window, enter the reset code and click Remove.
Changing Your Profile
© 2019 Shift4 Payments, LLC. All rights reserved. External Use NDA
Version 2.1 Page 12 of 13

Tip: If you do not have your reset code, an administrator-type user for the LTM account can remove your authenticator. (For additional information, see the Managing User Accounts document in Lighthouse Transaction Manager Help.) If you are the Account Administrator and do not have your reset code, you will need to contact the Shift4 Payments Customer Support team at 702.597.2480, option 2.
Changing Your Profile
© 2019 Shift4 Payments, LLC. All rights reserved. External Use NDA
Version 2.1 Page 13 of 13