Embed Size (px)
Citation preview

A Resilience Approach to Road Safety
Education
7CHALLENGESAND CHOICES
RTEACHER RESOURCE

TITLE: Challenges and Choices: A Resilience
Approach to Road Safety Education
Year 7 Teacher Resource
SCIS NO: 1766621
ISBN: 978-0-7307-4583-9
© School Drug Education and Road Aware, 2016
Author
Anne Miller, Resource Development, SDERA
Design & Production
Fuse Design and Communication
Illustrations
Murray Smoker
Terry Allen
Acknowledgements The author would like to acknowledge the contribution
made by Kim Chute (Titan Consulting) to the fi rst edition
of Challenges and Choices: Resilience, drug and road safety
education resource for early adolescence and the inclusion of
parts of her work in this publication.
The author has made a comprehensive eff ort to sight and
credit sources. Any omissions detected are not intentional.
The author welcomes information to correct any oversights in
subsequent editions.
Note: National and State legislation and regulations referred to
in this resource were correct at the time of publication. SDERA
advises the reader to review relevant websites and documents
for legislative and regulatory updates.
School Drug Education and Road Aware
School Drug Education and Road Aware (SDERA) is
the WA State Government’s primary drug and road
safety education strategy for all government and non-
government schools, and early childhood services.
SDERA is a cross-sectoral initiative of the Association
of Independent Schools of WA (AISWA), the Catholic
Education WA (CEWA) and Department of Education
(DOE) and is funded by the Mental Health Commission
and the Road Trauma Trust Account.
SDERA aims to prevent road-related injuries and the
harms from drug use in children and young people.
SDERA empowers early childhood and school-based
staff , parents and carers, and community groups to
implement eff ective resilience, drug and road safety
education approaches within their schools and
community, through the provision of professional
learning, evidence-based resources, and a state-wide
consultancy team.
School Drug Education & Road Aware
Statewide Services Centre
33 Giles Avenue
PADBURY WA 6025
P: 08 9402 6415
F: 08 9402 6399
W: www.sdera.wa.edu.au

Module 2Road Safety Education
Road safety education is an important strategy for reducing the extent of traffi c-related casualties among young people. Eff ective road safety education programs need to build knowledge and increase the competency of students to act in safe ways when presented with challenging situations.
This module supports the personal and social capabilities introduced in Module 1 and provides opportunities for students to build upon their road safety knowledge and skills, identify high risk situations, and develop a range of strategies to prepare them to make safer decisions as pedestrians, riders and future drivers.
The suggested activities in this module of work can be modifi ed or additional resources sourced to support student needs and the local context. It is recommended that videos be pre-viewed to determine suitability for diff erent student cohorts.

CH
ALL
ENG
ES A
ND
CH
OIC
ES
YE
AR
7
37A RESILIENCE APPROACH TO ROAD SAFETY EDUCATION
© 2016 School Drug Education and Road Aware
CHALL
ENG
ES A
ND C
HO
ICES
Y
EAR
7
37
TOPIC 1
Setting the scene
Activity 1 Introduction to
road safety
Learning intention
• Students explore road rules, road trauma statistics and
other road safety information
Equipment
In Gear student workbook – Start your engine – page 16
Internet and computer access
Activities
1. Have students complete Start your engine on page 16
of the student workbook. Check students’ answers
(the answer to each statement is ‘true’) and use the
following information to clarify any incorrect answers or
misconceptions that the students presented.
1. Restraints became compulsory in Australia in 1971.
In 2010 the WA government implemented new
laws about child car restraints and where in the
vehicle, children up to the age of 7 years, could sit
(refer to question 7). Crash statistics continue to
indicate that vehicle occupants are killed or injured
as a result of not wearing a restraint.
2. In Australia, all cyclists are required by law to wear a
bicycle helmet including young children travelling
in carriers or trailers. Australia is one of the few
countries that has compulsory helmet wearing
laws.
3. In October 2010 it became law that children up to
the age of 7 years must be placed in an approved
child car restraint and are not allowed to sit on an
adult’s lap.
4. A driver can be fi ned and be given demerit points
for travelling with an unrestrained passenger.
Passengers, over the age of 16, can also receive a
fi ne for not wearing a restraint.
5. Cyclists are not permitted to ride their bike over a
crosswalk or at pedestrian phased traffi c signals.
6. Pedestrians are not permitted to walk on the
road where a footpath is installed. In areas where
footpaths are not installed, it is suggested that
pedestrians walk on the verge facing oncoming
traffi c.
7. Children up to the age of 7 years are not allowed
to sit in the front seat of a vehicle unless all of the
rear seating positions are occupied with children
younger than the child who will be seated in the
front seat.
8. Anyone who is in control of a vehicle, including
a bicycle, must not have a Blood Alcohol
Concentration (BAC) over 0.05. Learner and
Provisional Drivers have a zero BAC restriction.
9. It is illegal to sit in the open space of a vehicle
unless there are approved restraints fi tted.
10. Pedestrians must not cross the road within 20
metres of a crosswalk.
11. Restraints cause the occupant to decelerate at the
same rate as the vehicle in a crash. They spread the
force of the impact over a greater area of the body
and also the stronger parts of the occupant’ body
(eg pelvis and chest), and minimise the occupant’s
contact with interior parts of the vehicle. Restraints
also reduce the risk of an occupant being thrown
from the vehicle.
12. Restraints are designed to reduce injuries to all
vehicle occupants.
13. Never use a single restraint for more than one
person as they are only designed to protect one
person in a crash. Doubling up may risk either one
or both of the occupants being seriously injured
or killed in a crash. If a young child is seated on an
adult’s lap and shares a restraint, the child may be
crushed between the restraint and the adult in a
crash situation.
14. Around 75% of all road crash fatalities in WA each
year involve males.
15. More pedestrian hospitalisation crashes occur in
the metropolitan area than regional and remote
areas.
16. More children and young people are injured or
killed in road crashes while travelling as passengers.
Pedestrian and cyclist injuries and fatalities are also
an issue for this age group.
17. Any person or object which is unrestrained in a
vehicle and that is involved in a crash will continue
to move around in the vehicle, long after the initial
impact. During this time the person or object may
make contact with other occupants in the vehicle
and cause injury or death. In police attended
fatality crashes, more males than females do not
wear restraints.
18. The intention of WA road rules is to maintain the
fl ow of traffi c and also ensure the safety of all road
users.
19. Alcohol and other drugs aff ect the central nervous
system and can reduce a road user’s capacity to
react quickly and make a reasonable assessment
of hazards. It is illegal to drive while intoxicated by
alcohol or other drugs.
20. A person can sit the Learner’s Permit Test at 16 years
of age in Western Australia and be on a Provisional
Licence by the age of 17 years, if all stages and
conditions of the licensing system are completed
and passed.
2. Explain that each year in Western Australia, crash statistics
continue to show the involvement of young people in
road trauma. Road trauma is the term used to describe
the deaths and injuries that result from a crash. There
are many reasons why young people are involved in
road crashes including not wearing a seatbelt while
travelling as a passenger or driver, not wearing a helmet
while travelling as cyclist or motorcyclist, or walking
while intoxicated and unable to make safe decisions.
Summarise this part of the activity by asking the following
questions.

CH
ALL
ENG
ES A
ND
CH
OIC
ES
YE
AR
7
38A RESILIENCE APPROACH TO ROAD SAFETY EDUCATION© 2016 School Drug Education and Road Aware
Explain that just like Mari’s situation, there are always a
range of factors that contribute to a crash. Draw a triangle
on the board and label the points – driver, location,
conditions – and write crash in the centre. Ask the
students to identify the factors that placed Mari at risk in
this situation and write these in their workbook.
• Driver – inexperience, consumed alcohol,
speeding for conditions
• Location – bend in road
• Conditions – driving at night, passenger not
wearing a seatbelt, wet weather
Use the following questions to discuss the scenario
further.
Ask
• Which of these factors increased the potential for a crash
to happen? (All of the factors previously identifi ed and
in particular the consumption of alcohol and speed).
• Who had a responsibility in this situation to make sure
that no-one was at risk of being hurt? (The driver who
was in control of a vehicle while under the infl uence of
alcohol, did not drive for the conditions or comply with
speed limits, and did not maintain his vehicle for safety.
A passenger must also take responsibility for their
own safety which in this case may have been fi nding
another way to travel home or telling the driver they
were not capable of driving).
Explain that using a restraint is one of the safest things
students can choose to do while travelling as a passenger
as it signifi cantly reduces their likelihood of injury or
death, especially when speed is involved in a collision.
Highlight that in a crash anything inside a vehicle,
including occupants, that is not restrained or secured,
will continue to move until the vehicle comes to a stop.
Occupants will make contact with the inside of the
vehicle and may also make contact with other occupants,
at a force which can cause serious injury.
2. With a partner, have students complete the activity on
page 17 of the student workbook to identify two choices
that Mari had in this situation, the consequences of these
choices, and a decision that may have resulted in her
not being injured. This activity is based on the decision-
making model (refer to page 68). Ask students to share
the choices they identifi ed and how these helped them
to make a decision. Remind students that in situations like
Mari’s, a decision needs to be made quickly so knowing
that travelling with a driver who is intoxicated or under
the infl uence of alcohol or other drugs can increase the
likelihood of a crash occurring. Their decision should be to
not get in the car, and to have a contingency plan in place
that will enable them to get home safely.
Ask
• On average, how many people do you think are aff ected
by road trauma each year in Western Australia? (Road
crash statistics vary each year however on average
there are around 160 people killed, and over 2500
hospitalisations).
• Do you think road trauma is an issue only in Australia?
(Road deaths and injuries are a global problem of
massive proportions. According to the World Health
Organisation, road traffi c injuries are the leading cause
of death by injury worldwide (one-fi fth of all deaths
from injury) and the tenth leading cause of all deaths
(2.2% of all deaths). Road traffi c injuries rank second
to HIV/AIDS as the leading cause of ill health and
premature death for adult men aged 15 to 44 years
(healthinfonet, n.d.).
• Do most young people your age make decisions that keep
themselves safe when travelling on the roads and in traffi c?
(It is important to acknowledge that young people do
make decisions that increase their safety and the safety
of others. However there are also a small number of
young people that make poor decisions or take risks
which result in their own injury or death, and/or the
injury or death of other road users).
Activity 2 Crashes aren’t
always accidents
Learning intentions
• Students identify the interacting factors that contribute
to road crashes including speed, alcohol and other
drugs
Equipment
In Gear student workbook – Crashes aren’t always accidents –
page 17
Access to the internet (optional)
Teaching tips
Watch the video clip Crash test with and without
seatbelt at http://www.youtube.com/watch?v=
d7iYZPp2zYY&feature=related and discuss what
happens to the vehicle occupant who is not
restrained. Point out the movement of neck and
head, the contact made with the inside of the
vehicle and windscreen.
Activities
1. Have students read the scenario about Mari on page 17 of
the student workbook.
• Mari decided to accept a lift home from the movies
with her friend’s older brother. He had only been
driving on P-plates for about 7 months. Mari could
smell alcohol when she hopped in the car but she
didn’t have any other way to get home and it was late
and had started to rain. Mari tried to put her seatbelt
on but it was jammed down behind the seat. She
didn’t feel comfortable asking the driver to wait while
she sorted it out. The driver started the car and drove
away very quickly. A kilometre up the road on a bend,
the driver lost control of the car and hit a tree.

CH
ALL
ENG
ES A
ND
CH
OIC
ES
YE
AR
7
39A RESILIENCE APPROACH TO ROAD SAFETY EDUCATION
© 2016 School Drug Education and Road Aware
10. False. To reduce or eliminate deaths from crashes,
every rider in the Tour must now wear a helmet
during every stage of the race, including time
trials. At their own risk, cyclists may remove their
helmets during the fi nal climb to the summit if the
climb is at least 5 kilometres (3.1 miles) long. A Tour
course marker designates the point on the course
where cyclists can remove their helmets. Removal
of helmets on mountain stages is never allowed
before the start of a climb.
11. True. California was the birthplace of the
skateboarding culture and came into existence as
the waves were too weak for surfi ng at the time. So
a surfboard shape with wheels was created. It was
known as sidewalk surfi ng.
12. True. In Norway, the ownership, use and sale of
skateboards was banned by the government from
1978 to 1989 due to an increase in the number of
people getting injured while skating.
13. True. Australia was the fi rst country to introduce
compulsory bike helmet wearing in 1990.
14. True. Cyclists of all ages, in Australia including
young children, must wear a helmet when cycling.
2. Read the poem Mulga Bill’s Bicycle by Banjo Patterson.
Explain that the poem was written in 1896 when cycling
was a relatively new and popular social activity in
Australia, and bicycles were ridden everywhere including
in the outback by shearers and other workers who
needed to travel cheaply. Discuss the poem using the
following questions.
Ask
• Why did Mulga Bill crash his bike?
• Why did Mulga Bill think he was better at riding than he
actually was?
• What mode of transport did Mulga Bill decide to use after
his crash?
3. Have students share their own experiences of learning to
cycle or ride other wheeled devices such as skateboards,
rip-sticks and scooters. (Quad bikes and motorbikes can
be included in the discussion if relevant to the student
cohort. Be prepared to interrupt if students share
experiences or relate stories about other people that
promote unsafe road use).
Ask
• Did you have any mishaps like Mulga Bill? Was it
something you did or something someone else did?
(Explain that collisions and falls are the main types of
incidents involving young cyclists, and that these are
usually caused through an error or lack of skills and
judgment. Crash types for motorcyclists also include
collisions and falls, and with off -road crashes sometimes
occurring due to the inexperience of the rider).
• Cycling was a cheap way of travelling back in the time that
Patterson wrote the poem. Is cycling, skateboarding or
riding a scooter still a cheap way to travel? Why?
• What are the health benefi ts from cycling or skating? (eg
physical fi tness, good for mental health, stress reliever).
• Is cycling, skateboarding or riding a scooter a safe way for
young people to travel? Why?
TOPIC 2
Cycling and riding
Activity 1 Introduction to cycling
Learning intention
• Students explore the health benefi ts of cycling and
riding
• Students identify the resilience skills and personal
strengths used to learn a new activity
Equipment
In Gear student workbook – Wheelie? – page 18
Mulga Bill’s Bicycle by A.B. Paterson, illustrated by Kilmeny
and Deborah Niland (Harper Collins Australia, 2007)
Family information sheet – Skateboarding – photocopy
one per student
Activities
1. To introduce the class to this topic, have students
complete the quiz on page18 of the student workbook.
To share their answers, have students play a game of
heads and tails (refer to page 69). The correct answers
are provided here.
1. True. In 1817, Karl von Drais invented a two-
wheeled, pedal-less device which was propelled by
pushing your feet against the ground. It became
known as the ‘draisine’.
2. True. The term bicycle was not introduced until the
1860’s.
3. True. A penny farthing has a large front wheel and
a small rear wheel. The bike sits so high it needs a
mounting step to get up to the seat
4. True. The entire trip, through Europe, Asia, and
the United States, covered 64,373 kilometres. Fred
pedalled about 40,233 kilometres and the rest was
travelled by boat. He wore out seven sets of tyres.
5. True. Bikes were fi rst brought to China in the late
1800s and remain a popular mode of transport.
6. True. About 100 million bikes are manufactured in
the world every year.
7. False. On 31 August 2011 the Australian Bicycle
Council released the results of the National Cycling
Participation Survey. The survey found that in a
typical week around 18% of Australians ride a
bicycle for transport and recreation with around
3.6 million people riding for recreation, leisure or
sport and 1.2 million people making at least one
transport journey.
8. True. Established in 1903, the Tour de France is
considered to be the biggest test of endurance out
of all sports.
9. True. BMX is an extreme style of bicycle track
racing. BMX became a sport in the 2008 Summer
Olympic Games in Beijing, China.

CH
ALL
ENG
ES A
ND
CH
OIC
ES
YE
AR
7
40A RESILIENCE APPROACH TO ROAD SAFETY EDUCATION© 2016 School Drug Education and Road Aware
• The amount of traffi c that we see on our roads today is
very diff erent to when the poem about Mulga Bill was
written. What does this increase in traffi c mean to cyclists?
(Cyclists are often not noticed by drivers in amongst
other traffi c. This can be due to the cyclist’s location
on the road such as in the driver’s blind spot or they
may be wearing dark clothing that doesn’t attract the
attention of drivers. Because of this and other factors
such as road conditions and time of day, cyclists need
to be alert and ready to react quickly).
• What road rules must cyclists and riders follow? (The same
rules as all other vehicles on the road such as keep to
the left, maintain the bicycle, and stop at traffi c signals
and signs. Talk about the hand signals that cyclists must
use to indicate their intention to stop or turn).
Use the discussion to talk about the strengths and skills
students used to become more profi cient when learning
to ride a bike or skateboard, or another new activity.
Ask
• What resilience skills do you use when you are learning
something new? (eg perseverance, able to learn
from failures, seeking advice from those who can
already do it).
• We each have personal strengths such as perseverance,
curiosity, self-discipline, humour, hope and bravery that
help us to tackle problems and learn new things. Which of
your strengths did you use when you were learning to ride
or skate? (Have students write these in their workbook
then share with a partner).
• Was goal setting a skill that you used when you were
learning to cycle or ride? What goals did you set yourself?
(eg practise as many times as possible each week, learn
the easy skills such as being able to ride in a straight
line for at least 10 metres before stopping then moving
onto more diffi cult skills such as indicating while
controlling the bike).
4. Have students write and illustrate their own poem
based on the fi rst stanza (verse) of Mulga Bill’s Bicycle that
describes a young person’s fi rst eff orts of learning to cycle
or skate. An example is provided.
Silly Bill’s skateboard
Was Silly Bill from Scarborough, who caught
the skating craze.
He threw away his old red bike he’d had for
many days.
Bill donned his bright new bike helmet, knee
and elbow pads,
He skated off along the path to catch up with
the lads.
And as he whizzed it over the kerb, with thrill
and daring speed,
His neighbour shouted out to Bill, ‘Slow down,
or a doctor you will need!’
‘Whatever, mate,’ said Silly Bill, ‘from Trigg to
Kalgoorlie,
From Broome to Meekatharra, there’s none
can skate like me.’
5. Send home a copy of the Family information sheet –
Skateboarding with each student to share with their
family.

FAMILY INFORMATION SHEET
EDU
CA
TIN
G F
OR
SM
AR
TER
CH
OIC
ES
A RESILIENCE APPROACH TO ROAD SAFETY EDUCATION© 2016 School Drug Education and Road Aware
Skateboarding is a popular
sport that sees many
young people ‘shredding’ it
at skate parks after school
and on weekends. But
have you ever wondered
if there are rules about
skateboarding or what
your children can do to
stay safer while having fun?
Here’s some information
that’s worth talking about
with your teenager.
Skateboarding
Skateboards can be used on:
• a road that has no dividing line and no
median strip
• a road where the speed limit is 50 km/h or
less
• a one-way road with less than two marked
lanes.
When on a road you must stay to the left and
not be any more than 2 abreast with other riders.
Skateboards are permitted on other roads
but only for the purpose of crossing that road
and only when taking the shortest possible
route. The skater doesn’t have to get off their
skateboard to do this.
Skateboards cannot be used on a road which
has signs saying ‘no recreational devices’.
Skateboards can be used during daylight hours
on roads but not during times of low visibility
eg sunrise, sunset and night. Makes sense
doesn’t it! Drivers often have trouble spotting a
cyclist at night even when they have lights and
refl ectors fi tted to their bike, so imagine how
hard it might be to see a skateboarder.
Yes, unless the footpath has a sign that says
‘no wheeled toys’ allowed. You must keep to
the left of the footpath or shared path unless
it is impracticable to do so. You must also give
way to pedestrians who are on a footpath or
shared path (except a person traveling in or on a
wheeled recreational device or wheeled toy). On
a footpath or shared path, cyclists must give way
to skateboarders.
No. It is not compulsory in Western Australia,
but as helmets are designed specifi cally to
protect a person’s head in a fall, it is strongly
recommended. South Australia is the only state
where skateboarders must wear a bike helmet.
No. A skateboarder must not be towed by a
moving car or travel within 2 metres of a car
continuously for any distance over 200 metres.
Where can I use a
skateboard?
Where can’t I skate?
Are there any times when I
can skate on roads?
Can I skate on
the footpath?
Is it compulsory
to wear a helmet when I
skate?
Can you ‘skitch’?

CH
ALL
ENG
ES A
ND
CH
OIC
ES
YE
AR
7
42A RESILIENCE APPROACH TO ROAD SAFETY EDUCATION© 2016 School Drug Education and Road Aware
Activity 2 How a bike
helmet works
Learning intention
• Students discuss common myths about bike helmets
• Students investigate how helmets are designed to
protect the wearer’s head
• Students design an advertisement to promote bike
helmet use
Equipment
Activity sheet – Myth busters – photocopy one set for each
group
In Gear student workbook – This way up - fragile goods –
page 19
Bicycle helmets
Two pieces of polystyrene foam approximately 4cms thick
2 litre plastic drink bottle
Tape and scissors
Heavy weight such as a small brick paver or rock
Large poster paper – one sheet per group
Access to the internet (optional)
Family information sheet – The proper helmet fi t – photocopy
one per student
Teaching tips
To show the process used when making a bicycle
helmet, watch How it’s made bike helmets at https://
www.youtube.com/watch?v=MeZa-LsqEW4
Activities
1. Distribute a set of myth buster cards to each group.
Explain that one student from each group is to read out
a myth and the other members are to ‘bust’ the myth by
giving facts to support their response. Groups then read
the information on the card to check if their responses
were accurate. Make sure students have enough time to
discuss all of the myths. Ask students to share one new
piece of information they learnt from the activity.
2. Read with the students This way up - fragile goods on page
19 of the student workbook. Using a bicycle helmet, have
students identify the components of the helmet that off er
protection to the wearer’s head in a collision (eg the outer
layer or shell and the foam liner). Explain that although
helmets come in many diff erent shapes and designs to
make them more marketable, the components that off er
protection to the wearer’s head remain the same. Point
out the Australian and New Zealand standards label (AS/
NZS 2063) and explain that this code indicates the helmet
has met stringent safety standards.
3. To reinforce the purpose of the hard shell and foam liner
conduct the following experiment.
i. Place a piece of polystyrene foam on the ground.
ii. From shoulder height, drop a weight such as a brick
paver or rock onto the polystyrene foam.
iii. Pass the polystyrene foam around the class and
have students note any dents or deformations.
iv. Cut a piece of plastic from a cool drink bottle and
tape it onto another piece of polystyrene foam (to
represent the construction of a bicycle helmet).
v. Repeat Step 2 and then pass the piece of
polystyrene foam around for students to observe
and discuss.
(If an old bicycle helmet is available, use this in the
experiment rather than the foam and plastic. First
test the helmet with its outer shell on, then remove
the shell and test again).
4. Have students answer the questions on page 19 of the
student workbook and then write an advertisement that
promotes helmet wearing.
5. Read the information about choosing and fi tting a bike
helmet from the Family information sheet – The proper
helmet fi t with the class and answer any questions. Send
the copy home with each student to share with their
family.

CH
ALL
ENG
ES A
ND
CH
OIC
ES
ACTIVITY SHEET
A RESILIENCE APPROACH TO ROAD SAFETY EDUCATION© 2016 School Drug Education and Road Aware
Myth busters
Bike helmets don’t
protect your head
Case-controlled studies prove the exact opposite. Helmets do protect and reduce
the injury to your head if you fall off your bike. When a cyclist’s helmet hits the
road, footpath or another hard object, the hard outer shell spreads the impact
over a wide area. The foam inner liner then absorbs the energy evenly which
reduces the damage to the cyclist’s head. A cyclist not wearing a helmet would
have the impact concentrated in one part of their head and would probably
fracture their skull and possibly damage their brain.
If the helmet is the wrong size or the buckles are not done up correctly the level
of protection is reduced.
Cyclists don’t wear
bike helmets because
they cost too much
Bike helmets can cost as little as $20. In fact, impact test results for safety
protection between helmets costing $20 and $400 are virtually identical. When
you pay more for a helmet you may get an easier or more comfortable fi t and/or
more vents and graphics, but the basic impact protection of the cheaper helmets
is the same as more expensive ones.
Look on the helmet for the AS/NZS 2063 sticker or label. This tells you that the
helmet meets the safety standard and has passed stringent tests.
Bike helmets are just
foam hats and foam
isn’t going to protect
your head
EPS (Expanded Polystyrene Foam), which is the material used in bike helmets, car
bumpers and packaging materials such as egg cartons, is designed to protect
your head by absorbing the force from an impact with another solid object.
However, once the foam has been damaged or cracked the level of protection
the helmet off ers a cyclist is reduced and so the helmet should not be used
again, and a new helmet purchased..
Bike helmets don’t
have a hard shell like
motorcycle helmets
and they won’t
protect your head
A bike helmet is made with foam that absorbs the force when your head hits
something hard so it doesn’t need to have the weight of a hard shell. In fact a
hard shell only protects the foam from damage. Motorbike helmets are designed
so they can be used over and over, even if the wearer is involved in a crash and
the helmet is slightly damaged. Bike helmets however cannot be used after they
have been involved in a crash.
A bike helmet adds
to the size and height
of your head so it’s
more likely you’ll get
whacked by a low
branch or a vehicle’s
side view mirror
Even though a bike helmet may add to the overall size of your head, it is unlikely
to make a diff erence between hitting or mssing an overhead or side-head object.
MYTH
1
MYTH
2
MYTH
3
MYTH
4
MYTH
5
✃
✃
✃
✃
✃
✃
CH
ALL
ENG
ES A
ND
CH
OIC
ES
ACTIVITY SHEET
A RESILIENCE APPROACH TO ROAD SAFETY EDUCATION© 2016 School Drug Education and Road Aware
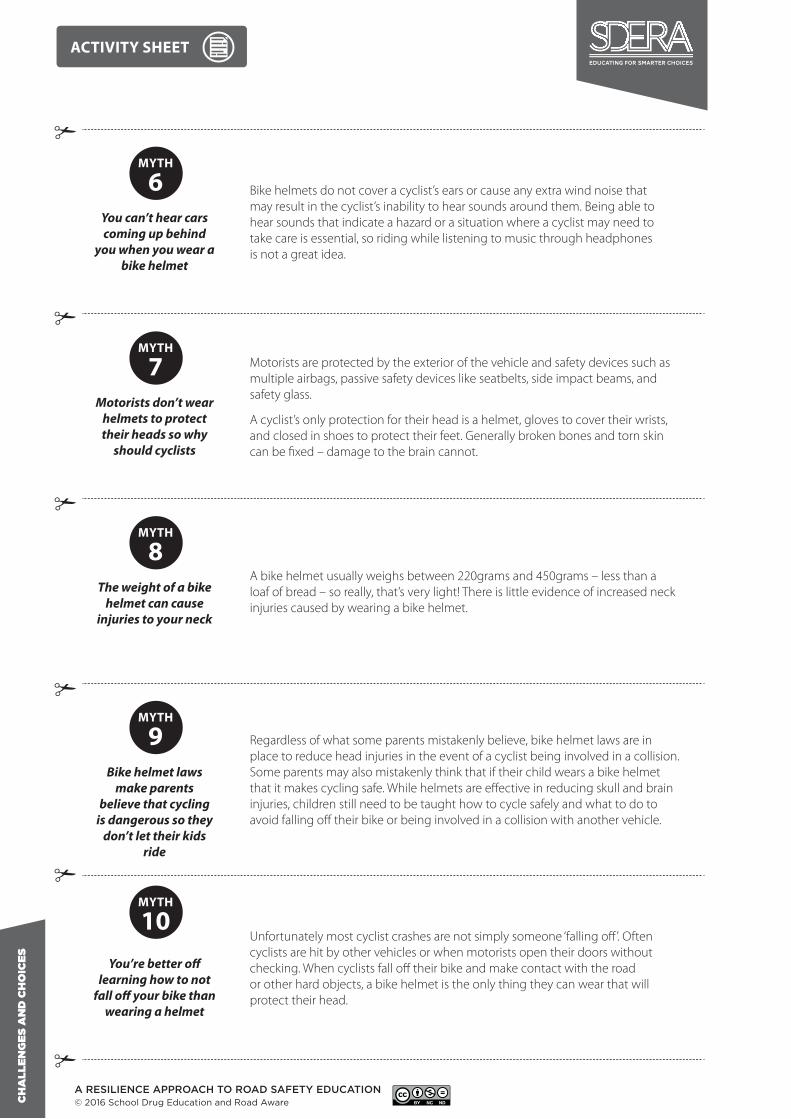
You can’t hear cars
coming up behind
you when you wear a
bike helmet
Bike helmets do not cover a cyclist’s ears or cause any extra wind noise that
may result in the cyclist’s inability to hear sounds around them. Being able to
hear sounds that indicate a hazard or a situation where a cyclist may need to
take care is essential, so riding while listening to music through headphones
is not a great idea.
Motorists don’t wear
helmets to protect
their heads so why
should cyclists
Motorists are protected by the exterior of the vehicle and safety devices such as
multiple airbags, passive safety devices like seatbelts, side impact beams, and
safety glass.
A cyclist’s only protection for their head is a helmet, gloves to cover their wrists,
and closed in shoes to protect their feet. Generally broken bones and torn skin
can be fi xed – damage to the brain cannot.
The weight of a bike
helmet can cause
injuries to your neck
A bike helmet usually weighs between 220grams and 450grams – less than a
loaf of bread – so really, that’s very light! There is little evidence of increased neck
injuries caused by wearing a bike helmet.
Bike helmet laws
make parents
believe that cycling
is dangerous so they
don’t let their kids
ride
Regardless of what some parents mistakenly believe, bike helmet laws are in
place to reduce head injuries in the event of a cyclist being involved in a collision.
Some parents may also mistakenly think that if their child wears a bike helmet
that it makes cycling safe. While helmets are eff ective in reducing skull and brain
injuries, children still need to be taught how to cycle safely and what to do to
avoid falling off their bike or being involved in a collision with another vehicle.
You’re better off
learning how to not
fall off your bike than
wearing a helmet
Unfortunately most cyclist crashes are not simply someone ‘falling off ’. Often
cyclists are hit by other vehicles or when motorists open their doors without
checking. When cyclists fall off their bike and make contact with the road
or other hard objects, a bike helmet is the only thing they can wear that will
protect their head.
MYTH
6
MYTH
7
MYTH
8
MYTH
9
MYTH
10
✃
✃
✃
✃
✃
✃

FAMILY INFORMATION SHEET
EDU
CA
TIN
G F
OR
SM
AR
TER
CH
OIC
ESED
UC
ATI
NG
FO
R S
MA
RTE
R C
HO
ICES
Tip for parents
You can use the Velcro pads that
manufacturers provide to give a
snugger fi t but if these don’t work, try
another design or size.
There are so many diff erent helmet designs
available that it can be hard to know which
one to choose. It’s simple. The helmet that fi ts
best and the design that your teenager likes,
is the one to buy. If it doesn’t look good –
they won’t wear it!
The proper helmet fi t
Will it
protect your
child’s head?
In Australia, bike helmets must
meet safety standards. Check
that the helmet you are going
to buy has an AS2063 or
AS/NZS 2063 label.
If it doesn’t – don’t buy it. Your
child’s safety is too
important.
Check the helmet fi tsThe helmet you buy must fi t your child’s head and be worn correctly or it will not off er the protection that it was designed to do.
1. Size – measure your child’s head to fi nd the right size. Have your child try on several helmets in their size until one feels right. Now put the helmet level on your child’s head and adjust the sizing pads until the helmet is snug. It should be sitting about two fi nger widths above their eyebrows.
2. Side straps – adjust the slider on both straps to form a ‘V’ shape under, and slightly in front of, the ears. Lock the slider if possible. 3. Buckles - center the left buckle under their chin. On most helmets, the straps can be pulled from the back of the helmet to lengthen or shorten the chin straps. This task is easier if you take the helmet off to make these adjustments.
4. Chin strap – buckle the chin strap. Tighten the strap until it is snug, so that no more than one or two fi ngers fi t under the strap.5. Does the helmet fi t right?
• Have your child open their mouth wide…big yawn. The helmet should pull down on their head. If not, go back and tighten the chin strap.
• Does the helmet rock back more than two fi ngers above the eyebrows? If yes, unbuckle and shorten the front strap by moving the slider forward. Buckle and re-tighten the chin strap and test again. • Does the helmet rock over your child’s eyes? If yes, unbuckle and tighten the back strap by moving the slider back toward the ear. Buckle and re-tighten the chin strap and test again.
Fragile Goods
THIS WAY UP
A RESILIENCE APPROACH TO ROAD SAFETY EDUCATION© 2016 School Drug Education and Road Aware

CH
ALL
ENG
ES A
ND
CH
OIC
ES
YE
AR
7
46A RESILIENCE APPROACH TO ROAD SAFETY EDUCATION© 2016 School Drug Education and Road Aware
Activity 3 The helmet debate
Learning intention
• Students consider the advantages and disadvantages
of helmet use
• Students express their own opinions and appreciate
the viewpoint of others
Equipment
Access to the internet
In Gear student workbook – Think tank – page 20
Large poster paper – one sheet per group
Activities
1. Explain that Australia was the fi rst country to make
helmets compulsory for all cyclists including young
children riding in a carrier or trailer behind a bike.
2. View the video clip 7PM Project Helmet Debate
at http://vimeo.com/14684738. Have students
note the points that were presented in a
T chart (refer to page 72) as shown. If access to
the internet is not available have students take
either side of the debate and list supporting
arguments.
Supporting bike helmet wearing
Against bike helmet wearing
3. Brainstorm (refer to page 67) the excuses some people
use for not wearing a bike helmet and add these to the
‘against bike helmet wearing’ section of the T chart.
Examples may include:
• makes my hair fl at
• my head gets hot and sweaty
• helmets make you look stupid
• my friends don’t wear one so I don’t need to either
• can’t aff ord to buy a helmet
• lost my helmet.
4. Nominate groups to take the ‘for’ or ‘against’ position on
bike helmet wearing. Explain groups are to consider the
information listed on their T chart and prepare arguments
to use in a debate. Conduct the debate and then have
students write a paragraph outlining their opinion about
helmet wearing.
5. Explain that some people choose to not wear a helmet
because they believe the design doesn’t fi t their needs
(eg cyclists who wear their hair in a ponytail can fi nd that
the helmet doesn’t sit correctly on their head). In groups,
students select one of the design tasks described on
Think tank on page 20 of the student workbook and work
through the ‘think tank’ steps. Have groups present their
design to the class for appraisal to check if they met the
client’s brief.
Activity 4
Stopping distance
Learning intention
• Students identify factors that can increase
stopping distance
Equipment
Cyclist wearing a helmet
100 metre tape measure or trundle wheel
Six markers labelled ‘braked’
Six markers labelled ‘stopped’
Whistle
Access to the internet (optional)
In Gear student workbook – Stop – page 21
Teaching tip
Markers can be made from recycled ice-cream, yoghurt or
take-away food containers.
Activities
1. Explain that ‘stopping distance’ refers to the total distance
a vehicle (or bike) travels to come to a complete stop.
This distance is measured from the point where the driver
(or cyclist) reacts and processes information (reaction
distance) and the distance the vehicle (or bike) continues
to travel once the brakes are applied (braking distance).
Discuss some of the factors that can increase stopping
distance such as: speed, road conditions, distractions, use
of alcohol or other drugs, size of the vehicle, alertness of
the driver or cyclist, the amount of tread on the tyres and
the friction between the tyre and the road, and listening
to music with headphones on. Have students write some
of these in the student workbook on page 21.
2. Mark a ‘road’ on a paved or bitumen area such as a
basketball, netball court or footpath. Have six volunteers
spread out along the road at intervals of around fi ve to
ten metres. Give each volunteer a ‘braked’ and ‘stopped’
marker. Have the cyclist ride down the road at a normal
speed and apply both the front and rear bike brakes
when they hear the whistle blown. The student closest
to where the cyclist applies the brakes should place a
marker at that spot. The student closest to where the bike
fi nally comes to a stop should indicate this using a marker.
Measure the distance from where the whistle was blown
to where the bike stopped. Have the class share their
observations and use the following questions to process
the activity.
Ask
• Did the bike travel further than you thought it would once
the brakes were applied?
• Would anything about the bicycle increase the stopping
distance? (Yes eg the condition of the brakes and tyres,
the weight of the bike, travelling speed).
• Could the road condition aff ect stopping distance? (Yes
eg smooth or rough surface, gravel road, wet slippery
road).

CH
ALL
ENG
ES A
ND
CH
OIC
ES
YE
AR
7
47A RESILIENCE APPROACH TO ROAD SAFETY EDUCATION
© 2016 School Drug Education and Road Aware
Repeat the activity and observe how other factors can
increase or decrease the stopping distance by having
the cyclist:
• ride at a faster speed than the fi rst trial
• ride at a slower speed than the fi rst trial
• ride on the ‘road’ after it has been sprayed with
water (or throw several buckets of water to reduce
friction levels)
• carry a heavy backpack
• dink another student (this student should also wear
a helmet)
• eat food or drink from a water bottle while riding
• wear earphones and listen to loud music while
riding.
Use the following questions to process the activity.
Ask
• What increased the stopping distance? (eg speed, wet
road, heavy weight, distractions).
• Did the bike come to an immediate stop in any of these
trials? Why?
• Why would a truck take longer than a bike to stop quickly?
(eg the truck’s size and weight, travelling speed).
• What do cyclists need to be aware of when riding in wet
weather?
• Should cyclists wear headphones? Why?
• What precautions can a cyclist take to ensure they can
stop quickly? (eg always assess the traffi c for hazards,
don’t ride fatigued or under the infl uence of alcohol or
drugs, maintain their bikes brakes and tyres, leave a safe
distance between the bike and other cars).
Have students complete page 21 in their workbook.
3. View Wipe off 5 at http://www.youtube.
com/watch?v=SuY_VHzKdjc. This clip shows
how a car travelling at 65km/h has a greater
stopping distance and impact in a crash than
a car travelling at 60 km/h. Use the following
questions to process the video.
Ask
• Why should cyclists and riders of skateboards and scooters
know about speed and stopping distances? (Cyclists
and other riders travelling in locations where the sign
posted speed is above 30 km/h should be aware that
vehicles, that need to brake suddenly, will travel a
signifi cant distance before being able to stop. A cyclist
or rider within that stopping distance will be at risk).
• Do you think cyclists should travel on roads with other
vehicles where the speed limit is over 50km/h? Why?
• Where can cyclists ride without having to share the road
with other vehicles? (eg all cyclists are permitted to ride
on footpaths but must give way to pedestrians).
4. Conduct a thumbs up, thumbs down (refer to page 73)
using the following statements. Encourage students to
share their own opinions with a partner fi rst then with the
class.
Statements
• The speed limit around schools should be 20km/h.
• Local roads and streets should have a 40km/h
speed limit not 50km/h.
• Cyclists can usually avoid tricky situations so they
don’t need to know about stopping distance.
• Most kids don’t think of a bike as a vehicle that
needs to be roadworthy and maintained.

CH
ALL
ENG
ES A
ND
CH
OIC
ES
YE
AR
7
48A RESILIENCE APPROACH TO ROAD SAFETY EDUCATION© 2016 School Drug Education and Road Aware
TOPIC 3
Promoting health and safety
Activity 1 Investigating
active transport practices
Learning intention
• Students investigate the benefi ts of using active
transport
Equipment
Large sheet of paper
Dot stickers – two per student
Teaching tip
Instead of using dot stickers, students can place a tick or
cross on the voting sheet.
Activities
1. Ask students to defi ne the term ‘active transport’. Answers
should include modes of travel such as cycling, walking
and using public transport.
2. Conduct a quick ‘hand up’ survey of the class to determine
how many students:
• walked to school in the last week
• cycled to school in the last week
• used the school bus or public transport in the last week
• travelled by car to school in the last week.
Convert the survey results into percentages ie 15 students
in a class of 30 walked to school, ie 50%.
Explain the results of a recent survey of WA students
showed that the number of students who reported using
at least one session of active transport (ie walking or
cycling) in the seven days prior to the survey included:
46.5% of primary boys and 43.1% of primary girls; and,
50.9% of secondary boys and 43.2% of secondary girls
(Martin, Rosenberg, Miller, French, McCormack, Bull, Giles-
Corti, & Pratt, 2008). Discuss the class survey results to
determine if they are similar to the WA survey and use the
following questions to further the discussion.
Ask
• In Western Australia most students travel to school by
car even though many of these students live less than
two kilometres from their school. Why do you think
most students travel by car rather than walk to school?
(eg parents make this decision, no public transport
available, easy. Active transport modes for students
living in regional areas may not be viable. Suggest that
these students are dropped off at least one kilometre
from the school and walk the remaining distance).
• Do most of our school community use active transport
as a way to get to school? Why? (eg have road safety
guidelines that encourage active transport to reduce
parking congestion and traffi c around the school,
school has a focus on health, health programs have
informed community of the physical and mental health
benefi ts).
• Which active transport mode do you think could be used
more often by our school community? Why?
3. Show how to construct a placemat (refer to page 70)
according to the number of students in the group (ie
up to four). Explain that students are to write some of
the associated social, health and wellbeing benefi ts of
active transport in their placemat section. When fi nished,
students are to share their ideas with their group then
decide which three ideas would increase the number
of members in their school community using active
transport. Try to group the ideas under the headings –
physical, social, mental health, other.
4. Listen to each group’s top three ideas and write these on
a large sheet of paper. Add the following if not identifi ed
by the class.
• Reduction in traffi c congestion around schools.
• Families get to spend more time together.
• Get to socialise with other children while walking to
school.
• It is a fun and healthy thing to do.
• Learn more about your neighbourhood eg streets,
people.
• We can have a cleaner environment as less traffi c
reduces the amount of air pollutants emitted by
vehicles.
• It can keep you fi t and healthy.
• Opportunities to learn how to be a safe road user
eg crossing roads.
• Gives students a sense of freedom and develops
their independence.
Explain students are to complete a dot voting (refer to
page 68) by placing a sticker on the reason or reasons
they think would most encourage Year 7 students to
use active transport. Discuss the voting results using the
following questions.
Ask
• Why might knowing there are physical, social and mental
health benefi ts encourage a young person your age to
walk, cycle or take public transport to school?
• Would knowing that pollution can be decreased with
fewer cars on the road encourage a young person to walk,
cycle or take public transport to school? Why?
• What might stop a parent from allowing a Year 1 child to
walk or ride to school? (eg parents have concerns about
their child’s safety, live too far away, don’t understand
the public transport system, children at this age need
to be supervised by adults as they don’t have the skills
to assess hazards in the traffi c environment).
• What might stop a parent from allowing or encouraging
a Year 7 student to walk, cycle or take public transport to
school?
• Do you think the neighbourhood around our school
is a safe place for students to walk and cycle? Why?
(Encourage students to talk about the road and traffi c
conditions rather than possible ‘stranger danger’
events).
• How can you increase the number of times you walk, cycle
or use public transport each week to get to school or other
locations? (eg put a plan in place and write it in your
diary or phone as a reminder, apply for a SmartRider, set
up a walking or cycling group with other students from
the school).

CH
ALL
ENG
ES A
ND
CH
OIC
ES
YE
AR
7
49A RESILIENCE APPROACH TO ROAD SAFETY EDUCATION
© 2016 School Drug Education and Road Aware
Activity 2 Assessing safety in
the community
Learning intention
• Students assess safety in their community for pedestrians
and cyclists
• Students devise a strategy to reduce the risks for
pedestrians and cyclists in the local community
Equipment
In Gear student workbook – Check it out – page 22
In Gear student workbook – Smart targets to safety – page 23
Access to the internet (optional)
Family information sheet – Travelling to school –
photocopy one per student
Teaching tip
Students can access the Walk Score free app or website at
www.walkscore.com and instantly calculate the ‘walkability’
of any location. Explain students can type in their home or
school address and Walk Score will provide a map and photos
of neighbourhood locations such as parks, restaurants,
schools and community buildings, entertainment and shops.
Activities
1. Have students assess the safety of the local area near their
home or school and record their observations on Check it
out in the student workbook on page 22. Have students
report their fi ndings to the class and then decide on an
overall safety rating for the community.
2. Brainstorm (refer to page 67) some strategies that the
class, the school community or local council could put in
place to address the list of safety issues. For example:
• create a map that shows the safest route to walk
and cycle to and from school. The route may be
safer because it has less traffi c and has more places
where students can safely cross the road
• set up a walking or cycling group where students
meet up with other families or students to travel
together to school
• teach younger students how to cross roads using
the ‘stop, look, listen and think’ procedure by
creating a play
• have areas at the school that separate pedestrians
from traffi c eg a ‘Kiss ‘n drive’ area
• teach students to choose safe places to cross roads
such as on a straight stretch of road, at a crosswalk
or traffi c signals, and with the traffi c warden
• have lower speed zones around the school and
local neighbourhood
• install traffi c calming devices such as speed bumps
and roundabouts on streets around the school
• survey the school to identify pedestrian hazards in
the local area
• survey parents of children with disabilities to
identify accessibility barriers
• start a Walking School Bus.
(Information on the Walking School Bus can be accessed
through the TravelSmart program [Department of
Transport, Western Australia]).
Explain that groups (or the class) are to choose one
strategy from the list and decide how this might be
implemented in their school community. For example,
students could create a neighbourhood map showing
the routes to school that have crossing facilities and less
traffi c, and publish the map in the school newsletter or
post it on the school website.
3. Introduce SMART goals by reading Smart targets to safety
on page 23 of the workbook and giving the following
SMART goal example. Explain that by setting a SMART
goal, students will increase the likelihood of achieving
their goal which is to reduce the risks in the local or
school community for pedestrians and cyclists.
• Specifi c – I want to save $60 in 4 weeks to buy a ticket
to the concert all my friends are going to on 2 July.
• Measurable – I will achieve my goal by 30 June and
buy my ticket on 1 July.
• Action-orientated – I will work two shifts at my part
time job each week to earn $40. I will wash dad’s car
twice to earn $20. I will put the money in my account
as soon as I earn it. I will check my bank balance at the
end of each week.
• Realistic – My boss has already approved me working
two shifts each week. Dad has agreed to pay me $10
for a car clean.
• Timeframe – I will have $30 in my bank account by
15 June and $60 by 30 June.
Groups are to then use the SMART goal steps to develop
their own an action plan. As this activity may be ongoing
and require assistance from parents, the school health
committee or administration, make sure students
nominate the actions they are responsible for so they are
clear about their role in the process. Set a time to monitor
the progress of each group’s goal and refl ect on their
ability to work as a team. Celebrate achievements along
the way. Use the questions on page 23 of the student
workbook to refl ect on the task completed.
4. Send home a copy of the Family information sheet –
Travelling to school for students to share and discuss with
their family.

FAMILY INFORMATION SHEET
EDU
CA
TIN
G F
OR
SM
AR
TER
CH
OIC
ES
A RESILIENCE APPROACH TO ROAD SAFETY EDUCATION© 2016 School Drug Education and Road Aware
Travelling to school
Did you know that in Western Australia, most
students travel to school by car even though
they live less than two kilometres from their
school? There are many physical, social and
mental health reasons why children should
walk, cycle or use public transport to travel to
and from school.
1. Helps prevent obesity and its subsequent
consequences such as heart disease, diabetes,
and bone and joint pain.
2. Improves learning and boosts academic
performance and concentration.
3. Helps develop lifelong fi tness habits.
4. Less traffi c congestion around schools which
means safety for pedestrians and cyclists
increases.
5. Helps young people grow into self-reliant,
independent adults.
6. Stronger sense of community as young people
meet their neighbours and other students
walking to school.
7. Safer streets as more walkers and cyclists can
improve personal security by providing more
‘eyes on the street’.
8. Promotes public transport routes that service
the school and local community.
Tips for travelling to school
For some Year 7 students, travelling to school on their own may be a new experience. Talk with your children about these tips that can help them to manage their own safety and the safety of their friends.
• Plan the safest route for getting to school. Suggest that whenever possible they avoid busy streets and intersections, and cross roads where they can get a clear view of oncoming traffi c.
• Always ‘stop, look, listen and think’ before crossing the road.
• Walk on footpaths if they are available. Walk on the nature strip, if no footpath is available, facing oncoming traffi c and walk as far away from the edge of the road as possible.
• Always use pedestrian crossings and cross with traffi c signals if they are available.
• Don’t step onto a crosswalk until all cars have stopped and try to make eye contact with each driver.
• Don’t take the risk of rushing to catch a bus or train.
• Wait until the bus has moved down the road so you can check for traffi c before you cross.
• Train tracks are ‘no go’ zones. Always obey warning signals at level crossings.
• Put your phone in your bag. Talking and texting on mobile phones or listening to music can interfere with you being able to hear traffi c.
Tips for parents
Try to nominate at least 2 days a week
that are walk, cycle or public transport
days.
If you are concerned about your
children’s safety, set up a walking or
riding group where students arrange
a meeting time and place, and then
continue their journey together.
If you live a long distance from the
school, you might like to drive your
children halfway and then let them walk
the rest of the way.
T
T

CH
ALL
ENG
ES A
ND
CH
OIC
ES
YE
AR
7
51A RESILIENCE APPROACH TO ROAD SAFETY EDUCATION
© 2016 School Drug Education and Road Aware
Activity 3 Mapping a safe
route to school
Learning intention
• Students assess potential hazards for pedestrians and
cyclists
• Students plan a route to walk safely to and from school
Equipment
Photocopy of a local area map – one per student (or use
Google Maps)
Internet access (optional)
Red pen – one per student
Highlighter – one per student
In Gear student workbook – Map it out – page 24
Teaching tip
If available, use an interactive whiteboard to display a local
area map and locate well-known landmarks such as parks,
schools, roads and churches.
Activities
1. Give each student a copy of a local area map (or print one
using Google maps). Explain how to fi nd a location on
the map by using vertical and horizontal grid coordinates.
Have the students practise fi nding several well-known
locations on the map such as the school, a local park, river
or lake, and a church. Ask each student to fi nd their home
and write down the grid coordinates. Talk about the types
of map symbols used to indicate places such as churches
and hospitals, and diff erent types of roads such as local,
highways and freeways, and railway tracks. Have students
locate some of these symbols on the map.
2. Explain the tasks described on Map it out on page 24 in
the student workbook. Put students into small groups and
if students live near one another, place these students
together.
Have groups share their work with the class, explaining
why the route was chosen and how a pedestrian or cyclist
could travel safely and avoid or manage possible hazards
such as busy roads or intersections.
Ask
• Besides knowing a safe way to get to and from school,
what else can a student your age do to stay safe while
out walking or cycling? (eg be more visible in the traffi c
environment by wearing light or bright coloured
clothing; walk where drivers expect pedestrians to be;
use footpaths when provided; plan ahead for situations
that might arise such as having to walk home in the
dark or rain; don’t use headphones or mobile phone; if
they have consumed alcohol or other drugs, don’t walk
or cycle).
• What is one tip about getting to school safely that you
could share with a student new to our school?
3. Publish the ‘safe routes to school’ maps and include a
copy in induction packs for new students.
Activity 4 Utilising strengths
to conduct a walking event
Learning intention
• Students practise setting a SMART goal to plan and
promote a walking event
• Students identify character strengths in themselves
and others that can benefi t a team
• Students make decisions for the benefi t of the group
Equipment
Large sheets of paper – one per group
In Gear student workbook – Event manager required –
page 25
Computer access, art equipment and paper
Strategy sheet – Thought shapes – page 80 – photocopy
one set
Teaching tip
A high level of student participation and contribution
will increase the benefi ts and outcomes of this
activity. However the student cohort will determine
the level of support required in the planning and
management of the walking event.
Activities
1. Explain that we all have strengths and qualities that make
up our character and personality. These can be grouped
into ability strengths (eg being a good runner or artist,
great at maths) and character strengths (eg honesty,
fair, being kind, team player). Have students discuss the
strengths listed on Events manager required on page 25 of
the student workbook.
2. Explain that the class are to plan a school community
event that aims to promote walking. To do this it is
important that the class utilise the strengths of individual
class members. Ask each student to be honest in their
appraisal of their areas of strength and explain that they
do not have to be ‘strong’ in all of the areas. Also ask
students to determine how their strengths will help them
to work as part of a team or perhaps take on a leadership
role. In small groups, have students share their strengths
and give an example of where they have used these
recently. Use the following questions to process this part
of the activity.
Ask
• What are some other ways you can identify your strengths?
(eg accept praise and feedback from others, look at
what you really like doing and why, compare yourself to
others in this area).
• Can you use your strengths to also identify your weaknesses
or challenges? (Yes, but be mindful that having three
very strong characteristics can be better than having
ten that still need to be further developed).
• Why is it important to look for this sort of evidence? (eg
knowing your strengths and challenges or limitations
can help you to achieve your goals, it helps you to get
a clearer picture of your strengths and limitations and
then you can set more realistic goals).
CH
ALL
ENG
ES A
ND
CH
OIC
ES
YE
AR
7
52A RESILIENCE APPROACH TO ROAD SAFETY EDUCATION© 2016 School Drug Education and Road Aware
• What can you do to overcome your weaknesses? (eg ask for
help and feedback, practise using the strength more).
• Can knowing our strengths help us to cope when times are
unhappy? (Yes. Often doing activities that involve our
strengths help us to ‘be in the zone’ and forget about
unhappy things for a while. We also learn things more
quickly when we are using our strengths and this can
give us more meaning and purpose).
• Can knowing your strengths help you to take on leadership
roles? (Yes, for those that want to take on leadership
roles).
3. Suggest that having a theme can help other planning
decisions fall into place. Knowing what motivates young
people their age and the school community will help
the class to decide what the event should be and when
it might be held. Write each of the following questions
on a sheet of paper. Conduct a graffi ti (refer to page 69)
by giving each group a question and time to write their
responses. After a designated time have groups swap
their sheets and continue the process.
Graffi ti questions
• What school community events have been
successful in the past? Why were these events
successful?
• What might motivate students at this school
to participate – concern for the environment,
reducing traffi c around the school, promoting
physical and mental health, promoting active
transport, fund raising for organisations?
• When would more students be able to be involved
in the event - before, during or after school? Why?
Would the event need to include all students?
Review and discuss the responses written on each graffi ti
sheet.
4. Have the class brainstorm (refer to page 67) a list of
events that would be suitable for the school community
and have a level of involvement. Some ideas could
include:
• a ‘walk to school’ day or ‘walking Wednesday’ where
everyone is encouraged to walk including staff
• a ‘Walking School Bus’ where students meet at a
designated location and are supervised by two
adults while walking to school
• a ‘walk at school’ event or ‘walkathon’, especially if
most students do not live within walking distance
to the school
• a ‘walk rally’ which is similar to a car rally and where
walkers answer questions along a set route
• a ‘park and stride’ day where families park away
from the school and walk the rest of the way.
Discuss the viability of the class being able to plan and
conduct the walking events. Delete any events that
may require a high level of school staff and parent
involvement, an extensive budget, or are too diffi cult to
manage from a safety aspect. Have the class select one
walking event from the list. Place students in small groups
to set a SMART goal using Event manager required on page
25 of the student workbook as part of their planning.
Explain that the task allocation should not be completed
at this stage, only the tasks and the timeframes. After a
nominated time, use the envoy strategy (refer to page
68) to allow groups to share their planning and listen to
the ideas of other groups.
When completed, have each group present their ideas
to the class. Hold a vote to decide which plan will
become the focus for the class. When the vote has been
conducted, allocate students or groups of students with
identifi ed strengths to each of the tasks. For example,
students who are good communicators can contact local
businesses for fi nancial or merchandise support, students
with strong leadership skills can be leaders of groups to
ensure that the students stay on task and achieve their
goal.
5. Explain that a few weeks before the event, the class
will need to promote and inform those who are to be
involved such as parents, students and other members of
the school community. Brainstorm a list of ideas that can
be used to promote the event. For example:
• write and design an advertisement for the
school newsletter, e-newsletter and community
newspaper
• create banners and signs to place along the
walking routes
• send home fl yers that outline event logistics (eg
a map of the routes students can take to and
from school or places to meet with adult walking
leaders)
• send information to parents about modelling and
teaching their children safe walking practices
• use the school announcement system to
encourage and remind students about the event
• create a rap, jingle or song that includes relevant
information and can be performed at a school
assembly.
6. After the event has been conducted, celebrate the work
carried out by the students and write to, and thank
volunteers for their eff orts.
7. Using a set of thought shapes (refer to page 73), have
the students refl ect on their event. Talk about the skills
that students practised such as planning, decision-
making, goal-setting, negotiation, communication, and
managing themselves and others.
CH
ALL
ENG
ES A
ND
CH
OIC
ES
YE
AR
7
53A RESILIENCE APPROACH TO ROAD SAFETY EDUCATION
© 2016 School Drug Education and Road Aware
• What is a SmartRider? (Primary and secondary students
with a student SmartRider are entitled to a student fare
when travelling to or from school on a Transperth bus,
train or ferry or on any regional bus services, regardless
of how many zones they travel. Student SmartRiders
must also be presented as proof of concession
entitlement on all Transperth, TransWA and regional
town bus services. Value can be added to student
SmartRiders to pay for Transperth fares, and can also be
used to tag on and off Transperth services.
Students can refer to the Transperth
website at http://www.transperth.
wa.gov.au/TicketsandFares/SmartRider/
BuyingSmartRider/StudentSmartRiders.aspx
for further information).
2. Explain that to practise using public transport,
students are to plan an excursion for the class. This
will demonstrate some of the social, health and
environmental benefi ts of public transport such as having
a fun outing, saving money and fuel, and learning new
road safety skills. (Students located in a country area may
need to plan a journey from a hypothetical metropolitan
location to an appealing destination).
3. Have groups complete Journey planner on page 26 in
the student workbook using the Transperth website.
Remind the class to also plan the return journey. For those
students outside the metropolitan area, use photocopies
from the local street directory and access the relevant
bus and train timetables, either in hard copy or on the
Internet. Research which service to travel on, where the
closest bus stop is, when they should be there, and how
long it will take to travel to their destination. Listen to
each group’s excursion plan and have the class vote to
determine the most popular (and feasible) destination.
4. Explain that students are to write a code of conduct
which outlines the safety and behaviour rules for the
excursion in their workbook. For example:
• wait for passengers to get off the bus or train
before boarding
• be courteous to other passengers; off ensive
behaviour will not be tolerated
• sit in a seat if it is available
• off er your seat to someone who needs it more
than you do, eg seniors, people with a disability, or
parents with prams or carrying small children
• use quiet voices
• do not place any part of your body outside of the
bus
• keep the volume low on all audio devices, even
through headphones
• keep clear of the doorways, on both the inside and
outside of the train
• make sure your backpack isn’t in anyone’s way
• keep your feet off the seats
• make sure your bike is secure on board a train
• possess a valid ticket at all times and show it upon
request
• always show proof of entitlement when travelling
on a concession fare.
Activity 5 Planning an
excursion
Learning intention
• Students practise planning a trip using public transport
• Students appreciate the responsibilities of a public
transport user
Equipment
Street directories (or use Google Maps)
Public transport timetables
Access to the Internet
In Gear student workbook – Journey planner – page 26
Family information sheet – Using public transport –
photocopy one per student
Teaching tips
This activity is for bus travel but can be adapted to include
train travel or focus only on train travel. Most students will
need to transfer between the two modes of transport to
get to and from school. Teachers will need to ensure that
the school administration has been notifi ed and all school
excursion policies have been followed when conducting
this activity.
Prior to conducting this activity it is suggested that schools
contact Transperth Education on (08) 9326 3970 or email
[email protected] for further information on
using public transport for class excursions.
Activities
1. Have students share their experiences of using bus and
train travel. Talk about: the types of tickets available; how
much fares cost; how to buy tickets; the rules for using
buses (eg reasonable behaviour, all body parts inside the
bus at all times, consideration of disabled and elderly
people); and how to indicate your intention to get on and
off a bus. The following questions can be used to guide
this discussion.
Ask
• What does the term ‘public transport’ mean? (In some
locations, students will not have access to public
transport however local or community transport
options may be available).
• Why did you choose to use public transport at that time?
• What did you know about using public transport when
you caught the bus or train?
• How did you plan your journey? (eg used the Journey
Planner on the Transperth website, Transperth App,
Transperth Infoline 13 62 13 or a timetable).
• What did you need to know before you checked the bus or
train timetable? (eg required time of arrival, location of
nearest bus or train stop to the departure and arrival
places, timetables, fare, connecting services).
• How did you buy your ticket? (eg at the station, on the
bus).

CH
ALL
ENG
ES A
ND
CH
OIC
ES
YE
AR
7
54A RESILIENCE APPROACH TO ROAD SAFETY EDUCATION© 2016 School Drug Education and Road Aware
5. Where possible, conduct the excursion at a suitable time
and use it to further students’ road safety learning, for
example:
• comply with public transport safety and behaviour
rules
• count the zones travelled through using the
Transperth zone map
• conduct a scavenger hunt for items such as No
food and drink signs, priority seating, closed circuit
cameras, the transit guard, emergency button
• take digital photos that can be used by the class
when writing a recount of the excursion.
After the excursion, students can:
• write a letter to the local paper or for the school
newsletter/website to explain the aim of the
excursion and the school’s commitment to safety
while using public transport
• write a recount of the excursion for the school
newsletter or website, highlighting the safer
behaviours that the students and other passengers
demonstrated
• write a narrative or create a poster to promote
the rights and responsibilities when using public
transport.
6. Suggest to students the importance of planning a journey
to ensure that it is timely and safe. Ask students to identify
strategies to manage unusual or unexpected situations that may arise when travelling by public transport such as losing their ticket or SmartRider, if they miss their stop or feel intimidated or threatened by passengers.
For more tips on safe travel, visit www.getonboard.transperth.wa.gov.au
7. Send home a copy of the Family information sheet – Using public transport on page 53 and 54 with each student to discuss with their family.

FAMILY INFORMATION SHEET
EDU
CA
TIN
G F
OR
SM
AR
TER
CH
OIC
ES
Using public transport
As young people become independent,
start to socialise more and become
involved in sporting and other after
school activities, they may need to start
using public transport more frequently.
These questions will help your children
learn how to use public transport.
Use www.transperth.wa.gov.au to fi nd timetables and maps, tickets and fares including SmartRider, and a Journey Planner.
Discover more tips to get to grips with public transport at:www.getonboard.transperth.wa.gov.au
1. Where is the closest bus stop/train station to your house?
2. Where is the closest bus stop/train station to your school?
3. What is the number of the bus that will drop you near:
• your home and take you to school?• your home and take you to the shops or town?
• your school and take you to your home?• your home and take you to a friend’s house or after school activity?
4. Do the buses or trains near your home run every day? How often do they run?
5. Do the buses or trains run less frequently on weekends and public holidays?
6. Do the trains ever skip the station nearest to you at certain times of the day?
7. What time would you need to catch the bus or train to get to school on time?
8. What time would you need to catch the bus or train near your school to take you home?
9. How much is the fare from your house to your friend’s house/shopping centre/school?
10. If you missed the bus or train after school, how long would you have to wait to catch the next one? Is there another bus or train?
11. What should you do if you miss the bus or train and can’t get home? What is your contingency plan?
A RESILIENCE APPROACH TO ROAD SAFETY EDUCATION
© 2016 School Drug Education and Road Aware

FAMILY INFORMATION SHEET
EDU
CA
TIN
G F
OR
SM
AR
TER
CH
OIC
ES
A RESILIENCE APPROACH TO ROAD SAFETY EDUCATION© 2016 School Drug Education and Road Aware
Passengers must have a valid ticket at all times and show it upon request.
Students must always show proof of entitlement when travelling on a student fare.
Seats should be offered to seniors, people with a disability, and parents with prams or carrying small children.
Passengers should be courteous to others. Offensive behaviour is not tolerated.
Passengers are not allowed to speak to the driver or stand in the cab area while the bus is moving.
All audio devices need to have the volume on low and be used with earphones.
Passengers can disembark anywhere along their bus route (traffic permitting), after 7:00 pm and outside
the CBD area. Passengers should advise their driver beforehand.
Smoking is not allowed while travelling on a bus or train.
Passengers are not permitted to consume food and/or beverages
while travelling.
Personal belongings should be placed on your lap and not in the aisle.
Passengers must not place any part of their body outside the bus.
Wait for the bus or train to stop then alight quickly and sensibly.
Wait for the bus to move away, at least 20 metres, before
trying to cross the road.
Using public transport
Passengers
using public transport
have the right to travel
safely and not be
annoyed by others.
However, with this
right comes
responsibilities.
✓✓✓✓✓✓✓
✓✓
✓✓✓✓
My responsibilities when using public transport
Sometimes young people can be infl uenced by their friends to behave unsafely or disturb others on public transport. Check that your child feels confi dent to tell their friends ‘no’ when they are in a situation where they might get injured or their behaviour will aff ect other users.

CH
ALL
ENG
ES A
ND
CH
OIC
ES
YE
AR
7
57A RESILIENCE APPROACH TO ROAD SAFETY EDUCATION
© 2016 School Drug Education and Road Aware
TOPIC 4
Strategies to manage risks
and seek help
Activity 1 Responding to
emergency situations
Learning intention
• Students practice responding in an emergency situation
Equipment
In Gear student workbook – What is your emergency? –
page 27
Two phones (optional)
Access to the internet
Activities
1. Explain that being able to help someone who is unwell
or unconscious may mean the diff erence between
that person living or dying. Have students share
their experiences of dealing with an emergency and
performing basic fi rst aid. (Remind the class not to use
people’s names when sharing their stories).
2. Listen to the radio advertisements at http://www.
triplezero.gov.au/Documents/radio_ads.mp3 that
promote the correct procedure for calling and using the
Triple Zero service. Stress that it is important to stay calm
in an emergency and always fi rst seek help from an adult
(if available) before calling 000 or administering fi rst aid.
(The Triple Zero radio advertisements are also available in
nine languages – Arabic, Cantonese, Greek, Italian, Korean,
Mandarin, Serbian, Spanish and Vietnamese at http://
www.triplezero.gov.au/Documents/cald_radio_ads.mp3)
3. Read What is your emergency? on page 27 of the student
workbook. Remind students that calling 000 (or 112 as an
alternative mobile number) is only for emergencies and
doing this for fun means that an operator is spending
time with their hoax call when they could be helping to
save someone’s life. With a student volunteer, model how
to complete the 000 call. Explain why it is important to
give the emergency operator the state in Australia they
are calling from (many of the suburb names in Australia
are repeated so clarifying which state they are calling
from will avoid confusion).
4. Place students with a partner. Nominate one student in
each pair to be the emergency operator and role-play
(refer to page 70) calling the emergency number for a
friend in the following situation:
• You and your friend were walking along Royal Street
in East Perth. Your friend has has been hit by a car. Call
Triple Zero now.
5. Have students view the Triple Zero website
www.triplezero.gov.au then complete a 3-2-1 refl ect
(refer to page 72). Listen to the students’ responses and
clarify the questions raised. Ensure the class are aware
that calling for an ambulance in an alcohol or drug-
related situation does not always mean that the police
will attend. This usually only occurs when the ambulance
offi cers feel their own safety is in jeopardy or the patient
is deceased. Also point out to students that if they are
concerned about sharing their identity with the operator,
they can choose not to give their name.
6. Ask the class if they have an ICE – In Case of Emergency
– number entered in their phone contact list. Discuss
how this strategy can help a person in the case of an
emergency.
Activity 2 Practising the
DRS ABCD procedure
Learning intention
• Students recognise signs that a person requires fi rst aid
• Students practice and apply basic fi rst aid principles
and strategies in emergency situations
• Students collaborate with peers to suggest strategies
they could use in emergencies
Equipment
In Gear student workbook – Tick tock – page 28
Access to internet
Empty tissue box and small cards (optional)
Teaching tip
Have students complete the St John
Ambulance online fi rst aid course – Click to Save
at http://clicktosave.com.au/ or enrol the class
in a free First Aid Focus presentation at
http://www.stjohnambulance.com.au/
fi rstaidfocus/home
Activities
1. Read the following scenario to the class.
• Your friend has been hit by a car…tick tock…your
friend isn’t moving...tick tock, tick tock…hurry up, you
need to do something…but what?
Ask the class what they would do in this situation and
write all responses on the board. Read through the DRS
ABCD steps described on Tick tock on page 28 of the
student workbook and check which of the steps were
identifi ed by the class.
2. View one the many Australian video clips available on
YouTube that demonstrate the DRS ABCD steps. Stress
that students must always assess the situation for possible
dangers and maintain their own safety fi rst when helping
others (eg being hit by passing vehicles if the emergency
is on a road, avoiding contact with blood) and that doing
something, rather than nothing, can be the diff erence
between a person living or dying. Reassure students that
performing fi rst aid, in most cases, will not result in the
person being further injured as sometimes fears of spinal
cord injury prohibit bystanders from helping.

CH
ALL
ENG
ES A
ND
CH
OIC
ES
YE
AR
7
58A RESILIENCE APPROACH TO ROAD SAFETY EDUCATION© 2016 School Drug Education and Road Aware
Conduct a dot voting (refer to page 68) by asking the
students to decide which two risks would most likely
contribute to pedestrians their age being injured or killed.
Have the students place their two dot stickers (or a tick)
to indicate their opinion. Discuss the voting results and
ask students to explain what information infl uenced their
decision.
2. Explain that pedestrians of all ages need to be constantly
assessing the traffi c environment and making decisions.
However some potential risks for young people can
be reduced by planning ahead. For example, a young
person can plan ahead to make sure they don’t have to
walk home in the dark alone by having credit on their
SmartRider and/or money to enable them to catch public
transport. Have groups write at least one way each of the
risks on their list, could be reduced. Ensure that groups
identify strategies such as following road rules, stopping
and checking for traffi c before crossing roads, and
allowing enough time to cross a road.
3. Have students share any experiences of not being able
to get home (eg bus didn’t arrive or missed the bus, lift
didn’t come through) and what they did in this situation
to stay safe. Explain that having a plan to get home safely
that they have discussed with their family can avoid these
situations and also help to manage any potential risks for
them, such as being stuck somewhere late at night.
4. Have students write their Plan A and B in the student
workbook on page 29. Suggest that the plan includes
information about what the student will do to get home
safely (eg always let their parents know what time they
will be home, have credit on their phone, not walk home
alone after dark), and also what their parents will do (eg
pick them up no matter where or what time, pay for a taxi
fare, provide the names of two other people to use in an
emergency when they are unavailable). Place students in
groups to share and discuss their plans.
5. Give each student a copy of the Family information
sheet – Out walking to take home and discuss with their
family, along with their ‘getting home safely’ plan.
3. Place students in groups of three. Allocate one of the
emergency scenarios below to each group. Explain that
students are to role-play (refer to page 70) their scenario
and practise the DRS ABCD procedure.
Scenarios
• You were in a car that has crashed and the driver is
unconscious at the wheel. What should you do?
• Your friend has fallen off their bike and wasn’t
wearing a helmet. You can see blood coming from
the side of your friend’s head. What should you do?
• You are walking home with your friend after a party.
Your friend walks onto the road and is hit by a car.
You know your friend was drinking alcohol at the
party. What should you do?
• Your friend was riding over a jump on their
motorbike and has crashed. They aren’t moving.
What should you do?
• You see a young child get hit by a car when she is
crossing the road. What should you do?
Process the role-plays and answer questions that students
may have about using fi rst aid. It is important to highlight
to the class that sometimes young people do not call
Triple Zero for alcohol or other drug-related incidents as
they are worried that the police will attend. Explain that
police are only involved when a person dies at the scene
or the ambulance workers feel under threat of violence.
4. Have students write an article for the school newsletter
promoting fi rst aid or create a PowerPoint about DRS
ABCD fi rst aid procedures and present to another class.
Activity 3 Identifying
and managing risks
Learning intention
• Students identify factors contributing to pedestrian
injuries
• Students identify strategies to manage potential risks
for pedestrians including contingency plans
Equipment
In Gear student workbook – On the right foot – page 29
Dot stickers – two per student (optional)
Large sheet of paper or whiteboard
Family information sheet – Out walking – photocopy one
per student
Activities
1. Have groups brainstorm (refer to page 67) a list of
factors that may be potential risks for pedestrians and
record these in the left column of On the right foot on
page 29 of the student workbook. Risks could include:
age, gender, location, time of day, infl uences from peers,
propensity for risk-taking behaviour, road and traffi c
conditions, use of alcohol or other drugs, distractions and
inattention, fatigue, and inability to assess traffi c hazards
and make safe decisions. Ask one group to read out their
list and write these on a large sheet of paper (or the
board). Continue having groups share their ideas until all
responses have been listed.

A RESILIENCE APPROACH TO ROAD SAFETY EDUCATION© 2016 School Drug Education and Road Aware
FAMILY INFORMATION SHEET
EDU
CA
TIN
G F
OR
SM
AR
TER
CH
OIC
ES
A RESILIENCE APPROACH TO ROAD SAFETY EDUCATION© 2016 School Drug Education and Road Aware ED
UC
ATI
NG
FO
R S
MA
RTE
R C
HO
ICES
Out walking
Pedestrians, along with cyclists and motorcyclists
are often called ‘vulnerable road users’. This is
because of their lack of protection if hit by a vehicle.
Young people are especially vulnerable as they:
• often travel alone
• get easily distracted and are often inattentive
when walking in groups
• may travel long distances to school, and to social
and sporting events
• may be infl uenced by their friends to act unsafely
• walk while using their mobile phone or listening
to music
• do not always give adequate time to check for
traffi c before attempting to cross the road
• may be starting to experiment with alcohol or
other drugs.
Staying safe while out walking
Help your children to plan their walking routes. Suggest that they try to avoid heavy traffi c areas and highlight locations where it is safe to cross roads such as crosswalks, traffi c islands and traffi c signals with pedestrian lights. Remind your children to always wait until traffi c has completely stopped before stepping onto a crosswalk as some drivers do not always stop.
Check for traffi c
Taking time to adequately check for traffi c can be overlooked by children so remind them to always ‘stop, look, listen and think’ before they cross.
Highlight the dangers of walking while talking on mobile phones or listening to music through headphones
Young people like to listen to music and talk on their mobile phone, however these devices can distract their attention and block out traffi c sounds that alert pedestrians to possible dangers. Encourage your children to not use these devices while out walking and to stay alert at all times.
Walking with friends
Help your children to choose a few excuses that can be used in situations where their friends encourage them to act unsafely. Using parents as an excuse is often a good ploy “I’m not going to do that. Mum will ground me if she fi nds out”.
Set a good example
Children watch their parents from a very young age. When you are out walking follow the road rules explaining to your children that you expect them to do the same.
Agree on a ‘getting home safely’ plan
Make sure your children know what to do if a situation arises where they feel unsafe or can’t get home, especially after dark. For example, what should they do if they miss the bus or a pre-arranged lift doesn’t arrive? Give your child two other numbers to call if they need help and put these in the contact list of their phone.

CH
ALL
ENG
ES A
ND
CH
OIC
ES
YE
AR
7
60A RESILIENCE APPROACH TO ROAD SAFETY EDUCATION© 2016 School Drug Education and Road Aware
Activity 4 Feelings and thoughts
infl uencing our actions
Learning intention
• Students consider the links between emotional responses,
self-talk and behaviour
• Students identify the skills and strategies useful in a range
of traffi c-related situations
Equipment
In Gear student workbook – Inner voice – page 30 and 31
Activities
1. Explain to students that everyone at some time will face
a situation where they might feel pressured into doing
something that they don’t want to. However we often
think that pressure from others is always aimed at making
us do something wrong. In fact it can also have a positive
outcome. For example, friends might try to talk you into
wearing a bike helmet when you don’t normally do this or
walking down to the crosswalk rather than trying to cross
a busy road.
Explain that the pressure we might feel doesn’t always
come from someone else and that it is often due to the
emotions we feel at the time and also what we say to
ourselves or our ‘inner voice’. If we use negative self-talk
it is very likely that we will behave in a way that may have
negative consequences. For example if a young person
thinks that their friend is laughing at them because they
are wearing a bike helmet, the young person might feel
angry or upset and decide to take the helmet off and ride
illegally or say something rude or nasty to their friend.
Read the scenario about Joe on Inner voice on page 30
of the student workbook. Allocate one of the following
feelings to each group – angry, worried, very anxious,
slightly anxious, confi dent, calm, excited or confused.
Have students complete the table in their workbook.
Listen to some of the group’s responses and discuss the
behaviour and actions when positive self-talk was used
by Joe. Have groups complete the other scenarios in their
workbook on pages 30 to 31.
2. Have groups choose one of the scenarios and create a
role-play (refer to page 70) that shows the character
using positive self-talk to manage themselves and the
situation. Tell students that the role-play must also
show how a young person reduces any possible risks
and maintains their relationships with others. Ask the
following questions after each role-play.
Ask
• Was the character dealing with external or internal
pressure?
• What emotion(s) was the character feeling?
• What positive self-talk did the character use?
• If the character had used negative self-talk, what might the
outcome have been?
• Do you think you would think the same way in this
situation?
• Do you think you would choose the same action in this
situation?
• What might help you to manage this situation? (Talk
about students wearing a ‘backpack’ that is full of skills
and strategies to deal with a range of situations such as
speaking assertively, problem-predicting and decision-
making. Suggest to students that some strategies will
always be useful such as speaking assertively whereas
others may only be appropriate in one or two situations
such as negotiation or help seeking).
Have students write the skills or strategies that the
characters would also need to help them manage the
situations on page 31 of the student workbook and then
discuss as a class. Identify the skills or strategies that were
useful for all situations and discuss why.

CH
ALL
ENG
ES A
ND
CH
OIC
ES
YE
AR
7
61A RESILIENCE APPROACH TO ROAD SAFETY EDUCATION
© 2016 School Drug Education and Road Aware
TOPIC 5
Refl ecting on road safety
Activity 1 Speaking up for
road safety
Learning intention
• Students share their opinions about road safety and
consider the viewpoint of others
Equipment
In Gear student workbook – Straight talking – page 32
Strategy sheet – Four corners – page 78 – photocopy one set
of number cards
Activities
1. Place a number card around the room and conduct a
four corners strategy (refer to page 69) using all or some
of the following statements. Have students make a quick
decision and move to the number that best represents
their opinion. Remind students there is no right or wrong
answer. Invite a few students from each corner to share
with the class the reason behind their decision.
Statements
• The best AFL team is:
1 The Dockers
2 The Eagles
3 The Sydney Swans
4 Don’t know
• My favourite type of holiday is:
1 Camping
2 At the beach
3 Overseas
4 At home
• Young people my age prefer to:
1 Play computer games or be on their phone
2 Watch TV
3 Get out and do something active like sport or
dancing
4 Spend more time with their friends than family
Process the four corners activity using the following
questions.
Ask
• Did everyone have the same opinion for each statement?
Why? (Explain that our opinions can be infl uenced
by a number of things such as our upbringing, our
culture or religion, our parents and friends, and
the media. So when someone else has a diff erent
viewpoint it is important to respect their opinion and
try to understand why in order to maintain positive
relationships).
• Were you surprised to fi nd out that some of your peers had
a diff erent opinion to your own?
• Should we try to convince other people to have the same
opinion as our own? Why? (To maintain relationships
with others it is important to respect that they have a
right to have their own opinion. Have students think
of a time when they had a diff erent opinion than
their friends and how this made them feel and what
happened. Remind students of the ‘no name’ rule).
2. Have students complete Straight talking on page 32 of the
student workbook on their own. Conduct a circle talk
(refer to page 67) by placing students in two concentric
circles. Nominate a statement from the workbook for
partners to discuss. Move students on several places
in the circle to discuss the same statement with a new
partner. This will provide students with a range of
views and opinions. Repeat the process with the other
statements then use the following questions to process
the activity.
Ask
• What did your partner do to let you know that they
respected your opinion? (eg empathised and made
comments such as, “I understand what you are
saying…”, nodded their head, smiled).
• When you disagreed with your partner’s opinion, what did
you do? (Explain that it’s okay to have a diff erent opinion
and to say why, but it is not okay to criticise or ridicule).
• Would getting angry with a friend who has a diff erent
viewpoint be likely to change your friend’s opinion? (Being
rude and dismissive of a friend’s opinion will most likely
result in them getting annoyed at you and could aff ect
the relationship).
3. Have students complete the refl ection statements on
page 32 in the student workbook.

CH
ALL
ENG
ES A
ND
CH
OIC
ES
YE
AR
7
62A RESILIENCE APPROACH TO ROAD SAFETY EDUCATION© 2016 School Drug Education and Road Aware
Ask
• Why might we all have a diff erent opinion about road
safety?
• If your opinion was diff erent to other students in our class,
how did that make you feel?
• Was it helpful to hear the opinion of other students in the
class? Why?
• Did hearing the viewpoint of other students change your
mind? Why?
• What would you do if someone you knew well often did
unsafe things while travelling? (Remind students that
changing an adult’s opinion or behaviour may be
diffi cult and so they should always follow what they
know is right and safe).
2. Have students complete these unfi nished sentences and
then share with a partner or their family.
• One thing I have learnt from this road safety
program is …
• Two things I intend to do to stay safe while
travelling as a passenger are …
• Two things I would tell a younger student about
being a safe road user are…
Activity 2 Identifying and
expressing opinions
Learning intention
• Students express their opinion about road safety and
consider the viewpoint of others
Equipment
Strategy sheet – Strongly agree, strongly disagree – page 83 –
photocopy the signs
Teaching tip
If a student disagrees with another student’s opinion they
should explain why to the facilitator, not directly to the
student.
Activities
1. Set up a values continuum (refer to page 73) using the
‘strongly agree’ and ‘strongly disagree’ signs. Read aloud
one of the statements below and have students move
to a position on the continuum. Remind students that
there is no correct answer and to choose a place that
best represents their opinion. Have students discuss the
statement with someone who is standing near them
and then invite students from diff erent places along
the continuum to share their opinions. Provide the
opportunity for students to change position after hearing
others’ responses.
Statements
• It’s not easy for a young person my age to tell someone
they shouldn’t drive after drinking alcohol.
• Having more people use public transport won’t reduce
the number of crashes on our roads.
• Vehicle manufacturers should design a car that will not
start unless all occupants are wearing a restraint.
• All students should learn about road safety.
• Road crash statistics would be lower if road safety
campaigns targeted young people my age.
• Most young people make good decisions when
travelling.
• It’s hard to say ‘no’ when someone else wants you to do
something that might be risky.
Process the activity using the following questions.

CH
ALL
ENG
ES A
ND
CH
OIC
ES
YE
AR
7
63A RESILIENCE APPROACH TO ROAD SAFETY EDUCATION
© 2016 School Drug Education and Road Aware
For groups designing a picture bookDiscuss a range of picture books suitable for early
childhood students and with a road safety theme such
as Duck on a bike by David Shannon, the Berenstain
Bears – The bike lesson or Bears on wheels by Stan
Berenstain. Also look at other well written picture books
and discuss the elements that make a good picture
book such as:
• use of repetition or refrain which encourages listeners
to participate
• humour
• rhyme
• simple and colourful illustrations.
For groups designing a PowerPointDiscuss elements of a successful PowerPoint such as:
• size of font and text
• use of colour and white space
• use of diagrams, illustrations, photos and video clips
• level of text suitable for target audience
• number of slides
• key messages and level of text suitable for the target
audience.
3. When the projects have been assessed and any
alterations made, set up a day where students can
share their designs with other students. Have students
refl ect on their input into the project by completing the
refl ection questions on page 33 in the student workbook.
Activity 3 Road safety
into practice
Learning intention
• Students promote safe road user behaviour
• Students identify and utilise individual strengths
within a group to achieve a goal
Equipment
In Gear student workbook – The project – page 33
Board games such as Monopoly, Snakes and Ladders,
Trivial Pursuit
Construction materials such as paper, coloured pens,
stickers, glue
Computer access
Range of picture books suitable for early childhood
students
Activities
1. Explain that each group is to create a product (eg board
game, picture book, PowerPoint) that promotes safe
road use. Suggest that within each group, students have
a range of strengths and that these should be utilised
to enable groups to achieve their goal. For example, if a
student has strong organisational skills they could write
the sequence of activities to be completed and nominate
a timeframe. A student whose strength is communication
could be responsible for the writing of instructions or
the story. Have groups discuss and identify the strengths
of their members and nominate roles for the project.
Remind groups that strengths may be ability (eg
words, music, maths and logic) or personal (eg fairness,
open-mindedness or creativity). Be prepared to off er a
suggestion if a group struggles to identify the strengths of
particular students.
2. Read The project on page 33 in the student workbook and
discuss the assessment criteria. Explain that each group’s
project will be ‘road-tested’ and assessed by their peers.
For groups designing a gameHave a few board games on display such as Monopoly,
Snakes and Ladders, and Trivial Pursuit. Discuss some of
the common features of these games. For example:
• The game has a set of instructions and rules for playing.
• Tokens are used to move and indicate where a player
has reached on the board.
• Cards are used to inform players when to move
forward or back a number of spaces, miss a turn or
have another go.
• There is a start and fi nish position on the board.
• A die is used to determine how many places the player
can move.