Embed Size (px)
Citation preview


Ceiling Boards 2012 1
About Everite and Nutec 2
Nutec Ceiling Board Features 4
Safety, Handling and Storage 5
General Design Criteria 6
Nutec Ceiling Boards Product Range 7
Nutec Ceiling Board Fixing Accessories 8
Installation Procedures 9
Nucornice Product Range 15
Nucornice Installation Procedures 16
Nucornice Adhesive 18
Mechanical and Physical Properties 20
Everite National Offices and Contact Details 24
c o n t e n t s
Ceiling Boards 20122 Ceiling Boards 2012 3
Catalogue Information
The information contained in this catalogue serves as a general guide only and should not be accepted
as the standard for all construction. EVERITE can assist in designs of a special nature, however, architects,
engineers and specifiers must finally approve the acceptability in terms of the design and construction
criteria, as well as other implications.
About Everite and Nutec Everite Building Products
Everite Building Products, wholly owned by JSE listed Group Five, has been associated with the South
African building industry since 1941. Producing a wide range of materials that satisfy the needs of the
commercial, industrial and residential market sectors, Everite is renowned for its comprehensive range of
Nutec Roofing and Cladding Solutions and includes fibre-cement roofing, cladding, ceilings and building
columns amongst others.
Nutec fibre-cement high performance properties and added benefits include: the use of safe renewable
fibres; considerable tensile strength with enhanced dynamic load bearing properties; excellent thermal
properties; water and wind resistance; hail resistance; fire resistance and resistance to fungus, rodents and
acid.
A programme of quality assurance in accordance with the requirements of the International Standards
Organisation (ISO 9001:2008) is entrenched in Everite’s process and management systems.
Quality of all products is continuously monitored as specified by the South African National Standards and
recognised international bodies.
Everite’s 54 hectare manufacturing facility near Johannesburg is well located and has immediate access
to all major road and rail links to national destinations and major ports. The company has branches
located at major centres throughout South Africa. Nutec products are distributed through leading stockists
countrywide and an established export market further endorses the international acceptance of the Nutec
Roofing and Cladding Solutions range of products.
Nutec
Nutec is the registered name for products manufactured without asbestos as a raw material. Nutec fibre
cement products are manufactured using a mixture of cellulose fibre, cement, silica and water.
Through ongoing research and development, Everite Building Products are committed to provide product of
world-class quality.
a b o u t e v e r i t e a n d n u t e c
a b o u t e v e r i t e a n d n u t e c
Accordingly, the Nutec product range is continuously reviewed not only in the interests of the end-user
and superior product performance, but also with respect to its impact on the environment. Everite Building
Products has over the years established a reputation for producing a variety of outstanding quality products
which have been used in a wide range of external and internal applications.
Environmental benefits of Nutec Fibre Cement
Environmental costs incurred by using fibre cement are measurably less than for other
building materials. (Low embodied energy per m2).
Requires less energy in assembly and construction than all other wall materials except timber.
Low energy consumption in transportation and installation.
Environmental costs relating to ozone layer depletion, carcinogenic substances and solid
waste emissions are almost negligible.
Low environmental impact in relation to ozone layer depletion, carcinogenic substances, and
solid waste emissions.
No pesticides are involved in the manufacture or use of fibre cement.
The benefits of Nutec Fibre Cement
The use of safe fibres.
Considerable tensile strength with enhanced dynamic load bearing properties.
Cost competitive.
Excellent thermal properties.
Water tight and wind resistant.
Hail resistant.
Fire-resistant.
Fungus and rodent resistant.
Acid resistant.
Complies with SABS ISO 9933.
ISO 9001 : 2008 Quality Management System.
The environmental benefits in the manufacturing process of Nutec Fibre Cement
Recycling the water used in production many times.
Recycling solid wastes.
Using sustainable raw materials in production.
Embodied Energy – Definition
Embodied energy is the energy consumed by all of the processes associated with the production of a
building, from the mining and processing of natural resources to manufacturing, transport and product
delivery. Embodied energy does not include the operation and disposal of the building material. This would
be considered in a life cycle approach. Embodied energy is the ‘upstream’ or ‘front-end’ component of the
lifecycle impact of a home. Fibre cement is one of the most energy efficient materials on the market and it
has one of the lowest embodied energy contents per square metre of cover of any building product.
Ceiling Boards 20122 Ceiling Boards 2012 3

n u t e c c e i l i n g b o a r d f e at u r e s
Ceiling Boards 20124 Ceiling Boards 2012 5
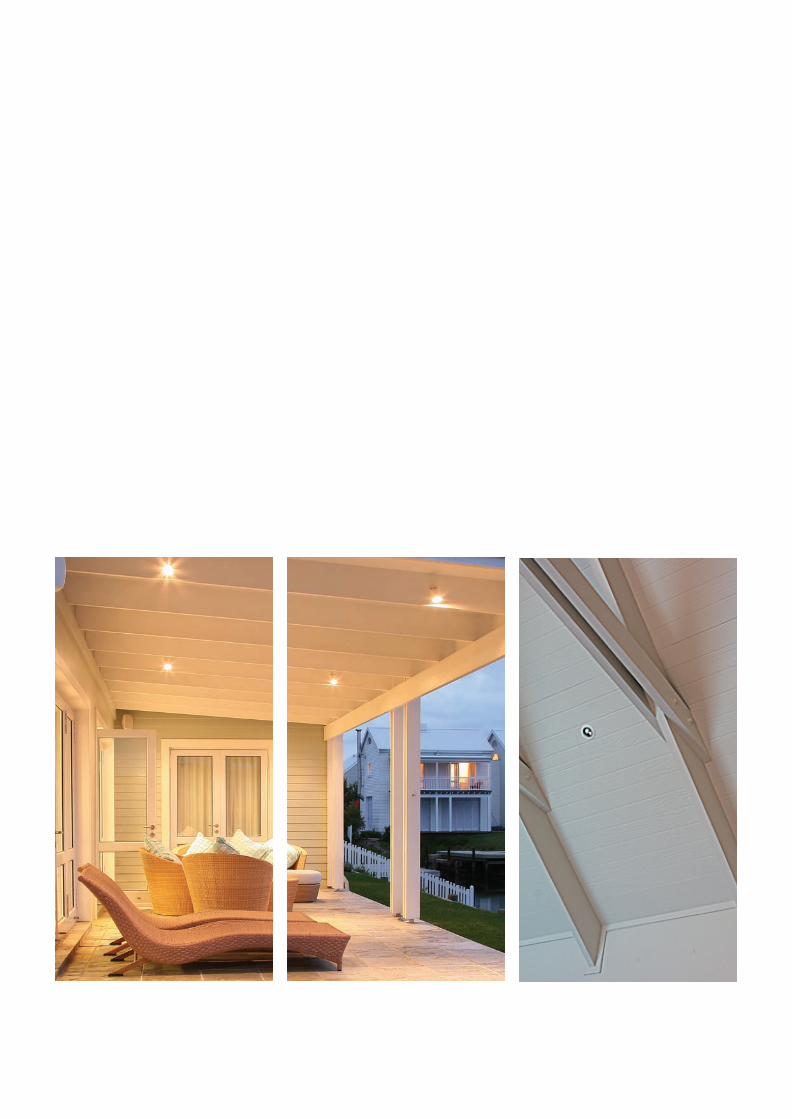
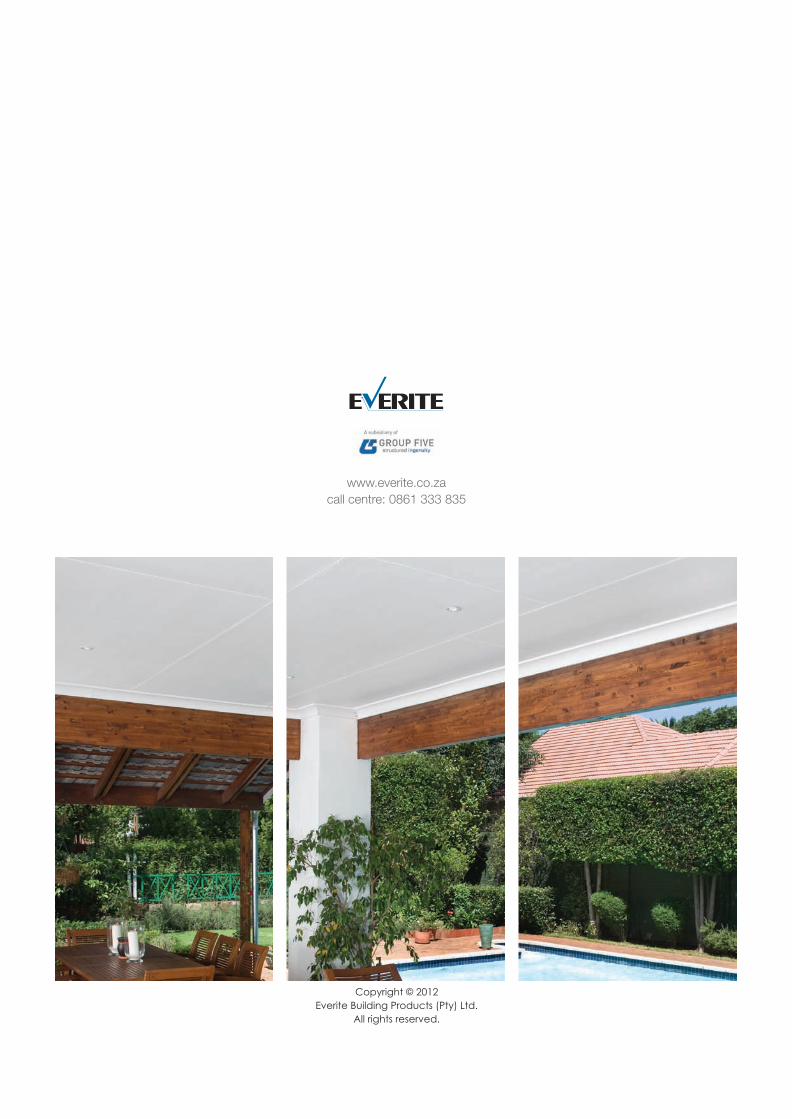
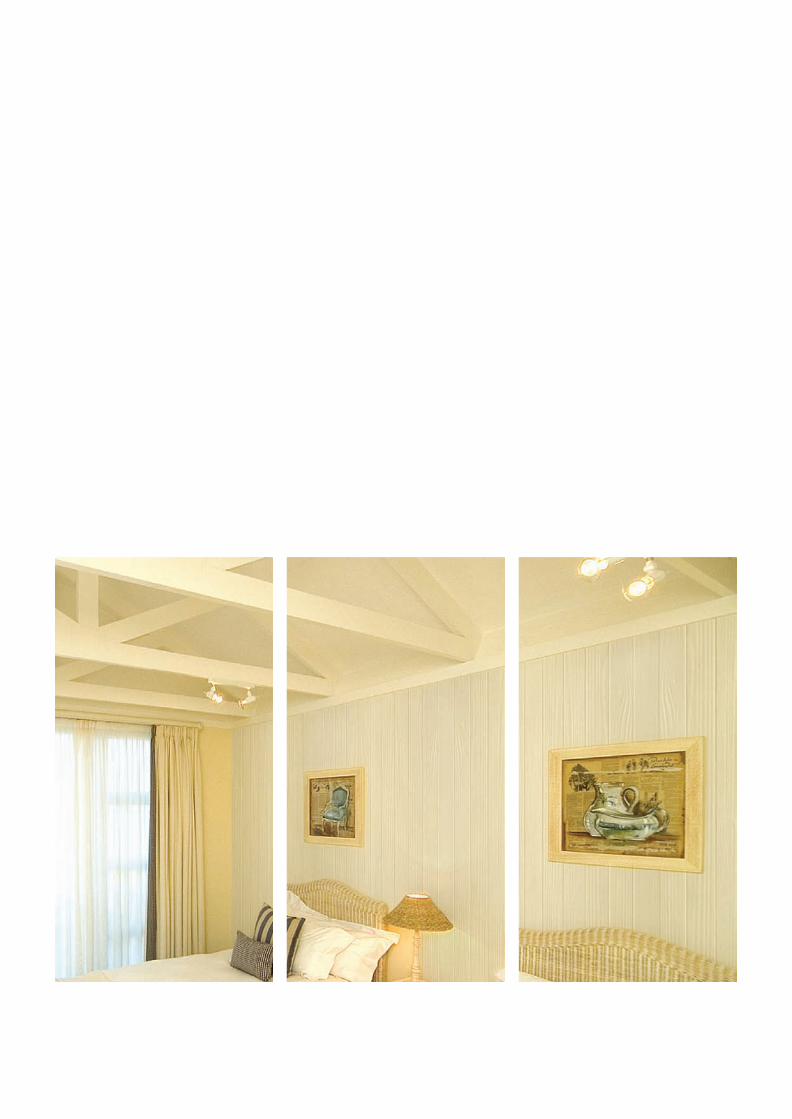
Nutec Ceiling Boards
The application of Nutec Ceiling Boards goes beyond the regular flat look. Raking or cathedral style ceilings
installed between roof rafters creates a luxurious and spacious look to any room at an affordable price.
Nutec Ceiling Boards are available in a plain or textured timber-grain like finish that simulates the look of real
timber.
Nutec plain and textured ceiling boards are extensively used as nail-up ceilings and as an all-purpose
building board for other interior and exterior applications. Not only are these products ideal for general use
indoors, but because these products are not affected by moisture and are therefore ideal for use in damp
areas such as kitchens, bathrooms and verandas, as well as for under eaves linings.
Features
Nutec Ceiling Boards exhibit all the inherent features of Nutec fibre-cement.
An economical all-purpose ceiling board, unaffected by moisture and ideal for internal use in
almost any conceivable application.
Nutec Ceiling Boards are supplied in their natural colour and will accept all water-based paints
without pre-treatment.
Nutec Ceiling Boards are non-combustible and will therefore inhibit the spread of fire. They provide
perfect protection against flying sparks.
The material will not rot and cannot be damaged by termites and rodents.
Resistant to corrosion.
All plain ceiling boards are manufactured and tested in accordance with the South African Bureau
of Standards Specification SANS 9001:2008 (ISO 9001). The product also carries an SABS Mark
under specification SABS 803.
Manufactured to the highest internal quality standards. Compliance is ensured by strict quality
assurance programmes in the production process as well as stringent testing in our laboratory.
s a f e t y , h a n d l i n g a n d s t o r a g e
Ceiling Boards 20124 Ceiling Boards 2012 5
Safety, Handling and Storage Instructions
Safety
Safety rules as per current legislation and work practices as described in General Installation Guidelines
must be observed when working with the product.
Handling
Nutec Ceiling Boards are cement-based and may be damaged under excessively high shock loads.
Reasonable care should therefore be taken to ensure that the products are not dropped or subjected to
rough handling. Nutec Ceiling Boards should not be exposed to the elements and under cover storage is
recommended.
Storage
A smooth level under cover area should therefore be made available where the boards can be stacked
safely. The boards should be stacked clear off the ground on suitable timber supports at maximum
400 mm centres and the edges and corners protected against possible damage.
Where under cover storage is not available, the stacked product should be covered to avoid it becoming
soaked with water. Soaked boards will be difficult to handle and should be allowed to dry out before use.
Ceiling Boards 20126 Ceiling Boards 2012 7
g e n e r a l d e s i g n c r i t e r i a
General Design Criteria
Supporting Structure
To ensure a high standard of finish, it is essential that the supporting structure is accurate and sound.
Warped, twisted or poor quality battens will reflect in the finished surface of the ceiling and for best results
selected structural grade timber should be used. When a perfectly flat ceiling is required and lighting
conditions are such that the slightest unevenness would be accentuated, the brandering should be
accurately sized and the spacing decreased.
Soffit Applications
For soffit applications areas where high wind pressures prevail, an architect or engineer should be consulted
for particular fixing and framing conditions.
Condensation
Condensation normally has no effect on Nutec Ceiling Boards, but it is nevertheless recommended that the
space between the ceiling and the roof is adequately ventilated.
Fixing Accessories
A specially designed range of fixing accessories such as nails, H-profile strips and cornices are obtainable
from EVERITE, full details are scheduled under Fixing Accessories.
Site Service
Site service personnel are available on request, to provide assistance on recommended storage, handling
and installation of Everite’s products.
Standard Brandering for Different Truss Spacings
The size of brandering used to construct the supporting framework for the Nutec Ceiling Boards is
dependent on the spacing of trusses or rafters. Refer to Table 1.
Storage
Nutec Ceiling Boards must be stored indoors.

n u t e c c e i l i n g b o a r d s p r o d u c t r a n g e
Ceiling Boards 20126 Ceiling Boards 2012 7
Product Range Nutec Ceiling Boards Product Range, Dimensions and Properties
Product No. Nominal thickness mm Size mm Average Mass (kg) 060-403 4 2 400 x 900 13,0
060-405 4 3 000 x 900 16,0
060-406 4 3 300 x 900 18,0
060-407 4 3 600 x 900 20,0
060-410 4 2 400 x 1 200 17,0
060-412 4 3 000 x 1 200 22,0
060-413 4 3 300 x 1 200 24,0
060-414 4 3 600 x 1 200 26,0
060-610 6 2 400 x 900 18,0
060-612 6 3 000 x 900 23,0
060-614 6 3 600 x 900 27,0
060-617 6 2 400 x 1 200 25,0
060-619 6 3 000 x 1 200 31,0
060-621 6 3 600 x 1 200 37,0
Plain Boards
Ceiling Range Thickness Width Length Product Application mm mm mm Nail-up Exposed Ceilings Beams & Soffits
Nutec (plain) 4
900 2 400 – 3 600 mm
6 300 mm increments
Nutec (plain)
4 1 200
2 400 – 3 600 mm
6 300 mm increments
Selection guide for Nutec Ceiling Boards

n u t e c c e i l i n g b o a r d f i x i n g a c c e s s o r i e s
Ceiling Boards 20128 Ceiling Boards 2012 9
Product Description Size Length Average Mass No. mm mm kg
H-profile Steel jointing strip 685-080 4 3 600 0,73 685-081 4 4 800 0,98 685-084 6 3 600 0,73 685-085 6 4 800 0,98 H-profile P.V.C. jointing strip white 685-283 4 3 000 0,30 685-285 4 3 600 0,36 685-289 4 4 800 0,50 690-038 6 3 600 0,001 Fasteners 605-632 Galvanised serrated ceiling nails 2,5 32 750/kg app.
Cornice Plain 605-756 Cove Cornice Plain (Non Paper Covering) 75 mm 3 000 0,10 605-730 Nu-Doric 75 mm 3 000 0,12 605-736 Nu-Doric 75 mm 3 600 0,14 Cornice Profiled 605-750 Nu-Doric 127 mm 3 000 0,14 605-751 Nu-Doric 127 mm 3 600 0,15 605-754 Nu-Corinthian 127 mm 3 000 0,14 605-755 Nu-Corinthian 127 mm 3 600 0,15 Nucornice Adhesive 605-749 Tube 310 ml 0.45 kg 605-803 Tub 2 L 3.0 kg 605-804 Bucket 5 L 7.6 kg
Nutec Ceiling Board Fixing Accessories
Nu-Doric Plain 75
55 mm
55 m
m75 mm
Nu-Doric 127 Nu-Corinthian 127
90 mm 90 mm
90 m
m
90 m
m
127 mm
127 mm
i n s ta l l at i o n p r o c e d u r e
Ceiling Boards 20128 Ceiling Boards 2012 9
General Installation Guidelines
The following basic safety rules and work practices should be observed when working with the product.
Although Nutec Ceiling Boards are manufactured without asbestos as a raw material, it is nevertheless
recommended that tools which do not create excessive dust are used when working with the product.
Ordinary carpenters’ tools can be used effectively.
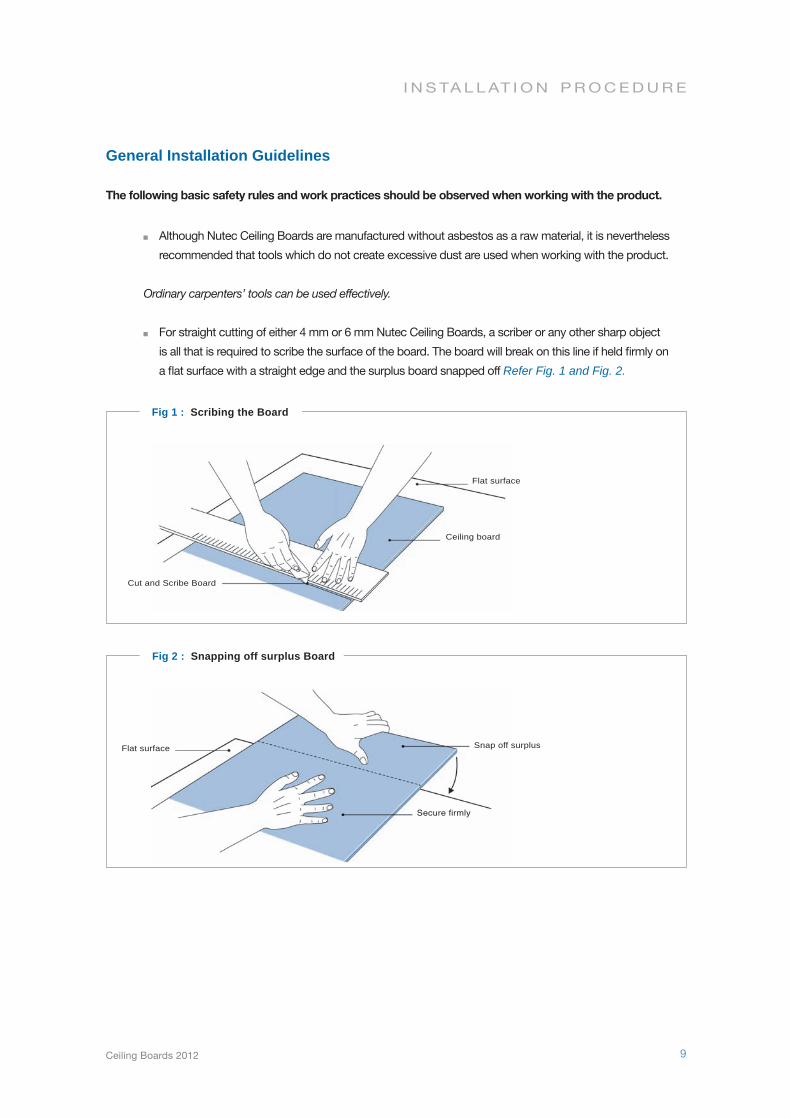
For straight cutting of either 4 mm or 6 mm Nutec Ceiling Boards, a scriber or any other sharp object
is all that is required to scribe the surface of the board. The board will break on this line if held firmly on
a flat surface with a straight edge and the surplus board snapped off Refer Fig. 1 and Fig. 2.
Fig 1 : Scribing the Board
Fig 2 : Snapping off surplus Board
Flat surface
Ceiling board
Cut and Scribe Board
Flat surface Snap off surplus
Secure firmly
i n s ta l l at i o n p r o c e d u r e
Ceiling Boards 201210
Brandering Requirements
The spacing of brandering shown in Table 2 is based on practical tests carried out for the various
thicknesses of ceiling boards.
Cross brandering is necessary at the joints and when cornices are to be fixed at right angles to
the brandering.
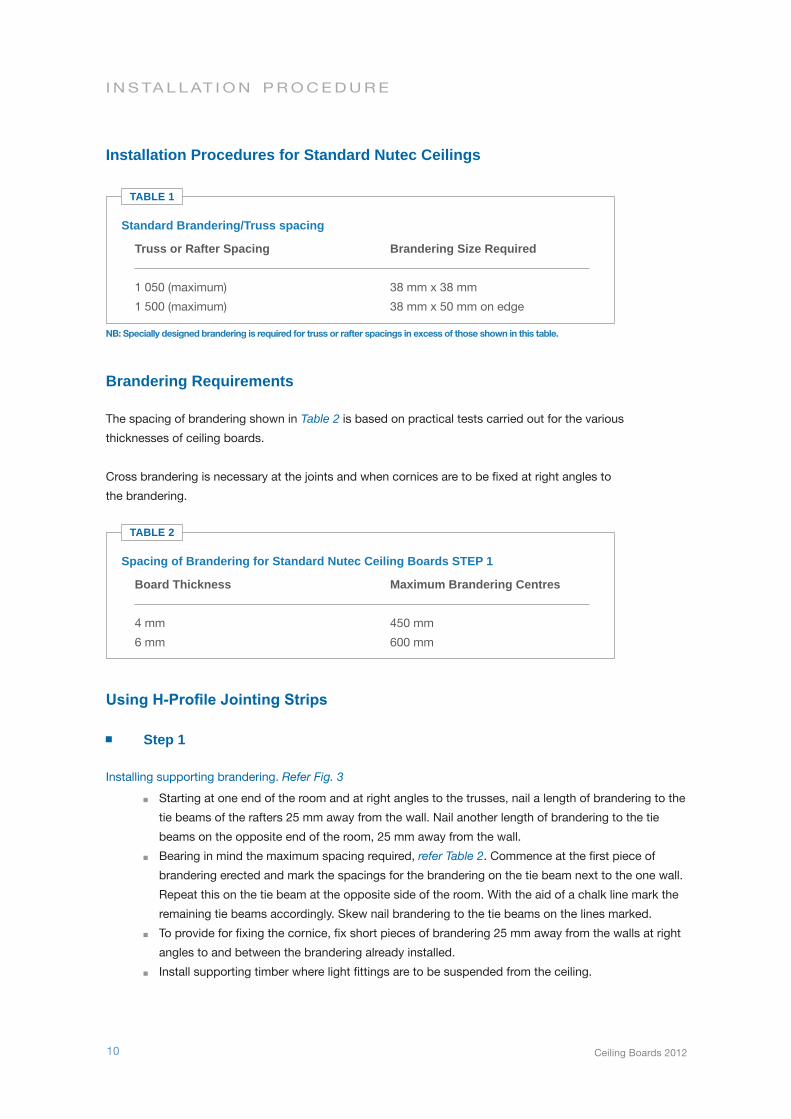
Standard Brandering/Truss spacing
Truss or Rafter Spacing Brandering Size Required
1 050 (maximum) 38 mm x 38 mm
1 500 (maximum) 38 mm x 50 mm on edge
TABLE 1
NB: Specially designed brandering is required for truss or rafter spacings in excess of those shown in this table.
Spacing of Brandering for Standard Nutec Ceiling Boards STEP 1
Board Thickness Maximum Brandering Centres
4 mm 450 mm
6 mm 600 mm
TABLE 2
Using H-Profile Jointing Strips
Step 1
Installing supporting brandering. Refer Fig. 3
Starting at one end of the room and at right angles to the trusses, nail a length of brandering to the
tie beams of the rafters 25 mm away from the wall. Nail another length of brandering to the tie
beams on the opposite end of the room, 25 mm away from the wall.
Bearing in mind the maximum spacing required, refer Table 2. Commence at the first piece of
brandering erected and mark the spacings for the brandering on the tie beam next to the one wall.
Repeat this on the tie beam at the opposite side of the room. With the aid of a chalk line mark the
remaining tie beams accordingly. Skew nail brandering to the tie beams on the lines marked.
To provide for fixing the cornice, fix short pieces of brandering 25 mm away from the walls at right
angles to and between the brandering already installed.
Install supporting timber where light fittings are to be suspended from the ceiling.
Installation Procedures for Standard Nutec Ceilings
i n s ta l l at i o n p r o c e d u r e
Ceiling Boards 2012 11
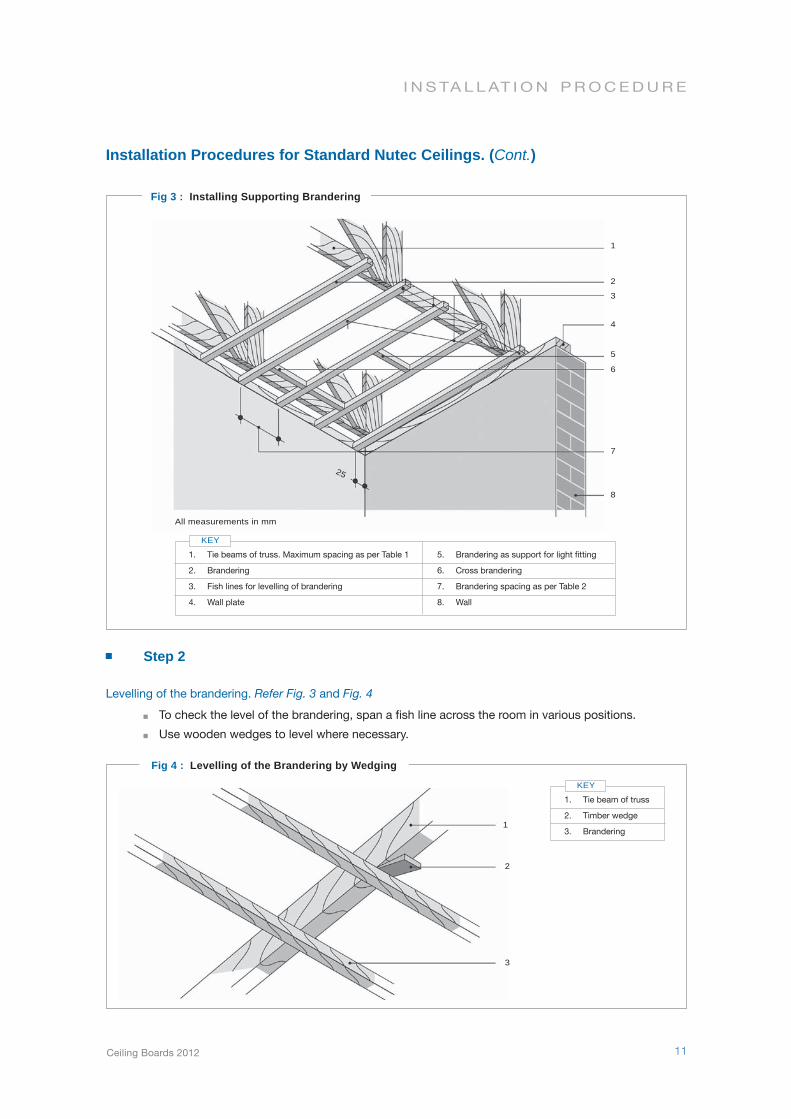
Fig 3 : Installing Supporting Brandering
1
23
4
5
6
7
Installation Procedures for Standard Nutec Ceilings. (Cont.)
8
25
All measurements in mm
Step 2
Levelling of the brandering. Refer Fig. 3 and Fig. 4
To check the level of the brandering, span a fish line across the room in various positions.
Use wooden wedges to level where necessary.
1. Tie beams of truss. Maximum spacing as per Table 1
2. Brandering
3. Fish lines for levelling of brandering
4. Wall plate
KEY5. Brandering as support for light fitting
6. Cross brandering
7. Brandering spacing as per Table 2
8. Wall
Fig 4 : Levelling of the Brandering by Wedging
1
2
3
1. Tie beam of truss
2. Timber wedge
3. Brandering
KEY

i n s ta l l at i o n p r o c e d u r e
Ceiling Boards 201212
Step 3
Installing Nutec Ceiling Boards. Refer Fig. 5
Measure the length and width of the room to establish the number of full boards required.
Space the boards so that the standard width boards are fixed from the centre, finishing off with
equal cut boards at each side of the room.
Starting from the middle, place the ceiling boards at right angles across the brandering on the
position previously established and nail in place with 32 x 2,5 mm serrated ceiling nails. The nails
should be placed at 150 mm centres and not closer than 12 mm from any edge of the board.
Push an H-profile jointing strip onto the long edge of the board. Fit the next board into the
H-profile strip and fix that board.
Fit H-profile cross sections cut to size onto the short edges of the board.
Repeat this procedure until the ceiling is complete.
NB: If more than one board is required for the length of the room, the best effect is achieved with
staggered joints.
Installation Procedures for Standard Nutec Ceilings. (Cont.)
Fig 5 : Installing Nutec Ceiling Boards
1
2
3
4
5
6
1 Tie Beam
2 Brandering
3 Wallplate
KEY4 Nutec Ceiling Board
5 H-profile jointing strip
6 Wall
i n s ta l l at i o n p r o c e d u r e
Ceiling Boards 2012 13
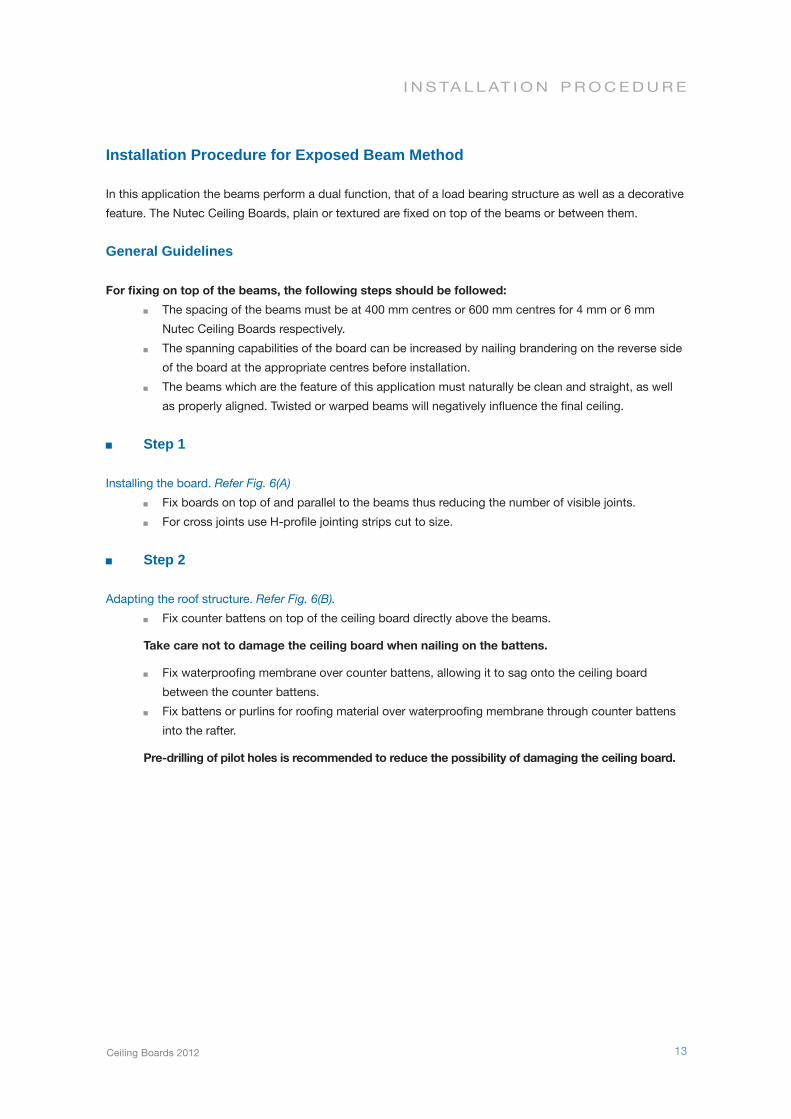
Installation Procedure for Exposed Beam Method
In this application the beams perform a dual function, that of a load bearing structure as well as a decorative
feature. The Nutec Ceiling Boards, plain or textured are fixed on top of the beams or between them.
General Guidelines
For fixing on top of the beams, the following steps should be followed:
The spacing of the beams must be at 400 mm centres or 600 mm centres for 4 mm or 6 mm
Nutec Ceiling Boards respectively.
The spanning capabilities of the board can be increased by nailing brandering on the reverse side
of the board at the appropriate centres before installation.
The beams which are the feature of this application must naturally be clean and straight, as well
as properly aligned. Twisted or warped beams will negatively influence the final ceiling.
Step 1
Installing the board. Refer Fig. 6(A)
Fix boards on top of and parallel to the beams thus reducing the number of visible joints.
For cross joints use H-profile jointing strips cut to size.
Step 2
Adapting the roof structure. Refer Fig. 6(B).
Fix counter battens on top of the ceiling board directly above the beams.
Take care not to damage the ceiling board when nailing on the battens.
Fix waterproofing membrane over counter battens, allowing it to sag onto the ceiling board
between the counter battens.
Fix battens or purlins for roofing material over waterproofing membrane through counter battens
into the rafter.
Pre-drilling of pilot holes is recommended to reduce the possibility of damaging the ceiling board.
i n s ta l l at i o n p r o c e d u r e
Ceiling Boards 201214
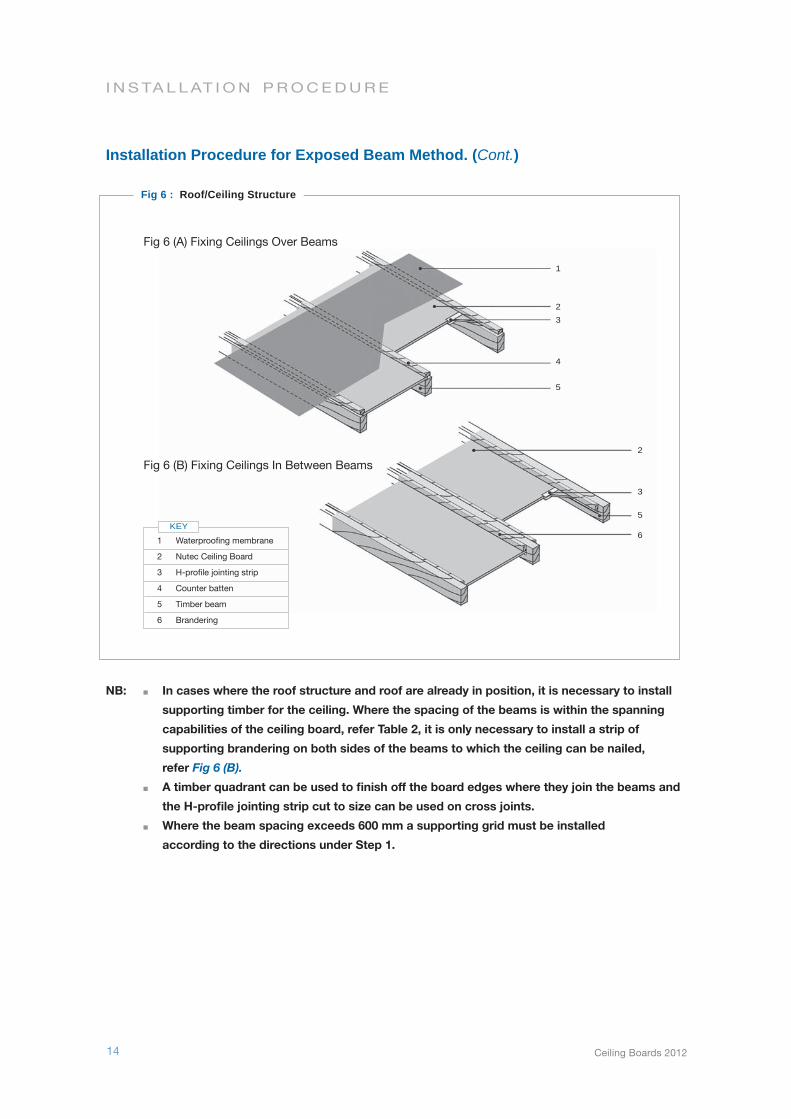
Installation Procedure for Exposed Beam Method. (Cont.)
Fig 6 : Roof/Ceiling Structure
1
23
4
5
6
Fig 6 (A) Fixing Ceilings Over Beams
Fig 6 (B) Fixing Ceilings In Between Beams
1 Waterproofing membrane
2 Nutec Ceiling Board
3 H-profile jointing strip
4 Counter batten
5 Timber beam
6 Brandering
KEY5
3
2
NB: In cases where the roof structure and roof are already in position, it is necessary to install
supporting timber for the ceiling. Where the spacing of the beams is within the spanning
capabilities of the ceiling board, refer Table 2, it is only necessary to install a strip of
supporting brandering on both sides of the beams to which the ceiling can be nailed,
refer Fig 6 (B).
A timber quadrant can be used to finish off the board edges where they join the beams and
the H-profile jointing strip cut to size can be used on cross joints.
Where the beam spacing exceeds 600 mm a supporting grid must be installed
according to the directions under Step 1.
n u c o r n i c e p r o d u c t r a n g e
Ceiling Boards 2012 15
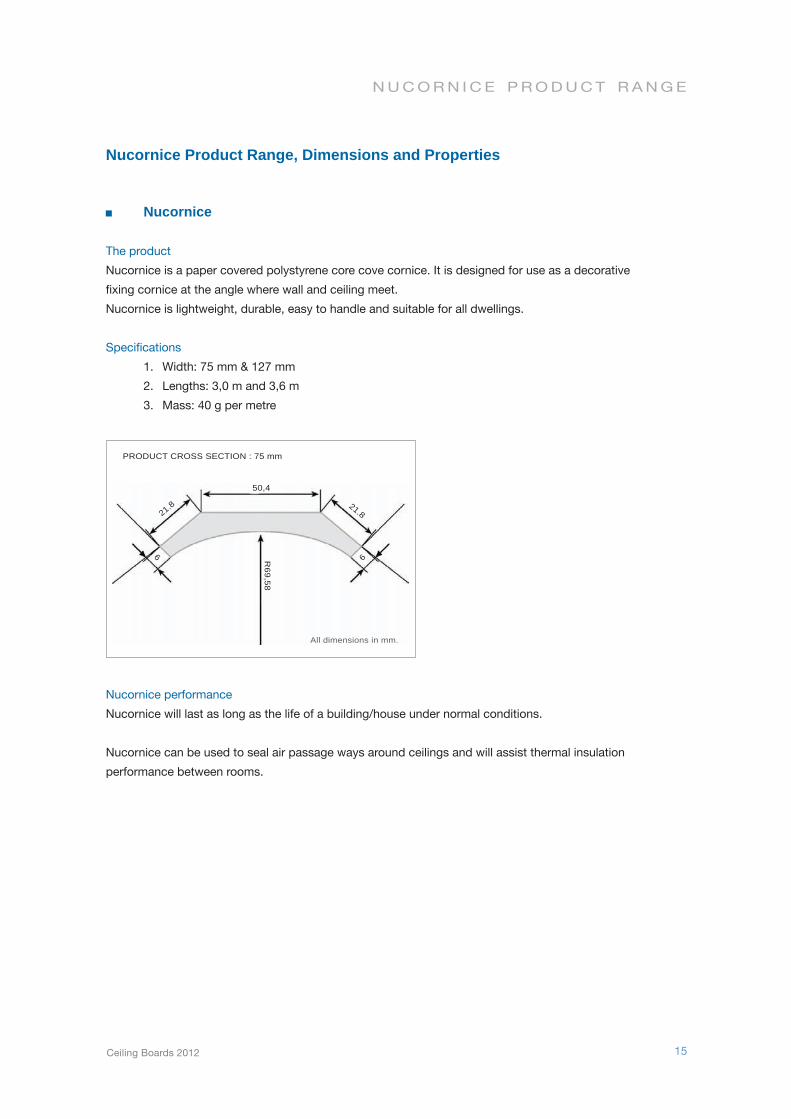
Nucornice Product Range, Dimensions and Properties
Nucornice
The product
Nucornice is a paper covered polystyrene core cove cornice. It is designed for use as a decorative
fixing cornice at the angle where wall and ceiling meet.
Nucornice is lightweight, durable, easy to handle and suitable for all dwellings.
Specifications
1. Width: 75 mm & 127 mm
2. Lengths: 3,0 m and 3,6 m
3. Mass: 40 g per metre
Nucornice performance
Nucornice will last as long as the life of a building/house under normal conditions.
Nucornice can be used to seal air passage ways around ceilings and will assist thermal insulation
performance between rooms.
50,4
21.821.8
6 6R69,58
PRODUCT CROSS SECTION : 75 mm
All dimensions in mm.

n u c o r n i c e i n s ta l l at i o n p r o c e d u r e
Ceiling Boards 201216
2. Internal Angles
(c) Left hand
(d) Right hand
1. External Angles
(a) Left hand
(b) Right hand
(a) (b) (c) (d)
Righthand
Righthand
Lefthand
Lefthand
External angle Internal angle
Nucornice Installation Guide
Mitres
Cutting Mitres
In order to cut a left hand corner mitre, the mitre must be positioned to the left of the length of cornice and
line up the measured mark with the opposite mitre block slot (depending on whether the angle is to be
internal or external).
For a right hand corner position the mitre block to the right of the length of cornice.
All marks, measurements, and cuts must be made from the back of the cornice’s wall edge.
Left Hand MitresExternal
angleInternal angle
Mitre Block to left
Right Hand MitresExternal angleInternal
angle
Mitre Block to right

Easy to fit
1. Measure
Measure length of
cornice and angle
2. Cut
Use a mitre box and
fine-tooth saw for cutting
3. Fit
Installing the cornice. Refer Fig. 7
Measure the length of Nucornice required and cut.
Strike a chalk line on the wall to maintain alignment.
Mitre the corners for a neat finish and nail to the brandering and to the wall or glue to ceiling board
and to the wall.
Fig 7 : Section through edge of Ceiling showing installation of Nucornice
1
2
3
4
5
6
1 Longitudinal brandering
2 Cross brandering
3 Nutec Ceiling Board
4 Nucornice
5 Fixing point/solvent free adhesive
6 Plaster
7 Wall
KEY
7
25
Ceiling Boards 2012 17
n u c o r n i c e i n s ta l l at i o n p r o c e d u r e
All dimensions in mm.

n u c o r n i c e a d h e s i v e
Ceiling Boards 201218
Nucornice Adhesive
The Product
Nucornice Adhesive, an acrylic filler and adhesive, has been specifically developed for use with Nucornice
and glues, seals and fills in one process.
Easy to Use
Nucornice cornice are prepared the same way as conventional cornice.
Cut Nucornice to size and apply Nucornice Adhesive evenly to the contact edges with a paint
scraper. Ensure there is a 2 mm vertical gap between all sections of Nurcornice to allow for
movement.
Press into position and leave. (Nucornice Adhesive bonds immediately)
Remove excess Nucornice Adhesive with your finger, sealing the horizontal joints at the same
time.
Installed Nucornice must immediately be wiped clean of excess Nucornice adhesive with a damp
cloth or sponge.
Vertical joints and corners can be filled with Nucornice Adhesive about 7 days later, or just before
painting.
n u c o r n i c e a d h e s i v e
Ceiling Boards 2012 19
Specifications
Available ready-to-use in 310 ml tube and 2l and 5l re-sealable buckets.
Fixes between 16 m and 20 m of 75 mm cove cornice per litre.
Best applied with a paint scraper.
Benefits of Nucornice
Nucornice is a fraction of the weight of conventional cornice.
Nucornice does not suffer from breaking during transport and erecting.
Nucornice Adhesive can be used against non-painted as well as painted walls.
Gluing Nucornice prevents unsightly hammer marks and ugly nail heads, which need to be
filled and sanded later.
Gluing Nucornice seals the ceiling to the wall in one step and the bond is flexible enough
to accommodate movement in ceiling and roof without cracking.
Gluing Nucornice with Nucornice Adhesive cuts fixing and sealing time by up to half compared
to the traditional nailing method of conventional cornice.
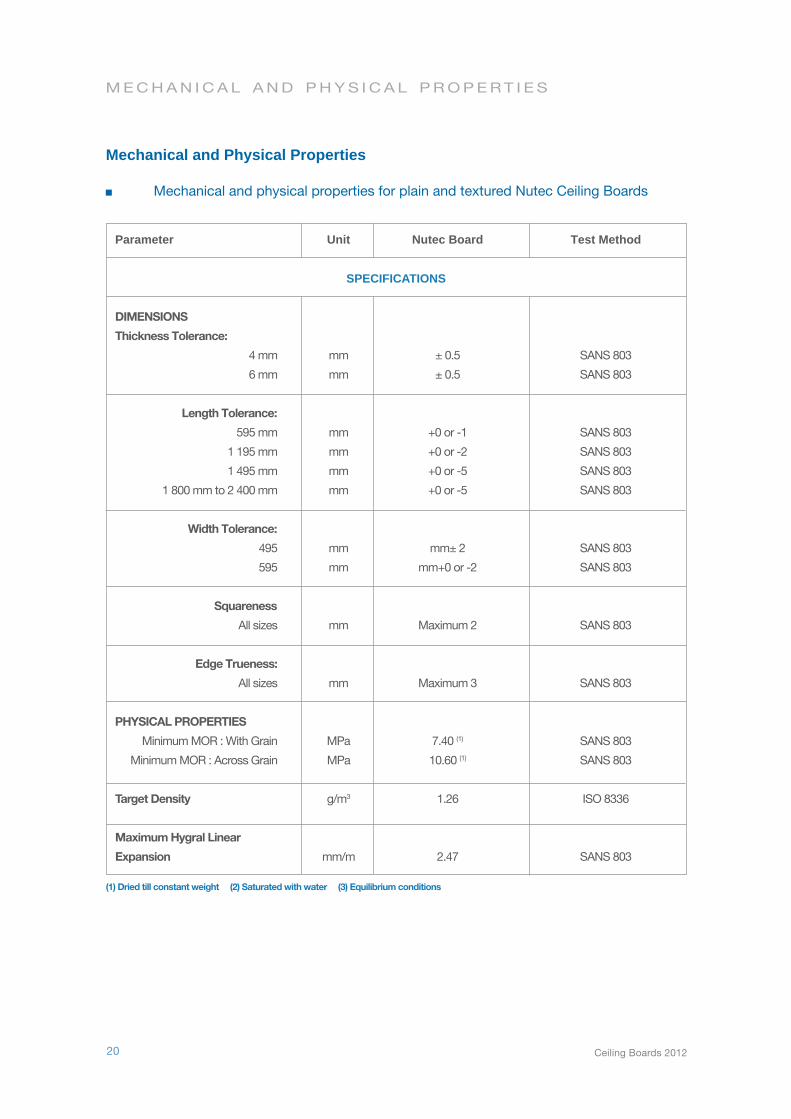
Parameter Unit Nutec Board Test Method
DIMENSIONS
Thickness Tolerance:
4 mm mm ± 0.5 SANS 803
6 mm mm ± 0.5 SANS 803
Length Tolerance:
595 mm mm +0 or -1 SANS 803
1 195 mm mm +0 or -2 SANS 803
1 495 mm mm +0 or -5 SANS 803
1 800 mm to 2 400 mm mm +0 or -5 SANS 803
Width Tolerance:
495 mm mm± 2 SANS 803
595 mm mm+0 or -2 SANS 803
Squareness
All sizes mm Maximum 2 SANS 803
Edge Trueness:
All sizes mm Maximum 3 SANS 803
PHYSICAL PROPERTIES
Minimum MOR : With Grain MPa 7.40 (1) SANS 803
Minimum MOR : Across Grain MPa 10.60 (1) SANS 803
Target Density g/m3 1.26 ISO 8336
Maximum Hygral Linear
Expansion mm/m 2.47 SANS 803
m e c h a n i c a l a n d p h y s i c a l p r o p e r t i e s
Ceiling Boards 201220
Mechanical and Physical Properties Mechanical and physical properties for plain and textured Nutec Ceiling Boards
SPECIFICATIONS
(1) Dried till constant weight (2) Saturated with water (3) Equilibrium conditions
m e c h a n i c a l a n d p h y s i c a l p r o p e r t i e s
Ceiling Boards 2012 21
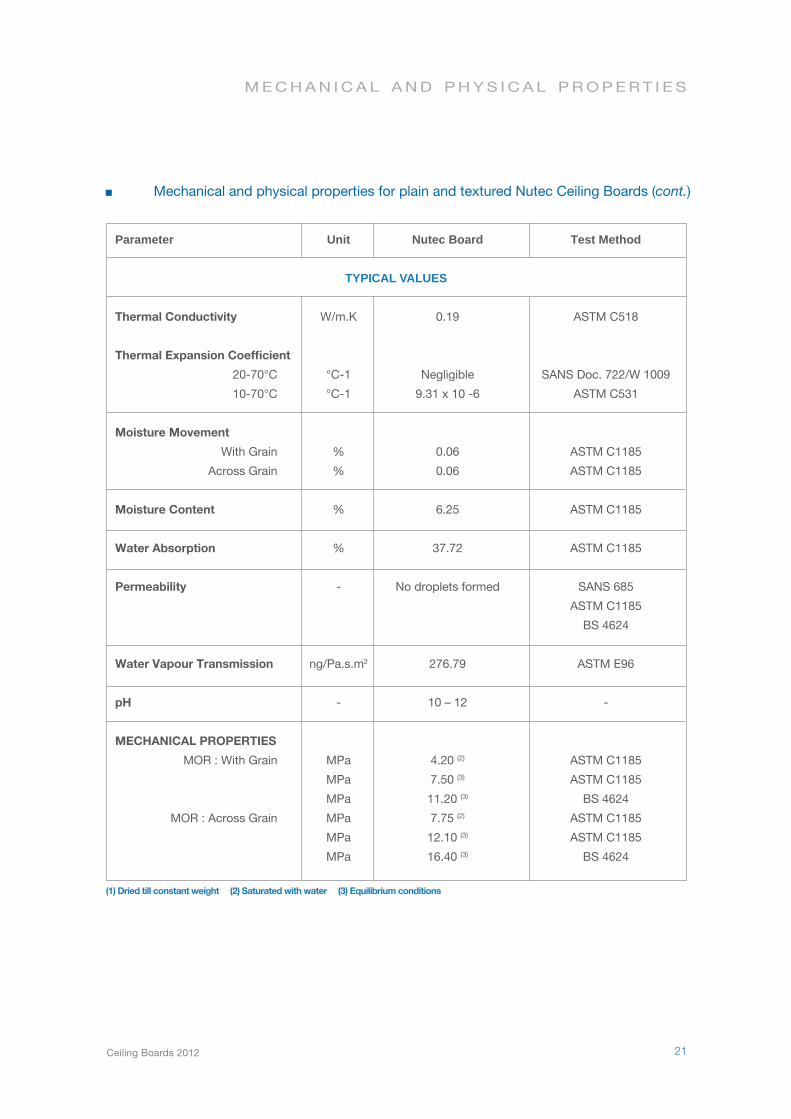
Mechanical and physical properties for plain and textured Nutec Ceiling Boards (cont.)
Parameter Unit Nutec Board Test Method
Thermal Conductivity W/m.K 0.19 ASTM C518
Thermal Expansion Coefficient
20-70°C °C-1 Negligible SANS Doc. 722/W 1009
10-70°C °C-1 9.31 x 10 -6 ASTM C531
Moisture Movement
With Grain % 0.06 ASTM C1185
Across Grain % 0.06 ASTM C1185
Moisture Content % 6.25 ASTM C1185
Water Absorption % 37.72 ASTM C1185
Permeability - No droplets formed SANS 685
ASTM C1185
BS 4624
Water Vapour Transmission ng/Pa.s.m2 276.79 ASTM E96
pH - 10 – 12 -
MECHANICAL PROPERTIES
MOR : With Grain MPa 4.20 (2) ASTM C1185
MPa 7.50 (3) ASTM C1185
MPa 11.20 (3) BS 4624
MOR : Across Grain MPa 7.75 (2) ASTM C1185
MPa 12.10 (3) ASTM C1185
MPa 16.40 (3) BS 4624
(1) Dried till constant weight (2) Saturated with water (3) Equilibrium conditions
TYPICAL VALUES
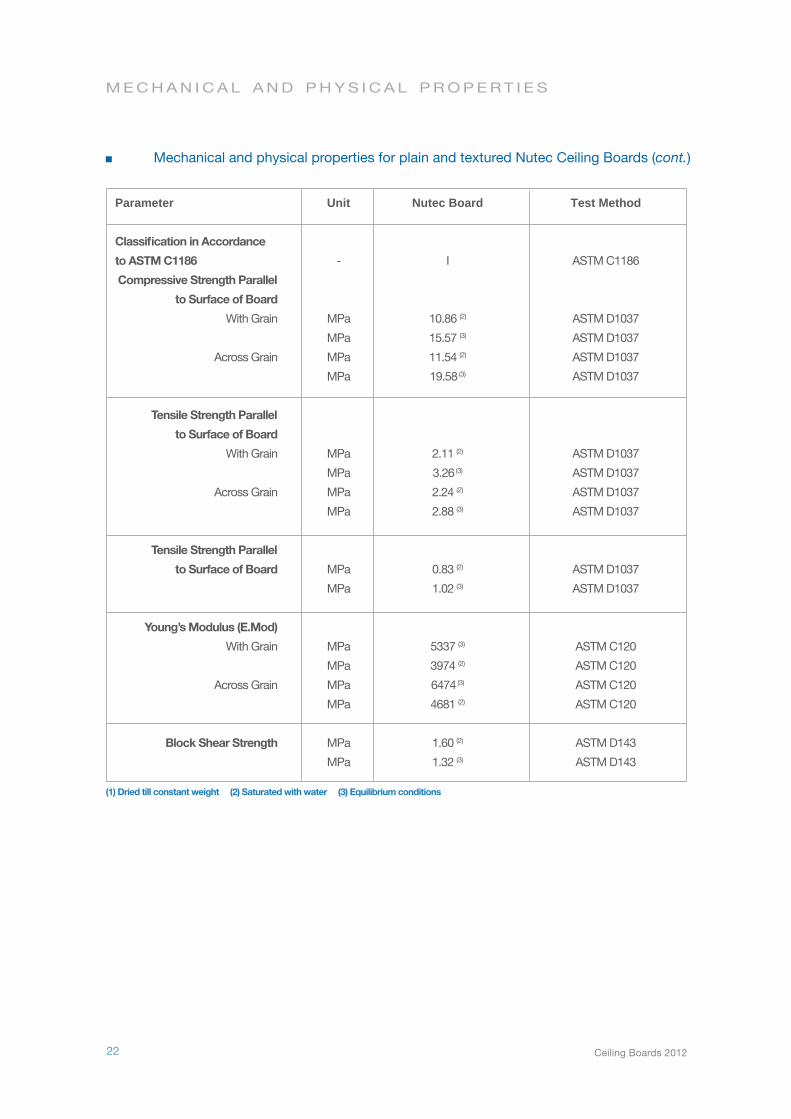
Parameter Unit Nutec Board Test Method
Classification in Accordance
to ASTM C1186 - I ASTM C1186
Compressive Strength Parallel
to Surface of Board
With Grain MPa 10.86 (2) ASTM D1037
MPa 15.57 (3) ASTM D1037
Across Grain MPa 11.54 (2) ASTM D1037
MPa 19.58 (3) ASTM D1037
Tensile Strength Parallel
to Surface of Board
With Grain MPa 2.11 (2) ASTM D1037
MPa 3.26 (3) ASTM D1037
Across Grain MPa 2.24 (2) ASTM D1037
MPa 2.88 (3) ASTM D1037
Tensile Strength Parallel
to Surface of Board MPa 0.83 (2) ASTM D1037
MPa 1.02 (3) ASTM D1037
Young’s Modulus (E.Mod)
With Grain MPa 5337 (3) ASTM C120
MPa 3974 (2) ASTM C120
Across Grain MPa 6474 (3) ASTM C120
MPa 4681 (2) ASTM C120
Block Shear Strength MPa 1.60 (2) ASTM D143
MPa 1.32 (3) ASTM D143
m e c h a n i c a l a n d p h y s i c a l p r o p e r t i e s
Ceiling Boards 201222
Mechanical and physical properties for plain and textured Nutec Ceiling Boards (cont.)
(1) Dried till constant weight (2) Saturated with water (3) Equilibrium conditions

m e c h a n i c a l a n d p h y s i c a l p r o p e r t i e s
Ceiling Boards 2012 23
Mechanical and physical properties for plain and textured Nutec Ceiling Boards (cont.)
Parameter Unit Nutec Board Test Method
Surface Spread of Flame Class 1 BS 476: Part 7 +
SABS 10177: Part 111
Spread of Flame Index - Nil SANS 10177 Part III
Heat Contribution Index - Nil SANS 10177 Part III
Smoke Emission Index - Nil SANS 10177 Part III
Surface Fire Index - Nil SANS 10177 Part III
Surface Burning Characteristics
FSI (Flame spread index) - 0 ASTM E84
SD (Smoke developed index) - 3 ASTM E 84
Non-Combustibility Non-combus. BS 476 Part 4,
SANS 10177: Part V
Continuous Temperature - 150°C -
Frost Resistance
Cycles Completed - 50 ASTM C1185
Strength Ratio % 78,5 ASTM C1185
Biological Resistance
Rodent Resistance Class B1 SANS Method 5419
Termite Resistance No Damage SANS Method 5471
Resistance to Bacteria No Growth BS 5980
FIRE PROPERTIES
OTHER PROPERTIES
(1) Dried till constant weight (2) Saturated with water (3) Equilibrium conditions
Ceiling Boards 201224
c o n ta c t d e ta i l s
Sales Support OfficeTelephone + 27 11 439 4400
Telefax + 27 11 903 7097
BloemfonteinMobile + 27 83 798 8049
Telefax + 27 51 522 1760
Cape TownTelephone + 27 21 941 8640
Telefax + 27 21 941 8641
DurbanTelephone + 27 31 267 1903
Telefax + 27 31 267 1907 East LondonMobile + 27 79 516 6510
Telefax + 27 43 726 0343
GeorgeTelephone + 27 44 873 2408
Mobile + 27 83 286 3435
Telefax + 27 44 873 2409
Middelburg (Mpumalanga)Mobile + 27 83 778 2787
PolokwaneTelephone + 27 15 297 3559/62
Telefax + 27 15 297 3424
Port ElizabethTelephone + 27 41 401 8900
Mobile + 27 83 780 6162
Telefax + 27 41 486 1884
WorcesterMobile + 27 83 286 3431
Telefax + 27 23 342 6966
Botswana (Gaborone)Telephone + 27 11 439 4400
Telefax + 27 11 903 8327
NamibiaMobile (00264) 81 124 2655
Telefax (00264) 64 40 5684
Everite National Offices
Call Centre 0861 333 835 + 27 11 439 4400www.everite.co.za