Embed Size (px)
Citation preview

1
CEH – Certification: Final Review: Updated 7-30-21
Table of Contents Overview ....................................................................................................................................................... 3
Schedule ....................................................................................................................................................... 3
CEH Testout Course Outline ......................................................................................................................... 4
2. Introduction to Penetration Testing ........................................................................................................ 4
2.3.3. Target Selection Facts ..................................................................................................................... 5
2.4.3 Assessment Type Facts .................................................................................................................... 8
2.5.4 Legal and Ethical Compliance Facts ............................................................................................... 10
2.5.6 Engagement Contract Facts ........................................................................................................... 11
3. Social Engineering and Physical Security ............................................................................................... 13
3.1.2 Social Engineering Overview Facts ................................................................................................. 14
3.1.4 Social Engineering Motivation Facts .............................................................................................. 16
3.1.6 Social Engineering Techniques Facts ............................................................................................. 19
3.1.7 Phishing and Internet-Based Technique Facts ............................................................................... 22
#Lab 3.1.10 Identify Social Engineering (Emails) .................................................................................... 24
3.2.2 Physical Security Facts ................................................................................................................... 24
3.2.4 Physical Security Attack Facts ........................................................................................................ 31
3.3.2 Countermeasures and Prevention Facts ........................................................................................ 34
Lab 3.3.3 Implement Physical Security Countermeasures ...................................................................... 38
4. Reconnaissance ...................................................................................................................................... 39
4.1 Reconnaissance Overview ............................................................................................................... 39
4.1.2 Reconnaissance Process Facts ................................................................................................... 39
4.1.3 Reconnaissance Tools Facts ...................................................................................................... 41
#Lab 4.1.7 Perform Reconnaissance Nmap ....................................................................................... 43
4.2 Reconnaissance Countermeasures ................................................................................................... 45
#Lab 4.2.3 Disable Windows Services ................................................................................................ 45
#Lab 4.2.5 Manage Linux Services ..................................................................................................... 46
#Lab 4.2.6 Enable and Disable Linux Services ................................................................................... 47
4.2.7 Reconnaissance Countermeasures Facts .................................................................................. 47
#Lab 4.2.9 Hide the IIS Banner Broadcast.......................................................................................... 48
5. Scanning .................................................................................................................................................. 49

2
5.1 Scanning Overview ........................................................................................................................... 49
5.1.2 Scanning Process Facts .............................................................................................................. 49
5.1.3 Scanning Tools Facts .................................................................................................................. 52
Lab# 5.1.5 Perform an Internal Scan .................................................................................................. 54
Lab# 5.1.6 Perform an External Scan Using Zenmap ......................................................................... 54
5.1.9 Scanning Considerations Facts .................................................................................................. 54
5.2 Banner Grabbing .............................................................................................................................. 56
5.2.2 Banner Grabbing Facts .............................................................................................................. 57
6. Enumeration ........................................................................................................................................... 58
6.1 Enumeration Overview .................................................................................................................... 58
6.1.5 Enumeration Facts ..................................................................................................................... 58
6.1.8 Enumerate Ports and Services Facts ......................................................................................... 64
Lab# 6.1.9 Perform Enumeration with Nmap ................................................................................... 65
Lab# 6.1.11 Perform Enumeration with Metasploit ......................................................................... 66
Lab# 6.1.12 Perform Enumeration of MSSQL with Metasploit ........................................................ 66
6.2 Enumeration Countermeasures ....................................................................................................... 67
6.2.2 Enumeration Countermeasures Facts ...................................................................................... 67
Lab# 6.2.4 Prevent Zone Transfer ...................................................................................................... 68
7. Analyze Vulnerabilities........................................................................................................................... 69
7.1 Vulnerability Assessment ................................................................................................................. 69
7.1.2 Vulnerability Assessment Facts ................................................................................................ 69
7.2 Vulnerability Management Life Cycle .............................................................................................. 73
7.2.2 Vulnerability Management Life Cycle....................................................................................... 74
7.2.4 Vulnerability Solution Facts ...................................................................................................... 76
7.3 Vulnerability Scoring System ........................................................................................................... 78
ExamTopics Review Questions .................................................................................................................... 79
References .................................................................................................................................................. 79
The end! ...................................................................................................................................................... 79

3
Overview
Schedule Weeks Activities Week 1: 7/26/21
1. Review ExamTopics Questions a. Part 1: Questions 1 to 52 b. Part 2: Questions 53 to 86 c. Part 3: Questions 87 to 122
2. Review Testout Course Material a. Chapter 1: Introduction to Penetration Testing b. Chapter 2: Social Engineering and Physical Security c. Chapter 3: Reconnaissance
Week 2: 8/1/21
3. Review ExamTopics Questions a. Part 3: Questions b. Part 4: Questions c. Part 6: Questions
4. Review Testout Course Material a. Chapter 4: b. Chapter 5: c. Chapter 6:
9/25/21 Take the exam

4
CEH Testout Course Outline
2. Introduction to Penetration Testing

5
2.3.3. Target Selection Facts
2.3.3 Target Selection Facts Before beginning a penetration test, there are a lot of details that must be worked out.
These details include the type of test being performed and any test limitations. After the

6
initial plans and details for a penetration test have been put together, there are some
additional details that should be considered. These include performing a risk assessment,
determining tolerance, scheduling the test, and identifying security exceptions that may be
applied to the penetration tester.
This lesson covers the following topics:
• Penetration test planning
• Security exceptions
• Risk assessment
• Determine tolerance
• Scope creep
Penetration Test Planning
Detail Description
How
One of the first items to consider is the type of test to be performed, internal or
external. An internal test focuses on systems that reside behind the firewall. This
would probably be a white box test. An external test focuses on systems that exist
outside the firewall, such as a web server. This would, more than likely, be a black
box test.
Who
Determine if the penetration tester is allowed to use social engineering attacks that
target users. It's common knowledge that users are generally the weakest link in any
security system. Often, a penetration test can target users to gain access. You
should also pre-determine who will know when the test is taking place.
What
The organization and the penetration tester need to agree on which systems will be
targeted. The penetration tester needs to know exactly which systems are being
tested, and as they cannot target any area that isn't specified by documentation. For
example, the organization may have a website they do not want targeted or tested.
Some other systems that need to look at include wireless networks and
applications.
When
Scheduling the test is very important. Should the test be run during business hours?
If so, this may result in an interruption of normal business procedures. Running the
tests when the business is closed (during weekends, holidays, or after-hours) may
be better, but might limit the test.
Where Finally, will the test be run on site, or remotely? An on-site test allows better testing
results but may be more expensive than a remote test.

7
Security Exceptions A security exception is any deviation from standard operating security protocols. The type
of test (white box, black box, grey box) will determine what, if any, security exceptions the
penetration test will be given.
Risk Assessment The purpose of a risk assessment is to identify areas of vulnerability within the
organization’s network. The risk assessment should look at all areas, including high value
data, network systems, web applications, online information, and physical security
(operating systems and web servers). Often, the penetration test is performed as part of a
risk assessment.
Once vulnerabilities have been determined, the organization needs to rank them and
figure out how to handle each risk. There are four common methods for dealing with risk:
1. Avoidance: whenever you can avoid a risk, you should. This means
performing only actions that are needed, such as collecting only relevant
user data.
2. Transference: the process of moving the risk to another entity, such as a
third party.
3. Mitigation: this technique is also known as risk reduction. When the risk
cannot be avoided or transferred, steps should be taken to reduce the
damage that can occur.
4. Acceptance: sometimes the cost to mitigate a risk outweighs the risk's
potentially damaging effects. In such cases, the organization will simply
accept the risk.
Determine Tolerance After the risk assessment has been performed and vulnerable areas are identified, the
organization needs to decide its tolerance level in performing a penetration test. There
may be areas of operation that absolutely cannot be taken down or affected during the
test. Areas of risk that can be tolerated need to be placed in the scope of work, and critical
areas may need to be placed out of the test's scope.
Scope Creep In project management, one of the most dangerous issues is scope creep. This is when the
client begins asking for small deviations from the scope of work. This can cause the project
to go off track and increase the time and resources needed to complete it. When a change
to the scope of work is requested, a change order should be filled out and agreed on. Once
this is done, the additional tasks can be completed.

8
2.4.3 Assessment Type Facts
2.4.3 Assessment Type Facts An organization's purpose for completing a penetration test will dictate how the test will be
carried out. Depending on the penetration test's goals, the ethical hacker may have specific
rules and regulations that need to be observed. There are scenarios that will result in
special considerations being made.
This lesson covers the following topics:
• Goal-based penetration test
• Objective-based penetration test
• Compliance-based penetration test
• Special considerations
Goal-Based Penetration Test A goal-based penetration test will focus on the end results. The goals must be specific and
well-defined before the test can begin. The penetration tester will utilize a wide range of
skills and methods to carry out the test and meet the goals. When you determine the goals
of the exam, you should use S.M.A.R.T. goals.
• S – Specific
• M – Measurable
• A – Attainable
• R – Relevant
• T – Timely
Objective-Based Penetration Test An objective-based test focuses on the overall security of the organization and its data
security. When people think of a penetration test, this is often what they think of. The
scope of work and rules of engagement documents specify what is to be tested.
Compliance-Based Penetration Test Ensuring that the organization is in compliance with federal laws and regulations is a major
purpose for performing a penetration test. Some of the main laws and regulations include
the following:
Regulation Description

9
Payment Card
Industry Data
Security
Standards (PCI-
DSS)
Defines the security standards for any organization that handles
cardholder information for debit cards, credit cards, prepaid cards, and
other types of payment cards.
Health Insurance
Portability
and
Accountability Act
(HIPAA)
A set of standards that ensures a person's health information is kept
safe and only shared with the patient and medical professionals that
need it.
ISO/IEC 27001 Defines the processes and requirements for an organization’s
information security management systems.
Sarbanes Oxley
Act (SOX)
A law enacted in 2002 with the goal of implementing accounting and
disclosure requirements that would increase transparency in corporate
governance and financial reporting and formalizing a system of internal
checks and balances.
Digital Millennium
Copyright Act
(DMCA)
Enacted in 1998, this law is designed to protect copyrighted works.
Federal
Information
Security
Management Act
(FISMA)
Defines how federal government data, operations, and assets are
handled.
Special Considerations There are a few scenarios where extra or special considerations need to be considered,
such as mergers and establishing supply chains. During a merger, a penetration test may
be performed to assess physical security, data security, company culture, or other facets of
an organization to determine if there are any shortcomings that may hinder or cancel the
merger. When establishing a supply chain, a penetration test needs to be performed to
determine if there are any security issues or violations that could affect everyone involved.
The organizations need to ensure that their systems can talk to each other and their
security measures align. For these tests, companies may employ red teams and blue
teams. They may also utilize purple team members.

10
2.5.4 Legal and Ethical Compliance Facts
2.5.4 Legal and Ethical Compliance Facts An ethical hacker's role is to break the rules and hack into an organization's network and
systems. Before this is done, both the penetration tester and organization must know and
agree to everything being done. Once the scope of work is finalized, there may be
additional laws that need to be looked at and followed.
This lesson covers the following topics:
• Federal laws
• Cloud-based and third-party systems
• Ethical scenarios
• Corporate policies
Federal Laws There are two key federal laws that apply to hacking: Title 18, Chapter 47, Sections 1029
and 1030. One thing that stands out in these laws is in most of the statements, the words
unauthorized or exceeds authorized access are used. These keywords are what apply to
the ethical hacker. The ethical hacker needs to ensure they access only the systems to
which they have explicit permission and only to the level they have authorized access.
• Section 1029 refers to fraud and related activity with access devices. An
access device is any application or hardware that is created specifically to
generate access credentials.
• Section 1030 refers to fraud and related activity with computers or any
other device that connects to a network.
In addition to the above two laws, the Wassenaar Arrangement on Export Controls for
Conventional Arms and Dual-Use Goods and Technologies was amended in 2013 to include
intrusion software. This agreement is between 41 countries that generally hold similar
views on human rights. The update in 2013 has led to a lot of issues and confusion in the
cybersecurity field, as many of the tools used in the penetration testing process can also be
used by black hat hackers for malicious purposes.
In 2018, the Wassenaar Arrangement was updated to clarify some of these policies. This
will hopefully make things easier for some penetration testers involved in international
testing.
Cloud-Based and Third-Party Systems

11
When dealing with cloud-based systems or other third-party systems, special
considerations need to be made. If an organization is using a cloud-based system, that
means the organization doesn't own the system and cannot legally provide permission for
a penetration test to be carried out on that system. The penetration tester must make sure
to get the explicit permission from the cloud provider before performing any tests.
Third-party systems can also cause some issues for the penetration tester. If systems are
interconnected, such as in a supply chain, the penetration tester needs to ensure they do
not accidentally access the third party's systems at all. The penetration tester may also run
across vulnerabilities that can affect the third party. In this scenario, the penetration tester
needs to report findings to the client and let the client handle the reporting.
Ethical Scenarios Aside from the laws and regulations, the ethical hacker must be aware of scenarios where
ethical decisions need to be made. One particular instance that can cause an issue is when
the penetration tester resides in one state and the organization is in another state. The
laws that govern computer usage and hacking can vary from state to state. When this
occurs, the penetration tester and the organization need to agree on which set of laws they
will adhere to. Whenever there are any questions or concerns regarding laws and
regulations, a lawyer should be consulted.
There will be instances where the ethical hacker will run across data and may not be sure
what to do with it. There are instances, such as child pornography, that is considered a
mandated report - these sorts of findings must always be immediately reported, no
exceptions. In any other situation where data is discovered that is not a mandated report,
the data should be disclosed to the client. As always, when there is doubt about which
course of action to take, a lawyer should be consulted.
Corporate Policies Corporate policies also play a role in how a penetration test is carried out. Corporate
policies are the rules and regulations that have been defined and put in place by the
organization. As part of the risk assessment and penetration test, these policies should be
reviewed and tested. Some common policies that most organizations have defined are
password polices, update frequency, handling sensitive data, and bring your own devices.
The organization needs to determine which, if any, of these policies will be tested during an
assessment.
2.5.6 Engagement Contract Facts
2.5.6 Engagement Contract Facts

12
Before a penetration test can begin, there are a few key documents that must be
completed and agreed on. These documents are designed to protect both the organization
and the penetration tester.
Even though much of this information could be put into a single document, it makes things
much clearer when all the details are separated out into the documents described in this
table.
Document Description
Scope of Work
The Scope of Work is one of the more detailed documents for a project.
This document spells out in detail the who, what, when, where, and why of
the penetration test. Explicitly stated in the Scope of Work are details of all
system aspects that can be tested, such as IP ranges, servers, and
applications.
Anything not listed is off-limits to the ethical hacker. Off-limit features
should also be explicitly stated in the Scope of Work document to avoid any
confusion. This document will also define the test's time frame, purpose,
and any special considerations.
Rules of
Engagement
The Rules of Engagement document defines how the penetration test will
be carried out. This document defines whether the test will be a white box,
gray box, or black box test. Other details, such as how to handle sensitive
data and who to notify in case something goes wrong, will be listed in the
document.
Master Service
Agreement
It is very common for companies to do business with each other multiple
times. In these situations, a Master Service Agreement is useful. This
document spells out many of the terms that are commonly used between
the two companies, such as payment. This makes future contracts much
easier to complete, as most details are already spelled out.
Non-
Disclosure
Agreement
This is a common legal contract outlining confidential material or
information that will be shared during the assessment and the restrictions
placed on it. This contract basically states that anything the tester finds
cannot be shared, with the exception of those people stated in the
document.
Permission to
Test
This document is often referred to as the get-out-of-jail-free card. Since
most people in the client's organization will not know about the penetration
test occurring, this document is used if the penetration tester gets caught.
This document is used only as a last resort but explains what the
penetration tester is doing and that the work is fully authorized.

13
3. Social Engineering and Physical Security

14
3.1.2 Social Engineering Overview Facts
3.1.2 Social Engineering Overview Facts Social engineering refers to enticing or manipulating people to perform tasks or relay
information that benefits an attacker. Social engineering tries to get a person to do
something the person wouldn't do under normal circumstances.
This lesson covers the following topics:
• Manipulation tactics
• Social engineering process
Manipulation Tactics Social engineers are master manipulators. The following table describes some of the most
popular tactics they use on targets.

15
Manipulation Type Description
Moral obligation An attacker uses moral obligation to exploit the target’s willingness
to be helpful and assist them out of a sense of responsibility.
Innate human trust
Attackers often exploit a target’s natural tendency to trust others.
The attacker wears the right clothes, has the right demeanor, and
speaks words and terms the target is familiar with so that the target
will comply with requests out of trust.
Threatening An attacker threatens when they intimidate a target with threats
convincing enough to make them comply with the attacker’s request.
Offering something
for very little to
nothing
Offering something for very little to nothing refers to an attacker
promising huge rewards if the target is willing to do a very small
favor or share what the target thinks is a very trivial piece of
information.
Ignorance
Ignorance means the target is not educated in social engineering
tactics and prevention, so the target can’t recognize social
engineering when it is happening. The attacker knows this and
exploits the ignorance to his or her advantage.
Social Engineering Process The social engineering process can be divided into three main phases: research,
development, and exploitation. The following table describes each phase.
Phase Description
Research
In the research phase, the attacker gathers information about the target
organization. Attackers use a process called Footprinting, which is using all
resources available to gain information, including going through the target
organization’s official websites and social media; performing dumpster
diving; searching sources for employees’ names, email addresses, and IDs;
going through an organization tour; and other kinds of onsite observation.
Research may provide information for pretexting. Pretexting is using a
fictitious scenario to persuade someone to perform an unauthorized action
such as providing server names and login information. Pretexting usually
requires the attacker to perform research to create a believable scenario. The

16
more the attacker knows about the organization and the target, the more
believable a scenario the attacker can come up with.
Development
The development phase involves two parts: selecting individual targets within
the organization being attacked and forming a relationship with the selected
targets. Usually, attackers select people who not only will have access to the
information or object they desire, but that also show signs of being
frustrated, overconfident, arrogant, or somehow easy to extract information
from. Once the targets are selected, the attacker will start forming a
relationship with them through conversations, emails, shared interests, and
so on. The relationship helps build the targets’ trust in the attacker, allowing
the target to be comfortable, relaxed, and more willing to help.
Exploitation
In the exploitation phase, the attacker takes advantage of the relationship
with the target and uses the target to extract information, obtain access, or
accomplish the attacker’s purposes in some way. Some examples include
disclosing password and username; introducing the attacker to other
personnel, providing social credibility for the attacker; inserting a USB flash
drive with a malicious payload into a organization's computer; opening an
infected email attachment; and exposing trade secrets in a discussion.
If the exploitation is successful, the only thing left to do is to wrap things up
without raising suspicion. Most attackers tie up loose ends, such as erasing
digital footprints and ensuring no items or information are left behind for the
target to determine that an attack has taken place or identify the attacker. A
well-planned and smooth exit strategy is the attacker's goal and final act in
the exploitation phase.
3.1.4 Social Engineering Motivation Facts
3.1.4 Social Engineering Motivation Facts There are many different social engineering techniques, attackers, and types of motivation
techniques.
This lesson covers the following topics:
• Social engineering attacks
• Types of attackers
• Types of motivation techniques
Social Engineering Attacks The following table describes a few social engineering attacks.

17
Attack Description
Shoulder
surfing
Shoulder surfing involves looking over someone's shoulder while they
work on a computer or review documents. This attack's purpose is to
obtain usernames, passwords, account numbers, or other sensitive
information.
Eavesdropping
Eavesdropping is an unauthorized person listening to private
conversations between employees or other authorized personnel when
sensitive topics are being discussed.
USB and
keyloggers
When on site, a social engineer also has the ability to stealing data through
a USB flash drive or a keystroke logger. Social engineers often employ
keystroke loggers to capture usernames and passwords. As the target logs
in, the username and password are saved. Later, the attacker uses the
username and password to conduct an exploit.
Spam and spim
When using spam, the attacker sends an email or banner ad embedded
with a compromised URL that entices a user to click it. Spim is similar, but
the malicious link is sent to the target using instant messaging instead of
email.
Hoax
Email hoaxes are often easy to spot because of their bad spelling and
terrible grammar. However, hoax emails use a variety of tactics to convince
the target they're real.
Types of Attackers The following table describes different types of attackers.
Type Description
Insider
An insider could be a customer, a janitor, or even a security guard. But most of the
time, it's an employee. Employees pose one of the biggest threats to any
organization. There are many reasons why an employee might become a threat.
The employee could:
• Be motivated by a personal vendetta because they are
disgruntled.
• Want to make money.

18
• Be bribed into stealing information.
Sometimes, an employee can become a threat actor without even realizing it. This
is known as an unintentional threat actor. The employee may create security
breaches doing what seems to be harmless day-to-day work. An unintentional
threat actor is the most common insider threat.
Hacker
Generally speaking, a hacker is any threat actor who uses technical knowledge to
bypass security, exploit a vulnerability, and gain access to protected information.
Hackers could attack for several different reasons. Some types of hackers are:
• Those motivated by bragging rights, attention, and the thrill.
• Hacktivists with a political motive.
• Script kiddies, who use applications or scripts written by much
more talented individuals.
• A white hat hacker, who tries to help a company see the
vulnerabilities that exist in their security.
• Cybercriminals, who are motivated by significant financial gain.
They typically take more risks and use extreme tactics. Corporate
spies are a sub-category of cybercriminal.
Nation
state
Attacks from nation states have several key components that make them
especially powerful. Typically, nation state attacks:
• Are highly targeted.
• Identify a target and wage an all-out war.
• Are extremely motivated.
• Use the most sophisticated attack techniques of all the attackers.
This often includes developing completely new applications and
viruses in order to carry out an attack.
• Are well financed.
Types of Motivation Techniques The following table describes types of techniques a social engineer uses to motivate an
employee to provide information.
Technique Description
Authority and
fear
Authority techniques rely on power to get a target to comply without
questioning the attacker. The attacker pretends to be a superior with
enough power that the target will comply right away without question.

19
The attacker could also pretend to be there in the name of or upon the
request of a superior. Authority is often combined with fear. If an
authority figure threatens a target with being fired or demoted, the target
is more likely to comply without a second thought.
Social proof
Social proof means the attacker uses social pressure to convince the
target that it’s okay to share or do something. In this case, the attacker
might say, "If everybody is doing it, then it's okay for you to do it, too."
Scarcity Scarcity appeals to the target's greed. If something is in short supply and
will not be available, the target is more likely to fall for it.
Likeability Likeability works well because humans tend to do more to please a
person they like as opposed to a person they don’t like.
Urgency To create a sense of urgency, an attacker fabricates a scenario of distress
to convince an individual that action is immediately necessary.
Common
ground and
shared interest
Common ground and shared interest work because sharing a hobby, life
experience, or problem instantly builds a connection and starts forming
trust between two parties.
3.1.6 Social Engineering Techniques Facts
3.1.6 Social Engineering Technique Facts Not all attackers are the same. They all have different motives, attributes, and attack
characteristics. Hackers may also employ several different techniques to obtain what they
want from the target.
This lesson covers the following topics:
• Attack types
• Elicitation
• Pretexting, preloading, and impersonation
• Interview and interrogation
Attack Types

20
A single hacker trying to exploit a vulnerability is going to have a completely different attack
profile than an organized crime group waging an assault on your network. The following
table describes the differences between the two.
Attack Description
Opportunistic
An opportunistic attack is typically automated and involves scanning a wide
range of systems for known vulnerabilities, such as old software, exposed
ports, poorly secured networks, and default configurations. When one is
found, the hacker will exploit the vulnerability, steal whatever is easy to
obtain, and get out.
Targeted
A targeted attack is much more dangerous. A targeted attack is extremely
methodical and is often carried out by multiple entities that have substantial
resources. Targeted attacks almost always use unknown exploits, and the
hackers go to great lengths to cover their tracks and hide their presence.
Targeted attacks often use completely new programs that are specifically
designed for the target.
Elicitation Elicitation is a technique that tries to extract information from a target without arousing
suspicion. The following table describes some elicitation tactics.
Tactic Description
Compliments
Attackers may give a target a compliment about something they know the
target did in hopes that the target will take the bait and elaborate on the
subject. Even if the target downplays the skill or ability involved, talking
about it might give the attacker valuable information.
Misinformation
Attackers might make a statement with the wrong details. The attacker’s
intent is that the target will give the accurate details that the attacker
wanted to confirm. The more precise the details given by the attacker, the
better the chance that the target will take the bait.
Feigning
ignorance
Attackers might make a wrong statement and then admit to not knowing
much about the subject. This statement will hopefully get the target to not
only correct the attacker, but also explain why the attacker is wrong in
detail. The explanation might help the attacker learn, or at least have a
chance to ask questions without looking suspicious.

21
Being a good
listener
An attacker may approach a target and carefully listen to what the target
has to say, validate any feelings they express, and share similar
experiences (which may be real or fabricated). The point is to be relatable
and sympathetic. As the target feels more connected to the attacker,
barriers go down and trust builds, leading the target to share more
information.
Pretexting, Preloading, and Impersonation All the social engineering techniques involve some pretexting, preloading, and
impersonation. The following table describes these steps.
Step Description
Pretexting Pretexting is doing research and information gathering to create convincing
identities, stories, and scenarios to be used on selected targets.
Preloading Preloading is used to set up a target by influencing the target’s thoughts,
opinions, and emotions.
Impersonation
Impersonation is pretending to be trustworthy and having a legitimate
reason for approaching the target to ask for sensitive information or access
to protected systems.
Interview and Interrogation Another technique social engineers use often is the concept of interviews and
interrogation. The following table describes some of the most important aspects of
conducting a successful interview and interrogation.
Concept Description
Interview vs
interrogation
In the interview phase, the attacker lets the target do the talking while the
attacker mostly listens. In this way, the attacker has the chance to learn
more about the target and how to extract information from them. Then the
attacker leads the interview phase into an interrogation phase. It’s most
effective when done smoothly and naturally and when the target already
feels a connection and trust with the attacker. In the interrogation phase,
the attacker talks about the target's statements. At this point, the attacker
is mostly leading the conversation with questions and statements that will
flow in the direction the attacker has in mind to obtain information.

22
Environment
The environment the attacker chooses for conducting an interview and
interrogation is essential to setting the mood. The location should not be
overly noisy or overly crowded. It should be a relaxing and stress-free
environment that puts the target at ease. The attacker shouldn’t sit
between the target and the door. The target should never feel trapped in
any way. Lighting should be good enough for both parties to see each
other clearly. This will allow the attacker to better read the target’s micro
expressions and movements. It will also inspire trust in the target.
Observation
During these interviews and interrogations, the hacker pays attention to
every change the target displays. This allows the attacker to discern the
target’s thoughts and topics that should be investigated further. Every part
of the human body can give a clue about what is going on inside the mind.
Most people don’t even realize they give many physical cues, nor do they
recognize these cues in others. A skilled observer pays close attention and
puts these clues together to confirm another person’s thoughts and
feelings.
3.1.7 Phishing and Internet-Based Technique Facts
3.1.8 Phishing and Internet-Based Technique Facts Users interfacing with the internet either through email or browsing websites can pose
substantial security threats to an organization. Attacks that entice users to provide
sensitive information or click a link that installs malware are called social engineering
attacks. Increasing user awareness of the types of threats and how to successfully avoid
them is critical to an organization's overall security.
This lesson covers the following topics:
• Phishing
• Other social engineering attacks
Phishing One of the most successful social engineering attacks is called a phishing attack. In a
phishing attack, the social engineer masquerades as a trustworthy entity in an electronic
communication. The following table describes a few variations of phishing attacks.
Attack Description

23
Spear
phishing
In spear phishing, an attacker gathers information about the victim, such as their
online bank. The attacker then sends a phishing email to the victim that appears
to be from that bank. Usually, the email contains a link that sends the user to a
site that looks legitimate but is intended to capture the victim's personal
information.
Whaling Whaling is another form of phishing that targets senior executives and high-
profile victims.
Vishing
Vishing is like phishing, but instead of an email, the attacker uses Voice over IP
(VoIP) to gain sensitive information. The term is a combination of voice and
phishing.
SMS
phishing
In SMS phishing (smishing), the attacker sends a text message with a supposedly
urgent topic to trick the victim into taking immediate action. The message usually
contains a link that will either install malware on the victim's phone or extract
personal information.
Other Social Engineering Attacks The table below describes other common social engineering attacks.
Attack Description
Pharming
Pharming involves the attacker executing malicious programs on the target’s
computer so that any URL traffic redirects to the attacker’s malicious website.
This attack is also called phishing without a lure. The attacker is then privy to
the user’s sensitive data, like IDs, passwords, and banking details. Pharming
attacks frequently come in the form of malware such as Trojan horses, worms,
and similar programs. Pharming is commonly implemented using DNS cache
poisoning or host file modification.
• In DNS cache poisoning, the attacker launches the attack on
the chosen DNS server. Then, in the DNS table, the attacker
changes the IP address of a legitimate website to a fake
website. When the user enters a legitimate URL, the DNS
redirects the user to the fake website controlled by the
attacker.
• In host file modification, the attacker sends malicious code as
an email attachment. When the user opens the attachment,
the malicious code executes and modifies the local host file
on the user’s computer. When the user enters a legitimate

24
URL in the browser, the compromised host file redirects the
user to the fraudulent website controlled by the attacker.
Social
networking
Many attackers are turning to applications such as Facebook, Twitter,
Instagram, to steal identities and information. Also, many attackers use social
media to scam users. These scams are designed to entice the user to click a
link that brings up a malicious site the attacker controls. Usually, the site
requests personal information and sensitive data, such as an email address or
credit card number.
#Lab 3.1.10 Identify Social Engineering (Emails)
3.2.2 Physical Security Facts
3.2.2 Physical Security Facts Physical security is the protection of corporate assets (including property, facilities,
equipment, and personnel) from damage, theft, or harm. Physical security inspections
should be performed quarterly. Violations should be addressed in a formal manner, with
warnings and penalties.
This lesson covers the following topics:
• Security factors
• Security aspects
• Physical controls
• Security sequence
• Layered defense
Security Factors There are three factors to keep in mind with physical security:
• Prevention is taking safeguards to protect property, facilities, equipment,
and personnel. The safeguards should deter an attack.
• Detection is identifying the extent of damage, theft, or harm.
• Recovery is the implementation of security procedures to minimize the
impact of an attack and repair any damage in order to get the organization
operational again. It also involves hardening the physical security of the
organization against future problems.
Security Aspects

25
Important aspects of physical security include:
• Restricting physical access to facilities and computer systems.
• Preventing interruptions of computer services caused by problems such as
loss of power or fire.
• Preventing unauthorized disclosure of information.
• Disposing of sensitive material.
• Protecting the interior and exterior of the facility.
Physical Controls The following table lists physical control measures and characteristics.
Control
Measure Characteristics
Perimeter
barriers
The first measure in physically securing a building is to secure the perimeter
and restrict access to only secure entry points. Methods for securing the
perimeter include:
• Fences to provide an environmental barrier that prevents
easy access to the facility.
o A low fence (3-4 feet) acts as a deterrent to
casual intrusion.
o A higher fence (6-7 feet) acts as a deterrent
unless the trespasser has a specific intent
to violate security.
o A fence 8 feet or higher topped with barbed
wire is an effective deterrent.
• Barricades and bollards can be erected to prevent vehicles
from approaching the facility.
• Signs should be posted to inform individuals that they are
entering a secured area.
• Guard dogs are generally highly reliable, but are appropriate
only for physical perimeter security. They can be expensive
to keep and maintain. Their use might raise issues of liability
and insurance.
• Lighting deters casual intruders, helps guards see intruders,
and is necessary for most cameras to monitor the area. To
be effective, lights should be placed to eliminate shadows or
dark spots.
• Security guards offer the best protection for perimeter
security because they can actively respond to a variety of
threat situations. Security guards can also reference
an access list, which explicitly lists who can enter a secure

26
facility. However, guards are expensive, require training, and
can be unreliable or inconsistent.
Closed-circuit
television
(CCTV)
Closed-circuit television can be used as both a preventative tool (when
monitoring live events) or as an investigative tool (when events are recorded
for later playback). Camera types include the following:
• A bullet camera has a built-in lens and is long and round in
shape. Most bullet cameras can be used indoors or
outdoors.
• A c-mount camera has interchangeable lenses and is
typically rectangular in shape with the lens on the end. Most
c-mount cameras require a special housing to be used
outdoors.
• A dome camera is a camera protected with a plastic or glass
dome. These cameras are more vandal-resistant than other
cameras.
• A pan tilt zoom (PTZ) camera can dynamically move the
camera and zoom in on specific areas. Cameras without PTZ
capabilities are manually set looking toward a specific
direction. Automatic PTZ mode automatically moves the
camera between several preset locations; manual PTZ lets
an operator remotely control the position of the camera.
When selecting cameras, be aware of the following characteristics:
• The focal length measures the magnification power of a lens.
The focal length controls the distance that the camera can
see, as well as how much detail can be seen at a specific
range.
o The focal length is expressed in millimeters (mm).
A higher focal length lets you see more detail at a
greater distance.
o Most cameras have a 4 mm lens with a range of
30-35 feet, allowing you to see facial features at
that distance.
o A fixed lens camera has a set focal length.
A varifocal camera lens lets you adjust the focus
(zoom).
• A 70-degree view angle is the largest view angle possible
without image distortion.
• The resolution is rated in the number of lines (such as 400)
included in the image. In general, the higher the resolution,
the sharper the image.

27
• LUX is a measure of the sensitivity to light. The lower the
number, the less light is necessary for a clear image.
• Infrared cameras can record images in little or no light.
Infrared cameras have a range of about 25 feet in no light
and further in dimly-lit areas.
When CCTV is used in a preventative way, you must have a guard or other
person available who monitors one or more cameras. The cameras
effectively expand the area that can be monitored by the guard. Cameras can
detect only security breaches. Guards can prevent and react to security
breaches.
Doors
Doors can enhance security if they are properly implemented. Specific door
types include the following:
• A mantrap is a specialized entrance with two doors that
create a security buffer zone between two areas.
o Once a person enters into the space between the
doors, both doors are locked.
o To enter the facility, authentication must be
provided. Authentication may include visual
identification and identification credentials.
o Mantraps should permit only a single person to
enter, and each person must provide
authentication.
o If authentication is not provided, the intruder is
kept in the mantrap until authorities arrive.
• A turnstile is a barrier that permits entry in only one
direction.
o Physical turnstiles are often used to control entry
for large events such as concerts and sporting
events.
o Optical turnstiles use sensors and alarms to
control entry.
o Turnstiles are often used to permit easy exit from
a secure area. Entry is controlled through a
mantrap or other system that requires
authentication for entry.
• A double-entry door has two doors that are locked from the
outside, but have crash bars on the inside that allow easy
exit. Double-entry doors are typically used only for
emergency exits. Alarms sound when double-entry doors
are opened.
Regular doors are susceptible to social engineering attacks such
as piggybacking, or tailgating, where an unauthorized person follows an

28
authorized person through a door. Mantraps and turnstiles that permit only
a single person to enter and require individual authentication are effective
deterrents to piggybacking.
Door locks
Door locks allow access only to people with the proper key. Lock types are
explained in the following list.
• Pick-resistant locks with restricted key duplication are the
most secure key lock. It is important to note that all
traditional key locks are vulnerable to lock picking
(shimming).
• Keypad locks require knowledge of a code and reduce the
threat of lost keys and cards. Keypads should be cleaned
frequently to remove indications of buttons used.
• Electronic systems often use key cards (or ID badges) instead
of keys to allow access.
o Dumb cards contain limited information.
o Smart cards have the ability to encrypt access
information. Smart cards can be contact or
contactless. Contactless smart cards use the 13.56
MHz frequency to communicate with proximity
readers.
o Proximity cards, also known as radio frequency
identification (RFID) cards, are a subset of smart
cards that use the 125 kHz frequency to
communicate with proximity readers. Proximity
cards differ from smart cards because they are
designed to communicate only the card's identity.
A smart card can communicate much more
information.
• Biometric locks increase security by using fingerprints or iris
scans. They reduce the threat of lost keys or cards.
Physical
access logs
Physical access logs are implemented by a facility's guards and require
everyone gaining access to the facility to sign in up on entry.
Physical
access
controls
Physical access controls can be implemented inside the facility in the
following ways.
• Physical controls may include key fobs, swipe cards, or
badges.
• Physical controls may include biometric factors such as
fingerprint scanners, retinal scanners, iris scanners, voice
recognition, and facial recognition.

29
o The false acceptance rate (FAR) refers to the
likelihood that an unauthorized user will
incorrectly be given access.
o The false recognition rate (FRR) refers to the
likelihood that an authorized user will incorrectly
be rejected and denied access.
o Both the FAR and FRR are influenced by the
biometric scanners threshold settings.
The crossover error rate (CER) is the rate at which
the FAR becomes equal to the FRR after adjusting
the threshold. The lower the CER, the better the
biometric system.
• To control access to sensitive areas within the facility,
require a card swipe or reader.
• Some systems can track personnel movement within a
facility and proactively lock or unlock doors based on each
person's access token device.
• An anti-passback system prevents a card holder from passing
a card back to someone else.
• Physical controls are often implemented along with sensors
and alarms to detect unauthorized access.
o Photoelectric sensors detect motion and are better
suited to detect a perimeter breach than interior
motion detection.
o Wave pattern, heat sensing, and ultrasonic
sensors are all better suited for interior motion
detection than perimeter breach detection.
Employee
and visitor
safety
As you implement physical security, be sure to keep the safety of employees
and visitors in mind. Consider the importance of the following actions:
• Implement adequate lighting in parking lots and around
employee entrances.
• Implement emergency lighting that runs on protected power
and automatically switches on when the main power goes
off.
• Implement fail-open locking systems that allow employees
to exit your facility quickly in the event of an emergency.
• Devise escape plans that utilize the best escape routes for
each area in your organization. Post these escape plans in
prominent locations.
• Conduct emergency drills to verify that the physical safety
and security measures you have implemented function
correctly.

30
Protected
distribution
system
A protected distribution system (PDS) encases network cabling within a carrier.
This enables data to be securely transferred directly between two high-
security areas through an area of lower security. Three types of PDS are most
frequently implemented:
• In a hardened carrier PDS, network cabling is run within
metal conduit. All conduit connections are permanently
welded or glued to prevent external access. To identify signs
of tampering, regular visual inspections of the carrier should
be conducted.
• In an alarmed carrier PDS, an electronic alarm system
replaces the welds and/or glue used to secure a hardened
carrier. The electronic alarm system can detect attempts to
compromise the carrier and access the protected cable
within it.
• In a continuously viewed carrier PDS, security guards
continuously monitor the carrier to detect any intrusion
attempt by attackers.
Security Sequence Physical security should deploy in the following sequence. If a step in the sequence fails,
the next step should implement itself automatically.
1. Deter initial access attempts.
2. Deny direct physical access.
3. Detect the intrusion.
4. Delay the violator to allow for response.
Layered Defense When designing physical security, implement a layered defense system. A layered defense
system is one in which controls are implemented at each layer to ensure that defeating one
level of security does not allow an attacker subsequent access. Using multiple types of
security controls within the same layer further enhances security. Tips for implementing a
multi-layered defense system include the following:
• Protect entry points with a card access system (or some other type of
control) as well as a security camera.
• Use a reception area to prevent the public, visitors, or contractors from
entering secure areas of the building without an escort.
• Use the card access or other system to block access to elevators and
stairwells. This will prevent someone who successfully tailgates from
gaining further access.

31
• Use a different access system such as key locks, keypad locks, or biometric
controls to secure offices or other sensitive areas.
• Implement security within offices and data centers using locking storage
areas and computer passwords.
3.2.4 Physical Security Attack Facts
3.2.4 Physical Security Attack Facts Planning, preparation, and prevention for physical security threats must be taken into
consideration to protect an organization's data and systems. The National Institute of
Standards and Technology (NIST) has a special publication, NIST SP 800-53, that details
security controls and assessment procedures to protect the integrity of information
systems.
This lesson covers the following topics:
• Environmental threats
• Threats to assets and property
• Facility breaches
• Physical attacks
Environmental Threats The following table describes some of the environmental threats an organization may
encounter.
Threat Description
Flood
Flooding can occur for a variety of reasons, including heavy rains,
overflowing rivers, broken dams, urban drainage basins, storm surges,
broken pipes, and lack of vegetation.
Fire
Fires are a common environmental threat. There are many controls
available that, if properly implemented, help reduce fire damage and
diminish their threat to physical security.
Hurricane and
tornado
Hurricanes and tornadoes are intense weather events that can be extremely
destructive. They often disrupt services, such as electricity and
communications networks, and prevent facility access.

32
Tsunami
Tsunamis are caused by underwater earthquakes, volcanic eruptions, or
other events that results in the displacement of large volumes of water.
Tsunami waves can be tens of feet high and cause an immense amount of
destruction.
Earthquake
Earthquakes result from the seismic shift of tectonic plates moving along
fault lines. Shaking ground, ruptured ground, and landslides can destroy
buildings, cause dams to collapse, and ignite ruptured gas lines.
Other natural
disasters
Other natural disasters include wind storms, electrical storms, blizzards, and
other types of extreme weather.
Threats to Assets and Property Threats to assets and property can be posed by those external to the organization as well
as insiders. The table below describes some of these threats.
Threat Description
Theft
Theft of an organization's assets can be very detrimental. For example if an
employee's laptop is stolen, it’s not only inconvenient for the employee but
also any plans, projects, and other sensitive data that might be on that laptop
could be leaked or used against the organization. The more important the
position of the employee within the organization, the more serious the theft is.
Vandalism
Vandalism is damaging, defacing, or destroying someone else's property.
Vandalism can be done by resentful employees or ex-employees; someone
with a political agenda or vendetta against the organization; or for other
reasons.
Destruction
Destruction is similar to vandalism, but it aims to completely destroy the
organization’s assets. This kind of malicious act could result in significant loss
for the organization.
Facility Breaches The following table describes a few techniques an attacker can use to gain access to a
facility.
Technique Description

33
Bump keys
A bump key is cut to the number nine position, which is the lowest possible
cut. When the bump key goes inside the lock, the hacker puts a little bit of
pressure on the back of the key by either bumping or tapping it. Doing this
makes the pins jump inside of the cylinder, creating a temporary shear line
that allows enough time for the intruder to quickly turn the lock.
Lock picking
Lock picking involves manipulating the lock’s components to open it without a
key. An attacker only needs a tension wrench and a pick. A tension wrench is a
small, L-shaped tool available in several thicknesses and sizes. A pick is a small,
angled, and pointed tool.
Scrubbing
One of the most common ways to pick a lock is called scrubbing. This method
involves holding the lock with the tension wrench while quickly scraping the
pins with the pick. Some of the pins are placed in a mechanical bind and
become stuck in the unlocked position. With practice, an attacker can do this
very easily. When all the pins stick, the lock is disengaged.
Lock shim Another technique uses lock shims. This tool is, basically, a thin, stiff piece of
metal that can be inserted into the latch of the padlock.
Badge
cloning
Many employee ID badges use an RFID chip to access their office and other
parts of their organization's building. However, this kind of chip can be easily
copied to another card. To do this, all an attacker needs is a high-frequency
antenna to capture a card's frequency, a card read/write device, a legitimate
card, and a blank card. The attacker gets close enough to the legitimate card to
read it. Once the card information is read, the attacker can easily clone it.
Physical Attacks The table below describes some physical attacks:
Attack Description
Cold boot
attack
In the cold boot attack, the attacker enters the facility and extracts data
remanence from RAM that might still be available before the system is
completely powered off.

34
BIOS
access
attack
BIOS attacks have been around for a long time but should not be overlooked.
This attack usually involves changing the boot order on a PC so that the hacker
can gain access to the computer by bypassing the installed operating system.
3.3.2 Countermeasures and Prevention Facts
3.3.2 Countermeasures and Prevention Facts Implementing and teaching strong security policies and procedures is a critical component
of security management. The most effective countermeasure for social engineering is
employee awareness training. Teach employees at all levels how to recognize social
engineering schemes and how to respond to them appropriately.
This lesson covers the following topics:
• Hiring and termination process
• Help desk
• Employee identification
• Physical prevention
• User awareness
• Paper shredding
• Backups
Hiring and Termination Process One of the most important policies any company should have in place is a hiring and
termination process for employees. The following table describes both processes.
Process Description
Hiring
The HR department should perform the following tasks:
• Check the background and contact the references of every
candidate who applies for a job with the company.
• Verify the candidate’s educational records.
• Have all employees sign a nondisclosure agreement (NDA).
• Have all employees sign acceptable use policies (AUPs).
Termination When an employee leaves the company, the HR department should be
responsible for:
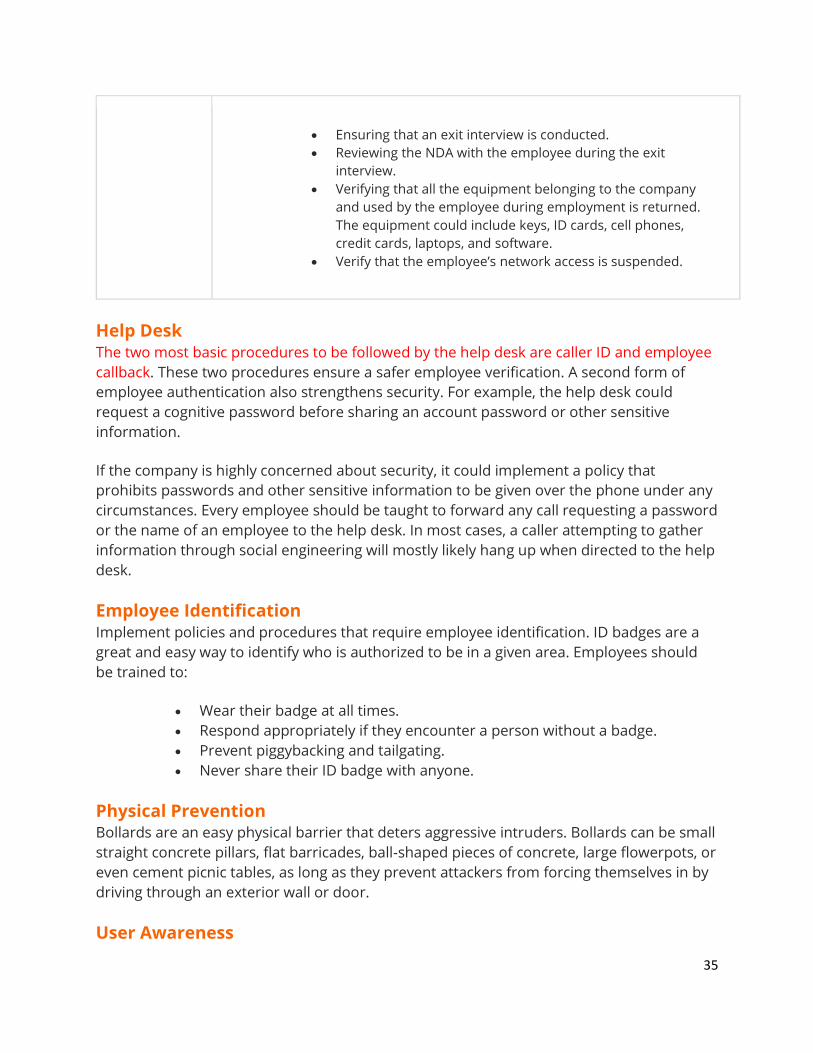
35
• Ensuring that an exit interview is conducted.
• Reviewing the NDA with the employee during the exit
interview.
• Verifying that all the equipment belonging to the company
and used by the employee during employment is returned.
The equipment could include keys, ID cards, cell phones,
credit cards, laptops, and software.
• Verify that the employee’s network access is suspended.
Help Desk The two most basic procedures to be followed by the help desk are caller ID and employee
callback. These two procedures ensure a safer employee verification. A second form of
employee authentication also strengthens security. For example, the help desk could
request a cognitive password before sharing an account password or other sensitive
information.
If the company is highly concerned about security, it could implement a policy that
prohibits passwords and other sensitive information to be given over the phone under any
circumstances. Every employee should be taught to forward any call requesting a password
or the name of an employee to the help desk. In most cases, a caller attempting to gather
information through social engineering will mostly likely hang up when directed to the help
desk.
Employee Identification Implement policies and procedures that require employee identification. ID badges are a
great and easy way to identify who is authorized to be in a given area. Employees should
be trained to:
• Wear their badge at all times.
• Respond appropriately if they encounter a person without a badge.
• Prevent piggybacking and tailgating.
• Never share their ID badge with anyone.
Physical Prevention Bollards are an easy physical barrier that deters aggressive intruders. Bollards can be small
straight concrete pillars, flat barricades, ball-shaped pieces of concrete, large flowerpots, or
even cement picnic tables, as long as they prevent attackers from forcing themselves in by
driving through an exterior wall or door.
User Awareness

36
The table below describes different areas in which employees should be trained.
Area Description
Phishing
Many browsers have phishing detection software. Require employees to enable
the phishing detection feature and restrict employees from using browsers
without that feature. Train employees to:
• Check the link destination within emails to verify that it points
to the correct URL.
• Never click on links in emails.
• Use the different types of HTTPS appropriately:
o Sites secured with a regular certificate will display a
lock in the address bar of most browsers. This
means that the connection is encrypted using HTTPS.
However, it doesn't necessarily mean the identity of
the person running the site is verified.
o Sites that display either a green lock or green bar in
the address bar indicate that the site is secure and
the identity of the site has been verified.
Guests
Ensure that any guest who visits the facility is escorted. This will help prevent
attackers from trying to gather information from within the facility. Also,
implement a policy that prohibits guests from connecting to the organization’s
wired or wireless network.
Passwords
Password protection is a vital part of securing a network. Teach users to:
• Never write down or share passwords under any
circumstances. It's not uncommon for users to write down their
passwords. Sometimes, they write their passwords on a sticky
note and attach it to the monitor, hide their password under
the keyboard, or put the password inside a desk drawer. Strong
passwords can be very difficult to remember, which tempts the
user to write the password down to remember it. This practice
should be prohibited.
• Never store passwords in cell phones. Phones are easily lost or
stolen, potentially exposing the passwords.
• Never give out passwords to anyone. Many social engineering
attacks attempt to leverage sympathy, bullying, or coercion to
get the user to reveal a password. Train users not to give their
passwords to anyone, even if that person claims to be the CEO
or a help desk administrator.

37
• Never email passwords. Most email systems are relatively
secure as they transmit email messages, but not all of them
are. If an email system uses clear text, such as POP3, IMAP, or
SMTP, without also using encrypting protocols, incoming and
outgoing messages are transmitted in clear text. An attacker
running a sniffer could capture email messages and read the
contents.
• Never use personally associated passwords. For convenience,
users tend to set passwords that contain personally associated
information, such as their name, birthday, spouse's name,
child's name, pet's name, anniversary date, and hometown.
This is an unsecure practice. A simple social media search can
reveal a great deal of personal information about a user,
making it possible to guess a password. In fact, many attackers
prefer this approach to a technological password attack
because it is easier and faster and has a very high success rate.
Paper Shredding Procure shredders that discourage or make it impossible to reassembled shredded
documents. It’s important to teach employees to safely shred all sensitive information
before disposal. This is one of the best ways to prevent information from being leaked
through a physical copy. There are two basic types of shredders, strip-cut and crosscut. The
table below describes each type in more detail.
Type Description
Strip-cut
Strip-cut shredders cut paper into long, thin strips. They usually handle a larger
volume of paper than the crosscut shredders, and they’re also lower
maintenance. They usually shred paper into 1/8 to 1/2 inch thick strips. The
downside of this type shredder is that dumpster divers can put the strips back
together and reassemble documents.
Crosscut
Crosscut shredders are more secure because they cut the paper both vertically
and horizontally, turning the paper into confetti. This makes it a lot more difficult
for dumpster divers to reassemble the document.
Backups Most organizations back up data once a day, usually at night. A backup can be full,
incremental, or differential. The table below describes each type of backup.

38
Backup
Type Description
Full backup
A full backup is exactly what it sounds like; it backs up everything. All data on
the system is backed up each time the backup runs. It's the most complete
backup you can choose. Most organizations run full backups at least weekly.
Incremental
backup
An incremental backup backs up every file that's changed since the last full or
incremental backup. This goes a lot faster than a full backup, allowing you to
back up files daily. Incremental backups have one drawback: restoring data
from incremental backups takes a long time. The first thing you must do is
restore the first full backup. Then you have to restore every incremental
backup in the order they were created. This could take hours.
Differential
backup
A differential backup backs every file that's changed since the last full
backup. This has advantages and disadvantages. The advantage is that when
a system crashes, data can be restored quickly. Only the last full backup and
the last differential backup are restored. The disadvantage is that, by the end
of the work week, the differential backup may contain a week's worth of data
instead of a day's worth.
Lab 3.3.3 Implement Physical Security Countermeasures

39
4. Reconnaissance 4.1 Reconnaissance Overview
4.1.2 Reconnaissance Process Facts Reconnaissance is a systematic attempt to locate, gather, identify, and record information
about a target.
This lesson covers the following topics:
• Information types
• Information gathering techniques
• Permission and documentation
Information Types

40
During the reconnaissance phase, you gather information about a company. In addition to
technical information, you’ll want to gather details about employees, vendors, business
processes, and physical security.
Information Description
Employees Contact names, phone numbers, email addresses, fax numbers,
addresses for any individuals associated with the target company
Physical security Geographical information, entry control systems, employee routines, and
vendor traffic
Vendors Names, contact information, and account numbers
Operations Intellectual property, critical business functions, and management
hierarchy
Information
systems Operating systems, applications, security policies, and network mapping
Information Gathering Techniques During the reconnaissance phase, you gather information by reading a company’s website,
getting to know their employees, or dumpster diving.
Method Description
Websites
You can research company websites, social media, discussion groups,
financial reports, and news articles. If you follow the breadcrumbs, you can
find some pretty interesting things about an organization online.
Social
engineering
Social engineering is an attempt to get to know the employees or the vendors
of the company. After-work social gatherings can provide important tidbits of
information about an employee and about a company, especially its
weaknesses.
Dumpster
diving Despite our highly technical society, dumpster diving is still an option to
consider. Let’s be honest; it’s not the most glamorous method. But, in some

41
instances, it may be very effective for finding employee names, account
numbers, client names, and vendor information.
Social
networking
After you’ve located employee names, you can extend your search to
LinkedIn, Facebook, Instagram, Twitter or People Search to learn even more
information about a company, a vendor, or an employee.
Permission and Documentation The difference between an ethical hacker and a criminal hacker is that the ethical hacker
always obtains permission. Before beginning work of any kind, an ethical hacker needs to
obtain written documentation granting permission from the customer. They should verify
that the agreement specifies the scope of the assessment and any guidelines or limitations
that may be in place.
As with any technical project, you will need to thoroughly document your findings.
Recording information while it’s fresh in your mind reduces the potential for errors or
missing details.
4.1.3 Reconnaissance Tools Facts
4.1.3 Reconnaissance Tool Facts There are several reconnaissance tools that you can use to gather information.
This lesson covers the following topics:
• Internet research tools
• Google hacking
• Network Footprinting tools
Internet Research Tools The following table identifies several internet research tools:
Tool Description
Earth
Google Earth is a satellite imagery tool that provides current and historical
images of most locations. Images can date back over several decades.

42
Maps
Google Maps is a web mapping service that provides a street view of houses,
businesses, roadways, and topologies.
Webcams Webcams are online streaming digital cameras that can provide video of places,
people, and activity in an area.
Echosec
Echosec is a tool that can be used to pull information from social media
postings that were made using location services. You can select a location on a
map and view all posts that have occurred at that location. These results can
be filtered by user, date, or keyword.
Maltego
Maltego is an open-source forensics tool that can be used to pull information
from social media postings and find relationships between companies, people,
email addresses, and other information.
Wayback
Machine
The Wayback Machine is a nonprofit catalog of old site snapshots. It may
contain information that your target thought they had removed from the
internet.
Google Hacking Despite its name, Google Hacking is legal because all of the results are pulled from public
websites. By adding a few operators, you can use the Google search engine to provide
filtered information about a specific topic as shown below:
Operator/Syntax Description
info:website Provides all information about a website.
link:website Lists web pages that contain links to websites.
related:website Displays websites similar to the one listed.
index of /keyword Displays websites where directory browsing has been enabled.
intitle:keyword Shows results in pages that contain the keyword in the title.

43
allinurl:keywords Shows results in pages that contain all of the listed keywords.
Network Footprinting Tools Although similar to reconnaissance, footprinting refers more specifically to information
that is accidentally shared publicly or that is outdated and has not been properly disposed
of. Website and email footprinting can provide details on information flow, operating
systems, filenames, and network connections.
Depending on the level of security within an organization, it is possible to create a network
map without stepping foot into the building. Just as a mailman can find a mailbox using a
mailing address, a hacker can find hosts and other objects on a network using DNS
network addressing. An IP address can direct you to a network access point such as an
email server or a web server.
The following table lists several network footprinting tools.
Tool Description
Whois
Whois is a utility used to gain information about a target network. It can gather
information about ownership, IP addresses, domain name, location, server type,
and the date the site was created. The syntax is Whois domain_name.
Nslookup Nslookup is a utility used to query DNS servers to obtain information about the
host network, including DNS records and host names.
ARIN ARIN is a website that will provide you with information about a network’s name,
range, origination dates, and server details.
#Lab 4.1.7 Perform Reconnaissance Nmap
In this lab, your task is to perform reconnaissance on www.corpnet.xyz and to find potentially
vulnerable ports on the servers in the CorpNet networks as follows:
• On Consult-Lap, use the Whois.org site to determine the domain name servers used by
www.corpnet.xyz.
• On Consult-Lap, use nslookup to determine the primary web server address.
• On Consult-Lap2, use Zenmap to perform an nmap search for open ports for the
198.28.1.0/24 network.
• Answer the questions.

44
Complete this lab as follows:
1. Find the name servers used by www.corpnet.xyz as follows:
a. From the taskbar, open Chrome.
b. In the URL field, type whois.org and press Enter.
c. In the Search for a domain name filed, enter www.corpnet.xyz.
d. Select Search.
e. In the top right, select Answer Questions.
f. Answer question 1.
2. Find the IP address used by www.corpnet.xyz as follows:
a. Right-click Start and select Windows PowerShell (Admin).
b. At the prompt, type nslookup www.corpnet.xyz ns1.nethost.net and
press Enter.
c. Answer question 2.
d. Minimize the question dialog.
3. Use Zenmap to run an nmap command to scan for open ports as follows:
a. From the navigation tabs, select Buildings.
b. Under Red Cell, select Consult-Lap2.
c. From the Favorites bar, open Zenmap.
d. Maximize Zenmap for easier viewing.
e. In the Command field type nmap -p- 198.28.1.0/24.
f. Select Scan to scan for open ports on all servers located on this network.
g. In the top right, select Answer Questions.
h. Answer question 3.
i. Select Score Lab.

45
4.2 Reconnaissance Countermeasures
#Lab 4.2.3 Disable Windows Services
In this lab, your task is to run a scan on the network with Zenmap to ensure that there are no traces
of any remote software running on the network. Run the scan as follows:
• Scan the network for services running on port 3389, match the IP address to the
computer name in the table, then disable and stop the Remote Desktop
Services service on that computer.
• Scan the network for services running on port 5938, match the IP address to the
computer name in the table, then disable and stop the TeamViewer service on that
computer.
IP Address Computer Name
192.168.0.30 Exec

46
192.168.0.31 ITAdmin
192.168.0.32 Gst-Lap
192.168.0.33 Office1
192.168.0.34 Office2
192.168.0.45 Support
192.168.0.46 IT-Laptop
Complete this lab as follows:
1. From the Favorites bar, open Zenmap.
2. In the Command field, type nmap -p 3389 192.168.0.0/24.
3. Select Scan to scan the subnet for a given service.
4. Using the table in the scenario, identify the computer with the open port using the IP
address.
5. From the top navigation tabs, select Floor 1 Overview.
6. Select the identified computer to enter its OS view.
7. In the search field on the taskbar, type Services.
8. Under Best match, select Services.
9. Maximize the window for easier viewing.
10. Double-click the service that needs to be stopped to open the Properties dialogue.
11. From the Startup type drop-down list, select Disabled.
12. Under Service status, select Stop.
13. Select OK.
14. From the top navigation tabs, select Floor 1 Overview.
15. Under IT Administration, select IT-Laptop.
16. In Zenmap's Command Field, enter nmap -p 5938 192.168.0.0/24.
17. Repeat steps 3–13.
#Lab 4.2.5 Manage Linux Services
In this lab, your task is to:
• Use the systemctl command to start bluetooth.service.
• Use the systemctl command to stop bluetooth.service.
• Use the systemctl command to restart bluetooth.service.
Complete this lab as follows:

47
1. At the prompt, type systemctl start bluetooth.service and press Enter to start
bluetooth.service.
2. Type systemctl stop bluetooth.service and press Enter to stop bluetooth.service.
3. Type systemctl restart bluetooth.service and press Enter to restart bluetooth.service.
#Lab 4.2.6 Enable and Disable Linux Services
In this lab, your task is to:
• Use the systemctl command to enable anaconda.service.
• Use the systemctl command to disable vmtoolsd.service.
• After each command, check the service status with the systemctl is-enabled command.
Complete this lab as follows:
1. At the prompt, type systemctl enable anaconda.service and press Enter to enable
anaconda.service.
2. Type systemctl is-enabled anaconda.service and press Enter to check the service
status.
3. Type systemctl disable vmtoolsd.service and press Enter to disable vmtoolsd.service.
4. Type systemctl is-enabled vmtoolsd.service and press Enter to check the service
status.
4.2.7 Reconnaissance Countermeasures Facts This lesson covers the following topics:
• Information sharing policies
• DNS countermeasures
Information Sharing Policies
Policy Description
Internet Review company websites to see what type of information is being shared
about sensitive information. Opt out of archiving sites.
Company
social media
Provide guidelines regarding the types of posts that are made to the
company's social media site.
Employee
social media Implement policies that restrict the sharing of sensitive company information
on an employee’s personal social media page. This could include product

48
information, customer or vendor information, employee information, or even
pictures of the organization.
Printed
materials
Limit the sharing of critical information in press releases, annual reports,
product catalogs, or marketing materials.
DNS Countermeasures DNS is one of the most popular internet services targeted during the reconnaissance
phase. It goes without saying that we should harden our servers. Failure to do so could
result in far bigger problems than just providing too much information to the outside
world.
Even the strongest security features are only as good as their implementation, so you’ll
want to be sure to learn as much as you can about your web server software and verify
that you’re optimizing your resources to their full potential. After you’ve set everything up,
your work is far from over. Hackers are always working to find new ways to access your
system, and you’ll want to work just as hard to keep your DNS servers up to date. This
means installing patches against known vulnerabilities, cleaning up out-of-date zones, files,
users, and groups, and, of course, running your own vulnerability tests.
You may also want to consider a split DNS. With the increase in the number of remote
access and cloud-based applications, this solution is becoming more common. Using this
method, clients accessing the DNS server from the internet receive public IP addresses, and
clients inside the company’s network receive internal IP addresses. Clients with the internal
IP addresses can be granted access to more secure content than the clients with the
external IP addresses.
#Lab 4.2.9 Hide the IIS Banner Broadcast In this lab, your task is to configure the IIS web server to stop broadcasting banners by removing
HTTP response headers from the CorpNet.xyz website.
Complete this lab as follows:
1. In Server Manager, select Tools > Internet Information Services (IIS) Manager.
2. In the left pane, expand CorpWeb(CorpNet.xyz\Administrator) Home.
3. Expand Sites.
4. Select CorpNet.xyz.
5. Double-click HTTP Response Headers.
6. Select a response header.
7. Under Actions, select Remove.
8. Click Yes to confirm.
9. Repeat steps 6–8 for each response header.

49
5. Scanning 5.1 Scanning Overview
5.1.2 Scanning Process Facts
Scanning is the process of actively connecting to a system to get a response and gather
information. Through scanning, you can determine live hosts, open ports, operating
systems in use, running services or processes, implemented patches, and firewalls.
This lesson covers the following topics:
• Network scans
• TCP scans
• Port scans
• Operating system fingerprinting
Network Scans
Scan
Type Description

50
Wardialing
Using a modem, the scan dials a large block of phone numbers and attempts to
locate other systems connected to a modem. If the modem gets a response, it
can establish a connection. Modems are still often used for fax machines and
multi-purpose copiers and as a backup for high-speed internet.
ping
ping works by sending an ICMP message from one system to another. Based on
the ICMP reply, you know whether the system is live and how quickly the
packets travel from one host to another.
ping
sweep
A ping sweep scans a range of IPs to look for live systems. ping sweeps help to
build a network inventory. However, they can also alert the security system,
potentially resulting in an alarm being triggered or the attempt being blocked.
TCP Flags TCP is a connection-oriented protocol that uses a three-way handshake to establish a
connection with a system port. When examining a TCP packet, you’ll notice the flag
indicators. Two of these indicators are SYN and ACK. SYN starts a connection between two
systems. ACK acknowledges that a packet has been received. There are other flag options
as well. Any of these indicators can be turned on or off using a packet crafter.
The three-way handshake occurs when you’re trying to use TCP to connect to a port. As
indicated by the name, the handshake has three steps:
1. Computer 1 sends a SYN packet to Computer 2.
2. Computer 2 receives the packet and sends a SYN/ACK packet to Computer
1.
3. Computer 1 receives the SYN/ACK packet and replies with an ACK packet,
and the connection is complete.
The following table describes TCP flags.
Flag Description
SYN Starts a connection between hosts.
ACK Acknowledges the receipt of a packet.
FIN Indicates that no additional information will be sent.

51
RST Resets a connection.
URG Flags a packet as urgent.
PSH Directs the sending system to send buffered data.
Port Scans After you’ve found a live system, you’ll need to find a way in. To do this, you’ll perform a
port scan.
Scan Description Command
Full
open
scan
The full open scan completes a full three-way handshake on all
ports. Open ports respond with a SYN/ACK, and closed ports
respond with an RST flag, ending the attempt. The down side of
this type of scan and the reason that it’s not frequently used is
that somebody now knows you were there.
nmap –sT IP
address
Half-
open
scan
A half-open scan, also known as a stealth scan, sends an SYN
packet to a port. The three-way handshake does not occur
because the originating system does not reply with the final
ACK. At this point, you have discovered an open port. Because
an ACK packet was not sent, a connection was not made, and
there is no security log.
nmap –sS IP
address
Xmas
tree
scan
An Xmas tree scan gets its name because all of the flags are
turned on, and the packet is lit up like a Christmas tree. The
recipient has no idea what to do with this packet, so either the
packet is ignored or dropped. If you get an RST packet, you
know the port is closed. If you don’t get a response, the port
may be open.
nmap –sX –
v IP address
FIN
scan
The packet is sent with the FIN flag set. This allows the packet to
pass through firewalls and onto the intended target without
attracting much attention. If a port is open, there will be no
response. If the port is closed, an RST response is returned.
nmap –sF IP
address

52
NULL
scan
The packet is sent with no flags set. If the port is open, there is
no response. If the ports are closed, an RST response is
returned.
nmap –sN IP
address
Idle
scan
The hacker finds a target machine, but wants to avoid getting
caught, so, he finds another system to take the blame. The
blamed system is called a zombie machine because it’s
disposable and creates a good distraction. The scan directs all
requests through the zombie machine. If that zombie machine
is flagged, the hacker simply creates another zombie machine
and continues to scan.
Operating System Fingerprinting You may be able to figure out which operating system a target is running by reviewing
packet information. Fingerprinting relies on small differences in packets created by various
operating systems. You can find differences by examining the TTL values, TCP window size,
DHCP requests, ICMP requests, HTTP packets, and open port patterns.
5.1.3 Scanning Tools Facts
This lesson covers the following topics:
• Scanning tools
• Network mapping tools
Scanning Tools The following tools can be used during the scanning phase of your investigation.
Tool Description
CurrPorts
CurrPorts lists all open UDP and TCP/IP ports on your computer. It also
provides information about the process that opened the port, the user who
created the process, and what time the port was created.
ping ping uses Internet Control Message Protocol (ICMP) messaging to determine
whether a remote system is live.

53
hping3
hping3 sends packets across a network and can also create custom packets
that can analyze the host. In addition to the normal ICMP pings, hping3
supports TCP and UDP, has a traceroute mode, and can send and receive
files. This tool was primarily designed for the Linux operating system, but
does have cross-platform capabilities.
Colasoft Colasoft is a packet crafting software that can modify flags and adjust other
packet content.
Angry IP
Scanner
Angry IP Scanner is a network scanner. It scans local and remote networks
and returns an IP range via a command-line interface.
SolarWinds
Port Scanner
SolarWinds Port Scanner is a command line tool that provides a list of open,
closed, or filtered ports.
IP-Tools
IP-Tools has 20 scanning utilities, including SNMP Scanner, UDP Scanner,
Trace, Finger, Telnet, IP-Monitor, and Trap Watcher. The program supports
multitasking so that you can use all utilities at once. IP-Tools is designed to
work on a Windows system.
Network Mapping Tools The following tools can be used for mapping network resources. Many are marketed as a
system inventory tool for use inside of an organization, but, as with most tools, can serve
multiple purposes depending on the user's intentions.
Tool Description
NetAuditor NetAuditor reports, manages, and diagrams network configurations.
SolarWinds
Network Topology
Manager
SolarWinds Network Topology Manager provides automated network
discovery and mapping.
Scany
Scany is a scanner application for iOS devices. It scans networks,
websites, and ports to find open network devices. It can obtain domain
and network names and includes basic networking utilities such as ping,
traceroute, and Whois.

54
Lab# 5.1.5 Perform an Internal Scan In this lab, your task is to perform a port scan using nmap in Terminal.
Complete this lab as follows:
1. From the Favorites bar, open Terminal.
2. At the prompt, type nmap -p- 192.168.0.45.
3. Press Enter.
Lab# 5.1.6 Perform an External Scan Using Zenmap In this lab, your task is to:
• Perform a Zenmap scan using the following information:
o Network address: 73.44.216.0
o Subnet mask: Class C
• Answer the questions.
Complete the following:
1. From the Favorites bar, open Zenmap.
2. At the prompt, type nmap 73.44.216.0/24.
3. Select Scan.
4. Find the network vulnerabilities in the output.
5.1.9 Scanning Considerations Facts
This lesson covers the following topics:
• Scanning considerations
• Evasion
• Vulnerability scans
• Preventing banner grabbing
Scanning Considerations You want to be strategic when you select which scanning tools and methods to use.
Carefully consider the strengths and weaknesses of each scan type. Selecting the wrong
method not only takes up valuable time, but it also increases the chances that you will get
caught.
Consider the time of day that you'll be doing your scans. Do you want to scan when there's
a lot of network traffic in hopes that you'll blend in with the crowd? Or do you want to
attempt to access the system in the middle of the night, or on the weekends when no one's

55
around? There isn't necessarily a right or wrong answer to these questions, and your
decisions could vary from one company to another depending on their operations.
Evasion Even the stealthiest of ethical hackers are going to come across a few obstacles. After all,
firewalls and security measures are typically in place to keep people like you out of the
network. So, what can you do when you find that your scanning attempts are being
blocked? A few options include scanning with ACK, fragmenting packets, spoofing IP
addresses, and using a proxy.
Method Description
Scan with
ACK
This scan will help you determine whether the firewall is stateful or stateless
and whether the ports are open. In an ACK scan, only the ACK flag is set. If a
port is unfiltered, both open and closed ports return an RST packet. If a port is
filtered, it either returns an error message or no response at all.
Fragment
packets
Fragmenting is probably one of the most used methods to avoid detection.
You're still sending packets; you're just breaking them apart so intrusion
detection systems don't know what they are. If you're not bombarding the
system, the packet segments float by without concern.
Spoof IP
addresses
Many scanning tools have the functionality to recraft the packet so that the
source address reflects a different IP address. The scan is sent to the recipient,
the feedback is returned to the fake IP address, and there is no record of your
IP address sending the requests.
Use a proxy
A proxy serves as a less vulnerable access point to a network. Typically, proxies
are placed in networks to keep external users from accessing the internal
network. Hackers like proxies because they filter incoming and outgoing
traffic, provide you with anonymity, and shield you from possible detection.
Vulnerability Scans All organizations should perform regular vulnerability scans. Various tools have been
designed to scan ports, banners, coding, and other high-target areas within a network for
vulnerabilities. Like virus scanners and malware detectors, though, a vulnerability scan is
only as good as its data. If a vulnerability is not included in the current database of issues
that are being scanned for, an "all clear" result could be misleading. In addition to keeping
your scanning tools up to date, you will want to use a variety of tools to be sure you're
covering as much ground as possible. Also, keep in mind that if these tools are available to

56
the companies you're working for, they are also available for hackers. Remind your clients
that even if they aren't running these scans on a regular basis, someone else may be.
The following are a few of the vulnerability scanning tools available:
Tool Description
Nessus
Nessus is often considered the industry standard for vulnerability scanning. The
software helps to identify software flaws, malware, missing or outdated
patches, and configuration errors across a network.
OpenVAS OpenVAS provides authentication testing, protocol testing, and performance
tuning for large-scale networks.
Beyond
Trust
Beyond Trust provides a network security scanner that helps to identify
vulnerabilities and prioritize solutions. This software is available as a standalone
application or part of their larger vulnerability management solution.
InsightVM Saint provides enterprise level vulnerability management tools.
Preventing Banner Grabbing A few banner grabbing prevention options are available. One option is to disable the
banners, or at least portions of the banner. Several utilities help to change or even remove
the banner contents. Second, they'll want to hide file extensions. File extensions tell
everyone what software is being used to create a web page. Hiding the file extension gives
one less bit of information to an intruder. A third option to banner grabbing prevention is
to enable custom error pages. This way, you have full control over what scanners can and
cannot see when they trigger an error message.
5.2 Banner Grabbing

57
5.2.2 Banner Grabbing Facts
5.2.2 Banner Grabbing Facts Banner grabbing is another common method for obtaining information about a system.
You can grab a banner by connecting to a host, sending a request to a port, or analyzing
network traffic. The targeted system returns a snippet of information, including
information about its operating system and the services that are running on it. Banner
grabbing tools include the following:
Tool Description
Telnet
Telnet is many hackers' tool of choice for banner grabbing. It operates on port 23.
If you type telnet ip_address at a command prompt, you’ll send TCP packets to the
destination port 23.
However, by tacking a port number on to the end of the same command, you can
check for other openings. If the port you specify is open, you’ll receive a banner
response for that port. These banners can include some interesting information
about the target system, including software type, software version, services,
patches, and the last modification date.
Netcraft Netcraft is an online tool that is used to obtain server and web server information.
P0f
P0F is a Linux tool that analyzes network traffic and returns information on
operating systems. Because it is passively viewing traffic, it is a stealthy method for
gathering information.
nmap
nmap is another tool for banner grabbing. nmap connects to an open TCP port
and returns anything sent in a five second period. The command syntax is nmap –
sV –script=banner ip_address. The -sV option probes open ports to determine
service/version info.

58
6. Enumeration 6.1 Enumeration Overview
6.1.5 Enumeration Facts
The word enumerate means to list items one by one. During the enumeration phase of
ethical hacking, you will extract and record as much information as you can about a
network or system.
This lesson covers the following topics:
• Enumeration processes
• Windows enumeration
• Linux enumeration
• Enumeration tools

59
Enumeration Processes Now that you have been able to establish active connections, you can gather information
about usernames, group names, machine names, routing tables, network shares,
applications, and more. Unlike the more passive phases of reconnaissance and scanning,
we are moving into a more active approach to information gathering. The odds of getting
caught are even higher now. You'll want every action to be strategic and precise.
It's also important to note that although you're still only gathering information, you're at
the point where your actions could be considered illegal. Make sure your permission
documentation is in order.
Process Description
Extract email
IDs An email address contains two parts, the username, and the domain name.
Use default
passwords
All devices have default passwords. These passwords are often left in place,
providing an easy access point for an attacker.
Attack
directory
services
A directory service is a database of information that is used for network
administration. Some directories are vulnerable to input verification
deficiencies. Because of this, they are susceptible to brute force attacks.
These attacks are usually automated. The program tries different
combinations of usernames and passwords until it finds something that
works.
Exploit SNMP
The Simple Network Management Protocol (SNMP) is used to manage
devices such as routers, hubs, and switches. SNMP works with an SNMP
agent and an SNMP management station. The agent is found on the device
that is being managed, and the SNMP management station serves as the
communication point for the agent.
SNMP has two configuration passwords by default, one for public access, and
one for private access. The public community string includes the
configuration of the device or system. The private read/write community
string provides read and write access to the device configuration. If the
passwords were not changed from the default, a hacker will have access to
these strings and therefore have access to usernames, information about
network devices, routing tables, network traffic, and file shares.
Exploit SMTP Simple Mail Transfer Protocol (SMTP) is the protocol used by most email
servers and clients to send email messages. Scanning tools and commands

60
can be used to verify the existence of specific email addresses. They can
even provide a list of all users on a distribution list.
Perform DNS
zone
transfers
DNS zone transfer is the process of transferring a copy of the DNS zone file
from the primary DNS server to a secondary DNS server. Zone transfers are
designed to provide updated network and access information to DNS
servers. This type of structural data could be valuable to a hacker. It could be
used to provide a mapping of the network.
To perform a DNS zone transfer, the hacker, pretending to be a client, sends
a zone transfer request to the DNS server. The DNS server then sends a
portion of its database as a zone to the hacker. This zone may contain a lot
of information about the DNS zone network.
Retrieve
system
policies
Large networks, especially enterprise environments, frequently have policy
settings in place to determine how security matters are handled. If you're
able to gain access to these settings, you will know more about your target.
The technique will vary depending on the operating system that you are
targeting.
Enumerate
IPsec
IPsec uses ESP (Encapsulation Security Payload), AH (Authentication Header),
and IKE (Internet Key Exchange) to secure communication between virtual
private network (VPN) endpoints. Using enumeration tools, hackers can pull
sensitive information such as the encryption and hashing algorithm,
authentication type, and key distribution algorithm.
Enumerate
VoIP
VoIP uses SIP (Session Initiation Protocol) to enable voice and video calls over
an IP network. SIP service generally uses UDP/TCP ports 2000, 2001, 5060,
5061.
Enumerate
RPC
Remote Procedure Call (RPC) allows client and server to communicate in
distributed client/server programs. Enumerating RPC endpoints enable
hackers to identify any vulnerable services on these service ports. You can
use the following nmap scan commands to identify RPC services running on
the network:
• nmap -sR IP/network
• map -T4 –A IP/network
Windows Enumeration In Windows, a user account is an object that contains information about a user, the user
access level, groups the user is a member of, and user access privileges. The default
Windows installation includes two primary user accounts, the administrator and the guest.

61
There are also a few other built-in accounts that are designed to run background processes
as needed. These include local service, network service, and system.
User Description
Guest
The guest account has been part of Windows for quite some time. By design,
this account has remained pretty much the same and is meant to be used
only in very limited circumstances. Although included in the Windows
installation, it is not enabled by default.
Administrator
The administrator account has gone through quite a few changes as the
operating system has evolved. In earlier versions of Windows, the
administrator account was enabled by default. However, in more recent
releases, Windows Vista and beyond, the administrator account has been
disabled by default. This change was made primarily for security purposes.
The administrator account was often used as a normal user account and, as
a result, the everyday user had unlimited access to permissions that the user
didn't necessarily know what to do with. If malware or other applications
were running in the background, those programs also had access to those
unlimited permissions. As you can imagine, that doesn't end well.
Current versions of Windows require user accounts to be created. Although
you can enable administrator privileges to the account, additional
permission needs to be granted when elevated administrator privileges are
needed. This way, the user cannot unintentionally allow an unwanted
application or process to run in the background.
Local service This account provides high-level access to the local machine, but only limited
access to the network.
Network
service
This account provides normal access to the network, but provides only
limited access to the local machine.
System This account provides almost unlimited access to the local machine.
Windows provides an efficient way of managing user control access. Users can be assigned
to groups and permissions can be assigned to these groups. You can create your own
groups based on departments, locations, or other methods. Microsoft also includes a few
preconfigured user groups. These groups can be used as-is or modified to suit your needs.
Group Description

62
Anonymous
logon
This group provides anonymous access to resources, typically on a web
server or web application.
Batch This group is used to run scheduled batch tasks.
Creator group
A Windows 2000-specific group, the Creator group is used to grant
permissions to users who are members of the same group as the creator of
a directory or file.
Creator owner
The file or directory creator is a member of this group. By default, all
releases after Windows 2000 use this group to grant permissions to the
creator of the file or directory.
Everyone All users are members of this group. It is used to provide wide-range access
to resources.
Network All users that access a system through a network are members of this
group. It provides all remote users access to a specific resource.
Although we typically think of the username as being the unique identifier, behind the
scenes, Windows relies on a security identifier (SID). When a user object is created,
Windows assigns it an SID. And, unlike a username, that ID cannot be used again. Why is
this necessary? Consider how many times a username could undergo a change. If
permissions were tied to a specific name, a new account would have to be created every
time. However, since Windows is looking at the SID, you simply adjust the username and
maintain the same SID.
SID identifiers can help you know more about the account. For example, if you find an
account ending in 500, then you've found the built-in administrator account. If you find an
account ending in 501, you've found the built-in guest account. The Windows Security
Accounts Manager (SAM) is a part of the system registry and stores all usernames and
passwords. The passwords are not saved in plain text, of course, but are encrypted in LM
and NTLM hash formats. For larger networks, Microsoft's Active Directory manages this
data.
Linux Enumeration A user account is needed to access a Linux system. When a user account is created, the
values are stored in the etc/passwd file. This file is accessible with a text editor.

63
Value Description
Username
A username and user ID (UID) are used to identify users. When a username is
created, it is given a UID. This number is selected from a range of numbers,
typically above 500.
Password Each account has a password that is encrypted and saved on the computer or
on the network.
Groups
Groups are used to manage permissions and rights. Group identification
numbers (GIDs) are stored in the /etc/passwd file. All users are assigned to the
default primary group and can be assigned to additional groups that are called
secondary groups. Secondary groups are listed in the /etc/group file.
Enumeration Tools The following table lists enumeration tools.
Tool Description
finger
The Linux finger command provides information about a user. Use finger –
s username to obtain the specified user's login name, real name, terminal name
and write status, idle time, login time, office location, and office phone number.
You can use finger –s to obtain the same information about all users on a
system. Use finger –l user@host to obtain information about all users on a
remote system.
NULL
session
Null sessions are created when no credentials are used to connect to a
Windows system. They are designed to allow clients access to limited types of
information across a network. These sessions can be exploited to find
information about users, groups, machines, shares, and host SIDs.
A hacker can enter net use //hostname/ipc$ \\hostname\ipc$ “” /user:”“ to
connect to a system. A hacker can use the command net view \\hostname to
display shares available on a system. The command net use s:
\\hostname\shared folder name allows a hacker to connect to and view one of
these shares.
PsTools
PsTools is a suite of very powerful tools that allow you to manage local and
remote Windows systems. The package includes tools that can change account
passwords, suspend processes, measure network performance, dump event
log records, kill processes, or view and control services.

64
SuperScan
SuperScan can be used to enumerate information from a Windows host.
Information can be gathered on the following: NetBIOS name table, services,
NULL session, trusted domains, MAC addresses, logon sessions, workstation
type, account policies, users, and groups.
6.1.8 Enumerate Ports and Services Facts
Enumeration requires the ethical hacker to understand protocols, ports, and services.
Although these items are a prerequisite for this course, we're going to identify the ones
that are used for enumeration. The following table lists common ports:
Port Description
TCP 21 FTP Port 21 is used for the File Transfer Protocol (FTP). FTP is used by all
operating systems to transfer files between client and server machines.
TCP 23 Telnet
Port 23 is used for the Telnet protocol/software. Telnet is used to connect
to and run services on remote systems. Because of security concerns,
Telnet is not used as frequently as it once was.
TCP 25 SMTP Port 25 is used for the Simple Mail Transfer Protocol (SMTP). SMTP is used
to send emails between client and server and between server and server.
TCP 53 DNS
Port 53 is used for DNS zone transfers. DNS zone transfer is the process of
transferring a copy of the DNS zone file from the primary DNS server to a
secondary DNS server. Zone transfers are designed to provide updated
network and access information to the DNS servers.
UDP 53 DNS Port 53 is used for UDP queries about IP-to-name and name-to-IP
mappings.
TCP 80 HTTP Port 80 is used for Hypertext Transport Protocol. HTTP is used by all web
browsers and most web applications.
TCP 135 RPC Port 135 is used by the Remote Procedure Call service in Windows for
client-server communications.

65
TCP 137
NetBIOS
Port 137 is used by the NetBIOS Name Server (NBNS.) NBNS is used to
associate names and IP addresses of systems and services.
TCP 139
NetBIOS
Port 139 is used by the NetBIOS Session Service (SMB over NetBIOS.) SMB
over NetBIOS allows you to manage connection between NetBIOS clients
and applications.
TCP 445 SMB
over TCP
Port 445 is used by SMB over TCP. SMB over TCP also known as Direct Host
is a service used to improve network access. This service is available in
Windows 2000 and newer.
UDP 161 and
162 SNMP
Ports 161 and 162 are used by the Simple Network Management Protocol
(SNMP.) SNMP is a standard method of managing devices and software
from most manufacturers.
TCP/UDP 389
LDAP
Port 389 is used by the Lightweight Directory Access Protocol (LDAP.) LDAP
is an internet protocol for accessing distributed directory service. If this
port is open, it indicates that Active Directory or Exchange may be in use.
TCP/UDP 3268
Global Catalog
Service
Port 3268 is used by the Global Catalog Service. The Global Catalog Service
is used by Windows 2000 and later systems to locate information in Active
Directory.
Lab# 6.1.9 Perform Enumeration with Nmap
In this lab, your task is to complete the following:
• Use Zenmap to determine the operating system of the hosts on your network.
• On ITAdmin, use net view to check for shared folders on CorpFiles12 and CorpFiles16.
• Map the H: drive to the Confidential folder on CorpFiles16.
• View the files in the Employee Records folder.
• Answer the questions.
Complete this lab as follows:
1. Scan for operating systems on the network as follows:
a. From the Favorites bar, open Zenmap.
b. In the Command field, type nmap -O 192.168.0.0/24.
c. Select Scan to scan the local subnet.
d. In the nmap scan, find the identified operating systems.
e. In the top right, select Answer Questions.

66
f. Answer question 1.
The nmap -O command may have a hard time recognizing the Windows OS,
but can easily detect Linux.
2. View the shared folders on CorpFiles12 and CorpFiles16 as follows:
a. From top navigation tabs, select IT Administration.
b. On the ITAdmin monitor, select Click to view Windows 10.
c. Right-click Start and select Windows PowerShell (Admin).
d. At the prompt, type net view corpfiles12 and press Enter.
e. Type net view corpfiles16 and press Enter.
3. Map the H: drive to the Confidential folder on CorpFiles16 as follows:
a. Type net use \\corpfiles16\confidential h: and press Enter.
b. Type h: and press Enter to change to the H: drive.
4. View the files in the Employee Records folder as follows:
a. Type dir and press Enter to view the folders available on the drive.
b. Type cd Employee Records and press Enter.
c. Type dir and press Enter to view the employee records.
d. Answer question 2.
e. Select Score Lab.
Lab# 6.1.11 Perform Enumeration with Metasploit In this lab, your task is to
• Use the post/windows/gather/enum_patches exploit in Metasploit to enumerate the
Windows patches that are missing or vulnerable.
• Answer the question.
Complete this lab as follows:
1. From the Favorites bar, open Metasploit Framework.
2. At the prompt, type use post/windows/gather/enum_patches and press Enter to use
the enumerate patches exploit.
3. Type show options and press Enter to show the exploit options.
Notice that the session option is absent.
4. Type set session 1 and press Enter to specify the session.
5. Type show options and press Enter.
Notice that the session option has been set.
6. Type run and press Enter to begin the exploit.
7. In the top right, select Answer Questions.
8. Answer the question.
9. Select Score Lab.
Lab# 6.1.12 Perform Enumeration of MSSQL with Metasploit In this lab, your task is to use the auxiliary/scanner/mssql/mssql_ping exploit in Metasploit to
determine which TCP port Microsoft SQL is using.

67
Complete this lab as follows:
1. From the Favorites bar, open Metasploit Framework.
2. At the prompt, type use auxiliary/scanner/mssql/mssql_ping and press Enter to use
the MSSQL Ping Utility exploit.
3. Type show options and press Enter to show the exploit options.
Notice that the RHOSTS setting is absent.
4. Type set RHOSTS 198.28.1.3 and press Enter to specify the remote host.
5. Type show options and press Enter to show the exploit options.
Notice that RHOSTS has been set.
6. Type exploit and press Enter to begin the exploit.
6.2 Enumeration Countermeasures
6.2.2 Enumeration Countermeasures Facts We have seen the extent of the information that can be gathered through enumeration.
Now, let’s examine a few countermeasures.
This lesson covers the following topics:
• SNMP countermeasures
• DNS countermeasures
• SMTP countermeasures
• LDAP countermeasures
SNMP Countermeasures There are several countermeasures for attacks on Simple Network Management Protocol
(SNMP) processes:
Method Description
Monitor SNMP
ports
Block or monitor activity on ports 161 and 162 and any other ports
that you have configured for SNMP traffic.
Remove SNMP
agent Remove the SNMP agent or turn off the SNMP service completely.
Update SNMP Verify that you are always running the most recent version of SNMP.
Change default
passwords Change default passwords on all devices and services.

68
Run SNScan Use SNScan, a utility that detects network SNMP devices that are
vulnerable to attack.
DNS Countermeasures Use the following countermeasures to mitigate attacks that target your Domain Name
System (DNS) vulnerabilities:
Method Description
DNS zone
restriction
DNS zone restriction ensures that a server provides copies of zone files
to only specific servers.
Digital signatures Modern systems include digital signatures that help with DNS zone
restriction.
Split DNS Splitting the DNS into internal and external groups provides an added
layer of security.
SMTP Countermeasures The most basic way to counteract Simple Mail Transfer Protocol (SMTP) exploitation is to
simply ignore messages to unknown recipients instead of sending back error messages.
Additionally, you’ll want to configure your server to block open SMTP relaying.
LDAP Countermeasures Hardening against Lightweight Directory Access Protocol (LDAP) enumeration can be tricky.
Although blocking LDAP port 389 is an option, you can’t always block ports, or you’ll risk
impacting your network. Blocking LDAP ports could prevent your clients from querying
necessary services. The best way to secure LDAP is to review and implement the security
settings and services available with your server software.
Lab# 6.2.4 Prevent Zone Transfer In this lab, your task is to disable zone transfers for the CorpNet.local zone.
Complete this lab as follows:
1. From Server Manager, select Tools > DNS.
2. In the left pane, expand CORPDC3.
3. Expand Forward Lookup Zones.
4. Right-click CorpNet.local and select Properties.
5. Select the Zone Transfers tab.

69
6. Deselect Allow zone transfers.
7. Click OK.
7. Analyze Vulnerabilities
7.1 Vulnerability Assessment
7.1.2 Vulnerability Assessment Facts A vulnerability assessment is the process of identifying weaknesses in an organization
infrastructure, including the operating system, web applications, and web server. An
assessment is also used to plan additional security measures to protect the organization
from attack. Every business that uses a computer to run their business is at risk of having
sensitive information stolen or misused. Having an ethical hacker conduct an assessment
sheds light on vulnerability to malicious attack. In a world where so much private
information is stored and transferred digitally, it is essential to be proactive in determining
and addressing system weaknesses.
Data obtained from a vulnerability assessment reveals security weaknesses. It will open
ports and running services, configuration errors, system flaws, and weaknesses in
applications and services. It is important to target multiple areas of operation in order to
have a comprehensive assessment. Once the data is obtained, a plan can be made to
correct, patch, or harden systems to protect data.
This lesson covers the following topics:
• Vulnerability scanning types
• Scan limitations
• Assessment types
• Vulnerability research
Vulnerability Scanning Types

70
There are two types of vulnerability scans. Each type of scan has advantages. Both types
can be used together to provide a more comprehensive assessment.
Vulnerability
Scanning Description
Active scanning
An active scan transmits to the nodes within a network to determine
exposed ports and can independently repair security flaws. It can also
simulate an attack to test for vulnerabilities and can repair weak points in
the system.
Passive scanning
A passive scan tries to find vulnerabilities without directly interacting with
the target network. The scan identifies vulnerabilities via information
exposed by systems in their normal communications. You can set a
scanner to scan constantly or at specific times.
Scan Limitations It’s important to understand that scanners are not foolproof. The following table identifies
two significant limitations.
Scan
Limitation Description
Point in time
A scan can only obtain data for the time period when it runs. For example,
some weaknesses may be exposed only when systems are operating at
peak capacity, at certain times of day, or even at certain times of the year.
New
vulnerabilities
Scans can only identify known vulnerabilities. This give an attacker that
uses a new attack an advantage, as scans are written only for
vulnerabilities that have been previously exploited.
Assessment Types There is not one assessment testing tool that will cover every area to be tested. It is
important to understand the goals and objectives of the organization; to gather
information about the systems, network, and applications; and then to determine the best
tools to make a comprehensive plan to correct security problems that you identify. Testing
only one area of a system will not be sufficient to expose all vulnerabilities that exist.

71
Assessment
Types Description
Active
assessment
In an active assessment, specifically created packets are sent to target
nodes to determine the OS of the domain, the hosts, the services, and the
vulnerabilities in the network. nmap is a useful tool for this assessment.
Passive
assessment
Using sniffer traces from a remote system, you can determine the
operating system of the remote host as well as a list of the current network
work. Wireshark is a common tool for this type of information gathering
and analysis.
External
assessment
This type of assessment looks for ways to access the network
infrastructure through open firewall ports, routers, web servers, web
pages, and public DNS servers. It is external because it is working from the
outside using public networks through the internet. This type of
assessment may include:
• Determining if maps exist for network and external
service devices
• Checking for vulnerabilities in web applications
• Examining the rule set for external network router
configurations and firewalls
• Detecting open ports on the external network and
services
• Identifying DNS zones
Internal
assessment
The ethical hacker can also be inside the network, testing the internal
networks and systems. This type of assessment can include:
• Inspecting physical security
• Checking open ports on network devices and router
configurations
• Scanning for Trojans, spyware, viruses, and malware
• Evaluating remote management processes
• Determining flaws and patches on the internal network
systems, devices, and servers
Host-based
assessment
This assessment focuses on all types of user risks, including malicious
users and untrained users as well as vendors and administrators. Host-

72
based assessment can also test the vulnerability of databases, firewalls,
files, and web servers, as well as flag configuration errors.
Application
Application-level scans allow the ethical hacker to scrutinize completed
applications when the source code is unknown. Every application should
be examined for input controls and data processing.
Wireless
network
assessment
A hacker can access sensitive information even from outside a building by
sniffing network packets that are transmitted wirelessly through radio
waves. Generally, a hacker will obtain the SSID (the name assigned to the
wireless network) through sniffing and use it to hack the wireless network
without ever entering the building. These assessments analyze the network
for patching errors, authentication and encryption problems, and
unnecessary services.
Vulnerability Research Vulnerability research is the process of discovering vulnerabilities and design flaws that will
open an operating system and its applications to attack or misuse. Time is on the attacker's
side. It is crucial for an ethical hacker to put in the effort and time to research an
organization from the outside in and to scan and gather information at every level.
Areas to Research Description
Misconfigurations
The primary cause of misconfiguration is human error. Web servers,
application platforms, databases, and networks are all at risk of
unauthorized access. Areas to check include outdated software,
unnecessary services, external systems that are incorrectly
authenticated, security settings that have been disabled, and debug
enabled on a running application.
Default settings
It is important to check default settings, especially for default SSIDs
and admin passwords. If a company never changes the default admin
passwords or the default SSID to combinations unique to the
company, it is very simple for an attacker to gain access to the
network.
Buffer overflows
A buffer is a temporary data storage area with limited space.
Overflows occur when more data is attempted to be stored than the
program was written for. Error checking should identify this problem.
When overflow occurs, it can allow hackers to cause data to flow to

73
other memory areas and to access database files or alter system files.
System crashing or instability can also occur.
Unpatched servers
Hackers gain access to data in a system through misconfigured or
unpatched servers. Since servers are integral part of an organization’s
infrastructure, this vulnerability creates a central route for access to
sensitive data and operations. Fixing bugs, patching, and simply
updating software can block an attack.
Design flaws
Every operating system or device has bugs or defects in its design.
Hackers take advantage of design flaws such as broken authentication
and access control, cross-site scripting, insufficient logging and
monitoring, and incorrect encryption.
Operating system
flaws
Flaws in the OS can leave a system susceptible to malicious
applications such as viruses, Trojan horses, and worms through
scripts, undesirable software, or code. Firewalls, minimal software
application usage, and regular system patches create protection from
this form of attack.
Application flaws
Flaws in the validation and authorization of users present the greatest
threat to security in transactional applications. This type of
assessment evaluates deployment and communication between the
server and client. It is imperative to develop tight security through
user authorization and validation. Both open-source and commercial
tools are recommended for this assessment.
Open services
Ports and services must be checked regularly to prevent unsecure,
open, or unnecessary ports, which can lead to attacks on connected
nodes or devices, loss of private information, or even denial of
service.
Default usernames
and passwords
Passwords should always be immediately changed after installation or
setup. Passwords should always be kept secret.
7.2 Vulnerability Management Life Cycle

74
7.2.2 Vulnerability Management Life Cycle Every business has sensitive information that, if accessed by hackers, could be used in
ways that could put the company and its employees at risk. Even a non-malicious user,
such as an untrained employee, could cause problems if proper security isn’t in place.
Unless a business physically unplugs its computers and never uses a network at all, the
company can be a target. Therefore, vulnerability management should be implemented in
every organization to identify, evaluate, and control risks and vulnerabilities.
This lesson covers the topic of the vulnerability management lifecycle.
Vulnerability Management Lifecycle The following table identifies the vulnerability management lifecycle an ethical hacker uses
to protect an organization.
Phase Description
Baseline
creation
The lifecycle starts by defining the effectiveness of the current security
policies and procedures. You should establish any risks that may be
associated with the enforcement of current security procedures and what
may have been overlooked. Try to see what the organization looks like from
an outsider’s perspective, as well as from an insider’s point of view. No
organization is immune to security gaps. Work with management to set
goals with start dates and end dates. Determine which systems to begin
with, set up testing standards, get approval in writing, and keep
management informed as you go.
For your own protection, it is important to make sure that everything you
do is aboveboard. Fully disclose to management what you are doing, how
you will do it, and the timing for each phase of the project. This protects you

75
and reassures the organization’s management of your integrity and
professionalism.
It is also crucial to know the goals of the organization so that you are able to
address specific concerns. This will also help you to know where to begin
and what is expected of you.
Vulnerability
assessment
The vulnerability phase refers to identifying vulnerabilities in the
organization’s infrastructure, including the operating system, web
applications, and web server. This is the phase where penetration testing
begins.
It is important to decide the best times to test. You don’t want to risk having
systems shut down during peak business hours or other sensitive times.
You must also choose the best security assessment tools for the systems
you choose to test. Be sure that you understand what each option of every
tool can do before you use it. This helps you avoid damaging the systems.
Everything you do as an ethical hacker depends on your ability to perform
effective penetration testing. You must conduct the correct tests with the
correct tools to be able to accurately assess the security vulnerabilities. All
remaining phases depend on the effectiveness of this vulnerability
assessment phase.
Risk
assessment
In this phase, you organize the results of your vulnerability testing
according to risk level and then categorize by levels of sensitivity and
access. You will need to create and present reports that clearly identify the
problem areas, then produce a plan of action to address weaknesses,
protect the information, and harden the systems.
At this phase, it is critical to communicate with management about your
findings and your recommendations for locking down the systems and
patching problems. You will be protected and valued as you communicate
and receive written approval for implementing the suggested remediation.
Remediation
Remediation refers to the steps that are taken regarding vulnerabilities,
such as evaluating vulnerabilities, locating risks, and designing responses
for the vulnerabilities. In this phase, you implement the controls and
protections from your plan of action. Begin with the highest-impact and
highest-likelihood security problems, then work through the lower-impact
and lower-likelihood issues.
It makes the most sense to protect the organization from its most
vulnerable areas first and then work to the less likely and less impactful
areas. It may be impossible to identify and fix every single vulnerability that

76
exists in an organization. That is why it is essential to start with the most
urgent issues based on what makes the most business sense, what
management expects from you, and compliance with regulations.
Verification
The verification phase helps the security analyst verify whether all the
previous phases have been effectively executed. In this phase, you retest
the systems for verification.
Even though you may be certain that you have corrected vulnerability
issues and are confident in your work, it benefits you to prove your work to
management and have verifiable evidence to show that your patching and
hardening implementations have been effective. You will increase the value
of your services when you can show the validity of your work.
Monitoring
After you have verified your work, move on to the post-assessment phase,
which is also known as the recommendation phase. At this point,
recommend ongoing monitoring and routine penetration testing to be
proactive in protecting the organization and its customers or clients.
It may be tempting for an organization to feel secure after going through
the process of penetration testing, implementing changes, and hardening
the system. However, it’s important for you to help management
understand that hackers have time on their side and there will always be
ongoing and new threats to security. Therefore, it is critical that the
organization has monitoring tools in place and regularly schedules
vulnerability maintenance testing.
7.2.4 Vulnerability Solution Facts
Vulnerability assessment is part of the scanning phase.
This lesson covers the following topics:
• Assessment solutions
• Assessment types
• Vulnerability scanning penetration steps
Assessment Solutions There are two approaches to solving the vulnerability problems you find.
Solution Description

77
Product-
based
This solution involves an organization purchasing a product and administering it
from inside the network. The product functions inside the firewall. This would
make it inaccessible from outside penetration. An organization could implement
this type of solution hoping that it solves vulnerability issues.
Service-
based
A service-based solution entails hiring a professional, such as yourself, to
provide a solution. This approach would involve using the vulnerability
management life cycle. The professional would conduct the testing and
solutions from outside the network. The risk of this approach is that an
assessment based entirely from outside the network leaves potential for a
hacker to gain access to the system.
An organization might be tempted not to hire a professional, but to install and run the
product-based solutions themselves. However, it is likely the organization would not have
the same level of protection that an ethical hacker would provide thorough analysis,
assessment, remediation, verification, and continuous monitoring.
Assessment Types There are two types of assessments.
Assessments Description
Tree-based
With a tree-based assessment, you have a preset plan for testing and
scanning based on some previous knowledge of the system. You then
choose specific modes of testing for each operating system and machine.
Inference-
based
In an inference-based approach, you test and discover information as you
go. You then adjust your scans according to the information you discover.
The tree-based assessment relies on the professional implementing a plan based on
information that may or may not be accurate and complete for the system being tested. An
inference-based approach relies on a current evaluation of the system to determine the
next step, testing only relevant areas of concern.
Vulnerability Scanning Penetration Steps As you conduct vulnerability scanning, it is important to understand that there are three
basic steps in penetration testing.

78
Steps Description
1 Locate the live nodes in the network. You can do this using a variety of techniques,
but you must know where each live host is.
2 Itemize each open port and service in the network.
3 Test each open port for known vulnerabilities.
7.3 Vulnerability Scoring System
7.4 Vulnerability Assessment Tools

79
ExamTopics Review Questions
References https://labsimapp.testout.com/v6_0_459/index.html/productviewer/834/3.1.6
https://www.linkedin.com/learning/paths/become-an-ethical-hacker?u=86261762
The end!

![Reserve Component Cyber Certification Outreachweb.cse.msstate.edu/~hamilton/P3I/resources/RC... · CEH certification. The CEHv9 certification is built around eighteen modules [8]](https://img.dokumen.tips/doc/110x75/5f05cbe47e708231d414c078/reserve-component-cyber-certification-hamiltonp3iresourcesrc-ceh-certification.jpg)


![[UPDATED] Get Ready to Crack Juniper JN0-1102 Certification Exam](https://img.dokumen.tips/doc/110x75/606c452f32aeda192a621124/updated-get-ready-to-crack-juniper-jn0-1102-certification-exam.jpg)


![[UPDATED] AWS SOA-C02 Certification | Question & Answer](https://img.dokumen.tips/doc/110x75/612363b1a30e5150b114904e/updated-aws-soa-c02-certification-question-answer.jpg)


![[UPDATED] Get Ready to Crack NetApp NS0-516 Certification Exam](https://img.dokumen.tips/doc/110x75/60ab994393abf5137f324f01/updated-get-ready-to-crack-netapp-ns0-516-certification-exam.jpg)
