Embed Size (px)
Citation preview
RJA510188-4
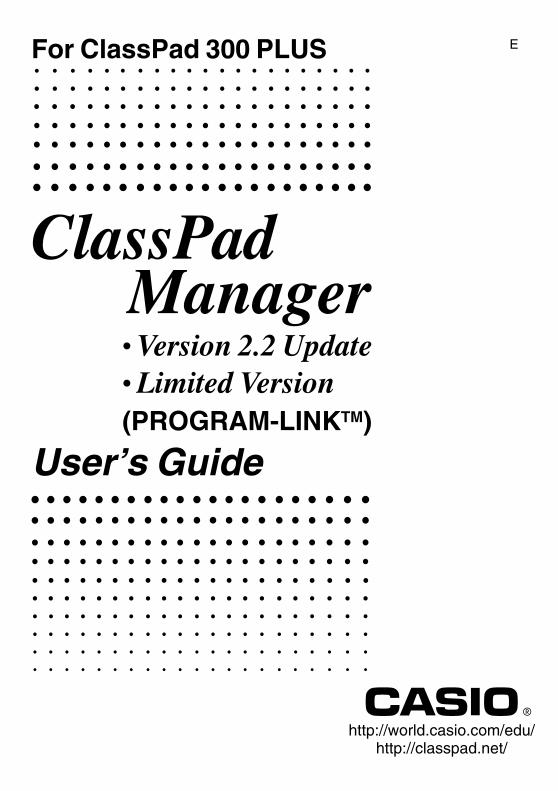
EFor ClassPad 300 PLUS
http://world.casio.com/edu/http://classpad.net/
• Version 2.2 Update• Limited Version
ClassPad Manager
User’s Guide(PROGRAM-LINKTM)

NoteDisplay examples shown in this User’s Guide are intended for illustrative purposes only.The actual text and values that appear on display may differ from the examples shown in thisUser’s Guide.

E-120050501
Getting Started• You can use ClassPad Manager to develop programs and eActivities using the same commands
as those available on the ClassPad. You can store your programs and eActivities on yourcomputer, and use the ClassPad Manager’s data communication functions to transfer them toyour ClassPad when you need them.
• Once you establish a link with your computer over the USB cable that comes bundled with theClassPad, you can use easy-to-understand Microsoft Explorer-like operations to transfer data(programs, variable data, and eActivities) between them.
• You can transfer data by putting the ClassPad into its communication standby state and thenperforming all operations on your connected computer.
• ClassPad Manager provides the following capabilities.
· ClassPad emulation, which lets you perform ClassPad operations on your computer
· Transfer of data between your ClassPad and computerYou can connect multiple ClassPads to a single PC. This makes it possible tosimultaneously copy files from the PC to multiple ClassPads, and use your PC to copy filesfrom one ClassPad to another.
· ClassPad data storage
· Update of the ClassPad Manager Version 2.0 (Single License or School License) to Version2.2
Important!• Be sure to install the ClassPad Manager before you connect the ClassPad to your computer.
Connecting before you install the ClassPad Manager can result in improper operation.
Note• Use only the USB cable that comes with ClassPad whenever connecting your ClassPad to a
computer to exchange data between them. Data exchange with ClassPad Manager will not bepossible if you use a commercially available USB cable.
• See your ClassPad User’s Guide and Quick Start Guide for details about operating the on-screenvirtual ClassPad unit. Note that you cannot send data to or receive data from the virtual ClassPadunit.
• Calculation results produced by ClassPad Manager may be different from those produced by theClassPad. This is due to the way that computers perform floating-point calculations. Also,ClassPad Manager cannot handle values that exceed ±1E+300.
User Registration• Before using the ClassPad Manager, be sure to read the contents of the file named Readme.html,
which is on the bundled CD-ROM. There you will find the URL for a Website where you canregister as an official user.
https://classpad.net/register/regist_form.html

E-2 20050501
System Requirements
Computer: Minimum required Intel® Pentium® II 200 with USBRecommended Intel® Pentium® II 300 with USB
CPU: Minimum required Intel® Pentium® II or AMD DuronTM
Operating Systems: Windows® 98SE/Me or Windows® 2000/XPDisk Space: 10 MB available for installationMemory: Recommended 64 MB (Minimum 32 MB)
Does not include memory required for Operating System.Video Display: Video adaptor and monitor must support resolution of 800 × 600 or higher.
OtherRequired Application: Microsoft ® Internet Explorer 4.01 or later
Note• Microsoft and Windows are either registered trademarks or trademarks of Microsoft Corporation
in the United States and/or other countries.• Intel and Pentium are trademarks or registered trademarks of Intel Corporation or its subsidiaries
in the United States and other countries.• AMD Duron is either registered trademark or trademark of Advanced Micro Devices, Inc. in the
United States and/or other countries.• Company and product names used herein are trademarks of their respective owners.

E-320050501
Contents
1. Updating the Software/Installing the Software ..................................... E-4Updating/Installing ............................................................................................ E-4Uninstalling ....................................................................................................... E-9Connecting your ClassPad to a computer ...................................................... E-10Starting Up and Quitting ClassPad Manager .................................................. E-13
2. ClassPad Manager Menu and Functions............................................. E-15ClassPad Manager Menu ............................................................................... E-15LCD Window Menu ......................................................................................... E-16
3. Exchange Window – Toolbar Buttons and Icons ............................... E-17
4. Exchange Window – Menu Commands and Icons ............................. E-18
5. Transferring Files from the ClassPad to Your PC............................... E-26ClassPad Operation ........................................................................................ E-26Using ClassPad Manager ............................................................................... E-30Transferring eActivity Files.............................................................................. E-40
6. Transferring Files Between Multiple ClassPads and the PC ............. E-41Before Connecting ClassPads to the PC ........................................................ E-41Connecting Multiple ClassPads to the PC ...................................................... E-41
7. Adding a Flash Image or Memory Image............................................. E-48From the ClassPad Manager Screen ............................................................. E-48From the Exchange Window........................................................................... E-52Using eActivity Files ........................................................................................ E-53
8. Handling Flash Images or Memory Images......................................... E-54
E-4 20050501
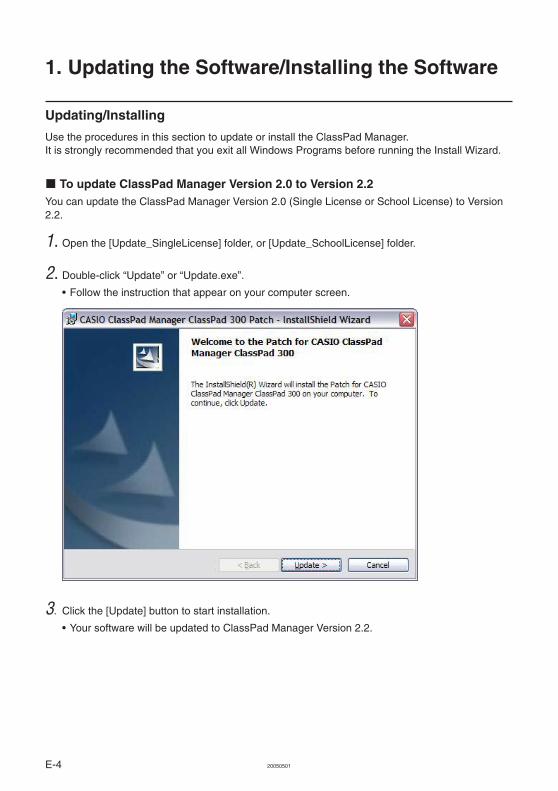
1. Updating the Software/Installing the Software
Updating/Installing
Use the procedures in this section to update or install the ClassPad Manager.It is strongly recommended that you exit all Windows Programs before running the Install Wizard.
k To update ClassPad Manager Version 2.0 to Version 2.2You can update the ClassPad Manager Version 2.0 (Single License or School License) to Version2.2.
1. Open the [Update_SingleLicense] folder, or [Update_SchoolLicense] folder.
2. Double-click “Update” or “Update.exe”.
• Follow the instruction that appear on your computer screen.
3. Click the [Update] button to start installation.
• Your software will be updated to ClassPad Manager Version 2.2.
E-520050501
1. Updating the Software/Installing the Software
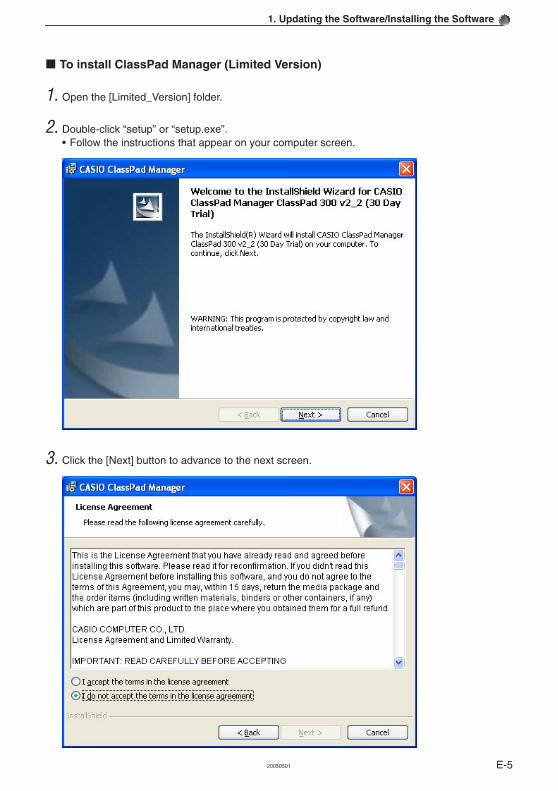
k To install ClassPad Manager (Limited Version)
1. Open the [Limited_Version] folder.
2. Double-click “setup” or “setup.exe”.• Follow the instructions that appear on your computer screen.
3. Click the [Next] button to advance to the next screen.
E-6 20050501
1. Updating the Software/Installing the Software
4. Carefully read the terms and conditions of the license agreement.
5. If you agree to the terms and conditions of the license agreement, click “I accept the terms…”,and then click the [Next] button.
• If you do not agree to the terms and conditions of the license agreement, click “I do not acceptthe terms…” and then click the [Cancel] button to exit the install procedure.

E-720050501
1. Updating the Software/Installing the Software
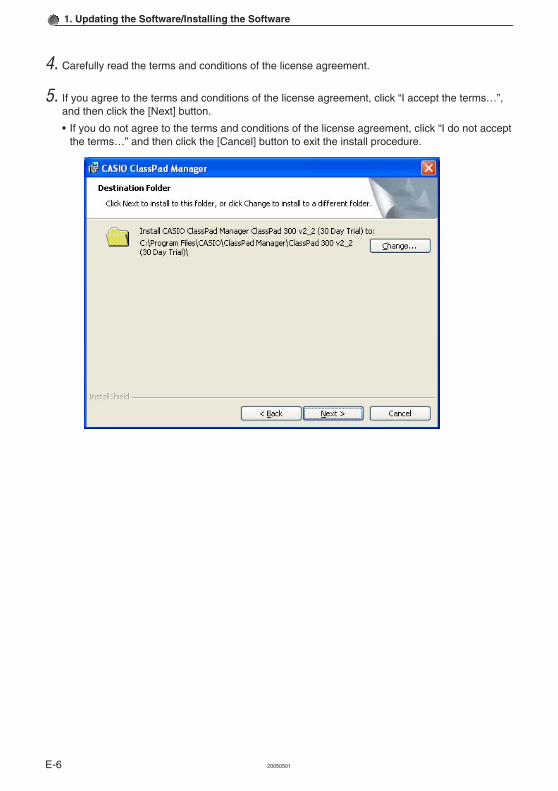
6. Perform either of the following two operations to specify the drive and folder where you want toinstall ClassPad Manager.
6-a To use the default settings, simply click the [Next] button.
6-b To specify a different folder, click the “Change…” button. Specify the folder you want, andthen click the [Next] button.
E-8 20050501
1. Updating the Software/Installing the Software
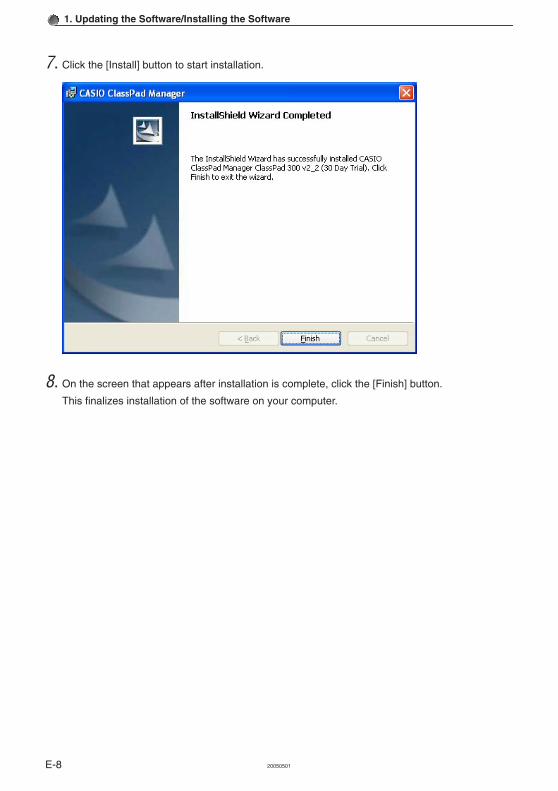
8. On the screen that appears after installation is complete, click the [Finish] button.
This finalizes installation of the software on your computer.
7. Click the [Install] button to start installation.

E-920050501
1. Updating the Software/Installing the Software
Uninstalling
Perform the following steps if you ever need to remove ClassPad Manager (PROGRAM-LINKTM)from your computer.
k To uninstall
1. Display the Windows Control Panel.
2. Click [Add/Remove Programs].
3. In the list of applications on the dialog box that appears, select “CASIO ClassPad ManagerClassPad 300 PLUS”.
4. Click the [Add/Remove] button to start a program maintenance wizard.
5. Click the [Yes] button.
• This completes the uninstall procedure.
E-10 20050501
1. Updating the Software/Installing the Software
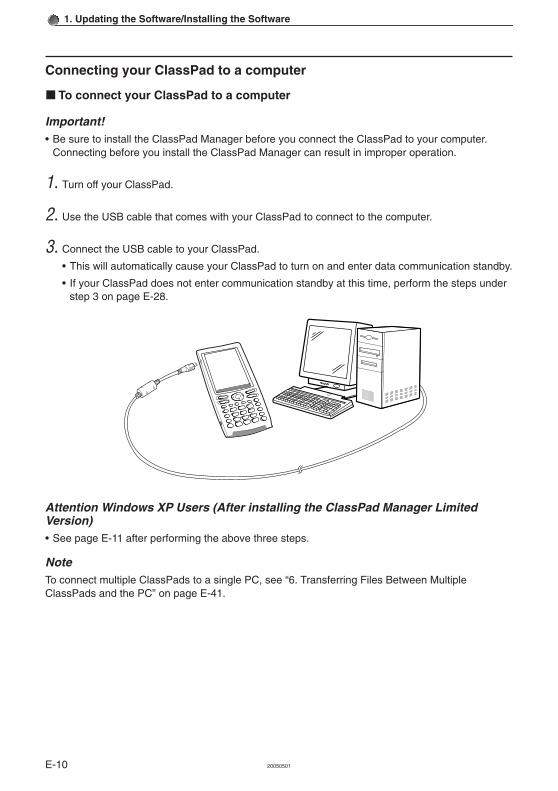
Connecting your ClassPad to a computer
kTo connect your ClassPad to a computer
Important!• Be sure to install the ClassPad Manager before you connect the ClassPad to your computer.
Connecting before you install the ClassPad Manager can result in improper operation.
1. Turn off your ClassPad.
2. Use the USB cable that comes with your ClassPad to connect to the computer.
3. Connect the USB cable to your ClassPad.
• This will automatically cause your ClassPad to turn on and enter data communication standby.
• If your ClassPad does not enter communication standby at this time, perform the steps understep 3 on page E-28.
Attention Windows XP Users (After installing the ClassPad Manager LimitedVersion)• See page E-11 after performing the above three steps.
NoteTo connect multiple ClassPads to a single PC, see “6. Transferring Files Between MultipleClassPads and the PC” on page E-41.
E-1120050501
1. Updating the Software/Installing the Software
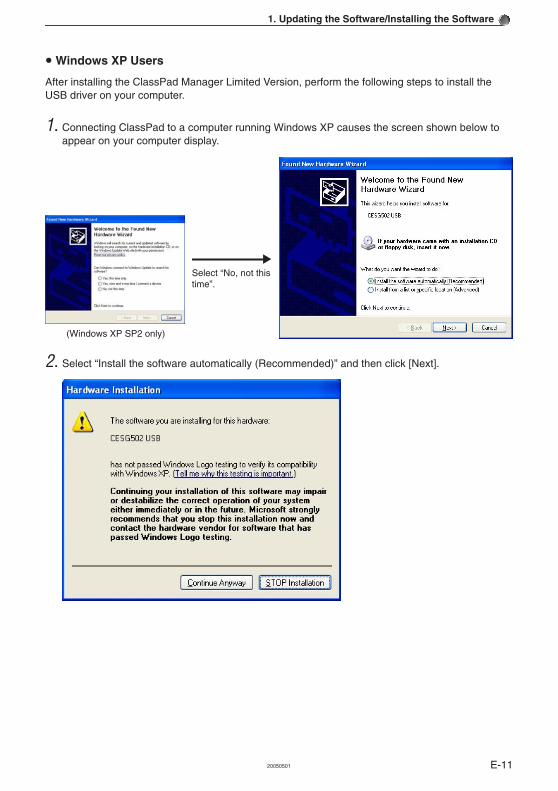
u Windows XP Users
After installing the ClassPad Manager Limited Version, perform the following steps to install theUSB driver on your computer.
1. Connecting ClassPad to a computer running Windows XP causes the screen shown below toappear on your computer display.
2. Select “Install the software automatically (Recommended)” and then click [Next].
Select “No, not thistime”.
(Windows XP SP2 only)
E-12 20050501
1. Updating the Software/Installing the Software
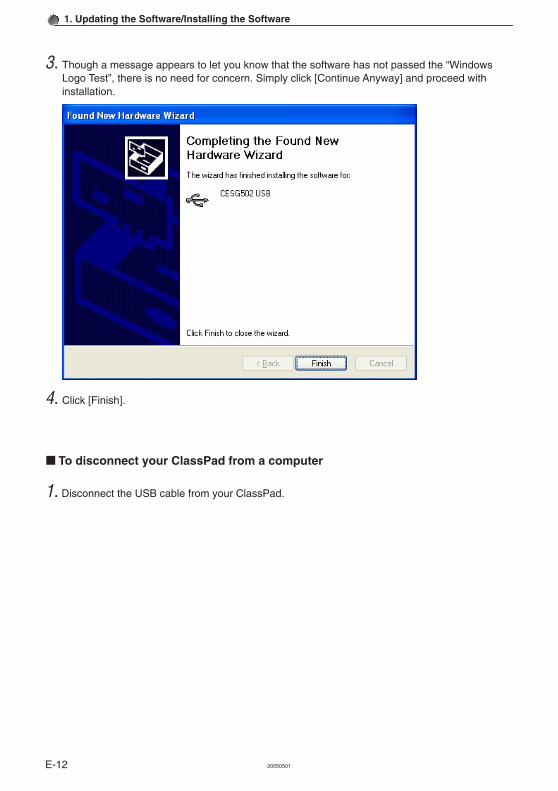
3. Though a message appears to let you know that the software has not passed the “WindowsLogo Test”, there is no need for concern. Simply click [Continue Anyway] and proceed withinstallation.
4. Click [Finish].
kTo disconnect your ClassPad from a computer
1. Disconnect the USB cable from your ClassPad.

E-1320050501
1. Updating the Software/Installing the Software
Starting Up and Quitting ClassPad Manager
kTo start up and quit ClassPad Manager
1. On your computer’s desktop, double-click “ClassPad Manager”.
• This starts up ClassPad Manager.
2. On ClassPad Manager, perform the data exchange and management tasks you want.
3. To quit ClassPad Manager, move the cursor to the ClassPad Manager window, right-click yourmouse, and then select [Exit] on the shortcut menu that appears. You can also click o toquit ClassPad Manager.
• This quits ClassPad Manager.

E-14 20050501
1. Updating the Software/Installing the Software
Viewing “About ClassPad Manager” Information“About ClassPad Manager” is a dialog box that shows version information about ClassPadManager, and your serial number.
You can use either of the following two procedures to display “About ClassPad Manager”information.• Right-click the ClassPad Manager window. On the menu that appears, select “About ClassPad
Manager”.• On the Exchange Window (see page E-17), click [Help], and then select “About ClassPad
Manager”.
E-1520050501
2. ClassPad Manager Menu and Functions
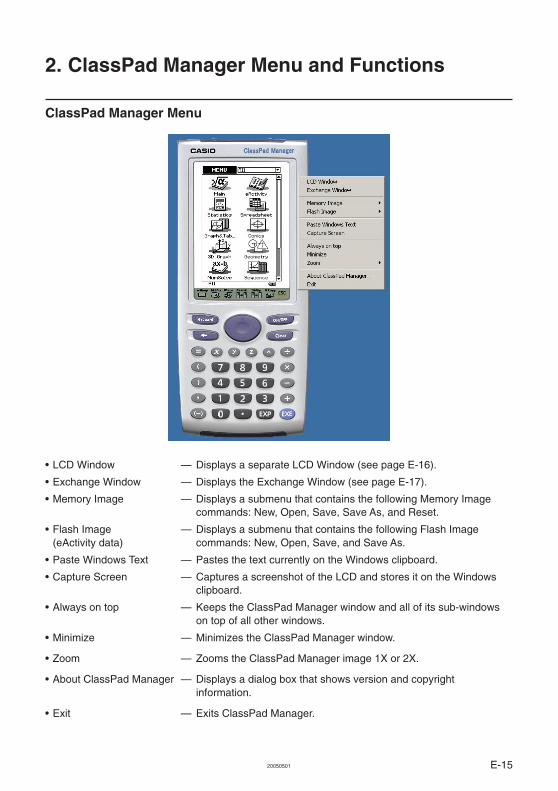
ClassPad Manager Menu
• LCD Window — Displays a separate LCD Window (see page E-16).
• Exchange Window — Displays the Exchange Window (see page E-17).
• Memory Image — Displays a submenu that contains the following Memory Imagecommands: New, Open, Save, Save As, and Reset.
• Flash Image — Displays a submenu that contains the following Flash Image(eActivity data) commands: New, Open, Save, and Save As.
• Paste Windows Text — Pastes the text currently on the Windows clipboard.
• Capture Screen — Captures a screenshot of the LCD and stores it on the Windowsclipboard.
• Always on top — Keeps the ClassPad Manager window and all of its sub-windowson top of all other windows.
• Minimize — Minimizes the ClassPad Manager window.
• Zoom — Zooms the ClassPad Manager image 1X or 2X.
• About ClassPad Manager — Displays a dialog box that shows version and copyrightinformation.
• Exit — Exits ClassPad Manager.
E-16 20050501
2. ClassPad Manager Menu and Functions
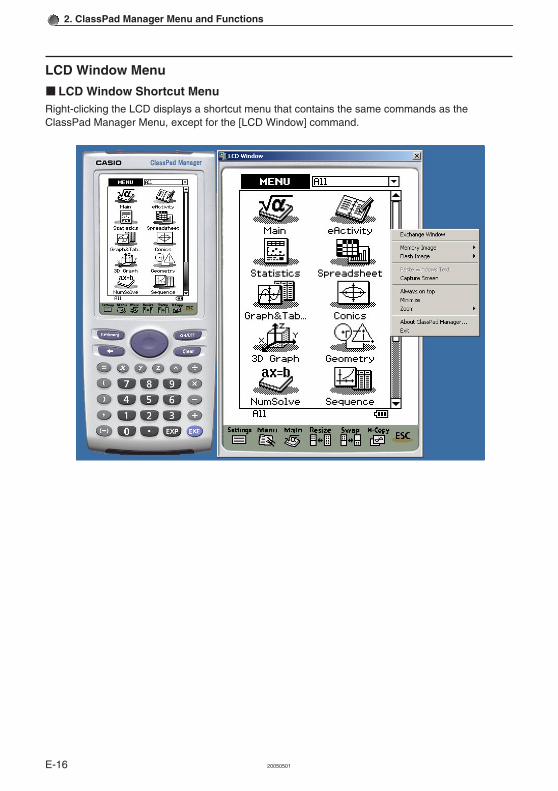
LCD Window Menu
kLCD Window Shortcut MenuRight-clicking the LCD displays a shortcut menu that contains the same commands as theClassPad Manager Menu, except for the [LCD Window] command.
E-1720050501
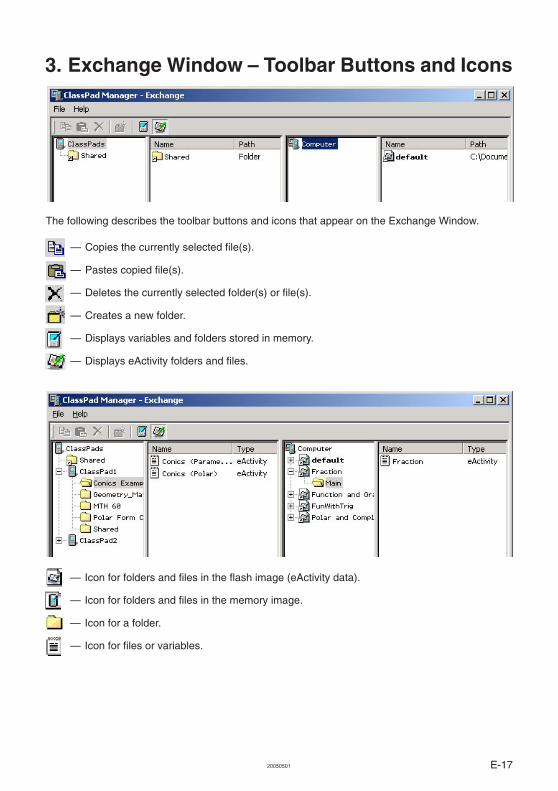
3. Exchange Window – Toolbar Buttons and Icons
The following describes the toolbar buttons and icons that appear on the Exchange Window.
— Copies the currently selected file(s).
— Pastes copied file(s).
— Deletes the currently selected folder(s) or file(s).
— Creates a new folder.
— Displays variables and folders stored in memory.
— Displays eActivity folders and files.
— Icon for folders and files in the flash image (eActivity data).
— Icon for folders and files in the memory image.
— Icon for a folder.
— Icon for files or variables.
E-18 20050501
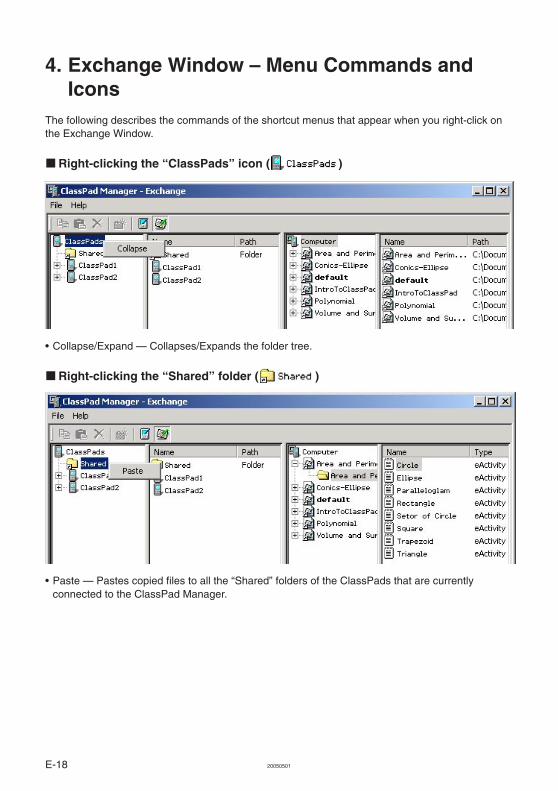
4. Exchange Window – Menu Commands andIcons
The following describes the commands of the shortcut menus that appear when you right-click onthe Exchange Window.
kRight-clicking the “ClassPads” icon ( )
• Collapse/Expand — Collapses/Expands the folder tree.
kRight-clicking the “Shared” folder ( )
• Paste — Pastes copied files to all the “Shared” folders of the ClassPads that are currentlyconnected to the ClassPad Manager.
E-1920050501
4. Exchange Window – Menu Commands and Icons
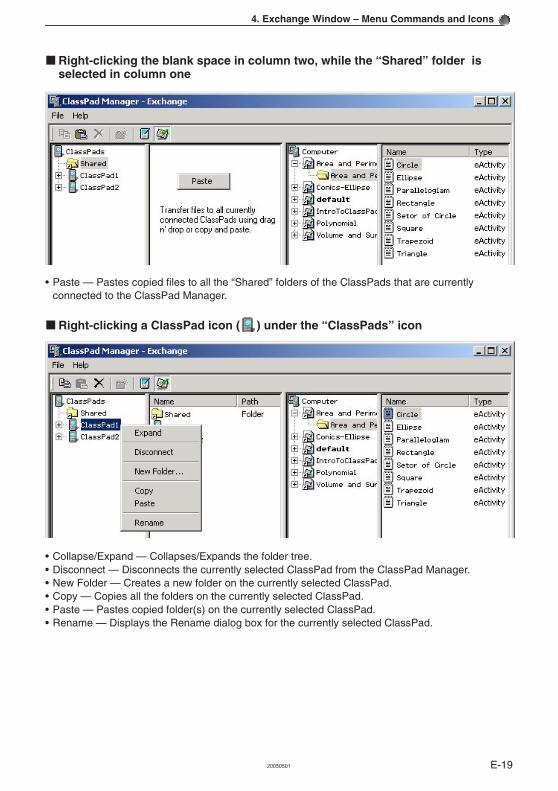
kRight-clicking the blank space in column two, while the “Shared” folder isselected in column one
• Paste — Pastes copied files to all the “Shared” folders of the ClassPads that are currentlyconnected to the ClassPad Manager.
kRight-clicking a ClassPad icon ( ) under the “ClassPads” icon
• Collapse/Expand — Collapses/Expands the folder tree.• Disconnect — Disconnects the currently selected ClassPad from the ClassPad Manager.• New Folder — Creates a new folder on the currently selected ClassPad.• Copy — Copies all the folders on the currently selected ClassPad.• Paste — Pastes copied folder(s) on the currently selected ClassPad.• Rename — Displays the Rename dialog box for the currently selected ClassPad.

E-20 20050501
4. Exchange Window – Menu Commands and Icons
kRight-clicking the blank space in column two, while a ClassPad icon ( ) isselected in column one
• Disconnect — Disconnects the currently selected ClassPad from the ClassPad Manager.• New Folder — Creates a new folder on the currently selected ClassPad.• Paste — Pastes copied folder(s) on the currently selected ClassPad.
kRight-clicking a folder icon ( ) under a ClassPad icon
• Copy — Copies the folder.• Paste — Pastes copied file(s) into the folder.
E-2120050501
4. Exchange Window – Menu Commands and Icons
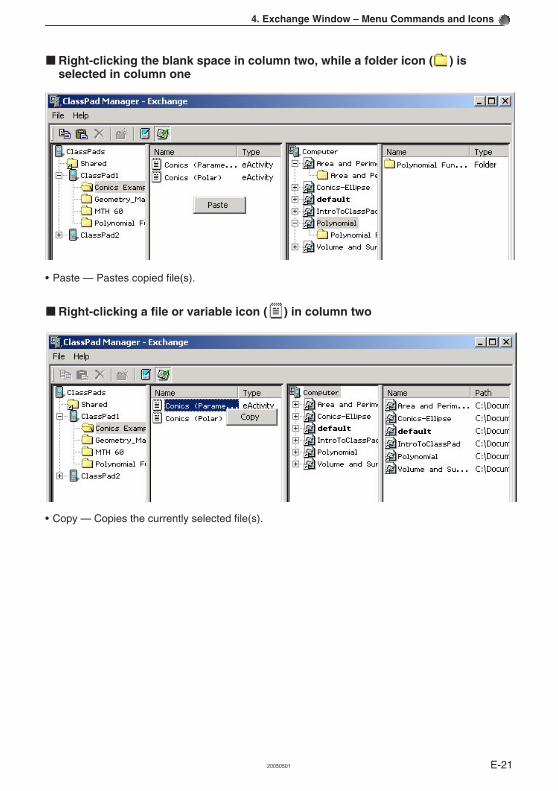
• Paste — Pastes copied file(s).
kRight-clicking a file or variable icon ( ) in column two
kRight-clicking the blank space in column two, while a folder icon ( ) isselected in column one
• Copy — Copies the currently selected file(s).

E-22 20050501
4. Exchange Window – Menu Commands and Icons
• Collapse/Expand — Collapses/Expands the folder tree.• Add Image — Adds a new image or inserts an existing image.
kRight-clicking the blank space in column four, while the Computer icon ( ) isselected in column three
• Add Image — Adds a new image or inserts an existing image.
kRight-clicking the Computer icon ( )

E-2320050501
4. Exchange Window – Menu Commands and Icons
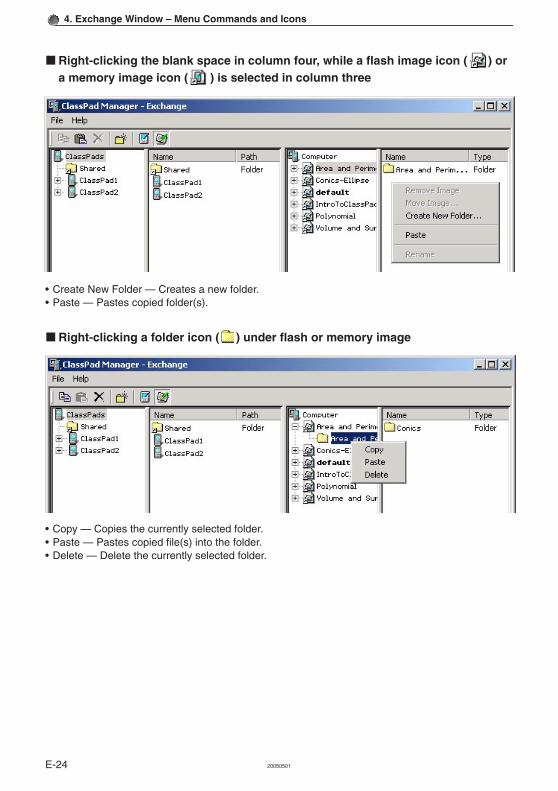
kRight-clicking a flash image icon ( ) or a memory image icon ( )
• Collapse/Expand — Collapses/Expands the folder tree.• Set as Active Image* — Sets the currently selected image as the active image.• Remove Image* — Removes the currently selected image.• Create New Folder — Creates a new folder.• Copy — Copies the currently selected flash or memory image.• Paste — Pastes copied folder(s).• Delete* — Deletes the currently selected flash or memory image.• Rename* — Displays the Rename dialog box for the currently selected flash or memory image.
NoteAny shortcut menu with an asterisk (*) is not available when you right-click the default flash ormemory image icon.
E-24 20050501
4. Exchange Window – Menu Commands and Icons
kRight-clicking the blank space in column four, while a flash image icon ( ) ora memory image icon ( ) is selected in column three
• Create New Folder — Creates a new folder.• Paste — Pastes copied folder(s).
kRight-clicking a folder icon ( ) under flash or memory image
• Copy — Copies the currently selected folder.• Paste — Pastes copied file(s) into the folder.• Delete — Delete the currently selected folder.
E-2520050501
4. Exchange Window – Menu Commands and Icons
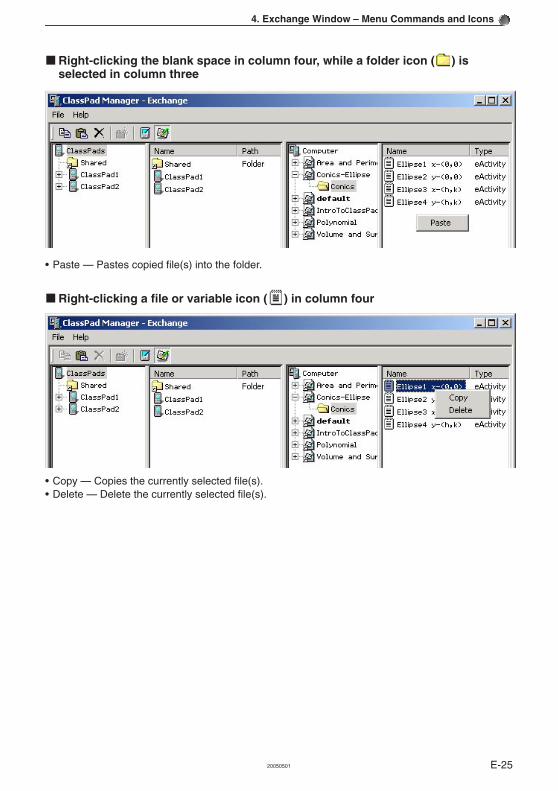
• Paste — Pastes copied file(s) into the folder.
kRight-clicking a file or variable icon ( ) in column four
• Copy — Copies the currently selected file(s).• Delete — Delete the currently selected file(s).
kRight-clicking the blank space in column four, while a folder icon ( ) isselected in column three
E-26 20050501
5. Transferring Files from the ClassPad toYour PC
First set up your ClassPad for data communication, and then perform the transfer operation onyour computer using ClassPad Manager.
NoteThis section describes how to connect a single ClassPad to your PC. For information about how toconnect multiple ClassPads to a single PC, see “6. Transferring Files Between Multiple ClassPadsand the PC” on page E-41.
ClassPad Operation
Use the following procedure to put your ClassPad into a standby state for data communication.
NoteIf your ClassPad is set up properly with USB chosen, it will automatically go into a standby statewhen you plug the USB cable into your ClassPad (if the USB cable is first connected to the PC).
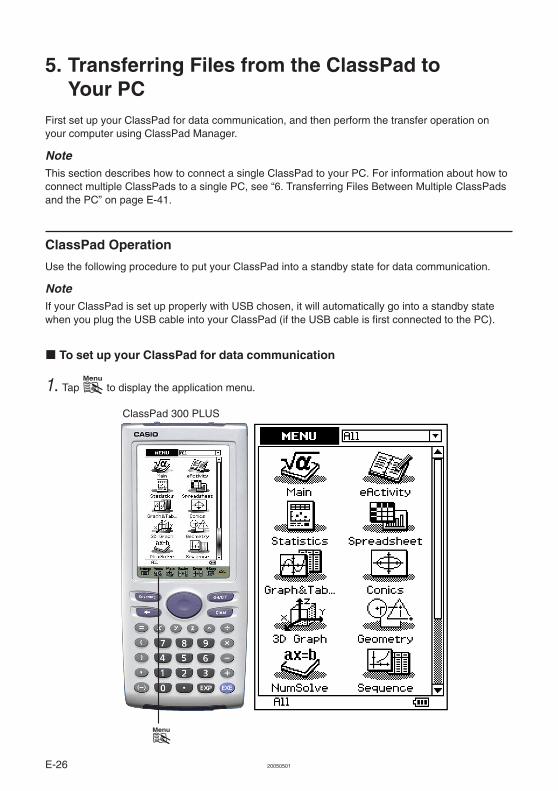
k To set up your ClassPad for data communication
1. Tap m to display the application menu.
ClassPad 300 PLUS
m

E-2720050501
5. Transferring Files from the ClassPad to Your PC
2. Scroll down the Menu and tap B.
E-28 20050501
5. Transferring Files from the ClassPad to Your PC
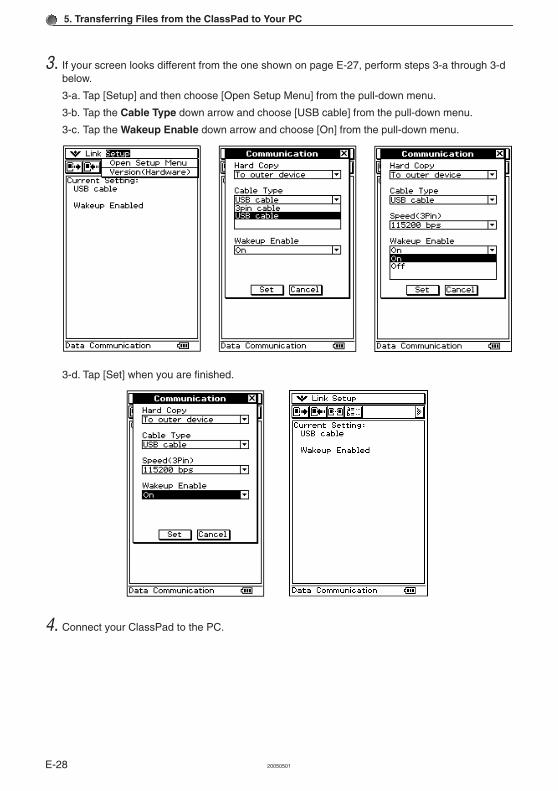
3-d. Tap [Set] when you are finished.
3. If your screen looks different from the one shown on page E-27, perform steps 3-a through 3-dbelow.
3-a. Tap [Setup] and then choose [Open Setup Menu] from the pull-down menu.
3-b. Tap the Cable Type down arrow and choose [USB cable] from the pull-down menu.
3-c. Tap the Wakeup Enable down arrow and choose [On] from the pull-down menu.
4. Connect your ClassPad to the PC.
E-2920050501
5. Transferring Files from the ClassPad to Your PC
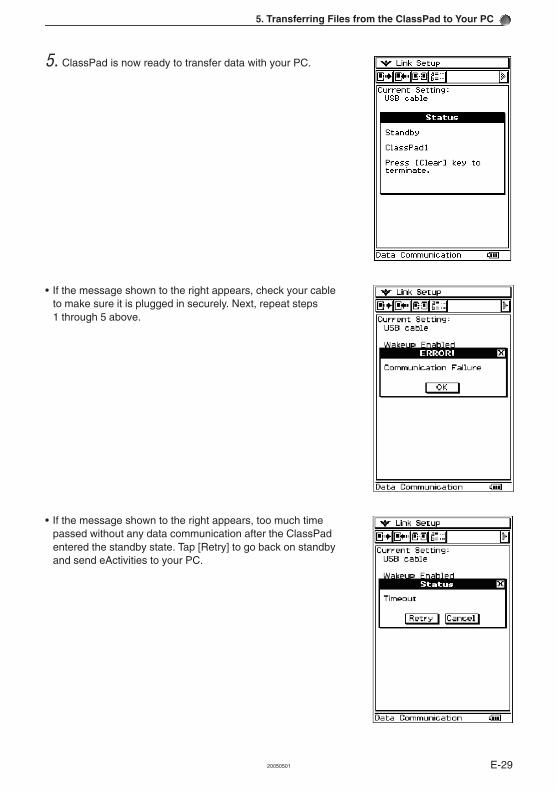
5. ClassPad is now ready to transfer data with your PC.
• If the message shown to the right appears, too much timepassed without any data communication after the ClassPadentered the standby state. Tap [Retry] to go back on standbyand send eActivities to your PC.
• If the message shown to the right appears, check your cableto make sure it is plugged in securely. Next, repeat steps1 through 5 above.

E-30 20050501
5. Transferring Files from the ClassPad to Your PC
Using ClassPad Manager
The following procedures explain how to perform various data transfer and other operations usingClassPad Manager.
k To establish a connection between your ClassPad and ClassPad Manager
1. After setting up your ClassPad for data communication (page E-26), start up the ClassPadManager.
2. Move the cursor to the ClassPad Manager window and right-click your mouse.
E-3120050501
5. Transferring Files from the ClassPad to Your PC
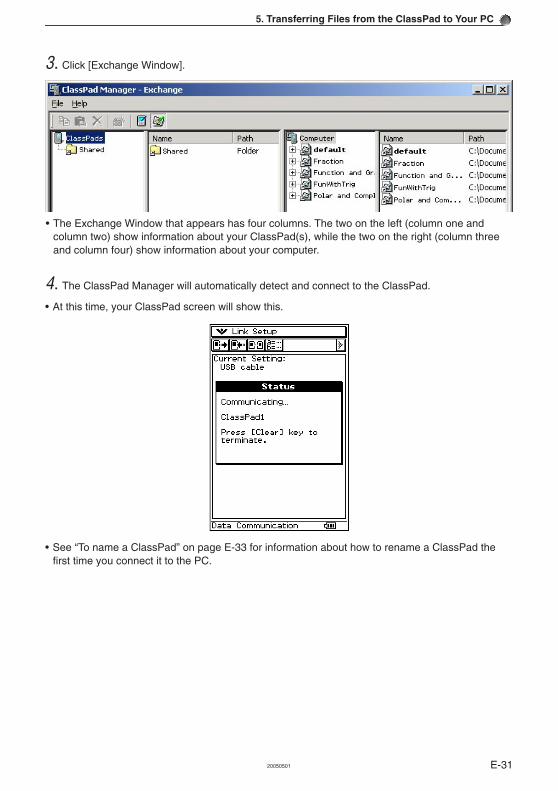
• The Exchange Window that appears has four columns. The two on the left (column one andcolumn two) show information about your ClassPad(s), while the two on the right (column threeand column four) show information about your computer.
3. Click [Exchange Window].
4. The ClassPad Manager will automatically detect and connect to the ClassPad.
• At this time, your ClassPad screen will show this.
• See “To name a ClassPad” on page E-33 for information about how to rename a ClassPad thefirst time you connect it to the PC.
E-32 20050501
5. Transferring Files from the ClassPad to Your PC
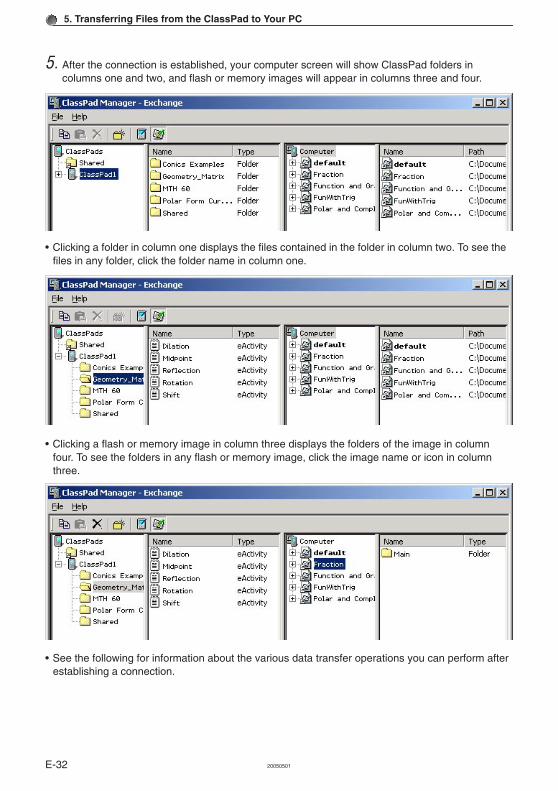
• Clicking a folder in column one displays the files contained in the folder in column two. To see thefiles in any folder, click the folder name in column one.
• Clicking a flash or memory image in column three displays the folders of the image in columnfour. To see the folders in any flash or memory image, click the image name or icon in columnthree.
• See the following for information about the various data transfer operations you can perform afterestablishing a connection.
5. After the connection is established, your computer screen will show ClassPad folders incolumns one and two, and flash or memory images will appear in columns three and four.
E-3320050501
5. Transferring Files from the ClassPad to Your PC
k To name a ClassPad
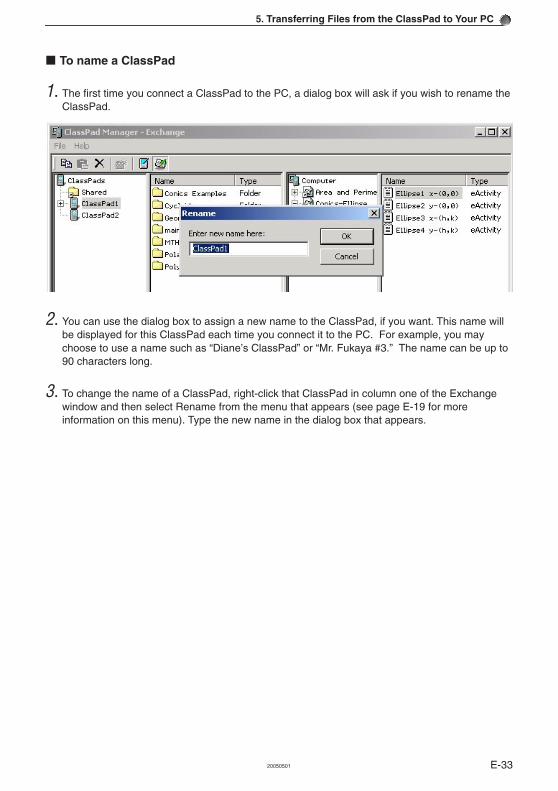
1. The first time you connect a ClassPad to the PC, a dialog box will ask if you wish to rename theClassPad.
2. You can use the dialog box to assign a new name to the ClassPad, if you want. This name willbe displayed for this ClassPad each time you connect it to the PC. For example, you maychoose to use a name such as “Diane’s ClassPad” or “Mr. Fukaya #3.” The name can be up to90 characters long.
3. To change the name of a ClassPad, right-click that ClassPad in column one of the Exchangewindow and then select Rename from the menu that appears (see page E-19 for moreinformation on this menu). Type the new name in the dialog box that appears.

E-34 20050501
5. Transferring Files from the ClassPad to Your PC
k To transfer a single folder
1. Start up ClassPad Manager and establish a connection with your ClassPad.
2. In column one of the ClassPad Manager Exchange Window, select the folder you want totransfer.
• To transfer the “test” folder (and its contents), click “test”. This will list its files in column two.Instead of transferring images to an existing image, you could also add a new image (page E-48)and transfer the images there.
3. Use your mouse to drag the selected folder to a flash or memory image in column three. Whenyou release the mouse button, the copied folder will appear in column three. Clicking the folderdisplays its files in column four.
4. Repeat steps 2 and 3 to transfer more folders, if you want.
5. After you are finished, terminate the connection between your ClassPad and computer (seepage E-39).

E-3520050501
5. Transferring Files from the ClassPad to Your PC
k To transfer multiple folders
1. Start up ClassPad Manager and establish a connection with your ClassPad.
2. In column one of the ClassPad Manager Exchange Window, click your ClassPad icon displayedunder .
• This displays the folders in column two.
3. Select all of the folders you want to transfer.
4. Use your mouse to drag the selected folders to a flash or memory image in column three. Whenyou release the mouse button, the copied folders will appear in column three. Clicking a folderdisplays its files in column four. Instead of transferring images to an existing image, you couldalso add a new image (page E-48) and transfer the images there.
5. Repeat steps 3 and 4 to transfer more folders, if you want.
6. After you are finished, terminate the connection between your ClassPad and computer (seepage E-39).

E-36 20050501
5. Transferring Files from the ClassPad to Your PC
k To transfer selected files to a folder
1. Start up ClassPad Manager and establish a connection with your ClassPad.
2. In column two, select the file(s) you want to transfer.
3. In column three, click the folder to which you want to transfer the file(s).
• Here you could create a new folder and transfer the file(s) to it, if you want. See “To create a newfolder” on page E-37 for more information.

E-3720050501
5. Transferring Files from the ClassPad to Your PC
4. Drag the selected files in column two to the folder in column three or to the list of files in columnfour. When you release the mouse button, the transferred files will appear in column four.
5. Repeat steps 2 through 4 to transfer more files, if you want.
6. After you are finished, terminate the connection between your ClassPad and computer (seepage E-39).
k To create a new folder
1. In column three of the Exchange Window, click the flash or memory image where you want tocreate a new folder.
2. Click the (New Folder) button on the [Computer] toolbar.
E-38 20050501
5. Transferring Files from the ClassPad to Your PC
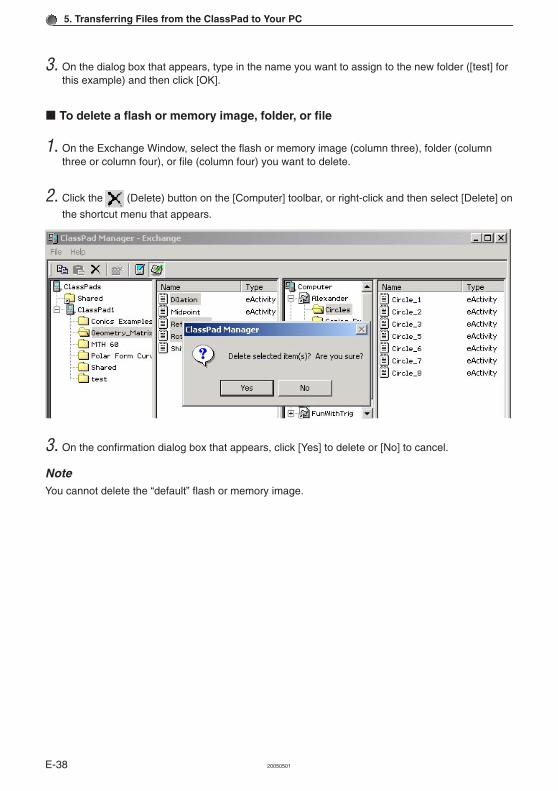
3. On the dialog box that appears, type in the name you want to assign to the new folder ([test] forthis example) and then click [OK].
k To delete a flash or memory image, folder, or file
1. On the Exchange Window, select the flash or memory image (column three), folder (columnthree or column four), or file (column four) you want to delete.
2. Click the (Delete) button on the [Computer] toolbar, or right-click and then select [Delete] on
the shortcut menu that appears.
3. On the confirmation dialog box that appears, click [Yes] to delete or [No] to cancel.
NoteYou cannot delete the “default” flash or memory image.
E-3920050501
5. Transferring Files from the ClassPad to Your PC
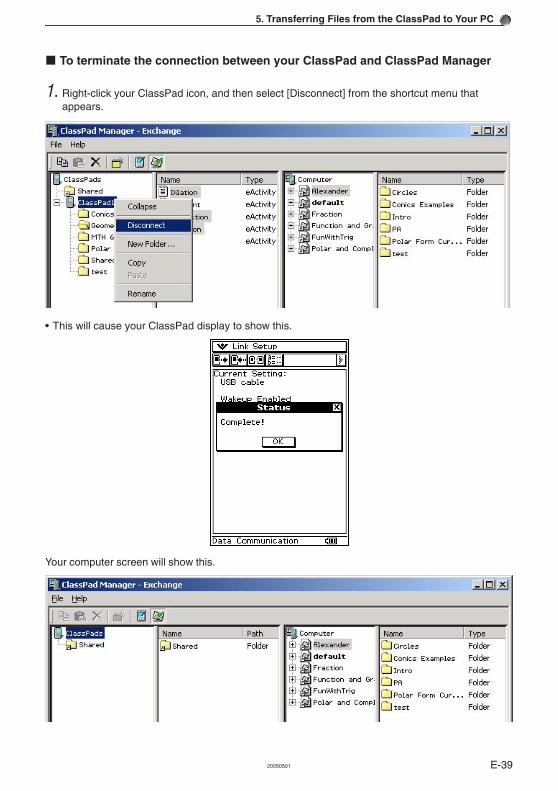
k To terminate the connection between your ClassPad and ClassPad Manager
1. Right-click your ClassPad icon, and then select [Disconnect] from the shortcut menu thatappears.
Your computer screen will show this.
• This will cause your ClassPad display to show this.

E-40 20050501
5. Transferring Files from the ClassPad to Your PC
Transferring eActivity Files
You can use ClassPad Manager to transfer eActivity files between your ClassPad and computer.Before doing so, however, you should check the version numbers of the ClassPad Managerapplication running on your computer and the operating system running on your ClassPad to makesure they are compatible with each other. Note that you will be able to transfer eActivity files only ifthe leading four digits of the ClassPad Manager application and the ClassPad operating system areidentical.
ClassPad Version Dialog Box ClassPad Manager Version Dialog Box
• See the ClassPad User’s Guide for information about viewing the ClassPad version number.
• See “1. Updating the Software/Installing the Software” for information about viewing the ClassPadManager version number (page E-14).
Important!• You will not be able to transfer data between ClassPad Manager and your ClassPad unless the
leading four digits of the version numbers are identical.
• If the leading four digits of the ClassPad Manager application version number and the ClassPadoperating system version number do not match, it means that they are equipped with functionsthat are different from each other. Because of this, their eActivity files will not be compatible. Donot try to exchange eActivity files when the leading four digits of the version numbers do notmatch.

E-4120050501
6. Transferring Files Between Multiple ClassPadsand the PC
Before Connecting ClassPads to the PC
1. Make sure that the ClassPads are set up for data communication via USB. If this is the firsttime you are connecting the ClassPads to the PC, follow the instructions on pages E-26 toE-29. If you have connected the ClassPads to a PC before, they should already be set up fordata communication.
2. You can use a USB hub to connect more than one ClassPads at a time to the PC. Performancemay vary depending on the type of USB hub you use. If you plan to use a hub, refer to themanufacturer’s instructions for installation and use.
3. Connect each ClassPad USB cable to the PC or the USB hub.
Connecting Multiple ClassPads to the PC
k To open the Exchange Window
1. Open ClassPad Manager on the PC.
2. Right-click anywhere on ClassPad Manager.

E-42 20050501
6. Transferring Files Between Multiple ClassPads and the PC
3. Choose [Exchange Window] from the menu that appears.
4. The Exchange Window is now ready to use.

E-4320050501
6. Transferring Files Between Multiple ClassPads and the PC
k To establish connections between multiple ClassPads and ClassPad Manager
Important!Connect the ClassPads one at a time. Do not connect a new ClassPad until you confirm that thefirst one has successfully connected.
1. Connect a ClassPad to a cable. The message “Standby. Press [Clear] key to terminate” shouldbe displayed on each ClassPad.
See page E-29 for a picture of what the ClassPad will display.
2. The PC will recognize the ClassPad as new hardware. Follow the instructions that appear onyour computer screen to approve the ClassPad as new hardware.
Important!If your PC is running Windows XP, be sure to choose [Continue Anyway] in the HardwareInstallation dialog box that appears the first time a ClassPad is connected to a USB port. Seepage E-11 for more information about connecting to a PC running Windows XP.
3. ClassPad Manager will automatically detect and connect to the ClassPad.
4. Once the ClassPad has been named (see “To name a ClassPad” on page E-33) and isdisplayed in column one of ClassPad Manager, continue connecting the other ClassPads one ata time until all are connected.
E-44 20050501
6. Transferring Files Between Multiple ClassPads and the PC
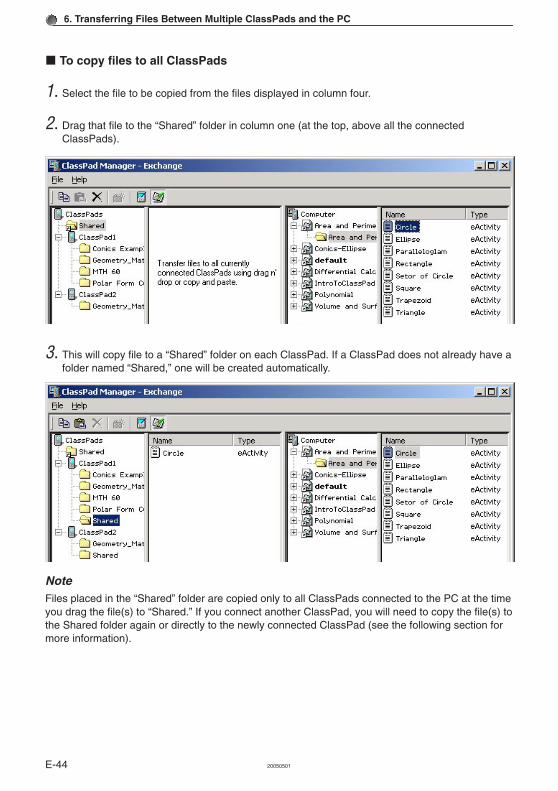
k To copy files to all ClassPads
1. Select the file to be copied from the files displayed in column four.
2. Drag that file to the “Shared” folder in column one (at the top, above all the connectedClassPads).
3. This will copy file to a “Shared” folder on each ClassPad. If a ClassPad does not already have afolder named “Shared,” one will be created automatically.
NoteFiles placed in the “Shared” folder are copied only to all ClassPads connected to the PC at the timeyou drag the file(s) to “Shared.” If you connect another ClassPad, you will need to copy the file(s) tothe Shared folder again or directly to the newly connected ClassPad (see the following section formore information).

E-4520050501
6. Transferring Files Between Multiple ClassPads and the PC
2. Under the name of the ClassPad you expanded in step 1, click the folder. The files in that folderwill now be listed in column two.
3. In column two, select the files you want to copy. To select multiple files hold the “Ctrl” key whileclicking each file.
k To copy files from one ClassPad to all other connected ClassPads
1. In column one, click the “+” next to the name of the ClassPad that contains the files you want tocopy.

E-46 20050501
6. Transferring Files Between Multiple ClassPads and the PC
4. Drag the file(s) to the “Shared” folder at the top of column one.
k To copy files from one ClassPad to one specific connected ClassPad
1. Perform steps 1 through 3 under “To copy files from one ClassPad to all other connectedClassPads” to select the file(s) you want to copy.
2. Click the “+” next to the name of the ClassPad to which you want to copy the file.
• This will display the folders currently in this ClassPad. If you wish to create a new folder, refer topages E-37 and E-38.

E-4720050501
6. Transferring Files Between Multiple ClassPads and the PC
3. Drag the files from column two to the appropriate folder on the destination ClassPad.
• To verify that transfer was successful, click the folder on the destination ClassPad.
k To disconnect the ClassPads from the ClassPad Manager
1. In column one, right-click the ClassPad you want to disconnect.
2. On the menu that appears, choose [Disconnect].
3. Repeat steps 1 and 2 for each ClassPad you wish to disconnect.
NoteIf you close the Exchange Window, any connected ClassPads will be disconnected and the“Complete!” dialog box will appear on the display.

E-48 20050501
7. Adding a Flash Image or Memory ImageYou can add a flash image or memory image starting either from the ClassPad Manager screen, orfrom the Exchange Window.
From the ClassPad Manager Screen
Use the following procedures to add a flash image or a memory image from the ClassPad Managerscreen.
k To add a flash image from the ClassPad Manager screen
1. Right-click the ClassPad Manager and then select [Flash Image] / [New] on the shortcut menuthat appears.

E-4920050501
7. Adding a Flash Image or Memory Image
2. Type in the name you want to assign to the image, and then click [Save].
E-50 20050501
7. Adding a Flash Image or Memory Image
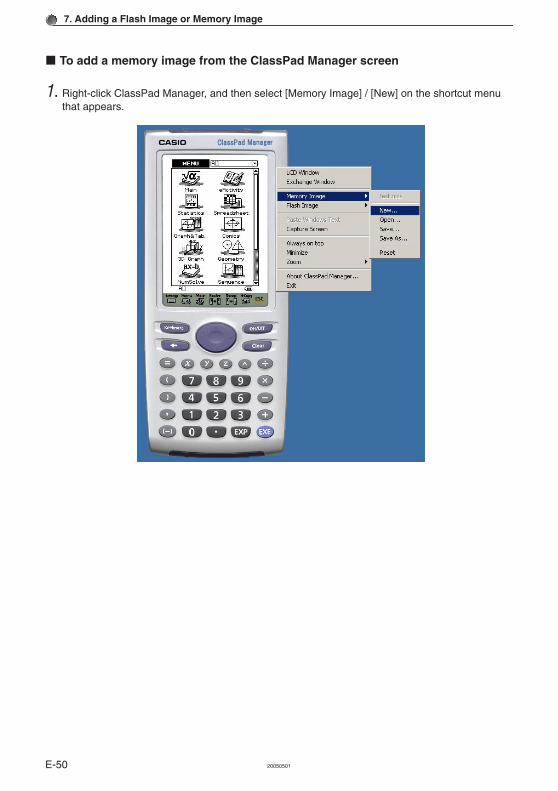
k To add a memory image from the ClassPad Manager screen
1. Right-click ClassPad Manager, and then select [Memory Image] / [New] on the shortcut menuthat appears.

E-5120050501
7. Adding a Flash Image or Memory Image
2. Type in the name you want to assign to the image, and then click [Save].
E-52 20050501
7. Adding a Flash Image or Memory Image
From the Exchange Window
You can also add a flash image or memory image from the Exchange Window. The followingprocedure shows how to add a flash image. The procedure for adding a memory image is virtuallyidentical.
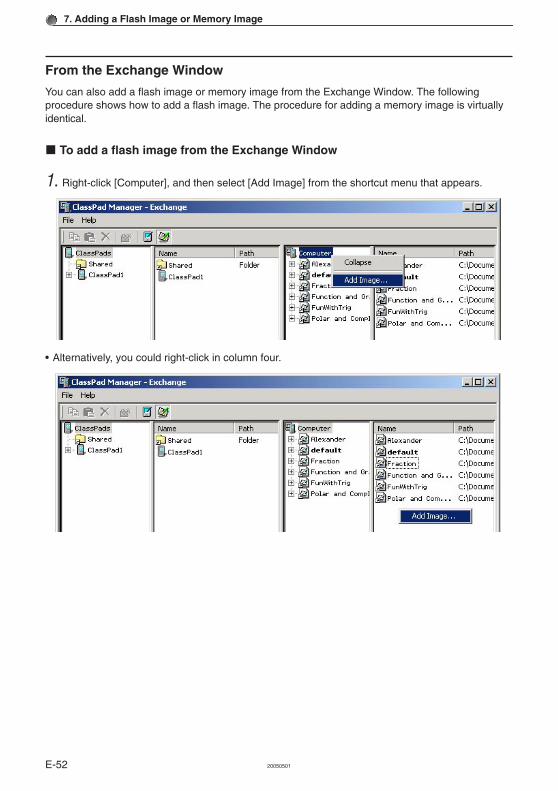
k To add a flash image from the Exchange Window
1. Right-click [Computer], and then select [Add Image] from the shortcut menu that appears.
• Alternatively, you could right-click in column four.
E-5320050501
7. Adding a Flash Image or Memory Image
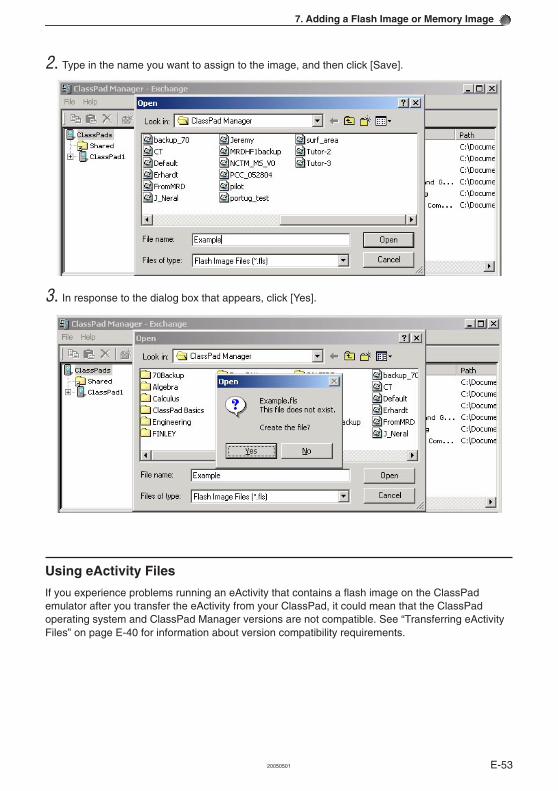
2. Type in the name you want to assign to the image, and then click [Save].
Using eActivity Files
If you experience problems running an eActivity that contains a flash image on the ClassPademulator after you transfer the eActivity from your ClassPad, it could mean that the ClassPadoperating system and ClassPad Manager versions are not compatible. See “Transferring eActivityFiles” on page E-40 for information about version compatibility requirements.
3. In response to the dialog box that appears, click [Yes].
E-54 20050501
8. Handling Flash Images or Memory ImagesYou can perform the following operations using the Exchange Window:
• Remove an image from the Exchange Window• Insert an existing image to the Exchange Window• Move an image from one location on your PC to another• Change the name of an image
k To remove an image from the Exchange Window
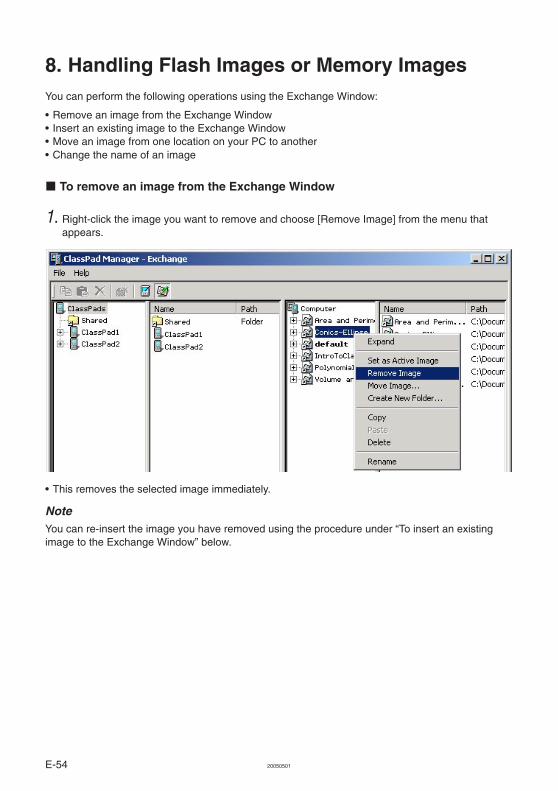
1. Right-click the image you want to remove and choose [Remove Image] from the menu thatappears.
• This removes the selected image immediately.
NoteYou can re-insert the image you have removed using the procedure under “To insert an existingimage to the Exchange Window” below.

E-5520050501
8. Handling Flash Images or Memory Images
k To insert an existing image to the Exchange Window
1. Right-click [Computer], and choose [Add Image] from the shortcut menu that appears. Thisdisplays an open dialog box.
• Alternatively, you could right-click in column four.
E-56 20050501
8. Handling Flash Images or Memory Images
k To move an image from one location on your PC to another
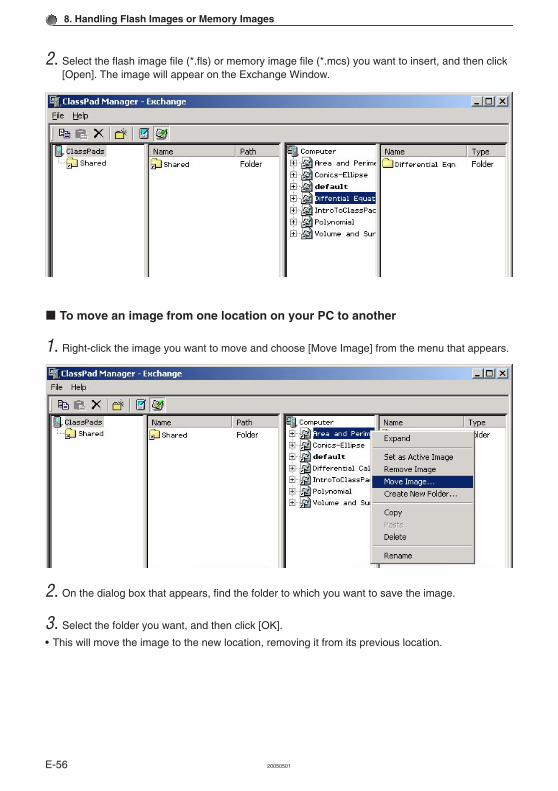
1. Right-click the image you want to move and choose [Move Image] from the menu that appears.
2. On the dialog box that appears, find the folder to which you want to save the image.
3. Select the folder you want, and then click [OK].
• This will move the image to the new location, removing it from its previous location.
2. Select the flash image file (*.fls) or memory image file (*.mcs) you want to insert, and then click[Open]. The image will appear on the Exchange Window.

E-5720050501
8. Handling Flash Images or Memory Images
k To rename an image
1. Right-click the image you want to rename and then choose [Rename].
2. Type the new name in the dialog box that appears, and then choose [OK].
• This will rename the image.

CASIO COMPUTER CO., LTD.
6-2, Hon-machi 1-chomeShibuya-ku, Tokyo 151-8543, Japan
SA0506-A