Embed Size (px)
Citation preview

Item #PBECIM
Cascade Box &Pump Canyon
Installation Manual
Choose Cascade Box Location
a. TheCascadeboxisbestpositionedsothatyoucanviewitfromtheoutdoorandindoorareaswhereyouplantoenjoyyournewwaterfeature.
Install Diffuser Mat
a. PositiontheblackdiffusermathorizontallyinthemiddleoftheCascadeBox.Itshouldpinchintoplaceeasily.
1a.
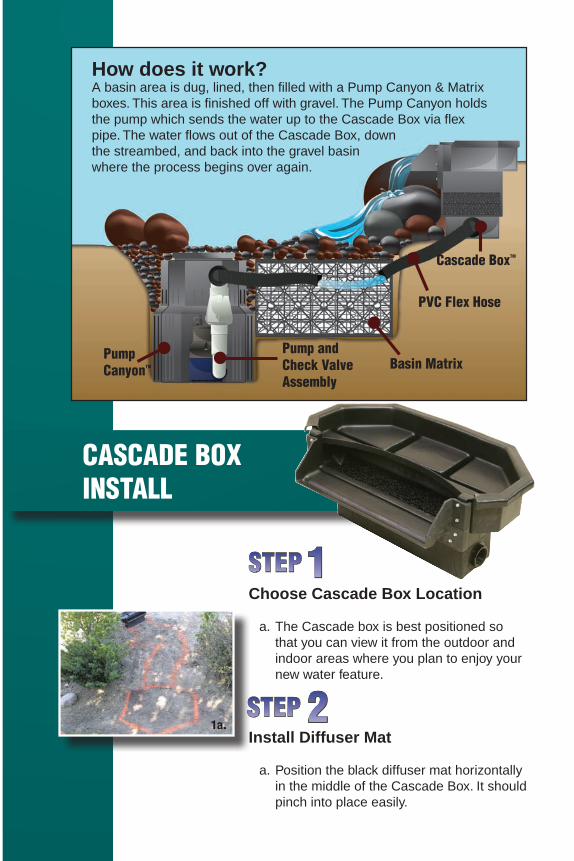
PumpCanyonTM
Pump andCheck ValveAssembly
Basin Matrix
PVC Flex Hose
Cascade BoxTM
How does it work?Abasinareaisdug,lined,thenfilledwithaPumpCanyon&Matrixboxes.Thisareaisfinishedoffwithgravel.ThePumpCanyonholdsthepumpwhichsendsthewateruptotheCascadeBoxviaflexpipe.ThewaterflowsoutoftheCascadeBox,downthestreambed,andbackintothegravelbasinwheretheprocessbeginsoveragain.
CAsCAdE BoxInsTAll
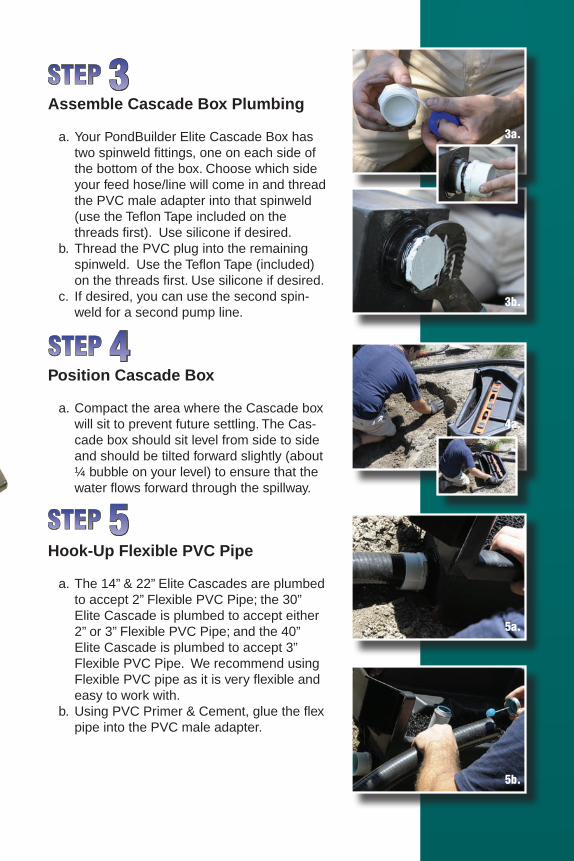
Assemble Cascade Box Plumbing
a. YourPondBuilderEliteCascadeBoxhastwospinweldfittings,oneoneachsideofthebottomofthebox.Choosewhichsideyourfeedhose/linewillcomeinandthreadthePVCmaleadapterintothatspinweld(usetheTeflonTapeincludedonthethreadsfirst).Usesiliconeifdesired.
b. ThreadthePVCplugintotheremainingspinweld.UsetheTeflonTape(included)onthethreadsfirst.Usesiliconeifdesired.
c. Ifdesired,youcanusethesecondspin-weldforasecondpumpline.
Position Cascade Box
a. CompacttheareawheretheCascadeboxwillsittopreventfuturesettling.TheCas-cadeboxshouldsitlevelfromsidetosideandshouldbetiltedforwardslightly(about¼bubbleonyourlevel)toensurethatthewaterflowsforwardthroughthespillway.
Hook-Up Flexible PVC Pipe
a. The14”&22”EliteCascadesareplumbedtoaccept2”FlexiblePVCPipe;the30”EliteCascadeisplumbedtoaccepteither2”or3”FlexiblePVCPipe;andthe40”EliteCascadeisplumbedtoaccept3”FlexiblePVCPipe.WerecommendusingFlexiblePVCpipeasitisveryflexibleandeasytoworkwith.
b. UsingPVCPrimer&Cement,gluetheflexpipeintothePVCmaleadapter.
5a.
4a.
3b.
3a.
5b.

Attach Liner to Cascade Box
a. BringthelineruptothefaceoftheCas-cadeboxandcheckthepositioningofthelineragainsttheCascadebox.Usethelinerclips(included)totemporarilyholdthelinertothebox.ThelinershouldfollowthecontoursofthestreamandthefaceoftheCascadebox.ItisagoodideatoleavealittleslackinthelinerwhereittransitionsfromthestreambottomtothefaceoftheCascadebox.ThiswillensurethattheweightoftherocksusedinthefallswillnotpulldownonthelineronceitisattachedtotheCascadebox.
b. KneelinfrontoftheCascadeboxandhavethefollowingwithinreach:cordlessscrewdriver,5/16”nutdriverbit,Cascadeweir(included),silicone(included),stain-lesssteelscrews(included),utilityknife(withnewblade),andacleanrag.
c. KneelinginfrontoftheCascadeboxremovethelinerclipsandfoldthelinerbacktowardyouleavingittorestonyourlap.UsingthecleanragwipedownthefaceoftheCascadeboxaroundtheareawheresiliconewillbeapplied.AlsocleantheareaonthelinerthatwillbecomingincontactwiththeareayoucleanedontheCascadebox.
d. ApplyabeadofsiliconealongthesidesandbottomoftheopeningonthefaceoftheCascade,keepingthesiliconebeadcenteredtheentireway.
e. BringthelinerbackupintopositionagainstthefaceoftheCascadebox.Holdthelinerinplaceagainwiththelinerclipstohelpkeepitfrommovingaroundaswepreparetoattachtheweir.Gentlyrunyourfingersalongthelinerovertheareawhereyouappliedthesiliconeandflattenthebeadoutslightly.Thiswillhelpensureamoreevendistributionofthesiliconeaswecompressitwhenwescrewdowntheweir.
6a.
6d.
6e.
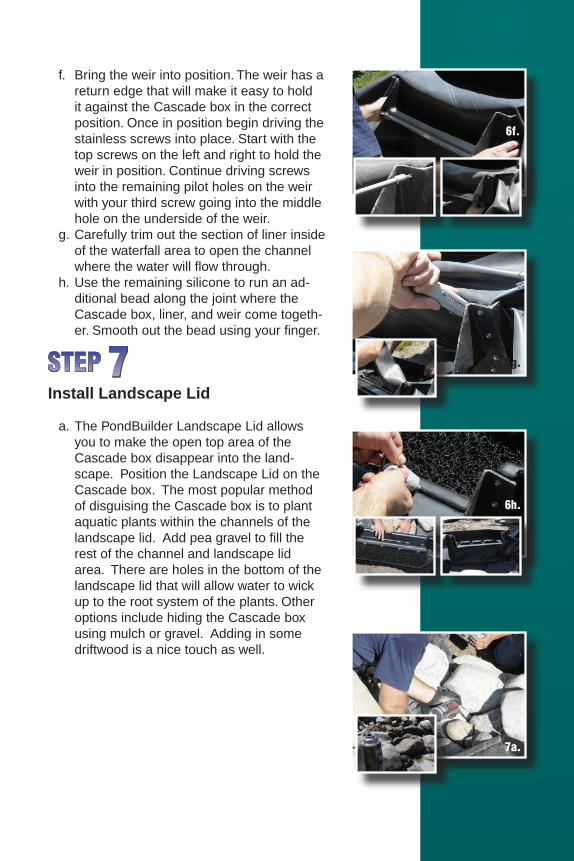
f. Bringtheweirintoposition.TheweirhasareturnedgethatwillmakeiteasytoholditagainsttheCascadeboxinthecorrectposition.Onceinpositionbegindrivingthestainlessscrewsintoplace.Startwiththetopscrewsontheleftandrighttoholdtheweirinposition.Continuedrivingscrewsintotheremainingpilotholesontheweirwithyourthirdscrewgoingintothemiddleholeontheundersideoftheweir.
g. Carefullytrimoutthesectionoflinerinsideofthewaterfallareatoopenthechannelwherethewaterwillflowthrough.
h. Usetheremainingsiliconetorunanad-ditionalbeadalongthejointwheretheCascadebox,liner,andweircometogeth-er.Smoothoutthebeadusingyourfinger.
Install Landscape Lid
a. ThePondBuilderLandscapeLidallowsyoutomaketheopentopareaoftheCascadeboxdisappearintotheland-scape.PositiontheLandscapeLidontheCascadebox.ThemostpopularmethodofdisguisingtheCascadeboxistoplantaquaticplantswithinthechannelsofthelandscapelid.Addpeagraveltofilltherestofthechannelandlandscapelidarea.Thereareholesinthebottomofthelandscapelidthatwillallowwatertowickuptotherootsystemoftheplants.OtheroptionsincludehidingtheCascadeboxusingmulchorgravel.Addinginsomedriftwoodisanicetouchaswell.
6f.
6h.
6g.
7a.
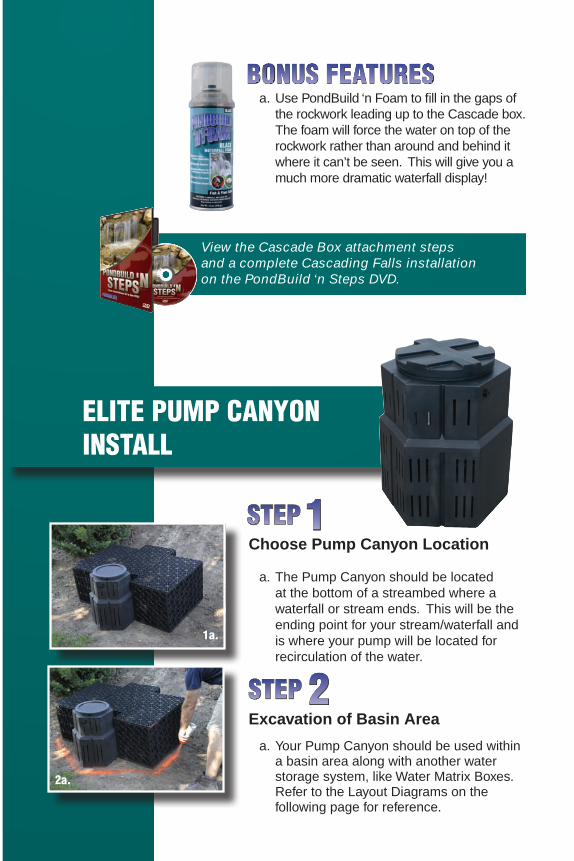
a. UsePondBuild‘nFoamtofillinthegapsoftherockworkleadinguptotheCascadebox.Thefoamwillforcethewaterontopoftherockworkratherthanaroundandbehinditwhereitcan’tbeseen.Thiswillgiveyouamuchmoredramaticwaterfalldisplay!
Choose Pump Canyon Location
a. ThePumpCanyonshouldbelocatedatthebottomofastreambedwhereawaterfallorstreamends.Thiswillbetheendingpointforyourstream/waterfallandiswhereyourpumpwillbelocatedforrecirculationofthewater.
Excavation of Basin Area
a. YourPumpCanyonshouldbeusedwithinabasinareaalongwithanotherwaterstoragesystem,likeWaterMatrixBoxes.RefertotheLayoutDiagramsonthefollowingpageforreference.
1a.
2a.
View the Cascade Box attachment steps and a complete Cascading Falls installation on the PondBuild ‘n Steps DVD.
ElITE PuMP CAnyonInsTAll
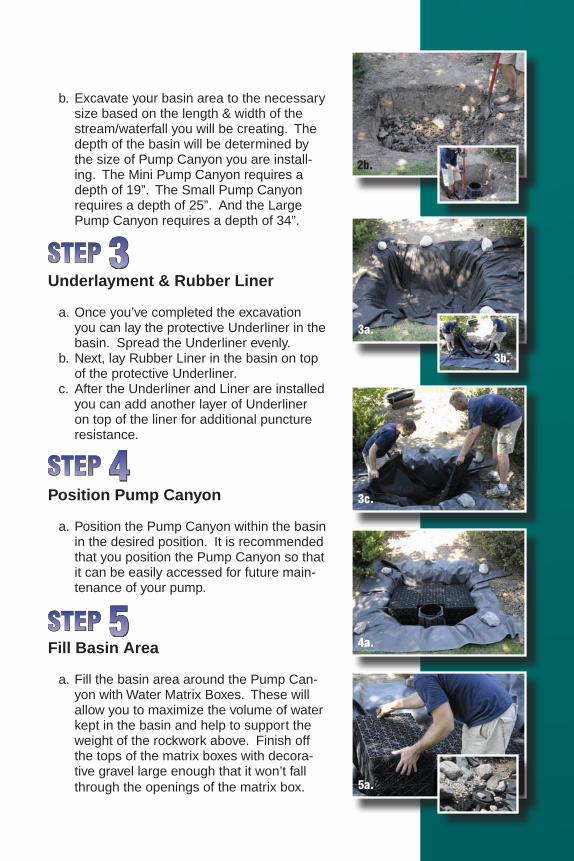
b. Excavateyourbasinareatothenecessarysizebasedonthelength&widthofthestream/waterfallyouwillbecreating.ThedepthofthebasinwillbedeterminedbythesizeofPumpCanyonyouareinstall-ing.TheMiniPumpCanyonrequiresadepthof19”.TheSmallPumpCanyonrequiresadepthof25”.AndtheLargePumpCanyonrequiresadepthof34”.
Underlayment & Rubber Liner
a. Onceyou’vecompletedtheexcavationyoucanlaytheprotectiveUnderlinerinthebasin.SpreadtheUnderlinerevenly.
b. Next,layRubberLinerinthebasinontopoftheprotectiveUnderliner.
c. AftertheUnderlinerandLinerareinstalledyoucanaddanotherlayerofUnderlinerontopofthelinerforadditionalpunctureresistance.
Position Pump Canyon
a. PositionthePumpCanyonwithinthebasininthedesiredposition.ItisrecommendedthatyoupositionthePumpCanyonsothatitcanbeeasilyaccessedforfuturemain-tenanceofyourpump.
Fill Basin Area
a. FillthebasinareaaroundthePumpCan-yonwithWaterMatrixBoxes.Thesewillallowyoutomaximizethevolumeofwaterkeptinthebasinandhelptosupporttheweightoftherockworkabove.Finishoffthetopsofthematrixboxeswithdecora-tivegravellargeenoughthatitwon’tfallthroughtheopeningsofthematrixbox.
2b.
3a.
3c.
4a.
3b.
5a.

Add in Submersible Pump
a. TheMiniPumpCanyoncanhandlepumpswithvolumesupto2500gph(gallonsperhour).
b. TheSmallPumpCanyoncanhandlepumpswithvolumesupto7500gph.
c. TheLargePumpCanyoncanhandlepumpswithvolumesupto20,000gph.
d. PlaceanappropriatelysizedpumpintothePumpCanyonandconnecttotheflexpiperunninguptoCascadeBox.
Mark Canyon Location
SetaflatrockoverthelidofthePumpCanyonasanidentifiersoyouknowwhereitislocated.
Optional Automatic Water Fill Kit
a. Dependingonanumberoffactorsupto1/2”ofevaporationispossibleperday.Youcaneitherfillthebasinfromagar-denhoseorinstallanautomaticwaterfillkit(Item#PB1342).Thiskitcanbecon-nectedtoanygardenhoseconnectionorirrigationlinetoautomaticallyreplaceanyevaporatedwater.SeeyourPond-Builderdealerforadditionalinfo.
8a.
7.
6d.
www.pondbuilder.com
Cascade BoxTM
Pump CanyonTM
Auto Fill Valve