Embed Size (px)
Citation preview
3201 W. Temple Ave. Ste 250
Pomona, CA 91768
For Assistance or Technical Support 800-925-1525 or 909-859-2040
Customer Support Hours: M-F 8:30AM – 9:00PM
Sat-Sun: 10:00AM-3:00PM
www.crmls.org
CARETS Commercial
Member Manual
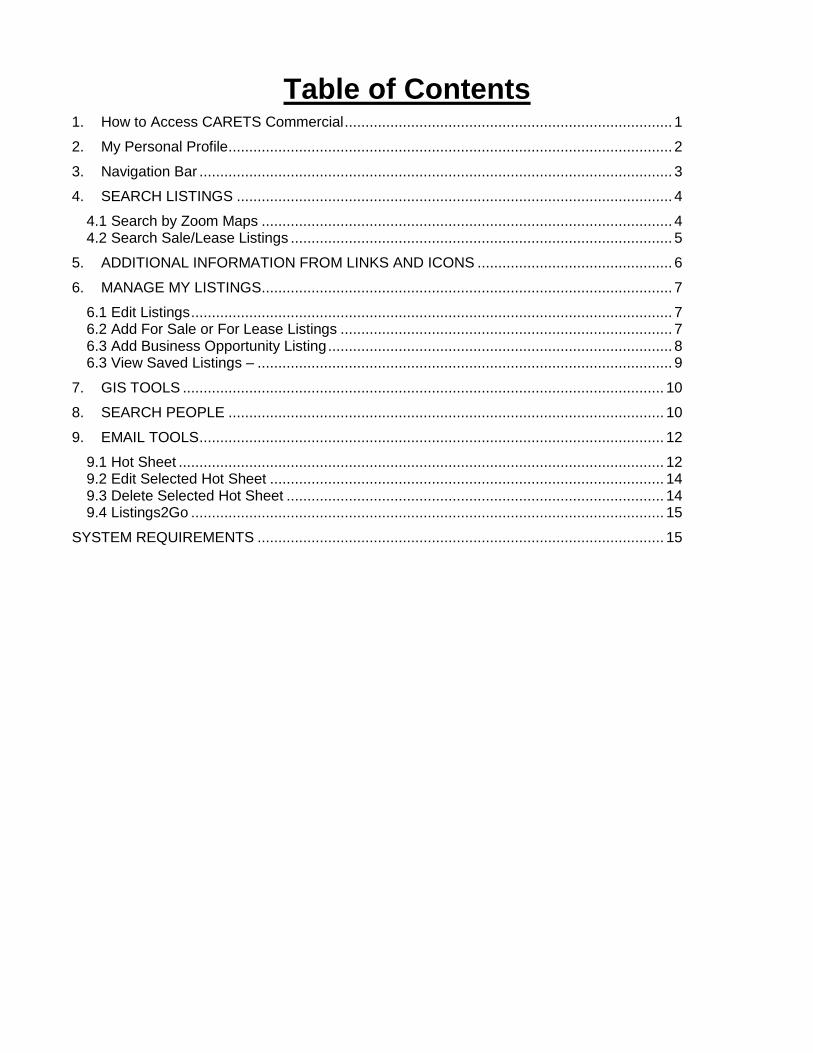
Table of Contents 1. How to Access CARETS Commercial ............................................................................... 1
2. My Personal Profile ........................................................................................................... 2
3. Navigation Bar .................................................................................................................. 3
4. SEARCH LISTINGS ......................................................................................................... 4
4.1 Search by Zoom Maps ................................................................................................... 4 4.2 Search Sale/Lease Listings ............................................................................................ 5
5. ADDITIONAL INFORMATION FROM LINKS AND ICONS ............................................... 6
6. MANAGE MY LISTINGS ................................................................................................... 7
6.1 Edit Listings .................................................................................................................... 7 6.2 Add For Sale or For Lease Listings ................................................................................ 7 6.3 Add Business Opportunity Listing ................................................................................... 8 6.3 View Saved Listings – .................................................................................................... 9
7. GIS TOOLS .................................................................................................................... 10
8. SEARCH PEOPLE ......................................................................................................... 10
9. EMAIL TOOLS ................................................................................................................ 12
9.1 Hot Sheet ..................................................................................................................... 12 9.2 Edit Selected Hot Sheet ............................................................................................... 14 9.3 Delete Selected Hot Sheet ........................................................................................... 14 9.4 Listings2Go .................................................................................................................. 15
SYSTEM REQUIREMENTS .................................................................................................. 15

1
1. How to Access CARETS Commercial 1. To access CARETS Commercial log into CRMLS Matrix through www.crmls.org 2. From the Matrix Home tab click on CARETS Commercial under the External Links widget.
2
2. My Personal Profile
This feature shows your contact information and allows you to display a profile of your related experience. There are several heading and paragraph sections that allow you to customize the information the way you want it. This feature also allows you to specify your areas of specialty (i.e. leasing, sales, etc.) and which market areas you service. From the home page, click on My Profile.
1. You can add or change your photo here. 2. Enter your website address here. 3. Here you can enter up to four paragraphs with headings outlining yourself and your real estate
experience. 4. Select the specialties that best describe your areas of expertise. 5. Select your market areas.
When you are finished, click the Add/Update Information button at the bottom of the page.
To 2
1
3
4
5
2

3
3. Navigation Bar
Home – Entry page for the CARETS - Member Area Search Listings – ZoomMaps (search by mapping an area); Search Sale/Lease Listings (search both For Sale and For Lease listings); Search For Sale Listings (search only For Sale listings); Search For Lease Listings (search only For Lease listings); Search Business Opportunity Listings (search only Business Opportunity listings); Search by Listing Number; Search Building Directory; View Saved Searches; New For Lease (search only new For Lease listings); New For Sale (search only new For Sale listings); New Business Opportunity (search only new Business Opportunity listings). Manage My Listings – Edit Active Sale/Lease; Edit Off-Mkt Sale/Lease; Edit Bus Op; Add Sale/Lease; Add Bus Op; View Saved Listings. Here you can edit any of your existing listings, add any new listings and view any saved listings. GIS Tools – Parcel Locator for Los Angeles County, San Diego County, Riverside County, Ventura County, Kern County, Santa Barbara County, and San Bernardino County. Search People – Find a CARETS Member (Search for agent or office); My Online Address Book. Email Tools – Hot Sheet (customize your hot sheets); Listings2Go (send inventory reports). Contact Us – Contact information, office hours and location for CARETS. Logging out of CARETS - Member Area
When you are finished working in the Member Area, click the Logout button in the upper right corner of the screen or close your web browser.

4
4. SEARCH LISTINGS
4.1 Search by Zoom Maps From the drop-down menu under Search Listings, select ZoomMaps.
1. Draw a box around the area you wish to search. 2. If you want to search an irregularly shaped area, select Draw Polygon.
3. If you need to start over with mapping your area, select Clear Lines and start again.
4. You can also set some search parameters on the right side of screen.
5. Notice the listing count change as you tighten your mapping and/or parameters.
6. You can preview properties by clicking on the property icon on the map.
7. When ready, click View Results on bottom right of screen.

5
4.2 Search Sale/Lease Listings 1. From the drop-down menu under Search Listings, select Search Sale/Lease Listings.
For Sale Listings, Search For Lease Listings, and Search Business Opportunity Listings will follow the same steps outlined below. Step 1 – Enter your requirements
Begin with a broad search, narrowing your results with additional criteria as necessary.
Do not put commas or dollar signs in the List Price field.
Click on Market Area to select the area(s) you wish to search.
Step 2 – Display your results
Click on Display Count button at any time.
Search results will only be displayed when fewer than 200.
Step 3 – View your results
Click on the Continue button that will appear on top left of screen once you‟ve chose to Display Results.
Select whether to print or email the listings.
Choose which listings to print or email.
If printing – choose Print on left side at top of list, click on Generate Reports on right side at top of list, select report options (including saving listings to folder), print in regular or pdf format.
If emailing – choose Email on left side at top of list, click on Generate Reports on right side at top of list, input necessary information and click Send Email.
Options
Save Search, Refine Search, New Search, Download
To view or generate reports on your full search results click on the Check All button and then click on Generate Reports. See next page for additional viewing and management options.

6
5. ADDITIONAL INFORMATION FROM LINKS AND ICONS To view map of property, click directly on the address. To suggest a revision on a property, click Suggest Revision. To view the property listing history, click on Building History. To view current listings on the property, click on Building Listings. To view area demographics, click on Demographics. To view the property from various angles, click Bird‟s Eye View. When icons (as shown in Legend above) are available, you may also choose the following: System Flyer, Aerial Photo, Map, Additional Photos or Brokerage Flyer (PDF). Search by Listing Number – From the drop-down menu under Search Listings, select Search by Listing Number.
Select Property Type
Input Listing Number(s) Search Building Directory – From the drop-down menu under Search Listings, select Search Building Directory. Established building standards will help all members when searching for buildings, as well as avoid listing duplication. Use the following rules to search:
For best results, enter a broad search using only the first few letters of the street or property name to ensure a match.
Do not include words such as Drive, Street, Avenue, etc. or their associated abbreviation
Do not use punctuation marks View Saved Searches – From the drop-down menu under Search Listings, select View Saved Searches.
Select the saved search you wish to work with.
Choose whether you want to run the search, delete the search, or search since your last search.
Follow instructions for Search Sale/Lease Listings as previously discussed. New For Lease, New For Sale, New Business Opportunity – From the drop-down menu under Search Listings, select which new search to run. You will see a list of listings added over the last week.

7
6. MANAGE MY LISTINGS
6.1 Edit Listings From the drop-down menu under Manage My Listings, select which category to edit.
1. Select the listing you wish to edit from the displayed list. 2. Edit information as needed. 3. Click on Submit Listing at bottom of page.
6.2 Add For Sale or For Lease Listings From the drop-down menu under Manage My Listings, select Add Sale/Lease.
Add Listing to My Current Properties : if you have an existing listing for a building or property, you may add a new listing for that property from your Active Listings list.
To add a listing to one of your active properties, you may click the link and follow the instructions.
To add a listing to one of your off-market properties, you may either change the status of your off-market listing to “Available” or “Back on Market”, or you can use the Property Search form to find the building and auto-fill your listing input form.
Add Improved Property Listing: To add a new listing for improved property, use the form provided to search building directory. You will then be prompted to choose a building or enter a new building record. Add Land Listing: To add a new property record with land for sale or for lease, you may click the appropriate Land For SALE or Land For LEASE link and input as much information as possible. Mandatory fields are BOLD and accompanied by a red asterisk (*). NOTE: When inputting a listing, you choose whether or not to “Hold” that listing. If you choose “Yes”, the listing will be held in abeyance with a status of “Hold” and WILL NOT be displayed in CIE search results. However, you will be able to view and edit this listing along with all of your other active listings.

8
6.3 Add Business Opportunity Listing From the drop-down menu under Manage My Listings, select Add Bus Op.
Hold New Listing – Yes or No – When inputting a listing, you choose whether or not to “Hold” that listing. If you choose “Yes”, the listing will be held in abeyance with a status of “Hold” and WILL NOT be displayed in CIE search results. However, you will be able to view and edit this listing along with all of your other active listings. All other information areas – Input as much information as possible. Mandatory fields are BOLD and accompanied by a red asterisk (*). Click Submit Listing when input is complete.

9
Add Business Opportunity Listing – Continued
6.3 View Saved Listings – From the drop-down menu under Manage My Listings, select View Saved Listings.
Select the saved listing folder you wish to work with.
Choose whether you want to Display Listings or Delete Selected Folder.
Click Continue.
Follow instructions for Search Sale/Lease Listings shown on page 5 of this instruction manual.

10
7. GIS TOOLS This feature contains a Parcel Locator for Los Angeles County, San Diego County, Riverside County, Ventura County, Kern County, Santa Barbara County, and San Bernardino County.
8. SEARCH PEOPLE
Find a CARETS Member – From the drop-down menu under Search People, select Find a CARETS Member.
To search for agent – Select Search For Agent and input information as needed.
Click on Search.
A list of all possible matches will be displayed along with links for the following:
View my profile & listings Send Email Add to Address Book
To search for office – Select Search For Office and input information as needed.
Click on Search.
A list of all possible matches will be displayed along with links to View Agents in This Office.
Find parcel by address – input the address on the right, click on Search.
Find parcel by map – zoom in on map until you find the parcel, click parcel on map.
Once parcel is located, the parcel #, owner and address appear on right, along with a list of options.
Options include – Building Info, Tax Data, Add Lease Listing, Add Sale Listing, Available Space, Building History, Demographics, Bird‟s Eye View, Suggest Revision.

11
My Online Address Book – From the drop-down menu under Search People, select My Online Address Book. Here you can add all your important contacts to facilitate immediate access to client information and the ability to email listings from the website.
To Search Contacts:
Click on the first letter of the contacts last name.
Highlight name in Contact List, select desired action and click Continue. To Add Contacts:
Fill in form, select Add New Contact and click Continue. To Update Contacts:
Search per instructions above.
If updating, make any necessary changes, select Update Contact and click Continue. To Delete Contacts:
Search per instructions above.
If deleting, select Delete Contact and click Continue. To Export Address Book:
Click on link next to Export List.
12
9. EMAIL TOOLS
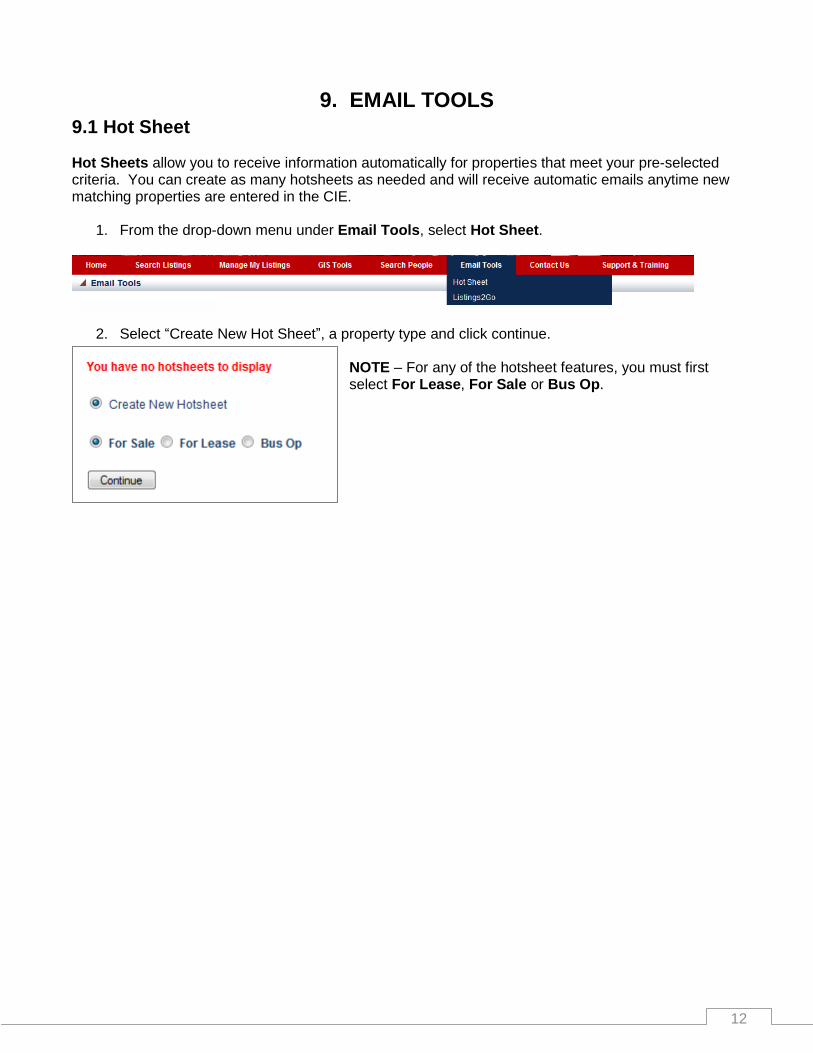
9.1 Hot Sheet Hot Sheets allow you to receive information automatically for properties that meet your pre-selected criteria. You can create as many hotsheets as needed and will receive automatic emails anytime new matching properties are entered in the CIE.
1. From the drop-down menu under Email Tools, select Hot Sheet.
2. Select “Create New Hot Sheet”, a property type and click continue. NOTE – For any of the hotsheet features, you must first select For Lease, For Sale or Bus Op.

13
3. To Create a New Hot Sheet name your hotsheet by typing into the Description field under
Hotsheet Information. Also choose Delivery Time. Look at the various headings and associated info for criteria you can use for your Hot Sheet.
4. You can choose how many “days back” your search should go by selecting the drop-down menu beside Date Entered under the Details heading.
5. 6. Make your selections and click Save Changes to save your Hot Sheet.
To Search Number of Days Back.

14
9.2 Edit Selected Hot Sheet
1. Choose a hotsheet from the list. Select Edit Selected Hotsheet. Click Continue. Make needed changes and click Save Changes.
9.3 Delete Selected Hot Sheet 1. choose a hotsheet from the list. Select Delete Selected Hotsheet. Click Continue.

15
9.4 Listings2Go
1. From the drop-down menu under Email Tools, select Listings2Go.
2. Listings2Go allows you to email your Office inventory and/or Broker inventory to one or more
recipients.
Simply type the email address for your intended recipient(s). If sending to multiple recipients, enter a semi-colon and a space between each email address. 3. Choose Report Type(s) and click on Email Report.
16
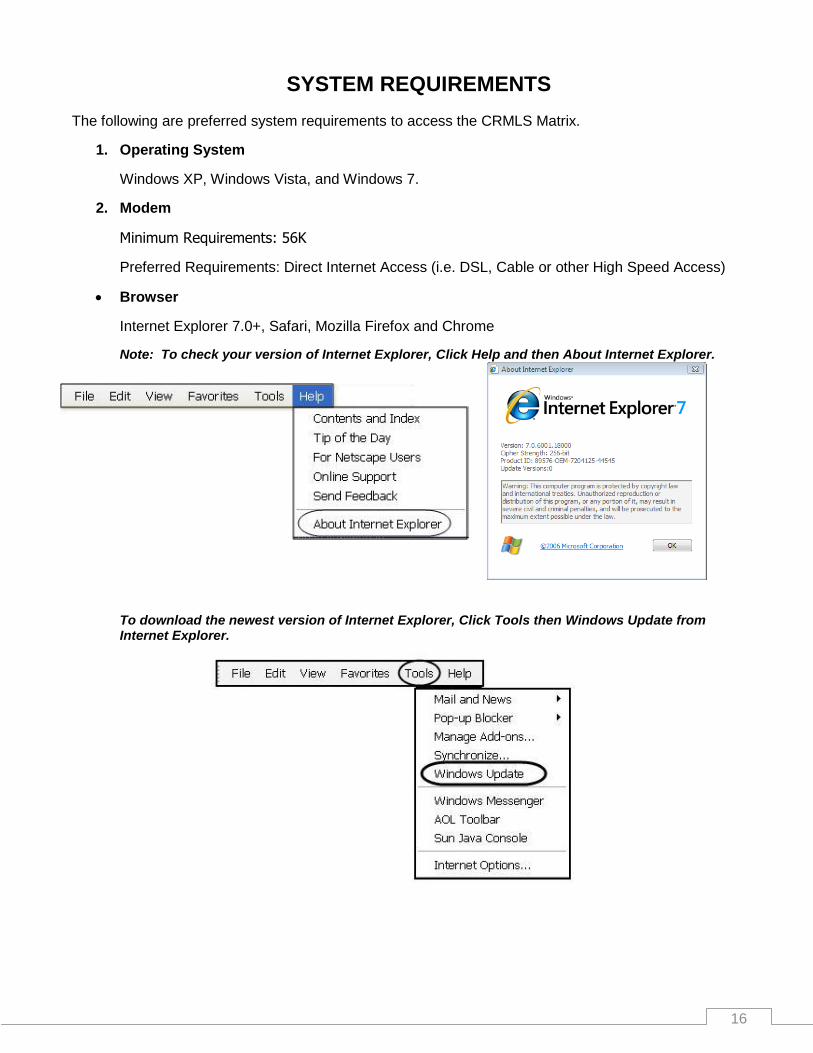
SYSTEM REQUIREMENTS
The following are preferred system requirements to access the CRMLS Matrix.
1. Operating System
Windows XP, Windows Vista, and Windows 7.
2. Modem
Minimum Requirements: 56K
Preferred Requirements: Direct Internet Access (i.e. DSL, Cable or other High Speed Access)
Browser
Internet Explorer 7.0+, Safari, Mozilla Firefox and Chrome
Note: To check your version of Internet Explorer, Click Help and then About Internet Explorer.
To download the newest version of Internet Explorer, Click Tools then Windows Update from Internet Explorer.

17
CRMLS Training Survey
Your feedback is very important to us. Please take a moment to complete this short survey and provide us with your feedback regarding the CRMLS University training class. Once completed, please turn this form into your training instructor or fax the form to CRMLS at (909) 859-2050. Date: ________________________________ Course:
_____________________________ Name: _______________________________ Location:
____________________________ Instructor:____________________________ Email: ______________________________ Please rate this course based on the following criteria:
Overall Experience with this Course Excellent Goo
d Fair
Needs Improvement
Poor
Instructor „s Knowledge of the Subject Excellent Goo
d Fair
Needs Improvement
Poor
Instructor‟s Presentation Excellent Goo
d Fair
Needs Improvement
Poor
Would You Recommend this course to others? Yes No What other CRMLS Training Courses have you taken? (Check All that Apply)
Basic Matrix Advanced Matrix Realist Tax Intermediate Matrix Listing Management
Where have you taken CRMLS Training Courses in the past? (Check All that Apply)
Broker‟s Office REALTOR® Association Office CRMLS Office Online What other CMLS Training Courses would you be interested in? (Check All that Apply)
Basic Matrix Advanced Matrix Realist Tax
Intermediate Matrix Listing Management
Where would you be interested in taking other CRMLS training classes? (Check All that Apply)
Broker‟s Office REALTOR® Association Office CRMLS Office Online
What other CRMLS Products would you like to learn more about? (Check All that Apply)
Listingbook Realist Tax CRMLS Mobile Realist Value Map ListHub
IDX Immobel
Please send me information about the courses I‟ve checked above
Thank you for your Participation!