Embed Size (px)
Citation preview
1
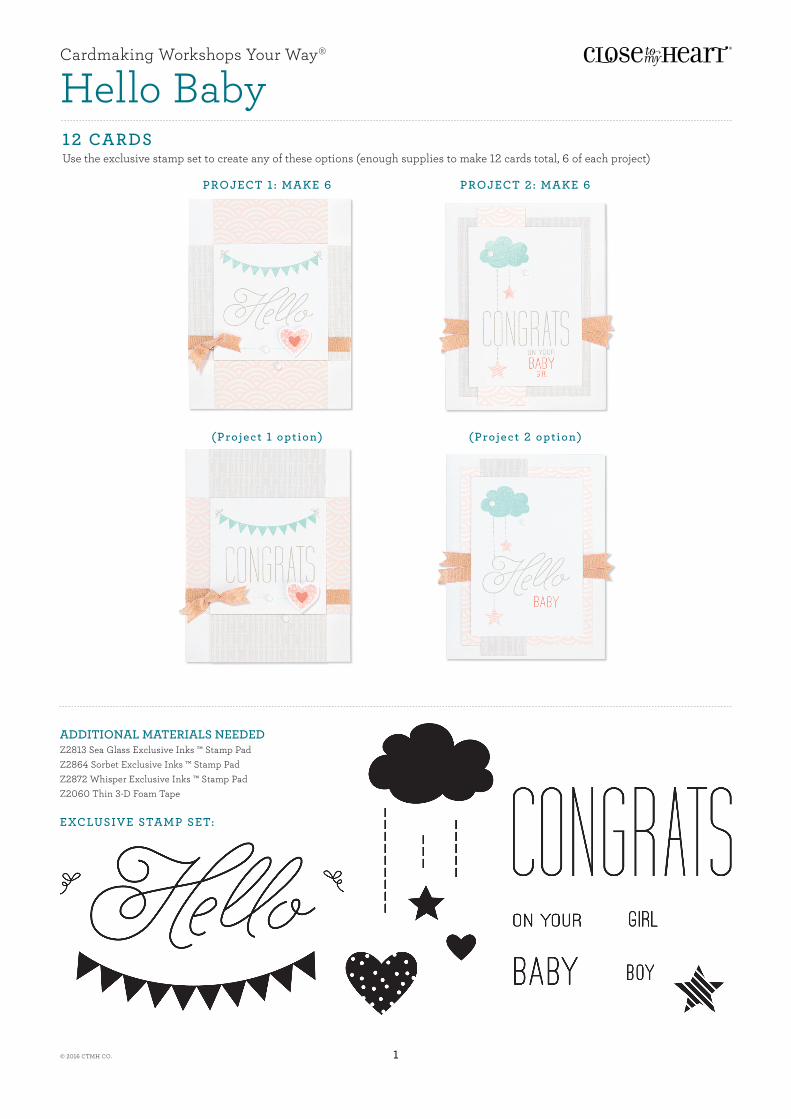
Cardmaking Workshops Your Way®
Hello Baby12 CARDS Use the exclusive stamp set to create any of these options (enough supplies to make 12 cards total, 6 of each project)
ADDITIONAL MATERIALS NEEDED Z2813 Sea Glass Exclusive Inks ™ Stamp PadZ2864 Sorbet Exclusive Inks ™ Stamp PadZ2872 Whisper Exclusive Inks ™ Stamp PadZ2060 Thin 3-D Foam Tape EXCLUSIVE STAMP SET:
PROJECT 1: MAKE 6 PROJECT 2: MAKE 6
(Project 1 option) (Project 2 option)
© 2016 CTMH CO.
2
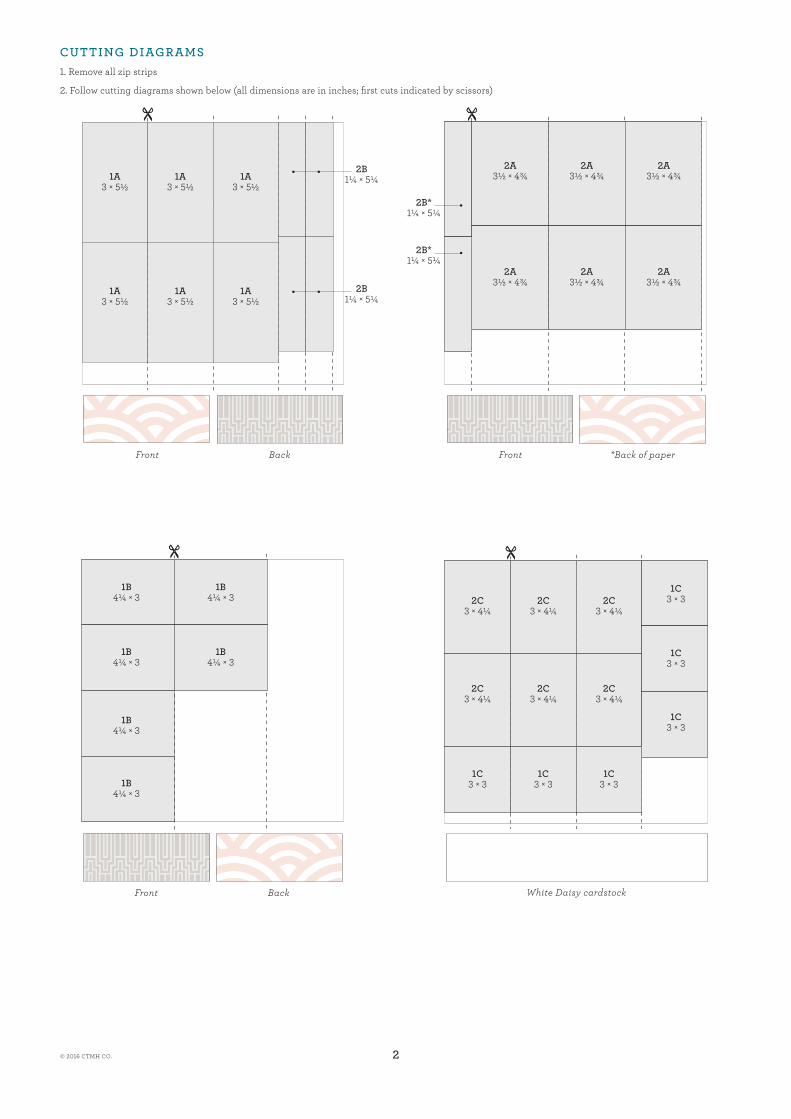
CUTTING DIAGRAMS 1. Remove all zip strips
2. Follow cutting diagrams shown below (all dimensions are in inches; first cuts indicated by scissors)
Front FrontBack *Back of paper
1A3 × 5½
1A3 × 5½
1A3 × 5½
1A3 × 5½
1A3 × 5½
1A3 × 5½
2B1¼ × 5¼
2B1¼ × 5¼
2B*1¼ × 5¼
2B*1¼ × 5¼
1B4¼ × 3
1B4¼ × 3
1B4¼ × 3
1B4¼ × 3
1B4¼ × 3
1B4¼ × 3
2C3 × 4¼
2C3 × 4¼
2C3 × 4¼
2C3 × 4¼
2C3 × 4¼
2C3 × 4¼
1C3 × 3
1C3 × 3
1C3 × 3
1C3 × 3
1C3 × 3
1C3 × 3
FOLD
FOLD
1A
1B 1C
1¼X2A
2B
2C
W
W
½ V
¼
¼
2A3½ × 4¾
2A3½ × 4¾
2A3½ × 4¾
2A3½ × 4¾
2A3½ × 4¾
2A3½ × 4¾
1A3 × 5½
1A3 × 5½
1A3 × 5½
1A3 × 5½
1A3 × 5½
1A3 × 5½
2B1¼ × 5¼
2B1¼ × 5¼
2B*1¼ × 5¼
2B*1¼ × 5¼
1B4¼ × 3
1B4¼ × 3
1B4¼ × 3
1B4¼ × 3
1B4¼ × 3
1B4¼ × 3
2C3 × 4¼
2C3 × 4¼
2C3 × 4¼
2C3 × 4¼
2C3 × 4¼
2C3 × 4¼
1C3 × 3
1C3 × 3
1C3 × 3
1C3 × 3
1C3 × 3
1C3 × 3
FOLD
FOLD
1A
1B 1C
1¼X2A
2B
2C
W
W
½ V
¼
¼
2A3½ × 4¾
2A3½ × 4¾
2A3½ × 4¾
2A3½ × 4¾
2A3½ × 4¾
2A3½ × 4¾
White Daisy cardstockFront Back
© 2016 CTMH CO.

3
1A3 × 5½
1A3 × 5½
1A3 × 5½
1A3 × 5½
1A3 × 5½
1A3 × 5½
2B1¼ × 5¼
2B1¼ × 5¼
2B*1¼ × 5¼
2B*1¼ × 5¼
1B4¼ × 3
1B4¼ × 3
1B4¼ × 3
1B4¼ × 3
1B4¼ × 3
1B4¼ × 3
2C3 × 4¼
2C3 × 4¼
2C3 × 4¼
2C3 × 4¼
2C3 × 4¼
2C3 × 4¼
1C3 × 3
1C3 × 3
1C3 × 3
1C3 × 3
1C3 × 3
1C3 × 3
FOLD
FOLD
1A
1B 1C
1¼X2A
2B
2C
W
W
½ V
¼
¼
2A3½ × 4¾
2A3½ × 4¾
2A3½ × 4¾
2A3½ × 4¾
2A3½ × 4¾
2A3½ × 4¾
TIPS• Attach ribbon to 1B before attaching 1C
• Using Sea Glass and Whisper inks, stamp banner and bow images along top of 1C
• Using Whisper ink, stamp “Hello” sentiment in center of 1C
• Using Sea Glass ink, stamping long dashed line repeatedly along bottom of 1C
• Using Sorbet ink and second generation technique, stamp large heart image onto White Daisy cardstock; using Sorbet ink, stamp small heart image in center; trim and attach using thin 3-D foam tape if desired
• Embellish card with ribbon and enamel gems as desired
TIPS
• Using Sea Glass ink, stamp cloud image in top left corner of 2C
• Using Whisper ink, stamp dashed lines, “Congrats” sentiment, and “On Your” sentiment underneath cloud, connecting pieces as desired
• Using Sorbet ink and the second generation technique, stamp star images onto 2C, connecting to dashed lines
• Using Sorbet ink, stamp “Baby” and “Girl” sentiments on bottom of 2C
• Attach ribbon to 2B before attaching 2C
• Embellish card with enamel gems as desired
ASSEMBLE 1. Assemble your 12 cards as desired using the patterns and options as guides
2. For additional variations, interchange stamped sentiments and ink colors or use other side of paper
1A3 × 5½
1A3 × 5½
1A3 × 5½
1A3 × 5½
1A3 × 5½
1A3 × 5½
2B1¼ × 5¼
2B1¼ × 5¼
2B*1¼ × 5¼
2B*1¼ × 5¼
1B4¼ × 3
1B4¼ × 3
1B4¼ × 3
1B4¼ × 3
1B4¼ × 3
1B4¼ × 3
2C3 × 4¼
2C3 × 4¼
2C3 × 4¼
2C3 × 4¼
2C3 × 4¼
2C3 × 4¼
1C3 × 3
1C3 × 3
1C3 × 3
1C3 × 3
1C3 × 3
1C3 × 3
FOLD
FOLD
1A
1B 1C
1¼X2A
2B
2C
W
W
½ V
¼
¼
2A3½ × 4¾
2A3½ × 4¾
2A3½ × 4¾
2A3½ × 4¾
2A3½ × 4¾
2A3½ × 4¾
PROJECT 1: VERTICAL 4¼ µ 5½ CARD (MAKE 6) PROJECT 2: VERTICAL 4¼ µ 5½ CARD (MAKE 6)
© 2016 CTMH CO.