Embed Size (px)
Citation preview

Admin User Gide
eZ Business Card
Management
Admin User Guide

Page | 1
A d m i n U s e r G u i d e
© 2018 Fidelity National Information Services, Inc and its subsidiaries. All rights reserved worldwide. This document is protected as a trade secret and under the copyright laws as the property of Fidelity National Information Services, Inc. Copying, reproduction, or distribution to third parties is strictly prohibited.
Admin User Guide v2
eZ Business Card Management
Contents Overview ..................................................................................................................................................................... 6
Basic Hierarchal Structure .................................................................................................................................. 6
Getting Started in eZBusiness ................................................................................................................................ 7 Setting up your password and security account .............................................................................................. 7 Login Authentication (RSA) ................................................................................................................................. 8 Out of Band Authentication ................................................................................................................................. 9
Email and Text Option ....................................................................................................................................... 9 Phone Option .................................................................................................................................................... 10
Logging In ............................................................................................................................................................. 11 Forgot Password ................................................................................................................................................... 11 Forgot password and not enrolled in a security account ...................................................................................... 12 Managing Your Password .................................................................................................................................... 13
General Navigation ................................................................................................................................................... 14 Home Page Overview ........................................................................................................................................... 14
Important Information ...................................................................................................................................... 15 New Messages .................................................................................................................................................. 15 To-Do List ......................................................................................................................................................... 16
Accessing Pages Within eZBusiness ................................................................................................................... 16 Site Help ............................................................................................................................................................... 16 My Links .............................................................................................................................................................. 17 Section Headers .................................................................................................................................................. 17 Search Filters ...................................................................................................................................................... 17 Downloading Lists .............................................................................................................................................. 18 Configure Columns ............................................................................................................................................ 18 Updating Columns Within a List ........................................................................................................................... 18
Company Home Page ............................................................................................................................................. 19 Company Snapshot ............................................................................................................................................ 19 Home Page Quick Links ..................................................................................................................................... 19 Urgent Items ........................................................................................................................................................ 20 Declined Transactions ....................................................................................................................................... 20 Company Activity ............................................................................................................................................... 20
Account Management ............................................................................................................................................... 21 Cardholder Account Search ................................................................................................................................. 21
Downloading Cardholder Search Results .......................................................................................................... 22 View Cardholder Details ....................................................................................................................................... 23 Cardholder Profile ................................................................................................................................................. 24
View Statements ................................................................................................................................................ 25 View Payment Activity ........................................................................................................................................ 25 View Associated Accounts ................................................................................................................................. 26 View Online Request Activity ............................................................................................................................. 26
Important Information............................................................................................................................................ 27 Hierarchy .............................................................................................................................................................. 27 User Enrollment Details ........................................................................................................................................ 28 Account Summary & Payment Information Section ............................................................................................. 30 Enrolling a Cardholder in eZCard ......................................................................................................................... 30 Emulating a Cardholder ........................................................................................................................................ 32 Locking a User and/or Account ........................................................................................................................ 32 Unlocking a User and/or Account ..................................................................................................................... 33 Resetting a Password ........................................................................................................................................ 34 Deleting a Cardholder from eZCard (MyCardStatement)................................................................................ 34

Page | 2
A d m i n U s e r G u i d e
© 2018 Fidelity National Information Services, Inc and its subsidiaries. All rights reserved worldwide. This document is protected as a trade secret and under the copyright laws as the property of Fidelity National Information Services, Inc. Copying, reproduction, or distribution to third parties is strictly prohibited.
Admin User Guide v2
eZ Business Card Management
Locking/Unlocking a User’s Security Account ................................................................................................ 35 Deleting a User’s Security Account .................................................................................................................. 36
Company Management ............................................................................................................................................ 38 Company Search ................................................................................................................................................ 38 View Company Hierarchies .................................................................................................................................. 39 View Account Lists within a Hierarchy .................................................................................................................. 40 View Company Account Lists ............................................................................................................................... 40
Downloading Company Account Lists ............................................................................................................... 41 View Company Level Details ............................................................................................................................. 42 View Account Credit Limits ................................................................................................................................... 44 Cardholder Search................................................................................................................................................ 45
Downloading Cardholder Search Results .......................................................................................................... 46 View Account Details ............................................................................................................................................ 47
Important Information ......................................................................................................................................... 47 User Enrollment Details ..................................................................................................................................... 48 Account Balance Information ............................................................................................................................. 49 Cardholder Profile .............................................................................................................................................. 50
View Hierarchy ...................................................................................................................................................... 50 View Online Request Activity ................................................................................................................................ 51 Expense Management Allocations ................................................................................................................... 51 View Statements ................................................................................................................................................... 52
Downloading the Statement List ........................................................................................................................ 53
Viewing Transactions ............................................................................................................................................... 54 View Transactions ................................................................................................................................................ 54 Searching Transactions ........................................................................................................................................ 56
Downloading the Transaction List ...................................................................................................................... 57 View Transaction Details ...................................................................................................................................... 57 Viewing Declined Transactions ............................................................................................................................ 58
Downloading the Declined Transactions List ..................................................................................................... 59 Disputing a Transaction ........................................................................................................................................ 60 Status of a Dispute Claim ..................................................................................................................................... 61
Authorizations ........................................................................................................................................................... 63 View Authorizations from the Company Account List ........................................................................................... 63
Downloading the Authorization Details List ....................................................................................................... 64 View Authorizations from the Account Detail Page .............................................................................................. 64
Company Inbox ........................................................................................................................................................ 66 Sending Messages ............................................................................................................................................... 67 Replying to Messages .......................................................................................................................................... 68 View Sent Messages ............................................................................................................................................ 69 Search for Messages ............................................................................................................................................ 69 Archive Company Messages ................................................................................................................................ 70 Viewing Archived Messages ................................................................................................................................. 70
Company Reports ..................................................................................................................................................... 72 Transaction Reports ............................................................................................................................................. 72
Downloading the Transactions Report ............................................................................................................... 73 View Company Spend Restrictions ...................................................................................................................... 74
Downloading the Spend Restrictions Report ..................................................................................................... 75 View Merchant Group Codes ............................................................................................................................... 75
Downloading the Merchant Group Codes Report .............................................................................................. 76 View Credit Lines .................................................................................................................................................. 77
Downloading View Credit Lines ......................................................................................................................... 78

Page | 3
A d m i n U s e r G u i d e
© 2018 Fidelity National Information Services, Inc and its subsidiaries. All rights reserved worldwide. This document is protected as a trade secret and under the copyright laws as the property of Fidelity National Information Services, Inc. Copying, reproduction, or distribution to third parties is strictly prohibited.
Admin User Guide v2
eZ Business Card Management
Online Service Requests .......................................................................................................................................... 80 Accessing Online Service Requests ..................................................................................................................... 81 Search for an Account from the Online Service Request Screen ................................................................. 82 Tracking Online Service Requests ....................................................................................................................... 82 Completing Online Service Requests ................................................................................................................... 83 Add Cash Access ................................................................................................................................................. 83 Add New Cardholder Request .............................................................................................................................. 84 Add or Remove PIN Request ............................................................................................................................... 89
Add PIN Request ............................................................................................................................................... 90 Remove PIN Request ........................................................................................................................................ 90
Address and Phone Change ................................................................................................................................ 91 Card Activation Request ....................................................................................................................................... 94 Card Replacement Request ................................................................................................................................. 95 Change Cardholder Authorization Block .............................................................................................................. 96 Change Credit Limit .............................................................................................................................................. 97
Change Credit Limit Restrictions ....................................................................................................................... 99 Current Temporary Credit Limit Option .............................................................................................................. 99 Active Temporary Credit Limit Indicator ............................................................................................................. 99
Close Account Request ........................................................................................................................................ 99 Manage Employee ID ......................................................................................................................................... 101 Order New PIN ................................................................................................................................................... 102 View Full Account Number ................................................................................................................................. 103 Virtual Accounts ............................................................................................................................................... 104
Change Virtual Card Account Type .............................................................................................................. 104 View Virtual Account Security Data ............................................................................................................. 105
Memos ............................................................................................................................................................... 106 Online Message Types ....................................................................................................................................... 106
Report a Website Issue .................................................................................................................................... 106 Transaction Inquiry........................................................................................................................................... 107 Account Inquiry ................................................................................................................................................ 107 Commercial Card Program Inquiry .................................................................................................................. 108 Other Inquiry .................................................................................................................................................... 108 Online Support Question (How do I?) .............................................................................................................. 109
Bulk Processing ................................................................................................................................................... 110 Creating and Uploading a File for Bulk Processing ...................................................................................... 110
Import/Export Queues ...................................................................................................................................... 113 Spend Restrictions ............................................................................................................................................... 114
Manage Spend Restrictions Online Request ................................................................................................. 114 Merchant Restrictions Overview ..................................................................................................................... 116 Merchant Group Codes (MGC) .......................................................................................................................... 117
Manage Merchant Group Codes ...................................................................................................................... 117 Add a Merchant Group ..................................................................................................................................... 118 Merchant Category Code (MCC) List ............................................................................................................... 119 Changing Merchant Groups ............................................................................................................................. 120
Manage Spending Limits .................................................................................................................................... 121 Adding a Spending Limit .................................................................................................................................. 121 Changing a Spending Limit .............................................................................................................................. 124 Delete Spend Restrictions ............................................................................................................................... 125 Delete All Spend Limits ................................................................................................................................. 125
Payments ................................................................................................................................................................ 126 Search for a Payment ......................................................................................................................................... 126
Download Payment Search Results ............................................................................................................. 127 View Payment Details ....................................................................................................................................... 127

Page | 4
A d m i n U s e r G u i d e
© 2018 Fidelity National Information Services, Inc and its subsidiaries. All rights reserved worldwide. This document is protected as a trade secret and under the copyright laws as the property of Fidelity National Information Services, Inc. Copying, reproduction, or distribution to third parties is strictly prohibited.
Admin User Guide v2
eZ Business Card Management
Viewing Payment History .................................................................................................................................... 128 Viewing Account Level Payment Accounts ................................................................................................ 129
Viewing Company Payment Accounts................................................................................................................ 130 Adding Payment Accounts ................................................................................................................................. 131 Change Payment Account Information ............................................................................................................... 132 Delete a Payment Account ................................................................................................................................. 133 ACH Payment Returns / Locked Accounts .................................................................................................... 133 Disabled Payment Accounts ............................................................................................................................... 133 Making a One-Time Payment ............................................................................................................................. 134 Update/Change a Payment ................................................................................................................................ 135 Cancel a Payment .............................................................................................................................................. 136 Create a Recurring Payment .............................................................................................................................. 136 View Existing Recurring Payments ..................................................................................................................... 137 Update / Change a Recurring Payment.............................................................................................................. 138 Delete a Recurring Payment .............................................................................................................................. 138 Approve / Reject Payments ................................................................................................................................ 139
Approval/Rejection flow via emails for Company ............................................................................................. 139 Reports – Data Analytics ..................................................................................................................................... 140
Creating Reports ............................................................................................................................................... 140 My Reports ........................................................................................................................................................ 141
Viewing and Downloading Reports .............................................................................................................. 142 Editing Reports .............................................................................................................................................. 142 Deleting Reports ............................................................................................................................................ 143
Table of Reports ................................................................................................................................................. 143 Account Transfers ................................................................................................................................................ 146
Processing Account Transfers in eZCard (MyCardStatement) and eZBusiness ....................................... 146 Transaction View for Cardholders .................................................................................................................. 146 Search by Transfer from Account in eZBusiness ......................................................................................... 146
Alerts ....................................................................................................................................................................... 147 Company Alert Navigation .................................................................................................................................. 147 Creating Company Alerts ................................................................................................................................... 148 Creating Account Alerts .................................................................................................................................. 150 Modify Existing Alerts ......................................................................................................................................... 151 Disable Alerts ...................................................................................................................................................... 152 Enable Alerts ...................................................................................................................................................... 152 Delete Alerts ....................................................................................................................................................... 152
Messages ............................................................................................................................................................... 153 Create a Message .............................................................................................................................................. 153 Search Messages.............................................................................................................................................. 155 Incoming Messages.......................................................................................................................................... 156
View Incoming Message Details ................................................................................................................... 157 Reply to an Incoming Message .................................................................................................................... 158 Accept an Incoming Message ....................................................................................................................... 158
My Messages ..................................................................................................................................................... 159 Deleting My Messages ................................................................................................................................... 160 Releasing a Message Back to Incoming Message .......................................................................................... 160
Sent Messages ................................................................................................................................................... 160 Modify a Sent Message ................................................................................................................................... 161
Admin Management ............................................................................................................................................... 162 Admin Security ................................................................................................................................................. 162 What is a security profile? .................................................................................................................................. 162 What is a security role? ...................................................................................................................................... 162
Page | 5
A d m i n U s e r G u i d e
© 2018 Fidelity National Information Services, Inc and its subsidiaries. All rights reserved worldwide. This document is protected as a trade secret and under the copyright laws as the property of Fidelity National Information Services, Inc. Copying, reproduction, or distribution to third parties is strictly prohibited.
Admin User Guide v2
eZ Business Card Management
Admin User Search........................................................................................................................................... 163 Downloading the Admin User List ............................................................................................................... 164
Downloading the Admin Login Report ................................................................................................................ 164 View / Edit Admin Account Information ......................................................................................................... 165 Updating Admin User’s Personal Information ............................................................................................... 166 Update Account Restrictions .......................................................................................................................... 167 Updating Admin Security Roles ...................................................................................................................... 167 Emulate Admin User......................................................................................................................................... 167 Delete an Admin User....................................................................................................................................... 168 Changing Admin User Passwords .................................................................................................................. 168 Locking Admin User Accounts ....................................................................................................................... 169 Unlocking Admin User Accounts .................................................................................................................... 170 Inactive Admin User Lock/Unlock Process ................................................................................................... 170 Unlocking/Locking an Admin’s Security Account ........................................................................................ 170 Deleting an Admin’s Security Account .......................................................................................................... 171 View Admin Security Account History ........................................................................................................... 172 Admin Activity Summary ..................................................................................................................................... 172
Download Admin Security Account History ............................................................................................... 173
Security Roles......................................................................................................................................................... 174 Search Roles ...................................................................................................................................................... 174
Download Security Roles List .......................................................................................................................... 175 View Admin Users Assigned to a Role ........................................................................................................... 175
Downloading the Admin Users Assigned to a Role List ............................................................................ 176

Page | 6
A d m i n U s e r G u i d e
© 2018 Fidelity National Information Services, Inc and its subsidiaries. All rights reserved worldwide. This document is protected as a trade secret and under the copyright laws as the property of Fidelity National Information Services, Inc. Copying, reproduction, or distribution to third parties is strictly prohibited.
Admin User Guide v2
eZ Business Card Management
Overview eZBusiness Card Management is a powerful credit card administration tool, which allows companies and program administrators of commercial and business card accounts to manage their cardholder accounts. It allows financial institution administrators and company administrators to do the following:
Search and view the company hierarchy and detailed information about each level of the hierarchy, including administrative information, balances, and processing options.
Search and view the accounts that are related to each level of a company hierarchy, and view detailed information about the accounts such as, balances, transactions, and statements.
Search for transaction activity within a company hierarchy and view the details of those transactions. Submit service requests to request updates of a company or cardholder level option. Send online messages to other administrators and cardholders. Make payments to the central billing account or individual cardholder accounts. Basic Hierarchal Structure A basic hierarchy consists of a company and up to five sublevels. The hierarchal sublevels identify the various levels of the organization such as subsidiaries, division, departments, and so on. Each level, company or sub-level, is a separate physical record in the commercial card processing system.

Page | 7
A d m i n U s e r G u i d e
© 2018 Fidelity National Information Services, Inc and its subsidiaries. All rights reserved worldwide. This document is protected as a trade secret and under the copyright laws as the property of Fidelity National Information Services, Inc. Copying, reproduction, or distribution to third parties is strictly prohibited.
Admin User Guide v2
eZ Business Card Management
Getting Started in eZBusiness IMPORTANT!
Depending on your security rights, you may or may not see all the options shown in this guide.
Setting up your password and security account Upon your first login to the eZBusiness site, users are required to change their password and create a Security Account. After you log in for the first time and change your password, you must set up your security questions and answers. The system prompts you in a few steps to set this up. To log into eZBusiness Card Management, perform the following steps:
1. From the eZBusiness landing page, enter your Username.
2. As you begin typing your Username, the Password field displays. Enter your temporary Password and click Login.
Note: The Additional Security window is displayed if it is determined that the risk score is high or the computer from which
the site is being accessed is not pre-selected as a private computer.
3. Once you enter your Username and Password, the Change Password window will be displayed. Enter your Current Password, New Password and click Submit.

Page | 8
A d m i n U s e r G u i d e
© 2018 Fidelity National Information Services, Inc and its subsidiaries. All rights reserved worldwide. This document is protected as a trade secret and under the copyright laws as the property of Fidelity National Information Services, Inc. Copying, reproduction, or distribution to third parties is strictly prohibited.
Admin User Guide v2
eZ Business Card Management
4. A pop-up will be displayed telling you that you have successfully changed your password. Click OK.
5. After you change your password, the RSA Enrollment page is displayed for you to set up your security questions. Answer the questions and if you are using a personal device, click the Personal Device box. Click Submit.
6. A pop-up will be displayed telling you that you have successfully enrolled in RSA. Click OK. Your default landing
page will be displayed.
IMPORTANT! If the admin user registers a computer/device, the system recognizes that admin user, and are less likely to be challenged
during future logins. It is important that public devices are not registered. If someone tries to use that device to log into the admin’s account, the system challenges them by going through the Out of Band authentication process. Refer to the topic Out of Band Authentication in this chapter for more information.
Login Authentication (RSA) Each time a user logs into eZBusiness, login authentication is performed. If the system detects a difference, the user is challenged using Out of Band authentication. The following are examples of when the user is challenged:
The user logs in to eZBusiness from a device other than the one where security questions were originally setup and answered (for example, the user logs in from a laptop but originally set up their account from a desktop).
The user did not register their computer or other device when they previously logged in from it. The user logs in from an IP address that has had known fraud occur. The geographic locations of consecutive logins are different, for example, the user logged in from Florida and then
logged in from California five minutes later. The login was not consistent with the user’s login behavior.

Page | 9
A d m i n U s e r G u i d e
© 2018 Fidelity National Information Services, Inc and its subsidiaries. All rights reserved worldwide. This document is protected as a trade secret and under the copyright laws as the property of Fidelity National Information Services, Inc. Copying, reproduction, or distribution to third parties is strictly prohibited.
Admin User Guide v2
eZ Business Card Management
Out of Band Authentication Out of Band Authentication is a form of authentication that sends a one-time security code to the user by way of a phone call, text or email. Out of band authentication is required when the user fails login authentication.
The security code can be generated by one of the following options:
Email – The security code will be sent to your registered email address. Text – The security code will be sent via a text message to your registered mobile number. Phone – The security code will be delivered via a phone call to your registered phone number.
Email and Text Option 1. Click on the option that you prefer – Email or Text.
2. The security code will be sent to you via the chosen method and the Security Code window will be displayed.
Enter the Security Code that was sent to you via email or text. If you are on a private computer, check the “This is a private computer. Please register it.” box and click Continue.
3. Your default landing page will be displayed.

Page | 10
A d m i n U s e r G u i d e
© 2018 Fidelity National Information Services, Inc and its subsidiaries. All rights reserved worldwide. This document is protected as a trade secret and under the copyright laws as the property of Fidelity National Information Services, Inc. Copying, reproduction, or distribution to third parties is strictly prohibited.
Admin User Guide v2
eZ Business Card Management
Phone Option Note: Registered phone numbers with extensions or where an IVR must be navigated cannot use this option.
1. Click the Phone option.
2. The security code will be displayed. An automated call is generated to the phone number registered for your
account in eZBusiness. When the call is received, press the hash/pound key (#) followed by the security code that is displayed on the application window. The security code is verified and the Continue option is enabled.
3. If you are on a private computer, check the “This a private computer. Please register it.” box and click
Continue.
4. You will be directed to your default landing page.
Page | 11
A d m i n U s e r G u i d e
© 2018 Fidelity National Information Services, Inc and its subsidiaries. All rights reserved worldwide. This document is protected as a trade secret and under the copyright laws as the property of Fidelity National Information Services, Inc. Copying, reproduction, or distribution to third parties is strictly prohibited.
Admin User Guide v2
eZ Business Card Management
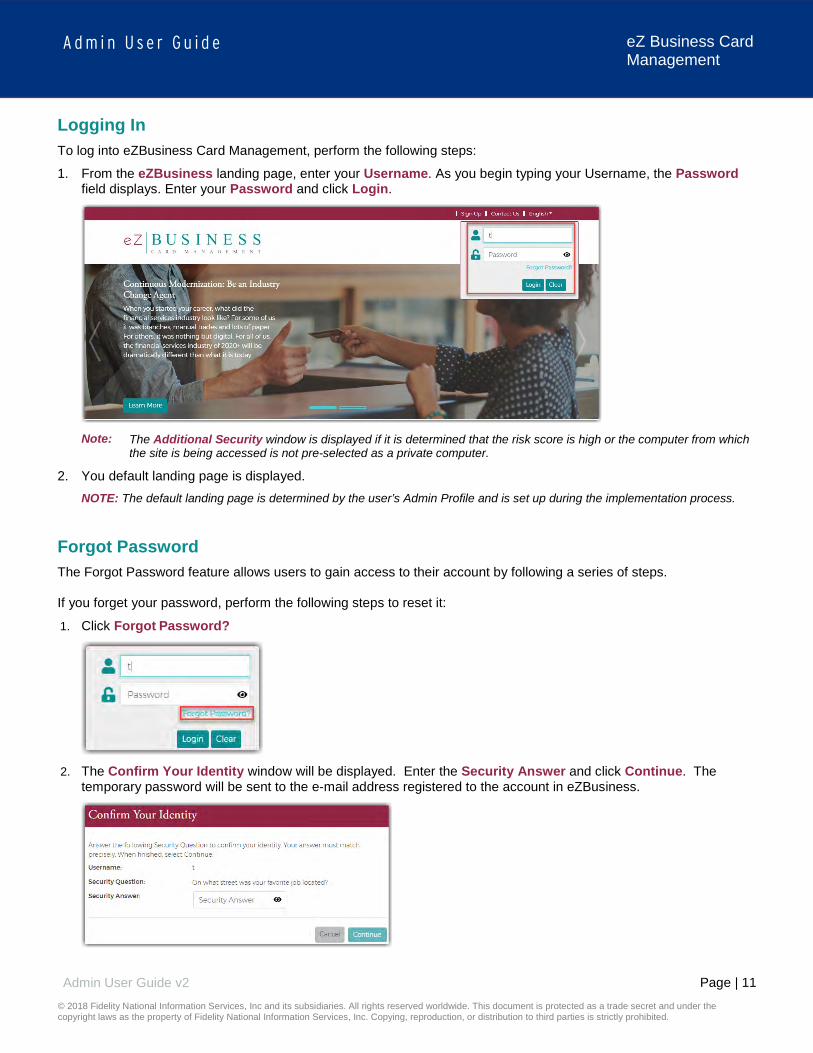
Logging In To log into eZBusiness Card Management, perform the following steps:
1. From the eZBusiness landing page, enter your Username. As you begin typing your Username, the Password field displays. Enter your Password and click Login.
Note: The Additional Security window is displayed if it is determined that the risk score is high or the computer from which
the site is being accessed is not pre-selected as a private computer.
2. You default landing page is displayed. NOTE: The default landing page is determined by the user’s Admin Profile and is set up during the implementation process.
Forgot Password The Forgot Password feature allows users to gain access to their account by following a series of steps. If you forget your password, perform the following steps to reset it:
1. Click Forgot Password?
2. The Confirm Your Identity window will be displayed. Enter the Security Answer and click Continue. The
temporary password will be sent to the e-mail address registered to the account in eZBusiness.
Page | 12
A d m i n U s e r G u i d e
© 2018 Fidelity National Information Services, Inc and its subsidiaries. All rights reserved worldwide. This document is protected as a trade secret and under the copyright laws as the property of Fidelity National Information Services, Inc. Copying, reproduction, or distribution to third parties is strictly prohibited.
Admin User Guide v2
eZ Business Card Management
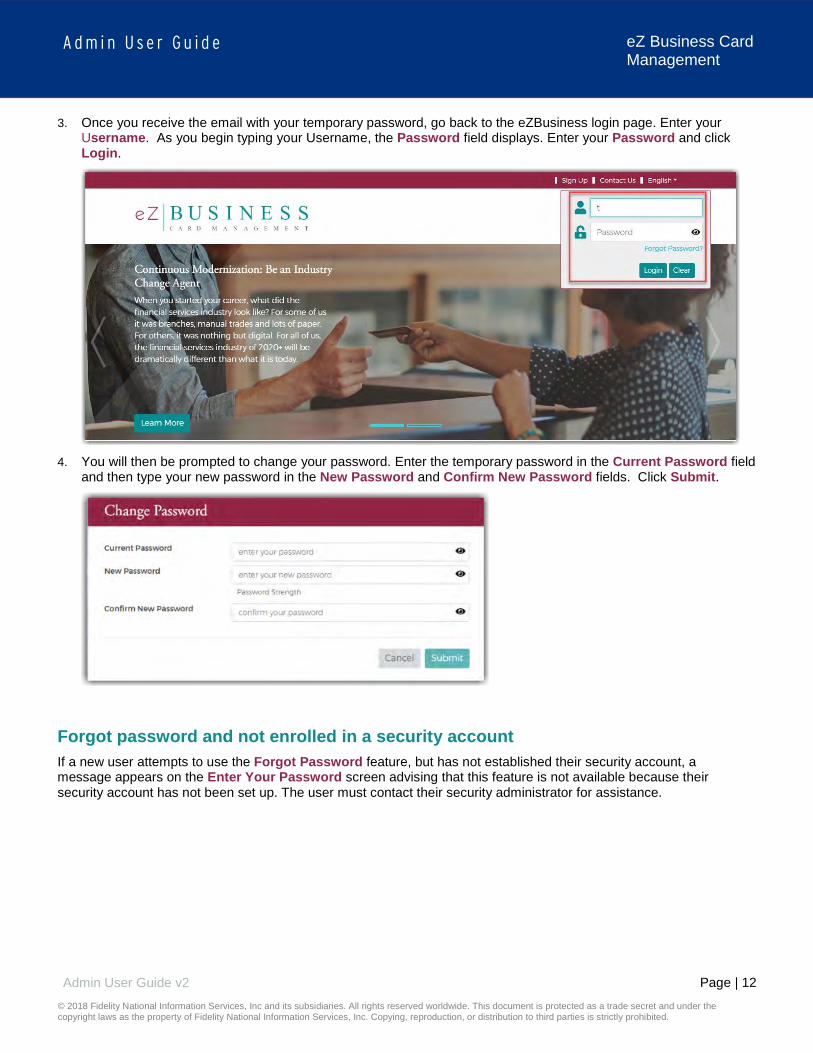
3. Once you receive the email with your temporary password, go back to the eZBusiness login page. Enter your Username. As you begin typing your Username, the Password field displays. Enter your Password and click Login.
4. You will then be prompted to change your password. Enter the temporary password in the Current Password field
and then type your new password in the New Password and Confirm New Password fields. Click Submit.
Forgot password and not enrolled in a security account If a new user attempts to use the Forgot Password feature, but has not established their security account, a message appears on the Enter Your Password screen advising that this feature is not available because their security account has not been set up. The user must contact their security administrator for assistance.
Page | 13
A d m i n U s e r G u i d e
© 2018 Fidelity National Information Services, Inc and its subsidiaries. All rights reserved worldwide. This document is protected as a trade secret and under the copyright laws as the property of Fidelity National Information Services, Inc. Copying, reproduction, or distribution to third parties is strictly prohibited.
Admin User Guide v2
eZ Business Card Management
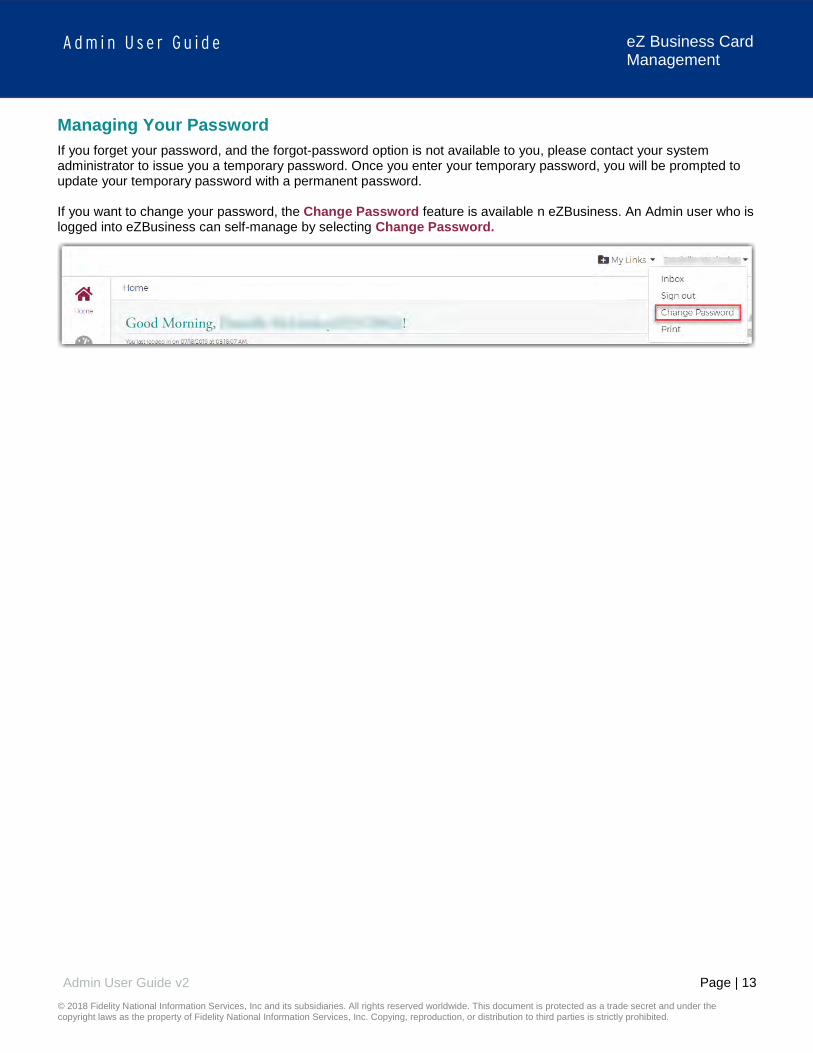
Managing Your Password If you forget your password, and the forgot-password option is not available to you, please contact your system administrator to issue you a temporary password. Once you enter your temporary password, you will be prompted to update your temporary password with a permanent password. If you want to change your password, the Change Password feature is available n eZBusiness. An Admin user who is logged into eZBusiness can self-manage by selecting Change Password.
Page | 14
A d m i n U s e r G u i d e
© 2018 Fidelity National Information Services, Inc and its subsidiaries. All rights reserved worldwide. This document is protected as a trade secret and under the copyright laws as the property of Fidelity National Information Services, Inc. Copying, reproduction, or distribution to third parties is strictly prohibited.
Admin User Guide v2
eZ Business Card Management
General Navigation IMPORTANT!
Depending on your security rights, you may or may not see all the options shown in this guide.
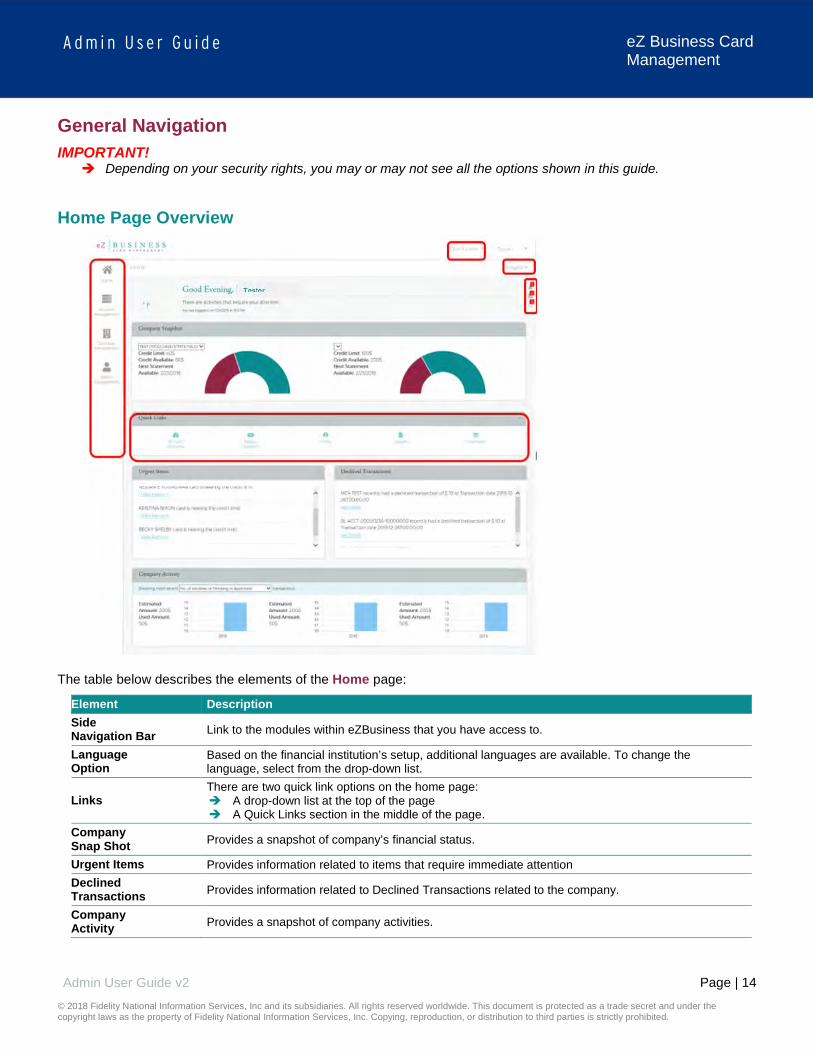
Home Page Overview
The table below describes the elements of the Home page:
Element Description Side Navigation Bar Link to the modules within eZBusiness that you have access to.
Language Option
Based on the financial institution’s setup, additional languages are available. To change the language, select from the drop-down list.
Links There are two quick link options on the home page: A drop-down list at the top of the page A Quick Links section in the middle of the page.
Company Snap Shot Provides a snapshot of company’s financial status.
Urgent Items Provides information related to items that require immediate attention Declined Transactions Provides information related to Declined Transactions related to the company.
Company Activity Provides a snapshot of company activities.
Page | 15
A d m i n U s e r G u i d e
© 2018 Fidelity National Information Services, Inc and its subsidiaries. All rights reserved worldwide. This document is protected as a trade secret and under the copyright laws as the property of Fidelity National Information Services, Inc. Copying, reproduction, or distribution to third parties is strictly prohibited.
Admin User Guide v2
eZ Business Card Management
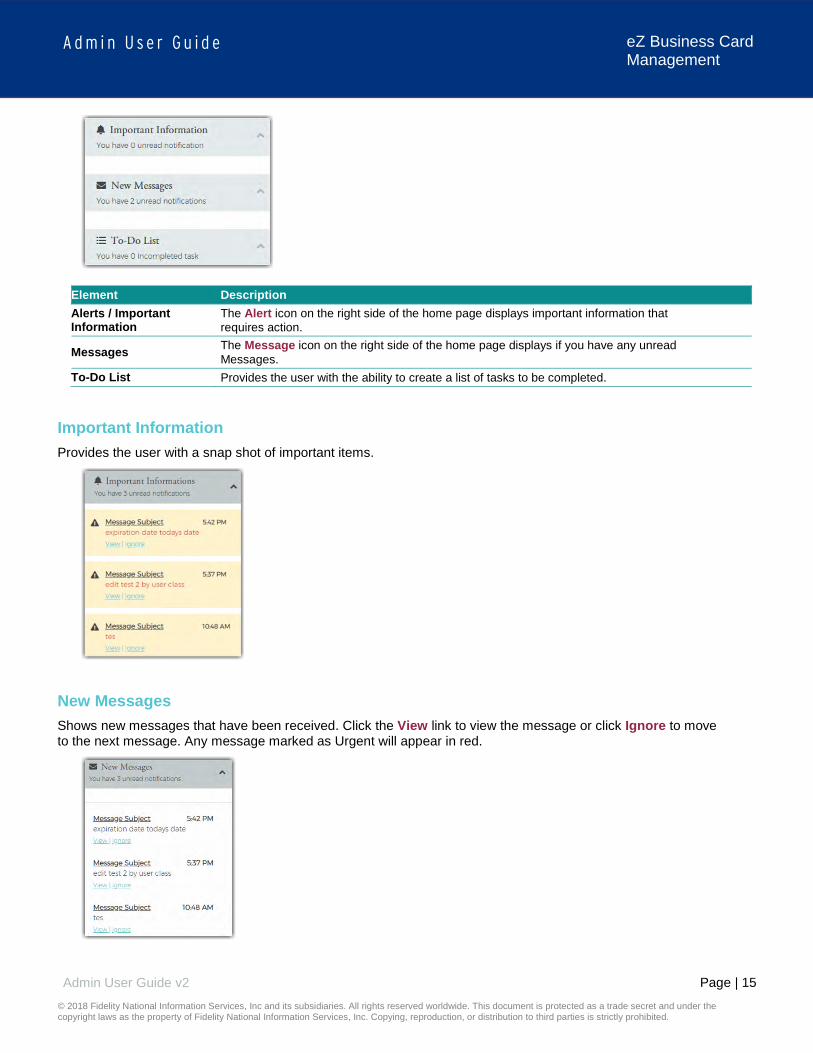
Element Description Alerts / Important Information
The Alert icon on the right side of the home page displays important information that requires action.
Messages The Message icon on the right side of the home page displays if you have any unread Messages.
To-Do List Provides the user with the ability to create a list of tasks to be completed.
Important Information Provides the user with a snap shot of important items.
New Messages Shows new messages that have been received. Click the View link to view the message or click Ignore to move to the next message. Any message marked as Urgent will appear in red.

Page | 16
A d m i n U s e r G u i d e
© 2018 Fidelity National Information Services, Inc and its subsidiaries. All rights reserved worldwide. This document is protected as a trade secret and under the copyright laws as the property of Fidelity National Information Services, Inc. Copying, reproduction, or distribution to third parties is strictly prohibited.
Admin User Guide v2
eZ Business Card Management
To-Do List The To-Do List provides users with the ability to prioritize a list of tasks that needs to be completed. The Admin user can define the list of items in this section.
Accessing Pages Within eZBusiness The left-hand side menu is used to navigate to various functionalities within the site. The icons that you see in the menu are based on your security rights. Click on an icon and a list of sub-menu icons display allowing you to navigate to pages to perform different functions.
Site Help Help is available within the site. When you see the information icon in a section header, click the icon and the help section will be displayed.

Page | 17
A d m i n U s e r G u i d e
© 2018 Fidelity National Information Services, Inc and its subsidiaries. All rights reserved worldwide. This document is protected as a trade secret and under the copyright laws as the property of Fidelity National Information Services, Inc. Copying, reproduction, or distribution to third parties is strictly prohibited.
Admin User Guide v2
eZ Business Card Management
Below is an example of the site help:
My Links The My Links link located at the top of each page allows you to add a link to the pages that you use most. Go to the page that you want to add and then click the + icon next to My Links. You can delete a page by clicking the Delete icon next to that page in the list.
Section Headers Clicking the up icon on the right side in a header field minimized that list of items.
Search Filters On each of the search pages there is a Manage Filters button. You can determine the fields that you would like to see on each page clicking the Manage Filters button and selecting your search preferences for that page. The search options will vary based on the type of search.
Page | 18
A d m i n U s e r G u i d e
© 2018 Fidelity National Information Services, Inc and its subsidiaries. All rights reserved worldwide. This document is protected as a trade secret and under the copyright laws as the property of Fidelity National Information Services, Inc. Copying, reproduction, or distribution to third parties is strictly prohibited.
Admin User Guide v2
eZ Business Card Management
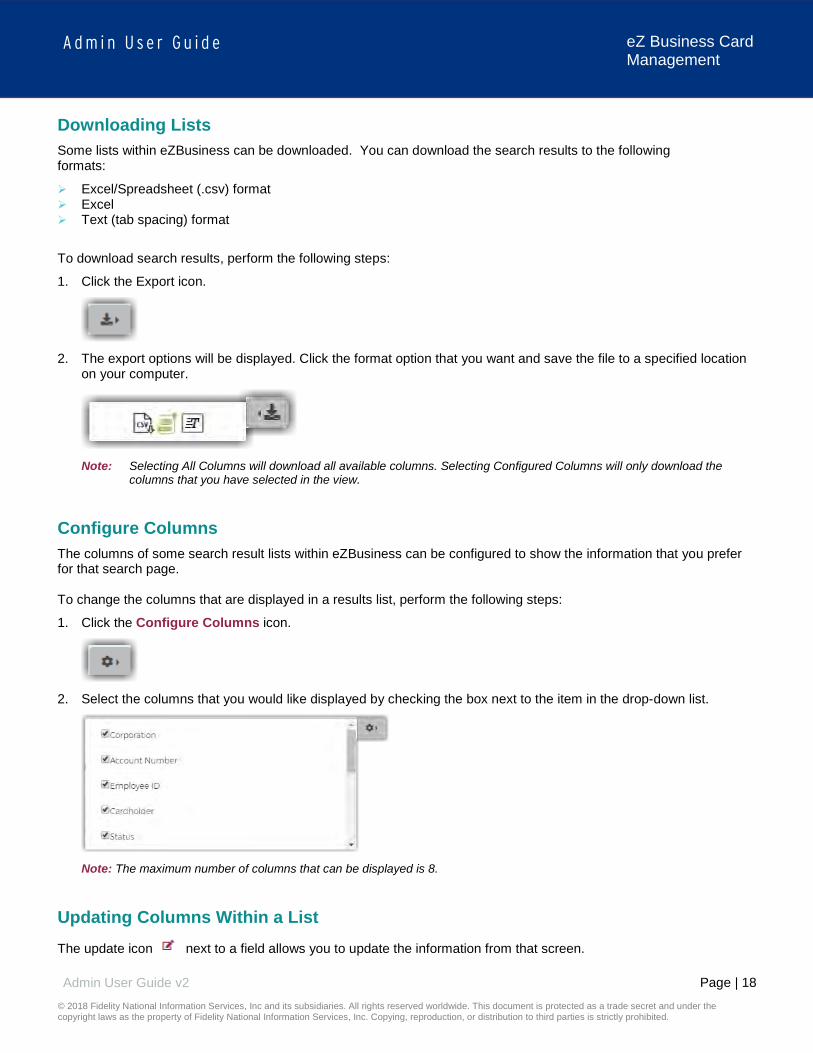
Downloading Lists Some lists within eZBusiness can be downloaded. You can download the search results to the following formats:
Excel/Spreadsheet (.csv) format Excel Text (tab spacing) format
To download search results, perform the following steps:
1. Click the Export icon.
2. The export options will be displayed. Click the format option that you want and save the file to a specified location
on your computer.
Note: Selecting All Columns will download all available columns. Selecting Configured Columns will only download the
columns that you have selected in the view.
Configure Columns The columns of some search result lists within eZBusiness can be configured to show the information that you prefer for that search page. To change the columns that are displayed in a results list, perform the following steps:
1. Click the Configure Columns icon.
2. Select the columns that you would like displayed by checking the box next to the item in the drop-down list.
Note: The maximum number of columns that can be displayed is 8.
Updating Columns Within a List The update icon next to a field allows you to update the information from that screen.

Page | 19
A d m i n U s e r G u i d e
© 2018 Fidelity National Information Services, Inc and its subsidiaries. All rights reserved worldwide. This document is protected as a trade secret and under the copyright laws as the property of Fidelity National Information Services, Inc. Copying, reproduction, or distribution to third parties is strictly prohibited.
Admin User Guide v2
eZ Business Card Management
Company Home Page The Company Home Page provides insight to high-level information. From the home page, Admins can:
View financial details Access available features Access transactions View items that require immediate attention
IMPORTANT!
Depending on your security rights, you may or may not see all the options shown in this guide.
Company Snapshot The company snapshot provides a high-level view of the financial details.
Company Available Balance Outstanding Authorizations Company Amount Due Company Due date Cash Limit Available Cash Credit Limit Available Credit
Home Page Quick Links The Quick Links that are available based on your security access are:
SSO to VISA Make a payment Reports Online Request Account Overview Manage Admins My Alerts Manage Expense reports Expense Management Setup Bulk Management
Page | 20
A d m i n U s e r G u i d e
© 2018 Fidelity National Information Services, Inc and its subsidiaries. All rights reserved worldwide. This document is protected as a trade secret and under the copyright laws as the property of Fidelity National Information Services, Inc. Copying, reproduction, or distribution to third parties is strictly prohibited.
Admin User Guide v2
eZ Business Card Management
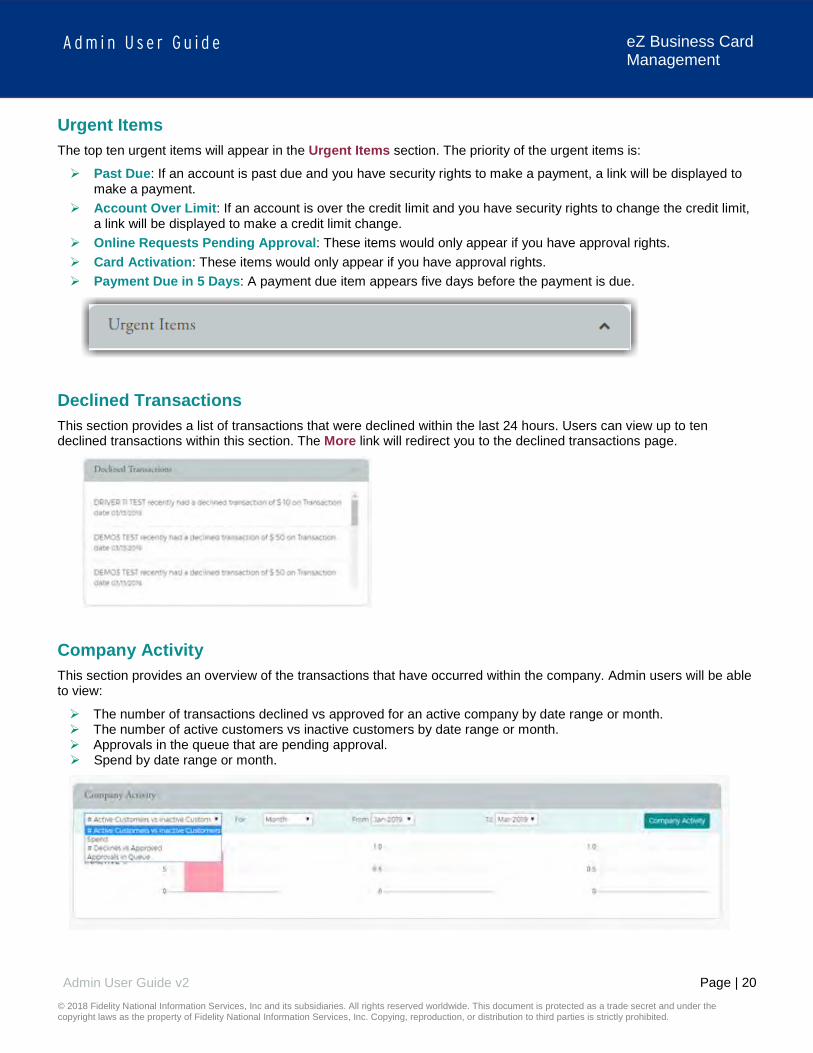
Urgent Items The top ten urgent items will appear in the Urgent Items section. The priority of the urgent items is:
Past Due: If an account is past due and you have security rights to make a payment, a link will be displayed to make a payment.
Account Over Limit: If an account is over the credit limit and you have security rights to change the credit limit, a link will be displayed to make a credit limit change.
Online Requests Pending Approval: These items would only appear if you have approval rights. Card Activation: These items would only appear if you have approval rights. Payment Due in 5 Days: A payment due item appears five days before the payment is due.
Declined Transactions This section provides a list of transactions that were declined within the last 24 hours. Users can view up to ten declined transactions within this section. The More link will redirect you to the declined transactions page.
Company Activity This section provides an overview of the transactions that have occurred within the company. Admin users will be able to view:
The number of transactions declined vs approved for an active company by date range or month. The number of active customers vs inactive customers by date range or month. Approvals in the queue that are pending approval. Spend by date range or month.

Page | 21
A d m i n U s e r G u i d e
© 2018 Fidelity National Information Services, Inc and its subsidiaries. All rights reserved worldwide. This document is protected as a trade secret and under the copyright laws as the property of Fidelity National Information Services, Inc. Copying, reproduction, or distribution to third parties is strictly prohibited.
Admin User Guide v2
eZ Business Card Management
Account Management IMPORTANT!
Depending on your security rights, you may or may not see all the options shown in this guide.
Cardholder Account Search The Search Cardholder page allows you to search the database for individual commercial and business cardholder accounts. You can search within all company hierarchal levels and sublevels that you have access to. To search for a cardholder in Account Management, perform the following steps:
1. Click the Account Management icon and then the Search Cardholder icon.
2. The Search Cardholder page is displayed. Enter one or any combination of search options and click Search.
Note: All accounts that you have access to will be displayed in the Cardholder Search Results before you enter the search
criteria. Search criteria only needs to be entered if you want to filter down the list.
3. The Cardholder Search Results section is displayed.

Page | 22
A d m i n U s e r G u i d e
© 2018 Fidelity National Information Services, Inc and its subsidiaries. All rights reserved worldwide. This document is protected as a trade secret and under the copyright laws as the property of Fidelity National Information Services, Inc. Copying, reproduction, or distribution to third parties is strictly prohibited.
Admin User Guide v2
eZ Business Card Management
The table below describes the search elements available on the Search Cardholder page.
Element Description Hierarchy Hierarchy level First Name Cardholder’s first name. Last Name Cardholder’s last name. User Name Cardholder account user-defined name
Account Number When searching by account number, you must enter the full 16-digit or last 4 of the credit card number.
Phone Number Cardholder’s phone number Social Security Number Cardholder’s Social Security number. Email Address Cardholder’s Email address on file in eZCardInfo (MyCardStatement).
The below table describes the icons available in the Cardholder Search Results section:\
Icon Description
Emulate the cardholder
View Cardholder Details page
Account status is open
Account status is closed
Download
Note: You can also search for a cardholder from the Company Management module.
Downloading Cardholder Search Results You can download the search results to the following formats and financial software programs: Excel/Spreadsheet (.csv) format Excel Text (tab spacing) format
To download the list, perform the following steps:
1. Click the Download icon in the Cardholder Search Results section.
2. Click on the format option that you want and save the file to a specified location on your computer.

Page | 23
A d m i n U s e r G u i d e
© 2018 Fidelity National Information Services, Inc and its subsidiaries. All rights reserved worldwide. This document is protected as a trade secret and under the copyright laws as the property of Fidelity National Information Services, Inc. Copying, reproduction, or distribution to third parties is strictly prohibited.
Admin User Guide v2
eZ Business Card Management
View Cardholder Details To view the cardholder’s Account Details, perform the following steps:
1. Click the Account Management icon and then the Search Cardholder icon.
2. The Search Cardholder page is displayed. Enter one or any combination of search options and click Search.
3. From the Cardholder Search Results section of Account Management, click on the View Cardholder Details
icon.
4. The Cardholder Detail page is displayed.
Page | 24
A d m i n U s e r G u i d e
© 2018 Fidelity National Information Services, Inc and its subsidiaries. All rights reserved worldwide. This document is protected as a trade secret and under the copyright laws as the property of Fidelity National Information Services, Inc. Copying, reproduction, or distribution to third parties is strictly prohibited.
Admin User Guide v2
eZ Business Card Management
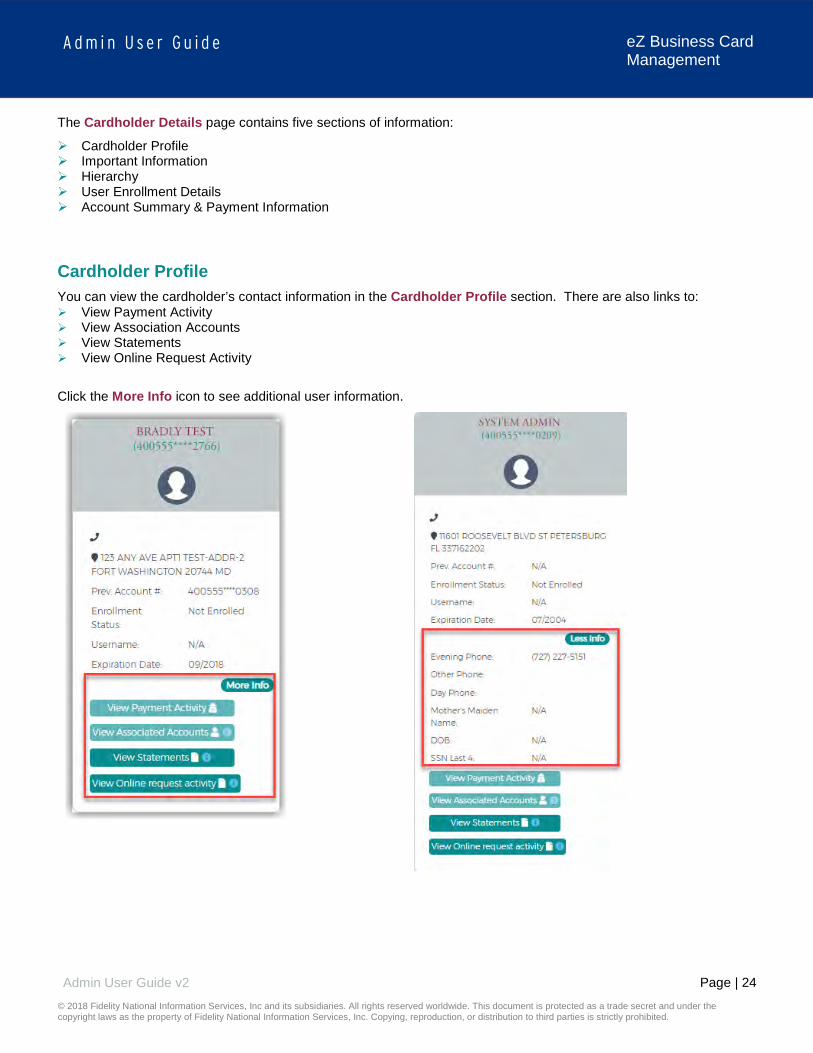
The Cardholder Details page contains five sections of information:
Cardholder Profile Important Information Hierarchy User Enrollment Details Account Summary & Payment Information
Cardholder Profile You can view the cardholder’s contact information in the Cardholder Profile section. There are also links to: View Payment Activity View Association Accounts View Statements View Online Request Activity
Click the More Info icon to see additional user information.
Page | 25
A d m i n U s e r G u i d e
© 2018 Fidelity National Information Services, Inc and its subsidiaries. All rights reserved worldwide. This document is protected as a trade secret and under the copyright laws as the property of Fidelity National Information Services, Inc. Copying, reproduction, or distribution to third parties is strictly prohibited.
Admin User Guide v2
eZ Business Card Management
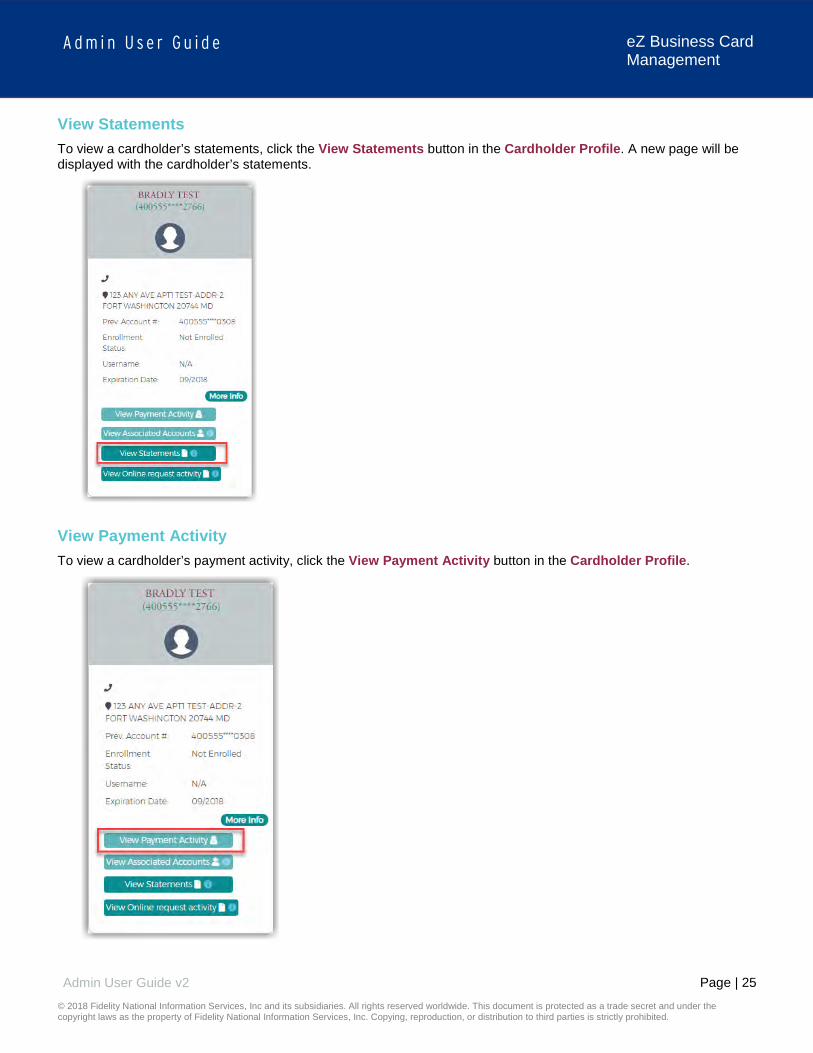
View Statements To view a cardholder’s statements, click the View Statements button in the Cardholder Profile. A new page will be displayed with the cardholder’s statements.
View Payment Activity To view a cardholder’s payment activity, click the View Payment Activity button in the Cardholder Profile.

Page | 26
A d m i n U s e r G u i d e
© 2018 Fidelity National Information Services, Inc and its subsidiaries. All rights reserved worldwide. This document is protected as a trade secret and under the copyright laws as the property of Fidelity National Information Services, Inc. Copying, reproduction, or distribution to third parties is strictly prohibited.
Admin User Guide v2
eZ Business Card Management
View Associated Accounts To view a cardholder’s associated accounts, click the See Associated Accounts button in the Cardholder Profile.
View Online Request Activity To view a cardholder’s online request activity, click the Online Request Activity button in the Cardholder Profile.

Page | 27
A d m i n U s e r G u i d e
© 2018 Fidelity National Information Services, Inc and its subsidiaries. All rights reserved worldwide. This document is protected as a trade secret and under the copyright laws as the property of Fidelity National Information Services, Inc. Copying, reproduction, or distribution to third parties is strictly prohibited.
Admin User Guide v2
eZ Business Card Management
Important Information The Important Information section displays important information about the account (past due details, declined transaction details, etc.).
Click More to see additional information, if needed.
Hierarchy The Hierarchy section displays the Corporation, Association, and Institution when the Cardholder Details page displays.
Click More to see additional information.
Page | 28
A d m i n U s e r G u i d e
© 2018 Fidelity National Information Services, Inc and its subsidiaries. All rights reserved worldwide. This document is protected as a trade secret and under the copyright laws as the property of Fidelity National Information Services, Inc. Copying, reproduction, or distribution to third parties is strictly prohibited.
Admin User Guide v2
eZ Business Card Management
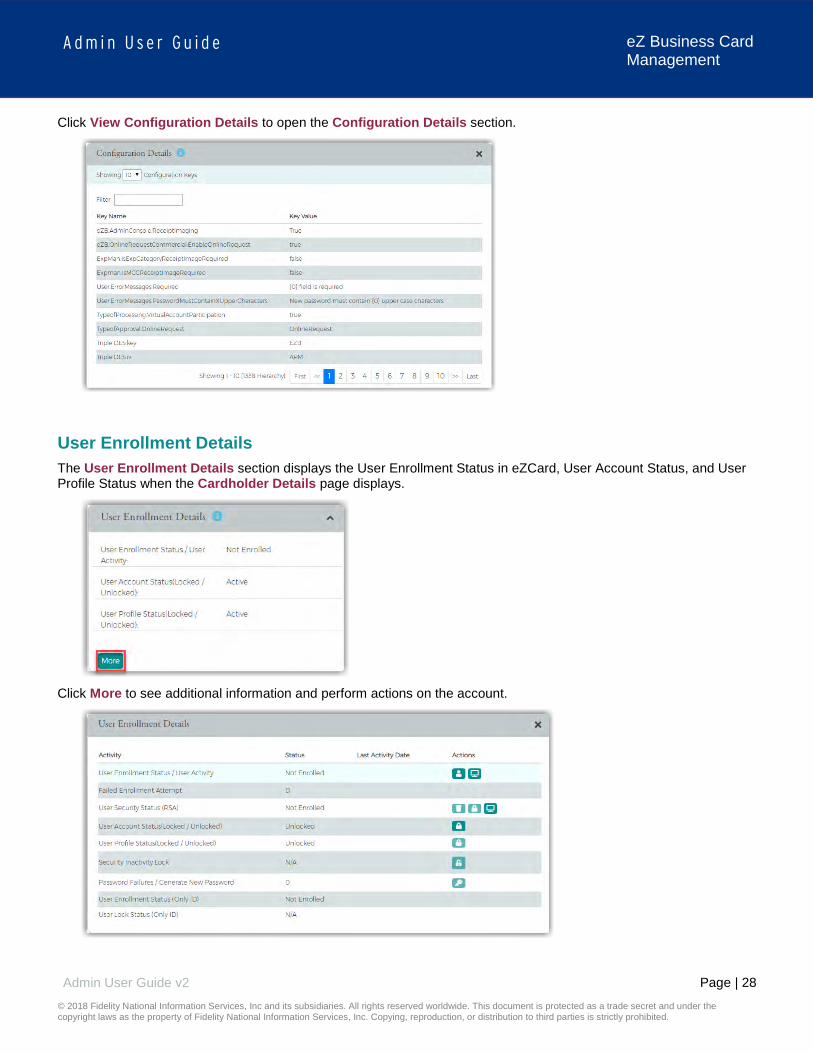
Click View Configuration Details to open the Configuration Details section.
User Enrollment Details The User Enrollment Details section displays the User Enrollment Status in eZCard, User Account Status, and User Profile Status when the Cardholder Details page displays.
Click More to see additional information and perform actions on the account.
Page | 29
A d m i n U s e r G u i d e
© 2018 Fidelity National Information Services, Inc and its subsidiaries. All rights reserved worldwide. This document is protected as a trade secret and under the copyright laws as the property of Fidelity National Information Services, Inc. Copying, reproduction, or distribution to third parties is strictly prohibited.
Admin User Guide v2
eZ Business Card Management
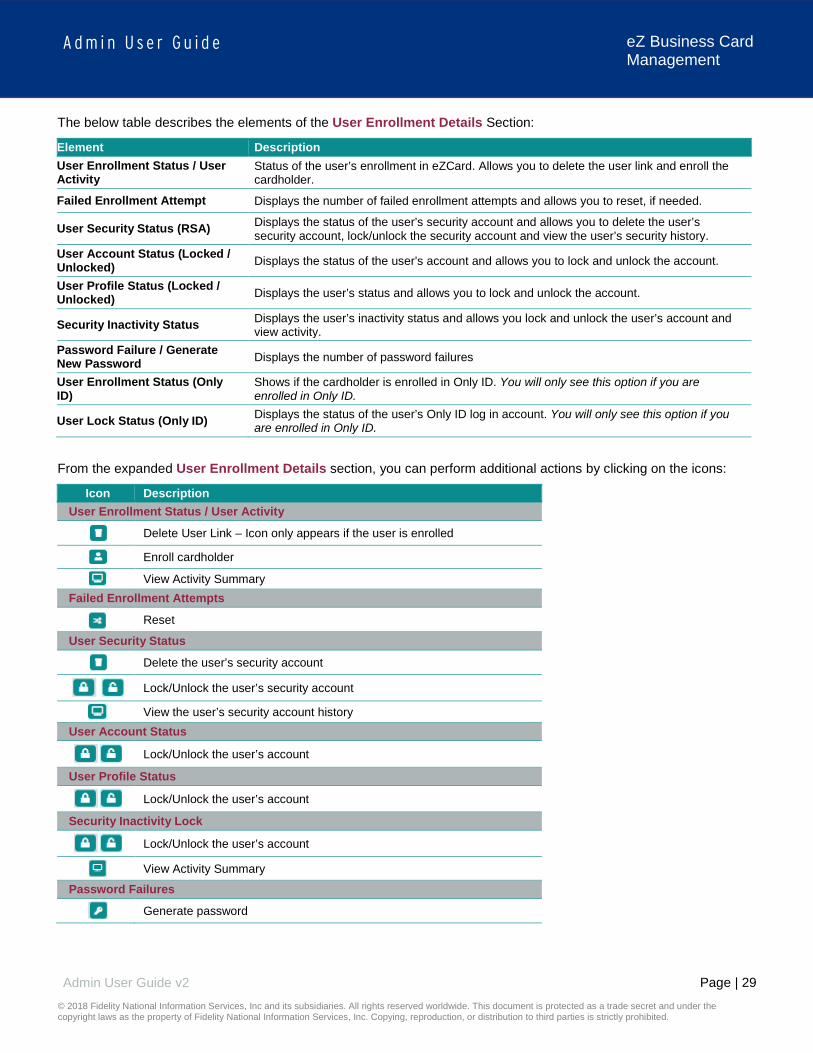
The below table describes the elements of the User Enrollment Details Section:
Element Description User Enrollment Status / User Activity
Status of the user’s enrollment in eZCard. Allows you to delete the user link and enroll the cardholder.
Failed Enrollment Attempt Displays the number of failed enrollment attempts and allows you to reset, if needed.
User Security Status (RSA) Displays the status of the user’s security account and allows you to delete the user’s security account, lock/unlock the security account and view the user’s security history.
User Account Status (Locked / Unlocked) Displays the status of the user’s account and allows you to lock and unlock the account.
User Profile Status (Locked / Unlocked) Displays the user’s status and allows you to lock and unlock the account.
Security Inactivity Status Displays the user’s inactivity status and allows you lock and unlock the user’s account and view activity.
Password Failure / Generate New Password Displays the number of password failures
User Enrollment Status (Only ID)
Shows if the cardholder is enrolled in Only ID. You will only see this option if you are enrolled in Only ID.
User Lock Status (Only ID) Displays the status of the user’s Only ID log in account. You will only see this option if you are enrolled in Only ID.
From the expanded User Enrollment Details section, you can perform additional actions by clicking on the icons:
Icon Description User Enrollment Status / User Activity
Delete User Link – Icon only appears if the user is enrolled
Enroll cardholder
View Activity Summary Failed Enrollment Attempts
Reset
User Security Status
Delete the user’s security account
Lock/Unlock the user’s security account
View the user’s security account history User Account Status
Lock/Unlock the user’s account
User Profile Status
Lock/Unlock the user’s account
Security Inactivity Lock
Lock/Unlock the user’s account
View Activity Summary
Password Failures
Generate password

Page | 30
A d m i n U s e r G u i d e
© 2018 Fidelity National Information Services, Inc and its subsidiaries. All rights reserved worldwide. This document is protected as a trade secret and under the copyright laws as the property of Fidelity National Information Services, Inc. Copying, reproduction, or distribution to third parties is strictly prohibited.
Admin User Guide v2
eZ Business Card Management
Account Summary & Payment Information Section The Account Summary & Payment Information section displays the Minimum Payment Due, Payment Due Date and Account Balance when the Cardholder Details page displays.
Click More to see additional information.
Enrolling a Cardholder in eZCard To enroll a cardholder in eZCard, perform the following steps:
1. From the Cardholder Details page, click the More button in the User Enrollment Details section to display additional enrollment details.

Page | 31
A d m i n U s e r G u i d e
© 2018 Fidelity National Information Services, Inc and its subsidiaries. All rights reserved worldwide. This document is protected as a trade secret and under the copyright laws as the property of Fidelity National Information Services, Inc. Copying, reproduction, or distribution to third parties is strictly prohibited.
Admin User Guide v2
eZ Business Card Management
2. Click on the Enroll icon in the User Enrollment Status row.
3. The Enroll User screen is displayed. Complete all the fields and click Confirm.

Page | 32
A d m i n U s e r G u i d e
© 2018 Fidelity National Information Services, Inc and its subsidiaries. All rights reserved worldwide. This document is protected as a trade secret and under the copyright laws as the property of Fidelity National Information Services, Inc. Copying, reproduction, or distribution to third parties is strictly prohibited.
Admin User Guide v2
eZ Business Card Management
Emulating a Cardholder If you are a company administrator, you can emulate, or view an enrolled individual cardholder’s online account to understand what the cardholder is viewing on eZCardInfo (MyCardStatement). To emulate a cardholder, perform the following steps:
1. From the Cardholder Search Results page. Click on the Emulate User icon for the appropriate cardholder.
Note: The Emulate Cardholder option is not available unless the cardholder is enrolled in eZCardInfo (MyCardStatement).
2. eZCardInfo.com (MyCardStatement.com) automatically launches allowing you to view the cardholder’s account online. By default, the eZCard (MyCard) Home page provides a summary of their account.
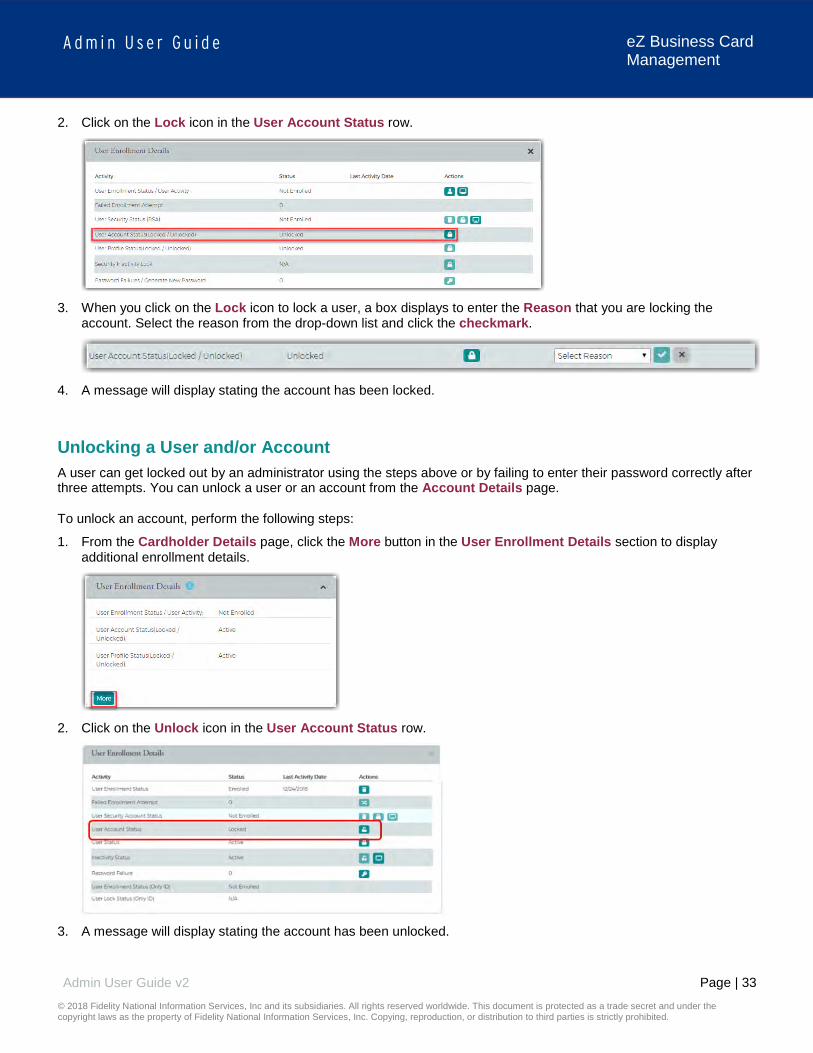
Locking a User and/or Account To lock a user’s account, perform the following steps:
1. From the Cardholder Details page, click the More button in the User Enrollment Details section to display additional enrollment details.
Page | 33
A d m i n U s e r G u i d e
© 2018 Fidelity National Information Services, Inc and its subsidiaries. All rights reserved worldwide. This document is protected as a trade secret and under the copyright laws as the property of Fidelity National Information Services, Inc. Copying, reproduction, or distribution to third parties is strictly prohibited.
Admin User Guide v2
eZ Business Card Management
2. Click on the Lock icon in the User Account Status row.
3. When you click on the Lock icon to lock a user, a box displays to enter the Reason that you are locking the
account. Select the reason from the drop-down list and click the checkmark.
4. A message will display stating the account has been locked.
Unlocking a User and/or Account A user can get locked out by an administrator using the steps above or by failing to enter their password correctly after three attempts. You can unlock a user or an account from the Account Details page. To unlock an account, perform the following steps:
1. From the Cardholder Details page, click the More button in the User Enrollment Details section to display additional enrollment details.
2. Click on the Unlock icon in the User Account Status row.
3. A message will display stating the account has been unlocked.
Page | 34
A d m i n U s e r G u i d e
© 2018 Fidelity National Information Services, Inc and its subsidiaries. All rights reserved worldwide. This document is protected as a trade secret and under the copyright laws as the property of Fidelity National Information Services, Inc. Copying, reproduction, or distribution to third parties is strictly prohibited.
Admin User Guide v2
eZ Business Card Management
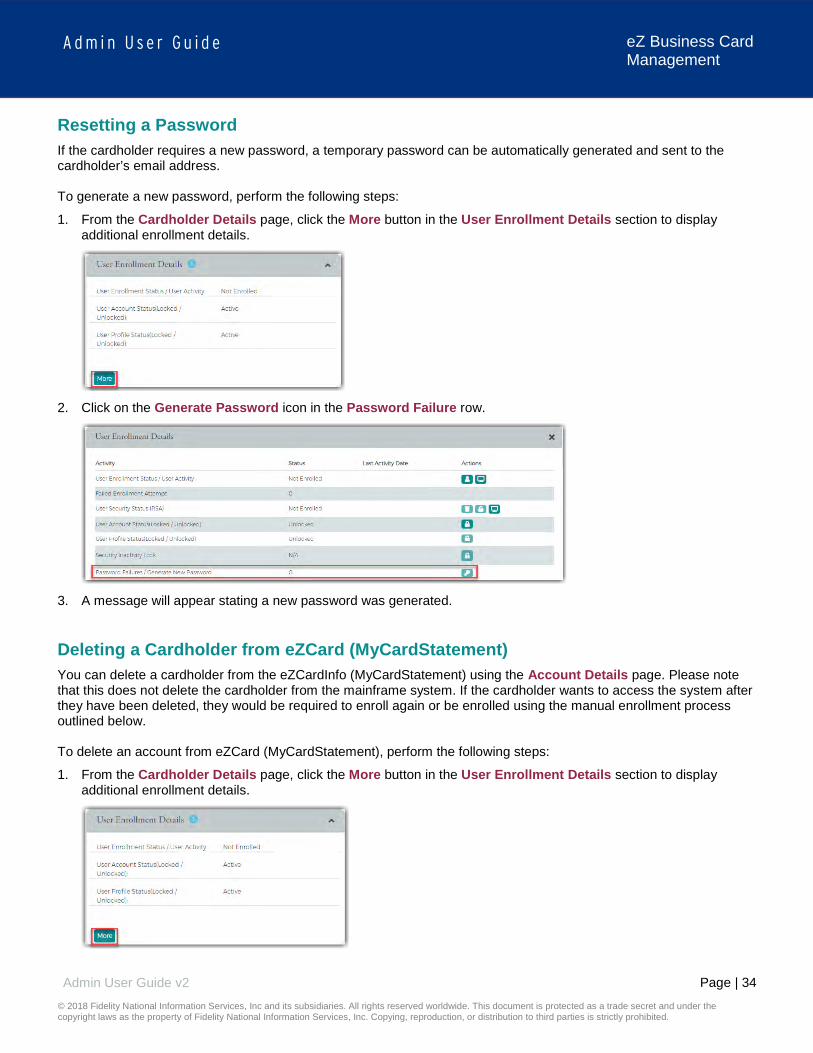
Resetting a Password If the cardholder requires a new password, a temporary password can be automatically generated and sent to the cardholder’s email address. To generate a new password, perform the following steps:
1. From the Cardholder Details page, click the More button in the User Enrollment Details section to display additional enrollment details.
2. Click on the Generate Password icon in the Password Failure row.
3. A message will appear stating a new password was generated.
Deleting a Cardholder from eZCard (MyCardStatement) You can delete a cardholder from the eZCardInfo (MyCardStatement) using the Account Details page. Please note that this does not delete the cardholder from the mainframe system. If the cardholder wants to access the system after they have been deleted, they would be required to enroll again or be enrolled using the manual enrollment process outlined below. To delete an account from eZCard (MyCardStatement), perform the following steps:
1. From the Cardholder Details page, click the More button in the User Enrollment Details section to display additional enrollment details.

Page | 35
A d m i n U s e r G u i d e
© 2018 Fidelity National Information Services, Inc and its subsidiaries. All rights reserved worldwide. This document is protected as a trade secret and under the copyright laws as the property of Fidelity National Information Services, Inc. Copying, reproduction, or distribution to third parties is strictly prohibited.
Admin User Guide v2
eZ Business Card Management
2. Click on the Delete icon in the User Enrollment Status row.
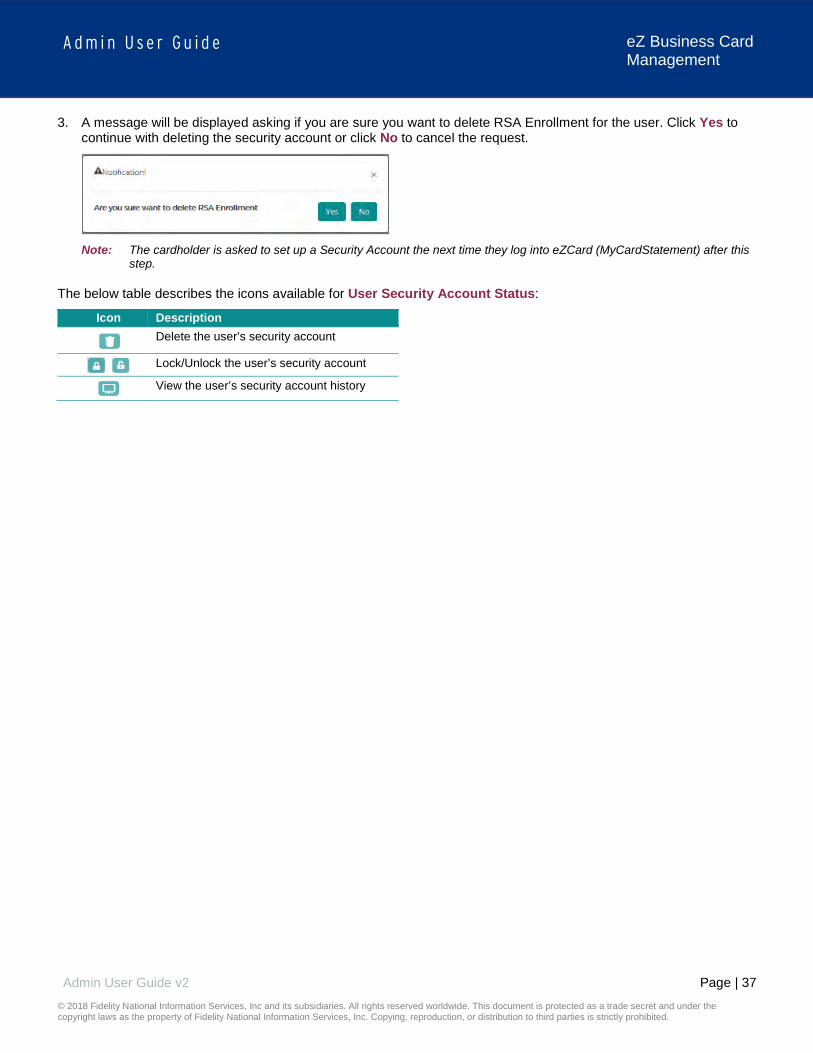
3. A Notification message will be displayed asking “Are you sure you want to delete enrollment?”. Click Yes to
proceed or No to cancel the request.
4. A message will display stating the user was successfully deleted.
Locking/Unlocking a User’s Security Account A cardholder can get locked out of their Security Account due to failing to answer security questions correctly. Once logged in, a customer service representative may lock or unlock a cardholder in their Security Account through the Account Details page. To lock or unlock a User’s Security Account, perform the following steps:
1. From the Cardholder Details page, click the More button in the User Enrollment Details section to display additional enrollment details.

Page | 36
A d m i n U s e r G u i d e
© 2018 Fidelity National Information Services, Inc and its subsidiaries. All rights reserved worldwide. This document is protected as a trade secret and under the copyright laws as the property of Fidelity National Information Services, Inc. Copying, reproduction, or distribution to third parties is strictly prohibited.
Admin User Guide v2
eZ Business Card Management
2. Click on the Lock or Unlock icon in the User Security Account Status row. A message will display stating the account was successfully locked/unlocked.
The below table describes the icons available for User Security Account Status:
Icon Description
Delete the user’s security account
Lock/Unlock the user’s security account
View the user’s security account history
Deleting a User’s Security Account If the Cardholder has forgotten all their security questions, they can be deleted from their Security Account. This allows them to log in again and create a new Security Account profile. Once logged in, customer service representatives may delete the Security Account. To delete a User’s Security Account, perform the following steps:
1. From the Cardholder Details page, click the More button in the User Enrollment Details section to display additional enrollment details.
2. Click on the Delete icon in the User Security Account Status row.
Page | 37
A d m i n U s e r G u i d e
© 2018 Fidelity National Information Services, Inc and its subsidiaries. All rights reserved worldwide. This document is protected as a trade secret and under the copyright laws as the property of Fidelity National Information Services, Inc. Copying, reproduction, or distribution to third parties is strictly prohibited.
Admin User Guide v2
eZ Business Card Management
3. A message will be displayed asking if you are sure you want to delete RSA Enrollment for the user. Click Yes to continue with deleting the security account or click No to cancel the request.
Note: The cardholder is asked to set up a Security Account the next time they log into eZCard (MyCardStatement) after this
step. The below table describes the icons available for User Security Account Status:
Icon Description
Delete the user’s security account
Lock/Unlock the user’s security account
View the user’s security account history

Page | 38
A d m i n U s e r G u i d e
© 2018 Fidelity National Information Services, Inc and its subsidiaries. All rights reserved worldwide. This document is protected as a trade secret and under the copyright laws as the property of Fidelity National Information Services, Inc. Copying, reproduction, or distribution to third parties is strictly prohibited.
Admin User Guide v2
eZ Business Card Management
Company Management IMPORTANT!
Depending on your security rights, you may or may not see all the options shown in this guide.
Company Search The Company Search page allows admins to search for a specific company. This feature can also be useful in locating specific cardholder accounts within a company. Note: This feature is only available to administrative users with the proper security access rights to this information.
To search for a company, perform the following steps:
1. Click the Company Management icon and then click Search Company.
2. The Company Search screen is displayed. Enter the search criteria and click Search. The Company Search
Results page is displayed.
Note: All the companies that you have access to will appear in the Company Search Results section. You will only
need to search for the company if you want to limit the number of companies displayed in the results.
The table below describes the elements of the Company Search page:
Element Description Hierarchy Company hierarchy level CompanyID Company’s Company ID Company Name Company’s Name Status Status drop-down: Open, Closed or Inactive
The below table describes the icons available in the Company Search Results section:
Icon Description
Configure company
View hierarchy
Online request
Account list
Payments
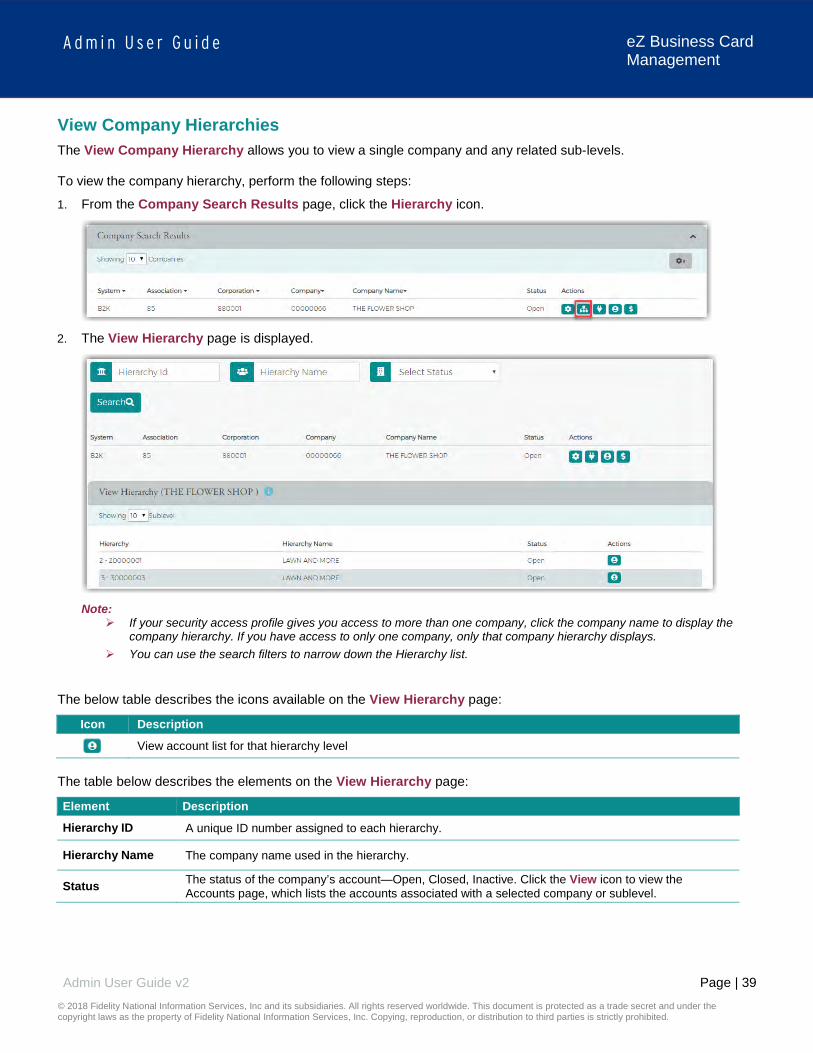
Page | 39
A d m i n U s e r G u i d e
© 2018 Fidelity National Information Services, Inc and its subsidiaries. All rights reserved worldwide. This document is protected as a trade secret and under the copyright laws as the property of Fidelity National Information Services, Inc. Copying, reproduction, or distribution to third parties is strictly prohibited.
Admin User Guide v2
eZ Business Card Management
View Company Hierarchies The View Company Hierarchy allows you to view a single company and any related sub-levels. To view the company hierarchy, perform the following steps:
1. From the Company Search Results page, click the Hierarchy icon.
2. The View Hierarchy page is displayed.
Note:
If your security access profile gives you access to more than one company, click the company name to display the company hierarchy. If you have access to only one company, only that company hierarchy displays.
You can use the search filters to narrow down the Hierarchy list. The below table describes the icons available on the View Hierarchy page:
Icon Description
View account list for that hierarchy level The table below describes the elements on the View Hierarchy page:
Element Description
Hierarchy ID A unique ID number assigned to each hierarchy.
Hierarchy Name The company name used in the hierarchy.
Status The status of the company’s account—Open, Closed, Inactive. Click the View icon to view the Accounts page, which lists the accounts associated with a selected company or sublevel.
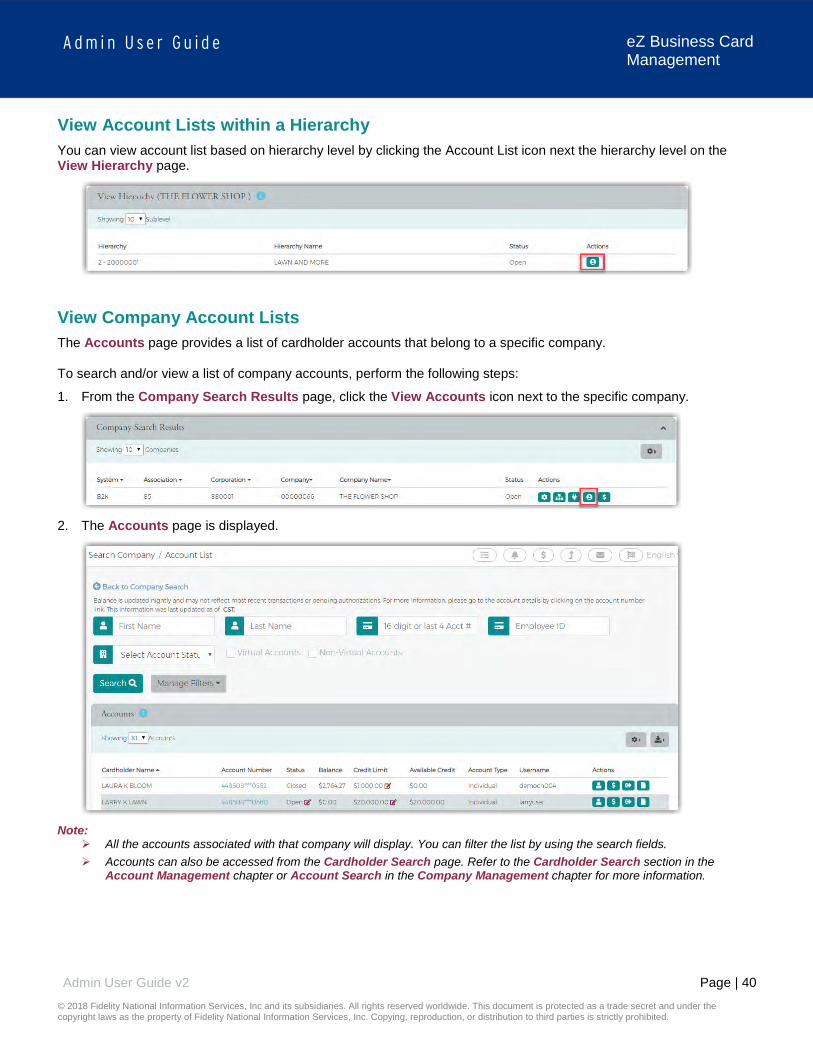
Page | 40
A d m i n U s e r G u i d e
© 2018 Fidelity National Information Services, Inc and its subsidiaries. All rights reserved worldwide. This document is protected as a trade secret and under the copyright laws as the property of Fidelity National Information Services, Inc. Copying, reproduction, or distribution to third parties is strictly prohibited.
Admin User Guide v2
eZ Business Card Management
View Account Lists within a Hierarchy You can view account list based on hierarchy level by clicking the Account List icon next the hierarchy level on the View Hierarchy page.
View Company Account Lists The Accounts page provides a list of cardholder accounts that belong to a specific company. To search and/or view a list of company accounts, perform the following steps:
1. From the Company Search Results page, click the View Accounts icon next to the specific company.
2. The Accounts page is displayed.
Note:
All the accounts associated with that company will display. You can filter the list by using the search fields. Accounts can also be accessed from the Cardholder Search page. Refer to the Cardholder Search section in the
Account Management chapter or Account Search in the Company Management chapter for more information.

Page | 41
A d m i n U s e r G u i d e
© 2018 Fidelity National Information Services, Inc and its subsidiaries. All rights reserved worldwide. This document is protected as a trade secret and under the copyright laws as the property of Fidelity National Information Services, Inc. Copying, reproduction, or distribution to third parties is strictly prohibited.
Admin User Guide v2
eZ Business Card Management
The table below describes the search elements on the Accounts page:
Element Description First Name Cardholder’s first name. Last Name Cardholder’s last name. Account Number Full 16-digit account number or the last 4 digits Employee ID Employee ID Account Type Select from the account type from the drop-down list. Account Status Select from the account status from the drop-down list – Open, Closed, Blocked Virtual Accounts Displays only virtual accounts Non-Virtual Accounts Displays only non-virtual accounts
The table below describes the icons on the Accounts page:
Icon Description
Emulate
Make a payment
Authorization
View Statement
Edit
Downloading Company Account Lists You can download the search results to the following formats and financial software programs: Excel/Spreadsheet (.csv) format Excel Text (tab spacing) format
To download the list, perform the following steps:
1. Click the Download icon in the Accounts section.
2. Click on the format option that you want and save the file to a specified location on your computer.

Page | 42
A d m i n U s e r G u i d e
© 2018 Fidelity National Information Services, Inc and its subsidiaries. All rights reserved worldwide. This document is protected as a trade secret and under the copyright laws as the property of Fidelity National Information Services, Inc. Copying, reproduction, or distribution to third parties is strictly prohibited.
Admin User Guide v2
eZ Business Card Management
View Company Level Details The Level Details page allows you to view company information, including balances and credit limit data, for a specific company or sublevel. To view this information, perform the following steps:
1. From the Company Accounts or Online Request page, click the Level Details icon.
2. The Level Details page will be displayed.

Page | 43
A d m i n U s e r G u i d e
© 2018 Fidelity National Information Services, Inc and its subsidiaries. All rights reserved worldwide. This document is protected as a trade secret and under the copyright laws as the property of Fidelity National Information Services, Inc. Copying, reproduction, or distribution to third parties is strictly prohibited.
Admin User Guide v2
eZ Business Card Management
The table below describes the information shown on the Level Details page.
Element Description Company Profile Total Balance The current amount owed on your account, including purchases and credits to the account since
your last statement and any purchases from previous statements that you have not yet paid. Cash Limit The total amount, set by your financial institution, which can be used a cash advance. Credit Limit The total amount, set by the financial institution, which can be charged to the account. Available Credit The credit limit minus the account balance. Available Cash The amount of available cash that can be drawn from the account. This value is determined by
the cash limit minus the cash balance minus the cash transaction authorizations. Past Due Amount The amount owed on the account immediately if a payment was not received by the due date. Overlimit Amount The amount an account exceeds the credit limit, if applicable. Primary Address Company’s primary address Statement Mailing Address Address where the company’s statement is mailed. View Hierarchy Hierarchy Information:
Level – displays the company or sublevel ID – displays the company ID Name – displays the company ID and name Enroll Date – displays the eZBusiness enrollment date for the applicable company.
Financial Details Current Balances
Total Balance The current amount owed on your account, including purchases and credits to the account since your last statement and any purchases from previous statements that you have not yet paid.
Cash Balance The balance of all cash advances or other cash transactions that have posted to the account. Credit Limit The total amount, set by the financial institution, which can be charged to the account. Cash Limit The balance of all cash advances or other cash transactions that have posted to the account. Available Credit The credit limit minus the account balance. Available Cash The amount of available cash that can be drawn from the account. This value is determined by
the cash limit minus the cash balance minus the cash transaction authorizations. Outstanding Authorizations Pending transactions on the account. Past Due Amount The amount owed on the account immediately if a payment was not received by the due date. Overlimit Amount The amount an account exceeds the credit limit, if applicable. Last Statement Date The date of the last account statement. Current Cycle Date The monthly billing date. Cardholder Statements Show if individual monthly statements are sent to the cardholders. Bill Day Date of the month that the company is billed. Financial Year End Month Company’s financial year end date. Currency Code Currency code Emboss Company Name Name embossed on the company’s credit cards. Limit Allocation Limit Allocated
Limit Available Aggregate Percent
Product Information Product Product Code Product Type Product Type Active Accounts All Levels Number of active accounts for all levels Active Accounts Current Levels
Number of active accounts for the current level

Page | 44
A d m i n U s e r G u i d e
© 2018 Fidelity National Information Services, Inc and its subsidiaries. All rights reserved worldwide. This document is protected as a trade secret and under the copyright laws as the property of Fidelity National Information Services, Inc. Copying, reproduction, or distribution to third parties is strictly prohibited.
Admin User Guide v2
eZ Business Card Management
Element Description Total Balances Total balance per product Outstanding Authorizations Total amount of outstanding authorizations per product PIN Suppression PIN suppression available by product Billing Account Option Billing account option selected by product Payable Provider Indicates if the product is a Payables participant.
Blank – Product does not participate
Contact Information Contact Contact name and information for the company
The table below describes the icons on the Level Details page:
Icon Description
Make a payment
View Account Credit Limits The Accounts page displays the credit limits for each account under that company. To view cardholder credit line information, perform the following steps:
1. From the Company Search Results page, click the Account List icon.
2. The Accounts page is displayed showing the Credit Limit for each account.
The below table shows the elements of the Accounts page:
Element Description Cardholder Details
Cardholder’s first and last name
Account # The first four and the last six numbers of the account number. The icon next to the account number indicates if the account is locked or unlocked.
Status Status of the account. The edit icon allows you to change the status from the Accounts page. Balance Balance of the cardholder’s account

Page | 45
A d m i n U s e r G u i d e
© 2018 Fidelity National Information Services, Inc and its subsidiaries. All rights reserved worldwide. This document is protected as a trade secret and under the copyright laws as the property of Fidelity National Information Services, Inc. Copying, reproduction, or distribution to third parties is strictly prohibited.
Admin User Guide v2
eZ Business Card Management
Element Description Credit Limit Cardholder’s credit limit. The edit icon allows you to change the credit limit from the Accounts page. Available Credit Cardholder’s available credit. Account Type Type of account for that cardholder. User Name Cardholder’s user name.
Cardholder Search To search for an account from Company Management, perform the following steps:
1. Click on the Company Management icon and then the Search Cardholder icon.
2. The Search Cardholder page is displayed. Enter one or any combination of search options and click Search.
Note: All accounts that you have access to will be displayed in the Cardholder Search Results before you enter the search
criteria. Search criteria only needs to be entered if you want to filter down the list.
The table below describes the search elements on the Search Cardholder page.
Element Description Hierarchy Company hierarchy level First Name Cardholder’s first name. Last Name Cardholder’s last name. Employee ID Employee’s ID Username Cardholder account user-defined name
Account # When searching by account number, you must enter the full 16-digit credit card number or the last 4.

Page | 46
A d m i n U s e r G u i d e
© 2018 Fidelity National Information Services, Inc and its subsidiaries. All rights reserved worldwide. This document is protected as a trade secret and under the copyright laws as the property of Fidelity National Information Services, Inc. Copying, reproduction, or distribution to third parties is strictly prohibited.
Admin User Guide v2
eZ Business Card Management
Element Description Phone Number 1 Cardholder’s phone number 1 Email Address 1 Cardholder’s email address 1 SSN Cardholder’s social security number. Status Select the status from the drop-down list: All, Open, Closed, Blocked
Account Balance Select an option from the drop-down list: Equal To, Between, More Than or Less Than. Once you select an option, additional field(s) will display to enter the dollar amount.
Credit Limit Select an option from the drop-down list: Equal To, Between, More Than or Less Than. Once you select an option, additional field(s) will display to enter the dollar amount.
The below table describes the icons available in the Cardholder Search Results section:
Icon Description
Emulate the cardholder
Account Details
Download the Cardholder Search Results
Downloading Cardholder Search Results You can download the search results to the following formats and financial software programs: Excel/Spreadsheet (.csv) format Excel Text (tab spacing) format
To download the list, perform the following steps:
1. Click the Download icon in the Search Cardholder Results section.
2. Click on the format option that you want and save the file to a specified location on your computer.

Page | 47
A d m i n U s e r G u i d e
© 2018 Fidelity National Information Services, Inc and its subsidiaries. All rights reserved worldwide. This document is protected as a trade secret and under the copyright laws as the property of Fidelity National Information Services, Inc. Copying, reproduction, or distribution to third parties is strictly prohibited.
Admin User Guide v2
eZ Business Card Management
View Account Details The Account Detail page displays account and cardholder information. It also provides links for viewing account transactions and the details of outstanding transactions. To view the details of a specific account:
1. From the Cardholder Search Results or the Company Account List, click on the Account Details icon to view the details for that account.
2. The Account Detail page is displayed.
Important Information The Important Information section displays important information about the account (past due details, declined transaction details, etc.).
Click More to see additional information, if needed.

Page | 48
A d m i n U s e r G u i d e
© 2018 Fidelity National Information Services, Inc and its subsidiaries. All rights reserved worldwide. This document is protected as a trade secret and under the copyright laws as the property of Fidelity National Information Services, Inc. Copying, reproduction, or distribution to third parties is strictly prohibited.
Admin User Guide v2
eZ Business Card Management
User Enrollment Details
Click the More button in the User Enrollment Details section to display additional enrollment details.
From the expanded User Enrollment Details section, you can perform additional actions by clicking on the icons:
Icon Description User Enrollment Status / User Activity
Delete Cardholder User – Icon only appears if the user is enrolled
Reset
Enroll cardholder
View Activity Summary
User Security Status (RSA)
Delete the user’s security account
Lock/Unlock the user’s security account
View the user’s security account history
Security Inactivity Lock
Lock/Unlock the user’s account
Password Failures / Generate New Password
Generate password
User Account Status & User Profile Status
Lock/Unlock the user’s account
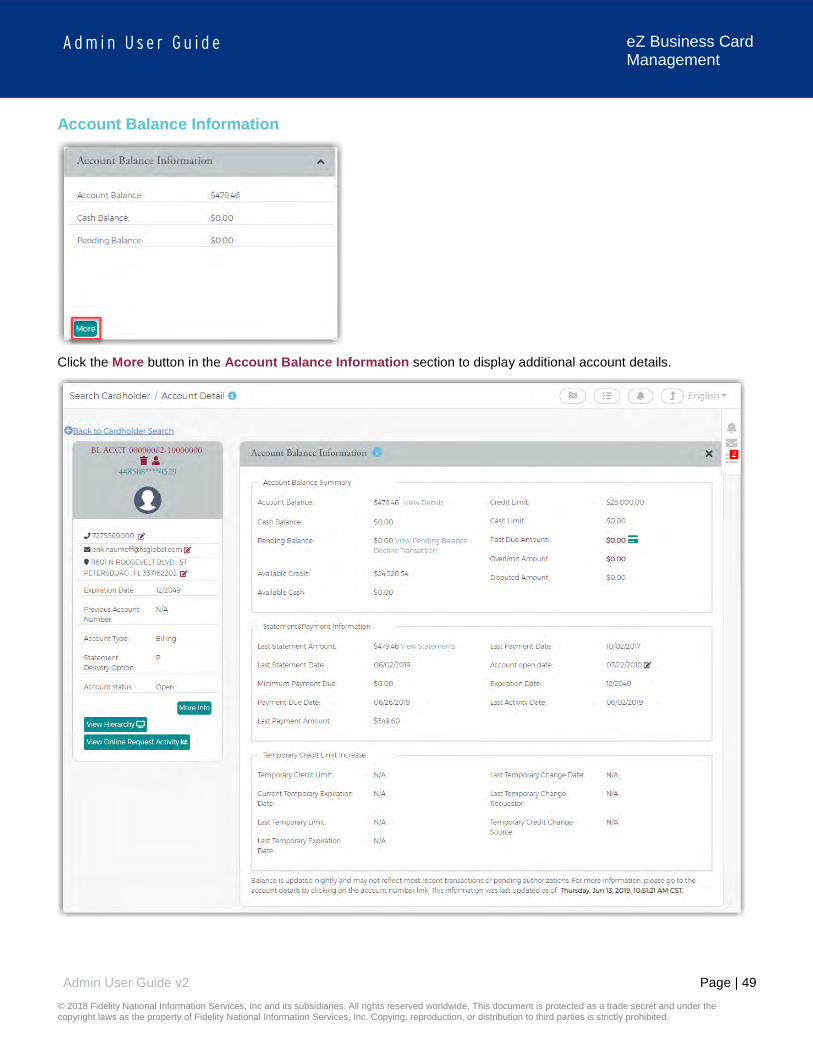
Page | 49
A d m i n U s e r G u i d e
© 2018 Fidelity National Information Services, Inc and its subsidiaries. All rights reserved worldwide. This document is protected as a trade secret and under the copyright laws as the property of Fidelity National Information Services, Inc. Copying, reproduction, or distribution to third parties is strictly prohibited.
Admin User Guide v2
eZ Business Card Management
Account Balance Information
Click the More button in the Account Balance Information section to display additional account details.

Page | 50
A d m i n U s e r G u i d e
© 2018 Fidelity National Information Services, Inc and its subsidiaries. All rights reserved worldwide. This document is protected as a trade secret and under the copyright laws as the property of Fidelity National Information Services, Inc. Copying, reproduction, or distribution to third parties is strictly prohibited.
Admin User Guide v2
eZ Business Card Management
Cardholder Profile You can view the cardholder’s contact information in the Cardholder Profile section. There are also links to:
View Hierarchy View Online Request Activity Expense Management Allocations
View Hierarchy To view the cardholder hierarchy, perform the following steps:
From the Account Detail page, click the View Hierarchy button in the Cardholder Profile section. The Hierarchy section is displayed below the View Hierarchy button.

Page | 51
A d m i n U s e r G u i d e
© 2018 Fidelity National Information Services, Inc and its subsidiaries. All rights reserved worldwide. This document is protected as a trade secret and under the copyright laws as the property of Fidelity National Information Services, Inc. Copying, reproduction, or distribution to third parties is strictly prohibited.
Admin User Guide v2
eZ Business Card Management
View Online Request Activity To view Online Request Activity, perform the following steps:
From the Account Detail page, click the View Online Request Activity button in the Cardholder Profile section. The Online Request Activity section is displayed below the Cardholder Profile section.
Expense Management Allocations If the cardholder is set up for eZBusiness Expense Management, you can view the allocations by clicking on the Expense Management Allocations icon.

Page | 52
A d m i n U s e r G u i d e
© 2018 Fidelity National Information Services, Inc and its subsidiaries. All rights reserved worldwide. This document is protected as a trade secret and under the copyright laws as the property of Fidelity National Information Services, Inc. Copying, reproduction, or distribution to third parties is strictly prohibited.
Admin User Guide v2
eZ Business Card Management
View Statements To view Statements, perform the following steps:
1. From the Account Detail page, click the More button in the Account Balance Information section to see all the account balance details.
2. Click the View Statements link in the Statement & Payment Information section.
3. The Statement Details section is displayed. Click on the row for the statement that you would like to view.
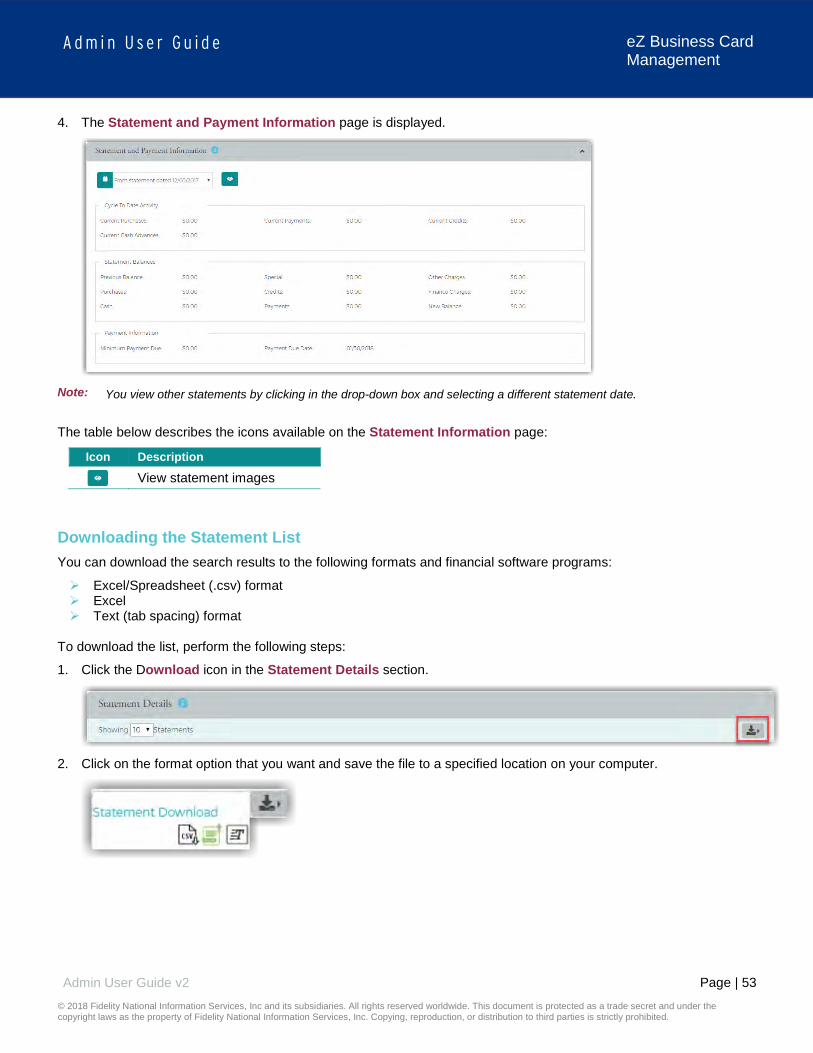
Page | 53
A d m i n U s e r G u i d e
© 2018 Fidelity National Information Services, Inc and its subsidiaries. All rights reserved worldwide. This document is protected as a trade secret and under the copyright laws as the property of Fidelity National Information Services, Inc. Copying, reproduction, or distribution to third parties is strictly prohibited.
Admin User Guide v2
eZ Business Card Management
4. The Statement and Payment Information page is displayed.
Note: You view other statements by clicking in the drop-down box and selecting a different statement date.
The table below describes the icons available on the Statement Information page:
Icon Description
View statement images
Downloading the Statement List You can download the search results to the following formats and financial software programs:
Excel/Spreadsheet (.csv) format Excel Text (tab spacing) format
To download the list, perform the following steps:
1. Click the Download icon in the Statement Details section.
2. Click on the format option that you want and save the file to a specified location on your computer.

Page | 54
A d m i n U s e r G u i d e
© 2018 Fidelity National Information Services, Inc and its subsidiaries. All rights reserved worldwide. This document is protected as a trade secret and under the copyright laws as the property of Fidelity National Information Services, Inc. Copying, reproduction, or distribution to third parties is strictly prohibited.
Admin User Guide v2
eZ Business Card Management
Viewing Transactions IMPORTANT!
Depending on your security rights, you may or may not see all the options shown in this guide. The Transaction Details page displays the cardholder transactions for a selected company or company sublevel. Transactions for the last 45 days are listed for both billing and individual accounts. Transaction details can be viewed by searching for a cardholder in Company Management or by searching for a company and selecting a cardholder from the Account List.
View Transactions To search and view transactions, perform the following steps:
1. From the Account Detail page, click the More button in the Account Balance Information section to see all the account balance details.
2. In the Account Balance Summary section, click on the View Details link next to Balance.
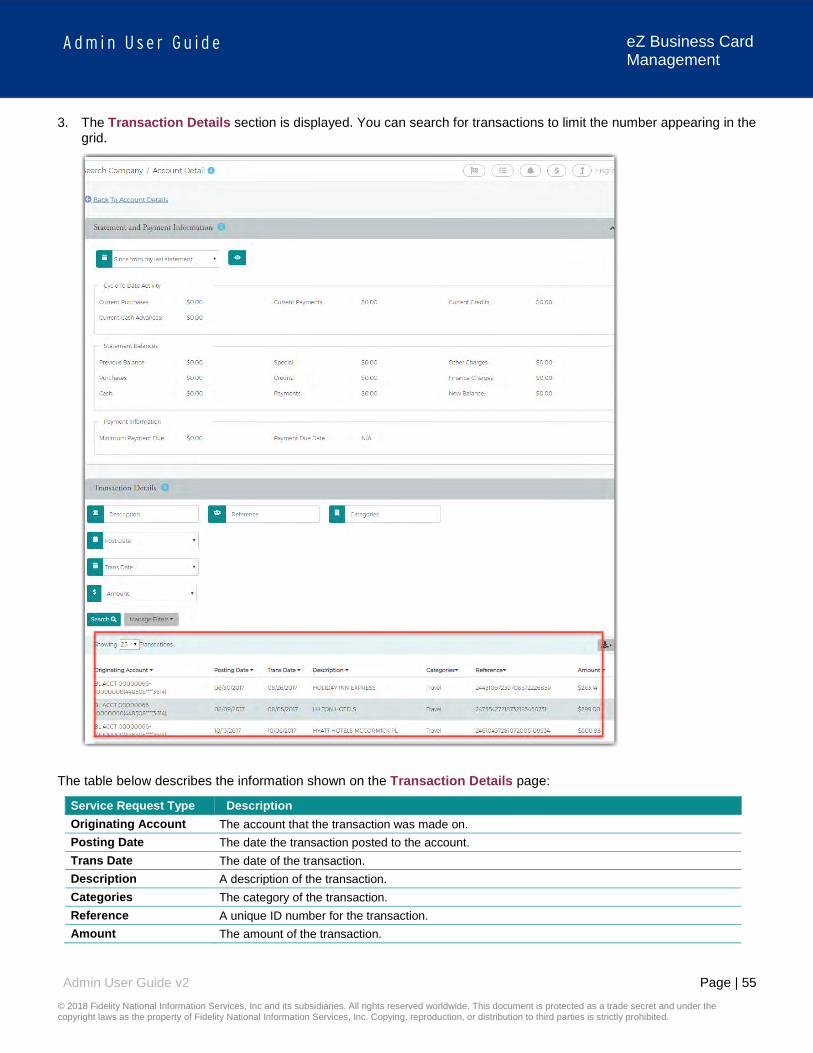
Page | 55
A d m i n U s e r G u i d e
© 2018 Fidelity National Information Services, Inc and its subsidiaries. All rights reserved worldwide. This document is protected as a trade secret and under the copyright laws as the property of Fidelity National Information Services, Inc. Copying, reproduction, or distribution to third parties is strictly prohibited.
Admin User Guide v2
eZ Business Card Management
3. The Transaction Details section is displayed. You can search for transactions to limit the number appearing in the grid.
The table below describes the information shown on the Transaction Details page:
Service Request Type Description Originating Account The account that the transaction was made on. Posting Date The date the transaction posted to the account. Trans Date The date of the transaction. Description A description of the transaction. Categories The category of the transaction. Reference A unique ID number for the transaction. Amount The amount of the transaction.

Page | 56
A d m i n U s e r G u i d e
© 2018 Fidelity National Information Services, Inc and its subsidiaries. All rights reserved worldwide. This document is protected as a trade secret and under the copyright laws as the property of Fidelity National Information Services, Inc. Copying, reproduction, or distribution to third parties is strictly prohibited.
Admin User Guide v2
eZ Business Card Management
Searching Transactions You can view information about a specific transaction by performing a search. If you have a long list of transactions, this feature is also useful for limiting the number of transactions in the list. To search for transaction information, perform the following steps:
1. In the Transaction Details section, enter the search criteria and click Search.
2. All transactions matching your search criteria will display in the Transaction List.
The table below describes the search elements on the Transaction page.
Element Description Description Transaction description Reference Transaction reference Categories Transaction category
Post Date Select Equal To, Between, After or Before from the drop-down list. Once you select an option, additional field will display to enter the date.
Transaction Date Select Equal To, Between, After or Before from the drop-down list. Once you select an option, additional field will display to enter the date.
Amount Select Equal To, Between, More Than or Less Than from the drop-down list. Once you select an option, additional field(s) will display to enter the dollar amount.

Page | 57
A d m i n U s e r G u i d e
© 2018 Fidelity National Information Services, Inc and its subsidiaries. All rights reserved worldwide. This document is protected as a trade secret and under the copyright laws as the property of Fidelity National Information Services, Inc. Copying, reproduction, or distribution to third parties is strictly prohibited.
Admin User Guide v2
eZ Business Card Management
Downloading the Transaction List You can download the list of transactions to the following formats and financial software programs: Excel/Spreadsheet (.csv) format Excel Text (tab spacing) format Quicken (QFX) Quickbooks (QBO)
To download the list, perform the following steps:
1. Click the Download icon in the Transaction Details section.
2. Click on the format option that you want and save the file to a specified location on your computer.
View Transaction Details To view the details of a transaction, perform the following steps:
1. From the Transaction Details page, click on a transaction row to view the details of that transaction.
2. The page is displayed with the detailed information of the transaction.
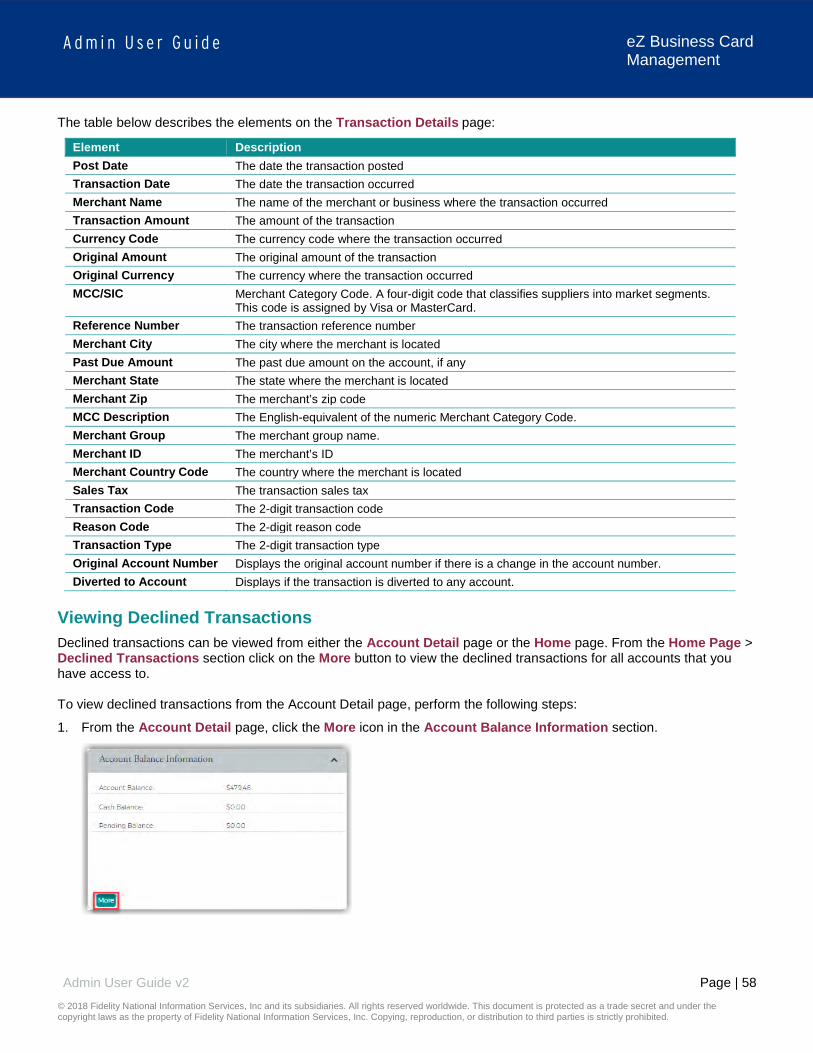
Page | 58
A d m i n U s e r G u i d e
© 2018 Fidelity National Information Services, Inc and its subsidiaries. All rights reserved worldwide. This document is protected as a trade secret and under the copyright laws as the property of Fidelity National Information Services, Inc. Copying, reproduction, or distribution to third parties is strictly prohibited.
Admin User Guide v2
eZ Business Card Management
The table below describes the elements on the Transaction Details page:
Element Description Post Date The date the transaction posted Transaction Date The date the transaction occurred Merchant Name The name of the merchant or business where the transaction occurred Transaction Amount The amount of the transaction Currency Code The currency code where the transaction occurred Original Amount The original amount of the transaction Original Currency The currency where the transaction occurred MCC/SIC Merchant Category Code. A four-digit code that classifies suppliers into market segments.
This code is assigned by Visa or MasterCard. Reference Number The transaction reference number Merchant City The city where the merchant is located Past Due Amount The past due amount on the account, if any Merchant State The state where the merchant is located Merchant Zip The merchant’s zip code MCC Description The English-equivalent of the numeric Merchant Category Code. Merchant Group The merchant group name. Merchant ID The merchant’s ID Merchant Country Code The country where the merchant is located Sales Tax The transaction sales tax Transaction Code The 2-digit transaction code Reason Code The 2-digit reason code Transaction Type The 2-digit transaction type Original Account Number Displays the original account number if there is a change in the account number. Diverted to Account Displays if the transaction is diverted to any account.
Viewing Declined Transactions Declined transactions can be viewed from either the Account Detail page or the Home page. From the Home Page > Declined Transactions section click on the More button to view the declined transactions for all accounts that you have access to. To view declined transactions from the Account Detail page, perform the following steps:
1. From the Account Detail page, click the More icon in the Account Balance Information section.

Page | 59
A d m i n U s e r G u i d e
© 2018 Fidelity National Information Services, Inc and its subsidiaries. All rights reserved worldwide. This document is protected as a trade secret and under the copyright laws as the property of Fidelity National Information Services, Inc. Copying, reproduction, or distribution to third parties is strictly prohibited.
Admin User Guide v2
eZ Business Card Management
2. The detailed Account Balance Information page is displayed. Click the Decline Transaction link in the Pending Balance field.
3. The Declined Transactions page is displayed.
Downloading the Declined Transactions List You can download the Declined Transaction list to the following formats and financial software programs:
Excel/Spreadsheet (.csv) format Excel Text (tab spacing) format To download the list, perform the following steps:
1. From the Declined Transactions page, click the Download icon.
2. Click on the format option that you want and save the file to a specified location on your computer.

Page | 60
A d m i n U s e r G u i d e
© 2018 Fidelity National Information Services, Inc and its subsidiaries. All rights reserved worldwide. This document is protected as a trade secret and under the copyright laws as the property of Fidelity National Information Services, Inc. Copying, reproduction, or distribution to third parties is strictly prohibited.
Admin User Guide v2
eZ Business Card Management
Disputing a Transaction If a cardholder does not recognize a transaction, did not receive the item, or believes that a transaction does not belong to their account, the transaction may be disputed by filing a transaction dispute claim. IMPORTANT!
All dispute claims must be received within 60 days of the statement closing date. Transactions that can be disputed are:
Sales draft reversal Purchase Credit voucher Credit voucher reversal Cash Advance
Transactions that CANNOT be disputed are: Payments Miscellaneous debits Miscellaneous credits Finance charges Fees
To dispute a transaction, perform the following steps:
1. From the Transaction Details screen, click the Dispute Form Details link.
2. The Dispute a New Charge page is displayed. Complete the form with the required information. Print the from by
clicking the Print button and submit the dispute by clicking the Dispute Submit Ticket button.
Note: A reference number will be generated when the claim gets submitted.

Page | 61
A d m i n U s e r G u i d e
© 2018 Fidelity National Information Services, Inc and its subsidiaries. All rights reserved worldwide. This document is protected as a trade secret and under the copyright laws as the property of Fidelity National Information Services, Inc. Copying, reproduction, or distribution to third parties is strictly prohibited.
Admin User Guide v2
eZ Business Card Management
Once the transaction is disputed, it cannot be disputed again from either eZCard or eZBusiness. A disputed transaction will appear in the Transaction Details list with an icon next to the Amount.
Status of a Dispute Claim If a transaction has been disputed, you can view the status of the claim in eZBusiness. An icon is displayed on the Transaction Details Page next to the transaction that was disputed. Once the transaction is disputed, it cannot be disputed again from either eZCard or eZBusiness. The dispute status will either be In Progress or Closed.
To view the status of a dispute, perform the following steps
1. From the Transaction Details Page, click on a transaction that has been disputed.
2. The details of the transaction are displayed along with the dispute reference number and the status of the dispute.
Note: From the Transaction Detail Information section, you can click the arrow icon next to the dispute reference number
to view the disputed transaction details.
The table below describes the field descriptions within the Dispute History Title page.
Element Description Customer Name Name of the customer who performed the transaction. Reference Number Transaction Reference Number. Transaction Amount Total Transaction amount.

Page | 62
A d m i n U s e r G u i d e
© 2018 Fidelity National Information Services, Inc and its subsidiaries. All rights reserved worldwide. This document is protected as a trade secret and under the copyright laws as the property of Fidelity National Information Services, Inc. Copying, reproduction, or distribution to third parties is strictly prohibited.
Admin User Guide v2
eZ Business Card Management
Element Description Dispute Info Any information related to the dispute. Card provided Enter the card number provided for the transaction (if any). Account Number Cardholder’s account number. Transaction Date Date on which the transaction occurred. Dispute Amount The disputed amount. Merchant Name of the Merchant. Posted Date Transaction posted date.
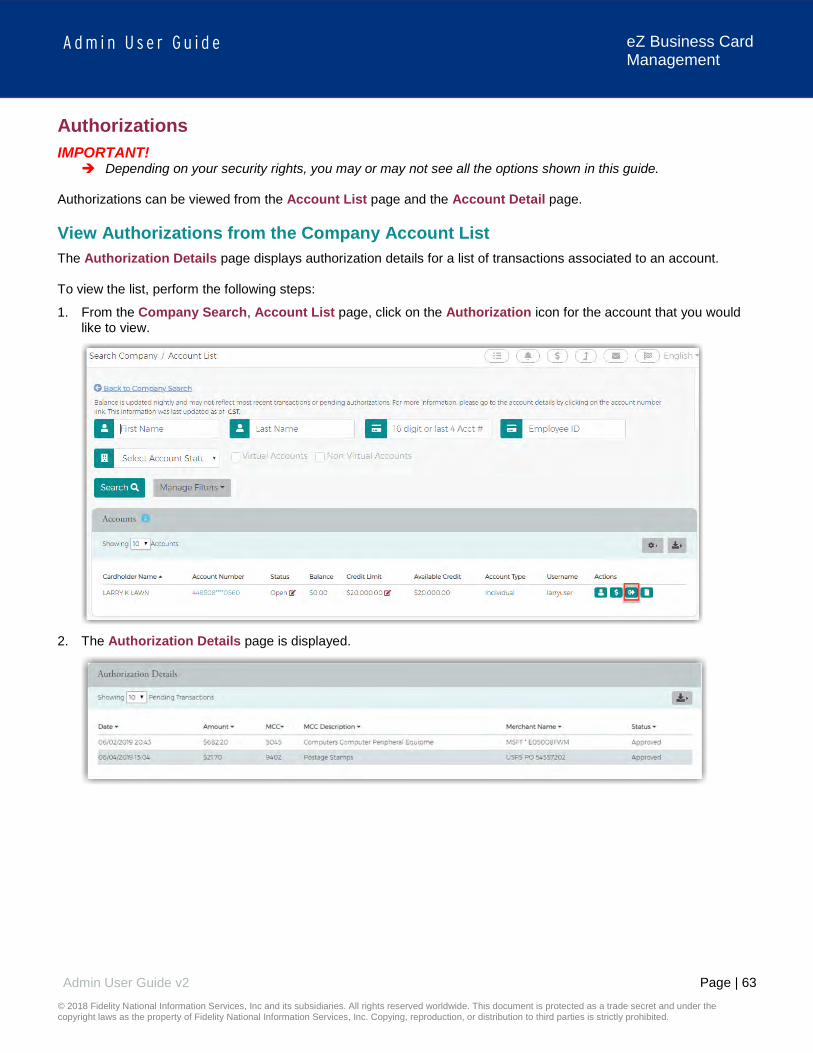
Page | 63
A d m i n U s e r G u i d e
© 2018 Fidelity National Information Services, Inc and its subsidiaries. All rights reserved worldwide. This document is protected as a trade secret and under the copyright laws as the property of Fidelity National Information Services, Inc. Copying, reproduction, or distribution to third parties is strictly prohibited.
Admin User Guide v2
eZ Business Card Management
Authorizations IMPORTANT!
Depending on your security rights, you may or may not see all the options shown in this guide. Authorizations can be viewed from the Account List page and the Account Detail page.
View Authorizations from the Company Account List The Authorization Details page displays authorization details for a list of transactions associated to an account. To view the list, perform the following steps:
1. From the Company Search, Account List page, click on the Authorization icon for the account that you would like to view.
2. The Authorization Details page is displayed.
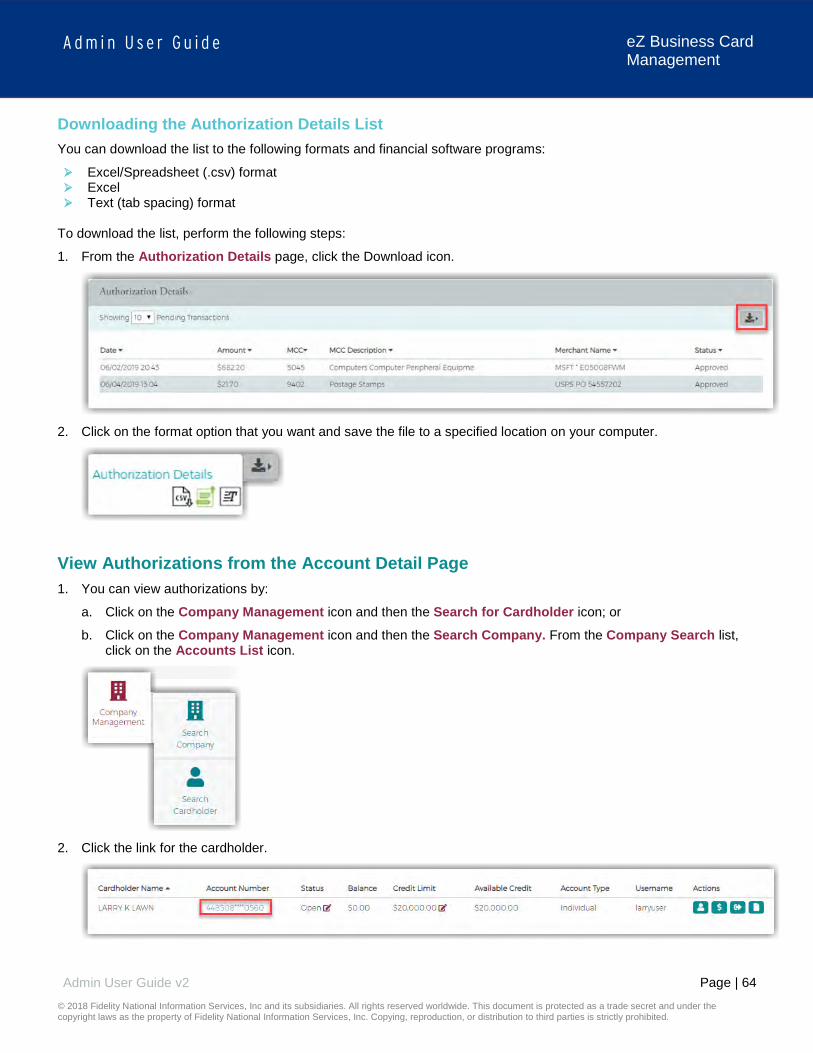
Page | 64
A d m i n U s e r G u i d e
© 2018 Fidelity National Information Services, Inc and its subsidiaries. All rights reserved worldwide. This document is protected as a trade secret and under the copyright laws as the property of Fidelity National Information Services, Inc. Copying, reproduction, or distribution to third parties is strictly prohibited.
Admin User Guide v2
eZ Business Card Management
Downloading the Authorization Details List You can download the list to the following formats and financial software programs:
Excel/Spreadsheet (.csv) format Excel Text (tab spacing) format
To download the list, perform the following steps:
1. From the Authorization Details page, click the Download icon.
2. Click on the format option that you want and save the file to a specified location on your computer.
View Authorizations from the Account Detail Page 1. You can view authorizations by:
a. Click on the Company Management icon and then the Search for Cardholder icon; or
b. Click on the Company Management icon and then the Search Company. From the Company Search list, click on the Accounts List icon.
2. Click the link for the cardholder.

Page | 65
A d m i n U s e r G u i d e
© 2018 Fidelity National Information Services, Inc and its subsidiaries. All rights reserved worldwide. This document is protected as a trade secret and under the copyright laws as the property of Fidelity National Information Services, Inc. Copying, reproduction, or distribution to third parties is strictly prohibited.
Admin User Guide v2
eZ Business Card Management
3. The Account Detail page is displayed. Click the More button in the Account Balance Information section.
4. The Account Balance Information section is displayed. Click View Pending Balance next to the Pending
Balance amount.
5. The Authorization Details page is displayed.
The table below describes the information shown on the Authorization Details page.
Element Description
Date Authorization date Time Authorization time Amount The pending authorization amount
MCC Merchant Category Code. A four-digit code that classifies suppliers into market segments. This code is assigned by Visa or MasterCard.
MCC Description The English-equivalent of the numeric Merchant Category Code. Merchant Name The name of the merchant or business where the authorization occurred. Status Authorization status.

Page | 66
A d m i n U s e r G u i d e
© 2018 Fidelity National Information Services, Inc and its subsidiaries. All rights reserved worldwide. This document is protected as a trade secret and under the copyright laws as the property of Fidelity National Information Services, Inc. Copying, reproduction, or distribution to third parties is strictly prohibited.
Admin User Guide v2
eZ Business Card Management
Company Inbox IMPORTANT!
Depending on your security rights, you may or may not see all the options shown in this guide.
To view the Company Inbox, perform the following steps:
1. From the Company Management, Company Search Results, click the Online Request or Account List icon.
2. The Online Requests or Account List screen is displayed. Click on the Messaging icon.
3. The Search Company / Company Inbox is displayed.
The below table describes the icons available in the Company Inbox section:
Icon Description
View detailed message
Delete the message
Archive the message
Reply to the message

Page | 67
A d m i n U s e r G u i d e
© 2018 Fidelity National Information Services, Inc and its subsidiaries. All rights reserved worldwide. This document is protected as a trade secret and under the copyright laws as the property of Fidelity National Information Services, Inc. Copying, reproduction, or distribution to third parties is strictly prohibited.
Admin User Guide v2
eZ Business Card Management
Sending Messages To send a message from the Company Inbox, perform the following steps:
1. From the Company Inbox, click on Compose.
2. The Company Compose Message screen is displayed. Complete the fields and click Send.
Note:
Message Subject should be less than 128 characters. Message Body should be less than 4500 characters.
The table below describes the elements on the Company Compose Message page.
Element Description Sublevel This is an optional field. Recipient(s) Select the recipient(s) from the drop-down list. Email Select to send the message as an email. In App Select to send the message within eZBusiness. Start Date Select the start date. Allow Replies Select to allow the recipient to respond. Force View on Login Select to force the message to be viewed upon login. High Priority Select to mark the message as high priority. Message Queue Select the required message queue from the drop down. Subject Complete with the subject of the message. Text Message body.

Page | 68
A d m i n U s e r G u i d e
© 2018 Fidelity National Information Services, Inc and its subsidiaries. All rights reserved worldwide. This document is protected as a trade secret and under the copyright laws as the property of Fidelity National Information Services, Inc. Copying, reproduction, or distribution to third parties is strictly prohibited.
Admin User Guide v2
eZ Business Card Management
Replying to Messages To reply to a message, perform the following steps:
1. From the Company Inbox screen, click on the Reply icon.
2. The Reply screen is displayed. Enter the Message Body and click Send.
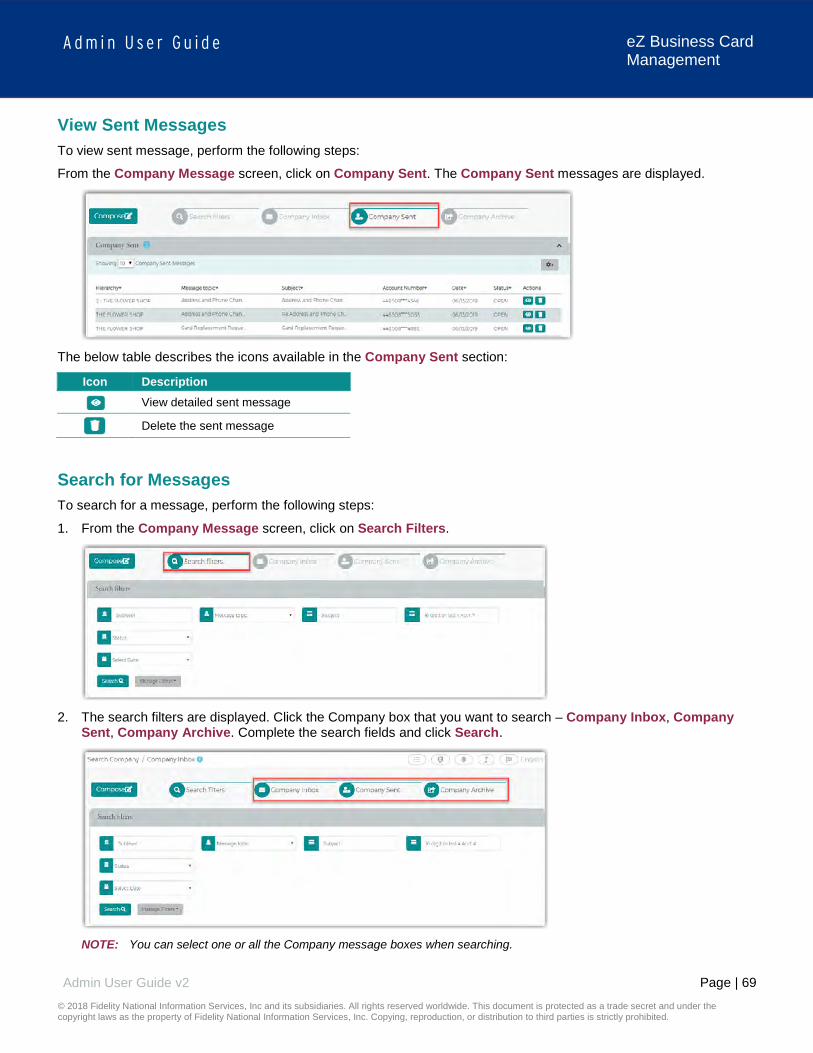
Page | 69
A d m i n U s e r G u i d e
© 2018 Fidelity National Information Services, Inc and its subsidiaries. All rights reserved worldwide. This document is protected as a trade secret and under the copyright laws as the property of Fidelity National Information Services, Inc. Copying, reproduction, or distribution to third parties is strictly prohibited.
Admin User Guide v2
eZ Business Card Management
View Sent Messages To view sent message, perform the following steps:
From the Company Message screen, click on Company Sent. The Company Sent messages are displayed.
The below table describes the icons available in the Company Sent section:
Icon Description
View detailed sent message
Delete the sent message
Search for Messages To search for a message, perform the following steps:
1. From the Company Message screen, click on Search Filters.
2. The search filters are displayed. Click the Company box that you want to search – Company Inbox, Company
Sent, Company Archive. Complete the search fields and click Search.
NOTE: You can select one or all the Company message boxes when searching.

Page | 70
A d m i n U s e r G u i d e
© 2018 Fidelity National Information Services, Inc and its subsidiaries. All rights reserved worldwide. This document is protected as a trade secret and under the copyright laws as the property of Fidelity National Information Services, Inc. Copying, reproduction, or distribution to third parties is strictly prohibited.
Admin User Guide v2
eZ Business Card Management
3. The messages are displayed.
Note: Company Messages are displayed based on the searched criteria specified.
The table below describes the search elements for the Company Messages page:
Element Description Sublevel Enter the sublevel Message Topic Select the message topic from the drop-down list Subject Search by the subject line Account Number Search by the account number Status Search by the status of the message – Open, Closed, Deleted, Read, Unread Date Search by the date – Equal to, Between, After, Before
Archive Company Messages To archive messages, perform the following steps:
1. From the Company Inbox screen, click on Company Inbox. Click the Archive icon in the company Inbox grid.
Note: Messages from the Inbox will be archived and moved to Company Archive grid by clicking on Archive icon.
Viewing Archived Messages To view archived messages, perform the following steps:
1. From the Company Inbox, click on Company Archive. The Company Archive grid is displayed.

Page | 71
A d m i n U s e r G u i d e
© 2018 Fidelity National Information Services, Inc and its subsidiaries. All rights reserved worldwide. This document is protected as a trade secret and under the copyright laws as the property of Fidelity National Information Services, Inc. Copying, reproduction, or distribution to third parties is strictly prohibited.
Admin User Guide v2
eZ Business Card Management
The table below describes icons on the Company Archive grid:
Icon Description
View the message details.
Reply to the message.
Delete the message.

Page | 72
A d m i n U s e r G u i d e
© 2018 Fidelity National Information Services, Inc and its subsidiaries. All rights reserved worldwide. This document is protected as a trade secret and under the copyright laws as the property of Fidelity National Information Services, Inc. Copying, reproduction, or distribution to third parties is strictly prohibited.
Admin User Guide v2
eZ Business Card Management
Company Reports IMPORTANT!
Depending on your security rights, you may or may not see all the options shown in this guide.
The Company Report page allows you to view and download the following information for a company, cardholder or a group of accounts: Transaction Reporting View Spend Restrictions View Merchant Group Codes View Credit Lines
The Company Report page can be accessed from the Hierarchy, Online Request and Account List pages. To access Company Reports from the Hierarchy, Online Request and Account List pages, perform the following steps:
1. Click the Company Reporting icon at the top of the page.
2. The Company Reporting page is displayed.
Transaction Reports This feature allows you to browse, view, and download a transaction report for a company or a specific account. To view a transaction report, perform the following steps:
1. From the Company Reporting page, click the Transaction Reporting icon.

Page | 73
A d m i n U s e r G u i d e
© 2018 Fidelity National Information Services, Inc and its subsidiaries. All rights reserved worldwide. This document is protected as a trade secret and under the copyright laws as the property of Fidelity National Information Services, Inc. Copying, reproduction, or distribution to third parties is strictly prohibited.
Admin User Guide v2
eZ Business Card Management
2. The Transaction Report section is displayed. All accounts that you have access to will be displayed. You can use the search fields to filter the data.
The table below describes the search elements available on the Transaction Report page:
Element Description Account Enter the full 16-digits or the last 4 Statement Date Select the statement date from the drop-down list Record Source Select the source from the drop-down list: eZCard / Online / Other
Total Amount Select the total amount option from the drop-down list: Equal to / Between / Higher than / Lower than Once an option is selected, amount field(s) are displayed.
Time Period Select the time period for the transactions that you want to view. The options available in the drop-down list are: Equal To / Between / After / Before
The table below describes the columns available on the Transaction Report page:
Element Description Cardholder Name Displays the cardholder’s name. Account # The first 6 digits and the last 4 digits of the account number. Posting Date The posting date of the transaction. Transaction Date The transaction date. Reference Number The transaction reference number. Total Amount Total amount of the transaction.
Downloading the Transactions Report You can download the search results to the following formats and financial software programs: Excel/Spreadsheet (.csv) format Excel Text (tab spacing) format Quicken (QFX) Quickbooks (QBO)
To download the list, perform the following steps:
1. From the Transactions Report page, click the Download icon.

Page | 74
A d m i n U s e r G u i d e
© 2018 Fidelity National Information Services, Inc and its subsidiaries. All rights reserved worldwide. This document is protected as a trade secret and under the copyright laws as the property of Fidelity National Information Services, Inc. Copying, reproduction, or distribution to third parties is strictly prohibited.
Admin User Guide v2
eZ Business Card Management
2. Click on the format option that you want and save the file to a specified location on your computer.
View Company Spend Restrictions This feature allows you to browse, view, and download the spend restrictions. To view a spend restrictions, perform the following steps:
1. From the Company Reporting page, click the View Spend Restrictions icon.
2. The View Spend Restrictions page is displayed. All accounts that you have access to will be displayed. You can
use the search fields to filter the data.
Note: The links in the MGC and Period columns redirect you to the Online Request page.
The table below describes the search elements available on the Merchant Group Codes page:
Element Description MGC Select the MGC from the drop-down list Hierarchy The level in the company hierarchy. Sublevel Search by the sublevel in a company hierarchy.
Period This is the time period to apply to a Merchant Group Code definition. Select a time period from the dropdown list: All / Cycle / Daily / Monthly / Other / Quarterly / Transaction (single purchase) / Weekly / Yearly
Status Select the status from the drop-down list: Blocked / Closed / Open Cardholder Name The cardholder’s name. Account # Type the account number.

Page | 75
A d m i n U s e r G u i d e
© 2018 Fidelity National Information Services, Inc and its subsidiaries. All rights reserved worldwide. This document is protected as a trade secret and under the copyright laws as the property of Fidelity National Information Services, Inc. Copying, reproduction, or distribution to third parties is strictly prohibited.
Admin User Guide v2
eZ Business Card Management
The below table describes the columns available in the Merchant Group Codes section:
Element Description Company Displays the name and level in the company hierarchy. Sublevel Displays the sublevel number. Account # Displays the cardholder account number Cardholder Name Displays the cardholder’s name. Status Displays the account status: Blocked / Closed / Open
MGC Displays the two-digit MGC for which spending limits are set on an account, sublevel, or company. If you select an MGC hyperlink in this column, the Manage Merchant Group Codes Online Request page appears.
Period The following time periods are displayed: C – Cycle / D – Daily / M – Monthly / O – Other / Q – Quarterly / T - Transaction (Single Purchase) / W – Weekly / Y – Yearly If you select a period hyperlink from this column, the Manage Spending Limits Online Request page appears.
Downloading the Spend Restrictions Report You can download the search results to the following formats and financial software programs: Excel/Spreadsheet (.csv) format Excel Text (tab spacing) format
To download the list, perform the following steps:
1. From the View Spending Restrictions page, click the Download icon.
2. Click on the format option that you want and save the file to a specified location on your computer.
View Merchant Group Codes This feature allows you to browse, view, and download Merchant Group Codes (MGC). To view Merchant Group Codes, perform the following steps:
1. From the Company Reporting page, click the View Merchant Group Codes icon.

Page | 76
A d m i n U s e r G u i d e
© 2018 Fidelity National Information Services, Inc and its subsidiaries. All rights reserved worldwide. This document is protected as a trade secret and under the copyright laws as the property of Fidelity National Information Services, Inc. Copying, reproduction, or distribution to third parties is strictly prohibited.
Admin User Guide v2
eZ Business Card Management
2. The Merchant Group Codes page is displayed. All accounts that you have access to will be displayed. You can use the search fields to filter the data.
The table below describes the search elements available on the Merchant Group Codes page:
Element Description
MGC This is the two-character code assigned to a Merchant Group Code (MGC). To browse, select a two-digit MGC. Only merchant groups established for your company are available.
MGC Description This is an entry field to search on an MGC description. Entering text in this field selects all entries that contain the entered value.
MGC Detail This is an entry field to search on an MGC detail. Entering text in this field selects all entries that contain the entered value.
The below table describes the columns available in the Merchant Group Codes section:
Element Description
MGC The column contains hyperlinks to the Manage Merchant Group Code Online Request page displaying all the MCC codes contained in the selected two-digit MGC.
No of Accounts with MGC This column displays the number of accounts within the specified company that have account level restrictions for this MGC.
MGC Description This column displays the description assigned to the established Merchant Group Code (MGC).
MGC Detail This column displays the MCCs belonging to a Merchant Group Code (MGC). An asterisk (*) indicates that a partial list of MCCs is displayed in the column. In this case, select the two digit code from the MGC column for a complete list of MCCs available for the definition.
Company Level The values in this column show if the MGC is applied at the company level in the hierarchy: Y = Yes N = No
Sublevel The values in this column show if the MGC is applied at a company sublevel in the hierarchy: Y = Yes N = No
Downloading the Merchant Group Codes Report You can download the search results to the following formats and financial software programs: Excel/Spreadsheet (.csv) format Excel Text (tab spacing) format
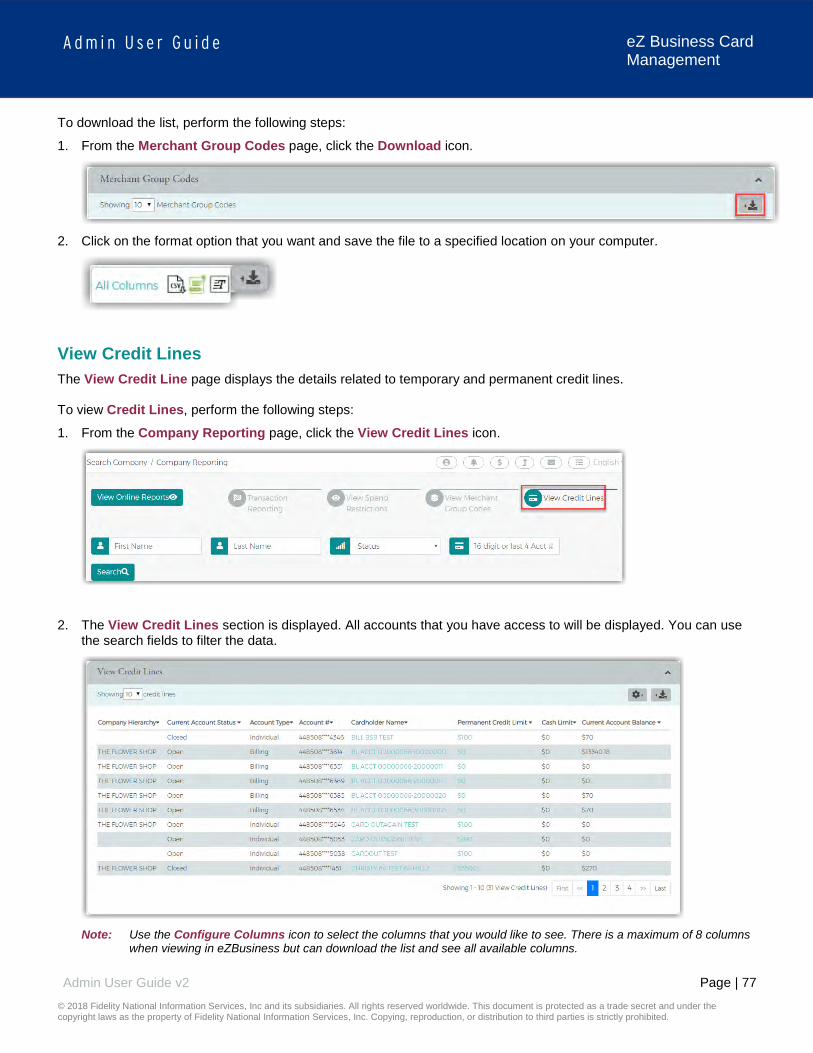
Page | 77
A d m i n U s e r G u i d e
© 2018 Fidelity National Information Services, Inc and its subsidiaries. All rights reserved worldwide. This document is protected as a trade secret and under the copyright laws as the property of Fidelity National Information Services, Inc. Copying, reproduction, or distribution to third parties is strictly prohibited.
Admin User Guide v2
eZ Business Card Management
To download the list, perform the following steps:
1. From the Merchant Group Codes page, click the Download icon.
2. Click on the format option that you want and save the file to a specified location on your computer.
View Credit Lines The View Credit Line page displays the details related to temporary and permanent credit lines. To view Credit Lines, perform the following steps:
1. From the Company Reporting page, click the View Credit Lines icon.
2. The View Credit Lines section is displayed. All accounts that you have access to will be displayed. You can use the search fields to filter the data.
Note: Use the Configure Columns icon to select the columns that you would like to see. There is a maximum of 8 columns
when viewing in eZBusiness but can download the list and see all available columns.

Page | 78
A d m i n U s e r G u i d e
© 2018 Fidelity National Information Services, Inc and its subsidiaries. All rights reserved worldwide. This document is protected as a trade secret and under the copyright laws as the property of Fidelity National Information Services, Inc. Copying, reproduction, or distribution to third parties is strictly prohibited.
Admin User Guide v2
eZ Business Card Management
The table below describes the search elements available on the View Credit Lines page:
Element Description First Name Type the first name of the cardholder to display the cardholder’s information. Last Name Type the last name of the cardholder to display the cardholder’s information. Account Status Select the status of the account(s) from the drop-down list: All / Blocked / Closed / Open Card Number Type the 16-digit account number or the last 4 digits to display the cardholder’s information.
The below table describes the columns available in the View Credit Line section:
Element Description Company Hierarchy Displays the name of the level in the company hierarchy. Current Account Status Displays the current status of the account: Blocked / Closed / Open Account Type Displays the type of account. Card Number Displays the masked 16-digit account number. Cardholder Name Displays the cardholder’s name. Permanent Credit Limit Displays the current permanent credit limit for the account(s). Cash Limit Displays the cash limit for an account(s). Current Account Balance Displays the outstanding balance on account(s). Active Temporary Credit Limit
Displays the non-expired temporary amount by which the credit limit was increased or decreased.
Active Temporary Credit Limit Increase Exp Date Displays the expiration date of the active temporary credit limit.
Active Temporary Credit Limit Requestor Displays the User ID that requested the current temporary credit limit.
Temporary Adjusted Credit Limit
Displays the temporarily adjusted credit limit. Cardholders are assigned a permanent credit limit and can receive a temporary credit limit increase. The account’s permanent credit limit plus the amount of an active temporary credit limit increase = a temporary adjusted credit limit.
Last Temporary Increase Amount Displays the amount of the last temporary increase.
Last Temporary Increase Exp Date Displays the expiration date of the last temporary increase amount.
Last Temporary Increase Requestor Displays the User ID who requested the previous temporary credit limit increase.
Last Temporary Increase Maintain Date and Time Displays the date and time the last temporary credit increase was modified.
Last Permanent Credit Limit Change Date Displays the last date the permanent credit limit was changed.
Last Permanent Credit Limit Change Amount Displays the change in the amount of the permanent credit limit.
Downloading View Credit Lines You can download the search results to the following formats and financial software programs: Excel/Spreadsheet (.csv) format Excel Text (tab spacing) format
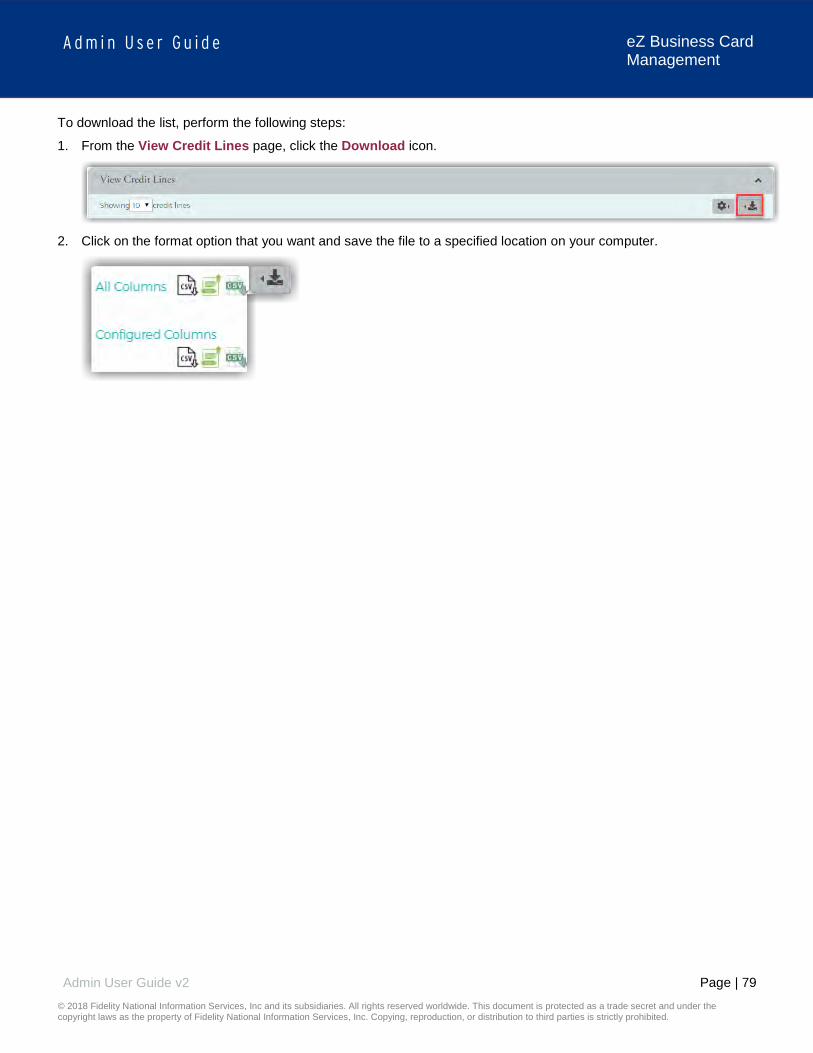
Page | 79
A d m i n U s e r G u i d e
© 2018 Fidelity National Information Services, Inc and its subsidiaries. All rights reserved worldwide. This document is protected as a trade secret and under the copyright laws as the property of Fidelity National Information Services, Inc. Copying, reproduction, or distribution to third parties is strictly prohibited.
Admin User Guide v2
eZ Business Card Management
To download the list, perform the following steps:
1. From the View Credit Lines page, click the Download icon.
2. Click on the format option that you want and save the file to a specified location on your computer.

Page | 80
A d m i n U s e r G u i d e
© 2018 Fidelity National Information Services, Inc and its subsidiaries. All rights reserved worldwide. This document is protected as a trade secret and under the copyright laws as the property of Fidelity National Information Services, Inc. Copying, reproduction, or distribution to third parties is strictly prohibited.
Admin User Guide v2
eZ Business Card Management
Online Service Requests Service Requests are requests made by Company Admin Users to FI Admin Users to take specific action on a cardholder’s account. Service requests may be queued or real-time. Real-time requests are processed by the system immediately, and queued requests are directed to the FI’s Incoming Messages queue for further action. Updates or change requests can be sent by an administrator using the Online Request feature. There are several types of service requests, as described in the table below. IMPORTANT!
Online requests only display to a user if the security rights have been set to include the request types set up by the financial institution.
Service Request Type Description Processing Allow on
Multiple Accounts
Add Cash Access Allows a cardholder cash access up to a specified percent of their credit limit. Queued Yes
Add New Cardholder Request Creates a new cardholder account. Real-time / Queued No
Add PIN Access Add or remove PIN access on an account. A PIN mailer is sent to the cardholder’s address. Queued Yes
Address and Phone Change Submit an address and/or phone number change. Real-time / Queued Yes Card Activation Request Activate a card. Real-time / Queued Yes
Card Replacement Request Orders a replacement credit card for a commercial/business cardholder. Real-time / Queued Yes
Change Cardholder Authorization Block Submit a temporary authorization block. Real-time Yes
Change Credit Limit Changes the permanent or temporary credit limit on a commercial cardholder account. Real-time / Queued Yes
Close Account Request Closes the card account and prevents authorizations and account reissue. Real-time / Queued Yes
Manage Employee ID Change an employee ID. Real-time / Queued Yes Order New PIN Request a new PIN for an account. Real-time / Queued Yes
View Full Account Number Ability to view the card account number immediately. Real-time Yes
Virtual Account Online Requests Change Virtual Account Type Change the virtual account type. Real-time No
View Virtual Account Security Data Allows Admin User the ability to use Virtual accounts to make online or mail order transactions.
Real-time No
Fleet Only Online Requests
Add/Modify Driver Create or modify a new fleet card driver record, which can be connected to a cardholder account. Real-time / Queued No
Add/Modify Group Create or modify a new fleet card group. Real-time / Queued No
Add/Modify Vehicle Create or modify a new fleet card vehicle record, which can be connected to a cardholder account. Real-time / Queued No
NOTE: If you have submitted a service request or online message for an account, you can view the response in your message
inbox. If you have more than one account linked to your username, you will see incoming messages for all your accounts.

Page | 81
A d m i n U s e r G u i d e
© 2018 Fidelity National Information Services, Inc and its subsidiaries. All rights reserved worldwide. This document is protected as a trade secret and under the copyright laws as the property of Fidelity National Information Services, Inc. Copying, reproduction, or distribution to third parties is strictly prohibited.
Admin User Guide v2
eZ Business Card Management
Accessing Online Service Requests To access the Online Request page, perform the following steps:
1. Click the Company Management icon and then the Search Company icon.
2. The Company Search screen is displayed. Enter the search criteria and click Search. The Company Search
Results page is displayed.
3. Click the Online Request icon for the company that you want to submit an online request for.
Note: All the companies that you have access to will appear in the Company Search Results section. You will only need to
search for the company if you want to limit the number of companies displayed in the results.
4. The Online Request page is displayed.
Note: If you do not have access to the Online Request feature, contact your Financial Institution Administrator. Depending
on your security rights, you may or may not see all the Online Request types shown here.
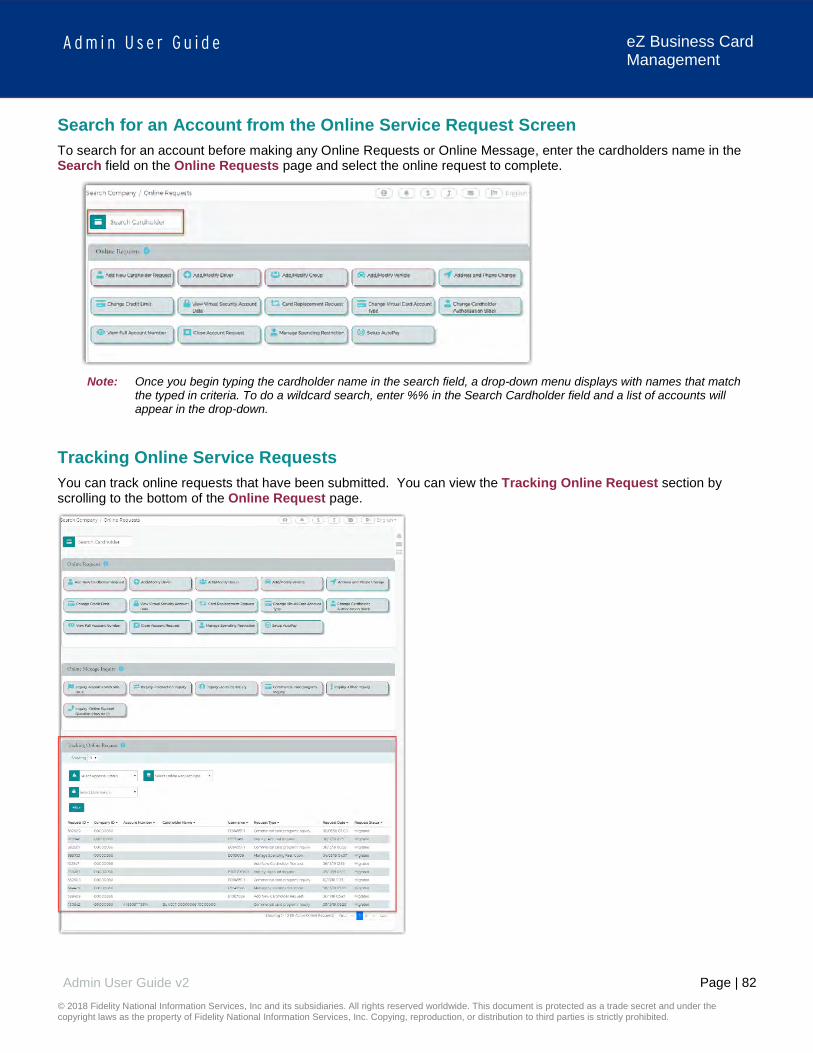
Page | 82
A d m i n U s e r G u i d e
© 2018 Fidelity National Information Services, Inc and its subsidiaries. All rights reserved worldwide. This document is protected as a trade secret and under the copyright laws as the property of Fidelity National Information Services, Inc. Copying, reproduction, or distribution to third parties is strictly prohibited.
Admin User Guide v2
eZ Business Card Management
Search for an Account from the Online Service Request Screen To search for an account before making any Online Requests or Online Message, enter the cardholders name in the Search field on the Online Requests page and select the online request to complete.
Note: Once you begin typing the cardholder name in the search field, a drop-down menu displays with names that match
the typed in criteria. To do a wildcard search, enter %% in the Search Cardholder field and a list of accounts will appear in the drop-down.
Tracking Online Service Requests You can track online requests that have been submitted. You can view the Tracking Online Request section by scrolling to the bottom of the Online Request page.

Page | 83
A d m i n U s e r G u i d e
© 2018 Fidelity National Information Services, Inc and its subsidiaries. All rights reserved worldwide. This document is protected as a trade secret and under the copyright laws as the property of Fidelity National Information Services, Inc. Copying, reproduction, or distribution to third parties is strictly prohibited.
Admin User Guide v2
eZ Business Card Management
The table below describes the filter elements for Tracking Online Requests:
Element Description Select Approval Status Select the approval status from the drop-down list: All, Approved, AutoApproved, Submitted Select Online Request Type
Select the online request type from the drop-down list. The online requests that you have access to will appear in the drop-down.
Select Date Range Select a date option from the drop-down list: All, Equal to, Between, After, Before. Once you select an option, another field(s) will appear to enter the date(s).
Completing Online Service Requests IMPORTANT!
If your card program has multiple hierarchy levels defined, be sure to validate the hierarchy level you have selected to ensure that account is available to be selected.
Some online requests and drop-down options only display to a user if the financial institution has set the permissions to include them.
The Add More button on the online request page will allow you to add additional cardholders to that request if the financial institution has enabled that option.
Add Cash Access The Add Cash Access Service Request allows the company to request access to a percentage of an individual cardholder's credit limit for use as a cash advance. To complete the Add Cash Access online request, perform the following steps:
1. From the Online Requests screen, select Add Cash Access.
2. The Add Cash Access screen is displayed. Enter the cardholder’s name.
Note: Once you enter the cardholder’s name, the Submit button will appear.
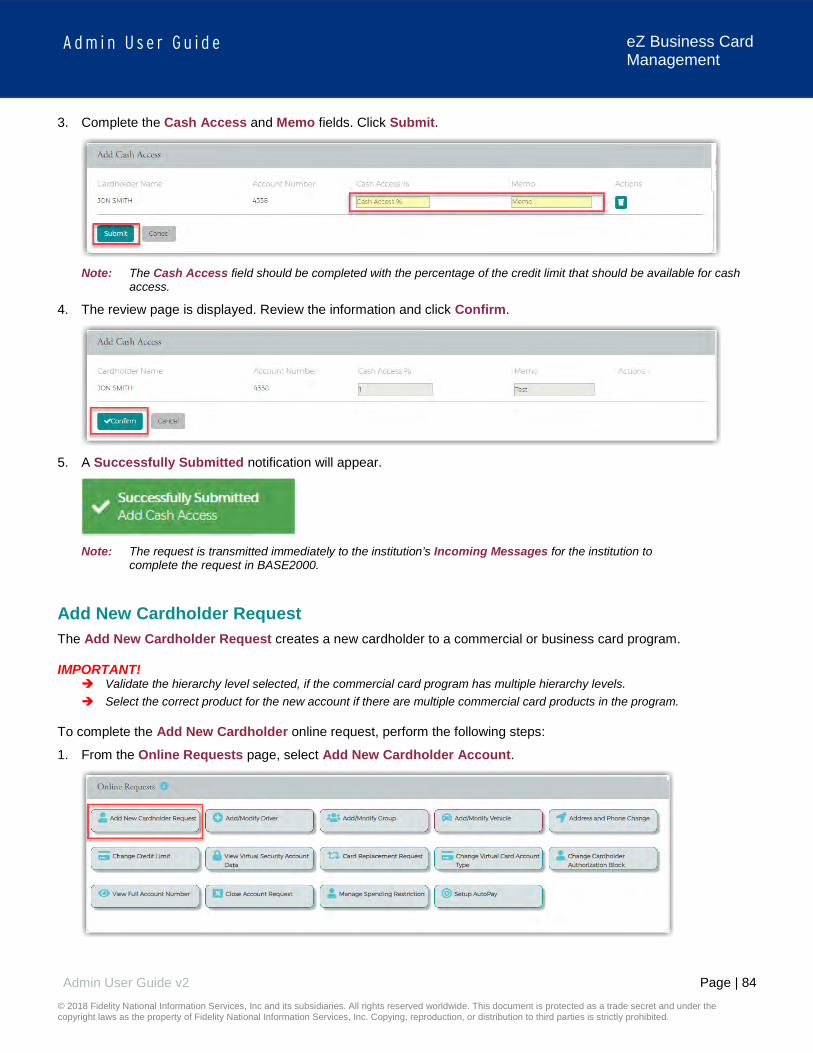
Page | 84
A d m i n U s e r G u i d e
© 2018 Fidelity National Information Services, Inc and its subsidiaries. All rights reserved worldwide. This document is protected as a trade secret and under the copyright laws as the property of Fidelity National Information Services, Inc. Copying, reproduction, or distribution to third parties is strictly prohibited.
Admin User Guide v2
eZ Business Card Management
3. Complete the Cash Access and Memo fields. Click Submit.
Note: The Cash Access field should be completed with the percentage of the credit limit that should be available for cash
access.
4. The review page is displayed. Review the information and click Confirm.
5. A Successfully Submitted notification will appear.
Note: The request is transmitted immediately to the institution’s Incoming Messages for the institution to
complete the request in BASE2000.
Add New Cardholder Request The Add New Cardholder Request creates a new cardholder to a commercial or business card program. IMPORTANT!
Validate the hierarchy level selected, if the commercial card program has multiple hierarchy levels. Select the correct product for the new account if there are multiple commercial card products in the program.
To complete the Add New Cardholder online request, perform the following steps:
1. From the Online Requests page, select Add New Cardholder Account.

Page | 85
A d m i n U s e r G u i d e
© 2018 Fidelity National Information Services, Inc and its subsidiaries. All rights reserved worldwide. This document is protected as a trade secret and under the copyright laws as the property of Fidelity National Information Services, Inc. Copying, reproduction, or distribution to third parties is strictly prohibited.
Admin User Guide v2
eZ Business Card Management
2. The Add New Cardholder page is displayed. Complete all the necessary fields on the page.
Note:
Some toggles open additional fields once they are selected. The Home Phone field should contain the phone number to best contact the cardholder. The Add Driver and Add Vehicle Online Requests must be completed before the Fleet Account Details section can
be completed. Enter the Fleet ID field value from the Driver or Vehicle record.

Page | 86
A d m i n U s e r G u i d e
© 2018 Fidelity National Information Services, Inc and its subsidiaries. All rights reserved worldwide. This document is protected as a trade secret and under the copyright laws as the property of Fidelity National Information Services, Inc. Copying, reproduction, or distribution to third parties is strictly prohibited.
Admin User Guide v2
eZ Business Card Management
3. Type in the Memo field to post questions or comments about the request and click Submit. Note: The information entered in the Memo box, if configured for real time processing, will not be reviewed by the
financial institution.
4. The review page is displayed. Review the information and click Confirm. Note: You can click Edit to return to the Add New Cardholder page and enter the new information.
5. A Successfully Submitted notification will appear. The table below describes the elements of the Add New Cardholder page:
Element Description Sublevel ID Displays the unique number and name assigned to sublevels set up for the company. Select a
company sublevel ID/name from the drop-down list where the cardholder is located. Product Select the product/sub-product from the drop-down list. Product Details Section PIN Access Click to issue a PIN for the account. Note: This field does not display if the company is not set up
for cash access. Credit Limit Type the total amount of approved credit for the cardholder account. Type Processing Select a code from the drop-down list that defines the type of account added. If the institution has a
default Type Processing set up on the card processing system, the field defaults to that value and cannot be changed.
Virtual Account Click to indicate this account is a virtual account. Once you click Virtual Account, additional fields appear: Account Type – select from the drop-down list Expiration Date – enter the expiration date of the virtual account Note: These fields do not display if virtual accounts are not enabled for the company.
Allow Cash Advance Access
Click to allow cash advances based on the Cash Limit. Once you click Allow Cash Advance Access, an additional field appears: Cash Limit - Type the total cash limit approved for the account. The dollar amount entered in
this field must not exceed the percentage allowed that is defined for your company. Note: This field does not display if the company is not set up for cash access.
Order Plastic Now Click to order a plastic for the account. Once you click Order Plastic Now, an additional field appears: No of Plastics - Type the number of plastics to order for the cardholder. Important! If the Order Plastics Now option is unchecked, the Number of Plastics is set to 0 and a card will not be issued.
Cardholder Details Section Details Prefix Type any optional prefix used at the beginning of a cardholder’s name. The values entered in the
Prefix, First Name, Middle Name, Last Name and Suffix fields cannot exceed a total of 25 characters.
First Name Type the cardholder’s first name. The values entered in the Prefix, First Name, Middle Name, Last Name and Suffix fields cannot exceed a total of 25 characters. Note: Virtual defaults as the first name if the Virtual Account box is checked.
Middle Name Type the cardholder’s middle name, if applicable. The values entered in the Prefix, First Name, Middle Name, Last Name and Suffix fields cannot exceed a total of 25 characters. Note: Account defaults as the middle name if the Virtual Account box is checked.
Last Name Type the cardholder’s last name. The values entered in the Prefix, First Name, Middle Name, Last Name and Suffix fields cannot exceed a total of 25 characters. Note: Type a company or account specific last name for a Virtual Account.
Suffix Type any optional suffix used at the end of a cardholder’s name. The values entered in the Prefix, First Name, Middle Name, Last Name and Suffix fields cannot exceed a total of 25 characters.
Employee ID Type the optional employee’s identification number.

Page | 87
A d m i n U s e r G u i d e
© 2018 Fidelity National Information Services, Inc and its subsidiaries. All rights reserved worldwide. This document is protected as a trade secret and under the copyright laws as the property of Fidelity National Information Services, Inc. Copying, reproduction, or distribution to third parties is strictly prohibited.
Admin User Guide v2
eZ Business Card Management
Element Description Emp Cost Center Type the employee’s cost center. If your company is set up on the card processing system with a
default Employee Cost Center, the field defaults to that value, but it may be updated. SSN or Tax ID Type either the cardholder’s Social Security Number or Tax ID number. This number is often used
to activate the new card. If your company is set up on the card processing system with a default Cardholder SSN/Tax ID, the field defaults to that value.
Mothers Maiden Name Type information used for cardholder verification. Date of Birth Type the selected cardholder’s birthdate in MM/DD/YYYY format. Note: This can be an optional or
required field, depending on your financial institution’s implementation. Primary Address
Address Line 1 Type the address for all plastics, correspondence, and statement if Statement Address is not noted. If your company is set up on the card processing system with the option to use the Company’s Primary Address as the Cardholder’s Primary Mailing Address, the address fields default and the Company Admin will not be able to update the Primary Address fields.
Address Line 2 Type any additional address information in this optional field. Address Line 3 Type any additional address information in this optional field. City Type the cardholder’s city of residence. State Select the cardholder’s state of residence from the drop-down list. If entering a Canadian address,
select the Province from this list. This is a required field for U.S. or Canadian addresses Zip Code Type the cardholder’s ZIP Code. This is a required field for U.S. or Canadian addresses. Foreign Address Click to indicate a foreign address. Select the country from the drop-down list.
Important! Requests that involve foreign addresses may be processed as a queued request depending on the option chosen by your financial institution. Canadian addresses are not foreign addresses. Enter the Canadian address the same as a U.S. address.
Statement Address same as Primary Address
Click to indicate that the statement address is the same as the primary address. The Statement Address section will only appear if this toggle is not turned on.
Statement Address Address Line 1 Type the address for mailing statements to a different address. Address Line 2 Type any additional statement address information in this optional field. Address Line 3 Type any additional statement address information in this optional field. City Type the city for the statement address. State Select the state for the statement address from the drop-down list. If entering a Canadian address,
select the Province from this list. This is a required field for U.S. or Canadian addresses. Zip Code Type the statement address Zip Code. This is a required field for U.S. or Canadian addresses. Foreign Address Click to indicate a foreign address. Select the country from the drop-down list.
Important! Requests that involve foreign addresses may be processed as a queued request depending on the option chosen by your financial institution. Canadian addresses are not foreign addresses. Enter the Canadian address the same as a U.S. address.
Phone Mobile Phone Type the cardholder’s mobile phone, if applicable. Business Phone Type the cardholder’s business phone number. Note: This can be an optional or required field,
depending on your financial institution’s implementation. Home Phone Type the cardholder’s home phone number or the best number to reach the cardholder. This could
be a cell phone. Other Phone Type the cardholder’s alternate phone number, if applicable. If your company is set up on the card
processing system with a default work phone, the Other Phone field populates with that default value. The default value may be updated.
Other Phone Type Select the type of phone number being entered in the Other Phone Type from the drop-down list. If your company is set up on the card processing system with a default work phone, the Other Phone Type field populates with a value of B-Business. The default value may be updated.

Page | 88
A d m i n U s e r G u i d e
© 2018 Fidelity National Information Services, Inc and its subsidiaries. All rights reserved worldwide. This document is protected as a trade secret and under the copyright laws as the property of Fidelity National Information Services, Inc. Copying, reproduction, or distribution to third parties is strictly prohibited.
Admin User Guide v2
eZ Business Card Management
Element Description Fleet Account Details Click to turn on Fleet features.
Note: Fleet Card information displays only if the company has a Fleet program and the option is enabled.
Account Type Select a Fleet account type from the drop-down list. This is a required field when a Fleet product has been selected.
Prompt Select from this drop-down list the prompt the driver is required to enter at the point of sale. If an option is not selected, it defaults to 5 – No Prompt when the account is added to the card processing system.
Auth Decline Override Click for overriding a declined authorization for the Fleet account. Not enabled - do not override a declined authorization Enabled - override a declined authorization Important! Checking this option results in authorizations that would be declined, or would normally decline, due to an invalid or missing prompt value, (for example, Driver ID of Vehicle ID), to be approved
Fleet ID Enter a Fleet Driver or Vehicle record ID or use the Search option to view and select a Fleet ID from the list of all the fleet identification numbers associated with the company’s drivers and vehicles. This is a required field when a Fleet product has been selected.
Product Restrictions Select from the drop-down list to choose the card restrictions for the Fleet Card product. If an option is not selected, it defaults to 0 – No Restrictions when the account is added to the card processing system.
Rush Card Delivery Click to indicate rush delivery of the plastic. This section only appears for the financial institution. Rush Card Details Select to enable additional fields. Signature Required Click if a signature is required for delivery. Your financial institution may have this option set so
that it is automatically enabled, and the user is unable to update it. Shipping Instructions Select from the drop-down list to choose the card shipping instructions. Contact Phone Type a contact phone number. Special Instructions Add additional information regarding the delivery instructions for the rush card. Card Mailing Address Select from the drop-down list where the rush card is mailed. This is only required when Rush
Card Delivery is requested. Contact Phone Extension
The phone extension is optional.
Card Mailing Address Address Line 1 If Other Address is selected, type an alternate address to send the rush card. Address Line 2 If Other Address is selected, type any additional alternate address information in this optional
field. Address Line 3 If Other Address is selected, type any additional alternate address information in this optional
field. City If Other Address is selected, type the city for the alternate address. State If Other Address is selected, select the state for the alternate address from the drop-down list. Zip Code If Other Address is selected, type the alternate address Zip Code. Foreign Address If Other Address is selected, click to indicate a foreign address. Select the country from the drop-
down list. Important! Requests that involve foreign addresses may be processed as a queued request depending on the options enabled by your financial institution.
Auto Pay This function is sent real time if it is added when setting up a new cardholder. If it is added later, it is queued to the institution.
Auto Pay Details Select to enable additional fields. Autopay Account Type Select the Account Type from the drop-down list: D – Checking / S – Savings. Bank Account Name Type the name of the institution that receives the debit transaction for an automatic payment. Bank Account Number Type the checking or savings account number from which the system drafts the automatic
payment.

Page | 89
A d m i n U s e r G u i d e
© 2018 Fidelity National Information Services, Inc and its subsidiaries. All rights reserved worldwide. This document is protected as a trade secret and under the copyright laws as the property of Fidelity National Information Services, Inc. Copying, reproduction, or distribution to third parties is strictly prohibited.
Admin User Guide v2
eZ Business Card Management
Element Description Routing Transit Number Type the routing number for the institution from which the system drafts the automatic payment. Auto Pay Option Select the auto pay option from the drop-down list. Frequency Select the frequency of the automatic payments from the drop-down list. Day If the Monthly frequency is selected, this indicates the number of calendar days after the
statement billing date that the auto payment is processed. If the Specific Date frequency is selected, this is the actual date the auto payment is processed.
Percentage Select the percentage of the account's balance that is used to calculate the automatic debit. This field is only required when the value P is selected from the Auto Pay Option field.
Fixed Amount Type the fixed amount of the automatic debit. This field is only required when the value A is selected from the Auto Pay Option field.
Auto Enrollment This section only appears when auto enrollment into eZCardInfo/My Card Statement is allowed by the financial institution. Note: These fields do not display if Auto Enrollment into eZCardInfo/MyCardStatement is not enabled.
Auto Enrollment Details Select to enable additional fields. Email Type the email address where eZCardInfo/My Card Statement enrollment email notification is
sent. Username Type in the username. Password Type a temporary password for this account’s access into eZCardInfo/My Card Statement. Verify Password Re-type the temporary password for this account’s access into eZCardInfo/My Card Statement. Memo The information entered here by the user is posted to the card processing system as a memo.
Only the financial institution can view it in the card processing system.
Add or Remove PIN Request The Add or Remove PIN Request Service Request allows the company to request that a commercial cardholder can access their account through a PIN number or remove this access. Note: The request is transmitted immediately to the institution’s Incoming Messages for the institution to complete the request in
BASE2000. Once processed, the new PIN is sent to the default mailing address of the commercial card account.

Page | 90
A d m i n U s e r G u i d e
© 2018 Fidelity National Information Services, Inc and its subsidiaries. All rights reserved worldwide. This document is protected as a trade secret and under the copyright laws as the property of Fidelity National Information Services, Inc. Copying, reproduction, or distribution to third parties is strictly prohibited.
Admin User Guide v2
eZ Business Card Management
Add PIN Request To add PIN access, perform the following steps:
1. From the Online Requests screen, select Add or Remove PIN Request. The Add or Remove Pin Access screen displays. Enter the cardholder’s name.
Note: Once you enter the cardholder’s name, the Submit button will appear.
2. Select Add from the PIN Access drop-down menu and add a note to the Memo field. Click Submit.
3. The review page is displayed. Review the information and click Confirm.
4. The Successfully Submitted screen will display if the request was successfully submitted. The request is
transmitted immediately to the institution’s Incoming Messages for the institution to complete the request in BASE2000. Once processed, the new PIN is sent to the default mailing address of the commercial card account. Note: It may take up to 48 hours for the request to take effect. If you have any questions, contact your Financial Institution’s
Administrator.
Remove PIN Request To remove PIN access, perform the following steps:
1. From the Online Requests screen, select Add or Remove PIN Request. The Add or Remove Pin Access screen displays. Enter the cardholder’s name.
Note: Once you enter the cardholder’s name, the Submit button will appear.

Page | 91
A d m i n U s e r G u i d e
© 2018 Fidelity National Information Services, Inc and its subsidiaries. All rights reserved worldwide. This document is protected as a trade secret and under the copyright laws as the property of Fidelity National Information Services, Inc. Copying, reproduction, or distribution to third parties is strictly prohibited.
Admin User Guide v2
eZ Business Card Management
2. Select Remove from the PIN Access drop-down menu and add a note to the Memo field. Click Submit.
3. The review page displays. Review the information and click Confirm.
4. The Successfully Submitted screen will display if the request was successfully submitted.
Note: It may take up to 48 hours for the request to take effect. If you have any questions, contact your Financial Institution’s
Administrator. Also consider changing the Cash Access to $0.
Address and Phone Change To complete an address and/or phone number online request, perform the following steps:
1. From the Online Requests screen, select Address and Phone Change.
2. The Address and Phone Change screen displays. Enter the cardholder’s name. One you enter the cardholder’s
name, the Submit button will appear.
Note: Once you enter the cardholder’s name, the Submit button will appear.

Page | 92
A d m i n U s e r G u i d e
© 2018 Fidelity National Information Services, Inc and its subsidiaries. All rights reserved worldwide. This document is protected as a trade secret and under the copyright laws as the property of Fidelity National Information Services, Inc. Copying, reproduction, or distribution to third parties is strictly prohibited.
Admin User Guide v2
eZ Business Card Management
3. Select the request type from the drop-down menu and add a note to the Memo field. The request type drop-down options are: Address Change – When selected, the primary and statement address fields are displayed. Phone Change – When selected, the phone number fields are displayed. Address and Phone Change – When selected, the phone number, primary address and statement address
fields are displayed.
a. Phone Change Request – Change or add the phone number in the appropriate field and click Submit.
b. Address Change Request – Update or add the address in the appropriate Primary Address and/or
Statement Address fields and click Submit.

Page | 93
A d m i n U s e r G u i d e
© 2018 Fidelity National Information Services, Inc and its subsidiaries. All rights reserved worldwide. This document is protected as a trade secret and under the copyright laws as the property of Fidelity National Information Services, Inc. Copying, reproduction, or distribution to third parties is strictly prohibited.
Admin User Guide v2
eZ Business Card Management
c. Address and Phone Change Request – Update and/or add the new phone number and address. Click Submit.
4. The review page displays. Review the information and click Confirm.
5. The Successfully Submitted screen will display if the request was successfully submitted.
Note: This Service Request is a real-time process and the Memo field serves as a notation.

Page | 94
A d m i n U s e r G u i d e
© 2018 Fidelity National Information Services, Inc and its subsidiaries. All rights reserved worldwide. This document is protected as a trade secret and under the copyright laws as the property of Fidelity National Information Services, Inc. Copying, reproduction, or distribution to third parties is strictly prohibited.
Admin User Guide v2
eZ Business Card Management
Card Activation Request To complete the Card Activation online request, perform the following steps:
1. From the Online Requests screen, select Card Activation Request.
2. The Card Activation Request screen displays. Cards Pending for Activation are displayed below the Card
Activation Request section. Click the icon next the name in the Cards Pending for Activation list or enter the cardholder’s name, select Activate from the Select Card Activation drop-down menu and add a note to the Memo field. Click Submit.
Note: Once you enter the cardholder’s name, the Submit button will appear.
If you enter a cardholder’s name and their card is active or the card is not eligible, a new section will appear showing the Ineligible Accounts.

Page | 95
A d m i n U s e r G u i d e
© 2018 Fidelity National Information Services, Inc and its subsidiaries. All rights reserved worldwide. This document is protected as a trade secret and under the copyright laws as the property of Fidelity National Information Services, Inc. Copying, reproduction, or distribution to third parties is strictly prohibited.
Admin User Guide v2
eZ Business Card Management
3. The review page is displayed. Review the information and click Confirm.
4. The Successfully Submitted screen will display if the request was successfully submitted.
Card Replacement Request The Card Replacement Request allows you to request replacement credit cards for existing commercial cardholders. This feature is not intended for lost or stolen accounts. IMPORTANT!
If you are trying to report a card lost or stolen, or to report fraud, please contact your Financial Institution’s Administrator Immediately.
To complete the Request Replacement Card online request, perform the following steps:
1. From the Online Requests screen, select Request Replacement Card.
2. The Card Replacement Request screen displays. Enter the cardholder’s name.
Note: Once you enter the cardholder’s name, the Submit button will appear.

Page | 96
A d m i n U s e r G u i d e
© 2018 Fidelity National Information Services, Inc and its subsidiaries. All rights reserved worldwide. This document is protected as a trade secret and under the copyright laws as the property of Fidelity National Information Services, Inc. Copying, reproduction, or distribution to third parties is strictly prohibited.
Admin User Guide v2
eZ Business Card Management
3. Complete the Reason field and type a note in the Memo Field. Click Submit.
Note: You can select a reason from the drop-down menu or you can type a reason in the Reason field.
4. The review page is displayed. Review the information and click Confirm.
5. The Successfully Submitted screen will display if the request was successfully submitted.
Note: It may take up to 48 hours for the request to take effect. If you have any questions, contact your Financial Institution’s Administrator.
Change Cardholder Authorization Block Change Cardholder Authorization Block Online Request allows the administrator to impose or remove a real-time cardholder authorization block at the account level. This block prevents additional approved authorizations on the account until an Administrator removes the block. To complete the Change Cardholder Authorization Block online request, perform the following steps:
1. From the Online Requests screen, select Change Cardholder Authorization.
2. The Change Cardholder Authorization Block screen displays. Enter the cardholder’s name.
Note: Once you enter the cardholder’s name, the Submit button will appear.

Page | 97
A d m i n U s e r G u i d e
© 2018 Fidelity National Information Services, Inc and its subsidiaries. All rights reserved worldwide. This document is protected as a trade secret and under the copyright laws as the property of Fidelity National Information Services, Inc. Copying, reproduction, or distribution to third parties is strictly prohibited.
Admin User Guide v2
eZ Business Card Management
3. In the Authorization Block field, select whether you are adding or removing a block from the drop-down menu and make a note in the Memo field. Click Submit.
Note: If you select Add a block, this will prevent authorizations on the account selected.
4. The Change Cardholder Authorization Block review page displays. Review the information and click Confirm.
5. A confirmation message is displayed.
Note: This Service Request is a real-time process and the Memo field serves as a notation.
Change Credit Limit The Change Credit Limit online request allows you to request an increase or decrease in a cardholder's credit limit in real time. To complete the Change Credit Limit online request, perform the following steps:
1. From the Online Requests screen, select Change Credit Limit.
2. The Change Credit Limit screen displays. Enter the cardholder’s name.
Note: Once you enter the cardholder’s name, the Submit button will appear.
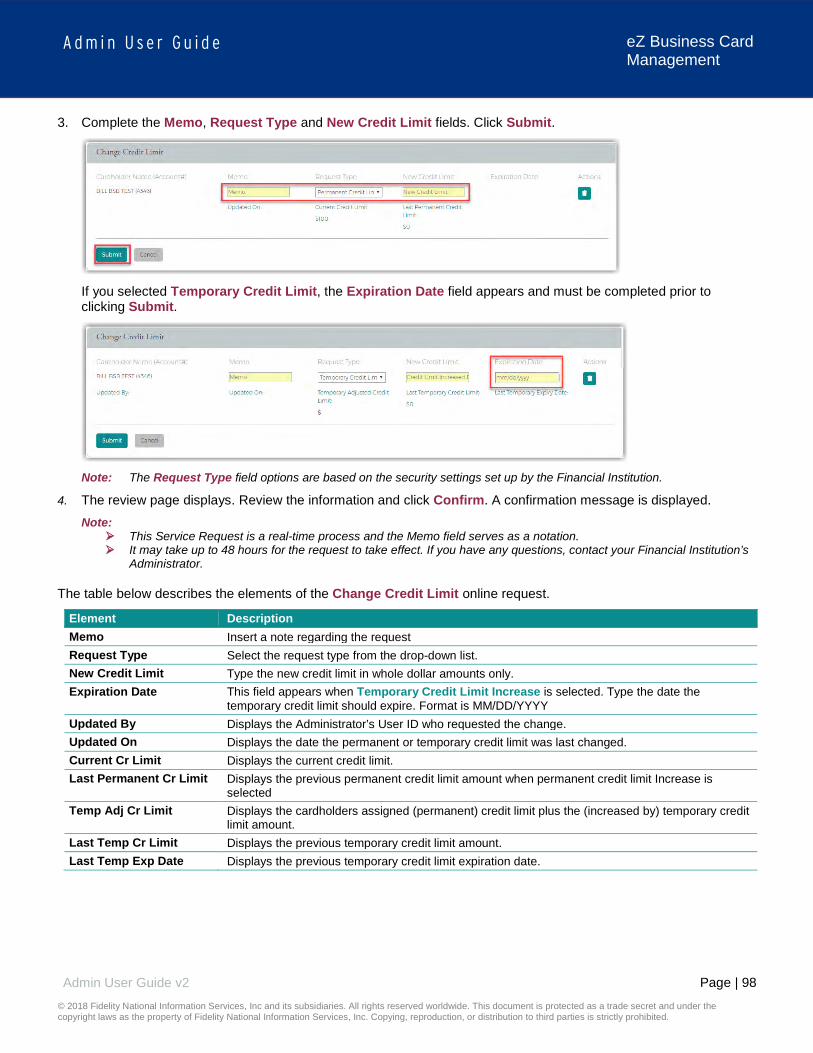
Page | 98
A d m i n U s e r G u i d e
© 2018 Fidelity National Information Services, Inc and its subsidiaries. All rights reserved worldwide. This document is protected as a trade secret and under the copyright laws as the property of Fidelity National Information Services, Inc. Copying, reproduction, or distribution to third parties is strictly prohibited.
Admin User Guide v2
eZ Business Card Management
3. Complete the Memo, Request Type and New Credit Limit fields. Click Submit.
If you selected Temporary Credit Limit, the Expiration Date field appears and must be completed prior to clicking Submit.
Note: The Request Type field options are based on the security settings set up by the Financial Institution.
4. The review page displays. Review the information and click Confirm. A confirmation message is displayed. Note:
This Service Request is a real-time process and the Memo field serves as a notation. It may take up to 48 hours for the request to take effect. If you have any questions, contact your Financial Institution’s
Administrator. The table below describes the elements of the Change Credit Limit online request.
Element Description Memo Insert a note regarding the request Request Type Select the request type from the drop-down list. New Credit Limit Type the new credit limit in whole dollar amounts only. Expiration Date This field appears when Temporary Credit Limit Increase is selected. Type the date the
temporary credit limit should expire. Format is MM/DD/YYYY Updated By Displays the Administrator’s User ID who requested the change. Updated On Displays the date the permanent or temporary credit limit was last changed. Current Cr Limit Displays the current credit limit. Last Permanent Cr Limit Displays the previous permanent credit limit amount when permanent credit limit Increase is
selected Temp Adj Cr Limit Displays the cardholders assigned (permanent) credit limit plus the (increased by) temporary credit
limit amount. Last Temp Cr Limit Displays the previous temporary credit limit amount. Last Temp Exp Date Displays the previous temporary credit limit expiration date.

Page | 99
A d m i n U s e r G u i d e
© 2018 Fidelity National Information Services, Inc and its subsidiaries. All rights reserved worldwide. This document is protected as a trade secret and under the copyright laws as the property of Fidelity National Information Services, Inc. Copying, reproduction, or distribution to third parties is strictly prohibited.
Admin User Guide v2
eZ Business Card Management
Change Credit Limit Restrictions IMPORTANT!
Do not process this request if the account is in a Closed or Blocked status.
These restrictions prevent the change credit limit service request from being submitted under any of the following conditions for Individually Billed, Billing Accounts, and Centrally Billed Accounts:
Requested credit limit change cannot exceed the company limit. Requested credit limit change must be different than the cardholder’s current credit limit. If the Service Request is unable to be completed in a real time manner it will be routed to the Financial Institutions
Incoming Messages queue to be worked.
Current Temporary Credit Limit Option If an account selected has an active (not expired or deleted) temporary credit limit, the active temporary limit is displayed in the Current Temp Limit field on the Change Credit Limit online requests page. The Current Temp Limit field allows the Admin the ability to change the amount, but this does not require entry of a new expiration date. The Current Temp Exp Date field allows the Admin the ability to change the date but does not require entry of a new limit.
Active Temporary Credit Limit Indicator An active temporary credit limit indicator T displays next to the credit limit any time the account has an active temporary credit limit. If you place the cursor over the indicator, a message displays stating there is an active temporary credit limit increase on this account.
Close Account Request The Close Account online request allows you to request to close a commercial card account in real time. This prevents future authorizations and account reissue. IMPORTANT!
This feature is not intended for lost or stolen accounts. For a lost or stolen account, contact the phone number provided by the institution.
To complete the Close Account online request, perform the following steps:
1. From the Online Requests screen, select Close Account Request.

Page | 100
A d m i n U s e r G u i d e
© 2018 Fidelity National Information Services, Inc and its subsidiaries. All rights reserved worldwide. This document is protected as a trade secret and under the copyright laws as the property of Fidelity National Information Services, Inc. Copying, reproduction, or distribution to third parties is strictly prohibited.
Admin User Guide v2
eZ Business Card Management
2. The Request to Close Accounts page is displayed. Enter the cardholder’s name.
Note: Once you enter the cardholder’s name, the Submit button will appear.
3. Select the Reason for closing the account, type a question or comments in the Memo field and click Submit.
Note: You can select a reason from the drop-down menu or you can type a reason in the Reason field.
4. The Request to Close Account review page displays. Review the information and click Confirm.
5. A confirmation message is displayed.
Note: This Service Request is a real-time process and the Memo field serves as a notation. The request is transmitted immediately but it may take up to 48 hours to process. To reopen a closed account, contact the financial institution.
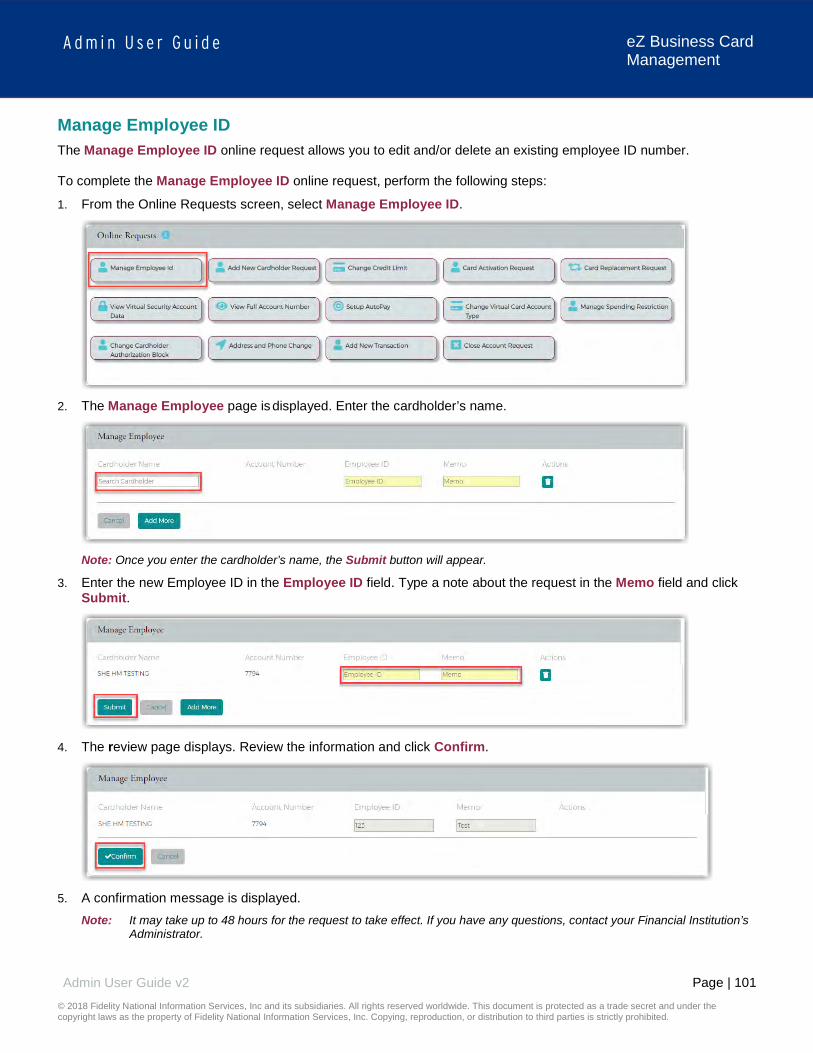
Page | 101
A d m i n U s e r G u i d e
© 2018 Fidelity National Information Services, Inc and its subsidiaries. All rights reserved worldwide. This document is protected as a trade secret and under the copyright laws as the property of Fidelity National Information Services, Inc. Copying, reproduction, or distribution to third parties is strictly prohibited.
Admin User Guide v2
eZ Business Card Management
Manage Employee ID The Manage Employee ID online request allows you to edit and/or delete an existing employee ID number. To complete the Manage Employee ID online request, perform the following steps:
1. From the Online Requests screen, select Manage Employee ID.
2. The Manage Employee page is displayed. Enter the cardholder’s name.
Note: Once you enter the cardholder’s name, the Submit button will appear.
3. Enter the new Employee ID in the Employee ID field. Type a note about the request in the Memo field and click Submit.
4. The review page displays. Review the information and click Confirm.
5. A confirmation message is displayed.
Note: It may take up to 48 hours for the request to take effect. If you have any questions, contact your Financial Institution’s Administrator.

Page | 102
A d m i n U s e r G u i d e
© 2018 Fidelity National Information Services, Inc and its subsidiaries. All rights reserved worldwide. This document is protected as a trade secret and under the copyright laws as the property of Fidelity National Information Services, Inc. Copying, reproduction, or distribution to third parties is strictly prohibited.
Admin User Guide v2
eZ Business Card Management
Order New PIN The Order New PIN online request creates new PIN request or creates a new PIN in the event of the PIN being lost or stolen. To complete the Order New PIN online request, perform the following steps:
1. From the Online Requests screen, select Order New Pin.
2. The Order Pin screen displays. Enter the cardholder’s name.
Note: Once you enter the cardholder’s name, the Submit button will appear.
3. Select New PIN or Send Reminder from the Select Request Code field drop-down menu. Add a note in the Memo field explaining your actions and click Submit.
4. The review page is displayed. Review the information and click Confirm.
5. A confirmation message is displayed.
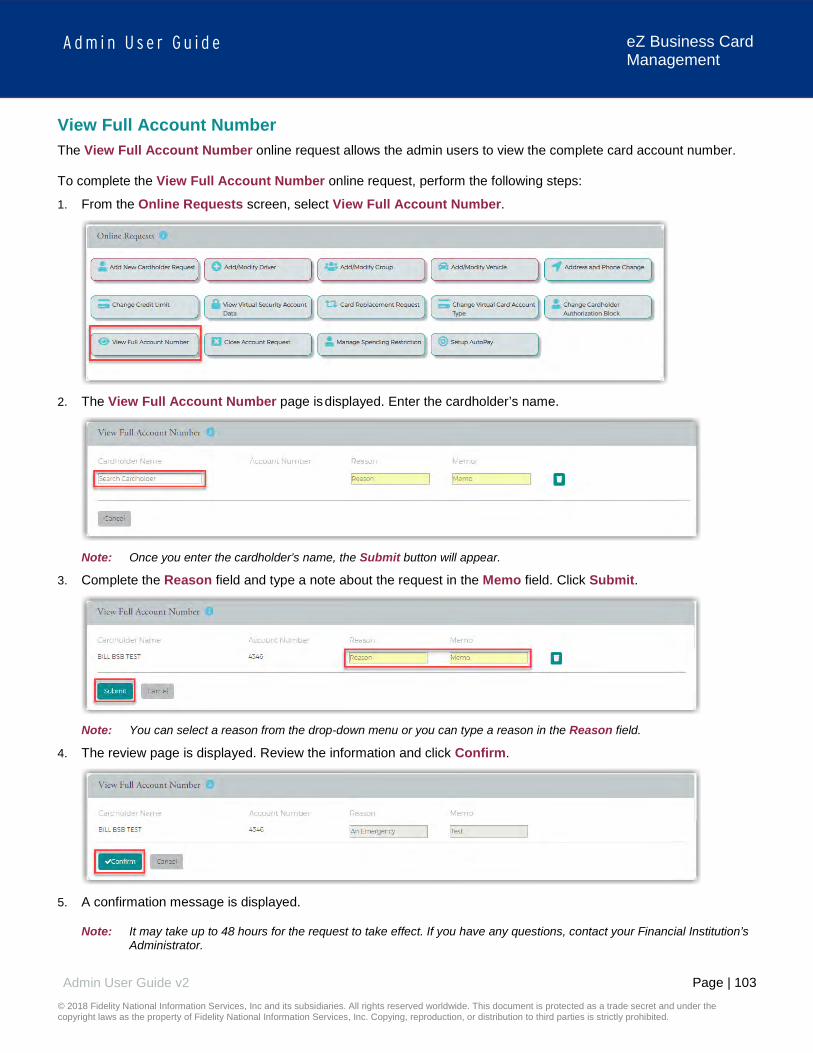
Page | 103
A d m i n U s e r G u i d e
© 2018 Fidelity National Information Services, Inc and its subsidiaries. All rights reserved worldwide. This document is protected as a trade secret and under the copyright laws as the property of Fidelity National Information Services, Inc. Copying, reproduction, or distribution to third parties is strictly prohibited.
Admin User Guide v2
eZ Business Card Management
View Full Account Number The View Full Account Number online request allows the admin users to view the complete card account number. To complete the View Full Account Number online request, perform the following steps:
1. From the Online Requests screen, select View Full Account Number.
2. The View Full Account Number page is displayed. Enter the cardholder’s name.
Note: Once you enter the cardholder’s name, the Submit button will appear.
3. Complete the Reason field and type a note about the request in the Memo field. Click Submit.
Note: You can select a reason from the drop-down menu or you can type a reason in the Reason field.
4. The review page is displayed. Review the information and click Confirm.
5. A confirmation message is displayed.
Note: It may take up to 48 hours for the request to take effect. If you have any questions, contact your Financial Institution’s Administrator.

Page | 104
A d m i n U s e r G u i d e
© 2018 Fidelity National Information Services, Inc and its subsidiaries. All rights reserved worldwide. This document is protected as a trade secret and under the copyright laws as the property of Fidelity National Information Services, Inc. Copying, reproduction, or distribution to third parties is strictly prohibited.
Admin User Guide v2
eZ Business Card Management
Virtual Accounts IMPORTANT!
The following sections support virtual accounts only.
Change Virtual Card Account Type To complete the Change Virtual Card Account Type online request, perform the following steps:
1. From the Online Requests screen, select Change Virtual Card Account Type.
2. The Change Virtual Card Account Type page is displayed. Enter the cardholder name.
Note: Once you enter the cardholder’s name, the Submit button will appear.
3. Select the Account Type, type a note in the Memo filed and click Submit.
Note: Highlighted fields are mandatory fields and must have a value entered.
4. The review page is displayed. Review the information and click Confirm.
5. A confirmation message is displayed.

Page | 105
A d m i n U s e r G u i d e
© 2018 Fidelity National Information Services, Inc and its subsidiaries. All rights reserved worldwide. This document is protected as a trade secret and under the copyright laws as the property of Fidelity National Information Services, Inc. Copying, reproduction, or distribution to third parties is strictly prohibited.
Admin User Guide v2
eZ Business Card Management
View Virtual Account Security Data Security data for virtual accounts is needed to make online or mail order transactions. To complete the View Virtual Account Security Data online request, perform the following steps:
1. From the Online Request page, enter the virtual account name and click the View Virtual Account Security Data online request.
2. The View Virtual Security Account Data page is displayed. Enter the cardholder name.
Note: Once you enter the cardholder’s name, the Submit button will appear.
3. The View Virtual Account Security Data screen is displayed. Click Submit.
4. A Successfully Submitted message will display and the full 16-digit account number, expiration and CVV2 is
displayed.
Note: This Online Service Request only appears for institutions with Virtual Accounts, admins with access, and only for Virtual accounts.
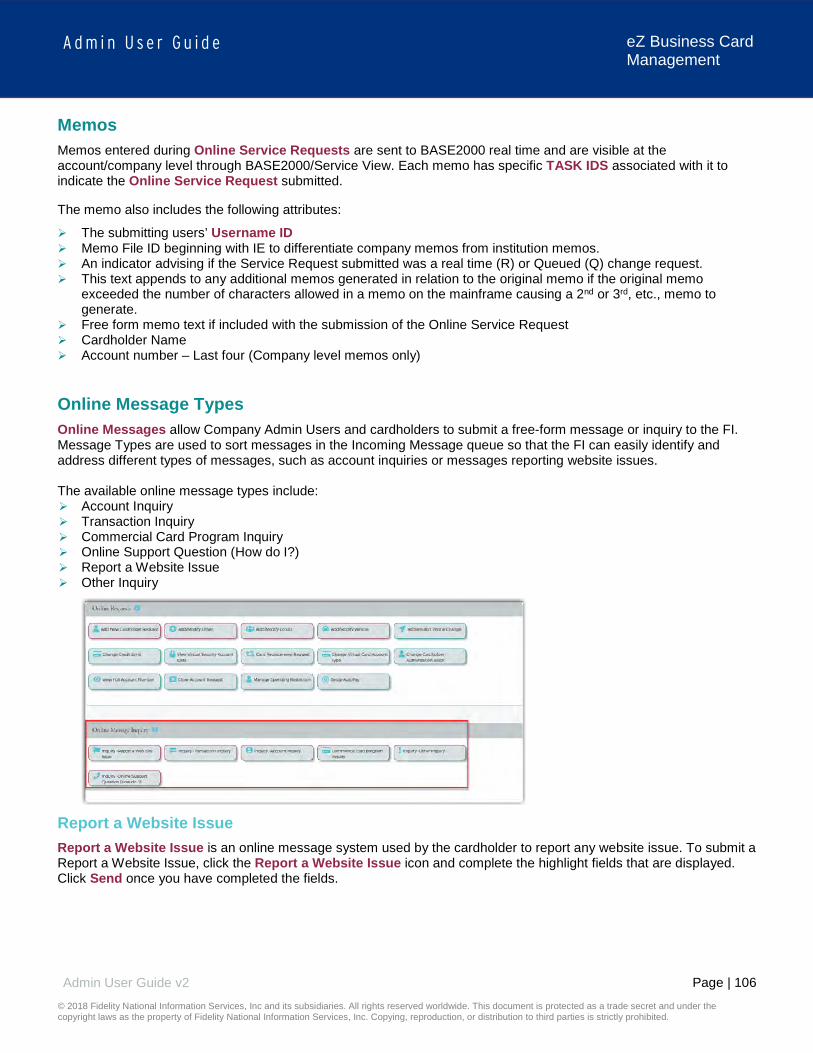
Page | 106
A d m i n U s e r G u i d e
© 2018 Fidelity National Information Services, Inc and its subsidiaries. All rights reserved worldwide. This document is protected as a trade secret and under the copyright laws as the property of Fidelity National Information Services, Inc. Copying, reproduction, or distribution to third parties is strictly prohibited.
Admin User Guide v2
eZ Business Card Management
Memos Memos entered during Online Service Requests are sent to BASE2000 real time and are visible at the account/company level through BASE2000/Service View. Each memo has specific TASK IDS associated with it to indicate the Online Service Request submitted.
The memo also includes the following attributes:
The submitting users’ Username ID Memo File ID beginning with IE to differentiate company memos from institution memos. An indicator advising if the Service Request submitted was a real time (R) or Queued (Q) change request. This text appends to any additional memos generated in relation to the original memo if the original memo
exceeded the number of characters allowed in a memo on the mainframe causing a 2nd or 3rd, etc., memo to generate.
Free form memo text if included with the submission of the Online Service Request Cardholder Name Account number – Last four (Company level memos only)
Online Message Types Online Messages allow Company Admin Users and cardholders to submit a free-form message or inquiry to the FI. Message Types are used to sort messages in the Incoming Message queue so that the FI can easily identify and address different types of messages, such as account inquiries or messages reporting website issues. The available online message types include: Account Inquiry Transaction Inquiry Commercial Card Program Inquiry Online Support Question (How do I?) Report a Website Issue Other Inquiry
Report a Website Issue Report a Website Issue is an online message system used by the cardholder to report any website issue. To submit a Report a Website Issue, click the Report a Website Issue icon and complete the highlight fields that are displayed. Click Send once you have completed the fields.

Page | 107
A d m i n U s e r G u i d e
© 2018 Fidelity National Information Services, Inc and its subsidiaries. All rights reserved worldwide. This document is protected as a trade secret and under the copyright laws as the property of Fidelity National Information Services, Inc. Copying, reproduction, or distribution to third parties is strictly prohibited.
Admin User Guide v2
eZ Business Card Management
Note: You can click View History Details to view the message sent history.
Transaction Inquiry Transaction Inquiry is an online message system used to make any inquiry on cardholder transactions. To submit a Transaction Inquiry, click the Transaction Inquiry icon and complete the highlight fields that are displayed. Click Send once you have completed the fields.
Note: You can click View History Details to view the message sent history.
Account Inquiry Account Inquiry is an online message system used to make any inquiry on the cardholder's account. To submit an Account Inquiry, click the Account Inquiry icon and complete the highlight fields that are displayed. Click Send once you have completed the fields.

Page | 108
A d m i n U s e r G u i d e
© 2018 Fidelity National Information Services, Inc and its subsidiaries. All rights reserved worldwide. This document is protected as a trade secret and under the copyright laws as the property of Fidelity National Information Services, Inc. Copying, reproduction, or distribution to third parties is strictly prohibited.
Admin User Guide v2
eZ Business Card Management
Note: You can click View History Details to view the message sent history.
Commercial Card Program Inquiry Commercial Card Program Inquiry is an online message system used to make any inquiry on the cardholder's commercial card program. To submit a Commercial Card Program Inquiry, click the Commercial Card Program Inquiry icon and complete the highlight fields that are displayed. Click Send once you have completed the fields.
Note: You can click View History Details to view the message sent history.
Other Inquiry Other Inquiry is an online message system used by the cardholder to make any other inquiry. To submit an Other Inquiry, click the Other Inquiry icon and complete the highlight fields that are displayed. Click Send once you have completed the fields.
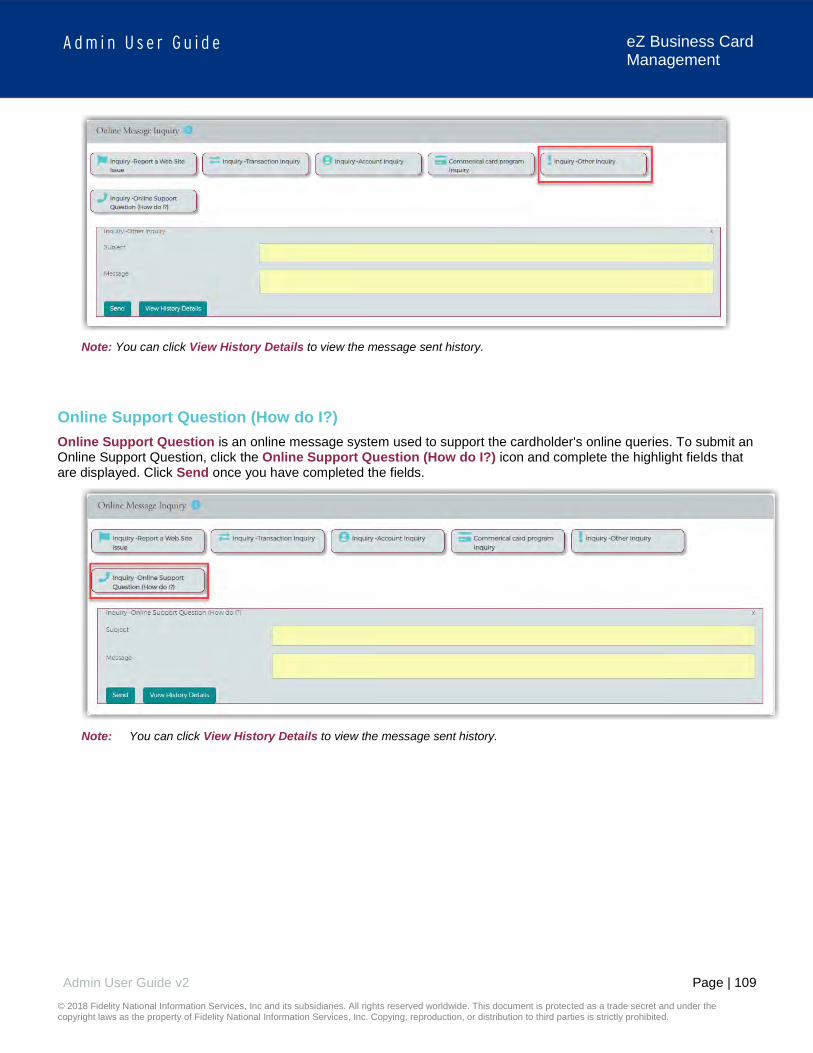
Page | 109
A d m i n U s e r G u i d e
© 2018 Fidelity National Information Services, Inc and its subsidiaries. All rights reserved worldwide. This document is protected as a trade secret and under the copyright laws as the property of Fidelity National Information Services, Inc. Copying, reproduction, or distribution to third parties is strictly prohibited.
Admin User Guide v2
eZ Business Card Management
Note: You can click View History Details to view the message sent history.
Online Support Question (How do I?) Online Support Question is an online message system used to support the cardholder's online queries. To submit an Online Support Question, click the Online Support Question (How do I?) icon and complete the highlight fields that are displayed. Click Send once you have completed the fields.
Note: You can click View History Details to view the message sent history.

Page | 110
A d m i n U s e r G u i d e
© 2018 Fidelity National Information Services, Inc and its subsidiaries. All rights reserved worldwide. This document is protected as a trade secret and under the copyright laws as the property of Fidelity National Information Services, Inc. Copying, reproduction, or distribution to third parties is strictly prohibited.
Admin User Guide v2
eZ Business Card Management
Bulk Processing The Bulk Processing feature allows Admins to generate a file that can be edited and imported whenever necessary. The following functionalities are available within the Bulk Processing page:
Download/Upload new file for bulk processing View My queue View All queue
IMPORTANT!
Depending on your security rights, you may or may not see all the options shown in this guide.
Creating and Uploading a File for Bulk Processing To upload a file for bulk processing, perform the following steps:
1. Click the Company Management icon and then File Import & Export.
2. The File Import Export page is displayed. Click the Create New icon.
3. The Create New File page is displayed. Select the Feature from the drop-down list. Once you select an option
from the drop-down list additional fields will appear. Complete all fields and click Continue.
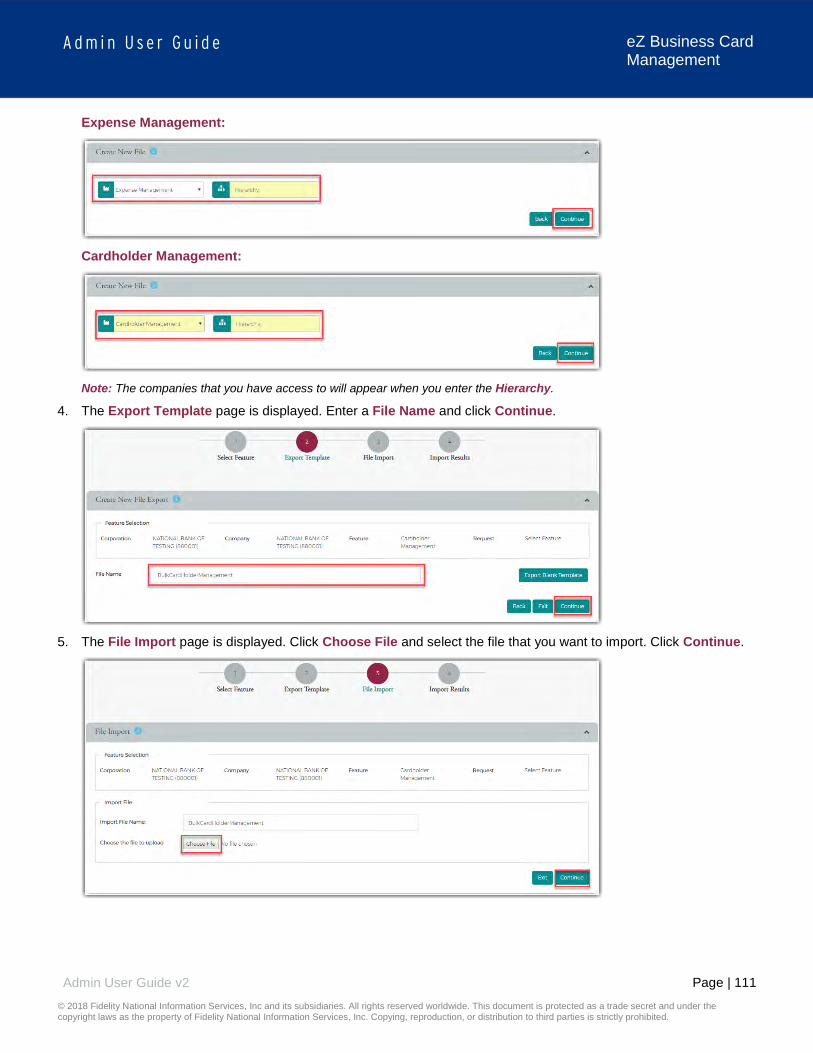
Page | 111
A d m i n U s e r G u i d e
© 2018 Fidelity National Information Services, Inc and its subsidiaries. All rights reserved worldwide. This document is protected as a trade secret and under the copyright laws as the property of Fidelity National Information Services, Inc. Copying, reproduction, or distribution to third parties is strictly prohibited.
Admin User Guide v2
eZ Business Card Management
Expense Management:
Cardholder Management:
Note: The companies that you have access to will appear when you enter the Hierarchy.
4. The Export Template page is displayed. Enter a File Name and click Continue.
5. The File Import page is displayed. Click Choose File and select the file that you want to import. Click Continue.

Page | 112
A d m i n U s e r G u i d e
© 2018 Fidelity National Information Services, Inc and its subsidiaries. All rights reserved worldwide. This document is protected as a trade secret and under the copyright laws as the property of Fidelity National Information Services, Inc. Copying, reproduction, or distribution to third parties is strictly prohibited.
Admin User Guide v2
eZ Business Card Management
6. Once the export is completed, the Import Results page is displayed. Click Finish.
Note: You can add a note to the request by clicking Add in the Notes field.
You can click the View Advanced Results link to see more details.
The following fields are displayed within the Import Advanced Results screen:
Element Description Corp Displays the associated corp number. Company ID Displays the associated company id. Feature Type of feature selected for bulk processing. Request Type of Request selected. Export Date The date on which the export file was created. Import File Name Name of the import file. Import Date Date on which the file was imported. Processed Date and Time Displays the time at which the file was processed. Status Status of the export.

Page | 113
A d m i n U s e r G u i d e
© 2018 Fidelity National Information Services, Inc and its subsidiaries. All rights reserved worldwide. This document is protected as a trade secret and under the copyright laws as the property of Fidelity National Information Services, Inc. Copying, reproduction, or distribution to third parties is strictly prohibited.
Admin User Guide v2
eZ Business Card Management
Element Description Total Records Total number of records within the file. Records Processed Total number of records processed. Records failed Total number of failed records.
Import/Export Queues The My Queue section displays the bulk processing requests that you have made. The queue can be used to complete an export request, view a request or delete a request.
The All Queue section of the File Import Export page displays all the export file tasks that are created by all admins that you have security access to view.
The table below describes the icons available in My Queue and All Queue:
Icon Description
Upload a file
View a request
Delete a request

Page | 114
A d m i n U s e r G u i d e
© 2018 Fidelity National Information Services, Inc and its subsidiaries. All rights reserved worldwide. This document is protected as a trade secret and under the copyright laws as the property of Fidelity National Information Services, Inc. Copying, reproduction, or distribution to third parties is strictly prohibited.
Admin User Guide v2
eZ Business Card Management
Spend Restrictions Depending on your user security profile, you can manage spending restrictions for your commercial card program. Start with Merchant Group Code (MGC) definitions to manage spending restrictions. An MGC definition contains a specific category of Merchant Category Codes (MCCs). Refer to the Online MCC List for the available codes and choose the MCCs to include in an MGC definition. These definitions must be included before the spending limits are set. Spending limits are rules that limit card usage by the dollar amount, the number or transactions within an MGC definition, or both. Commonly, spending limits are set up with a decline response. Transactions that qualify for MGC definitions that violate transaction amount or count criteria are not authorized. You can establish spending limits for a time period that you can determine or select a time period from a drop- down list. Spending limits are set for a company, sub level or cardholder account. Set the initial spending limit for at least one period. Adding limits for other periods is considered a change or modification. In addition, the same MGC is then displayed for all time periods. The amount, count, and response criteria, however, can remain undefined, and differ from the other time periods. If a sub level or cardholder account spending limit is added to a company, be sure to set up all criteria that has to be applied at each level. The system applies the spending limit to the lowest level it finds. For example, a company hierarchy can consist of a company, and one or more sub levels. Cardholder accounts can be set up under a company, or under any sub level. A spending limit set for a cardholder account takes precedence over sub level and company limits, and a spending limit set for a sub level takes precedence over one set for a company. If an MGC definition is deleted from a spending limit, the definition is removed from every time period. If the spending limit to an MGC definition is to be applied for one period, but not another, leave the Transaction Amount, Transaction Count, or Response Code fields blank for the MGC definition for the period that the spending limit does not apply to. If criteria already exist for an MCG definition, delete the criteria but keep the MGC definition. The MGC definition can be deleted only if the plan is to eliminate all spending limits for that definition for all time periods by selecting the Delete All Spending Limits option. If all the spending limits for a particular cardholder account, a sub level, or a company is to be removed, delete these limits. A spending restriction can be deleted from one-time period only. In this case, the Transaction Amount, Transaction Count, and Response Code for all the groups under that time period must be deleted. MGC definitions can be set without applying spending criteria to approve or decline transactions with the Exclude
MGC option. You can approve or decline transactions for undefined MCCs with the Other Merchants option. An MCC add/change/delete or a Spending Limit add/change/delete is passed to the Incoming Messages Queue if
the request is unable to be processed in a real-time manner. IMPORTANT!
Depending on your security rights, you may or may not see all the options shown in this guide.
Manage Spend Restrictions Online Request Based on the administrative access, company administrators can implement authorization restrictions to manage the risk of their commercial card programs. The access to manage codes and restrictions is based on administrative access set by the financial institution. Administrative access is one of the following:
No access – The institution is creating the groups and restrictions on your behalf Access to Manage groups and/or restrictions, (Add, Change, or Delete) View Only access
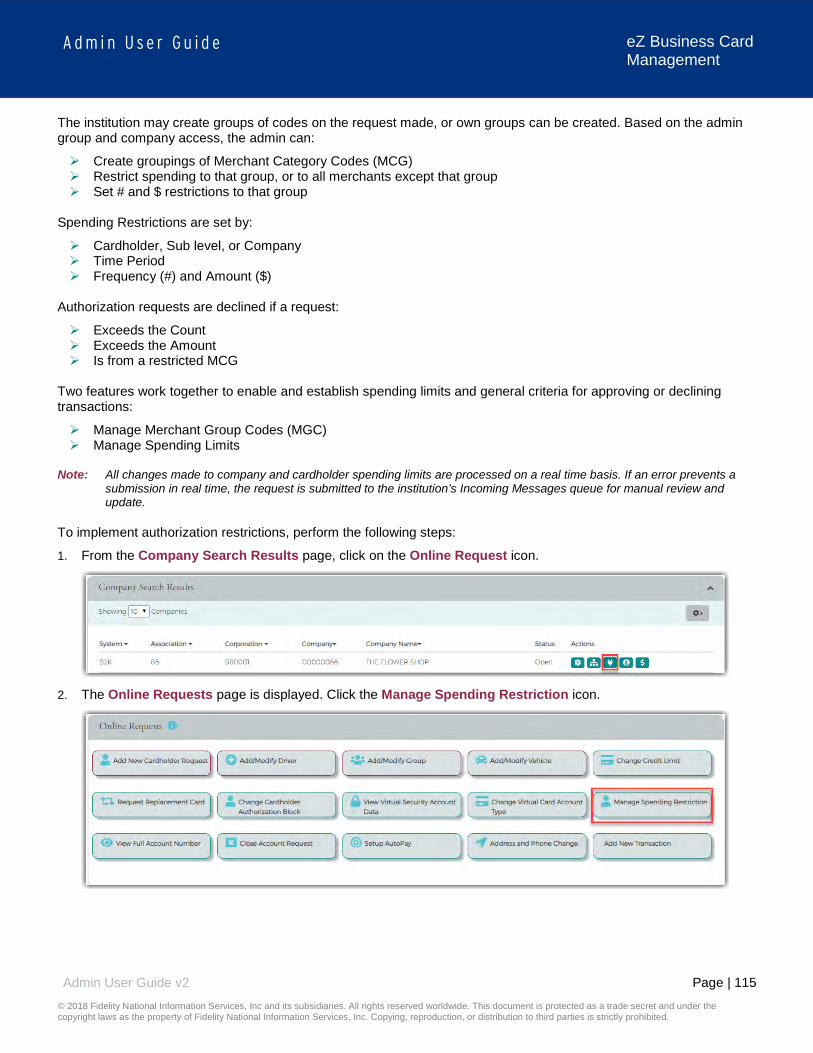
Page | 115
A d m i n U s e r G u i d e
© 2018 Fidelity National Information Services, Inc and its subsidiaries. All rights reserved worldwide. This document is protected as a trade secret and under the copyright laws as the property of Fidelity National Information Services, Inc. Copying, reproduction, or distribution to third parties is strictly prohibited.
Admin User Guide v2
eZ Business Card Management
The institution may create groups of codes on the request made, or own groups can be created. Based on the admin group and company access, the admin can:
Create groupings of Merchant Category Codes (MCG) Restrict spending to that group, or to all merchants except that group Set # and $ restrictions to that group
Spending Restrictions are set by:
Cardholder, Sub level, or Company Time Period Frequency (#) and Amount ($)
Authorization requests are declined if a request:
Exceeds the Count Exceeds the Amount Is from a restricted MCG
Two features work together to enable and establish spending limits and general criteria for approving or declining transactions:
Manage Merchant Group Codes (MGC) Manage Spending Limits
Note: All changes made to company and cardholder spending limits are processed on a real time basis. If an error prevents a
submission in real time, the request is submitted to the institution’s Incoming Messages queue for manual review and update.
To implement authorization restrictions, perform the following steps:
1. From the Company Search Results page, click on the Online Request icon.
2. The Online Requests page is displayed. Click the Manage Spending Restriction icon.

Page | 116
A d m i n U s e r G u i d e
© 2018 Fidelity National Information Services, Inc and its subsidiaries. All rights reserved worldwide. This document is protected as a trade secret and under the copyright laws as the property of Fidelity National Information Services, Inc. Copying, reproduction, or distribution to third parties is strictly prohibited.
Admin User Guide v2
eZ Business Card Management
3. The Merchant Restriction page is displayed.
IMPORTANT!
Some online requests only display to a user if the permissions have been set to include the request types set up by the financial institution.
Merchant Restrictions Overview If you select the Manage Spending Restrictions from the online service request types, the Merchant Restrictions Overview page appears. Please review this to understand how the process works in eZBusiness. The below table describes the elements of the Merchant Restriction page:
Element Description Merchant Restriction Overview This section shows general information about the Manage Spending Restrictions option.
Merchant Group Code Click this option to view, modify, delete, and add Merchant Group Code (MGC) definitions.
Manage Spending Limits Click this option to view, modify, delete, and set spending (velocity) limits for an MGC definition, or set general criteria for approving or declining an MGC or MCCs.
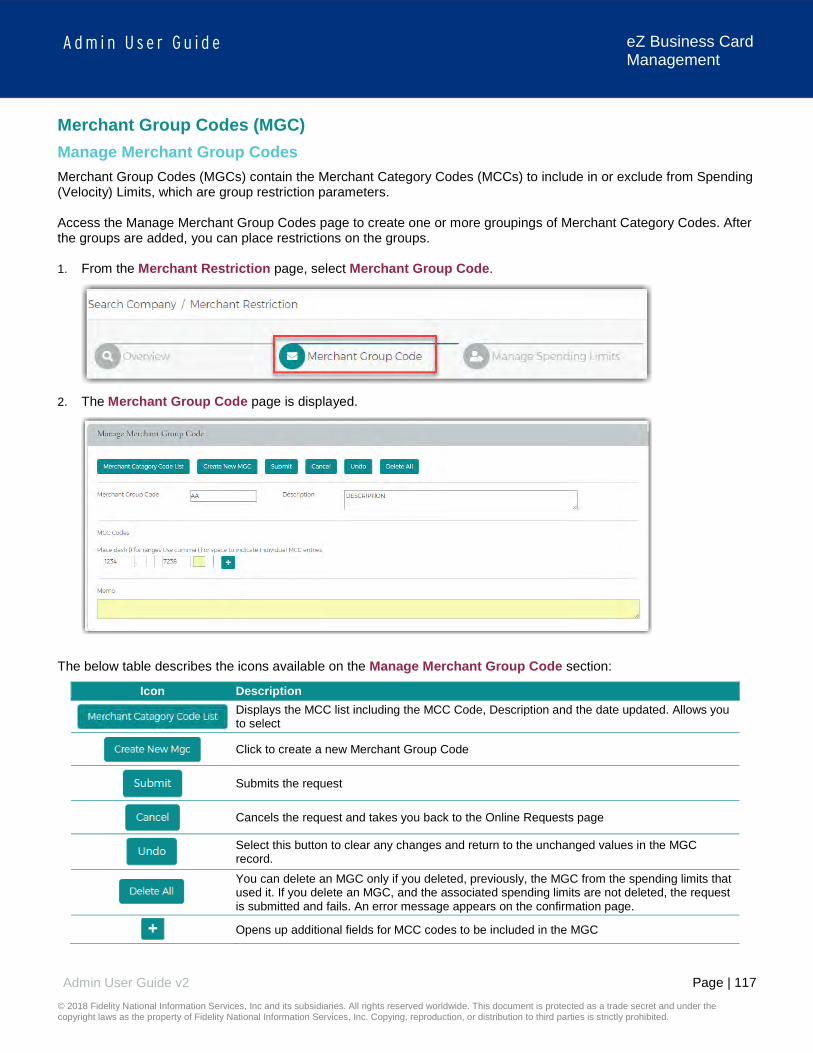
Page | 117
A d m i n U s e r G u i d e
© 2018 Fidelity National Information Services, Inc and its subsidiaries. All rights reserved worldwide. This document is protected as a trade secret and under the copyright laws as the property of Fidelity National Information Services, Inc. Copying, reproduction, or distribution to third parties is strictly prohibited.
Admin User Guide v2
eZ Business Card Management
Merchant Group Codes (MGC) Manage Merchant Group Codes Merchant Group Codes (MGCs) contain the Merchant Category Codes (MCCs) to include in or exclude from Spending (Velocity) Limits, which are group restriction parameters. Access the Manage Merchant Group Codes page to create one or more groupings of Merchant Category Codes. After the groups are added, you can place restrictions on the groups. 1. From the Merchant Restriction page, select Merchant Group Code.
2. The Merchant Group Code page is displayed.
The below table describes the icons available on the Manage Merchant Group Code section:
Icon Description
Displays the MCC list including the MCC Code, Description and the date updated. Allows you to select
Click to create a new Merchant Group Code
Submits the request
Cancels the request and takes you back to the Online Requests page
Select this button to clear any changes and return to the unchanged values in the MGC record.
You can delete an MGC only if you deleted, previously, the MGC from the spending limits that used it. If you delete an MGC, and the associated spending limits are not deleted, the request is submitted and fails. An error message appears on the confirmation page.
Opens up additional fields for MCC codes to be included in the MGC

Page | 118
A d m i n U s e r G u i d e
© 2018 Fidelity National Information Services, Inc and its subsidiaries. All rights reserved worldwide. This document is protected as a trade secret and under the copyright laws as the property of Fidelity National Information Services, Inc. Copying, reproduction, or distribution to third parties is strictly prohibited.
Admin User Guide v2
eZ Business Card Management
Add a Merchant Group 1. From the Merchant Group Code page, click the Create New MGC button.
2. Enter the following information and then click the Submit icon.
Merchant Group Code – type the code for the new group Description – type a description for the new group MCC Codes – enter the MCC codes to be included in the new MGC. Note: The plus icon allows you to enter
multiple MCC codes. Memo – type a note in the memo field
Note: You can click on the Merchant Category Code List icon to display the MCC list. Clicking the icon within the list will add
the MCC code to the MCC Codes section.
3. The review page will be displayed. Review the information and click Confirm.
4. The Merchant Group Code is successfully added message is displayed.

Page | 119
A d m i n U s e r G u i d e
© 2018 Fidelity National Information Services, Inc and its subsidiaries. All rights reserved worldwide. This document is protected as a trade secret and under the copyright laws as the property of Fidelity National Information Services, Inc. Copying, reproduction, or distribution to third parties is strictly prohibited.
Admin User Guide v2
eZ Business Card Management
Merchant Category Code (MCC) List The available Merchant Category Codes can be viewed to include in the spending restrictions by clicking the Merchant Category Code List icon on the Manage Merchant Group Code (MGC).
The MCC List is displayed.
The following fields are displayed within the Manage Merchant Group Code screen:
Element Description
MCC Code This is an entry field to search for an MCC Code. To sort by MCC Code, click the MCC Code link. All codes that contain the entered value are displayed.
Description This is an entry field to search for an MCC Description. To sort by Description, click the Description link. All MCC codes that contain the entered description are displayed.
Date Updated This is an entry field to search for the most recently updated MCC Codes. To sort by the date an MCC Code was last updated, click the Date of Last Update link.

Page | 120
A d m i n U s e r G u i d e
© 2018 Fidelity National Information Services, Inc and its subsidiaries. All rights reserved worldwide. This document is protected as a trade secret and under the copyright laws as the property of Fidelity National Information Services, Inc. Copying, reproduction, or distribution to third parties is strictly prohibited.
Admin User Guide v2
eZ Business Card Management
Changing Merchant Groups Depending on your access rights, you can modify or delete a new Merchant Group Code (MGC).
To change a merchant group, perform the following steps:
1. From the Manage Merchant Group Code Online Request, click the Undo button.
2. Click in the Merchant Group Code field and select the two-digit code to change from the drop-down list. Make
your changes to the description and MCC codes as needed and type a note in the Memo field. Click the Submit button.
3. The review page will be displayed. Review the information and click Confirm.
4. A confirmation message will be received.

Page | 121
A d m i n U s e r G u i d e
© 2018 Fidelity National Information Services, Inc and its subsidiaries. All rights reserved worldwide. This document is protected as a trade secret and under the copyright laws as the property of Fidelity National Information Services, Inc. Copying, reproduction, or distribution to third parties is strictly prohibited.
Admin User Guide v2
eZ Business Card Management
Manage Spending Limits Spending limits are rules that limit company/sublevel or card usage by dollar amount, the number or transactions within a Merchant Group Code (MGC) definition, or both. The limits are created and modified on the Manage Spending Limits page. You can manage these limits by completing the fields and submitting this service request through one of the following options:
For a single addition or change to an MGC, enter data into the columns at the bottom of the page. For numerous additions and changes, complete the fields in the Maintain Spending Limits section in the center
of the page. For additional information, see the Merchant Group Selection topic.
Adding a Spending Limit To manage spending restrictions, a spending (velocity) limit needs to be set on a Merchant Group Code (MGC) definition. These restrictions can be set at the company, sub-level or at an account level. To add a Spending Limit to a Merchant Group Code, perform the following steps:
1. From the Merchant Restriction page, select Manage Spending Limits.
2. The Manage Spending Limits page is displayed.
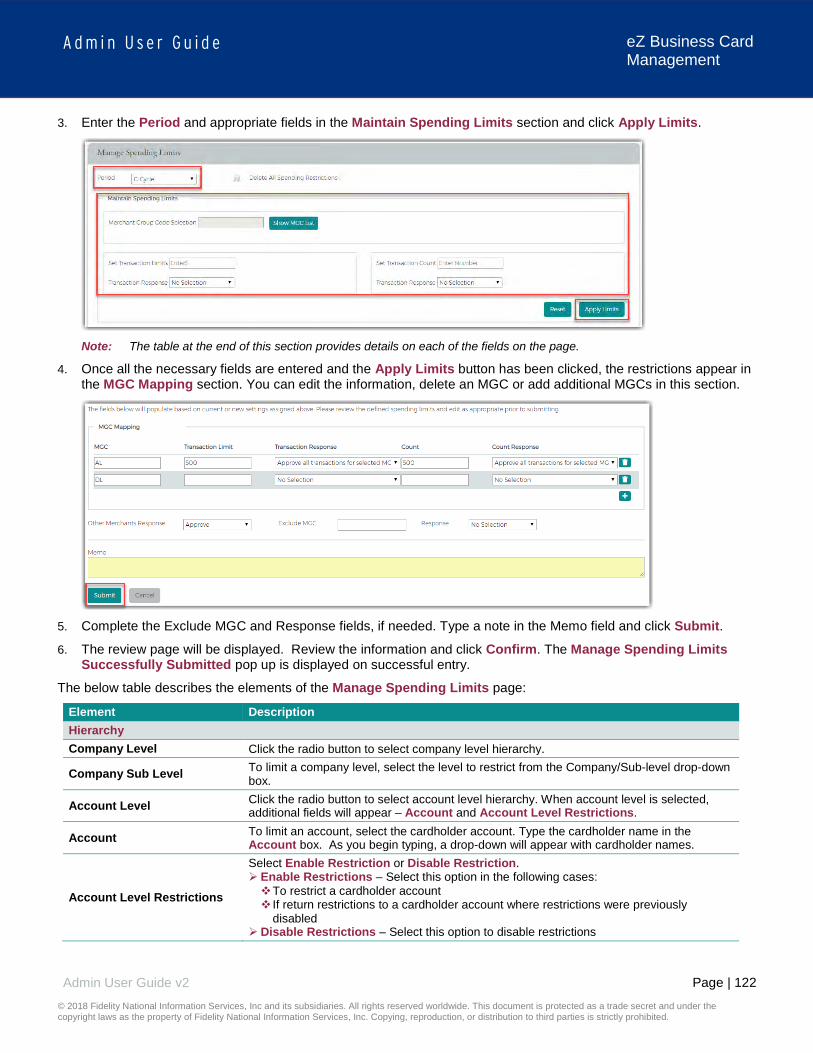
Page | 122
A d m i n U s e r G u i d e
© 2018 Fidelity National Information Services, Inc and its subsidiaries. All rights reserved worldwide. This document is protected as a trade secret and under the copyright laws as the property of Fidelity National Information Services, Inc. Copying, reproduction, or distribution to third parties is strictly prohibited.
Admin User Guide v2
eZ Business Card Management
3. Enter the Period and appropriate fields in the Maintain Spending Limits section and click Apply Limits.
Note: The table at the end of this section provides details on each of the fields on the page.
4. Once all the necessary fields are entered and the Apply Limits button has been clicked, the restrictions appear in the MGC Mapping section. You can edit the information, delete an MGC or add additional MGCs in this section.
5. Complete the Exclude MGC and Response fields, if needed. Type a note in the Memo field and click Submit.
6. The review page will be displayed. Review the information and click Confirm. The Manage Spending Limits Successfully Submitted pop up is displayed on successful entry.
The below table describes the elements of the Manage Spending Limits page:
Element Description Hierarchy Company Level Click the radio button to select company level hierarchy.
Company Sub Level To limit a company level, select the level to restrict from the Company/Sub-level drop-down box.
Account Level Click the radio button to select account level hierarchy. When account level is selected, additional fields will appear – Account and Account Level Restrictions.
Account To limit an account, select the cardholder account. Type the cardholder name in the Account box. As you begin typing, a drop-down will appear with cardholder names.
Account Level Restrictions
Select Enable Restriction or Disable Restriction. Enable Restrictions – Select this option in the following cases: To restrict a cardholder account If return restrictions to a cardholder account where restrictions were previously
disabled Disable Restrictions – Select this option to disable restrictions

Page | 123
A d m i n U s e r G u i d e
© 2018 Fidelity National Information Services, Inc and its subsidiaries. All rights reserved worldwide. This document is protected as a trade secret and under the copyright laws as the property of Fidelity National Information Services, Inc. Copying, reproduction, or distribution to third parties is strictly prohibited.
Admin User Guide v2
eZ Business Card Management
Element Description Manage Spending Limits
Period Select the time period that the restrictions are in effect for from the drop-down list: Cycle, Daily, Weekly, Monthly, Quarterly, Yearly, Transaction, Other
Other Days
This is a required field when the other option is selected from the Period field. This sets a revolving number of days in which the set limit cannot exceed. For example, if the days are set to 180 and the amount is set to $500.00, the account has 180 days to spend up to the maximum limit. If the maximum amount is met within 180 days, the account must wait until 180 days expires. At that time, the days reset, and purchases are allowed on the account at merchants with an MCC code defined under the specific Merchant Group Code (MGC).
Delete All Spending Restr Select the check box to permanently delete all of the spending limits FOR ALL PERIODS, for the selected company, sub-level, or an account.
Maintain Spending Limits
Merchant Group Code Selection
Click the Show MGC List button and a list of MGC’s will appear. Select the MGC from the list. The MGCs selected from the list appear in the MGC column after clicking Apply Limits. MGCs actively used for the selected company/sublevel or account are indicated in this list with an asterisk. Note: You are also able to view the MGC detail by clicking the Show MGC Detail button in the drop-down list.
Set Transaction Limits This field is optional. Enter the maximum dollar amount allowed on a transaction within the selected Period. Example: Enter 501 to set the limit for $500.
Transaction Response
Select an option from the drop-down list. This field is optional. If you entered a transaction dollar amount, the system’s default response is Decline. You can change the response as needed: Approve all transactions for the selected MGCs. Decline transactions above the entered value.
Set Transaction Count This field is optional. Enter the maximum number of transactions to allow within the selected Period. This option cannot be set for Transaction Spending Limits. Example: 30
Transaction Response
Select an option from the drop-down list. This field is optional. If you entered a transaction dollar amount, the system’s default response is Decline. You can change the response as needed: Approve all transactions for the selected MGCs. Decline transactions above the entered value.
Select this button to clear any changes and return to the unchanged values.
Select this button to apply the selections in the Maintain Spending Limits section. The selection results appear in the columns of the Spending Limits form. If necessary, the data can be edited by modifying or deleting the values from the form directly.
MGC Mapping MGC The Merchant Group Code
Transaction Limit This field is optional. Enter or change the maximum dollar amount allowed on an MGC. If you selected and applied transaction limits to MGCs from the Select MGC drop down list in the Maintain Spending Limits section, the corresponding values appear in this column.
Transaction Response If you selected and applied a transaction response to MGCs from the Select MGC drop down list in the Maintain Spending Limits section, the selected corresponding values appear in this column.
Count If you selected and applied a transaction count to MGCs from the Select MGC drop down list in the Maintain Spending Limits section, the corresponding values appear in this column.
Count Response If you selected and applied limits to MGCs from the Select MGC drop down list in the Maintain Spending Limits section, the corresponding values appear in this column.
The delete icon allows you to delete the Spend Limits for that row.
The add icon allows you to add additional Spend Limits.

Page | 124
A d m i n U s e r G u i d e
© 2018 Fidelity National Information Services, Inc and its subsidiaries. All rights reserved worldwide. This document is protected as a trade secret and under the copyright laws as the property of Fidelity National Information Services, Inc. Copying, reproduction, or distribution to third parties is strictly prohibited.
Admin User Guide v2
eZ Business Card Management
Element Description
Other Merchants Response For transactions with undefined MCCs in the MGCs with spending limit criteria, or in the Exclude MGC group, the response can be set to approved or declined. Once set, it is the same for all spending limit parameters.
Exclude MGC Enter a two-digit MGC to set to decline authorizations without applying spending limit criteria. Once set, it is the same for all spending limit parameters.
Response If you entered an MGC to restrict, select a response for these transactions: Approve Decline
Memo Insert a note regarding the request.
The Apply Limits button must be selected before this button is enabled. Click this button to submit changes. The Review page displays.
Changing a Spending Limit You can modify or delete a spending (velocity) limit set up for a Merchant Group Code (MGC) at the company, sublevel, or account levels. From the Manage Spending Limits online request page:
1. Select the Account Level or Company Level button in the Hierarchy section.
Note: If you select Account Level, you must select Enable Restrictions from the Account Level Restrictions section.
2. Enter the changes to the MGC you want to make, and the other required and optional field values. Click the Submit button.
3. The review page is displayed. Review the information and click the Confirm button.
4. The confirmation message appears.
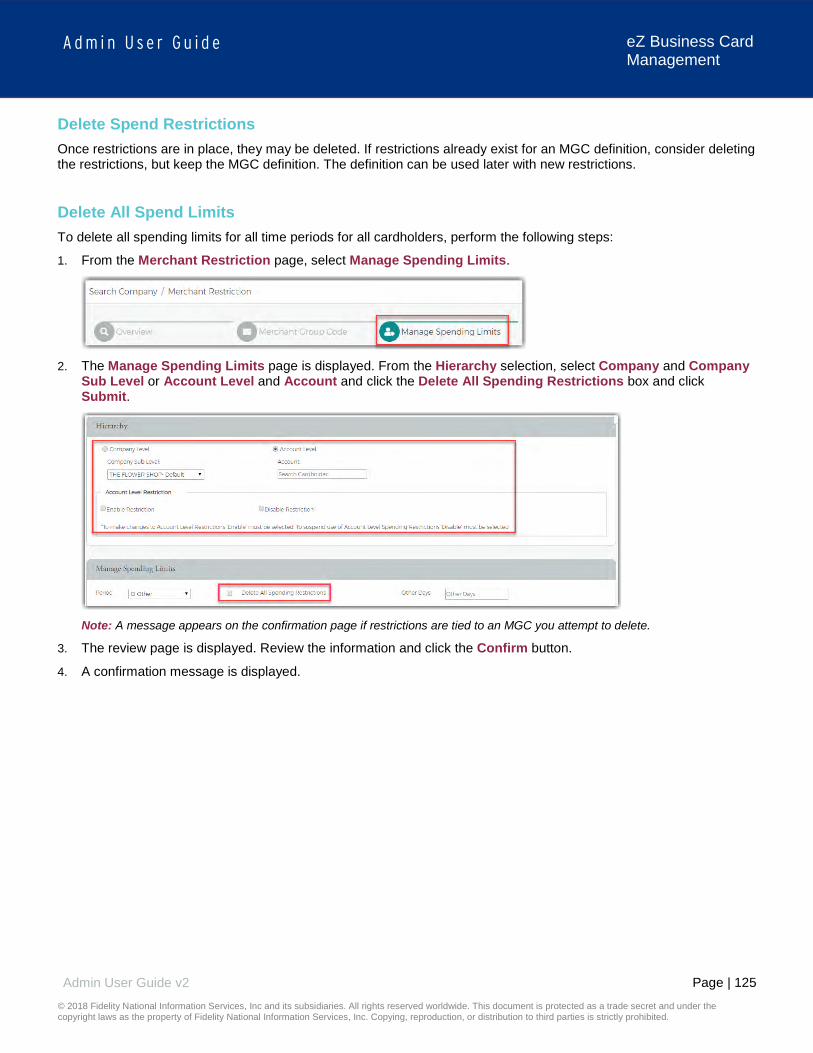
Page | 125
A d m i n U s e r G u i d e
© 2018 Fidelity National Information Services, Inc and its subsidiaries. All rights reserved worldwide. This document is protected as a trade secret and under the copyright laws as the property of Fidelity National Information Services, Inc. Copying, reproduction, or distribution to third parties is strictly prohibited.
Admin User Guide v2
eZ Business Card Management
Delete Spend Restrictions Once restrictions are in place, they may be deleted. If restrictions already exist for an MGC definition, consider deleting the restrictions, but keep the MGC definition. The definition can be used later with new restrictions.
Delete All Spend Limits To delete all spending limits for all time periods for all cardholders, perform the following steps:
1. From the Merchant Restriction page, select Manage Spending Limits.
2. The Manage Spending Limits page is displayed. From the Hierarchy selection, select Company and Company
Sub Level or Account Level and Account and click the Delete All Spending Restrictions box and click Submit.
Note: A message appears on the confirmation page if restrictions are tied to an MGC you attempt to delete.
3. The review page is displayed. Review the information and click the Confirm button.
4. A confirmation message is displayed.

Page | 126
A d m i n U s e r G u i d e
© 2018 Fidelity National Information Services, Inc and its subsidiaries. All rights reserved worldwide. This document is protected as a trade secret and under the copyright laws as the property of Fidelity National Information Services, Inc. Copying, reproduction, or distribution to third parties is strictly prohibited.
Admin User Guide v2
eZ Business Card Management
Payments IMPORTANT!
Depending on your security rights, you may or may not see all the options shown in this guide.
Search for a Payment To search for a payment, perform the following steps.
1. Click Account Management > Search Payment.
2. The Search Payment page is displayed. Enter one or any combination of search options and click Search.
Note:
You can click on the Manage Filters button to select the filters that you would like displayed. All payments that you have access to will be displayed before you enter search criteria. Search criteria only needs to be
entered if you want to filter down the list.
The table below describes the search elements on the Search Payment page.
Element Description Hierarchy Hierarchy level Account # Account number

Page | 127
A d m i n U s e r G u i d e
© 2018 Fidelity National Information Services, Inc and its subsidiaries. All rights reserved worldwide. This document is protected as a trade secret and under the copyright laws as the property of Fidelity National Information Services, Inc. Copying, reproduction, or distribution to third parties is strictly prohibited.
Admin User Guide v2
eZ Business Card Management
Element Description Confirmation # The confirmation number received when the payment was made First Name Cardholder’s first name. Last Name Cardholder’s last name. Payment Account # The checking or savings account number used to make the payment Routing # The checking or savings routing number used to make the payment Company ID The company ID Payment Status The status of the payment – All, Cancelled, Pending, Processing, Processed
Payment Amount Search by the amount of the payment. Select an option from the drop-down list – Equal to, Between, Higher than, Smaller than. Once a selection is made, a field will appear to enter the amount.
Payment Date Search by the date of the payment. Select an option from the drop-down list – Equal to, Between, After, Before. Once a selection is made, a field will appear to enter the date.
The below table describes the icons available in the Payment Search Results section:
Icon Description
View payment details
Download Payment Search Results You can download the search results to the following formats and financial software programs: Excel/Spreadsheet (.csv) format Excel Text (tab spacing) format
To download the list, perform the following steps:
1. Click the Download icon in the Payment Search Results section.
2. Click on the format option that you want and save the file to a specified location on your computer.
View Payment Details To view the details of a payment, perform the following steps:
1. From the Search Payment page, click the View Payment Details icon for the payment that you want to see the details for.

Page | 128
A d m i n U s e r G u i d e
© 2018 Fidelity National Information Services, Inc and its subsidiaries. All rights reserved worldwide. This document is protected as a trade secret and under the copyright laws as the property of Fidelity National Information Services, Inc. Copying, reproduction, or distribution to third parties is strictly prohibited.
Admin User Guide v2
eZ Business Card Management
2. The Payment Details page is displayed.
The below table describes the elements of the Payment Details page:
Element Description Account Number The account that the payment was made on Payment Type The type of payment: one-time or recurring Payment Status The status of the payment – Cancelled, Pending, Processing, Processed Payment Entered / Modified Date Date the payment was entered or modified Confirmation # The confirmation number of the payment Payment Account Name Nickname given for the payment account when it was set up FI Name Institution name of payment account Payment Account # The checking or savings account number used to make the payment Routing Number The routing number for the payment account Payment Account Type The type of account used to make the payment – checking or savings. Amount The amount of the payment Payment Date The date the payment was made Memo Data entered into the memo field Additional Email Email address of any additional admin that received notification of the payment Resent Confirmation Email If selected, a confirmation will be sent again to the email address on the account Update Payment Click to update the payment. Cancel Payment Click to cancel the payment.
Viewing Payment History The payment history for an account consists of all payments that have been made n the eZCardInfo and MyCardStatement site within the last eighteen months, including pending and canceled payments. Payments with a pending status can also be updated or canceled. To view the online payment history for a commercial card account, perform the following step:
1. From the Company Management, Search Company page, click on the Account List icon for the company that you would like to view the payment history for.
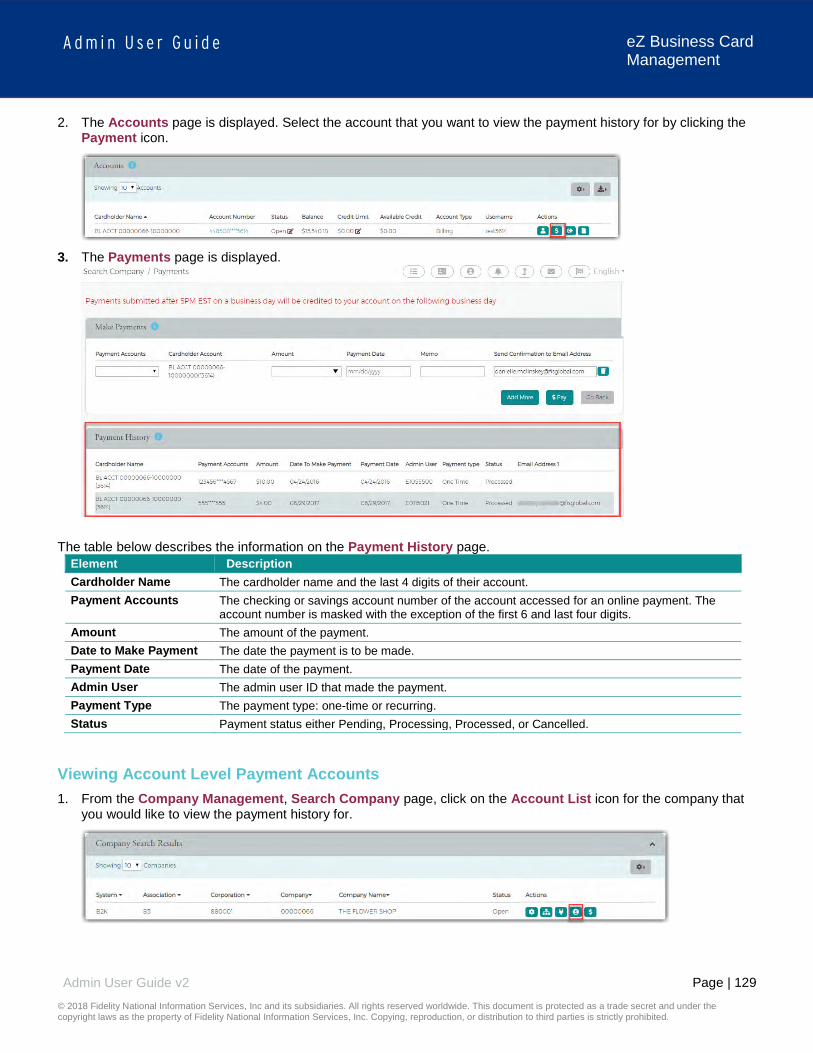
Page | 129
A d m i n U s e r G u i d e
© 2018 Fidelity National Information Services, Inc and its subsidiaries. All rights reserved worldwide. This document is protected as a trade secret and under the copyright laws as the property of Fidelity National Information Services, Inc. Copying, reproduction, or distribution to third parties is strictly prohibited.
Admin User Guide v2
eZ Business Card Management
2. The Accounts page is displayed. Select the account that you want to view the payment history for by clicking the Payment icon.
3. The Payments page is displayed.
The table below describes the information on the Payment History page.
Element Description Cardholder Name The cardholder name and the last 4 digits of their account. Payment Accounts The checking or savings account number of the account accessed for an online payment. The
account number is masked with the exception of the first 6 and last four digits. Amount The amount of the payment. Date to Make Payment The date the payment is to be made. Payment Date The date of the payment. Admin User The admin user ID that made the payment. Payment Type The payment type: one-time or recurring. Status Payment status either Pending, Processing, Processed, or Cancelled.
Viewing Account Level Payment Accounts 1. From the Company Management, Search Company page, click on the Account List icon for the company that
you would like to view the payment history for.

Page | 130
A d m i n U s e r G u i d e
© 2018 Fidelity National Information Services, Inc and its subsidiaries. All rights reserved worldwide. This document is protected as a trade secret and under the copyright laws as the property of Fidelity National Information Services, Inc. Copying, reproduction, or distribution to third parties is strictly prohibited.
Admin User Guide v2
eZ Business Card Management
2. The Accounts page is displayed. Select the account that you want to view the payment history for by clicking the Payment icon.
3. The Payments page is displayed. The Payment Accounts section is displayed under Payment History.
Viewing Company Payment Accounts The Payments page allows you to view existing payment accounts and set up payment accounts that can be used for making account payments online. To view information about an existing account, perform the following steps:
1. From the Company Management, Search Company page, click on the Payment icon for the company that you would like to view the payment account for.
2. The Payments page is displayed. The Payment Accounts section is below the Select Accounts To Make
Payments section.

Page | 131
A d m i n U s e r G u i d e
© 2018 Fidelity National Information Services, Inc and its subsidiaries. All rights reserved worldwide. This document is protected as a trade secret and under the copyright laws as the property of Fidelity National Information Services, Inc. Copying, reproduction, or distribution to third parties is strictly prohibited.
Admin User Guide v2
eZ Business Card Management
The table below describes the information on the Payment History page.
Element Description Account Nickname A unique name assigned by the cardholder to identify the account. Also referred to in eZCardInfo
(MyCardStatement) as Payment Account. Account Type The type of account – checking or savings. Account Number The checking or savings account number of the account to be accessed for the online payment. Routing Number The nine-digit routing number used to identify the financial institution from which the funds are
withdrawn for the online payment. Status The status of the online payment, either Pending, Completed, or Canceled.
Adding Payment Accounts The Payments page allows you to set up multiple checking or savings accounts to be used as payment accounts to pay your cardholder’s bill online. It also lists any active or canceled payment accounts. You can create an unlimited number of payment accounts. Once a payment account is created, it can be used immediately to make an online payment. To add a Payment Account, perform the following steps:
1. From the Payments page, click Add New in the Payment Accounts section.
2. The payment information fields are displayed. Complete all the fields and click Save.
3. The Success Payment Account Added message is displayed.
Note: The Payment Accounts section lists all of the active and deleted payment accounts, which can be used to pay the
cardholder’s accounts online. The table below describes the information in the Payment Accounts section.
Element Description Account Nickname A unique name assigned to identify the account. Account Type Identifies if the payment account is from a savings or checking account. Account Number The checking or savings account number of the account to be accessed for the online payment.
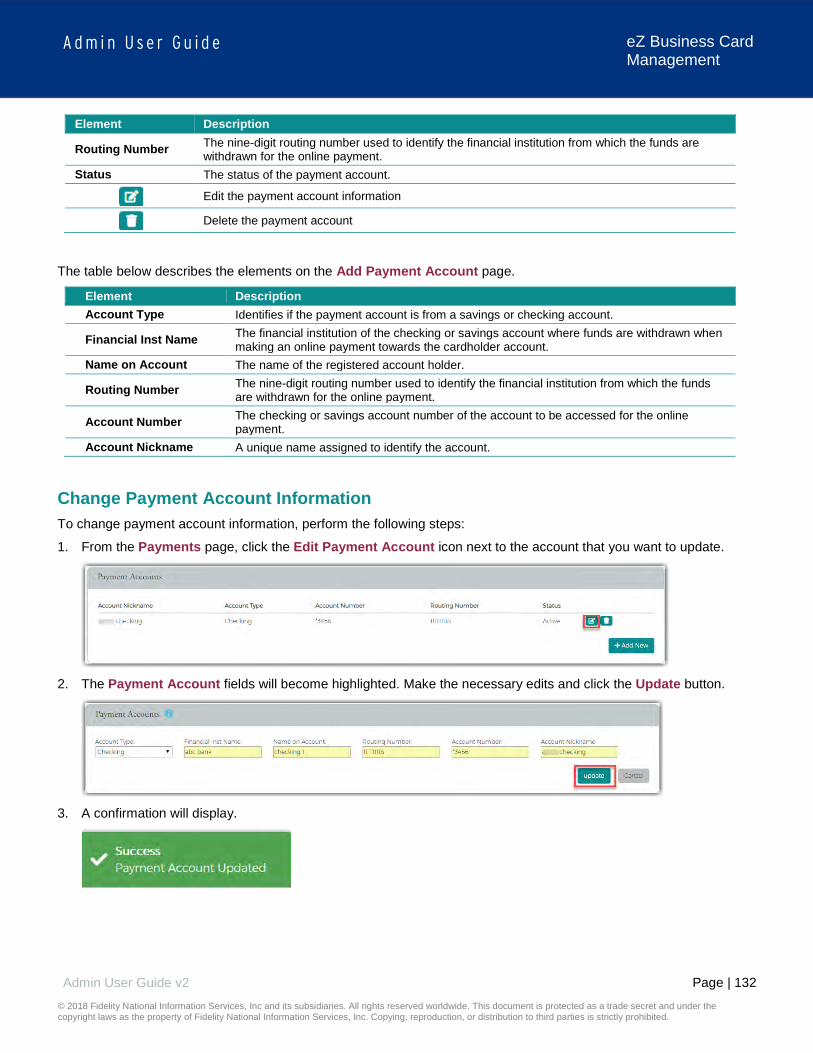
Page | 132
A d m i n U s e r G u i d e
© 2018 Fidelity National Information Services, Inc and its subsidiaries. All rights reserved worldwide. This document is protected as a trade secret and under the copyright laws as the property of Fidelity National Information Services, Inc. Copying, reproduction, or distribution to third parties is strictly prohibited.
Admin User Guide v2
eZ Business Card Management
Element Description
Routing Number The nine-digit routing number used to identify the financial institution from which the funds are withdrawn for the online payment.
Status The status of the payment account.
Edit the payment account information
Delete the payment account
The table below describes the elements on the Add Payment Account page.
Element Description Account Type Identifies if the payment account is from a savings or checking account.
Financial Inst Name The financial institution of the checking or savings account where funds are withdrawn when making an online payment towards the cardholder account.
Name on Account The name of the registered account holder.
Routing Number The nine-digit routing number used to identify the financial institution from which the funds are withdrawn for the online payment.
Account Number The checking or savings account number of the account to be accessed for the online payment.
Account Nickname A unique name assigned to identify the account.
Change Payment Account Information To change payment account information, perform the following steps:
1. From the Payments page, click the Edit Payment Account icon next to the account that you want to update.
2. The Payment Account fields will become highlighted. Make the necessary edits and click the Update button.
3. A confirmation will display.

Page | 133
A d m i n U s e r G u i d e
© 2018 Fidelity National Information Services, Inc and its subsidiaries. All rights reserved worldwide. This document is protected as a trade secret and under the copyright laws as the property of Fidelity National Information Services, Inc. Copying, reproduction, or distribution to third parties is strictly prohibited.
Admin User Guide v2
eZ Business Card Management
Delete a Payment Account To delete a payment account information, perform the following steps:
1. From the Payments page, click the Delete Payment Account icon next to the account that you want to delete.
2. A Delete Payment confirmation message will be displayed. Click Confirm.
3. A confirmation message is displayed.
ACH Payment Returns / Locked Accounts ACH payment returns can occur when cardholders continue to initiate payments through eZCardInfo using the same bank accounts that have been rejected, sometimes multiple times, by the Federal Reserve. A Locked Payment Accounts table houses the locked payment records. This table is used when the new Payment Accounts are added in eZCard or Commercial Card to verify their status. This table is locked for multiple users, (everyone on the account), if applicable. Disabled payment accounts are unavailable for use to schedule a payment and disables recurring payments.
Disabled Payment Accounts Temporarily Locked Payment Accounts - The following applies to accounts that are locked temporarily:
Only Pending Payments apply to this activity. If they are already in a Processing status, they are not changed. The pending payments that are tied to a payment account that is temporarily locked are not chosen for processing,
the status of the payment account can be identified by the status in the new Locked Payment Accounts table. This affects all Pending Payments for this payment account, no matter how far in the future they are scheduled. When the Payment Account is Unlocked, the Payment Status is changed to Pending. This also applies to future
dated payments, no matter how far in the future they are scheduled. Only Transactions with the status Disabled can be changed to Pending (WILLPROCESSON). The payment is then Processed if the date of the Payment is still valid for processing. The Unlocked Alert advises a review of Pending payments. Note: Payments are cancelled for permanently locked payment accounts.

Page | 134
A d m i n U s e r G u i d e
© 2018 Fidelity National Information Services, Inc and its subsidiaries. All rights reserved worldwide. This document is protected as a trade secret and under the copyright laws as the property of Fidelity National Information Services, Inc. Copying, reproduction, or distribution to third parties is strictly prohibited.
Admin User Guide v2
eZ Business Card Management
Making a One-Time Payment Administrators may make payments to individual and billing commercial card accounts. The one-time payment feature allows you to schedule one or more online payments for a current or future payment date. You can schedule a payment for a future date of up to 60 days. Once the payment is made, the payment amount is automatically deducted from the designated account. NOTE: If you have not yet set up a payment account, the Payment Account page displays. Before making a payment, you must
first have a Payment Account. Refer to Adding a Payment Account for more information. To make a one-time payment on an account, perform the following steps:
1. From the Company Management, Search Company page, click on the Payment icon for the company that you would like to view the payment account for.
2. The Payments page is displayed. Select the account(s) that you are making a payment on by clicking the
Checkmark icon next to the account(s) and click Make Payments.
Note: The payment accounts that have been set up will also appear on the page in the Payment Accounts section. You can edit
and delete existing payment accounts and add new accounts from this page.
2. The Make Payments section is displayed. Complete the required fields and then click the $Pay icon.

Page | 135
A d m i n U s e r G u i d e
© 2018 Fidelity National Information Services, Inc and its subsidiaries. All rights reserved worldwide. This document is protected as a trade secret and under the copyright laws as the property of Fidelity National Information Services, Inc. Copying, reproduction, or distribution to third parties is strictly prohibited.
Admin User Guide v2
eZ Business Card Management
3. A confirmation message is displayed. NOTE: If the payment is made before 5:00 P.M. EST, the payment posts to the account on the same day. If the payment is
made after 5:00 P.M. EST, the payment posts to the account on the next business day. If the payment is made on a Saturday or Sunday, the payment posts to the account on the following Monday.
The below table describes the elements in the Make Payments section:
Element Description Payments Account The account name or nickname of the payment account to be used for making the payment.
Select the payment account from the drop-down list. Payment Amount You can type in an amount or select from one of the drop-down options (Statement Balance,
Balance, Minimum Payment Amount) Payment Date Select the date that you want the payment made. Memo Additional identifying information about the payment for the cardholder’s records. This memo will
also display in the payment confirmation e-mail. Email Address Specifies the e-mail address where the payment confirmation will be sent. The email address
field will be auto populated with your email address but can be changed. The below table describes the icons available in this section:
Icon Description Make Payments
Process the payment
Split the payment
Delete the payment
Payment Accounts
Edit payment account
Delete payment account
Update/Change a Payment Payments can be changed as long as the payment status is Pending.
To change a payment, perform the following steps:
1. Go to Account Management and then click Search Payment. Click on the View Payment Details icon.

Page | 136
A d m i n U s e r G u i d e
© 2018 Fidelity National Information Services, Inc and its subsidiaries. All rights reserved worldwide. This document is protected as a trade secret and under the copyright laws as the property of Fidelity National Information Services, Inc. Copying, reproduction, or distribution to third parties is strictly prohibited.
Admin User Guide v2
eZ Business Card Management
2. The Payments Details page. The payment can be updated by clicking the Update Payment icon.
Cancel a Payment Payments can be cancelled as long as the payment status indicates Pending. To cancel a pending payment, click Cancel Payment on the Payment Details page.
Once a payment is cancelled, the changeable fields on the Payment Details page appear disabled, and the payment status is cancelled.
Create a Recurring Payment To add a recurring payment plan to a billing account, perform the following steps.
To make a one-time payment on an account, perform the following steps:
1. From the Company Management, Search Company page, click on the Payment icon.
2. The Payments page is displayed. Select the billing account that you want to set up a recurring payment for and
click Create Recurring Payment Plan.

Page | 137
A d m i n U s e r G u i d e
© 2018 Fidelity National Information Services, Inc and its subsidiaries. All rights reserved worldwide. This document is protected as a trade secret and under the copyright laws as the property of Fidelity National Information Services, Inc. Copying, reproduction, or distribution to third parties is strictly prohibited.
Admin User Guide v2
eZ Business Card Management
3. The New Recurring Payments page is displayed. Complete all the fields and click Save.
4. A confirmation is displayed.
The below table describes the elements of the Create a Recurring Payment page:
Element Description Account # The first 6 and last 4 digits of the card number for the billing account. Payment Account Select from the drop-down list the account that you want the payment made from.
Recurring Schedule
Select the schedule from the drop-down list: Minimum Payment Due – minimum amount due on the last statement Account Balance – the account balance at the time of the payment Statement Balance – the account balance at the time of the last statement Fixed Monthly – a set amount each month Fixed Weekly – a set amount each week Fixed Bi-weekly – a set amount every 2 weeks
Start Date Select the date to begin the recurring payment. Days before due date Enter the number of days before the due date for the payment to be made. Amount to Pay The dollar amount to pay for the fixed schedule.
View Existing Recurring Payments To view recurring payments, perform the following steps:
1. From the Company Management, Company Search Results page, click the Payment icon next to the company that you want to view a recurring payment for.
2. Select the billing account to which the recurring payment is associated and click Show Recurring Payment
Plans.
3. The Recurring Payments section is displayed.
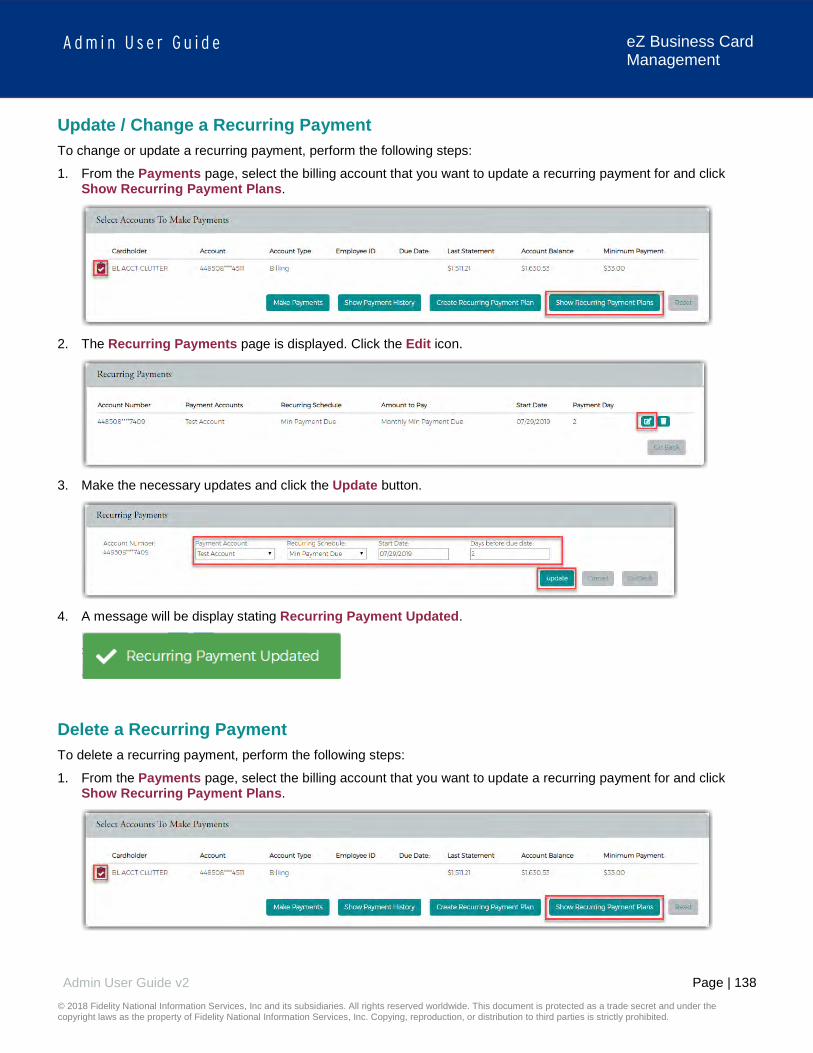
Page | 138
A d m i n U s e r G u i d e
© 2018 Fidelity National Information Services, Inc and its subsidiaries. All rights reserved worldwide. This document is protected as a trade secret and under the copyright laws as the property of Fidelity National Information Services, Inc. Copying, reproduction, or distribution to third parties is strictly prohibited.
Admin User Guide v2
eZ Business Card Management
Update / Change a Recurring Payment To change or update a recurring payment, perform the following steps:
1. From the Payments page, select the billing account that you want to update a recurring payment for and click Show Recurring Payment Plans.
2. The Recurring Payments page is displayed. Click the Edit icon.
3. Make the necessary updates and click the Update button.
4. A message will be display stating Recurring Payment Updated.
Delete a Recurring Payment To delete a recurring payment, perform the following steps:
1. From the Payments page, select the billing account that you want to update a recurring payment for and click Show Recurring Payment Plans.
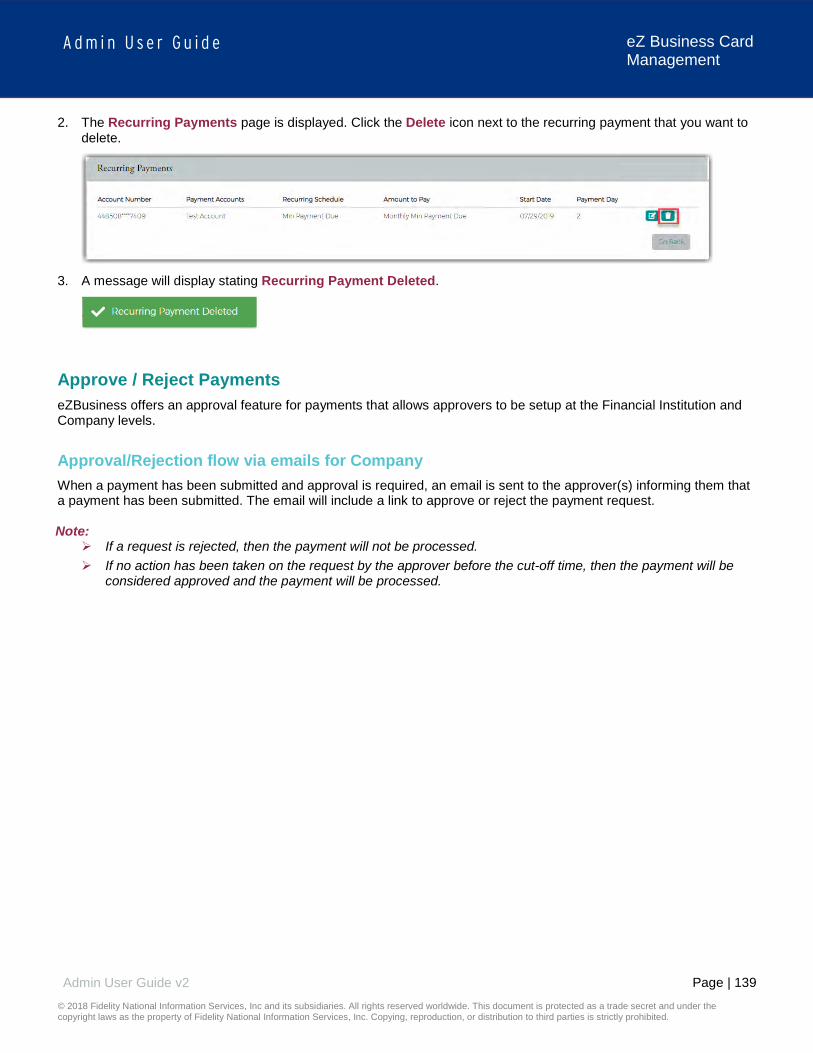
Page | 139
A d m i n U s e r G u i d e
© 2018 Fidelity National Information Services, Inc and its subsidiaries. All rights reserved worldwide. This document is protected as a trade secret and under the copyright laws as the property of Fidelity National Information Services, Inc. Copying, reproduction, or distribution to third parties is strictly prohibited.
Admin User Guide v2
eZ Business Card Management
2. The Recurring Payments page is displayed. Click the Delete icon next to the recurring payment that you want to delete.
3. A message will display stating Recurring Payment Deleted.
Approve / Reject Payments eZBusiness offers an approval feature for payments that allows approvers to be setup at the Financial Institution and Company levels.
Approval/Rejection flow via emails for Company When a payment has been submitted and approval is required, an email is sent to the approver(s) informing them that a payment has been submitted. The email will include a link to approve or reject the payment request. Note:
If a request is rejected, then the payment will not be processed. If no action has been taken on the request by the approver before the cut-off time, then the payment will be
considered approved and the payment will be processed.

Page | 140
A d m i n U s e r G u i d e
© 2018 Fidelity National Information Services, Inc and its subsidiaries. All rights reserved worldwide. This document is protected as a trade secret and under the copyright laws as the property of Fidelity National Information Services, Inc. Copying, reproduction, or distribution to third parties is strictly prohibited.
Admin User Guide v2
eZ Business Card Management
Reports – Data Analytics eZBusiness Card Management offers reporting that can viewed and exported. NOTE: This feature is only available to admins that have the proper reporting rights. Creating Reports To access the reports, perform the following steps:
1. From the left side bar, click Data Analytics and then Create Reports.
2. The Reports page is displayed.
Note: The reports that you see are based on your reporting security rights.
3. You can use the Report Category, Report Type and Report Description fields to filter the Report Template section.
4. Click the Create New Reports icon next the report that you want to run.

Page | 141
A d m i n U s e r G u i d e
© 2018 Fidelity National Information Services, Inc and its subsidiaries. All rights reserved worldwide. This document is protected as a trade secret and under the copyright laws as the property of Fidelity National Information Services, Inc. Copying, reproduction, or distribution to third parties is strictly prohibited.
Admin User Guide v2
eZ Business Card Management
5. The report details and parameters page will be displayed. Enter the Report Details and Report Parameters and click Save.
Note: The report parameters page will vary depending on the report that you select.
6. The Success Report Save message will be displayed.
My Reports Once a report has been run and you received the Success Report Saved message, the report will be available in the Your Reports section of the Reports page.

Page | 142
A d m i n U s e r G u i d e
© 2018 Fidelity National Information Services, Inc and its subsidiaries. All rights reserved worldwide. This document is protected as a trade secret and under the copyright laws as the property of Fidelity National Information Services, Inc. Copying, reproduction, or distribution to third parties is strictly prohibited.
Admin User Guide v2
eZ Business Card Management
Viewing and Downloading Reports 1. Click the Run Report icon to view the report.
2. The Report Open message is displayed, and the report appears. Click the Save/Download icon.
3. The export list of options will be displayed. Click on the format option that you want and save the file to a specified
location on your computer.
Editing Reports To change the parameters of the report, click the Modify Report icon next to the report in My Reports.
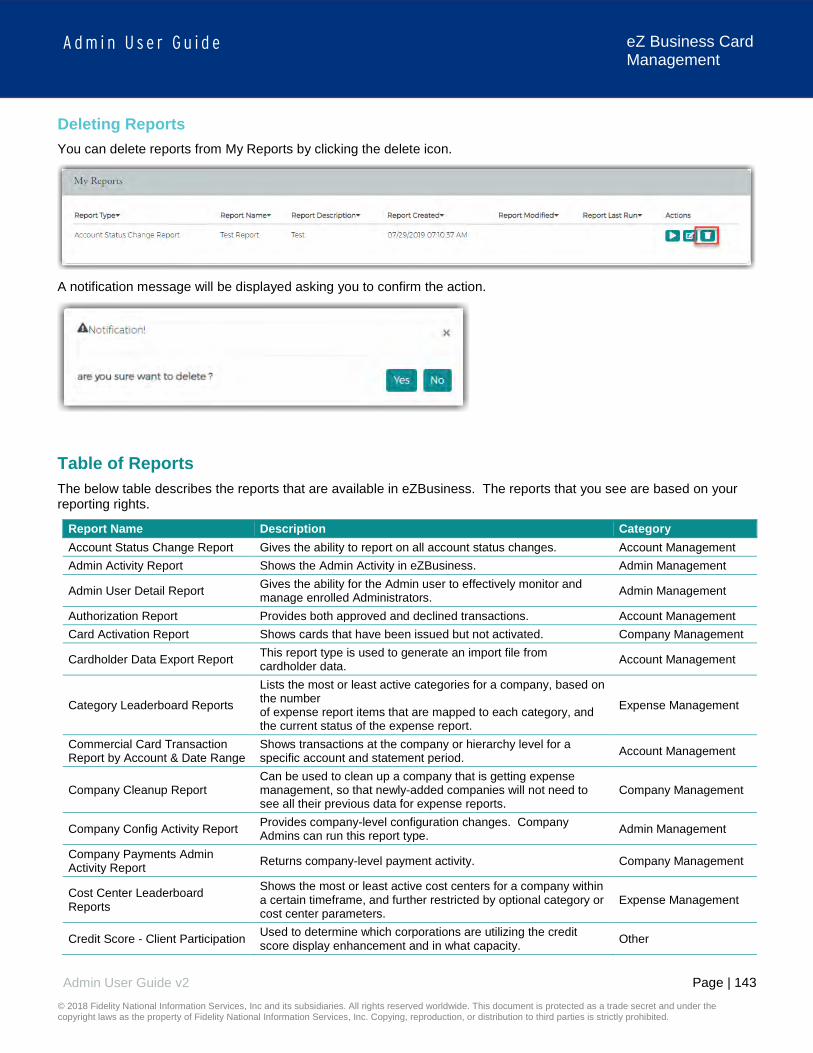
Page | 143
A d m i n U s e r G u i d e
© 2018 Fidelity National Information Services, Inc and its subsidiaries. All rights reserved worldwide. This document is protected as a trade secret and under the copyright laws as the property of Fidelity National Information Services, Inc. Copying, reproduction, or distribution to third parties is strictly prohibited.
Admin User Guide v2
eZ Business Card Management
Deleting Reports You can delete reports from My Reports by clicking the delete icon.
A notification message will be displayed asking you to confirm the action.
Table of Reports The below table describes the reports that are available in eZBusiness. The reports that you see are based on your reporting rights.
Report Name Description Category Account Status Change Report Gives the ability to report on all account status changes. Account Management Admin Activity Report Shows the Admin Activity in eZBusiness. Admin Management
Admin User Detail Report Gives the ability for the Admin user to effectively monitor and manage enrolled Administrators. Admin Management
Authorization Report Provides both approved and declined transactions. Account Management Card Activation Report Shows cards that have been issued but not activated. Company Management
Cardholder Data Export Report This report type is used to generate an import file from cardholder data. Account Management
Category Leaderboard Reports
Lists the most or least active categories for a company, based on the number of expense report items that are mapped to each category, and the current status of the expense report.
Expense Management
Commercial Card Transaction Report by Account & Date Range
Shows transactions at the company or hierarchy level for a specific account and statement period. Account Management
Company Cleanup Report Can be used to clean up a company that is getting expense management, so that newly-added companies will not need to see all their previous data for expense reports.
Company Management
Company Config Activity Report Provides company-level configuration changes. Company Admins can run this report type. Admin Management
Company Payments Admin Activity Report Returns company-level payment activity. Company Management
Cost Center Leaderboard Reports
Shows the most or least active cost centers for a company within a certain timeframe, and further restricted by optional category or cost center parameters.
Expense Management
Credit Score - Client Participation Used to determine which corporations are utilizing the credit score display enhancement and in what capacity. Other

Page | 144
A d m i n U s e r G u i d e
© 2018 Fidelity National Information Services, Inc and its subsidiaries. All rights reserved worldwide. This document is protected as a trade secret and under the copyright laws as the property of Fidelity National Information Services, Inc. Copying, reproduction, or distribution to third parties is strictly prohibited.
Admin User Guide v2
eZ Business Card Management
Report Name Description Category
Credit Score Feature Usage Provides information on the quantity of time users have accessed their credit score information (excludes Admin and/or emulation activity).
Other
Credit Score User Participation Provides information on the user’s credit score preferences. Other
Company Usage Report Can be used to determine which companies are using expense management, and in what capacity (relative usage, amount of configuration, etc.
Expense Management
Daily Exception Rebate Payout Report
Shows the companies that have a rebate amount calculated but will not receive a credit to the fee account or have a check automatically generated due to the following exception reasons: M = Max Check Amount Exceeded, S = Closed/Inactive Status, D = Delinquent, O = Overlimit
Rebate Management
Daily Manual Rebate Payout Report Shows the companies that have a rebate due, but not paid. Rebate Management
Enrollment Report (User Activity) User activity enrollment statistics report. Admin Management
Expense Report Detail Search The Expense Report Detail Search report is used for retrieving expense report detail items that are in a certain status, such as Pending or Submitted, or within a cost center.
Expense Management
Expense Report Search
The Expense Report Search report is intended to provide the ability to search for individual expense reports as a single unit – results are expense reports, not expense report items. This can be useful when trying to get a summary view of the expense reports that are in the Submitted status that have been there for longer than a certain period of time. The results are for summary data.
Expense Management
Export Chart of Accounts
The Export Chart of Accounts report is used to generate files that can be edited and imported using the Import Chart of Accounts functionality. This report’s output is not configurable, because the import requires the data to be in a specific format.
Expense Management
Export Previous GL Report This report is not intended to be created directly from the reporting interface, but instead from the Export to GL function in the Company Admin screen.
Expense Management
Export to GL
The Export to GL report is unique in that it can potentially modify the data in the system as well as report on it. There are different versions of this report, depending on what the user has access to see.
Expense Management
Export to GL by Date Range
The Export to GL report is unique in that it can potentially modify the data in the system as well as report on it. There are different versions of this report, depending on what the user has access to see.
Expense Management
Feature Usage Report (User Activity) Provides user activity feature usage. Admin Management
File Import Detail Report Allow company admins to report on file import activity within their own company. Company Management
FI-Level Import Access Exception Report
Provides import access exceptions to detect potential security issues. Other
Foreign Fee Report Relate fee to related transaction and cardholder. Account Management
Fraud and Dispute Report Provides the ability for admins to generate a fraud and dispute report. Company Management
Logins by Hour Report (User Activity) User activity login by hour. Admin Management

Page | 145
A d m i n U s e r G u i d e
© 2018 Fidelity National Information Services, Inc and its subsidiaries. All rights reserved worldwide. This document is protected as a trade secret and under the copyright laws as the property of Fidelity National Information Services, Inc. Copying, reproduction, or distribution to third parties is strictly prohibited.
Admin User Guide v2
eZ Business Card Management
Report Name Description Category Logon Report (User Activity) User activity logon statistics. Admin Management
Monthly Projected Rebate Report Shows the outstanding rebate amount by company and includes a summary at the corporation level. Rebate Management
Past Due Report Provides past due accounts. Company Management Payment Account Status Report Provides the status of payment accounts. Account Management
Payment Search Report Provides the posted payment amount and detail at the central bill or individual bill level. Account Management
Rebate Transaction Detail Daily Report Provides rebate transaction details. Rebate Management
Rebate Transaction Detail Monthly Report Provides rebate transaction details. Rebate Management
Reports on Reports (FI Level) This report type is used to determine which reports have been run. Admin Management
Spend Analysis Report Allows you to aggregate within the company hierarchy levels and date range. Company Management
SSO v3 Account Signature Report Provides account signatures at the Agent level. Admin Management
Statement of Accounts Generates PDF reports based on statement cycle. Expense Management
Top Spend Suppliers Report Shows top spend suppliers with spend activity as part of spend analysis. Account Management

Page | 146
A d m i n U s e r G u i d e
© 2018 Fidelity National Information Services, Inc and its subsidiaries. All rights reserved worldwide. This document is protected as a trade secret and under the copyright laws as the property of Fidelity National Information Services, Inc. Copying, reproduction, or distribution to third parties is strictly prohibited.
Admin User Guide v2
eZ Business Card Management
Account Transfers
Processing Account Transfers in eZCard (MyCardStatement) and eZBusiness Account transfers are applied in the eZCardInfo (MyCardStatement) application. The results of account transfers appear in both eZCardInfo and eZBusiness. The transferred from account number displays on the Cardholder Profile section and the Company Accounts Detail pages. Cardholder users do not have to re-enroll or create new accounts. All user account attributes are transferred under the new account. For example, associated email addresses, account status, user status, administrative locks, rewards, statement delivery preferences, and so on. Note: If the cardholder user has disabled their online access using the Disable Online Access option, the user account will
transfer in a disabled state.
Transaction View for Cardholders The cardholder can view transaction history and statement balance information for all accounts in the transfer chain in eZCard (MyCardStatement). The pages show the new account’s account number, but the user can view transactions from previous accounts. All transaction history transferred from the previous accounts is displayed under the most current accounts in the transfer chain. If the user selects a specific transaction from the list, the user can view the transactions originating under which the transaction was initiated in the Originating Account Number field. Note: Cycle-to-date transactions not transferred to the new account during the account transfer process, and/or transactions
posting to the previous account number after the account transfer has completed, are not visible within the eZCard application to the cardholder user.
Search by Transfer from Account in eZBusiness Within eZBusiness, Administrators may use the current (Transferred To) or previous (Transferred From) account number when searching for a specific account record. Admin users entering the previous (Transferred To) account number when searching for a specific account record, have the most current account record in the transfer chain returned in the search results. These searches include: Cardholder Search Expense Report Search Transaction Search Payment Search
Note: This does not include account records that have been purged from the mainframe. If the account record has been purged,
searching for it in eZBusiness does not yield any results.

Page | 147
A d m i n U s e r G u i d e
© 2018 Fidelity National Information Services, Inc and its subsidiaries. All rights reserved worldwide. This document is protected as a trade secret and under the copyright laws as the property of Fidelity National Information Services, Inc. Copying, reproduction, or distribution to third parties is strictly prohibited.
Admin User Guide v2
eZ Business Card Management
Alerts The Company Alert feature in eZBusiness provides information so that the Company Administrator can: Anticipate potential credit problems Ensure payment timeliness Be notified of other events that may occur Use preventive measures or follow-up activity Manage Company Alerts is added to the Commercial Card role on the Create Admin Group pages. The Admin users in that group have access to the Alerts page. Admin users have the ability to create, enable, disable, and delete their own Company Alerts. Note: Only Company Administrators and above are able to set up company level alerts. Admins who have Company Sublevel
restrictions do not have the option to set up most of the company level alerts but do have access to the Personal Reminder alert.
IMPORTANT! Depending on your security rights, you may or may not see all the options shown in this guide.
Company Alert Navigation After the Company Alerts functionality is enabled for your financial institution and the Manage Company Alert security right has been assigned to the user’s Admin Group, the Alerts icon will be available. To access the Alert option, perform the following steps:
1. Click Company Management and then click Search Company.
2. The Search Company screen is displayed. Click on Online Request or Account List icon.
3. From the Online Requests or Account List page, click the Alert icon at the top of the page.

Page | 148
A d m i n U s e r G u i d e
© 2018 Fidelity National Information Services, Inc and its subsidiaries. All rights reserved worldwide. This document is protected as a trade secret and under the copyright laws as the property of Fidelity National Information Services, Inc. Copying, reproduction, or distribution to third parties is strictly prohibited.
Admin User Guide v2
eZ Business Card Management
4. The Company Alerts page is displayed.
Note: The My Alerts page lists the alerts that the Admin has added. The below table describes the search elements on the My Alerts page:
Element Description Alert Name Search for an alert by a specific alert name Cardholder Name Search for an alert by a cardholder’s name Last 4 or 16 digit account Search for an alert by the last 4 digits of an account number or the full 16 digits Last Sent Date Search for an alert by the last sent date. Select option from the drop-down list – Equal To,
Between, After or Before. Once you select an option, another field(s) will appear to put a date in.
Alert Type Search for a company and/or account alert. The below table describes the icons available on the My Alerts page:
Icon Description
Disable the alert
Enable alert
Modify the alert
Delete the alert
Download the alert list
Creating Company Alerts To create new company alerts, click the Set Company Alerts button on the Company Alerts page.

Page | 149
A d m i n U s e r G u i d e
© 2018 Fidelity National Information Services, Inc and its subsidiaries. All rights reserved worldwide. This document is protected as a trade secret and under the copyright laws as the property of Fidelity National Information Services, Inc. Copying, reproduction, or distribution to third parties is strictly prohibited.
Admin User Guide v2
eZ Business Card Management
Once the Company Alerts page displays, the Admin can perform the following tasks and click Add:
Select the alert(s) Enter the variable data Select the Admins that should be alerted
The below table describes the elements of the Set Company Alerts page:
Element Description Available Balance Drops Below $X Company Available Balance is < $X defined on the alert. Current Balance Owed Drops Below $X Company’s Current Balance is < $X (specified by the user in the alert setup) Current Balance Owed Exceeds $X Company Current Balance is > $X (specified by the user in the alert setup) Current Balance Owed is Within $X of Credit Limit
Company Credit Limit – Current Balance is < or = $X (specified by the user in the alert setup)
Percentage of Credit Limit Percentage of credit limit has been met or exceeded Address Verification
Cash Limit Reached or Exceeded Company Cash Balance > or = Company Cash Limit Note: This alert is only applicable if the Company Cash Limit > $0, and the option does not display if it is not > $0.
Credit Limit Reached or Exceeded Company Balance > or = Company Credit Limit Declined Transaction An alert is sent when a transaction has been declined New Cardholder Added to Company An alert is sent when a new cardholder has been added
Past Due Company Past Due Amount >$0 Note: This alert is produced when the criteria is first eligible and each time a new statement drop date occurs if the company is still past due at that time.
Statement Available Alert Alert is sent when a new statement is available Transaction Occurs Alert is sent when a transaction occurs A transaction has occurred outside of the country
Alert is sent when a transaction occurs outside of a certain country (specified by the user in the alert setup)
A transaction has occurred outside of the state
Alert is sent when a transaction occurs outside of a certain state (specified by the user in the alert setup)
Send Copy to additional admin Search for admins using the Enter/Select admin box Company Personal Reminder This alert is produced only once, on the date selected by the Admin.

Page | 150
A d m i n U s e r G u i d e
© 2018 Fidelity National Information Services, Inc and its subsidiaries. All rights reserved worldwide. This document is protected as a trade secret and under the copyright laws as the property of Fidelity National Information Services, Inc. Copying, reproduction, or distribution to third parties is strictly prohibited.
Admin User Guide v2
eZ Business Card Management
Note: Alerts that notify the Admin about current balance, credit limit, cash limit, and available balance are produced only when the company first qualifies for the Alert. When the condition is met and no longer qualifies for the specific variables set in the Alert, the alert is reset. Once the Alert is reset, the company is eligible for the alert again. If Additional Administrators are copied on the alert, the alert is always sent to the primary email address for those users.
Creating Account Alerts To create new account alerts, perform the following steps:
1. From the Company Alerts page, click the Set Account Alerts button.
2. Once the Account Alerts page displays, the Admin can perform the following tasks and click Add:
Select the alert(s) Enter the variable data Select the Admins that should be alerted
The below table describes the elements of the Set Account Alerts page:
Element Description Available Balance Drops Below $X Account Available Balance is < $X defined on the alert. Current Balance Owed Drops Below $X Account’s Current Balance is < $X (specified by the user in the alert setup) Current Balance Owed Exceeds $X Account Current Balance is > $X (specified by the user in the alert setup) Current Balance Owed is Within $X of Credit Limit
Account Credit Limit – Current Balance is < or = $X (specified by the user in the alert setup)
Percentage of Credit Limit Percentage of credit limit has been met or exceeded
Cash Limit Reached or Exceeded Account Cash Balance > or = Account Cash Limit Note: This alert is only applicable if the Company Cash Limit > $0, and the option does not display if it is not > $0.
Credit Limit Reached or Exceeded Account Balance > or = Company Credit Limit Declined Transaction An alert is sent when a transaction has been declined
Past Due Account Past Due Amount >$0 Note: This alert is produced when the criteria is first eligible and each time a new statement drop date occurs if the company is still past due at that time.

Page | 151
A d m i n U s e r G u i d e
© 2018 Fidelity National Information Services, Inc and its subsidiaries. All rights reserved worldwide. This document is protected as a trade secret and under the copyright laws as the property of Fidelity National Information Services, Inc. Copying, reproduction, or distribution to third parties is strictly prohibited.
Admin User Guide v2
eZ Business Card Management
Element Description Transaction Occurs Alert is sent when a transaction occurs A transaction has occurred outside of the country
Alert is sent when a transaction occurs outside of a certain country (specified by the user in the alert setup)
A transaction has occurred outside of the state
Alert is sent when a transaction occurs outside of a certain state (specified by the user in the alert setup)
Send Copy to additional admin Search for admins using the Enter/Select admin box Note: Alerts that notify the Admin about current balance, credit limit, cash limit, and available balance are produced only when
the company first qualifies for the Alert. When the condition is met and no longer qualifies for the specific variables set in the Alert, the alert is reset. Once the Alert is reset, the company is eligible for the alert again. If Additional Administrators are copied on the alert, the alert is always sent to the primary email address for those users.
Modify Existing Alerts The Alerts and selected criteria can be modified by using the action icons on the My Alerts page. To modify an alert, perform the following steps:
1. From the Company Alerts page, select My Alerts and then click the Modify icon.
2. The View/Modify Alerts Page is displayed. Updated the appropriate information and click Submit.
3. The successfully message is displayed.

Page | 152
A d m i n U s e r G u i d e
© 2018 Fidelity National Information Services, Inc and its subsidiaries. All rights reserved worldwide. This document is protected as a trade secret and under the copyright laws as the property of Fidelity National Information Services, Inc. Copying, reproduction, or distribution to third parties is strictly prohibited.
Admin User Guide v2
eZ Business Card Management
Disable Alerts To disable an alert, perform the following steps:
1. From the Company Alerts page, select My Alerts and then click the Disable icon.
2. The successfully message is displayed.
Enable Alerts To enable an alert, perform the following steps:
1. From the Company Alerts page, select My Alerts and then click the Enable icon.
2. The successful message is displayed.
Delete Alerts To delete an alert, perform the following steps:
1. From the Company Alerts page, select My Alerts and then click the Delete icon.
2. A Notification message will be displayed asking you to confirm that you want to delete the alert. Click Yes to
delete the alert or click No to cancel the request.

Page | 153
A d m i n U s e r G u i d e
© 2018 Fidelity National Information Services, Inc and its subsidiaries. All rights reserved worldwide. This document is protected as a trade secret and under the copyright laws as the property of Fidelity National Information Services, Inc. Copying, reproduction, or distribution to third parties is strictly prohibited.
Admin User Guide v2
eZ Business Card Management
Messages You can view message that have been sent to you by clicking on Account Management and then Messages. The queues available on the Message page are:
Search Filters Incoming Messages My Message Sent Message Manager Queue
IMPORTANT!
Depending on your security rights, you may or may not see all the options shown in this guide.
Create a Message You can also create and send a new message from your message inbox. Note: Alerts that notify the Admin about current balance, credit limit, cash limit, and available balance are produced only when
the company first qualifies for the Alert. When the condition is met and no longer qualifies for the specific variables set in the Alert, the alert is reset. Once the Alert is reset, the company is eligible for the alert again. If Additional Administrators are copied on the alert, the alert is always sent to the primary email address for those users.
To send a new message, perform the following steps:
1. Go to Account Management and click Messages.
2. From the Messages page, click Compose.
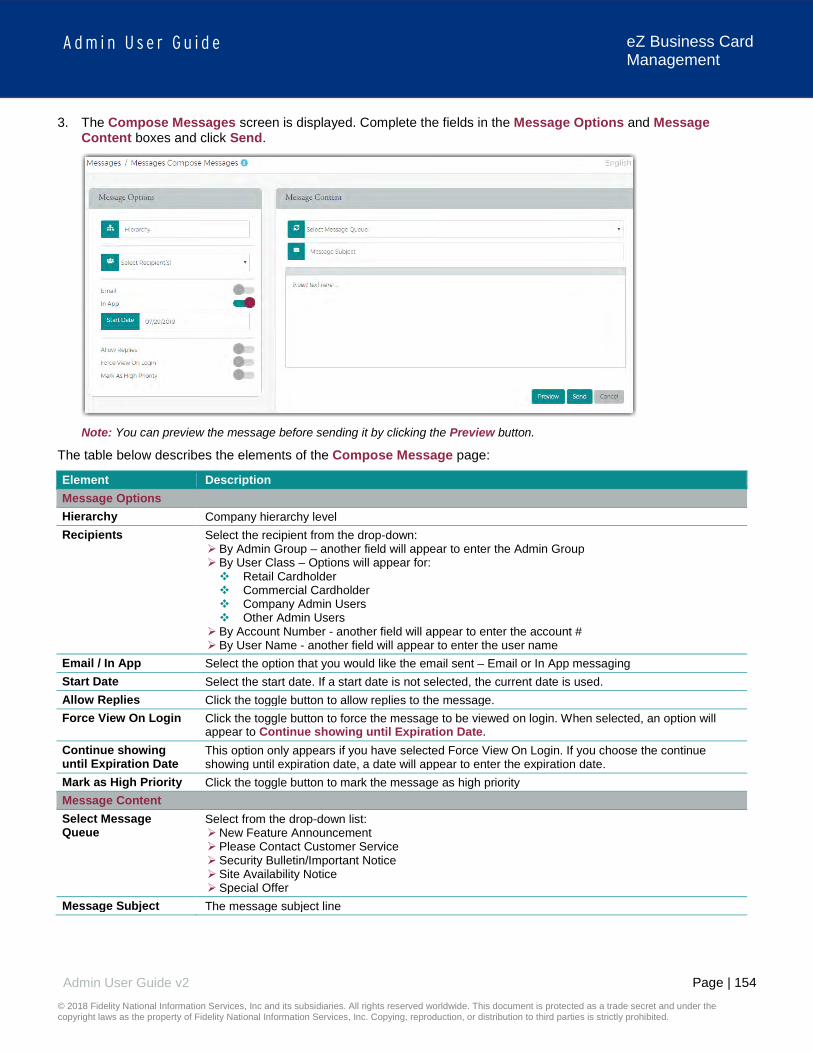
Page | 154
A d m i n U s e r G u i d e
© 2018 Fidelity National Information Services, Inc and its subsidiaries. All rights reserved worldwide. This document is protected as a trade secret and under the copyright laws as the property of Fidelity National Information Services, Inc. Copying, reproduction, or distribution to third parties is strictly prohibited.
Admin User Guide v2
eZ Business Card Management
3. The Compose Messages screen is displayed. Complete the fields in the Message Options and Message Content boxes and click Send.
Note: You can preview the message before sending it by clicking the Preview button.
The table below describes the elements of the Compose Message page:
Element Description Message Options Hierarchy Company hierarchy level Recipients Select the recipient from the drop-down:
By Admin Group – another field will appear to enter the Admin Group By User Class – Options will appear for: Retail Cardholder Commercial Cardholder Company Admin Users Other Admin Users
By Account Number - another field will appear to enter the account # By User Name - another field will appear to enter the user name
Email / In App Select the option that you would like the email sent – Email or In App messaging Start Date Select the start date. If a start date is not selected, the current date is used. Allow Replies Click the toggle button to allow replies to the message. Force View On Login Click the toggle button to force the message to be viewed on login. When selected, an option will
appear to Continue showing until Expiration Date. Continue showing until Expiration Date
This option only appears if you have selected Force View On Login. If you choose the continue showing until expiration date, a date will appear to enter the expiration date.
Mark as High Priority Click the toggle button to mark the message as high priority Message Content Select Message Queue
Select from the drop-down list: New Feature Announcement Please Contact Customer Service Security Bulletin/Important Notice Site Availability Notice Special Offer
Message Subject The message subject line

Page | 155
A d m i n U s e r G u i d e
© 2018 Fidelity National Information Services, Inc and its subsidiaries. All rights reserved worldwide. This document is protected as a trade secret and under the copyright laws as the property of Fidelity National Information Services, Inc. Copying, reproduction, or distribution to third parties is strictly prohibited.
Admin User Guide v2
eZ Business Card Management
Search Messages You can search for messages that are still opened and in the Incoming Message queue or messages that have been closed by a reply having been sent. To search for messages, perform the following steps:
1. From the Message page, click on Search Filters. The Search Filters section is displayed. Specify the search criteria and click search:
2. The Search Results are displayed.
Note: Entered search criteria will be applied on the Incoming Message, My Message and Sent Message grids.
The table below describes the search elements on the Message page. Use any combination of these search options to set the criteria for the search.
Element Description Hierarchy Company hierarchy level Request Type The request type for the message Status You can search by the status: Open / Closed / Deleted To Username Cardholder account user-defined name From Username The Username that submitted the request or inquiry

Page | 156
A d m i n U s e r G u i d e
© 2018 Fidelity National Information Services, Inc and its subsidiaries. All rights reserved worldwide. This document is protected as a trade secret and under the copyright laws as the property of Fidelity National Information Services, Inc. Copying, reproduction, or distribution to third parties is strictly prohibited.
Admin User Guide v2
eZ Business Card Management
Element Description Account Number Full 16-digit account number. When searching by account number, you must enter the full 16-digit
credit card number. Request Direction Search by Request Direction:
From eZCard User To eZCard User From Company User To Company User
Request Date Date of request/message
Incoming Messages Incoming Messages is a queue used to manage requests received from Admins and cardholders. If you have submitted a service request or online message for a cardholder account, you can view the response in your message inbox. You may also receive messages from the site administrator to notify you of important events or special offers. If you have more than one account is linked to your username, you will see incoming messages for all your accounts. To view messages, perform the following steps:
1. From the Messages page, click Incoming Messages.
2. The Incoming Messages page is displayed.
Note:
An F indicator displays in the Request Type column for all failed real time online service requests. This indicates that the request to process this action in a real time manner has failed.
Account Information is displayed if the online request is raised from the eZCard site and company information is displayed if the online request is raised from eZBusiness site.
The table below describes the elements for the Incoming Messages page:
Element Description Corp A unique ID number assigned to the Financial Institution Company The company name Account Number The first four and last six unmasked characters of the cardholder’s account number
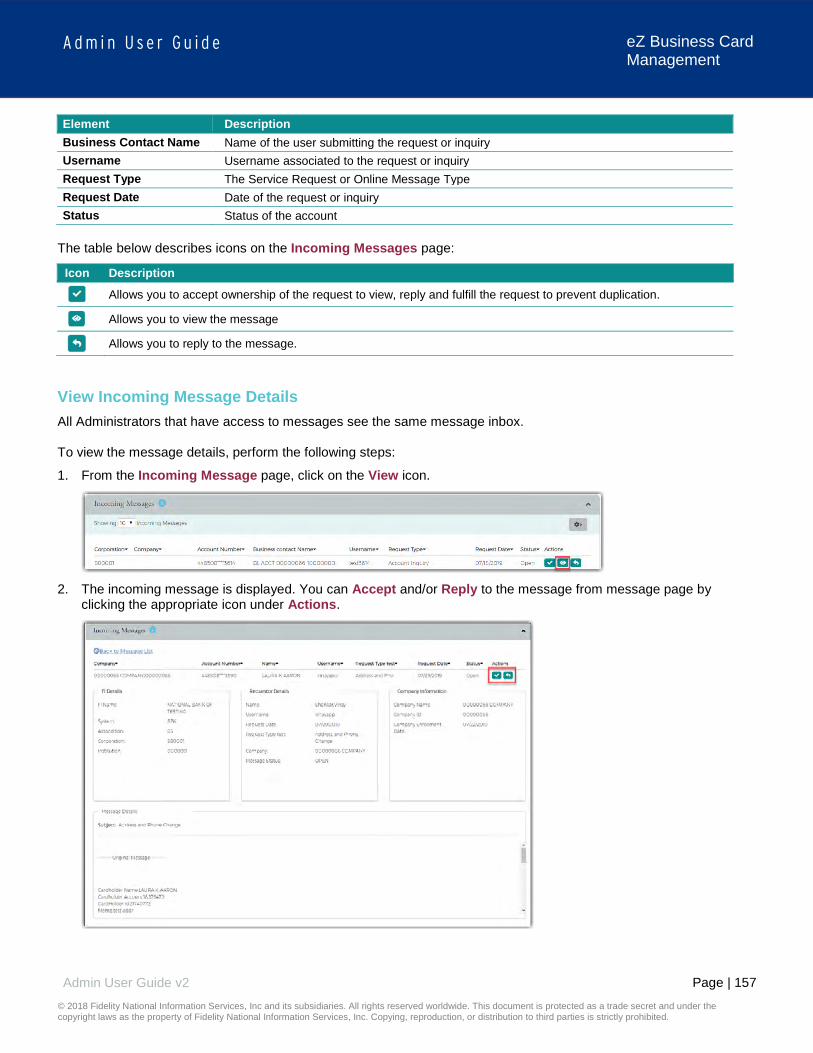
Page | 157
A d m i n U s e r G u i d e
© 2018 Fidelity National Information Services, Inc and its subsidiaries. All rights reserved worldwide. This document is protected as a trade secret and under the copyright laws as the property of Fidelity National Information Services, Inc. Copying, reproduction, or distribution to third parties is strictly prohibited.
Admin User Guide v2
eZ Business Card Management
Element Description Business Contact Name Name of the user submitting the request or inquiry Username Username associated to the request or inquiry Request Type The Service Request or Online Message Type Request Date Date of the request or inquiry Status Status of the account
The table below describes icons on the Incoming Messages page:
Icon Description
Allows you to accept ownership of the request to view, reply and fulfill the request to prevent duplication.
Allows you to view the message
Allows you to reply to the message.
View Incoming Message Details All Administrators that have access to messages see the same message inbox. To view the message details, perform the following steps:
1. From the Incoming Message page, click on the View icon.
2. The incoming message is displayed. You can Accept and/or Reply to the message from message page by
clicking the appropriate icon under Actions.

Page | 158
A d m i n U s e r G u i d e
© 2018 Fidelity National Information Services, Inc and its subsidiaries. All rights reserved worldwide. This document is protected as a trade secret and under the copyright laws as the property of Fidelity National Information Services, Inc. Copying, reproduction, or distribution to third parties is strictly prohibited.
Admin User Guide v2
eZ Business Card Management
Reply to an Incoming Message To reply to a message, perform the following steps:
1. From the Incoming Message page, click on the View icon.
2. The incoming message is displayed with the Reply section at the bottom of the page. Type your message in the
response field and click Send.
Accept an Incoming Message The Incoming Message page is one central location for all messages that are sent by the Company Administrators. An Administrator can accept a message to claim ownership to view, reply and fulfill the request. This prevents another Administrator from seeing the message and working the same request or inquiry.

Page | 159
A d m i n U s e r G u i d e
© 2018 Fidelity National Information Services, Inc and its subsidiaries. All rights reserved worldwide. This document is protected as a trade secret and under the copyright laws as the property of Fidelity National Information Services, Inc. Copying, reproduction, or distribution to third parties is strictly prohibited.
Admin User Guide v2
eZ Business Card Management
To accept an Incoming Message, perform the following steps:
1. From the Incoming Message page, click on the Accept icon.
2. A Successfully Accepted message is displayed and the message will be moved to your My Message.
My Messages Once you accept an Incoming Message. The message moves from the Incoming Message queue to the My Message queue. To access messages in the My Message queue, perform the following steps:
1. From the Incoming Message page, click My Message.
2. The My Message queue will be displayed below the Incoming Message queue.
Note: Clicking on the message labels at the top of the page will disable and enable the view for each queue.
The table below describes the elements of the My Messages page:
Icon Description
Allows you to view the message details
Allows you to delete the message
Allows you to release message back to the Incoming Messages queue
Allows you to reply to the message.
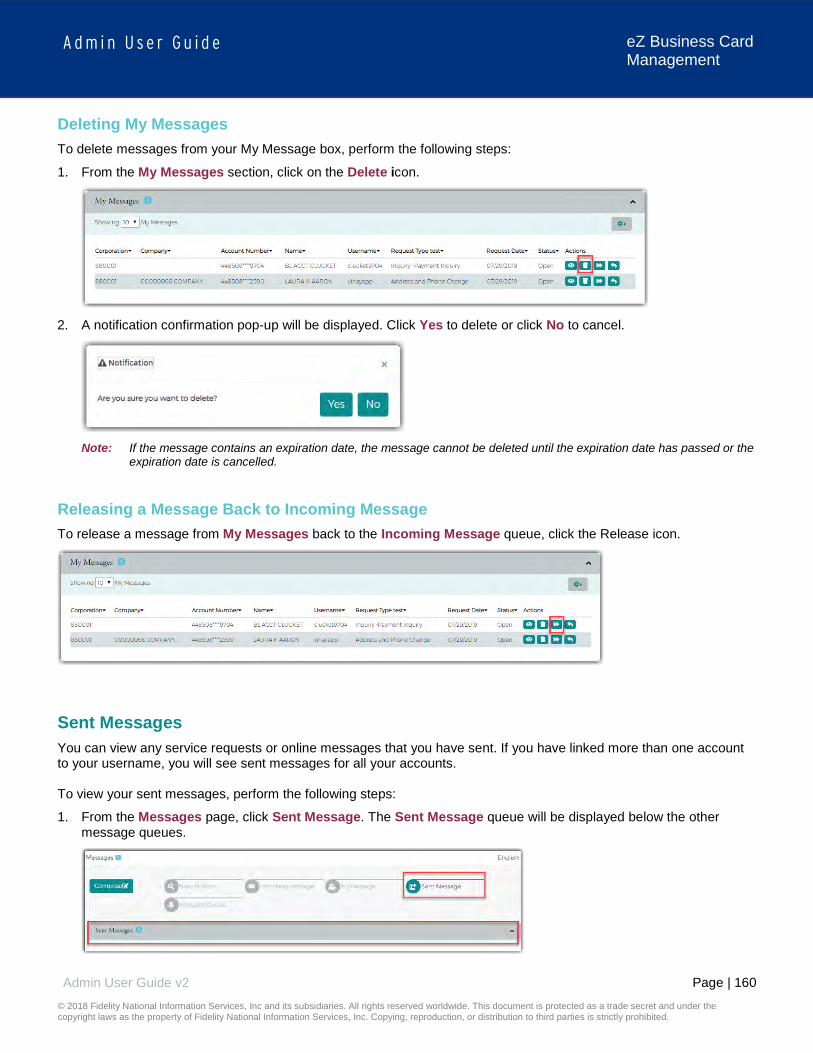
Page | 160
A d m i n U s e r G u i d e
© 2018 Fidelity National Information Services, Inc and its subsidiaries. All rights reserved worldwide. This document is protected as a trade secret and under the copyright laws as the property of Fidelity National Information Services, Inc. Copying, reproduction, or distribution to third parties is strictly prohibited.
Admin User Guide v2
eZ Business Card Management
Deleting My Messages To delete messages from your My Message box, perform the following steps:
1. From the My Messages section, click on the Delete icon.
2. A notification confirmation pop-up will be displayed. Click Yes to delete or click No to cancel.
Note: If the message contains an expiration date, the message cannot be deleted until the expiration date has passed or the
expiration date is cancelled.
Releasing a Message Back to Incoming Message To release a message from My Messages back to the Incoming Message queue, click the Release icon.
Sent Messages You can view any service requests or online messages that you have sent. If you have linked more than one account to your username, you will see sent messages for all your accounts. To view your sent messages, perform the following steps:
1. From the Messages page, click Sent Message. The Sent Message queue will be displayed below the other message queues.
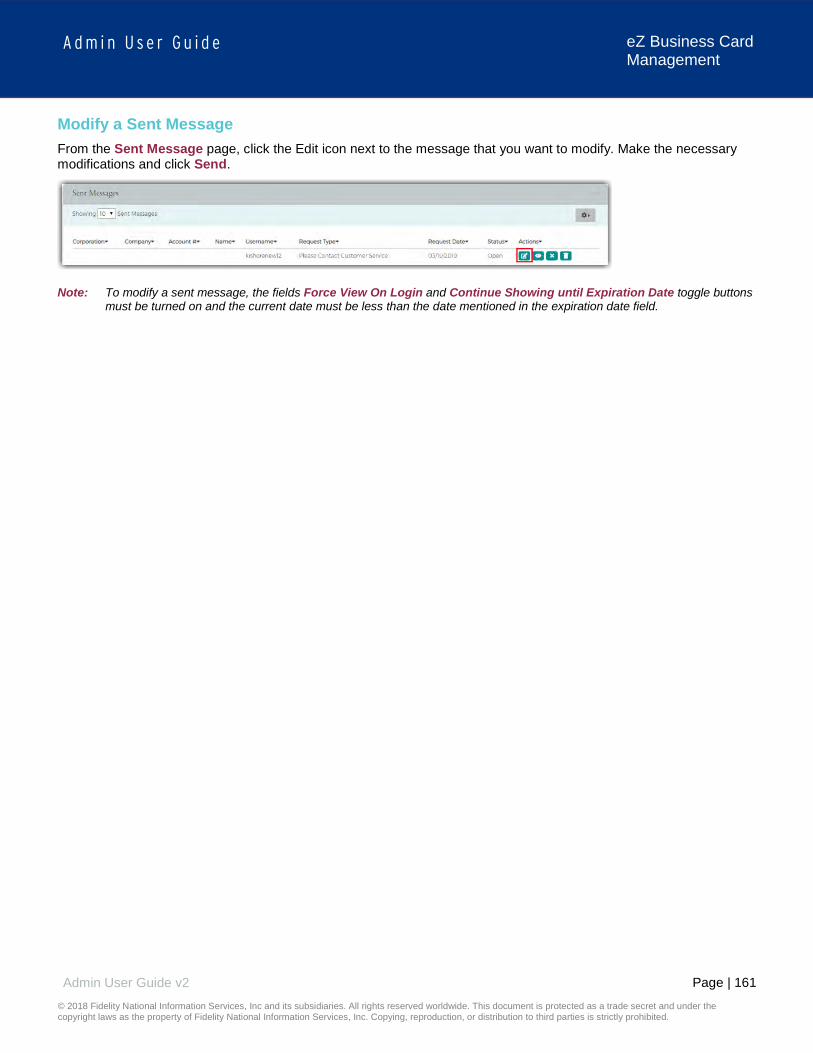
Page | 161
A d m i n U s e r G u i d e
© 2018 Fidelity National Information Services, Inc and its subsidiaries. All rights reserved worldwide. This document is protected as a trade secret and under the copyright laws as the property of Fidelity National Information Services, Inc. Copying, reproduction, or distribution to third parties is strictly prohibited.
Admin User Guide v2
eZ Business Card Management
Modify a Sent Message From the Sent Message page, click the Edit icon next to the message that you want to modify. Make the necessary modifications and click Send.
Note: To modify a sent message, the fields Force View On Login and Continue Showing until Expiration Date toggle buttons
must be turned on and the current date must be less than the date mentioned in the expiration date field.

Page | 162
A d m i n U s e r G u i d e
© 2018 Fidelity National Information Services, Inc and its subsidiaries. All rights reserved worldwide. This document is protected as a trade secret and under the copyright laws as the property of Fidelity National Information Services, Inc. Copying, reproduction, or distribution to third parties is strictly prohibited.
Admin User Guide v2
eZ Business Card Management
Admin Management IMPORTANT!
Depending on your security rights, you may or may not see all the options shown in this guide.
Admin Security Admin Security is a feature used to manage administrative user accounts, define the user roles and security access levels, and associate them with an administrative level hierarchy. Admin security consists of a Profile and Roles for each Admin user. The Profiles and Roles can be created at multiple levels in turn where the user can access multiple levels at a single time based on the assigned access rights. If the User has the proper security access, they can manage the users in an admin group by performing the following tasks: Create new Admin user Associate Admin user with hierarchies Set Admin user IP Address restrictions Delete Admin users from the system Create and reset Admin user passwords Lock Admin users from accessing eZBusiness Card Management Reset Password Failures and Unlock Admin user accounts View Admin user login activity View Admin user Security Account activity
Note: Some eZBusiness features, links, or entry fields, may be associated with Admin User Rights and not accessible unless
those Rights have been enabled.
What is a security profile? Profiles (Company and Non-Company) work like groups without security rights, which can be created at multiple hierarchy levels. If you have multiple corps, you can set up a Profile for each corp or set up one Profile with all corps included. Additionally, if you would like to customize messaging to Admin Users based on their area or responsibility, you will need to set up additional Profiles. An Admin user can create Company profiles using Corp and below level hierarchies. Consisting of single and multiple levels. Profiles consists of sections which enables an Admin user to a hierarchy with Profile Details, Configure Welcome Emails, Alerts and Configure Error Messages. Once a Profile is created, Admin users can be created under that profile. An Admin user will also be assigned with Roles during the creation by assigning security access rights.
What is a security role? Roles (Company and Non-Company) are a set of security access rights. Security access rights grant users the ability to perform certain functions within eZBusiness for the Profile that they are assigned to, including reviewing and/or editing cardholder user information, providing customer support, reviewing reports, and more. A Company Role and a Non-Company Role can be created at both single and multiple levels. The rights to these roles have three status:
Unassigned - If the right is Unassigned, the user will not have access to that right. Allow - If the right is Allow, then the user will have access to that right. Deny - If the right is Deny, the user will not have access to that right.
Some eZBusiness features, links, or entry fields, are associated with Admin User Rights and not accessible unless those rights have been enabled.
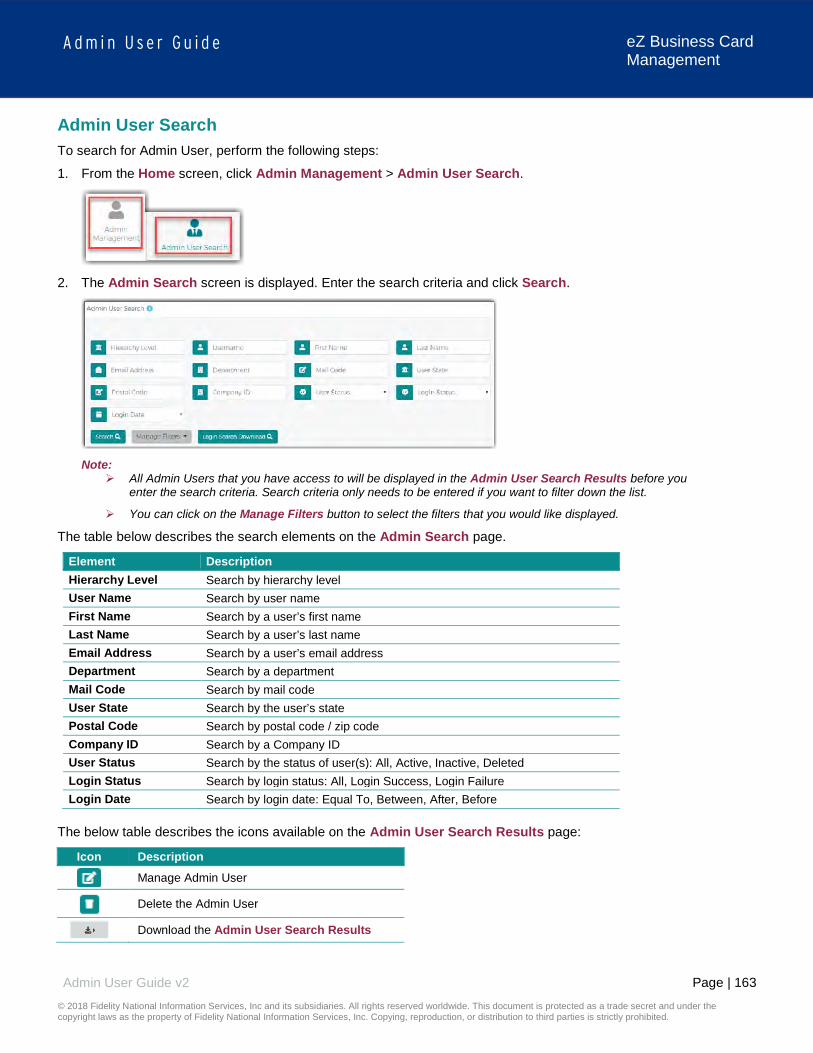
Page | 163
A d m i n U s e r G u i d e
© 2018 Fidelity National Information Services, Inc and its subsidiaries. All rights reserved worldwide. This document is protected as a trade secret and under the copyright laws as the property of Fidelity National Information Services, Inc. Copying, reproduction, or distribution to third parties is strictly prohibited.
Admin User Guide v2
eZ Business Card Management
Admin User Search To search for Admin User, perform the following steps:
1. From the Home screen, click Admin Management > Admin User Search.
2. The Admin Search screen is displayed. Enter the search criteria and click Search.
Note:
All Admin Users that you have access to will be displayed in the Admin User Search Results before you enter the search criteria. Search criteria only needs to be entered if you want to filter down the list.
You can click on the Manage Filters button to select the filters that you would like displayed.
The table below describes the search elements on the Admin Search page.
Element Description Hierarchy Level Search by hierarchy level User Name Search by user name First Name Search by a user’s first name Last Name Search by a user’s last name Email Address Search by a user’s email address Department Search by a department Mail Code Search by mail code User State Search by the user’s state Postal Code Search by postal code / zip code Company ID Search by a Company ID User Status Search by the status of user(s): All, Active, Inactive, Deleted Login Status Search by login status: All, Login Success, Login Failure Login Date Search by login date: Equal To, Between, After, Before
The below table describes the icons available on the Admin User Search Results page:
Icon Description
Manage Admin User
Delete the Admin User
Download the Admin User Search Results

Page | 164
A d m i n U s e r G u i d e
© 2018 Fidelity National Information Services, Inc and its subsidiaries. All rights reserved worldwide. This document is protected as a trade secret and under the copyright laws as the property of Fidelity National Information Services, Inc. Copying, reproduction, or distribution to third parties is strictly prohibited.
Admin User Guide v2
eZ Business Card Management
Downloading the Admin User List You can download the search results to the following formats and financial software programs: Excel/Spreadsheet (.csv) format Excel Text (tab spacing) format To download the Admin User list, perform the following steps:
1. Click the Download icon in the Admin User Search Results section.
2. Click on the format option that you want and save the file to a specified location on your computer.
Downloading the Admin Login Report The Admin Login Report shows a list of Admin logins by based on the criteria that you enter. To download the Admin Login Report, perform the following steps:
1. From the Admin User Search page, click the Login Search Download button.
2. The Login Search criteria page is displayed. Enter the criteria and click Download Search Results.
3. The Admin Login Search report will appear.

Page | 165
A d m i n U s e r G u i d e
© 2018 Fidelity National Information Services, Inc and its subsidiaries. All rights reserved worldwide. This document is protected as a trade secret and under the copyright laws as the property of Fidelity National Information Services, Inc. Copying, reproduction, or distribution to third parties is strictly prohibited.
Admin User Guide v2
eZ Business Card Management
The table below describes the search elements on the Login Search Download page.
Element Description Hierarchy Search based on the hierarchy level Username Search logins for a specific user name Login Status Search for logins by status: All, Login Success, Login Failure Login Date Search by login date: Equal To, Between, After, Before Admin Profile Search by the Admin Profile name.
View / Edit Admin Account Information From the Manage Admin User page, you can:
View and manage the Admin User’s status including locking, unlocking and deleting their security account Change the Admin User’s password Lock and unlock their Admin account To manage an admin user’s account, perform the following steps:
1. From the Admin User Search Results page, click on the Manage Admin User icon.
2. The Manage Admin User screen is displayed.
The below table describes the elements that are available on the Manage Admin User page.
Element Description Admin User Profile Personal Info User’s address and phone number
Auditing Info
Created By Created Date Created Time Updated By Modified Date Modified Time Last Activity
Manage Admin User Security Account Status Shows the status of the user’s security account Password Failures / Generate New Password Shows the number of password failures
Inactivity Lock Shows the status of the user’s inactivity lock Admin Lock Shows the status of the user’s admin lock Activity Summary Actions Description of activity including the date and time Modify Admin User Hierarchy Details Displays the hierarchy details Profile View and change the Admin User profile Personal Information Update the admin’s personal information:
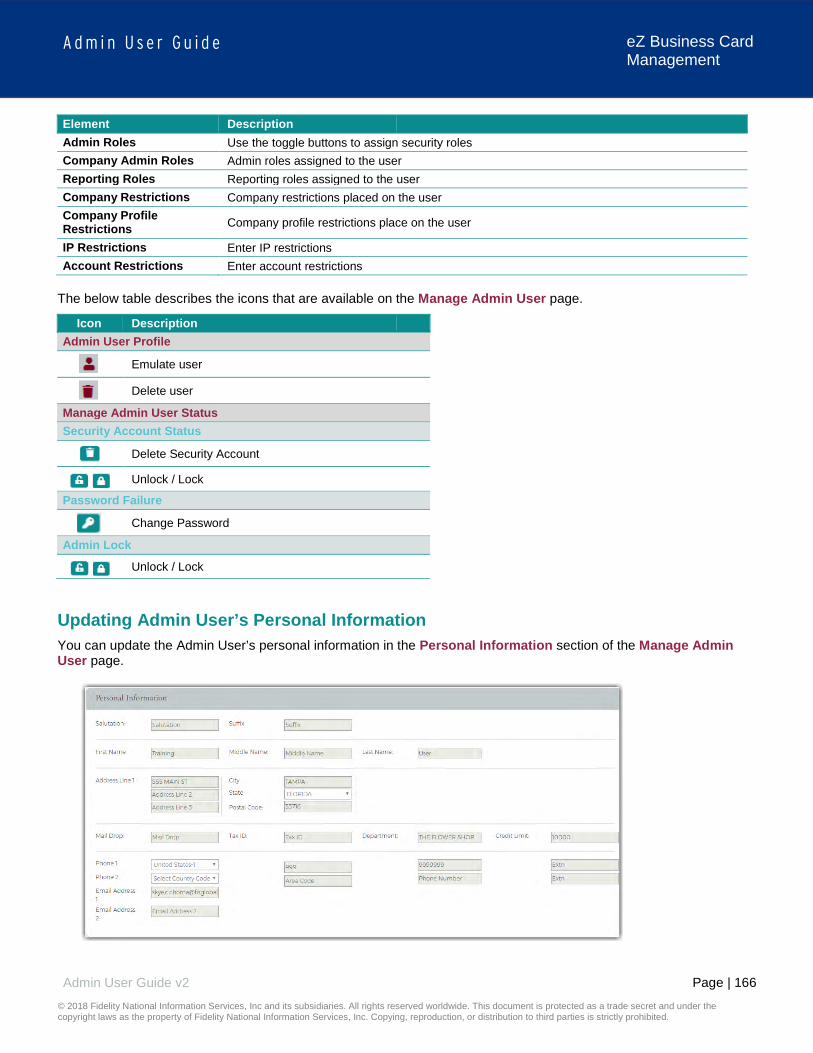
Page | 166
A d m i n U s e r G u i d e
© 2018 Fidelity National Information Services, Inc and its subsidiaries. All rights reserved worldwide. This document is protected as a trade secret and under the copyright laws as the property of Fidelity National Information Services, Inc. Copying, reproduction, or distribution to third parties is strictly prohibited.
Admin User Guide v2
eZ Business Card Management
Element Description Admin Roles Use the toggle buttons to assign security roles Company Admin Roles Admin roles assigned to the user Reporting Roles Reporting roles assigned to the user Company Restrictions Company restrictions placed on the user Company Profile Restrictions Company profile restrictions place on the user
IP Restrictions Enter IP restrictions Account Restrictions Enter account restrictions
The below table describes the icons that are available on the Manage Admin User page.
Icon Description Admin User Profile
Emulate user
Delete user
Manage Admin User Status Security Account Status
Delete Security Account
Unlock / Lock
Password Failure
Change Password
Admin Lock
Unlock / Lock
Updating Admin User’s Personal Information You can update the Admin User’s personal information in the Personal Information section of the Manage Admin User page.

Page | 167
A d m i n U s e r G u i d e
© 2018 Fidelity National Information Services, Inc and its subsidiaries. All rights reserved worldwide. This document is protected as a trade secret and under the copyright laws as the property of Fidelity National Information Services, Inc. Copying, reproduction, or distribution to third parties is strictly prohibited.
Admin User Guide v2
eZ Business Card Management
Once you have made updates, click the Modify Admin User at the bottom of the page.
Update Account Restrictions You can update the Admin User Account Restrictions in the Account Restrictions section of the Manage Admin User page.
To add or update the accounts that an Admin User has access to, enter the Account # in the Account Restrictions and click the + button.
Updating Admin Security Roles You can update the Admin User’s Security Roles in the Security Roles section of the Manage Admin User page by clicking on the toggle button for the security role that you want to enable/disable.
Emulate Admin User To emulate an Admin User, perform the following steps.
1. From the Manage Admin User page, click on the Emulate User icon in the Admin Profile section.
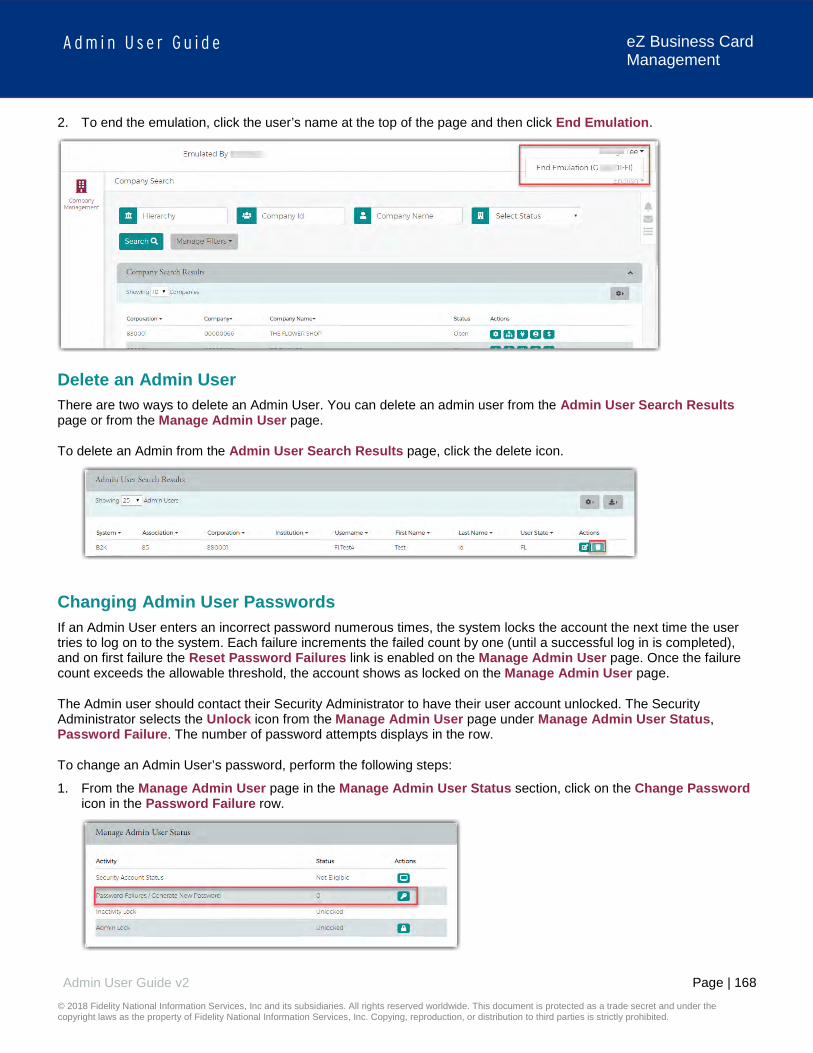
Page | 168
A d m i n U s e r G u i d e
© 2018 Fidelity National Information Services, Inc and its subsidiaries. All rights reserved worldwide. This document is protected as a trade secret and under the copyright laws as the property of Fidelity National Information Services, Inc. Copying, reproduction, or distribution to third parties is strictly prohibited.
Admin User Guide v2
eZ Business Card Management
2. To end the emulation, click the user’s name at the top of the page and then click End Emulation.
Delete an Admin User There are two ways to delete an Admin User. You can delete an admin user from the Admin User Search Results page or from the Manage Admin User page. To delete an Admin from the Admin User Search Results page, click the delete icon.
Changing Admin User Passwords If an Admin User enters an incorrect password numerous times, the system locks the account the next time the user tries to log on to the system. Each failure increments the failed count by one (until a successful log in is completed), and on first failure the Reset Password Failures link is enabled on the Manage Admin User page. Once the failure count exceeds the allowable threshold, the account shows as locked on the Manage Admin User page. The Admin user should contact their Security Administrator to have their user account unlocked. The Security Administrator selects the Unlock icon from the Manage Admin User page under Manage Admin User Status, Password Failure. The number of password attempts displays in the row. To change an Admin User’s password, perform the following steps:
1. From the Manage Admin User page in the Manage Admin User Status section, click on the Change Password icon in the Password Failure row.
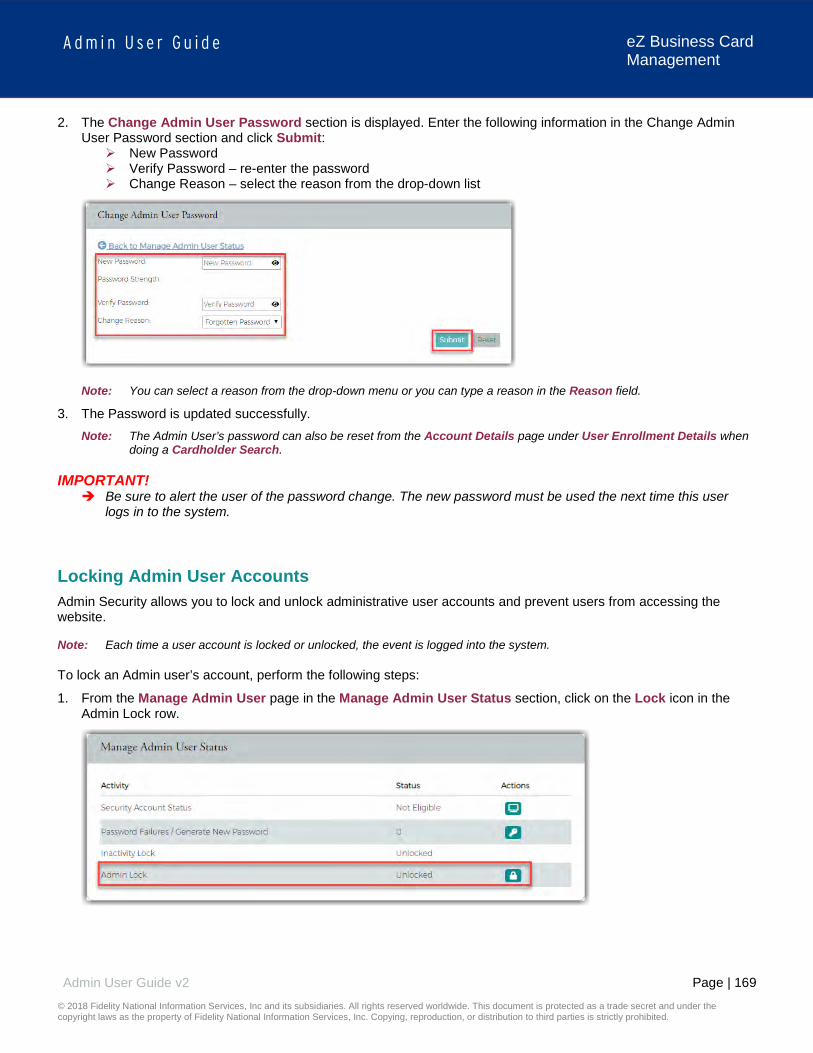
Page | 169
A d m i n U s e r G u i d e
© 2018 Fidelity National Information Services, Inc and its subsidiaries. All rights reserved worldwide. This document is protected as a trade secret and under the copyright laws as the property of Fidelity National Information Services, Inc. Copying, reproduction, or distribution to third parties is strictly prohibited.
Admin User Guide v2
eZ Business Card Management
2. The Change Admin User Password section is displayed. Enter the following information in the Change Admin User Password section and click Submit:
New Password Verify Password – re-enter the password Change Reason – select the reason from the drop-down list
Note: You can select a reason from the drop-down menu or you can type a reason in the Reason field.
3. The Password is updated successfully. Note: The Admin User’s password can also be reset from the Account Details page under User Enrollment Details when
doing a Cardholder Search. IMPORTANT!
Be sure to alert the user of the password change. The new password must be used the next time this user logs in to the system.
Locking Admin User Accounts Admin Security allows you to lock and unlock administrative user accounts and prevent users from accessing the website. Note: Each time a user account is locked or unlocked, the event is logged into the system. To lock an Admin user’s account, perform the following steps:
1. From the Manage Admin User page in the Manage Admin User Status section, click on the Lock icon in the Admin Lock row.
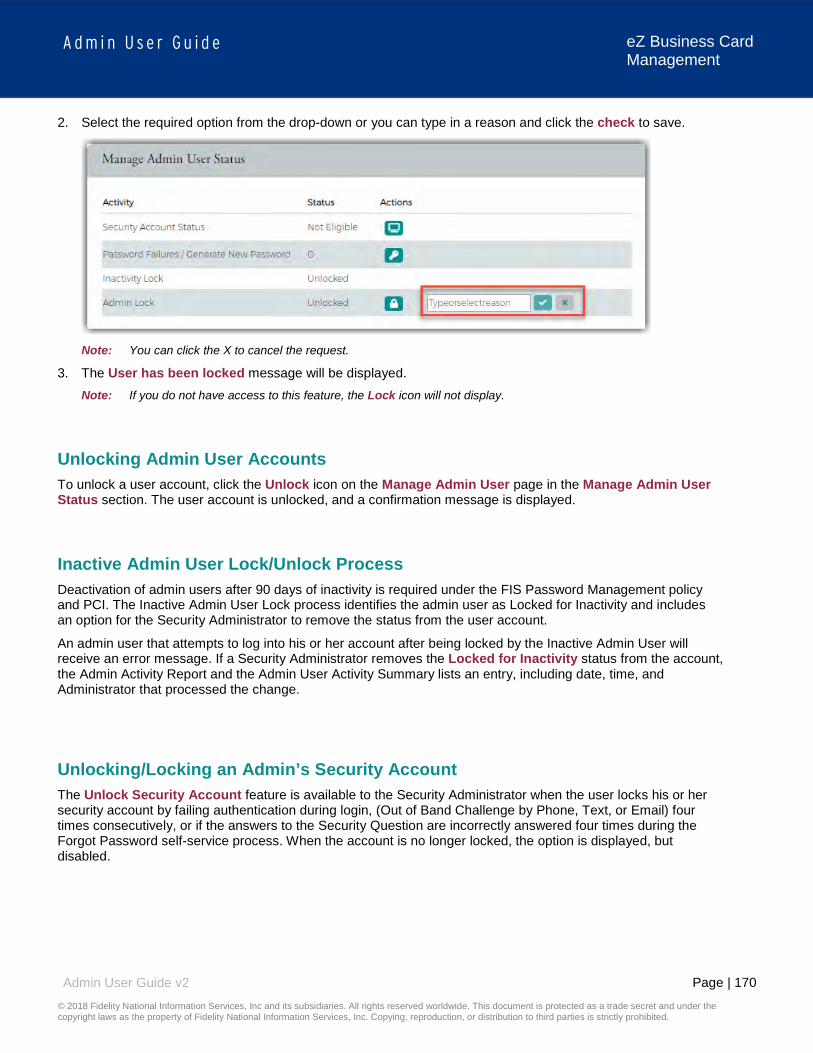
Page | 170
A d m i n U s e r G u i d e
© 2018 Fidelity National Information Services, Inc and its subsidiaries. All rights reserved worldwide. This document is protected as a trade secret and under the copyright laws as the property of Fidelity National Information Services, Inc. Copying, reproduction, or distribution to third parties is strictly prohibited.
Admin User Guide v2
eZ Business Card Management
2. Select the required option from the drop-down or you can type in a reason and click the check to save.
Note: You can click the X to cancel the request.
3. The User has been locked message will be displayed. Note: If you do not have access to this feature, the Lock icon will not display.
Unlocking Admin User Accounts To unlock a user account, click the Unlock icon on the Manage Admin User page in the Manage Admin User Status section. The user account is unlocked, and a confirmation message is displayed.
Inactive Admin User Lock/Unlock Process Deactivation of admin users after 90 days of inactivity is required under the FIS Password Management policy and PCI. The Inactive Admin User Lock process identifies the admin user as Locked for Inactivity and includes an option for the Security Administrator to remove the status from the user account.
An admin user that attempts to log into his or her account after being locked by the Inactive Admin User will receive an error message. If a Security Administrator removes the Locked for Inactivity status from the account, the Admin Activity Report and the Admin User Activity Summary lists an entry, including date, time, and Administrator that processed the change.
Unlocking/Locking an Admin’s Security Account The Unlock Security Account feature is available to the Security Administrator when the user locks his or her security account by failing authentication during login, (Out of Band Challenge by Phone, Text, or Email) four times consecutively, or if the answers to the Security Question are incorrectly answered four times during the Forgot Password self-service process. When the account is no longer locked, the option is displayed, but disabled.

Page | 171
A d m i n U s e r G u i d e
© 2018 Fidelity National Information Services, Inc and its subsidiaries. All rights reserved worldwide. This document is protected as a trade secret and under the copyright laws as the property of Fidelity National Information Services, Inc. Copying, reproduction, or distribution to third parties is strictly prohibited.
Admin User Guide v2
eZ Business Card Management
To lock or unlock an admin’s security account, perform the following steps:
1. From the Manage Admin User page in the Manage Admin User Status section, click on the Lock/Unlock icon in the Security Account Status row.
The below table describes the icons available for User Security Account Status:
Icon Description
Delete the user’s security account
Lock/Unlock the user’s security account
Get security account history
Deleting an Admin’s Security Account The Delete Security Account feature is used by the security admin if the user has forgotten the answers to their security questions and needs to change them. When the security admin deletes the Admin User’s Security Account, the Admin user will be asked to set it up again during their next login. When the Security Account has been deleted, the Delete Security Account option will be displayed, but disabled.
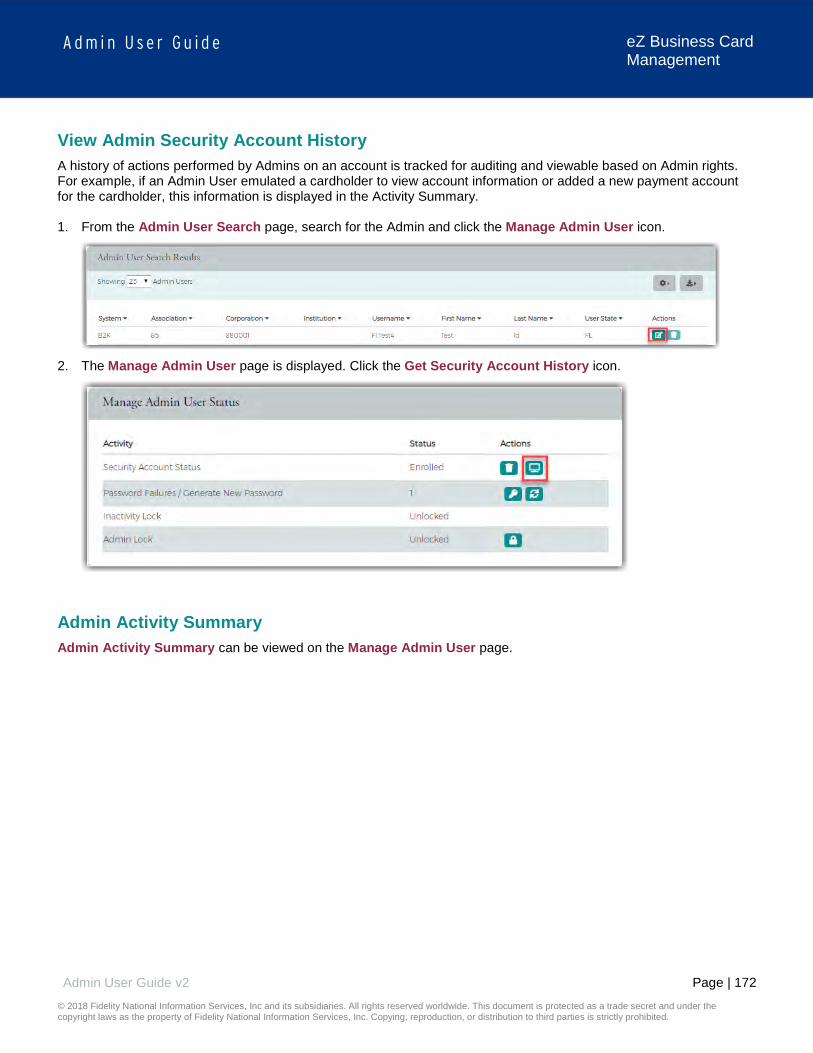
Page | 172
A d m i n U s e r G u i d e
© 2018 Fidelity National Information Services, Inc and its subsidiaries. All rights reserved worldwide. This document is protected as a trade secret and under the copyright laws as the property of Fidelity National Information Services, Inc. Copying, reproduction, or distribution to third parties is strictly prohibited.
Admin User Guide v2
eZ Business Card Management
View Admin Security Account History A history of actions performed by Admins on an account is tracked for auditing and viewable based on Admin rights. For example, if an Admin User emulated a cardholder to view account information or added a new payment account for the cardholder, this information is displayed in the Activity Summary. 1. From the Admin User Search page, search for the Admin and click the Manage Admin User icon.
2. The Manage Admin User page is displayed. Click the Get Security Account History icon.
Admin Activity Summary Admin Activity Summary can be viewed on the Manage Admin User page.

Page | 173
A d m i n U s e r G u i d e
© 2018 Fidelity National Information Services, Inc and its subsidiaries. All rights reserved worldwide. This document is protected as a trade secret and under the copyright laws as the property of Fidelity National Information Services, Inc. Copying, reproduction, or distribution to third parties is strictly prohibited.
Admin User Guide v2
eZ Business Card Management
Download Admin Security Account History You can download the search results to the following formats and financial software programs: Excel/Spreadsheet (.csv) format Excel Text (tab spacing) format To download the Admin Security Account History, click the Download icon in the Activity Summary Section.
1. Click the Download icon in the Activity Summary section.
2. Click on the format option that you want and save the file to a specified location on your computer.
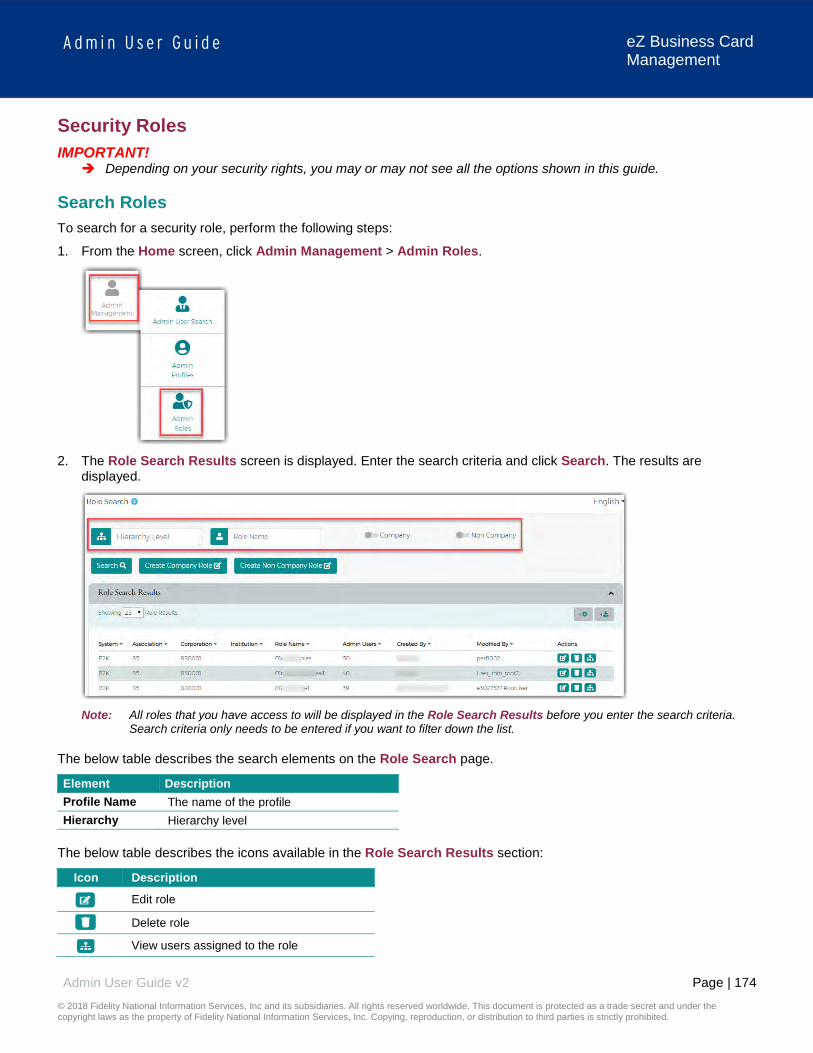
Page | 174
A d m i n U s e r G u i d e
© 2018 Fidelity National Information Services, Inc and its subsidiaries. All rights reserved worldwide. This document is protected as a trade secret and under the copyright laws as the property of Fidelity National Information Services, Inc. Copying, reproduction, or distribution to third parties is strictly prohibited.
Admin User Guide v2
eZ Business Card Management
Security Roles IMPORTANT!
Depending on your security rights, you may or may not see all the options shown in this guide.
Search Roles To search for a security role, perform the following steps:
1. From the Home screen, click Admin Management > Admin Roles.
2. The Role Search Results screen is displayed. Enter the search criteria and click Search. The results are
displayed.
Note: All roles that you have access to will be displayed in the Role Search Results before you enter the search criteria.
Search criteria only needs to be entered if you want to filter down the list. The below table describes the search elements on the Role Search page.
Element Description Profile Name The name of the profile Hierarchy Hierarchy level
The below table describes the icons available in the Role Search Results section:
Icon Description
Edit role
Delete role
View users assigned to the role

Page | 175
A d m i n U s e r G u i d e
© 2018 Fidelity National Information Services, Inc and its subsidiaries. All rights reserved worldwide. This document is protected as a trade secret and under the copyright laws as the property of Fidelity National Information Services, Inc. Copying, reproduction, or distribution to third parties is strictly prohibited.
Admin User Guide v2
eZ Business Card Management
Download Security Roles List You can download the search results to the following formats and financial software programs: Excel/Spreadsheet (.csv) format Excel Text (tab spacing) format To download the list, perform the following steps:
1. Click the Download icon in the Role Search Results section.
2. Click on the format option that you want and save the file to a specified location on your computer.
View Admin Users Assigned to a Role To view users assigned to a role, perform the following steps:
1. From the Role Search Results, click the View User icon.
2. The Admin Users page is displayed. You can view the user information by clicking the Manage Admin User icon.
The below table describes the icons available on the Admin User page:
Icon Description
Manage admin user

Page | 176
A d m i n U s e r G u i d e
© 2018 Fidelity National Information Services, Inc and its subsidiaries. All rights reserved worldwide. This document is protected as a trade secret and under the copyright laws as the property of Fidelity National Information Services, Inc. Copying, reproduction, or distribution to third parties is strictly prohibited.
Admin User Guide v2
eZ Business Card Management
Downloading the Admin Users Assigned to a Role List You can download the search results to the following formats and financial software programs: Excel/Spreadsheet (.csv) format Excel Text (tab spacing) format To download the list, perform the following steps:
1. Click the Download icon in the Admin User section.
2. Click on the format option that you want and save the file to a specified location on your computer.